Domo DO718K de handleiding
- Categorie
- Accessoires voor het maken van koffie
- Type
- de handleiding

PRODUCT OF
DO718K
Handleiding Volautomatische espressomachine
Mode d’emploi Machine à expresso automatique
Gebrauchsanleitung Vollautomatische Espresso-Maschine
Instruction booklet Fully automatic espresso machine
Manual de instrucciones Cafetera Completamente automática
Istruzioni per l’uso Macchina per caè espresso completamente automatica
Návod k použití Plně automatické espresso
Návod na použitie Plne automatické espresso

Lees aandachtig alle instructies - bewaar deze handleiding voor latere raadpleging.
Lisez attentivement les instructions - gardez le mode d’emploi pour utilisation ultérieur.
Lesen Sie genau die Anweisungen - bewahren Sie die Gebrauchsanleitung für spätere
heranziehung.
Read all instructions carefully - save this instruction manual for future reference.
Lea detenidamente todas las instrucciones - Conserve este manual para futura referencia.
Leggere con attenzione le istruzioni - conservarle per future consultazioni
Před použitím si důkladně přečtěte tento manuál - manuál si uschovejte i pro případ
budoucího nahlédnutí.
Pred použitím si dôkladne prečítajte tento manuál - manuál si uschovajte aj pre prípad
budúceho nahliadnutie.
Required for R32/R290 Refrigerant only
CAUTION
: RISK OF FIRE
NL Nederlands 3
FR Français 15
DE Deutsch 27
EN English 39
ES Espagnol 50
IT Italiano 62
CZ Čeština 74
SK Slovenčina 85

3
DO718K
www.domo-elektro.be
NL
GARANTIE
Geachte klant,
Al onze producten ondergaan steeds een strenge kwaliteitscontrole,
alvorens ze aan je worden aangeboden. Mocht je desondanks toch nog
problemen hebben met jouw toestel, dan betreuren wij dit ten zeerste.
In dat geval verzoeken wij je contact op te nemen met onze klantendienst.
Onze medewerkers zullen je met plezier verder helpen.
+32 14 21 71 91 [email protected]
Maandag – Donderdag : 8.30u – 12.00u en van 13.00u – 17.00u
Vrijdag : 8.30u – 12.00u en van 13.00u – 16.30u
Dit apparaat heeft een garantietermijn van 2 jaar vanaf de datum van aankoop. Gedurende de
garantieperiode zal de distributeur volledige verantwoording op zich nemen voor gebreken die
aanwijsbaar berusten op materiaal- of constructiefouten. Wanneer dergelijke gebreken voorkomen, zal
het apparaat, indien nodig, vervangen of gerepareerd worden. De garantieperiode van 2 jaar zal op dit
moment niet terug beginnen, maar loopt verder tot 2 jaar na de aankoop van het toestel. De garantie
wordt verleend op basis van het kassaticket. Indien je apparaat defect is binnen de garantietermijn van 2
jaar, dan mag je het toestel samen met het originele kassaticket binnenbrengen in de winkel waar je het
toestel hebt aangekocht.
De garantie op accessoires en onderdelen die onderhevig zijn aan slijtage, bedraagt 6 maanden.
De garantie en verantwoordelijkheid/aansprakelijkheid van de leverancier en fabrikant vervallen
automatisch in de volgende gevallen:
· Bij het niet naleven van de instructies in deze handleiding.
· Bij verkeerde aansluiting, vb. te hoge elektrische spanning.
· Bij verkeerd, hardhandig of abnormaal gebruik.
· Bij onvoldoende of verkeerd onderhoud.
· Bij herstelling of wijziging van het toestel door de consument of niet gemachtigde derden.
· Bij gebruik van onderdelen of accessoires welke niet worden aanbevolen of geleverd door de
leverancier / fabrikant.
VEILIGHEIDSVOORSCHRIFTEN
Wanneer je elektrische toestellen gebruikt, moeten volgende veiligheidsinstructies in acht genomen
worden:
· Lees deze instructies zorgvuldig door. Bewaar deze handleiding om later te raadplegen.
· Verwijder voor het eerste gebruik alle verpakkingsmaterialen en eventuele promotionele stickers.
Zorg ervoor dat kinderen niet met de verpakkingsmaterialen spelen.
· Dit toestel is geschikt om te gebruiken in de huishoudelijke omgeving en in gelijkaardige omgevingen
zoals:
· Keukenhoek voor personeel van winkels, kantoren en andere gelijkaardige professionele
omgevingen
· Boerderijen
· Hotel- en motelkamers en andere omgevingen met een residentieel karakter
· Gastenkamers, of gelijkaardige

4
DO718K
NL
· Dit toestel mag gebruikt worden door kinderen vanaf 16 jaar en personen met een fysieke of
sensoriële beperking of mensen met een beperkte mentale capaciteit of gebrek aan ervaring of
kennis, op voorwaarde dat deze personen toezicht krijgen of instructies hebben gekregen over het
gebruik van het toestel op een veilige manier en dat ze ook de gevaren kennen bij het gebruik van het
toestel. Kinderen mogen niet met het toestel spelen. Het onderhoud en de reiniging van het toestel
mogen niet door kinderen gebeuren tenzij ze ouder zijn dan 16 jaar en onder toezicht staan.
· Houd het toestel en de voedingskabel buiten het bereik van kinderen jonger dan 16 jaar.
· OPGELET: om ongevallen te vermijden, mag dit toestel niet bediend worden door een externe
bediening, zoals een externe timer, of op een net aangesloten worden dat regelmatig op- en afgezet
wordt.
· Het toestel kan warm worden tijdens het gebruik. We raden aan om - buiten bij het handvat - het
toestel niet aan te raken, om brandwonden te vermijden.
· Laat een werkend toestel niet zonder toezicht achter.
· Gebruik of bewaar het toestel niet buiten.
· Gebruik het toestel enkel voor het doel waarvoor het bestemd is.
· Kijk voor gebruik na of het voltage vermeld op het toestel overeenkomt met het voltage van het
elektriciteitsnet thuis.
· De voedingskabel moet steeds aangesloten worden op een stopcontact dat geïnstalleerd en geaard is
volgens de lokale standaarden en normen.
· Gebruik het toestel nooit wanneer de voedingskabel of stekker beschadigd is, na een slechte werking
van het toestel of wanneer het toestel beschadigd is. Breng het toestel dan naar de dienst na verkoop
van DOMO of het dichtsbijzijnde gekwaliceerde service center voor nazicht, reparatie of elektrische/
mechanische aanpassingen. Probeer het toestel nooit eigenhandig te repareren.
· Dompel het toestel, de voedingskabel of de stekker nooit onder in water of een andere vloeistof. Dit
om elektrische schokken of brand te voorkomen.
· Gebruik dit toestel niet met natte handen.
· Dit toestel is voorzien van een korte voedingskabel, zodat personen er niet in verstrikt kunnen
raken of over een langere voedingskabel kunnen vallen. GEBRUIK HET TOESTEL NOOIT MET EEN
VERLENGKABEL.
· Rol de voedingskabel volledig af om oververhitting van de kabel te voorkomen.
· Laat de voedingskabel niet over de rand van een tafel of aanrecht hangen of in aanraking komen met
een heet oppervlak.
· Laat de voedingskabel niet onder of rond het toestel hangen.
· Plaats het toestel nooit op of in de buurt van een hete elektrische kookplaat, een heet gasfornuis,
gootsteen of een warme oven.
· Plaats het toestel nooit in de buurt van ontvlambare materialen, gassen of explosieven.
· Sluit de voedingskabel pas op het stopcontact aan nadat het toestel zeker correct gemonteerd is. Om
het toestel te verwijderen van het stopcontact, moet de bediening eerst in de «OFF» of «0» positie
gezet worden. Daarna mag de stekker uit het stopcontact verwijderd worden. Trek nooit aan de
voedingskabel of het toestel zelf om de stekker uit het stopcontact te verwijderen.
· Als het toestel niet goed onderhouden wordt, kan dit de levensduur van het toestel drastisch
verminderen en een gevaarlijke situatie veroorzaken.
· Bij het opwarmen van water is het mogelijk dat hete stoom door de lter of een andere opening naar
buiten komt. Hou daarom handen uit de buurt van het toestel wanneer het in werking is.
· Ongevallen of schade veroorzaakt door het niet volgen van deze regels zijn op eigen risico. Noch de
fabrikant of de importeur, noch de leverancier kan daar dan verantwoordelijk voor geacht worden.
· Overschrijd de MAX-indicatie niet bij het vullen van het toestel.
· Wees voorzichtig om geen vloeistof te morsen op de voedingskabel.

5
DO718K
www.domo-elektro.be
NL
· Gebruik enkel de accessoires die met het toestel meegeleverd worden.
· Verplaats het toestel nooit terwijl het nog in gebruik is of wanneer het nog warm is. Laat het toestel
altijd eerst aoelen vooraleer het te verplaatsen.
ONDERDELEN
1. Druppelopvangbakje
2. Rooster druppelopvangbakje
3. Lekschaal
4. Koedikreservoir
5. Koe uitloop
6. Aan-uitknop
7. Bedieningspaneel
8. Bonenreservoir
9. Deksel bonenreservoir
10. Waterreservoir
11. Snoer
12. Zetgroep
13. Onderhoudsdeur
14. Reinigingsborsteltje
BEDIENINGSPANEEL
Icoon Omschrijving
Toetsen
Espresso (kleine, strae koe)
Lungo (normale, milde koe)
Americano (koe aangelengd met water)
Favoriete instelling
Heet water
Indicatielampjes
Indicatielampje brandt: bereiding klaar
Indicatielampje knippert: bereiding bezig
Waterreservoir leeg of niet geplaatst
1
2
3
4
5
7
6
8
9
10
11
13
12
14

6
DO718K
NL
Bonenreservoir leeg
Indicatielampje brandt: koedikreservoir vol
Indicatielampje knippert: lekschaal is niet geplaatst
Indicatielampje brandt: zetgroep is niet (goed) geplaatst
Indicatielampje knippert: onderhoudsdeur is niet (goed) geplaatst
Indicatielampje brandt: toestel ontkalken
Indicatielampje knippert: ontkalkingsproces loopt
Proces voor toestel ledigen loopt. Zie rubriek “reiniging en onderhoud/toestel
ledigen”
INSTALLATIE
Verwijder voor het eerste gebruik alle verpakkingsmaterialen en eventuele promotionele stickers.
1. Plaats het toestel op een vlakke, stabiele ondergrond. Zorg voor voldoende ruimte rondom het
toestel voor ventilatie.
2. Plaats het druppelopvangbakje. Zorg dat dit correct geïnstalleerd is.
3. Vul het waterreservoir. Zie rubriek “gebruik/waterreservoir vullen”.
4. Vul het bonenreservoir. Zie rubriek “gebruik/bonenreservoir vullen”.
5. Steek het snoer in de snoeraansluiting van het toestel. Steek de stekker in het stopcontact.
Voor het eerste gebruik is het aangeraden een kop heet water te maken om de leidingen te spoelen. Zie
rubriek “gebruik”.
1
150mm
150mm
150mm
150mm
150mm
2
3
4
5
GEBRUIK
1. Zet het toestel aan. Druk op de aan-uitknop. Het toestel zal automatisch spoelen. Uit de uitloop
komt een kopje heet water. Het toestel gaat hierna in sluimerstand. In sluimerstand zijn alle
indicatielampjes aan en is het toestel klaar voor gebruik.
Nota: automatisch spoelen gebeurt enkel als het toestel langer heeft uitgestaan.
2. Plaats een kop onder de koe uitloop. Je kan de hoogte van de uitloop aanpassen aan de
hoogte van je kop door deze omhoog of omlaag te schuiven. Voor een kleine kop gebruik je het
druppelopvangbakje. Als je een grotere kop gebruikt, kan je het druppelopvangbakje weglaten.
3. Kies je gewenste koe en druk de toets in voor een espresso, lungo, americano, heet water of je
favoriete instelling.
Nota: je kan de hoeveelheid koe van de toetsen zelf instellen. Zie rubrieken “volume instellen” en
“favoriete instelling”.

7
DO718K
www.domo-elektro.be
NL
4. Het indicatielampje van de gekozen toets licht op, het indicatielampje ‘bereiding bezig’ verschijnt
op het display en de kopjesverlichting gaat aan. Als je het bereidingsproces wil beëindigen voor de
koe klaar is, druk je nog een keer op de gekozen toets.
5. Als de koe klaar is, gaat het toestel terug in sluimerstand. Het toestel heeft een automatische
uitschakeling. Aankelijk van de modus, zal het toestel na 10, 20 of 30 minuten uitschakelen.
1
2
3
4
WATERRESERVOIR VULLEN
Als het indicatielampje ‘waterreservoir leeg’ knippert, moet je het waterreservoir vullen.
1. Neem het waterreservoir uit het toestel. Hiervoor kan je het deksel van het reservoir als handvat
gebruiken.
2. Spoel het reservoir en vul het met proper, koud water tot aan de maximumaanduiding.
3. Plaats het reservoir terug in het toestel.
!
Opgelet: neem telkens het waterreservoir uit het toestel als je het vult met water, dit om overloop en
schade te voorkomen.
!
Gebruik nooit warm, heet of bruisend water of een andere vloeistof in het waterreservoir.
1
2
3
!
BONENRESERVOIR VULLEN
Je kan kiezen om het deksel rechtstreeks op het reservoir te plaatsen, of om het accessoire voor het
bonenreservoir te verhogen te gebruiken.
Als het indicatielampje ‘bonenreservoir leeg’ knippert, moet je het bonenreservoir vullen.
1. Verwijder het deksel van het reservoir. Indien gewenst, plaats het accessoire om het bonenreservoir
te verhogen.
2. Voeg de bonen toe, door deze langzaam in het reservoir te gieten.
3. Plaats het deksel terug.
!
Gebruik enkel koebonen in het bonenreservoir. Vul het reservoir nooit met gemalen koe,
oploskoe of andere ingrediënten of voorwerpen.

8
DO718K
NL
1
2
3
KOFFIEDIKRESERVOIR LEDIGEN
Als het indicatielampje ‘koedikreservoir vol’ brandt, moet je het koedikreservoir ledigen.
1. Verwijder het druppelopvangbakje.
2. Neem de lekschaal uit het toestel.
3. Ledig het koedikreservoir. Spoel zowel de lekschaal als het koedikreservoir en droog af.
4. Plaats alles terug in de originele positie.
1
2
3
4
FAVORIETE INSTELLING
Je kan de toets ‘favoriete instelling’ programmeren naar je eigen voorkeur.
1. Houd de toets ‘favoriete instelling’ ingedrukt gedurende 2 seconden. De indicatielampjes van de
toetsen espresso, lungo en americano zullen knipperen.
2. Druk op de toets van de soort koe die je wil programmeren als favoriete instelling.
3. De bereiding zal starten. Druk opnieuw op de toets van de soort koe die je nu programmeert.
Houd de toets ingedrukt zolang je wenst dat de koe blijft lopen. Als je de toets loslaat, zal de
bereiding stoppen. Het toestel onthoudt het volume op het moment dat je de toets loslaat.
4. De toets ‘favoriete instelling’ is nu geprogrammeerd.
1
2
3
VOLUME INSTELLEN
Je kan de hoeveelheid van de toetsen espresso, lungo, americano en heet water instellen tussen 25 ml en
250 ml.

9
DO718K
www.domo-elektro.be
NL
1. Druk op de toets waarvan je het volume wil instellen.
2. De bereiding start. Druk opnieuw op de toets van de soort koe die je nu programmeert. Houd de
toets ingedrukt zolang je wenst dat de koe blijft lopen.
3. Wanneer de bereiding de gewenste hoeveelheid heeft bereikt, laat je de toets los. Je hoort 2 keer
een signaal, dit wil zeggen dat de hoeveelheid is ingesteld als nieuw volume van die toets.
1
2
MAALINSTELLING
In het bonenreservoir zit een draaiknop om de groeid van het malen in te
stellen. Draai tijdens de werking aan de knop om de bonen groer of jner
te laten malen.
!
Opgelet: draai niet aan deze knop als het apparaat niet
in werking is, dit kan het maalmes beschadigen indien er nog bonen in het
mechanisme zitten.
Op de draaiknop staan stipjes om de groeid aan te duiden. Hoe kleiner het
stipje, hoe jner de maalinstelling.
MODUS BEPALEN
De espressomachine heeft 3 instellingen: standaard, eco en snel. In de ecomodus bespaar je energie, met
de snelmodus maak je je koe nog sneller.
Ecomodus Snelmodus Standaardmodus
Kopjesverlichting Nee Ja Ja
Voorbrouwen* Ja Nee Ja
Automatische uitschakeling 10 min 30 min 20 min
Volumegeheugen Ja Ja Ja
* Het voorbrouwen bevochtigt de gemalen bonen in de zetgroep met een kleine hoeveelheid water voor
het koezetten. Dit zorgt ervoor dat de gemalen koe uitzet en de druk groter is, zodat het volle aroma
en de extractie van de olie uit de bonen optimaal is.
1. Als het toestel in sluimerstand staat, druk dan gedurende 5 seconden op de aan-uitknop. Je hoort 2
keer een signaal.
2. De toetsen van de soorten koe staan nu elk voor een andere instelling. De toets die brandt geeft
de huidige instelling aan. De andere toetsen zullen knipperen.
Heet water Espresso Lungo
Ecomodus X
Snelmodus X
Standaardmodus X

10
DO718K
NL
3. Je kan de instelling nu ook wijzigen door op één van de knipperende toetsen te drukken. Kies voor
de heet watertoets voor de ecomodus, de espressotoets voor de snelmodus en de lungotoets voor
de standaardmodus. Je hoort 2 keer een signaal als de instelling aangepast is.
4. Als je de huidige instelling wil behouden, druk dan opnieuw op de aan-uitknop en wacht 5 seconden.
Het toestel gaat terug in sluimerstand.
REINIGING EN ONDERHOUD
REINIGING
Het is aangeraden stap 1 tot en met stap 4 dagelijks uit te voeren. Als het toestel voor een langere periode
gebruikt wordt, kunnen er koeresten achterblijven in het toestel, reinig het toestel volgens stap 5.
Zet het toestel uit en trek de stekker uit het stopcontact.
1. Verwijder het druppelopvangbakje. Ledig het bakje. Reinig zowel het rooster als het bakje met
proper water. Droog beiden af. Deze kunnen ook in de vaatwasser gereinigd worden.
2. Neem de lekschaal uit het toestel. Ledig het koedikreservoir. Reinig zowel de lekschaal als het
koedikreservoir met proper water. Droog beiden af. Deze kunnen ook in de vaatwasser gereinigd
worden.
3. Open de onderhoudsdeur. Verwijder de zetgroep door beide knoppen aan de zijkant van de zetgroep
in te drukken en deze naar je toe te trekken. Reinig de zetgroep met proper water en droog af.
!
Opgelet: reinig de zetgroep nooit in de vaatwasser!
4. Reinig de behuizing met een vochtige doek. Gebruik het meegeleverde schoonmaakdoekje om het
touchpaneel schoon te vegen.
5. Gebruik het schoonmaakborsteltje om de koeresten rond de interne uitlaat van gemalen koe
schoon te maken.
6. Plaats alles terug in de originele positie. Als een onderdeel niet (goed) geïnstalleerd is, geeft het
toestel dit aan op het display. Zie rubriek “onderdelen” voor de uitleg van de indicatielampjes.
!
Dompel het toestel, de voedingskabel of de stekker nooit onder in water of een andere vloeistof. Dit
om elektrische schokken of brand te voorkomen.
!
Gebruik nooit agressieve of schurende schoonmaakmiddelen.
1
2
3
4
6

11
DO718K
www.domo-elektro.be
NL
ONTKALKEN
Als het indicatielampje ‘toestel ontkalken’ brandt, moet je het toestel ontkalken.
1. Vul het waterreservoir tot aan de maximumindicatie.
2. Voeg 1 zakje ontkalkingsproduct toe aan het waterreservoir. Er zijn 3 zakjes meegeleverd met het
toestel. Extra ontkalkingsproduct kan je verkrijgen via de website: webshop.domo-elektro.be
3. Steek de stekker in het stopcontact.
4. Plaats een opvangcontainer onder de koeuitloop. Zorg ervoor dat de container evenveel capaciteit
heeft als het waterreservoir zelf.
5. In sluimerstand, houd de aan-uitknop en espresso toets gelijktijdig ingedrukt gedurende 5
seconden. Je hoort een signaal en de indicatielampjes ‘toestel ontkalken’ en ‘espresso’ knipperen.
6. Druk op de espresso toets om het ontkalkingsproces te bevestigen. Als je toch niet wil ontkalken,
druk dan op de aan-uitknop om naar sluimerstand terug te keren.
7. Het indicatielampje ‘ontkalkingsproces’ knippert en het toestel zal beginnen ontkalken. Het water
met product komt in fases uit de uitloop. Het hele proces duurt enkele minuten. (± 20 min.)
8. Als al het water van het waterreservoir is doorgelopen, zullen de indicatielampjes ‘waterreservoir
leeg’ en ‘espresso’ ook branden.
9. Ledig je opvangcontainer en plaats deze terug. Indien er nog resten in het waterreservoir zijn
overgebleven, maak dan eerst het reservoir leeg en spoel. Vul het reservoir met proper water tot aan
de maximumindicatie en plaats het terug in het toestel.
10. Het ontkalkingsproces hervat. Het toestel zal de helft van het water in het reservoir laten doorlopen,
1 minuut pauzeren en dan de andere helft van het water laten doorlopen.
11. Het ontkalkingsproces is nu beëindigd en het toestel schakelt uit.
1
2
3
4
5
+
6 7
8
9
10
!
Opgelet: het water dat uit de koeuitloop komt is heet, houd daarom handen uit de buurt van het
toestel wanneer het in werking is.
!
Gebruik enkel de ontkalkingsproducten meegeleverd met het toestel. Andere ontkalkingsproducten,
agressieve schoonmaakmiddelen of azijn kunnen het toestel beschadigen.
!
Als het toestel niet goed onderhouden wordt, kan dit de levensduur van het toestel drastisch
verminderen.

12
DO718K
NL
MANUEEL SPOELEN
Om de koeuitloop schoon te maken, kan je het toestel manueel laten spoelen.
Het is aangeraden dit geregeld te doen als het toestel vaak gebruikt wordt, of als
het toestel lange tijd heeft stilgestaan.
1. Het is aangeraden een leeg kopje of opvangcontainer te plaatsen onder de
koe uitloop.
2. In sluimerstand, houd de aan-uitknop en heet water toets gelijktijdig
ingedrukt gedurende 5 seconden.
3. Het indicatielampje ‘heet water’ knippert. Er komt heet water uit de koe uitloop.
4. Als de uitloop gespoeld is, gaat het toestel terug in sluimerstand.
TOESTEL LEDIGEN
Als je het toestel wil opbergen of wil vervoeren, kan je het best volledig ledigen zodat er geen water in de
leidingen achterblijft.
1. In sluimerstand, houd de aan-uitknop en lungo toets gelijktijdig ingedrukt gedurende 5 seconden.
2. Het indicatielampje ‘toestel ledigen’ knippert op het display. Indien je toch niet wil verder gaan
met de functie toestel ledigen, druk dan terug op de aan-uitknop om terug te keren naar de
sluimerstand.
3. Verwijder het waterreservoir. Het indicatielampje ‘toestel ledigen’ brandt. Ledig het waterreservoir
en het druppelopvangbakje.
4. Als het proces beëindigd is, zal het toestel automatisch uitschakelen.
!
Als je het toestel nadien terug wil gebruiken, maak dan eerst een kop heet water.
1
+
2
3
MOGELIJKE PROBLEMEN
Probleem Oorzaak Oplossing
Het toestel werkt niet. Het toestel is niet aangesloten
op het elektriciteitsnetwerk.
Zorg ervoor dat het snoer goed
is aangesloten en dat de stekker
in het stopcontact steekt.
Geen of late reactie bij het
drukken op de toetsen van het
bedieningspaneel.
· Het toestel wordt
elektromagnetisch beperkt.
· Het bedieningspaneel is vuil.
· Trek de stekker uit het
stopcontact en probeer
enkele minuten later nog
eens.
· Reinig het bedieningspaneel
met het meegeleverde
reinigingsdoekje.
+

13
DO718K
www.domo-elektro.be
NL
De koe is niet warm genoeg. · De kopjes zijn niet
voorverwarmd.
· De zetgroep is nog koud.
· Verwarm de kopjes.
· Spoel het toestel 3 keer om
de zetgroep op te warmen.
De koe komt niet uit de
uitloop.
Het kan zijn dat de functie
toestel ledigen vorige keer
gebruikt is.
Druk op de heet water toets
zodat er heet water uit de
uitloop komt.
De eerste kop koe is van
slechte kwaliteit.
De eerste maalsessie geeft niet
voldoende gemalen koe.
Giet de koe weg. De volgende
koes zijn wel van goede
kwaliteit.
De koe heeft geen cremalaag. De koebonen zijn niet vers. Vervang de koebonen.
De toetsen van het
bedieningspaneel zijn niet
gevoelig.
De aanraking met de
touchtoetsen moet frontaal
gebeuren.
Raak de toetsen frontaal aan
op het onderste deel van de
icoontjes van de toetsen.
Het duurt lang eer het toestel
opgewarmd is.
Kalk is opgehoopt in het toestel. Ontkalk het toestel.
Ondanks het waterreservoir leeg
is/niet geplaatst is, brandt het
indicatielampje niet.
De sensor, in de buurt van
de aansluiting van het
waterreservoir, is nat.
Veeg het water weg rond
de aansluiting van het
waterreservoir.
Er zit veel water in het
koedikreservoir.
De gemalen koe is te jn en
blokkeert de wateruitlaat.
Pas de groeid aan met de
draaiknop in het bonenreservoir
tijdens werking.
De koe loopt heel langzaam/
druppelt uit de koeuitloop.
De gemalen koe is te jn en
blokkeert de wateruitlaat.
Pas de groeid aan met de
draaiknop in het bonenreservoir
tijdens werking.
Het indicatielampje
bonenreservoir leeg knippert,
terwijl er nog voldoende bonen
in het reservoir zitten.
De interne uitlaat van gemalen
koe is geblokkeerd.
Gebruik het
schoonmaakborsteltje om de
koeresten rond de interne
uitlaat van gemalen koe
schoon te maken.
Het indicatielampje ‘ontkalken’
knippert.
Het ontkalkingsproces is nog
bezig.
Volg de stappen van het
ontkalkingsproces, pas als
het volledige proces klaar is,
keert het toestel terug naar de
sluimerstand.

14
DO718K
NL
MILIEURICHTLIJNEN
Dit symbool op het product of op de verpakking wijst erop dat dit product niet
als huishoudafval mag worden behandeld. Het moet naar een plaats worden
gebracht waar elektrische en elektronische apparatuur wordt gerecycleerd.
Als je ervoor zorgt dat dit product op de correcte manier wordt verwijderd,
voorkom je mogelijk voor mens en milieu negatieve gevolgen die zich zouden
kunnen voordoen in geval van verkeerde afvalbehandeling. Voor meer
details in verband met het recycleren van dit product, neem je best contact
op met de gemeentelijke instanties, het bedrijf of de dienst belast met de
verwijdering van huishoudafval of de winkel waar je het product hebt gekocht.
Het verpakkingsmateriaal is recycleerbaar. Behandel de verpakking
milieubewust.

15
DO718K
www.domo-elektro.be
FR
GARANTIE
Cher client,
Tous nos produits sont soumis à des contrôles qualité stricts avant
d’être proposés à la vente. Si vous deviez toutefois rencontrer
un problème avec votre appareil, nous le déplorons vivement.
Dans ce cas, nous vous invitons à prendre contact avec notre service à la clientèle.
Nos collaboratrices se feront un plaisir de vous aider !
+32 14 21 71 91 [email protected]
Du lundi au jeudi : 8 h 30 – 12 h et 13 h – 17 h
Vendredi : 8 h 30 – 12 h et 13 h – 16 h 30
Cet appareil est garanti 2 ans à compter de la date d’achat. Durant la période de garantie, le distributeur
assumera l’entière responsabilité en cas de défauts de fonctionnement (matériel) ou de fabrication. Si un
tel problème survient, l’appareil sera remplacé ou réparé. La période de garantie de 2 ans ne reprend pas
à zéro, mais se poursuit (jusqu’à 2 ans à compter de la date d’achat de l’appareil). La garantie est accordée
sur la base du ticket de caisse.
Pour les accessoires et les éléments d’usure, une garantie de 6 mois s’applique.
La garantie et la responsabilité du fournisseur et du fabricant n’ont plus eet dans les cas suivants :
· Les instructions du manuel n’ont pas été suivies.
· Mauvais raccordement, par ex. tension électrique trop forte.
· Utilisation contraire, brutale ou anormale.
· Entretien insusant ou non conforme.
· Réparation ou modication de l’appareil par le consommateur ou un tiers non autorisé.
· Utilisation d’éléments ou d’accessoires qui ne sont pas recommandés ou fournis par le fournisseur/
fabricant.
CONSIGNES DE SÉCURITÉ
Les consignes de sécurité suivantes doivent être respectées lors de l’utilisation de tout appareil électrique:
· Lisez ces consignes très attentivement. Conservez ce mode d’emploi an de pouvoir le consulter
ultérieurement.
· Avant la première utilisation, enlevez tous les éléments d’emballage et les éventuels autocollants
promotionnels. Veillez à ce que les enfants ne jouent pas avec les matériaux d’emballage.
· Cet appareil est conçu pour être utilisé dans un environnement domestique ou dans des
environnements comparables, tels que :
· Coin-cuisine du personnel dans les commerces, les bureaux et autres environnements
professionnels comparables
· Fermes
· Chambres d’hôtel ou de motel et autres environnements à caractère résidentiel
· Chambres d’hôtes ou comparables
· Cet appareil peut être utilisé par des enfants âgés de 16 ans ou plus et par des personnes présentant
un handicap physique ou sensoriel, une capacité mentale limitée ou un manque d’expérience ou
de connaissances, à condition que ces personnes soient sous surveillance ou qu’elles aient reçu des
instructions sur la manière d’utiliser l’appareil en toute sécurité et qu’elles connaissent les dangers liés

16
DO718K
FR
à son utilisation. Les enfants ne peuvent pas jouer avec cet appareil. L’entretien et le nettoyage de
l’appareil ne peuvent pas être eectués par des enfants, sauf s’ils sont âgés de plus de 16 ans et sous la
surveillance d’un adulte.
· Gardez l’appareil et le cordon électrique hors de portée des enfants.
· Débranchez l’appareil lorsqu’il n’est pas utilisé ainsi qu’avant d’installer ou d’enlever des pièces et
avant de nettoyer l’appareil. Mettez au préalable tous les boutons en position « arrêt » et débranchez
l’appareil en saisissant la che électrique. Ne tirez jamais sur le cordon pour retirer la che de la prise.
· ATTENTION : Pour éviter tout accident, cet appareil ne peut pas être actionné via une commande
externe comme un minuteur extérieur, ni être raccordé à un réseau régulièrement mis sous tension ou
hors tension.
· Les surfaces de cet appareil s’échauent en cours d’utilisation. Pour éviter toute brûlure, il est
recommandé de ne pas toucher cet appareil, à l’exception des poignées.
· Ne laissez jamais un appareil en service sans surveillance.
· N’utilisez pas l’appareil à l’extérieur.
· N’utilisez l’appareil que pour l’usage auquel il est destiné.
· Vériez avant usage si la tension indiquée sur l’appareil correspond à la tension du réseau électrique de
votre domicile.
· Le cordon d’alimentation doit toujours être branché dans une prise de courant placée et mise à la terre
conformément aux normes et standards locaux.
· N’utilisez jamais l’appareil lorsque le cordon d’alimentation ou la che est endommagé(e), après un
mauvais fonctionnement de l’appareil ou lorsque l’appareil est lui-même endommagé. Portez dans
ce cas l’appareil au service après vente de DOMO ou au centre de services qualié le plus proche,
pour contrôle, réparation ou modications électriques/mécaniques. Ne tentez jamais de réparer cet
appareil vous-même.
· N’immergez jamais l’appareil, le cordon d’alimentation ou la che dans l’eau ou tout autre liquide. Ceci
an d’éviter des chocs électriques ou un incendie.
· N’utilisez pas l’appareil si vous avez les mains mouillées.
· Cet appareil est muni d’un cordon d’alimentation court, an d’éviter que des personnes ou objets
s’enroulent dans le cordon ou ne tombent à cause de ce dernier. N’UTILISEZ JAMAIS CET APPAREIL
AVEC UNE RALLONGE ÉLECTRIQUE.
· Déroulez complètement le cordon d’alimentation.
· Ne laissez pas le cordon d’alimentation pendre sur une surface chaude, ni sur le rebord d’une table ou
d’un plan de travail.
· Ne laissez pas le cordon d’alimentation se coincer sous l’appareil ou pendre autour de celui-ci.
· Ne placez jamais l’appareil sur ou à proximité d’une plaque de cuisson à gaz ou électrique chaude, ni
sur l’évier ou un four en fonctionnement.
· Gardez l’appareil éloigné des matériaux inammables, gaz ou explosifs.
· Ne branchez l’appareil qu’après être sûr qu’il soit correctement monté. Pour débrancher l’appareil, la
commande doit être préalablement placée en position « OFF » ou « 0 ». Après quoi, la che électrique
peut être retirée de la prise de courant. Ne tirez jamais sur le cordon d’alimentation ni sur l’appareil
pour le débrancher.
· Si l’appareil n’est pas correctement entretenu, sa durée de vie peut en être fortement diminuée et une
situation de danger en résulter.
· Lorsque l’eau est chauée, il est possible que de la vapeur s’échappe par le ltre ou une autre ouverture
; il est donc important de ne pas approcher vos mains de l’appareil lorsque celui-ci fonctionne.
· Les accidents ou dommages causés par le non-respect de ces consignes sont à vos propres risques.
Ni le fabricant, ni l’importateur, ni le fournisseur ne peuvent, dans ce cas, en être tenus pour
responsables.

17
DO718K
www.domo-elektro.be
FR
· Ne dépassez jamais l’indication MAX lorsque vous remplissez l’appareil.
· Assurez-vous de ne pas renverser de liquide sur le cordon d’alimentation.
· N’utilisez que les accessoires livrés avec l’appareil.
· Ne déplacez jamais l’appareil lorsqu’il fonctionne ou qu’il est encore chaud. Laissez toujours refroidir
l’appareil avant de le déplacer.
PARTIES
1. Bac d’égouttage
2. Grille du bac d’égouttage
3. Bac de récupération
4. Réservoir à marc de café
5. Bec verseur
6. Bouton de marche/arrêt
7. Panneau de commande
8. Réservoir à grains
9. Couvercle du réservoir à
grains
10. Réservoir à eau
11. Cordon d’alimentation
12. Unité de brassage
13. Porte de maintenance
14. Brossette de nettoyage
PANNEAU DE COMMANDE
Pictogramme Description
Touches
Espresso (petit café fort)
Lungo (café normal et doux)
Americano (café rallongé à l’eau)
Réglage préféré
Eau chaude
Voyants lumineux
Le voyant est allumé : préparation terminée
Le voyant clignote : préparation en cours
1
2
3
4
5
7
6
8
9
10
11
13
12
14

18
DO718K
FR
Réservoir à grains vide
Bonenreservoir leeg
Le voyant est allumé : le réservoir à marc de café est plein
Le voyant clignote : le bac de récupération n’est pas installé
Le voyant est allumé : l’unité de brassage n’est pas (correctement) installée
Le voyant clignote : la porte de maintenance n’est pas (correctement) installée
Le voyant est allumé : détartrage de l’appareil requis
Le voyant clignote : processus de détartrage en cours
Processus de vidange de l’appareil en cours. Voir la rubrique “nettoyage et
entretien/vidange de l’appareil”
INSTALLATION
Retirez tous les matériaux d’emballage et les éventuels autocollants promotionnels avant la première
utilisation.
1. Posez l’appareil sur une surface plane et stable. Prévoyez un espace susant tout autour de
l’appareil pour assurer la ventilation.
2. Placez le bac d’égouttage. Assurez-vous qu’il soit correctement installé.
3. Remplissez le réservoir à eau. Voir la rubrique “utilisation/remplissage du réservoir à eau”.
4. Remplissez le réservoir à grains. Voir la rubrique “utilisation/remplissage du réservoir à grains”.
5. Branchez le cordon d’alimentation dans le connecteur de l’appareil. Et branchez la prise.
Avant une première utilisation, il est conseillé de préparer une tasse d’eau chaude an de rincer les
conduites. Voir la rubrique “utilisation”.
1
150mm
150mm
150mm
150mm
150mm
2
3
4
5
UTILISATION
1. Allumez l’appareil. Appuyez sur le bouton de marche/arrêt. L’appareil se rincera automatiquement.
Une tasse d’eau chaude sort du bec verseur. L’appareil passe ensuite en mode veille. En mode veille,
tous les voyants sont allumés et l’appareil est prêt à l’emploi.
Remarque : le rinçage automatique ne se fait que si l’appareil est resté éteint un certain temps.
2. Placez une tasse sous le bec verseur. Vous pouvez ajuster la hauteur du bec à la hauteur de votre
tasse en le faisant glisser vers le haut ou le bas. Pour une petite tasse, utilisez le bac d’égouttage. Si
vous utilisez une tasse plus grande, vous pouvez vous passer du bac d’égouttage.

19
DO718K
www.domo-elektro.be
FR
3. Choisissez votre café et appuyez sur le bouton pour un expresso, un lungo, un americano, de l’eau
chaude ou votre réglage préféré.
Remarque : vous pouvez régler vous-même la quantité de café à l’aide des touches. Voir les rubriques
“réglage de la quantité” et “réglage préféré”.
4. Le voyant lumineux de la touche sélectionnée s’allume, le voyant “en cours préparation” apparaît
sur l’écran et l’éclairage de la tasse s’allume. Si vous souhaitez terminer le processus de préparation
avant que le café ne soit prêt, appuyez à nouveau sur la touche sélectionnée.
5. Lorsque le café est prêt, l’appareil revient en mode veille. L’appareil se met automatiquement hors
tension. Selon le mode choisi, l’appareil s’éteindra après 10, 20 ou 30 minutes.
1
2
3
4
REMPLISSAGE DU RÉSERVOIR À EAU
Si le voyant du réservoir à eau clignote pour indiquer qu’il est vide, c’est que vous devez le remplir.
1. Retirez le réservoir à eau de l’appareil. Vous pouvez pour cela utiliser le couvercle du réservoir en tant
que poignée.
2. Rincez le réservoir et remplissez-le d’eau claire et froide jusqu’au repère maximum.
3. Remettez le réservoir dans l’appareil.
!
Attention : retirez toujours le réservoir à eau de l’appareil lorsque vous le remplissez, an d’éviter tout
débordement et les dommages consécutifs éventuels.
!
Ne remplissez jamais le réservoir à eau avec de l’eau tiède, chaude ou gazeuse, ou tout autre liquide.
1
2
3
!
REMPLISSAGE DU RÉSERVOIR À GRAINS
Vous pouvez placer le couvercle directement sur le réservoir ou pour surélever l’accessoire situé devant le
réservoir à grains.
Si le voyant du réservoir à grains clignote pour indiquer qu’il est vide, c’est que vous devez le remplir.
1. Retirez le couvercle du réservoir. Si vous le souhaitez, placez l’accessoire pour surélever le réservoir
à grains.
2. Faites l’appoint en grains, en les déversant lentement dans le réservoir.
3. Remettez le couvercle.
!
Mettez uniquement des grains de café dans le réservoir prévu à cet eet. Ne remplissez jamais le
réservoir avec du café moulu, du café instantané ou d’autres ingrédients ou objets.

20
DO718K
FR
1
2
3
VIDANGE DU RÉSERVOIR À MARC DE CAFÉ
Si le voyant du réservoir à marc de café est allumé en permanence, c’est que vous devez le vider.
1. Retirez le bac d’égouttage.
2. Retirez le bac de récupération de l’appareil.
3. Videz le réservoir à marc de café. Rincez le bac de récupération et le réservoir à marc de café et
séchez-les.
4. Remettez tout bien en place.
1
2
3
4
RÉGLAGE PRÉFÉRÉ
Vous pouvez programmer la touche de réglage préféré à votre gré.
1. Maintenez la touche de réglage préféré enfoncée pendant 2 secondes. Les voyants des touches
expresso, lungo et americano vont se mettre à clignoter.
2. Appuyez sur la touche correspondant au type de café que vous souhaitez programmer comme
réglage préféré.
3. La préparation commence automatiquement. Appuyez à nouveau sur la touche du type de café
que vous êtes en train de programmer. Maintenez la touche enfoncée aussi longtemps que vous
souhaitez que le café continue de couler. Lorsque vous relâchez la touche, la préparation s’arrête.
L’appareil se souvient de la quantité choisie lorsque vous relâchez votre touche.
4. La touche de réglage préféré est désormais programmée.
1
2
3
RÉGLAGE DE LA QUANTITÉ
Vous pouvez régler la quantité correspondant aux touches expresso, lungo, americano et eau chaude
entre 25 ml et 250 ml.

21
DO718K
www.domo-elektro.be
FR
1. Appuyez sur la touche dont vous souhaitez régler la quantité.
2. La préparation commence. Appuyez à nouveau sur la touche du type de café que vous êtes en train
de programmer. Maintenez la touche enfoncée aussi longtemps que vous souhaitez que le café
continue de couler.
3. Lorsque la préparation a atteint la quantité souhaitée, relâchez le bouton. Vous entendrez un double
signal, ce qui signie que la quantité a été dénie en tant que nouvelle quantité pour cette touche.
1
2
RÉGLAGE DE LA MOUTURE DU CAFÉ
Le réservoir à grains dispose d’un bouton rotatif permettant de régler la nesse
de la mouture. Pendant le fonctionnement, tournez le bouton pour moudre les
grains de façon plus grossière ou plus ne.
!
Attention : ne manipulez pas ce bouton si l’appareil n’est pas en marche car
cela pourrait endommager le moulin s’il reste des grains dans le mécanisme. Le
bouton rotatif comporte de petits points indiquant la nesse de mouture. Plus le
point est petit, plus le réglage de mouture est n.
DÉTERMINATION DU MODE
La machine à expresso propose 3 réglages : standard, éco et rapide. En mode éco, vous économisez de
l’énergie alors qu’en mode rapide, vous obtenez un café encore plus rapidement.
Mode éco Mode rapide Mode standard
Éclairage des tasses Non Oui Oui
Prébrassage* Oui Non Oui
Mise hors tension automatique 10 min 30 min 20 min
Mémoire de quantité choisie Oui Oui Oui
* Le processus de prébrassage humidie les grains moulus de l’unité de brassage en y ajoutant
préalablement une petite quantité d’eau. Cela permet au café moulu de se dilater et d’augmenter la
pression, de façon à optimiser l’arôme et l’extraction de l’huile.
1. Si l’appareil est en mode veille, appuyez sur le bouton de marche/arrêt pendant 5 secondes. Vous
entendrez un double signal.
2. Les boutons correspondant aux diérents types de café ont désormais chacune un réglage diérent.
La touche allumée indique le réglage actuel. Les autres touches clignotent.
Eau chaude Expresso Lungo
Mode éco X
Mode rapide X
Mode standard X

22
DO718K
FR
3. Vous pouvez maintenant aussi modier le réglage en appuyant sur l’une des touches qui clignotent.
Choisissez la touche eau chaude pour le mode éco, la touche expresso pour le mode rapide et la
touche lungo pour le mode standard. Vous entendrez un double signal une fois le réglage adapté.
4. Si vous souhaitez conserver le réglage actuel, appuyez à nouveau sur le bouton marche/arrêt et
attendez 5 secondes. L’appareil revient en mode veille.
NETTOYAGE ET ENTRETIEN
NETTOYAGE
Il est conseillé d’eectuer les étapes 1 à 4 de façon quotidienne. Si l’appareil est utilisé pendant une
période plus longue, des résidus de café peuvent rester dans l’appareil ; nettoyez-le dans ce cas
conformément à l’étape 5.
Éteignez l’appareil et débranchez le cordon d’alimentation.
1. Retirez le bac d’égouttage. Videz le bac. Nettoyez la grille et le réservoir à l’eau claire. Séchez les
deux éléments. Ceux-ci peuvent également être passés au lave-vaisselle.
2. Retirez le bac de récupération de l’appareil. Videz le réservoir à marc de café. Nettoyez le bac de
récupération et le réservoir à marc de café à l’eau claire. Séchez les deux éléments. Ceux-ci peuvent
également être passés au lave-vaisselle.
3. Ouvrez la porte de maintenance. Retirez l’unité de brassage en appuyant sur les deux boutons
latéraux de l’unité de brassage et en le tirant vers vous. Nettoyez l’unité de brassage à l’eau claire et
séchez-la.
!
Attention : ne nettoyez jamais l’unité de brassage au lave-vaisselle !
4. Nettoyez le boîtier à l’aide d’un chion humide. Utilisez le chion fourni pour nettoyer l’écran tactile.
5. Utilisez la brosse de nettoyage pour nettoyer les résidus de café tout autour de la sortie interne du
café moulu.
6. Remettez tout bien en place. Si une pièce n’est pas (correctement) installée, l’écran de l’appareil
l’indiquera. Voir la rubrique “pièces” pour une explication des diérents voyants lumineux.
!
N’immergez jamais l’appareil, le cordon d’alimentation ou la che dans l’eau ou tout autre liquide. Ceci
pour éviter tout choc électrique ou incendie.
!
N’utilisez jamais de détergents agressifs ou abrasifs.
1
2
3
4
6

23
DO718K
www.domo-elektro.be
FR
DÉTARTRAGE
Si le voyant de détartrage est allumé, c’est que vous devez détartrer l’appareil.
1. Remplissez le réservoir à eau jusqu’à son repère maximum.
2. Ajoutez 1 sachet de produit détartrant dans le réservoir à eau. 3 sachets sont fournis avec l’appareil.
Des produits de détartrage supplémentaires sont disponibles via le site Web : webshop.domo-
elektro.be
3. Branchez la che dans une prise de courant.
4. Placez un récipient collecteur sous le bec verseur. Assurez-vous que le récipient a bien la même
capacité que le réservoir à eau proprement dit.
5. En mode veille, maintenez simultanément le bouton marche/arrêt et la touche expresso enfoncés
pendant 5 secondes. Vous entendrez un signal et les voyants détartrage et expresso de l’appareil
vont se mettre à clignoter.
6. Appuyez sur la touche expresso pour conrmer le processus de détartrage. Si, nalement, vous ne
souhaitez pas détartrer, appuyez sur le bouton marche/arrêt pour revenir en mode veille.
7. Le voyant de détartrage clignote et l’appareil commence le processus. De l’eau contenant du produit
sort du bec en plusieurs phases. L’ensemble du processus prend quelques minutes. (± 20 min.)
8. Lorsque toute l’eau du réservoir aura coulé, les voyants réservoir à eau vide et expresso sont allumés.
9. Videz votre récipient collecteur et remettez-le en place. S’il reste encore des résidus dans le
réservoir à eau, videz d’abord celui-ci et rincez-le. Remplissez le réservoir d’eau claire jusqu’au repère
maximum et remettez-le dans l’appareil.
10. Le processus de détartrage reprend. L’appareil fera couler la moitié de l’eau dans le réservoir,
s’arrêtera pendant 1 minute, puis fera couler l’autre moitié de l’eau.
11. Le processus de détartrage est maintenant terminé et l’appareil s’éteint.
1
2
3
4
5
+
6 7
8
9
10
!
Attention : l’eau qui s’écoule du bec verseur est très chaude ; éloignez par conséquent vos mains de
l’appareil lorsqu’il celui-ci fonctionne.
!
Utilisez uniquement les produits de détartrage fournis avec l’appareil. D’autres produits de détartrage,
des produits de nettoyage agressifs ou du vinaigre peuvent endommager l’appareil.
!
Si l’appareil n’est pas correctement entretenu, cela peut réduire considérablement sa durée de vie.

24
DO718K
FR
RINÇAGE MANUEL
Vous pouvez rincer manuellement l’appareil pour nettoyer le bec verseur. Il est
conseillé de le faire régulièrement si l’appareil est utilisé fréquemment ou s’il
reste inactif pendant un certain temps.
1. Il est conseillé de placer une tasse vide ou un récipient collecteur sous le
bec verseur.
2. En mode veille, maintenez simultanément le bouton marche/arrêt et la
touche d’eau chaude enfoncés pendant 5 secondes.
3. Le voyant d’eau chaude clignote. De l’eau chaude sort du bec verseur.
4. Une fois le bec rincé, l’appareil repasse en mode veille.
VIDANGE DE L’APPAREIL
Si vous souhaitez ranger ou transporter l’appareil, il est préférable de le vider complètement an qu’il ne
reste pas d’eau dans les conduites.
1. En mode veille, maintenez simultanément le bouton marche/arrêt et la touche lungo enfoncés
pendant 5 secondes.
2. Le voyant de vidange de l’appareil clignote. Si vous ne souhaitez pas poursuivre la vidange de
l’appareil, appuyez à nouveau sur le bouton marche/arrêt pour revenir en mode veille.
3. Retirez le réservoir à eau. Le voyant de vidange de l’appareil reste allumé. Videz le réservoir à eau et
le bac d’égouttage.
4. Une fois le processus terminé, l’appareil s’éteint automatiquement.
!
Si vous souhaitez ensuite réutiliser l’appareil, faites d’abord couler une tasse d’eau chaude.
1
+
2
3
PROBLÈMES ÉVENTUELS
Problème Cause Solution
L'appareil ne fonctionne pas. L'appareil n'est pas raccordé au
réseau électrique.
Vériez si le cordon est
correctement branché et si la
che est bien branchée dans
une prise.
Aucune réponse ou réponse
tardive lorsque l’on appuie sur
les touches du panneau de
commande.
· L’appareil est limité
électromagnétiquement.
· Le panneau de commande
est sale.
· Débranchez la che secteur
et réessayez quelques
minutes plus tard.
· Nettoyez le panneau de
commande avec le chion
fourni.
+

25
DO718K
www.domo-elektro.be
FR
Le café n'est pas assez chaud. · Les tasses n’ont pas été
préchauées.
· L’unité de brassage est
encore froide.
· Faites chauer les tasses.
· Rincez l’appareil 3 fois
pour réchauer l’unité de
brassage.
Le café ne sort pas du bec
verseur.
Il se peut que la fonction de
vidange de l'appareil ait été
utilisée la dernière fois.
Appuyez sur la touche d'eau
chaude pour que de l'eau chaude
sorte du bec.
La première tasse de café est de
mauvaise qualité.
La première séance de mouture
ne fournit pas susamment de
café moulu.
Jetez le café. Les cafés suivants
sont de bonne qualité.
Le café n'a pas de couche de
crème.
Les grains de café ne sont pas
frais.
Remplacez les grains de café.
Les touches du panneau
de commande ne sont pas
réactives.
Il faut toucher les touches
tactiles de face.
Appuyez frontalement sur les
touches, plus précisément dans
la partie inférieure de leurs
pictogrammes.
Il faut beaucoup de temps pour
que l'appareil chaue.
Du calcaire s'est accumulé dans
l'appareil.
Détartrez l'appareil.
Bien que le réservoir à eau soit
vide/non installé, le voyant ne
s'allume pas.
Le capteur, situé près du
raccordement du réservoir à
eau, est humide.
Essuyez l'eau tout autour du
raccordement du réservoir à
eau.
Il y a beaucoup d'eau dans le
réservoir à marc de café.
Le café moulu est trop n et
bloque la sortie d'écoulement
de l'eau.
Réglez la nesse de mouture
à l'aide du bouton rotatif du
réservoir à grains pendant que
l'appareil fonctionne.
Le café coule très lentement/
goutte du bec verseur.
Le café moulu est trop n et
bloque la sortie d'écoulement
de l'eau.
Réglez la nesse de mouture
à l'aide du bouton rotatif du
réservoir à grains pendant que
l'appareil fonctionne.
Le voyant du réservoir à grains
clignote pour indiquer qu'il est
vide alors qu'il reste encore
susamment de grains dans le
réservoir.
La sortie interne du café moulu
est bloquée.
Utilisez la brosse de nettoyage
pour nettoyer les résidus de café
tout autour de la sortie interne
du café moulu.
Le voyant de détartrage
clignote.
Le processus de détartrage est
toujours en cours.
Suivez les étapes du processus
de détartrage car l'appareil ne
revient en mode veille qu'une
fois tout le processus terminé.

26
DO718K
FR
MISE AU REBUT
Ce symbole sur le produit ou son emballage indique que ce produit ne peut
être traité comme déchet ménager. Il doit plutôt être remis au point de
ramassage concerné, se chargeant du recyclage du matériel électrique et
électronique. En vous assurant que ce produit est éliminé correctement, vous
favorisez la prévention des conséquences négatives pour l’environnement et
la santé humaine qui, sinon, seraient le résulat d’un traitement inapproprié
des déchets de ce produit. Pour obtenir plus de détails sur le recyclage de ce
produit, veuillez prendre contact avec le bureau municipal de votre région,
votre service d’éliminiation des déchets ménagers ou le magasin où vous avez
acheté le produit.
L’emballage est recyclable. Traitez l’emballage écologiquement.

27
DO718K
www.domo-elektro.be
DE
GARANTIE
Sehr geehrter Kunde,
Sämtliche unserer Produkte unterliegen einer strengen Qualitätskontrolle,
bevor Sie Ihnen angeboten werden. Sollten dennoch
Probleme mit Ihrem Gerät auftreten, bedauern wir dies zutiefst.
Wir möchten Sie in diesem Fall bitten, unseren Kundenservice zu kontaktieren.
Unsere Mitarbeiter helfen Ihnen gern weiter!
+32 14 21 71 91 [email protected]
Montag – Donnerstag: 8:30 Uhr – 12:00 Uhr und von 13:00 Uhr – 17:00 Uhr
Freitag: 8:30 Uhr – 12:00 Uhr und von 13:00 Uhr – 16:30 Uhr
Dieses Gerät hat eine Garantiefrist von 2 Jahren ab dem Kaufdatum. Während der Garantiezeit
übernimmt der Hersteller die vollständige Verantwortung für Mängel, die nachweislich auf Material- oder
Konstruktionsfehler zurückzuführen sind. Wenn derartige Mängel auftreten, wird das Gerät wenn nötig
ausgetauscht oder repariert. Die Garantiezeit von 2 Jahren beginnt in diesem Moment nicht erneut,
sondern sie läuft bis 2 Jahre nach dem Kaufdatum weiter. Die Garantie wird auf der Grundlage des
Kassenbons gewährt.
Die Garantie auf Accessoires und Verschleißteile beträgt 6 Monate.
Die Garantie und die Verantwortung/Haftung des Lieferanten und Herstellers entfallen automatisch in
den folgenden Fällen:
· Bei Nichtbeachtung der Anweisungen in dieser Bedienungsanleitung.
· Bei falschem Anschluss, z.B. bei einer zu hohen Stromspannung.
· Bei falscher, grober oder abnormaler Verwendung.
· Bei unzureichender oder falscher Wartung.
· Bei vom Verbraucher oder von nicht ermächtigten Dritten vorgenommenen Reparaturen oder
Änderungen am Gerät.
· Bei der Verwendung von Ersatzteilen oder Accessoires, die nicht vom Lieferanten / Hersteller
empfohlen oder geliefert werden.
SICHERHEITSVORKEHRUNGEN
Wenn Sie elektrische Geräte verwenden, müssen folgende Sicherheitshinweise beachtet werden:
· Lesen Sie diese Hinweise sorgfältig durch. Bewahren Sie diese Bedienungsanleitung zum späteren
Nachschlagen auf.
· Entfernen Sie vor dem ersten Gebrauch alle Verpackungsmaterialien und möglichen Werbeauleber.
Sorgen Sie dafür, dass Kinder nicht mit den Verpackungsmaterialien spielen.
· Dieses Gerät eignet sich für den Einsatz im Haushalt und in ähnlichen Umfeldern, zum Beispiel in
folgenden Bereichen:
· Küchenbereich für Mitarbeiter von Geschäften, Büros und anderen ähnlichen beruichen
Umfeldern.
· Bauernhöfe
· Hotel- und Motelzimmer und andere Bereiche mit wohnungsähnlichem Charakter
· Gästezimmer oder Ähnliches

28
DO718K
DE
· Diese Gerät darf von Kindern ab 16 Jahren und Menschen mit körperlichen oder sensorischen
Behinderungen oder Menschen mit eingeschränkten geistigen Fähigkeiten oder mangelnder
Erfahrung bzw. Sachkenntnis unter der Bedingung verwendet werden, dass diese Personen
beaufsichtigt werden oder sie eine Anleitung zur sicheren Verwendung des Geräts erhalten haben und
sich der Gefahren bei der Verwendung des Geräts bewusst sind. Kinder dürfen nicht mit dem Gerät
spielen. Die Wartung und Reinigung des Geräts darf nicht durch Kinder ausgeführt werden, außer
diese sind älter als 16 Jahre und werden von einem Erwachsenen beaufsichtigt.
· Netzstecker ziehen, wenn das Gerät nicht in Gebrauch ist, bevor Teile montiert oder abmontiert
werden und vor der Reinigung. Stellen Sie zunächst alle Schalter auf „Aus“ und ziehen Sie den Stecker
am Stecker selbst aus der Steckdose. Ziehen Sie den Stecker nie am Netzkabel aus der Steckdose.
· ACHTUNG: Zur Vermeidung von Unfällen sollte das Gerät nicht mit einem externen Zusatzgerät, wie
z. B. über einen externen Timer oder an einen Stromkreislauf angeschlossen werden, der regelmäßig
ein- und ausgeschaltet wird.
· Die Oberächen dieses Geräts werden während des Gebrauchs heiß. Wir empfehlen zur Vermeidung
von Brandverletzungen, das Gerät - außer an den Grien - nicht zu berühren.
· Eingeschaltetes Gerät nie unbeaufsichtigt stehen lassen.
· Verwenden Sie das Gerät nicht im Freien.
· Gerät nur für den vorgesehenen Zweck verwenden.
· Vor Gebrauch überprüfen, ob die auf dem Gerät angegebene Spannung mit dem des Stromnetzes
übereinstimmt.
· Das Netzkabel muss stets an eine Steckdose angeschlossen werden, die gemäß den örtlichen
Standards und Normen isoliert und geerdet wurde.
· Verwenden Sie das Gerät nie, wenn das Netzkabel oder der Stecker beschädigt ist, wenn es nicht
richtig funktioniert oder beschädigt ist. Bringen Sie das Gerät in diesem Fall zur Durchsicht,
Reparatur oder für elektrische/mechanische Anpassungen zum Kundendienst von DOMO oder zum
nächstgelegenen Servicecenter. Versuchen Sie nie, das Gerät selbst zu reparieren.
· Tauchen Sie das Gerät, das Kabel oder den Stecker auf keinen Fall in Wasser oder andere Flüssigkeiten.
Dies dient der Vermeidung von elektrischen Stromschlägen und Feuer.
· Verwenden Sie das Gerät nicht mit nassen Händen.
· Dieses Gerät ist mit einem kurzen Netzkabel ausgestattet, um das Risiko zu vermeiden, dass Personen
oder Gegenstände über/an einem längeren Netzkabel hängen bleiben oder darüber fallen. DIESES
GERÄT SOLLTE AUF KEINEN FALL MIT EINEM VERLÄNGERUNGSKABEL VERWENDET WERDEN.
· Rollen Sie das Netzkabel vollständig ab, um eine Überhitzung des Kabels zu vermeiden.
· Lassen Sie das Netzkabel nicht auf einer heißen Oberäche oder über einen Tischrand oder eine
Arbeitsplatte herunter hängen.
· Lassen Sie das Netzkabel nicht unter oder rund um das Gerät hängen.
· Stellen Sie das Gerät niemals auf einen heißen Gasherd oder ein heißes elektrisches Kochfeld bzw. in
deren Nähe, nicht in eine Spüle und nicht in einen heißen Ofen.
· Halten Sie das Gerät von brennbaren Materialien, Gas und explosiven Stoen fern.
· Schließen Sie das Netzkabel erst an die Steckdose an, wenn das Gerät korrekt zusammengebaut
wurde. Um das Gerät vom Netzstrom zu trennen, muss der Bedienschalter zuerst in die „AUS“- oder
„0“-Position gestellt werden. Anschließend kann der Stecker aus der Steckdose gezogen werden.
Ziehen Sie nie am Gerät oder am Netzkabel, um den Stecker aus der Steckdose zu ziehen.
· Wenn das Gerät nicht gut gewartet wird, kann dies die Lebensdauer des Geräts drastisch verringern
und zu Gefahrensituationen führen.
· Beim Wasserkochen ist es möglich, dass heißer Dampf durch den Filter oder eine andere Önung
austritt, es ist daher wichtig, die Hände beim Betrieb des Geräts von diesem fernzuhalten.

29
DO718K
www.domo-elektro.be
DE
· Für Unfälle oder Schäden, die durch die Nichtbefolgung dieser Regeln verursacht werden, haften
Sie selbst. Weder der Hersteller noch der Importeur oder der Lieferant können in solchen Fällen zur
Verantwortung gezogen werden.
· Beim Befüllen des Geräts darf die Höchstfüllstandanzeige „MAX“ nicht überschritten werden.
· Es ist darauf zu achten, dass keine Flüssigkeit über das Netzkabel verschüttet wird.
· Verwenden Sie nur das Zubehör, das mit dem Gerät mitgeliefert wird.
· Versetzen oder tragen Sie das Gerät nicht, solange es noch in Betrieb oder noch heiß ist. Lassen Sie
das Gerät erst abkühlen, bevor es an einen anderen Ort gestellt wird.
TEILE
1. Tropfschale
2. Gitter der Tropfschale
3. Auangschale
4. Kaeesatzbehälter
5. Kaeeauslauf
6. Ein-/Aus-Taste
7. Bedienfeld
8. Bohnenbehälter
9. Deckel des
Bohnenbehälters
10. Wassertank
11. Kabel
12. Brühgruppe
13. Wartungsklappe
14. Reinigungsbürste
BEDIENFELD
Symbol Beschreibung
Tasten
Espresso (kleiner, starker Kaee)
Lungo (normaler, milder Kaee)
Americano (mit Wasser verdünnter Kaee)
Bevorzugte Einstellung
Heißes Wasser
1
2
3
4
5
7
6
8
9
10
11
13
12
14

30
DO718K
DE
Kontrollleuchten
Kontrollleuchte leuchtet: Zubereitung fertig
Kontrollleuchte blinkt: Zubereitung im Gange
Wassertank leer oder nicht eingesetzt
Bohnenbehälter leer
Kontrollleuchte leuchtet: Kaeesatzbehälter voll
Kontrollleuchte blinkt: Auangschale ist nicht eingesetzt
Kontrollleuchte leuchtet: Brühgruppe ist nicht (richtig) eingesetzt
Kontrollleuchte blinkt: Wartungsklappe ist nicht (richtig) angebracht
Kontrollleuchte leuchtet: Gerät entkalken
Kontrollleuchte blinkt: Entkalkungsvorgang in Gange
Entleerung des Geräts im Gange. Siehe Abschnitt „Reinigung und Wartung/
Gerät entleeren“
INSTALLATION
Entfernen Sie vor der ersten Verwendung das gesamte Verpackungsmaterial und möglicherweise
vorhandene Werbeauleber.
1. Stellen Sie das Gerät auf einen achen, stabilen Untergrund. Achten Sie darauf, dass um das Gerät
herum genug Freiraum für ausreichende Belüftung vorhanden ist.
2. Bringen Sie die Tropfschale an. Achten Sie darauf, dass sie korrekt installiert ist.
3. Füllen Sie den Wassertank. Siehe Abschnitt „Verwendung/Wassertank füllen“.
4. Füllen Sie den Bohnenbehälter. Siehe Abschnitt „Verwendung/Bohnenbehälter füllen“.
5. Stecken Sie das Kabel in den Kabelanschluss des Geräts und stecken Sie den Stecker in die
Steckdose.
Vor der ersten Verwendung wird empfohlen, eine Tasse heißes Wasser zuzubereiten, um die Leitungen zu
spülen. Siehe Abschnitt „Verwendung“.
1
150mm
150mm
150mm
150mm
150mm
2
3
4
5
GEBRAUCH
1. Schalten Sie das Gerät ein. Drücken Sie die Ein-/Aus-Taste. Das Gerät wird automatisch gespült. Aus
dem Auslauf ießt eine Tasse heißes Wasser. Das Gerät kehrt anschließend in den Stand-by-Modus
zurück. Im Stand-by-Modus leuchten alle Kontrollleuchten und das Gerät ist einsatzbereit.

31
DO718K
www.domo-elektro.be
DE
Hinweis: Das automatische Spülen erfolgt nur, wenn das Gerät längere Zeit ausgeschaltet war.
2. Stellen Sie eine Tasse unter den Kaeeauslauf. Sie können die Höhe des Auslaufs an die Höhe Ihrer
Tasse anpassen, indem Sie ihn nach oben oder unten schieben. Bei einer kleinen Tasse verwenden
Sie die Tropfschale. Wenn Sie eine größere Tasse verwenden, können Sie die Tropfschale weglassen.
3. Wählen Sie Ihren gewünschten Kaee und drücken Sie die Taste für einen Espresso, Lungo,
Americano, heißes Wasser oder Ihre bevorzugte Einstellung.
Hinweis: Sie können die Menge Kaee der Tasten selbst einstellen. Siehe Abschnitte „Menge
einstellen“ und „bevorzugte Einstellung“.
4. Die Kontrollleuchte der gewählten Taste leuchtet auf, die Kontrollleuchte „Zubereitung im
Gange“ erscheint auf dem Display und die Tassenbeleuchtung wird eingeschaltet. Wenn Sie den
Zubereitungsvorgang beenden möchten, bevor der Kaee fertig ist, drücken Sie die gewählte Taste
noch einmal.
5. Wenn der Kaee fertig ist, kehrt das Gerät in den Stand-by-Modus zurück. Das Gerät verfügt über
eine automatische Abschaltung. Abhängig vom Modus schaltet sich das Gerät nach 10, 20 oder 30
Minuten aus.
1
2
3
4
WASSERTANK FÜLLEN
Wenn die Kontrollleuchte „Wassertank leer“ blinkt, müssen Sie den Wassertank füllen.
1. Nehmen Sie den Wassertank aus dem Gerät. Dazu können Sie den Deckel des Wassertanks als Gri
verwenden.
2. Spülen Sie den Wassertank aus und füllen Sie ihn mit sauberem, kaltem Wasser bis zur maximalen
Füllstandsmarkierung.
3. Setzen Sie den Wassertank wieder in das Gerät ein.
!
Achtung: Entfernen Sie den Wassertank jedes Mal aus dem Gerät, wenn Sie ihn mit Wasser füllen, um
ein Überlaufen und Schäden zu vermeiden.
!
Verwenden Sie niemals warmes, heißes oder kohlensäurehaltiges Wasser oder andere Flüssigkeiten
im Wassertank.
1
2
3
!
BOHNENBEHÄLTER FÜLLEN
Sie können entweder den Deckel direkt auf den Behälter aufsetzen oder das Zubehör zum Anheben des
Bohnenbehälters verwenden.

32
DO718K
DE
Wenn die Kontrollleuchte „Bohnenbehälter leer“ blinkt, müssen Sie den Bohnenbehälter füllen.
1. Nehmen Sie den Deckel vom Behälter. Falls gewünscht, bringen Sie das Zubehör zum Anheben des
Bohnenbehälters an.
2. Geben Sie die Bohnen hinzu, indem Sie sie langsam in den Behälter füllen.
3. Setzen Sie den Deckel wieder auf.
!
Verwenden Sie nur Kaeebohnen im Bohnenbehälter. Füllen Sie den Behälter niemals mit
gemahlenem Kaee, löslichem Kaee oder anderen Zutaten oder Gegenständen.
1
2
3
KAFFEESATZBEHÄLTER ENTLEEREN
Wenn die Kontrollleuchte „Kaeesatzbehälter voll“ leuchtet, müssen Sie den Kaeesatzbehälter
entleeren.
1. Entfernen Sie die Tropfschale.
2. Nehmen Sie die Auangschale aus dem Gerät.
3. Entleeren Sie den Kaeesatzbehälter. Spülen und trocknen Sie sowohl die Auangschale als auch
den Kaeesatzbehälter ab.
4. Bringen Sie alles wieder an seinem ursprünglichen Platz an.
1
2
3
4
BEVORZUGTE EINSTELLUNG
Sie können die Taste „bevorzugte Einstellung“ nach Ihrem eigenen Geschmack programmieren.
1. Halten Sie die Taste „bevorzugte Einstellung“ 2 Sekunden lang gedrückt. Die Kontrollleuchten der
Tasten „Espresso“, „Lungo“ und „Americano“ blinken.
2. Drücken Sie die Taste für die Art von Kaee, die Sie als bevorzugte Einstellung programmieren
möchten.
3. Die Zubereitung beginnt. Drücken Sie erneut die Taste für die Art von Kaee, die Sie jetzt
programmieren. Halten Sie die Taste so lange gedrückt, wie Sie möchten, dass der Kaee
weiterießt. Wenn Sie die Taste loslassen, wird der Zubereitungsvorgang gestoppt. Das Gerät merkt
sich die Menge zum Zeitpunkt, zu dem Sie die Taste loslassen.
4. Die Taste „bevorzugte Einstellung“ ist jetzt programmiert.

33
DO718K
www.domo-elektro.be
DE
1
2
3
MENGE EINSTELLEN
Sie können die Menge der Tasten „Espresso“, „Lungo“, „Americano“ und „heißes Wasser“ zwischen 25 ml
und 250 ml einstellen.
1. Drücken Sie die Taste, deren Menge Sie einstellen möchten.
2. Die Zubereitung beginnt. Drücken Sie erneut die Taste für die Art von Kaee, die Sie jetzt
programmieren. Halten Sie die Taste so lange gedrückt, wie Sie möchten, dass der Kaee
weiterießt.
3. Wenn die gewünschte Menge zubereitet wurde, lassen Sie die Taste los. Sie hören zweimal ein
Signal, was bedeutet, dass die Menge als die neue Menge dieser Taste eingestellt ist.
1
2
MAHLGRADEINSTELLUNG
Im Bohnenbehälter bendet sich ein Drehknopf zur Einstellung des Mahlgrads.
Drehen Sie den Knopf während des Betriebs, um die Bohnen gröber oder feiner
mahlen zu lassen.
!
Vorsicht: Drehen Sie diesen Knopf nicht, wenn das Gerät
nicht in Betrieb ist. Dies kann das Mahlmesser beschädigen, wenn sich noch
Bohnen im Mechanismus benden.
Auf dem Drehknopf benden sich Punkte, um den Mahlgrad anzudeuten. Je
kleiner der Punkt, desto feiner der Mahlgrad.
MODUS BESTIMMEN
Die Espressomaschine hat 3 Einstellungen: Standard, Eco und schnell. Im Ecomodus sparen Sie Energie,
mit dem Schnellmodus bereiten Sie Ihren Kaee noch schneller zu.
Ecomodus Schnellmodus Standardmodus
Tassenbeleuchtung Nein Ja Ja
Vorbrühen* Ja Nein Ja
Automatische Abschaltung 10 Min. 30 Min. 20 Min.
Mengenspeicher Ja Ja Ja
* Durch das Vorbrühen werden die gemahlenen Bohnen in der Brühgruppe vor dem Brühen des Kaees
mit einer kleinen Menge Wasser befeuchtet. Das sorgt dafür, dass sich der gemahlene Kaee ausdehnt
und der Druck höher ist, damit sich das volle Aroma entfalten kann und die Extraktion des Öls optimal ist.

34
DO718K
DE
1. Wenn sich das Gerät im Stand-by-Modus bendet, halten Sie die Ein-/Aus-Taste 5 Sekunden lang
gedrückt. Sie hören zweimal ein Signal.
2. Die Tasten für die Art von Kaee stehen jetzt jeweils für eine andere Einstellung. Die leuchtende
Taste zeigt die aktuelle Einstellung an. Die anderen Tasten blinken.
Heißes Wasser Espresso Lungo
Ecomodus X
Schnellmodus X
Standardmodus X
3. Sie können die Einstellung jetzt auch ändern, indem Sie eine der blinkenden Tasten drücken. Wählen
Sie die Heißwassertaste für den Ecomodus, die Espresso-Taste für den Schnellmodus und die Lungo-
Taste für den Standardmodus. Sie hören zweimal ein Signal, wenn die Einstellung angepasst ist.
4. Wenn Sie die aktuelle Einstellung behalten möchten, drücken Sie erneut die Ein-/Aus-Taste und
warten Sie 5 Sekunden. Das Gerät kehrt wieder in den Stand-by-Modus zurück.
REINIGUNG UND WARTUNG
REINIGUNG
Es wird empfohlen, die Schritte 1 bis 4 täglich auszuführen. Wenn das Gerät über einen längeren Zeitraum
verwendet wird, können Kaeereste im Gerät zurückbleiben. Reinigen Sie es gemäß Schritt 5.
Schalten Sie das Gerät aus und ziehen Sie den Stecker aus der Steckdose.
1. Entfernen Sie die Tropfschale. Entleeren Sie die Schale. Reinigen Sie sowohl das Gitter als auch die
Schale mit sauberem Wasser. Trocknen Sie beides ab. Sie können auch in der Spülmaschine gereinigt
werden.
2. Nehmen Sie die Auangschale aus dem Gerät. Entleeren Sie den Kaeesatzbehälter. Reinigen
Sie sowohl die Auangschale als auch den Kaeesatzbehälter mit sauberem Wasser. Trocknen Sie
beides ab. Sie können auch in der Spülmaschine gereinigt werden.
3. Önen Sie die Wartungsklappe. Entfernen Sie die Brühgruppe, indem Sie beide Tasten an der
Seite der Brühgruppe eindrücken und sie zu sich heranziehen. Reinigen Sie die Brühgruppe mit
sauberem Wasser und trocken Sie sie ab.
!
Achtung: Reinigen Sie die Brühgruppe niemals in der
Spülmaschine!
4. Reinigen Sie das Gehäuse mit einem feuchten Tuch. Verwenden Sie das mitgelieferte
Reinigungstuch, um das Touchpanel zu reinigen.
5. Verwenden Sie die Reinigungsbürste, um Kaeereste um den internen Auslass für gemahlenen
Kaee herum zu entfernen.
6. Bringen Sie alles wieder an seinem ursprünglichen Platz an. Wenn ein Teil nicht (richtig) installiert
ist, zeigt das Gerät dies auf dem Display an. Siehe Abschnitt „Einzelteile“ für eine Erläuterung der
Kontrollleuchten.
!
Tauchen Sie das Gerät, das Stromkabel oder den Stecker niemals in Wasser oder andere Flüssigkeiten
ein, um einen elektrischen Schlag oder Feuer zu verhindern.
!
Verwenden Sie niemals aggressive oder scheuernde Reinigungsmittel.

35
DO718K
www.domo-elektro.be
DE
1
2
3
4
6
ENTKALKEN
Wenn die Kontrollleuchte „Gerät entkalken“ leuchtet, müssen Sie das Gerät entkalken.
1. Füllen Sie den Wassertank bis zur maximalen Füllstandsmarkierung.
2. Geben Sie 1 Beutel Entkalker in den Wassertank. Es werden 3 Beutel mit dem Gerät mitgeliefert.
Zusätzlicher Entkalker ist über folgende Website erhältlich: webshop.domo-elektro.be
3. Stecken Sie den Stecker in die Steckdose.
4. Stellen Sie einen Auangbehälter unter den Kaeeauslauf. Stellen Sie sicher, dass der Behälter
mindestens das gleiche Fassungsvermögen wie der Wassertank selbst hat.
5. Halten Sie im Stand-by-Modus die Ein-/Aus-Taste und die Espresso-Taste gleichzeitig 5 Sekunden
lang gedrückt. Sie hören ein Signal und die Kontrollleuchten „Gerät entkalken“ und „Espresso“
blinken.
6. Drücken Sie die Espresso-Taste, um den Entkalkungsvorgang zu bestätigen. Wenn Sie doch nicht
entkalken möchten, drücken Sie die Ein-/Aus-Taste, um in den Stand-by-Modus zurückzukehren.
7. Die Kontrollleuchte „Entkalkungsvorgang“ blinkt und das Gerät beginnt mit der Entkalkung. Das
Wasser mit Entkalker ießt schubweise aus dem Auslauf. Der gesamte Vorgang dauert einige
Minuten. (± 20 Min.)
8. Nachdem das Wasser des Wassertanks durchgelaufen ist, leuchten auch die Kontrollleuchten
„Wassertank leer“ und „Espresso“.
9. Entleeren Sie den Auangbehälter und stellen Sie ihn zurück. Falls sich noch Rückstände im
Wassertank benden, entleeren Sie den Tank zuerst und spülen Sie ihn aus. Füllen Sie den
Wassertank bis zur maximalen Füllstandsmarkierung mit sauberem Wasser und setzen Sie ihn
wieder in das Gerät ein.
10. Der Entkalkungsvorgang wird fortgesetzt. Das Gerät lässt die Hälfte des Wassers im Wassertank
durchlaufen, macht eine Pause von 1 Minute und lässt dann die andere Hälfte des Wassers
durchlaufen.
11. Der Entkalkungsvorgang ist nun abgeschlossen und das Gerät schaltet sich aus.

36
DO718K
DE
1
2
3
4
5
+
6 7
8
9
10
!
Achtung: Das aus dem Kaeeauslauf ießende Wasser ist heiß. Halten Sie daher während des
Betriebs die Hände von der Maschine fern.
!
Verwenden Sie nur den mit dem Gerät mitgelieferten Entkalker. Andere Entkalker, aggressive
Reinigungsmittel oder Essig können die Maschine beschädigen.
!
Wenn das Gerät nicht richtig gewartet wird, kann dies die Lebensdauer des Geräts drastisch
verkürzen.
MANUELL SPÜLEN
Um den Kaeeauslauf zu reinigen, können Sie das Gerät manuell spülen
lassen. Es wird empfohlen, dies regelmäßig durchzuführen, wenn das Gerät oft
verwendet wird oder wenn es längere Zeit nicht verwendet wurde.
1. Es wird empfohlen, eine leere Tasse oder einen Auangbehälter unter den
Kaeeauslauf zu stellen.
2. Halten Sie im Stand-by-Modus die Ein-/Aus-Taste und die
Heißwassertaste-Taste gleichzeitig 5 Sekunden lang gedrückt.
3. Die Kontrollleuchte „heißes Wasser“ blinkt. Es ießt heißes Wasser aus dem Kaeeauslauf.
4. Nachdem der Auslauf gespült wurde, kehrt das Gerät in den Stand-by-Modus zurück.
GERÄT ENTLEEREN
Wenn Sie das Gerät lagern oder transportieren möchten, sollten Sie es am besten vollständig entleeren,
damit kein Wasser in den Leitungen zurückbleibt.
1. Halten Sie im Stand-by-Modus die Ein-/Aus-Taste und die Lungo-Taste gleichzeitig 5 Sekunden lang
gedrückt.
2. Die Kontrollleuchte „Gerät entleeren“ blinkt auf dem Display. Wenn Sie das Gerät doch
nicht entleeren möchten, drücken Sie wieder die Ein-/Aus-Taste, um in den Stand-by-Modus
zurückzukehren.
3. Entfernen Sie den Wassertank. Die Kontrollleuchte „Gerät entleeren“ leuchtet. Entleeren Sie den
Wassertank und die Tropfschale.
4. Wenn der Vorgang beendet ist, schaltet sich das Gerät automatisch aus.
!
Wenn Sie es danach wieder verwenden möchten, bereiten Sie zuerst eine Tasse heißes Wasser zu.
+

37
DO718K
www.domo-elektro.be
DE
1
+
2
3
MÖGLICHE PROBLEME
Problem Ursache Lösung
Das Gerät funktioniert nicht. Das Gerät ist nicht an das
Stromnetz angeschlossen.
Stellen Sie sicher, dass das Kabel
richtig angeschlossen und der
Stecker in der Steckdose steckt.
Keine oder verspätete Reaktion
beim Drücken der Tasten am
Bedienfeld.
· Das Gerät wird
elektromagnetisch begrenzt.
· Das Bedienfeld ist
schmutzig.
· Ziehen Sie den Stecker aus
der Steckdose und versuchen
Sie es einige Minuten später
noch einmal.
· Reinigen Sie das Bedienfeld
mit dem mitgelieferten
Reinigungstuch.
Der Kaee ist nicht heiß genug. · Die Tassen sind nicht
vorgewärmt.
· Die Brühgruppe ist noch kalt.
· Wärmen Sie die Tassen vor.
· Spülen Sie das Gerät
dreimal, um die Brühgruppe
aufzuwärmen.
Es ießt kein Kaee aus dem
Auslauf.
Es kann sein, dass beim letzten
Mal die Funktion „Gerät
entleeren“ verwendet wurde.
Drücken Sie die
Heißwassertaste, sodass heißes
Wasser aus dem Auslauf ießt.
Die erste Tasse Kaee ist von
schlechter Qualität.
Der erste Mahlvorgang ergibt
nicht genug gemahlenen Kaee.
Gießen Sie den Kaee weg. Die
nächsten Kaees sind von guter
Qualität.
Der Kaee hat keine
Cremaschicht.
Die Kaeebohnen sind nicht
frisch.
Tauschen Sie die Kaeebohnen
aus.
Die Tasten am Bedienfeld sind
nicht empndlich.
Die Touchtasten müssen frontal
berührt werden.
Berühren Sie die Tasten
frontal im unteren Teil der
Tastensymbole.
Es dauert lange bis sich das
Gerät aufgewärmt hat.
Im Gerät hat sich Kalk
angesammelt.
Entkalken Sie das Gerät.
Obwohl der Wassertank leer ist/
nicht eingesetzt ist, leuchtet die
Kontrollleuchte nicht.
Der Sensor in der Nähe des
Anschlusses des Wassertanks
ist nass.
Wischen Sie das Wasser um
den Anschluss des Wassertanks
herum weg.
Es bendet sich viel Wasser im
Kaeesatzbehälter.
Der gemahlene Kaee ist
zu fein und verstopft den
Wasserauslass.
Passen Sie den Mahlgrad
mit dem Drehknopf im
Bohnenbehälter während des
Betriebs an.

38
DO718K
DE
Der Kaee ießt sehr langsam/
tropft aus dem Kaeeauslauf.
Der gemahlene Kaee ist
zu fein und verstopft den
Wasserauslass.
Passen Sie den Mahlgrad
mit dem Drehknopf im
Bohnenbehälter während des
Betriebs an.
Die Kontrollleuchte
„Bohnenbehälter leer“ blinkt,
obwohl sich noch ausreichend
Bohnen im Behälter benden.
Der interne Auslass für
gemahlenen Kaee ist verstopft.
Verwenden Sie die
Reinigungsbürste, um
Kaeereste um den internen
Auslass für gemahlenen Kaee
herum zu entfernen.
Die Kontrollleuchte „Entkalken“
blinkt.
Der Entkalkungsvorgang ist
noch im Gange.
Führen Sie die Schritte für den
Entkalkungsvorgang aus. Erst
wenn der gesamte Vorgang
abgeschlossen ist, kehrt das
Gerät in den Stand-by-Modus
zurück.
ENTSORGEN
Dieses Symbol auf dem Produkt oder seiner Verpackung weist darauf hin, dass
dieses Produkt nicht als normaler Haushaltsabfall zu behandeln ist, sondern
an einem Sammelpunkt für das Recyling von elektrischen und elektronischen
Geräten abgegeben werden muss. Durch Ihren Beitrag zum korrekten
Entsorgen dieses Produkts schützen Sie die Umwelt und die Gesundheit Ihrer
Mitmenschen. Umwelt und Gesundheit werden durch falsches Entsorgen
gefährdet. Weitere Informationen über das Recycling dieses Produkts
erhalten Sie von Ihren Rathaus, Ihrer Müllabfuhr oder dem Geschäft, in dem
Sie das Produkt gekauft haben.
Das Verpackungsmaterial ist wiederverwertbar. Entsorgen Sie die Verpackung
umweltgerecht und führen Sie sie der Wertstosammlung zu.

39
DO718K
www.domo-elektro.be
EN
WARRANTY
Dear client ,
All of our products are always submitted to a strict quality control before they are sold to you.
Should you nevertheless experience problems with your device, we sincerely regret this.
In that case, we kindly request you to contact our customer service.
Our sta will gladly assist you.
+32 14 21 71 91 [email protected]
Monday – Thursday: 8.30 – 12.00 and 13.00 – 17.00
Friday: 8.30 – 12.00 and 13.00 – 16.30
This appliance has a two year warranty period. During this period the manufacturer is responsible for
any failures that are the direct result of construction failure. When these failures occur the appliance will
be repaired or replaced if necessary. The warranty will not be valid when the damage to the appliance is
caused by wrong use, not following the instructions or repairs executed by a third party. The guarantee is
issued with the original till receipt. All parts, which are subject to wear, are excluded from the warranty.
If your device breaks down within the 2-year warranty period, you can return the device together with
your receipt to the shop where you purchased it.
The guarantee on accessories and components that are liable to wear-and-tear is only 6 months.
The guarantee and responsibility of the supplier and manufacturer lapse automatically in the following
cases:
· If the instructions in this manual have not been followed.
· In case of incorrect connection, e.g., electrical voltage that is too high.
· In case of incorrect, rough or abnormal use.
· In case of insucient or incorrect maintenance.
· In case of repairs or alterations to the device by the consumer or non-authorised third parties.
· If the customer used parts or accessories that are not recommended or provided by the supplier /
manufacturer.
SAFETY INSTRUCTIONS
When using electrical appliances, basic safety precautions should always be taken, including the
following:
· Read all instructions carefully. Keep this manual for future reference.
· Make sure all packaging materials and promotional stickers have been removed before using the
appliance for the rst time. Make sure children cannot play with the packaging materials.
· This appliance is intended to be used in household and similar applications such as:
· sta kitchen areas in shops, oces and other working environments;
· farm houses;
· by clients in hotels, motels and other residential type environments;
· bed and breakfast type environments.
· Children should be supervised to ensure that they do not play with the appliance.
· This appliance can be used by children aged from 16 years and above and persons with reduced
physical, sensory or mental capabilities or lack of experience and knowledge if they have been given

40
DO718K
EN
supervision or instruction concerning use of the appliance in a safe way and understand the hazards
involved. Children shall not play with the appliance. Cleaning and user maintenance shall not be made
by children unless they are older than 16 and supervised.
· Keep the appliance and its cord out of reach of children younger than 16 years.
· The appliance must be disconnected from its power source when not in use, during service and when
replacing parts. Allow to cool before putting on or taking o parts, and before cleaning the appliance.
· CAUTION: In order to avoid a hazard this appliance must not be supplied through an external
switching device, such as a timer, or connected to a circuit that is regularly switched on and o by the
utility.
· The surfaces of the appliance are likely to get hot during use. It is advised not to touch the surfaces of
the appliance other than the handles to avoid burns.
· Never leave the appliance unattended while it is functioning.
· Do not use or store this appliance outdoors.
· Do not use this appliance for other than intended use.
· Check carefully that the voltage and frequency of the power net match the indications on the rating
label of the appliance.
· The plug must be plugged into an appropriate outlet that is installed and grounded in accordance with
all local standards and requirements.
· Do not operate this appliance with a damaged cord or plug or in the event the appliance malfunctions
or has been damaged in any manner. Return the appliance to the DOMO Service Department or its
service agent for examination, repair, or electrical or mechanical adjustment. Do not try to repair the
appliance yourself.
· To protect against electrical shock or burns, do not immerse unit, cord, or plug in water or other liquid.
· Do not operate the appliance with wet hands.
· A short power supply cord is provided to reduce the risk of becoming entangled in or tripping over a
longer cord. DO NOT USE WITH AN EXTENSION CORD.
· Unwrap the cord completely to prevent overheating of the cord.
· Do not let the power supply cord hang over the edge of a counter, or touch hot surfaces.
· Do not allow the power cord supply to run underneath or around the unit.
· Do not place on or near a hot gas or electric burner or sink, or in a heated oven.
· Do not place near ammable materials, gases or explosives.
· Make sure the appliance is correctly assembled, then plug the cord in the wall outlet. To disconnect,
turn controls to “OFF” or “0” position, then remove the plug from the wall. Never pull the cord or
appliance to remove the plug from the socket.
· Failure to maintain this appliance in a clean condition could adversely aect the life of the appliance
and possibly result in a hazardous situation.
· During boiling, hot steam may come through the lter or any other opening. Keep hands and face at a
safe distance during operation.
· Any injury or damage caused by failure to comply with these rules are at your own risk. Neither the
manufacturer, importer, or the supplier may be held liable.
· Do not overll the kettle. Never add water above the maximum level marked on the appliance.
· Do not spill any liquid on the connector.
· Only use the utensils delivered with the appliance.
· Do not move the appliance while in use or when still hot. Allow to cool before moving the appliance.

41
DO718K
www.domo-elektro.be
EN
PARTS
1. Drip tray
2. Drip tray grid
3. Drip pan
4. Coee grounds reservoir
5. Coee spout
6. On/o button
7. Control panel
8. Bean reservoir
9. Bean reservoir lid
10. Water reservoir
11. Cord
12. Brewing unit
13. Maintenance door
14. Cleaning brush
CONTROL PANEL
Icon Description
Keys
Espresso (small, strong coee)
Lungo (normal, mild coee)
Americano (coee diluted with water)
Favourite setting
Hot water
Indicator lights
Indicator light on: preparation ready
Indicator light ashing: preparation in progress
Water tank empty or not installed
Bean reservoir empty
1
2
3
4
5
7
6
8
9
10
11
13
12
14

42
DO718K
EN
Indicator light on: coee grounds reservoir full
Indicator light ashing: drip pan not installed
Indicator light on: brewing unit not inserted (correctly)
Indicator light ashing: maintenance door is not installed (correctly)
Indicator light on: descale the appliance
Indicator light ashing: descaling process in progress
The process for emptying the appliance is in progress. See “cleaning and
maintenance/emptying the appliance” section
INSTALLATION
Remove all packaging materials and any promotional stickers before using the appliance for the rst time.
1. Place the appliance on a at, stable surface. Provide adequate space around the appliance for
ventilation.
2. Put the drip tray in place. Make sure this is correctly installed.
3. Fill the water reservoir. See “use/ll water tank” section.
4. Fill the bean reservoir. See “use/ll bean reservoir” section.
5. Plug the electrical cable into the cable connector on the appliance. Plug the plug into an electrical
socket.
Before the rst use, it is recommended that a cup of hot water is made rst in order to rinse out the pipes.
See “use” section.
1
150mm
150mm
150mm
150mm
150mm
2
3
4
5
USE
1. Turn the appliance on. Press the on/o button. The appliance will rinse automatically. A cup of hot
water will come out of the spout. The appliance then goes into standby mode. In standby mode, all
indicator lights are on and the appliance is ready for use.
Note: automatic rinsing will only occur if the appliance has been turned o for an extended period of
time.
2. Place a cup under the coee spout. You can adjust the height of the spout to the height of your cup
by lifting it up or down. For a small cup, use the drip tray. If you use a larger cup, you can remove the
drip tray.
3. Choose your desired coee and press the key for an espresso, lungo, americano, hot water or your
favourite setting.
Note: you can set the amount of coee yourself using the keys. See “adjust volume” and “favourite
setting” sections.

43
DO718K
www.domo-elektro.be
EN
4. The indicator light for the selected key lights up, the in preparation indicator light appears on the
display, and the cup illumination lights up. If you want to nish the preparation process before the
coee is ready, press the selected key again.
5. When the coee is ready, the appliance returns to standby mode. The appliance has an automatic
switch-o. Depending on the mode selected, the appliance will turn o after 10, 20 or 30 minutes.
1
2
3
4
FILLING THE WATER TANK
If the water tank indicator light ashes empty, you must ll the water tank.
1. Remove the water tank from the appliance. You can use the lid of the tank as a handle to do this.
2. Rinse the tank out and ll it with clean, cold water up to the maximum mark.
3. Put the tank back in the appliance.
!
Attention: always take the water tank out of the appliance when you ll it with water to prevent
overow and damage.
!
Never use warm, hot or sparkling water, or any other liquid in the water tank.
1
2
3
!
FILL THE BEAN RESERVOIR
You can choose to place the lid directly on the reservoir, or use the accessory for the bean reservoir.
If the bean reservoir empty indicator light ashes, you must ll the bean reservoir.
1. Remove the reservoir lid. If desired, put the accessory in place to raise the bean reservoir.
2. Add the beans by slowly pouring them into the reservoir.
3. Place the lid back.
!
Only use coee beans in the bean reservoir. Never ll the reservoir with ground coee, instant coee,
or other ingredients or objects.
1
2
3

44
DO718K
EN
EMPTYING THE COFFEE GROUNDS RESERVOIR
If the coee grounds reservoir indicator light is on, you must empty the coee grounds reservoir.
1. Remove the drip tray.
2. Remove the drip pan from the appliance.
3. Empty the coee grounds reservoir. Rinse and dry both the drip pan and the coee grounds
reservoir.
4. Return everything to its original position.
1
2
3
4
FAVOURITE SETTING
You can programme the favourite setting key to your own preference.
1. Press and hold the favourite setting key for 2 seconds. The espresso, lungo and americano key
indicators will ash.
2. Press the key for the type of coee you want to programme as your favourite setting.
3. The preparation will start. Press the key for the type of coee you are now programming again.
Keep the key pressed for as long as you want the coee to continue to ow. When you release the
key, the preparation will stop. The appliance remembers the volume from the time you release your
key.
4. The favourite setting key is now programmed.
1
2
3
ADJUST VOLUME
You can adjust the amount of the espresso, lungo, americano and hot water keys from between 25 ml and
250 ml.
1. Press the key that you want to adjust the volume for.
2. The preparation starts. Press the key for the type of coee you are now programming again. Keep
the key pressed for as long as you want the coee to continue to ow.
3. When the preparation has reached the desired amount, release the key. You will hear a double beep -
this means the amount has been set as the new volume of that key.
1
2

45
DO718K
www.domo-elektro.be
EN
GRINDING SETTING
There is a rotary button in the bean reservoir to adjust the coarseness of the
grind. During operation, turn the button to achieve a coarser or ner grind of
the beans.
!
Caution: Do not turn this button when the appliance is not in
operation, this may damage the grinder if there are beans in the mechanism.
There are dots on the rotary button to indicate the coarseness. The smaller the
dot, the ner the grind setting.
MODE SELECTION
The espresso machine has 3 settings: standard, eco and fast. In eco mode, you save energy; in fast mode,
you make your coee even faster.
Eco mode Fast mode Standard mode
Cup lighting No Yes Yes
Front brewing* Yes No Yes
Automatic switch-o 10 min 30 min 20 min
Volume memory Yes Yes Yes
* For pre-brewing, the ground beans are moistened in the brewing unit with a small amount of water
before brewing. This ensures the ground coee expands, which increases the pressure to optimise the full
aroma and extraction of oil.
1. If the appliance is in standby mode, press the on/o button for 5 seconds. You will hear a double
beep.
2. The keys for the dierent types of coee now each represent a dierent setting. The lit key indicates
the current setting. The other keys will ash.
Hot water Espresso Lungo
Eco mode X
Fast mode X
Standard mode X
3. You can now also change the setting by pressing one of the ashing keys. Choose the hot water key
for eco mode, the espresso key for fast mode and the lungo key for standard mode. You will hear a
double beep if the setting is adjusted.
4. If you want to keep the current setting, press the on/o button again and wait 5 seconds. The
appliance returns to standby mode.
CLEANING AND MAINTENANCE
CLEANING
It is recommended that steps 1-4 are carried out daily. Once the appliance has been used for an extended
period of time, coee residue may build up in the appliance; in this case, clean the appliance according to
step 5.
Turn the appliance o and remove the plug from the socket.
1. Remove the drip tray. Empty the tray. Clean both the grid and the tray with clean water. Dry both
thoroughly. They can also be cleaned in the dishwasher.

46
DO718K
EN
2. Remove the drip pan from the appliance. Empty the coee grounds reservoir. Clean both the drip
pan and the coee grounds reservoir with clean water. Dry both thoroughly. They can also be
cleaned in the dishwasher.
3. Open the maintenance door. Remove the brewing unit by pressing both buttons on the side of the
brewing unit and pulling it towards you. Clean and dry the brewing unit with clean water.
!
Attention: never clean the brewing unit in the dishwasher.
4. Clean the housing with a clean, damp cloth. Use the supplied cleaning cloth to wipe the touch panel.
5. Use the cleaning brush to clean the coee residue from around the internal outlet of the coee mill.
6. Return everything to its original position. If a part is not (properly) installed, the appliance will
indicate this on the display. See “parts” section for an explanation of the indicator lights.
!
Never immerse the appliance, power cord or plug in water or any other liquid. This is to prevent
electric shock or re.
!
Never use an aggressive or abrasive cleaning agent.
1
2
3
4
6
DESCALING
If the descale the appliance indicator light is on, you must descale the appliance.
1. Fill the water tank up to the maximum indication.
2. Add 1 sachet of descaling solution to the water tank. 3 bags are supplied with the appliance.
Additional descaling product can be obtained from the website: www.webshop.domo-elektro.be
3. Plug the power cord into a socket.
4. Place a collection reservoir under the coee spout. Make sure the reservoir has the same capacity as
the water tank.
5. In standby mode, press and hold the on/o button and espresso key simultaneously for 5 seconds.
You will hear a beep and the descale the appliance and espresso lights will ash.
6. Press the espresso key to conrm the descaling process. If you do not want to carry out the
descaling operation, press the on/o button to return to hibernation mode.
7. The descaling process indicator light ashes and the appliance will start descaling. The water with
descaling product comes out of the spout in phases. The whole process takes a few minutes.(± 20
min.)

47
DO718K
www.domo-elektro.be
EN
8. When all the water in the water tank has run through the appliance, the water tank and espresso
indicator lights will go on.
9. Empty the collection reservoir and put it back in place. If there are any residues in the water tank,
rst empty the tank and rinse. Fill the tank with clean water up to the maximum indication and place
it back in the appliance.
10. The descaling process resumes. The appliance will run half of the water in the tank, pause for 1
minute and then run the other half of the water through.
11. The descaling process has now ended and the appliance will turn o.
1
2
3
4
5
+
6 7
8
9
10
!
Attention: the water that comes out of the coee spout is extremely hot, so keep your hands away
from the appliance when it is in operation.
!
Only use the descaling products supplied with the appliance. Other descaling products, aggressive
cleaning agents or vinegar can damage the appliance.
!
If the appliance is not properly maintained, this can drastically reduce the service life of the appliance.
MANUAL RINSE
You can manually rinse the appliance to clean the coee spout. It is
recommended that this be done regularly if the appliance is used frequently or
if the appliance has been idle for a long time.
1. It is recommended to place an empty cup or collection reservoir under the
coee spout.
2. In standby mode, press and hold the on/o button and hot water key
simultaneously for 5 seconds.
3. The hot water indicator light ashes. Hot water comes out of the coee outlet.
4. When the spout has been rinsed, the appliance returns to standby mode.
EMPTYING THE APPLIANCE
If you want to store or transport the appliance, it is best to empty it completely to ensure there is no water
in the pipes.
1. In standby mode, press and hold the on/o button and lungo key simultaneously for 5 seconds.
2. The empty appliance indicator light ashes on the display. If you do not want to continue with the
appliance emptying function, press the on/o button again to return to standby mode.
+

48
DO718K
EN
3. Remove the water tank. The appliance empty indicator light will go on. Empty the water tank and
the drip tray.
4. When the programme is nished, the appliance will automatically turn o.
!
If you want to use the appliance again afterwards, rst make a cup of hot water.
1
+
2
3
POSSIBLE PROBLEMS
Problem Cause Solution
The appliance is not working. The appliance is not connected
to the electricity.
Make sure the electrical cable is
properly connected and that the
plug is plugged in.
No or late response when
pressing the keys on the control
panel.
· The appliance is electro-
magnetically restricted.
· The control panel is dirty.
· Remove the plug from the
socket and try again a few
minutes later.
· Clean the control panel with
the supplied cleaning cloth.
The coee is not warm enough. · The cups have not been pre-
heated.
· The brewing unit is still cold.
· Heat the cups.
· Rinse the appliance 3 times
to heat the brewing unit.
Coee does not come out of the
spout.
It may be that the appliance
emptying function was the last
used setting.
Press the hot water key so hot
water comes out of the spout.
The rst cup of coee is of poor
quality.
The rst grinding session does
not provide enough ground
coee.
Drain the coee. The following
coees are good quality.
The coee has does not have a
creamy layer.
The coee beans are not fresh. Replace the coee beans.
The control panel keys are not
sensitive.
The touch keys must be
operated from the front.
Touch the keys from the front
on the lower part of the icons of
the keys.
It takes a long time for the
appliance to heat up.
Lime has accumulated in the
appliance.
Descale the appliance.
Despite the water tank being
empty/not installed, the
indicator light does not come
on.
The sensor, near the water tank
connector, is wet.
Wipe o the water around the
water tank connection.

49
DO718K
www.domo-elektro.be
EN
There is a lot of water in the
coee grounds reservoir.
The ground coee is too ne and
is blocking the water outlet.
Adjust the coarseness with
the rotary button in the bean
reservoir during operation.
The coee ows very slowly/
drips from the coee spout.
The ground coee is too ne and
is blocking the water outlet.
Adjust the coarseness with
the rotary button in the bean
reservoir during operation.
The bean reservoir indicator
light ashes empty while there
are still enough beans in the
reservoir.
The internal outlet of ground
coee is blocked.
Use the cleaning brush to clean
the coee residue from around
the internal outlet of the coee
mill.
The descaling indicator light
ashes.
The descaling process is still in
progress.
Follow the descaling process
steps, the complete process
is only complete when the
appliance returns to standby
mode.
ENVIRONMENTAL GUIDELINES
This symbol on the product or on its packaging indicates that this product
may not be treated as household waste. Instead it must be brought to
the applicable collection point for recycling of electrical and electronic
equipment. By ensuring this product is disposed of correctly, you will help
prevent potential negative consequences for the environment and human
health, which could otherwise be caused by inappropriate waste handling of
this product. For more detailed information about recycling of this product,
please contact your local city oce, your household waste disposal service or
the shop where you purchased the product.
The packaging is recyclable. Please treat the packaging ecologically.

50
DO718K
ES
GARANTIA
Este aparato tiene un periodo de garantía de 2 años a partir de la fecha de compra. Durante el periodo
de garantía, el distribuidor será completamente responsable de los defectos directamente asignables
a errores del material y fabricación. Cuando se detecten este tipo de errores, y siempre que se estime
necesario, el aparato se sustituirá o reparará. A partir de ese momento, el periodo de garantía de 2 años
no volverá a iniciarse, sino que seguirá siendo de 2 años a partir del momento de compra. La garantía se
concede sobre la base del recibo de caja.
La garantía de los accesorios y componentes sujetos a desgaste es de 6 meses.
La garantía y la responsabilidad/imputabilidad del proveedor y el fabricante expiran automáticamente en
los siguientes casos:
· Cuando no se cumplan las instrucciones que aparecen en este manual.
· En el caso de una conexión inadecuada, por ejemplo, a una tensión eléctrica demasiado alta.
· En caso de uso incorrecto, brusco o anormal.
· En caso de insuciente o incorrecto mantenimiento.
· Si el consumidor o un tercero no autorizado realizan reparaciones o modicaciones en el aparato.
· Si se usan componentes o accesorios que no están recomendados o que no son suministrados por el
proveedor/fabricante.
INSTRUCCIONES DE SEGURIDAD
Cuando utilice aparatos eléctricos, se deben seguir las instrucciones de seguridad mencionadas a
continuación:
· Lea detenidamente estas instrucciones. Conserve este manual para consultarlo posteriormente.
· Antes del primer uso retire todos los materiales de embalaje y etiquetas promocionales. Asegúrese de
que los niños no puedan jugar con el material de embalaje.
· Este aparato es adecuado para su uso en el ámbito doméstico y entornos similares como:
· Zona de cocina para el personal de tiendas, ocinas y otros entornos profesionales similares.
· Granjas.
· Habitaciones de hoteles y moteles, y otros entornos de carácter residencial.
· Habitaciones de invitados o similares.
· Supervise en todo momento a los niños para que no jueguen con el aparato.
· Este aparato puede ser utilizado por niños de 16 años o más, personas con discapacidad física o
sensorial, o personas con capacidad mental limitada o falta de experiencia o conocimiento, siempre,
y en tanto en cuanto, dichas personas estén vigiladas o hayan recibido instrucciones sobre el uso del
aparato de manera segura y conozcan los peligros del uso del mismo. Los niños no deben jugar con el
ventilador. El mantenimiento y la limpieza del dispositivo no deben ser realizados por niños, a menos
que tengan 16 años o más y estén supervisados por un adulto.
· Mantenga el aparato fuera del alcance de los niños.
· Saque el enchufe de la toma de corriente cuando no use el aparato, antes de montar o desmontar
piezas y antes de limpiarlo. Ponga primero todos los botones en posición de apagado y desconecte el
cable de alimentación de la toma de corriente. No tire nunca del cable de alimentación para sacar el
enchufe de la toma de corriente.
· ATENCIÓN: para evitar peligros, el aparato no debe ser controlado con un dispositivo externo, como
un temporizador externo, ni debe conectarse a una red que se encienda y se apague con frecuencia.
· Las supercies de este aparato se calientan durante el uso. Recomendamos no tocar la supercie de
este aparato, exceptuando las asas, para evitar quemaduras.
· No deje nunca sin vigilancia un aparato en marcha.

51
DO718K
www.domo-elektro.be
ES
· No utilice el aparato al aire libre.
· Utilice el aparato únicamente para el n para el que está destinado.
· Antes de utilizarlo, compruebe si el voltaje indicado en el aparato coincide con el voltaje de la red
eléctrica de su vivienda.
· El cable de alimentación debe estar conectado a una toma de corriente que debe haber sido instalada
y conectada a tierra de acuerdo con las normas y reglamentos locales.
· No utilice nunca el aparato si el cable de alimentación o el enchufe están dañados, después de un
mal funcionamiento del aparato o cuando el aparato está dañado. En el caso de que el aparato esté
dañado, llévelo al servicio de postventa de DOMO o al centro de servicio cualicado más cercano
para su inspección, reparación o para realizar ajustes eléctricos/mecánicos. Nunca intente reparar el
aparato por su cuenta.
· Nunca sumerja el aparato, el cable de alimentación o el enchufe en agua o en cualquier otro líquido.
Esto evitará choques eléctricos o incendios.
· No utilice el aparato con las manos mojadas.
· Este aparato está provisto de un cable de alimentación corto para evitar que personas u objetos se
enreden en el mismo o se caigan. NUNCA UTILICE EL APARATO CON UN CABLE ALARGADOR.
· Desenrolle el cable de alimentación completamente para evitar el sobrecalentamiento del mismo.
· No deje que el cable de alimentación cuelgue sobre supercies calientes o sobre el borde de una mesa
o encimera.
· No permita que el cable de alimentación cuelgue por debajo o alrededor del aparato.
· No coloque nunca el aparato encima ni cerca de una placa de cocina eléctrica o de gas, un fregadero o
un horno encendido.
· No coloque nunca el aparato cerca de materiales inamables, gases o explosivos.
· Solo debe introducir el cable de alimentación en la toma de corriente después de que el aparato
se haya montado correctamente. Antes de retirar el cable del aparato de la toma de corriente, el
control se debe poner en la posición «OFF» o «0». A continuación podrá retirar el cable de la toma
de corriente. Nunca tire del aparato o del cable de alimentación para retirar el enchufe de la toma de
corriente.
· Si no se realiza un correcto mantenimiento del aparato, la vida útil del aparato se reducirá
drásticamente y se podrían producir situaciones peligrosas.
· Al hervir agua, es posible que salga vapor caliente a través del ltro u otra abertura; por eso es
importante mantener las manos alejadas del aparato mientras está en funcionamiento.
· Los accidentes o los daños ocasionados por el no seguimiento de estas normas son su propia
responsabilidad. Ni el fabricante, ni el importador ni el distribuidor pueden ser considerados
responsables a este respecto.
· No supere la indicación MAX al llenar el aparato.
· Tenga cuidado de no derramar líquido sobre el cable de alimentación.
· Utilice únicamente los accesorios incluidos con el aparato.
· No mueva nunca el aparato cuando se encuentre todavía en funcionamiento ni mientras siga estando
caliente. Espere siempre a que el aparato se enfríe antes de cambiarlo de lugar.

52
DO718K
ES
PIEZAS
1. Recipiente de goteo
2. Rejilla del recipiente de
goteo
3. Bandeja de derrames
4. Depósito de posos de
café
5. Salida de café
6. Botón de encendido/
apagado
7. Panel de control
8. Depósito de granos
9. Tapa del depósito de
granos
10. Depósito de agua
11. Cable
12. Grupo dispensador
13. Puerta de
mantenimiento
14. Cepillo de limpieza
PANEL DE CONTROL
Icono Descripción
Teclas
Espresso (café pequeño, fuerte)
Lungo (café normal, suave)
Americano (café con agua)
Ajuste favorito
Agua caliente
Lámparas indicadoras
Lámpara indicadora encendida: preparación lista
Todas las lámparas indicadoras parpadean al mismo tiempo
El depósito de agua está vacío o no está colocado
Depósito de granos vacío
1
2
3
4
5
7
6
8
9
10
11
13
12
14

53
DO718K
www.domo-elektro.be
ES
La lámpara indicadora está encendida: depósito de posos de café lleno
La lámpara indicadora parpadea: la bandeja de derrames no está colocada
La lámpara indicadora está encendida: el grupo dispensador no está (bien)
colocado
La lámpara indicadora parpadea: la puerta de mantenimiento no está (bien)
colocada
La lámpara indicadora está encendida: descalcicar el aparato
La lámpara indicadora parpadea: el proceso de descalcicación está en curso
El proceso de vaciado del aparato está en curso. Consulte el apartado
«Limpieza y mantenimiento/vaciar el aparato».
INSTALACIÓN
Antes de usar el aparato por primera vez, retire todos los materiales de embalaje y, en su caso, las
etiquetas adhesivas promocionales.
1. Coloque el aparato sobre una supercie plana y estable. Deje suciente espacio alrededor del
aparato para garantizar una buena ventilación.
2. Coloque el recipiente de goteo. Asegúrese de que este recipiente esté correctamente instalado.
3. Llene el depósito de agua. Consulte el aparatado «uso/llenar el depósito de agua».
4. Llene el depósito de granos. Consulte el apartado «uso/llenar el depósito de granos».
5. Introduzca el cable en la toma de cable del aparato. A continuación, introduzca el enchufe en la
toma de corriente.
Antes del primer uso se recomienda preparar una taza de agua caliente para enjuagar los conductos.
Consulte el apartado «uso».
1
150mm
150mm
150mm
150mm
150mm
2
3
4
5
USO
1. Encienda el aparato. Pulse el botón de encendido/apagado. El aparato se enjuagará
automáticamente. De la salida saldrá una taza de agua caliente. Después, el aparato pasará al modo
de reposo. En el modo de reposo, todas las lámparas indicadoras están encendidas y el aparato está
preparado para su uso.
Nota: el enjuague automático solo se produce si el aparato se ha apagado durante un período de
tiempo más largo.
2. Coloque una taza debajo de la salida de café. Puede ajustar la altura de la salida a la altura de su taza
deslizando la salida hacia arriba o hacia abajo. Para una taza pequeña utilice el recipiente de goteo.
Si utiliza una taza más grande, puede dejar fuera el recipiente de goteo.

54
DO718K
ES
3. Seleccione el café deseado y pulse la tecla para preparar un espresso, lungo, americano, agua
caliente o su ajuste favorito.
Nota: puede ajustar la cantidad de café de las teclas usted mismo. Consulte los apartados «ajuste del
volumen» y «ajuste favorito».
4. Se enciende la lámpara indicadora de la tecla seleccionada, aparece la lámpara indicadora de
preparación en curso en la pantalla y se enciende la iluminación de las tazas. Si quiere nalizar el
proceso de elaboración antes de que el café esté listo, pulse de nuevo la tecla seleccionada.
5. Cuando el café esté preparado, la máquina volverá a ponerse en el modo de reposo. El aparato
tiene un apagado automático. Dependiendo del modo, el aparato se apagará después de 10, 20 o 30
minutos.
1
2
3
4
LLENAR EL DEPÓSITO DE AGUA
Si la lámpara indicadora del depósito de agua vacío parpadea, esto signica que tiene que llenar el
depósito de agua.
1. Retire el depósito de agua del aparato. Para ello, puede usar la tapa del depósito como asa.
2. Enjuague el depósito y llénelo con agua limpia y fría hasta la indicación máxima.
3. Vuelva a colocar el depósito en el aparato.
!
Atención: retire el depósito de agua del aparato cada vez que lo llene de agua, para evitar que se
desborde y se dañe.
!
Nunca use agua caliente, ni agua tibia o con gas, u otro líquido, en el depósito de agua.
1
2
3
!
LLENAR EL DEPÓSITO DE GRANOS
Puede elegir entre colocar la tapa directamente en el depósito, o usar el accesorio para levantar el
depósito de granos.
Si la lámpara indicadora del depósito de granos vacío parpadea, esto signica que tiene que llenar el
depósito de granos.
1. Retire la tapa del depósito. Si así lo desea, coloque el accesorio para levantar el depósito de granos.
2. Añada los granos de café vertiéndolos lentamente en el depósito.
3. Vuelva a colocar la tapa.

55
DO718K
www.domo-elektro.be
ES
!
En el depósito de granos solo debe usar granos de café. Nunca llene el depósito con café molido, café
soluble o con otros ingredientes u objetos.
1
2
3
VACIAR EL DEPÓSITO DE GRANOS
Cuando se encienda la lámpara indicadora del depósito posos de café vacío, tiene que vaciar el
depósito de posos de café.
1. Retire el recipiente de goteo.
2. Retire la bandeja de derrames del aparato.
3. Vacíe el depósito de posos de café. Enjuague la bandeja de derrames y el depósito de posos de café
y séquelos.
4. Vuelva a colocar todo en su posición original.
1
2
3
4
AJUSTE FAVORITO
Puede programar la tecla de su ajuste favorito según sus preferencias.
1. Mantenga pulsada la tecla de ajuste favorito durante 2 segundos. Parpadearán las lámparas
indicadoras de las teclas de espresso, lungo y americano.
2. Pulse la tecla del tipo de café que quiere programar como su ajuste favorito.
3. Empezará la preparación. Vuelva a pulsar la tecla del tipo de café que quiere programar. Mantenga
pulsada la tecla durante el tiempo que desee que siga saliendo café. Si suelta la tecla, la preparación
se detendrá. El aparato recuerda el volumen en el momento que suelta la tecla.
4. Ahora, la tecla de ajuste favorito ya está programada.
1
2
3

56
DO718K
ES
AJUSTAR EL VOLUMEN
Puede ajustar la cantidad de las teclas de espresso, lungo, americano y agua caliente entre 25 ml y 250 ml.
1. Presione la tecla cuyo volumen desea ajustar.
2. Empezará la preparación. Vuelva a pulsar la tecla del tipo de café que quiere programar. Mantenga
pulsada la tecla durante el tiempo que desee que siga saliendo café.
3. Cuando la preparación haya alcanzado la cantidad deseada, suelte la tecla. Escuchará una señal dos
veces, lo que signica que la cantidad se ha establecido como el nuevo volumen de esa tecla.
1
2
AJUSTE DE MOLIENDA
En el depósito de granos hay un botón giratorio para ajustar el grosor con el
que desea moler el café. Durante el funcionamiento, gire el botón para moler
los granos más gruesos o más nos.
!
Atención: no gire este botón cuando el
aparato no esté en funcionamiento, ya que esto podría dañar la cuchilla de moler
si todavía hay granos de café en el mecanismo.
En el botón giratorio hay puntos que indican el grosor. Cuanto más pequeño sea
el punto, más no será el ajuste para moler café.
DETERMINAR EL MODO
La cafetera espresso tiene 3 ajustes: estándar, eco y rápido. En el modo eco se ahorra energía, mientras
que en el modo rápido puede preparar su café aún más rápido.
Modo eco Modo rápido Modo estándar
Iluminación de tazas No Sí Sí
Preelaboración* Sí No Sí
Apagado automático 10 min 30 min 20 min
Memoria de volumen Sí Sí Sí
* Antes de la preelaboración del café, humedezca los granos molidos en el grupo dispensador con
una pequeña cantidad de agua. Esto asegura que el café molido se expande y que la presión es mayor,
asegurando que la extracción de aroma y aceite son óptimos.
1. Cuando el aparato esté en el modo de reposo, pulse el botón de encendido/apagado durante 5
segundos. Escuchará una señal dos veces.
2. Ahora, cada una de las teclas para los tipos de café tienen un ajuste diferente. La tecla que está
encendida indica el ajuste actual. Parpadearán las otras teclas.
Agua caliente Espresso Lungo
Modo eco X
Modo rápido X
Modo estándar X

57
DO718K
www.domo-elektro.be
ES
3. Ahora también puede cambiar el ajuste pulsando una de las teclas que parpadean. Seleccione la
tecla de agua caliente para el modo eco, la tecla de espresso para el modo rápido y la tecla de lungo
para el modo estándar. Cuando se haya establecido el ajuste escuchará una señal dos veces.
4. Si desea mantener el ajuste actual, pulse el botón de encendido/apagado de nuevo y espere 5
segundos. Después, el aparato volverá al modo de reposo.
LIMPIEZA Y MANTENIMIENTO
LIMPIEZA
Se recomienda realizar diariamente los pasos 1 a 4. Si el aparato se utiliza durante un período de tiempo
más largo, pueden quedar residuos de café en la máquina, límpiela según lo indicado en el paso 5.
Apague el aparato y retire el enchufe de la toma de corriente.
1. Retire el recipiente de goteo. Vacíe el recipiente. Limpie tanto la rejilla como el recipiente con agua
limpia. Seque bien estos componentes. También se pueden lavar en el lavavajillas.
2. Retire la bandeja de derrames del aparato. Vacíe el depósito de posos de café. Limpie tanto
la bandeja de derrames como el depósito de posos de café con agua limpia. Seque bien estos
componentes. También se pueden lavar en el lavavajillas.
3. Abra la puerta de mantenimiento. Retire el grupo dispensador presionando ambos botones
presentes en el lateral del grupo dispensador y tirando de este hacia usted. Limpie el grupo
dispensador con agua limpia, y séquelo.
!
Atención: ¡nunca lave el grupo dispensador en el
lavavajillas!
4. Limpie la carcasa con un paño húmedo. Utilice el paño de limpieza suministrado para limpiar el
panel táctil.
5. Utilice el cepillo de limpieza para limpiar los residuos de café alrededor de la salida interna de café
molido.
6. Vuelva a colocar todo en su posición original. Si un componente no está (correctamente) instalado,
el aparato lo indicará en la pantalla. Consulte el apartado «componentes» para consultar la
explicación de las lámparas indicadoras.
!
Nunca sumerja el aparato, el cable de alimentación o el enchufe en agua o en otro líquido. Esto es para
prevenir descargas eléctricas o un incendio.
!
Nunca utilice productos de limpieza agresivos o abrasivos.
1
2
3
4
6

58
DO718K
ES
DESCALCIFICAR
Cuando se encienda la lámpara indicadora para descalcicar, esto signica que el aparato se debe
descalcicar.
1. Llene el depósito de agua hasta la indicación máxima.
2. Añada 1 saquito de producto descalcicador al depósito de agua. Con el aparato se han suministrado
3 saquitos. Puede obtener un producto descalcicador adicional a través del sitio web: webshop.
domo-elektro.be
3. Introduzca el enchufe en la toma de corriente.
4. Coloque el contenedor de goteo debajo de la salida de café. Asegúrese de que el contenedor tenga
la misma capacidad que el propio depósito de agua.
5. En el modo de reposo, mantenga pulsados el botón de encendido/apagado y la tecla de espresso
simultáneamente durante 5 segundos. Escuchará una señal y las lámparas indicadoras para
descalcicar y espresso parpadearán.
6. Pulse la tecla espresso para conrmar el proceso de descalcicación. Si no quiere descalcicar,
presione el botón de encendido/apagado para volver al modo de reposo.
7. Parpadeará la lámpara indicadora para descalcicar y el aparato empezará a descalcicar. El agua
con producto sale de la salida por fases. El proceso dura varios minutos. (± 20 min.)
8. Cuando toda el agua del depósito de agua haya pasado, las lámparas indicadoras del depósito de
agua vacío y espresso se encenderán.
9. Vacíe el contenedor de goteo y vuelva a colocarlo. Si queda algún residuo en el depósito de agua,
vacíelo y enjuáguelo. Llene el depósito con agua limpia hasta la indicación máxima y vuelva a
colocarlo en el aparato.
10. El proceso de descalcicación se reanuda. El aparato dejará pasar la mitad del agua del depósito,
hará una pausa de 1 minuto y, a continuación, dejará pasar la otra mitad del agua.
11. El proceso de descalcicación ya estará completo y el aparato se apaga.
1
2
3
4
5
+
6 7
8
9
10
!
Atención: el agua que sale de la salida de café está caliente. Por lo tanto, mantenga las manos alejadas
del aparato cuando esté en funcionamiento.
!
Solo debe utilizar los productos de descalcicación suministrados con el aparato. El uso de otros
productos descalcicantes, así como de productos de limpieza agresivos o vinagre, podría dañar el
aparato.
!
Si el aparato no se mantiene adecuadamente se podría reducir drásticamente su vida útil.

59
DO718K
www.domo-elektro.be
ES
ENJUAGUE MANUAL
Para limpiar la salida de café, el aparato se puede enjuagar manualmente. Se
recomienda hacer esto regularmente si el aparato se utiliza con frecuencia o si
ha estado sin funcionar durante un largo período de tiempo.
1. Se recomienda colocar una taza vacía o un recipiente vacío debajo de la
salida de café.
2. En el modo de reposo, mantenga pulsados el botón de encendido/
apagado y la tecla de agua caliente simultáneamente durante 5 segundos.
3. Parpadeará la lámpara indicadora de agua caliente. Sale agua caliente de la salida de café.
4. Cuando la salida se haya enjuagado, el aparato volverá al modo de reposo.
VACIAR EL APARATO
Si quiere almacenar o transportar el aparato, le recomendamos que lo vacíe completamente para que no
quede agua en las tuberías.
1. En el modo de reposo, mantenga pulsados el botón de encendido/apagado y la tecla lungo
simultáneamente durante 5 segundos.
2. La lámpara indicadora para vaciar el aparato parpadeará en la pantalla. Si no quiere continuar con
la función para vaciar el aparato, vuelva a presionar el botón de encendido/apagado para volver al
modo de reposo.
3. Retire el depósito de agua. Se encenderá la lámpara indicadora para vaciar el aparato. Vacía el
depósito de agua y el recipiente de goteo.
4. Una vez nalizado el proceso, el aparato se apagará automáticamente.
!
Cuando quiera volver a utilizarlo, haga primero una taza de agua caliente.
1
+
2
3
POSIBLES PROBLEMAS
Problema Causa Solución
El aparato no funciona. El aparato no está conectado a
la red eléctrica.
Asegúrese de que el cable está
correctamente conectado y de
que el enchufe se ha introducido
en la toma de corriente.
Al pulsar las teclas del panel de
control no se produce ninguna
reacción o se produce tarde.
· El aparato está limitado
electromagnéticamente.
· El panel de control está
sucio.
· Retire el enchufe de la toma
de corriente y vuelva a
intentarlo en unos minutos.
· Limpie el panel de control
con el paño de limpieza
suministrado.
+

60
DO718K
ES
El café no está lo
sucientemente caliente.
· Las tazas no se precalientan.
· El grupo dispensador todavía
está frío.
· Caliente las tazas.
· Enjuague el aparato 3 veces
para calentar el grupo
dispensador.
No sale café de la salida. Es posible que la función para
vaciar el aparato se haya
utilizado la última vez.
Pulse la tecla de agua caliente
para que salga agua caliente por
la salida.
La primera taza de café es de
mala calidad.
La primera sesión de molienda
no proporciona suciente café
molido.
Tire el café. Los siguientes cafés
sí serán de buena calidad.
El café no tiene una capa de
crema.
Los granos de café no son
frescos.
Cambie los granos de café.
Las teclas del panel de control
no son sensibles.
Las teclas táctiles se deben tocar
frontalmente.
Toque las teclas frontalmente en
la parte inferior de los iconos de
las mismas.
El aparato tarda mucho en
calentarse.
Se ha acumulado cal en el
aparato.
Descalcique el aparato.
A pesar de que el depósito
de agua está vacío/no se ha
colocado, la lámpara indicadora
no está encendida.
El sensor, que se encuentra cerca
de la conexión del depósito de
agua, está mojado.
Limpie el agua alrededor de la
conexión del depósito de agua.
Hay demasiada agua en el
depósito de posos de café.
El café molido es demasiado no
y bloquea la salida de agua.
Ajuste el grosor con el
mando giratorio en el
depósito de granos durante el
funcionamiento.
El café sale muy lentamente,
salen gotas por la salida de café.
El café molido es demasiado no
y bloquea la salida de agua.
Ajuste el grosor con el
mando giratorio en el
depósito de granos durante el
funcionamiento.
La lámpara indicadora del
depósito de granos vacío
parpadea, pero hay sucientes
granos de café en el depósito.
La salida interna de café molido
está bloqueada.
Utilice el cepillo de limpieza
para limpiar los residuos de café
alrededor de la salida interna de
café molido.
La lámpara indicadora para
descalcicar está parpadeando.
El proceso de descalcicación
todavía está en curso.
Siga los pasos del proceso de
descalcicación. Solo cuando
se haya completado el proceso,
el aparato volverá al modo de
reposo.

61
DO718K
www.domo-elektro.be
ES
DIRECTRICES MEDIOAMBIENTALES
El símbolo en el producto o en el embalaje indica que este producto no puede
ser tratado como residuo doméstico. Se debe llevar a un lugar en el que se
reciclan equipos eléctricos y electrónicos. Si se asegura de que este producto
se desecha correctamente, usted ayudará a evitar posibles consecuencias
negativas para las personas y el medio ambiente que serían causadospor
un tratamiento de residuos inadecuado. Para obtener información más
detallada sobre el reciclaje de este producto, póngase en contacto con su
ayuntamiento, o con la empresa o departamento responsable del servicio de
recogida de basura doméstica, o con la tienda donde adquirió el producto.
El material de embalaje es reciclable. Trate el embalaje de una manera
medioambientalmente responsable.

62
DO718K
IT
GARANZIA
La garanzia dell’apparecchio è valida per 2 anni a partire dalla data di acquisto. Durante il periodo di
validità della garanzia, il distributore si assume la piena responsabilità dei difetti dei materiali o di quelli
di fabbricazione. In caso di presenza di tali difetti, se necessario, si procederà alla sostituzione o alla
riparazione dell’apparecchio. Il periodo di garanzia di 2 anni non ricomincia in quel momento, ma continua
per 2 anni dalla data di acquisto dell’apparecchio. Per la garanzia fa fede la data riportata sullo scontrino.
Se l’apparecchio si rivela difettoso nel periodo di validità della garanzia, cioè 2 anni, potete portarlo,
insieme allo scontrino, nel negozio dove l’avete acquistato.
La garanzia sugli accessori e sui componenti soggetti a usura è di 6 mesi.
La garanzia e la responsabilità del negoziante e del produttore decadono automaticamente nei seguenti
casi:
· mancata osservanza delle istruzioni contenute nel presente manuale;
· errato collegamento, per esempio con tensione elettrica troppo alta;
· uso errato, anormale e manesco;
· manutenzione insuciente o errata;
· riparazione o modiche all’apparecchio eseguite dal cliente o da terzi non autorizzati;
· uso di accessori o componenti non raccomandati o forniti dal negoziante o dal produttore.
INDICAZIONI DI SICUREZZA
· Quando si utilizzano dispositivi elettrici, è necessario tenere presenti le seguenti istruzioni di sicurezza:
· Leggere con attenzione le presenti istruzioni. Conservare le istruzioni per possibili future consultazioni.
· Prima di utilizzare il prodotto, togliere tutti gli imballi e gli eventuali adesivi promozionali. Assicurarsi
che i bambini non giochino con gli imballaggi.
· Questo apparecchio è destinato unicamente all’uso domestico e in ambienti analoghi, quali:
· angoli cottura riservati al personale nei negozi, negli uci e in altri ambienti professionali
· Fattorie
· Camere di alberghi, motel e altre strutture ricettive residenziali
· Camere per vacanze o ambienti analoghi
· L’apparecchio può essere utilizzato da bambini di età superiore a 16 anni e da persone con ridotte
capacità siche, sensoriali o mentali, o con mancanza di esperienza o conoscenza, solo se sorvegliati
o se hanno ricevuto istruzioni sull’uso sicuro dell’apparecchio e ne comprendono i rischi. I bambini
non possono giocare con l’apparecchio. Le operazioni di pulizia e di manutenzione non devono essere
eettuate dai bambini di età inferiore a 16 anni e senza sorveglianza.
· Tenere l’apparecchio fuori dalla portata dei bambini di età inferiore a 16 anni.
· Togliere la spina dalla presa quando l’apparecchio non è in funzione, prima di montarne o smontarne
i componenti e prima di pulirlo. Lasciare rareddare l’apparecchio prima di montare o smontare i
componenti e prima di pulirlo.
· ATTENZIONE: per evitare il rischio di incidenti, l’apparecchio non deve essere utilizzato con strumenti
esterni, come ad esempio un timer e non deve essere collegato a una rete che viene accesa e spenta in
continuazione.
· L’apparecchio potrebbe surriscaldarsi durante il normale utilizzo. Consigliamo di aerrare
l’apparecchio servendosi dell’impugnatura e di non toccarlo in altri punti per evitare ustioni.
· Non far funzionare l’apparecchio senza sorveglianza.
· Non utilizzare o conservare l’apparecchio all’aperto.
· Utilizzare l’apparecchio solo per lo scopo previsto.

63
DO718K
www.domo-elektro.be
IT
· Prima dell’uso, controllare che il voltaggio riportato sull’apparecchio corrisponda a quello della rete
elettrica domestica.
· Il cavo di alimentazione deve essere sempre collegato a una presa installata correttamente e con
messa a terra in conformità alla normativa locale vigente.
· Non utilizzare mai l’apparecchio se il cavo di alimentazione o la spina sono danneggiati, dopo un
malfunzionamento o quando è danneggiato. In questi casi, portare l’apparecchio al servizio assistenza
post-vendita di DOMO o al centro assistenza autorizzato più vicino per farlo controllare, riparare
o per apportare le necessarie modiche elettriche o tecniche. Non cercare mai di riparare da soli
l’apparecchio.
· Non immergere mai l’apparecchio, il cavo o la spina in acqua o in altri liquidi. Questo per evitare scosse
elettriche o incendi.
· Non utilizzare l’apparecchio con le mani bagnate.
· L’apparecchio è munito di un cavo di alimentazione corto; se fosse più lungo, ci sarebbe pericolo di
inciampare o di rimanere impigliati. NON UTILIZZARE MAI L’APPARECCHIO CON UNA PROLUNGA.
· Srotolare completamente il cavo di alimentazione per evitare che si surriscaldi.
· Non lasciare il cavo di alimentazione penzolante sul bordo del tavolo o della cucina ed evitare che
venga a contatto con superci calde.
· Non lasciare mai il cavo di alimentazione penzolante sotto l’apparecchio.
· Non posizionare mai l’apparecchio vicino a fornelli elettrici o a gas caldi, al lavandino o a un forno
acceso.
· Non posizionare mai l’apparecchio vicino a materiali inammabili, gas o esplosivi.
· Inserire il cavo di alimentazione nella presa solo dopo aver correttamente montato l’apparecchio.
Per staccare l’apparecchio dalla presa, assicurarsi che sia su “OFF” o in posizione “0”. Solo dopo sarà
possibile staccarlo dalla presa. Non tirare mai il cavo di alimentazione o l’apparecchio per staccare la
spina dalla presa di corrente.
· Se l’apparecchio non viene pulito bene, la sua durata di vita può ridursi in modo drastico e possono
vericarsi situazioni pericolose.
· Quando si riscalda l’acqua, è possibile che esca del vapore dal ltro o da altre aperture. Tenere le mani
lontane dall’apparecchio quando è in funzione.
· Gli incidenti o i danni causati dalla mancata osservanza delle presenti istruzioni sono responsabilità
dell’utilizzatore. Non possono essere ritenuti responsabili per tali danni né il produttore, né
l’importatore, né il fornitore.
· Non riempire l’apparecchio oltre il livello massimo indicato.
· Fare attenzione a non versare nessun liquido sul cavo di alimentazione.
· Utilizzare solo gli accessori forniti insieme all’apparecchio.
· Non spostare mai l’apparecchio mentre è in uso o se è ancora caldo. Prima di spostare l’apparecchio,
lasciarlo sempre rareddare.

64
DO718K
IT
COMPONENTI
1. Vaschetta raccogligocce
2. Griglia vaschetta
raccogligocce
3. Cassetto scarti
4. Recipiente per fondi di
caè
5. Ugello caè
6. Pulsante di accensione/
spegnimento
7. Pannello di controllo
8. Recipiente per caè in
grani
9. Coperchio recipiente per
caè in grani
10. Serbatoio dell’acqua
11. Cavo
12. Gruppo erogatore
13. Sportello per
manutenzione
14. Spazzolino per pulizia
PANNELLO DI CONTROLLO
Icona Descrizione
Pulsanti
Caè espresso (caè espresso in tazzina)
Caè lungo (caè leggero in tazza più grande)
Caè americano (caè allungato con acqua)
Impostazione preferita
Acqua calda
Indicatori luminosi
Indicatore luminoso acceso: preparazione terminata
Indicatore luminoso lampeggiante: preparazione in corso
Serbatoio dell’acqua vuoto o non inserito
Recipiente per caè in grani vuoto
1
2
3
4
5
7
6
8
9
10
11
13
12
14

65
DO718K
www.domo-elektro.be
IT
Indicatore luminoso acceso: recipiente per fondi di caè pieno
Indicatore luminoso lampeggiante: cassetto scarti non inserito
Indicatore luminoso acceso: gruppo erogatore non (ben) posizionato
Indicatore luminoso lampeggiante: sportello per manutenzione non (ben)
posizionato
Indicatore luminoso acceso: decalcicare l’apparecchio
Indicatore luminoso lampeggiante: decalcicazione in corso
Processo di svuotamento apparecchio in corso. Vedere la sezione “Pulizia e
manutenzione/Svuotamento dell’apparecchio”.
INSTALLAZIONE
Rimuovere tutti i materiali di imballaggio ed eventuali adesivi promozionali prima del primo utilizzo.
1. Posizionare l’apparecchio su una supercie piana e stabile. Assicurarsi che ci sia abbastanza spazio
attorno all’apparecchio per un’adeguata ventilazione.
2. Posizionare la vaschetta raccogligocce. Assicurarsi che sia ben inserita.
3. Riempire il serbatoio dell’acqua. Vedere la sezione “Utilizzo/Riempimento del serbatoio dell’acqua”.
4. Riempire il recipiente per caè in grani Vedere la sezione “Utilizzo/Riempimento del recipiente per
caè in grani”.
5. Inserire il cavo di alimentazione nell’apposito ingresso dell’apparecchio. Quindi inserire la spina nella
presa elettrica.
Per il primo utilizzo è consigliato fare una tazza di acqua calda (senza caè) per eseguire un risciacquo
delle condutture. Vedere la sezione “Utilizzo”.
1
150mm
150mm
150mm
150mm
150mm
2
3
4
5
UTILIZZO
1. Accendere l’apparecchio. Premere il pulsante di pulsante di accensione/spegnimento. L’apparecchio
eseguirà un risciacquo automatico. Dall’ugello fuoriesce una tazza di acqua calda Dopodiché
l’apparecchio passa alla modalità stand-by. Nella modalità stand-by tutti gli indicatori luminosi sono
accesi e l’apparecchio è pronto per essere utilizzato.
Nota: il risciacquo automatico avviene solo se l’apparecchio è rimasto spento a lungo.
2. Posizionare una tazza sotto l’ugello caè. È possibile adattare l’altezza dell’ugello all’altezza della
tazza facendolo scorrere in su o in giù. Per una tazzina piccola utilizzare la vaschetta raccogligocce.
Se si usa una tazza più grande, è possibile rimuovere la vaschetta raccogligocce.
3. Scegliere il caè desiderato e premere il pulsante per caè espresso, caè lungo, caè americano,
acqua calda o la propria impostazione preferita.
Nota: è possibile regolare la quantità di caè erogata dai pulsanti. Vedere le sezioni “Impostazione
dei volumi” e “Impostazione preferita”.

66
DO718K
IT
4. L’indicatore luminoso del pulsante selezionato si accende, sul display compare l’indicatore luminoso
della preparazione in corso e si accende l’illuminazione tazze. Se si desidera interrompere il processo
di preparazione prima che il caè sia pronto, premere nuovamente il tasto selezionato.
5. Quando il caè è pronto, l’apparecchio torna alla modalità stand-by. L’apparecchio è dotato di
spegnimento automatico: a seconda della modalità, si spegne dopo 10, 20 o 30 minuti.
1
2
3
4
RIEMPIMENTO DEL SERBATOIO DELL’ACQUA
Se lampeggia l’indicatore luminoso “serbatoio dell’acqua vuoto”, occorre riempire il serbatoio
dell’acqua.
1. Rimuovere il serbatoio dell’acqua dall’apparecchio. È possibile usare il coperchio del serbatoio come
impugnatura.
2. Sciacquare il serbatoio e riempirlo con acqua fredda pulita no all’indicazione di livello massimo.
3. Riposizionare il serbatoio nell’apparecchio.
!
Attenzione: allo scopo di evitare fuoriuscite e danni, per riempire il serbatoio dell’acqua, rimuoverlo
sempre dall’apparecchio.
!
Non usare mai acqua calda, bollente o frizzante né altri liquidi nel serbatoio dell’acqua.
1
2
3
!
RIEMPIMENTO DEL RECIPIENTE PER CAFFÈ IN GRANI
È possibile scegliere se posizionare il coperchio direttamente sul serbatoio o utilizzare l’accessorio per
sollevare il recipiente per caè in grani.
Se lampeggia l’indicatore luminoso “recipiente per caè in grani vuoto”, occorre riempire il recipiente
per caè in grani.
1. Rimuovere il coperchio del recipiente. Se lo si desidera, posizionare l’accessorio per sollevare il
recipiente per caè in grani.
2. Aggiungere il caè in grani versandolo lentamente nel recipiente.
3. Riposizionare il coperchio.
!
Utilizzare solo chicchi di caè nel recipiente per caè in grani. Non inserire mai nel recipiente caè
macinato, caè solubile o altri ingredienti e oggetti.

67
DO718K
www.domo-elektro.be
IT
1
2
3
SVUOTAMENTO DEL RECIPIENTE PER FONDI DI CAFFÈ
Se lampeggia l’indicatore luminoso “recipiente per fondi di caè pieno”, occorre svuotare il recipiente
per fondi di caè.
1. Rimuovere la vaschetta raccogligocce.
2. Estrarre il cassetto scarti dall’apparecchio.
3. Svuotare il recipiente per fondi di caè. Sciacquare il cassetto scarti e il recipiente per fondi di caè
e asciugarli.
4. Rimettere il tutto nella posizione originaria.
1
2
3
4
IMPOSTAZIONE PREFERITA
È possibile programmare il pulsante per l’impostazione preferita in base alle proprie preferenze.
1. Tenere premuto per 2 secondi il pulsante per l’impostazione preferita. Gli indicatori luminosi dei
pulsanti per caè espresso, caè lungo e caè americano lampeggiano.
2. Premere il pulsante del tipo di caè che si desidera programmare come impostazione preferita.
3. La preparazione ha inizio. Premere nuovamente il pulsante del tipo di caè che si sta
programmando. Tenere premuto il pulsante ntanto che si desidera che fuoriesca il caè. Se si
rilascia il pulsante, la preparazione si interrompe. L’apparecchio memorizza il volume raggiunto nel
momento in cui viene rilasciato il pulsante.
4. Il pulsante per l’impostazione preferita è ora programmato.
1
2
3
IMPOSTAZIONE DEI VOLUMI
È possibile impostare la quantità erogata premendo i pulsanti caè espresso, caè lungo, caè americano
e acqua calda, tra 25 e 250 ml.

68
DO718K
IT
1. Premere il pulsante di cui si desidera impostare il volume.
2. La preparazione ha inizio. Premere nuovamente il pulsante del tipo di caè che si sta
programmando. Tenere premuto il pulsante ntanto che si desidera che fuoriesca il caè.
3. Una volta raggiunta la quantità desiderata, rilasciare il pulsante. Si udirà 2 volte un segnale acustico.
Questo indica che la quantità è impostata come nuovo volume per tale tasto.
1
2
IMPOSTAZIONE DI MACINATURA
Nel recipiente per caè in grani si trova una manopola per regolare il grado di
macinatura. Girare la manopola durante il funzionamento per una macinatura
dei chicchi più o meno ne.
!
Attenzione: non girare questa manopola quando
l’apparecchio non è in funzione; ciò può danneggiare la lama se sono presenti
ancora dei chicchi nel meccanismo.
Il grado di macinatura è indicato da dei puntini sulla manopola. Più piccolo è il
puntino, più ne è la macinatura.
SCELTA DELLA MODALITÀ
La macchina per caè espresso ha 3 impostazioni: standard, eco e veloce. Con la modalità eco si risparmia
energia, con la modalità veloce si prepara il caè ancora più rapidamente.
Modalità eco Modalità veloce Modalità standard
Illuminazione tazze No Sì Sì
Preumidicazione* Sì No Sì
Spegnimento automatico 10 min 30 min 20 min
Memoria volume Sì Sì Sì
* La preumidicazione umidica il caè macinato nel gruppo erogatore con una piccola quantità di acqua
prima dell’erogazione del caè. Ciò garantisce una più elevata erogazione di caè macinato e pressione,
per ottimizzare l’aroma pieno e l’estrazione dell’olio.
1. Se l’apparecchio è in modalità stand-by, premere per 5 secondi il pulsante di accensione/
spegnimento. Si udirà 2 volte un segnale acustico.
2. Ogni pulsante per i tipi di caè indica un’impostazione diversa. Il pulsante illuminato indica
l’impostazione corrente. Gli altri pulsanti lampeggiano.
Acqua calda Caè espresso Lungo
Modalità eco X
Modalità veloce X
Modalità standard X

69
DO718K
www.domo-elektro.be
IT
3. A questo punto è inoltre possibile modicare l’impostazione premendo uno dei pulsanti
lampeggianti. Premere il pulsante per acqua calda per selezionare la modalità eco, il pulsante per
caè espresso per selezionare la modalità veloce e il pulsante per caè lungo per selezionare la
modalità standard. Si udirà 2 volte un segnale acustico quando l’impostazione è regolata.
4. Per mantenere l’impostazione attuale, premere nuovamente il pulsante di accensione/spegnimento
e attendere 5 secondi. L’apparecchio torna alla modalità stand-by.
PULIZIA E MANUTENZIONE
PULIZIA
Si consiglia di eseguire quotidianamente i passaggi da 1 a 4. Se l’apparecchio viene utilizzato per un
periodo prolungato, possono rimanere residui di caè nell’apparecchio, quindi pulirlo seguendo il
passaggio 5.
Spegnere l’apparecchio e scollegare la spina dalla presa di corrente.
1. Rimuovere la vaschetta raccogligocce. Svuotare la vaschetta. Sciacquare la vaschetta e la griglia con
dell’acqua pulita e asciugarle. Questi componenti possono anche essere lavati in lavastoviglie.
2. Estrarre il cassetto scarti dall’apparecchio. Svuotare il recipiente per fondi di caè. Pulire il cassetto
scarti e il recipiente per fondi di caè con dell’acqua pulita e asciugarli. Questi componenti possono
anche essere lavati in lavastoviglie.
3. Aprire lo sportello per manutenzione. Rimuovere il gruppo erogatore premendo i pulsanti su
entrambi i lati del gruppo e tirandolo verso di sé. Pulire il gruppo erogatore con dell’acqua pulita e
asciugarlo.
!
Attenzione: non lavare mai in lavastoviglie il gruppo erogatore!
4. Pulire l’alloggiamento con un panno umido. Utilizzare l’apposito panno fornito con il prodotto per
pulire il pannello di controllo.
5. Utilizzare l’apposito spazzolino per rimuovere i residui di caè attorno all’ugello interno del caè
macinato.
6. Rimettere il tutto nella posizione originaria. L’apparecchio indica sul display se un componente non è
(ben) installato. Vedere la sezione “Componenti” per l’illustrazione degli indicatori luminosi.
!
Non immergere mai l’apparecchio, il cavo di alimentazione o la spina in acqua o altri liquidi. Ciò per
evitare elettrocuzioni o incendi.
!
Non utilizzare mai detergenti aggressivi o abrasivi.
1
2
3
4
6

70
DO718K
IT
DECALCIFICAZIONE
Se lampeggia l’indicatore luminoso “decalcicazione”, occorre decalcicare l’apparecchio.
1. Riempire il serbatoio dell’acqua no all’indicazione di livello massimo.
2. Versare 1 sacchetto di decalcicante nel serbatoio dell’acqua. Con l’apparecchio vengono forniti 3
sacchetti. Per acquistare ulteriore decalcicante, visitare il sito Web: webshop.domo-elektro.be
3. Inserire la spina nella presa elettrica.
4. Posizionare un recipiente sotto l’ugello caè. Assicurarsi che il recipiente abbia almeno la stessa
capacità del serbatoio dell’acqua.
5. In modalità stand-by, tenere tenuti contemporaneamente il pulsante di accensione/spegnimento
e il pulsante per caè espresso per 5 secondi. Si udirà un segnale acustico e gli indicatori luminosi
“decalcicazione” e “caè espresso” lampeggiano.
6. Premere il pulsante per caè espresso per confermare il processo di decalcicazione. Se tuttavia non
si vuole eseguire la decalcicazione, premere il pulsante di accensione/spegnimento per tornare alla
modalità stand-by.
7. L’indicatore luminoso “processo di decalcicazione” lampeggia e l’apparecchio inizia a decalcicare.
L’acqua con il decalcicante fuoriesce in fasi dall’ugello. L’intero processo dura alcuni minuti. (± 20
min.)
8. Quando il serbatoio dell’acqua è vuoto, gli indicatori luminosi “serbatoio dell’acqua vuoto” e “caè
espresso” si accenderanno.
9. Svuotare il recipiente e riposizionarlo. Se sono rimasti ancora dei residui nel serbatoio dell’acqua,
svuotarlo e sciacquarlo. Riempire il serbatoio di acqua con acqua pulita no all’indicazione di livello
massimo e riposizionarlo nell’apparecchio.
10. Il processo di decalcicazione riparte. L’apparecchio fa uire la metà dell’acqua contenuta nel
serbatoio, esegue una pausa di 1 minuto, poi fa uire il resto dell’acqua.
11. A questo punto il processo di decalcicazione è terminato e l’apparecchio si spegne.
1
2
3
4
5
+
6 7
8
9
10
!
Attenzione: l’acqua che fuoriesce dall’ugello caè è molto calda, pertanto tenere le mani lontano
dall’apparecchio quando è in funzione.
!
Utilizzare solo i decalcicanti forniti con l’apparecchio. Altri decalcicanti, detergenti aggressivi o
aceto possono danneggiare l’apparecchio.
!
Se non si esegue una buona manutenzione dell’apparecchio, la sua durata può ridursi drasticamente.

71
DO718K
www.domo-elektro.be
IT
RISCIACQUO MANUALE
Per pulire l’ugello caè, è possibile eseguire un risciacquo dell’apparecchio
manuale. Si consiglia di farlo con regolarità se l’apparecchio è utilizzato spesso o
se è rimasto inutilizzato a lungo.
1. Si consiglia di posizionare una tazza o un recipiente vuoti sotto l’ugello
caè.
2. In modalità stand-by, tenere tenuti contemporaneamente il pulsante di
accensione/spegnimento e il pulsante per acqua calda per 5 secondi.
3. L’indicatore luminoso “acqua calda” lampeggia. Dall’ugello caè fuoriesce acqua calda.
4. Una volta sciacquato l’ugello, l’apparecchio torna alla modalità stand-by.
SVUOTAMENTO DELL’APPARECCHIO
Se si desidera riporre o trasportare l’apparecchio, è possibile svuotarlo completamente in modo che non
rimanga acqua nelle condutture.
1. In modalità stand-by, tenere tenuti contemporaneamente il pulsante di accensione/spegnimento e il
pulsante per caè lungo per 5 secondi.
2. L’indicatore luminoso “svuotamento apparecchio” lampeggia sul display. Se tuttavia non si vuole
procedere con la funzionalità di svuotamento dell’apparecchio, premere nuovamente il pulsante di
accensione/spegnimento per tornare alla modalità stand-by.
3. Rimuovere il serbatoio dell’acqua. L’indicatore luminoso “svuotamento apparecchio” lampeggia.
Svuotare il serbatoio dell’acqua e la vaschetta raccogligocce.
4. Una volta terminato il processo, l’apparecchio si spegne automaticamente.
!
Se successivamente si desidera riutilizzare l’apparecchio, fare prima una tazza di acqua calda.
1
+
2
3
POSSIBILI PROBLEMI
Problema Causa Soluzione
L'apparecchio non funziona. L'apparecchio non è collegato
alla rete elettrica.
Assicurarsi che il cavo di
alimentazione sia ben collegato
e che la spina sia inserita nella
presa elettrica.
Premendo i pulsanti del pannello
di controllo non si ottengono
reazioni o le si ottengono in
ritardo.
· L’apparecchio è disturbato
elettromagneticamente.
· Il pannello di controllo è
sporco.
· Scollegare la spina dalla
presa elettrica e riprovare
dopo alcuni minuti.
· Pulire il pannello di controllo
con il panno fornito con
l’apparecchio.
+

72
DO718K
IT
Il caè non è abbastanza caldo. · Le tazze non sono state
preriscaldate.
· Il gruppo erogatore è ancora
freddo.
· Preriscaldare le tazze.
· Eseguire 3 risciacqui
dell’apparecchio per scaldare
il gruppo erogatore.
Il caè non fuoriesce dall'ugello. È possibile che l'ultima volta sia
stato eseguito lo svuotamento
dell'apparecchio.
Premere il pulsante per acqua
calda in modo che fuoriesca
acqua calda dall'ugello.
Il primo caè è di cattiva qualità. Il primo ciclo di macinatura non
dà abbastanza caè macinato.
Gettare via il caè. I caè
successivi sono invece di buona
qualità.
Il caè non presenta una
supercie cremosa.
I chicchi di caè non sono
freschi.
Sostituire i chicchi di caè.
I pulsanti del pannello di
controllo non sono sensibili.
I pulsanti a soramento vanno
toccati frontalmente.
Toccare i pulsanti frontalmente
sulla parte inferiore dell'icona
dei pulsanti stessi.
L'apparecchio impiega molto
tempo per riscaldarsi.
Si è accumulato calcare
nell'apparecchio.
Decalcicare l'apparecchio.
Benché il serbatoio dell'acqua
sia vuoto/non sia inserito,
l'indicatore luminoso non è
acceso.
Il sensore, in prossimità
dell'attacco del serbatoio
dell'acqua, è bagnato.
Asciugare l'acqua attorno
all'attacco del serbatoio
dell'acqua.
È presente molta acqua nel
recipiente per fondi di caè.
Il caè macinato è troppo ne e
blocca l'ugello dell'acqua.
Regolare il grado di macinatura
mediante la manopola nel
recipiente per caè in grani
durante il funzionamento.
Il caè fuoriesce molto
lentamente/a gocce dall'ugello
caè.
Il caè macinato è troppo ne e
blocca l'ugello dell'acqua.
Regolare il grado di macinatura
mediante la manopola nel
recipiente per caè in grani
durante il funzionamento.
L'indicatore luminoso "recipiente
per caè in grani vuoto"
lampeggia mentre ci sono
ancora abbastanza chicchi nel
serbatoio.
L'ugello interno del caè
macinato è bloccato.
Utilizzare l'apposito spazzolino
per rimuovere i residui di caè
attorno all'ugello interno del
caè macinato.
L'indicatore luminoso
"decalcicazione" lampeggia.
Il processo di decalcicazione è
in corso.
Seguire i passaggi del
processo di decalcicazione.
L'apparecchio passa alla
modalità stand-by solo una volta
completato il processo.

73
DO718K
www.domo-elektro.be
IT
MISURE AMBIENTALI
Il simbolo sul prodotto o sulla confezione indica che esso non deve essere
trattato come riuto domestico. Deve, al contrario, essere conferito al
punto di raccolta predisposto per il riciclo delle apparecchiature elettriche
ed elettroniche. Facendo in modo che questo prodotto venga smaltito
correttamente aiuterete a prevenire potenziali conseguenze negative per
l’ambiente e la salute dell’uomo, che potrebbero essere causate da uno
smaltimento non corretto. Per maggiori informazioni sul riciclo di questo
prodotto, consultare le autorità comunali, l’azienda o il servizio responsabili
della raccolta dei riuti domestici o il negozio in cui il prodotto è stato
acquistato.
Il materiale di imballaggio è riciclabile. Lo smaltimento dell’imballaggio deve
avvenire al ne di tutelare l’ambiente.

74
DO718K
CZ
ZÁRUKA
Práva a povinnosti prodávajícího a kupujícího ohledně práv z vadného plnění se řídí příslušnými obecně
závaznými předpisy dle občanského zákoníku.
1. Trvání záruky: 2 roky
2. Záruka se nevztahuje
a) na mechanické poškození
b) nesprávné používání v rozporu s návodem k použití
3. Záruka zaniká:
- při použití spotřebiče jinak než v je uvedeno v manuálu (nesprávným postupem)
- při provádění opravy nebo změny na spotřebiči osobou jinou než pověřenou naším servisem
Prodávající odpovídá kupujícímu, že zboží při převzetí nemá vady. Zejména prodávající odpovídá
kupujícímu, že v době, kdy kupující zboží převzal:
· má zboží takové vlastnosti, které výrobce v tomto návodu popisuje,
· se zboží hodí k účelu, ke kterému výrobce uvádí,
· zboží odpovídá jakostí nebo provedením smluvenému vzorku nebo předloze, byla-li jakost nebo
provedení určeno podle smluveného vzorku nebo předlohy,
· zboží vyhovuje požadavkům právních předpisů.
Projeví-li se vada v průběhu šesti měsíců od převzetí, má se za to, že zboží bylo vadné již při převzetí.
Pokud není u výrobku uvedeno jinak, činí záruční doba 24 měsíců. Záruční doba počíná běžet od převzetí
věci kupujícím.
Práva z vadného plnění uplatňuje kupující u prodávajícího na adrese jeho provozovny, v níž je přijetí
reklamace možné s ohledem na sortiment prodávaného zboží, případně i v sídle nebo místě podnikání. Za
okamžik uplatnění reklamace se považuje okamžik, kdy prodávající obdržel od kupujícího reklamované
zboží.
Reklamaci lze také uplatnit v servisním středisku na adrese DOMO-elektro s.r.o., Na Kobyle 783, 345 06
Kdyně, Česká republika, tel. (+420) 379 422 550, [email protected]
Pro rychlé a bezproblémové vyřízení reklamace doporučujeme přiložit k reklamaci doklad o koupi a průvodní
dopis s popisem závady a zpáteční adresou s telefonickým kontaktem.
BEZPEČNOSTNÍ POKYNY
Při používání jakkéhokoli el. spotřebiče dbejte zvýšené opatrnosti a dodržujte určitá bezpečnostní
pravidla:
· Pečlivě si přečtěte tyto informace a manuál nechte i pro pozdější nahlédnutí.
· Ujistěte se, že před použitím odlepíte a odstraníte veškeré reklamní a ochranné fólie.
· Děti si s ochrannými ani reklamními polepy nesmí hrát.
· Přístroj je určen pro používání v domácnostech a podobných prostředích, tak jako je:
· kuchyňky v obchodech, kancelářích atd.
· chaty, chalupy
· hotely, penziony a jiné dočasné ubytování
· Dohlédněte, aby si děti nehrály s přístrojem.

75
DO718K
www.domo-elektro.be
CZ
· Tento spotřebič mohou používat děti ve věku 16 let a starší a osoby se sníženými fyzickými,
smyslovými nebo mentálními schopnostmi, nebo nedostatkem zkušeností a znalostí pokud jsou
pod neustálým dozorem nebo byly poučeny o používání spotřebiče bezpečným způsobem a rozumí
případným nebezpečím. Děti si s přístrojem nesmějí hrát. Čištění a údržbu prováděnou uživatelem
nesmějí provádět děti bez dozoru.
· Čistění a běžnou údržbu smí provádět pouze osoby starší 16 let a při tom být pod dohledem.
· Přístroj a jeho el. kabel skladujte mimo dosah dětí.
· Pokud přístroj nepoužíváte, nebo se jej chystáte rozebírat či měnit součásti, tak ho odpojte od el.
napětí. Před rozebírání, skládáním i před čistěním, vždy nechte přístroj dostatečně vychladnout. Nikdy
netahejte přímo za kabel, vypojujte za zástrčku.
· POZOR: tento přístroj nesmí být používán s žádnou externí součástkou (např. časovač …) ani jiné
dálkové ovládání.
· Povrch přístroje může být během používání horký, proto doporučujeme se ho během procesu pečení
nedotýkat.
· Nikdy nenechávejte spuštěný přístroj bez dozoru.
· Nikdy nepoužívejte přístroj venku.
· Nikdy nepoužívejte jinak, než je zamýšleno a určeno výrobcem.
· Před použitím zkontrolujte, zda parametry el. sítě odpovídají požadovaným parametrům na
informativním štítku přístroje.
· Pokud je přístroj nebo přívodní kabel poškozený, nikdy se ho nesnažte opravit sami doma. Vždy ho
svěřte odbornému servisu DOMO, který jej prohlédne a případně opraví.
· Abyste se vyvarovali úrazu elektrickým proudem nebo popáleninám, nesmíte nikdy potápět kabel,
síťovou zástrčku nebo samotný přístroj do vody nebo jiných tekutin.
· Nesahejte na přístroj s mokrýma rukama.
· Kratší přivodní kabel je vyráběn záměrně, aby se snížilo riziko zakopnutí či strhnutí přístroje ze stolu.
Nepoužívejte prodlužovací kabely.
· Vždy přívodní kabel kompletně odmotejte, aby se předešlo přehřívání tohoto kabelu.
· Nenechávejte viset kabel přístroje přes ostré hrany a vyvarujte se toho, aby přišel do styku s horkými
plochami.
· Přívodní kabel nikdy nesmí být pod přístrojem ani omotán kolem něj.
· Neumisťujte přístroj v blízkosti el. sporáků či trub, ani na místech kde je zvýšené teplo.
· Neumisťujte přístroj do blízkosti hořlavých ani vznětlivých materiálů.
· Ujistěte se, že je přístroj dobře sestaven a až poté zapojte do el. sítě. Před odpojením z el. sítě vždy
vypojte hlavní vypínač do polohy „0“ nebo „OFF“ a až poté odpojte. Nikdy netahejte za kabel, vždy
odpojujte přímo tahem za pevnou zástrčku.
· Zanedbaná údržba a nečistoty mohou vést ke zkrácené životnosti přístroje. Při extrémní nečistotě
dokonce hrozí riziko požáru.
· Během procesu vaření je pravděpodobné, že z něj bude pářit velmi horká pára. Buďte opatrní a držte
obličej i ruce v bezpečné vzdálenosti.
· Vždy používejte dle doporučeného návodu. Výrobce ani prodejce není schopen nést vzniklé riziko z
důvodu špatného použití.
· Do přístroje nikdy nelijte více vody než je vyznačené povolené maximum.
· Přístroj ani nesmí být ponořen do vody, a to ani při čištění.
· Ke kávovaru používejte pouze originální součásti a příslušenství.
· Nemanipulujte s přístrojem, pokud je zapojen a právě ohřívá. Vždy nechte přístroj vychladnout, až
potom přemisťujte.
· Přístroj nezapínejte na prázdno (bez vody).
· Přístroj vždy používejte na stabilním, rovném a suchém místě.

76
DO718K
CZ
ČÁSTI
1. Tácek pro odkap
2. Mřížka tácku odkapu
3. Podstavec odkapu a
zásobníku
4. Zásobník na kávové
sedliny
5. Dávkovač/výpusť hotové
kávy
6. Hlavní spínač on/o
7. Ovládací panel
8. Zásobník kávových zrn
9. Víko na zásobník
kávových zrn
10. Zásobník vody
11. Přívodní kabel
12. Spařovací jednotka
13. Boční kryt k údržbě
spařovací jednotky
14. Čistící kartáček
OVLÁDACÍ PANEL
Ikona Popis
Volba
Espresso (malá, silná káva)
Lungo (běžná, střední káva)
Americano (silná káva dopuštěná horkou vodou)
Oblíbené – nastavitelná volba
Horká voda
Světelné kontrolky
Kontrolka svítí: připraveno
Kontrolka bliká: probíhá příprava
Prázdný nebo nenasazený zásobník vody
Prázdný zásobník kávových zrn
1
2
3
4
5
7
6
8
9
10
11
13
12
14

77
DO718K
www.domo-elektro.be
CZ
Kontrolka svítí: plný zásobník na kávovou sedlinu
Kontrolka bliká: chybí odkapávací nádobka
Kontrolka svítí: spařovací jednotka není vložena (špatně vložena)
Kontrolka bliká: otevřen boční kryt (není správně usazen)
Kontrolka svítí: odvápněte zařízení
Kontrolka bliká: probíhá proces odstraňování vodního kamene
Probíhá proces vyprazdňování spotřebiče.
Viz část „Čištění a údržba / vyprazdňování spotřebiče“
PŘÍPRAVA PŘED POUŽITÍM
Před prvním použitím odstraňte veškerý obalový materiál a odlepte reklamní nálepky.
1. Přístroj postavte na rovný a stabilní povrch tak, aby kolem byl stále dostatečný prostor na odvětrání.
2. Před/pod kávovar položte misku na odkap a ujistěte se, že je správně sestaveno.
3. Naplňte zásobník na vodu – dle kapitoly “naplnění zásobníku vody”.
4. Naplňte zásobník kávových zrn – dle kapitoly “naplnění kávových zrn”
5. Zapojte kabel do konektoru na přístroji. Zástrčku zapojte do el. sítě.
Před prvním použitím doporučujeme nechat prokapat alespoň 1 hrnek horké vody, aby se pročistilo
potrubí kávovaru od případných nečistot.
1
150mm
150mm
150mm
150mm
150mm
2
3
4
5
POUŽITÍ
1. Přístroj zapněte stiskem hlavního spínače on/o. Kávovar se automaticky propláchne a následně
bude v pohotovostním režimu, kdy budou svítit všechny symboly na panelu. Nyní je vše připraveno a
vy si stiskem jen vyberete druh kávy, kterou chcete připravit.
Poznámka: k automatickému proplachování dojde, pouze pokud byl spotřebič delší dobu vypnut.
2. Pod výpusť umístěte šálek. Podle velikosti šálku si upravte výšku výpusti. Pokud máte malý šálek, tak
pod ním nechte odkapávací misku. Pokud máte šálek velký, tak misku můžete odejmout.
3. Stiskem symbolu si zvolte jaká káva se má připravit – espresso, lungo, americano nebo vaše
oblíbená volba.
Poznámka: objem kávy si můžete předvolit. Viz kapitola “nastavení objemu” nebo “oblíbená volba”
4. Rozsvítí se kontrolka zvoleného nápoje a na displeji se objeví kontrolka připravenosti. Zároveň se se
podsvícení i hrnek pod výpustí. Pokud chcete přípravu kávy ukončit dříve, tak stiskněte znovu stejné
tlačítko.
5. Jakmile je káva hotova, tak se přístroj přepne opět do pohotovostního režimu. Celý přístroj má
automatické vypnutí při nečinnosti, které lze nastavit na 10,20 nebo 30 minut. Po zvoleném čase
nečinnosti se přístroj zcela vypne.

78
DO718K
CZ
1
2
3
4
NAPLNĚNÍ ZÁSOBNÍKU VODY
Pokud bliká kontrolka zásobníku vody, tak je potřeba jej doplnit.
1. Zásobník vyjměte z přístroje. Pro snažší vyjmutí je na zásobníku přidělána horní rukojeť.
2. Zbylou vodu ze zásobníku vylijte a napusťte ho studenou, čerstvou vodou – nepřesahujte maximální
vyznačený objem.
3. Naplněný zásobník vložte zpět do přístroje.
!
Pozor: Nádržku nikdy neplňte v přístroji (vždy ji pro plnění vyjměte), jinak hrozí přelití vody a případné
poškození přístroje.
!
Nepoužívejte teplou, vlažnou ani perlivou vodu.
1
2
3
!
NAPLNĚNÍ ZÁSOBNÍKU KÁVOVÝCH ZRN
Při sestavení přístroje si můžete vybrat, zda vám stačí prostor na kávu přímo v kávovaru a nebo přidat
adapter, který zásobník kávy zvětší. Zvětšený zásobník nebo samotný prostor kávovaru uzavírejte víkem.
Pokud bliká kontrolka zásobníku kávy, tak je potřeba jej doplnit.
1. Odejměte víko, rozhodněte se jestli chcete zásobník zvětšit pomocí adaptéru.
2. Do prostoru pomalu nasypte kávová zrna.
3. Prostor znovu uzavřete víkem.
!
Do zásobníku sypte jen kávová zrna, nikdy tam nesypte již namletou kávu nebo jiné suroviny.
1
2
3

79
DO718K
www.domo-elektro.be
CZ
VYPRAZDŇOVÁNÍ ZÁSOBNÍKU SEDLINY
Pokud bliká kontrolka odpadního zásobníku sedliny, tak jej musíte vyprázdnit.
1. Odejměte misku odkapu.
2. Z přístroje vytáhněte podstavec odkapu.
3. Zásobník na kávovou sedlinu vysypte. Vše ještě můžete opláchnout čistou vodou.
4. Čisté části opět zasuňte do přístroje.
1
2
3
4
NASTAVENÍ „OBLÍBENÉ VOLBY“
Na kávovaru si můžete předvolit vaši oblíbenou kávu a připravovat ji jedním stiskem.
1. Tlačítko „oblíbené volby“ stiskněte a podržte na 2 vteřiny. Kontrolky espresso, lungo a americano
budou začnou blikat.
2. Stiskněte volbu/obrázek kávy kterou chcete programovat jako vaši oblíbenou.
3. Káva se začne připravovat. Opět stiskněte vybraný druh kávy a tlačítko držte – pokračujete v
programování. Dle toho jak dlouho budete tlačítko držet (káva stále teče), tím si programujete
velikost vaší oblíbené kávy. Jakmile tlačítko uvolníte, tak se káva zastaví a takový objem se uloží pod
tlačítko „oblíbená volba“.
1
2
3
NASTAVENÍ OBJEMU KÁVY
U jednotlivých druhů kávy (espresso, lungo i americano) si můžete nastavit jejich objem mezi 25-250 ml.
1. Nejdříve si stiskem vyberte u jakého druhu kávy si chcete objem nastavit.
2. Vybraný druh se začne připravovat. Opět stiskněte vybraný druh kávy a tlačítko držte, káva poteče,
dokud tlačítko neuvolníte.
3. Jakmile už je v hrnečku požadovaný objem, tak tlačítko pusťte. Ozve se dvojité pípnutí, které
zároveň potvrzuje, že je nastavení dané kávy přenastaveno a uloženo.
1
2

80
DO718K
CZ
NASTAVENÍ HRUBOSTI MLETÍ
V prostoru zásobníku kávy je otočný regulátor, kterým lze manuálně nastavit
stupeň hrubosti mletí. Nastavení provádějte vždy za běhu mlýnku – při
spuštěném mlýnku plynule otáčejte regulátorem.
!
Upozornění: regulace při zastaveném mlýnku může poškodit přístroj – v
mlýnku může být zapříčené zrno a mechanismus regulace se strhne.
Na regulátoru jsou namalovány tečky, které znázorňují hrubost mletí. Čím menší
tečky, tím jemnější mletí kávy.
NASTAVENÍ REŽIMU PŘÍSTROJE
Celý přístroj lze přepínat ve 3 režimech nastavení (ECO – šetří energii / Rychlý = ultra rychlé připravení
kávy)
Eco mode Rychlý režim Standard režim
Osvícení hrnečku NE ANO ANO
Předpaření* ANO NE ANO
Automatické vypnutí 10 min 30 min 20 min
Paměťová funkce - objem ANO ANO ANO
* Funkce předpaření: do namleté kávy ve spařovací jednotce se napustí malé množství horké vody. Horká
voda způsobí, že dávka kávy lehce nabude a tím se zvýší tlak v celé spařovací jednotce. Vyšší tlak při
propaření = lepší chuťovou extrakci a lepší aroma.
1. Nastavení režimu: v pohotovostním režimu kávovaru stiskněte on/o spínač a podržte ho alespoň na
5 vteřin. Ozve se dvojité pípnutí.
2. Nyní už každý symbol kávy reprezentuje jednotlivý režim nastavení kávovaru. Rozsvícené tlačítko
označuje aktuální nastavení. Ostatní klávesy budou blikat.
Horká voda Espresso Lungo
Eco mode X
Rychlý režim X
Standard režim X
3. Takto si můžete stiskem tlačítka vybrat požadovaný režim (tlačítka, které daný režim zastupuje). Pro
výběr ECO je to tlačítko horké vody, pro rychlý režim je tlačítko ESPRESSO a pro standart je tlačítko
LUNGO. Po vybrání režimu se ozve potvrzující dvojité pípnutí.
4. Pokud režim nechcete měnit, ale zůstat u již vybraného, tak opět stiskněte on/o a opět ho podržte
alespoň na 5 vteřin. Kávovar se opět přepne do pohotovostního režimu.
ČIŠTĚNÍ A ÚDRŽBA
Kroky 1-4 z údržby doporučujeme provádět každý den. Pokud je přístroj již používán delší dobu, tak je
možné že se v něm postupně usadili kávové sedliny a proto je potřeba provést čištění podle kroku 5.
Vypněte přístroj a vypojte z el. sítě.
1. Odejměte tácek odkapu a vyprázdněte ho. Tácek i mřížku omyjte a vysušte. Tyto 2 části jsou vhodné
i do myčky nádobí.

81
DO718K
www.domo-elektro.be
CZ
2. Z přístroje vytáhněte podtácek se zásobníkem sedliny. Kávovou sedlinu vysypte. Vše omyjte a
osušte. Tyto 2 části jsou vhodné i do myčky nádobí.
3. Otevřete boční dvířka ke spařovací jednotce. Spařovací jednotka lze vytáhnout ven a to tak, že z
boků dílu stiskněte tlačítka a vytáhnete ven k sobě. Spařovací jednotku umyjte, propláchněte.
!
POZOR: nikdy nemyjte spařovací jednotku v myčce nádobí.
4. Vnější povrch kávovaru stačí otírat vlhkým jemným hadříkem, tak aby se povrch nepoškodil.
Dotykový ovládací panel otírejte zvláště opatrně, raději ještě jemnějším hadříkem.
5. K čištění zbytků kávy kolem výstupu/trysky kávy použijte čisticí kartáček.
6. Po umytí vše vysušte a sestavte zpět jako bylo původně. Pokud některá z části nebude správně na
svém místě, tak kávovar bude hlásit chybu a nepůjde spustit.
!
Nikdy neponořujte přístroj ani jeho přívodní kabel do vody ani jiných tekutin. Hrozí riziko poranění
elektrickým šokem.
!
Na čištění nepoužívejte drsná ani agresivní čistidla.
1
2
3
4
6
ODVÁPNĚNÍ
Pokud svítí na kontrolka odvápnění, tak je přístroj potřeba co nejdříve odvápnit dle popsaného
postupu.
1. Zásobník vody naplňte do maxima až po rysku MAX.
2. Do zásobníku nasypte 1 sáček odvápňovacího prostředku. (V balení jsou 3 sáčky).
3. Přístroj zapojte do el. sítě.
4. Pod výpusť/trysku umístěte velkou nádobu s větším objemem než je vody v zásobníku.
5. V pohotovostním režimu kávovaru stiskněte on/o současně s tlačítkem espressa a držte alespoň 5
vteřin. Ozve se pípnutí a budou blikat kontrolky „odvápnění“ a „espresso“.
6. Samotný proces odvápnění je ještě potřeba potvrdit stiskem tlačítka „espresso“. Pokud odvápnění
nechcete nyní provést, tak stiskněte on/o a proces se zruší/odloží.
7. Během procesu odvápňování bude blikat jen příslušná kontrolka odvápnění. Z přední trysky bude
v pravidelných intervalech kapat/téct čistící voda s odvápňovacím prostředkem. Celý proces trvá
několik minut. (± 20 min.)
8. Jakmile se přístrojem prokape celý zásobník, tak se rozsvítí obě kontrolky (odvápnění + espresso).

82
DO718K
CZ
9. Vylijte nádobu s čistící vodou a vložte ji zpět na místo. Zásobník vody z přístroje vylijte, vyčistěte a
napusťte ho čistou vodou a vložte zpět do spotřebiče.
10. Proces odvápnění bude pokračovat. Nejdříve se prokape první polovina zásobníku, následuje
minutová pauza a poté se přes přístroj prokape zbývající voda ze zásobníku a tak se celý přístroj
pročistí.
11. Takto celý proces odvápnění končí a přístroj se vypne.
1
2
3
4
5
+
6 7
8
9
10
!
POZOR: Voda z trysky je horká, proto buďte opatrní a držte ruce i tělo v bezpečné vzdálenosti, ať se
neopaříte.
!
Na odvápňování používejte pouze originální dodaný přípravek nebo přípravek, který je přímo určený
na odvápnění automatických kávovarů. Jiné agresivní přípravky nebo ocet by mohl poškodit útroby
přístroje.
!
Pokud přístroj není pravidelně čištěn a odvápňován, tak to výrazně zkracuje jeho životnost.
MANUÁLNÍ PROPLACH TRYSKY
Pokud máte vypnutý automatický proplach po každém zapnutí, tak je zde
možnost proplachávat kávovar manuálně. Takový proplach se doporučuje dělat
pravidelně a to hlavně dle intenzity využívání kávovaru.
1. Při proplachu doporučujeme vždy pod výpusť/trysku vložit prázdný
hrneček, který tekutiny zachytí.
2. Proplach provedete: v pohotovostním režimu kávovaru stiskněte a podrže
on/o + tlačítko „horké vody“
3. Začne blikat kontrolka „horké vody“ a z trysky začne kapat proplachující horká voda.
4. Jakmile je proplach hotový, tak se přístroj vrátí do pohotovostního režimu.
VYPRÁZDNĚNÍ PŘÍSTROJE
Pokud chcete přístroj na delší dobu uskladnit, tak je vhodné ho kompletně vyprázdnit, aby v útrobách
nabyla žádná zbytková voda.
1. Vyprázdnění provedete: v pohotovostním režimu kávovaru stiskněte a podrže on/o + tlačítko
„lungo“
2. Začne blikat kontrolka „prázdného zásobníku“ Pokud chcete proces vypnout, tak stačí stisknout
tlačítko on/o.
+

83
DO718K
www.domo-elektro.be
CZ
3. Vyjměte zásobník vody a kontrolka prázdného zásobníku zůstane svítit. Zásobník a odkapávací
misku vyčistěte.
4. Jakmile bude program u konce, tak se automaticky vypne.
!
Když budete kávovar opět po takovém vyprázdnění potřebovat začít používat, tak prvně z něj udělejte
1 šálek horké vody, ať se přístroj zavodní.
1
+
2
3
PROBLÉMY A JEJICH MOŽNÉ ŘEŠENÍ
Problém Možná příčina Možné řešení
Přístroj nefunguje Přístroj není zapojen do el. sítě. Zkontrolujte, zda je kabel
správně připojen do zásuvky a
jestli je zásuvka v pořádku.
Žádná (nebo pozdní) odezva na
stisk jakéhokoli tlačítka.
· Do přístroje nejde správný
proud.
· Ovládací panel je špinavý.
· Přístroj odpojte ze sítě a
zkuste za chvíli znovu.
· Očistěte ovládací panel
jemným hadříkem.
Káva není dostatečně teplá. · Máte studené hrnky a káva
rychle vychladne.
· Spařovací jednotka byla
velmi studená.
· Hrnky si předehřívejte.
· Zkuste 2-3x spustit horkou
vodu z kávovaru.
Z trysky neteče žádné kafe . Může se stát, pokud by předtím
přístroj kompletně vyprázdněn a
delší dobu uskladněn.
Spusťte horkou vodu a nechte
alespoň 1 hrneček protéct
kávovarem.
První kafe je velmi slabé. Je možné, že při nasypání
kávových zrn do mlýnku se zrna
nedostaly do mlecího ústrojí.
První kávu vylijte. Následující
kávy už by měly být v pořádku.
Káva nemá krémovou pěnu na
povrchu.
Kávová zrna nejsou čerstvá. Doporučujeme kávu vyhodit a
nasypat čerstvé zrna z právě
otevřeného balení.
Prvky na ovládacím panelu
reagují obtížně / nejsou citlivá.
Dotyk k tlačítkům musí
přicházet z přední strany.
Dotýkejte se tlačítek z přední /
spodní strany.
Přístroj se nahřívá velmi dlouhou
dobu.
Vnitřek je zanesen vodním
kamenem.
Přístroj je potřeba odvápnit.
I přesto, že je zásobník vody
prázdný, nebo není nasazen, tak
se jeho kontrolka nerozsvítí.
Konektor vedle zásobníku je
mokrý / vlhký.
Zkuste okolí kolem napojení
zásobníku vysušit.

84
DO718K
CZ
V zásobníku kávové sedliny je
dost vody.
U mlýnku je nastaveno velmi
jemné mletí a tekoucí voda
nemůže tak rychle jemnou
utlačenou kávou prostupovat -
odtéká.
V zásobníku kávových zrn
nastavte hrubší mletí.
Káva z trysky téměř neteče, jen
kape.
Namletá káva je příliš jemná V zásobníku kávových zrn
nastavte hrubší mletí.
Kontrolka chybně hlásí prázdný
zásobník kávových zrn. V
zásobníku však káva stále je.
Vnitřní vývod mleté kávy je
zablokován.
K čištění zbytků kávy uvnitř
kávovaru použijte čisticí kartáč a
zkuste vyčistit
Bliká kontrolka odvápnění. Právě se provádí proces
odvápňování.
Přečtěte si postup odvápnění
a pokračujte dle návodu. Po
správném ukončení se přístroj
automaticky vypne.
OHLED NA ŽÍVOTNÍ PROSTŘEDÍ
Symbol na přístroji či na jeho obalu znamená, že s tímto výrobkem není možno
nakládat jako s běžným domovním odpadem, nýbrž musí být odevzdán na místech
určených ke sběru a likvidaci elektrických a elektronických zařízení. Dodržením
tohoto doporučení chráníte životní prostředí a zdraví spoluobčanů. Více informací o
možnostech likvidace nebezpečného odpadu obdržíte na obecních nebo městských
úřadech, sběrných dvorech nebo v prodejně, kde jste přístroj zakoupili.
Obalové materiály jsou recyklovatelné, nakládejte s nimi podle předpisů pro životní
prostředí.

85
DO718K
www.domo-elektro.be
SK
ZÁRUKA
Práva a povinnosti predávajúceho a kupujúceho ohľadom práv z chybného plnenia sa riadi príslušnými
všeobecne záväznými predpismi podľa občianskeho zákonníka.
1. Trvanie záruky: 2 roky
2. Záruka sa nevzťahuje
a) na mechanické poškodenie
b) nesprávne používanie v rozpore s návodom na použitie
3. Záruka zaniká:
- pri použití spotrebiča inak ako v je uvedené v manuále (nesprávnym postupom)
- pri vykonávaní opravy alebo zmeny na spotrebiči osobou inou než poverenou naším servisom
Predávajúci zodpovedá kupujúcemu, že tovar pri prevzatí nemá vady. Najmä predávajúci zodpovedá
kupujúcemu, že v čase, keď kupujúci tovar prevzal:
· má tovar také vlastnosti, ktoré výrobca v tomto návode popisuje,
· sa tovar hodí k účelu, ku ktorému výrobca uvádza,
· tovar zodpovedá kvalitou alebo prevedením dohovorené vzorky alebo predlohe, ak bola akosť alebo
prevedenie určené podľa dohodnutého vzorky alebo predlohy,
· tovar vyhovuje požiadavkám právnych predpisov.
Ak sa prejavia vada v priebehu šiestich mesiacov od prevzatia, má sa za to, že tovar bol chybný už pri
prevzatí.
Pokiaľ nie je pri výrobku uvedené inak, je záručná doba 24 mesiacov. Záručná doba začína plynúť od
prevzatia veci kupujúcim.
Práva z chybného plnenia uplatňuje kupujúci u predávajúceho na adrese jeho prevádzky, v ktorej je
prijatie reklamácie možné s ohľadom na sortiment predávaného tovaru, prípadne aj v sídle alebo mieste
podnikania. Za okamih uplatnenia reklamácie sa považuje okamih, kedy predávajúci dostal od kupujúceho
reklamovaný tovar.
Reklamáciu možno tiež uplatniť v servisnom stredisku na adrese DOMO-elektro s.r.o., Na Kobyle 783,
345 06 Kdyně, Česká republika, tel. (+420) 379 422 550, [email protected]
Pre rýchle a bezproblémové vybavenie reklamácie odporúčame priložiť k reklamácii doklad o kúpe a
sprievodný list s popisom závady a spiatočnou adresou s telefonickým kontaktom.
BEZPEČNOSTNÉ POKYNY
· Pri používaní jakkéhokoli el. spotrebiče dbajte na zvýšenú opatrnosť a dodržujte určitá bezpečnostné
pravidlá:
· Starostlivo si prečítajte tieto informácie a manuál nechajte aj k neskoršiemu nahliadnutiu.
· Uistite sa, že pred použitím odlepíte a odstránite všetky reklamné a ochranné fólie.
· Deti sa s ochrannými ani reklamnými polepy nesmie hrať.
· Prístroj je určený pre používanie v domácnostiach a podobných prostrediach, tak ako je:
· kuchynky v obchodoch, kanceláriách atď.
· chaty, chalupy
· hotely, penzióny a iné dočasné ubytovanie
· Dohliadnite, aby sa deti nehrali s prístrojom.

86
DO718K
SK
· Tento spotrebič môžu používať deti vo veku 16 rokov a staršie a osoby so zníženými fyzickými,
zmyslovými alebo mentálnymi schopnosťami, alebo nedostatkom skúseností a znalostí ak sú pod
neustálym dozorom alebo boli poučené o používaní spotrebiča bezpečným spôsobom a rozumejú
prípadným nebezpečenstvám. Deti si s prístrojom nesmú hrať. Čistenie a údržbu vykonávanú
používateľom nesmú vykonávať deti bez dozoru.
· Čistenie a bežnú údržbu môžu vykonávať len osoby staršie ako 16 rokov a pri tom byť pod
dohľadom.
· Prístroj a jeho el. kábel skladujte mimo dosahu detí.
· Pokiaľ prístroj nepoužívate, alebo sa ho chystáte rozoberať či meniť súčasti, tak ho odpojte od el.
napätia. Pred rozoberanie, skladaním aj pred čistením, vždy nechajte prístroj dostatočne vychladnúť.
Nikdy neťahajte priamo za kábel, vypojujte za zástrčku.
· Pokiaľ je prívodný kábel poškodený, musí byť vždy okamžite opravený v odbornom servise alebo
preškolenou osobou.
· POZOR: tento prístroj nesmie byť používaný s žiadnu externú súčiastkou (napr. časovač ...) ani iné
diaľkové ovládanie.
· Povrch prístroja môže byť počas používania horúci, preto odporúčame sa ho počas procesu pečenia
nedotýkať.
· Nikdy nenechávajte spustený prístroj bez dozoru.
· Nikdy nepoužívajte prístroj vonku.
· Nikdy nepoužívajte inak, než je zamýšľané a určené výrobcom.
· Pred použitím skontrolujte, či parametre el. siete odpovedajú požadovaným parametrom na
informatívnym štítku prístroja.
· Pokiaľ je prístroj alebo prívodný kábel poškodený, nikdy sa ho nesnažte opraviť sami doma. Vždy ho
zverte odbornému servisu DOMO, ktorý ho prezrie a prípadne opraví.
· Aby ste zabránili úrazu elektrickým prúdom, nesmiete nikdy potápať kábel, sieťovú zástrčku alebo
samotný prístroj do vody alebo iných tekutín.
· Nesiahajte na prístroj s mokrými rukami.
· Kratšie prívodný kábel je vyrábaný zámerne, aby sa znížilo riziko zakopnutia či strhnutí prístroja zo
stola. Nepoužívajte predlžovacie káble.
· Vždy prívodný kábel kompletne odmotajte, aby sa predišlo prehrievaniu tohto kábla.
· Nenechávajte visieť kábel prístroja cez hranu stola a vyvarujte sa toho, aby prišiel do styku s horúcimi
plochami.
· Prívodný kábel nikdy nesmie byť pod prístrojom ani omotaný okolo neho.
· Neumiestňujte prístroj v blízkosti el. sporákov či rúr, ani na miestach kde je zvýšené teplo.
· Neumiestňujte prístroj do blízkosti horľavých ani horľavých materiálov.
· Uistite sa, že je prístroj dobre zostavený a až potom zapojte do el. siete. Pred odpojením z el. siete
vždy vypojte hlavný vypínač do polohy “0” alebo “OFF” a až potom odpojte. Nikdy neťahajte za kábel,
vždy odpájajte priamo ťahom za pevnú zástrčku.
· Zanedbaná údržba a nečistoty môžu viesť ku skrátenej životnosti prístroja. Pri extrémnej nečistote
dokonca hrozí riziko požiaru.
· Počas procesu varenia je pravdepodobné, že z neho bude páriť veľmi horúca para. Buďte opatrní a
držte tvár aj ruky v bezpečnej vzdialenosti.
· Vždy používajte podľa odporúčaného návodu. Výrobca ani predajca nie je schopný znášať vzniknuté
riziko z dôvodu zlého použitia.
· Prístroj zapájajte iba do uzemnenej zásuvky, ktorá zodpovedá miestnym normám.
· Do prístroja nikdy nelejte viac vody ako je vyznačené povolené maximum.
· Prístroj ani nesmie byť ponorený do vody, a to ani pri čistení.
· Ku kávovaru používajte iba originálne súčasti a príslušenstvo.

87
DO718K
www.domo-elektro.be
SK
· Nemanipulujte s prístrojom, ak je zapojený a práve ohrieva. Vždy nechajte prístroj vychladnúť, až
potom premiestňujte.
· Prístroj nezapínajte naprázdno (bez vody).
· Prístroj vždy používajte na stabilnom, rovnom, suchom mieste.
ČASTI
1. Tácka pre odkvap
2. Mriežka tácke odkvapu
3. Podstavec odkvapu a
zásobníka
4. Zásobník na kávovej
usadeniny
5. Dávkovač / výpust
hotové kávy
6. Hlavný spínač on/o
7. Ovládací panel
8. Zásobník kávových zŕn
9. Veko na zásobník
kávových zŕn
10. Zásobník vody
11. Prívodný kábel
12. Sparovacia jednotka
13. Bočný kryt na údržbu
sparovacej jednotky
14. Čistiaca kea
OVLÁDACÍ PANEL
Ikona Popis
Voľba
Espresso (malá, silná káva)
Lungo (bežná, stredná káva)
Americano (silná káva dopustená horúcou vodou)
Obľúbené - nastaviteľná voľba
Horúca voda
Svetelné kontrolky
Kontrolka svieti: pripravené
Kontrolka bliká: prebieha príprava
Prázdny alebo Nenasadená zásobník vody
1
2
3
4
5
7
6
8
9
10
11
13
12
14

88
DO718K
SK
Prázdny zásobník kávových zŕn
Kontrolka svieti: plný zásobník na kávovú usadeninu
Kontrolka bliká: chýba odkvapkávacia nádobka
Kontrolka svieti: sparovacia jednotka nie je vložená (zle vložená)
Kontrolka bliká: otvorený bočný kryt (nie je správne usadený)
Kontrolka svieti: odvápnite zariadenie
Kontrolka bliká: prebieha proces odstraňovania vodného kameňa
Prebieha proces vyprázdňovania spotrebiča.
Pozrite časť “Čistenie a údržba / vyprázdňovanie spotrebiča”
PRÍPRAVA PRED POUŽITÍM
Pred prvým použitím odstráňte všetok obalový materiál a odlepte reklamné nálepky.
1. Prístroj postavte na rovný a stabilný povrch tak, aby okolo bol stále dostatočný priestor na
odvetranie.
2. Pred/pod kávovar položte misku na odkvap a uistite sa, že je správne zostavené.
3. Naplňte zásobník na vodu - podľa kapitoly “naplnenie zásobníka vody”.
4. Naplňte zásobník kávových zŕn - podľa kapitoly “naplnenie kávových zŕn”
5. Zapojte kábel do konektora na prístroji. Zástrčku zapojte do el. siete.
Pred prvým použitím odporúčame nechať prekvapkať aspoň 1 hrnček horúcej vody, aby sa prečistilo
potrubie kávovaru od prípadných nečistôt.
1
150mm
150mm
150mm
150mm
150mm
2
3
4
5
POUŽITIE
1. Prístroj zapnite stlačením hlavného spínača on/o. Kávovar sa automaticky prepláchne a následne
bude v pohotovostnom režime, kedy budú svietiť všetky symboly na paneli. Teraz je všetko
pripravené a vy si stlačením len vyberiete druh kávy, ktorú chcete pripraviť.
Poznámka: k automatickému preplachovanie dôjde, iba ak bol spotrebič dlhšiu dobu vypnutý.
2. Pod výpust umiestnite šálek. Podľa veľkosti šálky si upravte výšku výpuste. Ak máte malý šálku, tak
pod ním nechajte odkvapkávaciu misku. Ak máte šálka veľký, tak misku môžete odňať.
3. Stlačením symbolu si zvoľte aká káva sa má pripraviť - espresso, lungo, americano alebo vaša
obľúbená voľba.
Poznámka: objem kávy si môžete predvoliť. Pozri kapitolu “nastavenie objemu” alebo “obľúbená
voľba”

89
DO718K
www.domo-elektro.be
SK
4. Rozsvieti sa kontrolka zvoleného nápoja a na displeji sa objaví kontrolka pripravenosti. Zároveň sa
sa podsvietenie aj hrnček pod výpustí. Pokiaľ chcete prípravu kávy ukončiť skôr, tak stlačte znovu
rovnaké tlačidlo.
5. Akonáhle je káva hotová, tak sa prístroj prepne opäť do pohotovostného režimu. Celý prístroj má
automatické vypnutie pri nečinnosti, ktoré možno nastaviť na 10,20 alebo 30 minút. Po zvolenom
čase nečinnosti sa prístroj úplne vypne.
1
2
3
4
NAPLNENIE ZÁSOBNÍKA VODY
Ak bliká kontrolka zásobníka vody, tak je potrebné ho doplniť.
1. Zásobník vyberte z prístroja. Pre ľahšie vybratie je na zásobníku prirobená hornú rukoväť.
2. Zvyšnú vodu zo zásobníka vylejte a napustite ho studenou, čerstvou vodou - Nepresahujte
maximálny vyznačený objem.
3. Naplnený zásobník vložte späť do prístroja.
!
Pozor: Nádržku nikdy neplňte v prístroji (vždy ju pre plnenie vyberte), inak hrozí preliatie vody a
prípadné poškodenia prístroja.
!
Nepoužívajte teplú, vlažnú ani perlivú vodu.
1
2
3
!
NAPLNENIE ZÁSOBNÍKA KÁVOVÝCH ZŔN
Pri zostavení prístroja si môžete vybrať, či vám stačí priestor na kávu priamo v kávovare a alebo pridať
adaptér, ktorý zásobník kávy zväčší. Zväčšený zásobník alebo samotný priestor kávovaru uzatvárajte
vrchnákom.
Ak bliká kontrolka zásobníka kávy, tak je potrebné ho doplniť.
1. Odoberte veko, rozhodnite sa či chcete zásobník zväčšiť pomocou adaptéra.
2. Do priestoru pomaly nasypte kávové zrná.
3. Priestor znovu uzavrite vekom.
!
Do zásobníka sypte len kávové zrná, nikdy tam nesypte už namletú kávu alebo iné suroviny.

90
DO718K
SK
1
2
3
VYPRÁZDŇOVANIE ZÁSOBNÍKA USADENINY
Ak bliká kontrolka odpadového zásobníka usadeniny, tak ho musíte vyprázdniť.
1. Odoberte misku odkvapu.
2. Z prístroja vytiahnite podstavec odkvapu.
3. Zásobník na kávovú usadeninu vysypte. Všetko ešte môžete opláchnuť čistou vodou.
4. Čisté časti opäť zasuňte do prístroja.
1
2
3
4
NASTAVENIE “OBĽÚBENÉ VOĽBY”
Na kávovaru si môžete predvoliť vašu obľúbenú kávu a pripravovať ju jedným stlačením.
1. Tlačidlo “obľúbené voľby” stlačte a podržte na 2 sekundy. Kontrolky espresso, lungo a americano
budú začnú blikať.
2. Stlačte voľbu / obrázok kávy ktorú chcete programovať ako vašu obľúbenú.
3. Káva sa začne pripravovať. Opäť stlačte vybraný druh kávy a tlačidlo držte - pokračujete v
programovaní. Podľa toho ako dlho budete tlačidlo držať (káva stále tečie), tým si programujete
veľkosť vašej obľúbenej kávy. Akonáhle tlačidlo uvoľníte, tak sa káva zastaví a taký objem sa uloží
pod tlačidlo “obľúbená voľba”.
1
2
3
NASTAVENIE OBJEMU KÁVY
Pri jednotlivých druhov kávy (espresso, lungo i americano) si môžete nastaviť ich objem medzi 25-250 ml.
1. Najskôr si pomocou vyberte u akého druhu kávy si chcete objem nastaviť.
2. Vybraný druh sa začne pripravovať. Opäť stlačte vybraný druh kávy a tlačidlo držte, káva potečie,
kým tlačidlo neuvoľníte.

91
DO718K
www.domo-elektro.be
SK
3. Akonáhle už je v hrnčeku požadovaný objem, tak tlačidlo pusťte. Ozve sa dvojité pípnutie, ktoré
zároveň potvrdzuje, že je nastavenie danej kávy preskočené a uložené.
1
2
NASTAVENIE HRUBOSTI MLETIA
V priestore zásobníku kávy je otočný regulátor, ktorým možno manuálne nastaviť
stupeň hrubosti mletia. Nastavenie vykonávajte vždy za behu mlynčeka - pri
spustenom mlynčeka plynulo otáčajte regulátorom.
!
Upozornenie: regulácia pri zastavenom mlynčeku môže poškodiť prístroj - v
mlynčeku môže byť zapříčené zrno a mechanizmus regulácie sa strhne.
Na regulátora sú namaľované bodky, ktoré znázorňujú hrubosť mletia. Čím
menšie bodky, tým jemnejšia mletie kávy.
NASTAVENIE REŽIMU PRÍSTROJA
Celý prístroj možno prepínať v 3 režimoch nastavenia (ECO - šetrí energiu / Rýchly = ultra rýchle
pripravenie kávy)
Eco mode Rýchly režim Standard režim
Osvietenie hrnčeka NE ÁNO ÁNO
Predparenia* ÁNO NE ÁNO
Automatické vypnutie 10 min 30 min 20 min
Pamäťová funkcia - objem ÁNO ÁNO ÁNO
* Funkcia přepaření: do namletej kávy v sparovacej jednotke sa napustí malé množstvo horúcej vody.
Horúca voda spôsobí, že dávka kávy ľahko nadobudne a tým sa zvýši tlak v celej sparovacej jednotke.
Vyšší tlak pri propaření = lepšie chuťovú extrakciu a lepšiu arómu.
1. Nastavenie režimu: v pohotovostnom režime kávovare stlačte on/o spínač a podržte ho aspoň na 5
sekúnd. Ozve sa dvojité pípnutie.
2. Teraz už každý symbol kávy reprezentuje jednotlivý režim nastavenia kávovaru. Rozsvietené tlačidlo
označuje aktuálne nastavenie. Ostatné klávesy budú blikať.
Horúca voda Espresso Lungo
ECO mode X
Rýchly režim X
Standard režim X
3. Takto si môžete stlačením tlačidla zvoliť požadovaný režim (tlačidlá, ktoré daný režim zastupuje).
Pre výber ECO je to tlačidlo horúcej vody, pre rýchly režim je tlačidlo ESPRESSO a pre standart
režim je tlačítko LUNGO. Po vybraní režimu sa ozve potvrdzujúce dvojité pípnutie.
4. Ak režim nechcete meniť, ale zostať u už vybraného, tak opäť stlačte on / o a opäť ho podržte
aspoň na 5 sekúnd. Kávovar sa opäť prepne do pohotovostného režimu.

92
DO718K
SK
ČISTENIE A ÚDRŽBA
Kroky 1-4 z údržby odporúčame vykonávať každý deň. Pokiaľ je prístroj už používa dlhšiu dobu, tak je
možné že sa v ňom postupne usadili kávovej usadeniny a preto je potrebné vykonať čistenie podľa
kroku 5. Vypnite prístroj a odpojte z el. siete.
1. Odoberte tácka odkvapu a vyprázdnite ho. Tácka aj mriežku umyte a vysušte. Tieto 2 časti sú vhodné
aj do umývačky riadu.
2. Z prístroja vytiahnite podtácek so zásobníkom usadeniny. Kávovú usadeninu vysypte. Všetko umyte
a osušte. Tieto 2 časti sú vhodné aj do umývačky riadu.
3. Otvorte bočné dvierka ku sparovacej jednotke. Sparovacia jednotka dá vytiahnuť von a to tak, že z
bokov dielu stlačte tlačidlá a vytiahnete von k sebe. Sparovaciu jednotku umyte, prepláchnite.
!
POZOR: nikdy neumývajte sparovaciu jednotku v umývačke riadu.
4. Vonkajší povrch kávovaru stačí utierať vlhkou jemnou handričkou, tak aby sa povrch nepoškodil.
Dotykový ovládací panel umývajte obzvlášť opatrne, radšej ešte jemnejším handričkou.
5. Na čistenie zvyškov kávy okolo výstupu / dýzy kávy použite čistiaca kea.
6. Po umytí všetko vysušte a zostavte späť ako bolo pôvodne. Ak niektorá z časti nebude správne na
svojom mieste, tak kávovar bude hlásiť chybu a nepôjde spustiť.
!
Nikdy neponárajte prístroj ani jeho prívodný kábel do vody ani inych tekutín. Hrozí riziko poranením
elektrickým Soko.
!
Na čistením Nepoužívajte drsná ani agresívny čistidlá.
1
2
3
4
6
ODVÁPNENIE
Ak svieti na kontrolka odvápnenie, tak je prístroj potrebné čo najskôr odvápniť podľa popísaného
postupu.
1. Zásobník vody naplňte do maxima až po rysku MAX.
2. Do zásobníka nasypte 1 vrecúško odvápňovacieho prostriedku. (V balení sú 3 sáčky).
3. Prístroj zapojte do el. siete.
4. Pod výpust / trysku umiestnite veľkú nádobu s väčším objemom ako je vody v zásobníku.
5. V pohotovostnom režime kávovare stlačte on / o súčasne s tlačidlom espressa a držte aspoň 5
sekúnd. Ozve sa pípnutie a budú blikať kontrolky “odvápnenie” a “espresso”.

93
DO718K
www.domo-elektro.be
SK
6. Samotný proces odvápnenia je ešte potrebné potvrdiť stlačením tlačidla “espresso”. Ak odvápnenie
nechcete teraz vykonať, tak stlačte on / o a proces sa preruší / odloží.
7. Počas procesu odvápňovanie bude blikať len príslušná kontrolka odvápnenie. Z prednej trysky bude
v pravidelných intervaloch kvapkať / tiecť čistiaca voda s odvápňovacím prostriedkom. Celý proces
trvá niekoľko minút. (± 20 min.)
8. Akonáhle sa prístrojom prekvapka celý zásobník, tak sa rozsvietia obe kontrolky (odvápnenie +
espresso).
9. Vylejte nádobu s čistiacou vodou a vložte ju späť na miesto. Zásobník vody z prístroja vylejte,
vyčistite a napustite ho čistou vodou a vložte späť do spotrebiča.
10. Proces odvápnenia bude pokračovať. Najskôr sa prekvapkať prvá polovica zásobníka, nasleduje
minútová pauza a potom sa cez prístroj prekvapkať zostávajúce voda zo zásobníka a tak sa celý
prístroj prečistí.
11. Takto celý proces odvápnenia končí a prístroj sa vypne.
1
2
3
4
5
+
6 7
8
9
10
!
POZOR: Voda z trysky je horúca, preto buďte opatrní a držte ruky aj telo v bezpečnej vzdialenosti,
nech sa neobaríme.
!
Na odvápňovanie používajte len originálne dodaný prípravok alebo prípravok, ktorý je priamo určený
na odvápnenie automatických kávovarov. Iné agresívne prípravky alebo ocot by mohol poškodiť útroby
prístroje.
!
Ak prístroj nie je pravidelne čistený a odvápňovanie, tak to výrazne skracuje jeho životnosť.
MANUÁLNÝ PREPLACH TRYSKY
Pokiaľ máte vypnutý automatický preplach po každom zapnutí, tak je tu možnosť proplachávat kávovar
manuálne. Takýto preplach sa odporúča robiť pravidelne a to hlavne podľa intenzity využívania kávovaru.
1. Pri preplachu odporúčame vždy pod výpust / dýzu vložiť prázdny hrnček,
ktorý tekutiny zachytí.
2. Preplach vykonáte: v pohotovostnom režime kávovare stlačte a podržte
on / o + tlačidlo “horúcej vody”
3. Začne blikať kontrolka “horúcej vody” a z trysky začne kvapkať
proplachující horúca voda.
4. Akonáhle je preplach hotový, tak sa prístroj vráti do pohotovostného
režimu.
+

94
DO718K
SK
VYPRÁZDNENIE PRÍSTROJA
Pokiaľ chcete prístroj na dlhšiu dobu uskladniť, tak je vhodné ho kompletne vyprázdniť, aby v útrobách
nadobudla žiadna zvyšková voda.
1. Vyprázdnenie vykonáte: v pohotovostnom režime kávovare stlačte a podržte on / o + tlačidlo
“lungo”
2. Začne blikať kontrolka “prázdneho zásobníku” Pokiaľ chcete proces vypnúť, tak stačí stlačiť tlačidlo
on / o.
3. Vyberte zásobník vody a kontrolka prázdneho zásobníku zostane svietiť. Zásobník a odkvapkávaciu
misku vyčistite.
4. Akonáhle bude program u konca, tak sa automaticky vypne.
!
Keď budete kávovar opäť po takomto vyprázdnení potrebovať začať používať, tak prvýkrát z neho
urobte 1 šálku horúcej vody, nech sa prístroj zavodní.
1
+
2
3
PROBLÉMY A ICH MOŽNÉ RIEŠENIA
Problem Možná príčina Možné riešenie
Prístroj nefunguje Prístroj nie je zapojený do el.
siete.
Skontrolujte, či je kábel správne
pripojený do zásuvky a či je
zásuvka v poriadku.
Žiadna (alebo neskoré) odozva
na stlačenie akéhokoľvek
tlačidla.
· Do prístroja nejde správny
prúd.
· Ovládací panel je špinavý.
· Prístroj odpojte zo siete a
skúste za chvíľu znova.
· Očistite ovládací panel
jemnou handričkou.
Káva nie je dostatočne teplá. · Máte studené hrnčeky a káva
rýchlo vychladne.
· Sparovacia jednotka bola
veľmi studená.
· Hrnčeky si predhrievajte.
· Skúste 2-3x spustiť horúcu
vodu z kávovaru.
Z trysky netečie žiadne kafe. Môže sa stať, ak by predtým
prístroj kompletne vyprázdnený
a dlhšiu dobu uskladnený.
Spustite horúcu vodu a nechajte
aspoň 1 hrnček pretekať
kávovarom.
Prvý kafe je veľmi slabé. Je možné, že pri nasypanie
kávových zŕn do mlynčeka sa
zrná nedostali do mlecieho
ústrojenstva.
Prvé kávu vylejte. Nasledujúce
kávy už by mali byť v poriadku.
Káva nemá krémovú penu na
povrchu.
Kávové zrná nie sú čerstvá. Odporúčame kávu vyhodiť a
nasypať čerstvé zrná z práve
otvoreného balenia.

95
DO718K
www.domo-elektro.be
SK
Prvky na ovládacom paneli
reagujú ťažko / nie sú citlivá.
Dotyk k tlačidlám musia
prichádzať z prednej strany.
Dotýkajte sa tlačidiel z prednej /
spodnej strany.
Prístroj sa nahrieva veľmi dlhú
dobu.
Vnútro je zanesený vodným
kameňom.
Prístroj je potreba odvápniť.
Aj napriek tomu, že je zásobník
vody prázdny, alebo nie je
nasadený, tak sa jeho kontrolka
nerozsvieti.
Konektor vedľa zásobníka je
mokrý / vlhký.
Skúste okolie okolo napojenie
zásobníka vysušiť.
V zásobníku kávovej usadeniny
je dosť vody.
U mlynčeka je nastavené veľmi
jemné mletie a tečúca voda
nemôže tak rýchlo jemnú
utlačená kávou prestupovať -
odteká.
V zásobníku kávových zŕn
nastavte hrubší mletie.
Káva z trysky takmer netečie,
len kvapká.
Namletá káva je príliš jemná V zásobníku kávových zŕn
nastavte hrubší mletie.
Kontrolka chybne hlási prázdny
zásobník kávových zŕn. V
zásobníku však káva stále je.
Vnútorné vývod mletej kávy je
zablokovaný.
Na čistenie zvyškov kávy vnútri
kávovaru použite čistiace kefu a
skúste vyčistiť.
Bliká kontrolka odvápnenie. Práve sa vykonáva proces
odvápňovania.
Prečítajte si postup odvápnenia
a pokračujte podľa návodu. Po
správnom ukončení sa prístroj
automaticky vypne.
OHĽAD NA ŽIVOTNÉ PROSTREDIE
Symbol na prístroji alebo na jeho obale znamená, že s týmto výrobkom
nie je možné nakladať ako s domovým odpadom, ale musí byť odovzdaný
na miestach určených na zber a likvidáciu elektrických a elektronických
zariadení. Dodržaním tohto odporúčania chránite životné prostredie a zdravie
spoluobčanov. Viac informácií o možnostiach likvidácie nebezpečného
odpadu obdržíte na obecných alebo mestských úradoch, zberných dvoroch
alebo v predajni, kde ste prístroj zakúpili.
Obalové materiály sú recyklovateľné, nakladajte s nimi podľa predpisov pre
životné prostredie.

LINEA 2000 BV - Dompel 9 - 2200 Herentals - Belgium - Tel: +32 14 21 71 91 - Fax: +32 14 21 54 63
BESTEL
de originele
Domo-accessoires
en -onderdelen
online via:
of scan hier:
COMMANDEZ
d’authentiques
accessoires et
pièces Domo en
ligne sur:
ou scannez ici:
BESTELLEN SIE
die Domo
Original-Zubehör
und -Ersatzteile
online über:
oder hier scannen:
ORDER
the original
Domo
accessories and
parts online at:
or scan here:
webshop.domo-elektro.be
Webshop
Documenttranscriptie
DO718K Handleiding Volautomatische espressomachine Mode d’emploi Machine à expresso automatique Gebrauchsanleitung Vollautomatische Espresso-Maschine Instruction booklet Fully automatic espresso machine Manual de instrucciones Cafetera Completamente automática Istruzioni per l’uso Macchina per caffè espresso completamente automatica Návod k použití Plně automatické espresso Návod na použitie Plne automatické espresso PRODUCT OF Required for R32/R290 Refrigerant only CAUTION OF FIRE Lees aandachtig alle instructies - bewaar deze handleiding voor latere: RISK raadpleging. Lisez attentivement les instructions - gardez le mode d’emploi pour utilisation ultérieur. Lesen Sie genau die Anweisungen - bewahren Sie die Gebrauchsanleitung für spätere heranziehung. Read all instructions carefully - save this instruction manual for future reference. Lea detenidamente todas las instrucciones - Conserve este manual para futura referencia. Leggere con attenzione le istruzioni - conservarle per future consultazioni Před použitím si důkladně přečtěte tento manuál - manuál si uschovejte i pro případ budoucího nahlédnutí. Pred použitím si dôkladne prečítajte tento manuál - manuál si uschovajte aj pre prípad budúceho nahliadnutie. NL Nederlands 3 FR Français 15 DE Deutsch 27 EN English 39 ES Espagnol 50 IT Italiano 62 CZ Čeština 74 SK Slovenčina 85 NL GARANTIE Geachte klant, Al onze producten ondergaan steeds een strenge kwaliteitscontrole, alvorens ze aan je worden aangeboden. Mocht je desondanks toch nog problemen hebben met jouw toestel, dan betreuren wij dit ten zeerste. In dat geval verzoeken wij je contact op te nemen met onze klantendienst. Onze medewerkers zullen je met plezier verder helpen. +32 14 21 71 91 [email protected] Maandag – Donderdag : 8.30u – 12.00u en van 13.00u – 17.00u Vrijdag : 8.30u – 12.00u en van 13.00u – 16.30u Dit apparaat heeft een garantietermijn van 2 jaar vanaf de datum van aankoop. Gedurende de garantieperiode zal de distributeur volledige verantwoording op zich nemen voor gebreken die aanwijsbaar berusten op materiaal- of constructiefouten. Wanneer dergelijke gebreken voorkomen, zal het apparaat, indien nodig, vervangen of gerepareerd worden. De garantieperiode van 2 jaar zal op dit moment niet terug beginnen, maar loopt verder tot 2 jaar na de aankoop van het toestel. De garantie wordt verleend op basis van het kassaticket. Indien je apparaat defect is binnen de garantietermijn van 2 jaar, dan mag je het toestel samen met het originele kassaticket binnenbrengen in de winkel waar je het toestel hebt aangekocht. De garantie op accessoires en onderdelen die onderhevig zijn aan slijtage, bedraagt 6 maanden. De garantie en verantwoordelijkheid/aansprakelijkheid van de leverancier en fabrikant vervallen automatisch in de volgende gevallen: · Bij het niet naleven van de instructies in deze handleiding. · Bij verkeerde aansluiting, vb. te hoge elektrische spanning. · Bij verkeerd, hardhandig of abnormaal gebruik. · Bij onvoldoende of verkeerd onderhoud. · Bij herstelling of wijziging van het toestel door de consument of niet gemachtigde derden. · Bij gebruik van onderdelen of accessoires welke niet worden aanbevolen of geleverd door de leverancier / fabrikant. VEILIGHEIDSVOORSCHRIFTEN Wanneer je elektrische toestellen gebruikt, moeten volgende veiligheidsinstructies in acht genomen worden: · Lees deze instructies zorgvuldig door. Bewaar deze handleiding om later te raadplegen. · Verwijder voor het eerste gebruik alle verpakkingsmaterialen en eventuele promotionele stickers. Zorg ervoor dat kinderen niet met de verpakkingsmaterialen spelen. · Dit toestel is geschikt om te gebruiken in de huishoudelijke omgeving en in gelijkaardige omgevingen zoals: · Keukenhoek voor personeel van winkels, kantoren en andere gelijkaardige professionele omgevingen · Boerderijen · Hotel- en motelkamers en andere omgevingen met een residentieel karakter · Gastenkamers, of gelijkaardige www.domo-elektro.be DO718K 3 NL · · · · · · · · · · · · · · · · · · · · · · 4 · · Dit toestel mag gebruikt worden door kinderen vanaf 16 jaar en personen met een fysieke of sensoriële beperking of mensen met een beperkte mentale capaciteit of gebrek aan ervaring of kennis, op voorwaarde dat deze personen toezicht krijgen of instructies hebben gekregen over het gebruik van het toestel op een veilige manier en dat ze ook de gevaren kennen bij het gebruik van het toestel. Kinderen mogen niet met het toestel spelen. Het onderhoud en de reiniging van het toestel mogen niet door kinderen gebeuren tenzij ze ouder zijn dan 16 jaar en onder toezicht staan. Houd het toestel en de voedingskabel buiten het bereik van kinderen jonger dan 16 jaar. OPGELET: om ongevallen te vermijden, mag dit toestel niet bediend worden door een externe bediening, zoals een externe timer, of op een net aangesloten worden dat regelmatig op- en afgezet wordt. Het toestel kan warm worden tijdens het gebruik. We raden aan om - buiten bij het handvat - het toestel niet aan te raken, om brandwonden te vermijden. Laat een werkend toestel niet zonder toezicht achter. Gebruik of bewaar het toestel niet buiten. Gebruik het toestel enkel voor het doel waarvoor het bestemd is. Kijk voor gebruik na of het voltage vermeld op het toestel overeenkomt met het voltage van het elektriciteitsnet thuis. De voedingskabel moet steeds aangesloten worden op een stopcontact dat geïnstalleerd en geaard is volgens de lokale standaarden en normen. Gebruik het toestel nooit wanneer de voedingskabel of stekker beschadigd is, na een slechte werking van het toestel of wanneer het toestel beschadigd is. Breng het toestel dan naar de dienst na verkoop van DOMO of het dichtsbijzijnde gekwalificeerde service center voor nazicht, reparatie of elektrische/ mechanische aanpassingen. Probeer het toestel nooit eigenhandig te repareren. Dompel het toestel, de voedingskabel of de stekker nooit onder in water of een andere vloeistof. Dit om elektrische schokken of brand te voorkomen. Gebruik dit toestel niet met natte handen. Dit toestel is voorzien van een korte voedingskabel, zodat personen er niet in verstrikt kunnen raken of over een langere voedingskabel kunnen vallen. GEBRUIK HET TOESTEL NOOIT MET EEN VERLENGKABEL. Rol de voedingskabel volledig af om oververhitting van de kabel te voorkomen. Laat de voedingskabel niet over de rand van een tafel of aanrecht hangen of in aanraking komen met een heet oppervlak. Laat de voedingskabel niet onder of rond het toestel hangen. Plaats het toestel nooit op of in de buurt van een hete elektrische kookplaat, een heet gasfornuis, gootsteen of een warme oven. Plaats het toestel nooit in de buurt van ontvlambare materialen, gassen of explosieven. Sluit de voedingskabel pas op het stopcontact aan nadat het toestel zeker correct gemonteerd is. Om het toestel te verwijderen van het stopcontact, moet de bediening eerst in de «OFF» of «0» positie gezet worden. Daarna mag de stekker uit het stopcontact verwijderd worden. Trek nooit aan de voedingskabel of het toestel zelf om de stekker uit het stopcontact te verwijderen. Als het toestel niet goed onderhouden wordt, kan dit de levensduur van het toestel drastisch verminderen en een gevaarlijke situatie veroorzaken. Bij het opwarmen van water is het mogelijk dat hete stoom door de filter of een andere opening naar buiten komt. Hou daarom handen uit de buurt van het toestel wanneer het in werking is. Ongevallen of schade veroorzaakt door het niet volgen van deze regels zijn op eigen risico. Noch de fabrikant of de importeur, noch de leverancier kan daar dan verantwoordelijk voor geacht worden. Overschrijd de MAX-indicatie niet bij het vullen van het toestel. Wees voorzichtig om geen vloeistof te morsen op de voedingskabel. DO718K NL · · Gebruik enkel de accessoires die met het toestel meegeleverd worden. Verplaats het toestel nooit terwijl het nog in gebruik is of wanneer het nog warm is. Laat het toestel altijd eerst afkoelen vooraleer het te verplaatsen. ONDERDELEN 1. 2. 3. 4. 5. 6. 7. 8. 9. 10. 11. 12. 13. 14. Druppelopvangbakje Rooster druppelopvangbakje Lekschaal Koffiedikreservoir Koffie uitloop Aan-uitknop Bedieningspaneel Bonenreservoir Deksel bonenreservoir Waterreservoir Snoer Zetgroep Onderhoudsdeur Reinigingsborsteltje 10 9 8 11 7 6 5 4 12 13 14 3 2 1 BEDIENINGSPANEEL Icoon Omschrijving Toetsen Espresso (kleine, straffe koffie) Lungo (normale, milde koffie) Americano (koffie aangelengd met water) Favoriete instelling Heet water Indicatielampjes Indicatielampje brandt: bereiding klaar Indicatielampje knippert: bereiding bezig Waterreservoir leeg of niet geplaatst www.domo-elektro.be DO718K 5 NL Bonenreservoir leeg Indicatielampje brandt: koffiedikreservoir vol Indicatielampje knippert: lekschaal is niet geplaatst Indicatielampje brandt: zetgroep is niet (goed) geplaatst Indicatielampje knippert: onderhoudsdeur is niet (goed) geplaatst Indicatielampje brandt: toestel ontkalken Indicatielampje knippert: ontkalkingsproces loopt Proces voor toestel ledigen loopt. Zie rubriek “reiniging en onderhoud/toestel ledigen” INSTALLATIE Verwijder voor het eerste gebruik alle verpakkingsmaterialen en eventuele promotionele stickers. 1. Plaats het toestel op een vlakke, stabiele ondergrond. Zorg voor voldoende ruimte rondom het toestel voor ventilatie. Plaats het druppelopvangbakje. Zorg dat dit correct geïnstalleerd is. Vul het waterreservoir. Zie rubriek “gebruik/waterreservoir vullen”. Vul het bonenreservoir. Zie rubriek “gebruik/bonenreservoir vullen”. Steek het snoer in de snoeraansluiting van het toestel. Steek de stekker in het stopcontact. 2. 3. 4. 5. Voor het eerste gebruik is het aangeraden een kop heet water te maken om de leidingen te spoelen. Zie rubriek “gebruik”. 1 150mm 2 3 4 5 m 150m 150m m 150m m 150 mm GEBRUIK 1. 2. 3. 6 Zet het toestel aan. Druk op de aan-uitknop. Het toestel zal automatisch spoelen. Uit de uitloop komt een kopje heet water. Het toestel gaat hierna in sluimerstand. In sluimerstand zijn alle indicatielampjes aan en is het toestel klaar voor gebruik. Nota: automatisch spoelen gebeurt enkel als het toestel langer heeft uitgestaan. Plaats een kop onder de koffie uitloop. Je kan de hoogte van de uitloop aanpassen aan de hoogte van je kop door deze omhoog of omlaag te schuiven. Voor een kleine kop gebruik je het druppelopvangbakje. Als je een grotere kop gebruikt, kan je het druppelopvangbakje weglaten. Kies je gewenste koffie en druk de toets in voor een espresso, lungo, americano, heet water of je favoriete instelling. Nota: je kan de hoeveelheid koffie van de toetsen zelf instellen. Zie rubrieken “volume instellen” en “favoriete instelling”. DO718K 5. Het indicatielampje van de gekozen toets licht op, het indicatielampje ‘bereiding bezig’ verschijnt op het display en de kopjesverlichting gaat aan. Als je het bereidingsproces wil beëindigen voor de koffie klaar is, druk je nog een keer op de gekozen toets. Als de koffie klaar is, gaat het toestel terug in sluimerstand. Het toestel heeft een automatische uitschakeling. Afhankelijk van de modus, zal het toestel na 10, 20 of 30 minuten uitschakelen. 1 2 3 NL 4. 4 WATERRESERVOIR VULLEN Als het indicatielampje ‘waterreservoir leeg’ knippert, moet je het waterreservoir vullen. Neem het waterreservoir uit het toestel. Hiervoor kan je het deksel van het reservoir als handvat gebruiken. 2. Spoel het reservoir en vul het met proper, koud water tot aan de maximumaanduiding. 3. Plaats het reservoir terug in het toestel. ! Opgelet: neem telkens het waterreservoir uit het toestel als je het vult met water, dit om overloop en schade te voorkomen. ! Gebruik nooit warm, heet of bruisend water of een andere vloeistof in het waterreservoir. 1 3 2 ! 1. BONENRESERVOIR VULLEN Je kan kiezen om het deksel rechtstreeks op het reservoir te plaatsen, of om het accessoire voor het bonenreservoir te verhogen te gebruiken. Als het indicatielampje ‘bonenreservoir leeg’ knippert, moet je het bonenreservoir vullen. Verwijder het deksel van het reservoir. Indien gewenst, plaats het accessoire om het bonenreservoir te verhogen. 2. Voeg de bonen toe, door deze langzaam in het reservoir te gieten. 3. Plaats het deksel terug. 1. ! Gebruik enkel koffiebonen in het bonenreservoir. Vul het reservoir nooit met gemalen koffie, oploskoffie of andere ingrediënten of voorwerpen. www.domo-elektro.be DO718K 7 NL 1 2 3 KOFFIEDIKRESERVOIR LEDIGEN 1. 2. 3. 4. Als het indicatielampje ‘koffiedikreservoir vol’ brandt, moet je het koffiedikreservoir ledigen. Verwijder het druppelopvangbakje. Neem de lekschaal uit het toestel. Ledig het koffiedikreservoir. Spoel zowel de lekschaal als het koffiedikreservoir en droog af. Plaats alles terug in de originele positie. 1 2 3 4 FAVORIETE INSTELLING Je kan de toets ‘favoriete instelling’ programmeren naar je eigen voorkeur. 1. Houd de toets ‘favoriete instelling’ ingedrukt gedurende 2 seconden. De indicatielampjes van de toetsen espresso, lungo en americano zullen knipperen. 2. Druk op de toets van de soort koffie die je wil programmeren als favoriete instelling. 3. De bereiding zal starten. Druk opnieuw op de toets van de soort koffie die je nu programmeert. Houd de toets ingedrukt zolang je wenst dat de koffie blijft lopen. Als je de toets loslaat, zal de bereiding stoppen. Het toestel onthoudt het volume op het moment dat je de toets loslaat. 4. De toets ‘favoriete instelling’ is nu geprogrammeerd. 1 3 2 VOLUME INSTELLEN Je kan de hoeveelheid van de toetsen espresso, lungo, americano en heet water instellen tussen 25 ml en 250 ml. 8 DO718K 3. Druk op de toets waarvan je het volume wil instellen. De bereiding start. Druk opnieuw op de toets van de soort koffie die je nu programmeert. Houd de toets ingedrukt zolang je wenst dat de koffie blijft lopen. Wanneer de bereiding de gewenste hoeveelheid heeft bereikt, laat je de toets los. Je hoort 2 keer een signaal, dit wil zeggen dat de hoeveelheid is ingesteld als nieuw volume van die toets. 2 NL 1. 2. 1 MAALINSTELLING In het bonenreservoir zit een draaiknop om de grofheid van het malen in te stellen. Draai tijdens de werking aan de knop om de bonen groffer of fijner te laten malen. ! Opgelet: draai niet aan deze knop als het apparaat niet in werking is, dit kan het maalmes beschadigen indien er nog bonen in het mechanisme zitten. Op de draaiknop staan stipjes om de grofheid aan te duiden. Hoe kleiner het stipje, hoe fijner de maalinstelling. MODUS BEPALEN De espressomachine heeft 3 instellingen: standaard, eco en snel. In de ecomodus bespaar je energie, met de snelmodus maak je je koffie nog sneller. Ecomodus Snelmodus Standaardmodus Kopjesverlichting Nee Ja Ja Voorbrouwen* Ja Nee Ja Automatische uitschakeling 10 min 30 min 20 min Volumegeheugen Ja Ja Ja * Het voorbrouwen bevochtigt de gemalen bonen in de zetgroep met een kleine hoeveelheid water voor het koffiezetten. Dit zorgt ervoor dat de gemalen koffie uitzet en de druk groter is, zodat het volle aroma en de extractie van de olie uit de bonen optimaal is. 1. 2. Als het toestel in sluimerstand staat, druk dan gedurende 5 seconden op de aan-uitknop. Je hoort 2 keer een signaal. De toetsen van de soorten koffie staan nu elk voor een andere instelling. De toets die brandt geeft de huidige instelling aan. De andere toetsen zullen knipperen. Heet water Ecomodus Snelmodus Standaardmodus www.domo-elektro.be Espresso Lungo X X X DO718K 9 NL 3. 4. Je kan de instelling nu ook wijzigen door op één van de knipperende toetsen te drukken. Kies voor de heet watertoets voor de ecomodus, de espressotoets voor de snelmodus en de lungotoets voor de standaardmodus. Je hoort 2 keer een signaal als de instelling aangepast is. Als je de huidige instelling wil behouden, druk dan opnieuw op de aan-uitknop en wacht 5 seconden. Het toestel gaat terug in sluimerstand. REINIGING EN ONDERHOUD REINIGING Het is aangeraden stap 1 tot en met stap 4 dagelijks uit te voeren. Als het toestel voor een langere periode gebruikt wordt, kunnen er koffieresten achterblijven in het toestel, reinig het toestel volgens stap 5. Zet het toestel uit en trek de stekker uit het stopcontact. 1. Verwijder het druppelopvangbakje. Ledig het bakje. Reinig zowel het rooster als het bakje met proper water. Droog beiden af. Deze kunnen ook in de vaatwasser gereinigd worden. 2. Neem de lekschaal uit het toestel. Ledig het koffiedikreservoir. Reinig zowel de lekschaal als het koffiedikreservoir met proper water. Droog beiden af. Deze kunnen ook in de vaatwasser gereinigd worden. 3. Open de onderhoudsdeur. Verwijder de zetgroep door beide knoppen aan de zijkant van de zetgroep in te drukken en deze naar je toe te trekken. Reinig de zetgroep met proper water en droog af. ! Opgelet: reinig de zetgroep nooit in de vaatwasser! 4. Reinig de behuizing met een vochtige doek. Gebruik het meegeleverde schoonmaakdoekje om het touchpaneel schoon te vegen. 5. Gebruik het schoonmaakborsteltje om de koffieresten rond de interne uitlaat van gemalen koffie schoon te maken. 6. Plaats alles terug in de originele positie. Als een onderdeel niet (goed) geïnstalleerd is, geeft het toestel dit aan op het display. Zie rubriek “onderdelen” voor de uitleg van de indicatielampjes. ! Dompel het toestel, de voedingskabel of de stekker nooit onder in water of een andere vloeistof. Dit om elektrische schokken of brand te voorkomen. ! Gebruik nooit agressieve of schurende schoonmaakmiddelen. 1 2 3 4 10 DO718K 6 NL ONTKALKEN Als het indicatielampje ‘toestel ontkalken’ brandt, moet je het toestel ontkalken. 1. 2. 3. 4. 5. 6. 7. 8. 9. 10. 11. Vul het waterreservoir tot aan de maximumindicatie. Voeg 1 zakje ontkalkingsproduct toe aan het waterreservoir. Er zijn 3 zakjes meegeleverd met het toestel. Extra ontkalkingsproduct kan je verkrijgen via de website: webshop.domo-elektro.be Steek de stekker in het stopcontact. Plaats een opvangcontainer onder de koffieuitloop. Zorg ervoor dat de container evenveel capaciteit heeft als het waterreservoir zelf. In sluimerstand, houd de aan-uitknop en espresso toets gelijktijdig ingedrukt gedurende 5 seconden. Je hoort een signaal en de indicatielampjes ‘toestel ontkalken’ en ‘espresso’ knipperen. Druk op de espresso toets om het ontkalkingsproces te bevestigen. Als je toch niet wil ontkalken, druk dan op de aan-uitknop om naar sluimerstand terug te keren. Het indicatielampje ‘ontkalkingsproces’ knippert en het toestel zal beginnen ontkalken. Het water met product komt in fases uit de uitloop. Het hele proces duurt enkele minuten. (± 20 min.) Als al het water van het waterreservoir is doorgelopen, zullen de indicatielampjes ‘waterreservoir leeg’ en ‘espresso’ ook branden. Ledig je opvangcontainer en plaats deze terug. Indien er nog resten in het waterreservoir zijn overgebleven, maak dan eerst het reservoir leeg en spoel. Vul het reservoir met proper water tot aan de maximumindicatie en plaats het terug in het toestel. Het ontkalkingsproces hervat. Het toestel zal de helft van het water in het reservoir laten doorlopen, 1 minuut pauzeren en dan de andere helft van het water laten doorlopen. Het ontkalkingsproces is nu beëindigd en het toestel schakelt uit. 1 3 2 4 5 + 6 7 8 9 10 ! Opgelet: het water dat uit de koffieuitloop komt is heet, houd daarom handen uit de buurt van het toestel wanneer het in werking is. ! Gebruik enkel de ontkalkingsproducten meegeleverd met het toestel. Andere ontkalkingsproducten, agressieve schoonmaakmiddelen of azijn kunnen het toestel beschadigen. ! Als het toestel niet goed onderhouden wordt, kan dit de levensduur van het toestel drastisch verminderen. www.domo-elektro.be DO718K 11 NL MANUEEL SPOELEN Om de koffieuitloop schoon te maken, kan je het toestel manueel laten spoelen. Het is aangeraden dit geregeld te doen als het toestel vaak gebruikt wordt, of als het toestel lange tijd heeft stilgestaan. 1. Het is aangeraden een leeg kopje of opvangcontainer te plaatsen onder de koffie uitloop. 2. In sluimerstand, houd de aan-uitknop en heet water toets gelijktijdig ingedrukt gedurende 5 seconden. 3. Het indicatielampje ‘heet water’ knippert. Er komt heet water uit de koffie uitloop. 4. Als de uitloop gespoeld is, gaat het toestel terug in sluimerstand. + TOESTEL LEDIGEN Als je het toestel wil opbergen of wil vervoeren, kan je het best volledig ledigen zodat er geen water in de leidingen achterblijft. 1. In sluimerstand, houd de aan-uitknop en lungo toets gelijktijdig ingedrukt gedurende 5 seconden. 2. Het indicatielampje ‘toestel ledigen’ knippert op het display. Indien je toch niet wil verder gaan met de functie toestel ledigen, druk dan terug op de aan-uitknop om terug te keren naar de sluimerstand. 3. Verwijder het waterreservoir. Het indicatielampje ‘toestel ledigen’ brandt. Ledig het waterreservoir en het druppelopvangbakje. 4. Als het proces beëindigd is, zal het toestel automatisch uitschakelen. ! Als je het toestel nadien terug wil gebruiken, maak dan eerst een kop heet water. 1 3 2 + MOGELIJKE PROBLEMEN Probleem Oorzaak Oplossing Het toestel werkt niet. Het toestel is niet aangesloten op het elektriciteitsnetwerk. Zorg ervoor dat het snoer goed is aangesloten en dat de stekker in het stopcontact steekt. Geen of late reactie bij het drukken op de toetsen van het bedieningspaneel. · · · Het toestel wordt elektromagnetisch beperkt. Het bedieningspaneel is vuil. · 12 DO718K Trek de stekker uit het stopcontact en probeer enkele minuten later nog eens. Reinig het bedieningspaneel met het meegeleverde reinigingsdoekje. · De koffie komt niet uit de uitloop. Het kan zijn dat de functie toestel ledigen vorige keer gebruikt is. Druk op de heet water toets zodat er heet water uit de uitloop komt. De eerste kop koffie is van slechte kwaliteit. De eerste maalsessie geeft niet voldoende gemalen koffie. Giet de koffie weg. De volgende koffies zijn wel van goede kwaliteit. De koffie heeft geen cremalaag. De koffiebonen zijn niet vers. Vervang de koffiebonen. De toetsen van het bedieningspaneel zijn niet gevoelig. De aanraking met de touchtoetsen moet frontaal gebeuren. Raak de toetsen frontaal aan op het onderste deel van de icoontjes van de toetsen. Het duurt lang eer het toestel opgewarmd is. Kalk is opgehoopt in het toestel. Ontkalk het toestel. Ondanks het waterreservoir leeg is/niet geplaatst is, brandt het indicatielampje niet. De sensor, in de buurt van de aansluiting van het waterreservoir, is nat. Veeg het water weg rond de aansluiting van het waterreservoir. Er zit veel water in het koffiedikreservoir. De gemalen koffie is te fijn en blokkeert de wateruitlaat. Pas de grofheid aan met de draaiknop in het bonenreservoir tijdens werking. De koffie loopt heel langzaam/ druppelt uit de koffieuitloop. De gemalen koffie is te fijn en blokkeert de wateruitlaat. Pas de grofheid aan met de draaiknop in het bonenreservoir tijdens werking. Het indicatielampje bonenreservoir leeg knippert, terwijl er nog voldoende bonen in het reservoir zitten. De interne uitlaat van gemalen koffie is geblokkeerd. Gebruik het schoonmaakborsteltje om de koffieresten rond de interne uitlaat van gemalen koffie schoon te maken. Het indicatielampje ‘ontkalken’ knippert. Het ontkalkingsproces is nog bezig. Volg de stappen van het ontkalkingsproces, pas als het volledige proces klaar is, keert het toestel terug naar de sluimerstand. · www.domo-elektro.be De kopjes zijn niet voorverwarmd. De zetgroep is nog koud. · · Verwarm de kopjes. Spoel het toestel 3 keer om de zetgroep op te warmen. DO718K NL De koffie is niet warm genoeg. 13 NL MILIEURICHTLIJNEN Dit symbool op het product of op de verpakking wijst erop dat dit product niet als huishoudafval mag worden behandeld. Het moet naar een plaats worden gebracht waar elektrische en elektronische apparatuur wordt gerecycleerd. Als je ervoor zorgt dat dit product op de correcte manier wordt verwijderd, voorkom je mogelijk voor mens en milieu negatieve gevolgen die zich zouden kunnen voordoen in geval van verkeerde afvalbehandeling. Voor meer details in verband met het recycleren van dit product, neem je best contact op met de gemeentelijke instanties, het bedrijf of de dienst belast met de verwijdering van huishoudafval of de winkel waar je het product hebt gekocht. Het verpakkingsmateriaal is recycleerbaar. Behandel de verpakking milieubewust. 14 DO718K GARANTIE +32 14 21 71 91 FR Cher client, Tous nos produits sont soumis à des contrôles qualité stricts avant d’être proposés à la vente. Si vous deviez toutefois rencontrer un problème avec votre appareil, nous le déplorons vivement. Dans ce cas, nous vous invitons à prendre contact avec notre service à la clientèle. Nos collaboratrices se feront un plaisir de vous aider ! [email protected] Du lundi au jeudi : 8 h 30 – 12 h et 13 h – 17 h Vendredi : 8 h 30 – 12 h et 13 h – 16 h 30 Cet appareil est garanti 2 ans à compter de la date d’achat. Durant la période de garantie, le distributeur assumera l’entière responsabilité en cas de défauts de fonctionnement (matériel) ou de fabrication. Si un tel problème survient, l’appareil sera remplacé ou réparé. La période de garantie de 2 ans ne reprend pas à zéro, mais se poursuit (jusqu’à 2 ans à compter de la date d’achat de l’appareil). La garantie est accordée sur la base du ticket de caisse. Pour les accessoires et les éléments d’usure, une garantie de 6 mois s’applique. La garantie et la responsabilité du fournisseur et du fabricant n’ont plus effet dans les cas suivants : · Les instructions du manuel n’ont pas été suivies. · Mauvais raccordement, par ex. tension électrique trop forte. · Utilisation contraire, brutale ou anormale. · Entretien insuffisant ou non conforme. · Réparation ou modification de l’appareil par le consommateur ou un tiers non autorisé. · Utilisation d’éléments ou d’accessoires qui ne sont pas recommandés ou fournis par le fournisseur/ fabricant. CONSIGNES DE SÉCURITÉ Les consignes de sécurité suivantes doivent être respectées lors de l’utilisation de tout appareil électrique: · Lisez ces consignes très attentivement. Conservez ce mode d’emploi afin de pouvoir le consulter ultérieurement. · Avant la première utilisation, enlevez tous les éléments d’emballage et les éventuels autocollants promotionnels. Veillez à ce que les enfants ne jouent pas avec les matériaux d’emballage. · Cet appareil est conçu pour être utilisé dans un environnement domestique ou dans des environnements comparables, tels que : · Coin-cuisine du personnel dans les commerces, les bureaux et autres environnements professionnels comparables · Fermes · Chambres d’hôtel ou de motel et autres environnements à caractère résidentiel · Chambres d’hôtes ou comparables · Cet appareil peut être utilisé par des enfants âgés de 16 ans ou plus et par des personnes présentant un handicap physique ou sensoriel, une capacité mentale limitée ou un manque d’expérience ou de connaissances, à condition que ces personnes soient sous surveillance ou qu’elles aient reçu des instructions sur la manière d’utiliser l’appareil en toute sécurité et qu’elles connaissent les dangers liés www.domo-elektro.be DO718K 15 FR · · · · · · · · · · · · · · · · · · · · · · 16 à son utilisation. Les enfants ne peuvent pas jouer avec cet appareil. L’entretien et le nettoyage de l’appareil ne peuvent pas être effectués par des enfants, sauf s’ils sont âgés de plus de 16 ans et sous la surveillance d’un adulte. Gardez l’appareil et le cordon électrique hors de portée des enfants. Débranchez l’appareil lorsqu’il n’est pas utilisé ainsi qu’avant d’installer ou d’enlever des pièces et avant de nettoyer l’appareil. Mettez au préalable tous les boutons en position « arrêt » et débranchez l’appareil en saisissant la fiche électrique. Ne tirez jamais sur le cordon pour retirer la fiche de la prise. ATTENTION : Pour éviter tout accident, cet appareil ne peut pas être actionné via une commande externe comme un minuteur extérieur, ni être raccordé à un réseau régulièrement mis sous tension ou hors tension. Les surfaces de cet appareil s’échauffent en cours d’utilisation. Pour éviter toute brûlure, il est recommandé de ne pas toucher cet appareil, à l’exception des poignées. Ne laissez jamais un appareil en service sans surveillance. N’utilisez pas l’appareil à l’extérieur. N’utilisez l’appareil que pour l’usage auquel il est destiné. Vérifiez avant usage si la tension indiquée sur l’appareil correspond à la tension du réseau électrique de votre domicile. Le cordon d’alimentation doit toujours être branché dans une prise de courant placée et mise à la terre conformément aux normes et standards locaux. N’utilisez jamais l’appareil lorsque le cordon d’alimentation ou la fiche est endommagé(e), après un mauvais fonctionnement de l’appareil ou lorsque l’appareil est lui-même endommagé. Portez dans ce cas l’appareil au service après vente de DOMO ou au centre de services qualifié le plus proche, pour contrôle, réparation ou modifications électriques/mécaniques. Ne tentez jamais de réparer cet appareil vous-même. N’immergez jamais l’appareil, le cordon d’alimentation ou la fiche dans l’eau ou tout autre liquide. Ceci afin d’éviter des chocs électriques ou un incendie. N’utilisez pas l’appareil si vous avez les mains mouillées. Cet appareil est muni d’un cordon d’alimentation court, afin d’éviter que des personnes ou objets s’enroulent dans le cordon ou ne tombent à cause de ce dernier. N’UTILISEZ JAMAIS CET APPAREIL AVEC UNE RALLONGE ÉLECTRIQUE. Déroulez complètement le cordon d’alimentation. Ne laissez pas le cordon d’alimentation pendre sur une surface chaude, ni sur le rebord d’une table ou d’un plan de travail. Ne laissez pas le cordon d’alimentation se coincer sous l’appareil ou pendre autour de celui-ci. Ne placez jamais l’appareil sur ou à proximité d’une plaque de cuisson à gaz ou électrique chaude, ni sur l’évier ou un four en fonctionnement. Gardez l’appareil éloigné des matériaux inflammables, gaz ou explosifs. Ne branchez l’appareil qu’après être sûr qu’il soit correctement monté. Pour débrancher l’appareil, la commande doit être préalablement placée en position « OFF » ou « 0 ». Après quoi, la fiche électrique peut être retirée de la prise de courant. Ne tirez jamais sur le cordon d’alimentation ni sur l’appareil pour le débrancher. Si l’appareil n’est pas correctement entretenu, sa durée de vie peut en être fortement diminuée et une situation de danger en résulter. Lorsque l’eau est chauffée, il est possible que de la vapeur s’échappe par le filtre ou une autre ouverture ; il est donc important de ne pas approcher vos mains de l’appareil lorsque celui-ci fonctionne. Les accidents ou dommages causés par le non-respect de ces consignes sont à vos propres risques. Ni le fabricant, ni l’importateur, ni le fournisseur ne peuvent, dans ce cas, en être tenus pour responsables. DO718K · · · · Ne dépassez jamais l’indication MAX lorsque vous remplissez l’appareil. Assurez-vous de ne pas renverser de liquide sur le cordon d’alimentation. N’utilisez que les accessoires livrés avec l’appareil. Ne déplacez jamais l’appareil lorsqu’il fonctionne ou qu’il est encore chaud. Laissez toujours refroidir l’appareil avant de le déplacer. 1. 2. 3. 4. 5. 6. 7. 8. 9. 10. 11. 12. 13. 14. FR PARTIES Bac d’égouttage Grille du bac d’égouttage Bac de récupération Réservoir à marc de café Bec verseur Bouton de marche/arrêt Panneau de commande Réservoir à grains Couvercle du réservoir à grains Réservoir à eau Cordon d’alimentation Unité de brassage Porte de maintenance Brossette de nettoyage 10 9 8 11 7 6 5 4 12 13 14 3 2 1 PANNEAU DE COMMANDE Pictogramme Description Touches Espresso (petit café fort) Lungo (café normal et doux) Americano (café rallongé à l’eau) Réglage préféré Eau chaude Voyants lumineux Le voyant est allumé : préparation terminée Le voyant clignote : préparation en cours www.domo-elektro.be DO718K 17 Réservoir à grains vide Bonenreservoir leeg FR Le voyant est allumé : le réservoir à marc de café est plein Le voyant clignote : le bac de récupération n’est pas installé Le voyant est allumé : l’unité de brassage n’est pas (correctement) installée Le voyant clignote : la porte de maintenance n’est pas (correctement) installée Le voyant est allumé : détartrage de l’appareil requis Le voyant clignote : processus de détartrage en cours Processus de vidange de l’appareil en cours. Voir la rubrique “nettoyage et entretien/vidange de l’appareil” INSTALLATION Retirez tous les matériaux d’emballage et les éventuels autocollants promotionnels avant la première utilisation. 1. Posez l’appareil sur une surface plane et stable. Prévoyez un espace suffisant tout autour de l’appareil pour assurer la ventilation. Placez le bac d’égouttage. Assurez-vous qu’il soit correctement installé. Remplissez le réservoir à eau. Voir la rubrique “utilisation/remplissage du réservoir à eau”. Remplissez le réservoir à grains. Voir la rubrique “utilisation/remplissage du réservoir à grains”. Branchez le cordon d’alimentation dans le connecteur de l’appareil. Et branchez la prise. 2. 3. 4. 5. Avant une première utilisation, il est conseillé de préparer une tasse d’eau chaude afin de rincer les conduites. Voir la rubrique “utilisation”. 1 150mm 2 3 4 5 m 150m 150m m 150m m 150 mm UTILISATION 1. 2. 18 Allumez l’appareil. Appuyez sur le bouton de marche/arrêt. L’appareil se rincera automatiquement. Une tasse d’eau chaude sort du bec verseur. L’appareil passe ensuite en mode veille. En mode veille, tous les voyants sont allumés et l’appareil est prêt à l’emploi. Remarque : le rinçage automatique ne se fait que si l’appareil est resté éteint un certain temps. Placez une tasse sous le bec verseur. Vous pouvez ajuster la hauteur du bec à la hauteur de votre tasse en le faisant glisser vers le haut ou le bas. Pour une petite tasse, utilisez le bac d’égouttage. Si vous utilisez une tasse plus grande, vous pouvez vous passer du bac d’égouttage. DO718K 4. 5. Choisissez votre café et appuyez sur le bouton pour un expresso, un lungo, un americano, de l’eau chaude ou votre réglage préféré. Remarque : vous pouvez régler vous-même la quantité de café à l’aide des touches. Voir les rubriques “réglage de la quantité” et “réglage préféré”. Le voyant lumineux de la touche sélectionnée s’allume, le voyant “en cours préparation” apparaît sur l’écran et l’éclairage de la tasse s’allume. Si vous souhaitez terminer le processus de préparation avant que le café ne soit prêt, appuyez à nouveau sur la touche sélectionnée. Lorsque le café est prêt, l’appareil revient en mode veille. L’appareil se met automatiquement hors tension. Selon le mode choisi, l’appareil s’éteindra après 10, 20 ou 30 minutes. 1 2 3 FR 3. 4 REMPLISSAGE DU RÉSERVOIR À EAU Si le voyant du réservoir à eau clignote pour indiquer qu’il est vide, c’est que vous devez le remplir. Retirez le réservoir à eau de l’appareil. Vous pouvez pour cela utiliser le couvercle du réservoir en tant que poignée. 2. Rincez le réservoir et remplissez-le d’eau claire et froide jusqu’au repère maximum. 3. Remettez le réservoir dans l’appareil. ! Attention : retirez toujours le réservoir à eau de l’appareil lorsque vous le remplissez, afin d’éviter tout débordement et les dommages consécutifs éventuels. ! Ne remplissez jamais le réservoir à eau avec de l’eau tiède, chaude ou gazeuse, ou tout autre liquide. 1 3 2 ! 1. REMPLISSAGE DU RÉSERVOIR À GRAINS Vous pouvez placer le couvercle directement sur le réservoir ou pour surélever l’accessoire situé devant le réservoir à grains. Si le voyant du réservoir à grains clignote pour indiquer qu’il est vide, c’est que vous devez le remplir. Retirez le couvercle du réservoir. Si vous le souhaitez, placez l’accessoire pour surélever le réservoir à grains. 2. Faites l’appoint en grains, en les déversant lentement dans le réservoir. 3. Remettez le couvercle. ! Mettez uniquement des grains de café dans le réservoir prévu à cet effet. Ne remplissez jamais le réservoir avec du café moulu, du café instantané ou d’autres ingrédients ou objets. 1. www.domo-elektro.be DO718K 19 2 3 FR 1 VIDANGE DU RÉSERVOIR À MARC DE CAFÉ Si le voyant du réservoir à marc de café est allumé en permanence, c’est que vous devez le vider. Retirez le bac d’égouttage. Retirez le bac de récupération de l’appareil. Videz le réservoir à marc de café. Rincez le bac de récupération et le réservoir à marc de café et séchez-les. 4. Remettez tout bien en place. 1 2 4 3 1. 2. 3. RÉGLAGE PRÉFÉRÉ Vous pouvez programmer la touche de réglage préféré à votre gré. 1. Maintenez la touche de réglage préféré enfoncée pendant 2 secondes. Les voyants des touches expresso, lungo et americano vont se mettre à clignoter. 2. Appuyez sur la touche correspondant au type de café que vous souhaitez programmer comme réglage préféré. 3. La préparation commence automatiquement. Appuyez à nouveau sur la touche du type de café que vous êtes en train de programmer. Maintenez la touche enfoncée aussi longtemps que vous souhaitez que le café continue de couler. Lorsque vous relâchez la touche, la préparation s’arrête. L’appareil se souvient de la quantité choisie lorsque vous relâchez votre touche. 4. La touche de réglage préféré est désormais programmée. 3 1 2 RÉGLAGE DE LA QUANTITÉ Vous pouvez régler la quantité correspondant aux touches expresso, lungo, americano et eau chaude entre 25 ml et 250 ml. 20 DO718K 3. Appuyez sur la touche dont vous souhaitez régler la quantité. La préparation commence. Appuyez à nouveau sur la touche du type de café que vous êtes en train de programmer. Maintenez la touche enfoncée aussi longtemps que vous souhaitez que le café continue de couler. Lorsque la préparation a atteint la quantité souhaitée, relâchez le bouton. Vous entendrez un double signal, ce qui signifie que la quantité a été définie en tant que nouvelle quantité pour cette touche. 2 FR 1. 2. 1 RÉGLAGE DE LA MOUTURE DU CAFÉ Le réservoir à grains dispose d’un bouton rotatif permettant de régler la finesse de la mouture. Pendant le fonctionnement, tournez le bouton pour moudre les grains de façon plus grossière ou plus fine. ! Attention : ne manipulez pas ce bouton si l’appareil n’est pas en marche car cela pourrait endommager le moulin s’il reste des grains dans le mécanisme. Le bouton rotatif comporte de petits points indiquant la finesse de mouture. Plus le point est petit, plus le réglage de mouture est fin. DÉTERMINATION DU MODE La machine à expresso propose 3 réglages : standard, éco et rapide. En mode éco, vous économisez de l’énergie alors qu’en mode rapide, vous obtenez un café encore plus rapidement. Mode éco Mode rapide Mode standard Éclairage des tasses Non Oui Oui Prébrassage* Oui Non Oui Mise hors tension automatique 10 min 30 min 20 min Mémoire de quantité choisie Oui Oui Oui * Le processus de prébrassage humidifie les grains moulus de l’unité de brassage en y ajoutant préalablement une petite quantité d’eau. Cela permet au café moulu de se dilater et d’augmenter la pression, de façon à optimiser l’arôme et l’extraction de l’huile. 1. 2. Si l’appareil est en mode veille, appuyez sur le bouton de marche/arrêt pendant 5 secondes. Vous entendrez un double signal. Les boutons correspondant aux différents types de café ont désormais chacune un réglage différent. La touche allumée indique le réglage actuel. Les autres touches clignotent. Eau chaude Mode éco Mode rapide Mode standard www.domo-elektro.be Expresso Lungo X X X DO718K 21 3. FR 4. Vous pouvez maintenant aussi modifier le réglage en appuyant sur l’une des touches qui clignotent. Choisissez la touche eau chaude pour le mode éco, la touche expresso pour le mode rapide et la touche lungo pour le mode standard. Vous entendrez un double signal une fois le réglage adapté. Si vous souhaitez conserver le réglage actuel, appuyez à nouveau sur le bouton marche/arrêt et attendez 5 secondes. L’appareil revient en mode veille. NETTOYAGE ET ENTRETIEN NETTOYAGE Il est conseillé d’effectuer les étapes 1 à 4 de façon quotidienne. Si l’appareil est utilisé pendant une période plus longue, des résidus de café peuvent rester dans l’appareil ; nettoyez-le dans ce cas conformément à l’étape 5. Éteignez l’appareil et débranchez le cordon d’alimentation. 1. Retirez le bac d’égouttage. Videz le bac. Nettoyez la grille et le réservoir à l’eau claire. Séchez les deux éléments. Ceux-ci peuvent également être passés au lave-vaisselle. 2. Retirez le bac de récupération de l’appareil. Videz le réservoir à marc de café. Nettoyez le bac de récupération et le réservoir à marc de café à l’eau claire. Séchez les deux éléments. Ceux-ci peuvent également être passés au lave-vaisselle. 3. Ouvrez la porte de maintenance. Retirez l’unité de brassage en appuyant sur les deux boutons latéraux de l’unité de brassage et en le tirant vers vous. Nettoyez l’unité de brassage à l’eau claire et séchez-la. ! Attention : ne nettoyez jamais l’unité de brassage au lave-vaisselle ! 4. Nettoyez le boîtier à l’aide d’un chiffon humide. Utilisez le chiffon fourni pour nettoyer l’écran tactile. 5. Utilisez la brosse de nettoyage pour nettoyer les résidus de café tout autour de la sortie interne du café moulu. 6. Remettez tout bien en place. Si une pièce n’est pas (correctement) installée, l’écran de l’appareil l’indiquera. Voir la rubrique “pièces” pour une explication des différents voyants lumineux. ! N’immergez jamais l’appareil, le cordon d’alimentation ou la fiche dans l’eau ou tout autre liquide. Ceci pour éviter tout choc électrique ou incendie. ! N’utilisez jamais de détergents agressifs ou abrasifs. 1 2 3 4 22 DO718K 6 DÉTARTRAGE 1. 2. 3. 4. 5. 6. 7. 8. 9. 10. 11. Remplissez le réservoir à eau jusqu’à son repère maximum. Ajoutez 1 sachet de produit détartrant dans le réservoir à eau. 3 sachets sont fournis avec l’appareil. Des produits de détartrage supplémentaires sont disponibles via le site Web : webshop.domoelektro.be Branchez la fiche dans une prise de courant. Placez un récipient collecteur sous le bec verseur. Assurez-vous que le récipient a bien la même capacité que le réservoir à eau proprement dit. En mode veille, maintenez simultanément le bouton marche/arrêt et la touche expresso enfoncés pendant 5 secondes. Vous entendrez un signal et les voyants détartrage et expresso de l’appareil vont se mettre à clignoter. Appuyez sur la touche expresso pour confirmer le processus de détartrage. Si, finalement, vous ne souhaitez pas détartrer, appuyez sur le bouton marche/arrêt pour revenir en mode veille. Le voyant de détartrage clignote et l’appareil commence le processus. De l’eau contenant du produit sort du bec en plusieurs phases. L’ensemble du processus prend quelques minutes. (± 20 min.) Lorsque toute l’eau du réservoir aura coulé, les voyants réservoir à eau vide et expresso sont allumés. Videz votre récipient collecteur et remettez-le en place. S’il reste encore des résidus dans le réservoir à eau, videz d’abord celui-ci et rincez-le. Remplissez le réservoir d’eau claire jusqu’au repère maximum et remettez-le dans l’appareil. Le processus de détartrage reprend. L’appareil fera couler la moitié de l’eau dans le réservoir, s’arrêtera pendant 1 minute, puis fera couler l’autre moitié de l’eau. Le processus de détartrage est maintenant terminé et l’appareil s’éteint. 1 3 2 4 FR Si le voyant de détartrage est allumé, c’est que vous devez détartrer l’appareil. 5 + 6 7 8 9 10 ! Attention : l’eau qui s’écoule du bec verseur est très chaude ; éloignez par conséquent vos mains de l’appareil lorsqu’il celui-ci fonctionne. ! Utilisez uniquement les produits de détartrage fournis avec l’appareil. D’autres produits de détartrage, des produits de nettoyage agressifs ou du vinaigre peuvent endommager l’appareil. ! Si l’appareil n’est pas correctement entretenu, cela peut réduire considérablement sa durée de vie. www.domo-elektro.be DO718K 23 FR RINÇAGE MANUEL + Vous pouvez rincer manuellement l’appareil pour nettoyer le bec verseur. Il est conseillé de le faire régulièrement si l’appareil est utilisé fréquemment ou s’il reste inactif pendant un certain temps. 1. Il est conseillé de placer une tasse vide ou un récipient collecteur sous le bec verseur. 2. En mode veille, maintenez simultanément le bouton marche/arrêt et la touche d’eau chaude enfoncés pendant 5 secondes. 3. Le voyant d’eau chaude clignote. De l’eau chaude sort du bec verseur. 4. Une fois le bec rincé, l’appareil repasse en mode veille. VIDANGE DE L’APPAREIL Si vous souhaitez ranger ou transporter l’appareil, il est préférable de le vider complètement afin qu’il ne reste pas d’eau dans les conduites. 1. En mode veille, maintenez simultanément le bouton marche/arrêt et la touche lungo enfoncés pendant 5 secondes. 2. Le voyant de vidange de l’appareil clignote. Si vous ne souhaitez pas poursuivre la vidange de l’appareil, appuyez à nouveau sur le bouton marche/arrêt pour revenir en mode veille. 3. Retirez le réservoir à eau. Le voyant de vidange de l’appareil reste allumé. Videz le réservoir à eau et le bac d’égouttage. 4. Une fois le processus terminé, l’appareil s’éteint automatiquement. ! Si vous souhaitez ensuite réutiliser l’appareil, faites d’abord couler une tasse d’eau chaude. 1 3 2 + PROBLÈMES ÉVENTUELS 24 Problème Cause Solution L'appareil ne fonctionne pas. L'appareil n'est pas raccordé au réseau électrique. Vérifiez si le cordon est correctement branché et si la fiche est bien branchée dans une prise. Aucune réponse ou réponse tardive lorsque l’on appuie sur les touches du panneau de commande. · · DO718K · L’appareil est limité électromagnétiquement. Le panneau de commande est sale. · Débranchez la fiche secteur et réessayez quelques minutes plus tard. Nettoyez le panneau de commande avec le chiffon fourni. · · Les tasses n’ont pas été préchauffées. L’unité de brassage est encore froide. · · Faites chauffer les tasses. Rincez l’appareil 3 fois pour réchauffer l’unité de brassage. Le café ne sort pas du bec verseur. Il se peut que la fonction de vidange de l'appareil ait été utilisée la dernière fois. Appuyez sur la touche d'eau chaude pour que de l'eau chaude sorte du bec. La première tasse de café est de mauvaise qualité. La première séance de mouture ne fournit pas suffisamment de café moulu. Jetez le café. Les cafés suivants sont de bonne qualité. Le café n'a pas de couche de crème. Les grains de café ne sont pas frais. Remplacez les grains de café. Les touches du panneau de commande ne sont pas réactives. Il faut toucher les touches tactiles de face. Appuyez frontalement sur les touches, plus précisément dans la partie inférieure de leurs pictogrammes. Il faut beaucoup de temps pour que l'appareil chauffe. Du calcaire s'est accumulé dans l'appareil. Détartrez l'appareil. Bien que le réservoir à eau soit vide/non installé, le voyant ne s'allume pas. Le capteur, situé près du raccordement du réservoir à eau, est humide. Essuyez l'eau tout autour du raccordement du réservoir à eau. Il y a beaucoup d'eau dans le réservoir à marc de café. Le café moulu est trop fin et bloque la sortie d'écoulement de l'eau. Réglez la finesse de mouture à l'aide du bouton rotatif du réservoir à grains pendant que l'appareil fonctionne. Le café coule très lentement/ goutte du bec verseur. Le café moulu est trop fin et bloque la sortie d'écoulement de l'eau. Réglez la finesse de mouture à l'aide du bouton rotatif du réservoir à grains pendant que l'appareil fonctionne. Le voyant du réservoir à grains clignote pour indiquer qu'il est vide alors qu'il reste encore suffisamment de grains dans le réservoir. La sortie interne du café moulu est bloquée. Utilisez la brosse de nettoyage pour nettoyer les résidus de café tout autour de la sortie interne du café moulu. Le voyant de détartrage clignote. Le processus de détartrage est toujours en cours. Suivez les étapes du processus de détartrage car l'appareil ne revient en mode veille qu'une fois tout le processus terminé. www.domo-elektro.be DO718K FR Le café n'est pas assez chaud. 25 MISE AU REBUT FR Ce symbole sur le produit ou son emballage indique que ce produit ne peut être traité comme déchet ménager. Il doit plutôt être remis au point de ramassage concerné, se chargeant du recyclage du matériel électrique et électronique. En vous assurant que ce produit est éliminé correctement, vous favorisez la prévention des conséquences négatives pour l’environnement et la santé humaine qui, sinon, seraient le résulat d’un traitement inapproprié des déchets de ce produit. Pour obtenir plus de détails sur le recyclage de ce produit, veuillez prendre contact avec le bureau municipal de votre région, votre service d’éliminiation des déchets ménagers ou le magasin où vous avez acheté le produit. L’emballage est recyclable. Traitez l’emballage écologiquement. 26 DO718K GARANTIE Sehr geehrter Kunde, Sämtliche unserer Produkte unterliegen einer strengen Qualitätskontrolle, bevor Sie Ihnen angeboten werden. Sollten dennoch Probleme mit Ihrem Gerät auftreten, bedauern wir dies zutiefst. Wir möchten Sie in diesem Fall bitten, unseren Kundenservice zu kontaktieren. Unsere Mitarbeiter helfen Ihnen gern weiter! [email protected] DE +32 14 21 71 91 Montag – Donnerstag: 8:30 Uhr – 12:00 Uhr und von 13:00 Uhr – 17:00 Uhr Freitag: 8:30 Uhr – 12:00 Uhr und von 13:00 Uhr – 16:30 Uhr Dieses Gerät hat eine Garantiefrist von 2 Jahren ab dem Kaufdatum. Während der Garantiezeit übernimmt der Hersteller die vollständige Verantwortung für Mängel, die nachweislich auf Material- oder Konstruktionsfehler zurückzuführen sind. Wenn derartige Mängel auftreten, wird das Gerät wenn nötig ausgetauscht oder repariert. Die Garantiezeit von 2 Jahren beginnt in diesem Moment nicht erneut, sondern sie läuft bis 2 Jahre nach dem Kaufdatum weiter. Die Garantie wird auf der Grundlage des Kassenbons gewährt. Die Garantie auf Accessoires und Verschleißteile beträgt 6 Monate. Die Garantie und die Verantwortung/Haftung des Lieferanten und Herstellers entfallen automatisch in den folgenden Fällen: · Bei Nichtbeachtung der Anweisungen in dieser Bedienungsanleitung. · Bei falschem Anschluss, z.B. bei einer zu hohen Stromspannung. · Bei falscher, grober oder abnormaler Verwendung. · Bei unzureichender oder falscher Wartung. · Bei vom Verbraucher oder von nicht ermächtigten Dritten vorgenommenen Reparaturen oder Änderungen am Gerät. · Bei der Verwendung von Ersatzteilen oder Accessoires, die nicht vom Lieferanten / Hersteller empfohlen oder geliefert werden. SICHERHEITSVORKEHRUNGEN Wenn Sie elektrische Geräte verwenden, müssen folgende Sicherheitshinweise beachtet werden: · Lesen Sie diese Hinweise sorgfältig durch. Bewahren Sie diese Bedienungsanleitung zum späteren Nachschlagen auf. · Entfernen Sie vor dem ersten Gebrauch alle Verpackungsmaterialien und möglichen Werbeaufkleber. Sorgen Sie dafür, dass Kinder nicht mit den Verpackungsmaterialien spielen. · Dieses Gerät eignet sich für den Einsatz im Haushalt und in ähnlichen Umfeldern, zum Beispiel in folgenden Bereichen: · Küchenbereich für Mitarbeiter von Geschäften, Büros und anderen ähnlichen beruflichen Umfeldern. · Bauernhöfe · Hotel- und Motelzimmer und andere Bereiche mit wohnungsähnlichem Charakter · Gästezimmer oder Ähnliches www.domo-elektro.be DO718K 27 · · DE · · · · · · · · · · · · · · · · · · · 28 Diese Gerät darf von Kindern ab 16 Jahren und Menschen mit körperlichen oder sensorischen Behinderungen oder Menschen mit eingeschränkten geistigen Fähigkeiten oder mangelnder Erfahrung bzw. Sachkenntnis unter der Bedingung verwendet werden, dass diese Personen beaufsichtigt werden oder sie eine Anleitung zur sicheren Verwendung des Geräts erhalten haben und sich der Gefahren bei der Verwendung des Geräts bewusst sind. Kinder dürfen nicht mit dem Gerät spielen. Die Wartung und Reinigung des Geräts darf nicht durch Kinder ausgeführt werden, außer diese sind älter als 16 Jahre und werden von einem Erwachsenen beaufsichtigt. Netzstecker ziehen, wenn das Gerät nicht in Gebrauch ist, bevor Teile montiert oder abmontiert werden und vor der Reinigung. Stellen Sie zunächst alle Schalter auf „Aus“ und ziehen Sie den Stecker am Stecker selbst aus der Steckdose. Ziehen Sie den Stecker nie am Netzkabel aus der Steckdose. ACHTUNG: Zur Vermeidung von Unfällen sollte das Gerät nicht mit einem externen Zusatzgerät, wie z. B. über einen externen Timer oder an einen Stromkreislauf angeschlossen werden, der regelmäßig ein- und ausgeschaltet wird. Die Oberflächen dieses Geräts werden während des Gebrauchs heiß. Wir empfehlen zur Vermeidung von Brandverletzungen, das Gerät - außer an den Griffen - nicht zu berühren. Eingeschaltetes Gerät nie unbeaufsichtigt stehen lassen. Verwenden Sie das Gerät nicht im Freien. Gerät nur für den vorgesehenen Zweck verwenden. Vor Gebrauch überprüfen, ob die auf dem Gerät angegebene Spannung mit dem des Stromnetzes übereinstimmt. Das Netzkabel muss stets an eine Steckdose angeschlossen werden, die gemäß den örtlichen Standards und Normen isoliert und geerdet wurde. Verwenden Sie das Gerät nie, wenn das Netzkabel oder der Stecker beschädigt ist, wenn es nicht richtig funktioniert oder beschädigt ist. Bringen Sie das Gerät in diesem Fall zur Durchsicht, Reparatur oder für elektrische/mechanische Anpassungen zum Kundendienst von DOMO oder zum nächstgelegenen Servicecenter. Versuchen Sie nie, das Gerät selbst zu reparieren. Tauchen Sie das Gerät, das Kabel oder den Stecker auf keinen Fall in Wasser oder andere Flüssigkeiten. Dies dient der Vermeidung von elektrischen Stromschlägen und Feuer. Verwenden Sie das Gerät nicht mit nassen Händen. Dieses Gerät ist mit einem kurzen Netzkabel ausgestattet, um das Risiko zu vermeiden, dass Personen oder Gegenstände über/an einem längeren Netzkabel hängen bleiben oder darüber fallen. DIESES GERÄT SOLLTE AUF KEINEN FALL MIT EINEM VERLÄNGERUNGSKABEL VERWENDET WERDEN. Rollen Sie das Netzkabel vollständig ab, um eine Überhitzung des Kabels zu vermeiden. Lassen Sie das Netzkabel nicht auf einer heißen Oberfläche oder über einen Tischrand oder eine Arbeitsplatte herunter hängen. Lassen Sie das Netzkabel nicht unter oder rund um das Gerät hängen. Stellen Sie das Gerät niemals auf einen heißen Gasherd oder ein heißes elektrisches Kochfeld bzw. in deren Nähe, nicht in eine Spüle und nicht in einen heißen Ofen. Halten Sie das Gerät von brennbaren Materialien, Gas und explosiven Stoffen fern. Schließen Sie das Netzkabel erst an die Steckdose an, wenn das Gerät korrekt zusammengebaut wurde. Um das Gerät vom Netzstrom zu trennen, muss der Bedienschalter zuerst in die „AUS“- oder „0“-Position gestellt werden. Anschließend kann der Stecker aus der Steckdose gezogen werden. Ziehen Sie nie am Gerät oder am Netzkabel, um den Stecker aus der Steckdose zu ziehen. Wenn das Gerät nicht gut gewartet wird, kann dies die Lebensdauer des Geräts drastisch verringern und zu Gefahrensituationen führen. Beim Wasserkochen ist es möglich, dass heißer Dampf durch den Filter oder eine andere Öffnung austritt, es ist daher wichtig, die Hände beim Betrieb des Geräts von diesem fernzuhalten. DO718K · Für Unfälle oder Schäden, die durch die Nichtbefolgung dieser Regeln verursacht werden, haften Sie selbst. Weder der Hersteller noch der Importeur oder der Lieferant können in solchen Fällen zur Verantwortung gezogen werden. Beim Befüllen des Geräts darf die Höchstfüllstandanzeige „MAX“ nicht überschritten werden. Es ist darauf zu achten, dass keine Flüssigkeit über das Netzkabel verschüttet wird. Verwenden Sie nur das Zubehör, das mit dem Gerät mitgeliefert wird. Versetzen oder tragen Sie das Gerät nicht, solange es noch in Betrieb oder noch heiß ist. Lassen Sie das Gerät erst abkühlen, bevor es an einen anderen Ort gestellt wird. · · · · TEILE 10. 11. 12. 13. 14. Tropfschale Gitter der Tropfschale Auffangschale Kaffeesatzbehälter Kaffeeauslauf Ein-/Aus-Taste Bedienfeld Bohnenbehälter Deckel des Bohnenbehälters Wassertank Kabel Brühgruppe Wartungsklappe Reinigungsbürste 10 DE 1. 2. 3. 4. 5. 6. 7. 8. 9. 9 8 11 7 6 5 4 12 13 14 3 2 1 BEDIENFELD Symbol Beschreibung Tasten Espresso (kleiner, starker Kaffee) Lungo (normaler, milder Kaffee) Americano (mit Wasser verdünnter Kaffee) Bevorzugte Einstellung Heißes Wasser www.domo-elektro.be DO718K 29 Kontrollleuchten Kontrollleuchte leuchtet: Zubereitung fertig Kontrollleuchte blinkt: Zubereitung im Gange Wassertank leer oder nicht eingesetzt Bohnenbehälter leer Kontrollleuchte leuchtet: Kaffeesatzbehälter voll Kontrollleuchte blinkt: Auffangschale ist nicht eingesetzt DE Kontrollleuchte leuchtet: Brühgruppe ist nicht (richtig) eingesetzt Kontrollleuchte blinkt: Wartungsklappe ist nicht (richtig) angebracht Kontrollleuchte leuchtet: Gerät entkalken Kontrollleuchte blinkt: Entkalkungsvorgang in Gange Entleerung des Geräts im Gange. Siehe Abschnitt „Reinigung und Wartung/ Gerät entleeren“ INSTALLATION Entfernen Sie vor der ersten Verwendung das gesamte Verpackungsmaterial und möglicherweise vorhandene Werbeaufkleber. 1. Stellen Sie das Gerät auf einen flachen, stabilen Untergrund. Achten Sie darauf, dass um das Gerät herum genug Freiraum für ausreichende Belüftung vorhanden ist. Bringen Sie die Tropfschale an. Achten Sie darauf, dass sie korrekt installiert ist. Füllen Sie den Wassertank. Siehe Abschnitt „Verwendung/Wassertank füllen“. Füllen Sie den Bohnenbehälter. Siehe Abschnitt „Verwendung/Bohnenbehälter füllen“. Stecken Sie das Kabel in den Kabelanschluss des Geräts und stecken Sie den Stecker in die Steckdose. 2. 3. 4. 5. Vor der ersten Verwendung wird empfohlen, eine Tasse heißes Wasser zuzubereiten, um die Leitungen zu spülen. Siehe Abschnitt „Verwendung“. 5 4 3 2 1 150mm m 150m 150m m 150m m 150 mm GEBRAUCH 1. 30 Schalten Sie das Gerät ein. Drücken Sie die Ein-/Aus-Taste. Das Gerät wird automatisch gespült. Aus dem Auslauf fließt eine Tasse heißes Wasser. Das Gerät kehrt anschließend in den Stand-by-Modus zurück. Im Stand-by-Modus leuchten alle Kontrollleuchten und das Gerät ist einsatzbereit. DO718K 3. 4. 5. Hinweis: Das automatische Spülen erfolgt nur, wenn das Gerät längere Zeit ausgeschaltet war. Stellen Sie eine Tasse unter den Kaffeeauslauf. Sie können die Höhe des Auslaufs an die Höhe Ihrer Tasse anpassen, indem Sie ihn nach oben oder unten schieben. Bei einer kleinen Tasse verwenden Sie die Tropfschale. Wenn Sie eine größere Tasse verwenden, können Sie die Tropfschale weglassen. Wählen Sie Ihren gewünschten Kaffee und drücken Sie die Taste für einen Espresso, Lungo, Americano, heißes Wasser oder Ihre bevorzugte Einstellung. Hinweis: Sie können die Menge Kaffee der Tasten selbst einstellen. Siehe Abschnitte „Menge einstellen“ und „bevorzugte Einstellung“. Die Kontrollleuchte der gewählten Taste leuchtet auf, die Kontrollleuchte „Zubereitung im Gange“ erscheint auf dem Display und die Tassenbeleuchtung wird eingeschaltet. Wenn Sie den Zubereitungsvorgang beenden möchten, bevor der Kaffee fertig ist, drücken Sie die gewählte Taste noch einmal. Wenn der Kaffee fertig ist, kehrt das Gerät in den Stand-by-Modus zurück. Das Gerät verfügt über eine automatische Abschaltung. Abhängig vom Modus schaltet sich das Gerät nach 10, 20 oder 30 Minuten aus. 1 2 3 DE 2. 4 WASSERTANK FÜLLEN Wenn die Kontrollleuchte „Wassertank leer“ blinkt, müssen Sie den Wassertank füllen. Nehmen Sie den Wassertank aus dem Gerät. Dazu können Sie den Deckel des Wassertanks als Griff verwenden. 2. Spülen Sie den Wassertank aus und füllen Sie ihn mit sauberem, kaltem Wasser bis zur maximalen Füllstandsmarkierung. 3. Setzen Sie den Wassertank wieder in das Gerät ein. ! Achtung: Entfernen Sie den Wassertank jedes Mal aus dem Gerät, wenn Sie ihn mit Wasser füllen, um ein Überlaufen und Schäden zu vermeiden. ! Verwenden Sie niemals warmes, heißes oder kohlensäurehaltiges Wasser oder andere Flüssigkeiten im Wassertank. 1 3 2 ! 1. BOHNENBEHÄLTER FÜLLEN Sie können entweder den Deckel direkt auf den Behälter aufsetzen oder das Zubehör zum Anheben des Bohnenbehälters verwenden. www.domo-elektro.be DO718K 31 Wenn die Kontrollleuchte „Bohnenbehälter leer“ blinkt, müssen Sie den Bohnenbehälter füllen. Nehmen Sie den Deckel vom Behälter. Falls gewünscht, bringen Sie das Zubehör zum Anheben des Bohnenbehälters an. 2. Geben Sie die Bohnen hinzu, indem Sie sie langsam in den Behälter füllen. 3. Setzen Sie den Deckel wieder auf. ! Verwenden Sie nur Kaffeebohnen im Bohnenbehälter. Füllen Sie den Behälter niemals mit gemahlenem Kaffee, löslichem Kaffee oder anderen Zutaten oder Gegenständen. 1. 2 3 DE 1 KAFFEESATZBEHÄLTER ENTLEEREN Wenn die Kontrollleuchte „Kaffeesatzbehälter voll“ leuchtet, müssen Sie den Kaffeesatzbehälter entleeren. 1. Entfernen Sie die Tropfschale. 2. Nehmen Sie die Auffangschale aus dem Gerät. 3. Entleeren Sie den Kaffeesatzbehälter. Spülen und trocknen Sie sowohl die Auffangschale als auch den Kaffeesatzbehälter ab. 4. Bringen Sie alles wieder an seinem ursprünglichen Platz an. 1 2 4 3 BEVORZUGTE EINSTELLUNG Sie können die Taste „bevorzugte Einstellung“ nach Ihrem eigenen Geschmack programmieren. 1. Halten Sie die Taste „bevorzugte Einstellung“ 2 Sekunden lang gedrückt. Die Kontrollleuchten der Tasten „Espresso“, „Lungo“ und „Americano“ blinken. 2. Drücken Sie die Taste für die Art von Kaffee, die Sie als bevorzugte Einstellung programmieren möchten. 3. Die Zubereitung beginnt. Drücken Sie erneut die Taste für die Art von Kaffee, die Sie jetzt programmieren. Halten Sie die Taste so lange gedrückt, wie Sie möchten, dass der Kaffee weiterfließt. Wenn Sie die Taste loslassen, wird der Zubereitungsvorgang gestoppt. Das Gerät merkt sich die Menge zum Zeitpunkt, zu dem Sie die Taste loslassen. 4. Die Taste „bevorzugte Einstellung“ ist jetzt programmiert. 32 DO718K 1 3 2 Sie können die Menge der Tasten „Espresso“, „Lungo“, „Americano“ und „heißes Wasser“ zwischen 25 ml und 250 ml einstellen. 1. Drücken Sie die Taste, deren Menge Sie einstellen möchten. 2. Die Zubereitung beginnt. Drücken Sie erneut die Taste für die Art von Kaffee, die Sie jetzt programmieren. Halten Sie die Taste so lange gedrückt, wie Sie möchten, dass der Kaffee weiterfließt. 3. Wenn die gewünschte Menge zubereitet wurde, lassen Sie die Taste los. Sie hören zweimal ein Signal, was bedeutet, dass die Menge als die neue Menge dieser Taste eingestellt ist. 2 DE MENGE EINSTELLEN 1 MAHLGRADEINSTELLUNG Im Bohnenbehälter befindet sich ein Drehknopf zur Einstellung des Mahlgrads. Drehen Sie den Knopf während des Betriebs, um die Bohnen gröber oder feiner mahlen zu lassen. ! Vorsicht: Drehen Sie diesen Knopf nicht, wenn das Gerät nicht in Betrieb ist. Dies kann das Mahlmesser beschädigen, wenn sich noch Bohnen im Mechanismus befinden. Auf dem Drehknopf befinden sich Punkte, um den Mahlgrad anzudeuten. Je kleiner der Punkt, desto feiner der Mahlgrad. MODUS BESTIMMEN Die Espressomaschine hat 3 Einstellungen: Standard, Eco und schnell. Im Ecomodus sparen Sie Energie, mit dem Schnellmodus bereiten Sie Ihren Kaffee noch schneller zu. Ecomodus Schnellmodus Standardmodus Tassenbeleuchtung Nein Ja Ja Vorbrühen* Ja Nein Ja Automatische Abschaltung 10 Min. 30 Min. 20 Min. Mengenspeicher Ja Ja Ja * Durch das Vorbrühen werden die gemahlenen Bohnen in der Brühgruppe vor dem Brühen des Kaffees mit einer kleinen Menge Wasser befeuchtet. Das sorgt dafür, dass sich der gemahlene Kaffee ausdehnt und der Druck höher ist, damit sich das volle Aroma entfalten kann und die Extraktion des Öls optimal ist. www.domo-elektro.be DO718K 33 1. 2. Wenn sich das Gerät im Stand-by-Modus befindet, halten Sie die Ein-/Aus-Taste 5 Sekunden lang gedrückt. Sie hören zweimal ein Signal. Die Tasten für die Art von Kaffee stehen jetzt jeweils für eine andere Einstellung. Die leuchtende Taste zeigt die aktuelle Einstellung an. Die anderen Tasten blinken. Heißes Wasser Ecomodus Lungo X Schnellmodus DE Espresso X Standardmodus X 3. Sie können die Einstellung jetzt auch ändern, indem Sie eine der blinkenden Tasten drücken. Wählen Sie die Heißwassertaste für den Ecomodus, die Espresso-Taste für den Schnellmodus und die LungoTaste für den Standardmodus. Sie hören zweimal ein Signal, wenn die Einstellung angepasst ist. 4. Wenn Sie die aktuelle Einstellung behalten möchten, drücken Sie erneut die Ein-/Aus-Taste und warten Sie 5 Sekunden. Das Gerät kehrt wieder in den Stand-by-Modus zurück. REINIGUNG UND WARTUNG REINIGUNG Es wird empfohlen, die Schritte 1 bis 4 täglich auszuführen. Wenn das Gerät über einen längeren Zeitraum verwendet wird, können Kaffeereste im Gerät zurückbleiben. Reinigen Sie es gemäß Schritt 5. Schalten Sie das Gerät aus und ziehen Sie den Stecker aus der Steckdose. 1. Entfernen Sie die Tropfschale. Entleeren Sie die Schale. Reinigen Sie sowohl das Gitter als auch die Schale mit sauberem Wasser. Trocknen Sie beides ab. Sie können auch in der Spülmaschine gereinigt werden. 2. Nehmen Sie die Auffangschale aus dem Gerät. Entleeren Sie den Kaffeesatzbehälter. Reinigen Sie sowohl die Auffangschale als auch den Kaffeesatzbehälter mit sauberem Wasser. Trocknen Sie beides ab. Sie können auch in der Spülmaschine gereinigt werden. 3. Öffnen Sie die Wartungsklappe. Entfernen Sie die Brühgruppe, indem Sie beide Tasten an der Seite der Brühgruppe eindrücken und sie zu sich heranziehen. Reinigen Sie die Brühgruppe mit sauberem Wasser und trocken Sie sie ab. ! Achtung: Reinigen Sie die Brühgruppe niemals in der Spülmaschine! 4. Reinigen Sie das Gehäuse mit einem feuchten Tuch. Verwenden Sie das mitgelieferte Reinigungstuch, um das Touchpanel zu reinigen. 5. Verwenden Sie die Reinigungsbürste, um Kaffeereste um den internen Auslass für gemahlenen Kaffee herum zu entfernen. 6. Bringen Sie alles wieder an seinem ursprünglichen Platz an. Wenn ein Teil nicht (richtig) installiert ist, zeigt das Gerät dies auf dem Display an. Siehe Abschnitt „Einzelteile“ für eine Erläuterung der Kontrollleuchten. ! Tauchen Sie das Gerät, das Stromkabel oder den Stecker niemals in Wasser oder andere Flüssigkeiten ein, um einen elektrischen Schlag oder Feuer zu verhindern. ! Verwenden Sie niemals aggressive oder scheuernde Reinigungsmittel. 34 DO718K 1 2 3 6 DE 4 ENTKALKEN Wenn die Kontrollleuchte „Gerät entkalken“ leuchtet, müssen Sie das Gerät entkalken. 1. 2. 3. 4. 5. 6. 7. 8. 9. 10. 11. Füllen Sie den Wassertank bis zur maximalen Füllstandsmarkierung. Geben Sie 1 Beutel Entkalker in den Wassertank. Es werden 3 Beutel mit dem Gerät mitgeliefert. Zusätzlicher Entkalker ist über folgende Website erhältlich: webshop.domo-elektro.be Stecken Sie den Stecker in die Steckdose. Stellen Sie einen Auffangbehälter unter den Kaffeeauslauf. Stellen Sie sicher, dass der Behälter mindestens das gleiche Fassungsvermögen wie der Wassertank selbst hat. Halten Sie im Stand-by-Modus die Ein-/Aus-Taste und die Espresso-Taste gleichzeitig 5 Sekunden lang gedrückt. Sie hören ein Signal und die Kontrollleuchten „Gerät entkalken“ und „Espresso“ blinken. Drücken Sie die Espresso-Taste, um den Entkalkungsvorgang zu bestätigen. Wenn Sie doch nicht entkalken möchten, drücken Sie die Ein-/Aus-Taste, um in den Stand-by-Modus zurückzukehren. Die Kontrollleuchte „Entkalkungsvorgang“ blinkt und das Gerät beginnt mit der Entkalkung. Das Wasser mit Entkalker fließt schubweise aus dem Auslauf. Der gesamte Vorgang dauert einige Minuten. (± 20 Min.) Nachdem das Wasser des Wassertanks durchgelaufen ist, leuchten auch die Kontrollleuchten „Wassertank leer“ und „Espresso“. Entleeren Sie den Auffangbehälter und stellen Sie ihn zurück. Falls sich noch Rückstände im Wassertank befinden, entleeren Sie den Tank zuerst und spülen Sie ihn aus. Füllen Sie den Wassertank bis zur maximalen Füllstandsmarkierung mit sauberem Wasser und setzen Sie ihn wieder in das Gerät ein. Der Entkalkungsvorgang wird fortgesetzt. Das Gerät lässt die Hälfte des Wassers im Wassertank durchlaufen, macht eine Pause von 1 Minute und lässt dann die andere Hälfte des Wassers durchlaufen. Der Entkalkungsvorgang ist nun abgeschlossen und das Gerät schaltet sich aus. www.domo-elektro.be DO718K 35 1 3 2 4 5 + 7 8 9 10 DE 6 ! Achtung: Das aus dem Kaffeeauslauf fließende Wasser ist heiß. Halten Sie daher während des Betriebs die Hände von der Maschine fern. ! Verwenden Sie nur den mit dem Gerät mitgelieferten Entkalker. Andere Entkalker, aggressive Reinigungsmittel oder Essig können die Maschine beschädigen. ! Wenn das Gerät nicht richtig gewartet wird, kann dies die Lebensdauer des Geräts drastisch verkürzen. MANUELL SPÜLEN Um den Kaffeeauslauf zu reinigen, können Sie das Gerät manuell spülen lassen. Es wird empfohlen, dies regelmäßig durchzuführen, wenn das Gerät oft verwendet wird oder wenn es längere Zeit nicht verwendet wurde. 1. Es wird empfohlen, eine leere Tasse oder einen Auffangbehälter unter den Kaffeeauslauf zu stellen. 2. Halten Sie im Stand-by-Modus die Ein-/Aus-Taste und die Heißwassertaste-Taste gleichzeitig 5 Sekunden lang gedrückt. 3. Die Kontrollleuchte „heißes Wasser“ blinkt. Es fließt heißes Wasser aus dem Kaffeeauslauf. 4. Nachdem der Auslauf gespült wurde, kehrt das Gerät in den Stand-by-Modus zurück. + GERÄT ENTLEEREN Wenn Sie das Gerät lagern oder transportieren möchten, sollten Sie es am besten vollständig entleeren, damit kein Wasser in den Leitungen zurückbleibt. 1. Halten Sie im Stand-by-Modus die Ein-/Aus-Taste und die Lungo-Taste gleichzeitig 5 Sekunden lang gedrückt. 2. Die Kontrollleuchte „Gerät entleeren“ blinkt auf dem Display. Wenn Sie das Gerät doch nicht entleeren möchten, drücken Sie wieder die Ein-/Aus-Taste, um in den Stand-by-Modus zurückzukehren. 3. Entfernen Sie den Wassertank. Die Kontrollleuchte „Gerät entleeren“ leuchtet. Entleeren Sie den Wassertank und die Tropfschale. 4. Wenn der Vorgang beendet ist, schaltet sich das Gerät automatisch aus. ! Wenn Sie es danach wieder verwenden möchten, bereiten Sie zuerst eine Tasse heißes Wasser zu. 36 DO718K 1 3 2 + Problem Ursache Lösung Das Gerät funktioniert nicht. Das Gerät ist nicht an das Stromnetz angeschlossen. Stellen Sie sicher, dass das Kabel richtig angeschlossen und der Stecker in der Steckdose steckt. Keine oder verspätete Reaktion beim Drücken der Tasten am Bedienfeld. · · · Das Gerät wird elektromagnetisch begrenzt. Das Bedienfeld ist schmutzig. · Der Kaffee ist nicht heiß genug. · · Die Tassen sind nicht vorgewärmt. Die Brühgruppe ist noch kalt. · · Ziehen Sie den Stecker aus der Steckdose und versuchen Sie es einige Minuten später noch einmal. Reinigen Sie das Bedienfeld mit dem mitgelieferten Reinigungstuch. Wärmen Sie die Tassen vor. Spülen Sie das Gerät dreimal, um die Brühgruppe aufzuwärmen. Es fließt kein Kaffee aus dem Auslauf. Es kann sein, dass beim letzten Mal die Funktion „Gerät entleeren“ verwendet wurde. Drücken Sie die Heißwassertaste, sodass heißes Wasser aus dem Auslauf fließt. Die erste Tasse Kaffee ist von schlechter Qualität. Der erste Mahlvorgang ergibt nicht genug gemahlenen Kaffee. Gießen Sie den Kaffee weg. Die nächsten Kaffees sind von guter Qualität. Der Kaffee hat keine Cremaschicht. Die Kaffeebohnen sind nicht frisch. Tauschen Sie die Kaffeebohnen aus. Die Tasten am Bedienfeld sind nicht empfindlich. Die Touchtasten müssen frontal berührt werden. Berühren Sie die Tasten frontal im unteren Teil der Tastensymbole. Es dauert lange bis sich das Gerät aufgewärmt hat. Im Gerät hat sich Kalk angesammelt. Entkalken Sie das Gerät. Obwohl der Wassertank leer ist/ nicht eingesetzt ist, leuchtet die Kontrollleuchte nicht. Der Sensor in der Nähe des Anschlusses des Wassertanks ist nass. Wischen Sie das Wasser um den Anschluss des Wassertanks herum weg. Es befindet sich viel Wasser im Kaffeesatzbehälter. Der gemahlene Kaffee ist zu fein und verstopft den Wasserauslass. Passen Sie den Mahlgrad mit dem Drehknopf im Bohnenbehälter während des Betriebs an. www.domo-elektro.be DE MÖGLICHE PROBLEME DO718K 37 DE Der Kaffee fließt sehr langsam/ tropft aus dem Kaffeeauslauf. Der gemahlene Kaffee ist zu fein und verstopft den Wasserauslass. Passen Sie den Mahlgrad mit dem Drehknopf im Bohnenbehälter während des Betriebs an. Die Kontrollleuchte „Bohnenbehälter leer“ blinkt, obwohl sich noch ausreichend Bohnen im Behälter befinden. Der interne Auslass für gemahlenen Kaffee ist verstopft. Verwenden Sie die Reinigungsbürste, um Kaffeereste um den internen Auslass für gemahlenen Kaffee herum zu entfernen. Die Kontrollleuchte „Entkalken“ blinkt. Der Entkalkungsvorgang ist noch im Gange. Führen Sie die Schritte für den Entkalkungsvorgang aus. Erst wenn der gesamte Vorgang abgeschlossen ist, kehrt das Gerät in den Stand-by-Modus zurück. ENTSORGEN Dieses Symbol auf dem Produkt oder seiner Verpackung weist darauf hin, dass dieses Produkt nicht als normaler Haushaltsabfall zu behandeln ist, sondern an einem Sammelpunkt für das Recyling von elektrischen und elektronischen Geräten abgegeben werden muss. Durch Ihren Beitrag zum korrekten Entsorgen dieses Produkts schützen Sie die Umwelt und die Gesundheit Ihrer Mitmenschen. Umwelt und Gesundheit werden durch falsches Entsorgen gefährdet. Weitere Informationen über das Recycling dieses Produkts erhalten Sie von Ihren Rathaus, Ihrer Müllabfuhr oder dem Geschäft, in dem Sie das Produkt gekauft haben. Das Verpackungsmaterial ist wiederverwertbar. Entsorgen Sie die Verpackung umweltgerecht und führen Sie sie der Wertstoffsammlung zu. 38 DO718K WARRANTY Dear client , All of our products are always submitted to a strict quality control before they are sold to you. Should you nevertheless experience problems with your device, we sincerely regret this. In that case, we kindly request you to contact our customer service. Our staff will gladly assist you. +32 14 21 71 91 [email protected] This appliance has a two year warranty period. During this period the manufacturer is responsible for any failures that are the direct result of construction failure. When these failures occur the appliance will be repaired or replaced if necessary. The warranty will not be valid when the damage to the appliance is caused by wrong use, not following the instructions or repairs executed by a third party. The guarantee is issued with the original till receipt. All parts, which are subject to wear, are excluded from the warranty. If your device breaks down within the 2-year warranty period, you can return the device together with your receipt to the shop where you purchased it. The guarantee on accessories and components that are liable to wear-and-tear is only 6 months. EN Monday – Thursday: 8.30 – 12.00 and 13.00 – 17.00 Friday: 8.30 – 12.00 and 13.00 – 16.30 The guarantee and responsibility of the supplier and manufacturer lapse automatically in the following cases: · If the instructions in this manual have not been followed. · In case of incorrect connection, e.g., electrical voltage that is too high. · In case of incorrect, rough or abnormal use. · In case of insufficient or incorrect maintenance. · In case of repairs or alterations to the device by the consumer or non-authorised third parties. · If the customer used parts or accessories that are not recommended or provided by the supplier / manufacturer. SAFETY INSTRUCTIONS When using electrical appliances, basic safety precautions should always be taken, including the following: · Read all instructions carefully. Keep this manual for future reference. · Make sure all packaging materials and promotional stickers have been removed before using the appliance for the first time. Make sure children cannot play with the packaging materials. · This appliance is intended to be used in household and similar applications such as: · staff kitchen areas in shops, offices and other working environments; · farm houses; · by clients in hotels, motels and other residential type environments; · bed and breakfast type environments. · Children should be supervised to ensure that they do not play with the appliance. · This appliance can be used by children aged from 16 years and above and persons with reduced physical, sensory or mental capabilities or lack of experience and knowledge if they have been given www.domo-elektro.be DO718K 39 · · · · · · · · EN · · · · · · · · · · · · · · · · · · 40 supervision or instruction concerning use of the appliance in a safe way and understand the hazards involved. Children shall not play with the appliance. Cleaning and user maintenance shall not be made by children unless they are older than 16 and supervised. Keep the appliance and its cord out of reach of children younger than 16 years. The appliance must be disconnected from its power source when not in use, during service and when replacing parts. Allow to cool before putting on or taking off parts, and before cleaning the appliance. CAUTION: In order to avoid a hazard this appliance must not be supplied through an external switching device, such as a timer, or connected to a circuit that is regularly switched on and off by the utility. The surfaces of the appliance are likely to get hot during use. It is advised not to touch the surfaces of the appliance other than the handles to avoid burns. Never leave the appliance unattended while it is functioning. Do not use or store this appliance outdoors. Do not use this appliance for other than intended use. Check carefully that the voltage and frequency of the power net match the indications on the rating label of the appliance. The plug must be plugged into an appropriate outlet that is installed and grounded in accordance with all local standards and requirements. Do not operate this appliance with a damaged cord or plug or in the event the appliance malfunctions or has been damaged in any manner. Return the appliance to the DOMO Service Department or its service agent for examination, repair, or electrical or mechanical adjustment. Do not try to repair the appliance yourself. To protect against electrical shock or burns, do not immerse unit, cord, or plug in water or other liquid. Do not operate the appliance with wet hands. A short power supply cord is provided to reduce the risk of becoming entangled in or tripping over a longer cord. DO NOT USE WITH AN EXTENSION CORD. Unwrap the cord completely to prevent overheating of the cord. Do not let the power supply cord hang over the edge of a counter, or touch hot surfaces. Do not allow the power cord supply to run underneath or around the unit. Do not place on or near a hot gas or electric burner or sink, or in a heated oven. Do not place near flammable materials, gases or explosives. Make sure the appliance is correctly assembled, then plug the cord in the wall outlet. To disconnect, turn controls to “OFF” or “0” position, then remove the plug from the wall. Never pull the cord or appliance to remove the plug from the socket. Failure to maintain this appliance in a clean condition could adversely affect the life of the appliance and possibly result in a hazardous situation. During boiling, hot steam may come through the filter or any other opening. Keep hands and face at a safe distance during operation. Any injury or damage caused by failure to comply with these rules are at your own risk. Neither the manufacturer, importer, or the supplier may be held liable. Do not overfill the kettle. Never add water above the maximum level marked on the appliance. Do not spill any liquid on the connector. Only use the utensils delivered with the appliance. Do not move the appliance while in use or when still hot. Allow to cool before moving the appliance. DO718K PARTS Drip tray Drip tray grid Drip pan Coffee grounds reservoir Coffee spout On/off button Control panel Bean reservoir Bean reservoir lid Water reservoir Cord Brewing unit Maintenance door Cleaning brush 10 9 8 11 7 6 5 4 12 13 14 3 2 EN 1. 2. 3. 4. 5. 6. 7. 8. 9. 10. 11. 12. 13. 14. 1 CONTROL PANEL Icon Description Keys Espresso (small, strong coffee) Lungo (normal, mild coffee) Americano (coffee diluted with water) Favourite setting Hot water Indicator lights Indicator light on: preparation ready Indicator light flashing: preparation in progress Water tank empty or not installed Bean reservoir empty www.domo-elektro.be DO718K 41 Indicator light on: coffee grounds reservoir full Indicator light flashing: drip pan not installed Indicator light on: brewing unit not inserted (correctly) Indicator light flashing: maintenance door is not installed (correctly) Indicator light on: descale the appliance Indicator light flashing: descaling process in progress The process for emptying the appliance is in progress. See “cleaning and maintenance/emptying the appliance” section INSTALLATION Remove all packaging materials and any promotional stickers before using the appliance for the first time. EN 1. Place the appliance on a flat, stable surface. Provide adequate space around the appliance for ventilation. Put the drip tray in place. Make sure this is correctly installed. Fill the water reservoir. See “use/fill water tank” section. Fill the bean reservoir. See “use/fill bean reservoir” section. Plug the electrical cable into the cable connector on the appliance. Plug the plug into an electrical socket. 2. 3. 4. 5. Before the first use, it is recommended that a cup of hot water is made first in order to rinse out the pipes. See “use” section. 1 150mm 2 3 4 5 m 150m 150m m 150m m 150 mm USE 1. 2. 3. 42 Turn the appliance on. Press the on/off button. The appliance will rinse automatically. A cup of hot water will come out of the spout. The appliance then goes into standby mode. In standby mode, all indicator lights are on and the appliance is ready for use. Note: automatic rinsing will only occur if the appliance has been turned off for an extended period of time. Place a cup under the coffee spout. You can adjust the height of the spout to the height of your cup by lifting it up or down. For a small cup, use the drip tray. If you use a larger cup, you can remove the drip tray. Choose your desired coffee and press the key for an espresso, lungo, americano, hot water or your favourite setting. Note: you can set the amount of coffee yourself using the keys. See “adjust volume” and “favourite setting” sections. DO718K 4. 5. The indicator light for the selected key lights up, the in preparation indicator light appears on the display, and the cup illumination lights up. If you want to finish the preparation process before the coffee is ready, press the selected key again. When the coffee is ready, the appliance returns to standby mode. The appliance has an automatic switch-off. Depending on the mode selected, the appliance will turn off after 10, 20 or 30 minutes. 1 2 3 4 If the water tank indicator light flashes empty, you must fill the water tank. 1. Remove the water tank from the appliance. You can use the lid of the tank as a handle to do this. 2. Rinse the tank out and fill it with clean, cold water up to the maximum mark. 3. Put the tank back in the appliance. ! Attention: always take the water tank out of the appliance when you fill it with water to prevent overflow and damage. ! Never use warm, hot or sparkling water, or any other liquid in the water tank. 1 3 2 ! EN FILLING THE WATER TANK FILL THE BEAN RESERVOIR You can choose to place the lid directly on the reservoir, or use the accessory for the bean reservoir. If the bean reservoir empty indicator light flashes, you must fill the bean reservoir. 1. Remove the reservoir lid. If desired, put the accessory in place to raise the bean reservoir. 2. Add the beans by slowly pouring them into the reservoir. 3. Place the lid back. ! Only use coffee beans in the bean reservoir. Never fill the reservoir with ground coffee, instant coffee, or other ingredients or objects. 2 3 1 www.domo-elektro.be DO718K 43 EMPTYING THE COFFEE GROUNDS RESERVOIR If the coffee grounds reservoir indicator light is on, you must empty the coffee grounds reservoir. Remove the drip tray. Remove the drip pan from the appliance. Empty the coffee grounds reservoir. Rinse and dry both the drip pan and the coffee grounds reservoir. 4. Return everything to its original position. 1 2 4 3 1. 2. 3. EN FAVOURITE SETTING You can programme the favourite setting key to your own preference. 1. Press and hold the favourite setting key for 2 seconds. The espresso, lungo and americano key indicators will flash. 2. Press the key for the type of coffee you want to programme as your favourite setting. 3. The preparation will start. Press the key for the type of coffee you are now programming again. Keep the key pressed for as long as you want the coffee to continue to flow. When you release the key, the preparation will stop. The appliance remembers the volume from the time you release your key. 4. The favourite setting key is now programmed. 3 1 2 ADJUST VOLUME You can adjust the amount of the espresso, lungo, americano and hot water keys from between 25 ml and 250 ml. 1. Press the key that you want to adjust the volume for. 2. The preparation starts. Press the key for the type of coffee you are now programming again. Keep the key pressed for as long as you want the coffee to continue to flow. 3. When the preparation has reached the desired amount, release the key. You will hear a double beep this means the amount has been set as the new volume of that key. 2 1 44 DO718K GRINDING SETTING There is a rotary button in the bean reservoir to adjust the coarseness of the grind. During operation, turn the button to achieve a coarser or finer grind of the beans. ! Caution: Do not turn this button when the appliance is not in operation, this may damage the grinder if there are beans in the mechanism. There are dots on the rotary button to indicate the coarseness. The smaller the dot, the finer the grind setting. MODE SELECTION Eco mode Fast mode Standard mode Cup lighting No Yes Yes Front brewing* Yes No Yes Automatic switch-off 10 min 30 min 20 min Volume memory Yes Yes Yes * For pre-brewing, the ground beans are moistened in the brewing unit with a small amount of water before brewing. This ensures the ground coffee expands, which increases the pressure to optimise the full aroma and extraction of oil. 1. 2. EN The espresso machine has 3 settings: standard, eco and fast. In eco mode, you save energy; in fast mode, you make your coffee even faster. If the appliance is in standby mode, press the on/off button for 5 seconds. You will hear a double beep. The keys for the different types of coffee now each represent a different setting. The lit key indicates the current setting. The other keys will flash. Hot water Eco mode Espresso Lungo X Fast mode X Standard mode X 3. You can now also change the setting by pressing one of the flashing keys. Choose the hot water key for eco mode, the espresso key for fast mode and the lungo key for standard mode. You will hear a double beep if the setting is adjusted. 4. If you want to keep the current setting, press the on/off button again and wait 5 seconds. The appliance returns to standby mode. CLEANING AND MAINTENANCE CLEANING It is recommended that steps 1-4 are carried out daily. Once the appliance has been used for an extended period of time, coffee residue may build up in the appliance; in this case, clean the appliance according to step 5. Turn the appliance off and remove the plug from the socket. 1. Remove the drip tray. Empty the tray. Clean both the grid and the tray with clean water. Dry both thoroughly. They can also be cleaned in the dishwasher. www.domo-elektro.be DO718K 45 2. 3. 4. 5. 6. Remove the drip pan from the appliance. Empty the coffee grounds reservoir. Clean both the drip pan and the coffee grounds reservoir with clean water. Dry both thoroughly. They can also be cleaned in the dishwasher. Open the maintenance door. Remove the brewing unit by pressing both buttons on the side of the brewing unit and pulling it towards you. Clean and dry the brewing unit with clean water. ! Attention: never clean the brewing unit in the dishwasher. Clean the housing with a clean, damp cloth. Use the supplied cleaning cloth to wipe the touch panel. Use the cleaning brush to clean the coffee residue from around the internal outlet of the coffee mill. Return everything to its original position. If a part is not (properly) installed, the appliance will indicate this on the display. See “parts” section for an explanation of the indicator lights. ! Never immerse the appliance, power cord or plug in water or any other liquid. This is to prevent electric shock or fire. ! Never use an aggressive or abrasive cleaning agent. 2 3 EN 1 4 6 DESCALING If the descale the appliance indicator light is on, you must descale the appliance. 1. 2. 3. 4. 5. 6. 7. 46 Fill the water tank up to the maximum indication. Add 1 sachet of descaling solution to the water tank. 3 bags are supplied with the appliance. Additional descaling product can be obtained from the website: www.webshop.domo-elektro.be Plug the power cord into a socket. Place a collection reservoir under the coffee spout. Make sure the reservoir has the same capacity as the water tank. In standby mode, press and hold the on/off button and espresso key simultaneously for 5 seconds. You will hear a beep and the descale the appliance and espresso lights will flash. Press the espresso key to confirm the descaling process. If you do not want to carry out the descaling operation, press the on/off button to return to hibernation mode. The descaling process indicator light flashes and the appliance will start descaling. The water with descaling product comes out of the spout in phases. The whole process takes a few minutes.(± 20 min.) DO718K 8. 9. 10. 11. When all the water in the water tank has run through the appliance, the water tank and espresso indicator lights will go on. Empty the collection reservoir and put it back in place. If there are any residues in the water tank, first empty the tank and rinse. Fill the tank with clean water up to the maximum indication and place it back in the appliance. The descaling process resumes. The appliance will run half of the water in the tank, pause for 1 minute and then run the other half of the water through. The descaling process has now ended and the appliance will turn off. 1 3 2 4 5 + 7 8 9 10 EN 6 ! Attention: the water that comes out of the coffee spout is extremely hot, so keep your hands away from the appliance when it is in operation. ! Only use the descaling products supplied with the appliance. Other descaling products, aggressive cleaning agents or vinegar can damage the appliance. ! If the appliance is not properly maintained, this can drastically reduce the service life of the appliance. MANUAL RINSE You can manually rinse the appliance to clean the coffee spout. It is recommended that this be done regularly if the appliance is used frequently or if the appliance has been idle for a long time. 1. It is recommended to place an empty cup or collection reservoir under the coffee spout. 2. In standby mode, press and hold the on/off button and hot water key simultaneously for 5 seconds. 3. The hot water indicator light flashes. Hot water comes out of the coffee outlet. 4. When the spout has been rinsed, the appliance returns to standby mode. + EMPTYING THE APPLIANCE If you want to store or transport the appliance, it is best to empty it completely to ensure there is no water in the pipes. 1. In standby mode, press and hold the on/off button and lungo key simultaneously for 5 seconds. 2. The empty appliance indicator light flashes on the display. If you do not want to continue with the appliance emptying function, press the on/off button again to return to standby mode. www.domo-elektro.be DO718K 47 3. 4. Remove the water tank. The appliance empty indicator light will go on. Empty the water tank and the drip tray. When the programme is finished, the appliance will automatically turn off. ! If you want to use the appliance again afterwards, first make a cup of hot water. 1 3 2 + POSSIBLE PROBLEMS Cause Solution The appliance is not connected to the electricity. Make sure the electrical cable is properly connected and that the plug is plugged in. No or late response when pressing the keys on the control panel. · · EN Problem The appliance is not working. · The appliance is electromagnetically restricted. The control panel is dirty. · The coffee is not warm enough. · Coffee does not come out of the spout. It may be that the appliance emptying function was the last used setting. Press the hot water key so hot water comes out of the spout. The first cup of coffee is of poor quality. The first grinding session does not provide enough ground coffee. Drain the coffee. The following coffees are good quality. The coffee has does not have a creamy layer. The coffee beans are not fresh. Replace the coffee beans. The control panel keys are not sensitive. The touch keys must be operated from the front. Touch the keys from the front on the lower part of the icons of the keys. It takes a long time for the appliance to heat up. Lime has accumulated in the appliance. Descale the appliance. Despite the water tank being empty/not installed, the indicator light does not come on. The sensor, near the water tank connector, is wet. Wipe off the water around the water tank connection. · 48 DO718K The cups have not been preheated. The brewing unit is still cold. · · Remove the plug from the socket and try again a few minutes later. Clean the control panel with the supplied cleaning cloth. Heat the cups. Rinse the appliance 3 times to heat the brewing unit. The ground coffee is too fine and Adjust the coarseness with is blocking the water outlet. the rotary button in the bean reservoir during operation. The coffee flows very slowly/ drips from the coffee spout. The ground coffee is too fine and Adjust the coarseness with is blocking the water outlet. the rotary button in the bean reservoir during operation. The bean reservoir indicator light flashes empty while there are still enough beans in the reservoir. The internal outlet of ground coffee is blocked. Use the cleaning brush to clean the coffee residue from around the internal outlet of the coffee mill. The descaling indicator light flashes. The descaling process is still in progress. Follow the descaling process steps, the complete process is only complete when the appliance returns to standby mode. ENVIRONMENTAL GUIDELINES This symbol on the product or on its packaging indicates that this product may not be treated as household waste. Instead it must be brought to the applicable collection point for recycling of electrical and electronic equipment. By ensuring this product is disposed of correctly, you will help prevent potential negative consequences for the environment and human health, which could otherwise be caused by inappropriate waste handling of this product. For more detailed information about recycling of this product, please contact your local city office, your household waste disposal service or the shop where you purchased the product. EN There is a lot of water in the coffee grounds reservoir. The packaging is recyclable. Please treat the packaging ecologically. www.domo-elektro.be DO718K 49 GARANTIA Este aparato tiene un periodo de garantía de 2 años a partir de la fecha de compra. Durante el periodo de garantía, el distribuidor será completamente responsable de los defectos directamente asignables a errores del material y fabricación. Cuando se detecten este tipo de errores, y siempre que se estime necesario, el aparato se sustituirá o reparará. A partir de ese momento, el periodo de garantía de 2 años no volverá a iniciarse, sino que seguirá siendo de 2 años a partir del momento de compra. La garantía se concede sobre la base del recibo de caja. La garantía de los accesorios y componentes sujetos a desgaste es de 6 meses. La garantía y la responsabilidad/imputabilidad del proveedor y el fabricante expiran automáticamente en los siguientes casos: · Cuando no se cumplan las instrucciones que aparecen en este manual. · En el caso de una conexión inadecuada, por ejemplo, a una tensión eléctrica demasiado alta. · En caso de uso incorrecto, brusco o anormal. · En caso de insuficiente o incorrecto mantenimiento. · Si el consumidor o un tercero no autorizado realizan reparaciones o modificaciones en el aparato. · Si se usan componentes o accesorios que no están recomendados o que no son suministrados por el proveedor/fabricante. ES INSTRUCCIONES DE SEGURIDAD 50 Cuando utilice aparatos eléctricos, se deben seguir las instrucciones de seguridad mencionadas a continuación: · Lea detenidamente estas instrucciones. Conserve este manual para consultarlo posteriormente. · Antes del primer uso retire todos los materiales de embalaje y etiquetas promocionales. Asegúrese de que los niños no puedan jugar con el material de embalaje. · Este aparato es adecuado para su uso en el ámbito doméstico y entornos similares como: · Zona de cocina para el personal de tiendas, oficinas y otros entornos profesionales similares. · Granjas. · Habitaciones de hoteles y moteles, y otros entornos de carácter residencial. · Habitaciones de invitados o similares. · Supervise en todo momento a los niños para que no jueguen con el aparato. · Este aparato puede ser utilizado por niños de 16 años o más, personas con discapacidad física o sensorial, o personas con capacidad mental limitada o falta de experiencia o conocimiento, siempre, y en tanto en cuanto, dichas personas estén vigiladas o hayan recibido instrucciones sobre el uso del aparato de manera segura y conozcan los peligros del uso del mismo. Los niños no deben jugar con el ventilador. El mantenimiento y la limpieza del dispositivo no deben ser realizados por niños, a menos que tengan 16 años o más y estén supervisados por un adulto. · Mantenga el aparato fuera del alcance de los niños. · Saque el enchufe de la toma de corriente cuando no use el aparato, antes de montar o desmontar piezas y antes de limpiarlo. Ponga primero todos los botones en posición de apagado y desconecte el cable de alimentación de la toma de corriente. No tire nunca del cable de alimentación para sacar el enchufe de la toma de corriente. · ATENCIÓN: para evitar peligros, el aparato no debe ser controlado con un dispositivo externo, como un temporizador externo, ni debe conectarse a una red que se encienda y se apague con frecuencia. · Las superficies de este aparato se calientan durante el uso. Recomendamos no tocar la superficie de este aparato, exceptuando las asas, para evitar quemaduras. · No deje nunca sin vigilancia un aparato en marcha. DO718K · · · · · · · · · · · · · · · · · · No utilice el aparato al aire libre. Utilice el aparato únicamente para el fin para el que está destinado. Antes de utilizarlo, compruebe si el voltaje indicado en el aparato coincide con el voltaje de la red eléctrica de su vivienda. El cable de alimentación debe estar conectado a una toma de corriente que debe haber sido instalada y conectada a tierra de acuerdo con las normas y reglamentos locales. No utilice nunca el aparato si el cable de alimentación o el enchufe están dañados, después de un mal funcionamiento del aparato o cuando el aparato está dañado. En el caso de que el aparato esté dañado, llévelo al servicio de postventa de DOMO o al centro de servicio cualificado más cercano para su inspección, reparación o para realizar ajustes eléctricos/mecánicos. Nunca intente reparar el aparato por su cuenta. Nunca sumerja el aparato, el cable de alimentación o el enchufe en agua o en cualquier otro líquido. Esto evitará choques eléctricos o incendios. No utilice el aparato con las manos mojadas. Este aparato está provisto de un cable de alimentación corto para evitar que personas u objetos se enreden en el mismo o se caigan. NUNCA UTILICE EL APARATO CON UN CABLE ALARGADOR. Desenrolle el cable de alimentación completamente para evitar el sobrecalentamiento del mismo. No deje que el cable de alimentación cuelgue sobre superficies calientes o sobre el borde de una mesa o encimera. No permita que el cable de alimentación cuelgue por debajo o alrededor del aparato. No coloque nunca el aparato encima ni cerca de una placa de cocina eléctrica o de gas, un fregadero o un horno encendido. No coloque nunca el aparato cerca de materiales inflamables, gases o explosivos. Solo debe introducir el cable de alimentación en la toma de corriente después de que el aparato se haya montado correctamente. Antes de retirar el cable del aparato de la toma de corriente, el control se debe poner en la posición «OFF» o «0». A continuación podrá retirar el cable de la toma de corriente. Nunca tire del aparato o del cable de alimentación para retirar el enchufe de la toma de corriente. Si no se realiza un correcto mantenimiento del aparato, la vida útil del aparato se reducirá drásticamente y se podrían producir situaciones peligrosas. Al hervir agua, es posible que salga vapor caliente a través del filtro u otra abertura; por eso es importante mantener las manos alejadas del aparato mientras está en funcionamiento. Los accidentes o los daños ocasionados por el no seguimiento de estas normas son su propia responsabilidad. Ni el fabricante, ni el importador ni el distribuidor pueden ser considerados responsables a este respecto. No supere la indicación MAX al llenar el aparato. Tenga cuidado de no derramar líquido sobre el cable de alimentación. Utilice únicamente los accesorios incluidos con el aparato. No mueva nunca el aparato cuando se encuentre todavía en funcionamiento ni mientras siga estando caliente. Espere siempre a que el aparato se enfríe antes de cambiarlo de lugar. www.domo-elektro.be DO718K ES · · · 51 PIEZAS 1. 2. 3. 4. 5. 6. 7. 8. 9. 10. 11. 12. 13. 14. Recipiente de goteo Rejilla del recipiente de goteo Bandeja de derrames Depósito de posos de café Salida de café Botón de encendido/ apagado Panel de control Depósito de granos Tapa del depósito de granos Depósito de agua Cable Grupo dispensador Puerta de mantenimiento Cepillo de limpieza 10 9 8 11 7 6 5 4 12 13 14 ES PANEL DE CONTROL Icono Descripción Teclas Espresso (café pequeño, fuerte) Lungo (café normal, suave) Americano (café con agua) Ajuste favorito Agua caliente Lámparas indicadoras Lámpara indicadora encendida: preparación lista Todas las lámparas indicadoras parpadean al mismo tiempo El depósito de agua está vacío o no está colocado Depósito de granos vacío 52 DO718K 3 2 1 La lámpara indicadora está encendida: depósito de posos de café lleno La lámpara indicadora parpadea: la bandeja de derrames no está colocada La lámpara indicadora está encendida: el grupo dispensador no está (bien) colocado La lámpara indicadora parpadea: la puerta de mantenimiento no está (bien) colocada La lámpara indicadora está encendida: descalcificar el aparato La lámpara indicadora parpadea: el proceso de descalcificación está en curso El proceso de vaciado del aparato está en curso. Consulte el apartado «Limpieza y mantenimiento/vaciar el aparato». INSTALACIÓN Antes de usar el aparato por primera vez, retire todos los materiales de embalaje y, en su caso, las etiquetas adhesivas promocionales. Coloque el aparato sobre una superficie plana y estable. Deje suficiente espacio alrededor del aparato para garantizar una buena ventilación. Coloque el recipiente de goteo. Asegúrese de que este recipiente esté correctamente instalado. Llene el depósito de agua. Consulte el aparatado «uso/llenar el depósito de agua». Llene el depósito de granos. Consulte el apartado «uso/llenar el depósito de granos». Introduzca el cable en la toma de cable del aparato. A continuación, introduzca el enchufe en la toma de corriente. 2. 3. 4. 5. ES 1. Antes del primer uso se recomienda preparar una taza de agua caliente para enjuagar los conductos. Consulte el apartado «uso». 1 150mm 2 3 4 5 m 150m 150m m 150m m 150 mm USO 1. 2. Encienda el aparato. Pulse el botón de encendido/apagado. El aparato se enjuagará automáticamente. De la salida saldrá una taza de agua caliente. Después, el aparato pasará al modo de reposo. En el modo de reposo, todas las lámparas indicadoras están encendidas y el aparato está preparado para su uso. Nota: el enjuague automático solo se produce si el aparato se ha apagado durante un período de tiempo más largo. Coloque una taza debajo de la salida de café. Puede ajustar la altura de la salida a la altura de su taza deslizando la salida hacia arriba o hacia abajo. Para una taza pequeña utilice el recipiente de goteo. Si utiliza una taza más grande, puede dejar fuera el recipiente de goteo. www.domo-elektro.be DO718K 53 3. 4. 5. Seleccione el café deseado y pulse la tecla para preparar un espresso, lungo, americano, agua caliente o su ajuste favorito. Nota: puede ajustar la cantidad de café de las teclas usted mismo. Consulte los apartados «ajuste del volumen» y «ajuste favorito». Se enciende la lámpara indicadora de la tecla seleccionada, aparece la lámpara indicadora de preparación en curso en la pantalla y se enciende la iluminación de las tazas. Si quiere finalizar el proceso de elaboración antes de que el café esté listo, pulse de nuevo la tecla seleccionada. Cuando el café esté preparado, la máquina volverá a ponerse en el modo de reposo. El aparato tiene un apagado automático. Dependiendo del modo, el aparato se apagará después de 10, 20 o 30 minutos. 1 2 3 4 ES LLENAR EL DEPÓSITO DE AGUA Si la lámpara indicadora del depósito de agua vacío parpadea, esto significa que tiene que llenar el depósito de agua. 1. Retire el depósito de agua del aparato. Para ello, puede usar la tapa del depósito como asa. 2. Enjuague el depósito y llénelo con agua limpia y fría hasta la indicación máxima. 3. Vuelva a colocar el depósito en el aparato. ! Atención: retire el depósito de agua del aparato cada vez que lo llene de agua, para evitar que se desborde y se dañe. ! Nunca use agua caliente, ni agua tibia o con gas, u otro líquido, en el depósito de agua. 1 3 2 ! LLENAR EL DEPÓSITO DE GRANOS Puede elegir entre colocar la tapa directamente en el depósito, o usar el accesorio para levantar el depósito de granos. Si la lámpara indicadora del depósito de granos vacío parpadea, esto significa que tiene que llenar el depósito de granos. 1. Retire la tapa del depósito. Si así lo desea, coloque el accesorio para levantar el depósito de granos. 2. Añada los granos de café vertiéndolos lentamente en el depósito. 3. Vuelva a colocar la tapa. 54 DO718K ! En el depósito de granos solo debe usar granos de café. Nunca llene el depósito con café molido, café soluble o con otros ingredientes u objetos. 2 3 1 VACIAR EL DEPÓSITO DE GRANOS ES Cuando se encienda la lámpara indicadora del depósito posos de café vacío, tiene que vaciar el depósito de posos de café. 1. Retire el recipiente de goteo. 2. Retire la bandeja de derrames del aparato. 3. Vacíe el depósito de posos de café. Enjuague la bandeja de derrames y el depósito de posos de café y séquelos. 4. Vuelva a colocar todo en su posición original. 1 2 4 3 AJUSTE FAVORITO Puede programar la tecla de su ajuste favorito según sus preferencias. 1. Mantenga pulsada la tecla de ajuste favorito durante 2 segundos. Parpadearán las lámparas indicadoras de las teclas de espresso, lungo y americano. 2. Pulse la tecla del tipo de café que quiere programar como su ajuste favorito. 3. Empezará la preparación. Vuelva a pulsar la tecla del tipo de café que quiere programar. Mantenga pulsada la tecla durante el tiempo que desee que siga saliendo café. Si suelta la tecla, la preparación se detendrá. El aparato recuerda el volumen en el momento que suelta la tecla. 4. Ahora, la tecla de ajuste favorito ya está programada. 1 www.domo-elektro.be 2 3 DO718K 55 AJUSTAR EL VOLUMEN Puede ajustar la cantidad de las teclas de espresso, lungo, americano y agua caliente entre 25 ml y 250 ml. 1. Presione la tecla cuyo volumen desea ajustar. 2. Empezará la preparación. Vuelva a pulsar la tecla del tipo de café que quiere programar. Mantenga pulsada la tecla durante el tiempo que desee que siga saliendo café. 3. Cuando la preparación haya alcanzado la cantidad deseada, suelte la tecla. Escuchará una señal dos veces, lo que significa que la cantidad se ha establecido como el nuevo volumen de esa tecla. 2 1 AJUSTE DE MOLIENDA ES En el depósito de granos hay un botón giratorio para ajustar el grosor con el que desea moler el café. Durante el funcionamiento, gire el botón para moler los granos más gruesos o más finos. ! Atención: no gire este botón cuando el aparato no esté en funcionamiento, ya que esto podría dañar la cuchilla de moler si todavía hay granos de café en el mecanismo. En el botón giratorio hay puntos que indican el grosor. Cuanto más pequeño sea el punto, más fino será el ajuste para moler café. DETERMINAR EL MODO La cafetera espresso tiene 3 ajustes: estándar, eco y rápido. En el modo eco se ahorra energía, mientras que en el modo rápido puede preparar su café aún más rápido. Iluminación de tazas Modo eco Modo rápido Modo estándar No Sí Sí Preelaboración* Sí No Sí Apagado automático 10 min 30 min 20 min Memoria de volumen Sí Sí Sí * Antes de la preelaboración del café, humedezca los granos molidos en el grupo dispensador con una pequeña cantidad de agua. Esto asegura que el café molido se expande y que la presión es mayor, asegurando que la extracción de aroma y aceite son óptimos. 1. 2. Cuando el aparato esté en el modo de reposo, pulse el botón de encendido/apagado durante 5 segundos. Escuchará una señal dos veces. Ahora, cada una de las teclas para los tipos de café tienen un ajuste diferente. La tecla que está encendida indica el ajuste actual. Parpadearán las otras teclas. Agua caliente Modo eco Modo rápido 56 Modo estándar DO718K Espresso Lungo X X X 3. 4. Ahora también puede cambiar el ajuste pulsando una de las teclas que parpadean. Seleccione la tecla de agua caliente para el modo eco, la tecla de espresso para el modo rápido y la tecla de lungo para el modo estándar. Cuando se haya establecido el ajuste escuchará una señal dos veces. Si desea mantener el ajuste actual, pulse el botón de encendido/apagado de nuevo y espere 5 segundos. Después, el aparato volverá al modo de reposo. LIMPIEZA Y MANTENIMIENTO Se recomienda realizar diariamente los pasos 1 a 4. Si el aparato se utiliza durante un período de tiempo más largo, pueden quedar residuos de café en la máquina, límpiela según lo indicado en el paso 5. Apague el aparato y retire el enchufe de la toma de corriente. 1. Retire el recipiente de goteo. Vacíe el recipiente. Limpie tanto la rejilla como el recipiente con agua limpia. Seque bien estos componentes. También se pueden lavar en el lavavajillas. 2. Retire la bandeja de derrames del aparato. Vacíe el depósito de posos de café. Limpie tanto la bandeja de derrames como el depósito de posos de café con agua limpia. Seque bien estos componentes. También se pueden lavar en el lavavajillas. 3. Abra la puerta de mantenimiento. Retire el grupo dispensador presionando ambos botones presentes en el lateral del grupo dispensador y tirando de este hacia usted. Limpie el grupo dispensador con agua limpia, y séquelo. ! Atención: ¡nunca lave el grupo dispensador en el lavavajillas! 4. Limpie la carcasa con un paño húmedo. Utilice el paño de limpieza suministrado para limpiar el panel táctil. 5. Utilice el cepillo de limpieza para limpiar los residuos de café alrededor de la salida interna de café molido. 6. Vuelva a colocar todo en su posición original. Si un componente no está (correctamente) instalado, el aparato lo indicará en la pantalla. Consulte el apartado «componentes» para consultar la explicación de las lámparas indicadoras. ES LIMPIEZA ! Nunca sumerja el aparato, el cable de alimentación o el enchufe en agua o en otro líquido. Esto es para prevenir descargas eléctricas o un incendio. ! Nunca utilice productos de limpieza agresivos o abrasivos. 1 2 3 4 www.domo-elektro.be 6 DO718K 57 DESCALCIFICAR Cuando se encienda la lámpara indicadora para descalcificar, esto significa que el aparato se debe descalcificar. 1. 2. 3. 4. 5. 6. 7. 8. ES 9. 10. 11. Llene el depósito de agua hasta la indicación máxima. Añada 1 saquito de producto descalcificador al depósito de agua. Con el aparato se han suministrado 3 saquitos. Puede obtener un producto descalcificador adicional a través del sitio web: webshop. domo-elektro.be Introduzca el enchufe en la toma de corriente. Coloque el contenedor de goteo debajo de la salida de café. Asegúrese de que el contenedor tenga la misma capacidad que el propio depósito de agua. En el modo de reposo, mantenga pulsados el botón de encendido/apagado y la tecla de espresso simultáneamente durante 5 segundos. Escuchará una señal y las lámparas indicadoras para descalcificar y espresso parpadearán. Pulse la tecla espresso para confirmar el proceso de descalcificación. Si no quiere descalcificar, presione el botón de encendido/apagado para volver al modo de reposo. Parpadeará la lámpara indicadora para descalcificar y el aparato empezará a descalcificar. El agua con producto sale de la salida por fases. El proceso dura varios minutos. (± 20 min.) Cuando toda el agua del depósito de agua haya pasado, las lámparas indicadoras del depósito de agua vacío y espresso se encenderán. Vacíe el contenedor de goteo y vuelva a colocarlo. Si queda algún residuo en el depósito de agua, vacíelo y enjuáguelo. Llene el depósito con agua limpia hasta la indicación máxima y vuelva a colocarlo en el aparato. El proceso de descalcificación se reanuda. El aparato dejará pasar la mitad del agua del depósito, hará una pausa de 1 minuto y, a continuación, dejará pasar la otra mitad del agua. El proceso de descalcificación ya estará completo y el aparato se apaga. 1 3 2 4 5 + 6 7 8 9 10 ! Atención: el agua que sale de la salida de café está caliente. Por lo tanto, mantenga las manos alejadas del aparato cuando esté en funcionamiento. ! Solo debe utilizar los productos de descalcificación suministrados con el aparato. El uso de otros productos descalcificantes, así como de productos de limpieza agresivos o vinagre, podría dañar el aparato. ! Si el aparato no se mantiene adecuadamente se podría reducir drásticamente su vida útil. 58 DO718K ENJUAGUE MANUAL + Para limpiar la salida de café, el aparato se puede enjuagar manualmente. Se recomienda hacer esto regularmente si el aparato se utiliza con frecuencia o si ha estado sin funcionar durante un largo período de tiempo. 1. Se recomienda colocar una taza vacía o un recipiente vacío debajo de la salida de café. 2. En el modo de reposo, mantenga pulsados el botón de encendido/ apagado y la tecla de agua caliente simultáneamente durante 5 segundos. 3. Parpadeará la lámpara indicadora de agua caliente. Sale agua caliente de la salida de café. 4. Cuando la salida se haya enjuagado, el aparato volverá al modo de reposo. VACIAR EL APARATO Si quiere almacenar o transportar el aparato, le recomendamos que lo vacíe completamente para que no quede agua en las tuberías. 1. En el modo de reposo, mantenga pulsados el botón de encendido/apagado y la tecla lungo simultáneamente durante 5 segundos. 2. La lámpara indicadora para vaciar el aparato parpadeará en la pantalla. Si no quiere continuar con la función para vaciar el aparato, vuelva a presionar el botón de encendido/apagado para volver al modo de reposo. 3. Retire el depósito de agua. Se encenderá la lámpara indicadora para vaciar el aparato. Vacía el depósito de agua y el recipiente de goteo. 4. Una vez finalizado el proceso, el aparato se apagará automáticamente. 1 ES ! Cuando quiera volver a utilizarlo, haga primero una taza de agua caliente. 3 2 + POSIBLES PROBLEMAS Problema Causa Solución El aparato no funciona. El aparato no está conectado a la red eléctrica. Asegúrese de que el cable está correctamente conectado y de que el enchufe se ha introducido en la toma de corriente. Al pulsar las teclas del panel de control no se produce ninguna reacción o se produce tarde. · · www.domo-elektro.be · El aparato está limitado electromagnéticamente. El panel de control está sucio. · Retire el enchufe de la toma de corriente y vuelva a intentarlo en unos minutos. Limpie el panel de control con el paño de limpieza suministrado. DO718K 59 ES 60 El café no está lo suficientemente caliente. · · No sale café de la salida. Es posible que la función para vaciar el aparato se haya utilizado la última vez. Pulse la tecla de agua caliente para que salga agua caliente por la salida. La primera taza de café es de mala calidad. La primera sesión de molienda no proporciona suficiente café molido. Tire el café. Los siguientes cafés sí serán de buena calidad. El café no tiene una capa de crema. Los granos de café no son frescos. Cambie los granos de café. Las teclas del panel de control no son sensibles. Las teclas táctiles se deben tocar frontalmente. Toque las teclas frontalmente en la parte inferior de los iconos de las mismas. El aparato tarda mucho en calentarse. Se ha acumulado cal en el aparato. Descalcifique el aparato. A pesar de que el depósito de agua está vacío/no se ha colocado, la lámpara indicadora no está encendida. El sensor, que se encuentra cerca de la conexión del depósito de agua, está mojado. Limpie el agua alrededor de la conexión del depósito de agua. Hay demasiada agua en el depósito de posos de café. El café molido es demasiado fino y bloquea la salida de agua. Ajuste el grosor con el mando giratorio en el depósito de granos durante el funcionamiento. El café sale muy lentamente, salen gotas por la salida de café. El café molido es demasiado fino y bloquea la salida de agua. Ajuste el grosor con el mando giratorio en el depósito de granos durante el funcionamiento. La lámpara indicadora del depósito de granos vacío parpadea, pero hay suficientes granos de café en el depósito. La salida interna de café molido está bloqueada. Utilice el cepillo de limpieza para limpiar los residuos de café alrededor de la salida interna de café molido. La lámpara indicadora para descalcificar está parpadeando. El proceso de descalcificación todavía está en curso. Siga los pasos del proceso de descalcificación. Solo cuando se haya completado el proceso, el aparato volverá al modo de reposo. DO718K Las tazas no se precalientan. El grupo dispensador todavía está frío. · · Caliente las tazas. Enjuague el aparato 3 veces para calentar el grupo dispensador. DIRECTRICES MEDIOAMBIENTALES El símbolo en el producto o en el embalaje indica que este producto no puede ser tratado como residuo doméstico. Se debe llevar a un lugar en el que se reciclan equipos eléctricos y electrónicos. Si se asegura de que este producto se desecha correctamente, usted ayudará a evitar posibles consecuencias negativas para las personas y el medio ambiente que serían causadospor un tratamiento de residuos inadecuado. Para obtener información más detallada sobre el reciclaje de este producto, póngase en contacto con su ayuntamiento, o con la empresa o departamento responsable del servicio de recogida de basura doméstica, o con la tienda donde adquirió el producto. ES El material de embalaje es reciclable. Trate el embalaje de una manera medioambientalmente responsable. www.domo-elektro.be DO718K 61 GARANZIA La garanzia dell’apparecchio è valida per 2 anni a partire dalla data di acquisto. Durante il periodo di validità della garanzia, il distributore si assume la piena responsabilità dei difetti dei materiali o di quelli di fabbricazione. In caso di presenza di tali difetti, se necessario, si procederà alla sostituzione o alla riparazione dell’apparecchio. Il periodo di garanzia di 2 anni non ricomincia in quel momento, ma continua per 2 anni dalla data di acquisto dell’apparecchio. Per la garanzia fa fede la data riportata sullo scontrino. Se l’apparecchio si rivela difettoso nel periodo di validità della garanzia, cioè 2 anni, potete portarlo, insieme allo scontrino, nel negozio dove l’avete acquistato. La garanzia sugli accessori e sui componenti soggetti a usura è di 6 mesi. La garanzia e la responsabilità del negoziante e del produttore decadono automaticamente nei seguenti casi: · mancata osservanza delle istruzioni contenute nel presente manuale; · errato collegamento, per esempio con tensione elettrica troppo alta; · uso errato, anormale e manesco; · manutenzione insufficiente o errata; · riparazione o modifiche all’apparecchio eseguite dal cliente o da terzi non autorizzati; · uso di accessori o componenti non raccomandati o forniti dal negoziante o dal produttore. INDICAZIONI DI SICUREZZA · · · · IT · · · · · · · · 62 Quando si utilizzano dispositivi elettrici, è necessario tenere presenti le seguenti istruzioni di sicurezza: Leggere con attenzione le presenti istruzioni. Conservare le istruzioni per possibili future consultazioni. Prima di utilizzare il prodotto, togliere tutti gli imballi e gli eventuali adesivi promozionali. Assicurarsi che i bambini non giochino con gli imballaggi. Questo apparecchio è destinato unicamente all’uso domestico e in ambienti analoghi, quali: · angoli cottura riservati al personale nei negozi, negli uffici e in altri ambienti professionali · Fattorie · Camere di alberghi, motel e altre strutture ricettive residenziali · Camere per vacanze o ambienti analoghi L’apparecchio può essere utilizzato da bambini di età superiore a 16 anni e da persone con ridotte capacità fisiche, sensoriali o mentali, o con mancanza di esperienza o conoscenza, solo se sorvegliati o se hanno ricevuto istruzioni sull’uso sicuro dell’apparecchio e ne comprendono i rischi. I bambini non possono giocare con l’apparecchio. Le operazioni di pulizia e di manutenzione non devono essere effettuate dai bambini di età inferiore a 16 anni e senza sorveglianza. Tenere l’apparecchio fuori dalla portata dei bambini di età inferiore a 16 anni. Togliere la spina dalla presa quando l’apparecchio non è in funzione, prima di montarne o smontarne i componenti e prima di pulirlo. Lasciare raffreddare l’apparecchio prima di montare o smontare i componenti e prima di pulirlo. ATTENZIONE: per evitare il rischio di incidenti, l’apparecchio non deve essere utilizzato con strumenti esterni, come ad esempio un timer e non deve essere collegato a una rete che viene accesa e spenta in continuazione. L’apparecchio potrebbe surriscaldarsi durante il normale utilizzo. Consigliamo di afferrare l’apparecchio servendosi dell’impugnatura e di non toccarlo in altri punti per evitare ustioni. Non far funzionare l’apparecchio senza sorveglianza. Non utilizzare o conservare l’apparecchio all’aperto. Utilizzare l’apparecchio solo per lo scopo previsto. DO718K · · · · · · · · · · · · · · · · · · Prima dell’uso, controllare che il voltaggio riportato sull’apparecchio corrisponda a quello della rete elettrica domestica. Il cavo di alimentazione deve essere sempre collegato a una presa installata correttamente e con messa a terra in conformità alla normativa locale vigente. Non utilizzare mai l’apparecchio se il cavo di alimentazione o la spina sono danneggiati, dopo un malfunzionamento o quando è danneggiato. In questi casi, portare l’apparecchio al servizio assistenza post-vendita di DOMO o al centro assistenza autorizzato più vicino per farlo controllare, riparare o per apportare le necessarie modifiche elettriche o tecniche. Non cercare mai di riparare da soli l’apparecchio. Non immergere mai l’apparecchio, il cavo o la spina in acqua o in altri liquidi. Questo per evitare scosse elettriche o incendi. Non utilizzare l’apparecchio con le mani bagnate. L’apparecchio è munito di un cavo di alimentazione corto; se fosse più lungo, ci sarebbe pericolo di inciampare o di rimanere impigliati. NON UTILIZZARE MAI L’APPARECCHIO CON UNA PROLUNGA. Srotolare completamente il cavo di alimentazione per evitare che si surriscaldi. Non lasciare il cavo di alimentazione penzolante sul bordo del tavolo o della cucina ed evitare che venga a contatto con superfici calde. Non lasciare mai il cavo di alimentazione penzolante sotto l’apparecchio. Non posizionare mai l’apparecchio vicino a fornelli elettrici o a gas caldi, al lavandino o a un forno acceso. Non posizionare mai l’apparecchio vicino a materiali infiammabili, gas o esplosivi. Inserire il cavo di alimentazione nella presa solo dopo aver correttamente montato l’apparecchio. Per staccare l’apparecchio dalla presa, assicurarsi che sia su “OFF” o in posizione “0”. Solo dopo sarà possibile staccarlo dalla presa. Non tirare mai il cavo di alimentazione o l’apparecchio per staccare la spina dalla presa di corrente. Se l’apparecchio non viene pulito bene, la sua durata di vita può ridursi in modo drastico e possono verificarsi situazioni pericolose. Quando si riscalda l’acqua, è possibile che esca del vapore dal filtro o da altre aperture. Tenere le mani lontane dall’apparecchio quando è in funzione. Gli incidenti o i danni causati dalla mancata osservanza delle presenti istruzioni sono responsabilità dell’utilizzatore. Non possono essere ritenuti responsabili per tali danni né il produttore, né l’importatore, né il fornitore. Non riempire l’apparecchio oltre il livello massimo indicato. Fare attenzione a non versare nessun liquido sul cavo di alimentazione. Utilizzare solo gli accessori forniti insieme all’apparecchio. Non spostare mai l’apparecchio mentre è in uso o se è ancora caldo. Prima di spostare l’apparecchio, lasciarlo sempre raffreddare. www.domo-elektro.be DO718K IT · 63 COMPONENTI 1. 2. 3. 4. 5. 6. 7. 8. 9. 10. 11. 12. 13. 14. Vaschetta raccogligocce Griglia vaschetta raccogligocce Cassetto scarti Recipiente per fondi di caffè Ugello caffè Pulsante di accensione/ spegnimento Pannello di controllo Recipiente per caffè in grani Coperchio recipiente per caffè in grani Serbatoio dell’acqua Cavo Gruppo erogatore Sportello per manutenzione Spazzolino per pulizia 10 9 8 11 7 6 5 4 12 13 14 PANNELLO DI CONTROLLO Icona Descrizione Pulsanti Caffè espresso (caffè espresso in tazzina) IT Caffè lungo (caffè leggero in tazza più grande) Caffè americano (caffè allungato con acqua) Impostazione preferita Acqua calda Indicatori luminosi Indicatore luminoso acceso: preparazione terminata Indicatore luminoso lampeggiante: preparazione in corso Serbatoio dell’acqua vuoto o non inserito Recipiente per caffè in grani vuoto 64 DO718K 3 2 1 Indicatore luminoso acceso: recipiente per fondi di caffè pieno Indicatore luminoso lampeggiante: cassetto scarti non inserito Indicatore luminoso acceso: gruppo erogatore non (ben) posizionato Indicatore luminoso lampeggiante: sportello per manutenzione non (ben) posizionato Indicatore luminoso acceso: decalcificare l’apparecchio Indicatore luminoso lampeggiante: decalcificazione in corso Processo di svuotamento apparecchio in corso. Vedere la sezione “Pulizia e manutenzione/Svuotamento dell’apparecchio”. INSTALLAZIONE Rimuovere tutti i materiali di imballaggio ed eventuali adesivi promozionali prima del primo utilizzo. 1. Posizionare l’apparecchio su una superficie piana e stabile. Assicurarsi che ci sia abbastanza spazio attorno all’apparecchio per un’adeguata ventilazione. Posizionare la vaschetta raccogligocce. Assicurarsi che sia ben inserita. Riempire il serbatoio dell’acqua. Vedere la sezione “Utilizzo/Riempimento del serbatoio dell’acqua”. Riempire il recipiente per caffè in grani Vedere la sezione “Utilizzo/Riempimento del recipiente per caffè in grani”. Inserire il cavo di alimentazione nell’apposito ingresso dell’apparecchio. Quindi inserire la spina nella presa elettrica. 2. 3. 4. 5. Per il primo utilizzo è consigliato fare una tazza di acqua calda (senza caffè) per eseguire un risciacquo delle condutture. Vedere la sezione “Utilizzo”. 5 4 3 1 2 IT 150mm m 150m 150m m 150m m m 150 m UTILIZZO 1. 2. 3. Accendere l’apparecchio. Premere il pulsante di pulsante di accensione/spegnimento. L’apparecchio eseguirà un risciacquo automatico. Dall’ugello fuoriesce una tazza di acqua calda Dopodiché l’apparecchio passa alla modalità stand-by. Nella modalità stand-by tutti gli indicatori luminosi sono accesi e l’apparecchio è pronto per essere utilizzato. Nota: il risciacquo automatico avviene solo se l’apparecchio è rimasto spento a lungo. Posizionare una tazza sotto l’ugello caffè. È possibile adattare l’altezza dell’ugello all’altezza della tazza facendolo scorrere in su o in giù. Per una tazzina piccola utilizzare la vaschetta raccogligocce. Se si usa una tazza più grande, è possibile rimuovere la vaschetta raccogligocce. Scegliere il caffè desiderato e premere il pulsante per caffè espresso, caffè lungo, caffè americano, acqua calda o la propria impostazione preferita. Nota: è possibile regolare la quantità di caffè erogata dai pulsanti. Vedere le sezioni “Impostazione dei volumi” e “Impostazione preferita”. www.domo-elektro.be DO718K 65 4. 5. L’indicatore luminoso del pulsante selezionato si accende, sul display compare l’indicatore luminoso della preparazione in corso e si accende l’illuminazione tazze. Se si desidera interrompere il processo di preparazione prima che il caffè sia pronto, premere nuovamente il tasto selezionato. Quando il caffè è pronto, l’apparecchio torna alla modalità stand-by. L’apparecchio è dotato di spegnimento automatico: a seconda della modalità, si spegne dopo 10, 20 o 30 minuti. 1 2 3 4 RIEMPIMENTO DEL SERBATOIO DELL’ACQUA IT Se lampeggia l’indicatore luminoso “serbatoio dell’acqua vuoto”, occorre riempire il serbatoio dell’acqua. 1. Rimuovere il serbatoio dell’acqua dall’apparecchio. È possibile usare il coperchio del serbatoio come impugnatura. 2. Sciacquare il serbatoio e riempirlo con acqua fredda pulita fino all’indicazione di livello massimo. 3. Riposizionare il serbatoio nell’apparecchio. ! Attenzione: allo scopo di evitare fuoriuscite e danni, per riempire il serbatoio dell’acqua, rimuoverlo sempre dall’apparecchio. ! Non usare mai acqua calda, bollente o frizzante né altri liquidi nel serbatoio dell’acqua. 1 3 2 ! RIEMPIMENTO DEL RECIPIENTE PER CAFFÈ IN GRANI È possibile scegliere se posizionare il coperchio direttamente sul serbatoio o utilizzare l’accessorio per sollevare il recipiente per caffè in grani. Se lampeggia l’indicatore luminoso “recipiente per caffè in grani vuoto”, occorre riempire il recipiente per caffè in grani. 1. Rimuovere il coperchio del recipiente. Se lo si desidera, posizionare l’accessorio per sollevare il recipiente per caffè in grani. 2. Aggiungere il caffè in grani versandolo lentamente nel recipiente. 3. Riposizionare il coperchio. ! Utilizzare solo chicchi di caffè nel recipiente per caffè in grani. Non inserire mai nel recipiente caffè macinato, caffè solubile o altri ingredienti e oggetti. 66 DO718K 1 2 3 SVUOTAMENTO DEL RECIPIENTE PER FONDI DI CAFFÈ Se lampeggia l’indicatore luminoso “recipiente per fondi di caffè pieno”, occorre svuotare il recipiente per fondi di caffè. 1. Rimuovere la vaschetta raccogligocce. 2. Estrarre il cassetto scarti dall’apparecchio. 3. Svuotare il recipiente per fondi di caffè. Sciacquare il cassetto scarti e il recipiente per fondi di caffè e asciugarli. 4. Rimettere il tutto nella posizione originaria. 1 2 4 3 IT IMPOSTAZIONE PREFERITA È possibile programmare il pulsante per l’impostazione preferita in base alle proprie preferenze. 1. Tenere premuto per 2 secondi il pulsante per l’impostazione preferita. Gli indicatori luminosi dei pulsanti per caffè espresso, caffè lungo e caffè americano lampeggiano. 2. Premere il pulsante del tipo di caffè che si desidera programmare come impostazione preferita. 3. La preparazione ha inizio. Premere nuovamente il pulsante del tipo di caffè che si sta programmando. Tenere premuto il pulsante fintanto che si desidera che fuoriesca il caffè. Se si rilascia il pulsante, la preparazione si interrompe. L’apparecchio memorizza il volume raggiunto nel momento in cui viene rilasciato il pulsante. 4. Il pulsante per l’impostazione preferita è ora programmato. 1 3 2 IMPOSTAZIONE DEI VOLUMI È possibile impostare la quantità erogata premendo i pulsanti caffè espresso, caffè lungo, caffè americano e acqua calda, tra 25 e 250 ml. www.domo-elektro.be DO718K 67 1. 2. 3. Premere il pulsante di cui si desidera impostare il volume. La preparazione ha inizio. Premere nuovamente il pulsante del tipo di caffè che si sta programmando. Tenere premuto il pulsante fintanto che si desidera che fuoriesca il caffè. Una volta raggiunta la quantità desiderata, rilasciare il pulsante. Si udirà 2 volte un segnale acustico. Questo indica che la quantità è impostata come nuovo volume per tale tasto. 2 1 IMPOSTAZIONE DI MACINATURA Nel recipiente per caffè in grani si trova una manopola per regolare il grado di macinatura. Girare la manopola durante il funzionamento per una macinatura dei chicchi più o meno fine. ! Attenzione: non girare questa manopola quando l’apparecchio non è in funzione; ciò può danneggiare la lama se sono presenti ancora dei chicchi nel meccanismo. Il grado di macinatura è indicato da dei puntini sulla manopola. Più piccolo è il puntino, più fine è la macinatura. SCELTA DELLA MODALITÀ La macchina per caffè espresso ha 3 impostazioni: standard, eco e veloce. Con la modalità eco si risparmia energia, con la modalità veloce si prepara il caffè ancora più rapidamente. IT Illuminazione tazze Modalità eco Modalità veloce Modalità standard No Sì Sì Preumidificazione* Sì No Sì Spegnimento automatico 10 min 30 min 20 min Memoria volume Sì Sì Sì * La preumidificazione umidifica il caffè macinato nel gruppo erogatore con una piccola quantità di acqua prima dell’erogazione del caffè. Ciò garantisce una più elevata erogazione di caffè macinato e pressione, per ottimizzare l’aroma pieno e l’estrazione dell’olio. 1. 2. Se l’apparecchio è in modalità stand-by, premere per 5 secondi il pulsante di accensione/ spegnimento. Si udirà 2 volte un segnale acustico. Ogni pulsante per i tipi di caffè indica un’impostazione diversa. Il pulsante illuminato indica l’impostazione corrente. Gli altri pulsanti lampeggiano. Acqua calda Modalità eco Modalità veloce Modalità standard 68 DO718K Caffè espresso Lungo X X X 3. 4. A questo punto è inoltre possibile modificare l’impostazione premendo uno dei pulsanti lampeggianti. Premere il pulsante per acqua calda per selezionare la modalità eco, il pulsante per caffè espresso per selezionare la modalità veloce e il pulsante per caffè lungo per selezionare la modalità standard. Si udirà 2 volte un segnale acustico quando l’impostazione è regolata. Per mantenere l’impostazione attuale, premere nuovamente il pulsante di accensione/spegnimento e attendere 5 secondi. L’apparecchio torna alla modalità stand-by. PULIZIA E MANUTENZIONE PULIZIA ! Non immergere mai l’apparecchio, il cavo di alimentazione o la spina in acqua o altri liquidi. Ciò per evitare elettrocuzioni o incendi. ! Non utilizzare mai detergenti aggressivi o abrasivi. 1 2 3 4 www.domo-elektro.be IT Si consiglia di eseguire quotidianamente i passaggi da 1 a 4. Se l’apparecchio viene utilizzato per un periodo prolungato, possono rimanere residui di caffè nell’apparecchio, quindi pulirlo seguendo il passaggio 5. Spegnere l’apparecchio e scollegare la spina dalla presa di corrente. 1. Rimuovere la vaschetta raccogligocce. Svuotare la vaschetta. Sciacquare la vaschetta e la griglia con dell’acqua pulita e asciugarle. Questi componenti possono anche essere lavati in lavastoviglie. 2. Estrarre il cassetto scarti dall’apparecchio. Svuotare il recipiente per fondi di caffè. Pulire il cassetto scarti e il recipiente per fondi di caffè con dell’acqua pulita e asciugarli. Questi componenti possono anche essere lavati in lavastoviglie. 3. Aprire lo sportello per manutenzione. Rimuovere il gruppo erogatore premendo i pulsanti su entrambi i lati del gruppo e tirandolo verso di sé. Pulire il gruppo erogatore con dell’acqua pulita e asciugarlo. ! Attenzione: non lavare mai in lavastoviglie il gruppo erogatore! 4. Pulire l’alloggiamento con un panno umido. Utilizzare l’apposito panno fornito con il prodotto per pulire il pannello di controllo. 5. Utilizzare l’apposito spazzolino per rimuovere i residui di caffè attorno all’ugello interno del caffè macinato. 6. Rimettere il tutto nella posizione originaria. L’apparecchio indica sul display se un componente non è (ben) installato. Vedere la sezione “Componenti” per l’illustrazione degli indicatori luminosi. 6 DO718K 69 DECALCIFICAZIONE Se lampeggia l’indicatore luminoso “decalcificazione”, occorre decalcificare l’apparecchio. 1. 2. 3. 4. 5. 6. 7. 8. 9. 10. 11. Riempire il serbatoio dell’acqua fino all’indicazione di livello massimo. Versare 1 sacchetto di decalcificante nel serbatoio dell’acqua. Con l’apparecchio vengono forniti 3 sacchetti. Per acquistare ulteriore decalcificante, visitare il sito Web: webshop.domo-elektro.be Inserire la spina nella presa elettrica. Posizionare un recipiente sotto l’ugello caffè. Assicurarsi che il recipiente abbia almeno la stessa capacità del serbatoio dell’acqua. In modalità stand-by, tenere tenuti contemporaneamente il pulsante di accensione/spegnimento e il pulsante per caffè espresso per 5 secondi. Si udirà un segnale acustico e gli indicatori luminosi “decalcificazione” e “caffè espresso” lampeggiano. Premere il pulsante per caffè espresso per confermare il processo di decalcificazione. Se tuttavia non si vuole eseguire la decalcificazione, premere il pulsante di accensione/spegnimento per tornare alla modalità stand-by. L’indicatore luminoso “processo di decalcificazione” lampeggia e l’apparecchio inizia a decalcificare. L’acqua con il decalcificante fuoriesce in fasi dall’ugello. L’intero processo dura alcuni minuti. (± 20 min.) Quando il serbatoio dell’acqua è vuoto, gli indicatori luminosi “serbatoio dell’acqua vuoto” e “caffè espresso” si accenderanno. Svuotare il recipiente e riposizionarlo. Se sono rimasti ancora dei residui nel serbatoio dell’acqua, svuotarlo e sciacquarlo. Riempire il serbatoio di acqua con acqua pulita fino all’indicazione di livello massimo e riposizionarlo nell’apparecchio. Il processo di decalcificazione riparte. L’apparecchio fa fluire la metà dell’acqua contenuta nel serbatoio, esegue una pausa di 1 minuto, poi fa fluire il resto dell’acqua. A questo punto il processo di decalcificazione è terminato e l’apparecchio si spegne. 1 3 2 4 5 IT + 6 7 8 9 10 ! Attenzione: l’acqua che fuoriesce dall’ugello caffè è molto calda, pertanto tenere le mani lontano dall’apparecchio quando è in funzione. ! Utilizzare solo i decalcificanti forniti con l’apparecchio. Altri decalcificanti, detergenti aggressivi o aceto possono danneggiare l’apparecchio. ! Se non si esegue una buona manutenzione dell’apparecchio, la sua durata può ridursi drasticamente. 70 DO718K RISCIACQUO MANUALE + Per pulire l’ugello caffè, è possibile eseguire un risciacquo dell’apparecchio manuale. Si consiglia di farlo con regolarità se l’apparecchio è utilizzato spesso o se è rimasto inutilizzato a lungo. 1. Si consiglia di posizionare una tazza o un recipiente vuoti sotto l’ugello caffè. 2. In modalità stand-by, tenere tenuti contemporaneamente il pulsante di accensione/spegnimento e il pulsante per acqua calda per 5 secondi. 3. L’indicatore luminoso “acqua calda” lampeggia. Dall’ugello caffè fuoriesce acqua calda. 4. Una volta sciacquato l’ugello, l’apparecchio torna alla modalità stand-by. SVUOTAMENTO DELL’APPARECCHIO Se si desidera riporre o trasportare l’apparecchio, è possibile svuotarlo completamente in modo che non rimanga acqua nelle condutture. 1. In modalità stand-by, tenere tenuti contemporaneamente il pulsante di accensione/spegnimento e il pulsante per caffè lungo per 5 secondi. 2. L’indicatore luminoso “svuotamento apparecchio” lampeggia sul display. Se tuttavia non si vuole procedere con la funzionalità di svuotamento dell’apparecchio, premere nuovamente il pulsante di accensione/spegnimento per tornare alla modalità stand-by. 3. Rimuovere il serbatoio dell’acqua. L’indicatore luminoso “svuotamento apparecchio” lampeggia. Svuotare il serbatoio dell’acqua e la vaschetta raccogligocce. 4. Una volta terminato il processo, l’apparecchio si spegne automaticamente. ! Se successivamente si desidera riutilizzare l’apparecchio, fare prima una tazza di acqua calda. 1 3 2 IT + POSSIBILI PROBLEMI Problema Causa Soluzione L'apparecchio non funziona. L'apparecchio non è collegato alla rete elettrica. Assicurarsi che il cavo di alimentazione sia ben collegato e che la spina sia inserita nella presa elettrica. Premendo i pulsanti del pannello di controllo non si ottengono reazioni o le si ottengono in ritardo. · · www.domo-elektro.be · L’apparecchio è disturbato elettromagneticamente. Il pannello di controllo è sporco. · Scollegare la spina dalla presa elettrica e riprovare dopo alcuni minuti. Pulire il pannello di controllo con il panno fornito con l’apparecchio. DO718K 71 Il caffè non è abbastanza caldo. · · Le tazze non sono state preriscaldate. Il gruppo erogatore è ancora freddo. Preriscaldare le tazze. Eseguire 3 risciacqui dell’apparecchio per scaldare il gruppo erogatore. Il caffè non fuoriesce dall'ugello. È possibile che l'ultima volta sia stato eseguito lo svuotamento dell'apparecchio. Premere il pulsante per acqua calda in modo che fuoriesca acqua calda dall'ugello. Il primo caffè è di cattiva qualità. Il primo ciclo di macinatura non dà abbastanza caffè macinato. Gettare via il caffè. I caffè successivi sono invece di buona qualità. Il caffè non presenta una superficie cremosa. I chicchi di caffè non sono freschi. Sostituire i chicchi di caffè. I pulsanti del pannello di controllo non sono sensibili. I pulsanti a sfioramento vanno toccati frontalmente. Toccare i pulsanti frontalmente sulla parte inferiore dell'icona dei pulsanti stessi. L'apparecchio impiega molto tempo per riscaldarsi. Si è accumulato calcare nell'apparecchio. Decalcificare l'apparecchio. Benché il serbatoio dell'acqua sia vuoto/non sia inserito, l'indicatore luminoso non è acceso. Il sensore, in prossimità dell'attacco del serbatoio dell'acqua, è bagnato. Asciugare l'acqua attorno all'attacco del serbatoio dell'acqua. È presente molta acqua nel recipiente per fondi di caffè. Il caffè macinato è troppo fine e blocca l'ugello dell'acqua. Regolare il grado di macinatura mediante la manopola nel recipiente per caffè in grani durante il funzionamento. Il caffè fuoriesce molto lentamente/a gocce dall'ugello caffè. Il caffè macinato è troppo fine e blocca l'ugello dell'acqua. Regolare il grado di macinatura mediante la manopola nel recipiente per caffè in grani durante il funzionamento. IT 72 · · L'indicatore luminoso "recipiente L'ugello interno del caffè per caffè in grani vuoto" macinato è bloccato. lampeggia mentre ci sono ancora abbastanza chicchi nel serbatoio. Utilizzare l'apposito spazzolino per rimuovere i residui di caffè attorno all'ugello interno del caffè macinato. L'indicatore luminoso "decalcificazione" lampeggia. Seguire i passaggi del processo di decalcificazione. L'apparecchio passa alla modalità stand-by solo una volta completato il processo. DO718K Il processo di decalcificazione è in corso. MISURE AMBIENTALI Il simbolo sul prodotto o sulla confezione indica che esso non deve essere trattato come rifiuto domestico. Deve, al contrario, essere conferito al punto di raccolta predisposto per il riciclo delle apparecchiature elettriche ed elettroniche. Facendo in modo che questo prodotto venga smaltito correttamente aiuterete a prevenire potenziali conseguenze negative per l’ambiente e la salute dell’uomo, che potrebbero essere causate da uno smaltimento non corretto. Per maggiori informazioni sul riciclo di questo prodotto, consultare le autorità comunali, l’azienda o il servizio responsabili della raccolta dei rifiuti domestici o il negozio in cui il prodotto è stato acquistato. IT Il materiale di imballaggio è riciclabile. Lo smaltimento dell’imballaggio deve avvenire al fine di tutelare l’ambiente. www.domo-elektro.be DO718K 73 ZÁRUKA Práva a povinnosti prodávajícího a kupujícího ohledně práv z vadného plnění se řídí příslušnými obecně závaznými předpisy dle občanského zákoníku. 1. Trvání záruky: 2 roky 2. Záruka se nevztahuje a) na mechanické poškození b) nesprávné používání v rozporu s návodem k použití 3. Záruka zaniká: - při použití spotřebiče jinak než v je uvedeno v manuálu (nesprávným postupem) - při provádění opravy nebo změny na spotřebiči osobou jinou než pověřenou naším servisem CZ Prodávající odpovídá kupujícímu, že zboží při převzetí nemá vady. Zejména prodávající odpovídá kupujícímu, že v době, kdy kupující zboží převzal: · má zboží takové vlastnosti, které výrobce v tomto návodu popisuje, · se zboží hodí k účelu, ke kterému výrobce uvádí, · zboží odpovídá jakostí nebo provedením smluvenému vzorku nebo předloze, byla-li jakost nebo provedení určeno podle smluveného vzorku nebo předlohy, · zboží vyhovuje požadavkům právních předpisů. Projeví-li se vada v průběhu šesti měsíců od převzetí, má se za to, že zboží bylo vadné již při převzetí. Pokud není u výrobku uvedeno jinak, činí záruční doba 24 měsíců. Záruční doba počíná běžet od převzetí věci kupujícím. Práva z vadného plnění uplatňuje kupující u prodávajícího na adrese jeho provozovny, v níž je přijetí reklamace možné s ohledem na sortiment prodávaného zboží, případně i v sídle nebo místě podnikání. Za okamžik uplatnění reklamace se považuje okamžik, kdy prodávající obdržel od kupujícího reklamované zboží. Reklamaci lze také uplatnit v servisním středisku na adrese DOMO-elektro s.r.o., Na Kobyle 783, 345 06 Kdyně, Česká republika, tel. (+420) 379 422 550, [email protected] Pro rychlé a bezproblémové vyřízení reklamace doporučujeme přiložit k reklamaci doklad o koupi a průvodní dopis s popisem závady a zpáteční adresou s telefonickým kontaktem. 74 BEZPEČNOSTNÍ POKYNY Při používání jakkéhokoli el. spotřebiče dbejte zvýšené opatrnosti a dodržujte určitá bezpečnostní pravidla: · Pečlivě si přečtěte tyto informace a manuál nechte i pro pozdější nahlédnutí. · Ujistěte se, že před použitím odlepíte a odstraníte veškeré reklamní a ochranné fólie. · Děti si s ochrannými ani reklamními polepy nesmí hrát. · Přístroj je určen pro používání v domácnostech a podobných prostředích, tak jako je: · kuchyňky v obchodech, kancelářích atd. · chaty, chalupy · hotely, penziony a jiné dočasné ubytování · Dohlédněte, aby si děti nehrály s přístrojem. DO718K · · · · · · · · · · · · · · · · · · · · · · · · · · · · Tento spotřebič mohou používat děti ve věku 16 let a starší a osoby se sníženými fyzickými, smyslovými nebo mentálními schopnostmi, nebo nedostatkem zkušeností a znalostí pokud jsou pod neustálým dozorem nebo byly poučeny o používání spotřebiče bezpečným způsobem a rozumí případným nebezpečím. Děti si s přístrojem nesmějí hrát. Čištění a údržbu prováděnou uživatelem nesmějí provádět děti bez dozoru. Čistění a běžnou údržbu smí provádět pouze osoby starší 16 let a při tom být pod dohledem. Přístroj a jeho el. kabel skladujte mimo dosah dětí. Pokud přístroj nepoužíváte, nebo se jej chystáte rozebírat či měnit součásti, tak ho odpojte od el. napětí. Před rozebírání, skládáním i před čistěním, vždy nechte přístroj dostatečně vychladnout. Nikdy netahejte přímo za kabel, vypojujte za zástrčku. POZOR: tento přístroj nesmí být používán s žádnou externí součástkou (např. časovač …) ani jiné dálkové ovládání. Povrch přístroje může být během používání horký, proto doporučujeme se ho během procesu pečení nedotýkat. Nikdy nenechávejte spuštěný přístroj bez dozoru. Nikdy nepoužívejte přístroj venku. Nikdy nepoužívejte jinak, než je zamýšleno a určeno výrobcem. Před použitím zkontrolujte, zda parametry el. sítě odpovídají požadovaným parametrům na informativním štítku přístroje. Pokud je přístroj nebo přívodní kabel poškozený, nikdy se ho nesnažte opravit sami doma. Vždy ho svěřte odbornému servisu DOMO, který jej prohlédne a případně opraví. Abyste se vyvarovali úrazu elektrickým proudem nebo popáleninám, nesmíte nikdy potápět kabel, síťovou zástrčku nebo samotný přístroj do vody nebo jiných tekutin. Nesahejte na přístroj s mokrýma rukama. Kratší přivodní kabel je vyráběn záměrně, aby se snížilo riziko zakopnutí či strhnutí přístroje ze stolu. Nepoužívejte prodlužovací kabely. Vždy přívodní kabel kompletně odmotejte, aby se předešlo přehřívání tohoto kabelu. Nenechávejte viset kabel přístroje přes ostré hrany a vyvarujte se toho, aby přišel do styku s horkými plochami. Přívodní kabel nikdy nesmí být pod přístrojem ani omotán kolem něj. Neumisťujte přístroj v blízkosti el. sporáků či trub, ani na místech kde je zvýšené teplo. Neumisťujte přístroj do blízkosti hořlavých ani vznětlivých materiálů. Ujistěte se, že je přístroj dobře sestaven a až poté zapojte do el. sítě. Před odpojením z el. sítě vždy vypojte hlavní vypínač do polohy „0“ nebo „OFF“ a až poté odpojte. Nikdy netahejte za kabel, vždy odpojujte přímo tahem za pevnou zástrčku. Zanedbaná údržba a nečistoty mohou vést ke zkrácené životnosti přístroje. Při extrémní nečistotě dokonce hrozí riziko požáru. Během procesu vaření je pravděpodobné, že z něj bude pářit velmi horká pára. Buďte opatrní a držte obličej i ruce v bezpečné vzdálenosti. Vždy používejte dle doporučeného návodu. Výrobce ani prodejce není schopen nést vzniklé riziko z důvodu špatného použití. Do přístroje nikdy nelijte více vody než je vyznačené povolené maximum. Přístroj ani nesmí být ponořen do vody, a to ani při čištění. Ke kávovaru používejte pouze originální součásti a příslušenství. Nemanipulujte s přístrojem, pokud je zapojen a právě ohřívá. Vždy nechte přístroj vychladnout, až potom přemisťujte. Přístroj nezapínejte na prázdno (bez vody). Přístroj vždy používejte na stabilním, rovném a suchém místě. www.domo-elektro.be DO718K CZ · 75 ČÁSTI 1. 2. 3. 4. 5. 6. 7. 8. 9. 10. 11. 12. 13. 14. Tácek pro odkap Mřížka tácku odkapu Podstavec odkapu a zásobníku Zásobník na kávové sedliny Dávkovač/výpusť hotové kávy Hlavní spínač on/off Ovládací panel Zásobník kávových zrn Víko na zásobník kávových zrn Zásobník vody Přívodní kabel Spařovací jednotka Boční kryt k údržbě spařovací jednotky Čistící kartáček 10 9 8 11 6 5 4 12 13 14 OVLÁDACÍ PANEL Ikona Popis Volba Espresso (malá, silná káva) Lungo (běžná, střední káva) Americano (silná káva dopuštěná horkou vodou) Oblíbené – nastavitelná volba CZ Horká voda Světelné kontrolky Kontrolka svítí: připraveno Kontrolka bliká: probíhá příprava Prázdný nebo nenasazený zásobník vody Prázdný zásobník kávových zrn 76 DO718K 7 3 2 1 Kontrolka svítí: plný zásobník na kávovou sedlinu Kontrolka bliká: chybí odkapávací nádobka Kontrolka svítí: spařovací jednotka není vložena (špatně vložena) Kontrolka bliká: otevřen boční kryt (není správně usazen) Kontrolka svítí: odvápněte zařízení Kontrolka bliká: probíhá proces odstraňování vodního kamene Probíhá proces vyprazdňování spotřebiče. Viz část „Čištění a údržba / vyprazdňování spotřebiče“ PŘÍPRAVA PŘED POUŽITÍM Před prvním použitím odstraňte veškerý obalový materiál a odlepte reklamní nálepky. 1. Přístroj postavte na rovný a stabilní povrch tak, aby kolem byl stále dostatečný prostor na odvětrání. 2. Před/pod kávovar položte misku na odkap a ujistěte se, že je správně sestaveno. 3. Naplňte zásobník na vodu – dle kapitoly “naplnění zásobníku vody”. 4. Naplňte zásobník kávových zrn – dle kapitoly “naplnění kávových zrn” 5. Zapojte kabel do konektoru na přístroji. Zástrčku zapojte do el. sítě. Před prvním použitím doporučujeme nechat prokapat alespoň 1 hrnek horké vody, aby se pročistilo potrubí kávovaru od případných nečistot. 1 150mm 2 3 4 5 m 150m 150m m 150m m m 150 m 1. 2. 3. 4. 5. Přístroj zapněte stiskem hlavního spínače on/off. Kávovar se automaticky propláchne a následně bude v pohotovostním režimu, kdy budou svítit všechny symboly na panelu. Nyní je vše připraveno a vy si stiskem jen vyberete druh kávy, kterou chcete připravit. Poznámka: k automatickému proplachování dojde, pouze pokud byl spotřebič delší dobu vypnut. Pod výpusť umístěte šálek. Podle velikosti šálku si upravte výšku výpusti. Pokud máte malý šálek, tak pod ním nechte odkapávací misku. Pokud máte šálek velký, tak misku můžete odejmout. Stiskem symbolu si zvolte jaká káva se má připravit – espresso, lungo, americano nebo vaše oblíbená volba. Poznámka: objem kávy si můžete předvolit. Viz kapitola “nastavení objemu” nebo “oblíbená volba” Rozsvítí se kontrolka zvoleného nápoje a na displeji se objeví kontrolka připravenosti. Zároveň se se podsvícení i hrnek pod výpustí. Pokud chcete přípravu kávy ukončit dříve, tak stiskněte znovu stejné tlačítko. Jakmile je káva hotova, tak se přístroj přepne opět do pohotovostního režimu. Celý přístroj má automatické vypnutí při nečinnosti, které lze nastavit na 10,20 nebo 30 minut. Po zvoleném čase nečinnosti se přístroj zcela vypne. www.domo-elektro.be DO718K CZ POUŽITÍ 77 1 2 3 4 NAPLNĚNÍ ZÁSOBNÍKU VODY Pokud bliká kontrolka zásobníku vody, tak je potřeba jej doplnit. Zásobník vyjměte z přístroje. Pro snažší vyjmutí je na zásobníku přidělána horní rukojeť. Zbylou vodu ze zásobníku vylijte a napusťte ho studenou, čerstvou vodou – nepřesahujte maximální vyznačený objem. 3. Naplněný zásobník vložte zpět do přístroje. ! Pozor: Nádržku nikdy neplňte v přístroji (vždy ji pro plnění vyjměte), jinak hrozí přelití vody a případné poškození přístroje. ! Nepoužívejte teplou, vlažnou ani perlivou vodu. 1. 2. 1 3 2 ! NAPLNĚNÍ ZÁSOBNÍKU KÁVOVÝCH ZRN Při sestavení přístroje si můžete vybrat, zda vám stačí prostor na kávu přímo v kávovaru a nebo přidat adapter, který zásobník kávy zvětší. Zvětšený zásobník nebo samotný prostor kávovaru uzavírejte víkem. CZ 1. 2. 3. Pokud bliká kontrolka zásobníku kávy, tak je potřeba jej doplnit. Odejměte víko, rozhodněte se jestli chcete zásobník zvětšit pomocí adaptéru. Do prostoru pomalu nasypte kávová zrna. Prostor znovu uzavřete víkem. ! Do zásobníku sypte jen kávová zrna, nikdy tam nesypte již namletou kávu nebo jiné suroviny. 1 78 DO718K 2 3 VYPRAZDŇOVÁNÍ ZÁSOBNÍKU SEDLINY 1. 2. 3. 4. Pokud bliká kontrolka odpadního zásobníku sedliny, tak jej musíte vyprázdnit. Odejměte misku odkapu. Z přístroje vytáhněte podstavec odkapu. Zásobník na kávovou sedlinu vysypte. Vše ještě můžete opláchnout čistou vodou. Čisté části opět zasuňte do přístroje. 1 2 3 4 NASTAVENÍ „OBLÍBENÉ VOLBY“ Na kávovaru si můžete předvolit vaši oblíbenou kávu a připravovat ji jedním stiskem. 1. Tlačítko „oblíbené volby“ stiskněte a podržte na 2 vteřiny. Kontrolky espresso, lungo a americano budou začnou blikat. 2. Stiskněte volbu/obrázek kávy kterou chcete programovat jako vaši oblíbenou. 3. Káva se začne připravovat. Opět stiskněte vybraný druh kávy a tlačítko držte – pokračujete v programování. Dle toho jak dlouho budete tlačítko držet (káva stále teče), tím si programujete velikost vaší oblíbené kávy. Jakmile tlačítko uvolníte, tak se káva zastaví a takový objem se uloží pod tlačítko „oblíbená volba“. 3 1 2 U jednotlivých druhů kávy (espresso, lungo i americano) si můžete nastavit jejich objem mezi 25-250 ml. 1. Nejdříve si stiskem vyberte u jakého druhu kávy si chcete objem nastavit. 2. Vybraný druh se začne připravovat. Opět stiskněte vybraný druh kávy a tlačítko držte, káva poteče, dokud tlačítko neuvolníte. 3. Jakmile už je v hrnečku požadovaný objem, tak tlačítko pusťte. Ozve se dvojité pípnutí, které zároveň potvrzuje, že je nastavení dané kávy přenastaveno a uloženo. 2 CZ NASTAVENÍ OBJEMU KÁVY 1 www.domo-elektro.be DO718K 79 NASTAVENÍ HRUBOSTI MLETÍ V prostoru zásobníku kávy je otočný regulátor, kterým lze manuálně nastavit stupeň hrubosti mletí. Nastavení provádějte vždy za běhu mlýnku – při spuštěném mlýnku plynule otáčejte regulátorem. ! Upozornění: regulace při zastaveném mlýnku může poškodit přístroj – v mlýnku může být zapříčené zrno a mechanismus regulace se strhne. Na regulátoru jsou namalovány tečky, které znázorňují hrubost mletí. Čím menší tečky, tím jemnější mletí kávy. NASTAVENÍ REŽIMU PŘÍSTROJE Celý přístroj lze přepínat ve 3 režimech nastavení (ECO – šetří energii / Rychlý = ultra rychlé připravení kávy) Osvícení hrnečku Eco mode Rychlý režim Standard režim NE ANO ANO Předpaření* ANO NE ANO Automatické vypnutí 10 min 30 min 20 min Paměťová funkce - objem ANO ANO ANO * Funkce předpaření: do namleté kávy ve spařovací jednotce se napustí malé množství horké vody. Horká voda způsobí, že dávka kávy lehce nabude a tím se zvýší tlak v celé spařovací jednotce. Vyšší tlak při propaření = lepší chuťovou extrakci a lepší aroma. 1. 2. Nastavení režimu: v pohotovostním režimu kávovaru stiskněte on/off spínač a podržte ho alespoň na 5 vteřin. Ozve se dvojité pípnutí. Nyní už každý symbol kávy reprezentuje jednotlivý režim nastavení kávovaru. Rozsvícené tlačítko označuje aktuální nastavení. Ostatní klávesy budou blikat. Horká voda Eco mode CZ Rychlý režim Espresso Lungo X X Standard režim X 3. Takto si můžete stiskem tlačítka vybrat požadovaný režim (tlačítka, které daný režim zastupuje). Pro výběr ECO je to tlačítko horké vody, pro rychlý režim je tlačítko ESPRESSO a pro standart je tlačítko LUNGO. Po vybrání režimu se ozve potvrzující dvojité pípnutí. 4. Pokud režim nechcete měnit, ale zůstat u již vybraného, tak opět stiskněte on/off a opět ho podržte alespoň na 5 vteřin. Kávovar se opět přepne do pohotovostního režimu. ČIŠTĚNÍ A ÚDRŽBA Kroky 1-4 z údržby doporučujeme provádět každý den. Pokud je přístroj již používán delší dobu, tak je možné že se v něm postupně usadili kávové sedliny a proto je potřeba provést čištění podle kroku 5. Vypněte přístroj a vypojte z el. sítě. 1. 80 Odejměte tácek odkapu a vyprázdněte ho. Tácek i mřížku omyjte a vysušte. Tyto 2 části jsou vhodné i do myčky nádobí. DO718K 2. 3. 4. 5. 6. Z přístroje vytáhněte podtácek se zásobníkem sedliny. Kávovou sedlinu vysypte. Vše omyjte a osušte. Tyto 2 části jsou vhodné i do myčky nádobí. Otevřete boční dvířka ke spařovací jednotce. Spařovací jednotka lze vytáhnout ven a to tak, že z boků dílu stiskněte tlačítka a vytáhnete ven k sobě. Spařovací jednotku umyjte, propláchněte. ! POZOR: nikdy nemyjte spařovací jednotku v myčce nádobí. Vnější povrch kávovaru stačí otírat vlhkým jemným hadříkem, tak aby se povrch nepoškodil. Dotykový ovládací panel otírejte zvláště opatrně, raději ještě jemnějším hadříkem. K čištění zbytků kávy kolem výstupu/trysky kávy použijte čisticí kartáček. Po umytí vše vysušte a sestavte zpět jako bylo původně. Pokud některá z části nebude správně na svém místě, tak kávovar bude hlásit chybu a nepůjde spustit. ! Nikdy neponořujte přístroj ani jeho přívodní kabel do vody ani jiných tekutin. Hrozí riziko poranění elektrickým šokem. ! Na čištění nepoužívejte drsná ani agresivní čistidla. 1 2 3 6 4 ODVÁPNĚNÍ 1. 2. 3. 4. 5. 6. 7. 8. Zásobník vody naplňte do maxima až po rysku MAX. Do zásobníku nasypte 1 sáček odvápňovacího prostředku. (V balení jsou 3 sáčky). Přístroj zapojte do el. sítě. Pod výpusť/trysku umístěte velkou nádobu s větším objemem než je vody v zásobníku. V pohotovostním režimu kávovaru stiskněte on/off současně s tlačítkem espressa a držte alespoň 5 vteřin. Ozve se pípnutí a budou blikat kontrolky „odvápnění“ a „espresso“. Samotný proces odvápnění je ještě potřeba potvrdit stiskem tlačítka „espresso“. Pokud odvápnění nechcete nyní provést, tak stiskněte on/off a proces se zruší/odloží. Během procesu odvápňování bude blikat jen příslušná kontrolka odvápnění. Z přední trysky bude v pravidelných intervalech kapat/téct čistící voda s odvápňovacím prostředkem. Celý proces trvá několik minut. (± 20 min.) Jakmile se přístrojem prokape celý zásobník, tak se rozsvítí obě kontrolky (odvápnění + espresso). www.domo-elektro.be DO718K CZ Pokud svítí na kontrolka odvápnění, tak je přístroj potřeba co nejdříve odvápnit dle popsaného postupu. 81 9. 10. 11. Vylijte nádobu s čistící vodou a vložte ji zpět na místo. Zásobník vody z přístroje vylijte, vyčistěte a napusťte ho čistou vodou a vložte zpět do spotřebiče. Proces odvápnění bude pokračovat. Nejdříve se prokape první polovina zásobníku, následuje minutová pauza a poté se přes přístroj prokape zbývající voda ze zásobníku a tak se celý přístroj pročistí. Takto celý proces odvápnění končí a přístroj se vypne. 1 3 2 4 5 + 6 7 8 9 10 ! POZOR: Voda z trysky je horká, proto buďte opatrní a držte ruce i tělo v bezpečné vzdálenosti, ať se neopaříte. ! Na odvápňování používejte pouze originální dodaný přípravek nebo přípravek, který je přímo určený na odvápnění automatických kávovarů. Jiné agresivní přípravky nebo ocet by mohl poškodit útroby přístroje. ! Pokud přístroj není pravidelně čištěn a odvápňován, tak to výrazně zkracuje jeho životnost. MANUÁLNÍ PROPLACH TRYSKY Pokud máte vypnutý automatický proplach po každém zapnutí, tak je zde možnost proplachávat kávovar manuálně. Takový proplach se doporučuje dělat pravidelně a to hlavně dle intenzity využívání kávovaru. 1. Při proplachu doporučujeme vždy pod výpusť/trysku vložit prázdný hrneček, který tekutiny zachytí. 2. Proplach provedete: v pohotovostním režimu kávovaru stiskněte a podrže on/off + tlačítko „horké vody“ 3. Začne blikat kontrolka „horké vody“ a z trysky začne kapat proplachující horká voda. 4. Jakmile je proplach hotový, tak se přístroj vrátí do pohotovostního režimu. CZ + VYPRÁZDNĚNÍ PŘÍSTROJE Pokud chcete přístroj na delší dobu uskladnit, tak je vhodné ho kompletně vyprázdnit, aby v útrobách nabyla žádná zbytková voda. 1. Vyprázdnění provedete: v pohotovostním režimu kávovaru stiskněte a podrže on/off + tlačítko „lungo“ 2. Začne blikat kontrolka „prázdného zásobníku“ Pokud chcete proces vypnout, tak stačí stisknout tlačítko on/off. 82 DO718K 3. 4. Vyjměte zásobník vody a kontrolka prázdného zásobníku zůstane svítit. Zásobník a odkapávací misku vyčistěte. Jakmile bude program u konce, tak se automaticky vypne. ! Když budete kávovar opět po takovém vyprázdnění potřebovat začít používat, tak prvně z něj udělejte 1 šálek horké vody, ať se přístroj zavodní. 1 3 2 + PROBLÉMY A JEJICH MOŽNÉ ŘEŠENÍ Problém Možná příčina Možné řešení Přístroj nefunguje Přístroj není zapojen do el. sítě. Zkontrolujte, zda je kabel správně připojen do zásuvky a jestli je zásuvka v pořádku. Žádná (nebo pozdní) odezva na stisk jakéhokoli tlačítka. · Do přístroje nejde správný proud. Ovládací panel je špinavý. · Máte studené hrnky a káva rychle vychladne. Spařovací jednotka byla velmi studená. · · Káva není dostatečně teplá. · · · Hrnky si předehřívejte. Zkuste 2-3x spustit horkou vodu z kávovaru. Z trysky neteče žádné kafe . Může se stát, pokud by předtím přístroj kompletně vyprázdněn a delší dobu uskladněn. Spusťte horkou vodu a nechte alespoň 1 hrneček protéct kávovarem. První kafe je velmi slabé. Je možné, že při nasypání kávových zrn do mlýnku se zrna nedostaly do mlecího ústrojí. První kávu vylijte. Následující kávy už by měly být v pořádku. Káva nemá krémovou pěnu na povrchu. Kávová zrna nejsou čerstvá. Doporučujeme kávu vyhodit a nasypat čerstvé zrna z právě otevřeného balení. Prvky na ovládacím panelu reagují obtížně / nejsou citlivá. Dotyk k tlačítkům musí přicházet z přední strany. Dotýkejte se tlačítek z přední / spodní strany. Přístroj se nahřívá velmi dlouhou dobu. Vnitřek je zanesen vodním kamenem. Přístroj je potřeba odvápnit. I přesto, že je zásobník vody prázdný, nebo není nasazen, tak se jeho kontrolka nerozsvítí. Konektor vedle zásobníku je mokrý / vlhký. Zkuste okolí kolem napojení zásobníku vysušit. www.domo-elektro.be DO718K CZ · Přístroj odpojte ze sítě a zkuste za chvíli znovu. Očistěte ovládací panel jemným hadříkem. 83 V zásobníku kávové sedliny je dost vody. U mlýnku je nastaveno velmi jemné mletí a tekoucí voda nemůže tak rychle jemnou utlačenou kávou prostupovat odtéká. V zásobníku kávových zrn nastavte hrubší mletí. Káva z trysky téměř neteče, jen kape. Namletá káva je příliš jemná V zásobníku kávových zrn nastavte hrubší mletí. Kontrolka chybně hlásí prázdný zásobník kávových zrn. V zásobníku však káva stále je. Vnitřní vývod mleté kávy je zablokován. K čištění zbytků kávy uvnitř kávovaru použijte čisticí kartáč a zkuste vyčistit Bliká kontrolka odvápnění. Právě se provádí proces odvápňování. Přečtěte si postup odvápnění a pokračujte dle návodu. Po správném ukončení se přístroj automaticky vypne. OHLED NA ŽÍVOTNÍ PROSTŘEDÍ Symbol na přístroji či na jeho obalu znamená, že s tímto výrobkem není možno nakládat jako s běžným domovním odpadem, nýbrž musí být odevzdán na místech určených ke sběru a likvidaci elektrických a elektronických zařízení. Dodržením tohoto doporučení chráníte životní prostředí a zdraví spoluobčanů. Více informací o možnostech likvidace nebezpečného odpadu obdržíte na obecních nebo městských úřadech, sběrných dvorech nebo v prodejně, kde jste přístroj zakoupili. CZ Obalové materiály jsou recyklovatelné, nakládejte s nimi podle předpisů pro životní prostředí. 84 DO718K ZÁRUKA Práva a povinnosti predávajúceho a kupujúceho ohľadom práv z chybného plnenia sa riadi príslušnými všeobecne záväznými predpismi podľa občianskeho zákonníka. 1. Trvanie záruky: 2 roky 2. Záruka sa nevzťahuje a) na mechanické poškodenie b) nesprávne používanie v rozpore s návodom na použitie 3. Záruka zaniká: - pri použití spotrebiča inak ako v je uvedené v manuále (nesprávnym postupom) - pri vykonávaní opravy alebo zmeny na spotrebiči osobou inou než poverenou naším servisom Predávajúci zodpovedá kupujúcemu, že tovar pri prevzatí nemá vady. Najmä predávajúci zodpovedá kupujúcemu, že v čase, keď kupujúci tovar prevzal: · má tovar také vlastnosti, ktoré výrobca v tomto návode popisuje, · sa tovar hodí k účelu, ku ktorému výrobca uvádza, · tovar zodpovedá kvalitou alebo prevedením dohovorené vzorky alebo predlohe, ak bola akosť alebo prevedenie určené podľa dohodnutého vzorky alebo predlohy, · tovar vyhovuje požiadavkám právnych predpisov. Ak sa prejavia vada v priebehu šiestich mesiacov od prevzatia, má sa za to, že tovar bol chybný už pri prevzatí. Pokiaľ nie je pri výrobku uvedené inak, je záručná doba 24 mesiacov. Záručná doba začína plynúť od prevzatia veci kupujúcim. Práva z chybného plnenia uplatňuje kupujúci u predávajúceho na adrese jeho prevádzky, v ktorej je prijatie reklamácie možné s ohľadom na sortiment predávaného tovaru, prípadne aj v sídle alebo mieste podnikania. Za okamih uplatnenia reklamácie sa považuje okamih, kedy predávajúci dostal od kupujúceho reklamovaný tovar. Reklamáciu možno tiež uplatniť v servisnom stredisku na adrese DOMO-elektro s.r.o., Na Kobyle 783, 345 06 Kdyně, Česká republika, tel. (+420) 379 422 550, [email protected] Pre rýchle a bezproblémové vybavenie reklamácie odporúčame priložiť k reklamácii doklad o kúpe a sprievodný list s popisom závady a spiatočnou adresou s telefonickým kontaktom. · · · · · · Pri používaní jakkéhokoli el. spotrebiče dbajte na zvýšenú opatrnosť a dodržujte určitá bezpečnostné pravidlá: Starostlivo si prečítajte tieto informácie a manuál nechajte aj k neskoršiemu nahliadnutiu. Uistite sa, že pred použitím odlepíte a odstránite všetky reklamné a ochranné fólie. Deti sa s ochrannými ani reklamnými polepy nesmie hrať. Prístroj je určený pre používanie v domácnostiach a podobných prostrediach, tak ako je: · kuchynky v obchodoch, kanceláriách atď. · chaty, chalupy · hotely, penzióny a iné dočasné ubytovanie Dohliadnite, aby sa deti nehrali s prístrojom. www.domo-elektro.be DO718K SK BEZPEČNOSTNÉ POKYNY 85 · · · · · · · · · · · · · · · · · · · · · · SK · 86 · · · · · Tento spotrebič môžu používať deti vo veku 16 rokov a staršie a osoby so zníženými fyzickými, zmyslovými alebo mentálnymi schopnosťami, alebo nedostatkom skúseností a znalostí ak sú pod neustálym dozorom alebo boli poučené o používaní spotrebiča bezpečným spôsobom a rozumejú prípadným nebezpečenstvám. Deti si s prístrojom nesmú hrať. Čistenie a údržbu vykonávanú používateľom nesmú vykonávať deti bez dozoru. Čistenie a bežnú údržbu môžu vykonávať len osoby staršie ako 16 rokov a pri tom byť pod dohľadom. Prístroj a jeho el. kábel skladujte mimo dosahu detí. Pokiaľ prístroj nepoužívate, alebo sa ho chystáte rozoberať či meniť súčasti, tak ho odpojte od el. napätia. Pred rozoberanie, skladaním aj pred čistením, vždy nechajte prístroj dostatočne vychladnúť. Nikdy neťahajte priamo za kábel, vypojujte za zástrčku. Pokiaľ je prívodný kábel poškodený, musí byť vždy okamžite opravený v odbornom servise alebo preškolenou osobou. POZOR: tento prístroj nesmie byť používaný s žiadnu externú súčiastkou (napr. časovač ...) ani iné diaľkové ovládanie. Povrch prístroja môže byť počas používania horúci, preto odporúčame sa ho počas procesu pečenia nedotýkať. Nikdy nenechávajte spustený prístroj bez dozoru. Nikdy nepoužívajte prístroj vonku. Nikdy nepoužívajte inak, než je zamýšľané a určené výrobcom. Pred použitím skontrolujte, či parametre el. siete odpovedajú požadovaným parametrom na informatívnym štítku prístroja. Pokiaľ je prístroj alebo prívodný kábel poškodený, nikdy sa ho nesnažte opraviť sami doma. Vždy ho zverte odbornému servisu DOMO, ktorý ho prezrie a prípadne opraví. Aby ste zabránili úrazu elektrickým prúdom, nesmiete nikdy potápať kábel, sieťovú zástrčku alebo samotný prístroj do vody alebo iných tekutín. Nesiahajte na prístroj s mokrými rukami. Kratšie prívodný kábel je vyrábaný zámerne, aby sa znížilo riziko zakopnutia či strhnutí prístroja zo stola. Nepoužívajte predlžovacie káble. Vždy prívodný kábel kompletne odmotajte, aby sa predišlo prehrievaniu tohto kábla. Nenechávajte visieť kábel prístroja cez hranu stola a vyvarujte sa toho, aby prišiel do styku s horúcimi plochami. Prívodný kábel nikdy nesmie byť pod prístrojom ani omotaný okolo neho. Neumiestňujte prístroj v blízkosti el. sporákov či rúr, ani na miestach kde je zvýšené teplo. Neumiestňujte prístroj do blízkosti horľavých ani horľavých materiálov. Uistite sa, že je prístroj dobre zostavený a až potom zapojte do el. siete. Pred odpojením z el. siete vždy vypojte hlavný vypínač do polohy “0” alebo “OFF” a až potom odpojte. Nikdy neťahajte za kábel, vždy odpájajte priamo ťahom za pevnú zástrčku. Zanedbaná údržba a nečistoty môžu viesť ku skrátenej životnosti prístroja. Pri extrémnej nečistote dokonca hrozí riziko požiaru. Počas procesu varenia je pravdepodobné, že z neho bude páriť veľmi horúca para. Buďte opatrní a držte tvár aj ruky v bezpečnej vzdialenosti. Vždy používajte podľa odporúčaného návodu. Výrobca ani predajca nie je schopný znášať vzniknuté riziko z dôvodu zlého použitia. Prístroj zapájajte iba do uzemnenej zásuvky, ktorá zodpovedá miestnym normám. Do prístroja nikdy nelejte viac vody ako je vyznačené povolené maximum. Prístroj ani nesmie byť ponorený do vody, a to ani pri čistení. Ku kávovaru používajte iba originálne súčasti a príslušenstvo. DO718K · Nemanipulujte s prístrojom, ak je zapojený a práve ohrieva. Vždy nechajte prístroj vychladnúť, až potom premiestňujte. Prístroj nezapínajte naprázdno (bez vody). Prístroj vždy používajte na stabilnom, rovnom, suchom mieste. · · ČASTI 1. 2. 3. 4. 5. 6. 7. 8. 9. 10. 11. 12. 13. 14. Tácka pre odkvap Mriežka tácke odkvapu Podstavec odkvapu a zásobníka Zásobník na kávovej usadeniny Dávkovač / výpust hotové kávy Hlavný spínač on/off Ovládací panel Zásobník kávových zŕn Veko na zásobník kávových zŕn Zásobník vody Prívodný kábel Sparovacia jednotka Bočný kryt na údržbu sparovacej jednotky Čistiaca kefka 10 9 8 11 7 6 5 4 12 13 14 3 2 1 OVLÁDACÍ PANEL Ikona Popis Voľba Espresso (malá, silná káva) Lungo (bežná, stredná káva) Americano (silná káva dopustená horúcou vodou) Obľúbené - nastaviteľná voľba Horúca voda Svetelné kontrolky SK Kontrolka svieti: pripravené Kontrolka bliká: prebieha príprava Prázdny alebo Nenasadená zásobník vody www.domo-elektro.be DO718K 87 Prázdny zásobník kávových zŕn Kontrolka svieti: plný zásobník na kávovú usadeninu Kontrolka bliká: chýba odkvapkávacia nádobka Kontrolka svieti: sparovacia jednotka nie je vložená (zle vložená) Kontrolka bliká: otvorený bočný kryt (nie je správne usadený) Kontrolka svieti: odvápnite zariadenie Kontrolka bliká: prebieha proces odstraňovania vodného kameňa Prebieha proces vyprázdňovania spotrebiča. Pozrite časť “Čistenie a údržba / vyprázdňovanie spotrebiča” PRÍPRAVA PRED POUŽITÍM Pred prvým použitím odstráňte všetok obalový materiál a odlepte reklamné nálepky. 1. Prístroj postavte na rovný a stabilný povrch tak, aby okolo bol stále dostatočný priestor na odvetranie. Pred/pod kávovar položte misku na odkvap a uistite sa, že je správne zostavené. Naplňte zásobník na vodu - podľa kapitoly “naplnenie zásobníka vody”. Naplňte zásobník kávových zŕn - podľa kapitoly “naplnenie kávových zŕn” Zapojte kábel do konektora na prístroji. Zástrčku zapojte do el. siete. 2. 3. 4. 5. Pred prvým použitím odporúčame nechať prekvapkať aspoň 1 hrnček horúcej vody, aby sa prečistilo potrubie kávovaru od prípadných nečistôt. 5 4 3 1 2 150mm m 150m 150m m 150m m m 150 m POUŽITIE 1. SK 2. 88 3. Prístroj zapnite stlačením hlavného spínača on/off. Kávovar sa automaticky prepláchne a následne bude v pohotovostnom režime, kedy budú svietiť všetky symboly na paneli. Teraz je všetko pripravené a vy si stlačením len vyberiete druh kávy, ktorú chcete pripraviť. Poznámka: k automatickému preplachovanie dôjde, iba ak bol spotrebič dlhšiu dobu vypnutý. Pod výpust umiestnite šálek. Podľa veľkosti šálky si upravte výšku výpuste. Ak máte malý šálku, tak pod ním nechajte odkvapkávaciu misku. Ak máte šálka veľký, tak misku môžete odňať. Stlačením symbolu si zvoľte aká káva sa má pripraviť - espresso, lungo, americano alebo vaša obľúbená voľba. Poznámka: objem kávy si môžete predvoliť. Pozri kapitolu “nastavenie objemu” alebo “obľúbená voľba” DO718K 4. 5. Rozsvieti sa kontrolka zvoleného nápoja a na displeji sa objaví kontrolka pripravenosti. Zároveň sa sa podsvietenie aj hrnček pod výpustí. Pokiaľ chcete prípravu kávy ukončiť skôr, tak stlačte znovu rovnaké tlačidlo. Akonáhle je káva hotová, tak sa prístroj prepne opäť do pohotovostného režimu. Celý prístroj má automatické vypnutie pri nečinnosti, ktoré možno nastaviť na 10,20 alebo 30 minút. Po zvolenom čase nečinnosti sa prístroj úplne vypne. 1 2 3 4 NAPLNENIE ZÁSOBNÍKA VODY Ak bliká kontrolka zásobníka vody, tak je potrebné ho doplniť. Zásobník vyberte z prístroja. Pre ľahšie vybratie je na zásobníku prirobená hornú rukoväť. Zvyšnú vodu zo zásobníka vylejte a napustite ho studenou, čerstvou vodou - Nepresahujte maximálny vyznačený objem. 3. Naplnený zásobník vložte späť do prístroja. ! Pozor: Nádržku nikdy neplňte v prístroji (vždy ju pre plnenie vyberte), inak hrozí preliatie vody a prípadné poškodenia prístroja. ! Nepoužívajte teplú, vlažnú ani perlivú vodu. 1 3 2 ! 1. 2. NAPLNENIE ZÁSOBNÍKA KÁVOVÝCH ZŔN Pri zostavení prístroja si môžete vybrať, či vám stačí priestor na kávu priamo v kávovare a alebo pridať adaptér, ktorý zásobník kávy zväčší. Zväčšený zásobník alebo samotný priestor kávovaru uzatvárajte vrchnákom. Ak bliká kontrolka zásobníka kávy, tak je potrebné ho doplniť. Odoberte veko, rozhodnite sa či chcete zásobník zväčšiť pomocou adaptéra. Do priestoru pomaly nasypte kávové zrná. Priestor znovu uzavrite vekom. SK 1. 2. 3. ! Do zásobníka sypte len kávové zrná, nikdy tam nesypte už namletú kávu alebo iné suroviny. www.domo-elektro.be DO718K 89 1 2 3 VYPRÁZDŇOVANIE ZÁSOBNÍKA USADENINY 1. 2. 3. 4. Ak bliká kontrolka odpadového zásobníka usadeniny, tak ho musíte vyprázdniť. Odoberte misku odkvapu. Z prístroja vytiahnite podstavec odkvapu. Zásobník na kávovú usadeninu vysypte. Všetko ešte môžete opláchnuť čistou vodou. Čisté časti opäť zasuňte do prístroja. 1 2 3 4 NASTAVENIE “OBĽÚBENÉ VOĽBY” SK Na kávovaru si môžete predvoliť vašu obľúbenú kávu a pripravovať ju jedným stlačením. 1. Tlačidlo “obľúbené voľby” stlačte a podržte na 2 sekundy. Kontrolky espresso, lungo a americano budú začnú blikať. 2. Stlačte voľbu / obrázok kávy ktorú chcete programovať ako vašu obľúbenú. 3. Káva sa začne pripravovať. Opäť stlačte vybraný druh kávy a tlačidlo držte - pokračujete v programovaní. Podľa toho ako dlho budete tlačidlo držať (káva stále tečie), tým si programujete veľkosť vašej obľúbenej kávy. Akonáhle tlačidlo uvoľníte, tak sa káva zastaví a taký objem sa uloží pod tlačidlo “obľúbená voľba”. 3 1 2 90 NASTAVENIE OBJEMU KÁVY Pri jednotlivých druhov kávy (espresso, lungo i americano) si môžete nastaviť ich objem medzi 25-250 ml. 1. Najskôr si pomocou vyberte u akého druhu kávy si chcete objem nastaviť. 2. Vybraný druh sa začne pripravovať. Opäť stlačte vybraný druh kávy a tlačidlo držte, káva potečie, kým tlačidlo neuvoľníte. DO718K 3. Akonáhle už je v hrnčeku požadovaný objem, tak tlačidlo pusťte. Ozve sa dvojité pípnutie, ktoré zároveň potvrdzuje, že je nastavenie danej kávy preskočené a uložené. 2 1 NASTAVENIE HRUBOSTI MLETIA V priestore zásobníku kávy je otočný regulátor, ktorým možno manuálne nastaviť stupeň hrubosti mletia. Nastavenie vykonávajte vždy za behu mlynčeka - pri spustenom mlynčeka plynulo otáčajte regulátorom. ! Upozornenie: regulácia pri zastavenom mlynčeku môže poškodiť prístroj - v mlynčeku môže byť zapříčené zrno a mechanizmus regulácie sa strhne. Na regulátora sú namaľované bodky, ktoré znázorňujú hrubosť mletia. Čím menšie bodky, tým jemnejšia mletie kávy. NASTAVENIE REŽIMU PRÍSTROJA Celý prístroj možno prepínať v 3 režimoch nastavenia (ECO - šetrí energiu / Rýchly = ultra rýchle pripravenie kávy) Osvietenie hrnčeka Eco mode Rýchly režim Standard režim NE ÁNO ÁNO Predparenia* ÁNO NE ÁNO Automatické vypnutie 10 min 30 min 20 min Pamäťová funkcia - objem ÁNO ÁNO ÁNO * Funkcia přepaření: do namletej kávy v sparovacej jednotke sa napustí malé množstvo horúcej vody. Horúca voda spôsobí, že dávka kávy ľahko nadobudne a tým sa zvýši tlak v celej sparovacej jednotke. Vyšší tlak pri propaření = lepšie chuťovú extrakciu a lepšiu arómu. 2. Nastavenie režimu: v pohotovostnom režime kávovare stlačte on/off spínač a podržte ho aspoň na 5 sekúnd. Ozve sa dvojité pípnutie. Teraz už každý symbol kávy reprezentuje jednotlivý režim nastavenia kávovaru. Rozsvietené tlačidlo označuje aktuálne nastavenie. Ostatné klávesy budú blikať. Horúca voda ECO mode Rýchly režim Espresso Lungo X X Standard režim X 3. Takto si môžete stlačením tlačidla zvoliť požadovaný režim (tlačidlá, ktoré daný režim zastupuje). Pre výber ECO je to tlačidlo horúcej vody, pre rýchly režim je tlačidlo ESPRESSO a pre standart režim je tlačítko LUNGO. Po vybraní režimu sa ozve potvrdzujúce dvojité pípnutie. 4. Ak režim nechcete meniť, ale zostať u už vybraného, tak opäť stlačte on / off a opäť ho podržte aspoň na 5 sekúnd. Kávovar sa opäť prepne do pohotovostného režimu. www.domo-elektro.be DO718K SK 1. 91 ČISTENIE A ÚDRŽBA Kroky 1-4 z údržby odporúčame vykonávať každý deň. Pokiaľ je prístroj už používa dlhšiu dobu, tak je možné že sa v ňom postupne usadili kávovej usadeniny a preto je potrebné vykonať čistenie podľa kroku 5. Vypnite prístroj a odpojte z el. siete. 1. Odoberte tácka odkvapu a vyprázdnite ho. Tácka aj mriežku umyte a vysušte. Tieto 2 časti sú vhodné aj do umývačky riadu. 2. Z prístroja vytiahnite podtácek so zásobníkom usadeniny. Kávovú usadeninu vysypte. Všetko umyte a osušte. Tieto 2 časti sú vhodné aj do umývačky riadu. 3. Otvorte bočné dvierka ku sparovacej jednotke. Sparovacia jednotka dá vytiahnuť von a to tak, že z bokov dielu stlačte tlačidlá a vytiahnete von k sebe. Sparovaciu jednotku umyte, prepláchnite. ! POZOR: nikdy neumývajte sparovaciu jednotku v umývačke riadu. 4. Vonkajší povrch kávovaru stačí utierať vlhkou jemnou handričkou, tak aby sa povrch nepoškodil. Dotykový ovládací panel umývajte obzvlášť opatrne, radšej ešte jemnejším handričkou. 5. Na čistenie zvyškov kávy okolo výstupu / dýzy kávy použite čistiaca kefka. 6. Po umytí všetko vysušte a zostavte späť ako bolo pôvodne. Ak niektorá z časti nebude správne na svojom mieste, tak kávovar bude hlásiť chybu a nepôjde spustiť. ! Nikdy neponárajte prístroj ani jeho prívodný kábel do vody ani inych tekutín. Hrozí riziko poranením elektrickým Soko. ! Na čistením Nepoužívajte drsná ani agresívny čistidlá. 1 2 3 4 6 ODVÁPNENIE SK Ak svieti na kontrolka odvápnenie, tak je prístroj potrebné čo najskôr odvápniť podľa popísaného postupu. 92 1. 2. 3. 4. 5. Zásobník vody naplňte do maxima až po rysku MAX. Do zásobníka nasypte 1 vrecúško odvápňovacieho prostriedku. (V balení sú 3 sáčky). Prístroj zapojte do el. siete. Pod výpust / trysku umiestnite veľkú nádobu s väčším objemom ako je vody v zásobníku. V pohotovostnom režime kávovare stlačte on / off súčasne s tlačidlom espressa a držte aspoň 5 sekúnd. Ozve sa pípnutie a budú blikať kontrolky “odvápnenie” a “espresso”. DO718K 6. 7. 8. 9. 10. 11. Samotný proces odvápnenia je ešte potrebné potvrdiť stlačením tlačidla “espresso”. Ak odvápnenie nechcete teraz vykonať, tak stlačte on / off a proces sa preruší / odloží. Počas procesu odvápňovanie bude blikať len príslušná kontrolka odvápnenie. Z prednej trysky bude v pravidelných intervaloch kvapkať / tiecť čistiaca voda s odvápňovacím prostriedkom. Celý proces trvá niekoľko minút. (± 20 min.) Akonáhle sa prístrojom prekvapka celý zásobník, tak sa rozsvietia obe kontrolky (odvápnenie + espresso). Vylejte nádobu s čistiacou vodou a vložte ju späť na miesto. Zásobník vody z prístroja vylejte, vyčistite a napustite ho čistou vodou a vložte späť do spotrebiča. Proces odvápnenia bude pokračovať. Najskôr sa prekvapkať prvá polovica zásobníka, nasleduje minútová pauza a potom sa cez prístroj prekvapkať zostávajúce voda zo zásobníka a tak sa celý prístroj prečistí. Takto celý proces odvápnenia končí a prístroj sa vypne. 1 3 2 4 5 + 6 7 8 9 10 ! POZOR: Voda z trysky je horúca, preto buďte opatrní a držte ruky aj telo v bezpečnej vzdialenosti, nech sa neobaríme. ! Na odvápňovanie používajte len originálne dodaný prípravok alebo prípravok, ktorý je priamo určený na odvápnenie automatických kávovarov. Iné agresívne prípravky alebo ocot by mohol poškodiť útroby prístroje. ! Ak prístroj nie je pravidelne čistený a odvápňovanie, tak to výrazne skracuje jeho životnosť. MANUÁLNÝ PREPLACH TRYSKY Pokiaľ máte vypnutý automatický preplach po každom zapnutí, tak je tu možnosť proplachávat kávovar manuálne. Takýto preplach sa odporúča robiť pravidelne a to hlavne podľa intenzity využívania kávovaru. 1. Pri preplachu odporúčame vždy pod výpust / dýzu vložiť prázdny hrnček, ktorý tekutiny zachytí. 2. Preplach vykonáte: v pohotovostnom režime kávovare stlačte a podržte on / off + tlačidlo “horúcej vody” 3. Začne blikať kontrolka “horúcej vody” a z trysky začne kvapkať proplachující horúca voda. 4. Akonáhle je preplach hotový, tak sa prístroj vráti do pohotovostného režimu. www.domo-elektro.be DO718K SK + 93 VYPRÁZDNENIE PRÍSTROJA Pokiaľ chcete prístroj na dlhšiu dobu uskladniť, tak je vhodné ho kompletne vyprázdniť, aby v útrobách nadobudla žiadna zvyšková voda. 1. Vyprázdnenie vykonáte: v pohotovostnom režime kávovare stlačte a podržte on / off + tlačidlo “lungo” 2. Začne blikať kontrolka “prázdneho zásobníku” Pokiaľ chcete proces vypnúť, tak stačí stlačiť tlačidlo on / off. 3. Vyberte zásobník vody a kontrolka prázdneho zásobníku zostane svietiť. Zásobník a odkvapkávaciu misku vyčistite. 4. Akonáhle bude program u konca, tak sa automaticky vypne. ! Keď budete kávovar opäť po takomto vyprázdnení potrebovať začať používať, tak prvýkrát z neho urobte 1 šálku horúcej vody, nech sa prístroj zavodní. 1 3 2 + PROBLÉMY A ICH MOŽNÉ RIEŠENIA Problem Možná príčina Možné riešenie Prístroj nefunguje Prístroj nie je zapojený do el. siete. Skontrolujte, či je kábel správne pripojený do zásuvky a či je zásuvka v poriadku. Žiadna (alebo neskoré) odozva na stlačenie akéhokoľvek tlačidla. · Do prístroja nejde správny prúd. Ovládací panel je špinavý. · Káva nie je dostatočne teplá. · Máte studené hrnčeky a káva rýchlo vychladne. Sparovacia jednotka bola veľmi studená. · · · SK · 94 · Prístroj odpojte zo siete a skúste za chvíľu znova. Očistite ovládací panel jemnou handričkou. Hrnčeky si predhrievajte. Skúste 2-3x spustiť horúcu vodu z kávovaru. Z trysky netečie žiadne kafe. Môže sa stať, ak by predtým prístroj kompletne vyprázdnený a dlhšiu dobu uskladnený. Spustite horúcu vodu a nechajte aspoň 1 hrnček pretekať kávovarom. Prvý kafe je veľmi slabé. Je možné, že pri nasypanie kávových zŕn do mlynčeka sa zrná nedostali do mlecieho ústrojenstva. Prvé kávu vylejte. Nasledujúce kávy už by mali byť v poriadku. Káva nemá krémovú penu na povrchu. Kávové zrná nie sú čerstvá. Odporúčame kávu vyhodiť a nasypať čerstvé zrná z práve otvoreného balenia. DO718K Prvky na ovládacom paneli reagujú ťažko / nie sú citlivá. Dotyk k tlačidlám musia prichádzať z prednej strany. Dotýkajte sa tlačidiel z prednej / spodnej strany. Prístroj sa nahrieva veľmi dlhú dobu. Vnútro je zanesený vodným kameňom. Prístroj je potreba odvápniť. Aj napriek tomu, že je zásobník vody prázdny, alebo nie je nasadený, tak sa jeho kontrolka nerozsvieti. Konektor vedľa zásobníka je mokrý / vlhký. Skúste okolie okolo napojenie zásobníka vysušiť. V zásobníku kávovej usadeniny je dosť vody. U mlynčeka je nastavené veľmi jemné mletie a tečúca voda nemôže tak rýchlo jemnú utlačená kávou prestupovať odteká. V zásobníku kávových zŕn nastavte hrubší mletie. Káva z trysky takmer netečie, len kvapká. Namletá káva je príliš jemná V zásobníku kávových zŕn nastavte hrubší mletie. Kontrolka chybne hlási prázdny zásobník kávových zŕn. V zásobníku však káva stále je. Vnútorné vývod mletej kávy je zablokovaný. Na čistenie zvyškov kávy vnútri kávovaru použite čistiace kefu a skúste vyčistiť. Bliká kontrolka odvápnenie. Práve sa vykonáva proces odvápňovania. Prečítajte si postup odvápnenia a pokračujte podľa návodu. Po správnom ukončení sa prístroj automaticky vypne. OHĽAD NA ŽIVOTNÉ PROSTREDIE Symbol na prístroji alebo na jeho obale znamená, že s týmto výrobkom nie je možné nakladať ako s domovým odpadom, ale musí byť odovzdaný na miestach určených na zber a likvidáciu elektrických a elektronických zariadení. Dodržaním tohto odporúčania chránite životné prostredie a zdravie spoluobčanov. Viac informácií o možnostiach likvidácie nebezpečného odpadu obdržíte na obecných alebo mestských úradoch, zberných dvoroch alebo v predajni, kde ste prístroj zakúpili. SK Obalové materiály sú recyklovateľné, nakladajte s nimi podľa predpisov pre životné prostredie. www.domo-elektro.be DO718K 95 Webshop BESTEL de originele Domo-accessoires en -onderdelen online via: COMMANDEZ d’authentiques accessoires et pièces Domo en ligne sur: BESTELLEN SIE die Domo Original-Zubehör und -Ersatzteile online über: ORDER the original Domo accessories and parts online at: webshop.domo-elektro.be of scan hier: ou scannez ici: oder hier scannen: or scan here: LINEA 2000 BV - Dompel 9 - 2200 Herentals - Belgium - Tel: +32 14 21 71 91 - Fax: +32 14 21 54 63-
 1
1
-
 2
2
-
 3
3
-
 4
4
-
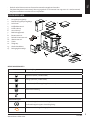 5
5
-
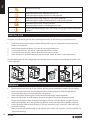 6
6
-
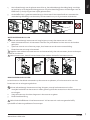 7
7
-
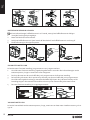 8
8
-
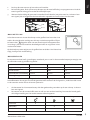 9
9
-
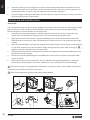 10
10
-
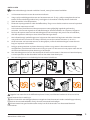 11
11
-
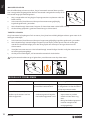 12
12
-
 13
13
-
 14
14
-
 15
15
-
 16
16
-
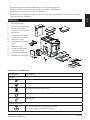 17
17
-
 18
18
-
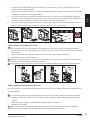 19
19
-
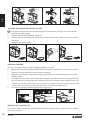 20
20
-
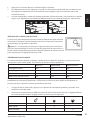 21
21
-
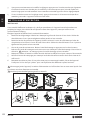 22
22
-
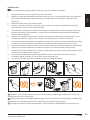 23
23
-
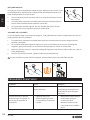 24
24
-
 25
25
-
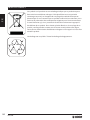 26
26
-
 27
27
-
 28
28
-
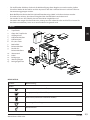 29
29
-
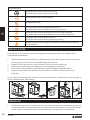 30
30
-
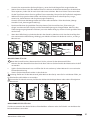 31
31
-
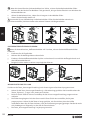 32
32
-
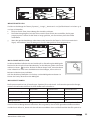 33
33
-
 34
34
-
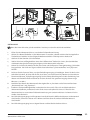 35
35
-
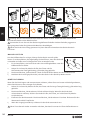 36
36
-
 37
37
-
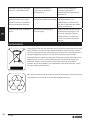 38
38
-
 39
39
-
 40
40
-
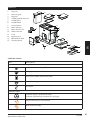 41
41
-
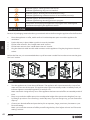 42
42
-
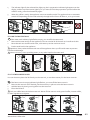 43
43
-
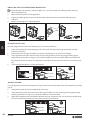 44
44
-
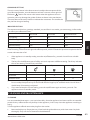 45
45
-
 46
46
-
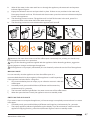 47
47
-
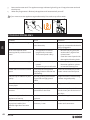 48
48
-
 49
49
-
 50
50
-
 51
51
-
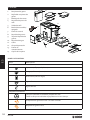 52
52
-
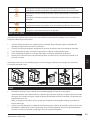 53
53
-
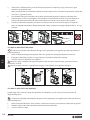 54
54
-
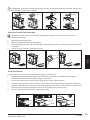 55
55
-
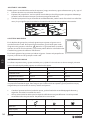 56
56
-
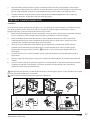 57
57
-
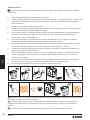 58
58
-
 59
59
-
 60
60
-
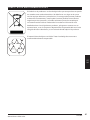 61
61
-
 62
62
-
 63
63
-
 64
64
-
 65
65
-
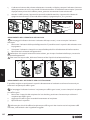 66
66
-
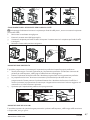 67
67
-
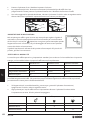 68
68
-
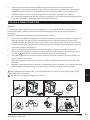 69
69
-
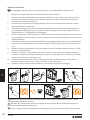 70
70
-
 71
71
-
 72
72
-
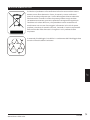 73
73
-
 74
74
-
 75
75
-
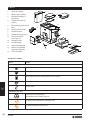 76
76
-
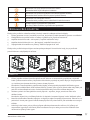 77
77
-
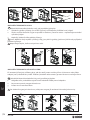 78
78
-
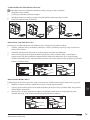 79
79
-
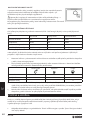 80
80
-
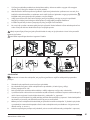 81
81
-
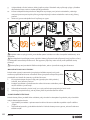 82
82
-
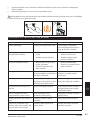 83
83
-
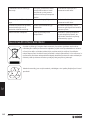 84
84
-
 85
85
-
 86
86
-
 87
87
-
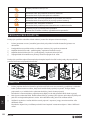 88
88
-
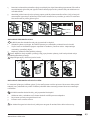 89
89
-
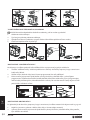 90
90
-
 91
91
-
 92
92
-
 93
93
-
 94
94
-
 95
95
-
 96
96


Domo DO718K de handleiding
- Categorie
- Accessoires voor het maken van koffie
- Type
- de handleiding
in andere talen
- English: Domo DO718K Owner's manual
- italiano: Domo DO718K Manuale del proprietario
- français: Domo DO718K Le manuel du propriétaire
- español: Domo DO718K El manual del propietario
- Deutsch: Domo DO718K Bedienungsanleitung
- slovenčina: Domo DO718K Návod na obsluhu
- čeština: Domo DO718K Návod k obsluze
Gerelateerde papieren

Andere documenten
-
Aeg-Electrolux CA FAMOSA CF 255.1 Handleiding
-
-
-
V-ZUG 25004 Handleiding
-
-
-
Siemens TE506F09DE Handleiding
-