Sony AG-R1 Handleiding
- Categorie
- Accessoires voor mixer / keukenmachine
- Type
- Handleiding

DSC-
RX100/RX100M2
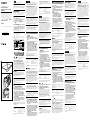
1
OFF
2
3
-3
4
-4
5
1
43 mm 39 mm 13 mm
5 g
1
Before operating the product, please read this manual
thoroughly and retain it for future reference.
< Notice for the customers in the
countries applying EU Directives >
This product has been manufactured by or on behalf
of Sony Corporation, 1-7-1 Konan Minato-ku Tokyo,
108-0075 Japan. Inquiries related to product compliance
based on European Union legislation shall be addressed to
the authorized representative, Sony Deutschland GmbH,
Hedelfinger Strasse 61, 70327 Stuttgart, Germany. For any
service or guarantee matters, please refer to the addresses
provided in the separate service or guarantee documents.
Features
The AG-R1 is an Attachiment Grip made especially
for DSC-RX100/RX100M2 Sony Digital Still Cameras
(referred to below as “camera”).
The attachment grip enables more stable photography by
improving your grip on the camera.
Notes on Use
If you notice any separation or peeling of the attachment
grip, we recommend that you stop using it and replace it
with a new one.
If it gets dirty, wipe it with a dry cloth.
Attaching the Attachment
Grip to the Camera
1 Turn off the power of the camera.
2 Wipe any dirt from the surface of the camera
where the attachment grip is to be attached.
3 Remove the release paper from the
attachment grip. (See illustration -3)
4 Align the top side of the attachment grip
with the front groove on the camera to
temporarily attach the attachment grip. (See
illustration -4)
5 Making sure that the attachment grip is
not tilted or positioned wrongly, press the
whole surface with your finger to firmly
attach it to the camera.
Adhesion is not stable for several hours after attaching the
attachment grip.
Start using the camera again about one day after attaching
the attachment grip.
Specifications
Dimensions (Approx.) 43 mm × 39 mm × 13 mm (w/h/d)
(1 3/4 in. × 1 9/16 in. × 17/32 in.)
Mass Approx. 5 g (0.2 oz)
Included items Attachment Grip (1), Set of printed
documentation
Design and specifications are subject to change without
notice.
/Operating Instructions/Mode d’emploi/
Manual de instrucciones/Bedienungsanleitung/
Gebruiksaanwijzing/Bruksanvisning/Istruzioni per l’uso/
Manual de instruções/
Οδηγίες λειτουργίας
/Instrukcja
obsługi/Návod na obsluhu/Használati útmutató/
Instrucţiuni
de utilizare
/Betjeningsvejledning/Návod k obsluze/
Käyttöohjeet/
Инструкция по эксплуатации
/
/
/
/
AG-R1
Attachment Grip
Poignée de prise en main
© 2013 Sony Corporation Printed in China
4-472-086-01 (1)
4
3
Avant d’utiliser ce produit, veuillez lire cette notice avec
attention et la conserver pour toute référence future.
< Avis aux consommateurs des pays
appliquant les Directives UE >
Ce produit a été fabriqué par ou pour le compte de Sony
Corporation, 1-7-1 Konan Minato-ku Tokyo, 108-0075
Japon. Toutes les questions relatives à la conformité des
produits basées sur la législation européenne doivent être
adressées à son représentant, Sony Deutschland GmbH,
Hedelfinger Strasse 61, 70327 Stuttgart, Allemagne.
Pour toute question relative au Service Après-Vente ou
à la Garantie, merci de bien vouloir vous référer aux
coordonnées qui vous sont communiquées dans les
documents « Service (SAV) » ou Garantie.
Caractéristiques
Le AG-R1 est une poignée de prise en main conçue
spécialement pour les appareils photo numériques Sony
DSC-RX100/RX100M2 (désignés ci-dessous par le terme
appareil photo ).
La poignée de prise en main permet des prises de vue plus
stables par une meilleure saisie de l’appareil photo.
Remarques sur l’emploi
Si vous remarquez que la poignée de prise en main
se détache ou se décolle, il est préférable de ne plus
l’utiliser et de la remplacer par une neuve.
Quand elle est sale, essuyez-la avec un chiffon sec.
Fixation de la poignée de
prise en main à l’appareil
photo
1 Éteignez l’appareil photo.
2 Nettoyez la saleté à l’endroit où la poignée
de prise en main doit être fixée sur l’appareil
photo.
3 Enlevez le papier de la poignée de prise en
main. (Voir l’illustration -3)
4 Alignez le haut de la poignée de prise en
main sur la rainure avant de l’appareil photo
pour fixer temporairement la poignée de
prise en main. (Voir l’illustration -4)
5 Après vous être assuré que la poignée de
prise en main n’est pas inclinée ou mal
positionnée, appuyez sur toute sa surface
avec le doigt pour bien la fixer à l’appareil
photo.
L’adhésion n’est résistante que plusieurs heures après la
fixation de la poignée de prise en main.
N’utilisez l’appareil photo qu’environ un jour après la
fixation de la poignée de prise en main.
Spécifications
Dimensions (environ) 43 mm × 39 mm × 13 mm (l/h/p)
(1 3/4 po. × 1 9/16 po. × 17/32 po.)
Poids Environ 5 g (0,2 oz)
Articles inclus Poignée de prise en main (1), Jeu
de documents imprimés
La conception et les spécifications peuvent être modifiées
sans préavis.
Antes de utilizar el producto, lea detenidamente este
manual y consérvelo para futuras referencias.
< Aviso para los clientes de países en los
que se aplican las directivas de la UE >
Este producto ha sido fabricado por, o en nombre de Sony
Corporation, 1-7-1 Konan Minato-ku Tokyo, 108-0075
Japón. Las consultas relacionadas con la conformidad
del producto basadas en la legislación de la Unión
Europea deben dirigirse al representante autorizado,
Sony Deutschland GmbH, Hedelfinger Strasse 61, 70327
Stuttgart, Alemania. Para cualquier asunto relacionado con
el servicio o la garantía, por favor diríjase a la dirección
indicada en los documentos de servicio o garantía
adjuntados con el producto.
Características
La AG-R1 es una empuñadura de enganche hecha
especialmente para las cámaras fotográficas digitales DSC-
RX100/RX100M2 Sony (a partir de ahora “cámara”).
La empuñadura de enganche permite fotografiar con
mayor estabilidad mejorando la sujeción de la cámara.
Notas sobre la utilización
Si nota cualquier separación o desprendimiento de la
empuñadura de enganche, le recomendamos que deje de
usarla y la sustituya por otra nueva.
Si se ensucia, frótela con un paño seco.
Fijación de la empuñadura
de enganche a la cámara
1 Desconecte la alimentación de la cámara.
2 Elimine la suciedad de la superficie de la
cámara en la que vaya a fijar la empuñadura
de enganche.
3 Retire el papel protector de la empuñadura
de enganche. (Consulte la ilustración -3)
4 Alinee la parte superior de la empuñadura
de enganche con la ranura frontal de
la cámara para fijar temporalmente la
empuñadura de enganche. (Consulte la
ilustración -4)
5 Tras cerciorarse de que la empuñadura de
enganche no esté inclinada ni colocada
erróneamente, presione toda la superficie
con su dedo para fijarla a la cámara.
La adhesión no será estable durante varias horas después
de de haber fijado la empuñadura de enganche.
Comience a utilizar de nuevo la cámara un día
aproximadamente después de haber fijado la empuñadura
de enganche.
Especificaciones
Dimensiones (Aprox.) 43 mm × 39 mm × 13 mm
(an/al/prf)
Peso Aprox. 5 g
Elementos incluidos Empuñadura de enganche (1),
Juego de documentación impresa
El diseño y las especificaciones están sujetos a cambio sin
previo aviso.
Lesen Sie diese Anleitung vor Inbetriebnahme des
Produkts bitte genau durch und bewahren Sie sie zum
späteren Nachschlagen sorgfältig auf.
< Hinweis für Kunden in Ländern, in
denen EU-Richtlinien gelten >
Dieses Produkt wurde von oder für Sony Corporation,
1-7-1 Konan Minato-ku Tokio, 108-0075 Japan hergestellt.
Bei Fragen zur Produktkonformität auf Grundlage der
Gesetzgebung der Europäischen Union kontaktieren Sie
bitte den Bevollmächtigten Sony Deutschland GmbH,
Hedelfinger Strasse 61, 70327 Stuttgart, Deutschland.
Für Kundendienst oder Garantieangelegenheiten
wenden Sie sich bitte an die in den Kundendienst- oder
Garantiedokumenten genannten Adressen.
Merkmale und Funktionen
Der AG-R1 ist ein Zusatzgriff, speziell für die Sony Digital-
Standbildkameras DSC-RX100/RX100M2 (im Folgenden
als „Kamera“ bezeichnet) hergestellt.
Der Zusatzgriff erlaubt stabilere Fotografie durch
verbesserten Griff der Kamera.
Hinweise zur Verwendung
Falls Sie jegliche Ablösungen oder Abpellen am
Zusatzgriff feststellen, empfehlen wir, die Verwendung
zu beenden und einen neuen Griff zu verwenden.
Bei Verschmutzung mit einem trockenen Tuch
abwischen.
Anbringen des
Zusatzgriffs an der
Kamera
1 Schalten Sie die Stromversorgung der
Kamera aus.
2 Wischen Sie jeglichen Schmutz von
der Oberfläche der Kamera ab, wo der
Zusatzgriff angebracht werden soll.
3 Nehmen Sie das Deckpapier vom Zusatzgriff
ab. (Siehe Abbildung -3)
4 Richten Sie die Oberseite des Zusatzgriffs
mit der Frontnut an der Kamera aus, um den
Zusatzgriff provisorisch anzubringen. (Siehe
Abbildung -4)
5 Stellen Sie sicher, dass der Zusatzgriff
nicht geneigt oder falsch positioniert ist,
und drücken Sie die gesamte Fläche mit
Ihrem Finger an, um ihn fest an der Kamera
anzubringen.
Die Anhaftung ist mehrere Stunden nach dem Anbringen
des Zusatzgriffs lang nicht stabil.
Verwenden Sie die Kamera erst nach Ablauf eines Tages
nach dem Anbringen des Zusatzgriffs.
Technische Daten
Abmessungen (ca.) 43 mm × 39 mm × 13 mm
(B / H / T)
Gewicht Ca. 5 g
Mitgeliefertes Zubehör Zusatzgriff (1), Anleitungen
Änderungen bei Design und technischen Daten bleiben
ohne vorherige Ankündigung vorbehalten.
Voordat u dit product gebruikt, dient u deze handleiding
grondig te lezen en te bewaren voor toekomstige naslag.
< Kennisgeving voor klanten in
de landen waar EU-richtlijnen van
toepassing zijn >
Dit product werd geproduceerd door of in opdracht
van Sony Corporation, 1-7-1 Konan Minato-ku Tokyo,
108-0075 Japan. Vragen met betrekking tot product
conformiteit gebaseerd op EU-wetgeving kunnen worden
gericht aan de gemachtigde vertegenwoordiger, Sony
Deutschland GmbH, Hedelfinger Strasse 61, 70327
Stuttgart, Duitsland. Voor service- of garantiezaken
verwijzen wij u door naar de adressen in de afzonderlijke
service of garantie documenten.
Kenmerken
De AG-R1 is een verbindingshandgreep speciaal gemaakt
voor Sony digitale fotocamera’s DSC-RX100/RX100M2
(hierna genoemd "camera").
Met de verbindingshandgreep kunt u stabieler fotograferen
door een verbeterde greep van de camera.
Opmerkingen over het
gebruik
Indien u loskomen of afbladeren van de
verbindingshandgreep merkt, raden we u aan om het
gebruik ervan te stoppen en de greep te vervangen voor
een nieuwe.
Indien hij vuil wordt, veeg hem dan af met een droge
doek.
De verbindingshandgreep
aan de camera bevestigen
1 Zet de camera uit.
2 Veeg vuil van het oppervlak van de camera
waar u de verbindingshandgreep wilt
bevestigen.
3 Verwijder het verpakkingspapier van de
verbindingshandgreep. (Zie afbeelding
-3)
4 Lijn de bovenkant van de
verbindingshandgreep uit met de
voorste groef op de camera om de
verbindingshandgreep tijdelijk te
bevestigen. (Zie afbeelding -4)
5 Druk op het hele oppervlak met uw
vinger om hem stevig aan de camera te
bevestigen en let er daarbij op dat de
verbindingshandgreep niet gekanteld of
verkeerd geplaatst is.
De hechting is gedurende meerdere uren niet stabiel na
bevestiging van de verbindingshandgreep.
Start pas met het gebruiken van uw camera één dag na het
bevestigen van de verbindingshandgreep.
Technische gegevens
Afmetingen (Ongeveer) 43 mm × 39 mm × 13 mm
(b/h/d)
Gewicht Ongeveer 5 g
Bijgeleverde toebehoren Verbindingshandgreep (1),
Handleiding en documentatie
Wijzigingen in ontwerp en technische gegevens
voorbehouden, zonder kennisgeving.
Läs noga igenom denna bruksanvisning innan produkten
tas i bruk. Spara bruksanvisningen.
< Anmärkning för kunder i de länder
som följer EU-direktiv >
Denna produkt har tillverkats av eller på uppdrag av Sony
Corporation, 1-7-1 Konan Minato-ku Tokyo, 108-0075
Japan. Frågor som rör produkternas överensstämmelse,
grundar sig på Europeiska unionens lagstiftning skall
ställas till den auktoriserade representanten, Sony
Deutschland GmbH, Hedelfinger Strasse 61, 70327
Stuttgart, Tyskland. För service och garantiärenden,
vänligen se de adresser som finns i de separata service och
garantihandlingarna.
Egenskaper
AG-R1 är ett extragrepp gjort speciellt för DSC-RX100/
RX100M2 Sony digitala stillbildskameror (nedan kallad
”kamera”).
Extragreppet möjliggör stadig fotografering genom att
förbättra ditt grepp om kameran.
Att tänka på vid användning
Om du märker att extragreppet har börjat släppa i
kanterna eller inte sitter fast ordentligt, rekommenderar
vi att du slutar använda det och byter ut det mot ett nytt.
Om det blivit smutsigt, torka av det med en torr
torkduk.
Montera extragreppet på
kameran
1 Stäng av strömmen till kameran.
2 Torka av smuts från ytan på kameran där
extragreppet ska fästas.
3 Ta bort släppapperet från extragreppet. (Se
illustration -3)
4 Rikta in översidan av extragreppet mot
frontspåret på kameran för att tillfälligt
fästa extragreppet. (Se illustration -4)
5 Kontrollera att extragreppet inte sitter snett
eller är felaktigt placerat, och tryck på hela
ytan med fingret för att fästa det ordentligt
på kameran.
Det dröjer flera timmar innan extragreppet sitter säkert
efter att ha satts på.
Börja använda kameran igen ungefär en dag efter att ha
satt på extragreppet.
Specifikationer
Storlek (Ca.) 43 mm × 39 mm × 13 mm (b/h/d)
Vikt Ca. 5 g
Inkluderade artiklar Extragrepp (1), Uppsättning tryckt
dokumentation
Utförande och specifikationer kan ändras utan föregående
meddelande.
Prima di usare il prodotto raccomandiamo di leggere con
attenzione le presenti istruzioni e di conservarle quindi per
ogni futura necessità.
< Avviso per i clienti residenti nei paesi
che applicano le direttive UE >
Questo prodotto è stato fabbricato da o per conto di Sony
Corporation, 1-7-1 Konan Minato-ku Tokyo, 108-0075
Giappone. Eventuali richieste in merito alla conformità
del prodotto in ambito della legislazione Europea,
dovranno essere indirizzate al rappresentante autorizzato,
Sony Deutschland GmbH, Hedelfinger Strasse 61, 70327
Stuttgart, Germania. Per qualsiasi informazione relativa
al servizio o la garanzia, si prega di fare riferimento agli
indirizzi riportati separatamente sui documenti relativi
all’assistenza o sui certificati di garanzia.
Caratteristiche
L’unità AG-R1 è una Impugnatura progettata
specificamente per le fotocamere digitali DSC-RX100/
RX100M2 Sony (di seguito indicate con il termine
“fotocamera”).
L’impugnatura consente di fotografare con maggiore
stabilità migliorando la presa sulla fotocamera.
Note sull’uso
Se si notano segni di separazione o distacco
dell’impugnatura, si raccomanda di interromperne
l’utilizzo e di sostituirla con una nuova.
Se si sporca, pulirla con un panno asciutto.
Applicazione
dell’impugnatura alla
fotocamera
1 Spegnere la fotocamera.
2 Eliminare ogni traccia di sporco dalla
superficie della fotocamera nel punto in cui
si applicherà l’impugnatura.
3 Rimuovere la carta di protezione
dall’impugnatura. (Vedere la figura -3)
4 Allineare la parte superiore
dell’impugnatura con la scanalatura
anteriore sulla fotocamera per applicare
temporaneamente l’impugnatura. (Vedere
la figura -4)
5 Accertarsi che l’impugnatura non sia storta
o posizionata male e premere l’intera
superficie con il dito per farla aderire
saldamente alla fotocamera.
L’aderenza non si sarà stabilizzata fino a diverse ore dopo
aver applicato l’impugnatura.
Iniziare a utilizzare la fotocamera di nuovo un giorno dopo
aver applicato l’impugnatura.
Caratteristiche tecniche
Dimensioni (circa) 43 mm × 39 mm × 13 mm (l/a/p)
Peso Circa 5 g
Accessori inclusi Impugnatura (1), corredo di
documentazione stampata
Disegno e caratteristiche tecniche sono soggetti a
modifiche senza preavviso.
Antes de utilizar o produto, leia este manual até ao fim e
guarde-o para consultas futuras.
< Nota para os clientes nos países que
apliquem as Directivas da UE >
Este produto foi fabricado por ou em nome da Sony
Corporation, 1-7-1 Konan Minato-ku Tokyo, 108-0075
Japão. As questões relativas à conformidade dos produtos
com base na legislação da União Europeia devem ser
dirigidas ao representante autorizado, Sony Deutschland
GmbH, Hedelfinger Strasse 61, 70327 Stuttgart, Alemanha.
Para quaisquer assuntos de serviço ou garantia, consulte
os endereços fornecidos nos documentos de serviço ou de
garantia.
Características
A AG-R1 é uma Pega Ergonómica fabricada
especificamente para as Câmaras Fotográficas Digitais
DSC-RX100/RX100M2 da Sony (referidas abaixo como
“câmara”).
A pega ergonómica permite tirar fotografias de uma forma
mais estável ao agarrar melhor a câmara.
Notas de utilização
Se notar qualquer separação ou remoção da pega
ergonómica, recomendamos que pare de utilizá-la e
substitua-a por uma nova.
Se ficar suja, limpe-a com um pano seco.
Montar a pega
ergonómica na câmara
1 Desligue a câmara.
2 Remova a sujidade da superfície da câmara
onde a pega ergonómica será montada.
3 Retire o papel de libertação da pega
ergonómica. (Consulte a Ilustração -3)
4 Alinhe o lado superior da pega ergonómica
com a ranhura frontal na câmara para
montar temporariamente a pega
ergonómica. (Consulte a Ilustração -4)
5 Certifique-se de que a pega ergonómica
não está inclinada ou posicionada
incorrectamente e pressione toda a
superfície com o dedo para montá-la
firmemente na câmara.
A aderência não é estável durante várias horas após montar
a pega ergonómica.
Comece a utilizar a câmara novamente cerca de um dia
após montar a pega ergonómica.
Características técnicas
Dimensões (Aprox.) 43 mm × 39 mm × 13 mm (l/a/p)
Peso Aprox. 5 g
Itens incluídos Pega ergonómica (1), Documentos
impressos
O design e as especificações estão sujeitos a alterações sem
aviso prévio.
Πριν θέσετε σε λειτουργία αυτό το προϊόν, διαβάστε
προσεκτικά το παρόν εγχειρίδιο και κρατήστε το για
ελλοντική αναφορά.
< Σημείωση για τους πελάτες στις χώρες
που ισχύουν οι οδηγίες της Ε.Ε. >
Αυτό το προϊόν έχει κατασκευαστεί από ή για λογαριασό
τη Sony Corporation, 1-7-1 Konan Minato-ku Τόκυο,
108-0075 Ιαπωνία. Ερωτήσει σχετικά ε την συόρφωση
του προϊόντο ω προ τη νοοθεσία τη Ευρωπαϊκή
Ένωση θα πρέπει να απευθύνονται στον εξουσιοδοτηένο
εκπρόσωπο Sony Deutschland GmbH, Hedelfinger
Strasse 61, 70327 Stuttgart, Γερανία. Για οποιοδήποτε
θέα υποστήριξη ή εγγύηση του προϊόντο, παρακαλώ
ανατρέξατε στι διευθύνσει που παρέχονται στα ειδικά
έγγραφα υποστήριξη ή εγγύηση.
Χαρακτηριστικά
Το AG-R1 είναι ια πρόσθετη λαβή κατασκευασένη
ειδικά για τι ψηφιακέ φωτογραφικέ ηχανέ DSC-
RX100/RX100M2 τη Sony (αναφέρονται παρακάτω ω
"κάερα").
Η πρόσθετη λαβή παρέχει τη δυνατότητα πιο σταθερή
φωτογράφηση καθώ βελτιώνει το κράτηα τη κάερα.
Σημειώσεις σχετικά με τη
χρήση
Αν παρατηρήσετε τυχόν αποκόλληση ή απόσπαση τη
πρόσθετη λαβή, συνιστάται η διακοπή χρήση τη και
η αντικατάστασή τη ε ια νέα λαβή.
Αν λερωθεί, σκουπίστε την ε ένα στεγνό πανί.
Επικόλληση της
πρόσθετης λαβής στην
κάμερα
1 Απενεργοποιήστε την κάμερα.
2 Σκουπίστε τυχόν βρομιά από την επιφάνεια
της κάμερας όπου θα επικολληθεί η
πρόσθετη λαβή.
3 Αφαιρέστε το χαρτί απελευθέρωσης από
την πρόσθετη λαβή. (Βλ. εικόνα -3)
4 Ευθυγραμμίστε την επάνω πλευρά της
πρόσθετης λαβής με την μπροστινή
εγκοπή της κάμερας για να επικολλήσετε
προσωρινά την πρόσθετη λαβή. (Βλ. εικόνα
-4)
5 Βεβαιωθείτε ότι η πρόσθετη λαβή δεν
έχει κλίση και ότι δεν έχει τοποθετηθεί
εσφαλμένα και πιέστε ολόκληρη την
επιφάνεια με το δάκτυλό σας για να την
επικολλήσετε γερά στην κάμερα.
Η επικόλληση δεν είναι σταθερή για αρκετέ ώρε ετά
από τη σύνδεση τη πρόσθετη λαβή.
Ξεκινήστε να χρησιοποιείτε την κάερα πάλι περίπου ια
έρα ετά από την επικόλληση τη πρόσθετη λαβή.
Προδιαγραφές
ιαστάσει (Περίπου) 43 mm × 39 mm × 13 mm
(π/υ/β)
Μάζα Περίπου 5 g
Περιεχόενα αντικείενα Πρόσθετη λαβή (1), Σύνολο
έντυπη τεκηρίωση
Ο σχεδιασό και οι προδιαγραφέ υπόκεινται σε αλλαγή
χωρί προειδοποίηση.
Pagina laadt ...
Documenttranscriptie
4-472-086-01 (1) アタッチメントグリップ Attachment Grip Poignée de prise en main 防滑手柄 取扱説明書 /Operating Instructions/Mode d’emploi/ Manual de instrucciones/Bedienungsanleitung/ Gebruiksaanwijzing/Bruksanvisning/Istruzioni per l’uso/ Manual de instruções/Οδηγίες λειτουργίας/Instrukcja obsługi/Návod na obsluhu/Használati útmutató/Instrucţiuni de utilizare/Betjeningsvejledning/Návod k obsluze/ Käyttöohjeet/Инструкция по эксплуатации/ / / / お買い上げいただきありがとうございます。 主な特長 本機はソニー製デジタルスチルカメラ(以下、カメラとする)DSCRX100/RX100M2用のアタッチメントグリップです。 本機はカメラのホールド性を高めて、安定した撮影を可能にしま す。 使用上のご注意 ˎ 使用中に浮きやはがれが見つかった場合は、使用を中止して、新 しいアタッチメントグリップに取り替えることをおすすめしま す。 ˎ グリップ部が汚れたら、乾いた布でふいてください。 取り付けかた 1 2 3 AG-R1 4 © 2013 Sony Corporation Printed in China 5 カメラの電源をOFFにする。 アタッチメントグリップを取り付ける部分のカメ ラ表面の汚れをきれいにふき取る。 アタッチメントグリップの剥離紙をはがす。 (イラ スト-3 ) カメラのフロント溝に、上部を合わせて仮貼りを する。 (イラスト-4 ) アタッチメントグリップの左右上下に曲がりやず れが無いことを確認し、アタッチメントグリップ 全面を指で押しつけて、しっかりと接着させる。 接着後、数時間は接着力が安定しません。 約1日経過してから、ご使用を開始してください。 主な仕様 外形寸法(約):43 mm × 39 mm × 13 mm (幅/高さ/奥行き) 約5g 質量: 同梱物: アタッチメントグリップ( 1 )、印刷物一式 仕様および外観は、改良のため予告なく変更することがあります が、ご了承ください。 Avant d’utiliser ce produit, veuillez lire cette notice avec attention et la conserver pour toute référence future. < Avis aux consommateurs des pays appliquant les Directives UE > Ce produit a été fabriqué par ou pour le compte de Sony Corporation, 1-7-1 Konan Minato-ku Tokyo, 108-0075 Japon. Toutes les questions relatives à la conformité des produits basées sur la législation européenne doivent être adressées à son représentant, Sony Deutschland GmbH, Hedelfinger Strasse 61, 70327 Stuttgart, Allemagne. Pour toute question relative au Service Après-Vente ou à la Garantie, merci de bien vouloir vous référer aux coordonnées qui vous sont communiquées dans les documents « Service (SAV) » ou Garantie. Caractéristiques Le AG-R1 est une poignée de prise en main conçue spécialement pour les appareils photo numériques Sony DSC-RX100/RX100M2 (désignés ci-dessous par le terme « appareil photo »). La poignée de prise en main permet des prises de vue plus stables par une meilleure saisie de l’appareil photo. Remarques sur l’emploi ˎˎSi vous remarquez que la poignée de prise en main se détache ou se décolle, il est préférable de ne plus l’utiliser et de la remplacer par une neuve. ˎˎQuand elle est sale, essuyez-la avec un chiffon sec. Fixation de la poignée de prise en main à l’appareil photo 1 Éteignez l’appareil photo. 2 Nettoyez la saleté à l’endroit où la poignée de prise en main doit être fixée sur l’appareil photo. 3 Enlevez le papier de la poignée de prise en main. (Voir l’illustration -3) 4 Alignez le haut de la poignée de prise en main sur la rainure avant de l’appareil photo pour fixer temporairement la poignée de prise en main. (Voir l’illustration -4) 5 Après vous être assuré que la poignée de prise en main n’est pas inclinée ou mal positionnée, appuyez sur toute sa surface avec le doigt pour bien la fixer à l’appareil photo. L’adhésion n’est résistante que plusieurs heures après la fixation de la poignée de prise en main. N’utilisez l’appareil photo qu’environ un jour après la fixation de la poignée de prise en main. Before operating the product, please read this manual thoroughly and retain it for future reference. 3 < Notice for the customers in the countries applying EU Directives > This product has been manufactured by or on behalf of Sony Corporation, 1-7-1 Konan Minato-ku Tokyo, 108-0075 Japan. Inquiries related to product compliance based on European Union legislation shall be addressed to the authorized representative, Sony Deutschland GmbH, Hedelfinger Strasse 61, 70327 Stuttgart, Germany. For any service or guarantee matters, please refer to the addresses provided in the separate service or guarantee documents. Features 4 The AG-R1 is an Attachiment Grip made especially for DSC-RX100/RX100M2 Sony Digital Still Cameras (referred to below as “camera”). The attachment grip enables more stable photography by improving your grip on the camera. Notes on Use ˎˎIf you notice any separation or peeling of the attachment grip, we recommend that you stop using it and replace it with a new one. ˎˎIf it gets dirty, wipe it with a dry cloth. Attaching the Attachment Grip to the Camera 1 Turn off the power of the camera. 2 Wipe any dirt from the surface of the camera where the attachment grip is to be attached. 3 Remove the release paper from the attachment grip. (See illustration -3) 4 Align the top side of the attachment grip with the front groove on the camera to temporarily attach the attachment grip. (See illustration -4) 5 Making sure that the attachment grip is not tilted or positioned wrongly, press the whole surface with your finger to firmly attach it to the camera. Adhesion is not stable for several hours after attaching the attachment grip. Start using the camera again about one day after attaching the attachment grip. Specifications Dimensions (Approx.) 43 mm × 39 mm × 13 mm (w/h/d) (1 3/4 in. × 1 9/16 in. × 17/32 in.) Mass Approx. 5 g (0.2 oz) Included items Attachment Grip (1), Set of printed documentation Design and specifications are subject to change without notice. Spécifications Dimensions (environ) 43 mm × 39 mm × 13 mm (l/h/p) (1 3/4 po. × 1 9/16 po. × 17/32 po.) Poids Environ 5 g (0,2 oz) Articles inclus Poignée de prise en main (1), Jeu de documents imprimés La conception et les spécifications peuvent être modifiées sans préavis. Antes de utilizar el producto, lea detenidamente este manual y consérvelo para futuras referencias. < Aviso para los clientes de países en los que se aplican las directivas de la UE > Este producto ha sido fabricado por, o en nombre de Sony Corporation, 1-7-1 Konan Minato-ku Tokyo, 108-0075 Japón. Las consultas relacionadas con la conformidad del producto basadas en la legislación de la Unión Europea deben dirigirse al representante autorizado, Sony Deutschland GmbH, Hedelfinger Strasse 61, 70327 Stuttgart, Alemania. Para cualquier asunto relacionado con el servicio o la garantía, por favor diríjase a la dirección indicada en los documentos de servicio o garantía adjuntados con el producto. Características La AG-R1 es una empuñadura de enganche hecha especialmente para las cámaras fotográficas digitales DSCRX100/RX100M2 Sony (a partir de ahora “cámara”). La empuñadura de enganche permite fotografiar con mayor estabilidad mejorando la sujeción de la cámara. Notas sobre la utilización ˎˎSi nota cualquier separación o desprendimiento de la empuñadura de enganche, le recomendamos que deje de usarla y la sustituya por otra nueva. ˎˎSi se ensucia, frótela con un paño seco. Fijación de la empuñadura de enganche a la cámara 1 Desconecte la alimentación de la cámara. 2 Elimine la suciedad de la superficie de la cámara en la que vaya a fijar la empuñadura de enganche. 3 Retire el papel protector de la empuñadura de enganche. (Consulte la ilustración -3) 4 Alinee la parte superior de la empuñadura de enganche con la ranura frontal de la cámara para fijar temporalmente la empuñadura de enganche. (Consulte la ilustración -4) 5 Tras cerciorarse de que la empuñadura de enganche no esté inclinada ni colocada erróneamente, presione toda la superficie con su dedo para fijarla a la cámara. La adhesión no será estable durante varias horas después de de haber fijado la empuñadura de enganche. Comience a utilizar de nuevo la cámara un día aproximadamente después de haber fijado la empuñadura de enganche. Especificaciones Dimensiones (Aprox.) Peso Elementos incluidos 43 mm × 39 mm × 13 mm (an/al/prf) Aprox. 5 g Empuñadura de enganche (1), Juego de documentación impresa El diseño y las especificaciones están sujetos a cambio sin previo aviso. Lesen Sie diese Anleitung vor Inbetriebnahme des Produkts bitte genau durch und bewahren Sie sie zum späteren Nachschlagen sorgfältig auf. < Hinweis für Kunden in Ländern, in denen EU-Richtlinien gelten > Dieses Produkt wurde von oder für Sony Corporation, 1-7-1 Konan Minato-ku Tokio, 108-0075 Japan hergestellt. Bei Fragen zur Produktkonformität auf Grundlage der Gesetzgebung der Europäischen Union kontaktieren Sie bitte den Bevollmächtigten Sony Deutschland GmbH, Hedelfinger Strasse 61, 70327 Stuttgart, Deutschland. Für Kundendienst oder Garantieangelegenheiten wenden Sie sich bitte an die in den Kundendienst- oder Garantiedokumenten genannten Adressen. Merkmale und Funktionen Der AG-R1 ist ein Zusatzgriff, speziell für die Sony DigitalStandbildkameras DSC-RX100/RX100M2 (im Folgenden als „Kamera“ bezeichnet) hergestellt. Der Zusatzgriff erlaubt stabilere Fotografie durch verbesserten Griff der Kamera. Hinweise zur Verwendung ˎˎFalls Sie jegliche Ablösungen oder Abpellen am Zusatzgriff feststellen, empfehlen wir, die Verwendung zu beenden und einen neuen Griff zu verwenden. ˎˎBei Verschmutzung mit einem trockenen Tuch abwischen. Anbringen des Zusatzgriffs an der Kamera 1 Schalten Sie die Stromversorgung der Kamera aus. 2 Wischen Sie jeglichen Schmutz von der Oberfläche der Kamera ab, wo der Zusatzgriff angebracht werden soll. 3 Nehmen Sie das Deckpapier vom Zusatzgriff ab. (Siehe Abbildung -3) 4 Richten Sie die Oberseite des Zusatzgriffs mit der Frontnut an der Kamera aus, um den Zusatzgriff provisorisch anzubringen. (Siehe Abbildung -4) 5 Stellen Sie sicher, dass der Zusatzgriff nicht geneigt oder falsch positioniert ist, und drücken Sie die gesamte Fläche mit Ihrem Finger an, um ihn fest an der Kamera anzubringen. Die Anhaftung ist mehrere Stunden nach dem Anbringen des Zusatzgriffs lang nicht stabil. Verwenden Sie die Kamera erst nach Ablauf eines Tages nach dem Anbringen des Zusatzgriffs. Technische Daten Abmessungen (ca.) 43 mm × 39 mm × 13 mm (B / H / T) Gewicht Ca. 5 g Mitgeliefertes Zubehör Zusatzgriff (1), Anleitungen Änderungen bei Design und technischen Daten bleiben ohne vorherige Ankündigung vorbehalten. Voordat u dit product gebruikt, dient u deze handleiding grondig te lezen en te bewaren voor toekomstige naslag. < Kennisgeving voor klanten in de landen waar EU-richtlijnen van toepassing zijn > Dit product werd geproduceerd door of in opdracht van Sony Corporation, 1-7-1 Konan Minato-ku Tokyo, 108-0075 Japan. Vragen met betrekking tot product conformiteit gebaseerd op EU-wetgeving kunnen worden gericht aan de gemachtigde vertegenwoordiger, Sony Deutschland GmbH, Hedelfinger Strasse 61, 70327 Stuttgart, Duitsland. Voor service- of garantiezaken verwijzen wij u door naar de adressen in de afzonderlijke service of garantie documenten. Kenmerken De AG-R1 is een verbindingshandgreep speciaal gemaakt voor Sony digitale fotocamera’s DSC-RX100/RX100M2 (hierna genoemd "camera"). Met de verbindingshandgreep kunt u stabieler fotograferen door een verbeterde greep van de camera. Opmerkingen over het gebruik ˎˎIndien u loskomen of afbladeren van de verbindingshandgreep merkt, raden we u aan om het gebruik ervan te stoppen en de greep te vervangen voor een nieuwe. ˎˎIndien hij vuil wordt, veeg hem dan af met een droge doek. De verbindingshandgreep aan de camera bevestigen 1 Zet de camera uit. 2 Veeg vuil van het oppervlak van de camera waar u de verbindingshandgreep wilt bevestigen. 3 Verwijder het verpakkingspapier van de verbindingshandgreep. (Zie afbeelding -3) 4 Lijn de bovenkant van de verbindingshandgreep uit met de voorste groef op de camera om de verbindingshandgreep tijdelijk te bevestigen. (Zie afbeelding -4) 5 Druk op het hele oppervlak met uw vinger om hem stevig aan de camera te bevestigen en let er daarbij op dat de verbindingshandgreep niet gekanteld of verkeerd geplaatst is. Caratteristiche L’unità AG-R1 è una Impugnatura progettata specificamente per le fotocamere digitali DSC-RX100/ RX100M2 Sony (di seguito indicate con il termine “fotocamera”). L’impugnatura consente di fotografare con maggiore stabilità migliorando la presa sulla fotocamera. Note sull’uso ˎˎSe si notano segni di separazione o distacco dell’impugnatura, si raccomanda di interromperne l’utilizzo e di sostituirla con una nuova. ˎˎSe si sporca, pulirla con un panno asciutto. Applicazione dell’impugnatura alla fotocamera Wijzigingen in ontwerp en technische gegevens voorbehouden, zonder kennisgeving. 1 Spegnere la fotocamera. 2 Eliminare ogni traccia di sporco dalla superficie della fotocamera nel punto in cui si applicherà l’impugnatura. 3 Rimuovere la carta di protezione dall’impugnatura. (Vedere la figura -3) 4 Allineare la parte superiore dell’impugnatura con la scanalatura anteriore sulla fotocamera per applicare temporaneamente l’impugnatura. (Vedere la figura -4) 5 Accertarsi che l’impugnatura non sia storta o posizionata male e premere l’intera superficie con il dito per farla aderire saldamente alla fotocamera. Läs noga igenom denna bruksanvisning innan produkten tas i bruk. Spara bruksanvisningen. L’aderenza non si sarà stabilizzata fino a diverse ore dopo aver applicato l’impugnatura. Iniziare a utilizzare la fotocamera di nuovo un giorno dopo aver applicato l’impugnatura. De hechting is gedurende meerdere uren niet stabiel na bevestiging van de verbindingshandgreep. Start pas met het gebruiken van uw camera één dag na het bevestigen van de verbindingshandgreep. Technische gegevens Afmetingen (Ongeveer) 43 mm × 39 mm × 13 mm (b/h/d) Gewicht Ongeveer 5 g Bijgeleverde toebehoren Verbindingshandgreep (1), Handleiding en documentatie < Anmärkning för kunder i de länder som följer EU-direktiv > Denna produkt har tillverkats av eller på uppdrag av Sony Corporation, 1-7-1 Konan Minato-ku Tokyo, 108-0075 Japan. Frågor som rör produkternas överensstämmelse, grundar sig på Europeiska unionens lagstiftning skall ställas till den auktoriserade representanten, Sony Deutschland GmbH, Hedelfinger Strasse 61, 70327 Stuttgart, Tyskland. För service och garantiärenden, vänligen se de adresser som finns i de separata service och garantihandlingarna. Egenskaper AG-R1 är ett extragrepp gjort speciellt för DSC-RX100/ RX100M2 Sony digitala stillbildskameror (nedan kallad ”kamera”). Extragreppet möjliggör stadig fotografering genom att förbättra ditt grepp om kameran. Att tänka på vid användning ˎˎOm du märker att extragreppet har börjat släppa i kanterna eller inte sitter fast ordentligt, rekommenderar vi att du slutar använda det och byter ut det mot ett nytt. ˎˎOm det blivit smutsigt, torka av det med en torr torkduk. Montera extragreppet på kameran 1 Stäng av strömmen till kameran. 2 Torka av smuts från ytan på kameran där extragreppet ska fästas. 3 Ta bort släppapperet från extragreppet. (Se illustration -3) 4 Rikta in översidan av extragreppet mot frontspåret på kameran för att tillfälligt fästa extragreppet. (Se illustration -4) 5 Kontrollera att extragreppet inte sitter snett eller är felaktigt placerat, och tryck på hela ytan med fingret för att fästa det ordentligt på kameran. Det dröjer flera timmar innan extragreppet sitter säkert efter att ha satts på. Börja använda kameran igen ungefär en dag efter att ha satt på extragreppet. Specifikationer Storlek (Ca.) 43 mm × 39 mm × 13 mm (b/h/d) Vikt Ca. 5 g Inkluderade artiklar Extragrepp (1), Uppsättning tryckt dokumentation Utförande och specifikationer kan ändras utan föregående meddelande. Prima di usare il prodotto raccomandiamo di leggere con attenzione le presenti istruzioni e di conservarle quindi per ogni futura necessità. < Avviso per i clienti residenti nei paesi che applicano le direttive UE > Questo prodotto è stato fabbricato da o per conto di Sony Corporation, 1-7-1 Konan Minato-ku Tokyo, 108-0075 Giappone. Eventuali richieste in merito alla conformità del prodotto in ambito della legislazione Europea, dovranno essere indirizzate al rappresentante autorizzato, Sony Deutschland GmbH, Hedelfinger Strasse 61, 70327 Stuttgart, Germania. Per qualsiasi informazione relativa al servizio o la garanzia, si prega di fare riferimento agli indirizzi riportati separatamente sui documenti relativi all’assistenza o sui certificati di garanzia. Caratteristiche tecniche Dimensioni (circa) 43 mm × 39 mm × 13 mm (l/a/p) Peso Circa 5 g Accessori inclusi Impugnatura (1), corredo di documentazione stampata Disegno e caratteristiche tecniche sono soggetti a modifiche senza preavviso. Antes de utilizar o produto, leia este manual até ao fim e guarde-o para consultas futuras. < Nota para os clientes nos países que apliquem as Directivas da UE > Este produto foi fabricado por ou em nome da Sony Corporation, 1-7-1 Konan Minato-ku Tokyo, 108-0075 Japão. As questões relativas à conformidade dos produtos com base na legislação da União Europeia devem ser dirigidas ao representante autorizado, Sony Deutschland GmbH, Hedelfinger Strasse 61, 70327 Stuttgart, Alemanha. Para quaisquer assuntos de serviço ou garantia, consulte os endereços fornecidos nos documentos de serviço ou de garantia. Características A AG-R1 é uma Pega Ergonómica fabricada especificamente para as Câmaras Fotográficas Digitais DSC-RX100/RX100M2 da Sony (referidas abaixo como “câmara”). A pega ergonómica permite tirar fotografias de uma forma mais estável ao agarrar melhor a câmara. Notas de utilização ˎˎSe notar qualquer separação ou remoção da pega ergonómica, recomendamos que pare de utilizá-la e substitua-a por uma nova. ˎˎSe ficar suja, limpe-a com um pano seco. Montar a pega ergonómica na câmara 1 Desligue a câmara. 2 Remova a sujidade da superfície da câmara onde a pega ergonómica será montada. 3 Retire o papel de libertação da pega ergonómica. (Consulte a Ilustração -3) 4 Alinhe o lado superior da pega ergonómica com a ranhura frontal na câmara para montar temporariamente a pega ergonómica. (Consulte a Ilustração -4) 5 Certifique-se de que a pega ergonómica não está inclinada ou posicionada incorrectamente e pressione toda a superfície com o dedo para montá-la firmemente na câmara. A aderência não é estável durante várias horas após montar a pega ergonómica. Comece a utilizar a câmara novamente cerca de um dia após montar a pega ergonómica. Características técnicas Dimensões (Aprox.) 43 mm × 39 mm × 13 mm (l/a/p) Peso Aprox. 5 g Itens incluídos Pega ergonómica (1), Documentos impressos O design e as especificações estão sujeitos a alterações sem aviso prévio. Πριν θέσετε σε λειτουργία αυτό το προϊόν, διαβάστε προσεκτικά το παρόν εγχειρίδιο και κρατήστε το για μελλοντική αναφορά. < Σημείωση για τους πελάτες στις χώρες που ισχύουν οι οδηγίες της Ε.Ε. > Αυτό το προϊόν έχει κατασκευαστεί από ή για λογαριασμό της Sony Corporation, 1-7-1 Konan Minato-ku Τόκυο, 108-0075 Ιαπωνία. Ερωτήσεις σχετικά με την συμμόρφωση του προϊόντος ως προς τη νομοθεσία της Ευρωπαϊκής Ένωσης θα πρέπει να απευθύνονται στον εξουσιοδοτημένο εκπρόσωπο Sony Deutschland GmbH, Hedelfinger Strasse 61, 70327 Stuttgart, Γερμανία. Για οποιοδήποτε θέμα υποστήριξης ή εγγύησης του προϊόντος, παρακαλώ ανατρέξατε στις διευθύνσεις που παρέχονται στα ειδικά έγγραφα υποστήριξης ή εγγύησης. Χαρακτηριστικά Το AG-R1 είναι μια πρόσθετη λαβή κατασκευασμένη ειδικά για τις ψηφιακές φωτογραφικές μηχανές DSCRX100/RX100M2 της Sony (αναφέρονται παρακάτω ως "κάμερα"). Η πρόσθετη λαβή παρέχει τη δυνατότητα πιο σταθερής φωτογράφησης καθώς βελτιώνει το κράτημα της κάμερας. Σημειώσεις σχετικά με τη χρήση ˎˎΑν παρατηρήσετε τυχόν αποκόλληση ή απόσπαση της πρόσθετης λαβής, συνιστάται η διακοπή χρήσης της και η αντικατάστασή της με μια νέα λαβή. ˎˎΑν λερωθεί, σκουπίστε την με ένα στεγνό πανί. Επικόλληση της πρόσθετης λαβής στην κάμερα 1 Απενεργοποιήστε την κάμερα. 2 Σκουπίστε τυχόν βρομιά από την επιφάνεια της κάμερας όπου θα επικολληθεί η πρόσθετη λαβή. 3 Αφαιρέστε το χαρτί απελευθέρωσης από την πρόσθετη λαβή. (Βλ. εικόνα -3) 4 Ευθυγραμμίστε την επάνω πλευρά της πρόσθετης λαβής με την μπροστινή εγκοπή της κάμερας για να επικολλήσετε προσωρινά την πρόσθετη λαβή. (Βλ. εικόνα -4) 5 Βεβαιωθείτε ότι η πρόσθετη λαβή δεν έχει κλίση και ότι δεν έχει τοποθετηθεί εσφαλμένα και πιέστε ολόκληρη την επιφάνεια με το δάκτυλό σας για να την επικολλήσετε γερά στην κάμερα. Η επικόλληση δεν είναι σταθερή για αρκετές ώρες μετά από τη σύνδεση της πρόσθετης λαβής. Ξεκινήστε να χρησιμοποιείτε την κάμερα πάλι περίπου μια μέρα μετά από την επικόλληση της πρόσθετης λαβής. Προδιαγραφές Διαστάσεις (Περίπου) 43 mm × 39 mm × 13 mm (π/υ/β) Μάζα Περίπου 5 g Περιεχόμενα αντικείμενα Πρόσθετη λαβή (1), Σύνολο έντυπης τεκμηρίωσης Ο σχεδιασμός και οι προδιαγραφές υπόκεινται σε αλλαγή χωρίς προειδοποίηση.-
 1
1
-
 2
2


Sony AG-R1 Handleiding
- Categorie
- Accessoires voor mixer / keukenmachine
- Type
- Handleiding
in andere talen
- English: Sony AG-R1 Operating instructions
- italiano: Sony AG-R1 Istruzioni per l'uso
- русский: Sony AG-R1 Инструкция по эксплуатации
- français: Sony AG-R1 Mode d'emploi
- español: Sony AG-R1 Instrucciones de operación
- Deutsch: Sony AG-R1 Bedienungsanleitung
- português: Sony AG-R1 Instruções de operação
- slovenčina: Sony AG-R1 Návod na používanie
- dansk: Sony AG-R1 Betjeningsvejledning
- suomi: Sony AG-R1 Käyttö ohjeet
- čeština: Sony AG-R1 Operativní instrukce
- svenska: Sony AG-R1 Bruksanvisningar
- polski: Sony AG-R1 Instrukcja obsługi
- română: Sony AG-R1 Instrucțiuni de utilizare