
OWNER’S MANUAL
Monitor XT10™
GUIDE DE DÉMARRAGE RAPIDE | GUÍA DE INICIO RÁPIDO | GUIDA RAPIDA |
SCHNELLSTARTANLEITUNG | SKRÓCONA INSTRUKCJA OBSŁUGI | SNABBSTARTSGUIDE |
SNELSTARTGIDS | 快速入门指南 | クイックス タートガイド

English
Check that the following items came in the box.
Unpack
Monitor XT10
Subwoofer Power Cable Documentation
For an optimal listening experience, placement is everything. Place the subwoofer in one of the
configurations below, and make adjustments according to your preferences.
Position the subwoofer
1
2
OR
Listening with one subwoofer
For a single-subwoofer setup, position the subwoofer on
either side of the front speakers and along the same wall.
For the best sound and minimal distortion, the subwoofer
should be positioned approximately 6 inches from the wall.
For optimal performance:
• Do not place the subwoofer in the middle of the
listening area.
• Ensure each subwoofer is at least 6 inches from the
wall.
• Experiment with placement. Moving the subwoofer a
few feet in any direction can make a big difference.
Listening with multiple subwoofers
For a multi-subwoofer setup, position the first subwoofer on either side of the front speakers and along the
same wall. Position the second subwoofer in an opposite, diagonal position from the first subwoofer.
Set up the subwoofer
Documentation
QSG + Reg Card Icons
Reg Card Icon

English
Plug in the power cable
Plug the power cable into the subwoofer, then into a wall outlet.
Connect the subwoofer to your amplifier or AVR
4
Select one of the two options below to connect the subwoofer to your amplifier or receiver.
NOTE: Make sure the subwoofer isn’t plugged into AC power before connecting it to your amplifier/receiver.
Line in setup
This method is recommended for systems with no LFE/subwoofer output jack, such as 2-channel systems.
1. Turn off the power on your amplifier/receiver.
2. Connect standard RCA cables from the front left and right pre-out jacks of the amplifier/receiver.
3. Set the volume knob to the 12 o’clock position.
4. Adjust the low-pass filter knob to blend the subwoofer and main speakers to your preferences.
LFE setup
1. Turn off the power on your amplifier/receiver.
2. Connect the LFE cable from your receiver to the left white RCA line input on the subwoofer.
NOTE: The ‘left white RCA line input’ is labeled as ‘L/LFE’.
3. Turn the low-pass filter knob on the subwoofer to 160 Hz.
4. Set the volume knob to the 12 o’clock position.
5. Follow the bass management instructions on your amplifier or AVR to integrate the subwoofer.
3
Setup is now complete!
Watch TV or listen to music and adjust the subwoofer settings to your preferences. See the next page for a
diagram of the subwoofer back panel.
For support, FAQs, and more information about the subwoofer, visit polkaudio.com/MonitorXT10.
5

English
MAXMIN
VOLUME
Monitor XT10 subwoofer
LOW PASS LINE IN
L/LFE
R
100
40 160
(LFE)
AC IN
2022-07-25
2022-06-07 Updated phase and power switch position
2022-07-25 Removed fuse symbol
HBP4830
Full Size
Josue Baltezar
White
Date
Drawing #
Scale
Prepared by
Color
Monitor XT10 Amp Back Panel NA
DateRevision Description
Pad printingProcess
Finish
Notes
1. Low pass filter knob
2. Phase switch
3. LED power indicator
4. On/auto/off power switch
5. Volume control knob
6. Line in (LFE = White RCA)
7. AC power inlet
Subwoofer back-panel controls
Subwoofer features
1
2 4
3
5 6
7

English
Type, power, and frequency
Speaker type Subwoofer
Base type Bass reflex (ported)
Overall frequency response 24 Hz–160 Hz
Continuous (RMS) 50 W
Peak power 100 W
Amplifier type Class D
Phase adjustment 0°/180°
Europe (<.5W compliance) Yes
Low-pass crossover frequency 40 Hz–160 Hz / LFE
Dimensions and weight
Product dimensions (W x H x D) 11.9” x 15.7” x 16.6” (302 x 400 x 421 mm)
Product weight (each) 23 lbs (10.4 kg)
Cabinetry
Available finishes Black vinyl PICA
Feet Permanently installed feet (no levelling)
Inputs
Line level Yes
LFE Single RCA
Controls
Main power Auto on/off
Volume Potentiometer
Low-pass filter Potentiometer
Specifications are subject to change without notice.
Subwoofer specifications
Technical assistance
If your product was damaged during shipping, please contact the authorized Polk Audio retailer where you
purchased your product. For technical support, FAQs, and repair information, visit support.polkaudio.com. Support
email addresses and phone numbers vary based on the region where you purchased your product.
© Copyright 2022 Polk Audio, LLC. All Rights Reserved. Polk and Polk Audio are registered trademarks of Polk Audio,
LLC. Polk Monitor XT10 is a trademark of Polk Audio, LLC.

English
WARNING: Listen carefully
Polk Audio loudspeakers are capable of playing at
extremely high volume levels, which could cause
serious or permanent hearing damage. Polk Audio
accepts no liability for hearing loss, bodily injury, or
property damage resulting from the misuse of its
products. Keep these guidelines in mind and always
use good judgment when controlling volume:
Limit prolonged exposure to volume levels that exceed
85 decibels (dB). For more information about safe
volume levels, please review the Occupational Health
and Safety Administration (OSHA) guidelines at
www.osha.gov/.
Care and cleaning
The only thing you should ever need to do to your
speakers is dust them occasionally. Never apply
any abrasive or solvent-based cleaner or any harsh
detergent.
Safety precautions
1. CAUTION! To reduce the risk of fire or electric
shock, do not expose this apparatus to rain or
moisture. The apparatus shall not be exposed to
dripping or splashing and that objects filled with
liquids, such as vases, shall not be placed on
apparatus.
2. Read these instructions.
3. Keep these instructions.
4. Heed all warnings.
5. Follow all instructions.
6. Do not use this apparatus near water.
7. Clean only with a dry cloth.
8. Do not block any ventilation openings. Install in
accordance with the manufacturer’s instructions.
9. Do not install near any heat sources such
as radiators, heat registers, stoves, or other
apparatus (including amplifiers) that produce
heat.
10. No naked flame sources, such as lighted candles,
should be placed on the apparatus.
11. Place the subwoofer close to your AC power
socket for easy plugging and unplugging.
12. Protect the power cord from being walked on or
pinched particularly at the plugs, convenience
receptacles, and at the point where they exit
from the apparatus.
13. Use only attachments/accessories specified by
the manufacturer.
14. Unplug the apparatus during lightning storms or
when unused for long periods of time.
15. Refer all servicing to qualified personnel. Servicing
is required when the apparatus has been
damaged in any way, such as when power supply
cord or plug is damaged, when liquid has been
spilled or objects have fallen into the apparatus,
when the apparatus has been exposed to rain or
moisture, does not operate normally, or has been
dropped.
16. WARNING! The mains plug/appliance coupler is
used as the disconnect device. The disconnect
device shall remain readily operable.
17. CAUTION! To completely disconnect this product
from the mains, disconnect the plug from the
wall socket outlet. The mains plug is used to
completely interrupt the power supply to the unit
and must be within easy access by the user.
18. The equipment can be used at a maximum
ambient temperature of 95 °F (35 °C).
19. The product is designed for altitudes up to and
including 2000m above sea level.
20. CAUTION! To completely disconnect this product
from the mains, disconnect the plug from the
wall socket outlet. The mains plug is used to
completely interrupt the power supply to the unit
and must be within easy access by the user.
21. CAUTION! Neutral fusing. After fuse is blown,
there is still a risk of electrical shock. Disconnect
power cord before service. When replacing, use a
fuse with the same current rating (China/Europe:
T 1AL 250V; Japan: T 2AL 250V).
Notes on use
• Avoid high temperatures.
• Allow for sufficient heat dispersion when installed
in a rack.
• Handle the power cord carefully.
• WARNING! Hold the plug when unplugging the
cord.
• Keep the unit free from moisture, water, and dust.
• Unplug the power cord when not using the unit for
long periods of time.
• Do not obstruct the ventilation holes.
• Do not let foreign objects into the unit.
• Do not let insecticides, benzene, and thinner come
in contact with the unit.
• WARNING! Never disassemble or modify the unit in
any way.
• Ventilation should not be impeded by covering
the ventilation openings with items such as
newspapers, tablecloths or curtains.
• Naked flame sources such as lit candles should
not be placed on the unit.
• Do not expose the unit to dripping or splashing
fluids.
• Do not place objects filled with liquids, such as
vases, on the unit.
• WARNING! Do not handle the mains cord with wet
hands.
• WARNING! When the switch is in the OFF
(STANDBY) position, the equipment is not
completely switched off from MAINS.
• The equipment shall be installed near the
power supply so that the power supply is easily
accessible.
• CAUTION! HOT SURFACE.
• DO NOT TOUCH.
• The rear metal panel over the internal heat
sink may become hot when operating this
product continuously. Do not touch hot areas,
especially around the “Hot surface” mark and the
rear metal panel.
Important product information

English
EU Declaration of Conformity
Hereby, Sound United, LLC declares that our product
complies with the following EU/EC directives:
• EMC:2014/30/EU
• LVD:2014/35/EU
• RoHS: 2011/65/EU and amendment Directive (EU)
2015/863
• ErP: EC regulation 1275/2008 and its framework
directive 2009/125/EC including amendment
801/2013
The full text of the EU declaration of conformity is
available at the following internet address: https://
www.polkaudio.com/declarations-of-conformity.
Sound United, LLC
5541 Fermi Court
Carlsbad, CA 92008, USA
EU Contact:
Sound United Europe
A division of D&M Europe B.V.
Beemdstraat 11, 5653 MA, Eindhoven
The Netherlands
UKCA Declaration of Conformity
Hereby, Sound United, LLC declares that our product
is in compliance with UK regulations.
• Electrical Equipment (Safety) Regulations 2016
• Electromagnetic Compatibility Regulations 2016
• The Restriction of the Use of Certain Hazardous
Substances in Electrical and Electronic Equipment
Regulations 2012
• Eco design for Energy-Related Products
Regulations 2010
The full text of the UKCA declaration of conformity is
available at the following internet address: https://
www.polkaudio.com/declarations-of-conformity.
Sound United, LLC
5541 Fermi Court
Carlsbad, CA 92008, USA
UK Importer:
D&M Audiovisual Ltd
Dale Road, Worthing, West Sussex, United Kingdom,
BN11 2BH
Product disposal
Certain international, national and/or local laws and/
or regulations may apply regarding the disposal of
this product. For more information, please contact the
retailer where you purchased this product or the Polk
importer/distributor in your country. More information
is also available at www.polkaudio.com or by
contacting Polk Audio at 5541 Fermi Court, Carlsbad,
California, 92008, USA. Phone: 1-800-377-7655.
This symbol on our electrical products or their
packaging indicates that it is prohibited in Europe
to discard this product(s) as domestic waste. To
ensure that you dispose of the product(s) correctly,
please dispose of the product(s) according to local
laws and regulations on the disposal of electrical
and electronic equipment. In doing so, you are
contributing to the retention of natural resources and
to the promotion of environmental protection by the
treatment and disposal of electronic waste.
Correct disposal of this product. This marking
indicates that this product should not be disposed
with other household wastes throughout the EU. To
prevent possible harm to the environment or human
health from uncontrolled waste disposal, recycle
it responsibly to promote the sustainable reuse of
material resources. To return your used device, please
use the return and collection systems or contact the
retailer where the product was purchased. They can
take this product for environmental safe recycling.
Pour en savoir plus
www.quefairedemesdechets.fr

Français
Vérifiez que les éléments suivants sont fournis dans la boîte.
Déballer
Monitor XT10
Caisson de basses
Câble
d’alimentation Documentation
Pour une expérience d’écoute optimale, le placement est primordial. Placez le subwoofer dans l’une des
configurations ci-dessous et effectuez les réglages en fonction de vos préférences.
Positionner le caisson de basses
1
2
OR
Écouter avec un subwoofer
Pour une configuration à un seul subwoofer, placez le
subwoofer de chaque côté des enceintes avant et le
long du même mur. Pour le meilleur son et une distorsion
minimale, le subwoofer doit être positionné à environ 6
pouces du mur.
Pour des performances optimales:
• Ne placez pas le subwoofer au milieu de la zone
d’écoute.
• Assurez-vous que chaque subwoofer est à au moins 6
pouces du mur.
• Expérimentez avec le placement. Déplacer le subwoofer
de quelques pieds dans n’importe quelle direction peut
faire une grande différence.
Écoute avec plusieurs subwoofers
Pour une configuration à plusieurs subwoofers, placez le premier subwoofer de chaque côté des enceintes
avant et le long du même mur. Positionnez le deuxième subwoofer dans une position diagonale opposée au
premier subwoofer.
Configurer le caisson de basses
Documentation
QSG + Reg Card Icons
Reg Card Icon

Français
Branchez le câble d’alimentation
Branchez le câble d’alimentation sur le subwoofer, puis sur une prise murale.
Connectez le subwoofer à votre amplificateur ou AVR
4
Sélectionnez l’une des deux options ci-dessous pour connecter le subwoofer à votre amplificateur
ou récepteur.
REMARQUE: Assurez-vous que le subwoofer n’est pas branché sur l’alimentation secteur avant de le
connecter à votre amplificateur/récepteur.
Configuration d’entrée de ligne
Cette méthode est recommandée pour les systèmes sans prise de sortie LFE/subwoofer, tels que les
systèmes à 2 canaux.
1. Coupez l’alimentation de votre amplificateur/récepteur.
2. Connectez les câbles RCA standard des prises de pré-sortie avant gauche et droite de l’amplificateur/
récepteur.
3. Réglez le bouton de volume sur la position 12 heures.
4. Ajustez le bouton du filtre passe-bas pour mélanger le subwoofer et les haut-parleurs principaux selon
vos préférences.
Configuration LFE
1. Coupez l’alimentation de votre amplificateur/récepteur.
2. Connectez le câble LFE de votre récepteur à l’entrée de ligne RCA blanche gauche sur le subwoofer.
REMARQUE: L’« entrée de ligne RCA blanche gauche » est étiquetée « L/LFE ».
3. Tournez le bouton du filtre passe-bas du subwoofer sur 160 Hz.
4. Réglez le bouton de volume sur la position 12 heures.
5. Suivez les instructions de gestion des basses sur votre amplificateur ou AVR pour intégrer le subwoofer.
3
La configuration est maintenant terminée !
Regardez la télévision ou écoutez de la musique et réglez les paramètres du caisson de basses selon vos
préférences. Voir la page suivante pour un schéma du panneau arrière du subwoofer.
Pour obtenir de l’aide, des FAQ et plus d’informations sur le subwoofer, visitez polkaudio.com/MonitorXT10.
5

Français
1. Bouton de filtre passe-bas
2. Interrupteur d’alimentation
marche/auto/arrêt
3. Indicateur d’alimentation LED
4. Commutateur de phase
5. Bouton de contrôle du volume
6. Entrée ligne (LFE = RCA blanc)
7. Prise d’alimentation CA
Commandes du panneau arrière du subwoofer
Caractéristiques du caisson de basses
MAXMIN
VOLUME
Monitor XT10 subwoofer
LOW PASS LINE IN
L/LFE
R
100
40 160
(LFE)
AC IN
2022-07-25
2022-06-07 Updated phase and power switch position
2022-07-25 Removed fuse symbol
HBP4830
Full Size
Josue Baltezar
White
Date
Drawing #
Scale
Prepared by
Color
Monitor XT10 Amp Back Panel NA
DateRevision Description
Pad printingProcess
Finish
Notes
1
2 4
3
5 6
7

Français
Type, puissance et fréquence
Type de haut-parleur Caisson de basses
Type de base Bass reflex (porté)
Réponse en fréquence globale 24 Hz–160 Hz
Continu (RMS) 50 W
Puissance de crête 100 W
Type d’amplificateur Class D
Ajustement des phases 0°/180°
Europe (conformité <.5W) Yes
Fréquence de croisement passe-bas 40 Hz–160 Hz / LFE
Dimensions et poids
Dimensions du produit (W x H x D) 11.9” x 15.7” x 16.6” (302 x 400 x 421 mm)
Poids du produit (chacun) 23 lbs (10.4 kg)
Ébénisterie
Finitions disponibles Vinyle noir PICA
Pieds Pieds installés en permanence (pas de mise à niveau)
Contributions
Niveau ligne Oui
LFE RCA unique
Les contrôles
Alimentation principale Marche/arrêt automatique
Le volume Potentiometer
Filtre passe bas Potentiometer
Filtre passe bas
Spécifications du caisson de basses
Assistance technique
Si votre produit a été endommagé pendant le transport, veuillez contacter le revendeur agréé Polk Audio auprès
duquel vous avez acheté votre produit. Pour l’assistance technique, les FAQ et les informations de réparation,
visitez support.polkaudio.com. Les adresses e-mail et les numéros de téléphone de l’assistance varient en fonction
de la région où vous avez acheté votre produit.
© Copyright 2022 Polk Audio, LLC. Tous les droits sont réservés. Polk et Polk Audio sont des marques déposées de
Polk Audio, LLC. Polk Monitor XT10 est une marque déposée de Polk Audio, LLC.

Français
AVERTISSEMENT : écoutez attentivement
Les haut-parleurs Polk Audio sont capables de jouer
à des niveaux de volume extrêmement élevés, ce qui
pourrait causer des dommages auditifs graves ou
permanents. Polk Audio décline toute responsabilité
en cas de perte auditive, de blessures corporelles ou
de dommages matériels résultant d’une mauvaise
utilisation de ses produits. Gardez ces directives à
l’esprit et faites toujours preuve de jugement lorsque
vous contrôlez le volume :
Limitez l’exposition prolongée à des niveaux de volume
supérieurs à 85 décibels (dB). Pour plus d’informations
sur les niveaux de volume sûrs, veuillez consulter
les directives de l’Occupational Health and Safety
Administration (OSHA) à l’adresse
www.osha.gov/.
Entretien et nettoyage
La seule chose que vous devriez avoir à faire à vos
haut-parleurs est de les dépoussiérer de temps en
temps. N’appliquez jamais de nettoyant abrasif ou à
base de solvant ou de détergent agressif.
Précautions de sécurité
1. MISE EN GARDE! Pour réduire le risque d’incendie
ou d’électrocution, n’exposez pas cet appareil
à la pluie ou à l’humidité. L’appareil ne doit pas
être exposé aux gouttes ou aux éclaboussures et
aucun objet rempli de liquide, tel que des vases,
ne doit être placé sur l’appareil.
2. Lisez ces instructions.
3. Conservez ces instructions.
4. Tenez compte de tous les avertissements.
5. Suivez toutes les instructions.
6. Ne pas utiliser cet appareil près de l’eau.
7. Nettoyez uniquement avec un chiffon sec.
8. Ne bloquez aucune bouche d’aération. Installer
conformément aux instructions du fabricant.
9. Ne l’installez pas à proximité de sources de
chaleur telles que des radiateurs, des registres
de chaleur, des cuisinières ou d’autres appareils
(y compris des amplificateurs) produisant de la
chaleur.
10. Aucune source de flamme nue, telle que des
bougies allumées, ne doit être placée sur
l’appareil.
11. Placez le subwoofer près de votre prise de
courant alternatif pour le brancher et le
débrancher facilement.
12. Protégez le cordon d’alimentation contre les
piétinements ou les pincements, en particulier
au niveau des fiches, des prises de courant et au
point de sortie de l’appareil.
13. Utilisez uniquement les pièces jointes/accessoires
spécifiés par le fabricant.
14. Débranchez l’appareil pendant les orages ou
lorsqu’il n’est pas utilisé pendant de longues
périodes.
15. Confiez tous les entretiens à du personnel
qualifié. Une réparation est nécessaire lorsque
l’appareil a été endommagé de quelque manière
que ce soit, par exemple lorsque le cordon
d’alimentation ou la fiche est endommagé,
lorsque du liquide a été renversé ou que des
objets sont tombés dans l’appareil, lorsque
l’appareil a été exposé à la pluie ou à l’humidité,
ne fonctionner normalement ou a été échappé.
16. ATTENTION! Le coupleur fiche secteur/appareil
est utilisé comme dispositif de déconnexion. Le
dispositif de déconnexion doit rester facilement
utilisable.
17. MISE EN GARDE! Pour débrancher complètement
ce produit du secteur, débranchez la fiche de la
prise murale. La fiche secteur sert à interrompre
complètement l’alimentation électrique de
l’appareil et doit être facilement accessible par
l’utilisateur.
18. L’équipement peut être utilisé à une température
ambiante maximale de 95 °F (35 °C).
19. Le produit est conçu pour des altitudes allant
jusqu’à 2000 m au-dessus du niveau de la mer
inclus.
20. MISE EN GARDE! Pour débrancher complètement
ce produit du secteur, débranchez la fiche de
la prise murale. La fiche secteur est utilisée
pour interrompre complètement l’alimentation
électrique de l’appareil et doit être facilement
accessible par l’utilisateur.
21. MISE EN GARDE! Fusion neutre. Une fois le fusible
sauté, il existe toujours un risque de choc
électrique. Débranchez le cordon d’alimentation
avant l’entretien. Lors du remplacement, utilisez
un fusible avec le même courant nominal (Chine/
Europe : T 1AL 250V ; Japon : T 2AL 250V).
Remarques sur l’utilisation
• Évitez les températures élevées.
• Permettre une dissipation de chaleur suffisante
lors de l’installation dans un rack.
• Manipulez le cordon d’alimentation avec
précaution.
• ATTENTION! Tenez la fiche lorsque vous
débranchez le cordon.
• Gardez l’appareil à l’abri de l’humidité, de l’eau et
de la poussière.
• Débranchez le cordon d’alimentation lorsque
vous n’utilisez pas l’appareil pendant de longues
périodes.
• Ne pas obstruer les trous de ventilation.
• Ne laissez pas d’objets étrangers pénétrer dans
l’appareil.
• Ne laissez pas les insecticides, le benzène et les
diluants entrer en contact avec l’appareil.
• ATTENTION! Ne jamais démonter ou modifier
l’appareil de quelque manière que ce soit.
• La ventilation ne doit pas être entravée en
couvrant les ouvertures de ventilation avec des
objets tels que des journaux, des nappes ou des
rideaux.
• Les sources de flammes nues telles que les
bougies allumées ne doivent pas être placées sur
l’appareil.
• N’exposez pas l’appareil à des gouttes ou des
éclaboussures de liquides.
• Ne placez pas d’objets remplis de liquide, tels que
des vases, sur l’appareil.
• ATTENTION! Ne manipulez pas le cordon
d’alimentation avec les mains mouillées.
• ATTENTION! Lorsque l’interrupteur est en
position OFF (STANDBY), l’équipement n’est pas
complètement éteint du SECTEUR.
Informations importantes sur le produit

Français
• L’équipement doit être installé à proximité de
l’alimentation électrique afin que l’alimentation
électrique soit facilement accessible.
• MISE EN GARDE! SURFACE CHAUDE.
• NE PAS TOUCHER.
• Le panneau métallique arrière au-dessus du
dissipateur de chaleur interne peut devenir
chaud lors de l’utilisation continue de ce
produit. Ne touchez pas les zones chaudes, en
particulier autour de la marque “Surface chaude”
et du panneau métallique arrière.
Déclaration de conformité UE
Par la présente, Sound United, LLC déclare que notre
produit est conforme aux directives UE/CE suivantes :
• EMC:2014/30/EU
• LVD:2014/35/EU
• RoHS: 2011/65/EU and amendment Directive (EU)
2015/863
• ErP: EC regulation 1275/2008 and its framework
directive 2009/125/EC including amendment
801/2013
Le texte complet de la déclaration de conformité UE
est disponible à l’adresse Internet suivante : https://
www.polkaudio.com/declarations-of-conformity.
Sound United, LLC
5541 Fermi Court
Carlsbad, CA 92008, USA
Contact UE:
Sound United Europe
A division of D&M Europe B.V.
Beemdstraat 11, 5653 MA, Eindhoven
The Netherlands
Déclaration de conformité UKCA
Par la présente, Sound United, LLC déclare que notre
produit est conforme à la réglementation britannique.
• Electrical Equipment (Safety) Regulations 2016
• Electromagnetic Compatibility Regulations 2016
• The Restriction of the Use of Certain Hazardous
Substances in Electrical and Electronic Equipment
Regulations 2012
• Eco design for Energy-Related Products
Regulations 2010
Le texte complet de la déclaration de conformité
UKCA est disponible à l’adresse Internet suivante
: https://www.polkaudio.com/declarations-of-
conformity.
Sound United, LLC
5541 Fermi Court
Carlsbad, CA 92008, USA
Importateur britannique:
D&M Audiovisual Ltd
Dale Road, Worthing, West Sussex, United Kingdom,
BN11 2BH
Élimination du produit
Certaines lois et/ou réglementations internationales,
nationales et/ou locales peuvent s’appliquer
concernant la mise au rebut de ce produit. Pour plus
d’informations, veuillez contacter le revendeur auprès
duquel vous avez acheté ce produit ou l’importateur/
distributeur Polk de votre pays. De plus amples
informations sont également disponibles sur www.
polkaudio.com ou en contactant Polk Audio au 5541
Fermi Court, Carlsbad, Californie, 92008, États-Unis.
Téléphone : 1-800-377-7655.
Ce symbole sur nos produits électriques ou leurs
emballages indique qu’il est interdit en Europe de
jeter ce(s) produit(s) avec les ordures ménagères.
Pour vous assurer que vous vous débarrassez
correctement du ou des produits, veuillez vous
débarrasser du ou des produits conformément
aux lois et réglementations locales sur la mise au
rebut des équipements électriques et électroniques.
Ce faisant, vous contribuez à la préservation des
ressources naturelles et à la promotion de la
protection de l’environnement par le traitement et
l’élimination des déchets électroniques.
Élimination correcte de ce produit. Ce marquage
indique que ce produit ne doit pas être jeté avec les
autres déchets ménagers dans toute l’UE. Pour éviter
d’éventuels dommages à l’environnement ou à la
santé humaine dus à une élimination incontrôlée des
déchets, recyclez-les de manière responsable afin
de promouvoir la réutilisation durable des ressources
matérielles. Pour retourner votre appareil usagé,
veuillez utiliser les systèmes de retour et de collecte
ou contacter le revendeur où le produit a été acheté.
Ils peuvent prendre ce produit pour un recyclage sans
danger pour l’environnement.
Pour en savoir plus
www.quefairedemesdechets.fr

Español
Compruebe que los siguientes elementos venían en la caja.
Deshacer
Monitor XT10
altavoz de subgraves
Cable de
energía Documentación
Para una experiencia auditiva óptima, la ubicación lo es todo. Coloque el subwoofer en una de las
configuraciones a continuación y realice los ajustes según sus preferencias.
Coloque el altavoz de subgraves
1
2
OR
Escuchar con un subwoofer
Para una configuración de un solo subwoofer, coloque el
subwoofer a cada lado de los altavoces frontales ya lo
largo de la misma pared. Para obtener el mejor sonido
y una distorsión mínima, el subwoofer debe colocarse
aproximadamente a 6 pulgadas de la pared.
Para un rendimiento óptimo:
• No coloque el subwoofer en el medio del área
de escucha.
• Asegúrese de que cada subwoofer esté al menos a 6
pulgadas de la pared.
• Experimenta con la colocación. Mover el subwoofer
unos pocos pies en cualquier dirección puede marcar
una gran diferencia.
Escuchar con múltiples subwoofers
Para una configuración de varios subwoofers, coloque el primer subwoofer a cada lado de los altavoces
frontales ya lo largo de la misma pared. Coloque el segundo altavoz de subgraves en una posición
diagonal opuesta al primer altavoz de subgraves.
Configurar el altavoz de subgraves
Documentation
QSG + Reg Card Icons
Reg Card Icon

Español
Enchufe el cable de alimentación
Enchufe el cable de alimentación en el altavoz de subgraves y, a continuación, en un tomacorriente
de pared.
Conecte el subwoofer a su amplificador o AVR
4
Seleccione una de las dos opciones a continuación para conectar el subwoofer a su amplificador
o receptor.
NOTA: Asegúrese de que el subwoofer no esté enchufado a la alimentación de CA antes de conectarlo a
su amplificador/receptor.
Configuración de entrada de línea
Este método se recomienda para sistemas sin conector de salida LFE/subwoofer, como sistemas de
2 canales.
1. Desconecte la alimentación de su amplificador/receptor.
2. Conecte los cables RCA estándar desde las tomas de salida de previo izquierda y derecha delanteras
del amplificador/receptor.
3. Ajuste la perilla de volumen a la posición de las 12 en punto.
4. Ajuste la perilla del filtro de paso bajo para mezclar el subwoofer y los altavoces principales según sus
preferencias.
Configuración LFE
1. Desconecte la alimentación de su amplificador/receptor.
2. Conecte el cable LFE de su receptor a la entrada de línea RCA blanca izquierda en el subwoofer.
NOTA: La ‘entrada de línea RCA blanca izquierda’ está etiquetada como ‘L/LFE’.
3. Gire la perilla del filtro de paso bajo en el subwoofer a 160 Hz.
4. Ajuste la perilla de volumen a la posición de las 12 en punto.
5. Siga las instrucciones de gestión de graves de su amplificador o AVR para integrar el subwoofer.
3
¡La configuración ya está completa!
Mire televisión o escuche música y ajuste la configuración del subwoofer según sus preferencias. Consulte la
página siguiente para ver un diagrama del panel posterior del subwoofer.
Para soporte, preguntas frecuentes y más información sobre el subwoofer, visite polkaudio.com/mnitorXT10.
5

Español
1. Perilla de filtro de paso bajo
2. Interruptor de encendido/
apagado/automático
3. Indicador LED de encendido
4. interruptor de fase
5. Perilla de control de volumen
6. Entrada de línea (LFE = RCA blanco)
7. Entrada de alimentación de CA
Controles del panel posterior del subwoofer
Características del subwoofer
MAXMIN
VOLUME
Monitor XT10 subwoofer
LOW PASS LINE IN
L/LFE
R
100
40 160
(LFE)
AC IN
2022-07-25
2022-06-07 Updated phase and power switch position
2022-07-25 Removed fuse symbol
HBP4830
Full Size
Josue Baltezar
White
Date
Drawing #
Scale
Prepared by
Color
Monitor XT10 Amp Back Panel NA
DateRevision Description
Pad printingProcess
Finish
Notes
1
2 4
3
5 6
7

Español
Tipo, potencia y frecuencia
Tipo de altavoz Altavoz de subgraves
Tipo básico Bass reflex (portado)
Respuesta de frecuencia general 24 Hz–160 Hz
Continua (RMS) 50 W
La punta del Poder 100 W
Tipo de amplificador Class D
Ajuste de fase 0°/180°
Europa (cumplimiento <.5W) Sí
Frecuencia de cruce de paso bajo 40 Hz–160 Hz / LFE
Dimensiones y peso
Dimensiones del producto (An. x
Al. x Pr.) 11.9” x 15.7” x 16.6” (302 x 400 x 421 mm)
Peso del producto (cada uno) 23 lbs (10.4 kg)
Gabinetes
Acabados disponibles Vinilo negro PICA
Pies Pies instalados de forma permanente (sin nivelación)
Entradas
Nivel de línea Sí
LFE RCA simple
Controls
Poder principal Encendido/apagado automático
Volumen Potentiometer
Filtro de paso bajo Potentiometer
Las especificaciones están sujetas a cambios sin previo aviso.
Especificaciones del subwoofer
Asistencia técnica
Si su producto se dañó durante el envío, comuníquese con el distribuidor autorizado de Polk Audio donde compró
su producto. Para soporte técnico, preguntas frecuentes e información de reparación, visite support.polkaudio.
com. Las direcciones de correo electrónico y los números de teléfono de soporte varían según la región donde
compró su producto.
© Copyright 2022 Polk Audio, LLC. Todos los derechos reservados. Polk y Polk Audio son marcas registradas de Polk
Audio, LLC. Polk Monitor XT10 es una marca comercial de Polk Audio, LLC.

Español
ADVERTENCIA: Escuche atentamente
Los altavoces de Polk Audio son capaces de
reproducir a niveles de volumen extremadamente
altos, lo que podría causar daños auditivos graves
o permanentes. Polk Audio no acepta ninguna
responsabilidad por pérdida de audición, lesiones
corporales o daños a la propiedad que resulten del
mal uso de sus productos. Tenga en cuenta estas
pautas y siempre use su buen juicio cuando controle
el volumen:
Limite la exposición prolongada a niveles de volumen
que excedan los 85 decibelios (dB). Para obtener
más información sobre los niveles de volumen
seguros, consulte las pautas de la Administración de
Seguridad y Salud Ocupacional (OSHA) en
www.osha.gov/.
Cuidado y Limpieza
Lo único que debería hacerle a sus parlantes es
quitarles el polvo de vez en cuando. Nunca aplique
ningún limpiador abrasivo o a base de solvente ni
ningún detergente fuerte.
Precauciones de seguridad
1. ¡PRECAUCIÓN! Para reducir el riesgo de incendio
o descarga eléctrica, no exponga este aparato a
la lluvia ni a la humedad. El aparato no se debe
exponer a goteos o salpicaduras y no se deben
colocar sobre el aparato objetos que contengan
líquidos, como jarrones.
2. Lea estas instrucciones.
3. Guarde estas instrucciones.
4. Preste atención a todas las advertencias.
5. Siga todas las instrucciones.
6. No use este aparato cerca del agua.
7. Limpie solamente con un paño seco.
8. No bloquee las aberturas de ventilación. Haga
la instalación conforme a las instrucciones del
fabricante.
9. No lo instale cerca de fuentes de calor, como
radiadores, rejillas de calefacción, estufas u
otros aparatos (incluidos los amplificadores) que
produzcan calor.
10. No se deben colocar sobre el aparato fuentes de
llamas descubiertas, como velas encendidas.
11. Coloque el altavoz de subgraves cerca de
la toma de corriente CA para enchufarlo y
desenchufarlo fácilmente.
12. Proteja el cable de alimentación para que no
lo pisen ni lo pellizquen, especialmente en los
enchufes, los receptáculos de conveniencia y en
el punto donde salen del aparato.
13. Utilice únicamente aditamentos/accesorios
especificados por el fabricante.
14. Desenchufe el aparato durante tormentas
eléctricas o cuando no se utilice durante largos
períodos de tiempo.
15. Remita todo el servicio a personal calificado.
Se requiere servicio cuando el aparato ha
sufrido algún daño, como cuando el cable de
alimentación o el enchufe están dañados, cuando
se ha derramado líquido o han caído objetos
dentro del aparato, cuando el aparato ha estado
expuesto a la lluvia o la humedad, no funcionar
normalmente o se ha caído.
16. ¡ADVERTENCIA! El enchufe de red/acoplador
del aparato se utiliza como dispositivo de
desconexión. El dispositivo de desconexión debe
permanecer fácilmente operable.
17. ¡PRECAUCIÓN! Para desconectar completamente
este producto de la red eléctrica, desconecte
el enchufe de la toma de corriente de la pared.
El enchufe de red se utiliza para interrumpir
completamente el suministro de energía a la
unidad y debe ser de fácil acceso para el usuario.
18. El equipo se puede utilizar a una temperatura
ambiente máxima de 95 °F (35 °C).
19. El producto está diseñado para altitudes de
hasta 2000 m sobre el nivel del mar inclusive.
20. ¡PRECAUCIÓN! Para desconectar completamente
este producto de la red eléctrica, desconecte
el enchufe de la toma de corriente de la pared.
El enchufe de red se utiliza para interrumpir
completamente el suministro de energía a la
unidad y debe ser de fácil acceso para el usuario.
21. ¡PRECAUCIÓN! Fusión neutra. Después de que se
funde el fusible, todavía hay riesgo de descarga
eléctrica. Desconecte el cable de alimentación
antes del servicio. Cuando lo reemplace, use un
fusible con la misma clasificación de corriente
(China/Europa: T 1AL 250V; Japón: T 2AL 250V).
Notas sobre el uso
• Evite las altas temperaturas.
• Permita suficiente dispersión del calor cuando se
instale en un rack.
• Manipule el cable de alimentación con cuidado.
• ¡ADVERTENCIA! Sujete el enchufe cuando
desenchufe el cable.
• Mantenga la unidad libre de humedad, agua y
polvo.
• Desenchufe el cable de alimentación cuando
no utilice la unidad durante largos períodos de
tiempo.
• No obstruya los orificios de ventilación.
• No permita que entren objetos extraños en la
unidad.
• No permita que insecticidas, benceno y diluyentes
entren en contacto con la unidad.
• ¡ADVERTENCIA! Nunca desmonte ni modifique la
unidad de ninguna manera.
• No se debe impedir la ventilación cubriendo las
aberturas de ventilación con elementos como
periódicos, manteles o cortinas.
• Las fuentes de llamas descubiertas, como velas
encendidas, no deben colocarse sobre la unidad.
• No exponga la unidad a líquidos que gotean o
salpican.
• No coloque objetos que contengan líquidos, como
jarrones, sobre la unidad.
• ¡ADVERTENCIA! No manipule el cable de
alimentación con las manos mojadas.
• ¡ADVERTENCIA! Cuando el interruptor está en la
posición de APAGADO (ESPERA), el equipo no está
completamente apagado de RED.
• El equipo debe instalarse cerca de la fuente de
alimentación para que la fuente de alimentación
sea fácilmente accesible.
• ¡PRECAUCIÓN! SUPERFICIE CALIENTE. NO TOCAR.
Configurar el altavoz de subgraves

Español
• El panel de metal posterior sobre
el disipador de calor interno puede
calentarse cuando se opera este producto
continuamente. No toque las áreas calientes,
especialmente alrededor de la marca de
“Superficie caliente” y el panel de metal posterior.
Declaración de conformidad de la UE
Por la presente, Sound United, LLC declara que
nuestro producto cumple con las siguientes directivas
de la UE/CE:
• EMC:2014/30/EU
• LVD:2014/35/EU
• RoHS: 2011/65/EU and amendment Directive (EU)
2015/863
• ErP: EC regulation 1275/2008 and its framework
directive 2009/125/EC including amendment
801/2013
El texto completo de la declaración UE de
conformidad está disponible en la siguiente dirección
de Internet: https://www.polkaudio.com/declarations-
of-conformity.
Sound United, LLC
5541 Fermi Court
Carlsbad, CA 92008, USA
Contacto UE:
Sound United Europe
A division of D&M Europe B.V.
Beemdstraat 11, 5653 MA, Eindhoven
The Netherlands
Declaración de conformidad de UKCA
Por la presente, Sound United, LLC declara que
nuestro producto cumple con las regulaciones del
Reino Unido.
• Electrical Equipment (Safety) Regulations 2016
• Electromagnetic Compatibility Regulations 2016
• The Restriction of the Use of Certain Hazardous
Substances in Electrical and Electronic Equipment
Regulations 2012
• Eco design for Energy-Related Products
Regulations 2010
El texto completo de la declaración de conformidad
de UKCA está disponible en la siguiente dirección de
Internet: https://www.polkaudio.com/declarations-of-
conformity.
Sound United, LLC
5541 Fermi Court
Carlsbad, CA 92008, USA
UK Importer:
D&M Audiovisual Ltd
Dale Road, Worthing, West Sussex, United Kingdom,
BN11 2BH
Eliminación de productos
Ciertas leyes y/o regulaciones internacionales,
nacionales y/o locales pueden aplicarse con respecto
a la eliminación de este producto. Para obtener
más información, comuníquese con el minorista
donde compró este producto o con el importador/
distribuidor de Polk en su país. También hay más
información disponible en www.polkaudio.com o
poniéndose en contacto con Polk Audio en 5541 Fermi
Court, Carlsbad, California, 92008, EE. UU. Teléfono:
1-800-377-7655.
Este símbolo en nuestros productos eléctricos o en
su embalaje indica que en Europa está prohibido
desechar estos productos como residuos domésticos.
Para asegurarse de desechar los productos
correctamente, deséchelos de acuerdo con las
leyes y normativas locales sobre la eliminación
de equipos eléctricos y electrónicos. Al hacerlo,
está contribuyendo a la retención de los recursos
naturales y a la promoción de la protección del medio
ambiente mediante el tratamiento y la eliminación de
desechos electrónicos.
Eliminación correcta de este producto. Esta marca
indica que este producto no debe desecharse con
otros residuos domésticos en toda la UE. Para
evitar posibles daños al medio ambiente o a la
salud humana por la eliminación descontrolada de
desechos, recíclelos de manera responsable para
promover la reutilización sostenible de los recursos
materiales. Para devolver su dispositivo usado,
utilice los sistemas de devolución y recolección o
comuníquese con el minorista donde compró el
producto. Pueden llevar este producto a un reciclaje
seguro para el medio ambiente.
Pour en savoir plus
www.quefairedemesdechets.fr

Italiano
Verifica che i seguenti articoli siano stati inseriti nella confezione.
Disimballare
Monitor XT10
Subwoofer
Cavo di
alimentazione Documentazione
Per un’esperienza di ascolto ottimale, il posizionamento è tutto. Posizionare il subwoofer in una delle
configurazioni seguenti ed effettuare le regolazioni in base alle proprie preferenze.
Posizionare il subwoofer
1
2
OR
Ascolto con un subwoofer
Per una configurazione a subwoofer singolo, posizionare
il subwoofer su entrambi i lati degli altoparlanti anteriori
e lungo la stessa parete. Per un suono migliore e una
distorsione minima, il subwoofer deve essere posizionato a
circa 6 pollici dalla parete.
Per prestazioni ottimali:
• Non posizionare il subwoofer al centro dell’area di
ascolto.
• Assicurarsi che ogni subwoofer sia ad almeno 6 pollici
dalla parete.
• Sperimenta con il posizionamento. Spostare il
subwoofer di qualche metro in qualsiasi direzione può
fare una grande differenza.
Ascolto con più subwoofer
Per una configurazione multi-subwoofer, posizionare il primo subwoofer su entrambi i lati degli altoparlanti
anteriori e lungo la stessa parete. Posizionare il secondo subwoofer in una posizione diagonale opposta
rispetto al primo subwoofer.
Installa il subwoofer
Documentation
QSG + Reg Card Icons
Reg Card Icon

Italiano
Collegare il cavo di alimentazione
Collegare il cavo di alimentazione al subwoofer, quindi a una presa a muro.
Collega il subwoofer al tuo amplificatore o AVR
4
Seleziona una delle due opzioni seguenti per collegare il subwoofer al tuo amplificatore o ricevitore.
NOTA: assicurarsi che il subwoofer non sia collegato all’alimentazione CA prima di collegarlo
all’amplificatore/ricevitore.
Linea in configurazione
Questo metodo è consigliato per i sistemi senza jack di uscita LFE/subwoofer, come i sistemi a 2 canali.
1. Spegnere l’amplificatore/ricevitore.
2. Collegare i cavi RCA standard dai jack pre-out anteriori sinistro e destro dell’amplificatore/ricevitore.
3. Impostare la manopola del volume sulla posizione ore 12.
4. Regola la manopola del filtro passa basso per unire il subwoofer e gli altoparlanti principali alle tue
preferenze.
LFE setup
1. Spegnere l’amplificatore/ricevitore.
2. Collegare il cavo LFE dal ricevitore all’ingresso di linea RCA bianco sinistro sul subwoofer.
NOTA: l’”ingresso di linea RCA bianco sinistro” è etichettato come “L/LFE”.
3. Ruotare la manopola del filtro passa basso del subwoofer su 160 Hz.
4. Impostare la manopola del volume sulla posizione ore 12.
5. Segui le istruzioni per la gestione dei bassi sul tuo amplificatore o AVR per integrare il subwoofer.
3
L’installazione è ora completa!
Guarda la TV o ascolta la musica e regola le impostazioni del subwoofer in base alle tue preferenze. Vedere
la pagina successiva per un diagramma del pannello posteriore del subwoofer.
Per supporto, domande frequenti e ulteriori informazioni sul subwoofer, visitare polkaudio.com/MonitorXT10.
5

Italiano
1. Manopola del filtro passa basso
2. Commutatore di fase
3. Indicatore di alimentazione a LED
4. Interruttore di accensione/
spegnimento automatico
5. Manopola di controllo del volume
6. Ingresso di linea (LFE = RCA bianco)
7. Ingresso di alimentazione CA
Controlli del pannello posteriore del subwoofer
Caratteristiche del subwoofer
MAXMIN
VOLUME
Monitor XT10 subwoofer
LOW PASS LINE IN
L/LFE
R
100
40 160
(LFE)
AC IN
2022-07-25
2022-06-07 Updated phase and power switch position
2022-07-25 Removed fuse symbol
HBP4830
Full Size
Josue Baltezar
White
Date
Drawing #
Scale
Prepared by
Color
Monitor XT10 Amp Back Panel NA
DateRevision Description
Pad printingProcess
Finish
Notes
1
2 4
3
5 6
7

Italiano
Tipo, potenza e frequenza
Tipo di altoparlante Subwoofer
Tipo base Bass reflex (portato)
Risposta in frequenza complessiva 24 Hz–160 Hz
Continuo (RMS) 50 W
Picco di potenza 100 W
Tipo di amplificatore Class D
Adeguamento di fase 0°/180°
Europa (conformità <.5W) sì
Frequenza di crossover passa basso 40 Hz–160 Hz / LFE
Dimensioni e peso
Dimensioni del prodotto (L x A x P) 11.9” x 15.7” x 16.6” (302 x 400 x 421 mm)
Peso del prodotto (ciascuno) 23 lbs (10.4 kg)
Ebanisteria
Finiture disponibili PICA in vinile nero
Piedi Piedi fissi (senza livellamento)
Inputs
Livello di linea sì
LFE RCA singolo
Controlli
Potere principale Accensione/spegnimento automatico
Volume Potenziometro
Filtro passa basso Potenziometro
Le specifiche sono soggette a modifiche senza preavviso.
Specifiche del subwoofer
Assistenza tecnica
Se il tuo prodotto è stato danneggiato durante la spedizione, contatta il rivenditore Polk Audio autorizzato dove
hai acquistato il prodotto. Per supporto tecnico, domande frequenti e informazioni sulla riparazione, visitare
support.polkaudio.com. Gli indirizzi e-mail e i numeri di telefono dell’assistenza variano in base alla regione in cui
hai acquistato il prodotto.
© Copyright 2022 Polk Audio, LLC. Tutti i diritti riservati. Polk e Polk Audio sono marchi registrati di Polk Audio, LLC.
Polk Monitor XT10 è un marchio di Polk Audio, LLC.

Italiano
ATTENZIONE: Ascolta attentamente
Gli altoparlanti Polk Audio sono in grado di
riprodurre a livelli di volume estremamente elevati,
che potrebbero causare danni all’udito gravi o
permanenti. Polk Audio non si assume alcuna
responsabilità per perdita dell’udito, lesioni personali
o danni alla proprietà derivanti dall’uso improprio dei
suoi prodotti. Tieni a mente queste linee guida e usa
sempre il buon senso quando controlli il volume:
Limitare l’esposizione prolungata a livelli di volume
superiori a 85 decibel (dB). Per ulteriori informazioni
sui livelli di volume di sicurezza, consultare le linee
guida OSHA (Occupational Health and Safety
Administration) all’indirizzo
www.osha.gov/.
Cura e pulizia
L’unica cosa che dovresti mai fare sui tuoi altoparlanti
è spolverarli di tanto in tanto. Non applicare mai
detergenti abrasivi o a base di solventi o detergenti
aggressivi.
Misure di sicurezza
1. ATTENZIONE! Per ridurre il rischio di incendi
o scosse elettriche, non esporre questo
apparecchio a pioggia o umidità. L’apparecchio
non deve essere esposto a gocciolamenti o
schizzi e gli oggetti pieni di liquidi, come vasi, non
devono essere collocati sull’apparecchio.
2. Leggi queste istruzioni.
3. Conserva queste istruzioni.
4. Presta attenzione a tutti gli avvisi.
5. Segui tutte le istruzioni.
6. Non utilizzare questo apparecchio vicino
all’acqua.
7. Pulisci solo con un panno asciutto.
8. Non ostruire le aperture di ventilazione. Installare
secondo le istruzioni del produttore.
9. Non installare vicino a fonti di calore come
radiatori, termosifoni, stufe o altri apparecchi
(inclusi amplificatori) che producono calore.
10. Sull’apparecchio non devono essere collocate
sorgenti di fiamme libere, come candele accese.
11. Posizionare il subwoofer vicino alla presa di
alimentazione CA per collegare e scollegare
facilmente.
12. Proteggere il cavo di alimentazione dal
calpestio o schiacciamento, in particolare in
corrispondenza delle spine, delle prese multiple e
nel punto in cui escono dall’apparecchio.
13. Utilizzare solo accessori/accessori specificati dal
produttore.
14. Scollegare l’apparecchio durante i temporali o
quando non viene utilizzato per lunghi periodi di
tempo.
15. Affidare tutta la manutenzione a personale
qualificato. L’assistenza è necessaria quando
l’apparecchio è stato danneggiato in
qualsiasi modo, ad esempio quando il cavo
di alimentazione o la spina sono danneggiati,
quando è stato versato del liquido o sono caduti
oggetti nell’apparecchio, quando l’apparecchio
è stato esposto alla pioggia o all’umidità, non
funziona normalmente o è caduto.
16. AVVERTIMENTO! La spina di alimentazione/
l’accoppiatore dell’apparecchio viene utilizzato
come dispositivo di disconnessione. Il dispositivo
di disconnessione deve rimanere prontamente
azionabile.
17. ATTENZIONE! Per scollegare completamente
questo prodotto dalla rete, scollegare la spina
dalla presa a muro. La spina di alimentazione
serve per interrompere completamente
l’alimentazione all’unità e deve essere facilmente
accessibile dall’utente.
18. L’apparecchiatura può essere utilizzata a una
temperatura ambiente massima di 35 °C (95 °F).
19. Il prodotto è progettato per altitudini fino a 2000
m sul livello del mare inclusi.
20. ATTENZIONE! Per scollegare completamente
questo prodotto dalla rete, scollegare la spina
dalla presa a muro. La spina di alimentazione
serve per interrompere completamente
l’alimentazione all’unità e deve essere facilmente
accessibile dall’utente.
21. ATTENZIONE! Fusione neutra. Dopo che il fusibile è
bruciato, c’è ancora il rischio di scossa elettrica.
Scollegare il cavo di alimentazione prima
dell’assistenza. In caso di sostituzione, utilizzare
un fusibile con la stessa corrente nominale (Cina/
Europa: T 1AL 250 V; Giappone: T 2AL 250 V).
Note sull’uso
• Evitare le alte temperature.
• Consentire una sufficiente dispersione del calore
quando installato in un rack.
• Maneggiare con cura il cavo di alimentazione.
• AVVERTIMENTO! Tenere la spina quando si
scollega il cavo.
• Tenere l’unità libera da umidità, acqua e polvere.
• Scollegare il cavo di alimentazione quando non si
utilizza l’unità per lunghi periodi di tempo.
• Non ostruire i fori di ventilazione.
• Non far entrare oggetti estranei nell’unità.
• Non lasciare che insetticidi, benzene e diluenti
entrino in contatto con l’unità.
• AVVERTIMENTO! Non smontare o modificare mai
l’unità in alcun modo.
• La ventilazione non deve essere ostacolata
coprendo le aperture di ventilazione con oggetti
come giornali, tovaglie o tende.
• Fonti di fiamma libera come candele accese non
devono essere collocate sull’unità.
• Non esporre l’unità a gocciolamenti o schizzi di
liquidi.
• Non posizionare oggetti pieni di liquidi, come vasi,
sull’unità.
• AVVERTIMENTO! Non maneggiare il cavo di
alimentazione con le mani bagnate.
• AVVERTIMENTO! Quando l’interruttore è in
posizione OFF (STANDBY), l’apparecchiatura non è
completamente spenta dalla RETE.
• L’apparecchiatura deve essere installata vicino
all’alimentatore in modo che l’alimentatore sia
facilmente accessibile.
• ATTENZIONE! SUPERFICIE CALDA.
Informazioni importanti sul prodotto

Italiano
• NON TOCCARE.
• Il pannello metallico posteriore sopra il
dissipatore di calore interno potrebbe
surriscaldarsi durante il funzionamento continuo
di questo prodotto. Non toccare le aree calde, in
particolare intorno al segno “Superficie calda” e
al pannello metallico posteriore.EU Declaration of
Conformity
Con la presente, Sound United, LLC dichiara che il
nostro prodotto è conforme alle seguenti direttive UE/
CE:
• EMC:2014/30/EU
• LVD:2014/35/EU
• RoHS: 2011/65/EU and amendment Directive (EU)
2015/863
• ErP: EC regulation 1275/2008 and its framework
directive 2009/125/EC including amendment
801/2013
Il testo completo della dichiarazione di conformità UE
è disponibile al seguente indirizzo Internet: https://
www.polkaudio.com/declarations-of-conformity.
Sound United, LLC
5541 Fermi Court
Carlsbad, CA 92008, USA
Contatto UE:
Sound United Europe
A division of D&M Europe B.V.
Beemdstraat 11, 5653 MA, Eindhoven
The Netherlands
Dichiarazione di conformità UKCA
Con la presente, Sound United, LLC dichiara che il
nostro prodotto è conforme alle normative del Regno
Unito.
• Electrical Equipment (Safety) Regulations 2016
• Electromagnetic Compatibility Regulations 2016
• The Restriction of the Use of Certain Hazardous
Substances in Electrical and Electronic Equipment
Regulations 2012
• Eco design for Energy-Related Products
Regulations 2010
Il testo completo della dichiarazione di conformità
UKCA è disponibile al seguente indirizzo Internet:
https://www.polkaudio.com/declarations-of-
conformity.
Sound United, LLC
5541 Fermi Court
Carlsbad, CA 92008, USA
Importatore del Regno Unito:
D&M Audiovisual Ltd
Dale Road, Worthing, West Sussex, United Kingdom,
BN11 2BH
Smaltimento del prodotto
Alcune leggi e/o regolamenti internazionali,
nazionali e/o locali possono applicarsi in merito
allo smaltimento di questo prodotto. Per ulteriori
informazioni, contatta il rivenditore presso cui
hai acquistato questo prodotto o l’importatore/
distributore Polk nel tuo paese. Ulteriori informazioni
sono disponibili anche su www.polkaudio.com o
contattando Polk Audio al 5541 Fermi Court, Carlsbad,
California, 92008, USA. Telefono: 1-800-377-7655.
Questo simbolo sui nostri prodotti elettrici o sulla
loro confezione indica che in Europa è vietato
gettare questo prodotto come rifiuto domestico. Per
assicurarsi di smaltire correttamente il/i prodotto/i,
smaltire il/i prodotto/i secondo le leggi e le normative
locali sullo smaltimento delle apparecchiature
elettriche ed elettroniche. In tal modo, contribuite
alla conservazione delle risorse naturali e alla
promozione della protezione dell’ambiente mediante il
trattamento e lo smaltimento dei rifiuti elettronici.
Smaltimento corretto di questo prodotto. Questa
marcatura indica che questo prodotto non deve
essere smaltito con altri rifiuti domestici in tutta l’UE.
Per prevenire possibili danni all’ambiente o alla salute
umana derivanti dallo smaltimento incontrollato dei
rifiuti, riciclarli in modo responsabile per promuovere
il riutilizzo sostenibile delle risorse materiali. Per
restituire il tuo dispositivo usato, utilizza i sistemi
di restituzione e ritiro o contatta il rivenditore
presso cui è stato acquistato il prodotto. Possono
prendere questo prodotto per il riciclaggio sicuro per
l’ambiente.
Pour en savoir plus
www.quefairedemesdechets.fr

Deutsch
Überprüfen Sie, ob die folgenden Artikel in der Verpackung enthalten sind.
Auspacken
Monitor XT10
Subwoofer Stromkabel Dokumentation
Für ein optimales Hörerlebnis ist die Platzierung alles. Platzieren Sie den Subwoofer in einer der folgenden
Konfigurationen und nehmen Sie die Einstellungen gemäß Ihren Vorlieben vor.
Positionieren Sie den Subwoofer
1
2
OR
Hören mit einem Subwoofer
Positionieren Sie bei einer Konfiguration mit einem
Subwoofer den Subwoofer auf beiden Seiten der
Frontlautsprecher und entlang derselben Wand. Für den
besten Klang und minimale Verzerrung sollte der Subwoofer
etwa 6 Zoll von der Wand entfernt positioniert werden.
Für optimale Leistung:
• Stellen Sie den Subwoofer nicht in der Mitte des
Hörbereichs auf.
• Stellen Sie sicher, dass jeder Subwoofer mindestens 6
Zoll von der Wand entfernt ist.
• Experimentieren Sie mit der Platzierung. Das Bewegen
des Subwoofers um ein paar Meter in eine beliebige
Richtung kann einen großen Unterschied machen.
Hören mit mehreren Subwoofern
Positionieren Sie für eine Konfiguration mit mehreren Subwoofern den ersten Subwoofer auf beiden
Seiten der Frontlautsprecher und an derselben Wand. Positionieren Sie den zweiten Subwoofer diagonal
gegenüber dem ersten Subwoofer.
Stellen Sie den Subwoofer auf
Documentation
QSG + Reg Card Icons
Reg Card Icon

Deutsch
Schließen Sie das Netzkabel an
Stecken Sie das Netzkabel in den Subwoofer und dann in eine Wandsteckdose.
Schließen Sie den Subwoofer an Ihren Verstärker oder AVR an
4
Wählen Sie eine der beiden folgenden Optionen, um den Subwoofer an Ihren Verstärker oder Receiver
anzuschließen.
HINWEIS: Stellen Sie sicher, dass der Subwoofer nicht an das Stromnetz angeschlossen ist, bevor Sie ihn an
Ihren Verstärker/Receiver anschließen.
Linie im Setup
Diese Methode wird für Systeme ohne LFE/Subwoofer-Ausgangsbuchse empfohlen, wie z. B. 2-Kanal-
Systeme.
1. Schalten Sie Ihren Verstärker/Receiver aus.
2. Schließen Sie Standard-RCA-Kabel an den vorderen linken und rechten Pre-Out-Buchsen des
Verstärkers/Empfängers an.
3. Stellen Sie den Lautstärkeregler auf die 12-Uhr-Position.
4. Passen Sie den Tiefpassfilterregler an, um den Subwoofer und die Hauptlautsprecher nach Ihren
Wünschen zu mischen.
LFE-Setup
1. Schalten Sie Ihren Verstärker/Receiver aus.
2. Verbinden Sie das LFE-Kabel Ihres Receivers mit dem linken weißen Cinch-Line-Eingang des Subwoofers.
HINWEIS: Der „linke weiße Cinch-Line-Eingang“ ist mit „L/LFE“ gekennzeichnet.
3. Drehen Sie den Tiefpassfilterregler am Subwoofer auf 160 Hz.
4. Stellen Sie den Lautstärkeregler auf die 12-Uhr-Position.
5. Befolgen Sie die Anweisungen zum Bassmanagement auf Ihrem Verstärker oder AVR, um den Subwoofer
zu integrieren.
3
Die Einrichtung ist jetzt abgeschlossen!
Sehen Sie fern oder hören Sie Musik und passen Sie die Subwoofer-Einstellungen Ihren Vorlieben an. Auf der
nächsten Seite finden Sie ein Diagramm der Subwoofer-Rückwand.
Für Support, FAQs und weitere Informationen zum Subwoofer besuchen Sie polkaudio.com/MonitorXT10.
5

Deutsch
1. Regler für Tiefpassfilter
2. Phasenschalter
3. LED-Betriebsanzeige
4. Ein/Auto/Aus-Schalter
5. Lautstärkeregler
6. Line-In (LFE = weißer Cinch)
7. Wechselstromeingang
Bedienelemente auf der Rückseite des Subwoofers
Subwoofer-Funktionen
MAXMIN
VOLUME
Monitor XT10 subwoofer
LOW PASS LINE IN
L/LFE
R
100
40 160
(LFE)
AC IN
2022-07-25
2022-06-07 Updated phase and power switch position
2022-07-25 Removed fuse symbol
HBP4830
Full Size
Josue Baltezar
White
Date
Drawing #
Scale
Prepared by
Color
Monitor XT10 Amp Back Panel NA
DateRevision Description
Pad printingProcess
Finish
Notes
1
2 4
3
5 6
7

Deutsch
Typ, Leistung und Frequenz
Lautsprechertyp Subwoofer
Basistyp Bassreflex (portiert)
Gesamtfrequenzgang 24 Hz–160 Hz
Kontinuierlich (RMS) 50 W
Spitzenleistung 100 W
Verstärkertyp Class D
Phaseneinstellung 0°/180°
Europa (<0,5 W-Konformität) Ja
Übergangsfrequenz des Tiefpasses 40 Hz–160 Hz / LFE
Dimensionen und Gewicht
Produktabmessungen (B x H x T) 11.9” x 15.7” x 16.6” (302 x 400 x 421 mm)
Produktgewicht (jeweils) 23 lbs (10.4 kg)
Schränke
Verfügbare Ausführungen PICA aus schwarzem Vinyl
Fuß Fest installierte Füße (keine Nivellierung)
Eingänge
Line-Ebene Ja
LFE Einzelner Cinch
Kontrollen
Hauptstrom Automatisch ein/aus
Volumen Potentiometer
Tiefpassfilter Potentiometer
Die Spezifikationen können ohne Vorankündigung geändert werden.
Subwoofer-Spezifikationen
Technische Unterstützung
Wenn Ihr Produkt während des Versands beschädigt wurde, wenden Sie sich bitte an den autorisierten Polk Audio-
Händler, bei dem Sie Ihr Produkt gekauft haben. Für technischen Support, FAQs und Reparaturinformationen
besuchen Sie support.polkaudio.com. Die E-Mail-Adressen und Telefonnummern des Supports variieren je nach
Region, in der Sie Ihr Produkt gekauft haben.
© Copyright 2022 Polk Audio, LLC. Alle Rechte vorbehalten. Polk und Polk Audio sind eingetragene Warzeichen von
Polk Audio, LLC. Polk Monitor XT10 ist eine eingetragene Warzeichen von Polk Audio, LLC.

Deutsch
WARNUNG: Hören Sie gut zu
Lautsprecher von Polk Audio können mit extrem
hoher Lautstärke wiedergegeben werden, was
zu ernsthaften oder dauerhaften Gehörschäden
führen kann. Polk Audio übernimmt keine Haftung
für Hörverlust, Körperverletzung oder Sachschaden,
die aus dem Missbrauch seiner Produkte resultieren.
Behalten Sie diese Richtlinien im Hinterkopf und gehen
Sie beim Steuern der Lautstärke immer mit gutem
Urteilsvermögen vor:
Begrenzen Sie die längere Belastung durch
Lautstärkepegel, die 85 Dezibel (dB) überschreiten.
Weitere Informationen zu sicheren Lautstärkepegeln
finden Sie in den Richtlinien der Occupational Health
and Safety Administration (OSHA) unter
www.osha.gov/.
Pflege und Reinigung
Das einzige, was Sie jemals mit Ihren Lautsprechern
tun müssen, ist, sie gelegentlich abzustauben.
Verwenden Sie niemals Scheuer- oder
Lösungsmittelreiniger oder scharfe Reinigungsmittel.
Sicherheitsvorkehrungen
1. VORSICHT! Um die Brand- oder
Stromschlaggefahr zu verringern, setzen Sie
dieses Gerät weder Regen noch Feuchtigkeit aus.
Das Gerät darf weder Tropfen noch Spritzern
ausgesetzt werden und es dürfen keine mit
Flüssigkeiten gefüllten Gegenstände, wie z. B.
Vasen, auf das Gerät gestellt werden.
2. Lesen Sie diese Anweisungen.
3. Bewahren Sie diese Anleitung auf.
4. Beachten Sie alle Warnungen.
5. Befolgen Sie alle Anweisungen.
6. Verwenden Sie dieses Gerät nicht in der Nähe von
Wasser.
7. Nur mit einem trockenen Tuch reinigen.
8. Blockieren Sie keine Belüftungsöffnungen.
Installieren Sie gemäß den Anweisungen des
Herstellers.
9. Installieren Sie das Gerät nicht in der Nähe von
Wärmequellen wie Heizkörpern, Heizregistern,
Öfen oder anderen Geräten (einschließlich
Verstärkern), die Wärme erzeugen.
10. Auf dem Gerät sollten keine offenen
Flammenquellen, wie z. B. brennende Kerzen,
platziert werden.
11. Stellen Sie den Subwoofer zum einfachen Ein- und
Ausstecken in die Nähe Ihrer Steckdose.
12. Schützen Sie das Netzkabel davor, dass
man darauf tritt oder es eingeklemmt wird,
insbesondere an den Steckern, Steckdosen und
an der Stelle, an der es aus dem Gerät heraustritt.
13. Verwenden Sie nur vom Hersteller angegebene
Anbaugeräte/Zubehörteile.
14. Trennen Sie das Gerät während eines Gewitters
oder wenn es längere Zeit nicht verwendet wird.
15. Überlassen Sie alle Wartungsarbeiten
qualifiziertem Personal. Eine Wartung ist
erforderlich, wenn das Gerät in irgendeiner Weise
beschädigt wurde, z. B. wenn das Netzkabel oder
der Stecker beschädigt ist, wenn Flüssigkeiten
verschüttet wurden oder Gegenstände in das
Gerät gefallen sind, wenn das Gerät Regen
oder Feuchtigkeit ausgesetzt war, nicht normal
funktionieren oder heruntergefallen sind.
16. WARNUNG! Als Trennvorrichtung dient der
Netzstecker/Gerätestecker. Die Trennvorrichtung
muss leicht bedienbar bleiben.
17. VORSICHT! Um dieses Produkt vollständig
vom Stromnetz zu trennen, ziehen Sie den
Stecker aus der Steckdose. Der Netzstecker
dient zur vollständigen Unterbrechung der
Stromversorgung des Gerätes und muss für den
Benutzer leicht zugänglich sein.
18. Das Gerät kann bei einer maximalen
Umgebungstemperatur von 35 °C (95 °F)
verwendet werden.
19. Das Produkt ist für Höhen bis einschließlich 2000
m über dem Meeresspiegel ausgelegt.
20. VORSICHT! Um dieses Produkt vollständig
vom Stromnetz zu trennen, ziehen Sie den
Stecker aus der Steckdose. Der Netzstecker
dient zur vollständigen Unterbrechung der
Stromversorgung des Gerätes und muss für den
Benutzer leicht zugänglich sein.
21. VORSICHT! Neutrale Sicherung. Nach dem
Durchbrennen der Sicherung besteht immer noch
die Gefahr eines Stromschlags. Trennen Sie das
Netzkabel vor Wartungsarbeiten. Verwenden
Sie beim Austausch eine Sicherung mit gleicher
Stromstärke (China/Europa: T 1AL 250V; Japan: T
2AL 250V).
Hinweise zur Verwendung
• Vermeiden Sie hohe Temperaturen.
• Achten Sie bei der Installation in einem Rack auf
eine ausreichende Wärmeableitung.
• Gehen Sie vorsichtig mit dem Netzkabel um.
• WARNUNG! Halten Sie den Stecker fest, wenn Sie
das Kabel abziehen.
• Halten Sie das Gerät frei von Feuchtigkeit, Wasser
und Staub.
• Ziehen Sie den Netzstecker, wenn Sie das Gerät
längere Zeit nicht benutzen.
• Blockieren Sie nicht die Belüftungsöffnungen.
• Lassen Sie keine Fremdkörper in das Gerät.
• Lassen Sie das Gerät nicht mit Insektiziden, Benzol
und Verdünner in Berührung kommen.
• WARNUNG! Zerlegen oder modifizieren Sie das
Gerät niemals in irgendeiner Weise.
• Die Belüftung sollte nicht behindert werden,
indem die Belüftungsöffnungen mit Gegenständen
wie Zeitungen, Tischdecken oder Vorhängen
abgedeckt werden.
• Offene Flammenquellen wie brennende Kerzen
sollten nicht auf das Gerät gestellt werden.
• Setzen Sie das Gerät keinen tropfenden oder
spritzenden Flüssigkeiten aus.
• Stellen Sie keine mit Flüssigkeiten gefüllten
Gegenstände wie Vasen auf das Gerät.
• WARNUNG! Fassen Sie das Netzkabel nicht mit
nassen Händen an.
• WARNUNG! Wenn sich der Schalter in der Position
OFF (STANDBY) befindet, ist das Gerät nicht
vollständig vom NETZ getrennt.
• Das Gerät muss in der Nähe der Stromversorgung
installiert werden, sodass die Stromversorgung
leicht zugänglich ist.
• VORSICHT! HEISSE OBERFLÄCHE.
Wichtige Produktinformationen

Deutsch
• NICHT TASTEN.
• Die hintere Metallplatte über dem internen
Kühlkörper kann heiß werden, wenn dieses
Produkt kontinuierlich betrieben wird. Berühren
Sie keine heißen Bereiche, insbesondere um die
„Heiße Oberfläche“-Markierung und die hintere
Metallplatte.EU Declaration of Conformity
Hiermit erklärt Sound United, LLC, dass unser Produkt
den folgenden EU/EG-Richtlinien entspricht:
• EMC:2014/30/EU
• LVD:2014/35/EU
• RoHS: 2011/65/EU and amendment Directive (EU)
2015/863
• ErP: EC regulation 1275/2008 and its framework
directive 2009/125/EC including amendment
801/2013
Der vollständige Text der EU-Konformitätserklärung ist
unter folgender Internetadresse verfügbar: https://
www.polkaudio.com/declarations-of-conformity.
Sound United, LLC
5541 Fermi Court
Carlsbad, CA 92008, USA
EU-Kontakt:
Sound United Europe
A division of D&M Europe B.V.
Beemdstraat 11, 5653 MA, Eindhoven
The Netherlands
UKCA-Konformitätserklärung
Hiermit erklärt Sound United, LLC, dass unser Produkt
den britischen Vorschriften entspricht.
• Electrical Equipment (Safety) Regulations 2016
• Electromagnetic Compatibility Regulations 2016
• The Restriction of the Use of Certain Hazardous
Substances in Electrical and Electronic Equipment
Regulations 2012
• Eco design for Energy-Related Products
Regulations 2010
Der vollständige Text der UKCA-Konformitätserklärung
ist unter folgender Internetadresse verfügbar: https://
www.polkaudio.com/declarations-of-conformity.
Sound United, LLC
5541 Fermi Court
Carlsbad, CA 92008, USA
UK-Importeur:
D&M Audiovisual Ltd
Dale Road, Worthing, West Sussex, United Kingdom,
BN11 2BH
Produktentsorgung
Für die Entsorgung dieses Produkts können
bestimmte internationale, nationale und/oder
lokale Gesetze und/oder Vorschriften gelten. Für
weitere Informationen wenden Sie sich bitte an den
Einzelhändler, bei dem Sie dieses Produkt gekauft
haben, oder an den Polk-Importeur/Vertrieb in Ihrem
Land. Weitere Informationen erhalten Sie auch unter
www.polkaudio.com oder wenden Sie sich an Polk
Audio unter 5541 Fermi Court, Carlsbad, Kalifornien,
92008, USA. Telefon: 1-800-377-7655.
Dieses Symbol auf unseren Elektroprodukten oder
deren Verpackung weist darauf hin, dass es in
Europa verboten ist, diese Produkte als Hausmüll
zu entsorgen. Um sicherzustellen, dass Sie das/die
Produkt(e) korrekt entsorgen, entsorgen Sie das/
die Produkt(e) bitte gemäß den örtlichen Gesetzen
und Vorschriften zur Entsorgung von Elektro- und
Elektronikgeräten. Damit leisten Sie einen Beitrag zur
Erhaltung natürlicher Ressourcen und zur Förderung
des Umweltschutzes durch die Behandlung und
Entsorgung von Elektroschrott.
Korrekte Entsorgung dieses Produkts. Diese
Kennzeichnung weist darauf hin, dass dieses
Produkt in der gesamten EU nicht mit anderen
Haushaltsabfällen entsorgt werden darf. Um mögliche
Schäden für die Umwelt oder die menschliche
Gesundheit durch unkontrollierte Abfallentsorgung zu
vermeiden, recyceln Sie es verantwortungsbewusst,
um die nachhaltige Wiederverwendung von
Materialressourcen zu fördern. Um Ihr gebrauchtes
Gerät zurückzugeben, nutzen Sie bitte die Rückgabe-
und Sammelsysteme oder wenden Sie sich an den
Händler, bei dem Sie das Produkt gekauft haben.
Sie können dieses Produkt zum umweltfreundlichen
Recycling bringen.
Pour en savoir plus
www.quefairedemesdechets.fr

Polski
Sprawdź, czy w pudełku znajdują się następujące elementy.
Rozpakować
Monitor XT10
Subwoofer
Przewód
zasilający Dokumentacja
Aby uzyskać optymalne wrażenia słuchowe, najważniejsza jest lokalizacja. Umieść subwoofer w jednej z
poniższych konfiguracji i dokonaj regulacji zgodnie z własnymi preferencjami.
Ustaw subwoofer
1
2
OR
Słuchanie za pomocą jednego subwoofera
W przypadku konfiguracji z jednym subwooferem umieść
subwoofer po obu stronach głośników przednich i wzdłuż
tej samej ściany. Aby uzyskać najlepszy dźwięk i minimalne
zniekształcenia, subwoofer powinien być umieszczony
około 6 cali od ściany.
Dla optymalnej wydajności:
• Nie umieszczaj subwoofera na środku obszaru
odsłuchowego.
• Upewnij się, że każdy subwoofer znajduje się co
najmniej 6 cali od ściany.
• Eksperymentuj z umieszczeniem. Przesunięcie
subwoofera o kilka stóp w dowolnym kierunku może
mieć duże znaczenie.
Słuchanie z wieloma subwooferami
W przypadku konfiguracji z wieloma subwooferami umieść pierwszy subwoofer po obu stronach głośników
przednich i wzdłuż tej samej ściany. Umieść drugi subwoofer w pozycji przeciwnej, po przekątnej od
pierwszego subwoofera.
Skonfiguruj subwoofer
Documentation
QSG + Reg Card Icons
Reg Card Icon

Polski
Podłącz kabel zasilający
Podłącz kabel zasilający do subwoofera, a następnie do gniazdka ściennego.
Podłącz subwoofer do wzmacniacza lub AVR
4
Wybierz jedną z dwóch poniższych opcji, aby podłączyć subwoofer do wzmacniacza lub odbiornika.
UWAGA: Upewnij się, że subwoofer nie jest podłączony do zasilania sieciowego przed podłączeniem go do
wzmacniacza/odbiornika.
Linia w konfiguracji
Ta metoda jest zalecana w przypadku systemów bez gniazda wyjściowego LFE/subwoofer, takich jak
systemy 2-kanałowe.
1. Wyłącz zasilanie we wzmacniaczu/odbiorniku.
2. Podłącz standardowe kable RCA z przedniego lewego i prawego gniazda przedwzmacniacza/
odbiornika.
3. Ustaw pokrętło głośności w pozycji godziny 12.
4. Wyreguluj pokrętło filtra dolnoprzepustowego, aby dopasować subwoofer i główne głośniki do swoich
preferencji.
Konfiguracja LFE
1. Wyłącz zasilanie we wzmacniaczu/odbiorniku.
2. Podłącz kabel LFE z odbiornika do lewego białego wejścia liniowego RCA na subwooferze.
UWAGA: „Lewe białe wejście liniowe RCA” jest oznaczone jako „L/LFE”.
3. Ustaw pokrętło filtra dolnoprzepustowego na subwooferze na 160 Hz.
4. Ustaw pokrętło głośności w pozycji godziny 12.
5. Postępuj zgodnie z instrukcjami zarządzania basami na wzmacniaczu lub odbiorniku AVR, aby
zintegrować subwoofer.
3
Konfiguracja została zakończona!
Oglądaj telewizję lub słuchaj muzyki i dostosuj ustawienia subwoofera do swoich preferencji. Na następnej
stronie znajduje się schemat tylnego panelu subwoofera.
Aby uzyskać pomoc, często zadawane pytania i więcej informacji na temat subwoofera, odwiedź stronę
polkaudio.com/MonitorXT10.
5

Polski
1. Pokrętło filtra
dolnoprzepustowego
2. Przełącznik fazy
3. Wskaźnik zasilania LED
4. Włącznik/wyłącznik zasilania/
automatycznego wyłączania
5. Pokrętło regulacji głośności
6. Wejście liniowe (LFE = Biały RCA)
7. Wejście zasilania prądem
zmiennym
Elementy sterujące na tylnym panelu subwoofera
Funkcje subwoofera
MAXMIN
VOLUME
Monitor XT10 subwoofer
LOW PASS LINE IN
L/LFE
R
100
40 160
(LFE)
AC IN
2022-07-25
2022-06-07 Updated phase and power switch position
2022-07-25 Removed fuse symbol
HBP4830
Full Size
Josue Baltezar
White
Date
Drawing #
Scale
Prepared by
Color
Monitor XT10 Amp Back Panel NA
DateRevision Description
Pad printingProcess
Finish
Notes
1
2 4
3
5 6
7

Polski
Typ, moc i częstotliwość
Typ głośnika Głośnik niskotonowy
Typ podstawowy Bas-refleks (przeniesiony)
Ogólna charakterystyka częstotliwościowa 24 Hz–160 Hz
Ciągły (RMS) 50 W
Moc szczytowa 100 W
Typ wzmacniacza Class D
Regulacja fazy 0°/180°
Europa (zgodność < 0,5 W) TAk
Częstotliwość podziału dolnoprzepustowego 40 Hz–160 Hz / LFE
Wymiary i waga
Wymiary produktu (szer. x wys. x gł.) 11.9” x 15.7” x 16.6” (302 x 400 x 421 mm)
Waga produktu (każdy) 23 lbs (10.4 kg)
Szafki
Dostępne wykończenia Czarny winyl PICA
Stopy Nóżki montowane na stałe (bez poziomowania)
Wejścia
Poziom linii TAk
LFE Pojedyncze RCA
Sterownica
Główne zasilanie Automatyczne włączanie/wyłączanie
Tom Potencjometr
Filtr dolnoprzepustowy Potencjometr
Specyfikacje mogą ulec zmianie bez powiadomienia.
Specyfikacje subwoofera
Pomoc techniczna
Jeśli produkt został uszkodzony podczas transportu, skontaktuj się z autoryzowanym sprzedawcą Polk Audio, u
którego zakupiono produkt. Aby uzyskać pomoc techniczną, często zadawane pytania i informacje dotyczące
naprawy, odwiedź stronę support.polkaudio.com. Adresy e-mail i numery telefonów pomocy technicznej różnią się
w zależności od regionu, w którym zakupiono produkt.
© Copyright 2022 Polk Audio, LLC. Wszelkie prawa zastrzeżone. Polk i Polk Audio są zarejestrowanymi znakami
towarowymi firmy Polk Audio, LLC. Polk Monitor XT10 jest znakiem towarowym firmy Polk Audio, LLC.

Polski
OSTRZEŻENIE: Słuchaj uważnie
Głośniki Polk Audio są w stanie odtwarzać bardzo
wysokie poziomy głośności, co może spowodować
poważne lub trwałe uszkodzenie słuchu. Polk Audio
nie ponosi odpowiedzialności za utratę słuchu,
obrażenia ciała lub szkody majątkowe wynikające z
niewłaściwego użytkowania jej produktów. Pamiętaj
o tych wskazówkach i zawsze kieruj się rozsądkiem
podczas kontrolowania głośności:
Ogranicz przedłużoną ekspozycję na poziomy
głośności przekraczające 85 decybeli (dB). Aby
uzyskać więcej informacji na temat bezpiecznych
poziomów głośności, zapoznaj się z wytycznymi
Administracji Bezpieczeństwa i Higieny Pracy (OSHA)
pod adresem
www.osha.gov/.
Pielęgnacja i czyszczenie
Jedyne, co powinieneś zrobić z głośnikami, to od
czasu do czasu je odkurzać. Nigdy nie stosuj żadnych
środków ściernych ani środków czyszczących na bazie
rozpuszczalników ani żadnych żrących detergentów.
Środki ostrożności
1. OSTROŻNOŚĆ! Aby zmniejszyć ryzyko pożaru
lub porażenia prądem, nie wystawiaj urządzenia
na działanie deszczu lub wilgoci. Urządzenie nie
może być narażone na kapanie lub zachlapanie, a
przedmioty wypełnione płynami, takie jak wazony,
nie mogą być stawiane na urządzeniu.
2. Przeczytaj te instrukcje.
3. Zachowaj te instrukcje.
4. Przestrzegaj wszystkich ostrzeżeń.
5. Postępuj zgodnie ze wszystkimi instrukcjami.
6. Nie używaj tego urządzenia w pobliżu wody.
7. Czyścić tylko suchą szmatką.
8. Nie blokuj żadnych otworów wentylacyjnych.
Zainstalować zgodnie z instrukcjami producenta.
9. Nie należy instalować w pobliżu źródeł ciepła,
takich jak kaloryfery, grzejniki, piece lub inne
urządzenia (w tym wzmacniacze), które
wytwarzają ciepło.
10. Na aparacie nie wolno stawiać źródeł otwartego
ognia, takich jak zapalone świece.
11. Umieść subwoofer blisko gniazda zasilania
prądem przemiennym, aby ułatwić podłączanie i
odłączanie.
12. Chroń przewód zasilający przed nadepnięciem
lub przyciśnięciem, szczególnie przy wtyczkach,
wygodnych gniazdach oraz w miejscu, w którym
wychodzą z urządzenia.
13. Używaj tylko przystawek/akcesoriów określonych
przez producenta.
14. Odłącz urządzenie podczas burzy z piorunami lub
gdy nie jest używane przez dłuższy czas.
15. Wszelkie czynności serwisowe należy powierzyć
wykwalifikowanemu personelowi. Serwisowanie
jest wymagane, gdy urządzenie zostało w
jakikolwiek sposób uszkodzone, na przykład w
przypadku uszkodzenia przewodu zasilającego
lub wtyczki, w przypadku rozlania płynu lub
wpadnięcia przedmiotów do wnętrza urządzenia,
gdy urządzenie zostało wystawione na działanie
deszczu lub wilgoci, nie działają normalnie lub
zostały upuszczone.
16. OSTRZEŻENIE! Jako urządzenie rozłączające
stosuje się wtyczkę sieciową/złącze do
urządzenia. Urządzenie odłączające powinno być
łatwo dostępne.
17. OSTROŻNOŚĆ! Aby całkowicie odłączyć ten
produkt od sieci, wyjmij wtyczkę z gniazdka
ściennego. Wtyczka sieciowa służy do
całkowitego odcięcia zasilania urządzenia i musi
być łatwo dostępna dla użytkownika.
18. Sprzęt może być używany w maksymalnej
temperaturze otoczenia 95 °F (35 °C).
19. Produkt przeznaczony jest na wysokości do 2000
m n.p.m. włącznie.
20. OSTROŻNOŚĆ! Aby całkowicie odłączyć ten
produkt od sieci, wyjmij wtyczkę z gniazdka
ściennego. Wtyczka sieciowa służy do
całkowitego odcięcia zasilania urządzenia i musi
być łatwo dostępna dla użytkownika.
21. OSTROŻNOŚĆ! Utrwalanie neutralne. Po
przepaleniu bezpiecznika nadal istnieje ryzyko
porażenia prądem. Odłącz przewód zasilający
przed serwisowaniem. Podczas wymiany użyj
bezpiecznika o tej samej wartości prądu (Chiny/
Europa: T 1AL 250V; Japonia: T 2AL 250V).
Notes on use
• Unikaj wysokich temperatur.
• Po zainstalowaniu w szafie zapewnij
wystarczające rozpraszanie ciepła.
• Ostrożnie obchodzić się z przewodem zasilającym.
• OSTRZEŻENIE! Podczas odłączania przewodu
trzymaj wtyczkę.
• Urządzenie należy chronić przed wilgocią, wodą i
kurzem.
• Odłącz przewód zasilający, gdy nie używasz
urządzenia przez dłuższy czas.
• Nie zasłaniaj otworów wentylacyjnych.
• Nie wpuszczaj ciał obcych do urządzenia.
• Nie dopuść do kontaktu urządzenia z
insektycydami, benzenem i rozcieńczalnikiem.
• OSTRZEŻENIE! Nigdy nie demontuj ani nie
modyfikuj urządzenia w żaden sposób.
• Nie należy utrudniać wentylacji poprzez
zakrywanie otworów wentylacyjnych
przedmiotami takimi jak gazety, obrusy lub
zasłony.
• Nie należy umieszczać na urządzeniu źródeł
otwartego ognia, takich jak zapalone świece.
• Nie wystawiaj urządzenia na działanie kapiących
lub rozpryskujących się płynów.
• Nie stawiać na urządzeniu przedmiotów
wypełnionych płynami, takich jak wazony.
• OSTRZEŻENIE! Nie dotykaj przewodu zasilającego
mokrymi rękami.
• OSTRZEŻENIE! Gdy przełącznik znajduje się
w pozycji OFF (STANDBY), urządzenie nie jest
całkowicie wyłączone z SIECIOWEGO.
• Sprzęt powinien być zainstalowany w pobliżu
zasilacza, aby zasilacz był łatwo dostępny.
• OSTROŻNOŚĆ! GORĄCA POWIERZCHNIA.
• NIE DOTYKAĆ.
Ważne informacje o produkcie

Polski
• Tylny metalowy panel nad wewnętrznym
radiatorem może się nagrzewać podczas
ciągłej pracy tego produktu. Nie dotykaj
gorących miejsc, zwłaszcza wokół oznaczenia
„Gorąca powierzchnia” i tylnego metalowego
panelu. Deklaracja zgodności UE
Niniejszym Sound United, LLC oświadcza, że nasz
produkt jest zgodny z następującymi dyrektywami UE/
WE:
• EMC:2014/30/EU
• LVD:2014/35/EU
• RoHS: 2011/65/EU and amendment Directive (EU)
2015/863
• ErP: EC regulation 1275/2008 and its framework
directive 2009/125/EC including amendment
801/2013
Pełny tekst deklaracji zgodności UE jest dostępny pod
następującym adresem internetowym: https://www.
polkaudio.com/declarations-of-conformity.
Sound United, LLC
5541 Fermi Court
Carlsbad, CA 92008, USA
Kontakt z UE:
Sound United Europe
A division of D&M Europe B.V.
Beemdstraat 11, 5653 MA, Eindhoven
The Netherlands
Deklaracja zgodności UKCA
Niniejszym Sound United, LLC oświadcza, że nasz
produkt jest zgodny z przepisami Wielkiej Brytanii.
• Electrical Equipment (Safety) Regulations 2016
• Electromagnetic Compatibility Regulations 2016
• The Restriction of the Use of Certain Hazardous
Substances in Electrical and Electronic Equipment
Regulations 2012
• Eco design for Energy-Related Products
Regulations 2010
Pełny tekst deklaracji zgodności UKCA jest dostępny
pod następującym adresem internetowym: https://
www.polkaudio.com/declarations-of-conformity.
Sound United, LLC
5541 Fermi Court
Carlsbad, CA 92008, USA
UK Importer:
D&M Audiovisual Ltd
Dale Road, Worthing, West Sussex, United Kingdom,
BN11 2BH
Utylizacja produktu
Niektóre międzynarodowe, krajowe i/lub lokalne
przepisy i/lub przepisy mogą mieć zastosowanie w
odniesieniu do utylizacji tego produktu. Aby uzyskać
więcej informacji, skontaktuj się ze sprzedawcą, u
którego zakupiłeś ten produkt lub z importerem/
dystrybutorem Polk w Twoim kraju. Więcej informacji
można również uzyskać na stronie www.polkaudio.
com lub kontaktując się z Polk Audio pod numerem
5541 Fermi Court, Carlsbad, Kalifornia, 92008, USA.
Telefon: 1-800-377-7655.
Ten symbol na naszych produktach elektrycznych
lub ich opakowaniach wskazuje, że w Europie nie
wolno wyrzucać tego produktu (produktów) wraz
z odpadami domowymi. Aby zapewnić prawidłową
utylizację produktów, należy je utylizować zgodnie
z lokalnymi przepisami i regulacjami dotyczącymi
utylizacji sprzętu elektrycznego i elektronicznego. W
ten sposób przyczyniasz się do zachowania zasobów
naturalnych i promowania ochrony środowiska
poprzez przetwarzanie i utylizację odpadów
elektronicznych.
Prawidłowa utylizacja tego produktu. To oznaczenie
wskazuje, że tego produktu nie należy wyrzucać
wraz z innymi odpadami domowymi w całej UE. Aby
zapobiec możliwym szkodom dla środowiska lub
zdrowia ludzkiego spowodowanym niekontrolowaną
utylizacją odpadów, poddawaj je odpowiedzialnemu
recyklingowi, aby promować zrównoważone ponowne
wykorzystanie zasobów materiałowych. Aby zwrócić
zużyte urządzenie, skorzystaj z systemów zwrotu i
odbioru lub skontaktuj się ze sprzedawcą, u którego
zakupiono produkt. Mogą zabrać ten produkt do
bezpiecznego dla środowiska recyklingu.
Pour en savoir plus
www.quefairedemesdechets.fr

Svenska
Kontrollera att följande föremål kom i kartongen.
Packa upp
Monitor XT10
Subwoofer Kraftledning Dokumentation
För en optimal lyssningsupplevelse är placering allt. Placera subwoofern i en av konfigurationerna nedan
och gör justeringar enligt dina önskemål.
Placera subwoofern
1
2
OR
Lyssna med en subwoofer
För en enkel subwoofer-inställning, placera subwoofern på
vardera sidan av de främre högtalarna och längs samma
vägg. För bästa ljud och minimal distorsion bör subwoofern
placeras cirka 6 tum från väggen.
För optimal prestanda:
• Placera inte subwoofern mitt i lyssningsområdet.
• Se till att varje subwoofer är minst 6 tum från väggen.
• Experimentera med placering. Att flytta subwoofern
några fot åt valfri riktning kan göra stor skillnad.
Lyssna med flera subwoofers
För en multi-subwoofer-inställning, placera den första subwoofern på vardera sidan av de främre
högtalarna och längs samma vägg. Placera den andra subwoofern i en motsatt, diagonal position från den
första subwoofern.
Ställ in subwoofern
Documentation
QSG + Reg Card Icons
Reg Card Icon

Svenska
Anslut strömkabeln
Anslut strömkabeln till subwoofern och sedan till ett vägguttag.
Anslut subwoofern till din förstärkare eller AVR
4
Välj ett av de två alternativen nedan för att ansluta subwoofern till din förstärkare eller mottagare.
OBS: Se till att subwoofern inte är ansluten till nätström innan du ansluter den till din förstärkare/
mottagare.
Linje i setup
Denna metod rekommenderas för system utan LFE/subwooferutgång, såsom 2-kanalssystem.
1. Stäng av strömmen till din förstärkare/mottagare.
2. Anslut vanliga RCA-kablar från de främre vänstra och högra pre-out-uttagen på förstärkaren/
mottagaren.
3. Ställ in volymratten på klockan 12.
4. Justera lågpassfilterratten för att blanda subwoofern och huvudhögtalarna efter dina önskemål.
LFE-inställning
1. TStäng av strömmen till din förstärkare/mottagare.
2. Anslut LFE-kabeln från din mottagare till den vänstra vita RCA-linjeingången på subwoofern.
OBS: Den “vänstra vita RCA-linjeingången” är märkt som “L/LFE”.
3. Vrid lågpassfilterratten på subwoofern till 160 Hz.
4. Ställ in volymratten på klockan 12.
5. Följ instruktionerna för bashantering på din förstärkare eller AVR för att integrera subwoofern.
3
Installationen är nu klar!
Titta på TV eller lyssna på musik och justera subwooferinställningarna efter dina önskemål. Se nästa sida
för ett diagram över subwooferns bakpanel.
För support, vanliga frågor och mer information om subwoofern, besök polkaudio.com/MonitorXT10.
5

Svenska
1. Lågpassfilterratt
2. Fasomkopplare
3. LED-strömindikator
4. På/auto/av strömbrytare
5. Volymkontrollratt
6. Linje in (LFE = Vit RCA)
7. AC strömingång
Kontroller på baksidan av subwoofern
Subwooferfunktioner
MAXMIN
VOLUME
Monitor XT10 subwoofer
LOW PASS LINE IN
L/LFE
R
100
40 160
(LFE)
AC IN
2022-07-25
2022-06-07 Updated phase and power switch position
2022-07-25 Removed fuse symbol
HBP4830
Full Size
Josue Baltezar
White
Date
Drawing #
Scale
Prepared by
Color
Monitor XT10 Amp Back Panel NA
DateRevision Description
Pad printingProcess
Finish
Notes
1
2 4
3
5 6
7

Svenska
Typ, effekt och frekvens
Typ av högtalare Subwoofer
Bastyp Basreflex (portad)
Övergripande frekvenssvar 24 Hz–160 Hz
Kontinuerlig (RMS) 50 W
Toppeffekt 100 W
Typ av förstärkare Klass D
Fasjustering 0°/180°
Europa (<.5W överensstämmelse) Ja
Lågpass delningsfrekvens 40 Hz–160 Hz / LFE
Mått och vikt
Produktmått (B x H x D) 11.9” x 15.7” x 16.6” (302 x 400 x 421 mm)
Produktvikt (varje) 23 lbs (10.4 kg)
Skåp
Tillgängliga ytbehandlingar Svart vinyl PICA
Fötter Permanent installerade fötter (ingen nivellering)
Ingångar
Linjenivå Ja
LFE Enkel RCA
Kontroller
Huvudkraft Automatisk på/av
Volym Potentiometer
Lågpassfilter Potentiometer
Specifikationerna kan ändras utan föregående meddelande.
Subwoofer specifikationer
Teknisk hjälp
Om din produkt skadades under transporten, kontakta den auktoriserade Polk Audio-återförsäljaren där du
köpte produkten. För teknisk support, vanliga frågor och reparationsinformation, besök support.polkaudio.com.
Supportens e-postadresser och telefonnummer varierar beroende på regionen där du köpte din produkt.
© Copyright 2022 Polk Audio, LLC. Alla rättigheter förbehållna. Polk och Polk Audio är registrerade varumärken som
tillhör Polk Audio, LLC. Polk Monitor XT10 är ett varumärke som tillhör Polk Audio, LLC.

Svenska
VARNING: Lyssna noga
Polk Audio-högtalare kan spela på extremt höga
volymnivåer, vilket kan orsaka allvarliga eller
permanenta hörselskador. Polk Audio tar inget
ansvar för hörselnedsättning, kroppsskada eller
egendomsskada till följd av missbruk av dess
produkter. Ha dessa riktlinjer i åtanke och använd
alltid gott omdöme när du kontrollerar volymen:
Begränsa långvarig exponering för volymnivåer som
överstiger 85 decibel (dB). För mer information om
säkra volymnivåer, läs riktlinjerna för Occupational
Health and Safety Administration (OSHA) på
www.osha.gov/.
Skötsel och rengöring
Det enda du någonsin borde behöva göra med
dina högtalare är att damma av dem då och då.
Använd aldrig slipmedel eller lösningsmedelsbaserat
rengöringsmedel eller något starkt rengöringsmedel.
Säkerhetsåtgärder
1. VARNING! För att minska risken för brand eller
elektriska stötar, utsätt inte denna apparat
för regn eller fukt. Apparaten får inte utsättas
för dropp eller stänk och att föremål fyllda
med vätskor, såsom vaser, inte får placeras på
apparaten.
2. Läs dessa instruktioner.
3. Spara dessa instruktioner.
4. Följ alla varningar.
5. Följ alla instruktioner.
6. Använd inte denna apparat nära vatten.
7. Rengör endast med en torr trasa.
8. Blockera inga ventilationsöppningar. Installera i
enlighet med tillverkarens instruktioner.
9. Installera inte nära några värmekällor som
radiatorer, värmeelement, spisar eller andra
apparater (inklusive förstärkare) som producerar
värme.
10. Inga källor med öppen låga, såsom tända ljus, bör
placeras på apparaten.
11. Placera subwoofern nära ditt nätuttag för enkel
in- och urkoppling.
12. Skydda nätsladden från att trampas på
eller klämmas, särskilt vid kontakterna,
bekvämlighetsuttagen och vid den punkt där de
kommer ut ur apparaten.
13. Använd endast tillbehör/tillbehör som
specificerats av tillverkaren.
14. Koppla ur apparaten under åskväder eller när den
inte används under långa perioder.
15. Överlåt all service till kvalificerad personal.
Service krävs när apparaten har skadats på
något sätt, till exempel när nätsladden eller
kontakten är skadad, när vätska har spillts eller
föremål har fallit in i apparaten, när apparaten
har utsatts för regn eller fukt, inte fungerar
normalt eller har tappats.
16. VARNING! Nätkontakten/apparatkopplingen
används som frånkopplingsenhet.
Frånkopplingsanordningen ska förbli lätt att
använda.
17. VARNING! För att helt koppla bort denna produkt
från elnätet, dra ut kontakten från vägguttaget.
Nätkontakten används för att helt avbryta
strömförsörjningen till enheten och måste vara
lättillgänglig för användaren.
18. Utrustningen kan användas vid en maximal
omgivningstemperatur på 95 °F (35 °C).
19. Produkten är designad för höjder upp till och med
2000m över havet.
20. VARNING! För att helt koppla bort denna produkt
från elnätet, dra ut kontakten från vägguttaget.
Nätkontakten används för att helt avbryta
strömförsörjningen till enheten och måste vara
lättillgänglig för användaren.
21. VARNING! Neutral säkring. Efter att säkringen
har gått finns det fortfarande risk för elektriska
stötar. Koppla ur nätsladden före service. Vid
byte, använd en säkring med samma strömstyrka
(Kina/Europa: T 1AL 250V; Japan: T 2AL 250V).
Anmärkningar om användning
• Undvik höga temperaturer.
• Tillåt tillräcklig värmespridning när den installeras
i ett ställ.
• Hantera nätsladden försiktigt.
• VARNING! Håll i kontakten när du drar ur sladden.
• Håll enheten fri från fukt, vatten och damm.
• Dra ur nätsladden när du inte använder enheten
under en längre tid.
• Blockera inte ventilationshålen.
• Släpp inte in främmande föremål i enheten.
• Låt inte insektsmedel, bensen och thinner komma i
kontakt med enheten.
• VARNING! Ta aldrig isär eller modifiera enheten på
något sätt.
• Ventilationen bör inte hindras genom att täcka
ventilationsöppningarna med föremål som
tidningar, dukar eller gardiner.
• Källor med öppen låga som tända ljus bör inte
placeras på enheten.
• Utsätt inte enheten för droppande eller stänkande
vätskor.
• Placera inte föremål fyllda med vätskor, såsom
vaser, på enheten.
• VARNING! Hantera inte nätsladden med våta
händer.
• VARNING! När omkopplaren är i läget OFF
(STANDBY) är utrustningen inte helt avstängd från
MAINS.
• Utrustningen ska installeras nära
strömförsörjningen så att strömförsörjningen är
lättillgänglig.
• VARNING! VARM YTA.
• RÖR INTE.
• Den bakre metallpanelen över den interna
kylflänsen kan bli varm när produkten
används kontinuerligt. Rör inte vid varma
områden, speciellt runt markeringen “Het yta” och
den bakre metallpanelen.
Important product information

Svenska
EU-försäkran om överensstämmelse
Härmed förklarar Sound United, LLC att vår produkt
överensstämmer med följande EU/EG-direktiv:
• EMC:2014/30/EU
• LVD:2014/35/EU
• RoHS: 2011/65/EU and amendment Directive (EU)
2015/863
• ErP: EC regulation 1275/2008 and its framework
directive 2009/125/EC including amendment
801/2013
Den fullständiga texten till EU-försäkran om
överensstämmelse finns tillgänglig på följande
internetadress: https://www.polkaudio.com/
declarations-of-conformity.
Sound United, LLC
5541 Fermi Court
Carlsbad, CA 92008, USA
EU-kontakt:
Sound United Europe
A division of D&M Europe B.V.
Beemdstraat 11, 5653 MA, Eindhoven
The Netherlands
UKCA-försäkran om överensstämmelse
Härmed förklarar Sound United, LLC att vår produkt
överensstämmer med brittiska regler:
• Electrical Equipment (Safety) Regulations 2016
• Electromagnetic Compatibility Regulations 2016
• The Restriction of the Use of Certain Hazardous
Substances in Electrical and Electronic Equipment
Regulations 2012
• Eco design for Energy-Related Products
Regulations 2010
Den fullständiga texten till UKCA-försäkran om
överensstämmelse finns tillgänglig på följande
internetadress: https://www.polkaudio.com/
declarations-of-conformity.
Sound United, LLC
5541 Fermi Court
Carlsbad, CA 92008, USA
Storbritannien importör:
D&M Audiovisual Ltd
Dale Road, Worthing, West Sussex, United Kingdom,
BN11 2BH
Avfallshantering av produkten
Vissa internationella, nationella och/eller lokala
lagar och/eller förordningar kan gälla för kassering
av denna produkt. För mer information, kontakta
återförsäljaren där du köpte den här produkten
eller Polk-importören/distributören i ditt land. Mer
information finns också på www.polkaudio.com eller
genom att kontakta Polk Audio på 5541 Fermi Court,
Carlsbad, Kalifornien, 92008, USA. Telefon: 1-800-377-
7655.
Den här symbolen på våra elektriska produkter eller
deras förpackningar indikerar att det är förbjudet
i Europa att kassera denna produkt(er) som
hushållsavfall. För att säkerställa att du kasserar
produkten/produkterna på rätt sätt, vänligen kassera
produkten/produkterna enligt lokala lagar och
förordningar om kassering av elektrisk och elektronisk
utrustning. Genom att göra det bidrar du till att
behålla naturresurser och till att främja miljöskydd
genom behandling och bortskaffande av elektroniskt
avfall.
Korrekt kassering av denna produkt. Denna märkning
indikerar att denna produkt inte ska kasseras med
annat hushållsavfall i hela EU. För att förhindra
eventuell skada på miljön eller människors hälsa från
okontrollerad avfallshantering, återvinn det på ett
ansvarsfullt sätt för att främja hållbar återanvändning
av materialresurser. För att returnera din använda
enhet, använd retur- och insamlingssystemen eller
kontakta återförsäljaren där produkten köptes. De kan
ta denna produkt för miljösäker återvinning.
Pour en savoir plus
www.quefairedemesdechets.fr

Nederlands
Controleer of de volgende items in de doos zijn geleverd.
Uitpakken
Monitor XT10
Subwoofer Stroomkabel Documentatie
Voor een optimale luisterervaring is plaatsing alles. Plaats de subwoofer in een van de onderstaande
configuraties en maak aanpassingen volgens uw voorkeuren.
Plaats de subwoofer
1
2
OR
Luisteren met één subwoofer
Voor een opstelling met één subwoofer plaatst u de
subwoofer aan weerszijden van de voorluidsprekers en
langs dezelfde muur. Voor het beste geluid en minimale
vervorming moet de subwoofer ongeveer 15 cm van de
muur worden geplaatst.
Voor optimale prestaties:
• Plaats de subwoofer niet in het midden van de
luisterruimte.
• Zorg ervoor dat elke subwoofer minstens 15 cm van de
muur verwijderd is.
• Experimenteer met plaatsing. Het verplaatsen van de
subwoofer een paar meter in elke richting kan een groot
verschil maken.
Luisteren met meerdere subwoofers
Voor een opstelling met meerdere subwoofers plaatst u de eerste subwoofer aan weerszijden van de
voorluidsprekers en langs dezelfde muur. Plaats de tweede subwoofer in een diagonale positie tegenover
de eerste subwoofer.
De subwoofer instellen
Documentation
QSG + Reg Card Icons
Reg Card Icon

Nederlands
Sluit de stroomkabel aan
Steek de stroomkabel in de subwoofer en vervolgens in een stopcontact.
Sluit de subwoofer aan op je versterker of AVR
4
Selecteer een van de twee onderstaande opties om de subwoofer aan te sluiten op je versterker of
receiver.
OPMERKING: Zorg ervoor dat de subwoofer niet is aangesloten op de netvoeding voordat u deze aansluit
op uw versterker/ontvanger.
Lijn in setup
Deze methode wordt aanbevolen voor systemen zonder LFE/subwoofer-uitgang, zoals 2-kanaals systemen.
1. Schakel de stroom van uw versterker/ontvanger uit.
2. Sluit standaard RCA-kabels aan op de pre-out-aansluitingen links en rechts vooraan van de versterker/
ontvanger.
3. Zet de volumeknop op 12 uur.
4. Pas de laagdoorlaatfilterknop aan om de subwoofer en de hoofdluidsprekers naar uw voorkeuren te
laten samensmelten.
LFE setup
1. Schakel de stroom van uw versterker/ontvanger uit.
2. Sluit de LFE-kabel van uw ontvanger aan op de linker witte RCA-lijningang op de subwoofer.
Opmerking: de ‘linker witte RCA-lijningang’ wordt aangeduid als ‘L/LFE’.
3. Draai de laagdoorlaatfilterknop op de subwoofer naar 160 Hz.
4. Zet de volumeknop op 12 uur.
5. Volg de instructies voor asbeheer op uw versterker of AVR om de subwoofer te integreren.
3
De installatie is nu voltooid!
Kijk tv of luister naar muziek en pas de subwoofer instellingen naar jouw voorkeuren aan. Zie de volgende
pagina voor een diagram van het achterpaneel van de subwoofer.
Ga voor ondersteuning, veelgestelde vragen en meer informatie over de subwoofer
naar polkaudio.com/MonitorXT10.
5

Nederlands
1. Knop voor laagdoorlaatfilter
2. Faseschakelaar:
3. LED-stroomindicator
4. Aan/auto/uit-schakelaar
5. Volumeknop
6. Lijningang (LFE = Witte RCA)
7. AC-stroomingang
Bedieningselementen op het achterpaneel
van de subwoofer
Subwooferfuncties
MAXMIN
VOLUME
Monitor XT10 subwoofer
LOW PASS LINE IN
L/LFE
R
100
40 160
(LFE)
AC IN
2022-07-25
2022-06-07 Updated phase and power switch position
2022-07-25 Removed fuse symbol
HBP4830
Full Size
Josue Baltezar
White
Date
Drawing #
Scale
Prepared by
Color
Monitor XT10 Amp Back Panel NA
DateRevision Description
Pad printingProcess
Finish
Notes
1
2 4
3
5 6
7

Nederlands
Type, vermogen en frequentie
Luidsprekertype: Subwoofer
basistype: Basreflex (geport)
Algemene frequentierespons 24 Hz–160 Hz
Continu (RMS) 50 W
Piekvermogen 100 W
Versterkertype: Klasse D
Fase aanpassing 0°/180°
Europa (<.5W-conformiteit) Ja
Low-pass crossover-frequentie 40 Hz–160 Hz / LFE
Dimensies en gewicht
Productafmetingen (B x H x D) 11.9” x 15.7” x 16.6” (302 x 400 x 421 mm)
Productgewicht (per stuk) 23 lbs (10.4 kg)
Kasten
Beschikbare afwerkingen Zwart vinyl PICA
Voeten Vast geïnstalleerde voeten (geen nivellering)
Ingangen
Lijnniveau Ja
LFE Enkele RCA
Bediening
Voornaamste kracht Automatisch aan/uit
Volume Potentiometer
Laagdoorlaatfilter Potentiometer
Specificaties kunnen zonder voorafgaande kennisgeving worden gewijzigd.
Subwooferspecificaties
Technische assistentie
Als uw product tijdens verzending is beschadigd, neem dan contact op met de geautoriseerde Polk Audio-dealer
waar u uw product hebt gekocht. Ga voor technische ondersteuning, veelgestelde vragen en reparatie-informatie
naar support.polkaudio.com. E-mailadressen en telefoonnummers voor ondersteuning zijn afhankelijk van de regio
waar u uw product hebt gekocht.
© Copyright 2022 Polk Audio, LLC. Alla rättigheter förbehållna. Alle rechten voorbehouden. Polk en Polk Audio zijn
Geregistreerde handelsmerken van Polk Audio, LLC. Polk Monitor XT10 is een handelsmerk van Polk Audio, LLC.

Nederlands
WAARSCHUWING: Luister goed
Polk Audio-luidsprekers kunnen op extreem hoge
volumeniveaus spelen, wat ernstige of permanente
gehoorschade kan veroorzaken. Polk Audio aanvaardt
geen aansprakelijkheid voor gehoorverlies, lichamelijk
letsel of materiële schade als gevolg van verkeerd
gebruik van haar producten. Houd deze richtlijnen in
gedachten en gebruik altijd uw gezond verstand bij
het regelen van het volume:
Beperk langdurige blootstelling aan volumeniveaus
van meer dan 85 decibel (dB). Raadpleeg voor
meer informatie over veilige volumeniveaus de
richtlijnen van de Occupational Health and Safety
Administration (OSHA) op:
www.osha.gov/.
Verzorging en reiniging
Het enige dat u ooit aan uw luidsprekers hoeft
te doen, is ze af en toe afstoffen. Gebruik nooit
schuurmiddelen of reinigingsmiddelen op basis van
oplosmiddelen of agressieve schoonmaakmiddelen.
Veiligheidsmaatregelen
1. VOORZICHTIGHEID! Stel dit apparaat niet bloot
aan regen of vocht om het risico op brand
of elektrische schokken te verminderen. Het
apparaat mag niet worden blootgesteld aan
druppels of spatten en er mogen geen met
vloeistof gevulde voorwerpen, zoals vazen, op het
apparaat worden geplaatst.
2. Lees deze instructies.
3. Bewaar deze instructies.
4. Neem alle waarschuwingen in acht.
5. Volg alle instructies.
6. Gebruik dit apparaat niet in de buurt van water.
7. Alleen reinigen met een droge doek.
8. Blokkeer geen ventilatieopeningen. Installeer
in overeenstemming met de instructies van de
fabrikant.
9. Installeer het apparaat niet in de buurt
van warmtebronnen zoals radiatoren,
warmteroosters, kachels of andere apparaten
(inclusief versterkers) die warmte produceren.
10. Er mogen geen bronnen van open vuur, zoals
brandende kaarsen, op het apparaat worden
geplaatst.
11. Plaats de subwoofer dicht bij uw AC-stopcontact
voor eenvoudig aansluiten en loskoppelen.
12. Zorg dat er niet op het netsnoer kan worden
gelopen of dat het kan worden afgekneld, met
name bij de stekkers, stopcontacten en op het
punt waar ze uit het apparaat komen.
13. Gebruik alleen hulpstukken/accessoires die door
de fabrikant zijn gespecificeerd.
14. Koppel het apparaat los tijdens onweer of
wanneer het gedurende lange tijd niet wordt
gebruikt.
15. Laat al het onderhoud over aan gekwalificeerd
personeel. Onderhoud is vereist wanneer het
apparaat op enigerlei wijze is beschadigd,
zoals wanneer het netsnoer of de stekker is
beschadigd, wanneer vloeistof is gemorst of
objecten in het apparaat zijn gevallen, wanneer
het apparaat is blootgesteld aan regen of vocht,
niet normaal functioneren of is gevallen.
16. WAARSCHUWING! De netstekker/
apparaatkoppeling wordt gebruikt
als ontkoppelingsapparaat. De
ontkoppelingsinrichting moet gemakkelijk
bedienbaar blijven.
17. VOORZICHTIGHEID! Om dit product volledig los
te koppelen van het lichtnet, haalt u de stekker
uit het stopcontact. De netstekker wordt gebruikt
om de stroomtoevoer naar het apparaat volledig
te onderbreken en moet gemakkelijk toegankelijk
zijn voor de gebruiker.
18. De apparatuur kan worden gebruikt bij een
maximale omgevingstemperatuur van 95 °F (35
°C).
19. Het product is ontworpen voor hoogtes tot en
met 2000 meter boven zeeniveau.
20. VOORZICHTIGHEID! Om dit product volledig los
te koppelen van het lichtnet, haalt u de stekker
uit het stopcontact. De netstekker wordt gebruikt
om de stroomtoevoer naar het apparaat volledig
te onderbreken en moet gemakkelijk toegankelijk
zijn voor de gebruiker.
21. VOORZICHTIGHEID! Neutrale fusing. Nadat de
zekering is doorgebrand, bestaat nog steeds
het risico op een elektrische schok. Koppel het
netsnoer los voordat u onderhoud uitvoert.
Gebruik bij het vervangen een zekering met
dezelfde stroomsterkte (China/Europa: T 1AL
250V; Japan: T 2AL 250V).
Opmerkingen over gebruik
• Vermijd hoge temperaturen.
• Zorg voor voldoende warmteafvoer bij installatie
in een rack.
• Ga voorzichtig om met het netsnoer.
• WAARSCHUWING! Houd de stekker vast wanneer u
het snoer loskoppelt.
• Houd het apparaat vrij van vocht, water en stof.
• Trek de stekker uit het stopcontact wanneer u het
apparaat voor langere tijd niet gebruikt.
• Blokkeer de ventilatieopeningen niet.
• Laat geen vreemde voorwerpen in het apparaat
komen.
• Laat insecticiden, benzeen en verdunner niet in
contact komen met het apparaat.
• WAARSCHUWING! Demonteer of wijzig het
apparaat op geen enkele manier.
• De ventilatie mag niet worden belemmerd door de
ventilatieopeningen af te dekken met voorwerpen
zoals kranten, tafelkleden of gordijnen.
• Open vuurbronnen zoals brandende
kaarsen mogen niet op het apparaat
worden geplaatst.
• Stel het apparaat niet bloot aan druipende
of opspattende vloeistoffen.
• Plaats geen met vloeistof gevulde voorwerpen,
zoals vazen, op het apparaat.
• WAARSCHUWING! Raak het netsnoer niet met
natte handen aan.
• WAARSCHUWING! Als de schakelaar in de UIT
(STANDBY)-stand staat, is het apparaat niet
volledig van het lichtnet uitgeschakeld.
• De apparatuur moet in de buurt van de
stroomvoorziening worden geïnstalleerd, zodat de
stroomvoorziening gemakkelijk toegankelijk is.
• VOORZICHTIGHEID! HEET OPPERVLAKTE.
Belangrijke productinformatie

Nederlands
• NIET AANRAKEN.
• Het metalen achterpaneel boven de interne
warmteafleider kan heet worden als dit product
continu wordt gebruikt. Raak hete gebieden
niet aan, vooral niet rond het merkteken ‘Hot
oppervlak’ en het metalen achterpaneel.
EU-verklaring van overeenstemming
Hierbij verklaart Sound United, LLC dat ons product
voldoet aan de volgende EU/EC-richtlijnen:
• EMC:2014/30/EU
• LVD:2014/35/EU
• RoHS: 2011/65/EU and amendment Directive (EU)
2015/863
• ErP: EC regulation 1275/2008 and its framework
directive 2009/125/EC including amendment
801/2013
De volledige tekst van de EU-conformiteitsverklaring is
beschikbaar op het volgende internetadres: https://
www.polkaudio.com/declarations-of-conformity.
Sound United, LLC
5541 Fermi Court
Carlsbad, CA 92008, USA
EU-contactpersoon:
Sound United Europe
A division of D&M Europe B.V.
Beemdstraat 11, 5653 MA, Eindhoven
The Netherlands
UKCA-verklaring van overeenstemming
Hierbij verklaart Sound United, LLC dat ons product in
overeenstemming is met de Britse regelgeving:
• Electrical Equipment (Safety) Regulations 2016
• Electromagnetic Compatibility Regulations 2016
• The Restriction of the Use of Certain Hazardous
Substances in Electrical and Electronic Equipment
Regulations 2012
• Eco design for Energy-Related Products
Regulations 2010
De volledige tekst van de UKCA-
conformiteitsverklaring is beschikbaar op het
volgende internetadres: https://www.polkaudio.com/
declarations-of-conformity.
Sound United, LLC
5541 Fermi Court
Carlsbad, CA 92008, USA
Britse importeur:
D&M Audiovisual Ltd
Dale Road, Worthing, West Sussex, United Kingdom,
BN11 2BH
Productverwijdering
Bepaalde internationale, nationale en/of lokale
wetten en/of voorschriften kunnen van toepassing zijn
met betrekking tot de verwijdering van dit product.
Neem voor meer informatie contact op met de winkel
waar u dit product heeft gekocht of met de Polk-
importeur/distributeur in uw land. Meer informatie
is ook beschikbaar op www.polkaudio.com of door
contact op te nemen met Polk Audio op 5541 Fermi
Court, Carlsbad, Californië, 92008, VS. Telefoon: 1-800-
377-7655.
Dit symbool op onze elektrische producten of hun
verpakking geeft aan dat het in Europa verboden is
om dit product(en) weg te gooien als huishoudelijk
afval. Om ervoor te zorgen dat u het product/
de producten op de juiste manier weggooit, dient
u het product/de producten weg te gooien in
overeenstemming met de lokale wet- en regelgeving
inzake de verwijdering van elektrische en elektronische
apparatuur. Zo draagt u bij aan het behoud van
natuurlijke hulpbronnen en aan de bevordering van
milieubescherming door de verwerking en verwijdering
van elektronisch afval.
Correcte verwijdering van dit product. Deze markering
geeft aan dat dit product in de hele EU niet met
ander huishoudelijk afval mag worden weggegooid.
Om mogelijke schade aan het milieu of de menselijke
gezondheid door ongecontroleerde afvalverwijdering
te voorkomen, moet u het op verantwoorde wijze
recyclen om duurzaam hergebruik van materiële
hulpbronnen te bevorderen. Gebruik voor het
retourneren van uw gebruikte apparaat de retour- en
ophaalsystemen of neem contact op met de winkel
waar het product is gekocht. Zij kunnen dit product
meenemen voor milieuvriendelijke recycling.
Pour en savoir plus
www.quefairedemesdechets.fr

中文
检查包装箱中是否包含以下物品。
设置低音炮
Monitor XT10
Subwoofer 电源线 文档
为了获得最佳的聆听体验,位置就是一切。将低音炮置于以下配置之一,并根据您的喜好进行调整。
放置低音炮
1
2
OR
用一个低音炮收听
对于单低音炮设置,将低音炮放置在前置扬声器的任一侧并沿同一面
墙放置。为获得最佳声音和最小失真,低音炮应放置在距离墙壁约 15
厘米的位置。
为了获得最佳性能:
• 请勿将低音炮放置在聆听区域的中间。
• 确保每个低音炮距离墙壁至少 15厘米。
• 尝试放置。将低音炮向任何方向移动几英尺会产生很大的不同。
使用多个低音炮聆听
对于多低音炮设置,将第一个低音炮放置在前置扬声器的任一侧并沿同一面墙放置。将第二个低音炮放置在与第一个低音炮相
对称的另一侧位置。
设置低音炮
Documentation
QSG + Reg Card Icons
Reg Card Icon

中文
插入电源线
将电源线插入低音炮,然后插入墙壁插座。
将低音炮连接到您的放大器或 AVR
4
选择以下两个选项之一,将低音炮连接到您的放大器或接收器。
注意:在将低音炮连接到放大器/接收器之前,确保低音炮未插入交流电源。
线路输入设置
建议将此方法用于没有 LFE/低音炮输出插孔的系统,例如 2 声道系统。
1. 关闭放大器/接收器的电源。
2. 从放大器/接收器的前左和右前级输出插孔连接标准 RCA 电缆。
3. 将音量旋钮设置到 12 点钟位置。
4. 调整低通滤波器旋钮以根据您的喜好混合低音炮和主扬声器。
LFE 设置
1. 关闭放大器/接收器的电源。
2. 将接收器的 LFE 电缆连接到低音炮左侧的白色 RCA 线路输入。
注意:“左白色 RCA 线路输入”标记为“L/LFE”。
3. 将低音炮上的低通滤波器旋钮转到 160 Hz。
4. 将音量旋钮设置到 12 点钟位置。
5. 按照放大器或 AVR 上的低音管理说明集成低音炮。
3
设置已经完成!
看电视或听音乐并根据您的喜好调整低音炮设置。有关低音炮后面板的图表,请参见下一页。
5
查看产品说明书 &
电子保修卡注册

中文
1. 低通滤波器旋钮
2. 相位开关
3. LED电源指示灯
4. 开启/自动/关闭电源开关
5. 音量控制旋钮
6. 线路输入(LFE = 白色 RCA)
7. 交流电源入口
低音炮背面板控制
低音炮特点
MAXMIN
VOLUME
Monitor XT10 subwoofer
LOW PASS LINE IN
L/LFE
R
100
40 160
(LFE)
AC IN
2022-07-25
2022-06-07 Updated phase and power switch position
2022-07-25 Removed fuse symbol
HBP4830
Full Size
Josue Baltezar
White
Date
Drawing #
Scale
Prepared by
Color
Monitor XT10 Amp Back Panel NA
DateRevision Description
Pad printingProcess
Finish
Notes
1
2 4
3
5 6
7

中文
类型、功率和频率
扬声器类型 低音炮
基本类型 低音反射(导向孔)
整体频率响应 24 赫兹–160 赫兹
连续 (RMS) 50 瓦
峰值功率 100 瓦
放大器类型 D类
相位调整 0°/180°
欧洲(<.5W 合规性) 支持
低通分频频率 40 Hz–160 Hz / LFE
尺寸及重量
产品尺寸(宽 x 高 x 深) 11.9” x 15.7” x 16.6”(302 毫米 x 400 毫米 x 421 毫米)
产品重量(每个) 23 磅(10.4 公斤)
箱体
可用饰面 黑色乙烯基 PICA
脚 永久安装支脚(无需调平)
输入
线路电平 支持
LFE 单RCA
控件
主电源 自动开/关
体积 电位器
低通滤波器 电位器
规格如有更改,恕不另行通知。
低音炮规格
技术援助
如果您的产品在运输过程中损坏,请联系您购买产品的授权 Polk Audio 零售商。如需技术支持、常见问题解答和维修信息,请访问
support.polkaudio.com。支持电子邮件地址和电话号码因您购买产品的地区而异。
© 版权所有 2022 Polk Audio, LLC。版权所有。 Polk 和 Polk Audio 是 Polk Audio, LLC 的注册商标。 Polk Monitor XT10 是 Polk Audio,
LLC 的商标。

中文
警告:仔细听
Polk Audio 扬声器能够以极高的音量播放,这可能会导致严重
或永久性的听力损伤。 Polk Audio 对因滥用其产品而导致的听
力损失、人身伤害或财产损失不承担任何责任。请牢记这些准则,
并在控制音量时始终使用良好的判断力:
限制长时间暴露于超过 85 分贝 (dB) 的音量。有关安全音量水
平的更多信息,请查看职业健康与安全管理局 (OSHA) 指南,网
址为
www.osha.gov/。
保养和清洁
您唯一需要对扬声器做的就是偶尔给它们除尘。切勿使用任何研
磨性或溶剂型清洁剂或任何刺激性清洁剂。
安全须知
1. 警告!为降低火灾或触电的风险,请勿将本设备暴露在雨中
或受潮。设备不得暴露在滴水或溅水环境中,不得将装有液
体的物体(例如花瓶)放在设备上。
2. 阅读这些说明。
3. 保留这些说明。
4. 注意所有警告。
5. 遵循所有说明。
6. 请勿在靠近水的地方使用本设备。
7. 只能用干布清洁。
8. 不要堵塞任何通风口。按照制造商的说明进行安装。
9. 不要安装在任何热源附近,例如散热器、热调节器、火炉或
其他产生热量的设备(包括放大器)。
10. 不得在设备上放置明火源,例如点燃的蜡烛。
11. 将低音炮放置在靠近交流电源插座的位置,以便于插拔。
12. 防止电源线被踩到或夹住,特别是在插头、便利插座以及它
们从设备中退出的位置。
13. 仅使用制造商指定的附件/附件。
14. 在雷雨天气或长时间不使用时,请拔下设备插头。
15. 将所有维修工作交由合格人员进行。当设备以任何方式损
坏时都需要进行维修,例如电源线或插头损坏、液体溅出或
物体落入设备、设备暴露在雨中或受潮、不正常运行,或已
被丢弃。
16. 警告!电源插头/电器耦合器用作断开设备。断开装置应保
持易于操作。
17. 警告!要完全断开本产品与电源的连接,请将插头从墙壁插
座上断开。电源插头用于完全中断设备的电源供应,并且必
须方便用户使用。
18. 该设备可在最高 95 °F (35 °C) 的环境温度下使用。
19. 该产品专为海拔 2000 米及以下的海拔而设计。
20. 警告!要完全断开本产品与电源的连接,请将插头从墙壁
插座上断开。电源插头用于完全中断设备的电源供
应,并且必须方便用户使用。
21. 警告!中性融合。保险丝熔断后,仍有触电危险。维
修前断开电源线。更换时,请使用相同额定电流的
保险丝(中国/欧洲:T 1AL 250V;日本:T 2AL 250V)。
使用注意事项
• 安装在机架中时,需要充分散热。
• 小心处理电源线。
• 警告!拔下电源线时握住插头。
• 使设备远离湿气、水和灰尘。
• 长时间不使用本机时,请拔下电源线。
• 不要阻塞通风孔。
• 不要让异物进入本机。
• 请勿让杀虫剂、苯和稀释剂接触本机。
• 警告!切勿以任何方式拆卸或改装设备。
• 不应通过用报纸、桌布或窗帘等物品覆盖通风口来阻碍通
风。
• 不应将明火源(例如点燃的蜡烛)放在设备上。
• 请勿将设备暴露在滴落或溅出的液体中。
• 请勿将装满液体的物体(例如花瓶)放在本机上。
• 警告!请勿用湿手处理电源线。
• 警告!当开关处于 OFF (STANDBY) 位置时,设备并未从
MAINS 完全关闭。
• 设备应安装在靠近电源的地方,以便电源容易接近。
• 警告!热表面。
• 请勿触摸。
• 持续操作本产品时,内部散热器上方的后金属面板可能会变
热。请勿触摸高温区域,尤其是“高温表面”标记和后金属面
板周围。
重要产品信息
(Pb) (Hg) (Cd) (Cr (VI)) (PBB) (PBDE)
箱体 O O O O O O
O O O O O O
O O O O O O
O O O O O O
O
制造商:Sound United, LLC
销售商:上海电音马兰士电子有限公司
产 地: 中国广东
联系地址: 上海市黄浦区西藏中路168号都市总部大楼1705室
中国服务热线: 4006210886
执行的国家标准编号
GB8898-2011
GB/T9254.1-2021
GB17625.1-2012

中文

日本
以下のアイテムが箱に入っていることを確認してください。
開梱
Monitor XT10
サブウーファー 電 源ケーブル 書類
最適なリスニング体験のためには、配置がとても重要です。サブウーファーを下の図中のいずれかの位置に置き、好みに応じて微
調 整してくだ さい 。
サブウーファー の 配 置
1
2
OR
1 つ の サブウ ーファーで 聴く
シングルサブウーファー のセットアップでは 、サブウーファー を左 右 いず
れかのフロントスピーカーの近くに配置します。最高のサウンドと最小限
の歪みのために、サブウーファーを壁から約15cm離して設置する必要
があります。
最 適 な パ フォ ー マ ン ス の た め に:
• サブウーファーをリスニングエリアの中央に置かないでください。
• サブウーファーが壁から少なくとも15cm離れていることを確認してく
ださい。
• 異なる配置を試してみてください。サブウーファーを任意の方向に数
10cm動かすと、サウンドが大きく変化することがあります。
複 数 の サブウーファーで 聴く
マルチサブウーファーのセットアップでは、1台目のサブウーファーを左右いずれかのフロントスピーカーの近くに配置します。 2台
目のサブウーファーは1台目のサブウーファーと対角線上に配置します。
サブウーファー をセットアップする
Documentation
QSG + Reg Card Icons
Reg Card Icon

日本
電源ケーブルの接続
電源ケーブルをサブウーファーに接続し、次に壁のコンセントに接続します。
サブウーファー をアンプまた は AVアンプに 接 続
4
以下の2つの接続方法のいずれかを選んで、サブウーファーをアンプまたはAVアンプに接続してください。
注:サブウーファーをアンプ/AVアンプに接続する前に、サブウーファーが電源に接続されていないことを確認してください。
ラ イ ン 入 力 の セ ット アップ
この方法は、2チャンネルシステムなど、LFE/サブウーファー出力ジャックのないシステムに推奨されます。
1. アンプ /A Vアンプの 電 源 を切ります。
2. アンプ/AVアンプのフロント(L/R)のプリアウト端子からサブウーファーのライン入力へ、RCAケーブルを接続します。
3. 音量を12時の位置に合わせます。
4. サブウーファーとメインスピーカーの音が違和感なく混じり合うようにローパスフィルターを調整します。
LFEのセットアップ
1. アンプ /A Vアンプの 電 源 を切ります。
2. アンプ/AVアンプからのLFEケーブルを左側のRCAライン入力(白色)に接続します。
注:「左側のRCAライン入力(白色)」は「L/LFE」と表示されています。
3. サブウーファーのローパスフィルターノブを160Hzにします。
4. 音量を12時の位置に合わせます。
5. アンプ/AVアンプのベースマネジメントの説明書に従って、サブウーファーを設定します。
3
これでセットアップは完了です
実際にテレビの音や音楽を再生して、サブウーファーをお好みに合わせて調整してください。次ページにあるサブウーファーの背
面 パ ネル の 図 もご確 認くだ さい 。
サポート、よくあるご質問、サブウーファーに関する詳細については、jp.polkaudio.comをご覧ください。
5

日本
1. ロ ー パ スフィル タ ー つ ま み
2. 位相切替スイッチ
3. LED電源インジケーター
4. 電源スイッチ(オン/オート/オフ)
5. 音調調節つまみ
6. ライン入力(LFE =白色RCA)
7. AC電源インレット
サブウ ーファー の 背 面 パ ネ ル
サブウーファー の 機 能
MAXMIN
VOLUME
Monitor XT10 subwoofer
LOW PASS LINE IN
L/LFE
R
100
40 160
(LFE)
AC IN
2022-07-25
2022-06-07 Updated phase and power switch position
2022-07-25 Removed fuse symbol
HBP4830
Full Size
Josue Baltezar
White
Date
Drawing #
Scale
Prepared by
Color
Monitor XT10 Amp Back Panel NA
DateRevision Description
Pad printingProcess
Finish
Notes
1
2 4
3
5 6
7

日本
タイプ、出力、および周波数
スピーカータイプ サブウーファー
エンクロ ー ジャー 形 式 バスレフ型
オーバーオール周波数特性 24 Hz〜160 Hz
連続出力(RMS) 50 W
ピークパワー 100 W
アンプ 方 式 クラスD
位相切替 0°/180°
ヨーロッパ(<.5W規制) 対応
ローパスフィルター周波数 40 Hz〜160 Hz / LFE
寸法と質量
外形寸法 (W x H x D) 302 mm x 400 mm x 421 mm
質量 10.4 kg
キ ャ ビ ネ ット
外装 ブラック PICAビニール
フット 固定式フット(高さ調整不可)
入力
ラインレベル あり
LFE シングルRCA
コ ントロ ー ル
電源 オン/オート/オフ
音量 ロ ータリー ボリューム
ロ ー パ スフィル タ ー ロ ータリー ボリューム
仕様は予告なく変更される場合があります。
サブウーファー の 仕 様
サポートについて
製品が配送中に損傷した場合は、製品を購入したPolk Audioの正規販売店にお問い合わせください。テクニカルサポート、FAQ、および修
理に関する情報については、jp.polkaudio.com/contact-usにアクセスしてください。サポートの電子メールアドレスと電話番号は、製品を
購入された地域によって異なります。
© 著作権 2022 Polk Audio, LLC.全著作権所有。 Polk および Polk Audio は Polk Audio, LLC の登録商標です。 Polk Monitor XT10 は
Polk Audio, LLC の商標です。

日本
警 告:必 ず お 読 みくだ さ い
Polk Audioのスピーカーは非常に高い音量での再生が可能な
ため、深刻な後遺症となる聴覚の障害を引き起こす恐れがあり
ます。Polk Audioは製品の誤用を原因とする聴覚障害、身体の損
傷、または物損に関して責任を負いかねます。本ガイドラインにご
留意いただき、適正なボリューム操作をお願いいたします。
85デシベル(dB)を超える音量に長時間さらされないようにして
ください。安全な音量レベルについての詳細は、労働衛生安全局
(OSHA)のガイドライン(www.osha.gov/)をご覧ください。
お 手 入 れ とクリー ニング
スピーカーに必要なお手入れは、折に触れて埃を払うことだけで
す。研磨剤や溶剤ベースのクリーナー、あるいは刺激の強い洗剤
は絶対に使用しないでください。
安全上のご注意
1. 警告!火災や感電を防止するために、本機を雨や湿気にさら
さな いでくだ さい 。本 機 を 水 滴 や 水しぶ きにさらさな いでく
ださい。花瓶など液体の入った物体は本機の上に置かない
でくだ さい 。
2. これらの指示をお読みください。
3. こ れら の 指 示 を 守 ってくだ さ い 。
4. すべての警告に注意してください。
5. すべ て の 指 示 に 従ってくだ さ い 。
6. 本機を水の近くで使用しないでください。
7. 清掃する際は乾いた布以外を使わないでください。
8. 換気口をふさがないでください。製造元の指示に従って設置
してくだ さい 。
9. ラジエーター、温風の送風口、ストーブ、またはその他の熱
を発生する機器(アンプを含む)などの周囲に設置しないで
くだ さい 。
10. 火のついたろうそくなどの裸火を本機の上に置かないでく
ださい。
11. 本機は電源コンセントの近くに配置して、電源コードを簡単
に 抜 き 差しで きるようにしてくだ さ い 。
12. 電源コードは、特にプラグやコンセント、およびそれらが本機
から出るポイントで、電源コードが踏まれたり挟まれたりす
ることが な いように 保 護 してくだ さい 。
13. 製造元が指定した付属品・アクセサリー以外は使用しない
でくだ さい 。
14. 雷雨の間、または長期間使用しない場合は、本機の電源コ
ード を 抜 いてくだ さい 。
15. 本機の修理は、必ず資格を持つサービス担当者に依頼して
ください。電源コードやプラグが破損した、液体をこぼした、
本機の中に物を落とした、本機が雨や湿気にさらされた、本
機が正常に動作しない、または本機が落下したなどの原因
により損傷を受けた場合には修理が必要です。
16. 警告!本機の電源プラグ/端子部は、遮断器として使用され
ますので、常に操作しやすい状態にしておいてください。
17. 注意!本機を電源から完全に切り離すには、プラグをコンセ
ントから抜きます。電源プラグは、本機への電源供給を完全
に遮断するために使用されるため、ユーザーが簡単にアク
セスできる場所にある必要があります。
18. 本機が使用可能な最大周囲温度は35°Cです。
19. 本機は、海抜2000m以下の標高に対応するように設計され
ています。
20. 注意!ニュートラルヒューズ。ヒューズが切れた後も、感電の
危険があります。修理を行う前に、電源コードを抜いてくださ
い。交換するときは、同じ定格電流のヒューズを使用してくだ
さい(中国/ヨーロッパ:T 1AL 250V、日本:T 2AL250V)。
使用上の注意
• 高 温 を 避 け てくだ さ い 。
• ラックに設置する場合は、十分な放熱経路を確保してくださ
い。
• 電源コードは慎重に取り扱ってください。
• 警告!コードを抜くときはプラグを持ってください。
• ユニットに湿気、水、ほこりが入らないようにしてください。
• 長期間使用しないときは、電源コードを抜いてください。
• 通気孔をふさがないでください。
• 本機に異物を入れないでください。
• 殺虫剤、ベンゼン、シンナーを本機に接触させないでください。
• 警告!本機を分解したり、改造したりしないでください。
• 新聞、テーブルクロス、カーテンなどで換気口を覆って換気を
妨 げ な いでくだ さい 。
• 火のついたろうそくなどの裸火を本機の上に置かないでくだ
さい。
• 本機を水滴や飛沫にさらさないでください。
• 花瓶など液体の入った物体を本機の上に置かないでください。
• 警 告!濡 れ た 手 で 電 源 コ ード を 扱 わ な い でくだ さ い 。
• 警告!スイッチがOFF(STANDBY)の位置にあるとき、本機は完
全に主電源から切り離されてはいません。
• 本機は、電源に簡単にアクセスできるように、電源の近くに設
置する必 要 があります。
• 注 意!表 面 が 熱くなって い ま す。
• 手 を 触 れ な いでくだ さい 。
• 本機を長時間使用すると、内部にヒートシンクがある背面の金
属パネルが熱くなることがあります。特に「高温注意」マーク
の周囲および背面の金属パネルの高温領域には手を触れな
いでくだ さい 。
製品に関する重要な情報

日本


HBP4818
Share Photos | Partager Des Photos | Compartir Fotos
#PolkAudio
Sound United, LLC
5541 Fermi Court
Carlsbad, CA 92008
U.S.A.
EU Contact:
Sound United Europe,
A division of D&M Europe B.V.
Beemdstraat 11, 5653 MA
Eindhoven, The Netherlands
UK Importer:
D&M Audiovisual Ltd
Dale Road, Worthing,
West Sussex, United
Kingdom, BN11 2BH
-
 1
1
-
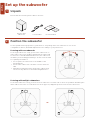 2
2
-
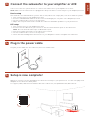 3
3
-
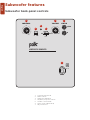 4
4
-
 5
5
-
 6
6
-
 7
7
-
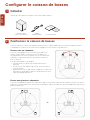 8
8
-
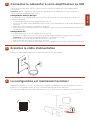 9
9
-
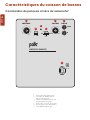 10
10
-
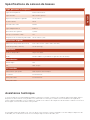 11
11
-
 12
12
-
 13
13
-
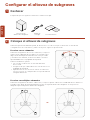 14
14
-
 15
15
-
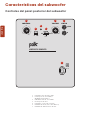 16
16
-
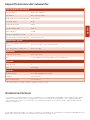 17
17
-
 18
18
-
 19
19
-
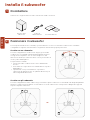 20
20
-
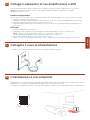 21
21
-
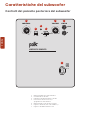 22
22
-
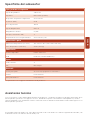 23
23
-
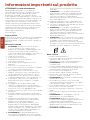 24
24
-
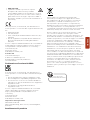 25
25
-
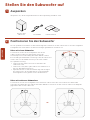 26
26
-
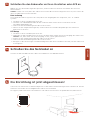 27
27
-
 28
28
-
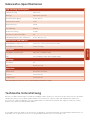 29
29
-
 30
30
-
 31
31
-
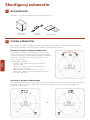 32
32
-
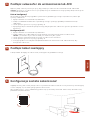 33
33
-
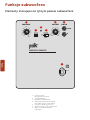 34
34
-
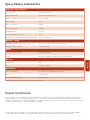 35
35
-
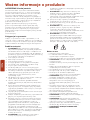 36
36
-
 37
37
-
 38
38
-
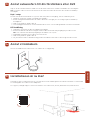 39
39
-
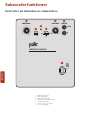 40
40
-
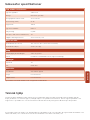 41
41
-
 42
42
-
 43
43
-
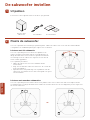 44
44
-
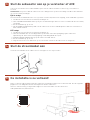 45
45
-
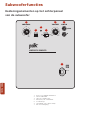 46
46
-
 47
47
-
 48
48
-
 49
49
-
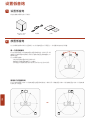 50
50
-
 51
51
-
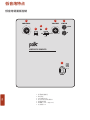 52
52
-
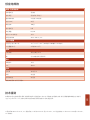 53
53
-
 54
54
-
 55
55
-
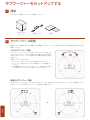 56
56
-
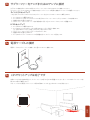 57
57
-
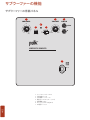 58
58
-
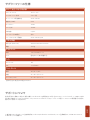 59
59
-
 60
60
-
 61
61
-
 62
62
-
 63
63
-
 64
64


in andere talen
- italiano: Polk XT10 Manuale del proprietario
- français: Polk XT10 Le manuel du propriétaire
- español: Polk XT10 El manual del propietario
- Deutsch: Polk XT10 Bedienungsanleitung
- 日本語: Polk XT10 取扱説明書
- polski: Polk XT10 Instrukcja obsługi
Gerelateerde papieren
Andere documenten
-
Yamaha RX-V659 de handleiding
-
Yamaha RX-V661 de handleiding
-
Yamaha V150 de handleiding
-
Yamaha MCX-2000 Handleiding
-
Sony RX-V559 de handleiding
-
-
Yamaha RX-V459 Handleiding
-
-
Yamaha RX-V861 de handleiding
-