
Bedienungsanleitung
celexon Aktiv Lautsprecher-Set
2-Wege 525
Vielen Dank für den Kauf dieses Produkts.
Für eine optimale Leistung und Sicherheit lesen Sie diese Anweisungen bitte sorgfältig
durch, bevor Sie dieses Produkt anschließen oder betreiben. Bitte bewahren Sie diese
Anleitung für eine spätere Verwendung auf.
Version: 32422_081

1
Diese Bedienungsanleitung dient dazu, Sie mit der Funktionsweise dieses Produktes
vertraut zu machen. Bewahren Sie diese Anleitung daher gut auf, damit Sie jederzeit
darauf zugreifen können.
• Beginnen Sie nicht mit der Montage, bevor Sie die komplette Bedienungsanleitung
gelesen und diese verstanden haben.
• Führen Sie die Installation mit einer weiteren Person durch um eine sichere Montage
zu gewährleisten.
• Entnehmen Sie das Produkt der Verpackung und entfernen alle Verpackungsmateri-
alien. Achten Sie darauf, dass sich kein Verpackungsmaterial am oder im Produkt be-
ndet Sollten Sie Verpackungsbeschädigungen feststellen, prüfen Sie zusätzlich ob
Beschädigungen am Produkt zu nden sind. Sollten Sie äußerliche Beschädigungen
an dem Gerät oder unerwartete oder unübliche Funktionsweisen feststellen, darf
das Produkt nicht weiter genutzt werden. Kontaktieren Sie umgehend den Händler,
bei dem Sie das Produkt gekauft haben oder celexon direkt (Web: www.celexon.de,
Mail: info@celexon.de) für weitere Informationen.
• Um einen störungsfreien Betrieb sicherzustellen, darf das Produkt ausschließlich in
Innenbereichen eingesetzt werden, es ist NICHT zur Nutzung im Freien geeignet.
• Die Nutzung des Geräts und Zubehörteile ist Kindern unter 12 Jahren verboten.
• Sorgen Sie dafür, dass keine Kinder mit den Geräten spielen oder sich ohne Aufsicht
in der Nähe aufhalten.
• Ein Umbauen oder Verändern des Produktes beeinträchtigt die Produktsicherheit.
• Achtung Verletzungsgefahr! Öffnen Sie das Produkt niemals eigenmächtig. Führen
Sie Reparaturen nie selbst aus!
• Verwenden Sie das Produkt nicht in der Nähe von Gas- oder Wassergerätschaften,
in staubiger Umgebung oder auf/ in der Nähe von metallischen Flächen (Empfangs-
beeinussung).
• Behandeln Sie das Produkt sorgfältig. Es kann durch Stöße, Schläge oder Fall aus
bereits geringer Höhe beschädigt werden.
• Halten Sie das Produkt fern von Feuchtigkeit und Hitze.
• Tauchen Sie das Produkt niemals in Wasser oder andere Flüssigkeiten.
• Verwenden Sie das Produkt nur in seiner bestimmungsgemäßen Art und Weise. Eine
anderweitige Verwendung kann zu Beschädigungen am Produkt oder in dessen Um-
gebung führen.
• Ziehen Sie die Schrauben fest, aber überdrehen diese nicht. Ein zu festes Anziehen
(z.B. Durch Verwendung eines Akkuschraubendrehers) kann Schäden verursachen
WARNHINWEISE

2
und den sicheren Halt des Produkts beeinträchtigen.
• Beschaffen Sie sich ggf. passendes Montagematerial für Ihren Montageuntergrund.
Achten Sie darauf, dass der Untergrund ausreichen Tragkraft aufweist um das Pro-
dukt inkl. weiterer Komponenten sicher und dauerhaft zu halten.
• Nach der Montage des Produkts und weiterer Komponenten sind diese auf ausrei-
chende Festigkeit und Betriebssicherheit zu überprüfen.
• Hängende Lasten müssen mindestens zweimal jährlich auf Festigkeit und Tragfähig-
keit geprüft werden.
• Alle Zuleitungen und Kabel dürfen nicht belastet werden und müssen so verlegt
werden, dass diese nicht beschädigt, gequetscht oder auf Spannung liegen.
• Schalten Sie das Gerät spannungsfrei, bevor Sie jegliche Verkabelung durchführen.
• Bei Nichtbeachtung obiger Anweisungen kann es zu Personenschäden und
Beschädigungen des Produktes oder Geräten die daran angeschlossen
sind kommen. Auch kann bei fehlerhafter Installation oder Verwendung die
Garantie erlöschen.
• Achten Sie auf eine angemessene Lautstärke, um Hörschäden zu vermeiden.
• Wenn Sie beim Verwenden des Produktes unsicher sind, kontaktieren Sie
Fachpersonal, Ihren Händler oder celexon direkt (Web: www.celexon.de,
Mail: info@celexon.de).
• Technische Änderungen und Irrtümer vorbehalten.
Der Hersteller übernimmt keine Verantwortung für Sachschäden oder Personenschäden,
wenn die Halterung außerhalb der empfohlenen Spezikationen verwendet wird, oder
bei unsachgemäßer Installation.
HAFTUNGSAUSSCHLUSS
Die Angaben in diesem Dokument können ohne vorherige Ankündigung durch
den Hersteller geändert werden. Änderungen werden jeweils in den folgenden
Versionen dieses Handbuchs ergänzt. Der Hersteller übernimmt keine Garantie
oder Gewährleistung auf die Richtigkeit der Angaben in diesem Dokument.

3
TECHNISCHE DATEN
• Spannung: AC 110-220 V, 50/60 Hz
• Verbrauch: Betrieb: 1,2 - 45 W (MAX)
Aus-Zustand: 0 W
• Leistung: 2 x 30 W (RMS), Peak 50 W
• Frequenzbereich: 40 Hz - 20 kHz
• T.H.D. @ 1kHz: < 1%
• Signal-Rausch-Verhältnis: >90 dB
• Abmessungen: 245 x 180 x 162 mm (BxHxT)
• Impedanz: 8 Ohm
• Audio Kanal: 2.0 (links und rechts)
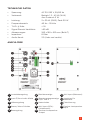
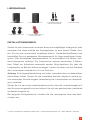
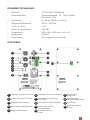
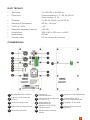
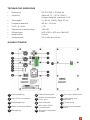
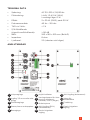
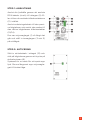
ANSCHLÜSSE
Lautstärkeregelung
Input 3,5mm Audio Klinke
Höhenregelung
Stereo/ Mono Schalter
Bassregelung
6
7
8
9
10
1
2
3
4
5
11
12
13
14
AUX Input (Balanced)
Anschluss für
Netzkabel
Feinsicherung
Passiver Lautsprecher
Input
Betriebsanzeige
Übersteuerungsanzeige
Clip L und R
Netzschalter
AUX Input (RCA)
(Unbalanced)
Passiver Lautsprecher
Output

4
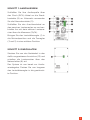
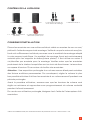
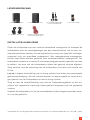
LIEFERUMFANG
INSTALLATIONSHINWEIS
Stellen Sie die Lautsprecher auf einen festen und tragfähigen Untergrund, oder
montieren Sie diese mithilfe der Montagebügel an eine Wand/ Decke. Ach-
ten Sie auf eine ausreichend tragfähige Wand-/ Deckenbeschaffenheit und
beschaffen Sie sich geeignetes Montagematerial für Ihren spezischen Unter-
grund. (Das beiliegende Montagematerial ist ausschließlich für Beton/ Voll-
stein-Untergrund zulässig.) Pro Lautsprecher müssen mindestens 2 Schrau-
ben/ Dübel zur Aufnahme verwendet werden. Bitte beachten Sie, dass die
Lautsprecher im Betrieb Wärme erzeugen. Lassen Sie daher um das Gehäuse
der Lautsprecher umlaufend ca. 10 cm Platz frei.
Achtung: Eine längere Beschallung mit hoher Lautstärke kann zu dauerhaften
Hörschäden führen. Stellen Sie die Lautstärke deshalb möglichst niedrig ein,
und vermeiden Sie eine längere Verwendung der Lautsprecher mit übermäßi-
ger Lautstärke.
Stellen Sie vor der ersten Inbetriebnahme sicher, dass die Lautstärkeregler auf
das Minimum eingestellt sind und nähern Sie sich der gewünschten Lautstärke
im Betrieb langsam an.
Bei längerem Nichtgebraucht, schalten Sie die Lautsprecher über den Netz-
schalter aus.
1 x aktiv Lautsprecher* 2 x Wandmontagebügel
und Montagematerial
1 x passiv Lautsprecher* 1 x 1,8m RCA Kabel
2 x Netzkabel (EU & UK) 1 x Anschlusskabel Aktiv zu
Passiv Kabel 4,8m
*je nach erworbenem Modell sind die Aktiv- und Passivlautsprecher W = Weiß oder B = Schwarz

5
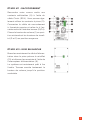
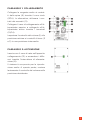
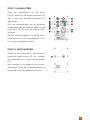
SCHRITT 1: ANSCHLIESSEN
Schließen Sie Ihre Audioquelle über
das Cinch (RCA) Kabel an die Steck-
kontakte (9) an. Alternativ verwenden
Sie die Klemmkontakte (11).
Schließen Sie das Anschlusskabel an
den passiven Lautsprecher an und ver-
binden ihn mit dem aktiven Lautspre-
cher über die Klemmen (10/14).
Bringen Sie den Lautstärkeregler (1) in
die Minimalposition und die Tonregler
(3 und 5) in eine mittlere Position.
SCHRITT 2: EINSCHALTEN
Stecken Sie nun das Netzkabel in den
dafür vorgesehenen Anschluss (12) und
schalten die Lautsprecher über den
Netzschalter (8) ein.
Das System ist nun bereit zur Audio-
wiedergabe. Drehen Sie nun langsam
den Lautstärkeregler in die gewünsch-
te Position.

6
Hersteller: celexon Europe GmbH
Adresse: Gutenbergstraße 2, 48282 Emsdetten, DE
Produktname: celexon Aktiv Lautsprecher-Set 2-Wege 525
Produkte, die mit dem CE-Zeichen gekennzeichnet sind, entsprechen allen
Anforderungen der entsprechenden EU-Direktiven. Die EU-Konformitäts-
erklärung kann unter folgender Adresse heruntergeladen werden:
www.celexon.de/zertikate
INFORMATION ZUR EU-KONFORMITÄT
Das Symbol weist auf die getrennte Rücknahme elektrischer und
elektronischer Geräte in EU-Ländern hin. Bitte werfen Sie das Gerät
nicht in den Hausmüll. Informieren Sie sich über das in Ihrem Land
gültige Rücknahmesystem und wenden Sie sich bei Fragen zum
Entsorgungsprozess an Ihre Kommune oder Ihre örtliche Wert-und
Schadstoffsammelstelle.

Operating instructions
celexon active loudspeaker set
2-way 525
Thank you for purchasing this product.
For optimum performance and safety, please read these instructions carefully
before connecting or operating this product. Please retain these instructions for future
reference.
Version: 32422_081

1
These operating instructions are intended to familiarise you with the operation of this
product. Keep this manual in a safe place so that you can refer to it at any time.
• Do not start assembly until you have read and understood the complete operating
instructions.
• Carry out the installation with another person to ensure safe installation.
• Remove the product from the packaging and remove all packaging material. Make
sure that there is no packaging material on or in the product. If you notice any da-
mage to the packaging, also check whether there is any damage to the product. If
you notice any external damage to the unit or any unexpected or unusual functio-
ning, the product must not be used any longer. Contact the dealer immediately from
whom you purchased the product or celexon directly (Web: www.celexon.co.uk,
Mail: info@celexon.co.uk) for further information.
• To ensure trouble-free operation, the product must only be used indoors and is NOT
suitable for outdoor use.
• The use of the appliance and accessories is forbidden to children under 12 years of
age.
• Ensure that no children play with the appliance or are in the vicinity without super-
vision.
• Modifying or altering the product will compromise product safety.
• Caution: Risk of injury! Never open the product without authorisation. Never carry
out repairs yourself!
• Do not use the product near gas or water appliances, in a dusty environment or on/
near metallic surfaces (reception interference).
• Handle the product with care. It can be damaged by knocks, blows or falling from
even a small height.
• Keep the product away from moisture and heat.
• Never immerse the product in water or other liquids.
• Only use the product in its intended manner. Any other use may result in damage to
the product or its surroundings.
• Tighten the screws, but do not overtighten them. Overtightening (e.g. by using a
cordless screwdriver) may cause damage and affect the secure t of the product.
• If necessary, procure suitable mounting material for your mounting surface. Make
sure that the surface has sufcient load-bearing capacity to hold the product incl.
other components securely and permanently.
WARNINGS

2
• After mounting the product and other components, check that they are sufciently
strong and safe to operate.
• Suspended loads must be checked for strength and load-bearing capacity at least
twice a year.
• All supply lines and cables must not be loaded and must be laid in such a way that
they are not damaged or crushed.
• Disconnect the unit from the power supply before carrying out any wiring.
• Failure to follow the above instructions may result in personal injury and damage
to the product or equipment connected to it. Incorrect installation or use may also
invalidate the warranty.
• Be sure to listen at an appropriate volume to avoid hearing damage.
• If you are unsure about the use of the product, contact your specialist personnel,
your dealer or celexon directly (Web: www.celexon.co.uk, Mail: info@celexon.co.uke).
• Technical changes and errors excepted.
The manufacturer accepts no responsibility for damage to property or personal injury if
the product is used outside the recommended specications, or in the event of improper
installation.
DISCLAIMER
The information in this document is subject to change without notice by the
manufacturer. Changes will be added to subsequent versions of this manual.
The manufacturer does not guarantee or warranty for the correctness of the
information in this document.

3
TECHNICAL DATA
• Voltage: AC 110-220 V, 50/60 Hz
• Consumption: Operation: 1,2 - 45 W (MAX)
Off mode: 0 W
• Power: 2 x 30 W (RMS), peak 50 W
• Frequency range: 40 Hz - 20 kHz
• T.H.D. @ 1kHz: < 1%
• Signal-to-noise ratio: >90 dB
• Dimensions: 245 x 180 x 162 mm (WxHxD)
• Impedance: 8 Ohm
• Audio channel: 2.0 (left and right)
CONNECTIONS
Volume control
3.5 mm audio jack Input
Treble control
Stereo / Mono switch
Bass control
6
7
8
9
10
1
2
3
4
5
11
12
13
14
AUX Input (Balanced)
Connection for mains cable
Fine-wire fuse
Passive loudspeaker input
Power indicator
Overload indicator
L and R
Power switch
AUX Input (RCA)
(Unbalanced)
Passive loudspeaker output

4
IN THE BOX
INSTALLATION NOTE
Place the speakers on a solid and stable surface or mount them on a wall/
ceiling using the mounting brackets. Make sure that the wall/ceiling has suf-
cient load-bearing capacity, and obtain suitable mounting materials for your
specic surface. (The enclosed mounting material is only suitable for concrete/
solid stone substrates). At least 2 screws/dowels must be used per speaker.
Please note that the speakers generate heat during operation. Therefore, leave
approx. 10 cm of space all the way around.
Caution: Prolonged exposure to sound at high volumes can cause permanent
hearing damage. Therefore, set the volume as low as possible and avoid pro-
longed use of the speakers at excessive volume.
Before using the speakers for the rst time, make sure that the volume controls
are set to the minimum and slowly approach the desired volume during opera-
tion. If the speakers will not be used for a long time, switch them off using the
mains switch.
1 x active loudspeaker* 2 x wall mounting brackets
and mounting material
1 x passive speaker* 1 x 1.8m RCA cable
2 x Mains cable (EU & UK) 1 x Active to Passive
Connection cable 4.8m
*depending on the model purchased, the active and passive loudspeakers are W = White or B = Black.

5
STEP 1: CONNECT
Connect your audio source via the
Cinch (RCA) cable to the plug cont-
acts (9). Alternatively, use the terminal
contacts (11). Connect the connection
cable to the passive loudspeaker and
connect it to the active loudspeaker via
the terminals (10/14).
Set the volume control (1) to the mini-
mum position and the tone controls (3
and 5) to a middle position.
STEP 2: SWITCH ON
Now plug the mains cable into the de-
signated connection (12) and switch
on the speakers with the mains switch
(8). The system is now ready for audio
playback. Now slowly turn the volume
control to the desired position.

6
Manufacturer: celexon Europe GmbH
Address: Gutenbergstraße 2, 48282 Emsdetten, DE
Product name: celexon active loudspeaker set 2-way 525
Products that are marked with the CE mark meet all requirements of the relevant
EU directives. The EU declaration of conformity can be downloaded from the
following address: www.celexon.de/zertikate
INFORMATION ON EU-CONFORMITY
The symbol indicates the separate collection of electrical and electronic
devices in EU countries. Please do not throw the device into household
waste. Find out about the return system applicable in your country and
contact your local authority or your local waste and pollutant collection
point if you have any questions about the disposal process.

7
Manufacturer: celexon Europe GmbH
Address: Gutenbergstraße 2, 48282 Emsdetten, DE
Product name: celexon active loudspeaker set 2-way 525
Products that are marked with the UKCA mark meet all requirements of the
relevant UK directives. The UK declaration of conformity can be downloaded
from the following address: www.celexon.de/zertikate
INFORMATION ON UK-CONFORMITY
The symbol indicates the separate collection of electrical and electronic
devices in EU countries. Please do not throw the device into household
waste. Find out about the return system applicable in your country and
contact your local authority or your local waste and pollutant collection
point if you have any questions about the disposal process.

Notice d’utilisation
Set d’enceintes actives celexon 2
voies 525
Merci d’avoir choisi ce produit.
Pour une performance et une sécurité optimales, veuillez lire attentivement les présentes
instructions avant de connecter ou d’utiliser ce produit. Veuillez conserver la présente
notice pour une utilisation ultérieure.
Version : 32422_081

1
La présente notice d’utilisation est destinée à vous familiariser avec le mode de fonction-
nement de ce produit. Conservez donc précieusement ces instructions an de pouvoir y
accéder à tout moment.
• Ne commencez pas le montage avant d’avoir lu entièrement et compris la notice
d’utilisation.
• Effectuez l’installation avec une autre personne an de garantir un montage sûr.
• Retirez le produit de l’emballage et enlevez tous les matériaux d’emballage. Veillez
à ce qu’aucun matériau d’emballage ne se trouve sur et dans le produit Si vous
constatez des dommages sur l’emballage, vériez également que le produit n’est
pas endommagé. Si vous constatez des dommages extérieurs sur l’appareil ou
des fonctionnements inattendus ou inhabituels, le produit ne doit plus être utilisé.
Contactez immédiatement le revendeur auprès duquel vous avez acheté le produit
ou directement celexon (web : www.celexon.fr, mail : info@celexon.fr) pour de plus
amples informations.
• Pour garantir un fonctionnement parfait, le produit doit être utilisé exclusivement en
intérieur, il N’est PAS adapté à une utilisation en extérieur.
• L’utilisation de l’appareil et de ses accessoires est interdite aux enfants de moins de
12 ans.
• Veillez à ce qu’aucun enfant ne joue avec les appareils ou ne se trouve à proximité
sans surveillance.
• Toute transformation ou modication du produit porte atteinte à sa sécurité.
• Attention risque de blessure ! N’ouvrez jamais le produit de votre propre initiative.
N’exécutez jamais vous-même les réparations !
• N’utilisez pas le produit à proximité d’appareils à gaz ou à eau, dans un environne-
ment exposé à la poussière ou sur/à proximité de surfaces métalliques (inuence
sur la réception).
• Traitez le produit avec soin. Il peut être endommagé par des chocs, des coups ou
des chutes, même de faible hauteur.
• Maintenez le produit à l’abri de l’humidité et de la chaleur.
• N’immergez jamais le produit dans l’eau ou d’autres liquides.
• N’utilisez le produit que de façon conforme. Toute autre utilisation peut entraîner
des dommages sur le produit ou dans son environnement.
• Serrez les vis, toutefois pas trop. Un serrage excessif (par exemple à l’aide d'un
tournevis sans l) peut entraîner des dommages et compromettre la bonne tenue
du produit.
AVERTISSEMENTS

2
• Procurez-vous, le cas échéant, le matériel de montage adapté à votre support de
montage. Veillez à ce que le support présente une capacité de charge sufsante
pour maintenir le produit et les autres composants de manière sûre et durable.
• Après le montage du produit et des autres composants, il convient de vérier que
leur résistance et leur sécurité de fonctionnement sont sufsantes.
• La résistance et la capacité admissible des charges suspendues doivent être contrô-
lées au moins deux fois par an.
• Tous les ls et câbles d’alimentation ne doivent pas être soumis à des contraintes et
doivent être posés de manière à ne pas être endommagés, écrasés ou sous tension.
• Mettez l’appareil hors tension avant d’effectuer tout câblage.
• Le non-respect des instructions énoncées ci-dessus peut entraîner des dom-
mages corporels et endommager le produit ou les appareils qui y sont raccor-
dés. Une installation ou une utilisation incorrecte peut entraîner l’annulation de
la garantie.
• Veillez à ce que le volume sonore soit raisonnable an d’éviter toute décience
auditive.
• Si vous n’êtes pas sûr lors de l’utilisation du produit, contactez le person-
nel spécialisé, votre revendeur ou directement celexon (Web : www.celexon.fr,
Mail : info@celexon.fr).
• Sous réserve de modications techniques et d’erreurs.
Le fabricant décline toute responsabilité en cas de dommages matériels ou corporels si
le support est utilisé en dehors des spécications recommandées ou s’il n’est pas installé
correctement.
EXCLUSION DE RESPONSABILITÉ
Les informations contenues dans le présent document peuvent être modiées
sans préavis par le fabricant. Les modications seront ajoutées dans les ver-
sions suivantes de ce manuel. Le fabricant n’offre aucune garantie ou assurance
quant à l’exactitude des informations contenues dans le présent document.

3
DONNÉES TECHNIQUES
• Tension : AC 110-220 V, 50/60 Hz
• Consommation : Fonctionnement : 1,2 - 45 W (MAX)
État arrêt : 0 W
• Puissance : 2 x 30 W (RMS), pic 50 W
• Plage de fréquences : 40 Hz - 20 kHz
• T.H.D. @ 1 kHz : < 1 %
• Rapport signal/bruit : >90 dB
• Dimensions : 245 x 180 x 162 mm (l x H x P)
• Impédance : 8 Ohms
• Canal audio : 2.0 (à gauche et à droite)
RACCORDS
Réglage du volume sonore
Entrée audio jack 3,5 mm
Réglage de la hauteur
Interrupteur stéréo/mono
Réglage des basses
6
7
8
9
10
1
2
3
4
5
11
12
13
14
Entrée AUX
(équilibré)
Raccord pour
câble d’alimentation
Fusible n
Enceinte passive
Entrée
Indicateur de fonctionnement
Indication de surcharge
Clip L et R
Interrupteur d’alimentation
Entrée AUX (RCA)
(non équilibré)
Enceinte passive
Sortie

4
CONTENU DE LA LIVRAISON
CONSIGNE D’INSTALLATION
Placez les enceintes sur une surface solide et stable ou montez-les sur un mur/
plafond à l’aide des supports de montage. Veillez à ce que la nature du mur/pla-
fond soit sufsamment solide et procurez-vous le matériel de montage adapté
à votre support spécique. (Le matériel de montage fourni est exclusivement
autorisé pour les supports en béton/pierre pleine). Il faut utiliser au moins 2
vis/chevilles par enceinte pour le montage. Veuillez noter que les enceintes
produisent de la chaleur lorsqu’elles sont en train de fonctionner. Laissez donc
un espace d’environ 10 cm autour du boîtier des enceintes.
Attention : Une exposition prolongée à un volume sonore élevé peut entraîner
des lésions auditives permanentes. Par conséquent, réglez le volume le plus
bas possible et évitez d’utiliser les enceintes à un volume excessif pendant une
période prolongée.
Avant la première utilisation, assurez-vous que les boutons de volume sont
réglés au minimum et rapprochez-vous progressivement du volume souhaité
pendant le fonctionnement.
En cas de non-utilisation prolongée, éteignez-les à l’aide de l’interrupteur d’ali-
mentation.
1 x enceinte active* 2 x étriers de montage mu-
ral et matériel de montage
1 x enceinte passive* 1 câble RCA de 1,8 m
2 x câbles d’alimentation
(UE & RU)
1 x câble de raccordement,
câble actif à passif 4,8 m
*selon le modèle acheté, les enceintes actives et passives sont W = blanc ou B = noir

5
ÉTAPE N°1 : RACCORDEMENT
Raccordez votre source audio aux
contacts enchables (9) à l’aide du
câble Cinch (RCA). Vous pouvez éga-
lement utiliser les contacts à pince (11).
Connectez le câble de raccordement
à l’enceinte passive et reliez-la à l’en-
ceinte active à l’aide des bornes (10/14).
Placez le bouton de volume (1) en posi-
tion minimale et les boutons de tonali-
té (3 et 5) en position moyenne.
ÉTAPE N°2 : MISE EN MARCHE
Branchez maintenant le câble d’alimen-
tation dans la prise prévue à cet effet
(12) et allumez les enceintes à l’aide de
l’interrupteur d’alimentation (8).
Le système est maintenant prêt à lire
l’audio. Tournez ensuite lentement le
bouton de volume jusqu’à la position
souhaitée.

6
Fabricant : celexon Europe GmbH
Adresse : Gutenbergstraße 2, 48282 Emsdetten, DE
Nom du produit : Set d’enceintes actives celexon 2 voies 525
Les produits qui comportent la marque CE respectent toutes les
exigences des directives européennes applicables. La déclaration de
conformité UE peut être téléchargée à l’adresse suivante :
www.celexon.de/zertikate
INFORMATION CONCERNANT LA CONFORMITÉ EUROPÉENNE
Ce symbole indique que les appareils électriques et électroniques
sont collectés séparément dans les pays de l’UE. Veuillez ne pas jeter
l’appareil avec les ordures ménagères. Renseignez-vous sur le sys-
tème de collecte en vigueur dans votre pays et adressez-vous à votre
commune ou à votre centre de collecte local pour toute question re-
lative au processus d’élimination.

Manual de instrucciones
Conjunto de altavoces activos
celexon de 2 vías 525
Gracias por adquirir este producto.
Para un rendimiento y seguridad óptimos, lea atentamente estas instrucciones antes de
conectar o utilizar este producto. Conserve estas instrucciones para futuras consultas.
Versión: 32422_081

1
Este manual de instrucciones tiene por objeto familiarizarle con el funcionamiento de
este producto. Por lo tanto, guarde estas instrucciones en un lugar seguro para poder
acceder a ellas en cualquier momento.
• No comience el montaje hasta haber leído y comprendido el manual de instruccio-
nes completo.
• Realice la instalación con otra persona para garantizar un montaje seguro.
• Saque el producto del envase y retire todos los materiales de embalaje. Asegúrese
de que no haya material de embalaje sobre o dentro del producto. Si observa algún
daño en el embalaje, compruebe también si hay algún daño en el producto. Si obser-
va algún daño externo en el dispositivo o un funcionamiento inesperado o inusual,
deje de utilizar el producto. Póngase en contacto inmediatamente con el distribui-
dor al que compró el producto o directamente con celexon (web: www.celexon.es,
correo: info@celexon.es) para obtener más información.
• Para garantizar un funcionamiento sin problemas, el producto solo debe utilizarse
en interiores, NO es apto para su uso en exteriores.
• Se prohíbe el uso del dispositivo y sus accesorios a niños menores de 12 años.
• Asegúrese de que no haya niños jugando con los dispositivos o en las proximidades
sin supervisión.
• Modicar o alterar el producto compromete su seguridad.
• Precaución: ¡Peligro de lesiones! No abra nunca el producto por cuenta propia. No
realice nunca reparaciones usted mismo.
• No utilice el producto cerca de aparatos de gas o agua, en ambientes polvorientos o
sobre/cerca de supercies metálicas (interferencias de recepción).
• Maneje el producto con cuidado. Puede dañarse por golpes, choques o caídas, in-
cluso desde poca altura.
• Mantenga el producto alejado de la humedad y el calor.
• No sumerja nunca el producto en agua u otros líquidos.
• Utilice el producto únicamente de la forma prevista. Cualquier otro uso puede cau-
sar daños al producto o a su entorno.
• Apriete los tornillos, pero no en exceso. Un apriete excesivo (por ejemplo, con un
destornillador inalámbrico) puede causar daños y afectar a la sujeción segura del
producto.
• Si es necesario, obtenga material de montaje adecuado para su supercie de mon-
taje. Asegúrese de que el sustrato tiene suciente capacidad de carga para sostener
el producto, incluidos otros componentes, de forma segura y permanente.
ADVERTENCIAS

2
• Una vez montados el producto y los demás componentes, debe comprobarse que
son sucientemente resistentes y que funcionan con seguridad.
• Debe comprobarse la resistencia y la capacidad de carga de las cargas suspendidas
al menos dos veces al año.
• Las líneas y cables de alimentación no deben estar cargados y deben tenderse de
forma que no sufran daños, aplastamientos o tensiones.
• Desconecte el aparato de la red eléctrica antes de realizar cualquier cableado.
• Si no se siguen las instrucciones anteriores, pueden producirse lesiones personales
y daños en el producto o en los equipos conectados a él. Además, la instalación o el
uso incorrectos pueden invalidar la garantía.
• Preste atención a emplear un volumen adecuado para evitar daños auditivos.
• Si no está seguro de cómo utilizar el producto, póngase en contacto con personal
cualicado, con su distribuidor o directamente con celexon (web: www.celexon.es,
correo: info@celexon.es).
• Salvo cambios y errores técnicos.
El fabricante no acepta ninguna responsabilidad por daños materiales o personales si el
soporte se utiliza fuera de las especicaciones recomendadas, o si se instala incorrec-
tamente.
EXENCIÓN DE RESPONSABILIDAD
La información contenida en este documento está sujeta a cambios sin previo
aviso por parte del fabricante. Los cambios se añadirán en las siguientes ver-
siones de este manual. El fabricante no garantiza la exactitud de la información
contenida en este documento.

3
DATOS TÉCNICOS
• Tensión: CA 110-220 V, 50/60 Hz
• Consumo: Funcionamiento: 1,2 - 45 W (MÁX)
Apagado: 0 W
• Potencia: 2 x 30 W (RMS), pico 50 W
• Rango de frecuencia: 40 Hz - 20 kHz
• T.H.D. @ 1kHz: < 1%
• Relación señal/ruido: >90 dB
• Dimensiones: 245 x 180 x 162 mm (anxalxpr)
• Impedancia: 8 ohm
• Canal de audio: 2.0 (izquierda y derecha)
CONEXIONES
Control de volumen
Entrada de audio jack de
3,5 mm
Regulación de altura
Interruptor estéreo/mono
Control de graves
6
7
8
9
10
1
2
3
4
5
11
12
13
14
Entrada AUX (balanceada)
Conexión para
cable de alimentación
Fusible para baja
intensidad
Altavoz pasivo
entrada
Indicador de funciona-
miento
Indicador de sobremodula-
ción Clip L y R
Interruptor de encendido
Entrada AUX (RCA)
(no balanceada)
Altavoz pasivo
salida

4
VOLUMEN DE SUMINISTRO
NOTAS DE INSTALACIÓN
Coloque los altavoces sobre una supercie sólida y estable o móntelos en una
pared/techo utilizando los soportes de montaje. Asegúrese de que la pared o
el techo tengan suciente capacidad de carga y adquiera el material de mon-
taje adecuado para la base sobre la que vaya a instalar. (El material de montaje
adjunto solo sirve para subsuelos de hormigón/piedra maciza). Deben utilizar-
se al menos 2 tornillos/tacos por altavoz para el montaje. Tenga en cuenta que
los altavoces generan calor durante su funcionamiento. Por lo tanto, deje unos
10 cm de espacio libre alrededor de la carcasa de los altavoces.
Atención: La exposición prolongada a un volumen de sonido elevado puede
causar lesiones auditivas permanentes. Por lo tanto, ajuste el volumen lo más
bajo posible y evite utilizar los altavoces a un volumen excesivo durante largos
periodos de tiempo.
Antes de utilizar el dispositivo por primera vez, asegúrese de que los controles
de volumen están ajustados al mínimo y acérquese lentamente al volumen de-
seado durante el funcionamiento.
Si no va a utilizar los altavoces durante mucho tiempo, apáguelos con el inte-
rruptor de red.
1 x altavoz activo* 2 x soportes de pared y
material de montaje
1 x altavoz pasivo* 1 x cable RCA 1,8 m
2 x cable de alimentación
(UE y UK)
1 x cable de conexión activo
a pasivo cable 4,8 m
*según el modelo adquirido, los altavoces activos y pasivos son W = blancos o B = negros

5
PASO 1: CONECTAR
Conecte su fuente de audio a los con-
tactos enchufables (9) mediante el ca-
ble cinch (RCA). Como alternativa, uti-
lice los contactos de los terminales (11).
Conecte el cable de conexión al altavoz
pasivo y conéctelo al altavoz activo a
través de los terminales (10/14).
Mueva el control de volumen (1) a la
posición mínima y los controles de
tono (3 y 5) a una posición intermedia.
PASO 2: ENCENDER
Enchufe ahora el cable de alimentación
en la conexión prevista para ello (12) y
encienda los altavoces mediante el in-
terruptor de red (8).
El sistema ya está listo para reproducir
audio. Ahora gire lentamente el control
de volumen a la posición deseada.

6
Fabricante: celexon Europe GmbH
Dirección: Gutenbergstraße 2, 48282 Emsdetten, DE
Nombre de producto: Juego de altavoces activos celexon de 2 vías 525
Los productos que llevan la marca CE cumplen todos los requisitos de las direc-
tivas comunitarias pertinentes. La declaración de conformidad de la UE puede
descargarse en la siguiente dirección: www.celexon.de/zertikate
INFORMACIÓN SOBRE LA CONFORMIDAD DE LA UE
El símbolo hace referencia a la recogida selectiva de dispositivos
eléctricos y electrónicos en los países de la UE. No tire el aparato a la
basura doméstica. Infórmese sobre el sistema de recogida aplicable
en su país y póngase en contacto con su ayuntamiento o con el punto
local de recogida de residuos peligrosos y reciclados si tiene alguna
duda sobre el proceso de eliminación.

Istruzioni per l’uso
Set di altoparlanti celexon Aktiv
a 2 vie 525
Grazie per aver acquistato questo prodotto.
Per garantire prestazioni e sicurezza ottimali, leggere attentamente le presenti istruzioni
prima di collegare o utilizzare il prodotto. Conservare queste istruzioni per riferimenti
futuri.
Versione: 32422_081

1
Le presenti istruzioni per l’uso hanno lo scopo di familiarizzare l’utente con il funziona-
mento di questo prodotto. Pertanto, conservare queste istruzioni in un luogo sicuro, in
modo da potervi accedere in qualsiasi momento.
• Non iniziare il montaggio prima di aver letto e compreso le istruzioni per l’uso nella
loro interezza.
• Eseguire l’installazione con un’altra persona per garantire un’installazione sicura.
• Estrarre il prodotto dalla confezione e rimuovere tutti i materiali di imballaggio.
Assicurarsi che non vi sia materiale di imballaggio sul prodotto o al suo interno.
Se si notano danni all’imballaggio, vericare se anche il prodotto è danneggiato.
Se si notano danni esterni al dispositivo o un funzionamento imprevisto o insoli-
to, interrompere l’utilizzo del prodotto. Contattare immediatamente il rivendito-
re presso il quale è stato acquistato il prodotto o direttamente celexon (sito web:
www.celexon.it, e-mail: info@celexon.it) per ulteriori informazioni.
• Per garantire un funzionamento ottimale, il prodotto può essere utilizzato solo in
ambienti interni e NON è adatto all’uso all’esterno.
• L’uso del dispositivo e degli accessori è vietato ai bambini di età inferiore ai 12 anni.
• Assicurarsi che i bambini non giochino con i dispositivi e che non si trovino nelle
vicinanze senza supervisione.
• La conversione o la modica del prodotto ne compromette la sicurezza.
• Attenzione! Pericolo di lesioni! Non aprire mai il prodotto senza autorizzazione.
Non eseguire mai riparazioni in proprio!
• Non utilizzare il prodotto in prossimità di apparecchi a gas o ad acqua, in ambienti
polverosi o su/vicino a superci metalliche (interferenze di ricezione).
• Maneggiare il prodotto con cura. Può essere danneggiato da urti, colpi o cadute
anche da un’altezza ridotta.
• Tenere il prodotto lontano da fonti di umidità e calore.
• Non immergere mai il prodotto in acqua o altri liquidi.
• Utilizzare il prodotto solo nel modo previsto. Qualsiasi altro utilizzo può causare
danni al prodotto o all’ambiente circostante.
• Serrare le viti senza ssarle eccessivamente. Un serraggio eccessivo (ad esempio
con un cacciavite a batteria) può causare danni e compromettere la tenuta del pro-
dotto.
• Se necessario, procurarsi il materiale di montaggio adatto alla supercie di montag-
gio. Assicurarsi che la supercie abbia una capacità di carico sufciente a sostenere
il prodotto e gli altri componenti in modo sicuro e permanente.
AVVERTENZE

2
• Dopo aver montato il prodotto e gli altri componenti, vericarne la resistenza e la
sicurezza operativa.
• I carichi sospesi devono essere controllati almeno due volte l’anno per vericarne la
resistenza e la capacità portante.
• Tutte le linee e i cavi di alimentazione non devono essere caricati e devono essere
posati in modo da non essere danneggiati, schiacciati o sottoposti a tensione.
• Prima di effettuare qualsiasi cablaggio, scollegare il dispositivo dall’alimentazione.
• La mancata osservanza di queste istruzioni può causare lesioni personali e danni al
prodotto o ai dispositivi ad esso collegati. Inoltre, un’installazione o un utilizzo non
corretti possono invalidare la garanzia.
• Assicurarsi che il livello del volume sia adeguato, onde evitare danni all’udito.
• In caso di dubbi sull’uso del prodotto, contattare il personale quali-
cato, il rivenditore o direttamente celexon (sito web: www.celexon.it,
e-mail: info@celexon.it).
• Con riserva di modiche tecniche ed errori.
Il produttore non si assume alcuna responsabilità per danni a cose o persone se il sup-
porto viene utilizzato al di fuori delle speciche raccomandate o se viene installato in
modo non corretto.
ESCLUSIONE DI RESPONSABILITÀ
Le informazioni contenute in questo documento sono soggette a modiche
senza preavviso da parte del produttore. Le modiche saranno aggiunte alle
versioni successive di questo manuale. Il produttore non garantisce o assicura
l’accuratezza delle informazioni contenute nel presente documento.

3
DATI TECNICI
• Tensione: CA 110-220 V, 50/60 Hz
• Consumo: Funzionamento: 1,2 - 45 W (MAX)
Stato spento: 0 W
• Potenza: 2 x 30 W (RMS), picco 50 W
• Gamma di frequenza: 40 Hz - 20 kHz
• T.H.D. @ 1 kHz: <1%
• Rapporto segnale/rumore: >90 dB
• Dimensioni: 245 x 180 x 162 mm (LxHxP)
• Impedenza: 8 Ohm
• Canale audio: 2.0 (a sinistra e a destra)
CONNESSIONI
Regolazione del volume
Ingresso jack audio da
3,5 mm
Controllo degli acuti
Interruttore stereo/mono
Controllo dei bassi
6
7
8
9
10
1
2
3
4
5
11
12
13
14
Ingresso AUX (Balanced)
Connessione per il
cavo di alimentazione
Fusibile a lo sottile
Altoparlante passivo
Ingresso
Display di
funzionamento
Indicatore di sovraccari-
co Clip L e R
Interruttore di
alimentazione
Ingresso AUX (RCA)
(Unbalanced)
Altoparlante passivo
Uscita

4
VOLUME DI FORNITURA
NOTA DI INSTALLAZIONE
Posizionare gli altoparlanti su una supercie solida e stabile o montarli a pare-
te/softto utilizzando le staffe di montaggio. Assicurarsi che la parete/softto
abbia una capacità di carico sufciente e procurarsi i materiali di montaggio
adatti alla supercie specica (il materiale di montaggio allegato è ammesso
solo per sottofondi in calcestruzzo/pietra massiccia). Per ogni altoparlante è
necessario utilizzare almeno 2 viti/tasselli. Nota: gli altoparlanti generano calo-
re durante il funzionamento. Lasciare quindi circa 10 cm di spazio libero intorno
al corpo degli altoparlanti.
Attenzione: l’esposizione prolungata a un volume elevato può causare danni
permanenti all’udito. Per questo motivo, è necessario impostare il volume il più
basso possibile ed evitare di utilizzare gli altoparlanti a un volume eccessivo
per lunghi periodi di tempo.
Prima di utilizzare gli altoparlanti per la prima volta, accertarsi che i controlli
del volume siano impostati al minimo e avvicinarsi lentamente al volume desi-
derato durante il funzionamento.
Se gli altoparlanti non vengono utilizzati per un periodo di tempo prolungato,
spegnerli utilizzando l’interruttore di alimentazione.
1 x altoparlante attivo* 2 x staffe di montaggio
a parete e materiale di
montaggio
1 x altoparlante passivo* 1 x cavo RCA da 1,8 m
2 x cavi di alimentazione
(UE e UK)
1 x cavo di collegamento da
attivo a passivo 4,8 m
*a seconda del modello acquistato, gli altoparlanti attivo e passivo sono W = bianco o B = nero

5
PASSAGGIO 1: COLLEGAMENTO
Collegare la sorgente audio ai contat-
ti della spina (9) tramite il cavo cinch
(RCA). In alternativa, utilizzare i con-
tatti dei morsetti (11).
Collegare il cavo di collegamento all’al-
toparlante passivo e collegarlo all’al-
toparlante attivo tramite i terminali
(10/14).
Impostare il controllo del volume (1) alla
posizione minima e i controlli di tono (3
e 5) in una posizione intermedia.
PASSAGGIO 2: ACCENSIONE
Inserire ora il cavo di rete nell’apposito
collegamento (12) e accendere i diffu-
sori tramite l’interruttore di alimenta-
zione (8).
Il sistema è ora pronto per la riprodu-
zione audio. A questo punto, ruotare
lentamente il controllo del volume nella
posizione desiderata.

6
Produttore: celexon Europe GmbH
Indirizzo: Gutenbergstraße 2, 48282 Emsdetten, DE
Denominazione del prodotto: set di altoparlanti celexon Aktiv a 2 vie 525
I prodotti contrassegnati dal simbolo CE sono conformi a tutti i requisiti
delle corrispondenti direttive UE. La dichiarazione di conformità UE può essere
scaricata dal seguente indirizzo: www.celexon.de/zertikate
INFORMAZIONI SULLA CONFORMITÀ UE
Il simbolo indica la raccolta differenziata dei dispositivi elettrici ed
elettronici nei Paesi dell’UE. Non gettare il dispositivo nei riuti do-
mestici. Informarsi sul sistema di ritiro in vigore nel proprio Paese e
contattare l’autorità locale o il punto di raccolta dei riuti pericolosi e
di riciclaggio in caso di domande sul processo di smaltimento.

Instrukcja obsługi
Zestaw głośników celexon Aktiv
2-drożne 525
Dziękujemy za zakup tego produktu.
Aby zapewnić optymalne działanie i bezpieczeństwo, przed podłączeniem lub obsługą
tego produktu należy uważnie przeczytać niniejsze instrukcje. Prosimy o zachowanie
niniejszej instrukcji do wykorzystania w przyszłości.
Wersja: 32422_081

1
Niniejsza instrukcja obsługi ma na celu zapoznanie użytkownika z działaniem
produktu. Niniejszą instrukcję przechowywać w bezpiecznym miejscu, aby mieć do niej
dostęp w dowolnym momencie.
• Przed podjęciem montażu należy przeczytać ze zrozumieniem całą instrukcję ob-
sługi.
• Instalację należy wykonywać z drugą osobą, aby zapewnić bezpieczny montaż.
• Wyjąć produkt z opakowania i usunąć wszelkie materiały opakowaniowe. Upew-
nić się, czy w produkcie lub na nim nie ma materiałów opakowaniowych. W przy-
padku stwierdzenia uszkodzeń opakowania należy również sprawdzić, czy nie jest
uszkodzony produkt. Jeśli widoczne są zewnętrzne uszkodzenia urządzenia lub w
przypadku stwierdzenia niespodziewanego lub nietypowego sposobu działania nie
wolno dalej używać produktu. Należy bezzwłocznie skontaktować się ze sprzedaw-
cą, u którego nabyto produkt lub bezpośrednio z rmą celexon (Internet: www.ce-
lexon.pl, e-mail: info@celexon.pl), aby uzyskać więcej informacji.
• Aby zapewnić bezawaryjną pracę, produkt może być używany wyłącznie w po-
mieszczeniach. Produkt NIE nadaje się do użytku na wolnym powietrzu.
• Dzieciom poniżej 12 roku życia zabrania się używania urządzenia i akcesoriów.
• Upewnić się, czy dzieci nie bawią się urządzeniami ani nie przebywają w pobliżu
bez nadzoru.
• Przebudowa lub modykowanie produktu ma negatywny wpływ na jego bezpie-
czeństwo.
• Uwaga, ryzyko obrażeń ciała! Nigdy nie otwierać produktu samodzielnie. Nigdy
nie przeprowadzać napraw samodzielnie!
• Nie należy używać produktu w pobliżu urządzeń gazowych lub wodnych, w zapy-
lonym otoczeniu lub na/w pobliżu powierzchni metalowych (zakłócenia odbioru).
• Z produktem obchodzić się ostrożnie. Może zostać uszkodzony przez wstrząsy, ude-
rzenia lub upadek nawet z niewielkiej wysokości.
• Produkt należy chronić przed wilgocią i wysoką temperaturą.
• Nigdy nie zanurzać produktu w wodzie lub innych płynach.
• Używać produktu wyłącznie zgodnie z jego przeznaczeniem. Każde inne użycie
może prowadzić do uszkodzenia produktu lub jego otoczenia.
• Dokręcić śruby, ale ich nie przekręcić. Zbyt mocne dokręcenie (np. za pomocą wkrę-
tarki akumulatorowej) może spowodować uszkodzenie i wpłynąć negatywnie na
bezpieczne zamocowanie produktu.
• W razie potrzeby należy zapewnić materiał montażowy dostosowany do istnieją-
WSKAZÓWKI OSTRZEGAWCZE

2
cej powierzchni montażowej. Upewnić się, czy powierzchnia ma wystarczającą no-
śność, aby bezpiecznie i trwale utrzymać produkt, w tym kolejne komponenty.
• Po zmontowaniu produktu i innych komponentów należy je sprawdzić pod kątem
odpowiedniej wytrzymałości i bezpieczeństwa eksploatacji.
• Obciążenia podwieszane należy sprawdzać pod kątem wytrzymałości i nośności co
najmniej dwa razy w roku.
• Wszelkie przewody zasilające i kable nie mogą być obciążone i muszą być ułożone
w taki sposób, aby nie mogły zostać uszkodzone, zgniecione ani naprężone.
• Przed wykonaniem jakiegokolwiek okablowania należy odłączyć urządzenie od za-
silania.
• Niezastosowanie się do powyższych instrukcji może spowodować obrażenia
ciała oraz uszkodzenie produktu lub podłączonych do niego urządzeń. Niewła-
ściwa instalacja lub użytkowanie może również doprowadzić do wygaśnięcia
gwarancji.
• Utrzymywać głośność na odpowiednim poziomie, aby uniknąć uszkodzenia słuchu.
• Jeśli nie ma pewności w odniesieniu do korzystania z produk-
tu, skontaktować się z wykwalikowanym personelem, sprzedaw-
cą lub bezpośrednio z rmą celexon (Internet: www.celexon.pl,
e-mail: info@celexon.pl).
• Zastrzega się możliwość zmian technicznych i błędów.
Producent nie ponosi odpowiedzialności za szkody materialne lub obrażenia ciała, jeśli
uchwyt jest używany niezgodnie z zalecanymi specykacjami lub jeśli uchwyt jest nie-
prawidłowo zainstalowany.
WYŁĄCZENIE ODPOWIEDZIALNOŚCI
Informacje zawarte w tym dokumencie mogą ulec zmianie bez uprzedniego
powiadomienia ze strony producenta. Zmiany będą dodawane do kolejnych
wersji niniejszej instrukcji. Producent nie udziela gwarancji ani rękojmi odno-
śnie poprawności informacji zawartych w tym dokumencie.

3
DANE TECHNICZNE
• Napięcie: AC 110-220 V, 50/60 Hz
• Zużycie: Eksploatacja: 1,2 - 45 W (MAKS.)
Stan wyłączenia: 0 W
• Moc: 2 x 30 W (RMS), Peak 50 W
• Zakres częstotliwości: 40 Hz - 20 kHz
• T.H.D. @ 1kHz: <1%
• Stosunek sygnału do szumu: >90 dB
• Wymiary: 245 x 180 x 162 mm (szer. x wys. x głęb.)
• Impedancja: 8 Ω
• Kanał audio: 2.0 (po lewej i po prawej stronie)
PRZYŁĄCZA
Regulacja głośności
Input 3,5 mm gniazdo audio
Regulacja wysokości
Przełącznik stereo / mono
Regulacja basu
6
7
8
9
10
1
2
3
4
5
11
12
13
14
AUX Input (Balanced)
Przyłącze
kabla sieciowego
Bezpiecznik czuły
Głośnik pasywny
Input
Wskaźnik eksploatacji
Wskaźnik przesterowania
Clip L i R
Przełącznik sieciowy
AUX Input (RCA)
(Unbalanced)
Głośnik pasywny
Output

4
ZAKRES DOSTAWY
WSKAZÓWKA DOTYCZĄCA INSTALACJI
Umieścić głośniki na twardej i stabilnej powierzchni lub zamontować je na
ścianie/sucie za pomocą wsporników montażowych. Upewnić się, że ściana/
sut jest wystarczająco stabilny i zapewnić odpowiedni materiał montażowy
do konkretnego podłoża. (Dołączony materiał montażowy jest dozwolony tyl-
ko do zastosowania na podłożu betonowym/kamiennym.) Do zamocowania
każdego głośnika należy użyć co najmniej 2 śrub/kołków. Należy pamiętać, że
głośniki generują ciepło podczas eksploatacji. Dlatego należy zostawić około
10 cm wolnej przestrzeni wokół obudowy głośnika.
Uwaga: Długotrwałe narażenie na wysoki poziom głośności może spowodo-
wać trwałe uszkodzenie słuchu. Dlatego ustawiać głośność tak nisko, jak to
możliwe i unikać korzystania z głośników przy nadmiernej głośności przez dłu-
gi czas.
Przed pierwszym użyciem upewnić się, czy regulacja głośności jest ustawio-
na na minimum i powoli zbliżać się do ustawienia żądanej głośności podczas
eksploatacji.
Jeśli głośniki nie są używane przez dłuższy czas, wyłączyć je za pomocą prze-
łącznika sieciowego.
1 x głośnik aktywny* 2 x wsporniki do montażu
na ścianie i materiał mon-
tażowy
1 x głośnik pasywny* 1 x 1,8 m kabel RCA
2 x kabel sieciowy (UE i UK) 1 x kabel przyłączeniowy,
aktywny na pasywny kabel
4,8 m
*w zależności od zakupionego modelu aktywne i pasywne głośniki mają kolor W = biały lub
B = czarny

5
KROK 1: PODŁĄCZANIE
Podłączyć źródło dźwięku do styków
wtykowych (9) za pomocą kabla cinch
(RCA). Alternatywnie użyć styków zaci-
skowych (11).
Podłączyć kabel przyłączeniowy do
głośnika pasywnego i podłączyć go do
głośnika aktywnego za pomocą zaci-
sków (10/14).
Ustawić regulator głośności (1) w po-
zycji minimalnej, a regulatory barwy
dźwięku (3 i 5) w pozycji środkowej.
KROK 2: WŁĄCZANIE
Teraz podłączyć kabel sieciowy do od-
powiedniego przyłącza (12) i włączyć
głośniki przełącznikiem sieciowym (8).
System jest teraz gotowy do odtwarza-
nia dźwięku. Następnie powoli obrócić
regulator głośności do żądanej pozycji.

6
Producent: celexon Europe GmbH
Adres: Gutenbergstraße 2, 48282 Emsdetten, DE
Nazwa produktu: Zestaw głośników celexon Aktiv 525, 2-drożne
Produkty oznaczone znakiem CE spełniają wszystkie
wymagania odpowiednich dyrektyw UE. Deklarację zgodności
UE można pobrać pod następującym adresem:
www.celexon.de/zertikate
INFORMACJA O ZGODNOŚCI Z PRZEPISAMI UE
Symbol oznacza, że w krajach UE urządzenia elektryczne i elektro-
niczne są odbierane osobno. Prosimy nie wyrzucać urządzenia do od-
padów domowych. Należy pozyskać informacje o systemie odbioru
obowiązującym w danym kraju i skontaktować się z władzami lokal-
nymi lub lokalnym punktem recyklingu i zbiórki zanieczyszczeń, jeśli
istnieją jakiekolwiek pytania dotyczące procesu utylizacji.

Handleiding
celexon actieve luidsprekerset
2-wegs 525
Hartelijk dank voor uw aankoop van dit product.
Voor optimale prestaties en veiligheid moet u deze aanwijzingen zorgvuldig doorlezen
voordat u dit product aansluit of gebruikt. Bewaar deze handleiding voor later gebruik.
Versie: 32422_081

1
Deze handleiding is bedoeld om u vertrouwd te maken met de werking van dit product.
Bewaar deze handleiding daarom goed, zodat u deze altijd kunt raadplegen.
• Begin niet met de montage voordat u de volledige handleiding hebt doorgelezen
en begrepen.
• Voer de installatie met een tweede persoon uit om een veilige montage te waar-
borgen.
• Haal het product uit de verpakking en verwijder alle verpakkingsmaterialen. Let
erop dat zich geen verpakkingsmateriaal aan of in het product bevindt. Mocht u
beschadigingen aan de verpakking constateren, moet u ook controleren of het pro-
duct beschadigd is. Mocht u beschadigingen aan de buitenkant van het apparaat
of een onverwachte of ongebruikelijke werking constateren, mag het product niet
verder worden gebruikt. Neem voor meer informatie onmiddellijk contact op met
de dealer waarbij u het product hebt gekocht of rechtstreeks met celexon (internet:
www.celexon.nl, e-mail: info@celexon.nl).
• Om te zorgen voor storingsvrij gebruik mag het product uitsluitend binnenshuis
worden gebruikt. Het product is NIET geschikt voor gebruik in de buitenlucht.
• Het gebruik van het apparaat en de accessoires is verboden voor kinderen jonger
dan 12 jaar.
• Zorg ervoor dat kinderen niet met het apparaat spelen of zich zonder toezicht in de
buurt van het apparaat bevinden.
• Ombouwen of veranderen van het product beïnvloedt de productveiligheid.
• Let op, letselgevaar! Open het product nooit eigenmachtig. Voer nooit zelf repa-
raties uit!
• Gebruik het product niet in de buurt van gas- of watervoerende apparaten, in stof-
ge omgevingen of op/in de buurt van metalen oppervlakken (beïnvloeding van de
ontvangst).
• Behandel het product zorgvuldig. Het apparaat kan door stoten, schokken of vallen
(al vanaf geringe hoogte) beschadigd raken.
• Houd het product uit de buurt van vocht en hitte.
• Dompel het product nooit in water of andere vloeistoffen.
• Gebruik het product alleen waarvoor het bedoeld is. Afwijkend gebruik kan leiden
tot beschadigingen van het product of in de omgeving van het product.
• Draai de schroeven vast, maar draai ze niet te strak aan. Te strak aandraaien (bijv.
door gebruik van een accuboormachine) kan schade veroorzaken en de veilige hou-
WAARSCHUWINGEN

2
vast van het product beïnvloeden.
• Zorg dat u evt. over passend montagemateriaal voor uw montage-ondergrond be-
schikt. Let erop dat de ondergrond voldoende draagvermogen heeft om het pro-
duct incl. verdere componenten veilig en permanent vast te houden.
• Na de montage van het product en verdere componenten moeten deze op voldoen-
de vastheid en gebruiksveiligheid worden gecontroleerd.
• Hangende lasten moeten minimaal twee keer per jaar op vastheid en draagvermo-
gen worden gecontroleerd.
• Alle toevoerleidingen en kabels mogen niet worden belast en moeten zo worden
gelegd dat deze niet beschadigd of geplet worden of op spanning liggen.
• Zorg dat het apparaat niet onder spanning staat als u bekabelingswerkzaamheden
uitvoert.
• Bij niet-inachtneming van bovenstaande aanwijzingen kun-
nen letsel en beschadigingen van het product of daaraan aange-
sloten apparaten ontstaan. Bij foutieve installatie of gebruik kan de
garantie ook komen te vervallen.
• Let op een gepast volume om gehoorschade te voorkomen.
• Als u twijfelt bij het gebruik van het product, neem dan contact op met vak-
personeel, uw dealer of rechtstreeks met celexon (internet: www.celexon.nl,
e-mail: info@celexon.nl).
• Technische wijzigingen en fouten zijn voorbehouden.
De fabrikant is niet aansprakelijk voor materiële schade of letsel als de houder buiten de
aanbevolen specicaties wordt gebruikt of bij ondeskundige installatie.
UITSLUITING VAN AANSPRAKELIJKHEID
De informatie in dit document kan zonder voorafgaande kennisgeving door de
fabrikant worden gewijzigd. Wijzigingen worden telkens in de volgende versies
van dit handboek aangevuld. De fabrikant geeft geen garantie op de juistheid
van de informatie in dit document.

3
TECHNISCHE GEGEVENS
• Spanning: AC 110-220 V, 50/60 Hz
• Verbruik: Gebruik: 1,2 - 45 W (MAX)
Uitgeschakelde toestand: 0 W
• Vermogen: 2 x 30 W (RMS), Peak 50 W
• Frequentiebereik: 40 Hz - 20 kHz
• T.H.D. @ 1 kHz: < 1%
• Signaal-ruis-verhouding: >90 dB
• Afmetingen: 245 x 180 x 162 mm (BxHxD)
• Impedantie: 8 ohm
• Audiokanaal: 2.0 (links en rechts)
AANSLUITINGEN
Volumeregeling
Input 3,5mm audiojack
Hoogteregeling
Stereo-monoschakelaar
Basregeling
6
7
8
9
10
1
2
3
4
5
11
12
13
14
AUX Input (Balanced)
Aansluiting voor
netsnoer
Fijnzekering
Passieve luidspreker
Input
Gebruiksweergave
Overdrive-weergave
Clip L en R
Netschakelaar
AUX Input (RCA)
(Unbalanced)
Passieve luidspreker
Output

4
LEVERINGSOMVANG
INSTALLATIE-AANWIJZING
Plaats de luidsprekers op een vaste en belastbare ondergrond, of monteer de
luidsprekers met de montagebeugel aan een wand/plafond. Let op een vol-
doende belastbare textuur van wand/plafond en zorg voor geschikt montage-
materiaal voor uw specieke ondergrond. (Het meegeleverde montagema-
teriaal mag alleen worden gebruikt voor betonnen/stenen ondergrond.) Per
luidspreker moeten er minimaal 2 schroeven/pluggen worden gebruikt om vast
te zetten. Let erop dat de luidsprekers tijdens het gebruik warmte afgeven.
Zorg daarom rond de behuizing van de luidsprekers voor een vrije ruimte van
10 cm.
Let op: Langere blootstelling aan te hoog volume kan leiden tot permanente
gehoorbeschadiging. Zet het volume daarom zo laag mogelijk en vermijd lan-
ger gebruik van de luidsprekers op een te hoog volume.
Zorg er voor de inbedrijfstelling voor dat de luidsprekerregelaars op het mi-
nimum zijn ingesteld en verhoog tijdens gebruik langzaam naar het gewenste
volume.
Schakel de luidsprekers uit via de netschakelaar tijdens langere periodes waar-
in u ze niet gebruikt.
1 x actieve luidspreker* 2 x wandmontagebeugel
en montagemateriaal
1 x passieve luidspreker* 1 x 1,8 m RCA-kabel
2 x netsnoer (EU en UK) 1 x kabel met aansluitkabel
actief naar passief 4,8m
*afhankelijk van het aangeschafte model zijn de actieve- en passieve luidspreker W = wit of B = zwart

5
STAP 1: AANSLUITEN
Sluit uw audiobron via de cinch
(RCA)-kabel op de steekcontacten (9)
aan. U kunt ook de klemcontacten (11)
gebruiken.
Sluit de aansluitkabel op de passieve
luidspreker aan en verbind deze via de
klemmen (10/14) met de actieve luid-
spreker.
Zet de volumeregelaar (1) op de mini-
male positie en de toonregelaar (3 en
5) op een middelste positie.
STAP 2: INSCHAKELEN
Steek nu het netsnoer in de daarvoor
bedoelde aansluiting (12) en schakel
de luidsprekers in via de netschakelaar
(8).
Het systeem is nu gereed voor audio-
weergave. Draai de volumeregelaar nu
langzaam naar de gewenste positie.

6
Fabrikant: celexon Europe GmbH
Adres: Gutenbergstraße 2, 48282 Emsdetten, DE
Productnaam: celexon actieve luidsprekerset 2-wegs 525
Producten die met het CE-teken zijn aangeduid, voldoen aan alle eisen van
de overeenkomstige EU-richtlijnen. De EU-conformiteitsverklaring kan via het
volgende adres worden gedownload: www.celexon.de/zertikate
INFORMATIE OVER EU-CONFORMITEIT
Het symbool wijst op de gescheiden inzameling van elektrische en
elektronische apparaten in EU-landen. Verwijder het apparaat niet met
het huishoudelijk afval. Informeer uzelf over het in uw land geldende
inzamelingssysteem en neem bij vragen over het verwijderingsproces
contact op met uw gemeente of uw plaatselijke inzamelpunt.

Bruksanvisning
celexon Aktivt högtalarset
2-vägs 525
Tack för att du har valt denna produkt!
Läs igenom denna bruksanvisning noga innan du ansluter eller använder produkten för
att garantera säkerheten och uppnå bästa möjliga prestanda. Spara denna bruksanvis-
ning för framtida bruk.
Version: 32422_081

1
Syftet med denna bruksanvisning är att förklara hur produkten fungerar. Spara därför
bruksanvisningen på ett säkert ställe så att du kan läsa i den senare om det behövs.
• Börja inte med monteringen förrän du har läst och förstått hela bruksanvisningen.
• Utför installationen tillsammans med en medhjälpare för att garantera säkerheten
under monteringen.
• Ta ut produkten ur förpackningen och avlägsna allt förpackningsmaterial. Kontroll-
era att det inte nns något förpackningsmaterial på eller i produkten. Om du ser att
förpackningen är skadad bör du kontrollera om produkten är skadad också. Om du
hittar utvändiga skador på produkten eller om den inte fungerar som den ska eller
om den beter sig onormalt så får produkten inte användas längre. Kontakta ome-
delbart återförsäljaren som du köpte produkten av eller vänd dig direkt till celexon
(webbplats: www.celexon.se, e-post: info@celexon.se) för mer information.
• För att produkten garanterat ska fungera felfritt får den enbart användas inomhus;
den är INTE lämpad för att användas utomhus.
• Barn under 12 år får inte använda produkten eller tillbehören.
• Se till så att inga barn leker med produkterna eller vistas i närheten av dessa utan
uppsikt.
• Om produkten byggs om eller förändras påverkas produktens säkerhet negativt.
• Varning för skaderisk! Öppna aldrig produkten på egen hand. Utför aldrig några
reparationer själv!
• Använd aldrig produkten i närheten av gas- eller vattenutrustning, i dammiga miljö-
er eller på eller i närheten av metallytor (påverkar mottagningen).
• Handskas försiktigt med produkten. Den kan skadas av stötar, slag eller fall från låga
höjder.
• Håll produkten borta från fukt och hög värme.
• Doppa aldrig produkten i vatten eller några andra vätskor.
• Använd produkten endast på det sätt som den är avsedd för. Om den används på
något annat sätt kan detta leda till skador på produkten eller dess omgivning.
• Dra åt skruvarna ordentligt, men dra inte åt dem för hårt. Om skruvarna dras åt för
hårt (t.ex. med en batteridriven skruvdragare) kan detta leda till skador och göra så
att produkten inte sitter fast ordentligt.
• Skaffa dig monteringsmaterial som passar till det aktuella monteringsunderlaget,
om så behövs. Kontrollera att underlaget är tillräckligt hållbart för att säkert och på
lång sikt bära produkten plus övriga komponenter.
VARNINGAR

2
• Efter monteringen av produkten och de övriga komponenterna måste dessa kont-
rolleras så att de sitter fast tillräckligt och kan användas säkert.
• Fastsättningen och hållfastheten för hängande laster måste kontrolleras minst två
gånger om året.
• Inga ledningar eller kablar får vara belastade och de måste dras så att de inte ska-
das, kläms eller spänningssätts.
• Se till att produkten är bortkopplad från strömförsörjningen (spänningsfri) innan du
drar några kablar eller ledningar.
• Om anvisningarna ovan inte följs kan detta leda till personskador eller skador på
produkten eller på utrustning som är ansluten till den. Felaktig installation eller fel-
aktig användning kan även leda till att garantin upphör att gälla.
• Tänk på att anpassa volymen för att undvika hörselskador.
• Om du är osäker på hur produkten ska användas ber vi dig kontakta en ex-
pert, din återförsäljare eller celexon direkt (webbplats: www.celexon.se,
e-post: info@celexon.se).
• Med reservation för tekniska ändringar och fel.
Tillverkaren ansvarar inte för sakskador eller personskador som uppstår om fästet inte
används enligt de rekommenderade specikationerna eller om installationen är felaktigt
utförd.
ANSVARSFRISKRIVNING
Informationen i detta dokument kan ändras av tillverkaren utan förvarning.
Ändringar införs i de efterföljande versionerna av denna bruksanvisning. Till-
verkaren garanterar inte att uppgifterna i detta dokument är korrekta.

3
TEKNISKA DATA
• Spänning: AC 110–220 V, 50/60 Hz
• Förbrukning: I drift: 1,2–45 W (MAX)
I avstängt läge: 0 W
• Effekt: 2 x 30 W (RMS), peak 50 W
• Frekvensområde: 40 Hz – 20 kHz
• THD vid 1 kHz: < 1 %
• S/N-förhållande
(signal-brusförhållande): > 90 dB
• Mått: 245 x 180 x 162 mm (BxHxD)
• Impedans: 8 ohm
• Ljudkanal: 2.0 (vänster och höger)
ANSLUTNINGAR
Volymreglage
Ingång 3,5 mm audio-tele-
plugg
Diskantreglage
Stereo/mono-omkopplare
Basreglage
6
7
8
9
10
1
2
3
4
5
11
12
13
14
AUX-ingång (balanserad)
Uttag för
strömkabeln
Finsäkring
Passiv högtalare
ingång
Av/på-indikator
Varningslampor för över-
styrning klämma L
(vänster) och R (höger)
Strömbrytare
AUX-ingång (RCA)
(obalanserad)
Passiv högtalare
utgång

4
LEVERANSOMFATTNING
INSTALLATIONSANVISNING
Ställ högtalarna på ett fast och hållbart underlag eller montera dem på väggen
eller i taket med hjälp av bygelfästena. Kontrollera att taket eller väggen är
tillräckligt hållbara för högtalaren och skaffa monteringsmaterial som passar
till materialet som väggen eller taket är gjorda av. (Det medföljande monte-
ringsmaterialet får endast användas till betong/massivtegel.) Minst 2 skruvar/
pluggar måste användas för att fästa varje högtalare. Tänk på att högtalarna
avger värme när de används. Lämna därför ungefär 10 cm fritt utrymme runt
om högtalarnas hölje.
Varning: Om man lyssnar på hög volym under en längre tid kan följden bli per-
manenta hörselskador. Ställ därför in volymen så lågt som möjligt och undvik
att använda högtalarna med för hög volym under en längre tid.
Skruva ner volymreglagen så långt det går innan du använder högtalarna för
första gången, och sedan höjer du volymen långsamt till den önskade nivån
medan högtalarna är i gång.
Om högtalarna inte ska användas under en längre tid stänger du av dem med
strömbrytaren.
1 st. aktiv högtalare* 2 st. bygelfästen för vägg-
montering och monte-
ringsmaterial
1 st. passiv högtalare* 1 st. 1,8 m RCA-kabel
2 st. strömkablar
(EU och UK)
1 st. anslutningskabel aktiv
till passiv kabel 4,8 m
*beroende på vilken modell du har köpt så är den aktiva och passiva högtalaren W = vit eller B = svart

5
STEG 1: ANSLUTNING
Anslut din ljudkälla genom att ansluta
RCA-kabeln (cinch) till uttagen (9) El-
ler så kan du använda klämkontakterna
(11) i stället.
Anslut anslutningskabeln till den passi-
va högtalaren och anslut den sedan till
den aktiva högtalarens klämkontakter
(10/14).
Dra ner volymreglaget (1) så långt det
går och ställ in tonreglagen (3 och 5)
på mittläget.
STEG 2: AKTIVERING
Sätt in strömkabeln i uttaget (12) och
sätt på högtalarna genom att trycka på
strömbrytaren (8).
Systemet är nu redo för att spela upp
ljud. Skruva långsamt upp volymregla-
get till önskat läge.

6
Tillverkare: celexon Europe GmbH
Adress: Gutenbergstraße 2, 48282 Emsdetten, DE
Produktens namn: celexon Aktivt högtalarset 2-vägs 525
Produkter som är försedda med CE-märkning uppfyller alla krav i de relevanta
EU-direktiven. EU-försäkran om överensstämmelse kan laddas ner på följande
adress: www.celexon.de/zertikate
INFORMATION OM EU-FÖRSÄKRAN
Denna symbol anger att elektriska och elektroniska apparater måste
lämnas in separat till återvinning inom EU. Släng inte apparaten i de
vanliga soporna. Ta reda på vad som gäller för återvinningssystemet
i ditt land och vänd dig till din kommun eller din lokala återvinnings-
central om du har frågor.
-
 1
1
-
 2
2
-
 3
3
-
 4
4
-
 5
5
-
 6
6
-
 7
7
-
 8
8
-
 9
9
-
 10
10
-
 11
11
-
 12
12
-
 13
13
-
 14
14
-
 15
15
-
 16
16
-
 17
17
-
 18
18
-
 19
19
-
 20
20
-
 21
21
-
 22
22
-
 23
23
-
 24
24
-
 25
25
-
 26
26
-
 27
27
-
 28
28
-
 29
29
-
 30
30
-
 31
31
-
 32
32
-
 33
33
-
 34
34
-
 35
35
-
 36
36
-
 37
37
-
 38
38
-
 39
39
-
 40
40
-
 41
41
-
 42
42
-
 43
43
-
 44
44
-
 45
45
-
 46
46
-
 47
47
-
 48
48
-
 49
49
-
 50
50
-
 51
51
-
 52
52
-
 53
53
-
 54
54
-
 55
55
-
 56
56
-
 57
57


Celexon Aktiv Lautsprecher-Set 2-Wege 525-W de handleiding
- Type
- de handleiding
- Deze handleiding is ook geschikt voor
in andere talen
- italiano: Celexon Aktiv Lautsprecher-Set 2-Wege 525-W Manuale del proprietario
- français: Celexon Aktiv Lautsprecher-Set 2-Wege 525-W Le manuel du propriétaire
- español: Celexon Aktiv Lautsprecher-Set 2-Wege 525-W El manual del propietario
- Deutsch: Celexon Aktiv Lautsprecher-Set 2-Wege 525-W Bedienungsanleitung
- svenska: Celexon Aktiv Lautsprecher-Set 2-Wege 525-W Bruksanvisning
- polski: Celexon Aktiv Lautsprecher-Set 2-Wege 525-W Instrukcja obsługi
Gerelateerde papieren
-
Celexon Tischleinwand Mobil Professional 81 x 61cm de handleiding
-
-
-
-
-
-
-