Tefal OPTIGRILL ELITE YY4397FB de handleiding
- Categorie
- Barbecues
- Type
- de handleiding
Deze handleiding is ook geschikt voor

Mode d’emploi - Instructies voor gebruik-
Bedienungsanleitung - Instructions for use - Istruzioni d‘uso -
Instrucciones de uso - Manual de instruções - Οδηγίες χρήσης
OptiGrill Elite
FR
NL
DE
EN
IT
ES
PT
EL

2
CONSIGNES DE SÉCURITÉ
PRÉCAUTIONS IMPORTANTES
Utilisation, entretien et installation du produit : pour votre sécurité,
merci de vous référer aux différents paragraphe de cette notice ou
aux pictogrammes correspondants.
Cet appareil est uniquement destiné à un usage domestique.
Il n’a pas été conçu pour être utilisé dans les cas suivants qui ne sont pas
couverts par la garantie :
- dans les coins de cuisine réservés au personnel dans des magasins,
bureaux et autres environnements professionnels,
- dans les fermes,
- par les clients des hôtels, motels et autres environnements à caractère
résidentiel,
- dans les environnements de type chambres d’hôtes.
Enlever tous les emballages, autocollants ou accessoires divers à l’intérieur
comme à l’extérieur de l’appareil.
Cet appareil n’est pas prévu pour être utilisé par des personnes (y compris les
enfants) dont les capacités physiques, sensorielles ou mentales sont réduites,
ou des personnes dénuées d’expérience ou de connaissance, sauf si elles ont pu
bénéficier, par l’intermédiaire d’une personne responsable de leur sécurité, d’une
surveillance ou d’instructions préalables concernant l’utilisation de l’appareil.
Il convient de surveiller les enfants pour s’assurer qu’ils ne doivent pas jouer
avec l’appareil et utiliser l'appareil comme un jouet.
Ne jamais utiliser l’appareil sans surveillance.
La température des surfaces accessibles peut être élevée lorsque
l'appareil est en fonctionnement.
Ne pas toucher les surfaces chaudes de l'appareil.
Cet appareil n’est pas destiné à être mis en fonctionnement au moyen d’une
minuterie extérieure ou par un système de commande à distance séparé.
Dérouler entièrement le cordon.
Si le câble d’alimentation est endommagé, il doit être remplacé par le
fabricant, son service après-vente ou une personne de qualification similaire
afin d’éviter un danger.
FR

3
Si une rallonge électrique est utilisée, elle doit être de section équivalente
et avec prise de terre incorporée. Prendre toutes les précautions nécessaires
afin que personne ne s’entrave dedans.
Ne brancher l’appareil que sur une prise avec terre incorporée.
Vérifier que l’installation électrique est compatible avec la puissance et la
tension indiqués sous l’appareil.
Cet appareil ne doit pas être immergé. Ne jamais plonger dans l’eau
l’appareil ni le cordon.
Cet appareil peut être utilisé par des enfants à partir de 8 ans et plus et par
des personnes ayant des capacités physiques, sensorielles ou mentales
réduites ou un manque d'expérience et de connaissances à condition
qu'elles aient reçu une supervision ou des instructions concernant l'utilisation
de l'appareil en toute sécurité et qu'elles comprennent les dangers encourus.
Le nettoyage et l’entretien par l'usager ne doivent pas être effectués par
des enfants, sauf s'ils ont plus de 8 ans et qu'ils sont surveillés.
Maintenir l'appareil et son cordon hors de portée des enfants de moins de 8 ans.
ATTENTION :
Ne pas faire chauffer ou préchauffer le grill sans les 2
plaques à l'intérieur.
À faire
•
Lire attentivement et garder à portée de main les instructions de cette notice, communes aux
différentes versions suivant les accessoires livrés avec votre appareil.
• Si un accident se produit, passez de l’eau froide immédiatement sur la brûlure et appelez un
médecin si nécessaire.
• Lors de la première utilisation, lavez les plaques (voir paragraphe 5), versez un peu d’huile sur
les plaques et les essuyez avec un chiffon doux.
• Veillez à l’emplacement du cordon avec ou sans rallonge, prendre toutes les précautions
nécessaires afin de ne pas gêner la circulation des convives autour de la table de telle sorte
que personne ne s’entrave dedans.
• Les fumées de cuisson peuvent être dangereuses pour les animaux ayant un système de
respiration particulièrement sensible, comme les oiseaux. Nous conseillons aux propriétaires
d’oiseaux de les éloigner du lieu de cuisson.
• Toujours mettre l’appareil hors de portée des enfants.
• Vérifiez que les deux faces de la plaque soient bien nettoyées avant utilisation.
• Pour éviter de détériorer les plaques, utilisez celles-ci uniquement sur l'appareil pour lequel elles
ont été conçues (ex : ne pas les mettre dans un four, sur le gaz ou une plaque électrique…).
FR

4
• Veillez à ce que les plaques soient stables, bien positionnées et bien clipsées sur la base de
l’appareil. N’utilisez que les plaques fournies ou acquises auprès du centre de service agréé.
• Pour préserver le revêtement des plaques de cuisson, toujours utiliser une spatule plastique
ou en bois.
• N'utiliser que les accessoires fournis avec l’appareil ou achetés à un centre de service autorisé.
Ne pas les utiliser avec d'autres appareils.
À ne pas faire
• Ne pas utiliser l'appareil à l'extérieur.
• Ne jamais brancher l’appareil lorsqu’il n’est pas utilisé.
• Pour éviter la surchauffe de l’appareil, ne pas le placer dans un coin ou contre un mur.
• Ne jamais placer votre appareil directement sur un support fragile (table en verre, nappe, meuble verni…)
ou sur un support de type nappe plastique.
• Ne jamais placer l’appareil sous un meuble fixé au mur ou une étagère ou à côté de matériaux
inflammables comme des stores, des rideaux, des tentures.
• Ne pas placer l’appareil sur ou près de surfaces glissantes ou chaudes, ni laisser le cordon pendre au-
dessus d’une source de chaleur (plaques de cuisson, cuisinière à gaz…).
• Ne pas poser d’ustensiles de cuisson sur les surfaces de cuisson de l’appareil.
• Ne pas couper directement sur les plaques.
• Ne jamais utiliser d’éponge métallique, ni de poudre à récurer afin de ne pas endommager la surface de
cuisson (revêtement antiadhésif).
• Ne pas déplacer l’appareil durant son utilisation.
• Ne pas porter l'appareil par la poignée ou les fils métalliques.
• Ne jamais utiliser l’appareil à vide.
• Ne jamais interposer de feuille d'aluminium ou tout autre objet entre les plaques et les aliments à cuire.
• Ne pas retirer le plateau de récupération de graisses pendant la cuisson. Si le plateau de récupération de
graisse est plein durant la cuisson, laissez refroidir l'appareil avant de le vider.
• Ne pas poser la plaque chaude sous l'eau ou sur une surface fragile.
• Pour conserver les qualités anti-adhésives du revêtement, évitez de laisser chauffer trop longtemps à vide.
• Les plaques ne doivent jamais être manipulées à chaud.
• Ne pas faire de cuisson en papillote.
• Pour éviter d’abîmer votre appareil, ne jamais réaliser de recettes flambées sur celui-ci.
• Ne jamais interposer de feuille d'aluminium ou tout autre objet entre les plaques et les résistances.
• Ne jamais faire chauffer ou faire des cuissons en position « grill ouvert ».
• Ne jamais faire chauffer l'appareil sans les plaques de cuisson.
Conseils/Informations
• Merci d’avoir acheté cet appareil, destiné uniquement à un usage domestique.
• Pour votre sécurité, cet appareil est conforme aux normes et réglementations applicables
(Directives Basse
Tension, Compatibilité Electromagnétique, Matériaux en contact des aliments, Environnement…).
• Lors de la première utilisation, un léger dégagement d’odeur ou de fumée peut se produire.
• Pour nettoyer les plaques de cuisson, utiliser une éponge, de l’eau chaude et du liquide vaisselle.
• Notre société se réserve le droit de modifier à tout moment, dans l’intérêt du consommateur, les
caractéristiques ou composants de ses produits.
• Tout aliment liquide ou solide entrant en contact avec les pièces marquées du logo ne peut être
consommé.
FR

5
• Si les aliments sont trop épais, le système de sécurité interdit la mise en marche de l'appareil.
• La résistance ne se nettoie pas. Si elle est vraiment sale, attendre son complet refroidissement et la
frotter avec un chiffon sec.
• Le tableau de bord est un élément fragile : le nettoyer, l'essuyer et le sécher, uniquement avec un chiffon
sec et doux. Ne pas le nettoyer avec une éponge mouillée, cela risquerait d'endommager ses fonctions.
• Le tableau de bord est un élément fragile : le nettoyer, l'essuyer et le sécher, uniquement avec un
chiffon sec et doux. Ne pas le nettoyer avec une éponge mouillée, cela risquerait d'endommager
ses fonctions.
Environnement
Participons à la protection de l’environnement !
Votre appareil contient de nombreux matériaux valorisables ou recyclables.
Confiez celui-ci dans un point de collecte ou à défaut dans un centre service agréé pour
que son traitement soit effectué.
FR

6
A1 A2 A3
A4
A5
A6
A7
D
E
B
C
F
B
Description
A
Tableau de bord
A1
Bouton marche/arrêt
A2
Fonction aliment congelé
A3
Fonction marquage
intensif
A4
Touches de réglage et de
navigation
A5
Indicateur de
préchauage et de
niveau de cuisson
A6
Ecran d'achage
A7
Bouton OK
B
Corps de l'appareil
C
Poignée
D
Plaques de cuisson
E
Plateau de récupération
de jus
F
Cordon d'alimentation
A
FR

7
12 programmes automatiques de cuisson
Un mode manuel
Mode
manuel
120
°C
Mode
manuel
180
°C
Mode
manuel
220
°C
Mode
manuel
250
°C
Deux options de cuissons possibles en mode
automatique
Fonction Aliment Congelé
Fonction Marquage Intensif
FR

8
1 Préparation
1 Enlevez tous les emballages,
autocollants ou accessoires divers
à l’intérieur comme à l’extérieur de
l’appareil.
2 Avant la première utilisation, nettoyez
soigneusement les plaques avec de
l’eau chaude et du liquide vaisselle,
rincez et séchez soigneusement.
3-4 Installez le plateau amovible de
récupération de jus à l’avant de
l’appareil.
1 2
OK
3 4
5 Si vous le souhaitez, pour obtenir de
meilleurs résultats et pour améliorer
l’ecacité de la surface antiadhésive,
vous pouvez essuyer les plaques
de cuisson à l’aide d’un essuie-tout
imprégné d’un peu d’huile de cuisson.
6 Éliminez tout surplus d’huile à l’aide
d’un essuie-tout propre.
7 Assurez-vous que les plaques
supérieures et inférieures sont
correctement positionnées dans le
produit. Ne lancez pas le préchauage
sans plaques. Branchez l’appareil sur
le secteur. (Notez que le cordon doit
être entièrement déroulé).
8 Appuyez sur le bouton marche / arrêt.
Attention : Assurez vous qu'il n'y ait pas
d'aliments entre les plaques.
5 6
7 8
FR

9
2
Première utilisation
9 Choisissez votre langue en utilisant les èches puis appuyez sur ok.
Language
choice
English
EN
Sprachauswahl
Deutsch
DE
Choix de la
langue
Français
FR
9
3
Marche/Arrê
t
10 Allumez
11 Pour éteindre le grill appuyez une fois
sur le bouton marche/arrêt et une fois
sur le bouton OK pour valider l'arrêt
de l'appareil.
10 11
FR

10
4
Fonction Aliment Congelé - en mode automatique
13-15 Fonction Aliment Congelé
à activer avant de lancer le
préchauage, lors de la sélection
du mode automatique, si les
aliments à cuire sont congelés/
surgelés.
En cas d'oubli d'activation de l'option,
éteindre l'appareil et recommencer
les étapes.
Cette fonction n'est disponible qu'en
mode automatique, pas en mode
manuel.
Bonjour
12 13
Frozen food
ON
Aliment congelé activé
14 15
FR

11
5
Fonction Marquage Intensif - en mode automatique
17-19 Fonction Marquage Intensif
à activer avant de lancer le
préchauage, lors de la sélection
du mode automatique, si vous
souhaitez un marquage plus
important des aliments à cuire.
En cas d'oubli d'activation de l'option,
éteindre l'appareil et recommencer
les étapes.
Cette fonction n'est disponible qu'en
mode automatique, pas en mode
manuel.
Bonjour
16 17
Searing
boost ON
Marquage intensif activé
18 19
FR

12
6
Cuisson en mode automatique
21 Sélectionnez le mode de cuisson
approprié en fonction du type
d’aliment à cuire.
Conseil, notamment pour la
viande : les résultats de cuisson des
programmes prédénis peuvent varier
selon l’origine, la coupe et la qualité
de l’aliment à cuire, les programmes
ayant été dénis et testés avec des
aliments de bonne qualité.
De même, l'épaisseur de la viande
doit être prise en compte lors de
la cuisson; vous ne devez pas faire
cuire d’aliments de plus de 4 cm
d'épaisseur.
Bonjour
20 21
En cas de doute sur le mode de cuisson à utiliser, reportez-vous aux guides de cuisson page 22.
Preheating in
progress
22 Appuyez sur le bouton « OK » :
l’appareil commence le préchauage.
Remarque : si vous sélectionnez un
programme par erreur, éteignez le gril
et revenez à l’étape 8.
23 Attendez 4 à 7 minutes.
24 Un signal sonore retentit pour signaler
que le préchauage est terminé.
Commentaire : si l’appareil demeure
fermé trop longtemps une fois le
préchauage terminé, le système de
sécurité mettra l’appareil hors tension.
Préchaue en cours
22 23
24
FR

13
insert
the food
25-26
Une fois le préchauage terminé,
vous pouvez insérer vos ingrédients.
Soulevez le couvercle du gril et
mettez les aliments dans le gril.
Commentaire : si l’appareil demeure
ouvert trop longtemps, le système de
sécurité mettra l’appareil hors tension
automatiquement.
27-29
L’appareil calcule automatiquement
le cycle de cuisson (temps et
température) selon la quantité et
l’épaisseur des aliments.
Fermez l’appareil pour que le cycle de
cuisson commence.
Remarque pour les aliments très
ns, par exemple du bacon : Le
bouton "OK" s'allume. Appuyez alors
sur "OK" pour s'assurer que l'appareil
reconnaisse bien l'aliment et que le
cycle de cuisson démarre.
La èche se déplace le long de
l'indicateur du niveau de cuisson
et lorsqu'elle atteint un niveau de
cuisson, le niveau est aché et un
signal sonore retentit.
NB: les niveaux de cuisson sont pré
programmés pour chaque mode
automatique.
Pendant la cuisson, un signal sonore
avertit l’utilisateur chaque fois qu’un
niveau de cuisson est atteint (p. ex.,
saignant/jaune).
Selon le degré de cuisson, l’indicateur
change de couleur et la èche de
progression de cuisson se déplace sur
l'écran.
Notez, notamment pour la viande,
qu’il est normal que les résultats de
cuisson varient selon le type, la qualité
et l’origine de la nourriture.
Mettez vos aliments
25 26
to start
cooking
Pour démarrer la cuisson
27 28
Start of
cooking
Début de cuisson
29 30
FR

14
Well-done
in 01:35
31-32 Vous avez la possibilité de
connaître à tout moment le temps restant
pour atteindre les diérents niveaux de
cuisson. Appuyez sur la èche de droite
si vous souhaitez voir dans combien de
temps le niveau de cuisson suivant sera
atteint. Attention, il ne s'agit pas d'une
sélection de niveaux de cuisson. Le gril
continue de cuire jusqu'au dernier niveau
de cuisson et prévient à chaque niveau.
Bien cuit dans 01:35
31 32
33-34 Lorsque le niveau de cuisson
correspondant à votre choix apparaît
et que le signal sonore retentit, ouvrez
l’appareil et retirez vos aliments.
35-36 Abaissez le couvercle. L'écran vous
demande conrmation pour stopper la
cuisson. Valider par OK si tous les aliments
ont été retirés, sinon laisser se poursuivre
la cuisson.
Si vous souhaitez réaliser une nouvelle
cuisson, vous référer au paragraphe 8.
Commentaire : le système de
sécurité mettra l’appareil hors tension
automatiquement si aucun programme
n’est sélectionné au bout d'un certain
temps.
33 34
to stop
cooking
Pour arrêter la cuisson
35 36
OK
FR

15
7
Comment réaliser une seconde cuisson
Seconde cuisson du même type d'aliment
Any refill?
37-38 A la n de la première cuisson, un
écran "nouvelle cuisson" apparait. Si
vous souhaitez griller le même type
d'aliment, appuyez sur OK.
39 L'appareil commence le préchauage.
40 Attendez la n du préchauage.
Nouvelle cuisson ?
37 38
Preheating in
progress
Préchaue en cours
39 40
Wait
insert
the food
41 Mettez les aliments dans le gril.
42 Suivez ensuite les étapes de 27 à 37.
Attendez Mettez vos aliments
41 42
Seconde cuisson d'un ingrédient diérent
Une fois que la cuisson de vos premiers ingrédients est terminée :
1. Assurez-vous que l’appareil est fermé et qu’il n’y a pas d’aliments à l’intérieur.
2. Sélectionnez le mode ou programme de cuisson approprié.
3. Appuyez sur le bouton « OK » pour commencer le préchauage. Pendant le préchauage,
l'indicateur du préchauage est indiqué sur l'écran.
4. Une fois le préchauage terminé, un signal sonore retentit et l'information de n de préchauage est
indiquée sur l'écran.
FR

16
8
Cuisson en mode manuel
OK
Mode
manuel
120
°C
43 Sélectionnez le mode manuel et
appuyez sur OK pour valider.
44 Sélectionnez la température
souhaitée à l'aide des touches de
réglages.
Appuyez sur OK pour valider la
température sélectionnée.
43 44
Preheating
180°C
180°C
OK
45 Attendez la n du préchauage.
46 Une fois le préchauage terminé,
appuyez sur OK pour lancer le timer.
Remarque : le temps de cuisson peut
également être réglé dès le début du
préchauage.
45 46
00:00
180°C
00:00
180°C
47 Appuyez sur les touches de réglage
pour sélectionner le temps de cuisson
souhaité.
48 Insérez vos aliments et appuyez sur
OK pour lancer la cuisson.
47 48
5. L’appareil est prêt à être utilisé une fois le préchauage terminé. Soulevez le couvercle du gril et
mettez les aliments à l’intérieur de l’appareil. Suivez ensuite les étapes de 27 à 37.
Important :
– Veuillez noter que le préchauage est obligatoire pour chaque cuisson.
Rappel : avant de lancer le préchauage, assurez-vous que l’appareil est fermé et qu’il n’y a pas
d’aliments à l’intérieur.
– Attendez ensuite que le préchauage soit terminé avant d’ouvrir le gril et de mettre des aliments à
l’intérieur.
Remarque : si le nouveau cycle de préchauage est lancé immédiatement après la n du cycle
précédent, le temps de préchauage sera plus court.
FR

17
00:00
180°C
to stop
cooking
49-50 Un signal sonore vous indique
quand le temps de cuisson est
terminé. Retirez vos aliments.
Appuyez sur OK pour arrêter la
cuisson et retirez vos aliments
Pour arrêter la cuisson
49 50
9
Commentaires
51-53
En fonction des préférences personnelles
ouvrez le gril et retirez les aliments ayant
atteint le niveau de cuisson souhaité, puis
refermez le gril pour poursuivre la cuisson
des autres aliments. Le programme
poursuivra le cycle de cuisson jusqu’au
dernier niveau de cuisson du mode
sélectionné.
54 Commentaire : le système de
sécurité mettra l’appareil hors tension
automatiquement après un certain
laps de temps.
51 52
Remove
your food
Overcooked
risk
Retirez votre aliment Risque de surcuisson
53 54
FR

18
10
Fin d'utilisation
55 Appuyez sur le bouton marche/
arrêt puis valider en appuyant sur le
bouton OK.
56 Débranchez l'appareil.
57 Laissez refroidir pendant au moins
2 heures.
Pour éviter des brûlures accidentelles,
laissez le gril refroidir complètement
avant de procéder à son nettoyage.
55 56
2 H
57
FR

19
11
Nettoyage
58 Avant le nettoyage, débloquez
et retirez les plaques pour éviter
d’endommager la surface de cuisson.
59 Le plateau de récupération de jus
et les plaques de cuisson peuvent
aller au lave-vaisselle. L’appareil et
son cordon ne doivent jamais être
mis au lave-vaisselle. Les éléments
chauants (les résistances) ne doivent
jamais être nettoyés après que les
plaques aient été enlevées. S’ils sont
très sales, attendez que l’appareil ait
complètement refroidi et nettoyez-les
à l’aide d’un chion sec.
60-61
Si vous ne voulez pas mettre les
plaques au lave-vaisselle, utilisez de
l’eau chaude et un peu de liquide
vaisselle pour les laver, puis rincez-
les abondamment pour enlever tout
résidu. Essuyez-les soigneusement
avec un essuie-tout.
N’utilisez pas de tampon à récurer
métallique, de laine d’acier ou de
produits de nettoyage abrasifs
pour nettoyer toute partie du gril,
utilisez uniquement des tampons
de nettoyage en nylon ou non
métalliques.
Videz le plateau de récupération du
jus et lavez-le dans de l’eau chaude
légèrement savonneuse, puis essuyez-
le soigneusement à l’aide d’un essuie-
tout.
62 Pour nettoyer le couvercle du gril,
passez une éponge imprégnée d’eau
chaude et essuyez avec un chion
doux et sec. Pour nettoyer le panneau
de commande, utiliser uniquement
un chion doux et sec.
63 N’immergez pas le boîtier du gril dans
l’eau ou tout autre liquide.
64 Assurez-vous toujours que le gril est
propre, froid et sec avant de le ranger.
Toute autre réparation doit être
eectuée par un représentant de
service agréé.
58 59
60 61
62 63
64
FR

20
Guide de dépannage
GUIDE DE DEPANNAGE ELITE
Problème Cause Solution
Changement de
langue
Brancher le Grill, Appuyer sur ON, puis
immédiatement sur la touche Frozen
(pendant que l’écran ache «Bonjour»)
5sec
Preheating
not finished,
remove your
food
10s before-
changeover
to manual
mode
Le temps de préchauage
n'était pas complètement
terminé. Le gril a été ouvert
et les aliments déposés sur
la plaque avant la n du
préchauage.
Il est possible de cuire les aliments,
mais vous devez contrôler la cuisson
car le gril est passé en mode manuel.
La température peut être ajustée.
Ou
Ouvrez le gril, enlevez les aliments,
fermez le gril correctement et attendez
jusqu'à la n du préchauage.
Je n’arrive pas à
éteindre mon appareil
Manque un second appui
ou temps trop long entre les
2 appuis.
Appuyer 2 fois de suite sur le bouton
marche/arrêt
ou
Appuyer une fois sur le bouton
marche/arrêt puis valider par OK
Err 1 a Err 8 L'appareil a été rangé ou
utilisé dans une pièce trop
froide.
Appareil en surchaue.
Débranchez l'appareil et attendez
quelques minutes.
Rebranchez à nouveau le gril et
appuyez sur Marche.
Si le problème persiste, contactez le
service client.
Err 9 a Err 13 Défaillance de l’appareil. Débranchez l'appareil et contactez le
service client.
L’appareil s’arrête tout
seul pendant le cycle
de préchauage ou de
cuisson.
L’appareil est resté ouvert
trop longtemps en cours
de cuisson. L’appareil est
demeuré au repos trop
longtemps après la n du
préchauage ou du maintien
au chaud.
Débranchez l’appareil et attendez
quelques minutes. Rebranchez ensuite
votre appareil et mettez-le en marche.
FR

21
GUIDE DE DEPANNAGE ELITE
Problème Cause Solution
to stop
cooking
Demande de conrmation de
n de cuisson
2 solutions :
Appuyer sur OK si tous les aliments ont
été retirés
Ou
Ne pas appuyer sur OK et laisser cuire
si il reste des aliments à cuire
to start
cooking
Aliment non détecté car
trop n
Appui sur OK pour démarrer la cuisson
for manual
mode
Aliment trop épais 2 solutions :
Appuyer sur OK pour continuer la
cuisson en mode manuel
Ou
Retirer les aliments pour diminuer
l'épaisseur, an de permettre une
cuisson en mode automatique
Je ne parviens pas à
régler un temps en
mode manuel
L'écran est resté sur le réglage
température
Appuyer une fois sur Ok pour aller sur
le réglage temps puis régler avec les
èches. Valider par OK.
00:00
180°C
FR

22
Niveaux de cuisson pour chaque programme automatique
12 PROGRAMMES AUTOMATIQUES
PROGRAMMES
AUTOMATIQUES
INDICATEUR DU NIVEAU DE CUISSON
MENUS
Blue
Rare
Medium
Well-done
Boeuf Bleu Saignant À point Bien cuit
Poulet - - - Bien cuit
Saucisse - - - Bien cuit
Bacon - - À point Croustillant
Steak haché
(burger)
- Saignant À point Bien cuit
Panini -
Légèrement
cuit
Toasté Croustillant
Poisson - À point À point plus Bien cuit
Fruits de mer - À point À point plus Bien cuit
Pomme de terre - - - Fondant
Poivron - - Croquant Fondant
Aubergine - - - Grillé
Tomate - - Croquant Fondant
FR

23
MODE MANUEL SPÉCIAL
LÉGUME OU FRUIT
De 180°C
à 195°C
De 220°C
à 235°C
De 225°C
à 270°C
- - Courgette (tranches)
- - Asperge
- - Champignon
- Oignon -
Brocoli - -
Mini-carotte - -
- Fenouil -
Patate douce
(tranches)
- -
- Pomme (tranches) -
- Ananas -
- Pêche -
CONSEIL DE CUISSON
PRODUITS
PROGRAMME
DE CUISSON
CONSEIL DE
CUISSON
Filet mignon de porc (sans os),
poitrine de porc
Bien cuit *
Bratwurst (porc précuit) 220°C / 8 min 30
Rindswurst (boeuf précuit) 220°C / 8 min 30
Nürnberger Wurst (porc précuit) 220°C / 4 min 30
FR

24
CONSEIL DE PRÉPARATION
Pour des grillades plus marquées, il est préférable de retourner l’aliment grillé avant de le servir
à vos convives.
PRODUITS CONSEIL DE PRÉPARATION
POMME DE
TERRE
• Tranches dans la longueur
• Ajouter de l'huile sur les ingrédients pour une meilleure cuisson
POIVRON • Coupé en deux dans la longueur
AUBERGINE
• Tranches dans la longueur
• Ajouter de l'huile sur les ingrédients pour une meilleure cuisson
TOMATE
• Utiliser des tomates de forme ronde
• Utiliser des tomates qui ne sont pas trop mûres
• Couper en deux dans la largeur
• Pour une cuisson optimale, placer le côté arrondi de la tomate
découpée en 2 sur la plaque inférieure du gril.
PORC
* Utiliser la fonction marquage intensif si l'épaisseur dépasse 20
mm.
FR

25
VEILIGHEIDSVOORSCHRIFTEN
BELANGRIJKE VOORZORGSMAATREGELEN
Gebruik, onderhoud en installatie van het product: gelieve
voor uw eigen veiligheid de verschillende paragrafen van
deze handleiding of de overeenkomstige pictogrammen te
raadplegen.
Uw apparaat is uitsluitend bedoeld om gebruikt te worden voor
huishoudelijk gebruik. Deze is niet ontworpen voor een gebruik in de
volgende gevallen, waarvoor de garantie niet geldig is:
- in kleinschalige personeelskeukens in winkels, kantoren en
andere arbeidsomgevingen,
- door gasten van hotels, motels of andere verblijfsvormen.
Verwijder de volledige verpakking, de stickers en diverse accessoires,
zowel aan de binnenkant als aan de buitenkant van het apparaat.
Dit apparaat is niet bedoeld om zonder hulp en/of toezicht gebruikt te worden
door kinderen of andere personen indien hun fysieke, zintuiglijke of mentale
vermogen hen niet in staat stellen dit apparaat op een veilige wijze te gebruiken.
Er moet toezicht zijn op kinderen zodat zij niet met het apparaat kunnen spelen.
Dit apparaat mag gebruikt worden door kinderen vanaf 8 jaar en door
personen met beperkte fysieke, zintuiglijke of mentale capaciteiten
of personen zonder ervaring of kennis, indien ze via een persoon die
verantwoordelijk is voor hun veiligheid onder toezicht staan of voorafgaand
instructies kregen over het gebruik van het toestel en op de hoogte zijn
van de mogelijke risico’s.
Kinderen mogen niet met het apparaat spelen. Schoonmaak en
onderhoudswerkzaamheden mogen alleen worden verricht door
kinderen boven de 8 jaar die onder toezicht staan.
Let erop dat kinderen niet met het apparaat spelen of dit als speelgoed
gebruiken.
Het apparaat nooit zonder toezicht gebruiken.
NL

26
Wanneer het apparaat aanstaat, kan de temperatuur hoog oplopen.
Raak de hete delen van het apparaat niet aan.
Dit apparaat is niet geschikt om gebruikt te worden in combinatie met
een tijdschakelaar of afstandsbediening.
Rol het snoer volledig uit.
Wanneer het netsnoer is beschadigd dient deze te worden vervangen door
de fabrikant, zijn servicedienst of een gelijkwaardig gekwalificeerd persoon
om een gevaarlijke situatie te voorkomen.
Als er een elektrisch verlengsnoer gebruikt wordt, moet deze minimaal van
een gelijke doorsnede zijn en met een geïntegreerde geaarde stekker; neem
de nodige voorzorgsmaatregelen om te voorkomen dat men hier over struikelt.
Sluit het apparaat uitsluitend aan op een geaard stopcontact.
Controleer of de elektrische installatie geschikt is voor de op het apparaat
aangegeven stroomsterkte en spanning.
Nooit het apparaat en het snoer in water onderdompelen.
Dit apparaat mag worden gebruikt door kinderen vanaf 8 jaar en door
personen met beperkte lichamelijke, zintuiglijke of geestelijke vermogens of
zonder ervaring en kennis, op voorwaarde dat dit onder toezicht gebeurt of zij
instructies hebben gekregen inzake het veilige gebruik van het apparaat en dat
zij op de hoogte zijn van de risico's waaraan zij zijn blootgesteld. De reiniging en
het onderhoud mag niet worden uitgevoerd door kinderen, tenzij ze minstens
8 jaar oud zijn en bovendien worden begeleid.
Houd het apparaat en het netsnoer buiten het bereik van kinderen jonger dan
8 jaar.
OPGELET: De grill niet laten opwarmen of voorverwarmen zonder de twee
binnenste platen.
NL

27
Doen
• Lees de instructies van deze handleiding aandachtig door en houd ze binnen handbereik; deze handleiding betreft
de verschillende modellen, afhankelijk van de meegeleverde accessoires.
• Als iemand zich brandt, koel de brandplek dan onmiddelijk met koud water en schakel, indien nodig, de hulp in van
een huisarts.
• Reinig de platen bij het eerste gebruik (zie paragraaf 5). Giet er een beetje olie over en wrijf droog met een zachte doek.
• Zorg ervoor dat u het snoer, met of zonder verlengsnoer, zo neerlegt dat iedereen vrij rond de tafel kan
• lopen en er niemand over kan struikelen.
• De dampen die tijdens het bereiden van voedsel vrijkomen kunnen gevaarlijk zijn voor (huis)dieren met bijzonder
gevoelige luchtwegen, zoals vogels. Wij raden u daarom aan eventuele vogels op een veilige afstand van de plek
waar u het apparaat gebruikt te plaatsen.
• Houd het apparaat altijd buiten het bereik van kinderen.
• Controleer of beide zijden van de plaat vóór gebruik goed zijn schoongemaakt.
• Om beschadigingen van de bakplaten te voorkomen dient u deze alleen te gebruiken bij het apparaat waar ze voor
bedoeld zijn. (bijv.: niet in een oven plaatsen, op het gas of een elektrische kookplaat…).
• Zorg ervoor dat de platen stabiel zijn, goed geplaatst en vastgeklikt op het apparaat. Gebruik alleen de bij het apparaat
geleverde bakplaten of platen aangeschaft via een erkend service center.
• Om beschadigingen aan de bakplaaten te voorkomen, adviseren wij u altijd een houten of kunststof spatel te gebruiken.
• Gebruik enkel de accessoires die bij het apparaat werden geleverd of werden gekocht bij een erkend servicenter. Niet
gebruiken op andere apparaten.
Niet doen
• Gebruik het apparaat niet buiten.
• De stekker van het apparaat niet in het stopcontact steken wanneer u het apparaat niet gebruikt.
• Om oververhitting van het apparaat te voorkomen, dient u dit niet in een hoek of tegen een muur te
plaatsen.
• Plaats het apparaat nooit rechtstreeks op een kwetsbare ondergrond (glazen tafel, tafelkleed, gelakt
meubel...) of op een onstabiele ondergrond, zoals tafelkleden met een verende vulling.
• Plaats het apparaat niet onder een aan de muur bevestigd meubel of wandmeubel of in de nabijheid van
andere brandbare materialen zoals (rol)gordijnen, behang, enz.
• Plaats het apparaat niet op of in de buurt van gladde of warme oppervlakken en laat het snoer nooit
boven een warmtebron hangen (kookplaat, gasfornuis, enzovoort).
• Plaats geen kookgerei op de kookoppervlakken van het apparaat.
• Snijd het voedsel niet op de platen.
• Gebruik om beschadiging van het bakoppervlak te voorkomen nooit een metalen spons of schuurpoeder.
• Het apparaat niet verplaatsen als het aanstaat.
• Het apparaat niet bij de handgreep of de metalen draden dragen.
• Het apparaat niet gebruiken als het leeg is.
• U mag nooit een velletje aluminiumfolie of ander voorwerp tussen de bakplaaten en de te bereiden
voedingsmiddelen leggen.
• De vetopvangbak niet vastnemen wanneer het apparaat nog warm is. Als de vetopvangbak tijdens het
bakken vol loopt, het apparaat af laten koelen, voordat u het leegt.
• De hete bakplaat niet onder water houden of op een kwetsbare ondergrond plaatsen.
• Om de anti-aanbaklaag te beschermen, dient u te voorkomen dat het apparaat te lang leeg verwarm.
• U mag de grillplaten nooit hanteren wanneer deze heet zijn.
• Gebruik geen aluminiumfolie om uw ingrediënten in te bakken.
• Geen geflambeerde gerechten bereiden met dit apparaat om beschadiging van uw product te voorkomen.
• Plaats nooit aluminiumfolie of enig ander voorwerp tussen de platen en de weerstanden.
• Laat het apparaat tijdens het opwarmen of bakken nooit in de stand 'grill open' staan.
• Laat het apparaat nooit zonder bakplaten opwarmen.
NL

28
Informatie
• Wij danken u voor de aankoop van dit apparaat, dat uitsluitend bestemd is voor huishoudelijk gebruik.
• Voor uw veiligheid voldoet dit apparaat aan de toepasselijke normen en regelgevingen (Richtlijnen
Laagspanning, Elektromagnetische Compatibiliteit, Materialen in contact met voedingswaren, Milieu…).
• Bij het eerste gebruik kan het apparaat enige geur of rook afgeven.
• Gebruik voor het reinigen van de platen een spons, warm water en wat afwasmiddel.
• De fabrikant behoudt zich het recht voor dit apparaat of onderdelen daarvan in het belang van de gebruiker
te allen tijde zonder voorafgaande kennisgeving te wijzigen.
• Alle vaste of vloeibare etenswaren die in contact komen met de bestanddelen waarop het logo staat,
kunnen niet meer geconsumeerd worden.
• Als het voedsel te dik is, verhindert het beveiligingssysteem de inschakeling van het apparaat.
• De weerstand niet schoonmaken. Als de weerstand echt vuil is, kunt u hem nadat hij volledig is afgekoeld,
afwrijven met een droge doek.
• Het bedieningspaneel is een delicaat onderdeel. Maak het alleen schoon met een droge en zachte
doek. Maak het niet schoon met een vochtige spons om het risico op schade aan de functies te
vermijden.
Milieu
Wees vriendelijk voor het milieu !
Uw apparaat bevat materialen die geschikt zijn voor hergebruik.
Lever het in bij het milieustation in uw gemeente of bij onze technische dienst.
NL

29
A1 A2 A3
A4
A5
A6
A7
D
E
B
C
F
B
Beschrijving
A
Bedieningspaneel
A1
Aan/uit-knop
A2
Bevroren ingrediënten-
functie
A3
Dichtschroei-functie
A4
Bedienings- en
navigatietoetsen
A5
Voorverwarmings- en
bakniveau-indicator
A6
Weergavescherm
A7
OK knop
B
Behuizing
C
Handvat
D
Grillplaten
E
Vetopvangbak
F
Snoer
A
NL

30
12 automatische bakprogramma’s
Een handmatige modus
120
°C
180
°C
220
°C
250
°C
Manual
mode
Manual
mode
Manual
mode
Manual
mode
Twee mogelijke bakopties in de
automatische modus
Bevroren ingrediënten-functie
Dichtschroei functie
NL

31
1 Voorbereiding
1 Verwijder alle verpakkingsmateriaal,
stickers en toebehoren aan de
binnen- en buitenkant van het
apparaat.
2 Voor ingebruikname, maak de
grillplaten altijd schoon met warm
water en afwasmiddel, spoel en veeg
vervolgens grondig droog.
3-4 Installeer de uitneembare
vetopvangbak aan de voorkant van
het apparaat.
1 2
OK
3 4
5 Indien gewenst, voor het
beste resultaat en een betere
doeltreendheid van de anti-
aanbaklaag, smeer de grillplaten met
een beetje spijsolie met behulp van
een vel keukenpapier.
6 Verwijder het teveel aan olie
met behulp van een schoon vel
keukenpapier.
7 Zorg dat de bovenste en onderste
platen correct in het product zijn
aangebracht. Verwarm het apparaat
niet zonder platen voor. Steek de
stekker in het stopcontact. (Zorg dat
het snoer volledig is afgerold).
8 Druk op de Aan/Uit-knop.
Opgelet: Zorg dat er geen voedsel
tussen de platen bevindt.
5 6
7 8
NL

32
2
Ingebruikname
9 Kies uw taal met behulp van de pijlen en druk op ok.
Language
choice
English
EN
Sprachauswahl
Deutsch
DE
Choix de la
langue
Français
FR
9
3
Aan/ui
t
10 Schakel de grill in
11 Om de grill uit te schakelen, druk één
keer op de aan/uit-knop en één keer
op de OK-knop om het uitschakelen
van het apparaat te bevestigen.
10 11
NL

33
4
Bevroren ingrediënten-functie -
in automatische modus
13-15 De Bevroren ingrediënten-
functie is tijdens het selecteren
van de automatische modus te
activeren voor het starten van het
voorverwarmingsproces, als het
te bakken ingrediënt bevroren/
ingevroren is.
Als u vergeten bent deze optie te
activeren, schakel het apparaat uit en
voer de stappen opnieuw uit.
Deze functie is alleen beschikbaar in
de automatische modus, en niet in de
handmatige modus.
Hallo
12 13
Frozen food
ON
Bevroren ingrediënten
aan
14 15
NL

34
5
Intensieve bakstrepen-functie -
in de automatische modus
17-19 De Dichtschroei functie is
tijdens het selecteren van
de automatische modus te
activeren voor het starten van
het voorverwarmingsproces, als
u duidelijke bakstrepen op uw te
bakken ingrediënt wilt.
Als u vergeten bent deze optie te
activeren, schakel het apparaat uit en
voer de stappen opnieuw uit.
Deze functie is alleen beschikbaar in
de automatische modus, en niet in de
handmatige modus.
Hallo
16 17
Searing
boost ON
Dichtschroeien aan
18 19
NL

35
6
Automatische bakmodus
21 Selecteer de gepaste bakmodus
afhankelijk van het soort te bakken
ingrediënt.
Tip, in het bijzonder voor vlees:
het resultaat van de vooraf ingestelde
bakprogramma‘s kan verschillen
naargelang de oorsprong, de snijdikte
en de kwaliteit van het te bakken
voedsel. De programma‘s werden
bepaald en getest met ingrediënten
van een hoogwaardige kwaliteit.
Houd tijdens het bakken tevens
rekening met de dikte van het vlees.
Bak geen vlees dat dikker dan 4 cm is.
Hallo
20 21
In geval u twijfelt over welke bakmodus te gebruiken, raadpleeg de bakgidsen op pagina 45.
Preheating in
progress
22 Druk op de “ OK “ knop: het apparaat
wordt voorverwarmd.
Opmerking : als u per ongeluk een
verkeerd programma selecteert,
schakel de grill uit en start opnieuw
vanaf stap 8.
23 Wacht 4 tot 7 minuten.
24 U hoort een geluidssignaal zodra het
voorverwarmen is beëindigd.
Opmerking: als het apparaat
te lang dicht blijft wanneer
het is voorverwarmd, zal het
beveiligingssysteem het apparaat
automatisch uitschakelen.
Voorverwarmen is bezig
22 23
24
NL

36
insert
the food
25-26
Zodra het voorverwarmen is
beëindigd, breng uw ingrediënten
aan. Breng de deksel van de grill
omhoog en doe de ingrediënten in
de grill.
Opmerking: als het apparaat te lang
open blijft, zal het beveiligingssysteem
het apparaat automatisch uitschakelen.
27-29
Het apparaat berekent automatisch
de bakcyclus (tijd en temperatuur)
afhankelijk van de hoeveelheid en de
dikte van het te bakken ingrediënt.
Sluit het apparaat en de bakcyclus
start.
Opmerking voor zeer jn voedsel,
zoals spek: De „OK“ knop brandt.
Druk op „OK“ om ervoor te zorgen dat
het apparaat het ingrediënt herkent
en de bakcyclus wordt gestart.
De pijl verplaatst zich langs de
bakniveau-indicator en wanneer een
bakniveau wordt bereikt, wordt het
niveau weergegeven en hoort u een
geluidssignaal.
Opmerking: de bakniveaus zijn
voorgeprogrammeerd voor elke
automatische modus.
Tijdens het bakproces hoort u telkens
een geluidssignaal wanneer er een
bakniveau wordt bereikt (bijv. kort
gebakken/geel).
Afhankelijk van de bakgraad verandert
de indicator van kleur en verplaatst
de pijl voor de voortgang van het
bakproces zich over het scherm.
Opmerking, in het bijzonder
voor vlees: het is normaal als de
bakresultaten verschillen afhankelijk
van het soort, de kwaliteit en de
oorsprong van het voedsel.
Plaats uw ingrediënten
25 26
to start
cooking
Om het grillproces te
starten
27 28
Start of
cooking
Start van de bereiding Start van de bereiding
29 30
NL

37
Well-done
in 01:35
31-32 U kunt op elk moment de
resterende baktijd voor het bereiken
van de verschillende bakniveaus te
weten komen. Druk op de rechter knop
om te zien hoe lang het nog duurt
voordat het volgend bakniveau wordt
bereikt. Opgelet, het betreft hier niet het
selecteren van de bakniveaus. De grill
blijft bakken tot aan het laatste bakniveau
en geeft een waarschuwing bij elk niveau.
Well-done in 01:35
31 32
33-34 Wanneer het bakniveau
overeenstemt met uw weergegeven
keuze en u hoort het geluidssignaal, open
het apparaat en verwijder het ingrediënt.
35-36 Breng de deksel omlaag. Het
scherm vraagt om uw bevestiging om het
bakproces te stoppen. Bevestig met OK
wanneer alle ingrediënten zijn verwijderd
of bak verder.
Als u een nieuw bakproces wilt starten,
raadpleeg sectie 7.
Opmerking: het beveiligingssysteem
schakelt het apparaat automatisch uit als
er na een bepaalde periode geen enkel
programma is geselecteerd.
33 34
to stop
cooking
Om het kookproces te
stoppen
35 36
OK
NL

38
7
Een tweede bakproces uitvoeren
Tweede bakproces van hetzelfde ingrediënt
Any refill?
37-38 Aan het einde van het eerste
bakproces geeft het scherm „nieuw
bakproces“ weer. Als u hetzelfde soort
ingrediënt wilt grillen, druk op OK.
39 Het apparaat start met
voorverwarmen.
40 Wacht tot aan het einde van het
voorverwarmingsproces.
Bijvullen?
37 38
Preheating in
progress
Voorverwarmen is bezig
39 40
Wait
insert
the food
41 Doe het ingrediënt in de grill.
42 Voer vervolgens stap 27 tot 37 uit.
Een ogenblik geduld Plaats uw etenswaren
41 42
Tweede bakproces van een verschillend ingrediënt
Na het beëindigen van het bakproces van uw eerste ingrediënten:
1. Zorg dat het apparaat dicht is en er zich geen ingrediënten in bevinden.
2. Selecteer de gepaste bakmodus.
3. Druk op de “OK“ knop om het apparaat voor te verwarmen. Tijdens het voorverwarmen wordt de
voorverwarmingsindicator op het scherm weergegeven.
NL

39
8
Bakproces in handmatige modus
OK
Manual
mode
120
°C
43 Selecteer de handmatige modus en
druk op OK om te bevestigen.
44 Selecteer de gewenste
temperatuur met behulp van de
bedieningstoetsen.
Druk op OK om de gekozen
temperatuur te bevestigen.
43 44
Preheating
180°C
180°C
OK
45 Wacht tot aan het einde van het
voorverwarmingsproces
46 Na het beëindigen van het
voorverwarmingsproces, druk op OK
om de timer te starten.
Opmerking: de baktijd kan tevens
worden ingesteld aan het begin van het
voorverwarmingsproces.
45 46
00:00
180°C
00:00
180°C
47 Druk op de bedieningstoetsen om de
gewenste baktijd te selecteren.
48 Doe het ingrediënt in het apparaat
en druk op OK om het bakproces te
starten.
47 48
4. Na het beëindigen van het voorverwarmen hoort u een geluidssignaal en wordt er informatie over
dit einde op het scherm weergegeven.
5. Het apparaat is klaar voor gebruik wanneer het voorverwarmen is beëindigd. Breng de deksel van
de grill omhoog en doe de ingrediënten in het apparaat. Voer vervolgens stap 27 tot 37 uit.
Belangrijk:
– Het apparaat voorverwarmen is voor elk bakproces nodig.
Herinnering: Voor het starten van het voorverwarmingsproces, zorg dat het apparaat dicht is en er zich
geen ingrediënt in bevindt.
– Wacht totdat het voorverwarmen is beëindigd voordat u de grill opent en er ingrediënten in doet.
Opmerking: als er onmiddellijk na een bakproces een nieuw voorverwarmingsproces wordt gestart,
zal de voorverwarmingstijd nu korter zijn
NL

40
00:00
180°C
to stop
cooking
49-50 Aan het einde van het bakproces
hoort u een geluidssignaal.
Verwijder het ingrediënt.
Druk op OK om het bakproces
te stoppen en het ingrediënt te
verwijderen
Om het kookproces te
stoppen
49 50
9
Opmerkingen
51-53
Naargelang uw persoonlijke voorkeur,
open de grill, verwijder het ingrediënt
dat uw gewenste bakniveau heeft bereikt
en sluit de deksel om het bakproces
voor achterblijvend e ingrediënten
voort te zetten. Het programma hervat
de bakcyclus tot aan het laatste gekozen
bakniveau.
54 Opmerking: het beveiligingssysteem
schakelt het apparaat automatisch uit na
een bepaalde periode.
51 52
Remove
your food
Overcooked
risk
Verwijder uw
ingrediënten
Risico op te gaar
53 54
NL

41
10
Na gebruik
55 Druk op de aan/uit-knop en
vervolgens op de OK-knop om te
bevestigen.
56 Haal de stekker uit het stopcontact.
57 Laat het apparaat minstens 2 uur
afkoelen.
Om brandwonden te vermijden, laat
de grill volledig afkoelen voordat u
het schoonmaakt.
55 56
2 U
57
NL

42
11
Reiniging
58 Maak de platen los en verwijder ze
voordat u ze schoonmaakt om het
bakoppervlak niet te beschadigen.
59 De vetopvangbak en de grillplaten
zijn vaatwasmachinebestendig.
Stop het apparaat en het snoer
nooit in de vaatwasmachine. De
verwarmingselementen dienen na
het verwijderen van de grillplaten
nooit te worden schoongemaakt. Als
ze echter zeer vuil zijn, wacht totdat
het apparaat volledig is afgekoeld en
maak ze dan schoon met een droge
doek.
60-61
Als u de grillplaten niet in de
vaatwasmachine wilt stoppen, maak
ze schoon met warm water en beetje
afwasmiddel en spoel vervolgens
grondig om alle resten te verwijderen.
Veeg grondig droog met een vel
keukenpapier.
Maak geen enkel onderdeel van
de grill schoon met een metalen
schuursponsje, staalwol of een
agressief schoonmaakmiddel. Gebruik
alleen een nylon of niet-metalen
schoonmaakspons.
Leeg de vetopvangbak, was het in
een warm sopje en veeg grondig
droog met een vel keukenpapier.
62 Maak de deksel van de grill schoon
met een spons gedompeld in
warm water en veeg droog met
een zachte en droge doek. Om het
bedieningspaneel schoon te maken,
gebruik alleen een zachte en droge
doek.
63 Dompel de behuizing van de grill niet
in water of een andere vloeistof.
64 Zorg dat de grill altijd schoon, koud
en droog is voordat u het opbergt.
Elke andere reparatie moet door
een erkende reparateur worden
uitgevoerd.
58 59
60 61
62 63
64
NL

43
Probleemoplossing
PROBBLEEMOPLOSSING ELITE
Probleem Oorzaak Oplossing
De taal is gewijzigd Steek de stekker in het stopcontact,
druk op ON en vervolgens onmiddellijk
op de Bevroren ingrediënten toets
(terwijl „Goedendag“ op het scherm
wordt weergegeven)
5sec
Preheating
not finished,
remove your
food
10s before-
changeover
to manual
mode
De voorverwarmingstijd
is niet helemaal voltooid.
De grill werd geopend
en het ingrediënt werd
voor het einde van het
voorverwarmingsproces op
de plaat gelegd.
Het is mogelijk om het ingrediënt te
bakken, maar u dient het bakproces
zelf te controleren aangezien de grill in
de handmatige modus staat.
De temperatuur kan worden
aangepast.
Of
Open de grill, verwijder het
ingrediënt, sluit de grill op een
juiste manier en wacht totdat het
voorverwarmingsproces is voltooid.
Ik kan mijn apparaat
niet uitschakelen
Er werd geen tweede keer
gedrukt of te veel tijd tussen
de 2 drukken.
Druk 2 keer na elkaar op de aan/Uit-
knop.
OF
Druk één keer op de aan/uit-knop en
dan op OK om te bevestigen
Fout 1 tot Fout 8 Het apparaat werd in een te
koude ruimte opgeborgen of
gebruikt.
Het apparaat is oververhit.
Haal de stekker uit het stopcontact en
wacht enkele minuten.
Steek de stekker opnieuw in het
stopcontact en druk op On (aan).
Als het probleem opnieuw optreedt,
neem contact op met een erkend
servicecentrum.
Fout 9 tot Fout 13 Storing op het apparaat. Haal de stekker uit het stopcontact
en neem contact op met een erkend
servicecentrum.
Het apparaat stopt
uit zichzelf tijdens het
voorverwarmings- of
bakproces.
Het apparaat werd tijdens
het bakproces te lang open
gehouden. Het apparaat
werd na het einde van
het voorverwarmings- of
warmhoudproces te lang niet
gebruikt.
Haal de stekker uit het stopcontact
en wacht enkele minuten. Steek de
stekker vervolgens opnieuw in het
stopcontact en schakel het apparaat in.
NL

44
PROBBLEEMOPLOSSING ELITE
Probleem Oorzaak Oplossing
to stop
cooking
Vraag tot bevestiging aan
einde van bakproces
2 oplossingen:
Druk op OK als al het voedsel is
verwijderd
Of
Druk niet op OK en laat bakken als er
nog te bakken levensmiddelen op de
grill achterblijven
to start
cooking
Ingrediënt is niet
gedetecteerd, het is te jn.
Druk op OK om het bakproces te
starten
for manual
mode
Ingrediënt is te dik 2 oplossingen:
Druk op OK om het bakproces in de
handmatige modus verder te zetten
Of
Verwijder het ingrediënt en snij het
dunner zodat de automatische modus
kan worden gebruikt
Ik kan geen tijd in de
handmatige modus
instellen
De temperatuurregeling blijft
op het scherm weergegeven
Druk één keer op OK om naar de
tijdregeling te gaan en stel vervolgens
in met behulp van de pijlen. Bevestig
met OK
00:00
180°C
NL

45
Bakniveaus voor elk automatisch programma
12 AUTOMATISCHE PROGRAMMA‘S
AUTOMATISCHE
PROGRAMMA‘S
BAKNIVEAU-INDICATOR
MENU‘S
Blue
Rare
Medium
Well-done
Rundvlees
Rauw van
binnen
Kort
gebakken
Half
doorbakken
Doorbakken
Kip - - - Doorbakken
Worst - - - Doorbakken
Spek - -
Half
doorbakken
Knapperig
Hamburger -
Kort
gebakken
Half
doorbakken
Doorbakken
Panini -
Licht
gebakken
Geroosterd Knapperig
Vis -
Half
doorbakken
Over half
doorbakken
Doorbakken
Vis en schaaldieren -
Half
doorbakken
Over half
doorbakken
Doorbakken
Aardappelen - - - Sappig
Paprika - - Krokant Sappig
Aubergine - - - Gegrild
Tomaat - - Krokant Sappig
NL

46
SPECIALE HANDMATIGE MODUS
GROENTE OF FRUIT
From 180°C
to 195°C
From 220°C
to 235°C
From 225°C
to 270°C
- - Courgette (schijes)
- - Asperge
- - Champignon
- Ui -
Brocoli - -
Mini-wortelen - -
- Venkel -
Zoete aardappel
(schijes)
- -
- Appel (schijes) -
- Ananas -
- Perzik -
BAKTIP
PRODUCTEN
BAK-
PROGRAMMA
BAK-
TIP
Varkenshaas (zonder botten),
varkensbuik
Doorbakken *
Bratwurst (voorgekookt varkensvlees) 220°C / 8 min 30
Rindswurst (voorgekookt rundvlees) 220°C / 8 min 30
Nürnberger Wurst (voorgekookt
varkensvlees)
220°C / 4 min 30
NL

47
BEREIDINGSTIP
Voor mooiere bakstrepen op het voedsel, wordt het aanbevolen om het geroosterde voedsel
voor het opdienen om te draaien.
PRODUCTEN BEREIDINGSTIP
AARD-
APPELEN
• Schijes in de lengte
• Voeg olie aan de ingrediënten toe voor een beter bakresultaat
PAPRIKA • Snij in de lengte in tweeën
AUBERGINE • Schijes in de lengte
• Voeg olie aan de ingrediënten toe voor een beter bakresultaat
TOMAAT • Gebruik ronde tomaten
• Gebruik geen te rijpe tomaten
• Snij in de breedte in tweeën
• Voor het beste bakresultaat, leg de ronde kant van de in 2
gesneden tomaat op de onderste grillplaat.
VARKENSVLEES * Gebruik de dichtschroei functie als de dikte 20 mm overschrijdt.
NL

48
WICHTIGE SICHERHEITSHINWEISE
Verwendung, Pflege und Einrichtung des Produkts: Lesen Sie zu Ihrer
eigenen Sicherheit bitte die folgenden Punkte durch bzw. sehen Sie sich
die zugehörigen Piktogramme an.
Dieses Gerät ist ausschließlich für den Hausgebrauch bestimmt.
Es ist keinesfalls geeignet, in folgenden Fällen verwendet zu werden, die zudem
von der Garantie ausgeschlossen sind:
- in Küchenecken für Verkaufs- und Büroangestellte und sonstigen
gewerblich genutzten Einrichtungen,
- in landwirtschaftlichen Betrieben,
- in Unterkünften und sonstigen Gastronomie- und Hotelbetrieben
für deren Gäste,
- in Pensionen und Privatunterkünften.
Alle Verpackungen, Klebestreifen oder diversen Zubehörteile innen und außen
am Gerät entfernen.
Dieses Gerät ist nicht zur Handhabung durch Personen (einschließlich Kindern)
mit eingeschränkten körperlichen, sensorischen oder mentalen Fähigkeiten
oder durch Personen mit mangelnder Erfahrung bzw. mangelnden Kenntnissen
vorgesehen, es sei denn unter Aufsicht einer Person, die für ihre Sicherheit
verantwortlich ist und gegebenenfalls vorab Anweisungen zur Handhabung des
Geräts gegeben hat. Kinder müssen beaufsichtigt werden, um sicherzustellen,
dass sie nicht mit dem Gerät spielen.
Kinder müssen beaufsichtigt werden, um sicherzustellen, dass sie nicht mit dem
Gerät spielen oder das Gerät als Spielzeug verwenden.
Gerät im Betrieb niemals unbeaufsichtigt lassen.
Frei zugängliche Flächen können im Betrieb hohe Temperaturen erreichen.
Achten Sie darauf, nicht mit heißen Geräteteilen in Berührung zu kommen.
Dieses Gerät ist nicht dafür bestimmt, durch einen externen Timer oder ein
separates Fernsteuerungssystem in Betrieb genommen zu werden.
Kab
el vollständig abrollen.
Um Gefahren zu vermeiden, darf ein schadhaftes Stromkabel nur
vom Hersteller, dessen Kundendienst oder einer ähnlich qualifizierten
Person ausgetauscht werden.
DE

49
Wird ein Verlängerungskabel verwendet, muss es mindestens
denselben Querschnitt haben und geerdet sein. Stellen Sich sicher,
dass das Kabel niemanden behindert.
Das Gerät nur an einer geerdeten Steckdose anschließen.
Sicherstellen, dass die Elektroinstallation mit der auf der
Geräteunterseite angegebenen Leistung und Spannung vereinbar
ist.
Gerät oder das Kabel niemals in Wasser tauchen.
Dieses Gerät darf nur dann von Kindern ab 8 Jahren und Personen
mit eingeschränkten körperlichen, sensorischen oder geistigen
Fähigkeiten oder von Personen mit mangelnder Erfahrung bzw.
mangelnden Kenntnissen verwendet werden, wenn sie beaufsichtigt
werden oder in die sichere Bedienung des Geräts eingewiesen wurden
und die damit verbundenen Gefahren verstehen. Die Reinigung und
Pflege darf nicht von Kindern ausgeführt werden, außer wenn sie
über 8 Jahre alt sind und beaufsichtigt werden.
Bewahren Sie das Gerät mitsamt Kabel außerhalb der Reichweite
von Kindern unter 8 Jahren auf.
ACHTUNG: Den Grill nicht ohne die 2 Platten auf- oder vorheizen.
Befolgen Sie die nachfolgenden Punkte:
• Die Hinweise in dieser Anleitung, die je nach dem mit Ihrem Gerät gelieferten Zubehör bei den unterschiedlichen
Versionen identisch ausfallen, aufmerksam lesen und in Reichweite aufbewahren.
• Im Falle eines Unfalls sofort kaltes Wasser über die Verbrennung laufen lassen und notfalls einen Arzt rufen.
• Vor der ersten Benutzung die Platten abwaschen (siehe Abschnitt 5), ein wenig Öl darauf verteilen und mit einem
weichen Lappen abreiben.
• Bei der Platzierung des Kabels, mit oder ohne Verlängerung, darauf achten und alle Sicherheitsvorkehrungen
treffen, dass keine sich am Tisch befindende Person behindert wird, indem sie sich darin beispielsweise verfängt.
• Für Tiere mit einem sensiblen Atmungssystem, wie beispielsweise Vögel, können Grilldämpfe gefährlich sein.
Vogelbesitzern wird empfohlen, die Tiere außerhalb der Reichweite des Gerätes zu platzieren.
• Stellen Sie das Gerät immer außerhalb der Reichweite von Kindern auf.
• Stellen Sie sicher, dass die beiden Heizplatten vor der Nutzung gut gereinigt sind.
• Damit die Platten nicht beschädigt werden, verwenden Sie diese ausschließlich mit dem Gerät, für das sie gedacht
sind (Verwenden Sie sie beispielsweise nicht in einem Backofen, auf einem Gasherd oder einer Elektrokochplatte...).
• Achten Sie darauf, dass die Platten fest am Gerät angebracht sind. Verwenden Sie ausschließlich die Platten, die
vom autorisierten Kundendienst ausgeliefert oder erworben wurden.
• Um die Beschichtung der Platten zu schützen, stets einen Kunststoff- oder Holzwender verwenden.
• Verwenden Sie nur mit dem Gerät geliefertes oder bei einer autorisierten Kundendienststelle gekauftes Zubehör.
Nicht mit anderen Geräten zusammen verwenden.
DE

50
Beachten Sie, was Sie vermeiden müssen.
• Gerät niemals am Stromkreislauf lassen, wenn es nicht benutzt wird.
• Um eine Überhitzung zu vermeiden, darf das Gerät nicht in Ecken oder an einer Wand platziert werden.
• Ihr Gerät niemals direkt auf eine empfindliche Fläche (Glastisch, Tischdecke, lackiertes Möbelstück…) oder auf eine
Plastiktischdecke stellen.
• Ihr Gerät niemals unter ein an der Wand befestigtes Möbelstück oder Regal oder in der Nähe von leicht
entflammbarem empfindlichem Material wie Rollos, Vorhänge oder Tapeten stellen. Sollte das Gerät Feuer fangen,
nicht mit Wasser löschen. Ziehen Sie den Netzstecker und ersticken Sie die Flammen mit einem feuchte Tuch.
• Ihr Gerät nicht auf oder in der Nähe einer rutschigen oder heißen Oberfläche stellen. Lassen Sie außerdem das
Kabel nicht in der Nähe einer Wärmequelle liegen (Heizplatten, Gasherd...) und legen oder ziehen Sie es nicht über
scharfe Kanten..
• Keine Kochutensilien auf die Grillflächen des Geräts legen.
• Nicht direkt auf den Heizplatten schneiden.
• Niemals einen Stahlschwamm oder Scheuerpulver verwenden, um die Grillfläche nicht zu beschädigen
(Antihaftbeschichtung).
• Achten Sie darauf, dass das Gerät bei Gebrauch immer frei steht.
• Das Gerät nicht am Griff oder an den Metalldrähten tragen.
• Gerät niemals leer betreiben. Benutzen Sie das Gerät nicht, wenn es nicht fehlerfrei funktioniert, gefallen ist oder
sichtbare Schäden aufweist. Jeder Eingriff, außer der im Haushalt üblichen Reinigung und Wartung durch den
Kunden, muss durch einen autorisierten Service Partner erfolgen. Ziehen Sie niemals den Steckeran der Zuleitung
aus der Steckdose. Lassen Sie das Gerät vollständig abkühlen, bevor Sie es reinigen und wegräumen. Bewegen Sie
das Gerät nicht so lange es heiß ist. Stellen Sie das Thermostat auf die Min.- Position (je nach Modell). Trennen Sie
das Gerät nach jeder Benutzung und vor jeder Reinigung vom Stromnetz. Vor der nächsten Benutzung müssen alle
Geräteteile trocken sein.
• Niemals Aluminiumfolie oder andere Gegenstände zwischen die Platten und die Speisen legen.
• Während des Garvorgangs die Fettauffangschale nicht herausnehmen. Wenn die Auffangschale während des
Garvorgangs voll ist, lassen Sie das Gerät erst abkühlen, bevor Sie sie herausnehmen.
• Die heiße Platte nicht unter Wasser oder auf eine empfindliche Oberfläche legen.
• Für die Erhaltung der Antihaftbeschichtung achten Sie darauf, dass das Gerät nicht zu lange leer erwärmt wird.
• Die Platten dürfen niemals in heißem Zustand behandelt werden.
• Niemals mit Folie garen.
• Flambieren Sie niemals Speisen auf dem Gerät, damit dieses nicht beschädigt wird.
• Niemals Aluminiumfolie oder andere Gegenstände zwischen die Platten und die Heizstäbe legen.
• Niemals erhitzen oder Garvorgänge durchführen, wenn sich das Gerät in der Stellung "Grill geöffnet" befindet.
• Das Gerät niemals ohne die Heizplatten erhitzen.
DE

51
Hinweise/Informationen
• Vielen Dank, dass Sie sich für den Kauf dieses Gerätes entschieden haben, das ausschließlich für den Hausgebrauch
bestimmt ist.
• Zur Gewährleistung Ihrer Sicherheit entspricht das Gerät den geltenden Normen und Bestimmungen
(Niederspannungsrichtlinie;
• elektromagnetische Verträglichkeit; Materialien, die mit Lebensmitteln in Berührung kommen; Umwelt...).
• Bei der ersten Inbetriebnahme ist es möglich, dass eine leichte Geruchs- oder Rauchentwicklung entsteht.
• Öfen Sie in diesem Fall das Fenster, bis keine Rauch oder Geruchsbildung mehr feststellbar ist.
• Verwenden Sie zur Reinigung der Heizplatten einen Schwamm, heißes Wasser und Spülmittel.
• Unsere Gruppe behält sich das Recht vor, im Interesse des Nutzers die Eigenschaften und Einzelteile des Produktes
jederzeit zu bearbeiten.
• Jedes flüssige oder feste Lebensmittel, das mit den mit dem Logo gekennzeichneten Teilen in Berührung
kommt, darf nicht verzehrt werden.
• Wenn die Lebensmittel zu dick sind, verhindert das Sicherheitssystem, dass das Gerät in Betrieb genommen wird.
• Das Heizelement darf nicht gereinigt werden. Sollte es sehr verschmutzt sein, warten Sie, bis es vollständig
abgekühlt ist und reiben Sie es mit einem trockenen Tuch ab.
• Das Bedienfeld ist sehr empfindlich: nur mit einem trockenen und weichen Tuch, reinigen,
abwischen und trocknen. Nicht mit einem feuchten Schwamm reinigen, andernfalls könnte die
Funktionsfähigkeit des Bedienfeldes beeinträchtigt werden.
Umwelt
Denken Sie an den Schutz der Umwelt!
Ihr Gerät enthält wertvolle Rohstoffe, die wiederverwertet werden können.
Geben Sie Ihr Gerät zur Entsorgung deshalb bitte bei einer Sammelstelle Ihrer Stadt oder
Gemeinde ab.
DE

52
A1 A2 A3
A4
A5
A6
A7
D
E
B
C
F
B
Beschreibung
A
Bedienfeld
A1
Ein-/Aus-Taste
A2
Funktion für tiefgekühlte
Lebensmittel
A3
Funktion für kräftigere
Grillstreifen
A4
Einstell- und
Navigationstasten
A5
Vorheiz- und Garstufen-
Anzeige
A6
Display
A7
OK-Taste
B
Haupteinheit
C
Gri
D
Grillplatten
E
Saftauangschale
F
Netzkabel
A
DE

53
12 automatische Garprogramme
Ein manueller Modus
120
°C
180
°C
220
°C
250
°C
Manual
mode
Manual
mode
Manual
mode
Manual
mode
Im automatischen Modus stehen zwei
Optionen zur Verfügung:
Funktion für tiefgekühlte Lebensmittel
Funktion für intensivere Grillstreifen
DE

54
1 Vorbereitung
1 Entfernen Sie sämtliches
Verpackungsmaterial, Aufkleber und
Zubehörteile im Inneren und an den
Außenächen des Geräts.
2 Reinigen Sie vor dem ersten Gebrauch
die Platten sorgfältig mit heißem
Wasser und Geschirrspülmittel,
spülen und trocknen Sie die Platten
anschließend gründlich ab.
3-4 Befestigen Sie die herausnehmbare
Saftauangschale an der Vorderseite
des Gerätes.
1 2
OK
3 4
5 Um bessere Ergebnisse zu
erzielen und die Wirkung der
antihaftbeschichteten Oberäche zu
optimieren, können Sie mithilfe eines
Küchenpapiers die Grillplatten mit
etwas Öl einfetten.
6 Entfernen Sie überschüssiges Öl mit
einem sauberen Küchenpapier.
7 Vergewissern Sie sich, ob die oberen
und unteren Platten korrekt im
Produkt eingesetzt wurden. Heizen
Sie das Gerät nicht ohne Platten
auf. Schließen Sie das Gerät an eine
Steckdose an. (Achten Sie darauf, dass
das Kabel vollständig abgewickelt ist.)
8 Drücken Sie die Ein/Aus-Taste.
Achtung: Vergewissern Sie sich, dass sich
keine Lebensmittel zwischen den Platten
benden.
5 6
7 8
DE

55
2
Erstmaliger Gebrauch
9 Wählen Sie mithilfe der Pfeile Ihre Sprache und drücken Sie dann OK.
Language
choice
English
EN
Sprachauswahl
Deutsch
DE
Choix de la
langue
Français
FR
9
3
Ein-/Aus-Tast
e
10 Schalten Sie das Gerät ein.
11 Drücken Sie zum Ausschalten
des Gerätes einmal auf die Ein-/
Aus-Taste und einmal auf OK, um
das Ausschalten des Gerätes zu
bestätigen.
10 11
DE

56
4
Funktion für tiefgekühlte Lebensmittel -
im automatischen Modus
(13-15) Die Funktion für tiefgekühlte
Lebensmittel ist vor dem
Starten des Vorheizvorgangs
zu aktivieren. Wählen
Sie bei der Auswahl des
automatischen Modus aus,
ob das Grillgut tiefgekühlt/
gefroren ist.
Falls Sie vergessen haben, die
Funktion zu aktivieren, schalten Sie
das Gerät aus und wiederholen Sie die
Schritte.
Diese Funktion steht nur im
automatischen Modus, nicht im
manuellen Modus, zur Verfügung.
Hallo
12 13
Frozen food
ON
Gefrorene Speisen aus
14 15
DE

57
5
Funktion für intensivere Grillstreifen-
im automatischen Modus
17-19 Die Funktion für intensivere
Grillstreifen ist vor dem
Starten des Vorheizvorgangs
zu aktivieren. Wählen Sie die
Funktion bei der Auswahl des
automatischen Modus aus, wenn
Sie ausgeprägtere Grillstreifen auf
dem Grillgut wünschen.
Falls Sie vergessen haben, die
Funktion zu aktivieren, schalten Sie
das Gerät aus und wiederholen Sie die
Schritte.
Diese Funktion steht nur im
automatischen Modus, nicht im
manuellen Modus, zur Verfügung.
Hallo
16 17
Searing
boost ON
Scharfes Anbraten ein
18 19
DE

58
6
Garen im automatischen Modus
21 Wählen Sie den für die Art des
Grillguts geeigneten Garmodus.
Tipp, insbesondere für Fleisch: Die
Garergebnisse der voreingestellten
Programme können je nach Herkunft,
Zuschnitt und Qualität des Grillguts
variieren. Die Programme wurden
mit Lebensmitteln von guter Qualität
eingestellt und getestet.
Ebenso muss die Dicke des Fleisches
beim Garen berücksichtigt werden.
Garen Sie keine Lebensmittel, die
dicker als 4 cm sind.
Hallo
20 21
Wenn Sie sich nicht sicher sind, welchen Garmodus Sie verwenden sollten, ziehen Sie den Garleitfaden
auf Seite 68 zurate.
Preheating in
progress
22 Drücken Sie die Taste „ OK “ : Das
Gerät beginnt, vorzuheizen.
Anmerkung: Wenn Sie versehentlich
das falsche Programm gewählt
haben, schalten Sie den Grill aus und
wiederholen Sie den Vorgang ab
Schritt 8.
23 Warten Sie 4 bis 7 Minuten.
24 Ein akustisches Signal zeigt an, wenn
das Vorheizen abgeschlossen ist.
Anmerkung: Wenn das Gerät nach
Abschluss des Vorheizvorgangs zu
lange geschlossen bleibt, schaltet das
Sicherheitssystem das Gerät aus.
Wird vorgeheizt
22 23
24
DE

59
insert
the food
(25-26)
Sobald der Vorheizvorgang
abgeschlossen ist, können Sie Ihre
Zutaten in den Grill legen. Önen Sie
den Deckel des Grills und legen Sie
die Lebensmittel auf den Grill.
Anmerkung: Wenn das Gerät
zu lange geönet ist, schaltet
das Sicherheitssystem das Gerät
automatisch aus.
27-29
Das Gerät berechnet automatisch
nach Menge und Dicke der
Lebensmittel den Garzyklus (Garzeit
und Temperatur).
Schließen Sie den Deckel des Gerätes,
damit der Garvorgang beginnen kann.
Hinweis zu sehr dünnen
Lebensmitteln, zum Beispiel
Bacon: Die OK-Taste leuchtet
auf. Drücken Sie dann auf OK, um
sicherzustellen, dass das Gerät
die Lebensmittel erkennt und der
Garzyklus beginnt.
Der Pfeil bewegt sich entlang der
Garstufen-Anzeige und wenn das
Gerät eine Garstufe erreicht, wird die
Stufe angezeigt und das Gerät erzeugt
ein akustisches Signal.
Anmerkung: Die Garstufen sind
für jedes automatische Programm
voreingestellt.
Während des Garvorgangs
benachrichtigt ein akustisches Signal
den Benutzer jedes Mal, wenn eine
Garstufe erreicht ist (z. B. blutig).
Die Anzeige ändert je nach Garstufe
die Farbe und der Pfeil bewegt sich
entsprechend des Garfortschritts
entlang des Displays.
Beachten Sie bitte, dass es besonders
bei Fleisch normal ist, wenn die
Garergebnisse je nach Fleischsorte,
Qualität und Herkunft der Nahrung
variieren.
Speisen einlegen
25 26
to start
cooking
Garvorgang starten
27 28
Start of
cooking
Garvorgang beginnt
29 30
DE

60
33-34 Wenn die Garstufe Ihrer Wahl
angezeigt wird und das akustische
Signal ertönt, önen Sie das Gerät und
entnehmen Sie Ihre Speisen.
35-36 Schließen Sie den Deckel. Das
Display fordert Sie auf, den Abbruch des
Garvorgangs zu bestätigen. Bestätigen
Sie mithilfe von OK, dass alle Lebensmittel
vom Grill genommen wurden, sonst wird
der Garvorgang fortgesetzt.
Wenn Sie einen neuen Garvorgang
starten möchten, lesen Sie bitte Abschnitt
8.
Anmerkung: Das Sicherheitssystem
schaltet das Gerät automatisch aus, wenn
nach einer gewissen Zeit kein Programm
ausgewählt wurde.
33 34
to stop
cooking
Garvorgang beenden
35 36
OK
Well-done
in 01:35
31-32 Sie können sich jederzeit über
die verbleibende Zeit zum Erreichen der
verschiedenen Garstufen informieren.
Drücken Sie auf den Rechts-Pfeil, wenn
Sie sehen möchten, wie lange es dauern
wird, bis die nächste Garstufe erreicht ist.
Achtung - Es handelt sich dabei nicht um
die Auswahl einer Garstufe. Der Grill fährt
fort, bis zur letzten Garstufe zu garen, und
benachrichtigt den Benutzer bei jeder
Garstufe.
Durchgebraten in 01:35
31 32
DE

61
7
Durchführen eines zweiten Garvorgangs
Zweiter Garvorgang mit der gleichen Art Grillgut
Any refill?
37-38 Nach Ablauf des ersten Garvorgangs
wird auf dem Display „nouvelle
cuisson“ (neuer Garvorgang) angezeigt.
Wenn Sie die gleiche Art von Grillgut
grillen möchten, drücken Sie OK.
39 Das Gerät beginnt vorzuheizen.
40 Warten Sie bis zum Ende des
Vorheizvorgangs.
Nachlegen?
37 38
Preheating in
progress
Wird vorgeheizt
39 40
Wait
insert
the food
41 Legen Sie das Grillgut in den Grill.
42 Folgen Sie dann den Schritten 27 bis
37.
Warten Speisen einlegen
41 42
Zweiter Garvorgang mit einer anderen Art Grillgut
Sobald der Garvorgang für Ihre ersten Speisen abgeschlossen ist:
1. Vergewissern Sie sich, dass das Gerät geschlossen ist und sich kein Grillgut zwischen den Platten
bendet.
2. Wählen Sie den passenden Modus oder das passende Garprogramm.
3. Drücken Sie „OK“, um den Vorheizvorgang zu beenden. Während des Vorheizens erscheint die
Vorheiz-Anzeige auf dem Display.
DE

62
8
Garen im manuellen Modus
OK
Manual
mode
120
°C
43 Wählen Sie den manuellen Modus
und drücken Sie zur Bestätigung OK.
44 Wählen Sie die gewünschte
Temperatur mithilfe der Einstelltasten.
Drücken Sie zur Bestätigung der
ausgewählten Temperatur OK.
43 44
Preheating
180°C
180°C
OK
45 Warten Sie bis zum Ende des
Vorheizvorgangs.
46 Sobald das Vorheizen beendet ist,
drücken Sie OK, um den Timer zu
starten.
Anmerkung: Die Garzeit kann auch zu
Beginn des Vorheizvorgangs eingestellt
werden.
45 46
00:00
180°C
00:00
180°C
47 Drücken Sie die Einstelltasten, um die
gewünschte Garzeit auszuwählen.
48 Legen Sie Ihr Grillgut in den Grill und
drücken Sie OK, um den Garvorgang
zu starten.
47 48
4. Sobald der Vorheizvorgang beendet ist, ertönt ein akustisches Signal und auf dem Display wird das
Ende des Vorheizvorgangs angezeigt.
5. Nach dem Vorheizen ist das Gerät einsatzbereit. Önen Sie den Deckel des Grills und legen Sie die
Lebensmittel in den Grill. Folgen Sie dann den Schritten 27 bis 37.
Wichtig:
– Bitte beachten Sie, dass das Vorheizen für jeden Garvorgang obligatorisch ist.
Denken Sie daran: Stellen Sie vor dem Starten des Vorheizvorgangs sicher, dass das Gerät geschlossen ist
und das sich kein Grillgut im Grill bendet.
– Warten Sie dann, bis das Vorheizen abgeschlossen ist, bevor Sie den Grill önen und die Lebensmittel
in den Grill legen.
Anmerkung: Wenn der neue Vorheizzyklus sofort nach dem Ende des vorherigen Zyklus gestartet wird,
ist der Vorheizvorgang kürzer.
DE

63
00:00
180°C
to stop
cooking
49-50 Ein akustisches Signal zeigt Ihnen
an, wenn die Garzeit abgelaufen
ist. Entnehmen Sie Ihre Speisen.
Drücken Sie OK, um den Garvorgang
zu beenden und Ihre Speisen zu
entnehmen.
Garvorgang beenden
49 50
9
Anmerkungen
51-53
Önen Sie je nach persönlicher Vorliebe
den Grill und entnehmen Sie die Speisen,
die die gewünschte Garstufe erreicht
haben. Schließen Sie den Grill dann
wieder, um den Garvorgang für die
restlichen Lebensmittel fortzusetzen. Das
Programm folgt dem Garzyklus bis zur
letzten Garstufe des gewählten Modus.
54 Anmerkung: Das Sicherheitssystem
schaltet das Gerät automatisch nach
einer gewissen Zeit aus.
51 52
Remove
your food
Overcooked
risk
Speisen entnehmen Evtl. verbraten
53 54
DE

64
10
Betrieb beenden
55 Drücken Sie einmal die Ein-/Aus-Taste
und dann zur Bestätigung die OK-
Taste.
56 Ziehen Sie den Netzstecker des
Geräts.
57 Lassen Sie das Gerät mindestens für
2 Stunden abkühlen.
Lassen Sie den Grill vor dem
Reinigen vollständig abkühlen, um
Verbrennungen zu vermeiden.
55 56
2 h
57
11
Reinigung
58 Lösen und entfernen Sie vor
der Reinigung die Platten, um
Beschädigungen an der Garäche zu
vermeiden.
59 Die Saftauangschale und
die Platten können in die
Geschirrspülmaschine gestellt
werden. Das Gerät und sein Kabel
dürfen unter keinen Umständen in
der Geschirrspülmaschine gereinigt
werden. Die Heizelemente dürfen
in keinem Fall gereinigt werden,
nachdem die Platten entfernt
wurden. Wenn sie sehr verschmutzt
sind, warten Sie bis das Gerät
vollständig abgekühlt ist, und
reinigen Sie die Heizelemente mit
einem trockenen Tuch.
58 59
DE

65
11
Reinigung
60-61
Wenn Sie die Platten nicht in der
Geschirrspülmaschine reinigen
möchten, waschen Sie sie in heißem
Wasser mit etwas Geschirrspülmittel
ab, spülen Sie sie dann mit reichlich
Wasser ab, um alle Rückstände zu
entfernen. Wischen Sie die Platten
sorgfältig mit einem Küchenpapier
trocken.
Verwenden Sie keine metallischen
Scheuerschwämme, Stahlwolle
oder scheuernde Reinigungsmittel,
um eines der Elemente des Grills
zu reinigen. Verwenden Sie nur
Nylonschwämme oder nicht
metallische Schwämme.
Entleeren Sie die Saftauangschale
und waschen Sie sie in heißem
Seifenwasser ab. Wischen Sie die
Schale dann gründlich mit einem
Küchenpapier trocken.
62 Wischen Sie den Grilldeckel mit einem
mit heißem Wasser angefeuchteten
Schwamm sauber und trocknen Sie
ihn dann mit einem weichen und
trockenen Tuch ab. Verwenden Sie
zum Reinigen des Bedienfeldes nur
ein weiches und trockenes Tuch.
63 Tauchen Sie das Gehäuse des Grills
niemals in Wasser oder eine andere
Flüssigkeit.
64 Vergewissern Sie sich stets, dass der
Grill sauber, abgekühlt und trocken ist,
bevor Sie ihn wegräumen.
Alle anderen Wartungsarbeiten
müssen von einem zugelassenen
Kundendienst durchgeführt werden.
60 61
62 63
64
DE

66
Fehlerbehebung
FEHLERBEHEBUNG FÜR DEN ELITE
Problem Ursache Lösung
Ändern der Sprache Grill mit einer Steckdose verbinden, auf
ON und dann sofort die Taste Frozen
drücken (währenddessen zeigt das
Display „Bonjour“ an).
5sec
Preheating
not finished,
remove your
food
10s before-
changeover
to manual
mode
Der Vorheizvorgang ist noch
nicht abgeschlossen. Der
Grill wurde vor Ende des
Vorheizvorgangs geönet und
Lebensmittel wurden auf die
Platte gelegt.
Die Lebensmittel können gegrillt
werden, der Garvorgang muss jedoch
überwacht werden, denn der Grill hat
in den manuellen Modus geschaltet.
Die Temperatur kann eingestellt
werden.
Oder
Grill önen, Speisen entnehmen,
Grill ordnungsgemäß schließen
und warten, bis der Vorheizvorgang
abgeschlossen ist.
Ich kann mein Gerät
nicht ausschalten.
Die Taste wurde nicht
lange genug gedrückt oder
zwischen dem ersten und
zweiten Drücken war zu viel
Zeit.
Zweimal die Ein/Aus-Taste drücken.
oder
einmal die Ein-/Aus-Taste drücken,
dann zur Bestätigung OK drücken.
Err 1 bis Err 8 Das Gerät wurde in einem zu
kalten Zimmer aufbewahrt
oder benutzt. Das Gerät ist
überhitzt.
Netzstecker des Gerätes herausziehen
und einige Minuten warten.
Grill erneut mit der Steckdose
verbinden und die Ein-/Aus-Taste
drücken.
Falls das Problem weiterhin besteht,
kontaktieren Sie einen Kundendienst.
Err 9 bis Err 13 Funktionsstörung Ziehen Sie den Netzstecker und
wenden Sie sich an den Kundendienst.
Das Gerät schaltet sich
während des Vorheiz-
oder Garvorgangs von
allein aus.
Das Gerät stand zu lange
oen, während des
Garvorgangs. Das Gerät
stand nach Abschluss des
Vorheizvorgangs oder
während des Warmhaltens zu
lange oen
Netzstecker ziehen und einige
Minuten warten. Dann wieder mit der
Steckdose verbinden und einschalten.
DE

67
FEHLERBEHEBUNG FÜR DEN ELITE
Problem Ursache Lösung
to stop
cooking
Auorderung, das Ende des
Garvorgangs zu bestätigen
2 Lösungen
OK drücken, wenn alle Lebensmittel
entnommen wurden
oder
nicht OK drücken und den Grill laufen
lassen, wenn noch Lebensmittel übrig
sind, die gegart werden müssen.
to start
cooking
Lebensmittel wird nicht
erkannt, weil es zu dünn ist.
OK drücken, um den Garvorgang zu
starten.
for manual
mode
Lebensmittel sind zu dick. 2 Lösungen:
OK drücken, um den Garvorgang im
manuellen Modus fortzusetzen.
oder
Lebensmittel vom Grill nehmen, um
sie dünner zu schneiden und den
Garvorgang im automatischen Modus
fortsetzen zu können.
Ich kann im manuellen
Modus keine
Temperatur einstellen.
Das Display bleibt auf der
Temperatureinstellung stehen.
Einmal OK drücken, um zur Einstellung
der Temperatur zu gehen, dann
mithilfe der Pfeile einstellen. Mit OK
bestätigen.
00:00
180°C
DE

68
Garstufe für jedes automatische Programm
12 AUTOMATISCHE PROGRAMME
AUTOMATISCHE
PROGRAMME
GARSTUFEN-ANZEIGE
MENÜS
Blue
Rare
Medium
Well-done
Rindeisch Blau Blutig Halbrosa Durchgebraten
Huhn - - - Durchgebraten
Würstchen - - - Durchgebraten
Bacon - - Halbrosa Kross
Hacksteak
(Frikadelle)
- Blutig Halbrosa Durchgebraten
Panini -
Leicht
aufgebacken
Getoastet Knusprig
Fisch - Halbrosa
Gut
durchgebraten
Durchgebraten
Meeresfrüchte - Halbrosa
Gut
durchgebraten
Durchgebraten
Kartoeln - - - Weich
1 rote Paprika - - Knackig Weich
Aubergine - - - Gegrillt
Tomate - - Knackig Weich
DE

69
SPEZIELLER MANUELLER MODUS
GEMÜSE ODER OBST
From 180°C
to 195°C
From 220°C
to 235°C
From 225°C
to 270°C
- - Zucchini (Scheiben)
- - Spargel
- - Pilze
- Zwiebeln -
Brokkoli - -
Mini-Karotten - -
- Fenchel -
Süßkartoel
(Scheiben)
- -
- Apfel (Scheiben) -
- Ananas -
- Prsich -
GRILLTIPPS
PRODUKTE
GAR-
PROGRAMM
GRILL-
TIPP
Schweinelet mignon (ohne
Knochen), Schweinebauch
Durchgebraten*
Bratwurst (vorgegartes
Schweineeisch)
220°C/8 min 30
Rindswurst (vorgegartes Rindeisch) 220°C/8 min 30
Nürnberger Wurst (vorgegartes
Schweineeisch)
220°C/4 min 30
DE

70
ZUBEREITUNGSTIPP
Für Grillgut mit ausgeprägteren Grillstreifen wenden Sie das Grillgut am besten, bevor Sie es
Ihren Gästen servieren.
PRODUKTE ZUBEREITUNGSTIPP
KARTOFFELN
• Der Länge nach in Scheiben schneiden
• Geben Sie für ein optimiertes Garergebnis Öl auf die Zutaten.
PAPRIKA • Der Länge nach halbieren
AUBERGINE
• Der Länge nach in Scheiben schneiden
• Für ein optimiertes Garergebnis Öl auf die Zutaten geben.
TOMATE
• Runde Tomaten verwenden
• Keine überreifen Tomaten verwenden.
• Der Breite nach halbieren
• Für ein optimales Garergebnis die gerundete Seite der
Tomatenhälfte auf die untere Platte des Grills legen.
SCHWEINEFLEISCH
* Funktion für intensivere Grillstreifen benutzen, wenn das Fleisch
dicker als 20 mm ist.
DE

71
SAFETY INSTRUCTIONS
IMPORTANT SAFEGUARDS
Use, maintenance and product installation guidelines: for your own
safety, please read through all paragraphs of the instruction manual
including the associated pictograms.
This appliance is intended for indoor, domestic household use only. It is not
intended to be used in the following applications, and the guarantee will not
apply for:
- staff kitchen areas in shops, offices and other working
environments;
- farm houses;
- by clients in hotels, motels and other residential type
environments;
- bed and breakfast type environments.
Before first use remove all packaging materials, stickers and accessories from
the inside and the outside of the appliance.
This appliance is not intended for use by persons (including children) with
reduced physical, sensory or mental capabilities, or lack of experience and
knowledge, unless they have been given supervision or instruction concerning
use of the appliance by an adult responsible for their safety. Children should
be supervised to ensure that they do not play with the appliance, and do not
use as a toy.
This appliance can be used by children aged from 8 years and above and
persons with reduced physical, sensory or mental capabilities or lack of
experience and knowledge if they have been given supervision or instruction
concerning use of the appliance in a safe way and understand the hazards
involved. Cleaning and user maintenance shall not be made by children unless
they are older than 8 and supervised.
Keep the appliance and its cord out of reach of children less than 8 years.
Never leave the appliance unattended when in use.
Accessible surface temperatures can be high when the appliance
is operating. Never touch the hot surfaces of the appliance.
This appliance is not intended to be operated by means of an external timer
EN

72
or separate remote-control system.
Fully unwind the power cord before plugging in the appliance.
If the power supply cord is damaged, it must be replaced by the manufacturer
or its after sales service in order to avoid any danger.
Do not use an extension lead. If you accept liability for doing so, only use an
extension lead which is in good condition, has a plug with an earth connection
and is suited to the power rating of the appliance. Take all necessary precautions
to prevent anyone tripping over an extension cord.
Always plug the appliance into an earthed socket.
Make sure that the electric power supply is compatible with the power rating
and voltage indicated on the bottom of the appliance.
Use a sponge, hot water and washing up liquid to clean the cooking plates.
Never immerse the appliance, its power cord or plug in water or any other liquid.
WARNING: Do not heat or pre-heat without the 2 cooking plates inside the
grill.
Do
• Read the instructions carefully, common to different models depending on the accessories your
appliance with supplied with. Keep the instructions within reach.
• If an accident occurs, rinse the burn immediately with cold water and call a doctor if necessary.
• Before first use, wash the plates (see paragraph 5), pour a little cooking oil onto the plates and wipe with a soft cloth
or paper kitchen towel.
• Position the power cord carefully, whether an extension is used or not, so that guests can move freely around the
table without tripping over it.
• Cooking fumes may be dangerous for animals which have a particularly sensitive respiratory system, such as birds.
We advise bird owners to keep them away from the cooking area.
• Always keep the appliance out of the reach of children.
• Check that both faces of the plate are clean before use.
• To prevent damage to the plates, only use them on the appliance for which they were designed (e.g., do not place in
an oven, on the gas ring or electric hot-plate, etc.).
• Ensure that the plates are stable, well positioned and correctly clipped to the appliance. Only use the plates provided
with the appliance or bought from an Approved Service Centre.
• Always use a wooden or plastic spatula to avoid damaging the cooking plates.
• Only use parts or accessories provided with the appliance or bought from an Approved Service Centre. Do not use
them for other appliances or intention.
Do not
• Do not use the appliance outside.
• Never leave the appliance unattended when plugged in or in use.
• To prevent the appliance from overheating, do not place it in a corner or below a wall cupboard.
• Never place the appliance directly on a fragile surface (glass table, tablecloth, varnished furniture,
etc.) or on a soft surface such as a tea-towel.
EN

73
• Never place the appliance under a cupboard attached to a wall or a shelf or next to inflammable
materials such as blinds, curtains or wall hangings.
• Never place the appliance on or near hot or slippery surfaces; the power cord must never be close
to or in contact with hot parts of the appliance, close to a source of heat or resting on sharp edges.
• Do not place cooking utensils on the cooking surfaces of the appliance.
• Never cut food directly on the plates,
• Do not use metal scouring pads, abrasive wire wool or harsh scouring powder as this may damage
the nonstick coating.
• Do not move the appliance when in use.
• Do not carry the appliance by the handle or metallic wires.
• Never run the appliance empty.
• Do not use aluminium foil or other objects between the plate and the food being cooked.
• Do not remove the grease collection tray while cooking. If the grease collection tray becomes full
when cooking: let the appliance cool down before emptying.
• Do not place the hot plate on a fragile surface or under water.
• To preserve the non-stick properties of the coating, avoid excessive pre-heating with the appliance
empty.
• The plates should never be handled when hot.
• Do not cook food in aluminium foil.
• To avoid spoiling your appliance, do not use flambé recipes in connection with it at any time.
• Do not place a sheet of aluminum or any other object between the plates and the heating element.
• Never heat or cook whilst the grill is open.
• Never heat up the appliance without the cooking plates.
Tips/information
• Thank you for buying this appliance, which is intended for domestic use only.
• For your safety, this appliance complies with the applicable standards and regulations - Low voltage
directive - Electromagnetic compatibility - The environment - Materials in contact with food.
• On first use, there may be a slight odour and a little smoke during the first few minutes.
• Our company has an ongoing policy of research and development and may modify these products
without prior notice.
• Do not consume foodstuff that comes into contact with the parts marked with logo .
• If the food is too thick, the safety system will stop the appliance from working.
• The instrument panel is fragile: clean, wipe and dry with a dry, soft cloth only. Do not clean it with
a wet sponge as this may damage its functions.
Environment
Environment protection first!
Your appliance contains valuable materials which can be recovered or recycled.
Leave it at a local civic waste collection point.
EN

74
A1 A2 A3
A4
A5
A6
A7
D
E
B
C
F
B
Description
A
Control panel
A1
On/O button
A2
Frozen food function
A3
Searing function
A4
Adjustment and
navigation buttons
A5
Preheating indicator and
cooking level
A6
Display screen
A7
OK button
B
Appliance body
C
Handle
D
Cooking plates
E
Drip tray
F
Power cord
A
EN

75
12 automatic cooking programs
Manual mode
120
°C
180
°C
220
°C
250
°C
Manual
mode
Manual
mode
Manual
mode
Manual
mode
Two additional cooking options in
automatic mode
Frozen food function
Searing function
Note: The Frozen food function and Searing function can be used independently or both at the
same time.
EN

76
1 Before first use
1 Remove all packaging, stickers and
various accessories from both the
inside and outside of the appliance.
2 Prior to rst use, thoroughly clean the
cooking plates using some hot water
and some washing-up liquid, carefully
rinse and dry.
3-4 Install the removable drip tray at the
front of the machine.
1 2
OK
3 4
5 If you wish, for best results and to
improve the eectiveness of the
non-stick surface, you can wipe the
cooking plates with a paper towel
dipped in a little cooking oil.
6 Remove any excess oil with a clean
paper towel.
7 Make sure the top and bottom
plates are correctly positioned in the
appliance. Do not start preheating
without the plates. Connect the
appliance to the mains supply. (the
cable must be completely unwound).
8 Press the On/O button.
Caution: Ensure that there is no food
between the plates.
5 6
7 8
EN

77
2
Using for the first time
9 Select your language using the arrows then press ok.
Language
choice
English
EN
Sprachauswahl
Deutsch
DE
Choix de la
langue
Français
FR
9
3
On/Off button
10 Switch on g. 10.
11 To switch o the grill press once on
the On/O button and once on the
OK button to switch o the appliance.
10 11
EN

78
5
Searing function in automatic only
17-19 Searing function must be activated
before starting preheating, if you
want signicant searing on the
food to be cooked.
If you forget to activate the option,
turn o the appliance and repeat the
steps.
This function is only available in
automatic mode, not in manual
mode.
16 17
Searing
boost ON
18 19
4
Frozen food function in automatic mode only
13-15 Frozen food function must
be activated before starting
preheating, if the food to be
cooked is frozen/deep frozen.
If you forget to activate the option,
turn o the appliance and repeat the
steps.
This function is only available in
automatic mode, not in manual
mode.
12 13
Frozen food
ON
14 15
EN

79
6
Cooking in automatic mode
21 Select the appropriate cooking mode
according to the type of food to be
cooked.
Note about meat: the cooking
results of the pre-dened programs
may vary depending on the origin,
the cut and the quality of the food to
be cooked; the programs having been
developed and tested with food of
good quality.
Similarly, the thickness of the meat
must be taken into account during
cooking; you must not cook foods
over 4 cm thick.
20 21
If you are unsure of which cooking mode to use, please refer to the Cooking Guide, page 89.
Preheating in
progress
22 Press the OK button : the appliance
starts to preheat.
Note: if you select the wrong
program, switch o the grill and go
back to step 8.
23 Wait 4 to 7 minutes.
24 A beep sounds to signal that
preheating is nished.
Caution: if the appliance remains
closed for too long after preheating is
nished, the safety system will turn o
the appliance.
22 23
24
EN

80
insert
the food
25-26
Once preheating has nished, you can
insert your ingredients. Fully lift the
grill lid and place the food on the grill.
Caution: if the appliance remains
open for too long, the safety system
will turn o the appliance.
27-29
The appliance automatically
calculates the cooking cycle (time
and temperature) according to the
quantity and thickness of the food.
Close the appliance so that the
cooking cycle can start.
Note for very thin foods, such as
bacon: The "OK" button is on. Then
press "OK" again to make sure that the
appliance recognises the food and
that the cooking cycle starts.
The arrow moves along the cooking
level indicator and when it reaches
a cooking level, the level is displayed
and a beep sounds.
Note: the cooking levels are pre-
programmed for each automatic
mode.
During cooking, a beep will alert
the user each time a cooking level is
reached (e.g. rare/yellow).
Depending on the degree of cooking,
the indicator changes colour and the
cooking progress arrow moves on the
screen.
Note, especially for meat, that it is
normal for the cooking results to vary
according to the type, quality and
origin of the food.
31-32 At any time, you can nd out the
time remaining to reach the dierent
levels of cooking. Press the right arrow if
you want to see in how long before the
next cooking level is reached. Note that
this does not select the cooking levels.
The grill continues to cook to the last
cooking level and a beep sounds at each
level.
25 26
to start
cooking
27 28
Start of
cooking
29 30
Well-done
in 01:35
31 32
EN

81
33-34 When the cooking level of your
choice is reached and the beep sounds,
open the appliance and remove your
food.
35-36 Close the lid. The screen asks
for your conrmation to stop cooking.
Conrm with OK if all foods have been
removed, otherwise allow it to continue
cooking.
If you wish to cook more food, refer to
section 7, page 82.
Note: the safety system will turn o the
power automatically if no program is
selected after a certain time.
33 34
35
to stop
cooking
36
OK
EN

82
7
How to cook a second batch
Second batch of the same type of food
Any refill?
37-38 At the end of the rst cook, an "any
rell" screen appears. If you want to grill
the same type of food, press OK.
39 The appliance starts preheating.
40 Wait until preheating has nished.
37 38
Preheating in
progress
39 40
Wait
insert
the food
41 Put the food on the grill.
42 Then follow steps 26 to 36.
41 42
Second cooking with a dierent type of food
Once cooking your rst ingredient has nished:
1. Ensure that the appliance is closed and that there is no food inside.
2. Select the appropriate cooking program or mode.
3. Press the OK button to start preheating. During preheating, the preheating indicator is displayed on
the screen.
4. Once preheating has nished, a beep sounds and the preheating information is shown on the screen.
5. The appliance is ready to use once preheating has nished. Lift the grill lid and place the food inside
the grill. Then follow steps 26-36.
EN

83
8
Cooking in manual mode
OK
Manual
mode
120
°C
43 Select manual mode and press OK to
conrm.
44 Select the desired temperature using
the adjustment buttons. Please refer
to manual cooking guide page 90.
Press OK to conrm the selected
temperature.
43 44
Preheating
180°C
180°C
OK
45 Wait until preheating has nished.
46 Once preheating has nished, press
OK to start the timer.
Note: the cooking time can also be set
from the start of preheating.
45 46
00:00
180°C
00:00
180°C
47 Press the adjustment buttons to select
the desired cooking time.
48 Insert your food and press OK to start
cooking.
47 48
Important:
– Preheating is essential to cooking.
Reminder: before starting preheating, ensure that the appliance is closed and that there is no food
inside.
– Wait until preheating is nished before opening the grill and putting food inside.
Note: if the new preheating cycle is started immediately after the end of the previous cycle, the
preheating time will be shorter.
EN

84
00:00
180°C
to stop
cooking
49-50 A beep sounds to indicate when
the cooking time has nished.
Remove your food.
Press OK to stop cooking and remove
your food.
49 50
9
Comments
51-53
Depending on your personal preferences,
open the grill and remove foods that
have reached the desired cooking level,
then close the grill to continue cooking
other foods. The program will continue
the cooking cycle until the last cooking
level of the selected mode.
54 Note: the safety system will turn
o the power automatically after a
certain time.
51 52
Remove
your food
53 54
Overcooked
risk
EN

85
10
End of use
55 Press the On/O button and conrm
by pressing the OK button.
56 Unplug the appliance.
57 Let it cool for at least 2 hours.
To prevent accidental burns, allow
the grill to cool completely before
cleaning.
55 56
2 H
57
EN

86
11
Cleaning
58 To unlock the plates, press the release
tabs on the left hand side of the
appliance. Before cleaning, unlock and
remove the plates to prevent damage
to the cooking plates.
59 The drip tray and cooking plates are
dishwasher safe. The appliance and
its power cord must never be put
in the dishwasher. If you wash the
plates in a dishwasher, always wipe
the plates over with a little cooking
oil on next use in order to condition
the coating and ensure the best
performance from the non-stick. The
heating elements should never be
cleaned after the plates have been
removed. If they are very dirty, wait
until the appliance has cooled down
completely and clean them with a dry
cloth.
60-61
If you do not wish to put the plates
in the dishwasher, use some hot
water and some washing-up liquid to
wash them, then rinse thoroughly to
remove all residue. Dry them gently
with a paper towel.
Do not use metal scouring pads, steel
wool or abrasive cleaners to clean any
part of the grill or cooking plates, use
only nylon or non-metallic cleaning
pads suitable for non-stick surfaces.
Empty the drip tray and wash it in
warm, slightly soapy water, then wipe
it thoroughly with a paper towel.
62 To clean the grill lid, wipe with a
sponge moistened with warm water
and dry with a soft, dry cloth. To clean
the control panel, use only a soft, dry
cloth.
63 The appliance must not be
submerged in water or in any other
liquid.
64 Always ensure that the appliance is
clean, cold and dry prior to storage.
All repairs must be done by an
authorised service centre.
58 59
60 61
62 63
64
EN

87
Troubleshooting Guide
OPTIGRILL ELITE TROUBLESHOOTING GUIDE
Problem Cause Solution
A change of language Switch on the grill, press ON, then
immediately on the Frozen button
(while the screen displays "Hello")
5sec
Preheating
not finished,
remove your
food
10s before-
changeover
to manual
mode
The preheating time was not
completely nished. The grill
was opened and the food
placed on the plate before the
end of preheating.
It is possible to cook the food, but you
have to check the cooking progress
because the grill is in manual mode.
The temperature can be adjusted.
Or
Open the grill, remove the food, close
the grill properly and wait until the end
of preheating.
My appliance does not
switch o
Missing a second press or too
long a time between the 2
presses.
Press the On/O button twice.
Or
Press the On/O button once then
press OK
Err 1 to Err 8 The unit has been stored or
used in a room that is too
cold.
Appliance overheating.
Unplug the appliance and wait a few
minutes.
Plug the grill in again and switch it on.
If the problem persists, contact
customer services.
Err 9 to Err 13 Appliance failure. Unplug the appliance and contact
customer services.
The appliance shuts
down itself during the
preheating or cooking
cycle.
The appliance remained open
for too long during cooking.
The unit has been idle for
too long after preheating or
preheating has nished.
Unplug the appliance and wait a few
minutes. Then plug in your appliance
again and turn it on.
EN

88
OPTIGRILL ELITE TROUBLESHOOTING GUIDE
Problem Cause Solution
to stop
cooking
End of cooking conrmation
request
2 solutions:
Press OK if all of the food has been
removed
Or
Do not press OK and leave the food to
cook a little longer
to start
cooking
Food not detected because it
is too thin, for example bacon
Press OK to start cooking
for manual
mode
Food too thick, over 4 cm 2 solutions:
Press OK to continue cooking in
manual mode
Or
Remove the food and cut thinner to
reduce the thickness, to allow cooking
in automatic mode
I cannot set a time in
manual mode
The screen is stuck on
temperature setting
Press OK once to go to the time setting
and then adjust it using the arrows.
Press OK to conrm.
00:00
180°C
EN

89
Cooking levels for each automatic program
12 AUTOMATIC PROGRAMS
AUTOMATIC
PROGRAMS
COOKING LEVEL INDICATOR
MENUS
Blue
Rare
Medium
Well-done
Beef
Very rare
(Blue)
Rare Medium Well done
Chicken breast* - - - Well done
Sausage - - - Well done
Bacon** - - Medium Crispy
Beef Burger*** - - - Well done
Panini -
Lightly
cooked
Toasted Crispy
Fish - Medium
Medium to
well-done
Well done
Seafood - Medium
Medium to
well-done
Well done
Potato - - - Soft
Pepper - - Crunchy Soft
Aubergine - - - Grilled
Tomato - - Crunchy Soft
* For the UK only: do not cook chicken breast from frozen. Always thaw completely first.
** As bacon is a thin food, after closing the lid, press the "OK" button to make sure the appliance
recognise the food and the cooking cycle starts.
*** For the UK only: For food safety reasons the Food Standards Agency do not advise serving rare or
medium burgers. Only serve well done burgers.
EN

90
MANUAL MODE
FRUIT OR VEGETABLES
From 180°C
to 195°C
From 220°C
to 235°C
From 225°C
to 270°C
- - Courgette (slices)
- - Asparagus (whole)
- - Mushroom
- Onion -
Broccoli orets - -
Baby carrot - -
- Fennel -
Sweet potato
(slices)
- -
- Apple (slices) -
- Banana -
- Peach (Stoned and sliced) -
COOKING ADVICE FOR OTHER FOODS
PRODUCTS
COOKING
PROGRAM
COOKING
TIP
Pork tenderloin (boneless), pork belly Well done*
Bratwurst (pre-cooked pork) 220°C / 8 min 30 sec
Rindswurst (pre-cooked beef) 220°C / 8 min 30 sec
Nürnberger Wurst (pre-cooked pork) 220°C / 4 min 30 sec
EN

91
OPTIGRILL ELITE PREPARATION ADVICE
For more signicant searing, it is best to return the grilled food to the grill before serving it to
your guests.
PRODUCTS PREPARATION ADVICE
POTATO
• Cut lengthways
• Coat or brush the potato slices with oil for the best cooking
results.
PEPPER • Cut in half lengthway and remove seeds
AUBERGINE
• Cut lengthways
• Coat or brush the aubergine slices with oil for the best cooking
results.
TOMATO
• Use round tomatoes
• Use tomatoes that are not too ripe
• Cut in half widthways
• For optimal cooking, place the rounded side of the halved
tomato on the bottom plate of the grill.
PORK * Use the searing function if the thickness is more than 20 mm.
EN

92
ISTRUZIONI DI SICUREZZA
AVVERTENZE IMPORTANTI
Istruzioni per l'uso, la manutenzione e l'installazione del prodotto: per la
propria sicurezza, leggere attentamente tutti i paragrafi del manuale di
istruzioni, inclusi i simboli associati.
Questo prodotto è destinato al solo uso domestico e in ambienti interni. Questo
apparecchio non è destinato a essere utilizzato nei seguenti ambiti, pena
l’annullamento della garanzia:
- cucine riservate al personale di negozi, uffici o altri ambienti
professionali;
- case coloniche;
- stanze di alberghi, motel e altri edifici residenziali;
- camere in affitto e altri ambienti analoghi.
Prima del primo utilizzo, rimuovere tutti i materiali di imballaggio, gli adesivi e
gli accessori dalle superfici esterne e interne dell'apparecchio.
Questo apparecchio non deve essere usato da persone (compresi i bambini) con
ridotte capacità fisiche, sensoriali o mentali o prive di esperienza o conoscenza,
a meno che non siano sorvegliate o siano state istruite sull’uso dell’apparecchio
da una persona responsabile della loro sicurezza. Sorvegliare i bambini per
accertarsi che non giochino con l'apparecchio.
Questo apparecchio può essere usato da bambini di età superiore a 8 anni e da
persone con ridotte capacità fisiche, sensoriali o mentali o prive di esperienza
o conoscenza, solo se supervisionati o istruiti sull’uso sicuro dell’apparecchio
e se comprendono i rischi correlati. Le operazioni di pulizia e manutenzione
ordinaria possono essere effettuate da bambini solo se di età superiore a 8
anni e supervisionati.
Tenere l'apparecchio e il cavo di alimentazione fuori dalla portata dei bambini
di età inferiore a 8 anni.
Non lasciare l'apparecchio incustodito quando è in funzione.
IT

93
La temperatura delle superfici accessibili può essere alta
quando l'apparecchio è in funzione. Non toccare le superfici
calde dell'apparecchio.
Questo apparecchio non è progettato per essere attivato tramite timer esterni
o telecomandi separati.
Svolgere completamente il cavo di alimentazione prima di collegare
l'apparecchio alla presa di corrente.
Per motivi di sicurezza, se il cavo di alimentazione è danneggiato deve essere
sostituito dal costruttore e dal suo centro di assistenza.
Non usare prolunghe elettriche. Se è necessario usare una prolunga, a proprio
rischio, usare esclusivamente prolunghe in buone condizioni, dotate di spina con
messa a terra e adatte alla potenza dell'apparecchio. Adottare le necessarie
precauzioni per evitare che altre persone possano inciampare nel cavo della
prolunga.
Collegare l'apparecchio esclusivamente a una presa dotata di messa a terra.
Assicurarsi che la rete elettrica sia compatibile con la potenza e il voltaggio
indicati sulla parte inferiore dell'apparecchio.
Per pulire le piastre di cottura, usare una spugna, acqua calda e detersivo per
piatti.
Non immergere l’apparecchio, il cavo di alimentazione o la spina in acqua o
altri liquidi.
AVVERTENZA! Non riscaldare o pre-riscaldare l'apparecchio senza le 2
piastre di cottura.
Che cosa fare
• Leggere attentamente le istruzioni, comuni a diverse versioni a seconda degli accessori forniti
insieme all'apparecchio, e conservarle a portata di mano.
• In caso di ustione, risciacquare immediatamente la parte lesa con acqua fredda e contattare un medico se
necessario.
• Prima del primo utilizzo, lavare le piastre (consultare il paragrafo 5), versare un po' di olio di cottura sulle piastre e
strofinarle con un panno morbido o della carta assorbente.
• Posizionare attentamente il cavo di alimentazione, con o senza prolunga, affinché le persone possano muoversi
liberamente intorno al tavolo senza inciamparvi.
IT

94
• I vapori di cottura possono essere nocivi per gli animali dotati di un sistema respiratorio particolarmente sensibile,
ad esempio gli uccelli. Si raccomanda ai proprietari di uccelli di tenerli lontani dall'area di cottura.
• Tenere l'apparecchio fuori dalla portata dei bambini.
• Verificare che entrambi i lati delle piastre siano pulite prima dell'uso.
• Per evitare danni alle piastre, usarle esclusivamente con l'apparecchio per il quale sono state progettate (ad es.
non usarle in forni, su fornelli o su piastre elettriche, ecc.).
• Assicurarsi che le piastre siano stabili, ben posizionate e fissate correttamente all'apparecchio. Usare
esclusivamente le piastre fornite con l'apparecchio o acquistate presso un centro di assistenza autorizzato.
• Usare esclusivamente spatole in legno o plastica per evitare di danneggiare le piastre di cottura.
• Usare esclusivamente parti o accessori forniti con l'apparecchio o acquistati presso un centro di assistenza
autorizzato. Non usarli con altri apparecchi o per altri scopi.
Che cosa non fare
• Non usare l'apparecchio all'aperto.
• Non lasciare l'apparecchio incustodito quando è collegato all'alimentazione o è in funzione.
• Per evitare che l'apparecchio si surriscaldi, non posizionarlo in angoli o sotto un pensile.
• Non posizionare l'apparecchio direttamente su superfici fragili (tavoli in vetro, tovaglie, mobili
laccati, ecc.) o morbide (strofinacci, ecc.).
• Non posizionare l'apparecchio sotto pensili o ripiani o in prossimità di materiali infiammabili come
tende, persiane o tappezzerie.
• Non posizionare l'apparecchio sopra o in prossimità di superfici calde o scivolose; non posizionare
il cavo di alimentazione in prossimità o a contatto con le parti calde dell'apparecchio, fonti di
calore e bordi affilati.
• Non collocare utensili da cottura sulle superfici di cottura dell'apparecchio.
• Non tagliare mai gli alimenti direttamente sulle piastre.
• Non usare spugnette metalliche, pagliette d'acciaio o detergenti in polvere abrasivi per evitare di
danneggiare il rivestimento antiaderente.
• Non spostare l'apparecchio mentre è in funzione.
• Non trasportare l'apparecchio tramite l'impugnatura o i cavi.
• Non usare l'apparecchio a vuoto.
• Non frapporre fogli di alluminio o altri oggetti tra le piastre e gli alimenti in cottura.
• Non rimuovere la vaschetta raccogli-grassi durante la cottura. Se la vaschetta raccogli-grassi
si riempie completamente durante la cottura, lasciare che l'apparecchio si raffreddi prima di
svuotarla.
• Non posizionare le piastre calde su superfici fragili o sotto l'acqua.
• Per preservare le proprietà antiaderenti del rivestimento, evitare un eccessivo pre-riscaldamento
con l'apparecchio vuoto.
• Non maneggiare mai le piastre quando sono calde.
• Non cuocere gli alimenti avvolti in fogli di alluminio.
• Per evitare di danneggiarlo, non preparare ricette flambé con questo apparecchio.
• Non frapporre fogli di alluminio o altri oggetti tra le piastre e l'elemento riscaldante.
• Non riscaldare o cuocere alimenti quando la griglia è aperta.
• Non riscaldare l'apparecchio senza le piastre di cottura.
IT

95
Note e informazioni aggiuntive
• Grazie per aver acquistato questo apparecchio, destinato al solo uso domestico.
• Per la sicurezza degli utenti, questo apparecchio è conforme agli standard e alle norme applicabili:
direttive Basso voltaggio, Compatibilità elettromagnetica, Ambiente, Materiali in contatto con
gli alimenti.
• Durante il primo utilizzo, l'apparecchio potrebbe emettere un leggero odore e una scia di fumo.
• Il prodotto potrebbe subire modifiche senza preavviso a causa della politica aziendale di costante
ricerca e sviluppo.
• Non consumare alimenti entrati a contatto con le parti contraddistinte dal logo
.
• Se gli alimenti sono troppo spessi, il sistema di sicurezza causerà lo spegnimento dell'apparecchio.
• Il pannello di controllo è un componente fragile: pulirlo e asciugarlo esclusivamente con un panno
morbido e asciutto. Non pulirlo con una spugna umida per evitare di danneggiarlo.
Protezione ambientale
Salvaguardiamo l'ambiente!
L'apparecchio contiene materiali utili che possono essere recuperati o riciclati.
Portarlo presso un apposito centro di raccolta affinché venga riciclato.
IT

96
A1 A2 A3
A4
A5
A6
A7
D
E
B
C
F
B
Descrizione
A
Pannello di controllo
A1
Pulsante di avvio/arresto
A2
Funzione Alimenti
surgelati
A3
Funzione Grigliatura extra
A4
Pulsanti di regolazione e
navigazione
A5
Indicatore del
preriscaldamento e del
livello di cottura
A6
Display
A7
Pulsante OK
B
Corpo dell'apparecchio
C
Impugnatura
D
Piastre di cottura
E
Vaschetta raccogli-grasso
F
Cavo di alimentazione
A
IT

97
12 programmi di cottura automatica
Una modalità manuale
120
°C
180
°C
220
°C
250
°C
Manual
mode
Manual
mode
Manual
mode
Manual
mode
Due funzioni di cottura in modalità
automatica
Funzione Alimenti surgelati
Funzione Grigliatura extra
IT

98
1 Preparazione
1 Rimuovere tutti i materiali di
imballaggio, gli adesivi o gli
accessori all'interno e all'esterno
dell'apparecchio.
2 Prima di usare l'apparecchio per la
prima volta, lavare accuratamente le
piastra con acqua calda e detersivo
per piatti, risciacquarle e asciugarle.
3-4 Installare la vaschetta raccogli-grasso
removibile sulla parte anteriore
dell'apparecchio.
1 2
OK
3 4
5 Per ottenere migliori risultati e
migliorare l'ecacia della supercie
antiaderente, è possibile stronare
le piastre di cottura con della carta
assorbente impregnata con un po' di
olio di cottura.
6 Eliminare l'olio in eccesso con della
carta assorbente asciutta.
7 Assicurarsi che le piastre di cottura
superiore e inferiore siano posizionate
correttamente nell'apparecchio. Non
avviare il preriscaldamento senza
piastre. Collegare l'apparecchio
a una presa di corrente (il cavo
di alimentazione deve essere
completamente svolto).
8 Premere il pulsante di avvio/arresto.
Attenzione! Assicurarsi che tra le piastre
non siano presenti alimenti.
5 6
7 8
IT

99
2
Primo utilizzo
9 Selezionare la lingua utilizzando le frecce e premere OK.
Language
choice
English
EN
Sprachauswahl
Deutsch
DE
Choix de la
langue
Français
FR
9
3
Avvio/arresto
10 Accensione.
11 Per spegnere l'apparecchio, premere
una volta il pulsante di avvio/arresto,
quindi premere il pulsante OK.
10 11
IT

100
4
Funzione Alimenti surgelati - in modalità automatica
13-15 La funzione Alimenti surgelati
deve essere attivata prima di
avviare il preriscaldamento,
durante la selezione della modalità
automatica, se gli alimenti da
cuocere sono congelati/surgelati.
Se la funzione non è stata attivata,
spegnere l'apparecchio e ricominciare
da capo.
Questa funzione è disponibile
esclusivamente in modalità
automatica, e non in modalità
manuale.
Benvenuto
12 13
Frozen food
ON
Alimento surgelato
disattivato
14 15
IT

101
5
Funzione Grigliatura extra - in modalità automatica
17-19 La funzione Grigliatura extra deve
essere attivata prima di avviare
il preriscaldamento, durante
la selezione della modalità
automatica, per ottenere dei segni
di grigliatura più intensi.
Se la funzione non è stata attivata,
spegnere l'apparecchio e ricominciare
da capo.
Questa funzione è disponibile
esclusivamente in modalità
automatica, e non in modalità
manuale.
Benvenuto
16 17
Searing
boost ON
Rosolatura extra attiva
18 19
IT

102
6
Cottura in modalità automatica
21 Selezionare la modalità di cottura
appropriata a seconda del tipo di
alimento.
Suggerimento, in particolare
per la carne: i risultati di cottura
dei programmi predeniti possono
variare a seconda dell'origine, del
taglio e della qualità dell'alimento
da cuocere; i programmi sono stati
calibrati e testati con alimenti di
qualità.
Inoltre, è necessario valutare lo
spessore della carne: non è possibile
cuocere alimenti con spessore a 4 cm.
Benvenuto
20 21
In caso di dubbi sulla modalità di cottura da utilizzare, consultare la guida di cottura a pagina 112.
Preheating in
progress
22 Premere il pulsante " OK " :
l'apparecchio avvierà il
preriscaldamento.
Nota: se è stato selezionato un
programma per errore, spegnere
l'apparecchio e tornare al passaggio 8.
23 Attendere da 4 a 7 minuti.
24 Al termine del preriscaldamento verrà
emesso un segnale acustico.
Nota: se l'apparecchio rimane inattivo
per un certo periodo dopo il termine
del preriscaldamento, il sistema di
sicurezza spegnerà l'apparecchio.
Pre riscaldamento
in corso
22 23
24
IT

103
insert
the food
25-26
Al termine del preriscaldamento è
possibile inserire gli alimenti. Sollevare
il coperchio dell'apparecchio e
disporre gli alimenti al suo interno.
Nota: se l'apparecchio rimane
aperto troppo a lungo, il sistema di
sicurezza spegnerà automaticamente
l'apparecchio.
27-29
L'apparecchio calcola
automaticamente i parametri di
cottura (tempo e temperatura) in
base alla quantità e allo spessore degli
alimenti.
Chiudere l'apparecchio per avviare il
ciclo di cottura.
Nota per gli alimenti molto sottili
come la pancetta: il pulsante "OK" si
accenderà. Premere il pulsante "OK"
per fare in modo che l'apparecchio
riconosca l'alimento e avvii la cottura.
La freccia si sposterà lungo
l'indicatore del livello di cottura; al
raggiungimento di un nuovo livello di
cottura, tale livello apparirà sul display
e verrà emesso un segnale acustico.
Nota: i livelli di cottura sono
preimpostati per ciascun programma
di cottura automatica.
Durante la cottura, ogni livello di
cottura è indicato da un segnale
acustico (ad es. al sangue/giallo).
A seconda del grado di cottura,
l'indicatore cambierà colore e la
freccia di progressione si sposterà sul
display.
Nota, in particolare per la carne: è
normale che i risultati di cottura
varino in base al tipo, alla qualità e
all'origine dell'alimento.
Inserire l'alimento
25 26
to start
cooking
inizio cottura
27 28
Start of
cooking
Inizio della cottura
29 30
IT

104
Well-done
in 01:35
31-32 è possibile visualizzare il tempo
mancante al raggiungimento dei
diversi livelli di cottura in qualsiasi
momento. Premere la freccia di destra
per visualizzare il tempo mancante al
raggiungimento del livello di cottura
successivo. Attenzione! Non si tratta
di una selezione del livello di cottura.
L'apparecchio proseguirà la cottura no
all'ultimo livello di cottura ed emetterà
un segnale acustico al raggiungimento di
ogni livello.
Ben cotta tra 01:35
31 32
33-34 Quando il livello di cottura
desiderato appare sul display e viene
emesso il segnale acustico, aprire
l'apparecchio e rimuovere gli alimenti.
35-36 Abbassare il coperchio.
L'apparecchio chiederà conferma per
arrestare la cottura. Premere il pulsante
OK se tutti gli alimenti sono stati rimossi,
altrimenti lasciare che la cottura prosegua.
Se si desidera avviare una nuova cottura,
tornare al passaggio 8.
Nota: il sistema di sicurezza spegnerà
automaticamente l'apparecchio se non
viene selezionato alcun programma entro
un certo intervallo.
33 34
to stop
cooking
Arresto cottura
35 36
OK
IT

105
7
Avvio di una seconda cottura
Seconda cottura dello stesso tipo di alimento
Any refill?
37-38 Al termine della prima cottura, sul
display apparirà "Nuova cottura?". Se
si desidera cuocere lo stesso tipo di
alimento, premere il pulsante OK.
39 L'apparecchio avvia il
preriscaldamento.
40 Attendere il termine del
preriscaldamento.
Un'altra cottura?
37 38
Preheating in
progress
Pre riscaldamento in corso
39 40
Wait
insert
the food
41 Inserire gli alimenti nell'apparecchio.
42 Seguire i passaggi da 27 a 37.
Attendere Inserire l'alimento
41 42
Seconda cottura di un alimento diverso
Al termine della cottura del primo alimento, procedere come descritto di seguito.
1. Assicurarsi che l'apparecchio sia chiuso e che al suo interno non siano presenti alimenti.
2. Selezionare la modalità o il programma di cottura appropriato.
3. Premere il pulsante "OK" per avviare il preriscaldamento. Durante il preriscaldamento, l'indicatore del
preriscaldamento apparirà sul display.
IT

106
8
Cottura in modalità manuale
OK
Manual
mode
120
°C
43 Selezionare la modalità manuale
e premere il pulsante OK per
confermare.
44 Selezionare la temperatura desiderata
con i pulsanti di regolazione.
Premere il pulsante OK per
confermare la temperatura
selezionata.
43 44
Preheating
180°C
180°C
OK
45 Attendere il termine del
preriscaldamento.
46 Al termine del preriscaldamento,
premere il pulsante OK Per avviare il
timer.
Nota: il tempo di cottura può
essere impostato anche all'inizio del
preriscaldamento.
45 46
00:00
180°C
00:00
180°C
47 Premere i pulsanti di regolazione
per selezionare il tempo di cottura
desiderato.
48 Inserire gli alimenti e premere il
pulsante OK per avviare la cottura.
47 48
4. Al termine del preriscaldamento verrà emesso un segnale acustico, e il display segnalerà la ne del
preriscaldamento.
5. Al termine del preriscaldamento, l'apparecchio è pronto per la cottura. Sollevare il coperchio
dell'apparecchio e disporre gli alimenti al suo interno. Seguire i passaggi da 27 a 37.
Importante!
– Il preriscaldamento è obbligatorio per ogni cottura.
Nota: prima di avviare il preriscaldamento, assicurarsi che l'apparecchio sia chiuso e che al suo interno
non siano presenti alimenti.
– Attendere il termine del preriscaldamento prima di aprire l'apparecchio e di inserire gli alimenti.
Nota: se la nuova fase di preriscaldamento viene avviata immediatamente dopo il termine della
cottura, la sua durata sarà inferiore.
IT

107
00:00
180°C
to stop
cooking
49-50 Allo scadere del tempo di cottura
verrà emesso un segnale acustico.
Rimuovere gli alimenti.
Premere il pulsante OK per arrestare la
cottura e rimuovere gli alimenti.
Arresto cottura
49 50
9
Note
51-53
A seconda delle preferenze personali,
aprire l'apparecchio e rimuovere gli
alimenti che hanno raggiunto il livello
di cottura desiderato, quindi richiudere
l'apparecchio per proseguire la cottura
degli altri alimenti. L'apparecchio
proseguirà il ciclo di cottura no
all'ultimo livello di cottura della modalità
selezionata.
54 Nota: il sistema di sicurezza spegnerà
automaticamente dopo un certo
intervallo.
51 52
Remove
your food
Rimuovere l'alimento Rischio di cottura
eccessiva
53 54
Overcooked
risk
IT

108
10
Dopo l'uso
55 Per spegnere l'apparecchi, premere
il pulsante di avvio/arresto e
confermare premendo il pulsante OK.
56 Scollegare l'apparecchio dalla presa di
corrente.
57 Lasciare che l'apparecchio si rareddi
per almeno 2 ore.
Per evitare il rischio di ustioni,
lasciare che l'apparecchio si rareddi
completamente prima di pulirlo.
55 56
2 H
57
IT

109
11
Pulizia
58 Prima di pulire l'apparecchio,
sbloccare e rimuovere le piastre per
evitare di danneggiare la supercie di
cottura.
59 La vaschetta raccogli-grasso e le
piastre di cottura possono essere
lavate in lavastoviglie. L'apparecchio
e il cavo di alimentazione non
devono essere lavati in lavastoviglie.
Gli elementi riscaldanti (le resistenze)
non devono essere pulite dopo la
rimozione delle piastre. Se sono molto
sporche, attendere che l'apparecchio
sia completamente freddo e pulirle
con un panno asciutto.
60-61
In alternativa al lavaggio in
lavastoviglie, è possibile lavare le
piastre con acqua calda e detersivo
per piatti, quindi risciacquarle
abbondantemente per eliminare ogni
residuo. Asciugarle accuratamente
con della carta assorbente.
Non usare spugne abrasive o
metalliche o prodotti di pulizia
abrasivi per pulire l'apparecchio; usare
esclusivamente spugne in nylon o
non metalliche.
Svuotare la vaschetta raccogli-grasso
e lavarla con acqua calda e un po'
di detergente, quindi asciugarla
accuratamente con della carta
assorbente.
62 Pulire il coperchio dell'apparecchio
con una spugna imbevuta d'acqua e
asciugarlo con un panno morbido e
asciutto. Per pulire il contorno dello
sportello, usare esclusivamente un
panno morbido e asciutto.
63 Non immergere il corpo
dell'apparecchio in acqua o altri
liquidi.
64 Assicurarsi che l'apparecchio sia
pulito, freddo e asciutto prima di
riporlo.
Qualsiasi altro intervento deve essere
eettuato da un centro di assistenza
autorizzato.
58 59
60 61
62 63
64
IT

110
Risoluzione dei problemi
Risoluzione dei problemi ELITE
Problema Causa Soluzione
Modica della lingua. Collegare l'apparecchio alla presa
di corrente, accenderlo e premere
immediatamente il pulsante Alimenti
surgelati (mentre sul display appare
"Bonjour").
5sec
Preheating
not finished,
remove your
food
10s before-
changeover
to manual
mode
Il preriscaldamento non è
terminato. L'apparecchio è
stato aperto e gli alimenti
sono stati inseriti sulla
piastra prima del termine del
preriscaldamento.
È possibile cuocere gli alimenti, ma
è necessario sorvegliare la cottura
perché l'apparecchio è passato in
modalità manuale.
La temperatura può essere regolata.
Oppure
Aprire l'apparecchio, rimuovere gli
alimenti, chiudere l'apparecchio
e attendere il termine del
preriscaldamento.
L'apparecchio non si
spegne.
Il pulsante non è stato
premuto per la seconda volta,
o è intercorso troppo tempo
tra le 2 pressioni.
Premere 2 volte il pulsante di avvio/
arresto
oppure
Premere una volta il pulsante di avvio/
arresto e confermare premendo il
pulsane OK
Da Err 1 a Err 8 L'apparecchio è stato riposto
o utilizzato in un ambiente
troppo freddo.
L'apparecchio si è
surriscaldato.
Scollegare l'apparecchio dalla presa di
corrente e attendere qualche minuto.
Collegare nuovamente l'apparecchio e
premere il pulsante di avvio/arresto.
Se il problema persiste, contattare il
servizio clienti.
Da Err 9 a Err 13 Malfunzionamento
dell'apparecchio.
Scollegare l'apparecchio dalla presa di
corrente e contattare il servizio clienti.
L'apparecchio si
arresta durante il ciclo
di preriscaldamento o
la cottura.
L'apparecchio è rimasto
aperto troppo a lungo durante
la cottura. L'apparecchio
è rimasto inattivo troppo
a lungo al termine del
preriscaldamento o del
mantenimento al caldo.
Scollegare l'apparecchio dalla presa di
corrente e attendere qualche minuto.
Ricollegare l'apparecchio e accenderlo.
IT

111
Risoluzione dei problemi ELITE
Problema Causa Soluzione
to stop
cooking
Richiesta di conferma di ne
cottura.
2 soluzioni:
Premere il pulsante OK se tutti gli
alimenti sono stati rimossi.
Oppure
Non premere il pulsante OK e lasciare
che gli alimenti rimanenti continuino
a cuocere.
to start
cooking
Alimento non rilevato perché
è troppo sottile.
Premere il pulsante OK per avviare la
cottura.
for manual
mode
Alimento troppo spesso. 2 soluzioni:
Premere il pulsante OK per proseguire
la cottura in modalità manuale.
Oppure
Rimuovere gli alimenti e ridurne lo
spessore per permettere la cottura in
modalità automatica.
Non è possibile
impostare il tempo di
cottura in modalità
manuale.
Il display è in modalità
di impostazione della
temperatura.
Premere una volta il pulsante OK per
passare all'impostazione del tempo
di cottura e impostarlo con le frecce.
Confermare con il pulsante OK.
00:00
180°C
IT

112
Livelli di cottura per ciascun programma automatico
12 PROGRAMMI AUTOMATICI
PROGRAMMI
AUTOMATICI
INDICATORE DEL LIVELLO DI COTTURA
MENU
Blue
Rare
Medium
Well-done
Manzo Scottato Al sangue A puntino Ben cotto
Pollo - - - Ben cotto
Salsiccia - - - Ben cotto
Pancetta - - A puntino Croccante
Carne trita
(hamburger)
- Al sangue A puntino Ben cotto
Sandwich -
Leggermente
cotto
Tostato Croccante
Pesce - A puntino
Più che a
puntino
Ben cotto
Frutti di mare - A puntino
Più che a
puntino
Ben cotto
Patate - - - Fondenti
Peperone - - Croccante Fondenti
Melanzana - - - Grigliata
Pomodoro - - Croccante Fondenti
IT

113
MODALITÀ MANUALE SPECIALE
VERDURA O FRUTTA
From 180°C
to 195°C
From 220°C
to 235°C
From 225°C
to 270°C
- - Zucchina (fette)
- - Asparagi
- - Funghi
- Cipolla -
Broccoli - -
Carote baby - -
- Finocchio -
Patata dolce
(fette)
- -
- Mela (fette) -
- Ananas -
- Pesca -
SUGGERIMENTI DI COTTURA
ALIMENTI
PROGRAMMA
DI COTTURA
SUGGERIMENTO DI
COTTURA
Filetto mignon di maiale (senza osso),
pancetta
Ben cotto *
Bratwurst (maiale precotto) 220°C / 8 min 30 sec
Rindswurst (manzo precotto) 220°C / 8 min 30 sec
Nürnberger Wurst (maiale precotto) 220°C / 4 min 30 sec
IT

114
SUGGERIMENTI DI PREPARAZIONE
Per una grigliatura più intensa, si raccomanda di voltare l'alimento grigliato prima di servirlo.
ALIMENTI SUGGERIMENTI DI PREPARAZIONE
PATATE
• Tagliarle per il lungo
• Aggiungere dell'olio per una cottura migliore
PEPERONI • Tagliarli in due per il lungo
MELANZANE
• Tagliarle per il lungo
• Aggiungere dell'olio per una cottura migliore
POMODORI
• Utilizzare pomodori di forma rotonda
• Utilizzare pomodori non troppo maturi
• Tagliarli in due nel senso della larghezza
• Per una cottura ottimale, posizionare il lato arrotondato del
pomodoro tagliato in 2 sulla piastra inferiore della griglia.
MAIALE
* Utilizzare la funzione Grigliatura extra se lo spessore supera i 20
mm.
IT

115
INSTRUCCIONES DE SEGURIDAD
PRECAUCIONES IMPORTANTES
Utilización, mantenimiento e instalación del producto: por su seguridad,
por favor, consulte los diferentes apartados de estas instrucciones o los
pictogramas correspondientes.
Este aparato está diseñado para un uso exclusivamente doméstico. No ha
sido concebido para utilizarse en los siguientes casos, que no están cubiertos
por la garantía:
- en zonas de cocina reservadas para el personal de almacenes, oficinas y
otros entornos profesionales,
- en granjas,
- por clientes de hoteles, moteles y otros espacios residenciales,
- en lugares como habitaciones de huéspedes.
Retire todos los envases, etiquetas y accesorios que hay tanto dentro como
fuera del aparato.
Este aparato no está diseñado para que lo utilicen personas (incluidos niños)
cuyas capacidades físicas, sensoriales o mentales sean reducidas, o por
personas sin experiencia ni conocimientos, a no ser que la persona responsable
de su seguridad las supervise o les haya proporcionado instrucciones previas
sobre el funcionamiento del aparato.
Se recomienda vigilar a los niños para asegurarse de que no juegan con el
aparato y que no lo utilizan como juguete.
Nunca deje el aparato en funcionamiento sin vigilancia.
La temperatura de las superficies accesibles puede ser elevada cuando el
aparato está en funcionamiento.
No toque las superficies calientes del aparato.
Este aparato no debe ponerse en marcha mediante un temporizador exterior
ni por un sistema de mando a distancia externo.
Desenrolle el cable por completo.
ES

116
Si el cable de alimentación está dañado debe ser reemplazado por el fabricante,
su servicio de posventa o por personal cualificado para evitar cualquier peligro.
Si se utiliza un alargador eléctrico, debe tener una sección equivalente y llevar
toma de tierra incorporada. Adoptar todas las precauciones necesarias para
que nadie tropiece con el alargador.
Conecte el aparato únicamente a un enchufe con toma de tierra incorporada.
Compruebe que la instalación eléctrica es compatible con la potencia y la
tensión indicadas debajo del aparato.
No sumerja este aparato. Nunca sumerja el aparato ni el cable en agua.
Este aparato puede ser utilizado por niños de 8 años o más y personas
con capacidades físicas, sensoriales o mentales reducidas o personas sin
experiencia ni conocimientos, siempre que hayan recibido instrucciones o
supervisión sobre el uso seguro del aparato y conozcan los riesgos a los que se
exponen. La limpieza y el mantenimiento que ha de realizar el usuario no deben
ser efectuados por niños, salvo que tengan más de 8 años y estén vigilados.
Mantenga el aparato y el cable de alimentación fuera del alcance de los niños
menores de 8 años.
ATENCIÓN : no calentar ni precalentar el grill sin las 2 placas interiores.
Qué debe hacer
• Lea atentamente y tenga a mano estas instrucciones, comunes a las diferentes versiones de los
accesorios suministrados con el aparato.
• Si ocurre un accidente, aplique de inmediato agua fría sobre la quemadura y llame a un médico
si fuera necesario.
• Antes del primer uso, lave las placas (véase el apartado 5), vierta unas gotas de aceite en las placas
y séquelas con un paño suave.
• Tenga cuidado al colocar el cable con o sin alargador; tome todas las precauciones necesarias
para no dificultar el paso de las personas alrededor de la mesa, de modo que nadie tropiece con él.
• Los humos de cocción pueden ser peligrosos para los animales que tengan un sistema de
respiración especialmente sensible, como los pájaros. Aconsejamos a los propietarios de pájaros
que los mantengan alejados del lugar de cocción.
• Mantenga siempre el aparato fuera del alcance de los niños.
• Compruebe que los 2 lados de la placa estén limpios antes de utilizar el aparato.
• Para evitar que se deterioren las placas, utilícelas únicamente con el aparatado para el que han
sido diseñadas (ejemplo: no las introduzca en el horno, ni las coloque sobre fogones de gas o una
placa eléctrica).
ES

117
• Cuide de que las placas estén en una posición estable, bien colocadas y encajadas en la base del
aparato. Utilice solamente las placas suministradas o adquiridas en el centro de servicio oficial.
• Para preservar el revestimiento de las placas de cocción, utilice siempre una espátula de plástico
o madera.
• Utilice únicamente los accesorios suministrados con el aparato o comprados en un centro de
servicio autorizado. No los utilice con otros aparatos.
Qué no debe hacer
• No utilice el aparato en el exterior.
• Nunca deje conectado el aparato cuando no vaya a utilizarlo.
• Para evitar el sobrecalentamiento del aparato, no lo coloque en una esquina ni contra una pared.
• Nunca coloque el aparato directamente sobre una superficie frágil (mesa de vidrio, mantel, mueble
barnizado, etc.) ni sobre un hule.
• Nunca coloque el aparato sobre un mueble fijado a la pared, sobre una estantería ni cerca de
materiales inflamables como toldos, cortinas o estores.
• No coloque el aparato sobre o cerca de superficies resbaladizas o calientes, ni deje el cable colgando
por encima de una fuente de calor (placas de cocción, cocinas de gas).
• No coloque utensilios de cocina en las superficies de cocción del aparato.
• No corte directamente sobre las placas.
• Nunca utilice esponjas metálicas ni detergente en polvo, para no dañar la superficie de cocción
(revestimiento antiadherente).
• No desplace el aparato mientras esté en funcionamiento.
• No transporte el aparato cogiéndolo por el asa o los bordes metálicos.
• Nunca utilice el aparato vacío.
• No coloque nunca hojas de aluminio ni ningún otro objeto entre las placas y los alimentos que vaya a cocinar.
• No retire la bandeja de recogida de grasas durante la cocción. En caso de que la bandeja de
recogida de grasas esté llena durante la cocción, deje enfriar el aparato antes de vaciarla.
• No coloque la placa caliente bajo el agua o sobre una superficie frágil.
• Para conservar las cualidades antiadherentes del revestimiento, evite calentar demasiado tiempo el aparato vacío.
• Las placas no se deben manipular nunca en caliente.
• No cocinar alimentos envueltos en papel de aluminio.
• Para evitar dañar el aparato, nunca realice recetas flambeadas sobre el mismo.
• No coloque nunca hojas de aluminio ni ningún otro objeto entre las placas y las resistencias.
• Nunca caliente ni realice ninguna cocción en posición «grill abierto».
• Nunca caliente el aparato sin las placas de cocción.
Consejos/Información
• Le agradecemos que haya comprado este aparato, exclusivamente destinado a uso doméstico.
• Por su seguridad, este aparato cumple las normas y reglamentaciones aplicables (Directivas de
Baja Tensión, Compatibilidad Electromagnética, Materiales en Contacto con Alimentos, Medio
Ambiente, etc.).
• En la primera utilización puede desprenderse un ligero olor o humo.
• Para limpiar las placas de cocción, utilice una esponja, agua caliente y jabón de lavavajillas líquido.
• Nuestra empresa se reserva el derecho de modificar en cualquier momento, en interés del
consumidor, las características o componentes de sus productos.
ES

118
• No se puede consumir ningún alimento sólido o líquido que entre en contacto con piezas marcadas
con el logo
.
• Si los alimentos son demasiado espesos, el sistema de seguridad impide la puesta en marcha del aparato.
• La resistencia no se debe limpiar. Si está sucia de verdad, espere a que se enfríe totalmente y
frótela con un paño seco.
• El panel de control es un elemento frágil, por lo que deberá limpiarlo, frotarlo y secarlo únicamente
con un paño seco y suave. No lo limpie con una esponja mojada, ya que podría dañar sus funciones.
Medio Ambiente
¡Colaboremos con la protección del medio ambiente!
Su aparato contiene numerosos materiales recuperables o reciclables.
Lleve el aparato a un punto de recogida de residuos o, en su defecto, a un centro de
servicio autorizado para que pueda ser procesado.
ES

119
A1 A2 A3
A4
A5
A6
A7
D
E
B
C
F
B
Descripción
A
Panel de control
A1
Botón de encendido/
apagado
A2
Función Descongelar
A3
Función Churrascar
A4
Botones de ajuste y de
navegación
A5
Indicador de
precalentamiento y de
nivel de cocción
A6
Pantalla de visualización
A7
Botón «OK» (Aceptar)
B
Cuerpo del aparato
C
Asa
D
Placas de cocción
E
Bandeja recogejugos
F
Cable de alimentación
A
ES

120
12 programas automáticos de cocción
Un modo manual
120
°C
180
°C
220
°C
250
°C
Manual
mode
Manual
mode
Manual
mode
Manual
mode
Dos opciones de cocción posibles en modo
automático
Función Descongelar
Función Churrascar
ES

121
1 Preparación
1 Retire todo el material de embalaje,
así como los adhesivos y elementos
de protección presentes tanto en
el interior como en el exterior del
aparato.
2 Antes de utilizar el aparato por
primera vez, limpie cuidadosamente
las placas con agua caliente y líquido
lavavajillas, enjuáguelas y séquelas
con cuidado.
3-4 Coloque la bandeja recogejugos
extraíble en la parte delantera del
aparato.
1 2
Bien
3 4
5 Si lo desea, para obtener los mejores
resultados y mejorar la ecacia de la
supercie antiadherente, puede frotar
las placas de cocción con un papel de
cocina impregnado con un poco de
aceite de cocina.
6 Elimine todo el exceso de aceite con
un papel de cocina limpio.
7 Asegúrese de que las placas
superiores e inferiores están
correctamente colocadas
en el producto. No inicie el
precalentamiento sin las placas.
Conecte el aparato a la corriente.
(Tenga en cuenta que el cable deberá
estar totalmente desenrollado).
8 Pulse el botón de encendido/
apagado.
Atención: Asegúrese de que no haya
alimentos entre las placas.
5 6
7 8
ES

122
2
Primer uso
9 Seleccione su idioma utilizando las echas y, a continuación, pulse el botón «OK».
Language
choice
English
EN
Sprachauswahl
Deutsch
DE
Choix de la
langue
Français
FR
9
3
Encendido/apagado
10 Encienda el aparato.
11 Para apagar el grill, pulse una vez el
botón de encendido/apagado y una
vez el botón «OK» para conrmar el
apagado del aparato.
10 11
ES

123
4
Función Descongelar (en modo automático)
13-15 Debe activar la función
Descongelar antes de iniciar el
precalentamiento, durante la
selección del modo automático,
si los alimentos que va a cocinar
están congelados.
Si ha olvidado activar esta función,
apague el aparato y vuelva a realizar
los pasos desde el principio.
Esta función solo está disponible
en modo automático (en el modo
manual no está disponible).
Hola
12 13
Frozen food
ON
Alimento congelado
desactivado
14 15
ES

124
5
Función Churrascar (en modo automático)
17-19 Debe activar la función
Churrascar antes de iniciar el
precalentamiento, durante la
selección del modo automático, si
desea que los alimentos que va a
cocinar se doren aún más.
Si ha olvidado activar esta función,
apague el aparato y vuelva a realizar
los pasos desde el principio.
Esta función solo está disponible
en modo automático (en el modo
manual no está disponible).
Hola
16 17
Searing
boost ON
Dorado turbo activado
18 19
ES

125
6
Cocción en modo automático
21 Seleccione el modo de cocción
adecuado en función del tipo de
alimento que vaya a cocinar.
Consejo (especialmente para la
carne): los resultados de cocción de
los programas preajustados pueden
variar según el origen, el corte y la
calidad del alimento que se cocine;
los programas han sido ajustados y
probados con alimentos de buena
calidad.
Asimismo, debe tenerse en cuenta el
grosor de la carne durante la cocción;
no deberá cocinar alimentos de más
de 4 cm de grosor.
Hola
20 21
Si tiene dudas acerca del modo de cocción que debe utilizar, consulte las guías de cocción en la
página 135.
Preheating in
progress
22 Pulse el botón "OK" y el aparato
comenzará el precalentamiento.
Nota: si selecciona un programa por
error, apague el grill y vuelva al paso 8.
23 Espere de 4 a 7 minutos.
24 Sonará una señal audible para indicar
que ha nalizado el precalentamiento.
Observación: si el aparato
permanece cerrado durante
demasiado tiempo después de que
haya nalizado el precalentamiento,
el sistema de seguridad apagará el
aparato.
Precalentando
22 23
24
ES

126
insert
the food
25-26
Una vez haya nalizado el
precalentamiento, puede introducir
los ingredientes. Levante la tapa del
gill e introduzca los alimentos en él.
Observación: si el aparato
permanece abierto durante
demasiado tiempo, el sistema de
seguridad apagará automáticamente
el aparato.
27-29
El aparato calcula automáticamente
el ciclo de cocción (tiempo y
temperatura) según la cantidad y el
grosor de los alimentos.
Cierre el aparato para que comience
el ciclo de cocción.
Nota para los alimentos muy
nos, por ejemplo, el beicon:
se encenderá el botón «OK». A
continuación, pulse el botón «OK»
para asegurarse de que el aparato
reconoce correctamente el alimento y
se inicia el ciclo de cocción.
La echa se desplaza a lo largo del
indicador del nivel de cocción y
cuando alcanza un nivel de cocción,
el nivel se muestra y suena una señal
audible.
Nota: los niveles de cocción están
preprogramados para cada modo
automático.
Durante la cocción, una señal audible
avisará al usuario cada vez que se
alcance un nivel de cocción (p. ej.:
poco hecho/amarillo).
Según el grado de cocción, el
indicador cambiará de color y la
echa de progreso de la cocción se
desplazará en la pantalla.
Tenga en cuenta, especialmente
con la carne, que es normal que los
resultados de cocción varíen según
el tipo, la calidad y el origen de los
alimentos.
Introduzca el alimento
25 26
to start
cooking
Para iniciar la cocción
27 28
Start of
cooking
Inicio de la cocción
29 30
ES

127
Well-done
in 01:35
31-32 Puede conocer en cualquier
momento el tiempo que falta para
alcanzar los diferentes niveles de cocción.
Pulse la echa derecha si desea ver en
cuánto tiempo se alcanzará el siguiente
nivel de cocción. Atención, de esta forma
no se seleccionan los niveles de cocción.
El grill continuará cocinando hasta el
último nivel de cocción y avisará cuando
se alcance cada nivel.
Muy hecho en 01:35
31 32
33-34 Cuando se muestre el nivel de
cocción que ha seleccionado y suene la
señal audible, abra el aparato y retire los
alimentos.
35-36 Baje la tapa. La pantalla le pedirá
su conrmación para detener la cocción.
Conrme pulsando el botón «OK» si ha
retirado todos los alimentos; si no, deje
que continúe la cocción.
Si desea realizar una nueva cocción,
consulte el párrafo 8.
Observación: el sistema de seguridad
apagará automáticamente el aparato
si no se selecciona ningún programa al
cabo de cierto tiempo.
33 34
to stop
cooking
Para detener la cocción
35 36
OK
ES

128
7
Cómo realizar una segunda cocción
Segunda cocción del mismo tipo de alimento
Any refill?
37-38 Cuando haya terminado la primera
cocción, aparecerá en la pantalla el
mensaje «nouvelle cuisson» («nueva
cocción»). Si desea asar el mismo tipo
de alimento, pulse el botón «OK».
39 El aparato comenzará el
precalentamiento.
40 Espere a que nalice el
precalentamiento.
¿Añadir?
37 38
Preheating in
progress
Precalentando
39 40
Wait
insert
the food
41 Introduzca los alimentos en el grill.
42 A continuación, siga los pasos 27 a 37.
Esperar Introduzca el alimento
41 42
Segunda cocción de un ingrediente distinto
Cuando haya terminado la cocción de sus primeros ingredientes:
1. Asegúrese de que el aparato esté cerrado y de que no haya alimentos en su interior.
2. Seleccione el modo o programa de cocción adecuado.
3. Pulse el botón «OK» para comenzar el precalentamiento. Durante el precalentamiento, el indicador
de precalentamiento aparecerá en la pantalla.
4. Cuando haya terminado el precalentamiento, sonará una señal audible y aparecerá en la pantalla la
información del n del precalentamiento.
ES

129
8
Cocción en modo manual
OK
Manual
mode
120
°C
43 Seleccione el modo manual y pulse el
botón «OK» para conrmar.
44 Seleccione la temperatura que desee
pulsando los botones de ajuste.
Pulse el botón «OK» para conrmar la
temperatura seleccionada.
43 44
Preheating
180°C
180°C
OK
45 Espere a que nalice el
precalentamiento.
46 Una vez haya terminado el
precalentamiento, pulse el botón
«OK» para iniciar el temporizador.
Nota: el tiempo de cocción también
se puede ajustar desde el inicio del
precalentamiento.
45 46
00:00
180°C
00:00
180°C
47 Pulse los botones de ajuste para
seleccionar el tiempo de cocción que
desee.
48 Introduzca los alimentos y pulse el
botón «OK» para iniciar la cocción.
47 48
5. El aparato estará listo para ser utilizado una vez haya terminado el precalentamiento. Levante la
tapa del grill e introduzca los alimentos en el interior del aparato. A continuación, siga los pasos
27 a 37.
Importante:
– Tenga en cuenta que el precalentamiento es obligatorio para cada cocción.
Recuerde: antes de iniciar el precalentamiento, asegúrese de que el aparato esté cerrado y de que no
haya.
– A continuación, espere a que haya terminado el precalentamiento antes de abrir el grill e introducir
los alimentos en su interior.
Nota: si el nuevo ciclo de precalentamiento se inicia inmediatamente después del n del ciclo anterior,
el tiempo de precalentamiento será más corto.
ES

130
00:00
180°C
to stop
cooking
49-50 Una señal audible le avisará
cuando haya nalizado el tiempo
de cocción. Retire los alimentos.
Pulse el botón «OK» para detener la
cocción y retire los alimentos.
Para detener la cocción
49 50
9
Observaciones
51-53
Según las preferencias personales, abra el
grill y retire los alimentos cuando se haya
alcanzado el nivel de cocción deseado; a
continuación, vuelva a cerrar el grill para
seguir cocinando los otros alimentos. El
programa continuará el ciclo de cocción
hasta el último nivel de cocción del modo
seleccionado.
54 Observación: el sistema de
seguridad apagará automáticamente
el aparato al cabo de cierto tiempo.
51 52
Remove
your food
Overcooked
risk
Saque el alimento Riesgo de cocción
excesiva
53 54
ES

131
10
Fin del uso
55 Pulse el botón de encendido/
apagado y conrme después
pulsando el botón «OK».
56 Desenchufe el aparato.
57 Deje que se enfríe durante al menos
2 horas.
Para evitar quemarse
accidentalmente, deje que el grill se
enfríe totalmente antes de limpiarlo.
55 56
2 H
57
ES

132
11
Limpieza
58 Antes de limpiarlo, desbloquee y
retire las placas para evitar dañar la
supercie de cocción.
59 La bandeja recogejugos y las placas
de cocción son aptas para lavavajillas.
No deberá introducir nunca el
aparato ni su cable en el lavavajillas.
Los elementos calefactores (las
resistencias) nunca deberán limpiarse
después de que se hayan quitado las
placas. Si están muy sucios, espere
a que el aparato se haya enfriado
totalmente y límpielas con un paño
seco.
60-61
Si no desea introducir las placas en
el lavavajillas, utilice agua caliente y
un poco de líquido lavavajillas para
lavarlas; a continuación, enjuáguelas
con abundante agua para eliminar
todos los residuos. Séquelas con
cuidado con un papel de cocina.
No utilice un estropajo metálico, lana
de acero ni productos de limpieza
abrasivos para limpiar ninguna parte
del grill, utilice únicamente estropajos
de nailon o no metálicos.
Vacíe la bandeja recogejugos y
lávela con agua caliente ligeramente
jabonosa; a continuación, séquela
cuidadosamente con un papel de
cocina.
62 Para limpiar la tapa del grill, pase una
esponja ligeramente humedecida con
agua caliente y séquela con un paño
suave y seco. Para limpiar el panel de
control, utilice únicamente un paño
suave y seco.
63 Nunca sumerja el cuerpo del grill en el
agua ni en ningún otro líquido.
64 Asegúrese siempre de que el grill está
limpio, frío y seco antes de guardarlo.
Cualquier reparación deberá realizarla
un representante de un servicio
técnico autorizado.
58 59
60 61
62 63
64
ES

133
Guía de resolución de problemas
GUÍA DE RESOLUCIÓN DE PROBLEMAS DE ELITE
Problema Causa Solución
Cambio de idioma Enchufe el Grill, pulse el botón de
encendido, inmediatamente después
pulse el botón Descongelar -mientras
la pantalla muestre el mensaje
«Bonjour» («Hola»).
5sec
Preheating
not finished,
remove your
food
10s before-
changeover
to manual
mode
El tiempo de
precalentamiento no había
nalizado del todo. El grill se
ha abierto y los alimentos se
han colocado sobre la placa
antes de que nalizara el
precalentamiento.
Se pueden cocinar los alimentos, pero
debe controlar la cocción, ya que el
grill ha cambiado al modo manual.
Puede ajustar la temperatura.
O
Abra el grill, retire los alimentos, cierre
el grill correctamente y espere a que
nalice el precalentamiento.
No puedo apagar el
aparato.
Ha mantenido pulsado el
botón durante un segundo
menos o ha transcurrido
demasiado tiempo entre las
dos pulsaciones.
Pulse 2 veces seguidas el botón de
encendido/apagado.
O
Pulse una vez el botón de encendido/
apagado y, después, conrme
pulsando el botón «OK».
Err 1 a Err 8 El aparato se ha guardado o
utilizado en una habitación
demasiado fría. El aparato
tiene un sobrecalentamiento.
Desenchufe el aparato y espere unos
minutos.
Vuelva a enchufar el grill y pulse el
botón de encendido.
Si el problema persiste, contacte con el
servicio de atención al cliente.
Err 9 a Err 13 Mal funcionamiento del
aparato.
Desenchufe el aparato y contacte con
el servicio de atención al cliente.
El aparato se apaga
solo durante el ciclo
de precalentamiento o
de cocción.
El aparato ha permanecido
abierto durante demasiado
tiempo durante la cocción. El
aparato ha estado sin utilizarse
durante demasiado tiempo
después de que nalizara
el precalentamiento o el
mantenimiento del calor.
Desenchufe el aparato y espere unos
minutos. A continuación, vuelva a
enchufar el aparato y enciéndalo.
ES

134
GUÍA DE RESOLUCIÓN DE PROBLEMAS DE ELITE
Problema Causa Solución
to stop
cooking
Solicitud de conrmación del
n de la cocción.
2 soluciones:
Si ha retirado todos los alimentos,
pulse el botón «OK».
O
Si aún quedan alimentos por cocinar,
no pulse el botón «OK» y deje que
continúe la cocción.
to start
cooking
Alimento no detectado
porque es demasiado no.
Pulse el botón «OK» para iniciar la
cocción.
for manual
mode
Alimento demasiado grueso. 2 soluciones:
Pulse el botón «OK» para continuar la
cocción en modo manual.
O
Retire los alimentos para reducir el
grosor y permitir así una cocción en
modo automático.
No consigo ajustar
un tiempo en modo
manual.
La pantalla se ha quedado ja
en el ajuste de la temperatura.
Pulse una vez el botón «OK» para ir al
ajuste del tiempo y, a continuación,
ajústelo con las echas. Conrme
pulsando el botón «OK».
00:00
180°C
ES

135
Niveles de cocción para cada programa automático
12 PROGRAMAS AUTOMÁTICOS
PROGRAMAS
AUTOMÁTICOS
INDICADOR DEL NIVEL DE COCCIÓN
MENÚS
Blue
Rare
Medium
Well-done
Buey Crudo Poco hecho Al punto Muy hecho
Pollo - - - Muy hecho
Salchicha - - - Muy hecha
Beicon - - Al punto Crujiente
Carne picada
(hamburguesa)
- Poco hecha Al punto Muy hecha
Panini -
Poco
cocido
Tostado Crujiente
Pescado - Al punto
Bastante
hecho
Muy hecho
Marisco - Al punto
Bastante
hecho
Muy hecho
Patata - - - Asada
Pimiento - - Crocante Asado
Berenjena - - - Asada
Tomate - - Crocante Asado
ES

136
MODO MANUAL ESPECIAL
VERDURAS O FRUTAS
From 180°C
to 195°C
From 220°C
to 235°C
From 225°C
to 270°C
- - Calabacín (en rodajas)
- - Espárragos
- - Setas
- Cebolla -
Brócoli - -
Zanahorias baby - -
- Hinojo -
Boniato
(en rodajas)
- -
- Manzana (en rodajas) -
- Piña -
- Melocotón -
CONSEJOS DE COCCIÓN
PRODUCTOS
PROGRAMA
DE COCCIÓN
CONSEJOS DE
COCCIÓN
Filet mignon de cerdo (sin huesos),
magro de cerdo
Muy hecho *
Bratwurst (cerdo precocido) 220 °C/8 min. 30
Rindswurst (buey precocido) 220 °C/8 min. 30
Nürnberger Wurst (cerdo precocido) 220 °C/4 min. 30
ES

137
CONSEJOS DE PREPARACIÓN
Para unas parrilladas más doradas, le recomendamos que dé la vuelta a los alimentos asados
antes de servirlos a sus comensales.
PRODUCTOS CONSEJOS DE PREPARACIÓN
PATATA
• Corte en rodajas a lo largo.
• Eche aceite sobre los ingredientes para que se cocinen mejor.
PIMIENTO • Corte por la mitad a lo largo.
BERENJENA
• Corte en rodajas a lo largo.
• Eche aceite sobre los ingredientes para que se cocinen mejor.
TOMATE
• Utilice tomates que tengan una forma redonda.
• Utilice tomates que no estén demasiado maduros.
• Corte por la mitad a lo ancho.
• Para una cocción óptima, coloque el lado redondeado del
tomate cortado por la mitad sobre la placa inferior del grill.
CERDO * Utilice la función Churrascar si el grosor es superior a 20 mm.
ES

138
INSTRUÇÕES DE SEGURANÇA PRECAUÇÕES
IMPORTANTES
Utilização, manutenção e instalação do seu produto : para sua
segurança, consulte os vários parágrafos deste folheto ou os pictogramas
correspondentes.
Esse produto destina-se exclusivamente ao uso doméstico. Não foi concebido
para ser usado nos seguintes casos, que não são abrangidos pela garantia:
- em zonas de cozinha reservadas aos funcionários nas lojas, escritórios e outros
espaços profissionais;
- em quintas,
- por clientes de hotéis, motéis e outros espaços de natureza residencial,
- em ambientes de tipo quarto de hóspedes.
Retirar todo o material de embalagem, autocolantes ou outros acessórios,
tanto no interior como no exterior do aparelho.
Este aparelho não foi concebido para ser utilizado por pessoas (incluindo
crianças) cujas capacidades físicas, sensoriais ou mentais se encontram
reduzidas, ou por pessoas com falta de experiência ou conhecimento, a não
ser que tenham sido devidamente acompanhadas e instruídas sobre a correta
utilização do aparelho por uma pessoa responsável pela sua segurança.
É importante vigiar as crianças para garantir que não brincam com o aparelho
e que não o utilizam como um brinquedo.
Nunca deixe o aparelho a funcionar sem vigilância.
A temperatura das superfícies acessíveis pode alcançar níveis elevados
quando o aparelho está em funcionamento.
Não toque nas superfícies quentes do aparelho.
Esse aparelho não se destina a ser colocado em funcionamento com um
temporizador exterior ou através de um sistema de comando à distância
separado.
Desenrole totalmente o cabo.
Se o cabo de alimentação estiver danificado, deve ser substituído pelo fabricante,
por um Serviço de Assistência Técnica autorizado ou por um técnico igualmente
qualificado, por forma a evitar qualquer situação de perigo para o utilizador.
PT

139
Se utilizar uma extensão elétrica, esta deve ter uma secção pelo menos
equivalente, e ter uma tomada com ligação de terra incorporada. Tome as
devidas precauções para que ninguém tropece.
O aparelho apenas deve ser ligado a uma tomada com ligação à terra incorporada.
Certifique-se de que a instalação elétrica é compatível com a potência e a
tensão indicadas por baixo do aparelho.
Este aparelho não pode ser mergulhado em líquidos. Nunca mergulhe o
aparelho nem o cabo em água.
O aparelho pode ser utilizado por crianças a partir dos 8 anos ou mais
e por pessoas com capacidades físicas, sensoriais e mentais reduzidas ou
falta de experiência e conhecimentos, desde que tenham sido devidamente
acompanhadas e instruídas sobre a utilização do aparelho em segurança e que
compreendam os perigos envolvidos. A limpeza e a manutenção do mesmo
por parte do utilizador não devem ser realizadas por crianças, a não ser que
tenham mais de 8 anos e sejam supervisionadas. Mantenha o aparelho e o
cabo de alimentação fora do alcance das crianças com menos de 8 anos.
ATENÇÃO : Não aqueça nem preaqueça o grelhador sem as duas placas
colocadas no interior.
O que pode fazer
• Leia atentamente estas instruções e guarde-as para futuras consultas. Estas instruções são as
mesmas para as várias versões consoante os acessórios fornecidos com o aparelho.
• Caso ocorra um acidente, passe imediatamente água fria sobre a zona queimada e consulte um
médico, se necessário.
• Quando utilizar o aparelho pela primeira vez, lave as placas (consulte o parágrafo 5), deite um
pouco de óleo sobre as placas e limpe com um pano macio.
• Tenha atenção à localização do cabo, com ou sem extensão. Tome as devidas precauções para
não perturbar a circulação das pessoas à volta da mesa e evitar que alguém tropece.
• Os fumos de cozedura podem ser perigosos para os animais com sistema respiratório
particularmente sensível, como os pássaros. Aconselhamos os proprietários de pássaros a afastá-
los do local de cozedura.
• Mantenha sempre o aparelho fora do alcance das crianças.
• Certifique-se de que as duas faces da placa estão bem limpas antes de utilizá-las.
• Para evitar danificar as placas, utilize-as apenas no aparelho para o qual foram concebidas (por
ex.: não coloque num forno, sobre um fogão ou uma placa elétrica...).
• Certifique-se de que as placas estão estáveis, devidamente posicionadas e encaixadas na base do
aparelho. Utilize apenas as placas fornecidas ou adquiridas num Serviço de Assistência Técnica
autorizado.
PT

140
• Para preservar o revestimento das placas de cozedura, utilize sempre uma espátula de plástico
ou madeira.
• Utilize apenas os acessórios fornecidos com o aparelho ou adquiridos num Serviço de Assistência
Técnica autorizado. Não utilize com outros aparelhos.
O que não pode fazer
• Não utilize o aparelho no exterior.
• Nunca ligue o aparelho quando não é utilizado.
• A fim de evitar o sobreaquecimento, não o coloque num canto nem encostado a uma parede.
• Nunca coloque o aparelho diretamente sobre um suporte frágil (mesa de vidro, toalha, móvel envernizado, etc.)
ou sobre um suporte de tipo toalha de plástico.
• Nunca coloque o aparelho por baixo de móveis fixados na parede, prateleiras, ou perto de materiais inflamáveis
como estores, cortinas, tapetes.
• Não coloque o aparelho sobre ou junto a superfícies escorregadias ou quentes, nem deixe o cabo pendurado por
cima de uma fonte de calor (placas de cozedura, fogões a gás, etc.).
• Nunca coloque utensílios de cozinha sobre as superfícies de cozedura do aparelho.
• Nunca corte os alimentos diretamente sobre as placas.
• Nunca utilize um esfregão metálico, nem pó abrasivo para não danificar a superfície de cozedura (ex: revestimento
antiaderente).
• Não desloque o aparelho durante a sua utilização.
• Não transporte o aparelho pela pega nem pelos cabos.
• Nunca coloque o aparelho a funcionar em vazio.
• Nunca coloque uma folha de papel alumínio nem qualquer outro objeto entre as placas e os alimentos a cozinhar.
• Nunca retire a gaveta de recolha de sucos durante a cozedura. Se a gaveta de recolha de sucos ficar cheia durante
a cozedura, deixe o aparelho arrefecer antes de esvaziá-la.
• Não coloque a placa quente debaixo de água ou sobre uma superfície frágil.
• Para conservar as qualidades antiaderentes do revestimento, evite deixar aquecer o aparelho vazio durante
muito tempo.
• Nunca pegue nas placas enquanto estiverem quentes.
• Não coza em papelote.
• Para evitar a degradação do aparelho, não faça receitas de flambé.
• Nunca coloque uma folha de papel alumínio nem qualquer outro objeto entre as placas e as resistências.
• Nunca aqueça ou coza em posição «grelhador aberto».
• Nunca coloque o aparelho em funcionamento sem as placas de cozedura.
Conselhos/Informações
• Obrigado por ter adquirido este aparelho, destinado exclusivamente a utilização doméstica.
• Para sua segurança, este aparelho está em conformidade com as normas e regulamentos aplicáveis (Diretivas
Baixa tensão, Compatibilidade Eletromagnética, Materiais em contacto com os alimentos, Ambiente…).
• Aquando da primeira utilização, pode ocorrer uma ligeira libertação de cheiro ou fumo.
• Limpe as placas de cozedura com uma esponja, água quente e detergente para a louça.
• A nossa empresa reserva-se o direito de alterar a qualquer momento, para benefício do consumidor, as
características ou componentes dos seus produtos.
• Qualquer alimento sólido ou líquido que entre em contacto com as peças marcadas com o símbolo
não deverá ser consumido.
PT

141
• Se os alimentos forem demasiado espessos, o sistema de segurança impede o arranque do aparelho.
• A resistência não deve ser limpa. Se estiver muito suja, deixe-a arrefecer por completo e friccione-a com um
pano seco.
• O painel de comandos é um elemento frágil: Limpe-o, e seque-o apenas com um pano suave e seco.
Não limpe com uma esponja molhada. Corre o risco de danificar as suas funções.
Ambiente
Proteção do ambiente em primeiro lugar!
O aparelho contém vários materiais que podem ser recuperados ou reciclados.
Entregue-o num ponto de recolha para possibilitar o seu tratamento.
PT

142
A1 A2 A3
A4
A5
A6
A7
D.
E.
B
C
F
B
Descrição
A
Painel de comandos
A1
Botão de ligar/desligar
A2
Função Alimentos
congelados
A3
Função Selar
A4
Botões de regulação e de
navegação
A5
Indicador de pré-
aquecimento e de nível
de confeção
A6
Visor
A7
Botão OK
B
Corpo
C
Pega
D
Placas de confeção
E
Tabuleiro para recolha
de sucos
F
Cabo de alimentação
A
PT

143
12 programas de confeção automáticos
Um modo manual
120
°C
180
°C
220
°C
250
°C
Manual
mode
Manual
mode
Manual
mode
Manual
mode
Duas opções de confeção possíveis no modo
automático
Função de Alimento Congelado
Função Selar
PT

144
1 Preparação
1 Retire todas as embalagens,
autocolantes ou acessórios existentes
tanto no interior como no do
aparelho.
2 Antes da primeira utilização, lave
cuidadosamente as placas com
água quente e detergente para
a loiça, passe por água e seque
cuidadosamente.
3-4 Coloque o tabuleiro de recolha de
sucos amovível parte da frente do
aparelho.
1 2
OK
3 4
5 Se desejar, para obter melhores
resultados e melhorar a ecácia da
superfície antiaderente, pode untar
as placas de confeção com papel de
cozinha embebido num pouco de
óleo de cozinha.
6 Elimine o excesso de óleo com papel
de cozinha limpo.
7 Certique-se de que as placas
superiores e inferiores estão
corretamente posicionadas
no aparelho. Não inicie o pré-
aquecimento sem as placas. Ligue
o aparelho a uma tomada. (Tenha
em conta que o cabo deve ser
desenrolado por completo).
8 Prima o botão de ligar/desligar.
Atenção: Certique-se de que não há
alimentos entre as placas.
5 6
7 8
PT

145
2
Primeira utilização
9 Escolha o seu idioma, utilizando as setas, depois prima Ok.
Language
choice
English
EN
Sprachauswahl
Deutsch
DE
Choix de la
langue
Français
FR
9
3
Ligar/desligar
10 Ligar
11 Para desligar o grelhador, prima
uma vez o botão de ligar/desligar e
uma vez o botão Ok para desligar o
aparelho.
10 11
PT

146
4
Função Alimentos Congelados No modo automático
13-15 Função de Alimentos congelados
deverá ser ativada antes de iniciar
o pré-aquecimento, durante a
seleção do modo automático, se
os alimentos a cozinhar estiverem
congelados.
Caso se esqueça de ativar a opção,
desligue o aparelho e repita os passos.
Esta função só está disponível no
modo automático e não no modo
manual.
Olá
12 13
Frozen food
ON
Função Congelados
desligada
14 15
PT

147
5
Função Selar - No modo automático
17-19 Função Selar deverá ser
ativada antes de iniciar o pré-
aquecimento, durante a seleção
do modo automático, se desejar
selar mais intensamente alimentos
a cozinhar.
Caso se esqueça de ativar esta opção,
desligue o aparelho e repita os passos.
Esta função só está disponível no
modo automático e não no modo
manual.
Olá
16 17
Searing
boost ON
Função Selar Rápido
ligada
18 19
PT

148
6
Confeção no modo automático
21 Selecione o modo de confeção
adequado de acordo com o tipo de
alimento a cozinhar.
Conselho relativamente à carne:
Os resultados de confeção dos
programas predenidos podem variar
de acordo com a origem, o corte e a
qualidade do alimento a cozinhar,
tendo os programas sido denidos
e testados com alimentos de boa
qualidade.
De igual modo, a espessura da carne
deve ser tida em conta durante a
confeção. Não cozinhe alimentos com
mais de 4 cm de espessura.
Olá
20 21
No caso de dúvidas acerca do modo de confeção a utilizar, consulte os guias de confeção na página 158.
Preheating in
progress
22 Prima o botão “ OK ” : O aparelho
começa o pré-aquecimento.
Observação: Se selecionar um
programa por engano, desligue o
grelhador e volte ao passo 8.
23 Espere 4 a 7 minutos.
24 É emitido um sinal sonoro para
assinalar que o pré-aquecimento
terminou.
Comentário: Se o aparelho
permanecer fechado demasiado
tempo após o pré-aquecimento
terminar, o sistema de segurança
desliga o aparelho.
Pré- aquecimento em
curso
22 23
24
PT

149
insert
the food
25-26
Quando o pré-aquecimento terminar,
pode colocar os ingredientes. Levante
a tampa do grelhador e coloque os
alimentos sobre as placas.
Comentário: Se o aparelho
permanecer aberto demasiado
tempo, o sistema de segurança
desliga o aparelho automaticamente.
27-29
O aparelho calcula automaticamente
o ciclo de confeção (tempo e
temperatura), de acordo com
a quantidade e espessura dos
alimentos.
Feche o aparelho para iniciar o ciclo
de confeção.
Observação para os alimentos
muito nos, por exemplo, bacon:
O botão “OK” acende. Prima “OK” para
garantir que o aparelho reconhece
bem o alimento e para o ciclo de
confeção começar.
A seta move-se ao longo do indicador
do nível de confeção e quando atingir
um nível de confeção, o nível é
apresentado é será emitido um sinal
sonoro.
Atenção: Os níveis de confeção estão
pré-programados para cada modo
automático.
Durante a confeção, um sinal sonoro
avisa o utilizador sempre que um
nível de confeção for atingido (por
exemplo, mal passado / branca).
De acordo com o grau de confeção,
o indicador muda de cor e a seta de
progresso da confeção move-se pelo
ecrã.
Tenha em conta que, especialmente
para a carne, é normal os resultados
de confeção variarem de acordo
com o tipo, qualidade e origem dos
alimentos.
Coloque os seus alimentos
25 26
to start
cooking
Para começar a confeção
27 28
Start of
cooking
Início da confeção
29 30
PT

150
Well-done
in 01:35
31-32 Pode saber a qualquer momento o
tempo restante para atingir os diferentes
níveis de confeção. Prima a seta da direita
se desejar ver quanto tempo demora
até que o nível de confeção seguinte
seja atingido. Atenção, não se trata de
uma seleção de níveis de confeção. O
grelhador continua a cozinhar até ao
último nível de confeção e avisa quando
chega a cada nível.
Bem passado em 01:35
31 32
33-34 Quando o nível de confeção
correspondente à sua escolha for atingido
e for emitido um sinal sonoro, abra o
aparelho e retire os alimentos.
35-36 Feche a tampa. O ecrã pede a
conrmação para parar a confeção. Valide
com OK se todos os alimentos tiverem
sido retirados, caso contrário, deixe
continuar a confeção.
Se desejar realizar uma nova confeção,
consulte o parágrafo 8.
Comentário: O sistema de segurança
desliga automaticamente o aparelho se
não for selecionado qualquer programa
passado algum tempo.
33 34
to stop
cooking
Para parar a confeção
35 36
OK
PT

151
7
Como efetuar uma segunda confeção
Segunda confeção do mesmo tipo de alimento
Any refill?
37-38 No nal da primeira confeção, aparece
a mensagem “nova confeção”. Se
desejar grelhar o mesmo tipo de
alimento, prima OK.
39 O aparelho começa o pré-
aquecimento.
40 Espere até ao nal do pré-
aquecimento.
Grelhar novamente?
37 38
Preheating in
progress
Pré- aquecimento em
curso
39 40
Wait
insert
the food
41 Coloque os alimentos no grelhador.
42 A seguir, siga os passos de 27 a 37.
Aguarde Coloque os seus alimentos
41 42
Segunda confeção de um ingrediente diferente
Quando a confeção dos primeiros ingredientes tiver terminado:
1. Certique-se de que o aparelho está fechado e que não há alimentos no interior.
2. Selecione o modo ou o programa de confeção adequado.
3. Prima o botão “OK” para começar o pré-aquecimento. Durante o pré-aquecimento, o indicador de
pré-aquecimento aparece no ecrã.
PT

152
8
Confeção no modo manual
OK
Manual
mode
120
°C
43 Selecione o modo manual e prima OK
para validar.
44 Selecione a temperatura desejada
com os botões de regulação.
Prima OK para validar a temperatura
selecionada.
43 44
Preheating
180°C
180°C
OK
45 Espere até ao nal do pré-
aquecimento.
46 Quando o pré-aquecimento terminar,
prima OK para iniciar o temporizador.
Observação: O tempo de confeção
também pode ser regulado desde o início
do pré-aquecimento.
45 46
00:00
180°C
00:00
180°C
47 Prima os botões de regulação para
selecionar o tempo de confeção
desejado.
48 Insira os seus alimentos e prima OK
para iniciar a confeção.
47 48
4. Quando o pré-aquecimento terminar, é emitido um sinal sonoro e a informação de nal de pré-
aquecimento aparece no ecrã.
5. Quando o pré-aquecimento terminar, o aparelho está pronto a ser utilizado. Levante a tampa do
grelhador e insira os alimentos. A seguir, siga os passos de 27 a 37.
Importante:
– Tenha em conta que o pré-aquecimento é obrigatório para cada confeção.
Nota: Antes de iniciar o pré-aquecimento, certique-se de que o aparelho está fechado e que não há
alimentos no interior.
– A seguir, espere que o pré-aquecimento termine antes de abrir o grelhador e de colocar os
alimentos no interior.
Observação: Se o novo ciclo de pré-aquecimento for lançado imediatamente após o nal do ciclo
anterior, o tempo de pré-aquecimento será mais curto.
PT

153
00:00
180°C
to stop
cooking
49-50 Um sinal sonoro indica quando
o tempo de confeção terminar.
Retire os seus alimentos.
Prima OK para parar a confeção e
retire os alimentos.
Para parar a confeção
49 50
9
Comentários
51-53
De acordo com as preferências pessoais,
abra o grelhador e retire os alimentos
que tenham atingido o nível de confeção
desejado, depois volte a fechar o
grelhador para continuar a confeção dos
outros alimentos. O programa continua o
ciclo de confeção até ao último nível de
confeção do modo selecionado.
54 Comentário: O sistema de segurança
desliga automaticamente o aparelho
passado algum tempo.
51 52
Remove
your food
Overcooked
risk
Retire os alimentos Alimento demasiado
cozinhado
53 54
PT

154
10
Fim de utilização
55 Prima o botão de ligar/desligar e
depois valide premindo o botão OK.
56 Retire a cha da tomada.
57 Deixe o aparelho arrefecer durante,
pelo menos, 2 horas.
Para evitar queimaduras acidentais,
deixe o grelhador arrefecer por
completo antes de proceder à sua
limpeza.
55 56
2 H
57
PT

155
11
Limpeza
58 Antes da limpeza, desbloqueie e
retire as placas para evitar danicar a
superfície de confeção.
59 O tabuleiro de recolha de sucos e
as placas de confeção podem ser
lavadas na máquina de lavar loiça. O
aparelho e o cabo nunca devem ir à
máquina de lavar loiça. Os elementos
de aquecimento (as resistências)
nunca devem ser lavados quando
as placas tiverem sido retiradas. Se
estiverem muito sujos, espere que
o aparelho arrefeça por completo e
limpe-os com um pano seco.
60-61
Se não desejar colocar as placas na
máquina de lavar loiça, utilize água
quente e detergente para a loiça
para as lavar, depois passe por água
abundante para eliminar quaisquer
resíduos. Seque cuidadosamente com
papel absorvente.
Não utilize esfregões metálicos,
palha de aço ou produtos de limpeza
abrasivos para limpar qualquer parte
do grelhador. Utilize apenas esponjas
de limpeza de nylon e que não sejam
de metálicos.
Esvazie o tabuleiro de recolha de
sucos e lave-o com água quente e
um pouco de detergente. De seguida,
seque cuidadosamente com um
papel absorvente.
62 Para limpar a tampa do grelhador,
passe uma esponja humedecida em
água quente e seque com um pano
macio e seco. Para limpar o painel de
comandos, utilize apenas um pano
macio e seco.
63 Não coloque o corpo do grelhador
dentro de água ou de qualquer outro
líquido.
64 Certique-se sempre de que o
grelhador está limpo, frio e seco antes
de o arrumar.
Qualquer reparação deve ser efetuada
por um Serviço de Assistência Técnica
autorizado.
58 59
60 61
62 63
64
PT

156
Resolução de problemas
GUIA DE RESOLUÇÃO DE PROBLEMAS ELITE
Problema Causa Solução
Mudança do idioma Ligue o grelhador, prima ON e depois
imediatamente no botão Frozen
(Congelados) (enquanto o ecrã
apresenta “Bom dia”).
5sec
Preheating
not finished,
remove your
food
10s before-
changeover
to manual
mode
O tempo de pré-aquecimento
não tinha terminado por
completo. O grelhador
foi aberto e os alimentos
colocados na placa antes do
nal do pré-aquecimento.
Pode cozinhar os alimentos, mas deve
controlar a confeção, pois o grelhador
passou para o modo manual.
A temperatura pode ser ajustada.
Ou
Abra o grelhador, retire os alimentos,
feche corretamente o grelhador
e espere até ao nal do pré-
aquecimento.
Não consigo desligar o
meu aparelho.
Falta premir uma segunda vez,
ou tempo demasiado longo
entre as 2 pressões.
Prima duas vezes o botão de ligar/
desligar.
Ou
Prima uma vez o botão de ligar/
desligar e depois valide premindo OK.
Err 1 a Err 8 O aparelho foi guardado
ou utilizado numa divisão
demasiado fria. Aparelho
sobreaquecido.
Desligue o aparelho da corrente e
espere alguns minutos.
Volte a ligar o aparelho à corrente e
coloque-o em funcionamento.
Se o problema persistir, contacte o
Centro de Contacto do Consumidor.
Err 9 a Err 13 Falha do aparelho. Desligue o aparelho da corrente e
contacte o Centro de Contacto do
Consumidor
O aparelho desliga-se
durante o ciclo de
pré-aquecimento ou
de confeção.
O aparelho esteve aberto
durante demasiado tempo
durante a confeção. O
aparelho esteve parado
demasiado tempo após o nal
do pré-aquecimento ou da
opção de manter quente.
Desligue o aparelho da corrente e
espere alguns minutos. A seguir, volte
a ligá-lo à corrente e coloque-o em
funcionamento.
PT

157
GUIA DE RESOLUÇÃO DE PROBLEMAS ELITE
Problema Causa Solução
to stop
cooking
Pedido de conrmação de
nal de confeção.
2 soluções:
Prima OK se todos os alimentos
tiverem sido retirados.
Ou
Não prima OK e deixe cozinhar o resto
dos alimentos.
to start
cooking
Alimento não detetado, pois é
demasiado no.
Prima OK para iniciar a confeção.
for manual
mode
Alimento demasiado espesso. 2 soluções:
Prima OK para continuar a confeção no
modo manual.
Ou
Retire os alimentos para diminuir a
espessura, de modo a permitir uma
confeção no modo automático.
Não consigo regular
um tempo no modo
manual.
O ecrã permanece na
regulação da temperatura.
Prima o botão OK para ir para a
regulação do tempo, depois regule-o
com as setas. Valide com OK.
00:00
180°C
PT

158
Níveis de confeção para cada programa automático
12 PROGRAMAS AUTOMÁTICOS
PROGRAMAS
AUTOMÁTICOS
INDICADOR DO NÍVEL DE CONFEÇÃO
MENUS
Blue
Rare
Medium
Well-done
Vaca Azul Mal passado Médio Bem passado
Frango - - - Bem passado
Salsicha - - - Bem passado
Bacon - - Médio Estaladiço
Carne picada
(hambúrguer)
- Mal passado Médio Bem passado
Panini -
Ligeiramente
cozinhado
Torrado Estaladiço
Peixe - Médio
No ponto
extra
Bem passado
Frutos do mar - Médio
No ponto
extra
Bem passado
Batata - - -
Bem
cozinhado
Pimento - - Estaladiço
Bem
cozinhado
Beringela - - - Grelhado
Tomate - - Estaladiço
Bem
cozinhado
PT

159
MODO MANUAL ESPECIAL
LEGUME OU FRUTO
From 180°C
to 195°C
From 220°C
to 235°C
From 225°C
to 270°C
- - Curgete rodelas
- - Espargos
- - Cogumelos
- Cebola -
Brócolos - -
Mini-cenoura - -
- Funcho -
Batata doce
rodelas
- -
- Maçã (fatias) -
- Banana -
- Pêssego -
CONSELHO DE CONFEÇÃO
PRODUTOS
PROGRAMA
DE CONFEÇÃO
CONSELHO DE
CONFEÇÃO
Lombo de porco (sem osso), barriga
de porco
Bem passado*
Salsicha alemã (porco pré-cozido) 220 °C / 8 min 30
Salsicha de carne de vaca (vaca
pré-cozida)
220 °C / 8 min 30
Salsicha de porco (porco pré-cozido) 220 °C / 4 min 30
PT

160
CONSELHO DE PREPARAÇÃO
Para grelhados bem selados, é preferível colocar novamente os alimentos no grelhador antes
de os servir.
PRODUTOS CONSELHO DE PREPARAÇÃO
BATATA
• Corte no sentido do comprimento
• Adicione óleo nos ingredientes para uma melhor confeção
PIMENTO • Cortado ao meio no sentido do comprimento
BERINGELA
• Corte no sentido do comprimento
• Adicione óleo nos ingredientes para uma melhor confeção
TOMATE
• Utilize tomates redondos.
• Utilize tomates que não estejam demasiado maduros.
• Corte ao meio no sentido da largura.
• Para uma confeção ótima, coloque o lado arredondado do
tomate cortado em 2 na placa inferior do grelhador.
PORCO * Utilize a função selar se a espessura for superior a 20 mm.
PT

161
ΟΔΗΓΙΕΣ ΓΙΑ ΤΗΝ ΑΣΦΑΛΕΙΑ ΣΗΜΑΝΤΙΚΕΣ
ΠΡΟΦΥΛΑΞΕΙΣ
Χρήση, συντήρηση και εγκατάσταση του προϊόντος: για την ασφάλειά
σας, παρακαλείστε να ανατρέχετε στις διάφορες παραγράφους των
οδηγιών και στις αντίστοιχες εικόνες.
Η συσκευή αυτή προορίζεται αποκλειστικά για οικιακή χρήση. Δεν έχει σχεδιαστεί
για χρήση στις ακόλουθες περιπτώσεις, οι οποίες δεν καλύπτονται από την εγγύηση:
- σε χώρους κουζίνας που χρησιμοποιούνται από το προσωπικό καταστημάτων,
γραφείων και άλλων επαγγελματικών χώρων,
- σε αγροκτήματα,
- από τους πελάτες ξενοδοχείων, ξενώνων και λοιπών χώρων με χαρακτήρα
φιλοξενίας,
- στα περιβάλλοντα τύπου δωματίων ξενοδοχείων.
Αφαιρέστε όλες τις συσκευασίες, τα αυτοκόλλητα ή τα διάφορα εξαρτήματα από
το εσωτερικό και το εξωτερικό της συσκευής.
Η παρούσα συσκευή δεν προορίζεται προς χρήση από άτομα
(συμπεριλαμβανομένων των παιδιών) των οποίων η σωματική, αισθητήρια ή
πνευματική ικανότητα είναι μειωμένη, ή από άτομα χωρίς εμπειρία ή γνώση ως
προς τη χρήση, εκτός εάν τα άτομα αυτά βρίσκονται υπό επίβλεψη ή ακολουθούν
πρότερες οδηγίες που αφορούν στη χρήση της συσκευής από κάποιο πρόσωπο
που είναι υπεύθυνο ως προς την ασφάλειά τους.
Τα παιδιά πρέπει να βρίσκονται υπό επίβλεψη προκειμένου να διασφαλιστεί ότι
δεν θα παίζουν με τη συσκευή ούτε θα την χρησιμοποιήσουν ως παιχνίδι.
Μην αφήνετε ποτέ τη συσκευή χωρίς επίβλεψη.
Η θερμοκρασία των προσβάσιμων επιφανειών μπορεί είναι υψηλή κατά την ώρα
λειτουργίας της συσκευής.
Μην αγγίζετε τις θερμές επιφάνειες της συσκευής. Η συσκευή δεν έχει σχεδιαστεί για
να τίθεται σε λειτουργία μέσω εξωτερικού χρονοδιακόπτη ή χωριστού συστήματος
τηλεχειρισμού. Ξετυλίξτε εντελώς το καλώδιο.
Εάν το καλώδιο ρεύματος έχει φθαρεί, πρέπει να αντικατασταθεί από την
κατασκευάστρια εταιρεία, το εξουσιοδοτημένο κέντρο εξυπηρέτησης μετά την πώληση
της κατασκευάστριας εταιρείας ή έναν εξειδικευμένο τεχνικό για να αποφευχθεί κάθε
κίνδυνος ατυχήματος.
EL

162
Εάν χρησιμοποιείτε ηλεκτρική μπαλαντέζα, η τάση της πρέπει να είναι τουλάχιστον
ισοδύναμη με αυτήν της συσκευής και να διαθέτει ενσωματωμένη γειωμένη πρίζα.
Λαμβάνετε όλες τις απαραίτητες προφυλάξεις, για να αποφύγετε τον κίνδυνο να
σκοντάψει κάποιος στο καλώδιο. Συνδέετε τη συσκευή αποκλειστικά και μόνο σε πρίζα
με γείωση. Ελέγξτε αν η ηλεκτρική εγκατάσταση είναι συμβατή με την ισχύ και την τάση
που υποδεικνύονται κάτω από τη συσκευή.
Η παρούσα συσκευή δεν πρέπει να βυθίζεται σε νερό ή άλλο υγρό. Μην βυθίζετε ποτέ
τη συσκευή και το καλώδιό της στο νερό.
Η συσκευή αυτή μπορεί να χρησιμοποιηθεί από παιδιά ηλικίας τουλάχιστον 8 ετών και
από άτομα με μειωμένες σωματικές, αισθητηριακές ή νοητικές ικανότητες ή από άτομα
που στερούνται εμπειρίας και γνώσεων, εφόσον εποπτεύονται ή έχουν λάβει σχετικές
οδηγίες ως προς τη χρήση της συσκευής κατά τρόπο πλήρως ασφαλή και εφόσον
κατανοούν τους κινδύνους που διατρέχουν. Ο καθαρισμός και η συντήρηση από τον
χρήστη δεν πρέπει να πραγματοποιούνται από παιδιά, εκτός εάν είναι ηλικίας άνω των
8 ετών και τελούν υπό επίβλεψη. Φυλάξτε τη συσκευή και το καλώδιο σε θέση, η οποία
δεν είναι προσβάσιμη σε παιδιά κάτω των 8 ετών.
ΠΡΟΣΟΧΗ :Μην ζεσταίνετε ή προθερμαίνετε τη σχάρα χωρίς τις 2 πλάκες στο
εσωτερικό
Τι να κάνετε
• Διαβάστε προσεκτικά τις οδηγίες χρήσεως και φυλάξτε τες σε ευπρόσιτο μέρος. Οι οδηγίες είναι κοινές
για διάφορους τύπους, ανάλογα με τα εξαρτήματα που διαθέτει η συσκευή σας.
• Σε περίπτωση που προκληθεί κάποιο ατύχημα, ρίξτε αμέσως κρύο νερό στο έγκαυμα και
συμβουλευθείτε έναν ιατρό εάν κριθεί απαραίτητο.
• Κατά την πρώτη χρήση, πλύνετε τις εστίες (βλέπε την παράγραφο 5), προσθέστε λίγο λάδι πάνω στις
πλάκες και σκουπίστε τις με ένα μαλακό πανί.
• Φροντίστε για την σωστή τοποθέτηση του καλωδίου με ή χωρίς προέκταση, και πάρτε όλα τα
απαραίτητα προστατευτικά μέτρα για να μην διαταράξετε την κυκλοφορία των παρευρισκομένων
στο τραπέζι, ώστε κανείς να μην σκοντάψει.
• Οι ατμοί του ψησίματος ενδέχεται να είναι επικίνδυνοι για τα ζώα με ιδιαίτερα ευαίσθητο αναπνευστικό
σύστημα, όπως τα πουλιά. Συνιστούμε στους ιδιοκτήτες πουλιών να τα απομακρύνουν από το χώρο ψησίματος.
• Κρατήστε τη συσκευή μακριά από τα παιδιά.
• Πριν από τη χρήση σιγουρευτείτε ότι οι δύο επιφάνειες της πλάκας έχουν καθαρίσει καλά.
• Για να αποφύγετε τη φθορά, να χρησιμοποιείτε τις πλάκες αποκλειστικά στη συσκευή για την οποία
έχουν σχεδιαστεί (π.χ.: μην τις τοποθετείτε σε φούρνο, σε εστία αερίου ή σε ηλεκτρική εστία…).
EL

163
• Προσέξτε οι πλάκες να είναι σταθερές και καλά τοποθετημένες και στερεωμένες στη βάση
της συσκευής. Να χρησιμοποιείτε μόνο πλάκες που έχετε προμηθευτεί ή αγοράσει από το
εξουσιοδοτημένο κέντρο επισκευής.
• Για να διατηρήσετε την επίστρωση των επιφανειών ψησίματος, να χρησιμοποιείτε πάντα μια πλαστική ή ξύλινη σπάτουλα.
• Να χρησιμοποιείτε μόνο τα εξαρτήματα που παρέχονται με τη συσκευή ή που αγοράζετε σε
εξουσιοδοτημένο κέντρο επισκευής. Μην τις χρησιμοποιείτε με άλλες συσκευές.
Τι να μην κάνετε
• Μην χρησιμοποιείτε τη συσκευή σε εξωτερικό χώρο.
• Μην αφήνετε ποτέ τη συσκευή συνδεδεμένη στο ρεύμα όταν δεν βρίσκεται σε χρήση.
• Για να αποφύγετε την υπερθέρμανση της συσκευής, μην την τοποθετείτε σε γωνία ή ακριβώς δίπλα στον τοίχο.
• Ποτέ μην τοποθετείτε τη συσκευή σας απευθείας επάνω σε ευπαθή επιφάνεια (γυάλινο τραπέζι,
τραπεζομάντιλο, βερνικωμένο έπιπλο…) ή σε επιφάνεια που καλύπτεται από πλαστικό τραπεζομάντιλο.
• Μην τοποθετείτε ποτέ τη συσκευή κάτω από έπιπλο που έχετε στερεώσει σε τοίχο ή σε εταζέρα ή κοντά σε
εύφλεκτα υλικά όπως στόρια, κουρτίνες, χρώματα.
• Μην τοποθετείτε τη συσκευή επάνω ή κοντά σε ολισθηρές ή καυτές επιφάνειες, μην αφήνετε το καλώδιο να
κρέμεται πάνω από μία πηγή θερμότητας (πλάκες ψησίματος, εστία με άεριο κ.λπ.).
• Μην τοποθετείτε σκεύη μαγειρικής πάνω στις επιφάνειες μαγειρέματος της συσκευής.
• Μην κόβετε τροφές απευθείας πάνω στις πλάκες.
• Ποτέ μην χρησιμοποιείτε μεταλλικό σφουγγάρι ή σκόνη καθαρισμού, διότι μπορεί να προκληθεί φθορά στην
επιφάνεια μαγειρέματος (π.χ.: στην αντικολλητική επίστρωση).
• Μην μετακινείτε τη συσκευή όταν είναι σε λειτουργία.
• Μην μεταφέρετε τη συσκευή από τη λαβή ή τα μεταλλικά σύρματα.
• Ποτέ μην χρησιμοποιείτε τη συσκευή ενώ είναι άδεια.
• Μην τοποθετείτε ποτέ φύλλα αλουμινόχαρτου ή οποιοδήποτε άλλο αντικείμενο ανάμεσα στις πλάκες και τα
τρόφιμα που θα ψήσετε.
• Μην αφαιρείτε το δίσκο συλλογής λιπών κατά το ψήσιμο. Εάν ο δίσκος συλλογής λιπών γεμίσει κατά το ψήσιμο,
αφήστε τη συσκευή να κρυώσει προτού τον αδειάσετε.
• Μην βάζετε τη ζεστή πλάκα κάτω από νερό ή επάνω σε ευαίσθητη επιφάνεια.
• Για να διατηρήσετε τις αντικολλητικές ιδιότητες της επίστρωσης, μην αφήνετε τη συσκευή να ζεσταίνεται για
πολλή ώρα άδεια.
• Ποτέ μην χειρίζεστε τις πλάκες όταν είναι ζεστές.
• Μην ψήνετε τροφές που βρίσκονται μέσα σε χαρτί.
• Για να αποφύγετε τις φθορές στη συσκευή σας, μην εκτελείτε ποτέ συνταγές φλαμπέ σε αυτήν.
• Μην τοποθετείτε ποτέ φύλλα αλουμινόχαρτου ή οποιοδήποτε άλλο αντικείμενο ανάμεσα στις πλάκες και
τις αντιστάσεις.
• Ποτέ μην ζεσταίνετε ή ψήνετε σε θέση «ανοιχτή σχάρα».
• Ποτέ μην ζεσταίνετε τη συσκευή χωρίς τις πλάκες ψησίματος.
EL

164
Συμβουλές/Πληροφορίες
• Ευχαριστούμε που αγοράσατε αυτή τη συσκευή, η οποία έχει κατασκευαστεί για οικιακή χρήση μόνο.
• Για την ασφάλειά σας, η συσκευή αυτή συμμορφώνεται προς τα ισχύοντα πρότυπα και κανονισμούς (Οδηγίες
περί χαμηλής τάσης, ηλεκτρομαγνητικής συμβατότητας, υλικών σε επαφή με τρόφιμα, περιβάλλοντος...).
• Κατά την πρώτη χρήση, η συσκευή μπορεί να παράγει μια ελαφριά μυρωδιά ή λίγο ατμό.
• Για να καθαρίσετε τις πλάκες ψησίματος, χρησιμοποιήστε ένα σφουγγάρι, ζεστό νερό και υγρό πιάτων.
• Η εταιρεία μας διατηρεί το δικαίωμα να τροποποιήσει ανά πάσα στιγμή, για το συμφέρον του καταναλωτή,
τα χαρακτηριστικά ή τα μέρη από τα οποία αποτελούνται τα προϊόντα της.
• Καμία υγρή ή στερεά τροφή η οποία έρχεται σε επαφή με τα εξαρτήματα που φέρουν το λογότυπο
δεν μπορεί να καταναλωθεί.
• Εάν τα τρόφιμα έχουν υπερβολικά μεγάλο πάχος, το σύστημα ασφάλειας απαγορεύει τη θέση της συσκευής
σε λειτουργία.
• Η αντίσταση δεν καθαρίζεται. Εάν είναι πολύ βρώμικη, περιμένετε μέχρι να κρυώσει εντελώς και σκουπίστε
τη με ένα στεγνό πανί.
• Ο πίνακας ελέγχου είναι ευαίσθητο εξάρτημα: πρέπει να καθαρίζεται, να σκουπίζεται και να στεγνώνεται
μόνο με ένα στεγνό και μαλακό πανί. Μη χρησιμοποιείτε βρεγμένο σφουγγάρι, διότι μπορεί να υποστούν
βλάβη οι λειτουργίες του.
Περιβάλλον
Ας συμβάλουμε στην προστασία του περιβάλλοντος!
Η συσκευή σας περιέχει αρκετά αξιοποιήσιμα ή ανακυκλώσιμα υλικά.
Παραδώστε την παλιά σας συσκευή σε ένα κέντρο συλλογής ή, ελλείψει αυτού, σε ένα
εξουσιοδοτημένο κέντρο επισκευής για την επεξεργασία της.
EL

165
A1 A2 A3
A4
A5
A6
A7
D
E
B
C
F
B
Περιγραφή
A
Πίνακας ελέγχου
A1
Κουμπί ενεργοποίησης/
απενεργοποίησης (ON/
OFF)
A2
Λειτουργία απόψυξης
A3
Λειτουργία θωράκισης
A4
Κουμπιά ρύθμισης και
πλοήγησης
A5
Ένδειξη προθέρμανσης
και βαθμού ψησίματος
A6
Οθόνη ενδείξεων
A7
Κουμπί OK
B
Σώμα συσκευής
C
Χειρολαβή
D
Πλάκες ψησίματος
E
Δίσκος περισυλλογής
υγρών
F
Ηλεκτρικό καλώδιο
A
EL

166
12 αυτόματα προγράμματα ψησίματος
Χειροκίνητη λειτουργία
120
°C
180
°C
220
°C
250
°C
Manual
mode
Manual
mode
Manual
mode
Manual
mode
Δύο επιλογές ψησίματος στην αυτόματη
λειτουργία
Λειτουργία απόψυξης
Λειτουργία θωράκισης
EL

167
1
Προετοιμασία
1 Αφαιρέστε όλα τα υλικά συσκευασίας,
τα αυτοκόλλητα και τα διάφορα
βοηθητικά εξαρτήματα εσωτερικά και
εξωτερικά της συσκευής.
2 Πριν από την πρώτη χρήση,
καθαρίστε καλά τις πλάκες με ζεστό
νερό και υγρό πιάτων, ξεπλύνετε και
σκουπίστε καλά.
3-4 Τοποθετήστε τον αφαιρούμενο δίσκο
περισυλλογής υγρών στο μπροστινό
μέρος της συσκευής.
1 2
OK
3 4
5 Για καλύτερα αποτελέσματα και
για να είναι πιο αποτελεσματική η
αντικολλητική επίστρωση, μπορείτε
αν θέλετε να περάσετε τις πλάκες
ψησίματος με χαρτί κουζίνας
εμποτισμένο με λίγο μαγειρικό λάδι.
6 Σκουπίστε την περίσσεια λαδιού με
καθαρό χαρτί κουζίνας.
7 Βεβαιωθείτε ότι έχετε τοποθετήσει
σωστά την πάνω και την κάτω πλάκα
στο προϊόν. Μην προθερμαίνετε τη
συσκευή χωρίς τις πλάκες. Συνδέστε
τη συσκευή στο ρεύμα. (Το καλώδιο
πρέπει να είναι ξετυλιγμένο τελείως).
8 Πατήστε το κουμπί ON/OFF.
Προσοχή: Βεβαιωθείτε ότι δεν υπάρχουν
τρόφιμα ανάμεσα στις πλάκες.
5 6
7 8
EL

168
2
Πρώτη χρήση
9 Επιλέξτε γλώσσα με τα βέλη και μετά πατήστε ΟΚ.
Language
choice
English
EN
Sprachauswahl
Deutsch
DE
Choix de la
langue
Français
FR
9
3
Ενεργοποίηση/Απενεργοποίηση
10 Ενεργοποιήστε τη συσκευή.
11 Πατήστε το κουμπί ON/OFF και μετά
επιβεβαιώστε, πατώντας το κουμπί
ΟΚ.
10 11
EL

169
4
Λειτουργία απόψυξης - στην αυτόματη λειτουργία
13-15 Η λειτουργία απόψυξης πρέπει
να ενεργοποιείται πριν από την
προθέρμανση, όταν επιλέγεται
η αυτόματη λειτουργία, αν τα
τρόφιμα που θα ψήσετε είναι
κατεψυγμένα.
Αν ξεχάσετε να ενεργοποιήσετε την
επιλογή, σβήστε τη συσκευή και
επαναλάβετε τα βήματα.
Αυτή η επιλογή είναι διαθέσιμη μόνο
στην αυτόματη λειτουργία, όχι στη
χειροκίνητη.
Γεια σας
12 13
Frozen food
ON
Κατεψυγμένα ΑΠΕΝ
14 15
EL

170
5
Λειτουργία θωράκισης - στην αυτόματη λειτουργία
17-19 Η λειτουργία θωράκισης πρέπει
να ενεργοποιείται πριν από την
προθέρμανση, όταν επιλέγεται η
αυτόματη λειτουργία, αν θέλετε
να θωρακίσετε τα τρόφιμα που θα
ψήσετε.
Αν ξεχάσετε να ενεργοποιήσετε την
επιλογή, σβήστε τη συσκευή και
επαναλάβετε τα βήματα.
Αυτή η επιλογή είναι διαθέσιμη μόνο
στην αυτόματη λειτουργία, όχι στη
χειροκίνητη.
Γεια σας
16 17
Searing
boost ON
Πιπεριά
18 19
EL

171
6
Ψήσιμο στην αυτόματη λειτουργία
21 Επιλέξτε το κατάλληλο πρόγραμμα
ψησίματος ανάλογα με το είδος του
τροφίμου.
Συμβουλή, κυρίως για το κρέας:
το αποτέλεσμα του ψησίματος στα
προκαθορισμένα προγράμματα
μπορεί να διαφέρει ανάλογα με
την προέλευση, το κομμάτι και
την ποιότητα του τροφίμου. Τα
προγράμματα έχουν διαμορφωθεί
και δοκιμαστεί με τρόφιμα καλής
ποιότητας.
Επίσης, για το ψήσιμο, θα πρέπει να
λαμβάνετε υπόψη και πόσο χοντρό
είναι το κομμάτι κρέατος. Μην ψήνετε
τρόφιμα με πάχος μεγαλύτερο από 4
cm.
Γεια σας
20 21
Αν δεν ξέρετε ποιο πρόγραμμα ψησίματος να χρησιμοποιήσετε, ανατρέξτε στον οδηγό ψησίματος στη
σελίδα 181.
Preheating in
progress
22 Πατήστε το κουμπί « OK » : η συσκευή
θα αρχίσει να προθερμαίνεται.
Σημείωση: αν επιλέξετε λάθος
πρόγραμμα, σβήστε την ψηστιέρα και
επαναλάβετε το βήμα 8.
23 Περιμένετε 4 με 7 λεπτά.
24 Μόλις ολοκληρωθεί η προθέρμανση,
θα ακουστεί ένας ήχος.
Σημείωση: αν η συσκευή
μείνει κλειστή πολλή ώρα αφού
ολοκληρωθεί η προθέρμανση,
το σύστημα ασφαλείας θα
απενεργοποιήσει τη συσκευή.
Προθέρμανση σε
εξέλιξη
22 23
24
EL

172
insert
the food
25-26
Μόλις τελειώσει η προθέρμανση,
μπορείτε να τοποθετήσετε τα
τρόφιμα. Σηκώστε το καπάκι της
ψηστιέρας και τοποθετήστε τα
τρόφιμα στην πλάκα.
Σημείωση: αν η συσκευή μείνει
ανοικτή πολλή ώρα, το σύστημα
ασφαλείας θα απενεργοποιήσει
αυτόματα τη συσκευή.
27-29
Η συσκευή θα υπολογίσει αυτόματα
τον κύκλο ψησίματος (χρόνος και
θερμοκρασία) ανάλογα με την
ποσότητα των υλικών και πόσο
χοντρά είναι τα κομμάτια.
Κλείστε τη συσκευή για να ξεκινήσει ο
κύκλος ψησίματος.
Σημείωση για πολύ λεπτά
τρόφιμα, όπως είναι το μπέικον:
Θα ανάψει το κουμπί «ΟΚ». Πατήστε
το «ΟΚ» για να αναγνωρίσει η συσκευή
το τρόφιμο και να ξεκινήσει ο κύκλος
ψησίματος.
Το βέλος μετατοπίζεται κατά μήκος
της ένδειξης βαθμού ψησίματος, και
μόλις επιτυγχάνεται κάθε επιμέρους
βαθμός ψησίματος, εμφανίζεται η
αντίστοιχη ένδειξη και ακούγεται ένας
ήχος.
Σημείωση: οι βαθμοί ψησίματος είναι
προκαθορισμένοι για κάθε αυτόματο
πρόγραμμα.
Στη διάρκεια του ψησίματος, κάθε
φορά που επιτυγχάνεται ένας βαθμός
ψησίματος, ακούγεται ένας ήχος (π.χ.,
σενιάν/ξεροψημένο).
Η ένδειξη αλλάζει χρώμα ανάλογα με
τον βαθμό ψησίματος και το βέλος
προόδου ψησίματος μετατοπίζεται
στην οθόνη.
Σημειώστε ότι, ειδικά για το κρέας,
το αποτέλεσμα του ψησίματος είναι
φυσιολογικό να διαφέρει ανάλογα
με το είδος, την ποιότητα και την
προέλευση του τροφίμου.
Τοποθετήστε τα τρόφιμα
25 26
to start
cooking
για έναρξη ψησίματος
27 28
Start of
cooking
Έναρξη ψησίματος
29 30
EL

173
Well-done
in 01:35
31-32 Μπορείτε να δείτε ανά πάσα
στιγμή τον χρόνο που απομένει μέχρι
να επιτευχθούν οι διάφοροι βαθμοί
ψησίματος. Πατήστε το δεξιό βέλος για
να δείτε σε πόσο χρόνο θα επιτευχθεί ο
επόμενος βαθμός ψησίματος. Προσοχή,
με αυτόν τον τρόπο δεν επιλέγετε βαθμό
ψησίματος. Η ψηστιέρα θα συνεχίσει
να ψήνει μέχρι τον τελευταίο βαθμό
ψησίματος και θα σας ειδοποιεί σε κάθε
βαθμό.
Καλοψημένο σε 01:35
31 32
33-34 Μόλις εμφανιστεί η επιθυμητή
ένδειξη βαθμού ψησίματος και ακουστεί
ο ήχος, ανοίξτε τη συσκευή και αφαιρέστε
τα τρόφιμα.
35-36 Κλείστε το καπάκι. Η οθόνη θα σας
ζητήσει να επιβεβαιώσετε ότι θέλετε να
σταματήσει το ψήσιμο. Πατήστε ΟΚ, αν
έχετε αφαιρέσει όλα τα τρόφιμα, αλλιώς
αφήστε να συνεχιστεί το ψήσιμο.
Αν θέλετε να ψήσετε κι άλλα υλικά,
ανατρέξτε στην παράγραφο 8.
Σημείωση: το σύστημα ασφαλείας θα
απενεργοποιήσει αυτόματα τη συσκευή,
αν δεν επιλέξετε κανένα πρόγραμμα μετά
από ορισμένο χρόνο.
33 34
v
to stop
cooking
για διακοπή ψησίματος
35 36
OK
EL

174
7
Πώς να ψήσετε δεύτερη δόση
Δεύτερο ψήσιμο με το ίδιο είδος τροφίμου
Any refill?
37-38 Μόλις τελειώσει το πρώτο ψήσιμο,
στην οθόνη θα εμφανιστεί η ένδειξη
«Θα ψήσετε κι άλλα;». Αν θέλετε
να ψήσετε το ίδιο είδος τροφίμου,
πατήστε ΟΚ.
39 Η συσκευή θα αρχίσει να
προθερμαίνεται.
40 Περιμένετε να ολοκληρωθεί η
προθέρμανση.
Θα ψήσετε κι άλλα;
37 38
Preheating in
progress
Προθέρμανση σε εξέλιξη
39 40
Wait
insert
the food
41 Τοποθετήστε τα τρόφιμα στην
ψηστιέρα.
42 Μετά, ακολουθήστε τα βήματα 27 έως
37.
Περιμένετε Τοποθετήστε τα τρόφιμα
41 42
Δεύτερο ψήσιμο με διαφορετικό υλικό
Αφού ψήσετε τα πρώτα υλικά σας:
1. Βεβαιωθείτε ότι η συσκευή είναι κλειστή και ότι δεν έχει μέσα τρόφιμα.
2. Επιλέξτε την επιθυμητή λειτουργία ή το επιθυμητό πρόγραμμα.
3. Πατήστε το κουμπί «OK» για να ξεκινήσει η προθέρμανση. Στην οθόνη θα εμφανίζεται η ένδειξη
προθέρμανσης.
4. Μόλις τελειώσει η προθέρμανση, θα ακουστεί ο ήχος και στην οθόνη θα εμφανιστεί η ένδειξη τέλους
προθέρμανσης.
EL

175
8
Ψήσιμο στη χειροκίνητη λειτουργία
OK
Manual
mode
120
°C
43 Επιλέξτε τη χειροκίνητη λειτουργία και
πατήστε ΟΚ για επιβεβαίωση.
44 Επιλέξτε την επιθυμητή θερμοκρασία
με τα κουμπιά ρύθμισης.
Πατήστε ΟΚ για να επιβεβαιώσετε την
επιλεγμένη θερμοκρασία.
43 44
Preheating
180°C
180°C
OK
45 Περιμένετε να ολοκληρωθεί η
προθέρμανση.
46 Μόλις τελειώσει η προθέρμανση,
πατήστε ΟΚ για να ξεκινήσει το
χρονόμετρο.
Σημείωση: μπορείτε να ρυθμίσετε τον
χρόνο ψησίματος και στην αρχή της
προθέρμανσης.
45 46
00:00
180°C
00:00
180°C
47 Επιλέξτε τον επιθυμητό χρόνο
ψησίματος με τα κουμπιά ρύθμισης.
48 Τοποθετήστε τα υλικά και πατήστε ΟΚ
για να ξεκινήσει το ψήσιμο.
47 48
5. Η συσκευή είναι έτοιμη να χρησιμοποιηθεί μόλις τελειώσει η προθέρμανση. Σηκώστε το καπάκι της
ψηστιέρας και τοποθετήστε τα τρόφιμα μέσα στη συσκευή. Μετά, ακολουθήστε τα βήματα 27 έως
37.
Σημαντικό:
– Σημειώστε ότι πρέπει να γίνεται προθέρμανση σε κάθε ψήσιμο.
Υπενθύμιση: πριν ξεκινήσετε την προθέρμανση, βεβαιωθείτε ότι η συσκευή είναι κλειστή και ότι δεν
έχει μέσα τρόφιμα.
– Μετά, περιμένετε να τελειώσει η προθέρμανση και ύστερα ανοίξτε την ψηστιέρα και τοποθετήστε
τα υλικά.
Σημείωση: αν ο νέος κύκλος προθέρμανσης ξεκινήσει αμέσως μόλις τελειώσει ο προηγούμενος
κύκλος, ο χρόνος προθέρμανσης θα είναι μικρότερος.
EL

176
00:00
180°C
to stop
cooking
49-50 Μόλις ολοκληρωθεί ο χρόνος
ψησίματος, θα ακουστεί ένας ήχος.
Αφαιρέστε τα τρόφιμα.
Πατήστε ΟΚ για να σταματήσει το
ψήσιμο και αφαιρέστε τα τρόφιμα.
για διακοπή ψησίματος
49 50
9
Σημειώσεις
51-53
Μπορείτε να ανοίξετε την ψηστιέρα
και να αφαιρέσετε τα τρόφιμα που
ψηθεί στον βαθμό που θέλετε, και μετά
να ξανακλείσετε την ψηστιέρα για να
συνεχίσουν να ψήνονται τα υπόλοιπα
τρόφιμα. Το πρόγραμμα θα συνεχίσει
τον κύκλο μέχρι τον τελευταίο βαθμό
ψησίματος για το επιλεγμένο πρόγραμμα.
54 Σημείωση: το σύστημα ασφαλείας
θα απενεργοποιήσει αυτόματα τη
συσκευή μετά από ορισμένο χρόνο.
51 52
Remove
your food
Overcooked
risk
Αφαιρέστε τα τρόφιμα Κίνδυνος να παραψηθεί
53 54
EL

177
10
Τερματισμός λειτουργίας
55 Πατήστε το κουμπί ON/OFF και μετά
επιβεβαιώστε, πατώντας το κουμπί
ΟΚ.
56 Αποσυνδέστε τη συσκευή από την
πρίζα.
57 Αφήστε να κρυώσει τουλάχιστον 2
ώρες.
Για να αποφύγετε τον κίνδυνο
εγκαύματος, αφήστε την ψηστιέρα να
κρυώσει τελείως πριν την καθαρίσετε.
55 56
2 ώρες
57
EL

178
11
Καθαρισμός
58 Πριν από τον καθαρισμό,
απασφαλίστε και αφαιρέστε τις πλάκες
για να μην καταστραφεί η επιφάνεια
ψησίματος.
59 Ο δίσκος περισυλλογής υγρών και
οι πλάκες ψησίματος πλένονται στο
πλυντήριο πιάτων. Μην τοποθετήσετε
ποτέ τη συσκευή και το καλώδιο
στο πλυντήριο πιάτων. Μην πλένετε
ποτέ τα θερμαντικά στοιχεία (τις
αντιστάσεις) αφού αφαιρέσετε τις
πλάκες. Αν έχουν λερωθεί, περιμένετε
να κρυώσει τελείως η συσκευή και
καθαρίστε τες με ένα στεγνό πανί.
60-61
Αν δεν θέλετε να βάλετε τις πλάκες
στο πλυντήριο πιάτων, μπορείτε να
τις πλύνετε με ζεστό νερό και λίγο
υγρό πιάτων και μετά να τις ξεπλύνετε
καλά για να απομακρυνθούν όλα
τα υπολείμματα. Σκουπίστε καλά με
χαρτί κουζίνας.
Μην καθαρίζετε κανένα μέρος
της ψηστιέρας με μεταλλικά
σφουγγαράκια, σύρμα ή διαβρωτικά
καθαριστικά. Χρησιμοποιήστε μόνο
νάιλον ή μη μεταλλικά σφουγγάρια.
Αδειάστε τον δίσκο περισυλλογής και
πλύνετε με ζεστό νερό και λίγο υγρό
πιάτων. Μετά, σκουπίστε καλά με
χαρτί κουζίνας.
62 Για να καθαρίσετε το καπάκι της
ψηστιέρας, περάστε το με ένα
σφουγγάρι εμποτισμένο με ζεστό
νερό και σκουπίστε με ένα στεγνό
μαλακό πανί. Για να καθαρίσετε τον
πίνακα ελέγχου, χρησιμοποιήστε μόνο
ένα μαλακό και στεγνό πανί.
63 Μη βυθίζετε το σώμα της ψηστιέρας
σε νερό ή άλλο υγρό.
64 Η ψηστιέρα πρέπει να είναι πάντα
καθαρή, κρύα και στεγνή πριν την
αποθηκεύσετε.
Κάθε άλλη εργασία επισκευής θα
πρέπει να πραγματοποιείται από
εξουσιοδοτημένο αντιπρόσωπο
σέρβις.
58 59
60 61
62 63
64
EL

179
Επίλυση προβλημάτων
ΕΠΙΛΥΣΗ ΠΡΟΒΛΗΜΑΤΩΝ ELITE
Πρόβλημα Αιτία Επίλυση
Αλλαγή γλώσσας Συνδέστε την ψηστιέρα στην πρίζα,
πατήστε το ΟΝ και αμέσως μετά το
κουμπί απόψυξης (όσο στην οθόνη
εμφανίζεται η ένδειξη «Γεια σας»).
5sec
Preheating
not finished,
remove your
food
10s before-
changeover
to manual
mode
Δεν ολοκληρώθηκε ο χρόνος
προθέρμανσης. Άνοιξε η
ψηστιέρα και τοποθετήθηκαν
τρόφιμα στην πλάκα πριν
ολοκληρωθεί η προθέρμανση.
Μπορείτε να ψήσετε τα τρόφιμα, αλλά
θα πρέπει να ελέγχετε το ψήσιμο
γιατί η ψηστιέρα έχει περάσει στη
χειροκίνητη λειτουργία.
Μπορείτε να ρυθμίσετε τη
θερμοκρασία.
Ή
Ανοίξτε την ψηστιέρα, αφαιρέστε τα
τρόφιμα, κλείστε σωστά την ψηστιέρα
και περιμένετε να ολοκληρωθεί η
προθέρμανση.
Δεν μπορώ να σβήσω
τη συσκευή.
Δεν πατήθηκε το κουμπί
δεύτερη φορά, ή πέρασε
πολύς χρόνος ανάμεσα στα 2
πατήματα.
Πατήστε 2 φορές διαδοχικά το κουμπί
ON/OFF.
ή
Πατήστε μία φορά το κουμπί ON/OFF
και μετά επιβεβαιώστε με το ΟΚ.
Σφάλμα 1 έως 8 Η συσκευή είχε αποθηκευτεί
ή χρησιμοποιείται σε πολύ
ψυχρό χώρο.
Η συσκευή έχει
υπερθερμανθεί.
Βγάλτε τη συσκευή από την πρίζα και
περιμένετε μερικά λεπτά.
Συνδέστε ξανά τη συσκευή στην πρίζα
και πατήστε το κουμπί ΟΝ.
Αν το πρόβλημα παραμένει,
απευθυνθείτε στην εξυπηρέτηση
πελατών.
Σφάλμα 9 έως 13 Βλάβη της συσκευής. Βγάλτε τη συσκευή από την πρίζα
και απευθυνθείτε στην εξυπηρέτηση
πελατών.
Η συσκευή σταματά
από μόνη της κατά την
προθέρμανση ή το
ψήσιμο.
Η συσκευή έμεινε ανοικτή
πολλή ώρα κατά το ψήσιμο.
Η συσκευή έμεινε ανενεργή
πολλή ώρα αφού τελείωσε η
προθέρμανση.
Αποσυνδέστε τη συσκευή από την
πρίζα και περιμένετε μερικά λεπτά.
Μετά, συνδέστε ξανά τη συσκευή στην
πρίζα και ενεργοποιήστε την.
EL

180
ΕΠΙΛΥΣΗ ΠΡΟΒΛΗΜΑΤΩΝ ELITE
Πρόβλημα Αιτία Επίλυση
to stop
cooking
Μήνυμα επιβεβαίωσης για
διακοπή ψησίματος
2 λύσεις:
Πατήστε ΟΚ, αν έχετε αφαιρέσει όλα
τα τρόφιμα.
Ή
Μην πατήσετε ΟΚ και αφήστε να
ψηθούν και τα υπόλοιπα τρόφιμα.
to start
cooking
Το υλικό δεν αναγνωρίζεται
γιατί είναι πολύ λεπτό.
Πατήστε ΟΚ για να ξεκινήσει το
ψήσιμο.
for manual
mode
Το υλικό είναι πολύ χοντρό. 2 λύσεις:
Πατήστε ΟΚ για να συνεχίσετε το
ψήσιμο στη χειροκίνητη λειτουργία.
Ή
Αφαιρέστε τα τρόφιμα και κόψτε τα
λεπτότερα, για να μπορείτε να τα
ψήσετε αυτόματα.
Δεν μπορώ να
ρυθμίσω τον χρόνο
στη χειροκίνητη
λειτουργία.
Η οθόνη έχει μείνει στη
ρύθμιση θερμοκρασίας.
Πατήστε μία φορά το ΟΚ για να
περάσετε στη ρύθμιση του χρόνου και
χρησιμοποιήστε τα βέλη για να ορίσετε
την επιθυμητή διάρκεια. Επιβεβαιώστε
με το ΟΚ.
00:00
180°C
EL

181
Βαθμοί ψησίματος αυτόματων προγραμμάτων
12 ΑΥΤΟΜΑΤΑ ΠΡΟΓΡΑΜΜΑΤΑ
ΑΥΤΟΜΑΤΑ
ΠΡΟΓΡΑΜΜΑΤΑ
ΕΝΔΕΙΞΗ ΒΑΘΜΟΥ ΨΗΣΙΜΑΤΟΣ
ΜΕΝΟΥ
Blue
Rare
Medium
Well-done
Μοσχάρι Ωμό Σενιάν Μέτριο Καλοψημένο
Στήθος κοτόπουλο - - - Καλοψημένο
Λουκάνικο - - - Καλοψημένο
Μπέικον - - Μέτριο Ξεροψημένο
Μπιφτέκι - Σενιάν Μέτριο Καλοψημένο
Σάντουιτς -
Ελαφρώς
ψημένο
Καλοψημένο Ξεροψημένο
Ψάρι - Μέτριο
Μέτριο προς
καλοψημένο
Καλοψημένο
Θαλασσινά - Μέτριο
Μέτριο προς
καλοψημένο
Καλοψημένο
Πατάτα - - - Μαλακό
Πιπεριά - -
Μαλακό
καλοψημένο
Μαλακό
Μελιτζάνα - - - Καλοψημένο
Ντομάτα - -
Μαλακό
καλοψημένο
Μαλακό
EL

182
ΕΙΔΙΚΗ ΧΕΙΡΟΚΙΝΗΤΗ ΛΕΙΤΟΥΡΓΙΑ
ΛΑΧΑΝΙΚΑ Ή ΦΡΟΥΤΑ
From 180°C
to 195°C
From 220°C
to 235°C
From 225°C
to 270°C
- - Κολοκύθι (φέτες)
- - Σπαράγγια
- - Μανιτάρια
- Κρεμμύδι -
Μπρόκολο - -
Καρότα baby - -
- Μάραθος -
Γλυκοπατάτα
(φέτες)
- -
- Πατάτα (φέτες) -
- Ανανάς -
- Ροδάκινο -
ΣΥΜΒΟΥΛΕΣ ΨΗΣΙΜΑΤΟΣ
ΠΡΟΪΟΝΤΑ
ΠΡΟΓΡΑΜΜΑ
ΨΗΣΙΜΑΤΟΣ
ΣΥΜΒΟΥΛΗ
ΨΗΣΙΜΑΤΟΣ
Χοιρινό φιλέτο (χωρίς κόκκαλο),
χοιρινή κοιλιά
Καλοψημένο *
Λουκάνικα Φρανκφούρτης
(προψημένο χοιρινό)
220°C / 8 λεπτά 30
Λουκάνικα Rindswurst (προψημένο
μοσχάρι)
220°C / 8 λεπτά 30
Λουκάνικα Nürnberger (προψημένο
χοιρινό)
220°C / 4 λεπτά 30
EL

183
ΣΥΜΒΟΥΛΕΣ ΠΑΡΑΣΚΕΥΗΣ
Για να έχουν τα ψητά τις χαρακτηριστικές ρίγες από το ψήσιμο, είναι καλό να γυρίσετε το
ψημένο κομμάτι πριν το σερβίρετε.
ΠΡΟΪΟΝΤΑ ΣΥΜΒΟΥΛΕΣ ΠΑΡΑΣΚΕΥΗΣ
ΠΑΤΑΤΑ
• Φέτες κατά μήκος
• Προσθέστε λάδι στα υλικά για να ψηθούν καλύτερα
ΠΙΠΕΡΙΑ • Κομμένη στα δύο κατά μήκος
ΜΕΛΙΤΖΑΝΑ
• Φέτες κατά μήκος
• Προσθέστε λάδι στα υλικά για να ψηθούν καλύτερα
ΝΤΟΜΑΤΑ
• Χρησιμοποιήστε στρογγυλές ντομάτες
• Μη χρησιμοποιήσετε πολύ ώριμες ντομάτες
• Κόψτε στα δύο κατά πλάτος
• Για βέλτιστο ψήσιμο, τοποθετήστε τη στρογγυλή πλευρά κάθε
κομμένης ντομάτας στην κάτω πλάκα της ψηστιέρας.
ΧΟΙΡΙΝΟ
* Χρησιμοποιήστε τη λειτουργία θωράκισης, αν το πάχος του
κομματιού είναι πάνω από 20 χιλιοστά.
EL

ARGENTINA
0800-122-2732
2 años
2 years
GROUPE SEB ARGENTINA S.A.
Billinghurst 1833 3°
C1425DTK
Capital Federal Buenos Aires
ՀԱՅԱՍՏԱՆ
ARMENIA
010 55-76-07
2 տարի
2 years
«SEB Ուկրանիա խումբ» ընկերություն
Խարկովի խճուղի, 201-203, 3-րդ հարկ
Կիեվ, 02121 Ուկրաինա
2 տարի
AUSTRALIA
1300307824 1 year
Groupe SEB Australia
PO Box 404
North Ryde, NSW, 1670
ÖSTERREICH
AUSTRIA
01 890 3476
2 Jahre
2 years
GROUPE SEB DEUTSCHLAND GmbH
Theodor-Stern-Kai 1
60596 Frankfurt
نيرحبلا
BAHRAIN
17716666 1 year www.tefal-me.com
БЕЛАРУСЬ
BELARUS
017 2239290
2 years
BELGIQUE BELGIE
BELGIUM
070 23 31 59
2 ans
2 jaar
2 years
GROUPE SEB BELGIUM SA NV
25 avenue de l'Espérance - ZI
6220 Fleurus
BOSNA I HERCEGOVINA
Info-linija za
033 551 220
2 godine
2 years
SEB Developpement
BRASIL
BRAZIL
11 2915-4400
1 ano
1 year
Seb Comercial gAv Jornalista Roberto Marinho,
БЪЛГАРИЯ
BULGARIA
0700 10 330
2 years
CANADA
1-800-418-3325
1 an
1 year
Groupe SEB Canada Inc.
36 Newmill Gate, Unit 2
Scarborough, ON M1V 0E2
CHILE
02 2 884 46 06
2 años
2 years
GROUPE SEB CHILE Comercial Ltda
Avenida Santa María 0858, Providencia -
Santiago
COLOMBIA
018000520022
2 años
2 years
GROUPE SEB COLOMBIA
Apartado Aereo 172, Kilometro 1
Via Zipaquira Cajica Cundinamarca
HRVATSKA
CROATIA
01 30 15 294
2 godine
2 years
SEB mku & p d.o.o.
Sarajevska 29, 10000 Zagreb
ČESKÁ REPUBLIKA
CZECH REPUBLIC
731 010 111
2 roky
2 years
Futurama Business Park (budova A)
Sokolovská 651/136a
186 00 Praha 8
DANMARK
DENMARK
43 350 350
2 år
2 years
Groupe SEB Denmark A/S
Delta Park 37, 3. sal
2665 Vallensbæk Strand
رصم
EGYPT
16622
1year
:
:
TEFAL/T-FAL INTERNATIONAL GUARANTEE: COUNTRY LIST
SMALL HOUSEHOLD APPLIANCES
www.tefal.com
EESTI
ESTONIA
668 1286
2 aastat
2 years
Groupe SEB Polska Sp. z o.o.
Gdański Business Center II D
ul. Inflancka 4C
00-189 Warsaw
SUOMI
FINLAND
09 8946 150
2 vuotta
2 years
Groupe SEB Finland OY
Pakkalankuja 6 01510 Vantaa
FRANCE Continentale +
Guadeloupe, Martinique,
Réunion, St-Martin
09 74 50 47 74
2 ans
2 years
GROUPE SEB France
Service Consommateur Tefal
112 Ch. Moulin Carron, TSA 92002
69134 ECULLY Cedex
DEUTSCHLAND
GERMANY
0212 387 400
2 Jahre
2 years
GROUPE SEB DEUTSCHLAND GmbH
Theodor-Stern-Kai 1
60596 Frankfurt
ELLADA
GREECE
2106371251
2 χρόνια
2 years
SEB GROUPE ΕΛΛΑΔΟΣ Α.Ε.
Καβαλιεράτου 7
Τ.Κ. 145 64 Κ. Κηφισιά
香港
HONG KONG
8130 8998 1 year
SEB ASIA Ltd.
9/F, South Block, Skyway House
3 Sham Mong Road, Tai Kok Tsui, Kowloon
Hong-Kong
MAGYARORSZÁG
HUNGARY
06 1 801 8434
2 év
2 years
GROUPE SEB CENTRAL-EUROPE Kft.
2040 Budaörs, Puskás Tivadar út 14
INDIA
1860-200-1232 2 years
Groupe SEB India (P) Limited
A-25, 1st Floor, Rear Tower, Mohan Cooperative
Industrial Suites, Mathura Road, New Delhi-
110044
INDONESIA
+62 21 5793 7007 1 year
GROUPE SEB INDONESIA (Representative
office)
Sudirman Plaza, Plaza Marein 8th Floor
JL Jendral Sudirman Kav 76-78,
Jakarta 12910, Indonesia
ITALIA
ITALY
1 99 207 354
2 anni
2 years
GROUPE SEB ITALIA S.p.A.
Via Montefeltro, 4
20156 Milano
日本
JAPAN
0570-077772
1年
1 year
株式会社グループセブジャパン
〒144-0042
東京都大田区羽田旭町11-1
羽田クロノゲート事務棟
5F
JORDAN
5665505 1 year www.tefal-me.com
KAZAKHSTAN
727 378 39 39
2 жыл
2 years
ЖАҚ "ГРУППА СЕБ-ВОСТОК", Мәскеу,
125171, Ленинград тас жолы, 16А үй, 3-
құрылыс, XII-ғимарат
한국어
KOREA
080-733-7878 1 year
(유)그룹 세브 코리아 서울특별시 종로구 종로1길
50, 더케이트윈타워 B동 14층 03142
KUWAIT
1807777 Ext :2104 1 year www.tefal-me.com
LATVJA
LATVIA
6 616 3403
2 gadi
2 years
Groupe SEB Polska Sp. z o.o.
Gdański Business Center II D
ul. Inflancka 4C
00-189 Warsaw
LEBANON
4414727 1 year www.tefal-me.com
LIETUVA
LITHUANIA
5 214 0057
2 metai
2 years
Groupe SEB Polska Sp. z o.o.
Gdański Business Center II D
ul. Inflancka 4C
00-189 Warsaw
ARGENTINA
0800-122-2732
2 años
2 years
GROUPE SEB ARGENTINA S.A.
Billinghurst 1833 3°
C1425DTK
Capital Federal Buenos Aires
ՀԱՅԱՍՏԱՆ
ARMENIA
010 55-76-07
2 տարի
2 years
«SEB Ուկրանիա խումբ» ընկերություն
Խարկովի խճուղի, 201-203, 3-րդ հարկ
Կիեվ, 02121 Ուկրաինա
2 տարի
AUSTRALIA
1300307824 1 year
Groupe SEB Australia
PO Box 404
North Ryde, NSW, 1670
ÖSTERREICH
AUSTRIA
01 890 3476
2 Jahre
2 years
GROUPE SEB DEUTSCHLAND GmbH
Theodor-Stern-Kai 1
60596 Frankfurt
نيرحبلا
BAHRAIN
17716666 1 year www.tefal-me.com
БЕЛАРУСЬ
BELARUS
017 2239290
2 years
BELGIQUE BELGIE
BELGIUM
070 23 31 59
2 ans
2 jaar
2 years
GROUPE SEB BELGIUM SA NV
25 avenue de l'Espérance - ZI
6220 Fleurus
BOSNA I HERCEGOVINA
Info-linija za
033 551 220
2 godine
2 years
SEB Developpement
BRASIL
BRAZIL
11 2915-4400
1 ano
1 year
Seb Comercial gAv Jornalista Roberto Marinho,
БЪЛГАРИЯ
BULGARIA
0700 10 330
2 years
CANADA
1-800-418-3325
1 an
1 year
Groupe SEB Canada Inc.
36 Newmill Gate, Unit 2
Scarborough, ON M1V 0E2
CHILE
02 2 884 46 06
2 años
2 years
GROUPE SEB CHILE Comercial Ltda Av.
Providencia, 2331, piso 5, oficina 501 Santiago
COLOMBIA
018000520022
2 años
2 years
GROUPE SEB COLOMBIA
Apartado Aereo 172, Kilometro 1
Via Zipaquira Cajica Cundinamarca
HRVATSKA
CROATIA
01 30 15 294
2 godine
2 years
SEB mku & p d.o.o.
Sarajevska 29, 10000 Zagreb
ČESKÁ REPUBLIKA
CZECH REPUBLIC
731 010 111
2 roky
2 years
Futurama Business Park (budova A)
Sokolovská 651/136a
186 00 Praha 8
DANMARK
DENMARK
44 66 31 55
2 år
2 years
GROUPE SEB NORDIC AS
Tempovej 27 2750 Ballerup
رصم
EGYPT
16622
1year
:
:
TEFAL/T-FAL INTERNATIONAL GUARANTEE: COUNTRY LIST
SMALL HOUSEHOLD APPLIANCES
www.tefal.com

LUXEMBOURG
0032 70 23 31 59
2 ans
2 years
GROUPE SEB BELGIUM SA NV
25 avenue de l'Espérance - ZI
6220 Fleurus
MACEDONIA
(02) 20 50 319
2 години
2 years
Груп Себ България ЕООД
бул. България 58 С, ет 9, офис 30
1680 София
MALAYSIA
603 7802 3000 2 years
GROUPE SEB MALAYSIA SDN. BHD
Unit No. 402-403, Level 4, Uptown 2,
No. 2, Jalan SS21/37, Damansara Uptown,
47400, Petaling Jaya, Selangor D.E Malaysia
MEXICO
(55) 52839354
1 año
1 year
Groupe Seb México S.A. de C.V.
Calle Boulevard Miguel de Cervantes, Saavedra
No 169 Piso 9, Col Ampliación Granada, C.P.
11520, Ciudad de México
NEDERLAND
The Netherlands
0318 58 24 24
2 jaar
2 years
GROUPE SEB NEDERLAND B.V.
De Schutterij 27
3905 PK Veenendaal
NEW ZEALAND
0800 700 711 1 year
GROUPE SEB NEW ZEALAND
PO Box 17 – 298, Greenlane, 1546 Auckland
New Zealand
NORGE
NORWAY
22 96 39 30
2 år
2 years
Groupe SEB Norway AS
Lilleakerveien 6d, 5 etg 0283, Oslo
OMAN
24703471 1 year www.tefal-me.com
POLSKA
POLAND
801 300 420
koszt jak za
połączenie lokalne
2 lata
2 years
Groupe SEB Polska Sp. z o.o.
Gdański Business Center II D
ul. Inflancka 4C
00-189 Warsaw
PORTUGAL
808 284 735
2 anos
2 years
GROUPE SEB IBÉRICA SA
Urb. da Matinha
Rua Projectada à Rua 3
Bloco1 - 3° B/D 1950 - 327 Lisboa
QATAR
44485555 1 year www.tefal-me.com
REPUBLIC OF IRELAND
01 677 4003
2 years
GROUPE SEB IRELAND
Unit B3 Aerodrome Business Park, College
Road, Rathcoole, Co. Dublin
ROMANIA
0 21 316 87 84
2 ani
2 years
GROUPE SEB ROMÂNIA
Str. Ermil Pangratti nr. 13
011881 Bucureşti
RUSSIA
495 213 32 30
2 года
2 years
ЗАО «Группа СЕБ-Восток», Москва, 125171,
Ленинградское шоссе, д.16А, строение 3,
помещение XII
SAUDI ARABIA
920023701 2 years www.tefal-me.com
SRBIJA
SERBIA
060 0 732 000
2 godine
2 years
SEB Developpement
Đorđa Stanojevića 11b
11070 Novi Beograd
SINGAPORE
6550 8900 2 years
GROUPE SEB (Singapore) Pte. Ltd.
3A International Business Park
#12-04/05, ICON@IBP
Singapore 609935
SLOVENSKO
SLOVAKIA
232 199 930
2 roky
2 years
GROUPE SEB Slovensko, spol. s r.o.
Cesta na Senec 2/A
821 04 Bratislava
SLOVENIJA
SLOVENIA
02 234 94 90
2 leti
2 years
GROUPE SEB Slovensko, spol. s r.o.
Cesta na Senec 2/A
821 04 Bratislava
ARGENTINA
0800-122-2732
2 años
2 years
GROUPE SEB ARGENTINA S.A.
Billinghurst 1833 3°
C1425DTK
Capital Federal Buenos Aires
ՀԱՅԱՍՏԱՆ
ARMENIA
010 55-76-07
2 տարի
2 years
«SEB Ուկրանիա խումբ» ընկերություն
Խարկովի խճուղի, 201-203, 3-րդ հարկ
Կիեվ, 02121 Ուկրաինա
2 տարի
AUSTRALIA
1300307824 1 year
Groupe SEB Australia
PO Box 404
North Ryde, NSW, 1670
ÖSTERREICH
AUSTRIA
01 890 3476
2 Jahre
2 years
GROUPE SEB DEUTSCHLAND GmbH
Theodor-Stern-Kai 1
60596 Frankfurt
نيرحبلا
BAHRAIN
17716666 1 year www.tefal-me.com
БЕЛАРУСЬ
BELARUS
017 2239290
2 years
BELGIQUE BELGIE
BELGIUM
070 23 31 59
2 ans
2 jaar
2 years
GROUPE SEB BELGIUM SA NV
25 avenue de l'Espérance - ZI
6220 Fleurus
BOSNA I HERCEGOVINA
Info-linija za
033 551 220
2 godine
2 years
SEB Developpement
BRASIL
BRAZIL
11 2915-4400
1 ano
1 year
Seb Comercial gAv Jornalista Roberto Marinho,
БЪЛГАРИЯ
BULGARIA
0700 10 330
2 years
CANADA
1-800-418-3325
1 an
1 year
Groupe SEB Canada Inc.
36 Newmill Gate, Unit 2
Scarborough, ON M1V 0E2
CHILE
02 2 884 46 06
2 años
2 years
GROUPE SEB CHILE Comercial Ltda Av.
Providencia, 2331, piso 5, oficina 501 Santiago
COLOMBIA
018000520022
2 años
2 years
GROUPE SEB COLOMBIA
Apartado Aereo 172, Kilometro 1
Via Zipaquira Cajica Cundinamarca
HRVATSKA
CROATIA
01 30 15 294
2 godine
2 years
SEB mku & p d.o.o.
Sarajevska 29, 10000 Zagreb
ČESKÁ REPUBLIKA
CZECH REPUBLIC
731 010 111
2 roky
2 years
Futurama Business Park (budova A)
Sokolovská 651/136a
186 00 Praha 8
DANMARK
DENMARK
44 66 31 55
2 år
2 years
GROUPE SEB NORDIC AS
Tempovej 27 2750 Ballerup
رصم
EGYPT
16622
1year
:
:
TEFAL/T-FAL INTERNATIONAL GUARANTEE: COUNTRY LIST
SMALL HOUSEHOLD APPLIANCES
www.tefal.com
ESPAÑA
SPAIN
933 06 37 65
2 años
2 years
GROUPE SEB IBÉRICA S.A.
C/ Almogàvers, 119-123, Complejo Ecourban
08018 Barcelona
SVERIGE
SWEDEN
08 629 25 00
2 år
2 years
TEFAL - OBH Nordica Group AB
Löfströms Allé 5
172 66 Sundbyberg
SUISSE SCHWEIZ
SWITZERLAND
044 837 18 40
2 ans
2 Jahre
2 years
GROUPE SEB SCHWEIZ GmbH
Thurgauerstrasse 105
8152 Glattpark
ประเทศไทย
THAILAND
02 765 6565 2 years
GROUPE SEB THAILAND
2034/66 Italthai Tower, 14th Floor, n° 14-02,
New Phetchburi Road,
Bangkapi, Huaykwang, Bangkok, 10320
TÜRKIYE
TURKEY
444 40 50
2 YIL
2 years
GROUPE SEB ISTANBUL AS
Dereboyu Cd. Bilim Sk. Sun Plaza No:5 K:2
Maslak 34398 Istanbul
UAE
8002272 1 year www.tefal-me.com
UKRAINE
044 300 13 04
2 роки
2 years
ТОВ «Груп СЕБ Україна»
02121, Харківське шосе, 201-203, 3 поверх,
Київ, Україна
UNITED KINGDOM
0345 602 1454
2 years
GROUPE SEB UK LTD
Riverside House, Riverside Walk
Windsor, Berkshire, SL4 1NA
U.S.A.
800-395-8325 1 year
GROUPE SEB USA
2121 Eden Road Millville, NJ 08332
VIETNAM
1800-555521
2 năm
2 years
Vietnam Fan Joint Stock Company
25 Nguyen Thi Nho Str, Ward 9, Tan Binh Dist,
HCM city
www.tefal.com 24/10/2018
TEFAL/T-FAL INTERNATIONAL GUARANTEE
Retailer name and address / Nom et adresse du revendeur / Nombre y dirección del minorista / Forhandler navn & adresse / Jälleenmyyjän nimi ja osoite /
Forhandler navn og adresse / Återförsäljarens namn och adress / Müüja kauplus ja aadress / Veikala nosaukums un adrese / Parduotuvės pavadinimas ir adresas /
Nazwa i adres sprzedawcy / Naziv i adresa prodajnog mjesta / Naziv in naslov trgovine / Forgalmazó neve és címe / Numele şi adresa vânzătorului / Търговки обект
/ Назва та адреса продавця / Կազմակերպության անվանում և հասցե. / Название и адрес продавца / Сатушының атауы мен мекен-жайы /
販売店名、住所 /
/
/ 소매점 이름과 주소 / Име и адреса на продавач :
Distributor stamp
/ Cachet / Sello del distribuidor / Forhandler stempel / Jälleenmyyjän leima / Forhandler stempel / Återförsäljarens stämpel / Tempel / Zīmogs /
Antspaudas / Pieczęć sprzedawcy / Pečat distributera / Pečat trgovine / Forgalmazó pecsétje / Ştampila vânzătorului / Печат на търговския обект / Печатка
продавця / Կնիք. / Печать продавца / Сатушының мөрі / 販売店印 / /
/ 소매점 직인 / Печат на дистрибутер :
Date of purchase / Date d’achat / Fecha de compra / Købsdato / Ostopäivä / Kjøpsdato / Inköpsdatum / Ostukuupäev / Pirkuma datums / Įsigijimo data / Data
zakupu / Datum izročitve blaga / Datum kupovine / Vásárlás dátuma / Data achiziţiei / Дата на закупуване / Дата продажу / Վաճառքի օր. / Дата продажи /
Сатылған күні / 購入日 /
/ 구입일자 / Датум на купување :
Product reference / Référence produit / Referencia del producto / Referencenummer / Tuotenumero / Artikkelnummer /Produktreferens / Toote viitenumber /
Produkta atsauces numurs / Gaminio numeris / Referencja produktu / Oznaka proizvoda / Tip aparata / Készülék típusa / Cod produs / Модел / Модель / Մոդել. /
Модель / Үлгісі / 製品リファレンス番号 /
/ 제품명 / Податоци за производот:
ARGENTINA
0800-122-2732
2 años
2 years
GROUPE SEB ARGENTINA S.A.
Billinghurst 1833 3°
C1425DTK
Capital Federal Buenos Aires
ՀԱՅԱՍՏԱՆ
ARMENIA
010 55-76-07
2 տարի
2 years
«SEB Ուկրանիա խումբ» ընկերություն
Խարկովի խճուղի, 201-203, 3-րդ հարկ
Կիեվ, 02121 Ուկրաինա
2 տարի
AUSTRALIA
1300307824 1 year
Groupe SEB Australia
PO Box 404
North Ryde, NSW, 1670
ÖSTERREICH
AUSTRIA
01 890 3476
2 Jahre
2 years
GROUPE SEB DEUTSCHLAND GmbH
Theodor-Stern-Kai 1
60596 Frankfurt
نيرحبلا
BAHRAIN
17716666 1 year www.tefal-me.com
БЕЛАРУСЬ
BELARUS
017 2239290
2 years
BELGIQUE BELGIE
BELGIUM
070 23 31 59
2 ans
2 jaar
2 years
GROUPE SEB BELGIUM SA NV
25 avenue de l'Espérance - ZI
6220 Fleurus
BOSNA I HERCEGOVINA
Info-linija za
033 551 220
2 godine
2 years
SEB Developpement
BRASIL
BRAZIL
11 2915-4400
1 ano
1 year
Seb Comercial gAv Jornalista Roberto Marinho,
БЪЛГАРИЯ
BULGARIA
0700 10 330
2 years
CANADA
1-800-418-3325
1 an
1 year
Groupe SEB Canada Inc.
36 Newmill Gate, Unit 2
Scarborough, ON M1V 0E2
CHILE
02 2 884 46 06
2 años
2 years
GROUPE SEB CHILE Comercial Ltda Av.
Providencia, 2331, piso 5, oficina 501 Santiago
COLOMBIA
018000520022
2 años
2 years
GROUPE SEB COLOMBIA
Apartado Aereo 172, Kilometro 1
Via Zipaquira Cajica Cundinamarca
HRVATSKA
CROATIA
01 30 15 294
2 godine
2 years
SEB mku & p d.o.o.
Sarajevska 29, 10000 Zagreb
ČESKÁ REPUBLIKA
CZECH REPUBLIC
731 010 111
2 roky
2 years
Futurama Business Park (budova A)
Sokolovská 651/136a
186 00 Praha 8
DANMARK
DENMARK
44 66 31 55
2 år
2 years
GROUPE SEB NORDIC AS
Tempovej 27 2750 Ballerup
رصم
EGYPT
16622
1year
:
:
TEFAL/T-FAL INTERNATIONAL GUARANTEE: COUNTRY LIST
SMALL HOUSEHOLD APPLIANCES
www.tefal.com

FR
2-24
NL
25-47
DE
48-70
EN
71-91
IT
92-114
ES
115-137
PT
138-160
EL
161-183
2100115156
-
 1
1
-
 2
2
-
 3
3
-
 4
4
-
 5
5
-
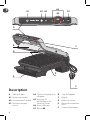 6
6
-
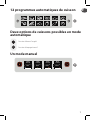 7
7
-
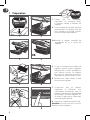 8
8
-
 9
9
-
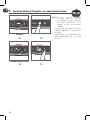 10
10
-
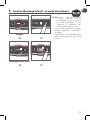 11
11
-
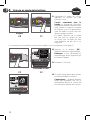 12
12
-
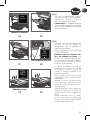 13
13
-
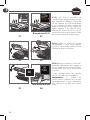 14
14
-
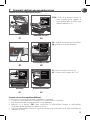 15
15
-
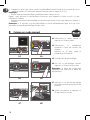 16
16
-
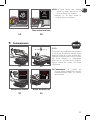 17
17
-
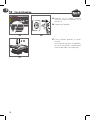 18
18
-
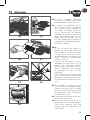 19
19
-
 20
20
-
 21
21
-
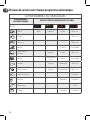 22
22
-
 23
23
-
 24
24
-
 25
25
-
 26
26
-
 27
27
-
 28
28
-
 29
29
-
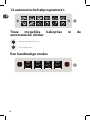 30
30
-
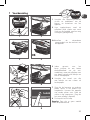 31
31
-
 32
32
-
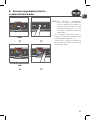 33
33
-
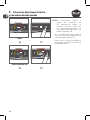 34
34
-
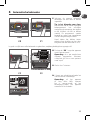 35
35
-
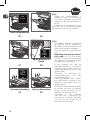 36
36
-
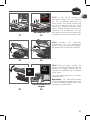 37
37
-
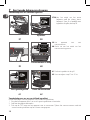 38
38
-
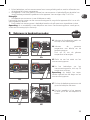 39
39
-
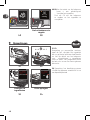 40
40
-
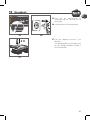 41
41
-
 42
42
-
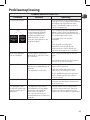 43
43
-
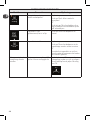 44
44
-
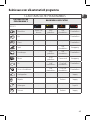 45
45
-
 46
46
-
 47
47
-
 48
48
-
 49
49
-
 50
50
-
 51
51
-
 52
52
-
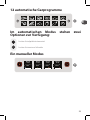 53
53
-
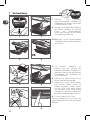 54
54
-
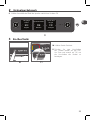 55
55
-
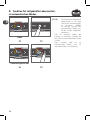 56
56
-
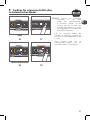 57
57
-
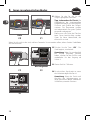 58
58
-
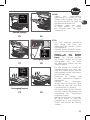 59
59
-
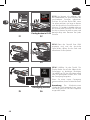 60
60
-
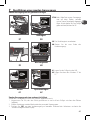 61
61
-
 62
62
-
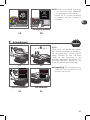 63
63
-
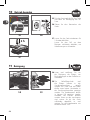 64
64
-
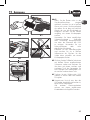 65
65
-
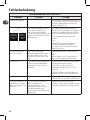 66
66
-
 67
67
-
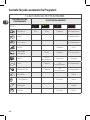 68
68
-
 69
69
-
 70
70
-
 71
71
-
 72
72
-
 73
73
-
 74
74
-
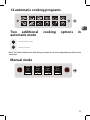 75
75
-
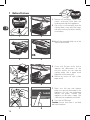 76
76
-
 77
77
-
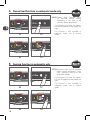 78
78
-
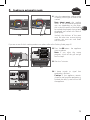 79
79
-
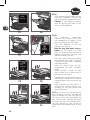 80
80
-
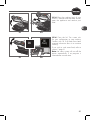 81
81
-
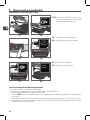 82
82
-
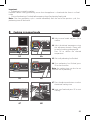 83
83
-
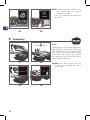 84
84
-
 85
85
-
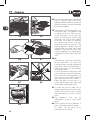 86
86
-
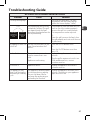 87
87
-
 88
88
-
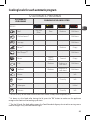 89
89
-
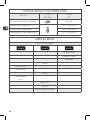 90
90
-
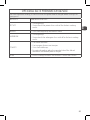 91
91
-
 92
92
-
 93
93
-
 94
94
-
 95
95
-
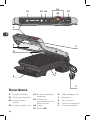 96
96
-
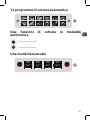 97
97
-
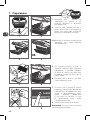 98
98
-
 99
99
-
 100
100
-
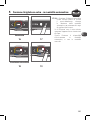 101
101
-
 102
102
-
 103
103
-
 104
104
-
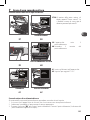 105
105
-
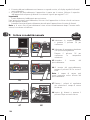 106
106
-
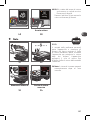 107
107
-
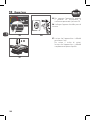 108
108
-
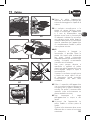 109
109
-
 110
110
-
 111
111
-
 112
112
-
 113
113
-
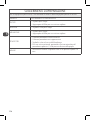 114
114
-
 115
115
-
 116
116
-
 117
117
-
 118
118
-
 119
119
-
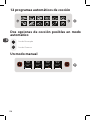 120
120
-
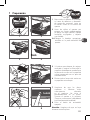 121
121
-
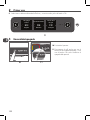 122
122
-
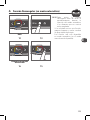 123
123
-
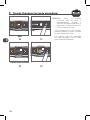 124
124
-
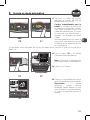 125
125
-
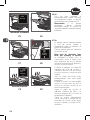 126
126
-
 127
127
-
 128
128
-
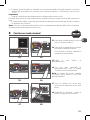 129
129
-
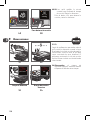 130
130
-
 131
131
-
 132
132
-
 133
133
-
 134
134
-
 135
135
-
 136
136
-
 137
137
-
 138
138
-
 139
139
-
 140
140
-
 141
141
-
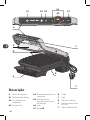 142
142
-
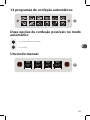 143
143
-
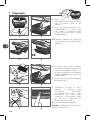 144
144
-
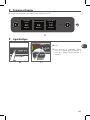 145
145
-
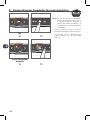 146
146
-
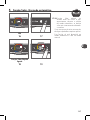 147
147
-
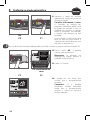 148
148
-
 149
149
-
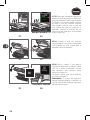 150
150
-
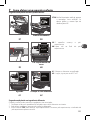 151
151
-
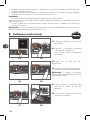 152
152
-
 153
153
-
 154
154
-
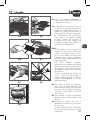 155
155
-
 156
156
-
 157
157
-
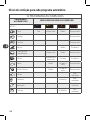 158
158
-
 159
159
-
 160
160
-
 161
161
-
 162
162
-
 163
163
-
 164
164
-
 165
165
-
 166
166
-
 167
167
-
 168
168
-
 169
169
-
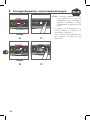 170
170
-
 171
171
-
 172
172
-
 173
173
-
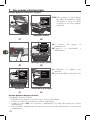 174
174
-
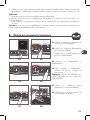 175
175
-
 176
176
-
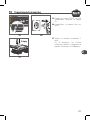 177
177
-
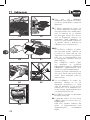 178
178
-
 179
179
-
 180
180
-
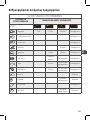 181
181
-
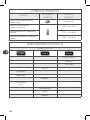 182
182
-
 183
183
-
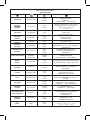 184
184
-
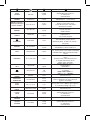 185
185
-
 186
186
-
 187
187
-
 188
188


Tefal OPTIGRILL ELITE YY4397FB de handleiding
- Categorie
- Barbecues
- Type
- de handleiding
- Deze handleiding is ook geschikt voor
in andere talen
- italiano: Tefal OPTIGRILL ELITE YY4397FB Manuale del proprietario
- français: Tefal OPTIGRILL ELITE YY4397FB Le manuel du propriétaire
- español: Tefal OPTIGRILL ELITE YY4397FB El manual del propietario
- Deutsch: Tefal OPTIGRILL ELITE YY4397FB Bedienungsanleitung
- português: Tefal OPTIGRILL ELITE YY4397FB Manual do proprietário