Haier LT22R3CGW Handleiding
- Categorie
- Lcd-tv's
- Type
- Handleiding
Deze handleiding is ook geschikt voor


Contents
EN-1 Digital LCD / LED LCD Television Instruction Manual
Contents
Safety Warnings 2
WELCOME............................................................. 2
IMPORTANT INFORMATION ................................ 2
About your LCD /LED LCD TV 5
INSTALLING THE STAND.......................................5
GET TO KNOW YOUR TV....................................... 7
GET TO KNOW YOUR REMOTE CONTROL ......... 11
CONNECTING YOUR TV......................................12
ANTENNA CONNECTION ..................................................12
IMPROVE YOUR SIGNAL ....................................................12
CONNECT YOUR PC TO THE TV .......................................12
CONNECT A DVD PLAYER TO YOUR TV ........................12
CONNECT A DVD PLAYER OR VCR TO YOUR TV ........12
Connection Option 1 .........................................................12
Connection Option 2 .........................................................12
SCART INPUT.........................................................................12
HDMI INPUT...........................................................................13
MOUNT YOUR TV ONTO THE WALL...............................13
PREPARATION OF YOUR REMOTE CONTROL....13
BATTERY INSTALLATION....................................................13
BATTERY CAUTION..............................................................13
Getting Started 13
Setting up........................................................... 13
LOCATION...............................................................................13
CONNECTION........................................................................13
SWITCHING YOUR TV ON..................................................14
TUNING YOUR TV ...............................................14
SWITCHING TO AN EXTERNAL SOURCE OTHER
THAT TV...................................................................................14
AUTO SEARCH.......................................................................14
DIGITAL MANUAL SEARCH...............................................14
Analog Manual Search ......................................................15
Channel Edit..........................................................................15
RENAME..................................................................................16
MOVE.......................................................................................16
Setting favourite channel.................................................16
SKIP...........................................................................................16
GUIDE (Electronic Program Guide) ...............................16
COMMON INTERFACE ........................................17
Software Update function ...............................................17
Operation...............................................................................18
USING YOUR TV.................................................. 18
How to select the TV program........................................18
HOW to adjust volume......................................................18
CH.LIST function ..................................................................19
ADJUSTING PICTURE SETTINGS ....................... 19
Changing the Picture Setting ..........................................19
ADJUSTING SOUND SETTINGS .........................19
Changing the Sound Setting ...........................................19
FUNCTION SETTINGS......................................... 20
TIME SETTINGS .................................................. 21
LOCK MENU SETTING ........................................23
SHORTCUT MENU DISPLAY...............................24
Using the features 26
Teletext functions 26
Teletext....................................................................................26
USB MODE..........................................................27
TO USE THE USB DEVICE ...................................................27
When connecting/removing the USB device ...........27
Operating the USB device................................................28
Playing a Picture..................................................................28
Playing Music........................................................................28
Playing a Movie....................................................................29
Text...........................................................................................29
Using External USB Disk For Recording...........29
TIME SHIFT .............................................................................30
RECORDING...........................................................................30
USING YOUR DVD PLAYER
(certain models only) ........................................ 31
ADDITIONAL DVD FUNCTIONS.........................32
Reference Sections 33
TROUBLESHOOTING..........................................33
Specification ...................................................... 34

Safety Warnings
Digital LCD / LED LCD Television Instruction Manual EN-2
WELCOME
Thanks for buying this 19"/22"/24"/32"/40" HD Ready Digital LCD/LED LCD TV. This guide will help you set up and begin
using your TV.
First, check the contents of your box with the parts checklist below:
19"/22"/24"/32"/40" HD Ready Digital LCD/LED LCD TVt
Remote control t
AAA battery t ×2
Instruction Manualt
Warrantyt
TV Standt
5XScrews for TV stand(only for 32"/40" model)t
Component adapter , Component audio adapter , SCART adapter (only for 32"/40" model)t
Cover bottom (only for 32"/40" model)t
Now you can get started!
IMPORTANT INFORMATION
READ ALL INSTRUCTIONS BEFORE USE AND KEEP FOR FUTURE REFERENCE.
WARNING: To avoid fire or electric hazards, never place your television receiver in an area with heavy
moisture. Attention should be paid to avoid accidental scratches or impacts onto the screen.
CAUTION: S Please read this manual carefully before using your television and keep this manual in a
good place for future reference.
STo achieve the best performance of your television, read this User‘s Manual carefully and
properly store it for future reference.
SInformation of screen displays and figures in the User’s Manual may vary due to technical
innovations.
CAUTION: SUnauthorized disassembly of this product is prohibited.
TruSurround XT, SRS and the symbol are trademarks of SRS Labs, Inc. TruSurround XT technology is
incorporated under license from SRS Labs, Inc.
TruSurround XT® creates a truly immersive surround sound experience with rich bass and clear dialog from only
two speakers.
WARNING To prevent the spread of re,keep candles or other open ames away from this product at all
times.
WARNING
*To avoid electric hazards, it is strongly suggested that the back cover not be opened, as
there is no any accessory inside the casing.
*If necessary, please contact authorized after-sales services.
could result in serious injury by high voltage.
*An exclamation mark in a triangle: Major part or accessory of which technical
must be followed i t is to be replaced.
WARNING
RISK OF ELECTRIC SHOCK
DO NOT OPEN
TO REDUCE THE RISK OF ELECTRIC SHOCK DO NOT REMOVE COVER (OR BACK). NO
USER SERVICEABLE PARTS INSIDE. REFER TO QUALIFIED SERVICE PERSONNEL.
f i

Safety Warningss
EN-3 Digital LCD / LED LCD Television Instruction Manual
The product should be tightly fixed to avoid
drop damages and even fire.
To avoid fire hazards, do not use this
product under direct sunlight or closely
to heat sources.
Do not locate the product close to water
or oil, which may cause fire hazards.
Unplug the power supply and antenna of
the product when there is a rainstorm,
especially
Thunderstorm.
Do not use damaged or worn electric plugs
and keep electric cord away from heat sources
to avoid electric shocks or fire hazards.
Do not connect excessive sockets in parallel
or share the same socket by multiple plugs
to avoid fire hazards.
The product must be placed on a solid and
stable surface to avoid collapse.
Unauthorized disassembly of the television
is prohibited to avoid electric shocks or fire
hazards. Contact
authorized after-sales
service if technical
service is needed.
Keep the product away from a transformer
or heat source to avoid fire hazards.
Disconnect the product from power supply
and contact authorized after-sales service
if abnormal sound is heard in the product.

Safety Warnings
Digital LCD / LED LCD Television Instruction Manual EN-4
Don‘t use or store inflammable materials
near the product to avoid explosion or fire
hazards.
Don’t place the product in a humid area to
avoid fire hazards.
The antenna of the product should be away
from electric cable to avoid
electric shocks.
Never touch the plug when your hand is wet
as this might cause electric shocks.
Always make sure that the televisionis well
plugged as poor electric
connection might cause fire.
When antenna is used, measures should be
taken to prevent water
from flowing down
along the cable into
the television.
Unplug the television, use soft fabric, never
chemicals, if you are going to make
cleaning of the product.
Make sure that no
water drops in the
product.
The plug and electric cable must be kept
clean to avoid electric
shocks or fire
hazards.
Disconnect the television from power supply
and antenna when there is a
rainstorm or thunderstorm
to avoid electric shocks
or fire hazards.
Disconnect the television from power supply
to avoid electric shocks or fire
hazards in a long
vocation.

About your LCD / LED LCD TV
EN-5 Digital LCD / LED LCD Television Instruction Manual
3FNPWFUIFTNBMMQJFDFPVUPGUIFCBTFTUBOE
1PTJUJPOUIFDPMVNOXJUIUIFCBTFTUBOE
3FQMBDFUIFTNBMMQJFDFJOUIFCBTF
0USHTHE46ONTOTHEBASE2OTATETHEMACHINEABOUTDEGREESACCORDINGTOTHEARROWONTHEBASESTAND
Installing the Stand
Only 19"/22"/24" LED LCD Model

About your LCD / LED LCD TV
Digital LCD / LED LCD Television Instruction Manual EN-6
Installing the Stand
Only 32"/40" LED LCD Model
1.Carefully place the TV screen face down on a table. We suggest that you place the
wrapping material from the TV package on thetable top to protect the screen from
damage.
2.Position the stand with the bottom of the TV as shown below.
4.Attach the screws from the bottom of the stand to the TV.
3.Push the stand onto the TVDŽ
.

About your LCD / LED LCD TV
EN-7 Digital LCD / LED LCD Television Instruction Manual
About your LCD/LED LCD TV
GET TO KNOW YOUR TV
Only 19"/22" LCD Model
Front control panel
108&3
4063$&
$BMMUIF*OQVU4PVSDFNFOV$POöSNCVUUPO
XIFOPQFSBUJOHNFOV
.&/6
1SFTTUPTFMFDUUIFNBJONFOV
70-
7PMVNFEPXO-FGUPSJFOUBUJPOUPBEKVTUUIF
JUFNJOUIF04%
70-
7PMVNFVQ3JHIUPSJFOUBUJPOUPBEKVTUUIF
JUFN1SFTTUPFOUFS
$)
57DIBOOFMEPXOUPTFMFDUUIFJUFNJOUIF
NFOV
$)
57DIBOOFMVQUPTFMFDUUIFJUFNJOUIFNFOV
1PXFSJOEJDBUPS
3FNPUF4FOTPS
POWER
1SFTTUPUVSOUIF57POBOEPò

About your LCD / LED LCD TV
Digital LCD / LED LCD Television Instruction Manual EN-8
Rear Terminals Control
1MFBTFSFGFSUPBDUVBMQSPEVDUPGUIF%7%TMPUBOE
CVUUPOT
+VTUUBLFPOF57XJUI%7%GPSFYBNQMFQMFBTFTFF
UIFSFBM

About your LCD / LED LCD TV
EN-9 Digital LCD / LED LCD Television Instruction Manual
Only 19"/22"/24" LED LCD Model
F
ront control panel
6
7
1
SOURCE
Call the input Source menu/Conrm button
when operating menu.
2
MENU
Press to select the main menu.
3
VOL-
Volume down/Left orientation to adjust the item
in the OSD.
VOL+
Volume up/Right orientation to adjust the item
in the OSD.
4
CH-
TV channel down/to select the item in the menu.
CH+
TV channel up/to select the item in the menu.
5
POWER
6
Power indicator
7
Remote Sensor
DC IN
USB
DIGITALVOUT
(COAXIAL)
HDMI IN
COMPONENT
IN
AV IN
Y Pb Pr
VIDEO L-AUDIO-R
L-AUDIO-R
PC/DVI AUDIO IN
PC IN
SCART
1
2 3
4
5
6
7
89
10
11
ANT IN
1
DC IN input
2
EARPHONE
output
3
USB
input
4
Digital output input
5
HDMI IN
input
6
PC IN input
7
PC/DVI AUDIO IN
input
8
TV SCART input/output
9
COMPONENT
AUDIO
input
>
AV IN input
A
COMPONENT IN
input
1
2
4
3
5
Content Si
d
e
Facing T
owar
ds
You
SOURCE
MENU
VOL+
VOL-
CH+
CH
-
STOP
PLAY/PAUSE OPEN/CLOSE
PREV NEXT
Rear Terminals Control
(Just take the TV with
DVD for example,please
see the real.)

About your LCD / LED LCD TV
Digital LCD / LED LCD Television Instruction Manual EN-10
Only 32"/40" LED LCD Model
F
ront control panel
LOV
HC
UNEM
ECRUOS
1
SOURCE
Toggles between all the available input
sources
2
MENU
Press to see an on-screen menu of your TV’s
features.
3
VOL-/+ Press to increase or decrease the volume .
4
CH-/+
Press to change channels.
5
POWER Press to turn the TV on and o.
HDMI 1 IN
USB
DIGITAL AUDIO OUT
(OPTICAL )
ANT IN
2 INIMDH
NITNENOPMOC
CP
Y P
b
P
r
L
OIDUA
R
NICP
3 INIMDH
TRACS
PC/DVI AUDIO
1
SCART
input
2
Component input
3
Component Audio
input
4
PC input
5
PC/DVI AUDIO
input
6
HDMI3 IN input
7
HDMI2 IN
input
8
Common Interface
9
Earphone
0
ANTENNA input
A
Optical output
B
USB
C
HDMI1 IN input
Rear Terminals Control

About your LCD / LED LCD TV
EN-11 Digital LCD / LED LCD Television Instruction Manual
GET TO KNOW YOUR REMOTE CONTROL
When using the remote control, aim it towards the remote sensor on the TV.
1
POWER
2
DVD Menu / REC
3
DVD open / close
4
Picture Mode
5
Sound Mode
6
Call Screen Display
7
Sleep button
8
DTV Audio / NICAM / DVD Audio
9
Aspect Ratio Control button
0
Channel list button
A
Subtitle button
B
Program Number Channel selection
C
Source Exchange
D
Q.VIEW / Swap Channel
E
V+/V-: Volume selection
F
P+/P-: Channel selection
G
Mute
H
Menu button
I
GUIDE button (only for DTV)
J
Favourite list button
K
OK button
L
Cursor Mover button
M
Back button (only for USB)
N
Exit Screen Display
O
REPEAT (only for DVD, USB, REC & Timeshift)/CANCEL button
P
Zoom (only for DVD & USB)/Teletext index (only for TV) / REC index
Q
Play / Pause button (only for DVD & USB) / Timeshift
R
Stop (only for DVD, USB, REC & Timeshift)
S
Fast Reverse (only for DVD, USB, REC & Timeshift)
T
Fast Forward (only for DVD, USB, REC & Timeshift)
U
Previous (only for DVD, USB, REC & Timeshift)
V
Next (only for DVD, USB, REC & Timeshift)
W
DVD Set up / Text
X
DVD Title / Teletext Mix
Y
DVD Search / Teletext Subcode
Z
DVD 10+ / Teletext Hold
[
DVD Program / Teletext Reveal
\
DVD A-B Repeat / Teletext Size
]
DVD Call / Teletext Mode
`
DVD Angle/Teletext Time
Note
RED button, GREEN button,O BLUE
button and YELLOW button are fast
text button in analog signal. Function
button in DVBT (just reference the
OSD)

About your LCD / LED LCD TV
Digital LCD / LED LCD Television Instruction Manual EN-12
CONNECTING YOUR
TV
ANTENNA CONNECTION
Connect your aerial to the back of the TV into the
ANTENNA IN socket.
IMPROVE YOUR SIGNAL
To improve picture quality in a poor signal area, use a
signal amplifier (not supplied).
CONNECT YOUR PC TO THE TV
You can use your TV as a monitor for your personal
computer by connecting it with a VGA cable (not
supplied).
Read your computer user guide and check it has a
A
VGA connector.
Turn the power o on your TV and PC.
B
Connect a D type 15-pin VGA interface cable to the C
VGA video interface connector on the PC. Connect
the other end of the cable to the PC interface
connector on the TV. Tighten the screws on the
VGA connectors and connect the audio cable (not
supplied) to the audio input socket on the back of
the TV.
Turn on the power of the TV firstly and then the PC.
D
Press the button on the TV or TV remote control to E
set the video input mode to VGA.
Once the image shows, if there is noise present,
F
change the VGA mode to another resolution,
change the refresh rate to another rate or adjust
the brightness and contrast on the menu until the
picture is clear.
CONNECT A DVD PLAYER TO YOUR
TV
Connect the DVD video outputs (Y, Pb, Pr) to the
COMPONENT (Y, Pb, Pr) IN socket on your TV.
Turn on the DVD player and insert a DVD.A
Press the button to select .B
Refer to the DVD player user guide for operating C
instructions.
DVD
CONNECT A DVD PLAYER OR VCR TO
YOUR TV
There are two ways in which you can connect a DVD
player or VCR to your TV. Make sure that both the TV and
DVD player or VCR are switched o before you connect
them.
Connection Option 1
Connect the audio and S-VIDEO cables from the VCR A
output jacks to the TV input jacks.
Insert a video tape into the VCR and press
B PLAY on
the VCR.
Turn on the power of the TV first, then the VCR.
C
Press theD SOURCE button on the TV to set the video
input mode to S-VIDEO.
Connection Option 2
Connect the AV DVD/VCR outputs to the AV IN A
socket on your TV.
Press the
B SOURCE button on the TV to set the video
input mode to AV.
SCART INPUT
Connect the scart lead from the external device A
(DVD player, Set-top box or games console) to the
TV scart socket.

About your LCD / LED LCD TV
EN-13 Digital LCD / LED LCD Television Instruction Manual
Press theB SOURCE button to select SCART mode.
Press the
C PLAY button on the external device.
HDMI INPUT
Connect the cable from the HDMI device to the TV A
HDMI socket.
Press the
B SOURCE button to select HDMI mode.
Refer to the HDMI device user guide for how to
C
operate.
MOUNT YOUR TV ONTO THE WALL
You can mount your TV onto the wall by using a wall
bracket (not supplied). Use M4/M6 machine screws (4
pcs) to screw the TV onto the bracket (not supplied).
PREPARATION OF
YOUR REMOTE
CONTROL
BATTERY INSTALLATION
Place the remote control face down, then open the A
cover of the battery compartment.
Install two AAA batteries. (The + and - symbol of the B
battery must match with the marks on the remote).
Close the cover of the battery compartment.C
BATTERY CAUTION
Confirm there is no object between the remote control
and the remote sensor of the TV set.
Sunshine or other strong light will interfere with the
signal sent by the remote control. In this situation turn
the TV set to avoid the direct light source.
Do not put the remote control in direct heat or in a
damp place as you may damage the remote.
Please use two AAA 1.5V batteries. Do not mix battery
types. Install the batteries at the correct polarities. Do
not use rechargeable batteries. If your TV is to be stored
for a period of time, remove the batteries from the
remote control.
03 Getting
Started
Setting up
LOCATION
You will need to place your TV near your plug socket
(so the power cable can comfortably reach) and within
reach of your aerial socket or extension lead.
CONNECTION
About your LCD / LED LCD TV / Getting Started

Getting Started
Digital LCD / LED LCD Television Instruction Manual EN-14
Insert your TV aerial lead into the Antenna input at A
the side of the TV.
Insert the batteries into the remote control. Make
B
sure they are inserted the right way around,
matching the polarity as indicated inside the battery
compartment.
SWITCHING YOUR TV ON
Press the A POWER button on the right side of the TV
once. A red ashing light will appear in the corner of
the screen.
Press
B POWER on the remote control. The TV will turn
on and the red light will turn blue. This may take a
few moments.
Select your chosen language when prompted from
C
the list that will appear on screen. Use the button
to scroll to the language you want and press to
confirm.
TUNING YOUR TV
SWITCHING TO AN EXTERNAL
SOURCE OTHER THAT TV
If you have attached a DVD player or similar external
device to the TV, you will need to tell the TV to display
the content from it. Simply press SOURCE which will
bring up the source menu in the left corner of the screen,
use the and button to highlight the required
source and press OK select.
For details of how to plug in other equipment see GET
TO KNOW YOUR TV on page 5.
AUTO SEARCH
Press A MENU button.
Press B button to select Tuning menu, press
button to enter.
Press
C button to select Country item.
Press button to select you needed.
Press
D button to select Auto Search item, press
OK button to enter.
Press button to select the OK option, and press
OK button to start searching.
Press the MENU button, you can choose to skip the
TV /DTV Search or not.
Press E EXIT button to stop auto search during
searching.
Note
It may take a few moments to complete the Auto O
Search.
DIGITAL MANUAL SEARCH
Press A MENU button.

Getting Started
EN-15 Digital LCD / LED LCD Television Instruction Manual
Press B button to select Tuning menu, press
button to enter.
Press
C button to select Digital Manual Search
item, press button to enter.
Press D button to select the Channel.
Press OK button to start searching.
Once a channel is located, you can press
E OK button
to save it.
Press EXIT button to exit.
Analog Manual Search
Follow the below steps when you need to have a manual
search.
Press
A MENU button.
Press B button to select Tuning menu, press
button to enter.
Press
C button to select Analog Manual Search
item, press button to enter.
Press D button to select Search item, press
button is used to select the higher frequency
channel.
Press button is used to select the lower frequency
channel.
And then select Storage To, press
E button to
select the position number you want the channel
on. Once a channel is located, you can press red
button to save it. Press EXIT button to exit.
Sound SystemV
Press button to select “Sound System”, then
press button to select the correct sound system.
Current CHV
Press button to select the channel number to
edit.
Storage ToV
Press button to select the program number you
want to storage to.
Fine tuneV
If the picture and/or sound are poor, try using the
FINE TUNE feature. Do not use this feature unless
reception is poor.
Repeat above steps
A A-C, then press button to
select the Fine Tune item.
Press
B button repeatedly to carry out fine
tune, till the best picture and sound are obtained,
then loosen the button.
Channel Edit
Using this function, you can rename, move, set favorite
channel and skip the channel in the analogue mode.
Press
A MENU button.

Getting Started
Digital LCD / LED LCD Television Instruction Manual EN-16
Press B button to select TUNING menu, press
button to enter.
Press
C button to select CHANNEL EDIT item.
Press button to enter the sub-menu. You can
press red, green, yellow or blue button to enter the
menu you need.
RENAME
Press A button to select the channel, and press
green button to rename.
Press
B button to select the number position of
channel name. Press button to select number.
You can press the
C EXIT button to cancel the changes
at anytime.
Note
The RENAME function is only available in ATV O
program.
MOVE
Press A button to select the channel and press
yellow button to select the position.
Press B button to select the number position you
want to remove to, press yellow button to confirm.
You can press the
C EXIT button to cancel the changes
at anytime.
Setting favourite channel
Press A button to select the channel, press red
button to set your favourite channel.
You can press the red button to cancel the changes
B
at anytime.
Press
C FAV button on the remote control and
Favourite List will be displayed.
Press
D button to select the channel, and press
OK button to enter.
SKIP
PressA button to select the channel and press
blue button to skip the current channel.
You can press the
B blue button to cancel the changes
at anytime.
GUIDE (Electronic Program Guide)
Using this function, you can access the DTV program
information.
Press
A MENU button.
Press B button to select TUNING menu.
Press button to enter.

Getting Started
EN-17 Digital LCD / LED LCD Television Instruction Manual
Press
C button to select the guide item.
Press OK button to enter the submenu, the
electronic program guide is displayed.
You can quickly call up Guide menu by GUIDE
button on the remote control.
Note
Only DTV mode.O
COMMON INTERFACE
The common interface (CI) slot is designed to accept the
Conditional Access (CA) Module and Smart card in order
to view the pay TV programmes and additional services.
Contact your Common Interface service provider to get
more information about the modules and subscription.
Please noted that CA modules and smart cards are
neither supplied nor optional accessories from us.
Warning
Switch o your TV before any module is inserted in t
the Common Interface slot.
Insert the CAM correctly, then Smart Card to the CI A
slot that is located at the side of the TV.
CI Slot
CAM
Smart Card
Turn on the TV and it will display the below message B
if the CA module is detected. Wait for few moments
until the card is activated.
Press the
C MENU button to display the Main Menu
and use the and button to highlight the
“Common Interface” line and press the “OK” button.
Detailed information on the CI card in use is
D
displayed.
Press
E OK button to access the card menu. Refer to
the module instruction manual for setting details.
When module is removed, the following message
F
will appear on the screen.
Software Update function
When you get the updating news from the TV shop’s t
web, you can update the operating software using
the Download menu. The data for various units are
transferred consecutively on a special receiving
channel.
You need to search the channel with updating code t
stream.

Getting Started
Digital LCD / LED LCD Television Instruction Manual EN-18
Note
You can get information from the TV shop or O
internet.
Operation
Press A MENU button.
Press B button to select TUNING menu, press
button to enter.
Press
C button to select Software Upgrade item.
Press
D button to set it as On. (The default is O)
The Start Upgrade item can be selected.(The default
E
is grey and cannot be selected).
13%
Press EXIT to cancel download
Press F button to select the Start Upgrade option
and use OK button to enter. Then the TV will restart
and search the upgrade information.
Note
If the upgrade information is received, the TV will O
begin to upgrade. Or else, the TV will be back the
DTV source.
Load the receiver identification. This process may
G
also take several minutes. You can press EXIT button
to cancel the download and your TV set will be back
the DTV source.
100%
15%
Press EXIT to cancel download
Updating in progress - Do not turn off the TV
After the download has finished, your TV set will H
enter burning state and the indicator light is shining.
The menu 4 of right appears.
The set will be back the DTV source when the update is
completed.
USING YOUR TV
How to select the TV program
Using Program number button Enter the channel A
number with the number keypad on the remote
control.
Using
B P+/P- button.
Press the P+/P- button to select a channel number.
HOW to adjust volume
Press V+/V- button on the remote control or the side of
the TV to adjust the volume level.

Getting Started
EN-19 Digital LCD / LED LCD Television Instruction Manual
CH.LIST function
Press CH.LIST button on the remote control will display
Channel List menu, and then press button to enter.
Press button to select the channel, and then press
OK button to enter.
ADJUSTING PICTURE
SETTINGS
Changing the Picture Setting
Press A MENU button.
Press B button to select Picture menu, press
button to enter.
Press
C button to select the item requires
adjusting.
Press
D button to adjust the selection item.
When you are satisfied with your choice, press the
E
EXIT button to return to normal viewing or press
MENU button to return to the previous menu.
ContrastV
This will adjust the intensity of bright parts in the
picture but keep the dark parts unchanged.
BrightnessV
This will adjust the light output of the complete
picture, which will mainly aect the darker areas of
the picture.
ColourV
This will adjust the saturation level of the colours to
suit your personal preference.
SharpnessV
This will adjust the sharpness of fine details in the
picture.
TintV
Allows you to select the colour mix (Tint) of the
picture.
Note
The Tint function is only available in NTSC mode.O
ModeV
This will select the picture mode. Select Standard/
Mild/User/Vivid according to the program. You can
quickly select the desired mode by P.MODE button on
the remote control.
Colour temperatureV
This will increase or decrease Warm (red) and Cool
(blue) colours to suit personal preferences.
Select Cool to give the white colour a blue tint,
Normal to give the white colour a neutral tint, Warm
to give the white colour a red tint.
Noise ReductionV
Automatically filters out and reduces the image noise
and improves picture quality when receiving weak
video signals.
Select O/Low/Standard/High according to the
image noise.
ResetV
To recover to the default value.
ADJUSTING SOUND
SETTINGS
Changing the Sound Setting
Press A MENU button.
Press
B button to select Sound menu, press
button to enter.

Getting Started
Digital LCD / LED LCD Television Instruction Manual EN-20
Press C button to select the item requires
adjusting.
Press
D button to adjust the selection item.
When you are satisfied with your choice, press the
E
EXIT button to return to normal viewing or press
MENU button to return to the previous menu.
BalanceV
This will adjust the output of the right and left
speakers to obtain the best stereo reproduction for
your listening position.
ModeV
This will select the sound mode.
Press button to select Standard/Music/
Theater/User according to the program. You can
quickly select the desired mode by S.MODE button
on the remote control.
AVL V (Automatic volume control)
This will reduces the dierences in volume level
among broadcasters.
SRS TS XTV
This will control the Woofer output.
Press button to select SRS TS XT.
Press button to set SRS TS XT as OFF, ON.
Digital Audio OutputV
This will control the Digital Audio Output.
Press button to select Digital Audio Output.,
Press button to set Digital Audio Output. as OFF,
PCM,RAW.
EqualizerV
This sound setting can be adjusted to suit your
personal preference.
Audio LanguagesV
Press button to select Primary/Secondary item,
and then press button to select the languages
you needed.
Press button to select Close item, press OK button
to close it.
Note
The Audio Language function is only available in O
DTV mode.
ResetV
To recover to the default menu setting.
FUNCTION SETTINGS
Press A MENU button.
PressB button to select Sound menu, press
button to enter.

Getting Started
EN-21 Digital LCD / LED LCD Television Instruction Manual
Press C button to select the item requires adjusting.
PressD button to adjust the selection item.
When you are satisfied with your choice, press the
E
EXIT button to return to normal viewing or press
MENU button to return to the previous menu.
LanguageV
To select the menu language.
Subtitle LanguageV
To select the Subtitle language.
Display ModeV
To set the picture proportion, press button to
select 4:3/Zoom1/Zoom2/Wide/16:9/Auto. You can
quickly select the desired mode by SCREEN button
on the remote control.
4:3 modet
Choose 4:3 when you want to view a picture
with an original 4:3 aspect ratio, with gray bars
appearing at both the left and right sides.
16:9 modet
Choose 16:9 when you want to adjust the picture
horizontally, in a linear proportion to fill the entire
screen.
Zoom1t
Choose Zoom1 when you want to view the picture
without any alteration. However, the top and
bottom portions of the picture will be cropped.
Zoom2t
Choose Zoom2 when you want the picture to be
altered, both vertically extended and cropped.
The picture taking a halfway trade o between
alteration and screen coverage.
Widet
Choose Wide when you want to adjust the picture
in a non-linear proportion, that is, more enlarged
at top sides and no alteration, at bottom side.
Blue ScreenV
This will select the character background colour.
Note
The Blue Screen function is only available for O
ATV mode.
RecorderV
To recorder the DTV program. Details of Recorder are
described in the page of 29-31.
SCART InputV
The item is not able to be selected for 32"/40" model
and does not display for 19"/22"/24" model.
OSD Time OutV
To set how long you want the menus to appear
on-screen. Each press of button repeatedly to
select the number of preset minutes, the Time will be
set in sequence: o, 10sec, 15sec, 30sec, 45sec, 60sec.
OSD TransparencyV
To set the transparency background of OSD, the
transparency will be set in sequence: O, 25%, 50%,
75%, 100%.
ResetV
To recover to the default value.
TIME SETTINGS
ClockV
Press A MENU button.
Press
B button to select Time menu, press
button to enter.

Getting Started
Digital LCD / LED LCD Television Instruction Manual EN-22
Press
C button to select Clock item, press
button to enter setting.
Press button to select hour or minute, press
button to adjust the value.
DateV
Press A MENU button.
Press
B button to select Time menu, press
button to enter.
Press C button to select Date item, press
button to enter setting.
Press button to select the option, and then
press button to adjust value.
Note
In DTV mode, because the time information is O
from the signal, the Clock and Date are not able
to be changed.
If you want to change the time, turn o the TV in
ATV mode, then turn on the TV.
O TimeV
Press A MENU button.
Press
B button to select Time menu, press
button to enter.
Press C button to select O Time item, press
button to enter setting.
Press button to select Repeat option, and
then pressbutton to set it on.
Press button to select hour or minute, press
button to adjust the value.
When the o time has arrived, the TV set will
enter into standby mode.
On TimeV
Press A MENU button.
Press
B button to select Time menu, press
button to enter.
Press C button to select On Time item, press
button to enter setting.
Press button to select activate option, and
then pressbutton to set it On.
Press button to select hour or minute, press
button to adjust the value.
When the on time has arrived, the TV set will
switch on automatically.
Note
The On Time function is only for 19"/22" model.O
SleepV
The sleep timer automatically shuts o the TV after a
preset time (from 5 to 240 minutes).
Press the
A MENU button and then use button
to select the Time menu.

Getting Started
EN-23 Digital LCD / LED LCD Television Instruction Manual
Press the
B button and then use button to
select the Sleep.
Press the
C button and then use button
to select the number of minutes. Select O, 5Min,
10Min, 15Min, 30Min, 45Min, 60Min, 90Min,
120Min, 180Min, 240Min.
When you are satisfied with your choice, press
D
MENU button to return to the previous menu or
press the EXIT button to return to TV viewing.
And the time begins to count down from the
number of minutes selected.
Time ZoneV
Press A MENU button.
Press
B button to select Time menu, press
button to enter.
Press
C button to select Time Zone item.
Press
D button to select the correct time zone.
Press
E MENU button to save and exit.
LOCK MENU SETTING
Using this function can control the tuner, program,
source volume and so on. Pressing MENU on the remote
control, press button to select Lock menu, press
button to enter the sub-menu, and you will be required
to enter the password. The initial password of the
television is 0000. If you forget your password, you can
always input 9443 to regain control.
CHANGE PASSWORDV
Press A button to select Change Password
item. Press button to enter the submenu.
When you have inputted the four digits you will B
be prompted to enter it again.
Your new password will then be automatically
saved.
CHILD LOCKV
Press button to select Child Lock.
Press button to set On or O mode. If lock on
mode is set, Child Lock is in activated automatically.
In such case, if Child Lock button (button on the
television) is pressed, the screen will display Child
Lock, which can be erased by press of MENU button.
5 seconds later after the latest press, the screen
display will disappear automatically. The Child Lock
mode can be resumed by entering Lock Set menu, set
Child Lock On or O.
Tuning LockV
Press to select Tuner Lock and to set On/O.
(To set On, some operation such as search will be not
available. When enter the Tuning menu, Tuner Lock
will be on the screen. If you want to operate Tuning
menu, you need to enter the Lock menu to set Tuner
Lock O or operate unlock.)

Getting Started
Digital LCD / LED LCD Television Instruction Manual EN-24
Channel NO.V
Channel NO. is opted for setting up preset channel.
Press button to select preset Channel. Press
button to select channel number.
Source setV
Channel set is opted for setting up start source.
Press button to select O, DTV, TV, AV, SCART,
S-Video, Component1, Component2, PC, HDMI1,
HDMI2, HDMI3, USB in turn. DVD is available for some
model.
Source LockV
Source Lock will control the On or O of hinder
external input modes.
Press button to set as on or o.
When the source lock is set as on, TV source will
display, at this time, when press SOURCE button,
the TV can switch to corresponding source and will
display the Source is locked.
Max VolumeV
Press button to select Max Volume. Press
button for adjustment between 0-100. If a certain
Value is set, when volume is being adjusted, the
sound value can not exceed maximum volume value.
If current volume is over Max Volume, when lock set
menu is set, current volume will become set maximum
volume, if current volume is below maximum volume,
customer set volume will stay unchanged.
Initial VolumeV
The TV will remember it after your setting, that will be
the volume when turn on the TV next time.
Parental LockV
Press button to select parental lock. Press
button to select OFF or 4-18 to limit the age of
children who will watch TV.
Clear LockV
Press button to select Unlock mode. Press
button to unlock all set modes, setting all lock options
to o, and the maximum volume returns to 100.
SHORTCUT MENU
DISPLAY
Subtitle FunctionV
Press A SUBTITLE button on the remote control will
display Subtitle languages menu, press button
to enter.
Press B button to select the item and press OK
button to enter. You can press the EXIT button to
cancel the changes at anytime.
Note
Press O SUBTITLE button on the remote, it will
display subtitle languages menu only in the DTV
mode.
CH.LIST FunctionV
Press A CH.LIST button on the remote control, will
display Channel List menu.
Press B button to select the channel and press
OK button to enter. You can press the EXIT button
to cancel the changes at anytime.
GUIDE FunctionV
Press GUIDE button on the remote control, will
display Program Guide menu, press button
to select the program.
You can press the EXIT button to cancel the changes
at anytime.

Getting Started
EN-25 Digital LCD / LED LCD Television Instruction Manual
Note
AvO ailable only in the DTV mode.
FAV FunctionV
Press FAV button on the remote control, will display
Favourite List menu.
Press button to select program and press OK
button to enter. You can press the EXIT button to
cancel the changes at anytime.
INFOV
Press INFO button on the remote control, will display
the current channel information.
You can press the EXIT button to cancel the changes
at anytime.
AUDIO/I/IIV
Press AUDIO button on the remote control, will
display Audio Languages menu.
Press button to select the desired settings and
press OK button to enter.
You can press the EXIT button to cancel the changes
at anytime.
Note
Press O AUDIO button on the remote, it will
display Audio Languages menu only in the DTV
mode.
Eliminate SoundV
When you need to pay attention to surrounded
sounds, or there is a telephone calling you
or there are some guests visiting you, the sound
elimination (mute) function is very convenient.
Press theA MUTE button on the remote control and
“Mute” type face will display on the lower part of
the screen. At this Time, the sound of the TV set is
turned o.
If you want to recover the sound, press the
B MUTE
button again or directly press V+ button.
Quick program viewV
This function enables quick swap to the last watched
program. Press Q.view button, and the TV will be back
to the TV source, expect in the USB and DVD source.
Suppose the channel number you used just now
A
is 8 and the channel number you are using is 18
(as shown in the figure).
If you want to return to the last watched program B
channel 8, you can simply press the Q.View button.
If you want to return to channel 18, press the C
button again. Use this function, you can easily
change between the channel you are using and
the channel you used last Timer.

Using the features
Digital LCD / LED LCD Television Instruction Manual EN-26
Using the features
Teletext functions
Teletext is an information system, broadcast by certain
channels, which can be read like a newspaper. It also
provides subtitles for people with hearing difficulties or
those who are unfamiliar with the language in which a
particular program is being broadcast (cable networks,
satellite channels, etc.).
Note
The O teletext buttons could be working even if
there is no teletext signal, but there is no teletext
display.
Teletext
Teletext functionsV
To select “teletext” press the button on the
handset. To switch o teletext, press the button again.
“Note all menu functions are not available in teletext
mode”. Only a few direct button control functions are
available in teletext mode, they are:
Volume adjustment t
Mute functiont
Page up/downV
Use the P+/P- buttons to browse next or previous
page.
Page number enteringV
To select a Teletext page, enter the page number
using the numeric key pad on the remote control,
or use the P+ or P- buttons, or the coloured Fast text
buttons.
Mix modeV
To view the TV picture while in Text mode press the
button, this will superimpose the Teletext data on top
of the TV picture. Press this button again to return to
Full text.
INDEXV
Press the INDEX button to go to the index page of
teletext.
Language changeV
Pressing the button will change the Teletext
characters between Eastern and Western.
HoldV
Pressing the button will stop the teletext page
automatically updating. This feature is very useful
where there are several teletext pages or data on the
same page number.
SizeV
Pressing the button changes between full screen
top half bottom half full screen. This feature is
very useful as it magnifies the image making the
characters easier to read.
RevealV
Pressing the button will reveal hidden text. This
feature is used to reveal information such as answers
to Teletext on-line interactive puzzles.

Using the features
EN-27 Digital LCD / LED LCD Television Instruction Manual
TimeV
While in normal TV mode only, pressing the button
will display the teletext time in the top right hand
corner for a few seconds.
Fast text colouredV buttons
Fast text automatically displays the four most
commonly used pages that the broadcaster thinks
that you may want to choose next. Press the same
coloured button on the remote control as the
coloured link at the bottom of the teletext page to go
directly to that page.
SubcodeV
Pressing the button by entering its 4-digit number
to enter a secondary page.
USB MODE
Note
The diagrams in the following section are O
schematic and only for your reference. Please see
the actual product if necessary.
The OSD of the USB function may be somewhat O
dierent from your product because it is just
example to help the instruction.
TO USE THE USB DEVICE
Supported file formats:A
Photo: *.jpg;t
Music: *.mp3 files;t
Movie: *.avi files;t
TEXT: *.txtt
Note
Due to the particularity of file cording, some files O
may be unable to read.
Supported equipment: B
Support the equipment that supports Mass Storage
Protocol and whose file system is FAT32, such
as some USB disks, mobile harddisks, and MP3
player. If USB equipment could not be identified
due to unsupported file system, please format the
equipment to the above-mentioned file system.
To achieve smooth playing, ensure the following:
C
The file code rate should be lower than 300KB/S;t
Due to the limitation of USB signal transmission t
distance, it is recommended not to use USB patch
cord, in case of using the cord, make sure that its
length is not over 1m;
Use high-speed USB equipment in conformity t
with USB2.0 full speed Interface Standard; If USB
equipment in conformity with USB1.1 full speed
Interface Standard is used, the playing may be
unsmooth.
When connecting/removing the USB
device
Press “A SOURCE” on the remote control unit to select
USB option.
Insert USB equipment into corresponding USB
B
interface 2s after starting the system.
After entering the system menu, press “
C /“ on the
remote control unit to select the require USB files,
press “OK” button to confirm the selection and enter
the file list relative to the selection.
Press D “/“ on the remote control unit to select the
required file, press “OK” button to enter the selected file.
To exit the streaming media playing system and E
watch a TV program, you must press “BACK” button
to return to the streaming media main menu at first
(to protect equipment), and then press “SOURCE” to
select “TV” to return to the TV mode.
Note
Under source of USB, whenQ press button MENU,
screen goes black, except when images or movies
are being played.
While playing the USB, press “Q BACK” button
repeatly, the screen picture will return to USB
main interface, and only at this time you can
switch corresponding signal sources by pressing
“SOURCE” again.

Using the features
Digital LCD / LED LCD Television Instruction Manual EN-28
Please do not unplug the USB device when the Q
connected USB storage device is working. When such
device is suddenly separated or unplugged, the stored
files or the USB storage device may be damaged.
Operating the USB device
Press “A /“ to scroll through main menu or
submenu and select your desired option.
Press “
B OK” to confirm your selection.
Press “
C /“ to achieve the FWD (fast forward) and
REV (fast back) of the option being played.
Press “
D PLAY/PAUSE” to play, and press it again to
pause playing.
Press “E ZOOM” to magnify pictures; when the picture is
enlarged, press “/“ and “/“ to move the picture.
Press “F STOP“ to stop playing, or return to the
previous menu, and press “BACK” repeatedly to
return to the main menu.
Note
You can choose the photos or music in dierent O
files to play together.
Playing a Picture
After entering USB main interface, press A “/“ to
select “PHOTO” item.
Press ”
B OK“ to confirm the selection and enter the
picture file list.
Press C “/“ to select the picture you want to play,
press ”OK“ to confirm, and then press “PLAY/PAUSE”
button to play the pictures.
If you want to pause the picture which is being D
palyed, press the PALY/PAUSE button again.
Press ”ZOOM“ to magnify the picture. When the
picture is enlarged, press “/“ and “/“ to
move the picture.
Press “PREV/NEXT“ to select the last or next picture.
Press “/“ to rotate the picture.
Press “STOP
” to stop the picture being played.
To exit playing, just press “
E BACK” repeatedly.
Note
The menu display varies with the photo name and O
pixel in your equipment.
Playing Music
After entering USB main interface, press A “/“ to
select “MUSIC”.
Press ”
B OK“ to confirm the selection and enter the
music file list.
Press C “/“ and “OK” button to select the music
you want to play, then press “PLAY/PAUSE“ button
to play the music.
Press “
/“ to achieve the REV (fast back) and FWD
(fast forward) of the music being played.
Press “PREV/NEXT “ to select the last or next music.
Press “STOP
“ to stop the music being played,
when the current interface is the music being
played.
To return to the main menu, just press “
D BACK”
repeatedly.
Note
You can enjoy the music and the picture at the O
same time.

Using the features
EN-29 Digital LCD / LED LCD Television Instruction Manual
Playing a Movie
Atter entering USB main interface, press A “/“ to
select “Movie”.
Press “
B OK” to confirm the selection and enter the
movie file list.
Press C “/“ and “OK” button to select the movie
you want to play, and then press “PLAY/PAUSE”
button to play the movie.
Press “ZOOM” to magnify the picture.
Press “PREV/NEXT “ to select the last or next movie.
Press “STOP
“ to stop the movie being played.
To exit playing, just press “
D BACK” repeatedly.
Text
After entering USB main interface, press “A /“ to
select “Text” .
Press “
B OK” to confirm the selection and enter the
text file list.
Press “C /” and “OK” button to select the text you
want to play, and then press “PLAY/PAUSE” button
to play the text.
Press “PREV/NEXT “ to select the last or next text.
To exit the “Text”
D mode, just press “BACK” repeatedly.
Note
You can enjoy the music and the text at the same O
time.
Using External USB
Disk For Recording
Insert the USB device with FAT32 format into the A
USB1 connector. Then, press MENU button.
Note
Only USB1 is available for recording.O
Press
B button to select FUNCTION menu, press
button to enter .
Press
C button to select Recorder. Press OK
button to enter the submenu.
Press
D button to Select Disk and press or OK
button to enter. Press button to select disk if
your device has several disks.
Press
E button to select Format and press to
enter. Press button to select the size you want
to format. Press OK button to format the USB Disk.

Using the features
Digital LCD / LED LCD Television Instruction Manual EN-30
Note
The system will format the whole device and if your O
device size is bigger than 1GB, you can set the size
which is used for time shift.
Format may take several minutes and the time is
F
depending on the memory size. Press button
to select the Time Shift Disk Size. The max device size
for Time Shift is 8GB. Then, press OK button to save.
Note
If you select all the size format for time shift, you O
can not do any recording.
Waiting for the system checking. And you can see
G
the speed data after the success checking.
Note
Only have to format when you use the device for O
record for the first time.
The minimum device size for record is 1GB. Provide O
device formatting function is up to 2TB. The max
Multi-Partition is 16 partitions and one is active at
a time.
Bit rate:O
Device bit-rate>4.5MB/s REC is safe at HD t
stream
Device bit-rate>1.5MB/s REC is safe at SD t
stream
Device bitt -rate<600KB/s REC is bad for REC
The system can not work normally if the USB O
device have the listing problem below:
The device has bug.t
The device has error block.t
The device reports the unfaithful size.t
IMPORTANT
USB device should be format as FAT32 format by t
your PC before insert to the USB connector.
TIME SHIFT
Time Shift function is only available in DTV mode. Press
PLAY/PAUSE to pause the program, and press PLAY/
PAUSE again, the time shift program will be played. If
you want to stop time shift function, press the STOP
button.
You can stop the time shift program being played by
pressing the STOP button.
RECORDING
Press A D.MENU button to record the program being
played, and press D.MENU or EXIT button to make
the recording interface minimum.
Press B STOP button to stop the program recording
being played.
For Playback the recorded program. Press
C INDEX
button to open the recorded list.

Using the features
EN-31 Digital LCD / LED LCD Television Instruction Manual
Press button to select the content you recorded.
Press the button to display the program
information.
Press button to cancel.
Press OK or PLAY/PAUSE button to play the
program recorded and press STOP button to stop it.
Note
Changing the channel will not inuence the O
recording in the same frequency, but will inuence
the time shift. When the recorded program is being
played, you can not delete it.
Press theO INDEX button repeatedly, the program
will be displayed in the order of program name,
channel name, program time, file name and file
length.
USING YOUR DVD
PLAYER
(certain models only)
PLAYING A DVDV
Press theA SOURCE button on the remote control
to enter DVD mode.
Place the DVD in the disc slot with the DVD label
B
facing away from you and the screen. The disc slot
will only take standard-sized DVD.
The DVD will automatically load; most begin with
C
a disc menu.
Use the
D ,, and buttons to navigate
around the DVD menu to highlight the play
option and then press PLAY/PAUSE.
PAUSING A DVDV
Press A PLAY/PAUSE to pause playback. The sound
will also be muted.
Press
B PLAY/PAUSE to resume normal playback.
STOPPING A DVDV
Press the A button to stop playback of a DVD. The
TV screen will show the DVD start-up logo.
Some discs will remember the moment at which
B
the DVD was stopped, so press PLAY/PAUSE to
recall the moment and continue playback.
Press the
C button twice to stop completely and
clear the memory.
USING FAST FORWARD OR REWINDV
To move forward through a disc more quickly, A
press the button.
To rewind through the disc, press the
button.
Press the
B or button repeatedly to cycle
through the available speeds, which appear in the
top left corner of the screen: 2X, 4X, 8X, 16X, 32X
and normal playback speed.
Press
C PLAY/PAUSE to resume normal playback.
SKIP TO THE NEXT OR PREVIOUS SCENEV
During playback press the button to skip to the
next scene on the disc, or press
to skip to the
previous one.
PASSWORDV
Parental control can be activated by setting the
Password Mode to On. The default password is 1234.
If you forget the password, you can always input 1369
to regain control.

Using the features
Digital LCD / LED LCD Television Instruction Manual EN-32
USING THE ZOOM FUNCTIONV
Press theA ZOOM button to zoom into the image
on screen. You can press it repeatedly to further
enlarge the picture.
In zoom mode use the
B , , and buttons to
display a dierent section of the enlarged picture
on the screen.
SWITCHING ON SUBTITLESV
Press the A SUBTITLE button during playback.
The available languages will appear in the top left
B
corner of the screen.
Press repeatedly until your desired subtitle
language is shown.
Press
C SUBTITLE repeatedly until SUBTITLE OFF is
shown to switch the subtitles o.
USING REPEAT MODEV
Press REPEAT once to repeat the chapter on a DVD,
twice to repeat the currently playing title or three
times to repeat the whole contents of the disc.
CHANGING THE CAMERA ANGLEV
Some DVD have multiple camera angles for some
or all scenes. Press the ANGLE button to change the
camera angle. Dierent camera angles may include:
front, side, whole view or exterior.
ADDITIONAL DVD
FUNCTIONS
D.MENUV
Press this button to return to the previous menu item.
AUDIOV
Many DVD have multiple soundtracks. To change
between them press the AUDIO button. Wait three
seconds before pressing the button again, to cycle
through the options.
TITLEV
Press this button to return to the title menu on some
DVD. Use the , , and buttons to navigate
around the menu.
SEARCHV
Press SEARCH and use the numerical keys to enter
the chapter number you wish to go to and press
PLAY/PAUSE.
PROGRAMV
During playback press PROGRAM to move directly
to a section or programme on the DVD. Press the
digit buttons to select the programme number that
you want. When finished, move the cursor to select
START. The DVD will jump directly to that section
and begin to play. If you want to cancel this function,
press PROGRAM and move to STOP, then press PLAY/
PAUSE.
A-BV
Use A-B to set a section of a DVD to repeat. Press A-B
to mark the start point and again to mark the end. The
section will begin to be repeated immediately. Press
A-B to cancel the repetition.
ANGLEV
When enjoying sports, concert or theatre, press
this key to watch same actions in dierent angles.
(Valid for discs possessing this function. Using a disc
recorded in multi-angle you can view the scene from
dierent angles, for example, front, side, whole view
and exterior scene.)
D.CALLV
When pressing the D.CALL button repeatedly
dierent OSD indicator will be displayed for dierent
types of disc DVD, CD etc.
PLAYING A JPEG CDV
Insert a JPEG CD in the same way as you would a A
DVD or Audio CD, with the label facing away from
you.
The CD will load and a menu of the disc’s contents
B
will appear on screen.
Use the
C and buttons to highlight the
folder and picture you wish to view and press
PLAY/PAUSE. Each image on the disc will show
consecutively, like a slide show.
Press
D PLAY/PAUSE during the slide show to
pause on one image.
Press the
E or button to skip to the next
image or return to the previous one.

Using the features
EN-33 Digital LCD / LED LCD Television Instruction Manual
PLAYING AN AUDIO CDV
Insert a CD in the same way as you would a DVD, A
with the label facing away from you.
The CD will load and a menu of the disc’s contents
B
will appear on screen.
Use the
C and buttons to highlight the track
you wish to play and press PLAY/PAUSE, or just
press PLAY/PAUSE to listen to the whole CD from
the beginning.
You can stop, pause, fast forward or fast rewind a
CD in the same way as a DVD. You can also use the
REPEAT button to repeat a track, folder album or
the contents of the whole disc. Press repeatedly
to select what you would like to repeat. You can
also use the A-B function to repeat a certain
section of a track or CD.
Reference Sections
TROUBLESHOOTING
To assist in location of possible faults use the help
guide below:
No picture, no
sound
Verify if the television is
properly plugged in.
Verify if the television has a
proper supplied power source.
Verify if electricity is available.
Blank screen
Verify if correct signals are
input.
Operate the remote to change
signal input to correct input.
Restart the television if power
supply is interrupted.
No sound
Press MUTE button and verify if
Mute mode is set.
Switch to other channel and
verify if the same problem
happens.
Press VOL+ button to see if the
problem can be solved.
Poor sound
Verify if sound system is correct.
Refer to user‘s manual for
adjustment.
No picture in
some channel
Verify if correct channel is
selected.
Adjust the antenna.
No color for
some channel
program
(black and
white)
Verify if the same problem exists
in other channels.
Check out of picture and sound
systems.
Refer to relative instructions
in the Manual for color
adjustment.
Spots with
some or all
pictures
Verify if the antenna is correctly
connected.
Verify if the antenna is in good
condition.
Make fine adjustment of
channel.
Television out
of control
Disconnect the television from
power supply and 10 seconds
later, connect the television
to the power supply. If the
problem still exists, contact
authorized after-sales service
for technical assistance.
Note
If the fault can not be repaired using the above O
guide consult with your local authorized service
centre.
The TV set must only be repaired by a qualified O
registered service person. Never attempt to
remove the back cover as the TV set has dangerous
voltages in side that may cause a fatally or fire.

Reference Sections
Digital LCD / LED LCD Television Instruction Manual EN-34
v
2EMOTECONTROL!!!BATTERY§)NSTRUCTION-ANUAL7ARRANTY463TAND
83CREWSFOR46STANDONLYFORvMODEL
#OMPONENTADAPTER#OMPONENTAUDIOADAPTER3#!24ADAPTERONLYFORvMODEL
#OVERBOTTOMONLYFORvMODEL
0OWER!DAPTER˄ONLYFORvMODEL˅
, AV (AV is only for 19”/22”/24” LED LCD model)
3W+3W
8W+8W
(only for LCD model)
4FFSBUJOHQMBUF
4FFSBUJOHQMBUF
-
24” 32”
4HEPARTSPECIFICATIONSOFTHIS46SETPROVIDEDHEREAREFORREFERENCEONLY
$IFFERENCESMAYOCCURASPRODUCTTECHNOLOGYISUPDATED
$ESIGNANDSPECIFICATIONSARESUBJECTTOCHANGEWITHOUTNOTICE
ˈ
ˈ
ˈ
ˈ
PC Audio input

Sommaire
FR-1 Manuel D’utilisation Television Numerique ecran LCD / LED LCD
Consignes de sécurité 2
BIENVENUE...................................................................................2
INFORMATIONS IMPORTANTES...........................2
A propos de la télévision à écran LCD/
LED LCD TV 5
Installation du support........................................5
SE FAMILIARISER AVEC LA TÉLÉVISION..............7
SE FAMILIARISER AVEC LA TÉLÉCOMMANDE...11
BRANCHER LA TÉLÉVISION................................12
BRANCHER L'ANTENNE..................................................... 12
AMELIORER LE SIGNAL..................................................... 12
CONNECTER UN PC A LA TELEVISION ......................... 12
CONNECTER UN LECTEUR DVD A LA TELEVISION .. 12
CONNECTER UN LECTEUR DVD OU UN
MAGNETOSCOPE A LA TELEVISION.............................. 12
Option de connexion 1 .................................................... 12
Option de connexion 2 .................................................... 12
ENTREE PERITEL .................................................................. 12
ENTREE HDMI....................................................................... 13
FIXER LA TELEVISION AU MUR....................................... 13
PRÉPARATION DE LA TÉLÉCOMMANDE............13
INSTALLATION DES PILES................................................. 13
PRECAUTIONS D'UTILISATION DES PILES................... 13
Mise en route 13
Configuration.....................................................13
EMPLACEMENT ................................................................... 13
BRANCHEMENT................................................................... 13
ALLUMER LA TELEVISION................................................. 13
REGLER LA TELEVISION......................................14
BASCULER VERS UNE SOURCE EXTERNE.....................14
RECHERCHE AUTOMATIQUE........................................... 14
RECHERCHE MANUELLE NUMERIQUE......................... 14
Recherche manuelle analogique.................................. 15
Modification de chaîne.................................................... 15
RENAME (Renommer)....................................................... 15
MOVE (Déplacer) ................................................................ 16
Paramétrer une chaîne favorite..................................... 16
SKIP (Ignorer)....................................................................... 16
GUIDE (Guide du programme électronique) 16
INTERFACE COMMUNE.......................................16
Fonction de mise à niveau du logiciel........................ 17
Fonctionnement................................................................. 17
UTILISER LA TELEVISION................................... 18
Sélectionner une émission de télévision................... 18
Régler le volume................................................................. 18
Fonction CH.LIST (Liste chaînes)................................... 18
REGLER LES PARAMETRES DE L'IMAGE.............18
Modifier les paramètres de l'image............................. 18
REGLER LES PARAMETRES DU SON...................19
Modifier les paramètres du son..........................19
PARAMETRES DES FONCTIONS.........................20
PARAMETRES DE L'HEURE..................................21
PARAMETRES DU MENU VERROUILLAGE.........23
AFFICHAGE DU MENU CONTEXTUEL................ 24
Utiliser les fonctions 25
Fonctions Télétexte............................................25
Télétexte................................................................................ 26
MODE USB...........................................................27
UTILISER LE DISPOSITIF USB........................................... 27
Connecter/Retirer le dispositif USB ............................. 27
Utiliser le dispositif USB ................................................... 28
Lire une image..................................................................... 28
Lire de la musique.............................................................. 28
Lire un film............................................................................ 29
Texte........................................................................................ 29
Utiliser un disque externe USB pour l'enregistre
ment....................................................................29
PROGRAMMATION............................................................. 30
ENREGISTREMENT.............................................................. 31
UTILISER UN LECTEUR DVD (certains modèles u
niquement).........................................................31
AUTRES FONCTIONS POUR LE DVD.................. 32
Sections des références ...................33
DEPANNAGE....................................................... 33
Caractéristiques techniques............................. 35
Sommaire

Consignes de sécurité
Manuel D’utilisation Television Numerique ecran LCD / LED LCD FR-2
Consignes de sécurité
BIENVENUE
Merci d’avoir acheté cette télévision numérique LCD LCD/LED 19"/22"/24"/32"/40" HD Ready. Ce guide est destiné à
vous aider lors de l’installation et de la prise en main de votre télévision.
Tout d’abord, veuillez vérier que les accessoires suivants se trouvent bien dans le carton :
Télévision numérique LCD LCD/LED 19"/22"/24"/32"/40" HD ReadyTélécommandet
Télécommandet
2 piles AAAt
t.BOVFMEVUJMJTBUJPO
t(BSBOUJF
t4VQQPSUEFMBUÏMÏWJTJPO
tWJTQPVSMFTVQQPSUVOJRVFNFOUQPVSMFNPEÒMF
t"EBQUBUFVSDPNQPTBOUFBEBQUBUFVSDPNQPTBOUFBVEJPBEBQUBUFVS1ÏSJUFMVOJRVFNFOUQPVSMFNPEÒMF
t$BDIFCPVUPOVOJRVFNFOUQPVSMFNPEÒMF
A présent, vous pouvez commencer !
INFORMATIONS IMPORTANTES
AVERTISSEMENT
AVERTISSEMENT
RISQUE DE CHOC ELECTRIQUE,
NE PAS OUVRIR
* Afin d'éviter tout risque électrique, il est fortement recommandé de ne pas ouvrir le capot :
aucun accessoire ne se trouve à l'intérieur.
* Si nécessaire, contacter un service après-vente agréé.
* Un voyant clignotant dans un triangle : situation potentiellement dangereuse pouvant entraîner
de graves blessures dues à la haute tension.
* Un point d'exclamation dans un triangle : suivre les spécifications techniques des pièces ou
accessoires importants devant être remplacés.
AFIN DE RÉDUIRE LE RISQUE DE CHOC ÉLECTRIQUE, NE PAS RETIRER LE CAPOT ARRIÈRE.
AUCUNE PIÈCE INTERNE NE PEUT ÊTRE REPAREE PAR L'UTILISATEUR.
APPELER UN CENTRE DE REPARATION AGREE.
AVERTISSEMENT : Afin d'éviter tout risque d'incendie ou électrique, ne jamais placer le poste de
télévision dans une zone très humide. Eviter toute éraure ou choc sur l'écran.
ATTENTION : S Lire attentivement ce manuel avant d'utiliser la télévision. Le conserver en vue d'une
utilisation ultérieure.
S Pour une performance optimale de la télévision, lire attentivement ce manuel
d'utilisation et le conserver en vue d'une utilisation ultérieure.
S Les informations concernant les affichages et chires contenus dans le manuel
d'utilisation peuvent varier en raison d'innovations techniques.
ATTENTION :
S Le démontage non autorisé de la télévision est interdit.

Consignes de sécurité
FR-3 Manuel D’utilisation Television Numerique ecran LCD / LED LCD
Ne pas utiliser ou stocker des matériaux
inammables à proximité de la télévision afin
d'éviter tout risque
d'explosion ou
d'incendie.
Ne pas placer la télévision dans un endroit
humide afin d'éviter tout
risque d'incendie.
L'antenne de la télévision doit être tenue à
l'écart de tout câble
électrique afin d'éviter
tout choc électrique.
Ne jamais toucher la prise avec les mains
mouillées car cela peut entraîner un choc
électrique.
Toujours s'assurer que la
télévision est
bien branchée car une mauvaise connexion
électrique peut provoquer
un incendie.
Lorsque l'antenne est utilisée, s'assurer que
de l'eau ne puisse pas couler le long du câble
jusque dans la télévision.
Pour nettoyer la télévision, la débrancher,
utiliser un c
hion doux et jamais de produits
chimiques. S'assurer qu'aucune goutte d'eau
ne tombe dans la
télévision.
La fiche et le câble électrique doivent rester
propres afin d'éviter tout choc électrique ou
risque d'incendie.
Débrancher la télévision de l'a
limentation,
ainsi que l'antenne en cas d'orage afin
d'éviter tout choc
électrique ou risque
d'incendie.
En cas d'absence prolongée, débrancher la
télévision de l'alimentation afin d'éviter tout
choc électrique ou risque d'incendie.

Consignes de sécurité
Manuel D’utilisation Television Numerique ecran LCD / LED LCD FR-4
La télévision doit être fermement fixée afin
d'éviter toute chute, voire tout incendie.
Afin d'éviter tout risque d'incendie, ne
pas utiliser la télévision à la lumière
directe du soleil ou près de
sources de chaleur.
Ne pas placer de liquide ou d'huile près
de la télévision
afin d'éviter tout risque
d'incendie.
Débrancher l'alimentation et l'antenne de
la télévision en cas d'orage.
Ne pas utiliserdeprisesélectriques
endommagées ou usées. Maintenir le cordon
électrique à l'écart de toute sourcedechaleur
afin d'éviter les chocs
électriques ou les
risques d'incendie.
Ne pas brancher trop de
prises en parallèle
ou ne pas partager la même prise avec
plusieurs fiches afin d'éviter
tout risque d'incendie.
La télévision doit être placée sur une surface
solide et stable afin d'éviter toute chute.
Tout démontage non autorisé de
la télévision
est interdit afin d'éviter tout choc électrique
ou risque d'incendie.
Contacter le service
après-vente agréé si
des réparations
techniques sont
nécessaires.
Tenir la télévision à l'écart de tout
transformateur ou source de chaleur afin
d'éviter tout risque d
'incendie.
Débrancher la
télévision de
l'alimentation, puis contacter le service
après-vente agréé si la télévision émet un
son inhabituel.

A propos de la télévision à écran LCD / LED LCD
FR-5 Manuel D’utilisation Television Numerique ecran LCD / LED LCD
1. Ôtez la petite pièce de la base du support.
2. Positionnez la colonne sur la base du support.
4. Insérez la petite pièce dans la base. Vous pouvez également utiliser une vis.
3. Insérez la TV LCD dans la base. Eectuez une rotation de 15 degrés dans le sens de la èche située
sur la base du support.
A propos de la télévision à écran LCD/LED
LCD
Installation du support
Modèles LED LCD 19"/22"/24" uniquement

A propos de la télévision à écran LCD / LED LCD
Manuel D’utilisation Television Numerique ecran LCD / LED LCD FR-6
Installation du support
Modèle LED LCD 32"/40" uniquement
1. Posez délicatement la face avant de la télévision sur une table. Nous vous conseillons de po
s
télévision sur son emballage afin d’éviter d’abimer l’écran.
2. Positionnez le support sur la base de la télévision, comme indiqué ci-dessous.
4. Insérez les vis dans les trous du support et serrez-les.
3. Insérez le support dans la télévision.

A propos de la télévision à écran LCD / LED LCD
FR-7 Manuel D’utilisation Television Numerique ecran LCD / LED LCD
SE FAMILIARISER AVEC LA TÉLÉVISION
Panneau de commande avant
Modèle LCD 19"/22" uniquement
ÏSFOUEFDFRVFWPVT BWF[BDUVFMMFNFOU
TVS WPUSF UÏMÏWJTFVS WFVJMMF[ WPVT SÏGÏSFSBDFRVFWPVT WPZF[ SÏFMMFNFOU
4063$&
$IPJTJTTF[MFTTJHOBVYEhFOUSÏFPSJFOUBUJPO
ESPJUFQPVSDPOöSNFS WPUSFTÏMFDUJPO
.&/6
"QQVZFS TVS DFCPVUPOQPVSDIPJTJS MFNFOVQSJODJQBM
70-
%JNJOVFS WPMVNFPSJFOUBUJPOHBVDIFQPVS
BKVTUFSMhBSUJDMFEBOTMh04%
70-
"VHNFOUFS WPMVNFPSJFOUBUJPOESPJUFQPVS
BKVTUFSMhBSUJDMF"QQVZFSQPVSFOUSFS
$)
$IBÔOFQSÏDÏEFOUFQPVSDIPJTJSMhBSUJDMFEBOT
MFNFOV
$)
$IBÔOFTVJWBOUFQPVSDIPJTJSMhBSUJDMFEBOTMF
NFOV
*OEJDBUFVS
EhBMJNFOUBUJPO
$BQUFVSEF
SÏDFQUJPOEFMB
UÏMÏDPNNBOEF
POWER
108&3
"QQVZFSTVSDFCPVUPOQPVSBMMVNFSPV
ÏUFJOESFMBUÏMÏWJTJPO

A propos de la télévision à écran LCD / LED LCD
Manuel D’utilisation Television Numerique ecran LCD / LED LCD FR-8
Panneau de connexions arrière
1MFBTF SFGFS UPBDUVBMQSPEVDUPGUIF%7%TMPUBOE
CVUUPOT
1SFOF[VODPNCP UÏMÏWJTFVSMFDUFVSEF%7%QPVS
WPVTZSFQPSUFS
64#
)%.* #SBODIF[JDJMBQSJTFEFTQÏSJQIÏSJRVFT)%.*
574$"35
:1#13
#SBODIF[VOQÏSJQIÏSJRVFWJEÏPBVEJPËDFT
QSJTFT
$PNNPO
*OUFSGBDF
47*%&0 1SJTFQÏSJQIÏSJRVF47JEFP "VEJP
"6%*0*/
7("*/
$POOFDUF[JDJMBQSJTFBOBMPHJRVF7("CSPDIFT
EFMBDBSUFJNBHFEFWPUSF1$QPVSVUJMJTFSMF
UÏMÏWJTFVS DPNNFÏDSBOEF1$
1$ "6%*0*/
&BSQIPOF
QPSU
$0"9*"-
"/5*/
#SBODIF[MFDÉCMFPVMFTTJHOBVYEhBOUFOOFBV
UÏMÏWJTFVSEJSFDUFNFOUPVWJBWPUSFCPÔUFEF
KPODUJPO

A propos de la télévision à écran LCD / LED LCD
FR-9 Manuel D’utilisation Television Numerique ecran LCD / LED LCD
Modèles LED LCD 19"/22"/24" uniquement
6
7
1
SOURCE
Appuyer sur ce bouton plusieurs fois pour
sélectionner les périphériques connectés.
2
MENU
Appuyer sur ce bouton pour acher à l’écran le
menu des caractéristiques de votre télévision.
3
VOL-/VOL+
Appuyer sur ce bouton pour augmenter ou
diminuer le volume.
4
CH-/CH+
Appuyer sur ce bouton pour changer de chaîne.
5
POWER
Appuyer sur ce bouton pour allumer ou éteindre
la télévision.
6
Indicateur
d'alimentation
7
Capteur de
réception de la
télécommande
DC IN
USB
DIGITALVOUT
(COAXIAL)
HDMI IN
C
OMPONENT
IN
AV
I
N
Y Pb Pr
VIDEO L-AUDIO-R
L-AUDIO-R
PC/DVI AUDIO IN
PC IN
SCART
1
2 3
4
5
6
7
89
10
11
ANT IN
1
DC IN entrée
2
EARPHONE
sortie
3
USB entrée
4
Digital output entrée
5
HDMI IN entrée
6
PC IN entrée
7
PC/DVI AUDIO IN entrée
8
TV SCART entrée/
sortie
9
COMPONENT
AUDIO
entrée
>
AV IN entrée
A
COMPONENT IN entrée
1
2
4
3
5
Content Si
d
e
Facing T
owar
ds
You
SOURCE
MENU
VOL+
VOL-
CH+
CH
-
STOP
PLAY/PAUSE OPEN/CLOSE
PREV NEXT
(Prenez un combo
téléviseur/lecteur de DVD
pour vous yreporter)

A propos de la télévision à écran LCD / LED LCD
Manuel D’utilisation Television Numerique ecran LCD / LED LCD FR-10
Modèle LED LCD 32"/40" uniquement
LOV
HC
UNEM
ECRUOS
1
SOURCE
Appuyer sur ce bouton plusieurs fois pour
sélectionner les périphériques connectés.
2
MENU
Appuyer sur ce bouton pour acher à
l’écran le menu des caractéristiques de votre
télévision.
3
VOL+/-
Appuyer sur ce bouton pour augmenter ou
diminuer le volume.
4
CH+/-
Appuyer sur ce bouton pour changer de chaîne.
5
POWER
Appuyer sur ce bouton pour allumer ou
éteindre la télévision.
HDMI 1 IN
USB
DIGITAL AUDIO OUT
(OPTICAL )
ANT IN
2 INIMDH
NITNENOPMOC
CP
Y P
b
P
r
L
OIDUA
R
NICP
3 INIMDH
TRACS
PC/DVI AUDIO
1
SCART
entrée
2
Component entrée
3
Component Audio
entrée
4
PC entrée
5
PC/DVI AUDIO
entrée
6
HDMI3 IN entrée
7
HDMI2 IN
entrée
8
Common Interface
9
Earphone
0
ANTENNA entrée
A
Optical sortie
B
USB
C
HDMI1 IN entrée

A propos de la télévision à écran LCD / LED LCD
FR-11 Manuel D’utilisation Television Numerique ecran LCD / LED LCD
SE FAMILIARISER AVEC LA TÉLÉCOMMANDE
Pour utiliser la télécommande, la diriger vers le capteur infrarouge de la télévision.
1
Veille
2
Menu DVD / ENREG.
3
Ouvrir / Fermer lecteur DVD
4
Mode Image
5
Mode Son
6
Affichage Ecran
7
Veille auto
8
DTVAudio / NICAM / DVDAudio
9
Format de l'image
0
Liste des chaînes
A
Sous-titres
B
Sélection du numéro de chaîne
C
Changement de source
D
Q. VIEW (permet de revenir à la dernière chaîne visionnée) / Changer de chaîne
E
V+/V- : Sélection du volume
F
P+/P- : Sélection de la chaîne
G
Sourdine
H
Menu
I
GUIDE (seulement pour DTV)
J
Liste des favoris
K
OK
L
Déplacement du curseur
M
Retour (seulement pour USB)
N
Quitter l'écran
O
REPETER (uniquement pour DVD, USB, ENREG. et Programme) / BoutonANNULER
P
Zoom (uniquement pour DVD et USB) /Télétex (uniquement pourTV) / Index ENREG.
Q
Lecture / Pause (uniquement pour DVD et USB) / Programmation
R
Arrêt (uniquement pour DVD, USB, ENREG. et Programmation)
S
Retour arrière rapide (uniquement pour DVD, USB, ENREG. et Programmation)
T
Avance rapide (uniquement pour DVD, USB, ENREG. et Programmation)
U
Précédent (uniquement pour DVD, USB, ENREG. et Programmation)
V
Suivant(uniquementpourDVD,USB,ENREG.etProgrammation)
W
Configuration DVD /Texte
X
Titre DVD /Teletext Mix (Télétexte avec comme fond d'image la chaîne sélectionnée)
Y
Recherche DVD / Sous-code Télétexte
Z
DVD 10+ /Arrêter le défilement des pages en mode Télétexte
[
Programme DVD /Affichage Télétexte
\
Répét. DVDA-B /Taille télétexte
]
Appel DVD / Mode Télétexte
`
Angle DVD / Heure Télétexte
Remarque
Les boutons ROUGE, VERT, BLEU et O
JAUNE sont des boutons Fast text
dans un signal analogique. Bouton
DVBT (consulter l'affichage à l'écran).
SCREEN
SSTTOOPP
1
4
2
6
8
11
15
17
18
25
24
13
22
26
29
30
33
34
2737
2738
3
5
7
9
10
12
14
16
19
23
27
28
21
27
26
31
27
32
35
36
20
2739
2740

A propos de la télévision à écran LCD / LED LCD
Manuel D’utilisation Television Numerique ecran LCD / LED LCD FR-12
BRANCHER LA TÉLÉVISION
BRANCHER L'ANTENNE
Connecter l'antenne sur le côté de la télévision à la prise
ANTENNA IN.
AMELIORER LE SIGNAL
Afin d'améliorer la qualité d'image lorsque le signal est
faible, utiliser un amplificateur de signaux (non fourni).
CONNECTER UN PC A LA TELEVISION
Il est possible d'utiliser la télévision comme moniteur en
le connectant grâce à un câble VGA (non fourni).
Lire le guide d'utilisation de l'ordinateur et vérifier
A
qu'il possède un connecteur VGA.
Eteindre le PC et la télévision.
B
Brancher un câble d'interface VGA à 15 broches C
de type D au connecteur d'interface vidéo VGA
sur le PC. Brancher l'autre extrémité du câble au
connecteur d'interface du PC sur la télévision. Serrer
les vis des connecteurs VGA et brancher le câble
audio (non fourni) à la prise d'entrée audio à l'arrière
de la télévision.
Allumer d'abord la télévision, puis le PC.
D
Appuyer sur le bouton de la télévision ou sur la E
télécommande de la télévision pour sélectionner le
mode VGA.
Une fois que l'image apparaît, s'il y a du bruit,
F
changer la résolution du mode VGA, changer le
taux de rafraîchissement ou régler la luminosité/le
contraste dans le menu jusqu'à ce que l'image soit
nette.
CONNECTER UN LECTEUR DVD A LA
TELEVISION
Connecter les sorties vidéo DVD (Y, Pb, Pr) à la prise
COMPONENT IN (Y, Pb, Pr) sur la télévision.
Allumer le lecteur DVD et insérer un DVD.
A
Appuyer sur le bouton pour sélectionner.B
Consulter le manuel d'utilisation du lecteur DVD C
pour connaître les instructions d'utilisation.
LR YPbPr
DVD
CONNECTER UN LECTEUR DVD OU UN
MAGNETOSCOPE A LA TELEVISION
Il existe deux façons de connecter un lecteur DVD ou un
magnétoscope à la télévision. S'assurer que la télévision
et le lecteur DVD ou le magnétoscope sont éteints avant
de les brancher.
Option de connexion 1
Connecter les câbles audio et S-VIDEO entre les A
connecteurs de sortie du magnétoscope et les
connecteurs d'entrée de la télévision.
Insérer une cassette vidéo dans le magnétoscope
B
et appuyer sur le bouton PLAY (Lecture) du
magnétoscope.
Allumer la télévision en premier, puis le
C
magnétoscope.
Appuyer sur
D SOURCE sur la télévision pour mettre le
mode d'entrée vidéo sur S-VIDEO.
Option de connexion 2
Connecter les sorties DVD/VCR (magnétoscope) à la A
fiche AV IN de la télévision.
Appuyer sur
B SOURCE de la télévision pour
sélectionner le mode AV.
ENTREE PERITEL
Connecter le câble Péritel du dispositif externe A
(lecteur DVD, boîtier décodeur ou console de jeux) à
la prise Péritel de la télévision.
Appuyer sur
B SOURCE pour sélectionner le mode
SCART (Péritel).
Appuyer sur
C PLAY (Lecture) sur le dispositif externe.

A propos de la télévision à écran LCD / LED LCD
FR-13 Manuel D’utilisation Television Numerique ecran LCD / LED LCD
ENTREE HDMI
Connecter le câble du dispositif HDMI à la prise A
HDMI de la télévision.
Appuyer sur
B SOURCE pour sélectionner le mode
HDMI.
Consulter le manuel d'utilisation du dispositif HDMI
C
pour savoir comment l'utiliser.
FIXER LA TELEVISION AU MUR
Il est possible de fixer la télévision au mur à l'aide d'un
support mural (non fourni). Utiliser des vis à métaux M4/
M6 (x 4) pour visser la télévision au support (non fourni).
PRÉPARATION DE LA
TÉLÉCOMMANDE
INSTALLATION DES PILES
Retourner la télécommande, puis ouvrir le couvercle A
du compartiment à piles.
Installer deux piles AAA. (Les symboles + et – de la B
pile doivent correspondre aux repères figurant sur la
télécommande).
Fermer le couvercle du compartiment à piles.C
PRECAUTIONS D'UTILISATION DES PILES
S'assurer qu'aucun obstacle ne se trouve entre la
télécommande et le capteur infrarouge de la télévision.
La lumière du soleil ou toute autre source lumineuse
intense interfère avec le signal envoyé par la
télécommande. Dans ce cas, tourner la télévision afin
d'éviter toute source lumineuse directe.
Ne pas exposer la télécommande à une source de
chaleur directe ou l'utiliser dans un endroit humide pour
éviter de l'endommager.
Utiliser deux piles AAA de 1,5 V. Ne pas mélanger
les types de pile. Installer les piles en respectant les
polarités. Ne pas utiliser de piles rechargeables. Si la
télévision n'est pas utilisée pendant un certain temps,
retirer les piles de la télécommande.
Mise en route
Configuration
EMPLACEMENT
Il faut placer la télévision près d'une prise (afin de
pouvoir atteindre facilement le câble d'alimentation) et à
portée de la prise de l'antenne ou de la rallonge.
BRANCHEMENT
Insérer le câble de l'antenne de la télévision A
dans l'entrée Antenna (Antenne) sur le côté de la
télévision.
Insérer les piles dans la télécommande. S'assurer
B
qu'elles sont correctement insérées, en respectant la
polarité indiquée dans le compartiment à piles.
ALLUMER LA TELEVISION
Appuyer une fois sur A POWER (Veille) à droite de la
télévision. Un voyant clignotant rouge s'affiche dans
un coin de l'écran.
Appuyer sur
B POWER (Veille) sur la télécommande.
La télévision s'allume et le voyant rouge devient
bleu. Cela peut prendre un certain temps.
A propos de la télévision à écran LCD / LED LCD /Mise en route

Mise en route
Manuel D’utilisation Television Numerique ecran LCD / LED LCD FR-14
Lorsqu'une invite s'affiche, sélectionner la C
langue dans la liste s'affichant à l'écran. Utiliser
le boutonpour faire défiler jusqu'à la langue
souhaitée et appuyer pour confirmer.
REGLER LA TELEVISION
BASCULER VERS UNE SOURCE EXTERNE
Si un lecteur DVD ou dispositif externe similaire est relié
à la télévision, il faut régler la télévision de manière à ce
qu'elle en affiche le contenu. Appuyer sur SOURCE pour
afficher le menu Source en haut à gauche de l'écran.
Utiliser le bouton ou pour mettre en surbrillance la
source souhaitée, puis appuyer sur OK.
Pour en savoir plus sur le branchement des autres
équipements, voir SE FAMILIARISER AVEC LA TÉLÉVISION
à la page 5.
RECHERCHE AUTOMATIQUE
Appuyer sur A MENU.
Appuyer sur B ou pour sélectionner le menu
Tuning (Réglage), puis sur pour entrer.
Appuyer sur C ou pour sélectionner Country
(Pays), puis sur ou pour sélectionner le pays.
Appuyer sur
D ou pour sélectionner la recherche
automatique (Auto Search), puis sur OK pour entrer.
Appuyer sur ou pour sélectionner l'option OK,
puis sur OK pour lancer la recherche. Appuyer sur
MENU (il est possible de ne pas lancer la recherche
TV/DTV).
Appuyer sur E EXIT (Quitter) pour arrêter la recherche
automatique.
Remarque
La recherche automatique peut prendre un certain O
temps.
RECHERCHE MANUELLE NUMERIQUE
Appuyer sur A MENU.
Appuyer sur B ou pour sélectionner le menu
Tuning (Réglage), puis appuyer sur pour entrer.
Appuyer sur
C ou pour sélectionner la recherche
manuelle numérique (Digital Manual Search),
appuyer sur pour entrer.
Appuyer sur D ou pour sélectionner la chaîne
(Channel).
Puis sur OK pour lancer la recherche.

Mise en route
FR-15 Manuel D’utilisation Television Numerique ecran LCD / LED LCD
Lorsqu'une chaîne est trouvée, appuyer sur E OK pour
l'enregistrer.
Appuyer sur EXIT pour quitter.
Recherche manuelle analogique
Suivre les étapes ci-dessous pour eectuer une
recherche manuelle.
Appuyer sur
A MENU.
Appuyer sur B ou pour sélectionner le menu
Tuning (Réglage), puis sur pour entrer.
Appuyer sur
C ou pour sélectionner la recherche
manuelle analogique (Analog Manual Search), puis
sur pour entrer.
Appuyer sur D ou pour sélectionner la recherche
(Search), puis sur pour sélectionner la chaîne
ayant la plus haute fréquence.
Appuyer sur pour sélectionner la chaîne ayant la
plus basse fréquence.
Sélectionner Storage To (Stocker dans), puis
E
appuyer sur ou pour sélectionner le numéro
de position pour la chaîne. Lorsque la chaîne
est trouvée, appuyer sur le bouton rouge pour
l'enregistrer. Appuyer sur EXIT (Quitter) pour quitter.
Sound System (Système son)V
Appuyer sur ou pour sélectionner Sound
System, puis sur ou afin de sélectionner le
système son approprié.
Current CH (Chaîne actuelle)V
Appuyer sur ou afin de sélectionner le numéro
de chaîne à modifier.
Storage To (Stocker dans)V
Appuyer sur ou afin de sélectionner le numéro
de programme à stocker.
Fine Tune (Mise au point)V
Si l'image et/ou le son est/sont mauvais, utiliser la
fonction FINE TUNE (Mise au point). Ne pas utiliser
cette fonction si la réception est bonne.
Répéter les étapes
A A à C ci-dessus, puis appuyer sur
ou afin de sélectionner Fine Tune (Mise au point).
Appuyer sur
B ou plusieurs fois pour procéder à
la mise au point, jusqu'à obtenir la meilleure image
et le meilleur son possibles, puis relâcher le bouton.
Modification de chaîne
Il est possible de renommer, déplacer, paramétrer une
chaîne favorite et passer la chaîne en mode analogique.
Appuyer sur
A MENU.
Appuyer sur B ou pour sélectionner le menu
TUNING (Réglage), puis sur pour entrer.
Appuyer sur C ou afin de sélectionner CHANNEL
EDIT (Modification chaîne).
Appuyer sur pour entrer dans le sous-menu. Il est
possible d'appuyer sur le bouton rouge, vert, jaune
ou bleu pour entrer dans le menu souhaité.
RENAME (Renommer)
Appuyer sur A ou pour sélectionner la chaîne,
puis sur le bouton vert pour la renommer.

Mise en route
Manuel D’utilisation Television Numerique ecran LCD / LED LCD FR-16
Appuyer sur B ou pour sélectionner le numéro
du nom de la chaîne, puis sur ou pour
sélectionner ce numéro.
Il est possible d'appuyer sur
C EXIT (Quitter) pour
annuler les modifications à tout moment.
Remarque
La fonction RENAME (Renommer) n'est disponible O
que dans le programme ATV.
MOVE (Déplacer)
Appuyer sur A ou pour sélectionner la chaîne,
puis sur le bouton jaune pour sélectionner la position.
Appuyer sur
B ou pour sélectionner le numéro à
déplacer, puis sur le bouton jaune pour confirmer.
Il est possible d'appuyer sur
C EXIT (Quitter) pour
annuler les modifications à tout moment.
Paramétrer une chaîne favorite
Appuyer sur A ou pour sélectionner la chaîne,
puis sur le bouton rouge afin de paramétrer la
chaîne favorite.
Il est possible d'appuyer sur le bouton rouge pour
B
annuler les modifications à tout moment.
Appuyer sur le bouton C FAV (Favorite) de la télécommande.
La liste des favoris Favourite List s'affiche.
Appuyer sur D ou pour sélectionner la chaîne,
puis sur OK pour entrer.
SKIP (Ignorer)
Appuyer sur A ou pour sélectionner la chaîne,
puis sur le bouton bleu pour ignorer la chaîne
actuelle.
Il est possible d'appuyer sur le bouton bleu pour
B
annuler les modifications à tout moment.
GUIDE (Guide du programme électronique)
Avec cette fonction, il est possible d'accéder aux
informations du programme DTV.
Appuyer sur
A MENU.
Appuyer sur B ou pour sélectionner le menu
TUNING (Réglage), puis sur pour entrer.
Appuyer sur
C ou pour sélectionner Guide.
Appuyer sur OK pour entrer dans le sous-menu, le
guide du programme électronique s'affiche. Il est
possible de rouvrir rapidement le menu GUIDE en
appuyant sur le bouton GUIDE de la télécommande.
Remarque
Uniquement en mode DTV.O
INTERFACE COMMUNE
La fente d'interface commune (IC) est conçue pour
recevoir le module d'accès conditionnel (AC) et
la carte à puce afin de visualiser les programmes
télévisuels payants et d'autres services. Il est nécessaire
de contacter le fournisseur de services d'interface
commune pour obtenir davantage d'informations sur
les modules et l'abonnement.
Remarque : nous ne fournissons pas les modules AC et
les cartes à puce. Ils ne constituent pas des accessoires
optionnels.

Mise en route
FR-17 Manuel D’utilisation Television Numerique ecran LCD / LED LCD
Avertissement
ÉŖ teindre la télévision avant d'insérer tout module
dans la fente d'interface commune.
Insérer le module AC correctement, puis la carte A
à puce dans la fente IC située sur le côté de la
télévision.
Allumer la télévision. Le message ci-dessous s'affiche B
si le module AC est détecté. Attendre quelques
instants jusqu'à ce que la carte soit activée.
Appuyer sur
C MENU pour afficher le menu principal
(Main Menu), utiliser les boutons et pour
mettre en surbrillance la ligne « Common Interface »
(Interface commune), puis appuyer sur OK.
Des informations détaillées sur la carte IC utilisée
D
s'affichent.
Appuyer sur
E OK pour accéder au menu de la carte.
Consulter le manuel d'utilisation du module pour
connaître les détails de paramétrage.
Lorsque le module est retiré, le message suivant F
s'affiche à l'écran.
Fonction de mise à niveau du logiciel
Lorsque le site Internet du magasin de télévision Ŗ
envoie de nouvelles mises à niveau, il est possible
de mettre à niveau le logiciel d'exploitation à l'aide
du menu Download (Télécharger). Les données de
diverses unités sont transférées consécutivement sur
une chaîne de réception dédiée.
Il faut chercher la chaîne avec le code numérique de Ŗ
mise à niveau.
Remarque
Des informations sont disponibles dans le magasin O
de télévisions ou sur Internet.
Fonctionnement
Appuyer sur A MENU.
Appuyer sur B ou pour sélectionner le menu
TUNING (Réglage), puis sur pour entrer.
Appuyer sur
C ou afin de sélectionner Software
Upgrade (Mise à niveau du logiciel).
Appuyer sur
D ou pour l'activer. Le paramètre
par défaut est O (Désactivé).

Mise en route
Manuel D’utilisation Television Numerique ecran LCD / LED LCD FR-18
L’option Start Upgrqde(Démarrer la mise à jour )E
pecrt être sélectionnée (Le défaut est gray et ne
peut pas être sélectioné)
13%
Press EXIT to cancel download
Appuyer sur F ou pour sélectionner l'option
Start Upgrqde(Démarrer la mise à jour ), puis sur OK
pour entrer. La télévision redémarre et cherche les
informations de mise à niveau.
Remarque
Si des informations de mise à niveau sont O
disponibles, la télévision commence la mise à
niveau. Sinon, la télévision repasse en source DTV.
Charger l'identification du récepteur. Ce processus
G
peut également prendre quelques minutes. Il est
possible d'appuyer sur EXIT (Quitter) pour annuler
le téléchargement ; la télévision repasse en source
DTV.
100%
13%
Press EXIT to cancel download
Up dating in progress - Do not turn off the TV
Une fois le téléchargement terminé, la télévision H
passe en mode téléchargement et le voyant
s'allume. Le menu 4 de droite s'affiche.
La télévision repasse en source DTV lorsque la mise à
niveau se termine.
UTILISER LA TELEVISION
Sélectionner une émission de télévision
A l'aide du bouton Program number (Numéro de A
programme), saisir le numéro de la chaîne à l'aide du
clavier numérique de la télécommande.
Utiliser la touche
B P+/P-.
Appuyer sur P+/P- pour sélectionner un numéro de
chaîne.
Régler le volume
Appuyer sur le bouton V+/V- de la télécommande ou sur
le côté de la télévision pour régler le volume.
Fonction CH.LIST (Liste chaînes)
Appuyer sur le bouton CH.LIST de la télécommande
pour afficher le menu Channel List (Liste des chaînes),
puis sur pour entrer.
Appuyer sur ou pour sélectionner la chaîne, puis
sur OK pour entrer.
REGLER LES PARAMETRES DE
L'IMAGE
Modifier les paramètres de l'image
Appuyer sur A MENU.
Appuyer sur B ou pour sélectionner le menu
Picture (Image), puis sur pour entrer.
Appuyer sur C ou pour sélectionner l'élément à régler.
Appuyer sur
D ou afin de régler l'élément sélectionné.
Une fois le réglage eectué, appuyer sur E EXIT
(Quitter) pour rétablir l'affichage normal ou sur
MENU pour retourner au menu précédent.
Contrast (Contraste)V
Permet de régler l'intensité des zones lumineuses de
l'image, mais ne modifie pas les zones sombres.

Mise en route
FR-19 Manuel D’utilisation Television Numerique ecran LCD / LED LCD
Brightness (Luminosité)V
Permet de régler le ux lumineux de l'image entière,
ce qui aecte principalement les zones les plus
sombres de l'image.
Colour (Couleur)V
Permet de régler le niveau de saturation des couleurs
selon les préférences de l'utilisateur.
Sharpness (Netteté)V
Permet de régler la netteté des détails fins de l'image.
Tint (Teinte)V
Permet de sélectionner le mélange de couleurs
(teinte) de l'image.
Remarque
La fonction Tint (Teinte) n'est disponible qu'en O
mode NTSC.
ModeV
Permet de sélectionner le mode image. Sélectionner
Standard/Mild/User/Vivid (Standard/Doux/
Utilisateur/Intense) selon le programme. Il est possible
de sélectionner le mode souhaité grâce au bouton
P.MODE de la télécommande.
Colour temperature (Température des V
couleurs)
Permet d'augmenter ou de réduire les couleurs
chaudes (Warm) (rouge) et froides (Cool) (bleu) selon
les préférences de l'utilisateur.
Sélectionner Cool (Froid) pour donner au blanc une
teinte bleutée, Normal pour donner au blanc une
teinte neutre et Warm pour donner au blanc une
teinte rouge.
Noise Reduction (Réduction du bruit)V
Filtre/réduit automatiquement le bruit de l'image et
améliore la qualité d'image lorsque des signaux vidéo
faibles sont reçus.
Sélectionner O/Low/Standard/High (Désactivé/
Faible/Standard/Elevé) selon le bruit de l'image.
Reset (Réinitialiser)V
Pour rétablir les valeurs par défaut.
REGLER LES PARAMETRES
DU SON
Modifier les paramètres du son
Appuyer sur A MENU.
Appuyer sur B ou pour sélectionner le menu
Sound (Son), puis sur pour entrer.
Appuyer sur C ou pour sélectionner l'élément à régler.
Appuyer sur D ou afin de régler l'élément sélectionné.
Une fois le réglage eectué, appuyer sur E EXIT
(Quitter) pour rétablir l'affichage normal ou sur
MENU pour retourner au menu précédent.
BalanceV
Permet de régler la sortie des haut-parleurs droit et
gauche afin d'obtenir la meilleure reproduction stéréo
pour l'écoute.
ModeV
Permet de sélectionner le mode son.
Appuyer sur ou pour sélectionner Standard/
Music/Theater/User (Standard/Musique/Théâtre/
Utilisateur) selon le programme. Il est possible
de sélectionner le mode souhaité avec le bouton
S.MODE de la télécommande.
AVLV (Contrôle automatique du volume)
Réduit les diérences de volume entre les diuseurs.
SRS TS XTV
Permet de contrôler la sortie du Woofer.
Appuyer sur ou pour sélectionner SRS TS XT.
Appuyer sur ou pour paramétrer SRS TS XT sur
OFF, ON (désactivé/activé).
SORTIE DIGITALE AUDIOV
Cette fonction contrôle la sortie digitale audio
Appuyer sur les boutons ou pour sélectionner la
sortie digitale audio.
Appuyer sur les boutons ou pour xer la sortie
digitale sur : OFF , PCM , RAW.
Equalizer (Egaliseur)V
Ce paramètre peut être réglé selon les préférences

Mise en route
Manuel D’utilisation Television Numerique ecran LCD / LED LCD FR-20
de l'utilisateur.
Audio Languages (Langues audio)V
Appuyer sur ou pour sélectionner Primary/
Secondary (Primaire/Secondaire), puis sur ou
pour sélectionner les langues nécessaires. Appuyer
sur pour sélectionner Close (Fermer), puis sur OK
pour fermer l'option.
Remarque
La fonction Audio Language n'est disponible O
qu'en mode DTV.
Reset (Réinitialiser)V
Pour rétablir les valeurs par défaut.
PARAMETRES DES
FONCTIONS
Appuyer sur A MENU.
Appuyer sur B ou pour sélectionner le menu
Sound (Son), puis sur pour entrer.
Appuyer sur C ou pour sélectionner l'élément à
régler.
Appuyer sur
D ou afin de régler l'élément
sélectionné.
Une fois le réglage eectué, appuyer sur
E EXIT
(Quitter) pour rétablir l'affichage normal ou sur
MENU pour retourner au menu précédent.
Language (Langue)V
Permet de sélectionner la langue des menus.
Subtitle Language (Langue des sous-titres)V
Permet de sélectionner la langue des sous-titres.
Display Mode (Mode d'affichage)V
Pour régler le format, appuyer sur ou pour
sélectionner 4:3/Zoom1/Zoom2/Wide/16:9/
Auto. Il est possible de sélectionner rapidement
le mode souhaité avec le bouton SCREEN de la
télécommande.
Mode 4:3Ŗ
Choisir 4:3 pour visualiser une image avec un
format original de 4:3, avec des barres grises à
droite et à gauche.
Mode 16:9Ŗ
Choisir 16:9 pour régler l'image horizontalement,
dans une proportion linéaire afin de remplir tout
l'écran.
Zoom1Ŗ
Choisir Zoom1 pour visualiser l'image sans aucune
altération. Cependant, les parties supérieure et
inférieure de l'image seront rognées.
Zoom2Ŗ
Choisir Zoom2 pour altérer l'image, l'étendre
verticalement et la rogner. L'image adopte un
compromis entre l'altération et le remplissage de l'écran.
Wide (Large)Ŗ
Choisir Wide pour régler l'image dans une
proportion non linéaire, c'est-à-dire plus large en

Mise en route
FR-21 Manuel D’utilisation Television Numerique ecran LCD / LED LCD
haut et sans altération en bas.
Blue Screen (Ecran bleu)V
Permet de sélectionner la couleur de fond des
caractères.
Remarque
La fonction Blue Screen n'est disponible qu'en O
mode ATV.
Recorder (Enregistreur)V
Permet d'enregistrer le programme DTV. Les détails de
l'enregistreur sont décrits à la page 29-31.
SCART Input (Entrée Péritel)V
Cette fonction est visible mais non sélectionnable
sur le 32"/40'', elle n'est pas visible et donc par
conséquent non sélectionnable sur le 19''/22" et le
24''.
OSD Time Out (Expiration de l'affichage à V
l'écran)
Etablir la durée pendant laquelle les menus doivent
s'afficher à l'écran. Appuyer plusieurs fois sur ou
pour sélectionner le nombre de minutes préréglées.
La durée (Time) sera réglée en séquence : désactivé,
10 sec, 15 sec, 30 sec, 45 sec, 60 sec.
OSD Transparency (Transparence de V
l'affichage à l'écran)
Pour régler le fond en transparence de l'affichage
à l'écran, la transparence sera réglée en séquence :
désactivé, 25 %, 50 %, 75 %, 100 %.
Reset (Réinitialiser)V
Pour rétablir les valeurs par défaut.
PARAMETRES DE L'HEURE
Clock (Horloge)V
Appuyer sur A MENU.
Appuyer sur
B ou pour sélectionner le menu
Time (Heure), puis sur pour entrer.
Appuyer sur C ou pour sélectionner
Clock (Horloge), puis sur pour confirmer le
paramètre.
Appuyer sur ou pour sélectionner les
heures ou les minutes, puis sur ou pour
régler la valeur.
DateV
Appuyer sur A MENU.
Appuyer sur
B ou pour sélectionner le menu
Time (Heure), puis sur pour entrer.
Appuyer sur C ou pour sélectionner Date,
puis sur pour confirmer le paramètre.
Appuyer sur ou pour sélectionner l'option,
puis sur ou pour régler la valeur.
Remarque
En mode DTV, l'heure et la date ne peuvent O
être modifiées car les informations horaires
proviennent du signal.
Pour modifier l'heure, éteindre la télévision
en mode ATV, puis la rallumer.

Mise en route
Manuel D’utilisation Television Numerique ecran LCD / LED LCD FR-22
O Time (Heure de désactivation)V
Appuyer sur A MENU.
Appuyer sur
B ou pour sélectionner le menu
Time (Heure), puis sur pour entrer.
Appuyer sur C ou pour sélectionner O
Time (Heure de désactivation), puis sur pour
confirmer le paramètre.
Appuyer sur ou pour sélectionner l'option
Repeat (Répéter), puis sur pour la régler.
Appuyer sur ou pour sélectionner les
heures ou les minutes, appuyer sur ou afin
de régler la valeur.
Lorsque l'heure de désactivation est atteinte, la
télévision passe en mode veille.
On Time (Heure d'activation)V
Appuyer sur A MENU.
Appuyer sur
B ou pour sélectionner le menu
Time (Heure), puis sur pour entrer.
Appuyer sur C ou pour sélectionner On Time
(Heure d'activation), puis sur pour confirmer le
paramètre.
Appuyer sur ou pour sélectionner l'option
Activate (Activer), puis sur pour la régler.
Appuyer sur ou pour sélectionner les
heures ou les minutes, appuyer sur ou afin
de régler la valeur.
Lorsque l'heure d'activation est atteinte, la
télévision s'allume automatiquement.
Sleep (Veille auto.)V
La veille éteint automatiquement la télévision après
un certain temps préréglé (de 5 à 240 minutes).
Appuyer sur
A MENU, puis sur ou pour
sélectionner le menu Time (Heure).
Appuyer sur
B , puis sur ou pour
sélectionner Sleep (Veille auto.).
Appuyer sur
C ou pour sélectionner le
nombre de minutes. Sélectionner O, 5 min, 10
min, 15 min, 30 min, 45 min, 60 min, 90 min,
120 min, 180 min ou 240 min.
Une fois le réglage eectué, appuyer sur
D EXIT
(Quitter) pour rétablir l'affichage de la télévision
ou sur MENU pour retourner au menu précédent.
Le décompte commence à partir du nombre de
minutes sélectionné.
Time Zone (Fuseau horaire)V
Appuyer sur A MENU.
Appuyer sur
B ou pour sélectionner le menu
Time (Heure), puis sur pour entrer.
Appuyer sur
C ou afin de sélectionner Time
Zone (Fuseau horaire).
Appuyer sur
D ou afin de sélectionner le
fuseau horaire approprié.
Appuyer sur
E MENU pour sauvegarder et quitter.

Mise en route
FR-23 Manuel D’utilisation Television Numerique ecran LCD / LED LCD
PARAMETRES DU MENU
VERROUILLAGE
Avec cette fonction, il est possible de contrôler le
syntoniseur, le programme, le volume de la source, etc.
Appuyer sur MENU sur la télécommande, sur ou
pour sélectionner le menu Lock (Verrouillage), puis sur
pour entrer dans le sous-menu. Le mot de passe initial
de la télévision est 0000. En cas d'oubli, il est toujours
possible de saisir 9443 pour déverrouiller.
CHANGE PASSWORD (MODIFIER LE MOT DE V
PASSE)
Appuyer sur A ou pour sélectionner Change
Password (Modifier le mot de passe), puis sur
pour entrer dans le sous-menu.
Une fois les 4 chires saisis, il faudra les ressaisir B
une deuxième fois.
Le nouveau mot de passe est alors
automatiquement enregistré.
CHILD LOCK (SECURITE ENFANTS)V
Appuyer sur ou pour sélectionner Child Lock.
Appuyer sur ou pour régler le mode sur On ou
O (activé ou désactivé). Si le mode de verrouillage
est activé, le mode Child Lock est automatiquement
désactivé. Si l'on appuie sur Child Lock (sur la
télévision), l'écran affiche Child Lock, ce qui peut
être eacé en appuyant sur MENU. 5 secondes
après avoir appuyé sur le bouton, l'écran s'affiche
automatiquement. Le mode Child Lock peut être repris
en accédant au menu Lock Set (Paramétrer verrouillage)
et en paramétrant Child Lock sur On ou O.
Tuning Lock (Verrouillage du réglage)V
Appuyer sur ou pour sélectionner Tuning Lock
et choisir On ou O. Remarque : certaines opérations,
comme la recherche, ne seront pas disponibles
lorsque cette option est activée. En entrant dans le
menu Tuning, Tuning Lock s'affiche à l'écran. Pour
utiliser le menu Tuning, il faut entrer dans le menu
Lock afin de désactiver Tuning Lock ou activer le
déverrouillage.
Channel NO. (N° de chaîne)V
Channel NO. est une option pour le paramétrage
d'une chaîne préréglée. Appuyer sur ou pour
sélectionner la chaîne préréglée, puis sur ou
pour sélectionner le numéro de chaîne.
Source set (Paramétrer la source)V
Channel set est une option pour le paramétrage
de la source de départ. Appuyer sur ou pour
sélectionner O, DTV, TV, AV, SCART, S-Video,
Component1, Component2, PC, HDMI1, HDMI2,
HDMI3, USB. Le DVD est disponible avec certains
modèles.
Source Lock (Verrouillage de la source)V
Source Lock permet de contrôler l'activation ou la
désactivation des modes d'entrée externes gênants.
Appuyer sur ou pour régler le mode sur On ou
O. Lorsque le verrouillage de la source est activé,
la source de la télévision s'affiche. En appuyant
sur SOURCE, la télévision peut passer à la source
correspondante et affiche la source verrouillée.
Max Volume (Volume maximal)V
Appuyer sur ou pour sélectionner le volume
maximal. Appuyer sur ou pour régler le volume
entre 0 et 100. La valeur du son ne peut dépasser la
valeur du volume maximal. Si le volume actuel est
supérieur au volume maximal lors du réglage du

Mise en route
Manuel D’utilisation Television Numerique ecran LCD / LED LCD FR-24
menu Lock set (Paramétrer verrouillage), le volume
actuel devient le volume maximal configuré. Si le
volume actuel est inférieur au volume maximal, le
volume configuré par l'utilisateur reste le même.
Initial Volume (Volume initial)V
La télévision garde en mémoire le volume initial après
la configuration et au prochain allumage.
Parent Lock (Verrouillage parental)V
Appuyer sur ou pour sélectionner le verrouillage
parental, puis sur ou pour sélectionner OFF
ou 4-18 afin de limiter l'âge des enfants regardant la
télévision.
Clear Lock (Désactivation du verrouillage)V
Appuyer sur ou pour sélectionner le mode de
déverrouillage, puis sur ou pour déverrouiller
tous les modes configurés. En réglant toutes les
options verrouillées sur OFF, le volume maximal est
rétabli sur 100.
AFFICHAGE DU MENU
CONTEXTUEL
Fonction Subtitle (Sous-titres)V
Appuyer sur le bouton A SUBTITLE de la
télécommande pour afficher le menu de langues
des sous-titres, puis sur pour entrer.
Appuyer sur B ou pour sélectionner l'élément,
puis sur OK pour entrer. Il est possible d'appuyer
sur EXIT (Quitter) pour annuler les modifications
à tout moment.
Remarque
Appuyer sur le bouton O SUBTITLE de la
télécommande permet d'afficher le menu de
langues des sous-titres uniquement en mode
DTV.
Fonction CH.LISTV
Appuyer sur le bouton A CH.LIST de la
télécommande pour afficher le menu Channel
List (Liste des chaînes).
Appuyer sur B ou pour sélectionner la chaîne,
puis sur OK pour entrer. Il est possible d'appuyer
sur EXIT (Quitter) pour annuler les modifications
à tout moment.
Fonction GUIDEV
Appuyer sur le bouton GUIDE de la télécommande
pour afficher le menu du guide des programmes, puis
sur , , ou pour sélectionner le programme.
Il est possible d'appuyer sur EXIT (Quitter) pour
annuler les modifications à tout moment.
Remarque
Disponible en mode DTV uniquement.O
Fonction FAVV
Appuyer sur le bouton FAV de la télécommande pour
afficher le menu Favourite List (Liste des favoris).
Appuyer sur ou pour sélectionner le
programme, puis sur OK pour entrer. Il est possible
d'appuyer sur EXIT (Quitter) pour annuler les
modifications à tout moment.

Mise en route
FR-25 Manuel D’utilisation Television Numerique ecran LCD / LED LCD
INFOV
Appuyer sur le bouton INFO de la télécommande
pour afficher les informations sur la chaîne actuelle.
Il est possible d'appuyer sur EXIT (Quitter) pour
annuler les modifications à tout moment.
AUDIO/I/IIV
Appuyer sur le bouton AUDIO de la télécommande
pour afficher le menu Audio Languages (Langues
audio).
Appuyer sur ou pour sélectionner les
paramètres souhaités, puis sur OK pour entrer.
Il est possible d'appuyer sur EXIT (Quitter) pour
annuler les modifications à tout moment.
Remarque
Appuyer sur le bouton O AUDIO de la
télécommande permet d'afficher le menu de
langues audio uniquement en mode DTV.
Couper le sonV
La fonction de coupure du son (sourdine) est très utile
en cas d'appel téléphonique ou si des invités vous
rendent visite.
Appuyer sur le bouton
A MUTE (Sourdine) de la
télécommande. Le message Mute s'affiche
en bas de l'écran et le son de la télévision est
coupé.
Pour rétablir le son, appuyer sur
B MUTE de
nouveau ou directement sur V+.
Affichage du programme repideV
Cette fonction permet de revenir rapidement au
dernier programme visionné. Appuyer sur Q.View
pour que la télévision retourne à la source TV,
supposément la source USB ou DVD.
Supposons que le numéro de chaîne venant
A
d'être utilisé est 8 et que le numéro de chaîne
actuel est 18 (comme indiqué sur la figure).
Pour revenir à la chaîne 8, il suffit d'appuyer sur B
Q.View.
Pour revenir à la chaîne 18, appuyer de nouveau
C
sur le bouton. Cette fonction permet de
facilement passer de la chaîne actuelle à la chaîne
utilisée juste avant.
Utiliser les fonctions
Fonctions Télétexte
Le télétexte est un système d'informations diusé par
certaines chaînes pouvant être lu comme un journal. Il
ore également des sous-titres pour malentendants ou
les personnes ne parlant pas la langue d'un programme
particulier diusé (réseaux câblés, chaînes satellite, etc.).
Remarque
Les boutons du O télétexte fonctionnent même sans
signal télétexte, mais il n'y a aucun affichage.
Mise en route / Utiliser les fonctions

Utiliser les fonctions
Manuel D’utilisation Television Numerique ecran LCD / LED LCD FR-26
Télétexte
TélétexteV
Pour sélectionner le télétexte, appuyer sur le bouton
de la télécommande. Pour éteindre le télétexte,
appuyer de nouveau sur ce bouton.
Remarque : toutes les fonctions ne sont pas
disponibles en mode télétexte. Seules quelques
fonctions de commande directe par bouton sont
disponibles en mode télétexte, à savoir :
Réglage du volume Ŗ
Fonction Mute (Sourdine)Ŗ
Faire défiler vers le haut/le bas les pagesV
Utiliser les boutons P+/P- pour passer à la page
suivante ou précédente.
Saisir le numéro de pageV
Pour sélectionner une page de télétexte, saisir le
numéro de page à l'aide du clavier numérique de
la télécommande, ou utiliser P+/P- ou les boutons
colorés Fast text.
Mode mixteV
Pour voir l'image de la télévision tout en étant
en mode Texte, appuyer sur
pour superposer
les données de télétexte en haut de l'image de la
télévision. Appuyer de nouveau sur ce bouton pour
retourner en affichage texte intégral.
INDEXV
Appuyer sur INDEX pour accéder à la page d'index du
télétexte.
Modification de la langueV
Appuyer sur le bouton pour modifier les caractères
du télétexte entre Eastern (orientaux) et Western
(occidentaux).
PauseV
Appuyer sur pour arrêter la mise à jour
automatique de la page de télétexte. Cette fonction
est très utile lorsqu'il y a plusieurs pages de télétexte
ou données sur le même nombre de pages.
TailleV
Appuyer sur pour passer de l'écran plein à la moitié
d'écran. Cette fonction est très utile car elle permet
d'agrandir l'image, rendant le texte facile à lire.
RévélerV
Appuyer sur le bouton pour afficher le texte
masqué. Cette fonction est utilisée pour afficher des
informations telles que des réponses à des questions
interactives en ligne du télétexte.

Utiliser les fonctions
FR-27 Manuel D’utilisation Television Numerique ecran LCD / LED LCD
HeureV
En mode télévision normal uniquement, appuyer sur
permet d'afficher l'heure du télétexte en haut à
droite pendant quelques secondes.
Boutons colorés Fast textV
Fast text affiche automatiquement les quatre pages
les plus fréquemment utilisées. Selon le diuseur, ces
pages peuvent être choisies par l'utilisateur. Appuyer
sur le bouton coloré de la télécommande ayant
la même couleur que le lien en bas de la page de
télétexte pour accéder directement à cette page.
Sous-codeV
Appuyer sur le bouton en saisissant le nombre à 4
chires pour accéder à une page secondaire.
MODE USB
Remarque
Les schémas de la partie ci-dessous sont fournis à O
des fins de référence uniquement. Voir la télévision
si nécessaire.
UTILISER LE DISPOSITIF USB
Formats de fichiers pris en charge :A
Photo : *.jpg ;t
Musique : *fichiers .mp3 ;t
Film : *fichiers .avi ;t
Texte : *.txt.t
Remarque
Certains fichiers ne peuvent être lus selon la O
manière dont ils ont été enregistrés.
Appareils pris en charge : B
Prend en charge les appareils de stockage de masse
dont le fichier système est FAT32, tels que certains
disques USB, disques durs externes et lecteurs MP3.
Si un dispositif USB ne peut être identifié en raison
d'un fichier système incompatible, il faut le formater
sur le fichier système mentionné ci-dessus.
Pour obtenir une lecture régulière :
C
Le taux d'encodage du fichier doit être inférieur à t
300 Ko/s ;
En raison de la distance limitée de transmission t
des signaux du dispositif USB, il est recommandé
de ne pas utiliser de cordon USB. En cas
d'utilisation d'un tel cordon, s'assurer que sa
longueur ne dépasse pas 1 mètre ;
Utiliser un dispositif USB haute vitesse conforme t
à la norme USB 2.0 ; avec un dispositif USB 1.1, la
lecture peut être irrégulière.
Connecter/Retirer le dispositif USB
Appuyer sur le bouton A SOURCE de la télécommande
pour sélectionner l'option USB.
Insérer le dispositif USB dans l'interface USB
B
correspondante 2 secondes après avoir lancé le
système.
Après être entré dans le menu du système, appuyer
C
sur le bouton ou de la télécommande pour
sélectionner les fichiers USB requis. Appuyer sur OK
pour confirmer la sélection, puis entrer dans la liste
de fichiers sélectionnée.
Appuyer sur le bouton
D ou de la télécommande
pour sélectionner le fichier requis, puis sur OK pour
entrer dans le fichier sélectionné.
Pour quitter le système de lecture multimédia en
E
continu et regarder une émission de télévision,
appuyer sur BACK (Retour) pour retourner au
menu principal de la transmission multimédia
(afin de protéger l'appareil), puis sur SOURCE pour
sélectionner TV (Télévision) et retourner en mode TV.
Remarque
En appuyant sur Q MENU lorsque le dispositif USB
est sélectionné comme source, l'écran devient noir
sauf lorsque des images ou films sont lus.

Utiliser les fonctions
Manuel D’utilisation Television Numerique ecran LCD / LED LCD FR-28
Pendant la lecture de l'appareil USB, appuyer sur Q
BACK (Retour) plusieurs fois pour retourner à
l'interface principale USB. Il est ensuite possible
de passer aux sources de signal souhaitées en
appuyant de nouveau sur SOURCE.
Ne pas débrancher l'appareil USB en cours Q
d'utilisation. Lorsque ce type d'appareil est débranché
inopinément, les fichiers stockés ou le dispositif de
stockage USB peuvent être endommagés.
Utiliser le dispositif USB
Appuyer sur le bouton A ou pour faire défiler le
menu principal ou le sous-menu, puis sélectionner
l'option souhaitée.
Appuyer sur
B OK pour confirmer la sélection.
Appuyer sur
C ou pour l'avance rapide (FWD)
ou le retour en arrière rapide (REV) de l'élément lu.
Appuyer sur
D PLAY/PAUSE pour lancer la lecture,
puis de nouveau sur le bouton pour interrompre la
lecture.
Appuyer sur
E ZOOM pour agrandir les images, puis
sur , , ou pour déplacer l'image.
Appuyer sur
F STOPpour arrêter la lecture ou
retourner au menu précédent, puis sur BACK
plusieurs fois pour retourner au menu principal.
Remarque
Il est possible de choisir des photographies ou de O
la musique dans diérents fichiers afin de les lire
en même temps.
Lire une image
Après être entré dans l'interface principale USB, A
appuyer ou pour sélectionner PHOTO.
Appuyer sur
B OK pour confirmer la sélection et entrer
dans la liste de fichiers d'images.
Appuyer sur C ou pour sélectionner l'image à
lire, sur OK pour confirmer, puis sur PLAY/PAUSE
(Lecture/Pause) pour lire les images.
Pour faire un arrêt sur image, appuyer de nouveau
D
sur PLAY/PAUSE.
Appuyer sur ZOOM pour agrandir l'image, puis sur
, , ou pour déplacer l'image.
Appuyer sur PREV/NEXT (Précédent/Suivant) pour
sélectionner l'image précédente ou suivante.
Appuyer sur ou pour faire pivoter l'image.
Appuyer sur STOP pour arrêter l'image en cours
de lecture.
Pour quitter la lecture, appuyer sur
E BACK (Retour)
plusieurs fois.
Remarque
l'affichage du menu varie selon le nom de la O
photographie et la définition de votre appareil.
Lire de la musique
Après être entré dans l'interface principale USB, A
appuyer ou pour sélectionner MUSIC
(Musique).
Appuyer sur
B OK pour confirmer la sélection et entrer
dans la liste de fichiers de musique.

Utiliser les fonctions
FR-29 Manuel D’utilisation Television Numerique ecran LCD / LED LCD
Appuyer sur C ou , sur OK pour sélectionner la
musique à lire, puis sur PLAY/PAUSE (Lecture/Pause)
pour lire la musique.
Appuyer sur ou pour l'avance rapide (FWD)
ou le retour arrière rapide (REV) de la musique lue.
Appuyer sur PREV/NEXT (Précédent/Suivant) pour
sélectionner le morceau de musique précédent ou
suivant.
Appuyer sur STOP pour arrêter le morceau de
musique en cours de lecture lorsque l'interface
actuelle est la musique lue.
Pour retourner au menu principal, appuyer sur
D BACK
(Retour) plusieurs fois.
Remarque
Il est possible de lire de la musique et une image O
en même temps.
Lire un film
Après être entré dans l'interface principale USB, A
appuyer ou pour sélectionner Movie (Film).
Appuyer sur
B OK pour confirmer la sélection et entrer
dans la liste de fichiers de films.
Appuyer sur C ou , sur OK pour sélectionner le
film à lire, puis sur PLAY/PAUSE (Lecture/Pause)
pour lancer la lecture.
Appuyer sur ZOOM pour agrandir l'image.
Appuyer sur PREV/NEXT (Précédent/Suivant) pour
sélectionner le film précédent ou suivant.
Appuyer sur STOP pour arrêter le film en cours de
lecture.
Pour quitter la lecture, appuyer sur
D BACK (Retour)
plusieurs fois.
Texte
Après être entré dans l'interface principale USB, A
appuyer ou pour sélectionner Text (Texte).
Appuyer sur
B OK pour confirmer la sélection et entrer
dans la liste de fichiers de textes.
Appuyer sur C ou , sur OK pour sélectionner le
texte à lire, puis sur PLAY/PAUSE (Lecture/Pause)
pour lire ce texte.
Appuyer sur PREV/NEXT (Précédent/Suivant) pour
sélectionner le texte précédent ou suivant.
Pour quitter le mode Text, appuyer sur
D BACK
(Retour) plusieurs fois.
Remarque
Il est possible de lire de la musique et un texte en O
même temps.
Utiliser un disque externe
USB pour l'enregistrement
Insérer le dispositif USB au format FAT32 dans le A
connecteur USB1, puis appuyer sur MENU.
Remarque
Seule l'entrée USB1 est disponible pour O
l'enregistrement.
Appuyer sur
B ou pour sélectionner le menu
FUNCTION (Fonction), puis sur pour entrer.
Appuyer sur le bouton
C ou pour sélectionner
Recorder (Enregistreur), puis sur OK pour entrer
dans le sous-menu.

Utiliser les fonctions
Manuel D’utilisation Television Numerique ecran LCD / LED LCD FR-30
Appuyer sur le bouton
D ou pour sélectionner
Disk (Disque), puis sur le bouton ou OK pour
entrer. Appuyer sur le bouton ou pour
sélectionner le disque si le dispositif possède
plusieurs disques.
Appuyer sur
E ou pour sélectionner Format,
puis sur pour entrer. Appuyer sur ou pour
sélectionner la taille de format souhaitée, puis sur
OK pour formater le disque USB.
Remarque
Le système formatera tout le dispositif. Si la taille O
du dispositif est supérieure à 1 Go, il est possible
de régler la taille utilisée pour la programmation.
Le formatage peut prendre plusieurs minutes, en
F
fonction de la taille de la mémoire. Appuyer sur
ou afin de sélectionner la taille du disque pour
la programmation. La taille maximale du dispositif
pour Time Shift (Programmation) est de 8 Go.
Appuyer sur OK pour enregistrer.
Remarque
Si l'utilisateur sélectionne la taille maximale de O
programmation, il n'est pas possible de procéder à
un enregistrement.
Attendre que le système procède à une vérification. G
Les données de vitesse sont visibles une fois la
vérification réussie.
Remarque
Le formatage n'est que requis lors du premier O
enregistrement.
La taille minimale du dispositif pour O
l'enregistrement est de 1 Go. La fonction de
formatage du dispositif prend jusqu'à 2 To. Le
nombre maximal de partitions est de 16 ; une seule
est active à la fois.
Débit binaire :O
Débit binaire du dispositif > 4,5 Mo/s; Ŗ
l'enregistrement est sûr en ux HD ;
Débit binaire du dispositif > 1,5 Mo/s; Ŗ
l'enregistrement est sûr en ux SD ;
Débit binaire du dispositif > 600 Ko/s ; Ŗ
l'enregistrement n'est pas sûr.
Le système ne peut fonctionner normalement si O
le dispositif USB présente l'un des problèmes ci-
dessous :
Le dispositif a un bug.Ŗ
Le dispositif a un message d'erreur.Ŗ
Le dispositif signale une taille infidèle.Ŗ
IMPORTANT
Le dispositif USB doit être formaté au format FAT32 Ŗ
par un PC avant d'être inséré dans le connecteur
USB.
PROGRAMMATION
La fonction Time Shift (Programmation) n'est disponible
qu'en mode DTV. Appuyer sur PLAY/PAUSE (Lecture/
Pause) pour interrompre le programme, puis de nouveau
sur PLAY/PAUSE pour que le programme Time Shift soit
lu. Pour arrêter la fonction Time Shift, appuyer sur STOP
(Arrêt).
Pour arrêter le programme Time Shift en cours de
lecture, appuyer sur STOP (Quitter).

Utiliser les fonctions
FR-31 Manuel D’utilisation Television Numerique ecran LCD / LED LCD
ENREGISTREMENT
Appuyer sur A D.MENU pour enregistrer le
programme en cours de lecture, puis sur D.MENU
ou EXIT (Quitter) pour réduire l'interface
d'enregistrement.
Appuyer sur B STOP pour arrêter l'enregistrement en
cours.
Pour lire le programme enregistré, appuyer sur
C
INDEX pour ouvrir la liste enregistrée.
Appuyer sur le bouton ou pour sélectionner le
contenu enregistré.
Appuyer sur pour afficher les informations
sur le
programme.
Appuyer sur pour annuler.
Appuyer sur OK ou PLAY/PAUSE (Lecture/Pause)
pour lire le programme enregistré, puis sur STOP
pour arrêter la lecture.
Remarque
Le fait de changer la chaîne n'aura aucune O
conséquence sur l'enregistrement à la
même fréquence, mais aura un impact sur la
programmation. Le programme enregistré ne peut
être supprimé en cours de lecture.
Appuyer sur O INDEX plusieurs fois. Le programme
affiche cet ordre : nom du programme, nom de la
chaîne, heure du programme, nom du fichier et
durée du fichier.
UTILISER UN LECTEUR DVD
(certains modèles uniquement)
LIRE UN DVDV
Appuyer sur le bouton A SOURCE de la
télécommande pour accéder au mode DVD.
Placer le DVD dans la fente prévue à cet eet, face
B
imprimée vers l'extérieur. La fente n'accepte que
les DVD de taille standard.
Le DVD se lance automatiquement (la plupart des
C
DVD commencent avec un menu du disque).
UtiliserD , , ou pour naviguer dans le menu
du DVD et mettre en surbrillance l'option de lecture,
puis appuyer sur PLAY/PAUSE (Lecture/Pause).
INTERROMPRE LA LECTURE D'UN DVDV
Appuyer sur A PLAY/PAUSE (Lecture/Pause) pour
interrompre la lecture. Le son est également mis
en sourdine.
Appuyer sur
B PLAY/PAUSE (Lecture/Pause) pour
reprendre une lecture normale.
ARRÊTER LA LECTURE D'UN DVDV
Appuyer sur A pour arrêter la lecture d'un
DVD. L'écran de la télévision affiche le logo de

Utiliser les fonctions
Manuel D’utilisation Television Numerique ecran LCD / LED LCD FR-32
démarrage du DVD.
Certains disques mémorisent l'endroit où le DVD
B
a été arrêté. Appuyer sur PLAY/PAUSE (Lecture/
Pause) pour y revenir et poursuivre la lecture.
Appuyer sur
C deux fois pour arrêter
complètement et vider la mémoire du lecteur.
UTILISER L'AVANCE RAPIDE OU LE RETOUR V
ARRIERE RAPIDE
Pour faire avancer un disque plus rapidement, A
appuyer sur le bouton .
Pour retourner en arrière, appuyer sur le bouton
.
Appuyer sur
B ou plusieurs fois pour passer
aux diérentes vitesses. Ces vitesses s'affichent en
haut à gauche de l'écran : 2X, 4X, 8X, 16X, 32X et
vitesse de lecture normale.
Appuyer sur
C PLAY/PAUSE (Lecture/Pause) pour
reprendre une lecture normale.
PASSER A LA SCENE SUIVANTE OU PRECEDENTEV
Pendant la lecture, appuyer sur pour passer à la scène
suivante ou sur pour repasser à la scène précédente.
MOT DE PASSEV
Le contrôle parental peut être activé en configurant
le mode Password (Mot de passe) sur On. Le mot de
passe par défaut est 1234. En cas d'oubli, il est toujours
possible de saisir 1369 pour déverrouiller cette fonction.
UTILISER LA FONCTION DE ZOOMV
Appuyer sur A ZOOM pour agrandir l'image ou
l'écran. Appuyer sur ce bouton plusieurs fois pour
agrandir davantage l'image.
En mode ZOOM, utiliser le bouton
B , , ou
pour afficher à l'écran une partie diérente de
l'image agrandie.
PASSER EN SOUS-TITRESV
Appuyer sur A SUBTITLE (Sous-titre) pendant la
lecture.
Les langues disponibles s'affichent en haut à B
gauche de l'écran. Appuyer plusieurs fois jusqu'à ce
que la langue de sous-titrage souhaitée s'affiche.
Appuyer plusieurs fois sur C SUBTITLE jusqu'à
ce que SUBTITLE OFF (Désactivation sous-titre)
s'affiche afin de désactiver les sous-titres.
UTILISER LE MODE REPETITIONV
Appuyer sur REPEAT (Répéter) une fois pour relire
le chapitre d'un DVD, deux fois pour relire le titre
en cours de lecture ou trois fois pour relire tout le
contenu du disque.
MODIFIER L'ANGLE DE LA CAMERAV
Certains DVD orent plusieurs angles de caméra pour
certaines scènes, voire toutes. Appuyer sur ANGLE
pour modifier l'angle de la caméra. Il existe diérents
angles de caméra : avant, latéral, vue d'ensemble ou
extérieur.
AUTRES FONCTIONS POUR
LE DVD
D.MENUV
Appuyer sur ce bouton pour retourner au menu
précédent.
AUDIOV
De nombreux DVD possèdent plusieurs bandes
sonores. Pour passer d'une bande à l'autre, appuyer
sur le bouton AUDIO. Attendre trois secondes avant
d'appuyer de nouveau sur le bouton afin de naviguer
entre les options.
TITLE (Titre)V
Appuyer sur ce bouton pour retourner au menu du
titre sur certains DVD. Appuyer sur , , ou
pour naviguer dans le menu.
SEARCH (Recherche)V
Appuyer sur SEARCH (Recherche). Utiliser les touches
numériques pour saisir le numéro du chapitre à lire,
puis appuyer sur PLAY/PAUSE (Lecture/Pause).
PROGRAM (Programme)V
Pendant la lecture, appuyer sur PROGRAM pour
passer directement à une partie ou un programme
sur le DVD. Appuyer sur les boutons chirés pour
sélectionner le numéro du programme souhaité. Une
fois terminé, déplacer le curseur pour sélectionner
START (Démarrer). Le DVD passe directement à cette
partie et lance la lecture. Pour annuler cette fonction,
appuyer sur PROGRAM et se positionner sur STOP
(Arrêt), puis appuyer sur PLAY/PAUSE (Lecture/
Pause).
A-BV
Utiliser A-B pour configurer une partie d'un DVD à
répéter. Appuyer sur A-B pour marquer le point de
départ et appuyer une nouvelle fois pour marquer

Utiliser les fonctions
FR-33 Manuel D’utilisation Television Numerique ecran LCD / LED LCD
la fin. La répétition de cette partie commence
immédiatement.
Appuyer sur A-B pour annuler la répétition.
ANGLEV
Pour profiter au maximum de l'ambiance des
programmes sportifs, concerts ou pièces de théâtre,
appuyer sur ce bouton pour regarder certaines
actions avec des angles diérents (fonction disponible
sur certains disques. En utilisant un disque enregistré
avec plusieurs angles, il est possible de visualiser la
scène sous diérents angles, par exemple : avant,
latéral, vue d'ensemble et extérieure).
D.CALLV
En appuyant plusieurs fois sur D.CALL, un indicateur
s'affiche à l'écran pour diérents types de disque DVD,
CD, etc.
LIRE UN CD D'IMAGES JPEGV
Insérer un CD JPEG de la même façon qu'avec un A
DVD ou CD AUDIO, face imprimée vers l'extérieur.
Le CD se charge et le menu du contenu s'affiche
B
à l'écran.
Utiliser
C ou pour mettre en surbrillance le
dossier et l'image à visualiser, puis appuyer sur
PLAY/PAUSE (Lecture/Pause). Chaque image du
disque s'affiche consécutivement, comme un
panorama.
Appuyer sur
D PLAY/PAUSE (Lecture/Pause)
pendant le panorama afin de faire un arrêt sur
image.
Appuyer sur le bouton
E ou pour passer
à l'image suivante ou retourner à l'image
précédente.
LIRE UN CD AUDIOV
Insérer un CD de la même façon qu'avec un DVD, A
face imprimée vers l'extérieur.
Le CD se charge et le menu du contenu s'affiche
B
à l'écran.
Utiliser
C ou pour mettre en surbrillance
la piste à lire, puis appuyer sur PLAY/PAUSE
(Lecture/Pause) pour écouter le CD en entier
depuis le début. Il est possible d'arrêter ou
d'interrompre la lecture, d'avancer ou de
retourner en arrière de la même façon qu'avec
un DVD. Il est également possible d'utiliser
la fonction REPEAT (Répéter) pour répéter
une piste, un dossier ou le contenu entier du
disque. Appuyer plusieurs fois pour sélectionner
l'élément à répéter. Il est également possible
d'utiliser la fonction A-B pour répéter une certaine
partie d'une piste ou d'un CD.
Sections des références
DEPANNAGE
Le guide ci-dessous peut aider à résoudre certaines
anomalies :
Pas d'image,
pas de son
Vérifier si la télévision est
correctement branchée.
Vérifier si la télévision est
branchée à une source
d'alimentation appropriée.
Vérifier s'il n'y a pas de coupure
d'électricité.
Ecran noir
Vérifier l'arrivée de signaux
corrects.
Utiliser la télécommande pour
modifier l'entrée des signaux sur
l'entrée appropriée.
Redémarrer la télévision si
l'alimentation a été coupée.
Pas de son
Appuyer sur MUTE (Sourdine) et
vérifier si ce mode est activé.
Passer à d'autres chaînes et
vérifier s'il existe le même
problème.
Appuyer sur VOL+ pour voir si le
problème peut être résolu.
Son de
mauvaise
qualité
Vérifier si le système audio est
correct.
Consulter le manuel d'utilisation
pour le réglage.
Pas d'image
sur certaines
chaînes
Vérifier si la chaîne appropriée est
sélectionnée.
Régler l'antenne.
Pas de couleur
sur certaines
émissions (noir
et blanc)
Vérifier si le même problème
existe sur d'autres chaînes.
Consulter les instructions
appropriées dans le manuel pour
le réglage des couleurs.
Utiliser les fonctions / Sections des références

Sections des références
Manuel D’utilisation Television Numerique ecran LCD /LED LCD FR-34
Parasites sur
certaines
images ou
toutes
Vérifier si l'antenne est
correctement connectée. Vérifier
si l'antenne est en bon état.
Eectuer un réglage précis de la
chaîne.
Télévision hors
contrôle
Débrancher la télévision de
l'alimentation. Attendre 10
secondes, puis la rebrancher.
Si le problème persiste, contacter
le service après-vente agréé pour
une assistance technique.
Remarque
Si l'anomalie ne peut être corrigée à l'aide du guide O
ci-dessus, contacter un centre de réparation agréé
local.
La télévision doit uniquement être réparée par O
un service agréé. Ne jamais tenter de retirer le
capot arrière car la télévision contient des tensions
dangereuses pouvant entraîner la mort ou un
incendie.

Sections des références
FR-35 Manuel D’utilisation Television Numerique ecran LCD / LED LCD
2EMOTECONTROL!!!BATTERY§)NSTRUCTION-ANUAL7ARRANTY463TAND
83CREWSFOR46STANDONLYFORMODEL
#OMPONENTADAPTER#OMPONENTAUDIOADAPTER3#!24ADAPTERONLYFORMODEL
#OVERBOTTOMONLYFORMODEL
0OWER!DAPTER˄ONLYFORMODEL˅
3W+3W
8W+8W
Caractéristiques techniques
En raison d’innovations technologiques, les caractéristiques de la télévision que vous venez d’acheter
peuvent varier par rapport aux données de ce tableau.
Modèle
Système audiovisuel
Sortie audio
Connectique
Alimentation
Consommation
Température
Humidité
Accessoires
Fonctionnement : 20 % ~ 80 %
Stockage : 5 % ~ 90 %
Fonctionnement : 5° C~ 35° C
Stockage : - 15° C ~ 35° C
Entrée COMPOSANTE, entrée PC, entrée SCART, entrée PC Audio,
entrée Péritel, entrée antenne, entrée HDMI,AV(Modèles 19”/22”/24”LED LCD
uniquement) ,USB,entrée S-VIDEO (Modèles LCD uniquement).
L’
Voir plaque signalétique
Voir plaque signalétique
24 32
Remarque :
Les caractéristiques des pièces de ce téléviseur ne vousest fournie qu'à titre de référence.O
Des diérences peuvent se produire lors de la mise à jour de la technologie du produit. La conception et les O
caractéristiques sont soumises à des changements sans préavis.
Toutes les données sont des valeurs approximatives.O

Sections des références
Manuel D’utilisation Television Numerique ecran LCD /LED LCD FR-36

Inhalt
DE-1 Digital LCD / LED LCD Television bedienung sanleitung
Inhalt
-Elektronische Programmzeitschrift)........................... 17
COMMON INTERFACE (CI)..................................17
Funktion Softwareaktualisierung................................. 18
Ablauf..................................................................................... 18
BEDIENUNG IHRES TV-GERÄTES.......................19
Programmwahl.................................................................... 19
Lautstärkeeinstellung....................................................... 19
CH.LIST function ................................................................. 19
BILDEINSTELLUNGEN........................................19
Ändern der Bildeinstellungen ....................................... 19
TONEINSTELLUNGEN.........................................20
Ändern der Toneinstellungen........................................ 20
FUNKTIONSEINS TELLUNGEN...........................21
ZEITEINSTELLUNGEN.........................................22
EINSTELLUNGEN IM MENU SPERREN ...............24
EINSTELLUNG DES MENÜS DIREKTWAHL........25
Verwendung der Funktionen 27
Videotextfunktionen.........................................27
USB-MODUS.......................................................28
VERWENDUNG VON USB-GERÄTEN............................. 28
Verbindung/Trennung eines USB-Gerätes................ 28
Bedienung des USB-Gerätes .......................................... 29
Bilder anzeigen ................................................................... 29
Musik abspielen.................................................................. 29
Film abspielen ..................................................................... 30
Text.......................................................................................... 30
Aufnahme auf ein externes USB-
Speichermedium ...............................................30
TIMESHIFT............................................................................. 31
AUFNAHME........................................................................... 32
BEDIENUNG IHRES DVD-PLAYERS
(nur
bestimmte Modelle) ............................................. 32
ZUSÄTZLICHE DVD-FUNKTIONEN ....................33
Referenzteil 34
FEHLERBEHEBUNG ............................................34
Spezifikationen .................................................36
Sicherheitsinformationen 2
Herzlichen Glückwunsch.....................................2
WICHTIGE INFORMATIONEN...............................2
Über Ihren LCD / LED LCD-TV 5
Installation des Sockels.......................................5
LERNEN SIE IHR TV-GERÄT KENNEN ...................7
LERNEN SIE IHRE FERNBEDIENUNG KENNEN ..11
SCHLIESSEN SIE IHR TV-GERÄT AN...................12
ANTENNENVERBINDUNG ................................................ 12
SIGNALVERBESSERUNG.................................................... 12
ANSCHLUSS EINES PC AN DAS TV-GERÄT.................. 12
ANSCHLUSS EINES DVD-PLAYERS AN IHR TV-GERÄT...
...................................................................................................12
ANSCHLUSS EINES DVD-PLAYERS ODER
VIDEORECORDERS AN IHR TV-GERÄT.......................... 13
Anschlussoption 1 ............................................................. 13
Anschlussoption 2 ............................................................. 13
SCART-EINGANG................................................................. 13
HDMI-EINGANG .................................................................. 13
MOUNT YOUR TV ONTO THE WANDMONTAGE IHRES
TV-GERÄTES.......................................................................... 13
RICHTEN SIE IHRE FERNBEDIENUNG EIN .........13
EINLEGEN DER BATTERIEN .............................................. 13
VORSICHT IM UMGANG MIT BATTERIEN.................... 13
Inbetriebnahme 14
Aufstellung.........................................................14
STANGORT ............................................................................ 14
ANSCHLUSS.......................................................................... 14
EINSCHALTEN DES TV-GERÄTES.................................... 14
ABSTIMMUNG IHRES TV-GERÄTES ...................14
EINSCHALTEN EINER EXTERNEN PROGRAMMQUELLE
10
AUTOMATISCHE SUCHE ................................................... 14
DIGITALE MANUELLE SUCHE.......................................... 15
Analog Manual Search - Analoge Manuelle Suche 15
Channel Edit......................................................................... 16
UMBENENNEN..................................................................... 16
VERSCHIEBEN....................................................................... 16
Kanal als Favorit auswählen ........................................... 16
ÜBERSPRINGEN................................................................... 17
GUIDE (EPG - Electronic Program Guide

Digital LCD / LED LCD Television bedienung sanleitung DE-2
Sicherheitsinformationen
Sicherheitsinformationen
WILLKOMMEN
Wir danken Ihnen für den Kauf dieses HD-fähigen digitalen LCD/LED LCD-Fernsehgeräts in den Größen 19 Zoll/22
Zoll/24 Zoll/32 Zoll/40 Zoll (48 cm/55 cm/61cm/81cm/102 cm). Dieser Leitfaden wird Sie beim Aufstellen, Einrichten und
anfänglichen Gebrauch Ihres Fernsehgeräts unterstützen.
Zuerst vergleichen Sie bitte den Inhalt des Kartons mit folgender Checkliste:
t)%GÊIJHFTEJHJUBMFT-$%-&%-$%'FSOTFIHFSÊUJOEFO(SÚFO;PMM;PMM24 Zoll/32 Zoll/40 Zoll (48 cm/55
cm/61cm/81cm/102 cm)
t'FSOCFEJFOVOH
t"""#BUUFSJFO
t#FEJFOVOHTBOMFJUVOH
t(BSBOUJF
t'FSOTFIHFSÊUTPDLFM
t4DISBVCFOGàSEFO'FSOTFIHFSÊUTPDLFMOVSGàSEBT;PMM.PEFMM
t,PNQPOFOUFOBEBQUFS,PNQPOFOUFO"
VEJPBEBQUFS4$"35"EBQUFSOVSGàSEBT;PMM.PEFMM
t(FIÊVTFLOPQGOVSGàSEBT;PMM.PEFMM
Jetzt können Sie beginnen!
WICHTIGE INFORMATIONEN
Warnung: TV-Gerät unter keinen Umständen an Orten mit hoher Luftfeuchtigkeit einsetzen, um
Brand- oder elektrische Gefahren zu vermeiden. Achten Siedarauf, den Bildschirm nicht
versehentlich zu verkratzen oder Stößen auszusetzen.
Vorsicht: S Lesen Sie diese Bedienungsanleitung vor der ersten Verwendung Ihres TV-Gerätes bitte
sorgfältig durch und bewahren Sie sie für zukünftiges Nachschlagen an einem sicheren
Ort auf.
SLesen Sie diese Bedienungsanleitung sorgfältig durch, um Ihr TV-Gerät bestmöglich
nutzen zu können, und bewahren Sie sie für zukünftiges Nachschlagen auf.
SDie in der Bedienungsanleitung dargestellten Bildschirmanzeigen und Zahlen können
sich aufgrund technischer Innovationen verändern.
Vorsicht:
SDie unbefugte Demontage dieses Produkts ist nicht gestattet.
WARNUNG
WARNUNG
787
8
*"'##$&.#'+#/0.,*/!&)%/1/51/!&)'#6#+3'."".'+%#+"2,+"#.<+1+%"#.
#.90#.;!(/#'0# %#.0#+"/'!&"&'+0#.(#'+# #"'#+1+%/.#)#2+0#+10#')# #=+"#+
)'054* ,)'++#.&) #'+#/.#'#!(/,0#+5'#))%#$9&.)'!&#'010',+"#.#+'+0.#0#+51
/!&3#.#+#.)#051+%#+"1.!&,!&/-++1+%$;&.#+(++
1/.1$#5#'!&#+'++#.&) #'+#/.#'#!(/'!&0'%#/10#'),"#.1 #&:.0#')"#//#+
0#!&+'/!&#-#5'=(0',+#+ #'1/01/!&%#+1#'+%#&)0#+3#."#+*;//#+
))/#.$,."#.)'!&3#+"#+'#/'!& '00#+10,.'/'#.0#/1+"#+"'#+/0-#./,+)

Sicherheitsinformationen
DE-3 Digital LCD / LED LCD Television bedienung sanleitung
& %"(' (&& (' &'' &! (
'(%+ "% %!&,! +( )% !
'%!&&%"('!'
(!'%%'%"!!!!&'%(!"%
!(! ''%%,)"!
,% $(!(
%!%!+(
)% !
'+%!&%"('!'!%
,)"!&&%"%-(
%!%!+(
)% !
!'%%!!(!
!&&"!%*''%&'.% !
'%" )%&"%(!(!
!'!!!!&(&&
%*!! ! &,'!
'+&'% (! )%! & '+
! (&%!% !'%!(! +( ,% $(!
( '%" &, "%
%!%! +(
)% !
'!!(%!%! !+)"!
'"&!#%(!)%*!!
!%&'"&!
( %!%!+(
)% !
&%"(' (&&(!%&'!(!
&'!%/,&'!( '(%+%
+()% !
(!(' "!'& %,'&
&'!'&''''( '%" &,(!
%!%!+()% !
!!&!
('"%&%'&
(!!!&'#%&"!
&'!&
!'%&'.'+(!
!0'!
'+%!&%"('!'!%,
)"! %!&"% '"%!"%,% $(!
( %!%!+()% !
!'%%!
'%" )%&"%(!(!*!!&
!('"%&%'&(!!!&'#%&"!&
(!*0!%,(& %"('
*%! !

Digital LCD / LED LCD Television bedienung sanleitung DE-4
Sicherheitsinformationen
"
%&
#
$ !
$
$
!
) '
&
3
&
$ !
2
+&
11
$
.*&!&
0 '!"
,
0 .*&
. .*&!$
!"" .
( $
0
$ $2
" &
$ !
/-
*"2!
'
&
$ !
.& '"
.*&!$ &
$ !

Über Ihren LCD/LED LCD-TV
DE-5 Digital LCD /LED LCD Television bedienung sanleitung
1. Das kleine Teil aus dem Sockelständer nehmen.
2. Das runde Anschlussstück mit dem Sockelständer ausrichten.
4. Das kleine Teil wieder in den Sockel einsetzen; dies kann auch mit einer Schraube geschehen.
3. Das LCD-Fernsehgerät auf den Sockel schieben. Das Gerät gemäß dem Pfeil auf dem
Sockelständer um ca. 15 Grad drehen.
Über Ihren LCD/LED LCD-TV
Installation des Sockels
Nur für das 19/22 Zoll große LED-LCD-Modell

Über Ihren LCD/LED LCD-TV
Digital LCD / LED LCD Television bedienung sanleitung DE-6
Installation des Sockels
Nur für das 32/40 Zoll große LED-LCD-Modell
1.
2. Den Sockel mit der Unterseite des Fernsehgeräts wie unten dargestellt ausrichten.
4.Die Schraube von der Sockelunterseite her am Fernsehgerät festziehen.
3.Den Sockel auf das Fernsehgerät schieben bzw. drücken.
Das Fernsehgerät vorsichtig mit der Bildschirmseite nach unten auf einen Tisch le
g
Wir empfehlen, das Einwickelmaterial aus dem Fernseherkarton auf die Tischplatt
e
legen, um den Bildschirm vor Beschädigung zu schützen.

Über Ihren LCD/LED LCD-TV
DE-7 Digital LCD /LED LCD Television bedienung sanleitung
LERNEN SIE IHR TV-GERÄT KENNEN
Bedieneinheit vorne
Nur für das 19/22 Zoll große LCD-Modell
108&3
4063$&
4DIBMUFU[XJTDIFOBMMFOWFSGàHCBSFO&JOHBOHTRVFMMFO
IJOVOEIFS
.&/6
%SàDLFOVNEBT'VOLUJPOTNFOàEFT(FSÊUTBVG[VSVGFO
70-
%SàDLFOVNEJF-BVUTUÊSLF[VFSIÚIFOPEFS[VWFSSJOHFSO
$)
%SàDLFOVNEFO'FSOTFILBOBM[VÊOEFSO
4USPNBO[FJHF
4FOTPSGàS
'FSOCFEJFOVOH
POWER
%SàDLFOVNEBT'FSOTFIHFSÊUFJOVOEBVT[VTDIBMUFO

Über Ihren LCD/LED LCD-TV
Digital LCD / LED LCD Television bedienung sanleitung DE-8
Anschlussleisten hinten
;VN"OTDIMVTTBOEFO)%.*"VTHBOHBOEFSFS(FSÊUF
;VN"OTDIMVTTFJOFS,PNQPOFOUFO7JEFP
"VEJP7PSSJDIUVOH
,PNQPOFOUFO47JEFP"VEJPFJOHBOH
;VN"OTDIMVTTBOEFO7("1*/BOBMPHFO
"VTHBOHTLPOOFLUPSEFS1$"O[FJHFLBSUF [XFDLT
1$"O[FJHF
;VN"OTDIMVTTEFT1$"VTHBOHTLPOOFLUPSTWPOFJOFN
1$BOEFO"VEJPBOTDIMVTT
;VN"OTDIMVTTWPO,BCFMPEFS"OUFOOFOTJHOBMFOBOEBT
'FSOTFIHFSÊUFOUXFEFSEJSFLUPEFSàCFSFJOF,BCFMCPY
#JUUFTDIBVFO4JFXPTJDIBO*ISFN(FSÊUEFS%7%
&JOTDIVCTPXJFEJF#FEJFOLOÚQGFCFmOEFO
;FJDIOVOHEJFOUOVSBMT3FGFSFO[*IS(FSÊULBOO
IJFSWPOBCXFJDIFO

Über Ihren LCD/LED LCD-TV
DE-9 Digital LCD /LED LCD Television bedienung sanleitung
6
7
1
2
4
3
5
Conten t Si
d
e
Facing T
owar
ds
You
SOURCE
MENU
VOL+
VOL-
CH+
CH
-
STOP
PLAY/PAUSE OPEN/CLOSE
PREV NEXT
DC IN
USB
DIGITALVOUT
(COAXIAL)
HDMI IN
COMPONENT
IN
AV IN
Y Pb Pr
VIDEO L-AUDIO-R
L-AUDIO-R
PC/DVI AUDIO IN
PC IN
SCART
1
2 3
4
5
6
7
89
10
11
ANT IN
1
SOURCE
Schaltet zwischen allen verfügbaren
Eingangsquellen hin und her.
2
MENU
Drücken, um das Funktionsmenü des Geräts
aufzurufen.
3
VOL+/-
Drücken, um die Lautstärke zu erhöhen oder zu
verringern.
4
CH+/-
Drücken, um den Fernsehkanal zu ändern.
5
POWER
Drücken, um das Fernsehgerät ein- und
auszuschalten..
6
Stromanzeige
7
Fernsensor
Nur für das 19/22/24 Zoll große LED-LCD-Modell
1
DC IN Eingang
2
EARPHONE
Ausgang
3
USB
Eingang
4
Digital output Eingang
5
HDMI IN
Eingang
6
PC IN Eingang
7
PC/DVI AUDIO IN
Eingang
8
TV SCART Eingang/
Ausgang
9
COMPONENT
AUDIO
Eingang
>
AV IN Eingang
A
COMPONENT IN
Eingang
(Zeichnung dient nur als
Referenz Ihr Gerät kann
hiervon abweichen)

Über Ihren LCD/LED LCD-TV
Digital LCD / LED LCD Television bedienung sanleitung DE-10
LOV
HC
UNEM
ECRUOS
HDMI 1 IN
USB
DIGITAL AUDIO OUT
(OPTICAL )
ANT IN
2 INIMDH
NITNENOPMOC
CP
Y P
b
P
r
L
OIDUA
R
NICP
3 INIMDH
TRACS
PC/DVI AUDIO
1
SCART
Eingang
2
Component Eingang
3
Component Audio
Eingang
4
PC Eingang
5
PC/DVI AUDIO
Eingang
6
HDMI3 IN Eingang
7
HDMI2 IN
Eingang
8
Common Interface
9
Earphone
0
ANTENNA Eingang
A
Optical Ausgang
B
USB
C
HDMI1 IN Eingang
1
SOURCE
Schaltet zwischen allen verfügbaren
Eingangsquellen hin und her.
2
MENU
Drücken, um das Funktionsmenü des Geräts
aufzurufen.
3
VOL+/-
Drücken, um die Lautstärke zu erhöhen oder zu
verringern.
4
CH+/-
Drücken, um den Fernsehkanal zu ändern.
5
POWER
Drücken, um das Fernsehgerät ein- und
auszuschalten..
Nur für das 32/40 Zoll große LED-LCD-Modell

Über Ihren LCD/LED LCD-TV
DE-11 Digital LCD /LED LCD Television bedienung sanleitung
LERNEN SIE IHRE FERNBEDIENUNG KENNEN
Richten Sie Ihre Fernbedienung während der Bedienung auf den Empfangssensor am TV-Gerät.
HINWEIS
Die Multifunktionstasten ROT, Q
GRÜN, BLAU und GELB sind im
Analogbetrieb Seitenwahltasten,
bei DVB-T Funktionstasten
(Funktionen im OSD abrufbar)..
1
POWER
2
DVD-Menü / REC
3
DVD önen / schließen
4
Bildmodus
5
Tonmodus
6
OSD aufrufen
7
Schlafmodus
8
Digital-TV Audio / NICAM / DVD Audio
9
Bildformat
0
Programmkanal
A
Untertitel
B
Programmdirektwahl
C
Eingangsumschaltung
D
Q.VIEW / Swap Channel
E
V+/V- : Lautstärke
F
P+/P-: Programm
G
Stummschaltung
H
Menü
I
GUIDE-Taste (EPG - nur bei Digital-TV)
J
Favoritenliste
K
ok
L
Cursor-Bewegungstaste
M
Zurück (nur für USB)
N
OSD verlassen
O
WIEDERHOLEN (nur für DVD, USB, REC & Timeshift) / ABBRECHEN-Taste
P
Zoom (nur für DVD & USB) / Videotext-Index (nur für TV) / REC-Index
Q
Abspielen / Pause (nur für DVD & USB) / Timeshift
Stop (nur für DVD, USB, REC & Timeshift)
R
Press to jump back and forth between two channels
S
Zurückspulen (nur für DVD, USB, REC & Timeshift)
T
Vorspulen (nur für DVD, USB, REC & Timeshift)
U
Vorherige (nur für DVD, USB, REC & Timeshift)
V
Nächste (nur für DVD, USB, REC & Timeshift)
W
DVD Setup / Text
X
DVD Titel / Videotext-Mix
Y
DVD Suche / Videotext-Subcode
Z
DVD 10+ / Videotext halten
[
DVD Programm / Videotext zeigen
\
DVD A-B Wiederholen / Videotextgröße
]
DVD Aufrufen / Videotextmodus
^
DVD Winkel / Videotextzeit

Über Ihren LCD/LED LCD-TV
Digital LCD / LED LCD Television bedienung sanleitung DE-12
SCHLIESSEN SIE IHR TV-
GERÄT AN
ANTENNENVERBINDUNG
Verbinden Sie Ihre Antenne mit der Buchse ANTENNA IN
seitlich am TV-Gerät.
SIGNALVERBESSERUNG
Um die Bildqualität unter ungünstigen Empfangsbedingungen
zu verbessern, kann ein Signalverstärker (nicht im
Lieferumfang enthalten) angeschlossen werden.
ANSCHLUSS EINES PC AN DAS TV-
GERÄT
Mit Hilfe eines VGA-Kabels (nicht im Lieferumfang
enthalten) kann Ihr TV-Gerät als Bildschirm für Ihren PC
eingesetzt werden.
Stellen Sie anhand der Bedienungsanleitung Ihres
A
Computers fest, ob ein VGA-Anschluss vorhanden ist.
Schalten Sie TV-Gerät und PC aus.B
Verbinden Sie ein 15-poliges VGA-Anschlusskabel C
Typ D mit der VGA-Schnittstelle am PC. Verbinden Sie
das andere Ende des Kabels mit der PC-Schnittstelle
am TV-Gerät. Ziehen Sie die Schrauben an den VGA-
Schnittstellen fest und verbinden Sie das Audiokabel
(nicht im Lieferumfang enthalten) mit der Audio
Input-Buchse auf der Rückseite des TV-Geräts.
Schalten Sie zuerst das TV-Gerät und anschließend D
den PC ein.
Schalten Sie mittels der entsprechenden Taste
E
am TV-Gerät oder auf der Fernbedienung den
Bildeingangsmodus auf VGA.
Sobald ein Bild erscheint und Bildrauschen sichtbar
F
ist, ändern Sie die Auösung des VGA-Modus,
ändern Sie die Bildwiederholfrequenz oder stellen
Sie Helligkeit und Kontrast im Menü neu ein, bis das
Bild störungsfrei ist.
ANSCHLUSS EINES DVD-PLAYERS AN
IHR TV-GERÄT
Schließen Sie die DVD-Bildausgänge (Y, Pb, Pr) an die
Buchse COMPONENT (Y, Pb, Pr) IN Ihres TV-Geräts an.
Schalten Sie den DVD-Player ein und legen Sie eine
A
DVD ein.
Drücken Sie auf die Taste SOURCE.
B
Weitere Informationen entnehmen Sie bitte der C
Bedienungsanleitung des DVD-Players.
DVD
ANSCHLUSS EINES DVD-PLAYERS
ODER VIDEORECORDERS AN IHR TV-
GERÄT
Ein DVD-Player oder Videorecorder kann auf zwei
Arten mit Ihrem TV-Gerät verbunden werden. Stellen
Sie sicher, dass sowohl das TV-Gerät als auch DVD-
Player oder Videorecorder ausgeschaltet sind, bevor sie
angeschlossen werden.
Anschlussoption 1
Verbinden Sie Audio- und S-VIDEO-Kabel von den A
Ausgangsbuchsen des Videorecorders mit den
Eingangsbuchsen des TV-Geräts.
Legen Sie eine Videokassette in den Videorecorder
B
ein und drücken Sie auf dem Videorecorder auf
PLAY.
Schalten Sie zuerst das TV-Gerät und anschließend
C
den Videorecorder ein.
Schalten Sie mittels der
D EINGANGSWAHLTASTE am
TV-Gerät den Bildeingangsmodus auf S-VIDEO.

Über Ihren LCD/LED LCD-TV
DE-13 Digital LCD /LED LCD Television bedienung sanleitung
Anschlussoption 2
Verbinden Sie die AV DVD/VCR-Ausgänge mit der AV A
IN-Buchse Ihres TV-Gerätes.
Schalten Sie mittels der
B EINGANGSWAHLTASTE am
TV-Gerät den Bildeingangsmodus auf AV.
SCART-EINGANG
Verbinden Sie das Scart-Kabel mit dem externen A
Gerät (DVD-Player, Settop-Box oder Spielkonsole)
und der Scart-Buchse am TV-Gerät.
Drücken Sie auf die
B EINGANGSWAHLTASTE und
wählen Sie den SCART-Modus.
Drücken Sie auf die
C PLAY-Taste am externen Gerät.
HDMI-EINGANG
Verbinden Sie das Kabel mit dem HDMI-Gerät und A
der HDMI-Buchse am TV-Gerät.
Drücken Sie auf die
B EINGANGSWAHLTASTE und
wählen Sie den HDMI-Modus.
Weitere Informationen entnehmen Sie bitte der
C
Bedienungsanleitung des HDMI-Gerätes.
WANDMONTAGE IHRES TV-GERÄTES
Mit Hilfe einer Wandkonsole (nicht im Lieferumfang
enthalten) können Sie das TV-Gerät an eine Wand
montieren. Die Befestigung des TV-Gerätes an der
Wandkonsole (nicht im Lieferumfang enthalten) erfolgt
mit M4/M6-Maschinenschrauben (4 St.).
RICHTEN SIE IHRE
FERNBEDIENUNG EIN
EINLEGEN DER BATTERIEN
Legen Sie die Fernbedienung mit derA
Rückseite nach oben vor sich und önen Sie den
Deckel des Batteriefachs.
Setzen Sie zwei AAA-Batterien ein. (Die Batterien B
müssen entsprechend der Markierungen + und - in
die Fernbedienung eingesetzt werden).
Schließen Sie den Deckel des Batteriefachs.C
VORSICHT IM UMGANG MIT
BATTERIEN
Vergewissern Sie sich, dass sich zwischen der
Fernbedienung und dem Empfangssensor am TV-Gerät
keine Gegenstände befinden.
Sonnenlicht oder sonstige starke Lichtquellen können
das von der Fernbedienung ausgesandte Signal
beeinträchtigen. Drehen Sie in diesem Fall das TV-Gerät,
um das direkte Anstrahlen des TV-Gerätes zu verhindern.
Setzen Sie die Fernbedienung weder großer Hitze noch
Feuchtigkeit aus, um sie nicht zu beschädigen.
Verwenden Sie zwei 1,5V-AAA-Batterien. Verwenden
Sie identische Batterien. Setzen Sie die Batterien unter
Beachtung der Polarität ein. Verwenden Sie keine
wiederauadbaren Batterien. Falls Ihr TV-Gerät über
einen längeren Zeitraum nicht benutzt wird, entfernen
Sie die Batterien aus der Fernbedienung.

Inbetriebnahme
Digital LCD /LED LCD Television bedienung sanleitung DE-14
Inbetriebnahme
Aufstellung
STANDORT
Stellen Sie IhrTV-Gerät vorzugsweise in der Nähe einer
Steckdose (innerhalb der Reichweite des Netzkabels)
und der Antennenbuchse auf oder verwenden Sie
Verlängerungskabel.
ANSCHLUSS
Stecken Sie Ihr TV-Antennenkabel in den A
Antenneneingang seitlich amTV-Gerät.
Setzen Sie die Batterien in die Fernbedienung ein.
B
Stellen Sie sicher, dass Sie in der richtigen Position
unter Beachtung der im Batteriefach angezeigten
Polarität eingesetzt werden.
EINSCHALTEN DES TV-GERÄTES
Drücken Sie einmal auf die A POWER-Taste an der
rechten Seite des TV-Gerätes. Ein rotes Blinklicht
erscheint in einer Ecke des Bildschirms.
Drücken Sie auf die
B POWER-Taste der
Fernbedienung. Das TV-Gerät schaltet sich ein und
die Farbe des Lichts wechselt von Rot zu Blau. Dies
kann kurze Zeit dauern.
Wählen Sie die gewünschte Sprache, sobald
C
die Sprachenliste auf dem Bildschirm erscheint.
Verwenden Sie die Taste
um zur Sprache zu
scrollen und drücken Sie zur Bestätigung OK.
ABSTIMMUNG IHRES TV-
GERÄTES
EINSCHALTEN EINER EXTERNEN
PROGRAMMQUELLE
Haben Sie einen DVD-Player oder ein ähnliches Gerät
an Ihr TV-Gerät angeschlossen, muss das TV-Gerät
mitgeteilt bekommen, dass es den Inhalt dieser
Programmquelle wiedergeben soll. Drücken Sie einfach
auf EINGANGSWAHL, um das Eingangsmenü in der
linken Ecke des Bildschirms aufzurufen. Verwenden Sie
die Tasten
und
, um die jeweilige Programmquelle
zu markieren, und drücken Sie auf OK.
Genaue Informationen zum Anschluss zusätzlicher
Geräte erhalten Sie unter LERNEN SIE IHR TV-GERÄT
KENNEN auf Seite 6.
AUTOMATISCHE SUCHE
Drücken Sie auf die Taste MENU.A
Drücken Sie auf B
, um das Menü „Abstimmung"
auszuwählen, bestätigen Sie durch Drücken von
.
Drücken Sie auf
C
, um den Unterpunkt „Land"
auszuwählen.
Drücken Sie auf
, um das gewünschte Land
auszuwählen.
Drücken Sie auf
D
, um den Unterpunkt „Auto
Search" auszuwählen, bestätigen Sie durch Drücken
von OK.
Drücken Sie auf
,
um die gewünschte Option

Inbetriebnahme
DE-15 Digital LCD / LED LCD Television bedienung sanleitung
auszuwählen, und drücken Sie OK, um die Suche zu
starten.
Drücken Sie auf MENU, um die TV /Digital-TV-Suche
zu überspringen, falls gewünscht.
Drücken Sie auf E EXIT, um Auto Search während der
Suche abzubrechen.
HINWEIS
Der Auto Search-Vorgang kann eine gewisse Zeit in Q
Anspruch nehmen.
DIGITALE MANUELLE SUCHE
Drücken Sie auf die Taste A MENU.
Drücken Sie auf B
, um das Menü Tuning
auszuwählen, bestätigen Sie durch Drücken von
.
Drücken Sie auf
C
, um den Unterpunkt Digital
Manual Search auszuwählen, bestätigen Sie durch
Drücken von
.
Drücken Sie auf D
, um den Kanal auszuwählen.
Drücken Sie auf OK, um die Suche zu starten.
Sobald ein Kanal gefunden wurde, können Sie
E
diesen durch Drücken auf OK speichern.
Drücken Sie auf EXIT, um die Suche zu verlassen.
Analog Manual Search - Analoge
Manuelle Suche
Führen Sie die nachfolgenden Schritte durch, wenn Sie
die Kanalsuche manuell durchführen möchten.
Drücken Sie auf die Taste
A MENU.
Drücken Sie auf
B
, um das Menü Tuning
auszuwählen, bestätigen Sie durch Drücken von
.
Drücken Sie auf
C
, um den Unterpunkt analog
manual SEARCH auszuwählen, bestätigen Sie durch
Drücken von
.
Drücken Sie auf
D
, um den Unterpunkt Suche
auszuwählen, durch Drücken von
wählen Sie
einen höheren Frequenzbereich.
Drücken Sie auf
, um einen niedrigeren
Frequenzbereich auszuwählen.
Wählen Sie anschließend Speichern In und drücken
E
Sie
,
um den Programmplatz auszuwählen,
in dem Sie den Kanal speichern möchten. Sobald
ein Kanal gefunden wurde, können Sie diesen durch
Drücken auf die rote Taste speichern. Drücken Sie
auf EXIT, um die Suche zu verlassen.
TonwiedergabeV
Drücken Sie auf
, um Sound System
auszuwählen, drücken Sie anschließend auf
, um den richtigen Tonwiedergabemodus
auszuwählen.

Inbetriebnahme
Digital LCD /LED LCD Television bedienung sanleitung DE-16
Derzeitiger KanalV
Drücken Sie auf
, um die Kanalnummer
auszuwählen, die Sie ändern möchten.
Speichern inV
Drücken Sie auf
, um den Programmplatz
auszuwählen, in dem Sie einen Kanal speichern
möchten.
FeinabstimmungV
Sollte die Qualität von Bild - und/oder
Tonwiedergabe nicht zufriedenstellend sein,
verwenden Sie die Funktion FINETUNE. Diese
Funktion sollte nur bei mäßiger Empfangsqualität
verwendet werden.
Wiederholen Sie die oben dargelegten Schritte
A
A-C und drücken Sie anschließend auf
,
um den Unterpunkt Fine Tune auszuwählen.
Drücken Sie wiederholt auf
B
, um die
Feinabstimmung durchzuführen, bis die
bestmögliche Bild- und Tonqualität erreicht ist.
Channel Edit
Mit dieser Funktion lassen sich im Analogbetrieb Kanäle
umbenennen, verschieben, Favoriten auswählen und
überspringen.
Drücken Sie auf die Taste
A MENU.
Drücken Sie auf B
, um das Menü TUNING
auszuwählen, bestätigen Sie durch Drücken von
.
Drücken Sie
C
, um CHANNEL EDIT auszuwählen.
Drücken Sie auf
, um das Untermenü aufzurufen.
Mit Hilfe der roten, grünen, gelben und blauen Taste
gelangen Sie in das gewünschte Menü.
UMBENENNEN
Drücken Sie auf A
, um die Kanalnummer
auszuwählen, drücken Sie die grüne Taste für die
Funktion „Umbenennen".
Drücken Sie auf
B
, um die Position der
Kanalbezeichnung auszuwählen, wählen Sie mit
die Nummer aus.
Drücken Sie auf
C EXIT, um die Änderungen jederzeit
zu löschen.
HINWEIS
Die Funktion UMBENENNEN ist nur bei Q
Analogprogrammen möglich.
VERSCHIEBEN
Drücken Sie auf A
,
um den Kanal auszuwählen
und wählen Sie mit der gelben Taste die Position.
Drücken Sie auf
B
, um den Programmplatz
auszuwählen, zu dem Sie verschieben möchten, und
drücken Sie die gelbe Taste zur Bestätigung.
Drücken Sie auf
C EXIT, um die Änderungen jederzeit
zu löschen.
Kanal als Favorit auswählen
Drücken Sie auf A
, um die Kanalnummer
auszuwählen, drücken Sie die rote Taste für die
Funktion Favorit auswählen.
Drücken Sie auf die rote Taste, um die Änderungen
B
jederzeit zu abzubrechen.
Drücken Sie
C FAV auf der Fernbedienung und die
Favoritenliste wird angezeigt.

Inbetriebnahme
DE-17 Digital LCD / LED LCD Television bedienung sanleitung
Drücken Sie auf D
, um die Kanalnummer
auszuwählen, und bestätigen Sie mit OK.
ÜBERSPRINGEN
Drücken Sie auf A
, um den Kanal auszuwählen
und überspringen Sie mit der blauen den aktuellen
Kanal.
Drücken Sie auf die blaue Taste, um die Änderungen
B
jederzeit zu abzubrechen.
GUIDE (EPG - Electronic Program
Guide -Elektronische Program-
mzeitschrift)
Mit Hilfe dieser Funktion können Sie auf die Digital-TV-
Programminformationen zugreifen.
Drücken Sie auf die Taste
A MENU.
Drücken Sie auf B
, um das Menü TUNING
auszuwählen. Drücken Sie auf
, um die Auswahl
zu bestätigen.
Drücken Sie auf
C
, um GUIDE auszuwählen.
Drücken Sie auf OK, um das Untermenü aufzurufen.
EPG wird aufgerufen.
Über die Taste GUIDE auf der Fernbedienung
können Sie das EPG-Menü direkt aufrufen.
HINWEIS
Nur im Digital-Betrieb.Q
COMMON INTERFACE (CI)
Der Cl-Schacht dient der Aufnahme von CAMs
(Conditional Access Module) und Chipkarten (Smart
Cards), um Pay-TV-Programme empfangen und
zusätzliche Dienstleistungen nutzen zu können.
Wenden Sie sich an lhren Cl-Dienstanbieter, um weitere
lnformationen über Module und Dienstleistungen zu
erfahren. Beachten Sie bitte, dass CAMs und Chipkarten
weder im Lieferumfang enthalten sind noch von uns als
Zubehör geliefert werden können.
Warnung
Schalten Sie Ihr TV-Gerät aus, bevor Sie ein Modul Ŗ
in den CI-Schacht einstecken.
Stecken Sie zuerst das CAM korrekt in den seitlich A
am TV-Gerät befindlichen CI-Schacht ein und führen
Sie anschließend die Smart Card ein.

Inbetriebnahme
Digital LCD /LED LCD Television bedienung sanleitung DE-18
Schalten Sie das TV-Gerät ein, woraufhin nach B
Erkennung des CAM die folgende Nachricht
angezeigt wird. Warten Sie kurze Zeit, bis die Karte
aktiviert wird.
Drücken Sie aufC MENU, um das Hauptmenü
anzuzeigen, markieren Sie mit Hilfe der Tasten
und
die Zeile „Common Interface" und drücken Sie auf
„OK".
Detaillierte Informationen zur gerade verwendeten D
Cl-Karte werden angezeigt.
Drücken Sie auf „
E OK”, um das Chipkarten-Menü
aufzurufen. Detaillierte Informationen zur
Einstellung entnehmen Sie der Bedienungsanleitung
des Moduls.
Wird das Modul entfernt, erscheint die folgende
F
Nachricht auf dem Bildschirm.
Funktion Softwareaktualisierung
Sobald Sie über eine mögliche Ŗ
Softwareaktualisierung informiert werden, können
Sie die Betriebssoftware über das Download-
Menü aktualisieren. Die Daten für verschiedene
Geräte werden fortlaufend über einen speziellen
Empfangskanal gesendet.
Sie müssen diesen Kanal, über den der Datenstrom Ŗ
mit der Aktualisierung gesendet wird, suchen.
HINWEIS
Informationen hierzu erhalten Sie im Fachhandel Q
oder über das Internet.
Ablauf
Drücken Sie auf die TasteA MENU.
Drücken Sie Ablauf B
, um das Menü TUNING
auszuwählen, bestätigen Sie durch Drücken von
.
Drücken Sie auf
C
und wählen Sie
Softwareaktualisierung.
Schalten Sie die Funktion über die Tasten
D
ein.
Die Basiseinstellung ist „Aus“.
“START UPDATE” kann ausgewählt werden (Die grau E
unterlegten Felder können nicht verändert werden).
13%
Press EXIT to cancel download
F
Drücken Sie auf
, um die Option Start
Update auszuwählen, und bestätigen Sie mit OK.
Anschließend schaltet sich das TV-Gerät neu ein und
sucht nach den Aktualisierungsdaten.
HINWEIS
Wurden die Aktualisierungsdaten empfangen, Q
beginnt das TV-Gerät mit der Aktualisierung.
Ansonsten geht das TV zurück in den DTV Modus.
Laden Sie die Empfängererkennung. Dieser
G
Vorgang kann einige Minuten in Anspruch
nehmen. Drücken Sie auf EXIT, um den
Download jederzeit abzubrechen und Ihr TV-
Gerät geht das TV zurück in den DTV Modus.

Inbetriebnahme
DE-19 Digital LCD / LED LCD Television bedienung sanleitung
Nach Beendigung des Downloads schaltet Ihr TV-H
Gerät in den Speichermodus und die entsprechende
Anzeige leuchtet auf. Das rechts aufgeführte Menü
wird angezeigt.
Sobald die Aktualisierung beendet istgeht das TV zurück
in den DTV Modus.
BEDIENUNG IHRES TV-
GERÄTES
Programmwahl
Programmplatz direkt eingeben. Geben Sie den A
Programmplatz direkt mit den Zierntasten auf der
Fernbedienung ein.
Programmplatz über
B P+/P- eingeben. Verwenden
Sie die Tasten P+/P-, um ein Programm zu wählen.
Lautstärkeeinstellung
Stellen Sie die Lautstärke über die Tasten V+/V- auf der
Fernbedienung oder seitlich am TV-Gerät ein.
CH.LIST-Funktion
Nach Drücken von CH.LIST auf der Fernbedienung wird
die Programmliste angezeigt. Durch Drücken von
gelangen Sie in die Liste. Drücken Sie auf
, um
die Kanalnummer auszuwählen, und bestätigen Sie
anschließend mit OK.
BILDEINSTELLUNGEN
Ändern der Bildeinstellungen
Drücken Sie auf die Taste A MENU.
Drücken Sie auf B
, um das Menü „Bild"
auszuwählen, bestätigen Sie durch Drücken von
.
Drücken Sie auf
C
, um die zu ändernde
Einstellung auszuwählen.
Drücken Sie auf
D
, um die betreende
Einstellung zu ändern.
Haben Sie die Einstellungen wunschgemäß geändert, E
drücken Sie auf EXIT, um zu Ihrem Programm
zurückzukehren, oder drücken Sie auf MENU, um zum
vorhergehenden Menü zurückzukehren.
KontrastV
Regelt die Intensität heller Bildteile und lässt dunkle
Bildteile unverändert.
HelligkeitV
Regelt die Lichtleistung des gesamten Bildes, was vor
allem die dunklen Bildteile beeinusst.
FarbeV
Regeln Sie hier das Sättigungsniveau der Farben
entsprechend Ihren Sehgewohnheiten.
SchärfeV
Regelt die Schärfe feiner Objekte im Bild.
FarbtonV
Gestattet die Wahl der Farbenmischung (Farbton) des Bildes
.
HINWEIS
Die Funktion „Farbton" ist nur im NTSC-Modus Q
verfügbar.
ModusV
Regelt den Bildmodus. Wählen Sie je nach Art

Inbetriebnahme
Digital LCD /LED LCD Television bedienung sanleitung DE-20
des Programms zwischen Standard/ Ruhig/
User/Lebhaft. Über die Taste P.MODE auf der
Fernbedienung können Sie den gewünschten Modus
direkt anwählen.
FarbtemperaturV
Erhöht oder senkt warme Farben (Warm - rot)
und kalte Farben (Cool - blau) entsprechend Ihren
Sehgewohnheiten. Cool verleiht Weiß eine bläuliche
Färbung, Normal verleiht Weiß eine neutrale Färbung,
Warm verleiht Weiß eine rötliche Färbung.
RauschminderungV
Filtert und vermindert Bildrauschen automatisch und
verbessert die Bildqualität bei Empfang schwacher
Bildsignale. Wählen Sie je nach Art des Bildrauschens
zwischen Aus/Niedrig/Standard/Hoch.
ResetV
Wiederherstellung der Grundeinstellungen.
TONEINSTELLUNGEN
Ändern der Toneinstellungen
Drücken Sie auf die Taste A MENU.
Drücken Sie auf
B
, um das Menü „Ton“
auszuwählen, bestätigen Sie durch Drücken von
.
Drücken Sie auf
C
, um die zu ändernde
Einstellung auszuwählen.
Drücken Sie auf
D
, um die betreende
Einstellung zu ändern.
Haben Sie die Einstellungen wunschgemäß geändert, E
drücken Sie auf EXIT, um zu Ihrem Programm
zurückzukehren, oder drücken Sie auf MENU, um zum
vorhergehenden Menü zurückzukehren.
BalanceV
Regelt die Ausgangsleistung des rechten und linken
Lautsprechers, um den Stereoton optimal auf Ihre
Hörposition abzustimmen.
ModeV
Regelt den Tonmodus.
Wählen Sie je nach Art des Programms zwischen
Standard/Musik/Theater/User. Über die Taste
S.MODE auf der Fernbedienung können Sie den
gewünschten Modus direkt anwählen.
AVL V (Automatische Lautstärkekontrolle)
Vermindert die Lautstärkeunterschiede zwischen
verschiedenen Tonquellen.
SRS TS XTV
Regelt den Tieftonwiedergabe.
Drücken Sie auf
,
um SRS TS XT auszuwählen.
Drücken Sie auf
, um SRS TS XT aus- oder
einzuschalten (AUS, EIN).
Ausgang Audio Digital V
Steuert die digitale Audioausgabe
Taste
drücken zur Auswahl Digital Audio Ausgabe
Taste ücken um Digital Audio Ausgang festzulegen für
OFF, PCM, RAW.
EqualizerV
Regeln Sie hier die Toneinstellungen entsprechend
Ihren Hörgewohnheiten.
Audio-SprachenV
Drücken Sie auf
, um Erstsprache/Zweitsprache
auszuwählen und drücken Sie anschließend
,
um die gewünschten Sprachen auszuwählen.
Drücken Sie auf
, um den Unterpunkt „Schließen"
auszuwählen, bestätigen Sie durch Drücken von OK.

Inbetriebnahme
DE-21 Digital LCD / LED LCD Television bedienung sanleitung
HINWEIS
Die Option Audio-Sprachen ist nur im Digital-TV-Q
Modus verfügbar.
ResetV
Wiederherstellung der Grundeinstellungen.
FUNKTIONSEINS TELLUNGEN
Drücken Sie auf die Taste A MENU.
Drücken Sie auf
, um das Menü „Ton"
auszuwählen, bestätigen Sie durch Drücken von
.
Drücken Sie auf
B
, um die zu ändernde
Einstellung auszuwählen.
Drücken Sie auf
, um die betreffende
Einstellung zu ändern.
Haben Sie die Einstellungen wunschgemäß
C
geändert, drücken Sie auf EXIT, um zu Ihrem
Programm zurückzukehren, oder drücken Sie
auf MENU, um zum vorhergehenden Menü
zurückzukehren.
SpracheV
Auswahl des Menüs Sprache.
UntertitelspracheV
Auswahl der Untertitelsprache.
Display ModeV
Zur Einstellung des Bildverhältnisses
drücken,
um zwischen 4:3/Zoom1/Zoom2/Wide/ 16:9/Auto zu
wählen.
Über die Taste SCREEN auf der Fernbedienung können
Sie den gewünschten Modus direkt anwählen.
4:3 modeŖ
Wählen Sie 4:3, falls Sie das ursprüngliche
Bildseitenverhältnis von 4:3 bevorzugen, wobei
links und rechts graue Balken zu sehen sind.
16:9 modeŖ
Wählen Sie 16:9, falls Sie das Bild horizontal und in
linearem Verhältnis ausrichten möchten, wobei der
Bildschirm vollständig ausgefüllt ist.
Zoom1Ŗ
Wählen Sie Zoom1, falls Sie das Bild ohne
Änderung sehen möchten. Allerdings werden
oben und unten Teile des Bildes abgeschnitten.
Zoom2Ŗ
Wählen Sie Zoom2, falls Sie die Bilddarstellung
ändern möchten, wobei die Bilddarstellung vertikal
ausgedehnt und abgeschnitten werden kann. Das
Bild ist ein Kompromiss zwischen Änderung und
Bildschirmächenabdeckung.
WideŖ
Wählen Sie Wide, falls Sie das Bild nichtlinear
verändern möchten, also etwas größer oben und
keine Änderung unten.
HINWEIS
Die Funktion Farbton ist nur im ATV-Modus verfügbar.Q
RecorderV
Zur Aufzeichnung des Digital-TV-Programms.
Weitere Information zum Recorder finden Sie auf Seite
30-32.
SCART-EingangV

Inbetriebnahme
Digital LCD /LED LCD Television bedienung sanleitung DE-22
Der Artikel ist nicht in der Lage, für 32'/40' Modell
gewählt zu werden, und nicht für 19'/22'/24' Modell
angezeigt.
OSD Time OutV
Regelt die Anzeigedauer der Menüs auf dem
Bildschirm.
Für jeden Druck auf
zur Wahl der vorgegebenen
Minuten wird die Zeit in Schritten gewählt: Aus, 10
Sek., 15. Sek., 30 Sek., 45 Sek., 60 Sek.
OSD TransparenzV
Um den Transparenzhintergrund des OSD zu setzen,
wird die Transparenz in Schritten gewählt: Aus, 25%,
50%, 75%, 100%.
ResetV
Wiederherstellung der Grundeinstellungen.
ZEITEINSTELLUNGEN
UhrzeitV
Drücken Sie auf die Taste A MENU.
Drücken Sie auf
B
, um das Menü Zeit
auszuwählen, bestätigen Sie durch Drücken
von
.
Drücken Sie auf
C
um den Unterpunkt
Uhrzeit auszuwählen, bestätigen Sie die
Einstellung durch Drücken von
.
Drücken Sie auf
um Stunde oder Minute
auszuwählen, drücken Sie anschließend auf
um den Wert einzustellen.
DatumV
Drücken Sie auf die Taste A MENU.
Drücken Sie auf
B
, um das Menü Zeit
auszuwählen, bestätigen Sie durch Drücken
von
.
Drücken Sie auf C
, um den Unterpunkt
Datum auszuwählen, bestätigen Sie die
Einstellung durch Drücken von
.
Drücken Sie auf
, um die gewünschte
Option auszuwählen, und drücken Sie OK, um
den Wert einzustellen.
HINWEIS
Da im Digitalbetrieb die Zeitdaten mit dem Signal Q
geliefert werden, können Uhrzeit und Datum nicht
geändert werden. Falls Sie die Uhrzeit ändern
möchten, schalten Sie das TV-Gerät im Analog-
Betrieb aus und anschließend wieder ein.
O Time - Zeitgesteuerte AbschaltungV
Drücken Sie auf die Taste A MENU.
Drücken Sie auf
B
, um das Menü Zeit
auszuwählen, bestätigen Sie durch Drücken
von
.

Inbetriebnahme
DE-23 Digital LCD / LED LCD Television bedienung sanleitung
Drücken Sie auf
C
um den Unterpunkt O
Time auszuwählen, bestätigen Sie die Einstellung
durch Drücken von
.
Drücken Sie auf
, um die Option
Wiederholen auszuwählen, und drücken Sie OK,
um die Option einzuschalten.
Drücken Sie auf
, um Stunde oder Minute
auszuwählen, drücken Sie auf
, um den Wert
zu ändern.
Sobald der eingestellte Zeitpunkt erreicht ist,
schaltet das TV-Gerät in denStandby-Betreib.
On Time - Zeitgesteuertes EinschaltenV
Drücken Sie auf die Taste A MENU.
Drücken Sie auf
B
, um dasMenü Zeit
auszuwählen, bestätigen Sie durch Drücken
von
.
Drücken Sie auf
C
, um den Unterpunkt
OnTime auszuwählen, bestätigen Sie die
Einstellung durch Drücken von
.
Drücken Sie auf
, um die Option Aktivieren
auszuwählen, und drücken Sie OK, um die Option
einzuschalten.
Drücken Sie auf
,
um Stunde oder Minute.
auszuwählen
,
drücken Sie auf
,
um den Wert zu
ändern.
Sobald der eingestellte Zeitpunkt erreichtist, schaltet
sich dasTV-Gerät automatisch ein.
SchlafmodusV
Der Schlaftimer schaltet das TV-Gerät automatisch
nach einer vorgegebenen Zeit (zwischen 5 und 240
Minuten) aus.
Drücken Sie auf
A MENU und drücken Sie auf
,
um das Menü Zeit auszuwählen.
Drücken Sie auf
B
und drücken Sie auf
,
um Ruhe auszuwählen.
Drücken Sie auf
C
und verwenden Sie
,
um die Dauer in Minuten auszuwählen. Wählen
Sie zwischen Aus, 5Min, 10Min, 15Min, 30Min,
45Min, 60Min, 90Min, 120Min, 180Min,
240Min.
Haben Sie die Einstellungen wunschgemäß
D
geändert, drücken Sie auf MENU, um zum
vorhergehenden Menü zurückzukehren, oder
drücken Sie auf EXIT, um zum TV-Betrieb
zurückzukehren. Ab diesem Zeitpunkt zählt die
Uhr die gewählte Dauer in Minuten bis zum
Abschalten des TV-Gerätes.
ZeitzoneV
Drücken Sie auf die Taste A MENU.
Drücken Sie auf
B
, um das Menü Zeit
auszuwählen, bestätigen Sie durch Drücken
von
.
Drücken Sie auf
C
,
um die Zeitzone
auszuwählen.

Inbetriebnahme
Digital LCD /LED LCD Television bedienung sanleitung DE-24
Drücken Sie auf
D
, um die korrekte Zeitzone
auszuwählen.
Drücken Sie auf
E MENU, um die Einstellung zu
speichern und das Menü zu verlassen.
EINSTELLUNGEN IM MENÜ
SPERREN
Diese Funktion regelt Tuner, Programm,
Eingangslautstärke usw. Drücken Sie MENU auf
der Fernbedienung, drücken Sie auf
, um das
Menü Sperren auszuwählen, drücken Sie auf
,
um das Untermenü aufzurufen und geben Sie nun
das erforderliche Passwort ein. Das Passwort für das
TV-Gerät in der Grundeinstellung lautet 0000. Sollten
Sie Ihr Passwort vergessen, können Sie jederzeit
die Zahlenfolge 9443 eingeben, um die Bedienung
fortsetzen zu können.
PASSWORT ÄNDERNV
Drücken Sie auf A
, um den Unterpunkt
„Passwort ändern" auszuwählen. Drücken Sie
auf
, um das Untermenü aufzurufen.
Sobald Sie eine vierstellige Zahl eingegeben
B
haben, werden Sie aufgefordert, die Eingabe zu
wiederholen.
Das neue Passwort wird daraufhin automatisch
gespeichert.
KINDERSICHERUNGV
Drücken Sie auf
,
um Kindersicherung auszuwählen.
Schalten Sie die Funktion über die Tasten
Ein oder Aus. Ist der Sperrmodus eingeschaltet, ist
die Kindersicherung automatisch aktiviert. Falls in
diesem Fall die Taste
Kindersicherung
(am TV-Gerät)
gedrückt
wird, erscheint Kindersicherung auf dem
Bildschirm, was durch Drücken der Taste MENU
gelöscht werden kann. 5 Sekunden nach der letzten
Betätigung wird der Text automatisch vom Bildschirm
gelöscht. Der Kindersicherungsmodus kann durch
das Aufrufen des Menüs Sperre Aktivieren wieder
eingeschaltet werden. Setzen Sie die Kindersicherung
auf Ein oder Aus.
EinstellsicherungV
Drücken Sie auf
, um die Einstellsicherung
auszuwählen und ein- und auszuschalten. Zum
Einschalten ist keine sonstige Tätigkeit, wie das
Durchführen einer Suche, erforderlich. Nach
Aufruf des Menüs „Einstellen" erscheint die
Einstellsicherung auf dem Bildschirm. Soll das Menü
Einstellen bearbeitet werden, müssen Sie zuerst das
Menü Sperren aufrufen, um die Einstellsicherung
auszuschalten.
Kanal-Nr.V
Kanal-Nr. dient dem Aufrufen voreingestellter Kanäle.
Drücken Sie auf
, um den voreingestellten
Kanal auszuwählen. Drücken Sie auf
,
um die
Kanalnummer auszuwählen.
EingangseinstellungV
Die Eingangseinstellung dient der Voreinstellung
eines Starteingangs. Drücken Sie auf
, um
zwischen Aus, Digital-TV, TV, AV, SCART , S-Video,
Componentl, Component2, PC, HDMI1, HDMI2,
HDMI3, USB auszuwählen. DVD ist bei einigen
Modellen verfügbar.
EingangssicherungV

Verwendung der Funktionen
DE-25 Digital LCD / LED LCD Television bedienung sanleitung
Die Eingangssicherung regelt die Abschaltung/
Zulassung externer Eingangsmodi.
Schalten Sie die Funktion über die Tasten
Ein
oder Aus.
Ist die Eingangssicherung eingeschaltet, ist TV-Betrieb
möglich. Wird gleichzeitig die Taste Eingangswahl
gedrückt, zeigt das TV-Gerät an, dass der jeweilige
Eingang gesperrt ist.
Max. LautstärkeV
Drücken Sie auf
, um Max. Lautstärke
auszuwählen. Drücken Sie auf
, um einen Wert
zwischen 0-100 einzustellen. Sobald ein bestimmter
Wert eingestellt ist, kann mit der Lautstärkeregelung
diese Lautstärke nicht überschritten werden. Falls
bei der Einstellung der max. Lautstärke die aktuelle
Lautstärke über der eingestellten Lautstärke liegt, wird
die aktuelle Lautstärke als max. Lautstärke gespeichert.
Liegt die aktuelle Lautstärke unter der max. Lautstärke,
bleibt die aktuelle Lautstärke unverändert.
EinschaltlautstärkeV
Nach der Einstellung dieses Wertes ist dies die
Lautstärke bei Einschalten des TV-Gerätes.
JugendschutzV
Drücken Sie auf
, um Jugendschutz
auszuwählen. Drücken Sie auf
, um zwischen
AUS und 4-18 zu wählen und damit das Alter der
Kinder und Jugendlichen zu begrenzen, die das TV-
Gerät nutzen.
Sperren löschenV
Drücken Sie auf
, um den Entsperrmodus
auszuwählen. Drücken Sie auf
, um
alle eingestellten Modi zu entsperren, alle
Entsperroptionen auf Aus zu schalten und die
maximale Lautstärke auf 100 zu setzen.
EINSTELLUNG DES MENÜS
DIREKTWAHL
Untertitel-FunktionV
Nach Drücken von A SUBTITLE auf der
Fernbedienung wird das Menü Untertitelsprachen
angezeigt. Durch Drücken von
gelangen Sie
in die Liste.
D
B rücken Sie auf
, um den Unterpunkt
auszuwählen, und bestätigen Sie mit OK. Drücken
Sie auf EXIT, um die Änderungen jederzeit zu
löschen.
HINWEIS
Nach Drücken von Q SUBTITLE auf der
Fernbedienung wird das Menü Untertitelsprachen
nur im Digital-Betrieb angezeigt.
CCH.LIST-FunktionV
Drücken Sie A CH.LIST auf der Fernbedienung und
das Menü Kanalliste wird angezeigt.
Drücken Sie auf B
, um den Kanal
auszuwählen,
und bestätigen Sie mit OK. Drücken Sie auf EXIT, um
die Änderungen jederzeit zu löschen
.
GUIDE-FunktionV
Nach Drücken von GUIDE auf der Fernbedienung
wird das Menü Programmführer angezeigt. Durch
Drücken von
wählen Sie das Programm.
Drücken Sie auf EXIT, um die Änderungen jederzeit
zu löschen.

Verwendung der Funktionen
Digital LCD / LED LCD Television bedienung sanleitung DE-26
HINWEIS
Nur im Digital-Betrieb verfügbar.Q
FAV-FunktionV
Drücken Sie FAV auf der Fernbedienung und das Menü
Favoritenliste wird angezeigt.
Drücken Sie auf
, um das Programm
auszuwählen, und bestätigen Sie mit OK.
Drücken Sie auf EXIT, um die Änderungen jederzeit zu
löschen.
INFOV
Drücken Sie INFO auf der Fernbedienung und
Informationen zum aktuellen Programm werden
angezeigt. Drücken Sie auf EXIT, um die Änderungen
jederzeit zu löschen.
AUDIO/I/IIV
Drücken Sie AUDIO auf der Fernbedienung und das
Menü „Audio-Sprachen" wird angezeigt.
Drücken Sie auf
,
um den gewünschten
Einstellungen auszuwählen, und bestätigen Sie mit OK.
Drücken Sie auf EXIT, um die Änderungen jederzeit zu
löschen.
HINWEIS
Nach Drücken von Q AUDIO auf der Fernbedienung
wird das Menü Audio-Sprachen nur im Digital-
Betrieb angezeigt.
StummschaltungV
Die Funktion Stummschaltung dient dazu, den
Ton abzuschalten, wenn Sie beispielsweise einen
Telefonanruf entgegennehmen müssen oder
Besucher in Empfang nehmen.
Drücken Sie auf
A MUTE auf der Fernbedienung,
woraufhin „Mute" auf dem unteren Teil des
Bildschirms angezeigt wird. Gleichzeitig ist der
Ton des TV-Gerätes abgeschaltet.
Um den Ton wieder einzuschalten, drücken Sie
B
erneut auf MUTE oder direkt auf die Taste V+.
Rückkehr zum zuletzt eingestellten ProgrammV
Diese Funktion ermöglicht ein schnelles Umschalten
zum zuletzt eingestellten Programm. Drücken
Sie auf Q.View und das TV-Gerät schaltet zum
vorhergehenden TV-Programm zurück (außer bei
USB-und DVD-Quellen).
Im Beispiel ist Ihr zuletzt eingestelltes Programm
A
auf Programmplatz 8 und das aktuelle Programm
auf Programmplatz 18 (siehe Abbildung).
Möchten Sie zurück zum Programmplatz 8
B
wechseln, drücken Sie lediglich die Taste Q.View.
Möchten Sie zu Programmplatz 18 zurückkehren,
C
drücken Sie die Taste erneut. Mit dieser Funktion
können Sie auf einfache Weise zwischen
dem aktuellen und dem zuletzt eingestellten
Programm wechseln.

Verwendung der Funktionen
DE-27 Digital LCD / LED LCD Television bedienung sanleitung
Verwendung der
Funktionen
Videotextfunktionen
Videotext ist ein Informationssystem, das von vielen
Fernsehsendern ausgestrahlt wird und wie eine
Zeitung gelesen werden kann. Darüber hinaus stellt es
Untertitel für Hörgeschädigte oder für Personen, die die
Sprache eines gesendeten Programms nicht verstehen
(Kabelnetze, Satellitenprogramme usw.), zur Verfügung.
HINWEIS
Die für die Bedienung von Videotext vorgesehenen Q
Tasten funktionieren u. U. auch dann, wenn ein
Sender kein Videotextangebot ausstrahlt.
Videotext
VideotextfunktionenV
Durch Drücken der Taste
auf der Fernbedienung
schalten Sie auf Videotext
um. Durch erneutes
Drücken dieser Taste
schalten Sie Videotext
wieder aus. Nicht alle
Menüfunktionen stehen
bei eingeschaltetem
Videotext zur Verfügung.
Nur einige wenige
Funktionen können
bei eingeschaltetem
Videotext direkt
ausgeführt werden. Dies
sind:
LautstärkeregelungŖ
StummschaltungŖ
Seite Auf/AbV
Verwenden Sie die Tasten
P+/P-, um die nächste
bzw. vorhergehende Seite
aufzurufen.
Eingabe der SeitenzahlenV
Um eine Videotext-Seite anzuwählen, geben Sie
die Seitenzahl mit Hilfe der Zierntasten auf der
Fernbedienung ein, verwenden Sie die Tasten P+ oder
P- oder die farbigen Multifunktionstasten.
MixbetriebV
Drücken Sie diese Taste, um das Bild im
Videotextbetrieb sehen zu können. Der Videotext
wird dadurch über das TV-Bild gelegt. Durch erneutes
Drücken kehren Sie in den reinen Videotextbetrieb
zurück.
INDEXV
Drücken Sie INDEX, um zur Videotext-Indexseite
zurückzukehren.
SchriftzeichenwechselV
Durch Drücken der Taste
| können Sie zwischen
fernöstlichen und lateinischen
Schriftzeichen umschalten.
HaltenV
Durch Drücken der Taste
wird die automatische
Weiterschaltung unterbunden.
Diese Funktion ist hilfreich, wenn
unter einer Seitenzahl mehrere
Unterseiten vorhanden sind.
GrößeV
Durch Drücken der Taste
wechseln Sie zwischen Vollbild
/ obere Hälfte / untere Hälfte
/ Vollbild. Diese Funktion
dient der Vergrößerung des
Schriftbildes, wodurch die
Buchstaben leichter erkennbar
sind.
ZeigenV
Durch Drücken der Taste
wird verborgener Text
angezeigt. Diese Funktion
dient der Anzeige verborgener
Informationen, wie z. B.
Antworten für interaktive
Online-Puzzle im Videotext.
ZeitV
Im TV-Betrieb wird bei Drücken
der Taste für einige Sekunden
die Videotext-Zeit in der oberen
rechten Ecke angezeigt.

Verwendung der Funktionen
Digital LCD / LED LCD Television bedienung sanleitung DE-28
Farbige MultifunktionstastenV
Die Multifunktionstasten ermöglichen die schnelle
Seitenwahl entsprechend der Funktionsvorgaben
des Senders, der den Videotext ausstrahlt. Drücken
Sie die Taste mit der jeweiligen Farbe, um die auf der
Videotextseite unten dargestellte Seitenwahlfunktion
auszuwählen.
SubcodeV
Durch Drücken der Taste und Eingabe ihrer
4-stelligen Nummer kann eine Unterseite aufgerufen
werden.
USB-MODUS
Hinweis
Die Grafiken im folgenden Abschnitt sind Q
schematische Darstellungen und dienen lediglich
als Beispiele. Falls erforderlich, beziehen Sie sich
bitte auf die Angaben auf dem jeweiligen Produkt.
VERWENDUNG VON USB-GERÄTEN
Unterstützte Datenformate:A
Foto: *.jpgt
Musik: *.mp3 filest
Film: *.avi files;t
Text:*.txt;t
Hinweis
Aufgrund von Besonderheiten bei der Q
Datenkodierung können manche Dateien nicht
lesbar sein.
Unterstützte Geräte:
B
Unterstützt werden Geräte, die das Mass Storage
Protocol unterstützen und die als Dateisystem
FAT32 verwenden, wie z. B. USB-Speichermedien,
mobile Festplatten und MP3-Player. Falls USB-Geräte
aufgrund eines nicht unterstützten Dateisystems
nicht erkannt werden, formatieren Sie das Gerät mit
dem oben genannten Dateisystem.
Um eine einwandfreie Wiedergabe zu erhalten,
C
müssen folgende Vorgaben eingehalten werden:
Die Datencodierrate sollte unter 300 kB/s t
betragen.
Aufgrund der Einschränkungen bei der t
Übertragungsdistanz von USB-Signalen
wird empfohlen, keine USB-Adapterkabel zu
verwenden. Die Länge verwendeter Kabel sollte
nicht mehr als 1 m betragen.
Verwenden Sie High-Speed-USB-Geräte t
entsprechend des USB 2.0 FullSpeed Interface-
Standards. Falls USB-Geräte verwendet werden,
die nur dem USB 1.1 FullSpeed-Interface-Standard
entsprechen, kann die Wiedergabe verzerrt sein.
Verbindung/Trennung eines USB-
Gerätes
Drücken Sie SOURCE auf der Fernbedienung und A
wählen Sie die Option USB.
Verbinden Sie das jeweilige USB-Gerät 2 Sek. nach
B
Start des Systems mit der USB-Schnittstelle.
Nach Önen des Menüs System drücken Sie
C
auf der Fernbedienung und wählen Sie die
gewünschte USB-Dateiart, drücken Sie auf OK, um
die Auswahl zu bestätigen und gehen Sie in die Ihrer
Auswahl entsprechende Dateiliste.
Drücken Sie
D
auf der Fernbedienung und wählen
Sie die gewünschte Datei und drücken Sie auf OK, um
die gewählte Datei aufzurufen.
Um das Streaming Media-Abspielsystem zu verlassen
E
und ein TV-Programm anzusehen, drücken Sie auf
BACK, um zuerst in das Streaming Media-Hauptmenü
zu gelangen (zum Schutz der Geräte), drücken Sie
anschließend SOURCE und wählen Sie TV, um in den
TV-Betrieb zu wechseln.
Hinweis
Wenn Sie im USB-Betrieb auf Q MENU drücken, wird
der Bildschirm dunkel, sofern nicht Bilder oder ein
Film abgespielt werden.
Solange die USB-Quelle in Betrieb ist, drücken Q
Sie wiederholt auf BACK, um zum USB-
Hauptbildschirm zu wechseln. Erst dann können
Sie die entsprechenden Signalquellen durch
Drücken von SOURCE wechseln.
Trennen Sie die USB-Verbindung nicht, solange das Q
angeschlossene USB-Gerät in Betrieb ist. Ein Trennen
oder Ausstecken eines im Betrieb befindlichen USB-
Gerätes kann die gespeicherten Daten oder das USB-
Speichergerät beschädigen.

Verwendung der Funktionen
DE-29 Digital LCD / LED LCD Television bedienung sanleitung
Bedienung des USB-Gerätes
Drücken Sie auf A
/
um durch Haupt- oder
Untermenü zu scrollen und die gewünschte Option
auszuwählen.
Drücken Sie auf
B OK, um Ihre Auswahl zu bestätigen.
Drücken Sie auf
C /, um FWD (Schneller Vorlauf)
und REV (Schneller Rücklauf) zu aktivieren.
Drücken Sie auf
D PLAY/PAUSE, um eine Datei
abzuspielen, und drücken Sie erneut, um den
Abspielvorgang zu unterbrechen.
Drücken Sie auf E ZOOM, um Bilder zu vergrößern. Drücken
Sie im vergrößerten Bild auf
und
, um sich
innerhalb des Bildes zu bewegen.
Drücken Sie auf F STOP , um den Abspielvorgang
zu beenden oder zum vorhergehenden Menü
zurückzukehren, und drücken Sie wiederholt auf
BACK, um zum Hauptmenü zurückzukehren.
Hinweis
Sie können Fotos oder Musik in verschiedenen Q
Ordnern wählen und zusammen abspielen.
Bilder anzeigen
Drücken Sie nach Aufruf des USB-Hauptbildschirms A
auf
, um den Unterpunkt FOTO auszuwählen.
Drücken Sie auf
B OK, um die Auswahl zu bestätigen,
und gehen Sie in die Liste mit den Bilddateien.
Drücken Sie auf
C
, um das gewünschte Bild
auszuwählen, bestätigen Sie mit OK und drücken
Sie anschließend auf PLAY/PAUSE, um die Bilder zu
zeigen.
Möchten Sie das Zeigen der Bilder unterbrechen,
D
drücken Sie erneut auf PLAY/PAUSE.
Drücken Sie auf ZOOM, um das Bild zu vergrößern.
Drücken Sie im vergrößerten Bild auf
und
um sich innerhalb des Bild zu bewegen.
Drücken Sie PREV/NEXT, um das nächste bzw. letzte
Bild anzuwählen.
Drücken Sie auf
um das Bild zu drehen.
Drücken Sie auf STOP
, um das Anzeigen der
Bilder zu beenden.
Um den Abspielmodus zu verlassen, drücken Sie E
wiederholt auf BACK.
Hinweis
Auf dem Menüdisplay werden der Name und die Q
Pixelzahl der Bilder auf Ihrem Gerät angezeigt.
Musik abspielen
Drücken Sie nach Aufruf des USB-Hauptbildschirms A
auf
, um den Unterpunkt MUSIK auszuwählen.
Drücken Sie auf OK, um die Auswahl zu bestätigen,
B
und gehen Sie in die Liste mit den Musikdateien.
Drücken Sie auf
C
, um den gewünschten Titel
auszuwählen, bestätigen Sie mit OK und drücken
Sie anschließend auf PLAY/PAUSE, um den Titel
abzuspielen.
Drücken Sie auf
/, um FWD (Schneller Vorlauf)
und REV (Schneller Rücklauf) zu aktivieren.
Drücken Sie PREV/NEXT, um den nächsten bzw.
letzten Titel anzuwählen.
Drücken Sie STOP
, um das Abspielen von
Musiktiteln zu beenden.
Um zum Hauptmenü zurückzukehren, drücken Sie
A
wiederholt auf BACK.

Verwendung der Funktionen
Digital LCD / LED LCD Television bedienung sanleitung DE-30
HINWEIS
Sie können gleichzeitig Musik abspielen und Bilder Q
ansehen.
Film abspielen
Drücken Sie nach Aufruf des USB-Hauptbildschirms A
auf
, um den Unterpunkt FILM auszuwählen.
Drücken Sie auf
B OK, um die Auswahl zu bestätigen,
und gehen Sie in die Liste mit den Filmdateien.
Drücken Sie auf
C
, um den gewünschten Titel
auszuwählen, bestätigen Sie mit OK und drücken
Sie anschließend auf PLAY/PAUSE, um den Titel
abzuspielen.
Drücken Sie auf ZOOM, um den Film zu vergrößern.
Drücken Sie PREV/NEXT, um den nächsten bzw.
letzten Titel anzuwählen.
Drücken Sie auf STOP
, um das Abspielen des
Films zu beenden.
Um den Abspielmodus zu verlassen, drücken Sie
D
wiederholt auf BACK.
Text
Drücken Sie nach Aufruf des USB-A
Hauptbildschirms auf
, um den
Unterpunkt TEXT auszuwählen.
Drücken Sie auf B OK, um die Auswahl zu bestätigen,
und gehen Sie in die Liste mit den Textdateien.
Drücken Sie auf
C
, um den gewünschten Text
auszuwählen, bestätigen Sie mit OK und drücken
Sie anschließend auf PLAY/PAUSE, um den Text
anzuzeigen.
Drücken Sie PREV/NEXT, um den nächsten bzw.
letzten Text anzuwählen.
Um den
D Tex t modus zu verlassen, drücken Sie
wiederholt auf BACK.
HINWEIS
Sie können gleichzeitig Musik abspielen und Texte Q
ansehen.
Aufnahme auf ein externes
USB-Speichermedium
Verbinden Sie das USB-Gerät mit FAT32-A
Dateiformat mit der USB1-Schnittstelle. Drücken Sie
anschließend auf MENU.
Hinweis
Aufnahmen sind nur über USB1 möglich.Q
Drücken Sie auf
B
, um das Menü FUNKTION
auszuwählen, bestätigen Sie mit
.
Drücken Sie auf
C
, um Recorder auszuwählen.
Drücken Sie auf OK, um das Untermenü aufzurufen.
Drücken Sie auf
D
, um Speichermedium
auszuwählen, und bestätigen Sie mit
oder OK.
Drücken Sie auf
, um das Speichermedium
auszuwählen, falls Ihr Gerät über mehrere
Speichermedien verfügt.
Drücken Sie auf
E
, um Format auszuwählen,
bestätigen Sie mit
. Drücken Sie auf
,
um die zu formatierende Speicherkapazität
auszuwählen. Drücken Sie auf OK, um das USB-
Speichermedium zu formatieren.

Verwendung der Funktionen
DE-31 Digital LCD / LED LCD Television bedienung sanleitung
HINWEIS
Das System formatiert das gesamte Gerät. Liegt die Q
Speicherkapazität Ihres Gerätes über 1 GB, können
Sie die für Timeshift verwendete Speichermenge
definieren.
Die Formatierung kann mehrere Minuten dauern F
und ist abhängig von der Speicherkapazität. Drücken
Sie auf
,
um die Größe des Timeshift-Speichers
zu definieren. Die maximale Größe des Timeshift-
Speichers ist 8 GB. Speichern Sie anschließend mit OK.
HINWEIS
Verwenden Sie die gesamte Speicherkapazität Q
eines Mediums für Timeshift, sind keine
Aufnahmen möglich.
Warten Sie auf den Abschluss der
G
Systemüberprüfung. Nach erfolgreicher
Systemüberprüfung können Sie die Geschwindigkeit
der Datenübertragung sehen.
HINWEIS
Die Formatierung muss nur vor der ersten Q
Aufnahme mit einem Gerät durchgeführt werden.
Die Mindestspeicherkapazität eines Q
Aufnahmegeräts liegt bei 1 GB. Die Formatierung
kann für Geräte bis zu einer Speicherkapazität von
2 TB erfolgen. Die maximale Zahl der Partitionen
ist 16, wobei immer nur eine Partition aktiv sein
kann.
Bitrate:Q
Bitrate eines Gerätes > 4,5 MB/s REC ist für HD-Ŗ
Streams geeignet
Bitrate eines Gerätes > 1,5 MB/s REC ist für SD-Ŗ
Streams geeignet
Bitrate eines Gerätes < 600 KB/s REC Ŗ
istfürAufnahmen ungeeignet
Das System arbeitet nicht störungsfrei, falls das Q
USB-Gerät eines der folgenden Probleme aufweist:
Das USB-Gerät ist fehlerhaft.Ŗ
Das USB-Gerät weisteinen Fehlerblock auf.Ŗ
Das USB-Gerät gibt eine unkorrekte Ŗ
Kapazitätan.
WICHTIG
Das USB-Gerät sollte durch Ihren PC als FAT32-Ŗ
Dateisystem formatiert werden, bevor es mit der
USB-Schnittstelle verbunden wird.
TIMESHIFT
Die Funktion Timeshift ist nur im Digital-Betrieb
verfügbar. Drücken Sie PLAY/PAUSE, um die Sendung
zu unterbrechen. Nach erneutem Drücken von PLAY/
PAUSE wird die per Timeshift aufgezeichnete Sendung
abgespielt. Möchten Sie die Timeshift-Funktion
beenden, drücken Sie auf STOP. Das Abspielen einer mit
Timeshift aufgezeichneten Sendung beenden Sie mit
STOP.

Verwendung der Funktionen
Digital LCD / LED LCD Television bedienung sanleitung DE-32
AUFNAHME
Drücken Sie auf A D.MENU, um die aktuelle Sendung
aufzuzeichnen, und drücken Sie auf D.MENU oder
EXIT, um die Aufnahmeanzeige zu minimieren.
Drücken Sie auf B STOP, um dasAbspielen einer
aufgezeichneten Sendung zu beenden.
Zum Abspielen der aufgezeichneten Sendung
C
drücken Sie auf INDEX, um die Aufnahmeliste zu
önen.
Drücken Sie auf
,
um den aufgezeichneten
Inhalt auszuwählen.
Drücken Sie auf
,
um die Sendungsinformation
anzuzeigen.
Löschen Sie mit
. .
Drücken Sie auf OK oder PLAY/PAUSE, um eine
aufgezeichnete Sendung abzuspielen, und
drücken Sie auf STOP, um den Abspielvorgang zu
unterbrechen.
HINWEIS
Der Wechsel zu einem anderen Programm hat Q
keinen Einuss auf Aufnahmen im gleichen
Frequenzbereich, wirkt sich jedoch auf die
Timeshift-Funktion aus. Eine aufgezeichnete
Sendung kann während des Abspielens nicht
gelöscht werden.
Durch wiederholtes Drücken vonQ INDEX werden
die Sendungen geordnet nach Sendungsname,
Programmname, Sendungszeit, Dateiname und
Dateigröße angezeigt.
BEDIENUNG IHRES DVD-
PLAYERS
(nur bestimmte Modelle)
ABSPIELEN EINER DVDV
Drücken Sie auf A SOURCE auf der Fernbedienung,
um den DVD-Modus aufzurufen.
Stecken Sie die DVD so in denAufnahmeschlitz,
B
dass sich das Label der DVD auf der Ihnen
von abgewandten Seite befindet. Der
Aufnahmeschlitz akzeptiert lediglich DVDs in
Standardgröße.
Die DVD wird automatisch geladen. In den
C
meisten Fällen gelangen Sie in das DVD-
Hauptmenü.
Verwenden Sie die Tasten
D
,
,
und
zur
Navigation innerhalb des DVD-Menüs und der
Auswahl der Abspieloptionen und drücken Sie
anschließend auf PLAY/PAUSE.
ABSPIELEN EINER DVD UNTERBRECHENV
Drücken Sie auf A PLAY/PAUSE, um
denAbspielvorgang zu unterbrechen. Dabei wird
auch der Ton stummgeschaltet.
Drücken Sie auf
B PLAY/PAUSE, um
denAbspielvorgang wieder aufzunehmen.
ABSPIELEN EINER DVD BEENDENV
Drücken Sie auf A , um das Abspielen einer
DVD zu beenden.Auf dem Bildschirm wird das
Startlogo der DVD angezeigt.

Verwendung der Funktionen
DE-33 Digital LCD / LED LCD Television bedienung sanleitung
Manche DVDs enthalten eine Speicherfunktion B
für den Punkt, an dem das Abspielen gestoppt
wurde. Durch Drücken von PLAY/PAUSE wird
der Abspielvorgang an der jeweiligen Stelle
fortgesetzt.
Drücken Sie zweimal auf
C , um den
Abspielvorgang vollständig abzubrechen und
den Speicher zu löschen.
VERWENDUNG VON SCHNELLEM RÜCKLAUF V
UND SCHNELLEM VORLAUF
Um eine DVD schneller vorlaufen zu lassen, A
drücken Sie auf . Den schnellen Rücklauf durch
eine DVD aktivieren Sie durch
.
Durch wiederholtes Drücken von
B oder
erhalten Sie die verfügbaren Geschwindigkeiten,
die in der oberen linken Ecke des Bildschirms
angezeigt werden: 2X, 4X, 8X, 16X, 32X und die
normaleAbspielgeschwindigkeit.
Drücken Sie auf
C PLAY/PAUSE, um den
Abspielvorgang wieder aufzunehmen.
SPRUNGFUNKTION ZUR NÄCHSTEN ODER V
VORHERGEHENDEN SZENE
Drücken Sie während des Abspielens auf
, um
zur nächsten Szene auf der DVD zu springen, oder
drücken Sie auf
, um zur vorhergehenden Szene zu
springen.
PASSWORTV
Die Jugendschutzfunktion kann durch das Einschalten
des Passwortmodus aktiviert werden. Das Passwort
in der Grundeinstellung lautet 1234. Sollten Sie
Ihr Passwort vergessen, können Sie jederzeit die
Zahlenfolge 1369 eingeben, um die Bedienung
fortsetzen zu können.
VERWENDUNG DER ZOOM-FUNKTIONV
Drücken Sie auf A ZOOM, um die Bildansicht zu
zoomen. Durch wiederholtes Drücken lässt sich
das Bild weiter heranzoomen.
Verwenden Sie die Tasten
B
,
,
und
im
Zoommodus, um zu den verschiedenen Bildteilen
zu fahren.
EINSCHALTEN VON UNTERTITELNV
Drücken Sie während des Abspielvorgangs auf A
SUBTITLE.
Die verfügbaren Sprachen erscheinen
B
in der oberen linken Ecke des Bildschirms.
Drücken Sie wiederholt, bis Ihre gewünschte
Untertitelsprache angezeigt wird.
Um die Untertitel auszuschalten, drücken Sie
C
wiederholt auf SUBTITLE, bis UNTERTITEL AUS
angezeigt wird.
WIEDERHOLMODUSV
Drücken Sie einmal auf REPEAT, um ein Kapitel
der DVD, zweimal, um den gerade gespielten Titel
und dreimal, um den gesamten Inhalt der DVD zu
wiederholen.
ÄNDERN DES KAMERAWINKELSV
Manche DVDs bieten verschiedene
Kameraeinstellungen für manche oder alle Szenen.
Drücken Sie auf ANGLE, um den Kamerawinkel zu
verändern. Zu den verschiedenen Kamerawinkeln
gehören: vorne, seitlich, total oder außen.
ZUSÄTZLICHE DVD-
FUNKTIONEN
D.MENUV
Durch Drücken dieser Taste kehren Sie zum
vorhergehenden Menü zurück.
AUDIOV
Viele DVDs enthalten mehrere Tonspuren. Die
Taste AUDIO dient dem Wechsel zwischen diesen
Tonspuren. Warten Sie jeweils drei Sekunden, bevor
Sie die Taste erneut drücken, um von einer Option zur
nächsten zu gelangen.
TITLEV
Durch Drücken dieser Taste kehren Sie auf manchen
DVDs zum Titelmenü zurück. Verwenden Sie die
Tasten
,
,
und
zur Navigation innerhalb
des Menüs.
SEARCHV
Drücken Sie auf SEARCH, geben Sie mit Hilfe der
Zierntasten die Nummer des gewünschten Kapitels
ein und drücken Sie auf PLAY/PAUSE.

Verwendung der Funktionen
Digital LCD / LED LCD Television bedienung sanleitung DE-34
PROGRAMV
Drücken Sie PROGRAM während des
Abspielvorgangs, um direkt zu einem Abschnitt
oder einer Sendung auf der DVD zu gelangen.
Verwenden Sie die Zierntasten, um die Nummer
der gewünschten Sendung einzugeben. Danach
bewegen Sie den Cursor, um START auszuwählen. Die
DVD springt direkt zu diesem Abschnitt und beginnt
mit dem Abspielvorgang. Möchten Sie diese Funktion
löschen, drücken Sie auf PROGRAM und gehen Sie
auf STOP, drücken Sie anschließend auf PLAY/PAUSE.
A-BV
Wählen Sie mit A-B einen Abschnitt der DVD
zur Wiederholung aus. Drücken Sie A-B, um den
Startpunkt und den Endpunkt zu markieren. Die
Wiederholung des Abschnitts beginnt unmittelbar
darauf. Drücken Sie A-B, um die Wiederholung zu
löschen.
ANGLEV
Nutzen Sie diese Funktion bei Sport-, Konzert-
oder Theatersendungen, um Handlungen aus
verschiedenen Einstellungen zu erleben. (Nutzbar
bei DVDs, bei denen diese Funktion verfügbar
ist. Bei Multi-Angle-DVDs lassen sich Szenen aus
verschiedenen Perspektiven betrachten, z. B. von
vorne, seitlich, aus der Totalen und von außen.)
D.CALLV
Bei wiederholtem Drücken auf D.CALL werden
verschiedene OSD-Indikatoren für verschiedene Disk-
Arten angezeigt, z. B. DVD, CD usw.
ABSPIELEN EINER JPEG-CDV
Legen Sie eine JPEG-CD auf die gleiche Weise wie A
eine DVD oder Audio-CD ein, also mit dem Label
auf der von Ihnen abgewandten Seite.
Die CD wird geladen und ein Menü mit dem CD-
B
Inhalt erscheint auf dem Bildschirm.
Verwenden Sie die Tasten
C
und
, um den
Ordner und das gewünschte Bild zu markieren,
und drücken Sie auf PLAY/PAUSE. Ähnlich
einer Slideshow werden alle Bilder auf der Disc
nacheinander gezeigt.
Drücken Sie während der Slideshow auf
D PLAY/
PAUSE, um ein Bild zu betrachten.
Drücken Sie auf
E l oder l, um zum nächsten
oder vorhergehenden Bild zu springen.
ABSPIELEN EINER AUDIO-CDV
Legen Sie die CD auf die gleiche Weise wie eine A
DVD ein, also mit dem Label auf der von Ihnen
abgewandten Seite.
Die CD wird geladen und ein Menü mit dem CD-
B
Inhalt erscheint auf dem Bildschirm.
Verwenden Sie die Tasten
C
und
, um den
gewünschten Titel abzuspielen und drücken
Sie auf PLAY/PAUSE, oder drücken Sie direkt
auf PLAY/PAUSE, um die CD von Anfang an
abzuspielen.
Die Laufwerksfunktionen Stop, Pause, Schneller
Vorlauf und Schneller Rücklauf lassen sich bei
einer CD in der gleichen Weise wie bei einer DVD
anwenden. Sie können auch die Taste REPEAT
verwenden, um einen Titel, den Inhalt eines
Ordners oder den Inhalt der gesamten CD zu
wiederholen. Drücken Sie wiederholt, um den zu
wiederholenden Inhalt auszuwählen. Auch die
A-B-Funktion kann genutzt werden, um einen
bestimmten Abschnitt eines Titels oder einer CD
zu wiederholen.
Referenzteil
FEHLERBEHEBUNG
Nutzen Sie den nachfolgendenAbschnitt, um
mögliche Fehlerursachen zu identifizieren:
Kein Bild, kein
Ton
Überprüfen Sie, ob der Netzstecker
des TV-Gerätes richtig eingesteckt ist.
Überprüfen Sie, ob eine ädaquate
Stromquelle verwendet wird.
Überprüfen Sie, ob es etwaig einen
Stromausfall gibt.
Keine
Bildschirmanzeige
Überprüfen Sie, ob die korrekten
Signale eingespeist werden.
Ändern Sie per Fernbedienung die
Signalquelle, um dies zu korrigieren.
Schalten Sie das TV-Gerät nach
Stromunterbrechung nochmals ein.
Verwendung der Funktionen / Referenzteil

Referenzteil
DE-35 Digital LCD / LED LCD Television bedienung sanleitung
Kein Ton
Taste MUTE drücken und so
überprüfen, ob die Stummschaltung
aktiviert ist.
Durch Umschalten auf ein anderes
Programm überprüfen, ob das
Problem auch dortbesteht.
Taste VOL+ drücken, um so
möglicherweise das Problem zu
beheben.
SchlechterTon
Überprüfen, ob die Tonwiedergabe
korrekt eingestellt ist. Konsultieren
Sie die Bedienungsanleitung
hinsichtlich der Einstellung.
Kein Bild auf
manchen
Kanälen
Überprüfen Sie, ob Sie das korrekte
Programm ausgewählt haben.
Richten Sie dieAntenne neu aus.
Nur Schwarz-
WeißEmpfang
einiger
Kanäle
Überprüfen Sie, ob das Problem
auch auf anderen Kanälen besteht.
Überprüfen Sie die Bild-
und Tonsysteme. Lesen die
entsprechendenAbschnitte
zur Farbeinstellung in
Bedienungsanleitung nach.
Bildstörungen
auf manchen
oder allen
Kanälen
Überprüfen Sie, ob die Antenne
richtig angeschlossen ist.
Überprüfen Sie den Zustand der
Antenne.
Nehmen Sie eine Feineinstellung
des Kanals.
TV-Gerät
funktioniert
nicht
Trennen Sie das TV-Gerätvon
der Stromversorgung. Nach
10 Sekunden TV-Gerät wieder
anschließen. Besteht das Problem
unverändert weiter, wenden
Sie sich bitte an autorisiertes
Kundendienstpersonal, um
technische Unterstützung zu
erhalten.
Hinweis
Kann der Fehler nicht anhand der obigen Hinweise Q
behoben werden, wenden Sie sich an autorisiertes
Kundendienstpersonal.
Das TV-Gerät darf nur von einem qualifizierten Q
Kundendienstmitarbeiter repariert werden.
Versuchen Sie keinesfalls, die Geräterückseite zu
önen, da das TV-Gerät unter Hochspannung
stehende Bauteile enthält, die tödliche
Verletzungen oder Brände verursachen können.

Referenzteil
Digital LCD / LED LCD Television bedienung sanleitung DE-36
v
&ERNBEDIENUNG!!!"ATTERIEN"EDIENUNGSANLEITUNG'ARANTIE&ERNSEHGERÊTSOCKEL
3CHRAUBENFàRDEN&ERNSEHGERÊTSOCKELNURFàRDAS:OLL-ODELL
+OMPONENTENADAPTER+OMPONENTEN!UDIOADAPTER3#!24!DAPTERNURFàRDAS
:OLL-ODELL
'EHÊUSEKNOPFNURFàRDAS:OLL-ODELL
3W+3W
8W+8W
Spezifikationen
Die Spezifikationen des von Ihnen erworbenen Fernsehgeräts können u. U. aufgrund technischer
Neuerungen von den in der folgenden Tabelle enthaltenen Angaben abweichen.
Modell
Bild-, Klangsystem
Audioausgang
Externer
Eingangsanschluss
Stromanforderungen
Stromverbrauch
Temperatur
Feuchtigkeit
Zubehörteile
Betrieb: 20 %~80 %
Lagerung: 5 %~90 %
Betrieb: 5 °C ~35 °C
Lagerung: -15 °C~45 °C
L’
Siehe Leistungsschild
Siehe Leistungsschild
KOMPONENTEN-Eingang, PC-Eingang, PC Audio eingang,
SCART-Antenneneingang, HDMI-Eingang, AV (Nur für das 19”/ 22”/24” Zoll große
LED-LCD-Modell),USB, S-VIDEO-Eingang (Nur für die LCD-Modelle)
24” 32”

IT-1 HD Ready Digital LCD / LED LCD TV /DVD Combi USER'S MANUAL
Sommario
Sommario
Avvertenze di sicurezza 2
INTRODUZIONE....................................................2
INFORMAZIONI IMPORTANTI .............................2
Informazioni sul televisore con
schermo LCD / LED LCD 5
Installazione del cavalletto.................................5
DESCRIZIONE DEL TELEVISORE...........................7
DESCRIZIONE DEL TELECOMANDO ..................11
COLLEGAMENTO DEL TELEVISORE...................12
COLLEGAMENTO DELL'ANTENNA................................. 12
MIGLIORAMENTO DEL SEGNALE.................................. 12
COLLEGAMENTO DEL PC AL TELEVISORE.................. 12
COLLEGAMENTO DI UN LETTORE DVD AL
TELEVISORE .......................................................................... 12
COLLEGAMENTO DI UN LETTORE DVD O DI UN
VIDEOREGISTRATORE AL TELEVISORE......................... 12
Opzione di collegamento 1............................................ 12
Opzione di collegamento 2............................................ 12
INGRESSO SCART................................................................ 13
INGRESSO HDMI ................................................................. 13
MONTAGGIO A PARETE DEL TELEVISORE................... 13
PREPARAZIONE DEL TELECOMANDO...............13
INSTALLAZIONE DELLE BATTERIE................................. 13
AVVERTENZE SULL'USO DELLE BATTERIE................... 13
Operazioni preliminari......................................13
Preparazione......................................................13
UBICAZIONE......................................................................... 13
COLLEGAMENTO ................................................................ 14
ACCENSIONE DEL TELEVISORE ...................................... 14
SINTONIZZAZIONE DEL TELEVISORE ...............14
PASSAGGIO A UNA SORGENTE DI SEGNALE ESTERNA
DIVERSA DALL'ANTENNA................................................. 14
RICERCA AUTOMATICA..................................................... 14
RICERCA MANUALE DIGITALE........................................ 15
Ricerca Manuale Analogica............................................. 15
Channel Edit (Modifica canale) .........................................16
RENAME (Rinomina).......................................................... 16
MOVE (Sposta)..................................................................... 16
Impostazione dei canali preferiti.................................. 16
SKIP (Salto dei canali indesiderati)............................... 16
GUIDE (Guida elettronica)............................................... 16
COMMON INTERFACE (CI)..................................17
Funzione di aggiornamento del software................. 18
Esecuzione dell'aggiornamento................................... 18
USO DEL TELEVISORE ........................................18
Selezione del programma desiderato ........................ 18
Regolazione del volume.................................................. 19
Funzione CH.LIST................................................................ 19
REGOLAZIONE DELL'IMMAGINE .......................19
Modifica delle impostazioni dell'immagine ............. 19
REGOLAZIONE DELL'AUDIO ..............................20
Modifica delle impostazioni audio .............................. 20
IMPOSTAZIONE DELLE FUNZIONI.....................21
IMPOSTAZIONE DELLA DATA E DELL'ORA........22
IMPOSTAZIONI DEL MENU LOCK ......................23
VISUALIZZAZIONE DEL MENU SHORTCUT.......25
Utilizzo delle funzioni 26
Funzione teletext 26
Teletext................................................................................... 26
MODALITÀ USB ..................................................28
UTILIZZO DI UN DISPOSITIVO USB............................... 28
Collegamento/rimozione di un dispositivo USB..... 28
Utilizzo di un dispositivo USB........................................ 29
Riproduzione di un'immagine....................................... 29
Riproduzione di brani musicali...................................... 29
Riproduzione di un filmato............................................. 30
Testo........................................................................................ 30
Registrazione su un disco USB esterno............30
Funzione TIME SHIFT (Registrazione dierita)......... 31
REGISTRAZIONE.................................................................. 32
UTILIZZO DI UN LETTORE DVD
(solo alcuni
modelli) ..............................................................32
FUNZIONI DVD AGGIUNTIVE ............................33
Sezioni di riferimento 35
RISOLUZIONE DEI PROBLEMI............................35
Specifiche...........................................................36

HD Ready Digital LCD / LED LCD TV/DVD Combi USER'S MANUAL IT-2
Avvertenze di sicurezza
Avvertenze di sicurezza
BENVENUTI
Vi ringraziamo per avere acquistato questo apparecchio televisivo Digitale LCD/LED LCD TV HD Ready da
19/22/24/32/40 pollici. Questo manuale vi aiuterà a installare e a mettere in funzione il vostro televisore.
Innanzitutto, assicuratevi che la confezione contenga le parti elencate sotto:
t57%JHJUBMF-$%-&%-$%)%3FBEZQPMMJDJ
t5FMFDPNBOEP
t#BUUFSJB"""¨
t.BOVBMFEhVTP
t(BSBO[JB
t$BWBMMFUUP57
t9#VMMPOJQFSDBWBMMFUUP57TPMPQFSNPEFMMPQPMMJDJ
t"EBUUBUPSFDPNQPOFOUBEBUUBUPSFBVEJP$PNQPOFOUBEBUUBUPSF4$"35TPMPQFSNPEFMMJEBQPMMJDJ
t$PWFSCPUUPNTPMPQFSNPEFMMJEBQPMMJDJ
INFORMAZIONI IMPORTANTI
AVVERTENZA
*Se necessario, contattare il servizio clienti post-vendita autorizzato.
*Il simbolo del fulmine racchiuso in un triangolo indica una situazione potenzialmente
pericolosa che, se non evitata, può causare lesioni gravi dovute a tensioni elevate.
*Il simbolo del punto esclamativo racchiuso in un triangolo indica un importante componente
o accessorio di cui è necessario rispettare le specifiche in caso di sostituzione.
AVVERTENZA
RISCHIO DI SCOSSA ELETTRICA.
NON APRIRE
PER RIDURRE IL PERICOLO DI SCOSSE ELETTRICHE, NON RIMUOVERE IL PANNELLO
POSTERIORE. ALL'INTERNO DELL'APPARECCHIO NON SONO PRESENTI PARTI
RIPARABILI DALL'UTILIZZATORE. RIVOLGERSI A PERSONALE QUALIFICATO PER
QUALSIASI OPERAZIONE DI RIPARAZIONE.
*Per evitare il rischio di scosse elettriche, si raccomanda di non
aprire il pannello posteriore,
poiché all'interno dell'apparecchio non vi sono accessori.
Avvertenza: Per evitare il pericolo di incendio o di scosse elettriche, non posizionare mai il televisore
in ambienti in cui è presente un elevato tasso di umidità. Prestare la massima attenzione a
evitare graffi o urti accidentali sullo schermo.
Attenzione: SPrima di iniziare a utilizzare il televisore, leggere attentamente questo manuale e tenerlo
a portata di mano per eventuali consultazioni future.
SPer ottenere il funzionamento ottimale dell'apparecchio, leggere attentamente questo
manuale utente e conservarlo con cura per eventuali consultazioni future.
SLe immagini di schermate e le figure contenute nel manuale utente possono variare in
seguito a miglioramenti tecnici.
Attenzione: SÈ espressamente proibito lo smontaggio dell'apparecchio da parte di persone non
autorizzate.

IT-3 HD Ready Digital LCD / LED LCD TV/DVD Combi USER'S MANUAL
Avvertenze di sicurezza

HD Ready Digital LCD / LED LCD TV/DVD Combi USER'S MANUAL IT-4
Avvertenze di sicurezza

IT-5 HD Ready Digital LCD / LED LCD TV/DVD Combi USER'S MANUAL
Informazioni sul televisore con schermo LCD / LED LCD
1. Togliere l'elemento di ssaggio dalla base del cavalletto.
2. Allineare la colonna con la base del cavalletto.
4. Mettere l'elemento di ssaggio nella base, aiutandosi eventualmente con un cacciavite
3. Spingere il televisore LCD sulla base. Ruotare l'apparato di circa 15 gradi nel senso della freccia sulla base del
cavalletto.
Informazioni sul televisore con schermo LCD/
LED LCD
Installazione del cavalletto
Solo modello LCD LED 19/22/24 pollici

HD Ready Digital LCD / LED LCD TV/DVD Combi USER'S MANUAL IT-6
Informazioni sul televisore con schermo LCD /LED LCD
Installazione del cavalletto
Solo modello LCD LED 32/40 pollici
1.
2. Posizionare il cavalletto rispetto alla base della TV per come mostrato sotto.
4.Fissare il bullone dalla base del cavalletto al televisore.
3.Spingere il cavalletto inserendolo nel televisore.
Disporre con attenzione lo schermo TV con la parte frontale rivolta verso il basso
s
tavolo. Vi suggeriamo di porre il materiale di imballaggio del televisore sul tavolo p
proteggere lo schermo da eventuali danni.

IT-7 HD Ready Digital LCD / LED LCD TV/DVD Combi USER'S MANUAL
Informazioni sul televisore con schermo LCD / LED LCD
DESCRIZIONE DEL TELEVISORE
Pannello di controllo anteriore
Solo modello LCD 19/22 pollici
108&3
'0/5&
3JDIJBNBJMNFOV'POUFEJ*OHSFTTP5BTUPEJ
DPOGFSNBRVBOEPDJTJUSPWBOFMNFOVGVO[JPOBNFOUP
.&/6
1SFNFSFQFSTFMF[JPOBSFJMNFOVQSJODJQBMF
70-
1SFNFSFQFSBVNFOUBSFPEJNJOVJSFJMWPMVNF
$)
1SFNFSFQFSDBNCJBSFDBOBMF
*OEJDBUPSFEJ
BDDFOTJPOF
4FOTPSF
UFMFDPNBOEP
POWER
1SFNFSFQFSBDDFOEFSFFTQFHOFSFJMUFMFWJTPSF

HD Ready Digital LCD / LED LCD TV/DVD Combi USER'S MANUAL IT-8
Informazioni sul televisore con schermo LCD /LED LCD
Pannello collegamenti posteriore
Collegare all'uscita HDMI dell'altro dispositivo
Collegare un dispositivo video/audio component
a questi connettori
Ingresso audio component/S-Video
Collegare al connettore di uscita analogica VGA
15PIN della scheda display del PC per il display
del PC
Collegare al connettore di uscita audio del PC
Collegare i segnali cavo o antenna alla TV,
direttamente o dal decoder
1MFBTFSFGFSUPBDUVBMQSPEVDUPGUIF%7%TMPUBOE
CVUUPOT
+VTUUBLFPOF57XJUI%7%GPSFYBNQMFQMFBTFTFF
UIFSFBM

IT-9 HD Ready Digital LCD / LED LCD TV/DVD Combi USER'S MANUAL
Informazioni sul televisore con schermo LCD / LED LCD
6
7
1
2
4
3
5
Content Si
d
e
Facing T
owar
ds
You
SOURCE
MENU
VOL+
VOL-
CH+
CH
-
STOP
PLAY/PAUSE OPEN/CLOSE
PREV NEXT
DC IN
USB
DIGITALVOUT
(COAXIAL)
HDMI IN
COMPON
E
NT
IN
AV IN
Y Pb Pr
VIDEO L-AUDIO-R
L-AUDIO-R
PC/DVI AUDIO IN
PC IN
SCART
1
2 3
4
5
6
7
89
10
11
ANT IN
1
SOURCE
Commuta tra tutte le fonti di ingresso
disponibili
2
MENU
Premere per visualizzare sullo schermo il menu
delle caratteristiche del televisore
3
VOL-/+
Premere per aumentare o diminuire il volume
4
CH-/+
Premere per cambiare canale.
5
POWER Premere oer accendere e spegnere il televisore.
6
Indicatore di
accensione
7
Sensore
telecomando
Solo modello LCD LED 19/22/24 pollici
1
DC IN ingresso
2
EARPHONE
uscita
3
USB
ingresso
4
Digital output ingresso
5
HDMI IN
ingresso
6
PC IN ingresso
7
PC/DVI AUDIO IN
ingresso
8
TV SCART ingresso/
uscita
9
COMPONENT
AUDIO
ingresso
>
AV IN ingresso
A
COMPONENT IN
ingresso
(Just take one TV with DVD for
example, please see the real)

HD Ready Digital LCD / LED LCD TV/DVD Combi USER'S MANUAL IT-10
Informazioni sul televisore con schermo LCD /LED LCD
LOV
HC
UNEM
ECRUOS
HDMI 1 IN
USB
DIGITAL AUDIO OUT
(OPTICAL )
ANT IN
2 INIMDH
NITNENOPMOC
CP
Y P
b
P
r
L
OIDUA
R
NICP
3 INIMDHTRACS
PC/DVI AUDIO
1
SCART
ingresso
2
Component
ingresso
3
Component Audio
ingressot
4
PC
ingresso
5
PC/DVI AUDIO
ingresso
6
HDMI3 IN
ingresso
7
HDMI2 IN
ingresso
8
Common Interface
9
Earphone
0
ANTENNA
ingresso
A
Optical
uscita
B
USB
C
HDMI1 IN
ingresso
1
SOURCE
Input Source /Tasto di conferma quando si
gestisce il menu.
2
MENU Premere per selezionare il menu principale.
3
VOL-/+
Premere per aumentare o diminuire il volume.
4
CH-/+
Premere per cambiare canale.
5
POWER Premere oer accendere e spegnere il televisore.
Solo modello LCD LED 32/40 pollici

IT-11 HD Ready Digital LCD / LED LCD TV/DVD Combi USER'S MANUAL
Informazioni sul televisore con schermo LCD / LED LCD
DESCRIZIONE DEL TELECOMANDO
Per utilizzare il telecomando, puntarlo in direzione del sensore sul televisore.
Nota
Durante la visualizzazione del segnale Q
analogico, i tasti ROSSO, VERDE, BLU
e GIALLO permettono di muoversi
tramite la funzione Fast Text (testo
rapido); in modalità DVBT questi tasti
agiscono da tasti funzione.
1
POWER
2
Menu DVD/REC (registrazione)
3
Apertura/chiusura DVD
4
Modalità immagine
5
Modalità audio
6
Visualizzazione schermo informazioni
7
Spegnimento temporizzato
8
Audio DTV/NICAM/Audio DVD
9
Controllo formato immagine
0
Elenco canali
A
Sottotitoli
B
Selezione canali per numero programma
C
Cambio sorgente immagine
D
Cambio rapido canale
E
V+/V-: regolazione volume
F
P+/P-: selezione canale
G
Esclusione audio
H
Accesso al menu
I
Guida (solo per DTV)
J
Elenco canali preferiti
K
Tasto di conferma
L
Spostamento cursore
M
Indietro (solo USB)
N
Uscita visualizzazione su schermo
O
Ripetizione (solo DVD, USB, REC e Time Shift)/Annullamento
P
Zoom (solo DVD e USB)/Indice teletext (solo TV)/Indice programmi registrati
Q
Riproduzione/Pausa (solo DVD e USB)/Time Shift
R
Arresto (solo DVD, USB, REC e Time Shift)
S
Indietro veloce (solo DVD, USB, REC e Time Shift)
T
Avanti veloce (solo DVD, USB, REC e Time Shift)
U
Elemento precedente (solo DVD, USB, REC e Time Shift)
V
Elemento successivo (solo DVD, USB, REC e Time Shift)
W
Impostazione DVD/Testo
X
Titolo DVD/Mix teletext
Y
Ricerca DVD/Sottocodice teletext
Z
DVD 10+/Pausa teletext
[
Programma DVD/Rivela teletext
\
Ripetizione A-B DVD/Dimensioni teletext
]
Richiamo DVD/Modalità teletext
`
Angolo DVD/Ora teletext

HD Ready Digital LCD / LED LCD TV/DVD Combi USER'S MANUAL IT-12
Informazioni sul televisore con schermo LCD /LED LCD
COLLEGAMENTO DEL
TELEVISORE
COLLEGAMENTO DELL'ANTENNA
Collegare il cavo dell'antenna alla presa ANTENNA IN
posta sul lato dell'apparecchio.
MIGLIORAMENTO DEL SEGNALE
Per migliorare la qualità dell'immagine in zone in cui il
segnale è scarso, è possibile utilizzare un amplificatore di
segnale (non fornito).
COLLEGAMENTO DEL PC AL
TELEVISORE
Se collegato tramite un cavo VGA (non fornito), il
televisore può essere utilizzato come monitor per un
personal computer.
Per procedere al collegamento, consultare il
A
manuale utente del computer e verificare se è
dotato di un connettore VGA.
Spegnere e scollegare televisore e computer dalla
B
presa di corrente.
Collegare un cavo di interfaccia VGA tipo D a 15 pin
C
al connettore di interfaccia video VGA del computer.
Collegare l'altra estremità del cavo al connettore
dell'interfaccia per computer del televisore. Serrare
le viti sui connettori VGA e collegare il cavo audio
(non fornito) alla presa di ingresso audio sul lato
posteriore del televisore.
Ricollegare gli apparecchi alla presa di corrente
D
iniziando dal televisore.
Sul televisore o sul telecomando, premere il tasto
E
per impostare la modalità di ingresso video VGA.
Una volta visualizzata l'immagine, in caso di presenza F
di rumori cambiare la modalità VGA passando a
un'altra risoluzione, modi
fi
care la frequenza di
aggiornamento o regolare luminosità e contrasto da
menu
fi
no a ottenere un'immagine chiara.
COLLEGAMENTO DI UN LETTORE
DVD AL TELEVISORE
Collegare le uscite video DVD (Y, Pb, Pr) alla presa
COMPONENT (Y, Pb, Pr) IN del televisore.
Accendere il lettore DVD e inserire un DVD.
A
Premere il tasto di selezione della sorgente del segnale.B
Per informazioni sul funzionamento, consultare la guida C
utente del lettore DVD.
COLLEGAMENTO DI UN LETTORE
DVD O DI UN VIDEOREGISTRATORE
AL TELEVISORE
Per collegare un lettore DVD o un videoregistratore al
televisore, è possibile procedere in due modi dierenti.
Prima di procedere, assicurarsi che entrambi i dispositivi
siano spenti.
Opzione di collegamento 1
$PMMFHBSFJDBWJBVEJPF47*%&0QSPWFOJFOUJA
dalle uscite del videoregistratore agli ingressi del
televisore.
Inserire una videocassetta nel videoregistratore e
B
premere il tasto PLAY per avviare la riproduzione.
Accendere per primo il televisore, quindi il
C
videoregistratore.
Premere il tasto di selezione della sorgente del
D
segnale sul televisore per impostare la modalità di
JOHSFTTPWJEFPTV47*%&0
Opzione di collegamento 2
Collegare le uscite AV di un dispositivo DVD/VCR alla A
presa AV IN del televisore.

IT-13 HD Ready Digital LCD / LED LCD TV/DVD Combi USER'S MANUAL
Informazioni sul televisore con schermo LCD / Operazioni preliminari
Premere il tasto di selezione della sorgente del B
segnale sul televisore per impostare modalità di
ingresso video su AV.
INGRESSO SCART
Collegare il cavo SCART proveniente dal dispositivo A
FTUFSOPMFUUPSF%7%TFUUPQCPYPDPOTPMFQFS
video giochi) alla presa scart del televisore.
Premere il tasto
B SOURCE di selezione della sorgente
del segnale per selezionare la modalità SCART.
Premere il tasto
C PLAY sul dispositivo esterno.
INGRESSO HDMI
Collegare il cavo proveniente dal dispositivo HDMI A
alla presa HDMI del televisore.
Premere il tasto
B SOURCE di selezione della sorgente
del segnale per selezionare la modalità HDMI.
Per informazioni sul funzionamento, consultare il
C
manuale utente fornito con il dispositivo HDMI.
MONTAGGIO A PARETE DEL
TELEVISORE
Il televisore può essere montato a parete utilizzando
l'apposita staa (non fornita). Per fissare il televisore alla
staa, utilizzare viti M4/M6 (4 pezzi, non fornite).
PREPARAZIONE DEL
TELECOMANDO
INSTALLAZIONE DELLE BATTERIE
Appoggiare il telecomando sul tavolo con i tasti A
rivolti in basso e aprire il coperchio del vano batterie.
Inserire due batterie di tipo AAA. Fare attenzione che B
i simboli + e – sulle batterie corrispondano a quelli
presenti sul telecomando.
Chiudere il coperchio del vano batterie.C
AVVERTENZE SULL'USO DELLE
BATTERIE
Verificare che non vi siano oggetti tra il telecomando e il
sensore posto sul televisore.
La luce solare o altre forti fonti luminose possono
disturbare il segnale del telecomando interferendo con
il funzionamento. In questa situazione, è consigliabile
girare il televisore in modo da evitare l'esposizione alla
luce diretta.
Non lasciare il telecomando in prossimità di fonti
di calore diretto o in luoghi umidi, poiché ciò può
danneggiarlo.
Utilizzare due batterie formato AAA da 1,5 V. Non
utilizzare batterie di tipi dierenti. Installare le batterie
rispettandone la polarità. Non utilizzare batterie
ricaricabili. Se si prevede di non utilizzare il televisore
per lunghi periodi di tempo, rimuovere le batterie dal
telecomando.
Operazioni preliminari
Preparazione
UBICAZIONE
Il televisore deve essere posizionato in prossimità di una
presa di corrente, in modo che il cavo di alimentazione
possa raggiungerla facilmente, e in un luogo in cui

HD Ready Digital LCD / LED LCD TV/DVD Combi USER'S MANUAL IT-14
Operazioni preliminari
è disponibile una presa o un cavo di prolunga per
l'antenna.
COLLEGAMENTO
Inserire il cavo dell'antenna TV nella presa Antenna A
posta sul pannello laterale del televisore.
Inserire le batterie nel telecomando. Veri
B ficare che
siano inserite correttamente rispettando le polarità
indicate all'interno dell'apposito vano.
ACCENSIONE DEL TELEVISORE
Premere una volta il tasto A POWER sul lato destro del
televisore. Nell'angolo dello schermo apparirà una
luce rossa lampeggiante.
Premere il tasto
B POWER sul telecomando. Il
televisore si accende e la luce lampeggiante rossa
diventa di colore blu. Questa operazione può
richiedere alcuni secondi.
Alla richiesta, selezionare la lingua desiderata
C
dall'elenco che appare sullo schermo. Premere il
tasto per scorrere l'elenco delle lingue disponibili,
quindi premere OK per confermare.
SINTONIZZAZIONE DEL
TELEVISORE
PASSAGGIO A UNA SORGENTE
DI SEGNALE ESTERNA DIVERSA
DALL'ANTENNA
Se al televisore è collegato un lettore DVD o un altro
dispositivo esterno simile, è possibile fare in modo che
il televisore visualizzi il segnale proveniente da tale
apparecchio. Per procedere, premere il tasto SOURCE
(selezione della sorgente del segnale) per visualizzare
il menu delle sorgenti video nell'angolo sinistro dello
schermo, quindi premere i tasti o per evidenziare la
sorgente desiderata e premere OK per selezionarla.
Per informazioni dettagliate su come collegare
dispositivi esterni al televisore, vedere DESCRIZIONE DEL
TELEVISORE a pagina 5.
RICERCA AUTOMATICA
Premere il tasto A MENU.
Premere i tasti B o per selezionare il menu Tuning
(Sintonia), quindi premere il tasto per accedervi.
Premere i tasti C o per selezionare Country (Paese).
Premere i tasti o per selezionare il paese
desiderato.
Premere i tasti
D o per selezionare Auto Search
(Ricerca automatica), quindi premere il tasto OK per
accedervi.
Premere i tasti o per selezionare l'opzione OK,
quindi premere il tasto OK per avviare la ricerca.
Premere il tasto MENU, sarà possibile scegliere se si
desidera eseguire o saltare la ricerca TV/DTV.
Se necessario, la ricerca automatica può essere E
interrotta premendo il tasto EXIT.
Nota
Il completamento dell'operazione di ricerca Q
automatica può richiedere alcuni minuti.

IT-15 HD Ready Digital LCD / LED LCD TV/DVD Combi USER'S MANUAL
Operazioni preliminari
RICERCA MANUALE DIGITALE
Premere il tasto A MENU.
Premere i tasti B o per selezionare il menu Tuning
(Sintonia), quindi premere il tasto per accedervi.
Premere i tasti
C o per selezionare Digital Manual
Search (Ricerca manuale digitale), quindi premere il
tasto per accedervi.
Premere i tasti D o per selezionare il canale.
Premere il tasto OK per avviare la ricerca.
Una volta trovato il canale desiderato, premere il
E
tasto OK per memorizzarlo.
Premere il tasto EXIT per uscire.
Ricerca Manuale Analogica
La procedura che segue illustra come procedere per
eseguire una ricerca manuale.
Premere il tasto
A MENU.
Premere i tasti B o per selezionare il menu Tuning
(Sintonia), quindi premere il tasto per accedervi.
Premere i tasti
C o per selezionare Analog Manual
Search (Ricerca manuale analogica), quindi premere
il tasto per accedervi.
Premere i tasti
D o per selezionare Search
(Ricerca), quindi premere il tasto per selezionare i
canali sulle frequenze superiori.
Premere il tasto per selezionare i canali sulle
frequenze inferiori.
Al termine, selezionare Storage To (Memorizzazione
E
in) e premere i tasti o per selezionare il numero
della posizione in cui si desidera memorizzare il
canale. Una volta localizzato il canale desiderato,
premere il tasto rosso per memorizzarlo. Premere il
tasto EXIT per uscire.
Sound System (Sistema audio)V
Premere i tasti o per selezionare Sound System
(Sistema audio), quindi premere i tasti o per
selezionare il sistema audio corretto.
Current CH (Canale attuale)V
Premere i tasti o per selezionare il numero del
canale da modificare.
Storage To (Memorizzazione in)V
Premere i tasti o per selezionare il numero del
programma in cui si desidera memorizzare il canale
sintonizzato.

HD Ready Digital LCD / LED LCD TV/DVD Combi USER'S MANUAL IT-16
Operazioni preliminari
Fine tune (Sintonia fine)V
Se l'immagine o l'audio sono di scarsa qualità, è
possibile provare a migliorarle mediante la funzione
FINE TUNE. Non utilizzare questa funzione in presenza
di immagini o audio di buona qualità.
Ripetere i precedenti punti da
A A a C, quindi
premere i tasti o per selezionare Fine Tune.
Premere ripetutamente i tasti
B o per eseguire
la sintonizzazione fino a ottenere immagini e
audio di buona qualità.
Channel Edit (Modifica canale)
Questa funzione consente di rinominare e spostare i
canali, di impostare i canali preferiti e di saltare quelli
indesiderati in modalità analogica.
Premere il tasto
A MENU.
Premere i tastiB o per selezionare il menu
TUNING (Sintonia), quindi premere il tasto per
accedervi.
Premere i tasti
C o per selezionare CHANNEL EDIT
(Modifica canale), quindi premere il tasto per
accedere al sottomenu. Premere i tasti rosso, verde,
giallo o blu per accedere al menu desiderato.
RENAME (Rinomina)
Premere i tastiA o per selezionare il canale, quindi
premere il tasto verde per rinominarlo.
Premere i tastiB o per selezionare il numero della
posizione del nome di canale, quindi premere i tasti
o per selezionare il numero desiderato.
Se necessario, premere il tasto
C EXIT in qualsiasi
momento per annullare le modifiche.
Nota
La funzione RENAME è disponibile solo nel Q
programma ATV.
MOVE (Sposta)
Premere i tastiA o per selezionare il canale, quindi
premere il tasto giallo per selezionare la posizione.
Premere i tasti
B o per selezionare il numero della
posizione in cui spostarlo, quindi premere il tasto
giallo per confermare l'operazione.
Se necessario, premere il tasto
C EXIT in qualsiasi
momento per annullare le modifiche.
Impostazione dei canali preferiti
Premere i tastiA o per selezionare il canale, quindi
premere il tasto rosso per impostarlo come preferito.
Se necessario, premere il tasto rosso in qualsiasi
B
momento per annullare le modifiche.
Premere il tasto
C FAV sul telecomando per
visualizzare la schermata Favourite List (Elenco
canali preferiti).
Premere i tasti
D o per selezionare il canale, quindi
premere il tasto OK per accedervi.
SKIP (Salto dei canali indesiderati)
Premere i tastiA o per selezionare il canale, quindi
premere il tasto blu per saltare il canale corrente.
Se necessario, premere il tasto blu in qualsiasi
B
momento per annullare le modifiche.
GUIDE (Guida elettronica)
Questa funzione consente di accedere alle informazioni
del programma DTV:

IT-17 HD Ready Digital LCD / LED LCD TV/DVD Combi USER'S MANUAL
Operazioni preliminari
Premere il tasto
A MENU.
Premere i tastiB o per selezionare il menu
TUNING (Sintonia), quindi premere il tasto per
accedervi.
Premere i tasti
C o per selezionare Guide (Guida).
Premere il tasto OK per accedere al sottomenu; sullo
schermo appare la guida alla programmazione. Il
menu Guide può essere richiamato rapidamente
premendo il tasto GUIDE sul telecomando.
Nota
Solo modalità DTV.Q
COMMON INTERFACE (CI)
Lo slot Common Interface (CI, interfaccia comune) è
progettato per accogliere il modulo Conditional Access
(CA, accesso condizionale) e le smart card e consentire
così di vedere programmi a pagamento e di usufruire
di altri servizi interattivi. Per ulteriori informazioni sui
moduli e gli abbonamenti, contattare il fornitore di
servizi CI. Haier non fornisce i moduli CA e le smart card,
né di serie né come opzioni.
Attenzione
Spegnere il televisore prima di procedere t
all'inserimento di un modulo nello slot Common
Interface.
Inserire prima il modulo e quindi la smart card nello A
slot CI situato sul lato del televisore.
CI Slot
CAM
Smart Card
Accendere il televisore; se il modulo CA viene B
rilevato correttamente, sullo schermo appare il
messaggio mostrato di seguito. Attendere alcuni
secondi per l'attivazione della scheda.
Premere il tasto
C MENU per visualizzare il menu
principale, quindi premere i tasti o per
selezionare la riga relativa alla Common Interface
e premere il tasto OK.
Sullo schermo vengono visualizzate informazioni
D
dettagliate sulla scheda CI inserita.
Premere il tasto E OK per accedere al menu Card
(Scheda). Per informazioni sulla procedura di
configurazione, consultare il manuale di istruzioni
fornito con la scheda.
Quando il modulo viene rimosso dallo slot, sullo
F
schermo appare il seguente messaggio.

HD Ready Digital LCD / LED LCD TV/DVD Combi USER'S MANUAL IT-18
Operazioni preliminari
Funzione di aggiornamento del
software
Quando si riceve la comunicazione della t
disponibilità di un aggiornamento, è possibile
procedere alla sua installazione aggiornando il
software operativo tramite il menu Download. I dati
relativi a più unità vengono trasferiti su uno speciale
canale dedicato a questo scopo.
Per procedere è necessario cercare il canale su cui t
viene trasmesso il codice dell'aggiornamento.
Nota
LQ e informazioni relative agli aggiornamenti sono
disponibili presso il proprio rivenditore o su Internet.
Esecuzione dell'aggiornamento
Premere il tasto A MENU.
Premere i tastiB o per selezionare il menu
TUNING (Sintonia), quindi premere il tasto per
accedervi.
Premere i tasti
C o per selezionare Software
Upgrade (Aggiornamento software).
Premere i tasti
D o per impostarlo su On.
L'impostazione predefinita è O.
Iniziare Aggiornamento (la impostazione iniziale è in E
colore grigio e non pùò essere selezionata).
13%
Press EXIT to cancel download
Premere i tasti F o per selezionare l'opzione di
aggiornamento del sistema, quindi premere il tasto
OK per confermare. Il televisore si riavvia e inizia la
ricerca delle informazioni di aggiornamento.
Nota
Se le informazioni sono disponibili, il televisore Q
inizia automaticamente la procedura di
aggiornamento. In caso contrario, il televisore
torna alla sorgente DTV.
Caricare la identicazione del ricevitore. Questo
G
processo potrebbe richiedere alcuniminuti, avete la
possibilità di premere il pulsante “Exit” per cancellare
l’operazione e la televisione tornerà alla sorgente
DTV.
100%
13%
Press EXIT to cancel download
Up dating in progress - Do not turn off the TV
Al termine del download, il televisore passa allo H
stato di aggiornamento indicato dalla spia luminosa
accesa. Sullo schermo appare il quarto menu a
destra.
Al termine dell' tornerà alla sorgente DTV, l'apparecchio
torna alla modalità standby.
USO DEL TELEVISORE
Selezione del programma desiderato

IT-19 HD Ready Digital LCD / LED LCD TV/DVD Combi USER'S MANUAL
Operazioni preliminari
Con il numero del programma: selezionare il numero A
del canale desiderato premendo i tasti numerici sul
telecomando.
Con i tasti
B P+/P-.
Premere i tasti P+ o P- per selezionare il numero del
canale desiderato.
Regolazione del volume
Per regolare il volume, premere i tasti V+ o V- sul
telecomando o sul lato del televisore.
Funzione CH.LIST
Premere il tasto CH.LIST sul telecomando per
visualizzare il menu Channel List (Elenco canali), quindi
premere il tasto per accedervi. Premere i tasti o
per selezionare il canale, quindi premere il tasto OK per
accedervi.
REGOLAZIONE
DELL'IMMAGINE
Modifica delle impostazioni
dell'immagine
Premere il tasto A MENU.
Premere i tastiB o per selezionare il menu Picture
(Immagine), quindi premere il tasto per accedervi.
Premere i tastiC o per selezionare il parametro
che si desidera regolare.
Premere i tasti
D o per regolare il parametro
selezionato.
Una volta ottenuta una regolazione soddisfacente,
E
premere il tasto EXIT per tornare alla normale
visione, oppure il tasto MENU per tornare al menu
precedente.
Contrast (Contrasto)V
Consente di regolare l'intensità delle parti più
luminose dell'immagine, mantenendo invariate le
parti più scure.
Brightness (Luminosità)V
Consente di regolare la luminosità dell'intera
immagine, con eetto principalmente sulle sue
parti più scure.
Colour (Colore)V
Consente di impostare il livello di saturazione dei
colori per adattarli alle preferenze personali.
Sharpness (Nitidezza)V
Consente di impostare il livello di nitidezza dei
dettagli dell'immagine.
Tint (Tonalità)V
Consente di scegliere il mix di colori (tonalità)
dell'immagine.
Nota
LQ a funzione Tint è disponibile solo in modalità
NTSC.
Mode (Modalità)V
Consente di selezionare la modalità dell'immagine. A
seconda del programma, le opzioni disponibili sono
Standard/Mild/User/Vivid (Standard/Delicata/
Utente/Intensa). La modalità desiderata può essere
selezionata rapidamente premendo il tasto P.MODE
sul telecomando.
Colour temperature (Temperatura colore)V
Consente di aumentare o diminuire i colori caldi
(rosso) e freddi (blu) per adattarli alle proprie
preferenze.
Selezionare Cool (Freddo) per dare ai colori una
tonalità tendente al blu, Normal (Normale) per
ottenere una tonalità neutra, o Warm (Caldo) per
selezionare una tonalità tendente al rosso.
Noise Reduction (Riduzione rumore)V
Filtra e riduce automaticamente il rumore
dell'immagine e ne migliora la qualità in caso di
ricezione di segnali video di intensità insufficiente.
A seconda del livello di rumore presente
nell'immagine, selezionare O/Low/Standard/High
(O/Basso/Standard/Alto).

HD Ready Digital LCD / LED LCD TV/DVD Combi USER'S MANUAL IT-20
Operazioni preliminari
Reset (Ripristina)V
Consente di ripristinare le impostazioni predefinite.
REGOLAZIONE DELL'AUDIO
Modifica delle impostazioni audio
Premere il tasto A MENU.
PrB
e
mere i tasti oper selezionare il menu Sound
(Audio), quindi premere il tasto per accedervi.
Premere i tastiC
o
per selezionare il parametro che
si desidera regolare.
Premere i tastiD o per regolare il parametro
selezionato.
Una volta ottenuta una regolazione soddisfacente,
E
premere il tasto EXIT per tornare alla normale
visione, oppure il tasto MENU per tornare al menu
precedente.
Balance (Bilanciamento)V
Consente di regolare il volume del segnale emesso
dagli altoparlanti sinistro e destro, in modo
da ottenere la migliore riproduzione possibile
del segnale stereo per la posizione occupata
dall'ascoltatore.
Mode (Modalità)V
Consente di selezionare la modalità audio.
A seconda del programma, le opzioni disponibili sono
Standard/Music/Theater/User (Standard/Musica/
Cinema/Utente). La modalità desiderata può essere
selezionata rapidamente premendo il tasto S.MODE
sul telecomando.
AVL (Automatic Volume Control, Controllo V
automatico volume)
Consente di ridurre le dierenze di livello del volume
tra le diverse stazioni radio.
SRS TS XTV
Consente di controllare il segnale in uscita dal woofer.
Premere i tasti oQFSTFMF[JPOBSF4345495
Premere i tasti o per impostare la funzione SRS TS
95TVOFF o ON.
Uscita Digitale AudioV
Questa funzione permette di controllare il canale di
uscita digitale audio.
Premereo per selezionare il canale audio
Premereoper impostare il canale selezionato su
OFF, PCM, RAW
Equalizer (Equalizzatore)V
Questo parametro può essere regolato in base alle
preferenze personali.
Audio Languages (Lingue audio)V
Premere i tasti o per selezionare Primary/
Secondary (Principale/Secondaria), quindi premere i
tasti o per selezionare le lingue desiderate.
Premere il tasto per selezionare Close (Chiudi),
oppure OK per chiudere.
Nota
LQ a funzione Audio Language è disponibile solo
nella modalità DTV.
Reset (Ripristina)V
Consente di ripristinare le impostazioni predefinite.

IT-21 HD Ready Digital LCD / LED LCD TV/DVD Combi USER'S MANUAL
Operazioni preliminari
IMPOSTAZIONE DELLE
FUNZIONI
Premere il tasto A MENU.
Premere i tastiB o per selezionare il menu Sound
(Audio), quindi premere il tasto per accedervi.
Premere i tastiC o per selezionare il parametro
che si desidera regolare.
Premere i tasti
D o per regolare il parametro
selezionato.
Una volta ottenuta una regolazione soddisfacente,
E
premere il tasto EXIT per tornare alla normale
visione, oppure il tasto MENU per tornare al menu
precedente.
Language (Lingua)V
Consente di selezionare la lingua usata per i menu.
Subtitle Language (Lingua sottotitoli)V
Consente di selezionare la lingua usata per i sottotitoli.
Display Mode (Modalità schermo)V
Consente di impostare le proporzioni dell'immagine.
Premere i tasti o per selezionare le opzioni
4:3/Zoom1/Zoom2/Wide/16:9/Auto. La modalità
desiderata può essere selezionata rapidamente
premendo il tasto SCREEN sul telecomando.
4:3 mode (Modalità 4:3)t
Consente di vedere immagini con un rapporto
originale tra base e altezza di 4:3, con bande di
colore grigio a sinistra e a destra dell'immagine.
16:9 mode (Modalità 16:9)t
Consente di regolare le immagini orizzontalmente
con una proporzione lineare che permette di
riempire l'intero schermo.
Zoom1t
Consente di vedere le immagini senza alcuna
alterazione. Tuttavia, le parti superiore e inferiore
dell'immagine vengono tagliate.
Zoom2t
Consente di visualizzare immagini alterate
estendendole e tagliandole in senso verticale.
L'immagine visualizzata risulta un compromesso
tra alterazione e riempimento dello schermo.
Wide (Largo)t
Consente di regolare l'immagine secondo una
proporzione non lineare che la rende più larga nella
parte superiore e invariata nella parte inferiore.
Blue Screen (Schermo blu)V
Consente di selezionare il colore dello sfondo.
Nota
LQ a funzione Blue Screen è disponibile solo per
la modalità ATV.
Recorder (Registratore)V
Consente di registrare i programmi televisivi DTV.
Per ulteriori informazioni su questa funzione, vedere a
QBHJOB
SCART Input (Ingresso SCART)V
Questa funzione non è abilitata nei 32/40 pollici e non
è disponibile nei modelli 19/22 e 24 pollici.
OSD Time Out (Disattivazione OSD)V
Consente di impostare l'intervallo di tempo per cui
i menu devono rimanere visualizzati sullo schermo.
Premere ripetutamente il tasto per selezionare un
numero predefinito di secondi tra le seguenti opzioni:
O, 10 sec, 15 sec, 30 sec, 45 sec, 60 sec.

HD Ready Digital LCD / LED LCD TV/DVD Combi USER'S MANUAL IT-22
Operazioni preliminari
OSD Transparency (Trasparenza OSD)V
Consente di definire la trasparenza dello sfondo
dell'OSD secondo le seguenti opzioni: O, 25%, 50%,
75%, 100%.
Reset (Ripristina)V
Consente di ripristinare le impostazioni predefinite.
IMPOSTAZIONE DELLA
DATA E DELL'ORA
Clock (Orologio)V
Premere il tasto A MENU.
Premere i tastiB o per selezionare il menu Time
(Ora), quindi premere il tasto per accedervi.
Premere i tastiC o per selezionare Clock
(Orologio), quindi premere il tasto per
immettere il valore desiderato.
Premere i tasti o per selezionare ora o minuto,
premere i tasti o per regolare il valore.
Date (Data)V
Premere il tasto A MENU.
Premere i tasti
B o per selezionare il menu
Time (Ora), quindi premere il tasto per
accedervi.
Premere i tastiC o per selezionare Date (Data),
quindi premere il tasto per immettere il valore
desiderato. Premere i tasti o per selezionare
l'opzione, quindi premere i tasti o per
impostare il valore desiderato.
Nota
NQ ella modalità DTV le informazioni di data e ora
vengono ricevute tramite un segnale; pertanto
le funzioni Clock e Date non possono essere
modificate manualmente. Per modificare l'ora,
spegnere il televisore in modalità ATV, quindi
riaccenderlo.
O Time (Ora di spegnimento)V
Premere il tasto A MENU.
Premere i tasti
B o per selezionare il menu
Time (Ora), quindi premere il tasto per
accedervi.
Premere i tastiC o per selezionare O Time
(Ora di spegnimento), quindi premere il tasto
per immettere il valore desiderato.
Premere i tasti o per selezionare Repeat
(Ripetizione), quindi premere il tasto per
attivare l'opzione.
Premere i tasti o per selezionare ora o
minuto.
Premere i tasti o per impostare il valore
desiderato.
Al raggiungimento dell'ora impostata, il televisore
passa automaticamente alla modalità standby.
On Time (Ora di accensione)V
Premere il tasto A MENU.
Premere i tasti
B o per selezionare il menu Time
(Ora), quindi premere il tasto per accedervi.

IT-23 HD Ready Digital LCD / LED LCD TV/DVD Combi USER'S MANUAL
Operazioni preliminari
Premere i tastiC o per selezionare On Time
(Ora di accensione), quindi premere il tasto per
immettere il valore desiderato.
Premere i tasti o per selezionare l'opzione
Activate (Attiva), quindi premere i tasti per
impostare il valore desiderato.
Premere i tasti o per selezionare ora o minuto
desiderati.
Premere i tasti o per impostare il valore
desiderato.
Il televisore si accende automaticamente al
raggiungimento dell'ora impostata.
Sleep (Spegnimento temporizzato)V
Il timer per lo spegnimento temporizzato consente
di spegnere automaticamente il televisore dopo un
periodo di tempo predefinito compreso tra 5 e 240
minuti.
Premere il tasto
A MENU, quindi premere i tasti
o per selezionare il menu Time (Ora).
Premere il tasto
B , quindi premere i tasti o
per selezionare Sleep.
Premere i tasti
C o , quindi premere i tasti
o per selezionare il numero di minuti
desiderato. Le opzioni disponibili sono O, 5 Min,
10 Min, 15 Min, 30 Min, 45 Min, 60 Min, 90 Min,
120 Min, 180 Min e 240 Min.
Una volta selezionata l'opzione desiderata,
D
premere il tasto MENU per tornare al menu
precedente, oppure il tasto EXIT per tornare alla
normale visione. Il timer inizia il conteggio alla
rovescia per lo spegnimento per un tempo pari al
numero di minuti selezionato.
Time Zone (Fuso orario)V
Premere il tasto A MENU.
Premere i tastiB o per selezionare il menu
Time (Ora), quindi premere il tasto per
accedervi.
Premere i tasti
C o per selezionare Time Zone.
Premere i tasti
D o per selezionare il proprio
fuso orario.
Premere il tasto
E MENU per salvare le impostazioni
e uscire.
IMPOSTAZIONI DEL MENU
LOCK
Questa funzione consente di controllare sintonia,
programma, volume e altre impostazioni del televisore.
Premere il tasto MENU sul telecomando, quindi premere
i tasti o per selezionare il menu Lock, infine premere
il tasto per accedere al sottomenu. Un messaggio sul
televisore chiede di inserire la password. La password
preimpostata sull'apparecchio è 0000. Qualora si decida
di modificarla e si dimentichi il nuovo valore impostato,
è possibile ristabilire il controllo del televisore inserendo
9443.

HD Ready Digital LCD / LED LCD TV/DVD Combi USER'S MANUAL IT-24
Operazioni preliminari
CHANGE PASSWORD (Modifica password)V
Premere i tastiA o per selezionare Change
Password. Premere il tasto per accedervi.
Dopo aver inserito le quattro cifre, un messaggio B
sul televisore chiede di ripeterle per poterle
verificare. La nuova password viene salvata
automaticamente al termine dell'operazione.
CHILD LOCK (Blocco bambini)V
Premere i tasti o per selezionare Child Lock.
Premere i tasti o per impostare la modalità
On o O. La funzione Child Lock viene attivata
automaticamente se è attivata la modalità Lock.
In questo caso, premendo il tasto Child Lock sul
televisore, viene visualizzata la schermata Child
Lock da cui è possibile uscire immediatamente
premendo il tasto MENU. La schermata scompare
automaticamente cinque secondi dopo la pressione
dell'ultimo tasto. La modalità Child Lock può essere
riattivata accedendo al menu Lock Set (Impostazione
blocco) e impostando Child Lock su On o O.
Tuning Lock (Blocco sintonia)V
Premere i tasti o per selezionare Tuner Lock,
quindi premere i tasti o per selezionare On o
O. Alcune operazioni, come ad esempio la ricerca,
non sono disponibili se è impostata l'opzione On.
Durante l'accesso al menu Tuning (Sintonia), sullo
schermo viene visualizzata la schermata Tuner Lock.
Per utilizzare il menu Tuning, accedere al menu
Lock (Blocco) e impostare Tuner Lock su O, oppure
utilizzare la funzione di sblocco.
Channel NO. (Nr. canale)V
Questa funzione consente di definire i canali
preimpostati.
Premere i tasti o per selezionare il canale
predefinito. Premere i tasti o per selezionare il
numero del canale.
Source set (Imposta sorgente del segnale)V
Questa opzione consente di impostare la sorgente
predefinita del segnale, da utilizzare all'accensione del
televisore.
Premere i tasti o per selezionare le opzioni
0ò%5757"74$"3547JEFP$PNQPOFOU
Component2, PC, HDMI1, HDMI2, HDMI3, USB; queste
vengono visualizzate nell'ordine indicato. L'opzione
DVD è disponibile solo su alcuni modelli.
Source Lock (Blocco sorgente del segnale)V
Questa funzione consente di controllare l'attivazione
o la disattivazione della scelta delle modalità di
ingresso da dispositivi esterni.
Premere i tasti o per impostare su On o O. Se
la funzione è attivata, all'accensione il televisore
visualizza il segnale TV; in seguito, premendo il tasto
SOURCE il televisore non potrà passare alla sorgente
corrispondente e verrà visualizzato un messaggio che
informa che la selezione della sorgente del segnale è
bloccata.
Max Volume (Volume massimo)V
Premere i tasti o per selezionare Max Volume.
Premere i tasti o per regolare il valore del
volume tra 0 e 100. Al termine dell'operazione, per
ogni successiva regolazione il volume dell'audio
del televisore non potrà superare il valore massimo
impostato. Se è attivata la funzione Lock Set (Blocca
impostazioni) e il volume attuale è superiore al
valore impostato in Max Volume, il volume corrente
viene memorizzato come nuovo valore massimo;
qualora invece il volume attuale sia inferiore al valore
massimo, il volume impostato dall'utente rimane
invariato.
Initial Volume (Volume iniziale)V
Il televisore è in grado di memorizzare il volume
impostato e di ripristinarlo alla successiva accensione
del televisore.
Parental Lock (Blocco genitori)V
Premere i tasti o per selezionare Parental Lock.
Premere i tasti o per selezionare l'opzione
0òPQQVSFQFSMJNJUBSFMhFUËEFJCBNCJOJDIF
possono utilizzare il televisore.

IT-25 HD Ready Digital LCD / LED LCD TV/DVD Combi USER'S MANUAL
Operazioni preliminari
Clear Lock (Annulla blocco)V
Premere i tasti o per selezionare la modalità
Unlock (Sbloccato). Premere i tasti o per
annullare tutte le modalità impostate reimpostando
così tutte le opzioni di blocco su O e riportare il
valore del volume massimo a 100.
VISUALIZZAZIONE DEL
MENU SHORTCUT
Funzione Subtitle (Sottotitoli)V
Premere il tasto A SUBTITLE sul telecomando per
visualizzare il menu delle lingue dei sottotitoli,
quindi premere il tasto per accedervi.
Premere i tastiB o per selezionare la voce
desiderata, quindi premere il tasto OK per
accedervi. Se necessario, premere il tasto EXIT in
qualsiasi momento per annullare le modifiche.
Nota
LQ a visualizzazione del menu delle lingue dei
sottotitoli è disponibile solo nella modalità DTV.
Funzione CH.LIST (Elenco canali)V
Premere il tasto A CH.LIST sul telecomando per
visualizzare il menu Channel List (Elenco canali).
Premere i tasti B o per selezionare il canale,
quindi premere il tasto OK per accedervi. Se
necessario, premere il tasto EXIT in qualsiasi
momento per annullare le modifiche.
Funzione GUIDE (Guida)V
Premere il tasto GUIDE sul telecomando per
visualizzare il menu Program Guide (Guida
programmi), quindi premere i tasti , , o
per selezionare il programma desiderato.
Se necessario, premere il tasto EXIT in qualsiasi
momento per annullare le modifiche.
Nota
QQ uesta funzione è disponibile solo nella modalità
DTV.
Funzione FAVV
Premere il tasto FAV sul telecomando per visualizzare
il menu Favourite List (Elenco preferiti).
Premere i tasti o per selezionare il programma
desiderato, quindi premere il tasto OK per accedervi.
Se necessario, premere il tasto EXIT in qualsiasi
momento per annullare le modifiche.
INFOV
Premere il tasto INFO sul telecomando per
visualizzare le informazioni relative al canale
attualmente sintonizzato.
Se necessario, premere il tasto EXIT in qualsiasi
momento per annullare le modifiche.

HD Ready Digital LCD / LED LCD TV/DVD Combi USER'S MANUAL IT-26
Operazioni preliminari / Utilizzo delle funzioni
AUDIO I/IIV
Premere il tasto AUDIO sul telecomando per
visualizzare il menu Audio Languages (Lingue audio).
Premere i tasti o per selezionare le impostazioni
desiderate, quindi premere il tasto OK per accedervi.
Se necessario, premere il tasto EXIT in qualsiasi
momento per annullare le modifiche.
Nota
LQ a visualizzazione del menu Audio Languages è
disponibile solo nella modalità DTV.
Esclusione dell’audioV
La funzione Mute (Esclusione dell'audio) è utile
quando è necessario prestare attenzione a quanto
avviene in casa, per rispondere a una telefonata o
accogliere un visitatore.
Per attivare la funzione, premere il tasto
A MUTE
sul telecomando; verrà visualizzata la dicitura
Mute nella parte inferiore dello schermo. Quando
si preme il tasto, il volume dell'audio emesso dal
televisore viene disattivato.
Per tornare al normale ascolto, premere
B
nuovamente il tasto MUTE o il tasto V+ sul
telecomando.
Visualizzazione rapida di un programmaV
Questa funzione consente di passare rapidamente
all'ultimo programma sintonizzato. Per procedere,
premere il tasto Q.View (Visualizzazione rapida); il
televisore torna alla sorgente TV e visualizza il canale
sintonizzato in precedenza (ignorando le sorgenti USB
e DVD).
Supponendo che il numero del canale
A
precedentemente sintonizzato sia 8 e che il
numero del canale attualmente visualizzato sia
18 (come mostrato nella figura), è sufficiente
premere il tasto Q.View per tornare al canale 8.
In seguito è possibile premere ancora una volta il B
tasto Q.View per tornare nuovamente al canale
18. Grazie a questa funzione, è possibile passare
rapidamente dal canale visualizzato a quello
sintonizzato in precedenza e viceversa.
Utilizzo delle funzioni
Funzione teletext
La funzione teletext è un sistema di diusione delle
informazioni trasmesso da alcuni canali che consente di
leggere notizie su svariati argomenti. Questa funzione
permette anche di disporre di sottotitoli per le persone
che hanno difficoltà uditive o per chi non conosce la
lingua del programma trasmesso da reti televisive via
cavo, canali satellitari e così via.
Nota
IQ l tasto della funzione teletext può risultare
operativo anche in assenza di segnale; in
questo caso sullo schermo non appare alcuna
informazione.
Teletext
Funzioni teletextV
Per selezionare la funzione teletext, premere il tasto
sul telecomando. Per disattivare la funzione
teletext, premere nuovamente il tasto. Notare che

IT-27 HD Ready Digital LCD / LED LCD TV/DVD Combi USER'S MANUAL
Utilizzo delle funzioni
funzione teletext; sono disponibili le opzioni Eastern
(Lingue orientali) e Western (Lingue occidentali).
PausaV
Il tasto consente di interrompere
temporaneamente l'aggiornamento automatico delle
pagine della funzione teletext. Questa funzionalità è
molto utile qualora vi siano più pagine di informazioni
o di dati per uno stesso numero di pagina.
DimensioniV
Il tasto consente di passare da una modalità di
visualizzazione delle informazioni del teletext all'altra
nell'ordine seguente: Full screen (Schermo intero),
Top half (Metà superiore), Bottom half (Metà inferiore)
e nuovamente Full screen. Questa funzione è molto
utile poiché permette di ingrandire l'immagine e di
facilitare così la lettura dei caratteri.
RivelaV
Il tasto permette di visualizzare sullo schermo
eventuali caratteri nascosti. Questa funzione consente
di rivelare informazioni quali le risposte ai giochi
interattivi che si svolgono sul servizio teletext.
OraV
Il tasto permette di visualizzare per alcuni secondi
l'ora del servizio teletext nell'angolo in alto a destra
(solo in modalità TV normale).
Tasti colorati della funzione Fast Text (Testo V
rapido)
La funzione Fast Text visualizza automaticamente
le quattro pagine usate più frequentemente tra
quelle trasmesse dal canale sintonizzato. Per
passare direttamente a una di tali pagine, premere
nella modalità teletext non sono disponibili tutte le
funzioni di menu. In questa modalità sono attive solo
alcune funzioni di controllo, ad esempio:
Regolazione del volumet
Funzione Mute (Esclusione audio)t
Pagina precedente/successivaV
Per passare alla pagina precedente o successiva,
premere i tasti P+/P-.
Inserimento del numero di paginaV
Per selezionare una specifica pagina del teletext,
inserirne il numero tramite i tasti numerici del
telecomando, utilizzare i tasti P+ o P- per scorrere le
pagine oppure premere i tasti colorati per spostarsi
tramite la funzione Fast Text (Testo rapido).
Modalità MixV
Per vedere l'immagine del canale sintonizzato
sul televisore durante l'uso della modalità testo,
premere il tasto
per sovrapporre i dati del teletext
sull'immagine televisiva. Premere nuovamente il tasto
per tornare alla modalità testo.
INDEXV
Premere il tasto INDEX per passare alla pagina
dell'indice del teletext.
Modifica della linguaV
Il tasto consente di modificare i caratteri usati dalla

HD Ready Digital LCD / LED LCD TV/DVD Combi USER'S MANUAL IT-28
Utilizzo delle funzioni
il tasto colorato del telecomando corrispondente
al contrassegno colorato visualizzato nella parte
inferiore della pagina del servizio teletext.
SottocodiceV
Il tasto consente di inserire un codice numerico di
quattro cifre che permette di accedere a una pagina
secondaria.
MODALITÀ USB
Nota
LQ e informazioni fornite nelle sezioni che seguono
sono indicative e devono essere usate solo a scopo
di riferimento. Se necessario, far riferimento al
prodotto reale.
UTILIZZO DI UN DISPOSITIVO USB
Formati di file supportati:A
Fotografie: file *.jpgt
Musica: file *.mp3t
Filmati: file *.avit
Testo: file *.txtt
Nota
AQ causa delle caratteristiche di memorizzazione,
alcuni file possono risultare non leggibili.
Dispositivi supportati:
B
Possono essere utilizzati i dispositivi che supportano
il protocollo Mass Storage Protocol e che usano
un file system in formato FAT32, come ad esempio
alcuni dischi USB, dischi rigidi portatili e lettori MP3.
Qualora il dispositivo USB impiegato non venga
identificato a causa di un file system non supportato,
formattare l'apparecchiatura con il formato di file
system FAT32.
Per ottenere una modalità di riproduzione corretta,
C
verificare quanto segue:
Lt a frequenza di campionamento del file dovrebbe
essere inferiore a 300 KB/sec;
At causa di limitazioni nella distanza di trasmissione
del segnale USB, si raccomanda di non utilizzare
un cavo di prolunga del collegamento USB; in caso
contrario, assicurarsi che la lunghezza di tale cavo
non sia superiore a un metro;
Ut tilizzare dispositivi con porte USB ad alta velocità
secondo le specifiche dell'interfaccia standard
USB 2.0; in caso di impiego di dispositivi dotati
di porte USB conformi alle specifiche USB 1.1, la
riproduzione può risultare non uniforme.
Collegamento/rimozione di un
dispositivo USB
Premere il tasto A SOURCE sul telecomando per
selezionare l'opzione USB.
Avviare il sistema, quindi attendere due secondi
B
prima di inserire il cavo proveniente dal dispositivo
USB nell'interfaccia USB corrispondente.
Dopo aver visualizzato il menu di sistema, premere
C
i tasti o sul telecomando per selezionare i
file USB desiderati, quindi premere il tasto OK
per confermare la selezione eettuata e accedere
all'elenco di file relativo alla selezione.
Premere i tastiD o sul telecomando per selezionare il
file desiderato, quindi premere il tasto OK per accedervi.
Per uscire dal sistema di riproduzione dei E file
multimediali e tornare alla normale visione dei
programmi televisivi, premere il tasto BACK per
tornare al menu precedente (e proteggere il
dispositivo collegato), quindi il tasto SOURCE per
selezionare la modalità TV e tornare al normale
funzionamento del televisore.
Nota
Durante l'uso di un dispositivo USB, lo schermo Q
diventa di colore nero quando viene premuto il
tasto MENU, tranne durante la riproduzione di
immagini o filmati.
Durante la riproduzione di file multimediali da un Q
dispositivo USB, premere ripetutamente il tasto
BACK per tornare alla schermata dell'interfaccia
principale della modalità USB; a quel punto
è possibile cambiare la sorgente del segnale
visualizzato premendo nuovamente il tasto
SOURCE.
NON scollegare il dispositivo USB mentre viene Q
impiegato per riprodurre file multimediali. In caso
di disconnessione improvvisa, i file archiviati sul
dispositivo USB possono essere danneggiati.

IT-29 HD Ready Digital LCD / LED LCD TV/DVD Combi USER'S MANUAL
Utilizzo delle funzioni
Utilizzo di un dispositivo USB
Premere i tastiA o per scorrere le voci del menu
principale o del sottomenu e selezionare l'opzione
desiderata.
Premere il tasto
B OK per confermare la selezione.
Premere i tasti
C o per selezionare le funzioni REV
(Indietro veloce) o FWD (Avanti veloce) dell'opzione
in fase di riproduzione.
Premere il tasto
D PLAY/PAUSE per avviare
la riproduzione; premerlo nuovamente per
sospenderla temporaneamente.
Premere il tasto
E ZOOM per ingrandire l'immagine;
una volta ingrandita, è possibile spostarla premendo
i tasti , , o .
Premere il tasto
F STOP per interrompere la
riproduzione o tornare al menu precedente, quindi
premere ripetutamente il tasto BACK per tornare al
menu principale.
Nota
SQ e si desidera, è possibile selezionare e riprodurre
fotografie e filmati di più file diversi.
Riproduzione di un'immagine
Dopo avere eseguito l'accesso all'interfaccia A
principale della modalità USB, premere i tasti o
per selezionare PHOTO (Fotografia).
Premere
B OK per confermare la selezione eettuata e
accedere all'elenco delle immagini.
Premere i tastiC o per selezionare l'immagine
desiderata, quindi premere OK per confermare e
PLAY/PAUSE per visualizzarla.
Per mettere in pausa la riproduzione delle immagini, D
premere nuovamente il tasto PLAY/PAUSE.
Premere il tasto ZOOM per ingrandire l'immagine.
Una volta ingrandita l'immagine, premere i tasti ,
, o per spostarla.
Premere i tasti PREV/NEXT per selezionare
l'immagine precedente o successiva.
Premere i tasti o per ruotare l'immagine.
Premere il tasto STOP per interrompere la
visualizzazione delle immagini.
Per uscire dalla riproduzione, premere
E
ripetutamente il tasto BACK.
Nota
IQ l menu visualizzato cambia per mostrare i dati
della fotografia e la risoluzione in pixel del
dispositivo.
Riproduzione di brani musicali
Dopo avere eseguito l'accesso all'interfaccia A
principale della modalità USB, premere i tasti o
per selezionare MUSIC (Musica).
Premere
B OK per confermare la selezione eettuata e
accedere all'elenco dei file musicali.
Premere i tastiC o e OK per selezionare il brano
desiderato, quindi premere il tasto PLAY/PAUSE per
avviare la riproduzione.
Premere i tasti
o per selezionare le funzioni REV
(Indietro veloce) o FWD (avanti veloce) del brano in
fase di riproduzione.
Premere i tasti PREV/NEXT per selezionare il brano
musicale precedente o successivo.
Premere il tasto STOP per interrompere il brano
in fase di riproduzione.
Premere ripetutamente il tasto
D BACK per tornare al
menu principale.

HD Ready Digital LCD / LED LCD TV/DVD Combi USER'S MANUAL IT-30
Utilizzo delle funzioni
Nota
SQ e si desidera, è possibile riprodurre musica e
immagini contemporaneamente.
Riproduzione di un filmato
Dopo avere eseguito l'accesso all'interfaccia A
principale della modalità USB, premere i tasti o
per selezionare Movie (Filmato).
Premere
B OK per confermare la selezione eettuata e
accedere all'elenco dei filmati.
Premere i tastiC o e OK per selezionare il filmato
desiderato, quindi premere il tasto PLAY/PAUSE per
avviare la riproduzione.
Premere il tasto ZOOM per ingrandire il filmato.
Premere i tasti PREV/NEXT per selezionare il filmato
precedente o successivo.
Premere il tasto STOP per interrompere la
visualizzazione del filmato.
Per uscire dalla riproduzione, premere
D
ripetutamente il tasto BACK.
Testo
Dopo avere eseguito l'accesso all'interfaccia A
principale della modalità USB, premere i tasti
o
per selezionare Text (Testo).
Premere B OK per confermare la selezione eettuata e
accedere all'elenco dei file di testo.
Premere i tastiC o e OK per selezionare il testo
desiderato, quindi premere il tasto PLAY/PAUSE per
avviare la riproduzione.
Premere i tasti PREV/NEXT per selezionare il testo
precedente o successivo.
Per uscire dalla modalità Text, premere
D
ripetutamente il tasto BACK.
Nota
SQ e si desidera, è possibile riprodurre musica e testo
contemporaneamente.
Registrazione su un disco
USB esterno
Collegare il dispositivo USB formattato in modalità A
FAT32 al connettore USB1. Premere il tasto MENU.
Nota
Per la registrazione è possibile utilizzare solo il Q
connettore USB1.
Premere i tasti
B o per selezionare ilmenu
FUNCTION (Funzione), quindi premere il tasto per
accedervi.
Premere i tasti
C o per selezionare Recorder
(Registratore). Premere il tasto per accedere al
sottomenu.
Premere i tasti
D o per selezionare Select Disk
(Selezione disco), quindi premere i tasti o OK
per accedervi. Se il dispositivo è dotato di più
dischi, premere i tasti o per selezionare quello
desiderato.
Premere i tasti
E o per selezionare Format
(Formattazione), quindi premere per accedervi.
Premere i tasti o per selezionare le dimensioni

IT-31 HD Ready Digital LCD / LED LCD TV/DVD Combi USER'S MANUAL
Utilizzo delle funzioni
che si desidera formattare, quindi premere OK per
formattare il disco USB.
Nota
IQ l sistema esegue la formattazione dell'intero
dispositivo; qualora questo abbia dimensioni
superiori a 1GB, è possibile selezionare le
dimensioni desiderate per la funzione Time Shift
(Registrazione dierita).
La formattazione può richiedere alcuni minuti, il
F
tempo necessario dipende dalle dimensioni del
supporto di archiviazione. Premere i tasti o per
selezionare Time Shift Disk Size (Dimensioni disco
registrazione dierita). Le dimensioni massime
consentite per la funzione Time Shift sono di 8 GB.
Premere il tasto OK per salvare le impostazioni.
Nota
SQ e si seleziona tutto lo spazio su disco per la
funzione Time Shift, non sarà possibile utilizzarlo
per registrare.
Attendere il completamento dei controlli di
G
sistema. Al termine viene visualizzata la velocità di
trasferimento dei dati.
Nota
Generalmente, il dispositivo deve essere Q
formattato solo prima del suo primo utilizzo per la
registrazione.
Le dimensioni minime del dispositivo di Q
registrazione sono di 1GB. La funzione di
formattazione può gestire unità con spazio
EJTQPOJCJMFGJOPB5#*MWBMPSFNBTTJNPEJ.VMUJ
Partition (Partizione multipla) è pari a 16, con una
sola partizione attiva alla volta.
Bit rate:Q
Ut n bit rate del dispositivo > di 4,5 MB/sec
consente la registrazione in qualità HD
Ut n bit rate del dispositivo > di 1,5 MB/sec
consente la registrazione in qualità SD
Ut n bit rate del dispositivo < di 600 KB/sec
non consente la registrazione
Il sistema non può operare normalmente se il Q
dispositivo USB presenta i problemi elencati di
seguito:
St ul dispositivo è presente un errore di
programmazione.
It l dispositivo è bloccato in seguito a un errore.
It l dispositivo segnala una dimensione non
corrispondente al vero.
IMPORTANT
Prima di eettuare la connessione, formattare i t
dispositivi USB da PC in formato FAT32.
Funzione TIME SHIFT
(Registrazione dierita)
La funzione Time Shift è disponibile solamente in
modalità DTV. Premere il tasto PLAY/PAUSE per mettere
il pausa il programma, quindi premerlo nuovamente
per avviare la riproduzione della registrazione dierita.
Per interrompere la funzione Time Shift, premere il tasto
STOP.
Per interrompere il programma registrato tramite la
funzione Time Shift, premere il tasto STOP.

HD Ready Digital LCD / LED LCD TV/DVD Combi USER'S MANUAL IT-32
Utilizzo delle funzioni
REGISTRAZIONE
Premere il tasto A D.MENU per registrare il
programma in corso, quindi premere D.MENU o
EXIT per ridurre la visualizzazione dell'interfaccia di
registrazione.
Premere il tasto B STOP per interrompere la
registrazione del programma in corso.
Per avviare la riproduzione della registrazione, C
premere il tasto INDEX per visualizzare l'elenco dei
programmi registrati.
Premere i tasti
o
per selezionare il contenuto
registrato.
Premere il tasto per visualizzare le informazioni
relative al programma.
Premere il tasto per annullare l'operazione.
Premere i tasti OK o PLAY/PAUSE per avviare la
riproduzione del programma registrato, oppure
STOP per interromperla.
Nota
Il cambio di canale non ha eetti sulla registrazione 1.
nella stessa frequenza, ma inuenza la funzione
Time Shift. I programmi registrati non possono
essere cancellati durante la loro riproduzione.
Premere ripetutamente il tasto 2. INDEX per
visualizzare i programmi registrati, ordinati in base
a nome del programma, nome del canale, ora del
programma, nome del file e durata del file.
UTILIZZO DI UN LETTORE DVD
(solo alcuni modelli)
RIPRODUZIONE DI UN DVDV
Premere il tasto A SOURCE sul telecomando per
passare alla modalità DVD.
Inserire il disco DVD nell'apposito alloggiamento
B
con l'etichetta rivolta in direzione opposta
all'utente e allo schermo. L'alloggiamento del
disco accetta solamente DVD di dimensioni
standard.
Il DVD viene caricato automaticamente; nella C
maggior parte dei casi, sullo schermo appare il
menu del disco.
Premere i tasti
D
, , e
per navigare
nel menu del DVD ed evidenziare l'opzione di
riproduzione desiderata, quindi premere PLAY/
PAUSE.
MESSA IN PAUSA DELLA RIPRODUZIONE DI V
UN DVD
Premere il tasto A PLAY/PAUSE per interrompere
temporaneamente la riproduzione. Questa
operazione esclude anche l'audio.

IT-33 HD Ready Digital LCD / LED LCD TV/DVD Combi USER'S MANUAL
Utilizzo delle funzioni
Premere il tasto
B PLAY/PAUSE per riprendere la
riproduzione.
INTERRUZIONE DELLA RIPRODUZIONE DI UN V
DVD
Premere il tasto A per interrompere la
riproduzione di un DVD. Sullo schermo del
televisore viene visualizzato il logo di avvio del
DVD.
Alcuni dischi sono in grado di memorizzare il
B
punto in cui ne è stata interrotta la riproduzione;
in questo caso è possibile premere il tasto PLAY/
PAUSE per riprendere la riproduzione da tale
punto.
Premere due volte il tasto
C per interrompere
completamente la riproduzione e cancellare il
contenuto della memoria.
USO DELLE FUNZIONI DI AVANZAMENTO E V
RITORNO VELOCE
Premere il tasto A per spostarsi avanti
velocemente nel contenuto del disco.
Per spostarsi indietro, premere il tasto
.
Premere ripetutamente i tasti
B o per
selezionare la velocità di spostamento desiderata
tra quelle disponibili, come visualizzato
OFMMhBOHPMPJOBMUPBTJOJTUSBEFMMPTDIFSNP99
999FWFMPDJUËEJSJQSPEV[JPOFOPSNBMF
Premere il tasto
C PLAY/PAUSE per tornare alla
normale riproduzione.
PASSAGGIO ALLA SCENA PRECEDENTE O V
SUCCESSIVA
Durante la riproduzione, premere il tasto per
passare alla scena successiva del disco, oppure per
passare a quella precedente.
PASSWORDV
Se necessario, è possibile attivare il blocco dei
programmi mediante l'impostazione di Password
Mode (Modalità password) su On. La password
predefinita dell'apparecchio è 1234. Qualora si
dimentichi il valore impostato, è possibile ristabilire il
controllo del televisore inserendo 1369.
UTILIZZO DELLA FUNZIONE ZOOMV
Premere il tasto A ZOOM per ingrandire l'immagine
visualizzata sullo schermo. Se necessario,
ripetere l'operazione più volte per ottenere un
ingrandimento maggiore.
Durante l'uso della modalità Zoom, premere i tasti
B
, , e per visualizzare una parte dierente
dell'immagine ingrandita.
VISUALIZZAZIONE DEI SOTTOTITOLIV
Per visualizzare i sottotitoli, premere il tasto A
SUBTITLE durante la riproduzione.
Le lingue disponibili vengono visualizzate
B
nell'angolo in alto a sinistra dello schermo.
Premere ripetutamente il tasto fino a visualizzare la
lingua desiderata.
Per disattivare i sottotitoli, premere più volte il tasto
C
SUBTITLE fino a visualizzare SUBTITLE OFF.
UTILIZZO DELLA MODALITÀ REPEATV
Premere una volta il tasto REPEAT per riprodurre
nuovamente il capitolo di un DVD, due volte per
ripetere il titolo attualmente visualizzato o tre volte
per ripetere l'intero contenuto del disco.
MODIFICA DELL'ANGOLO VISUALE DELLA V
TELECAMERA
Alcuni DVD dispongono di più visuali riprese da
telecamere dierenti per alcune o per tutte le scene.
Premere il tasto ANGLE per cambiare la visuale
della telecamera. Le visuali disponibili possono
comprendere la visione anteriore, laterale, intera o
esterna.
FUNZIONI DVD AGGIUNTIVE
D.MENUV
Premere per tornare alla voce di menu precedente.
AUDIOV
Molti DVD dispongono di più colonne sonore in
lingue dierenti. Per cambiare l'audio riprodotto,
premere il tasto AUDIO. Per scorrere le opzioni
disponibili, attendere tre secondi prima di premere
nuovamente il tasto.
TITLEV
Premere per tornare al menu dei titoli (solo su alcuni
DVD). Premere i tasti, , e per spostarsi tra i
menu.

HD Ready Digital LCD / LED LCD TV/DVD Combi USER'S MANUAL IT-34
Utilizzo delle funzioni
SEARCHV
Premere il tasto SEARCH e usare i tasti numerici
per inserire il numero del capitolo a cui si desidera
passare, quindi premere il tasto PLAY/PAUSE.
PROGRAMV
Durante la riproduzione, premere il tasto PROGRAM
per passare direttamente a una sezione o programma
del DVD. Premere i tasti numerici per selezionare
il numero di programma desiderato. Al termine,
spostare il cursore per selezionare START (Avvio).
Il DVD passa direttamente alla sezione prescelta e
inizia la riproduzione. Per annullare questa funzione,
premere il tasto PROGRAM e spostarsi su STOP, quindi
premere il tasto PLAY/PAUSE.
A-BV
-BGVO[JPOF"#DPOTFOUFEJJNQPTUBSFVOBTF[JPOF
del DVD da ripetere. Premere il tasto A-B per
contrassegnare il punto iniziale, quindi premerlo
nuovamente per contrassegnare il punto finale. La
riproduzione della sezione così identificata inizia
immediatamente. Premere nuovamente il tasto A-B
per annullare la ripetizione.
ANGLEV
Durante la visione di eventi sportivi, concerti o
programmi teatrali, premere questo tasto per
vedere la stessa scena da più punti di vista dierenti.
Questa funzione è disponibile solo sui dischi che la
prevedono espressamente. Durante la riproduzione
EJVOEJTDPSFHJTUSBUPJONPEBMJUËNVMUJBOHPMPÒ
possibile vedere la stessa scena da punti di vista
dierenti, ad esempio con la visione frontale, laterale,
intera ed esterna.
D.CALLV
Premendo ripetutamente il tasto D.CALL, sullo
schermo vengono visualizzati alcuni indicatori OSD
dierenti corrispondenti ai vari tipi di disco DVD, CD
e così via.
RIPRODUZIONE DI UN CD CONTENENTE V
IMMAGINI JPEG
Così come avviene per i DVD o i CD audio, i CD A
contenenti immagini in formato JPEG possono
essere inseriti con l'etichetta rivolta in direzione
opposta all'utente.
Dopo l'inserimento, il CD viene caricato e sullo
B
schermo appare un menu del suo contenuto.
Premere i tasti
C eper evidenziare la cartella e
l'immagine che si desidera visualizzare, quindi
premere PLAY/PAUSE. Le immagini presenti sul
disco vengono visualizzate in sequenza come
avviene con una normale presentazione.
Durante la visualizzazione delle immagini,
D
premere il tasto PLAY/PAUSE per interrompere
temporaneamente la riproduzione.
Premere i tasti
E o per passare
rispettivamente all'immagine precedente o
successiva.
RIPRODUZIONE DI UN CD AUDIOV
Come avviene per i DVD, i CD audio possono A
essere inseriti con l'etichetta rivolta in direzione
opposta all'utente.
Dopo l'inserimento, il CD viene caricato e sullo
B
schermo appare un menu del suo contenuto.
Premere i tasti
C o per evidenziare il brano
che si desidera riprodurre, quindi premere il
tasto PLAY/PAUSE; in alternativa, premere
semplicemente il tasto PLAY/PAUSE per ascoltare
il contenuto dell'intero CD dall'inizio.
Come avviene per i DVD, anche con i CD è
possibile interrompere, mettere in pausa,
avanzare o arretrare velocemente. Premere il
tasto REPEAT per ripetere un brano, una cartella
album o l'intero contenuto del disco. Premerlo
ripetutamente per selezionare ciò che si desidera
SJQFUFSF*OBMUFSOBUJWBVUJMJ[[BSFMBGVO[JPOF"#
per ripetere solamente una sezione specifica di
una traccia o CD.

IT-35 HD Ready Digital LCD / LED LCD TV/DVD Combi USER'S MANUAL
Sezioni di riferimento
Sezioni di riferimento
RISOLUZIONE DEI PROBLEMI
La guida che segue contiene informazioni utili per
identificare eventuali malfunzionamenti:
Immagine
e audio
mancanti
Verificare se l'apparecchio è
collegato correttamente.
Verificare se l'apparecchio è
connesso a una presa di corrente
adatta.
Verificare la presenza di elettricità.
Schermo
vuoto
Verificare se vi sono segnali validi in
ingresso.
Azionare il telecomando per
passare a una sorgente di segnale
valida.
In caso di interruzione
dell'elettricità, spegnere e
riaccendere l'apparecchio.
Audio
mancante
Premere il tasto MUTE e verificare
se viene attivata la modalità Mute.
Cambiare canale e verificare se il
problema persiste.
Premere il tasto VOL+ per verificare
se il problema può essere risolto.
Audio di
scarsa qualità
Verificare se il sistema audio
selezionato è corretto.
Consultare il manuale per l'utente ed
eseguire le necessarie regolazioni.
Immagini
mancanti in
alcuni canali
Verificare che sia selezionato il
canale corretto.
Regolare l'antenna.
Colore
mancante per
alcuni canali
(immagini
in bianco e
nero)
Verificare la presenza del problema
su altri canali.
Controllare il funzionamento dei
sistemi video e audio.
Consultare le istruzioni sulla
regolazione del colore contenute
nel manuale.
Presenza
di macchie
in alcune
immagini
Verificare che l'antenna sia
collegata correttamente.
Verificare le condizioni generali
dell'antenna.
Eettuare la regolazione fine del
canale.
L'apparecchio
non risponde
ai comandi
Scollegare l'apparecchio dalla presa
di corrente e attendere 10 secondi
prima di ricollegarlo.
Se il problema persiste, contattare
JMTFSWJ[JPDMJFOUJQPTUWFOEJUBQFS
assistenza tecnica.
Nota
Qualora il malfunzionamento non possa essere 1.
eliminato seguendo i consigli della guida,
consultare un centro di assistenza autorizzato
locale.
L'apparecchio televisivo deve essere riparato 2.
esclusivamente da personale tecnico qualificato.
Non tentare mai di rimuovere il pannello
posteriore dell'apparecchio; al suo interno sono
presenti alte tensioni pericolose che possono
causare lesioni o incendi.

HD Ready Digital LCD / LED LCD TV/DVD Combi USER'S MANUAL IT-36
Sezioni di riferimento
v
4ELECOMANDOBATTERIE!!!§-ANUALEDgUSO'ARANZIACAVALLETTO46
8BULLONIPERCAVALLETTO46SOLOPERMODELLODAPOLLICI
!DATTATORECOMPONENTADATTATORECOMPONENTAUDIOADATTATORE3#!24SOLOPERMODELLO
DAPOLLICI
#OVERBOTTOMSOLOPERMODELLODAPOLLICI
3W+3W
8W+8W
7FEJUBSHBDBSBUUFSJTUJDIF
7FEJUBSHBDBSBUUFSJTUJDIF
-
Caratteristiche tecniche
Le caratteristiche del televisore che avete appena acquistato possono variare rispetto alle informazioni in
tabella a causa di innovazioni tecniche.
Modello
Immagine, sistema audio
Uscita audio
Porta di ingresso esterna
Alimentazione
Consumo energetico
Temperatura
Umidità
Accessori
Ingresso COMPONENT, ingresso PC, ingresso AV(Solo modello 19”/22”/24” LCD
LED pollici) ,ingresso PC audio, ingresso antenna SCART, ingresso HDMI, USB
ingresso S-VIDEO(Solo modello LCD pollici) .
In funzione: 5°C ~ 35°C
Conservazione: -15°C ~ 45°C
In funzione: 20% ~ 80%C
Conservazione: 5% ~ 90%
Nota
24” 32”
Le specifiche tecniche delle parti di questo televisore sono indicate solo come riferimento.
Potrebbero esserci differenze dovute all'aggiornamento tecnologico del prodotto.
Design e specifiche tecniche sono soggetti a modifiche senza preavviso.

Inhoud
NL-1 Digitale LCD/LED LCD-Televisie Gebruiksaanwijzing
Inhoud
Veiligheidswaarschuwingen 2
INTRODUCTIE....................................................... 2
BELANGRIJKE INFORMATIE................................. 2
Over uw LCD/LED LCD-televisie 5
De standaard installeren.....................................5
OVERZICHT VAN DE TELEVISIE............................7
OVERZICHT VAN DE AFSTANDSBEDIENING..... 11
DE TELEVISIE AANSLUITEN ...............................12
DE ANTENNE AANSLUITEN ..............................................12
HET SIGNAAL VERBETEREN..............................................12
EEN COMPUTER OP DE TELEVISIE AANSLUITEN.......12
EEN DVD-SPELER OP DE TELEVISIE AANSLUITEN.....12
EEN DVD-SPELER OF VIDEORECORDER OP DE
TELEVISIE AANSLUITEN .....................................................12
Aansluitingsmogelijkheid 1.............................................12
Aansluitingsmogelijkheid 2.............................................12
SCART-INGANG ....................................................................13
HDMI-INGANG......................................................................13
DE TELEVISIE AAN DE MUUR BEVESTIGEN..................13
DE AFSTANDSBEDIENING GEBRUIKSKLAAR
MAKEN................................................................13
DE BATTERIJEN PLAATSEN ...............................................13
WAARSCHUWINGEN OVER DE BATTERIJEN ...............13
Aan de slag 14
Installatie ...........................................................14
PLAATSING............................................................................14
AANSLUITING.......................................................................14
DE TELEVISIE INSCHAKELEN ............................................14
DE TELEVISIE AFSTEMMEN ...............................14
OVERSCHAKELEN NAAR EEN ANDERE BRON DAN
DE TELEVISIE..........................................................................14
AUTO SEARCH (Automatisch zoeken)..........................14
DIGITAL MANUAL SEARCH (Digitale kanalen
handmatig zoeken) ............................................................15
Analog Manual Search (Analoge kanalen
handmatig zoeken) ............................................................15
Channel Edit (Kanaal aanpassen) ..................................16
RENAME (Hernoemen) ......................................................16
MOVE (Verplaatsen) ...........................................................16
Setting favourite channel
(Favoriet kanaal instellen) ................................................16
SKIP (Overslaan)...................................................................17
GUIDE (Elektronische televisiegids)..............................17
COMMON INTERFACE ........................................17
Software update-functie ..................................................18
Werkwijze...............................................................................18
DE TELEVISIE GEBRUIKEN ................................. 19
Het televisiekanaal selecteren........................................19
Het volume aanpassen......................................................19
CH.LIST-functie.....................................................................19
DE BEELDINSTELLINGEN WIJZIGEN.................. 19
Aangepast beeld instellen...............................................19
DE GELUIDSINSTELLINGEN WIJZIGEN..............20
Aangepast geluid instellen..............................................20
FUNCTIE-INSTELLINGEN ................................... 21
TIJDINSTELLINGEN ............................................ 22
HET VERGRENDELINGSMENU INSTELLEN........23
SNELMENUWEERGAVE...................................... 25
WEERGAVE SNELMENU .....................................26
De functies gebruiken 27
Teletekstfuncties ...............................................27
Teletekst..................................................................................27
USB-MODUS....................................................... 28
HET USB-APPARAAT GEBRUIKEN ...................................28
Usb-media aansluiten/ontkoppelen............................28
Het usb-apparaat gebruiken...........................................29
Foto's afspelen......................................................................29
Muziek afspelen...................................................................29
Films afspelen.......................................................................30
Tekst .........................................................................................30
De externe usb-schijf voor opnamen
gebruiken...........................................................30
TIME SHIFT (TIMESHIFTEN) ..............................................32
OPNEMEN...............................................................................32
DE DVD-SPELER GEBRUIKEN
(alleen bepaalde modellen).............................. 32
AANVULLENDE DVD-FUNCTIES........................33
Referentie 35
PROBLEMEN OPLOSSEN.................................... 35
Specificaties.......................................................36

Veiligheidswaarschuwingen
Digitale LCD/LED LCD-Televisie Gebruiksaanwijzing NL-2
Veiligheidswaarschuwingen
WELKOM
Hartelijk dank dat u deze 19/22/24/32/40 inch HD Ready Digitale LCD/LED-TV hebt gekocht. Deze gids zal u helpen bij
het instellen en het eerste gebruik van uw TV .
Controleer eerst of de onderstaande onderdelen in de verpakking aanwezig zijn:
tJODI)%3FBEZ%JHJUBMF-$%-&%57
t"GTUBOETCFEJFOJOH
t"""CBUUFSJKY
t*OTUSVDUJFIBOEMFJEJOH
t(BSBOUJF
t57TUBOEBBSE
tY4DISPFWFOWPPS57TUBOEBBSEBMMFFOWPPSJODINPEFM
t$PNQPOFOUBEBQUFSDPNQPOFOUBVEJPBEBQUFS4$"35BEBQUFSBMMFFOWPPSJODINPEFM
t,OPQEFLTFMBMMFFOWPPSJODINPEFM
U kunt nu beginnen!
WAARSCHUWING
*Om het gevaar van elektrische schokken te vermijden, raden we u sterk aan de achterkant
niet te openen, omdat zich in de behuizing geen toebehoren bevinden.
*Neem indien nodig contact op met een gekwaliceerde onderhoudsdienst.
*Een bliksemschicht in een driehoek duidt een mogelijk gevaarlijke situatie aan die als gevolg
van hoge elektrische spanning tot ernstig letsel kan leiden.
*Een uitroepteken in een driehoek duidt een belangrijk onderdeel of toebehoren aan waarbij
de technische specicaties in acht moeten worden genomen als het moet worden vervangen.
WAARSCHUWING
RISICO VAN ELEKTRISCHE SCHOK,
APPARAAT NIET OPENEN
OM HET RISICO VAN ELEKTRISCHE SCHOKKEN TE BEPERKEN, MAG U DE BEHUIZING
(OF ACHTERKANT) NIET VERWIJDEREN. AAN DE BINNENKANT BEVINDEN ZICH GEEN
ONDERDELEN DIE DOOR GEBRUIKERS KUNNEN WORDEN GEREPAREERD. NEEM
CONTACT OP MET GEKWALIFICEERD SERVICEPERSONEEL.
Waarschuwing: NCSBOEHFWBBSPGIFUSJTJDPWBOFMFLUSJTDIFTDIPLLFOUFWFSNJKEFONBHVEF
televisieontvanger nooit in een zeer vochtige omgeving plaatsen. Wees voorzichtig om
krassen of andere beschadigingen van het scherm te voorkomen.
Let op: Ÿ Neem de gebruiksaanwijzing zorgvuldig door voordat u het televisietoestel in
gebruik neemt en bewaar deze op een geschikte plaats voor toekomstige referentie.
Ÿ Neem deze gebruiksaanwijzing zorgvuldig door om ervoor te zorgen dat de
televisie optimale prestaties levert en bewaar de gebruiksaanwijzing voor
toekomstige referentie.
Ÿ In de gebruiksaanwijzing verschafte informatie over schermmenu's en gegevens
zijn onderhevig aan wijzigingen als gevolg van technische vernieuwingen.
Let op: Ÿ Het is verboden dit product zonder toestemming te demonteren.

Veiligheidswaarschuwingen
NL-3 Digitale LCD/LED LCD-Televisie Gebruiksaanwijzing
Het product moet stevig worden bevestigd
om te voorkomen dat het valt of dat er brand
wordt veroorzaakt.
Om brandgevaar te vermijden, mag u dit
product niet in direct zonlicht of in de
nabijheid van
warmtebronnen
gebruiken.
Plaats het product niet in de nabijheid van
water of olie; dit zou tot brandgevaar
kunnen leiden.
Koppel het product los van het stroomnet en
de antenne bij zware regenval en in het
bijzonder bij een
onweersbui.
Gebruik geen beschadigde of versleten
elektrische aansluitingen en zorg ervoor dat
elektrische kabels zich niet vlakbij
warmtebronnen
bevinden om elektrische
schokken of
brandgevaar te
vermijden.
Sluit geen contactdozen op elkaar aan of
meerdere stekkers op één wandcontact om
brandgevaar te voorkomen.
Het product moet op een stevige en stabiele
ondergrond worden geplaatst om te
voorkomen dat het
omvalt.
Het is verboden de televisie zonder
toestemming te demonteren omdat dit tot
elektrische schokken of
brandgevaar kan leiden.
Neem contact op met
een
e
onderhoudsdienst als
technische ondersteuning
vereist is.
Houd het product uit de buurt van een
transformator of warmtebron om
brandgevaar te vermijden.
Koppel het product
los van het stroomnet en neem contact op
als u een afwijkend geluid in het product
hoort.

Veiligheidswaarschuwingen
Digitale LCD/LED LCD-Televisie Gebruiksaanwijzing NL-4
U mag in de nabijheid van het product geen
ontvlambare materialen gebruiken of opslaan
om explosie- of brandgevaar te vermijden.
Plaats het product niet in een vochtige
omgeving om brandgevaar
te vermijden.
Houd de antenne van het product uit de buurt
van elektrische kabels om
elektrische schokken
te vermijden.
Raak de stekker nooit met natte handen aan;
dit zou elektrische schokken kunnen
veroorzaken.
Zorg ervoor dat de televisie altijd goed
is aangesloten; een slechte elektrische
aansluiting kan brand
veroorzaken.
Als u de antenne gebruikt, moet u
maatregelen nemen om ervoor te zorgen
dat er geen water via de
kabel in de televisie
kan lopen.
Koppel de televisie los van het stroomnet
en gebruik een zachte doek (nooit chemische
middelen) als u het product
schoonmaakt.
Zorg ervoor dat er
geen water in het
product druppelt.
De stekker en de elektrische kabel moeten
schoon worden gehouden om elektrische
schokken of
brandgevaar
te vermijden.
Koppel de televisie los van het stroomnet en
de antenne in geval van zware
regenval of een
onweersbui om elektrische
schokken of brandgevaar
te vermijden.
Koppel de televisie los van het stroomnet
om elektrische schokken of brandgevaar te
vermijden wanneer u langere tijd op
vakantie gaat.

Over uw LCD/LED LCD-televisie
NL-5 Digitale LCD/LED LCD-Televisie Gebruiksaanwijzing
1. Haal het kleine stukje uit de voetstandaard.
2. Plaats de kolom tegen de voetstandaard.
4. Schuif het kleine stukje in de voet. U kunt ook een schroef gebruiken.
3. Druk de LCD TV op de voet. Draai de machine ongeveer 15 graden in de richting van de pijl op de voetstandaard.
Over uw LCD/LED LCD-televisie
De standaard installeren
Alleen LED LCD MODEL 19/22/24 inch

Over uw LCD/LED LCD-televisie
Digitale LCD/LED LCD-Televisie Gebruiksaanwijzing NL-6
De standaard installeren
Alleen LED LCD MODEL 32/40 inch
1. Leg het TV-scherm voorzichtig met de voorkant naar beneden op een tafel. Wij raden u aan
verpakkingsmateriaal van het TV-pakket op het tafelblad te leggen om het scherm te besche
r
2.Plaats de standaard tegen de onderkant van de TV, zoals hieronder afgebeeld.
4.Bevestig de schroef van de onderkant van de standaard op de TV.
3. Duw de standaard op de TV.

Over uw LCD/LED LCD-televisie
NL-7 Digitale LCD/LED LCD-Televisie Gebruiksaanwijzing
OVERZICHT VAN DE TELEVISIE
Bedieningspaneel
Alleen LCD MODEL 19/22 inch
108&3
4063$&
%FLOPQ$POöSN#FWFTUJHFOPQXBOOFFSNFO
IFUNFOVCFEJFOU
.&/6
*OESVLLFOPNIFUIPPGENFOVUFTFMFDUFSFO
70-
7PMVNFMBHFS/BBSMJOLTPNIFUJUFNJOEF04%UF
XJK[JHFO
70-
7PMVNFIPHFS/BBSSFDIUTPNIFUJUFNUFXJK[JHFO
*OESVLLFOPNJOUFWPFSFO
$)
57LBOBBMMBHFSPNIFUJUFNJOIFUNFOVUF
TFMFDUFSFO
$)
57LBOBBMIPHFSPNIFUJUFNJOIFUNFOVUF
TFMFDUFSFO
1PXFSJOEJDBUPS
3FNPUF4FOTPS
POWER
%SVLPNEF57JOFOVJUUFTDIBLFMFO

Over uw LCD/LED LCD-televisie
Digitale LCD/LED LCD-Televisie Gebruiksaanwijzing NL-8
Aansluitpaneel achterkant
Aansluiting op HDMI-uitgang of andere apparatuur
Sluit een component video/audio-apparaat aan op
deze uitgangen
Component/S-video audio-ingang
Aansluiting op de VGA 15PINS analoge
uitgangsconnector van de PC-kaart om op PC
weer te geven
Aansluiting op de PC-uitgang of van een PC naar
de audio
Sluit kabel of antennesignalen op TV aan, direct of
via uw kabeldoos
#BTFFSVPQVX%7%MBEFSFOEFLOPQQFO
#BTFFSVPQFFODPNCJUFMFWJTJF%7%MF[FS

Over uw LCD/LED LCD-televisie
NL-9 Digitale LCD/LED LCD-Televisie Gebruiksaanwijzing
6
7
1
2
4
3
5
Conten t Si
d
e
Facing T
owar
ds
You
SOURCE
MENU
VOL+
VOL-
CH+
CH
-
STOP
PLAY/PAUSE OPEN/CLOSE
PREV NEXT
DC IN
USB
DIGITALVOUT
(COAXIAL)
HDMI IN
C
OMPONENT
IN
AV I
N
Y Pb Pr
VIDEO L-AUDIO-R
L-AUDIO-R
PC/DVI AUDIO IN
PC IN
SCART
1
2 3
4
5
6
7
89
10
11
ANT IN
1
SOURCE
Schakelt heen en weer tussen de beschikbare
ingangsbronnen.
2
MENU
Druk om een menu op het scherm te zien met de
functies van uw TV.
3
VOL-/+
Druk om het volume te hoger of lager te zetten.
4
CH-/+
Druk om van kanaal te veranderen.
5
POWER
Druk om de TV in en uit te schakelen.
6
Power indicator
7
Remote Sensor
Alleen LED LCD MODEL 19/22/24 inch
1
DC IN ingang
2
EARPHONE
uitgang
3
USB
ingang
4
Digital output ingang
5
HDMI IN
ingang
6
PC IN ingang
7
PC/DVI AUDIO IN
ingang
8
TV SCART ingang/
uitgang
9
COMPONENT
AUDIO
ingang
>
AV IN ingang
A
COMPONENT IN
ingang
(Baseer u op een
combi televisie/
DVD-lezer)

Over uw LCD/LED LCD-televisie
Digitale LCD/LED LCD-Televisie Gebruiksaanwijzing NL-10
LOV
HC
UNEM
ECRUOS
HDMI 1 IN
USB
DIGITAL AUDIO OUT
(OPTICAL )
ANT IN
2 INIMDH
NITNENOPMOC
CP
Y P
b
P
r
L
OIDUA
R
NICP
3 INIMDHTRACS
PC/DVI AUDIO
1
SCART
ingang
2
Component ingang
3
Component Audio
ingang
4
PC ingang
5
PC/DVI AUDIO
ingang
6
HDMI3 IN ingang
7
HDMI2 IN
ingang
8
Common Interface
9
Earphone
0
ANTENNA ingang
A
Optical uitgang
B
USB
C
HDMI1 IN ingang
Alleen LED LCD MODEL 32/40 inch
1
SOURCE
Schakelt heen en weer tussen de beschikbare
ingangsbronnen.
2
MENU
Druk om een menu op het scherm te zien met de
functies van uw TV.
3
VOL-/+
Druk om het volume te hoger of lager te zetten.
4
CH-/+
Druk om van kanaal te veranderen.
5
POWER
Druk om de TV in en uit te schakelen.

Over uw LCD/LED LCD-televisie
NL-11 Digitale LCD/LED LCD-Televisie Gebruiksaanwijzing
OVERZICHT VAN DE AFSTANDSBEDIENING
Richt de afstandsbediening tijdens het gebruik op de afstandsbedieningssensor op de televisie.
1
POWER
2
DVD-menu / REC
3
DVD openen / sluiten
4
Fotomodus
5
Geluidsmodus
6
Schermmenu's oproepen
7
Knop Slaapstand
8
Dtv-audio / NICAM / dvd-audio
9
Knop Bediening breedte-hoogteverhouding
0
Knop Kanaallijst
A
Knop Ondertiteling
B
Positie kanaal selecteren
C
Bron wijzigen
D
Q.VIEW / kanaal wisselen
E
V+/V-: volumeselectie
F
P+/P-: kanaalselectie
G
Geluid uit
H
Knop Menu
I
Knop Gids (alleen voor dtv)
J
Knop Favorietenlijst
K
Knop OK
L
Knop Cursor bewegen
M
Knop Terug (alleen voor usb)
N
Schermmenu's verlaten
O
Knop Herhalen (alleen voor dvd, usb, opnemen en timeshiften) /
annuleren
P
In-/uitzoomen (alleen voor dvd en usb) / teletekstindex (alleen voor
televisie) / opname-index
Q
Knop Afspelen / pauzeren (alleen voor dvd en usb) / timeshiften
R
Stoppen (alleen voor dvd, usb, opnemen en timeshiften)
S
Snel terugspoelen (alleen voor dvd, usb, opnemen en timeshiften)
T
Snel vooruitspoelen (alleen voor dvd, usb, opnemen en timeshiften)
U
Vorige (alleen voor dvd, usb, opnemen en timeshiften)
V
Volgende (alleen voor dvd, usb, opnemen en timeshiften)
W
Dvd instellen / teletekst
X
Dvd titel / teletekstmix
Y
Dvd zoeken / teletekstsubcode
Z
Dvd 10+ / teletekst stilzetten
[
Dvd programmeren / teletekst weergeven
\
Dvd A-B-herhaling / teletekstformaat
]
Dvd oproepen / teletekstmodus
`
Dvd-hoek / teleteksttijd
OPMERKING
EFSPEFHSPFOFCMBVXFFOHFMFO
knoppen zijn sneltoetsen in het
analoge signaal en functieknoppen
in DVB-T (zie de schermmenu's).

Over uw LCD/LED LCD-televisie
Digitale LCD/LED LCD-Televisie Gebruiksaanwijzing NL-12
DE TELEVISIE AANSLUITEN
DE ANTENNE AANSLUITEN
Sluit de antenne aan op de ANTENNA IN-ingang aan de
zijkant van de televisie.
HET SIGNAAL VERBETEREN
Om de beeldkwaliteit in een gebied met
TMFDIUFPOUWBOHTUUFWFSCFUFSFOHFCSVJLUVFFO
signaalversterker (niet meegeleverd).
EEN COMPUTER OP DE TELEVISIE
AANSLUITEN
U kunt uw televisie als monitor voor een computer
gebruiken door ze op elkaar aan te sluiten met een VGA-
kabel (niet meegeleverd).
Raadpleeg de gebruiksaanwijzing van uw computer
A
en controleer of deze over een VGA-aansluiting
beschikt.
Schakel de televisie en de computer uit.
B
Sluit een VGA-interfacekabel met 15-pinsstekker C
type D aan op de interfaceconnector voor VGA-
video op de computer. Sluit het andere uiteinde
van de kabel aan op de interfaceconnector voor de
computer op de televisie. Draai de schroees van
de VGA-aansluitingen vast en sluit de audiokabel
(niet meegeleverd) aan op de audio-ingang aan de
achterkant van de televisie.
Schakel eerst de televisie in en dan de computer.
D
Druk op de knop op de televisie of de E
afstandsbediening om de videoingangsmodus op
VGA in te stellen.
"MTIFUCFFME[POEFSHFMVJEXPSEUXFFSHFHFWFO
F
wijzigt u in het menu de VGA-modus in een andere
SFTPMVUJFXJK[JHUVEFWFSWFSTJOHTTOFMIFJEPGQBTU
u de helderheid en het contrast aan tot het beeld
scherp is.
EEN DVD-SPELER OP DE TELEVISIE
AANSLUITEN
4MVJUEFEWEWJEFPVJUHBOHFO:1b1r) en de
$0.10/&/5:1b1r) IN-ingang van de televisie op
elkaar aan.
Schakel de dvd-speler in en plaats een dvd.
A
Druk op de knop om uw keuze te maken.B
Raadpleeg de gebruiksaanwijzing van de dvd-speler voor C
gebruiksinstructies.
DVD
EEN DVD-SPELER OF
VIDEORECORDER OP DE TELEVISIE
AANSLUITEN
U kunt een dvd-speler of videorecorder op twee
manieren op de televisie aansluiten. Schakel zowel de
televisie als de dvd-speler of videorecorder uit voordat u
deze op elkaar aansluit.
Aansluitingsmogelijkheid 1
Sluit de audio- en S-VIDEO-kabels van de uitgangen A
van de videorecorder aan op de TV-ingangen.
Plaats een band in de videorecorder en druk op de
B
knop PLAY op de videorecorder.
Schakel eerst de televisie in en dan de videorecorder.
C
Druk op de knop D SOURCE op de televisie om de
video-ingangsmodus op S-VIDEO in te stellen.
Aansluitingsmogelijkheid 2
Sluit de AV-uitgangen op de dvd-speler/A
videorecorder en de AV IN-aansluiting op de
televisie op elkaar aan.

Over uw LCD/LED LCD-televisie
NL-13 Digitale LCD/LED LCD-Televisie Gebruiksaanwijzing
Druk op de knop B SOURCE op de televisie om de
video-ingangsmodus op AV in te stellen.
SCART-INGANG
4MVJUEF4$"35LBCFMWBOIFUFYUFSOFBQQBSBBUA
EWETQFMFSTFUUPQCPYPGTQFMDPNQVUFSBBOPQEF
SCART-ingang op de televisie.
Druk op de knop
B SOURCE om de SCART-modus te
selecteren.
Druk op de knop
C PLAYPQIFUFYUFSOFBQQBSBBU
HDMI-INGANG
Sluit de kabel van het HDMI-apparaat aan op de A
HDMI-aansluiting op de televisie.
Druk op de knop
B SOURCE om de HDMI-modus te
selecteren.
Raadpleeg de gebruiksaanwijzing van het HDMI-
C
apparaat voor gebruiksinstructies.
DE TELEVISIE AAN DE MUUR
BEVESTIGEN
U kunt uw televisie aan de muur bevestigen met een
muurbeugel (niet meegeleverd). Gebruik M4- of M6-
schroeven (4 stuks) om de televisie aan de beugel te
bevestigen (niet meegeleverd).
DE AFSTANDSBEDIENING
GEBRUIKSKLAAR MAKEN
DE BATTERIJEN PLAATSEN
Houd de afstandsbediening ondersteboven en open A
het klepje van het batterijvakje.
Plaats twee AAA-batterijen (de symbolen +en – van B
de batterij moeten overeenkomen met de
markeringen op de afstandsbediening).
Sluit het klepje van het batterijvakje.C
WAARSCHUWINGEN OVER DE
BATTERIJEN
Zorg ervoor dat zich tussen de afstandsbediening en de
afstandsbedieningssensor op de televisie geen objecten
bevinden.
Zonlicht of ander sterk licht verstoort het signaal
van de afstandsbediening. Draai in dat geval het
televisietoestel zodat het niet direct aan de lichtbron
wordt blootgesteld.
Stel de afstandsbediening niet direct bloot aan warmte
en bewaar deze niet op een vochtige plek; dit zou tot
beschadiging van de afstandsbediening kunnen leiden.
(FCSVJLUXFF"""CBUUFSJKFOWBO7(FCSVJLOJFU
verschillende typen batterijen. Plaats de batterijen met
Over uw LCD-televisie / Aan de slag

Aan de slag
Digitale LCD/LED LCD-Televisie Gebruiksaanwijzing NL-14
de polen in de juiste richting. Gebruik geen oplaadbare
batterijen. Als de televisie voor langere tijd moet
XPSEFOPQHFTMBHFOWFSXJKEFSUVEFCBUUFSJKFOVJUEF
afstandsbediening.
Aan de slag
Installatie
PLAATSING
Plaats de televisie in de nabijheid van het stopcontact
(binnen bereik van de elektriciteitskabel) en binnen
bereik van de antenneaansluiting of de verlengkabel.
AANSLUITING
Sluit de kabel van de televisieantenne aan op de A
antenne-ingang aan de zijkant van de televisie.
Plaats de batterijen in de afstandsbediening. Zorg
B
ervoor dat polen van de batterij overeenkomen met
de markeringen in het batterijvakje.
DE TELEVISIE INSCHAKELEN
Druk één maal op de knop A STANDBY aan de
rechterkant van de televisie. In de hoek van het
scherm wordt een rood knipperlichtje weergegeven.
Druk op de knop
B STANDBY op de
afstandsbediening. De televisie wordt ingeschakeld
en het rode lichtje wordt blauw. Dit kan enkele
seconden duren.
Selecteer in de lijst op het scherm de taal van uw
C
keuze. Gebruik de knop Ź om naar de gewenste taal
te gaan en druk op OK om uw keuze te bevestigen.
DE TELEVISIE AFSTEMMEN
OVERSCHAKELEN NAAR EEN
ANDERE BRON DAN DE TELEVISIE
"MTVFFOEWETQFMFSPGWFSHFMJKLCBBSFYUFSOBQQBSBBU
PQEFUFMFWJTJFIFCUBBOHFTMPUFONPFUVEFUFMFWJTJF
zodanig instellen dat de inhoud van dat apparaat erop
wordt weergegeven. Druk op SOURCE en het bronmenu
wordt in de linkerhoek van het scherm weergegeven.
Gebruik de knoppen Ÿ en ź om de gewenste bron te
markeren en druk op OK om uw keuze te selecteren.
Zie OVERZICHT VAN DE TELEVISIE op pagina 6 voor
informatie over het aansluiten van andere apparatuur.
AUTO SEARCH (Automatisch zoeken)
Druk op de knop A MENU.
Druk op B ŻŹ om het menu Tuning (Afstemmen) te
selecteren en op ź om het te openen.
Druk op
C Ÿź om de optie Country (Land) te
selecteren.
Druk op ŻŹ om het gewenste land te selecteren.
Druk op
D Ÿź om de optie Auto Search (Automatisch
zoeken) te selecteren en druk op OK om uw keuze te
bevestigen.
Druk op ŻŹ om de optie OK te selecteren en druk
op OK om te beginnen met zoeken.
Druk op MENU; u kunt aangeven of u TV/DTV Search
(TV/DTV zoeken) wilt overslaan of niet.

Aan de slag
NL-15 Digitale LCD/LED LCD-Televisie Gebruiksaanwijzing
Druk op E EXIT om Auto Search tijdens het zoeken te
beëindigen.
Opmerking
het kan enkele seconden duren voordat Auto O
Search voltooid is.
DIGITAL MANUAL SEARCH (Digitale
kanalen handmatig zoeken)
Druk op de knop A MENU.
Druk op B ŻŹ om het menu Tuning (Afstemmen) te
selecteren en op ź om het te openen.
Druk op
C Ÿź om de optie Digital Manual Search
(Digitale kanalen handmatig zoeken) te selecteren
en druk op Ź om uw keuze te bevestigen.
Druk op D ŻŹ om het kanaal te selecteren.
Druk op OK om te beginnen met zoeken.
"MTFSFFOLBOBBMXPSEUHFWPOEFOLVOUVPQ
E OK
drukken om het op te slaan.
Druk op EXIT om af te sluiten.
Analog Manual Search (Analoge ka-
nalen handmatig zoeken)
Volg de onderstaande stappen als u handmatig moet
zoeken.
Druk op de knop
A MENU.
Druk op B ŻŹ om het menu Tuning (Afstemmen) te
selecteren en op ź om het te openen.
Druk op
C Ÿź om de optie Analog Manual Search
(Analoge kanalen handmatig zoeken) te selecteren
en druk op Ź om uw keuze te bevestigen.
Druk op
D Ÿź om de optie Search (Zoeken) te
selecteren; met Ź kunt u een kanaal met een
hogere frequentie selecteren.
Druk op Ż om een kanaal met een lagere frequentie
te selecteren.
Selecteer vervolgens Storage To (Opslaan op)
E
en druk op ŻŹ om de positie van het kanaal te
TFMFDUFSFO"MTFSFFOLBOBBMJTHFWPOEFOLVOUVPQ
de rode knop drukken om het op te slaan. Druk op
EXIT om af te sluiten.
Sound System (Audiosysteem)V
Druk op Ÿź om Sound System (Audiosysteem) te
selecteren en op ŻŹ om het gewenste audiosysteem
te selecteren.

Aan de slag
Digitale LCD/LED LCD-Televisie Gebruiksaanwijzing NL-16
Current CH (Huidig kanaal)V
Druk op ŻŹ om het kanaalnummer te selecteren dat
u wilt wijzigen.
Storage To (Opslaan op)V
Druk op ŻŹ om de positie te selecteren waarop u
het kanaal wilt opslaan.
Fine Tune (Fijnafstemming)V
Als de kwaliteit van het beeld en/of geluid niet goed
JTLVOUVQSPCFSFOEF[FNFUEFGVODUJF'JOF5VOF
(Fijnafstemming) aan te passen. Gebruik deze functie
alleen als de ontvangst slecht is.
Herhaal stap
A A-C en druk vervolgens op Ÿź om
de optie Fine Tune te selecteren.
Druk een aantal keren op
B ŻŹ om het kanaal
nauwkeurig in te stellen. Laat de knop los als u
optimaal beeld en geluid hebt.
Channel Edit (Kanaal aanpassen)
.FUEF[FGVODUJFLVOUVFFOLBOBBMIFSOPFNFO
WFSQMBBUTFOBMTGBWPSJFUJOTUFMMFOFOPWFSTMBBOJOEF
analoge modus.
Druk op de knop
A MENU.
Druk op B ŻŹ om het menu Tuning (Afstemmen) te
selecteren en druk op ź om het te openen.
Druk op
C Ÿź om de optie Channel Edit (Kanaal
aanpassen) te selecteren.
Druk op Ź om het submenu te openen. Druk op de
SPEFHSPFOFHFMFPGCMBVXFLOPQPNIFUHFXFOTUF
menu te openen.
RENAME (Hernoemen)
Druk op A Ÿź om het kanaal te selecteren en op de
groene knop om het te hernoemen.
Druk op
B ŻŹ om de positie van het kanaal te
selecteren. Druk op Ÿź om het nummer te
selecteren.
U kunt op elk gewenst moment op
C EXIT drukken om
de wijzigingen ongedaan te maken.
Opmerking
De functie Rename is alleen beschikbaar in de O
analoge tv-modus.
MOVE (Verplaatsen)
Druk op A Ÿź om het kanaal te selecteren en op de
gele knop om de positie te selecteren.
Druk op
B Ÿź om de positie te selecteren waarnaar u
het kanaal wilt verplaatsen en druk op de gele knop
om uw keuze te bevestigen.
U kunt op elk gewenst moment op
C EXIT drukken om
de wijzigingen ongedaan te maken.
Setting favourite channel (Favoriet
kanaal instellen)
Druk op A Ÿź om het kanaal te selecteren en op de
rode knop om het als favoriet in te stellen.
U kunt op elk gewenst moment op de rode knop
B
drukken om de wijzigingen ongedaan te maken.
Druk op de knop
C FAV op de afstandsbediening om
de lijst met favoriete kanalen weer te geven.
Druk op
D Ÿź om het kanaal te selecteren en op OK
om uw keuze te bevestigen.

Aan de slag
NL-17 Digitale LCD/LED LCD-Televisie Gebruiksaanwijzing
SKIP (Overslaan)
Druk op A Ÿź om het kanaal te selecteren en op de
blauwe knop om het huidige kanaal over te slaan.
U kunt op elk gewenst moment op de blauwe knop
B
drukken om de wijzigingen ongedaan te maken.
GUIDE (Elektronische televisiegids)
Met deze functie beschikt u over digitale tv-
programmagegevens.
Druk op de knop
A MENU.
Druk op B ŻŹ om het menu Tuning (Afstemmen) te
selecteren en op ź om het te openen.
Druk op
C Ÿź om de optie Guide (Gids) te selecteren.
Druk op OK om het submenu te openen; de
elektronische televisiegids wordt weergegeven.
U kunt het menu Guide snel oproepen door op de
knop GUIDE op de afstandsbediening te drukken.
Opmerking
Alleen beschikbaar in de digitale tv-modus.O
COMMON INTERFACE
De Common Interface-ingang (CI) dient voor de
Conditional Access-module (CA) en –smartcard waarmee
betaaltelevisie en aanvullende diensten kunnen worden
bekeken. Neem contact op met uw Common Interface-
serviceprovider voor meer informatie over de modules
en abonnementen. We leveren zelf geen CA-modules
en–smartcards of optionele toebehoren.
Waarschuwing
Schakel de televisie uit voordat u een module in de t
Common Interface-ingang plaatst.
Plaats de CAM en steek vervolgens de smartcard op A
de juiste wijze in de CI-ingang aan de zijkant van de
televisie.
CI Slot
CAM
Smart Card

Aan de slag
Digitale LCD/LED LCD-Televisie Gebruiksaanwijzing NL-18
Schakel de televisie in. Het onderstaande bericht B
wordt weergegeven als de CA-module is gevonden.
Wacht enkele seconden tot de kaart is geactiveerd.
Druk op de knop
C MENU om het hoofdmenu weer
UFHFWFOESVLPQŸ en ź om de regel Common
Interface te markeren en druk op OK.
Er wordt gedetailleerde informatie over de
D
gebruikte CI-kaart weergegeven.
Druk op
E OK om het kaartmenu te openen.
Raadpleeg de gebruiksaanwijzing van de module
voor informatie over het instellen.
"MTEFNPEVMFXPSEUWFSXJKEFSEXPSEUIFU
F
volgende bericht op het scherm weergegeven.
Software update-functie
Als u van de televisieshop nieuws ontvangt over t
VQEBUFTLVOUVEFCFTUVSJOHTTPGUXBSFCJKXFSLFOWJB
het menu Download (Downloaden). De gegevens
van verschillende eenheden worden vervolgens
naar een speciaal ontvangstkanaal overgedragen.
U moet het desbetreende kanaal zoeken door t
middel van de update-codestream.
Opmerking
U kunt informatie ontvangen via de televisieshop O
of internet.
Werkwijze
Druk op de knop A MENU.
Druk op B ŻŹ om het menu Tuning (Afstemmen) te
selecteren en op ź om het te openen.
Druk op
C Ÿź om de optie Software Upgrade
(Software upgraden) te selecteren.
Druk op
D ŻŹ om deze optie op On (Aan) in te
stellen. De standaardinstelling is O (Uit).
De"Start Upgrade" opdracht kan worden
E
geselecteerd.( De standaardwaarde / default is grijs
gekleurd en kan niet worden geselecteerd ).
13%
Press EXIT to cancel download
Druk op F Ÿź om de optie System Update
(Systeemupdate) te selecteren en op OK om uw
keuze te bevestigen. Vervolgens wordt de televisie
opnieuw opgestart en worden de upgradegegevens
gezocht.
Opmerking
"MTEFVQHSBEFHFHFWFOTXPSEFOPOUWBOHFOO
wordt er een upgrade uitgevoerd; als dit niet het
HFWBMJTTDIBLFMUEFUFMFWJTJFUFSVHOBBSEFEJHJUBMF
tv-bron.
Laad de ontvanger identicatie. Dit proces kan
G
een paar minuten duren. U kunt de EXIT knop
indrukken om de download te stoppen en uw
TV zal dan terugschakelen naar de DTV bron.

Aan de slag
NL-19 Digitale LCD/LED LCD-Televisie Gebruiksaanwijzing
100%
15%
Press EXIT to cancel download
Updating in progress - Do not turn off the TV
8BOOFFSIFUEPXOMPBEFOWPMUPPJEJTXPSEUEFH
televisie op de brandmodus ingesteld en gaat het
indicatielampje aan. Het vierde menu rechts wordt
weergegeven.
Het TV apparaat schakelt terug naar de DTV bron
wanneer de "Upgrade" volledig is uitgevoerd.
DE TELEVISIE GEBRUIKEN
Het televisiekanaal selecteren
Met de nummertoetsen Voer het kanaalnummer in A
met de nummertoetsen op de afstandsbediening.
Met de knop
B P+/P-
Druk op de knop P+/P- om een kanaalnummer te
selecteren.
Het volume aanpassen
Druk op de knop V+/V- op de afstandsbediening of aan
de zijkant van de televisie om het volume aan te passen.
CH.LIST-functie
Druk op de knop CH.LIST op de afstandsbediening om
het menu Channel List (Kanaallijst) weer te geven en
druk op ź om het te openen.
Druk op Ÿź om het kanaal te selecteren en op OK om
uw keuze te bevestigen.
DE BEELDINSTELLINGEN
WIJZIGEN
Aangepast beeld instellen
Druk op de knop A MENU.
Druk op B ŻŹ om het menu Picture (Beeld) te
selecteren en op ź om het te openen.
Druk op
C Ÿź om de optie te selecteren die u wilt
aanpassen.
Druk op
D ŻŹ om de geselecteerde optie aan te
passen.
"MTVVXLFV[FIFCUHFNBBLUESVLUVPQ
E EXIT om
terug te keren naar de normale weergave of op
MENU om naar het vorige menu terug te keren.
Contrast (Contrast)V
Hiermee wordt de helderheid van lichte delen in
IFUCFFMEWFSTUFSLUNBBSCMJKWFOEPOLFSFEFMFO
ongewijzigd.
Brightness (Helderheid)V
Hiermee wordt de helderheid van het gehele beeld
aangepast; dit beïnvloedt vooral de donkere delen
van het beeld.
Colour (Kleur)V
Hiermee kunt u het verzadigingsniveau van de
kleuren aan uw persoonlijke voorkeuren aanpassen.
Sharpness (Scherpte)V
Hiermee wordt de scherpte van kleine details in het
beeld aangepast.
Tint (Tint)V
Hiermee kunt u het kleurenpalet (de tint) van het
beeld aanpassen.
Opmerking
de functie Tint is alleen in NTSC-modus O
beschikbaar.

Aan de slag
Digitale LCD/LED LCD-Televisie Gebruiksaanwijzing NL-20
Mode (Modus)V
Hiermee kunt u de beeldmodus selecteren.
Kies afhankelijk van het kanaal voor Standard
4UBOEBBSEMild.JMEUser (Gebruiker) of Vivid
(Levendig).
U kunt de gewenste modus snel selecteren met de
knop P.MODE op de afstandsbediening.
Colour Temperature (Kleurtemperatuur)V
Hiermee kunt u de kleurtemperatuur van Warm
(rood) tot CoolLPFMCMBVXBBOVXQFSTPPOMJKLF
voorkeuren aanpassen.
Selecteer Cool om de witte kleur een blauwe tint
UFHFWFONormal (Normaal) om de witte kleur een
neutrale tint te geven en Warm om de witte kleur een
rode tint te geven.
Noise Reduction (Ruisonderdrukking)V
Hiermee wordt de beeldruis van de televisie
weggefilterd en beperkt en wordt de beeldkwaliteit
verbeterd wanneer zwakke videosignalen worden
ontvangen.
Kies afhankelijk van de beeldruis O6JULow-BBH
Standard (Standaard) of High (Hoog).
Reset (Herstellen)V
Hiermee worden de instellingen teruggezet op de
standaardwaarden
DE GELUIDSINSTELLINGEN
WIJZIGEN
Aangepast geluid instellen
Druk op de knop A MENU.
Druk op B ŻŹ om het menu Sound (Geluid) te
selecteren en op ź om het te openen.
Druk op
C Ÿź om de optie te selecteren die u wilt
aanpassen.
Druk op
D ŻŹ om de geselecteerde optie aan te
passen.
"MTVVXLFV[FIFCUHFNBBLUESVLUVPQ
E EXIT om
terug te keren naar de normale weergave of op
MENU om naar het vorige menu terug te keren.
Balance (Balans)V
Hiermee kunt het volume van de rechter- en
linkerluidspreker aanpassen om het beste
stereogeluid voor uw luisterpositie te verkrijgen.
Mode (Modus)V
Hiermee kunt u de geluidsmodus selecteren.
Druk op ŻŹPNBGIBOLFMJKLWBOIFULBOBBMWPPS
Standard4UBOEBBSEMusic.V[JFLTheater
(Theater) of User (Gebruiker) te kiezen. U kunt de
gewenste modus snel selecteren met de knop
S.MODE op de afstandsbediening.
AVL (Automatische volumeaanpassing)V
Hiermee worden de verschillen in volume tussen
zenders beperkt.
SRS TS XTV
Hiermee wordt het woofervolume geregeld.
Druk op Ÿź om SRS TS XT te selecteren.
Druk op ŻŹ om SRS TS XT op OFF (UIT) of ON (AAN)
in te stellen.
Digital Audio Output (Digitale audio-uitvoer)V
Hiermee wordt de digitale audio-uitvoer geregeld.
Druk op Ÿź om Digital Audio Output te selecteren.
Druk op ŻŹ om Digital Audio Output op OFF6*5
PCM of RAW in te stellen.
EqualizerV
Deze geluidsinstelling kunt u aan uw persoonlijke
voorkeuren aanpassen.
Audio Languages (Audiotalen)V
Druk op Ÿź om de optie Primary (Primair) of
Secondary (Secundair) te selecteren en druk
vervolgens op ŻŹ om de gewenste talen te
selecteren.

Aan de slag
NL-21 Digitale LCD/LED LCD-Televisie Gebruiksaanwijzing
Druk op ź om de optie Close (Sluiten) te selecteren
en op OK om uw keuze te bevestigen.
Opmerking
De functie Audio Languages is alleen O
beschikbaar in digitale tv-modus.
Reset (Herstellen)V
Hiermee worden de standaardmenu-instellingen
hersteld.
FUNCTIE-INSTELLINGEN
Druk op de knop A MENU.
Druk op B ŻŹ om het menu Sound (Geluid) te
selecteren en op ź om het te openen.
Druk op C Ÿź om de optie te selecteren die u wilt
aanpassen.
Druk op
D ŻŹ om de geselecteerde optie aan te
passen.
"MTVVXLFV[FIFCUHFNBBLUESVLUVPQ
E EXIT om
terug te keren naar de normale weergave of op
MENU om naar het vorige menu terug te keren.
Language (Taal)V
Hiermee selecteert u de menutaal.
Subtitle Languages (Taal ondertiteling)V
Hiermee selecteert u de taal van de ondertiteling.
Display Mode (Weergavemodus)V
Hiermee stelt u het beeldformaat in. Druk op ŻŹ
PN;PPN;PPN8JEF#SFFEPG"VUP
(Automatisch) te selecteren. U kunt de gewenste
modus snel selecteren met de knop SCREEN op de
afstandsbediening.
4:3t
Kies 4:3 als u een beeld met een originele breedte-
IPPHUFWFSIPVEJOHWBOXJMUNFUFFOHSJK[FCBML
aan de rechter- en linkerzijde van het beeld.
16:9t
Kies 16:9 wanneer u het beeld in horizontale
richting en in een lineaire verhouding wilt
aanpassen zodat het gehele scherm wordt gevuld.
Zoom1t
Kies Zoom1 wanneer u het beeld ongewijzigd
wilt laten. De bovenste en onderste delen van het
beeld worden dan echter afgesneden.
Zoom2t
Kies Zoom2XBOOFFSVIFUCFFMEXJMUBBOQBTTFO
zowel in verticale richting uitvergroot als
afgesneden. Dit beeld vormt een middenweg
tussen een aangepast en een volledig gevuld
scherm.
Wide (Breed)t
Kies Wide wanneer u het beeld in een niet-lineaire
WFSIPVEJOHXJMUBBOQBTTFOEBUXJM[FHHFO
uitvergroot aan de bovenkant en ongewijzigd aan
de onderkant.
Blue Screen (Blauw scherm)V
Hiermee kunt u de achtergrondkleur van lettertekens
selecteren.
Opmerking
De functie Blue Screen is alleen beschikbaar in O
de analoge tv-modus.
RecorderV

Aan de slag
Digitale LCD/LED LCD-Televisie Gebruiksaanwijzing NL-22
Met deze functie kunt u digitale tv-programma's
opnemen. Meer informatie over deze functie vindt u
op pag.30-32.
SCART-ingangV
Questa funzione non è abilitata nei 32/40 pollici e non
è disponibile nei modelli 19/22 e 24 pollici.
OSD Time Out (Time-out schermmenu's)V
Hiermee stelt u in hoe lang de menu's op het scherm
worden weergegeven. Druk op ŻŹ om de gewenste
tijd in te stellen. De tijd wordt in de volgende
WPMHPSEFJOHFTUFME0ò6JUTFDTFDTFD
TFDTFD
OSD Transparency (Transparantie V
schermmenu's)
U kunt de transparantie van de achtergrond van de
schermmenu's in de volgende volgorde instellen: O
6JU
Reset (Herstellen)V
Hiermee worden de instellingen teruggezet op de
standaardwaarden.
TIJDINSTELLINGEN
Clock (Klok)V
Druk op de knop A MENU.
Druk op
B ŻŹ om het menu Time (Tijd) te
selecteren en op ź om het te openen.
Druk op
C Ÿź om de optie Clock (Klok) te
selecteren en op Ź om de klok in te stellen.
Druk op Ÿź om uren of minuten te selecteren
en op ŻŹ om de instelling aan te passen.
DateV
Druk op de knop A MENU.
Druk op
B ŻŹ om het menu Time (Tijd) te
selecteren en op ź om het te openen.
Druk op C Ÿź om de optie Date (Datum) te
selecteren en op Ź om de datum in te stellen.
Druk op Ÿź om de optie te selecteren en op
ŻŹ om de instelling aan te passen.
Opmerking
In digitale tv-modus zijn de tijdgegevens O
afkomstig van het signaal. Daardoor kunnen de
tijd en de datum niet worden gewijzigd.
"MTVEFUJKEXJMUXJK[JHFOTDIBLFMUVEFUFMFWJTJF
uit in de analoge tv-modus en schakelt u
vervolgens de televisie opnieuw in.
O Time (Tijdstip uit)V
Druk op de knop A MENU.
Druk op
B Ź om het menu Time (Tijd) te selecteren
en op Ź om het te openen.

Aan de slag
NL-23 Digitale LCD/LED LCD-Televisie Gebruiksaanwijzing
Druk op C Ÿź om de optie O Time (Tijdstip uit) te
selecteren en op Ź om het tijdstip in te stellen.
Druk op Ÿź om de optie Repeat (Herhalen) te
selecteren en op Ź om deze in te schakelen.
Druk op Ÿź om uren of minuten te selecteren.
Druk op Ź om de instelling aan te passen.
Als het tijdstip wordt bereikt waarop de televisie
NPFUXPSEFOVJUHFTDIBLFMETDIBLFMUEFUFMFWJTJF
over naar stand-bymodus.
On Time (Tijdstip aan) V
Druk op de knop A MENU.
Druk op
B ŻŹ om het menu Time (Tijd) te
selecteren en op ź om het te openen.
Druk op C Ÿź om de optie On Time (Tijdstip aan)
te selecteren en op Ź om het tijdstip in te stellen.
Druk op Ÿź om de optie Repeat (Herhalen) te
selecteren en op Ź om deze in te schakelen.
Druk op Ÿź om uren of minuten te selecteren.
Druk op ŻŹ om de instelling aan te passen.
Als het tijdstip wordt bereikt waarop de
UFMFWJTJFNPFUXPSEFOJOHFTDIBLFMEHBBUEF[F
automatisch aan.
Sleep (Slaap)V
De slaaptimer zorgt ervoor dat de televisie
automatisch wordt uitgeschakeld na een vooraf
ingestelde tijd (5 tot 240 minuten).
Druk op de knop
A MENU en op ŻŹ om het menu
Time (Tijd) te selecteren.
Druk op
B ź om het menu te openen en op Ÿź
om de optie Sleep (Slaap) te selecteren.
Druk op
C ŻŹ en selecteer vervolgens met ŻŹ
het aantal minuten. Maak een keuze uit O (Uit),
5 min., 10 min., 15 min., 30 min., 45 min.,
60 min., 90 min., 120 min., 180 min. of 240 min.
"MTVVXLFV[FIFCUHFNBBLUESVLUVPQD EXIT om
terug te keren naar de televisieweergave of op
MENU om naar het vorige menu terug te keren.
De tijd begint af te lopen vanaf het geselecteerde
aantal minuten.
Time Zone (Tijdzone)V
Druk op de knop A MENU.
Druk op
B ŻŹ om het menu Time (Tijd) te
selecteren en op ź om het te openen.
Druk op
C Ÿź om de optie Time Zone (Tijdzone)
te selecteren.
Druk op
D ŻŹ om de juiste tijdzone te selecteren.
5. Druk op de knop
E MENU om op te slaan en af te
sluiten.
HET VERGRENDELINGSMENU
INSTELLEN

Aan de slag
Digitale LCD/LED LCD-Televisie Gebruiksaanwijzing NL-24
.FUEF[FGVODUJFLVOUVEFUVOFSIFULBOBBMIFU
bronvolume enz. instellen. Druk op MENU op de
afstandsbediening en druk op ŻŹ om het menu
Lock (Vergrendeling) te selecteren. Druk op ź om het
submenu te openen; daarvoor moet u een wachtwoord
opgeven. Het eerste wachtwoord van de televisie is
"MTVVXXBDIUXPPSEWFSHFUFOCFOULVOUVBMUJKE
9443 invoeren om verder te gaan.
CHANGE PASSWORD (Wachtwoord wijzigen)V
Druk op A Ÿź om de optie Change Password
(Wachtwoord wijzigen) te selecteren. Druk op Ź
om het submenu te openen.
/BEBUVEFWJFSDJKGFSTIFCUJOHFWPFSENPFUVB
deze nogmaals opgeven.
Vervolgens wordt uw nieuwe wachtwoord
automatisch opgeslagen.
CHILD LOCK (Kinderslot)V
Druk op Ÿź om de optie Child Lock (Kinderslot) te
selecteren.
Druk op ŻŹ om de modus On (Aan) of O (Uit) te
TFMFDUFSFO"MTV0OTFMFDUFFSUXPSEUIFULJOEFSTMPU
automatisch ingeschakeld. In dat geval wordt op
het scherm Child Lock weergegeven als op de knop
Child Lock (op de televisie) wordt gedrukt. Dit kan
worden gewist door op de knop MENU te drukken.
Vijf seconden nadat de laatste keer op een knop is
HFESVLUWFSEXJKOFOEFTDIFSNNFOVhTBVUPNBUJTDI
De modus Child Lock kan opnieuw worden
opgeroepen door het menu Lock Set (Slot instellen) te
openen en Child Lock op On of O in te stellen.
Tuning Lock (Afstemming vergrendelen)V
Druk op Ÿź om de optie Tuner Lock (Afstemming
vergrendelen) te selecteren en op ŻŹ om de
modus On (Aan) of O (Uit) in te stellen. (Als deze
PQUJFXPSEUJOHFTDIBLFME[JKOTPNNJHFGVODUJFT
zoals de zoekfunctie niet beschikbaar. Als het menu
5VOJOH"GTUFNNFOXPSEUHFTFMFDUFFSEXPSEU
op het scherm Tuner Lock weergegeven. Als u het
NFOV5VOJOHXJMUHFCSVJLFONPFUVIFUNFOV-PDL
(Vergrendeling) openen om Tuner Lock op O in te
stellen of de vergrendeling op te heen.)
Channel No. (Kanaalnummer)V
Met de optie Channel No. (Kanaalnummer) kan een
vooraf ingesteld kanaal worden geprogrammeerd.
Druk op Ÿź om Preset Channel (Kanaal vooraf
instellen) te selecteren. Druk op ŻŹ om het
kanaalnummer te selecteren.
Source Set (Bron instellen)V
Met Source Set (Bron instellen) kunt u de startbron
instellen.
Druk op ŻŹPN0ò6JU%5757"74$"35
4$"3547JEFP$PNQPOFOU$PNQPOFOU1$
)%.*)%.*)%.*PG64#UFTFMFDUFSFO7PPS
sommige modellen is ook de optie DVD beschikbaar.
Source Lock (Bron vergrendelen)V
Met Source Lock (Bron vergrendelen) bepaalt u of
JOWPFSWBOFYUFSOFCSPOOFOJTUPFHFTUBBOPGOJFU
Druk op ŻŹ om deze optie op On (Aan) of O (Uit) in
UFTUFMMFO"MT4PVSDF-PDLXPSEUJOHFTDIBLFMEXPSEU
de bron van de televisie weergegeven. Als u nu op de
knop SOURCEESVLUTDIBLFMUEFUFMFWJTJFPWFSOBBS
de bijbehorende bron en wordt aangegeven dat de
bron is vergrendeld.
Max Volume (Maximaal volume)V
Druk op de knop ŸźPNEFPQUJF.BY7PMVNF
.BYJNBBMWPMVNFUFTFMFDUFSFO%SVLPQŻŹ om
een waarde tussen 0 en 100 in te stellen. Als u een
NBYJNVNXBBSEFIFCUJOHFTUFMELBOIFUWPMVNF
deze waarde niet overschrijden. Als het huidige

Aan de slag
NL-25 Digitale LCD/LED LCD-Televisie Gebruiksaanwijzing
WPMVNFEFNBYJNVNXBBSEFPWFSTDISJKEU[BMEJU
WPMVNFOBBSIFUJOHFTUFMEFNBYJNBMFWPMVNF
worden verlaagd. Als het huidige volume lager is dan
IFUJOHFTUFMEFNBYJNBMFWPMVNFCMJKGUIFUWPMVNF
ongewijzigd.
Initial Volume (Beginvolume)V
"MTVFFOCFHJOWPMVNFJOTUFMUXPSEUEJUPQHFTMBHFO
en is dit het volume wanneer u de televisie de
volgende keer inschakelt.
Parental Lock (Oudervergrendeling)V
Druk op Ÿź om de optie Parental Lock
(Oudervergendeling) te selecteren. Druk op ŻŹ
om O (Uit) te selecteren of 4-18 om de leeftijd te
beperken van kinderen die televisie mogen kijken.
Clear Lock (Vergrendeling opheen)V
Druk op Ÿź om de modus Unlock (Vergrendeling
opheen) te selecteren. Druk op ŻŹ om de
vergrendeling van alle instellingen op te heen en
alle vergrendelingsopties op O (Uit) in te stellen; het
NBYJNBMFWPMVNFXPSEUXFFSPQJOHFTUFME
SNELMENUWEERGAVE
SUBTITLE (Ondertiteling)V
Druk op de knop A SUBTITLE op de
afstandsbediening om het menu Subtitle
Languages (Talen ondertiteling) weer te geven en
druk op ź om het te openen.
Druk op B Ÿź om de optie te selecteren en op OK
om uw keuze te bevestigen. U kunt op elk gewenst
moment op EXIT drukken om de wijzigingen
ongedaan te maken.
Opmerking
Het menu Subtitle Languages wordt alleen in O
de digitale tv-modus weergegeven als u op de
knop SUBTITLE op de afstandsbediening drukt.
CH.LISTV
Druk op de knop A CH.LIST op de
afstandsbediening om het menu Channel List
(Kanaallijst) weer te geven.
Druk op B Ÿź om het kanaal te selecteren en
op OK om uw keuze te bevestigen. U kunt op
elk gewenst moment op EXIT drukken om de
wijzigingen ongedaan te maken.
GUIDEV
Druk op de knop GUIDE op de afstandsbediening
om het menu Program Guide (Televisiegids) weer te
geven.
Druk op ŸźŻŹ om het kanaal te selecteren. U
kunt op elk gewenst moment op EXIT drukken om de
wijzigingen ongedaan te maken.
Opmerking
Alleen beschikbaar in de digitale tv-modus.O
FAVV
Druk op de knop FAV op de afstandsbediening om
het menu Favourite List (Favorietenlijst) weer te
geven.
Druk op Ÿź om een kanaal te selecteren en op OK
om uw keuze te bevestigen.
U kunt op elk gewenst moment op EXIT drukken om
de wijzigingen ongedaan te maken.

Aan de slag
Digitale LCD/LED LCD-Televisie Gebruiksaanwijzing NL-26
INFOV
Druk op de knop INFO op de afstandsbediening om
informatie over het huidige kanaal weer te geven.
U kunt op elk gewenst moment op EXIT drukken om
de wijzigingen ongedaan te maken.
AUDIO/I/IIV
Druk op de knop AUDIO op de afstandsbediening
om het menu Audio Languages (Audiotalen) weer te
geven.
Druk op Ÿź om de gewenste instellingen te
selecteren en op OK om uw keuze te bevestigen.
U kunt op elk gewenst moment op EXIT drukken om
de wijzigingen ongedaan te maken.
Opmerking
Het menu Audio Languages wordt alleen in O
de digitale tv-modus weergegeven als u op de
knop AUDIO op de afstandsbediening drukt.
WEERGAVE SNELMENU
Geluid uitzettenV
"MTVPQPNHFWJOHTHFMVJENPFUMFUUFOXPSEUHFCFME
PGCF[PFLIFCULVOUVIFUHFMVJEPQFFOWPVEJHF
wijze uitzetten.
Druk op de knop A MUTE op de afstandsbediening
om het geluid van de televisie uit te schakelen. Dit
wordt onderaan het scherm aangegeven.
"MTVIFUHFMVJEXFFSXJMUJOTDIBLFMFOESVLUV
B
opnieuw op de knop MUTE of op V+.
Snel van kanaal wisselenV
Met deze functie kunt u snel naar het laatst bekeken
kanaal terugkeren. Druk op de knop Q.VIEW en de
UFMFWJTJFLFFSUUFSVHOBBSEFCSPOWBOEFUFMFWJTJF
tenzij de bron usb of dvd is.
Stel dat u nu naar kanaal 18 kijkt en daarvóór naar
A
kanaal 8 hebt gekeken (zie afbeelding).
Als u wilt terugkeren naar het laatst bekeken kanaal B
ESVLUVTJNQFMXFHPQEFLOPQQ.VIEW.
Als u vervolgens wilt terugkeren naar kanaal C
ESVLUVPQOJFVXPQEFLOPQ;PLVOUVPQ
eenvoudige wijze wisselen tussen het huidige
kanaal en het daarvoor gebruikte kanaal.

De functies gebruiken
NL-27 Digitale LCD/LED LCD-Televisie Gebruiksaanwijzing
De functies gebruiken
Teletekstfuncties
Teletekst is een informatiesysteem dat door bepaalde
kanalen wordt uitgezonden en als een krant kan worden
gelezen. Daarnaast biedt teletekst ondertiteling voor
mensen met gehoorproblemen of kijkers die de taal
XBBSJOFFOQSPHSBNNBXPSEUVJUHF[POEFOOJFUNBDIUJH
[JKOLBCFMOFUXFSLFOTBUFMMJFU[FOEFSTFO[
Opmerking
mogelijk werken de teletekstknoppen ook O
wanneer er geen teletekstsignaal is; in dat geval
wordt er geen teletekst weergegeven.
Teletekst
TeletekstfunctiesV
Druk op de knop op de afstandsbediening
om teletekst te selecteren. Als u teletekst wilt
VJUTDIBLFMFOESVLUVPQOJFVXPQEF[FLOPQ
Niet alle menufuncties zijn in de teletekstmodus
beschikbaar. Slechts enkele directe knopfuncties zijn
JOUFMFUFLTUNPEVTCFTDIJLCBBSOBNFMJKL
Volumeaanpassingt
Geluid uitzettent
Pagina omhoog/omlaagV
Gebruik de knoppen P+ en P- om naar de volgende of
de vorige pagina te gaan.
Paginanummers invoerenV
Om een teletekstpagina te selecteren voert u het
paginanummer in met de nummertoetsen op de
afstandsbediening of drukt u op de knop P+ of P- of
de gekleurde sneltoetsen.
MixmodusV
Als u het televisiebeeld wilt bekijken terwijl u
UFMFUFLTUHFCSVJLUESVLUVPQEFLOPQ
op de
afstandsbediening. De teletekstgegevens worden dan
over het televisiebeeld weergegeven. Druk opnieuw
op deze knop om naar de volledige tekstweergave
terug te keren.
INDEXV
Druk op de knop INDEXPNOBBSEFJOEFYQBHJOBWBO
teletekst te gaan.
Taal wijzigenV
Druk op de knop om oosterse of westerse tekens in
teletekst te gebruiken.
StilzettenV
Druk op de knop om te voorkomen dat de
teletekstpagina automatisch wordt bijgewerkt. Deze
functie is zeer handig wanneer één paginanummer
meerdere teletekstpagina's of –gegevens bevat.
FormaatV
Druk op de knop om te wisselen tussen volledige
TDIFSNXFFSHBWFXFFSHBWFPQEFCPWFOTUFIFMGUWBO
het scherm en weergave op de onderste helft van
het scherm. Deze functie is zeer handig omdat de
weergave daarmee wordt uitvergroot en lettertekens
gemakkelijker te lezen zijn.

De functies gebruiken
Digitale LCD/LED LCD-Televisie Gebruiksaanwijzing NL-28
OnthullenV
Druk op de knop om verborgen tekst weer te
geven. Deze functie wordt bijvoorbeeld gebruikt om
antwoorden op interactieve puzzels op teletekst te
onthullen.
TijdV
Als u in de normale televisiemodus op de knop
ESVLUXPSEUEFUFMFUFLTUUJKEFOLFMFTFDPOEFOJOEF
rechterbovenhoek weergegeven.
Gekleurde sneltoetsenV
Met de gekleurde sneltoetsen kunnen de vier meest
gebruikte pagina's worden weergegeven waarvan de
zender denkt dat u deze mogelijk als volgende wilt
kiezen. Druk op de knop met dezelfde kleur als de
link onderaan de teletekstpagina om direct naar de
desbetreende pagina te gaan.
SubcodeV
Druk op de knop om de vier cijfers van een
secundaire pagina in te voeren.
USB-MODUS
Opmerking
De afbeeldingen in dit hoofdstuk zijn schematisch O
en dienen uitsluitend ter referentie; raadpleeg
indien nodig het werkelijke product.
HET USB-APPARAAT GEBRUIKEN
Ondersteunde bestandsindelingen:A
Foto: *.jpgt
Muziek: *.mp3t
Film: *.avit
5FLTUUYUt
Opmerking
Bepaalde bestandscoderingen hebben mogelijk O
tot gevolg dat sommige bestanden niet kunnen
worden gelezen.
Ondersteunde media:
B
De televisie ondersteunt media met het
bestandssysteem FAT32 die het Mass Storage
1SPUPDPMPOEFSTUFVOFO[PBMTFFOBBOUBMVTC
TDIJKWFOFYUFSOFIBSEFTDIJKWFOFO.1TQFMFST
Als usb-media niet worden herkend omdat het
CFTUBOETTZTUFFNOJFUXPSEUPOEFSTUFVOEEJFOUV
deze om te zetten naar het bestandssysteem FAT32.
Voor probleemloos afspelen dient u de volgende
C
aanwijzingen in acht te nemen:
De coderingssnelheid van het bestand moet lager t
dan 300KB/sec. zijn.
Aangezien de overdrachtsafstand van usb-t
TJHOBMFOCFQFSLUJTSBEFOXFVBBOHFFOVTC
verbindingskabel te gebruiken; mocht dit toch
OPPE[BLFMJKL[JKOHFCSVJLEBOFFOLBCFMEJFOJFU
langer is dan 1m;
Gebruik usb-media die hoge snelheden t
aankunnen en voldoen aan Full Speed Interface
Standard USB 2.0. Als usb-media worden gebruikt
die voldoen aan Full Speed Interface Standard
64#LBOEJUUPUQSPCMFNFOMFJEFOCJKIFU
afspelen.
Usb-media aansluiten/ontkoppelen
Druk op de knop A SOURCE op de afstandsbediening
om de optie USB te selecteren.
Sluit de usb-media 2 sec. na het starten van het
B
systeem aan op de bijbehorende usb-interface.
8BOOFFSVIFUTZTUFFNNFOVIFCUHFPQFOE
C
drukt u op ŻŹ op de afstandsbediening om de
benodigde usb-bestanden te selecteren. Druk op
OK om uw keuze te bevestigen en de bijbehorende
bestandslijst in te voeren.
Druk op
D Ÿź op de afstandsbediening om het
gewenste bestand te selecteren en druk op OK om
uw keuze te bevestigen.

De functies gebruiken
NL-29 Digitale LCD/LED LCD-Televisie Gebruiksaanwijzing
Als u het systeem voor het afspelen van streaming E
NFEJBXJMUBGTMVJUFOPNUFMFWJTJFUFLJKLFONPFUV
op de knop BACK drukken om eerst terug te keren
naar het hoofdmenu voor de streaming media (dit
om de media te beschermen). Vervolgens drukt u op
SOURCE en selecteert u TV om terug te keren naar
de televisiemodus.
Opmerking
"MTEFCSPO64#JTXPSEUIFUTDIFSN[XBSUBMTVPQEFQ
knop MENUESVLUUFO[JKFSGPUPhTXPSEFOXFFSHFHFWFO
of er een film wordt afgespeeld.
"MTVTCCFTUBOEFOXPSEFOBGHFTQFFMELVOUVQ
terugkeren naar het usb-hoofdmenu door een aantal
keren op de knop BACK te drukken. Pas dan kunt u
de signaalbron wijzigen door opnieuw op SOURCE te
drukken.
Verwijder usb-media niet terwijl het aangesloten usb-Q
opslagapparaat nog ingeschakeld is. Als het apparaat
QMPUTFMJOHXPSEUMPTHFLPQQFMELBOEJUUPUCFTDIBEJHJOH
van de opgeslagen bestanden of het apparaat leiden.
Het usb-apparaat gebruiken
Druk op A Ÿź om door het menu of submenu te
bladeren en de gewenste optie te selecteren.
Druk op
B OK om uw keuze te bevestigen.
Druk op FWD om snel vooruit te spoelen en REV om
C
snel terug te spoelen.
Druk op
D PLAY/PAUSE om af te spelen. Druk er
nogmaals op om het afspelen te onderbreken.
Druk op
E ZOOM om foto's te vergroten; wanneer de
GPUPJTVJUWFSHSPPUESVLUVPQŻŹ en Ÿź om deze
te verplaatsen.
Druk op
F STOP Ŷ om het afspelen te beëindigen
of naar het vorige menu terug te keren. Druk een
aantal keren op BACK om terug te keren naar het
hoofdmenu.
Opmerking
U kunt tegelijkertijd foto's weergeven en O
muziekbestanden afspelen.
Foto's afspelen
8BOOFFSIFUVTCIPPGENFOVJTHFPQFOEESVLUVA
op ŻŹ om de optie PHOTO (FOTO) te selecteren.
Druk op
B OK om uw keuze te bevestigen en de lijst
met fotobestanden te openen.
Druk op C Ÿź om de foto's te selecteren die u wilt
afspelen en druk op OK om uw keuze te bevestigen.
Druk vervolgens op PLAY/PAUSE om de foto's af te
spelen.
"MTVEFHFUPPOEFGPUPXJMUTUJM[FUUFOESVLUV
D
opnieuw op PLAY/PAUSE.
Druk op ZOOM om de foto te vergroten; wanneer de
GPUPJTVJUWFSHSPPUESVLUVPQŻŹ en Ÿź om deze
te verplaatsen.
Druk op PREV/NEXT om de vorige of de volgende
foto te selecteren.
Druk op Ÿź om de foto te draaien.
Druk op STOP Ŷ om het afspelen van de foto's te
beëindigen.
Druk een aantal keren op
E BACK om het afspelen af
te sluiten.
Opmerking
De menuweergave is afhankelijk van de fotonaam O
FOIFUBBOUBMQJYFMTWBOVXNFEJB
Muziek afspelen
8BOOFFSIFUVTCIPPGENFOVJTHFPQFOEESVLUVA
op ŻŹ om de optie MUSIC (MUZIEK) te selecteren.
Druk op
B OK om uw keuze te bevestigen en de lijst
met muziekbestanden te openen.

De functies gebruiken
Digitale LCD/LED LCD-Televisie Gebruiksaanwijzing NL-30
Druk op C Ÿź en OK om de muziek te selecteren die
u wilt afspelen en druk vervolgens op PLAY/PAUSE
om de muziek af te spelen.
Druk op FWD om de muziek snel vooruit te spoelen
en REV om de muziek snel terug te spoelen.
Druk op PREV/NEXT om het vorige of het volgende
muziekbestand te selecteren.
Druk op STOP Ŷ om het afspelen van de muziek te
beëindigen wanneer het menu voor het afspelen
van muziek wordt weergegeven.
Druk een aantal keren op
D BACK om terug te keren
naar het hoofdmenu.
Opmerking
U kunt tegelijkertijd muziekbestanden en foto's O
afspelen.
Films afspelen
8BOOFFSIFUVTCIPPGENFOVJTHFPQFOEESVLUVPQA
ŻŹ om de optie MOVIE (FILM) te selecteren.
Druk op
B OK om uw keuze te bevestigen en de lijst
met filmbestanden te openen.
Druk op C Ÿź en OK om de film te selecteren die u
wilt afspelen en druk vervolgens op PLAY/PAUSE
om de film af te spelen.
Druk op ZOOM om het beeld te vergroten.
Druk op PREV/NEXT om de vorige of de volgende
film te selecteren.
Druk op STOP Ŷ om het afspelen van de film te
beëindigen.
Druk een aantal keren op
D BACK om het afspelen af
te sluiten.
Tekst
8BOOFFSIFUVTCIPPGENFOVJTHFPQFOEA
drukt u op ŻŹ om de optie TEXT (TEKST) te
selecteren.
Druk op B OK om uw keuze te bevestigen en de lijst
met tekstbestanden te openen.
Druk op C Ÿź en OK om de tekst te selecteren die u
wilt weergeven en druk vervolgens op PLAY/PAUSE
om de tekst weer te geven.
Druk op PREV/NEXT om de vorige of de volgende
tekst te selecteren.
Druk een aantal keren op
D BACK om de tekstmodus
af te sluiten.
Opmerking
U kunt tegelijkertijd muziekbestanden afspelen en O
tekst weergeven.
De externe usb-schijf voor
opnamen gebruiken
Sluit de usb-media met bestandssysteem FAT32 aan A
op de USB1-ingang. Druk vervolgens op de knop
MENU.

De functies gebruiken
NL-31 Digitale LCD/LED LCD-Televisie Gebruiksaanwijzing
Opmerking
Alleen USB1 is beschikbaar voor opnamen.O
Druk op
B ŻŹ om het menu Function (Functie) te
selecteren en op ź om het te openen.
Druk op
C Ÿź om de optie Recorder te selecteren en
op OK om het submenu te openen.
Druk op
D Ÿź om de optie Select Disk (Schijf
selecteren) te selecteren en op OK om uw keuze
te bevestigen. Als uw apparaat meerdere schijven
IFFGUESVLUVPQŻŹ om een schijf te selecteren.
Druk op
E Ÿź om de optie Format (Formatteren) te
selecteren en op Ź om deze te bevestigen. Druk
op ŻŹ om aan te geven hoeveel geheugenruimte
u wilt formatteren. Druk op OK om de usb-schijf te
formatteren.
Opmerking
Het gehele apparaat wordt geformatteerd en als O
EFHFIFVHFOSVJNUFNFFSEBO(#CFESBBHULVOU
u de omvang instellen die voor timeshiften wordt
gebruikt.
)FUGPSNBUUFSFOLBOFOLFMFNJOVUFOEVSFO
F
afhankelijk van de geheugenruimte. Druk op ŻŹ
om de optie Time Shift Disk Size (Geheugenruimte
UJNFTIJGUFOUFTFMFDUFSFO%FNBYJNBMFPNWBOH
voor timeshiften is 8GB. Druk vervolgens op OK om
op te slaan.
Opmerking
Als u de volledige geheugenruimte voor O
UJNFTIJGUFOTFMFDUFFSULVOUVHFFOPQOBNFO
maken.
Wacht tot de systeemcontrole is voltooid.
G
Vervolgens kunt u de snelheidsgegevens bekijken.
Opmerking
U hoeft het apparaat alleen te formatteren als u O
het voor de eerste keer gebruikt om op te nemen.
De minimale ruimte die voor opnamen vereist O
JTCFESBBHU(#&SLBONBYJNBBM5#XPSEFO
HFGPSNBUUFFSE%FNBYJNBMFNVMUJQBSUJUJF
bedraagt 16 partities; er is één partitie per keer
actief.
Bitrate:O
#JUSBUFBQQBSBBU.#TFD3&$JTHFTDIJLUt
voor HD streaming
#JUSBUFBQQBSBBU.#TFD3&$JTHFTDIJLUt
voor SD streaming
Bitrate apparaat < 600KB/sec. REC is niet t
geschikt voor REC
Het systeem kan niet normaal functioneren als het O
usb-apparaat een van de volgende problemen
heeft:
Het apparaat heeft een bug.t
Het apparaat wordt door een fout geblokkeerd.t
De geheugenruimte is ontoereikend.t
BELANGRIJK
Het usb-apparaat moet via uw computer als t
FAT32-systeem zijn gedefinieerd voordat u het op
de usb-ingang aansluit.

De functies gebruiken
Digitale LCD/LED LCD-Televisie Gebruiksaanwijzing NL-32
TIME SHIFT (TIMESHIFTEN)
De functie Time Shift (Timeshiften) is alleen beschikbaar
in de digitale tv-modus. Druk op PLAY/PAUSE om het
programma te onderbreken en nogmaals op PLAY/
PAUSE om het timeshift-programma af te spelen.
Druk op STOP om de timeshift-functie af te sluiten.
U kunt het timeshift-programma tijdens het afspelen
beëindigen door op STOP te drukken.
OPNEMEN
Druk op de knop A D.MENU om het lopende
programma op te nemen en nogmaals op D.MENU
of EXIT om het opnamemenu te minimaliseren.
Druk op B STOP om het opnemen te beëindigen.
Ga als volgt te werk om het opgenomen programma
C
af te spelen. Druk op INDEX om de opnamelijst op
te roepen.
Druk op Ÿź om de opgenomen inhoud te
selecteren.
Druk op Ź om de programmagegevens weer te
geven.
Druk op Ż om uw keuze ongedaan te maken.
Druk op OK of PLAY/PAUSE om het opgenomen
programma af te spelen en op STOP om het
afspelen te beëindigen.
Opmerking
"MTVIFULBOBBMXJK[JHUIFFGUEJUHFFOHFWPMHFOO
WPPSIFUPQOFNFOPQEF[FMGEFGSFRVFOUJFNBBS
wel voor het timeshiften. U kunt het opgenomen
programma niet verwijderen tijdens het afspelen.
Druk een aantal keren op O INDEX om de
programmagegevens als volgt weer te geven:
QSPHSBNNBUJUFM[FOEFSOBBNQSPHSBNNBUJKE
bestandsnaam en bestandslengte.
DE DVD-SPELER GEBRUIKEN
(alleen bepaalde modellen)
EEN DVD AFSPELENV
Druk op A SOURCE op de afstandsbediening om de
dvd-modus in te schakelen.
Plaats de dvd in de dvd-lade met het dvd-label
B
van u en het scherm afgekeerd. Er kunnen alleen
dvd's met een standaardformaat in de dvd-lade
worden geplaatst.

De functies gebruiken
NL-33 Digitale LCD/LED LCD-Televisie Gebruiksaanwijzing
De dvd wordt automatisch geladen; meestal
C
wordt er eerst een dvd-menu weergegeven.
Gebruik de knoppen
D źŸ Ź Ż om door het
dvd-menu te navigeren en de afspeeloptie te
selecteren. Druk vervolgens op PLAY/PAUSE.
EEN DVD ONDERBREKENV
Druk op A PLAY/PAUSE om het afspelen te
onderbreken. Het geluid wordt dan ook uitgezet.
Druk op
B PLAY/PAUSE om het afspelen te
hervatten.
HET AFSPELEN VAN EEN DVD BEËINDIGENV
Druk op A Ŷ om het afspelen van een dvd te
beëindigen. Het dvd-beginlogo wordt op het
scherm weergegeven.
Bij sommige schijven wordt opgeslagen op welk
B
moment het afspelen van de dvd is beëindigd.
Druk in dat geval op PLAY/PAUSE om het
afspelen vanaf dat moment te hervatten.
Druk twee keer op
C Ŷ om het afspelen geheel te
beëindigen en het geheugen te wissen.
SNEL VOORUIT- EN TERUGSPOELENV
Druk op A ŹŹ om het afspelen te versnellen.
Druk op ŻŻ om snel terug te spoelen.
Druk een aantal keren op
B ŹŹ of ŻŻ de
verschillende afspeelsnelheden te doorlopen.
Deze worden in de linkerbovenhoek van het
TDIFSNXFFSHFHFWFO99999FO
normale afspeelsnelheid.
Druk op
C PLAY/PAUSE om het normale afspelen te
hervatten.
NAAR DE VOLGENDE OF DE VORIGE SCÈNE V
SPRINGEN
Druk tijdens het afspelen op ŹŹ l om naar de
volgende scène op de schijf te springen of op l ŻŻ
om naar de vorige terug te keren.
WACHTWOORDV
De oudervergrendeling kan worden geactiveerd
door de wachtwoordmodus in te schakelen. Het
standaardwachtwoord is 1234. Als u uw wachtwoord
WFSHFUFOCFOULVOUVBMUJKE1369 invoeren om verder
te gaan.
DE ZOOMFUNCTIE GEBRUIKENV
Druk op A ZOOM om op het beeld op het scherm in
te zoomen. Druk een aantal keren op deze knop
om het beeld verder te vergroten.
Gebruik in de zoommodus de knoppen
B źŸ Ź
Ż om een ander deel van het uitvergrote beeld
op het scherm weer te geven.
ONDERTITELING INSCHAKELENV
Druk tijdens het afspelen op A SUBTITLE.
De beschikbare talen worden in de
B
linkerbovenhoek van het scherm weergegeven.
Druk een aantal keren op deze knop tot de
gewenste taal voor de ondertiteling wordt
weergegeven.
Druk een aantal keren op
C SUBTITLE tot SUBTITLE
OFF (Ondertiteling uit) wordt weergegeven om
de ondertiteling uit te schakelen.
DE HERHALINGSMODUSV
Druk één keer op REPEAT om een hoofdstuk op een
EWEUFIFSIBMFOUXFFLFFSPNEFIVJEJHFBGTQFFMUJUFM
te herhalen en drie keer om de gehele inhoud van de
dvd te herhalen.
DE CAMERAHOEK WIJZIGENV
Op sommige dvd's zijn voor sommige of alle scènes
meerdere camerahoeken beschikbaar. Druk op
ANGLE om de camerahoek te wijzigen. Mogelijke
DBNFSBIPFLFO[JKOWPPSPQ[JKWPMMFEJHFXFFSHBWFPG
buitenaanzicht.
AANVULLENDE DVD-
FUNCTIES
D.MENUV
Druk op deze knop om naar de vorige menuoptie
terug te keren.

De functies gebruiken
Digitale LCD/LED LCD-Televisie Gebruiksaanwijzing NL-34
AUDIOV
Op veel dvd's zijn meerdere soundtracks beschikbaar.
"MTVEF[FXJMUXJK[JHFOESVLUVPQAUDIO. Wacht drie
seconden voordat u opnieuw op deze knop drukt om
de beschikbare mogelijkheden te doorlopen.
TITLEV
Druk op deze knop om op sommige dvd's naar het
titelmenu terug te keren. Gebruik de knoppen ŹŻ
Ÿź om door het menu te navigeren.
SEARCHV
Druk op SEARCH en gebruik de nummertoetsen
om het gewenste hoofdstuk te selecteren. Druk
vervolgens op PLAY/PAUSE om het hoofdstuk direct
af te spelen.
PROGRAMV
Druk tijdens het afspelen op PROGRAM om direct
naar een sectie of programma op de dvd te gaan.
Druk op de nummertoetsen om het gewenste
programmanummer in te voeren. Selecteer
vervolgens START met de cursor. De desbetreende
sectie van de dvd wordt direct afgespeeld. Als u deze
GVODUJFXJMUBOOVMFSFOESVLUVPQPROGRAMHBBUV
naar STOP en drukt u op PLAY/PAUSE.
A-BV
Met A-B kunt u instellen dat een gedeelte van een
dvd wordt herhaald. Druk op A-B om het beginpunt
in te stellen en druk er nogmaals op om het eindpunt
in te stellen. Het geselecteerde gedeelte wordt
onmiddellijk herhaald.
Druk op A-B om het herhalen te annuleren.
ANGLEV
Druk op deze knop wanneer u bijvoorbeeld
TQPSUXFETUSJKEFODPODFSUFOPGUPOFFMTUVLLFO
vanuit verschillende invalshoeken wilt bekijken.
(Alleen van toepassing op dvd's met deze functie. Als
FFOEWEWBOVJUWFSTDIJMMFOEFIPFLFOJTPQHFOPNFO
kunt u een scène vanuit verschillende perspectieven
CFLJKLFOCJKWPPSCFFMEWPPSPQ[JKWPMMFEJHFXFFSHBWF
of buitenaanzicht.)
D.CALLV
Druk een aantal keren op D.CALL om verschillende
schermmenu-indicatoren voor verschillende
TDIJKGUZQFOXFFSUFHFWFO[PBMTEWEDEFO[
EEN JPEG-CD AFSPELENV
Plaats een A JPEG-cd op dezelfde wijze als een dvd
PGBVEJPDENFUIFUMBCFMWBOVBGHFLFFSE
De cd wordt geladen en op het scherm wordt een
B
menu met de inhoud van de cd weergegeven.
Gebruik
C Ÿ en ź om de map en de foto te
selecteren die u wilt bekijken en druk op
PLAY/PAUSE. De foto's op de schijf worden
achtereenvolgens als diavoorstelling getoond.
Druk tijdens de diavoorstelling op
D PLAY/PAUSE
om een foto stil te zetten.
Druk op
E ŹŹl of lŻŻ om naar de volgende of de
vorige foto te gaan.
EEN AUDIO-CD AFSPELENV
1MBBUTFFODEPQEF[FMGEFXJK[FBMTFFOEWENFUA
het label van u afgekeerd.
De cd wordt geladen en op het scherm wordt een
B
menu met de inhoud van de cd weergegeven.
Gebruik
C ź en Ÿ om de nummers te selecteren
die u wilt afspelen en druk op PLAY/PAUSEPG
druk meteen op PLAY/PAUSE om de gehele cd
vanaf het begin te beluisteren.
&FODEXPSEUPQEF[FMGEFXJK[FHFTUPQU
POEFSCSPLFOWPPSVJUFOUFSVHHFTQPFMEBMTFFO
dvd.
Met de knop REPEATLVOUVPPLFFOOVNNFS
een album of de gehele inhoud van de cd
herhalen. Druk een aantal keren op deze knop om
aan te geven wat u wilt herhalen. U kunt ook de
A-B-functie gebruiken om een gedeelte van een
nummer of de cd te herhalen.

De functies gebruiken
NL-35 Digitale LCD/LED LCD-Televisie Gebruiksaanwijzing
Referentie
PROBLEMEN OPLOSSEN
Raadpleeg in geval van problemen de volgende
mogelijke oplossingen:
Geen
beeld,
geen
geluid
Controleer of de televisie op de juiste
wijze is aangesloten.
Controleer of de stroomvoorziening
van de televisie goed functioneert.
Controleer of de stroom niet is
uitgevallen.
Leeg
scherm
Controleer of de juiste signalen
worden ingevoerd.
Stel met de afstandsbediening de
signaalinvoer in op het juiste signaal.
Schakel de televisie opnieuw in als de
stroomvoorziening is onderbroken..
Geen
geluid
Druk op MUTE om te controleren of
het geluid gedempt is. Controleer
of zich op andere kanalen hetzelfde
probleem voordoet. Druk op VOL+
om te controleren of het probleem zo
kan worden opgelost.
Slecht
geluid
Controleer of het audiosysteem
in orde is. Raadpleeg de
gebruiksaanwijzing om het bij te
stellen.
Geen
beeld op
sommige
kanalen
Controleer of het juiste kanaal is
geselecteerd. Pas de antenne aan.
Geen
kleur op
sommige
kanalen
(zwart-wit)
Controleer of zich op andere
kanalen hetzelfde probleem
voordoet. Controleer de beeld- en
audiosystemen.
Raadpleeg de desbetreende
instructies in de gebruiksaanwijzing
om de kleuren aan te passen.
Vlekken in
sommige
of alle
beelden
Controleer of de antenne op
de juiste wijze is aangesloten.
Controleer of de antenne geen
gebreken heeft.
Stel het kanaal nauwkeuriger af.
Televisie
kan niet
worden
bediend
Koppel de televisie los van het
stroomnet; sluit de televisie
na 10 seconden opnieuw aan.
Als het probleem zich blijft
WPPSEPFOOFFNUVDPOUBDU
op met een gekwalificeerde
onderhoudsdienst voor
technische ondersteuning.
Opmerking
Als het probleem niet aan de hand van O
CPWFOTUBBOEFTVHHFTUJFTLBOXPSEFOPQHFMPTU
neemt u contact op met de plaatselijke
gekwalificeerde servicedienst.
%FUFMFWJTJFNBHBMMFFOEPPSHFLXBMJGJDFFSEO
erkend onderhoudspersoneel worden
gerepareerd. Probeer nooit de achterkant van
de televisie te verwijderen; onderdelen van de
televisie staan onder hoge spanning en kunnen
levensgevaarlijke elektrische schokken of brand
veroorzaken.
De functies gebruiken / Referentie

Reference Sections
Digitale LCD/LED LCD-Televisie Gebruiksaanwijzing NL-36
v
3W+3W
8W+8W
;JFUZQFQMBBUKF
;JFUZQFQMBBUKF
-
Specificaties
Specificaties van de televisie die u zojuist hebt aangeschaft kunnen door technische innovaties van de informatie in deze
tabel afwijken.
Beeld, geluidssysteem
Audio-output
Externe ingangspoort
Stroomeisen
Stroomverbruik
Temperatuur
Vochtigheid
Accessoires
COMPONENT-ingang, PC-ingang, AV ingang(Alleen 19”/22”/24” LED LCD MODEL inch)
PC audio-ingang ,SCART antenne-ingang,HDMI-ingang, USB
S-VIDEO ingang(Alleen LCD MODEL )
In bedrijf: 5 -35°C
Opslag: -15 - 45°C
In bedrijf: 20% - 80%
Opslag: 5% - 90%
Afstandsbediening, AAA-batterij (x2), instructiehandleiding, garantie, TV-standaard,
5x schroeven voor TV-standaard (alleen voor 32/40 inch-model),componentadapter,
component-audioadapter, SCART-adapter (alleen voor 32/40 inch-model ),
knop deksel (alleen voor 32/40 inch-model)
Opmerking:
Le specifiche tecniche delle parti di questo televisore sono indicate solo come riferimento.
Potrebbero esserci differenze dovute all'aggiornamento tecnologico del prodotto.
Design e specifiche tecniche sono soggetti a modifiche senza preavviso.
24”
32”

-
 1
1
-
 2
2
-
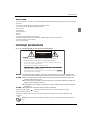 3
3
-
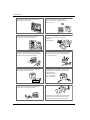 4
4
-
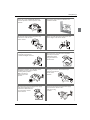 5
5
-
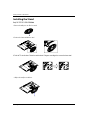 6
6
-
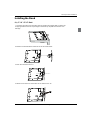 7
7
-
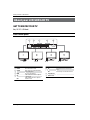 8
8
-
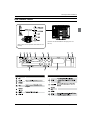 9
9
-
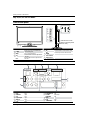 10
10
-
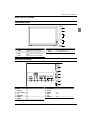 11
11
-
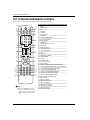 12
12
-
 13
13
-
 14
14
-
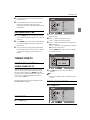 15
15
-
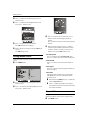 16
16
-
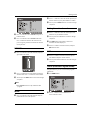 17
17
-
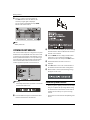 18
18
-
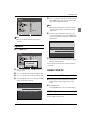 19
19
-
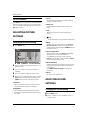 20
20
-
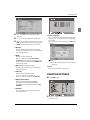 21
21
-
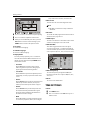 22
22
-
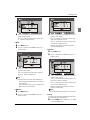 23
23
-
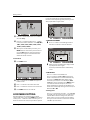 24
24
-
 25
25
-
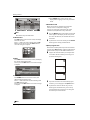 26
26
-
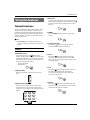 27
27
-
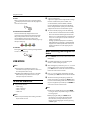 28
28
-
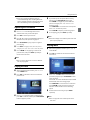 29
29
-
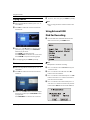 30
30
-
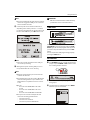 31
31
-
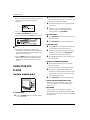 32
32
-
 33
33
-
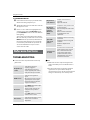 34
34
-
 35
35
-
 36
36
-
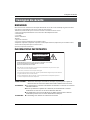 37
37
-
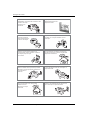 38
38
-
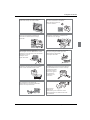 39
39
-
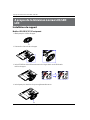 40
40
-
 41
41
-
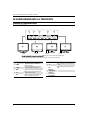 42
42
-
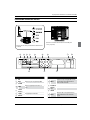 43
43
-
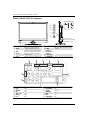 44
44
-
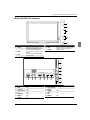 45
45
-
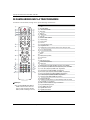 46
46
-
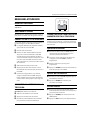 47
47
-
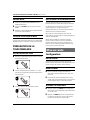 48
48
-
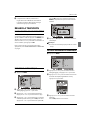 49
49
-
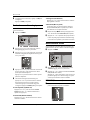 50
50
-
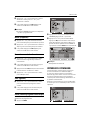 51
51
-
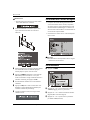 52
52
-
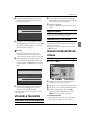 53
53
-
 54
54
-
 55
55
-
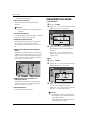 56
56
-
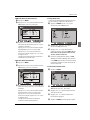 57
57
-
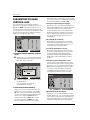 58
58
-
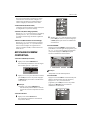 59
59
-
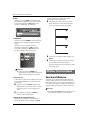 60
60
-
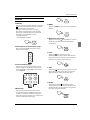 61
61
-
 62
62
-
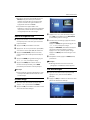 63
63
-
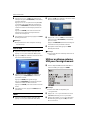 64
64
-
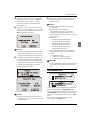 65
65
-
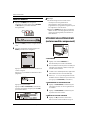 66
66
-
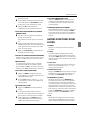 67
67
-
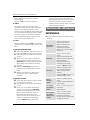 68
68
-
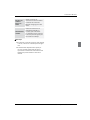 69
69
-
 70
70
-
 71
71
-
 72
72
-
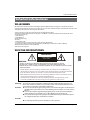 73
73
-
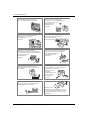 74
74
-
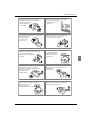 75
75
-
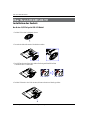 76
76
-
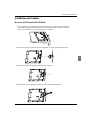 77
77
-
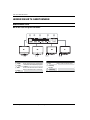 78
78
-
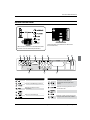 79
79
-
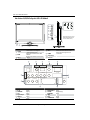 80
80
-
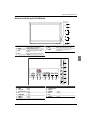 81
81
-
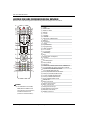 82
82
-
 83
83
-
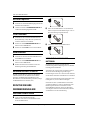 84
84
-
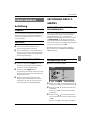 85
85
-
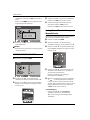 86
86
-
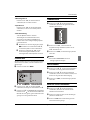 87
87
-
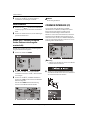 88
88
-
 89
89
-
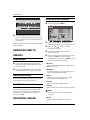 90
90
-
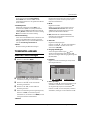 91
91
-
 92
92
-
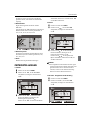 93
93
-
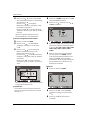 94
94
-
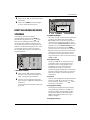 95
95
-
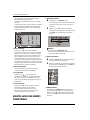 96
96
-
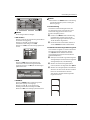 97
97
-
 98
98
-
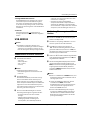 99
99
-
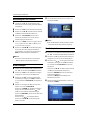 100
100
-
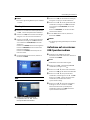 101
101
-
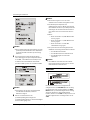 102
102
-
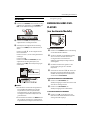 103
103
-
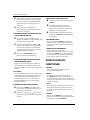 104
104
-
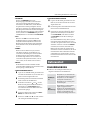 105
105
-
 106
106
-
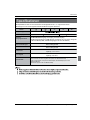 107
107
-
 108
108
-
 109
109
-
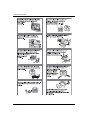 110
110
-
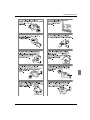 111
111
-
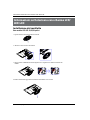 112
112
-
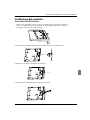 113
113
-
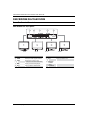 114
114
-
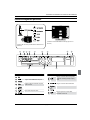 115
115
-
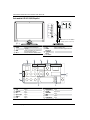 116
116
-
 117
117
-
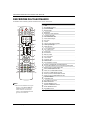 118
118
-
 119
119
-
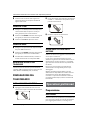 120
120
-
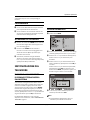 121
121
-
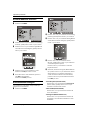 122
122
-
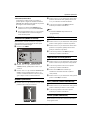 123
123
-
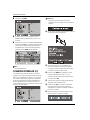 124
124
-
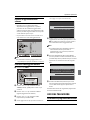 125
125
-
 126
126
-
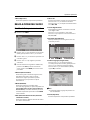 127
127
-
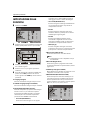 128
128
-
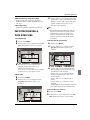 129
129
-
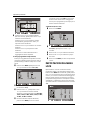 130
130
-
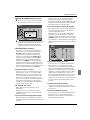 131
131
-
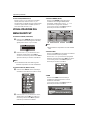 132
132
-
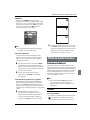 133
133
-
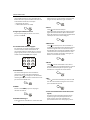 134
134
-
 135
135
-
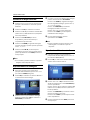 136
136
-
 137
137
-
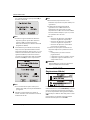 138
138
-
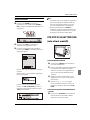 139
139
-
 140
140
-
 141
141
-
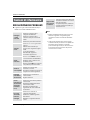 142
142
-
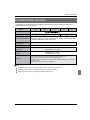 143
143
-
 144
144
-
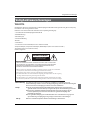 145
145
-
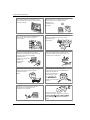 146
146
-
 147
147
-
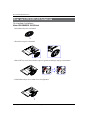 148
148
-
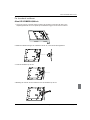 149
149
-
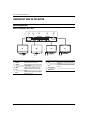 150
150
-
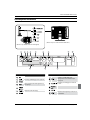 151
151
-
 152
152
-
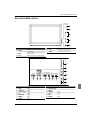 153
153
-
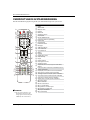 154
154
-
 155
155
-
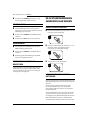 156
156
-
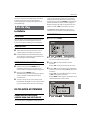 157
157
-
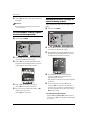 158
158
-
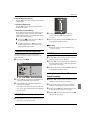 159
159
-
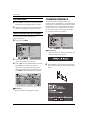 160
160
-
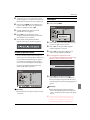 161
161
-
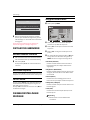 162
162
-
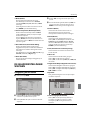 163
163
-
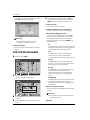 164
164
-
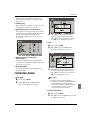 165
165
-
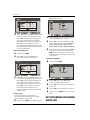 166
166
-
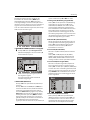 167
167
-
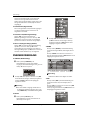 168
168
-
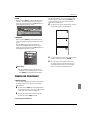 169
169
-
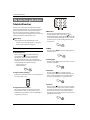 170
170
-
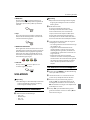 171
171
-
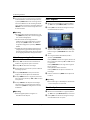 172
172
-
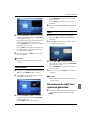 173
173
-
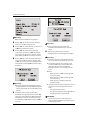 174
174
-
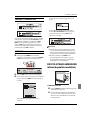 175
175
-
 176
176
-
 177
177
-
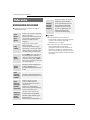 178
178
-
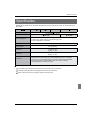 179
179
-
 180
180


Haier LT22R3CGW Handleiding
- Categorie
- Lcd-tv's
- Type
- Handleiding
- Deze handleiding is ook geschikt voor
in andere talen
- English: Haier LT22R3CGW User manual
- italiano: Haier LT22R3CGW Manuale utente
- français: Haier LT22R3CGW Manuel utilisateur
- Deutsch: Haier LT22R3CGW Benutzerhandbuch