
2
z
y
x
Art.-Nr.: 22369
x
30...37
3 mm, Art.-Nr.: 31932
4 mm, Art.-Nr.: 45915
z = y
18.
z > y
17.
5,5 mm, Art.-Nr.:31931
J
K
U
L
G
H
L
R
L
A
B
2 x
S2
Option 1:
2 x
S3
Option 2:
A8
A7
A7
A7
U
L U
Option I
+
Option II
Option I:
X = 0-13 mm
U
= X
Option II:
X ≥ 14 mm
L
+
U
= X
B
B
B
A
A
Option I:
X = 0-13 mm
4 x
Option II:
X =
≥ 14 mm 3 x
B
A
max.
Ø 4 mm
3 x
A
4 mm / 4,5 mm
AL
PVC
FE
4 x
B
4 mm / 4,5 mm
= IM 100/BA
AL
PVC
FE
PVC
= IM 100/BA
PVC
/
G H
~ 2 mm
MADE IN
GERMANY
05/2014 | 390402
©
ABUS | D 58292 Wetter | Germany | www.abus.com
1. 2.
4.
5.
6.
z
7.
12.
10.
11.
13.
15.
3.
1.
2.
16. Option A 16. Option B
Nicht im Lieferumfang enthalten |
Non
compris dans la livraison |
Niet inbegrepen in
de levering |
•
IT
Non compreso nella fornitura
Not included in delivery
14. Option I 14. Option II
8. 9.
1 x
D
1 x
F
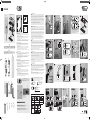
Wichtige Hinweise:
1. Vor der Montage prüfen Sie bitte die Einstellung des Fensters bzw. der
Fenstertür. Stellen Sie sicher, dass sich das Fenster/die Fenstertür einwandfrei
önenundschließenlässt.
2. MessenSieauchnach,obdieinAbb.1bangegebenenMindestmaßeanIhrem
Fenster/IhrerFenstertürvorhandensind.
3. DieBohrlochtiefenbzw.dieSchraubenlängenmüssenaufdieörtlichen
Gegebenheiten abgestimmt werden.
4. Austreten des Bohrers bzw. der Schrauben auf der Rückseite vermeiden! Ggf.
mit Bohranschlag arbeiten oder die vorhandenen Schrauben kürzen. Beim
Bohren keine beweglichen Teile, Dichtungen oder Glasscheiben verletzen.
Indications importantes:
1. Avant le montage contrôlez le réglage de la fenêtre ou de la porte-fenêtre.
Assurez-vous que la fenêtre/porte-fenêtre ouvre et ferme parfaitement.
2.Vériezsivotrefenêtre/porte-fenêtredisposedesdimensionsminimales
indiquées en schéma 1b.
3. Les profondeurs de perçage ou les longueurs de vis doivent être adaptées aux
conditions locales.
4. Evitez le dépassement de perçage ou de vis sur la face arrière! Utilisez le cas
échéantunebutéedeperçageouraccourcissezlesvisdexation.
5. Lors du perçage, évitez d’endommager les éléments mobiles, les joints ou les
vitres.
Belangrijke instructies:
1. Voor de montage dient u de afstelling van het raam resp. de deur te controleren.
Stel evt. het beslag opnieuw in, zodat het correct functioneert.
2. Meetookna,ofdeina.1baangegevenminimumafmetingendaadwerkelijk
op uw raam/deur bschikbaar zijn.
3. Deboordieptesenschroeengtesmoetenaanhetgevelelemenetaangepastworden.
4. Voorkom doorboren en/of -schroeven. Evt. met booraanslag werken, kortere
schroeven kopen of inkorten. Bij het boren geen bewegende delen,
afdichtingen of glas beschadigen.
Avvertenza importante:
1. Primadelmontaggiovericareperfavorelaregolazionedellanestrarisp.della
portanestra.Senecessarioregistrarenuovamenteiferramentianchélanestra
(laporta-nestra)sichiudaesiapraperfettamente.
2. Vericateanchechelemisureminimeindicatenell’ill.1besistanonellevostre
nestre/porte-nestre.
3. Le profondità per trapanare i fori, risp. le lunghezze delle viti devono essere
adattate alle condizioni particolari.
4. Evitare che la punta del trapano risp. la vite fuoriesca dall’altra parte! Se necessario
lavorare con arresto del trapano o accorciare le viti. Quando si trapana,
nondanneggiare parti mobili, guarnizioni o vetri.
Important information:
1. Beforeinstallation,pleasecheckthesettingofthewindoworFrenchdoor.If
necessary,readjustthettingssothatthewindow(Frenchdooropensand
closes perfectly.
2. Also check whether your window/French door complies with the minimum
dimensionsshowning.1b.
3. The depths of the drilled holes and screw lengths must be adjusted to the
local conditions. Avoid the drill or screws from coming out at the back!
4. Possibly work with drill stopper or shorten the existing screws. When drilling,
do not damage any moving parts,seals or glass panes.
FAS
FO
FAS
FAS
FTS
FTS
FO
1 x
I
1 x
G
1 x
H
1 x
J
1 x
K
2 x
L
6 x
S1
2 x
S2
2 x
S3
3 x
S4
2 x
S5
Allgemeine Hinweise
DerFenstergri-SchlossFO400NistnachdenstrengenPrüfanforderungenderDIN18104-1
undVdS2536anerkannt.DurchDINCertcoistFO400Nzertiziert„EINBRUCHHEMMEND
DIN-geprü“.FO400NbietetzusätzlichSchutzgegenunberechtigtesEindringeninihre
Räume.GemäßDIN18104-1wirdempfohlen,dasspro1MeterFensterhöherechtsund
linksjeweilseineZusatzsicherungmontiertwird(proFenster).BeiderMontageder
FO400Nsollte,derFensterhöheentsprechend,aufderGriseiteeventuelleineweitere
Zusatzsicherung angebracht werden. Polizei und Versicherer empfehlen dieses ebenfalls.
Die optimale Schutzwirkung erreichen Sie, wenn Sie entsprechend dieser Montage- und
Bedienungsanleitung vorgehen. Die Befestigungsschrauben sollten zur Vermeidung von
ÜberdrehungmiteinemgeeignetenWerkzeugeingeschraubtundvonHandangezogen
werden.AusschließlichABUS-Befestigungsmaterialeinsetzen.
FüreventuellauretendeVerletzungenbzw.Schäden,diebeiderMontageund/oder
durchunsachgemäßeHandhabungentstehen,übernimmtderHerstellerkeineHaung!
TechnischeÄnderungenvorbehalten.FürIrrtürmerundDruckfehlerkeineHaung.
Conseils d’ordre général
LaserruredefenêtreFO400NsatisfaitauxexigencesdecontrôlesévèresdesnormesDIN
18104-1etVdS2536.LecerticatDINindiquequeFO400Naobtenulaqualication«anti-
eractionDIN».FO400Noreenplusuneprotectioncontrelesintrusionspareraction
dansvotrelogement.SelonlanormeDIN18104-1,ilestrecommandédemonterune
sécurité complémentaire par mètre de hauteur de fenêtre, à gauche comme à droite (par
fenêtre).
Lors de l’installation de FO400N, il est recommandé de monter éventuellement une
sécurité complémentaire du côté de la poignée, en fonction de la hauteur de fenêtre.
Lapoliceetlescompagniesd’assurancelerecommandentégalement.Pouruneetde
protection optimal, suivez les instructions de ce manuel d’installation et d’utilisation.
And’éviterunserrageabusif,vissezetserrezlesvisdexationàlamainetavecun
outillageadéquat.UtilisezexclusivementdesproduitsdexationABUS.
Le fabricant n’assume aucune responsabilité pour d’éventuels blessures ou dégâts cau-
sés pendant l’installation et/ou par suite de manipulations inappropriées!
Nousnousréservonsledroitdetoutesmodicationstechniques.Nousn‘assumons
aucuneresponsabilitpordeserreuersoudéfautsd‘impressionéventuels.
Algemeen
Afsluitbare raamgreep voor naar binnen draaiende - en draai/kiep elementen. De
FO400N biedt daarnaast bescherming tegen onbevoegd binnendringen van uw woning.
Advies: monteer aan de sluitzijde voor maximale veiligheid 2 stuks per 1 meter raamh-
oogte. Op kunststof zonder metalen kern dient u dit slot in combinatie met ABUS BA be-
vestigingsanker te monteren. Optioneel verkrijgbaar, zie voor montage in de handleiding
van BA.
Optimale veiligheid wordt bereikt door nauwkeurig opvolgen van deze montage- en
gebruiksaanwijzing. Om overexpansie of doldraaien van de bevestigingsschroeven te
vermijden, draait u handmatig en met passend gereedschap de schroeven vast. Voor
eventueel verwondingen en/of schade tijdens montage en/of door ondeskundig gebruik
ontstaan, aanvaardt de fabrikant geen aansprakelijkheid!
Technische wijzigingen voorbehouden. Geen aansprakelijkheid voor vergissingen en
drukfouten.
Istruzioni generali
LaserraturapermanigliedinestreFO400Nèconformeaiseverirequisitidicontrollo
dellaDIN18104-1edellaVdS2536.ConlaDINCertcoessaècerticatacome«ANTISCASSO
conf.DIN».LaFO400NgarantisceunaprotezioneinpiùadifesadellaVostracasa.Secon-
doDIN18104-1siconsigliadimontareperognimetrodialtezzadellanestra,unasicura
supplementaresullatodestroeunasullatosinistro(perogninestra).Anchelapolizia
e le compagnie d´assicurazione consigliano tali misure.
Si può ottenere una protezione ottimale, procedendo secondo queste istruzioni di
montaggioeduso.Levitidissaggio,perevitarneunserraggioeccessivo,devonoessere
avvitateconunutensileadattoepoiserrateamano.Impiegareesclusivamentemateri-
aledissaggioABUS.
Pereventualiferimentie/odanni,chesivericanoduranteilmontaggioe/opermaneg-
gio indebito, il produttore non si assume alcuna responsabilità!
Cisiriservanomodichetecniche.Pererrorieredfusidistampanoncisiassume
alcuna responsabilità.
General instructions
The window handle lock FO400N is recognised as complying with the strict test require-
mentsofDIN18104-1andVdS2536.ItiscertiedbyDINCertcoas“BURGLARRETARDANT
DINtested”.FO400Noersadditionalprotectionfromunauthorisedintrudersinyour
rooms.DIN18104-1recommendsthatanadditionalsecuritydeviceshouldbetted
ontheleandrightforeverymeterinheight(perwindow).Thepoliceandinsurance
companies also give the same recommendation.
Optimum protection can be achieved by proceeding according to these installation and
operation instructions. To prevent the risk of overtightening, the fastening screws should
by screwed in using a suitable tool and tightened by hand. Only use ABUS fastening
material.
The manufacturer does not assume any liability for possible injuries or damages caused
during installation and/or by incorrect handling!
Subject to technical alterations. No liabiltity for mistakes and printing errors.
©
ABUS
August Bremicker Söhne KG
Altenhofer Weg 25
D 58300 Wetter
Tel.: +49 23 35 63 40
www.abus.com
?
ABUS France SAS
www.abus.fr
Achtung! Kleinteile können von Kindern verschluckt werden!
Attention! Les petites pièces peuvent être avalées par les enfants!
Let op! Kleine onderdelen kunnen door kinderen worden ingeslikt!
Attenzione! Piccole parti possono essere ingerite dai bambini!
Attention!Childrencanswallowsmallparts!
Vorsicht!
Attention!
Voorzichtig!
Attenzione!
Caution!
5,5 x 60 mm
M5 x 45 mm
M5 x 35 mm
M6 x 16 mm
M4 x 20 mm
≥18mm
30-37 mm
≥23mm
76 mm
100 mm
R
L
L
1 x
E
R
1 x
L
1 Set
U
T = 1 mm, 2mm, 4 mm, 8 mm
T = 14 mm
Ø 5,5 mm Ø 4,0 mm Ø 4,5 mm
Ø 4,8 mm Ø 3,0 mm Ø 3,5 mm
PVC
90 % 10 %
AL
PVC
FE
1. 1a.
1b.
HinweisezurMontage
Instructionsdemontage
Instructiesvoordemontage
Noteperl‘installazione
Further fitting details
1 x
A
enthält|
contient |
bevat
•
IT
contiene |
contains:
A1
A3
A4
A6
A7
A8
FO400A
FO400E
A2
A5
FO400N
Demontage |
démontage |
demontage
•
IT
smantellamento |
disassembling
AnleitungzeigtMontagerechts(R)|
Manuel
d‘installationdemontagesurladroite(R)
Instructiestonenmontagerechts(R)|
•
IT
Manuale
diinstallazionemontaggioadestra(R)|
Manual
showsmountingontheright(R)
Bohrschablone
gabarit de perçage
boormal
•
IT
dima di foratura
drilling template
FO400_01_r.indd 1 26.05.14 09:55

2
19.
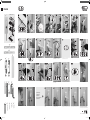
Bedienung
Opération
Operatie
•
IT
Funzionamento
Operation
4 mm
1 x
~ 20°
38.
FO400A/FO400E
S1
1.
2.
90 % 10 %
~ 20°
34. Option A2
A3
1 x
A3
S1
1.
2.
90 % 10 %
1.
2.
90 % 10 %
S1
S1
S1
I
~ 20°
90°
4,5 mm
1 x
90°
PVC
FE
PVC
A1
F
4 x
A4
S1
TEST
A5
TEST
A5
1.
2.
90 % 10 %
S1
90°
MADE IN
GERMANY
05/2014 | 390402
©
ABUS | D 58292 Wetter | Germany | www.abus.com
E
S5
3 x
S4
R:
E
L :
D
2 x
S5
27.
29.
B2.
B4.
B5.
30.
B1.
20.
21.
23.
24.
26.
25.
verriegelt |
fermé |
afgesloten |
•
IT
bloccato
locked
entriegelt |
pas verrouillé |
niet vergrendeld
•
IT
non bloccato |
not locked
geönet|
ouvert |
open |
•
IT
aperto |
open
gekippt |
inclinaison |
kantelen |
•
IT
tilt |
tilt
geneigtmitblockiertemGri|
incliner avec poig-
née bloqué |
kantelen met geblokkeerde handvat
•
IT
tilt con maniglia bloccata |
tilt with blocked handle
B3.
18.
17.
30...37
11.
22.
28.
31.
33.
34. Option
35. Option B1
36.
32.
37. 39.
40. 41.
35. Option B2 35. Option B3
4 mm / 4,5 mm *
2 x
1 x
D
1 x
F
1 x
A
1 x
I
1 x
G
1 x
H
1 x
J
1 x
K
2 x
L
6 x
S1
2 x
S2
2 x
S3
3 x
S4
2 x
S5
5,5 x 60 mm
M5 x 45 mm
M5 x 35 mm
M6 x 16 mm
M4 x 20 mm
76 mm
100 mm
R
L
L
1 x
E
R
1 x
L
1 Set
U
T = 1 mm, 2mm, 4 mm, 8 mm
T = 14 mm
enthält|
contient |
bevat
•
IT
contiene |
contains:
A1
A3
A4
A6
A7
A8
FO400A
FO400E
A2
A5
FO400N
Fensterönen|
Ouvrir la fenêtre |
Open raam
•
IT
Aprirelanestra|
Open window
S4 = selbstfurchend |
S4 = auto-taraudeuse
S4=zelappende|
•
IT
S4=autolettanti
S4 = self-cutting
S5 = selbstfurchend |
S5 = auto-taraudeuse
S5=zelappende|
•
IT
S5=autolettanti
S5 = self-cutting
FO400_01_r.indd 2 26.05.14 09:56
Documenttranscriptie
FO400N 1. A1 1a. FTS A2 FO400A FO400E FAS FO FAS Allgemeine Hinweise Der Fenstergriff-Schloss FO400N ist nach den strengen Prüfanforderungen der DIN 18104-1 und VdS 2536 anerkannt. Durch DIN Certco ist FO400N zertifiziert „EINBRUCHHEMMEND DIN-geprüft“. FO400N bietet zusätzlich Schutz gegen unberechtigtes Eindringen in ihre Räume. Gemäß DIN 18104-1 wird empfohlen, dass pro 1 Meter Fensterhöhe rechts und links jeweils eine Zusatzsicherung montiert wird (pro Fenster). Bei der Montage der FO400N sollte, der Fensterhöhe entsprechend, auf der Griffseite eventuell eine weitere Zusatzsicherung angebracht werden. Polizei und Versicherer empfehlen dieses ebenfalls. Die optimale Schutzwirkung erreichen Sie, wenn Sie entsprechend dieser Montage- und Bedienungsanleitung vorgehen. Die Befestigungsschrauben sollten zur Vermeidung von Überdrehung mit einem geeigneten Werkzeug eingeschraubt und von Hand angezogen werden. Ausschließlich ABUS-Befestigungsmaterial einsetzen. Für eventuell auftretende Verletzungen bzw. Schäden, die bei der Montage und/oder durch unsachgemäße Handhabung entstehen, übernimmt der Hersteller keine Haftung! Technische Änderungen vorbehalten. Für Irrtürmer und Druckfehler keine Haftung. FO 1b. A3 30-37 mm A4 FTS A7 A8 T = 1 mm, 2mm, 4 mm, 8 mm L 1x Belangrijke instructies: 1. Voor de montage dient u de afstelling van het raam resp. de deur te controleren. Stel evt. het beslag opnieuw in, zodat het correct functioneert. 2. Meet ook na, of de in afb. 1b aangegeven minimum afmetingen daadwerkelijk op uw raam/deur bschikbaar zijn. 3. De boordieptes en schroeflengtes moeten aan het gevelelemenet aangepast worden. 4. Voorkom doorboren en/of -schroeven. Evt. met booraanslag werken, kortere schroeven kopen of inkorten. Bij het boren geen bewegende delen, afdichtingen of glas beschadigen. T = 14 mm F 1x E 1x R Avvertenza importante: 1. Prima del montaggio verificare per favore la regolazione della finestra risp. della porta finestra. Se necessario registrare nuovamente i ferramenti affinché la finestra (la porta-finestra) si chiuda e si apra perfettamente. 2. Verificate anche che le misure minime indicate nell’ill. 1b esistano nelle vostre finestre/ porte-finestre. 3. Le profondità per trapanare i fori, risp. le lunghezze delle viti devono essere adattate alle condizioni particolari. 4. Evitare che la punta del trapano risp. la vite fuoriesca dall’altra parte! Se necessario lavorare con arresto del trapano o accorciare le viti. Quando si trapana, nondanneggiare parti mobili, guarnizioni o vetri. L Important information: 1. Before installation, please check the setting of the window or French door. If necessary, readjust the fittings so that the window (French door opens and closes perfectly. 2. Also check whether your window/French door complies with the minimum dimensions shown in fig. 1b. 3. The depths of the drilled holes and screw lengths must be adjusted to the local conditions. Avoid the drill or screws from coming out at the back! 4. Possibly work with drill stopper or shorten the existing screws. When drilling, do not damage any moving parts,seals or glass panes. R L G 1x I 1x H 1x ≥ 18 mm Indications importantes: 1. Avant le montage contrôlez le réglage de la fenêtre ou de la porte-fenêtre. Assurez-vous que la fenêtre/porte-fenêtre ouvre et ferme parfaitement. 2. Vérifiez si votre fenêtre/porte-fenêtre dispose des dimensions minimales indiquées en schéma 1b. 3. Les profondeurs de perçage ou les longueurs de vis doivent être adaptées aux conditions locales. 4. Evitez le dépassement de perçage ou de vis sur la face arrière! Utilisez le cas échéant une butée de perçage ou raccourcissez les vis de fixation. 5. Lors du perçage, évitez d’endommager les éléments mobiles, les joints ou les vitres. U 1 Set D 1x ≥ 23 mm Wichtige Hinweise: 1. Vor der Montage prüfen Sie bitte die Einstellung des Fensters bzw. der Fenstertür. Stellen Sie sicher, dass sich das Fenster/die Fenstertür einwandfrei öffnen und schließen lässt. 2. Messen Sie auch nach, ob die in Abb. 1b angegebenen Mindestmaße an Ihrem Fenster/Ihrer Fenstertür vorhanden sind. 3. Die Bohrlochtiefen bzw. die Schraubenlängen müssen auf die örtlichen Gegebenheiten abgestimmt werden. 4. Austreten des Bohrers bzw. der Schrauben auf der Rückseite vermeiden! Ggf. mit Bohranschlag arbeiten oder die vorhandenen Schrauben kürzen. Beim Bohren keine beweglichen Teile, Dichtungen oder Glasscheiben verletzen. A6 A5 FAS Algemeen Afsluitbare raamgreep voor naar binnen draaiende - en draai/kiep elementen. De FO400N biedt daarnaast bescherming tegen onbevoegd binnendringen van uw woning. Advies: monteer aan de sluitzijde voor maximale veiligheid 2 stuks per 1 meter raamhoogte. Op kunststof zonder metalen kern dient u dit slot in combinatie met ABUS BA bevestigingsanker te monteren. Optioneel verkrijgbaar, zie voor montage in de handleiding van BA. Optimale veiligheid wordt bereikt door nauwkeurig opvolgen van deze montage- en gebruiksaanwijzing. Om overexpansie of doldraaien van de bevestigingsschroeven te vermijden, draait u handmatig en met passend gereedschap de schroeven vast. Voor eventueel verwondingen en/of schade tijdens montage en/of door ondeskundig gebruik ontstaan, aanvaardt de fabrikant geen aansprakelijkheid! Technische wijzigingen voorbehouden. Geen aansprakelijkheid voor vergissingen en drukfouten. General instructions The window handle lock FO400N is recognised as complying with the strict test requirements of DIN 18104-1 and VdS 2536. It is certified by DIN Certco as “BURGLAR RETARDANT DIN tested”. FO400N offers additional protection from unauthorised intruders in your rooms. DIN 18 104-1 recommends that an additional security device should be fitted on the left and right for every meter in height (per window). The police and insurance companies also give the same recommendation. Optimum protection can be achieved by proceeding according to these installation and operation instructions. To prevent the risk of overtightening, the fastening screws should by screwed in using a suitable tool and tightened by hand. Only use ABUS fastening material. The manufacturer does not assume any liability for possible injuries or damages caused during installation and/or by incorrect handling! Subject to technical alterations. No liabiltity for mistakes and printing errors. 76 mm FR 100 mm S5 2 x M4 x 20 mm S4 3 x M6 x 16 mm S3 2 x M5 x 35 mm M5 x 45 mm 5,5 x 60 mm S2 2 x 3 mm, Art.-Nr.: 31932 shows mounting on the right (R) DE Demontage | FR démontage | NL demontage • I T smantellamento | GB disassembling 6. G A8 /H 7. 8. J x Option I: X = 0-13 mm U =X A7 S2 Option II: X ≥ 14 mm L + U =X Option 2: 2x U K x Option 1: 2x 9. L S3 11. 10. Option I U Option II L + U 13. 12. A B ~ 2 mm B A B Option I: X = 0-13 mm Option II: X = ≥ 14 mm 30...37 B 4x B max. Ø 4 mm A 3x A DE Hinweise zur Montage FR Instructions de montage NL Instructies voor de montage Note per l‘installazione GB Further fitting details ABUS August Bremicker Söhne KG Altenhofer Weg 25 D 58300 Wetter Tel.: +49 23 35 63 40 www.abus.com 14. Option I 14. Option II 2 Option B 16. 16. Option A 15. ABUS France SAS www.abus.fr y Art.-Nr.: 22369 4x B AL • I T dima di foratura GB drilling template S1 6 x d‘installation de montage sur la droite (R) NL Instructies tonen montage rechts (R) | • I T Manuale di installazione montaggio a destra (R) | GB Manual © L 2x DE Bohrschablone FR gabarit de perçage NL boormal DE Anleitung zeigt Montage rechts (R) | FR Manuel Attenzione! Piccole parti possono essere ingerite dai bambini! ? L L 1. GB Attention! Children can swallow small parts! Attenzione! 5. R DE Achtung! Kleinteile können von Kindern verschluckt werden! FR Attention! Les petites pièces peuvent être avalées par les enfants! NL Let op! Kleine onderdelen kunnen door kinderen worden ingeslikt! DE Vorsicht! FR Attention! NL Voorzichtig! 4. 3. 2. Istruzioni generali La serratura per maniglie di finestre FO400N è conforme ai severi requisiti di controllo della DIN 18104-1 e della VdS 2536. Con la DIN Certco essa è certificata come «ANTISCASSO conf. DIN». La FO400N garantisce una protezione in più a difesa della Vostra casa. Secondo DIN 18104-1 si consiglia di montare per ogni metro di altezza della finestra, una sicura supplementare sul lato destro e una sul lato sinistro (per ogni finestra). Anche la polizia e le compagnie d´assicurazione consigliano tali misure. Si può ottenere una protezione ottimale, procedendo secondo queste istruzioni di montaggio ed uso. Le viti di fissaggio, per evitarne un serraggio eccessivo,devono essere avvitate con un utensile adatto e poi serrate a mano. Impiegare esclusivamente materiale di fissaggio ABUS. Per eventuali ferimenti e/o danni, che si verificano durante il montaggio e/o per maneggio indebito, il produttore non si assume alcuna responsabilità! Ci si riservano modifiche tecniche. Per errori e redfusi di stampa non ci si assume alcuna responsabilità. GB Caution! K 1x 2. Conseils d’ordre général La serrure de fenêtre FO400N satisfait aux exigences de contrôle sévères des normes DIN 18104-1 et VdS 2536. Le certificat DIN indique que FO400N a obtenu la qualification «antieffraction DIN». FO400N offre en plus une protection contre les intrusions par effraction dans votre logement. Selon la norme DIN 18104-1, il est recommandé de monter une sécurité complémentaire par mètre de hauteur de fenêtre, à gauche comme à droite (par fenêtre). Lors de l’installation de FO400N, il est recommandé de monter éventuellement une sécurité complémentaire du côté de la poignée, en fonction de la hauteur de fenêtre. La police et les compagnies d’assurance le recommandent également. Pour un effet de protection optimal, suivez les instructions de ce manuel d’installation et d’utilisation. Afin d’éviter un serrage abusif, vissez et serrez les vis de fixation à la main et avec un outillage adéquat. Utilisez exclusivement des produits de fixation ABUS. Le fabricant n’assume aucune responsabilité pour d’éventuels blessures ou dégâts causés pendant l’installation et/ou par suite de manipulations inappropriées! Nous nous réservons le droit de toutes modifications techniques. Nous n‘assumons aucune responsabilit por des erreuers ou défauts d‘impression éventuels. DE Nicht im Lieferumfang enthalten | FR Non compris dans la livraison | NL Niet inbegrepen in de levering | • I T Non compreso nella fornitura GB Not included in delivery J 1x 1. PVC PVC Ø 4,0 mm Ø 4,5 mm Ø 4,8 mm Ø 3,0 mm Ø 3,5 mm 4 mm / 4,5 mm AL PVC A7 A7 z H z 3x A FE Ø 5,5 mm G FE 4 mm / 4,5 mm PVC AL = IM 100/BA PVC PVC FE = IM 100/BA z=y z>y 18. 17. 4 mm, Art.-Nr.: 45915 5,5 mm, Art.-Nr.:31931 90 % 10 % 05/2014 | 390402 DE enthält | FR contient | NL bevat • I T contiene | GB contains: A 1x MADE IN GERMANY ABUS | D 58292 Wetter | Germany | www.abus.com © FO400_01_r.indd 1 26.05.14 09:55 FO400N 18. 17. DE enthält | FR contient | NL bevat • I T contiene | GB contains: A 1x 21. 20. 19. 22. 24. 23. 25. 11. A4 A1 30...37 A2 FO400A FO400E A3 A4 4x A6 A5 A7 27. 26. A8 29. 31. 30. S1 S1 A3 U 1 Set S1 28. L 1x 1x T = 14 mm ~ 20° S1 S5 T = 1 mm, 2mm, 4 mm, 8 mm S1 1. 2x A3 2. 1. 2x 4 mm / 4,5 mm * F 1x D 1x 34. Option 33. 32. 90 % 10 % TEST E 1x 90 % DE S5 = selbstfurchend | FR S5 = auto-taraudeuse NL S5 = zelftappende | • I T S5 = autofilettanti GB S5 = self-cutting 1x ~ 20° 10 % 4 mm DE Fenster öffnen | FR Ouvrir la fenêtre | NL Open raam • I T Aprire la finestra | GB Open window R A5 2. S5 34. Option A2 35. Option B1 35. Option B2 2 36. 35. Option B3 S1 S1 37. 39. 38. E 90° 90° ~ 20° I L A1 FO400A/FO400E R L 1. 90 % G 1x I 1x H 1x 2. 10 % 90° 1. 1x PVC PVC 2. R: L: FE 4,5 mm 90 % 10 % E D TEST 3 x S4 A5 DE S4 = selbstfurchend | FR S4 = auto-taraudeuse NL S4 = zelftappende | • I T S4 = autofilettanti GB S4 = self-cutting J 1x K 1x 40. 41. B1. B2. B3. B4. B5. 76 mm L 2x DE Bedienung FR Opération NL Operatie 100 mm F • IT Funzionamento GB Operation S5 2 x DE verriegelt | FR fermé | NL afgesloten | • GB locked IT bloccato DE entriegelt | FR pas verrouillé | NL niet vergrendeld • I T non bloccato | GB not locked DE geöffnet | FR ouvert | NL open | • IT aperto | GB open DE gekippt | FR inclinaison | NL kantelen | • IT tilt | GB tilt DE geneigt mit blockiertem Griff | FR incliner avec poignée bloqué | NL kantelen met geblokkeerde handvat • I T tilt con maniglia bloccata | GB tilt with blocked handle 05/2014 | 390402 M4 x 20 mm S4 3 x M6 x 16 mm S3 2 x M5 x 35 mm S2 2 x M5 x 45 mm 5,5 x 60 mm S1 6 x MADE IN GERMANY ABUS | D 58292 Wetter | Germany | www.abus.com © FO400_01_r.indd 2 26.05.14 09:56-
 1
1
-
 2
2


in andere talen
- English: Abus 4043158058062 User manual
- italiano: Abus 4043158058062 Manuale utente
- français: Abus 4043158058062 Manuel utilisateur
- Deutsch: Abus 4043158058062 Benutzerhandbuch
Gerelateerde artikelen
-
Abus DFS 95 Assembly and Operating Instructions
-
-
-
-
-
-
-
-
-