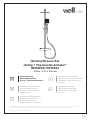
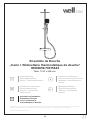
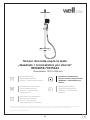
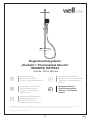
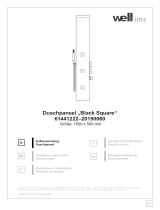
Welltime Duschsystem Turin Installatie gids
- Type
- Installatie gids

Aufbauanleitung
Überkopfbrause-Set
„Eckig + Thermostat-Armatur“
Installations Instructions
Overheadshower-Set
„Square + Thermostatic
showermixer“
Instructions d‘installation
Ensemble de Douche
„Carré + Robinetterie
thermostatique de douche“
Istruzioni d‘installazione
Set per doccetta sopra la testa
„Quadrato + termostatico per
doccia“
Montagehandleiding
Regendouchesysteem
„Vierkant + Thermostaat
douche“
D: Nachdruck, auch auszugsweise, nicht gestattet! GB: Reproduction, even in extracts, is not permitted! F: Toute reproduction de ce mode d’emploi
même par extraits est interdite ! IT: È vietata la riproduzione, anche parziale. NL: Nadruk, ook slechts gedeeltelijk, niet toegestaan!
Anleitung, Nr.: 20219088465970015644
Überkopfbrause-Set
„Eckig + Thermostat-Armatur“
90884659-70015644
Größe: 1010 x 268 mm

2
WICHTIG, FÜR SPÄTERE BEZUGNAHME DIESES DOKUMENT
AUFBEWAHREN! SORGFÄLTIG LESEN!
Bestimmungsgemäßer Gebrauch
- Dieser Artikel ist ein Überkopfbrause-Set zum Duschen.
- Dieser Artikel ist nur zum Einsatz im privaten Bereich bestimmt.
Sicherheitshinweise
- VORSICHT WASSERSCHADEN!
Stellen Sie bitte vor der Montage die allgemeine Wasserzuführung ab.
- Achten Sie darauf, dass alle Dichtungen den korrekten Sitz haben.
- Diese Brause-Sets sind nicht für die Verwendung an Niederdruckgeräten und oenen (drucklosen)
Elektrokleinspeichern geeignet.
- Wir empfehlen den Einbau eines Filters in der Installation oder mindestens die Verwendung von Eckventilen
mit Filter, um den Eingang von Fremdkörpern zu vermeiden.
- Brause-Sets zur Verwendung in Privathaushalten! Ausschließlich geeignet zur Verwendung in Räumen mit
einer Temperatur über 0 °C, bei Frostgefahr Wasserzufuhr unterbrechen und Brause-Set entleeren.
- VORSICHT bei Warmwassereinstellung: Verbrühungsgefahr!
- Achten Sie darauf, dass keine ätzenden oder korrosiven Mittel, wie z. B. Putzmittel oder Haushaltsreiniger
an die Schläuche gelangen, dies kann zu Wasserschäden führen.
- Erstickungs- / Verletzungsgefahr! Lassen Sie Kinder nicht mit der Verpackung spielen.
Sie könnten an der Folie ersticken oder sich an der Umverpackung verletzen.
- Achten Sie darauf, dass Kinder keine kleinen Teile, wie z. B. Muttern, Abdeckkappen oder Ähnliches in den
Mund nehmen. Sie könnten sie verschlucken und daran ersticken.
- Beschädigungsgefahr! Vor der Montage bitte Montageanleitung genauestens durchlesen
und Produkt auf evtl. Transportschäden überprüfen. Gehen Sie bei der Montage des Artikels sorgfältig vor.
- Der Artikel darf nur von fachkundigen Personen montiert werden. Es empehlt sich die Montage mit zwei
Personen durchzuführen.
- Verletzungsgefahr! Beachten Sie bei der Montage, dass einige Teile scharfe Kanten aufweisen.
- Montieren Sie den Artikel nur an einer geeigneten, massiven Wand.
- Achtung: Die Befestigung des Artikels an der Wand muss von einer fachkundigen Person vorgenommen
werden, da für die Montage an die Wand angepasste Dübel erforderlich sind.
- Stellen Sie sicher, dass sich keine Kabel oder Rohrleitungen in den Bohrbereichen benden.
- Prüfen Sie die Bereiche vor dem Bohren mit einem Metallsuchgerät.
- Bei Ersatzteilbestellung (siehe Teileliste) bitte an den Kundenservice wenden.
- Teile zur Befestigung sind nicht im Lieferumfang enthalten und im Fachmarkt käuich zu erwerben.
Pegehinweise
Für die Reinigung und Pege verwenden Sie einen Schwamm oder ein weiches Tuch. Es genügen umwelt-
schonende und sanfte Haushaltsreiniger. Verwenden Sie keinesfalls aggressive oder Lösemittel enthaltende
Reinigungsmittel. Benutzen Sie zur Reinigung auf keinen Fall scharfe Gegenstände, Stahlwolle, Chemikalien
oder sandhaltige Scheuermittel. Diese führen zu einer Beschädigung der Oberäche und zu einem Verlust der
Garantie. Leichte Kalkbeläge lassen sich mühelos mit etwas Haushaltessig entfernen.

3
Aufgrund des hohen Gewichts dieses Produktes
könnte der Aufbau zwei Personen erfordern.
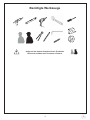
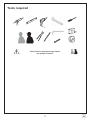
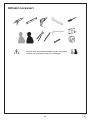
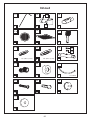
Benötigte Werkzeuge

4
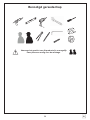
Verpackungsinhalt
1 x 1 x
1 2
1 x
4
1 x
5
2 x
7
3 x
8
2 x
10
2 x
11
2 x
13
2 x
14
ca. 150 cm
1 x
6
1 x
1x
1 x
1 x
3
12
9
15
2.1
2.1
9.1
9.2
1/2" (Ø ca. 1,9 cm)
1 x
16
3/4" (Ø ca. 2,5 cm)

5
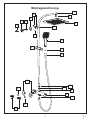
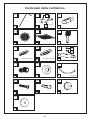
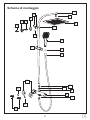
Montagezeichnung
1
4
6
2.1
10
15
16
13
14
3
2.1
7
9.1
8
5
2
12
9
7
11
8
8
9.2

6
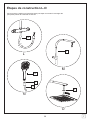
Aufbauschritte A-C
Positionierung der Höhe des Überkopfbrause-Sets für den Benutzer
In Abhängigkeit davon, wie groß Sie sind, empfehlen wir, den Duschkopf etwa 260 mm oberhalb Ihres
Kopfes anzubringen. Wenn mehrere Personen in Ihrem Haushalt die Dusche nutzen, messen Sie die
Größe der größten Person und bringen den Duschkopf 260 mm oberhalb der gemessenen Höhe an.
Unten stehend nden Sie eine Schritt-für-Schritt-Anleitung, wie Sie die Hauptkomponenten des
Überkopfbrause-Sets zusammenbauen.
10
A
B
C
10

7
Aufbauschritte D-E
Unten stehend nden Sie eine Schritt-für-Schritt-Anleitung, wie Sie die Hauptkomponenten des
Überkopfbrause-Sets zusammenbauen.
D
E
9.1
9.2
1
2.1 2
2.1

8
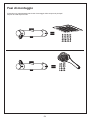
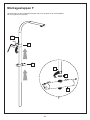
Aufbauschritt F
Unten stehend nden Sie eine Schritt-für-Schritt-Anleitung, wie Sie die Hauptkomponenten des
Überkopfbrause-Sets zusammenbauen.
F
2.1
2
3
8
1
9

9
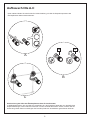
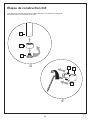
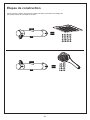
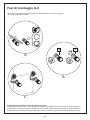
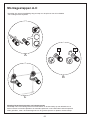
Aufbauschritte G-I
Unten stehend nden Sie eine Schritt-für-Schritt-Anleitung, wie Sie die Hauptkomponenten des
Überkopfbrause-Sets zusammenbauen.
14 15
13 16
11
G
H
I
11

10
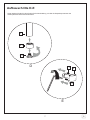
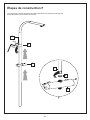
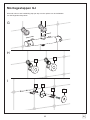
Aufbauschritte J-K
Unten stehend nden Sie eine Schritt-für-Schritt-Anleitung, wie Sie die Hauptkomponenten des
Überkopfbrause-Sets zusammenbauen.
7
J
K
12
88

11
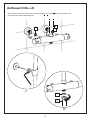
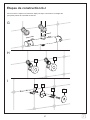
Aufbauschritte L-O
Unten stehend nden Sie eine Schritt-für-Schritt-Anleitung, wie Sie die Hauptkomponenten des
Überkopfbrause-Sets zusammenbauen.
M
1
L
12
6
7
12
N
4
O

12
Aufbauschritte
Unten stehend nden Sie eine Schritt-für-Schritt-Anleitung, wie Sie die Hauptkomponenten des
Überkopfbrause-Sets zusammenbauen.

13
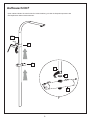
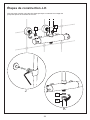
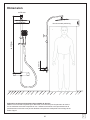
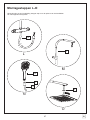
Abmessung
Vorbereitung der richtigen Position Ihres Überkopfbrause-Sets
Verwenden Sie Ihre Körpergröße als Basis für die Festlegung der Position Ihres
Überkopfbrause-Sets (Angaben in mm).
ca. 55 mm
ca. 30 mm
ca. 990 mm
Recommended positioning
ca. 250 mm

14
Entsorgung
Sollte dieser Artikel einmal nicht mehr benutzt werden können, so ist jeder Verbraucher gesetzlich ver-
pichtet, Altgeräte getrennt vom Hausmüll zu entsorgen und z.B. bei einer Sammelstelle seiner
Gemeinde / Stadtteils abzugeben.
Unser Service
Eine umgehende Fachberatung erhalten Sie von unserem Service-Team:
- Deutschland: Telefon 01806-63 06 30, Festnetz 20ct/Anruf, Mobilfunk max. 60 ct/Anruf
- Österreich, Universal: Telefon +43 / 662-4485 59, Festnetz je nach Betreiber, Fachberatung
Heimwerken – Otto: +43 / 316-606 159 Festnetz je nach Betreiber, Beratung
Heimwerken – Quelle: +43 / 662-9005 59 Festnetz je nach Betreiber, Fachberatung Heimwerken
- Schweiz, Quelle: DE: +41 / 848 85 85 00, FR: +41 / 848 85 85 01, I: +41 / 848 858 530
Ackermann: DE: +41 / 848 85 85 11, FR: +41 / 848 85 85 21, I: +41 / 848 858 530
- Niederlande, call center 0900-1901 (15ct/Min.)
Um Ihnen schnell helfen zu können, nennen Sie uns bitte:
Artikelbezeichnung: Überkopfbrause-Set
„Eckig + Thermostat-Armatur“ 90884659-70015644
und die Artikelnummer unter der Sie den Artikel bestellt haben (siehe Rechnung).
Imported by AproductZ GmbH, Werner-Otto-Str. 1-7, 22179 Hamburg (Germany)

D: Nachdruck, auch auszugsweise, nicht gestattet! GB: Reproduction, even in extracts, is not permitted! F: Toute reproduction de ce mode d’emploi
même par extraits est interdite ! IT: È vietata la riproduzione, anche parziale. NL: Nadruk, ook slechts gedeeltelijk, niet toegestaan!
Anleitung, Nr.: 20219088465970015644
15
Aufbauanleitung
Überkopfbrause-Set
„Eckig + Thermostat-Armatur“
Installations Instructions
Overheadshower-Set
„Square + Thermostatic
showermixer“
Instructions d‘installation
Ensemble de Douche
„Carré + Robinetterie
thermostatique de douche“
Istruzioni d‘installazione
Set per doccetta sopra la testa
„Quadrato + termostatico per
doccia“
Montagehandleiding
Regendouchesysteem
„Vierkant + Thermostaat
douche“
Overheadshower-Set
„Square + Thermostatic showermixer“
90884659-70015644
Size: 1010 x 268 mm

16
IMPORTANT: PLEASE KEEP THIS DOCUMENT FOR LATER
REFERENCE!READ CAREFULLY!
Indented use
- This article is a Overheadshower-Set for showering.
- This product is intended for use in private spheres only.
Safety instructions
- CAUTION DAMAGE BY WATER!
Prior to installation please turn the general water supply o.
- Ensure that all gaskets have the correct t.
- These taps are not suitable for use on low pressure and small electrical storage heaters.
- We recommend the installation of a lter into the appliance or at least the use of angle valves with lter, in
order to avoid the inow of foreign matter, which could damage the cartridge.
- This tap is only intended for use in private households! Only suitable for use in rooms with a temperature
over 0 °C, when there is danger of frost, sut o the water supply and empty the tap.
- Take care when adjusting the warm water. Danger of scalding!
- Please ensure that no caustic or corrosive products such as detergents or household cleaning products
make contact with the connection hoses; this can lead to water damages.
- Choking hazard / danger of injury! Do not let children play with the packaging.
They might suocate by the wrapping or injure themselves with the packaging cover.
- Make sure that children do not take small parts such as nuts, cover caps or the like into their mouths. They
could swallow these and choke on them.
- Risk of damage! Please read the assembly instructions very carefully prior to assembling and check the
product for possible transportation damage. Be careful during the product‘s assembly.
- The product must only be installed by competent persons. The assembly is recommended to be conducted
by two people.
- Danger of injury! During the assembly, please consider that some parts have sharp edges.
- Fix product to suitable and solid walls only.
- Caution: The wall xture of the article must be carried out by a competent person because it requires
customized plugs.
- Make sure that there are no wires or pipelines in the drilling ranges.
- Check the areas with a metal detector prior to drilling.
- To order spare parts (see part‘s list), please contact the customer service.
- Installation accessories are not included and need to be purchased from a specialist retailer.
Maintenance instructions
Use a sponge or a soft cloth for cleaning and care. Environmentally friendly and gentle cleaning agents suce.
By no means use any aggressive liquids or cleaning agents containing solvents. Never use sharp objects, steel
wool, chemicals or sandy scouring agents for cleaning. These lead to surface damage and loss of warranty.
Slight lime deposits are easily removed with some household vinegar.

17
This product is heavy and may require
two people to install.
Tools required

18
Box contents
1 x 1 x
1 2
1 x
4
1 x
5
2 x
7
3 x
8
2 x
10
2 x
11
2 x
13
2 x
14
ca. 150 cm
1 x
6
1 x
1x
1 x
1 x
3
12
9
15
2.1
2.1
9.1
9.2
1/2" (Ø ca. 1,9 cm)
1 x
16
3/4" (Ø ca. 2,5 cm)

19
Assembly drawing
1
4
6
2.1
10
15
16
13
14
3
2.1
7
9.1
8
5
2
12
9
7
11
8
8
9.2

20
Installation steps A-C
Below is a visual step-by-step sequence of how to put the Overheadshower-Set main
components together.
Positioning the Overheadshower-Set using user’s height
Depending on your height, we recommend the shower head to be positioned approx. 260mm above your
head. If you have several persons in your home who will be using this shower panel, measure the height
of the tallest person and position the shower head 260mm over that height.
10
A
B
C
10

21
Installation steps D-E
Below is a visual step-by-step sequence of how to put the Overheadshower-Set main
components together.
D
E
9.1
9.2
1
2.1 2
2.1

22
Installation step F
Below is a visual step-by-step sequence of how to put the Overheadshower-Set main
components together.
F
2.1
2
3
8
1
9

23
Installation steps G-I
Below is a visual step-by-step sequence of how to put the Overheadshower-Set main
components together.
14 15
13 16
11
G
H
I
11

24
Installation steps J-K
Below is a visual step-by-step sequence of how to put the Overheadshower-Set main
components together.
7
J
K
12
88

25
Installation steps L-O
Below is a visual step-by-step sequence of how to put the Overheadshower-Set main
components together.
M
1
L
12
6
7
12
N
4
O

26
Installation steps
Below is a visual step-by-step sequence of how to put the Overheadshower-Set main
components together.

27
Dimensions
Preparing the proper position for your Overheadshower-Set
Using your Body Height as a basis for determining the position of your overheadshower-set,
you’re your height in mm.
ca. 55 mm
ca. 30 mm
ca. 990 mm
Recommended positioning
ca. 250 mm

28
Disposal
Should the product no longer be serviceable, every consumer has a statutory obligation to dispose
of old appliances separately from domestic waste and dispose of them e.g. at a local authority /
district collection point.
Our service
You will receive prompt professional advice from our service team:
- Germany: Telephone 01806-63 06 30, Land line 20ct/call, mobile telephone connection 60ct/call
max.
- Austria, Universal: Telephone +43 / 662-4485 59 landline depending on provider,
Home improvement expert service - Otto: +43 / 316-606 159 landline depending on provider,
Home improvement expert service - Quelle: +43 / 662-9005 59 landline depending on provider,
Home improvement expert service
- Switzerland, Quelle: DE: +41 / 848 85 85 00, FR: +41 / 848 85 85 01, I: +41 / 848 858 530
Ackermann: DE: +41 / 848 85 85 11, FR: +41 / 848 85 85 21, I: +41 / 848 858 530
- The Netherlands: call center 0900-1901 (15ct/min.)
In order to assist you more eciently, please tell us the:
product designation: Overheadshower-Set
„Square + Thermostatic showermixer“ 90884659-70015644
and item number you used to order the item (see invoice).
Imported by AproductZ GmbH, Werner-Otto-Str. 1-7, 22179 Hamburg (Germany)

D: Nachdruck, auch auszugsweise, nicht gestattet! GB: Reproduction, even in extracts, is not permitted! F: Toute reproduction de ce mode d’emploi
même par extraits est interdite ! IT: È vietata la riproduzione, anche parziale. NL: Nadruk, ook slechts gedeeltelijk, niet toegestaan!
Anleitung, Nr.: 20219088465970015644
29
Aufbauanleitung
Überkopfbrause-Set
„Eckig + Thermostat-Armatur“
Installations Instructions
Overheadshower-Set
„Square + Thermostatic
showermixer“
Instructions d‘installation
Ensemble de Douche
„Carré + Robinetterie
thermostatique de douche“
Istruzioni d‘installazione
Set per doccetta sopra la testa
„Quadrato + termostatico per
doccia“
Montagehandleiding
Regendouchesysteem
„Vierkant + Thermostaat
douche“
Ensemble de Douche
„Carré + Robinetterie thermostatique de douche“
90884659-70015644
Taille: 1010 x 268 mm

30
IMPORTANT, CONSERVER CE DOCUMENT POUR TOUTE RÉFÉ-
RENCE ULTÉRIEURE ! À LIRE ATTENTIVEMENT !
Utilisation conforme à la destination
- Cet article est un ensemble de douche.
- Cet article n’est destiné qu’à un usage de type privé.
Avis de sécurité
- RISQUE DE DÉGÂTS DES EAUX !
Veuillez couper l’alimentation générale en eau avant le montage.
- Vériez que tous les joints sont correctement positionnés.
- Ces armatures ne sont pas conçues pour l’utilisation sur des petites ballons électriques
ou à basse pression.
- Nous recommandons l’intégration d’un ltre à l’installation ou, au moins, l’utilisation de robinets d’équerre
avec ltre an d‘éviter la pénétration de corps étrangers, qui peuvent endommager la cartouche.
- Armature à usage privé ! Uniquement conçue pour l’utilisation dans les pièces où la température est
supérieure à 0 °C. En cas de risque de gel, coupez l’alimentation en eau et videz l’armature.
- Attention en cas de réglage de l’eau chaude : risque de brûlure !
- Assurer-vous qu‘aucun uide irritant ou corrosif, par ex. un produit de nettoyage ou un nettoyant ménager,
ne s‘écoule dans les tuyaux de raccordement, ce qui pourrait entraîner des dégâts des eaux.
- Risque d’étouement / de blessure ! Ne laissez pas les enfants jouer avec l’emballage car ils pourraient
s’étouer avec le lm ou se blesser avec les matériaux d’emballage.
- Veillez à ce que les enfants ne portent pas à la bouche de petits éléments comme les écrous, rondelles de
couverture ou autres. Ils pourraient les avaler et s’étouer avec.
- Risque de dégradations ! Avant le montage, merci de lire très attentivement les instructions de montage et
de vérier que le produit n’a pas été endommagé au cours du transport. Merci de procéder au montage de
l’article avec de grandes précautions.
- L’article ne peut être assemblé que par du personnel compétent. Il est conseillé de procéder au montage
à deux personnes.
- Risque de blessure ! Lors du montage, prenez en compte le fait que cet article présente plusi-eurs arêtes
vives.
- Ne montez l’article que contre des murs massifs et adaptés.
- Attention: La xation des éléments de mobilier au mur doit être eectuée par du personnel compétent, car
des chevilles adaptées au mur sont nécessaires pour le montage.
- Assurez-vous qu’aucun câble ou tuyau ne se trouve dans les zones de perçage.
- Avant le perçage, inspectez les zones avec un détecteur de métaux.
- Merci de contacter le service clientèle pour toute commande de pièces détachées (voir la liste des pièces).
- Les pièces servant à la xation ne sont pas fournies. Celles-ci sont en vente dans les magasins
spécialisés.
Instructions d’entretien
Pour le nettoyage et l’entretien, utilisez une éponge ou un chion doux. Un nettoyant ménager doux et respec-
tueux de l’environnement sut. N’utilisez jamais de produits de nettoyage agressifs ou contenant des solvants.
Pour le nettoyage, n’utilisez jamais d’objets pointus, de laine métallique, de produits chimiques ou de produits
à récurer contenant du sable. Ils entraîneront une dégradation de la surface et une privation de la garantie. Les
dépôts légers de calcaire peuvent être éliminés sans eorts avec un peu de vinaigre de cuisine.

31
Outils nécessaires
En raison du poids important de ce produit,
le montage peut nécessiter deux personnes.

32
Contenu de l’emballage
1 x 1 x
1 2
1 x
4
1 x
5
2 x
7
3 x
8
2 x
10
2 x
11
2 x
13
2 x
14
ca. 150 cm
1 x
6
1 x
1x
1 x
1 x
3
12
9
15
2.1
2.1
9.1
9.2
1/2" (Ø ca. 1,9 cm)
1 x
16
3/4" (Ø ca. 2,5 cm)

33
Dessin d’assemblage
1
4
6
2.1
10
15
16
13
14
3
2.1
7
9.1
8
5
2
12
9
7
11
8
8
9.2

34
Étapes de construction A-C
Vous trouverez ci-après une instruction étape par étape concernant le montage des
principales pièces du ensemble de douche.
Ajustement du ensemble de douche. d’après la taille corporelle
En fonction de la taille corporelle, il est recommandé de placer la tête de douche à une distance d’env. 260
mm au-dessus de votre tête. Si plusieurs personnes veulent utiliser le panneau de douche dans votre foyer,
mesurez la personne la plus grande et positionnez la tête de douche 260 mm au-dessus de cette taille.
10
A
B
C
10

35
Étapes de construction D-E
Vous trouverez ci-après une instruction étape par étape concernant le montage des
principales pièces du ensemble de douche.
D
E
9.1
9.2
1
2.1 2
2.1

36
Étapes de construction F
Vous trouverez ci-après une instruction étape par étape concernant le montage des
principales pièces du ensemble de douche.
F
2.1
2
3
8
1
9

37
Étapes de construction G-I
Vous trouverez ci-après une instruction étape par étape concernant le montage des
principales pièces du ensemble de douche.
14 15
13 16
11
G
H
I
11

38
Étapes de construction J-K
Vous trouverez ci-après une instruction étape par étape concernant le montage des
principales pièces du ensemble de douche.
7
J
K
12
88

39
Étapes de construction L-O
Vous trouverez ci-après une instruction étape par étape concernant le montage des
principales pièces du ensemble de douche.
M
1
L
12
6
7
12
N
4
O

40
Étapes de construction
Vous trouverez ci-après une instruction étape par étape concernant le montage des
principales pièces du ensemble de douche.

41
Dimension
Préparation au bon positionnement du ensemble de douche
Référez-vous à la taille corporelle pour déterminer la hauteur de pose du panneau de douche
en convertissant votre taille corporelle en mm. Utilisez les schémas A et B pour déterminer le
positionnement exact des trous percés destinés à réceptionner le dispositif d’accrochage et les
étriers d’appui.
ca. 55 mm
ca. 30 mm
ca. 990 mm
Recommended positioning
ca. 250 mm

42
Traitement des déchets
Si cet article devient inutilisable, chaque utilisateur est légalement obligé de traiter les vieux ap-
pareils ménagers séparément des déchets domestiques, par exemple en les déposants dans un
lieu de collecte de sa commune / de son quartier.
Notre service
Vous pourrez bénécier immédiatement de conseils techniques en contactant notre équipe de
services:
- Allemagne: téléphone 01806-63 06 30, depuis un poste xe 20 c/appel, depuis un mobile
- Autriche: Universal: téléphone +43 / 662-4485 59, depuis un poste xe en fonction de l’opérateur,
conseil spécialisé bricolage – Otto: +43 / 316-606 159 depuis un poste xe en fonction de
l’opérateur, conseil spécialisé bricolage – Quelle: +43 / 662-9005 59 depuis un poste xe en fonc-
tion de l’opérateur, conseil spécialisé
- Suisse, Quelle: DE: +41 / 848 85 85 00, FR: +41 / 848 85 85 01, I: +41 / 848 858 530
Ackermann: DE: +41 / 848 85 85 11, FR: +41 / 848 85 85 21, I: +41 / 848 858 530
- Pays-Bas: centre d’appel 0900-1901 (15 c/mn)
Pour nous permettre de vous aider aussi rapidement que possible, merci de préciser:
Le nom de l’article : Ensemble de Douche
„Carré + Robinetterie thermostatique de douche“ 90884659-70015644
et le numéro d’article sous lequel vous avez commandé cet article (voir facture).
Importé par AproductZ GmbH, Werner-Otto-Str. 1-7, 22179 Hamburg (Germany)

43
D: Nachdruck, auch auszugsweise, nicht gestattet! GB: Reproduction, even in extracts, is not permitted! F: Toute reproduction de ce mode d’emploi
même par extraits est interdite ! IT: È vietata la riproduzione, anche parziale. NL: Nadruk, ook slechts gedeeltelijk, niet toegestaan!
Anleitung, Nr.: 20219088465970015644
Aufbauanleitung
Überkopfbrause-Set
„Eckig + Thermostat-Armatur“
Installations Instructions
Overheadshower-Set
„Square + Thermostatic
showermixer“
Instructions d‘installation
Ensemble de Douche
„Carré + Robinetterie
thermostatique de douche“
Istruzioni d‘installazione
Set per doccetta sopra la testa
„Quadrato + termostatico per
doccia“
Montagehandleiding
Regendouchesysteem
„Vierkant + Thermostaat
douche“
Set per doccetta sopra la testa
„Quadrato + termostatico per doccia“
90884659-70015644
Dimensione: 1010 x 268 mm

44
IMPORTANTE, CONSERVARE IL PRESENTE DOCUMENTO PER UN
FUTURO RIFERIMENTO! LEGGERE CON ATTENZIONE!
Uso conforme
- Il presente articolo è Set per doccetta sopra la testa.
- L‘articolo è destinato esclusivamente all‘uso privato.
Avvisi di sicurezza
- ATTENZIONE, DANNI CAUSATI DALL‘ACQUA!
Prima di installare il prodotto, si raccomanda di chiudere il sistema di adduzione dell‘acqua.
- Controllare in quest‘occasione la corretta sede delle guarnizioni.
- Queste rubinetterie non sono adatte per l‘utilizzo in serbatoi di accumulo elettrici e a bassa pressione.
- È consigliabile installare un ltro o utilizzare valvole angolari dotate di ltro onde evitare l‘entrata di corpi
estranei che potrebbero danneggiare la cartuccia.
- La rubinetteria è concepita per l‘impiego in abitazioni private! Essa si adatta esclusivamente per l‘utilizzo
in locali con temperatura superiore agli 0 °C. In caso di imminente gelo, interrompere l‘alimentazione
dell‘acqua e svuotare i rubinetti.
- Prestare particolare attenzione nella regolazione dell‘acqua calda: pericolo di ustioni!
- Assicurarsi che nessun agente caustico o corrosivo, come detersivi o detergenti per la casa, niscano dei
tubi di collegamento. Ciò potrà causare danni da acqua.
- Pericolo di soocamento / lesioni! L‘imballaggio non è un giocattolo per bambini.
Potrebbero soocarsi con la pellicola o ferirsi con l‘involucro.
- Fare attenzione che i bambini non mettano in bocca piccole parti quali bulloni, tappi ecc.
L‘ingerimento potrebbe comportare il soocamento.
- Pericolo di danneggiamento! Prima del montaggio, leggere attentamente le istruzioni di montaggio e
accertarsi dell‘assenza di danni da trasporto. Installare l‘articolo con la massima cura.
- Il montaggio dell‘articolo è consentito solo alle persone esperte. Si consiglia di eettuare il montaggio con
l‘aiuto di una seconda persona.
- Pericolo di lesioni! Durante il montaggio, fare attenzione ai bordi taglienti di alcune parti.
- Montare l‘articolo esclusivamente a ridossi di una parete adatta e massiccia.
- Attenzione: Il ssaggio dell‘articolo alla parete va eettuato da una persona esperta, dato che il
montaggio richiede l‘utilizzo di tasselli adatti alla parete.
- Accertarsi dell‘assenza di cavi e tubi nei punti di perforazione.
- Controllare la parete con un cercametalli prima di eettuare i fori.
- Per ordinare le parti di ricambio (ved. lista dei ricambi) si prega di rivolgersi al servizio clienti.
- Le parti per il ssaggio non sono contenute nella fornitura e si possono acquistare nei negozi
specializzati.
Avvisi per la pulizia
Per la pulizia si consiglia l‘utilizzo di una spugna o di un panno morbido. Sono sucienti i detersivi ecologici
e/o delicati. Si sconsiglia l‘utilizzo di detersivi aggressivi o contenenti solventi.
Non utilizzare oggetti taglienti, lana d‘acciaio, agenti chimici o abrasivi contenenti sabbia. Potrebbero dan-
neggiare la supercie e comportare di conseguenza la decadenza della garanzia. Le incrostazioni leggere di
calcare si possono rimuovere facilmente con dell‘aceto.

45
Attrezzi necessari
L‘elevato peso del prodotto potrebbe rendere necessario
l‘aiuto di una seconda persona per il montaggio.

46
Contenuto della confezione
1 x 1 x
1 2
1 x
4
1 x
5
2 x
7
3 x
8
2 x
10
2 x
11
2 x
13
2 x
14
ca. 150 cm
1 x
6
1 x
1x
1 x
1 x
3
12
9
15
2.1
2.1
9.1
9.2
1/2" (Ø ca. 1,9 cm)
1 x
16
3/4" (Ø ca. 2,5 cm)

47
Schema di montaggio
1
4
6
2.1
10
15
16
13
14
3
2.1
7
9.1
8
5
2
12
9
7
11
8
8
9.2

48
Fasi di montaggio A-C
Di seguito sono rappresentate tutte le fasi di montaggio delle componenti principali
Set per doccetta sopra la testa.
Allineamento del pannello in base all’altezza personale
In base all’altezza personale, si raccomanda l’installazione del soone a una distanza di ca. 260mm sopra la
propria testa. In caso si prevedesse l’utilizzo Set per doccetta sopra la testa da più persone, il riferimento per il
posizionamento del soone è l’altezza dell’utente più alto: il soone va posizionato a tale altezza più 260mm.
10
A
B
C
10

49
Fasi di montaggio D-E
Di seguito sono rappresentate tutte le fasi di montaggio delle componenti principali
Set per doccetta sopra la testa.
D
E
9.1
9.2
1
2.1 2
2.1

50
Fasi di montaggio F
Di seguito sono rappresentate tutte le fasi di montaggio delle componenti principali
Set per doccetta sopra la testa.
F
2.1
2
3
8
1
9

51
Fasi di montaggio G-I
Di seguito sono rappresentate tutte le fasi di montaggio delle componenti principali
Set per doccetta sopra la testa.
14 15
13 16
11
G
H
I
11

52
Fasi di montaggio J-K
Di seguito sono rappresentate tutte le fasi di montaggio delle componenti principali
Set per doccetta sopra la testa.
7
J
K
12
88

53
Fasi di montaggio L-O
Di seguito sono rappresentate tutte le fasi di montaggio delle componenti principali
Set per doccetta sopra la testa.
M
1
L
12
6
7
12
N
4
O

54
Fasi di montaggio
Di seguito sono rappresentate tutte le fasi di montaggio delle componenti principali
Set per doccetta sopra la testa.

55
Misure
Preparazione per il corretto posizionamento Set per doccetta sopra la testa
Per calcolare l’altezza di montaggio del Set per doccetta sopra la testa, basatevi sulla vostra
altezza personale in mm. Usare le gure A e B per individuare l’esatta posizione dei fori per il
ssaggio del dispositivo di sospensione e delle stae di sostegno.
ca. 55 mm
ca. 30 mm
ca. 990 mm
Recommended positioning
ca. 250 mm

56
Smaltimento
Qualora l‘articolo non dovesse più servire, ogni consumatore è obbligato per legge allo smaltimento
separato delle vecchie apparecchiature consegnandole ad esempio all‘ecocentro del proprio
comune / quartiere.
Il nostro servizio
Il nostro team di servizio vi ore una rapida consulenza specialistica:
- Germania: telefono 01806-63 06 30, rete ssa 20ct/chiamata, telefonia mobile max. 60 ct/chia-
mata
- Austria, Universal: telefono +43 / 662-4485 59, rete ssa a secondo del gestore, consulenza
specialistica per il fai da te – Otto: +43 / 316-606 159 rete ssa a secondo del gestore, consulenza
specialistica per il fai da te – Quelle: +43 / 662-9005 59 rete ssa a secondo del gestore,
consulenza specialistica per il fai da te
- Svizzera, Quelle: DE: +41 / 848 85 85 00, FR: +41 / 848 85 85 01, I: +41 / 848 858 530
- Ackermann: DE: +41 / 848 85 85 11, FR: +41 / 848 85 85 21, I: +41 / 848 858 530
- Paesi bassi: call center 0900-1901 (15ct/min.)
Per poter garantire un celere aiuto, si prega di indicare:
Il nome dell‘articolo: Set per doccetta sopra la testa
„Quadrato + termostatico per doccia“ 90884659-70015644
e il codice articolo con il quale avete ordinato l‘articolo (ved. scontrino).
Imported by AproductZ GmbH, Werner-Otto-Str. 1-7, 22179 Hamburg (Germany)

57
Aufbauanleitung
Überkopfbrause-Set
„Eckig + Thermostat-Armatur“
Installations Instructions
Overheadshower-Set
„Square + Thermostatic
showermixer“
Instructions d‘installation
Ensemble de Douche
„Carré + Robinetterie
thermostatique de douche“
Istruzioni d‘installazione
Set per doccetta sopra la testa
„Quadrato + termostatico per
doccia“
Montagehandleiding
Regendouchesysteem
„Vierkant + Thermostaat
douche“
D: Nachdruck, auch auszugsweise, nicht gestattet! GB: Reproduction, even in extracts, is not permitted! F: Toute reproduction de ce mode d’emploi
même par extraits est interdite ! IT: È vietata la riproduzione, anche parziale. NL: Nadruk, ook slechts gedeeltelijk, niet toegestaan!
Anleitung, Nr.: 20219088465970015644
Regendouchesysteem
„Vierkant + Thermostaat douche“
90884659-70015644
Grootte: 1010 x 268 mm

58
BELANGRIJK, BEWAAR DIT DOCUMENT VOOR EVENTUELE
TOEKOMSTIGE RAADPLEGING! ZORVULDIG LEZEN!
Beoogd gebruik
- Dit artikel is een Regendouchesysteem om te douchen.
- Dit artikel is uitsluitend bedoeld voor privégebruik.
Veiligheidsinstructies
- WEES VOORZICHTIG: WATERSCHADE!
Gelieve vóór de montage de algemene watertoevoer uit te schakelen.
- Let erop dat alle afdichtingen juist op hun plaats zitten.
- Deze kranen zijn niet geschikt voor het gebruik aan lagedruk- en elektrische kleine boilers.
- Wij adviseren de inbouw van een lter in de installatie of minstens het gebruik van haakse afsluiters met
lter om het binnentreden van vreemde voorwerpen, die het patroon schade kunnen berokkenen, te
vermijden.
- Waterkraan voor het gebruik in particuliere huishoudens! Uitsluitend geschikt voor het gebruik in kamers
met een temperatuur van meer dan 0 °C, bij vorstgevaar watertoevoer onderbreken en armatuur ledigen.
- WEES VOORZICHTIG bij warmwaterinstelling: Gevaar voor brandwonden!
- Zorg ervoor, dat er geen bijtende of corrosieve middelen, zoals poetsmiddelen of huishoudelijke
schoonmaakmiddelen in/aan de aansluitslangen terechtkomen; dit kan tot waterschade leiden.
- Verstikkingsgevaar en risico op letsel! Laat uw kinderen nooit met de verpakking spelen. Ze zouden in het
plastic kunnen stikken en zich aan de verpakking kunnen verwonden.
- Let er op dat kinderen geen kleine onderdelen zoals moeren, doppen of iets dergelijks in hun mond nemen.
Bij inslikken bestaat er een risico op verstikking.
- Risico op schade! Lees de handleiding voor het monteren nauwkeurig door en controleer het product op
eventuele transportschade. Wees zorgvuldig bij het monteren van het artikel.
- Het artikel mag uitsluitend door vakmensen worden gemonteerd. Het verdient aanbeveling om de montage
door twee personen te laten uitvoeren.
- Risico op letsel! Let er bij de montage op dat sommige onderdelen scherpe randen hebben.
- Monteer het artikel uitsluitend aan een daarvoor geschikte, massieve muur.
- Let op: De wandmontage van dit artikel moet door een deskundige persoon worden uitgevoerd, daar voor
de wandmontage speciale pluggen nodig zijn.
- Ga na of er op de plekken waar geboord wordt geen kabels of leidingen lopen.
- Controleer die plekken voor het boren met een metaaldetector.
- Neem voor het bestellen van onderdelen (zie onderdelenlijst) contact op met de klantenservice.
- Onderdelen ter bevestiging zijn niet inbegrepen in de levering en moeten in de vakwinkel
worden gekocht
Onderhoudsadvies
Gebruik voor het reinigen en het onderhoud een spons of een zachte doek. Milieuvriendelijke en milde huis-
houdelijke schoonmaakmiddelen zijn al voldoende. Gebruik in geen geval agressieve of oplosmiddelhoudende
schoonmaakmiddelen. Gebruik in geen geval scherpe voorwerpen, staalwol, chemicaliën of zandhoudende
schuurmiddelen voor de reiniging. Dit kan leiden tot schade aan het oppervlak en het vervallen van de garantie.
Lichte kalkaanslag kunt u zonder problemen met een kleine hoeveelheid huishoudazijn verwijderen.

59
Benodigd gereedschap
Vanwege het gewicht van dit product zijn er mogelijk
twee personen nodig voor de montage.

60
Inhoud
1 x 1 x
1 2
1 x
4
1 x
5
2 x
7
3 x
8
2 x
10
2 x
11
2 x
13
2 x
14
ca. 150 cm
1 x
6
1 x
1x
1 x
1 x
3
12
9
15
2.1
2.1
9.1
9.2
1/2" (Ø ca. 1,9 cm)
1 x
16
3/4" (Ø ca. 2,5 cm)

61
Montagetekening
1
4
6
2.1
10
15
16
13
14
3
2.1
7
9.1
8
5
2
12
9
7
11
8
8
9.2

62
Montagestappen A-C
Hieronder zien we een handleiding stap per stap voor de opbouw van de hoofddelen
van het Regendouchesysteem.
Afstelling Regendouchesysteem op lichaamsgrootte
Afhankelijk van uw lichaamsgrootte is het aanbevolen om de douchekop op een afstand van ca.
260 mm boven het hoofd te plaatsen. Als meerdere personen in uw huishouden het douchepaneel
willen gebruiken, meet u de lichaamsgrootte van de grootste persoon en plaatst u de douchekop.
10
A
B
C
10

63
Montagestappen D-E
Hieronder zien we een handleiding stap per stap voor de opbouw van de hoofddelen
van het Regendouchesysteem.
D
E
9.1
9.2
1
2.1 2
2.1

64
Montagestappen F
Hieronder zien we een handleiding stap per stap voor de opbouw van de hoofddelen
van het Regendouchesysteem.
F
2.1
2
3
8
1
9

65
Montagestappen G-I
Hieronder zien we een handleiding stap per stap voor de opbouw van de hoofddelen
van het Regendouchesysteem.
14 15
13 16
11
G
H
I
11

66
Montagestappen J-K
Hieronder zien we een handleiding stap per stap voor de opbouw van de hoofddelen
van het Regendouchesysteem.
7
J
K
12
88

67
Montagestappen L-O
Hieronder zien we een handleiding stap per stap voor de opbouw van de hoofddelen
van het Regendouchesysteem.
M
1
L
12
6
7
12
N
4
O

68
Montagestappen
Hieronder zien we een handleiding stap per stap voor de opbouw van de hoofddelen
van het Regendouchesysteem.

69
Afmeting
Voorbereiding voor het correct positioneren van het Regendouchesysteem
Gebruik uw lichaamsgrootte voor het bepalen van de aanbrenghoogte van het douchepaneel door uw
lichaamsgrootte in mm om te rekenen. Gebruik de tekeningen A en B om de correcte positionering van de
boorgaten te bepalen voor het aanbrengen van de ophangvoorziening en de steunbeugel.
ca. 55 mm
ca. 30 mm
ca. 990 mm
Recommended positioning
ca. 250 mm

70
Afvalverwijdering
Indien dit product niet meer gebruikt wordt, is elke consument wettelijk verplicht om dergelijke
huisraad apart van het huisvuil te verwijderen en bijv. bij de gemeente/milieustraat in te leveren.
Onze service
Ons serviceteam staat u onmiddellijk vakkundig te woord:
- Duitsland: Telefoon 01806-63 06 30, Vaste lijn20ct/gesprek, Mobiel max. 60 ct/gesprek
- Oostenrijk, Universal: Telefoon +43 / 662-4485 59, Vaste lijn afhankelijk van aanbieder,
Service afd. Doe-het-zelf - Otto: +43 / 316-606 159 - , Vaste lijn afhankelijk van aanbieder,
Service afd. Doe-het-zelf - Quelle: +43 / 662-9005 59, Vaste lijn afhankelijk van aanbieder,
Service afd. Doe-het-zelf
- Zwitserland, Quelle: DE: +41 / 848 85 85 00, FR: +41 / 848 85 85 01, I: +41 / 848 858 530
Ackermann: DE: +41 / 848 85 85 11, FR: +41 / 848 85 85 21, I: +41 / 848 858 530
- Niederlande, call center 0900-1901 (15ct/Min.)
Voor een snelle service verzoeken wij u om het volgende te vermelden:
Productomschrijving: Regendouchesysteem
„Vierkant + Thermostaatdouche“ 90884659-70015644
alsmede het Artikelnummer waaronder u het artikel heeft besteld (zie factuur).
Imported by AproductZ GmbH, Werner-Otto-Str. 1-7, 22179 Hamburg (Germany)
BD-BAD-ÜBS-eckig-TH-90884659-70015644_0921
-
 1
1
-
 2
2
-
 3
3
-
 4
4
-
 5
5
-
 6
6
-
 7
7
-
 8
8
-
 9
9
-
 10
10
-
 11
11
-
 12
12
-
 13
13
-
 14
14
-
 15
15
-
 16
16
-
 17
17
-
 18
18
-
 19
19
-
 20
20
-
 21
21
-
 22
22
-
 23
23
-
 24
24
-
 25
25
-
 26
26
-
 27
27
-
 28
28
-
 29
29
-
 30
30
-
 31
31
-
 32
32
-
 33
33
-
 34
34
-
 35
35
-
 36
36
-
 37
37
-
 38
38
-
 39
39
-
 40
40
-
 41
41
-
 42
42
-
 43
43
-
 44
44
-
 45
45
-
 46
46
-
 47
47
-
 48
48
-
 49
49
-
 50
50
-
 51
51
-
 52
52
-
 53
53
-
 54
54
-
 55
55
-
 56
56
-
 57
57
-
 58
58
-
 59
59
-
 60
60
-
 61
61
-
 62
62
-
 63
63
-
 64
64
-
 65
65
-
 66
66
-
 67
67
-
 68
68
-
 69
69
-
 70
70


Welltime Duschsystem Turin Installatie gids
- Type
- Installatie gids
in andere talen
Gerelateerde papieren
-
Welltime 11514753-53316528 Handleiding
-
 Welltime WC-Sitz Relax 4.5 Newsletter anmelden & Vorteile sichern Installatie gids
-
 Welltime Brausethermostat Black 5.0 Newsletter anmelden & Vorteile sichern Installatie gids
-
 Welltime Brausethermostat Trento Installatie gids
-
 Welltime Eckdusche Texas Installatie gids
-
 Welltime Stangenbrause-Set Lina 4.0 Newsletter anmelden & Vorteile sichern Installatie gids
-
 Welltime Eckdusche Trento Banda Plus Installatie gids
-
 Welltime Eckdusche Florenz Black Installatie gids
-
 Welltime Eckdusche Trento Nero 4.5 Newsletter anmelden & Vorteile sichern Installatie gids
-
 Welltime Duschsäule Black Square 5.0 Newsletter anmelden & Vorteile sichern Installatie gids


