
Clover Mini
Feature Guide

English
Deutsch
Español
Français
Italiano
Nederlands
Polski
1
10
20
30
40
50
60

1 Clover Mini Feature Guide English 2
What’s included
Power brick
Power cord
(2 for Europe)
USB
SIM adapters
(3G devices only)
Receipt paper x2 Screwdriver
Ethernet
PIN Shield
PIN Shield + PIN Entry Aid
Clover Mini
Hub
OR
We are continuously
improving our software.
To see the latest version
of this guide, visit
clover.com/setup.
In Europe, visit eu.clover.com/setup

3 Clover Mini Feature Guide English 4
Paper roll release
pull tab
Reset button
Insert payment
Contactless
payment reader
Audio jack
Speaker
Front facing
camera
Swipe payment
Microphone
SIM card slot
(3G devices only)
Receipt door
Clover Mini Front Payment Methods
Clover Mini Back
Get to know Clover Mini
Chip Card Magnetic Stripe Card
1234 5678 9012 3456
1234 5678 9012 3456
1234 5678 9012 3456
1234 5678 9012 3456
1234 5678 9012 3456
1234 5678 9012 3456
1234 5678 9012 3456
1234 5678 9012 3456
01
01
01
01
1234 5678 9012 3456
1234 5678 9012 3456
1234 5678 9012 3456
1234 5678 9012 3456
1234 5678 9012 3456
1234 5678 9012 3456
Insert Card
(chip card only)
Tap Card
(contactless card only)
Swipe Card

5 Clover Mini Feature Guide English 6
Video zur Einrichtung: clover.com/setup
Europa: eu.clover.com/setup
Set up your Clover Mini
3G devices only: to replace the SIM card, loosen the
green screw and open the card slot. Place the new card
on the matching SIM adapter. Slide the adapter into the
slot, close it, and tighten the screw.
Plug all accessories into Hub. Provided Ethernet and USB
cords are optional.
Plug power brick cable into Hub charger port .
Plug power cord into power source. Device will
automatically power on.
Pull on receipt door and load paper.
3
5
2
4
1
2
3
4
5
1
For instructions on how to connect
Clover Mini to another Clover device:
US: clover.com/setup
Europe: eu.clover.com/setup
Power
Switching Hub cable’s direction:
1
2
3
4
Ethernet Type A USB Type B USB Cash drawer
Hub Ports
Green screw on Hub connector must always be tightened to
ensure reliable connection.
Turn Clover Mini over to access underside
Use provided screwdriver to loosen green screw
Switch cable to desired direction
Tighten green screw (be sure to not overtighten)
2
3

7 Clover Mini Feature Guide English 8
Secure PIN Entry and PIN Entry Aid Transactions with the PIN Entry Aid
Place the PIN Shield on your Clover
Mini for secure PIN entry. The PIN
Entry Aid can assist cardholders
with disabilities who have diculty
using a touchscreen to enter their
PIN.
For security purposes, contact us immediately if your PIN
Entry Aid does not match the images below.
Front Back
When taking a payment, tap the “USE AID” button on the
Enter PIN screen and follow on-screen instructions to
securely place the aid over the screen and allow a customer
to enter their PIN. Remove aid after the customer removes
their card.
Additional Accessibility Features
Clover Mini incorporates other native Android accessibility
features such as larger text and magnication gestures (not
available during secure PIN entry). These features can be
found in the Accessibility menu in your device Settings.

Deutsch 109 Clover Mini Feature Guide
Useful Resources
Web Access
Manage Your Apps
Some apps allow you to access them via
your web browser. We’ve put shortcuts to
these web pages at clover.com/home.
Please use Chrome, Safari, or Firefox.
In Europe, visit eu.clover.com/home
Need Help?
Visit help.clover.com, use the Help app,
or call us anytime at the phone number
given in your welcome email.
Deutsch 10
Funktionsübersicht Clover Mini

11 Funktionsübersicht Clover Mini Deutsch 12
Wir entwickeln unsere
Software ständig weiter.
Die neueste Version
dieser Anleitung nden
Sie auf clover.com/setup.
Für Europa nden Sie diese Informationen auf
eu.clover.com/setup.
Inhalt
Netzteil
Netzkabel
(2 für Europa)
USB
SIM-Adapter
(nur 3G-Geräte)
2Belegrollen Schraubendreher
Ethernet
Sichtschutz für PIN-Eingabe
Sichtschutz für PIN-Eingabe
+ PIN-Eingabehilfe
Clover Mini
Hub
ODER

13 Funktionsübersicht Clover Mini Deutsch 14
Zuglasche zur
Papierrollenfreigabe
Reset-Taste
Audio-Buchse
Lautsprecher
SIM-Kartensteckplatz
(nur 3G-Geräte)
Quittungsklappe
Rückseite des Clover Mini
Lernen Sie Clover Mini kennen
Zahlung per
Einstecken
Kontaktloser
Leser
Frontkamera
Zahlung per
Durchziehen
Mikrofon
Vorderseite des Clover Mini Zahlungsarten
Chipkarte Magnetstreifenkarte
1234 5678 9012 3456
1234 5678 9012 3456
1234 5678 9012 3456
1234 5678 9012 3456
1234 5678 9012 3456
1234 5678 9012 3456
1234 5678 9012 3456
1234 5678 9012 3456
01
01
01
01
1234 5678 9012 3456
1234 5678 9012 3456
1234 5678 9012 3456
1234 5678 9012 3456
1234 5678 9012 3456
1234 5678 9012 3456
Karte einführen
(nur Chipkarte)
Karte kurz auegen
(nur kontaktlose Karten)
Karte durchziehen

15 Funktionsübersicht Clover Mini Deutsch 16
Video zur Einrichtung: clover.com/setup
Europa: eu.clover.com/setup
Einrichten des Clover Mini-Geräts
Nur 3G-Geräte: Um die SIM-Karte zu ersetzen,
lösen Sie die grüne Schraube und önen Sie den
Kartensteckplatz. Setzen Sie die neue Karte auf den
passenden SIM-Adapter. Schieben Sie den Adapter
in den Steckplatz, schließen Sie den Steckplatz und
ziehen Sie die Schraube fest.
Schließen Sie alle Zubehörgerät an den Hub an. Die
mitgelieferten Ethernet- und USB-Kabel sind optional.
Stecken Sie das Kabel des Netzadapters in den
Ladekabelanschluss des Hubs.
Verbinden Sie das Netzteil mit einer Stromquelle. Das
Gerät schaltet sich automatisch ein.
Ziehen Sie die Quittungsklappe auf und legen Sie
Papier ein.
2
3
4
5
1
Anweisungen zum Herstellen einer
Verbindung zwischen Clover Mini und
einem anderen Clover-Gerät nden Sie
je nach Region auf den folgenden Sites:
USA: clover.com/setup
Europa: eu.clover.com/setup
3
2
4
1
Netzteilanschluss
Kabel am Hub zur anderen Seite verlegen:
1
2
3
4
Ethernet
USB Typ AUSB
Typ B
Kassenlade
Hub-Anschlüsse
Die grüne Schraube am Hub-Anschluss muss immer angezogen
werden, um eine zuverlässige Verbindung zu ermöglichen.
Den Clover Mini umdrehen, um an die Unterseite zu
gelangen
Mit dem mitgelieferten Schraubendreher die grüne
Schraube lösen
Schalten Sie das Kabel in die gewünschte Richtung um
Die grüne Schraube anziehen (aber nicht überdrehen)
2
3

17 Funktionsübersicht Clover Mini Deutsch 18
Sichere PIN-Eingabe und PIN-
Eingabehilfe
Transaktionen mit der PIN-
Eingabehilfe
Bringen Sie den PIN-Sichtschutz am
Clover Mini an, um die Sicherheit
bei der PIN-Eingabe zu verbessern.
Die PIN-Eingabehilfe unterstützt
Karteninhaber mit Behinderungen,
die Schwierigkeiten bei der
Verwendung eines Touchscreen
haben, bei der Eingabe der PIN.
Wenden Sie sich aus Sicherheitsgründen sofort an uns,
wenn Ihre PIN-Eingabehilfe nicht den Abbildungen unten
entspricht.
Vorderansicht Rückseite
Tippen Sie beim Annehmen einer Zahlung im Bildschirm für
die PIN-Eingabe auf die Schaltäche „USE AID“ (Eingabehilfe
verwenden). Befolgen Sie dann die Anweisungen auf dem
Bildschirm, um die Eingabehilfe richtig über dem Bildschirm
zu positionieren und dem Kunden die Eingabe seiner PIN zu
ermöglichen. Entfernen Sie die Eingabehilfe, nachdem der
Kunde seine Karte entfernt hat.
Zusätzliche Bedienungshilfen
Clover Mini bietet weitere Android-Bedienungshilfen,
wie größeren Text und Vergrößerungsgesten (während
der PIN-Eingabe nicht verfügbar). Diese Funktionen sind
im Bedienungshilfenmenü in den Geräteeinstellungen
verfügbar.

19 Funktionsübersicht Clover Mini Español 20
Guía de funciones de Clover Mini
Weitere Informationen
Internetzugang
Apps verwalten
Der Zugri auf bestimmte Anwendungen
erfolgt über Ihren Webbrowser. Auf
clover.com/home nden Sie Links zu den
entsprechenden Webseiten.
Verwenden Sie hierzu Chrome, Safari
oder Firefox.
In Europa nden Sie diese Informationen
unter eu.clover.com/home.
Hilfe
Nutzen Sie die Anwendung „Hilfe“,
besuchen Sie help.clover.com oder
setzen Sie sich unter der in Ihrer
Begrüßungs-E-Mail angegebenen
Telefonnummer mit uns in Verbindung.

21 Guía de funciones de Clover Mini Español 22
Siempre estamos
mejorando nuestro
software. Para ver la
última versión de esta
guía, visite
clover.com/setup.
En Europa, visite eu.clover.com/setup
Se incluye
Fuente de
alimentación
Cable de
alimentación
(2 para Europa)
Cable USB
Adaptadores SIM (Solo
para dispositivos 3G)
2 rollos de papel
para recibos
Destornillador
Cable Ethernet
Protector de PIN
Protector de PIN +
Ayuda de entrada de PIN
Clover Mini
Concentrador
O

23 Guía de funciones de Clover Mini Español 24
Lengüeta para
liberar rollo de
papel
Botón de reajuste
Conector de
audio
Altavoz
Ranura para tarjetas SIM
(Solo para dispositivos 3G)
Puerta de recibos
Parte trasera de Clover Mini
Descripción de Clover Mini
Insertar tarjeta
Lector de tarjetas de
pago sin contacto
Cámara frontal
Deslizar tarjeta
Micrófono
Parte delantera de Clover Mini Formas de pago
Tarjeta con chip Tarjeta con banda magnética
1234 5678 9012 3456
1234 5678 9012 3456
1234 5678 9012 3456
1234 5678 9012 3456
1234 5678 9012 3456
1234 5678 9012 3456
1234 5678 9012 3456
1234 5678 9012 3456
01
01
01
01
1234 5678 9012 3456
1234 5678 9012 3456
1234 5678 9012 3456
1234 5678 9012 3456
1234 5678 9012 3456
1234 5678 9012 3456
Insertar la tarjeta
(únicamente tarjetas
con chip)
Acercar la tarjeta (solo para
tarjetas contactless)
Deslizar la tarjeta

25 Guía de funciones de Clover Mini Español 26
Vídeo de instalación: clover.com/setup
Para Europa: eu.clover.com/setup
Instalación de Clover Mini
(Solo para dispositivos 3G): para cambiar la tarjeta
SIM, aoje el tornillo verde y abra la ranura de la tarjeta.
Coloque la tarjeta nueva en el adaptador de tarjeta SIM
correspondiente. Deslice el adaptador en la ranura,
ciérrela y apriete el tornillo.
Conecte todos los accesorios en el concentrador. Los
cables Ethernet y USB proporcionados son opcionales.
Conecte el cable del adaptador de alimentación en el
puerto de carga del concentrador .
Conecte el cable de alimentación en la toma de
electricidad. El dispositivo se encenderá automáticamente.
Tire de la puerta de recibos y cargue papel.
2
3
4
5
Para obtener más instrucciones
sobre cómo conectar Clover Mini
a otro dispositivo de Clover, visite:
Estados Unidos: clover.com/setup
Europa: eu.clover.com/setup
3
2
4
Alimentación
Cambio de orientación del cable del concentrador:
1
2
3
4
Cable
Ethernet
USB tipo AUSB
tipo B
Caja
registradora
Puertos del
concentrador
Para garantizar una buena conexión, el tornillo verde del
conector del concentrador siempre debe estar apretado.
Dé la vuelta al dispositivo Clover Mini para acceder a la
parte inferior
Utilice el destornillador proporcionado para aojar el
tornillo verde
Cambiar la orientación del cable como desee
Apriete el tornillo verde sin excesiva fuerza
2
3
1
1

27 Guía de funciones de Clover Mini Español 28
Ingreso seguro del PIN y ayuda de
entrada de PIN
Transacciones con la ayuda de
entrada de PIN
Coloque el protector de PIN en
el dispositivo Clover Mini para
permitir el ingreso seguro del PIN.
La ayuda de entrada de PIN
puede asistir a aquellas personas
con discapacidades que tengan
dicultadas para utilizar la pantalla
táctil para ingresar su PIN.
Por motivos de seguridad, póngase en contacto
inmediatamente si su Ayuda de entrada de PIN no coincide
con las imágenes debajo.
Parte delantera Parte trasera
Al momento de efectuar un cobro, pulse el botón “USE
AID” (Utilizar ayuda) en la pantalla de ingreso de PIN y siga
las instrucciones en pantalla para ubicar la ayuda sobre la
pantalla y permitir al cliente el ingreso de su PIN. Retire la
ayuda luego de que el cliente retire su tarjeta.
Funciones de accesibilidad adicionales
Clover Mini incorpora otras funciones de accesibilidad
adicionales nativas de Android, como texto más grande y
movimientos manuales de aumento (no disponible durante
la introducción segura del PIN). Estas funciones pueden
encontrarse en el Menú de accesibilidad en los Ajustes de su
dispositivo.

29 Guía de funciones de Clover Mini Français 30
Guide des fonctionnalités
de CloverMini
Recursos útiles
Acceso a la Web
Gestione sus aplicaciones
A algunas aplicaciones se puede acceder
mediante el navegador web. Hemos
colocado accesos directos a esas páginas
web en clover.com/home.
Use Chrome, Safari o Firefox.
En Europa, visite eu.clover.com/home
¿Necesita ayuda?
Visite help.clover.com, utilice la aplicación
de ayuda o llámenos cuando lo necesite
al número de teléfono incluido en el
mensaje de bienvenida.

31 Guide des fonctionnalités de CloverMini Français 32
Nous améliorons sans
cesse nos logiciels. Pour
consulter la dernière
version de ce guide,
rendez-vous sur
clover.com/setup.
Depuis l’Europe, rendez-vous sur eu.clover.com/setup
Contenu
Adaptateur secteur
Câble d’alimentation
(2 pour l’Europe)
Câble USB
Adaptateurs SIM
(appareils 3G
uniquement)
Deux rouleaux de
caisse
Tournevis
Câble Ethernet
Cache de protection de PIN
Cache de protection de PIN +
Module d’aide à la saisie de PIN
Clover Mini
Concentrateur
OU

33 Guide des fonctionnalités de CloverMini Français 34
Tirette d’accès au
rouleau
Bouton
Réinitialiser
Prise jack
Haut-parleur
Emplacement carte SIM
(appareils 3G uniquement)
Trappe d’áccès
Face arrière de Clover Mini
Présentation de Clover Mini
Lecteur de carte
à puce
Lecteur pour paiement
sans contact
Caméra frontale
Lecteur de carte à
piste magnétique
Microphone
Face avant de Clover Mini Moyens de paiement
Carte à puce Carte à piste magnétique
1234 5678 9012 3456
1234 5678 9012 3456
1234 5678 9012 3456
1234 5678 9012 3456
1234 5678 9012 3456
1234 5678 9012 3456
1234 5678 9012 3456
1234 5678 9012 3456
01
01
01
01
1234 5678 9012 3456
1234 5678 9012 3456
1234 5678 9012 3456
1234 5678 9012 3456
1234 5678 9012 3456
1234 5678 9012 3456
Insérer la carte (carte
à puce uniquement)
Toucher l’écran avec la carte
(carte sans contact uniquement)
Passer la carte

35 Guide des fonctionnalités de CloverMini Français 36
Vidéo d’installation : clover.com/setup
Europe : eu.clover.com/setup
Installation de Clover Mini
Appareils 3G uniquement : pour remplacer la carte SIM,
dégagez la vis verte et ouvrez le logement de la carte.
Placez la nouvelle carte sur le support correspondant
à la taille. Faites glisser le support dans l’emplacement,
fermez-le, et serrez la vis verte.
Connectez tous les accessoires au concentrateur.
L’utilisation des câbles Ethernet et USB est facultative.
Connectez le câble de l’adaptateur secteur au port
d’alimentation du concentrateur.
Branchez le câble d’alimentation sur le secteur. L’appareil
se mettra automatiquement en marche.
Tirez sur la trappe d’accès et mettez le rouleau en place.
2
3
4
5
Pour des instructions sur la connexion
de Clover Mini à un autre appareil Clover :
États-Unis : clover.com/setup
Europe : eu.clover.com/setup
3
2
4
Alimentation
Changement de l’orientation du câble du concentrateur :
1
2
3
4
Ethernet USB type AUSB type B Tiroir-caisse
Ports du
concentrateur
La vis verte du connecteur de concentrateur doit être serrée
en permanence pour garantir une connexion able.
Retourner le Clover Mini pour accéder à la face arrière
Utiliser le tournevis fourni pour desserrer la vis verte
Placez le câble dans la direction souhaitée
Serrer la vis verte (ne pas la serrer de façon excessive)
2
3
1
1

37 Guide des fonctionnalités de CloverMini Français 38
Saisie sécurisée du code PIN et
module d’aide à la saisie de PIN
Transactions avec le module d’aide
à la saisie de PIN
Placez le cache de protection de
PIN sur votre Clover Mini pour une
saisie sécurisée du code PIN. Le
module d’aide à la saisie de PIN est
destiné à assister les titulaires de
cartes handicapés qui rencontrent
des problèmes pour saisir leur code
PIN sur un écran tactile.
Pour des raisons de sécurité, veuillez nous contacter
immédiatement si votre module d’aide à la saisie de PIN
n’était pas conforme aux images ci-dessous.
Face avant Face arrière
Lors de la réalisation d’un paiement, appuyez sur le bouton
« USE AID » (aide) de l’écran de saisie de PIN et suivez les
instructions qui s’achent an de positionner correctement
le module d’aide sur l’écran et ainsi permettre au client de
saisir son code PIN. Une fois que le client a récupéré sa
carte, retirez le module d’aide.
Fonctionnalités d’accessibilité
supplémentaires
Clover Mini comprend d’autres fonctionnalités d’accessibilité
Android natives comme une police plus grande ou les
gestes d’agrandissement (non disponibles lors de la saisie
sécurisée du code PIN). Ces fonctionnalités sont disponibles
dans le menu Accessibilité des Paramètres de votre
appareil.

39 Guide des fonctionnalités de CloverMini Italiano 40
Guida alle funzionalità
di Clover Mini
Ressources utiles
Accès au Web
Gérer vos applications
Vous pouvez accéder à certaines
applications à l’aide d’un navigateur
Internet. Nous avons répertorié des
raccourcis conduisant à ces pages Web à
l’adresse clover.com/home.
Utilisez les navigateurs Chrome, Safari ou
Firefox.
Pour les pays d’Europe, consultez la page
eu.clover.com/home
Besoin d’aide?
Consultez la page help.clover.com, utilisez
l’application Aide ou contactez-nous à
tout moment par téléphone au numéro
indiqué dans votre e-mail de bienvenue.

41 Guida alle funzionalità di Clover Mini Italiano 42
Il nostro software viene
sottoposto a continui
miglioramenti. Per
visualizzare la versione
più aggiornata della
guida, visitare il sito
clover.com/setup.
In Europa, visitare eu.clover.com/setup
Componenti inclusi
Trasformatore
Cavo di
alimentazione
(2 per l’Europa)
USB
Adattatori
SIM (solo per i
modelli 3G)
2 x rotoli di carta per
ricevute
Cacciavite
Ethernet
Protezione digitazione PIN
Protezione digitazione PIN +
Aiuto alla digitazione PIN
Clover Mini
Hub
OPPURE

43 Guida alle funzionalità di Clover Mini Italiano 44
Linguetta per
rilascio rotolo di
carta
Pulsante Reset
Altoparlante
Sportello ricevute
Parte posteriore di Clover Mini
Informazioni su Clover Mini
Pagamento con
inserimento
Lettore per
pagamenti senza
contatto
Jack audio
Fotocamera
anteriore
Pagamento con
strisciata
Microfono
Alloggiamento SIM
(solo per i modelli 3G)
Parte frontale di Clover Mini Metodi di pagamento
Carta con tocco Carta con banda magnetica
1234 5678 9012 3456
1234 5678 9012 3456
1234 5678 9012 3456
1234 5678 9012 3456
1234 5678 9012 3456
1234 5678 9012 3456
1234 5678 9012 3456
1234 5678 9012 3456
01
01
01
01
1234 5678 9012 3456
1234 5678 9012 3456
1234 5678 9012 3456
1234 5678 9012 3456
1234 5678 9012 3456
1234 5678 9012 3456
Inserire la carta (solo
carta con chip)
Toccare la carta (solo
carte senza contatto)
Carta magnetica

45 Guida alle funzionalità di Clover Mini Italiano 46
Video per la configurazione: clover.com/setup
Europa: eu.clover.com/setup
Congurazione di Clover Mini
Solo per i modelli 3G: per sostituire la scheda SIM,
allentare la vite verde e aprire l’alloggiamento della scheda.
Posizionare la scheda sull’adattatore SIM corrispondente.
Fare scorrere l’adattatore nell’alloggiamento, chiuderlo e
stringere la vite.
Collegare tutti gli accessori nell’Hub. I cavi Ethernet e USB
forniti sono opzionali.
Inserire il cavo dell’adattatore di alimentazione nella porta
per carica dell’Hub .
Inserire il cavo di alimentazione nella fonte di alimentazione
(elettrica). Il dispositivo si accenderà automaticamente.
Sollevare lo sportello ricevute e caricare la carta.
2
3
4
5
Per istruzioni sul collegamento di
Clover Mini ad un altro dispositivo Clover:
USA: clover.com/setup
Europa: eu.clover.com/setup
3
2
4
Alimentazione
Cambio della direzione del cavo dell’Hub:
1
2
3
4
Ethernet USB tipo AUSB
tipo B
Cassetto cassa
Porte Hub
Per un collegamento adabile, stringere sempre la vite verde
sul connettore Hub.
Girare Clover Mini per accedere alla parte inferiore
Allentare la vite verde con il cacciavite in dotazione
Posizionare il cavo sulla direzione desiderata
Stringere la vite verde senza serrare eccessivamente
2
3
1
1

47 Guida alle funzionalità di Clover Mini Italiano 48
Immissione PIN sicura e
Inserimento guidato PIN
Transazioni con l’aiuto alla
digitazione PIN
Installare lo schermo di
protezione PIN su Clover Mini
per l’inserimento sicuro del PIN.
L’aiuto alla digitazione PIN può
semplicare l’inserimento del PIN
ai titolari di carta con disabilità, che
hanno dicoltà ad utilizzare un
touchscreen per questa operazione.
Per motivi di sicurezza, contattateci immediatamente
qualora il vostro aiuto alla digitazione PIN non corrisponda
alle immagini in basso.
Parte anteriore Parte posteriore
Quando si eettua un pagamento, toccare il pulsante
“USE AID” (Usa ausilio) nella schermata di inserimento PIN
e seguire le istruzioni a video per collocare l’ausilio sullo
schermo e consentire a un cliente di inserire il proprio PIN.
Rimuovere l’ausilio dopo che il cliente ha rimosso la propria
tessera.
Funzionalità aggiuntive per l’accessibilità
Clover Mini comprende altre funzionalità native Android
per l’accessibilità, quali testo più grande e gesti per eseguire
l’ingrandimento (non disponibili durante l’inserimento sicuro
del PIN). Queste funzionalità sono disponibili nel menu
Accessibilità delle Impostazioni del dispositivo.

49 Guida alle funzionalità di Clover Mini Nederlands 50
Clover Mobile - Functiegids
Risorse utili
Accesso Web
Gestione delle app
È possibile accedere ad alcune app tramite
browser Web. All’indirizzo eu.clover.com/
home, sono disponibili i collegamenti alle
pagine Web corrispondenti.
Utilizzare Chrome, Safari o Firefox.
In Europa, visitare eu.clover.com/home
Per ricevere assistenza
Visitare l’indirizzo help.clover.com,
utilizzare l’app Guida o chiamare in
qualsiasi momento i numeri indicati nell’e-
mail di benvenuto.

51 Clover Mini - Functiegids Nederlands 52
Wij werken continu aan
de verbetering van onze
software. Voor de meest
recente versie van deze
handleiding gaat u naar
clover.com/setup.
In Europa gaat u naar eu.clover.com/setup
In de verpakking
Stroomsnoer
Stroomsnoer
(2 voor Europa)
USB
Simadapters
(alleen 3G-apparaten)
Kassabonpapier x2 Schroevendraaier
Ethernet
Pinschild
Pinschild +
Hulpstuk voor invoer pincode
Clover Mini
Hub
OF

53 Clover Mini - Functiegids Nederlands 54
Treklipje voor
losmaken van
papierrol
Terugstelknop
Luidspreker
Kassabonklep
Achterzijde Clover Mini
Kennismaking met de Clover Mini
Betaling insteken
Lezer voor
contactloze
betaling
Audio-aansluiting
Naar de voorkant
gerichte camera
Betaling doorhalen
Microfoon
Simkaartsleuf
(alleen 3G-apparaten)
Voorzijde Clover Mini Betalingswijzen
Chipkaart Kaart met magneetstrip
1234 5678 9012 3456
1234 5678 9012 3456
1234 5678 9012 3456
1234 5678 9012 3456
1234 5678 9012 3456
1234 5678 9012 3456
1234 5678 9012 3456
1234 5678 9012 3456
01
01
01
01
1234 5678 9012 3456
1234 5678 9012 3456
1234 5678 9012 3456
1234 5678 9012 3456
1234 5678 9012 3456
1234 5678 9012 3456
Steek de kaart in
(alleen chipkaart)
Tik de kaart (alleen con-
tactloze kaart)
Doorhaalkaart

55 Clover Mini - Functiegids Nederlands 56
Instelfilmpje: clover.com/setup
Europa: eu.clover.com/setup
De Clover Mini congureren
Alleen voor 3G-apparaten: draai de groene schroef
los en open de kaartlade om de simkaart te vervangen.
Plaats de nieuwe kaart op de juiste simadapter. Schuif de
adapter in de lade, sluit deze en draai de schroef vast.
Koppel alle toebehoren aan de hub. De meegeleverde
ethernet- en USB-kabels zijn optioneel.
Steek de voedingsadapterkabel in de hub-oplaadpoort .
Steek het netsnoer in het stopcontact. Het apparaat
schakelt automatisch in.
Trek de kassabonklep open en plaats het gewenste papier.
2
3
4
5
Voor instructies over het verbinden
van de Clover Mini met een ander Clover-apparaat:
VS: clover.com/setup
Europa: eu.clover.com/setup
3
2
4
Stroom
De richting van de hubkabel omdraaien:
1
2
3
4
Ethernet USB type AUSB type B Geldlade
Hubpoorten
De groene schroef op de hubaansluiting moet altijd vastzitten
om een betrouwbare verbinding te garanderen.
Draai de Clover Mini op zijn kop
Maak de groene schroef los met de meegeleverde
schroevendraaier
Plaats de kabel in de gewenste positie
Draai de groene schroef vast (niet te vast)
2
3
1
1

57 Clover Mini - Functiegids Nederlands 58
Veilige invoer van pincode en
hulpstuk voor invoer pincode
Transacties met het hulpstuk voor
invoer pincode
Plaats het pinschild op uw Clover
Mini voor veilige invoer van
pincode. Het hulpstuk voor invoer
pincode kan hulp bieden aan
kaarthouders met beperkingen,
die moeite hebben met het
invoeren van hun pincode op een
touchscreen.
Neem om veiligheidsredenen onmiddellijk contact met ons
op als het hulpstuk voor invoer pincode niet overeenkomt
met onderstaande afbeeldingen.
Voorkant Achterkant
Wanneer u een betaling aanneemt, tikt u op de knop ‘USE
AID’ (Hulpstuk gebruiken) op het scherm Pincode invoeren
en volgt de instructies op het scherm om het schild veilig
over het scherm te plaatsen, zodat de klant zijn pincode kan
invoeren. Verwijder het hulpstuk nadat de klant zijn kaart
verwijderd heeft.
Extra toegankelijkheidsfuncties
Clover Mini bevat andere native Android
toegankelijkheidsfuncties, zoals grotere tekst en
vergrotingsgebaren (niet beschikbaar tijdens Veilige
invoer van pincode). Deze functies vindt u in het menu
Toegankelijkheid in de Instellingen van uw apparaat.

59 Clover Mini - Functiegids Polski 60
Przewodnik po funkcjach
urządzenia Clover Mini
Nuttige bronnen
Webtoegang
Beheer uw apps
Sommige apps zijn toegankelijk via uw
webbrowser. Op clover.com/home vindt u
snelkoppelingen naar deze webpagina’s.
Gebruik hiervoor Chrome, Safari of
Firefox.
In Europa gaat u naar
eu.clover.com/home
Hulp nodig?
Ga naar help.clover.com, gebruik de app
Help of bel ons op het telefoonnummer
dat u vindt in uw welkomst-e-mail.

61 Przewodnik po funkcjach urządzenia Clover Mini Polski 62
Staramy się ciągle ulepszać
nasze oprogramowanie.
Aby zapoznać się z
najnowszą wersją tej
instrukcji, odwiedź stronę
clover.com/setup.
W Europie: eu.clover.com/setup
Zawartość zestawu
Zasilacz
Kabel zasilający
(2 w krajach
Europie)
Kabel USB
Przejściówki do
kart SIM (tylko w
urządzeniach 3G)
Papier paragonowy
(2 szt.)
Wkrętak
Kabel Ethernet
Osłona wprowadzania kodu PIN
Osłona wprowadzania kodu PIN +
Asystent wprowadzania kodu PIN
Clover Mini
Rozgałęziacz
LUB

63 Przewodnik po funkcjach urządzenia Clover Mini Polski 64
Wypustka
zwalniająca rolkę
papieru
Przycisk
resetowania
Głośnik
Pokrywa
paragonów
Tył urządzenia Clover Mini
Zapoznanie z urządzeniem
Clover Mini
Płatności przez
włożenie
Czytnik kart
zbliżeniowych
Gniazdo dźwięku
Kamera przednia
Płatności przez
przesunięcie
Mikrofon
Gniazdo karty SIM
(tylko w urządzeniach 3G)
Przód urządzenia Clover Mini Metody płatności
Karta z procesorem Karta z paskiem magnetycznym
1234 5678 9012 3456
1234 5678 9012 3456
1234 5678 9012 3456
1234 5678 9012 3456
1234 5678 9012 3456
1234 5678 9012 3456
1234 5678 9012 3456
1234 5678 9012 3456
01
01
01
01
1234 5678 9012 3456
1234 5678 9012 3456
1234 5678 9012 3456
1234 5678 9012 3456
1234 5678 9012 3456
1234 5678 9012 3456
Włóż kartę (tylko karty
z procesorem)
Przyłóż kartę (tylko karty
zbliżeniowe)
Przesuń kartę

65 Przewodnik po funkcjach urządzenia Clover Mini Polski 66
Film przedstawiający konfigurację: clover.com/setup
W Europie: eu.clover.com/setup
Kongurowanie urządzenia
Clover Mini
Dotyczy tylko urządzeń 3G: aby wymienić kartę SIM,
odkręć zielony wkręt i otwórz gniazdo karty. Umieść
nową kartę w pasującym do niej uchwycie adapterze SIM.
Wsuń kartę do gniazda, zamknij je i dokręć wkręt.
Podłącz wszystkie akcesoria do rozgałęziacza. Dołączone
kable Ethernet i USB są opcjonalne.
Podłącz kabel zasilacza do gniazda ładowarki w
rozgałęziaczu .
Podłącz kabel zasilający do źródła zasilania. Urządzenie
włączy się automatycznie.
Odchyl pokrywę paragonów i włóż papier.
2
3
4
5
Aby uzyskać instrukcje podłączania
urządzenia Clover Mini do innego urządzenia Clover:
USA: clover.com/setup
Europa: eu.clover.com/setup
3
2
4
Zasilanie
Zmiana kierunku kabla rozgałęziacza:
1
2
3
4
Ethernet USB typu AUSB typu B Szuada
kasowa
Porty
rozgałęziacza
Aby połączenie działało prawidłowo, zielony wkręt mocujący
łącznik rozgałęziacza musi być zawsze dokręcony.
Obróć urządzenie Clover Mini spodem do góry.
Poluzuj zielony wkręt dołączonym wkrętakiem.
Ułóż kabel w pożądanym kierunku.
Dokręć zielony wkręt (tylko nie za mocno).
2
3
1
1

67 Przewodnik po funkcjach urządzenia Clover Mini Polski 68
Osłona wprowadzania kodu PIN i
Asystent wprowadzania kodu PIN
Transakcje z zastosowaniem
Ułatwienia wprowadzania kodu PIN
Umieść osłonę kodu PIN na
urządzeniu Clover Mini, aby
umożliwić bezpieczne podawanie
kodu PIN. Asystent wprowadzania
kodu PIN ułatwia podawanie
kodu PIN niepełnosprawnym
posiadaczom kart, którym trudno
jest korzystać z ekranu dotykowego.
Ze względów bezpieczeństwa niezwłocznie się z nami
skontaktuj, jeśli Asystent wprowadzania kodu PIN wygląda
inaczej niż na poniższych ilustracjach.
Przód Tył
Przyjmując płatność, stuknij przycisk „USE AID” (Użyj
Asystenta) na ekranie Wprowadź numer PIN i postępuj
zgodnie z wyświetlanymi instrukcjami, aby bezpiecznie
zamocować Asystenta na ekranie i umożliwić klientowi
podanie kodu PIN. Gdy klient wyjmie kartę, zdejmij
Asystenta.
Dodatkowe funkcje ułatwień dostępu
Urządzenie Clover Mini obsługuje też inne funkcje ułatwień
dostępu natywnego systemu Android, takie jak większy
tekst czy gesty powiększania (niedostępne w przypadku
korzystania z osłony wprowadzania kodu PIN). Funkcje te są
dostępne w menu Ułatwienia dostępu w sekcji Ustawienia
urządzenia.

English 7069 Przewodnik po funkcjach urządzenia Clover Mini
Przydatne zasoby
Dostęp przez Internet
Zarządzanie aplikacjami
Niektóre aplikacje są dostępne za
pośrednictwem przeglądarki internetowej.
Skróty do ich stron internetowych można
znaleźć pod adresem clover.com/home.
Należy użyć przeglądarki Chrome, Safari
lub Firefox.
W Europie: eu.clover.com/home
Potrzebujesz pomocy?
Skorzystaj z aplikacji Pomoc, odwiedź
stronę help.clover.com lub w dowolnym
czasie zadzwoń do nas pod numer podany
w powitalnej wiadomości e-mail.
FCC Part 15
This device complies with Part 15 of the FCC Rules. Operation is subject to the
following two conditions: (1) This device may not cause harmful interference,
(2) This device must accept any interference received, including interference
that may cause undesired operation.
FCC Part 15 Class B-specic
Note: This equipment has been tested and found to comply with the limits
for a Class B digital device, pursuant to part 15 of the FCC Rules. These limits
are designed to provide reasonable protection against harmful interference
in a residential installation. This equipment generates, uses and can radiate
radio frequency energy and, if not installed and used in accordance with
the instructions, may cause harmful interference to radio communications.
However, there is no guarantee that interference will not occur in a particular
installation. If this equipment does cause harmful interference to radio or
television reception, which can be determined by turning the equipment o
and on, the user is encouraged to try to correct the interference by one or
more of the following measures:
•
Reorient or relocate the receiving antenna.
•
Increase the separation between the equipment and receiver.
•
Connect the equipment into an outlet on a circuit dierent from that to
which the receiver is connected.
•
Consult the dealer or an experienced radio/TV technician for help.
FCC Warning
Changes or modications not expressly approved by the party responsible for
compliance could void the user‘s authority to operate the equipment.
FCC exposure limit compliance statement (SAR statement)
This equipment complies with radio frequency (RF) exposure limits adopted by
the Federal Communications Commission for an uncontrolled environment.
This equipment should be installed and operated with minimum distance 20
cm between the radiator & your body.

Industry Canada Compliance
CAN ICES-3 (B)/NMB-3(B)
This device complies with Industry Canada license-exempt RSS standard(s).
Operation is subject to the following two conditions:
(1) this device may not cause interference, and
(2) this device must accept any interference, including interference that may
cause undesired operation of the device.
Le présent appareil est conforme aux CNR d’Industrie Canada applicables
aux appareils radio exempts de licence. L’exploitation est autorisée aux deux
conditions suivantes:
(1) l’appareil ne doit pas produire de brouillage, et
(2) l’utilisateur de l’appareil doit accepter tout brouillage radioélectrique subi,
même si le brouillage est susceptible d’en compromettre le fonctionnement.
The device could automatically discontinue transmission in case of absence of
information to transmit, or operational failure. Note that this is not intended to
prohibit transmission of control or signaling information or the use of repetitive
codes where required by the technology.
•
The device for operation in the band 5150–5250 MHz is only for indoor
use to reduce the potential for harmful interference to co-channel mobile
satellite systems;
•
The maximum antenna gain permitted for devices in the bands 5250–5350
MHz and 5470–5725 MHz shall comply with the e.i.r.p. limit; and
•
The maximum antenna gain permitted for devices in the band 5725–5825
MHz shall comply with the e.i.r.p. limits specied for point-to-point and non
point-to-point operation as appropriate.
In addition, high-power radars are allocated as primary users (i.e. priority users)
of the bands 5250–5350 MHz and 5650–5850 MHz and that these radars could
cause interference and/or damage to LE-LAN devices.
L’appareil pourrait automatiquement interrompre la transmission s’il n’y
a aucune information à transmettre ou en cas de panne fonctionnelle. À
noter que l’objectif de cette disposition n’est pas d’empêcher la transmission
d’informations de contrôle ou de signalisation, ou encore l’utilisation de codes
répétitifs exigés par la technique.
•
L’appareil fonctionnant dans la bande comprise entre 5150 et 5250MHz
est uniquement réservé à une utilisation en intérieur, an de réduire le
risque d’interférences nocives aux systèmes mobiles par satellite utilisant
le même canal;
•
Le gain d’antenne maximum autorisé pour les appareils fonctionnant
dans les bandes comprises entre 5250 et 5350MHz, et entre 5470 et
5725MHz, doit se conformer à la limite de p.i.r.e.; et
•
Le gain d’antenne maximum autorisé pour les appareils fonctionnant dans
la bande comprise entre 5725 et 5825MHz doit se conformer aux limites
de p.i.r.e. spéciées pour l’exploitation point à point et non point à point,
selon le cas.
De plus, les utilisateurs de radars de haute puissance sont désignés comme
utilisateurs principaux (c.-à-d. comme utilisateurs prioritaires) des bandes
comprises entre 5250 et 5350MHz, et entre 5650 et 5850MHz, et ces radars
pourraient causer des interférences et/ou des dommages aux appareils
LAN-EL.
This equipment complies with IC RSS-102 RF exposure limits set forth for an
uncontrolled environment. This equipment should be installed and operated
with minimum distance 20 cm between the radiator & your body.
Cet équipement est conforme aux limites d’exposition aux rayonnements
IC établies pour un environnement non contrôlé. Cet équipement doit être
installé et utilisé avec un minimum de 20 cm de distance entre la source de
rayonnement et votre corps.
CE RF Exposure Compliance
This device meets the EU requirements (1999/519/EC) and the International
Commission on Non-Ionizing Radiation Protection (ICNIRP) on the limitation
of exposure of the general public to electromagnetic elds by way of health
protection.
This device is restricted to indoor use only when operating in the 5150 to 5350
MHz frequency range.

Clover Network, Inc.
415 N Mathilda Ave, Sunnyvale, CA 94085, USA
EU Declaration of Conformity
Hereby, Clover Network, Inc. declares that the radio equipment type, POS
Terminal is in compliance with Directive 2014/53/EU. The full text of the EU
declaration of conformity is available at the following internet address:
help.clover.com/eu-compliance
The frequency band and the maximum transmitted power in EU are listed below:
2400MHz - 2483.5MHz: 20dBm (EIRP)
5150MHz – 5250MHz: 23dBm (EIRP)
5250MHz – 5350MHz: 20dBm (EIRP)
5470MHz – 5725MHz: 20dBm (EIRP)
GSM & WCDMA (Model C301 only)
GSM 850: 33.5dBm (conducted)
GSM 900: 33.5dBm (conducted)
GSM 1800: 30.5dBm (conducted)
GSM 1900: 30.5dBm (conducted)
WCDMA Band I (2100MHz): 24.5dBm (conducted)
WCDMA Band VIII (900MHz): 24.5dBm(conducted)
Restrictions in AT/BE/BG/CZ/DK/EE/FR/DE/IS/IE/IT/EL/ES/CY/LV/LI/LT/LU/HU/
MT/NL/NO/PL/PT/RO/SI/SK/TR/FI/SE/CH/UK/HR. 5150MHz-5350MHz is for indoor
use only.
Caution: Exposure to Radio Frequency Radiation
This equipment complies with EU radiation exposure limits set forth for an
uncontrolled environment. This equipment should be installed and operated
with minimum distance 20cm between the radiator & your body
IMPORTANT
If the available socket outlet is not suitable for the plug supplied with this
equipment, it should be cut o and an appropriate three pin plug tted. With
alternative plugs on approved 3 amp fuse must be tted in the plug or adaptor
or in the main fuse box.
NOTE: The plug severed from the mains lead must be destroyed, as a plug with
bared exible cords is hazardous if engaged in a live socket outlet. In the event
of replacing the plug fuse, use a 3 amp fuse approved by ASTA to BS 1362, ie
carries the mark.
Always replace the fuse cover, never use plugs with the fuse cover omitted.
WARNING - THIS APPLIANCE MUST BE EARTHED.
The wires in this mains lead are coloured in accordance with the following code:
Green-and Yellow Earth
Blue Neutral
Brown Live
As the colour of the wiring in the mains lead of this appliance may not
correspond with the coloured markings identifying the terminals in your plug,
proceed as follows.
The wire which is coloured Green-and-Yellow must be connected to the terminal
in the plug which is marked with the letter “E”, or by the earth symbol or
coloured Green-and-Yellow,
The wire which is coloured Blue must be connected to the terminal which is
marked with the letter “N” or coloured Black or Blue.
The wire which is coloured Brown must be connected to the terminal which is
marked with the letter “L” or coloured Red or Brown.
v.14

Waste Electrical and Electronic Equipment-WEEE
NOTE: This product is covered electronic equipment under the European Union’s
Waste from Electrical and Electronic Equipment (“WEEE”) Directive(2012/19/EU).
The WEEE Directive requires that covered equipment be collected and managed
separately from typical household waste in all EU member states. Please follow
the guidance of your local environmental authority or ask the shop where you
purchased the product for collection or recycling options.
Clover Mini Wi-Fi
Model: C300
FCC ID: HFS-C300
EU Importer
OmniPay Ltd
Unit 9, Richview Oce Park, Clonskeagh, Dublin 14, Ireland
Clover Mini 3G
Model: C301
FCC ID: HFS-C301
Documenttranscriptie
Clover Mini Feature Guide English 1 Deutsch 10 Español 20 Français 30 Italiano 40 Nederlands 50 Polski 60 What’s included We are continuously improving our software. To see the latest version Clover Mini of this guide, visit Hub OR clover.com/setup. PIN Shield PIN Shield + PIN Entry Aid In Europe, visit eu.clover.com/setup Power brick Power cord (2 for Europe) 1 Clover Mini Feature Guide Receipt paper x2 Ethernet USB Screwdriver SIM adapters (3G devices only) English 2 Get to know Clover Mini Clover Mini Front Insert payment Payment Methods Chip Card Microphone Magnetic Stripe Card Swipe payment 1234 5678 9012 3456 Front facing camera 1234 5678 9012 3456 Insert Card (chip card only) Swipe Card 1234 5678 9012 3456 Contactless payment reader 1234 5678 9012 3456 SIM card slot (3G devices only) 1234 5678 9012 01 3456 1234 5678 9012 3456 Audio jack Speaker Clover Mini Back 1234 Tap Card (contactless card only) 5678 9012 3456 Reset button Paper roll release pull tab Receipt door 3 Clover Mini Feature Guide English 4 Set up your Clover Mini Video zur Einrichtung: clover.com/setup Europa: eu.clover.com/setup Hub Ports 1 3G devices only: to replace the SIM card, loosen the green screw and open the card slot. Place the new card on the matching SIM adapter. Slide the adapter into the slot, close it, and tighten the screw. 2 Plug all accessories into Hub. Provided Ethernet and USB cords are optional. 3 Plug power brick cable into Hub charger port 4 Plug power cord into power source. Device will automatically power on. 5 Pull on receipt door and load paper. Type B USB Ethernet Type A USB Cash drawer . Switching Hub cable’s direction: 1 2 3 4 5 2 Turn Clover Mini over to access underside Use provided screwdriver to loosen green screw Switch cable to desired direction Tighten green screw (be sure to not overtighten) 3 1 2 3 For instructions on how to connect Clover Mini to another Clover device: US: clover.com/setup Europe: eu.clover.com/setup 5 Clover Mini Feature Guide Power 4 Green screw on Hub connector must always be tightened to ensure reliable connection. English 6 Secure PIN Entry and PIN Entry Aid Place the PIN Shield on your Clover Mini for secure PIN entry. The PIN Entry Aid can assist cardholders with disabilities who have difficulty using a touchscreen to enter their PIN. Transactions with the PIN Entry Aid When taking a payment, tap the “USE AID” button on the Enter PIN screen and follow on-screen instructions to securely place the aid over the screen and allow a customer to enter their PIN. Remove aid after the customer removes their card. For security purposes, contact us immediately if your PIN Entry Aid does not match the images below. Front Back Additional Accessibility Features Clover Mini incorporates other native Android accessibility features such as larger text and magnification gestures (not available during secure PIN entry). These features can be found in the Accessibility menu in your device Settings. 7 Clover Mini Feature Guide English 8 Useful Resources Web Access Manage Your Apps Some apps allow you to access them via your web browser. We’ve put shortcuts to these web pages at clover.com/home. Please use Chrome, Safari, or Firefox. Funktionsübersicht Clover Mini In Europe, visit eu.clover.com/home Need Help? Visit help.clover.com, use the Help app, or call us anytime at the phone number given in your welcome email. 9 Clover Mini Feature Guide Deutsch 10 Inhalt Wir entwickeln unsere Software ständig weiter. Die neueste Version Clover Mini Hub dieser Anleitung finden ODER Sie auf clover.com/setup. Sichtschutz für PIN-Eingabe Sichtschutz für PIN-Eingabe + PIN-Eingabehilfe Für Europa finden Sie diese Informationen auf eu.clover.com/setup. Netzteil Netzkabel (2 für Europa) 11 Funktionsübersicht Clover Mini 2 Belegrollen Ethernet Schraubendreher USB SIM-Adapter (nur 3G-Geräte) Deutsch 12 Lernen Sie Clover Mini kennen Zahlung per Einstecken Mikrofon Zahlungsarten Chipkarte Zahlung per Durchziehen Frontkamera 1234 5678 9012 3456 Magnetstreifenkarte 1234 5678 9012 3456 Karte einführen (nur Chipkarte) Karte durchziehen Kontaktloser Leser 1234 5678 9012 3456 Vorderseite des Clover Mini 1234 5678 9012 3456 SIM-Kartensteckplatz (nur 3G-Geräte) 1234 5678 9012 01 3456 1234 5678 9012 3456 Audio-Buchse Lautsprecher Rückseite des Clover Mini 1234 Karte kurz auflegen (nur kontaktlose Karten) 5678 9012 3456 Reset-Taste Zuglasche zur Papierrollenfreigabe Quittungsklappe 13 Funktionsübersicht Clover Mini Deutsch 14 Einrichten des Clover Mini-Geräts Video zur Einrichtung: clover.com/setup Europa: eu.clover.com/setup 1 Hub-Anschlüsse Nur 3G-Geräte: Um die SIM-Karte zu ersetzen, lösen Sie die grüne Schraube und öffnen Sie den Kartensteckplatz. Setzen Sie die neue Karte auf den passenden SIM-Adapter. Schieben Sie den Adapter in den Steckplatz, schließen Sie den Steckplatz und ziehen Sie die Schraube fest. 2 Schließen Sie alle Zubehörgerät an den Hub an. Die mitgelieferten Ethernet- und USB-Kabel sind optional. 3 Stecken Sie das Kabel des Netzadapters in den Ladekabelanschluss des Hubs. 4 Verbinden Sie das Netzteil mit einer Stromquelle. Das Gerät schaltet sich automatisch ein. 5 Ethernet USB Typ A Kassenlade Kabel am Hub zur anderen Seite verlegen: Ziehen Sie die Quittungsklappe auf und legen Sie Papier ein. 1 Den Clover Mini umdrehen, um an die Unterseite zu gelangen 2 Mit dem mitgelieferten Schraubendreher die grüne Schraube lösen 3 Schalten Sie das Kabel in die gewünschte Richtung um 4 Die grüne Schraube anziehen (aber nicht überdrehen) 2 3 1 3 Anweisungen zum Herstellen einer Verbindung zwischen Clover Mini und einem anderen Clover-Gerät finden Sie je nach Region auf den folgenden Sites: USA: clover.com/setup Europa: eu.clover.com/setup 15 Funktionsübersicht Clover Mini USB Typ B Netzteilanschluss 2 4 Die grüne Schraube am Hub-Anschluss muss immer angezogen werden, um eine zuverlässige Verbindung zu ermöglichen. Deutsch 16 Sichere PIN-Eingabe und PINEingabehilfe Bringen Sie den PIN-Sichtschutz am Clover Mini an, um die Sicherheit bei der PIN-Eingabe zu verbessern. Die PIN-Eingabehilfe unterstützt Karteninhaber mit Behinderungen, die Schwierigkeiten bei der Verwendung eines Touchscreen haben, bei der Eingabe der PIN. Transaktionen mit der PINEingabehilfe Tippen Sie beim Annehmen einer Zahlung im Bildschirm für die PIN-Eingabe auf die Schaltfläche „USE AID“ (Eingabehilfe verwenden). Befolgen Sie dann die Anweisungen auf dem Bildschirm, um die Eingabehilfe richtig über dem Bildschirm zu positionieren und dem Kunden die Eingabe seiner PIN zu ermöglichen. Entfernen Sie die Eingabehilfe, nachdem der Kunde seine Karte entfernt hat. Wenden Sie sich aus Sicherheitsgründen sofort an uns, wenn Ihre PIN-Eingabehilfe nicht den Abbildungen unten entspricht. Vorderansicht Rückseite Zusätzliche Bedienungshilfen Clover Mini bietet weitere Android-Bedienungshilfen, wie größeren Text und Vergrößerungsgesten (während der PIN-Eingabe nicht verfügbar). Diese Funktionen sind im Bedienungshilfenmenü in den Geräteeinstellungen verfügbar. 17 Funktionsübersicht Clover Mini Deutsch 18 Weitere Informationen Internetzugang Apps verwalten Der Zugriff auf bestimmte Anwendungen erfolgt über Ihren Webbrowser. Auf clover.com/home finden Sie Links zu den entsprechenden Webseiten. Guía de funciones de Clover Mini Verwenden Sie hierzu Chrome, Safari oder Firefox. In Europa finden Sie diese Informationen unter eu.clover.com/home. Hilfe Nutzen Sie die Anwendung „Hilfe“, besuchen Sie help.clover.com oder setzen Sie sich unter der in Ihrer Begrüßungs-E-Mail angegebenen Telefonnummer mit uns in Verbindung. 19 Funktionsübersicht Clover Mini Español 20 Se incluye Siempre estamos mejorando nuestro software. Para ver la Clover Mini última versión de esta O guía, visite clover.com/setup. Concentrador Protector de PIN Protector de PIN + Ayuda de entrada de PIN En Europa, visite eu.clover.com/setup Fuente de alimentación 2 rollos de papel para recibos Cable de Cable Ethernet alimentación (2 para Europa) 21 Guía de funciones de Clover Mini Cable USB Destornillador Adaptadores SIM (Solo para dispositivos 3G) Español 22 Descripción de Clover Mini Insertar tarjeta Micrófono Formas de pago Tarjeta con chip Deslizar tarjeta Cámara frontal 1234 5678 9012 3456 Lector de tarjetas de pago sin contacto Tarjeta con banda magnética 1234 5678 9012 3456 Insertar la tarjeta (únicamente tarjetas con chip) Deslizar la tarjeta 1234 5678 9012 3456 Parte delantera de Clover Mini 1234 5678 9012 3456 Ranura para tarjetas SIM (Solo para dispositivos 3G) 1234 5678 9012 01 3456 1234 5678 9012 3456 Conector de audio Altavoz Parte trasera de Clover Mini 1234 Acercar la tarjeta (solo para tarjetas contactless) 5678 9012 3456 Botón de reajuste Lengüeta para liberar rollo de papel Puerta de recibos 23 Guía de funciones de Clover Mini Español 24 Instalación de Clover Mini Vídeo de instalación: clover.com/setup Para Europa: eu.clover.com/setup 1 Puertos del concentrador (Solo para dispositivos 3G): para cambiar la tarjeta SIM, afloje el tornillo verde y abra la ranura de la tarjeta. Coloque la tarjeta nueva en el adaptador de tarjeta SIM correspondiente. Deslice el adaptador en la ranura, ciérrela y apriete el tornillo. Alimentación USB tipo B Cable Ethernet USB tipo A Caja registradora 2 Conecte todos los accesorios en el concentrador. Los cables Ethernet y USB proporcionados son opcionales. 3 Conecte el cable del adaptador de alimentación en el puerto de carga del concentrador . Cambio de orientación del cable del concentrador: 4 Conecte el cable de alimentación en la toma de electricidad. El dispositivo se encenderá automáticamente. 1 Dé la vuelta al dispositivo Clover Mini para acceder a la 5 Tire de la puerta de recibos y cargue papel. parte inferior 2 Utilice el destornillador proporcionado para aflojar el tornillo verde 3 Cambiar la orientación del cable como desee 4 Apriete el tornillo verde sin excesiva fuerza 2 1 3 3 2 Para obtener más instrucciones sobre cómo conectar Clover Mini a otro dispositivo de Clover, visite: Estados Unidos: clover.com/setup Europa: eu.clover.com/setup 25 Guía de funciones de Clover Mini 4 Para garantizar una buena conexión, el tornillo verde del conector del concentrador siempre debe estar apretado. Español 26 Ingreso seguro del PIN y ayuda de entrada de PIN Coloque el protector de PIN en el dispositivo Clover Mini para permitir el ingreso seguro del PIN. La ayuda de entrada de PIN puede asistir a aquellas personas con discapacidades que tengan dificultadas para utilizar la pantalla táctil para ingresar su PIN. Transacciones con la ayuda de entrada de PIN Al momento de efectuar un cobro, pulse el botón “USE AID” (Utilizar ayuda) en la pantalla de ingreso de PIN y siga las instrucciones en pantalla para ubicar la ayuda sobre la pantalla y permitir al cliente el ingreso de su PIN. Retire la ayuda luego de que el cliente retire su tarjeta. Por motivos de seguridad, póngase en contacto inmediatamente si su Ayuda de entrada de PIN no coincide con las imágenes debajo. Parte delantera Parte trasera Funciones de accesibilidad adicionales Clover Mini incorpora otras funciones de accesibilidad adicionales nativas de Android, como texto más grande y movimientos manuales de aumento (no disponible durante la introducción segura del PIN). Estas funciones pueden encontrarse en el Menú de accesibilidad en los Ajustes de su dispositivo. 27 Guía de funciones de Clover Mini Español 28 Recursos útiles Acceso a la Web Gestione sus aplicaciones A algunas aplicaciones se puede acceder mediante el navegador web. Hemos colocado accesos directos a esas páginas web en clover.com/home. Use Chrome, Safari o Firefox. Guide des fonctionnalités de Clover Mini En Europa, visite eu.clover.com/home ¿Necesita ayuda? Visite help.clover.com, utilice la aplicación de ayuda o llámenos cuando lo necesite al número de teléfono incluido en el mensaje de bienvenida. 29 Guía de funciones de Clover Mini Français 30 Contenu Nous améliorons sans cesse nos logiciels. Pour consulter la dernière Clover Mini version de ce guide, Concentrateur OU rendez-vous sur clover.com/setup. Cache de protection de PIN Cache de protection de PIN + Module d’aide à la saisie de PIN Depuis l’Europe, rendez-vous sur eu.clover.com/setup Adaptateur secteur Câble d’alimentation (2 pour l’Europe) 31 Guide des fonctionnalités de Clover Mini Deux rouleaux de caisse Câble Ethernet Câble USB Tournevis Adaptateurs SIM (appareils 3G uniquement) Français 32 Présentation de Clover Mini Lecteur de carte à puce Microphone Moyens de paiement Carte à puce Lecteur de carte à piste magnétique Caméra frontale 1234 5678 9012 3456 Carte à piste magnétique 1234 5678 9012 3456 Passer la carte Lecteur pour paiement sans contact Insérer la carte (carte à puce uniquement) 1234 5678 9012 3456 Face avant de Clover Mini 1234 5678 9012 3456 Emplacement carte SIM (appareils 3G uniquement) 1234 5678 9012 01 3456 1234 5678 9012 3456 Prise jack Haut-parleur 1234 Face arrière de Clover Mini Toucher l’écran avec la carte (carte sans contact uniquement) 5678 9012 3456 Bouton Réinitialiser Tirette d’accès au rouleau Trappe d’áccès 33 Guide des fonctionnalités de Clover Mini Français 34 Installation de Clover Mini Ports du concentrateur Vidéo d’installation : clover.com/setup Europe : eu.clover.com/setup 1 Appareils 3G uniquement : pour remplacer la carte SIM, dégagez la vis verte et ouvrez le logement de la carte. Placez la nouvelle carte sur le support correspondant à la taille. Faites glisser le support dans l’emplacement, fermez-le, et serrez la vis verte. 2 Connectez tous les accessoires au concentrateur. L’utilisation des câbles Ethernet et USB est facultative. 3 Connectez le câble de l’adaptateur secteur au port d’alimentation du concentrateur. Changement de l’orientation du câble du concentrateur : 4 Branchez le câble d’alimentation sur le secteur. L’appareil se mettra automatiquement en marche. 5 Tirez sur la trappe d’accès et mettez le rouleau en place. 1 2 3 4 Alimentation USB type B Ethernet USB type A Tiroir-caisse Retourner le Clover Mini pour accéder à la face arrière Utiliser le tournevis fourni pour desserrer la vis verte Placez le câble dans la direction souhaitée Serrer la vis verte (ne pas la serrer de façon excessive) 2 3 1 2 3 Pour des instructions sur la connexion de Clover Mini à un autre appareil Clover : États-Unis : clover.com/setup Europe : eu.clover.com/setup 35 Guide des fonctionnalités de Clover Mini 4 La vis verte du connecteur de concentrateur doit être serrée en permanence pour garantir une connexion fiable. Français 36 Saisie sécurisée du code PIN et module d’aide à la saisie de PIN Placez le cache de protection de PIN sur votre Clover Mini pour une saisie sécurisée du code PIN. Le module d’aide à la saisie de PIN est destiné à assister les titulaires de cartes handicapés qui rencontrent des problèmes pour saisir leur code PIN sur un écran tactile. Transactions avec le module d’aide à la saisie de PIN Lors de la réalisation d’un paiement, appuyez sur le bouton « USE AID » (aide) de l’écran de saisie de PIN et suivez les instructions qui s’affichent afin de positionner correctement le module d’aide sur l’écran et ainsi permettre au client de saisir son code PIN. Une fois que le client a récupéré sa carte, retirez le module d’aide. Pour des raisons de sécurité, veuillez nous contacter immédiatement si votre module d’aide à la saisie de PIN n’était pas conforme aux images ci-dessous. Face avant Face arrière Fonctionnalités d’accessibilité supplémentaires Clover Mini comprend d’autres fonctionnalités d’accessibilité Android natives comme une police plus grande ou les gestes d’agrandissement (non disponibles lors de la saisie sécurisée du code PIN). Ces fonctionnalités sont disponibles dans le menu Accessibilité des Paramètres de votre appareil. 37 Guide des fonctionnalités de Clover Mini Français 38 Ressources utiles Accès au Web Gérer vos applications Vous pouvez accéder à certaines applications à l’aide d’un navigateur Internet. Nous avons répertorié des raccourcis conduisant à ces pages Web à l’adresse clover.com/home. Guida alle funzionalità di Clover Mini Utilisez les navigateurs Chrome, Safari ou Firefox. Pour les pays d’Europe, consultez la page eu.clover.com/home Besoin d’aide ? Consultez la page help.clover.com, utilisez l’application Aide ou contactez-nous à tout moment par téléphone au numéro indiqué dans votre e-mail de bienvenue. 39 Guide des fonctionnalités de Clover Mini Italiano 40 Componenti inclusi Il nostro software viene sottoposto a continui miglioramenti. Per Clover Mini visualizzare la versione OPPURE più aggiornata della guida, visitare il sito Hub Protezione digitazione PIN Protezione digitazione PIN + Aiuto alla digitazione PIN clover.com/setup. In Europa, visitare eu.clover.com/setup Trasformatore Cavo di alimentazione (2 per l’Europa) 41 Guida alle funzionalità di Clover Mini 2 x rotoli di carta per ricevute Ethernet USB Cacciavite Adattatori SIM (solo per i modelli 3G) Italiano 42 Informazioni su Clover Mini Pagamento con inserimento Metodi di pagamento Carta con tocco Microfono Pagamento con strisciata Fotocamera anteriore 1234 5678 9012 3456 Carta con banda magnetica 1234 5678 9012 3456 Carta magnetica Lettore per pagamenti senza contatto Inserire la carta (solo carta con chip) 1234 5678 9012 3456 Parte frontale di Clover Mini 1234 5678 9012 3456 Alloggiamento SIM (solo per i modelli 3G) 1234 5678 9012 01 3456 1234 5678 9012 3456 Jack audio Altoparlante 1234 Parte posteriore di Clover Mini Toccare la carta (solo carte senza contatto) 5678 9012 3456 Pulsante Reset Linguetta per rilascio rotolo di carta Sportello ricevute 43 Guida alle funzionalità di Clover Mini Italiano 44 Configurazione di Clover Mini Video per la configurazione: clover.com/setup Europa: eu.clover.com/setup Porte Hub 1 Solo per i modelli 3G: per sostituire la scheda SIM, allentare la vite verde e aprire l’alloggiamento della scheda. Posizionare la scheda sull’adattatore SIM corrispondente. Fare scorrere l’adattatore nell’alloggiamento, chiuderlo e stringere la vite. 2 Collegare tutti gli accessori nell’Hub. I cavi Ethernet e USB forniti sono opzionali. 3 Inserire il cavo dell’adattatore di alimentazione nella porta per carica dell’Hub . 4 Inserire il cavo di alimentazione nella fonte di alimentazione (elettrica). Il dispositivo si accenderà automaticamente. 5 Sollevare lo sportello ricevute e caricare la carta. Alimentazione USB tipo B Ethernet USB tipo A Cassetto cassa Cambio della direzione del cavo dell’Hub: 1 2 3 4 Girare Clover Mini per accedere alla parte inferiore Allentare la vite verde con il cacciavite in dotazione Posizionare il cavo sulla direzione desiderata Stringere la vite verde senza serrare eccessivamente 2 3 1 2 3 Per istruzioni sul collegamento di Clover Mini ad un altro dispositivo Clover: USA: clover.com/setup Europa: eu.clover.com/setup 45 Guida alle funzionalità di Clover Mini 4 Per un collegamento affidabile, stringere sempre la vite verde sul connettore Hub. Italiano 46 Immissione PIN sicura e Inserimento guidato PIN Installare lo schermo di protezione PIN su Clover Mini per l’inserimento sicuro del PIN. L’aiuto alla digitazione PIN può semplificare l’inserimento del PIN ai titolari di carta con disabilità, che hanno difficoltà ad utilizzare un touchscreen per questa operazione. Transazioni con l’aiuto alla digitazione PIN Quando si effettua un pagamento, toccare il pulsante “USE AID” (Usa ausilio) nella schermata di inserimento PIN e seguire le istruzioni a video per collocare l’ausilio sullo schermo e consentire a un cliente di inserire il proprio PIN. Rimuovere l’ausilio dopo che il cliente ha rimosso la propria tessera. Per motivi di sicurezza, contattateci immediatamente qualora il vostro aiuto alla digitazione PIN non corrisponda alle immagini in basso. Parte anteriore Parte posteriore Funzionalità aggiuntive per l’accessibilità Clover Mini comprende altre funzionalità native Android per l’accessibilità, quali testo più grande e gesti per eseguire l’ingrandimento (non disponibili durante l’inserimento sicuro del PIN). Queste funzionalità sono disponibili nel menu Accessibilità delle Impostazioni del dispositivo. 47 Guida alle funzionalità di Clover Mini Italiano 48 Risorse utili Accesso Web Gestione delle app È possibile accedere ad alcune app tramite browser Web. All’indirizzo eu.clover.com/ home, sono disponibili i collegamenti alle pagine Web corrispondenti. Clover Mobile - Functiegids Utilizzare Chrome, Safari o Firefox. In Europa, visitare eu.clover.com/home Per ricevere assistenza Visitare l’indirizzo help.clover.com, utilizzare l’app Guida o chiamare in qualsiasi momento i numeri indicati nell’email di benvenuto. 49 Guida alle funzionalità di Clover Mini Nederlands 50 In de verpakking Wij werken continu aan de verbetering van onze software. Voor de meest Clover Mini recente versie van deze OF handleiding gaat u naar clover.com/setup. Hub Pinschild Pinschild + Hulpstuk voor invoer pincode In Europa gaat u naar eu.clover.com/setup Stroomsnoer Stroomsnoer (2 voor Europa) 51 Clover Mini - Functiegids Kassabonpapier x2 Ethernet USB Schroevendraaier Simadapters (alleen 3G-apparaten) Nederlands 52 Kennismaking met de Clover Mini Voorzijde Clover Mini Betaling insteken Betalingswijzen Chipkaart Microfoon Kaart met magneetstrip Betaling doorhalen Naar de voorkant gerichte camera 1234 5678 9012 3456 1234 5678 9012 3456 Steek de kaart in (alleen chipkaart) Doorhaalkaart 1234 5678 9012 3456 Lezer voor contactloze betaling 1234 5678 9012 3456 Simkaartsleuf (alleen 3G-apparaten) 1234 5678 9012 01 3456 1234 5678 9012 3456 Audio-aansluiting Luidspreker 1234 Achterzijde Clover Mini Tik de kaart (alleen contactloze kaart) 5678 9012 3456 Terugstelknop Treklipje voor losmaken van papierrol Kassabonklep 53 Clover Mini - Functiegids Nederlands 54 De Clover Mini configureren Instelfilmpje: clover.com/setup Europa: eu.clover.com/setup 1 Hubpoorten Alleen voor 3G-apparaten: draai de groene schroef los en open de kaartlade om de simkaart te vervangen. Plaats de nieuwe kaart op de juiste simadapter. Schuif de adapter in de lade, sluit deze en draai de schroef vast. Stroom 2 Koppel alle toebehoren aan de hub. De meegeleverde ethernet- en USB-kabels zijn optioneel. 3 Steek de voedingsadapterkabel in de hub-oplaadpoort 4 Steek het netsnoer in het stopcontact. Het apparaat schakelt automatisch in. 5 Trek de kassabonklep open en plaats het gewenste papier. . USB type B Ethernet USB type A Geldlade De richting van de hubkabel omdraaien: 1 Draai de Clover Mini op zijn kop 2 Maak de groene schroef los met de meegeleverde schroevendraaier 3 Plaats de kabel in de gewenste positie 4 Draai de groene schroef vast (niet te vast) 2 3 1 3 Voor instructies over het verbinden van de Clover Mini met een ander Clover-apparaat: VS: clover.com/setup Europa: eu.clover.com/setup 55 Clover Mini - Functiegids 2 4 De groene schroef op de hubaansluiting moet altijd vastzitten om een betrouwbare verbinding te garanderen. Nederlands 56 Veilige invoer van pincode en hulpstuk voor invoer pincode Plaats het pinschild op uw Clover Mini voor veilige invoer van pincode. Het hulpstuk voor invoer pincode kan hulp bieden aan kaarthouders met beperkingen, die moeite hebben met het invoeren van hun pincode op een touchscreen. Transacties met het hulpstuk voor invoer pincode Wanneer u een betaling aanneemt, tikt u op de knop ‘USE AID’ (Hulpstuk gebruiken) op het scherm Pincode invoeren en volgt de instructies op het scherm om het schild veilig over het scherm te plaatsen, zodat de klant zijn pincode kan invoeren. Verwijder het hulpstuk nadat de klant zijn kaart verwijderd heeft. Neem om veiligheidsredenen onmiddellijk contact met ons op als het hulpstuk voor invoer pincode niet overeenkomt met onderstaande afbeeldingen. Voorkant Achterkant Extra toegankelijkheidsfuncties Clover Mini bevat andere native Android toegankelijkheidsfuncties, zoals grotere tekst en vergrotingsgebaren (niet beschikbaar tijdens Veilige invoer van pincode). Deze functies vindt u in het menu Toegankelijkheid in de Instellingen van uw apparaat. 57 Clover Mini - Functiegids Nederlands 58 Nuttige bronnen Webtoegang Beheer uw apps Sommige apps zijn toegankelijk via uw webbrowser. Op clover.com/home vindt u snelkoppelingen naar deze webpagina’s. Gebruik hiervoor Chrome, Safari of Firefox. Przewodnik po funkcjach urządzenia Clover Mini In Europa gaat u naar eu.clover.com/home Hulp nodig? Ga naar help.clover.com, gebruik de app Help of bel ons op het telefoonnummer dat u vindt in uw welkomst-e-mail. 59 Clover Mini - Functiegids Polski 60 Zawartość zestawu Staramy się ciągle ulepszać nasze oprogramowanie. Aby zapoznać się z Clover Mini najnowszą wersją tej LUB instrukcji, odwiedź stronę clover.com/setup. Rozgałęziacz Osłona wprowadzania kodu PIN Osłona wprowadzania kodu PIN + Asystent wprowadzania kodu PIN W Europie: eu.clover.com/setup Zasilacz Kabel zasilający (2 w krajach Europie) 61 Przewodnik po funkcjach urządzenia Clover Mini Papier paragonowy (2 szt.) Kabel Ethernet Kabel USB Wkrętak Przejściówki do kart SIM (tylko w urządzeniach 3G) Polski 62 Zapoznanie z urządzeniem Clover Mini Płatności przez włożenie Metody płatności Karta z procesorem Mikrofon Płatności przez przesunięcie Kamera przednia 1234 5678 9012 3456 Karta z paskiem magnetycznym 1234 5678 9012 3456 Włóż kartę (tylko karty z procesorem) Przesuń kartę Czytnik kart zbliżeniowych 1234 5678 9012 3456 Przód urządzenia Clover Mini 1234 5678 9012 3456 Gniazdo karty SIM (tylko w urządzeniach 3G) 1234 5678 9012 01 3456 1234 5678 9012 3456 Gniazdo dźwięku Głośnik Tył urządzenia Clover Mini 1234 Przyłóż kartę (tylko karty zbliżeniowe) 5678 9012 3456 Przycisk resetowania Wypustka zwalniająca rolkę papieru Pokrywa paragonów 63 Przewodnik po funkcjach urządzenia Clover Mini Polski 64 Konfigurowanie urządzenia Clover Mini Film przedstawiający konfigurację: clover.com/setup W Europie: eu.clover.com/setup 1 Dotyczy tylko urządzeń 3G: aby wymienić kartę SIM, odkręć zielony wkręt i otwórz gniazdo karty. Umieść nową kartę w pasującym do niej uchwycie adapterze SIM. Wsuń kartę do gniazda, zamknij je i dokręć wkręt. 2 Podłącz wszystkie akcesoria do rozgałęziacza. Dołączone kable Ethernet i USB są opcjonalne. 3 Podłącz kabel zasilacza do gniazda ładowarki w rozgałęziaczu . 4 Podłącz kabel zasilający do źródła zasilania. Urządzenie włączy się automatycznie. 5 Odchyl pokrywę paragonów i włóż papier. Porty rozgałęziacza Zasilanie USB typu B Ethernet USB typu A Szuflada kasowa Zmiana kierunku kabla rozgałęziacza: 1 2 3 4 Obróć urządzenie Clover Mini spodem do góry. Poluzuj zielony wkręt dołączonym wkrętakiem. Ułóż kabel w pożądanym kierunku. Dokręć zielony wkręt (tylko nie za mocno). 2 3 1 3 Aby uzyskać instrukcje podłączania urządzenia Clover Mini do innego urządzenia Clover: USA: clover.com/setup Europa: eu.clover.com/setup 65 Przewodnik po funkcjach urządzenia Clover Mini 2 4 Aby połączenie działało prawidłowo, zielony wkręt mocujący łącznik rozgałęziacza musi być zawsze dokręcony. Polski 66 Osłona wprowadzania kodu PIN i Asystent wprowadzania kodu PIN Umieść osłonę kodu PIN na urządzeniu Clover Mini, aby umożliwić bezpieczne podawanie kodu PIN. Asystent wprowadzania kodu PIN ułatwia podawanie kodu PIN niepełnosprawnym posiadaczom kart, którym trudno jest korzystać z ekranu dotykowego. Transakcje z zastosowaniem Ułatwienia wprowadzania kodu PIN Przyjmując płatność, stuknij przycisk „USE AID” (Użyj Asystenta) na ekranie Wprowadź numer PIN i postępuj zgodnie z wyświetlanymi instrukcjami, aby bezpiecznie zamocować Asystenta na ekranie i umożliwić klientowi podanie kodu PIN. Gdy klient wyjmie kartę, zdejmij Asystenta. Ze względów bezpieczeństwa niezwłocznie się z nami skontaktuj, jeśli Asystent wprowadzania kodu PIN wygląda inaczej niż na poniższych ilustracjach. Przód Tył Dodatkowe funkcje ułatwień dostępu Urządzenie Clover Mini obsługuje też inne funkcje ułatwień dostępu natywnego systemu Android, takie jak większy tekst czy gesty powiększania (niedostępne w przypadku korzystania z osłony wprowadzania kodu PIN). Funkcje te są dostępne w menu Ułatwienia dostępu w sekcji Ustawienia urządzenia. 67 Przewodnik po funkcjach urządzenia Clover Mini Polski 68 Przydatne zasoby Dostęp przez Internet Zarządzanie aplikacjami Niektóre aplikacje są dostępne za pośrednictwem przeglądarki internetowej. Skróty do ich stron internetowych można znaleźć pod adresem clover.com/home. Należy użyć przeglądarki Chrome, Safari lub Firefox. W Europie: eu.clover.com/home FCC Part 15 This device complies with Part 15 of the FCC Rules. Operation is subject to the following two conditions: (1) This device may not cause harmful interference, (2) This device must accept any interference received, including interference that may cause undesired operation. FCC Part 15 Class B-specific Note: This equipment has been tested and found to comply with the limits for a Class B digital device, pursuant to part 15 of the FCC Rules. These limits are designed to provide reasonable protection against harmful interference in a residential installation. This equipment generates, uses and can radiate radio frequency energy and, if not installed and used in accordance with the instructions, may cause harmful interference to radio communications. However, there is no guarantee that interference will not occur in a particular installation. If this equipment does cause harmful interference to radio or television reception, which can be determined by turning the equipment off and on, the user is encouraged to try to correct the interference by one or more of the following measures: • Reorient or relocate the receiving antenna. • Increase the separation between the equipment and receiver. • Connect the equipment into an outlet on a circuit different from that to Potrzebujesz pomocy? Skorzystaj z aplikacji Pomoc, odwiedź stronę help.clover.com lub w dowolnym czasie zadzwoń do nas pod numer podany w powitalnej wiadomości e-mail. which the receiver is connected. • Consult the dealer or an experienced radio/TV technician for help. FCC Warning Changes or modifications not expressly approved by the party responsible for compliance could void the user‘s authority to operate the equipment. FCC exposure limit compliance statement (SAR statement) This equipment complies with radio frequency (RF) exposure limits adopted by the Federal Communications Commission for an uncontrolled environment. This equipment should be installed and operated with minimum distance 20 cm between the radiator & your body. 69 Przewodnik po funkcjach urządzenia Clover Mini English 70 Industry Canada Compliance CAN ICES-3 (B)/NMB-3(B) This device complies with Industry Canada license-exempt RSS standard(s). Operation is subject to the following two conditions: (1) this device may not cause interference, and (2) this device must accept any interference, including interference that may cause undesired operation of the device. Le présent appareil est conforme aux CNR d’Industrie Canada applicables aux appareils radio exempts de licence. L’exploitation est autorisée aux deux conditions suivantes: (1) l’appareil ne doit pas produire de brouillage, et (2) l’utilisateur de l’appareil doit accepter tout brouillage radioélectrique subi, même si le brouillage est susceptible d’en compromettre le fonctionnement. The device could automatically discontinue transmission in case of absence of information to transmit, or operational failure. Note that this is not intended to prohibit transmission of control or signaling information or the use of repetitive codes where required by the technology. • The device for operation in the band 5150–5250 MHz is only for indoor use to reduce the potential for harmful interference to co-channel mobile satellite systems; • The maximum antenna gain permitted for devices in the bands 5250–5350 MHz and 5470–5725 MHz shall comply with the e.i.r.p. limit; and • The maximum antenna gain permitted for devices in the band 5725–5825 MHz shall comply with the e.i.r.p. limits specified for point-to-point and non point-to-point operation as appropriate. In addition, high-power radars are allocated as primary users (i.e. priority users) of the bands 5250–5350 MHz and 5650–5850 MHz and that these radars could cause interference and/or damage to LE-LAN devices. L’appareil pourrait automatiquement interrompre la transmission s’il n’y a aucune information à transmettre ou en cas de panne fonctionnelle. À noter que l’objectif de cette disposition n’est pas d’empêcher la transmission d’informations de contrôle ou de signalisation, ou encore l’utilisation de codes répétitifs exigés par la technique. • L’appareil fonctionnant dans la bande comprise entre 5 150 et 5 250 MHz est uniquement réservé à une utilisation en intérieur, afin de réduire le risque d’interférences nocives aux systèmes mobiles par satellite utilisant le même canal ; • Le gain d’antenne maximum autorisé pour les appareils fonctionnant dans les bandes comprises entre 5 250 et 5 350 MHz, et entre 5 470 et 5 725 MHz, doit se conformer à la limite de p.i.r.e. ; et • Le gain d’antenne maximum autorisé pour les appareils fonctionnant dans la bande comprise entre 5 725 et 5 825 MHz doit se conformer aux limites de p.i.r.e. spécifiées pour l’exploitation point à point et non point à point, selon le cas. De plus, les utilisateurs de radars de haute puissance sont désignés comme utilisateurs principaux (c.-à-d. comme utilisateurs prioritaires) des bandes comprises entre 5 250 et 5 350 MHz, et entre 5 650 et 5 850 MHz, et ces radars pourraient causer des interférences et/ou des dommages aux appareils LAN-EL. This equipment complies with IC RSS-102 RF exposure limits set forth for an uncontrolled environment. This equipment should be installed and operated with minimum distance 20 cm between the radiator & your body. Cet équipement est conforme aux limites d’exposition aux rayonnements IC établies pour un environnement non contrôlé. Cet équipement doit être installé et utilisé avec un minimum de 20 cm de distance entre la source de rayonnement et votre corps. CE RF Exposure Compliance This device meets the EU requirements (1999/519/EC) and the International Commission on Non-Ionizing Radiation Protection (ICNIRP) on the limitation of exposure of the general public to electromagnetic fields by way of health protection. This device is restricted to indoor use only when operating in the 5150 to 5350 MHz frequency range. IMPORTANT Clover Network, Inc. If the available socket outlet is not suitable for the plug supplied with this equipment, it should be cut off and an appropriate three pin plug fitted. With alternative plugs on approved 3 amp fuse must be fitted in the plug or adaptor or in the main fuse box. 415 N Mathilda Ave, Sunnyvale, CA 94085, USA NOTE: The plug severed from the mains lead must be destroyed, as a plug with bared flexible cords is hazardous if engaged in a live socket outlet. In the event of replacing the plug fuse, use a 3 amp fuse approved by ASTA to BS 1362, ie carries the mark. Always replace the fuse cover, never use plugs with the fuse cover omitted. WARNING - THIS APPLIANCE MUST BE EARTHED. The wires in this mains lead are coloured in accordance with the following code: Green-and Yellow Blue Brown Earth Neutral Live As the colour of the wiring in the mains lead of this appliance may not correspond with the coloured markings identifying the terminals in your plug, proceed as follows. The wire which is coloured Green-and-Yellow must be connected to the terminal in the plug which is marked with the letter “E”, or by the earth symbol or coloured Green-and-Yellow, The wire which is coloured Blue must be connected to the terminal which is marked with the letter “N” or coloured Black or Blue. The wire which is coloured Brown must be connected to the terminal which is marked with the letter “L” or coloured Red or Brown. EU Declaration of Conformity Hereby, Clover Network, Inc. declares that the radio equipment type, POS Terminal is in compliance with Directive 2014/53/EU. The full text of the EU declaration of conformity is available at the following internet address: help.clover.com/eu-compliance The frequency band and the maximum transmitted power in EU are listed below: 2400MHz - 2483.5MHz: 20dBm (EIRP) 5150MHz – 5250MHz: 23dBm (EIRP) 5250MHz – 5350MHz: 20dBm (EIRP) 5470MHz – 5725MHz: 20dBm (EIRP) GSM & WCDMA (Model C301 only) GSM 850: 33.5dBm (conducted) GSM 900: 33.5dBm (conducted) GSM 1800: 30.5dBm (conducted) GSM 1900: 30.5dBm (conducted) WCDMA Band I (2100MHz): 24.5dBm (conducted) WCDMA Band VIII (900MHz): 24.5dBm(conducted) Restrictions in AT/BE/BG/CZ/DK/EE/FR/DE/IS/IE/IT/EL/ES/CY/LV/LI/LT/LU/HU/ MT/NL/NO/PL/PT/RO/SI/SK/TR/FI/SE/CH/UK/HR. 5150MHz-5350MHz is for indoor use only. Caution: Exposure to Radio Frequency Radiation This equipment complies with EU radiation exposure limits set forth for an uncontrolled environment. This equipment should be installed and operated with minimum distance 20cm between the radiator & your body v.14 Clover Mini Wi-Fi Clover Mini 3G Model: C300 Model: C301 FCC ID: HFS-C300 FCC ID: HFS-C301 EU Importer OmniPay Ltd Unit 9, Richview Office Park, Clonskeagh, Dublin 14, Ireland Waste Electrical and Electronic Equipment-WEEE NOTE: This product is covered electronic equipment under the European Union’s Waste from Electrical and Electronic Equipment (“WEEE”) Directive(2012/19/EU). The WEEE Directive requires that covered equipment be collected and managed separately from typical household waste in all EU member states. Please follow the guidance of your local environmental authority or ask the shop where you purchased the product for collection or recycling options.-
 1
1
-
 2
2
-
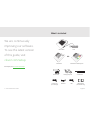 3
3
-
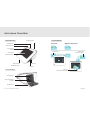 4
4
-
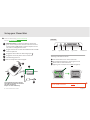 5
5
-
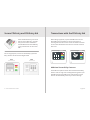 6
6
-
 7
7
-
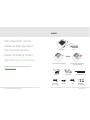 8
8
-
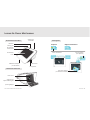 9
9
-
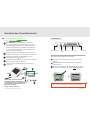 10
10
-
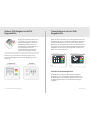 11
11
-
 12
12
-
 13
13
-
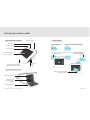 14
14
-
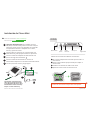 15
15
-
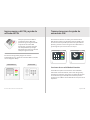 16
16
-
 17
17
-
 18
18
-
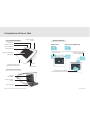 19
19
-
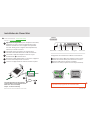 20
20
-
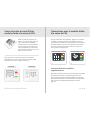 21
21
-
 22
22
-
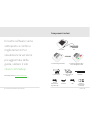 23
23
-
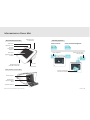 24
24
-
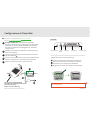 25
25
-
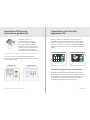 26
26
-
 27
27
-
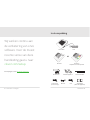 28
28
-
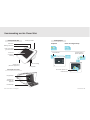 29
29
-
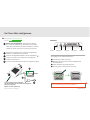 30
30
-
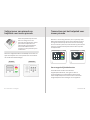 31
31
-
 32
32
-
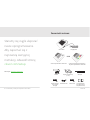 33
33
-
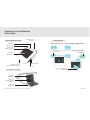 34
34
-
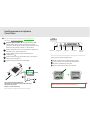 35
35
-
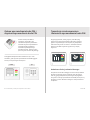 36
36
-
 37
37
-
 38
38
-
 39
39
-
 40
40


Clover C300 Features Manual
- Type
- Features Manual
- Deze handleiding is ook geschikt voor
in andere talen
- English: Clover C300
- italiano: Clover C300
- français: Clover C300
- español: Clover C300
- Deutsch: Clover C300
- polski: Clover C300


