
Operating instructions
Dryers
Gebruiksaanwijzing
Droogautomaten
PT 8257
PT 8337
PT 8407
PT 8507
PT 8807
To avoid the risk of accidents or damage to the machine it is
essential to read these instructions before installing,
commissioning and using it for the first time.
M.-Nr. 07 713 432
en, nl - GB, NL

This machine must be installed in accordance with local and national building and safety regulations by a
suitably qualified engineer. In the U.K. this must be done for gas-heated machines by a Gas Safe registered
engineer. Adequate ventilation must be present in the room in which the machine is operated.
It is essential to read these instructions before installing and operating the machine.
Gas-heated machines
Safety precautions to take if you smell gas
– Turn off the gas emergency control valve immediately. This is usually located near the gas meter.
– Do not enter a room with an open flame where there is a smell of gas.
– Eliminate all sources of ignition in a safe manner. Do not smoke, light cigarette lighters or matches.
– Do not operate electrical lights or switches, i.e. do not switch them "On" or "Off".
– Open all windows and doors to ventilate the area.
– If the smell of gas persists, evacuate the building.
In the UK you must now:
- Call the Gas Emergency Contact Centre (Tel: 0 800 111 999)
- For any gas work in the UK always use a Gas Safe registered engineer.
In other countries please follow relevant country specific procedures on gas.
Keep these instructions in a safe place and ensure they are made available to new users. They must be made
aware of these Warning and Safety instructions.
All personnel working with this machine must be fully trained in all aspects of its use and safety.
Gas safety precautions
2

Gas safety precautions ......................................................................2
Warning and Safety instructions...............................................................4
Caring for the environment ...................................................................6
Guide to the machine ........................................................................7
Control elements.............................................................................8
Drying....................................................................................10
Sort the laundry.............................................................................10
Before using for the first time ..................................................................11
Switch the machine on and load the drum ........................................................11
Select a programme .........................................................................12
Card operation / coin mechanism .............................................................15
Card access operation .......................................................................15
Drying using coin mechanism C 4060 / C 4065 / C 4070 .........................................15
Additional options .........................................................................16
Start date and time ..........................................................................16
Programme stop ............................................................................17
Programme cancellation......................................................................17
Changing the programme order................................................................17
Programme information ......................................................................17
Programme overview .......................................................................18
Standard programmes .......................................................................18
Duvets....................................................................................20
Mops (Buildings maintenance).................................................................20
Fire service ................................................................................21
Professional cleaners ........................................................................21
Optional modules ..........................................................................23
Operating data .............................................................................23
Peak load cut-out ...........................................................................24
Problem solving guide ......................................................................25
Error messages.............................................................................25
After sales service ..........................................................................26
Cleaning and care ..........................................................................27
Fluff filter ..................................................................................27
Installation and connection ..................................................................28
Levelling the machine........................................................................29
Installation on a raised plinth ..................................................................29
Coin mechanism ............................................................................29
Communication module XKM RS232 ............................................................29
Electrical connection ........................................................................30
Air inlet and exhaust connection ...............................................................30
Steam connection ...........................................................................30
Hot water connection ........................................................................30
Gas connection.............................................................................30
Technical data .............................................................................31
Explanation of symbols on the data plate ......................................................32
Abbreviated operating instructions PT 8257 / 8337 / 8407 / 8507 / 8807..............................33
Contents
3

Explanation of the Warning and Safety
symbols on the machine
It is essential to read these operating
instructions.
Please refer to specific instructions, e.g.
Installation instructions
Caution, hot surfaces.
Caution, voltage up to 1000 volts.
Earthing
To avoid the risk of accidents and damage to the
machine read the operating instructions carefully
before using it for the first time. They contain
important information about the installation, safety,
use and maintenance of the machine. Keep them
in a safe place and ensure that new users are
familiar with the content. Pass them on to any
future owner of the machine.
Correct application
~
This dryer must only be used for drying articles
which were washed in water and which have a care
label stating that the article is suitable for machine
drying.
~
To prevent the risk of fire, the following must
not be dried in this tumble dryer (with the exception
of those fabrics which can be dried in the Special
Programmes specifically designed for them):
– fabrics which contain a large proportion of rubber,
foam rubber or rubber-like materials.
– items which have been treated with inflammable
cleaning agents.
– items which have been splashed with hair lacquer,
hair spray, nail varnish remover or similar
substances.
–
items which have been soiled with oils or residues
containing grease (kitchen oils, cosmetics etc.).
–
items soiled with wax or other chemicals (e.g.
mops and floor cloths).
–
items with damaged padding or fillings (e.g.
pillows, jackets).
–
items soiled with grease or oil which have not been
properly cleaned beforehand. Use heavy-duty
detergents where necessary to clean heavily soiled
garments, e.g. workwear. If necessary consult the
detergent manufacturer for advice.
With sensitive fabrics there may be a danger of them
self igniting if dried for too long. They should be
removed as soon as the programme has finished or if
there is a power cut.
Keep a fire extinguisher near the machine at all times.
~
Do not unload laundry from the drum until the
cooling down phase has been completed.
Hot laundry can self ignite and cause a fire when
folded or put away.
~
Check that all pockets of workwear etc are empty
to avoid the danger of inflammable objects, e.g.
cigarette lighters, matches, candles or cosmetics
being placed in the dryer.
~
If the dryer is installed in a public area the owner
must ensure that it can be operated safely.
~
This dryer must not be used outside.
Technical and electrical safety
~
This machine must only be installed and
commissioned by a Miele authorised technician.
~
The electrical safety of this machine can only be
guaranteed if connected to a correctly installed
earthing system on site. It is most important that this
basic safety requirement is present and tested
regularly, and where there is any doubt, the on-site
electrical wiring should be inspected by a qualified
electrician. The manufacturer cannot be held liable
for the consequences of an inadequate earthing
system (e.g. electric shock).
~
The machine is only completely isolated from the
electricity supply either when it is switched off at the
isolator switch or the mains fuse has been withdrawn.
~
Repairs to electrical and gas heated appliances
should only be carried out by a suitably qualified and
competent person in accordance with local and
national safety regulations. Repairs and other work by
unqualified persons could be dangerous. The
manufacturer cannot be held liable for unauthorised
work.
~
Faulty components must only be replaced by
genuine Miele original spare parts. Only when these
parts are fitted can the safety standards of the
machine be guaranteed.
~
This machine must not be operated in the same
room as dry cleaning machines which use solvents
containing chlorofluorocarbons (CFCs). Escaping
vapours break down during combustion into
hydrochloric acid which can have a detrimental effect
on both the laundry and the machine. Even when
such machines are installed in separate rooms, care
should be taken to ensure that no exchange of air
can take place.
Warning and Safety instructions
4

~
The dryer must have a constant supply of fresh air.
Vapours containing chlorine, fluorine or other solvents
must not be able to reach the dryer.
~
The ventilation inlet to the dryer is located at the
back of the machine. It must not be blocked or
hindered in any way. Do not cover the machine lid
with cloths or similar items.
~
Benzine, petrol, paraffin or any easily flammable
substance must not be stored or used near the
tumble dryer. Fire and explosion risk.
~
To ensure the correct performance of the machine
and to prevent the risk of faults and fire, it is important
to check the machine and carry out maintenance on
a regular basis.
Use
~
This tumble dryer must only be used when it is
connected to a suitable ducting system. The
installation site must be adequately ventilated.
~
This tumble dryer is not intended for use by
people with reduced physical, sensory or mental
capabilities, or lack of experience or knowledge,
unless they are supervised whilst using it or have
been shown how to use it by a by a person
responsible for their safety.
~
Keep children away from the tumble dryer at all
times. It is not a toy! To avoid the risk of injury do not
allow them to play on or near it or to play with the
controls. Supervise children whilst you are using it.
~
Always close the drum door and the fluff filter
compartment after use to avoid:
– the risk of children hiding things in the dryer
– the risk of children and small animals climbing into
the drum and endangering their lives.
~
Do not use a machine with damaged controls or
cables. These must be repaired before it is used
again.
~
Do not damage, remove or bypass the safety
features, fixtures and control elements of this
machine.
~
Any removable outer panels must be back in
place, and all moving or electrical parts shielded
before the machine is switched on.
~
Whilst the dryer is in use the porthole glass and
drum door frame can become very hot. Laundry will
also be very hot if you remove it early.
~
To prevent the risk of injury or scalding
components carrying steam must not be touched.
~
Always make sure that the drum is stationary
before reaching into the machine to remove laundry.
Reaching into a moving drum is extremely
dangerous.
~
Take care near the drum door hinges and the fluff
filter compartment flap. Danger of injury. Ensure that
you always use the handles.
~
The drum door must be able to be opened to its
fullest extent. This area must not be restricted by
doors or structural features.
~
Do not use the machine without the built-in fluff
filter in place. Fire risk.
A damaged fluff filter must be replaced before the
machine is used again.
Otherwise fluff and lint will cause a blockage in the
airways, the heating and the vent ducting, and the
correct functioning of the machine cannot be
assured.
~
Cleaning and disinfecting agents often contain
chlorine-based substances. Do not let such agents
come into contact with the stainless steel surfaces, as
the chlorine can have a corrosive effect and cause
rust. Use chlorine-free agents for washing and
disinfecting and also for cleaning stainless steel
surfaces to protect them from corrosion. If in doubt,
confirm with the manufacturer that their product is
suitable. If any agent containing chlorine comes into
contact with the stainless steel surfaces, wipe it away
immediately with clean water. Then dry with a soft
cloth.
~
Do not use a pressure washer or hose to clean the
machine.
Gas heated dryers
~
The gas mains connection point and the gas
connection to the machine should be switched off for
all cleaning and maintenance work and in the event
of a fault.
~
Warning. After commissioning the machine, and
after any maintenance, conversion or repair work all
components carrying gas from the gas tap to the
burners should be tested for leakage. Test points on
the gas tap and the burner are particularly important.
The machine should be tested with the burner
switched on and switched off.
Using accessories
~
Accessory parts may only be fitted when
expressly approved by Miele. Using spare parts or
accessories from other manufacturers will invalidate
the guarantee, and Miele cannot accept liability.
Disposing of your old machine
~
Before disposing of an old machine, first make the
door lock unusable. This way you will prevent
children from accidentally locking themselves in and
endangering their lives.
Keep these instructions in a safe and
accessible place.
Warning and Safety instructions
5

Disposal of the packing material
The transport and protective packing has been
selected from materials which are environmentally
friendly for disposal.
Rather than just throwing these materials away,
please ensure they are recycled.
,
Ensure that any plastic wrappings, bags, etc
are disposed of safely and kept out of the reach of
babies and young children. Danger of suffocation.
Disposing of your old machine
Electrical and electronic machines often contain
materials which, if handled or disposed of incorrectly
could be potentially hazardous to human health and
to the environment. They are, however, essential for
the correct functioning of your machine. Please do
not therefore dispose of it with your household waste.
Please dispose of it at your local community waste
collection / recycling centre or contact your Dealer for
advice. Ensure that it presents no danger to children
while being stored for disposal.
See the "Warning and Safety" section of this booklet
for further details.
Tips on saving energy
Make sure that your laundry is thoroughly spun
before drying. This saves time and energy.
Rinsing the laundry using hot water in the final rinse
helps to reduce the residual moisture level, and the
residual heat in the laundry will help keep processing
time down, thus saving energy.
Sort textiles according to:
- fabric and weave,
- drying level required,
- residual moisture levels.
For greater economy dry a full load. Underloading is
uneconomical. Overloading will impair the drying
result and the laundry finish.
Ensure that the room is well ventilated.
Caring for the environment
6

a Emergency stop switch
Only for use in an emergency.
Once the danger is no longer present, turn the
grooved disc clockwise to disengage the switch.
Do not use the Emergency stop switch to turn off
the dryer in normal use.
b Control panel
c Drum door
Pull the door handle to open the drum door.
d Access to fluff filter
Pull the handle to open the fluff filter compartment.
e 4 adjustable screw feet
f Electrical connection
g Air intake
h Exhaust connection
i Equipotential bonding
j Communication slot
Guide to the machine
7
f
g
h
j
i
ab
c
d
e

Control elements
a Display
1 Cottons extra dry 0%
2 Cottons dry 0%
3 Cottons damp 20%
FC A
After switching on, the "Welcome" display will appear
for a short time followed by the programme list. The
most recently used programme is highlighted.
b Function buttons
The six buttons underneath the display are the
function buttons. These buttons have specific
functions depending on the status of the machine.
These functions will be listed in the display above the
buttons and will be highlighted once selected.
If the machine is reprogrammed to "Direct button
allocation" the first 6 programmes listed in the display
can be selected directly via these buttons.
c Start button
The lightring will flash when a selected programme
can be started. Pressing the Start button will start the
programme. After a programme has started, pressing
this button will show the display as it was before the
start of the programme.
d PC / Optical interface
This interface is used for transferring data to the
control unit from a PC and vice versa.
e Rotary selector
Turning the selector brings up options and menus in
the display.
Pressing the selector confirms your selection.
f Chip card reader (optional)
If the machine has been programmed for card
operation, you can only use those programmes
stored on the card to dry laundry.
Insert the card in the direction of the arrow (on the
card).
g I Mains on switch
Switches the machine on.
h 0 Mains off switch
Switches the machine off.
Guide to the machine
8

Function buttons
fStop/End
The function button on the right-hand side is used to
stop a programme after it has started. Pressing it
again finishes the programme.
[ Block plus
The relevant programme block (e.g. Pre-dry) is
added to the programme.
FC Settings
Press this button to switch to another
language temporarily.
m Start time
Pressing this button before the start of a programme
displays the message that a start time can be
selected.
K Information
Press this button to call up programme
information in the display.
ü Change order
The order of the programme in progress can be
changed or programme blocks can be repeated.
A Back
Takes you back to the previous display.
e/- Indicates that there is more
information on next or previous line.
S Save
See the programming instruction booklet.
$ Programme locked
Once a locked programme has been started, the End
button can only be used to stop and cancel it during
the first minute.
% Programme unlocked
\ Operating data
Data transfer
Chip card operation
The chip card is supplied without any programmes.
See the programming instruction booklet for
information on transferring data from the control unit
to the chip card and vice versa.
The chip card can store a maximum of 30
programmes, each with 6 blocks.
The back of the chip card can be labelled.
Guide to the machine
9

Sort the laundry
Not all textiles are suitable for machine drying.
Please read the instructions given on the garment
care label.
The meaning of the care symbols:
q = Dry at normal temperature
r = Dry at low temperature
s = Do not tumble dry
Sort the laundry according to fibre type and weave to
ensure even drying and to prevent the risk of damage
to textiles.
,
To prevent the risk of fire, the following
must not be dried in this tumble dryer (with the
exception of those fabrics which can be dried in
the Special Programmes specifically designed for
them):
- fabrics which contain a large proportion of
rubber, foam rubber or rubber-like materials.
- items which have been treated with inflammable
cleaning agents.
- items which have been splashed with hair
lacquer, hair spray, nail varnish remover or similar
substances.
- items which have been soiled with oils or
residues containing grease (kitchen oils,
cosmetics etc.).
- items soiled with wax or other chemicals (e.g.
mops and floor cloths).
- items with damaged padding or fillings (e.g.
pillows, jackets).
- items soiled with grease or oil which have not
been properly cleaned beforehand. Use
heavy-duty detergents where necessary to clean
heavily soiled garments, e.g. workwear. If
necessary consult the detergent manufacturer for
advice.
The following textiles should not be machine
dried:
Woollens and wool blends as these tend to matt and
shrink. Pre-finish drying these using in the "Woollens"
programme.
Pure linen tends to roughen if tumble dried. Please
follow instructions given on the care label.
Important:
Textiles with large metal accessories such as
buckles, hooks and zip tags should be placed in a
laundry bag or a pillow case before drying. This is to
protect the drum from scratches and dents during
drying.
Garments with closed metal zips can cause the
sensor electrodes in the drum ribs to be bridged.
This can cause the drying process to go on for too
long, or to not finish at all. Open zips before drying.
Loopknit and woven textiles (e.g. T-shirts and
underwear) have a tendency to shrink depending on
their quality. This is made worse by over-drying. Do
not use the "Cottons extra dry" for these textiles.
Starched laundry can be machine dried. Select the
most appropriate programme for ironing by hand or
machine.
Sort the laundry according to the level of dryness
required. It is not necessary to sort according to size.
Duvet covers and pillow cases should be closed to
prevent smaller items rolling up inside them.
For greater economy dry a full load. Underloading is
uneconomical. Overloading will impair the drying
result and the laundry finish.
Rinsing the laundry using hot water in the final rinse
helps to reduce the residual moisture level, and the
residual heat in the laundry will help keep processing
time down, thus saving energy.
Drying
10

The machine must be commissioned by a Miele
authorised technician before it is used for the first
time. For gas heated machines in the U.K. this
must be carried out by a Gas Safe registered
technician.
Before using for the first time
Before loading the dryer with laundry you should wipe
the internal drum surface with a soft, dry cloth.
Switch the machine on and load the drum
^ Open all stopcocks for gas and steam as
applicable.
^ Switch on the on-site mains switch.
^ Press the I "On" button in.
The Welcome screen will appear.
Miele
PROFESSIONAL
PT 8xx7
Welcome
This is followed by the programme list (with the most
recently used programme highlighted).
1 Cottons extra dry 0%
2 Cottons dry 0%
3 Cottons damp 20%
FC A
Select a programme using the rotary selector.
^ Open the drum door.
^ Load the drum.
The pre-sorted laundry should be loaded loosely in
the drum.
Make sure any dispensing aids such as detergent
balls have been removed from the laundry.
Max. load (dry weight of laundry)
PT 8257 PT 8337 PT 8407 PT 8507 PT 8807
Drum volume in litres
250 325 400 500 800
1, 2, 3, 4, 5 Cottons
10-13 kg 13*-16
kg
16*-20
kg
20*-25
kg
32*-40
kg
6, 7, 8 Minimum iron
5kg 6.6kg 8kg 10kg 16kg
9 Woollens
4 kg 5.2 kg 6.4 kg 8 kg 12.8 kg
10 Delicates / Synthetics
2 kg 2.6 kg 3.2 kg 4 kg 6.4 kg
11, 12 Timed drying programmes
10-13 kg 13*-16
kg
16*-20
kg
20*-25
kg
32*-40
kg
13, 14 Proofing, Outerwear
5-6.6 kg 6.6-9 kg 8-11 kg 10-13 kg 16-20 kg
* Hot water machines
To prevent the risk of damaging laundry make
sure it cannot be trapped when the door is closed.
^ Close the drum door.
Drying
11

Select a programme
This machine is equipped with an electronic sensor
system that continually monitors the moisture level of
the laundry.
As soon as the required dryness is reached the
laundry is cooled down. At the end of this cooling
down phase the drying programme is automatically
finished.
Standard programmes:
– For drying cotton and linen textiles
1 Cottons extra dry 0 %
2 Cottons dry 0 %
3 Cottons damp 20 %
4 Cottons damp 25%
5 Cottons damp 40 %
– For drying synthetic and mixed fibre textiles
6 Minimum iron dry 0 %
7 Minimum iron damp 10 %
8 Minimum iron damp 20 %
9 Woollens 5 min.
10 Delicates 20 %
– For airing textiles
11Timed drying cold air 15 min.
– For drying small loads of laundry or for
finishing drying individual items.
12Timed drying hot air 20 min.
1 Cottons extra dry 0%
2 Cottons dry 0%
3 Cottons damp 20%
FC A
^ Turn the rotary dial to select a programme (e.g.
Programme 2 Cottons dry).
Select the additional option [ "Blockplus" if
required
(this is not available on standard programmes)
^
Confirm the selection of the programme by
pressing the rotary selector.
The following (example) will appear in the display:
22 Cottons dry 10.0 / 13.0 kg
0 % Drying 70°C
Cooling down e
[ m A
^ If wished you can now select a programme block,
e.g. Pre-drying by pressing the [ "Blockplus"
function button.
When the [ "Blockplus" function button is pressed,
the following will appear in the display:
2 2 Cottons dry 10.0 / 13.0 kg
24 % Pre-drying
0 % Drying e
[ m A
The [ field is highlighted.
Press the function button again to deselect the
function.
If you do not wish to make any further alterations to
the programme:
^ Press the "Start" button. The programme will start.
If you wish to make alterations before the start of
the programme, e.g. to the load size, temperature
or residual moisture:
^ Confirm the selection of the programme by
pressing the rotary selector.
The following (example) will appear in the display:
2 Cottons dry 10.0 / 13.0 kg
0 % Drying 70°C
Cooling down e
m A
The max. load will be shown at the far right of the
display.
Drying
12

Load weight
You can enter the weight of the load manually before
the start of the programme.
2 Cottons dry 10,0 13.0 kg
0 % Drying 70°C
Cooling down e
m A
^ Turn the rotary dial to highlight the load. Press the
dial to confirm your selection. Turn the dial to alter
the weight and confirm your selection by pressing
it.
Temperature in 1 °C increments from cold, 30 to
max. 80 °C .
^ Turn the rotary dial to select the "Temperature" field
(70 °C for drying) and press it to confirm your
selection.
2 Cottons dry 13.0 kg
0 % Drying 70°C
Cooling down e
m A
^ Turn the rotary dial to alter the temperature value
and then press it to confirm your selection.
Residual moisture in 1 % increments from -4 to 40 %.
^ Turn the rotary dial to select the "Residual moisture"
field (0 %) and press it to confirm your selection.
2 Cottons dry 13.0 kg
0% Drying 70°C
Cooling down
m A
^ Turn the rotary dial to alter the residual moisture
level and then press it to confirm your selection.
^ Press the Start button and the programme selected
will commence
Once a programme has started the programme
sequence will appear in the display.
2 Cottons dry
0 % Drying >40 %{
Cooling down Ready at 12:35
mKf
In the 2nd line of the display, drying in this example,
the actual residual moisture level (>40%) and the
symbol for { Electric or * Gas heating switched on
will also be shown. The 3rd line displays the following
programme block.
The time that the programme will finish (12:35) is
shown on the right hand side of the display.
The programme end display has a self-learning
function and will not show an accurate reading until
the programme has been run several times.
At the end of a programme
2 Cottons dry
Programme finished
Anti-crease Ready at 12:35
m FC Kf
The programme end time is displayed,the buzzer
sounds and the anti-crease phase commences. The
drum will rotate at intervals to keep the laundry from
creasing.
This is useful if laundry is not going to be unloaded as
soon as the programme finishes.
^ Open the drum door.
^ Unload the drum.
Make sure nothing is left behind in the drum. If
items are left in the dryer, they could be damaged
by overdrying when the dryer is next used.
,
Do not unload laundry from the drum until after
the cooling down phase has been completed.
Hot laundry can self-ignite and cause a fire when
folded or put away.
^ Check the fluff / lint filter and clean if necessary.
2 Cottons dry
Programme finished
Check lint filter
A
A reminder will appear in the display when the filter
need to be cleaned. The filter should be cleaned as
soon as the programme finishes.
Drying
13

If no more laundry is to be processed:
^
Close the drum door
^
Press the 0 "Off" button to switch the machine off.
^
Switch off the on-site mains switch.
^
Close all stopcocks for gas and steam as
applicable.
Adding or removing items
The drum door can be opened during a drying
programme to remove or add items if necessary.
,
Always make sure that the drum is stationary
before reaching into the machine to remove
laundry. Reaching into a moving drum is extremely
dangerous!
2 Cottons dry
Programme stop
Door open. Please close the door.
FC f
To continue the drying programme:
^ Close the drum door
The fan will switch itself on automatically if the
temperature in the drum is too high.
^ Press the "Start" button and the programme
selected will continue.
Drying
14

Cards on which a programme has been saved can
only be used on the machine type for which they
have been written.
Unwritten cards can be used universally.
^
Press the "On" I button to switch the
machine on.
The Welcome screen will appear.
^ Insert the card in the reader.
The programmes listed on the card will
appear in the display.
Card operation
17 Protective clothing 45 °C
18 Minimum iron 60 °C
FC A
^ Use the rotary selector to highlight the programme
you want to use. Press the rotary dial to select the
programme you have highlighted.
^ Press the Start button. The programme will start.
After pressing the "Start" button you can remove the
card from the reader. The programme is deleted from
the machine's memory once it has finished.
,
Never insert any other card or object into the
card reader!
If the card is inserted the wrong way round the
following message will appear in the display:
§
Card fault
Card incorrectly inserted in card reader.
üA
^ Insert the card the right way round in the card
reader.
If the card is not the right one for the machine it is
being used in, the following message will appear in
the display:
Card operation
Programmes on the card are only suitable
for machine type PT 8507
A
^ Insert the correct card for the machine in the card
reader.
Card access operation
Programmes requiring special procedures are written
onto a card which is then used to run the programme.
"Card access" has be activated via the supervisor
level in the machine.
The machine will then only run programmes by using
a card (on which one programme has been saved).
Programmes in the machine's control unit cannot then
be accessed.
Drying using coin mechanism C 4060 /
C 4065 / C 4070
If the machine is not operated in the following order
you will lose your money or tokens!
A Load the drum and close the door.
B Press the I "On" button.
C Select a programme
D Insert coins or tokens.
E Press the "Start" button.
Card operation / coin mechanism
15

Language selection
The language shown in the display can be changed
briefly before starting a programme if you wish. To do
so use the button underneath the flag symbol.
1 Cottons extra dry 0%
2 Cottons dry 0%
3 Cottons damp 20%
FC A
If you press the FC button the following will appear
in the display:
Settings Back <-
Main menu Language
Supervisor level
FC A
^ Press the rotary dial to confirm your selection of the
"Language" menu.
Settings deutsch
Language F english (GB)
español
FC A
^ Turn the rotary dial to highlight the language you
want and then press the dial to confirm your
selection.
The FC function button can be pressed to change
to a different language temporarily. By highlighting
the language the display will immediately change to
show the language selected. If the programme is not
started, or no other buttons or controls are activated
in the next 5 minutes the language will revert back to
the default setting.
The language will revert back to the default setting 5
minutes after the end of a programme with the door
open.
Start date and time
If you want a programme to start at a later time use
the m button for "Start date and time".
To set a date and time
After selecting your programme, the following
(example) will appear in the display:
2 Cottons dry 13.0 kg
0 % Drying 70°C
Cooling down e
m A
^
Press the m "Start date and time" button.
The following (example) will appear in the display:
2 Cottons dry 13.0 kg
Start time: 16 : 10 Start date: 2.4.2003
After selection press the start button.
m A
The current time and date will then appear. The input
field for hours will be highlighted.
^ Press the rotary dial to change the hour.
Turn the rotary dial to alter the hour and then press
it to confirm your selection.
^ Then turn the rotary dial to select the "Minutes" field
and press it to confirm your selection.
Turn the dial to alter the minutes and then press it
to confirm your selection.
^ Then turn the rotary dial to select the "Start date"
field and press it to confirm your selection.
Turn the dial to alter the date and then press it to
confirm your selection.
^ Do the same for the month and the year.
After setting the required start date and time:
^ Press the Start button and the programme selected
will commence at the time specified.
The display will now contain the following information:
2 Cottons dry 13.0 kg
0 % Drying
16:15 -2.4.2009 Start 6:00-3.4.2009
m A
The current time and date as well as the start time will
be displayed.
^ If the door is opened again you will have to press
the Start button again.
To cancel the start time and date function
Press the m "Start date and time" button again or
press A"Back", and any changes will be rejected.
Additional options
16

Programme stop
To halt the programme press the f button.
The programme remains stationary.
2 Cottons dry
Programme stop
Press the start button.
ü f
To continue the programme press the "Start" button.
Programme cancellation
To cancel a programme press the f "Stop/End"
button twice in succession.
Changing the programme order
The order of the programme in progress can be
changed or programme blocks can be repeated.
^ Press the f button and the programme will stop.
2 Cottons dry
Programme stop
Press the start button.
ü f
^ After pressing the ü button the current area or
block will appear in the display.
See also "Programme structure" in the Progamming
Manual.
Reorganise -> 2 Cottons dry
Programme stop
Area 1: Drying e
S A
Area 1: Drying
Block 1: Pre-drying
-
S A
^ Turn the rotary dial to select the area, and then
press it to confirm your selection.
Select Area: 1 Drying, or 2 Cooling down and
confirm your selection.
^
Turn the rotary dial to select the block and then
press it to confirm your selection.
Select Block: Drying 1-10, or Cooling down 1-10
and confirm your selection.
^
Press the S "Save" button and then press "Start" to
reorganise the programme order or press the A
"Back" button to go back to programme stop and
not change the programme order.
Programme information
Pressing the K "Information" button will call up further
information about the programme e.g.:
2 Cottons dry
Start date and time: 10.7.2009
Start time: 9:47 e
m K f
Time after start: 0h 23 min
Time left: 0h 11min
Progr.-End: 10: 21 h e
Area: 1 Drying
Block: 1 Pre-drying
Actual exhaust air temp. 59 °C e
Rqrd. exhaust air temp. 74 °C
Peak load: No
Anti-crease: 3 s./87s./60 min e
2 Cottons dry
Exhaust / Recirculation: Recirculation -
Block end signal Yes
A
^ Press the A "Back" button to return to the
programme sequence display.
Additional options
17

Standard programmes
Programme Fabric type max. load capacity
(kg, dry weight)
1 Cottons extra dry 0 %
(Normal+) 74°C
Multi-layered and bulky cotton and linen textiles which do
not get dry in the Cottons dry programme.
PT 8257 10-13
PT 8337 13-16
PT 8407 16-20
PT 8507 20-25
PT 8807 32-40
2 Cottons dry 0 %
(Normal) 74°C
Single and multi-layered cotton and linen textiles.
3 Cottons damp 20 %
(Machine iron) 74°C
Cotton and linen textiles which are to be machine ironed.
4 Cottons damp 25%
(Machine iron) 74°C
5 Cottons damp 40 %
(Machine iron) 74°C
6 Minimum iron dry 0 %
(Normal) 60°C
Synthetic, cotton and mixed fibre textiles which are to be
machine ironed.
PT 8257 5.0 kg
PT 8337 6.6 kg
PT 8407 8.0 kg
PT 8507 10 kg
PT 8807 16 kg
7 Minimum iron damp 10 %
(Machine iron) 60°C
8 Minimum iron damp 20 %
(Machine iron) 60°C
9 Woollens
(5 min.) 74°C
For fluffing up woollen garments. This programme does
not dry woollens.
PT 8257 4
PT 8337 5.2
PT 8407 6.4
PT 8507 8
PT 8807 12.8
10 Delicates 20 %
40°C
Delicate cotton, synthetic and mixed fibre fabrics. PT 8257 2
PT 8337 2.6
PT 8407 3.2
PT 8507 4
PT 8807 6.4
11 Timed drying cool air
(15 min.)
Items which need airing only.
PT 8257 10-13
PT 8337 13-16
PT 8407 16-20
PT 8507 20-25
PT 8807 32-40
12 Timed drying hot air
(20 min.) 74°C
For drying small loads of laundry or for finishing drying
individual items.
Programme overview
18

Programme Fabric type max. load capacity
(kg, dry weight)
13 Proofing
(Normal) 60°C
For drying microfibre fabrics, skiwear, fine, closeweave
cotton garments (poplin) or tablecloths which are
suitable for drying in a tumble dryer and have been
treated to provide a water and dirt resistant finish.
PT 8257 5 - 6.6
PT 8337 6.6 - 9
PT 8407 8 - 11
PT 8507 10 - 13
PT 8807 16 - 20
This programme includes a proofing fixing phase.
Only use proofing agents containing fluorochemical compounds which are stated by the
manufacturer as being "suitable for use on membrane textiles".
Fire hazard. Do not dry items which have been treated with proofing agents containing
paraffin.
14 Outerwear
60°C
Outerwear which is suitable for drying in a tumble dryer.
Temperatures given refer to extracted air temperature.
Programme overview
19

Duvets
Programme Fabric type max. load capacity (kg, dry weight)
Down duvets Feather and down filled duvets and pillows. PT 8257 1 single duvet or 2 pillows (10)
PT 8337 3 pillows or (13)
1 pillow + 1 single duvet
PT 8407 4 pillows or (16)
2 pillows + 1 single duvet or
2 single duvets
PT 8507 5 pillows or (20)
3 pillows + 1 single duvet or
2 single duvets
PT 8807 8 pillows or (32)
3 pillows + 3 single duvet or
4 single duvets
The loads quoted are estimates and will
vary depending on the size and volume
of the duvets.
74°C, Dries to 0 % residual moisture, Tumble phase, Cooling down
phase
Synthetic duvets Synthetic duvets and pillows.
74°C, Dries to 0 % residual moisture, Tumble phase, Cooling down
phase
Natural fibre blankets Natural fibre quilts and blankets.
74°C, 3 min. drying phase, Cooling down phase.
Natural fibre blankets and quilts must not be dried completely in a
tumble dryer, as this could cause the fibres to matt. These should
only be partially dried in a tumble dryer.
Mops (Buildings maintenance)
,
Items that have not been washed thoroughly and may still contain residual wax or chemicals are a fire
hazard.
Wash heavily soiled items very thoroughly before drying them, ensuring that you use sufficient detergent and
select a high temperature. If in doubt, wash the items several times.
Programme Fabric type max. load capacity
(kg, dry weight)
Mops Cotton mops PT 8257 10
PT 8337 13
PT 8407 16
PT 8507 20
PT 8807 32
74°C, Dries to 0 % residual moisture, Cooling down phase.
Microfibre mops Microfibre mops
60°C, Dries to 0 % residual moisture, Cooling down phase.
Cleaning cloths Microfibre cloths, dusters PT 8257 5.6
PT 8337 7
PT 8407 8.6
PT 8507 11
PT 8807 17.6
60°C, Dries to 0 % residual moisture, Cooling down phase.
Temperatures given refer to extracted air temperature.
Programme overview
20

Fire service
Programme Fabric type max. load capacity (kg, dry weight)
Face masks Face masks with
head straps
max. no. holders / masks
PT 8257 4 8
PT 8337 4 12
PT 8407 4 16
PT 8507 4 12
PT 8807 4 16
50°C, 45 min. drying phase, Cooling down phase.
Breathing masks may only be dried if special holders (available as an
optional accessory) are fitted in the drum.
Protective clothing Protective clothing (e.g. as used by the fire
brigade), overalls, jackets, trousers
PT 8257 approx.1-2suits
(1 jacket + 2 trousers or 2 jackets)
PT 8337 approx. 2 suits (or 3 jackets)
PT 8407 approx. 3 suits
PT 8507 approx.3-4suits
PT 8807 approx. 6 suits
PT 8257 5 - 6.6 kg
PT 8337 6.6 - 9 kg
PT 8407 8 - 10 kg
PT 8507 10 - 13 kg
PT 8807 16 - 20 kg
74°C, Dries to 0% residual moisture, Tumble phase, Cooling down
phase
For best results, dry items inside out.
Reproof protect.
clothing
For all textiles that have been treated with a
proofing agent
74°C, Dries to 0 % residual moisture, Tumble phase, Cooling down
phase
Only use proofing agents containing fluorochemical compounds which
are stated by the manufacturer as being "suitable for use on membrane
textiles".
Fire hazard. Do not dry items which have been treated with proofing
agents containing paraffin.
Professional cleaners
Programme Fabric type max. load capacity (kg,
dry weight)
WetCare sensitive For non washable garments PT 8257 approx.4-5
PT 8337 apporx.5-6.6
PT 8407 approx. 6.6 - 8
PT 8507 approx.8-10
PT 8807 approx. 16 - 21
50°C, 3 min. drying phase, Cooling down phase.
WetCare silks For non washable garments which crease easily PT 8257 approx.4-5
PT 8337 approx.5-6.6
PT 8407 approx. 6.6 - 8
PT 8507 approx.8-10
PT 8807 approx. 13 - 16
60°C, Dries to 15 % residual moisture, Cooling down phase.
WetCare intensive Washable garments PT 8257 approx.5-6.6
PT 8337 approx. 6.6 - 9
PT 8407 approx.8-11
PT 8507 approx. 10 - 13
PT 8807 approx. 16 - 21
74°C, Dries to 0 % residual moisture, Cooling down phase.
Temperatures given refer to extracted air temperature.
Programme overview
21

Equestrian
,
Metal buckles and fasteners etc. should be removed to protect the items being dried and the drum. If it is
not possible to remove them, then cover them with protective bags.
Programme Fabric type max. load capacity
(kg, dry weight)
Horse blankets Horse blankets, saddle-cloths, gaiters, boots, bandages, textile
halters PT 8257 10
PT 8337 13
PT 8407 16
PT 8507 20
PT 8807 32
60°C, Dries to 0 % residual moisture, Tumble phase, Cooling down phase
Woollen horse
blankets
Horse blankets with high percentage of wool
74°C, 5 min. drying phase, Cooling down phase.
Temperatures given refer to extracted air temperature.
Dryer
Load (individual items)
Saddle cloths/
Numnahs
Summer
blankets
Winter
blankets
PT 8257 7 2 1
PT 8337 9 2 - 3 1 - 2
PT 8407 11 2 - 3 1 - 2
PT 8507 12 3 2
PT 8807 18 4 - 5 3
Programme overview
22

Operating data
By pressing the \ "Operating data" button, the
module can be used to read or delete operating data
either before the start of a programme, or after it has
finished.
1 Cottons extra dry 0%
2 Cottons dry 0%
3 Cottons damp 20%
\FCA
After pressing the \ button the following will appear
in the display:
Operating data module
Total data
Programme data e
\ A
Selection choice:
– Total data
In this option all programme data is collated and
summarised.
– Programme data
Programme data contains all the data called up
during a programme.
– Delete data
- Module (delete total data including programme
data)
- Total data (only delete total data)
- Programme data (only delete programme data)
Pressing the button again deselects the \
"Operating data" option.
If there is no more memory available in the operating
data module a message will appear after pressing
the "Start" button to say that the operating data will be
overwritten.
If you press the A "Back" button or do not press the
"Start" button within 30 seconds, the display will revert
to the way it was before starting the programme.
Total data
Operating data module
Total data
Programme data e
\ A
After selecting Total data, the following (example) will
appear in the display:
Operating data module ~ Total data
Total time power on: 200,987 h
Operating hours: 123456 h e
\ A
Other options:
Total time power on: 200,987 h
Operating hours: 123,456 h
Duration heating active: 123,456 h
Duration drive motor active: 93,456 h
Programme starts: 23,456
Programme stops: 567
Programme cancellations: 67
Amount of laundry: 1,234,567 kg
Energy: 12,345,678 kWh
Programme data
Operating data module
Programme data
Delete data e
\ A
After selecting Programme data the following
(example) will appear in the display:
Operating data module~ Programme data
1 Cottons extra dry 0 %
2 Cottons dry 0 % e
\ A
Select the programme you want from the list and
press the rotary dial to call up a list of all programme
starts including date and start time for that
programme (Cottons extra dry in the example).
Programme data ~ 1 Cottons extra dry
Date: 21.05.2009 Start time: 11:30
Date: 21.05.2009 Start time: 12:30 e
\ A
Select the required programme start from the list for
programme 1 Cottons extra dry and confirm your
choice by pressing the rotary dial.
Programme data ~ 1 Cottons extra dry
Date: 21.05.2009 Start time: 11:30
Name: Smith e
\ A
Optional modules
23

Other options:
Town: Abingdon
Serial number: 12345678
Machine type: PT 8337
Load size: 13 kg
+ Button: Activated
Programme start: 11:30
Programme finished: 12:05
Total operating time:0h35min
Electrical energy: 12.5 kWh
Gas energy: 0 kWh
Steam energy: 0 kWh
Programme change: 2
(after making your selection and
pressing the rotary dial only the last 3 stops and starts will
be displayed.)
Programme fault: None (only the last 3 faults are saved.)
Area 1: Drying
Block1: Pre-drying
Process type: Residual moisture
Value: 15 %
Actual residual moisture: 15 %
Duration: 6 min
Max. exhaust temperature: 72 °C
Max. air intake temperature: 122 °C
Area1: Drying
Block2: Drying
Process type: Residual moisture
Value: 0 %
Actual residual moisture: 0 %
Duration: 6 min
Max. exhaust temperature: 78 °C
Max. air intake temperature: 138 °C
Area2: Cooling down
Block: Cooling down
Process type: Cooling down
Value: 50 %
Actual temperature: 50 °C
Duration: 3 min
Max. exhaust temperature: 52 °C
Max. air intake temperature: 95 °C
Residual moisture: -3 %
Delete data
Operating data module
Programme data
Delete data e
[ A
After selecting Delete data the following message will
appear in the display:
Operating data module~ Delete data
Module: 21.02.2009
Total data: 12.07.2009 e
[ A
The module menu option can be used to delete the
total data and programme data from the operating
data memory.
The total data option can only be used to delete the
total data from the operating data. The programme
data option can only be used to delete programme
data from the operating data.
After making your selection and pressing the rotary
dial you will be prompted to enter your password.
Password:____
ABCDEFGHIJKLMNOPQRSTUVWXYZ
0123456789
KSA
After keying in your password or inserting your
supervisor level key card in the reader the following
security prompt will appear in the display:
Delete operating data?
S A
After pressing the S button the data will be deleted!
Peak load cut-out
If the peak-load cut out function is activated the
heating will switch itself off and any programme
running will be stopped. The following message will
appear in the display:
1 Cottons extra dry
Prog. stopped. Peak load cut-out.
Programme will continue.
ü f
Once the peak load has finished, the programme will
continue automatically as before.
If the door is opened during the peak load cut-out the
programme will have to be started again.
Optional modules
24

Error messages
,
Repairs to electrical, gas or steam operated
machines may only be carried out by a suitably
qualified person in accordance with national and
local safety regulations. For gas heated machines
in the U.K. this must be a Gas Safe registered
technician. Repairs and other work by unqualified
persons could be dangerous. The manufacturer
cannot be held liable for unauthorised work.
Whenever the machine is switched on or the
programme list is called up the controls carry out an
analysis of the system. All modules and sensors, data
from the operating system, drying programmes and
languages are tested.
If a fault is detected in a programme or a language
the following symbol will appear in the display §.
The programme or language affected cannot be
selected.
1 Cottons extra dry 0%
2 Cottons dry 0%
3 Cottons damp 20% §
f
Settings Back <-
Language Deutsch
English §
FC A
If a fault is found in a language that has already been
selected the following message will appear:
§
Data fault
Function restricted
Language defect
f
A message will flash in the display if there is a
problem either before starting a programme or once it
has started:
If any of the following messages still appear after five
re-starts of the machine the following general fault
message will appear:
§
System fault
Call the Service Department
if restart does not work.
f
The display remains dark.
There is no power to the machine.
^ Check the mains switch and the on-site fuses.
§
Fan fault
Programme stopped. Press the start
button. Motor overheating.
f
^ Allow the motor to cool down.
§
Machine fault
Call the Service Department
if restart does not work.
f
^ Call the Service Department.
m
Drive motor fault
Programme stopped. Press Start.
Motor overheated due to overloading.
f
^
Allow the motor to cool down.
Problem solving guide
25

y
Power cut
Programme stop
Press the start button.
f
^
The programme can be continued by pressing the
"Start" button.
§
Heating system fault
Programme stopped. Press the start button.
Programme will run without heating
f
^ To continue the programme without heating press
the h "Start" button.
Call the Service Department.
§
Heating system fault
Call the Service Department
if restart does not work.
f
^ Call the Service Department.
§
Pressure monitor fault
Call the Service Department
if restart does not work
f
^ If the programme still will not start please call the
Service Department.
§
Gas system fault
Call the Service Department
if restart does not work.
f
If this message appears after a programme has been
started:
^
Open the gas tap and then press the "Start" button.
If this message appears during a programme the
pressure in the gas supply has dropped because of
other gas heated appliances operating at the same
time.
^
Press the "Start" button.
^
If the programme still will not start please call the
Service Department.
§
Card fault
Card incorrectly inserted in card reader.
A
^
Insert the card the right way round in the card
reader.
After sales service
In the event of any faults please contact your Dealer
or the nearest Service Department.
When contacting your Dealer or the Service
Department, please quote the Model, Serial number
(SN) and Material number (M.Nr) of your machine.
These are shown on the data plate.
This is visible above the door aperture or at the back
of the machine.
Please let the Service Department know any error
message that has appeared in the display.
Should you require spare parts ensure that you only
use genuine original Miele Spare Parts (and
remember to let the Spare Parts
Department know the model, serial number and
material number of your machine).
Problem solving guide
26

Fluff filter
,
Do not use the machine without the fluff filter in
place. Fire risk.
A damaged fluff filter must be replaced before the
machine is used again.
Otherwise fluff and lint will cause a blockage in the
airways, the heating and the vent ducting, and the
correct functioning of the machine cannot be
assured.
The fluff filter collects any fluff and lint from the
laundry. It should be cleaned at least once a day and
whenever a reminder to clean it appears in the
display.
If there is a large amount of fluff and lint, the filter will
need frequent cleaning.
The fluff filter must not be removed. When cleaning it,
do so with care and make sure it does not get
damaged.
^ Open the fluff compartment flap.
^ Wipe the fluff off the filter by hand. Never use
pointed or sharp edged objects to do this.
Tumble dryer
Before any cleaning or maintenance switch the dryer
off at the on-site mains switch.
With gas heated dryers the gas connection must also
be switched off, both at the mains and at the
machine. With steam heated dryers the steam supply
cut-off valve must be closed.
,
Do not use a pressure washer or hose to clean
the machine.
^
The housing, control panel and any plastic
components should be cleaned using a suitable
mild cleaning agent, applied with a soft damp
cloth. Rub dry with a soft cloth after cleaning.
^
If starched laundry has been dried, the drum
should be wiped out with a damp cloth afterwards.
Do not clean the machine with abrasive cleaning
agents.
After cleaning, check the seals for any damage and
make sure the door and fluff compartment flap shut
correctly.
The ventilation inlet to the dryer is located at the
back of the machine. It must not be blocked or
hindered in any way. Do not cover the machine lid
with cloths or similar items.
The area surrounding the machine, in particular
around the air inlet, must be kept free of dust and fluff
at all times. If taken into the dryer, they can cause
faults with the machine.
The following should be checked and cleaned once
a year by a Miele authorised service technician:
– The burners and burner compartment on
gas-heated dryers, the heaters and heater shaft on
electric-heated dryers.
– The entire interior of the dryer
– The fins on the exhaust fan
,
To ensure the correct performance of the
machine and to prevent the risk of faults and fire, it
is important to check the machine and carry out
maintenance on a regular basis.
Cleaning and care
27

Read the instructions supplied before installing
and using it for the first time.
This machine must be installed and commissioned in
strict accordance with local and national safety and
building regulations by a suitably qualified engineer.
In the UK, gas heated tumble dryers must only be
installed by a Gas Safe registered engineer.
The tumble dryer must only be operated in a room
with sufficient ventilation.
Do not install the tumble dryer in a room where there
is a risk of frost occurring.
,
The machine must not be transported without
its transport pallet in position.
Once the dryer reaches its final location, use a
suitable lifting mechanism to lift the dryer off its
transport pallet.
To ensure suitable access for future maintenance and
service work, please ensure that the minimum
distances between the dryer and the wall specified
on the installation diagram are strictly observed.
PT 825X / 833X / 840X PT 850X / 880X
x 1400 mm 1640 mm
y 906 mm 1206 mm
z 852 / 1035 / 1164 mm 1018 / 1384 mm
Installation and connection
28

Levelling the machine
The dryer does not require a plinth. However, make
sure that any uneven areas of the floor are made
level.
The dryer must be perfectly level to ensure that it
functions correctly.
The screw feet A can be adjusted to align it.
After aligning correctly you will need to use a
screwdriver to secure discs B to the floor plate.
Installation on a raised plinth
The dryer can be installed on a raised concrete
plinth.
,
If the machine is installed on an on-site plinth,
it must be secured using the fixing brackets
supplied. Otherwise there is the danger of the
machine moving and falling off the plinth.
^ Secure the front feet of the dryer with the clamps
supplied.
Reducing the noise level
The dryer is fitted with an exhaust fan which can be
heard during operation.
If this noise disturbs you it is possible to fit a silencer
(available from Miele as an optional accessory) into
the dryer's exhaust duct (see "Installation
instructions).
Coin mechanism
The dryer can be fitted with a coin mechanism.*
A suitable adapter* is required for this. The machine
has to be reprogrammed by a Miele authorised
service technician.
Empty the coin box every day. This prevents too
many coins or tokens collecting in the coin box,
which could lead to the machine breaking down.
* available from your Miele Dealer or the Miele Spare
Parts Department.
Communication module XKM RS232
The dryer can fitted with a communication module
which enables it to be linked to a PC via a serial
interface.
The slot for the communication module is located on
the rear of the machine.
An editor programme is available from Miele.
Installation and connection
29

Electrical connection
The electrical components of this machine comply
with IEC 335-1 and IEC 335-2-11.
Electrical connection may only be carried out by a
suitably qualified technician in strict accordance with
local and national safety regulations (BS 7671 in the
UK).
Please observe the wiring diagram supplied.
Please ensure that the voltage and frequency of the
machine as quoted on the data plate comply with the
on-site supply.
Connection should be made via a suitable isolator
which complies with local and national safety
regulations and which is easily accessible for
disconnecting the machine from the electricity
supply. Provision must be made on site to switch off
all poles. Switches with a minimum all-pole contact
gap greater than 3 mm are suitable for isolating the
machine. These include circuit breakers, fuses and
relays (IEC/EN 60947).
If the machine is isolated from the electrical supply
adequate measures must be taken to ensure that the
machine cannot be reconnected to the electrical
supply until all work has been carried out.
After the machine has been connected to the
electricity supply check the phase rotation on the
incoming power supply to the machine.
Equipotential bonding
Equipotential bonding must be carried out if required.
Air inlet and exhaust connection
This tumble dryer must only be used when it is
connected to a suitable ducting system. The
installation site must be adequately ventilated.
See the installation instructions supplied.
Steam connection
Steam connection must only be carried out by an
authorised installer.
See the installation instructions supplied.
A steam valve and condensate trap are available to
order from your Miele Dealer or the Miele Spare Parts
Department.
Hot water connection
Connection to the hot water supply must only be
carried out by an authorised installer.
See the installation instructions supplied.
If required a stopcock must be fitted on-site.
Gas connection
This work must be carried out by an authorised
person in accordance with local and national safety
regulations. This must be a Gas Safe registered
technician in the UK. See the installation instructions
supplied.
,
The earth lead (N) and phase conductor (L)
must be connected to the correct connectors.
Take care not to connect them incorrectly.
The gas group to which the dryer has been set at the
factory is given on the Gas Data label on the rear of
the machine.
If the machine is converted for a different gas group,
or to liquid gas, a conversion kit is required. This is
available from the the Miele Spare Parts Department.
When ordering please quote the model and serial
number of the machine, as well as the gas type,
group and connection pressure in the country of
installation.
Please follow the installation instructions carefully. To
ensure safety, any conversion work must only be
carried out by an authorised technician, e.g. Gas
Safe registered in the UK.
,
Do not attempt to repair or work on gas-heated
machines yourself. Repairs must only be carried
out by an authorised technician to ensure safety.
In the event of a fault please contact the Miele
Service Department.
,
After setting up and connecting the dryer,
ensure that all outer casing parts are correctly
fitted back into position.
Installation and connection
30

PT 825X EL/G PT 833X EL/G/D PT 840X EL/G/D PT 850X EL/G/D PT 880X EL/G/D
Height in mm 1400 1400 1400 1640 1640
Width in mm 906 906 906 1206 1206
Depth in mm 852 1035 1164 1018 1384
Depth with door open in
mm
1456 1639 1768 1622 1988
Weight in kg 148/149.5 164.5/167.5/201 190.5/188.5/215.5 238/238.5/265 286/280/318
Drum volume in l 250 325 400 500 800
Max. capacity in kg
(dry laundry)
13 16 20 25 40
Voltage See data plate
Connected load See data plate
Fuse rating See data plate
Test certificates
awarded
See data plate
Max. load bearing
in operation in N
1636/1651 1857/1886/2250 2136/2143/2408 2703/2708/2968 3394/3335/3708
Product safety standard IEC 335-1, IEC 335-2-11
Emission sound
pressure level in
dB (A), EN ISO 11204
<70
Sound power level in
dB (A), EN ISO 9614-2
<80
Technical data
31

1 Machine type
2 Serial number
3 Article number
4 Material number
5 Voltage/Frequency
6 Control fuse
7 Drive motor
8 Drum data
9 Drum diameter/Drum depth
10 Spin speed
11 Drum volume/Laundry dry weight
12 Kinetic energy
13 Run-up time
14 Braking time
15 Heating
16 Indentification/Year of manufacture
17 Commissioning date
18 Electric heating
19 Fuse rating (on-site)
20 Indirect steam heating
21 Direct steam heating
22 Gas heating
23 Area for test certification labels
Explanation of symbols on the data plate
32
a
bopq
c
drs
e
ft
g
u
i
hj v
k
lw
m
n

1.Sort the laundry
Not all textiles are suitable for machine drying. Please read the instructions given on the
garment care label.
q = Dry at normal temperature
r = Dry at low temperature
s = Do not tumble dry
^
Sort the laundry according to fibre type and weave
2.Switch the machine on and load the drum
^
Press the "On" button I in
^
Open the drum door and load the laundry
3.Select a programme using the rotary selector
Standard programmes: 1 Cottons extra dry 0 %
2 Cottons dry 0 %
3 Cottons damp 20 %
4 Cottons damp 25 %
5 Cottons damp 40 %
6 Minimum iron dry 0 %
7 Minimum iron damp 10 %
8 Minimum iron damp 20 %
9 Woollens 5 min.
10 Delicates 20%
11 Timed drying cold air 15 min.
12 Timed drying hot air 20 min.
13 Proofing
14 Outerwear
4.Press the start button and the programme selected will commence
5.A buzzer will sound at the end of the programme
^
Open the drum door and unload the laundry
6.If no more laundry is to be processed:
^
Close the drum door
^
Then switch the dryer off using the 0 "Off" switch
^
Check the fluff / lint filter and clean if necessary.
Abbreviated operating instructions PT 8257 / 8337 / 8407 / 8507 / 8807
33
2 Cottons dry
Programme finished
Anti-crease Ready at 12:35
m FC Kf

34

35

Alteration rights reserved/4812
M.-Nr. 07 713 432 / 02
!
"#$
%&'%
()*+) "
$,-.).))++
/0,-.).)(1.+
&23
45%+*..
!)67
/8#9)&3
:,)+))*.*(
4,222";#
<,;=";#
$
.$65
>)*)?744
6"+*.
:,-.(.1(/0,-.(.1(.
<,;=#6
4,2226
@$A
.$$#*
$B0.**)
:,@)A+1()))/0,@)A+1()(
<,;=#C
4,222#C
8""#
$B0*1+
%$9935
6.DB;;#&.*.)
%E
:,-1**+***/0,-1**++(
<,;=4,222
/##5
8E6B0BF*:?
$;:,)+*(.(..)+
<,";=#9
4,222";#9
8$
8&))(.(+
8&.))(.(+
E$9%!0;G4+)
:,))1*
4,222";#
<,;=";#
@6A:6
/&+H5
'6I%#
)))*)6$5
:,-+..(1())/0,-+..(1(
<,;=#4,222#
*D/*)$#
?6:5
2766
:,@+(A.)/0,@+(A.))
<,9=#9
!"#
4$!
/""
$&'
&2%))(
:,)*.)))))/0,)*.))))
<,##=4,222
$
4
)*#8!
2"%E*
:,@)A*.)1)/0,@)A*.)11
<,;=4,222
$

Gebruiksaanwijzing
Droogautomaten
PT 8257
PT 8337
PT 8407
PT 8507
PT 8807
Lees beslist de gebruiksaanwijzing voordat u het apparaat
plaatst, installeert en in gebruik neemt.
Dat is veiliger voor uzelf en u voorkomt onnodige schade aan het apparaat.
M.-Nr. 07 713 432
nl-NL

2

Veiligheidsinstructies en waarschuwingen ......................................................4
Een bijdrage aan de bescherming van het milieu .................................................7
Algemeen..................................................................................8
Algemeen..................................................................................9
Functie van de bedieningselementen .............................................................9
Drogen ...................................................................................11
Voorbereiding ..............................................................................11
Drogen ...................................................................................12
Vóór het eerste gebruik ......................................................................12
Machine inschakelen en vullen.................................................................12
Programma kiezen ..........................................................................13
Drogen met kaarten / muntautomaat ..........................................................16
Partijen wasgoed ...........................................................................16
Drogen met de muntautomaten C 4060 / C 4065 / C 4070 .........................................16
Extra functies .............................................................................17
Starttijd/-datum .............................................................................17
Programmastop ............................................................................18
Programma afbreken ........................................................................18
Programma versneld doorlopen ................................................................18
Programma-informatie .......................................................................18
Programma-overzicht .......................................................................19
Basisprogramma's ..........................................................................19
Dekbedden ................................................................................21
Mops en pads..............................................................................21
Brandweer ................................................................................22
Textielreiniging .............................................................................22
Optionele modules .........................................................................24
Gebruiksgegevens ..........................................................................24
Piekbelastingsschakelaar .....................................................................26
Nuttige tips ...............................................................................27
Foutmeldingen .............................................................................27
Service ...................................................................................28
Reiniging en onderhoud.....................................................................29
Pluizenzeef ................................................................................29
Plaatsen en aansluiten ......................................................................30
Stellen ....................................................................................31
Sokkelopstelling ............................................................................31
Muntautomaat ..............................................................................31
Communicatiemodule XKM RS232..............................................................31
Elektrische aansluiting .......................................................................32
Luchttoevoer / luchtafvoer ....................................................................32
Stoomaansluiting ...........................................................................32
Aansluiting op heet water .....................................................................32
Gasaansluiting .............................................................................32
Technische gegevens.......................................................................33
Betekenis van de symbolen op het typeplaatje ..................................................34
Verkorte gebruiksaanwijzing PT 8257 / 8337 / 8407 / 8507 / 8807....................................35
Inhoud
3

Toelichting op de veiligheidsinstructies
en waarschuwingen op de automaat
Lees de gebruiksaanwijzing.
Lees de aanwijzingen, bijvoorbeeld een
installatie-instructie.
Waarschuwing! Hete oppervlakken.
Waarschuwing! Spanning tot 1000 Volt.
Aarde
Lees eerst de gebruiksaanwijzing voordat u het
apparaat in gebruik neemt. Dat is veiliger voor
uzelf en u voorkomt schade aan het apparaat.
Als andere personen worden geïnstrueerd om het
apparaat te bedienen, moeten zij toegang hebben
tot deze gebruiksaanwijzing en moeten zij op de
hoogte zijn van deze veiligheidsinstructies.
Verantwoord gebruik
~
Deze droogautomaat mag alleen worden gebruikt
voor wasgoed dat volgens het wasetiket geschikt is
voor machinaal drogen en dat met water is gewas-
sen.
~
Onderstaand wasgoed is niet geschikt voor
deze automaat in verband met brandgevaar (behal-
ve als het bij een speciaal programma wordt ge-
noemd):
– wasgoed dat voor een groot deel bestaat uit
(schuim-) rubberen of rubberachtige stukken.
– wasgoed dat in aanraking is geweest met brand-
bare reinigingsmiddelen (bijvoorbeeld wasbenzi-
ne).
– kledingstukken die in aanraking zijn geweest met
haarversteviger, haarspray, nagellakremover of
soortgelijke producten.
–
wasgoed met olie-, vet- of vergelijkbare verontreini
-
gingen (zoals keukentextiel en wasgoed met cos
-
meticaresten).
–
wasgoed met resten van bijvoorbeeld was of che
-
micaliën (zoals mops en reinigingsdoekjes).
–
beschadigd wasgoed met een vulling (zoals kus
-
sens of jassen).
–
wasgoed dat niet voldoende is gereinigd en dat
met vetten of oliën verontreinigd is. Behandel ern
-
stig verontreinigd textiel (zoals werkkleding) met
speciale wasmiddelen. Neem hiervoor contact op
met uw wasmiddelenleverancier.
Bij bepaalde textielsoorten bestaat gevaar van
zelfontbranding. Haal de droogautomaat dan ook
meteen leeg als het programma afgelopen is of bij
een stroomstoring.
Plaats een brandblusser in de nabijheid van de auto-
maat.
~
Haal het wasgoed niet vóór afloop van het droog-
programma, dus niet zonder afkoelfase, uit de auto-
maat.
Wasgoed kan door zelfontbranding brand veroorza-
ken als het heet wordt opgeslagen of verpakt.
~
Haal alle zakken van de kleding leeg, zodat geen
ontvlambare voorwerpen (aanstekers, lucifers, kaar-
sen, cosmetica, etc.) in de automaat komen.
~
Als de droogautomaat in een vrij toegankelijke
ruimte staat opgesteld, moet de exploitant veiligstel-
len dat de automaat zonder risico kan worden ge-
bruikt.
Technische veiligheid
~
Alleen Miele of een geautoriseerde vakhandelaar
mag de automaat plaatsen en in gebruik nemen.
~
De elektrische veiligheid van het apparaat is al-
leen dan gewaarborgd als het wordt aangesloten op
een volgens de voorschriften geïnstalleerd aardings-
systeem. Het is belangrijk dat u dit controleert en in
geval van twijfel de huisinstallatie door een vakman
laat controleren. De fabrikant kan niet aansprakelijk
worden gesteld voor schade die is ontstaan door een
ontbrekende of beschadigde aarddraad.
~
Er staat alleen dan geen spanning op het appa-
raat als de stekker uit de contactdoos is getrokken,
dan wel als de hoofdschakelaar of de zekering van
de huisinstallatie is uitgeschakeld.
~
Reparaties aan elektrische apparaten en gasap-
paraten mogen uitsluitend door vakmensen worden
uitgevoerd. Ondeskundig uitgevoerde reparaties le-
veren gevaar op voor de gebruiker.
~
Defecte onderdelen mogen alleen door originele
Miele-onderdelen worden vervangen. Alleen van die
onderdelen kan worden gegarandeerd dat zij vol-
doen aan de veiligheidseisen die Miele stelt.
Veiligheidsinstructies en waarschuwingen
4

~
Plaats de droogautomaat niet in één ruimte met
reinigingsautomaten waarin oplosmiddelen worden
gebruikt die CFK's bevatten. Door de vrijkomende
dampen kan zoutzuur ontstaan dat schade kan ver
-
oorzaken aan het wasgoed en de automaat. Bij plaat
-
sing in gescheiden ruimtes mag geen luchtuitwisse
-
ling plaatsvinden.
~
Zorg voor de toevoer van schone, frisse lucht. De
lucht mag geen chloor-, fluor- of andere oplosmiddel-
dampen bevatten.
~
Aan de achterkant van de machine bevindt zich
de opening voor de luchttoevoer van de droogauto-
maat. Deze opening mag nooit worden afgesloten.
Leg dan ook geen dekens of doeken op het machine-
deksel.
~
Bewaar en gebruik in de buurt van de automaat
geen benzine, petroleum of andere licht ontvlambare
stoffen. Er bestaat brand- en explosiegevaar!
~
Als het apparaat niet tijdig en volgens de voor-
schriften wordt onderhouden, kunnen de prestaties
van de automaat afnemen. Bovendien kunnen er
functiestoringen optreden en kunnen er brandgevaar-
lijke situaties ontstaan.
Gebruik
~
De droogautomaat mag alleen worden gebruikt,
als de leiding voor de luchtafvoer aangesloten is en
de ruimte voldoende wordt geventileerd.
~
Dit apparaat mag alleen worden gebruikt door
personen die in staat zijn het apparaat veilig te be-
dienen en die volledig op de hoogte zijn van de in-
houd van de gebruiksaanwijzing!
~
Zorg dat kinderen nooit in, op of in de buurt van
de automaat spelen of deze zelfs bedienen.
~
Sluit de deur nadat u de droogautomaat heeft ge-
bruikt. Zo voorkomt u dat:
– kinderen zich in de automaat opsluiten of voor-
werpen erin verstoppen.
– kleine dieren in de automaat opgesloten raken.
~
Wanneer de bedieningselementen of de isolatie
van de aansluitkabels beschadigd zijn, mag het ap-
paraat niet worden gebruikt totdat het is gerepareerd.
~
De veiligheidsvoorzieningen en de bedieningsele-
menten mogen niet worden beschadigd of verwij-
derd.
~
Gebruik het apparaat alleen wanneer alle afneem-
bare delen van de ommanteling gemonteerd zijn, zo-
dat men niet in aanraking kan komen met onderdelen
die onder spanning staan of draaien.
~
Tijdens het drogen ontstaan hoge temperaturen.
Hierdoor worden het kijkglas en de rand van de deur
heet. Ook de was is heet als u deze voortijdig uit de
automaat haalt.
~
De onderdelen van de stoomtoevoer (afhankelijk
van het model) mogen niet worden aangeraakt. U
kunt zich eraan branden.
~
Wacht tot de trommel stilstaat voordat u de was uit
de automaat haalt. Grijp nooit in een nog draaiende
trommel.
~
U kunt zich verwonden aan de scharnieren van de
deur en aan de klep van de pluizenzeef. Gebruik al-
tijd de daarvoor bestemde grepen.
~
U moet de deur van de automaat helemaal kun-
nen openen. Deuren of bouwkundige situaties mogen
hierop geen invloed hebben.
~
Gebruik de droogautomaat nooit zonder de in-
gebouwde pluizenzeef. Brandgevaar!
Een beschadigde zeef moet onmiddellijk worden ver-
vangen.
De pluizen verstoppen anders de luchtwegen, de
verwarming en de afvoerbuis.
De correcte werking van de droogautomaat is dan
niet meer gewaarborgd.
~
Desinfectie- en reinigingsmiddelen bevatten vaak
chloorhoudende verbindingen. Wanneer dergelijke
middelen op een roestvrijstalen oppervlak opdrogen,
kunnen chloriden ontstaan. Deze tasten het roestvrije
staal aan en veroorzaken roest. U beschermt het
roestvrije staal het best tegen roestvorming als u voor
het wassen/desinfecteren en voor het reinigen van de
roestvrijstalen oppervlakken middelen gebruikt die
geen chloor bevatten.
Neem bij twijfel contact op met de fabrikant van het
middel. Wanneer chloorhoudende middelen per on-
geluk op roestvrij staal terechtkomen, verwijder deze
dan met water. Wrijf het oppervlak daarna met een
doek droog.
~
Voor de reiniging van het apparaat mag geen ho-
gedrukreiniger of waterstraal worden gebruikt.
Veiligheidsinstructies en waarschuwingen
5

Gasverwarmde droogautomaten
~
Sluit bij een storing en bij reinigings- of onder
-
houdswerkzaamheden de gaskraan bij het apparaat
en de hoofdkraan bij de gasmeter.
~
Let op! Voor beëindiging van de werkzaamheden
bij ingebruikneming, onderhoud, ombouw of repara
-
ties moeten alle gasleidingen en onderdelen waar
gas door stroomt, van de gaskraan tot de inspuiter,
op lekkage worden gecontroleerd.
Let met name op de meetaansluitingen bij de gasklep
en de brander.
Controleer als de brander is ingeschakeld en als de
brander is uitgeschakeld.
Veiligheidsmaatregelen bij gaslucht
– Doof onmiddellijk alle vlammen!
– Open onmiddellijk alle ramen en deuren!
– Sluit onmiddellijk de gaskranen bij de gasmeter of
de hoofdkraan!
– Betreed ruimtes waar u een gaslucht waarneemt
nooit met onafgeschermd licht!
– Steek geen lucifers of aanstekers aan!
– Niet roken!
– Veroorzaak geen elektrische vonken, bijvoorbeeld
door stekkers uit het stopcontact te trekken of door
elektrische schakelaars of bellen te gebruiken.
– Sluit de gaskraan die ter plaatse voor de droogau-
tomaat is aangebracht.
– Wanneer u de oorzaak van de gaslucht niet kunt
vaststellen terwijl alle gaskranen gesloten zijn,
moet u het plaatselijke gasbedrijf waarschuwen.
Gebruik van toebehoren
~
Toebehoren mogen alleen worden aan- of inge
-
bouwd, als ze uitdrukkelijk door Miele zijn vrijgege
-
ven. Als andere onderdelen worden aan- of inge
-
bouwd, kan Miele niet voor de gevolgen instaan en
kan geen beroep worden gedaan op bepalingen met
betrekking tot de garantie en de productaansprake
-
lijkheid.
Het afdanken van het apparaat
~
Wanneer u uw oude droogautomaat afdankt (laat
afvoeren), maak dan eerst het deurslot onbruikbaar.
Daarmee voorkomt u dat spelende kinderen zich op-
sluiten en in levensgevaar komen.
Bewaar deze gebruiksaanwijzing zorgvuldig!
Veiligheidsinstructies en waarschuwingen
6

Het verpakkingsmateriaal
De verpakking beschermt het apparaat tegen trans
-
portschade. Het verpakkingsmateriaal is uitgekozen
met het oog op een zo gering mogelijke belasting van
het milieu en de mogelijkheden voor recycling.
Hergebruik van het verpakkingsmateriaal remt de af
-
valproductie en het gebruik van grondstoffen. Vaak
neemt de leverancier de verpakking terug. Als u de
verpakking zelf wegdoet, informeer dan bij de reini-
gingsdienst van uw gemeente waar u die kunt af-
geven.
,
Houd verpakkingsmaterialen (zoals folies en
plastic zakken) bij kinderen vandaan. Verstikkings-
gevaar!
Het afdanken van het apparaat
Oude elektrische en elektronische apparaten bevat-
ten meestal nog waardevolle materialen. Ze bevatten
echter ook schadelijke stoffen die nodig zijn geweest
om de apparaten goed en veilig te laten functioneren.
Wanneer u uw oude apparaat bij het gewone afval
doet of er op een andere manier niet goed mee om-
gaat, kunnen deze stoffen schadelijk zijn voor de ge-
zondheid en het milieu.
Het apparaat moet volgens de daarvoor geldende
voorschriften worden verwijderd.
Neem zo nodig contact op met Miele of met de vak-
handelaar.
Het afgedankte apparaat moet tot die tijd buiten het
bereik van kinderen worden opgeslagen. Hierover
vindt u meer informatie in het hoofdstuk "Veiligheids-
instructies en waarschuwingen".
Tips om energie te besparen
Centrifugeer de was in de wasautomaat met het
maximale centrifugetoerental. Dit bespaart veel tijd
en energie tijdens het drogen.
Als u de was tijdens het laatste spoelen in de wasau
-
tomaat met warm water spoelt, zal de was minder
restvocht bevatten en al warm zijn. De verwerkingstijd
neemt hierdoor af, wat een aanzienlijke energiebe
-
sparing oplevert.
Sorteer het wasgoed:
- op vezel-/weefselsoort,
- op de gewenste droogtegraad,
- op restvochtigheid.
Maak zoveel mogelijk gebruik van de maximale bela
-
dingscapaciteit. Bij een te lege trommel is het ener
-
gieverbruik relatief hoog. Een te volle trommel beïn
-
vloedt het droogresultaat en leidt tot onnodige slijta
-
ge.
Zorg voor voldoende ventilatie in de ruimte waar de
automaat staat opgesteld.
Een bijdrage aan de bescherming van het milieu
7

a Noodschakelaar
Gebruik de noodschakelaar alleen in noodgevallen.
Als het probleem is verholpen, ontgrendelt u de scha-
kelaar weer door de schijf met de kartelrand naar
rechts te draaien.
Gebruik de noodschakelaar niet als u de machine
gewoon wilt uitschakelen!
b Bedieningspaneel
c Deur
Trek aan de deurgreep om de deur te openen.
d Klep pluizenzeef
Trek aan de greep om de klep te openen.
e Verstelbare machinevoeten (4 stuks)
f Elektrische aansluiting
g Opening luchttoevoer
h Tuit luchtafvoer
i Aarding
j Communicatieschacht
Algemeen
8
f
g
h
j
i
ab
c
d
e

Functie van de bedieningselementen
a Display
1 Witte/bonte was droog + 0%
2 Witte/bonte was droog 0%
3 Witte/bonte was vochtig 20%
FC A
Na het inschakelen, verschijnt kort een welkomst-
scherm en daarna de programmalijst. Het laatst ge-
kozen programma is gemarkeerd.
b Functietoetsen
De zes toetsen onder het display zijn de functietoet-
sen. Afhankelijk van de machinestatus worden hier-
aan bepaalde functies toegewezen.
De functies verschijnen in het display boven de
toetsen en worden gemarkeerd als u op de betreffen-
de toets drukt.
Bij herprogrammering op "Toetsendefinitie direct"
kunt u de eerste 6 programma's van de programma-
lijst rechtstreeks via de functietoetsen1-6kiezen.
c Starttoets
De ringverlichting knippert als u een gekozen pro-
gramma kunt starten. Als u op de knop drukt, wordt
het programma gestart. Als u na de start van een pro-
gramma op de knop drukt, wordt de displayinhoud
weergegeven, zoals die voor de programmastart
was.
d Optische interface PC
Met speciale software kunnen gegevens worden uit-
gewisseld tussen de besturing en een PC (en omge-
keerd). De aansluiting geschiedt via de optische in-
terface aan de voorkant van het bedieningspaneel.
e Programmaschakelaar (duo-knop)
Door aan de ring van de knop te draaien, kunt u dis-
playkeuzevelden of invoervelden kiezen. Als u op het
binnenste gedeelte van de knop drukt, kunt u een
displaykeuzeveld of een invoerveld voor verandering
vrijgeven of na verandering bevestigen.
f Kaartlezer
Is de machine voor kaartgebruik geprogrammeerd, dan
kan men alleen de droogprogramma's kiezen die op die
kaart staan.
De kaart moet in pijlrichting worden ingestoken.
g I Aan-schakelaar
Met deze schakelaar wordt de machine ingescha-
keld.
h 0 Uit-schakelaar
Met deze schakelaar wordt de machine uitgescha-
keld.
Algemeen
9

Functietoetsen
fStop/Einde
De rechter functietoets wordt na de programmastart
als stoptoets gebruikt.
Als u op de toets drukt, wordt het gekozen program
-
ma gestopt of een gestopt programma beëindigd.
[ Blok plus
Met deze toets wordt het betreffende programmablok
(bijvoorbeeld voordrogen) aan het programma toege-
voegd.
FC Functies
Als u op deze toets drukt, kunt u tijdelijk naar een an-
dere taal overschakelen.
mStarttijd/-datum
Als u vóór de programmastart op deze toets drukt,
verschijnt in het display de melding dat u een starttijd
kunt kiezen.
K Informatie
Als u op deze toets drukt, verschijnt in het display
programma-informatie.
ü Versneld doorlopen
Met deze toets kunt u het lopende programma ver-
sneld doorlopen of programmablokken herhalen.
A Terug
Met deze toets gaat u terug naar het vorige display.
e/- Aanwijzing dat er een volgende of voorafgaande
regel is.
S Opslaan
Zie het programmeerhandboek.
$ Programma vergrendeld
Als een vergrendeld programma gestart is, kan het
na één minuut niet meer met de einde-toets worden
gestopt of afgebroken.
% Programma ontgrendeld
\ Gebruiksgegevens
Datatransfer
Kaart exploitant
Op deze kaart staan nog geen programma's.
Voor de datatransfer van de besturing naar de kaart
en omgekeerd zie het programmeerhandboek.
De kaart heeft geheugenruimte voor maximaal 30
programma's met elk 6 blokken.
De achterkant van de kaart kan worden beschreven.
Algemeen
10

Voorbereiding
Niet alle textielsoorten mogen in een droogauto
-
maat worden gedroogd. Houdt u zich aan de aan
-
wijzingen van de fabrikant op het wasetiket.
Betekenis van de symbolen:
q = drogen op normale temperatuur
r = drogen op lage temperatuur
s= niet geschikt voor droogautomaten
Sorteer het wasgoed op vezel- en weefselsoort. U be-
reikt zo een gelijkmatig droogresultaat en voorkomt
beschadigingen aan het textiel.
,
Onderstaand wasgoed is niet geschikt voor
deze automaat in verband met brandgevaar (be-
halve als het bij een speciaal programma wordt
genoemd):
- wasgoed dat voor een groot deel bestaat uit
(schuim-) rubberen of rubberachtige stukken.
- wasgoed dat in aanraking is geweest met brand-
bare reinigingsmiddelen (bijvoorbeeld wasbenzi-
ne).
- kledingstukken die in aanraking zijn geweest met
haarversteviger, haarspray, nagellakremover of
soortgelijke producten.
- wasgoed met olie-, vet- of vergelijkbare verontrei-
nigingen (zoals keukentextiel en wasgoed met
cosmeticaresten).
- wasgoed met resten van bijvoorbeeld was of
chemicaliën (zoals mops en reinigingsdoekjes).
- beschadigd wasgoed met een vulling (zoals kus-
sens of jassen).
- wasgoed dat niet voldoende is gereinigd en dat
met vetten of oliën verontreinigd is. Behandel ern-
stig verontreinigd textiel (zoals werkkleding) met
speciale wasmiddelen. Neem hiervoor contact op
met uw wasmiddelenleverancier.
De volgende textielsoorten kunnen beter niet wor-
den gedroogd:
Textielsoorten van wol/wolmengweefsels kunnen
gaan vervilten. Gebruik voor dergelijke textielsoorten
alleen het programma "Wol".
Zuiver linnen kan in de droogautomaat ruw worden.
Neem daarom de aanwijzingen van de fabrikant in
acht.
Belangrijke aanwijzingen voor het drogen:
Grote metalen delen (gespen, haken, oogjes, sluitin
-
gen van ritsen, etc.) moeten voor het drogen in een
doek worden gewikkeld. Zo voorkomt u schade aan
de droogtrommel (krassen en deuken).
Bij wasgoed met een gesloten metalen rits bestaat
het gevaar dat de elektrodes bij de trommelribben
worden overbrugd. Dit kan tot gevolg hebben dat het
droogproces niet of te laat wordt beëindigd. Droog
dergelijk wasgoed alleen met geopende ritssluiting.
Machinaal gebreid textiel (zoals tricot) kan krimpen.
Intensief drogen kan dit effect versterken. Gebruik
voor dergelijk wasgoed daarom niet het programma
"Witte/bonte was droog plus".
Gesteven wasgoed kan in een droogautomaat wor-
den gedroogd. De juiste vochtigheid (restvochtwaar-
de) voor het strijken of mangelen bereikt u door een
geschikt programma te kiezen.
Sorteer het wasgoed op de gewenste droogtegraad.
U hoeft niet op grootte te sorteren.
Knoop dekbedovertrekken en kussenslopen dicht,
zodat er tijdens het drogen geen klein wasgoed in
komt.
Maak zoveel mogelijk gebruik van de maximale bela-
dingscapaciteit. Een te lege trommel is onecono-
misch. Een te volle trommel beïnvloedt het droogre-
sultaat en veroorzaakt onnodige slijtage.
Als u de was tijdens het laatste spoelen in de wasau-
tomaat met warm water spoelt, zal de was minder
restvocht bevatten en al warm zijn. De verwerkingstijd
neemt hierdoor af, wat een aanzienlijke energiebe-
sparing oplevert.
Drogen
11

De droogautomaat mag alleen door Miele worden
geplaatst en in gebruik genomen.
Vóór het eerste gebruik
Reinig de binnenkant van de trommel met een
zachte, droge doek, voordat u wasgoed in de droog-
automaat doet.
Machine inschakelen en vullen
^ Open alle kranen (voor gas c.q. stoom).
^ Schakel de hoofdschakelaar (ter plaatse) in.
^ Druk op de schakelaar "I Aan".
Er verschijnt een welkomstmelding
Miele
PROFESSIONAL
PT 8xx7
Welkom
en vervolgens de programmalijst (het laatst gekozen
programma is gemarkeerd).
1 Witte/bonte was droog + 0%
2 Witte/bonte was droog 0%
3 Witte/bonte was vochtig 20%
FC A
Kies met de programmaschakelaar een programma.
^
Open de deur.
^
Vul het wasgoed in de automaat.
De gesorteerde was moet losjes in de trommel lig
-
gen.
Er mogen geen doseerbollen en dergelijke tussen
het wasgoed zitten!
Vulgewicht (droge was)
PT 8257 PT 8337 PT 8407 PT 8507 PT 8807
Trommelinhoud in liters
250 325 400 500 800
1, 2, 3, 4, 5 Witte/bonte was
10-13 kg 13*-16
kg
16*-20
kg
20*-25
kg
32*-40
kg
6, 7, 8 Kreukherstellend
5kg 6,6kg 8kg 10kg 16kg
9 Wol
4 kg 5,2 kg 6,4 kg 8 kg 12,8 kg
10 Fijn/synthetisch
2 kg 2,6 kg 3,2 kg 4 kg 6,4 kg
11, 12 Tijdprogramma
10-13 kg 13*-16
kg
16*-20
kg
20*-25
kg
32*-40
kg
13, 14 Impregneren, Outdoor
5-6,6 kg 6,6-9 kg 8-11 kg 10-13 kg 16-20 kg
* Heetwaterdroger
Voorkom dat wasgoed klem raakt als u de deur
sluit. Het wasgoed kan anders beschadigd raken.
^ Sluit de deur.
Drogen
12

Programma kiezen
De droogautomaat heeft een elektronisch sensorsys
-
teem dat het vochtgehalte van de was continu be
-
waakt.
Als de ingestelde droogtegraad bereikt is, wordt het
wasgoed afgekoeld en het droogproces automatisch
beëindigd.
Afhankelijk van de textielsoort en de gewenste ver-
dere behandeling kunt u verschillende programma's
kiezen.
Basisprogramma's:
– voor het drogen van katoen/linnen
1 Witte/bonte was droog + 0 %
2 Witte/bonte was droog 0 %
3 Witte/bonte was vochtig 20 %
4 Witte/bonte was vochtig 25%
5 Witte/bonte was vochtig 40 %
– voor het drogen van synthetische stoffen/meng-
weefsels
6 Kreukherstellend droog 0 %
7 Kreukherstellend vochtig 10 %
8 Kreukherstellend vochtig 20 %
9 Fijne was 20 %
10 Wol 5 min.
– voor het luchten van wasgoed
11 Tijdprogramma koud 15 min.
– voor het drogen van geringe washoeveelheden
en het nadrogen van losse stukken wasgoed
12 Tijdprogramma warm 20 min.
1 Witte/bonte was droog + 0%
2 Witte/bonte was droog 0%
3 Witte/bonte was vochtig 20%
FC A
^ Kies met de programmaschakelaar een program-
ma (bijvoorbeeld programma 2 Witte/bonte was
droog).
Extra functie "[ Blok plus" kiezen
(niet bij de standaardprogramma's)
^ Bevestig het gekozen programma door op het bin-
nenste gedeelte van de programmaschakelaar te
drukken.
In het display verschijnt dan (bijvoorbeeld):
22 Witte/bonte was droog 10,0 / 13,0 kg
0 % Drogen 70°C
Afkoelen e
[ m A
^ Indien gewenst, kunt u het programmablok "Voor-
drogen" toevoegen met de functietoets "[ Blok
plus".
Als u op de functietoets "[ Blok plus" drukt, ver-
schijnt in het display:
2 2 Witte/bonte was droog 10,0 / 13,0 kg
24 % Voordrogen
0 % Drogen e
[ m A
Het veld "[" is gemarkeerd.
Als u nogmaals op de toets drukt, wordt de functie
weer uitgezet.
Als geen verdere aanpassingen van het programma
nodig zijn:
^ Druk op de toets "Start" en het droogprogramma
begint.
Drogen
13

Als voor de programmastart nog aanpassingen
nodig zijn (bijvoorbeeld van het vulgewicht, de
temperatuur of de restvochtwaarde), ga dan als
volgt te werk:
^
Bevestig het gekozen programma door op het bin
-
nenste gedeelte van de programmaschakelaar te
drukken.
In het display verschijnt dan (bijvoorbeeld):
2 Witte/bonte was droog 10,0 / 13,0 kg
0 % Drogen 70°C
Afkoelen e
m A
Het maximale vulgewicht verschijnt helemaal rechts
in het display.
Vulgewicht
Voordat u het programma start, kunt u het vulgewicht
handmatig invoeren.
2 Witte/bonte was droog 10,0 13,0 kg
0 % Drogen 70°C
Afkoelen e
m A
^ Kies het invoerveld "Vulgewicht" door aan de pro-
grammaschakelaar te draaien. Bevestig uw keuze
door op de schakelaar te drukken. Wijzig het vulge-
wicht door aan de schakelaar te draaien en druk
erop om de waarde te bevestigen.
U kunt de temperatuur in stappen van 1 °C veran-
deren. U kunt kiezen uit "koud" en uit waarden tussen
30 en 80 °C.
^ Kies het invoerveld "Temperatuur" door aan de pro-
grammaschakelaar te draaien (bijvoorbeeld 70 °C
voor het drogen). Bevestig uw keuze door op de
schakelaar te drukken.
2 Witte/bonte was droog 13,0 kg
0 % Drogen 70°C
Afkoelen e
m A
^ Wijzig de temperatuur door aan de schakelaar te
draaien en druk erop om de waarde te bevestigen.
U kunt de restvochtwaarde van de was in stappen
van 1 % instellen. U kunt kiezen uit een waarde tus-
sen -4 en 40 %.
^
Kies het invoerveld "Restvocht" door aan de pro
-
grammaschakelaar te draaien (bijvoorbeeld 0 %).
Bevestig uw keuze door op de schakelaar te druk
-
ken.
2 Witte/bonte was droog 10,0 kg
0% Drogen 70°C
Afkoelen
m A
^ Wijzig de restvochtwaarde door aan de schakelaar
te draaien en druk erop om de waarde te beves-
tigen.
^ Druk op de toets "Start" en het gekozen programma
wordt gestart.
Na de start wordt het programmaverloop in het dis-
play weergegeven.
2 Witte/bonte was droog
0 % Drogen >40 %{
Afkoelen Einde om 12:35
mKf
In de tweede regel van het display (hier "Drogen")
verschijnen tevens de actuele restvochtwaarde
(>40%) en "{ Elektrische" of "* Gasverwarming inge-
schakeld". In de derde regel verschijnt het volgende
programmablok.
Rechts beneden in het display kunt u zien hoe laat
het programma is afgelopen (12:35).
De weergave van het programma-einde is "zelfle-
rend", daarom moeten voor een nauwkeurige weerga-
ve programma's meermaals zijn gebruikt.
Programma-einde
2 Witte/bonte was droog
Programma-einde
Kreukbeveiliging Einde om 12:35
m FC Kf
Het programma-einde wordt in het display weergege-
ven, de zoemer klinkt en de kreukbeveiliging wordt
geactiveerd. De trommel beweegt met korte tussen-
pozen om kreukvorming te voorkomen.
Wordt het wasgoed na afloop van het programma
niet meteen uit de trommel gehaald, dan kan automa-
tisch een veiligheidsafkoeling plaatsvinden.
^ Open de deur.
^ Haal het wasgoed uit de automaat.
Laat geen was in de trommel achter. Deze stukken
kunnen anders tijdens een volgend droogprogram
-
ma beschadigd raken door te intensieve droging.
,
Haal het wasgoed niet vóór afloop van het
droogprogramma, dus niet zonder afkoelfase, uit
de automaat.
Wasgoed kan door zelfontbranding brand veroor
-
zaken als het heet wordt opgeslagen of verpakt.
Drogen
14

^
Controleer de pluizenzeef en reinig deze eventueel.
Sluit de klep van de pluizenzeef.
2 Witte/bonte was droog
Programma-einde
PLUIZENZEEF CONTROLEREN
A
De displaymelding "Pluizenzeef controleren" ver-
schijnt, als de pluizenzeef moet worden gereinigd.
Reinig de zeef meteen na afloop van het programma.
Als u de machine daarna niet meer gebruikt:
^ Sluit de deur.
^ Druk op de toets "0 Uit" om de droogautomaat uit te
schakelen.
^ Schakel de hoofdschakelaar (ter plaatse) uit.
^ Sluit alle kranen (voor gas c.q. stoom).
Deur openen tijdens een programma
U kunt de deur tijdens een programma openen om
wasgoed toe te voegen of voortijdig eruit te halen.
,
Wacht tot de trommel stilstaat voordat u de
was uit de automaat haalt. Grijp nooit in een nog
draaiende trommel.
2 Witte/bonte was droog
Programmastop
Deur is open. Deur sluiten a.u.b.
FC f
Ga als volgt te werk om het programma voort te zet-
ten:
^ Sluit de deur.
De ventilator kan om veiligheidsredenen automatisch
worden ingeschakeld als de temperatuur in de auto-
maat hoog is.
^ Druk op de toets "Start" en het programma wordt
voortgezet.
Drogen
15

Kaarten waarop een programma staat, zijn op een
bepaald machinetype afgestemd. Onbeschreven
kaarten zijn universeel toepasbaar.
^
Schakel de machine in met de toets "I Aan".
Er verschijnt een welkomstmelding.
^ Voer de kaart in.
In het display verschijnt de programmalijst van de
kaart.
Kaartgebruik
17 Brandweer 45 °C
18 Kreukherstellend 60 °C
FC A
^ Markeer een programma door aan de programma-
schakelaar te draaien. Als u op de knop drukt,
wordt het programma gekozen.
^ Druk op de toets "Start" en het programma begint.
Nadat u op de toets "Start" heeft gedrukt, kunt u de
kaart uit de kaartlezer halen. Na afloop van het pro-
gramma wordt het programma gewist.
,
Steek geen andere voorwerpen dan de kaart
in de kaartgleuf.
Als u de kaart verkeerd heeft ingestoken, verschijnt
de volgende melding in het display:
§
Kaartfout
Kaart verkeerd ingestoken.
A
^ Steek de kaart goed in de kaartlezer.
Als het om een kaart gaat die niet bij dit machinetype
hoort, verschijnt bijvoorbeeld de volgende melding in
het display:
Kaartgebruik
De programma's op de kaart zijn alleen
geschikt voor machinetype PT 8507.
A
^ Plaats een kaart die geschikt is voor dit machinety-
pe.
Partijen wasgoed
Voor partijen wasgoed die met een specifiek pro-
gramma moeten worden gereinigd, kan een kaart
worden gebruikt waarop dat ene programma staat.
Op exploitatieniveau kan deze functie via het menu-
punt "Partij" worden geactiveerd.
De besturing van de machine accepteert dan alleen
nog kaarten voor partijen wasgoed (waarop één pro-
gramma staat). De programma's in de besturing wor-
den genegeerd.
Drogen met de muntautomaten C 4060 /
C 4065 / C 4070
Als de droogautomaat anders dan in de beschreven
volgorde wordt bediend, kan het geld of de waarde-
munt verloren gaan.
A Doe de was in de trommel en sluit de deur.
B Druk op de schakelaar "I Aan".
C Kies het gewenste programma.
D Werp het geld of de waardemunt in.
E Druk op de toets "Start".
Drogen met kaarten / muntautomaat
16

Taalkeuze
Voor de start van een programma, kunt u via het vlag
-
symbool de taal wijzigen.
1 Witte/bonte was droog + 0%
2 Witte/bonte was droog 0%
3 Witte/bonte was vochtig 20%
FC A
Als u op de functietoets FC drukt, verschijnt het vol-
gende display:
Instellingen terug <-
Hoofdmenu Taal
Exploitatieniveau
FC A
^ Bevestig de functie "Taal" door op de programma-
schakelaar te drukken.
Instellingen italiano
Taal F Nederlands
português
FC A
^ Draai aan de programmaschakelaar om de ge-
wenste taal te selecteren. Druk op het binnenste
gedeelte van de knop om uw keuze te bevestigen.
Als men op de functietoets FC drukt, kan het sys-
teem tijdelijk op een andere taal worden ingesteld.
Als de betreffende taal wordt gemarkeerd, wordt de
inhoud van het display meteen in die taal weergege-
ven. Als daarna binnen 5 minuten geen andere
toetsen worden bediend c.q. het programma niet
wordt gestart, schakelt het systeem weer terug naar
de standaard ingestelde taal.
Het systeem schakelt ook 5 minuten na het program-
ma-einde en bij open deur weer terug naar de stan-
daard ingestelde taal.
Starttijd/-datum
Als u aan een programma een starttijd/
-datum wilt toewijzen, kunt u met de functietoets "m
Starttijd/-datum" het gewenste moment instellen.
Starttijd/-datum instellen
Nadat u een programma heeft gekozen, verschijnt in
het display (bijvoorbeeld):
2 Witte/bonte was droog 13,0 kg
0 % Drogen 70°C
Afkoelen e
m A
^
Druk op de toets "m Starttijd/-datum".
In het display verschijnt dan (bijvoorbeeld):
2 Witte/bonte was droog 13,0 kg
Starttijd: 16 : 10 Startdatum: 2.4.2009
Na invoeren starttoets indrukken
m A
In het display verschijnt altijd de actuele tijd en da-
tum. Het invoerveld voor "uren" is gemarkeerd.
^ U selecteert de uren door op de programmascha-
kelaar te drukken.
Door aan de programmaschakelaar te draaien, ver-
andert u de waarde. Druk op de schakelaar om de
ingestelde waarde te bevestigen.
^ Draai aan de programmaschakelaar om het invoer-
veld "minuten" te selecteren. Bevestig uw keuze.
Door aan de programmaschakelaar te draaien, ver-
andert u de waarde. Druk op de schakelaar om de
ingestelde waarde te bevestigen.
^ Draai aan de programmaschakelaar om het invoer-
veld "Startdatum - dag" te selecteren. Bevestig uw
keuze.
Door aan de programmaschakelaar te draaien, ver-
andert u de waarde. Druk op de schakelaar om de
ingestelde waarde te bevestigen.
^ Verander eventueel de maand en het jaar.
Na het instellen van het gewenste tijdstip, gaat u als
volgt te werk:
^ Druk op de toets "Start" en het programma wordt
op het ingestelde tijdstip gestart.
Het display toont de volgende inhoud:
2 Witte/bonte was droog 13,0 kg
0 % Drogen
16:15 -2.4.2009 Start: 6:00-3.4.2009
m A
Op het display verschijnt de actuele tijd en datum en
ook de ingestelde starttijd/
-datum.
^ Als u de deur van de machine nog eens opent,
moet u opnieuw op de toets "Start" drukken.
Starttijd/-datum niet overnemen
Als u opnieuw op de toets "m Starttijd/ -datum" drukt
of op de toets "A terug", worden de veranderingen
niet overgenomen.
Extra functies
17

Programmastop
Als u het programma wilt stopzetten, drukt u op de
toets "f Stop/Einde".
Het programma wordt dan stopgezet.
2 Witte/bonte was droog
Programmastop
Druk op de starttoets.
ü f
Als u het programma wilt voortzetten, drukt u op de
toets "Start".
Programma afbreken
Als u het programma wilt afbreken, drukt u twee keer
achtereen op de toets "f Stop/Einde".
Programma versneld doorlopen
U kunt het lopende programma versneld doorlopen
(doorbladeren) of programmablokken herhalen.
^ Druk op de toets "f Stop/Einde". Het programma
wordt stopgezet.
2 Witte/bonte was droog
Programmastop
Druk op de starttoets.
ü f
^ Als u op de toets "ü Versneld doorlopen" drukt,
verschijnt in het display het actuele bereik of het
actuele blok.
Zie ook het programmeerhandboek onder "Pro-
grammastructuur".
Versneld doorlopen -> 2 Witte/bonte was droog
Programmastop
Bereik 1: Drogen e
S A
Bereik 1: Drogen
Blok 1: Drogen
-
S A
^
Draai aan de programmaschakelaar om "Bereik" te
selecteren. Bevestig uw keuze door op de knop te
drukken. Kies en bevestig het bereik: "1 Drogen" of
"2 Afkoelen".
^
Draai aan de programmaschakelaar om "Blok" te
selecteren. Bevestig uw keuze door op de knop te
drukken. Kies en bevestig het blok: "Drogen 1-10"
of "Afkoelen 1-10".
^
Druk op de toets "S Opslaan" en vervolgens op
"Start". De functie "Versneld doorlopen" wordt nu
uitgevoerd.
Als u op de toets "A terug" drukt, springt het sys
-
teem naar programmastop en wordt de functie
"Versneld doorlopen" niet uitgevoerd.
Programma-informatie
Als u tijdens een programma op de toets "K Informa-
tie" drukt, verschijnt in het display meer informatie
over het droogprogramma, bijvoorbeeld:
2 Witte/bonte was droog
Startdatum: 10.7.2009
Starttijd: 9:47 e
m K f
Tijd na start: 0h 23 min
Resttijd: 0h 11min
Progr.-einde: 10: 21 uur e
Bereik: 1 Drogen
Blok: 1 Drogen
Actuele temp. luchtafvoer: 59 °C e
Ingest. temp. luchtafvoer: 74 °C
Piekbelasting: nee
Kreukbeveiliging: 3s./87s./60min e
2 Witte/bonte was droog
Klep recirculatie/luchtafvoer: Recircul. -
Blokeindesignaal: ja
A
^ Met de toets "A terug" gaat u terug naar het pro-
grammaverloop.
Extra functies
18

Basisprogramma's
Programma Textielsoort Max. belading (kg,
droge was)
1 Witte/bonte was droog + 0 %
(Kastdroog+) 74°C
Katoenen/linnen wasgoed dat uit meerdere lagen be
-
staat of zeer dik is en bij "Witte/bonte was droog" niet
helemaal droog wordt.
PT 8257 10-13
PT 8337 13-16
PT 8407 16-20
PT 8507 20-25
PT 8807 32-40
2 Witte/bonte was droog 0 %
(Kastdroog) 74°C
Katoenen/linnen wasgoed dat uit een of meerdere la-
gen bestaat.
3 Witte/bonte was vochtig 20 %
(Mangeldroog) 74°C
Katoenen/linnen wasgoed dat aansluitend wordt ge-
mangeld.
4 Witte/bonte was vochtig 25%
(Mangeldroog) 74°C
5 Witte/bonte was vochtig 40 %
(Mangeldroog) 74°C
6 Kreukherstellend droog 0 %
(Kastdroog) 60°C
Kreukherstellend wasgoed van synthetische stoffen,
katoen of mengweefsels dat kastdroog moet worden
of dat aansluitend moet worden gemangeld.
PT 8257 5,0 kg
PT 8337 6,6 kg
PT 8407 8,0 kg
PT 8507 10 kg
PT 8807 16 kg
7 Kreukherstellend vochtig 10 %
(Mangeldroog) 60°C
8 Kreukherstellend vochtig 20 %
(Mangeldroog) 60°C
9 Wol
(5 min.) 74°C
Voordrogen van wol. PT 8257 4
PT 8337 5,2
PT 8407 6,4
PT 8507 8
PT 8807 12,8
10 Fijne was 20 %
40°C
Kwetsbaar textiel van synthetische stoffen, katoen of
mengweefsels.
PT 8257 2
PT 8337 2,6
PT 8407 3,2
PT 8507 4
PT 8807 6,4
11 Tijdprogramma koud
(15 min.)
Wasgoed dat alleen hoeft te worden gelucht.
PT 8257 10-13
PT 8337 13-16
PT 8407 16-20
PT 8507 20-25
PT 8807 32-40
12 Tijdprogramma warm
(20 min.) 74°C
Voor het drogen van geringe washoeveelheden en
voor het nadrogen van losse stukken wasgoed.
Programma-overzicht
19

Programma Textielsoort Max. belading (kg,
droge was)
13 Impregneren
(Kastdroog) 60°C
Textielsoorten die machinaal mogen worden gedroogd,
zoals wasgoed van microvezels, ski- en outdoor-kleding,
fijne, dichte katoensoorten (popelin) en tafelkleden.
PT 8257 5 - 6,6
PT 8337 6,6 - 9
PT 8407 8 - 11
PT 8507 10 - 13
PT 8807 16 - 20
Dit programma omvat een extra fixatiefase voor de impregnering.
Geïmpregneerd textiel mag alleen zijn behandeld met impregneermiddel dat geschikt is
voor membraantextiel. Deze middelen bestaan uit fluorchemische verbindingen.
Brandgevaar! Droog geen textiel dat met paraffinehoudende middelen is geïmpregneerd!
14 Outdoor
60°C
Outdoor-kleding van materiaal dat machinaal mag wor-
den gedroogd.
De temperatuurwaarde heeft betrekking op de temperatuur van de luchtafvoer.
Programma-overzicht
20

Dekbedden
Programma Textielsoort Max. belading (kg, droge was)
Dekbedden (dons) Veren en donzen dekbedden en kussens. PT 8257 1 dekbed of 2 kussens (10)
PT 8337 3 kussens of (13)
1 kussen + 1 dekbed
PT 8407 4 kussens of (16)
2 kussens + 1 dekbed of
2 dekbedden
PT 8507 5 kussens of (20)
3 kussens + 1 dekbed of
2 dekbedden
PT 8807 8 kussens of (32)
3 kussens + 3 dekbedden of
4 dekbedden
De genoemde aantallen zijn afhankelijk
van de grootte en de dikte van het bed-
dengoed.
74°C, drogen tot 0% restvocht, nadrogen, afkoelen.
Dekbedden (synthetisch) Synthetische dekbedden en kussens.
74°C, drogen tot 0% restvocht, nadrogen, afkoelen.
Dekbedden (natuurhaar) Natuurhaardekbedden en dekens.
74°C, drogen 3 min., afkoelen.
Dekbedden met natuurhaarvulling mogen niet volledig in een droogau-
tomaat worden gedroogd. Het materiaal kan anders vervilten. Droog
deze dekbedden alleen gedeeltelijk.
Mops en pads
,
Er bestaat brandgevaar als het wasgoed onvoldoende gereinigd is en bijvoorbeeld nog veel was en che-
micaliën bevat!
Was ernstig verontreinigd wasgoed grondig. Gebruik voldoende wasmiddel en kies een hoge temperatuur. Bij
twijfel moet u het wasgoed meermaals wassen.
Programma Textielsoort Max. belading (kg,
droge was)
Mops Katoenen mops PT 8257 10
PT 8337 13
PT 8407 16
PT 8507 20
PT 8807 32
74°C, drogen tot 0% restvocht, afkoelen.
Microvezelmops Mops van microvezels
60°C, drogen tot 0% restvocht, afkoelen.
Reinigingsdoeken Doeken van microvezels, stofdoeken PT 8257 5,6
PT 8337 7
PT 8407 8,6
PT 8507 11
PT 8807 17,6
60°C, drogen tot 0% restvocht, afkoelen.
De temperatuurwaarde heeft betrekking op de temperatuur van de luchtafvoer.
Programma-overzicht
21

Brandweer
Programma Textielsoort Max. belading (kg, droge was)
Veiligheidsmaskers Maskers met
hoofdriempjes
Max. houders / maskers
PT 8257 4 8
PT 8337 4 12
PT 8407 4 16
PT 8507 4 12
PT 8807 4 16
50°C, drogen 45 min., afkoelen.
Maskers mag u alleen in de automaat drogen als u deze met speciale
houders (bij te bestellen) in de trommel vastzet.
Beschermende kle-
ding
Pakken (bijvoorbeeld Nomex
®
-brandweerpak-
ken), overalls, jassen, broeken
PT 8257 ca.1-2pakken
(1 jas + 2 broeken of 2 jassen)
PT 8337 ca. 2 pakken (of 3 jassen)
PT 8407 ca. 3 pakken
PT 8507 ca.3-4pakken
PT 8807 ca. 6 pakken
PT 8257 5 - 6,6 kg
PT 8337 6,6 - 9 kg
PT 8407 8 - 10 kg
PT 8507 10 - 13 kg
PT 8807 16 - 20 kg
74°C, drogen tot 0% restvocht, nadrogen, afkoelen.
Voor een optimaal droogresultaat moet u de producten binnenstebuiten
keren.
Bescherm. kled. impr. Textielsoorten die met impregneermiddel zijn be-
handeld
74°C, drogen tot 0% restvocht, nadrogen, afkoelen.
Geïmpregneerd textiel mag alleen zijn behandeld met impregneermiddel
dat geschikt is voor membraantextiel. Deze middelen bestaan uit fluor-
chemische verbindingen.
Brandgevaar! Droog geen textiel dat met paraffinehoudende middelen is
geïmpregneerd!
Textielreiniging
Programma Textielsoort Max. belading (kg,
droge was)
WetCare sensitive Niet wasbare bovenkleding PT 8257 ca.4-5
PT 8337 ca.5-6,6
PT 8407 ca. 6,6 - 8
PT 8507 ca.8-10
PT 8807 ca. 16 - 21
60°C, losschudden 3 min., afkoelen.
WetCare zijde Niet wasbare, kreukgevoelige bovenkleding PT 8257 ca.4-5
PT 8337 ca.5-6,6
PT 8407 ca. 6,6 - 8
PT 8507 ca.8-10
PT 8807 ca. 13 - 16
60°C, drogen tot 15% restvocht, afkoelen.
WetCare intensive Wasbare bovenkleding PT 8257 ca.5-6,6
PT 8337 ca. 6,6 - 9
PT 8407 ca.8-11
PT 8507 ca. 10 - 13
PT 8807 ca. 16 - 21
74°C, drogen tot 0% restvocht, afkoelen.
De temperatuurwaarde heeft betrekking op de temperatuur van de luchtafvoer.
Programma-overzicht
22

Manege
,
Om het wasgoed en de trommel te beschermen, moet u metalen gespen, ogen, haken en dergelijke verwij
-
deren. Als dat niet mogelijk is, moet u deze delen met geschikte zakken afdekken (niet bijgeleverd).
Programma Textielsoort Max. belading (kg,
droge was)
Paardendekens Paardendekens, zadeldekken, beenwindsels, bandages, textiel-
halsters PT 8257 10
PT 8337 13
PT 8407 16
PT 8507 20
PT 8807 32
60°C, drogen tot 0% restvocht, nadrogen, afkoelen.
Dekens wol Paardendekens met hoog wolgehalte
74°C, drogen 5 min., afkoelen.
De temperatuurwaarde heeft betrekking op de temperatuur van de luchtafvoer.
Type
Belading (stuks)
Zadeldekken Zomerdekens Winterdekens
PT 8257 7 2 1
PT 8337 9 2 - 3 1 - 2
PT 8407 11 2 - 3 1 - 2
PT 8507 12 3 2
PT 8807 18 4 - 5 3
Programma-overzicht
23

Gebruiksgegevens
Met de module "Gebruiksgegevens" kunnen met de
toets "\ Gebruiksgegevens", voor of na een pro
-
gramma, gebruiksgegevens worden gelezen of ge
-
wist.
1 Witte/bonte was droog + 0%
2 Witte/bonte was droog 0%
3 Witte/bonte was vochtig 20%
\FCA
Als u op de toets \ drukt, verschijnt het volgende
display:
Module gebruiksgegev.
Alle gegevens
Programmagegevens e
\ A
Keuzemogelijkheden:
– Alle gegevens
Bij "Alle gegevens" worden de gegevens van alle pro-
gramma's verzameld en berekend.
– Programmagegevens
Bij de programmagegevens gaat het om de gege-
vens die tijdens een programma worden geregi-
streerd.
– Gegevens wissen:
- Module ("Alle gegevens" en "Programmagegevens"
wissen)
- Alle gegevens (alleen "Alle gegevens" wissen)
- Programmagegevens (alleen "Programmagegevens"
wissen)
U kunt de functie weer uitzetten door opnieuw op de
toets "\ Gebruiksgegevens" te drukken.
Als het geheugen van de module "Gebruiksgege-
vens" vol is, verschijnt na het indrukken van de toets
"Start" de melding dat gebruiksgegevens worden
overschreven.
Als u op de toets "A terug" drukt of binnen 30 se-
conden niet op de toets "Start", wordt het programma
niet gestart en verschijnt het display zoals dat voor
de programmastart was.
Alle gegevens
Module gebruiksgegev.
Alle gegevens
Programmagegevens e
\ A
Nadat "Alle gegevens" is gekozen, verschijnt bijvoor-
beeld het volgende display:
Module gebruiksgegev. ~ Alle gegevens
Totale inschakeltijd: 200.987 h
Bedrijfsuren: 123456 h e
\ A
Andere keuzemogelijkheden:
Totale inschakeltijd: 200.987 h
Bedrijfsuren: 123.456 h
Actieftijd verwarming: 73.456 h
Actieftijd aandrijfmotor: 93.456 h
Programmastarts: 23.456
Programmastops: 567
Programma-afbrekingen: 67
Washoeveelheid: 1.234.567 kg
Energie: 12.345.678 kWh
Optionele modules
24

Programmagegevens
Module gebruiksgegev.
Programmagegevens
Gegevens wissen e
\ A
Nadat "Programmagegevens" is gekozen, verschijnt
bijvoorbeeld het volgende display:
Module gebruiksgegev. ~ Programmagegevens
1 Witte/bonte was droog + 0 %
2 Witte/bonte was droog 0 % e
\ A
Kies uit de programmalijst het betreffende program-
ma. Als u op de programmaschakelaar drukt, ver-
schijnt eerst een lijst van alle programmastarts van
"Programma 1 Witte/bonte was droog +" met datum
en starttijd.
Programmagegevens ~ 1 Witte/bonte was droog +
Datum: 21.05.2009 Starttijd: 11:30
Datum: 21.05.2009 Starttijd: 12:30 e
\ A
Kies uit de lijst van alle programmastarts van "Pro-
gramma 1 Witte/bonte was droog +" de gewenste
programmastart en bevestig uw keuze door op de
schakelaar te drukken.
Programmagegevens ~ 1 Witte/bonte was droog +
Datum: 21.05.2009 Starttijd: 11:30
Naam: Mulder e
\ A
Andere keuzemogelijkheden:
Plaats: Lehrte
Serienummer: 12345678
Machinetype: PT 8337
Washoeveelheid: 13 kg
Toets +: ingedrukt
Programmastart: 11:30
Programma-einde: 12:05
Totale bedrijfsduur:0h35min
Elektrische energie: 12,5 kWh
Gasenergie: 0 kWh
Stoomenergie: 0 kWh
Programmawijziging: 2
(na het kiezen met en het indruk
-
ken van de programmaschakelaar worden alleen de laatste
3 stops en 3 starts weergegeven)
Programmafout: geen (alleen de laatste 3 fouten worden
opgeslagen)
Bereik 1: Drogen
Blok 1: Voordrogen
Procesfunctie: Restvocht
Proceswaarde: 15%
Actuele restvochtwaarde: 15%
Looptijd: 6 min.
Max. temperatuur luchtafvoer: 72 °C
Max. temp. luchttoevoer: 122 °C
Bereik 1: Drogen
Blok 2: Drogen
Procesfunctie: Restvocht
Proceswaarde: 0 %
Actuele restvochtwaarde: 0 %
Looptijd: 6 min.
Max. temperatuur luchtafvoer: 78 °C
Max. temp. luchttoevoer: 138 °C
Bereik 2: Afkoelen
Blok: Afkoelen
Procesfunctie: Afkoelen
Proceswaarde: 50 %
Actuele temperatuur: 50 °C
Looptijd: 3 min.
Max. temperatuur luchtafvoer: 52 °C
Max. temp. luchttoevoer: 95 °C
Restvocht: -3 %
Optionele modules
25

Gegevens wissen
Module gebruiksgegev.
Programmagegevens
Gegevens wissen e
[ A
Na het kiezen van het menupunt "Gegevens wissen"
verschijnt het volgende display:
Module gebruiksgegev. ~ Gegevens wissen
Module: 21.02.2009
Alle gegevens: 12.07.2009 e
[ A
Via het menupunt "Module" worden "Alle gegevens"
en de "Programmagegevens" uit de gebruiksgege-
vens gewist.
Via het menupunt "Alle gegevens" worden alleen die
gegevens gewist en via het menupunt "Programma-
gegevens" alleen de programmagegevens.
Nadat u een menupunt heeft gekozen en op de pro-
grammaschakelaar heeft gedrukt, verschijnt het ver-
zoek het password in te voeren.
Password:____
ABCDEFGHIJKLMNOPQRSTUVWXYZ
0123456789
KSA
Na het invoeren van het password of het insteken van
de kaart voor het exploitatieniveau komt u in het be-
treffende menu. Voor de veiligheid verschijnt een ex-
tra melding:
Gebruiksgegevens werkelijk wissen?
S A
Nadat u op de toets "S Opslaan" heeft gedrukt, wor-
den de gegevens gewist.
Piekbelastingsschakelaar
Als de piekbelastingsschakelaar reageert, wordt de
verwarming uitgeschakeld en het programma stopge
-
zet. In het display verschijnt de volgende melding:
1 Witte/bonte was droog +
Programmastop door piekbelastingsschakelaar
Programma wordt automatisch voortgezet.
ü f
Als de piekbelasting voorbij is, wordt het programma
automatisch voortgezet.
Als u de deur opent, terwijl de piekbelastingsfunctie
actief is, moet het programma opnieuw worden ge-
start.
Optionele modules
26

Foutmeldingen
,
Reparaties aan elektrisch, gas- en stoomver
-
warmde apparaten mogen uitsluitend door vak
-
mensen worden uitgevoerd. Ondeskundig uitge
-
voerde reparaties kunnen gevaar opleveren voor
de gebruiker.
Telkens na het indrukken van de "Aan"-toets of als
men terugspringt naar de programmalijst voert de be-
sturing een systeemanalyse uit. Alle modules en bij-
behorende sensoren, de gegevens van het bestu-
ringssysteem, de droogprogramma's en de talen wor-
den gecontroleerd.
Mocht de besturing een fout in een programma of
taal vaststellen, dan wordt dit met het symbool §
aangegeven en kan de betreffende functie niet meer
worden gekozen.
1 Witte/bonte was droog + 0%
2 Witte/bonte was droog 0%
3 Witte/bonte was vochtig 20% §
f
Instellingen terug <-
Taal Deutsch
English §
FC A
Treedt er een storing op bij een reeds gekozen taal,
dan verschijnt de volgende foutmelding.
§
Datafout
Beperkte functie.
Taal defect.
f
Als er voor of na de start van een programma sto
-
ringen optreden, worden deze knipperend in het dis
-
play weergegeven.
Als de hierna genoemde foutmeldingen na vijf keer
herstarten niet zijn verdwenen, verschijnt de volgen
-
de algemene foutmelding:
§
Systeemfout
Bel Miele als het probleem na het onder
-
breken van de spanning niet is verholpen.
f
Het display blijft donker.
De droogautomaat heeft geen stroom.
^ Controleer de stekker, de hoofdschakelaar en de
zekeringen (ter plaatse).
§
Fout ventilatormotor
Programmastop! Druk op de starttoets.
Motortemperatuur te hoog.
f
^ Laat de motor afkoelen.
§
Machinefout
Bel Miele als het probleem na het onder-
breken van de spanning niet is verholpen.
f
^ Neem contact op met Miele.
m
Fout aandrijving
Programmastop! Druk op de starttoets.
Motor door overbelading te warm.
f
^
Laat de motor afkoelen.
Nuttige tips
27

y
Spanningsonderbreking
Programmastop
Druk op de starttoets.
f
^
U kunt het programma met de toets "Start" voortzet
-
ten.
§
Fout verwarming
Programmastop! Druk op de starttoets.
Programma alleen zonder verwarming.
f
^ Als u op de toets "Start" drukt, wordt het program-
ma zonder verwarming voortgezet.
Neem contact op met Miele.
§
Fout verwarming
Neem contact op met Miele als na een
herstart het probleem niet is verholpen.
f
^ Neem contact op met Miele.
§
Fout drukschakelaar
Neem contact op met Miele als na een
herstart het probleem niet is verholpen.
f
^ Neem contact op met Miele, als het probleem met
de herstart niet is verholpen.
§
Fout gassysteem
Neem contact op met Miele als na een
herstart het probleem niet is verholpen.
f
Verschijnt de foutmelding na de start van het pro-
gramma, ga dan als volgt te werk:
^
Open de gaskraan en druk op de toets "Start".
Als de foutmelding midden in een programma ver
-
schijnt, is de gasdruk gedaald, bijvoorbeeld omdat
andere gasapparaten zijn ingeschakeld.
^
Druk op de toets "Start".
^
Neem contact op met Miele, als het probleem met
de herstart niet is verholpen.
§
Kaartfout
Kaart verkeerd ingestoken.
A
^ Steek de kaart goed in de kaartlezer.
Service
Neem bij storingen contact op met Miele.
Voor een goede en vlotte afhandeling is het noodza-
kelijk dat Miele weet welk model u heeft en welk se-
rienummer (SN) en onderdeelnummer (M.-Nr.) het
heeft.
Beide gegevens vindt u op de typeplaatjes:
bij geopende deur boven de deur, of boven aan de
achterkant van de machine.
Geef ook de foutmelding in het display door aan
Miele.
Gebruik uitsluitend originele Miele-onderdelen als
onderdelen moeten worden vervangen. Geef ook
hierbij het model, het serienummer (SN) en het onder-
deelnummer (M.-Nr.) aan Miele door.
Nuttige tips
28

Pluizenzeef
,
Gebruik de droogautomaat nooit zonder de in
-
gebouwde pluizenzeef. Brandgevaar!
Een beschadigde zeef moet onmiddellijk worden
vervangen.
De pluizen verstoppen anders de luchtwegen, de
verwarming en de afvoerbuis.
De correcte werking van de droogautomaat is dan
niet meer gewaarborgd.
De pluizenzeef moet eens per dag worden gereinigd
en als de melding "Pluizenzeef controleren" in het dis-
play verschijnt.
Als er veel pluisvorming optreedt, moet u de pluizen-
zeef meermaals per dag reinigen.
De pluizenzeef mag niet worden verwijderd. De zeef
mag niet beschadigd raken.
^ Open de klep van de pluizenzeef.
^ Verwijder de pluizen handmatig. Gebruik geen spit-
se of scherpe voorwerpen.
Droogautomaat
Schakel de droogautomaat met de hoofdschakelaar
(ter plaatse) uit, voordat reinigings- of onderhouds-
werkzaamheden worden uitgevoerd.
Bij gasverwarmde droogautomaten moeten tevens de
gaskraan bij de automaat en de gaskraan bij de gas-
meter worden dichtgedraaid. Bij stoomverwarmde
automaten moet de stoomkraan worden dichtge
-
draaid.
,
Voor de reiniging van het apparaat mag geen
hogedrukreiniger of waterstraal worden gebruikt.
^
Reinig de ommanteling, het bedieningspaneel en de
kunststof delen alleen met een mild reinigingsmiddel
of met een zachte, vochtige doek. Wrijf de delen ver
-
volgens weer droog.
^
Als u gesteven wasgoed heeft gedroogd, raden wij
u aan de trommel met een zachte, vochtige doek af
te wissen.
Reinig de droogautomaat nooit met een schuur-
middel.
Controleer de afdichting en de sluiting van de deur
en de klep van de pluizenzeef.
Aan de achterkant van de machine bevindt zich de
opening voor de luchttoevoer van de droogauto-
maat. Deze opening mag nooit worden afgesloten.
Leg dan ook geen dekens of doeken op het machine-
deksel.
De omgeving van de automaat, met name het ge-
deelte bij de opening voor de luchttoevoer, moet plui-
zenvrij worden gehouden, zodat deze niet kunnen
worden aangezogen. Pluizen zetten zich vast in de
automaat en kunnen functiestoringen tot gevolg heb-
ben.
Laat Miele de volgende delen eens per jaar op afge-
zette pluizen controleren en, indien nodig, reinigen:
– De brander en de branderruimte (bij gasverwar-
ming), het verwarmingsregister en de verwar-
mingsschacht (bij elektrische verwarming).
– De gehele binnenruimte van de droogautomaat.
– De schoepen van de ventilator voor de luchtafvoer.
,
Als het apparaat niet tijdig en volgens de voor-
schriften wordt onderhouden, kunnen de presta-
ties van de automaat afnemen. Bovendien kunnen
er functiestoringen optreden en kunnen er brand-
gevaarlijke situaties ontstaan.
Reiniging en onderhoud
29

Alleen Miele of een geautoriseerde vakhandelaar
mag de automaat plaatsen en in gebruik nemen.
Dit apparaat moet volgens de geldende voorschriften
worden geïnstalleerd en mag uitsluitend in een ruimte
worden gebruikt die voldoende wordt geventileerd.
Lees de betreffende handleidingen voordat het appa
-
raat wordt geïnstalleerd en gebruikt.
Plaats de automaat in een vorstvrije ruimte.
,
De automaat mag niet zonder transportpallet
worden getransporteerd.
Haal de automaat op de plaats van opstelling alleen
met een geschikt hefsysteem van de transportpallet.
Om latere onderhoudswerkzaamheden door Miele
eenvoudiger te maken, dient u rekening te houden
met de aangegeven minimale afmetingen en met de
afstand tot de wand.
PT 825X / 833X / 840X PT 850X / 880X
x 1400 mm 1640 mm
y 906 mm 1206 mm
z 852 / 1035 / 1164 mm 1018 / 1384 mm
Plaatsen en aansluiten
30

Stellen
De automaat hoeft niet op een speciale ondergrond
te worden geplaatst. Oneffenheden moeten wel wor
-
den gecompenseerd.
De droogautomaat moet waterpas staan. Alleen dan
kan de automaat goed functioneren.
Stel de automaat met behulp van de stelvoeten A.
Na het stellen moeten de schijven B met een schroe-
vendraaier worden vastgedraaid (tegen de bodem-
plaat van het apparaat).
Sokkelopstelling
Plaatsing op een betonnen sokkel is mogelijk.
,
Als u de automaat op een aanwezige sokkel
plaatst moet het apparaat met spanstrips worden
vastgezet. De automaat kan anders van de sokkel
vallen.
^ Zet de beide voorste voetjes van de automaat vast
met de bijgeleverde spanstrips.
Vermindering geluidsniveau
De droogautomaat is voorzien van een ventilator voor
de luchtafvoer. De ventilator heeft een bepaald ge
-
luidsniveau.
U kunt het geluidsniveau verminderen door een ge
-
luiddemper op de luchtafvoertuit van de automaat te
plaatsen (zie installatiehandleiding). Een dergelijke
demper is bij Miele verkrijgbaar.
Muntautomaat
De droogautomaat kan van een muntautomaat* wor-
den voorzien.
Hiervoor is een speciale adapter* nodig. De herpro-
grammering van de droogautomaat mag alleen door
Miele of door een Miele-vakhandelaar worden ge-
daan.
Haal de muntautomaat dagelijks leeg. Hiermee voor-
komt u dat de munten zich in de automaat ophopen,
waardoor storingen kunnen ontstaan.
Alle met * aangeduide onderdelen zijn verkrijgbaar bij
de Miele-vakhandel en bij Miele.
Communicatiemodule XKM RS232
Via de communicatiemodule kunt u een PC op de au-
tomaat aansluiten (via een seriële interface).
De schacht voor de communicatiemodule bevindt
zich aan de achterkant van de automaat.
Een geschikt editorprogramma is verkrijgbaar bij
Miele en bij de Miele-vakhandel.
Plaatsen en aansluiten
31

Elektrische aansluiting
De elektrische installatie van de droogautomaat vol
-
doet aan de normen IEC 335-1 en IEC 335-2-11.
Het apparaat mag uitsluitend op een volgens de
voorschriften geïnstalleerde huisinstallatie worden
aangesloten. Dit mag alleen door een erkend elektri
-
cien worden gedaan, met inachtneming van de lan-
delijke voorschriften en de voorschriften van het
plaatselijke energiebedrijf.
Gebruik het bijgevoegde schema.
Vergelijk de aansluitgegevens (spanning en frequen-
tie) op het typeplaatje met de waarden van het elek-
triciteitsnet. Deze gegevens moeten beslist overeen-
komen.
Bij een vaste aansluiting moet het apparaat via een
schakelaar met alle polen van de netspanning kun-
nen worden losgekoppeld. De contactopening in uit-
geschakelde toestand moet minimaal 3 mm bedra-
gen. Geschikt zijn zelf-uitschakelaars, zekeringen en
relais (EN 60335).
De stekkerverbinding of de schakelaar voor het los-
koppelen van de netspanning moet altijd toegankelijk
zijn.
Bij loskoppeling van de netspanning moet het betref-
fende systeem afsluitbaar zijn. Hierop moet op elk
moment controle mogelijk zijn.
Controleer na de aansluiting de draairichting van het
ventilatorrad. Het moet met de wijzers van de klok
mee draaien. Als het ventilatorrad tegen de wijzers
van de klok in draait, moeten twee fasen op de klem
worden gewisseld.
Aarding
Het apparaat moet correct worden geaard (lekstroom
>10 mA).
Luchttoevoer / luchtafvoer
De droogautomaat mag alleen worden gebruikt, als
de leiding voor de luchtafvoer aangesloten is en de
ruimte voldoende wordt geventileerd.
Zie ook de installatiehandleiding.
Stoomaansluiting
De stoomaansluiting mag uitsluitend worden gereali-
seerd door een erkend installateur.
Neem de bijgevoegde installatiehandleiding in acht.
Deze is van belang voor de stoomaansluiting.
De stoomklep en de condensafscheider zijn verkrijg
-
baar bij de Miele-vakhandel en bij Miele.
Aansluiting op heet water
De heetwateraansluiting mag uitsluitend worden ge
-
realiseerd door een erkend installateur.
Neem de bijgevoegde installatiehandleiding in acht.
Deze is van belang voor de heetwateraansluiting.
Indien een afsluitkraan wordt gewenst, dient deze ter
plaatse te worden gemonteerd.
Gasaansluiting
De gasaansluiting mag uitsluitend worden gereali
-
seerd door een erkend installateur, met inachtneming
van alle geldende voorschriften. Zie de bijgevoegde
installatiehandleiding.
,
Sluit de nuldraad (N) en de fasedraad (L) cor-
rect aan. Verwissel de aansluitingen niet!
Vanwege de te geringe doorstroomhoeveelheid is het
bij het aangegeven verwarmingsvermogen niet toe-
gestaan een gascontactdoos te gebruiken.
De gasverwarming is af fabriek ingesteld zoals ver-
meld staat op de machine (zie de sticker op de ach-
terkant van het apparaat).
Voor aansluiting op een andere gassoort kan bij Miele
een ombouwset worden besteld. Vermeld bij de be-
stelling de volgende gegevens: machinetype, machi-
nenummer, gasfamilie, gasgroep, gasaansluitdruk en
land van opstelling.
Neem de installatieaanwijzingen in acht. Deze aan-
passing mag uitsluitend door een erkend vakman
worden uitgevoerd.
,
Voer nooit zelf reparaties uit aan gasver-
warmde machines! Reparaties mogen uitsluitend
door vakmensen worden uitgevoerd. Neem daar-
om altijd contact op met Miele of met een geautori-
seerde vakhandelaar.
,
Nadat de automaat is opgesteld, moeten alle
gedemonteerde delen van de ommanteling weer
worden teruggeplaatst.
Plaatsen en aansluiten
32

PT 825X EL/G PT 833X EL/G/D PT 840X EL/G/D PT 850X EL/G/D PT 880X EL/G/D
Hoogte in mm 1400 1400 1400 1640 1640
Breedte in mm 906 906 906 1206 1206
Diepte in mm 852 1035 1164 1018 1384
Diepte bij geopende
deur in mm
1456 1639 1768 1622 1988
Gewicht in kg 148/149,5 164,5/167,5/201 190,5/188,5/215,5 238/238,5/265 286/280/318
Trommelinhoud in l 250 325 400 500 800
Max. capaciteit in kg
(droge was)
13 16 20 25 40
Aansluitspanning zie typeplaatje
Aansluitwaarde zie typeplaatje
Zekering zie typeplaatje
Keurmerken zie typeplaatje
Max. vloerbelasting in N
als de automaat in wer-
king is
1636/1651 1857/1886/2250 2136/2143/2408 2703/2708/2968 3394/3335/3708
Gehanteerde normen
inzake productveiligheid
IEC 335-1, IEC 335-2-11
Geluidsdruk in
dB (A), EN ISO 11204
<70
Geluidsvermogen in
dB (A), EN ISO 9614-2
<80
Technische gegevens
33

1 Model
2 Serienummer
3 Artikelnummer
4 Materiaalnummer
5 Spanning/frequentie
6 Besturingszekering
7 Aandrijfmotor
8 Trommelgegevens
9 Diameter/diepte trommel
10 Centrifugetoerental
11 Trommelinhoud/gewicht droog wasgoed
12 Kinetische energie
13 Centrifugeertijd (aanlooptijd vanaf 0)
14 Remtijd
15 Verwarming
16 Aanduiding/bouwjaar
17 Datum ingebruikneming
18 Elektrische verwarming
19 Zekering (huisinstallatie)
20 Stoomverwarming, indirect
21 Stoomverwarming, direct
22 Gasverwarming
23 Ruimte voor keurmerken/kenmerken
Betekenis van de symbolen op het typeplaatje
34
a
bopq
c
drs
e
ft
g
u
i
hj v
k
lw
m
n

1.Bereid het wasgoed voor.
Niet alle textielsoorten mogen in een droogautomaat worden gedroogd. Houdt u zich daar-
om aan de aanwijzingen van de fabrikant op het wasetiket.
q = drogen op normale temperatuur
r = drogen op lage temperatuur
s = niet geschikt voor droogautomaten
^
Sorteer de was op vezel- en weefselsoort.
2.Schakel de machine in en doe het wasgoed in de automaat.
^
Druk op de schakelaar "I Aan".
^
Open de deur en doe het wasgoed in de trommel.
3.Kies met de programmaschakelaar een programma.
Standaardprogramma's: 1 Witte/bonte was droog + 0 %
2 Witte/bonte was droog 0 %
3 Witte/bonte was vochtig 20 %
4 Witte/bonte was vochtig 25 %
5 Witte/bonte was vochtig 40 %
6 Kreukherstellend droog 0 %
7 Kreukherstellend vochtig 10 %
8 Kreukherstellend vochtig 20 %
9 Wol 5 min.
10 Fijne was 20%
11 Tijdprogramma koud 15 min.
12 Tijdprogramma warm 20 min.
13 Impregneren
14 Outdoor
4.Druk op de toets "Start" en het gekozen programma wordt gestart.
5.Een zoemer geeft het programma-einde aan.
^
Open de deur en haal het wasgoed uit
de trommel.
6.Als u de machine daarna niet meer gebruikt:
^
Sluit de deur.
^
Schakel de automaat uit met de schakelaar "0 Uit".
^
Controleer de pluizenzeef en reinig deze eventueel.
Verkorte gebruiksaanwijzing PT 8257 / 8337 / 8407 / 8507 / 8807
35
2 Witte/bonte was droog
Programma-einde
Kreukbeveiliging Einde om 12:35
m FC Kf

36

37

Wijzigingen voorbehouden/3412
M.-Nr. 07 713 432 / 02M.-Nr. 07 713 432 / 01
-
 1
1
-
 2
2
-
 3
3
-
 4
4
-
 5
5
-
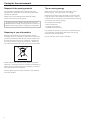 6
6
-
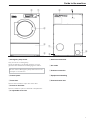 7
7
-
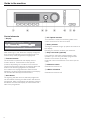 8
8
-
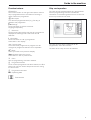 9
9
-
 10
10
-
 11
11
-
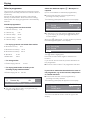 12
12
-
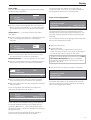 13
13
-
 14
14
-
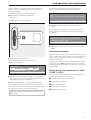 15
15
-
 16
16
-
 17
17
-
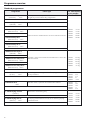 18
18
-
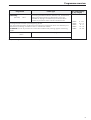 19
19
-
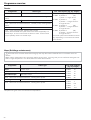 20
20
-
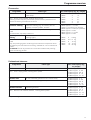 21
21
-
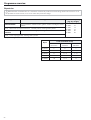 22
22
-
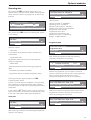 23
23
-
 24
24
-
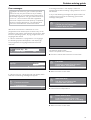 25
25
-
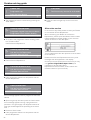 26
26
-
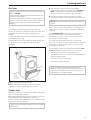 27
27
-
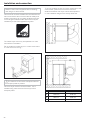 28
28
-
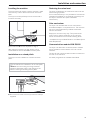 29
29
-
 30
30
-
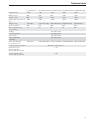 31
31
-
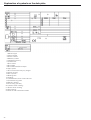 32
32
-
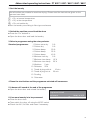 33
33
-
 34
34
-
 35
35
-
 36
36
-
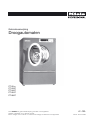 37
37
-
 38
38
-
 39
39
-
 40
40
-
 41
41
-
 42
42
-
 43
43
-
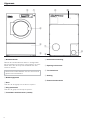 44
44
-
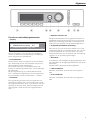 45
45
-
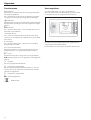 46
46
-
 47
47
-
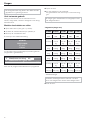 48
48
-
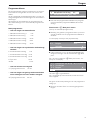 49
49
-
 50
50
-
 51
51
-
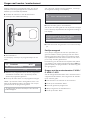 52
52
-
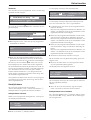 53
53
-
 54
54
-
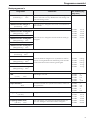 55
55
-
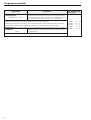 56
56
-
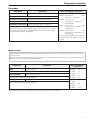 57
57
-
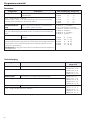 58
58
-
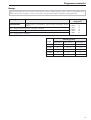 59
59
-
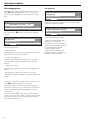 60
60
-
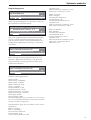 61
61
-
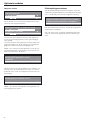 62
62
-
 63
63
-
 64
64
-
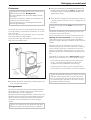 65
65
-
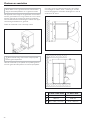 66
66
-
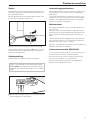 67
67
-
 68
68
-
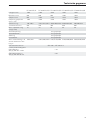 69
69
-
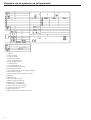 70
70
-
 71
71
-
 72
72
-
 73
73
-
 74
74


in andere talen
- English: Miele PT 8257 Owner's manual
Gerelateerde artikelen
Andere documenten
-
Bosch WTA3500CH/08 de handleiding
-
Brandt EFH303K de handleiding
-
Proline TDVT6 Handleiding
-
Electrolux EDE67550W Handleiding
-
Electrolux EDH97961W Handleiding
-
Aeg-Electrolux T59880 Handleiding
-
-
-
Electrolux EDE77550W Handleiding
-