Electrolux EDE67550W Handleiding
- Categorie
- Wasdrogers
- Type
- Handleiding

gebruiksaanwijzing
user manual
Wasdroger
Tumble Dryer
EDE 67550W

Electrolux. Thinking of you.
Ga voor meer van onze ideeën naar www.electrolux.com
Inhoud
Belangrijke veiligheidsinformatie 2
Productbeschrijving 4
Bedieningspaneel 5
Voordat u de droger in gebruik neemt
5
Wasgoed sorteren en voorbereiden 5
Programmatabel 6
Dagelijks gebruik 8
Reiniging en onderhoud 10
Wat moet u doen als… 11
Machine-instellingen 12
Technische gegevens 13
Installatie 13
Milieu 16
Onderhoud 17
Wijzigingen voorbehouden
Belangrijke veiligheidsinformatie
Belangrijk! In het belang van uw
veiligheid en om een correct gebruik te
kunnen waarborgen is het van belang
dat u, alvorens het apparaat te
installeren en in gebruik te nemen, deze
gebruiksaanwijzing, inclusief de tips en
waarschuwingen, grondig doorleest.
Om onnodige vergissingen en
ongevallen te voorkomen is het
belangrijk ervoor te zorgen dat alle
mensen die het apparaat gebruiken,
volledig bekend zijn met de werking
ervan en de veiligheidsvoorzieningen.
Bewaar deze instructies en zorg ervoor
dat zij bij het apparaat blijven als het
wordt verplaatst of verkocht, zodat
iedereen die het apparaat gedurende
zijn hele levensduur gebruikt, naar
behoren is geïnformeerd over het
gebruik en de veiligheid van het
apparaat.
Algemene veiligheid
• Het is gevaarlijk om de specificaties te wij-
zigen of om te proberen op enigerlei wijze
veranderingen aan te brengen aan dit ap-
paraat.
• Dit apparaat is niet bedoeld voor gebruik
door personen (met inbegrip van kinderen)
met beperkte lichamelijke of verstandelijke
vermogens of een gebrek aan ervaring en
kennis, tenzij dit onder toezicht gebeurt
van een voor hun veiligheid verantwoorde-
lijke persoon of tenzij zij van een dergelijke
persoon instructie hebben ontvangen over
het gebruik van het apparaat.
• Zorg ervoor dat kleine huisdieren niet in de
trommel klimmen. Controleer om dit te
voorkomen de trommel vóór gebruik.
• Voorwerpen als munten, veiligheidsspel-
den, spijkers, schroeven, stenen of andere
harde, scherpe materialen kunnen grote
schade aan het apparaat toebrengen en
mogen niet in het apparaat terechtkomen.
• Om brandgevaar te voorkomen door te
lang drogen, dient het apparaat niet ge-
bruikt te worden om de volgende voor-
werpen te drogen: Kussens, gewatteerde
dekens en dergelijke (deze artikelen zor-
gen voor ophoping van hitte).
• Artikelen van schuimrubber (latexschuim),
douchemutsjes, waterdichte kleding, arti-
kelen met een rubberbinnenkant en kle-
ding of kussens met vulling van schuim-
rubber dienen niet in de droogtrommel te
worden gedroogd.
• Het apparaat dient na gebruik, bij reiniging
en bij onderhoud altijd afgesloten te wor-
den van stroomvoorziening.
• Probeer in geen geval zelf de machine te
repareren. Reparaties die door niet-des-
kundige personen uitgevoerd worden,
kunnen tot schade of letsel leiden. Neem
contact op met een Klantenservice bij u in
de buurt. Vraag altijd om originele vervan-
gingsonderdelen.
2 electrolux

• Artikelen die zijn bevuild met stoffen als
spijsolie, aceton, benzine, petroleum, vlek-
kenverwijderaars terpentine, boenwas en
boenwasverwijderaars dienen alvorens in
de droogtrommel te worden gedroogd, te
worden gewassen in heet water met een
extra hoeveelheid wasmiddel.
• Explosiegevaar: droog nooit voorwerpen
in de wasdroger die in aanraking zijn ge-
weest met ontvlambare oplosmiddelen
(petroleum, spiritus, producten voor che-
mische reiniging en dergelijke). Aangezien
deze bestanddelen vluchtig zijn, kunnen ze
een explosie veroorzaken. Droog alleen
voorwerpen in de wasdroger die met water
gewassen zijn.
• Brandgevaar: voorwerpen die vlekken
bevatten of gedrenkt zijn in plantaardige of
bakolie vormen een gevaar voor brand en
mogen niet in de wasdroger geplaatst
worden.
• Als u uw was met vlekkenverwijderaar
heeft gewassen, moet u een extra spoel-
cyclus uitvoeren voordat u uw was in de
wasdroger laadt.
• Zorg ervoor dat er geen aanstekers of lu-
cifers in de zakken zijn achtergebleven van
kleding die in de wasdroger geladen wordt
Waarschuwing! Stop een wasdroger
nooit voor het einde van een droog-
cyclus, tenzij alle voorwerpen snel
uit de trommel verwijderd en uitge-
hangen worden, zodat de hitte
wordt verdreven. Brandgevaar!
•
Gevaar voor elektrische schokken!
Spuit geen waterstralen op het apparaat.
• Het laatste deel van een droogcyclus vindt
plaats zonder warmte (koelcyclus) om er-
voor te zorgen dat de artikelen uiteindelijk
een temperatuur hebben waarbij is ge-
waarborgd dat de artikelen niet worden
beschadigd.
• Zorg voor een goede ventilatie in de ruimte
waar het apparaat geïnstalleerd is om het
terugstromen van gassen van apparaten in
de ruimte die op andere brandstoffen wer-
ken, zoals open haarden, te voorkomen.
Installatie
• Dit apparaat is zwaar. Wees voorzichtig als
u het apparaat verplaatst.
• Controleer bij het uitpakken van het appa-
raat of dit niet is beschadigd. Gebruik het
apparaat bij twijfel niet en neem contact op
met de Klantenservice.
• Alle verpakkingsmaterialen en transport-
bouten moeten vóór het gebruik worden
verwijderd. Als dit wordt nagelaten kan dit
ernstige schade aan het product en ande-
re eigendommen tot gevolg hebben. Zie
het desbetreffende hoofdstuk in de ge-
bruiksaanwijzing.
• Eventuele voor de installatie van het appa-
raat noodzakelijke elektrotechnische
werkzaamheden, moeten worden uitge-
voerd door een gekwalificeerde elektricien.
• Er moet voor gezorgd worden dat het ap-
paraat niet op het aansluitsnoer komt te
staan.
• Als het apparaat op een tapijtvloer wordt
geplaatst, dient de hoogte van de stelpoo-
tjes te worden aangepast om de lucht toch
goed te kunnen laten circuleren.
• Controleer na de installatie van het appa-
raat dat het niet op het aansluitsnoer of de
toevoerslang staat of drukt.
• Als de wasdroger bovenop een wasma-
chine wordt geplaatst, is het noodzakelijk
de stapelkit te gebruiken (optioneel acces-
soire).
Gebruik
• Dit apparaat is bestemd voor huishoudelijk
gebruik. Het is niet toegestaan het appa-
raat te gebruiken voor andere doeleinden
dan waarvoor het is bestemd.
• Was alleen textiel dat geschikt is voor ma-
chinaal drogen. Volg de instructies op het
wasvoorschrift in de kleding.
• Droog geen ongewassen artikelen in de
wasdroger.
• Doe niet te veel wasgoed in de machine.
Zie het desbetreffende hoofdstuk in de ge-
bruiksaanwijzing.
• Kleding die druipnat is mag niet in de dro-
ger worden geplaatst.
• Kledingstukken die in aanraking zijn ge-
weest met vluchtige aardolieproducten
mogen niet in de wasdroger gedroogd
worden. Als vluchtige reinigingsvloeistof-
fen zijn gebruikt, dient u ervoor te zorgen
dat de vloeistof uit het kledingstuk is ver-
wijderd voordat u het in de machine doet.
electrolux 3

• Trek de stekker nooit aan het snoer uit het
stopcontact; maar aan de stekker zelf.
• Gebruik de wasdroger nooit als het elek-
trische snoer, het bedieningspaneel, het
bovenblad of de sokkel beschadigd zijn,
zodat de binnenkant van de wasmachine
toegankelijk is.
• Wasverzachters of soortgelijke producten
dienen te worden gebruikt zoals gespeci-
ficeerd in de wasverzachterinstructies.
• Let op – heet oppervlak : Raak het op-
pervlak van het dekseltje van de deurver-
lichting niet aan wanneer de verlichting in-
geschakeld is.
1)
•
Heet oppervlak: Raak de achterkant
van het apparaat niet aan wanneer het in
gebruik is!
Veiligheid van kinderen
• Deze machine is niet bedoeld voor gebruik
door jonge kinderen of verstandelijk ge-
handicapten zonder toezicht.
• Kinderen zijn zich vaak niet bewust van de
gevaren die elektrische apparaten met zich
meebrengen. Houd kinderen uit de buurt,
om te voorkomen dat ze met het apparaat
spelen.
• De verpakkingsmaterialen (zoals plasticfo-
lie en polystyreen) kunnen gevaarlijk zijn
voor kinderen - verstikkingsgevaar! Houd
deze materialen buiten het bereik van kin-
deren.
• Berg alle wasmiddelen op een veilige
plaats op, buiten het bereik van kinderen.
• Zorg ervoor dat kinderen of huisdieren niet
in de trommel kunnen klimmen.
Productbeschrijving
1
3
4
2
5
6
7
8
1 Bedieningspaneel
2 Deur
3 Pluisfilter
4 Typeplaatje
5 Verstelbare pootjes
6 Ventilatieopeningen aan de zijkanten/
ventilatieopeningen aan de achterkant
7 Ringmoer
1) Alleen drogers die zijn uitgerust met inwendige trommelverlichting.
4 electrolux

8 Verlichting
Bedieningspaneel
5 4
2 31
1 Programmaknop en "O" (UIT)-schake-
laar
2 Functietoetsen
3 START PAUZE -toets
4 STARTUITSTEL -toets
5 Functielampjes
Voordat u de droger in gebruik neemt
Om eventuele restanten, die ontstaan zijn tij-
dens de fabricage, te verwijderen, de trom-
mel van de droger afvegen met een vochtige
doek of een korte cyclus ( ca. 30 min.) met
vochtige lappen in de trommel laten draaien.
Wasgoed sorteren en voorbereiden
Het wasgoed sorteren
• Sorteer op weefseltype:
– Katoen/linnen voor programma's in de
programmagroep KATOEN.
– Gemengde en synthetische stoffen voor
programma's in de programmagroep
SYNTHETISCH.
• Sorteren op onderhoudslabel: De onder-
houdslabels betekenen:
Drogen in de wasdroger in principe
mogelijk
Drogen op normale temperatuur
Drogen op een lagere temperatuur
(druk op de DELICAAT -toets!)
Drogen in de wasdroger is niet moge-
lijk
Belangrijk! Stop geen nat wasgoed in de
machine als niet op het onderhoudslabel ver-
meld is dat het geschikt is om gedroogd te
worden in een wasdroger.
Deze machine kan gebruikt worden voor al
wasgoed dat voorzien is van het label "ge-
schikt om gedroogd te worden in een was-
droger".
• Droog nieuw, gekleurd textiel niet samen
met lichtgekleurd wasgoed. De kleur van
textiel kan afgeven.
• Droog geen katoenen jersey en gebreide
kleding met het programma EXTRA
DROOG . Deze stukken kunnen krimpen!
• Wollen en wolachtige stoffen kunnen ge-
droogd worden met het WOL-program-
ma.
Wasgoed voorbereiden
• Om te voorkomen dat was verstrikt raakt:
sluit ritsen, knoop dekbedovertrekken
dicht en sluit losse riemen of strikken (bijv.
van schorten).
• Maak zakken leeg. Verwijder metalen
voorwerpen (paperclips, veiligheidsspel-
den etc.).
electrolux 5

• Keer voorwerpen met dubbellaagse weef-
sels binnenstebuiten (bijv. met katoen af-
gewerkte anoraks, de katoenlaag moet
aan de buitenkant zitten). Deze weefsels
drogen dan beter.
Belangrijk! Doe niet te veel wasgoed in de
machine. Houd de max. belading van 7 kg
aan.
Het gewicht van wasgoed
Type was-
goed
Gewicht
Badjas 1200 gram
Servet 100 gram
Dekbedover-
trek
700 gram
Laken 500 gram
Kussensloop 200 gram
Type was-
goed
Gewicht
Tafelkleed 250 gram
Badstof hand-
doek
200 gram
Theedoek 100 gram
Nachthemd 200 gram
Damesslips 100 gram
Herenover-
hemd
600 gram
Herenover-
hemd
200 gram
Herenpyjama 500 gram
Bloes 100 gram
Herenonder-
goed
100 gram
Programmatabel
Program-
ma's
max. belading (droog gewicht)
Extra functies/opties Toepassing/eigenschappen
Onderhoudsmerkteken
KATOEN
EXTRA
DROOG
7 kg
DELICAAT , ANTI-KREUK
, ZOEMER , STARTUIT-
STEL
Grondig drogen van dik of meerlaags
textiel, bijv. badstof artikelen, badjas-
sen.
KATOEN
INTENSIEF
DROOG
7 kg
DELICAAT , ANTI-KREUK
, ZOEMER , STARTUIT-
STEL
Grondig drogen van dik of meerlaags
textiel, bijv. badstof artikelen, badjas-
sen.
KATOEN
KASTDROOG
1)
7 kg
DELICAAT , ANTI-KREUK
, ZOEMER , STARTUIT-
STEL
Grondig drogen van textiel van gelijke
dikte, bijv. badstof artikelen, brei-
goed, handdoeken.
KATOEN
VOCHTIG
1)
7 kg
DELICAAT , ANTI-KREUK
, ZOEMER , STARTUIT-
STEL
Voor dun textiel dat nog gestreken
moet worden, bijv. gebreide artike-
len, katoenen overhemden.
KATOEN
STRIJK-
DROOG
1)
7 kg
DELICAAT , ANTI-KREUK
, ZOEMER , STARTUIT-
STEL
Voor dunne stoffen die nog gestre-
ken moeten worden, bijv. gebreide
artikelen, katoenen overhemden.
6 electrolux

Program-
ma's
max. belading (droog gewicht)
Extra functies/opties Toepassing/eigenschappen
Onderhoudsmerkteken
SYNTHE-
TISCH
EX-
TRA DROOG
3 kg
DELICAAT , ANTI-KREUK
, ZOEMER , STARTUIT-
STEL
Grondig drogen van dik of meerlaags
textiel, bijv. truien, beddengoed, ta-
fellinnen.
2)
SYNTHE-
TISCH
KASTDROOG
1)
3 kg
DELICAAT , ANTI-KREUK
, ZOEMER , STARTUIT-
STEL
Voor dunne stoffen die niet gestreken
worden, bijv. easy care shirts, tafel-
kleden, babykleertjes, sokken, linge-
rie met baleinen of met beugels.
2)
SYNTHE-
TISCH
STRIJK-
DROOG
3 kg
DELICAAT , ANTI-KREUK
, ZOEMER , STARTUIT-
STEL
Voor dunne stoffen die nog gestre-
ken moeten worden, bijv. gebreide
artikelen, katoenen overhemden.
2)
30' (TIJD) 7 kg
DELICAAT , ANTI-KREUK
, ZOEMER , STARTUIT-
STEL
Voor verder drogen van afzonderlijke
stukken wasgoed.
MIX (GE-
MENGD)
3 kg
DELICAAT
3)
, ANTI-KREUK
, ZOEMER , STARTUIT-
STEL
Voor het drogen van katoenen en
synthetische stoffen, op lagere tem-
peratuur.
ANTI-KREUK
1 kg
(of 5
over
hem
den)
DELICAAT
Automatisch)
,
ANTI-KREUK
, ZOEMER
, STARTUITSTEL
Speciaal programma met anti-kreuk-
mechanisme voor strijkvrij textiel
zoals overhemden en bloezen; om
makkelijker te kunnen strijken. Het
resultaat hangt af van het soort textiel
en de kwaliteit ervan. (Het laadvolu-
me komt overeen met ong. 5 tot 7
overhemden.) Aanbeveling: doe kle-
dingstukken direct na het centrifuge-
ren in de droger. Als ze eenmaal
droog zijn, haal de kledingstukken er
dan onmiddellijk uit en hang ze op
een kleerhanger.
JEANS
7 kg
DELICAAT , ANTI-KREUK
, ZOEMER , STARTUIT-
STEL
Voor vrijetijdskleding, zoals jeans,
sweatshirts, enz., van verschillende
materiaaldikte (bijv. bij de kraag,
manchetten en naden).
electrolux 7

Program-
ma's
max. belading (droog gewicht)
Extra functies/opties Toepassing/eigenschappen
Onderhoudsmerkteken
WOL
1 kg
DELICAAT , ZOEMER ,
STARTUITSTEL
WOL is een speciaal programma
voor het kort behandelen van wollen
kledingstukken met warme lucht na-
dat ze aan de lucht zijn gedroogd,
gedragen, of langere tijd zijn be-
waard. De wolvezels worden glad-
gemaakt en de wol wordt zacht en
behaaglijk.
AFKOELING
7 kg
ZOEMER
Speciaal programma van ongeveer
10 minuten, voor het opfrissen of
voorzichtig reinigen van textiel met in
de handel verkrijgbare producten
voor chemische reiniging. (Gebruik
alleen producten die door de fabri-
kant geschikt zijn verklaard voor de
droger; lees de gebruiksaanwijzin-
gen van de fabrikant voor gebruik.)
1) In overeenstemming met IEC61121
2) kies de optie DELICAAT
3) Automatisch
Dagelijks gebruik
Machine inschakelen
Draai de programmakeuzeknop op een pro-
gramma. De machine is ingeschakeld.
Het programma selecteren
Gebruik de programmakeuzeknop om het
gewenste programma te selecteren.
Extra functies selecteren
U kunt kiezen uit de volgende extra functies:
8 electrolux

toets 1 - DELICAAT
toets 2 - ANTI-KREUK
toets 3 - ZOEMER
toets 5- STARTUITSTEL
DELICAAT
Als deze toets wordt ingedrukt vindt het dro-
gen plaats bij een lagere temperatuur, voor
fijne artikelen. Het bijbehorende lampje gaat
branden. Deze functie kan ook worden ge-
bruikt voor tijdgestuurd drogen.
ANTI-KREUK LANG
Met de functie "anti-kreuk lang" wordt de an-
tikreukfase (30 min.) na het drogen uitgebreid
met 60 minuten. De trommel draait geduren-
de deze fase met onderbrekingen. Hierdoor
blijft het wasgoed los en kreukt het niet. Deze
fase duurt in totaal 90 minuten. Het wasgoed
kan tijdens de antikreukfase te allen tijde uit
de machine gehaald worden.
Als de functie actief is, brandt het Anti frois-
sage (antikreuk)lampje.
ZOEMER
Wanneer de droogcyclus beëindigd is, klinkt
er een intermitterend geluidssignaal. Door de
toets ALARME (zoemer) in te drukken, wordt
het geluidssignaal in de volgende gevallen
uitgeschakeld:
• bij het selecteren van het programma
• bij het indrukken van de knoppen
• wanneer de programmakeuzeknop in een
andere positie wordt gedraaid tijdens het
programma of wanneer u een optieknop
tijdens de cyclus indrukt
• aan het einde van het programma.
Het bijbehorende lampje gaat branden.
41 2 3
12 11 10 9 8 7 56
Startuitstel
Met de toets Startuitstel kunt u de
start van een programma 3, 6 of 9
uur uitstellen.
1. Selecteer het programma en de extra
functies.
2. Druk zo vaak als nodig op de toets Star-
tuitstel (de lampjes laten zien welke uit-
steltijd is gekozen).
3. Om de timer van de uitgestelde start te
activeren drukt u op de Start/Pauze-
toets. De lampjes 9h 6h 3h veranderen
elke drie uur tot de tijd nadert om de cy-
clus te starten.
Het programma starten
Druk op de START PAUZE -toets. Het pro-
gramma wordt gestart.
De fase van het programma wordt aangege-
ven met bijbehorende lampjes. Van boven
naar beneden, van DROGEN (lampje 10),
AFKOELING, (lampje 11) naar ANTI-KREUK/
EINDE (lampje 12) .
Het programma veranderen
Als u een verkeerd programma hebt gestart,
kunt u dit wijzigen. Zet eerst de programma-
keuzeknop op "O" UIT. Het programma
wordt geannuleerd.
Als het programma eenmaal begonnen
is, kan het niet meer veranderd worden.
Als toch wordt geprobeerd het program-
ma op de programmakeuzeknop te wij-
zigen of als er op een functietoets (met
uitzondering van de ZOEMER -toets)
wordt gedrukt, dan gaat boven de
START PAUZE -toets tijdelijk een geel
lampje knipperen. Het droogprogramma
wordt hierdoor echter niet beïnvloed
(wasgoedbescherming).
Droogcyclus voltooid / wasgoed uit de
trommel halen
Als de droogcyclus klaar is, gaan de lampjes
ANTI-KREUK/EINDE en FILTER branden. Als
de zoemerfunctie ingeschakeld is, klinkt er
gedurende één minuut een geluidssignaal
met onderbrekingen.
electrolux 9

De droogcycli worden automatisch ge-
volgd door een anti-kreuk fase die on-
geveer 30 minuten duurt. De trommel
draait gedurende deze fase met onder-
brekingen. Hierdoor blijft het wasgoed
los en kreukt het niet. Het wasgoed kan
tijdens de anti-kreukfase te allen tijde uit
de machine gehaald worden. (Het was-
goed moet op zijn laatst tegen het einde
van de anti-kreukfase uit de trommel ge-
haald worden om te voorkomen dat het
gaat kreuken.) Als de functie ANTI-
KREUK functie is gekozen, wordt de
anti-kreukfase met 60 minuten verlengd.
1. Open de deur.
2. Haal het wasgoed uit de trommel.
3. Verwijder het filter nadat de kledingstuk-
ken uit de machine zijn gehaald. Maak het
filter schoon.
Waarschuwing! Controleer voordat u
het filter terugplaatst dat zich niets in de
filterbehuizing bevindt.
4. Draai de programmakeuzeknop op "O"
(UIT).
Belangrijk! Maak het filter na elke droogcy-
clus schoon.
5. Sluit de vuldeur.
Reiniging en onderhoud
Waarschuwing! De wasdroger mag
niet worden gebruikt als er industriële
chemische reinigingsmiddelen zijn
gebruikt!
Het pluisfilter schoonmaken
Het filter verzamelt alle pluizen die zich tijdens
het drogen ophopen. Om te garanderen dat
de droger perfect werkt, moet het pluisfilter
na elke droogcyclus worden gereinigd.
Het waarschuwingslampje FILTER
brandt
om u daaraan te herinneren.
Let op! Gebruik de droger nooit zonder
pluisfilter of met beschadigd of verstopt
pluisfilter.
1.
Open de vuldeur en haal het wasgoed uit
de trommel.
2. Haal het filter, dat is ingebouwd in het on-
derste deel van de vulopening, eruit.
3.
Open het filter door de knop, tussen twee
gleuven, met de vingers in te drukken.
Maak het filter schoon met een vochtige
hand of doekje. Na verloop van tijd ont-
staat er aanslag van restanten wasmiddel
op de filters. Maak als dit gebeurt het filter
schoon met warm water en een borstel.
Sluit het filter en vergeet het niet terug te
plaatsen.
Waarschuwing! Controleer voordat u
het filter terugplaatst dat zich niets in de
filterbehuizing bevindt.
4. Het filter kan maar aan een kant worden
geplaatst. Als de positie niet klopt, steekt
het filter uit.
Als het filter niet vastklikt op zijn plaats,
kan de vuldeur niet worden gesloten.
De deur schoonmaken
Maak geregeld de binnenkant van de deur
schoon om pluizen te verwijderen. Zorgvul-
10 electrolux

dig reinigen zorgt voor een correcte manier
van drogen.
De trommel reinigen
Let op! Gebruik geen schuurmiddelen
of staalwol om de trommel schoon te
maken.
Kalk in het water of reinigingsproducten
kunnen een nauwelijks zichtbare aan-
slag op de binnenkant van de trommel
achterlaten. De waarneming van de
droogtegraad van het wasgoed is dan
niet meer betrouwbaar. Het wasgoed is
vochtiger dan verwacht wanneer het uit
de droger wordt gehaald.
Gebruik een standaard huishoudelijk rei-
nigingsmiddel (bijv. op azijn gebaseerd
reinigingsmiddel) om de binnenkant van
de trommel en de trommelribben af te
vegen.
Het bedieningspaneel en de behuizing
schoonmaken
Let op! Gebruik geen meubelreinigers of
agressieve reinigingsmiddelen om de
machine schoon te maken.
Gebruik een vochtige doek om het be-
dieningspaneel en de behuizing af te ve-
gen.
Wat moet u doen als…
Zelf problemen oplossen
Probleem Mogelijke oorzaak Oplossing
Droger doet het niet.
Stekker zit niet in het stopcon-
tact of de zekering werkt niet
goed.
Steek de stekker in het stopcon-
tact. Controleer de zekering in
de zekeringenkast (huisinstalla-
tie).
De vuldeur staat open. Sluit de vuldeur.
Heeft u de START PAUZE -toets
ingedrukt?
Druk nogmaals op de START
PAUZE -toets.
Droogresultaten niet naar tevre-
denheid.
Verkeerde programma geselec-
teerd.
Selecteer een ander programma
wanneer u de volgende keer
droogt (zie het hoofdstuk "Pro-
grammatabel").
Pluisfilter verstopt. Maak het pluisfilter schoon.
Te grote hoeveelheid wasgoed.
Houd u aan de geadviseerde
beladingsvolumes.
Ventilatieopeningen zijn afge-
dekt.
Maak de ventilatieopeningen
vrij.
Aanslag op binnenkant opper-
vlak trommel of trommelribben.
Reinig het oppervlak aan de bin-
nenkant van de trommel en de
trommelribben.
Geleiding van water op installa-
tieplaats verschilt van stan-
daardinstellingen van machine.
Herprogrammeer de standaard-
instelling voor de droogtegraad
(zie het hoofdstuk "Programma-
opties").
Vuldeur sluit niet. Filter zit niet op zijn plaats.
Installeer het filter op de juiste
plaats.
Droogcyclus eindigt kort nadat
het programma start.
Niet voldoende wasgoed gela-
den of de geladen was is te
droog voor het geselecteerde
programma.
Selecteer een tijdgestuurd pro-
gramma of een hogere droogte-
graad (bijv. EXTRA DROOG in
plaats van KASTDROOG ).
electrolux 11

Probleem Mogelijke oorzaak Oplossing
De droogcyclus duurt onge-
woon lang. Opmerking: Na on-
geveer 5 uur stopt de droogcy-
clus automatisch.
Filter verstopt. Maak het filter schoon.
Laadvolume te groot. Verminder laadvolume.
Wasgoed niet voldoende ge-
centrifugeerd.
De was moet grondig gecentri-
fugeerd zijn.
Het lampje van de binnenverlichting
vervangen
Gebruik alleen lampjes die speciaal ontwor-
pen zijn voor wasdrogers. Deze speciale
lampjes zijn verkrijgbaar bij de Klantenservi-
ce, ET nr. 112 552 000-5.
Waarschuwing! Als het apparaat is
ingeschakeld, gaat de binnenverlichting
4 minuten nadat de deur is gesloten
automatisch uit.
Waarschuwing! Gebruikt geen
gewone gloeilampen! Deze ontwikkelen
te veel hitte en kunnen de machine
beschadigen!
Waarschuwing! Voordat u het lampje
vervangt, de stekker uit het stopcontact
halen.
1. Schroef het dekseltje van het lampje los
(dit kunt u vinden direct achter de vuldeur,
aan de bovenkant; zie deel "Beschrijving
van de machine".)
2. Vervang het kapotte lampje.
3. Schroef het dekseltje weer vast.
Controleer of de o-ringpakking correct ge-
plaatst is voordat u het dekseltje van de deur-
verlichting weer vastschroeft. Gebruik de
droger niet als de o-ringpakking op het dek-
seltje van de deurverlichting ontbreekt.
Waarschuwing! Om
veiligheidsredenen moet het dekseltje
stevig worden vastgedraaid. Als dat niet
gebeurd is, mag de droger niet gebruikt
worden.
Machine-instellingen
ZOEMERSIGNAAL permanent uit
1. Draai de programmakeuzeknop op een
willekeurig programma.
2. Druk tegelijkertijd op de toetsen DELI-
CAAT en ANTI-KREUK en houd deze on-
geveer 5 seconden ingedrukt.
3. Standaard staat de zoemer altijd uit. U
kunt de toets ZOEMER gebruiken om het
geluid in- of uit te schakelen, maar deze
selectie wordt door de machine niet in het
geheugen opgeslagen.
Waterhardheid
Water bevat een variabele hoeveelheid kalk-
steen en minerale zouten waarvan de hoe-
veelheden variëren afhankelijk van geografi-
sche locaties, waardoor de geleidingswaar-
den ervan variëren. Relevante variaties op de
geleiding van het water vergeleken met de
door de fabrikant vastgestelde geleiding kan
enigszins van invloed zijn op de restvochtig-
heid van het wasgoed aan het einde van de
cyclus. Met uw droger kunt u de gevoeligheid
van de droogsensor afstellen op basis van de
geleidingswaarden van het water.
1. Draai de programmakeuzeknop op een
willekeurig programma.
2. Druk tegelijkertijd op de toetsen ANTI-
KREUK en START PAUZE en houd deze
ongeveer 5 seconden ingedrukt. De hui-
dige instelling wordt met lampjes weer-
gegeven: ANTI-KREUK/EINDE – lage ge-
leiding <300 micro S/cm, AFKOELING –
gemiddelde geleiding 300-600 micro S/
cm, DROGEN – hoge geleiding >600 mi-
cro S/cm
3. Druk net zo lang op de START PAUZE -
toets totdat het gewenste niveau is inge-
steld.
4. Druk om de instelling op te slaan tegelij-
kertijd op de toetsen ANTI-KREUK en
START PAUZE of draai de knop op
"O"(UIT)
12 electrolux

Technische gegevens
Hoogte x breedte x diepte 85 x 60 x 58 cm
Volume trommel 108 liter
Diepte met vuldeur open 109 cm
De hoogte kan worden afgesteld met 1,5 cm
Leeg gewicht ca. 32,5 kg
Laadvolume (afhankelijk van het programma)
1)
max. 7 kg
Spanning 230 V
Benodigde zekering 16 A
Totaal vermogen 2600 W
Energiezuinigheidsklasse C
Energieverbruik (7 kg katoen, voorgecentri-
fugeerd op 1000 tpm)
2)
3,9 kWh
Gemiddeld jaarlijks energieverbruik 263,1 kWh
Gebruik Huishoudelijk
Toegestane omgevingstemperatuur + 5°C tot + 35°C
Verbruikswaarden
De verbruikswaarden zijn vastgesteld op basis van standaardcondities. Deze kunnen afwij-
ken bij bediening van de machine in huishoudelijke omstandigheden.
Programma
Energieverbruik in kWh / gemiddelde
droogtijd in min.
Katoen Kastdroog
2)
3,9 / 95 (7 kg lading voorgecentrifugeerd opj
1000 tpm)
Katoen Strijkdroog
2)
3,05 / 75 (7 kg lading voorgecentrifugeerd
op 1000 tpm)
Synthetica Kastdroog
2)
1,15 / 30 (3 kg lading voorgecentrifugeerd
op 1200 tpm)
1) In sommige landen kunnen andere laadvolumegegevens nodig zijn, vanwege andere meetmethodes.
2) in overeenstemming met EN 61121
Installatie
Belangrijk! Het apparaat moet
getransporteerd worden in verticale positie.
Plaatsing van het apparaat
• Voor uw gemak wordt geadviseerd de ma-
chine dichtbij de wasmachine te plaatsen.
• De wasdroger moet op een schone plaats
worden geïnstalleerd, waar geen vuilopho-
ping kan plaatsvinden.
• Lucht moet vrij kunnen circuleren rond het
hele apparaat. Belemmer het voorste
luchtrooster en het achterste luchtrooster
niet.
• Om trillingen en geluid tot een minimum te
beperken wanneer de droger in gebruik is,
moet deze op een stabiel horizontaal vlak
geplaatst worden.
• Zodra het apparaat op zijn definitieve
plaats staat, dient gecontroleerd te wor-
den of de droger wel helemaal horizontaal
staat met behulp van een luchtbelwater-
pas. Is dit niet het geval, stel dan de stel-
pootjes af totdat dit wel het geval is.
electrolux 13

• De pootjes mogen nooit verwijderd wor-
den. Belemmer de speling tussen het ap-
paraat en de vloer niet met hoogpolig ta-
pijt, houten strips of dergelijke. Hierdoor
kan er hitte worden opgebouwd die sto-
ring kan veroorzaken bij de bediening van
dit apparaat.
Belangrijk! De hete lucht die door de
wasdroger wordt uitgestoten kan
temperaturen bereiken tot 60 °C. Het
apparaat mag daarom niet geïnstalleerd
worden op vloeren die niet bestendig zijn
tegen hoge temperaturen.
Bij het bedienen van de trommeldroger mag
de kamertemperatuur niet lager liggen dan
+5°C en niet hoger dan +35°C, omdat dit de
prestaties van het apparaat in de weg kan
staan.
Waarschuwing! Als het apparaat
verplaatst moet worden moet dit
verticaal gebeuren.
Waarschuwing! Het apparaat mag niet
worden geplaatst achter een afsluitbare
deur, een schuifdeur of een deur met
scharnieren aan de tegenovergestelde
zijde als die van het apparaat.
Verwijdering van de
transportbeveiliging
Let op! Voordat u de droger in gebruik
neemt moeten alle
transportbeveiligingen verwijderd
worden.
1. Open de vuldeur.
2. Trek de repen plakband los van de bin-
nenkant van de machine, boven op de trom-
mel.
3. Verwijder de plastic folie en de polystyreen
vulling van de machine.
Het aansluiten van de ventilatieslang
Om de installatie te vereenvoudigen kunt u
kiezen uit ventilatie-uitgangen: een aan de
achterkant, en de andere aan de linker- en
rechterkant. Sluit de slang aan op de uitgang
die het handigst is door de ringmoer (A) uit
de ventilatie-uitgang aan de achterkant te
trekken en deze op de slang te schroeven en
hem stevig op zijn plaats te duwen. De niet-
gebruikte ventilatie-uitgangen moeten nu
worden afgesloten met de speciale bijgele-
verde afdekkingen.
A
14 electrolux

Als de slang te lang is en de kamertempera-
tuur laag is, kan het vocht in de slang con-
denseren tot water. Dit is een onvermijdelijk
natuurlijk verschijnsel. Om te voorkomen dat
dit water in de slang blijft staan of terug-
stroomt naar de wasdroger, is het raadzaam
om een klein gaatje (diam. 3 mm) te boren in
het laagste punt van de slang en er een kleine
bak onder te plaatsen. (Zie afbeelding, punt
B).
Als de ventilatieslang eenmaal op de droger
is aangesloten, laat hem dan tot aan het ge-
wenste uitlaatpunt lopen, en zorg ervoor dat
de totale lengte minder is dan 2 meter, en dat
hij niet meer dan twee bochten bevat. Wat
betreft de uitlaat zelf, als u heeft gekozen
voor een vast rooster aan de wand of het
raam, kan een goede plaatselijke doe-het-
zelfzaak u de benodigde fittingen en installa-
tieadvies verschaffen.
Waarschuwing! Het is belangrijk om de
ventilatieslang niet te bevestigen aan
A
B
bijvoorbeeld een afzuigkap, een
schoorsteen of een rookkanaal dat
ontworpen is om uitlaatgassen van een
apparaat dat brandstof verbruikt af te
voeren.
Merk op dat om condensatieproblemen te
vermijden het van belang is dat de droger is
uitgerust met de flexibele slang om zijn "uit-
laatgassen" ten minste tot voorbij keukenon-
derdelen af te voeren; bij voorkeur buiten de
keuken. Om te voorkomen dat het apparaat
oververhit raakt, is het van belang dat de
stoomafvoer niet wordt belemmerd. Daarom
moet in het geval van een permanente slang
die aan een buitenmuur of plafond is beves-
tigd een afvoercapaciteit van ten minste 150
m3/uur worden gegarandeerd. Als de droger
is geïnstalleerd nabij keukenonderdelen, zorg
er dan voor dat de ventilatieslang niet wordt
platgedrukt. Als de slang gedeeltelijk wordt
platgedrukt, zal de droogefficiëntie worden
verminderd, wat leidt tot langere droogtijden
en een hoger energieverbruik. Als de slang
volledig wordt platgedrukt kan de veiligheids-
uitschakeling waarmee de machine is uitge-
rust in werking treden. Bij het bedienen van
de wasdroger mag de kamertemperatuur
niet lager liggen dan +5° C en niet hoger dan
+35° C, omdat dit de prestaties van het ap-
paraat kan beïnvloeden.
Deur omkeren
Om het in- en uitladen van het wasgoed te
vergemakkelijken kan de deur worden om-
gekeerd. De draairichting van de deur mag
alleen worden veranderd door een gekwali-
ficeerd vakman. Neem contact op met de
electrolux 15

service-afdeling. De kosten voor het veran-
deren van de draairichting van de deur zijn
voor u.
Elektrische aansluiting
Details over het voltage, soort stroom en de
zekeringen vindt u op het typeplaatje. Het ty-
peplaatje is vlakbij de vulopening gemon-
teerd (zie hoofdstuk "Productbeschrijving").
Sluit de machine aan op een geaard
stopcontact, in overeenstemming met
de geldende bedradingsvoorschriften.
Waarschuwing! De fabrikant kan
niet aansprakelijk gesteld worden
voor schade of letsel die
voortkomen uit het niet opvolgen
van bovengenoemde
veiligheidsmaatregelen.
Indien de voedingskabel moet wor-
den vervangen, dan MOET dit ge-
beuren door onze Klantenservice.
Waarschuwing! De stekker moet na
het installeren van de machine
toegankelijk zijn.
Speciale accessoires
Stapelkit
Via uw dealer is een speciale stapelkit ver-
krijgbaar om het mogelijk te maken de droger
bovenop een wasmachine (voorlader) met
een diepte van het deksel tussen 48 en 60
cm te plaatsen. Lees de bij de kit geleverde
gebruiksaanwijzing zorgvuldig door.
Milieu
Het symbool op het product of op de
verpakking wijst erop dat dit product niet als
huishoudafval mag worden behandeld, maar
moet worden afgegeven bij een
verzamelpunt waar elektrische en
elektronische apparatuur wordt gerecycled.
Als u ervoor zorgt dat dit product op de juiste
manier wordt verwijderd, voorkomt u
mogelijke negatieve gevolgen voor mens en
milieu die zich zouden kunnen voordoen in
geval van verkeerde afvalverwerking. Voor
gedetailleerdere informatie over het recyclen
van dit product, kunt u contact opnemen met
de gemeente, de gemeentereiniging of de
winkel waar u het product hebt gekocht.
Verpakkingsmaterialen
De verpakkingsmaterialen zijn milieuvriende-
lijk en kunnen worden gerecycled. De kunst-
stofonderdelen zijn gemarkeerd, bijv. >PE<,
>PS<, enz. Gooi het verpakkingsmateriaal in
de daarvoor bedoelde container bij uw plaat-
selijke afvaldienst.
Waarschuwing! Als u uw oude
apparaten afvoert, verwijder dan de
hoofdkabel en voer deze samen met de
stekker af. Verwijder de deurhaak en
zorg ervoor dat deze niet langer kan
worden afgesloten om te voorkomen dat
jonge kinderen in het apparaat
opgesloten raken.
Milieutips
• In de droger wordt uw wasgoed pluizig en
zacht. Daarom heeft u bij het wassen geen
wasverzachter nodig.
• Uw droger werkt het zuinigst als u:
– de ventilatieopeningen in de sokkel altijd
vrijhoudt;
– u zich aan de in het programma-over-
zicht aanbevolen laadvolumes houdt;
– het filter na elke droogcyclus schoon-
maakt;
– het wasgoed goed centrifugeert voordat
u het in de droger stopt. Voorbeeld: Ver-
bruiksgegevens – afhankelijk van centri-
fugetoerental – voor 7 kg wasgoed, ge-
droogd met het programma KATOEN
(cotton) KASTDROOG .
16 electrolux

Voorcentrifugeren Droogcyclus
Toeren per minuut
Restvochtigheid
Energie in kWh
in liter als %
1000 4,20 60 3,9
1400 3,64 52 3,7
Onderhoud
Indien zich technische problemen voordoen,
controleer dan eerst of u ze zelf kunt oplos-
sen met behulp van de bedieningsinstructies
- zie hoofdstuk Wat moet u doen als….
Als u het probleem niet zelf kunt oplossen,
neem dan contact op met de Klantenservice
of een van onze geautoriseerde dealers.
Om u snel te kunnen helpen, hebben wij de
volgende informatie nodig:
– Modelbeschrijving
– Productnummer (PNC)
– Serienummer (S No. staat op het typepla-
tje op het apparaat - zie hoofdstuk Product-
beschrijving ) om de plaats te vinden
– Soort storing
– De foutmeldingen die op het display wor-
den weergegeven
Om de noodzakelijke referentienummers van
uw apparaat bij de hand te hebben, advise-
ren wij u ze hier te noteren:
Modelbeschrij-
ving:
Productnum-
mer:
S No:
electrolux 17

Electrolux. Thinking of you.
Share more of our thinking at www.electrolux.com
Contents
Important safety information 18
Product description 20
Control Panel 20
Before first use 21
Sorting and preparing laundry 21
Programme chart 22
Daily use 24
Cleaning and maintenance 26
What to do if ... 27
Machine settings 28
Technical data 28
Installation 29
Environment 31
Service 32
Subject to change without notice
Important safety information
Important! In the interest of your safety
and to ensure the correct use, before
installing and first using the appliance,
read this user manual carefully,
including its hints and warnings. To
avoid unnecessary mistakes and
accidents, it is important to ensure that
all people using the appliance are
thoroughly familiar with its operation
and safety features. Save these
instructions and make sure that they
remain with the appliance if it is moved
or sold, so that everyone using it through
its life will be properly informed on
appliance use and safety.
General safety
• It is dangerous to alter the specifications or
attempt to modify this product in any way.
• This appliance is not intended for use by
persons (including children) with reduced
physical, sensory or lack of experience and
knowledge, unless they have been given
supervision or instruction concerning use
of the appliance by a person responsible
for their safety.
• Make sure that small pets do not climb into
the drum. To avoid this, please check into
the drum before using.
• Any objects such as coins, safety pins,
nails, screws, stones or any other hard,
sharp material can cause extensive dam-
age and must not be placed into the ma-
chine.
• In order to avoid danger of fires caused by
excessive drying, do not use appliance to
dry the following items: Cushions, quilts
and the like (these items accumulate heat).
• Items such as foam rubber (latex foam),
shower caps, waterproof textiles, rubber
backed articles and clothes or pillows fit-
ted with foam rubber pads should not be
dried in the tumble dryer.
• Always unplug the appliance after use,
clean and maintenance.
• Under no circumstances should you at-
tempt to repair the machine yourself. Re-
pairs carried out by inexperienced persons
may cause injury or serious malfunction-
ing. Contact your local Service Centre. Al-
ways insist on genuine spare parts.
• Items that have been soiled with substan-
ces such as cooking oil acetone, petrol,
kerosene, spot removers, turpentine, wax-
es and wax removers should be washed in
hot water with an extra amount of deter-
gent before being dried in the tumble dry-
er.
• Danger of explosion: Never tumble dry
items that have been in contact with in-
flammable solvents (petrol, methylated
spirits, dry cleaning fluid and the like). As
these substance are volatile, they could
cause an explosion. Only tumble dry items
washed with water.
•
Risk of fire: items that have been spotted
or soaked with vegetable or cooking oil
constitute a fire hazard and should not be
placed in the tumble dryer.
• If you have washed your laundry with stain
remover you must execute an extra rinse
cycle before loading your tumble dryer.
18 electrolux

• Please make sure that no gas lighters or
matches have accidentally been left in
pockets of garments to be loaded into ap-
pliance
Warning! Never stop a tumble dry
before the end of the drying cycle
unless all items are quickly removed
and spread out so that the heat is
dissipated. Risk of fire!
• Risk of electric shock! Do not spray
down the appliance with jets of water.
• The final part of a tumble dryer cycle oc-
curs without heat (cool down cycle) to en-
sure that the items are left at a temperature
that ensures that items will not be dam-
aged.
• Ensure you have adequate ventilation in
the installation room to avoid the back flow
of gases into the room from appliances
burning other fuels, including open fires.
Installation
• This appliance is heavy. Care should be
taken when moving it.
• When unpacking the appliance, check that
it is not damaged. If in doubt, do not use it
and contact the Service Centre.
• All packing and transit bolts must be re-
moved before use. Serious damage can
occur to the product and to property if this
is not adhered to. See relevant section in
the user manual.
• Any electrical work required to install this
appliance should be carried out by a quali-
fied electrician or competent person.
• Care must be taken to ensure that the ap-
pliance does not stand on the electrical
supply cable.
• If the machine is situated on a carpeted
floor, please adjust the feet in order to al-
low air to circulate freely.
• After having installed the appliance, check
that it is not pressing or standing on its
electrical supply cable or/and inlet hose.
• If the tumble dryer is placed on top of a
washing machine, it is compulsory to use
the stacking kit (optional accessory).
Use
• This appliance is designed for domestic
use. It must not be used for purposes other
than those for which it was designed.
• Only wash fabrics which are designed to
be machine dried. Follow the instructions
on each garment label.
• Do not dry unwashed items in the tumble
dryer.
• Do not overload the appliance. See the
relevant section in the user manual.
• Clothes which are dripping wet should not
be placed in the dryer.
• Garments which have been in contact with
volatile petroleum products should not be
machine dried. If volatile cleaning fluids are
used, care should be taken to ensure that
the fluid is removed from the garment be-
fore placing in the machine.
• Never pull the power supply cable to re-
move the plug from the socket; always
take hold of the plug itself.
• Never use the tumble dryer if the power
supply cable, the control panel, the work-
ing surface or the base are damaged so
that the inside of the tumble dryer is ac-
cessible.
• Fabric softeners, or similar products
should be used as specified by the fabric
softener instructions.
• Caution - hot surface : Do not touch the
door light cover surface when the light is
switched on.
2)
•
Hot surface: Do not touch the back
of the appliance while it is operating!
Child safety
• This machine is not intended for use by
young children or infirm persons without
supervision.
• Children often do not recognise the haz-
ards associated with electrical appliances.
Children should be supervised to ensure
that they do not play with the appliance.
• The packaging components (e.g. plastic
film, polystyrene) can be dangerous to chil-
dren - danger of suffocation! Keep them
out of children’s reach.
• Keep all detergents in a safe place out of
children’s reach.
• Make sure that children or pets do not
climb into the drum.
2) Only dryers equipped with internal drum light.
electrolux 19

Product description
1
3
4
2
5
6
7
8
1 Control panel
2 Door
3 Fluff filter
4 Rating plate
5 Adjustable feet
6 Sideways vent outlets / back vent outlet
7 Ring nut
8 Drum light
Control Panel
5 4
2 31
1 Programme knob and "O" (OFF) switch
2 Function buttons
3 START PAUSE (START PAUSE) button
4 STARTUITSTEL ( DELAY START) button
5 Function lights
20 electrolux

Before first use
In order to remove any residues which may
have been produced during production, wipe
the dryer drum with a damp cloth or carry out
a brief drying cycle (ca. 30 min.) with damp
cloths in the machine.
Sorting and preparing laundry
Sorting laundry
• Sort by fabric type:
– Cotton/linen for programmes in KA-
TOEN (COTTONS) programme group.
– Mixtures and synthetics for pro-
grammes in SYNTHETICA (SYNTHET-
ICS) programme group.
• Sort by care label: The care labels mean:
Drying in the tumble dryer possible in
principle
Drying at normal temperature
Drying at reduced temperature (press
DELICAAT (DELICATE) button!)
Drying in the tumble dryer not possible
Important! Do not place in the appliance any
wet laundry which is not specified on the care
label as being suitable for tumble-drying.
This appliance can be used for all wet laundry
items which are labelled as suitable for tum-
ble-drying.
• Do not dry new, coloured textiles together
with light-coloured laundry items. Textile
colours may bleed.
• Do not dry cotton jersey and knitwear with
the EXTRA DROOG (EXTRA DRY) pro-
gramme. Items may shrink!
• Wool and wool-like textiles can be dried
using the WOL (WOOL CARE) pro-
gramme.
Preparing laundry
• To avoid laundry becoming tangled: close
zips, button up duvet covers and tie loose
ties or ribbons (e.g. of aprons).
• Empty pockets. Remove metal items (pa-
per clips, safety pins, etc).
• Turn items with double-layered fabrics in-
side out (e.g. with cotton-lined anoraks,
the cotton layer should be outermost).
These fabrics will then dry better.
Important! Do not overload the appliance.
Observe max. loading volume of 7 kg.
Laundry weights
Type of laun-
dry
Weight
Bathrobe 1200 g
Napkin 100 g
Quilt cover 700 g
Sheet 500 g
Pillow case 200 g
Tablecloth 250 g
Towelling tow-
el
200 g
Tea cloth 100 g
Night dress 200 g
Ladies' briefs 100 g
Man's work
shirt
600 g
Man's work
shirt
200 g
Man's pyja-
mas
500 g
Blouse 100 g
Men's under-
pants
100 g
electrolux 21

Programme chart
Programmes
max. load (weight when dry)
Additional functions/options Application/properties
Care mark
KATOEN
(COTTON) EX-
TRA DOOG
(EXTRA
DRY)
7 kg
DELICAAT (DELICATE), AN-
TI-KREUK
(LONG ANTI-
CREASE) , ZOEMER
(BUZ-
ZER) , STARTUITSTEL
( DE-
LAY START)
Thorough drying of thick or multi- lay-
ered fabrics, e.g. terry towelling
items, bathrobes.
KATOEN
(COTTON) IN-
TENSIEF
DROOG
(STRONG
DRY)
7 kg
DELICAAT (DELICATE) ,
ANTI-KREUK
(LONG ANTI-
CREASE) , ZOEMER
(BUZ-
ZER) , STARTUITSTEL
( DE-
LAY START)
Thorough drying of thick or multi- lay-
ered fabrics, e.g. terry towelling
items, bathrobes.
KATOEN
(COTTON)
KASTDROOG
1)
(STOR-
AGE DRY )
7 kg
DELICAAT (DELICATE) ,
ANTI-KREUK
(LONG ANTI-
CREASE) , ZOEMER
(BUZ-
ZER) , STARTUITSTEL
( DE-
LAY START)
Thorough drying of fabrics of even
thicknesses, e.g. terry towelling
items, knitwear, towels.
KATOEN
(COTTON)
VOCHTIG
1)
(DAMP)
7 kg
DELICAAT (DELICATE) ,
ANTI-KREUK
(LONG ANTI-
CREASE) , ZOEMER
(BUZ-
ZER) , STARTUITSTEL
( DE-
LAY START)
For thin textiles which are still to be
ironed, e.g. knitted items, cotton
shirts.
KATOEN
(COTTON)
STRIJK-
DROOG
1)
(IRON DRY)
7 kg
DELICAAT (DELICATE) ,
ANTI-KREUK
(LONG ANTI-
CREASE) , ZOEMER
(BUZ-
ZER) , STARTUITSTEL
( DE-
LAY START)
For thin fabrics which are also to be
ironed, e.g. knitwear, cotton shirts.
SYNTHTISCH
(SYNTHET-
ICS)
EX-
TRA DROOG
(EXTRA
DRY)
3 kg
DELICAAT (DELICATE) ,
ANTI-KREUK
(LONG ANTI-
CREASE) , ZOEMER
(BUZ-
ZER) , STARTUITSTEL
( DE-
LAY START)
Thorough drying of thick or multi-lay-
ered fabrics, e.g. pullovers, bedding,
table linen.
2)
SYNTHTISCH
(SYNTHET-
ICS)
KASTDROOG
1)
(STOR-
AGE DRY )
3 kg
DELICAAT (DELICATE) ,
ANTI-KREUK
(LONG ANTI-
CREASE) , ZOEMER
(BUZ-
ZER) , STARTUITSTEL
( DE-
LAY START)
For thin fabrics which are not ironed,
e.g. easy care shirts, table linen, ba-
by clothes, socks, lingerie with bones
or wires.
2)
22 electrolux

Programmes
max. load (weight when dry)
Additional functions/options Application/properties
Care mark
SYNTHTISCH
(SYNTHET-
ICS)
STRIJK-
DROOG
(IRON DRY)
3 kg
DELICAAT (DELICATE) ,
ANTI-KREUK
(LONG ANTI-
CREASE) , ZOEMER
(BUZ-
ZER) , STARTUITSTEL
( DE-
LAY START)
For thin fabrics which are also to be
ironed, e.g. knitwear, cotton shirts.
2)
30' (TIME) 7 kg
DELICAAT (DELICATE) ,
ANTI-KREUK
(LONG ANTI-
CREASE) , ZOEMER
(BUZ-
ZER) , STARTUITSTEL
( DE-
LAY START)
For further drying of individual items
of laundry.
MIX
(MIXED)
3 kg
DELICAAT
3)
(DELICATE) ,
ANTI-KREUK
(LONG ANTI-
CREASE) , ZOEMER
(BUZ-
ZER) , STARTUITSTEL (DELAY
START)
For drying cotton and synthetic fab-
rics, uses low temperature.
ANTI-KREUK
(EASY
IRON PLUS)
1 kg
(or 5
shirt
s)
DELICAAT
Automatic)
(DELI-
CATE) , ANTI-KREUK
(LONG ANTICREASE) , ZOEM-
ER
(BUZZER) , STARTUIT-
STEL
( DELAY START)
Special programme with anti-crease
mechanism for easy care textiles
such shirts and blouses; for minimum
ironing effort. The result depends on
the type and quality of textiles. (The
loading volume corresponds to ap-
prox. 5 to 7 shirts.) Recommenda-
tion: Place textiles in the dryer
straight after spinning. Once dried,
immediately remove textiles and
place on clothes hanger.
JEANS
7 kg
DELICAAT (DELICATE) ,
ANTI-KREUK
(LONG ANTI-
CREASE) , ZOEMER
(BUZ-
ZER) , STARTUITSTEL
( DE-
LAY START)
For leisure clothing, such as jeans,
sweat-shirts, etc., of different mate-
rial thicknesses (e.g. at the neck,
cuffs and seams).
WOL
(WOOL CARE)
1 kg
DELICAAT (DELICATE) ,
ZOEMER
(BUZZER) , STAR-
TUITSTEL
( DELAY START)
WOOL CARE is special programme
for briefly treating woollens with
warm air after they have been dried
naturally, worn or stored for long pe-
riods. Wool fibres are aligned and the
wool becomes soft and snugly.
electrolux 23

Programmes
max. load (weight when dry)
Additional functions/options Application/properties
Care mark
AFKOELING
(COOL-
ING)
7 kg
ZOEMER (BUZZER)
Special programme, lasting around
10 minutes, for refreshing or gently
cleaning textiles with commercially
available dry cleaning sets. (Only use
those products which are declared
as suitable for the drier by the man-
ufacturer; please observe the manu-
facturer’s instructions for use.)
1) In accordance with IEC61121
2) select DELICATE option
3) Automatic
Daily use
Switching machine on
Turn the programme selector to any pro-
gramme. The machine has been switched
on.
Selecting the programme
Use the programme selector to set the pro-
gramme you require.
Selecting additional functions
You can choose from the additional func-
tions:
button 1 -DELICAAT (DELICATE)
button 2 -ANTI-KREUK
(LONG ANTI-
CREASE)
button 3 -ZOEMER
(BUZZER)
button 5- STARTUITSTEL ( DELAY
START)
DELICAAT (DELICATE)
Pressing this button allows drying to be per-
formed at a lower temperature, for delicate
items. The corresponding pilot light comes
on. This option can also be used for time
controlled drying.
41 2 3
12 11 10 9 8 7 56
24 electrolux

ANTI-KREUK (LONG ANTI-CREASE)
A long anti-crease phase lengthen the anti-
crease phase (30 min.) at the end of the dry-
ing additionally by 60 minutes. The drum ro-
tates at intervals during this phase. This
keeps the laundry loose and free of creases.
Phase lasts in total 90 minutes. The laundry
can be removed at any time during the anti-
crease phase.
When the option is active, the LONG ANTI-
CREASE light is on.
ZOEMER (BUZZER)
When the drying cycle has finished, an inter-
mittent audible signal will sound. By depress-
ing button ZOEMER the acoustic signal is
switched off in the following cases:
• when selecting the programme
• when depressing the buttons
• when the programme selector dial is
turned to another position during the pro-
gramme or when you depress an option
button during the cycle
• at the end of the programme.
The corresponding light comes on.
STARTUITSTEL (DELAY START)
With the STARTUITSTEL button, you
can delay the start of a programme
by 3, 6 or 9 hours.
1. Select the programme and additional
functions.
2. Press the STARTUITSTEL button as
many times as necessary (the lights show
which delay time have been chosen).
3. To activate the delay timer, press button
START/PAUZE. The lights 9h 6h 3h
change on every three hours until the time
is getting on for start cycle.
Starting the programme
Press the START PAUZE (START PAUSE)
button. The programme is started.
The programme phase is shown by appro-
priate lights. From up to the down, from
DROGEN (DRYING) (light 10), LUCHTEN ,
(COOLING) (light 11) to ANTI-KREUK/EINDE
(END) (light 12) .
Changing programme
To change a programme which has been se-
lected by mistake once the programme has
started, first turn the programme selector to
OFF (OFF) position. The programme is can-
celled.
The programme can no longer be
changed directly once the programme
has started. If nevertheless there is an
attempt to change the programme on
the programme knob or if an function
button (excluding the ZOEMER (Buz-
zer) button) is pressed, led START
PAUZE (START / PAUSE) button starts
flashing temporarily in yellow. The drying
programme is not however affected by
this (laundry protection).
Drying cycle complete / removing
laundry
Once the drying cycle is complete, the lights
ANTI-KREUK/EINDE (END) and FILTER are
on. If the buzzer function is active, an acous-
tic signal will sounds intermittently for about
one minute.
The drying cycles are automatically fol-
lowed by an anti-crease phase which
lasts around 30 minutes. The drum ro-
tates at intervals during this phase. This
keeps the laundry loose and free of crea-
ses. The laundry can be removed at any
time during the anti-crease phase. (The
laundry should be taken out towards the
end of the anti-crease phase at the latest
to prevent creases from forming.) If AN-
TI-KREUK (LONG ANTICREASE) func-
tion has been selected, the anti-crease
phase is lengthened by 60 minutes.
1. Open door.
2. Remove laundry.
3. Remove filter after clothes has been re-
moved. Clean the filter.
Warning! Before You place the filter,
please check it there is nothing inside the
filter seat.
4. Turn the programme selector to "O"
(OFF).
Important! Clean the filter after each drying
cycle.
5. Close the door.
electrolux 25

Cleaning and maintenance
Warning! The tumble dryer is not to be
used if industrial chemicals have been
used for cleaning!
Cleaning fluff filter
The filter collect all the fluff which accumu-
lates during drying. To ensure that the dryer
works perfectly, the fluff filter must be
cleaned after every drying cycle.
The warning light FILTER
, is on to remind
you this operation.
Caution! Never operate the dryer
without fluff filter or with damaged or
blocked fluff filter.
1.
Open loading door and remove laundry.
2. Remove the filter which is built into the
lower part of the loading aperture.
3.
Open the filter pressing the button,
among two slots on fingers. Clean the fil-
ter using dump hand or cloth. After a pe-
riod of time, a patina due to detergent
residue on laundry forms on the filters.
When this occurs, clean the filter with
warm water using a brush.
Close the filter and do not forget to put it
back.
Warning! Before You place the filter,
please check it there is nothing inside the
filter seat.
4. The filter can be positioned only to one
side. If position is wrong, the filter over-
hangs.
If the filter will not snap into place, the
loading door cannot be closed.
Cleaning the door
Clean periodically the interior part of the door
to remove any fluff. Accurate cleaning en-
sures correct drying.
Cleaning the drum
Caution! Do not use abrasives or steel
wool to clean the drum.
Lime in the water or cleaning agents may
form a barely visible lining on the inside
of the drum. The degree to which the
laundry has been dried is then no longer
detected reliably. The laundry is damper
than expected when removed from the
dryer.
Use a standard domestic cleaner (e.g.
vinegar-based cleaner) to wipe down the
inside of the drum and drum ribs.
Clean operating screen and housing
Caution! Do not use furniture cleaners
or aggressive cleaning agents to clean
the machine.
Use a damp cloth to wipe down the op-
erating screen and housing.
26 electrolux

What to do if ...
Problem Possible cause Remedy
Dryer does not work.
Mains plug is not plugged in or
fuse is not working correctly.
Plug in at mains socket. Check
fuse in fuse box (domestic in-
stallation).
Loading door is open. Close loading door.
Have you pressed the START
PAUZE (START PAUSE) but-
ton?
Press the START PAUZE
(START PAUSE) button again.
Drying results unsatisfactory.
Wrong programme selected.
Select a different programme
the next time you dry (see “Pro-
gramme chart” chapter).
Fluff filter clogged. Clean fluff filter.
Overloading of laundry.
Observe recommended loading
volumes.
Ventilation slots covered up. Uncover ventilation slots.
Residue on inside surface of
drum or drum ribs.
Clean inside surface of drum
and drum ribs.
Conductance of water at instal-
lation site differs from standard
setting of machine.
Re-programme standard setting
for degree of drying (see ‘Pro-
gramming options’ chapter).
Loading door does not close. Filter not in place. Install filter into place.
Drying cycle ends shortly after
programme starts.
Not enough washing loaded or
washing loaded is too dry for se-
lected programme.
Select time programme or high-
er drying level (e.g. EXTRA
DROOG (EXTRA DRY) instead
of KASTDROOG (STORAGE
DRY)).
Drying cycle lasts an unusually
long time. Note: After around 5
hours the drying cycle ends au-
tomatically.
Filter clogged. Clean filter.
Load volume too big. Reduce load volume.
Laundry insufficiently spun.
Laundry must be adequately
spun.
Changing the bulb for interior lighting
Only use a special bulb which is designed
specially for dryers. The special bulb can be
obtained from your local Service Force cen-
tre.
Warning! When the appliance is
switched on, the interior lighting
switches itself off after 4 minutes when
the door is open.
Warning! Do not use standard bulbs!
These develop too much heat and may
damage the machine!
Warning! Before replacing the bulb,
disconnect the mains plug.
1. Unscrew cover above the bulb (this can
be found directly behind the loading aper-
ture, at the top; refer to “Description of
machine” section.)
2. Replace defective bulb.
3. Screw cover back down.
Check the correct positioning of o-ring gas-
ket before screwing back the door light cov-
er. Do not operate the dryer when missing o-
ring gasket on door light cover.
Warning! For safety reasons, the cover
must be screwed down tightly. If this is
not done, the dryer must not be
operated.
electrolux 27

Machine settings
BUZZER SIGNAL permanent off
1. Turn the programme selector to any pro-
gramme.
2. Press simultaneously theDELICAAT
(DELICATE) and ANTI-KREUK (LONG
ANTICREASE) buttons and hold down for
approx. 5 seconds.
3. The buzzer is by default always off. You
can use BUZZER button to activate or
deactivate sound but machine does not
memorize your selection.
Water hardness
Water contains, a variable quantity of lime-
stone and mineral salts of which quantities
vary according to geographical locations
thus varying its conductivity values. Relevant
variations of the conductivity of the water
compared to those prefixed by the factory
could slightly influence the residual humidity
of the laundry at the end of the cycle. Your
dryer allows you to regulate the sensitivity of
the drying sensor based on conductivity val-
ues of the water.
1. Turn the programme selector to any pro-
gramme.
2. Press simultaneously the ANTI-KREUK
(LONG ANTICREASE) and START
PAUZE (START PAUSE) buttons and
hold down for approx. 5 seconds. The
current setting is on the lights: ANTI-
KREUK-EINDE (END) – low conductivity
<300 micro S/cm, AFKOELING (COOL-
ING)– medium conductivity 300-600 mi-
cro S/cm, DROGEN(DRYING) – high
conductivity >600 micro S/cm
3. Press the START PAUZE (START
PAUSE) button sequentially until you set
desired level.
4. To memorize setting press simultaneous-
ly the ANTI-KREUK (LONG ANTI-
CREASE) and START PAUZE (START
PAUSE) buttons or turn knob to "O"(OFF)
position
Technical data
Height x width x depth 85 x 60 x 58 cm
Drum volume 108 l
Depth with loading door open 109 cm
Height can be adjusted by 1.5 cm
Weight when empty approx. 32.5kg
Loading volume (depends on programme)
1)
max. 7 kg
Voltage 230 V
Required fuse 16 A
Total power 2600 W
Energy efficiency class
C
Energy consumption (7 kg of cotton, pre-
drained at 1000 rpm)
2)
3.9 kWh
Average annual energy consumption 263.1 kWh
Use Domestic
Permissible ambient temperature + 5°C to + 35°C
Consumption values
The consumption values have been established under standard conditions. They may de-
viate when the machine is operated in domestic circumstances.
Programme
Energy consumption in kWh / average
drying time in min.
KATOEN (COTTON) KASTDROOG (CUP-
BOARD DRY )
2)
3.9 / 95 (7 kg load pre-drained at 1000 rpm)
28 electrolux

KATOEN (COTTON) STRIJKDROOG (IRON
DRY)
2)
3.05 / 75 (7 kg load pre-drained at 1000
rpm)
SYNTHETISCH (SYNTHETICS) KAST-
DROOG (STORAGE DRY)
2)
1.15 / 30 (3 kg load pre-drained at 1200
rpm)
1) Different loading volume data may be needed in some countries as a result of different measuring
methods.
2) in accordance with EN 61121
Installation
Important! The appliance must be moved in
vertical position for transport.
Appliance positioning
• It is recommended that, for your conven-
ience, the machine is positioned close to
your washing machine.
• The tumble dryer must be installed in a
clean place, where dirt does not build up.
• Air must be able to circulate freely all round
the appliance. Do not obstruct the front
ventilation grille or the air intake grilles at
the back of the machine.
• To keep vibration and noise to a minimum
when the dryer is in use, it should be
placed on a firm, level surface.
• Once in its permanent operating position,
check that the dryer is absolutely level with
the aid of a spirit level. If it is not, raise or
lower the feet until it is.
• The feet must never be removed. Do not
restrict the floor clearance through deeply
carpets, strips of wood or similar. This
might cause heat built-up which would in-
terfere with the operation of the appliance.
Important! The hot air emitted by the tumble
dryer can reach temperatures of up to 60°C.
The appliance must therefore not be installed
on floors which are not resistant to high
temperatures.
When operating the tumble dryer, the room
temperature must not be lower than +5°C
and higher than +35°C, as it may affect the
performance of the appliance.
Warning! Should the appliance be
moved, it must be transported vertically.
Warning! The appliance must not be
installed behind the lockable door, a
sliding door or a door with a hinge on the
opposite side to that of the appliance.
Removing transport safety packaging
Caution! Before use all parts of the
transport packaging must be removed.
1. Open loading door.
2. Pull off adhesive strips from inside ma-
chine on top of drum.
3. Remove foil hose and polystyrene padding
from the machine.
Fitting the vent hose
To simplify the installation, there is a choice
of vent outlets: one at the back, the others in
the left and right-hand side. Connect the
hose to whichever is the more convenient by
electrolux 29

pulling the ring nut (A) from the vent outlet at
the back, screwing it on to the hose and
pushing it firmly back into place. The unused
vents should now be sealed with the special
snap covers provided.
If the hose is long and the room temperature
low, the moisture might condense to water
inside the hose. This is an unavoidable nat-
ural phenomenon. To prevent this water from
Iying in the hose or flowing back into the tum-
ble dryer, it is advisable to drill a small hole
(via. 3 mm) in the lowest point of the hose and
to place a small container below it. (See pic-
ture, point B).
A
A
Once connected to the dryer, run the vent
hose to the desired outlet point, ensuring that
the run’s overall length is less than 2 m, and
that it contains no more than two bends. As
to the outlet itself, if you have decided on a
fixed wall/window grille, a good local build-
er’s merchant should be able to supply you
with the necessary fittings and installation
advice.
Warning! It is important not to connect
the vent hose to, for example, a cooker
hood, or a chimney or flue pipe designed
to carry the exhaust from a fuel burning
appliance.
Note that to avoid condensation problems, it
is essential that the dryer be fitted with the
flexible hose to carry its “exhaust” at least
beyond the kitchen units; preferable outside
the kitchen. In order to prevent the appliance
from overheating, it is important that the
steam exhaust is unobstructed. Therefore, in
B
30 electrolux

case of a permanent hose fitted to an exterior
wall or ceiling, it must be ensured an exhaust
capacity of at least 150 m3/h. If the dryer is
fitted next to kitchen units, make sure that the
vent hose is not squashed. If the hose is par-
tially squashed, drying efficiency will be re-
duced, resulting in longer drying times and
higher energy consumption. If the hose is
completely squashed, the safety cut-outs
with which the machine is fitted may operate.
When operating the tumble dryer, the room
temperature must not be lower than +5°C
and higher than +35°C, as it may affect the
performance of the appliance.
Door reversal
To make it easier to load or unload the laun-
dry, the door can be reversed. The door must
only be reversed by an authorised service
engineer. Please contact your local Service
Force Centre. The engineer will carry out the
door reversal at your cost.
Electrical connection
Details on mains voltage, type of current and
the fuses required should be taken from the
type plate. The type plate is fitted near the
loading aperture (see “Product description”
chapter).
Connect the machine to an earthed
socket, in accordance with current wir-
ing regulations.
Warning! The manufacturer declines
any responsibility for damage or
injury through failure to comply with
the above safety precautions.
Should the appliance power supply
cable need to be replaced, this must
be carried out by our Service Center.
Warning! The plug must be
accessible after installing the
machine.
Special accessories
Stacking kit
A special stacking kit is available through
your dealer, to enable the mounting of the
dyer on top of a front loading washing ma-
chine with cover’s depth between 48 and 60
cm. Read carefully the instructions supplied
with the kit.
Environment
The symbol on the product or on its
packaging indicates that this product may
not be treated as household waste. Instead
it should be taken to the appropriate
collection point for the recycling of electrical
and electronic equipment. By ensuring this
product is disposed of correctly, you will help
prevent potential negative consequences for
the environment and human health, which
could otherwise be caused by inappropriate
waste handling of this product. For more
detailed information about recycling of this
product, please contact your local council,
your household waste disposal service or the
shop where you purchased the product.
Packaging material
The packaging materials are environmentally
friendly and can be recycled. The plastic
components are identified by markings, e.g.
>PE<, >PS<, etc. Please dispose of the
packaging materials in the appropriate con-
tainer at the community waste disposal fa-
cilities.
electrolux 31

Warning! When disposing of old
appliances, remove the mains cable and
dispose of together with the plug.
Remove the door hook and ensure it is
no longer lockable to prevent young
children being trapped inside.
Environmental tips
• In the dryer, laundry becomes fluffy and
soft. Fabric softeners are not therefore
needed when washing.
• Your dryer will function most economically
if you:
– always keep the ventilation slots on the
base of the dryer unobstructed;
– use the loading volumes specified in the
programme overview;
– clean the filter after each drying cycle;
– spin the laundry well before drying. Ex-
ample: Consumption data – depending
on spinning speed – for 7 kg of laundry,
dried using the KATOEN (cotton) STOR-
AGE DRY (STORAGE DRY) pro-
gramme.
Pre-draining Drying cycle
Revolutions per minute
Residual dampness
Energy in kWh
in litres as a %
1000 4.20 60 3,9
1400 3.64 52 3,7
Service
In the event of technical faults, please first
check whether you can remedy the problem
yourself with the help of the operating in-
structions - see chapter What to do if….
If you were not able to remedy the problem
yourself, please contact the Customer Care
Department or one of our service partners.
In order to be able to assist you quickly, we
require the following information:
– Model description
– Product number (PNC)
– Serial number (S No. is on rating plate stuck
to the product - to find it see chapter Product
description ))
– Type of fault
– Any error messages displayed by the ap-
pliance
So that you have the necessary reference
numbers from your appliance at hand, we
recommend that you write them in here:
Model descrip-
tion:
PNC:
S No:
32 electrolux

electrolux 33

34 electrolux

electrolux 35

136908711-00-012009
www.electrolux.com
U kan toebehoren, verbruiksprodukten en onderdelen bestellen via onze webwinkel op:
www.aeg-electrolux.be
-
 1
1
-
 2
2
-
 3
3
-
 4
4
-
 5
5
-
 6
6
-
 7
7
-
 8
8
-
 9
9
-
 10
10
-
 11
11
-
 12
12
-
 13
13
-
 14
14
-
 15
15
-
 16
16
-
 17
17
-
 18
18
-
 19
19
-
 20
20
-
 21
21
-
 22
22
-
 23
23
-
 24
24
-
 25
25
-
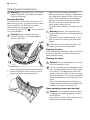 26
26
-
 27
27
-
 28
28
-
 29
29
-
 30
30
-
 31
31
-
 32
32
-
 33
33
-
 34
34
-
 35
35
-
 36
36


Electrolux EDE67550W Handleiding
- Categorie
- Wasdrogers
- Type
- Handleiding
in andere talen
- English: Electrolux EDE67550W User manual