ProfiCook PC-EKM 1205 Handleiding
- Categorie
- Accessoires voor het maken van koffie
- Type
- Handleiding

Bedienungsanleitung / Garantie
Gebruiksaanwijzing • Mode d’emploi • Manual de instrucciones • Istruzioni per l’uso
Instruction Manual • Instrukcja obsługi / Gwarancja • Használati utasítás
Руководство по эксплуатации •
PC-EKM1205_IM 29.10.19
Elektrisches Kaffeemahlwerk PC-EKM 1205
Elektrische kofemolen • Moulin à café électrique • Molinillo de café eléctrico
Macinacaffè elettrico • Electric Coffee Grinder • Elektryczny młynek do kawy
Elektromos kávédaráló • Электрическая кофемолка •

PC-EKM1205_IM 29.10.19
Bedienungsanleitung ....................................................................................Seite 4
Gebruiksaanwijzing ................................................................................... Pagina 10
Mode d’emploi............................................................................................... Page 15
Manual de instrucciones .......................................................................... Página 20
Istruzioni per l’uso .....................................................................................Pagina 25
Instruction Manual ........................................................................................ Page 30
Instrukcja obsługi .......................................................................................Strona 35
Használati utasítás .......................................................................................Oldal 41
Руководство по эксплуатации .................................................................. стр. 46
55 ....................................................................................................................
2

PC-EKM1205_IM 29.10.19
3
Übersicht der Bedienelemente
Overzicht van de bedieningselementen • Liste des différents éléments de commande
Indicación de los elementos de manejo • Elementi di comando • Overview of the Components
Przegląd elementów obsługi • A kezelőelemek áttekintése
Обзор деталей прибора •

4
PC-EKM1205_IM 29.10.19
Bedienungsanleitung
Vielen Dank, dass Sie sich für unser Produkt entschieden
haben. Wir wünschen Ihnen viel Freude mit dem Gerät.
Symbole in dieser Bedienungsanleitung
Wichtige Hinweise für Ihre Sicherheit sind besonders ge-
kennzeichnet. Beachten Sie diese Hinweise unbedingt, um
Unfälle und Schäden am Gerät zu vermeiden:
WARNUNG:
Warnt vor Gefahren für Ihre Gesundheit und zeigt mög-
liche Verletzungsrisiken auf.
ACHTUNG:
Weist auf mögliche Gefährdungen für das Gerät oder
andere Gegenstände hin.
HINWEIS:
Hebt Tipps und Informationen für Sie hervor.
Inhalt
Übersicht der Bedienelemente ..........................................3
Allgemeine Hinweise .......................................................... 4
Spezielle Sicherheitshinweise für dieses Gerät ..............4
Bestimmungsgemäßer Gebrauch .....................................5
Auspacken des Gerätes ..................................................... 5
Übersicht der Bedienelemente / Lieferumfang ................6
Anwendungshinweise ........................................................ 6
Elektrischer Anschluss .....................................................6
Sicherheitsschalter ...........................................................6
Gerät ein- / ausschalten ....................................................6
Kurzzeitbetrieb .................................................................6
Einstellung des Mahlgrades .............................................6
Einstellung für die Pulvermenge (Anzahl der Tassen) ....6
Restliche Kaffeebohnen ................................................... 6
Bedienung............................................................................7
Reinigung .............................................................................7
Abnehmbares Zubehör ....................................................7
Mahlwerk .......................................................................... 7
Motorgehäuse ..................................................................8
Aufbewahrung .....................................................................8
Störungsbehebung .............................................................8
Technische Daten ...............................................................8
Hinweis zur Richtlinienkonformität ..................................8
Garantie ................................................................................8
Garantiebedingungen ......................................................8
Garantieabwicklung .........................................................9
Entsorgung .......................................................................... 9
Bedeutung des Symbols „Mülltonne“ ...............................9
Allgemeine Hinweise
Lesen Sie vor Inbetriebnahme dieses Gerätes die Bedie-
nungsanleitung sehr sorgfältig durch und bewahren Sie diese
inkl. Garantieschein, Kassenbon und nach Möglichkeit den
Karton mit Innenverpackung gut auf. Falls Sie das Gerät an
Dritte weitergeben, geben Sie auch die Bedienungsanleitung
mit.
• Benutzen Sie das Gerät ausschließlich für den privaten
und den dafür vorgesehenen Zweck. Dieses Gerät ist
nicht für den gewerblichen Gebrauch bestimmt.
• Benutzen Sie das Gerät nicht im Freien. Halten Sie
es vor Hitze, direkte Sonneneinstrahlung, Feuchtigkeit
(auf keinen Fall in Flüssigkeiten tauchen) und scharfen
Kanten fern. Benutzen Sie das Gerät nicht mit feuchten
Händen. Bei feucht oder nass gewordenem Gerät sofort
den Netzstecker ziehen.
• Schalten Sie das Gerät aus und ziehen Sie immer
den Netzstecker aus der Steckdose (ziehen Sie am
Netzstecker, nicht am Kabel), wenn Sie das Gerät nicht
benutzen, Zubehörteile anbringen, zur Reinigung oder
bei Störung.
• Betreiben Sie das Gerät nicht unbeaufsichtigt. Sollten
Sie den Raum verlassen, schalten Sie das Gerät immer
aus. Ziehen Sie den Netzstecker aus der Steckdose.
• Das Gerät und das Netzkabel müssen regelmäßig auf
Zeichen von Beschädigungen untersucht werden. Wird
eine Beschädigung festgestellt, darf das Gerät nicht
mehr benutzt werden.
• Verwenden Sie nur Original-Zubehör.
• Zur Sicherheit Ihrer Kinder lassen Sie keine Verpackungs-
teile (Plastikbeutel, Karton, Styropor, etc.) erreichbar
liegen.
WARNUNG:
Lassen Sie kleine Kinder nicht mit Folie spielen.
Es besteht Erstickungsgefahr!
Spezielle Sicherheitshinweise für dieses Gerät
WARNUNG:
• Das Gerät ist bei nicht vorhandener Aufsicht und vor dem Zu-
sammenbau, dem Auseinandernehmen oder Reinigen stets
vom Netz zu trennen.

5
PC-EKM1205_IM 29.10.19
WARNUNG:
• Manipulieren Sie keine Sicherheitsschalter! Dieser Missbrauch
kann Verletzungen zur Folge haben.
• Dieses Gerät darf nicht von Kindern benutzt werden.
• Das Gerät und seine Anschlussleitung sind von Kindern fernzu-
halten.
• Kinder dürfen nicht mit dem Gerät spielen.
• Geräte können von Personen mit reduzierten physischen,
sensorischen oder mentalen Fähigkeiten oder Mangel an Erfah-
rung und / oder Wissen benutzt werden, wenn sie beaufsichtigt
werden oder bezüglich des sicheren Gebrauchs des Gerätes
unterwiesen wurden und die daraus resultierenden Gefahren
verstanden haben.
• Reparieren Sie das Gerät nicht selbst, sondern suchen Sie
einen autorisierten Fachmann auf. Wenn die Netzanschlusslei-
tung dieses Gerätes beschädigt wird, muss sie durch den Her-
steller oder seinen Kundendienst oder eine ähnlich qualizierte
Person ersetzt werden, um Gefährdungen zu vermeiden.
ACHTUNG:
Dieses Gerät ist nicht dazu bestimmt, bei der Reinigung in Was-
ser eingetaucht zu werden. Beachten Sie die Anweisungen, die
wir Ihnen im Kapitel „Reinigung“ dazu geben.
Bestimmungsgemäßer Gebrauch
Dieses Gerät dient zum Mahlen von gerösteten Kaffeeboh-
nen. Es ist nicht geeignet, Nüsse, Gewürze oder Ähnliches
zu mahlen.
Es ist für den Gebrauch im Haushalt und ähnlichen An-
wendungsbereichen vorgesehen. Es darf nur in der Art
und Weise benutzt werden, wie es in dieser Bedienungs-
anleitung beschrieben ist. Sie dürfen das Gerät nicht für
gewerbliche Zwecke einsetzen.
Jede andere Verwendung gilt als nicht bestimmungsgemäß
und kann zu Sachschäden oder sogar zu Personenschäden
führen.
Der Hersteller übernimmt keine Haftung für Schäden, die
durch nicht bestimmungsgemäßen Gebrauch entstehen.
Auspacken des Gerätes
1. Nehmen Sie das Gerät aus seiner Verpackung.
2. Entfernen Sie sämtliches Verpackungsmaterial, wie
Folien, Füllmaterial, Kabelhalter und Kartonverpackung.

6
PC-EKM1205_IM 29.10.19
3. Prüfen Sie den Lieferumfang auf Vollständigkeit.
4. Sollte der Verpackungsinhalt unvollständig oder Be-
schädigungen feststellbar sein, nehmen Sie das Gerät
nicht in Betrieb. Bringen Sie es umgehend zum Händler
zurück.
HINWEIS:
Am Gerät können sich noch Staub oder Produktionsreste
benden. Wir empfehlen Ihnen, das Gerät wie unter
„Reinigung“ beschrieben zu säubern.
Übersicht der Bedienelemente /
Lieferumfang
1 Deckel für den Kaffeebohnenbehälter
2 Behälter für die Kaffeebohnen (abnehmbar)
3 Verschluss des Mahlwerks (oberer Mahlkegel)
4 Mahlwerk
5 Hebel zur Einstellung des Mahlgrades
6 Symbolik zur Einstellung des Mahlgrades
7 Maßlöffel mit Reinigungspinsel
8 Motorgehäuse
9 Auffangbehälter für das Kaffeepulver (herausziehbar)
10 Deckel für den Auffangbehälter
11 Regler zur Einstellung für die Pulvermenge (Anzahl der
Tassen)
12 Kontrollleuchte
13 Ein- / Ausschalttaste
Anwendungshinweise
Elektrischer Anschluss
1. Bevor Sie den Netzstecker in die Steckdose stecken,
prüfen Sie, ob die Netzspannung, die Sie benutzen
wollen, mit der des Gerätes übereinstimmt. Die Angaben
dazu nden Sie auf dem Typenschild.
2. Schließen Sie das Gerät an eine vorschriftsmäßig instal-
lierte Schutzkontakt-Steckdose an. Die Kontrollleuchte
blinkt 3-mal.
Sicherheitsschalter
Das Gerät ist mit einem Sicherheitsschalter ausgestattet.
Es funktioniert nur, wenn der Behälter für die Kaffeebohnen
richtig montiert ist.
Gerät ein- / ausschalten
HINWEIS:
Das Gerät kann erst eingeschaltet werden, wenn eine
Einstellung für die Pulvermenge gewählt wurde.
• Drücken Sie die Taste . Die Kontrollleuchte leuchtet
kontinuierlich. Der Mahlvorgang beginnt.
• Der Mahlvorgang endet automatisch.
• Sie können den Mahlvorgang mit der Taste auch
jederzeit selbst beenden.
Kurzzeitbetrieb
Benutzen Sie das Gerät höchstens 5-mal unmittelbar hinter-
einander. Lassen Sie das Gerät vor weiterer Benutzung für
ca. 10 Minuten abkühlen.
Einstellung des Mahlgrades
Das Mahlwerk ist stufenweise von extra fein bis grob ein-
stellbar. Beachten Sie die Symbolik zur Einstellung des
Mahlgrades. Die kleinen Punkte bedeuten eine feine Ein-
stellung und die großen Punkte eine grobe Einstellung.
Wie fein oder grob Sie Ihren Kaffee mahlen, hängt von der
weiteren Verwendung des Kaffeepulvers ab. Die Sorte und
Röstung der Kaffeebohnen beeinussen zusätzlich den
Geschmack. Mit etwas Übung werden Sie herausnden,
welche Mahlgradeinstellung für Sie die Richtige ist. Fol-
gende Anhaltspunkte können wir Ihnen geben:
Mahlgradeinstellung Verwendung
Extra fein Espressomaschine
Fein Kaffeemaschine
Mittel Handlter
Grob French Press Kaffee
HINWEIS:
Vermeiden Sie Blockaden des Mahlwerks
Stellen Sie den Mahlgrad ein, wenn der Behälter für
Kaffeebohnen komplett leer ist oder erst während des
Mahlvorgangs.
Um den Mahlgrad zu verändern, schieben Sie den Hebel
auf die gewünschte Einstellung.
Einstellung für die Pulvermenge (Anzahl der Tassen)
Mit dem Regler bestimmen Sie die Menge an Kaffee, die
gemahlen wird. Achten Sie darauf, dass sich immer aus-
reichend Kaffeebohnen in dem Behälter für Kaffeebohnen
benden. Wählen Sie zwischen 2 und 12 Tassen Kaffee.
Die Kontrollleuchte blinkt.
Die Menge Kaffeepulver pro Tasse hängt von Ihrem persön-
lichen Geschmack, der Kaffeesorte und der Mahlgradein-
stellung ab.
HINWEIS: Tipp für Espresso
Mahlen Sie nur die Menge Kaffee, die Sie sofort ver-
wenden.
Restliche Kaffeebohnen
Entfernen Sie die Kaffeebohnen aus dem Gerät, wenn sie
älter als eine Woche sind. Sie haben ihr Aroma verloren und
mindern den Kaffeegeschmack.
TIPP:
Bewahren Sie Kaffeebohnen in einem verschlossenen,
luftundurchlässigen Behälter im Kühlschrank auf. So
bleibt der Kaffee länger aromatisch.

7
PC-EKM1205_IM 29.10.19
Bedienung
ACHTUNG:
Bevor Sie das Gerät benutzen, untersuchen Sie den Be-
hälter für Kaffeebohnen auf Fremdkörper und entfernen
Sie diese.
1. Setzen Sie den Behälter für die Kaffeebohnen auf das
Mahlwerk. Beachten Sie die Symbole. Setzen Sie den
Behälter mit dem Symbol über das Symbol am Ge-
rät. Drehen Sie den Behälter im Uhrzeigersinn bis zum
Anschlag fest. Er muss hörbar einrasten.
2. Setzen Sie den Auffangbehälter für das Kaffeepulver mit
dem Deckel bis zum Anschlag in das Motorgehäuse.
3. Stellen Sie mit dem Hebel den gewünschten Mahlgrad
ein.
4. Füllen Sie die Kaffeebohnen in den Behälter. Überfüllen
Sie den Behälter nicht.
5. Setzen Sie den Deckel auf den Behälter für die Kaffee-
bohnen.
6. Wählen Sie mit dem Regler die Anzahl der Tassen, für
die Sie Kaffeepulver gemahlen haben möchten.
7. Schalten Sie das Gerät mit der Taste ein. Die Kontroll-
leuchte leuchtet kontinuierlich.
HINWEIS:
Möchten Sie den Mahlvorgang vor Ablauf der Zeit be-
enden, drücken Sie die Taste .
8. Ist der Mahlvorgang beendet, blinkt die Kontrollleuchte
3-mal. Ziehen Sie den Auffangbehälter mit dem Kaffee-
pulver heraus. Entleeren Sie ihn.
9. Wenn Sie das Gerät nicht mehr benötigen, ziehen Sie
den Netzstecker aus der Steckdose.
Reinigung
WARNUNG:
• Ziehen Sie vor der Reinigung immer den Netzstecker aus der
Steckdose!
• Das Gerät auf keinen Fall zum Reinigen in Wasser tauchen.
Füllen Sie kein Wasser in den montierten Behälter für Kaffee-
bohnen. Es könnte zu einem elektrischen Schlag oder Brand
führen.
ACHTUNG:
• Benutzen Sie keine Drahtbürste oder andere scheu-
ernde Gegenstände.
• Benutzen Sie keine scharfen oder scheuernden
Reinigungsmittel.
• Reinigen Sie das Gerät regelmäßig. Kaffeebohnen
hinterlassen einen öligen Rückstand. Diese abgelagerten
Öle werden ranzig. Die ranzigen Öle beeinussen den
Geschmack Ihres Kaffees negativ.
• Espresso und andere dunkle Kaffeeröstungen haben
einen höheren Ölanteil, was eine häugere Reinigung
erfordert.
Abnehmbares Zubehör
1. Drehen Sie den Behälter für die Kaffeebohnen entgegen
dem Uhrzeigersinn, um ihn abzunehmen. Wischen Sie
ihn mit einem feuchten Tuch aus.
2. Den Auffangbehälter für das Kaffeepulver sowie die De-
ckel können Sie in einem warmen Spülbad reinigen.
3. Lassen Sie die Teile vollkommen trocknen, bevor Sie
diese wieder montieren.
4. Setzen Sie den Behälter für die Kaffeebohnen auf das
Mahlwerk. Beachten Sie die Symbole. Setzen Sie den
Behälter mit dem Symbol über das Symbol am Ge-
rät. Drehen Sie den Behälter im Uhrzeigersinn bis zum
Anschlag fest. Er muss hörbar einrasten.
5. Setzen Sie den Auffangbehälter für das Kaffeepulver mit
dem Deckel bis zum Anschlag in das Motorgehäuse.
Mahlwerk
1. Lösen Sie den Verschluss des Mahlwerks mit einer
kleinen Drehung gegen den Uhrzeigersinn. Nehmen Sie
ihn heraus.
HINWEIS:
Dieser Vorgang könnte durch verklemmte Bohnenreste
schwergängig sein.
2. Reinigen Sie den oberen Mahlkegel mit dem Reini-
gungspinsel.

8
PC-EKM1205_IM 29.10.19
3. Anhaftendes Pulver im Mahlwerk lösen Sie auch mit
dem Reinigungspinsel. Um die Reste von Kaffeepulver
aus dem Mahlwerk zu entfernen, nehmen Sie einen
Staubsauger zur Hilfe.
4. Setzen Sie den Verschluss des Mahlwerks wieder ein.
Drehen Sie ihn ein kleines Stück im Uhrzeigersinn bis
zum Anschlag.
Motorgehäuse
Zur äußeren Reinigung des Gehäuses benutzen Sie nur ein
feuchtes Spültuch mit ein wenig Handspülmittel.
Aufbewahrung
• Reinigen Sie das Gerät wie beschrieben. Lassen Sie das
Zubehör vollständig trocknen.
• Wir empfehlen, das Gerät in der Original-Verpackung
aufzubewahren, wenn Sie es über einen längeren Zeit-
raum nicht benutzen möchten.
• Lagern Sie das Gerät immer außerhalb der Reichweite
von Kindern an einem gut belüfteten und trockenen Ort.
Störungsbehebung
Störung Mögliche Ursache Abhilfe
Das Gerät ist ohne
Funktion.
Das Gerät hat keine Stromversorgung. Überprüfen Sie die Steckdose mit einem anderen
Gerät.
Ihr Gerät ist mit einem Sicherheits-
schalter versehen. Dieser verhindert das
unbeabsichtigte Anlaufen des Motors.
Stellen Sie sicher Sie, dass der Behälter für die
Kaffeebohnen richtig montiert ist.
Der Überhitzungs schutz ist aktiviert.
Der Motor ist zu heiß.
Lassen Sie das Gerät für mindestens 30 Minuten
abkühlen, bevor Sie neu starten.
Das Gerät ist defekt. Wenden Sie sich an unseren Service oder an
einen Fachmann.
• Das Gerät stoppt un-
erwartet den Betrieb.
• Der Mahlgrad lässt sich
nicht verstellen.
Es hat sich eine Kaffeebohne verklemmt. 1. Ziehen Sie den Netzstecker aus der Steck-
dose!
2. Ziehen Sie den Auffangbehälter heraus.
3. Entfernen Sie die restlichen Kaffeebohnen.
4. Nehmen Sie den Behälter für die Kaffeebohnen
und den Verschluss für das Mahlwerk ab, wie
unter „Reinigung“ beschrieben.
5. Entfernen Sie die verklemmte Kaffeebohne oder
den Fremdkörper.
Das Mahlwerk ist durch einen Fremd-
körper blockiert.
Technische Daten
Modell: ............................................................. PC-EKM 1205
Spannungsversorgung: ......................220 - 240 V~, 50 - 60 Hz
Leistungsaufnahme:......................................................200 W
Schutzklasse: .......................................................................
Nettogewicht: .........................................................ca. 1,93 kg
Technische und gestalterische Änderungen im Zuge stetiger
Produktentwicklungen vorbehalten.
Hinweis zur Richtlinienkonformität
Hiermit erklärt der Hersteller, dass sich das Gerät
PC-EKM 1205 in Übereinstimmung mit den folgenden
Anforderungen bendet:
• Europäische Niederspannungsrichtlinie 2014 / 35 / EU
• EU-Richtlinie für elektromagnetische Verträglichkeit
2014 / 30 / EU
• Ökodesign Richtlinie 2009 / 125 / EG
• RoHS-Richtlinie 2011 / 65 / EU & (EU) 2015 / 863
Garantie
Garantiebedingungen
1. Gegenüber Verbrauchern gewähren wir bei privater
Nutzung des Geräts eine Garantie von 24 Monaten ab
Kaufdatum.
Ist das Gerät zur gewerblichen Nutzung geeignet, ge-
währen wir beim Kauf durch Unternehmer für das Gerät
eine Garantie von 12 Monaten.
Die Garantiezeit für Verbraucher reduziert sich auf
12 Monate, sofern sie ein zur gewerblichen Nutzung ge-
eignetes Gerät – auch teilweise – gewerblich nutzen.
2. Voraussetzung für unsere Garantieleistungen sind der
Kauf des Geräts in Deutschland bei einem unserer Ver-
tragshändler sowie die Übersendung einer Kopie des
Kaufbelegs und dieses Garantiescheins an uns.
3. Bendet sich das Gerät zum Zeitpunkt des Garantiefalls
im Ausland, muss es auf Kosten des Käufers uns zur

9
PC-EKM1205_IM 29.10.19
Erbringung der Garantieleistungen zur Verfügung gestellt
werden.
4. Mängel müssen innerhalb von 14 Tagen nach Erkenn-
barkeit uns gegenüber schriftlich angezeigt werden.
Besteht der Garantieanspruch zu Recht, entscheiden wir,
auf welche Art der Schaden / Mangel behoben werden
soll, ob durch Reparatur oder durch Austausch eines
gleichwertigen Geräts.
5. Garantieleistungen werden nicht für Mängel erbracht, die
auf der Nichtbeachtung der Gebrauchsanweisung, un-
sachgemäßer Behandlung oder normaler Abnutzung des
Geräts beruhen. Garantieansprüche sind ferner ausge-
schlossen für leicht zerbrechliche Teile, wie zum Beispiel
Glas oder Kunststoff. Schließlich sind Garantieansprüche
ausgeschlossen, wenn nicht von uns autorisierte Stellen
Arbeiten an dem Gerät vornehmen.
6. Durch Garantieleistungen wird die Garantiezeit nicht
verlängert. Es besteht auch kein Anspruch auf neue
Garantieleistungen. Diese Garantieerklärung ist eine
freiwillige Leistung von uns als Hersteller des Geräts.
Die gesetzlichen Gewährleistungsrechte (Nacherfüllung,
Rücktritt, Schadensersatz und Minderung) werden durch
diese Garantie nicht berührt.
Stand 06 2012
Garantieabwicklung
24 Stunden am Tag, 7 Tage in der Woche
Sollte Ihr Gerät innerhalb der Garantiezeit einen Mangel
aufweisen, steht Ihnen die schnellste und komfortabelste
Möglichkeit der Reklamationsanmeldung über unser SLI -
Internet-Serviceportal zur Verfügung.
www.sli24.de
Bitte melden Sie direkt den Servicevorgang auf unserem
Online Serviceportal www.sli24.de an. Sie erhalten wenige
Sekunden nach Abschluss der Anmeldung ein kostenloses
Versandticket per E-Mail übermittelt. Zusätzlich erhalten Sie
weitere Informationen zur Abwicklung Ihrer Reklamation.
Mit Ihren persönlichen Zugangsdaten, die direkt nach Ihrer
Anmeldung per E-Mail an Sie übermittelt werden, können
Sie den Status Ihres Vorgangs auf unserem Serviceportal
www.sli24.de online verfolgen.
Sie brauchen das kostenlose Versandticket nur noch auf die
Verpackung Ihres gut verpackten Gerätes zu kleben und
das Paket bei der nächsten Annahmestelle der Deutschen
Post / DHL abzugeben. Der Versand erfolgt für Sie kostenlos
an unser Servicecenter bzw. Servicepartner.
So einfach kann Service sein!
1. Anmelden
2. Einpacken
3. Ab zur Post damit
Fertig, so einfach geht es!
Bitte vergessen Sie nicht, dem Gerät eine Kopie Ihres
Kaufbeleges (Kassenbon, Rechnung, Lieferschein) als Ga-
rantienachweis beizulegen, da wir sonst keine kostenlosen
Garantieleistungen erbringen können.
Unser Serviceportal www.sli24.de bietet Ihnen weitere
Leistungen an:
• Downloadbereich für Bedienungsanleitungen
• Downloadbereich für Firmwareupdates
• FAQ‘s, die Ihnen Problemlösungen anbieten
• Kontaktformular
• Zugang zu unseren Zubehör- und Ersatzteile-Webshops
Auch nach der Garantie sind wir für Sie da! – Kosten-
günstige Reparaturen zum Festpreis!
Bitte nehmen Sie in keinem Fall eine unfreie Einsendung
Ihres Gerätes vor. Unfreie Lieferungen werden von uns
nicht angenommen. Es entstehen Ihnen damit erhebliche
Kosten.
Stand 06 2012
Entsorgung
Bedeutung des Symbols „Mülltonne“
Schonen Sie unsere Umwelt, Elektrogeräte ge-
hören nicht in den Hausmüll.
Nutzen Sie die für die Entsorgung von Elektro-
geräten vorgesehenen Sammelstellen und
geben dort Ihre Elektrogeräte ab, die Sie nicht
mehr benutzen werden.
Sie helfen damit die potenziellen Auswirkungen, durch
falsche Entsorgung, auf die Umwelt und die menschliche
Gesundheit zu vermeiden.
Sie leisten damit Ihren Beitrag zur Wiederverwertung, zum
Recycling und zu anderen Formen der Verwertung von
Elektro- und Elektronik-Altgeräten.
Informationen, wo die Geräte zu entsorgen sind, erhalten
Sie über Ihre Kommunen oder die Gemeindeverwaltungen.

PC-EKM1205_IM 29.10.19
10
Gebruiksaanwijzing
Dank u voor het kiezen van ons product. Wij hopen dat u
het gebruik van het apparaat zult genieten.
Symbolen in deze gebruiksaanwijzing
Belangrijke aanwijzingen voor uw veiligheid zijn speciaal
gekenmerkt. Neem deze aanwijzingen strikt in acht om
ongevallen en schade aan het apparaat te vermijden:
WAARSCHUWING:
Waarschuwt voor gevaren voor uw gezondheid en toont
mogelijk letsel risico’s.
LET OP:
Wijst op mogelijke gevaren voor het apparaat of andere
voorwerpen.
OPMERKING:
Kenmerkt tips en informatie voor u.
Inhoud
Overzicht van de bedieningselementen ...........................3
Algemene opmerkingen ................................................... 10
Speciale veiligheidsinstructies voor dit apparaat ........10
Beoogd gebruik .................................................................11
Het apparaat uitpakken .................................................... 11
Overzicht van de bedieningselementen /
Omvang van levering .......................................................12
Opmerkingen voor het gebruik .......................................12
Elektrische aansluiting ...................................................12
Veiligheidsschakelaar ....................................................12
Apparaat aan- / uitschakelen .......................................... 12
Kort gebruiken ................................................................ 12
Instellen van de maling ..................................................12
Regelaar voor het instellen
van de hoeveelheid kofe (aantal kopjes) .....................12
Overgebleven kofebonen ............................................. 12
Bediening ...........................................................................12
Reiniging ............................................................................ 13
Verwijderbare accessoires ............................................. 13
Molen ..............................................................................13
Motorbehuizing ...............................................................13
Bewaren .............................................................................13
Probleemoplossing ..........................................................14
Technische gegevens .......................................................14
Verwijdering .......................................................................14
Betekenis van het symbool “vuilnisemmer” ................... 14
Algemene opmerkingen
Lees vóór de ingebruikname van dit apparaat de handlei-
ding uiterst zorgvuldig door en bewaar deze goed, samen
met het garantiebewijs, de kassabon en zo mogelijk de
doos met de binnenverpakking. Geef ook de handleiding
mee wanneer u de machine aan derden doorgeeft.
• Gebruik het apparaat uitsluitend privé en uitsluitend
voor de voorgeschreven toepassing. Dit apparaat is niet
geschikt voor commercieel gebruik.
• Gebruik het apparaat niet buiten. Bescherm het tegen
hitte, directe zonnestralen, vocht (in geen geval in
vloeistoffen dompelen) en scherpe randen. Gebruik
het apparaat niet met vochtige handen. Bij vochtig of
nat geworden apparaat onmiddellijk de stroomtoevoer
onderbreken.
• Schakel het apparaat uit en onderbreek altijd de stroom-
toevoer (trek aan de stekker, niet aan de kabel) wanneer
u het apparaat niet gebruikt, hulpstukken aanbrengt,
reinigt of wanneer storingen optreden.
• Laat het ingeschakelde apparaat niet zonder toezicht
werken. Schakel het apparaat altijd uit voordat u de
ruimte verlaat. Trek de netstekker uit de contactdoos.
• Het apparaat en de netkabel moeten regelmatig op zicht-
bare schade worden gecontroleerd. Wanneer u schade
vaststelt, mag het apparaat niet meer worden gebruikt.
• Gebruik alleen originele reserveonderdelen.
• Laat om veiligheidsredenen geen verpakkingsdelen
(plasticzak, doos, piepschuim, enz.) binnen het bereik
van uw kinderen liggen.
WAARSCHUWING:
Laat kleine kinderen niet met de folie spelen. Er be-
staat gevaar voor verstikking!
Speciale veiligheidsinstructies voor dit apparaat
WAARSCHUWING:
• Altijd de stekker uit het stopcontact verwijderen wanneer het ap-
paraat niet wordt gebruikt en wordt gemonteerd, gedemonteerd
of gereinigd.

PC-EKM1205_IM 29.10.19
11
WAARSCHUWING:
• Probeer de veiligheidsschakelaars niet te manipuleren! Dit mis-
bruik kan tot verwondingen leiden.
• Dit apparaat mag niet worden gebruikt door kinderen.
• Het apparaat en het netsnoer buiten bereik van kinderen hou-
den.
• Kinderen dienen niet met het apparaat te spelen.
• Apparaten kunnen worden gebruikt door personen met vermin-
derde fysieke, zintuiglijke of geestelijke vermogens, of gebrek
aan ervaring en / of kennis, mits onder toezicht of na aanwijzin-
gen met betrekking tot het veilige gebruik van het apparaat en
zij de gevaren die hiermee gepaard gaan, begrijpen.
• Repareer het apparaat niet zelf. Neem altijd contact op met een
erkende monteur. Als de stroomkabel is beschadigd, moet deze
door de fabrikant, zijn dealer of vergelijkbare, erkende personen
vervangen worden om gevaar te vermijden.
LET OP:
Dompel het apparaat niet in water om het schoon te maken. Volg
de instructies zoals vermeld in het hoofdstuk “Reiniging”.
Beoogd gebruik
Dit apparaat is ontworpen voor het malen van geroosterde
kofebonen. Het is niet geschikt om noten, kruiden of
dergelijke te malen.
Het is bedoeld voor huishoudelijk en soortgelijk gebruik. Het
mag alleen gebruikt worden waarvoor het bedoeld is, zoals
beschreven in deze handleiding. Het apparaat mag niet
voor commerciële doeleinden worden gebruikt.
Leder ander gebruik wordt gezien als niet waarvoor het
bedoeld is, en kan leiden tot schade aan goederen of
verwondingen.
De fabrikant is niet aansprakelijk voor schade veroorzaakt
door onjuist gebruik.
Het apparaat uitpakken
1. Verwijder het apparaat uit de verpakking.
2. Verwijder alle verpakkingsmaterialen zoals folies, vulma-
terialen, kabelbinders en karton.
3. Controleer of de inhoud van de levering compleet is.
4. Indien de inhoud van het pakket onvolledig is of er
beschadigingen worden gevonden, neem het apparaat
dan niet in gebruik. Breng het onmiddellijk terug naar de
leverancier.
OPMERKING:
Er is mogelijk wat stof of productieresten op het apparaat
te vinden. We raden u aan om het apparaat te reinigen,
zoals beschreven onder “Reiniging”.

PC-EKM1205_IM 29.10.19
12
Overzicht van de bedieningselementen /
Omvang van levering
1 Deksel voor de kofebonenhouder
2 Houder voor de kofebonen (afneembaar)
3 Vergrendeling van de molen (bovenste maalkegel)
4 Molen
5 Hendel voor het instellen van de maling
6 Symbolen voor instellen van de maling
7 Maatlepel met reinigingsborsteltje
8 Motorbehuizing
9 Opvangbak voor de gemalen kofe (kan uitgenomen
worden)
10 Deksel voor de opvangbak
11 Regelaar voor het instellen van de hoeveelheid kofe
(aantal kopjes)
12 Controlelampje
13 Aan / uit toets
Opmerkingen voor het gebruik
Elektrische aansluiting
1. Controleer of de netspanning die u wilt gebruiken over-
eenkomt met die van het apparaat. U vindt de informatie
ervan op het typeplaatje.
2. Sluit het apparaat alleen aan op een volgens de voor-
schriften geïnstalleerd geaard stopcontact. Het controle-
lampje knippert 3 maal.
Veiligheidsschakelaar
Uw apparaat is uitgerust met een veiligheidsschakelaar.
Deze werkt alleen als de houder voor de kofebonen
correct geplaatst is.
Apparaat aan- / uitschakelen
OPMERKING:
Het apparaat kan niet ingeschakeld worden tot er een
hoeveelheid kofe is ingesteld.
• Druk op de toets. Het controlelampje brandt continu.
Het malen start.
• Het malen stopt automatisch.
• U kunt het malen ook stoppen met de toets wanneer
u wilt.
Kort gebruiken
Gebruik het toestel alleen in onmiddellijk opvolgende beur-
ten voor maximaal 5 keer. Laat het toestel gedurende onge-
veer 10 minuten afkoelen voordat u het opnieuw gebruikt.
Instellen van de maling
De molen is geleidelijk instelbaar van extra jn tot grof. Let
op de symbolen voor instellen van de maling. De kleine
stippen houden een jne maling in en de grote een grove
maling.
Hoe jn of grof u de kofe maalt hangt af van het verdere
gebruik van het kofepoeder. Het soort kofebonen en het
roosterproces hebben ook invloed op de smaak. Met een
beetje proberen zult u er achter komen welke instelling voor
u de juiste is. We kunnen u de volgende indicaties geven:
Maling Gebruik
Extra jn Espresso machine
Fijn Kofezetapparaat
Gemiddeld Hand lter
Grof Perskofe
OPMERKING: Voorkom blokkeren van de molen
Stel de maling in als de houder voor kofebonen helemaal
leeg is of alleen tijdens het malen.
Om de maling te wijzigen, beweegt u de hendel naar de
gewenste instelling.
Regelaar voor het instellen van de hoeveelheid kofe
(aantal kopjes)
Gebruik de schuifregelaar om het aantal kppjes in te stellen
waarvoor kofe gemalen wordt. Zorg dat er altijd genoeg
kofebonen in de houder voor de bonen zit. Kies een aantal
tussen 2 en 12 kopjes kofe. Het controlelampje gaat
knipperen.
De hoeveelheid kofepoeder per kopje hangt af van uw
persoonlijke smaak, het soort kofe en de maling.
OPMERKING: Tip voor espresso
Maal alleen de hoeveelheid kofe die u ook meteen
gebruikt.
Overgebleven kofebonen
Haal de kofebonen uit het apparaat als ze ouder zijn dan
een week. Ze hebben hun aroma verloren en verminderen
de smaak van de kofe.
TIP:
Bewaar kofebonen in een afgesloten, luchtdichte houder
in de koelkast. Op deze manier blijft de kofe langer
aromatisch.
Bediening
LET OP:
Voor u het apparaat gaat gebruiken inspecteert u de
bonenhouder op ongerechtigheden en verwijdert deze.
1. Plaats de houder voor de kofebonen op de molen. Let
op de symbolen. Plaats de houder met het symbool
boven het symbool op het apparaat. Draai de
houder rechtsom totdat deze stopt. Hij moet hoorbaar
vastklikken.
2. Plaats de houder voor gemalen kofe met het deksel in
de motorbehuizing tot deze stopt.

PC-EKM1205_IM 29.10.19
13
3. Pas de gewenste maling aan met de hendel.
4. Doe de kofebonen in de houder. Doe niet teveel in de
houder!
5. Plaats het deksel op de houder voor de kofebonen.
6. Gebruik de schuifregelaar om het aantal kopjes kofe
waarvoor u de kofe wilt malen te selecteren.
7. Zet hetapparaat aan met de toets. Het controlelampje
brandt continu.
OPMERKING:
Als u het malen wilt stoppen voordat de ingestelde tijd
is vestreken, drukt u op de toets.
8. Als het malen klaar is, knippert het controlelampje
3 maal. Neem de opvangbak met de gemalen kofe uit.
Leeg deze.
9. Trek de stekker uit het stopcontact wanneer u het appa-
raat niet gebruikt.
Reiniging
WAARSCHUWING:
• Verwijder altijd de stekker uit het stopcontact voor het reinigen.
• Dompel het apparaat nooit in water onder voor het reinigen.
Giet geen water in de gemonteerde houder voor kofebonen.
Dit kan elektrische schokken of brand veroorzaken.
LET OP:
• Gebruik geen staalborstels of andere schurende
voorwerpen.
• Gebruik geen bijtende of schurende schoonmaakmid-
delen.
• Reinig het apparaat regelmatig. Kofebonen laten een
olieachtig residu achter. Dit residu wordt ranzig. Deze
ranzige olie beïnvloedt de smaak van de kofe negatief.
• Espresso en andere donkere kofeblends bevatten meer
olie, waardoor er vaker gereinigd moet worden.
Verwijderbare accessoires
1. Draai de kofebonenhouder linksom om deze te verwij-
deren. Veeg het af met een vochtige doek.
2. Reinig de houder voor de gemalen kofe en deksels in
warm water.
3. Laat de onderdelen volledig drogen voor u ze terug-
plaatst.
4. Plaats de houder voor de kofebonen op de molen. Let
op de symbolen. Plaats de houder met het symbool
boven het symbool op het apparaat. Draai de
houder rechtsom totdat deze stopt. Hij moet hoorbaar
vastklikken.
5. Plaats de houder voor gemalen kofe met het deksel in
de motorbehuizing tot deze stopt.
Molen
1. Maak de vergrendeling van de molen linksom los met
een lichte draai. Verwijder deze.
OPMERKING:
Dit kan lastig gaan door achterblijvende vastzittende
bonenresten.
2. Reinig de bovenste maalkegel met het reinigingsbor-
steltje.
3. Verwijder achtergebleven poeder in de molen met het
reinigingsborsteltje. Gebruik een stofzuiger om achterge-
bleven kofepoeder uit het maalgedeelte te verwijderen.
4. Plaats de vergrendeling van de molen terug. Draai deze
rechtsom totdat hij stopt.
Motorbehuizing
Gebruik voor het reinigen van de behuizing alleen een
vochtige lap en milde schoonmaakmiddelen.
Bewaren
• Reinig het apparaat volgens de aanwijzingen. Laat de
accessoires volledig drogen.
• Wij raden aan om het apparaat in de oorspronkelijke
verpakking te bewaren wanneer u het voor een langere
tijd niet wilt gebruiken.
• Berg het apparaat altijd buiten bereik van kinderen op en
op een goed geventileerde, droge plek.

PC-EKM1205_IM 29.10.19
14
Probleemoplossing
Probleem Mogelijke oorzaak Oplossing
Het apparaat functio-
neert niet.
Het apparaat heeft geen stroomtoevoer. Controleer het stopcontact met een ander apparaat.
Uw apparaat is uitgerust met een veilig-
heidsschakelaar. Dit voorkomt het per
ongeluk starten van de motor.
Zorg dat de houder voor de kofebonen correct
geplaatst is.
De beveiliging tegen oververhitting werd
ingeschakeld. De motor is te warm.
Laat het apparaat tenminste 30 minuten afkoelen
voordat u het opnieuw aanzet.
Het apparaat is defect. Raadpleeg onze klantenservice of met een specialist.
• Het apparaat stopt
onverwacht.
• De maling kan niet
ingesteld worden.
Er zit een kofeboon vast. 1. Trek de stekker uit het stopcontact!
2. Neem de opvangbak uit.
3. Verwijder de overgebleven kofebonen.
4. Verwijder de houder voor de kofebonen en de
vergrendeling voor de molen als beschreven bij
“Reiniging”.
5. Verwijder de vastzittende kofeboon of andere
ongerechtigheid.
De molen is geblokkeerd door een onge-
rechtigheid.
Technische gegevens
Model:.............................................................. PC-EKM 1205
Spanningstoevoer: ............................. 220 - 240 V~, 50 - 60 Hz
Elektriciteitsverbruik: .....................................................200 W
Beschermingsklasse: ...........................................................
Nettogewicht: ...................................................... ong. 1,93 kg
Het recht om technische en ontwerpaanpassingen te ma-
ken in de loop van voortdurende productontwikkeling blijft
voorbehouden.
Dit apparaat voldoet aan alle huidige CE-richtlijnen,
zoals de richtlijn elektromagnetische compatibiliteit en de
laagspanningsrichtlijn, en is gefabriceerd volgens de meest
recente veiligheidsvoorschriften.
Verwijdering
Betekenis van het symbool “vuilnisemmer”
Bescherm ons milieu, elektrische apparaten
horen niet in het huisafval.
Maak voor het afvoeren van elektrische
apparaten gebruik van de voorgeschreven
verzamelpunten en geef daar de elektrische
apparaten af die u niet meer gebruikt.
Daardoor helpt u de potentiële effecten te voorkomen
die een verkeerde afvoer op het milieu en de menselijke
gezondheid kunnen hebben.
Op deze wijze levert u uw bijdrage aan het hergebruik, de
recycling en andere verwerkingsvormen voor oude elektro-
nische en elektrische apparaten.
Voor informatie over verzamelpunten voor uw apparaten
kunt u contact opnemen met uw gemeente of gemeentead-
ministratie.

PC-EKM1205_IM 29.10.19
15
Mode d’emploi
Merci d’avoir choisi notre produit. Nous espérons que vous
saurez proter votre appareil.
Symboles de ce mode d’emploi
Les informations importantes pour votre sécurité sont
particulièrement indiquées. Veillez à bien respecter ces
indications an d’éviter tout risque d’accident ou d’endom-
magement de l’appareil :
AVERTISSEMENT :
Prévient des risques pour votre santé et des risques
éventuels de blessure.
ATTENTION :
Indique les risques pour l’appareil ou tout autre appareil.
NOTE :
Attire votre attention sur des conseils et informations.
Sommaire
Liste des différents éléments de commande ..................3
Notes générales ................................................................15
Conseils de sécurité spéciques à cet appareil ...........15
Utilisation conforme .........................................................16
Déballage de l’appareil ..................................................... 16
Liste des différents éléments de commande /
Contenu de la livraison ....................................................17
Notes d’utilisation ............................................................. 17
Branchement électrique ................................................. 17
Interrupteur de sécurité .................................................. 17
Marche / arrêt l’appareil ..................................................17
Utilisation dans une courte période ...............................17
Régler la nesse de mouture ......................................... 17
Réglage de la quantité de poudre de café
(en nombre de tasses) ...................................................17
Grains de café restants .................................................. 17
Utilisation ........................................................................... 17
Nettoyage ...........................................................................18
Accessoires amovibles ..................................................18
Moulin ............................................................................. 18
Boîtier du moteur ............................................................18
Rangement ........................................................................18
Dépannage .........................................................................19
Données techniques .........................................................19
Élimination .........................................................................19
Signication du symbole « Poubelle » ........................... 19
Notes générales
Lisez attentivement ce mode d’emploi avant de mettre l’ap-
pareil en marche pour la première fois. Conservez le mode
d’emploi ainsi que le bon de garantie, votre ticket de caisse
et si possible, le carton avec l’emballage se trouvant à
l’intérieur. Si vous remettez l’appareil à des tiers, veuillez-le
remettre avec son mode d’emploi.
• N’utilisez cet appareil que pour un usage privé et pour
les taches auxquelles il est destiné. Cet appareil n’est
pas prévu pour une utilisation professionnelle.
• Ne l’utilisez pas en plein air. Protégez-le de la chaleur,
des rayons directs du soleil, de l’humidité (ne le plongez
en aucun cas dans l’eau) et des objets tranchants.
N’utilisez pas cet appareil avec des mains humides. S’il
arrive que de l’humidité ou de l’eau atteignent l’appareil,
débranchez aussitôt le câble d’alimentation.
• Arrêtez l’appareil et débranchez toujours le câble d’ali-
mentation de la prise de courant (en tirant sur la che et
non pas sur le câble) si vous n’utilisez pas l’appareil, si
vous installez les accessoires, pour le nettoyage ou en
cas de panne.
• Ne laissez jamais fonctionner l’appareil sans surveil-
lance. Lorsque vous quittez la pièce, toujours arrêter
l’appareil. Débranchez la che de la prise.
• Il y a lieu d’inspecter l’appareil et le bloc d’alimentation
régulièrement en vue d’éventuels signes d’endom-
magements. Lorsqu’un endommagement est détecté,
l’appareil ne doit plus être utilisé.
• N’utilisez que les accessoires d’origine.
• Par mesure de sécurité vis-à-vis des enfants, ne
laissez pas les emballages (sac en plastique, carton,
polystyrène) à leur portée.
AVERTISSEMENT :
Ne pas laisser les jeunes enfants jouer avec le lm
plastique. Il y a risque d’étouffement !
Conseils de sécurité spéciques à cet appareil
AVERTISSEMENT :
• Débranchez toujours l’appareil de l’alimentation s’il est laissé
sans surveillance et avant de le monter, démonter ou nettoyer.

PC-EKM1205_IM 29.10.19
16
AVERTISSEMENT :
• Ne manipuler les interrupteurs de sécurité ! Une utilisation incor-
recte peut entraîner des blessures.
• Cet appareil ne doit pas être utilisé par des enfants.
• Conservez l’appareil et son cordon hors de portée des enfants.
• Les enfants ne doivent pas jouer avec l’appareil.
• Cet appareil peut être utilisé par des personnes ayant des
capacités mentales ou sensorielles réduites, un niveau de
connaissances ou d’expérience limité, tant qu’elles le font sous
surveillance, ou qu’elles ont reçu des instructions d’utilisation de
l’appareil pour leur sécurité et qu’elles comprennent les risques
possibles.
• Ne réparez pas vous-même l’appareil. Contactez toujours un
technicien agrée. Si le cordon d’alimentation est endommagé, il
doit être remplacé par le fabricant, son agent de service ou des
personnes ayant qualité semblable an d’éviter un risque.
ATTENTION :
Ne plongez pas l’appareil dans l’eau pour le nettoyer. Veuillez
suivre les consignes comme stipulées au chapitre « Nettoyage ».
Utilisation conforme
Cet appareil est conçu pour moudre des grains de café
grillés. Il n’est pas adapté pour moudre les noix, les épices
ou autres.
Cet appareil est destiné à un usage domestique ou simi-
laire. Il peut être utilisé uniquement tel qu’il est décrit dans
ce mode d’emploi. Cet appareil ne doit pas être utilisé pour
dans le cadre industriel.
Tout autre utilisation est considérée comme inadéquate et
peut causer des dommages au bien ou même des bles-
sures physiques.
Le fabricant n’assure aucune responsabilité pour les pertes
causes par un usage autre que celui auquel cet appareil
est destiné.
Déballage de l’appareil
1. Retirez l’appareil de son emballage.
2. Retirez la totalité du matériau d’emballage, tel que les
lms, le rembourrage, les supports de câble et le carton.
3. Vériez l’intégralité du contenu de livraison.
4. Si des éléments sont manquants ou endommagés,
n’utilisez pas l’appareil. Renvoyez-le immédiatement au
vendeur.
NOTE :
Il se peut de la poussière ou des résidus de fabrication
demeurent dans l’appareil. Nous vous conseillons de
nettoyer l’appareil comme décrit sous « Nettoyage ».

PC-EKM1205_IM 29.10.19
17
Liste des différents éléments de
commande / Contenu de la livraison
1 Couvercle du réservoir de grains de café
2 Réservoir des grains de café (amovible)
3 Verrouillage pour le moulin (cône de mouture supérieur)
4 Moulin
5 Levier de sélection de la nesse de mouture
6 Symboles d’indication de la nesse de mouture
7 Cuillère à mesurer avec brosse de nettoyage
8 Boîtier du moteur
9 Réservoir de récupération pour la poudre de café (peut
être retiré)
10 Couvercle pour le réservoir de récupération
11 Sélecteur de réglage de la quantité de poudre de café
(en nombre de tasses)
12 Voyant de commande
13 Bouton marche / arrêt
Notes d’utilisation
Branchement électrique
1. Vériez que la tension électrique que vous souhaitez
utiliser, corresponde à celle de l’appareil. Vous trouverez
les informations sur son sujet sur la plaque signalétique.
2. Branchez l’appareil uniquement dans une prise de cou-
rant en bon état. Le voyant de commande clignote 3 fois.
Interrupteur de sécurité
Votre appareil est muni d’un interrupteur de sécurité. Il ne
fonctionne que si le réservoir des grains de café est correc-
tement installé.
Marche / arrêt l’appareil
NOTE :
L’appareil ne peut pas être allumé tant qu’un réglage de
volume de poudre n’a pas été sélectionné.
• Appuyez sur le bouton . Le voyant de contrôle s’illu-
mine en continu. Le processus de mouture commence.
• Le processus de mouture nit automatiquement.
• Vous pouvez également terminer le processus de mou-
ture avec le bouton quand vous le souhaitez.
Utilisation dans une courte période
N’utilisez l’appareil que 5 fois en rapide succession au
maximum. Laissez l’appareil refroidir pendant environ
10 minutes avant de l’utiliser à nouveau.
Régler la nesse de mouture
Le moulin est réglable à différents niveaux pour obtenir une
mouture extra ne à grossière. Observez les symboles d’in-
dication de la nesse de mouture Les petits points indiquent
que la mouture sera ne, de gros points indiquent que le
réglage grossier est sélectionné.
Sélectionnez la nesse de la mouture selon l’utilisation
que vous ferez de la poudre de café. Le type des grains
de café, ainsi que le processus de cuisson de ces derniers
inuencent également le goût du café. Avec un peu de
pratique, vous déterminerez quel réglage est adapté pour
vos besoins. Nous pouvons cependant vous donner les
conseils suivants :
Réglage de mouture Utilisation
Extra ne Machine à expresso
Fine Machine à café
Moyenne Filtré à la main
Grossière Machine à piston
NOTE : Évitez d’obstruer le moulin
Réglez le degré de mouture lorsque le réservoir à grains
de café est complètement vide, ou pendant le processus
de mouture.
Pour modier la nesse de la mouture, faites glisser le levier
sur le réglage désiré.
Réglage de la quantité de poudre de café (en nombre
de tasses)
Utilisez le levier coulissant pour dénir la quantité de café
que vous souhaitez moudre. Assurez-vous que le réservoir
à grains de café contient toujours sufsamment de grains.
Choisissez entre 2 et 12 tasses de café. Le voyant de
commande clignotera.
La quantité de poudre de café par tasse dépend de vos
goûts, le type de café et le réglage de la nesse.
NOTE : Conseil pour faire un expresso
Ne moudre que la quantité de café que vous allez utiliser
immédiatement.
Grains de café restants
Retirez les grains de café de l’appareil, si ces derniers sont
vieux de plus d’une semaine. Ils auront perdu leur arôme et
le goût du café en sera réduit.
CONSEIL :
Stockez les grains de café dans un conteneur scellé et
hermétique dans le réfrigérateur. De cette manière, le
café garde son goût plus longtemps.
Utilisation
ATTENTION :
Avant d’utiliser l’appareil, inspectez le réservoir de grains
de café et retirez-en les débris le cas échéant.
1. Installez le réservoir des grains de café sur le moulin.
Respectez le sens de symboles. Positionnez le réservoir
avec le symbole positionné au-dessus du symbole
sur l’appareil. Faites tourner le réservoir dans le sens

PC-EKM1205_IM 29.10.19
18
horaire jusqu’à ce qu’il s’emboîte. Il doit s’enclencher en
émettant un bruit.
2. Placez le réservoir à café moulu avec le couvercle sur le
boîtier du moteur jusqu’à ce qu’il s’emboîte.
3. Réglez la nesse de mouture avec le levier.
4. Ajoutez les grains de café dans le réservoir. Ne remplis-
sez pas trop le réservoir.
5. Installez le couvercle sur le réservoir de grains de café.
6. Utilisez le sélecteur pour dénir le nombre de tasses
pour lesquelles vous souhaitez moudre le café.
7. Allumez l’appareil à l’aide du bouton . Le voyant de
contrôle s’illumine en continu.
NOTE :
Pour interrompre le processus de mouture avant la n,
appuyez sur le bouton .
8. Le voyant de commande clignote 3 fois lorsque le pro-
cessus de mouture est terminé. Retirez le réservoir de
collecte avec la poudre de café. Videz-le.
9. Débranchez l’alimentation de la prise murale lorsque
vous n’utilisez pas l’appareil.
Nettoyage
AVERTISSEMENT :
• Débranchez toujours la che secteur avant le nettoyage.
• N’immergez jamais l’appareil dans l’eau pour la nettoyer. Ne
versez pas d’eau dans le réservoir à grains de café lorsqu’il est
installé. Cela peut causer un choc électrique ou un incendie.
ATTENTION :
• N’utilisez pas de brosses métalliques ou d’autres
objets abrasifs.
• N’utilisez pas de produits de nettoyage corrosifs ou
abrasifs.
• Nettoyez régulièrement l’appareil. Les grains de café
laissent un résidu huileux. Ce dépôt huileux devient
rance. L’huile rance inuence négativement le goût de
votre café.
• L’expresso et d’autres infusions de café fort contiennent
une plus haute concentration d’huile, et nécessitent donc
un nettoyage plus fréquent.
Accessoires amovibles
1. Tournez le réservoir à grains de café dans le sens anti-
horaire pour l’enlever. Essuyez avec un tissu humide.
2. Vous pouvez nettoyer le réservoir à café moulu en le
plongeant dans un bain d’eau chaude.
3. Laissez les pièces sécher complètement avant de les
réinstaller.
4. Installez le réservoir des grains de café sur le moulin.
Respectez le sens de symboles. Positionnez le réservoir
avec le symbole positionné au-dessus du symbole
sur l’appareil. Faites tourner le réservoir dans le sens
horaire jusqu’à ce qu’il s’emboîte. Il doit s’enclencher en
émettant un bruit.
5. Placez le réservoir à café moulu avec le couvercle sur le
boîtier du moteur jusqu’à ce qu’il s’emboîte.
Moulin
1. Desserrez le verrou du moulin dans le sens anti-horaire
d’un court mouvement tournant. Retirez-le.
NOTE :
Cela peut nécessiter d’appliquer un peu de force car il
peut être coincé par des grains de café.
2. Nettoyez le cône de mouture supérieur avec une brosse
de nettoyage.
3. Retirez les résidus de poudre de café qui collent au
moulin à l’aide de la brosse de nettoyage. Utilisez un
aspirateur pour retirer les résidus de poudre de café
restants dans le moulin.
4. Remettez le verrou du moulin en place. Faites-le tourner
d’un court mouvement dans le sens horaire jusqu’à son
enclenchement.
Boîtier du moteur
Pour nettoyer la surface externe, utilisez un chiffon humide
avec un détergent doux.
Rangement
• Nettoyez l’appareil comme décrit. Laissez complètement
sécher les accessoires.
• Nous vous conseillons de ranger l’appareil dans son
emballage d’origine, si vous ne souhaitez pas l’utiliser
pendant une longue période.
• Gardez toujours l’appareil hors de la portée des enfants
dans un endroit sec et bien ventilé.

PC-EKM1205_IM 29.10.19
19
Dépannage
Problème Cause possible Solution
L’appareil ne fonctionne
pas.
L’appareil ne reçoit pas d’alimentation
électrique.
Vériez la sortie avec un autre appareil.
Votre appareil est muni d’un inter-
rupteur de sécurité. Il empêche le
démarrage accidentel du moteur.
Assurez-vous que le réservoir à grains de café est
correctement installé.
La protection anti surchauffe s’est dé-
clenchée. Le moteur est trop chaud.
Laissez l’appareil refroidir pendant au moins 30 mi-
nutes avant de le rallumer.
L’appareil est défectueux. Contactez notre service après-vente ou un spécialiste.
• L’appareil s’arrête de
manière imprévue.
• La nesse de mouture
ne peut pas être
réglée.
Un grain de café est coincé. 1. Débranchez la che de la prise murale !
2. Retirez le réservoir de collecte de la poudre.
3. Retirez les grains de café restants.
4. Retirez le réservoir de grains de café ainsi que le
verrou du moulin comme décrit dans la section
« Nettoyage ».
5. Retirez le grain de café coincé ou le corps étranger.
Le moulin à café est bloqué par un
corps étranger.
Données techniques
Modèle : .......................................................... PC-EKM 1205
Alimentation : .....................................220 - 240 V~, 50 - 60 Hz
Consommation : ............................................................ 200 W
Classe de protection : ..........................................................
Poids net : ............................................................env. 1,93 kg
Nous nous réservons le droit d’apporter des modications
techniques ainsi que des modications de conception dans
le cadre du développement continu de nos produits.
Cet appareil est conforme à toutes les directives CE en
vigueur, telles que les directives sur la compatibilité électro-
magnétique et les faibles tensions et a été fabriqué selon
les derniers règlements de sécurité.
Élimination
Signication du symbole « Poubelle »
Protégez votre environnement, ne jetez pas
vos appareils électriques avec les ordures mé-
nagères.
Utilisez, pour l’élimination de vos appareils
électriques, les bornes de collecte prévues à
cet effet où vous pouvez vous débarrasser des
appareils que vous n’utilisez plus.
Vous contribuez ainsi à éviter les impacts potentiels dans
l’environnement et sur la santé de chacun, causés par une
mauvaise élimination de ces déchets.
Vous contribuez aussi au recyclage sous toutes ses formes
des appareils électriques et électroniques usagés.
Vous trouverez toutes les informations sur les bornes
d’élimination des appareils auprès de votre commune ou de
l’administration de votre communauté.

PC-EKM1205_IM 29.10.19
20
Manual de instrucciones
Le agradecemos la conanza depositada en este producto
y esperamos que disfrute de su uso.
Símbolos en este manual de instrucciones
Advertencias importantes para su seguridad están seña-
ladas en especial. Siga estas advertencias incondicional-
mente, para evitar accidentes y daños en el aparato:
AVISO:
Advierte ante los peligros para su salud y demuestra
posibles riesgos de herida.
ATENCIÓN:
Indica los posibles riesgos para el aparato u otros objetos.
NOTA:
Pone en relieve consejos e informaciones para usted.
Índice
Indicación de los elementos de manejo ..........................3
Notas generales ................................................................20
Consejos de seguridad especiales para este aparato
... 20
Uso para el que está destinado.......................................21
Desembalado del aparato ................................................ 21
Indicación de los elementos de manejo /
Contenido en la entrega ...................................................22
Notas de uso .....................................................................22
Conexión eléctrica ..........................................................22
Interruptor de seguridad .................................................22
Cómo encender / apagar el aparato ............................... 22
Funcionamiento a corto plazo ........................................22
Selección del grado de molienda...................................22
Regulador de la cantidad
de café en polvo (número de tazas) ..............................22
Granos de café restantes...............................................22
Utilización ..........................................................................22
Limpieza ............................................................................. 23
Accesorios extraíbles ..................................................... 23
Molinillo...........................................................................23
Carcasa del motor ..........................................................23
Almacenamiento ...............................................................23
Resolución de problemas ................................................ 24
Datos técnicos ..................................................................24
Eliminación ........................................................................ 24
Signicado del símbolo “Cubo de basura” ....................24
Notas generales
Antes de la puesta en servicio de este aparato lea deteni-
damente el manual de instrucciones y guarde éste bien in-
cluido la garantía, el recibo de pago y si es posible también
el cartón de embalaje con el embalaje interior. En caso de
dejar el aparato a terceros, también entregue el manual de
instrucciones.
• Solamente utilice el aparato para el uso privado y para el
n previsto. Este aparato no está destinado para el uso
profesional.
• No lo utilice al aire libre. No lo exponga al calor, a la
entrada directa de rayos de sol, a la humedad (en
ningún caso sumerja el aparato en agua) y a los cantos
agudos. No utilice el aparato con las manos húmedas.
En caso de que el aparato esté húmedo o mojado retire
de momento la clavija de la caja de enchufe.
• Desconecte el aparato y siempre retire la clavija de la
caja de enchufe (por favor tire de la clavija y no del ca-
ble), cuando no quiera utilizar el aparato, montar piezas
o en caso de limpieza o defectos.
• No utilice el aparato sin vigilancia. En caso de salir de
la habitación, desconecte siempre el aparato. Retire la
clavija de la caja de enchufe.
• El aparato y el cable de alimentación de red se deben
controlar regularmente para garantizar que no estén
dañados. En caso de que se comprobara un daño, no se
podrá seguir utilizando el aparato.
• Solamente utilice accesorios originales.
• Para la seguridad de sus niños no deje material de
embalaje (bolsas de plástico, cartón, poliestireno etc.) a
su alcance.
AVISO:
No deje jugar a los niños con las láminas de plástico.
¡Existe peligro de asxia!
Consejos de seguridad especiales para este aparato
AVISO:
• Desconecte siempre el aparato de la alimentación si se le deja
sin atención y antes de montarlo, desmontarlo o limpiarlo.
• ¡No manipule los interruptores de seguridad! Este mal uso
puede causar lesiones.

PC-EKM1205_IM 29.10.19
21
AVISO:
• Este aparato no debe ser utilizado por los niños.
• Mantenga el aparato y su cable fuera del alcance de los niños.
• Los niños no deben jugar con la unidad.
• Esta unidad puede ser utilizada por personas con capacidades
físicas, sensoriales o mentales reducidas y por personas con
falta de experiencia y conocimientos, siempre y cuando hayan
recibido supervisión o instrucciones respecto al uso seguro de
la unidad y comprendan los riesgos implícitos.
• No repare usted mismo el aparato. Póngase en contacto con
un técnico autorizado. Si el cable de alimentación está dañado,
corresponde al fabricante, a su representante o persona de
cualicación similar su reemplazo para evitar peligros.
ATENCIÓN:
No sumerja el aparato en agua para su limpieza. Siga las instruc-
ciones según lo estipulado en el capítulo “Limpieza”.
Uso para el que está destinado
Este aparato se usa para moler granos de café tostado.
No es adecuado para moler nueces, especias o granos
similares.
El aparato está destinado al uso doméstico y a su uso en
áreas similares. Sólo se puede utilizar en la forma descrita
en este manual de instrucciones. El aparato no se puede
utilizar con nes comerciales.
Cualquier otro uso no se considera como el pretendido
y puede dar lugar a daños materiales o incluso lesiones
físicas.
El fabricante no asume ninguna responsabilidad por daños
que se puedan producir por un uso incorrecto.
Desembalado del aparato
1. Saque el aparato del embalaje.
2. Quite todos los materiales de embalaje como películas
de plástico, protecciones, sujeciones de cables, y
cartones.
3. Compruebe que están todas las piezas.
4. Si el contenido del embalaje está incompleto u observa
daños, no use el aparato. Devuélvalo de inmediato al
vendedor.
NOTA:
Es posible que queden residuos derivados de la pro-
ducción en el aparato. Le recomendamos que limpie el
aparato como se describe en “Limpieza”.

PC-EKM1205_IM 29.10.19
22
Indicación de los elementos de manejo /
Contenido en la entrega
1 Tapa del recipiente para el café en grano
2 Recipiente para el café en grano (extraíble)
3 Bloqueo del molinillo (cono de molienda superior)
4 Molinillo
5 Palanca para ajustar el grado de molienda
6 Símbolos para seleccionar el grado de molienda
7 Cuchara medidora con cepillo de limpieza
8 Carcasa del motor
9 Depósito para el café en polvo (extraíble)
10 Tapa para el depósito de café en polvo
11 Regulador de la cantidad de café en polvo (número de
tazas)
12 Testigo de control
13 Botón encender / apagar
Notas de uso
Conexión eléctrica
1. Compruebe que la tensión eléctrica que vaya a usar
coincide con la del aparato. Encontrará información al
respecto en la placa identicadora.
2. Conectar el aparato solamente en un enchufe con con-
tacto de protección instalado según las prescripciones.
La lámpara de control parpadea 3 veces.
Interruptor de seguridad
Su aparato dispone de un interruptor de seguridad. Solo
funciona si el recipiente para el café en grano está colocado
correctamente.
Cómo encender / apagar el aparato
NOTA:
El aparato no se enciende hasta que se haya seleccio-
nado una cantidad de café.
• Pulse el botón . La lámpara de control permanece
encendida. Comienza el proceso de molienda.
• El proceso de molienda termina automáticamente.
• También puede detener el proceso de molienda en
cualquier momento con el botón .
Funcionamiento a corto plazo
Use el aparato de forma consecutiva un máximo de
5 veces. Deje enfriar el aparato durante aproximadamente
10 minutos antes de usarlo de nuevo.
Selección del grado de molienda
El molinillo se puede ajustar gradualmente de extrano a
grueso. Fíjese en los símbolos para seleccionar el grado de
molienda. Los puntos pequeños signican que obtiene un
grano no y los puntos grandes, un grano grueso.
Lo no o grueso que muela el café depende del uso que
le vaya a dar una vez molido. El tipo de granos de café
y el proceso de tostado repercuten en el sabor. Con un
poco de práctica descubrirá qué ajuste de molienda es el
más adecuado en cada caso. Le ofrecemos las siguientes
indicaciones:
Ajuste de la molienda Uso
Extrano Cafetera exprés
Fino Cafetera
Medio Filtro manual
Grueso Café de prensa francesa
NOTA: Evite que el molinillo se obstruya
Seleccione el grado de molienda cuando el recipiente
para el café en grano esté completamente vacío o solo
durante el proceso de molienda.
Para cambiar el grado de molienda, deslice la palanca a la
opción deseada.
Regulador de la cantidad de café en polvo (número de
tazas)
Use la palanca para establecer la cantidad de café que se
va a moler. Asegúrese de que siempre haya sucientes
granos de café en el recipiente. Elija entre 2 y 12 tazas de
café. La lámpara de control parpadeará.
La cantidad de café en polvo por taza depende del gusto
personal, del tipo de café y del grado de molienda.
NOTA: Consejo para expreso
Muela únicamente la cantidad de café que vaya a usar en
el momento.
Granos de café restantes
Retire los granos de café del aparato si tienen más de una
semana, ya que han perdido su aroma y disminuyen el
sabor del café.
CONSEJO:
Guarde los granos de café en un recipiente hermético en
el frigoríco. De esa manera, el café mantiene su aroma
durante más tiempo.
Utilización
ATENCIÓN:
Antes de usar el aparato, compruebe que no haya impu-
rezas en el recipiente del café en grano. Si las hubiera,
retírelas.
1. Coloque el recipiente para el café en grano en el mo-
linillo. Observe los símbolos. Coloque el recipiente de
forma que el símbolo quede sobre el símbolo del
aparato. Gire el recipiente hacia la derecha hasta que se
detenga. Debe oírse un chasquido.

PC-EKM1205_IM 29.10.19
23
2. Ajuste el recipiente de café molido con la tapa en la
carcasa del motor hasta que se detenga.
3. Utilice la palanca para seleccionar el grado de molienda
que desee.
4. Añada los granos de café al recipiente. No llene el
recipiente en exceso.
5. Coloque la tapa en el recipiente para el café en grano.
6. Use la palanca deslizante para seleccionar la cantidad
de tazas de café que desee.
7. Encienda el aparato con el botón . La lámpara de
control permanece encendida.
NOTA:
Si desea detener el proceso de molienda antes de
tiempo, presione el botón .
8. Cuando se completa el proceso de molienda, la lámpara
de control parpadea 3 veces. Saque el depósito del café
en polvo. Vacíelo.
9. Desconecte la alimentación de la toma cuando no use
el aparato.
Limpieza
AVISO:
• Desconecte el enchufe de corriente antes de limpiar.
• Nunca sumerja el aparato en agua para limpiarlo. No vierta
agua en el recipiente para el café en grano cuando esté mon-
tado. Podría causar una descarga eléctrica o un incendio.
ATENCIÓN:
• No use cepillos metálicos ni otros abrasivos.
• No use agentes limpiadores puntiagudos ni abrasivos.
• Limpie el aparato con regularidad. Los granos de café
dejan un residuo aceitoso. Con el tiempo, estos residuos
se vuelven rancios y aportan un sabor desagradable al
café.
• El expreso y otros cafés tostados contienen más
cantidad de aceite, por lo que es necesario que limpie el
molinillo con más frecuencia.
Accesorios extraíbles
1. Gire el recipiente para el café en grano en sentido
antihorario para retirarlo. Límpielo con una gamuza
humedecida.
2. Limpie el recipiente de café molido y las tapas con agua
tibia.
3. Deje secar las piezas al aire completamente antes de
volver a colocarlas.
4. Coloque el recipiente para el café en grano en el mo-
linillo. Observe los símbolos. Coloque el recipiente de
forma que el símbolo quede sobre el símbolo del
aparato. Gire el recipiente hacia la derecha hasta que se
detenga. Debe oírse un chasquido.
5. Ajuste el recipiente de café molido con la tapa en la
carcasa del motor hasta que se detenga.
Molinillo
1. Aoje el bloqueo del molinillo en sentido antihorario con
una pequeña vuelta. Retirar.
NOTA:
Puede costar trabajo retirarlo debido a los restos que
hayan quedado atascados.
2. Limpie el cono de molienda superior con el cepillo de
limpieza.
3. Retire el polvo que haya quedado adherido al molinillo
con el cepillo de limpieza. Use una aspiradora para reti-
rar los residuos de café en polvo del interior del molinillo.
4. Vuelva a colocar el bloqueo del molinillo. Gírelo un poco
hacia la derecha hasta que se detenga.
Carcasa del motor
Para limpiar la carcasa, utilice solamente una gamuza
húmeda y detergentes suaves.
Almacenamiento
• Limpie el aparato del modo descrito. Deje que los acce-
sorios se sequen del todo.
• Recomendamos que guarde el aparato en su embalaje
original, si no va a usarlo durante un periodo de tiempo
prolongado.
• Guarde el dispositivo lejos del alcance de los niños en
una zona bien ventilada y seca.

PC-EKM1205_IM 29.10.19
24
Resolución de problemas
Avería Posible causa Solución
El aparato no tiene
función.
El aparato no recibe suministro eléctrico. Compruebe el enchufe con un dispositivo diferente.
Su aparato dispone de un interruptor
de seguridad. Este interruptor evita que
el motor se active accidentalmente.
Asegúrese de que el recipiente para el café en grano
esté colocado correctamente.
Se ha activado la protección contra
sobrecalentamiento. El motor está
demasiado caliente.
Para evitar el sobrecalentamiento, espere al menos
30 minutos antes de encender de nuevo la unidad.
El aparato está defectuoso. Póngase en contacto con nuestro departamento de
atención al cliente o con un especialista.
• El aparato se detiene
inesperadamente.
• El grado de molienda
no se puede ajustar.
Un grano de café se ha quedado
atascado.
1. Desconecte el enchufe de alimentación de la
toma de corriente.
2. Quite el depósito para el café en polvo.
3. Retire los restos de café.
4. Quite el recipiente para el café en grano y el blo-
queo del molinillo como se describe en “Limpieza”.
5. Retire el grano de café o el cuerpo extraño
atascado.
El molinillo está bloqueado por un
cuerpo extraño.
Datos técnicos
Modelo: ........................................................... PC-EKM 1205
Alimentación: ......................................220 - 240 V~, 50 - 60 Hz
Consumo: ...................................................................... 200 W
Clase de la protección: ........................................................
Peso neto: ........................................................ aprox. 1,93 kg
El derecho de realizar modicaciones técnicas y de diseño
en el curso del desarrollo continuo del producto esta
reservado.
Este dispositivo cumple con todas las directrices CE actua-
les, como la directriz de compatibilidad electromagnética y
de bajo voltaje, y está fabricada según las últimas normas
de seguridad.
Eliminación
Signicado del símbolo “Cubo de basura”
Proteja nuestro medio ambiente, aparatos eléc-
tricos no forman parte de la basura doméstica.
Haga uso de los centros de recogida previstos
para la eliminación de aparatos eléctricos y
entregue allí sus aparatos eléctricos que no
vaya a utilizar más.
Ayudará en evitar las potenciales consecuencias, a causa
de una errónea eliminación de desechos, para el medio
ambiente y la salud humana.
Con ello, contribuirá a la recuperación, al reciclado y a otras
formas de reutilización de los aparatos viejos eléctricos y
electrónicos.
La información cómo se debe eliminar los aparatos, se
obtiene en su ayuntamiento o su administración municipal.

PC-EKM1205_IM 29.10.19
25
Istruzioni per l’uso
Grazie per aver scelto il nostro prodotto. Vi auguriamo un
buon utilizzo del dispositivo.
Simboli per questo manuale di istruzioni per l’uso
Le indicazioni importanti per la propria sicurezza sono
indicati appropriatamente. Osservare assolutamente queste
indicazioni, per evitare incidenti e danni all’apparecchio:
AVVISO:
Previene i rischi della propria salute ed indica possibili
rischi di ferite.
ATTENZIONE:
Indica possibili pericoli per l’apparecchio o altri oggetti.
NOTA:
Mette in risalto consigli ed informazioni.
Indice
Elementi di comando ..........................................................3
Note generali .....................................................................25
Avvertenze speciali di sicurezza
per questo apparecchio ...................................................25
Utilizzo conforme alla destinazione ................................26
Disimballaggio dell’apparecchio ....................................26
Elementi di comando / Nella fornitura .............................27
Note per l’uso ....................................................................27
Collegamento elettrico ...................................................27
Interruttore di sicurezza..................................................27
Accensione / spegnimento dell’apparecchio ..................27
Operatività a breve termine............................................27
Impostazione del grado di macinazione ........................27
Regolatore per la determinazione della quantità
di caffè macinato (numero di tazze) ...............................27
Caffè in grani rimanente .................................................27
Uso ......................................................................................27
Pulizia ................................................................................. 28
Accessori rimovibili .........................................................28
Macina caffè ................................................................... 28
Alloggiamento del motore ..............................................28
Conservazione ..................................................................28
Risoluzione dei problemi .................................................29
Dati tecnici ......................................................................... 29
Smaltimento ......................................................................29
Significato del simbolo “Eliminazione” ...........................29
Note generali
Prima di mettere in funzione questo apparecchio, leggere
molto attentamente le istruzioni per l’uso e conservarle con
cura unitamente al certificato di garanzia, allo scontrino
e, se possibile, alla scatola di cartone con la confezione
interna. Se passate l’apparecchio a terzi, consegnate anche
le istruzioni per l’uso.
• Utilizzare l’apparecchio esclusivamente per scopi privati
e conformemente al tipo di applicazione previsto. Questo
prodotto non è stato concepito ai fini di un impiego in
ambito industriale.
• Non utilizzarlo all’aperto. Proteggerlo dal calore, nonché
dall’esposizione diretta ai raggi solari e dall’umidità (non
immergerlo mai in sostanze liquide) e tenerlo a distanza
da oggetti con spigoli affilati. Non utilizzare l’apparecchio
con le mani umide. Nel caso in cui si bagni o si inumidi-
sca l’apparecchio, staccare immediatamente la spina.
• Disattivare l’apparecchio e staccare sempre la spina
dalla relativa presa (prendendo in mano la spina, non
tirando il cavo) allorché non si utilizza l’apparecchio,
quando si applicano degli accessori oppure nel caso in
cui lo si debba pulire o si siano manifestate anomalie.
• Non mettere in funzione l’apparecchio senza sorve-
glianza. Spegnere sempre l’apparecchio, se si desidera
uscire dalla stanza. Estrarre la spina dalla presa.
• Controllare regolarmente che l’apparecchio e il cavo
non presentino tracce di danneggiamento. In tal caso
l’apparecchio non deve più essere utilizzato.
• Utilizzare esclusivamente accessori originali.
• Per sicurezza tenere l’imballaggio (sacchetto di plastica,
scatola, polistirolo, ecc.) fuori dalla portata dei bambini.
AVVISO:
Non lasciar giocare i bambini piccoli con la pellicola di
plastica. Pericolo di soffocamento!
Avvertenze speciali di sicurezza per questo apparecchio
AVVISO:
• Scollegare sempre l’apparecchio dall’alimentazione se viene la-
sciato incustodito e prima del montaggio, smontaggio e pulizia.
• Non manomettere gli interruttori di sicurezza! Tale utilizzo impro-
prio può provocare lesioni.

PC-EKM1205_IM 29.10.19
26
AVVISO:
• Non permettere ai bambini di usare questo apparecchio.
• Tenere l’apparecchio ed il relativo cavo di alimentazione lontano
dalla portata dei bambini.
• I bambini non devono giocare con l’apparecchio.
• Gli apparecchi possono essere usati da persone con ridotte ca-
pacità fisiche, sensoriali o mentali o che manchino di esperienza
e / o conscenza se hanno la supervisione o hanno ricevuto istru-
zioni riguardo all’uso dell’apparecchio in modo sicuro ed hanno
compreso i pericoli coinvolti.
• Non riparare l’apparecchio da soli. Contattare sempre un tec-
nico autorizzato. Se il cavo di alimentazione è danneggiato,
farlo sostituire dal produttore, dall’agente addetto all’assistenza
oppure da personale qualificato per evitare situazioni pericolose.
ATTENZIONE:
Non immergere il dispositivo in acqua per pulire. Seguire le istru-
zioni come indicato nel capitolo “Pulizia”.
Utilizzo conforme alla destinazione
Questo apparecchio è utilizzato per macinare chicchi di
caffè tostato. Non è idoneo alla macinazione di noci, spezie
o simili.
È adatto ad uno domestico e all’uso in aree simili. Può
essere utilizzato solo nel modo descritto in questo manuale
d’istruzione. L’apparecchio non può essere utilizzato per
scopi commerciali.
Qualsiasi altro uso è considerato non idoneo e può determi-
nare guasti alla proprietà e anche alle persone.
Il produttore non si assume alcuna responsabilità per danni
che potrebbero verificarsi per uso non corretto.
Disimballaggio dell’apparecchio
1. Rimuovere la macchina dalla confezione.
2. Rimuovere tutti i materiali di imballaggio come pellicole di
plastica, materiali di riempimento, fermacavi e cartone.
3. Controllare che il contenuto della confezione sia com-
pleto.
4. In caso di contenuti mancanti o danneggiati, non mettere
in funzione l’apparecchio. Riportarlo immediatamente al
rivenditore.
NOTA:
Potrebbero esserci polvere o residui di produzione sull’ap-
parecchio. Si raccomanda di pulire la macchina come
descritto nella sezione “Pulizia”.

PC-EKM1205_IM 29.10.19
27
Elementi di comando / Nella fornitura
1 Coperchio del contenitore del caffè in grani
2 Contenitore del caffè in grani (rimovibile)
3 Blocco del macina caffè (cono di macinazione supe-
riore)
4 Macina caffè
5 Selettore di regolazione del grado di macinazione
6 Simboli per l’impostazione del grado di macinazione
7 Misurino dosatore con spazzolino pulitore
8 Alloggiamento motore
9 Serbatoio di raccolta del caffè macinato (estraibile)
10 Coperchio del serbatoio di raccolta del caffè macinato
11 Regolatore per la determinazione della quantità di caffè
macinato (numero di tazze)
12 Spia luminosa di controllo
13 Tasto accensione / spegnimento
Note per l’uso
Collegamento elettrico
1. Controllare se il voltaggio elettrico che si desidera utiliz-
zare corrisponde a quello del dispositivo. Le informazioni
sono presenti sulla targhetta del modello.
2. Collegate l’apparecchio solo ad una presa con contatto
di terra regolarmente installata. La spia luminosa di
controllo lampeggia 3 volte.
Interruttore di sicurezza
L’apparecchio è dotato di un interruttore di sicurezza. È
operativo solo se il contenitore del caffè in grani è montato
correttamente.
Accensione / spegnimento dell’apparecchio
NOTA:
L’apparecchio non può essere azionato finché non è stata
selezionata l’impostazione del dosaggio desiderato di
caffè macinato.
• Premere il tasto . La spia luminosa di controllo è accesa
in modo permanente. Il processo di macinazione ha inizio.
• Il processo di macinazione conclude automaticamente.
• È inoltre possibile terminare il processo di macinazione
con il tasto in qualsiasi momento.
Operatività a breve termine
Utilizzare l’apparecchio in sequenza immediata solo per
un massimo di 5 volte. Prima di riutilizzare l’apparecchio,
lasciarlo raffreddare per circa 10 minuti.
Impostazione del grado di macinazione
Il macina caffè è regolabile gradualmente da extra fine a
grossolano. Attenersi ai simboli per impostare il grado di
macinazione. I puntini piccoli rappresentano un’imposta-
zione di macinazione fine e i puntini grandi un’impostazione
grossolana.
Quanto fine o grossolano si macina il caffè dipende dal
successivo utilizzo della macinatura. Il tipo di caffè in grani e
il processo di tostatura hanno un ulteriore impatto sul gusto.
Con un po’ di pratica è possibile stabilire quale imposta-
zione di macinatura è quella giusta in base alle esigenze.
Come impostazioni da adottare, in generale, si forniscono le
seguenti indicazioni:
Regolazione di
macinazione Utilizzo
Extra fine Macchina per caffè espresso
Fine Moka
Medio Filtro a mano
Grossolana Caffè per caffettiera a stantuffo
NOTA: Evitare le ostruzioni del macina caffè
Impostare il grado di macinazione quando il contenitore
del caffè in grani è completamente vuoto o solo durante il
processo di macinazione.
Per variare il grado di macinazione, azionare il selettore fino
all’impostazione desiderata.
Regolatore per la determinazione della quantità di caffè
macinato (numero di tazze)
Utilizzare il regolatore per impostare la quantità di caffè da
macinare. Assicurarsi che sia sempre presente abbastanza
caffè in grani nel contenitore apposito. Scegliere una quan-
tità compresa tra 2 e 12 tazze di caffè. La spia di controllo
lampeggerà.
La quantità di caffè macinato per tazza è soggetta al proprio
gusto personale, al tipo di caffè e all’impostazione del grado
di macinazione.
NOTA: Suggerimento per la preparazione del caffè
espresso
Macinare solo la quantità di caffè che si intende utilizzare
subito.
Caffè in grani rimanente
Rimuovere il caffè in grani dall’apparecchio se stoccato
nel contenitore da oltre una settimana. Tale operazione va
effettuata perché i grani hanno perso il loro aroma e dunque
peggiorano il gusto del caffè.
SUGGERIMENTO:
Conservare il caffè in grani in un contenitore ermetico e
sigillato in frigorifero. In tal modo, il caffè resta aromatiz-
zato più a lungo.
Uso
ATTENZIONE:
Prima di utilizzare l’apparecchio, controllare che il conteni-
tore del caffè in grani non contenga corpi estranei e, in tal
caso, rimuoverli.

PC-EKM1205_IM 29.10.19
28
1. Posizionare il contenitore dei chicchi in grani sul macina
caffè. Attenersi ai simboli. Posizionare il contenitore
con il simbolo sopra il simbolo corrispondente,
stampigliato sull’apparecchio. Ruotare il contenitore in
senso orario fino a quando non si blocca. Deve scattare
in modo udibile.
2. Collocare il contenitore del caffè macinato con il coper-
chio nell’alloggiamento motore fino all’arresto.
3. Regolare il grado di macinazione desiderato con il
selettore.
4. Riempire il contenitore con il caffè in grani. Non riempire
eccessivamente il contenitore.
5. Posizionare il coperchio sul contenitore apposito per il
caffè in grani.
6. Utilizzare il regolatore per selezionare il numero di tazze
per le quali si desidera effettuare la macinatura.
7. Accendere l’apparecchio con il tasto . La spia luminosa
di controllo è accesa in modo permanente.
NOTA:
Se si desidera interrompere il processo di macinazione
prima della selezione impostata, premere il tasto .
8. Al termine del processo di macinazione, la spia luminosa
lampeggia 3 volte. Estrarre il contenitore di raccolta con il
caffè macinato. Svuotarlo.
9. Scollegare la spina dalla presa di corrente quando non si
utilizza l’apparecchio.
Pulizia
AVVISO:
• Scollegare sempre la spina prima della pulizia.
• Non immergere mai l’apparecchio in acqua per pulire. Non ver-
sare acqua nel contenitore per il caffè in grani già installato. Ciò
potrebbe causare scosse elettriche o incendi.
ATTENZIONE:
• Non usare spazzole metalliche o altri oggetti abrasivi.
• Non utilizzare detergenti aggressivi o abrasivi.
• Pulire il dispositivo con regolarità. Il caffè in grani rilascia
un residuo oleoso. Questo residuo oleoso irrancidisce.
Il residuo oleoso irrancidito influenza negativamente il
gusto del caffè.
• Il caffè dedicato a ottenere l’espresso e gli altri tipi di
caffè a tostatura scura contengono un maggiore con-
tenuto di olio, tale prerogativa richiede una pulizia più
frequente.
Accessori rimovibili
1. Ruotare il contenitore del caffè in grani in senso antiora-
rio per rimuoverlo. Pulire con un panno umido.
2. Pulire il contenitore del caffè macinato e i coperchi me-
diante immersione in acqua calda.
3. Lasciare asciugare completamente i componenti prima
di rimontarli.
4. Posizionare il contenitore dei chicchi in grani sul macina
caffè. Attenersi ai simboli. Posizionare il contenitore
con il simbolo sopra il simbolo corrispondente,
stampigliato sull’apparecchio. Ruotare il contenitore in
senso orario fino a quando non si blocca. Deve scattare
in modo udibile.
5. Collocare il contenitore del caffè macinato con il coper-
chio nell’alloggiamento motore fino all’arresto.
Macina caffè
1. Allentare il blocco del macina caffè in senso antiorario
effettuando una piccola rotazione. Rimuoverlo.
NOTA:
Questo processo potrebbe essere difficoltoso dovuto
alla presenza di residui di chicchi incastrati.
2. Pulire il cono di macinazione superiore con lo spazzolino
pulitore.
3. La polvere di caffè che aderisce al macina caffè può
essere rimossa con lo spazzolino pulitore. Utilizzare un
aspiratore per rimuovere i residui di polvere all’interno
del macina caffè.
4. Riposizionare il blocco del macina caffè. Ruotarlo legger-
mente in senso orario fino a quando non si blocca.
Alloggiamento del motore
Per pulire l’alloggiamento, usare esclusivamente un panno
umido ed un detergente delicato.
Conservazione
• Pulire l’apparecchio come descritto. Lasciar asciugare
completamente gli accessori.
• Si consiglia di conservare l’apparecchio nella confezione
originale se non viene utilizzato per un lungo periodo.
• Conservare sempre l’apparecchio fuori dalla portata dei
bambini ed in un luogo asciutto e ben ventilato.

PC-EKM1205_IM 29.10.19
29
Risoluzione dei problemi
Problema Possibile causa Soluzione
L’apparecchio è senza
funzione.
L’apparecchio non è alimentato. Controllare la presa inserendovi la spina di un altro
apparecchio.
L’apparecchio è dotato di un interrut-
tore di sicurezza. Tale interruttore
previene l’avvio accidentale del motore.
Assicurarsi che il contenitore del caffè in grani sia
montato correttamente.
È scattata la termica. Motore troppo
caldo.
Lasciar raffreddare il dispositivo per almeno 30 minuti
prima di accenderlo di nuovo.
L’apparecchio è difettoso. Consultare il nostro centro assistenza o un esperto.
• L’apparecchio si arresta
inaspettatamente.
• Il grado di macinazione
non è regolabile.
Un grano di caffè è rimasto bloccato. 1. Scollegare la spina di alimentazione dalla
presa di corrente!
2. Estrarre il serbatoio di raccolta.
3. Rimuovere i grani di caffè rimanenti.
4. Rimuovere il contenitore dei grani di caffè e il
blocco del macina caffè come descritto alla voce
“Pulizia”.
5. Rimuovere i grani di caffè incastrati o un even-
tuale corpo estraneo.
Il macina caffè è bloccato da un corpo
estraneo.
Dati tecnici
Modello: ........................................................... PC-EKM 1205
Alimentazione elettrica: ...................... 220 - 240 V~, 50 - 60 Hz
Consumo di energia: ..................................................... 200 W
Classe di protezione: ...........................................................
Peso netto: .............................................................ca. 1,93 kg
Si riserva il diritto di apportare modiche tecniche e di
design nel corso dello sviluppo del prodotto.
Questo dispositivo risponde a tutte le direttive della CE,
come la direttiva sulla compatibilità elettromagnetica e
quella sul basso voltaggio ed è prodotto secondo le più
recenti norme di sicurezza.
Smaltimento
Significato del simbolo “Eliminazione”
Salvaguardare l’ambiente, gli elettrodomestici
non vanno eliminati come riuti domestici.
Per l’eliminazione degli elettrodomestici, fare
uso dei posti di raccolta previsti per questo tipo
e porre quegli elettrodomestici che non sono
più in uso.
Si contribuisce così ad evitare un effetto potenziale sull’am-
biente e sulla salute, dovuto magari ad una eliminazione
sbagliata.
Questo signica un contributo personale alla riutilizzazione,
al riciclaggio e altre forme di utilizzazione di elettrodomestici
ed apparecchi elettronici usati.
Si possono trovare le corrispondenti informazioni sugli ap-
positi luoghi di raccolta, nelle amministrazioni dei comuni.

PC-EKM1205_IM 29.10.19
30
Instruction Manual
Thank you for choosing our product. We hope you will enjoy
using the appliance.
Symbols in this Instruction Manual
Important information for your safety is specially marked.
It is essential to comply with these instructions in order to
avoid accidents and prevent damage to the appliance:
WARNING:
This warns you of dangers to your health and indicates
possible injury risks.
CAUTION:
This refers to possible hazards to the appliance or other
objects.
NOTE:
This highlights tips and information.
Contents
Overview of the Components ............................................3
General Notes ....................................................................30
Special Safety Precautions for this Appliance .............. 30
Designated Use ................................................................. 31
Unpacking the Appliance .................................................31
Overview of the Components / Scope of Delivery ......... 31
Notes for Use .....................................................................32
Electrical Connection .....................................................32
Safety Switch .................................................................32
Switching the Appliance On / Off ....................................32
Short-term Operation .....................................................32
Setting the Degree of Grinding ......................................32
Regulator for Setting the Powder Quantity
(Number of Cups)...........................................................32
Remaining Coffee Beans ............................................... 32
Operation ...........................................................................32
Cleaning ............................................................................. 33
Removable Accessories.................................................33
Grinder ...........................................................................33
Motor Housing ................................................................ 33
Storage ............................................................................... 33
Troubleshooting ................................................................ 33
Technical Data ................................................................... 34
Disposal .............................................................................34
Meaning of the “Dustbin” Symbol ..................................34
General Notes
Read the operating instructions carefully before putting the
appliance into operation and keep the instructions including
the warranty, the receipt and, if possible, the box with the
internal packing. If you give this appliance to other people,
please also pass on the operating instructions.
• The appliance is designed exclusively for private use and
for the envisaged purpose. This appliance is not t for
commercial use.
• Do not use it outdoors. Keep it away from sources of
heat, direct sunlight, humidity (never dip it into any
liquid) and sharp edges. Do not use the appliance with
wet hands. If the appliance is humid or wet, unplug it
immediately.
• When cleaning or putting it away, switch off the appliance
and always pull out the plug from the socket (pull the
plug itself, not the lead) if the appliance is not being used
and remove the attached accessories.
• Do not operate the appliance without supervision. If you
leave the room you should always turn the appliance off.
Remove the plug from the socket.
• The appliance and the mains lead have to be checked
regularly for signs of damage. If damage is found the
appliance must not be used.
• Use only original spare parts.
• In order to ensure your children’s safety, please keep all
packaging (plastic bags, boxes, polystyrene etc.) out of
their reach.
WARNING:
Do not allow small children to play with the plastic foil.
There is a danger of suffocation!
Special Safety Precautions for this Appliance
WARNING:
• Always disconnect the appliance from the supply if it is left unat-
tended and before assembling, disassembling or cleaning.
• Do not manipulate any safety switches! This misuse may result
in injuries.

PC-EKM1205_IM 29.10.19
31
WARNING:
• This appliance shall not be used by children.
• Keep the appliance and its cord out of the reach of children.
• Children shall not play with the appliance.
• Appliances can be operated by persons with reduced physical,
sensory, or mental capabilities or lack of experience and / or
knowledge if they have been given supervision or instruction
concerning the use of the appliance in a safe way and under-
stood the hazards involved.
• Do not repair the appliance by yourself. Always contact an
authorized technician. If the supply cord is damaged, it must be
replaced by the manufacturer, its service agent or similarly quali-
ed persons in order to avoid a hazard.
CAUTION:
Do not immerse the appliance into water for cleaning. Please fol-
low the instructions as stipulated in the chapter “Cleaning”.
Designated Use
This appliance is used for grinding roasted coffee beans. It
is not suitable to grind nuts, spices or the like.
It is intended for domestic use and use of similar areas. It
may only be used in the manner described in this instruction
manual. The appliance may not be used for commercial
purposes.
Any other use is considered as not intended and may lead
to damage of property or even to personal injury.
The manufacturer assumes no liability for damage which
may occur through incorrect use.
Unpacking the Appliance
1. Remove the appliance from the package.
2. Remove all packaging material such as lms, ller, cable
holders and cardboard.
3. Check the delivery contents for completeness.
4. Should the package contents be incomplete or damages
be found, do not take the appliance into operation. Take
it immediately back to the dealer.
NOTE:
Dust or production residues can be located on the appli-
ance. We recommend to clean the appliance as described
under “Cleaning”.
Overview of the Components /
Scope of Delivery
1 Lid for the coffee bean container
2 Container for the coffee beans (removable)
3 Cap of the grinder (upper grinding cone)
4 Grinder
5 Lever for adjusting the degree of grinding
6 Symbols for setting the grinding degree
7 Measuring spoon with cleaning brush
8 Motor housing
9 Collection tank for the coffee powder (can be pulled out)
10 Lid for the collection tank
11 Regulator for setting the powder quantity (number of
cups)
12 Control lamp
13 On / off button

PC-EKM1205_IM 29.10.19
32
Notes for Use
Electrical Connection
1. Check whether the mains voltage that you want to use,
corresponds with that of the appliance. You will nd the
information about it on the rating plate.
2. Only connect the appliance to a properly installed safety
socket. The control lamp ashes 3 times.
Safety Switch
The appliance is equipped with a safety switch. It only works
if the container for the coffee beans is mounted correctly.
Switching the Appliance On / Off
NOTE:
The appliance cannot be switched on until a powder
volume setting has been selected.
• Press the button. The control lamp lights up continu-
ously. The grinding process begins.
• The grinding process nishes automatically.
• You can also nish the grinding process with the
button at any time.
Short-Term Operation
Only use the appliance in immediate succession for a max-
imum of 5 times. Allow the appliance to cool down for about
10 minutes before using it again.
Setting the Degree of Grinding
The grinder is gradually adjustable from extra ne to coarse.
Observe the symbols for setting the grinding degree. The
small dots mean a ne setting and the big dots a coarse
setting.
How ne or coarse you grind your coffee depends on
the further use of the coffee powder. The type of coffee
beans and the roasting process have an additional impact
on the taste. With a little practice you will nd out which
grind setting is right for you. We can give you the following
indications:
Grind adjustment Usage
Extra ne Espresso machine
Fine Coffee machine
Medium Hand lter
Coarse French Press coffee
NOTE: Avoid blockages of the grinder
Set the grinding degree when the container for coffee
beans is completely empty or only during the grinding
process.
To change the grinding degree, slide the lever to the desired
setting.
Regulator for Setting the Powder Quantity (Number of
Cups)
Use the slider to set the amount of coffee that is to be
ground. Make sure that there are always enough coffee
beans in the container for coffee beans. Choose between
2 and 12 cups of coffee. The control lamp will ash.
The amount of coffee powder per cup depends on your
personal taste, the type of coffee and the grinding grade
setting.
NOTE: Tip for espresso
Only grind the amount of coffee you are going to use
immediately.
Remaining Coffee Beans
Remove the coffee beans from the appliance if they are
older than a week. They have lost their aroma and diminish
the coffee taste.
TIP:
Store coffee beans in a sealed, air-tight container in the
refrigerator. That way, the coffee stays aromatic for longer.
Operation
CAUTION:
Before using the appliance, inspect the coffee bean con-
tainer for foreign matter and remove it.
1. Place the container for the coffee beans on the grinder.
Observe the symbols. Place the container with the sym-
bol above the symbol on the appliance. Turn the
container clockwise until it stops. It must audibly snap in.
2. Place the coffee grounds container with the lid in the
motor housing until it stops.
3. Adjust the desired degree of grinding with the lever.
4. Fill the coffee beans into the container. Do not overll the
container.
5. Place the lid on the container for the coffee beans.
6. Use the slider to select the number of cups for which you
want to ground coffee powder.
7. Switch on the appliance with the button. The control
lamp lights up continuously.
NOTE:
If you want to stop the grinding process prior to the set
time, press the button.
8. When the grinding process is completed, the control
lamp ashes 3 times. Pull out the collecting container
with the coffee powder. Empty it.
9. Disconnect the power supply from the socket when you
are not using the appliance.

PC-EKM1205_IM 29.10.19
33
Cleaning
WARNING:
• Always disconnect the power plug before cleaning.
• Never immerse the appliance in water for cleaning. Do not
pour water into the mounted container for coffee beans. It could
cause an electric shock or re.
CAUTION:
• Do not use wire brushes or other abrasive objects.
• Do not use any sharp or abrasive cleaning agents.
• Clean the appliance regularly. Coffee beans leave an oily
residue. These deposited oils turn rancid. The rancid oils
negatively inuence the taste of your coffee.
• Espresso and other dark coffee roasts have a higher oil
content, which requires more frequent cleaning.
Removable Accessories
1. Turn the coffee beans container counterclockwise to
remove it. Wipe it with a damp cloth.
2. Clean the coffee grounds container and lids in a warm
rinse bath.
3. Allow the parts to dry completely before retting them.
4. Place the container for the coffee beans on the grinder.
Observe the symbols. Place the container with the sym-
bol above the symbol on the appliance. Turn the
container clockwise until it stops. It must audibly snap in.
5. Place the coffee grounds container with the lid in the
motor housing until it stops.
Grinder
1. Loosen the cap of the grinder counter-clockwise with a
small turn. Remove it.
NOTE:
This process could be difcult due to jammed bean
remains.
2. Clean the upper grinding cone with the cleaning brush.
3. Adherent powder in the grinder can also be removed
with the cleaning brush. Use a vacuum cleaner to re-
move the coffee powder residues from inside the grinder.
4. Replace the cap of the grinder. Turn it a little clockwise
until it stops.
Motor Housing
For cleaning of the housing, only use a damp cloth and mild
detergents.
Storage
• Clean the appliance as described. Let the accessories
dry completely.
• We recommend that you keep the appliance in the
original packaging, if you do not want to use it for a
longer period.
• Always store the appliance out of reach of children in a
well ventilated, dry place.
Troubleshooting
Problem Possible Cause Solution
The appliance is not
working.
The appliance has no power supply. Check the outlet with a different appliance.
Your appliance is equipped with a
safety switch. This prevents an
accidental starting of the engine.
Make sure that the container for the coffee beans is
mounted correctly.
The overheating protection has been
activated. The motor is too hot.
Let the appliance cool down for at least 30 minutes
before switching it on again.
The appliance is defect. Consult our service department or an expert.

PC-EKM1205_IM 29.10.19
34
Problem Possible Cause Solution
• The appliance stops
unexpectedly.
• The degree of grinding
cannot be adjusted.
A coffee bean has become stuck. 1. Disconnect the mains plug from the wall socket!
2. Pull out the collection tank.
3. Remove the remaining coffee beans.
4. Remove the container for the coffee beans and the
locking for the grinder as described under “Cleaning”.
5. Remove the jammed coffee bean or foreign body.
The grinder is blocked by a foreign
body.
Technical Data
Model:.............................................................. PC-EKM 1205
Power supply:.....................................220 - 240 V~, 50 - 60 Hz
Power consumption: .....................................................200 W
Protection class: ...................................................................
Net weight: ..................................................... approx. 1.93 kg
The right to make technical and design modications in
the course of continuous product development remains
reserved.
This appliance has been tested according to all relevant
current CE guidelines, such as electromagnetic compatibility
and low voltage directives, and is manufactured according
to the latest safety regulations.
Disposal
Meaning of the “Dustbin” Symbol
Protect our environment: do not dispose of
electrical equipment in the domestic waste.
Please return any electrical equipment that
you will no longer use to the collection points
provided for their disposal.
This helps avoid the potential effects of incorrect disposal
on the environment and human health.
This will contribute to the recycling and other forms of
re-utilisation of electrical and electronic equipment.
Information concerning where the equipment can be dis-
posed of can be obtained from your local authority.

PC-EKM1205_IM 29.10.19
35
Instrukcja obsługi
Dziękujemy za wybór naszego produktu. Mamy nadzieję, że
korzystanie z urządzenia sprawi państwu radość.
Symbole użyte w tej instrukcji obsługi
Ważne informacje dotyczące bezpieczeństwa użytkownika
są specjalnie wyróżnione. Koniecznie stosuj się do tych
wskazówek, aby uniknąć wypadków i uszkodzenia urzą-
dzenia:
OSTRZEŻENIE:
Ostrzega przed zagrożeniami dla zdrowia i wskazuje na
potencjalne ryzyka obrażeń.
UWAGA:
Wskazuje na potencjalne zagrożenia dla urządzenia lub
innych przedmiotów.
WSKAZÓWKA:
Wyróżnia porady i informacje ważne dla użytkownika.
Spis treści
Przegląd elementów obsługi .............................................3
Ogólne uwagi ....................................................................35
Specjalne wskazówki bezpieczeństwa dla urządzenia
..35
Użytkowanie zgodnie z przeznaczeniem .......................36
Rozpakowanie urządzenia ............................................... 36
Przegląd elementów obsługi / Zakres dostawy..............37
Wskazówki dotyczące użytkowania ...............................37
Połączenia elektryczne ..................................................37
Przełącznik bezpieczeństwa .......................................... 37
Przełączanie urządzenia wł. / wył. .................................. 37
Działanie krótkotrwałe .................................................... 37
Ustawienie poziomu zmielenia ......................................37
Regulacja ilości mielonej kawy (liczba liżanek) ...........37
Pozostałe ziarna kawy ...................................................37
Obsługa .............................................................................. 37
Czyszczenie ....................................................................... 38
Wyjmowany akcesoria ...................................................38
Młynek ............................................................................ 38
Obudowa silnika .............................................................38
Przechowywanie ...............................................................38
Eliminowanie usterek i zakłóceń ....................................39
Dane techniczne ................................................................39
Warunki gwarancji ............................................................39
Usuwanie ...........................................................................40
Znaczenie symbolu „Pojemnik na śmieci” ..................... 40
Ogólne uwagi
Przed uruchomieniem urządzenia proszę bardzo dokładnie
przeczytać instrukcję obsługi. Proszę zachować ją wraz
z kartą gwarancyjną, paragonem i w miarę możliwości rów-
nież kartonem z opakowaniem wewnętrznym. Przekazując
urządzenie innej osobie, oddaj jej także instrukcję obsługi.
• Proszę wykorzystywać urządzenie jedynie dla prywat-
nego celu, jaki został przewidziany dla urządzenia. Urzą-
dzenie to nie zostało przewidziane do użytku w ramach
działalności gospodarczej.
• Proszę nie korzystać z urządzenia na zewnątrz. Proszę
trzymać urządzenie z daleka od ciepła, bezpośredniego
promieniowania słonecznego, wilgoci (w żadnym
wypadku nie zanurzać w substancjach płynnych) oraz
ostrych krawędzi. Proszę nie obsługiwać urządzenia
wilgotnymi dłońmi. Jeżeli urządzenie jest wilgotne lub
mokre, proszę natychmiast wyciągnąć wtyczkę.
• Jeżeli nie korzystacie państwo z urządzenia, jeżeli
chcecie Państwo zamontować jakieś akcesoria, w celu
wyczyszczenia lub w przypadku jakichkolwiek zakłóceń,
proszę zawsze wyłączyć urządzenie i wyjąć wtyczkę
z gniazdka (należy ciągnąć za wtyczkę, nie za przewód).
• Pracującego urządzenia nie należy pozostawiać bez
nadzoru. Przed opuszczeniem pomieszczenia urządze-
nie należy zawsze wyłączać i wyciągać wtyczkę sieciową
z gniazda.
• Należy regularnie sprawdzać, czy urządzenie i kabel
sieciowy nie są uszkodzone. W razie uszkodzenia należy
przestać korzystać z urządzenia.
• Proszę stosować tylko oryginalne akcesoria.
• Dla bezpieczeństwa dzieci proszę nie zostawiać swo-
bodnie dostępnych części opakowania (torby plastikowe,
kartony, styropian itp.).
OSTRZEŻENIE:
Nie pozwalaj dzieciom bawić się folią. Niebezpieczeń-
stwo uduszenia!
Specjalne wskazówki bezpieczeństwa dla urządzenia
OSTRZEŻENIE:
• Zawsze odłączać urządzenie od zasilania, kiedy jest pozosta-
wione bez nadzoru i przed montażem, demontażem lub czysz-
czeniem.

PC-EKM1205_IM 29.10.19
36
OSTRZEŻENIE:
• Prosimy nie manipulować wyłącznikami bezpieczeństwa! Takie
niewłaściwe użytkowanie może spowodować obrażenia.
• Dzieci nie mogą korzystać z urządzenia.
• Trzymać urządzenie i przewód poza zasięgiem dzieci.
• Dzieci nie mogą bawić się tym urządzeniem.
• To urządzenie mogą użytkować osoby z ograniczeniami -
zycznymi, ruchowymi czy umysłowymi, z brakiem wiedzy czy
doświadczenia, o ile są one pod nadzorem lub instruowane
w zakresie bezpiecznego użytkowania urządzenia i rozumieją
związane z tym zagrożenia.
• Nie naprawiać urządzenia samodzielnie. Skontaktować się
z pracownikiem autoryzowanego serwisu. Jeśli przewód zasila-
nia jest uszkodzony, należy go wymienić u producenta, przed-
stawiciela serwisu lub podobnie wykwalikowanej osoby, aby
uniknąć zagrożenia.
UWAGA:
Nie zanurzać urządzenia w wodzie w celu czyszczenia. Proszę
korzystać z instrukcji podanych w rozdziale „Czyszczenie”.
Użytkowanie zgodnie z przeznaczeniem
Urządzenie to służy do mielenia palonych ziaren kawy. Nie
jest ono przeznaczone do mielenia orzechów, przypraw itp.
Jest przeznaczone do użytku domowego oraz użycia na po-
dobnych obszarach. Może być użyte tylko zgodnie z opisem
w niniejszej instrukcji użytkowania. Urządzenia nie wolno
używać w celach komercyjnych.
Inne użycie nie jest uważane za zgodne z zamierzeniem
i może prowadzić do uszkodzeń mienia lub nawet obrażeń
ciała.
Producent nie ponosi odpowiedzialności za szkody, które
mogą pojawić się wskutek nieprawidłowego użytkowania.
Rozpakowanie urządzenia
1. Urządzenie wyjąć z jego opakowania.
2. Wyjąć wszystkie elementy opakowania, takie jak folia,
wypełniacz, uchwyty kabli i tektura.
3. Sprawdzić, czy w opakowaniu znajdują się wszystkie
części składowe.
4. Jeśli zawartość opakowań nie jest kompletna lub są
uszkodzenia, takiego urządzenia nie należy użytkować.
Należy je niezwłocznie zwrócić sprzedawcy.
WSKAZÓWKA:
Na urządzeniu może znajdować się oraz pozostałości
po produkcji. Zaleca się umycie części robota zgodnie
z informacją podaną w części „Czyszczenie”.

PC-EKM1205_IM 29.10.19
37
Przegląd elementów obsługi /
Zakres dostawy
1 Pokrywa zbiornika na ziarna kawy
2 Zbiornik na ziarna kawy (wyjmowany)
3 Blokada młynka (górny stożek mielący)
4 Młynek
5 Dźwignia regulacji stopnia mielenia
6 Symbole regulacji stopnia mielenia
7 Łyżka do odmierzania ze szczoteczką
8 Obudowa silniczka
9 Zbiornik na kawę mieloną (wyjmowany)
10 Pokrywa zbiornika
11 Regulacja ilości mielonej kawy (liczba liżanek)
12 Lampka kontrolna
13 Przycisk wł. / wył.
Wskazówki dotyczące użytkowania
Połączenia elektryczne
1. Sprawdzić, czy napięcie sieciowe, którego chcemy użyć
jest zgodne z napięciem urządzenia. Informacja na ten
temat znajduje się na plakietce znamionowej.
2. Urządzenie wolno podłączyć tylko i wyłącznie do
przepisowo zamontowanego gniazdka wtykowego ze
stykiem ochronnym z prądem. Lampka kontrolna miga
trzykrotnie.
Przełącznik bezpieczeństwa
Twoje urządzenie jest wyposażone w wyłącznik bezpie-
czeństwa. Zadziała jedynie, jeśli pojemnik na ziarna kawy
jest poprawnie włożony.
Przełączanie urządzenia wł. / wył.
WSKAZÓWKA:
Urządzenie nie może być włączone, póki ilość mielonej
kawy nie zostanie wybrana.
• Naciśnij przycisk . Lampka kontrolna świeci się jednym
ciągiem. Rozpoczyna się proces mielenia.
• Się proces mielenia automatyczne zakończenie.
• Można również wcześniej anulować pracę, w dowolnym
momencie wciskając przycisk .
Działanie krótkotrwałe
Urządzenie można włączyć maksymalnie 5 razy z kolei.
Odstaw urządzenie w celu ostygnięcia na około 10 minut
przed jego ponownym użyciem.
Ustawienie poziomu zmielenia
Młynek można regulować w zakresie od mielenia drobnego
do grubego. Zwróć uwagę na oznaczenia regulacji stopnia
zmielenia. Małe kropki oznaczają ustawienie drobnego
mielenia, a duże kropki mielenie grube.
Jak drobno lub grubo zostaną zmielone ziarna, zależy od
późniejszego sposobu spożycia kawy. Rodzaj ziaren kawy
i proces prażenia mają dodatkowy wpływ na smak. Wystar-
czy trochę praktyki, aby odkryć, jaki poziom mielenia jest dla
nas odpowiedni. Przygotowaliśmy nieco wskazówek:
Regulacja mielenia Użytkowanie
Bardzo drobno Ekspres do kawy espresso
Drobno Ekspres do kawy
Średnio Filtr ręczny
Grubo Ekspres Ciśnieniowy
WSKAZÓWKA: Unikaj blokady młynka
Stopień mielenia należy ustawiać jedynie, kiedy zbiornik
na ziarna będzie kompletnie pusty lub w trakcie mielenia.
Aby zmienić stopień mielenia, należy przesunąć dźwignię
na docelowe ustawienie.
Regulacja ilości mielonej kawy (liczba liżanek)
Za pomocą suwaka ustaw ilość kawy, która zostanie zmie-
lona. Sprawdź, czy w zbiorniku znajduje się wystarczająca
ilość ziaren. Można wybrać pomiędzy 2 a 12 liżankami
kawy. Kontrolka będzie migać.
Ilość zmielonej kawy jest zależna od osobistego gustu,
rodzaju kawy i ustawienia stopnia zmielenia.
WSKAZÓWKA: dla espresso
Miel tylko taką ilość ziaren kawy, jaką chcesz zaparzyć.
Pozostałe ziarna kawy
Usuń ziarna kawy z urządzenia, jeśli mają ponad tydzień.
Straciły już swój aromat, co negatywnie wpłynie na smak
kawy.
WSKAZÓWKA:
Przechowuj ziarna w zapieczętowanych, szczelnych
pojemnikach, w zamrażalce. W ten sposób kawa dłużej
utrzyma swój aromat.
Obsługa
UWAGA:
Przed skorzystaniem z urządzenia, sprawdź, czy w po-
jemniku nie znajdują się ciała obce, a następnie wyjmij je.
1. Umieść pojemnik na ziarna kawy w młynku. Zwróć uwagę
na oznaczenia. Umieść pojemnik z symbolem nad
symbolem na urządzeniu. Obracaj urządzenie zgodnie
z ruchem wskazówek zegara, aż się zatrzyma. Musi
zaskoczyć na swoim miejscu ze słyszalnym kliknięciem.
2. Umieść pojemnik na kawę wraz z pokrywą w obudowie
silnika, aż się zatrzyma.
3. Popchnij stelaż w dół, za pomocą dźwigni.
4. Wsyp ziarna kawy do pojemnika. Nie przepełniaj
pojemnika.

PC-EKM1205_IM 29.10.19
38
5. Umieść pokrywę na pojemniku na ziarna kawy.
6. Za pomocą suwaka wybierz ilość liżanek.
7. Włącz urządzenie za pomocą przycisku . Lampka
kontrolna zaświeci się jednym ciągiem.
WSKAZÓWKA:
Jeśli chciałbyś zatrzymać urządzenie przed upływem
ustawionego czasu, naciśnij przycisk .
8. Po zakończeniu procesu mielenia lampka kontrolna
mignie trzykrotnie. Wyjmij zbiornik ze zmieloną kawą.
Opróżnij go.
9. Odłączyć wtyczkę zasilania z gniazdka po wykorzystaniu
urządzenia.
Czyszczenie
OSTRZEŻENIE:
• Przed czyszczeniem zawsze wyjmować wtyczkę z gniazdka
zasilania.
• Nigdy nie zanurzać podstawy urządzenia w wodzie w celu jego
umycia. Nie polewaj wodą zamontowanego zbiornika na ziarna
kawy. Mogłoby to być przyczyną porażenia prądem lub pożaru.
UWAGA:
• Nie stosować czyścików drucianych lub innych drapią-
cych przedmiotów.
• Nie należy używać ostrych narzędzi ani silnie ścier-
nych środków czyszczących.
• Regularnie czyść urządzenie. Ziarna kawy pozostawiają
tłusty osad. Zgromadzony tłuszcz jełczeje. Zjełczały
tłuszcz ma negatywny wpływ na smak Twojej kawy.
• Espresso i inne ciemne odmiany kaw charakteryzują
się większą zawartością tłuszczu, przez co pojemnik
wymaga częstszego czyszczenia.
Wyjmowany akcesoria
1. Chcąc wyjąć pojemnik z podstawy, obróć go w kierunku
przeciwnym do ruchu wskazówek zegara. Następnie
wytrzyj go wilgotną szmatką.
2. Ręcznie umyj pojemnik na ziarna kawy i pokrywę,
w ciepłej wodzie.
3. Przed ponownym użyciem, pozwól wszystkim częściom
zupełnie wyschnąć.
4. Umieść pojemnik na ziarna kawy w młynku. Zwróć
uwagę na oznaczenia. Umieść pojemnik z symbolem
nad symbolem na urządzeniu. Obracaj urządzenie
zgodnie z ruchem wskazówek zegara, aż się zatrzyma.
Musi zaskoczyć na swoim miejscu ze słyszalnym
kliknięciem.
5. Umieść pojemnik na kawę wraz z pokrywą w obudowie
silnika, aż się zatrzyma.
Młynek
1. Zwolnij blokadę młynka, obracając go lekko w kierunku
przeciwnym do ruchu wskazówek zegara. Wyjmij go.
WSKAZÓWKA:
Ta czynność może być utrudniona przez pozostałości
ziaren blokujące mechanizm.
2. Wyczyść górny stożek szczoteczką.
3. Usuń z młynka resztki zmielonej kawy za pomocą szczo-
teczki. Użyj odkurzacza, aby usunąć resztki zmielonej
kawy z wnętrza młynka.
4. Załóż blokadę ponownie. Obracaj ją w prawo, aż się
zatrzyma.
Obudowa silnika
Do czyszczenia obudowy używać tylko wilgotnej ścierki
i łagodnych detergentów.
Przechowywanie
• Oczyścić urządzenie zgodnie z opisem. Akcesoria należy
pozostawić do całkowitego wyschnięcia.
• Jeśli urządzenie nie będzie używane przez dłuższy
czas, zalecane jest jego przechowywanie w oryginalnym
opakowaniu.
• Urządzenie zawsze przechowywać w miejscu niedostęp-
nym dla dzieci, dobrze przewietrzanym i suchym.

PC-EKM1205_IM 29.10.19
39
Eliminowanie usterek i zakłóceń
Problem Możliwa przyczyna Rozwiązanie
Urządzenie nie funk-
cjonuje.
Brak zasilania urządzenia. Sprawdzić wyjście za pomocą innego urządzenia.
Twoje urządzenie jest wyposażone w wy-
łącznik bezpieczeństwa. Zapobiega to
przypadkowemu włączeniu silnika.
Sprawdź, czy trójkątne wgłębienie w wałku szczotki
jest ustawione prawidłowo.
Uruchomiona została ochrona przed
przegrzaniem. Silnik jest zbyt gorący.
Przed ponownym włączeniem odstaw urządzenie
do ostygnięcia na co najmniej 30 minut.
Urządzenie jest wadliwe. Skontaktować się z działem sprzedaży lub specja-
listą.
• Urządzenie wyłącza
się niespodziewanie.
• Stopnia zmielenia nie
można regulować.
Ziarna kawy się zablokowały. 1. Wyciągnij wtyczkę z kontaktu!
2. Wyciągnij zbiornik na kawę mieloną.
3. Usuń pozostałe ziarna kawy.
4. Usuń pojemnik na ziarna kawy i blokadę młynka,
tak jak to opisano w dziale „Czyszczenie”.
5. Usuń zablokowane ziarno kawy lub ciało obce.
Młynek jest zablokowany przez ciało
obce.
Dane techniczne
Model:.............................................................. PC-EKM 1205
Zasilanie: ............................................ 220 - 240 V~, 50 - 60 Hz
Pobór mocy: .................................................................. 200 W
Stopień ochrony: ..................................................................
Masa netto: ............................................................ok. 1,93 kg
Zastrzegamy sobie prawo wprowadzania zmian technicz-
nych i projektowych w trakcie ciągłego rozwoju produktu.
Urządzenie jest zgodne z aktualnymi dyrektywami CE,
dotyczącymi zgodności elektromagnetycznej czy niskiego
napięcia i produkowane jest zgodnie z najnowszymi przepi-
sami bezpieczeństwa.
Warunki gwarancji
Przyznajemy 24 miesiące gwarancji na produkt licząc od
daty zakupu.
W tym okresie będziemy bezpłatnie usuwać w terminie
14 dni od daty dostarczenia wadliwego sprzętu z kartą
gwarancyjną do miejsca zakupu wszystkie uszkodzenia
powstałe w tym urządzeniu na skutek wady materiałów
lub wadliwego wykonania, naprawiając oraz wymieniając
wadliwe części lub (jeśli uznamy za stosowne) wymieniając
całe urządzenie na nowe.
Sprzęt do naprawy powinien być dostarczony w komplecie
wraz z dowodem zakupu oraz z ważną kartą gwarancyjną
do sprzedawcy w miarę możliwości w oryginalnym opako-
waniu lub innym odpowiednim dla zabezpieczenia przed
uszkodzeniem. W razie braku kompletnego opakowania fa-
brycznego, ryzyko uszkodzenia sprzętu podczas transportu
do i z miejsca zakupu ponosi reklamujący.
Naprawa gwarancyjna nie dotyczy czynności przewidzia-
nych w instrukcji obsługi, do wykonania których zobowią-
zany jest użytkownik we własnym zakresie i na własny
koszt.
Gwarancja nie obejmuje:
• mechanicznych, termicznych, chemicznych uszkodzeń
sprzętu i wywołanych nimi wad,
• uszkodzeń powstałych w wyniku działania sił zewnętrz-
nych takich jak wyładowania atmosferyczne, zmiana
napięcia zasilania i innych zdarzeń losowych,
• nieprawidłowego ustawienia wartości napięcia elektrycz-
nego, zasilanie z nieodpowiedniego gniazda zasilania,
• sznurów połączeniowych, sieciowych, żarówek, baterii,
akumulatorów,
• uszkodzeń wyrobu powstałych w wyniku niewłaściwego
lub niezgodnego z instrukcją jego użytkowania, przecho-
wywania, konserwacji, samowolnego zrywania plomb
oraz wszelkich przeróbek i zmian konstrukcyjnych doko-
nanych przez użytkownika lub osoby niepowołane,
• roszczeń z tytułu parametrów technicznych wyrobu, o ile
są one zgodne z podanymi przez producenta,
• prawidłowego zużycia i uszkodzeń, które mają nieistotny
wpływ na wartość lub działanie tego urządzenia.
Karta gwarancyjna bez pieczątki sklepu, daty sprzedaży,
nie wypełniona, źle wypełniona, ze śladami poprawek,
nieczytelna wskutek zniszczenia, bez możliwości ustalenia
miejsca sprzedaży oraz dołączonego dowodu zakupu jest
nieważna.
Korzystanie z usług gwarancyjnych nie jest możliwe po
upływie daty ważności gwarancji. Gwarancja na części lub
całe urządzenie, które są wymieniane kończy się, wraz
z końcem gwarancji na to urządzenie.
Wszystkie inne roszczenia, wliczając w to odszkodowania
są wykluczone chyba, że prawo przewiduje inaczej. Rosz-
czenia wykraczające poza tą umowę nie są uwzględniane
przez tą gwarancję.

PC-EKM1205_IM 29.10.19
40
Gwarancja na sprzedany towar konsumpcyjny nie wyłącza,
nie ogranicza ani nie zawiesza uprawnień kupującego
wynikających z niezgodności towaru z umową.
Gwarancja oraz zawarte w niej warunki obowiązują na
terenie Rzeczpospolitej Polskiej.
Dystrybutor:
CTC Clatronic Sp. z o.o
Ul. Brzeska 1
45-960 Opole
Usuwanie
Znaczenie symbolu „Pojemnik na śmieci”
Proszę oszczędzać nasze środowisko, sprzęt
elektryczny nie należy do śmieci domowych.
Proszę korzystać z punktów zbiorczych,
przewidzianych do zdawania sprzętu elektrycz-
nego, i tam proszę oddawać sprzęt elektryczny,
którego już nie będą Państwo używać.
Tym sposobem pomagają Państwo unikać potencjalnych
następstw niewłaściwego usuwania odpadów, mających
wpływ na środowisko i zdrowie ludzi.
Tą drogą przyczyniają się Państwo do ponownego użycia,
do recyklingu i do innych form wykorzystania starego
sprzętu elektrycznego i elektronicznego.
Informacje, gdzie można zdać sprzęt, otrzymają Państwo
w swoich urzędach komunalnych lub w administracji gminy.

PC-EKM1205_IM 29.10.19
41
Használati utasítás
Köszönjük, hogy a termékünket választotta. Reméljük,
elégedetten használja majd a készüléket.
A használati útmutatóban található szimbólumok
Az ön biztonságára vonatkozó utasítások kifejezetten meg
vannak különböztetve. Kérjük, mindenképpen ügyeljen
ezekre annak érdekében, hogy elkerülje a baleseteket és a
készülék károsodását:
FIGYELMEZTETÉS:
Egészségét károsító veszélyforrásokra gyelmeztet és
rámutat a lehetséges sérülési lehetőségekre.
VIGYÁZAT:
Lehetséges veszélyre utal, mely a készülékben vagy más
tárgyakban kárt tehet.
MEGJEGYZÉS:
Tippeket és információkat emel ki.
Tartalom
A kezelőelemek áttekintése ...............................................3
Általános megjegyzések ..................................................41
Speciális biztonsági előírások a
készülékre vonatkozóan ..................................................41
Rendeltetésszerű használat ............................................42
A készülék kicsomagolása ..............................................42
A kezelőelemek áttekintése / A csomag tartalma ..........43
Megjegyzések használatra ...............................................43
Elektromos csatlakozás .................................................43
Biztonsági kapcsoló .......................................................43
A készülék be- / ki-kapcsolása ........................................43
Rövid idejű használat ..................................................... 43
Őrlési fokozat beállítása .................................................43
Pormennyiség szabályzó (csészék száma) ..................43
Megmaradó kávészemek ...............................................43
Kezelés ............................................................................... 43
Tisztítás .............................................................................. 44
Levehető tartozékok .......................................................44
Őrlő .................................................................................44
A motor burkolata ...........................................................44
Tárolás ...............................................................................44
Hibaelhárítás......................................................................45
Műszaki adatok .................................................................45
Selejtezés ........................................................................... 45
A „kuka” piktogram jelentése..........................................45
Általános megjegyzések
A készülék használatba vétele előtt gondosan olvassa végig
a használati utasítást, és őrizze meg a garancialevéllel, a
pénztári nyugtával és lehetőleg a csomagolókartonnal, ill. az
abban lévő bélésanyaggal együtt! Amennyiben a készüléket
harmadik személynek adja tovább, a használati útmutatót is
adja a készülékhez.
• Kizárólag személyi célra használja a készüléket, és
csupán arra, amire való! A készülék nem ipari jellegű
használatra készült.
• Ne használja a szabadban! Ne tegye ki erős hőhatásnak,
közvetlen napsugárzásnak és nedvességnek (semmi
esetre se mártsa folyadékba), és óvja az éles szélektől!
Ne használja a készüléket vizes kézzel! Ha a készülék
vizes vagy nedves lett, azonnal húzza ki a konnektorból!
• Kapcsolja ki a készüléket és mindig húzza ki a csatla-
kozót a dugaszoló aljzatból (a csatlakozót, ne pedig a
vezetéket húzza), ha nem használja a készüléket, tarto-
zékokat szerel fel rá, tisztítja vagy zavart észlel.
• Ne működtesse a készüléket felügyelet nélkül! Mindig
kapcsolja ki a készüléket, ha elhagyja a helyiséget!
Húzza ki a csatlakozót a dugaszoló aljzatból!
• A készüléket és a hálózati kábelt rendszeresen elle-
nőrizni kell, hogy nincs-e rajta sérülés jele. Ha sérülést
lát rajta, a készüléket nem szabad használni.
• Csak eredeti tartozékokat használjon!
• Gyermekei biztonsága érdekében ne hagyja általuk
elérhető helyen a csomagolóelemeket (műanyag zacskó,
karton, sztiropor stb.)!
FIGYELMEZTETÉS:
Kisgyermekeket ne engedjen a fóliával játszani. Fulla-
dás veszélye állhat fenn!
Speciális biztonsági előírások a készülékre vonatkozóan
FIGYELMEZTETÉS:
• Mindig válassza le a készüléket az elektromos hálózatról, ha
felügyelet nélkül hagyja, valamint összeszerelés, szétszerelés
vagy tisztítás előtt.

PC-EKM1205_IM 29.10.19
42
FIGYELMEZTETÉS:
• Ne manipulálja a biztonsági kapcsolókat! A nem rendelte-
tésszerű használat sérüléseket okozhat.
• A készüléket gyerekek nem használhatják.
• Tartsa a készüléket és a kábelét gyerekektől távol.
• Gyerekek ne játsszanak a készülékkel.
• A készülékeket csökkent zikai, érzékelési vagy értelmi ké-
pességű személyek, vagy akiknek nincs meg a tapasztalatuk
és / vagy tudásuk ehhez, csak akkor használhatják, ha megtaní-
tották őket a biztonságos használatra vagy aközben felügyelik
őket, és tisztában vannak a kapcsolódó veszélyekkel.
• Ne javítsa saját kezűleg a készüléket. Mindig lépjen kapcso-
latba szakképzett szerelővel. Ha a villanyvezeték megsérül, a
gyártónak, a szerviz ügynökségnek vagy más, hasonlóan kép-
zett személynek kell a javítást végeznie, a veszélyek elkerülése
érdekében.
VIGYÁZAT:
Ne merítse vízbe a készüléket tisztításkor. Kövesse a „Tisztítás”
részben megadott utasításokat.
Rendeltetésszerű használat
A készülék pörkölt kávészemek darálására. Nem alkalmas
dió, fűszerek vagy hasonlók őrlésére.
Háztartási és más hasonló területeken való használatra ké-
szült. Csak a használati útmutatónak megfelelően leírtakra
használható. A készülék nem használható kereskedelmi
célokra.
Minden más használat helytelen használatnak minősül, és
anyagi kárhoz vagy személyi sérüléshez vezethet.
A gyártó nem vállal felelősséget a helytelen használatból
eredő károkért.
A készülék kicsomagolása
1. Vegye ki a készüléket a csomagból.
2. Távolítsa el az összes csomagolóanyagot, úgymint a
fóliákat, töltőanyagot, kábelrögzítőket és a kartondoboz
csomagolást.
3. Ellenőrizze a csomagot, hogy minden megvan-e.
4. Ha a csomag tartalma nem teljes vagy sérülések találha-
tók, ne vegye használatba a készüléket. Azonnal vigye
vissza az értékesítőhöz.
MEGJEGYZÉS:
A készülék poros lehet, vagy gyártási maradékok lehetnek
rajta. Javasoljuk, hogy a „Tisztítás” részben leírtak szerint
tisztítsa meg a készüléket.

PC-EKM1205_IM 29.10.19
43
A kezelőelemek áttekintése /
A csomag tartalma
1 Kávészemtartály fedele
2 Kávészemtartály (levehető)
3 Az őrlő retesze (felső őrlőkúp)
4 Őrlő
5 Őrlésfokozat állító kar
6 Szimbólumok az őrlésfokozat beállításához
7 Mérőkanál tisztítókefével
8 Motorház
9 Kávépor gyűjtőtartály (kihúzható)
10 Gyűjtőtartály fedele
11 Pormennyiség szabályzó (csészék száma)
12 Ellenőrzőlámpa
13 Be / ki gomb
Megjegyzések használatra
Elektromos csatlakozás
1. Ellenőrizze, hogy a használni kívánt hálózati áram
feszültsége megfelel a készüléken feltüntetett értéknek.
Ezt a készülék adattábláján találja.
2. Csak előírásszerűen felszerelt, földelt konnektorba
csatlakoztassa a készüléket. Az ellenőrzőlámpa 3-szor
felvillan.
Biztonsági kapcsoló
A készülék biztonsági kapcsolóval van felszerelve. Csak
akkor működik, ha a kávészem tartály megfelelően van
felszerelve.
A készülék be- / ki-kapcsolása
MEGJEGYZÉS:
A készüléket nem lehet bekapcsolni, míg be nem állítottuk
a pormennyiséget.
• Nyomja meg a gombot. Az ellenőrzőlámpa folyamato-
san világít. Az őrlés megkezdődik.
• Az őrlés befejezés automatikus.
• Az őrlést a gombbal bármikor be lehet fejezni.
Rövid idejű használat
Közvetlenül egymás után legfeljebb 5-ször használja a
készüléket. Hagyja a készüléket kb. 10 percig hűlni, mielőtt
ismét használná.
Őrlési fokozat beállítása
Az őrlőgép beállítható a nagyon nom fokozattól a durva fo-
kozatig. Szimbólumok jelzik az őrlési fokozatot. A kis pontok
nom őrlést, a nagy pontok durva őrlést jelentenek.
A kávé őrlési nomsága a kávépor további felhasználásától
függ. A kávészemek típusa és a pörkölés is befolyásolják a
kávé ízét. Kis gyakorlattal rájön, melyik fokozat megfelelő
önnek. Az alábbiakat javasoljuk:
Őrlési beállítás Felhasználás
Extra nom Presszókávéfőző
Finom Kávéfőző
Közepes Kézi lteres kávé
Durva French Press kávé
MEGJEGYZÉS: Kerülje az őrlőgép megszorulását
Állítsa be az őrlési fokozatot, amikor a kávétartó teljesen
üres, vagy majd csak őrlés közben.
Az őrlési fokozatot a kar csúsztatásával állíthatja be.
Pormennyiség szabályzó (csészék száma)
Használja a csúszkát az őrlendő kávé mennyiségének
beállítására. Tegyen mindig megfelelő mennyiségű kávé-
szemet a tartályba. Válasszon 2 és 12 csésze között. Az
ellenőrzőlámpa villog.
A csészénkénti kávépor mennyiség személyes ízlésétől, a
kávé típusától és az őrlési fokozattól függ.
MEGJEGYZÉS: Tipp presszókávéhoz
Csak annyi kávét őröljön meg, amennyit azonnal felhasz-
nál.
Megmaradó kávészemek
Távolítsa el a kávészemeket a készülékből, ha egy hétnél
régebbiek. Elvesztették aromájukat, és a kávé nem lesz
olyan jó ízű.
TIPP:
Tárolja a kávészemeket légmentesen záró edényben
vagy hűtőszekrényben. Így tovább megmarad a kávé
aromája.
Kezelés
VIGYÁZAT:
A készülék használata előtt ellenőrizze a kávészemtar-
tályt, nincs-e benne idegen test, és adott esetben távolítsa
el azt.
1. Tegye a kávészemtartályt az őrlőre. Ügyeljen a szimbólu-
mokra. Úgy helyezze fel a tartályt, hogy a szimbólum
a szimbólum felett legyen a készüléken. Forgassa a
tartályt az óra járása szerint, amíg lehet. Hallhatóan be
kell kattannia.
2. Helyezze a kávéőrlő tartályt a fedéllel a motorházba
ütközésig.
3. Állítsa be az őrlési fokozatot a karral.
4. Töltse fel a tartályt kávészemekkel. Ne töltse túl a
tartályt.
5. Tegye fel a kávészemtartály fedelét.
6. A csúszkával állítsa be, hány csészéhez való kávét kíván
őrölni.

PC-EKM1205_IM 29.10.19
44
7. Kapcsolja be a készüléket a gombbal. Az ellenőrző-
lámpa folyamatosan világít.
MEGJEGYZÉS:
Ha le akarja állítani az őrlést a beállított idő előtt,
nyomja meg a gombot.
8. Az őrlés befejeztével az ellenőrzőlámpa 3-szor felvillan.
Húzza ki a kávépor gyűjtőtartályát. Ürítse ki.
9. Húzza ki a konnektorból az áramvezetéket, ha nem
használja a készüléket.
Tisztítás
FIGYELMEZTETÉS:
• Tisztítás előtt mindig húzza ki a hálózati kábelt.
• Soha ne merítse vízbe a készüléket, ha tisztítja. Ne öntsön vizet
a felszerelt kávészemtartályba. Ez áramütést vagy tüzet okoz-
hat.
VIGYÁZAT:
• Ne használjon drótkefét vagy más karcoló tárgyakat.
• Ne használjon semmilyen éles vagy karcoló tisztító-
szereket.
• Rendszeresen tisztítsa meg a készüléket. A kávészemek
olajos lerakodást hagynak maguk után. Ez az olajlera-
kódás megavasodik. Az avas olaj negatív hatással van
a kávé ízére.
• A presszókávé- és egyéb sötét kávé őrlemény
olajtartalma nagyobb, ami gyakoribb tisztítást tesz
szükségessé.
Levehető tartozékok
1. Forgassa a kávészemtartályt az óra járásával ellentéte-
sen, hogy levehesse. Törölje ki nedves ruhával.
2. Tisztítsa a kávéőrlemény tartályt és a fedeleket meleg
mosogatóvízben.
3. Hagyja az alkatrészeket teljesen megszáradni, mielőtt
visszaszerelné őket.
4. Tegye a kávészemtartályt az őrlőre. Ügyeljen a szimbólu-
mokra. Úgy helyezze fel a tartályt, hogy a szimbólum
a szimbólum felett legyen a készüléken. Forgassa a
tartályt az óra járása szerint, amíg lehet. Hallhatóan be
kell kattannia.
5. Helyezze a kávéőrlő tartályt a fedéllel a motorházba
ütközésig.
Őrlő
1. Lazítsa meg az őrlő reteszét az óra járásával ellentéte-
sen kissé elforgatva. Vegye le.
MEGJEGYZÉS:
Ez nehéz lehet a beszorult kávészemek miatt.
2. Tisztítsa meg a felső őrlőkúpot a tisztítókefével.
3. Az őrlőben megtapadt port is a kefével lehet eltávolítani.
Porszívóval távolítsa el az őrlő belsejéből a kávépor
maradékokat.
4. Helyezze vissza az őrlő reteszét. Forgassa kissé az óra
járása szerint ütközésig.
A motor burkolata
A burkolat tisztításához egy nedves ruhát és enyhe tisztító-
szert használjon.
Tárolás
• A leírtaknak megfelelően tisztítsa a készüléket. Hagyja,
hogy a tartozékok teljesen megszáradjanak.
• Ha a készüléket hosszabb ideig nem használja, akkor
azt javasoljuk, hogy az eredeti csomagolásában tárolja.
• Mindig a gyerekektől távol tárolja a készüléket, egy jól
szellőztetett, száraz helyiségben.

PC-EKM1205_IM 29.10.19
45
Hibaelhárítás
Probléma Lehetséges oka Megoldás
A készülék nem
működik.
A készüléknek nincs áramellátása. Ellenőrizze a konnektort egy másik készülékkel.
A készülék biztonsági kapcsolóval
van felszerelve. Ez megakadályozza
a motor véletlenszerű beindítását.
Győződjön meg a kávészemtartály megfelelő felszerelé-
séről.
A túlmelegedés elleni védelem akti-
válódott. A motor túl meleg.
A készüléket az újbóli bekapcsolás előtt legalább 30 percig
hagyja lehűlni.
A készülék elromlott. Lépjen kapcsolatba a szervizhálózatunkkal vagy egy
szakemberrel.
• A készülék váratla-
nul leáll.
• Az őrlési fokozatot
nem lehet állítani.
Beszorult egy kávészem. 1. Húzza ki a dugót a fali konnektorból!
2. Húzza ki a gyűjtőtartályt.
3. Vegye ki a megmaradt kávészemeket.
4. Vegye le a kávészemtartályt és az őrlő reteszét a „Tisztí-
tás” pontban leírtak szerint.
5. Távolítsa el a beszorult kávészemet vagy idegen testet.
Az őrlőt idegen test blokkolja.
Műszaki adatok
Modell: ............................................................. PC-EKM 1205
Áramellátás: .......................................220 - 240 V~, 50 - 60 Hz
Teljesítményfelvétel: ......................................................200 W
Védelmi osztály: ...................................................................
Nettó súly: ..............................................................kb. 1,93 kg
A műszaki és kivitelezési módosítások jogát a folyamatos
termékfejlesztés miatt fenntartjuk.
A készülék megfelel minden érvényes CE irányelvnek,
beleértve az elektromágneses megfelelőségről, és a kisfe-
szültségű berendezésekről szóló irányelveket, és a legújabb
biztonsági szabályozások gyelembe vételével készült.
Selejtezés
A „kuka” piktogram jelentése
Kímélje környezetünket, az elektromos készü-
lékek nem a háztartási szemétbe valók!
Használja az elektromos készülékek ártalmat-
lanítására kijelölt gyűjtőhelyeket, ott adja le
azokat az elektromos készülékeit, amelyeket
többé már nem kíván használni!
Ezzel segítséget nyújt ahhoz, hogy elkerülhetők legyenek
azok a hatások, amelyeket a helytelen „szemétre dobás”
gyakorolhat a környezetre és az emberi egészségre.
Ezzel hozzájárul az újrahasznosításhoz, a recyclinghoz és a
kiöregedett elektromos és elektronikus készülékek értékesí-
tésének egyéb formáihoz.
Az önkormányzatoknál vagy a polgármesteri hivatalokban
tájékoztatást kaphat arról, hogy hova viheti a kiselejtezett
készülékeket.

PC-EKM1205_IM 29.10.19
46
Руководство по эксплуатации
Спасибо за выбор нашего продукта. Надеемся, он вам
понравится.
Символы применяемые в данном руководстве
пользователя
Важные рекомендации для обеспечения вашей без-
опасности обозначены по особенному. Обязательно
следуйте этим рекомендациям, чтобы предотвратить
несчастный случай или поломку изделия:
ПРЕДУПРЕЖДЕНИЕ:
Предупреждает об опасности для здоровья и возмож-
ном риске получения травмы.
ВНИМАНИЕ:
Указывает на возможную опасность для изделия и
других окружающих предметов.
ПРИМЕЧАНИЯ:
Дает советы и информацию.
Содержание
Обзор деталей прибора ...................................................3
Общая информация .......................................................46
Особые указания по технике
безопасности для данного устройства ...................... 47
Назначение ....................................................................... 48
Распаковка устройства ..................................................48
Обзор деталей прибора / Комплект поставки ...........48
Примечания по использования ................................... 48
Электрические соединения .........................................48
Предохранительный выключатель ............................48
Включение / выключение прибора .............................. 48
Кратковременная работа ............................................48
Настройка степени помола .........................................48
Регулятор для настройки
количества порошка (количество чашек) ..................49
Остаток кофейных зерен .............................................49
Работа ................................................................................49
Очистка..............................................................................49
Съемные принадлежности ..........................................50
Кофемолка .................................................................... 50
Корпус двигателя .........................................................50
Хранение ........................................................................... 50
Решение проблем ...........................................................50
Технические данные ......................................................51
Утилизация ....................................................................... 51
Значение символа «корзина» .....................................51
Общая информация
Перед началом эксплуатации прибора внимательно
прочитайте прилагаемую инструкцию по эксплуатации и
сохраните ее в надежном месте, вместе с гарантийным
талоном, кассовым чеком и, по возможности, картонной
коробкой с упаковочным материалом. Если даете кому-
либо попользоваться прибором, обязательно дайте в
придачу данную инструкцию по эксплуатации.
• Пользуйтесь прибором только частным образом и по
назначению. Прибор не предназначен для коммерче-
ского использования.
• Не пользуйтесь прибором под открытым небом. Пре-
дохраняйте прибор от жары, прямых солнечных лу-
чей, влажности (ни в коем случае не погружайте его
в воду) и ударов об острые углы. Не прикасайтесь к
прибору влажными руками. Если прибор увлажнился
или намок, тут же выньте вилку из розетки.
• После эксплуатации, монтаже принадлежностей,
чистке или поломке прибора всегда вынимайте вилку
из розетки (тяните за вилку, а не за кабель).
• Не оставляйте включенные электроприборы без при-
смотра. Выходя из помещения всегда выключайте
прибор. Выньте штекер из розетки.
• Прибор и кабель сетевого питания необходимо
регулярно обследовать на наличие следов повреж-
дения. При обнаружении повреждения пользоваться
прибором запрещается.
• Используйте только оригинальные запчасти.
• Из соображений безопасности для детей не остав-
ляйте лежать упаковку (пластиковые мешки, картон,
пенопласт и т.д.) без присмотра.
ПРЕДУПРЕЖДЕНИЕ:
Не позволяйте детям играть с полиэтиленовой
пленкой. Опасность удушья!

PC-EKM1205_IM 29.10.19
47
Особые указания по технике безопасности
для данного устройства
ПРЕДУПРЕЖДЕНИЕ:
• Всегда отключайте устройство из сети, когда с ним никто
не работает, а также перед началом разборки, сборки и
чистки.
• Не манипулируйте выключателями блокировки! Такое не-
правильное применение может привести к травмам.
• Детям запрещается пользоваться данным устройством.
• Храните устройство и его шнур в местах, недоступных для
детей.
• Дети не должны играть с устройством.
• Устройство может использоваться людьми c пониженными
физическими, сенсорными или умственными способно-
стями или с недостатком опыта и / или знаний, в случае
если они находятся под присмотром или прошли инструк-
таж в отношении безопасного использования устройства и
понимают связанные с ним опасности.
• Не отремонтировать устройство самостоятельно. Обя-
зательно свяжитесь с авторизованным мастером. При
повреждении сетевого шнура, во избежание опасности
поражения электрическим током, шнур следует заменить у
изготовителя, сервисного представителя или других квали-
фицированных лиц.
ВНИМАНИЕ:
Запрещается погружать устройство в воду для очистки.
Просим вас соблюдать инструкции, приведенные в разделе
«Очистка».

PC-EKM1205_IM 29.10.19
48
Назначение
Прибор предназначен для помола жаренных кофейных
зерен. Он не пригоден для помола орехов, приправ и т.п.
Устройство предназначено для домашнего исполь-
зования. Его можно использовать только способом,
описанным в данном руководстве. Устройство нельзя
использовать для коммерческих целей.
Любое другое использование считается использо-
ванием не по назначению и может привести к порче
имущества или даже к травме.
Производитель не несет ответственности за возможный
ущерб, который может быть причинен в результате
неправильного использования устройства.
Распаковка устройства
1. Достаньте устройство из упаковки.
2. Удалите все упаковочные материалы, такие как
пленки, наполнительный материал, фиксаторы
кабеля и картон.
3. Проверьте комплектность поставки.
4. Не эксплуатируйте устройство при наличии повреж-
дений, либо если устройство некомплектно. Неза-
медлительно верните покупку в магазин.
ПРИМЕЧАНИЯ:
На устройстве может иметься пыль или остатки мате-
риалов от производства. Мы рекомендуем очистить
устройство, как описано в разделе «Очистка».
Обзор деталей прибора /
Комплект поставки
1 Крышка для контейнера кофейных зерен
2 Контейнер для кофейных зерен (съемный)
3 Замок для кофемолки (верхний конус дробилки)
4 Кофемолка
5 Рычаг для регулировки степени помола
6 Знаки для настройки степени помола
7 Мерная ложка с чистящей щеткой
8 Корпус электродвигателя
9 Сборная емкость для кофейного порошка (может
выниматься)
10 Крышка для сборной емкости
11 Регулятор для настройки количества порошка (коли-
чество чашек)
12 Контрольная лампочка
13 Кнопка вкл / выкл
Примечания по использования
Электрические соединения
1. Проверьте, что напряжение сетевого электропита-
ния, которое предполагается использовать, соответ-
ствует номиналу прибора. Номинальное напряжение
прибора указано на информационной табличке.
2. Подсоедините прибор к встроенной в соответствии
с предписаниями штепсельной розетке с защитным
контактом. Контрольная лампа мигает три раза.
Предохранительный выключатель
Ваш прибор оборудован предохранительным выключа-
телем. Он работает, только если правильно установлен
контейнер для кофейных зерен.
Включение / выключение прибора
ПРИМЕЧАНИЯ:
Включить прибор невозможно, пока не будет выбрана
настройка объема порошка.
• Нажмите кнопку . Контрольная лампа горит непре-
рывно. Начинается процесс помола.
• Процесс помола заканчивается автоматически.
• Также закончить процесс помола можно в любой
момент с помощью кнопки .
Кратковременная работа
Используйте прибор не более 5 раз подряд. Перед
следующим использованием дайте прибору остыть в
течение примерно 10 минут.
Настройка степени помола
Данная кофемолка имеет последовательную регули-
ровку от экстра-мелкого до грубого помола. Соблю-
дайте знаки для настройки степени помола. Маленькая
точка означает настройку мелкого помола, а большие
точки - настройку грубого помола.
Выбирайте степень помола - мельче или крупнее - с
учетом дальнейшего использования кофейного по-
рошка. На вкус дополнительно влияет сорт и процесс
обжарки кофейных зерен. После небольшой практики
вы найдете ту настройку помола, которая подходит
именно вам. Мы можем дать вам следующие советы:
Регулировка помола Использование
Экстра-мелкий Эспрессо-машина
Мелкий Кофе-машина
Средний Бумажный фильтр
Грубый Френч-пресс
ПРИМЕЧАНИЯ:
Избегайте закупоривания кофемолки
Настраивайте степень помола, когда контейнер для
кофейных зерен полностью пуст или только во время
процесса помола.
Для изменения степени помола сдвиньте рычаг на
нужную настройку.

PC-EKM1205_IM 29.10.19
49
Регулятор для настройки количества порошка
(количество чашек)
Используйте ползунок, чтобы настроить количество
кофе, которое следует размолоть. Убедитесь, что в
контейнере для кофейных зерен всегда достаточно ко-
фейных зерен. Сделайте выбор от 2 до 12 чашек кофе.
Контрольная лампа при этом будет мигать.
Количество кофейного порошка на одну чашку зависит
от вашего вкуса, типа кофе и настройки степени
помола.
ПРИМЕЧАНИЯ: Совет для эспрессо
Перемалывайте ровно тот объем кофе, который вы
собираетесь использовать немедленно.
Остаток кофейных зерен
Удалите кофейные зерна из прибора, если им больше
одной недели. Они потеряли аромат и испортят вкус
кофе.
СОВЕТ:
Храните кофейные зерна в герметичной, воздухоне-
проницаемой емкости в холодильнике. За счет этого
кофе дольше сохранит аромат.
Работа
ВНИМАНИЕ:
Перед применением прибора осмотрите контейнер
для кофейных зерен на наличие посторонних предме-
тов и удалите их.
1. Установите контейнер для кофейных зерен на ко-
фемолку. Соблюдайте знаки. Поместите контейнер,
чтобы знак был над знаком на приборе. Повер-
ните контейнер по часовой стрелке до упора. Должен
быть ясно слышен щелчок.
2. Установите контейнер для размолотого кофе с крыш-
кой в корпус электродвигателя до упора.
3. Настройте нужную степень помола с помощью
рычага.
4. Засыпьте кофейные зерна в контейнер. Не допу-
скайте переполнения контейнера.
5. Установите крышку на контейнер для кофейных
зерен.
6. С помощью ползунка выберите количество чашек, на
которое вы хотите приготовить кофейный порошок.
7. Включите прибор с помощью кнопки . Контрольная
лампа горит непрерывно.
ПРИМЕЧАНИЯ:
Если вы хотите остановить процесс помола до
заданного времени, нажмите кнопку .
8. Когда процесс помола будет завершен, контрольная
лампа мигнет 3 раза. Извлеките сборный контейнер с
кофейным порошком. Опорожните его.
9. Отключите прибор от розетки электропитания, когда
он не используется.
Очистка
ПРЕДУПРЕЖДЕНИЕ:
• Всегда отключайте сетевой штепсель перед очисткой.
• Не опускайте устройство в воду для очистки. Не заливайте
воду в установленный контейнер для кофейных зерен. Это
может вызвать поражение электрическим током или пожар.
ВНИМАНИЕ:
• Не используйте металлические щетки или другие
абразивные предметы.
• Не применяйте едкие или абразивные чистящие
средства.
• Периодически очищайте прибор. Кофейные зерна
оставляют маслянистый остаток. Такие отложения
масла могут прогоркнуть. Прогоркшие масла отрица-
тельно сказываются на вкусе вашего кофе.
• Жареные зерна для эспрессо и других черных кофе
имеют большее содержание масел, что делает необ-
ходимой более частую чистку.

PC-EKM1205_IM 29.10.19
50
Съемные принадлежности
1. Поверните контейнер для кофейных зерен против
часовой стрелки, чтобы снять его. Протрите его
влажной тканью.
2. Очистите контейнер для кофейного порошка и
крышки в теплой промывочной ванне.
3. Перед установкой на место дайте всем компонентам
полностью высохнуть.
4. Установите контейнер для кофейных зерен на ко-
фемолку. Соблюдайте знаки. Поместите контейнер,
чтобы знак был над знаком на приборе. Повер-
ните контейнер по часовой стрелке до упора. Должен
быть ясно слышен щелчок.
5. Установите контейнер для размолотого кофе с крыш-
кой в корпус электродвигателя до упора.
Кофемолка
1. Откройте замок кофемолки, выполнив неполный
поворот против часовой стрелки. Снимите ее.
ПРИМЕЧАНИЯ:
Этот процесс может быть затруднительным из-за
застрявших остатков зерен.
2. Очистите верхний конус дробилки чистящей щеткой.
3. Липкий порошок в кофемолке также можно удалить
с помощью чистящей щетки. Используйте пылесос
для удаления остатков кофейного порошка из
кофемолки.
4. Установите на место замок кофемолки. Поверните
его по часовой стрелке до упора.
Корпус двигателя
Для очистки корпуса используйте только мягкую ткань и
щадящие чистящие вещества.
Хранение
• Очистите устройство в соответствии с инструкциями.
Дайте принадлежностям полностью высохнуть.
• Если вы хотите продлить срок службы устройства,
рекомендуется хранить его в оригинальной упаковке.
• Всегда храните устройство в недоступном для детей,
хорошо проветриваемом и сухом месте.
Решение проблем
Проблема Возможная причина Решение
Прибор не функцио-
нирует.
Нет подачи питания. Проверьте розетку включением другого устройства.
Ваш прибор оснащен предохра-
нительным выключателем. Он
предотвращает случайный запуск
двигателя.
Убедитесь, чтобы контейнер для кофейных зерен
был установлен правильно.
Защита от перегревания была акти-
вирована. Двигатель перегрелся.
Дайте прибору остыть в течение 30 минут, прежде
чем использовать его снова.
Прибор неисправен. Свяжитесь с сервисным центром или пригласите
специалиста.
• Прибор неожиданно
останавливается.
• Степень помола
невозможно отрегу-
лировать.
Застряло кофейное зерно. 1. Отключите вилку от настенной розетки!
2. Выньте сборную емкость.
3. Удалите оставшиеся кофейные зерна.
4. Извлеките контейнер для кофейных зерен и
замок для кофемолки в порядке, описанном в
разделе «Очистка».
5. Удалите застрявшее кофейное зерно или посто-
ронний предмет.
Кофемолка заблокирована посто-
ронним предметом.

PC-EKM1205_IM 29.10.19
51
Технические данные
Модель: .......................................................... PC-EKM 1205
Подача напряжения: ........................ 220 - 240 B~, 50 - 60 Гц
Мощность на входе: ................................................200 ватт
Класс защиты: ....................................................................
Вес нетто: ........................................................прибл. 1,93 кг
Сохранено право на технические и конструкционные
изменения в рамках продолжающейся разработки
продукта.
Данное устройство соответствует всем текущим дирек-
тивам CE, таким как электромагнитная совместимость и
низкое напряжение; оно произведено в соответствии с
новейшими правилами техники безопасности.
Утилизация
Значение символа «корзина»
Защита окружающей среды: не допускается
утилизация электроприборов вместе с бы-
товыми отходами.
Утилизация устаревшей техники и неис-
правных электроприборов производится в
городских приёмных пунктах.
Не допускайте неправильной утилизации отходов. Это
наносит вред окружающей среде и оказывает негатив-
ное воздействие на здоровье людей.
Оказывайте содействие программе утилизации и дру-
гим формам переработки электронной и электрической
техники.
Информацию о пунктах утилизации бытовой техники
можно получить в местных органах власти.

PC-EKM1205_IM 29.10.19
52
PC-EKM 1205 ..................................................................................:
60-50 240-220 .......................:
200.................................................................................:
II ................................................................................................ :
1,93.........................................................................:
.
CE
.
" "
:
.
.
.
.
.
. . .
. .
.
. 30 . .
. .
1 .!
2 ..
3 ..
4 .
.""
5 ..
. •.
•
.
.
1 .. .
:
.
2 ..
3 . .
.
4 .. .
.
•. .
•
.
•.

PC-EKM1205_IM 29.10.19
53
.
.
.
:
:
.
.
( )
.
12 2 .
. .
.
:
.
.
:
.
.
:
.
1 . . .
.
. .
2 ..
3 ..
4 ..
5 ..
6 ..
7 ..
:
.
8 . . 3
. .
9 ..
:
•.
• . .
.
:
•.
•.
•
.
•
.
1 .
.
2 ..
3 ..
4 . . .
.
. .
5 ..

PC-EKM1205_IM 29.10.19
54
:
•
/
.
• . .
.
:
."" .
.
.
.
.
.
.
1 ..
2 .
.
3 ..
4 .
. .
:
.
.""
/
1
( ) 2
( ) 3
4
5
6
7
8
( ) 9
10
( ) 11
12
/ 13
1 .
. .
2 . .
. 3
.
/
:
.
•. .
•.
•.
. 5
. 10
.
.
.

PC-EKM1205_IM 29.10.19
55
:
•
.
•. !
•.
•.
•.
. .
.
:
:
.
:
.
. :
3 .......................................................................
55 ..................................................................................
55 ....................................................
54 ................................................................................
54 .......................................................................
54 ............................................... /
54 .....................................................................
54 ................................................................................
54 .....................................................................................
54 .............................................................. /
54 ...................................................................
53 ............................................................................
53 ..........................................( )
53 ..........................................................................
53 ............................................................................................
53 ............................................................................................
53 ...........................................................................
52................................................................................................
52........................................................................................
52 .............................................................................................
52 ...............................................................
52 ....................................................................................
52 .............................................................................
52................................................................" "
.
.
.
• .
.
• .
( )
. .
.
•
( )
.
• .
. .
•
. .
•.
• )
. (
:
!

PC-EKM1205_IM 29.10.19

PC-EKM1205_IM 29.10.19

PC-EKM1205_IM 29.10.19
Stand 09 / 2019
PC-EKM 1205
Internet: www.procook-germany.de
Made in P.R.C.
-
 1
1
-
 2
2
-
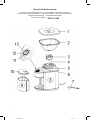 3
3
-
 4
4
-
 5
5
-
 6
6
-
 7
7
-
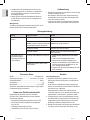 8
8
-
 9
9
-
 10
10
-
 11
11
-
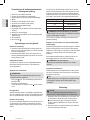 12
12
-
 13
13
-
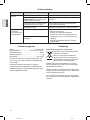 14
14
-
 15
15
-
 16
16
-
 17
17
-
 18
18
-
 19
19
-
 20
20
-
 21
21
-
 22
22
-
 23
23
-
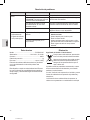 24
24
-
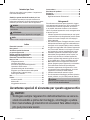 25
25
-
 26
26
-
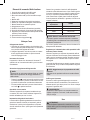 27
27
-
 28
28
-
 29
29
-
 30
30
-
 31
31
-
 32
32
-
 33
33
-
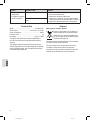 34
34
-
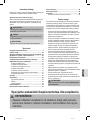 35
35
-
 36
36
-
 37
37
-
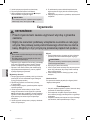 38
38
-
 39
39
-
 40
40
-
 41
41
-
 42
42
-
 43
43
-
 44
44
-
 45
45
-
 46
46
-
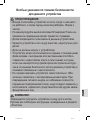 47
47
-
 48
48
-
 49
49
-
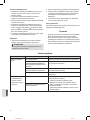 50
50
-
 51
51
-
 52
52
-
 53
53
-
 54
54
-
 55
55
-
 56
56
-
 57
57
-
 58
58


ProfiCook PC-EKM 1205 Handleiding
- Categorie
- Accessoires voor het maken van koffie
- Type
- Handleiding
in andere talen
Gerelateerde artikelen
Andere documenten
-
Unold 28915 de handleiding
-
Melitta MOLINO® Handleiding
-
-
Silvercrest SKMS 180 A1 Handleiding
-
Clatronic cb 2002 de handleiding
-
Sage the Barista Pro SES878 de handleiding
-
-
Melitta CALIBRA 1027-01 de handleiding
-
Electrolux EEG8000 Handleiding