
DVD-V6800
www.samsung.com
User’s Manual
AK68-01605Q
01605Q_V6800_XFA_Eng1 3/20/08 5:46 PM Page 1

2 -
English
The lightning bolt is a warning sign alerting you to dangerous voltage inside the product.
DO NOT OPEN THE DVD-VCR. Refer to service personnel.
DO NOT expose the DVD-VCR to
extreme temperature conditions
(below 5°C and above 40°C) or to
extreme humidity conditions (less
than 10% and more than 75%).
THIS DEVICE IS NOT FOR USE IN INDUSTRIAL ENVIRONMENTS
Safety Instructions
DO NOT expose the DVD-VCR to
direct sunlight.
DO NOT expose the DVD-VCR
to any liquids.
If the remote control is not used
for a long period of time, remove
the batteries and store it in a
cool, dry place.
During a storm and/or lightning,
unplug the DVD-VCR from the
mains jack and aerial.
This product incorporates copyright protection technology that is protected by method claims of certain U.S.
patents and other intellectual property rights owned by Macrovision Corporation and other rights owners.
Use of this copyright protection technology must be authorized by Macrovision Corporation, and is intended for
home and other limited viewing uses only unless otherwise authorized by Macrovision Corporation. Reverse engi-
neering or disassembling is prohibited.
The following illustrations represent precautions.
DO NOT place any objects on the
DVD-VCR or remote control.
HH
5¡C
40¡C
10% 75%
1.Apparatus shall not be exposed to dripping or splashing and no objects filled with
uids, such as vases, shall be placed on the apparatus.
2 The Mains plug is used as a disconnect device and shall stay readily operable at any
time.
01605Q_V6800_XFA_Eng1 3/20/08 5:46 PM Page 2

English
- 3
Disc Type and Characteristics
Disc Markings
• CD is recorded as a Digital Signal
with better audio quality, less distor-
tion and less deterioration of audio
quality over time.
• Video with CD sound, VHS quality &
MPEG-1 compression technology.
- DO NOT play Video CD, CD-ROM, CD-I and DVD-ROM in this player! (CDGs play audio only, not
graphics).
- It may not play CD-R,CD-RW and DVD-R, -RW, DVD+R, +RW in all cases due to the type of disc
or condition of the recording.
- The recorded disc may not run as playback depends on the recording speed.
- Do not run the player with two discs loaded at the same time.
~
PAL
DIGITAL
SOUND
STEREO
NTSC
Play Region Number
Both the DVD-VCR and the discs are coded by
region. These regional codes must match in
order for the disc to play. If the codes do not
match, the disc will not be played.
The Region Number for this player is
described on the rear panel of the player.
Disc Types (Logos)
Recording Types
Disc Size Max. Playing Time Characteristics
Single-sided 240 min.
Double-sided 480 min.
Audio
+
Video
VIDEO-CD
AUDIO-CD
DVD
• DVD contains excellent sound and
video due to Dolby Digital and
MPEG-2 system.
• Various screen and audio functions
can be easily selected through the
on-screen menu.
74 min.
Audio
+
Video
Audio
This DVD-VCR is capable of playing the following types of discs with the corresponding logos :
Play Region Number.
Stereo disc.
Dolby Digital disc.
Digital Audio disc.
NTSC broadcast system in U.S.A,
Canada, Korea, Japan, etc.
PAL colour system in Europe, Australia,
New Zealand, etc.
DTS disc.
20 min.
74 min.
20 min.
Single-sided 80 min.
Double-sided 160 min.
12 Cm
8 Cm
12 Cm
8 Cm
12 Cm
8 Cm
Disc contains a Divx software product.
01605Q_V6800_XFA_Eng1 3/20/08 5:46 PM Page 3

4 -
English
Getting Started
Getting Started
Safety Instructions . . . . . . . . . . . . . . . . . . . . . . . . . . . . . . . .2
Disc Type and Characteristics . . . . . . . . . . . . . . . . . . . . . . .3
Overviews . . . . . . . . . . . . . . . . . . . . . . . . . . . . . . . . . . . . . . .5
Front View of the DVD-VCR (DVD-V6800) . . . . . . . . . . .5
Rear View of the DVD-VCR (DVD-V6800) . . . . . . . . . . . .5
Display Indicators . . . . . . . . . . . . . . . . . . . . . . . . . . . . . . . . .5
Accessories . . . . . . . . . . . . . . . . . . . . . . . . . . . . . . . . . . . . . .6
Inserting Batteries in the Remote Control . . . . . . . . . . . . . . .6
Tour of the Remote Control . . . . . . . . . . . . . . . . . . . . . . . .6
Connections
Connections
Connecting DVD-VCR to the TV using the RF Cable . . . . 8
Connecting DVD-VCR to the TV using the
Audio/Video Cable . . . . . . . . . . . . . . . . . . . . . . . . . . . . . . . 8
Connecting DVD-VCR to the TV using the
Component Video Cable . . . . . . . . . . . . . . . . . . . . . . . . . 9
Connecting to an AV amplifier with the digital
input jack . . . . . . . . . . . . . . . . . . . . . . . . . . . . . . . . . . . . . 9
Connecting External Devices . . . . . . . . . . . . . . . . . . . . . . 10
Plug & Auto Setup . . . . . . . . . . . . . . . . . . . . . . . . . . . . . . . 11
Settings
Settings
Tuning Your Television for the DVD-VCR . . . . . . . . . . . . . .12
Copying From DVD to VCR . . . . . . . . . . . . . . . . . . . . . . . . .12
Setting the Date and Time . . . . . . . . . . . . . . . . . . . . . . . . . .13
Setting the Menu Language . . . . . . . . . . . . . . . . . . . . . . . .13
Presetting the Stations Automatically . . . . . . . . . . . . . . . . .14
Presetting the Stations Manually . . . . . . . . . . . . . . . . . . . . .15
Clearing a Preset Station . . . . . . . . . . . . . . . . . . . . . . . . . . .16
Changing the Preset Station Table . . . . . . . . . . . . . . . . . . .16
Selecting the RF OUT Sound Mode (I-B/G-D/K) . . . . . . . . .17
Setting the VCR Output Channel . . . . . . . . . . . . . . . . . . . .17
VCR Functions
VCR Functions
Selecting the Colour Mode . . . . . . . . . . . . . . . . . . . . . . . . .18
NICAM . . . . . . . . . . . . . . . . . . . . . . . . . . . . . . . . . . . . . . . . .18
Intelligent Picture Control . . . . . . . . . . . . . . . . . . . . . . . . . .19
Auto Power off . . . . . . . . . . . . . . . . . . . . . . . . . . . . . . . . . . .19
Screen Messages . . . . . . . . . . . . . . . . . . . . . . . . . . . . . . . . 20
Selecting the Cassette Type . . . . . . . . . . . . . . . . . . . . . . . . 20
Repeat Play . . . . . . . . . . . . . . . . . . . . . . . . . . . . . . . . . . . . . 20
Selecting the Recording Speed . . . . . . . . . . . . . . . . . . . . . .21
Protecting a Recorded Cassette . . . . . . . . . . . . . . . . . . . . .21
Recording a Programme Immediately . . . . . . . . . . . . . . . . .21
Recording a Programme with Automatic Stop . . . . . . . . . .22
Recording from Another VCR or Camcorder . . . . . . . . . . . . . .22
Using the Assemble Edit Function . . . . . . . . . . . . . . . . . . .23
Using the Timer Programming Feature . . . . . . . . . . . . . . . .23
Checking a Preset Recording . . . . . . . . . . . . . . . . . . . . . . .24
Cancelling a Preset Recording . . . . . . . . . . . . . . . . . . . . . .25
Playing Back
Playing Back
Playing a Cassette . . . . . . . . . . . . . . . . . . . . . . . . . . . . . . .25
Adjusting Picture Alignment Manually . . . . . . . . . . . . . . . . .25
Selecting the Audio Output Mode . . . . . . . . . . . . . . . . . . . .26
Playing a Cassette in Slow Motion . . . . . . . . . . . . . . . . . . .26
Playing a Sequence Frame by Frame . . . . . . . . . . . . . . . .26
Playing a Sequence at Variable Speeds . . . . . . . . . . . . . . .26
Searching for a Specific Sequence . . . . . . . . . . . . . . . . . . .27
Using the Tape Counter . . . . . . . . . . . . . . . . . . . . . . . . . . .28
DVD Functions
DVD Functions
Setting Up the Language Features . . . . . . . . . . . . . . . . . . .29
Setting Up the Audio Options . . . . . . . . . . . . . . . . . . . . . . .30
Setting Up the Display Options . . . . . . . . . . . . . . . . . . . . . .31
Setting Up the Parental Control . . . . . . . . . . . . . . . . . . . . . .32
DivX(R) Registration . . . . . . . . . . . . . . . . . . . . . . . . . . . . . .34
Firmware Upgrade . . . . . . . . . . . . . . . . . . . . . . . . . . . . . . . .34
Special Playback Features . . . . . . . . . . . . . . . . . . . . . . . . .35
Using the Display Function . . . . . . . . . . . . . . . . . . . . . . . . .36
Adjusting the Aspect Ratio (EZ View) . . . . . . . . . . . . . . . . .37
Selecting the Subtitle Language . . . . . . . . . . . . . . . . . . . . .38
Selecting the Audio Language . . . . . . . . . . . . . . . . . . . . . . .38
Changing the Camera Angle . . . . . . . . . . . . . . . . . . . . . . . .38
Zoom . . . . . . . . . . . . . . . . . . . . . . . . . . . . . . . . . . . . . . . . . .39
Marks . . . . . . . . . . . . . . . . . . . . . . . . . . . . . . . . . . . . . . . . . .39
Repeat Chapter/Title . . . . . . . . . . . . . . . . . . . . . . . . . . . . . .40
A to B Repeat . . . . . . . . . . . . . . . . . . . . . . . . . . . . . . . . . . .40
MP3/WMA/ CD Audio Play . . . . . . . . . . . . . . . . . . . . . . . . .41
Picture CD Playback . . . . . . . . . . . . . . . . . . . . . . . . . . . . . .42
DivX/MPEG4 Playback . . . . . . . . . . . . . . . . . . . . . . . . . . . .44
Divx/MPEG4 Special Playback Features . . . . . . . . . . . . . .45
Reference
Reference
Technical Specifications . . . . . . . . . . . . . . . . . . . . . . . . . . .46
Troubleshooting Guide (VCR) . . . . . . . . . . . . . . . . . . . . . . .47
Troubleshooting Guide (DVD) . . . . . . . . . . . . . . . . . . . . . . .48
Contents
01605Q_V6800_XFA_Eng1 3/20/08 5:46 PM Page 4

English
- 5
1. DVD DECK.
2. OPEN/CLOSE BUTTON.
3. VIDEO CASSETE COMPARTMENT.
4. EJECT BUTTON.
5. STANDBY/ON BUTTON.
6. LINE IN 2 VIDEO INPUT JACK.
7. LINE IN 2 AUDIO L/R INPUT JACK.
8. FRONT PANEL DISPLAY.
9. PROGRAMME SELECTION BUTTON.
10. DVD/VCR SELECTION BUTTON.
11. COPY BUTTON.
12. RECORD BUTTON.
13. REWIND/SKIP BACK BUTTON.
14. STOP BUTTON.
15. PLAY/STILL BUTTON.
16. FAST FORWARD/SKIP NEXT BUTTON.
Front View of the DVD-VCR (DVD-V6800)
5 6 7 8 9 10 11 12 13 14 15 16
1 2 3 4
1. The DVD Deck is active.
2. Disc is loaded.
3. The time, counter position, current
deck status is displayed.
4. VHS tape is inserted.
5. The VCR Deck is active.
6. A Timer Recording is programmed or
in progress.
6
1 2 3 4 5
Rear View of the DVD-VCR (DVD-V6800)
Display Indicators
1. ANTENA INPUT
2. RF OUT TO TV
3. LINE IN 1 (Audio / Video)
4. LINE OUT (Audio / Video)
5. LINE AUDIO OUT
(COMPONENT)
6. DIGITAL AUDIO OUT (COAXIAL)
7. COMPONENT VIDEO OUT
8. DIGITAL AUDIO OUT (OPTICAL)
2 4 6 8
1 3 5 7
Overviews
01605Q_V6800_XFA_Eng1 3/20/08 5:46 PM Page 5

6 -
English
Make sure that the following basic accessories
are supplied with your DVD-VCR.
You must insert or replace the batteries in the
remote control when you:
• Purchase the DVD-VCR
• Find that the remote control is no longer
working correctly
1 To release the battery compartment cover,
push the tab in the direction of the arrow and
lift up.
2 Insert two AAA, RO3 or equivalent batteries,
taking care to respect the polarities:
• + on the battery with + on the remote
control.
• – on the battery with – on the remote
control.
Do not mix different battery types (manganese
and alkaline for example).
3 Replace the cover by aligning it with the base
of the remote control and push it down.
Batteries for
remote controls
Remote Control
Audio & Video
Cable
RF-Cable
Owner’s
Instructions
Accessories
Inserting Batteries in the Remote
Control
Tour of the Remote Control
1
21
5
19
18
17
16
4
23
22
24
6
26
25
10
9
7
8
29
14
28
27
13
12
11
30
15
20
2
3
01605Q_V6800_XFA_Eng1 3/20/08 5:46 PM Page 6

English
- 7
1. DVD,VCR
Used to operate DVD, VCR.
2. STANDBY/ON
Used to turn the power on or off.
3. Number buttons
4. TIMER
Used to activate the timer recording of
a programme.
5. REC ( ● )
Used to make a recording on cassette.
6. SKIP ( / )
Use to skip a title, chapter or track.
7. STOP ( ■ )
Used to stop during playback.
8. AUDIO
Used to access various audio functions.
9. TRK ( / )
Used to adjust picture alignment manually to
obtain the best possible picture during play-
back.
10. MENU
Used to display the on-screen menu.
11. OK
/
,
¦¦
/
Used to control the cursor in the on-screen
menu and confirm your choice.
12. EZ VIEW
Used to adjust the aspect ratio on a disc.
13. DISC MENU
Used to display a disc menu.
14. SUBTITLE
Used to change the DVD’s subtitle language.
15. ANGLE
Used to access various camera angles on a
DVD.
IPC (Intelligent Picture Control).
Used to adjust the sharpness of the picture.
16. INPUT SEL.
Used to select a external input signal.
17. TV/VCR
18. INFO.
Used to display the current setting or disc
status.
19. OPEN/CLOSE
Used to open and close the disc and video
cassette tray.
20. SHUTTLE
Used to play a sequence at variable speeds.
21. F.ADV/STEP
Used to advance a sequence frame by
frame.
22. SPEED
Used to select the recording speed.
23. PLAY/PAUSE ( )
Used to play or pause during playback.
24. SEARCH ( / )
Used to search forward or backward through
a disc.
25. PROG
(
/
)
Used to select a TV programme.
26. RETURN
Used to return to a previous menu.
27. ZOOM
Used to enlarges picture .
28. CLEAR
Used to clear a preset TV station.
Used to cancel a preset recording.
Used to cancel a preset mark.
Used to set the tape counter to zero.
Used to resume normal play during repeat
play.
29. MARK
Used to mark a position during playback a
disc.
SEARCH
Used to search for a specific sequence.
30. MODE
REPEAT
Used to allow the repeat play a title, chapter,
track, disc or A-B.
01605Q_V6800_XFA_Eng1 3/20/08 5:46 PM Page 7

8 -
English
To receive television programmes a signal
must be received from one of the following
sources:
• An outdoor aerial
• An indoor aerial
• A cable television network
• A satellite receiver
1 Remove the aerial or network input cable
from the television.
2 Connect this cable to the 75Ω coaxial jack
marked on the rear of your DVD-VCR.
3 Plug the RF Cable supplied into the jack
on your DVD-VCR.
4 Plug the other end of the RF Cable into the
connector previously used for the aerial on
the television.
TV
You can connect your DVD-VCR to the tele-
vision using the Audio/Video cable if the
appropriate input is available on the televi-
sion. You thus:
• Obtain better quality sound and pictures
• Simplify the setting up procedure of your
DVD-VCR
1 Connect the RF Cable.
2 Connect one end of the Audio/Video cable
to the Video output and Audio L, R output
jack on the rear of the DVD-VCR.
3 Plug the other end into the appropriate
connector on the television.
ANT IN
Aerial
Aerial cable
RF cable
•
Make sure that both the television and the
DVD-VCR are switched off before connecting
the cables.
Note
Connecting DVD-VCR to the TV
using the Audio/Video Cable
Connecting DVD-VCR to the TV
using the RF Cable
TV
RF cable
Aerial cable
Aerial
2
3
4
• Regardless of the type of connection chosen,
you must always connect the RF Cable sup-
plied. Otherwise, no picture will be visible on
the screen when the DVD-VCR is switched off.
• M
ake sure that both the television and the
DVD-VCR are switched off before connecting
the cables.
Notes
C
C
onnections
onnections
Yellow
01605Q_V6800_XFA_Eng1 3/20/08 5:46 PM Page 8

English
- 9
COMPONENT VIDEO IN
COMPONENT INPUT
1
2
COMPONENT VIDEO OUT
Connecting DVD-VCR to the TV
using the Component Video Cable
Your TV must support progressive scan input
to allow you to watch component video output.
You will enjoy high quality accurate colour
reproduction images. Component video seper-
ates the picture element into black and
white(Y), blue(Pb), red(Pr) signals to present
most clear and clean images.
1 Connect Component video cables between
the COMPONENT VIDEO OUT jacks on the
rear of the DVD-VCR and COMPONENT
VIDEO IN jacks on the rear of the TV.
2 Connect audio cables between the AUDIO
LINE OUT jacks on the rear of the DVD-VCR
and AUDIO IN jacks on the rear of the TV.
• Take care to respect the colour coding of
the left and right channels.
To take full advantage of the movie theater
experience that DVD offers, you may want to
connect your DVD-VCR to a complete
Surround Sound system, including an A/V
Receiver and six Surround Sound speakers.
If your A/V receiver is equipped with a Dolby
Digital Decoder, you have the option to bypass
the DVD-VCR’s built-in Dolby Digital Decoder.
Use the Digital Audio Out connection below.
To enjoy Dolby Digital or DTS sound, you must
set up the audio settings.
1 Connect a Digital Audio coaxial/optical cable
from the Digital Audio Out jacks on the panel of
the DVD-VCR to their corresponding Digital
Audio Input jacks on your A/V Receiver:
To Digital Audio Input of an A/V
Receiver with a Dolby, MPEG2, DTS,
Digital Decoder
Connecting to an AV amplifier with
the digital input jack
01605Q_V6800_XFA_Eng1 3/20/08 5:46 PM Page 9

10 -
English
This allows you to connect your DVD -VCR to
other external devices and view or record their
outputs.
• Method 1 : Connecting a VCR, Set-Top
Box(STB) or
DVD-VCR to the AUDIO/VIDEO
LINE IN 1 jacks.
• Method 2 : Connecting a Camcorder to the LINE
IN 2
in jacks.
You can use the LINE IN 2 jacks on the front
panel of the DVD-VCR. You can record from
connected equipment.
When an input source is inserted into LINE IN 2
while viewing TV, the input will be switched to
LINE IN 2 automatically.
Connecting External Devices
• You can also use the LINE IN 2 jacks on the front
panel of the DVD-VCR.
• Copy protected content cannot be recorded.
Notes
Method 1 : Connecting a VCR,
set-top Box (STB) Or DVD-VCR to
the AUDIO/VIDEO LINE IN 1 jacks
Method 2 : Connecting a
Camcorder to the LINE IN 2
jacks
Connecting a VCR or external device to
AUDIO/VIDEO LINE IN 1 jacks of the DVD-VCR.
You can record from connected equipment
(VCR, STB or DVD).
01605Q_V6800_XFA_Eng1 3/20/08 5:46 PM Page 10

English
- 11
5 Start the auto scanning.
The number of stations automatically stored
by the DVD-VCR depends on the number of
stations that it has found.
6 Check the date and time.
Refer to “Setting the Date and Time” to
change the date and time. (see page: 11)
Plug & Auto Setup
Your DVD-VCR will automatically set itself up
when it is plugged into the mains for the first time.
TV stations will be stored in memory. The
process takes a few minutes. Your DVD-VCR
will then be ready for use.
1 Connect the RF Cable as indicated on page
8. (Connecting Your DVD-VCR to the TV
using the RF Cable)
2 Plug the DVD-VCR into the mains.
• “AUTO” in the front panel display flickers.
3 The Language Set menu is displayed.Press
the or button move selection bar to
select the desired laguange then press OK
button.
4 Press the or button to select the
desired language, then press OK button.
Start the auto setup.
• Now, you only have to switch the DVD-VCR
on and it is ready for use.
• Function for “Plug & Auto Set Up” is fixed
already. So if you want to change this fixed
one, you can change. (refer to “Presetting the
Stations Manually” page 15).
Notes
Auto Setup will be
started.
Check antenna and TV
cable connection.
Channel Memorizing
Please Wait ....
SETUP
VCR
PROG
FUNC
DVD
OK Return Menu
Time Date Year
12 : 00 01 / 01 2007 MON
SETUP
VCR
PROG
FUNC
DVD
OK Return Menu
SETUP
VCR
PROG
FUNC
DVD
OK Return Menu
English
Français
Deutsch
Español
Italiano
Nederlands
Language
SETUP
VCR
PROG
FUNC
DVD
OK Return Menu
√
êÛÒÒÍËÈ
01605Q_V6800_XFA_Eng1 3/20/08 5:46 PM Page 11

The DVD-VCR allows you to copy the contents
of a DVD to a VHS tape with a press of the
COPY button.
If the DVD you are attempting to copy is copy
protected, you will not be able to copy the disc.
It is not permitted to copy Macrovision®
encoded DVDs.
1 Insert the disc you wish to copy in the DVD
deck and close the drawer.
2 Insert a blank VHS videotape into the VCR
deck.
3
Press the COPY button on the DVD-VCR
front panel.
•
The DVD will go into Play mode and the VCR
will go into Record mode.
•
If the DVD disc menu appears, you may
need to press the PLAY button manually to
begin copying.
4 When the DVD is finished playing, press the
VCR button on the remote control and then
press the STOP button to end the copy.
• You must stop the Copy process manually
when the DVD movie ends or the DVD may
replay and record over and over again.
12 -
English
Tuning Your Television for the DVD-
VCR
You must tune your television for the DVD-VCR
only if you are using the RF cable.
To view pictures from your DVD-VCR when a
Audio-video cable is used, the television must
be set to the audio/video mode (AV).
1 Switch on the television.
2 Switch on the DVD-VCR by pressing the
STANDBY/ON on the front of the DVD-
VCR or STANDBY/ON on the remote control.
3 Select a programme position on the television
to be reserved for use with your DVD-VCR.
4 Insert the video cassette in the DVD-VCR.
Check that the DVD-VCR starts reading the
cassette; if not, press the II button.
5 Start a scan on your television or set the tele-
vision to UHF channel 36.
6 Fine tune the television until the pictures and
sound are obtained clearly.
7 When the picture and sound are perfectly
clear, store this channel at the desired
programme position on the television.
That programme is now reserved for use with
your DVD-VCR.
S
S
ettings
ettings
Copying From DVD to VCR
01605Q_V6800_XFA_Eng1 3/20/08 5:46 PM Page 12

English
- 13
Setting the Menu Language
1 Press the MENU button, then press the OK or
button.
2 Press the OK or button again.
The Language Set menu is displayed.
3 Press the or button to select desired
language, then press the OK or button.
• Press the MENU button to exit the menu.
Your DVD-VCR contains a 24-hour clock and
calendar used to:
• Automatically stop programme recording.
• Preset your DVD-VCR to record a programme
automatically.
You must set the date and time when:
• You purchase the DVD-VCR.
• Do not forget to reset the time when you
change clocks from winter to summer time
and vice versa.
1 Press the MENU button, then press the OK or
button.
2 Press the or button to select Clock,
then press the OK or button.
The Clock Set menu is displayed.
3 Press the ¦ or button to select the hour,
minutes, day, month, and year. The selected
option is highlighted. Press the or button
to set them. The day of the week is displayed
automatically. Press the OK button.
• You can hold down the or button to
scroll more quickly through the values.
• Press the MENU button to exit the menu.
Setting the Date and Time
English
Français
Deutsch
Español
Italiano
Nederlands
Language
SETUP
VCR
PROG
FUNC
DVD
OK Return Menu
√
êÛÒÒÍËÈ
SETUP
VCR
PROG
FUNC
DVD
OK Return Menu
Time Date Year
12 : 00 01 / 01 2007 MON
OK
SETUP
VCR
PROG
FUNC
DVD
Language
Clock
Install
User Set
Auto Power Off : Off
Screen Messages : On
Return Menu
OK
SETUP
VCR
PROG
FUNC
DVD
Language
Clock
Install
User Set
Auto Power Off : Off
Screen Messages : On
Return Menu
01605Q_V6800_XFA_Eng1 3/20/08 5:46 PM Page 13

14 -
English
4 Press the OK button A mesagge is displayed,
indicating that any cannels already preset on
your DVD-VCR will be delete.
5 Press the OK button to start the auto scanning.
The message Please Wait is displayed.
• The first frequency band is scanned and
stored, then the DVD-VCR searches for the
second station and so on.
When the automatic scanning procedure
has finished, the DVD-VCR switches
automatically to programme 1.
• If you wish to cancel the auto scanning
before the end, press the MENU button.
• The number of stations automatically stored by the
DVD-VCR depends on the number of stations that
it has found.
• Once the auto scanning procedure has finished,
some stations may have been stored more than
once; select the stations with the best reception
and delete the ones no longer required (refer to
page 16).
Notes
You do not need to preset the stations if you
have already set them automatically (refer to
“Plug & Auto Set Up” on page 11).
Your DVD-VCR contains a built-in tuner used
to receive television broadcasts.
You must preset the stations received through
the tuner. This can be done:
• Plug & Auto Set up (refer to page 11)
• Automatically
• Manually (refer to page 15)
You can store up to 80 stations.
1 Press the MENU button, then press the OK
or button.
2 Press the or button to select Install,
then press the OK or button.
The Install menu is displayed.
Presetting the Stations
Automatically
OK
SETUP
VCR
PROG
FUNC
DVD
Return Menu
Auto Setup
Manual Setup
TV System : I
VCR Output CH : CH 36
3 Press the OK or button. The System
Selection is displayed. Press the /
buttons to select your system.
OK
SETUP
VCR
PROG
FUNC
DVD
Language
Clock
Install
User Set
Auto Power Off : Off
Screen Messages : On
Return Menu
OK
SETUP
VCR
PROG
FUNC
DVD
Return Menu
System - B/G
System - D/K
System - I
Channel Memorizing
Please Wait ....
SETUP
VCR
PROG
FUNC
DVD
OK Return Menu
SETUP
VCR
PROG
FUNC
DVD
OK Return Menu
Your data will be lost
Press OK to continue
MENU to exit
01605Q_V6800_XFA_Eng1 3/20/08 5:46 PM Page 14

English
- 15
You do not need to preset the stations manually
if you have already set them automatically.
1 Press the MENU button, then press the OK or
button.
2 Press the or button to select Install,
then press the OK or button.
3 Press the or button to select Manual
Setup, then press the OK or button.
The TV STATION TABLE menu is displayed.
4 Press the or button to select the
required programme number.
Presetting the Stations Manually
5 Press the button to preset the station.
The MANUAL TUNING menu will be dis-
played.
Press the ¦ or button to start scanning the
channels. The frequency band is scanned and
the first station found is displayed.
6 If necessary, press the or button to
select MFT, then press the ¦ or button to
adjust the picture.
7 Press the or button to select NAME.
The station name is set automatically from the
broadcast signal.
• To change the programme’s name, press
the button. The first letter of the name
flashes.
8
9
Repeat this procedure from step 4 onwards,
until all the required stations have been
stored.
10 Press the MENU button to exit the menu.
Select a character
in the name.
Move to the next
previous or
character
Press the or button until the
required character is displayed
(letters, numbers or “-” character)
.
Press the ¦ or button
respectively.
To... Then...
If you... Then...
Wish to store the
station displayed
Do not wish to
store the station
displayed
•
Press OK to store the
station.
•
Press the or button until
the CH is selected.
•
Press the ¦ or button to
go on scanning the
frequency band and display
the next station.
❉ ❉ MANUAL TUNING. ❉ ❉
SYSTEM : I
PR : 1
CH : 021
MFT : -
NAME : - - - -
¦¦
MEMORY : OK
RETURN
❉ ❉ TV STATION TABLE ❉ ❉
PR CH NAME SYSTEM
1 021
- - - -
I
2
3
4
5
SWAPPING : OK
DELETE : CLEAR RETURN
OK
SETUP
VCR
PROG
FUNC
DVD
Return Menu
Auto Setup
Manual Setup
TV System : I
VCR Output CH : CH 36
OK
SETUP
VCR
PROG
FUNC
DVD
Language
Clock
Install
User Set
Auto Power Off : Off
Screen Messages : On
Return Menu
01605Q_V6800_XFA_Eng1 3/20/08 5:46 PM Page 15

16 -
English
Changing the Preset Station Table
You can rearrange the station table and give
different programme numbers to the stations
listed according to your own preferences.
1 Press the MENU button, then press the OK or
button.
2 Press the or button to select Install,
then press the OK or button. The Install
menu is displayed.
3 Press the or button to Select Manual
Setup, then press the OK or button.
The TV STATION TABLE menu is displayed.
4 preset TV station. The selected station is dis-
played at the same time on the television
screen.
5 Press the OK button to change the
programme number assigned to a station.
6 Press the or button to select required
position, then press the OK button to swap
the position.
For example to move a TV station in
programme 1 to programme 3.
If you have stored a TV station:
• That you do not require
• At the wrong programme position, you can
cancel it.
1 Press the MENU button, then press the OK or
button.
2 Press the or button to select Install,
then press the OK or button.
The Install menu is displayed.
3 Press the or button to select Manual
Setup, then press the OK or button.
The TV STATION TABLE menu is displayed.
4 Press the or button to select required
preset TV station.
Press the CLEAR button to delete.
5 Repeat the same procedure from step 4
onwards until all the required stations have
Clearing a Preset Station
❉ ❉ TV STATION TABLE ❉ ❉
PR CH NAME SYSTEM
1 021
- - - - I
2
3
4
5
SWAPPING : OK
DELETE : CLEAR RETURN
❉ ❉ TV STATION TABLE ❉ ❉
PR CH NAME SYSTEM
1 021
- - - - I
2
3
4
5
SWAPPING : OK
DELETE : CLEAR RETURN
OK
SETUP
VCR
PROG
FUNC
DVD
Language
Clock
Install
User Set
Auto Power Off : Off
Screen Messages : On
Return Menu
OK
SETUP
VCR
PROG
FUNC
DVD
Language
Clock
Install
User Set
Auto Power Off : Off
Screen Messages : On
Return Menu
OK
SETUP
VCR
PROG
FUNC
DVD
Return Menu
Auto Setup
Manual Setup
TV System : I
VCR Output CH : CH 36
OK
SETUP
VCR
PROG
FUNC
DVD
Return Menu
Auto Setup
Manual Setup
TV System : I
VCR Output CH : CH 36
01605Q_V6800_XFA_Eng1 3/20/08 5:46 PM Page 16

English
- 17
Your DVD-VCR output channel may need to be
changed if the pictures suffer from interference
or if your TV cannot find the pictures.
1 Press the MENU button, then press the OK
or button.
2 Press the or button to select Install,
then press the OK or button.
The Install menu is displayed.
3 Press the or button to select VCR
Output CH.
4 Press the OK or ¦ or button to select the
required output channel .
➝ CH21 ➝ ..CH36 ➝ ..CH69
• Press the MENU button to exit the menu.
Then tune your television again (see page 12)
• You can select the required output channel
directly by using the number button.
You can choose the sound mode (I,B/G or D/K)
according to the TV set connected to your VCR.
1 Press the MENU button, then press the OK
or button.
2 Press the or button to select Install,
then press the OK or button. The Install
menu is displayed.
3 Press the or button to select TV
System, then press the OK or button to
select I,G or K.
• Press the MENU button to exit the menu.
• Press the MENU button to exit the menu.
Setting the VCR Output Channel
Selecting the RF OUT Sound Mode
(I-B/G-D/K)
❉ ❉ TV STATION TABLE ❉ ❉
PR CH NAME SYSTEM
1
2
3 021
- - - - I
4
5
SWAPPING : OK
DELETE : CLEAR RETURN
OK
SETUP
VCR
PROG
FUNC
DVD
Language
Clock
Install
User Set
Auto Power Off : Off
Screen Messages : On
Return Menu
OK
SETUP
VCR
PROG
FUNC
DVD
Language
Clock
Install
User Set
Auto Power Off : Off
Screen Messages : On
Return Menu
OK
SETUP
VCR
PROG
FUNC
DVD
Return Menu
Auto Setup
Manual Setup
TV System : I
VCR Output CH : CH 36
OK
SETUP
VCR
PROG
FUNC
DVD
Return Menu
Auto Setup
Manual Setup
TV System : I
VCR Output CH : CH 36
01605Q_V6800_XFA_Eng1 3/20/08 5:46 PM Page 17

18 -
English
NICAM programmes are divided into 3 types.
NICAM Stereo, NICAM Mono and Bilingual
(transmission in another language).
NICAM programmes are always accompanied by
a standard mono sound broadcast and you can
select the desired sound. Please refer to page 26.
1 Press the MENU button, then press the OK or
button.
2 Press the or button to select User Set,
then Press the OK or button.
The User Set menu is displayed.
3 Press the or button to select NICAM, then
press the OK or button to select On or Off.
• On (for NICAM mode):
Normally set at this position
• Off (for MONO mode):
Only set at this position to record
the standard mono sound during a NICAM
broadcast if the stereo sound is distorted
due to inferior reception conditions.
NICAM
Before recording or playing back a cassette,
you can select the required system standard.
Otherwise, the system automatically selects the
reception standard when you select AUTO.
• When playing back a cassette, the standard is
automatically selected by the DVD-VCR.
• When you playback an NTSC-recorded tape
on this DVD-VCR make a setting on the colour
system according to your TV. If your TV is a
PAL system only TV, set NTPB. If your TV is
multi system TV (NTSC 4.43 compatible), set
NT4.43 and you can record NT4.43.
1 Press the MENU button, then press the OK
or button.
2 Press the or button to select User Set,
then press the OK or button.
The User Set menu is displayed.
3 Press the OK or button to select required
colour system.
Auto ➝ PAL ➝ MESECAM➝ B/W
• Auto: When playing back a cassette,
the system standard is automatically
selected by the DVD-VCR.
• B/W: Black and White
Selecting the Colour Mode
V
V
CR
CR
F
F
unctions
unctions
OK
SETUP
VCR
PROG
FUNC
DVD
Language
Clock
Install
User Set
Auto Power Off : Off
Screen Messages : On
Return Menu
OK
SETUP
VCR
PROG
FUNC
DVD
Language
Clock
Install
User Set
Auto Power Off : Off
Screen Messages : On
Return Menu
OK
SETUP
VCR
PROG
FUNC
DVD
Return Menu
Colour System : Auto
NICAM : ON
IPC : On
OK
SETUP
VCR
PROG
FUNC
DVD
Return Menu
Colour System : Auto
NICAM : ON
IPC : On
01605Q_V6800_XFA_Eng1 3/20/08 5:46 PM Page 18

English
- 19
Intelligent Picture Control
This feature allows you to adjust the sharpness
of the image automatically, according to your
own preferences.
1 During playback, press the MENU button,
then press the OK or button.
2 Press the or button to select User Set,
then press the OK or button.
The User Set menu is displayed.
3 Press the or button to select IPC
(Intelligent Picture Control), then press the OK
or button.
• You can select the modes simply by press-
ing the IPC button.
4 To adjust the sharpness manually, press the
button to turn the IPC mode OFF.
The sharpness of the picture is adjusted
manually.
Press the ¦ or buttons until the picture is
displayed according to your preferences.
❉ ❉ PICTURE ❉ ❉
IPC : OFF
SOFTEN SHARPEN
¦¦
ON/OFF :
❉
Auto Power Off
This feature automatically turns off your DVD-
VCR if no signal is received and you do not
press any button for the selected time.
1 Press the MENU button, press the OK or
button.
2 Press the or button to select Auto
Power Off.
3 Press the OK or button to select the
preset interval.
➝ Off ➝ 1 Hour ➝ 2 Hour ➝ 3 Hour
• Press the MENU button to exit the menu.
OK
SETUP
VCR
PROG
FUNC
DVD
Language
Clock
Install
User Set
Auto Power Off : Off
Screen Messages : On
Return Menu
OK
SETUP
VCR
PROG
FUNC
DVD
Language
Clock
Install
User Set
Auto Power Off : Off
Screen Messages : On
Return Menu
OK
SETUP
VCR
PROG
FUNC
DVD
Return Menu
Colour System : Auto
NICAM : ON
IPC : On
01605Q_V6800_XFA_Eng1 3/20/08 5:46 PM Page 19

20 -
English
You can set repeat play to repeat the tape
continously from beginning to end.
1 Press the MENU button, then press the or
button to select VCR.
2 Press the OK or button, then press the
or button to select Repeat Play.
Press the OK or button to select On or
Off.
• On: Repeat play.
• Off: Do not wish to repeat play.
Selecting the Cassette Type
If you wish to use the tape counter to display the
time remaining on a cassette, you must indicate
the type of cassette inserted.
1 Press the MENU button, then press the or
button to select VCR.
2 Press the OK or button.
The Tape Select is highlighted.
3 Press the OK or button to select the
correct cassette length.
➝ E180 ➝ E240 ➝ E260 ➝ E300
• Press the MENU button to exit the menu.
Repeat Play
Screen Messages
Your DVD-VCR displays most information both
the DVD-VCR and the television.
You can choose to display or hide this information
on the television screen (If you configure the
Screen Message to Off, the Fast Forward and
Rewind messages will not be displayed on the
screen. However, the Search Message will not be
displayed on the screen regardless of the Screen
Message configuration).
1 Press the MENU button, then press the OK or
button.
2 Press the or button to select Screen
Messages.
3 Press the OK or button to select On or Off.
• On : Select to display on-screen information.
• Off : Select to hide on-screen information.
• Press the MENU button to exit the menu.
OK
SETUP
VCR
PROG
FUNC
DVD
Language
Clock
Install
User Set
Auto Power Off : Off
Screen Messages : On
Return Menu
OK
SETUP
VCR
PROG
FUNC
DVD
Language
Clock
Install
User Set
Auto Power Off : Off
Screen Messages : On
Return Menu
SETUP
VCR
PROG
FUNC
DVD
Menu
Return
OK
Tape Select : E180
Repeat Play : Off
SETUP
VCR
PROG
FUNC
DVD
Menu
Return
OK
Tape Select : E180
Repeat Play : Off
01605Q_V6800_XFA_Eng1 3/20/08 5:46 PM Page 20

English
- 21
Selecting the Recording Speed
Video cassettes have a safety tab to prevent
accidental erasure. When this tab has been
removed, you cannot record on the tape.
1 If you wish to protect a cassette, break off the
tab using a small screwdriver.
2 To re-record over a protected cassette (safety
tab broken), cover the hole with adhesive
tape.
You can record a cassette at two different
speeds:
• SP (Standard Play)
• LP (Long Play)
In Long Play modes:
• Each cassette lasts twice as long
• The recording is of a slightly lower quality
1 Press the SPEED button to select SP or LP.
• The selected record speed will appear on
the front panel display.
Type Recording Time (in SP)
E180 180 mins. or 3 hours
E240 240 mins. or 4 hours
E260 260 mins. or 4 hours and 20 mins.
E300 300 mins. or 5 hours
Protecting a Recorded Cassette
Recording a Programme
Immediately
Before recording a programme, you must have
preset the corresponding station (unless you are
recording via an external video source). If you
have not done so, refer to pages 14~15.
1 Switch on the television.
2 Insert the video tape in to the VCR deck, with
the window visible and the safety tab intact or
the opening covered with adhesive tape. The
DVD-VCR is switched on automatically.
3 Select the station by pressing the PROG
( or ) button or select the source (LINE IN
1, LINE IN 2) by pressing the INPUT SEL.
button for a satellite tuner or external video
source. The station number is displayed and
the programme can be seen on the television.
4 Select the recording speed by pressing the
SPEED button as many times as required
5 Hold down the REC (●) button for a while to
start recording.
The record indicator appears on the television
and DVD-VCR display. An index is recorded
on the tape (Refer to page 27).
6 To stop recording, press the ■ button once.
• If your DVD-VCR ejects the cassette when
you start recording, check to make sure
that the cassette’s safety tab is intact or
that the opening (Created by a broken
safety tab) is overed with adhesive tape.
• If you reach the end of the tape while
recording, the cassette rewinds
automatically.
01605Q_V6800_XFA_Eng1 3/20/08 5:46 PM Page 21

22 -
English
Recording from Another VCR or
Camcorder
You can copy a cassette to your DVD-VCR from
another video source, such as another VCR or a
Camcorder etc.
• It is an infringement of copyright laws to copy
prerecorded cassettes or to re-record them in
any form without the permission of the owners
of the corresponding copyright.
1 Connect the output jack of your external
devices to the LINE IN 1 or LINE IN 2 on the
front or rear of the DVD-VCR.
2 Insert a blank cassette in your DVD-VCR.
3 Insert the pre-recorded cassette in the other
video source (VCR or Camcorder etc).
4 Press the INPUT SEL. button to select the
appropriate input on your DVD-VCR:
• LINE IN 1, LINE IN 2 for the audio/video input.
5 Start playing back the cassette to be copied.
6 Hold down the REC (●) button for a while to
start recording on your DVD-VCR.
7 When you have finished recording, press the
■ button on both VCR and DVD-VCR.
• If you wish to view the cassette being
copied, your DVD-VCR must be connected
as usual to the television (Refer to page 8
for further details).
Recording a Programme with
Automatic Stop
This function enables you to record up to nine
hours (LP) of programmes.Your DVD-VCR stops
automatically after the requested length of time.
1 Switch on the television.
2 Insert the cassette on which the programme
is to be recorded, with the window visible and
the safety tab intact or the opening covered
with adhesive tape. The DVD-VCR is
switched on automatically.
3 Select the station to be recorded by pressing
the PROG( or ) button or select the
source (LINE IN 1, LINE IN 2) by pressing the
INPUT SEL. button for a satellite tuner or
external video source. The station number is
displayed and the programme can be seen on
the television.
4 Select the recording speed by pressing the
SPEED button as many times as required
(Refer to page 21).
5 Hold down the REC (●) button for a while to
start recording. The record indicator appears
on the television screen and DVD-VCR dis-
play. An index is recorded on the tape (Refer
to page 27).
6 Press the REC (●) button several times to
increase the recording time in:
• 30-minute intervals up to four hours.
• 1-hour intervals up to nine hours.
The length is displayed on the television dis-
plays. The selected programme is recorded
for the length of time requested. At the end of
that time, the DVD-VCR stops recording auto-
matically and power off.
7 If you wish to cancel the recording before the
end, press the STANDBY/ON button.
• If the end of the tape is reached while
recording, the recording stops and power off.
LENGTH 2:30
SET LENGTH :
PRESS REC
●
01605Q_V6800_XFA_Eng1 3/20/08 5:46 PM Page 22

English
- 23
Using the Assemble Edit Function
This function allows you to start a new recording
at a specific position on the cassette while main-
taining a very smooth scene change.
1 Insert the cassette to be edited in your
DVD-VCR.
2 Press the ll button to start playback.
3 When you reach the position from which you
wish to start the new recording,
press the ll button.
4 Press the F.ADV/STEP button as often as
necessary to advance frame by frame, until
the exact recording position is located.
5 While the DVD-VCR is in still mode, hold
down the REC (●) button for a while to acti-
vate the assemble edit function. The mode is
changed to pause.
6 Select the source from which you wish to
record by pressing:
• The PROG or button for television
channels.
• The INPUT SEL. button for the LINE IN 1,
LINE IN 2 input source.
7 Press the ll button to start recording.
If you want to finish the recording, press the
■ button.
Using The Timer Programming
Feature
The Timer Programming feature allows you to
preset the DVD-VCR to record a programme up
to one month before that programme is to be
broadcast. Up to six programmes can be preset.
• Before presetting a recording, check that the
Date and Time are correct.
• You must check that the cassette tape is
loaded.
1Press the MENU button, then press the or
button to select PROG.
2 Press the OK or button. The timer pro-
gramming menu is displayed.
3 Press the OK or button to select PR, then
press the or button to select the required
station.
• Press the INPUT SEL. button to select an
input source (LINE IN 1, LINE IN 2) other
then the tuner.
4 Press the button to select Day, then press
the or button to select the required day.
Menu
Return
OK
SETUP
VCR
PROG
FUNC
DVD
If you want to set the
timer program, press
theOKkey.
::
::
::
::
::
::
PR Day Start Stop Speed
Return Menu
OK
01 MO 01
01605Q_V6800_XFA_Eng1 3/20/08 5:46 PM Page 23

24 -
English
9 Press the MENU button to exit the menu.
10 Press the STANDBY/ON button to activate
the timer.
Before starting recording, the DVD-VCR
compares the timer duration with the
remaining time on the cassette.
You can check your preset recordings:
• When you have finished presetting the DVD-
VCR
• If you have forgotten which programmes will
be recorded.
1 Press the MENU button, then press the or
button to select PROG.
The Timer Method menu is displayed.
2 Press the OK or button. The list of preset
recodings is displayed with the corresponding
information.
• It can be displayed simply by pressing the
TIMER button on the remote control.
3 To change any values, select the required
programme by pressing the or button,
then change any values as required. For
more details refer to page 24. (Step 2 to 9).
• Press the MENU button to exit the menu.
Checking a Preset Recording
SETUP
DVD
VCR
PROG
FUNC
Menu
Return
OK
If you want to set the
timer program, press
theOKkey.
::
::
::
::
::
::
PR Day Start Stop Speed
Return Menu
OK
01 MO 01 13 : 25 19 : 57 SP
-- -- -- --
:
-- --
:
-- --
• DLY : Daily
• W-SU : Weekly Sunday
• W-MO Weekly Monday
• W-SA Weekly Saturday
• MO 01 : Monday 01
5 Press the button to select Start (Start time
of recording).
6 Press the button to select Stop (Recording
stop time).
• Press the ¦ or button to select the hour
or minute.
• Press the or button to set the stop
time.
7 Press the button to select Speed
(Recording speed).
• Press the or button to select the
required recording speed.
• Auto ➝ SP (Standard Play) ➝ LP (Long
Play)
• Auto Tape Speed Select
The DVD-VCR’s “Auto Tape Speed Select”
function compares the duration of the timer
recording to the actual recording time remain-
ing on the tape loaded. If there is insufficient
tape to complete a timer recording in Auto
mode, the DVD-VCR automatically switches
to LP mode to record the whole programme.
8 When you have finished, press the OK button
to set the Timer Programming.
::
::
::
::
::
::
PR Day Start Stop Speed
Return Menu
OK
01 MO 01 13 : 25
::
::
::
::
::
::
PR Day Start Stop Speed
Return Menu
OK
01 MO 01 13 : 25 19 : 57 SP
01605Q_V6800_XFA_Eng1 3/20/08 5:46 PM Page 24

English
- 25
Cancelling a Preset Recording
You can cancel any programmes that are:
• Incorrect
• No longer required
1 Press the MENU button, then press the or
button to select PROG . The Timer
Method menu is displayed.
2 Press the OK or button. The list of preset
recodings is displayed with the corresponding
information.
• It can be displayed simply by pressing the
TIMER button on the remote control.
3 Press the or button to select the
programme to be cancelled,then press the
CLEAR button .
• All the recording information is deleted and
broadcast will not be recorded.
• Press the MENU button to exit the menu.
Menu
Return
OK
SETUP
VCR
PROG
FUNC
DVD
If you want to set the
timer program, press
theOKkey.
::
::
::
::
::
::
PR Day Start Stop Speed
Return Menu
OK
-- -- -- --
:
-- --
:
-- --
This function allows you to play any pre-
recorded cassette.
1 Switch on both the television and your
DVD-VCR.
2 If the safety tab on the cassette is removed,
the cassette is played automatically.
• When a cassette is loaded, the tape position
is optimized automatically to reduce
disturbance (Digital Auto Tracking).
• When playing a cassette, if the end of the
tape is reached, the cassette is rewound
automatically. NTSC tapes can be played
back but cannot be recorded with this DVD-
VCR.
3 Press the ■ (stop) button to stop the
playback.
Press the (eject) button to eject the
playback.
This feature allows you to adjust the alignment
manually to obtain the best possible picture.
When noise bars or streaks appear during play-
back, adjust alignment manually by pressing the
TRK ( or ) button until the picture is clear
and stable.
• The tracking bar appears.
• The image is adjusted.
Playing a Cassette
Adjusting Picture Alignment
Manually
P
P
laying Back
laying Back
01605Q_V6800_XFA_Eng1 3/20/08 5:46 PM Page 25

26 -
English
You can select the mode in which the sound is
reproduced on the loudspeakers and AV outputs.
The following options are available.
Press the AUDIO button on the remote control
until the required option is displayed.
Option Description
L Used to listen to the sound on the left Hi-Fi channel.
R Used to listen to the sound on the right Hi-Fi
channel.
MIX Used to listen to the mixed sound of the Hi-Fi and
normal channels.
MONO Used to listen to the sound on the normal mono
channel.
LR Used to listen to Hi-Fi stereo sound on the left
and right channels
• When playing back tapes recorded in Hi-Fi, the
sound switches to Hi-Fi after five seconds of Mono.
➝ L ➝ R ➝ MIX ➝ MONO ➝ LR
You can play a cassette in slow motion.
• No sound is heard when playing back a
cassette in slow motion.
1 Press the :
• ll button to start playing the cassette.
• ll button again to make still mode.
• button to start slow mode.
• ¦¦ or button as many times as
required to decrease or increase the
speed respectively.
• ll button twice to return to the normal
speed.
• The slow motion feature does not support
running video backwards.
2 When playing back in slow motion, picture
interference may occur.
Press the TRK ( or ) button to minimize
this effect.
• When you have been using the Slow Motion
function for more than about two minutes,
the DVD-VCR will automatically play to
protect the:
- Cassette.
- Video heads.
Selecting the Audio Output Mode
Playing a Cassette in Slow Motion
Playing a Sequence Frame by
Frame
You can vary the playback speed using the
Shuttle function (up to nine times the normal
speed). Example: You wish to analyse a sports
person’s technique, movement by movement.
• No sound is heard when playing a sequence
at variable speeds.
1 Press the :
• ll button to start playing the cassette.
• SHUTTLE (<<) button to play the cassette
backwards.
• SHUTTLE (>>) button to play the cassette
forwards.
2 Each time you press the SHUTTLE button,
the speed is changed as shown in the
following illustration.
You can
• Stop the cassette at a given frame (image)
• Advance one frame at a time
No sound is heard when playing back frame by
frame.
1 Press the :
• ll button to start playing the cassette.
• ll button again to make still mode.
• F.ADV button to advance frame by frame.
• ll button to return to normal playback.
• Vertical stability: When playing back frame
by frame, interference may be seen on the
screen. Press the TRK ( or ) button to
minimize this effect.
REVERSE
PLAY
X9
REVERSE
PLAY
X5
REVERSE
PLAY
X3
STILL
SLOW
MOTION
X1/10
SLOW
MOTION
X1/5
PLAY
PLAY
X3
PLAY
X5
PLAY
X9
Playing a Sequence at Variable
Speeds
01605Q_V6800_XFA_Eng1 3/20/08 5:46 PM Page 26

English
- 27
Searching for a Specific Sequence
Each time you record a cassette on this DVD-
VCR, an “index” is automatically marked on the
tape when recording starts. The Search function
allows you to fast-forward or rewind to a specific
index and start playback from that point.
Depending on the direction selected, the index-
es are numbered as follows:
• This DVD-VCR uses a standard indexing
system (VISS). As a result, it will recognize
any indexes marked by other VCRs using the
same system and vice versa.
Go To [0:00:00] Stop
Use this feature when you want to search for
the 0:00:00 counter position on a cassette.
Press the CLEAR button at the point on the
tape where you want to set the counter to
0:00:00. The VCR will rewind or fast forward,
searching for the 0:00:00 counter position, and
then automatically stop at that position.
1 Press the MENU button, then press the or
button to select FUNC. The Function
menu is displayed. Press the OK or button.
2 Press the or button to select VCR
Function, then press the OK or button.
The VCR Function menu is displayed with
the Go To [0:00:00] selected.
• It can be displayed simply by pressing the
SEARCH button.
etc.
21 1 2
etc.
Prev
Seq.
Seq. being
played
Next
Seq.
➔
SETUP
DVD
VCR
PROG
FUNC
Go To [0:00:00]
End Search
Intro Scan
OK Return Menu
3 Press the OK or button again.
End Search
Use this feature when you want to search for a
blank position to record a program on a cassette.
The VCR will fast forward, searching for a blank
position, and then automatically stop at that
position. If the VCR reaches the end of the tape
during end search, the tape will be ejected.
1 Press the SEARCH button. The VCR
Function menu is displayed. Press the or
button to select End Search.
2 Press the OK or button.
Intro Scan
1 Press the SEARCH button.
The VCR Function menu is displayed.
Press the or button to select Intro Scan.
2 Press the OK or button.
3 Press the ¦¦ or button depending on
the direction where your desired programme is
located.
SETUP
DVD
VCR
PROG
FUNC
Go To [0:00:00]
End Search
Intro Scan
OK Return Menu
INTRO SCAN : ¦¦
SETUP
DVD
VCR
PROG
FUNC
VCR Function
Go To [0:00:00]
End Search
Intro Scan
OK Return Menu
01605Q_V6800_XFA_Eng1 3/20/08 5:46 PM Page 27

28 -
English
Index Skip Search
This feature will enable you to fast
forward/rewind to a specific point on a tape: e.g.
If you have recorded 3 different programmes on
a tape and you have rewound the tape to the
beginning, by using this feature you can go
directly to the start of programme 2 simply by
pressing the SEARCH button.
1 Press the SEARCH button.
The VCR Function menu is displayed.
Press the orbutton to select Intro Scan.
2 Press the OK or button.
3 Press the ¦¦ or button twice more.
4 These Index searches can be made forwards
(press the button) or backwards (press
the ¦¦ button).
(¦¦ -20
● ●
0
● ●
+20 )
This will take you directly to the start of the
desired programme is located.
To cancel an Index search simply press the
ll or ■ button.
SETUP
DVD
VCR
PROG
FUNC
Go To [0:00:00]
End Search
Intro Scan
OK Return Menu
INDEX SEARCH : ¦¦ -06
4 When an Index mark is found the DVD-VCR
will playback the tape for 5 seconds, after
which it will continue searching for the next
Index mark
5 If you want to watch the tape from a
particular Index, press the
ll button twice.
INTRO SCAN : ¦¦
The tape counter:
• Indicates the elapsed time in the play and
record modes (Hours, Minutes and Seconds).
• Is reset when a cassette is inserted in the
DVD-VCR.
• Allows you to find the beginning of a sequence
easily.
• If the remaining time is to be calculated
correctly, you must indicate the type of
cassette being used.
1 Insert a cassette in your DVD-VCR.
To set the tape counter to zero at the begin-
ning of a sequence:
• Press the INFO button twice to display the
counter.
• Press the CLEAR button when you want to
set the tape counter to zero.
2 When you are ready,
• Start Playback or Recording.
• Press the ■ button.
• To fast-froward or rewind to the sequence at
which the counter was set to zero, press the
¦¦ or button.
• Some DVD-VCR information, such as the
counter, can be displayed on the television
screen (Unless you have deactivated the
Screen Messages mode; refer to page 20).
Press the INFO button:
• Once to display the current function,
programme number, recording speed, time
and counter.
• Twice to display the counter only.
• Three times to display the time remaining on
the cassette.
• Four times to clear the display.
Using the Tape Counter
0:00:00
01605Q_V6800_XFA_Eng1 3/20/08 5:46 PM Page 28

English
- 29
Setting Up the Language Features
D
D
VD
VD
F
F
unctions
unctions
If you set disc menu, audio and subtitle language in advance,
it will come up automatically every time you watch a movie.
Using the Disc Menu Language
1 Press the MENU button in the stop mode.
Press the or button to select DVD, then
press the OK or button.
2 Press the OK or button again.
Press the or button to select Disc
Menu, then press the OK or button.
3 Press the or button to select the
required language, then press the OK or
button.
- If the selected language is not recorded on
the disc, the original pre-recorded language is
selected.
- The language is selected and the screen
returns to Language Setup menu.
- To make the setup menu disappear, press the
MENU button.
OK Return Menu
OK Return Menu
Disc Menu : English
Audio : English
Subtitle : Automatic
DivX Subtitle : Unicode
Using the Audio Language
1 Press the MENU button in the stop mode.
Press the or button to select DVD, then
press the OK or button.
2 Press the OK or button again. Press
the or button to select Audio, then
press the OK or button.
3 Press the or button to select the
required language, then press the OK or
button.
- Select “Original” if you want the default sound
track language to be the original language the
disc is recorded in.
- If the selected language is not recorded on the
disc, the original pre-recorded language is
selected.
- The language is selected and the screen
returns to Language Setup menu.
- To make the setup menu disappear, press the
MENU button.
OK Return Menu
OK Return Menu
Disc Menu : English
Audio : English
Subtitle : Automatic
DivX Subtitle : Unicode
SETUP
DVD
VCR
PROG
FUNC
OK Return Menu
Language Setup
Audio Setup
Display Setup
Parental Setup :
Divx (R) Registration
SETUP
DVD
VCR
PROG
FUNC
OK Return Menu
Language Setup
Audio Setup
Display Setup
Parental Setup :
Divx (R) Registration
▲
✓ English
Français
Deutsch
Español
Italiano
Nederlands
Cesky
▼
Disc Menu
Audio
Subtitle
DivX Subtitle
SETUP
DVD
VCR
PROG
FUNC
SETUP
DVD
VCR
PROG
FUNC
SETUP
DVD
VCR
PROG
FUNC
SETUP
DVD
VCR
PROG
FUNC
▲
Original
✓ English
Français
Deutsch
Español
Italiano
Nederlands
▼
Disc Menu
Audio
Subtitle
DivX Subtitle
01605Q_V6800_XFA_Eng2 3/20/08 5:51 PM Page 29

30 -
English
Using the Subtitle Language
1Press the MENU button in the stop mode.
Press the or button to select DVD, then
press the OK or button.
2Press the OK or button again. Press the
or button to select Subtitle, then press the
OK or button.
3 Press the or button to select the
required language, then press the OK or
button.
- Select “Automatic” if you want the subtitle
language to be the same as the language
selected as the audio language.
- Some discs may not contain the language you
select as your initial language; in that case the
disc will use its original language setting.
- The language is selected and the screen
returns to setup menu.
- To make the setup menu disappear, press the
MENU button.
OK Return Menu
Disc Menu : English
Audio : English
Subtitle : Automatic
DivX Subtitle : Unicode
SETUP
DVD
VCR
PROG
FUNC
OK Return Menu
Language Setup
Audio Setup
Display Setup
Parental Setup :
Divx (R) Registration
Using the DivX Subtitle
Language
1Press the MENU button. Press the or
buttons to select DVD, then press the OK or
button.
2 Press the OK or button again. Press the
or button to select DivX Subtitle, then
press the OK or button.
3 Press the or button to select the
required language, then press the OK or
button.
- The language is selected and the screen
returns to Language Setup menu.
- To make the setup menu disappear, press
the MENU button.
OK Return Menu
Disc Menu : English
Audio : English
Subtitle : Automatic
DivX Subtitle : Unicode
SETUP
DVD
VCR
PROG
FUNC
OK Return Menu
Language Setup
Audio Setup
Display Setup
Parental Setup :
Divx (R) Registration
SETUP
DVD
VCR
PROG
FUNC
OK Return Menu
▲
✓ Automatic
English
Français
Deutsch
Español
Italiano
Nederlands
▼
Disc Menu
Audio
Subtitle
DivX Subtitle
SETUP
DVD
VCR
PROG
FUNC
OK Return Menu
✓ Unicode
Cyrillic
Greek
Disc Menu : English
Audio : English
Subtitle
DivX Subtitle
SETUP
DVD
VCR
PROG
FUNC
SETUP
DVD
VCR
PROG
FUNC
01605Q_V6800_XFA_Eng2 3/20/08 5:51 PM Page 30

English
- 31
Dynamic Compression
• On: To select dynamic compression.
• Off: To select the standard range.
PCM Down Sampling
• On: Select this when the amplifier connected
to the player is not 96KHz compatible. In
this case, the 96KHz signals will be down
converted to 48KHZ.
• Off: Select this when the amplifier connected
to the player is 96KHz compatible. In
this case, all signals will be output with
out any changes.
Even when PCM Down sampling is Off
• Some discs will only output down sampled audio
through the digital outputs.
• To make the Setup menu disappear, press the
MENU button.
• Manufactured under license from Dolby
Laboratories. “Dolby” and the double-D symbol are
trademarks of Dolby Laboratories.
1 Press the MENU button in the stop mode.
Press the or button to select DVD, then
press the OK or button.
Setting Up the Display Options
Notes
SETUP
DVD
VCR
PROG
FUNC
OK Return Menu
Language Setup
Audio Setup
Display Setup
Parental Setup :
Divx (R) Registration
Setting Up the Audio Options
Dolby Digital Out
• PCM: Converts to PCM (2CH) audio.
Select PCM when using the Analog
Audio Outputs.
• Bitstream: Converts to Dolby Digital Bitstream
(5.1CH).Select Bitstream when
using the Digital Audio Output.
MPEG-2 Digital Out
• PCM: Converts to PCM (2CH) audio.
Select PCM when using the Analog
Audio Outputs.
• Bitstream: Converts to MPEG-2 Digital
Bitstream (5.1CH or 7.1CH).
Select Bitstream when using the
Digital Audio Output.
• Be sure to select the correct Digital Output or no
audio will be heard.
1 Press the MENU button in the stop mode.
Press the or button to select DVD, then
press the OK or button.
2 Press the or button to select Audio
Setup, then press the OK or button. The
Audio Setup menu is displayed.
3 Press the or button to select the
required item.
4 Press the OK or button to select the
required option.
Note
OK Return Menu
Dolby Digital Out : PCM
MPEG-2 Digital Out : PCM
Dynamic Compression : On
PCM Down Sampling : On
SETUP
DVD
VCR
PROG
FUNC
OK Return Menu
Language Setup
Audio Setup
Display Setup
Parental Setup :
Divx (R) Registration
SETUP
DVD
VCR
PROG
FUNC
01605Q_V6800_XFA_Eng2 3/20/08 5:51 PM Page 31

32 -
English
2 Press the or button to select Display
Setup, then press the OK or button.
3 Press the or button to select TV Aspect,
press the OK or button.
4 Press the or button to select the
required item, then press the OK button to
select the required option.
TV Aspect
Depending on the type of television you have,
you may want to adjust the screen setting
(Aspect Ratio).
• 4:3 Letter Box :
Select when you want to see the total 16:9
ratio screen DVD supplies, even though you
have a TV with a 4:3 ratio screen. Black bars
will appear at the top and bottom of the
screen.
• 4:3 Pan & Scan :
Select this for conventional size TVs when
you want to see the central portion of the 16:9
screen. (Extreme left and right side of movie
picture will be cut off).
• 16:9 Wide :
You can view the full 16:9 picture on your
widescreen TV.
Black Level
Adjusts the brightness of the screen (On/Off).
OK Return Menu
OK Return Menu
TV Aspect : Wide
Black Level : Off
TV System : PAL
Video Output : I-SCAN
TV Aspect : Wide
Black Level : Off
TV System : PAL
Video Output : I-SCAN
✓ 4:3 Letter Box
4:3 Pan &Scan
16:9 Wide
SETUP
VCR
PROG
FUNC
DVD
SETUP
VCR
PROG
FUNC
DVD
The Parental Control function works in conjunc-
tion with DVDs that have been assigned a rating
which helps you control the types of DVDs that
your family watches. There are up to 8 rating
levels on a disc.
1 Press the MENU button in the stop mode.
Press the or button to select DVD, then
press the OK or button. Press the or
button to select Parental Setup.
Setting Up the Parental Control
TV System
- NTSC : In case of using NTSC disc
• If your TV system only has PAL-Video input,
you must choose “PAL”. When you choose
“PAL”, Interlace output format is PAL 60 Hz
output.
• If your TV system only has NTSC, input you
must choose “NTSC ”.
- PAL : In case of using PAL disc
• If your TV system only has NTSC-Video
input, you must choose “NTSC”.
• If your TV system only has PAL input, you
must choose “PAL ”.
Video Output
Select Video Output.
- I-SCAN : Select when you want to use
Component Interlace (625i/525i) Out.
- P-SCAN : Select when you want to use
Component Progressive (625p/525p) Out.
• If the Yes/No selection in the Display Setup
sub Menu is not made within 10 seconds, the
screen returns to the previous menu.
SETUP
DVD
VCR
PROG
FUNC
OK Return Menu
Language Setup
Audio Setup
Display Setup
Parental Setup :
Divx (R) Registration
01605Q_V6800_XFA_Eng2 3/20/08 5:51 PM Page 32

English
- 33
5 To make the Setup menu disappear press the
MENU button. For example, if you select up to
level 6, Discs that contain Level 7, 8 will now
not play.
Changing the Password
6 Press the or button to select Change
password.
7 The Enter Password is displayed. Enter your
password by pressing the number buttons.
The Enter New Password is displayed to
confirm the password.
• How to make the DVD menu disappear or
return to menu screen during set up; Press
the RETURN or ¦ button.
• If you have forgotten your password, refer to
Forgot Password in the Troubleshooting
Guide.
Setting up the Rating Level
4 Press the or button to select Rating
Level, then press the OK or button.
OK Return Menu
SETUP
VCR
PROG
FUNC
DVD
Rating Level : Kids Safe
Change Password
OK Return Menu
Rating Level : Kids Safe
Change Password
SETUP
VCR
PROG
FUNC
DVD
▲
✓ Kids Safe
Level 2
Level 3
Level 4
Level 5
Level 6
Level 7
▼
OK Return Menu
Rating Level : Kids Safe
Change Password
SETUP
VCR
PROG
FUNC
DVD
Enter Password
OK Return Menu
Rating Level : Kids Safe
Change Password
SETUP
VCR
PROG
FUNC
DVD
Enter New Password
OK Return Menu
SETUP
VCR
PROG
FUNC
DVD
Rating Level : Kids Safe
Change Password
OK Return Menu
Rating Level : Kids Safe
Change Password
SETUP
VCR
PROG
FUNC
DVD
Enter Password
2 Press the OK or button.
3 Press the OK or button. Enter your pass-
word. - By default, password is set to 0000.
01605Q_V6800_XFA_Eng2 3/20/08 5:51 PM Page 33

34 -
English
Firmware Upgrade
Please read the below information before
update procedure.
1 The following events may interrupt the update
procedure and may result in permanent
damage to DVD-VCR.
• Unplugging the power cord.
• Power outage.
• Dirt or Scratch in the discs.
• Open a tray door during processing.
2 Playback can only support English Subtitle.
If you have any question or any problem,
please feel free to contact your nearest
SAMSUNG Service Center and agency.
DivX Feature Table
• A DivX disc may not be playable as playback
depends on the file format, the recording
conditions, the recording method, etc.
• A video file that has not been interleaved
supports only voice or video.
• Check the DivX disc format as this is not an
error.
• Normal operation is only possible when the
screen size is 720X480 pixels or less.
• A maximum of 65 characters for the caption
title of a DivX disc is supported.
• Unsupported caption content will be
displayed using asterisks (*).
DivX can be divided into Video and Audio.
Supported CODEC formats DivX3, DivX4, DivX5 (GMC 1WP)
Supported file formats *.avi, *.mpeg
Supported audio formats AC3, MP3, WMA
Supported caption formats * .SMI, * .SRT, * .SUB
DivX(R) Registration
DivX, DivX Certified,
and associated logos
are trademarks of
DivXNetworks, Inc and
are used under license.
Please use your registration code to register
this DVD-VCR with the DivX(R) Video On
Demand service. This will allow you to rent and
purchase videos using the DivX(R) Video On
Demand format. To learn more go to
www.divx.com/vod.
1 Press the MENU button in the stop mode.
Press the or button to select DVD.
The DVD Setup menu is displayed.
2 Press the OK or button. Press the or
button to select DivX(R) Registration.
3 Press the OK or button. A message is dis-
played.
SETUP
DVD
VCR
PROG
FUNC
OK RETURN MENU
Language Setup
Audio Setup
Display Setup
Parental Setup :
DivX(R) Registration
SETUP
DVD
VCR
PROG
FUNC
OK RETURN MENU
Language Setup
Audio Setup
Display Setup
Parental Setup :
DivX(R) Registration
DivX(R) Video on Demand
Your Registration Code is
HAMG648S
http://www.divx.com/vod
OK
SETUP
DVD
VCR
PROG
FUNC
OK RETURN MENU
01605Q_V6800_XFA_Eng2 3/20/08 5:51 PM Page 34

English
- 35
How to make an update disc
Write the downloaded file onto a blank CD-R
disc, using the following settings.
1
You have to download a new file through Download
Center of Samsung Internet Site
(www.samsung.com).
2
Write the file to Disc using CD-RW of your comput-
er.
- File System CD-ROM ISO Level
- Character set ISO 9660
- Finalized, single session
- Write speed low
Note
.
Update procedure
1
Open the disc tray. Place the disc on the tray.
Close the tray. The Firmware upgrade screen
appears.
2
Press the ¦/ buttons to select Total, then press
the OK button.
- In the middle of the writing, the tray will open
automatically. After taking out the disc, please
wait for about 2 minutes.
• The display can be changed depend on its
version and without any notice.
Note
Special Playback Features
During DVD/VCD playback you can select from
the following special playback options.
To resume normal playback, press the ll but-
ton.
Still
Press the ll button during playback.
• The picture will still and the audio will mute.
• To resume playback, press the ll button.
• If the player is left in still mode for 5 minutes, it
will stop automatically.
Frame Advance (Step)
While in playback mode, press the F.ADV/STEP
button on the remote control to advance one
frame at a time.
• Audio is muted during frame advance mode.
• Press the ll button to resume normal play-
back.
Skip Forward/Back
While a DVD disc is in play mode, press the
l¦¦ or l button to jump forward and back-
ward through disc chapters.
• Skip Forward (l) will jump to the next
chapter.
• Skip Back (l¦¦) will jump to the beginning of
the current chapter.
• Press the l¦¦ button again to jump to the
beginning of the previous chapter.
Search Forward/Back
While a disc is in play mode, press the ¦¦ or
button to visually search forward/backward
at 2X - 4X - 64x - 128X speed. Press the ll
button to resume normal speed.
• CD : 2X - 4X - 8X.
Slow Motion
During playback, press the ll button to still the
image. Then press the ¦¦or button to
play in slow motion at variable speeds.
• Each press increases the slow motion speed
playback to 1/2, 1/4 or 1/8 normal speed.
• Audio is muted during slow motion playback..
• Frame Advance operates only in the forward direc-
tion.
Note
01605Q_V6800_XFA_Eng2 3/20/08 5:51 PM Page 35

36 -
English
Stop/Resume
• Press the ■ button once to stop playback.
To resume the DVD/VCD from the point where
the disc stopped, press the ll button.
• Press the ■ button twice to completely stop
playback. The next time you press the ll
button, the disc will start over from the begin-
ning.
• Slow motion is not available for CD.
Note
To access the desired title when
there is more than one in the disc.
For example, if there is more than
one movie on a DVD, each movie
will be identified. A DVD may
contain several different titles.
For example, if a disc contains four
different movies, each might be con-
sidered a title.
Most of DVD discs are recorded in
chapters so that you can quickly find
a specific passage.
Each Title on a DVD is usually divid-
ed into chapters (similar to tracks on
an audio CD).
Allows playback of the film from a
desired time.
Refers to the language of the film
soundtrack. In the example, the
soundtrack is played in English
5.1CH.A DVD disc can have up to
eight different soundtracks.
Refers to the subtitle languages
available in the disc.
You will be able to choose the subti-
tles language or, if you prefer, turn
them off from the screen.
A DVD disc can have up to 32
different subtitles.
Shortcut
To access the desired Bookmark or
Angle function. Some DVD discs are
have more angle function from any pic
ture. Bookmark function make you easily
and quickly to find chapter from DVD.
Shortcut
• When in VCD 2.0 is in Menu Off mode only, this
function works. You can choose Menu On or Menu
Off by using the DISC MENU button.
Note
3 Press the ¦or button to make the desired
setup, then press the OK button.
• You may use the number buttons of the
remote control to directly access a title,
chapter or to start the playback from the
desired time.
4 To make the screen disappear, press the
CLEAR button again.
Using the Display Function
To view the current Title, Chapter, and
counter position, press the INFO button during
DVD playback. The display screen can also be
used to quickly choose a title, chapter or
playing time.
1 View the Display
During DVD/VCD playback, press the INFO
button.
• To make the screen disappear, press the
CLEAR button again.
2 Press the or button to select the desired
item.
01605Q_V6800_XFA_Eng2 3/20/08 5:51 PM Page 36

English
- 37
If you are using a 4:3 TV
For 16:9 aspect ratio discs
- 4:3 Letter Box
Displays the content of the DVD title in
16:9 aspect ratio. The black bars will
appear at the top and bottom of the
screen.
- 4:3 Pan Scan
The left and right portions of the screen
are cut off an the central portion of the
16:9 screen is displayed.
- Screen Fit
The top and bottom portions of the screen
are cut off and a full screen appears.
The picture will look vertically stretched.
- Zoom Fit
The top, bottom, left and right portions of
the screen are cut off and the central
portion of the screen is enlarged.
For 4:3 aspect ratio discs
- Normal Screen
Displays the content of the DVD title in 4:3
aspect ratio.
- Screen Fit
The top and bottom portions of the screen
are cut off and the full screen appears.
The picture will look vertically stretched.
- Zoom Fit
The top, bottom, left and right portions of
the screen are cut off and the central
portion of the screen is enlarged.
Adjusting the Aspect Ratio (EZ View)
This function may be different depending on the
type of disc.
To play using aspect ratio (DVD)
1 Press the EZ VIEW button.
• The screen size changes when the button is
pressed repeatedly.
• The screen zoom mode operates differently
depending on the screen setting in the initial
DVD menu.
• To ensure correct operation of the EZ VIEW
button, you should set the correct aspect
ratio in the initial setup.
If you are using a 16:9 TV
For 16:9 aspect ratio discs
- Wide Screen
Displays the content of the DVD title in
16:9 aspect ratio.
- Screen Fit
The top and bottom portions of the screen
are cut off. When playing a 2.35:1 aspect
ratio disc, the black bars at the top and
bottom of the screen will disappear. The
picture will look vertically stretched.
(Depending on a type of disc, the black
bars may not disappear completely.)
- Zoom Fit
The top, bottom, left and right of the
screen are cut off and the central portion
of the screen is enlarged.
For 4:3 aspect ratio discs
- Normal Screen
Displays the content of the DVD title in
16:9 aspect ratio. The picture will look
horizontally stretched.
- Screen Fit
The top and bottom portions of the screen
are cut off and the full screen appears.
The picture will look vertically stretched.
- Zoom Fit
The top, bottom, left and right portions
of the screen are cut off and the central
portion of the screen is enlarged.
01605Q_V6800_XFA_Eng2 3/20/08 5:51 PM Page 37

38 -
English
Selecting the Subtitle Language
Some DVDs provide subtitles in one or more
languages. You can use the SUBTITLE button
to quickly view and change settings.
1 During playback, press the SUBTITLE button.
2 Press the SUBTITLE button repeatedly to
select the desired subtitle language.
3 To make the menu bar disappear, press the
CLEAR or RETURN button again.
• You have to change the desired subtitle in the Disc
Menu, according to discs. Press the DISC MENU
button.
• This function depends on what languages are
encoded on the disc and may not work with all
DVDs.
• A DVD disc can contain up to 32 subtitle languages.
• How to have the same subtitle language come up
whenever you play a DVD; Refer to “Using the
Subtitle Language” on page
30
ENG
SUBTITLE
Notes
Selecting the Audio Language
Multiple language/audio setup options, such as
Dolby Digital 5.1, Dolby Pro Logic or LPCM 2
Channel audio are available on some DVDs.
You can use the AUDIO button to quickly view
and select the options available on a disc.
1 During playback, press the AUDIO button.
2 Press the ¦ or button to select the desired
language or audio setup on the DVD.
• Languages are represented by abbrevia-
tions, e.g. ENG for English.
3 To remove the AUDIO icon, press the CLEAR
or RETURN button.
• This function depends on what languages are
encoded on the disc and may not work with all
DVDs.
• A DVD disc can contain up to 32 subtitle
languages.
• How to have the same audio language come up
whenever you play a DVD; Refer to “Using the
Audio Language” on page 29
.
ENG
DOLBY DIGITAL 5.1CH
AUDIO
DVD
Stereo
Changing the Camera Angle
Some DVD Movies provide you with various
camera angle views on the same scene if disc
contains multiple angles.
1 Press the ANGLE button.
2 Press the ¦ or button to select a camera
angle you may wish to see.
VCD, CD
Notes
01605Q_V6800_XFA_Eng2 3/20/08 5:51 PM Page 38

English
- 39
Zoom
1 During playback or pause mode, press the
ZOOM button on the remote control, press
the OK button.
2 Press the /,¦/ buttons to select the
part of the screen you want to zoom in on.
- During DVD play, press OK to zoom in
2X/4X/2X/Normal in order.
Marks
Up to three Bookmarks can be inserted for a
given DVD/VCD, allowing you to quickly jump to
your favorite scene or song.
1 During playback, press the MARK button.
2 Press the ¦ or button to select one of the
three mark placeholders (- - -).
Keep on playing the DVD up to the scene you
want to mark, then press the OK button. The
placeholder (-) is changed to a number (1, 2
or 3).
• You may continue to set up to three marks.
Press the MARK button again to exit the
mark menu.
Recalling a Maked Scene
1 During playback, press the MARK button.
2 Press the ¦ or button to select the mark
you want to recall.
3 Press the ll button to play the mark.
Clearing Mark
1 During playback, press the MARK button.
2 Press the ¦ or button to select the mark
you want to delete.
3 Press the CLEAR button to delete the mark.
• Press the MARK button again to exit the
mark menu.
• Up to three scenes may be marked at a timer.
• When VCD 2.0 is in Menu Off mode only,
this function works.
• Depending on the disc, the mark function may not
work.
Note
01605Q_V6800_XFA_Eng2 3/20/08 5:51 PM Page 39

40 -
English
Repeat Chapter/Title
You can repeat a single chapter or a complete
title.
1 Press the REPEAT button while in playback
mode to open the repeat menu.
The current repeat mode is displayed.
2 Press the ¦ or button to select
Chapter/Title. Press the OK button to repeat
the current chapter/Title.
• The menu will display Track in place of
Chapter if you are playing a VCD.
Cancel Chapter/Title
1 Press the REPEAT button to open the repeat
menu.
2 Press the ¦ or button to selected Off,
then press the OK button.
• It is available to press the CLEAR button in
order to stop repeat play.
A to B Repeat
A to B Repeat feature enables you to repeat the
designated section on a DVD or VCD. To acti-
vate, mark where to start (A) and where to end
(B) of the section you want to watch.
1 Press the REPEAT button while in playback
mode, then press the ¦ or button to select
A-.
2 Press the OK button at the beginning of the
segment you want to repeat (Point A).
The B is selected.
3 Press the OK button again at the end of the
segment you want to repeat (Point B).
The segment will begin repeating in a
continuous loop.
Off
01
B
01 A-B
01
A
B
OK REPEAT
Off
01
B
01 A-B
01
A
B
OK REPEAT
DVD
VCD
Chapter Title A - BB
01
A
Off
01
01 A-B
Chapter Title A - BB
01
A
Off
01
01 A-B
DVD
VCD
B
Off
01
01 A-B
A
B
B
Off
01
01 A-B
A
B
DVD
VCD
B
01
Off
01
01 A-B
B
B
01
Off
01
01 A-B
B
DVD
VCD
01605Q_V6800_XFA_Eng2 3/20/08 5:51 PM Page 40

English
- 41
Cancel A-B Repeat
1 Press the REPEAT button to open the repeat
menu.
2 Press the ¦ or button to selected Off, then
press the OK button.
• It is available to press the CLEAR button in
order to stop repeat play.
• When in VCD 2.0 mode (MENU ON mode),
this function does not work.
• Use the DISC MENU button in the VCD 2.0 mode
to select MENU ON or OFF.
Note
MP3/WMA/ CD Audio Play
If you insert an MP3/WMA/ CD AUDIO Disc into
the DVD-VCR, you can see the folder directory.
1 Press the or button to select the desired
music folder, then press the OK button.
- Only one kind of file is played back when a
disc or a folder contains both MP3 and
WMA files.
2 Press the /,¦/ button again to select a
music file. Press the OK button to begin play-
back of a music file.
Repeat/ Random Playback
1 Press the REPEAT button to change the play-
back mode. There are four modes, such as
Off, Track, Folder and Random.
- Off: Normal Playback
- Track: Repeats the current song file.
- Folder: Repeats the song files which have
the same extension in the current folder.
- Random: Song files which have the same
extension will be played in random order.
To resume normal play, press the CLEAR but-
ton.
Chapter Title A - BB
01
A
Off
01
01 A-B
Chapter Title A - BB
01
A
Off
01
01 A-B
DVD
VCD
Off
Stop
WMA
JPEG
MP3
MPEG4
00:00:00
OK Return
T
T
Menu
UIT
Afspelen
...
Because You
Cactus
Sad Dayu
Wonderful
Because You
00:00:23
REPEAT
OK
Return
Repeat
T
T
01605Q_V6800_XFA_Eng2 3/20/08 5:51 PM Page 41

42 -
English
If you insert a Picture (JPEG) CD Disc into the
DVD-VCR, you can see the folder directory.
1 Press the /,¦/ button to select the pic-
ture you want to view, then press the OK but-
ton. The selected picture is displayed.
2 Press the l¦¦ or l button to display the
previous or next picture.
3 Press the INFO button on the remote control
to select the menu you want to view and then
press the OK button.
Picture CD Playback
- Press the STOP button to return to the clips menu.
- When playing a Kodak Picture CD, the unit
displays the Photo directly, not the clips menu.
Note
CD-R MP3/WMA discs
When playing CD-R/MP3 or WMA discs,
please follow all the recommendations for
CD-R above, plus the comments below:
Your MP3 or WMA files should be ISO
9660 or JOLIET format.
ISO 9660 format and Joliet MP3 or WMA
files are compatible with Microsoft's DOS
and Windows, and with Apple's Mac. These
two formats are the most widely used.
When naming your MP3 or WMA files do
not exceed 8 characters, and place
".mp3, .wma" as the file extension.
General name format of: Title.mp3. or
Title.wma. When composing your title,
make sure that you use 8 characters or
less, have no spaces in the name, and
avoid the use of special characters
including: (.,/,\,=,+).
Use a decompression transfer rate of at
least 128Kbps when recording MP3 files.
Sound quality with MP3 files basically
depends on the rate of compression
/decompression you choose. Getting audio
CD quality sound requires an analog/digital
sampling rate, that is conversion to MP3
format, of at least 128Kbps and up to
160Kbps. However, choosing higher rates,
like 192Kbps or more, only rarely give
better sound quality. Conversely, files with
decompression rates below 128Kbps will
not be played properly.
Use a decompression transfer rate of at
least 64Kbps when recording WMA files.
Sound quality with WMA files basically
depends on the rate of compression
/decompression you choose. Getting audio
CD quality sound requires an analog/digital
sampling rate, that is conversion to WMA
format, of at least 64Kbps and up to
192Kbps. Conversely, files with decompres-
sion rates below 64Kbps or over 192Kbps
will not be played properly.
Do not try recording copyright protected
MP3 files.
Certain "securized" files are encrypted and
code protected to prevent illegal copying.
These files are of the following types:
Windows MediaTM (registered trade mark
of Microsoft Inc) and SDMITM (Registered
trade mark of The SDMI Foundation). You
cannot copy such files.
Important :
The above recommendations cannot be
taken as a guarantee that the DVD-VCR
will play MP3 recordings, or as an assur-
ance of sound quality. You should note that
certain technologies and methods for MP3
file recording on CD-Rs prevent optimal
playback of these files on your DVD
player (degraded sound quality and in some
cases, inability of the player to read the
files).
This unit can play a maximum of 500 files
and 500 folders per disc.
UIT
Stop
...
00:00:00
OK Return
T
T
Menu
RETURN
01605Q_V6800_XFA_Eng2 3/20/08 5:51 PM Page 42

English
- 43
Rotation
Press the ¦ or button to select .
Each time the OK button is pressed, the picture
rotates 90 degrees clockwise.
Zoom
Press the ¦ or button to select .
Each time the OK button is pressed, the picture
is enlarged up to 4X.
(Normal ➝ 2X ➝ 4X ➝ Normal)
Slide show
Press the ¦ or button to select .
Press the OK button. The 3 icons are displayed
for time interval.
Press the ¦ or button to select one of these.
Press the OK button.
The pictures change automatically with
about an 6 second interval.
The pictures change automatically with
about an 12 second interval.
The pictures change automatically with
about an 18 second interval.
• Depending on the file size, each interval
between images may take longer or shorter
than the manual suggests.
- If you don’t press any button, the slide show
wil start automatically in about 10 seconds by
default.
RETURN
Timer :
RETURN
RETURN
01605Q_V6800_XFA_Eng2 3/20/08 5:51 PM Page 43

44 -
English
CD-R JPEG Discs
• Only files with the “.jpg” and “.JPG” extensions
can be played.
• If the disc is not closed, it will take longer to
start playing and not all of the recorded files
may be played.
• Only CD-R discs with JPEG files in ISO 9660
or Joliet format can be played.
• The name of the JPEG file may not be longer
than 8 characters and should contain no blank
spaces or special characters (. / = +).
• Only a consecutively written multisession disc
can be played. If there is a blank segment in
the multisession disc, the disc can be played
only up to the blank segment.
• When playing a Kodak Picture CD, only the
JPEG files in the pictures folder can be
played.
• Picture discs other than Kodak Picture CD
may take longer to start playing or may not
play at all.
DivX/MPEG4 Playback
1 When the disc is inserted, the file structure of
the disc will be shown. Depending on the file
format, a different icon will appear next to
each file. The and files will have been
highlighted.
Use /,¦/ button to select the movie file,
and then press OK or ll.
Result : When the 'Reading Index......'
message is displayed, wait for a
second or two. The movie will be
played back.
If the "Cannot support" message is
displayed, the selected file cannot
be played back.
2 To navigate to a specific time while viewing
the movie, During playback press the INFO
button
3 Press the / button to select the desired
item.
4 Press the ¦/ button to make the desired
setup, then press the OK button.
• You may use the number buttons of the
remote control to directly access a title, chap-
ter or to start the playback from the desired
time.
5 To make the screen disappear, press the
CLEAR button again.
6 Repeat playback
Press the REPEAT button to change playback
mode. There are 3 modes, such as Off,
Folder and Title.
- Folder : repeats the AVI files which have the
same extension in the current folder.
- Title : repeats the title that is playing.
Off
Stop
...
a01_divx51b-8
a02_divx505b-8
a03_divx502sp-8
a04_divx412-8
/a01_divx51b-8
00:00:00
OK Return
T
T
Menu
01605Q_V6800_XFA_Eng2 3/20/08 5:51 PM Page 44

English
- 45
DivX/MPEG4 Special Playback
Features
During DivX/MPEG4 playback you can select
from the following special playback options.
1 Still
Press the ll button on the remote control
during playback.
• The picture will still and the audio will mute.
• To resume playback, press the ll button.
• If the player is left in Still mode for 5
minutes, it will stop automatically.
2 Frame Advance (Step)
While in playback mode, press the
F.ADV/STEP button on the remote control to
advance one frame at a time.
• Audio is muted during Frame Advance mode.
• Press ll to resume normal playback.
3 Slow Motion
During playback, press the ll button to Still
the image. Then use the Search to play in
slow motion at variable speeds.
• Each press increases the slow motion
speed playback to 1/2, 1/4 or 1/8 normal
speed.
• Audio is muted during slow motion playback.
• The Search function may not operate
depending on the condition of the disc.
4 Stop/Resume
• Press the ■ button once to stop playback. To
resume the DivX/MPEG4 from the point
where the disc stopped, press the ll but-
ton.
5 Search Forward/Backward
• During play press the SEARCH button and
press again to search at faster speed (2x, 4x,
8x).
• Frame advance and slow motion operate only in the
forward direction.
Note
6 Zoom
During play, press the ZOOM button on the
remote control. Then press the OK button
• Press the /,¦/ button to select the
part of the screen you want to zoom in on,
then press the OK button. The screen will be
enlarged to twice the normal size.
01605Q_V6800_XFA_Eng2 3/20/08 5:51 PM Page 45

46 -
English
Rated voltage AC 110 - 240V, 50/60Hz
Power consumption 19 Watts
Weight 3.9Kg
General Size 430mm X 282mm X 82mm
Operating ambient temperature +5°C ~ +40°C
Installation conditions Operation position : Horizontal,
Relative humidity : Below 75%
Video input (Rear) RCA jack : 1.0Vp-p (unbalanced) 75Ω
Input Audio input (Rear) RCA jack : -8dBm, 47Kohm unbalanced
Input (Front) RCA Jack
RF out UHF 21-69 (Initial CH36)
Audio (DVD, VCR) RCA jack
Output Audio (DVD only) Digital audio out (COAXIAL, OPTICAL)
Video (DVD, VCR) RCA jack
Video (DVD only) Component out : RCA jackAudio (DVD only)
Tape format VHS type video tape
Colour system
PAL,MESECAM,NT 3.58, NTSC4.43, NTSC playback on PAL TV
VCR Tuning system I,B/G,D/K
Video S/N Above 43dB (standard recording)
Resolution Above 240 lines (standard recording)
Audio S/N Above 68dB (Hi-Fi), 39dB (Mono)
Audio frequency characteristics 20Hz - 20KHz (Hi-Fi)
Disc DVD, VCD, CD,
DVD Audio S/N 100dB
Audio dynamic range 95dB
Technical Specifications
01605Q_V6800_XFA_Eng2 3/20/08 5:51 PM Page 46

English
- 47
Troubleshooting Guide (VCR)
Before contacting the Samsung after-sales service, perform the following simple checks.
If you are unable to solve the problem after reading the below instructions, note:
•
The model and serial number on the rear of your DVD-VCR.
•
The warranty information.
•
A clear description of the problem.
Then contact your nearest SAMSUNG after-sales service.
Problem Solution
No power ◆ Check that the power plug is connected to a wall outlet.
◆ Have you pressed the STANDBY/ON button?
You cannot insert a video cassette ◆ A video cassette can only be inserted with the window
side up and the safety tab facing you.
The television programme ◆ Check the DVD-VCR aerial connections.
was not recorded ◆ Is the DVD-VCR tuner properly set?
◆ Check if the safety tab is intact on the cassette.
Timer recording was unsuccessful ◆ Was the STANDBY/ON button pressed to activate the timer?
◆ Re-check the recording start/stop time settings.
◆ If there was a power failure or interruption during timer
recording, the recording will have been cancelled.
You cannot see normal broadcasts ◆ Check the tuner or external setting. It should be on tuner.
◆ Check the TV or VCR aerial connections.
Noise bars or streaks on playback ◆ Press the
TRK (
or
)
buttons to minimize this effect.
When the
II
button is pressed ◆ A still picture may have “noise bars”, depending on the
during playback, the still picture
condition of the tape. Press the
TRK (
or
)
buttons
has severe “noise bars” streaks during slow motion to minimize this effect.
Video Head Cleaning ◆ If poor pictures appear on a variety of cassettes, the video
heads may need cleaning. This is not a common problem
and unless it appears, the heads should not be cleaned.
When cleaning the video heads, read all instructions
provided with the head cleaning cassette. Incorrect head
cleaning can permanently damage the video heads
If when tuning in your TV to the
DVD-VCR, TV does not find the Screen
or the pattern when found suffers from
interference, it may be due to the DVD-VCR
output channel clashing with the normal
TV transmissions in your area.
To prevent this you will need to change the
DVD-VCR output channel in the following way.
01605Q_V6800_XFA_Eng2 3/20/08 5:51 PM Page 47

48 -
English
Troubleshooting Guide (DVD)
The icon appears on
screen.
Disc does not play.
5.1 channel sound is not
being reproduced.
Playback mode differs
from the Setup menu
selection.
The screen ratio cannot
be changed.
No audio.
Forgot password.
If you experience other
problems.
◆ Ensure that the disc is installed with the label side facing up.
◆ Check the region number of the DVD.
◆
This DVD-VCR cannot play CD-ROMs, DVD-ROMs, etc. Insert a DVD, or a CD.
◆ 5.1 channel sound is reproduced only when the following conditions are met.:
1) The DVD-VCR is connected with the proper amplifier.
2) The disc is recorded with 5.1 channel sound.
◆ Check whether the disc being played has the “5.1 ch” mark on the outside.
◆ Check if your audio system is connected and working properly.
◆ The features or action cannot be completed at this time because:
1. The DVD’s software restricts it.
2. The DVD’s software doesn’t support the feature (e.g., angles).
3. The feature is not available at the moment.
4. You’ve requested a title or chapter number or search time that is out of
range.
◆ Some of the functions selected in the Setup menu may not work
properly if the disc is not encoded with the corresponding function.
◆ The screen ratio is fixed on your DVDs.
◆ Make sure you have selected the correct Digital Output in the Audio Options
Menu.
◆ Press STANDBY/ON with no disc in the unit. Press the
I
button on the
front panel for five seconds. Power off and on the DVD-VCR by pressing
STANDBY/ON button. The parental mode is now unlocked as indicated on the
display. You can now set your rating level and change your password to a new
number.
◆ Check the contents of the instruction book that contains the explanations
regarding the current problem and follow the procedure once again.
◆ If the problem still cannot be solved, please contact your nearest authorized
service center.
P3
P10
P31
P29~44
P29~34
P31
P29
P32~33
Problem
Solution
Page
01605Q_V6800_XFA_Eng2 3/20/08 5:51 PM Page 48

Contact SAMSUNG WORLD WIDE
If you have any questions or comments relating to Samsung products, please contact the SAMSUNG customer
care
center
.
Region Country Customer Care Center Web Site
North America
CANADA 1-800-SAMSUNG(726-7864) www.samsung.com/ca
MEXICO 01-800-SAMSUNG(726-7864) www.samsung.com
U.S.A 1-800-SAMSUNG(726-7864) www.samsung.com
Latin America
ARGENTINE 0800-333-3733 www.samsung.com/ar
BRAZIL 0800-124-421 , 4004-0000 www.samsung.com
CHILE 800-SAMSUNG(726-7864) www.samsung.com/cl
NICARAGUA 00-1800-5077267
HONDURAS 800-7919267
COSTA RICA 0-800-507-7267 www.samsung.com/latin
ECUADOR 1-800-10-7267 www.samsung.com/latin
EL SALVADOR 800-6225 www.samsung.com/latin
GUATEMALA 1-800-299-0013 www.samsung.com/latin
JAMAICA 1-800-234-7267 www.samsung.com/latin
PANAMA 800-7267 www.samsung.com/latin
PUERTO RICO 1-800-682-3180 www.samsung.com/latin
REP. DOMINICA 1-800-751-2676 www.samsung.com/latin
TRINIDAD & TOBAGO 1-800-SAMSUNG(726-7864) www.samsung.com/latin
VENEZUELA 0-800-100-5303 www.samsung.com/latin
COLOMBIA 01-8000112112 www.samsung.com.co
Europe
BELGIUM 0032 (0)2 201 24 18 www.samsung.com/be
CZECH REPUBLIC
844 000 844
Distributor pro Českou republiku:
Samsung Zrt., česka organizační složka
Vyskočilova 4, 14000 Praha 4
www.samsung.com/cz
DENMARK 70 70 19 70 www.samsung.com/dk
FINLAND 030-6227 515 www.samsung.com/fi
FRANCE
3260 SAMSUNG (
0,15/Min),
08 25 08 65 65 (
0,15/Min)
www.samsung.com
GERMANY
01805 - SAMSUNG(726-7864) ( 0,14/Min)
www.samsung.com
HUNGARY 06-80-SAMSUNG(726-7864) www.samsung.com
ITALIA 800-SAMSUNG(726-7864) www.samsung.com
LUXEMBURG 0035 (0)2 261 03 710 www.samsung.com/be
NETHERLANDS
0900-SAMSUNG(726-7864) ( 0,10/Min)
www.samsung.com/nl
NORWAY 815-56 480 www.samsung.com/no
POLAND 0 801 801 881 , 022-607-93-33 www.samsung.com/pl
PORTUGAL 80820-SAMSUNG(726-7864) www.samsung.com/pt
SLOVAKIA 0800-SAMSUNG(726-7864) www.samsung.com/sk
SPAIN 902 10 11 30 www.samsung.com
SWEDEN 0771-400 200 www.samsung.com/se
U.K 0845 SAMSUNG (7267864) www.samsung.com
EIRE 0818 717 100 www.samsung.com/ie
AUSTRIA 0800-SAMSUNG(726-7864) www.samsung.com/at
SWITZERLAND 0800-SAMSUNG(726-7864) www.samsung.com/ch
CIS
RUSSIA 8-800-555-55-55 www.samsung.com
KAZAHSTAN 8-10-800-500-55-500 www.samsung.kz
UZBEKISTAN 8-10-800-500-55-500 www.samsung.uz
KYRGYZSTAN 00-800-500-55-500
TADJIKISTAN 8-10-800-500-55-500
UKRAINE 8-800-502-0000 www.samsung.com
LITHUANIA 8-800-77777 www.samsung.lt
LATVIA 800-7267 www.samsung.com/lv
ESTONIA 800-7267 www.samsung.ee
Asia Pacifi c
AUSTRALIA 1300 362 603 www.samsung.com
NEW ZEALAND 0800SAMSUNG(726-7864) www.samsung.com/nz
CHINA 800-810-5858 , 010-6475 1880 www.samsung.com
HONG KONG 3698-4698 www.samsung.com/hk
INDIA 3030 8282 , 1800 110011 www.samsung.com
INDONESIA 0800-112-8888 www.samsung.com
JAPAN 0120-327-527 www.samsung.com/jp
MALAYSIA 1800-88-9999 www.samsung.com/my
PHILIPPINES 1800-10-SAMSUNG(726-7864) www.samsung.com/ph
SINGAPORE 1800-SAMSUNG(726-7864) www.samsung.com
THAILAND 1800-29-3232 , 02-689-3232 www.samsung.com
TAIWAN 0800-329-999 www.samsung.com/tw
VIETNAM 1 800 588 889 www.samsung.com
Middle East &
Africa
TURKEY 444 77 11 www.samsung.com
SOUTH AFRICA 0860-SAMSUNG(726-7864 ) www.samsung.com
U.A.E 800-SAMSUNG (726-7864), 8000-4726
www.samsung.com
01605Q_V6800_XFA_Eng2 3/20/08 5:51 PM Page 49

AK68-01605Q
01605Q_V6800_XFA_Eng2 3/20/08 5:51 PM Page 50

Gebruiksaanwijzing
DVD-V6800
www.samsung.com
AK68-01605Q
01605Q_V6800_XFA_NL1 3/20/08 6:14 PM Page 1

2 - Nederlands
Veiligheidsvoorschriften
De volgende afbeeldingen geven voorzorgsmaatregelen aan.
De bliksemschicht waarschuwt voor een gevaarlijke spanning in het product.
DE DVD-VCR NIET ZELF OPENMAKEN. Neem voor reparatie contact op met een erkend servicecentrum.
Stel de DVD-VCR NIET bloot aan extreme temperaturen
(onder 5°C en boven 40°C) of aan een extreme
vochtigheidsgraad (minder dan 10% en meer dan 75%).
Stel de DVD-VCR NIET bloot aan direct zonlicht.
Stel de DVD-VCR NIET bloot aan vloeistoffen.
Plaats GEEN voorwerpen op de DVD-VCR of op de
afstandsbediening.
Haal bij (dreigend) onweer de stekker uit het stopcontact en
maak de antennekabel los van de DVD-VCR.
Verwijder de batterijen en bewaar de afstandsbediening op een
droge, koele plaats als u de afstandsbediening langere tijd niet
gebruikt.
DIT APPARAAT IS NIET BEDOELD VOOR GEBRUIK IN EEN INDUSTRIËLE OMGEVING
Dit product maakt gebruik van een techniek ter bescherming van auteursrechten die op zijn beurt weer is beschermd
door methodeclaims onder bepaalde patenten in de Verenigde Staten en andere intellectuele eigendomsrechten die
in het bezit zijn van Macrovision Corporation en andere rechtmatige eigenaren.
Het gebruik van deze techniek ter bescherming van auteursrechten moet zijn goedgekeurd door Macrovision
Corporation en is uitsluitend bedoeld voor privégebruik en weergave voor een beperkt publiek, tenzij Macrovision
Corporation een andere goedkeuring heeft verleend.
Reverse engineering of demonteren is niet toegestaan.
HH
5¡C
40¡C
10% 75%
1. De hoofdstekker wordt beschouwd als een loskoppelingsapparaat en moet op ieder moment klaar voor
gebruik zijn.
2. Het apparaat moet niet worden blootgesteld aan druppels en waterspetters, en objecten gevuld met
vloeistoffen, zoals vazen, mogen niet op het apparaat geplaatst worden.
01605Q_V6800_XFA_NL1 3/20/08 6:14 PM Page 2

12Cm
8 Cm
Nederlands - 3
Aanduidingen op de disc
Disctype en kenmerken
Met deze DVD-speler kunt u de volgende soorten discs met de corresponderende logo's afspelen:
12 Cm
8 Cm
Enkelzijdig 240 min.
Dubbelzijdig 480 min.
Enkelzijdig 80 min.
Dubbelzijdig 160 min.
Audio
+
Video
- De geluids- en beeldkwaliteit van
DVD’s is uitstekend dankzij Dolby
Digital, DTS en het MPEG-2 systeem.
- U kunt verschillende scherm- en
audiofuncties selecteren via het
schermmenu.
Disctype (logo)
Opnametype Discformaat Maximale speelduur Kenmerken
DVD
12 Cm
8 Cm
74 min.
20 min.
74 min.
20 min.
Audio
Audio
+
Video
- Een cd is opgenomen als digitaal
signaal met minder vervorming en een
betere en duurzamere geluidskwaliteit.
- Video met CD-geluid, VHS-kwaliteit en
MPEG-1-compressietechnologie.
AUDIO-CD
VIDEO-CD
- GEEN CD-ROM, CD-I en DVD-ROM afspelen in deze speler! (CDG’s spelen alleen audio af, geen beelden.)
- Soms kan een CD-R,CD-RW of DVD-R, -RW, DVD+R, +RW niet worden afgespeeld. De oorzaak moet worden gezocht in het
disctype of de staat van de opname.
- De opgenomen disc wordt mogelijk niet afgespeeld omdat de weergave afhangt van de opnamesnelheid.
- Gebruik de speler niet als er twee discs tegelijkertijd zijn geladen.
~
PAL
Regiocode
PAL-kleursysteem in Australië, Nieuw-Zeeland, enzovoort.
NTSC-systeem in de Verenigde Staten, Canada, Korea, Japan, enzovoort.
Dolby Digital-disc
Stereo-disc
Disc met digitaal geluid
DTS-disc
De disc bevat een Divx softwareproduct
DIGITAL
SOUND
STEREO
NTSC
Regiocode
Zowel de DVD-VCR als de DVD’s zijn per regio gecodeerd. De regiocodes moeten overeenkomen om de
DVD te kunnen afspelen. Als de codes niet overeenkomen, kunt u de DVD niet afspelen.
De regiocode voor dit apparaat staat op de achterzijde van de speler.
01605Q_V6800_XFA_NL1 3/20/08 6:14 PM Page 3

4 - Nederlands
Inhoud
Aan de slag
Aan de slag
Veiligheidsvoorschriften . . . . . . . . . . . . . . . 2
Disctype en kenmerken . . . . . . . . . . . . . . . 3
Overzichten . . . . . . . . . . . . . . . . . . . . . . . . 5
Voorkant van de DVD-VCR (DVD-V6800) . . . . . . 5
Achterkant van de DVD-VCR(DVD-V6800) . . . . . . 5
Indicaties in het display . . . . . . . . . . . . . . . . . . . . . 5
Accessoires . . . . . . . . . . . . . . . . . . . . . . . . 6
Batterijen in de afstandsbediening plaatsen
6
De toetsen van de afstandsbediening . . . . . . . . . . 6
Aansluiten
Aansluiten
De DVD- en videorecorder op de TV
aansluiten met de RF-kabel . . . . . . . . . . . 8
De DVD - en videorecorder op de TV
aansluiten met de audio-en videokabel . . 8
De DVD- en videorecorder op de TV
aansluiten met de component-
videokabel . . . . . . . . . . . . . . . . . . . . . . . . 9
AV - ontvanger aansluitingen . . . . . . . . . . 9
Uitbreidingsapparaat aansluiten . . . . . . . . 10
Inschakelen en automatisch instellen . . . . 11
Instellen
Instellen
Uw televisie instellen voor de DVD-en
videorecorder . . . . . . . . . . . . . . . . . . . . . . 12
Vand DVD naar videorecorder kopieren . . 12
De datum en tijd instellen . . . . . . . . . . . . . 13
De menutaal instellen . . . . . . . . . . . . . . . . 13
De zenders automatisch programmeren . . 14
De zenders handmatig programmeren . . . 15
Een geprogrammeerde zender wissen . . . 16
De tabel met geprogrammeerde zenders
wijzigen . . . . . . . . . . . . . . . . . . . . . . . . . . . 16
RF OUT geluidsmodus instellen
(I-B/G-D/K) . . . . . . . . . . . . . . . . . . . . . . . . 17
Het uitvoerkanaal van de DVD-VCR . . . . . 17
V
V
ideofuncties
ideofuncties
De kleurmodus selecteren . . . . . . . . . . . . 18
NICAM . . . . . . . . . . . . . . . . . . . . . . . . . . . . 18
IPC (Intelligente beeldbesturing) . . . . . . . . 19
Automatisch uitschakelen . . . . . . . . . . . . . 19
Meldingen op het scherm . . . . . . . . . . . . . 20
Het type videocassette selecteren . . . . . . 20
Afspelen herhalen . . . . . . . . . . . . . . . . . . . 21
De opnamesnelheid selecteren . . . . . . . . 21
Een bespeelde videoband beveiligen . . . . 21
Een programma direct opnemen . . . . . . . 22
Een programma opnemen met
automatische stop . . . . . . . . . . . . . . . . . . . 22
Opnemen vanaf een andere DVD-VCR
of camcorder . . . . . . . . . . . . . . . . . . . . . . . 23
Montage bewerken gebruiken . . . . . . . . . . 23
De timerprogrammering gebruiken . . . . . . 24
Een Ingestelde opname controleren . . . . . . 25
Een ingestelde opname annuleren . . . . . . . 26
Afspelen
Afspelen
Een cassette afspelen . . . . . . . . . . . . . . . . 27
Tracking van het beeld handmatig bijstellen
27
De audio-uitvoermodus selecteren . . . . . . 27
Een cassette vertraagd afspelen . . . . . . . 27
Een passage frame voor frame afspelen . 28
Een passage op verschillende snelheden
afspelen . . . . . . . . . . . . . . . . . . . . . . . . . . . 28
Een bepaalde passage zoeken . . . . . . . . . 28
De teller gebruiken . . . . . . . . . . . . . . . . . . 30
DVD-functies
DVD-functies
De taalfuncties instellen . . . . . . . . . . . . . . 31
De geluiopties instellen . . . . . . . . . . . . . . . 33
De beeldopties instellen . . . . . . . . . . . . . . 34
Kinderslot instellen . . . . . . . . . . . . . . . . . . 35
DivX(R)-registratie . . . . . . . . . . . . . . . . . . 36
Firmware-upgrade . . . . . . . . . . . . . . . . . . . 37
Speciale afspeelfuncties . . . . . . . . . . . . . . 38
De schermfunctie gebruiken . . . . . . . . . . . 39
De beeldverhouding instellen (EZ View) . . 40
De ondertitelingstaal selecteren . . . . . . . . 41
De taal van het geluid selecteren . . . . . . . 41
De camerahoek veranderen . . . . . . . . . . . 42
Zoomen . . . . . . . . . . . . . . . . . . . . . . . . . . . 42
Bladwijzers . . . . . . . . . . . . . . . . . . . . . . . . 42
Hoofdstuk/titel herhalen . . . . . . . . . . . . . . 43
A-B herhalen . . . . . . . . . . . . . . . . . . . . . . . 43
Afspelen van MP3/WMA/CD Audio
bestanden . . . . . . . . . . . . . . . . . . . . . . . . . 44
Weergave foto-cd’s . . . . . . . . . . . . . . . . . . 45
DivX/MPEG4 afspelen . . . . . . . . . . . . . . . 47
DivX/MPEG4 speciale afspeelfuncties
. . .
47
Naslag
Naslag
Technische specificaties . . . . . . . . . . . . . . 49
Problemen oplossen (VCR) . . . . . . . . . . . 50
Problemen oplossen (DVD) . . . . . . . . . . . 51
01605Q_V6800_XFA_NL1 3/20/08 6:14 PM Page 4

Nederlands - 5
Voorkant van de DVD-VCR (DVD-V6800)
Overzichten
1. DVD-STATION
2. De toets OPEN/CLOSE <OPENEN/SLUITEN>
3. VIDEOCASSETTECOMPARTIMENT
4. De toets EJECT <UITWERPEN>
5. De toets STANDBY/ON <STAND-BY/AAN>
6. AUX VIDEO-INGANG
7. AUX AUDIO-INGANG L/R
8. DISPLAY VOORPANEEL
9. De toets PROG <PROGRAMMASELECTIE>
10. De toets DVD/VCR <DVD/VCR-SELECTIE>
11. De toets COPY
12. De toets REC <OPNEMEN>
13. De toets TERUGSPOELEN/ACHTERWAARTS
SPRINGEN
14. De toets STOPPEN
15. De toets AFSPELEN/STILZETTEN
16. De toets VOORUITSPOELEN/VOORWAARTS
SPRINGEN
Achterkant van de DVD-VCR (DVD-V6800)
Indicaties in het display
1 H t DVD t ti i ti f
6
1 2 3 4 5
1. ANTENA INPUT
2. RF OUT TO TV
3. LINE IN 1 (Audio / Video)
4. LINE OUT (Audio / Video)
5. LINE AUDIO OUT
(COMPONENT)
6. DIGITAL AUDIO OUT (COAXIAAL)
7. COMPONENT VIDEO OUT
8. DIGITAL AUDIO OUT (OPTISCH)
1. Het DVD-station is actief.
2. Er is een disc geladen.
3. De tijd, tellerpositie, resterende tijd of status
van het actieve station wordt weergegeven.
4. Er is een VHS-band geplaatst.
5. Het videostation is actief.
6. Er is een timeropname geprogrammeerd of
actief.
5 6 7 8 9 10 11 12 13 14 15 16
1 2 3 4
2 4 6 8
1 3 5 7
01605Q_V6800_XFA_NL1 3/20/08 6:14 PM Page 5

6 - Nederlands
Accessoires
Hartelijk dank voor het aanschaffen van deze
SAMSUNG DVD-VCR.
Naast de DVD-VCR treft u de volgende accessoires
in de doos aan.
Plaats of vervang de batterijen in de afstandsbediening:
• na aankoop van de DVD-VCR
• wanneer de afstandsbediening niet meer correct werkt
Schuif het klepje in de richting van de pijl om
het deksel van het batterijvak los te maken.
Het batterijvak bevindt zich aan de onderzijde
van de afstandsbediening.
1
Plaats twee batterijen (AAA, RO3 of
gelijkwaardig). Let op de juiste polariteit:
• leg de + op de batterij tegen de + in het
batterijvak van de afstandsbediening
• leg de - op de batterij tegen de - in het
batterijvak van de afstandsbediening
• Gebruik geen verschillende soorten
batterijen door elkaar (bijvoorbeeld
manganese en alkaline).
2
Plaats het deksel gelijk met de onderkant van
de afstandsbediening en schuif het dicht.
3
Batterijen in de afstandsbediening
plaatsen
1
21
5
19
18
17
16
4
23
22
24
6
26
25
10
9
7
8
29
14
28
27
13
12
11
30
15
20
2
3
De toetsen van de afstandsbediening
Afstands-
bediening
Batterijen voor de
afstandsbediening
Audio-en videokabel
Gebruiks-
aanwijzing
RF-Coaxkabel
01605Q_V6800_XFA_NL1 3/20/08 6:14 PM Page 6

Nederlands - 7
1. DVD,VCR
De DVD,Video bedienen.
2. STANDBY/ON <STAND-BY/AAN>
De afstandsbediening in- of uitschakelen.
3. Numerieke toetsen
4. TIMER
De timeropname van een programma activeren
5. REC <OPNEMEN> (
●
)
Een opname op een disc of videocassette
maken
6. SKIP <ACHTERUIT ZOEKEN> (
l¦¦
/
l
)
Een titel, hoofdstuk of track overslaan.
7. STOP (
■
)
Het afspelen stoppen.
8. AUDIO
Toegang tot verschillende geluidsfuncties op
een disc.
9. TRK
/
De tracking van het beeld handmatig afstellen
(voor een zo goed mogelijk beeld).
10. MENU
Het menu op het scherm weergeven.
11. OK/
¦¦
/
,
/
De cursor in het schermmenu bedienen en een
keuze bevestigen.
12. EZ VIEW
Het beeldformaat op een disc aanpassen.
13. DISC MENU
Een discmenu weergeven.
14. SUBTITLE <ONDERTITELING>
De ondertitelingstaal van de DVD wijzigen.
15. ANGLE <HOEK>
Toegang tot verschillende camerahoeken op
een DVD.
IPC (Intelligente beeldbesturing)
De scherpte van het beeld aanpassen.
16. INPUT SEL. <INVOERSELECTIE>
Een extern invoersignaal selecteren.
17. TV/VCR
TV of video selecteren.
18. INFO.
De huidige instelling of discstatus weergeven.
19. OPEN/CLOSE <OPENEN/SLUITEN>
De disclade en videocassettelade openen en
sluiten.
.
20. SHUTTLE
Een fragment op variabele snelheid afspelen.
21. F.ADV/STEP <BEELD-VOOR-BEELD
VOORUIT/STAP>
Een fragment beeld-voor-beeld vooruit afspelen
22. Snelheid
De opnamesnelheid selecteren..
.
23. PLAY/PAUSE (
ll
)
Het afspelen pauzeren of hervatten.
24. SEARCH <VOORUIT ZOEKEN> (
¦¦
/
)
Voor- of achteruit zoeken op een disc.
25. PROG / <PROGRAMMA>
Een tv-programma selecteren.
.
26. RETURN <TERUG>
Terugkeren naar een vorig menu.
27. ZOOM
28. CLEAR <WISSEN>
Een geprogrammeerde tv-zender wissen.
Een geprogrammeerde opname annuleren.
Een geprogrammeerde markering annuleren.
De bandteller op nul zetten.
Het normale afspelen hervatten tijdens het
herhalen afspelen.
29. MARK
Een positie markeren tijdens het afspelen van
een disc.
SEARCH <ZOEKEN>
Zoeken naar een specifiek fragment
30. MODE
REPEAT <HERHALEN>
Een titel, hoofdstuk, track of disc herhalen.
01605Q_V6800_XFA_NL1 3/20/08 6:14 PM Page 7

8 - Nederlands
1
Verwijder de antenne- of netwerkkabel uit de
televisie.
2
Sluit deze kabel achterop de DVD- en
videorecorder aan op de 75 Ω coaxiale
aansluiting.
3
Sluit de meegeleverde RF-kabel aan op het
aansluitingspunt van uw DVD- en videorecorder.
4
Sluit het andere uiteinde van de geluidskabels
aan op de juiste ingangen op de televisie.
De DVD- en videorecorder op de tv
aansluiten met de RF-kabel
Om televisieprogramma’s te ontvangen moet een
signaal worden ontvangen van een van de volgende
bronnen:
• een buitenantenne
• een binnenantenne
• een kabeltelevisienetwerk
• een satellietontvanger
Zorg ervoor dat de televisie en de DVD- en
videorecorder zijn uitgeschakeld voordat u de
kabels aansluit.
Opmerking
Opmerking
Aansluiten
TV
RF cable
Aerial cable
Aerial
2
3
4
De DVD - en videorecorder op de
tv aansluiten met de audio- en
videokabel
ANT IN
Aerial
Aerial cable
RF cable
Ongeacht het type verbinding, moet u de
meegeleverde RF-kabel altijd aansluiten.
Als de RF-kabel niet is aangesloten, is
geen beeld zichtbaar op het scherm
wanneer de DVD- en videorecorder is
uitgeschakeld.
Zorg ervoor dat de televisie en de DVD-
en videorecorder zijn uitgeschakeld
voordat u de kabels aansluit.
Yellow
Als de televisie over de juiste ingang beschikt, kunt u
met de audio/videokabel de DVD- en videorecorder
op de televisie aansluiten. Dit heeft de volgende
voordelen:
• Betere kwaliteit van geluid en beeld
• Vereenvoudigde instellingsprocedure voor de DVD-
en videorecorder
1
Sluit de RF-kabel aan.
2
Sluit één uiteinde van de audio- en videokabel
aan op de video-uitgang en de Audio
L, R-uitgang aan de achterkant van
de DVD- en videorecorder.
3
Sluit de meegeleverde RF-kabel aan op het
aansluitingspunt van uw DVD- en videorecorder.
01605Q_V6800_XFA_NL1 3/20/08 6:14 PM Page 8

Nederlands - 9
COMPONENT VIDEO IN
COMPONENT INPUT
1
2
COMPONENT VIDEO OUT
De DVD - en videorecorder op
de tv aansluiten met de
componentvideokabel
Uw TV moet progressieve-scaninvoer ondersteunen
om componentvideo te kunnen bekijken.
Voor een hoge beeldkwaliteit en nauwgezette
kleurweergave Componentvideo verdeelt het
beeldelement in zwart/wit (Y), blauw (PB) en rood
(PR)-signalen voor heldere en scherpe beelden.
1
Sluit de componentvideokabels aan op de
COMPONENT VIDEO OUT-uitgangen op de
achterkant van de DVD- en videorecorder en de
COMPONENT VIDEO IN-ingangen op de
achterzijde van de TV.
2
Sluit geluidsabels aan op de AUDIO LINE OUT-
aansluitingspunten op de achterzijde van de DVD-
en videorecorder en de AUDIO IN-ingangen op de
achterzijde van de TV.
• Take Let op de kleurcode voor het linker- en
rechterkanaal.
AV-ontvanger aansluitingen
Als u ten volle wilt kunnen genieten van het echte
bioscoopgevoel dat DVD kan bieden, kunt u uw DVD-
VCR het beste aansluiten op een volledig Surround
Sound-systeem, inclusief AV-ontvanger en zes Surround
Sound-luidsprekers.
Als uw AV-ontvanger is uitgerust met een Dolby Digital-
decoder hebt u de mogelijkheid de ingebouwde Dolby
Digital-decoder van de DVD-VCR te passeren. In dat
geval gebruikt u de digitale audio-uitgang hieronder.
1
Sluit een digitale coaxiale kabel aan tussen de
digitale audio-uitgang (Digital Audio Out) op het
paneel van de DVD-VCR en de corresponderende
digitale audio-ingangen op uw AV-ontvanger.
• Coaxiale
• Gebruik een van de beschikbare ingangen op
uw AV-ontvanger.
Digital Audio-uitgang
stekker
Naar digitale audio-ingang van een
AV-ontvanger met een Dolby MPEG2, DTS,
Digital-decoder
01605Q_V6800_XFA_NL1 3/20/08 6:14 PM Page 9

10 - Nederlands
Hiermee kunt u de DVD- en videorecorder op
andere externe apparaten aansluiten en hun uitvoer
weergeven of opnemen.
• Methode 1 : een videorecorder, Set-Top
Box (STB) of DVD-en
videorecorder aansluiten op de
AUDIO/VIDEO LINE IN
1-aansluitingspunten.
• Methode 2 : Een camcorder aansluiten op de LINE IN
2-aansluitigen.
U kunt de LINE IN 2-aansluitingen op het
voorpaneel van de DVD- en videorecorder
gebruiken. Het is mogelijk om van aangesloten
apparatuur op te nemen.
Als een ingangsbron in LINE IN 2 wordt
geplaatst terwijl er TV wordt gekeken, wordt de
ingang automatisch overgeschakeld naar LINE
IN 2.
Uitbreidingsapparaat
aansluiten
Methode 1: een videorecorder, set-top
box (STB) of DVD- en videorecorder
aansluiten op de AUDIO-VIDEO LINE IN
1-aansluitingen.
Methode 2: Een camcorder aansluiten
op de LINE IN 2-aansluitingen.
Een videorecorder of extern apparaat aansluiten op
de AUDIO/VIDEO LINE IN 1-aansluitingen van de
DVD- en videorecorder.
Het is mogelijk om van aangesloten apparatuur op
te nemen (videorecorder, STB of dvd-speler).
01605Q_V6800_XFA_NL1 3/20/08 6:14 PM Page 10

De DVD-VCR stelt zichzelf automatisch in wanneer
het apparaat voor de eerste keer op het stroomnet
wordt aangesloten.
De tv-zenders worden in het geheugen opgeslagen.
Dit proces duurt een paar minuten. Nadat de zenders
in het geheugen zijn opgeslagen is de DVD-VCR
klaar voor gebruik.
1
Sluit de RF-kabel aan zoals aangegeven op
pagina 9 (DVD-VCR aansluiten op de tv met
behulp van de RF-kabel).
2
Steek de stekker van de DVD-VCR in het
stopcontact.
• “AUTO” knippert op het op het voorpaneel.
3
Het menu Language Set (Taal instellen) wordt
geopend
4
Druk op de toets of om de gewenste taal
te selecteren en druk vervolgens op OK. Start
de automatische installatie.
Nederlands - 11
5
Start het automatisch scannen.
Het aantal zenders dat automatisch door de
DVD-VCR wordt opgeslagen, hangt af van het
aantal gevonden zenders.
6
De huidige tijd en datum worden automatisch
weergegeven.
Controleer de datum en tijd.
Indien de datum en tijd:
• niet correct zijn, raadpleegt u pagina 15.
• correct zijn, drukt u twee keer op de toets
RETURN om het menu te verlaten.
De volgende keer kunt u de DVD-VCR
meteen na het inschakelen gebruiken.
De functie "Inschakelen en automatisch
instellen” is reeds geactiveerd. U kunt deze
functie desgewenst uitschakelen. (zie "De
zenders automatisch programmeren" op
pagina 15).
Opmerking
Inschakelen en automatisch
instellen
Autom. instellen wordt gestart.
Controleer de antenne- en tv-
kabel aansluiting.
Even geduld S. V. P
SETUP
VCR
PROG
FUNC
DVD
OK
Return
Menu
SETUP
VCR
PROG
FUNC
DVD
OK
Return
Menu
SETUP
VCR
PROG
FUNC
DVD
OK
Return
Menu
Tijd Datum Jaar
12 : 00 01 / 01 2007 MA
SETUP
VCR
PROG
FUNC
DVD
OK
Return
Menu
Taal
English
Français
Deutsch
Español
Italiano
Nederlands
√
êÛÒÒÍËÈ
01605Q_V6800_XFA_NL1 3/20/08 6:14 PM Page 11

12 - Nederlands
Instellen
Uw televisie instellen voor de
DVD- en videorecorder
U moet uw televisie alleen voor de DVD- en
videorecorder instellen als u de RF-kabel gebruikt.
Als u beelden van uw DVD- en videorecorder met
een scartkabel wilt bekijken, dan moet de televisie
zijn ingesteld op de audio/videomodus (AV).
1
Zet de televisie aan.
2
Schakel de DVD- en videorecorder in door op
STANDBY/ON op de voorkant van de DVD-
videorecorder of op STANDBY/ON op de
afstandsbediening te drukken.
3
Selecteer een programmapositie op de televisie
die is gereserveerd als kanaal voor uw DVD- en
videorecorder.
4
Plaats de videoband in de DVD- en
videorecorder. Controleer of de DVD-en
videorecorder begint met het lezen van de band,
zo niet, dan drukt u op de knop II .
5
Start met een scan op uw televisie of stel de
televisie in op UHF-kanaal 36.
6
Stel de televisie af totdat de beelden en
geluiden helder zijn.
7
Wanneer het beeld en geluid perfect helder zijn,
slaat u dit kanaal op de gewenste
programmapositie op de televisie op. Dat
programma is nu gereserveerd voor gebruik met
uw DVD- en videorecorder.
Met de DVD- en videorecorder kunt u de inhoud van
een dvd naar een videoband kopiëren met een druk
op de knop COPY (Kopiëren).
Als de dvd die u probeert te kopiëren is beveiligd
tegen kopiëren, zult u deze niet naar de schijf
kunnen kopiëren. Het is niet toegestaan
Macrovision®-gecodeerde dvd’s te kopiëren.
1
Plaats de schijf die u wilt kopiëren in de dvd-
lade en sluit deze.
2
Plaats een lege VHS-videoband in de
videorecorder.
3
Druk op de knop COPY (Kopiëren) op het
voorpaneel van de DVD- en videorecorder.
•
De dvd schakelt over naar de modus Play
(Afspelen) en de videorecorder schakelt over naar
de modus Record (Opnemen).
•
Als het dvd-menu wordt geopend, moet u mogelijk
op de knop PLAY (Afspelen) drukken voordat u met
kopiëren begint.
4
Wanneer de dvd klaar is met afspelen, drukt u
op de knop VCR op de afstandsbediening en
daarna op de knop STOP om het kopiëren te
beëindigen.
• U moet het kopieerproces handmatig stop
pen als de dvd-film eindigt, anders wordt de
dvd mogelijk steeds weer opnieuw afge
speeld.
Van DVD naar videorecorder
kopiëren
01605Q_V6800_XFA_NL1 3/20/08 6:14 PM Page 12

De DVD-VCR is voorzien van een 24-uurs klok en
een kalender die wordt gebruikt om:
• de opname van een programma automatisch te
stoppen
• de DVD-VCR te programmeren om een
programma automatisch op te nemen
Stel na aankoop van de DVD-VCR de datum en tijd
in.
• De datum en tijd worden automatisch ingesteld via
het zendsignaal. Als het signaal zwak is of
echobeelden produceert, kunnen de datum en tijd
mogelijk niet automatisch worden ingesteld. In dat
geval moet u de datum en tijd handmatig instellen.
• Vergeet niet om de tijd opnieuw in te stellen bij het
begin van de zomer- en wintertijd.
1
Druk op de toets MENU.
Het menu INST wordt weergegeven.
Druk op de toets OK of .
Druk op de toets of om Klok te
selecteren.
2
Druk op de toets OK of .
Het menu Klok Instellen wordt weergegeven.
3
Druk op de toets ¦ of om het uur, de
minuten, de dag, de maand en het jaar te
selecteren.
De geselecteerde optie wordt gemarkeerd.
Druk op de toets of om de gewenste
datum of tijd in te stellen.
De dag van de week wordt automatisch
weergegeven.
Druk op de toets OK.
• Houd de toets of ingedrukt om sneller
door de waarden te bladeren.
Nederlands - 13
De menutaal instellen
1
Druk op de toets MENU .
Het menu INST wordt weergegeven.
Druk op de toets OK of .
Selecteer de optie Taal.
2
Druk nog een keer op de toets OK of .
Het menu Taalkeuze verschijnt.
3
Druk op de toets of om de gewenste taal
te selecteren. Druk op de toets OK of .
• Druck op de toets MENU om het menu
teverlaen.
De datum en tijd instellen
SETUP
VCR
PROG
FUNC
DVD
OK
Return
Menu
Tijd Datum Jaar
12 : 00 01 / 01 2007 MA
SETUP
VCR
PROG
FUNC
DVD
OK
Return
Menu
Taal
English
Français
Deutsch
Español
Italiano
Nederlands
√
êÛÒÒÍËÈ
Taal
Klok
Afstemmen
Opties
Auto Uitschakelen: Uit
Meldingen via TV : Aan
SETUP
VCR
PROG
FUNC
DVD
OK
Return
Menu
Taal
Klok
Afstemmen
Opties
Auto Uitschakelen: Uit
Meldingen via TV : Aan
SETUP
VCR
PROG
FUNC
DVD
OK
Return
Menu
01605Q_V6800_XFA_NL1 3/20/08 6:14 PM Page 13

U hoeft de zenders die u reeds automatisch hebt
ingesteld niet te programmeren (zie "Inschakelen en
automatisch instellen" op pagina 11).
De DVD-VCR bevat een ingebouwde tuner die wordt
gebruikt voor het ontvangen van televisie-uitzendingen.
De zenders die u via de tuner ontvangt, moeten wel
worden geprogrammeerd. Het programmeren kan als
volgt worden uitgevoerd:
• Inschakelen en automatisch instellen (zie pagina 11)
• Automatisch
• Handmatig (zie pagina 15)
U kunt maximaal 80 zenders opslaan.
1
Druk op de knop MENU en daarna op OK of
de knop
.
2
Druk op de knop of om Install (Installeren) te
selecteren en druk daarna op OK of de knop .
Het menu Install (Installeren) verschijnt.
3
Druk op de knop OK of . Het menu System
Selection (Systeem kiezen) verschijnt. Druk op de
knoppen / om uw systeem te selecteren.
14 - Nederlands
De zenders automatisch
programmeren
INST
DVD
VCR
PROG
FUNC
Autom. Instal.
Handmatig Instal.
TV Systeem : I
VCR Uitgang CH : CH 36
OK TERUG MENU
4
Druk op de toets OK.
Er verschijnt een melding met de tekst dat
eventuele reeds geprogrammeerde kanalen op
uw DVD-VCR worden verwijderd.
5
Druk op OK om het automatisch scannen te
starten.
Het bericht Even geduld S.V.P wordt
weergegeven.
De eerste frequentieband wordt doorzocht en
de eerste zender die wordt gevonden, wordt
getoond en vastgelegd.
De DVD-VCR zoekt vervolgens naar de tweede
zender, enzovoort.
Wanneer het automatisch scannen is voltooid,
schakelt de DVD-VCR automatisch over naar
programmanummer 1.
• Het aantal zenders dat automatisch door de
videorecorder wordt vastgelegd, hangt af van
het aantal stations dat is gevonden
(verschillend per land en afhankelijk van de
ontvangstcondities e.d.).
Wanneer het automatisch scannen is
voltooid, zijn sommige zenders wellicht
meerdere keren opgeslagen. Selecteer de
zender met de beste ontvangst en verwijder
de overbodige zenders (zie pagina 16).
Opmerking
Taal
Klok
Afstemmen
Opties
Auto Uitschakelen: Uit
Meldingen via TV : Aan
SETUP
VCR
PROG
FUNC
DVD
OK
Return
Menu
Even geduld S. V. P
SETUP
VCR
PROG
FUNC
DVD
OK
Return
Menu
Uw lijst zal verloren gaan.
Druk op OK voor vervolg
MENU voor annuleren
SETUP
VCR
PROG
FUNC
DVD
OK
Return
Menu
System - B/G
System - D/K
System - I
SETUP
VCR
PROG
FUNC
DVD
OK
Return
Menu
01605Q_V6800_XFA_NL1 3/20/08 6:14 PM Page 14

U hoeft de zenders niet handmatig te programmeren
als u ze reeds automatisch hebt geprogrammeerd.
1
Druk op de knop MENU en daarna op OK of de
knop .
2
Druk op de knop of om Install (Installeren)
te selecteren en druk daarna op de knop OK of
. Het menu Install (Installeren) verschijnt.
3
Druk op de knop of om Manual Setup
(Handmatig instellen) te selecteren en druk op
de knop OK of .
Het menu TV STATION TABLE (TV-
stationtabel) wordt geopend.
4
Druk op de knop of om het vereiste
programmanummer te selecteren.
Nederlands - 15
5
Druk op de knop om het station in te stellen.
Het menu MANUAL TUNING (Handmatig
instellen) zal worden geopend. Druk op de knop
¦ of om te beginnen met het zoeken naar
de kanalen. De frequentieband wordt gescand
en het eerste gevonden station wordt
weergegeven.
6
Druk zonodig op de toets of om FIJN, te
selecteren. Druk vervolgens op de toets
¦ of om het beeld aan te passen.
7
Druk op de toets of om NAAM te
selecteren. De zendernaam wordt automatisch
ingesteld via het zendsignaal.
• Druk op de toets om de naam te wijzigen.
De eerste letter van de naam gaat knippere
8
❉ MET DE HAND AFSTEMMEN ❉
SYS. : I
PR : - -
CH : - - -
FIJN : -
NAAM : - - - -
¦¦
OPSLAAN : OK
RETURN
Een teken
selecteren
Naar het volgende
of vorige teken
gaan
de toets of tot het gewenste
teken wordt weergegeven
(letters, cijfer of teken “ - ”)
de toets ¦ of .
U wilt... Dan drukt u op...
U wilt.. Dan drukt u op....
De weergegeven
zender opslaan
De weergegeven
zender niet
opslaan
•
Selecteer Gereed om de zender
op te slaan.
•
de toetsen of totdat de
zender (CH) is geselecteerd.
•
de toetsen ¦ of om door te
gaan met het afzoeken van de
frequentieband en de volgende
zender weergeven.
De zenders handmatig
programmeren
❉ TV ZENDER OVERZICHT ❉
PR CH NAAM SYS.
1
2
3
4
5
VERWISSEL : OK
VERPL : CLEAR RETURN
9
Herhaal deze procedure vanaf stap 4 totdat
alle gewenste zenders zijn opgeslagen.
10
Druk op de toets MENU om het menu te
verlaten.
Taal
Klok
Afstemmen
Opties
Auto Uitschakelen: Uit
Meldingen via TV : Aan
SETUP
VCR
PROG
FUNC
DVD
OK
Return
Menu
Autom. Instal.
Handmatig Instal.
TV- Systeem : I
VCR Uitgang CH : CH 36
SETUP
VCR
PROG
FUNC
DVD
OK
Return
Menu
01605Q_V6800_XFA_NL1 3/20/08 6:14 PM Page 15

U kunt de zendertabel opnieuw sorteren en de
opgeslagen zenders naar eigen voorkeur een ander
programmanummer geven.
1
Druk op de knop MENU en daarna op OK of de
knop
2
Druk op de knop of om Install (Installeren)
te selecteren en druk daarna op de knop OK of
. Het menu Install (Installeren) verschijnt.
3
Druk op de knop of om Manual Setup
(Handmatig instellen) te selecteren en druk op
de knop OK of . Het menu TV STATION
TABLE (TV-stationtabel) wordt geopend.
4
Stel het TV-station in. Het geselecteerde station
wordt tegelijkertijd op het TV-scherm
weergegeven.
5
Stel het TV-station in. Het geselecteerde station
wordt tegelijkertijd op het TV-scherm
weergegeven.
U kunt een opgeslagen tv-zender wissen:
• als u de zender niet meer nodig hebt
• als u de zender op de verkeerde programmapositie
hebt opgeslagen
1
Druk op de knop MENU en daarna op OK of de
knop .
2
Druk op de knop of om Install (Installeren) te
selecteren en druk daarna op OK of de knop .
Het menu Install (Installeren) verschijnt.
3
Druk op de knop of om Manual Setup
(Handmatig instellen) te selecteren en druk op de
knop OK of .
Het menu TV STATION TABLE (TV-stationtabel)
wordt geopend.
4
Druk op de knop of om het vereiste vooraf
ingestelde TV-station te selecteren. Druk op de
knop CLEAR (Wissen) om te wissen. Druk op de
knop of om te selecteren.
5
Herhaal deze procedure vanaf stap 4 totdat alle
gewenste zenders zijn gewist.
16 - Nederlands
Een geprogrammeerde zender
wissen
De tabel met geprogrammeerde
zenders wijzigen
INST
DVD
VCR
PROG
FUNC
Autom. Instal.
Handmatig Instal.
TV Systeem : I
VCR Uitgang CH : CH 36
OK TERUG MENU
❉ TV ZENDER OVERZICHT ❉
PR CH NAAM SYS.
1 021 - - - - I
2
3
4
5
VERWISSEL : OK
VERPL : CLEAR RETURN
❉ TV ZENDER OVERZICHT ❉
PR CH NAAM SYS.
1 021 - - - - I
2
3
4
5
VERWISSEL : OK
VERPL : CLEAR RETURN
Taal
Klok
Afstemmen
Opties
Auto Uitschakelen: Uit
Meldingen via TV : Aan
SETUP
VCR
PROG
FUNC
DVD
OK
Return
Menu
Taal
Klok
Afstemmen
Opties
Auto Uitschakelen: Uit
Meldingen via TV : Aan
SETUP
VCR
PROG
FUNC
DVD
OK
Return
Menu
01605Q_V6800_XFA_NL1 3/20/08 6:14 PM Page 16

U kunt de geluidsmodus kiezen (I,B/G of D/K) die
gebruikt wordt door de tv waarop uw DVD-VCR is
aangesloten.
1
Druk op de knop MENU en daarna op OK of de
knop
2
Druk op de knop of om Install (Installeren) te
selecteren en druk daarna op OK of de knop .
Het menu Install (Installeren) verschijnt.
3
Druk op de knop of om het TV-systeem
te selecteren en druk op de knop OK of om
I, G of K te selecteren.
Als het beeld wordt gestoord of niet kan worden
gevonden, moet het uitgangskanaal van de DVD- en
videorecorder mogelijk worden gewijzigd.
1
Druk op de knop MENU en daarna op OK of de
knop .
2
Druk op de knop of om Install (Installeren) te
selecteren en druk daarna op de knop OK of .
Het menu Install (Installeren) verschijnt.
3
Druk op de knop of om het
uitgangskanaal van de videorecorder te
selecteren.
4
Druk op de knop ¦ of om het
uitgangskanaal van de videorecorder te
selecteren.
CH21 ..CH36 ..CH69
• ruk op de knop MENU om het menu af te sluiten.
Stel daarna weer uw televisie in (zie pagina 13)
• U kunt het vereiste uitgangskanaal rechtstreeks
selecteren met de nummertoetsen.
Nederlands - 17
Het uitvoerkanaal van de
DVD-VCR instellen
RF OUT geluidsmodus
instellen (I-B/G - D/K)
6
Druk op de knop of om de gewenste
positie te selecteren en druk op de knop OK om
de positie te wisselen. Als u bijvoorbeeld een
TV-station in programma 1 naar programma 3
wilt verplaatsen.
• Druk op de knop MENU om het menu af te sluiten.
VERWISSEL : OK
VERPL : CLEAR RETURN
❉ TV ZENDER OVERZICHT ❉
PR CH NAAM SYS.
1
2
3 021 - - - - I
4
5
Taal
Klok
Afstemmen
Opties
Auto Uitschakelen: Uit
Meldingen via TV : Aan
SETUP
VCR
PROG
FUNC
DVD
OK
Return
Menu
Taal
Klok
Afstemmen
Opties
Auto Uitschakelen: Uit
Meldingen via TV : Aan
SETUP
VCR
PROG
FUNC
DVD
OK
Return
Menu
Autom. Instal.
Handmatig Instal.
TV- Systeem : I
VCR Uitgang CH : CH 36
SETUP
VCR
PROG
FUNC
DVD
OK
Return
Menu
Autom. Instal.
Handmatig Instal.
TV- Systeem : I
VCR Uitgang CH : CH 36
SETUP
VCR
PROG
FUNC
DVD
OK
Return
Menu
01605Q_V6800_XFA_NL1 3/20/08 6:14 PM Page 17

Voordat u een videoband opneemt of afspeelt, kunt u de
gewenste systeemstandaard selecteren.
Als u dat niet doet, stelt het systeem automatisch de
standaard in wanneer u AUTO selecteert.
• Bij het afspelen van een videoband wordt de standaard
automatisch geselecteerd door de DVD-VCR.
• Als u een NTSC-videoband op deze DVD-VCR wilt
afspelen, moet u het kleursysteem instellen in
overeenstemming met uw televisie. Als uw televisie
alleen het PAL-systeem ondersteunt, stelt u NTPB in.
Als u een multisysteem-tv heeft (compatibel met NTSC
4.43) stelt u NT4.43 in en kunt u NT4.43 opnemen.
1
Druk op de knop MENU en daarna op OK of de
knop .
2
Druk op de knop of om User Set
(Gebruikersinstellingen) te selecteren en druk
op de knop OK of .
Het menu User Set wordt geopend.
3
Druk op de knop OK of om het gewenste
kleursysteem te selecteren.
Auto ➝ PAL ➝ MESECAM ➝ B/W
• Auto : Bij het afspelen van een videoband
wordt de systeemstandaard automatisch
geselecteerd door de DVD-VCR.
• B/W : Zwart-wit
NICAM-programma’s zijn verdeeld in drie soorten.
NICAM Stereo, NICAM Mono en Bilingual (transmissie
in een andere taal).
NICAM-programma’s hebben standaard monogeluid.
U kunt het gewenste geluid selecteren. Zie pagina 26.
1
Druk op de knop MENU en daarna op OK of de knop
.
2
Druk op de knop of om User Set
(Gebruikersinstellingen) te selecteren en druk op
de knop OK of .
Het menu User Set wordt geopend.
3
Druk op de knop of om NICAM te
selecteren, druk daarna op de knop OK of om
On of Off te selecteren.
• Aan (voor NICAM-modus):
Normaal ingesteld op deze positie
• Uit (voor MONO-modus):
Alleen ingesteld op deze positie om het standaard
monogeluid op te nemen tijdens een NICAM-
uitzending als het stereogeluid vervormd is als
gevolg van een slechte ontvangst.
18 - Nederlands
Videofuncties
De kleurmodus selecteren
NICAM
Taal
Klok
Afstemmen
Opties
Auto Uitschakelen: Uit
Meldingen via TV : Aan
SETUP
VCR
PROG
FUNC
DVD
OK
Return
Menu
Taal
Klok
Afstemmen
Opties
Auto Uitschakelen: Uit
Meldingen via TV : Aan
SETUP
VCR
PROG
FUNC
DVD
OK
Return
Menu
Kleursysteem : Auto
NICAM : Aan
IPC : Aan
SETUP
VCR
PROG
FUNC
DVD
OK
Return
Menu
Kleursysteem : Auto
NICAM : Aan
IPC : Aan
SETUP
VCR
PROG
FUNC
DVD
OK
Return
Menu
01605Q_V6800_XFA_NL1 3/20/08 6:14 PM Page 18

Nederlands - 19
Automatisch uitschakelen
De functie Auto Uitschakelen schakelt de DVD-VCR
automatisch uit als er geen signaal wordt ontvangen en
u geen toets indrukt gedurende de geselecteerde tijd.
1
Druk op de knop MENU en daarna op de knop
OK of .
2
Druk op de knop of om Auto Power Off
(Automatisch uitschakelen) te selecteren.
3
Druk op de toets OK of om de
geprogrammeerde interval te selecteren in
stappen van één uur.
➝ Uit ➝ 1 Uur ➝ 2 Uur ➝ 3 Uur
IPC
(Intelligentebeeldbesturing)
Met deze functie kunt u de scherpte van het beeld
automatisch instellen op uw eigen voorkeur.
1
Druk tijdens het afspelen op de knop MENU en
druk daarna op de knop OK of .
2
Druk op de knop of om User Set te
selecteren en druk op de knop OK of .
Het menu User Set wordt geopend.
3
Druk op de knop of om IPC (Intelligent
Picture Control) te selecteren en druk daarna
op de Knop OK of .
• U kunt de modus eenvoudig selecteren door
op de knop IPC te drukken
4
Om de scherpte handmatig aan te passen,
drukt u op de knop om de IPC-modus uit te
schakelen.
De scherpte van het beeld wordt handmatig
aangepast.
Druk op de knoppen ¦ of totdat het beeld
volgens uw voorkeuren wordt weergegeven.
❉ ❉ PICTURE ❉ ❉
IPC : OFF
SOFTEN SHARPEN
¦
ON/OFF:
❉
Taal
Klok
Afstemmen
Opties
Auto Uitschakelen: Uit
Meldingen via TV : Aan
SETUP
VCR
PROG
FUNC
DVD
OK
Return
Menu
Taal
Klok
Afstemmen
Opties
Auto Uitschakelen: Uit
Meldingen via TV : Aan
SETUP
VCR
PROG
FUNC
DVD
OK
Return
Menu
Kleursysteem : Auto
NICAM : Aan
IPC : Aan
SETUP
VCR
PROG
FUNC
DVD
OK
Return
Menu
01605Q_V6800_XFA_NL1 3/20/08 6:14 PM Page 19

20 - Nederlands
Meldingen op het scherm
Uw DVD- en videorecorder geeft de meeste informatie
weer op zowel de DVD- en videorecorder als de
televisie.
U kunt deze informatie laten weergeven of verbergen op
het televisiescherm. (Als u de berichten op het scherm
uitschakelt, zullen de berichten voor Fast Forward
(Vooruitspoelen) en Rewind (Terugspoelen) niet op het
scherm worden weergegeven. Het bericht Search
(Zoeken) zal echter niet op het scherm worden
weergegeven, ongeacht de instellingen hiervoor).
1
Druk op de knop MENU en daarna op de knop
OK of .
2
Druk op de knop of om Screen
Messages (Berichten op het scherm) te
selecteren.
3
Druk op de toets OK of om Aan of Uit te
selecteren.
• Aan : De informatie wordt op het televisiescherm
weergegeven.
• Uit : De informatie wordt niet op het
televisiescherm weergegeven.
Het type videocassette
selecteren
Als u de bandteller wilt gebruiken om de resterende tijd
op een videoband weer te geven, dient u aan te geven
welk type videocassette u gebruikt.
1
Druk op de toets MENU .
Druk op de toets of om VCR te selecteren.
Het menu VCR Functies Instellen wordt
weergegeven.
2
Druk op de toets OK of .
De optie Tape Lengte is geselecteerd.
Druk op de toets OK of om de juiste lengte te
selecteren.
➝ E180 ➝ E240 ➝ E260 ➝ E300
SETUP
DVD
VCR
PROG
FUNC
Tape Lengte : E180
Herhalen : Uit
OK Return Menu
SETUP
DVD
VCR
PROG
FUNC
Tape Lengte : E180
Herhalen : Uit
OK Return Menu
Taal
Klok
Afstemmen
Opties
Auto Uitschakelen: Uit
Meldingen via TV : Aan
SETUP
VCR
PROG
FUNC
DVD
OK
Return
Menu
Taal
Klok
Afstemmen
Opties
Auto Uitschakelen: Uit
Meldingen via TV : Aan
SETUP
VCR
PROG
FUNC
DVD
OK
Return
Menu
01605Q_V6800_XFA_NL1 3/20/08 6:14 PM Page 20

Nederlands - 21
De opnamesnelheid
selecteren
U kunt kiezen uit twee verschillende opnamesnelheden:
• SP (Standard Play)
• LP (Long Play)
In de stand Long Play:
• kunt u twee maal zoveel op een videoband opnemen
iets lager
• is de opnamekwaliteit iets slechter
1
Druk op de toets SPEED om SP of LP te
selecteren.
Type Opnametijd (in SP)
E180 180 min. of 3 uur
E240 240 min. of 4 uur
E260 260 min. of 4 uur en 20 mins.
E300 300 min. of 5 uur
Een bespeelde videoband
beveiligen
Een videocassette is voorzien van een veiligheidslipje
waarmee wordt voorkomen dat de videoband per
ongeluk wordt gewist. Wanneer het lipje is verwijderd,
kunt u op deze videocassette niet opnieuw opnemen.
1
Als u een cassette wilt beveiligen, breekt u het lipje
af met behulp van een kleine schroevendraaier.
2
Als u toch opnieuw wilt opnemen op een
beveiligde videocassette (met afgebroken lipje),
dekt u de opening af met plakband.
Afspelen herhalen
Het afspelen van een videoband kan continu van het
begin tot het eind worden herhaald.
1
Druk op de toets MENU.
Druk op de toets of om VCR te selecteren.
Het menu VCR Functies Instellen wordt
weergegeven.
2
Druk op de toets OK of
.
Druk op de toets of om Herhalen te
selecteren.
Druk op de toets OK of om Aan of Uit te
selecteren.
SETUP
DVD
VCR
PROG
FUNC
Tape Lengte : E180
Herhalen : Uit
OK Return Menu
SETUP
DVD
VCR
PROG
FUNC
Tape Lengte : E180
Herhalen : Uit
OK Return Menu
• On (Aan): afspelen herhalen.
• Off (Uit) : afspelen niet herhalen.
01605Q_V6800_XFA_NL1 3/20/08 6:14 PM Page 21

22 - Nederlands
Een programma direct
opnemen
U kunt alleen een programma opnemen als de
corresponderende zender is geprogrammeerd (tenzij u
opneemt via een externe videobron). Zie pagina 16 en
17 voor meer informatie over het programmeren van
zenders.
1
Schakel de televisie in.
2
Plaats de videocassette waarop u het programma
wilt opnemen in het apparaat. Controleer of het
venster zichtbaar is, het veiligheidslipje intact is of
eventueel met plakband is afgedekt.
De DVD-VCR wordt automatisch ingeschakeld.
3
Druk op de toets of van PROG om de juiste
zender te selecteren. Druk voor een
satellietontvanger of externe videobron op de toets
INPUT SEL. om de bron (LINE IN 1,LINE IN 2) te
selecteren.
Het zendernummer wordt weergegeven en u kunt
het programma op de televisie zien.
4
Selecteer de opnamesnelheid door net zo vaak op
de toets SPEED te drukken als nodig is (zie
pagina 21).
5
Houd de toets REC (
●
) even ingedrukt om de
opname te starten.
De opname-indicatie verschijnt op het televisiescherm
en in het display van de DVD-VCR. Er wordt een
markering op de videoband gezet (zie pagina 27).
6
Druk één keer op de toets
■
om de opname te
stoppen.
• Als de videocassette wordt uitgeworpen bij het
starten van de opname, controleer dan of het
veiligheidslipje nog intact is of dat de opening (die
is ontstaan door het afbreken van het lipje) met
plakband is bedekt.
• De band wordt automatisch teruggespoeld als
tijdens de opname het einde van de band wordt
bereikt.
Een programma opnemen met
automatische stop
Met deze functie kunt u maximaal negen uur (LP)
programma’s opnemen.
De DVD-VCR stopt automatisch na de gewenste tijdsduur.
• Deze functie is niet beschikbaar bij DVD-opnamen
1
Schakel de televisie in.
2
Plaats de videocassette waarop u het programma
wilt opnemen in het apparaat. Controleer of het
venster zichtbaar is, het veiligheidslipje intact is of
eventueel met plakband is afgedekt.
De DVD-VCR wordt automatisch ingeschakeld.
3
Druk op de toets of van PROG om de juiste
zender te selecteren. Druk voor een satellietont-
vanger of externe videobron op de toets INPUT
SEL. om de bron (LINE IN 1,LINE IN 2) te
selecteren.
Het zendernummer wordt weergegeven en u kunt
het programma op de televisie zien.
4
Selecteer de opnamesnelheid door net zo vaak op
de toets SPEED te drukken als nodig is (zie
pagina 21).
5
Houd de toets REC (
●
) even ingedrukt om de
opname te starten.
De opname-indicatie verschijnt op het
televisiescherm en in het display van de DVD-
VCR. Er wordt een markering op de videoband
gezet (zie pagina 27).
6
Druk een aantal keer op de toets REC (
●
) om de
opnametijd te verlengen:
• elke keer dat u op de toets drukt, neemt de
opnametijd in stappen van dertig minuten toe tot
maximaal vier uur
• daarna in stappen van één uur tot maximaal
negen uur
De lengte van de opnametijd wordt weergegeven
op het televisiescherm.Het geselecteerde
programma wordt opgenomen gedurende de
gewenste tijdsperiode. Zodra deze tijd is verlopen,
wordt de opname automatisch stopgezet en wordt
de DVD-VCR uitgeschakeld.
7
Als u de opname wilt annuleren voordat de
opgegeven tijd verstreken is, drukt u op de toets
STANDBY/ON.
• Als tijdens de opname het einde van de band
wordt bereikt, wordt de opname gestopt en het
apparaat uitgeschakeld.
LENGTE 2:30
KIES LENGTE :
DRUK REC
●
01605Q_V6800_XFA_NL1 3/20/08 6:15 PM Page 22

Nederlands - 23
Montage bewerken gebruiken
Met deze functie kunt u een nieuwe opname starten op
een bepaalde positie op de band met een soepele
overgang tussen de scènes.
1
Plaats de te bewerken cassette in de DVD-VCR.
2
Druk op de toets ll om met afspelen te
beginnen.
3
Druk op de toets ll zodra u het punt hebt bereikt
waar u de nieuwe opname wilt starten.
4
Druk zo vaak als nodig op de toets F.ADV/STEP
totdat u de precieze opnamepositie hebt
gevonden.
5
Houd, terwijl de DVD-VCR zich in de stand Still
bevindt, de toets REC (
●
) enige tijd ingedrukt om
de functie Montage bewerken te activeren.
6
Selecteer de bron vanwaar u wilt opnemen door
middel van:
• De toets PROG of voor televisiekanalen
• De toets INPUT SEL. voor de ingangsbronnen
LINE IN1 , LINE IN 2.
7
Druk op de toets ll om met opnemen te
beginnen.
Wanneer u klaar bent met opnemen, drukt u op de
toets
■
.
Opnemen vanaf een andere
DVD-VCR of camcorder
U kunt cassettes van een andere bron, bijvoorbeeld een
andere videorecorder of een camcorder, kopiëren naar
uw DVD-VCR.
• Het in enige vorm kopiëren of opnieuw opnemen van
eerder opgenomen cassettes zonder toestemming van
de eigenaren van het bijbehorende auteursrecht wordt
beschouwd als een overtreding van de wetten op het
gebied van het auteursrecht.
1
Sluit de DVD-VCR vanwaar u de cassette gaat
kopiëren aan op de juiste LINE IN 1 OF LINE IN 2
audio- en video-ingangen aan de achterkant van
de DVD-VCR.
2
Plaats een lege cassette in de DVD-VCR.
3
Plaats de eerder opgenomen cassette in de
andere videobron (videorecorder of camcorder
etc).
4
Druk op de toets INPUT SEL. om de juiste ingang
te selecteren op de DVD-VCR:
• LINE IN 1, LINE IN 2 voor de AV-ingang
5
Speel de cassette af die u wilt kopiëren.
6
Houd de toets REC (
●
) enige tijd ingedrukt om de
opname op de DVD-VCR te starten.
7
Als u klaar bent met opnemen, drukt u de toets
■
in op de videorecorder of Camcorder en op de
DVD-VCR.
• Als u de gekopieerde cassette wilt bekijken, moet
de DVD-VCR op de normale manier op de
televisie worden aangesloten (zie pagina 8 voor
meer informatie).
01605Q_V6800_XFA_NL1 3/20/08 6:15 PM Page 23

24 - Nederlands
De timerprogrammering
gebruiken
Met deze functie kunt u de DVD-VCR maximaal één
maand vooruit programmeren om een bepaald
programma op te nemen. U kunt maximaal zes
programma’s programmeren.
• Voordat u een opname programmeert, controleert u of
de datum en tijd correct zijn.
1
Druk op de toets MENU .
Druk op de toets of om PROG. te
selecteren.
Het menu Timer verschijnt.
2
Druk nog een keer op de toets OK of .
Het menu van de timerprogrammering verschijnt.
3
Druk op de toets om PR te selecteren.
Druk op de toets of om de gewenste zender
te selecteren.
• Druk op de toets INPUT SEL. om een invoerbron
te selecteren (LINE IN 1, LINE IN 2) anders dan de
tuner.
4
Druk op de toets om Day te selecteren, druk
vervolgens op de toets of om de gewenste
dag te selecteren.
• DGL : Dagelijks
• W-SU : Wekelijks op zondag
• W-MA : Wekelijks op maandag
• W-ZA : Wekelijks op zaterdag
• MA 01 : Maandag 01
SETUP
DVD
VCR
PROG
FUNC
Als u het
timerprogramma wilt
instellen, Druk op de
toets OK .
OK
Return
Menu
5
Druk op de toets om Start te selecteren.
6
Druk op de toets om Stop te selecteren.
• Druk op de toets ¦ of om het uur of de
minuten te selecteren.
• Druk op de toets of om het uur of de
minuten in te stellen.
7
Druk op de toets om Speed te selecteren.
• Druk op de toets of om de gewenste
opnamesnelheid te selecteren.
• Auto ➝ SP (Standard Play) ➝ LP (Long Play)
• Auto – Autoselectie bandsnelheid:
Deze functie vergelijkt de duur van de
timeropname met de resterende opnametijd van
de videoband. Als de videoband in de stand Auto
onvoldoende opnametijd voor de timeropname
heeft, schakelt de DVD-VCR automatisch over
naar de stand LP om het gehele programma te
kunnen opnemen.
::
::
::
::
::
::
PR Dag Start Stop Speed
OK
Return Menu
01 MA 01 13 : 25
::
::
::
::
::
::
PR Dag Start Stop Speed
OK
Return Menu
01 MA 01
::
::
::
::
::
::
PR Dag Start Stop Speed
OK
Return Menu
01 MA 01 13 : 25 19:57 SP
01605Q_V6800_XFA_NL1 3/20/08 6:15 PM Page 24

Nederlands - 25
Een ingestelde opname
controleren
U kunt uw ingestelde opnamen controleren:
• Als u klaar bent met het instellen van de DVD-VCR
• Als u vergeten bent welke programma’s u hebt
ingesteld voor opname
1
Druk op de toets MENU .
Druk op de toets of om PROG. te
selecteren.
Het menu Timer verschijnt.
2
Druk nogmaals op de toets OK of .
De lijst met ingestelde opnamen verschijnt met de
bijbehorende informatie.
3
Als u waarden wilt veranderen, selecteert u het
gewenste programma met de toets of en
herhaalt u stap 3 om 9 op pagina 24.
SETUP
DVD
VCR
PROG
FUNC
Als u het
timerprogramma wilt
instellen, Druk op de
toets OK .
OK
Return
Menu
8
Druk op de toets OK als u de programmering hebt
voltooid.
9
Druck op de toets MENU om het menu
teverlaen.
10
Druk op de toets STANDBY/ON om de timer te
activeren.
Druck op de toets MENU om het menu
teverlaen.
::
::
::
::
::
::
PR Dag Start Stop Speed
OK
Return Menu
01 MA 01 13 : 25 19:57 SP
-- -- -- --
:
-- --
:
-- --
01605Q_V6800_XFA_NL1 3/20/08 6:15 PM Page 25

26 - Nederlands
Een ingestelde opname
annuleren
U kunt programma’s annuleren:
• Als ze niet correct zijn
• Als ze niet meer nodig zijn
1
Druk op de toets MENU.
Druk op de toets of om PROG. te
selecteren.
Het menu Timer verschijnt.
2
Druk nogmaals op de toets OK of .
De lijst met ingestelde opnamen verschijnt met de
bijbehorende informatie.
3
Druk op de toets of om het programma te
selecteren dat u wilt annuleren.
Druk op de toets CLEAR.
Alle opname-informatie wordt gewist en het
programma wordt niet opgenomen.
SETUP
DVD
VCR
PROG
FUNC
Als u het
timerprogramma wilt
instellen, Druk op de
toets OK .
OK
Return
Menu
::
::
::
::
::
::
PR Dag Start Stop Speed
OK
Return Menu
-- -- -- --
:
-- --
:
-- --
01605Q_V6800_XFA_NL1 3/20/08 6:15 PM Page 26

Nederlands - 27
AFSPELEN
Een cassette afspelen
Met deze functie kunt u een eerder opgenomen
cassette afspelen.
1
Schakel de televisie en de DVD-VCR in.
2
Voer de videocassette in die u wilt afspelen. Indien
het veiligheidslipje van de band niet gebroken is,
drukt u op de toets
ll (afspelen/pauze). Anders
wordt de cassette automatisch afgespeeld.
• Wanneer de cassette is geladen, wordt de positie
van de cassette automatisch verbeterd om storing
te voorkomen (Digital Auto Tracking). Wanneer bij
het afspelen van een cassette het eind van de
band wordt bereikt, wordt deze automatisch
teruggespoeld. NTSC-banden kunnen met deze
DVD-VCR wel worden afgespeeld, maar niet
worden gebruikt voor het maken van opnamen.
3
Druk op de toets
■
(stop) om het afspelen te
beëindigen.
Druk op de toets (eject) om de cassette uit te
werpen.
Met deze functie kunt u de tracking van het beeld
handmatig bijstellen om de best mogelijke beeldkwaliteit
te verkrijgen.
Als u tijdens het afspelen ruisbalken of strepen in het
beeld ziet, stelt u de tracking handmatig bij door op de
toets TRK
of
te drukken totdat het beeld er
duidelijk en stabiel uitziet.
◆ De tracking-balk wordt weergegeven.
◆ Het beeld wordt bijgesteld.
◆ De tracking-balk verdwijnt zodra u de knop loslaat.
Tracking van het beeld
handmatig bijstellen
De audio-uitvoermodus
selecteren
U kunt de modus selecteren waarin het geluid wordt
weergegeven via de luidsprekers en de AV-uitgangen.
De volgende opties zijn beschikbaar:
Druk op de toets AUDIO op de afstandsbediening totdat
de gewenste optie wordt weergegeven.
Een cassette
vertraagd
afspelen
U kunt een cassette vertraagd afspelen.
• U hoort geen geluid als de cassette vertraagd wordt
afgespeeld.
1
Druk op:
•
De toets ll om de cassette af te spelen.
• Nogmaals op de toets
ll om het beeld stil te
zetten.
• De toets om het vertraagd afspelen te
starten.
• Zo vaak als nodig op de toets ¦¦ of om de
snelheid te verlagen of te verhogen.
• Tweemaal op de toets
ll om terug te keren
naar de normale snelheid.
2
Tijdens het vertraagd afspelen kan het beeld
storen. Druk op de toets TRK
of
om dit effect
te minimaliseren.
• Wanneer u de functie voor vertraagd afspelen
langer dan ongeveer twee minuten hebt gebruikt,
wordt de cassette verder automatisch normaal
afgespeeld ter bescherming van:
- de cassette
- de videokoppen
Optie Beschrijving
L Geluid weergeven van linker HI-FI-
kanaal.
R Geluid weergeven van rechter HI-FI-
kanaal
MIX Mix van geluid van de HiFi-kanalen en
normale kanalen.
MONO Geluid weergeven van het normale
LR Geluid weergeven va beide HIFI-stereo
kalalen.
- Bij het afspelen van HiFi-opgenomen
banden schakelt het geluid na vijf
seconden van mono om naar HiFi.
➝ L ➝ R ➝ MIX ➝ MONO ➝ LR
01605Q_V6800_XFA_NL1 3/20/08 6:15 PM Page 27

28 - Nederlands
U kunt:
• De cassette stopzetten bij een bepaald frame (beeld)
• De cassette frame voor frame afspelen
• U hoort geen geluid als er frame voor frame wordt
afgespeeld.
1
Druk op:
• De toets
ll om de cassette af te spelen.
• Nogmaals op de toets
ll om het beeld stil te
zetten.
•
F.ADV toets cassette frame voor frame afspelen
• Nogmaals op de toets ll om weer normaal af te
spelen.
• Verticale stabiliteit: Tijdens het frame voor frame
afspelen kan het beeld storen. Druk op de toets
TRK
of
om dit effect te minimaliseren.
• De functie voor vertraagd afspelen ondersteunt
het achteruit afspelen van een video niet.
Met de functie Shuttle kunt u de afspeelsnelheid
wijzigen (tot negen keer de normale snelheid).
V
oorbeeld: U wilt de techniek van een sporter beweging
voor beweging analyseren.
U vindt de functie Shuttle op de afstandsbediening.
• U hoort geen geluid als de cassette op verschillende
snelheden wordt afgespeeld.
1
Druk op:
• De toets
ll om de cassette af te spelen.
• De toets SHUTTLE (
<<) om de cassette achteruit
af te spelen.
• De toets SHUTTLE (
>>) om de cassette vooruit
af te spelen.
2
Elke keer dat u op de toets SHUTTLE drukt, wordt
de afspeelsnelheid gewijzigd, zoals aangegeven in
de volgende illustratie.
Een bepaalde passage zoeken
Elke keer dat u met deze DVD-VCR een opname maakt
op een cassette, wordt er op de band automatisch een
‘index’-markering gemaakt bij het begin van de opname.
Met de functie Zoeken kunt u snel voor- of achteruit
spoelen naar een bepaalde index en op dat punt
beginnen met afspelen.
Afhankelijk van de geselecteerde richting zijn de indices
als volgt genummerd:
• Deze DVD-VCR gebruikt een standaard indexsysteem
(VISS). Hierdoor herkent hij ook indices die door
andere videorecorders zijn gemarkeerd en hetzelfde
systeem hebben, en herkennen andere videorecorders
ook de indices van dit apparaat.
❚
Go To [0:00:00] Stop
<Ga Naar [0:00:00] Stop>
Met deze functie kunt u de tellerpositie 0:00:00 op
een cassette zoeken.
Druk op de toets CLEAR <WISSEN> op het punt
op de band waar u de teller op 0:00:00 wilt instellen.
De videorecorder spoelt snel voor- of achteruit om
de tellerpositie 0:00:00 te zoeken en stopt dan
automatisch op die positie.
1
Druk op de toets MENU .
Druk op de toets of om FUNC. te selecteren.
Het menu Functie wordt weergegeven.
Druk op de toets OK of .
Druk op de toets of om VCR Functies te
selecteren.
enz.
21 1 2
enz.
Vor.
pass.
Huidige
pass.
Volg.
pass.
➔
Een passage op verschillende
snelheden afspelen
Een passage frame voor
frame afspelen
9X 5 X 3 X
STIL- SLOW SLOW NORMALE
3 X 5 X 9 X
ACHTERUIT ACHTERUIT ACHTERUIT STAAND MOTION MOTION WEERGAVE SNELHEID SNELHEID SNELHEID
BEELD
1/10 X 1/5 X
DVD Functies
VCR Functies
SETUP
VCR
PROG
FUNC
DVD
OK
Return
Menu
01605Q_V6800_XFA_NL2 3/20/08 6:13 PM Page 28

Nederlands - 29
2
Druk op de toets OK of .
Het menu VCR Functies wordt weergegeven met
Ga Naar [0:00:00] geselecteerd.
Druk nogmaals op de toets OK of .
• Dit scherm wordt ook weergegeven als u op de
toets SEARCH drukt.
❚
Einde zoeken
Met deze functie kunt u een lege plek op een
cassette zoeken om een programma op te nemen.
De videorecorder spoelt snel vooruit om een lege
plek te zoeken en stopt dan automatisch op die
positie.
Als de videorecorder tijdens het zoeken het einde
van de band bereikt, wordt deze uitgeworpen.
1
Druk op de toets SEARCH .
Het menu VCR Functies wordt weergegeven.
Druk op de toets of om Einde
zoekopdracht te selecteren.
Druk op de toets OK of .
❚
Intro scan
1
Druk op de toets SEARCH.
Het menu VCR Functies wordt weergegeven.
Druk op de toets of om Intro Scan te
selecteren.
Druk op de toets OK of .
2
Druk, afhankelijk van de richting waarin het
gewenste programma zich bevindt, op de toets
¦¦
of
.
3
Zodra er een index-markering wordt gevonden,
speelt de DVD-VCR de band gedurende 5
seconden af, waarna verder gezocht wordt naar
de volgende index-markering.
4
Als u de band vanaf een bepaalde index wilt
bekijken, drukt u op de toets
ll
.
INTRO SCAN: ¦¦
INTRO SCAN: ¦¦
Ga Naar [0:00:00]
Einde zoekopdracht
Intro Scan
SETUP
VCR
PROG
FUNC
DVD
OK
Return
Menu
Ga Naar [0:00:00]
Einde zoekopdracht
Intro Scan
Ga Naar [0:00:00]
Einde zoekopdracht
Intro Scan
SETUP
VCR
PROG
FUNC
DVD
OK
Return
Menu
SETUP
VCR
PROG
FUNC
DVD
OK
Return
Menu
01605Q_V6800_XFA_NL2 3/20/08 6:13 PM Page 29

30 - Nederlands
❚
Zoeken op index
Met deze functie kunt u snel voor- of
achteruitspoelen naar een bepaald punt op een
band. Stel, u hebt op een band drie verschillende
programma’s opgenomen en u hebt daarna de band
teruggespoeld naar het begin. Met deze functie kunt
u door middel van de toets SEARCH direct naar het
begin van het tweede programma spoelen.
1
Druk op de toets SEARCH.
Het menu VCR Functies wordt weergegeven.
Druk op de toets of om Intro Scan te
selecteren.
Druk op de toets OK of .
2
Druk nog tweemaal op de toets ¦¦ of .
De band wordt nu direct naar het begin van het
gewenste programma gespoeld.
3
U kunt zowel vooruit (met de toets ¦¦) als
achteruit (met de toets ]) op index zoeken.
(¦¦ -20
● ●
0
● ●
+20 )
U annuleert het zoeken op index door op de toets
ll of
■
te drukken.
INDEX ZOEKEN : ¦¦ -6
De teller gebruiken
De teller:
• Geeft de verstreken tijd aan in de standen Afspelen en
Opname (in uren, minuten en seconden).
• Wordt gereset wanneer er een cassette in de
videorecorder wordt geplaatst.
• Helpt u om het begin van een passage gemakkelijk te
vinden.
• Voor een correcte berekening van de resterende tijd
dient u aan te geven welk type cassette wordt gebruikt.
1
Plaats een cassette in de DVD-VCR.
Zo zet u de teller aan het begin van een passage
op nul:
• Druk tweemaal op de toets INFO. om de teller
weer te geven.
• Druk op de toets CLEAR wanneer u de teller op
nul wilt zetten.
2
Vervolgens volgt u deze stappen:
• Begin met afspelen of opnemen.
• Druk op de toets
■
.
• Druk op de toets ¦¦ of om snel voor- of
achteruit te spoelen naar de passage waar de
teller op nul is gezet.
• Bepaalde DVD-VCR-informatie, waaronder de
teller, kan worden weergegeven op het
televisiescherm (tenzij u de modus Meldingen
op scherm hebt uitgeschakeld, zie pagina 20).
Druk op de toets INFO.:
• Eenmaal om de huidige functie,
programmanummer, opnamesnelheid, datum, tijd
en teller weer te geven.
• Tweemaal om alleen de teller weer te geven.
• Driemaal om de resterende tijd op de cassette
weer te geven.
• Viermaal om de meldingen van het scherm te
verwijderen.
0:00:00
INTRO SCAN: œœ
Ga Naar [0:00:00]
Einde zoekopdracht
Intro Scan
SETUP
VCR
PROG
FUNC
DVD
OK
Return
Menu
01605Q_V6800_XFA_NL2 3/20/08 6:13 PM Page 30

Nederlands - 31
❚
Taalkeuze geluidsspoor
1
Druk in de stopstand op de knop MENU.
Druk op de toets of om DVD te selecteren,
druk vervolgens op de toets OK of .
2
Druk op de toets OK of .
Druk op de toets of om Taal Geluid te
selecteren, druk vervolgens op de toets OK of
.
3
Druk op de toets of om de gewenste taal te
selecteren, druk vervolgens op de toets OK of
.
- Selecteer “Origineel” indien u wilt dat de
standaardtaal van de soundtrack de taal is
waarin de disk oorspronkelijk werd opgenomen.
- Indien de geselecteerde taal niet op de disk is
opgenomen, wordt de taal waarin de disk werd
opgenomen, geselecteerd.
- De taal wordt geselecteerd en op het scherm
verschijnt het menu Taal instellen weer.
- Het scherm verdwijnt als u op de toets MENU
drukt.
Disc Menutaal : English
Taal Geluid : English
Taal Ondertitels : Automatisch
Taal DivX Odertitels : Unicode
SETUP
VCR
PROG
FUNC
DVD
OK
Return
Menu
Disc Menutaal : English
Taal Geluid : English
Taal Ondertitels : Automatisch
Taal DivX Odertitels : Unicode
▲
Original
✓ English
Français
Deutsch
Español
Italiano
Nederlands
▼
SETUP
VCR
PROG
FUNC
DVD
OK
Return
Menu
Taal instellen
Geluidopties
Beeldopties
Kinderslot :
DivX(R) Registratie
SETUP
VCR
PROG
FUNC
DVD
OK
Return
Menu
DVD Functies
De taalfuncties instellen
Indien u het menu van de disc, audio en de taal van de
ondertitels vooraf instelt, worden de instellingen
automatisch ingeschakeld als u een film kijkt.
❚
Menutaal Disc
1
Druk in de stopstand op de knop MENU.
Druk op de toets of om DVD te selecteren,
druk vervolgens op de toets OK of .
2
Druk nogmaals op de toets OK of .
Druk op de toets of om Disc Menutaal te
selecteren, druk vervolgens op de toets OK of
.
3
Druk op de toets of om de gewenste taal te
selecteren, druk vervolgens op de toets OK of
.
- Indien de geselecteerde taal niet op de disk is
opgenomen, wordt de taal waarin de disk werd
opgenomen, geselecteerd.
- De taal wordt geselecteerd en op het scherm
verschijnt het menu Taal instellen (Language
Setup) weer.
- Het scherm verdwijnt als u op de toets MENU
drukt.
Disc Menutaal : English
Taal Geluid : English
Taal Ondertitels : Automatisch
Taal DivX Odertitels : Unicode
Taal instellen
Geluidopties
Beeldopties
Kinderslot :
DivX(R) Registratie
SETUP
VCR
PROG
FUNC
DVD
OK
Return
Menu
SETUP
VCR
PROG
FUNC
DVD
OK
Return
Menu
Disc Menutaal : English
Taal Geluid : English
Taal Ondertitels : Automatisch
Taal DivX Odertitels : Unicode
▲
✓ English
Français
Deutsch
Español
Italiano
Nederlands
Cesky
▼
SETUP
VCR
PROG
FUNC
DVD
OK
Return
Menu
01605Q_V6800_XFA_NL2 3/20/08 6:13 PM Page 31

32 - Nederlands
❚
Taalkeuze voor ondertiteling
1
Druk in de stopstand op de knop MENU.
Druk op de toets of om DVD te selecteren,
druk vervolgens op de toets OK of .
2
Druk op de toets OK of .
Druk op de toets of om Taal Ondertitels te
selecteren, druk vervolgens op de toets OK of
.
3
Druk op de toets of om de gewenste taal te
selecteren, druk vervolgens op de toets OK of
.
- Selecteer “Automatisch” indien u wilt dat de taal
van de ondertiteling gelijk is aan de taal die is
ingesteld voor het geluidsspoor.
- Het is mogelijk dat niet iedere disk de taal bevat
die u als eerste taal selecteert; in dat geval
gebruikt de disk de oorspronkelijke taalinstelling.
- De taal wordt geselecteerd en op het scherm
verschijnt het menu Taal instellen weer.
- Het scherm verdwijnt als u op de toets MENU
drukt.
Taal instellen
Geluidopties
Beeldopties
Kinderslot :
DivX(R) Registratie
SETUP
VCR
PROG
FUNC
DVD
OK
Return
Menu
Disc Menutaal : English
Taal Geluid : English
Taal Ondertitels : Automatisch
Taal DivX Odertitels : Unicode
SETUP
VCR
PROG
FUNC
DVD
OK
Return
Menu
Disc Menutaal : English
Taal Geluid : English
Taal Ondertitels : Automatisch
Taal DivX Odertitels : Unicode
▲
✓ Automatic
English
Français
Deutsch
Español
Italiano
Nederlands
▼
SETUP
VCR
PROG
FUNC
DVD
OK
Return
Menu
❚
Taalkeuze voor ondertiteling voor DivX
1
Druk in de stopstand op de knop MENU.
Druk op de toets of om DVD te selecteren,
druk vervolgens op de toets OK of .
2
Druk op de toets OK of .
Druk op de toets of om Taal DivX Odertitels
te selecteren, druk vervolgens op de toets OK of
.
3
Druk op de toets of om de gewenste taal te
selecteren, druk vervolgens op de toets OK of
.
- De taal wordt geselecteerd en op het scherm
verschijnt het menu Taal instellen weer.
- Het scherm verdwijnt als u op de toets MENU
drukt.
Taal instellen
Geluidopties
Beeldopties
Kinderslot :
DivX(R) Registratie
SETUP
VCR
PROG
FUNC
DVD
OK
Return
Menu
Disc Menutaal : English
Taal Geluid : English
Taal Ondertitels : Automatisch
Taal DivX Odertitels : Unicode
✓ Unicode
Cyrillic
Greek
SETUP
VCR
PROG
FUNC
DVD
OK
Return
Menu
01605Q_V6800_XFA_NL2 3/20/08 6:13 PM Page 32

Nederlands - 33
De geluidopties instellen
1
Druk in de stopstand op de knop MENU.
Druk op de toets of om DVD te selecteren,
druk vervolgens op de toets OK of .
2
Druk op de toets of om Geluidopties te
selecteren, druk vervolgens op de toets OK of
.
3
Het menu Geluidopties wordt weergegeven.
4
Druk op de toets of om het gewenste item te
selecteren.
5
Druk op de toets OK of om de gewenste optie
te selecteren.
Dolby Digitaal UIT audio : PCM
MPEG-2 Digitaal : PCM
Dynamische Compressie : Aan
PCM Codering : Aan
Taal instellen
Geluidopties
Beeldopties
Kinderslot :
DivX(R) Registratie
SETUP
VCR
PROG
FUNC
DVD
OK
Return
Menu
Taal instellen
Geluidopties
Beeldopties
Kinderslot :
DivX(R) Registratie
SETUP
VCR
PROG
FUNC
DVD
OK
Return
Menu
SETUP
VCR
PROG
FUNC
DVD
OK
Return
Menu
❚
Dolby Digitaal Uit Audio
• PCM : Converteert naar PCM (2CH) audio.
Selecteer PCM als u gebruikmaakt van
analoge audio-uitvoer.
• Bitstream : Converteert naar Dolby Digital Bitstream
(5.1CH).
Selecteer Bitstream als u gebruikmaakt
van digitale audio-uitvoer.
❚
MPEG-2 Digitaal
• PCM : Converteert naar PCM (2CH) audio.
Selecteer PCM als u gebruikmaakt van
analoge audio-uitvoer.
• Bitstream : Converteert naar MPEG-2 Digital
Bitstream (5.1CH of 7.1CH). Selecteer
Bitstream als u gebruikmaakt van digitale
audio-uitvoer.
❚
Dynamische Compressie
• Aan: Om dynamische compressie te selecteren.
• Uit: Om het standaardbereik te selecteren.
❚
PCM Codering
• Aan: Selecteer deze optie als de versterker die op de
speler is aangesloten niet 96KHz-compatibel is.
De 96KHz-signalen worden nu geconverteerd
naar 48KHZ.
• Uit: Selecteer deze optie als de versterker die op de
speler is aangesloten 96KHz-compatibel is. Alle
signalen worden nu onveranderd afgegeven.
Als u niet de juiste digitale uitvoer selecteert,
hoort u geen geluid.
Opmerking
Zelfs wanneer PCM-codering is uitgeschakeld
• Sommige disks geven alleen audiocodering af
via de digitale uitgangen.
• Het scherm verdwijnt als u op de toets MENU
drukt.
Geproduceerd onder licentie van Dolby
Laboratories. "Dolby" en het symbool met de
dubbele D zijn handelsmerken van Dolby
Laboratories.
Opmerking
01605Q_V6800_XFA_NL2 3/20/08 6:13 PM Page 33

34 - Nederlands
De beeldopties instellen
1
Druk in de stopstand op de knop MENU.
Druk op de toets of om DVD te selecteren,
druk vervolgens op de toets OK of .
2
Druk op de toets of om Beeldopties te
selecteren, druk vervolgens op de toets OK of
.
3
Druk op de toets of om
Normaal/Breedbeeld te selecteren, druk
vervolgens op de toets OK of .
Normaal / Breedbeeld : Breed
Zwarting : Uit
TV Systeem : PAL
Video Uitgang : I-SCAN
Taal instellen
Geluidopties
Beeldopties
Kinderslot :
DivX(R) Registratie
SETUP
VCR
PROG
FUNC
DVD
OK
Return
Menu
SETUP
VCR
PROG
FUNC
DVD
OK
Return
Menu
SETUP
VCR
PROG
FUNC
DVD
OK
Return
Menu
Normaal / Breedbeeld : Breed
Zwarting : Uit
TV Systeem : PAL
Video Uitgang : I-SCAN
4:3 Letter Box
4:3 Pan Scan
✓ 16:9 Breed
❚
Normaal / Breedbeeld
Afhankelijk van het type televisie dat u hebt, kunt u de
instellingen voor het beeld aanpassen (beeldformaat).
• 4:3 Letter Box :
Selecteer deze optie als u het gehele 16:9-scherm wilt
zien dat DVD biedt, ook al heeft uw TV een beeldfor-
maat van 4:3. Aan de boven- en onderkant van het
scherm ziet u zwarte balken.
• 4:3 Pan &Scan :
Selecteer deze optie voor conventionele tv’s als u het
centrale deel van het 16:9-scherm wilt zien.
(De uiterste rechter- en linkerkant van het beeld
worden afgesneden)
• 16:9 Breed :
U ziet het volledige 16:9-scherm op uw breedbeeld-
televisie.
❚
Zwarting
Hiermee past u de helderheid van het scherm aan.
(Aan/Uit)
❚
TV Systeem (TV System)
- NTSC : Bij gebruik van een NTSC-disk
• Als uw tv-systeem alleen een PAL-video-ingang heeft,
moet u “PAL” selecteren. Als u “PAL” selecteert, wordt
PAL 60 Hz uitvoer gebruikt als indeling voor Interlace-
uitvoer.
• Als uw tv-systeem alleen een NTSC-video-ingang
heeft, moet u “NTSC” selecteren.
- PAL : Bij gebruik van een PAL-disk
• Als uw tv-systeem alleen een NTSC-video-ingang
heeft, moet u “NTSC” selecteren.
• Als uw tv-systeem alleen een PAL-video-ingang heeft,
moet u “PAL” selecteren.
❚
Video Uitgang (Video Output)
Selecteer de video-uitgang.
-
I-SCAN: Selecteer deze optie als u de Component-
uitgang voor interlaced scannen (525i) wilt gebruiken.
-
P-SCAN: Selecteer deze optie als u de Component-
uitgang voor progressief scannen (525p) wilt
gebruiken.
• Als u niet binnen 10 seconden Ja of Nee (Yes/No)
hebt geselecteerd in het submenu van
Instellingen Beeld (Display Setup), wordt het
vorige menu op het scherm weergegeven.
01605Q_V6800_XFA_NL2 3/20/08 6:13 PM Page 34

Nederlands - 35
Kinderslot instellen
Het kinderslot kunt u gebruiken voor met DVD’s die
voorzien zijn van een classificatie. Zo kunt u controle
houden over het type films waarnaar uw familie kijkt.
Een disc bevat maximaal acht classificatieniveaus.
1
Druk in de stopstand op de knop MENU.
Druk op de toets of om DVD te selecteren,
druk vervolgens op de toets OK of .
Druk op de toets of om Kinderslot te
selecteren.
2
Druk op de toets OK of .
3
Druk nogmaals op de toets OK of
Voer uw toegangscode in.
- Door de standaard, wachtwoord wordt te 0000
ingestellen..
Taal instellen
Geluidopties
Beeldopties
Kinderslot :
DivX(R) Registratie
SETUP
VCR
PROG
FUNC
DVD
OK
Return
Menu
Kinderslot : Kinderen
Veranderen Toegangscode
SETUP
VCR
PROG
FUNC
DVD
OK
Return
Menu
Kinderslot : Kinderen
Veranderen Toegangscode
SETUP
VCR
PROG
FUNC
DVD
OK
Return
Menu
Geef Toegangscode
❚
Het classificatieniveau instellen
4
Druk op de toets of om Kinderslot te
selecteren, druk vervolgens op de toets OK of
.
5
Het scherm verdwijnt als u op de toets MENU
drukt. Als u bijvoorbeeld niveau 6 kiest, worden
disks van niveau 7 of 8 niet afgespeeld.
Kinderslot : Kinderen
Veranderen Toegangscode
SETUP
VCR
PROG
FUNC
DVD
OK
Return
Menu
▲
✓ Kinderen
Niveau 2
Niveau 3
Niveau 4
Niveau 5
Niveau 6
Niveau 7
▼
01605Q_V6800_XFA_NL2 3/20/08 6:13 PM Page 35

36 - Nederlands
❚
De toegangscode wijzigen
6
Druk op de toets of om Veranderen
Toegangscode te selecteren.
7
Druk op de toets OK of .
Geef Toegangscode wordt weergegeven.
Voer het wachtwoord in met behulp van de
cijfertoetsen.
Geef Nieuwe Toegangscode verschijnt. Hier
kunt u het wachtwoord bevestigen.
• Het menu DVD laten verdwijnen of terugkeren
naar het menuscherm tijdens het instellen;
Druk op de toets RETURN of ¦ .
• Als u uw toegangscode hebt vergeten,
raadpleegt u Toegangscode vergeten in het
gedeelte Problemen oplossen.
Kinderslot : Kinderen
Veranderen Toegangscode
SETUP
VCR
PROG
FUNC
DVD
OK
Return
Menu
Kinderslot : Kinderen
Veranderen Toegangscode
SETUP
VCR
PROG
FUNC
DVD
OK
Return
Menu
Geef Toegangscode
Kinderslot : Kinderen
Veranderen Toegangscode
SETUP
VCR
PROG
FUNC
DVD
OK
Return
Menu
Geef Nieuwe Toegangscode
DivX, DivX Certified, en de
bijbehorende logo's zijn
handelsmerken van
DivXNetworks, Inc en worden
gebruikt onder licentie.
DivX(R)-registratie
Voor het aanmelden van deze speler bij de Div(R) Video
On Demand-service hebt u uw registratiecode nodig. U
kunt dan video's huren en kopen die het Div(R) Video
On Demand-formaat hebben. Voor meer informatie kunt
u terecht op www.divx.com/vod.
1
Druk in de stopstand op de toets MENU.
Druk op de toets of om DVD te selecteren.
Het menu DVD Opties verschijnt.
2
Druk op de toets OK of .
Druk op de toets of om DivX(R) Registratie
te selecteren.
3
Druk op de toets OK of .
Er verschijnt een boodschap met uw
registratiecode.
Taal instellen
Geluidopties
Beeldopties
Kinderslot :
DivX(R) Registratie
SETUP
VCR
PROG
FUNC
DVD
OK
Return
Menu
Taal instellen
Geluidopties
Beeldopties
Kinderslot :
DivX(R) Registratie
SETUP
VCR
PROG
FUNC
DVD
OK
Return
Menu
SETUP
VCR
PROG
FUNC
DVD
OK
Return
Menu
DivX(R)Video on Demand
Uw registratiecode is:
HAJY648X
http://www.divx.com/vod
OK
01605Q_V6800_XFA_NL2 3/20/08 6:13 PM Page 36

Nederlands - 37
Firmware-upgrade
Lees de onderstaande informatie voordat u de
updateprocedure uitvoert.
1
De volgende voorvallen kunnen de
updateprocedure verstoren en kunnen resulteren
in permanente schade aan uw DVD+VCR.
• Loshalen van het netsnoer.
• Stroomstoring.
• Vuil of krassen op de discs.
• Openen van ladedeur tijdens de verwerking.
2
Divx-weergave ondersteunt alleen Engelse
ondertiteling.
Neem bij vragen of problemen gerust contact op
met het dichtstbijzijnde SAMSUNG Service Center.
❚
Functietabel voor DivX
• Een DivX-disc speelt mogelijk niet goed af, omdat
weergave afhankelijk is van het bestandsformaat, de
opname-omstandigheden, de opnamemethode enz.
• Een videobestand dat niet vervlochten is,
ondersteunt alleen stem of video.
• Controleer het DivX discformaat. Dit is geen fout.
• Normale werking is alleen mogelijk als de
schermgrootte 720X480 pixels of minder is
(breedte x hoogte).
• Een maximum van 65 tekens voor de titel van een
DivX-disc wordt ondersteund.
• Niet-ondersteunde titelinhoud wordt weergegeven
door middel van asterisken (*).
DivX-discs, kunnen worden onderverdeeld in
Video en Audio.
Ondersteunde CODEC- DivX3, DivX4, DivX5 (GMC 1WP)
formaten
Ondersteunde bestandsformaten *.avi, *.mpeg
Ondersteunde geluidsformaten AC3, MP3, WMA
Ondersteunde titelformaten * .SMI, * .SRT, * .SUB
❚
Een update-disc maken
Schrijf het bestand dat u hebt gedownload op een lege
CD-R, met de volgende instellingen.
1
Download het upgrade-bestand van het Download
Center op de Samsung website
(www.samsung.com).
2
Brand het bestand met behulp van uw pc op een
CD-RW.
❚
Updateprocedure
1
Open de disklade. Plaats de disk in de lade. Sluit de
lade. Het firmware upgrade-scherm verschijnt.
2
Druk op
¦¦
om Total te selecteren, en druk
vervolgens op OK.
- Halverwege het schrijven wordt de disklade
automatisch geopend. Wacht twee minuten nadat
u de disk hebt verwijderd.
- Als de update van de speler is geslaagd, wordt
de speler uit- en ingeschakeld nadat de lade
automatisch is gesloten.
- Bestandssysteem CD-ROM ISO niveau
- Tekenset ISO 9660
- Gefinaliseerd, enkele sessie
- Schrijfsnelheid laag
Opmerking
01605Q_V6800_XFA_NL2 3/20/08 6:13 PM Page 37

38 - Nederlands
Het scherm kan zonder voorafgaande
kennisgeving in een nieuwe versie worden
gewijzigd.
Opmerking
❚
Volgend/vorig nummer
Tijdens het afspelen van een DVD kunt u met de
toetsen
l
¦¦
en
l springen naar het volgende of
vorige hoofdstuk/nummer op de disc.
• Met Volgend nummer (
l) springt u naar het
volgende hoofdstuk/nummer.
• Met Vorig nummer (
l
¦¦
) springt u naar het begin van
het huidige hoofdstuk/nummer.
• Als u de toets
l
¦¦
nogmaals indrukt, springt u naar
het begin van het vorige hoofdstuk/nummer.
Beeld-voor-beeld werkt slechts in één richting.
Opmerking
Speciale afspeelfuncties
Tijdens DVD/VCD-weergave kunt u de volgende
speciale afspeelopties selecteren.
Als u weer normaal wilt afspelen, drukt u op de toets
ll .
❚
Stilstaand beeld
Druk tijdens weergave op de toets ll .
• Het beeld wordt stilgezet en het geluid wordt
uitgeschakeld.
• Als u het afspelen wilt hervatten, drukt u op de toets
ll .
• Nadat de speler 5 minuten in de stand Stilstaand beeld
heeft gestaan, wordt deze automatisch uitgeschakeld.
❚
Beeld-voor-beeld
Als u tijdens het afspelen op de toets F.ADV/STEP op
de afstandsbediening drukt, kunt u beeld-voor-beeld
laten afspelen.
• Tijdens beeld-voor-beeld afspelen wordt het geluid
uitgeschakeld.
• Als u weer normaal wilt afspelen, drukt u op de toets
ll.
❚
Vooruit/Achteruit zoeken
Tijdens het afspelen van een disc toets ¦¦ of
ingedrukt houden om met beeld vooruit/achteruit te
zoeken op een snelheid van 2X - 4X - 64X - 128X.
Als u weer op normale snelheid wilt afspelen, drukt u
op de toets ll.
• VCD/CD : 2X - 4X - 8X
❚
Vertraagd afspelen
Tijdens het afspelen kunt u op de toets ll drukken om
het beeld te vertragen. Vervolgens kunt u de toets
¦¦
en
gebruiken om op verschillende snelheden
vertraagd af te spelen.
• Telkens wanneer u deze toets indrukt wordt het
vertraagd afspelen een stap versneld, naar 1/2, 1/4 of
1/8 van de normale afspeelsnelheid.
• Tijdens vertraagd afspelen wordt het geluid
uitgeschakeld.
❚
Stoppen/Hervatten
• Druk eenmaal op de toets
■
om de weergave te
stoppen. Als u het afspelen van de DVD/VCD wilt
hervatten vanaf het punt waar het afspelen was
gestopt, drukt u op de toets ll .
• Als u het afspelen volledig wilt stoppen, drukt u
tweemaal op de toets
■
. De volgende keer dat u op
de toets ll drukt, wordt de disc weer vanaf het begin
afgespeeld.
01605Q_V6800_XFA_NL2 3/20/08 6:13 PM Page 38

Nederlands - 39
De gewenste titel openen als er meer dan
één titel op de disc staat.
Als er bijvoorbeeld meerdere films op een
DVD staan, worden alle films vermeld.
Als een disk bijvoorbeeld vier
verschillende films bevat, kunt u iedere
film als een titel beschouwen.
De meeste DVD’s zijn onderverdeeld in
hoofdstukken zodat u een bepaalde
passage snel kunt vinden.
Iedere titel op een DVD wordt gebruikelijk
verdeeld in hoofdstukken.
Film afspelen vanaf het gewenste tijdstip.
De taal van het geluidsspoor van de film.
In het voorbeeld wordt het geluidsspoor
afgespeeld in Engels 5.1CH.
Een DVD kan maximaal acht verschillende
geluidssporen bevatten.
De talen waarin ondertiteling op de disc
beschikbaar is.
U kunt de taal van de ondertiteling kiezen
of indien gewenst de ondertiteling op het
scherm uitschakelen.
Een DVD kan maximaal 32 verschillende
ondertitelingen bevatten.
Voor toegang tot de gewenste functie
Bookmark of Angle.
Sommige dvd's hebben meer hoekfuncties
dan mogelijk bij een bepaalde afbeelding.
Met de functie Bookmark kunt u
eenvoudig en snel een nummer of
hoofdstuk op een dvd vinden.
Shortcut
Note
Als het apparaat in de modus VCD 2.0 staat
(MENU ON), werkt deze functie niet. Gebruik
de toets DISC MENU in de modus VCD 2.0
om MENU ON of OFF te selecteren.
De schermfunctie gebruiken
Als u de huidige titel, het hoofdstuk en de tijdpunt wilt
bekijken, drukt u tijdens het afspelen van een DVD op
de toets INFO.
U kunt het scherm ook gebruiken om snel een titel,
hoofdstuk/nummer of tijdpunt te selecteren.
1
Druk tijdens het afspelen van een DVD op de toets
INFO. .
• Het scherm verdwijnt weer als u nogmaals op de
toets CLEAR drukt.
2
Gebruik de toets of om het gewenste item te
selecteren.
3
Druk op de toets ¦ om de gewenste instelling
te realiseren en druk vervolgens op OK.
• U kunt de cijfertoetsen van de fstandsbediening
gebruiken om direct naar een titel of hoofdstuk te
gaan, of om de weergave vanaf het gewenste
tijdstip te starten.
4
Het scherm verdwijnt weer als u nogmaals op de
toets CLEAR drukt.
01605Q_V6800_XFA_NL2 3/20/08 6:13 PM Page 39

40 - Nederlands
De beeldverhouding
instellen (EZ View)
De werking van deze functie kan verschillen afhankelijk
van het type disc.
❚
Afspelen in de normale
beeldverhoudingen (DVD)
1
Druk op de toets EZ VIEW.
• Telkens wanneer u op de toets drukt, verandert
het beeldformaat.
• De werking van de zoomfunctie kan verschillen,
afhankelijk van de scherminstelling in het eerste
DVD-menu.
• Om ervoor te zorgen dat de toets EZ VIEW het
gewenste resultaat geeft, moet u tijdens de
eerste instelling van het apparaat de juiste
beeldverhoudingen instellen.
❚
Als uw tv een beeldverhouding van
16:9 heeft
Voor discs met een beeldverhouding van
16:9
- Breed scherm
De inhoud van de DVD wordt weergegeven in een
beeldverhouding van 16:9.
- Automatisch
De ruimte boven en onder het beeld wordt
verwijderd. Wanneer u een disc met een
beeldverhouding van 2.35:1 afspeelt, verdwijnen de
zwarte balken aan de boven- en onderkant van het
scherm. Het beeld ziet eruit alsof het verticaal is
uitgerekt. (Afhankelijk van het type disc verdwijnen
de zwarte balken mogelijk niet helemaal)
- Zoom Aanpassen
De randen aan de boven-, onder-, linker- en
rechterkant van het scherm worden afgesneden en
het middelste gedeelte van het scherm wordt
uitvergroot.
Voor discs met een beeldverhouding van 4:3
- Normaal 4:3
De inhoud van de DVD wordt weergegeven in een
beeldverhouding van 16:9. Het beeld ziet eruit alsof
het horizontaal is uitgerekt.
- Automatisch
De ruimte boven en onder het beeld wordt
verwijderd en het beeld wordt beeldvullend
weergegeven.
Het beeld ziet eruit alsof het verticaal is uitgerekt.
- Zoom Aanpassen
De randen aan de boven-, onder-, linker- en
rechterkant van het scherm worden afgesneden en
het middelste gedeelte van het scherm wordt
uitvergroot.
❚
Als uw tv een beeldverhouding van 4:3 heeft
Voor discs met een beeldverhouding
van 16:9
- 4:3 Letter Box
De inhoud van de DVD wordt weergegeven in een
beeldverhouding van 16:9. Aan de boven- en
onderkant van het scherm ziet u zwarte balken.
- 4:3 Pan-Scan
De randen aan de linker- en rechterkant van het
scherm worden afgesneden en het middelste
gedeelte van het 16:9-beeld wordt weergegeven.
- Automatisch
De ruimte boven en onder het beeld wordt
verwijderd en het beeld wordt beeldvullend
weergegeven.
Het beeld ziet eruit alsof het verticaal is uitgerekt.
- Zoom Aanpassen
De randen aan de boven-, onder-, linker- en
rechterkant van het scherm worden afgesneden en
het middelste gedeelte van het scherm wordt
uitvergroot.
Voor discs met een beeldverhouding
van 4:3
- Normaal 4:3
De inhoud van de DVD wordt weergegeven in een
beeldverhouding van 4:3.
- Automatisch
De ruimte boven en onder het beeld wordt
verwijderd en het beeld wordt beeldvullend
weergegeven.
Het beeld ziet eruit alsof het verticaal is uitgerekt.
- Zoom Aanpassen
De randen aan de boven-, onder-, linker- en
rechterkant van het scherm worden afgesneden en
het middelste gedeelte van het scherm wordt
uitvergroot.
01605Q_V6800_XFA_NL2 3/20/08 6:13 PM Page 40

Nederlands - 41
De ondertitelingstaal
selecteren
Sommige DVD's bevatten ondertiteling in een of meer
talen.
Met de toets SUBTITLE kunt u de instellingen hiervoor
snel bekijken en wijzigen.
1
Druk tijdens de weergave op de toets SUBTITLE.
2
Drukpers SUBTITLE knop op remocon herhaaldelijk om
de gewenste ondertitelingstaal.
3
Als u het pictogram SUBTITLE wilt verwijderen,
drukt u op CLEAR of RETURN.
ENG
SUBTITLE
Afhankelijk van de DVD's kunt u de gewenste
taal voor ondertiteling instellen in het Disc Menu
(Diskmenu). Druk op de toets DISC MENU.
Deze functie hangt af van de gecodeerde talen
op de disk en werkt misschien niet bij alle
DVD's.
Een DVD kan maximaal 32 verschillende
ondertitelingstalen bevatten.
Zie “De taalfuncties instellen” op pagina 31 om
iedere keer dat u een DVD afspeelt dezelfde
ondertitelingstaal weer te geven.
Opmerking
De taal van het geluid
selecteren
Op sommige DVD's zijn diverse instellingen beschikbaar
voor taal en audiosystemen, zoals Dolby Digital 5.1,
Dolby Pro Logic, of LPCM 2 Channel-audio. Met de
toets AUDIO kunt u de beschikbare opties snel bekijken
en selecteren.
1
Druk tijdens de weergave op de toets AUDIO.
Druk op de toets
¦
of
om de gewenste taal of
audio-instelling op de DVD te selecteren.
• Talen worden vermeld in de vorm van
afkortingen, bijv. ENG voor Engels.
• Druk op de toets > om stereo stereo links of
rechts te selecteren.
2
Als u het pictogram AUDIO wilt verwijderen, drukt u
op CLEAR of RETURN.
DVD
VCD
ENG
DOLBY DIGITAL 5.1CH
AUDIO
Stereo
Deze functie hangt af van de gecodeerde talen
op de disk en werkt misschien niet bij alle
DVD's.
Een DVD kan maximaal 8 verschillende
geluidstalen bevatten.
Zie “De taalfuncties instellen” op pagina 31om
iedere keer dat u een DVD afspeelt dezelfde
geluidstaal weer te geven.
Opmerking
01605Q_V6800_XFA_NL2 3/20/08 6:13 PM Page 41

42 - Nederlands
Bladwijzers
U kunt gedeelten van een DVD of VCD markeren,
zodat u deze later snel kunt terugvinden.
1
Druk tijdens de weergave op de toets MARK.
2
Druk op de toets
¦
of
om een van de drie
posities voor bladwijzers te selecteren (- - -).
Ga door met afspelen van de DVD tot u het punt
bereikt waar u de bladwijzer wilt plaatsen en druk
op de toets OK. Op de positie van de bladwijzer (-)
verschijnt een nummer (1, 2 of 3).
• Druk op de toets MARK wanneer u klaar bent.
❚
Een scène met bladwijzer herroepen
1 Druk tijdens de weergave op de toets MARK.
2 Druk op de toets
¦
of
om de bladwijzer die u wilt
verwijderen te selecteren.
3 Druk op de toets ll om de weergave te starten vanaf
de bladwijzer.
❚
Bladwijzer wissen
1 Druk tijdens de weergave op de toets MARK.
2 Druk op de toets
¦
of
om de bladwijzer die u wilt
verwijderen te selecteren.
3 Druk op de toets CLEAR om de weergave te starten
vanaf de bladwijzer.
• Druk nogmaals op de toets MARK om het
bladwijzermenu te sluiten.
U kunt tot drie scènes tegelijk van een
bladwijzer voorzien.
Als het apparaat in de modus VCD 2.0 staat
(MENU ON modus), werkt deze functie niet.
Gebruik de toets DISC MENU in de modus
VCD 2.0 om MENU ON of OFF te selecteren.
Op sommige disks werkt de bladwijzerfunctie
mogelijk niet.
Opmerking
Bij sommige dvd-films kunt u kiezen uit verschillende
camerahoeken voor dezelfde scène indien de schijf
meerdere camerahoeken bevat
.
1
Druk op de toets ANGLE (Hoek).
2
Druk op de toets
¦
of
om het camerastandpunt
te selecteren dat u wilt bekijken.
De camerahoek veranderen
Zoomen
1
Druk tijdens het afspelen of in de pauzestand op
de toets ZOOM van de afstandsbediening.Druk op
de toets OK.
2
Druk op of /
¦
of
het deel van het
scherm te selecteren waarop u wilt inzoomen.
Druk op de toets OK.
- Bij het afspelen van een DVD drukt u
herhaaldelijk op OK voor een vergroting van
achtereenvolgens 2X/4X/2X/normaal.
01605Q_V6800_XFA_NL2 3/20/08 6:13 PM Page 42

Nederlands - 43
Hoofdstuk/titel herhalen
U kunt een afzonderlijk hoofdstuk of een volledige titel
laten herhalen.
1
Druk tijdens het afspelen op de toets REPEAT om
het herhalingsmenu te openen.
De huidige herhalingsmodus wordt weergegeven.
2
Druk op de toets
¦
of
om Hoofdstuk/Titel te
selecteren.
Druk op de toets OK om het huidige
hoofdstuk/Titel te laten herhalen.
• Tijdens het afspelen van een VCD ziet u in het
menu Nummer in plaats van Hoofdstuk.
❚
Hoofdstuk/titel annuleren
1
Druk op de toets REPEAT om het herhalingsmenu
te openen.
2
Druk op de toets
¦
of
om Uit te selecteren en
druk vervolgens op de toets OK.
• Indien beschikbaar kunt u op de toets CLEAR
drukken om het herhaald afspelen te stoppen.
B
Uit
01
01 A-B
A
B
DVD
B
Uit
01
01 A-B
A
B
VCD
B
Uit
01
01 A-B
A
B
DVD
B
Uit
01
01 A-B
A
B
VCD
A-B herhalen
Met de functie A-B herhalen kunt u een bepaalde
gedeelte van een DVD/VCD of laten herhalen. Als u
deze functie wilt activeren, markeert u eerst het begin
(A) en het einde (B) van het gedeelte dat u wilt bekijken.
1
Druk op de toets REPEAT tijdens het afspelen, en
druk vervolgens op de toets
¦
of
om A- te
selecteren.
2
Druk op de toets OK aan het begin van het
gedeelte dat u wilt laten herhalen (punt A).
Nu wordt de B geselecteerd.
• De minimum duur voor een A-B fragment is 5
seconden.
B
01
Uit
01
01 A-B
B
DVD
B
01
Uit
01
01 A-B
B
VCD
Chapter Title A - BB
01
A
Uit
01
01 A-B
DVD
Chapter Title A - BB
01
A
Uit
01
01 A-B
VCD
01605Q_V6800_XFA_NL2 3/20/08 6:13 PM Page 43

44 - Nederlands
3
Druk nogmaals op de toets OK aan het einde van
het gedeelte dat u wilt laten herhalen (punt B). Het
geselecteerde gedeelte wordt doorlopend
herhaald.
❚
A-B herhalen annuleren
1
Druk op de toets REPEAT om het herhalingsmenu
te openen.
2
Druk op de toets
¦
of
om Uit te selecteren en
druk vervolgens op de toets OK.
• Indien beschikbaar kunt u op de toets CLEAR
drukken om het herhaald afspelen te stoppen.
Note
Als het apparaat in de modus VCD 2.0 staat
(MENU ON), werkt deze functie niet.
Gebruik de toets DISC MENU in de modus
VCD 2.0 om MENU ON of OFF te selecteren.
Chapter Title A - BB
01
A
Uit
01
01 A-B
DVD
Chapter Title A - BB
01
A
Uit
01
01 A-B
VCD
Afspelen van MP3/WMA/ CD AUDIO
bestanden
Als u een MP3/WMA /CD AUDIO -disc in de DVD-VCR
legt, kunt de mappen op de disc zien.
1
Druk op de toets
¦
of
, of en het
geselecteerde muziekbestand wordt afgespeeld.
•
Als een disk zowel MP3- als WMA-bestanden
bevat, kan slechts één type worden afgespeeld.
2
Druk nogmaals op de toets of ,
¦
of
om
een muziekbestand te selecteren. Druk op de
toets OK om het muziekbestand af te spelen.
❚
Repeat/willekeurige weergave
Druk op de toets REPEAT om de afspeelmodus
te wijzigen. Er zijn vier modi: Uit, Track, Map en
Willekeurig.
- Uit: Normaal afspelen
- Track: Herhaalt het huidige muziekbestand.
- Map (folder): Herhaalt de muziekbestanden
met dezelfde extensie in de huidige map.
- Willekeurig: Muziekbestanden met dezelfde
extensie worden in willekeurige volgorde
afgespeeld.
Als u het normaal afspelen wilt hervatten, drukt
u op de toets CLEAR.
Off
Stop
WMA
JPEG
MP3
MPEG4
00:00:00
OK Return
T
T
Menu
UIT
Afspelen
...
Because You
Cactus
Sad Dayu
Wonderful
Because You
00:00:23
REPEAT
OK
Return
Repeat
T
T
Uit
01605Q_V6800_XFA_NL2 3/20/08 6:13 PM Page 44

Als u een foto-cd disk (JPEG) in de DVD-VCR
plaatst, wordt de mappenlijst weergegeven.
1
Druk op de toets
¦
of
, of om de foto te
selecteren die u wilt bekijken en druk vervolgens
op de toets OK. De geselecteerde foto wordt
weergegeven.
2
Druk op de toets l¦¦ of l om de vorige of
volgende foto weer te geven.
3
Druk op de toetsen INFO om het menu dat u wilt
bekijken te selecteren en druk vervolgens op de toets
OK.
Nederlands - 45
❚
MP3/WMA op CD-R
Zie voor het afspelen van MP3/WMA op CD-R de
alle aanbevelingen voor CD-R hierboven, plus de
onderstaande opmerkingen:
Uw MP3- of WMA-bestanden zijn opgeslagen in
een ISO 9660- of JOLIET-indeling.
MP3- en WMA-bestanden die zijn opgeslagen in een
ISO 9660- of Joliet-indeling zijn compatibel met
Microsoft DOS, Microsoft Windows en Apple Mac.
Deze twee indelingen worden het meest gebruikt.
Geef uw MP3- of WMA-bestanden namen van
maximaal 8 tekens en gebruik als
bestandsextensie ".mp3"of ".wma".
Algemene notatie voor de naam: titel.mp3 of
titel.wma.Gebruik bij het samenstellen van een titel
niet meer dan 8 tekens en geen spaties of een van
de onderstaande tekens: (.,/,\,=,+).
Gebruik tijdens het opnemen van MP3-bestanden
een bitrate van minimaal 128 kbps.
De geluidskwaliteit van MP3-bestanden hangt vooral
af van de gekozen bitrate. Voor een geluidskwaliteit
die vergelijkbaar is met die van een audio-CD, hebt u
een bitrate nodig van minimaal 128 kbps en
maximaal 160 kbps. Een hogere bitrate, bijvoorbeeld
192 kbps of hoger, levert echter maar zelden een
betere geluidskwaliteit op. Bestanden met een bitrate
van minder dan 128 kbps worden daarentegen niet
correct afgespeeld.
Gebruik tijdens het opnemen van WMA-
bestanden een bitrate van minimaal 64 kbps.
De geluidskwaliteit van WMA-bestanden hangt
vooral af van de gekozen bitrate. Voor een
geluidskwaliteit die vergelijkbaar is met die van een
audio-CD, hebt u een bitrate nodig van minimaal 64
kbps en maximaal 192 kbps. Bestanden met een
bitrate van minder dan 64 kbps of meer dan 192
kbps worden daarentegen niet correct afgespeeld.
Probeer geen MP3-bestanden op te nemen die
auteursrechtelijk zijn beschermd.
Bepaalde "beveiligde" bestanden zijn gecodeerd om
illegaal kopiëren tegen te gaan. Het gaat hierbij om
de volgende bestandstypen: Windows MediaTM
(gedeponeerd handelsmerk van Microsoft Inc) en
SDMITM (gedeponeerd handelsmerk van The SDMI
Foundation). U kunt dergelijke bestanden niet
kopiëren.
Belangrijk:
Bovenstaande aanbevelingen moeten niet worden
gezien als garantie dat de DVD-speler MP3-
bestanden afspeelt of als waarborg met betrekking
tot de geluidskwaliteit. Door bepaalde technologieën
en methoden voor het opnemen van MP3-bestanden
op CD-R kunnen deze bestanden misschien niet
optimaal worden afgespeeld op de DVD-speler
(verminderde geluidskwaliteit en in sommige
gevallen problemen bij het lezen van de bestanden).
Dit apparaat kan maximaal 500 bestanden en 500
mappen per disk afspelen.
Weergave foto-cd’s
Opmerking
- Druk op de knop STOP om naar het clipsmenu
terug te keren.
- Bij het afspelen van een Kodak foto-CD, geeft
de speler niet het clipsmenu, maar de foto
direct weer.
UIT
Stop
...
00:00:00
OK Return
T
T
Menu
RETURN
01605Q_V6800_XFA_NL2 3/20/08 6:13 PM Page 45

46 - Nederlands
❚
Draaien
Druk op de toets
¦
of
om te selecteren.
Telkens wanneer u op de toets OK drukt, wordt de
foto 90 graden rechtsom gedraaid.
❚
Zoomen
Druk op de toets
¦
of
om te selecteren.
Telkens wanneer u op de toets OK drukt, wordt de
foto uitvergroot (tot 4X).
(Normaal ➝ 2X ➝ 4X ➝ Normaal)
RETURN
❚
Diashow
Druk op de toets
¦
of
om te selecteren.
Druk op de toets OK.
U ziet drie pictogrammen om het tijdsinterval te
selecteren.
Druk op de toets
¦
of
om een van deze
instellingen te selecteren. Druk op de toets OK.
Wisselen de foto's automatisch elke 6
seconden.
De foto's wisselen automatisch elke 12
seconden.
De foto's wisselen automatisch elke 18
seconden.
• Afhankelijk van de bestandsomvang kan de tijd
voor het wisselen van de foto's langer of korter
zijn dan in deze gebruiksaanwijzing wordt
aangegeven.
• Als u niet op een knop drukt, wordt de diashow
automatisch gestart en wordt elke tien
seconden een nieuwe foto weergegeven.
❚
JPEG op CD-R
• Alleen bestanden met de extensie ".jpg" of ".JPG"
kunnen worden weergegeven.
• Als de disc niet is afgesloten, duurt het langer voordat
de weergave begint en worden mogelijk niet alle
aanwezige bestanden weergegeven,
• Alleen CD-R discs met JPEG-bestanden die zijn
opgeslagen in ISO 9660- of Juliet-indeling kunnen
worden weergegeven.
• De namen van de JPEG-bestanden mogen niet langer
zijn dan 8 tekens en mogen geen spaties of de
volgende speciale tekens bevatten: (. / = +).
• Alleen multisessiediscs waarvan de sessies achter
elkaar zijn opgenomen, kunnen worden weergegeven.
Als een leeg gedeelte voorkomt op een
multisessiedisc, kunnen alleen de bestanden worden
weergegeven die voor het lege gedeelte staan.
• Tijdens het weergeven van een Kodak foto-cd worden
alleen de JPEG-bestanden in de fotomap
weergegeven.
• Andere foto-cd's dan Kodak foto-cd's worden mogelijk
langzamer of helemaal niet weergegeven.
RETURN
RETURN
TIJD:
01605Q_V6800_XFA_NL2 3/20/08 6:13 PM Page 46

Nederlands - 47
1
Als de disc wordt geplaatst, wordt de
bestandsstructuur van de disc weergegeven.
Afhankelijk van de bestandsindeling wordt een
ander pictogram weergegeven naast elk bestand.
De bestanden en worden gemarkeerd
weergegeven.
Gebruik , of
¦
,
om het filmbestand te
selecteren en druk vervolgens op OK of ll.
Resultaat
: Als het bericht 'Reading Index…' wordt
weergegeven, wacht u enkele
seconden. De film wordt vervolgens
afgespeeld.
Als het bericht "Codec niet ondersteund"
wordt weergegeven, kan het geselecteerde
bestand niet worden afgespeeld.
2
U kunt naar een specifiek tijdstip navigeren tijdens
het bekijken van de film door op de toets INFO. te
drukken.
3
Druk op om het gewenste item te selecteren.
4
Druk op de toets ¦ om de gewenste instelling
te realiseren en druk vervolgens op OK.
- U kunt de cijfertoetsen op de afstandsbediening
gebruiken om rechtstreeks naar een titel of
hoofdstuk te gaan of om de weergave te starten
vanaf het gewenste tijdstip.
5
Het scherm verdwijnt als u weer op de toets CLEAR
drukt.
6
Druk op de toets REPEAT om de afspeelmodus te
wijzigen. Er zijn 3 modi, namelijk Uit, Map (folder),
en Titel.
- Map(folder) : Herhaalt de AVI-bestanden met
dezelfde exten sie in de huidige map.
- Titel : herhaalt de titel die wordt afgespeeld.
DivX/MPEG4 afspelen
UIT
Stop
...
a01_divx51b-8
a02_divx505b-8
a03_divx502sp-8
a04_divx412-8
/MPEG4
00:00:00
OK Return
T
T
Menu
DivX/MPEG4 speciale
afspeelfuncties
Tijdens het afspelen van een DivX/MPEG4 kunt u kiezen
uit de volgende speciale afspeelopties. U kunt normaal
afspelen hervatten door op de toets ll te drukken.
1
Stilstaand beeld
Druk tijdens het afspelen op de toets ll op de
afstandsbediening.
• Het beeld wordt stilgezet en het geluid
uitgeschakeld.
• U kunt het afspelen hervatten door op de toets
ll te drukken.
• Als de speler 5 minuten lang in de pauzestand
heeft gestaan, wordt deze automatisch gestopt.
2
Beeld verder
Druk, terwijl het beeld stilstaat, op de toets l op
de afstandsbediening om beeld voor beeld vooruit
te gaan.
• Het geluid wordt uitgeschakeld.
• Druk op ll om normaal afspelen te hervatten.
3
Vertraagde weergave
Druk, tijdens het afspelen, op de toets ll om het
beeld stil te zetten. Druk vervolgens op de toets
om het beeld op verschillende snelheden
vertraagd weer te geven. Telkens wanneer u op
deze toets drukt, neemt de snelheid voor
vertraagde weergave toe tot 1/2, 1/4 of 1/8 van de
normale snelheid. Tijdens vertraagde weergave is
het geluid uitgeschakeld. Slow Motion-toetsen op
voorpaneel - Druk op de toets op het
voorpaneel om de vertraagde weergave te starten.
Druk op de toets ll om het afspelen op normale
snelheid te hervatten.
De Search (Zoek)-functie werkt mogelijk niet,
afhankelijk van de conditie van de disc.
4
Stoppen/Hervatten
Druk éénmaal op de toets n om het afspelen te
stoppen. U kunt het afspelen van de dvd hervatten
op het punt waar de disc werd gestopt, door op de
toets ll te drukken.
Beeld verder werkt alleen in voorwaartse
richting.
Opmerking
01605Q_V6800_XFA_NL2 3/20/08 6:13 PM Page 47

48 - Nederlands
5
SEARCH n druknogmaals
Druk tijdens het afspelen op SEARCH n druk
nogmaals voor een hogere zoeksnelheid. Hiermee
kunt u sneller in een AVI-bestand zoeken. 2X, 4X,
8X
6
Zoomen
Druk tijdens het afspelen of in de pauzestand op
de toets ZOOM van de afstandsbediening.Druk op
de toets OK.
Druk op of /
¦
of
het deel van het
scherm te selecteren waarop u wilt inzoomen.
Druk op de toets OK. Telkens wanneer u op de
toets OK drukt, wordt de foto uitvergroot (tot 2X).
01605Q_V6800_XFA_NL2 3/20/08 6:13 PM Page 48

Nederlands - 49
Netspanning AC 110 - 240V, 50/60Hz
Opgenomen vermogen 19 Watt
Gewicht 3,9 kg
Algemeen Formaat 430 mm X 282 mm X 82 mm
Omgevingstemperatuur +5°C ~ +40°C
Installatie-omstandigheden Plaatsing voor gebruik: horizontaal
Relatieve luchtvochtigheid lager dan 75%
Ingangen
Video-ingang (achterzijde) RCA-aansluiting
: 1,0 Vp-p (ongebalanceerd) 75 Ω
Audio-ingang (achterzijde) RCA-aansluiting : -8 dBm, 47 kΩ ongebalanceerd
Ingang (
voorkant
) RCA-stekker
RF-uit UHF 21-69
Audio (DVD, VCR) RCA-stekker
Uitgang Audio (alleen DVD) Coax, RCA-stekker,
(OPTISCH)
Video (DVD, VCR) RCA-stekker
Video (alleen DVD) Component
RGB uit: RCA-stekker
Bandsoort VHS videoband
Kleursysteem
PAL,MESECAM ,NTSC 3.58,NTSC4.43, NTSC-weergave op PAL-tv
VCR Afstemmingssysteem I,B/G, D/K
Video S/R 43 dB (standaardopname)
Resolutie 240 lijnen (standaardopname)
Audio S/R 68 dB (hifi), > 39 dB (mono)
Audio frequentiekarakteristieken 20 Hz - 20 kHz (hifi)
Disc DVD, VCD, CD
DVD Audio S/R 100dB
Audio dynamisch bereik 95dB
Technische specificaties
01605Q_V6800_XFA_NL2 3/20/08 6:13 PM Page 49

50 - Nederlands
Probleem Oplossing
Geen stroom ◆ Controleer of de stekker in het stopcontact zit.
◆ Hebt u op de knop STANDBY/ON gedrukt?
U kunt geen videocassette plaatsen ◆ Een videocassette kan alleen worden ingevoerd met het venster naar boven
en het veiligheidslipje naar u toe.
Het televisieprogramma is niet ◆ Controleer de antenne-aansluitingen van de DVD-VCR.
opgenomen ◆ Is de tuner van de DVD-VCR goed ingesteld?
◆ Controleer of het veiligheidslipje op de cassette intact is.
Opnemen met de timer is niet ◆ Hebt u de toets STANDBY/ON ingedrukt om de timer te activeren?
gelukt ◆ Controleer of u de juiste begin- en eindtijd hebt ingesteld.
◆ Als zich tijdens het opnemen een stroomstoring of -onderbreking heeft
voorgedaan, is de opname geannuleerd.
Geen of vervormd beeld tijdens het ◆ Controleer of de band wel een opname bevat.
afspelen
U kunt geen normale uitzendingen ◆ Controleer de tuner of externe instelling. Deze moet op tuner staan.
bekijken ◆ Controleer de antenne-aansluitingen van de tv of VCR.
Ruisbalken- of strepen tijdens ◆ Druk op de toets
TRK
of
om dit effect te onderdrukken.
afspelen
Wanneer u tijdens afspelen op ◆ Een stilstaand beeld kan ruisstrepen vertonen, afhankelijk van de
II
drukt, vertoont het
conditie van de band. Druk tijdens de vertraagde weergave op de
stilstaande beeld toets
TRK
of
om dit effect te onderdrukken.
aanzienlijke ruisstrepen.
Reiniging videokop ◆ Als slecht beeld voorkomt bij verschillende cassettes, kan het nodig zijn de
videokoppen te reinigen. Dit is geen alledaags probleem en de koppen
mogen alleen worden gereinigd als dit probleem zich voordoet. Lees voor
het reinigen van de videokoppen alle instructies bij de reinigingscassette.
Onoordeelkundige reiniging kan permanente schade aan de videokoppen
veroorzaken.
Problemen oplossen (VCR)
Voer de onderstaande eenvoudige controles uit voordat u contact opneemt met de technische
dienst van Samsung.
Als u het probleem niet hebt kunnen oplossen na het lezen van de bovenstaande instructies, maakt
u een notitie van:
•
Model en serienummer, vermeld op de achterzijde van uw DVD-VCR
•
De garantiegegevens
•
Een duidelijke omschrijving van het probleem
En neem vervolgens contact op met het dichtstbijzijnde SAMSUNG Service Center.
01605Q_V6800_XFA_NL2 3/20/08 6:13 PM Page 50

Nederlands - 51
Problemen oplossen (DVD)
Disc wordt niet afgespeeld.
5.1 channel-geluid wordt
niet weergegeven.
Het pictogram wordt
op het scherm
weergegeven.
De afspeelmodus wijkt af
van de selectie in het
Instellingenmenu.
De beeldschermverhoudingen
kunnen niet worden
gewijzigd.
Geen audio.
Toegangscode vergeten.
Hebt u andere problemen?
◆ Controleer of het etiket van de disc aan de bovenzijde zit.
◆ Controleer het regionummer van de DVD.
◆ Deze speler kan geen CD-ROM, DVD-ROM, enzovoort afspelen.
Plaats een DVD of CD.
◆ 5.1-kanaals geluid wordt alleen weergegeven als aan de volgende
voorwaarden wordt voldaan:
1) De DVD/VCR-speler is aangesloten op een geschikte versterker
2) De disc is opgenomen met 5.1 channel-geluid.
◆ Controleer of aan de buitenzijde van de disc die wordt afgespeeld,
"5.1 ch" wordt vermeld.
◆ Controleer of uw audiosysteem is aangesloten en goed werkt.
◆ De functies of actie zijn momenteel niet mogelijk omdat:
1. De software van de DVD dit beperkt.
2. De software van de DVD de functie niet ondersteunt
(bijvoorbeeld camerastandpunten). .
3. De functie momenteel niet beschikbaar is.
4. U een titel, hoofdstuknummer of zoektijd hebt gevraagd buiten
het toegestane bereik.
◆ Een aantal functies die in het Instellingenmenu zijn geselecteerd,
werken niet goed indien de disc niet met de overeenkomstige
functie is gecodeerd.
◆ De beeldschermverhoudingen zijn vastgesteld op de DVD.
◆ Controleer of u de juiste digitale uitgang hebt geselecteerd in het
menu Geluidopties.
◆ Druk op STANDBY/ON uit te voeren zonder disc in het apparaat.
Druk de toetsen
l
op het voorpaneel vijf seconden lang
gelijktijdig in. POWER de DVD-VCR uit en weer aan met de toets
STANDBY/ON. Het kinderslot wordt nu ontgrendeld (zoals op het
scherm wordt vermeld). U kunt nu het classificatieniveau instellen
en een nieuwe toegangscode instellen.
◆ Ga naar de Inhoud en zoek het hoofdstuk waarin toelichting wordt
gegeven op het probleem. Herhaal de procedure.
◆ Als u het probleem nog niet kunt oplossen, neem dan contact op
met een erkend servicecentrum in uw omgeving.
Probleem
Oplossing
Pagina
P3
P9
P33
P31~49
P31~36
P34
P33
P35~36
01605Q_V6800_XFA_NL2 3/20/08 6:13 PM Page 51

Region Country Customer Care Center Web Site
North America
CANADA 1-800-SAMSUNG(726-7864) www.samsung.com/ca
MEXICO 01-800-SAMSUNG(726-7864) www.samsung.com
U.S.A 1-800-SAMSUNG(726-7864) www.samsung.com
Latin America
ARGENTINE 0800-333-3733 www.samsung.com/ar
BRAZIL 0800-124-421 , 4004-0000 www.samsung.com
CHILE 800-SAMSUNG(726-7864) www.samsung.com/cl
NICARAGUA 00-1800-5077267
HONDURAS 800-7919267
COSTA RICA 0-800-507-7267 www.samsung.com/latin
ECUADOR 1-800-10-7267 www.samsung.com/latin
EL SALVADOR 800-6225 www.samsung.com/latin
GUATEMALA 1-800-299-0013 www.samsung.com/latin
JAMAICA 1-800-234-7267 www.samsung.com/latin
PANAMA 800-7267 www.samsung.com/latin
PUERTO RICO 1-800-682-3180 www.samsung.com/latin
REP. DOMINICA 1-800-751-2676 www.samsung.com/latin
TRINIDAD & TOBAGO 1-800-SAMSUNG(726-7864) www.samsung.com/latin
VENEZUELA 0-800-100-5303 www.samsung.com/latin
COLOMBIA 01-8000112112 www.samsung.com.co
Europe
BELGIUM 0032 (0)2 201 24 18 www.samsung.com/be
CZECH REPUBLIC
844 000 844
Distributor pro Českou republiku:
Samsung Zrt., česka organizační složka
Vyskočilova 4, 14000 Praha 4
www.samsung.com/cz
DENMARK 70 70 19 70 www.samsung.com/dk
FINLAND 030-6227 515 www.samsung.com/fi
FRANCE
3260 SAMSUNG (
0,15/Min),
08 25 08 65 65 (
0,15/Min)
www.samsung.com
GERMANY
01805 - SAMSUNG(726-7864) ( 0,14/Min)
www.samsung.com
HUNGARY 06-80-SAMSUNG(726-7864) www.samsung.com
ITALIA 800-SAMSUNG(726-7864) www.samsung.com
LUXEMBURG 0035 (0)2 261 03 710 www.samsung.com/be
NETHERLANDS
0900-SAMSUNG(726-7864) ( 0,10/Min)
www.samsung.com/nl
NORWAY 815-56 480 www.samsung.com/no
POLAND 0 801 801 881 , 022-607-93-33 www.samsung.com/pl
PORTUGAL 80820-SAMSUNG(726-7864) www.samsung.com/pt
SLOVAKIA 0800-SAMSUNG(726-7864) www.samsung.com/sk
SPAIN 902 10 11 30 www.samsung.com
SWEDEN 0771-400 200 www.samsung.com/se
U.K 0845 SAMSUNG (7267864) www.samsung.com
EIRE 0818 717 100 www.samsung.com/ie
AUSTRIA 0800-SAMSUNG(726-7864) www.samsung.com/at
SWITZERLAND 0800-SAMSUNG(726-7864) www.samsung.com/ch
CIS
RUSSIA 8-800-555-55-55 www.samsung.com
KAZAHSTAN 8-10-800-500-55-500 www.samsung.kz
UZBEKISTAN 8-10-800-500-55-500 www.samsung.uz
KYRGYZSTAN 00-800-500-55-500
TADJIKISTAN 8-10-800-500-55-500
UKRAINE 8-800-502-0000 www.samsung.com
LITHUANIA 8-800-77777 www.samsung.lt
LATVIA 800-7267 www.samsung.com/lv
ESTONIA 800-7267 www.samsung.ee
Asia Pacifi c
AUSTRALIA 1300 362 603 www.samsung.com
NEW ZEALAND 0800SAMSUNG(726-7864) www.samsung.com/nz
CHINA 800-810-5858 , 010-6475 1880 www.samsung.com
HONG KONG 3698-4698 www.samsung.com/hk
INDIA 3030 8282 , 1800 110011 www.samsung.com
INDONESIA 0800-112-8888 www.samsung.com
JAPAN 0120-327-527 www.samsung.com/jp
MALAYSIA 1800-88-9999 www.samsung.com/my
PHILIPPINES 1800-10-SAMSUNG(726-7864) www.samsung.com/ph
SINGAPORE 1800-SAMSUNG(726-7864) www.samsung.com
THAILAND 1800-29-3232 , 02-689-3232 www.samsung.com
TAIWAN 0800-329-999 www.samsung.com/tw
VIETNAM 1 800 588 889 www.samsung.com
Middle East &
Africa
TURKEY 444 77 11 www.samsung.com
SOUTH AFRICA 0860-SAMSUNG(726-7864 ) www.samsung.com
U.A.E 800-SAMSUNG (726-7864), 8000-4726
www.samsung.com
Contact Samsung wereldwijd
Wanneer u suggesties of vragen heeft met betreking tot Samsung producten, gelieve contact op te
nemen met de consumeten dienst van samsung.
01605Q_V6800_XFA_NL2 3/20/08 6:13 PM Page 52

AK68-01605Q
01605Q_V6800_XFA_NL2 3/20/08 6:13 PM Page 53
-
 1
1
-
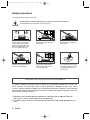 2
2
-
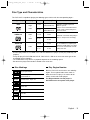 3
3
-
 4
4
-
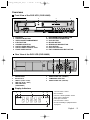 5
5
-
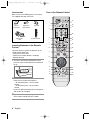 6
6
-
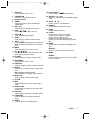 7
7
-
 8
8
-
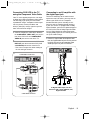 9
9
-
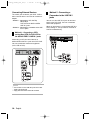 10
10
-
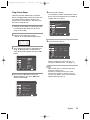 11
11
-
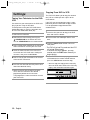 12
12
-
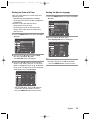 13
13
-
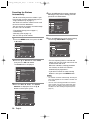 14
14
-
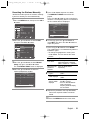 15
15
-
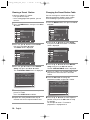 16
16
-
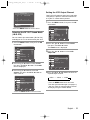 17
17
-
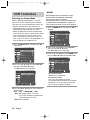 18
18
-
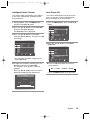 19
19
-
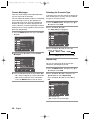 20
20
-
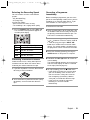 21
21
-
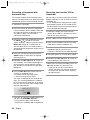 22
22
-
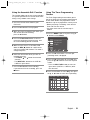 23
23
-
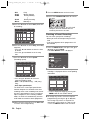 24
24
-
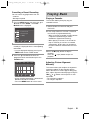 25
25
-
 26
26
-
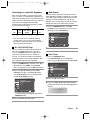 27
27
-
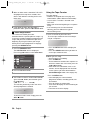 28
28
-
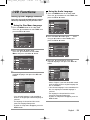 29
29
-
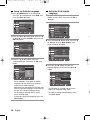 30
30
-
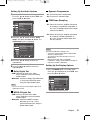 31
31
-
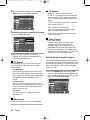 32
32
-
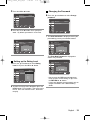 33
33
-
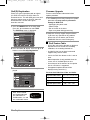 34
34
-
 35
35
-
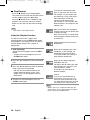 36
36
-
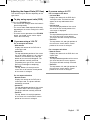 37
37
-
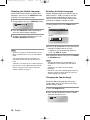 38
38
-
 39
39
-
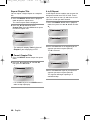 40
40
-
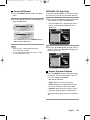 41
41
-
 42
42
-
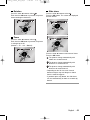 43
43
-
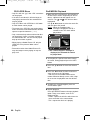 44
44
-
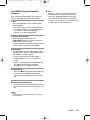 45
45
-
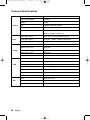 46
46
-
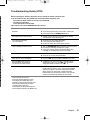 47
47
-
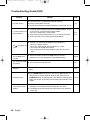 48
48
-
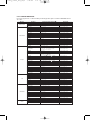 49
49
-
 50
50
-
 51
51
-
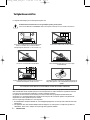 52
52
-
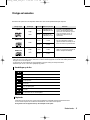 53
53
-
 54
54
-
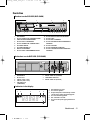 55
55
-
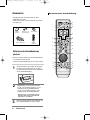 56
56
-
 57
57
-
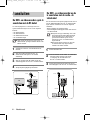 58
58
-
 59
59
-
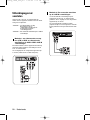 60
60
-
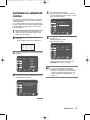 61
61
-
 62
62
-
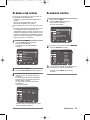 63
63
-
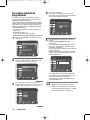 64
64
-
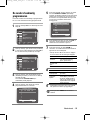 65
65
-
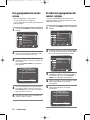 66
66
-
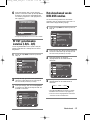 67
67
-
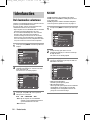 68
68
-
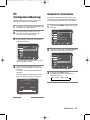 69
69
-
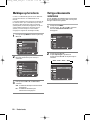 70
70
-
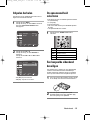 71
71
-
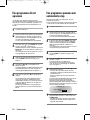 72
72
-
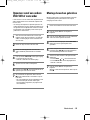 73
73
-
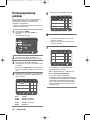 74
74
-
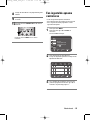 75
75
-
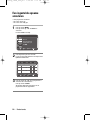 76
76
-
 77
77
-
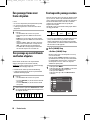 78
78
-
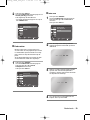 79
79
-
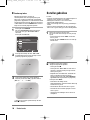 80
80
-
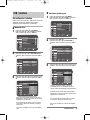 81
81
-
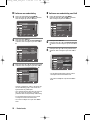 82
82
-
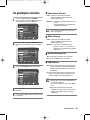 83
83
-
 84
84
-
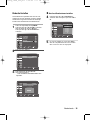 85
85
-
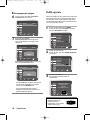 86
86
-
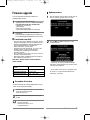 87
87
-
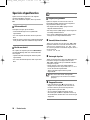 88
88
-
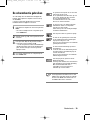 89
89
-
 90
90
-
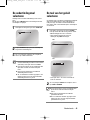 91
91
-
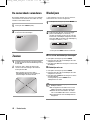 92
92
-
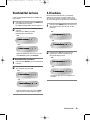 93
93
-
 94
94
-
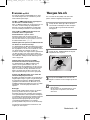 95
95
-
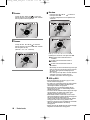 96
96
-
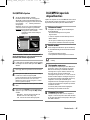 97
97
-
 98
98
-
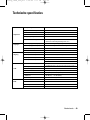 99
99
-
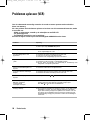 100
100
-
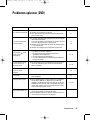 101
101
-
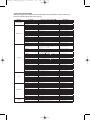 102
102
-
 103
103


