Sony SH-L32W Handleiding
- Categorie
- Accessoires voor het maken van koffie
- Type
- Handleiding

SH-L32W
©2008 Sony Corporation Printed in China
4-114-904-11(1)
LCD Hood
Pare-soleil LCD
SH-L32W
1 2 3
1
-1
2
3
-3
-
PUSH
89 60 25 mm
40 g
1 1
English
Before operating this unit, please read this manual
thoroughly and retain it for future reference.
e SH-L32W is an LCD hood for the Sony digital video
camera (referred to below as “camera”).
ese camera models may not be available in all countries/
regions.
Read the operating instructions carefully before use.
Features
is LCD hood improves the visibility of the LCD screen
when recording outdoors, for example, by preventing
unwanted light or reection from shining onto the LCD
screen.
e light-blocking eect of the LCD screen is enhanced
by narrowing the LCD hood opening.
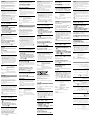
You can close the hood portion with the LCD hood
attached, and rotate and store the LCD screen into the
camera (illustration
).
You can carry the attachment by detaching it from the
LCD hood.
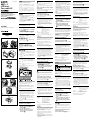
Identifying the parts
1 Attachment 2 Frame 3 Hood portion
Attaching the LCD Hood
1 Attach the attachment to this LCD hood
(illustration
-1).
2 O
pen the camera’s LCD screen.
3 S
lide this LCD hood along the camera’s
LCD screen until it stops. Then, attach it.
(illustration
-3).
/Operating Instructions/
Mode d’emploi/Bedienungsanleitung/
Manual de instrucciones/Gebruiksaanwijzing/
Bruksanvisning/Manual de instruções/
Istruzioni per l’uso/
/
/ / /
1
3
Opening and closing the hood portion
Open the hood portion as shown in illustration. Close the
hood portion in the reverse way.
ere is hook and loop fastener at the back side of the hood
portion.
How to use the LCD hood to enhance the light
blocking eect
Adjust the hook and loop fastener of the hood to narrow the
LCD screen opening (illustration
-
)
Detaching the LCD Hood
Slide this LCD hood and detach it.
How to detach the attachment
Press the PUSH part of this LCD hood on the top and
bottom to detach the attachment.
Notes on use
Do not hold the camera only by the LCD hood when it is
attached. e LCD hood may become detached and you
may damage the camera or injure yourself.
Hold the LCD screen to open it when the LCD hood is
attached. If you hold the LCD hood to try to open the
LCD screen, the LCD hood will become detached from
the camera.
Specications
Dimensions Approx. 89 × 60 × 25 mm (w/h/d)
(3 5/8 × 2 3/8 × 1 in.)
(when the hood portion is closed)
(ex
cluding the projecting parts)
Mass Approx. 40 g (1.5 oz)
Included items LCD hood (1), Attachment (1),
Set of printed documentation
Design and specications are subject to change without
notice.
Franćais
Avant de faire fonctionner cet appareil, lisez attentivement
ce mode d’emploi et conservez-le pour toute référence
ultérieure.
Le SH-L32W est une pare-soleil LCD destiné aux
caméscopes numériques Sony (désignés par le terme « le
caméscope » ci-dessous).
Ces modèles de caméscopes peuvent ne pas être
commercialisés dans certains pays ou dans certaines régions.
Lisez le mode d’emploi avec attention avant utilisation.
Caractéristiques
Ce pare-soleil LCD améliore la visibilité de l’écran LCD
lorsque vous lmez à l’extérieur, par exemple, en réduisant
la lumière et les reets indésirables sur l’écran LCD.
L’eet de blocage de la lumière de l’écran LCD est
amélioré si vous réduisez l’ouverture du pare-soleil LCD.
Vous pouvez fermer la visière lorsque le pare-soleil
LCD est xé, et tourner et ranger l’écran LCD dans le
caméscope (illustration
).
Vous pouvez transporter la xation en la retirant du pare-
soleil LCD.
Identication des pièces
1 Fixation 2 Cadre 3 Visière
Fixation du pare-soleil LCD
1 Fixez la xation sur ce pare-soleil LCD
(illustration
-1).
2 O
uvrez l’écran LCD du caméscope.
3 F
aites coulisser le pare-soleil LCD le long de
l’écran LCD jusqu’à la butée, puis xez-le.
(illustration
-3).
Ouverture et fermeture de la visière
Ouvrez la visière tel qu’illustré à la gure. Pour fermer la
visière, eectuez les mêmes opérations mais dans le sens
inverse.
La partie arrière de la visière comporte un crochet et une
attache.
Comment utiliser le pare-soleil LCD pour
améliorer l’eet de blocage de la lumière
Ajustez le crochet et l’attache de la visière de sorte à réduire
l’ouverture de l’écran LCD (illustration
-
)
Retrait du pare-soleil LCD
Faites coulisser le pare-soleil LCD et détachez-le.
Comment retirer la xation
Appuyez sur les emplacements PUSH du pare-soleil LCD,
situés sur le haut et le bas, pour retirer la xation.
Remarques sur l’utilisation
Ne tenez pas le caméscope uniquement par le pare-soleil
LCD lorsqu’il est xé. Il risquerait de se détacher et cela
pourrait endommager le caméscope ou entraîner des
blessures.
Tenez l’écran LCD pour l’ouvrir lorsque le pare-soleil LCD
est xé. Si vous tenez le pare-soleil LCD pour essayer
d’ouvrir l’écran LCD, le pare-soleil LCD se détachera du
caméscope.
Spécications
Dimensions environ 89 × 60 × 25 mm (l/h/p)
(3 5/8 × 2 3/8 × 1 pouces)
(lorsque la visière est fermée)
(parties saillantes non comprises)
Poids environ 40 g (1,5 once)
Articles inclus Pare-soleil LCD (1), Fixation (1)
Jeu de documents imprimés
La conception et les spécications peuvent être modiées
sans préavis.
Deutsch
Lesen Sie diese Anleitung vor Inbetriebnahme des Geräts
bitte genau durch und bewahren Sie sie zum späteren
Nachschlagen sorgfältig auf.
Die SH-L32W ist eine LCD-Blende, die speziell für den
digitalen Sony-Camcorder (im Folgenden als „Kamera“
bezeichnet) hergestellt ist.
Diese Kameramodelle sind unter Umständen nicht in allen
Ländern/Regionen erhältlich.
Lesen Sie die Bedienungsanleitung vor Inbetriebnahme bitte
sorgfältig durch.
1 2 3
Merkmale
Die LCD-Blende verhindert Lichtspiegelungen und
Reexionen auf dem LCD-Bildschirm und sorgt so z. B.
bei Außenaufnahmen dafür, dass sich der LCDBildschirm
besser ablesen lässt.
Der Lichtschutzeekt für den LCD-Bildschirm lässt sich
noch verbessern, indem Sie die Breite der Önung der
LCD-Blende verringern.
Auch wenn die LCD-Blende am Bildschirm befestigt ist,
können Sie sie zusammenklappen, den LCD-Bildschirm
drehen und an das Kameragehäuse klappen (Abbildung
).
Sie können den Adapter zum Transportieren von der
LCD-Blende abnehmen.
Bezeichnung der Teile
1 Adapter 2 Rahmen 3 Blende
Anbringen der LCD-Blende
1 Bringen Sie den Adapter an der LCD-Blende
an (Abbildung
-1).
2 Klapp
en Sie den LCD-Bildschirm der Kamera
auf.
3 S
chieben Sie die LCD-Blende bis zum
Anschlag auf den LCD-Bildschirm der
Kamera. Arretieren Sie sie dann (Abbildung
-3).
Auf- und Zuklappen der Blende
Klappen Sie die Blende wie in Abbildung gezeigt auf. Zum
Zuklappen der Blende gehen Sie in umgekehrter Reihenfolge
vor.
An der Rückseite der Blende benden sich Fixierungen.
So verbessern Sie den Lichtschutzeekt der
LCD-Blende
Verringern Sie die Breite der Önung am LCD-Bildschirm
mit den Fixierungen der Blende (Abbildung
-
).
Abnehmen der LCD-Blende
Schieben Sie die LCD-Blende zum Abnehmen herunter.
So nehmen Sie den Adapter ab
Drücken Sie oben und unten auf der LCD-Blende auf PUSH,
um den Adapter abzunehmen.
Hinweise zur Verwendung
Halten Sie die Kamera nicht an der LCD-Blende, wenn
diese angebracht ist. Die LCD-Blende kann sich lösen,
wodurch die Kamera beschädigt werden könnte und Sie
sich verletzen könnten.
Fassen Sie bei angebrachter LCD-Blende zum Aulappen
den LCD-Bildschirm. Wenn Sie zum Aulappen des
LCD-Bildschirms die LCD-Blende fassen, löst sich die
LCD-Blende von der Kamera.
Technische Daten
Abmessungen ca. 89 × 60 × 25 mm (B/H/T)
(bei zugeklappter Blende)
(ohne vorstehende Teile)
Gewicht ca. 40 g
Mitgeliefertes Zubehör LCD-Blende (1), Adapter (1),
A
nleitungen
Änderungen bei Design und technischen Daten bleiben
ohne vorherige Ankündigung vorbehalten.
Español
Antes de utilizar esta unidad, lea este manual atentamente y
consérvelo para consultarlo en el futuro.
El SH-L32W es un parasol LCD para videocámaras digitales
Sony (a partir de ahora “cámara”).
Estos modelos de cámara pueden no estar disponibles en
todos los países o regiones.
Lea minuciosamente el manual de instrucciones antes de la
utilización.
Características
Dicho parasol mejora la visibilidad de la pantalla de cristal
líquido cuando se realizan grabaciones en el exterior, ya
que impide que la luz o los reejos no deseados brillen
sobre ésta.
La reducción de la abertura del parasol LCD permite
mejorar el efecto de bloqueo de luz de la pantalla de cristal
líquido.
Es posible cerrar el componente del parasol con el parasol
LCD incorporad, así como girar y guardar la pantalla de
cristal líquido dentro de la videocámara (ilustración
).
Para transportar el acoplamiento, desmóntelo del parasol
LCD.
Identicación de los componentes
1 Acoplamiento 2 Marco
3 Componente del parasol LCD
Colocación del parasol LCD
1 Fije el acoplamiento al parasol LCD
(ilustración
-1).
2 A
bra la pantalla de cristal líquido de la
cámara.
3 Deslic
e el parasol LCD sobre la pantalla de
cristal líquido de la cámara hasta que se
detenga. A continuación, fíjelo (ilustración
-3).
Apertura y cierre del componente del
parasol
Abra el componente del parasol tal como se indica en la
ilustración. Cierre el componente del parasol en el orden
inverso.
En la parte posterior del componente del parasol encontrará
velcro.
Utilización del parasol LCD para mejorar el
efecto de bloqueo de luz
Ajuste el velcro del parasol para reducir la abertura de la
pantalla de cristal líquido (ilustración
-
)
Extracción del parasol LCD
Deslice el parasol LCD y extráigalo.
Extracción del acoplamiento
Presione las partes superior e inferior del parasol LCD en las
que aparece PUSH y retire el acoplamiento.
Notas sobre el uso
No sostenga la videocámara únicamente por el parasol
LCD, si está colocada. Es posible que se desprenda el
parasol LCD y le ocasione daños personales, o bien, daños
a la cámara.
Sujete la pantalla de cristal líquido para abrirla cuando el
parasol LCD se encuentre instalado. Si sujeta el parasol
LCD para intentar abrir la pantalla de cristal líquido, el
parasol LCD se desprenderá de la cámara.
Especicaciones
Dimensiones Aprox. 89 × 60 × 25 mm (an/al/prf)
(cuando el componente del parasol
es
tá cerrado)
(excluidas las piezas protectoras)
Peso Aprox. 40 g
Elementos incluidos Parasol LCD (1), Acoplamiento (1),
Juego de documentación impresa
El diseño y las especicaciones están sujetos a cambios sin
previo aviso.
Nederlands
Voordat u het apparaat gebruikt, moet u deze
gebruiksaanwijzing aandachtig doorlezen. Bewaar
de gebruiksaanwijzing voor het geval u deze later als
referentiemateriaal nodig hebt.
De SH-L32W is een LCD-kap voor de Sony digitale
videocamera (hierna "camera" genoemd).
Deze cameramodellen zijn mogelijk niet beschikbaar in alle
landen/regio’s.
Lees de gebruiksaanwijzing aandachtig door voor gebruik.
Kenmerken
Deze LCD-kap verbetert de leesbaarheid van het
LCDscherm wanneer u buiten opneemt, bijvoorbeeld
door ongewenst licht of ongewenste reecties op het
LCDscherm te voorkomen.
Het lichtblokkeringseect van het LCD-scherm wordt
versterkt door de opening voor de LCD-kap te verkleinen.
U kunt het kapgedeelte sluiten terwijl de LCD-kap is
bevestigd en het LCD-scherm draaien zodat deze wordt
opgeborgen in de camera (aeelding
).
U kunt het opzetstuk meenemen door het te verwijderen
van de LCD-kap.
Onderdelen
1 Opzetstuk 2 Rand 3 Kapgedeelte
De LCD-kap bevestigen
1 Bevestig het opzetstuk op deze LCD-kap
(afbeelding
-1).
2 O
pen het LCD-scherm van de camera.
3 S
chuif deze LCD-kap zo ver mogelijk langs
het LCD-scherm van de camera. Vervolgens
bevestigt u de kap. (afbeelding
-3).
Het kapgedeelte openen en sluiten
Open het kapgedeelte zoals in aeelding wordt weergegeven.
Sluit het kapgedeelte in de omgekeerde volgorde.
Er bevindt zich een sluiting aan de achterkant van het
kapgedeelte.
De LCD-kap gebruiken om het
lichtblokkeringseect te versterken
Pas de sluiting van de kap aan om de opening voor het LCD-
scherm te verkleinen (aeelding
-
).
De LCD-kap verwijderen
Schuif deze LCD-kap en verwijder deze van het
scherm.
Het opzetstuk verwijderen
Druk op het PUSH-gedeelte aan de boven- en onderkant
van deze LCD-kap om het opzetstuk te verwijderen.
Opmerkingen bij het gebruik
Als de LCD-kap is bevestigd, moet u de camera niet alleen
optillen aan de LCD-kap. De LCD-kap kan losraken en
de camera kan worden beschadigd of u kunt zichzelf
verwonden.
Houd het LCD-scherm vast om dit te openen wanneer
de LCD-kap is bevestigd. Als u de LCD-kap vasthoudt
wanneer u het LCD-scherm wilt openen, raakt de LCD-
kap los van de camera.
Technische gegevens
Afmetingen Ongeveer 89 × 60 × 25 mm (b/h/d)
(wanneer het kapgedeelte is gesloten)
(exclusief uitstekende delen)
Gewicht Ongeveer 40 g
Bijgeleverd toevehoren LCD-kap (1), Opzetstuk (1),
Handleiding en documentatie
Wijzigingen in ontwerp en technische gegevens
voorbehouden, zonder kennisgeving.
Pagina wordt geladen...
Documenttranscriptie
日本語 4-114-904-11(1) お買い上げいただきありがとうございます。 液晶フード ご使用の前にこの取扱説明書をお読みください。お読み になったあとは、いつでも見られるところに必ず保管して ください。 LCD Hood Pare-soleil LCD SH-L32Wは、ソニーのデジタルビデオカメラレコーダー (以下、カメラとする)用の液晶フードです。対象のカメラ はすべての国や地域で取り扱いをしているわけではあり ません。お使いになる前に、この取扱説明書をよくお読み ください。 取扱説明書 /Operating Instructions/ Mode d’emploi/Bedienungsanleitung/ Manual de instrucciones/Gebruiksaanwijzing/ Bruksanvisning/Manual de instruções/ Istruzioni per l’uso/ / / / / 屋外での撮影などで液晶画面への不要な光や映り込み を防ぎ、液晶画面の視認性を高めます。 フード部の開口部を狭くすることで、液晶部の遮光性を より高めることもできます。 取り付けたままフード部を閉じ、液晶画面を反転させて カメラに収納できます。 (イラスト) アタッチメントを液晶フードから取りはずして持ち運 ぶことができます。 1 アタッチメント 2 外枠 3 フード部 ©2008 Sony Corporation Printed in China アタッチメントを本機に取り付ける。 (イラスト-1) カメラの液晶画面を開く。 本機の外枠をカメラの液晶画面に沿わせ、止まる位置 までスライドさせて取り付ける。 (イラスト-3) フード部を開閉する イラストの手順でフード部を開きます。閉じるときは逆 の手順で閉じます。 フード部に面ファスナーがついています。 遮光性を高める使いかた フード部の面ファスナーを調整して液晶画面の開口部を 狭くしてください。 (イラスト-) 取りはずす 本機の外枠をスライドさせて取りはずす。 アタッチメントの取りはずしかた 本機のPUSH部を上下から押さえ、アタッチメントを取り はずします。 1 2 3 使用上のご注意 主な仕様 外形寸法 1 質量 同梱物 Adjust the hook and loop fastener of the hood to narrow the LCD screen opening (illustration -) Detaching the LCD Hood How to detach the attachment Press the PUSH part of this LCD hood on the top and bottom to detach the attachment. Notes on use Do not hold the camera only by the LCD hood when it is attached. The LCD hood may become detached and you may damage the camera or injure yourself. Hold the LCD screen to open it when the LCD hood is attached. If you hold the LCD hood to try to open the LCD screen, the LCD hood will become detached from the camera. Dimensions Mass Included items Approx. 89 × 60 × 25 mm (w/h/d) (3 5/8 × 2 3/8 × 1 in.) (when the hood portion is closed) (excluding the projecting parts) Approx. 40 g (1.5 oz) LCD hood (1), Attachment (1), Set of printed documentation Design and specifications are subject to change without notice. Franćais Avant de faire fonctionner cet appareil, lisez attentivement ce mode d’emploi et conservez-le pour toute référence ultérieure. Le SH-L32W est une pare-soleil LCD destiné aux caméscopes numériques Sony (désignés par le terme « le caméscope » ci-dessous). Ces modèles de caméscopes peuvent ne pas être commercialisés dans certains pays ou dans certaines régions. Lisez le mode d’emploi avec attention avant utilisation. Caractéristiques カメラに装着した状態で本機だけを持たないでくださ い。本機がはずれてカメラが壊れたり、思わぬけがをす ることがあります。 本機が取り付けられているときは、液晶画面を持って開 いてください。本機を持って開くと、本機がカメラから はずれます。 How to use the LCD hood to enhance the light blocking effect Specifications 取り付ける 1 2 3 Open the hood portion as shown in illustration. Close the hood portion in the reverse way. There is hook and loop fastener at the back side of the hood portion. Slide this LCD hood and detach it. 主な特長 各部の名前 SH-L32W Opening and closing the hood portion 約89×60×25 mm(幅/高さ/奥行き) (フード部を閉じた場合) (最大突起部を除く) 約40 g 液晶フード(1)、アタッチメント(1)、 印刷物一式 仕様および外観は、改良のため予告なく変更することがあ りますが、ご了承ください。 3 Ce pare-soleil LCD améliore la visibilité de l’écran LCD lorsque vous filmez à l’extérieur, par exemple, en réduisant la lumière et les reflets indésirables sur l’écran LCD. L’effet de blocage de la lumière de l’écran LCD est amélioré si vous réduisez l’ouverture du pare-soleil LCD. Vous pouvez fermer la visière lorsque le pare-soleil LCD est fixé, et tourner et ranger l’écran LCD dans le caméscope (illustration ). Vous pouvez transporter la fixation en la retirant du paresoleil LCD. Identification des pièces 1 Fixation 2 Cadre 3 Visière Fixation du pare-soleil LCD 1 Fixez la fixation sur ce pare-soleil LCD (illustration -1). 2 Ouvrez l’écran LCD du caméscope. 3 Faites coulisser le pare-soleil LCD le long de l’écran LCD jusqu’à la butée, puis fixez-le. (illustration -3). Ouverture et fermeture de la visière Ouvrez la visière tel qu’illustré à la figure. Pour fermer la visière, effectuez les mêmes opérations mais dans le sens inverse. La partie arrière de la visière comporte un crochet et une attache. Comment utiliser le pare-soleil LCD pour améliorer l’effet de blocage de la lumière Ajustez le crochet et l’attache de la visière de sorte à réduire l’ouverture de l’écran LCD (illustration -) English Before operating this unit, please read this manual thoroughly and retain it for future reference. The SH-L32W is an LCD hood for the Sony digital video camera (referred to below as “camera”). These camera models may not be available in all countries/ regions. Read the operating instructions carefully before use. Features This LCD hood improves the visibility of the LCD screen when recording outdoors, for example, by preventing unwanted light or reflection from shining onto the LCD screen. The light-blocking effect of the LCD screen is enhanced by narrowing the LCD hood opening. You can close the hood portion with the LCD hood attached, and rotate and store the LCD screen into the camera (illustration ). You can carry the attachment by detaching it from the LCD hood. Identifying the parts 1 Attachment 2 Frame 3 Hood portion Attaching the LCD Hood 1 Attach the attachment to this LCD hood (illustration -1). 2 Open the camera’s LCD screen. 3 Slide this LCD hood along the camera’s LCD screen until it stops. Then, attach it. (illustration -3). Retrait du pare-soleil LCD Faites coulisser le pare-soleil LCD et détachez-le. Comment retirer la fixation Appuyez sur les emplacements PUSH du pare-soleil LCD, situés sur le haut et le bas, pour retirer la fixation. Remarques sur l’utilisation Ne tenez pas le caméscope uniquement par le pare-soleil LCD lorsqu’il est fixé. Il risquerait de se détacher et cela pourrait endommager le caméscope ou entraîner des blessures. Tenez l’écran LCD pour l’ouvrir lorsque le pare-soleil LCD est fixé. Si vous tenez le pare-soleil LCD pour essayer d’ouvrir l’écran LCD, le pare-soleil LCD se détachera du caméscope. Spécifications Dimensions Poids Articles inclus environ 89 × 60 × 25 mm (l/h/p) (3 5/8 × 2 3/8 × 1 pouces) (lorsque la visière est fermée) (parties saillantes non comprises) environ 40 g (1,5 once) Pare-soleil LCD (1), Fixation (1) Jeu de documents imprimés La conception et les spécifications peuvent être modifiées sans préavis. Deutsch Lesen Sie diese Anleitung vor Inbetriebnahme des Geräts bitte genau durch und bewahren Sie sie zum späteren Nachschlagen sorgfältig auf. Die SH-L32W ist eine LCD-Blende, die speziell für den digitalen Sony-Camcorder (im Folgenden als „Kamera“ bezeichnet) hergestellt ist. Diese Kameramodelle sind unter Umständen nicht in allen Ländern/Regionen erhältlich. Lesen Sie die Bedienungsanleitung vor Inbetriebnahme bitte sorgfältig durch. Merkmale Die LCD-Blende verhindert Lichtspiegelungen und Reflexionen auf dem LCD-Bildschirm und sorgt so z. B. bei Außenaufnahmen dafür, dass sich der LCDBildschirm besser ablesen lässt. Der Lichtschutzeffekt für den LCD-Bildschirm lässt sich noch verbessern, indem Sie die Breite der Öffnung der LCD-Blende verringern. Auch wenn die LCD-Blende am Bildschirm befestigt ist, können Sie sie zusammenklappen, den LCD-Bildschirm drehen und an das Kameragehäuse klappen (Abbildung ). Sie können den Adapter zum Transportieren von der LCD-Blende abnehmen. Bezeichnung der Teile 1 Adapter 2 Rahmen 3 Blende Anbringen der LCD-Blende 1 Bringen Sie den Adapter an der LCD-Blende an (Abbildung -1). 2 Klappen Sie den LCD-Bildschirm der Kamera auf. 3 Schieben Sie die LCD-Blende bis zum Anschlag auf den LCD-Bildschirm der Kamera. Arretieren Sie sie dann (Abbildung -3). Extracción del parasol LCD Deslice el parasol LCD y extráigalo. Extracción del acoplamiento Presione las partes superior e inferior del parasol LCD en las que aparece PUSH y retire el acoplamiento. Notas sobre el uso No sostenga la videocámara únicamente por el parasol LCD, si está colocada. Es posible que se desprenda el parasol LCD y le ocasione daños personales, o bien, daños a la cámara. Sujete la pantalla de cristal líquido para abrirla cuando el parasol LCD se encuentre instalado. Si sujeta el parasol LCD para intentar abrir la pantalla de cristal líquido, el parasol LCD se desprenderá de la cámara. Especificaciones Dimensiones Peso Elementos incluidos Aprox. 89 × 60 × 25 mm (an/al/prf) (cuando el componente del parasol está cerrado) (excluidas las piezas protectoras) Aprox. 40 g Parasol LCD (1), Acoplamiento (1), Juego de documentación impresa El diseño y las especificaciones están sujetos a cambios sin previo aviso. Nederlands Auf- und Zuklappen der Blende Voordat u het apparaat gebruikt, moet u deze gebruiksaanwijzing aandachtig doorlezen. Bewaar de gebruiksaanwijzing voor het geval u deze later als referentiemateriaal nodig hebt. So verbessern Sie den Lichtschutzeffekt der LCD-Blende Verringern Sie die Breite der Öffnung am LCD-Bildschirm mit den Fixierungen der Blende (Abbildung -). De SH-L32W is een LCD-kap voor de Sony digitale videocamera (hierna "camera" genoemd). Deze cameramodellen zijn mogelijk niet beschikbaar in alle landen/regio’s. Lees de gebruiksaanwijzing aandachtig door voor gebruik. Abnehmen der LCD-Blende Kenmerken Klappen Sie die Blende wie in Abbildung gezeigt auf. Zum Zuklappen der Blende gehen Sie in umgekehrter Reihenfolge vor. An der Rückseite der Blende befinden sich Fixierungen. Schieben Sie die LCD-Blende zum Abnehmen herunter. So nehmen Sie den Adapter ab Drücken Sie oben und unten auf der LCD-Blende auf PUSH, um den Adapter abzunehmen. Hinweise zur Verwendung Halten Sie die Kamera nicht an der LCD-Blende, wenn diese angebracht ist. Die LCD-Blende kann sich lösen, wodurch die Kamera beschädigt werden könnte und Sie sich verletzen könnten. Fassen Sie bei angebrachter LCD-Blende zum Aufklappen den LCD-Bildschirm. Wenn Sie zum Aufklappen des LCD-Bildschirms die LCD-Blende fassen, löst sich die LCD-Blende von der Kamera. Deze LCD-kap verbetert de leesbaarheid van het LCDscherm wanneer u buiten opneemt, bijvoorbeeld door ongewenst licht of ongewenste reflecties op het LCDscherm te voorkomen. Het lichtblokkeringseffect van het LCD-scherm wordt versterkt door de opening voor de LCD-kap te verkleinen. U kunt het kapgedeelte sluiten terwijl de LCD-kap is bevestigd en het LCD-scherm draaien zodat deze wordt opgeborgen in de camera (afbeelding ). U kunt het opzetstuk meenemen door het te verwijderen van de LCD-kap. Onderdelen 1 Opzetstuk 2 Rand 3 Kapgedeelte Technische Daten De LCD-kap bevestigen Änderungen bei Design und technischen Daten bleiben ohne vorherige Ankündigung vorbehalten. Het kapgedeelte openen en sluiten Abmessungen ca. 89 × 60 × 25 mm (B/H/T) (bei zugeklappter Blende) (ohne vorstehende Teile) Gewicht ca. 40 g Mitgeliefertes Zubehör LCD-Blende (1), Adapter (1), Anleitungen Español Antes de utilizar esta unidad, lea este manual atentamente y consérvelo para consultarlo en el futuro. 1 Bevestig het opzetstuk op deze LCD-kap (afbeelding -1). 2 Open het LCD-scherm van de camera. 3 Schuif deze LCD-kap zo ver mogelijk langs het LCD-scherm van de camera. Vervolgens bevestigt u de kap. (afbeelding -3). Open het kapgedeelte zoals in afbeelding wordt weergegeven. Sluit het kapgedeelte in de omgekeerde volgorde. Er bevindt zich een sluiting aan de achterkant van het kapgedeelte. De LCD-kap gebruiken om het lichtblokkeringseffect te versterken Pas de sluiting van de kap aan om de opening voor het LCDscherm te verkleinen (afbeelding -). El SH-L32W es un parasol LCD para videocámaras digitales Sony (a partir de ahora “cámara”). Estos modelos de cámara pueden no estar disponibles en todos los países o regiones. Lea minuciosamente el manual de instrucciones antes de la utilización. Características Dicho parasol mejora la visibilidad de la pantalla de cristal líquido cuando se realizan grabaciones en el exterior, ya que impide que la luz o los reflejos no deseados brillen sobre ésta. La reducción de la abertura del parasol LCD permite mejorar el efecto de bloqueo de luz de la pantalla de cristal líquido. Es posible cerrar el componente del parasol con el parasol LCD incorporad, así como girar y guardar la pantalla de cristal líquido dentro de la videocámara (ilustración ). Para transportar el acoplamiento, desmóntelo del parasol LCD. Identificación de los componentes 1 Acoplamiento 2 Marco 3 Componente del parasol LCD Colocación del parasol LCD 1 Fije el acoplamiento al parasol LCD (ilustración -1). 2 Abra la pantalla de cristal líquido de la cámara. 3 Deslice el parasol LCD sobre la pantalla de cristal líquido de la cámara hasta que se detenga. A continuación, fíjelo (ilustración -3). Apertura y cierre del componente del parasol Abra el componente del parasol tal como se indica en la ilustración. Cierre el componente del parasol en el orden inverso. En la parte posterior del componente del parasol encontrará velcro. Utilización del parasol LCD para mejorar el efecto de bloqueo de luz Ajuste el velcro del parasol para reducir la abertura de la pantalla de cristal líquido (ilustración -) De LCD-kap verwijderen Schuif deze LCD-kap en verwijder deze van het scherm. Het opzetstuk verwijderen Druk op het PUSH-gedeelte aan de boven- en onderkant van deze LCD-kap om het opzetstuk te verwijderen. Opmerkingen bij het gebruik Als de LCD-kap is bevestigd, moet u de camera niet alleen optillen aan de LCD-kap. De LCD-kap kan losraken en de camera kan worden beschadigd of u kunt zichzelf verwonden. Houd het LCD-scherm vast om dit te openen wanneer de LCD-kap is bevestigd. Als u de LCD-kap vasthoudt wanneer u het LCD-scherm wilt openen, raakt de LCDkap los van de camera. Technische gegevens Afmetingen Ongeveer 89 × 60 × 25 mm (b/h/d) (wanneer het kapgedeelte is gesloten) (exclusief uitstekende delen) Gewicht Ongeveer 40 g Bijgeleverd toevehoren LCD-kap (1), Opzetstuk (1), Handleiding en documentatie Wijzigingen in ontwerp en technische gegevens voorbehouden, zonder kennisgeving.-
 1
1
-
 2
2


Sony SH-L32W Handleiding
- Categorie
- Accessoires voor het maken van koffie
- Type
- Handleiding
in andere talen
- English: Sony SH-L32W User manual
- italiano: Sony SH-L32W Manuale utente
- русский: Sony SH-L32W Руководство пользователя
- français: Sony SH-L32W Manuel utilisateur
- español: Sony SH-L32W Manual de usuario
- Deutsch: Sony SH-L32W Benutzerhandbuch
- português: Sony SH-L32W Manual do usuário
- 日本語: Sony SH-L32W ユーザーマニュアル
- svenska: Sony SH-L32W Användarmanual