i-box i-box Blinky Kids Alarm Clock and Sleep Trainer Handleiding
- Categorie
- Wekkers
- Type
- Handleiding
Deze handleiding is ook geschikt voor

EN Kids’ Alarm Clock & Sleep Trainer
DE Wecker und Schlaftrainer für Kinder
ES Reloj despertador para niños y entrenador del sueño
FR Réveil et dispositif d’aide au sommeil pour les enfants
IT Sveglia e sleep trainer per bambini
NL Wekker en slaaptrainer voor kinderen

02 | Blinky
EN Introduction
Introducing Blinky, the all-in-one children’s sleep trainer.
Blinky is designed for children and parents. Packed with features that will help your
child learn good sleeping habits and enable you to get that much needed extra sleep.
The nightlight, soothing sounds and friendly smiley face immediately sets the scene for
bedtime, whilst the nap timer, pre-set alarm and sleep trainer function can be used to
train your little one about when to go to sleep and when to get up and out of bed.
DE Einführung
Wir präsentieren Blinky, den Allround-Schlaftrainer für Kinder.
Blinky ist für Kinder und ihre Eltern gedacht. Seine zahlreichen Funktionen helfen Ihrem
Kind, gesunde Schlafgewohnheiten zu entwickeln, und verschaffen Ihnen die dringend
benötigte Extraportion Schlaf.
Das Nachtlicht, beruhigende Klänge und das lächelnde Gesicht stimmen Ihr Kind
auf den Nachtschlaf ein. Mit dem Schlaftimer, dem voreingestellten Alarm und der
Schlaftrainerfunktion können Sie ihm beibringen, wann es schlafen gehen soll und
wann es Zeit zum Aufstehen und Hinlegen ist.
ES Introducción
Presentamos Blinky, el entrenador del sueño infantil todo en uno.
Blinky ha sido diseñado para niños y padres. Ofrece varias funciones que ayudarán a su
hijo a aprender buenos hábitos de sueño y le permitirán a usted conseguir ese sueño
extra tan necesario.
La luz nocturna, los sonidos relajantes y la simpática carita sonriente preparan
inmediatamente el terreno para la hora de dormir, mientras que el temporizador de la
siesta, la alarma preestablecida y la función de entrenador del sueño pueden utilizarse
para habituar a su pequeño sobre cuándo debe ir a dormir y cuándo debe levantarse y
salir de la cama.

Blinky | 03
NL Invoering
Dit is Blinky, de alles-in-één slaaptrainer voor
kinderen.
Blinky is ontworpen voor kinderen en ouders.
Hij zit vol met functies die je kind goede
slaapgewoonten bijbrengen en jou dat
broodnodige beetje extra slaap bezorgen.
Het nachtlampje, de kalmerende geluiden
en het vriendelijke lachende gezichtje zetten
meteen de toon voor bedtijd. En met de
dutjestimer, het vooringestelde alarm en de
slaaptrainerfunctie kun je je kleintje bijbrengen
wanneer hij moet gaan slapen, wanneer hij
moet opstaan en uit bed moet komen.
FR Introduction
Découvrez Blinky, le dispositif d’aide au sommeil tout-en-un destiné aux enfants.
Blinky s’adresse aux enfants et à leurs parents. Riche en fonctionnalités, il aidera votre
enfant à acquérir de bonnes habitudes de sommeil et vous permettra de dormir davantage.
La veilleuse, les sons apaisants et le visage souriant préparent immédiatement le
terrain pour l’heure du coucher, tandis que le minuteur de sieste, l’alarme prédéfinie et
la fonction d’aide au sommeil indiquent à votre enfant quand se coucher et se lever.
IT Introduzione
È arrivato Blinky, il primo sleep trainer tutto-in-uno per bambini.
Blinky è stato appositamente ideato per il benessere di bambini e genitori. Il dispositivo
è ricco di funzionalità pensate per aiutare i bimbi ad acquisire abitudini sane,
permettendo a mamma e papà di godersi qualche ora di sonno in più.
La luce notturna è accompagnata da suoni rilassanti e da una faccina sorridente per
creare subito l’atmosfera giusta per la nanna. Il timer, la sveglia preconfigurata e lo sleep
trainer sono tutte funzioni che possono essere utilizzate per far capire al bimbo che è
ora di andare a letto o di alzarsi.

04 | Blinky
EN
Caring for your
Alarm Clock
Do not place naked flame sources, such as lighted candles on or near the Blinky.
Keep away from dripping or splashed liquids.
The unit should not be exposed to direct sunlight, very high or low temperatures,
moisture, strong magnetic fields high frequencies and dusty environments.
Always leave sufficient space around the unit for ventilation.
Do not use abrasives, solvents or polish to clean this product. Use only a clean, damp,
soft, cloth.
Never attempt to insert wires, pins or other such objects into the vents or opening of the
unit.
Do not disassemble or modify the unit, there are no user serviceable parts.
If the alarm clock is damaged or malfunctions do not use. Consult a qualified service
engineer.
This product contains a Lithium coin cell battery keep the battery away from children.
The battery could be harmful or fatal if swallowed. Seek immediate medical advice if you
believe a battery has been swallowed.
Do not dispose of this product with household waste at the end of its life cycle; take it to
a designated collection centre for the recycling of electrical and electronic appliances with
batteries. Please check with your Local Authority for recycling advice.
Contents
Safety information .......................................... 4
Controls & features ...........................................5
Powering your Alarm Clock .......................... 6
Battery Backup.................................................. 6
Setting the Clock .............................................. 6
Setting the Alarm ..............................................7
Nap Timer Mode ...........................................8-9
Sleep Trainer Mode ...................................9-10
Sound Mode .....................................................10
Volume Adjustment ........................................11
Specifications ....................................................11
Troubleshooting ...............................................11
Technical Support ..........................................58

Blinky | 05
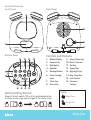
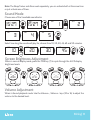
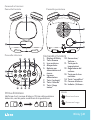
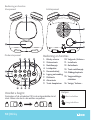
Front Panel
Controls & Features
Bottom Panel
Back Panel
Controls and Features
1. Blinky Display
2. Snooze Key
3. Nightlights
4. Speaker
5. Backup Battery
6. Power Supply
Input
7. Clock Key
8. Alarm Key
9. Sleep Trainer Key
10. Next / Volume +
11. Set Key
12. Sound Key
13. Nightlight Key
14. Nap Timer Key
15. Lock Switch
16. Previous /
Volume -
Before Getting Started
Ensure the lock switch (15) is in the unlocked position
to allow you to make any changes to the alarm clock.
1
2
3
4
5
6
12
7
13 14 1615
8 9 10 11
Help
Short Press
Long Press

06 | Blinky
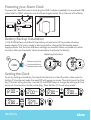
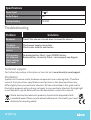
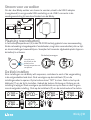
Powering your Alarm Clock
To power the i-box Blinky alarm clock, plug the USB C adaptor (supplied) into a powered USB
socket and the USB C connector into the Power Supply Socket (6) on the back of the Blinky.
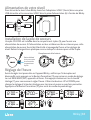
Battery Backup Installation
1 x CR-2032 battery is installed in the battery compartment (5) to provide a backup
power supply. If the mains supply is disconnected or interrupted this backup power
supply ensures that the time and alarm settings are saved but does not power any other
functions. Remove the plastic tab as shown below to activate the battery.
Replacing the battery
Remove screw first
to remove battery
compartment cover
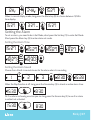
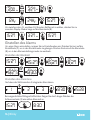
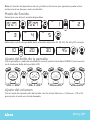
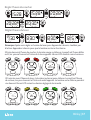
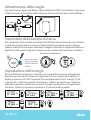
Setting the Clock
To set any setting on the Blinky, first check that the lock is in the off position, then press the
Set Key (11) to enter set mode; the word SET will appear on screen. Then short press the Clock
key (7) to start setting the time. Use the UP and DOWN keys to change the setting and Clock
key to set it and move on to the next setting. Press Set Key (11) to exit setup mode.
12:00 12:00 12:00 3:00
3:00 3:27
SET SET SET
SET SET
AM AM AM PM
PM PM
C
R
2
0
3
2
3
V
O
L
T
S
L
I
T
H
I
U
M
B
A
T
T
E
R
Y
C
R
2
0
3
2
3
V
O
L
T
S
L
I
T
H
I
U
M
B
A
T
T
E
R
Y

Blinky | 07
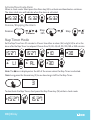
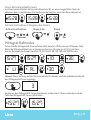
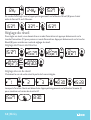
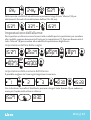
Setting the Alarm
To set an alarm, you need to be in Set Mode, short press the Set key (11) to enter Set Mode.
Short press the Alarm key (8) to enter alarm set mode.
Setting the Alarm Time
Setting the Alarm Sound
Choose from 5 built-in sounds to use for the alarm when it is sounding.
12H 24H
SET SET
PM
15:27
15:27 3:27 15:27
15:27 15:27 8:27
8:27
1 2 3
8:30
8:30 15:28
15:27
SET
SET SET SET
SET
SET SET SET
SET
SET
When in normal display mode, long press the Alarm key (8) to choose between 12/24hr
time display.
When the Nap function is off. Long press the Snooze key (2) to check an active alarm time.
8:30
15:30
8:30
15:30
Or if no alarm is showing as active you can long press the Snooze key (2) to see if an alarm
is set but not activated.

08 | Blinky
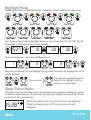
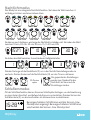
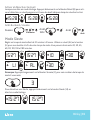
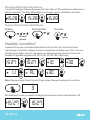
Nap Timer Mode
Set the Nap Timer from 10 minutes to 3 hours. Use either an alarm (AL) or light (LI) to act as the
alarm after the Nap Timer has elapsed. Choose from 10, 30, 45, 60, 90, 120, 150 or 180 minutes.
Note: Long press the Snooze key (2) to see how long is left for the Nap Timer.
To deactivate the Nap Timer, short press the Nap Timer key (14) while in clock mode.
15:27
15:27 15:27
15:27 10 30
30
3
Li Al
SET SET SET
SET
SET SET
Activate/Deactivate Alarm
When in clock mode. Short press the Alarm key (8) to activate and deactivate a set alarm.
The alarm clock icon will indicate when the alarm is activated.
15:32 15:3215:32
Snooze / Stopping the Alarm
Note: The icon is displayed on the left of the screen when the Nap Timer is activated.
➡
➡
10 minutes
Snooze Stop
24h Stop
➡
➡
Off

Blinky | 09
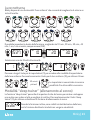
Nightlight Mode
The Blinky has a built-in Nightlight feature, choose from 4 solid colours and a blue cycle.
You can also set how long the nightlight will stay on for; choose from 10 / 20 / 30 / 45 / 60
90 minutes or ON (continously until switched off).
Choose the brightness, select from 3 different levels.
Short press the Set key (11) to exit Nightlight setting mode. Short press the Nightlight key (13) to
activate the timer.
The saved settings will become the
default for the nightlight until the
settings are changed again.
30 minutes later
15:27 10 20 30
SET SET SET SET
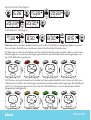
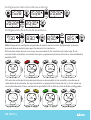
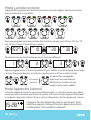
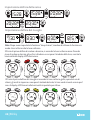
Sleep Trainer Mode
The sleep trainer function allows you to set up sleep cycle to help with developing a routine
for bedtime and waking up in the morning. Short press the Sleep Trainer key (9) to activate
or deactivate the trainer function.
When the sleep trainer is on, the sun/moon icon will show;
When the sleep trainer is off, the sun/moon icon will
disappear.
15:28
1 2 3
SET SET SET

10 | Blinky
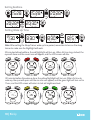
30 minutes before the wake up time, the yellow Nightlight will turn on; When it’s time to
wake up, the eyes will open and the sun icon will appear, and the green light will turn on for
1 hour, and the LCD screen will return to last set brightness level.
30 minutes before bedtime, the red Nightlight will turn on. When it’s time to go to bed, the
eyes will close and the moon icon will appear, and the LCD screen will dim.
Note: After setting the Sleep Trainer wake up time period, remember to turn on the sleep
trainer to make sure the Nightlight will work.
15:2815:28 20:28
20:28 20:30
SET
Setting Bedtime
7:30 8:30 8:30 8:15
Setting Wake Up Time
19:59 20:00 20:30
20:30
7:59
8:00 8:30 9:30

Blinky | 11
Note: The Sleep Trainer and Alarm work separately, you can activate both at the same time
or just activate one of them.
Sound Mode
Choose one of the 5 available soundtracks.
Screen Brightness Adjustment
When in normal display mode, press the TIME key (7) to cycle through the 4 LCD display
brightness levels.
15:27 15:27 1 2
3 4 5
SET SET SET
SET SET SET
Volume Adjustment
When in Sound playback mode. Use the Volume + / Volume - keys (10 or 16) to adjust the
volume to the desired level.
Select how long the sounds will play for, choose from 10, 20, 30, 45, 60 and 90 minutes.
10 20 30 45
SET SET SET SET
20:30
20:30
20:30
20:30

12 | Blinky
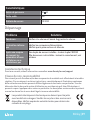
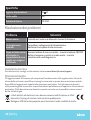
Troubleshooting
Problem Solutions
No sound
Check if the volume is turned down. Increase the volume.
The alarm
clock does not
turn on
Check power supply connections.
Check mains socket is switched on.
After a power
cut, time and
alarm settings
don’t reset
No backup battery fitted - Insert CR2032 battery
Backup battery incorrectly fitted - insert properly see diagram
Waste electrical and electronic products should not be disposed of with
household waste. Please recycle where facilities exist. Check with your Local
Authority for recycling advice.
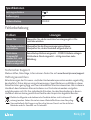
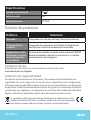
Specifications
Power Input 5V 1A
Audio Output 5W
Backup Battery CR2032
Technical support
For further help, advice, information or live chat visit: www.iboxstyle.com/support
Disclaimer
Updates to Firmware and/or hardware components are made regularly. Therefore
some of the instructions, specifications and pictures in this documentation may
differ slightly from your particular situation. All items described in this guide are for
illustration purposes only and may not apply to your particular situation. No legal right
or entitlements may be obtained from the description made in this manual.

Blinky | 13
DE
Pflege Ihres Weckers
Stellen Sie keine offenen Flammenquellen, wie z. B. brennende Kerzen, auf oder in die
Nähe des Blinky.
Von tropfenden oder spritzenden Flüssigkeiten fernhalten.
Das Gerät sollte nicht direktem Sonnenlicht, sehr hohen oder niedrigen Temperaturen,
Feuchtigkeit, starken Magnetfeldern, hohen Frequenzen und staubigen Umgebungen
ausgesetzt werden.
Lassen Sie immer ausreichend Platz um das Gerät herum zur Belüftung.
Verwenden Sie keine Scheuermittel, Lösungsmittel oder Polituren, um dieses Produkt zu
reinigen. Verwenden Sie nur ein sauberes, feuchtes, weiches Tuch.
Versuchen Sie niemals, Drähte, Stifte oder ähnliche Gegenstände in die Lüftungsschlitze
oder Öffnungen des Geräts einzuführen.
Zerlegen oder modifizieren Sie das Gerät nicht, es gibt keine vom Benutzer zu wartenden Teile.
Wenn der Wecker beschädigt ist oder Funktionsstörungen aufweist, verwenden Sie ihn
nicht. Wenden Sie sich an einen qualifizierten Servicetechniker.
Dieses Produkt enthält eine Lithium-Knopfzellenbatterie. Halten Sie die Batterie von
Kindern fern. Der Akku kann beim Verschlucken gesundheitsschädlich oder tödlich sein.
Suchen Sie sofort einen Arzt auf, wenn Sie glauben, dass eine Batterie verschluckt wurde.
Entsorgen Sie dieses Produkt am Ende seines Lebenszyklus nicht mit dem Hausmüll;
Bringen Sie es zu einer ausgewiesenen Sammelstelle für das Recycling von elektrischen
und elektronischen Geräten mit Batterien. Bitte erkundigen Sie sich bei Ihrer örtlichen
Behörde nach Recyclingempfehlungen.
Inhalt
Sicherheitshinweise .......................................13
Bedienelemente & Funktionen ..................14
Stromversorgung Ihres Weckers ...............15
Batteriesicherung ............................................ 15
Einstellen der Uhr ...........................................15
Alarm einstellen ...............................................16
Nickerchenzeitmodus .............................17-18
Schlaftrainermodus ................................ 18-19
Tonmodus ..........................................................19
Lautstärkeregelung ....................................... 20
Spezifikationen ................................................ 21
Fehlerbehebung ..............................................21
Technischer Support ..................................... 58

14 | Blinky
Vorderseite
Bedienelemente und Funktionen
Unterseite
Rückseite
Bedienelemente und Funktionen
1. Display des Blinky
2. Schlummertaste
3. Nachtlicht
4. Lautsprecher
5. Backup-Batterien
6. Eingang für die
Stromversorgung
7. Uhrentaste
8. Alarmtaste
9. Schlaflerntaste
10. Nächster /
Lautstärke +
11. Einstelltaste
12. Klangtaste
13. Nachtlichttaste
14. Taste für den
Mittagsschlaf-
Timer
15. Sperrschalter
16. Vorheriger /
Lautstärke –
Vor dem erstmaligen Gebrauch
Achten Sie darauf, dass der Sperrschalter (15) entsperrt ist,
bevor Sie etwas an dem Wecker verändern.
1
2
3
4
5
6
12
7
13 14 1615
8 9 10 11
Hilfe
Kurz drücken
Lange drücken

Blinky | 15
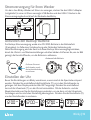
Stromversorgung für Ihren Wecker
Um den i-box Blinky-Wecker mit Strom zu versorgen, stecken Sie den USB-C-Adapter
(mitgeliefert) in eine mit Strom versorgte USB-Buchse und den USB-C-Stecker in die
Stromversorgungsbuchse (6) auf der Rückseite des Blinky.
Aktivieren der Backup-Batterie
Zur Backup-Stromversorgung wurde eine CR-2032-Batterie in das Batteriefach
(5) eingelegt. Im Falle einer Unterbrechung oder fehlenden Verbindung der
Netzstromversorgung wird das Gerät mit dieser Backup-Stromversorgung betrieben,
damit die Uhrzeit- und Weckereinstellungen erhalten bleiben. Entfernen Sie, wie im Bild
gezeigt, die Kunststofflasche, um die Batterie zu aktivieren.
Austausch der Batterie
Entfernen Sie zuerst
die Schraube, um die
Batteriefachabdeckung
zu entfernen
Einstellen der Uhr
Bevor Sie Einstellungen am Blinky vornehmen, muss zunächst die Sperrtaste entsperrt
werden. Drücken Sie anschließend die Einstelltaste (11), um in den Einstellmodus zu
gelangen. Auf dem Display wird das Wort SET angezeigt. Drücken Sie anschließend
kurz auf die Uhrentaste (7), um die Uhrzeit einzustellen. Mit der Aufwärts- und der
Abwärtstaste können Sie die Einstellungen verändern, um sie dann mit der Uhrentaste
festzulegen und zur nächsten Einstellung überzugehen. Drücken Sie die Einstelltaste (11),
um den Einstellmodus zu verlassen.
12:00 12:00 12:00 3:00
SET SET SET
AM AM AM PM
C
R
2
0
3
2
3
V
O
L
T
S
L
I
T
H
I
U
M
B
A
T
T
E
R
Y
C
R
2
0
3
2
3
V
O
L
T
S
L
I
T
H
I
U
M
B
A
T
T
E
R
Y

16 | Blinky
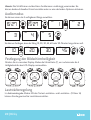
Einstellen des Alarms
Um einen Alarm einzustellen, müssen Sie im Einstellmodus sein. Drücken Sie kurz auf die
Einstelltaste (11), um in den Einstellmodus zu gelangen. Drücken Sie kurz auf die Alarmtaste
(8), um in den Alarmeinstellungsmodus zu wechseln.
Einstellen der Weckzeit
Einstellen des Alarmtons
Sie haben die Wahl zwischen 5 integrierten Alarmtönen.
12H 24H
SET SET
PM
15:27
15:27 3:27 15:27
15:27 15:27 8:27
8:27
1 2 3
8:30
8:30 15:28
15:27
15:27 8:30
SET
SET SET SET
SET
SET SET SET
SET
SET
Um zwischen dem 12- und dem 24-Stunden-Zeitformat zu wählen, drücken Sie im
normalen Display-Modus lange auf die Alarmtaste (8).
Bei ausgeschalteter Mittagsschlaffunktion: Zeigen Sie durch langes Drücken der
Schlummertaste (2) eine aktive Alarmzeit an.
3:00 3:27
SET SET
PM PM

Blinky | 17
Mittagsschlafmodus
Setzen Sie den Mittagsschlaf-Timer auf einen Wert zwischen 10 Minuten und 3 Stunden. Nach
Ablauf der Mittagsschlafzeit kann entweder ein Alarmton (AL) oder ein Licht (LI) als Alarm
dienen. Sie haben die Auswahl zwischen 10, 30, 45, 60, 90, 120, 150 oder 180 Minuten.
Hinweis: Wenn Sie lange auf die Schlummertaste (2) drücken, wird die verbleibende Zeit für
den Mittagsschlaf-Timer angezeigt.
Sie können den Mittagsschlaf-Timer deaktivieren, indem Sie im Uhrenmodus kurz auf die
Taste des Mittagsschlaf-Timers (14) drücken.
15:27
15:27 15:27
15:27 10 30
30
3
Li Al
SET SET SET
SET
SET SET
Alarm aktivieren/deaktivieren
Im Uhrenmodus: Drücken Sie kurz die Alarmtaste (8), um einen eingestellten Alarm zu
aktivieren bzw. zu deaktivieren. Ein Weckersymbol zeigt an, wenn der Alarm aktiviert ist.
15:28 15:2815:28
Schlummerfunktion / Stoppen des Alarms
Schlummerfunktion Stopp
Stopp 24hr
➡
Aus
➡
➡
10 minuten
➡

18 | Blinky
Nachtlichtmodus
Der Blinky hat eine integrierte Nachtlichtfunktion. Sie haben die Wahl zwischen 4
einfarbigen Lichtern und einem blauen Kreis.
Sie können auch festlegen, wie lange das Nachtlicht an bleiben soll. Sie haben die Wahl
zwischen 10 min, 20 min, 30 min, 45 min, 1 h, 1 h 30 min, EIN.
Sie haben die Wahl zwischen 3 verschiedenen Helligkeitsstufen.
Drücken Sie lange auf die Einstelltaste (11), um in den Nachtlichteinstellungsmodus zu
wechseln. Drücken Sie kurz auf die Nachtlichttaste (13), um den Timer zu aktivieren.
Die gespeicherten Einstellungen
werden zum Standard für das
Nachtlicht, bis Sie erneut die
Einstellungen ändern.
30 Minuten
später
15:27 10 20 30
SET SET SET SET
Schlaflernmodus
Mit der Schlaflernfunktion können Sie einen Schlafzyklus festlegen, um die Gewöhnung
an einen festen Einschlaf- und Aufwachrhythmus zu unterstützen. Drücken Sie kurz die
Schlaflerntaste (9), um die Lernfunktion zu aktivieren bzw. zu deaktivieren.
Bei eingeschaltetem Schlaftrainer wird das Sonnen- bzw.
Mondsymbol angezeigt. Bei ausgeschaltetem Schlaftrainer
verschwindet das Sonnen- bzw. Mondsymbol
15:28
1 2 3
SET SET SET

Blinky | 19
30 Minuten vor der Aufwachzeit schaltet sich das gelbe Nachtlicht ein. Wenn es Zeit zum
Aufstehen ist, öffnen sich die Augen und das Sonnensymbol wird angezeigt. Anschließend
geht für 1 Stunde das grüne Licht an und der LCD-Bildschirm nimmt wieder die zuletzt
eingestellte Helligkeit an.
30 Minuten vor der Einschlafzeit wird das rote Nachtlicht eingeschaltet. Wenn es Zeit zum
Schlafengehen ist, werden die Augen geschlossen, das Mondsymbol wird angezeigt und
der LCD-Bildschirm gedimmt.
Hinweis: Wenn Sie den Aufwachzeitraum für den Schlaftrainer festgelegt haben, müssen
Sie noch den Schlaftrainer aktivieren, damit das Nachtlicht funktioniert.
15:2815:28 20:28
20:28 20:30
SET
Einschlafzeit festlegen
7:30 8:30 8:30 8:15
Aufstehzeit festlegen
19:59 20:00 20:30
20:30
7:59
8:00 8:30 9:30

20 | Blinky
Hinweis: Der Schlaftrainer und der Alarm funktionieren unabhängig voneinander. Sie
können beide auf dieselbe Uhrzeit einstellen oder nur eine der beiden Optionen aktivieren.
Audiomodus
Sie können einen der 5 verfügbaren Klänge auswählen.
Festlegung der Bildschirmhelligkeit
Drücken Sie im normalen Display-Modus die Uhrzeittaste (7), um nacheinander die 4
Helligkeitsstufen des LCD-Displays anzuwählen.
15:27 15:27 1 2
3 4 5
SET SET SET
SET SET SET
Lautstärkeregelung
Im Audiowiedergabe-Modus: Mit den Tasten Lautstärke + und Lautstärke – (10 bzw. 16)
können Sie die gewünschte Lautstärke einstellen.
Sie können festlegen, dass der Klang 10, 20, 30, 45, 60 oder 90 Minuten lang ertönen soll.
10 20 30 45
SET SET SET SET
20:30
20:30
20:30
20:30

Blinky | 21
Fehlerbehebung
Problem Lösungen
Keinen Ton
Überprüfen Sie, ob die Lautstärke heruntergeregelt ist. Die
Lautstärke erhöhen.
Der Wecker schaltet
sich nicht ein
Überprüfen Sie die Stromversorgungsanschlüsse.
Überprüfen Sie, ob die Steckdose eingeschaltet ist.
Nach einem
Stromausfall
werden Zeit- und
Alarmeinstellungen
nicht zurückgesetzt
Keine Backup-Batterie eingesetzt - CR2032-Batterie einlegen.
Stützbatterie falsch eingesetzt - richtig einsetzen siehe
Abbildung.
Spezifikationen
Leistungsaufnahme 5V 1A
Audioausgang 5W
Batterie-Backup CR2032
Elektrische Altgeräte und elektronische Produkte dürfen nicht imHausmüll
entsorgt werden. Geben Sie sie bei einem Wertstoffhof bzw. einer Recycling-
Sammelstelle ab. Bei Fragen zum Recycling können Sie sich an Ihre örtlichen
Behörden oder Ihr Geschäft vor Ort wenden.
Technischer Support
Weitere Hilfen, Ratschläge, Informationen finden Sie auf: www.iboxstyle.com/support
Haftungsausschluss
Aktualisierungen der Firmware- und/oder Hardwarekomponenten werden regelmäßig
durchgeführt. Daher können einige Anweisungen, Spezifikationen und Bilder in dieser
Dokumentation geringfügig von Ihrer individuellen Situation abweichen. Alle in diesem
Handbuch beschriebenen Elemente dienen nur Illustrationszwecken und gelten
möglicherweise nicht für Ihre individuelle Situation. Aus der Beschreibung in diesem
Handbuch können keine gesetzlichen Rechte oder Ansprüche abgeleitet werden.

22 | Blinky
ES
Cuidando tu despertador
No coloque fuentes de llamas descubiertas, como velas encendidas, sobre o cerca del Blinky.
Mantener alejado de líquidos que gotean o salpican.
La unidad no debe exponerse a la luz solar directa, temperaturas muy altas o bajas,
humedad, fuertes campos magnéticos de alta frecuencia y entornos polvorientos.
Siempre deje suficiente espacio alrededor de la unidad para la ventilación.
No use abrasivos, solventes o abrillantadores para limpiar este producto. Utilice
únicamente un paño limpio, húmedo y suave.
Nunca intente insertar cables, clavijas u otros objetos similares en las ventilaciones o
aberturas de la unidad.
No desmonte ni modifique la unidad, no hay piezas reparables por el usuario.
Si el despertador está dañado o funciona mal, no lo use. Consulte a un ingeniero de
servicio calificado.
Este producto contiene una batería de litio tipo moneda, mantenga la batería fuera del
alcance de los niños. La batería podría ser dañina o fatal si se traga. Busque atención
médica de inmediato si cree que se ha tragado una batería.
No deseche este producto con la basura doméstica al final de su ciclo de vida; llévelo a un
centro de recogida designado para el reciclaje de aparatos eléctricos y electrónicos con
pilas. Consulte con su autoridad local para obtener consejos sobre reciclaje.
Contenido
Información de seguridad ...........................22
Controles y funciones ...................................23
Encendido de su despertador ...................24
Respaldo de batería ......................................24
Puesta en hora del reloj ...............................24
Configuración de la alarma .........................25
Modo de tiempo de siesta ................... 26-27
Modo entrenador de sueño ..................27-28
Modo de sonido ..............................................28
Ajuste de volumen .........................................29
Especificaciones ............................................. 29
Solución de problemas ................................29
Soporte técnico .............................................. 59

Blinky | 23
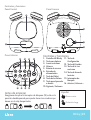
Panel frontal
Controles y funciones
Panel inferior
Panel trasero
Controles y funciones
1. Pantalla del Blinky
2. Tecla para Aplazar
3. Luces nocturnas
4. Altavoz
5. Batería de reserva
6. Entrada de
alimentación
7. Tecla del Reloj
8. Tecla de la Alarma
9. Tecla para Aprender
a dormir
10. Siguiente / Volumen +
11. Tecla de
Configuración
12. Tecla del Sonido
13. Tecla de la Luz
nocturna
14. Tecla de Hora de
la siesta
15. Interruptor de
bloqueo
16. Anterior / Volumen –
Antes de empezar
Asegúrese de que el interruptor de bloqueo (15) esté en la
posición desbloqueada para poder hacer los cambios que
desee en el reloj despertador.
1
2
3
4
5
6
12
7
13 14 1615
8 9 10 11
Ayudar
Prensa corta
Pulsación larga

24 | Blinky
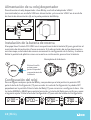
Alimentación de su reloj despertador
Para alimentar el reloj despertador i-box Blinky, enchufe el adaptador USB C
(suministrado) en un enchufe USB con alimentación y el conector USB C en el enchufe
de fuente de alimentación (6) en la parte posterior del Blinky.
Instalación de la batería de reserva
El equipo lleva 1 batería CR-2032 en el compartimento de la batería (5) para garantizar el
suministro de alimentación si fuera necesario. Si la alimentación de red se desconecta o
se interrumpe, esta batería de reserva conservará la configuración de la fecha y la alarma.
Retire la pestaña de plástico como se muestra a continuación, para activar la batería.
Reemplazo de la batería
Retire el tornillo
primero para
quitar la tapa del
compartimiento de
la batería
Configuración del reloj
Para configurar cualquier ajuste del Blinky, compruebe que el reloj esté en la posición Off,
pulse la tecla de Configuración (11) para acceder al modo de Configuración; la palabra SET
parpadeará en la pantalla. Pulse la tecla del Reloj (7) para comenzar a configurar la hora. Use
las teclas ARRIBA y ABJAO para cambiar los ajustes y la tecla del Reloj para confirmar y pasar
al siguiente ajuste. Pulse la tecla de Configuración (11) para salir del modo de Configuración.
12:00 12:00 12:00 3:00
SET SET SET
AM AM AM PM
C
R
2
0
3
2
3
V
O
L
T
S
L
I
T
H
I
U
M
B
A
T
T
E
R
Y
C
R
2
0
3
2
3
V
O
L
T
S
L
I
T
H
I
U
M
B
A
T
T
E
R
Y

Blinky | 25
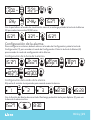
Configuración de la alarma
Para configurar una alarma, deberá estar en el modo de Configuración; pulse la tecla de
Configuración (11) para acceder al modo de Configuración. Pulse la tecla de la Alarma (8)
para acceder al modo de configuración de la Alarma.
Configuración de la hora de la alarma
Configuración del sonido de la alarma
Elija entre 5 sonidos incorporados para cuando suene la alarma.
3:00 3:27
12H 24H
SET SET
SET SET
PM
PM PM
15:27
15:27 3:27 15:27
15:27 15:27 8:27
8:27
1 2 3
8:30
8:30 15:28
15:27
15:27 8:30
SET
SET SET SET
SET
SET SET SET
SET
SET
Con la pantalla en el modo de visualización normal, mantenga pulsada la tecla de la Alarma
(8) para seleccionar entre 12/24 horas.
Con la función de Siesta desconectada. Mantenga pulsada la tecla para Aplazar (2) para ver
la hora de la alarma activa.

26 | Blinky
Modo Hora de la siesta
Configure un tiempo para la siesta entre 10 minutos y 3 horas. Use una alarma (AL) o una luz
(LI) para actuar como alarma una vez transcurrido ese tiempo. Elija entre 10, 30, 45, 60, 90,
120, 150 o 180 minutos.
Nota: Mantenga pulsada la tecla para Aplazar (2) para ver cuánto queda de siesta.
Para desactivar el temporizador para la siesta, pulse la tecla del Temporizador para la siesta
(14) en el modo de Reloj.
15:27
15:27 15:27
15:27 10 30
30
3
Li Al
SET SET SET
SET
SET SET
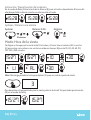
Activación / Desactivación de la alarma
En el modo de Reloj. Pulse la tecla de la Alarma (8) para activarla o desactivarla. El icono del
reloj despertador indicará cuándo una alarma está activada.
15:28 15:2815:28
Aplazar / Detener una alarma
➡
➡
10 minutos
Aplazar Detener 24hr Detener
➡
➡
Off

Blinky | 27
Modo de Luz nocturna
El Blinky incorpora una función de luz nocturna, elija entre 4 colores y un ciclo de azules.
También puede configurar durante cuánto tiempo estarán encendidas las luces nocturnas;
elija entre 10 m, 20 m, 30 m, 45 m, 1 hora, 1,5 horas, ON
Seleccione el nivel de brillo, puede elegir entre 3 niveles diferentes
Pulse la tecla de configuración de la Alarma (11) para salir del modo de configuración de la Luz
nocturna. Pulse la tecla de la Luz nocturna (13) para activar el temporizador.
Los ajustes guardados pasarán a ser
predeterminados para la luz nocturna
hasta que se cambien nuevamente.
30 minutos
más tarde
15:27 10 20 30
SET SET SET SET
Modo de Aprender a dormir
La función para aprender a dormir le permite establecer ciclos de sueño para ayudar a
desarrollar una rutina para irse a la cama y despertarse por las mañanas. Pulse la tecla de
Aprender a dormir (9) para activarla o desactivar esta función.
Con la función de Aprender a dormir activada, se mostrará
el icono sol/luna; cuando la función esté apagada, el icono
desaparecerá.
15:28
1 2 3
SET SET SET

28 | Blinky
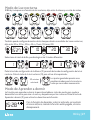
30 minutos antes de la hora de levantarse, se encenderá la luz amarilla; cuando sea el
momento de levantarse, los ojos se abrirán y aparecerá el icono del sol, y la luz verde se
encenderá durante 1 hora, volviendo la pantalla LCD al último nivel de brillo configurado.
30 minutos antes de irse a la cama, se encenderá la luz nocturna de color rojo. En el
momento de acostarse, se cerrarán los ojos y aparecerá el icono de la luna, atenuándose la
pantalla LCD.
Nota: Después de configurar el periodo de sueño en la función de Aprender a dormir,
recuerde desconectarla para que funcione la luz nocturna.
15:2815:28 20:28
20:28 20:30
SET
Configuración de la hora de irse a dormir
7:30 8:30 8:30 8:15
Configuración de la hora de levantarse
19:59 20:00 20:30
20:30
7:59
8:00 8:30 9:30

Blinky | 29
Nota: La función de Aprender a dormir y la Alarma funcionan por separado, puede activar
ambas al mismo tiempo o solo una de ellas.
Modo de Sonido
Seleccione uno de los 5 sonidos disponibles.
Ajuste del brillo de la pantalla
Con la pantalla en modo de visualización normal, pulse la tecla de la HORA (7) para recorrer
los 4 niveles de brillo de la pantalla LCD.
15:27 15:27 1 2
3 4 5
SET SET SET
SET SET SET
Ajuste del volumen
Con el modo de reproducción del sonido. Use las teclas Volumen + / Volumen - (10 o 16)
para ajustar el volumen al nivel deseado.
Seleccione cuánto tiempo debe durar el sonido, elija entre 10, 20, 30, 45, 60 y 90 minutos.
10 20 30 45
SET SET SET SET
20:30
20:30
20:30
20:30

30 | Blinky
Solución de problemas
Problema Soluciones
Sin sonido
Compruebe si el volumen está bajo. Aumenta el volumen.
El despertador no
enciende
Compruebe las conexiones de la fuente de alimentación.
Verifique que la toma de corriente esté encendida.
Después de un corte
de energía, los ajustes
de hora y alarma no
se restablecen
Sin batería de respaldo instalada: inserte la batería CR2032
Batería de respaldo colocada incorrectamente - insértela
correctamente, vea el diagrama
Especificaciones
Entrada de alimentación 5V 1A
Salida de audio 5W
Batería de reserva CR2032
Los productos eléctricos y electrónicos desechados no deben tirase con los
residuos domésticos. Por favor, recíclelos a través de los servicios apropiados.
Para obtener asesoría sobre el reciclaje, consulte a su Autoridad Local.
Asistencia técnica
Para obtener más asistencia, asesoramiento o información visite:
www.iboxstyle.com/support
Limitación de responsabilidad
Se realizan actualizaciones en el firmware y los componentes de hardware con
regularidad. Por tanto, algunas de las instrucciones, especificaciones e imágenes de
este documento pueden diferir ligeramente de las correspondientes a su dispositivo
en particular. Todos los elementos descritos en esta guía son meramente ilustrativos
y puede que no se apliquen a su dispositivo en particular. No se obtendrán derechos
legales ni beneficios adquiridos a partir de la descripción de este manual.

Blinky | 31
FR
Entretien de votre réveil
Ne placez pas de sources de flammes nues, telles que des bougies allumées, sur ou à
proximité du Blinky.
Tenir à l’écart des gouttes ou des éclaboussures de liquides.
L’appareil ne doit pas être exposé à la lumière directe du soleil, à des températures très
élevées ou basses, à l’humidité, à des champs magnétiques puissants à hautes fréquences
et à des environnements poussiéreux.
Laissez toujours suffisamment d’espace autour de l’appareil pour la ventilation.
N’utilisez pas d’abrasifs, de solvants ou de vernis pour nettoyer ce produit. Utilisez
uniquement un chiffon propre, humide et doux.
N’essayez jamais d’insérer des fils, des broches ou d’autres objets similaires dans les évents
ou l’ouverture de l’appareil.
Ne démontez pas et ne modifiez pas l’appareil, il n’y a pas de pièces réparables par
l’utilisateur.
Si le réveil est endommagé ou en cas de dysfonctionnement, ne l’utilisez pas. Consultez
un ingénieur de service qualifié.
Ce produit contient une pile bouton au lithium. Gardez la pile hors de portée des enfants.
La batterie peut être nocive ou mortelle si elle est avalée. Consultez immédiatement un
médecin si vous pensez qu’une pile a été avalée.
Ne jetez pas ce produit avec les ordures ménagères à la fin de son cycle de vie ;
apportez-le à un centre de collecte agréé pour le recyclage des appareils électriques et
électroniques avec piles. Veuillez consulter votre autorité locale pour obtenir des conseils
sur le recyclage.
Contenu
Consignes de sécurité .................................... 31
Commandes et fonctions ........................... 32
Alimenter votre réveil ...................................33
Batterie de secours ........................................ 33
Réglage de l’horloge ...................................... 33
Réglage de l’alarme .......................................34
Mode Sieste...............................................35-36
Mode d’entraînement au sommeil ... 36-37
Mode son ...........................................................38
Réglage du volume ........................................38
Spécifications .................................................. 39
Dépannage .......................................................39
Assistance technique .................................... 59

32 | Blinky
Panneau avant
Commandes et fonctionnalités
Panneau inférieur
Panneau arrière
Commandes et fonctionnalités
1. Affichage clignotant
2. Bouton Snooze
3. Lumières nocturnes
4. Haut-parleur
5. Pile de secours
6. Entrée de
l’alimentation
électrique
7. Bouton Horloge
8. Bouton Réveil
9. Bouton Apprendre à
dormir
10. Piste suivante/
Volume +
11. Bouton Paramètres
12. Bouton Son
13. Bouton Lumière
nocturne
14. Bouton Sieste
15. Interrupteur de
verrouillage
16. Piste précédente/
Volume -
Avant de commencer
Assurez-vous que l’interrupteur de verrouillage (15) soit
dans la position déverrouillée pour que vous puissiez
effectuer des changements au réveil.
1
2
3
4
5
6
12
7
13 14 1615
8 9 10 11
Aider
Appui court
Appui long

Blinky | 33
Alimentation de votre réveil
Pour alimenter le réveil i-box Blinky, branchez l’adaptateur USB C (fourni) dans une prise
USB alimentée et le connecteur USB C dans la prise d’alimentation (6) à l’arrière du Blinky.
Installation de la pile de secours
Une pile CR-2032 est installée dans le compartiment à piles (5) pour fournir une
alimentation de secours. Si l’alimentation secteur est déconnectée ou interrompue, cette
alimentation de secours fournit de l’électricité et sauvegarde l’heure et les réglages du
réveil. Retirez la languette en plastique comme indiqué ci-dessous pour activer la pile.
Remplacement de la batterie
Retirez d’abord
la vis pour retirer
le couvercle du
compartiment
à piles
Réglage de l’heure
Avant de régler tout paramètre sur l’appareil Blinky, vérifiez que l’interrupteur est
déverrouillé, puis appuyez sur le Bouton Paramètres (11) pour arriver en mode de réglage.
Le mot REGLAGES (SET) apparaitra à l’écran. Puis appuyez brièvement sur la touche
Horloge (7) pour commencer à régler l’heure. Utilisez les boutons UP et DOWN pour
changer le réglage et le bouton Horloge pour terminer et passer au prochain paramètre.
Appuyez sur le Bouton Paramètres (11) pour sortir du mode de paramétrage.
12:00 12:00 12:00 3:00
3:00 3:27
SET SET SET
SET SET
AM AM AM PM
PM PM
C
R
2
0
3
2
3
V
O
L
T
S
L
I
T
H
I
U
M
B
A
T
T
E
R
Y
C
R
2
0
3
2
3
V
O
L
T
S
L
I
T
H
I
U
M
B
A
T
T
E
R
Y

34 | Blinky
Réglage du réveil
Pour régler un réveil, vous devez être en mode Paramètres et appuyer brièvement sur la
touche Paramètres (11) pour passer en mode Paramètres. Appuyez brièvement sur la touche
Réveil(8) pour accéder au mode de réglage du réveil.
Réglage de l’heure de l’alarme
Réglage du son du réveil
Choisissez le son de votre réveil à partir de 5 sons intégrés.
12H 24H
SET SET
PM
15:27
15:27 3:27 15:27
15:27 15:27 8:27
8:27
1 2 3
8:30
8:30 15:28
15:27
15:27 8:30
SET
SET SET SET
SET
SET SET SET
SET
SET
En mode d’affichage normal, appuyez longuement sur le Bouton Réveil (8) pour choisir
entre le format 12 ou 24 heures.
Lorsque la fonction Sieste est désactivée. Appuyez longuement sur le Bouton Snooze (2)
pour visualiser un horaire de réveil actif.

Blinky | 35
Mode Sieste
Réglez un temps de sieste allant de 10 minutes à 3 heures. Utilisez un réveil (AL) ou la lumière
(LI) pour vous réveiller à la fin de votre temps de sieste. Vous pouvez choisir entre 10, 30, 45,
60, 90, 120, 150 et 180 minutes.
Remarque: Appuyez longuement sur le Bouton Snooze (2) pour voir combien de temps de
sieste il vous reste.
Pour désactiver une Sieste, appuyez brièvement sur le bouton Sieste (14) en
étant en mode Horloge.
15:27
15:27 15:27
15:27 10 30
30
3
Li Al
SET SET SET
SET
SET SET
Activer et désactiver le réveil
Lorsque vous êtes en mode Horloge. Appuyez brièvement sur le Bouton Réveil (8) pour acti-
ver et désactiver un réveil programmé. L’icone du réveil indiquera lorsqu’un réveil est activé.
15:28 15:2815:28
Arrêt du réveil / snooze
Snooze Arrêt
Arrêt
24hr
➡
Arrêt
➡
➡
10 minutos
➡

36 | Blinky
Mode Lumière nocturne
L’appareil Blinky possède une fonction de lumière nocturne intégrée. Vous pouvez choisir
entre 4 couleurs et un cycle bleu.
Vous pouvez également choisir la durée de la lumière nocturne, entre 10 min, 20 min, 30
min, 45 min, 1 heure, 1 heure 30 min, marche.
Choisissez la luminosité, sélectionnez parmi 3 niveaux différents.
Appuyez longuement sur la touche Paramètres (11) pour accéder au mode de réglage de la lumière
nocturne. Appuyez brièvement sur le Bouton Lumière nocturne (13) pour activer la durée.
Les paramètres sauvegardés
deviennent les paramètres par
défaut pour la lumière nocturne
jusqu’à ce qu’ils soient modifiés.
30 minutes
plus tard
15:27 10 20 30
SET SET SET SET
Mode Apprendre à dormir
La fonction Apprendre à dormir vous permet de paramétrer un cycle de sommeil pour aider à
mettre en place une routine pour l’heure du coucher et du lever le matin. Appuyez brièvement
sur le Bouton Apprendre à dormir (9) pour activer et désactiver la fonction Apprendre à dormir.
Lorsque la fonction Apprendre à dormir est activée, l’icône
soleil/lune apparait. Lorsque la fonction Apprendre à dormir
est désactivée, l’icône soleil/lune disparait.
15:28
1 2 3
SET SET SET

Blinky | 37
30 minutes avant l’heure du lever, la lumière nocturne jaune s’allume. Lorsqu’il est l’heure
de se lever, les yeux s’ouvrent et l’icône du soleil apparait. La lumière verte s’allume pendant
une heure et l’écran LCD revient au dernier réglage de luminosité.
30 minutes avant l’heure du coucher, la lumière rouge va s’allumer. Lorsqu’il est l’heure d’aller
au lit, les yeux se forment et l’icône de la lune apparait. L’écran LCD devient moins lumineux.
Remarque: Après avoir régler un horaire de lever pour Apprendre à dormir, n’oubliez pas
d’activer Apprendre à dormir pour que la lumière nocturne fonctionne.
15:28
15:28 20:28
20:28 20:30
SET
Régler l’heure du coucher
7:30 8:30 8:30 8:15
Régler l’heure du lever
19:59 20:00 20:30
20:30
7:59
8:00 8:30 9:30

38 | Blinky
Remarque: La fonction Apprendre à dormir et le Réveil fonctionnent de manière
indépendante. Vous pouvez activer les deux en même temps ou n’en activer qu’un des deux.
Mode Son
Choisissez entre les 5 sons disponibles.
Ajustement de la luminosité de l’écran
En mode d’affichage normal, appuyez sur le bouton TEMPS (7) pour passer en revue les 4
niveaux de luminosité de l’affichage LCD.
15:27 15:27 1 2
3 4 5
SET SET SET
SET SET SET
Réglage du volume
En mode Lecture de sons. Utilisez les touches Volume - et Volume + (10 et 16) pour régler
le volume au niveau souhaité.
Sélectionnez la durée pendant laquelle le son sera actif. Choisissez entre 10, 20, 30, 45,
60 et 90 minutes.
10 20 30 45
SET SET SET SET
20:30
20:30
20:30
20:30

Blinky | 39
Dépannage
Problème Solutions
Pas de son
Vérifiez si le volume est baissé. Augmenter le volume.
Le réveil ne s'allume
pas
Vérifier les connexions d’alimentation.
Vérifiez que la prise secteur est allumée.
Après une coupure
de courant, les
paramètres d'heure
et d'alarme ne se
réinitialisent pas
Pas de pile de secours installée - Insérez la pile CR2032
Pile de secours mal installée - insérez-la correctement, voir
schéma
Caractéristiques
Entrée de puissance 5V 1A
Sortie audio 5W
Batterie de secours CR2032
Les produits électriques et électroniques ne doivent pas être jetés
avec les déchets ménagers. Veuillez les recycler si des services sont
disponibles. Vérifiez auprès des autorités locales pour obtenir des
conseils de recyclage.
Assistance technique
Pour tous conseils, aide et informations consultez: www.iboxstyle.com/support
Clause de non-responsabilité
Des mises à jour du firmware et/ou des composants du matériel sont effectuées à intervalles
réguliers. Par conséquent, certaines instructions, caractéristiques et illustrations contenues
dans cette documentation peuvent différer légèrement dans votre cas particulier. Tous les
éléments décrits dans cette notice d’utilisation ne sont donnés qu’à titre d’illustration et
peuvent ne pas s’appliquer dans votre cas particulier. La description contenue dans le présent
manuel ne donne lieu à aucun droit légal ni aucune admissibilité.

40 | Blinky
IT
Prendersi cura della tua sveglia
Non posizionare sorgenti di fiamme libere, come candele accese sopra o vicino a Blinky.
Tenere lontano da liquidi gocciolanti o spruzzati.
L’unità non deve essere esposta alla luce solare diretta, temperature molto alte o basse,
umidità, forti campi magnetici, alte frequenze e ambienti polverosi.
Lasciare sempre spazio sufficiente intorno all’unità per la ventilazione.
Non utilizzare abrasivi, solventi o lucidanti per pulire questo prodotto. Utilizzare solo un
panno pulito, umido, morbido.
Non tentare mai di inserire fili, spine o altri oggetti simili nelle prese d’aria o nell’apertura
dell’unità.
Non smontare o modificare l’unità, non ci sono parti riparabili dall’utente.
Se la sveglia è danneggiata o malfunzionante non utilizzarla. Consultare un tecnico
dell’assistenza qualificato.
Questo prodotto contiene una batteria a bottone al litio, tenere la batteria lontano dalla
portata dei bambini. La batteria potrebbe essere dannosa o letale se ingerita. Consultare
immediatamente un medico se si ritiene che una batteria sia stata ingerita.
Non smaltire questo prodotto con i rifiuti domestici al termine del suo ciclo di vita;
portarlo in un centro di raccolta designato per il riciclaggio di apparecchi elettrici ed
elettronici con batterie. Si prega di verificare con l’autorità locale per consigli sul riciclaggio.
Contenuti
Informazioni sulla sicurezza .....................40
Controlli e funzionalità .................................41
Alimentare la tua sveglia .............................42
Batteria di riserva ...........................................42
Impostazione dell’orologio ........................ 42
Impostazione della sveglia ......................... 43
Modalità ora del pisolino.......................44-45
Modalità Sleep Trainer ......................... 45-46
Modalità audio ................................................47
Regolazione del volume .............................. 47
Specifiche ........................................................ 48
Risoluzione dei problemi ........................... 48
Assistenza tecnica ......................................... 60

Blinky | 41
Pannello frontale
Comandi e funzioni
Pannello inferiore
Pannello posteriore
Comandi e funzioni
1. Display di Blinky
2. Tasto Snooze
3. Luce notturna
4. Altoparlante
5. Batteria per
alimentazione di
riserva
6. Ingresso
alimentatore
7. Tasto “orologio”
8. Tasto “allarme”
9. Tasto “sleep
trainer”
10. Successivo /
Volume +
11. Tasto per le
impostazioni
12. Regolazione del
volume
13. Tasto per la luce
notturna
14. Tasto “sonnellino”
15. Cursore di blocco
16. Indietro / Volume -
Prima di iniziare
Verificare che il cursore di blocco (15) sia nella posizione
sbloccata, così da poter modificare le impostazioni.
1
2
3
4
5
6
12
7
13 14 1615
8 9 10 11
Aiuto
Pressione breve
Premere a lungo

42 | Blinky
Alimentazione della sveglia
Per alimentare la sveglia i-box Blinky, collega l’adattatore USB C (in dotazione) a una presa
USB alimentata e il connettore USB C alla presa di alimentazione (6) sul retro del Blinky.
Inserimento della batteria di riserva
Nel vano batteria (5) è installata una batteria CR-2032 per l’alimentazione di riserva. Qualora
si verificasse un’interruzione di corrente o l’alimentazione principale dovesse scollegarsi,
subentra la batteria di riserva per alimentare la sveglia e mantenere le impostazioni dell’ora e
degli allarmi. Rimuovere la linguetta in plastica come mostrato sotto per attivare la batteria.
Sostituzione della batteria
Rimuovere prima la
vite per rimuovere il
coperchio del vano
batteria
Impostazione dell’orologio
Prima di effettuare impostazioni, verificare che il cursore di blocco si trovi nella posizione
sbloccata; premere quindi il tasto per le impostazioni (11) per accedere alla modalità: sul
display compare la scritta SET (Impostare). Premere brevemente il tasto “orologio” (7) per
impostare l’ora. Utilizzare le opzioni “Successivo” e “Indietro” per selezionare il valore che
si desidera impostare e confermare con il tasto “orologio”, quindi passare all’impostazione
successiva. Premere il tasto per le impostazioni (11) per uscire dalla modalità.
12:00 12:00 12:00 3:00
3:00 3:27
SET SET SET
SET SET
AM AM AM PM
PM PM
C
R
2
0
3
2
3
V
O
L
T
S
L
I
T
H
I
U
M
B
A
T
T
E
R
Y
C
R
2
0
3
2
3
V
O
L
T
S
L
I
T
H
I
U
M
B
A
T
T
E
R
Y

Blinky | 43
Impostazione dell’allarme
Per impostare un allarme occorre trovarsi nella modalità per le impostazioni; per accedere
alla modalità, premere brevemente il tasto per le impostazioni (11). Premere brevemente il
tasto “allarme” (8) per accedere alla modalità di impostazione degli allarmi.
Impostazione dell’ora della sveglia
Impostazione della suoneria dell’allarme
È possibile scegliere tra 5 suoni già integrati per la suoneria.
12H 24H
SET SET
PM
15:27
15:27 3:27 15:27
15:27 15:27 8:27
8:27
1 2 3
8:30
8:30 15:28
15:27
15:27 8:30
SET
SET SET SET
SET
SET SET SET
SET
SET
Nella normale modalità di visualizzazione premere a lungo il tasto “allarme” (8) per
selezionare il formato di visualizzazione dell’ora (12 o 24 ore).
Con la funzione “sonnellino” disattivata: premere a lungo il tasto Snooze (2) per vedere un
orario per il quale risulta attivo un allarme.

44 | Blinky
Modalità “sonnellino”
Impostare il timer per un sonnellino della durata da 10 minuti a 3 ore. Trascorso il tempo
impostato per il sonnellino, utilizzare un allarme (visualizzato sul display come “AL”) o una luce
(visualizzato sul display come “LI”) per agire come allarme quando è trascorso il tempo del
sonnellino. È possibile scegliere tra 10, 30, 45, 60, 90, 120, 150 e 180 minuti.
Nota: Premere a lungo il tasto Snooze (2) per vedere il tempo rimasto per il sonnellino.
Per disattivare il timer, in modalità “orologio” premere brevemente il tasto dedicato (14).
15:27
15:27 15:27
15:27 10 30
30
3
Li Al
SET SET SET
SET
SET SET
Attivazione/Disattivazione allarme
In modalità “orologio”. Premere brevemente il tasto “allarme” (8) per attivare o disattivare un
allarme impostato. Il simbolo dell’orologio con la sveglia segnala che l’allarme è inserito.
15:28 15:2815:28
Snooze / Disattivazione dell’allarme
10 minuti
più tardi
Snooze FermareFermare 24hr
➡
Spento
➡
➡
➡

Blinky | 45
Luce notturna
Blinky dispone di una funzionalità “luce notturna” che consente di scegliere tra 4 colori e un
ciclo di luce blu.
È possibile impostare la durata della funzione, scegliendo tra 10 min., 20 min., 30 min., 45
min., 1 ora, 1 ora e mezza, sempre acceso (ON).
Selezionare uno dei 3 livelli di luminosità.
Premere a lungo il tasto per le impostazioni (11) per accedere alla modalità di impostazione
della luce notturna. Premere brevemente il tasto per la luce notturna (13) per attivare il timer.
Le impostazioni memorizzate rimarranno
predefinite fino alla modifica successiva.
30 minuti
più tardi
15:27 10 20 30
SET SET SET SET
Modalità “sleep trainer” (allenamento al sonno)
La funzione “sleep trainer” permette di impostare il ciclo del sonno per aiutare a sviluppare
una routine per andare a letto e svegliarsi al mattino. Premere brevemente il tasto “sleep
trainer” (9) per attivare o disattivare la funzione di allenamento al sonno.
Quando la funzione è attiva, sono visibili i simboli del sole e della luna;
con la funzione disattivata i simboli non vengono visualizzati.
15:28
1 2 3
SET SET SET

46 | Blinky
30 minuti prima dell’ora del risveglio si accende la luce notturna gialla; quando è ora di
alzarsi, gli occhi si riaprono e compare il simbolo del sole, la luce verde rimarrà accesa per 1
ora e il display LCD tornerà alla luminosità impostata per ultima.
30 minuti prima dell’ora di andare a dormire, si accende la luce notturna rossa. Quando
è ora di andare a dormire gli occhi si chiudono e compare il simbolo della luna, mentre la
luminosità del display LCD diminuisce.
Nota: Dopo avere impostato la funzione “sleep trainer”, ricordare di attivare la funzione in
modo che si attivi anche la luce notturna.
15:28
15:28 20:28
20:28 20:30
SET
Impostazione dell’ora della nanna
7:30 8:30 8:30 8:15
Impostazione dell’ora del risveglio
19:59 20:00 20:30
20:30
7:59
8:00 8:30 9:30

Blinky | 47
Nota: “sleep trainer” e “allarme” funzionano separatamente; è possibile attivare le due
funzioni contemporaneamente o una alla volta.
Suoneria
Selezionare una delle 5 suonerie disponibili.
Luminosità del display
Nella modalità di visualizzazione normale premere il tasto “orologio” (7) per scorrere tra i 4
livelli di luminosità disponibili per il display.
15:27 15:27 1 2
3 4 5
SET SET SET
SET SET SET
Regolazione del volume
In modalità riproduzione suono: utilizzare i tasti Volume + / Volume - (10 o 16) per regolare
il volume.
È possibile scegliere la durata delle suonerie tra 10, 20, 30, 45, 60 e 90 minuti.
10 20 30 45
SET SET SET SET
20:30
20:30
20:30
20:30

48 | Blinky
Risoluzione dei problemi
Problema Soluzioni
Nessun suono
Controlla se il volume è abbassato. Aumenta il volume.
La sveglia non si
accende
Controllare i collegamenti di alimentazione.
Verificare che la presa di rete sia accesa.
Dopo un'interruzione
di corrente, le
impostazioni di ora e
sveglia non vengono
ripristinate
Nessuna batteria di riserva montata - Inserire la batteria CR2032.
Batteria tampone montata in modo errato - inserirla
correttamente vedi diagramma.
Specifiche
Ingresso alimentazione 5V 1A
Uscita audio 5W
Batteria di riserva CR2032
I rifiuti elettrici ed elettronici non devono essere smaltiti insieme ai rifiuti
domestici. Si prega di riciclare nelle strutture predisposte.
Rivolgersi all’Ente locale preposto per informazioni sulle modalità di riciclo.
Assistenza tecnica
Per ulteriori aiuti, consigli o informazioni visitare: www.iboxstyle.com/support
Disconoscimento
Gli aggiornamenti al firmware e/o componenti hardware sono fatti regolarmente. Pertanto,
alcune delle istruzioni, specifiche e immagini contenute in questa documentazione potreb-
bero differire leggermente rispetto alla situazione particolare. Tutti gli elementi descritti
nella presente guida sono solo a scopo illustrativo e potrebbero non applicarsi alla situazione
particolare. Dalla descrizione contenuta in questo manuale non è possibile ricavare nessun
diritto o titolo legale.

Blinky | 49
NL
Je wekker onderhouden
Plaats geen bronnen met open vuur, zoals brandende kaarsen, op of in de buurt van de Blinky.
Verwijderd houden van druipende of opspattende vloeistoffen.
Het apparaat mag niet worden blootgesteld aan direct zonlicht, zeer hoge of lage
temperaturen, vocht, sterke magnetische velden, hoge frequenties en stoffige omgevingen.
Laat altijd voldoende ruimte rond het apparaat voor ventilatie.
Gebruik geen schuurmiddelen, oplosmiddelen of poetsmiddelen om dit product schoon te
maken. Gebruik alleen een schone, vochtige, zachte doek.
Probeer nooit draden, pinnen of andere soortgelijke voorwerpen in de ventilatieopeningen of
opening van het apparaat te steken.
Demonteer of wijzig het apparaat niet, er zijn geen onderdelen die door de gebruiker kunnen
worden onderhouden.
Als de wekker beschadigd is of storingen vertoont, gebruik hem dan niet. Raadpleeg een
gekwalificeerde servicemonteur.
Dit product bevat een lithium-knoopcelbatterij, houd de batterij uit de buurt van kinderen.
De batterij kan schadelijk of dodelijk zijn bij inslikken. Zoek onmiddellijk medisch advies als u
denkt dat een batterij is ingeslikt.
Gooi dit product aan het einde van zijn levenscyclus niet weg met het huisvuil; breng het naar
een aangewezen inzamelcentrum voor de recycling van elektrische en elektronische apparaten
met batterijen. Neem contact op met uw lokale overheid voor advies over recycling.
Inhoud
Veiligheidsinformatie ...................................49
Bediening & functies .................................... 50
Uw wekker aanzetten ....................................51
Batterij back-up ...............................................51
De klok instellen .............................................. 51
Het alarm instellen ........................................ 52
Dutje Tijd Modus .....................................53-54
Slaaptrainer-modus ...............................54-55
Geluidsmodus .................................................56
Volumeregeling ...............................................56
Specificaties ..................................................... 57
Problemen oplossen .....................................57
Technische ondersteuning .........................60

50 | Blinky
Voorpaneel
Bediening en functies
Onderste paneel
Achterpaneel
Bediening en functies
1. Blinky-scherm
2. Sluimertoets
3. Nachtlampje
4. Luidspreker
5. Reservebatterij
6. Ingang netvoeding
7. Kloktoets
8. Alarmtoets
9. Toets slaaptrainer
10. Volgende / Volume +
11. Insteltoets
12. Geluidtoets
13. Toets nachtlampje
14. Middagslaaptoets
15. Vergrendelingss-
chakelaar
16. Vorige / Volume -
Voordat u begint
Controleer of de schakelaar (15) in de ontgrendelde stand
staat. Alleen dan kunt u de wekker aanpassen.
1
2
3
4
5
6
12
7
13 14 1615
8 9 10 11
Helpen
Kort indrukken
Lang indrukken

Blinky | 51
Stroom voor uw wekker
Om de i-box Blinky-wekker van stroom te voorzien, steekt u de USB C-adapter
(meegeleverd) in een gevoede USB-aansluiting en de USB C-connector in de
voedingsaansluiting (6) aan de achterkant van de Blinky.
Plaatsing reservebatterij
In het batterijcompartiment (5) is één CR-2032-batterij geplaatst voor reservevoeding.
Als de netvoeding is losgekoppeld of onderbroken, zorgt deze reservebatterij dat uw tijd-
en alarminstellingen bewaard blijven. Verwijder het hieronder afgebeelde plastic lipje om
de batterij te activeren.
De batterij vervangen
Verwijder eerst
de schroef om het
deksel van het
batterijcompartiment te
verwijderen
De klok instellen
Als u instellingen van de Blinky wilt aanpassen, controleert u eerst of de vergrendeling
in de ontgrendelde stand staat. Druk vervolgens op de insteltoets (11) om de
instellingsmodus te openen. Op het scherm komt “SET” te staan. Druk nu kort op de
kloktoets (7) om de tijd in te stellen. Gebruik de toetsen Omhoog en Omlaag om de
instelling te wijzigen. Druk vervolgens op de kloktoets om op te slaan en door te gaan
naar de volgende instelling. Druk op de insteltoets (11) om de instelmodus af te sluiten.
12:00 12:00 12:00 3:00
3:00 3:27
SET SET SET
SET SET
AM AM AM PM
PM PM
C
R
2
0
3
2
3
V
O
L
T
S
L
I
T
H
I
U
M
B
A
T
T
E
R
Y
C
R
2
0
3
2
3
V
O
L
T
S
L
I
T
H
I
U
M
B
A
T
T
E
R
Y

52 | Blinky
Het alarm instellen
Als u een alarm wilt instellen, moet u in de stand-bymodus zijn. Open de stand-bymodus
door kort op de stand-bytoets (11) te drukken. Druk kort op de alarmtoets (8) om naar de
alarminstelmodus te gaan.
De alarmtijd instellen
Het wekgeluid instellen
Kies welke van de 5 ingebouwde geluiden moet klinken als het alarm afgaat.
12H 24H
SET SET
PM
15:27
15:27 3:27 15:27
15:27 15:27 8:27
8:27
1 2 3
8:30
8:30 15:28
15:27
15:27 8:30
SET
SET SET SET
SET
SET SET SET
SET
SET
In de normale weergavemodus drukt u de alarmtoets (8) lang in om tussen 12- of
24-uursweergave te kiezen.
Als de middagslaapfunctie uitstaat: Druk lang op de sluimertoets (2) om de tijd van een
actief alarm te zien.

Blinky | 53
Middagslaapmodus
Stel de duur van het middagslaapje in: van 10 minuten tot 3 uur. Kies alarm (AL) of licht (LI) als
signaal aan het einde van het middagslaapje. U kunt kiezen uit 10, 30, 45, 60, 90, 120, 150 of
180 minuten.
Opmerking: Druk lang op de sluimertoets (2) om te zien hoeveel tijd er nog resteert voor
het middagslaapje.
U kunt de middagslaaptimer uitzetten door in de klokmodus kort op de middagslaaptoets
te drukken (14).
15:27
15:27 15:27
15:27 10 30
30
3
Li Al
SET SET SET
SET
SET SET
Het alarm activeren/deactiveren
Als de klokmodus actief is: Druk kort op de alarmtoets (8) om het ingestelde alarm te acti-
veren of deactiveren. Het wekkertje geeft aan dat het alarm actief is.
15:28 15:2815:28
Sluimerfunctie / Alarm stoppen
Sluimeren Stoppen
Stoppen 24hr
➡
Uit
➡
➡
10 minutes
➡

54 | Blinky
Nachtlampmodus
De Blinky heeft een ingebouwd nachtlampje, met keuze uit vier effen kleuren en een blauwe cyclus.
Verder kunt u kiezen hoelang het nachtlampje blijft branden: 10 min, 20 min, 30 min, 45
min, 1u, 1u30min, AAN.
Kies de helderheid. Er zijn drie verschillende niveaus.
Druk kort op de insteltoets (11) om naar de instelmodus voor het nachtlampje te gaan.
Druk kort op de toets voor het nachtlampje (13) om de timer te activeren.
De opgeslagen instellingen gelden als de
standaardinstellingen voor het nachtlampje
totdat de instellingen weer worden gewijzigd.
30 minuten
later
15:27 10 20 30
SET SET SET SET
Slaaptrainermodus
Met de slaaptrainer kunt u een slaapcyclus instellen die uw kind helpt een routine
te ontwikkelen voor het naar bed gaan en ‘s ochtends opstaan. Druk kort op de
slaaptrainertoets (9) om de slaaptrainer aan of uit te zetten.
Als de slaaptrainer aan staat, ziet u het icoon met het zonnetje
of het maantje. Staat de slaaptrainer uit, dan verdwijnt dit
icoon.
15:28
1 2 3
SET SET SET

Blinky | 55
Een half uur voor het opstaan gaat het nachtlampje geel branden. Als het tijd is om wakker
te worden, gaan de ogen open, verschijnt het zonnetje en brandt 1 uur lang het groene licht.
Verder keert het lcd-scherm terug naar de laatst ingestelde helderheid.
Een half uur voor het naar bed gaan gaat het nachtlampje rood branden. Als het bedtijd is,
gaan de ogen dicht, verschijnt het maantje en wordt het lcd-scherm gedimd.
Opmerking: Om ervoor te zorgen dat het nachtlampje gaat branden, moet u na het
instellen van de wektijd niet vergeten om de slaaptrainer aan te zetten.
15:28
15:28 20:28
20:28 20:30
SET
Stel de bedtijd in
7:30 8:30 8:30 8:15
Stel de wektijd in
19:59 20:00 20:30
20:30
7:59
8:00 8:30 9:30

56 | Blinky
Opmerking: De slaaptrainer en het alarm zijn aparte functies die u tegelijkertijd of
afzonderlijk van elkaar kunt inschakelen.
Geluidsmodus
Kies een van de vijf beschikbare geluiden.
Helderheid van het scherm aanpassen
Druk in de normale weergavemodus op de kloktoets (7) om door de 4 helderheidsniveaus
van het lcd-scherm te bladeren.
15:27 15:27 1 2
3 4 5
SET SET SET
SET SET SET
Volume aanpassen
Als de afspeelmodus voor geluid actief is: Stel met de toetsen Volume omhoog (10) en
Volume omlaag (16) het gewenste volume in.
Stel in hoelang het geluid moet klinken: kies uit 10, 20, 30, 45, 60 of 90 minuten.
10 20 30 45
SET SET SET SET
20:30
20:30
20:30
20:30

Blinky | 57
Probleemoplossen
Probleem Oplossingen
Geen geluid
Controleer of het volume laag staat. Verhoog het volume.
De wekker gaat niet
aan
Controleer de voedingsaansluitingen.
Controleer of het stopcontact is ingeschakeld.
Na een stroomstoring
worden de tijd- en
alarminstellingen niet
gereset
Geen back-upbatterij geplaatst - Plaats CR2032-batterij.
Back-up batterij verkeerd geplaatst - correct plaatsen zie
diagram.
Specificaties
Stroomaansluiting 5V 1A
Audio uitgang 5W
Batterij backup CR2032
Elektrische en elektronische producten mogen niet bij het huishoudelijk
afval worden gedaan. Recycle wanneer hiervoor voorzieningen zijn.
Neem contact op met de lokale autoriteiten voor advies over recycling.
Technische ondersteuning
Voor hulp, advies, informatie ga naar: www.iboxstyle.com/support
Disclaimer
Er vinden regelmatige updates plaats van firmware en/of hardwarecomponenten.Sommige
instructies, specificaties en afbeeldingen in deze documentatie kunnen daarom enigszins
afwijken van uw specifieke situatie. Alle items die in deze handleiding worden beschreven, zijn
uitsluitend bedoeld ter illustratie en zijn mogelijk niet van toepassing op uw specifieke situ-
atie. Aan de beschrijving in deze handleiding kunnen geen wettelijke rechten of aanspraken
worden ontleend.

58 | Blinky
Power Supply/Steckernetzteil/ Adaptador de alimentación/
Adaptateur secteur/Alimentatore/ Stroomvoorziening Oplader
ErP/EuP directive No. (EU) 2019(1782)
Manufacturer/Address
Hersteller/Address, Fabricante/
Dirección Fabricant / Ad-
dresse
Produttore / indirizzo, Fabrikant /
adres
Philex Electronic Ltd.
Kingfisher Wharf, London Road,
Bedford, United Kingdom.
Registration No. 339123
Model identifier / Modellkennung
Identificador del modelo
Référence du modèle
Identificatore del modello, Mod-
elidentificatie
HX06B-0501000-CU
HX06B-0501000-CB
HX06B-0501000-CG
EN DE
Input voltage 100-240V Eingangsspannung 100-240V
Input AC frequency 50/60Hz Eingangs AC frequenz 50/60Hz
Output voltage 5.0V Ausgangsspannung 5.0V
Output current 1A Strom 1A
Output power 5W Leistung 5W
Average active efficiency 73.62% Durchschnittlich
Netzteileffizienz 73.62%
Efficiency at low load (10%)
60.08% EU/UK
73.23% US
Effizienz bei geringer Last
(10%)
60.08% EU/UK
73.23% US
No-load power consumption 0.075W Standby-Leistung 0.075W

Blinky | 59
ES FR
Tensión de entrada 100-240V Tension d’entrée 100-240V
Frecuencia de la CA de
entrada 50/60Hz Fréquence du CA d’entrée 50/60Hz
Tensión de salida 5.0V Tension de sortie 5.0V
Intensidad de salida 1A Courant de sortie 1A
Potencia de salida 5W Puissance de sortie 5W
Eficiencia media en activo 73.62% Rendement moyen en
mode actif 73.62%
Eficiencia a baja carga (10%).
60.08% EU/UK
73.23% US
Rendement à faible charge
(10%)
60.08% EU/UK
73.23% US
Consumo eléctrico en vacío 0.075W
Consommation électrique
hors charge
0.075W
IT NL
Tensione di ingresso 100-240V Ingangsspanning 100-240V
Ingresso frequenza AC 50/60Hz Ingang AC-frequentie 50/60Hz
Tensione di uscita 5.0V Uitgangsspanning 5.0V
Corrente di uscita 1A Uitgangsstroom 1A
Potenza di uscita 5W Uitgangsvermogen 5W
Efficienza attiva media 73.62% Gemiddelde actieve
efficiëntie 73.62%
Efficienza a basso carico (10%)
60.08% EU/UK
73.23% US
Efficiëntie bij lage
belasting (10%)
60.08% EU/UK
73.23% US
Consumo energetico a vuoto 0.075W Onbelast energieverbruik 0.075W

60 | Blinky
© Philex Electronic Ltd 2022. vb1.5
Made in China
UK Distributor
Philex Electronic Ltd.
Kingfisher Wharf, London Road,
Bedford, MK42 0NX, United Kingdom.
EU Distributor
Philex Electronic Ireland Ltd.,
Robwyn House, Corrintra, Castleblayney,
Co. Monaghan A75 YX76, Ireland.
-
 1
1
-
 2
2
-
 3
3
-
 4
4
-
 5
5
-
 6
6
-
 7
7
-
 8
8
-
 9
9
-
 10
10
-
 11
11
-
 12
12
-
 13
13
-
 14
14
-
 15
15
-
 16
16
-
 17
17
-
 18
18
-
 19
19
-
 20
20
-
 21
21
-
 22
22
-
 23
23
-
 24
24
-
 25
25
-
 26
26
-
 27
27
-
 28
28
-
 29
29
-
 30
30
-
 31
31
-
 32
32
-
 33
33
-
 34
34
-
 35
35
-
 36
36
-
 37
37
-
 38
38
-
 39
39
-
 40
40
-
 41
41
-
 42
42
-
 43
43
-
 44
44
-
 45
45
-
 46
46
-
 47
47
-
 48
48
-
 49
49
-
 50
50
-
 51
51
-
 52
52
-
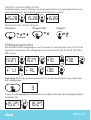 53
53
-
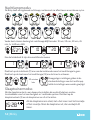 54
54
-
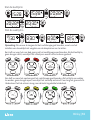 55
55
-
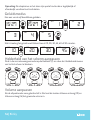 56
56
-
 57
57
-
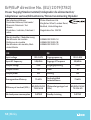 58
58
-
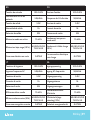 59
59
-
 60
60


i-box i-box Blinky Kids Alarm Clock and Sleep Trainer Handleiding
- Categorie
- Wekkers
- Type
- Handleiding
- Deze handleiding is ook geschikt voor
in andere talen
- italiano: i-box i-box Blinky Kids Alarm Clock and Sleep Trainer Manuale utente
- français: i-box i-box Blinky Kids Alarm Clock and Sleep Trainer Manuel utilisateur
- español: i-box i-box Blinky Kids Alarm Clock and Sleep Trainer Manual de usuario
- Deutsch: i-box i-box Blinky Kids Alarm Clock and Sleep Trainer Benutzerhandbuch
Andere documenten
-
Silvercrest 313843 Operating Instructions And Safety Instructions
-
Alecto BC-100 Handleiding
-
-
ZAZU Brody the bear Sleep Trainer Handleiding
-
TFA Light Alarm Clock with Nature Sounds and Colour Changing Mood Light MOOD LIGHT Handleiding
-
-
-
Lexibook RP500UNI Projecteur Nintendo Mario Kart de handleiding
-
-