IT Works 500MBPS X2 WIFI/2XRJ45 de handleiding
- Categorie
- Routers
- Type
- de handleiding

500 Mbps
Kit 2 Powerline WiFi Adapters
MODEL: CPL500W
USER MANUAL

1
Table of Contents
FEATURES...................................................................................................................................................... 3
SAFETY PRECAUTIONS .................................................................................................................................. 3
OVERVIEW .................................................................................................................................................... 4
Product Introduction.................................................................................................................... 4
Packing List ................................................................................................................................... 4
HARDWARE DESCRIPTION AND DEVICE CONNECTION ................................................................................ 4
LED Status Description and Pushbutton Description ................................................................... 4
Interface Description.................................................................................................................... 6
Hardware Installation................................................................................................................... 6
System requirements................................................................................................... 6
Before You Begin.......................................................................................................... 6
Connecting the Device ................................................................................................. 6
Operation Range .......................................................................................................................... 7
Improving the Transmission Performance of Network................................................................ 7
CONFIGURING THE LAN PC........................................................................................................................... 7
WEB CONFIGURATION.................................................................................................................................. 9
Logging In to the PLC Wireless Adapter ..................................................................................... 10
Setup .......................................................................................................................................... 10
Wizard ........................................................................................................................ 10
Wireless setup............................................................................................................ 16
PLC Setting ................................................................................................................. 19
LAN setup................................................................................................................... 20
Advanced Settings...................................................................................................................... 20
Advanced wireless ..................................................................................................... 20
Access control ............................................................................................................ 21
Advanced Security...................................................................................................... 22
MAINTENANCE ........................................................................................................................................... 23
Device Management .................................................................................................................. 23
Reboot and Restore.................................................................................................................... 23
Firmware update........................................................................................................................ 24

2
Status.......................................................................................................................................... 25
Device information..................................................................................................................... 25
Logout......................................................................................................................................... 25
USING THE SECURITY PUSHBUTTON .......................................................................................................... 25
Forming a HomePlug AV Logical Network.................................................................................. 25
Joining an AVLN Network........................................................................................................... 26
Leaving an AVLN Network.......................................................................................................... 26
TROUBLESHOOTING ................................................................................................................................... 27
SPECIFICATIONS.......................................................................................................................................... 28
DISPOSAL .................................................................................................................................................... 29

3
FEATURES
PLC Features
• Power voltage range is 100 to 240 V AC 50/60 Hz.
• Support the HomePlug AV protocol and the IEEE1901 protocol.
• PLC physical link rate is up to 500 Mbps.
• Support the following modulation schemes: OFDM QAM 4096/1024/256/64/16/8, QPSK, BPSK, and ROBO.
• Support 128-bit AES link encryption and user NMK authentication, for providing secure power line communication.
• Support windowed OFDM with noise mitigation based on patented line synchronization technique, for improving data
integrity in noisy conditions.
• Support channel self-adaptation and channel estimation for maximizing real-time throughput.
• Support priority-based CSMA/CA channel access scheme for maximizing efficiency and throughput.
• Support four-level QoS.
• Support ToS and CoS packet classifications.
• Support IGMP multicast management session.
Wireless Features
• Support IEEE802.11b, IEEE802.11g, IEEE802.11n, IEEE802.3, IEEE802.3u, IEEE802.11i and IEEE802.11e.
• Support 2T2R mode. Transmission data rate is up to 300 Mbps.
• Support WEP and WPA for secure data transmission.
• Support DHCP server.
• Support version upgrade through Web page.
• Support restoring factory default settings.
• Support the following wireless security modes: WEP, WPA-PSK, WPA2-PSK, and WPA/WPA2-PSK Mixed.
• Support system status display.
• Support system log.
SAFETY PRECAUTIONS
This device is intended for connection to the AC power line. Before using this product, please read the following precautions:
• Follow all warnings and instructions marked on the product.
• Unplug the device from the wall outlet before cleaning. Use a dry cloth for cleaning. Do not use liquid cleaners or aerosol
cleaners.
• Do not put this product near water.
• Do not put this product near a radiator or heat source.
• Do not use an extension cord between the device and the AC power source.
• Only a qualified technician should service this product. Opening or removing covers may result in exposure to dangerous
voltage points or other risks.
• Unplug the device from the wall outlet and refer the product to qualified service personnel for the following conditions:

4
− If liquid has been spilled into the product;
− If the product has been exposed to rain or water;
− If the product does not operate normally when the operating instructions are followed;
− If the product exhibits a distinct change in performance.
This mark is applied to show the equipment conforms to European safety and electro-magnetic compatibility
standards.
OVERVIEW
Product Introduction
The product is compatible with the HomePlug AV, IEEE1901 and 802.11b/g/n protocols. It supports CCK and OFDM modulation
schemes. Its PLC physical link rate is up to 500 Mbps, and its wireless physical rate is up to 300Mbps in the 802.11n mode.
The product supports 128-bit AES link encryption of power line communication and wireless security modes including WEP, WPA-
PSK, WPA2-PSK, and WPA/WPA2-PSK mixed, which provide secure and reliable communication for users.
Packing List
Please check whether your packing list includes the following items:
• 1 x 500 Mbps Powerline Wireless Adapter
• 1x 500 Mbps Powerline Passthrough Adapters
• 2x Network cables
• User manual (CD)
HARDWARE DESCRIPTION AND DEVICE CONNECTION
LED Status Description and Pushbutton Description
There are 5 LED indicators on the front panel of the PLC wireless adapter. By observing their status, you can check whether the
device runs normally.
The following table describes the status of LED indicators on the front panel.

5
LED indicator Colour Status Description
Green On System runs normally.
Green Flash
System is resetting.
System is in the process of password synchronisation.
Power
__ Off Device is powered off or system is down.
Green On Connection via the LAN1 interface succeeds.
Green Flash Data is being transmitted via the LAN1 interface.
LAN1
__ Off No connection is established via the LAN1 interface.
Green On Connection via the LAN2 interface succeeds.
Green Flash Data is being transmitted via the LAN2 interface.
LAN2/WAN
__ Off No connection is established via the LAN2 interface.
Green On PLC transmission rate equals to or is greater than 40 Mbps.
Orange On PLC transmission rate is between 20 Mbps and 40 Mbps.
Red On PLC transmission rate is smaller than or equals to 20 Mbps.
Data
__ Off Device is not connected to the power line network.
Green On WLAN is enabled.
Green Flash Wireless data is being transmitted.
__ Off WLAN is disabled.
Orange On WLAN is enabled and WPS connection succeeds.
WLAN/WPS
Orange Flash
WPS negotiation is in progress and wireless data is being
transmitted.
The following table describes push buttons on the front panel.
Button Description
Security
It is used to set the status of the device members.
• Press and hold the Security button for more than 10 seconds to exit the current
network and generate a random password of network member.
• Press and hold the Security button for about 3 seconds, and then the PLC wireless
adapter becomes a member of the existing AVLN.
Reset
Press and Reset button for about 3 seconds and then release it. System will restore
the factory default settings.
WPS
It has the following functions:
• Press the WPS button for about 3 seconds to enable the negotiation of PBC mode.
• Press and WPS button for about 5 seconds to enable or disable WLAN.

6
Interface Description
The following table describes interfaces on the PLC wireless adapter:
Interface Description
LAN1
LAN2/WAN
RJ45 LAN interface, for connecting a hub, switch, or computer on a LAN.
OFF ON Turn on or turn off the device.
Hardware Installation
System requirements
Before installing the device, please ensure that the following items are ready:
• At least one Ethernet RJ45 cable (10Base-T/100Base-T)
• One PLC wireless adapter
• One PLC passthrough adapter for PLC communication
• A PC that is installed with the TCP/IP protocol and can access the Internet.
Before You Begin
Before you install the device, please pay attention to the following items:
• When the device is connected to a computer, hub, router, or switch, the Ethernet cable should be shorter than 100 meters.
• Place this device on a stable surface or support. Do not put this device on the ground.
• Keep the device clean. Keep away the device from direct sunshine. Avoid any metal in the device.
• Place the device in the centre of the placement area, and try to optimise the wireless coverage.
Connecting the Device
To connect the device, do as follows:

7
Step 1 Connect one end of the RJ45 cable to the LAN interface of the PLC wireless adapter.
Step 2 Connect the other end of the RJ45 cable to your PC.
Step 3 Insert the power plug of the device into the wall socket directly.
Operation Range
The operation range of the PLC wireless adapter depends on the actual environment. The path and effect of signal transmission
may vary with the deployment in a house or an office. In theory, the maximum PLC transmission distance can reach 300 metres.
But for the practical application, the PLC transmission distance may vary due to the number of PLC devices connected to the
power line network. For wireless transmission, straight transmission distance in the open air for some devices can reach 300
meters and indoor transmission distance can reach 100 meters.
Improving the Transmission Performance of Network
In order to improve the transmission performance of network, it is recommended that you insert the power plug of the device
into the wall socket directly. Do not use the patch board.
CONFIGURING THE LAN PC
By default, the DHCP server is enabled. The LAN IP address of the PLC wireless adapter is 192.168.1.1 and the subnet mask is
255.255.255.0.
Note:
The configuration steps and figures on Windows XP are depicted as an example. The configuration process may vary
depending on operation system of your PC.
To manually set the network adapter on a Windows XP PC, do as follows:
Step 1 Right-click the icon of My Network Places and choose Properties from the menu. The Network Connections window
appears.

8
Step 2 Right-click the network adapter icon and choose Properties from the menu. The Local Area Connections Properties
window appears.
Note:
If multiple network cards are installed on your PC, a window other than the Local Area Connections Properties window may
appears.
Step 3 Double-click Internet Protocol (TCP/IP) and the Internet Protocol (TCP/IP) Properties window appears.
Step 4 Select Use the following IP address and enter the IP address of the network adapter. Set the IP address to 192.168. 1 .X
(‘X’ is a number in the range of 2 to 254) and set the subnet mask to 255.255.255.0. Configure the default gateway and
IP addresses of the DNS servers according to your actual network, or leave them blank. After setting the parameters,
click OK.

9
Step 5 Ping the default IP address of the PLC wireless adapter, to check whether the current connection between your PC and
the PLC wireless adapter is normal. Choose Start > Run from the desktop and enter ping 192.168.1.1. See the following
figure:
Note:
192.168.1.1 in the ping command is the default IP address of the LAN interface. If the IP address changes, enter the current IP
address instead.
Step 6 If your PC can ping through the default IP address of the PLC wireless adapter, the following page appears, indicating
that the connection between your PC and the PLC wireless adapter is normal:
WEB CONFIGURATION
This chapter describes how to log in to the PLC wireless adapter as a super user and how to configure the parameters in the Web
pages.

10
Logging In to the PLC Wireless Adapter
If you log in to the PLC wireless adapter for the first time, do as follows:
Step 1 Open the IE browser, and enter http://192.168.1.1 in the address bar.
Step 2 On the login page, enter the user name and password.
Note:
• Password by default is admin.
• Language can be switched between English and French in the upper right corner.
Step 3 Click Login, and the following page appears.
Setup
Wizard
You can set the basic network parameters for accessing the Internet by following this wizard.
To configure the wizard, do as follows:
Step 1 Choose SETUP > Wizard, and the following page appears.

11
Note:
When you order the broadband service, pay attention to the Internet connection type. The PLC wireless adapter adopts
Ethernet connection. Technical parameters of Internet connection properties are provided by your Internet service provider
(ISP). For example, your ISP should tell you whether the Internet connection mode is static IP or dynamic IP, and whether the
protocol used for Internet communication is DHCP or PPPoE.
Step 2 Click Setup Wizard to display the following page:
Step 3 There are 4 steps for configuring the wizard. Click Next to display the following page:
Note:
The factory default password of this adapter is admin. To secure your network, it is recommended that you should set a new
password.
Step 4 On this page, you can change the password of the PLC wireless adapter. If you do not want to change the password, click
Next or Skip. After setting the new password, click Next to display the following page:

12
Step 5 On this page, you can configure the wireless parameters of the adapter.
The following table describes parameters on this page:
Field Description
Enable Wireless Interface Enable or disable the wireless interface.
Wireless Network Name
(SSID)
The wireless network name (SSID) can contain up to 32 characters and can be letters,
numerals, underlines, and any combinations of them. The SSID is case-sensitive.
Visibility Status
If Visible is selected, the PLC wireless adapter broadcasts its SSID on the wireless
network.
If Invisible is selected, the PLC wireless adapter does not broadcast its SSID on the
wireless network.
Country Select the country where you are from the drop-down list.
802.11 Mode
Select the appropriate wireless mode. The default is Mixed 802.11b/g/n.
802.11b only: The maximum rate is 11Mbps.
802.11g only: The maximum rate is 54Mbps.
802.11n only: For 20M bandwidth, the maximum rate is 130Mbps (150Mbps for
short preamble); for 40M Upper (+) or 40M Lower (-) bandwidth, the maximum
rate is 270Mbps (300Mbps for short preamble).
Mixed 802.11b/g: It is compatible with 802.11b and 802.11g.
Mixed 802.11n/g: It is compatible with 802.11n and 802.11g.
Mixed 802.11b/g/n: It is compatible with 802.11b, 802.11n, and 802.11g.
Band Width
You can set the band width only in the 802.11 mode that is compatible with 802.11n.
For 20M bandwidth, the maximum rate is 130Mbps (150Mbps for short preamble); for
40M Upper (+) or 40M Lower (-) bandwidth, the maximum rate is 270Mbps (300Mbps
for short preamble).
Wireless Channel
Select the working channel of the wireless network. The default is Auto Scan, which
indicates that the wireless router automatically searches for the best channel among
the available channels.
Step 6 After setting the wireless parameters, click Next to display the following page.
Step 7 On this page, you can set the wireless security modes.
The PLC wireless adapter provides the following 5 types of wireless security modes: None, WEP, WPA-PSK, WPA2-PSK
and WPA/WPA2-PSK.
(1) None

13
Select None from the drop-down list to display the following page.
None means data encryption is not adopted, the network is not secure, and any station can access the network.
This option is not recommended.
(2) WEP
Select WEP from the drop-down list of wireless security mode to display the following page.
The following table describes parameters related to the WEP mode:
Field Description
WEP Key Length Select the encryption length of WEP key. You can select 64 bit or 128 bit.
Default Tx Key Select one from the four keys as the default key of the wireless network.
WEP Key Format
• When the key format is 64 bit, you need to enter 5 ASCII characters or 10 hexadecimal
digits.
• When the key format is 128 bit, you need to enter 13 ASCII characters or 26
hexadecimal digits.
WEP Key 1/2/3/4 Set 64-bit or 128-bit key according to the key format.
Authentication Select the proper authentication mode. You can select Open or Share Key.

14
(3) WPA-PSK
Select WPA-PSK from the drop-down list of wireless security mode to display the following page.
The following table describes parameters related to the WPA mode:
Field Description
WPA Mode Only WPA-Personal is available.
Encryption Mode Only TKIP is available.
Pre-shared Key Set the pre-shared key. The PLC wireless adapter uses this key to authenticate the
identity of workstation.
(4) WPA2-PSK
Select WPA2-PSK from the drop-down list of wireless security mode to display the following page.

15
The following table describes parameters related to the WPA2 mode:
Field Description
WPA Mode Only WPA2-Personal is available.
Encryption Mode Only AES is available.
Pre-shared Key Set the pre-shared key. The PLC wireless adapter uses this key to authenticate the
identity of workstation.
(5) WPA/WPA2-PSK
Select WPA/WPA2-PSK from the drop-down list of wireless security mode to display the following page.
The following table describes parameters related to the WPA/WPA2 Mixed mode:
Field Description
WPA Mode Only WPA/WPA2 Mixed-Personal is available.
Encryption Mode You can only select Both.
Pre-shared Key Set the pre-shared key. The PLC wireless adapter uses this key to authenticate the
identity of workstation.
Step 8 After selecting the proper wireless security mode and its relevant parameters, click Next to display the following page.

16
Step 9 On this page, you can view the configuration information of the PLC wireless adapter. If you want to modify some
settings, click Back. If you want to make the settings take effect, click Complete.
Note:
In any configuration page of Wizard, you can click Back to modify the previous settings, or click Cancel to exit the page.
Wireless setup
Choose SETUP > Wireless Setup, and the following page appears.
A. Wireless Basic Settings
Choose Wireless Setup > Wireless Basic on the left pane or click Wireless Basic in the WIRELESS SETUP page to display the
following page.
On this page, you can configure the basic wireless parameters.
The following table describes parameters in this page:
Field Description
Enable Wireless Interface Enable or disable the wireless interface.
Wireless Network Name
(SSID)
The wireless network name (SSID) can contain up to 32 characters and can be
letters, numerals, underlines, and any combinations of them. The SSID is case-
sensitive.
Wireless Security Mode There are 5 types of wireless security modes: None, WEP, WPA-PASK, WPA2-
PSK and WPA/WPA2-PSK.
PassPhrase The PassPhrase should be 8 to 63 ASCII, or 64 hexadecimal numbers.
Show encryption key Show or hide the encryption key.
After setting the parameters, click Apply to save the settings.

17
B. WPS
WPS refers to Wi-Fi Protected Setup. You can use the WPS setup function to add a wireless client to a network, without setting
some specific parameters, such as SSID, security mode, and password. To use this function, a wireless client must support WPS. If
the wireless client does not support WPS, you must manually configure the wireless settings of wireless client, and ensure that its
SSID and other wireless security settings are the same as that of the PLC wireless adapter.
Choose Wireless Setup > WPS on the left pane or click WPS in the WIRELESS SETUP page to display the following page.
The following table describes parameters on this page:
Field Description
Enabled WPS Enable or disable WPS.
WPA Mode Display current WPA mode.
Caution:
If you want to use WPS, you must select the WPA-PSK/WPA2-PSK mode and the SSID must be broadcasted.
WPS modes contain PBC mode, PIN mode and AP-PIN mode.
• PBC Mode
Select PBC in the WPS mode dropdown list, and click the PBC button on the WPS page or press the WPS button on the PLC
wireless adapter to start WPS connection.

18
Press the WPS button on the network card or click the PBC button in the configuration utility page of network card within two
minutes to start WPS connection. After WPS connection is established, the following page appears. The client can now visit the
LAN.
Click Apply to save your configuration.
• PIN Mode
Select PIN from the WPS mode dropdown list.
Enter the PIN value of the network card on the WPS page (refer to the client of the network card), and then click the PIN button
on the right configuration utility page of network card within two minutes to start WPS connection.

19
• AP-PIN mode
Select AP-PIN from the WPS mode dropdown list.
Enter the PIN value of the network card on the WPS page (refer to the client of the network card), and click the AP-PIN button on
the right configuration utility page of network card within two minutes to start WPS connection.
PLC Setting
Choose SETUP > PLC Setting, and the following page appears.
This page displays the local device information, including device name, MAC Address, device password and network name.

20
Click Refresh to refresh the page. Click Add Member to add new device information.
Enter the member information and click Apply to save the settings.
LAN setup
Choose SETUP > LAN Setup, and the following page appears.
This page displays the LAN setting of your adapter.
Advanced Settings
Advanced wireless
Choose ADVANCED >Advanced Wireless > Advanced on the left pane or click Advanced in the Advanced Wireless page to display
the following page.
The following table describes parameters on this page:

21
Field Description
Wireless Name (SSID)
The wireless network name (SSID) can contain up to 32 characters and can be letters,
numerals, underlines, and any combinations of them. The SSID is case-sensitive.
Network Name Status
If Visible is selected, the PLC wireless adapter broadcasts its SSID on the wireless
network.
If Invisible is selected, the PLC wireless adapter does not broadcast its SSID on the
wireless network.
Transmission Rate Set the proper transmission rate.
Transmit Power
Select the proper transmission power from the drop-down list. You can select 100%, 80%,
60%, 40%, or 20%.
User Isolation
On indicates that the computers wirelessly connecting to the same SSID cannot
communicate with each other.
Off indicates that the computers wirelessly connecting to the same SSID can
communicate with each other.
Enable WMM (Wireless QoS)
This function is not available. If this function is disabled, the wireless PLC adapter adopts
WMM to mark priority and to arrange the order of Wi-Fi network queues.
Max Clients
Beacon period indicates the frequency of the PLC wireless adapter that sends the Beacon
frame. By default, the PLC wireless adapter sends the beacon frame every other 100ms. The
range is 20~1024.
Region Select the country where you are from the drop-down list.
802.11 Mode
Select the appropriate wireless mode. The default is Mixed 802.11b/g/n.
802.11b only: The maximum rate is 11Mbps.
802.11g only: The maximum rate is 54Mbps.
802.11n only: For 20M bandwidth, the maximum rate is 130Mbps (150Mbps for short
preamble); for 40M Upper (+) or 40M Lower (-) bandwidth, the maximum rate is
270Mbps (300Mbps for short preamble).
Mixed 802.11b/g: It is compatible with 802.11b and 802.11g.
Mixed 802.11n/g: It is compatible with 802.11n and 802.11g.
Mixed 802.11b/g/n: It is compatible with 802.11b, 802.11n, and 802.11g.
Bandwidth
You can set the band width only in the 802.11 mode that is compatible with 802.11n. For
20M bandwidth, the maximum rate is 130Mbps (150Mbps for short preamble); for 40M
Upper (+) or 40M Lower (-) bandwidth, the maximum rate is 270Mbps (300Mbps for short
preamble).
Wireless Channel
Select the working channel of the wireless network. The default is Auto Scan, which
indicates that the wireless router automatically searches for the best channel among the
available channels.
After setting the parameters, click Apply to save the configuration.
Access control
Choose ADVANCED >Advanced Wireless > Access Control on the left pane or click Access Control on the Advanced Wireless page
to display the following page.

22
The following table describes parameters in this page:
Field Description
Enable Access Control You can enable or not enable the access control.
Access Control Mode
You can select black list or white list. The white list means that if a MAC address of a LAN device
is consistent with the specified MAC address, the PLC wireless adapter will assign the bound IP
address to the device. The black list means the opposite.
Add Add new WLAN filters.
Click Add to display the following page.
Enter the MAC address and comment of the incoming MAC filter, and click Apply to save the configuration.
Advanced Security
Choose Advanced Wireless > Advanced Security on the left pane or click Advanced Security in the ADVANCED WIRELESS page to
display the following page.

23
For the parameters in this page, refer to Wizard.
MAINTENANCE
Device Management
Choose MAINTENANCE > Device Management, and the following page appears.
On this page, you can modify the password for logging in to the PLC wireless adapter.
The following table describes parameters on this page:
Field Description
Old Password Enter the current password.
New Password Enter the new password.
Confirm Password Enter the new password again.
After setting the parameters, click Apply to save the configuration.
Reboot and Restore
Choose MAINTENANCE > Reboot and Restore to display the following page.
On this page, you can reboot the adapter and restore the factory default settings of the adapter.
• Reboot
Click Reboot to reboot the adapter.

24
• Restore
Click Restore to restore the factory default settings of the adapter. You may also press the Reset pushbutton on the front panel
for 3 seconds to restore the factory default settings of the adapter.
Caution:
When operating on this page, do not press the Reset pushbutton.
Firmware update
Choose MAINTENANCE > Firmware Update, and the following page appears.
On this page, you can update the firmware version of the PLC wireless adapter.
The following table describes parameters on this page:
Field Description
Firmware Version Display current firmware version.
Select File Click Browse… to navigate to the latest firmware.
Clear Config
If you check Clear Config, the PLC adapter restores to the default settings after
upgrade. Otherwise, the PLC adapter keeps the current settings.
Click Apply, and then system begins to upgrade firmware.
After upgrade
completes, the PLC wireless adapter automatically reboots.
Caution:
To avoid losing previous configuration of the adapter, save the configuration before upgrade.
During upgrade, do not cut off the power supply or press the Reset pushbutton.

25
Status
Device information
Choose STATUS > Device Info to display the following page.
This page displays device information, including system information, PLC status, LAN information and WLAN information. Click
Refresh to refresh the page.
Logout
Click Logout to log out from the Web configuration page.
USING THE SECURITY PUSHBUTTON
This chapter describes how to add new devices to, or remove old devices from a HomePlug AV logical network (AVLN). Both can
be accomplished by using a Security (NMK) pushbutton.
Operation progress and outcome can be monitored by observing the behaviours of the Power and Data LED indicators.
Forming a HomePlug AV Logical Network
When two devices (A and B) with different NMK values are connected to the same power line, you want them to form a logical
network. Do as follows:
Step1 Press the Security pushbutton on A or B for at least 10 seconds. The device will reset and restart with a random NMK.
Step2 Press the Security pushbutton on the first device A for less than 3 seconds.
Step3 Press the Security pushbutton on the second device B for less than 3 seconds. Press the pushbutton on B within 2
minutes.
Step4 Wait for the connection to complete.

26
The Power LED indicators on both devices will flash evenly at 1-second interval until the operation succeeds or fails. If the
connection is successful, the Power and Data LED indicators on both devices illuminate steadily. If the connection is failed, the
Power LED indicators on both devices still illuminate steadily, but the Data LED indicators on both devices go out. In that case,
please repeat Step1 to Step4.
Joining an AVLN Network
Assume that a network exists, a new device, the ‘joiner’, wants to join the network. Any device on the existing network can
become the ‘adder’.
Step1 Press the Security pushbutton on the ‘joiner’ for at least 10 seconds. The device will reset and restart with a random
NMK.
Step2 Press the Security pushbutton on the ‘joiner’ for less than 3 seconds.
Step3 Press the Security pushbutton on any network device for less than 3 seconds, making it the ‘adder’. Please press this
pushbutton within 1 minute.
Step4 Wait for the connection to complete.
The Power LED indicators on both devices will flash at 1-second interval until the process succeeds or fails. If the connection is
successful, the Power and Data LED indicators on both devices illuminate steadily. If the connection is failed, the Power LED
indicators on both devices still illuminate steadily, but the Data LED indicators on both devices go out. In that case please repeat
Step1 to Step4.
Leaving an AVLN Network

27
Assume that a network exists. If you want to remove one device, the ‘leaver’ from an AVLN network, or remove the device from
the existing network and have it join another logical network, do as follows:
Step1 Press the Security pushbutton on the ‘leaver’ for more than 10 seconds.
The device will reset and restart with a random NMK.
Step2 Wait for reset to complete.
The Power LED indicator on the ‘leaver’ will momentarily extinguish during reset and flash during restart, then illuminate steadily.
The ‘leaver’ is removed from the existing network successfully.
Once the process completes, you may disconnect the device from the medium or join it to another logical network on the same
medium.
TROUBLESHOOTING
Why all the LED indicators are off?
(1) Check the connection between the power adapter and power socket.
(2) Check whether the device is turned on.
Why the Ethernet indicator is off?
(1) Check the connection between your PLC wireless adapter and computer, hub, or switch.
(2) Check the running status of your computer, hub, or switch, and verify whether they run normally or not.
(3) Check the network cable that is connected to the PLC wireless adapter and other devices.
Why you fail to access the Web page?
Follow the steps below to check the connection between the computer and the device:
(1) Click Start > Run and enter ping command ping 192.168.1.1 (the IP address of PLC wireless adapter).
(2) If you fail to access the PLC wireless adapter, check the following settings:
− The network cable type
− The connection between your adapter and the computer
− TCP/IP settings of PC
How to restore factory defaults after carrying out the incorrect configuration?
(1) Press the Reset pushbutton for about 3 seconds and then release it.

28
(2) The default IP address of the PLC wireless adapter is 192.168.1.1 and the subnet mask is 255.255.255.0.
(3) The user name and password of the super user are admin.
SPECIFICATIONS
Homeplug AV compliant
Up to 500 Mbps PLC data transmission rate
128-bit AES Link Encryption with key management
2 internal antennas
802.11b+g+n
Security: WPA-TKIP, WPA2-AES, WPA2-Mixed
Wireless speed up to 300 Mbps
IEEE 802.3, IEEE 802.3U, Homeplug 1.1
Frequency band 2MHz ~ 68MHz
Supports OFDM QAM 8/16/64/256/1024/4096, BPSK, QPSK and ROBO Modulation Schemes
Ports: Two 10/100 Ethernet RJ45
Power consumption: 6.5W Operation

29
DISPOSAL
As a responsible retailer we care about the environment.
As such we urge you to follow the correct disposal procedure for the product, packaging materials and if applicable, accessories.
This will help conserve natural resources and ensure that the materials are recycled in a manner that protects health and the
environment.
You must follow laws and regulations about disposal. Waste electrical products must be disposed of separately from household
waste when the product reaches the end of its life.
Contact the store where you bought the product and your local authority to learn about disposal and recycling.
We apologise for any inconvenience caused by minor inconsistencies in these instructions, which may occur as a result of product
improvement and development.
Darty Plc © UK: EC1N 6TE 13 / 11/ 2013


EUROPEAN
FRENCH

500 Mbps Kit 2 adaptateurs CPL-WiFi
MODÈLE : CPL500W
MODE D’EMPLOI

1
Table des matières
CARACTÉRISTIQUES ...................................................................................................................................... 3
MISES EN GARDE .......................................................................................................................................... 3
DESCRIPTION ................................................................................................................................................ 4
Présentation du produit ............................................................................................................... 4
Contenu de l'emballage................................................................................................................ 4
DESCRIPTION DU MATÉRIEL ET BRANCHEMENTS ........................................................................................ 4
Description des boutons et de l'état des témoins LED ................................................................ 4
Description des interfaces............................................................................................................ 6
Installation du matériel ................................................................................................................ 6
Configuration du système..................................................................................................................... 6
Avant de commencer............................................................................................................................ 7
Branchements....................................................................................................................................... 7
Portée de fonctionnement........................................................................................................... 7
Améliorer la qualité de transmission du réseau .......................................................................... 7
CONFIGURATION DU PC LAN........................................................................................................................ 8
CONFIGURATION WEB................................................................................................................................ 10
Connexion à l'adaptateur CPL sans fil ........................................................................................ 10
Réglages...................................................................................................................................... 11
Assistant.............................................................................................................................................. 11
Configuration sans fil .......................................................................................................................... 19
A. Paramètres sans fil de base............................................................................................................ 19
Configuration CPL ............................................................................................................................... 23
Configuration LAN .............................................................................................................................. 24
Réglages avancés........................................................................................................................ 25
Sans fil avancé..................................................................................................................................... 25
Contrôle d'accès ................................................................................................................................. 26
Sécurité avancée................................................................................................................................. 27
ENTRETIEN .................................................................................................................................................. 28
Gestion du périphérique ............................................................................................................ 28
Redémarrer et réinitialiser......................................................................................................... 28

2
Mise à jour du micrologiciel ............................................................................................................... 29
État ............................................................................................................................................. 30
Infos périphérique .............................................................................................................................. 30
Déconnexion....................................................................................................................................... 30
UTILISATION DU BOUTON SECURITY (sécurité).......................................................................................... 30
Création de réseau logique HomePlug AV ................................................................................. 30
Rejoindre un réseau AVLN ......................................................................................................... 31
Quitter un réseau AVLN ............................................................................................................. 32
DÉPANNAGE ............................................................................................................................................... 32
SPÉCIFICATIONS.......................................................................................................................................... 33
MISE AU REBUT .......................................................................................................................................... 34

3
CARACTÉRISTIQUES
Caractéristiques CPL
• Plage de tension: 100-240V AC 50/60 Hz.
• Compatible avec les protocoles HomePlug AV et IEEE1901.
• Débit de liaison physique CPL: jusqu'à 500 Mbps.
• Compatible avec les modulations suivantes: OFDM QAM 4096/1024/256/64/16/8, QPSK, BPSK et ROBO
• Permet le chiffrement de liaison AES 128 bit et l'authentification NMK, pour une plus grande sécurité des
communications CPL.
• Compatible avec l'OFDM à fenêtres avec atténuation du bruit basée sur la technique de synchronisation de ligne
brevetée, permettant de préserver l'intégrité des données.
• Estimation et auto-adaptation de canal, permettant d'optimiser le débit en temps réel.
• Accès canal CSMA/CA avec priorisation, permettant d'optimiser le rendement et le débit.
• QoS quatre niveaux.
• Classifications de paquets ToS et CoS.
• Sessions de gestion multidiffusion IGMP.
Caractéristiques sans fil
• Compatible avec les normes IEEE802.11b, IEEE802.11g, IEEE802.11n, IEEE802.3, IEEE802.3u, IEEE802.11i et IEEE802.11e.
• Compatible avec le mode 2T2R. Débit de transmission de données: jusqu'à 300 Mbps.
• Compatible avec WEP et WPA pour plus de sécurité dans la transmission des données.
• Compatible avec le serveur DHCP.
• Permet de mettre à jour la version par Internet.
• Permet de rétablir tous les paramètres par défaut.
• Compatible avec les modes de sécurité sans fil suivants: WEP, WPA-PSK, WPA2-PSK, et WPA/WPA2-PSK mixte.
• Affichage de l'état du système.
• Affichage du journal système.
MISES EN GARDE
Cet appareil est conçu pour être relié au réseau CPL AC. Avant d'utiliser cet appareil, lisez les mises en garde suivantes:
• Respectez l'intégralité des instructions et des mises en garde figurant sur l'appareil.
• Débranchez l'appareil avant de le nettoyer. Utilisez un chiffon sec pour le nettoyage. N’utilisez pas de nettoyant liquide
ou en aérosol.
• Ne mettez pas l'appareil près de l’eau.
• Ne mettez pas l'appareil à proximité d'une source de chaleur (ex: radiateur).

4
• Cet appareil ne doit pas être relié à la prise de courant par l'intermédiaire d'une rallonge.
• Seul un technicien dûment qualifié est habilité à réparer cet appareil. N'essayez en aucun cas d'ouvrir l'appareil ou
d'enlever des panneaux: vous risqueriez entre autres une dangereuse exposition à des pièces sous tension.
• Débranchez l'appareil et faites appel à un réparateur qualifié dans les cas suivants:
− Si un liquide a pénétré dans l'appareil;
− Si l'appareil a été exposé à la pluie ou à l’eau en général;
− Si l'appareil ne fonctionne pas normalement alors que vous avez respecté les indications du mode d’emploi;
− Si le fonctionnement de l'appareil est perturbé de manière visible.
Ce symbole indique que l'appareil est conforme aux normes européennes de sécurité et de compatibilité
électromagnétique.
DESCRIPTION
Présentation du produit
Cet appareil est compatible avec les protocoles HomePlug AV, IEEE1901 et 802.11b/g/n. Il est compatible avec les modulations
CCK et OFDM. Il possède un débit de liaison physique CPL maximum de 500 Mbps, et un débit physique sans fil maximum de
300 Mbps en mode 802.11n.
Cet appareil permet le chiffrement de liaison AES 128 bit pour les communications CPL; il accepte les modes de sécurité sans fil
WEP, WPA-PSK, WPA2-PSK et WPA/WPA2-PSK mixte, permettant d'assurer la sécurité et la fiabilité des communications entre les
usagers.
Contenu de l'emballage
Le contenu de l'emballage doit être le suivant:
• 1 x adaptateur CPL sans fil de 500 Mbps
• 1 x adaptateur CPL intermédiaire de 500 Mbps
• 2x câbles réseau
• Mode d'emploi (CD)
DESCRIPTION DU MATÉRIEL ET BRANCHEMENTS
Description des boutons et de l'état des témoins LED
Votre adaptateur CPL sans fil comporte 5 témoins LED sur son panneau avant. Ceux-ci vous permettent de savoir si l'appareil
fonctionne normalement ou non.

5
Le tableau suivant décrit les différents états des témoins LED du panneau avant.
Tém oin L ED Couleur État Description
Vert Allumé Le système fonctionne normalement.
Vert Clignotant
Le système est en train de se réinitialiser.
Le système est en train de synchroniser le mot de passe.
Alimentation
__ Éteint L'appareil est éteint ou le système est désactivé.
Vert Allumé Connexion réussie via l'interface LAN1.
Vert Clignotant Données en cours de transmission via l'interface LAN1.
LAN1
__ Éteint Aucune connexion établie via l'interface LAN1.
Vert Allumé Connexion réussie via l'interface LAN2.
Vert Clignotant Données en cours de transmission via l'interface LAN2.
LAN2/WAN
__ Éteint Aucune connexion établie via l'interface LAN2.
Vert Allumé Débit de transmission CPL supérieur ou égal à 40 Mbps.
Orange Allumé Débit de transmission CPL compris entre 20 et 40 Mbps.
Rouge Allumé Débit de transmission CPL inférieur ou égal à 20 Mbps.
Données
__ Éteint L'appareil n'est pas connecté au réseau CPL.
Vert Allumé WLAN activé.
Vert Clignotant Données sans fil en cours de transmission.
__ Éteint WLAN désactivé.
Orange Allumé WLAN activé et connexion WPS établie avec succès.
WLAN/WPS
Orange Clignotant
Négociations WPS et transmission de données sans fil en
cours.

6
Le tableau suivant décrit les boutons situés sur le panneau avant.
Bouton Description
Security
(sécurité)
Permet de définir le statut des périphériques membres.
• Maintenez enfoncée la touche Security pendant au moins 10 secondes pour quitter
le réseau actuel et créer un mot de passe aléatoire de membre de réseau.
• Maintenez enfoncée la touche Security pendant environ trois secondes pour
intégrer l'adaptateur CPL sans fil à l'AVLN existant.
Reset
(réinitialisation)
Maintenez enfoncée la touche Reset pendant environ trois secondes, puis relâchez-la.
Les paramètres par défaut du système seront réinitialisés.
WPS
(configuration
protégée par
Wi-Fi)
Cette touche a les fonctions suivantes:
• Maintenez enfoncée la touche WPS pendant environ 3 secondes pour activer la
négociation de mode PBC.
• Maintenez enfoncée la touche WPS pendant environ 5 secondes pour activer ou
désactiver le WLAN.
Description des interfaces
Le tableau ci-dessous décrit les interfaces de l'adaptateur CPL sans fil:
Interface: Description
LAN1
LAN2
Interface LAN RJ45, pour connecter un hub, un commutateur ou un ordinateur à un LAN.
OFF ON Allumer ou éteindre l'appareil.
Installation du matériel
Configuration du système
Avant de procéder à l'installation de l'appareil, vous devez avoir à votre disposition:

7
• Au moins 1 câble Ethernet RJ45 (10Base-T/100Base-T)
• 1 adaptateur CPL sans fil
• 1 adaptateur CPL intermédiaire pour la communication CPL
• Un PC installé avec le protocole TCP/IP et pouvant accéder à Internet.
Avant de commencer
Avant de procéder à l'installation, veuillez noter les points suivants:
• Lorsque l'appareil est relié à un ordinateur, à un hub, à un routeur ou à un commutateur, le câble Ethernet ne doit pas faire plus
de 100 mètres de long.
• Placez l'appareil sur un support ou une surface stable. Ne le posez pas par terre.
• L'appareil doit rester propre. Ne laissez jamais l'appareil exposé au soleil. Aucun objet métallique ne doit être introduit dans
l'appareil.
• Placez l'appareil au centre de l'emplacement choisi, en essayant d'optimiser la couverture sans fil.
Branchements
Pour connecter l'appareil, procédez de la manière suivante:
Étape 1 Reliez une extrémité du câble RJ45 à l'interface LAN de l'adaptateur CPL sans fil.
Étape 2 Reliez l'autre extrémité du câble RJ45 à votre PC.
Étape 3 Branchez directement la fiche de l'appareil sur une prise de courant.
Portée de fonctionnement
La portée de fonctionnement de l'adaptateur CPL sans fil dépend des conditions de l'environnement. La trajectoire et l'effet de la
transmission du signal dépendent de l'emplacement dans la maison ou le bureau. En théorie, la portée de transmission CPL est de
300 mètres maximum.
Dans la pratique, cette distance peut varier selon le nombre de périphériques CPL reliés au réseau. Pour la transmission sans fil, la
portée en ligne droite à l'air libre peut atteindre 300 mètres pour certains appareils, en intérieur, elle n'est que de 100 mètres.
Améliorer la qualité de transmission du réseau
Pour améliorer la qualité de transmission du réseau, il est conseillé de brancher la fiche de l'appareil directement sur la prise de
courant. N'utilisez pas de multiprise.

8
CONFIGURATION DU PC LAN
Le serveur DHCP est activé par défaut. L'adresse IP LAN de l'adaptateur CPL sans fil est 192.168.1.1, et le masque de sous-réseau
est 255.255.255.0.
Remarque:
Les étapes et les illustrations de la procédure de configuration sont valables pour Windows XP et ne sont données qu'à titre
d'exemple. La procédure de configuration peut être différente selon le système d'exploitation de votre PC.
Pour paramétrer manuellement l'adaptateur réseau sur un PC avec Windows XP, procédez de la manière suivante:
Étape 1 Faites un clic droit sur l'icône Favoris réseau et choisissez Propriétés dans le menu. La fenêtre Connexions réseau
apparaît.
Étape 2 Faites un clic droit sur l'icône de l'adaptateur réseau et choisissez Propriétés dans le menu. La fenêtre Propriétés de la
connexion au réseau local apparaît.

9
Remarque:
Si plusieurs cartes réseau sont installées sur votre PC, vous verrez peut-être apparaître une autre fenêtre que Propriétés de la
connexion au réseau local.
Étape 3 Faites un double clic sur Protocole Internet (TCP/IP); la fenêtre Propriétés du protocole Internet (TCP/IP) apparaît.
Étape 4 Allez dans Utiliser l'adresse IP suivante puis tapez l'adresse IP de l'adaptateur réseau. Réglez l'adresse IP sur 192.168.
1 .X (X étant un nombre de 2 à 254) et le masque de sous-réseau sur 255.255.255.0. Configurez la passerelle par défaut
et les adresses IP des serveurs DNS selon votre réseau actuel, sinon laissez-les vides. Une fois tous les paramètres réglés,
cliquez sur OK.

10
Étape 5 Testez l'adresse IP par défaut de l'adaptateur CPL sans fil afin de vous assurer que la connexion actuelle entre
l'adaptateur et votre PC est normale. Sur le bureau, allez dans Démarrer > Exécuter et tapez ping 192.168.1.1. Voir
image ci-dessous:
Remarque:
Dans la commande ping, 192.168.1.1 est l'adresse IP par défaut de l'interface LAN. En cas de changement de l'adresse IP,
mettez ici l'adresse IP actuelle.
Étape 6 Si votre PC réussit à tester l'adresse IP par défaut de l'adaptateur CPL sans fil, la page suivante apparaît, indiquant que la
connexion actuelle entre l'adaptateur et votre PC est normale:
CONFIGURATION WEB
Cette section vous explique comment vous connecter à l'adaptateur CPL sans fil en tant que super utilisateur et comment
configurer les paramètres dans les pages Web.
Connexion à l'adaptateur CPL sans fil
Lors de la première connexion à l'adaptateur, procédez de la manière suivante:
Étape 1 Ouvrez Internet Explorer et tapez http://192.168.1.1 dans la barre d'adresse.

11
Étape 2 Dans la page de connexion, tapez le nom d'utilisateur et le mot de passe.
Remarque:
• Le mot de passe par défaut est admin.
• La langue se change en haut à droite de l'écran (anglais et français disponibles).
Étape 3 Cliquez sur Connexion; l'écran suivant apparaît.
Réglages
Assistant
L'assistant vous permet de régler les paramètres de base du réseau pour accéder à Internet.
Pour configurer l'assistant, procédez de la manière suivante:

12
Étape 1 Allez dans CONFIGURATION > Assistant; l'écran suivant apparaît.
Remarque:
Lorsque vous commandez un service de bande passante, faites attention au type de connexion Internet. L'adaptateur CPL sans
fil utilise la connexion Ethernet. Les paramètres techniques des propriétés de la connexion Internet sont fournis par votre
fournisseur d'accès Internet (ISP). Par exemple, votre ISP est censé vous dire si la connexion à internet se fait par adresse IP
statique ou dynamique, et si le protocole utilisé pour la communication Internet est DHCP ou PPPoE.
Étape 2 Cliquez sur Configurer l'assistant; l'écran suivant apparaît:
Étape 3 La configuration de l'assistant se fait en 4 étapes. Cliquez sur Suivant pour passer à la page suivante.

13
Remarque:
Le mot de passe par défaut de cet adaptateur est admin. Pour la sécurité de votre réseau, nous vous conseillons de changer le
mot de passe.
Étape 4 Sur cette page, vous pouvez changer le mot de passe de l'adaptateur CPL sans fil. Si vous ne souhaitez pas changer le mot
de passe, cliquez sur Suivant ou sur Ignorer. Après avoir changé le mot de passe, cliquez sur Suivant; l'écran suivant
apparaît:
Étape 5 Sur cette page, vous pouvez configurer les paramètres sans fil de l'adaptateur.
Le tableau ci-dessous décrit les paramètres de cette page:

14
Champ Description
Activer l'interface sans fil Activer ou désactiver l'interface sans fil.
Nom de réseau sans fil
(SSID)
Le nom de réseau sans fil (SSID) peut contenir jusqu'à 32 caractères (lettres, chiffres ou
tirets bas, seuls ou mélangés). Le SSID prend en compte les majuscules.
État de visibilité
Si vous choisissez Visible, l'adaptateur CPL sans fil diffuse son SSID sur le réseau
sans fil.
Si vous choisissez Invisible, l'adaptateur ne diffuse pas son SSID sur le réseau sans
fil.
Pays Choisissez dans le menu déroulant le pays dans lequel vous vous trouvez.
Mode 802.11
Choisissez le mode sans fil qui convient. Le mode par défaut est Mixed
802.11b/g/n.
802.11b seulement: Le débit maximal est de 11 Mbps.
802.11g seulement: Le débit maximal est de 54 Mbps.
802.11n seulement: Pour une bande passante de 20M, le débit maximal est de
130 Mbps (150 Mbps préambule court); pour une bande passante de 40M
supérieur (+) or 40M inférieur (-), le débit maximal est de 270Mbps (300 Mbps
préambule court).
802.11b/g mixte: compatible avec 802.11b et 802.11g.
802.11n/g mixte: compatible avec 802.11n et 802.11g.
802.11b/g/n mixte: compatible avec 802.11b, 802.11n, et 802.11g.
Bande passante
La bande passante ne peut être réglée que dans le mode 802.11 compatible avec
802.11n. Pour une bande passante de 20M, le débit maximal est de 130 Mbps
(150 Mbps préambule court); pour une bande passante de 40M supérieur (+) or 40M
inférieur (-), le débit maximal est de 270Mbps (300 Mbps préambule court).
Canal sans fil
Permet de choisir le canal de service du réseau sans fil. Le réglage par défaut est
Recherche auto, signifiant que le routeur sans fil recherche automatiquement le
meilleur canal parmi les canaux disponibles.
Étape 6 Après avoir réglé les paramètres sans fil, cliquez sur Suivant; l'écran suivant apparaît:
Étape 7 Sur cette page, vous pouvez régler le mode de sécurité sans fil.
L'adaptateur CPL sans fil fournit les 5 modes de sécurité sans fil suivants: None, WEP, WPA-PSK, WPA2-PSK, et
WPA/WPA2-PSK.

15
(1) Aucun
Si vous choisissez Aucun dans le menu déroulant, la page suivante s'affiche.
Aucun signifie que les données ne sont pas cryptées, que le réseau n'est pas sécurisé et que n'importe quelle station peut donc
accéder au réseau.
Cette option n'est pas conseillée.
(2) WEP
Si vous choisissez WEP dans le menu déroulant des modes de sécurité sans fil, la page suivante s'affiche.

16
Le tableau ci-dessous décrit les paramètres en rapport avec le mode WEP:
Champ Description
Longueur de la
clé WEP
Choisir la longueur de cryptage de la clé WEP. Les options sont les suivantes: 64 bit ou 128 bit.
Clé Tx par défaut Choisir l'une des quatre clés comme clé par défaut pour le réseau sans fil.
Format de la clé
WEP
• Si le format de clé est réglé sur 64 bit, vous devez taper 5 caractères ASCII ou 10 caractères
hexadécimaux.
• Si le format de clé est réglé sur 128 bit, vous devez taper 13 caractères ASCII ou 26 caractères
hexadécimaux.
Clé WEP 1/2/3/4 Choisissez 64 bit ou 128 bit selon le format de la clé.
Authentification Permet de choisir le mode d'authentification adéquat. Vous avez le choix entre Clé ouverte et Clé
partagée.
(3) WPA-PSK
Si vous choisissez WPA-PSK dans le menu déroulant des modes de sécurité sans fil, la page suivante s'affiche.
Le tableau ci-dessous décrit les paramètres en rapport avec le mode WPA:
Champ Description
Mode WPA Seul le mode WPA-Personnel est disponible.
Mode de cryptage Seul le mode TKIP est disponible.
Clé pré-partagée Définir la clé partagée. Cette clé permet à l'adaptateur d'authentifier l'identité du poste de travail.

17
(4) WPA2-PSK
Si vous choisissez WPA2-PSK dans le menu déroulant des modes de sécurité sans fil, la page suivante s'affiche.
Le tableau ci-dessous décrit les paramètres en rapport avec le mode WPA2:
Champ Description
Mode WPA Seul le mode WPA2-Personnel est disponible.
Mode de cryptage Seul le mode AES est disponible.
Clé pré-partagée Définir la clé partagée. Cette clé permet à l'adaptateur d'authentifier l'identité du
poste de travail.
(5) WPA/WPA2-PSK
Si vous choisissez WPA/WPA2-PSK dans le menu déroulant des modes de sécurité sans fil, la page suivante s'affiche.

18
Le tableau ci-dessous décrit les paramètres en rapport avec le mode WPA/WPA2 mixte:
Champ Description
Mode WPA Seul le mode WPA/WPA2 mixte-personnel est disponible.
Mode de cryptage La seule option possible est Les deux.
Clé pré-partagée Définir la clé partagée. Cette clé permet à l'adaptateur d'authentifier l'identité du
poste de travail.
Étape 8 Après avoir choisi le mode de sécurité sans fil et les paramètres correspondants, cliquez sur Suivant; la page suivante
s'affiche.

19
Étape 9 Sur cette page, vous pouvez vérifier les informations de configuration de l'adaptateur. Si vous souhaitez modifier certains
des paramètres, cliquez sur Retour. Si vous souhaitez appliquer les paramètres, cliquez sur Te rmi ne r.
Remarque:
Sur chacune des pages de configuration de l'assistant, vous avez la possibilité de cliquer sur Retour pour modifier les
paramètres précédents, ou sur Annuler pour quitter la page.
Configuration sans fil
Allez dans CONFIGURATION > Configuration sans fil; l'écran suivant apparaît.
A. Paramètres sans fil de base
Allez dans Configuration sans fil > Paramètres sans fil de base dans le panneau de gauche ou cliquez sur Paramètres sans fil de
base dans la page CONFIGURATION SANS FIL; l'écran suivant apparaît.

20
Sur cette page, vous pouvez configurer les paramètres sans fil de base.
Le tableau ci-dessous décrit les paramètres de cette page:
Champ Description
Activer l'interface sans fil Activer ou désactiver l'interface sans fil.
Nom de réseau sans fil
(SSID)
Le nom de réseau sans fil (SSID) peut contenir jusqu'à 32 caractères (lettres, chiffres ou
tirets bas, seuls ou mélangés). Le SSID prend en compte les majuscules.
Mode sécurité sans fil 5 modes de sécurité sans fil sont disponibles: Aucun, WEP, WPA-PSK, WPA2-PSK, et
WPA/WPA2-PSK.
Mot de passe Le mot de passe doit comporter entre 8 et 63 caractères ASCII ou 64 caractères
hexadécimaux.
Afficher la clé de cryptage Afficher ou cacher la clé de cryptage.
Une fois les paramètres réglés, cliquez sur Appliquer pour les sauvegarder.
B. WPS (configuration protégée par Wi-Fi)
WPS signifie Wi-Fi Protected Setup (configuration protégée par Wi-Fi). La fonction de configuration WPS vous permet d'ajouter
un client sans fil sur un réseau sans avoir à régler certains paramètres comme le SSID, le mode de sécurité et le mot de passe.
Pour pouvoir utiliser cette fonction, le client sans fil doit accepter la fonctionnalité WPS. Si votre client sans fil n'accepte pas la
fonctionnalité WPS, vous devrez le configurer manuellement afin qu'il ait le même SSID et les mêmes paramètres de sécurité que
ceux de l'adaptateur.
Allez dans Configuration sans fil > WPS dans le panneau de gauche ou cliquez sur WPS dans la page CONFIGURATION SANS FIL;
l'écran suivant apparaît.
Le tableau ci-dessous décrit les paramètres de cette page:
Champ Description
Activer WPS Activer ou désactiver la fonction WPS.
Mode WPA Afficher le mode WPA actuel.

21
Attention:
Si vous souhaitez utiliser la fonction WPS, vous devez choisir le mode WPA-PSK/WPA2-PSK et le SSID doit être diffusé.
Les modes WPS sont les suivants: PBC, PIN et AP-PIN.
• Mode PBC
Choisissez PBC dans le menu déroulant des modes WPS puis cliquez sur PBC dans la page WPS, ou appuyez sur la touche WPS de
l'adaptateur pour lancer la connexion WPS.
Appuyez sur la touche WPS de la carte réseau ou cliquez sur PBC dans la page de l'utilitaire de configuration de la carte réseau
dans les deux minutes qui suivent; la connexion WPS se lance. Une fois établie la connexion WPS, l'écran suivant apparaît. Le
client peut maintenant accéder au LAN.
Cliquez sur Appliquer pour sauvegarder votre configuration.

22
• Mode PIN
Choisissez PIN dans le menu déroulant des modes WPS.
Tapez la valeur PIN de la carte réseau dans la page WPS (en vous référant au client de la carte réseau), puis cliquez sur le bouton
PIN dans la page droite de l'utilitaire de configuration de la carte réseau dans les deux minutes qui suivent; la connexion WPS se
lance.
• Mode AP-PIN
Choisissez AP-PIN dans le menu déroulant des modes WPS.

23
Tapez la valeur PIN de la carte réseau dans la page WPS (en vous référant au client de la carte réseau), puis cliquez sur le bouton
AP-PIN dans la page droite de l'utilitaire de configuration de la carte réseau dans les deux minutes qui suivent; la connexion WPS
se lance.
Configuration CPL
Allez dans CONFIGURATION > Configuration CPL; l'écran suivant apparaît.
Cette page contient les informations du périphérique local (nom du périphérique, adresse MAC, mot de passe et nom de réseau).

24
Cliquez sur Rafraîchir pour rafraîchir la page. Cliquez sur Ajouter un membre pour entrer les informations d'un nouveau
périphérique.
Tapez les informations du nouveau membre puis cliquez sur Appliquer pour les sauvegarder.
Configuration LAN
Allez dans CONFIGURATION > Configuration LAN; l'écran suivant apparaît.
Cette page contient les paramètres LAN de votre adaptateur.

25
Réglages avancés
Sans fil avancé
Allez dans AVANCÉ >Sans fil avancé > Avancé dans le panneau de gauche ou cliquez sur Avancé dans la page Sans fil
avancé; l'écran suivant apparaît.
Le tableau ci-dessous décrit les paramètres de cette page:
Champ Description
Nom de réseau sans fil (SSID)
Le nom de réseau sans fil (SSID) peut contenir jusqu'à 32 caractères (lettres, chiffres ou
tirets bas, seuls ou mélangés). Le SSID prend en compte les majuscules.
État du nom de réseau
Si vous choisissez Visible, l'adaptateur CPL sans fil diffuse son SSID sur le réseau sans fil.
Si vous choisissez Invisible, l'adaptateur ne diffuse pas son SSID sur le réseau sans fil.
Débit de transmission Régler le débit de transmission adéquat.
Puissance de transmission
Choisissez la puissance de transmission qui convient dans le menu déroulant. Les options
sont les suivantes: 100%, 80%, 60%, 40% ou 20%.
Isolation des utilisateurs
ON signifie que les ordinateurs connectés sans fil au même SSID ne peuvent pas
communiquer entre eux.

26
Champ Description
OFF signifie que les ordinateurs connectés sans fil au même SSID peuvent communiquer
entre eux.
Activer WMM (QoS sans fil)
Cette fonction n'est pas disponible. Si cette fonction est désactivée, l'adaptateur adopte le
WMM pour marquer les priorités et définir l'ordre de la file d'attente pour le réseau WiFi.
Clients Max
L'intervalle de balise indique la fréquence avec laquelle l'adaptateur envoie la trame de
balise. Par défaut, l'adaptateur envoie la trame de balise toutes les 100 ms. La plage de
réglage est de 20 à 1024.
Région Choisissez dans le menu déroulant le pays dans lequel vous vous trouvez.
Mode 802.11
Choisissez le mode sans fil qui convient. Le mode par défaut est Mixed 802.11b/g/n.
802.11b seulement: Le débit maximal est de 11 Mbps.
802.11g seulement: Le débit maximal est de 54 Mbps.
802.11n seulement: Pour une bande passante de 20M, le débit maximal est de
130 Mbps (150 Mbps préambule court); pour une bande passante de 40M supérieur (+)
or 40M inférieur (-), le débit maximal est de 270Mbps (300 Mbps préambule court).
802.11b/g mixte: compatible avec 802.11b et 802.11g.
802.11n/g mixte: compatible avec 802.11n et 802.11g.
802.11b/g/n mixte: compatible avec 802.11b, 802.11n, et 802.11g.
Largeur de bande
La bande passante ne peut être réglée que dans le mode 802.11 compatible avec 802.11n.
Pour une bande passante de 20M, le débit maximal est de 130 Mbps (150 Mbps préambule
court); pour une bande passante de 40M supérieur (+) or 40M inférieur (-), le débit
maximal est de 270Mbps (300 Mbps préambule court).
Canal sans fil
Permet de choisir le canal de service du réseau sans fil. Le réglage par défaut est Recherche
auto, signifiant que le routeur sans fil recherche automatiquement le meilleur canal parmi
les canaux disponibles.
Une fois les paramètres réglés, cliquez sur Appliquer pour les sauvegarder.
Contrôle d'accès
Allez dans AVANCÉ >Sans fil avancé > Contrôle d'accès dans le panneau de gauche ou cliquez sur Contrôle d'accès dans la page
Sans fil avancé; l'écran suivant apparaît.
Le tableau ci-dessous décrit les paramètres de cette page:
Champ Description
Activer le contrôle d'accès Activer ou désactiver le contrôle d'accès.
Mode contrôle d'accès
Vous avez le choix entre liste noire et liste blanche. Liste blanche signifie que si l'adresse MAC
d'un périphérique LAN correspond à l'adresse MAC spécifiée, l'adaptateur attribue l'adresse IP
attachée au périphérique en question. Liste noire signifie le contraire.
Ajouter Ajouter de nouveaux filtres WLAN.

27
Cliquez sur Ajouter pour passer à la page suivante.
Tapez l'adresse MAC et les commentaires du filtre MAC d'entrée, puis cliquez sur Appliquer pour sauvegarder la configuration.
Sécurité avancée
Allez dans Sans fil avancé >Sécurité avancée dans le panneau de gauche ou cliquez sur Sécurité avancée dans la page SANS FIL
AVANCÉ ; l'écran suivant apparaît.

28
Pour les paramètres de cette page, référez-vous à l'Assistant.
ENTRETIEN
Gestion du périphérique
Allez dans ENTRETIEN > Gestion du périphérique; l'écran suivant apparaît.
Sur cette page, vous pouvez changer le mot de passe d'accès à l'adaptateur.
Le tableau ci-dessous décrit les paramètres de cette page:
Champ Description
Ancien mot de passe Tapez l'ancien mot de passe.
Nouveau mot de passe Tapez le nouveau mot de passe.
Confirmer mot de passe. Retapez le nouveau mot de passe.
Une fois les paramètres réglés, cliquez sur Appliquer pour les sauvegarder.
Redémarrer et réinitialiser
Allez dans ENTRETIEN > Redémarrer et réinitialiser; l'écran suivant apparaît.

29
Dans cette page, vous pouvez redémarrer l'adaptateur et rétablir tous ses paramètres par défaut.
• Redémarrer
Cliquez sur Redémarrer pour redémarrer l'adaptateur.
• Réinitialiser
Cliquez sur Réinitialiser pour rétablir tous les paramètres par défaut de l'adaptateur. Pour réinitialiser l'adaptateur, vous pouvez
également appuyer sur le bouton Reset du panneau avant pendant 3 secondes.
Attention:
N'appuyez pas sur le bouton Reset au cours des manipulations décrites dans cette page.
Mise à jour du micrologiciel
Allez dans ENTRETIEN > Mise à jour du micrologiciel; l'écran suivant apparaît.
Sur cette page, vous pouvez mettre à jour la version du micrologiciel de l'adaptateur.
Le tableau ci-dessous décrit les paramètres de cette page:
Champ Description
Version micrologiciel Afficher la version actuelle du micrologiciel.
Sélectionner fichier Cliquez sur Parcourir… pour retrouver le dernier micrologiciel.
Effacer config
Si vous cochez la case Effacer config, l'adaptateur CPL rétablira les paramètres par
défaut après chaque mise à jour. Dans le cas contraire, l'adaptateur conservera les
paramètres actuels.
Cliquez sur Appliquer; le système lance la mise à jour du micrologiciel.
Une fois la mise à jour
terminée, l'adaptateur redémarre automatiquement.
Attention:
Sauvegardez la dernière configuration de l'adaptateur afin d'éviter de la perdre après la mise à jour.
Pendant la mise à jour, n'appuyez pas sur la touche Reset et ne coupez pas l'alimentation.

30
État
Infos périphérique
Allez dans ÉTAT > Infos périphérique; l'écran suivant apparaît.
Cette page contient les informations en rapport avec le périphérique: infos système, état CPL, infos LAN et WLAN. Cliquez sur
Rafraîchir pour rafraîchir la page.
Déconnexion
Cliquez sur Déconnexion pour vous déconnecter de la page de configuration web.
UTILISATION DU BOUTON SECURITY (sécurité)
Cette section explique comment ajouter de nouveaux périphériques ou enlever un périphérique existant dans un réseau logique
HomePlug AV (AVLN). La touche Security (NMK) permet d'effectuer ces deux manipulations.
Les LED d'alimentation et de données indiquent l'état d'avancement du processus puis son résultat.
Création de réseau logique HomePlug AV
Quand deux périphériques A et B de valeurs NMK différentes sont connectés au même réseau CPL, il est pertinent de les
combiner en un réseau logique. Procédez de la manière suivante:

31
Étape 1 Appuyez sur le bouton Security du périphérique A ou B pendant au moins 10 secondes. Le périphérique redémarre et se
réinitialise avec une valeur NMK aléatoire.
Étape 2 Appuyez sur le bouton Security du périphérique A pendant moins de 3 secondes.
Étape 3 Appuyez sur le bouton Security du périphérique B pendant moins de 3 secondes. Appuyez sur le bouton du périphérique
B dans les 2 minutes qui suivent.
Étape 4 Attendez que la connexion soit établie.
Le témoin d'alimentation des deux périphériques clignote de manière stable, à 1 seconde d'intervalle, jusqu'à ce que l'opération
réussisse ou échoue. Si la connexion réussit, les LED d'alimentation et de données restent allumées. Si la connexion échoue, les
LED d'alimentation des deux périphériques restent allumées mais les LED de données s'éteignent. Dans ce cas, répétez les étapes
1 à 4.
Rejoindre un réseau AVLN
Imaginons qu'un nouveau périphérique, dit "le nouveau", doive être intégré à un réseau existant. N'importe quel périphérique du
réseau existant peut jouer le rôle d'"ajouteur".
Étape 1 Appuyez sur le bouton Security du "nouveau" pendant au moins 10 secondes. Le périphérique redémarre et se
réinitialise avec une valeur NMK aléatoire.
Étape 2 Appuyez sur le bouton Security du "nouveau" pendant moins de 3 secondes.
Étape 3 Appuyez sur le bouton Security de n'importe quel périphérique du réseau pendant moins de 3 secondes; ce
périphérique est maintenant l'"ajouteur". Appuyez sur ce bouton dans la minute qui suit.
Étape 4 Attendez que la connexion soit établie.
Le témoin d'alimentation des deux périphériques clignote à 1 seconde d'intervalle jusqu'à ce que l'opération réussisse ou échoue.
Si la connexion réussit, les LED d'alimentation et de données restent allumées. Si la connexion échoue, les LED d'alimentation des
deux périphériques restent allumées mais les LED de données s'éteignent. Dans ce cas, répétez les étapes 1 à 4.

32
Quitter un réseau AVLN
Imaginons un réseau existant. Si vous souhaitez enlever un périphérique (dit "le sortant") d'un réseau AVLN ou le sortir d'un
réseau existant pour ensuite l'intégrer à un réseau logique, procédez de la manière suivante:
Étape 1 Appuyez sur le bouton Security du "sortant" pendant au moins 10 secondes.
Le périphérique redémarre et se réinitialise avec une valeur NMK aléatoire.
Étape 2 Attendez la fin de la réinitialisation.
Le témoin d'alimentation du "sortant" s'éteint provisoirement pendant la réinitialisation, clignote lors du redémarrage, puis reste
allumé. Le "sortant" n'appartient plus au réseau existant.
Une fois la procédure terminée, vous pouvez déconnecter le périphérique du support ou l'intégrer à un autre réseau logique situé
sur le même support.
DÉPANNAGE
Tous les témoins LED sont éteints. Pourquoi?
(1) L'adaptateur secteur est peut-être mal branché.
(2) L'appareil n'est peut-être pas allumé.
Le témoin Ethernet est éteint. Pourquoi?

33
(1) Vérifiez la connexion entre l'adaptateur et l'ordinateur (ou le hub, ou le commutateur le cas échéant).
(2) Vérifiez l'état de fonctionnement de votre ordinateur (ou hub, ou commutateur, le cas échéant); peut-être ne fonctionne-t-il
pas normalement.
(3) Vérifiez le câble réseau reliant l'adaptateur aux autres périphériques.
Je n'arrive pas à accéder à la page Web. Pourquoi?
Vérifiez la connexion entre l'ordinateur et le périphérique de la manière suivante:
(1) Allez dans Démarrer > Exécuter et tapez la commande ping 192.168.1.1 (correspondant à l'adresse IP de l'adaptateur).
(2) Si vous n'arrivez pas à accéder à l'adaptateur, vérifiez les points suivants:
− Type de câble réseau
− Connexion entre l'adaptateur et l'ordinateur
− Paramètres TCP/IP du PC
La configuration que j'ai effectuée est incorrecte. Comment puis-je rétablir les paramètres par défaut?
(1) Maintenez enfoncée la touche Reset pendant environ 3 secondes, puis relâchez-la.
(2) L'adresse IP par défaut de l'adaptateur est 192.168.1.1, et le masque de sous-réseau est 255.255.255.0.
(3) Le nom et le mot de passe du super-utilisateur sont tous les deux admin.
SPÉCIFICATIONS
Conforme à la norme Homeplug AV
Débit de transmission de données CPL jusqu'à 500Mbps
Chiffrement de liaison AES 128 bit avec gestion de clé
2 antennes internes
802.11b+g+n
Sécurité: WPA-TKIP, WPA2-AES, WPA2-Mixte
Vitesse sans fil jusqu'à 300 Mbps
IEEE 802.3, IEEE 802.3U, Homeplug 1.1
Bande de fréquences 2MHz-68MHz
Compatible avec les modulations OFDM QAM 8/16/64/256/1024/4096, BPSK, QPSK et ROBO
Ports: Deux ports Ethernet RJ45 10/100
Consommation électrique : 6,5W en fonctionnement

34
MISE AU REBUT
En tant que distributeurs responsables, nous sommes soucieux de l’environnement.
Nous vous prions donc de bien vouloir respecter la procédure de mise au rebut de votre produit, de l’emballage et, le cas échéant,
des accessoires, afin de contribuer à la préservation des ressources naturelles et de garantir le recyclage des matériaux d’une
manière respectueuse de la santé et de l’environnement.
Ce produit doit être mis au rebut d’une manière conforme aux lois et réglementations locales. Les produits électriques usagés ne
doivent pas être jetés avec les ordures ménagères à la fin de leur durée de vie.
Contactez le magasin d'achat et les autorités locales pour plus d'informations concernant les procédures de mise au rebut et de
recyclage.
En raison des mises au point et améliorations constamment apportées à nos produits, de petites incohérences peuvent apparaître
dans le mode d'emploi. Veuillez nous excuser pour la gêne occasionnée.
Darty Plc © UK: EC1N 6TE 13 / 11/ 2013


DUTCH

500 Mbps Set van 2 Powerline
draadloze adapters
MODEL: CPL500W
GEBRUIKSAANWIJZING

1
Inhoudstabel
KENMERKEN .......................................................................................................................................................................3
VEILIGHEIDSMAATREGELEN ...............................................................................................................................................3
OVERZICHT..........................................................................................................................................................................4
LEER UW TOESTEL KENNEN.............................................................................................................................. 4
Verpakkingslijst ................................................................................................................................................ 4
HARDWAREBESCHRIJVING EN AANSLUITING VAN HET APPARAAT ...................................................................................4
Benamingen LED Status en Druktoetsen..........................................................................................................4
Interfacebeschrijving........................................................................................................................................6
Hardware Installatie .........................................................................................................................................6
Systeemvereisten:..............................................................................................................................6
Vooraleer U Begint.............................................................................................................................7
Het Apparaat Aansluiten....................................................................................................................7
Werkbereik.......................................................................................................................................................7
De Transmissiekwaliteit van een Netwerk verbeteren. ................................................................................... 7
DE LAN PC CONFIGUREREN ................................................................................................................................................8
WEB CONFIGURATIE.........................................................................................................................................................11
Een draadloze PLC adapter............................................................................................................................. 11
Instellen..........................................................................................................................................................12
Wizard ..............................................................................................................................................12
Wireless setup (Draadloze Instelling) ..............................................................................................19
A. Wireless Basic Settings (Basisinstellingen Draadloos) .................................................................19
PLC Setting (PLC Instelling)...............................................................................................................23
LAN setup.........................................................................................................................................24
Advanced Settings (Geavanceerde Instellingen)............................................................................................ 25
Advanced wireless (Geavanceerd Draadloos) .................................................................................25
Access control (Toegangsbeheer)....................................................................................................26
Advanced Security (Gevanceerde Beveiliging).................................................................................27
MAINTENANCE (ONDERHOUD) ........................................................................................................................................28
Device Management (Apparaatbeheer) ........................................................................................................28

2
Reboot and Restore (Opnieuw Starten en Herstellen) .................................................................................. 28
Firmware update..............................................................................................................................................29
Status..............................................................................................................................................................30
Apparaatinformatie..........................................................................................................................................30
Logout (Afmelden)............................................................................................................................................31
DE BEVEILIGING-DRUKTOETS GEBRUIKEN........................................................................................................................31
Een HomePlug AV Logisch Netwerk Vormen ................................................................................................. 31
Verbinding met een AVLN Netwerk Maken ...................................................................................................31
Een AVLN Netwerk Verlaten ..........................................................................................................................32
PROBLEEMGIDS ................................................................................................................................................................33
TECHNISCHE GEGEVENS ...................................................................................................................................................33
VERWIJDERING .................................................................................................................................................................34

3
KENMERKEN
PLC Kenmerken
• Het bereik van de voedingsspanning is 100 tot 240V AC 50/60 Hz.
• Ondersteunt het HomePlug AV protocol en het IEEE1901 protocol.
• De ratio van de PLC fysieke verbinding bedraagt tot 500 Mbps.
• Ondersteunt de volgende modulatieschema's: OFDM QAM 4096/1024/256/64/16/8, QPSK, BPSK, en ROBO.
• Ondersteunt 128-bit AES linkencryptie en NMK gebruikersauthenticatie om een veilige energielijncommunicatie te
verzekeren.
• Ondersteunt windowed OFDM met ruisonderdrukking, op basis van een gepantenteerde lijnsynchronisatietechniek die
dataintegriteit bij omstandigheden met ruis verbetert.
• Ondersteunt zelfaanpassing en schatting van kanalen voor het maximaliseren van real time doorvoer.
• Ondersteunt een op prioriteit gebaseerd CSMA/CA toegangsschema voor kanalen om efficientie en doorvoer te
maximaliseren.
• Ondersteunt QoS met vier niveaus.
• Ondersteunt ToS en CoS pakketclassificaties.
• Ondersteunt IGMP multicast beheersessie.
Draadloze Kenmerken
• Ondersteunt IEEE802.11b, IEEE802.11g, IEEE802.11n, IEEE802.3, IEEE802.3u, IEEE802.11i en IEEE802.11e.
• Ondersteunt 2T2R modus. Transmissiesnelheid bedraagt tot 300 Mbps.
• Ondersteunt WEP en WPA voor beveiligde datatransmissie.
• Ondersteunt DHCP server.
• Ondersteunt versie-upgrade via Webpagina.
• Ondersteunt het opnieuw instellen van de fabrieksinstellingen.
• Ondersteunt de volgende draadloze veiligheidsmodi: WEP, WPA-PSK, WPA2-PSK, en WPA/WPA2-PSK Mixed.
• Ondersteunt weergave van systeemstatus.
• Ondersteunt systeemlogboek.
VEILIGHEIDSMAATREGELEN
Dit apparaat moet aangesloten worden op een stopcontact met wisselstroom. Gelieve de volgende voorzorgsmaatregelen te
lezen vooraleer dit apparaat te gebruiken.
• Volg alle waarschuwingen en instructies die op het apparaat staan vermeld.
• Trek het apparaat uit het stopcontact voordat U het schoonmaakt. Gebruik een zachte doek om te reinigen. Gebruik
geen vloeibare reinigingsmiddelen of spuitbussen.

4
• Plaats dit apparaat niet nabij water.
• Plaats dit apparaat niet nabij een radiator of een warmtebron.
• Gebruik geen verlengsnoer tussen het apparaat en het stopcontact.
• Enkel een gekwalificeerde technieker mag dit toestel herstellen.. Het openen of verwijderen van de behuizingen kan
resulteren in blootstelling aan gevaarlijke spanningspunten of andere risico's.
• Trek het apparaat uit het stopcontact en laat het herstellen door gekwalificeerd onderhoudspersoneel in de volgende
omstandigheden:
− indien U vloeistof op dit apparaat heeft gemorst;
− Indien het toestel blootgesteld is aan regen of water;
− Indien het toestel niet naar behoren werkt bij het volgen van de gebruiksaanwijzing.
− Indien het toestel plots anders blijkt te functioneren.
Deze markering geeft aan dat het toestel conform is met de Europese veiligheid- en elektromagnetische
compatibiliteitstandaarden.
OVERZICHT
LEER UW TOESTEL KENNEN
Dit toestel is compatibel met de HomePlug AV, IEEE1901 en 802.11b/g/n protocollen. Het ondersteunt de CCK en OFDM
modulatieschema’s. De ration voor de PLC fysieke verbinding bedraagt tot 500 Mbps en de draadloze fysieke ratio bedraagt tot
300 Mbps in de 802.11n modus.
Het apparaat ondersteunt 128-bit AES linkencryptie van de voedingslijncommunicatie en draadloze veiligheidsmodi waaronder
WEP, WPA-PSK, WPA2-PSK en WPA/WPA2-PSK mixed die een veilige en betrouwbare communicatie voor de gebruikers voorzien.
Verpakkingslijst
Gelieve na te gaan of de verpakkingslijst de volgende onderdelen bevat:
• 1 x 500 Mbps Powerline Draadloze Adapter
• 1x 500 Mbps Powerline Passthrough Adapters
• 2x Netwerkkabels
• Gebruiksaanwijzing (CD)
HARDWAREBESCHRIJVING EN AANSLUITING VAN HET APPARAAT
Benamingen LED Status en Druktoetsen
Er zijn 5 LED indicatoren op het voorste paneel van de PLC draadloze adapter. Door hun status te observeren kan U nagaan of het
toestel naar behoren werkt.

5
De volgende tabel beschrijft de status van de LED indicatoren op het voorste paneel.
LED indicator Kleur Status Beschrijving
Groen Aan Systeem functioneert normaal.
Groen Knipperen
Systeem wordt opnieuw opgestart.
Paswoordsynchronisatie van het systeem is aan de gang.
Voeding
__ Uit Toestel of systeem is uitgeschakeld.
Groen Aan Aansluiting via de LAN1 interface is succesvol.
Groen Knipperen Data wordt verzonden via de LAN1 interface.
LAN1
__ Uit Er is geen verbinding gemaakt via de LAN1 interface.
Groen Aan Aansluiting via de LAN2 interface is succesvol.
Groen Knipperen Data wordt verzonden via de LAN2 interface.
LAN2
__ Uit Er is geen verbinding gemaakt via de LAN2 interface.
Groen Aan PLC transmissiesnelheid is gelijk aan of groter dan 40 Mbps.
Oranje Aan
PLC transmissiesnelheid bedraagt tussen 20 Mbps en 40
Mbps
Rood Aan
PLC transmissiesnelheid is kleiner dan of gelijk aan 20
Mbps.
Data
__ Uit Toestel is niet aangesloten op het electriciteitsnet.
Groen Aan WLAN is ingeschakeld.
Groen Knipperen Draadloze data wordt doorgestuurd.
__ Uit WLAN is uitgeschakeld.
Oranje Aan WLAN is ingeschakeld en WPS verbinding is succesvol.
WLAN/WPS
Oranje Knipperen
WPS onderhandeling is aan de gang en de draadloze data
wordt doorgestuurd.

6
De volgende tabel beschrijft de druktoetsen op het voorste paneel.
Toets Beschrijving
Beveiliging
Wordt gebruikt om de status in te stellen van de apparaatleden.
• Houd de Security (Beveiliging) toets langer dan 10 seconden ingedrukt om het
huidige netwerk te verlaten en een willekeurig paswoord te genereeren voor een
netwerklid.
• Houd de Security (Beveiliging) toets gedurende 3 seconden ingedrukt . De draadloze
PLC adapter zal vevolgens lid worden van het bestaande AVLN.
Reset
Houd de Reset toets gedurende 3 seconden ingedrukt en laat vervolgens los. Het
systeem zal de standaard fabrieksinstellingen opnieuw instellen.
WPS
Deze toets voorziet de volgende functies:
• Houd de WPS toets gedurende 3 seconden ingedrukt om de onderhandeling van
PBC modus in te schakelen.
• Houd de WPS toets gedurende 5 seconden ingedrukt om WLAN in- of uit te
schakelen.
Interfacebeschrijving
De volgende tabel beschrijft de interfaces van de draadloze PLC adapter.
Interface Beschrijving
LAN1
LAN2
R145 LAN interface, voor het aansluiten van een hub, schakelaar of computer op een
LAN.
OFF ON He apparaat in- en uitschakelen
Hardware Installatie
Systeemvereisten:
Verzeker eerst dat de volgende onderdelen klaar zijn voordat U het apparaat installeert.

7
• Tenminste één Ethernet Rj45 kabel (10Base-T/100Base-T)
• Een draadloze PLC adapter
• Een doorvoer PLC adapter voor PLC communicatie
• Een PC waarop het TCP/IP protocol is geinstalleerd en die verbinding kan maken met het Internet.
Vooraleer U Begint
Let op de volgende zaken voordat U het apparaat installeert:
• Wanneer het toestel is aangesloten op een computer, hub, router of schakelaar dan moet de Ethernetkabel korter zijn dan 100
meter.
• Plaats het apparaat op een stabiel oppervlak of standaard. Plaats dit apparaat niet op de grond.
• Houd het toestel schoon. Houd het apparaat uit de buurt van rechtstreeks zonlicht. Vermijd metaal in het apparaat.
• Plaats het apparaat in het midden van de kamer en probeer het draadloze bereik zo te optimaliseren.
Het Apparaat Aansluiten
Ga als volgt te werk om het apparaat aan te sluiten:
Stap 1: Sluit een uiteinde van de RJ45 kabel aan op de LAN interface van de draadloze PLC adapter.
Stap 2 Sluit het ander uiteinde van de RJ45 kabel aan op uw PC.
Step 3 Plaats de stekker van het toestel rechtstreeks in het stopcontact.
Werkbereik
Het werkbereik van de draadloze PLC adapter is afhankelijk van de werkelijke omgeving. De route en het effect van de
signaaltransmissie is afhankelijk van de opstelling in een huis of een kantoor. In theorie kan de maximale PLC transmissieafstand
tot 300 meter bedragen.
Maar in de praktijk kan de PLC transmissieafstand varieren wegens het aantal PLC apparaten aangesloten op het
electriciteitsnetwerk. In geval van draadloze transmissie kan het rechtstreekse bereik voor sommige apparaten 300 meter
bedragen in open lucht en tot 100 meter binnenshuis.
De Transmissiekwaliteit van een Netwerk verbeteren.
Om de transmissiekwaliteit van een netwerk te verbeteren is het aangeraden om de stekker van het apparaat rechtstreeks in het
stopcontact te steken. Gebruik geen verdeelstekker.

8
DE LAN PC CONFIGUREREN
De DHCP server is standaard ingeschakeld. Het LAN IP adres van de draadloze PLC adapter is 192.168.1.1 en het subnet mask is
255.255.255.0.
Opmerking:
De configuratiestappen en illustraties omtrent Windows XP worden als voorbeeld gegeven. De configuratieprocedure kan
verschillen afhankelijk van het besturingssysteem van uw PC.
Ga als volgt te werk om de netwerkadapter handmating in te stellen op een PC met Windows XP:
Stap 1 Recherklik op het icoon My Network Places (Mijn Netwerklocaties) en kies Eigenschappen uit het menu. Het venster
Netwerkverbindingen zal verschijnen.
Stap 2 Rechterklik op het icoon van de netwerkadapter en kies Eigenschappen uit het menu. Het venster Local Area
Connections Properties (Eigenschappen Local Area Verbindingen) verschijnt.

9
Opmerking:
Indien meerdere netwerkkaarten zijn geinstalleerd op uw PC dan kan er mogelijks een ander venster verschijnen dan het
Local Area Connections Properties (Eigenschappen Local Area Verbindingen).
Stap 3 Dubbelklik Internet Protocol (TCP/IP) en het venster Eigenschappen Internet Protocol (TCP/IP) zal verschijnen.

10
Stap 4 Selecteer Gebruik het volgende DNS-server adres en voer het IP adres van de netwerkadapter in. Stel het IP adres in op
192.168. 1 .X (‘X’ is een nummer tussen 2 en 254) en stel het subnetmasker in op 255.255.255.0. Configureer de
standaard gateway en IP adressen van de DNS servers overeenkomstig met uw plaatselijk netwerk of laat ze leeg. Klik
OK nadat U de parameters heeft ingesteld.
Stap 5 Ping het standaard IP adres van de draadloze PLC adapter om na te gaan of de huidige verbinding tussen uw PC en de
draadloze PLC adapter normaal is. Selecteer Start > Lopende op het bureaublad en voer ping 192.168.1.1 in. Zie de
volgende afbeelding:
Opmerking:
192.168.1.1 In het ping commando is het standaard IP adres van de LAN interface. Indien het IP adres verandert voert U in
plaats daarvan het huidige IP adres in.
Stap 6 Indien uw PC kan pingen via het standaard IP adres van de draadloze PLC adapter, dan zal het volgende venster
verschijnen om aan te geven dat de verbinding tussen uw PC en de draadloze PLC adapter normaal is:

11
WEB CONFIGURATIE
Dit hoofdstuk beschrijft hoe U kan inloggen op de draadloze PLC adapter als supergebruiker en hoe U de parameters in de
Webpagina's kan configureren.
Een draadloze PLC adapter
Ga als volgt te werk indien U de eerste keer inlogt op de draadloze PLC adapter:
Stap 1 Open de IE browser en voer http://192.168.1.1
in in de adresbalk.
Stap 2 In de login pagina voert U de gebruikersnaam en het paswoord in.
Opmerking:
• Het standaard paswoord is admin.
• U kan de taal instellen op Engels of Frans in de bovenrechterhoek.
Stap 3 Klik op Login (Aanmelden) en de volgende pagina zal verschijnen.

12
Instellen
Wizard
U kan de basis netwerkparameters instellen om verbinding te maken met het Internet door deze Wizard te volgen.
Ga als volgt te werk om de wizard te configureren:
Stap 1 Selecteer SETUP > Wizard, en de volgende pagina zal verschijnen.
Opmerking:
Wanneer U een breedbanddienst bestelt, let dan op het Internet-verbindingstype. De draadloze PLC adapter neemt de
Ethernet-verbinding over. De technische parameters van de eigenschappen van de Internetverbinding worden voorzien door
uw Internet Service Provider (ISP). Bijvoorbeeld, uw ISP dient U mee te delen of de Internetverbindingsmodus een statisch IP
of dynamisch IP is en dien het protocol dat gebruikt wordt voor Internetcommunicatie DHCP of PPPoE is.
Stap 2 Klik op Setup Wizard (Installatiewizard) om de volgende pagina weer te geven:
Stap 3 Er zijn 4 stappen voor het configureren van de wizard. Klik op Next (Volgende) om de volgende pagina weer te geven:

13
Opmerking:
Het standaard paswoord van deze adapter is admin. Om uw netwerk te beveiligen is het aangeraden om een nieuw
paswoord in te stellen.
Stap 4 Op deze pagina kan U het paswoord van de draadloze PLC adapter veranderen. Indien U het paswoord wil veranderen
klik dan op Next (Volgende) of Skip (Overslaan) Nadat U het nieuwe paswoord heeft ingesteld klikt U op Next (Volgende)
om de volgende pagina weer te geven:
Stap 5 Op deze pagina kan U de draadloze parameters van de adapter configureren.
De volgende tabel beschrijft de parameters op deze pagina:
Veld Beschrijving
Enable Wireless Interface
(Draadloze Interface
Inschakelen)
De draadloze interface in- of uitschakelen.
Wireless Network Name De draadloze netwerknaam (SSID) kan tot 32 tekens bevatten. Dit kunnen letters,

14
Veld Beschrijving
(SSID) (Draadloze
Netwerknaam)
nummers, onderstrepen of een combinatie daarvan zijn. De SSID is hoofdlettergevoelig.
Visibility Status
(Zichtbaarheidstatus)
Indien Visible (zichtbaar) is geselecteerd dan zal
de draadloze PLC adapter zijn SSID uitzenden op
het draadloze netwerk.
Indien Invisible (onzichtbaar) is geselecteerd
dan zal de draadloze PLC adapter zijn SSID niet
uitzenden op het draadloze netwerk.
Country (Land) Selecteer het land waar U zich bevindt uit het vervolgmenu.
802.11 Mode
Selecteer de geschikte draadloze modus. De
standaard is Mixed 802.11b/g/n.
802.11enkel b: De maximumsnelheid is 11Mbps
802.11g enkel: De maximumsnelheid is 54Mbps
802.11n enkel: Bij 20M bandbreedte is de
maximum snelheid 130Mbps (150Mbps voor
korte preambule); bij 40M Upper (+) of 40M
Lower (-) bandbreedte is de maximumsnelheid
is 270Mbps (300Mbps voor korte preambule).
Mixed 802.11b/g: is compatibel met 802.11b en
802.11g.
Mixed 802.11n/g: is compatibel met 802.11n en
802.11g.
Mixed 802.11b/g/n: is compatibel met 802.11b
en 802.11n en 802.11g.
Band Width (Bandbreedte)
U kan de bandbreedte enkel instellen in de 802.11 modus die compatibel is met
802.11n. Bij 20M bandbreedte is de maximum snelheid 130Mbps (150Mbps voor korte
preambule); bij 40M Upper (+) of 40M Lower (-) bandbreedte is de maximumsnelheid is
270Mbps (300Mbps voor korte preambule).
Wireless Channel
(Draadloos Kanaal)
Selecteer het werkkanaal van het draadloze netwerk. De standaard is Auto Scan die
aangeeft dat de draadloze router automatisch naar het beste kanaal zoekt tussen de
beschikbare kanalen.
Stap 6 Na het instellen van de draadloze parameters klikt U op Next (Volgende) om de volgende pagina weer te geven.

15
Stap 7 Op deze pagina kan U de draadloze beveiligingsmodi instellen.
De draadloze PLC adapter voorziet de volgende 5 types draadloze beveiligingsmodi: Geen, WEP, WPA-PSK, WPA2-PSK
en WPA/WPA2-PSK.
(1) None (Geen)
Selecteer None (Geen) uit het vervolgmenu om de volgende pagina weer te geven.
None (Geen) betekent dat geen dataencryptie wordt gebruikt. Het netwerk is niet beveiligd en elk station kan toegang verkrijgen
tot het netwerk.
Deze optie wordt niet aangeraden.
(2) WEP
Selecteer WEP uit het vervolgmenu van de draadloze beveiligingsmodi om de volgende pagina weer te geven.

16
De volgende tabel beschrijft de parameters met betrekking tot de WEP modus:
Veld Beschrijving
WEP Key Length(Lengte
WEP Sleutel)
Selecteer de encrypielengte van de WEP sleutel. U kan 64 bit of 128 bit selecteren.
Default Tx Key (Standaard
Tx Sleutel)
Selecteer een van de vier sleutels als standaardsleutel van het draadloze netwerk.
WEP Key Format
(Formaat WEP Sleutel)
• Wanneer het sleutelformaat 64 bit bedraagt dient U 5 ASCII karakters of 10
hexadecimale cijfers in te voeren.
• Wanneer het sleutelformaat 128 bit bedraagt dient U 13 ASCII karakters of 26
hexadecimale cijfers in te voeren.
WEP Key 1/2/3/4 (WEP
Sleutel 1/2/3/4)
Stel de 65-bit of 128 bit sleutel in overeenkomstig met het sleutelformaat.
Authentication
(Authenticatie)
Selecteer de juiste authenticatiemodus. U kan Open (Openen) of Share Key (Sleutel
Delen).
(3) WPA-PSK
Selecteer WPA-PSK uit het vervolgmenu van de draadloze beveiligingsmodi om de volgende pagina weer te geven.
De volgende tabel beschrijft de parameters met betrekking tot de WPA modus:
Veld Beschrijving
WPA Mode (WPA Modus) Enkel WPA-Personal is beschikbaar.
Encryption Modus
(Encryptiemodus)
Enkel TKIP is beschikbaar.
Pre-shared Key (Vooraf
Gedeelde Sleutel)
Stel de vooraf gedeelde sleutel in. De draadloze PLC adapter gebruikt
deze sleutel om de identiteit van het werkstation te identificeren.

17
(4) WPA2-PSK
Selecteer WPA2-PSK uit het vervolgmenu van de draadloze beveiligingsmodi om de volgende pagina weer te geven.
De volgende tabel beschrijft de parameters met betrekking tot de WPA2 modus:
Veld Beschrijving
WPA Mode (WPA
Modus)
Enkel WPA2-Personal is beschikbaar.
Encryption Modus
(Encryptiemodus)
Enkel AES is beschikbaar.
Pre-shared Key
(Vooraf Gedeelde
Sleutel)
Stel de vooraf gedeelde sleutel in. De draadloze PLC adapter gebruikt deze sleutel
om de identiteit van het werkstation te identificeren.
(5) WPA/WPA2-PSK
Selecteer WPA/WPA2-PSK uit het vervolgmenu van de draadloze beveiligingsmodi om de volgende pagina weer te geven.

18
De volgende tabel beschrijft de parameters met betrekking tot de WPA/WPA2 Mixed modus:
Veld Beschrijving
WPA Mode (WPA
Modus)
Enkel WPA/WPA2 Mixed-Personal is beschikbaar.
Encryption Modus
(Encryptiemodus)
U kan enkel Both (Beide) selecteren.
Pre-shared Key
(Vooraf Gedeelde
Sleutel)
Stel de vooraf gedeelde sleutel in. De draadloze PLC adapter gebruikt deze sleutel
om de identiteit van het werkstation te identificeren.
Stap 8 Nadat U de geschikte draadloze veiligheidsmodus heeft geselecteerd en de bijhorende parameters klikt U op Next
(Volgende) om de volgende pagina weer te geven.

19
Stap 9 Op deze pagina kan U de configuratieinformatie bekijken van de draadloze PLC adapter. Indien U enkele instellingen wil
aanpassen klikt U op Back (Terug). Indien U wil dat de instellingen van kracht gaan klikt U op Complete (Voltooien).
Opmerking:
Op elke configuratiepagina van de Wizard kan U op Back (Terug) klikken om de vorige instellingen aan te passen of op Cancel
(Annuleren) om de pagina te verlaten.
Wireless setup (Draadloze Instelling)
Selecteer SETUP > Wireless Setup (SETUP > Draadloze Instelling) en de volgende pagina zal verschijnen.
A. Wireless Basic Settings (Basisinstellingen Draadloos)
Selecteer Wireless Setup > Wireless Basic (Draadloze Instelling > Draadloos Basis) in het linkerdeelvenster of klik op Wireless
Basic (Draadloos Basis) in de WIRELESS SETUP (DRAADLOZE INSTELLING) pagina om de volgende pagina weer te geven.
Op deze pagina kan U de standaard parameters voor de draadloze verbinding configureren.
De volgende tabel beschrijft de parameters op deze pagina:

20
Veld Beschrijving
Enable Wireless Interface
(Draadloze Interface Inschakelen)
De draadloze interface in- of uitschakelen.
Wireless Network Name (SSID)
(Draadloze Netwerknaam)
De draadloze netwerknaam (SSID) kan tot 32 tekens bevatten. Dit kunnen letters, nummers,
onderstrepen of een combinatie daarvan zijn. De SSID is hoofdlettergevoelig.
Wireless Security Mode
(Draadloze Beveiligingsmodus)
Er zijn 5 types draadloze beveiligingsmodus: None (Geen), WEP, WPA-PASK, WPA2-PSK en
WPA/WPA2-PSK.
PassPhrase De PassPhrase dient 8 tot 63 ASCII, of 64 hexadecimale nummers te bevatten.
Show encryption key (Toon
encryptiesleutel)
Toon of verberg de encryptiesleutel.
Nadat U de parameters heeft ingesteld klikt U op Apply (Toepassen) om de instellingen te bewaren.
B. WPS
WPS referereert naar Wi-Fi Protected Setup. U kan de WPS instellingfunctie gebruiken om een draadloze client toe te voegen aan
een netwerk zonder dat U specifieke parameters hoeft in te stellen zoals SSID, beveiligingsmodus en paswoord. Om deze functie
te gebruiken moet de draadloze client WPS ondersteunen. Indien de draadloze client geen WPS ondersteunt dan moet U de
draadloze instellingen van de draadloze client handmatig instellen en verzekeren dat zijn SSID en andere draadloze
veiligheidsinstellingen hetzelfde zijn als van de draadloze PLC adapter.
Selecteer Wireless Setup > WPS (Draadloze Instelling > WPS) in het linkerdeelvenster of klik op WPS in de WIRELESS SETUP
(DRAADLOZE INSTELLING) pagina om de volgende pagina weer te geven.
De volgende tabel beschrijft de parameters op deze pagina:
Veld Beschrijving
Enabled WPS (WPS Ingeschakeld) WPS in- of uitschakelen.
WPA Mode (WPA Modus) Geef de huidige WPA modus weer.

21
Opgepast:
Indien U WPS wil gebruiken moet U de WPA-PSK/WPA2-PSK modus selecteren en moet het SSID uitgestuurd worden.
WPS modi bevatten PBC modus, PIN modus en AP-PIN modus.
• PBC Mode
Selecteer PBC in het vervolgmenu van de WPS modus en klik op de PBC toets op WPS pagina of druk op de WPS toets op de
draadloze PLC adapter om de WPS verbinding te starten.
Druk op de WPS toets op de netwerkkaart of klik op de PBC toets in de configuratiepagina van de netwerkkaart binnen twee
minuten om de WPS verbinding te starten. Nadat de WPS verbinding is gemaakt zal de volgende pagina verschijnen. De client
kan de LAN nu bezoeken.

22
Klik op Apply (Toepassen) om uw configuratie te bewaren.
• PIN Mode
Selecteer PIN uit het WPS modus vervolgmenu.
Voer de PIN waarde van de netwerkkaart in op de WPS pagina (referereer naar de client van de netwerkkaart) en klik vervolgens
binnen de twee minuten op de PIN toets in de rechter configuratiepagina van de netwerkkaart om de WPS verbinding te starten.
• AP-PIN mode
Selecteer AP-PIN uit het WPS modus vervolgmenu.

23
Voer de PIN waarde van de netwerkkaart in op de WPS pagina (referereer naar de client van de netwerkkaart) en klik vervolgens
binnen de twee minuten op de AP-PIN toets in de rechter configuratiepagina van de netwerkkaart om de WPS verbinding te
starten.
PLC Setting (PLC Instelling)
Selecteer SETUP > PLC Setting (SETUP > PLC Instelling) en de volgende pagina zal verschijnen.
Deze pagina geeft informatie weer over het lokale apparaat inclusief apparaatnaam, MAC Adres, paswoord en netwerknaam.

24
Klik Refresh (vernieuwen) om de pagina te hernieuwen. Klik op Add Member (Lid Toevoegen) om nieuwe apparaatinformatie toe
te voegen.
Voeg de informatie van het lid toe en klik op Apply (Toepassen) om de instellingen te bewaren.
LAN setup
Selecteer SETUP > LAN Setup (SETUP > LAN Instelling) en de volgende pagina zal verschijnen.
Deze pagina geeft de LAN instelling van uw adapter weer.

25
Advanced Settings (Geavanceerde Instellingen).
Advanced wireless (Geavanceerd Draadloos)
Selecteer ADVANCED >Advanced Wireless > Advanced (GEAVANCEERD > Geavanceerd Draadloos > Geavanceerd) in het
linkerdeelvenster of klik op Advanced (Geavanceerd) op de Advanced Wireless pagina om de volgende pagina weer te geven.
De volgende tabel beschrijft de parameters op deze pagina:
Veld Beschrijving
Wireless Name (SSID)
(Draadloze Naam)
De draadloze netwerknaam (SSID) kan tot 32 tekens bevatten. Dit kunnen letters, nummers,
onderstrepen of een combinatie daarvan zijn. De SSID is hoofdlettergevoelig.
Network Name Status (Status
Netwerknaam)
Indien Visible (zichtbaar) is geselecteerd dan zal de
draadloze PLC adapter zijn SSID uitzenden op het
draadloze netwerk.
Indien Invisible (onzichtbaar) is geselecteerd dan zal
de draadloze PLC adapter zijn SSID niet uitzenden op
het draadloze netwerk.
Transmission Rate
(Transmissiesnelheid)
Stel de juiste transmissiesnelheid in.
Transmit Power
(Transmissievermogen)
Selecteer het geschikte transmissievermogen uit het vervolgmenu. U kan 100%, 80%, 60%,
40%, of 20% selecteren.
User Isolation
(Gebruikersisolatie)
On (Aan) geeft aan de computers die draadloos verbinding maken met dezelfde SSID
niet met elkaar kunnen communiceren.
Off (Uit) geeft aan de computers die draadloos verbinding maken met dezelfde SSID met
elkaar kunnen communiceren.
Enable WMM (Wireless QoS)
(WMM Inschakelen
(Draadloze QoS)
Deze functie is niet beschikbaar. Indien deze functie is uitgeschakeld zal de draadloze PLC
adapter WMM adopteren om prioriteit te markeren en om de volgorde van de Wi-Fi
netwerkrijen te rangschikken.
Max Clients (Max Clienten)
De bakenperiode geeft de frequentie van de draadloze PLC adapter weer die de bakenframe
verstuurt. Als standaard verstuurt de draadloze PLC adapter de bakenframe elke 100ms. Het
bereik is 20~1024.
Region (Regio) Selecteer het land waar U zich bevindt uit het vervolgmenu.
802.11 Mode
Selecteer de geschikte draadloze modus. De
standaard is Mixed 802.11b/g/n.

26
Veld Beschrijving
802.11enkel b: De maximumsnelheid is 11Mbps
802.11g enkel: De maximumsnelheid is 54Mbps
802.11n enkel: Bij 20M bandbreedte is de maximum
snelheid 130Mbps (150Mbps voor korte
preambule); bij 40M Upper (+) of 40M Lower (-)
bandbreedte is de maximumsnelheid is 270Mbps
(300Mbps voor korte preambule).
Mixed 802.11b/g: is compatibel met 802.11b en
802.11g.
Mixed 802.11n/g: is compatibel met 802.11n en
802.11g.
Mixed 802.11b/g/n: is compatibel met 802.11b en
802.11n en 802.11g.
Bandwidth (Bandbreedte)
U kan de bandbreedte enkel instellen in de 802.11 modus die compatibel is met 802.11n. Bij
20M bandbreedte is de maximum snelheid 130Mbps (150Mbps voor korte preambule); bij
40M Upper (+) of 40M Lower (-) bandbreedte is de maximumsnelheid is 270Mbps
(300Mbps voor korte preambule).
Wireless Channel (Draadloos
Kanaal)
Selecteer het werkkanaal van het draadloze netwerk. De standaard is Auto Scan die
aangeeft dat de draadloze router automatisch naar het beste kanaal zoekt tussen de
beschikbare kanalen.
Nadat U de parameters heeft ingesteld klikt U op Apply (Toepassen) om de instellingen te bewaren.
Access control (Toegangsbeheer)
Selecteer ADVANCED >Advanced Wireless > Access Control (GEAVANCEERD > Geavanceerd Draadloos > Toegangsbeheer) in het
linkerdeelvenster of klik op Access Control (Toegangsbeheer) op de Advanced Wireless pagina om de volgende pagina weer te
geven.
De volgende tabel beschrijft de parameters op deze pagina:
Veld Beschrijving
Enable Access control
(Toegangsbeheer
Inschakelen)
U kan het toegangsbeheer in- of uitschakelen.
Access Control Mode
(Toegangsbeheermodus)
U kan de black list (zwarte lijst) of witte lijst (witte lijst) selecteren. De witte lijst betekent dat
indien een MAC adres of een LAN apparaat consistent is met het gespecifieerde MAC adres, de
draadloze PLC adapter in dat geval het gekoppelde IP adres aan het apparaat zal toekennen. De
zwarte lijst betkekent het tegenovergestelde.

27
Veld Beschrijving
Add (Toevoegen) Voeg nieuwe WLAN filters toe.
Klik op Add (Toevoegen) om de volgende pagina weer te geven.
Voer het MAC adres in en opmerking bij de inkomende MAC fitler en klik op Apply (Toepassen) om de configuratie te bewaren.
Advanced Security (Gevanceerde Beveiliging)
Selecteer Advanced Wireless > Advanced Security (Geavanceerd Draadloos > Geavanceerde Beveiliging) in het linkerdeelvenster
of klik op Advanced Security (Geavanceerde Beveiliging) op de Advanced Wireless pagina om de volgende pagina weer te geven.

28
Wat betreft de parameters op deze pagina, zie de Wizard
MAINTENANCE (ONDERHOUD)
Device Management (Apparaatbeheer)
Selecteer MAINTENANCE > Device Management (ONDERHOUD > Apparaatbeheer) en de volgende pagina zal verschijnen.
Op deze pagina kan U het paswoord aanpassen om in te loggen op de draadloze PLC adapter.
De volgende tabel beschrijft de parameters op deze pagina:
Veld Beschrijving
Old Password (Oud
Paswoord)
Voer het huidige paswoord in.
New Password (Nieuw
Paswoord)
Voer het nieuwe paswoord in.
Confirm Password (Bevestig
Paswoord)
Voer het nieuwe paswoord in.
Nadat U de parameters heeft ingesteld klikt U op Apply (Toepassen) om de instellingen te bewaren.
Reboot and Restore (Opnieuw Starten en Herstellen)
Selecteer MAINTENANCE > Reboot and Restore (ONDERHOUD > Opnieuw Starten en Herstellen) om de volgende pagina weer te
geven.

29
Op deze pagina kan U de adapter opnieuw starten en de standaardinstellingen van de adapter herstellen.
• Reboot
Klik Reboot om de adapter opnieuw te starten.
• Restore
Klik op Restore om de standaardinstellingen van de adapter te herstellen. U kan ook de Reset druktoets op het voorste paneel
indrukken gedurende 3 seconden om de standaardinstellingen van de adapter te herstellen.
Opgepast:
Druk niet op de Reset-druktoets wanneer U zich op deze pagina bevindt.
Firmware update
Selecteer MAINTENANCE > Firmware Update (ONDERHOUD > Firmware Update), en de volgende pagina zal verschijnen.

30
Op deze pagina kan U de firmwareversie van de draadloze PLC adapter bijwerken.
De volgende tabel beschrijft de parameters op deze pagina:
Veld Beschrijving
Firmwareversie Geeft de huidige firmwareversie weer.
Select File (Bestand Selecteren) Klik op Browse... (Bladeren...) om de laatste firmware te localiseren.
Clear Config (Config Wissen)
Indien U Clear Config (Config Wissen) aanvinkt dan zal de PLC adapter de
standaardinstellingen herstellen na de upgrade. Zoniet zal de PLC adapter de huidige
instellingen bewaren.
Klik op Apply (Toepassen) en het systeem zal de firmware beginnen bijwerken.
Nadat de bijwerking voltooid is zal de draadloze PLC adapter automatisch herstarten.
Opgepast:
Om te vermijden dat U de vorige configuratie van de adapter verliest dient U deze op te slaan voordat U het systeem
bijwerkt.
Snij de stroomtoevoer niet af en drukt niet op de Reset-druktoets tijdens de upgrade.
Status
Apparaatinformatie
Selecteer STATUS > Device Info (Apparaatinfo) om de volgende pagina weer te geven.

31
Deze pagina geeft apparaatinformatie weer, waaronder systeeminformatie, PLC status, LAN informatie en WLAN informatie. Klik
Refresh (vernieuwen) om de pagina te hernieuwen.
Logout (Afmelden)
Klik op Logout (Afmelden) om de huidige Web-configuratiepagina te verlaten.
DE BEVEILIGING-DRUKTOETS GEBRUIKEN
Dit hoofdstuk beschrijft hoe U nieuwe apparaten kan toevoegen aan of oude apparaten kan verwijderen van een HomePlug AV
logisch netwerk (AVLN) Beide kunnen voltooid worden door een Beveiligings-druktoets (NMK) te gebruiken.
Activiteitsverloop en resultaat kan gecontroleerd worden door de Voeding en Data LED indicatoren te observeren.
Een HomePlug AV Logisch Netwerk Vormen
Wanneer twee apparaten (A en B) met verschillende NMK waarden worden aangesloten op dezelfde voedingslijn dan U wil U dat
ze een logisch netwerk vormen. Ga als volgt te werk:
Stap1 Druk de Beveiligings-druktoets op A of B tenminste 10 seconden in. Het apparaat zal resetten en opnieuw starten met
een random NMK.
Stap2 Druk de Beveiligings-druktoets op het eerste apparaat A minder dan 3 seconden in.
Stap3 Druk de Beveiligings-druktoets op het tweede apparaat B minder dan 3 seconden in. Druk de drukttoets op apparaat B
binnen de 2 minuten in.
Stap4 Wacht tot de verbinding is gemaakt.
De Power LED indicatoren op beide apparaten zullen gelijkmatig knipperen aan een interval van 1 seconde tot de bewerking
succesvol is of niet. Indien de verbinding succesvol is dan zullen de Power en Data LED indicatoren op beide apparaten opgelicht
blijven. Indien de verbinding mislukt dan zullen de Power LED indicatoren op beide apparaten opgelicht blijven, maar de Data LED
indicatoren op beide apparaten zullen uitdoven. In dat geval moet U Stap1 tot Stap4 herhalen.
Verbinding met een AVLN Netwerk Maken
Een nieuw apparaat, het ‘verbindingspunt’, wil verbinding maken met het netwerk (ervan uitgaand dat een netwerk bestaat). Elk
apparaat op het bestaande netwerk kan de ‘toevoeger’ worden.

32
Stap1 Druk de Beveiligings-druktoets op het ‘verbindingspunt' tenminste 10 seconden in. Het apparaat zal resetten en
opnieuw starten met een random NMK.
Stap2 Druk de Beveiligings-druktoets op het 'verbindingspunt' minder dan 3 seconden in.
Stap3 Druk de Beveiligings-druktoets op eender welk netwerkapparaat minder dan 3 seconden in waardoor het de 'toevoeger'
wordt. Druk deze druktoets binnen 1 minuut in.
Stap4 Wacht tot de verbinding is gemaakt.
De Power LED indicatoren op beide apparaten zullen gelijkmatig knipperen aan een interval van 1 seconde tot de bewerking
succesvol is of niet. Indien de verbinding succesvol is dan zullen de Power en Data LED indicatoren op beide apparaten opgelicht
blijven. Indien de verbinding mislukt dan zullen de Power LED indicatoren op beide apparaten opgelicht blijven, maar de Data LED
indicatoren op beide apparaten zullen uitdoven. In dat geval moet U Stap1 tot Stap4 herhalen.
Een AVLN Netwerk Verlaten
Ga ervan uit dat een netwerk bestaat. Ga als volgt te werk indien U een apparaat wil verwijderen van een AVLN netwerk, de
‘verlater’, of een apparaat wil verwijderen van een bestaand netwerk en het verbinding wil laten maken met een ander logisch
netwerk.
Stap1 Druk de Beveiligings-druktoets op de 'verlater' langer dan 10 seconden in.
Het apparaat zal resetten en opnieuw starten met een random NMK.
Stap2 Wacht tot de reset voltooid is.
De Power LED indicator op de 'verlater' zal enkele momenten uitdoven tijdens de reset, knipperen tijdens het herstarten en
vervolgens oplichten. De ‘verlater’ is succesvol verwijderd van het bestaande netwerk.
Eens de procedure is voltooid kan U het toestel ontkoppelen van hetn medium of kan U het verbinden met een ander logisch
netwerk op hetzelfde medium.

33
PROBLEEMGIDS
Waarom zijn alle LED indicatoren uitgedoofd?
(1) Controleer de verbinding tussen stroomadapter en het stopcontact.
(2) Controleer of het apparaat is ingeschakeld;
Waarom is de Ethernetindicator uitgeschakeld?
(1) Controleer de verbinding tussen uw draadloze PLC adapter en computer, hub of schakelaar.
(2) Controleer de verwerkingsstatus van uw computer, hub of schakelaar en controleer of ze naar behoren werken of niet.
(3) Controleer de netwerkkabel die is aangesloten op de draadloze PLC adapter en andere apparaten.
Waarom krijg ik geen toegang tot de Webpagina?
Volg onderstaande stappen om de verbinding tussen de computer en het apparaat te controleren:
(1) Klik Start > Run en voer het pingcommando ping 192.168.1.1 (het IP adres van de draadloze PLC adapter).
(2) Indien U geen verbinding kan maken met de draadloze PLC adapter, controleer dan de volgende instellingen:
− Het type netwerkkabel
− De verbinding tussen uw adapter en de computer
− TCP/IP instellingen van uw PC
Hoe kan ik de standaardinstellingen herstellen wanneer ik de verkeerde configuratie heb uitgevoerd?
(1) Houd de Reset druktoets gedurende 3 seconden ingedrukt en laat ze vervolgens los.
(2) Het standaard IP adres van de draadloze PLC adapter is 192.168.1.1 en het subnetmasker is 255.255.255.0.
(3) De gebruikersnaam en paswoord van de supergebruiker zijn admin.
TECHNISCHE GEGEVENS
Homeplug AV compatibel
PLC datatransmissiesnelheid tot 500 Mbps
128-bit AES Link Encryptie met sleutelbeheer
2 interne antennes
802.11b+g+n
Beveiliging: WPA-TKIP, WPA2-AES, WPA2-Mixed
Draadloze snelheid tot 300 Mbps
IEEE 802.3, IEEE 802.3U, Homeplug 1.1
Frequentieband 2MHz ~ 68MHz
Ondersteunt OFDM QAM 8/16/64/256/1024/4096, BPSK, QPSK en ROBO Modulatieschema’s
Poorten: Twee 10/100 Ethernet RJ45
Stroomverbruik: 6.5W Werking

34
VERWIJDERING
Als een verantwoordelijke verdeler hechten wij waarde aan het milieu.
Daarom raden wij U aan om de correcte verwijderingsprocedure voor uw product, verpakkingsmaterialen, en indien van
toepassing, accessoires te volgen. Hierdoor zal U bijdragen tot het behouden van natuurlijke rijkdommen en ervoor zorgen dat de
materialen gereycleerd worden op een manier die de gezondheid en het milieu ten goede komen.
U dient de wetgeving en het reglement inzake afvalverwijdering te volgen. Elektrische afvalproducten moeten afzonderlijk van
het huishoudelijk afval verwijderd worden wanneer het toestel het einde van de levensduur bereikt.
Contacteer de winkel waar U het toestel heeft gekocht en de gemeente om meer te weten over afvalverwijdering en recyclage.
Wij verontschuldigen ons voor eventuele ongemakken door kleine onnauwkeurigheden in deze gebruiksaanwijzing, die zich
ondanks onze zorgen kunnen voordoen als gevolg van voortdurende productverbetering en –ontwikkeling.
Darty Plc © UK: EC1N 6TE 13 / 11/ 2013

-
 1
1
-
 2
2
-
 3
3
-
 4
4
-
 5
5
-
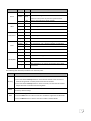 6
6
-
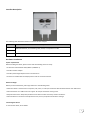 7
7
-
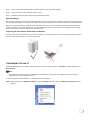 8
8
-
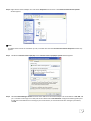 9
9
-
 10
10
-
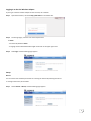 11
11
-
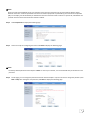 12
12
-
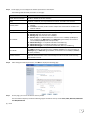 13
13
-
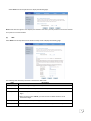 14
14
-
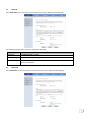 15
15
-
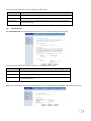 16
16
-
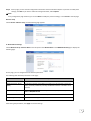 17
17
-
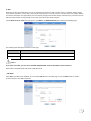 18
18
-
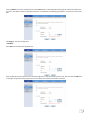 19
19
-
 20
20
-
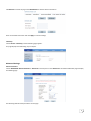 21
21
-
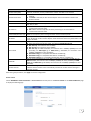 22
22
-
 23
23
-
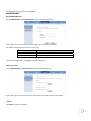 24
24
-
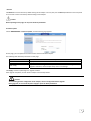 25
25
-
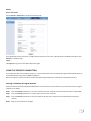 26
26
-
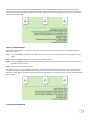 27
27
-
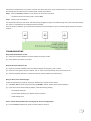 28
28
-
 29
29
-
 30
30
-
 31
31
-
 32
32
-
 33
33
-
 34
34
-
 35
35
-
 36
36
-
 37
37
-
 38
38
-
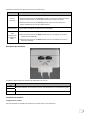 39
39
-
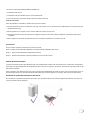 40
40
-
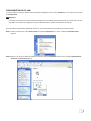 41
41
-
 42
42
-
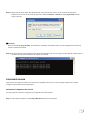 43
43
-
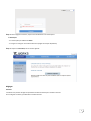 44
44
-
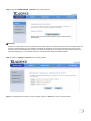 45
45
-
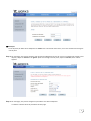 46
46
-
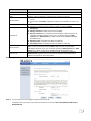 47
47
-
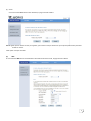 48
48
-
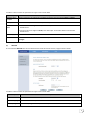 49
49
-
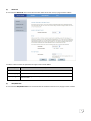 50
50
-
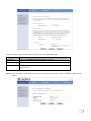 51
51
-
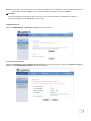 52
52
-
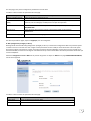 53
53
-
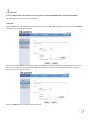 54
54
-
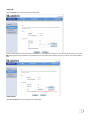 55
55
-
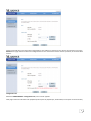 56
56
-
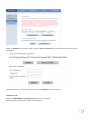 57
57
-
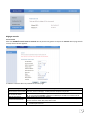 58
58
-
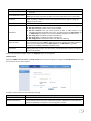 59
59
-
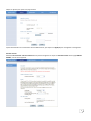 60
60
-
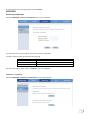 61
61
-
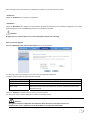 62
62
-
 63
63
-
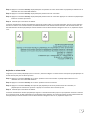 64
64
-
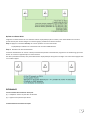 65
65
-
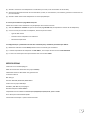 66
66
-
 67
67
-
 68
68
-
 69
69
-
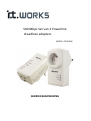 70
70
-
 71
71
-
 72
72
-
 73
73
-
 74
74
-
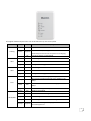 75
75
-
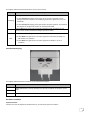 76
76
-
 77
77
-
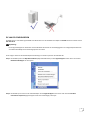 78
78
-
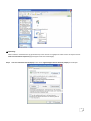 79
79
-
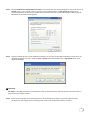 80
80
-
 81
81
-
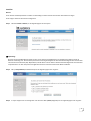 82
82
-
 83
83
-
 84
84
-
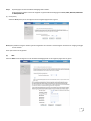 85
85
-
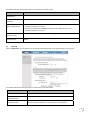 86
86
-
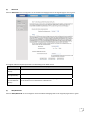 87
87
-
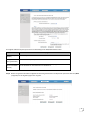 88
88
-
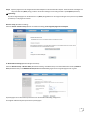 89
89
-
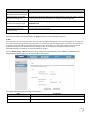 90
90
-
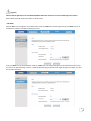 91
91
-
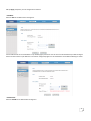 92
92
-
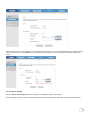 93
93
-
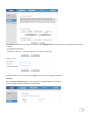 94
94
-
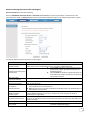 95
95
-
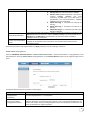 96
96
-
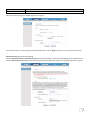 97
97
-
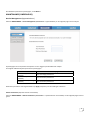 98
98
-
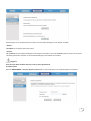 99
99
-
 100
100
-
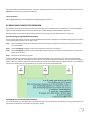 101
101
-
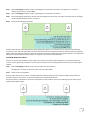 102
102
-
 103
103
-
 104
104
-
 105
105


IT Works 500MBPS X2 WIFI/2XRJ45 de handleiding
- Categorie
- Routers
- Type
- de handleiding
in andere talen
Gerelateerde papieren


Andere documenten
-
Canon MF4780w Handleiding
-
Yamaha YWA-10 Handleiding
-
Konig Electronic 1000Mbps Handleiding
-
-
Belkin F5D8232-4 de handleiding
-
Longshine LCS-8131N3 Gebruikershandleiding
-
Hama 53133 de handleiding
-
Belkin F5D8633-4 Handleiding
-
-