Aeg-Electrolux 78031KF-MN Handleiding
- Categorie
- Kookplaten
- Type
- Handleiding

78031KF-MN
Notice d'utilisation Table de cuisson
induction
Gebruiksaanwijzing Keramische
inductiekookplaat
User manual Ceramic glass induction
hob

Nous vous remercions d’avoir choisi l’un de nos produits de qualité.
Afin de garantir une performance optimale et constante de votre appareil, veuillez
lire attentivement cette notice d'utilisation. Il vous permettra d’utiliser
correctement et efficacement toutes les fonctions de l’appareil. Nous vous
recommandons de conserver cette notice à proximité pour une utilisation rapide et
optimale. Si l'appareil devez être vendu ou cédé à une autre personne, assurez-vous
que la notice d'utilisation l'accompagne.
Nous vous souhaitons beaucoup de plaisir avec votre nouvel appareil.
Sommaire
Utilisation de l'appareil 2
Consignes de sécurité 2
Description de l'appareil 4
Utilisation de l'appareil 6
Conseils de cuisson et de rôtissage 13
Nettoyage et entretien 15
Que faire si... 15
Élimination 17
Instructions d'installation 18
Consignes de sécurité 18
Réparations 21
Sous réserve de modifications
Utilisation de l'appareil
Consignes de sécurité
AVERTISSEMENT
Veuillez vous conformer aux avertissements figurant dans cette notice d'utilisation. Dans
le cas contraire, tout dommage dû au non-respect de ces avertissements ne sera pas pris
en compte par la garantie.
Utilisation réglementaire
• Cet appareil n'est pas destiné à être utilisé par des enfants ou des personnes dont les
capacités physiques, sensorielles ou mentales, ou le manque d'expérience et de con-
naissance les empêchent d'utiliser l'appareil sans risque lorsqu'ils sont sans surveillance
ou en l'absence d'instruction d'une personne responsable qui puisse leur assurer une
utilisation de l'appareil sans danger.
• Ne laissez pas l'appareil sans surveillance en cours de fonctionnement.
• Cet appareil est uniquement destiné à l'usage domestique habituel, à savoir la cuisson
et le rôtissage des aliments.
• L'appareil ne peut en aucun cas servir de plan de travail ou de support.
• Toute transformation ou modification de l'appareil est proscrite.
2
Sommaire

• Ne posez pas ou ne stockez pas de liquides ou matériaux inflammables ou des objets
susceptibles de fondre (par ex. film plastique, plastique, aluminium) sur ou à proximité
de l'appareil.
Sécurité enfants
• Evitez systématiquement que les enfants en bas âge s'approchent de l'appareil.
• Les enfants plus âgés ne doivent être autorisés à utiliser l'appareil qu'accompagnés et
sous surveillance.
• Pour éviter que les enfants ou animaux mettent en fonctionnement l'appareil, activez la
sécurité enfants.
Consignes générales de sécurité
• Le montage et le branchement de l'appareil sont du ressort exclusif de spécialistes agréés.
• Les appareils encastrables ne peuvent être mis en fonctionnement qu'après avoir été
montés dans des armoires et des plans de travail homologués et adaptés.
• Si l'appareil présente un dysfonctionnement ou un endommagement de la table de
cuisson (éclat, fêlure, cassure), mettez à l'arrêt l'appareil, débranchez-le pour éviter tout
risque d'électrocution et contactez immédiatement votre service après vente.
• Les réparations doivent être effectuées uniquement par des professionnels qualifiés.
Sécurité durant l'utilisation
• Retirez les étiquettes et les films protecteurs de la vitrocéramique.
• Attention aux risques de brûlures lors de l'utilisation de l'appareil.
• Assurez-vous que les câbles d'appareils électriques n'entrent pas en contact avec les
surfaces chaudes de l'appareil ou les récipients brûlants.
• Surveillez attentivement la cuisson lors de friture dans l'huile ou la graisse : les graisses
surchauffées s'enflamment facilement. Attention : Risque d'incendie !
• Mettez les zones de cuisson hors service après chaque utilisation.
• Les porteurs de pacemakers doivent se tenir à une distance d'au moins 30 cm des zones
de cuisson à induction en fonctionnement.
• Danger de brûlures ! Ne posez pas d'objets métalliques comme des couteaux, des four-
chettes, des cuillères et des couvercles sur la table de cuisson car ils peuvent devenir très
chauds.
Sécurité lors du nettoyage
• Mettez l'appareil hors service et laissez-le refroidir avant de le nettoyer.
• Pour des raisons de sécurité, il est interdit de nettoyer l'appareil avec un jet à vapeur ou
un appareil à haute pression.
Pour éviter d'endommager l'appareil
• Des objets peuvent endommager la vitrocéramque en tombant.
• Les plats de cuisson peuvent endommager la vitrocéramique en heurtant le bord.
• N'utilisez pas de récipients en fonte, ni de récipients dont le fond est endommagé et
rugueux. Ils risqueraient de rayer la table de cuisson.
• Les objets susceptibles de fondre ou les produits ayant débordé peuvent se consumer sur
la vitrocéramique et doivent par conséquent être immédiatement enlevés.
• N'utilisez pas les plaques de cuisson à vide (sans y déposer un ustensile de cuisson) ou
avec des récipients vides.
Consignes de sécurité
3

• Ne faites pas "brûler" les récipients et ne laissez pas le contenu s'évaporer en totalité.
Cela peut entraîner des dégâts permanents des récipients et de la table de cuisson.
• Évitez de couvrir l'ouverture de ventilation de 5 mm située entre le plan de travail et la
partie avant de l'appareil installé au-dessus.
Description de l'appareil
Description de la surface de cuisson
1
56 34
2
1 Zone de cuisson à induction 2300 W, avec fonction Booster 3200 W
2 Zone de cuisson à induction 2300 W, avec fonction Booster 3200 W
3 Bandeau de commande
4 Zone de cuisson à induction 2300 W, avec fonction Booster 3200 W
5 Zone de cuisson à induction 2300 W, avec fonction Booster 3200 W
6 Bandeau de commande
La table de cuisson est divisée en quatre zones de cuisson. Sous chaque zone de cuisson de
la table de cuisson, se trouve un élément chauffant à induction, dont le centre est indiqué
par un repère (une croix) sur la surface de la vitrocéramique. Les récipients de cuisson
peuvent être posés sur n'importe quelle zone de cuisson. Mais le récipient doit être entiè-
rement recouvert par le récipient de cuisson. Le fond magnétique du récipient de cuisson
doit avoir un diamètre compris entre 125 et 210 mm.
Cuisson sur deux zones de cuisson
Vous pouvez faire reposer un récipient de grande taille sur deux zones de cuisson simul-
tanément. Il peut s'agir des deux zones de cuisson de gauche ou de droite de la table de
cuisson.
1. Centrez le récipient sur les deux zones.
Le récipient doit recouvrir au moins deux croix.
2. Réglez le même niveau de cuisson pour les deux zones (niveau 8 max.).
La répartition de la chaleur peut varier selon les récipients. Les récipients dont le fond est
épais et plat permettent de meilleurs résultats de cuisson.
4
Description de l'appareil

Bandeau de commande
1 Sécurité enfants avec voyant
2 Stop+Go avec voyant
3 Marche/Arrêt avec voyant
4 Indicateur du niveau de cuisson
5 Fonction Booster
6 Sélection du niveau de cuisson
7 Minuteur
8 Affichage du minuteur
9 Voyants des zones de cuisson / Minuterie
Touches sensitives
L'appareil est doté de touches sensitives. Les fonctions sont activées en appuyant sur ces
touches et confirmées par des affichages et des signaux sonores. Effleurez uniquement la
touche sensitive qui active la fonction souhaitée. Évitez de recouvrir les autres touches
sensitives.
Si vous effleurez le bandeau de commande pendant plus de 6 secondes, un signal sonore
retentit et l'appareil s'éteint.
Touche sensitive Fonction
Marche / Arrêt Pour mettre l'appareil en fonctionnement et à l'arrêt
Sécurité enfants Pour verrouiller le bandeau de commande pour la
sécurité des enfants
STOP+GO Pour activer / désactiver la fonction Maintien au
chaud
Puissance Activation/désactivation de la fonction Booster
Minuteur Pour sélectionner le minuteur
1
2
3
9
8
7
4
5
6
Description de l'appareil
5

Touche sensitive Fonction
Augmenter les réglages Pour augmenter la durée programmée sur le minu-
teur
Réduire les réglages Pour réduire la durée programmée sur le minuteur
Affichages
Affichage Description
Le foyer est mis hors tension
Position de maintien au
chaud
La fonction de Maintien au chaud / STOP+GO est
activée
-
Niveaux de cuisson Régler le niveau de cuisson
Préchauffage automa-
tique
La fonction de préchauffage automatique est ac-
tivée
+ chiffre
Erreur Une erreur s'est produite
Détection des récipients Utilisation d'un ustensile de cuisine non adapté ou
trop petit ou absence d'ustensile sur la zone de
cuisson
Chaleur résiduelle La zone de cuisson est encore chaude
Sécurité enfants La sécurité enfants est activée
Puissance La fonction Booster est activée
Mise à l'arrêt automati-
que
L'arrêt automatique est activé
Indicateur de chaleur résiduelle
AVERTISSEMENT
La chaleur résiduelle peut être source de brûlures. Une fois l'appareil mis à l'arrêt, les zones
de cuisson se refroidissent au bout d'un certain temps. Observez l'indicateur de chaleur
résiduelle .
Vous pouvez utiliser la chaleur résiduelle pour faire fondre des ingrédients ou pour con-
server les aliments au chaud.
Les zones de cuisson à induction génèrent la chaleur nécessaire directement sur le fond
des plats de cuisson. La chaleur résiduelle des plats de cuisson suffit pour chauffer la table
vitrocéramique.
Utilisation de l'appareil
Utilisez des récipients adaptés aux zones de cuisson à induction.
Mise en fonctionnement et mise à l'arrêt de l'appareil
6
Utilisation de l'appareil

Bandeau de commande Affichage Voyant de contrôle
Mettre en fonc-
tionnement
Appuyez légèrement sur
pendant une seconde
/
s'allume.
Mettre à l'arrêt
Appuyez légèrement sur
pendant une seconde
/ aucun
disparaît.
Après la mise en fonctionnement, il est nécessaire de sélectionner un niveau de cuisson ou
une fonction dans les 10 secondes environ qui suivent, dans le cas contraire, l'appareil se
met à l'arrêt.
Réglage du niveau de cuisson
Bandeau de commande Affichage
Pour régler le ni-
veau de cuisson
Appuyez sur le niveau de cuisson souhaité, que vous
pouvez corriger, si besoin
/ à
Mise à l'arrêt
Appuyez sur
Verrouillage/déverrouillage du bandeau de commande
A tout moment de la cuisson, la zone tactile, à l'exception de la touche Marche/Arrêt, est
verrouillée pour empêcher une modification des réglages, par exemple lors du nettoyage
de la table.
Bandeau de com-
mande
Affichage
Mise en fonction-
nement
Effleurez (pendant 4 secondes)
Mettre à l'arrêt
Effleurez
niveau de cuisson précédemment sélectionné
Le verrouillage se désactive automatiquement à la mise à l'arrêt de l'appareil.
Activation/désactivation de la fonction STOP+GO
La fonction STOP+GO bascule simultanément toutes les zones de cuisson actives sur le
mode de Maintien au chaud, puis à nouveau sur leur réglage de température initial
Bandeau de com-
mande
Affichage
Mise en fonction-
nement
Effleurez
Mettre à l'arrêt
Effleurez
Niveau de cuisson initial (sauf démarrage de cuisson au-
tomatique et fonction Booster)
STOP+GO ne désactive pas les fonctions de la minuterie.
STOP+GO contrôle le bandeau de commande entier, mise à part la zone tactile .
Utilisation de l'appareil
7

Utilisation de la fonction Démarrage automatique de cuisson
Toutes les zones de cuisson sont équipées de la fonction de démarrage automatique de
cuisson. Lors du réglage d'un niveau de cuisson avec la fonction de démarrage automatique
de cuisson, la zone de cuisson est chauffée à la puissance maximale pendant un temps
déterminé, puis repasse automatiquement au niveau de cuisson sélectionné.
Étape Bandeau de commande Affichage
1.
Appuyez sur
2. Glissez le doigt en partant
de
pour sélectionner
le niveau de cuisson souhai-
té entre
et
/ au bout de 5 secondes . Tant que
est affiché, l'appareil fonctionne à la puissance
maximale. Une fois la durée de démarrage auto-
matique écoulée, le niveau de cuisson
/
s'affiche à nouveau.
Lorsque la cuisson automatique est sélectionnée, sa durée de fonctionnement dépend du
niveau cuisson sélectionné.
Niveau de cuisson Durée de fonctionnement de la cuisson auto-
matique [min:sec]
0:12
0:12
1:21
3:07
4:24
5:51
8:12
10:12
10:36
2:01
2:01
2:28
2:52
---
Utilisation de la sécurité enfants
La sécurité enfants empêche l'utilisation accidentelle ou involontaire de l'appareil.
Activation de la sécurité enfants
Étape Bandeau de commande Affichage/signal
1.
Mettre l'appareil en marche. Ne sélectionner aucun réglage de
température.
8
Utilisation de l'appareil

Étape Bandeau de commande Affichage/signal
2.
Effleurer pendant 4 secondes
La sécurité enfants est activée.
Désactivation de la sécurité enfants
Étape Bandeau de commande Affichage/signal
1.
Mettre l'appareil en marche. Ne sélectionner aucun ré-
glage de température.
2.
Effleurer pendant 4 secondes s'allume
3.
Mettre à l'arrêt l'appareil.
La sécurité enfants est désactivée.
La sécurité enfants peut être activée et désactivée uniquement en l'absence de tout réglage
de niveau de cuisson.
Bridage de la sécurité enfants
Cette fonction permet de désactiver temporairement la sécurité enfants le temps d'une
cuisson ; elle se réactive ensuite.
Étape Bandeau de commande Affichage/signal
1.
Mettre l'appareil en marche
2.
Effleurer pendant 4 secondes s'allume
Jusqu'au prochain arrêt de l'appareil, celui-ci peut être utilisé normalement. Après la mise à l'arrêt
de l'appareil, la sécurité enfants est de nouveau activée.
Après la désactivation de la sécurité enfants, un niveau de cuisson ou une fonction doit
être sélectionné dans les 10 secondes, dans le cas contraire, l'appareil se met à l'arrêt au-
tomatiquement.
Activation/désactivation de la fonction Booster
La fonction Booster confère davantage de puissance aux zones de cuisson par induction,
par exemple pour porter rapidement à ébullition une grande quantité d'eau. La fonction
Booster est activée pour une durée maximale de 8 minutes. Après cela, la zone de cuisson
à induction revient automatiquement au niveau de cuisson
.
Bandeau de commande Affichage
Pour activer
Appuyez sur
Pour désactiver Sélectionnez un niveau de cuis-
son
/
Utilisation de l'appareil
9

Gestion du niveau de puissance
Les zones de cuisson disposent d'un niveau
de puissance maximale.
La puissance maximale est atteinte lorsque
vous avez sélectionné le niveau de cuisson 13
pour toutes les zones de cuisson.
Deux zones de cuisson sont couplées, for-
mant une paire (voir la figure), et donc le
dispositif de gestion de la puissance répartit
la puissance maximale disponible entre ces
deux zones de cuisson.
Lorsque vous sélectionnez la fonction Boos-
ter sur une zone de cuisson, le gestionnaire
de puissance parvient à doter cette zone de cuisson de plus de puissance en réduisant la
puissance de l'autre zone de cuisson couplée, et ce pour ne pas excéder la puissance maxi-
male de la table.
Exemple : le niveau de cuisson 13 est sélectionné pour une zone de cuisson. La fonction
Booster est activée pour une autre zone de cuisson. La fonction Booster est activée, mais,
la sélection du niveau de cuisson 13 sur une zone de cuisson et la sélection de la fonction
Booster sur la zone de cuisson couplée, excèdent la puissance maximale de la table. Dans
ce cas, le gestionnaire de puissance réduit la puissance de la première zone de cuisson
activée, en la faisant passer de 13 à 5, par exemple. L'affichage de cette zone de cuisson
passe de 13 à 5, puis reste à 5, la puissance maximale momentanément possible. (L'affichage
passe de 13 à 5 ou de 13 à 3 ou une autre valeur en fonction du type d'appareil et de la
taille de la zone de cuisson.)
Utilisation du minuteur
Fonction Condition requise Résultat après écoulement de
la durée sélectionnée
Arrêt automatique Un niveau de cuisson a été sé-
lectionné
Signal sonore
00
clignote
La zone de cuisson s'éteint
Minuteur Zones de cuisson non utilisées Signal sonore
00
clignote
Si seule la fonction minuteur a été activée, celle-ci ne peut être modifiée que lorsque
l'appareil est en marche.
Si vous sélectionnez le niveau de cuisson et réglez le minuteur d'une zone de cuisson, la
zone de cuisson s'éteint lorsque le temps imparti est écoulé.
Si une zone de cuisson est mise à l'arrêt, le minuteur est également mis à l'arrêt.
Sélection d'une zone de cuisson
10
Utilisation de l'appareil

Étape Bandeau de
commande
Affichage
1. Appuyez une
fois sur
Le voyant de la première zone de cuisson clignote
2. Appuyez une
fois sur
Le voyant de la deuxième zone de cuisson clignote
3. Appuyez une
fois sur
Le voyant de la troisième zone de cuisson clignote
4. Appuyez une
fois sur
Le voyant de la quatrième zone de cuisson clignote
Si d'autres fonctions de minuterie sont sélectionnées, le temps restant le plus court de
toutes les fonctions de minuterie s'affiche au bout de quelques secondes et le voyant cor-
respondant clignote.
Réglage de la durée
Étape Bandeau de commande Affichage
1.
Sélectionnez une zone de cuisson
L'indicateur de la zone de cuisson sélec-
tionnée clignote
2.
Effleurez ou
00
jusqu'à
99
minutes
Au bout de quelques secondes, le voyant clignote plus lentement.
La durée est réglée.
Le décompte commence.
Mise à l'arrêt du minuteur
Étape Bandeau de commande Affichage
1.
Sélectionnez une zone de cuis-
son
L'indicateur de la zone de cuisson sélectionnée cli-
gnote plus rapidement
Le temps restant s'affiche
2.
Appuyez sur Le temps restant est décompté jusqu'à
00
.
Le voyant s'éteint.
La fonction de minuterie de la zone de cuisson sélectionnée est désactivée.
Modification de la durée
Étape Bandeau de commande Affichage
1.
Sélectionnez une zone de cuisson
L'affichage de la zone de cuisson sélection-
née clignote plus rapidement.
Le temps restant s'affiche.
2.
Appuyez sur ou
0
1
à
99
minutes
Au bout de quelques secondes, le voyant clignote plus lentement.
La durée est réglée.
Le décompte commence.
Utilisation de l'appareil
11

Affichage du temps restant d'une zone de cuisson
Étape Bandeau de commande Affichage
1.
Sélectionnez une zone de
cuisson
Le voyant de la zone de cuisson sélectionnée clignote plus
rapidement
Le temps restant s'affiche
Au bout de quelques secondes, le voyant clignote plus lentement.
Désactivation du signal sonore
Étape Bandeau de commande Signal sonore
1.
Appuyez sur
Signal sonore pour confirmer.
Le signal sonore s'interrompt.
Coupure automatique
Plan de cuisson
• Si aucun niveau de cuisson n'est sélectionné dans les 10 secondes suivant la mise sous
tension de la table de cuisson, cette dernière se met automatiquement à l'arrêt.
• Si une ou plusieurs touches sensitives sont recouvertes par des objets (tels que casserole,
etc.) pendant plus de 10 secondes, un signal sonore retentit et la table de cuisson se
désactive automatiquement.
• Si toutes les zones de cuisson sont mises à l'arrêt, la table de cuisson se met à l'arrêt
automatiquement au bout d'environ 10 secondes.
Bandeau de commande
• Lorsque l'appareil est en fonctionnement, si une ou plusieurs touches sensitives du ban-
deau de commande sont recouvertes pendant plus de 10 secondes, un signal sonore
retentit. Celui-ci se désactive automatiquement dès que les touches sensitives ne sont
plus recouvertes.
Zones de cuisson à induction
• En cas de surchauffe (par ex. casserole dont l'eau s'est complètement évaporée), la zone
de cuisson s'éteint automatiquement.
s'affiche. Avant de réutiliser la zone de cuisson,
il faut la remettre sur
et la laisser refroidir.
• Si un récipient de cuisson non adapté à la zone de cuisson est utilisé,
s'allume sur
l'afficheur. L'affichage de la zone de cuisson concernée s'éteint au bout de 2 minutes.
• Si l'une des zones n'est pas mise à l'arrêt après un certain temps ou si le niveau de cuisson
n'est pas modifié, la zone de cuisson correspondante se met automatiquement à l'arrêt.
s'affiche. Avant de l'utiliser de nouveau, il faut mettre la zone de cuisson sur .
Niveau de cuisson Désactivation après
1 - 3 6 heures
4 - 7 5 heures
8 - 9 4 heures
10 - 14 1,5 heures
12
Utilisation de l'appareil

Conseils de cuisson et de rôtissage
Informations sur les acrylamides
Selon la recherche scientifique la plus récente, faire brunir les aliments de manière intensive,
en particulier les produits contenant de l'amidon, peut nuire à la santé à cause de l'acry-
lamide. C'est pourquoi nous vous recommandons de faire cuire les aliments à basse tem-
pérature et de ne pas trop les faire brunir.
Ustensiles de cuisine pour zones de cuisson à induction
Matériau de l'ustensile Convient
Acier, acier émaillé +
Fonte +
Acier inoxydable +*
Fond du récipient multicouche +*
Aluminium, cuivre, laiton -
Verre, céramique, porcelaine -
* Les ustensiles de cuisine pour zones de cuisson à induction portent un marquage spécial
apposé par leur fabricant.
Test d'aptitude
Les ustensiles de cuisine conviennent pour l'induction si
• ... une petite quantité d'eau déposée sur un foyer à induction, réglé sur un niveau de
cuisson élevé, devient chaude en peu de temps.
• ... un aimant adhère au fond de l'ustensile de cuisson.
Certains ustensiles de cuisson peuvent émettre des bruits pendant la cuisson lorsqu'ils sont
posés sur des foyers à induction. Ces bruits ne signalent pas un dysfonctionnement de
l'appareil et n'influencent en aucun cas son bon fonctionnement.
Fond de l'ustensile de cuisine
Le fond doit être aussi plat et épais que possible.
Dimension de l'ustensile
Les zones de cuisson à induction s'adaptent automatiquement au diamètre du fond du
récipient utilisé, jusqu'à une certaine limite. Cependant, la zone magnétique au fond du
récipient doit avoir un diamètre minimum par rapport à la taille de la zone de cuisson. Les
récipients de cuisson dont le fond magnétique présente un diamètre inférieur à 12 cm ne
conviennent pas.
Conseils pour l'économie d'énergie
Il est impératif de placer les plats de cuisson avant d'activer la zone de cuisson.
Si possible, mettre toujours un couvercle sur les récipients
Conseils de cuisson et de rôtissage
13

Exemples de cuisson
Ces informations sont données à titre indicatif.
Niveau de
cuisson
Processus de cuis-
son
adapté pour Durée Conseils
0 Position Off (arrêt)
1
Maintien au chaud Conserver les ali-
ments au chaud
selon les besoins Couvrir
1-3 Faire fondre Sauce hollandaise,
faire fondre du
beurre, du choco-
lat, de la gélatine
5-25 min. Remuer de temps
en temps
1-3 Solidifier Omelettes, œufs au
plat
10-40 min. Couvrir pendant la
cuisson
3-5 Faire mijoter Faire gonfler du riz
et des plats à base
de lait
Réchauffer des
plats cuisinés
25-50 min. Ajouter au moins
deux fois plus de li-
quide que de riz,
mélanger le plat à
base de lait à mi-
cuisson
5-7 Faire cuire à la va-
peur
Braiser
Cuire des légumes
et du poisson à la
vapeur, braiser de
la viande
20-45 min. Pour les légumes,
ajouter une petite
quantité de liquide
(quelques cuillères
à soupe)
7-9 Faire bouillir Cuire des pommes
de terre à la vapeur
20-60 min. Utiliser une petite
quantité de liquide,
par ex. : max. ¼ l
d'eau pour 750 g de
pommes de terre
7-9 Faire bouillir Quantités plus im-
portantes d'ali-
ments, ragoûts et
soupes
60-150 min. Jusqu'à 3 l de liqui-
de plus ingrédients
9-12 Faire revenir Cuisson des escalo-
pes, des cordons
bleus de veau, des
côtelettes, des ris-
solettes, des sau-
cisses, du foie, des
œufs, des crêpes,
des beignets, faire
un roux
selon les besoins Retourner à mi-
cuisson
14
Conseils de cuisson et de rôtissage

Niveau de
cuisson
Processus de cuis-
son
adapté pour Durée Conseils
12-13 Frire à feu vif Pommes de terre
rissolées, côtelettes
de filet, steaks,
Flädle (crêpes pour
garnir la soupe)
5-15 min. par poêle Retourner à mi-
cuisson
14 Bouillir Saisir Frire Faire bouillir de grandes quantités d'eau, cuire des pâtes, griller
la viande (goulash, bœuf en daube), cuire des frites
La fonction Booster convient pour faire chauffer de grands volumes de liquide.
Nettoyage et entretien
AVERTISSEMENT
Les produits de nettoyage agressifs ou abrasifs endommagent l'appareil. Nettoyez l'appareil
à l'eau additionnée d'un peu de détergent après chaque utilisation. Veillez également à
éliminer soigneusement toute trace de produit de nettoyage !
Les rayures ou les taches foncées présentes sur la surface vitrocéramique qui ne peuvent
être éliminées n'entravent toutefois pas le bon fonctionnement de l'appareil.
Nettoyez l'appareil après chaque utilisation
1. Les aliments contenant du sucre, les matières plastiques, les feuilles d'aluminium doi-
vent être éliminés immédiatement à l'aide d'un grattoir. Placer le grattoir en angle sur
la surface en vitrocéramique et enlever les résidus en faisant glisser la lame sur la
surface. Essuyez le bandeau de commande avec un chiffon humide et un peu de produit
vaisselle. Pour finir, essuyez l'appareil à l'aide d'un torchon propre .
2. Les traces de tartre, d'eau, les éclaboussures de graisse, les décolorations métalliques
luisantes doivent être éliminées une fois l'appareil refroidit, en utilisant un produit
spécial pour la vitrocéramique ou l'acier inox.
Que faire si...
Problème/Affichage Cause possible Solution
La zone de cuisson ne s'allume
pas ou ne fonctionne pas
Plus de 10 secondes se sont
écoulées depuis la mise sous
tension de l'appareil
Remettre l'appareil en marche.
Le verrouillage est activé
Désactivez le verrouillage (Voir
le chapitre "Verrouillage/Dé-
verrouillage du bandeau de
commande")
La sécurité enfants est activée Désactivez la sécurité enfants
(voir le chapitre "Sécurité en-
fants")
Nettoyage et entretien
15

Problème/Affichage Cause possible Solution
Plusieurs touches sensitives ont
été effleurées simultanément
N'effleurer qu'une seule touche
sensitive à la fois
Le dispositif d'arrêt automati-
que s'est déclenché
Enlever les objets se trouvant
éventuellement sur le bandeau
de commande (casserole, chif-
fon, etc.). Remettre l'appareil
en fonctionnement
Il y a de l'eau ou des éclabous-
sures de graisse sur le bandeau
de commande
Essuyer le bandeau de com-
mande
La fonction STOP+GO est acti-
vée
Désactiver la fonction STOP
+GO
L'affichage alterne deux ni-
veaux de cuisson
Le dispositif de gestion de la
puissance réduit la puissance
de cette zone de cuisson
Voir le chapitre " Activation/
désactivation de la fonction
Booster "
Le témoin de chaleur résiduelle
ne s'affiche pas
La zone de cuisson fonctionne
seulement depuis peu et n'est
donc pas encore chaude
Si la zone de cuisson devrait
être chaude, appeler le Service
Après-vente.
s'allume
Ustensiles de cuisson n'étant
pas adaptés
Utiliser des plats de cuisson
adéquats
Aucun ustensile de cuisson sur
la zone de cuisson
Poser le récipient de cuisson sur
la zone de cuisson
Le diamètre du fond du réci-
pient est trop petit pour la zone
de cuisson
Déplacer le récipient sur une
zone de cuisson plus petite Uti-
liser des récipients adaptés aux
foyers
s'allume
Le dispositif d'arrêt automati-
que s'est déclenché
Mettre à l'arrêt l'appareil. Re-
mettre l'appareil en fonction-
nement
et le nombre sont affichés
Défaut dans l'électronique Débranchez l'appareil du sec-
teur pendant quelques minutes
(coupez le fusible de l'installa-
tion électrique du domicile) Si
après une nouvelle mise sous
tension,
s'affiche de nou-
veau, appelez le service après-
vente
Un signal sonore retentit lors-
que l'appareil est mis à l'arrêt
Le bandeau de commande est
entièrement ou en partie re-
couvert.
Retirer les objets.
Signal sonore émis de façon ré-
pétée (6x), l'appareil se met à
l'arrêt
Une ou plusieurs touches sen-
sitives ont été recouvertes pen-
dant plus de 10 secondes
Enlever ce qui recouvre la ou les
touches sensitives
16
Que faire si...

Problème/Affichage Cause possible Solution
Un signal sonore retentit et
l'appareil se met sous tension
puis se met à l'arrêt ; au bout
de 5 secondes, un autre signal
sonore retentit
La touche On/Off a été recou-
verte, par exemple par un tor-
chon
Ne poser aucun objet sur le
bandeau de commande
Si les indications ci-dessus ne vous permettent pas de remédier au problème, veuil-
lez vous adresser à votre concessionnaire ou au service après-vente.
AVERTISSEMENT
Les réparations doivent être effectuées uniquement par des professionnels qualifiés. Des
réparations n'étant pas effectuées dans les règles de l'art peuvent s'avérer très dangereuses
pour l'utilisateur.
En cas d'erreur de manipulation de la part de l'utilisateur, le déplacement du technicien du
Service Après-vente peut être facturé même en cours de garantie.
Bruits de fonctionnement
En fonction du matériau et du traitement du fond du récipient de cuisson, les bruits suivants
peuvent se produire lors de l'utilisation des zones de cuisson à induction.
• Craquement
1
lorsque l'ustensile est composé de différents
matériaux (conception "sandwich")
• Sifflement
1
lorsque vous utilisez une ou plusieurs zones de
cuisson avec la fonction Booster si l'ustensile
est composé de différents matériaux (concep-
tion "sandwich")
• Bourdonnement
2
peut se produire avec la fonction Booster
• Cliquètement
2
pendant les commutations électriques
• Sifflement, bourdonnement
3
L'appareil est doté d'un ventilateur servant au refroidissement des composants électri-
ques. Un son de crécelle peut se produire lors du fonctionnement du ventilateur et se
poursuivre pendant un moment encore après la mise à l'arrêt de l'appareil.
Les bruits décrits sont normaux et ne constituent pas une malfaçon.
Élimination
Le symbole sur le produit ou son emballage indique que ce produit ne peut être traité
comme déchet ménager. Il doit être remis au point de collecte dédié à cet effet (collecte et
recyclage du matériel électrique et électronique).
1
3
2
Élimination
17

En procédant à la mise au rebut de l'appareil dans les règles de l’art, nous préservons
l'environnement et notre sécurité, s’assurant ainsi que les déchets seront traités dans des
conditions optimum.
Pour obtenir plus de détails sur le recyclage de ce produit, veuillez prendre contact avec les
services de votre commune ou le magasin où vous avez effectué l'achat.
Tous les matériaux d'emballage sont écologiques et recyclables. Les composants en plastique
sont identifiables grâce aux sigles PE , PS , etc. Veuillez jeter les matériaux d'emballage dans
le conteneur approprié du centre de collecte des déchets de votre commune.
Instructions d'installation
Consignes de sécurité
AVERTISSEMENT
Veuillez lire les indications ci-dessous !
L'utilisateur est tenu de respecter la législation, la réglementation, les lignes directrices et
les normes en vigueur dans son pays de résidence (dispositions relatives à la sécurité, re-
cyclage conforme et réglementaire, etc.)
Le montage relève de la compétence exclusive de spécialistes. Respectez l'espacement mi-
nimal requis par rapport aux autres appareils.
La protection contre les contacts accidentels doit être assurée par le montage, par exemple
les tiroirs doivent être installés uniquement avec un plancher de protection directement
sous l'appareil. Protégez les surfaces découpées de l'humidité avec un produit d'étanchéité.
Le joint comble les fentes entre le plan de travail et l'appareil. Lors de la mise en place,
protégez la partie inférieure de l'appareil de la vapeur et de l'humidité, provenant par
exemple d'un lave-vaisselle ou d'un four.
Evitez d'installer l'appareil à proximité d'une porte ou sous une fenêtre. Les récipients chauds
pourraient être renversés par l'ouverture de la fenêtre ou de la porte.
18
Consignes de sécurité

AVERTISSEMENT
Le courant électrique peut provoquer des blessures.
• La borne d'alimentation est sous tension.
• Mettez la borne d'alimentation hors tension.
• Suivez le schéma électrique.
• Observez les consignes de sécurité électro-techniques.
• Garantissez une protection anti-chocs grâce à une installation correcte.
• Le branchement électrique doit être effectué par un électricien spécialisé.
• Des connexions desserrées ou incorrectes peuvent être à l'origine d'une surchauffe des
bornes.
• Le raccordement électrique ne doit être effectué que par un électricien qualifié.
• Le câble ne doit pas être tendu.
• En cas de raccordement monophasé ou biphasé, utilisez un câble approprié de type
H05BB-F Tmax 90°C (ou plus)
• Si le câble d'alimentation est endommagé, il doit être remplacé par un câble spécial (type
H05BB-F Tmax 90°C ; ou plus). Prenez conseil auprès de votre Service Après-vente.
Dans le cas d'une installation fixe, le raccordement au réseau doit être effectué par l'in-
termédiaire d'un interrupteur à coupure omnipolaire, ayant une distance d'ouverture des
contacts d'au moins 3 mm
Les dispositifs d'isolement comprennent des coupe-circuits, des fusibles (les fusibles à visser
doivent être retirés du support), des disjoncteurs de mise à la terre et des contacteurs.
Mise en place du joint
• Nettoyez la zone de la découpe du plan de travail.
• Coller immédiatement le joint d'étanchéité autocollant d'un côté livré sur la partie in-
férieure du plan de travail, le long du bord extérieur de la vitrocéramique. Ne pas l'étirer.
Le point de jonction doit se trouver au milieu d'un côté. Après avoir mesuré la longueur
(ajoutez quelques mm), poussez fermement les deux extrémités l'une contre l'autre.
Ensemble
min. 500
min. 5
min.
50
Consignes de sécurité
19

600
680 +1
R5
490 +1
=
=
min. 5 min. 5
min. 20
min. 25
min. 5
min. 20
min. 38
min. 5
Plaque signalétique
78031KF-MN
949 593 062
55 GDD D4 AU
AEG-ELECTROLUX
20
Consignes de sécurité

Réparations
En cas de problème technique, vérifiez au préalable si vous pouvez y remédier personnel-
lement en consultant le chapitre " Que faire si ...".
Si vous ne parvenez pas à y remédier, adressez-vous au Service Après-vente ou à l'un de
nos partenaires.
Pour pouvoir intervenir rapidement, veuillez nous fournir les informations suivantes :
– Combinaison à 3 lettres et chiffres
pour la table de cuisson vitrocéramique
– Désignation du modèle
– Référence produit (PNC)
– Numéro de série
(No S - voir plaque signalétique)
– Type de dysfonctionnement
– Tout message d'erreur affiché par
l'appareil
Réparations
21

Wij danken u voor uw keuze voor een van onze producten van hoogwaardige
kwaliteit.
Lees deze gebruiksaanwijzing alstublieft zorgvuldig door, zo kunt u zeker zijn van
optimale en professionele prestaties van uw apparaat. De handleiding zal u in staat
stellen om alle processen perfect en op de meest efficiënte wijze te laten verlopen.
Wij adviseren u deze handleiding op een veilige plaats te bewaren, dan kunt u hem
te allen tijde raadplegen. Geef deze handleiding ook aan een eventuele toekomstige
eigenaar van het apparaat.
Wij wensen u veel plezier met uw nieuwe apparaat.
Inhoud
Bediening van het apparaat 22
Veiligheidsvoorschriften 22
Productbeschrijving 24
Bediening van het apparaat 26
Kook- en braadtips 32
Reiniging en onderhoud 34
Wat te doen als… 35
Afvalverwerking 37
Installatie-instructie 37
Veiligheidsinformatie 37
Onderhoud 40
Wijzigingen voorbehouden
Bediening van het apparaat
Veiligheidsvoorschriften
WAARSCHUWING!
Volg deze instructies op. Als u deze instructies niet opvolgt, wordt de eventuele schade die
hieruit voortvloeit niet gedekt door de garantie.
Gebruik conform de voorschriften
• Dit apparaat is niet bedoeld voor gebruik door kinderen of andere personen met beperkte
lichamelijke, zintuiglijke of geestelijke vermogens of een gebrek aan ervaring en kennis,
tenzij dit plaatsvindt onder toezicht van een voor hun veiligheid verantwoordelijke per-
soon of tenzij zij van een dergelijke persoon instructies hebben ontvangen over het
gebruik van het apparaat.
• Laat het apparaat tijdens het gebruik niet onbeheerd achter.
• Dit apparaat dient alleen te worden gebruikt voor het normaal huishoudelijk koken en
braden van gerechten.
• Het apparaat mag niet worden gebruikt als werkoppervlak of een vlak om iets op te
bergen.
• Het is niet toegestaan het apparaat om te bouwen of te veranderen.
22
Inhoud

• Plaats geen brandbare vloeistoffen, licht ontvlambare materialen of smeltbare voorwer-
pen (bijv. plastic folie, plastic, aluminium) op of in de buurt van het apparaat.
Kinderbeveiliging
• Houd kleine kinderen uit de buurt van het apparaat.
• Laat grote kinderen alleen onder toezicht met het apparaat werken.
• Om te voorkomen dat kleine kinderen of dieren per ongeluk het apparaat inschakelen,
adviseren wij de kinderbeveiliging te activeren.
Algemene veiligheid
• Het apparaat mag alleen worden geïnstalleerd en aangesloten worden door deskundige,
geregistreerde installateurs.
• Inbouwapparaten mogen alleen worden gebruikt nadat zij ingebouwd zijn in geschikte
inbouwunits of werkbladen die aan de normen voldoen.
• In het geval dat het apparaat defecten vertoont of de glazen keramische plaat beschadigd
is(barsten, krassen of scheuren), moet het apparaat worden uitgeschakeld en losgekop-
peld worden van het lichtnet om de kans op een elektrische schok te voorkomen.
• Reparaties aan het apparaat mogen alleen worden uitgevoerd door deskundige, gere-
gistreerde servicemonteurs.
Veiligheid tijdens het gebruik
• Stickers en folie van keramische plaat verwijderen.
• Bij onachtzaam gebruik van het apparaat bestaat de kans op brandwonden.
• Kabels van elektrische apparaten mogen niet het hete oppervlak van het apparaat of het
kookgerei raken.
• Oververhitte vetten en oliën kunnen snel ontbranden. Waarschuwing! Brandgevaar!
• Schakel de kookzones na ieder gebruik uit.
• Gebruikers met geïmplanteerde pacemakers moeten hun bovenlichaam op een afstand
van ten minste 30 cm van ingeschakelde inductiekookzones houden.
• Gevaar voor verbranding! Plaats geen voorwerpen die gemaakt zijn van metaal, zoals
messen, vorken, lepels en deksels op de kookplaat, daar zij zeer heet kunnen worden.
Veiligheid tijdens het reinigen
• Voor reinigingswerkzaamheden moet het apparaat worden uitgeschakeld en zijn afge-
koeld.
• Om veiligheidsredenen is het reinigen van het apparaat met stoom of hogedruk reini-
gingsapparatuur niet toegestaan.
Voorkoming van beschadiging van het apparaat
• Het glaskeramiek kan worden beschadigd door vallende voorwerpen.
• De rand van de glazen keramische plaat kan worden beschadigd als het kookgerei hier
tegen wordt geslagen.
• Kookgerei dat gemaakt is van gietijzer, aluminium of met beschadigde bodems, kunnen
krassen veroorzaken op de keramische glasplaat als deze over het oppervlak worden
geschoven.
• Smeltbare voorwerpen en gerechten die kunnen overkoken, kunnen inbranden op het
glaskeramiek en moeten direct worden verwijderd.
• Gebruik de kookzones niet met leeg kookgerei of zonder kookgerei erop.
Veiligheidsvoorschriften
23

• Om te voorkomen dat kookgerei en glazen keramische platen kunnen beschadigen, dient
u ervoor te zorgen dat steelpannen of braadpannen niet droog kunnen koken.
• De ventilatiespleet van 5 mm tussen het werkblad en de voorkant van de eenheid eronder
mag niet worden afgedekt.
Productbeschrijving
Indeling kookplaat
1
56 34
2
1 Inductiekookzone 2300 W met powerfunctie 3200 W
2 Inductiekookzone 2300 W met powerfunctie 3200 W
3 Bedieningspaneel
4 Inductiekookzone 2300 W met powerfunctie 3200 W
5 Inductiekookzone 2300 W met powerfunctie 3200 W
6 Bedieningspaneel
De kookplaat is onderverdeeld in vier kookzones. Elke kookzone onder de glaskeramische
plaat bevat een inductieverwarmingselement, waarvan de middelste steeds is gemarkeerd
met een kruis op het glaskeramische oppervlak. U kunt pannen op elke kookzone zetten.
Maar het kruis moet volledig bedekt zijn door de pan. De onderkant van de pan moet een
diameter van 125 - 210 mm hebben.
Koken op twee kookzones
Grote pannen kunnen worden verwarmd met twee kookzones tegelijk. De twee kookzones
aan de linkerkant of de twee kookzones aan de rechterkant kunnen hiervoor gebruikt wor-
den.
1. Plaats de pan in het midden op de twee zones.
De pan moet ten minste twee kruisen bedekken.
2. Stel dezelfde warmte-instelling voor de twee kookzones in (max. instelling 8).
Bij verschillende pannen kunnen er verschillen in de warmteverdeling zijn. Goede resultaten
worden bereikt met plannen met dikke, vlakke bodems.
24
Productbeschrijving

Indeling bedieningspaneel
1 Kinderbeveiliging met indicatielampje
2 Stop+Go met indicatielampje
3 Aan/Uit met indicatielampje
4 Indicator kookstand
5 Powerfunctie
6 Kookstand kiezen
7 Timer
8 Timerdisplay
9 Indicatielampjes kookzone - Timerfunctie
Druksensorvelden
Het apparaat wordt bediend door druksensorvelden. De functies worden bediend door
sensorvelden aan te raken en bevestigd door indicaties en geluidssignalen. Raak alleen de
sensorvelden aan die de gewenste functie activeren. Dek andere sensorvelden niet af.
Als de bedieningsstrip langer dan 6 seconden wordt aangeraakt, dan klikt er een signaal en
schakelt het apparaat zichzelf uit.
Sensorveld Functie
Aan / Uit In- en uitschakelen van het apparaat
Kinderslot Bedieningspaneel vergrendelen voor kinderen
STOP+GO In- en uitschakelen van de Warmhoudstand
Vermogen Powerfunctie in- en uitschakelen
Timer Keuze timer
Instellingen verhogen Timer-tijd verhogen
Instellingen verlagen Timer-tijd verlagen
1
2
3
9
8
7
4
5
6
Productbeschrijving
25

Display
Indicatie Beschrijving
De kookzone is uitgeschakeld
Warmhoudinstellingen Warmhouden / STOP+GO-functie is ingeschakeld
-
Kookstanden Voor het instellen van de kookstanden
Automatisch opwarmen De automatische opwarmfunctie is ingeschakeld
+ cijfer
Fout Er is een storing opgetreden
Pandetectie De pan is niet geschikt of te klein, of er is geen pan
op de kookzone geplaatst
Restwarmte Kookzone is nog warm
Kinderbeveiliging Vergrendeling/kinderbeveiliging is ingeschakeld
Power Powerfunctie is ingeschakeld
Automatische uitscha-
keling
Uitschakeling is actief
Restwarmte-indicatie
WAARSCHUWING!
Verbrandingsgevaar door restwarmte. Nadat het apparaat is uitgeschakeld, duurt het even
voordat de kookzones zijn afgekoeld. Kijk naar de restwarmte-indicator
.
Restwarmte kan worden gebruikt voor het smelten en warmhouden van gerechten.
De inductiekookzones creëren de warmte die nodig is voor de bereiding direct in de on-
derkant van de pannen. Het keramische glas wordt slechts verwarmd door de restwarmte
van de pannen.
Bediening van het apparaat
Gebruik de inductiekookzones met geschikte pannen.
Apparaat in- en uitschakelen
Bedieningspaneel Indicatie Controlelampje
Inschakelen
1 seconde aanraken /
gaat branden.
Uitschakelen
1 seconde aanraken / geen
gaat uit.
Na het inschakelen van apparaat, moet ongeveer. binnen 10 seconden een kookstand of
functie zijn ingesteld, anders schakelt het apparaat automatisch uit.
Kookstand instellen
26
Bediening van het apparaat

Bedieningspaneel Indicatie
Kookstand instel-
len
Raak de gewenste kookstand aan en stel deze indien
gewenst hoger of lager in
/ tot
Uitschakelen
Raak aan
Bedieningspaneel vergrendelen/ontgrendelen
Tijdens de bereiding wordt het Touch-gebied, met uitzondering van het Aan/Uit-gebied,
geblokkeerd om een wijziging in de instellingen te voorkomen, bijv. bij het afdrogen van
de kookplaat.
Bedieningspaneel Indicatie
Inschakelen
Raak aan (gedurende 4 seconden)
Uitschakelen
Raak aan
vooraf ingestelde kookstand
Als u het apparaat uitschakelt, wordt de vergrendeling automatisch uitgeschakeld.
De functie STOP+GO in- en uitschakelen
De functie STOP+GO schakelt alle actieve kookzones automatisch in de warmhoudstand en
weer terug naar de kookstand waarin ze zich eerder bevonden
Bedieningspa-
neel
Indicatie
Inschakelen
Raak aan
Uitschakelen
Raak aan
Eerdere kookstand (geen automatische opwarm- of po-
werfunctie)
STOP+GO stopt geen timerfuncties.
STOP+GO regelt het complete bedieningspaneel los van het sensorveld .
De automatische opwarmfunctie gebruiken
Alle kookzones zijn voorzien van een automatische warmhoudfunctie. Tijdens het instellen
van een kookstand met de automatische opwarmfunctie schakelt de kookzone gedurende
een bepaalde periode over naar volledig vermogen en vervolgens automatisch weer terug
naar de ingestelde kookstand.
Stap Bedieningspaneel Indicatie
1.
Raak aan
2. Beweeg uw vinger omlaag
van
om de gewenste
kookstand te selecteren
tussen
en
/ na 5 seconden . Zolang wordt
getoond, werkt het product op volledig vermo-
gen. Nadat de automatische opwarming is vol-
tooid, wordt de kookstand
/ opnieuw ge-
toond.
De duur van de automatische opwarmfunctie is afhankelijk van de gekozen kookstand.
Bediening van het apparaat
27

Temperatuurinstelling Duur van de automatische opwarmfunctie
(min:sec)
0:12
0:12
1:21
3:07
4:24
5:51
8:12
10:12
10:36
2:01
2:01
2:28
2:52
---
Kinderbeveiliging gebruiken
De kinderbeveiliging voorkomt het ongewenste gebruik van het apparaat.
Kinderbeveiliging inschakelen
Stap Bedieningspaneel Indicatie/signaal
1.
Schakel het apparaat in. Stel geen kookstand in.
2.
4 seconden aanraken
De kinderbeveiliging is ingeschakeld.
Kinderbeveiliging uitschakelen
Stap Bedieningspaneel Indicatie/signaal
1.
Schakel het apparaat in. Stel geen kookstand in.
2.
4 seconden aanraken gaat branden
3.
Schakel het apparaat uit.
De kinderbeveiliging is uitgeschakeld.
De kinderbeveiliging kan alleen worden in- of uitgeschakeld als er geen kookstand is in-
gesteld.
28
Bediening van het apparaat

Kinderbeveiliging tijdelijk uitschakelen
De kinderbeveiliging kan op deze manier worden uitgeschakeld voor een enkele kooksessie;
daarna blijft hij geactiveerd.
Stap Bedieningspaneel Indicatie/signaal
1.
Schakel het apparaat in
2.
4 seconden aanraken gaat branden
Het apparaat kan normaal worden gebruikt tot het de volgende keer wordt uitgeschakeld. Na het
uitschakelen van het apparaat, wordt de kinderbeveiliging weer geactiveerd.
Na het uitschakelen van de kinderbeveiliging, moet een kookstand of functie binnen. 10
seconden worden ingesteld, anders wordt het apparaat automatisch uitgeschakeld.
Powerfunctie in- en uitschakelen
De powerfunctie maakt meer vermogen beschikbaar voor de inductiekookzones, b.v. om
een grote hoeveelheid water snel aan de kook te brengen. De powerfunctie wordt maximaal
8 minuten geactiveerd. Daarna wordt de inductiekookzone automatisch teruggeschakeld
naar kookstand
.
Bedieningspaneel Indicatie
Inschakelen
Raak aan
Uitschakelen Raak een kookstand aan
/
Vermogensbeheer
De kookzones van het kookoppervlak hebben
een maximaal vermogen.
Het maximale vermogen wordt bereikt als
voor alle kookzones kookstand 13 is inge-
steld.
Twee kookzones vormen een paar (zie af-
beelding) en daarom verdeelt het vermo-
gensbeheer het maximaal beschikbare ver-
mogen over deze kookzones.
Als de powerfunctie wordt gekozen voor één
kookzone, maakt het vermogensbeheer extra
vermogen beschikbaar voor deze kookzone
door vermogen van de bijbehorende andere kookzone te verlagen.
Voorbeeld: kookstand 13 is gekozen voor één kookzone. De powerfunctie is ingeschakeld
voor de bijbehorende kookzone. De powerfunctie wordt uitgevoerd, maar de kookstand 13
van een van de kookzones en de powerfunctie voor de andere kookzone van het paar zijn
bij elkaar hoger dan het maximaal toegestane vermogen voor beide tegelijk. Daarom ver-
mindert het vermogensbeheer het vermogen van de kookzone die het eerst werd inge-
schakeld van 13 naar bijvoorbeeld 5 en verandert het display van deze kookzone van 13
naar 5, en blijft dan op het huidige mogelijke maximum 5 staan. (Of het display verandert
van 13 naar 5 of van 13 naar 3 of naar een andere waarde hangt af van het type apparaat
en de afmetingen van de kookzone).
Bediening van het apparaat
29

De timer gebruiken
Functie Voorwaarde Resultaat na het verstrijken van
de tijd
Automatische uitschakeling Kookstand is ingesteld Geluidssignaal
00
knippert
Kookzone wordt uitgeschakeld
Kookwekker kookzones niet in gebruik Geluidssignaal
00
knippert
Als er slechts één aftelwaarde is ingesteld, kunt u deze alleen veranderen als het apparaat
is ingeschakeld.
Als naast het instellen van de kookstand voor deze kookzone een kookwekker wordt inge-
steld, zal de kookzone na het verstrijken van de tijd worden uitgeschakeld.
Als een kookzone wordt uitgeschakeld, wordt de ingestelde timerfunctie ook uitgeschakeld.
Een kookzone selecteren
Stap Bedieningspa-
neel
Indicatie
1.
Raak één
keer aan
Controlelampje van de eerste kookzone knippert
2.
Raak één
keer aan
Controlelampje van de tweede kookzone knippert
3.
Raak één
keer aan
Controlelampje van de derde kookzone knippert
4.
Raak één
keer aan
Controlelampje van de vierde kookzone knippert
Als er andere timerfuncties zijn ingesteld, zal na een paar seconden de kortste resterende
tijd van alle timerfuncties worden weergegeven en zal het overeenkomstige controlelampje
beginnen te knipperen.
Tijd instellen
Stap Bedieningspaneel Display
1.
Een kookzone selecteren
Controlelampje van de geselecteerde kook-
zone knippert
2.
Raak of aan
00
tot
99
minuten
Na een paar seconden begint het controlelampje langzamer te knipperen.
De tijd is ingesteld.
De tijd telt terug.
De timerfunctie uitschakelen
30
Bediening van het apparaat

Stap Bedieningspaneel Indicatie
1.
Selecteer een kookzone
Het controlelampje van de geselecteerde kookzone
knippert sneller
Resterende tijd wordt weergegeven
2.
Raak aan De resterende tijd telt af tot
00
.
Het controlelampje gaat uit.
De timerfunctie voor de geselecteerde kookzone wordt uitgeschakeld.
Tijd veranderen
Stap Bedieningspaneel Indicatie
1.
Selecteer een kookzone
Het controlelampje voor de gekozen kook-
zone knippert sneller
Resterende tijd wordt weergegeven
2.
Raak of aan
0
1
tot
99
minuten
Na een paar seconden begint het controlelampje langzamer te knipperen.
De tijd is ingesteld.
De tijd telt terug.
De resterende tijd voor een kookzone weergeven
Stap Veld bedieningspaneel Indicatie
1.
Selecteer een kookzone
Het controlelampje voor de gekozen kookzone knippert
sneller
Resterende tijd wordt weergegeven
Na een paar seconden begint het controlelampje langzamer te knipperen.
Het geluidssignaal uitschakelen
Stap Veld bedieningspaneel Geluidssignaal
1.
Raak aan
Geluidssignaal om te bevestigen.
Geluidssignaal stopt.
Automatische uitschakeling
Kookplaat
• Als na het inschakelen van de kookplaat er voor een kookzone binnen ong. 10 seconden
geen kookstand is ingesteld, wordt de kookplaat automatisch uitgeschakeld.
• Als één of meer sensorvelden langer dan 10 seconden worden bedekt door voorwerpen
(een pan e.d.) klinkt er een geluidssignaal en schakelt de kookplaat zichzelf automatisch
uit.
• Als alle kookzones worden uitgeschakeld, schakelt de kookplaat zichzelf automatisch uit
na ong. 10 seconden.
Bediening van het apparaat
31

Bedieningspaneel
• Als het apparaat wordt uitgeschakeld en één of meer sensorvelden op het bedienings-
paneel langer dan 10 seconden worden bedekt, dan klinkt er een geluidssignaal. Het
geluidssignaal wordt automatisch uitgeschakeld als de sensorvelden niet meer worden
bedekt.
Inductiekookzones
• In geval van oververhitting (b.v. wanneer een pan droogkookt) wordt de kookzone au-
tomatisch uitgeschakeld.
wordt weergegeven. Om de kookzone weer te kunnen ge-
bruiken moet deze op
worden gezet en de tijd krijgen om af te koelen.
• Als er ongeschikte pannen worden gebruikt, gaat
branden op het display en wordt
het display voor de kookzone na 2 minuten uitgeschakeld.
• Als een van de kookzones na een bepaalde tijd niet wordt uitgeschakeld of als de kook-
stand niet wordt gewijzigd, wordt de desbetreffende kookzone automatisch uitgescha-
keld.
wordt weergegeven. Voordat u deze kookzone opnieuw gebruikt, moet de kook-
zone worden ingesteld op
.
Kookstand Uitschakeling na
1 - 3 6 uur
4 - 7 5 uur
8 - 9 4 uur
10 - 14 1,5 uur
Kook- en braadtips
Informatie over acrylamides
Volgens het laatste wetenschappelijke onderzoek kan het intensief bruinen van levens-
middelen, met name bij zetmeelhoudende producten, een gevaar voor de gezondheid op-
leveren als gevolg van acrylamide. Om die reden adviseren wij levensmiddelen zoveel mo-
gelijk bij lage temperaturen gaar te laten worden en de gerechten niet te veel te bruinen.
Kookmaterialen voor inductiekookzones
Kookmaterialen Geschikt
Staal, geëmailleerd staal +
Gietijzer +
Roestvrij staal +*
Pannen met meerlaagse bodems +*
Aluminium, koper, messing -
Glas, keramiek, porselein -
* Kookgerei voor inductiekookzones wordt door de fabrikant overeenkomstig aangegege-
ven.
Geschiktheidstest
Kookgerei is geschikt voor inductie als…
32
Kook- en braadtips

• ...een beetje water op een inductiekookzone op de hoogste kookstand binnen korte tijd
wordt verhit.
• ...een magneet blijft plakken aan de bodem van de pan.
Bepaald kookgerei kan tijdens het gebruik op inductiekookzones lawaai veroorzaken. Dit
lawaai is geen storing van het apparaat en de functie wordt op geen enkele wijze beïnvloed.
Bodem van de pannen
De bodem van de pannen moet zo dik en vlak mogelijk zijn.
Grootte van de pannen
Inductiekookzones passen zich tot op zekere hoogte automatisch aan aan de grootte van
de bodem van de pan. Het magnetische gedeelte van de bodem van de pan moet echter
een minimale diameter hebben, afhankelijk van de grootte van de kookzone. Pannen met
een bodem met een diameter van minder dan 12 cm zijn niet geschikt.
Tips voor het besparen van energie
Plaats het kookgerei altijd op de kookzone voordat u deze inschakelt.
Plaats indien mogelijk altijd een deksel op de pan.
Voorbeelden van kooktoepassingen
De gegevens in de volgende tabel dienen slechts als richtlijn.
Kookstand Bereidingsproces Geschikt voor Bereidingstijd Aanwijzingen/tips
0 Uit-stand
1
Warmhouden Bereide gerechten
warmhouden
Naar behoefte Afdekken
1-3 Smelten Hollandaisesaus,
boter smelten, cho-
colade, gelatine
5-25 min. Tussendoor omroe-
ren
1-3 Stollen Luchtige omelet-
ten, gebakken eier-
en
10-40 min. Met deksel berei-
den
3-5 Sudderen Koken van rijst en
melkgerechten
Verhitten van kant-
en-klare gerechten
25-50 min. Voeg minstens
tweemaal zoveel
vloeistof toe als
rijst, melkgerech-
ten tijdens het be-
reiden tussendoor
roeren
5-7 Stomen
Smoren
Groenten en vis
stomen, vlees smo-
ren
20-45 min. Bij groente weinig
vocht toevoegen
(een paar eetlepels)
Kook- en braadtips
33

Kookstand Bereidingsproces Geschikt voor Bereidingstijd Aanwijzingen/tips
7-9 Koken Aardappelen sto-
men
20-60 min. Gebruik weinig
vloeistof, bijv.: max.
¼ l water voor 750
g aardappelen
7-9 Koken Bereiden van gro-
tere hoeveelheden
voedsel, stoofscho-
tels en soepen
60-150 min. Tot 3 l vloeistof plus
ingrediënten
9-12 Zachtjes braden Braden van kalfs-
lappen, cordon
bleu van kalfsvlees,
rissoles, worstjes,
lever, roux, eieren,
pannenkoeken, do-
nuts
Naar behoefte Halverwege de be-
reidingstijd om-
draaien
12-13 Intensief braden Opgebakken aard-
appelen, lendebief-
stukken, biefstuk-
ken, flädle (pan-
nenkoeken voor
het garneren van
soep)
5-15 min. per pan Halverwege de be-
reidingstijd om-
draaien
14 Koken Dicht-
schroeien Frituren
Aan de kook brengen van grotere hoeveelheden water, pasta
koken, aanbraden van vlees (goulash, stoofvlees), frituren van
patates frites
De powerfunctie is geschikt voor het verwarmen van grote hoeveelheden vloeistof.
Reiniging en onderhoud
WAARSCHUWING!
Scherpe en schurende reinigingsmiddelen beschadigen het apparaat. Reinig het apparaat
en verwijder de resten na elk gebruik met water en afwasmiddel. Verwijder ook de resten
van reinigingsmiddelen!
Krassen of donkere vlekken in de glaskeramiek kunnen niet meer worden verwijderd, maar
hebben geen invloed op de werking van het apparaat.
Het apparaat reinigen na gebruik
1. Suiker houdend voedsel, kunststoffen, resten aluminiumfolie moeten direct worden
verwijderd met een schraper. Zet een schraper onder een hoek op het glaskeramische
oppervlak en verwijder resten door het blad over het oppervlak te schuiven. Veeg over
het apparaat met een vochtig doek en een beetje afwasmiddel. Wrijf het apparaat ten
slotte droog met een schone doek .
2. Kalk- en watersporen, vetspatten en metaalachtig glanzende verkleuringen kunnen,
nadat het apparaat is afgekoeld, met schoonmaakmiddel voor glaskeramiek of roestvrij
staal worden verwijderd
34
Reiniging en onderhoud

Wat te doen als…
Probleem/Indicatie Mogelijke oorzaak Oplossing
De kookzones kunnen niet wor-
den ingeschakeld of werken
niet
Na het inschakelen van het ap-
paraat zijn meer dan 10 secon-
den verstreken
Schakel het apparaat opnieuw
in.
De kinderbeveiliging is inge-
schakeld
Schakel de vergrendeling uit
(zie de paragraaf "Bedienings-
paneel vergrendelen/ontgren-
delen")
De kinderbeveiliging is inge-
schakeld
Schakel de kinderbeveiliging uit
(zie hoofdstuk "Kinderbeveili-
ging")
Er zijn meerdere sensorvelden
tegelijk aangeraakt
Raak slechts één sensorveld te-
gelijk aan
Automatische uitschakeling is
geactiveerd
Verwijder eventuele voorwer-
pen (pannen enz.) die op het
bedieningspaneel liggen. Scha-
kel het apparaat weer in.
Er staat water op het bedie-
ningsveld of het veld is met vet-
spatten bedekt
Bedieningsveld afnemen
STOP+GO is geactiveerd
Schakel STOP+GO uit
Display schakelt tussen twee
kookstanden
Vermogensbeheer verlaagt het
vermogen van deze kookzone
Zie de paragraaf "Powerfunctie
in- en uitschakelen"
De restwarmte-indicator geeft
niets aan
De kookzone is slechts kort ge-
bruikt en is daarom nog niet
heet
Als de kookzone heet zou moe-
ten zijn, neem dan contact op
met de klantenservice.
gaat branden
Ongeschikte pannen Gebruik geschikte pannen
Geen pan op de kookzone Zet een pan op de zone
De diameter van de bodem van
pan is te klein voor de kookzone
Gebruik een kleinere kookzone
Gebruik geschikte pannen
gaat branden
Automatische uitschakeling is
geactiveerd
Schakel het apparaat uit. Scha-
kel het apparaat weer in.
en het nummer wordt
weergegeven
Elektronische fout Koppel het apparaat een paar
minuten los van de stroomtoe-
voer (haal de stop uit de stop-
penkast). Als na het opnieuw
inschakelen weer
verschijnt,
bel dan de klantenservice
Een geluidssignaal klinkt als het
apparaat wordt uitgeschakeld
Het bedieningspaneel is geheel
of deels bedekt met voorwer-
pen.
Verwijder voorwerpen.
Wat te doen als…
35

Probleem/Indicatie Mogelijke oorzaak Oplossing
Herhaald geluidssignaal (6x),
apparaat wordt uitgeschakeld
Een of meer sensorvelden zijn
langer dan 10 seconden bedekt
geweest
Maak sensorveld vrij
Er klinkt een geluidssignaal en
het apparaat schakelt zichzelf
automatisch in en vervolgens
weer uit; na 5 seconden klinkt
een ander geluidssignaal
Het aan/uit-sensorveld is be-
dekt, bijv. door een doek
Plaats geen voorwerpen op het
bedieningspaneel
Als u de storing met de aangegeven oplossingen niet kunt verhelpen, neem dan
contact op met uw vakhandelaar of met de Klantenservice.
WAARSCHUWING!
Reparaties aan het apparaat mogen alleen worden uitgevoerd door deskundige, geregi-
streerde servicemonteurs. Door onvakkundig uitgevoerde reparaties kunnen grote gevaren
voor de gebruiker ontstaan.
Bij foutieve bediening wordt het bezoek van de technicus van de klantenservice in rekening
gebracht, ook tijdens de garantieperiode.
Geluiden tijdens de werking
Afhankelijk van het materiaal en de afwerking van de bodem, kunnen de volgende geluiden
voorkomen bij het gebruiken van inductiekookzones.
• Krakend geluid
1
bij gebruik van pannen die van verschillende
materialen zijn gemaakt (Sandwich-construc-
tie)
•Fluiten
1
bij gebruik van één kookzone of meerdere kook-
zones met hoog vermogen wanneer de pannen
gemaakt zijn van verschillende materialen
(Sandwich-constructie)
•Zoemen
2
kan optreden bij hoge vermogens
• Klikken
2
tijdens elektrische schakelprocessen
• Sissen, zoemen
3
Het apparaat is uitgerust met een ventilator voor het koelen van de elektronica. Een
brommend geluid kan te horen zijn als de ventilator in werking is, dit kan afwijken af-
hankelijk van de prestatie en kan nog een tijd doorgaan nadat het apparaat is uitge-
schakeld.
De beschreven geluiden zijn normaal en hebben niets met een defect te maken.
1
3
2
36
Wat te doen als…

Afvalverwerking
Het symbool op het product of op de verpakking wijst erop dat dit product niet als
huishoudafval mag worden behandeld, maar moet worden afgegeven bij een verzamelpunt
waar elektrische en elektronische apparatuur wordt gerecycled. Als u ervoor zorgt dat dit
product op de juiste manier wordt verwijderd, voorkomt u mogelijke negatieve gevolgen
voor mens en milieu die zich zouden kunnen voordoen in geval van verkeerde
afvalverwerking. Voor gedetailleerdere informatie over het recyclen van dit product, kunt
u contact opnemen met de gemeente, de gemeentereiniging of de winkel waar u het
product hebt gekocht.
De verpakkingsmaterialen zijn milieuvriendelijk en herbruikbaar. De kunststofonderdelen
zijn gemarkeerd, bijv. >PE<, >PS<, enz. Gooi het verpakkingsmateriaal in de daarvoor be-
doelde container bij uw plaatselijke afvaldienst
Installatie-instructie
Veiligheidsinformatie
WAARSCHUWING!
Dit moet u lezen!
De wetten, voorschriften, richtlijnen en normen die van kracht zijn in het land waar het
apparaat wordt gebruikt dienen in acht genomen te worden (veiligheidsvoorschriften, cor-
recte recycling overeenkomstig de voorschriften, enz.).
De installatie mag alleen worden uitgevoerd door een gekwalificeerde elektricien. De mi-
nimale afstanden ten opzichte van andere apparaten en units dienen in acht genomen te
worden.
Tijdens de installatie moet een antistootbescherming zijn aangebracht, bijv. lades mogen
alleen worden aangebracht als er onder het apparaat een beschermende vloer aanwezig is.
De uitgezaagde oppervlakken van het werkblad moeten beschermd worden tegen vocht
met een geschikte afdichting.
De afdichting dicht de opening tussen het apparaat en het werkblad af. Als het apparaat
wordt ingebouwd, dient u de onderkant van het apparaat te beschermen tegen stoom en
vocht, bijv. van een afwasmachine of oven.
Installeer het apparaat niet in de buurt van deuren of onder ramen. Anders kan het hete
kookgerei van de ringen worden gestoten , als de deuren of ramen worden geopend.
Afvalverwerking
37

WAARSCHUWING!
Risico op verwonding door elektrische stroom.
• De netaansluiting staat onder stroom.
• Schakel de stroomtoevoer naar de netaansluiting uit.
• Volg het aansluitschema.
• Houd u aan de veiligheidsvoorschriften met betrekking tot elektrische installaties.
• Zorg ervoor dat de antistootbescherming correct geïnstalleerd is.
• Laat de elektrische aansluiting uitvoeren door een gekwalificeerde elektricien.
• Loszittende en onvakkundig aangebrachte stekkerverbindingen kunnen oververhitting
van de aansluiting veroorzaken.
• Laat de klemaansluitingen correct installeren door een gekwalificeerde elektricien.
• Zorg ervoor dat het snoer niet wordt belast door trekken.
• In het geval van een eenfase- of tweefase-aansluiting, moet het geschikte netsnoer van
het type H05BB-F Tmax. 90°C (of hoger) worden gebruikt.
• Als het netsnoer van het apparaat is beschadigd, moet het vervangen worden door een
speciale kabel (type H05BB-F Tmax. 90°C; of hoger). Neem contact op met uw plaatselijke
klantenservice voor verder advies.
Er moet een voorziening in de elektrische installatie aanwezig zijn die het mogelijk maakt
om het apparaat los te koppelen van alle polen van de netvoeding, met een contactopening
van minstens 3 mm
Geschikte scheidingsvoorzieningen zijn onder andere stroomonderbrekers, zekeringen
(schroefzekeringen moeten uit de houder worden verwijderd), aardlekstrips en schakelaars.
De afdichting aanbrengen
• Het werkblad op de plaats van de uitsnijding reinigen.
• Plak het meegeleverde eenzijdig zelfklevende afdichtband rondom de onderkant van de
kookplaat langs de buitenste rand van de glaskeramische plaat. Rek het afdichtband
daarbij niet uit. De plaats van het punt waar de tape samenkomt dient in het midden
van één van de zijden te liggen. Na het op maat maken (met enige mm speling) de beide
uiteinden vlak tegen elkaar aan drukken.
Montage
min. 500
min. 5
min.
50
38
Veiligheidsinformatie

600
680 +1
R5
490 +1
=
=
min. 5 min. 5
min. 20
min. 25
min. 5
min. 20
min. 38
min. 5
Typeplaatje
78031KF-MN
949 593 062
55 GDD D4 AU
AEG-ELECTROLUX
Veiligheidsinformatie
39

Onderhoud
Probeer bij technische storingen eerst met behulp van de gebruiksaanwijzing (Hoofdstuk
"Wat te doen als...") het probleem zelf op te lossen.
Als u het probleem niet zelf kunt oplossen, dient u contact op te nemen met de klanten-
service of een van onze servicepartners.
Om u snel te kunnen helpen, hebben wij de volgende gegevens nodig:
– Letter-cijfercombinatie van 3 tekens
voor glazen keramische plaat
– Modelbeschrijving
– Productnummer (PNC)
– Serienummer
(S-nr. - zie het typeplaatje)
– Aard van de storing
– Foutmeldingen die door het apparaat
worden weergegeven
40
Onderhoud

Thank you for choosing one of our high-quality products.
To ensure optimal and regular performance of your appliance please read this
instruction manual carefully. It will enable you to navigate all processes perfectly
and most efficiently. To refer to this manual any time you need to, we recommend
you to keep it in a safe place. And please pass it to any future owner of the appliance.
We wish you much joy with your new appliance.
Contents
Operating the appliance 41
Safety Information 41
Description of the appliance 43
Operating the appliance 45
Tips on cooking and frying 51
Cleaning and care 53
What to do if ... 53
Disposal 55
Installation instructions 56
Safety information 56
Service 58
Subject to change without notice
Operating the appliance
Safety Information
WARNING!
Please comply with these instructions. If you do not, any damage resulting is not covered
by the warranty.
Correct use
• This appliance is not intended for use by children or other persons whose physical, sensory
or mental capabilities or lack of experience and knowledge prevents them from using
the appliance safely without supervision or instruction by a responsible person to ensure
that they can use the appliance safely.
• Do not leave the appliance unattended during operation.
• This appliance should be used only for normal domestic cooking and frying of food.
• The appliance must not be used as a work surface or as a storage surface.
• Additions or modifications to the appliance are not permitted.
• Do not place or store flammable liquids, highly inflammable materials or fusible objects
(e.g. plastic film, plastic, aluminium) on or near the appliance.
Children’s safety
• Small children must be kept away from the appliance.
• Only let bigger children work on the appliance under supervision.
Contents
41
892930305-B-102008

• To avoid small children and pets unintentionally switching the appliance on, we recom-
mend activation of the child safety device.
General safety
• The appliance may only be installed and connected by trained, registered service engi-
neers.
• Built-in appliances may only be used after they have built in to suitable built-in units
and work surfaces that meet standards.
• In the event of faults with the appliance or damage to the glass ceramic (cracks, scratches
or splits), the appliance must be switched off and disconnected from the electrical supply,
to prevent the possibility of an electric shock.
• Repairs to the appliance must only be carried out by trained registered service engineers.
Safety during use
• Remove stickers and film from the glass ceramic.
• There is the risk of burns from the appliance if used carelessly.
• Cables from electrical appliances must not touch the hot surface of the appliance or hot
cookware.
• Overheated fats and oils can ignite very quickly. Warning! Fire hazard!
• Switch the cooking zones off after each use.
• Users with implanted pacemakers should keep their upper body at least 30 cm from
induction cooking zones that are switched on.
• Risk of burns! Do not place objects made of metal, such as knives, forks, spoons and
saucepan lids on the cooking surface, as they can get hot.
Safety when cleaning
• For cleaning, the appliance must be switched off and cooled down.
• For safety reasons, the cleaning of the appliance with steam jet or high-pressure cleaning
equipment is not permitted.
How to avoid damage to the appliance
• The glass ceramic can be damaged by objects falling onto it.
• The edge of the glass ceramic can be damaged by being knocked by the cookware.
• Cookware made of cast iron, cast aluminium or with damaged bottoms can scratch the
glass ceramic if pushed across the surface.
• Objects that melt and things that boil over can burn onto the glass ceramic and should
be removed straightaway.
• Do not use the cooking zones with empty cookware or without cookware.
• To avoid damaging cookware and glass ceramics, do not allow saucepans or frying pans
to boil dry.
• The ventilation gap of 5mm between the worktop and front of the unit underneath it
must not be covered.
42
Safety Information

Description of the appliance
Cooking surface layout
1
56 34
2
1 Induction cooking zone 2300W, with power function 3200W
2 Induction cooking zone 2300W, with power function 3200W
3 Control panel
4 Induction cooking zone 2300W, with power function 3200W
5 Induction cooking zone 2300W, with power function 3200W
6 Control panel
The cooking surface is divided into four cooking zones. In each cooking zone under the
glass ceramic is an induction heating element, the middle of each one being marked with
a cross on the glass ceramic surface. Cookware can be placed on any of the cooking zones.
But the cross must be completely covered by the cookware. The bottom of the cookware
must be from 125 - 210 mm in diameter.
Cooking over two cooking zones
Large cookware can be heated with two cooking zones simultaneously. Either the two
cooking zones on the left-hand side or on the right-hand side of the cooking surface are
suitable for this.
1. Place cookware centrally on the two zones.
The cookware must cover at least two crosses.
2. Set the same heat setting for the two cooking zones (max. setting 8).
With different cookware there can be differences in the heat distribution. Good cooking
results can be achieved with cookware with thick, flat bottoms.
Description of the appliance
43

Control panel layout
1 Child lock with a pilot light
2 Stop+Go with a pilot light
3 On/Off with indicator
4 Heat setting indicator
5 Power function
6 Heat setting selection
7 Timer
8 Timer display
9 Cooking zone indicators - Timer function
Touch Control sensor fields
The appliance is operated using Touch Control sensor fields. Functions are controlled by
touching sensor fields and confirmed by displays and acoustic signals. Only touch the sensor
fields which activate a desired function. Do not cover other sensor fields.
If the control bar is touched for longer than 6 seconds, a signal sounds and the appliance
switches itself off.
Sensor field Function
On / Off Switches appliance on and off
Child lock Locking control panel for children
STOP+GO To switch the Keep Warm setting on/ off
Power Switching the power function on and off
Timer Timer selection
Increase settings To increase Timer time
Reduce settings To reduce Timer time
1
2
3
9
8
7
4
5
6
44
Description of the appliance

Displays
Display Description
The cooking zone is switched off
Keep Warm settings Keep Warm / STOP+GO function is switched on
-
Heat settings To set heat settings
Auto Warm-up The Auto Warm-up function is switched on
+ digit
Fault Malfunction has occurred
Pan detection Cookware is unsuitable or too small or no cookware
has been placed on the cooking zone
Residual heat Cooking zone is still hot
Child safety device Lock/Child safety device is set
Power Power function is switched on
Automatic Switch off Switch off is active
Residual heat indicator
WARNING!
Risk of burns from residual heat. After being switched off, the cooking zones need some
time to cool down. Look at the residual heat indicator
.
Residual heat can be used for melting and keeping food warm.
The induction cooking zones create the heat required for cooking directly in the base of
the cookware. The glass ceramic is merely heated by the residual heat of the cookware.
Operating the appliance
Use the induction cooking zones with suitable cookware.
Switching the appliance on and off
Control panel Display Pilot light
Switch on
Touch for 1 second /
lights up.
Switch off
Touch for 1 second / none
goes out.
After switching on, within approx. 10 seconds a heat setting or a function must be set,
otherwise the appliance automatically switches itself off.
Setting the heat setting
Operating the appliance
45

Control panel Display
To set the heat
setting
Touch the desired heat setting, if necessary, correct
up or down
/ to
Switch off
Touch
Locking/unlocking the control panel
The control panel, with the exception of the “On/Off” sensor field, can be locked at any time
in order to prevent the settings being changed e.g. by wiping over the panel with a cloth.
Control panel Display
To switch on
Touch (for 4 seconds)
To switch off
Touch
previously set heat setting
When you switch the appliance off, the locking function is automatically switched off.
Turning the STOP+GO function on and off
The STOP+GO function simultaneously toggles all active cooking zones to keep-warm mode
then back to the heat setting they were at before
Control panel Display
To switch on
Touch
To switch off
Touch
Previous heat setting (not automatic warm-up or power
function)
STOP+GO does not stop timer functions.
STOP+GO controls the entire control panel apart from the sensor field .
Using the automatic warm-up function
All cooking zones are equipped with an automatic warm-up function. When setting a heat
setting using the automatic warm-up function, the cooking zone switches to full power
for a certain amount of time and then automatically switches back to the heat setting set.
Step Control Panel Display
1.
Touch
2. Move your finger down
from
to select the de-
sired heat setting between
and
/ after 5 seconds . As long as is
displayed, the appliance works at full power. After
the automatic warm up is completed, the heat
setting
/ is displayed again.
The length of time that the automatic warm up function operates depends on the heat
setting selected.
Heat setting Length of the automatic warm up [min:sec]
0:12
46
Operating the appliance

Heat setting Length of the automatic warm up [min:sec]
0:12
1:21
3:07
4:24
5:51
8:12
10:12
10:36
2:01
2:01
2:28
2:52
---
Using the child safety device
The child safety device prevents unintentional use of the appliance.
Switching on the child safety device
Step Control panel Display/Signal
1.
Switch on appliance. Do not set a heat setting.
2.
Touch for 4 seconds
The child safety device is switched on.
Switching off the child safety device
Step Control panel Display/Signal
1.
Switch on appliance. Do not set a heat setting.
2.
Touch for 4 seconds lights up
3.
Switch appliance off.
The child safety device is switched off.
The child safety device can only be switched on and off if no heat setting is set.
Overriding the child safety device
The child safety device can be switched off in this way for a single cooking session; it remains
activated afterwards.
Operating the appliance
47

Step Control panel Display/Signal
1.
Switch appliance on
2.
Touch for 4 seconds lights up
Until the appliance is next switched off, it can used as normal. After switching off the appliance,
the child safety device is active again.
After overriding the child safety device, a heat setting or a function must be set within
approx. 10 seconds, otherwise the appliance automatically switches itself off.
Switching the power function on and off
The power function makes more power available to the induction cooking zones, e.g. to
bring a large quantity of water to the boil quickly. The power function is activated for 8
minutes at most. After that the induction cooking zone automatically switches back to heat
setting
.
Control panel Display
To switch on
Touch
To switch off Touch a heat setting
/
Power Management
The cooking zones of the cooking surface
have a maximum power.
The maximum power is reached when the
heat setting 13 has been set for all cooking
zones.
Two cooking zones generate a pair (see fig-
ure) and therefore, the power management
shares the maximum available power be-
tween these cooking zones.
When the power function is selected for one
cooking zone, the power management
makes the additional power for this cooking
zone available by reducing the power of the corresponding other cooking zone.
Example: the heat setting 13 is selected on one cooking zone. The power function is
switched on for the corresponding cooking zone. The power function is carried out but the
heat setting 13 of one of the cooking zones and the power function for the other cooking
zone of the pair exceed the maximum power for both at the same time. For this purpose,
the power management reduces the power of the cooking zone that switched on first from
13 to example 5 and the display of this cooking zone changes between 13 and 5 and then
stays at the current possible maximum 5 (If the display changes between 13 and 5 or 13
and 3 or another value depends on the type of appliance and the size of the cooking zone).
Using the timer
48
Operating the appliance

Function Condition Outcome after the time has
elapsed
Automatic cut-out a heat setting is set acoustic signal
00
flashes
Cooking zone switches off
Countdown timer cooking zones not in use acoustic signal
00
flashes
If just one countdown value is set you can change it only when the appliance is switched
on.
If a heat setting is set on this cooking zone in addition to a countdown timer, the cooking
zone is switched off after the time set has elapsed.
If a cooking zone is switched off, the timer function set is also switched off.
Selecting a cooking zone
Step Control panel Display
1.
Touch once
Pilot light of the first cooking zone flashes
2.
Touch once
Pilot light of the second cooking zone flashes
3.
Touch once
Pilot light of the third cooking zone flashes
4.
Touch once
Pilot light of the fourth cooking zone flashes
If other timer functions are set, after a few seconds the shortest remaining time of all the
timer functions is displayed and the corresponding pilot light flashes.
Setting the time
Step Control panel Display
1.
Select a cooking zone
Pilot light for the cooking zone selected
flashes
2.
Touch or
00
to
99
minutes
After a few seconds the pilot light flashes more slowly.
The time is set.
The time counts down.
Switching off the timer function
Step Control panel Display
1.
Select a cooking zone
Pilot light of cooking zone selected flashes faster
Time remaining is displayed
Operating the appliance
49

Step Control panel Display
2.
Touch The time remaining counts backwards to
00
.
The pilot light goes out.
The Timer function for the selected cooking zone is switched off.
Changing the time
Step Control panel Display
1.
Select a cooking zone
Pilot light of the selected cooking zone
flashes more quickly
Remaining time is displayed
2.
Touch or
0
1
to
99
minutes
After a few seconds the pilot light flashes more slowly.
The time is set.
The time counts down.
Displaying the time remaining for a cooking zone
Step Control panel field Display
1.
Select a cooking zone
Pilot light of the cooking zone selected flashes faster
The time remaining is displayed
After a few seconds the pilot light flashes more slowly.
Switching off the acoustic signal
Step Control panel field Acoustic signal
1.
Touch
Acoustic signal to acknowledge.
Acoustic signal stops.
Automatic switch off
Cooking surface
• If after switching on the cooking surface, a heat setting is not set for a cooking zone
within approx. 10 seconds, the cooking surface automatically switches itself off.
• If one or more sensor fields are covered by objects (a pan, etc.) for longer than approx.
10 seconds, a signal sounds and the cooking surface switches off automatically.
• If all cooking zones are switched off, the cooking surface automatically switches itself
off after approx. 10 seconds.
Control panel
• When the appliance is switched off, if one or more of the sensor fields on the control
panel are covered for more than 10 seconds, an acoustic signal sounds. The acoustic
signal switches itself off automatically when the sensor fields are no longer covered.
Induction cooking zones
• In the case of overheating (e.g. when a saucepan boils dry) the cooking zone automat-
ically switches itself off.
is displayed. Before being used again the cooking zone must
be set to
and allowed to cool.
50
Operating the appliance

• If cookware that is not suitable is used, lights up in the display and after 2 minutes
the display for the cooking zone switches itself off.
• If one of the cooking zones is not switched off after a certain time, or if the heat setting
is not modified, the relevant cooking zone switches off automatically.
is displayed.
Before being used again, the cooking zone must be set to
.
Heat setting Switches off after
1 - 3 6 hours
4 - 7 5 hours
8 - 9 4 hours
10 - 14 1.5 hours
Tips on cooking and frying
Information about acrylamides
According to the latest scientific research, intensive browning of food, especially in products
containing starch, may present a health risk due to acrylamide. Therefore we recommend
cooking at low temperatures and not browning foods too much.
Cookware for induction cooking zones
Cookware material Suitable
Steel, enamelled steel +
Cast iron +
Stainless steel +*
Cookware bottom of multilayer +*
Aluminium, copper, brass -
Glass, ceramic, porcelain -
* Cookware for induction cooking zones is labelled as suitable by the manufacturer.
Suitability test
Cookware is suitable for induction cooking, if …
• ... a little water on an induction cooking zone set to the highest heat setting is heated
within a short time.
• ... a magnet sticks to the bottom of the cookware.
Certain cookware can make noises when being used on induction cooking zones. These
noises are not a fault in the appliance and do not affect operation in any way.
Bottom of the cookware
The bottom of the cookware should be as thick and level as possible.
Pan size
Induction cooking zones adapt automatically to the size of the bottom of the cookware up
to a certain point. However the magnetic part of the bottom of the cookware must have
Tips on cooking and frying
51

a minimum diameter depending on the size of the cooking zone. Cookware with a bottom
with a diameter of less than 12cm is not suitable.
Tips on energy saving
Place cookware on the cooking zone before it is switched on.
If possible, always place a lid on the cookware.
Examples of cooking applications
The information given in the following table is for guidance only.
Heat set-
ting
Cooking process suitable for Cook time Tips/Hints
0 Off position
1
Keeping food warm Keeping cooked
foods warm
as required Cover
1-3 Melting Hollandaise sauce,
melting butter,
chocolate, gelatine
5-25 mins. Stir occasionally
1-3 Solidifying Fluffy omelettes,
baked eggs
10-40 mins. Cook with lid on
3-5 Simmering Simmering rice and
milkbased dishes
Heating up ready-
cooked meals
25-50 mins. Add at least twice
as much liquid as
rice, stir milk dishes
part way through
cooking
5-7 Steaming
Braising
Steaming vegeta-
bles, fish Braising
meat
20-45 mins. With vegetables
add only a little liq-
uid (a few table-
spoons)
7-9 Boiling Steaming potatoes 20-60 mins. Use only a little liq-
uid, e. g.: max. ¼ l
water for 750 g of
potatoes
7-9 Boiling Cooking larger
quantities of food,
stews and soups
60-150 mins. Up to 3 l liquid plus
ingredients
9-12 Gentle frying Frying escalope,
veal cordon bleu,
cutlets, rissoles,
sausages, liver,
roux, eggs, pan-
cakes, doughnuts
as required Turn halfway
through cooking
52
Tips on cooking and frying

Heat set-
ting
Cooking process suitable for Cook time Tips/Hints
12-13 Heavy frying Hash browns, loin
steaks, steaks, Flä-
dle (pancakes for
garnishing soup)
5-15 mins. per pan Turn halfway
through cooking
14 Boiling Searing
Deep frying
Boiling large quantities of water, cooking pasta, searing meat
(goulash, pot roast), deep frying chips
The power function is suitable for heating large quantities of liquid.
Cleaning and care
WARNING!
Sharp objects and abrasive cleaning agents will damage the appliance. Clean the appliance
and remove the residues with water and washing up liquid after each use. Remove also the
remnants of the cleaning agents!
Scratches or dark stains on the glass ceramic that cannot be removed do not affect the
functioning of the appliance.
Cleaning the appliance after each use
1. Food containing sugar, plastics, tin foil residues should be removed at once using a
scraper. Place a scraper on the glass ceramic surface at an angle and remove residues
by sliding the blade over the surface. Wipe the appliance with a damp cloth and a little
washing up liquid. Finally, rub the appliance dry using a clean cloth .
2. Limescale rings, water rings, fat splashes, shiny metallic discolorations should be re-
moved after the appliance has cooled down using cleaner for glass ceramic or stainless
steel.
What to do if ...
Problem/Display Possible Cause Remedy
The cooking zones cannot be
switched on or are not operat-
ing
More than 10 seconds have
passed since the appliance was
switched on
Switch the appliance on again.
The lock is switched on
Switch off the lock (See the
section “Locking/unlocking the
control panel”)
The child safety device is
switched on
Deactivate child safety device
(see the section "Child safety
device")
Several sensor fields were
touched at the same time
Only touch one sensor field
Cleaning and care
53

Problem/Display Possible Cause Remedy
Automatic switch-off has been
triggered
Remove any objects (pans, etc.)
that are lying on the control
panel. Switch appliance on
again
There is water on the control
panel or the control panel is
covered with fat splashes
Wipe the control panel
STOP+GO is activated
Switch off STOP+GO
Display is switching between
two heat settings
Power management is reduc-
ing the power of this cooking
zone
See the section “Switching the
power function on and off”
The residual heat indicator is
not displaying anything
The cooking zone was only on
for a short time and is therefore
not hot
If the cooking zone is supposed
to be hot, call your local Service
Force Centre.
lights up
Unsuitable cookware Use suitable cookware
No cookware on the cooking
zone
Put cookware on zone
Diameter of the base of the
cookware is too small for the
cooking zone
Move to smaller cooking zone
Use suitable cookware
lights up
Automatic switch-off has been
triggered
Switch appliance off. Switch
appliance on again
and number are displayed
Electronics fault Disconnect the appliance from
the electrical supply for a few
minutes (Take the fuse out of
the house’s wiring system) If
after switching on again,
is
displayed again, call the cus-
tomer service department
Acoustic signal sounds when
appliance is switched off
The control panel is wholly or
partly covered by objects.
Remove objects.
Repeated acoustic signal (6x),
appliance switches off
One or more sensor fields have
been covered for longer than
10 seconds
Uncover sensor field
Acoustic signal sounds and ap-
pliance switches itself on and
then off again; after 5 seconds
another acoustic signal sounds
The On/Off sensor field has
been covered up, e.g. by a cloth
Do not place any objects on the
control panel
If you are unable to remedy the problem by following the above suggestions, please
contact your local Service Force Centre.
WARNING!
Repairs to the appliance are only to be carried out by qualified service engineers. Consid-
erable danger to the user may result from improper repairs.
54
What to do if ...

If the appliance has been operated incorrectly, the engineer's visit will be chargeable, even
during the warranty period.
Operating noises
Depending on the material and the processing of the base, the following noises may occur
when using induction cooking zones.
•Cracking noise
1
when using cookware made of different mate-
rials (Sandwich construction)
• Whistling
1
when using an individual cooking zone or sev-
eral cooking zones with high powers when the
cookware is made of different materials (Sand-
wich construction)
• Humming
2
can occur at high power levels
• Clicking
2
during electric switching processes
• Hissing, buzzing
3
The device is fitted with a fan for cooling the electrics. A whiring noise can be heard
when operating the fan which may deviate depending on the performance and may
continue for a while after the appliance is switched off.
The noises described are normal and do not refer to any defects.
Disposal
The symbol on the product or on its packaging indicates that this product may not be
treated as household waste. Instead it should be taken to the appropriate collection point
for the recycling of electrical and electronic equipment. By ensuring this product is disposed
of correctly, you will help prevent potential negative consequences for the environment
and human health, which could otherwise be caused by inappropriate waste handling of
this product. For more detailed information about recycling of this product, please contact
your local council, your household waste disposal service or the shop where you purchased
the product.
The packaging materials are environmentally friendly and can be recycled. The plastic com-
ponents are identified by markings, e.g. >PE<, >PS<, etc. Please dispose of the packaging
materials in the appropriate container at your local waste disposal facilities.
1
3
2
Disposal
55

Installation instructions
Safety information
WARNING!
This must be read!
The laws, ordinances, directives and standards in force in the country of use are to be
followed (safety regulations, proper recycling in accordance with the regulations, etc.)
Installation may only be carried out by a qualified electrician. The minimum distances to
other appliances and units are to be observed.
Anti-shock protection must be provided by the installation, for example drawers may only
be installed with a protective floor directly underneath the appliance. The cut surfaces of
the worktop are to be protected against moisture using a suitable sealant.
The sealant seals the appliance to the work top with no gap. When building in, protect the
underside of the appliance from steam and moisture, e.g. from a dishwasher or oven.
Avoid installing the appliance next to doors and under windows. Otherwise hot cookware
may be knocked off the rings when doors and windows are opened.
WARNING!
Risk of injury from electrical current.
• The electrical mains terminal is live.
• Make electrical mains terminal free of voltage.
• Follow connection schematic.
• Observe electrical safety rules.
• Ensure anti-shock protection by installing correctly.
• The appliance must be connected to the electrical supply by a qualified electrician.
• Loose and inappropriate plug and socket connections can make the terminal overheat.
• Have the clamping connections correctly installed by a qualified electrician.
• Use strain relief clamp on cable.
• In the event of single-phase or two-phase connection, the appropriate mains cable of
type H05BB-F Tmax 90°C (or higher) must be used.
• If this appliance’s mains cable is damaged, it must be replaced by a special cable (type
H05BB-F Tmax 90°C; or higher). Please contact your local Service Force Center for further
advice.
A device must be provided in the electrical installation which allows the appliance to be
disconnected from the mains at all poles with a contact opening width of at least 3 mm
Suitable isolation devices include line protecting cut-outs, fuses (screw type fuses are to
be removed from the holder), earth leakage trips and contactors.
Sticking on the seal
• Clean the worktop in the area of the cut-out section.
• Stick the one-sided self-adhesive sealing tape supplied all the way round the lower edge
of the cooking surface along the outer edge of the glass ceramic panel. Do not stretch
it. The cut ends should lie in the middle of one side. When you have cut it to length (add
a few mm), press the two ends flush up against one another.
56
Safety information

Assembly
min. 500
min. 5
min.
50
600
680 +1
R5
490 +1
=
=
min. 5 min. 5
min. 20
min. 25
min. 5
min. 20
min. 38
min. 5
Safety information
57

Rating Plate
78031KF-MN
949 593 062
55 GDD D4 AU
AEG-ELECTROLUX
Service
In the event of technical faults, please first check whether you can remedy the problem
yourself with the help of the operating instructions (section “What to do if…”).
If you were not able to remedy the problem yourself, please contact the Customer Care
Department or one of our service partners.
In order to be able to assist you quickly, we require the following information:
– Three-digit-letter combination
for glass ceramic
– Model description
– Product number (PNC)
– Serial number
(S No. - see the rating plate)
– Type of fault
– Any error messages displayed by
the appliance
58
Service

59

www.electrolux.com
Vous pouvez commander des accessoires, consommables et pièces détachées via notre magasin
online sur:
www.aeg-electrolux.be
U kan toebehoren, verbruiksprodukten en onderdelen bestellen via onze webwinkel op:
www.aeg-electrolux.be
892930305-B-102008
-
 1
1
-
 2
2
-
 3
3
-
 4
4
-
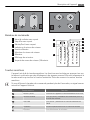 5
5
-
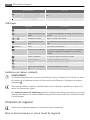 6
6
-
 7
7
-
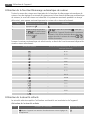 8
8
-
 9
9
-
 10
10
-
 11
11
-
 12
12
-
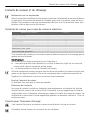 13
13
-
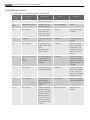 14
14
-
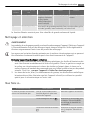 15
15
-
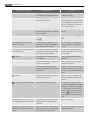 16
16
-
 17
17
-
 18
18
-
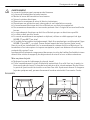 19
19
-
 20
20
-
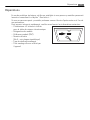 21
21
-
 22
22
-
 23
23
-
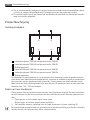 24
24
-
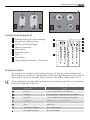 25
25
-
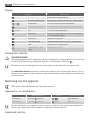 26
26
-
 27
27
-
 28
28
-
 29
29
-
 30
30
-
 31
31
-
 32
32
-
 33
33
-
 34
34
-
 35
35
-
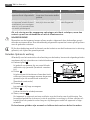 36
36
-
 37
37
-
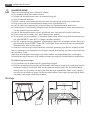 38
38
-
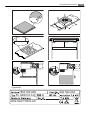 39
39
-
 40
40
-
 41
41
-
 42
42
-
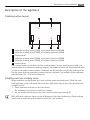 43
43
-
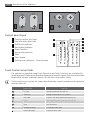 44
44
-
 45
45
-
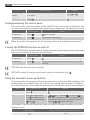 46
46
-
 47
47
-
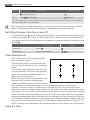 48
48
-
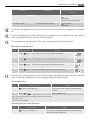 49
49
-
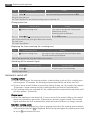 50
50
-
 51
51
-
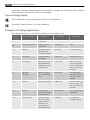 52
52
-
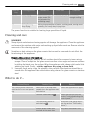 53
53
-
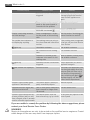 54
54
-
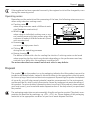 55
55
-
 56
56
-
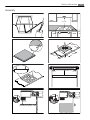 57
57
-
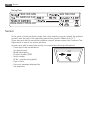 58
58
-
 59
59
-
 60
60


Aeg-Electrolux 78031KF-MN Handleiding
- Categorie
- Kookplaten
- Type
- Handleiding