
SMART-HEAT10
1 2 3 4 5 6
NL
FR
DE
GB
ES
IT
PT
PL
SE
RO
Dit apparaat kan alleen aangemeld worden op een al
eerder aangemelde Zigbee bridge. Wij garanderen een
correcte werking op de Alecto SMART-BRIDGE10.
Cet appareil ne peut être connecté qu’à un pont Zigbee
précédemment connecté. Nous garantissons le bon
fonctionnement de l’Alecto SMART-BRIDGE10.
Dieses Gerät kann nur an einer zuvor angemeldeten
Zigbee-Brücke angemeldet werden. Wir garantieren
den korrekten Betrieb des Alecto SMART-BRIDGE10.
This device can only be linked on to a previously linked
Zigbee bridge. We guarantee correct operation on the
Alecto SMART-BRIDGE10.
Este dispositivo sólo puede conectarse a un usuario previa-
mente conectado en el puente de Zigbee. Garantizamos el
correcto funcionamiento del Alecto SMART-BRIDGE10.
Questo dispositivo può essere collegato solo ad un
ponte Zigbee precedentemente connesso. Garantiamo
il corretto funzionamento dell’Alecto SMART-BRIDGE10
Este dispositivo só pode ser logado em uma ponte
Zigbee previamente logada. Garantimos o correcto
funcionamento do Alecto SMART-BRIDGE10.
To urządzenie może być zalogowany tylko do wc-
ześniej zalogowanego mostka Zigbee. Gwarantujemy
poprawne działanie Alecto SMART-BRIDGE10
Den här kan endast anmälas på en tidigare anmäld
Zigbee-bro. Vi garanterar en korrekt funktion på Alecto
SMART-BRIDGE10.
Acest dispozitiv poate conectat numai la o punte Zig-
bee legată anterior. Noi garantăm funcționarea corectă
a dispozitivului Alecto SMART-BRIDGE10.
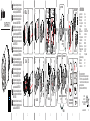
A
G
B
H
INSTALL
HOLD 5 SEC.
BZZT
J
K
BZZT
SWITCH MODE
SWITCH MODE
AUTO-MODE (SET BY APP):
0-30°C
2X AA
-
-
+
+
PRESS 1X
C
D
E
F
I1
I2
28mm
18-
22mm
1
2
MAX. 5N
TORQUE
MAX. 5N
TORQUE
3
4
1
2
DECLARATION OF CONFORMITY
Hereby, Hesdo declares that the radio equipment type Alecto
SMART-HEAT10 is in compliance with directive 2014/53/EU.
The full text of the EU declaration of conformity is available at
the following internet address:
http://DOC.hesdo.com/SMART-HEAT10-DOC.pdf
Transport protocol:
Wireless frequency:
Working voltage:
Max. working current:
Standby current:
Lifespan:
Operating system:
Battery:
Working temperature:
Relative humidity:
Dimensions:
Environment of use:
Measurement intervals:
Valve stroke:
Weight:
Temperature setting range
Automatic mode:
Manual mode:
Anti-freeze mode:
Zigbee
2.4 GHz
2.4-3.3 V
<800 mA
<100 uA
Up to 12 months
Android 4.4+ or iOS 9.0+
2x AA Alkaline
-20°C ~ 65°C
0% - 95%
89xØ57 mm
Only indoor!
Every 2 min.
Max. 6mm
192g inc. batteries
5-30°C
5-30 °C
5-15 °C
SPECIFICATIONS
Hesdo BV
Azielaan 12
5232 BA, ‘s-Hertogenbosch
The Netherlands
www.alectosmart.com
v1.0
L1
SWITCH MODE
N
CHILD LOCK MODE
ON / OFF
HOLD 5 SEC.
L2L3
-NO ICON-
ANTIFROST:
0-15
PRESS 1X
PRESS 1X
PRESS 1X
MANUAL MODE:
0-30°C
M
-°C<<<
+°C >>>
OPEN WINDOW-ICON
(CONTROLLED BY APP)
O
INSTALLATION ERROR
P
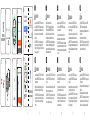
STEP A

Asegúrese de que la SMART-HEAT10 esté en
el alcance del SMART-BRIDGE10 durante el
proceso de registro.
Assicurati che la SMART-HEAT10 sia nel raggio
del SMART-BRIDGE10 durante il processo di
registrazione.
ATENCIÓN:
ATTENZIONE!
Mantener alejado de líquidos y de la humedad.
Tenere lontano da liquidi e umidità.
ES
IT
87 9 10
Certique-se de que a SMART-HEAT10 está
dentro do alcance do SMART-BRIDGE10 durante o
processo de registo.
Upewnić się, że SMART-HEAT10 znajduje się
w zasięgu SMART-BRIDGE10 podczas procesu
rejestracji.
Se till att SMART-HEAT10 kan nås av SMART-
BRIDGE10 under registreringsprocessen.
ATENÇÃO!
UWAGA!
OBS!
Mantenha afastado de líquidos e de humidade.
Trzymać z dala od płynów i wilgoci.
Undvik kontakt med vätskor och fukt.
PT
PL
SE
11
Auto-calibration after installation takes up to 24hrs
Etalonnage auto après l’installation jusqu’à 24 hrs
La calibrazione automatica richiede no a 24 ore
Automatyczna kalibracja po instalacji trwa do 24gzn
Stellen Sie sicher, dass sich die
SMART-HEAT10 während der Registrierung in
Reichweite des SMART-BRIDGE10 bendet.
Zorg ervoor dat de SMART-HEAT10 binnen bereik
van de SMART-BRIDGE10 is tijdens de registratie.
ACHTUNG!ATTENTIE!
Von Flüssigkeiten und Feuchtigkeit fernhalten.
Houd het product uit de buurt van vloeistoffen en
vochtigheid.
DENL
Die auto Kalibrierung dauert bis zu 24 Stunden.
Automatische calibratie na installatie duurt tot 24u
Calibração auto após a instalação leva até 24 hrs
La calibración auto tarda hasta 24 horas
Automatisk kalibrering efter installationen tar upp
till 24 timmar!
Make sure that the SMART-HEAT10 is within range
of the SMART-BRIDGE10 during the registration
process.
Assurez-vous que la SMART-HEAT10 soit dans la
portée du SMART-BRIDGE10 durant le processus
d’enregistrement.
ATTENTION!ATTENTION!
Keep away from liquids and humidity.
Eloignez toujours des liquides et de l’humidité.
GBFR
ATENȚIE!
RO
Asigurați-vă că SMART-HEAT10 se aă în raza de
acțiune a SMART-BRIDGE10 în timpul procesului
de înregistrare.
Nu lăsați produsul departe lichide și umiditate.
Calibrarea automată după instalare durează până
la 24 de ore
9c
9a 9b
STEP 2
Finished!
Failed to add device, please
retry or check Help
Device added
successfully
Help Got it
STEP A
De SMART-HEAT10 moet horizontaal geplaatst
worden om een goede werking te garanderen.
Gebruik voor vervanging van een verticale radiator-
kraan een koppelstuk.
The SMART-HEAT10 must be placed horizontally
to ensure proper operation. Use a coupling to
replace a vertical radiator valve.
Der SMART-HEAT10 muss horizontal aufgestellt wer-
den, um einen einwandfreien Betrieb zu gewährleis-
ten. Verwenden Sie eine Kupplung, um ein vertikales
Heizkörperventil zu ersetzen.
12
Le SMART-HEAT10 doit être placé horizontalement
pour assurer son bon fonctionnement. Utilisez un
raccord pour remplacer une vanne de radiateur
verticale.
El SMART-HEAT10 debe colocarse horizontalmente
para garantizar un funcionamiento correcto. Utilice un
acoplamiento para reemplazar una válvula de radiador
vertical.
O SMART-HEAT10 deve ser colocado horizontalmen-
te para garantir um funcionamento adequado. Use um
acoplamento para substituir uma válvula de radiador
vertical.
SMART-HEAT10 deve essere posizionato orizzon-
talmente per garantire il corretto funzionamento.
Utilizzare un giunto per sostituire una valvola
verticale del radiatore.
Urządzenie SMART-HEAT10 musi być umieszczo-
ne poziomo, aby zapewnić prawidłową pracę. W
celu wymiany pionowego zaworu grzejnikowego
należy użyć sprzęgła.
SMART-HEAT10 måste placeras horisontellt för att
säkerställa korrekt drift. Använd en koppling för att
byta ut en vertikal radiatorventil.
SMART-HEAT10 trebuie amplasat orizontal pentru
a asigura funcționarea corectă. Folosiți un cuplaj
pentru a înlocui o supapă de radiator verticală.
5
6
7
8
± 3 MIN
1 2
OPEN THE
SMART LIFE APP
4
Add subdevice
3
Alecto SMART-BRIDGE10
5-7x
9d
?
SMARTLIFE APP HELP:
www.alectosmart.com
Documenttranscriptie
NL SMART-HEAT10 FR DE GB ES IT PT PL SE RO Dit apparaat kan alleen aangemeld worden op een al eerder aangemelde Zigbee bridge. Wij garanderen een correcte werking op de Alecto SMART-BRIDGE10. Cet appareil ne peut être connecté qu’à un pont Zigbee précédemment connecté. Nous garantissons le bon fonctionnement de l’Alecto SMART-BRIDGE10. Dieses Gerät kann nur an einer zuvor angemeldeten Zigbee-Brücke angemeldet werden. Wir garantieren den korrekten Betrieb des Alecto SMART-BRIDGE10. This device can only be linked on to a previously linked Zigbee bridge. We guarantee correct operation on the Alecto SMART-BRIDGE10. Este dispositivo sólo puede conectarse a un usuario previamente conectado en el puente de Zigbee. Garantizamos el correcto funcionamiento del Alecto SMART-BRIDGE10. Questo dispositivo può essere collegato solo ad un ponte Zigbee precedentemente connesso. Garantiamo il corretto funzionamento dell’Alecto SMART-BRIDGE10 Este dispositivo só pode ser logado em uma ponte Zigbee previamente logada. Garantimos o correcto funcionamento do Alecto SMART-BRIDGE10. To urządzenie może być zalogowany tylko do wcześniej zalogowanego mostka Zigbee. Gwarantujemy poprawne działanie Alecto SMART-BRIDGE10 Den här kan endast anmälas på en tidigare anmäld Zigbee-bro. Vi garanterar en korrekt funktion på Alecto SMART-BRIDGE10. Acest dispozitiv poate fi conectat numai la o punte Zigbee legată anterior. Noi garantăm funcționarea corectă a dispozitivului Alecto SMART-BRIDGE10. 1 A INSTALL B E I1 F I2 28mm L1 1822mm SWITCH MODE M 2 1 3 2 MAX. 5N TORQUE C D 2X AA + G H BZZT 2 3 4 1 -NO ICONANTIFROST: 0-15 BZZT PRESS 1X 4 HOLD 5 SEC. +°C >>> L3 K + HOLD 5 SEC. -°C<<< PRESS 1X PRESS 1X MAX. 5N TORQUE J MODE N CHILD LOCK ON / OFF L2 SWITCH MODE SWITCH MODE O P SPECIFICATIONS Transport protocol: Wireless frequency: Working voltage: Max. working current: Standby current: Lifespan: Operating system: Battery: Working temperature: Relative humidity: Dimensions: Environment of use: Measurement intervals: Valve stroke: Weight: Temperature setting range Automatic mode: Manual mode: Anti-freeze mode: Zigbee 2.4 GHz 2.4-3.3 V <800 mA <100 uA Up to 12 months Android 4.4+ or iOS 9.0+ 2x AA Alkaline -20°C ~ 65°C 0% - 95% 89xØ57 mm Only indoor! Every 2 min. Max. 6mm 192g inc. batteries 5-30°C 5-30 °C 5-15 °C DECLARATION OF CONFORMITY Hereby, Hesdo declares that the radio equipment type Alecto SMART-HEAT10 is in compliance with directive 2014/53/EU. The full text of the EU declaration of conformity is available at the following internet address: http://DOC.hesdo.com/SMART-HEAT10-DOC.pdf MANUAL MODE: 0-30°C AUTO-MODE (SET BY APP): 0-30°C 5 PRESS 1X INSTALLATION ERROR OPEN WINDOW-ICON (CONTROLLED BY APP) STEP A 6 Hesdo BV Azielaan 12 5232 BA, ‘s-Hertogenbosch The Netherlands www.alectosmart.com v1.0 1 2 6 5 9a NL 9b ATTENTIE! Device added successfully Failed to add device, please retry or check Help OPEN THE SMART LIFE APP Help Finished! Alecto SMART-BRIDGE10 Got it STEP 2 7 4 3 8 9c 9d ? Add subdevice 5-7x ± 3 MIN SMARTLIFE APP HELP: www.alectosmart.com STEP A 7 DE ES ACHTUNG! PT ATENCIÓN: ATENÇÃO! Zorg ervoor dat de SMART-HEAT10 binnen bereik van de SMART-BRIDGE10 is tijdens de registratie. Automatische calibratie na installatie duurt tot 24u Houd het product uit de buurt van vloeistoffen en vochtigheid. De SMART-HEAT10 moet horizontaal geplaatst worden om een goede werking te garanderen. Gebruik voor vervanging van een verticale radiatorkraan een koppelstuk. Stellen Sie sicher, dass sich die SMART-HEAT10 während der Registrierung in Reichweite des SMART-BRIDGE10 befindet. Die auto Kalibrierung dauert bis zu 24 Stunden. Von Flüssigkeiten und Feuchtigkeit fernhalten. Der SMART-HEAT10 muss horizontal aufgestellt werden, um einen einwandfreien Betrieb zu gewährleisten. Verwenden Sie eine Kupplung, um ein vertikales Heizkörperventil zu ersetzen. Asegúrese de que la SMART-HEAT10 esté en el alcance del SMART-BRIDGE10 durante el proceso de registro. La calibración auto tarda hasta 24 horas Mantener alejado de líquidos y de la humedad. El SMART-HEAT10 debe colocarse horizontalmente para garantizar un funcionamiento correcto. Utilice un acoplamiento para reemplazar una válvula de radiador vertical. FR GB IT ATTENTION! ATTENTION! Assurez-vous que la SMART-HEAT10 soit dans la portée du SMART-BRIDGE10 durant le processus d’enregistrement. Etalonnage auto après l’installation jusqu’à 24 hrs Eloignez toujours des liquides et de l’humidité. Le SMART-HEAT10 doit être placé horizontalement pour assurer son bon fonctionnement. Utilisez un raccord pour remplacer une vanne de radiateur verticale. 8 9 OBS! Certifique-se de que a SMART-HEAT10 está dentro do alcance do SMART-BRIDGE10 durante o processo de registo. Calibração auto após a instalação leva até 24 hrs Mantenha afastado de líquidos e de humidade. O SMART-HEAT10 deve ser colocado horizontalmente para garantir um funcionamento adequado. Use um acoplamento para substituir uma válvula de radiador vertical. PL ATTENZIONE! Make sure that the SMART-HEAT10 is within range of the SMART-BRIDGE10 during the registration process. Auto-calibration after installation takes up to 24hrs Keep away from liquids and humidity. The SMART-HEAT10 must be placed horizontally to ensure proper operation. Use a coupling to replace a vertical radiator valve. SE Assicurati che la SMART-HEAT10 sia nel raggio del SMART-BRIDGE10 durante il processo di registrazione. La calibrazione automatica richiede fino a 24 ore Tenere lontano da liquidi e umidità. SMART-HEAT10 deve essere posizionato orizzontalmente per garantire il corretto funzionamento. Utilizzare un giunto per sostituire una valvola verticale del radiatore. 10 Se till att SMART-HEAT10 kan nås av SMARTBRIDGE10 under registreringsprocessen. Automatisk kalibrering efter installationen tar upp till 24 timmar! Undvik kontakt med vätskor och fukt. SMART-HEAT10 måste placeras horisontellt för att säkerställa korrekt drift. Använd en koppling för att byta ut en vertikal radiatorventil. RO UWAGA! ATENȚIE! Upewnić się, że SMART-HEAT10 znajduje się w zasięgu SMART-BRIDGE10 podczas procesu rejestracji. Automatyczna kalibracja po instalacji trwa do 24gzn Trzymać z dala od płynów i wilgoci. Urządzenie SMART-HEAT10 musi być umieszczone poziomo, aby zapewnić prawidłową pracę. W celu wymiany pionowego zaworu grzejnikowego należy użyć sprzęgła. 11 Asigurați-vă că SMART-HEAT10 se află în raza de acțiune a SMART-BRIDGE10 în timpul procesului de înregistrare. Calibrarea automată după instalare durează până la 24 de ore Nu lăsați produsul departe lichide și umiditate. SMART-HEAT10 trebuie amplasat orizontal pentru a asigura funcționarea corectă. Folosiți un cuplaj pentru a înlocui o supapă de radiator verticală. 12-
 1
1
-
 2
2


Alecto SMART-HEAT10 de handleiding
- Type
- de handleiding
- Deze handleiding is ook geschikt voor
in andere talen
- English: Alecto SMART-HEAT10 Owner's manual
- italiano: Alecto SMART-HEAT10 Manuale del proprietario
- português: Alecto SMART-HEAT10 Manual do proprietário
- svenska: Alecto SMART-HEAT10 Bruksanvisning
- polski: Alecto SMART-HEAT10 Instrukcja obsługi
Gerelateerde artikelen
-
Fysic SMART-MOTION10 Handleiding
-
Alecto Smart Motion 10 de handleiding
-
-
Alecto SMART-SMOKE10 de handleiding
-
-
Alecto SMART-PLUG10 Handleiding
-
Alecto SMART-PLUG20 Handleiding
-
-
-
