
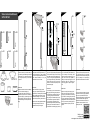
You can now place the silicone head (F2)
on the top of the rod (E3) and mount the
rack. The easiest way is to first position
the upper end of the rod on the ceiling and
then, by pressing on the spiral spring,
place the lower end of the rod on the floor.
Please refer to the backside of this booklet
to find out how many and which rods (S)
you need for your perfect height. Place the
silicone foot (F1) on the lower end of the
first rod (S) and put also your other rods
on top of it.
Put the silicone ring (R) over the rod (S)
and position it at the height at which you
want the basket (K) at. Place the basket
(K) over the ring (R). Repeat this with the
other baskets. Baskets can only be
attached to S-rods, not E-rods.
Push the cap (C1) over the top of the rod
(S3). This rod (S3) is always the uppermost
S-rod. Insert the rod (E1) into the rod (S3)
and rotate it until it is firmly seated in the
rod (S3). To change the height afterwards,
you can tighten the rod (E1) to the desired
height. Hereby, the notch on the rod (E1)
should not be visible, respectively not be
outside the rod (S3).
Insert the spiral spring (E2) into the rod
(E1), if it is not already inside. Put the cap
(C2) over the top of the rod (E1). Now
insert the rod (E3) into the rod (E1). The
height can also be finely adjusted by
pressing on the spiral spring (E2). You can
achieve the best grip by tensioning the
spiral spring (E2) to a depth of approx.
5cm.
S3
K2
42cm
K2
1x S34x S1 1x S2
1x E1 1x E31x E2
S3
42cm
23cm
ck
42cm
42cm
19cm
1x F1
1x C1 1x C2 4x R
4x
K2
S1
S2
F1
R
S3
C1
E1
E1
E2
C2
E3 F2
K2
K2
K2
2,2cm
1,6cm 1x F2
1 2 3 4 5
Nederlands:
Bekijk de achterkant van de handleiding
om te zien hoeveel stangen (S)
je precies nodig hebt voor de door jou
gewenste hoogte van het rek. Plaats het
siliconen voetje (F1) op het begin van de
eerste stang (S). Plaats vervolgens de
resterende stangen bovenop de eerste
stang.
Strex Instruction Manual
SP181/SP241
Nederlands:
Plaats de siliconen ring (R) over de
stang (S) en verplaats de ring naar de
hoogte waar je het bakje (K2) wilt hebben.
Plaats het bakje (K2) over de ring (R).
Herhaal deze stappen voor het aantal
bakjes dat je op de stang wilt monteren.
Bakjes kunnen alleen geplaatst worden
op S-stangen. Bakjes kunnen niet
geplaatst worden op E-stangen.
Nederlands:
Druk de dop (C1) over de bovenkant van
stang (S3). Deze stang (S3) is altijd de
bovenste S-stang. Plaats de stang (E1)
in de stang (S3) en draai deze tot de
stang stevig in de andere stang zit (S3).
Om achteraf de hoogte aan te passen,
kun je stang (E1) aandraaien tot de
gewenste hoogte. Hierbij moet het kopje
van stang E1 niet zichtbaar worden en
de buitenkant van de stang (S3) ook niet.
Nederlands:
Stop de veer (E2) in de stang (E1), als
deze niet al in de stang zit. Stop nu de
dop (C2) op de bovenkant van de stang
(E1). Plaats nu de stang (E3) in de stang
(E1). De hoogte kan nauwkeurig worden
aangepast door druk uit te oefenen op de
veer (E2). Voor een optimale grip is het
belangrijk dat de veer (E2) circa 5CM
diep zit.
Nederlands:
Je kunt nu de siliconen dop (F2) op de
bovenkant van de stang (E3) plaatsen.
Hierna kun je het doucherek op de
gewenste plek plaatsen. De beste manier
is om eerst de bovenkant tegen het
plafond aan te drukken, en hierna de
onderkant met het veerstuk vast te
zetten op de vloer.
www.support.strex.nl/files/sp181/montage.mp4
Bekijk hier de
montagevideo:

Your ceiling height is:
Jouw plafond hoogte is:
70 - 87cm
then use the following rods:
Gebruik dan de volgende onderdelen:
27,6 - 34,3in
88 - 107cm
34,4 - 42,2in
108 - 125cm
42,3 - 49,2in
126 - 144cm
49,3 - 56,7in
145 - 162cm
56,8 - 63,8in
163 - 181cm
63,9 - 71,3in
182 - 199cm
71,4 - 78,4in
200 - 218cm
78,5 - 85,9in
219 - 236cm
86 - 93in
237 - 275cm
93,1 - 108,3in
S3 2F3E1E1F
S3 2F3E1E1F S2
S3 2F3E1E1F S1
S3 2F3E1E1F S2 S1
S3 2F3E1E1F S1 S1
S3 2F3E1E1F S2 S1 S1
S3 2F3E1E1F S1 S1 S1
S3 2F3E1E1F S2 S1 S1 S1
S3 2F3E1E1F S1 S1 S1 S1
S3 2F3E1E1F S2 S1 S1 S1 S1
-
 1
1
-
 2
2


in andere talen
- English: STREX SP181 User manual
Andere documenten
-
MOTO GUZZI V 11 SPORT Workshop Manual
-
Husqvarna SWEEPER 960 de handleiding
-
Cleanmaxx 00519 Handleiding
-
Makita SC190DW de handleiding
-
-
Makita LH1040F Handleiding
-
Tristar KA-5283 Handleiding
-
Toro E-Z Vac Complete Twin Bagger, TITAN Zero-Turn-Radius Riding Mower Handleiding