
EN
G
Network Player
Owner’s Manual
This product is designed for use at home to enjoy listening to audio.
Before using this product, read the safety instructions described in the supplied Quick Start Guide.

2
CONTENTS
BEFORE USING THE UNIT 4
Accessories . . . . . . . . . . . . . . . . . . . . . . . . . . . . . . . . . . . . . . . . . . . . . . . . . . . . . . 4
About this manual. . . . . . . . . . . . . . . . . . . . . . . . . . . . . . . . . . . . . . . . . . . . . . . . 4
FEATURES 5
What you can do with the unit. . . . . . . . . . . . . . . . . . . . . . . . . . . . . . . . . . . . . 5
Using the MusicCast CONTROLLER app . . . . . . . . . . . . . . . . . . . . . . . . . . . . . . . . . . . . . . . . . . . . . . . . .6
Part names and functions . . . . . . . . . . . . . . . . . . . . . . . . . . . . . . . . . . . . . . . . . 7
Front panel . . . . . . . . . . . . . . . . . . . . . . . . . . . . . . . . . . . . . . . . . . . . . . . . . . . . . . . . . . . . . . . . . . . . . . . . . . . .7
Rear panel . . . . . . . . . . . . . . . . . . . . . . . . . . . . . . . . . . . . . . . . . . . . . . . . . . . . . . . . . . . . . . . . . . . . . . . . . . . . .8
Remote control . . . . . . . . . . . . . . . . . . . . . . . . . . . . . . . . . . . . . . . . . . . . . . . . . . . . . . . . . . . . . . . . . . . . . . . .9
PREPARATION 11
1 Connecting to an amplifier. . . . . . . . . . . . . . . . . . . . . . . . . . . . . . . . . . . .11
2 Preparing to connect to a network . . . . . . . . . . . . . . . . . . . . . . . . . . . .12
Connecting a network cable. . . . . . . . . . . . . . . . . . . . . . . . . . . . . . . . . . . . . . . . . . . . . . . . . . . . . . . . . . 12
Preparing a wireless antenna . . . . . . . . . . . . . . . . . . . . . . . . . . . . . . . . . . . . . . . . . . . . . . . . . . . . . . . . . 12
3 Connecting the power cord . . . . . . . . . . . . . . . . . . . . . . . . . . . . . . . . . . .13
4 Turning on the power to the unit . . . . . . . . . . . . . . . . . . . . . . . . . . . . . .13
Turning on the power to the unit for the first time . . . . . . . . . . . . . . . . . . . . . . . . . . . . . . . . . . . . 13
5 Connecting the unit to the network . . . . . . . . . . . . . . . . . . . . . . . . . . .14
Connecting to a network by using MusicCast CONTROLLER . . . . . . . . . . . . . . . . . . . . . . . . . . . 14
Connecting to a network using another method . . . . . . . . . . . . . . . . . . . . . . . . . . . . . . . . . . . . . . 16
Connecting a mobile device to the unit directly (Wireless Direct) . . . . . . . . . . . . . . . . . . . . . . 21
Verifying the network connection status. . . . . . . . . . . . . . . . . . . . . . . . . . . . . . . . . . . . . . . . . . . . . . 22
PLAYING AUDIO 23
Listening to Internet radio . . . . . . . . . . . . . . . . . . . . . . . . . . . . . . . . . . . . . . . 23
Selecting an Internet radio station . . . . . . . . . . . . . . . . . . . . . . . . . . . . . . . . . . . . . . . . . . . . . . . . . . . . 23
Playing music files stored on your USB device. . . . . . . . . . . . . . . . . . . . . 24
Connecting a USB storage device . . . . . . . . . . . . . . . . . . . . . . . . . . . . . . . . . . . . . . . . . . . . . . . . . . . . . 24
Playing songs stored on a USB storage device . . . . . . . . . . . . . . . . . . . . . . . . . . . . . . . . . . . . . . . . . 24
Playing music files stored on a media server (PC/NAS) . . . . . . . . . . . . . 26
Media sharing setup. . . . . . . . . . . . . . . . . . . . . . . . . . . . . . . . . . . . . . . . . . . . . . . . . . . . . . . . . . . . . . . . . . 26
Selecting and playing music stored on a PC (or server) . . . . . . . . . . . . . . . . . . . . . . . . . . . . . . . . . 27
Listening to music via AirPlay . . . . . . . . . . . . . . . . . . . . . . . . . . . . . . . . . . . .28
Playing a song from iTunes/iPhone . . . . . . . . . . . . . . . . . . . . . . . . . . . . . . . . . . . . . . . . . . . . . . . . . . . 28
Listening to music via Bluetooth. . . . . . . . . . . . . . . . . . . . . . . . . . . . . . . . . .30
Playing audio from Bluetooth devices on the unit . . . . . . . . . . . . . . . . . . . . . . . . . . . . . . . . . . . . . . 30
Playing audio from this unit through Bluetooth-compatible speakers or headphones . . . 31
Useful functions . . . . . . . . . . . . . . . . . . . . . . . . . . . . . . . . . . . . . . . . . . . . . . . . 32
Switching information on the display . . . . . . . . . . . . . . . . . . . . . . . . . . . . . . . . . . . . . . . . . . . . . . . . . 32
Registering favorite content (Preset function) . . . . . . . . . . . . . . . . . . . . . . . . . . . . . . . . . . . . . . . . .32
Displaying audio signal information. . . . . . . . . . . . . . . . . . . . . . . . . . . . . . . . . . . . . . . . . . . . . . . . . . . 33
Enabling/disabling automatic playback . . . . . . . . . . . . . . . . . . . . . . . . . . . . . . . . . . . . . . . . . . . . . . . 34

3
Setup 35
Configuring various functions (Setup menu) . . . . . . . . . . . . . . . . . . . . . .35
Setup menu items . . . . . . . . . . . . . . . . . . . . . . . . . . . . . . . . . . . . . . . . . . . . . . . . . . . . . . . . . . . . . . . . . . . 35
Configuring the system settings (Advanced Setup menu) . . . . . . . . . .39
Viewing the firmware version (VERSION). . . . . . . . . . . . . . . . . . . . . . . . . . . . . . . . . . . . . . . . . . . . . . 39
Initializing the unit (INIT) . . . . . . . . . . . . . . . . . . . . . . . . . . . . . . . . . . . . . . . . . . . . . . . . . . . . . . . . . . . . . 39
Updating the firmware (UPDATE). . . . . . . . . . . . . . . . . . . . . . . . . . . . . . . . . . . . . . . . . . . . . . . . . . . . . 39
Updating the unit’s firmware via the network . . . . . . . . . . . . . . . . . . . . .40
APPENDIX 41
Troubleshooting . . . . . . . . . . . . . . . . . . . . . . . . . . . . . . . . . . . . . . . . . . . . . . . .41
General. . . . . . . . . . . . . . . . . . . . . . . . . . . . . . . . . . . . . . . . . . . . . . . . . . . . . . . . . . . . . . . . . . . . . . . . . . . . . . 41
Bluetooth . . . . . . . . . . . . . . . . . . . . . . . . . . . . . . . . . . . . . . . . . . . . . . . . . . . . . . . . . . . . . . . . . . . . . . . . . . . . 42
USB/Network . . . . . . . . . . . . . . . . . . . . . . . . . . . . . . . . . . . . . . . . . . . . . . . . . . . . . . . . . . . . . . . . . . . . . . . . 43
Display messages . . . . . . . . . . . . . . . . . . . . . . . . . . . . . . . . . . . . . . . . . . . . . . .45
Supported devices and file formats. . . . . . . . . . . . . . . . . . . . . . . . . . . . . . .46
Trademarks . . . . . . . . . . . . . . . . . . . . . . . . . . . . . . . . . . . . . . . . . . . . . . . . . . . . .47
Specifications . . . . . . . . . . . . . . . . . . . . . . . . . . . . . . . . . . . . . . . . . . . . . . . . . . .48

4
BEFORE USING THE UNIT
Make sure that the following accessories are supplied with the product. Please note the following when you read this manual:
• This manual explains preparations and operations for everyday users of the unit.
• Due to product improvements, specifications and appearance are subject to change
without notice.
• This manual explains operations performed primarily on the supplied remote control.
• In this manual, illustrations of English menu screens are used as examples.
• In this manual, iPhone, iPad and iPod touch are collectively referred to as “iPhone”.
Unless otherwise noted, the term “iPhone” as used in this manual also refers to an
iPhone, iPad, or iPod touch.
• Explanation of graphic symbols used in this manual:
– “ WARNING” is intended to alert you to the possibility of death or serious injury.
– “ CAUTION” is intended to alert you to the possibility of personal injury.
– is intended to provide information to avoid product malfunction,
damages, incorrect operation, or data loss.
– is intended to provide supplemental information that might be handy.
• For details on streaming services, visit the following website:
http://download.yamaha.com/
• You can also find information regarding streaming services in the Owner’s Manual
(CD-ROM).
Accessories
Remote control Power cord
* The supplied power cord
varies depending on the
region of purchase.
RCA stereo cable
Batteries (x2)
(AA, R03, UM-4)
Owner’s Manual (CD-ROM)
Quick Start Guide
Inserting batteries into the remote control
Insert the batteries in the proper orientation.
Batteries (AA, R03, UM-4)
About this manual
NOTICE
NOTE

5
FEATURES
This unit is a network player compatible with a network source such as a media server or mobile device.
1 Listening to Internet radio (page 23)
2 Listening to Streaming service
3 Playing music files stored on your PC (page 27)
4 Playing music files with AirPlay (page 28)
5 Playing music files stored on a Network Attached Storage (NAS) device
(page 27)
6 Playing audio content from a Bluetooth device (page 30)
7 Playing music using MusicCast CONTROLLER (page 14)
8 Playing music files stored on your USB device (page 24)
What you can do with the unit
5V
A
USB
Wi
BLUETOOTH
Fi
RETURNSOURCE
CONNECT
SELECT
PUSH
ENTER
1 Internet radio
2 Streaming service
3 PC
4 AirPlay (iTunes)
5 Network Attached
Storage (NAS)
4 AirPlay (iPhone)
6 Bluetooth
7 MusicCast CONTROLLER
Modem
Router *
Mobile device
8 USB
This unit
Amplifier
* You will need a commercially available wireless LAN
router (access point) if you plan to use a mobile device.

6
Using the MusicCast CONTROLLER app
Using the free MusicCast CONTROLLER app installed on a mobile device enables you
to use your mobile device like a remote control to set up and operate MusicCast-
compatible devices. You can also share and play music on multiple MusicCast-
compatilbe devices located in different rooms.
For more information on MusicCast CONTROLLER, visit the following website:
http://www.yamaha.com/musiccast/
Download and install the (free) MusicCast CONTROLLER app to your
mobile device from the App Store or Google Play.
Use the MusicCast CONTROLLER app to configure a network (MusicCast network) as
shown below:
* If you use this unit to play audio from another MusicCast-compatible device,
“MC Link” will appear on the unit’s display.
Wireless LAN router

7
Front panel
1 z (power)
Turns on/off the unit.
2 Power indicator
Indicates the unit’s power status.
Brightly lit: Power is on
Dimly lit: Standby mode
Off: Power is off
3 USB jack
Used to connect a USB device (page 24).
4 Display
Shows information about the operational status of this
unit.
5 MUTE
Blinks when audio is muted.
6 Bluetooth indicator
Lights up when the unit connects to a Bluetooth
device (page 30).
7 Wi-Fi indicator
Lights up when the unit is:
– connecting to a wireless network (page 16).
– registering with MusicCast, even if the unit is
connected to a wired connection (page 14).
– connecting to a wireless network using Wireless
Direct (page 21).
8 Remote control sensor
Receives infrared signals from the remote control.
9 SOURCE
Switches the unit's audio source.
0 RETURN
Displays the next higher level of the menu.
CONNECT
Use this button to operate the unit via the MusicCast
CONTROLLER (page 14).
A Jog dial
To select a menu item or song
Rotate the dial to select an item, then press it to
confirm the selection.
To control playback of the music stored on the
USB device, PC, or server
Rotate the dial to skip to the previous or next song.
Press the dial to switch between play and pause.
Part names and functions
5V
A
USB
Wi
BLUETOOTH
Fi
RETURNSOURCE
CONNECT
SELECT
PUSH
ENTER
1 762 3 9 0 A4 5
MUTE
8

8
Rear panel
1 ANALOG OUT connectors
Output stereo analog audio signals. Connect the unit
to your amplifier or audio system using the RCA
stereo cable (supplied) (page 11).
2 DIGITAL OUT (COAXIAL) connector
Outputs digital audio signals. Connect the unit to
your amplifier or audio system using a coaxial digital
audio cable (commercially available) (page 11).
3 DIGITAL OUT (OPTICAL) connector
Outputs digital audio signals. Connect the unit to
your amplifier or audio system using an optical digital
audio cable (commercially available) (page 11).
4 NETWORK connector
Connect the unit to a network using a LAN cable
(commercially available) (page 12).
5 Wireless antenna
Use this antenna to connect the unit to a network
wirelessly (Wi-Fi) (page 14). It is also used to enable
the Bluetooth function (page 30).
6 AC IN connector
Connect the supplied power cord here (page 13).
AC IN
NETWORK
DIGITAL OUT
COAXIAL OPTICAL
ANALOG OUT
R
2 3 64 51
* Illustration above shows Europe model.

9
Remote control
1 Remote control signal transmitter
Transmits infrared signals to the main unit.
2 z (power)
Switches this unit between on and standby mode.
3 DIMMER
Enables you to adjust the brightness of the display to
5 levels. Each press of the button changes the
brightness.
4 MUTE
Turns mute on or off.
5 PRESET j / i
Recalls a preset song from your PC or USB device, or
tunes in to a preset Internet radio station (page 33).
6 Preset number keys
Enable you to enter a number to register or recall a
preset (page 32, 33).
7 SHUFFLE
Changes the shuffle settings.
8 REPEAT
Changes the repeat settings.
9 Source select keys
Select the source to which you want.
NOTE
• Pressing NET (network sources) repeatedly selects a
different network source each time.
0 / / / (cursor keys), ENTER
Use the cursor keys to select an item, and then press
ENTER to confirm the selection.
A SETUP
Display the Setup menu (page 35).
B DISPLAY
Switches information shown on the display, such as
playback information (page 32).
C Playback control keys
pe (Play/Pause)
Starts or pauses playback.
s (Stop)
Stops playback.
b/w (Skip backward/Search backward)
Skips back to the top of the currently-playing song or
the top of the previous song. It also searches tracks
backward if the button is pressed and held during
playback.
f/a (Skip forward/Search forward)
Skips forward to the top of the next song. It also
searches tracks forward if the button is pressed and
held during playback.
D Amplifier control keys
Controls a Yamaha amplifier.
For details on using the amplifier, refer to the manual
supplied with the amplifier.
z (power)
Turns the amplifier on or off.
INPUT (
B
/
C
)
Switches input sources on the amplifier.
VOLUME (+ / –)
Adjusts the amplifier volume.
MUTE
Turns mute on or off on the amplifier.
NOTE
• Certain Yamaha amplifiers might not support these
remote control functions.
AMP
MUTE
INPUT
DISPLAY
SETUP
OPTION
RETURN
REPEAT
SHUFFLE
NOW PLAYING
ENTER
HOMEMEMORY
NET USB
BLUETOOTH
DIMMERMUTE
PRESET
VOLUME
7
1
0
89
456
1
23
9
5
6
A
0
8
4
3
7
2
1
B
C
D

10
E HOME
Moves directly to the top level of the menu when you
are selecting music files, folders, etc.
This can be convenient if you want to navigate the
menu levels quickly.
F MEMORY
Register a song stored on your PC or USB device, or
register an Internet radio station as a preset
(page 32).
G NOW PLAYING
Displays the song information while you are selecting
or browsing music files, folders, etc.
H RETURN
Displays the next higher level of the menu.
I OPTION
Displays audio signal information (page 33).
It also enables or disables automatic playback
(page 34).
AMP
MUTE
INPUT
DISPLAY
SETUP
OPTION
RETURN
REPEAT
SHUFFLE
NOW PLAYING
ENTER
HOMEMEMORY
NET USB
BLUETOOTH
DIMMERMUTE
PRESET
VOLUME
7
1
0
89
456
1
23
E
G
F
H
I
The operating range of the remote control
Point the remote control toward the remote control
sensor on the unit from within the range shown in the
figure below.
30° 30°
Within 6 m
(20 ft)

11
PREPARATION
CAUTION
• Do not plug the power cords of this unit and all other connected devices into AC outlets until all connections are complete.
NOTE
• On some audio devices (such as an amplifier) that are digitally connected, audio output might be interrupted at the beginning of a track.
• DSD signals and signals over 192kHz will not be output from the DIGITAL OUT jacks of this unit.
• Digital signals output from this unit cannot be recorded.
1 Connecting to an amplifier
Only PCM signals can be output from the DIGITAL OUT (OPTICAL/COAXIAL) jacks of this unit.
AC IN
NETWORK
DIGITAL OUT
COAXIAL OPTICAL
ANALOG OUT
R
AmplifierAmplifier
RCA stereo cable
(supplied)
Coaxial digital audio cable
(commercially available)
Optical digital cable
(commercially available)
* Illustration above shows Europe model.

12
On this unit, you can tune in to an Internet radio station, or play music files that are
stored on your PC or a Digital Living Network Alliance (DLNA) server (such as a
Network Attached Storage (NAS) device).
Connecting a network cable
To use a wired network, connect the unit to your router with a commercially-available
STP network cable (CAT-5 or higher straight cable).
NOTE
• To switch from a wireless network connection to a wired network connection, change “Connection”
under “Network” in the Setup menu to “Wired” (page 36).
Preparing a wireless antenna
If you connect the unit to a wireless network and use the Bluetooth function, set the
wireless antenna in the upright position. For information on how to connect the unit to a
wireless network, see “Connecting the unit to the network” (page 14). For information
on how to connect the unit to a Bluetooth device, see “Listening to music via Bluetooth”
(page 30).
NOTE
• Do not apply excessive force to the wireless antenna. Doing so might damage the antenna.
2 Preparing to connect to a network
DIGITAL OUT
COAXIAL OPTICAL
ANALOG OUT
R
NETWORK
LAN
WAN
Network Attached Storage
(NAS)
Internet
Modem
Wireless
router
Network cable
PC
This unit (rear)

13
After all the connections are complete, connect the supplied power cord to the AC IN
jack on this unit, and then plug into a home AC outlet.
To turn on the power to the unit, press z (power) on the front panel.
Turning on the power to the unit for the first time
When you turn on the power to the unit for the first time after you purchase or initialize it,
the unit will indicate “WAC” on the display, and share the network settings of the iOS
device (iPhone) to connect to a wireless network (unless the unit is already connected
to a wired network).
If you use this function, proceed to Step 7 in “Sharing the iOS device setting” (page 16).
If you connect the unit to a wireless network using another method, press RETURN and
proceed to the next page.
WAC (Wireless Accessory Configuration)
3 Connecting the power cord
AC IN
To an AC wall outlet
This unit (rear)
power cord (supplied)
* Illustration above shows Europe model.
4 Turning on the power to the unit
5V
A
USB
Wi
BLUETOOTH
Fi
RETURNSOURCE
CONNECT
SELECT
PUSH
ENTER
z (power)
NP-S303 XXXXXX
WAC

14
Select a connection method that is suitable for your environment.
This section describes how to use the MusicCast CONTROLLER app to connect the
unit to a wireless network.
If you want to connect the unit to a wireless network without using MusicCast
CONTROLLER, refer to page 16 for more information. To use MusicCast CONTROLLER
while the unit is connected to a network by cable, perform Steps 1 through 4 in the
section “Connecting to a network using MusicCast CONTROLLER”.
The following functions are available only if you use the MusicCast CONTROLLER app.
• Playback music from music streaming services.
• Sending signals via Bluetooth (page 30)
NOTE
• If you want to play high-resolution audio sources via the network, a wired connection is
recommended for more stable playback (page 12).
• Your mobile device must already be connected to the wireless LAN router (access point).
• To manually connect the unit to a network wirelessly, have the SSID and security key for the
wireless router (access point) ready.
Connecting to a network by using MusicCast CONTROLLER
This section explains how to register the unit with MusicCast and set up the unit for the
network connection.
1
Install MusicCast CONTROLLER.
Download and install the MusicCast CONTROLLER app (free) to your mobile
device from the App Store or Google Play.
2
Start the MusicCast CONTROLLER app on your mobile device, and
then tap “Setup”.
3
Follow the instructions on the display of the mobile device to operate
MusicCast CONTROLLER, and then press and hold down the
CONNECT on the front panel of the unit for 5 seconds.
“CONNECT” appears on the display and the WiFi indicator blinks.
5 Connecting the unit to the network
5V
A
USB
Wi
BLUETOOTH
Fi
RETURNSOURCE
CONNECT
SELECT
PUSH
ENTER
Wi-Fi indicator CONNECT

15
4
Follow the instructions on the display of the mobile device to operate
MusicCast CONTROLLER to make the network settings.
Now the unit is registered with MusicCast and the network settings are complete.
Use MusicCast CONTROLLER to play the music.
NOTE
• To set up additional MusicCast-compatible devices, tap the icon (Settings) in the upper-right
corner of the MusicCast CONTROLLER screen, and then select “Add New Device”.
• If you make a “wired” connection between a MusicCast-compatible device and the router, you can
expand the reception range (Extend mode). Extend mode will automatically engage in if you install
a MucicCast-compatible device in a location where the reception from the router is poor.
Tap here to start settings.
Normal mode
Extend mode

16
Connecting to a network using another method
You can connect the unit to a wireless network without using
MusicCast CONTROLLER.
Select a connection method that is suitable for your environment.
• Sharing the iOS device setting (page 16)
• Using the WPS push button on the router (page 18)
• Manual setup (page 19)
You can easily setup a wireless connection by applying the
connection settings of your iOS device (iPhone) to this unit.
Before proceeding, confirm that your iOS device is connected to a
wireless LAN router (access point).
NOTE
• Performing the following procedure will initialize all network settings.
• This configuration does not work if the encryption method of your wireless
router (access point) is WEP. In this case, use another connection method.
1
Press SETUP.
2
Use the cursor keys (/) to select “Network”, and
then press ENTER.
NOTE
• To return to the previous screen, press RETURN.
3
Use the cursor keys (/) to select “Connection”,
and then press ENTER.
4
Use the cursor keys (/) to select “Wireless”, and
then press ENTER.
5
Use the cursor keys (/) to select “Share
Setting”, and then press ENTER.
6
Press ENTER.
The connection process starts. “Connecting” appears on the
display.
NOTE
• If the unit is connected to the network by a cable, “LAN CBL Pls
disconnect” will appear on the display. Disconnect the network cable
from the unit, and then press ENTER.
7
In the Wi-Fi screen of your iOS device, select this
unit as the AirPlay speaker.
Sharing the iOS device setting
¡WPS
WIRELESS
Wireless(WAC)
SHARE
This unit’s name
E.g., (iOS 10)
AMP
MUTE
INPUT
DISPLAY
SETUP
OPTION
RETURN
REPEAT
SHUFFLE
NOW PLAYING
ENTER
HOMEMEMORY
NET USB
BLUETOOTH
DIMMERMUTE
PRESET
VOLUME
7
1
0
89
456
1
23
A
M
P
MUTE
INP
UT
DISPLA
Y
OPTIO
N
REPEAT
S
H
U
FFLE
N
O
W PLAYIN
G
HOME
M
EMOR
Y
NET
U
S
B
B
LUET
OO
T
H
DIMMER
MUTE
PRESET
V
O
L
U
M
E
7
1
0
8
9
4
5
6
1
2
3
RETURN
SETUP
ENTER
Cursor keys

17
8
Make sure that the “Network” field is set to your preferred network,
and then tap “Next”.
When the setup is complete, the unit will automatically connect to the selected
network (access point).
Tap here to start setup.
Currently-selected network

18
You can use the WPS button on the wireless LAN router (access
point) to begin setting up a wireless connection.
NOTE
• This configuration does not work if the encryption method of your wireless
LAN router (access point) is WEP or WPA2-TKIP. In this case, use another
connection method.
1
Press SETUP.
2
Use the cursor keys (/) to select “Network”, and
then press ENTER.
NOTE
• To return to the previous screen, press RETURN.
3
Use the cursor keys (/) to select “Connection”,
and then press ENTER.
4
Use the cursor keys (/) to select “Wireless”, and
then press ENTER.
5
Use the cursor keys (/) to select “WPS”, and
then press ENTER.
6
Press ENTER.
The connection process starts. “Connecting” appears on the
display.
7
Push the WPS button on the wireless LAN router
(access point).
When the connection process is complete, “Completed”
appears on the display.
If “Not connected” appears, repeat this procedure from step 1
or try another connection method.
8
Press SETUP to complete the setting.
Using the WPS push button on the router
¡WPS
WIRELESS
About WPS
WPS (Wi-Fi Protected Setup) is a network security standard
created by the Wi-Fi Alliance. WPS lets home users set up a
wireless network easily.
AMP
MUTE
INPUT
DISPLAY
SETUP
OPTION
RETURN
REPEAT
SHUFFLE
NOW PLAYING
ENTER
HOMEMEMORY
NET USB
BLUETOOTH
DIMMERMUTE
PRESET
VOLUME
7
1
0
89
456
1
23
A
M
P
MUTE
INP
UT
DISPLA
Y
OPTIO
N
REPEAT
S
H
U
FFLE
N
O
W PLAYIN
G
HOME
M
EMOR
Y
NET
U
S
B
B
LUET
OO
T
H
DIMMER
MUTE
PRESET
V
O
L
U
M
E
7
1
0
8
9
4
5
6
1
2
3
RETURN
SETUP
ENTER
Cursor keys

19
You can connect this unit to a wireless network manually. Before
performing the following procedure, verify the encryption method
and security key for the wireless LAN router (access point).
1
Press SETUP.
2
Use the cursor keys (/) to select “Network”, and
then press ENTER.
NOTE
• To return to the previous screen, press RETURN.
3
Use the cursor keys (/) to select “Connection”,
and then press ENTER.
4
Use the cursor keys (/) to select “Wireless”, and
then press ENTER.
5
Use the cursor keys (/) to select
“ManualSetting”, and then press ENTER.
6
Use the cursor keys (/) to select “SSID”, and
then press ENTER.
7
Use the cursor keys to enter the SSID for the
wireless LAN router (access point), and then press
ENTER.
Use the cursor keys (/) to select a character. Use the
cursor keys (/) to move the edit position.
You can insert or delete a character by pressing PRESET >
(insert) or PRESET < (delete).
8
Use the cursor keys (/) to select “Security”, and
then press ENTER.
9
Use the cursor keys (/) to select the desired
encryption method, and then press ENTER.
Settings
None, WEP, WPA2-PSK (AES), Mixed Mode
NOTE
• If you select “None”, the connection might not be completely secure
since communications will not be encrypted.
10
Use the cursor keys (/) to select “Security Key”,
and then press ENTER.
11
Use the cursor keys to enter the security key for the
wireless LAN router (access point), and then press
ENTER.
If you select “WEP” in Step 9, enter either a 5 or 13-character
string; or a 10 or 26-digit hexadecimal number.
If you select “WPA2-PSK (AES)” or “Mixed Mode”, enter either
an 8 to 63-character string; or a 64-digit hexadecimal number.
Use the cursor keys (/) to select a character. Use the
cursor keys (/) to move the edit position.
You can insert or delete a character by pressing PRESET >
(insert) or PRESET < (delete).
Manual setup
¡SSID
MANUAL
¡
SSID
¡WPA2-PSK(AES)
SECURITY
KEY
AMP
MUTE
INPUT
DISPLAY
SETUP
OPTION
RETURN
REPEAT
SHUFFLE
NOW PLAYING
ENTER
HOMEMEMORY
NET USB
BLUETOOTH
DIMMERMUTE
PRESET
VOLUME
7
1
0
89
456
1
23
A
M
P
MUTE
INP
UT
DISPLA
Y
OPTIO
N
REPEAT
S
H
U
FFLE
N
O
W PLAYIN
G
HOME
M
EMOR
Y
NET
U
S
B
B
LUET
OO
T
H
DIMMER
MUTE
V
O
L
U
M
E
7
1
0
8
9
4
5
6
1
2
3
RETURN
SETUP
PRESET
ENTER
Cursor keys

20
12
Use the cursor keys (/) to select “Connect
[ENT]”, and then press ENTER.
The connection process starts.
If “Not connected” appears, check the SSID and security key
for the wireless router (access point) and repeat this
procedure from Step 6.
13
Press SETUP to complete the setting.
AMP
MUTE
INPUT
DISPLAY
SETUP
OPTION
RETURN
REPEAT
SHUFFLE
NOW PLAYING
ENTER
HOMEMEMORY
NET USB
BLUETOOTH
DIMMERMUTE
PRESET
VOLUME
7
1
0
89
456
1
23
A
M
P
MUTE
INP
UT
DISPLA
Y
OPTIO
N
R
ET
U
R
N
REPEAT
S
H
U
FFLE
N
O
W PLAYIN
G
HOME
M
EMOR
Y
NET
U
S
B
B
LUET
OO
T
H
DIMMER
MUTE
PRESET
V
O
L
U
M
E
7
1
0
8
9
4
5
6
1
2
3
SETUP
ENTER
Cursor keys

21
Connecting a mobile device to the unit directly (Wireless Direct)
The Wireless Direct connection enables you to use this unit as a
wireless network access point, to which you can connect your
mobile devices directly.
NOTE
• Wireless Direct supports the following functions:
– Operating the unit from a MusicCast CONTROLLER app installed on your
mobile device
– Playing music files via AirPlay
– Playing music files stored on Android devices using MusicCast
CONTROLLER app.
1
Press SETUP.
2
Use the cursor keys (/) to select “Network”, and
then press ENTER.
NOTE
• To return to the previous screen, press RETURN.
3
Use the cursor keys (/) to select “Connection”,
and then press ENTER.
4
Use the cursor keys (/) to select “W.Direct”, and
then press ENTER.
5
Press ENTER to view the SSID for this unit, and then
press RETURN.
You will need the SSID in Step 11 to configure the Wi-Fi
settings for your mobile device.
6
Use the cursor keys (/) to select “Security”, and
then press ENTER.
7
Use the cursor keys (/) to select the desired
encryption method, and then press RETURN.
Settings
None, WPA2-PSK (AES)
NOTE
• If you select “None”, the connection might not be completely secure
since communications will not be encrypted.
8
Use the cursor keys (/) to select “Security Key”,
and then press ENTER.
NOTE
• If you select “None” in Step 7, the security key setting will be
unavailable. Skip to Step 10.
9
Use the cursor keys to enter a security key, and then
press ENTER.
Enter either an 8 to 63-character string or a 64-digit
hexadecimal number.
Use the cursor keys (/) to select a character. Use the
cursor keys (/) to move the edit position.
You can insert or delete a character by pressing PRESET >
(insert) or PRESET < (delete).
You will need the security key in Step 11 to configure the Wi-Fi
settings for your mobile device.
10
Use the cursor keys (/) to select “Connect
[ENT]”, and then press ENTER.
¡SSID
W.DIRECT
KEY
AMP
MUTE
INPUT
DISPLAY
SETUP
OPTION
RETURN
REPEAT
SHUFFLE
NOW PLAYING
ENTER
HOMEMEMORY
NET USB
BLUETOOTH
DIMMERMUTE
PRESET
VOLUME
7
1
0
89
456
1
23
A
M
P
MUTE
INP
UT
DISPLA
Y
OPTIO
N
REPEAT
S
H
U
FFLE
N
O
W PLAYIN
G
HOME
M
EMOR
Y
NET
U
S
B
B
LUET
OO
T
H
DIMMER
MUTE
V
O
L
U
M
E
7
1
0
8
9
4
5
6
1
2
3
RETURN
SETUP
PRESET
ENTER
Cursor keys

22
11
Configure the Wi-Fi settings for your mobile device.
For more information, refer to the instruction manual for the
mobile device.
a Enable the Wi-Fi function on the mobile device.
b Select the unit’s SSID (that you viewed in Step 5) from the
list of available access points.
c When you are prompted to enter a password, enter the
security key that you set in Step 9.
If “Not connected” appears, the entered security key may
have been incorrect. Set the Wi-Fi function on the mobile
device again.
12
Press SETUP to complete the setting.
Verifying the network connection status
Perform the following procedure to verify that the unit is connected
to the network (unless it is connected via Wireless Direct).
1
Press SETUP.
2
Use the cursor keys (/) to select “Network”, and
then press ENTER.
NOTE
• To return to the previous screen, press RETURN.
3
Use the cursor keys (/) to select “Information”,
and then press ENTER.
4
Use the cursor keys (/) to select “STATUS”.
If “Connect” appears, the unit has been connected to the
network. If “Disconnect” appears, establish the connection
again.
5
Press SETUP to complete the setting.
¡Connect
STATUS
AMP
MUTE
INPUT
DISPLAY
SETUP
OPTION
RETURN
REPEAT
SHUFFLE
NOW PLAYING
ENTER
HOMEMEMORY
NET USB
BLUETOOTH
DIMMERMUTE
PRESET
VOLUME
7
1
0
89
456
1
23
A
M
P
MUTE
INP
UT
DISPLA
Y
OPTIO
N
REPEAT
S
H
U
FFLE
N
O
W PLAYIN
G
HOME
M
EMOR
Y
NET
U
S
B
B
LUET
OO
T
H
DIMMER
MUTE
PRESET
V
O
L
U
M
E
7
1
0
8
9
4
5
6
1
2
3
RETURN
SETUP
ENTER
Cursor keys

23
AMP
MUTE
INPUT
DISPLAY
SETUP
OPTION
RETURN
REPEAT
SHUFFLE
NOW PLAYING
ENTER
HOMEMEMORY
NET USB
BLUETOOTH
DIMMERMUTE
PRESET
VOLUME
7
1
0
89
456
1
23
A
M
P
MUTE
INP
UT
S
ET
UP
OPTIO
N
REPEAT
S
H
U
FFLE
M
EMOR
Y
U
S
B
B
LUET
OO
T
H
DIMMER
MUTE
PRESET
V
O
L
U
M
E
7
1
0
8
9
4
5
6
1
2
3
RETURN
HOME
NET
NOW PLAYING
DISPLAY
ENTER
PLAYING AUDIO
This unit enables you to listen to Internet radio stations.
NOTE
• To use this function, the unit must be connected to the Internet. You can
verify whether the network parameters (such as the IP address) are properly
assigned to the unit under “Network” (page 36) in the Setup menu.
• Certain Internet radio stations might not be available at all times or during
certain hours.
• This function uses the “airable.Radio” service. This service is provided by
Tune In GmbH.
• This service may be discontinued without notice.
Selecting an Internet radio station
Follow the procedure below to select an Internet radio station and
start streaming.
1
Press NET to select “NetRadio” as the source.
2
Use the cursor keys to select content, and then
press ENTER.
Once you select an Internet radio station, the content will start
to play and the information will appear on the display.
Use the following remote control keys to operate the Internet radio
streaming service.
NOTE
• You can register the current radio station as a preset (page 32).
• Press DISPLAY repeatedly to switch the type of displayed information
(page 32).
• Certain information might be unavailable, depending on the radio station.
• An underscore (_) will be displayed for characters not supported by the unit.
Listening to Internet radio
Radios
NetRadio
Available keys Function
Cursor keys
Enable you to select an Internet radio station
or a category such as a genre of music.
ENTER
Starts playing the broadcast if pressed while
an Internet radio station is selected. Selects
the next lower level of the menu if pressed
while a category is selected.
RETURN Selects the next higher level of the menu.
Playback
control keys
pe Starts playing the broadcast.
s Stops playing the broadcast.
HOME
Displays the top level of the menu for the
category selection.
NOW PLAYING
Displays the information of the current Internet
radio broadcast.
Cursor keys
Playback
control keys

24
You can play music files stored on your USB device on the unit.
NOTE
• For information on supported USB storage devices, please refer to
“Supported devices and file formats” (page 46).
Connecting a USB storage device
1
Connect the USB storage device to the USB jack.
NOTE
• If the USB storage device contains many files, it may take some time to load
them. In this case, “Loading…” will appear on the display.
• Stop playback of the USB storage device before you disconnect the device
from the USB jack.
• Connect a USB storage device directly to the USB jack of the unit. Do not
use extension cables.
• Do not connect your PC to the USB jack.
Playing songs stored on a USB storage
device
Follow the procedure below to select a song to play stored on a
USB storage device.
NOTE
• An underscore (_) will be displayed for characters not supported by the unit.
1
Press USB to select “USB” as the source.
2
Use the cursor keys to select content, and then
press ENTER.
The track begins to play. Related information appears on the
display.
NOTE
• You cannot select files in a format that is not supported by the unit.
• Press DISPLAY repeatedly to switch the type of displayed information
(page 32).
• You can register the currently-playing song as a preset (page 32).
Playing music files stored on your USB device
5V
A
USB
This unit (front panel)
USB storage device
Blues
USB
Track #3
USB
AMP
MUTE
INPUT
DISPLAY
SETUP
OPTION
RETURN
REPEAT
SHUFFLE
NOW PLAYING
ENTER
HOMEMEMORY
NET USB
BLUETOOTH
DIMMERMUTE
PRESET
VOLUME
7
1
0
89
456
1
23
A
M
P
MUTE
INP
UT
S
ET
UP
OPTIO
N
R
ET
U
R
N
REPEAT
S
H
U
FFLE
N
O
W PLAYIN
G
HOME
M
EMOR
Y
NET
B
LUET
OO
T
H
DIMMER
MUTE
PRESET
V
O
L
U
M
E
7
1
0
8
9
4
5
6
1
2
3
DISPLAY
USB
ENTER
Cursor keys

25
AMP
MUTE
INPUT
DISPLAY
SETUP
OPTION
RETURN
REPEAT
SHUFFLE
NOW PLAYING
ENTER
HOMEMEMORY
NET USB
BLUETOOTH
DIMMERMUTE
PRESET
VOLUME
7
1
0
89
456
1
23
A
M
P
MUTE
INP
UT
DISPLA
Y
S
ET
UP
OPTIO
N
M
EMOR
Y
NET
U
S
B
B
LUET
OO
T
H
DIMMER
MUTE
PRESET
V
O
L
U
M
E
7
1
0
8
9
4
5
6
1
2
3
RETURN
HOME
SHUFFLE
REPEAT
NOW PLAYING
ENTER
Use the following remote control keys to navigate the menu and to
control transport functions.
Available keys Function
Cursor keys Select a music file or folder.
ENTER
Starts playing the selected music file. Selects
the next lower level of the menu if pressed
while a folder is selected.
RETURN Selects the next higher level of the menu.
Playback
control keys
pe Starts or pauses playback.
s Stops playback.
b / w Skips back to the top of the currently-playing
song (or the previous song if pressed
continuously); Skips forward to the next song.
f / a
HOME Displays the root directory of the USB device.
NOW PLAYING
Displays information about the currently-
playing song.
REPEAT
Changes the repeat settings.
Off: Turns off the repeat function.
One: Plays the current song repeatedly.
All: Plays all songs in the current album
(folder) repeatedly.
SHUFFLE
Changes the shuffle settings.
Off: Turns off the shuffle function.
On: Plays songs in the current album
(folder) in random order.
Cursor keys
Playback
control keys

26
You can play music files stored on your PC or DLNA-compatible Network Attached
Storage (NAS) device on the unit.
NOTE
• To use this function, the unit and the PC must be connected to the same router. You can verify
whether the network parameters (such as the IP address) are properly assigned to the unit in the
“IP” for “Information” under “Network” in the Setup menu (page 36).
• Audio may be interrupted while using a wireless network connection. In this case, use a wired
network connection.
• For information on the file format that can be played by the unit, please refer to “Supported devices
and file formats” (page 46). Also, please refer to the specifications for the NAS device.
Media sharing setup
To play music stored on the PC (or NAS device) on the unit, you need to enable media
sharing between this unit and the other devices.
The setting procedure may vary depending on the PC or the version of Windows Media
Player. The following instructions use Windows Media Player12 as an example.
1
Start Windows Media Player 12 on your PC.
2
Select “Stream”, then “Turn on media streaming”.
3
Click “Turn on media streaming”.
4
Select “Allowed” from the drop-down list next to the unit’s model
name.
5
Click “OK” to exit.
NOTE
• For details on media sharing settings, refer to the Windows Media Player help.
Refer to the instruction manual for the device or software and configure the media
sharing settings.
Playing music files stored on a media server (PC/NAS)
For a PC that runs Windows Media Player
For a PC or a NAS that runs DLNA server software other than
Windows Media Player

27
AMP
MUTE
INPUT
DISPLAY
SETUP
OPTION
RETURN
REPEAT
SHUFFLE
NOW PLAYING
ENTER
HOMEMEMORY
NET USB
BLUETOOTH
DIMMERMUTE
PRESET
VOLUME
7
1
0
89
456
1
23
A
M
P
MUTE
INP
UT
S
ET
UP
OPTIO
N
M
EMOR
Y
U
S
B
B
LUET
OO
T
H
DIMMER
MUTE
PRESET
V
O
L
U
M
E
7
1
0
8
9
4
5
6
1
2
3
DISPLAY
RETURN
HOME
SHUFFLE
REPEAT
NET
NOW PLAYING
ENTER
Selecting and playing music stored on a PC
(or server)
Follow the procedure below to select a song to play stored on a PC
(or server).
NOTE
• An underscore (_) will be displayed for characters not supported by the unit.
1
Press NET repeatedly to select “Server” as the
source.
2
Use the cursor keys to select a PC (or server), and
then press ENTER.
3
Use the cursor keys to select content, and then
press ENTER.
The track begins to play. Related information appears on the
display.
NOTE
• If you are playing a music file stored on your PC, the song information
will appear on the PC monitor.
• You can register the currently-playing song as a preset (page 32).
• Press DISPLAY repeatedly to switch the type of displayed information
(page 32).
• You cannot select files in a format that is not supported by the unit.
• If there are consecutive unplayable files (including image or hidden
files), playback will stop automatically.
Use the following remote control keys to control playback and other
transport functions.
NOTE
• You can also use a DLNA-compatible Digital Media Controller (DMC) to
control playback. For more information, please refer to “DMC Control”
(page 37) in the “Setup” section.
NAS A
SERVER
Available keys Function
Cursor keys Select a music file or folder.
ENTER
Starts playing the currently-selected content.
Selects the next lower level of the menu if
pressed while a folder is selected.
RETURN Selects the next higher level of the menu.
Playback
control keys
pe Starts or pauses playback.
s Stops playback.
b / w Skips back to the top of the currently-playing
song (or the previous song if pressed
continuously); Skips forward to the next song.
f / a
HOME
Displays the root directory of the PC (or
server).
NOW PLAYING
Displays information about the currently-
playing song.
REPEAT
Changes the repeat settings.
Off: Turns off the repeat function.
One: Plays the current song repeatedly.
All: Plays all songs in the current album
(folder) repeatedly.
SHUFFLE
Changes the shuffle settings.
Off: Turns off the shuffle function.
On: Plays songs in the current album
(folder) in random order.
Cursor keys
Playback
control keys

28
You can use the AirPlay function to play iTunes or iPhone music files via a network.
NOTE
• To use this function, the unit and your PC, iPhone must be connected to the same router (page 14).
You can verify whether the network parameters (such as the IP address) are properly assigned to
the unit under “Network” (page 36) in the Setup menu.
• If the iPhone does not recognize the unit, check your network environment (such as the router)
(page 14).
• For information on supported iPhones, please refer to “Supported devices and file formats”
(page 46).
Playing a song from iTunes/iPhone
Follow the procedure below to play the music from iTunes or iPhone on the unit.
1
Start iTunes, or display the Music playback screen on the iPhone.
Once the iTunes or iPhone recognizes the unit, the AirPlay icon appears.
NOTE
• If the icon does not appear, make sure that the unit and the PC or iPhone are connected to
the router properly.
2
On the iTunes or iPhone, click (tap) the AirPlay icon, and then select
“NP-S303 XXXXXX” (network name of the unit) as the audio output
device.
NOTE
• You can change the network name of the unit by using the “Network Name” parameter under
“Network” in the Setup menu (page 37).
3
Select a song in iTunes or on the iPhone to start playback.
The unit automatically selects “AirPlay” as the source, and playback starts.
The playback information is shown on the display.
NOTE
• Press DISPLAY repeatedly to switch the type of displayed information (page 32).
• If “Standby (Network Standby)” (page 37)in the Setup menu is set to “On” or “Auto”, the unit
will automatically turn on when playback starts on iTunes or iPhone.
• An underscore (_) will be displayed for characters not supported by the unit.
Listening to music via AirPlay
PC
iTunes
Wireless
router
iPhone
This unit
iOS 10 (display example) iTunes (display example)

29
AMP
MUTE
INPUT
DISPLAY
SETUP
OPTION
RETURN
REPEAT
SHUFFLE
NOW PLAYING
ENTER
HOMEMEMORY
NET USB
BLUETOOTH
DIMMERMUTE
PRESET
VOLUME
7
1
0
89
456
1
23
A
M
P
MUTE
INP
UT
DISPLA
Y
S
ET
UP
OPTIO
N
R
ET
U
R
N
N
O
W PLAYIN
G
ENTER
HOME
M
EMOR
Y
NET
U
S
B
B
LUET
OO
T
H
DIMMER
MUTE
PRESET
V
O
L
U
M
E
7
1
0
8
9
4
5
6
1
2
3
SHUFFLE
REPEAT
Use the following remote control keys to navigate the menu and
transport function.
Available keys Function
Playback
control keys
pe Starts or pauses playback.
s Stops playback.
b / w Skips back to the top of the currently-playing
song (or the previous song if pressed
continuously); Skips forward to the next song.
f / a
REPEAT Changes the repeat settings.
SHUFFLE Changes the shuffle settings.
Playback
control keys

30
AMP
MUTE
INPUT
DISPLAY
SETUP
OPTION
RETURN
REPEAT
SHUFFLE
NOW PLAYING
ENTER
HOMEMEMORY
NET USB
BLUETOOTH
DIMMERMUTE
PRESET
VOLUME
7
1
0
89
456
1
23
A
M
P
MUTE
INP
UT
DISPLA
Y
S
ET
UP
OPTIO
N
R
ET
U
R
N
REPEAT
S
H
U
FFLE
N
O
W PLAYIN
G
ENTER
HOME
M
EMOR
Y
NET
U
S
B
DIMMER
MUTE
PRESET
V
O
L
U
M
E
7
1
0
8
9
4
5
6
1
2
3
BLUETOOTH
Playing audio from
Bluetooth
devices on
the unit
You can play music files stored on a Bluetooth device (such as a
smartphone) on the unit.
NOTE
• To use the Bluetooth function, set “Bluetooth” (page 38) in the Setup menu
to “On”.
• If you use the Bluetooth function, set the wireless antenna on the rear panel
in the upright position (page 12).
• For information on supported Bluetooth devices, refer to “Supported devices
and file formats” (page 46).
1
Press BLUETOOTH to select “Bluetooth” as the
source.
2
On the Bluetooth device, turn the Bluetooth function
on.
3
On the Bluetooth device, select the unit “NP-S303
XXXXXX Bluetooth” from the available device list.
“Connected” appears on the display and the BLUETOOTH
indicator lights up when the unit establishes a connection to
the Bluetooth device.
NOTE
• If you are prompted to enter a passkey, enter the number “0000”.
• The initial network name of the unit is “NP-S303 XXXXXX”.
• You can change the network name of the unit by using the “Network
Name” parameter under “Network” in the Setup menu (page 37).
• If the unit is registered as a MusicCast device, the room name will
appear on the available device list.
4
On the Bluetooth device, select a song and start
playback.
NOTE
• If the unit detects a Bluetooth device that was previously connected,
the unit will automatically connect to the Bluetooth device after you
perform Step 1. To establish another Bluetooth connection, first
terminate the current Bluetooth connection.
• To terminate a Bluetooth connection, perform one of the following
operations:
– Disconnect from the Bluetooth device.
– Select any option other than “Bluetooth” as the source for this unit.
– Press and hold down the BLUETOOTH key for three seconds or
longer.
Listening to music via Bluetooth
Bluetooth devices
(e.g., smartphone)
This unit
Wi
BLUETOOTH
Fi
Connected
BT

31
Playing audio from this unit through
Bluetooth
-
compatible speakers or headphones
You can listen to audio (that is being played on the unit) through Bluetooth-compatible
speakers or headphones. To do this, you will use the MusicCast CONTROLLER app
(installed on your mobile device) to transmit audio to Bluetooth-compatible speakers or
headphones.
NOTE
• Use Bluetooth-compatible speakers or headphones that support the A2DP profile.
• You cannot use both a Bluetooth device (such as a smartphone) and Bluetooth speakers (or
headphones) at the same time.
• AirPlay or DSD audio will not be transferred.
• Examples of the MuscCast CONTROLLER screens are taken from an iPhone.
• Please also refer to the instruction manual for your Bluetooth device.
1
Use the MusicCast CONTROLLER app to connect the unit to a
network, and register the unit with MusicCast (page 14).
2
Use the MusicCast CONTROLLER app to play a song (via any device
other than a Bluetooth device).
3
Pair Bluetooth-compatible speakers (or headphones) and the unit to
establish a Bluetooth connection.
4
Tap in the MusicCast CONTROLLER app’s playback screen.
5
Tap “Bluetooth Transmission”.
6
Enable the
Bluetooth
Transmission function, and then select your
Bluetooth
-compatible speakers (or headphones) as the transmission
destination.
When the connection is established, the unit’s Bluetooth indicator will light up, and
audio will play from the Bluetooth-compatible speakers (or headphones).
7
Close the Setup screen.
NOTE
• To disconnect Bluetooth-compatible speakers (or headphones), perform one of the following
operations.
– Disconnect from the Bluetooth-compatible speakers or headphones.
– Disable the MusicCast CONTROLLER app’s Bluetooth Transmission function.
– Select “Bluetooth” as the source for this unit.
Bluetooth-compatible
speakers/headphones
This unit
Tap here.
Tap here.

32
AMP
MUTE
INPUT
DISPLAY
SETUP
OPTION
RETURN
REPEAT
SHUFFLE
NOW PLAYING
ENTER
HOMEMEMORY
NET USB
BLUETOOTH
DIMMERMUTE
PRESET
VOLUME
7
1
0
89
456
1
23
A
M
P
MUTE
INP
UT
S
ET
UP
OPTIO
N
R
ET
U
R
N
REPEAT
S
H
U
FFLE
N
O
W PLAYIN
G
HOME
NET
U
S
B
B
LUET
OO
T
H
DIMMER
MUTE
V
O
L
U
M
E
MEMORY
DISPLAY
PRESET
Switching information on the display
You can switch information shown on the display, such as playback
information.
1
Press DISPLAY.
Each time you press the key, the displayed item changes.
About 3 seconds later, the information regarding the displayed
item appears.
Registering favorite content (Preset function)
You can register up to 40 favorite content items (songs stored on
your PC or USB devices and Internet Radio stations) as presets,
and recall them directly by specifying the preset numbers.
NOTE
• You can also register them using MusicCast CONTROLLER (page 6).
• You cannot clear registered presets from this unit. Use MusicCast
CONTROLLER to do so.
You can select desired content and register it to a preset number.
1
Play a song or an Internet Radio station that you
want to register.
NOTE
• By pressing and holding down preset number keys following step 1,
you can skip the steps below and automatically register the content.
2
Press and hold down MEMORY for 3 seconds.
To assign content to a preset number, select a preset number
using PRESET
j
/
i
or the cursor keys (
/
). You can also
directly enter the preset number using the preset number keys.
NOTE
• To cancel the registration, press RETURN.
3
Press MEMORY to confirm the registration.
Useful functions
Source Item
Bluetooth
Track (song title)
Artist (artist name)
Album (album name)
Server
AirPlay
USB
Track (song title)
Artist (artist name)
Album (album name)
Time (elapsed time)
Net Radio
Station (station name)
Track (song title)
Album (album name)
Time (elapsed time)
Track
INFO
› Track #1
SERVER
Registering content
01: Empty
MEMORY
Preset
number
“Empty” (not in use) or the content name that is
currently registered
Cursor keys
Preset
number
keys

33
AMP
MUTE
INPUT
DISPLAY
SETUP
OPTION
RETURN
REPEAT
SHUFFLE
NOW PLAYING
ENTER
HOMEMEMORY
NET USB
BLUETOOTH
DIMMERMUTE
PRESET
VOLUME
7
1
0
89
456
1
23
A
M
P
MUTE
INP
UT
DISPLA
Y
S
ET
UP
REPEAT
S
H
U
FFLE
N
O
W PLAYIN
G
HOME
NET
U
S
B
B
LUET
OO
T
H
DIMMER
MUTE
V
O
L
U
M
E
MEMORY
OPTION
RETURN
PRESET
ENTER
You can select an audio file from the registered preset numbers.
1
Press PRESET j / i or the preset number keys to
specify the preset number to select the content to
which you want to listen.
A few seconds after you select the preset number, playback
will start.
NOTE
• You can recall preset numbers 1 through 10 by using preset number keys.
• “No Presets” will appear if no items are registered.
• In the following cases, the selected preset item will not play.
– The connected USB storage device does not contain the registered audio
file.
– A PC that stores the registered item is turned off or is not connected to the
network.
– An Internet Radio station (that is registered as a preset) is temporarily off
air or out of service.
– The registered item (file) has been deleted or moved to another location.
• When you register a music file (stored on a USB storage device or a PC),
the unit memorizes the relative position of the music file in the folder.
Therefore, if you add or delete music files to or from the folder, the unit may
be unable to recall the preset music file correctly. In such cases, register the
item again.
• To cancel the recall operation, press RETURN.
• Even if the unit is in Standby mode, pressing a preset number key will turn
on the power to the unit and recall the corresponding preset content.
Displaying audio signal information
You can view information about the signal from the currently-
playing audio source.
1
Press OPTION.
2
Use the cursor keys (/) to select “Signal Info.”,
and then press ENTER.
NOTE
• To return to the previous screen during menu operations, press
RETURN.
3
Use the cursor keys (/) to switch the display of
the audio signal information.
4
Press OPTION to complete the setting.
Recalling a preset content
FORMAT Audio format
SAMPLING Number of samples per second
Cursor keys
Preset
number
keys

34
AMP
MUTE
INPUT
DISPLAY
SETUP
OPTION
RETURN
REPEAT
SHUFFLE
NOW PLAYING
ENTER
HOMEMEMORY
NET USB
BLUETOOTH
DIMMERMUTE
PRESET
VOLUME
7
1
0
89
456
1
23
A
M
P
MUTE
INP
UT
DISPLA
Y
S
ET
UP
REPEAT
S
H
U
FFLE
N
O
W PLAYIN
G
HOME
M
EMOR
Y
NET
U
S
B
B
LUET
OO
T
H
DIMMER
MUTE
PRESET
V
O
L
U
M
E
7
1
0
8
9
4
5
6
1
2
3
OPTION
RETURN
ENTER
Enabling/disabling automatic playback
You can enable (or disable) the automatic playback function so that
playback will (or will not) automatically start immediately after the
power is turned on or the source is changed. (This function is
effective only when the source is “Server” or “USB”.)
1
Press OPTION.
2
Use the cursor keys (/) to select “Auto
Playback”, and then press ENTER.
NOTE
• To return to the previous screen during menu operations, press
RETURN.
3
Use the cursor keys (/) to switch between
enabling and disabling the automatic playback
function.
4
Press OPTION to complete the setting.
Off Disables the automatic playback function.
On (default)
Enables the automatic playback function.
If the unit keeps a history of playback, the last item that
was played will be played again. If such an item no
longer exists, the unit will not play it.
Cursor keys

35
Setup
This section explains how to configure various functions.
1
Press SETUP.
2
Use the cursor keys (/) to select a menu, and
then press ENTER.
3
Use the cursor keys (/) to select a menu option,
and then press ENTER.
NOTE
• To return to the previous screen during menu operations, press
RETURN.
4
Use the cursor keys (/) to select a value, and
then press ENTER.
5
Press SETUP to complete the setting.
Setup menu items
Configuring various functions
(Setup menu)
Network
SETUP
Menu Menu options Function Page
Network
Connection
Enables you to select a network
connection method.
36
Information
Displays the unit’s network
information.
36
IP Address
Enables you to configure the
network parameters (such as IP
address).
36
DMC Control
Enables or disables DLNA-
compatible Digital Media
Controllers (DMC) to control
playback.
37
Standby
(Network Standby)
Enables or disables the function
that turns on the power to the
unit from other network devices.
37
Network Name
Enables you to edit the unit’s
name as displayed on other
network devices.
37
Update
(Network Update)
Updates the firmware via the
network.
37
Bluetooth
On/Off
Enables or disables the
Bluetooth function.
38
Standby
(Bluetooth
Standby)
Enables or disables the function
that turns on the unit from
Bluetooth devices.
38
AutoPowerStby
(Auto Power Standby)
Enables or disables the Auto-
Standby function. When this
function is enabled, if you do
not operate the unit or play any
file for the specified time, the
unit will automatically enter
standby mode.
38
AMP
MUTE
INPUT
DISPLAY
SETUP
OPTION
RETURN
REPEAT
SHUFFLE
NOW PLAYING
ENTER
HOMEMEMORY
NET USB
BLUETOOTH
DIMMERMUTE
PRESET
VOLUME
7
1
0
89
456
1
23
A
M
P
MUTE
INP
UT
DISPLA
Y
OPTIO
N
REPEAT
S
H
U
FFLE
N
O
W PLAYIN
G
HOME
M
EMOR
Y
NET
U
S
B
B
LUET
OO
T
H
DIMMER
MUTE
PRESET
V
O
L
U
M
E
7
1
0
8
9
4
5
6
1
2
3
RETURN
SETUP
ENTER
Cursor keys

36
The Network menu enables you to configure network parameters.
❑ Connection
Enables you to select a network connection method.
NOTE
• If other MusicCast-compatible devices are connected in Extend mode, “Extend(1)” or “Extend(2)”
will appear. For more information on the Extend mode, refer to page 15.
❑ Information
Displays the unit’s network information.
❑ IP Address
Enables you to configure the network parameters (such as IP address).
DHCP
This parameter specifies whether a DHCP server will be used.
Configuring the network parameters manually
1
Select “DHCP”.
2
Use the cursor keys (/) to select “Off”, and then use the cursor
keys (/) to select a parameter to configure.
3
Use the cursor keys (/) to select the edit position.
Use the cursor keys (/) to select a segment to edit.
4
Use the Cursor keys (/) to change the value.
5
Press SETUP to complete the setting.
Network
Wired
Select this option if you connect the unit to a network using a commercially-
available network cable (Page 12).
Wireless
Select this option if you connect the unit to a network via a wireless LAN
router (access point) (Page 16).
W.Direct
Select this option if you connect your mobile device directly to the unit. For
more information, refer to “Connecting a mobile device to the unit directly
(Wireless Direct)” (page 21).
NEW FW Indicates whether an update for this unit’s firmware is available (Page 40).
STATUS
Displays the network connection status of the unit (except for Wireless
Direct connection).
MC NET
Displays the status of the MusicCast Network. If “Ready” appears, you can
use the MusicCast CONTROLLER app.
MAC
Displays the unit’s MAC address. MAC address varies depending on the
connection method (wired LAN connection or wireless LAN/Wireless Direct
connection).
SSID
Displays the unit’s SSID (only for wireless LAN or Wireless Direct
connection).
IP Displays the unit’s IP address.
SUBNET Displays the subnet mask
GATEWAY Displays the IP address of the default gateway.
DNS P Displays the IP address of the primary DNS server.
DNS S Displays the IP address of the secondary DNS server.
Off
A DHCP server will not be used. You must configure network parameters
manually. For details, see “Configuring the network parameters manually”
below.
On (default)
A DHCP server will be used, and it will automatically obtain the unit’s network
parameters (such as IP address).
IP Specifies the IP address.
SUBNET Specifies the subnet mask.
GATEWAY Specifies the IP address of the default gateway.
DNS P Specifies the IP address of the primary DNS server.
DNS S Specifies the IP address of the secondary DNS server.
Address1••192›
IP
(Example: IP address setting)

37
❑ DMC Control
Enables or disables DLNA-compatible Digital Media Controllers (DMC) to control
playback.
NOTE
• A Digital Media Controller (DMC) is a device that enables you to control other network devices
through the network. When this function is turned on, you can control playback of the unit from a
DMC, such as Windows Media Player 12 (that is on the same network as this unit).
❑ Standby (Network Standby)
Enables or disables the function that turns on the power to the unit from other network
devices.
❑ Network Name
Enables you to edit the the unit’s name as displayed on other network devices.
1
Select “Network Name”.
2
Press ENTER to display the edit screen.
3
Use the cursor keys (/) to select the edit position, and then use
the cursor keys (/) to change the character.
You can insert or delete a character by pressing PRESET i (insert) or PRESET j
(delete).
4
Press ENTER to confirm the new name.
5
Press SETUP to complete the setting.
❑ Update (Network Update)
Updates the firmware via the network.
Disable Disables DMCs to control playback.
Enable
(default)
Enables DMCs to control playback.
Off Disables the Network Standby function.
On
Enables the Network Standby function. This setting will consume more power
than the “Off” setting.
Auto (default)
Enables the Network Standby function. If the unit is not connected to a network,
the function will be turned off automatically.
With an advanced energy saving design,
this product achieves a low power
consumption of not more than 2 watts when
in Network Standby mode.
PerformUpdate
Executes firmware update. For more information, refer to “Updating the unit’s
firmware via the network” (page 40).
Version Displays the current firmware version.
ID Displays the unit’s system ID number.
NP-S303 XXXXX
NET NAME
NP-S303 XXXXX›
NET NAME

38
This menu enables you to configure the Bluetooth settings of the unit.
❑ On/Off
Enables or disables the Bluetooth function.
❑ Standby (Bluetooth Standby)
Enables or disables the function that turns on the power to the unit from Bluetooth
devices. If this function is set to “On”, the unit will automatically turn on when you
operate a Bluetooth-connected device.
NOTE
• This setting is not available when “Standby (Network Standby)” (page 37) is set to “Off”.
This menu setting enables or disables the Auto Power Standby function. If you select
“On”, the unit will automatically enter standby mode if you do not operate the unit or
play any file for the specified time.
Default
U.K. and Europe models: On
Other models: Off
NOTE
• Immediately before the unit automatically enters standby mode, “AutoPowerStby” will appear on the
display along with the number of seconds it takes until standby mode kicks in.
Bluetooth
Off Disables the Bluetooth function.
On (default)
Enables the Bluetooth function. Immediately after selecting “On”, the audio
output from the network will pause momentarily.
Off Disables the Bluetooth Standby function.
On (default) Enables the Bluetooth Standby function.
AutoPowerStby (Auto Power Standby)
Off Disables the Auto Power Standby function.
On
Enables the Auto Power Standby function. The unit will automatically enter
standby mode if you do not play audio or operate the unit for 20 minutes.
Also, the unit (with any source selected) will automatically enter standby mode if
you leave it unoperated for 8 hours.

39
You can change the system settings from the front panel.
1
If the power to the unit is on, press z (power) to turn the power off.
2
While pressing and holding down RETURN, press z (power).
3
Rotate the jog dial to select a parameter to change.
4
Press the jog dial to select the value.
5
Press z (power) to turn off the power to the unit. Then turn it on
again.
The new settings take effect.
Viewing the firmware version (VERSION)
You can view the version of the firmware currently installed on the unit.
NOTE
• You can also view the firmware version under “Update (Network Update)” (page 37) in the Setup
menu.
• It may take a while until the firmware version is displayed.
Initializing the unit (INIT)
You can initialize the unit to restore the default settings.
Settings
Updating the firmware (UPDATE)
You can update the firmware on the unit.
New firmware that provides additional features or product improvements is released as
needed. Do not perform this procedure unless firmware update is necessary. Also,
make sure you read the information supplied with the updates.
Settings
1
Press the jog dial on the front panel repeatedly to select “USB” or
“NETWORK”, and then press SOURCE on the front panel to start
firmware update.
NOTE
• Alternatively, you can follow the steps in “Updating the unit’s firmware via the network” (page 40) to
update the firmware.
Configuring the system settings (Advanced Setup menu)
5V
A
USB
Wi
BLUETOOTH
Fi
RETURNSOURCE
CONNECT
SELECT
PUSH
ENTER
z (power) RETURN Jog dial
CANCEL (default) Does not initialize the unit.
NETWORK
Initializes all network, Bluetooth, and USB settings.
Initialization will also clear all presets for the network and USB devices
(page 32).
All Initializes all settings on the unit.
USB Updates the firmware using a USB storage device.
NETWORK
Updates the firmware via the network.
(The unit must be connected to the Internet.)
Updating the firmware

40
AMP
MUTE
INPUT
DISPLAY
SETUP
OPTION
RETURN
REPEAT
SHUFFLE
NOW PLAYING
ENTER
HOMEMEMORY
NET USB
BLUETOOTH
DIMMERMUTE
PRESET
VOLUME
7
1
0
89
456
1
23
A
M
P
MUTE
INP
UT
DISPLA
Y
OPTIO
N
REPEAT
S
H
U
FFLE
N
O
W PLAYIN
G
HOME
M
EMOR
Y
NET
U
S
B
B
LUET
OO
T
H
DIMMER
MUTE
PRESET
V
O
L
U
M
E
7
1
0
8
9
4
5
6
1
2
3
RETURN
SETUP
ENTER
New firmware that provides additional features or product
improvements is released as needed. If the unit is connected to the
Internet, you can download the latest firmware via the network and
update it. For details on how to update, visit the Yamaha website.
NOTICE
• Firmware update takes about 5 minutes or longer (depending on your
Internet connection speed). Do not operate the unit or disconnect the power
cord or network cable during firmware update.
NOTE
• A firmware update may fail due to insufficient Internet speed or other issues
related to wireless network connections. In this case, try to update the
firmware later, or update it using the USB storage device (page 39).
1
Press SETUP.
2
Use the cursor keys (/) to select “Network”, and
then press ENTER.
3
Use the cursor keys (/) to select “Information”,
and then press ENTER.
If new firmware is available, “NEW FW Available” will appear
on the front display.
4
Press RETURN to return to the previous screen.
5
Use the cursor keys (/) to select “Update”, and
then press ENTER.
NOTE
• To cancel the firmware update operation, press SETUP to exit the
Setup menu.
6
Press ENTER.
The firmware update starts.
7
When “UPDATE SUCCESS” appears on the display,
press A (power) on the front panel to turn off the
power to the unit.
The firmware update is complete.
If new firmware is available, “NEW FW Available” will appear on the
display for a short while when you turn on the power to the unit.
To start the firmware update, press ENTER while this notice is
displayed. When “UPDATE PerformUpdate” appears on the
display, press ENTER. When “UPDATE SUCCESS” appears on the
display, press z (power) on the front panel to turn off the power to
the unit.
Updating the unit’s firmware via the network
Available
NEW FW
PerformUpdate
UPDATE
Notice of new firmware available
Update [ENTER]
NEW FW
Cursor keys

41
APPENDIX
Refer to the table below if the unit fails to function properly.
If your problem is not listed below, or if the symptoms persist after you follow the instructions below, turn off the power to the unit by pressing z (power) on the front panel, disconnect
the power cord, and contact your nearest authorized Yamaha dealer or service center.
General
Troubleshooting
Problem Cause Solution Page
The power does not turn on. The protection circuitry has been activated three times consecutively.
If you try to turn on the power to the unit under this condition, the power
indicator on the front panel will blink.
As a safety precaution, capability to turn on the power has been
disabled. Contact your nearest Yamaha dealer or service center to
request repair.
—
The power cord is not connected or the plug is not completely inserted. Connect the power cord firmly. 13
The internal microcomputer has frozen, due to an external electrical
shock (such as lightning or excessive static electricity) or due to a drop
in the power supply voltage.
Disconnect the power cord from the AC wall outlet, wait 15 seconds or
longer, and then plug in the cable again. —
Pressing the z (power) on the remote
control does not turn on the power to the
unit.
The unit is turned off. If the power to the unit is turned off, pressing the z (power) on the
remote control will not turn on the unit. To turn on the power to the unit,
press z (power) on the front panel.
13
The unit does not turn off or enter
standby mode.
The internal microcomputer has frozen, due to an external electrical
shock (such as lightning or excessive static electricity) or due to a drop
in the power supply voltage.
Disconnect the power cord from the AC wall outlet, wait 15 seconds or
longer, and then plug in the cable again. —
No sound. The cable is not properly connected to the unit or the amplifier. Connect the cables properly. If the problem persists, the cables may be
defective. Replace the cables.
11
The unit or amplifier is muted. Press MUTE to turn mute off on the unit or amplifier. 9
The sound suddenly goes off. The Auto Power Standby function has turned off the power to the unit. Set the Auto Power Standby function (“AutoPowerStby” in the Setup
menu) to “Off”.
38
The protection circuit has kicked in. As a safety precaution, the protection circuit has been engaged.
Turn on the power to the unit again.
—
The remote control does not work or
function properly.
Wrong distance or angle. Use the remote control within the operative range. 10
Direct sunlight or lighting (from an inverter type of fluorescent lamp,
etc.) is striking the remote control sensor of this unit.
Reposition the orientation of the lighting or the unit.
—
The batteries are weak. Replace all batteries. 4

42
Bluetooth
Problem Cause Solution Page
Unable to pair the unit with the Bluetooth
device.
The Bluetooth function on the unit is disabled. Set “Bluetooth” in the Setup menu to “On”. 38
Another Bluetooth device is already connected to this unit. Disconnect the Bluetooth device that is currently paired, and then pair
with the desired Bluetooth device.
30
The unit and the Bluetooth devices are too far apart. Move the Bluetooth device closer to the unit. —
A device emitting electromagnetic waves (such as a microwave oven,
a wireless device and so on) may be located nearby.
Use this unit further away from any devices that emit electromagnetic
waves.
—
Your Bluetooth device does not support the A2DP protocol. Use a Bluetooth device that supports the A2DP protocol. —
The connection profile registered in the Bluetooth device may not be
functioning correctly for some reason.
Delete the Bluetooth profile in the Bluetooth device, and then connect
the Bluetooth device to this unit.
—
The passkey of the devices, such as a Bluetooth adaptor, that you want
to pair with the unit is other than “0000”.
Use a connecting device with a passkey “0000”.
—
No sound can be heard, or the sound
cuts off intermittently.
The volume level of the Bluetooth device is too low. Increase the volume level of the Bluetooth device. —
The Bluetooth device is not set to send audio signals to this unit. On the Bluetooth device, select this unit as the audio output destination. 30
The Bluetooth connection has been cut. Perform Bluetooth connection operations again. 30
The unit and the Bluetooth devices are too far apart. Move the Bluetooth device closer to the unit. —
A device emitting electromagnetic waves (such as a microwave oven,
a wireless device and so on) may be located nearby.
Use this unit further away from any devices that emit electromagnetic
waves.
—

43
USB/Network
Problem Cause Solution Page
The unit does not recognize the USB
device.
The USB device may not be properly connected to the USB jack. Turn off the power on this unit, and reconnect the USB device. 24
You may be using a USB device that is not formatted as FAT16/32. Be sure to use a USB device formatted as FAT16/32. 46
The folders and files on the USB device
are not displayed.
The data on the USB device may have been encrypted. Be sure to use a USB device that has not been encrypted.
46
Unable to use the network function. The network parameters (IP address) have not been obtained properly. Enable the DHCP server function on the router. Set “DHCP” in the Setup
menu to “On”. If you are manually setting network parameters without
using a DHCP server, make sure that the unit will have a unique IP
address that does not match the IP address of other devices on the
network.
36
The unit is unable to connect to the
Internet via a wireless LAN router
(access point).
The wireless LAN router (access point) is turned off. Turn on the power to the wireless LAN router (access point). —
The unit and the wireless LAN router (access point) are too far apart. Place the unit and the wireless LAN router (access point) closer to each
other.
—
There is an obstacle between the unit and the wireless LAN router
(access point).
Move the unit and the wireless router (access point) to locations with no
obstacles between them.
—
A wireless network cannot be found. A device emitting electromagnetic waves (such as a microwave oven,
a wireless device and so on) may be located nearby.
When connecting the unit wirelessly, do not use it near devices that emit
electromagnetic waves.
—
Access to the network is restricted by the firewall settings of the wireless
LAN router (access point).
Check the firewall settings of the wireless LAN router (access point).
—
The computer (server) cannot be
detected.
The media sharing settings on the PC (or server) may be incorrect. Modify the media sharing settings so that the unit will be able to access
the folders on the PC (or server).
—
Access is restricted due to the security settings on the PC (or server) or
router.
Check the security settings on the PC (or server) or router.
—
The unit and the PC are not connected to the same network. Check the network connection and the router settings to make sure that
they are connected to the same network.
—
Files on the PC (or server) are not
displayed (or played back).
The file format is not supported by the unit or the PC (or server). Be sure to use a file format that is supported by the unit and the PC.
46
Unable to play the Internet radio. The selected Internet radio station is currently out of service. There may be a network problem at the radio station, or the
broadcasting service may have been stopped.Try to play the station
later or select another station.
—
The currently-selected radio station is broadcasting silence. Some Internet radio stations broadcast silence at certain times of the
day. In this case, there is no problem with the reception, but no audio
will be produced. Try to play the station later or select another station.
—
Access to the network is restricted by the firewall settings of the network
devices (such as the router).
Check the firewall settings on your devices. The Internet radio can be
played only through the port designated by each radio station.
The port number varies depending on the radio station.
—

44
The iPhone does not detect the unit
when using AirPlay.
You may be using a router that supports multiple SSIDs. The router’s network separator function may be blocking access to the
unit. If you are connecting an iPhone to the unit, use an SSID that allows
access to the unit. (Try to connect to the Primary SSID.)
—
The unit is not detected when using a
dedicated application on a mobile
device.
The unit and the mobile device are not on the same network. Check the network connection and the router settings to make sure that
they are connected to the same network.
—
You may be using a router that supports multiple SSIDs. The router’s network separator function may be blocking access to the
unit. If you are connecting an iPhone to the unit, use an SSID that allows
access to the unit. (Try to connect to the Primary SSID.)
—
The firmware on this unit failed to update
via the network.
The network connection may not be good. Try updating again after a while. Alternatively, update the firmware using
a USB memory device.
39
The unit is unable to connect to the
wireless LAN router (access point).
MAC address filtering may have been enabled on the wireless LAN
router (access point).
The unit is unable to connect to the router if MAC address filtering is
enabled. Change the setting on the wireless LAN router (access point),
and try to connect the unit again.
—
Problem Cause Solution Page

45
Display messages
Message Meaning Solution
Access denied Access to the PC (or server) has been denied. Modify the media sharing settings so that the unit will be able to access the folders on the PC (or
server) (page 26).
Access error Unable to access the USB device. Turn off the power to the unit, turn it on again, and then reconnect the USB device. If the problem
persists, move the music files to another USB device and try again.
There is a problem with the signal path from the network to the unit. Make sure that your router and modem are turned on.
Check the connection between the unit and your router (or hub) (page 12).
No content There are no playable files in the selected folder. Select a folder that contains files supported by the unit.
Please wait The unit is preparing to connect to the network. Wait until the message disappears. If the message stays more than 3 minutes, turn off the unit and
then turn it on again.
Unable to play Unable to play a music file stored on your USB device. Check to see whether the file format is supported by the unit. If other devices are unable to play
the file, the song data might be corrupt.
Unable to play a music file stored on your PC (or server). Check to see whether the file format is supported by the unit. For information on music files
supported by this unit, please refer to “Supported devices and file formats” (page 46). If the unit
supports the file format, but still cannot play any files, the network may be overloaded with heavy
traffic.
Version error Firmware update failed. Update the firmware again (page 39).

46
The following devices and file formats can be used by the unit.
❑ Bluetooth devices
• You can use Bluetooth devices that support the A2DP protocol.
• Yamaha does not guarantee the connections of all Bluetooth devices.
❑ USB storage device
• This unit supports USB mass storage class devices (e.g., flash memories or portable
audio players) using the FAT16 or FAT32 format.
• Do not connect any devices other than USB mass storage class devices (such as
USB chargers or USB hubs), PCs, card readers, an external HDD, etc.
• USB devices with encryption cannot be used.
• Certain USB devices may not be recognized by the unit, or certain features may not
be compatible with the unit, depending on the model or manufacturer of the USB
storage device.
❑ AirPlay
AirPlay works with iPhone, iPad, and iPod touch with iOS 4.3.3 or later, Mac with OS X
Mountain Lion or later, and PC with iTunes 10.2.2 or later.
❑ USB, PC/NAS
* Linear PCM format only
• To play back FLAC files stored on your PC/NAS, you must install server software that
supports the sharing of FLAC files via DLNA on your PC, or use a NAS device that
supports FLAC files.
For more information, refer to the instruction manual for the server software.
• Digital Rights Management (DRM) encoded content cannot be played back.
Supported devices and file formats
Supported devices
Compatible models (as of June, 2017)
Made for.
iPhone 7 Plus, iPhone 7, iPhone SE, iPhone 6s Plus, iPhone 6s, iPhone 6 Plus,
iPhone 6, iPhone 5s, iPhone 5c, iPhone 5, iPhone 4s
iPad Pro (9.7" and 12.9"), iPad mini 4, iPad Air 2, iPad mini 3, iPad Air
iPad mini 2, iPad mini, iPad (3rd and 4th generation), iPad 2
iPod touch (5th and 6th generations)
File formats
File
Sampling
frequency
(kHz)
Bit depth (bit) Bitrate (kbps)
Number of
channels
Support for
gapless
playback
WAV *
32/44.1/48/
88.2/96/
176.4/192
16/24 - 2 ✔
MP3 32/44.1/48 - 8 - 320 2 -
WMA 32/44.1/48 - 8 - 320 2 -
MPEG-4 AAC 32/44.1/48 - 8 - 320 2 -
FLAC
32/44.1/48/
88.2/96/
176.4/192
16/24 - 2 ✔
ALAC
32/44.1/48/
88.2/96
16/24 - 2 ✔
AIFF
32/44.1/48/
88.2/96/
176.4/192
16/24 - 2 ✔
DSD
2.8 MHz/
5.6 MHz
1-2-

47
The trademarks used in this manual are as follows.
Supports iOS 7 or later for setup using Wireless Accessory
Configuration.
“Made for iPod,” “Made for iPhone,” and “Made for iPad” mean that
an electronic accessory has been designed to connect specifically
to iPod, iPhone, or iPad, respectively, and has been certified by the
developer to meet Apple performance standards.
Apple is not responsible for the operation of this device or its
compliance with safety and regulatory standards.
Please note that the use of this device with iPod, iPhone, or iPad may
affect wireless performance.
iTunes, AirPlay, iPad, iPhone, iPod, and iPod touch are trademarks of
Apple Inc., registered in the U.S. and other countries.
iPad Air and iPad mini are trademarks of Apple Inc.
App Store is a service mark of Apple Inc.
Windows™
Windows is a registered trademark of Microsoft Corporation in the
United States and other countries.
Internet Explorer, Windows Media Audio and Windows Media Player
are either registered trademarks or trademarks of Microsoft
Corporation in the United States and/or other countries.
Android™ Google Play™
Android and Google Play are trademarks of Google Inc.
The Wi-Fi CERTIFIED™ Logo is a certification mark of Wi-Fi
Alliance®.
The Wi-Fi Protected Setup™ Identifier Mark is a certification mark of
Wi-Fi Alliance®.
The Bluetooth
®
word mark and logos are registered trademarks
owned by Bluetooth SIG, Inc., and any use of such marks by Yamaha
Corporation is under license.
Bluetooth protocol stack (Blue SDK)
©1999-2014 OpenSynergy GmbH
All rights reserved. All unpublished rights reserved.
MusicCast is a trademark or registered trademark of Yamaha
Corporation.
Yamaha Eco-Label is a mark that certifies products of high
environmental performance.
Trademarks
Explanations regarding GPL/LGPL
This product utilizes GPL/LGPL open-source software in some
sections.
You have the right to obtain, duplicate, modify, and redistribute
only this open-source code.
For information on GPL/LGPL open source software, how to
obtain it, and the GPL/LGPL license, refer to the Yamaha
Corporation website:
http://download.yamaha.com/sourcecodes/musiccast/

48
The specifications of this unit are as follows.
Output Jacks
• Analog audio x 1 (RCA Unbalanced)
• Digital audio
Optical x 1
Coaxial x 1
Other Jacks
• USB×1 (USB2.0)
• NETWORK (Wired) x 1 (100Base-TX/10Base-T)
• NETWORK (Wireless) x 1 (IEEE802.11b/g/n)
USB
• Mass Storage Class USB Memory
• Current Supply Capacity: 1.0 A
Bluetooth
• Sink Function
- Source Device to this unit (ex. Smartphone/Tablet)
- Supported codec: SBC, AAC
• Source Function
- This unit to Sink Device (ex. Bluetooth Headphone)
- Supported codec: SBC
- Capable of Play/Stop Operation from Sink Device
(ex. Bluetooth Headphone)
• Supported profile................................................ A2DP, AVRCP
• Bluetooth version ................................................. Ver. 2.1+EDR
• Wireless output ............................................. Bluetooth Class 2
• Radio Frequency (Operational Frequency)
.............................................................2402 MHz to 2480 MHz
• Maximum Output Power (E.I.R.P) ................ 4.0 dBm (2.5 mW)
• Maximum communication distance
................................................10 m (33 ft) without interference
Network
• Compatible with DLNA ver. 1.5
• AirPlay supported
• Internet Radio
Wireless Network
• Wireless Network Standard: IEEE802.11b/g/n
• Radio Frequency Band: 2.4 GHz
• WPS (Wi-Fi Protected Setup)
- Push-Button-Method
• Capable of Direct Connection with Mobile Device
• Available Security Method
-WEP
- WPA2-PSK (AES)
-Mixed Mode
• Radio Frequency (Operational Frequency)
............................................................ 2412 MHz to 2472 MHz
• Maximum Output Power (E.I.R.P).............17.5 dBm (56.2 mW)
Audio Section
• Output level (1 kHz, 0 dB, FS44.1 kHz) ................... 2.0 ±0.3 V
• Signal to Noise Ratio (IHF-A Network)
(1 kHz, 0 dB, Fs 44.1 kHz) .............................110 dB or higher
• Dynamic range
(1 kHz, 0 dB, Fs 44.1 kHz) .............................100 dB or higher
• Harmonic Distortion
(1 kHz, 0 dB, Fs 44.1 kHz) ..............................0.003% or lower
• Frequency Response
Fs 44.1 kHz ............................................ 2 Hz to 20 kHz, –3 dB
Fs 48 kHz ...............................................2 Hz to 24 kHz, –3 dB
Fs 96 kHz ...............................................2 Hz to 48 kHz, –3 dB
Fs 192 kHz .............................................2 Hz to 96 kHz, –3 dB
General
• Power Supply
[Canada model] ............................................. .AC 120 V, 60 Hz
[General model] ..................................AC 110-240 V, 50/60 Hz
[Australia model]............................................. AC 240 V, 50 Hz
[U.K. and Europe models] .............................. AC 230 V, 50 Hz
[Asia model]........................................AC 220-240 V, 50/60 Hz
• Power Consumption.......................................................... 12 W
• Standby Power Consumption .......................................... 0.1 W
• Network Standby On/Bluetooth Standby Off
Wired................................................................................ 1.6 W
Wireless (WiFi) ................................................................. 1.5 W
Wireless Direct .................................................................1.7 W
• Network Standby On/
Bluetooth Standby On ...................................................... 1.7 W
• Dimensions (W x H x D) ............................ 435 × 87 × 289 mm
(17-1/8" × 3-3/8" × 11-3/8")
• Reference Dimensions (with wireless antenna upright)
(W x H x D) ........................................... 435 × 148 × 289 mm
(17-1/8" × 5-7/8" × 11-3/8")
• Weight ............................................................... 2.7 kg (6.0 lbs)
* The contents of this manual apply to the latest specifications
as of the publishing date. To obtain the latest manual, access
the Yamaha website and download the manual file.
Specifications

Manual Development Group
© 2017 Yamaha Corporation
Published 06/2017 IP-A0
AV16-0047
Yamaha Global Site
http://www.yamaha.com/
Yamaha Downloads
http://download.yamaha.com/
-
 1
1
-
 2
2
-
 3
3
-
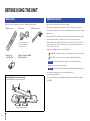 4
4
-
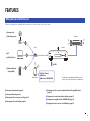 5
5
-
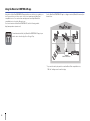 6
6
-
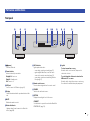 7
7
-
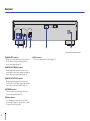 8
8
-
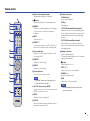 9
9
-
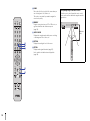 10
10
-
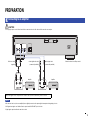 11
11
-
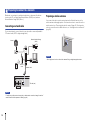 12
12
-
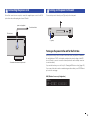 13
13
-
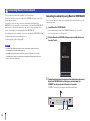 14
14
-
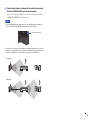 15
15
-
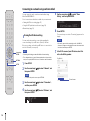 16
16
-
 17
17
-
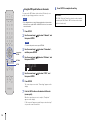 18
18
-
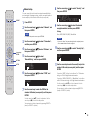 19
19
-
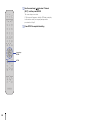 20
20
-
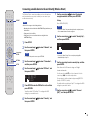 21
21
-
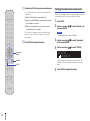 22
22
-
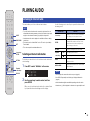 23
23
-
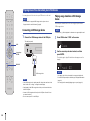 24
24
-
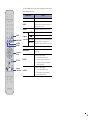 25
25
-
 26
26
-
 27
27
-
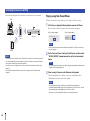 28
28
-
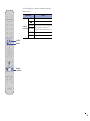 29
29
-
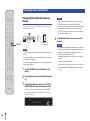 30
30
-
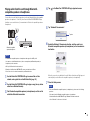 31
31
-
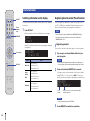 32
32
-
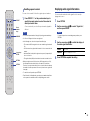 33
33
-
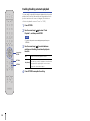 34
34
-
 35
35
-
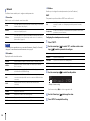 36
36
-
 37
37
-
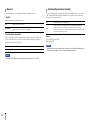 38
38
-
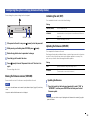 39
39
-
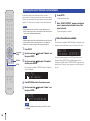 40
40
-
 41
41
-
 42
42
-
 43
43
-
 44
44
-
 45
45
-
 46
46
-
 47
47
-
 48
48
-
 49
49


in andere talen
- English: Yamaha NP-S303 Owner's manual
- italiano: Yamaha NP-S303 Manuale del proprietario
- русский: Yamaha NP-S303 Инструкция по применению
- français: Yamaha NP-S303 Le manuel du propriétaire
- Deutsch: Yamaha NP-S303 Bedienungsanleitung
- dansk: Yamaha NP-S303 Brugervejledning
- suomi: Yamaha NP-S303 Omistajan opas
- svenska: Yamaha NP-S303 Bruksanvisning
- Türkçe: Yamaha NP-S303 El kitabı