Pagina wordt geladen...
Pagina wordt geladen...

V-ZUG AG 1
Seite 3/8 155788 – H7.4062D-0
EN
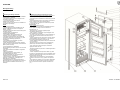
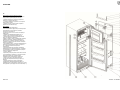
Preparation for assembly of the door fronts
- Tap two holes each on the left and right in the door
fronts using template (1).
- Attach support bracket (6) to the elongated holes
with screws (7).
- Tap two holes each on the bottom left and right using
template (18).
- Attach clamp (13) to the bottom left and right of the
door fronts using screws (14).
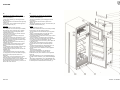
Installation
- Place the appliance in front of the niche.
- If the refrigerator is not to be started up immediately
after assembly, put the control into the “0” position.
- Insert the plug and push the refrigerator almost
completely into the niche.
- Glue compensation profile (10) onto the outside of
the housing on the grip side.
- Hang the door fronts on levelling screws (8) and
secure with nuts (5).
- With the doors closed, push the appliance in so it is
flush with the front, through hinges (17) on the side,
and tighten the screws on the top and bottom through
attachment straightedge (19).
- Align the door fronts from the side with screws (7)
and tighten the screws.
- Adjust the height using levelling screws (8) (upper
door first, and ensure that the vertical gaps are
parallel).
- To compensate for the door loading, shift the height
levelling of the upper door upwards by 1 mm.
- Adjust the depth by pushing the door fronts into the
elongated holes.
- Tighten nuts (5).
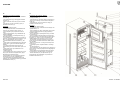
- Insert attachment bracket (15) entirely into clamp
(13) (engagement) and screw annulated self-tapping
screws (16) into the prepunched holes on the
refrigerator.
- Attach covers (4) over the levelling device, secure
them with screws (3) and attach cover caps (2).
- Secure attachment bracket (12) to the refrigerator door
with pan head tapping screws (9) driven into the
prepunched holes, and use screws (11) to secure it to
the inner side of the door front.
NL
Voorbereiding voor montage van de deurbladen
- Maak zowel links- als rechtsboven 2 gaten in de
deurbladen met de sjabloon (1).
- Bevestig de klemhaken (6) aan de langsgaten met de
schroeven (7).
- Maak zowel links- als rechtsonder 2 gaten met de
sjabloon (18).
- Bevestig de slangbeugels (13) links- en rechtsonder op de
deurbladen met de schroeven (14).
Inbouw
- Plaats het toestel voor de nis.
- Wanneer de koelkast niet meteen na de montage in bedrijf
wordt genomen, zet u de regelaar op stand „0”.
- Duw de stekker erin en schuif de kast bijna in zijn geheel
in de nis.
- Plak het compensatieprofiel (10) aan de zijde van de
handgreep op de buitenkant van de behuizing.
- Hang de deurbladen aan de stelschroeven (8) op en zet ze
met de moeren (5) vast.
- Schuif het toestel er met gesloten deuren vlak met de
voorzijde in. Schroef het aan de zijkant door de scharnieren
(17) en boven en onder door klemlinialen (19) vast.
- Lijn de deurbladen met de schroeven (7) aan de zijkant uit
en schroef ze vast.
- Stel de hoogte met de stelschroeven (8) af (eerst de
bovenste deur en let erop dat verticale kieren parallel
lopen).
- Verzet de hoogtenivellering van de bovenste deur 1 mm
naar boven ter compensatie van de deurbelasting.
- Stel de diepte af door de deurbladen in de langsgaten te
schuiven.
- Draai de moeren (5) vast.
- Schuif de bevestigingshaken (15) volledig in de
slangbeugels (13) (raster) en schroef ze met de
draadschroeven (16) aan de koelkast in de voorgestanste
gaten vast.
- Breng de afdekkingen (4) over het nivelleerapparaat aan,
bevestig ze met de schroeven (3) en plaats de afdekkappen
(2).
- Breng de bevestigingshaken (12) op de koelkastdeur aan
met de plaatschroeven (9) in de voorgestanste gaten en aan
de binnenzijde van het deurblad met de schroeven (11).

V-ZUG AG 1
Seite 4/8 155788 – H7.4062D-0
EN
Changing the direction in which the doors open
- Remove the covers from the attachment holes and
use a knife to carefully remove cap (20).
- Remove the covers over the hinge mounts (lift
against the front side facing the centre of the
refrigerator and remove), unscrew the hinges and
mount them again on the other side.
- Mount the covers again.
- Repeat the process with the second door.
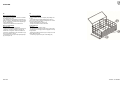
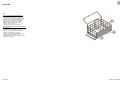
Converting the bottle pullout
(if required)
- Pull out pullout (24) as far as it will go.
- Use handle (25) to pull the basket upwards with a
jerking motion.
- Hold the basket on the inner wall across from the
hinges, and lift the front of the basket slightly.
- Place the basket with the rear edge onto ball rails
(26) and push them in together as far as they will go.
- Snap in the front part of the basket by pressing down
on handle (25).
.
NL
Deurhengsels van de koelkast
- Verwijder de afdekkingen uit de bevestigingsgaten en de
kap (20) voorzichtig met een mes.
- Verwijder de afdekkingen via de scharnierbevestigingen
(de naar het kastmidden gerichte kopzijde optillen en
afnemen), schroef de scharnieren los en monteer ze
opnieuw kruisgewijs.
- Monteer de afdekkingen opnieuw.
- Herhaal de procedure met de tweede deur.
De flessenlade verplaatsen
(indien nodig)
- Trek de lade (24) er tot de aanslag uit.
- Trek de korf aan de bedieningsbeugel (25) met een ruk
omhoog.
- Houd de korf tegen de binnenwand aan die zich tegenover
de scharnieren bevindt, til de korf daarbij aan de voorzijde
iets op.
- Plaats de korf met de achterzijde op de kogelrails (26) en
schuif het geheel er tot de aanslag in.
- Klik de voorzijde van de korf vast door de
bedieningsbeugel (25) omlaag te drukken.
Pagina wordt geladen...
Pagina wordt geladen...
Pagina wordt geladen...
Pagina wordt geladen...
Documenttranscriptie
1 V-ZUG AG EN NL Preparation for assembly of the door fronts Voorbereiding voor montage van de deurbladen - Tap two holes each on the left and right in the door fronts using template (1). - Attach support bracket (6) to the elongated holes with screws (7). - Tap two holes each on the bottom left and right using template (18). - Attach clamp (13) to the bottom left and right of the door fronts using screws (14). - Maak zowel links- als rechtsboven 2 gaten in de deurbladen met de sjabloon (1). - Bevestig de klemhaken (6) aan de langsgaten met de schroeven (7). - Maak zowel links- als rechtsonder 2 gaten met de sjabloon (18). - Bevestig de slangbeugels (13) links- en rechtsonder op de deurbladen met de schroeven (14). Installation Inbouw - Place the appliance in front of the niche. - If the refrigerator is not to be started up immediately after assembly, put the control into the “0” position. - Insert the plug and push the refrigerator almost completely into the niche. - Glue compensation profile (10) onto the outside of the housing on the grip side. - Hang the door fronts on levelling screws (8) and secure with nuts (5). - With the doors closed, push the appliance in so it is flush with the front, through hinges (17) on the side, and tighten the screws on the top and bottom through attachment straightedge (19). - Align the door fronts from the side with screws (7) and tighten the screws. - Adjust the height using levelling screws (8) (upper door first, and ensure that the vertical gaps are parallel). - To compensate for the door loading, shift the height levelling of the upper door upwards by 1 mm. - Adjust the depth by pushing the door fronts into the elongated holes. - Tighten nuts (5). - Insert attachment bracket (15) entirely into clamp (13) (engagement) and screw annulated self-tapping screws (16) into the prepunched holes on the refrigerator. - Attach covers (4) over the levelling device, secure them with screws (3) and attach cover caps (2). - Secure attachment bracket (12) to the refrigerator door with pan head tapping screws (9) driven into the prepunched holes, and use screws (11) to secure it to the inner side of the door front. - Plaats het toestel voor de nis. - Wanneer de koelkast niet meteen na de montage in bedrijf wordt genomen, zet u de regelaar op stand „0”. - Duw de stekker erin en schuif de kast bijna in zijn geheel in de nis. - Plak het compensatieprofiel (10) aan de zijde van de handgreep op de buitenkant van de behuizing. - Hang de deurbladen aan de stelschroeven (8) op en zet ze met de moeren (5) vast. - Schuif het toestel er met gesloten deuren vlak met de voorzijde in. Schroef het aan de zijkant door de scharnieren (17) en boven en onder door klemlinialen (19) vast. - Lijn de deurbladen met de schroeven (7) aan de zijkant uit en schroef ze vast. - Stel de hoogte met de stelschroeven (8) af (eerst de bovenste deur en let erop dat verticale kieren parallel lopen). - Verzet de hoogtenivellering van de bovenste deur 1 mm naar boven ter compensatie van de deurbelasting. - Stel de diepte af door de deurbladen in de langsgaten te schuiven. - Draai de moeren (5) vast. - Schuif de bevestigingshaken (15) volledig in de slangbeugels (13) (raster) en schroef ze met de draadschroeven (16) aan de koelkast in de voorgestanste gaten vast. - Breng de afdekkingen (4) over het nivelleerapparaat aan, bevestig ze met de schroeven (3) en plaats de afdekkappen (2). - Breng de bevestigingshaken (12) op de koelkastdeur aan met de plaatschroeven (9) in de voorgestanste gaten en aan de binnenzijde van het deurblad met de schroeven (11). Seite 3/8 155788 – H7.4062D-0 1 V-ZUG AG EN NL Changing the direction in which the doors open Deurhengsels van de koelkast - Remove the covers from the attachment holes and use a knife to carefully remove cap (20). - Remove the covers over the hinge mounts (lift against the front side facing the centre of the refrigerator and remove), unscrew the hinges and mount them again on the other side. - Mount the covers again. - Repeat the process with the second door. - Verwijder de afdekkingen uit de bevestigingsgaten en de kap (20) voorzichtig met een mes. - Verwijder de afdekkingen via de scharnierbevestigingen (de naar het kastmidden gerichte kopzijde optillen en afnemen), schroef de scharnieren los en monteer ze opnieuw kruisgewijs. - Monteer de afdekkingen opnieuw. - Herhaal de procedure met de tweede deur. Converting the bottle pullout (if required) - Pull out pullout (24) as far as it will go. - Use handle (25) to pull the basket upwards with a jerking motion. - Hold the basket on the inner wall across from the hinges, and lift the front of the basket slightly. - Place the basket with the rear edge onto ball rails (26) and push them in together as far as they will go. - Snap in the front part of the basket by pressing down on handle (25). De flessenlade verplaatsen (indien nodig) - Trek de lade (24) er tot de aanslag uit. - Trek de korf aan de bedieningsbeugel (25) met een ruk omhoog. - Houd de korf tegen de binnenwand aan die zich tegenover de scharnieren bevindt, til de korf daarbij aan de voorzijde iets op. - Plaats de korf met de achterzijde op de kogelrails (26) en schuif het geheel er tot de aanslag in. - Klik de voorzijde van de korf vast door de bedieningsbeugel (25) omlaag te drukken. . Seite 4/8 155788 – H7.4062D-0-
 1
1
-
 2
2
-
 3
3
-
 4
4
-
 5
5
-
 6
6
-
 7
7
-
 8
8


V-ZUG 51028 Installatie gids
- Type
- Installatie gids
- Deze handleiding is ook geschikt voor
in andere talen
- English: V-ZUG 51028 Installation guide
- русский: V-ZUG 51028 Инструкция по установке
- français: V-ZUG 51028 Guide d'installation
- Deutsch: V-ZUG 51028 Installationsanleitung
- svenska: V-ZUG 51028 Installationsguide