
Instructions for Use EN
Istruzioni di uso IT
1MCFY
1630881-b

2
EN
Contents
Safety Information .............................................................................................................................. 3
Safety Instructions ............................................................................................................................. 7
The advantages of microwaves ......................................................................................................... 8
Description of your oven .................................................................................................................... 9
Description of Functions .................................................................................................................. 10
Basic controls ................................................................................................................................... 11
Basic Functions ................................................................................................................................ 13
Special functions .............................................................................................................................. 18
Using the Browning Plate ................................................................................................................ 21
When the oven is working... ............................................................................................................. 22
Defrosting .......................................................................................................................................... 23
Cooking with a microwave oven ..................................................................................................... 25
Cooking with the Grill ....................................................................................................................... 27
Roasting and baking......................................................................................................................... 30
What kind of ovenware can be used? ............................................................................................. 32
Oven Cleaning and Maintenance ..................................................................................................... 34
What should I do if the oven doesn’t work? ................................................................................... 36
Technical characteristics ................................................................................................................. 37
Installation instructions ................................................................................................................... 38
Installation ......................................................................................................................................... 76
Dear Customer,
Thank you for choosing this BARAZZA product.
We ask you to read the instructions in this booklet very carefully as this will allow you to get the best
results from using it.
KEEP THE DOCUMENTATION OF THIS PRODUCT FOR FUTURE REFERENCE.
Always keep the instruction manual handy. If you lend the appliance to someone else give them
the manual as well!
The user manual is also available for download at www.barazzasrl.it

3
EN
Safety Information
Before the installation and use of the appliance, carefully read
the supplied instructions. The manufacturer is not responsible if an
incorrect installation and use causes injuries and damages. Always
keep the instructions with the appliance for future reference.
CHILDREN AND VULNERABLE PEOPLE SAFETY
Warning! Risk of suffocation, injury or permanent disability.
This appliance can be used by children aged from 8 years and
above and persons with reduced physical, sensory or mental
capabilities or lack of experience and knowledge if they are
supervised by an adult or a person who is responsible for their
safety.
Do not let children play with the appliance.
Keep all packaging away from children.
Warning: Keep children away from the appliance when it
operates or when it cools down. Accessible parts are hot.
If the appliance has a child safety device, we recommend that
you activate it. Children under 3 years must not be left
unsupervised in the vicinity of the appliance.
Cleaning and user maintenance shall not be made by children
without supervision.
GENERAL SAFETY
This appliance is intended to be used in household and similar
applications such as:
– staff kitchen areas in shops, offices and other working
environments;
– farm houses;
– by clients in hotels, motels and other residential environments;
– bed and breakfast type environments.
Internally the appliance becomes hot when in operation. Do not
touch the heating elements that are in the appliance. Always use
oven gloves to remove or put in accessories or ovenware.

4
EN
Safety Information
Warning: Do not heat liquids and other foods in sealed
containers. They are liable to explode.
Only use utensils that are suitable for use in microwave ovens.
When heating food in plastic or paper containers, keep an eye on
the appliance due to the possibility of ignition.
The appliance is intended for heating food and beverages. Drying
of food or clothing and heating of warming pads, slippers,
sponges, damp cloth and similar may lead to risk of injury,
ignition or fire.
Warning! The oven cannot be used if:
- The door is not closed correctly;
- The door hinges are damaged;
- The surfaces of the contact between the door and the oven front
are damaged;
- The door window glass is damaged;
- There is frequent electrical arcing inside the oven even though
there is no metal object inside.
The oven can only be used again after it has been repaired by a
Technical Assistance Service technician.
If smoke is emitted, switch off or unplug the appliance and keep
the door closed in order to stifle any flames.
Microwave heating of beverages can result in delayed eruptive
boiling. Care must be taken when handling the container.
The contents of feeding bottles and baby food jars shall be stirred
or shaken and the temperature checked before consumption, in
order to avoid burns.
Eggs in their shell and whole hard-boiled eggs should not be
heated in the appliance since they may explode, even after
microwave heating has ended.
INSTALLATION
The electrical installation is to be set up so that the appliance can
be isolated from the mains with a minimum 3mm all-pole contact
separation.

5
EN
Safety Information
Suitable separation devices include e.g. cutouts, fuses (screw
fuses are to be taken out of the holder), RCD’s and contactors.
This installation must comply with current regulations.
If the electrical connection is done through a plug and this
remains accessible after installation, then it is not necessary to
provide the mentioned separation device.
Protection against electric shock must be provided by the
electrical installation
Warning: The oven must be earthed.
CLEANING
The appliance should be cleaned regularly and any food deposits
removed.
Failure to maintain the appliance in a clean condition could lead
to deterioration of the surface that could adversely affect the life
of the appliance and possibly result in a hazardous situation.
Do not use harsh abrasive cleaners or sharp metal scrapers to
clean the glass door since they can scratch the surface, which
may result in shattering of the glass.
Do not use a steam cleaner to clean the appliance.
The door contact surfaces (the front of the cavity and the inside
part of the doors) must be kept very clean in order to ensure the
oven functions correctly.
Please follow the instructions regarding cleaning in the section
"Oven Cleaning and Maintenance".
REPAIRS
Warning: Before maintenance cut the power supply.
Warning: Only a competent person can carry out any service or
repair operation that involves the removal of a cover which gives
protection against exposure to microwave energy.
Warning: If the door or door seals are damaged, the appliance
must not be operated until it has been repaired by a competent
person.

6
EN
Safety Information
If the power cable is damaged it should be substituted by the
manufacturer, authorized agents or technicians qualified for this
task in order to avoid dangerous situations. Furthermore, special
tools are required for this task.
Repair and maintenance work, especially of current carrying
parts, can only be carried out by technicians authorized by the
manufacturer.

7
EN
Safety Instructions
Warning! Do not heat pure alcohol or
alcoholic drinks in the microwave. FIRE
RISK!
Beware!
To avoid food overheating or burning it is
very important not to select long time periods
or power levels that are too high when
heating small quantities of food. For example,
a bread roll can burn after 3 minutes if the
power selected is too high.
For toasting, use just the grilling function and
watch the oven all the time. It you use a
combined function to toast bread it will catch
fire in a very short time.
Make sure you never catch the power cables
of other electrical appliances in the hot door
or the oven. The cable insulation may melt.
Danger of short-circuiting!
Take care when heating liquids!
When liquids (water, coffee, tea, milk, etc.)
are nearly at boiling point inside the oven and
are taken out suddenly, they may spurt out of
their containers.
DANGER OF INJURIES AND BURNS!
To avoid that type of situation when heating
liquids, put a teaspoon or glass rod inside the
container.
Avoid damaging the oven or other
dangerous situations by following these
instructions:
Do not switch on the oven without the
turntable support, the turntable ring and the
respective plate being in place.
Never switch on the microwave when it is
empty. If there is no food inside there may be
an electrical overcharge and the oven could
be damaged.
RISK OF DAMAGE!
For carrying out oven programming tests put
a glass of water inside the oven. The water
will absorb the microwaves and the oven will
not be damaged.
Do not cover or obstruct the ventilation
openings.
Use only dishes suitable for microwaves.
Before using dishes and containers in the
microwave, check that these are suitable
(see the section on types of dishes).
Never remove the mica cover on the ceiling
of the oven interior! This cover stops fat and
pieces of food damaging the microwave
generator.
Do not keep any inflammable object inside
the oven as it may burn if the oven is
switched on.
Do not use the oven as a pantry.
Do not use the oven for frying as it is
impossible to control the temperature of oil
heated by microwaves.
Do not lean or sit on the open oven door.
This may damage the oven, especially in the
hinge zone. The door can bear a maximum
weight of 8 kg.
The turntable and the grills can bear a
maximum load of 8 kg. To avoid damaging
the oven, do not exceed this load.

8
EN
The advantages of microwaves
In conventional ovens, heat radiated by electrical
elements or gas burners slowly penetrates the
food from outside to inside. On account of this
there is a major amount of energy is wasted
heating the air, the oven components and the food
containers.
In a microwave oven, heat is generated by the
food itself and the heat travels from inside to
outside. No heat is lost to the air, the walls of the
oven cavity or the dishes and containers (if these
are suitable for use in microwave oven), in other
words, only the food is heated.
Microwave ovens have the following advantages:
1. Shorter cooking times; in general these are
up to 3/4 less than the time required for
conventional cooking.
2. Ultra-fast food defrosting, thus reducing the
danger of bacterial development.
3. Energy savings.
4. Conservation of the nutritional value of foods
due to the shorter cooking times.
5. Easy to clean.
How a microwave oven works
In a microwave oven there is a high tension valve
called a magnetron which converts electrical
energy into microwave energy. These
electromagnetic waves are channelled to the
interior of the oven through a wave guide and
distributed by a metallic spreader or through a
turntable.
Inside the oven the microwaves propagate in all
directions and are reflected by the metal walls,
uniformly penetrating the food.
Why food heats up
Most foods contain water and water molecules
vibrate when subjected to microwaves.
The friction between molecules produces heat
which raises the temperature of the food, de-
freezing it, cooking it or keeping it hot.
Since the heat arises inside the food:
This can be cooked with little or no liquid or
fats/oils;
De-freezing, heating or cooking in a
microwave oven is quicker than in a
conventional oven;
The vitamins, minerals and nutritional
substances in the food are conserved;
The natural colour and aroma of the food are
unchanged.
Microwaves pass through china, glass, cardboard
or plastic but do not go through metal. For this
reason, metal containers or ones with metal parts
must not be used in a microwave oven.
Microwaves are reflected by metal...
... but go through glass and china...
... and are absorbed by foods.

9
EN
Description of your oven
1.
Function lights
4a.
Power/Weight indication lights
2.
Function selection key
5.
Clock/ Time selection key
3.
Oven Temperature selection key
5a.
Clock/ Time indication lights
3a.
Oven Temperature indication light
6.
Start and Stop/ Safety blocking keys
4.
Power/Weight selection key
23:15
1
2
6
5
4
3
800
160
3a
4a
5a
1. Control panel
6. Turntable support
2. Door window glass
7. Turntable ring
3. Lateral supports
8. Turntable plate
4. Catches
9. Rectangular Glass tray
5. Hot Air Output
10. Rectangular Rack
11. Browning Plate

10
EN
Description of Functions
Symbol
Function
Microwave Power
Output
Foods
Microwave
200 W
Slow defrosting for delicate foods; keeping food hot.
400 W
Cooking with little heat; boiling rice.
Rapid defrosting, heating baby food.
600 W
Heating and cooking food.
800 W
Cooking vegetables and food.
Cooking and heating carefully.
Heating and cooking small portions of food.
1000 W
Rapidly heating liquids.
Microwave
+ Grill
200 W
Toasting food.
400 W
Grilling poultry and meat.
600 W
Cooking pies and cheese-topped dishes.
Grill
Grilling food.
Grill + Fan
---
Grilling meat and fish.
Grilling poultry.
Potatoes – deep-frozen, defrosting and roasting.
Hot-Air
---
Roasting and baking.
Microwaves +
Hot-Air
200-600 W
Quick meat, fish and poultry roasting.
Baking cakes.

11
EN
Basic Controls
Setting the clock
After your microwave oven is first plugged in or
after a power failure, the clock display will flash to
indicate that the time shown is not correct. To set
the clock, proceed as follows:
1. Press the Clock key. The hour numbers will
start to flash.
2. Press key “-” and “+” to set the hours.
3. Press again the Clock key to set the minutes.
The minute numbers will start to flash.
4. Press key “-” and “+” to set the minutes.
5. To finish, press the Clock key again.
Hiding/Displaying the Clock
If the clock display disturbs you, you can hide it by
pressing the Clock key for 3 seconds. The dots
that separate the hours and minutes will flash but
the rest of the clock display will be hidden.
If you want to see the clock display again, press
the Clock key again for 3 seconds.
Safety blocking
The oven functioning can be blocked (for
example, to stop it being used by children).
1. To block the oven, press the Stop key for 3
seconds. You will hear a sound signal and the
display will show the word “SAFE”. The oven is
blocked in this state and cannot be used.
2. To unblock the oven, press the Stop key
again for 3 seconds. You will hear a sound
signal and the display will show the time
again.

12
EN
Basic Controls
Stopping the rotating plate
1. To stop the rotating plate, press the “+” key and
the “Stop” key at the same time
2. To start plate rotation again, press the “+” Key
and the “Stop” key at the same again.

13
EN
Basic Functions
Microwave oven
Use this function to cook and heat vegetables, potatoes, rice, fish and meat.
1. Press the Microwave function key. The
function key lights up.
2. Press the Power Selection key to change the
microwave power. The respective light will start
to flash. If you do not press this key, the oven
operates at 800 W power.
3. To change the microwave power press key “-”
and “+”.
4. Press the Time Selection key to change the
operating time. The correspondent light will
start to flash.
5. Press key “-” and “+”, to change the function
time (e.g. 1 minute).
6. Press the START key. The oven will start to
operate
NOTE: When 1000 W power is selected, the
operating time is limited to a maximum of 15
minutes.
Microwave oven – Quick Start
Use this function to rapidly heat foods with high water content, such as water, coffee, tea or thin soup.
1. Press the Start key. The oven starts to operate
in the Microwave function at maximum power
for 30 seconds.
2. If you want to increase the operating time press
the Start key again. Each time you press this
key the operating time will be increased by 30
seconds.
NOTE: When 1000 W power is selected, the
operating time is limited to a maximum of 15
minutes.
00:30
1000
1,2

14
EN
Basic Functions
Grill
Use this function to brown the top of food quickly.
1. Press the function key Grill. The function key
lights up.
2. Press the Time Selection key to change the
operating time. The correspondent light will
start to flash.
3. Press key “-” and “+”, to change the function
time (e.g. 15 minutes).
4. Press the Start key. The oven will start to
operate.
Microwave + Grill
Use this function to cook lasagne, poultry, roast potatoes and toasted foods.
1. Press the function key Microwave + Grill. The
function key lights up.
2. Press the Power Selection key to change the
microwave power. The respective light will
flash. If you do not press this key, the oven
operates at 600 W power.
3. To change the microwave power press key “-”
and “+”.
4. Press the Time Selection key to change the
operating time. The respective light will start to
flash.
5. Press key “-” and “+”, to change the function
time (e.g. 10 minutes).
6. Press the Start key. The oven will start to
operate.
NOTE: In combined mode, the microwave oven
power is limited to 600 W.

15
EN
Basic Functions
Hot air
Use this function to bake and roast.
1. Press the function key Hot air. The function
key lights up.
2. Press the Temperature Selection key to
change the temperature. The respective light
will flash. If you do not press this key, the
oven operates at 160 ºC.
3. To change the temperature press key “-” and
“+”.
4. Press the Time Selection key to change the
operating time. The respective light will start
to flash.
5. Press key “-” and “+”, to change the function
time (e.g. 12 minutes).
6. Press the Start key. The oven will start to
operate.
Microwave + Hot air
Use this function to bake and roast
1. Press the function key Microwave + Hot air.
The function key lights up.
2. Press the Temperature Selection key to
change the temperature. The respective light
will flash. If you do not press this key, the
oven operates at 160 ºC.
3. To change the microwave power press the
“-“ and “+” keys.
4. Press the Power Selection key to change
the power. The respective light will start to
flash. If you do not press this key, the oven
operates at 400 W.
5. Press key “-” and “+”, to change the
temperature.
6. Press the Time Selection key to change the
operating time. The respective light will start
to flash.
7. Press key “-” and “+”, to change the function
time (e.g. 12 minutes).
8. Press the Start key. The oven will start to
operate,
NOTE: In combined mode, the microwave
oven power is limited to 600 W.
20:00
160
4
1
3,5
6
2
20:00
400
160
6
4
1
3,5,7
8
2

16
EN
Basic Functions
Grill with Fan
Use this function for crispy roast meat, fish, poultry or French fries
1. Press the function key Grill with Fan. The
function key lights up.
2. Press the Temperature Selection key to
change the temperature. The respective light
will flash. If you do not press this key, the
oven operates at 160 ºC.
3. To change the temperature press key “-” and
“+”.
4. Press the Time Selection key to change the
operating time. The respective light will start
to flash
5. Press key “-” and “+”, to change the function
time (e.g. 12 minutes).
6. Press the Start key. The oven will start to
operate.
Defrosting by time (manual)
Use this function to defrost any type of food quickly.
1. Press the function key Defrosting by time.
The function key lights up.
2. Press the Time Selection key to change the
function time. The respective light will flash.
3. Press key “-” and “+”, to change the function
time (e.g. 10 minutes).
4. Press the Start key. The oven will start to
operate.
20:00
160
4
1
3,5
6
2

17
EN
Basic Functions
Defrosting by weight (automatic)
Use this function to defrost meat, poultry, fish, fruit and bread quickly.
1. Press the function key Defrosting by
weight. The function key lights up.
2. Press the Food Type selection key to
change the food type. The respective lights
will flash.
3. Press key “-” and “+”, to change the
programme, e.g. “Pr 01” (see following
table).
4. Press the Weight Selection key to define
the food weight. The respective light will
flash.
5. Press key “-” and “+”, to change the weight.
6. Press the Start key. The oven will start to
operate.
Note: Turn the food whenever the oven lets out
a sound signal and the display flashes the
word: .
The following table shows the defrosting by weight function programmes, indicating weight intervals, and
defrosting and standing times (in order to ensure the food is of a uniform temperature).
Programme
Food
Weight (g)
Time (min)
Standing time (min)
Pr 01
Meat
100 – 2000
2 – 43
20 – 30
Pr 02
Poultry
100 – 2500
2 – 58
20 – 30
Pr 03
Fish
100 – 2000
2 – 40
20 – 30
Pr 04
Fruit
100 – 500
2 – 13
10 – 20
Pr 05
Bread
100 – 800
2 – 19
10 – 20
Important Note: see “General instructions for defrosting”.

18
EN
Special functions
Special Function P1: Heating food
Use this function to heat various types of food.
1. Press the function key Special function P1.
The function key lights up.
2. Press the Food Type selection key to
change the food type. The respective lights
will flash.
3. Press key “-” and “+”, to change the
programme, e.g. “A 01” (see following table).
4. Press the Weight Selection key to define
the food weight. The respective light will
flash.
5. Press key “-” and “+”, to change the weight.
6. Press the Start key. The oven will start to
operate.
The following table shows the Special Function P1 programmes, indicating weight intervals, and
defrosting and standing times (in order to ensure the food is of a uniform temperature).
Programme
Food
Weight (kg)
Time (min)
Standing time
(min)
A 01
Soup
200 – 1500
3 – 15
Turn 1-2 x, keep
covered, 1-2 min.
A 02
Pre-prepared dishes
dense food
200 – 1500
3 – 20
Turn 1-2 x, keep
covered, 1-2 min.
A 03
Pre-prepared dishes
e.g. goulash
200 – 1500
3 – 18
Turn 1-2 x, keep
covered, 1-2 min.
A 04
Vegetables
200 – 1500
2,6 – 14
Turn 1-2 x, keep
covered, 1-2 min.
Important Notes:
Always use dishes for use in the
microwave oven and a lid or cover to avoid
loss of liquids.
Stir or mix the foods several times during
heating.
The time required to heat the food will
depend on its initial temperature. Food
taken straight from the fridge will take
longer to heat up than food that is at room
temperature. If the food temperature is not
what is wanted, select a greater or lesser
weight next time you heat up the food.
After heating, stir the food or shake the
container and then leave the food to stand for
some time to allow the temperature to become
uniform throughout the food.
Warning! After heating the container may be very
hot. Although microwaves do not heat up most
containers, these may heat up through heat
transmission from food.

19
EN
Special functions
Special Function P2: Cooking
Use this function to cook fresh food.
1. Press the function key Special function P2.
The function key lights up.
2. Press the Food Type selection key to
change the food type. The respective lights
will flash.
3. Press key “-” and “+”, to change the
programme, e.g. “b 01” (see following table).
4. Press the Weight Selection key to define
the food weight. The respective light will
flash.
5. Press key “-” and “+”, to change the weight.
6. Press the Start key. The oven will start to
operate.
The following table shows the Special Function P2 programmes, indicating weight intervals, and
defrosting and standing times (in order to ensure the food is of a uniform temperature).
Programme
Food
Weight (kg)
Time (min)
Note
b 01
Potatoes
200 – 1000
4 – 17
Turn 1-2 x, keep
covered
b 02
Vegetables
200 – 1000
4 – 15
Turn 1-2 x, keep
covered
b 03
Rice
200 – 500
13 – 20
One part rice, two
parts water, keep
covered
b 04
Fish
200 – 1000
4 – 13
Keep covered
Important Notes:
Always use dishes for use in the
microwave oven and a lid or cover to avoid
loss of liquids.
Stir or mix the foods several times during
heating.
Warning! After heating, the container may be
very hot. Although microwaves do not heat up
most containers, these may heat up through
heat transmission from food.
Preparation instructions:
Fish pieces – Add 1 to 3 soup spoons of water
or lemon juice.
Rice – Add water equivalent to twice or three
times the quantity of rice.
Unpeeled potatoes – Use potatoes of the
same size. Wash them and prick the skin
several times. Do not add water.
Peeled potatoes and Fresh vegetables– Cut
into pieces of the same size. Add a soup
spoon of water for every 100 g of vegetables,
and salt to taste.
b 01
200
2
4
1
3,5
6

20
EN
Special functions
Special Function P3: Defrosting & Toasting
Use this function to cook and toast various types of food.
1. Press the function key Special function P3.
The function key lights up.
2. Press the Food Type selection key to
change the food type. The respective lights
will flash.
3. Press key “-” and “+”, to change the
programme, e.g. “C 01” (see following table).
4. Press the Weight Selection key to define
the food weight. The respective light will
flash.
5. Press key “-” and “+”, to change the weight.
6. Press the Start key. The oven will start to
operate.
The following table shows the Special Function P3 programmes, indicating weight intervals, and
defrosting and standing times (in order to ensure the food is of a uniform temperature).
Programme
Food
Weight (kg)
Time (min)
Note
C 01
Pizza
300 – 550
8 – 12
Rack
C 02
Deep frozen food
350 – 500
8 – 14
Turn 1 x, keep
covered
C 03
Potato dishes, frozen
200 – 450
10 – 12
Glass plate
Important Notes:
Always use dishes that are suitable for
microwaving and heat resistant (eg baking
dishes). The oven produces very high
temperatures. For programme C 02 always
use a lid, to prevent loss of liquids.
Warning! After heating, the container may be
very hot. Although microwaves do not heat most
containers, they can get very hot due to heat
transfer
Preparation instructions:
Frozen pizza – Use pre-cooked frozen pizzas
and pizzas-rolls.
Deep-frozen food – Use lasagne, cannelloni,
prawn soufflé, all frozen. Keep covered.
Potato dishes, frozen – Chips, potato
croquettes and fried potatoes must be suitable
for preparation in the oven.

21
EN
Using the Browning Plate
Normally when cooking food, such as pizzas or
pies, on a grill or in a microwave oven, the dough
or pastry becomes soggy. This can be avoided by
using a browning plate. As a high temperature is
reached quickly on the bottom of the browning
plate, the crust turns crisp and brown.
The browning plate can also be used for bacon,
eggs, sausages, etc.
VERY IMPORTANT NOTES:
Use oven gloves at all times as the browning
plate will become very hot.
Never place the browning plate in the oven
without the glass plate.
Do not place any recipients on the browning
plate that are not heat-resistant (plastic bowls
for example).
How to cook with the browning plate:
1. Preheat the browning plate by selecting
the Microwave and Grill function for 3 to 5
minutes with a 600 W microwaves power
level.
2. Brush the browning plate with oil in order
to brown the food nicely.
3. Place the fresh or frozen food directly on
the browning plate.
4. Place the browning plate on the glass
turntable in the microwave oven.
5. Select the Microwaves and Grill function
and the cooking time as described below.
VERY IMPORTANT NOTES:
As the browning plate has a Teflon layer, if you
use it incorrectly, it can be damaged.
Never cut the food on the plate. Remove the
food from the plate prior to cutting.
Cleaning:
The best way to clean the browning plate is to
wash it with hot water and detergent and rinse off
with clean water. Do not use a scrubbing brush or
a hard sponge otherwise the top layer will be
damaged.
Food
Weight
Cooking
Time
Standing Time
Recommendation
Pizza
200 g
4 - 5 min
---
If the pizza is thin.
If the pizza is high increase the time
by 1 – 2 minutes
300 g
5 - 6 min
---
400 g
7 – 8 min
---
Quiches and
Pies
200 g
3 – 4 min
2 – 3 min
300 g
5 - 6 min
2 – 3 min
Hamburgers
150 - 200
8 - 10 min
5 – 8 min
Turn 2 x
Oven chips
400 g
6 -8 min
---
Turn 1 x

22
EN
When the oven is working...
Interrupting a cooking cycle
You can stop the cooking process at any time by
pressing the Stop key once or by opening the
oven door.
In both cases:
Microwave emission is stopped immediately.
The grill is de-activated but is still very hot.
Danger of burning!
The timer stops and the display shows the
remaining amount of operating time.
If you wish, at this time you can:
1. Turn or stir the food to ensure it will be
evenly cooked.
2. Change the process parameters.
3. Cancel the process by pressing the Stop
key.
To restart the process, close the door and press
the Start key
Altering parameters
The operating parameters (time, weight, power,
etc.) can only be altered when the cooking
process has been interrupted by proceeding as
follows:
1. To alter the time, press key “-” and “+”. The
new time defined is immediately valid.
2. To alter the power, press the Power
Selection key. The display and respective
light start to flash. Alter the parameter by
pressing the “-” and “+” keys and confirm by
pressing the Power Selection key again.
Cancelling a cooking cycle
If you wish to cancel the cooking process, press
the Stop key for 3 seconds.
You will then hear a beep and the time will appear
on the display.
End of a cooking cycle
At the end of the process you will hear three
beeps and the display will show the word “End”.
The beeps are repeated every 30 seconds until
the door is opened or the Stop key is pressed.

23
EN
Defrosting
The table below shows different defrosting and
standing times (in order to ensure the food
temperature is evenly distributed) for different types
and weights of food, plus recommendations.
Food
Weight (g)
Defrosting time (min)
Standing time
(min)
Recommendation
Portions of meat,
veal, beef, pork
100
2-3
5-10
Turn once
200
4-5
5-10
Turn once
500
10-12
10-15
Turn twice
1000
21-23
20-30
Turn twice
1500
32-34
20-30
Turn twice
2000
43-45
25-35
Turn three times
Goulash
500
8-10
10-15
Turn twice
1000
17-19
20-30
Turn three times
Minced meat
100
2-4
10-15
Turn once
500
10-14
20-30
Turn twice
Sausages
200
4-6
10-15
Turn once
500
9-12
15-20
Turn twice
Poultry (portions)
250
5-6
5-10
Turn once
Chicken
1000
20-24
20-30
Turn twice
Poularde
2500
38-42
25-35
Turn three times
Fish fillet
200
4-5
5-10
Turn once
Trout
250
5-6
5-10
Turn once
Prawns
100
2-3
5-10
Turn once
500
8-11
10-20
Turn twice
Fruit
200
4-5
5-10
Turn once
300
8-9
5-10
Turn once
500
11-14
10-20
Turn twice
Bread
200
4-5
5-10
Turn once
500
10-12
10-15
Turn once
800
15-17
10-20
Turn twice
Butter
250
8-10
10-15
Cream cheese
250
6-8
10-15
Creams
250
7-8
10-15

24
EN
Defrosting
General instructions for defrosting
1. When defrosting, use only dishes that are
appropriate for microwaves (china, glass,
suitable plastic).
2. The defrost function by weight and the tables
refer to the defrosting of raw food.
3. The defrosting time depends on the quantity
and thickness of the food. When freezing
food keep the defrosting process in mind.
Distribute the food evenly in the container.
4. Distribute the food as best as possible inside
the oven. The thickest parts of fish or
chicken drumsticks should be turned towards
the outside. You can protect the most
delicate parts of food with pieces of
aluminium foil. Important: The aluminium
foil must not come into contact with the oven
cavity interior as this can cause electrical
arcing.
5. Thick portions of food should be turned
several times.
6. Distribute the frozen food as evenly as
possible since narrow and thin portions
defrost more quickly than the thicker and
broader parts.
7. Fat-rich foods such as butter, cream cheese
and cream should not be completely
defrosted. If they are kept at room
temperature they will be ready to be served
in a few minutes. With ultra-frozen cream, if
you find small pieces of ice in it, you should
mix these in before serving.
8. Place poultry on an upturned plate so that the
meat juices can run off more easily.
9. Bread should be wrapped in a napkin so that
it does not become too dry.
10. Turn the food at regular intervals.
11. Remove frozen food from its wrapping and do
not forget to take off any metal twist-tags. For
containers that are used to keep frozen food
in the freezer and which can also be used for
heating and cooking, all you need to do is
take off the lid. For all other cases you should
put the food into containers that are suitable
for microwave use.
12. The liquid resulting from defrosting, principally
that from poultry, should be discarded. In no
event should such liquids be allowed to come
into contact with other foods.
13. Do not forget that by using the defrosting
function you need to allow for standing time
until the food is completely defrosted.

25
EN
Cooking with a microwave oven
Warning! Read the section “Microwave Safety”
before cooking with your microwave.
Follow these recommendations when cooking with
your microwave:
Before heating or cooking foods with peel or
skin (e.g. apples, tomatoes, potatoes,
sausages) prick them so that they do not
burst. Cut the food up before starting to
prepare it.
Before using a container or dish make sure
that it is suitable for microwave use (see the
section on types of ovenware).
When cooking food with very little moisture
(e.g. defrosting bread, making popcorn,
etc.) evaporation is very quick. The oven
then works as if it was empty and the food
may burn. The oven and the container may
be damaged in such a situation. You should
therefore set just the cooking time necessary
and you must keep a close eye on the
cooking process.
It is not possible to heat large quantities of
oil (frying) in the microwave.
Remove pre-cooked food from the
containers they come in since these are not
always heat resistant. Follow the food
manufacturer’s instructions.
If you have several containers, such as
cups, for example, set them out uniformly on
the turntable plate.
Do not close plastic bags with metal clips.
Use plastic clips instead. Prick the bags
several times so that the steam can escape
easily.
When heating or cooking foods, check that
they reach at least a temperature of 70°C.
During cooking, steam may form on the
oven door window and may start to drip.
This situation is normal and may be more
noticeable if the room temperature is low.
The oven’s safe working is not affected by
this. After you have finished cooking, clean
up the water coming from the condensation
When heating liquids, use containers with
a wide opening, so that the steam can
evaporate easily.
Prepare the foods as per the instructions and
keep in mind the cooking times and power levels
indicated in the tables.
Keep in mind that the figures given are only
indicative and can vary depending on the initial
state, temperature, moisture and type of food. It is
advisable to adjust the times and power levels to
each situation. Depending on the exact
characteristics of the food you may need to
increase or shorten the cooking times or increase
or decrease the power levels.
Cooking with microwaves...
1. The greater the amount of food, the longer the
cooking time. Keep in mind that:
Double the quantity » double the time
Half the quantity » half the time
2. The lower the temperature, the longer the
cooking time.
3. Foods containing a lot of liquid heat up more
quickly.
4. Cooking will be more uniform if the food is
evenly distributed on the turntable. If you put
dense foods on the outside part of the plate and
less dense ones on the centre of the plate, you
can heat up different types of food simultaneously.
5. You can open the oven door at any time. When
you do this the oven switches off automatically.
The microwave will only start working again when
you close the door and press the start key.
6. Foods that are covered require less
cooking time and retain their characteristics
better. The lids used must let microwaves
pass through and have small holes that
allow steam to escape.

26
EN
Cooking with a microwave oven
Tables and suggestions – Cooking vegetables
Food
Quantity (g)
Addition of
liquids
Power
(Watt)
Time
(min.)
Standing
Time (min.)
Instructions
Cauliflower
Broccoli
Mushrooms
500
300
250
100ml
50ml
25ml
800
800
800
9-11
6-8
6-8
2-3
2-3
2-3
Cut into slices.
Keep covered
Turn once
Peas & carrots
Frozen carrots
300
250
100ml
25ml
800
800
7-9
8-10
2-3
2-3
Cut into chunks or
slices. Keep
covered
Turn once
Potatoes
250
25ml
800
5-7
2-3
Peel and cut into
equal sized pieces.
Keep covered
Turn once
Paprika
Leek
250
250
25ml
50ml
800
800
5-7
5-7
2-3
2-3
Cut into chunks or
slices Keep covered
Turn once
Frozen Brussel
sprouts
300
50ml
800
6-8
2-3
Keep covered
Turn once
Sauerkraut
250
25ml
800
8-10
2-3
Keep covered
Turn once
Tables and suggestions – Cooking fish
Food
Quantity (g)
Power
(Watt)
Time (min.)
Standing
Time (min.)
Instructions
Fish fillets
500
600
10-12
3
Cook covered over. Turn after half
of cooking time.
Whole fish
800
800
400
2-3
7-9
2-3
Cook covered over. Turn after half
of cooking time. You may wish to
cover up the small edges of the
fish.

27
EN
Cooking with the Grill
WARNING: Accessible parts may become hot
when the grill is in use. Children should be kept
away.
For good results with the grill, use the
Rectangular Rack supplied with the oven. It must
be placed over the Rectangular Glass Tray in two
possible positions that give different heights for
grilling (see below picture).
Fit the rectangular rack in such a way that it
doesn’t come into contact with the metal
surfaces of the oven cavity since if it does
there is a danger of electric arcing which may
damage the oven.
IMPORTANT POINTS:
1. When the microwave grill is used for the
first time there will be some smoke and a
smell coming from the oils used during oven
manufacture.
2. The oven door window becomes very hot
when the grill is working. Keep children
away.
3. When the grill is operating, the cavity walls
and the rectangular rack become very hot.
You should use oven gloves.
4. If the grill is used for extended period of
time it is normal to find that the elements
will switch themselves off temporarily due to
the safety thermostat.
5. Important! When food is to be grilled or
cooked in containers you must check that
the container in question is suitable for
microwave use. See the section on types of
ovenware!
6. When the grill is used it is possible that
some splashes of fat may go onto the
elements and be burnt. This is a normal
situation and does not mean there is any
kind of operating fault.
7. After you have finished cooking, clean the
interior and the accessories so that cooking
remains do not become encrusted.

28
EN
Cooking with the Grill
Tables and suggestions – Grill without microwave
Type of food
Quantity (g)
Time (min.)
Instructions
Fish
Bass
Sardines/gurnard
800
6-8 fish.
18-24
15-20
Spread lightly with butter. After half of
cooking time turn and spread with
seasoning.
Meat
Sausages
6-8 units
22-26
Prick after half cooking time and turn.
Frozen hamburgers
3 units
18-20
Prick after half cooking time.
Spare rib (approx. 3 cm thick)
400
25-30
Brush with oil. After half of cooking time,
baste and turn.
Others
Toast
4 units
1½-3
Watch toasting. Turn
Toasted sandwiches
2 units
5-10
Watch toasting.
Heat up the grill beforehand for 2 minutes. Unless
indicated otherwise, use the rectangular rack. The
times shown are merely indicative and can vary
as a function of the composition and quantity of
the food, as well as the final condition wished for.
Fish and meat taste great if, before grilling, you
brush them with vegetable oil, spices and herbs
and leave to marinate for a few hours. Only add
salt after grilling.
Sausages will not burst if you prick them with a
fork before grilling.
After half the grilling time has passed, check on
how the cooking is going and, if necessary, turn
the food over or brush it with some oil.
The grill is especially suitable for cooking thin
portions of meat and fish. Thin portions of meat
only need to be turned once, but thicker portions
should be turned several times. In the case of fish,
you should join the two ends, putting the tail in its
mouth, and then put the fish on the rectangular
rack.

29
EN
Cooking with the Grill
Tables and suggestions – Microwave + Grill
The microwave + grill function is ideal for cooking
quickly and, at the same time, browning foods.
Furthermore, you can also grill and cook cheese
covered food.
The microwave and the grill work simultaneously.
The microwave cooks and the grill toasts.
Food
Quantity (g)
Dish
Power
(Watt)
Time (min.)
Standing
time (min.)
Cheese topped pasta
500
Low dish
400
12-17
3-5
Cheese topped potatoes
800
Low dish
600
20-22
3-5
Lasagne
approx. 800
Low dish
600
15-20
3-5
Grilled cream cheese
approx. 500
Low dish
400
18-20
3-5
2 fresh chicken legs
(grilled)
200 each
Low dish
400
10-15
3-5
Chicken
approx. 1000
Low and wide dish
400
35-40
3-5
Cheese topped onion
soup
2 x 200 g cups
Soup bowls
400
2-4
3-5
Before using a dish in the microwave oven make
sure that it is suitable for microwave use. Only use
dishes or containers that are suitable for
microwave use.
The dish to be used in the combined function
must be suitable for microwave and grill use. See
the section on types of ovenware!
Keep in mind that the figures given are merely
indicative and can vary as a function of the initial
state, temperature, moisture and type of food.
If the time is not enough to brown the food well,
put it under the grill for another 5 or 10 minutes.
Please follow the standing times and don’t forget
to turn the meat pieces.
Unless indicated to the contrary, use the turntable
plate for cooking.
The values given in the tables are valid when the
oven cavity is cold (it is not necessary to pre-heat
the oven).

30
EN
Roasting and baking
Table and advices – Preparing meat and cake
Microwave / Hot air
Food
Quantity
(g)
Power
(W)
Temperature
ºC
Time
(Min.)
Standing
time (min.)
Instructions
Roast beef
1000-1500
400
200
30-40
20
Do not put lid on container
Turn once
Pork loin / Cutlet or
bones
Pork roast
800-1000
200
180-190
50-60
20
Do not put lid on container
Turn once
Whole chicken
1000/1200
400
200
30-40
10
Do not put lid on container.
Turn the chicken chest
down. Turn once.
Half chicken
500-1000
400
200
25-35
10
Do not put lid on container.
Turn the the pieces with
skin down. Turn once.
Roast loin of veal
1500/2000
200
180
60-65
20
Do not put lid on container.
Turn once or twice. After
turning keep it without lid
Beef topside
1500-1800
200
200
80-90
20
Do not put lid on container.
Turn once or twice
Microwave / Baking
Pastry
Power
(W)
Temperature
ºC
Time
(Min.)
Standing
time (min.)
Instructions
Chocolate– cherry pie
200
200
30
5-10
Turntable, small grill,
Springform, Ø 28 cm
Cheesecake with fruit
400
180
40-45
5-10
Turntable, small grill,
Springform, Ø 28 cm
Apple pie
200
185
40-45
5-10
Turntable, small grill,
Springform, Ø 28 cm
Cheese cake with streusel
400
180
40-50
5-10
Turntable, small grill,
Springform, Ø 26 cm
Nuts cake
200
170
30-35
5-10
Turntable,
Cake tin
Advice to roast - bake
Turn the pieces of meat halfway through the
cooking time. When the roasted meat is ready
you should let it stand for 20 minutes in the oven
with this switched off and closed. This will ensure
the juices in the meat are well distributed.
The roasting temperature and time required
depends on the type and amount of meat being
cooked.
If the weight of the meat to be roasted does not
appear on the table choose the settings for the
weight immediately below and extend the
cooking times.
Advice on ovenware
Check that the ovenware fits inside the oven.
Hot glass containers should be put on a dry
kitchen cloth. If such containers are put on a cold
or wet surface the glass may crack and break.
Use oven gloves to take the ovenware out of the
oven.

31
EN
Baking
Table and advices – baking/hot air
Type
Container
Level
Temperature
Time (min.)
Walnut cake
Spring-form type tin
Turntable
170/180
30/35
Fruit tart
Spring-form type tin Ø 28 cm
Turntable
150/160
35/45
Ring cake
Spring-form type tin
Turntable
170/190
30/45
Piquant cakes e.g. Pizza
made with potatoes
Runde Glasform
Turntable
160/180
50/70
Sponge cake
Spring-form type tin Ø 26 cm
Turntable
160/170
40/45
Jelly roll
Glass griddle
1
110
35/45
Cherry pie
Glass griddle
1
170/180
35/45
Advice on cake baking ware
The most commonly used type of baking ware is
black metal tins. If you are also going to use the
microwave, use glass, ceramic or plastic baking
ware. These must be able to withstand
temperatures up to 250ºC. If you use these types
of baking ware the cakes are not browned as
much.
Advice on how to bake cakes
Different amounts and types of pastry require
different temperatures and baking times. Try low
settings first of all and then, if necessary, use
higher temperatures next time. A lower
temperature will result in more uniform baking.
Always put the cake tray in the centre of the
turntable.
Baking suggestions
How to check if the cake is properly cooked
Start sticking a tooth pick in the highest part of the
cake 10 minutes before the end of the baking
time. When no dough sticks to the tooth pick the
cake is ready.
If the cake is very dark on the outside
Next time choose a lower temperature and let the
cake bake for a longer time.
If the cake is very dry
Make small holes in the cake with a tooth pick
after baking has finished. Then sprinkle the cake
with some fruit juice or alcoholic drink. Next time
increase the temperature by about 10º and reduce
the baking time.
If the cake does not come free when turned
Let the cake cool down for 5 to 10 minutes after
baking and it will come out of the tin more easily.
If the cake still does not come free run a knife
carefully around the edges. Next time grease the
cake tin well.
Advice on saving energy
When you are making more than one cake, it is
advisable to bake them in the oven one after the
other when the oven is still hot. This lets you
reduce the baking time for the second and later
cakes.
It is preferable to use dark coloured baking ware -
painted or enamelled black – since such baking
tins absorb heat better.
When dealing with long baking times, you can
switch the oven off 10 minutes before the end of
the time and make use of the residual heat to
complete the baking.
.

32
EN
What kind of ovenware can be used?
Microwave function
For the microwave function, keep in mind that
microwaves are reflected by metal surfaces.
Glass, china, clay, plastic, and paper let
microwaves pass.
For this reason, metal pans and dishes or
containers with metal parts or decorations
cannot be used in the microwave. Glass ware
and clay with metallic decoration or content
(e.g. lead crystal) cannot be used in microwave
ovens.
The ideal materials for use in microwave ovens
are glass, refractory china or clay, or heat
resistant plastic. Very thin, fragile glass or china
should only be used for short period of times (e.g.
heating).
Hot food transmits heat to the dishes which can
become very hot. You should, therefore, always
use an oven glove!
How to test ovenware you want to use
Put the item you want to use in the oven for 20
seconds at maximum microwave power. After that
time, if it is cold and just slightly warm, it is
suitable to use. However, if it heats up a lot or
causes electric arcing it is not suitable for
microwave use.
Grill or Hot air function
In the case of the Grill or Hot Air function, the
ovenware must be resistant to temperature of at
least 300°C.
Plastic dishes are not suitable for use in the grill.
Combined functions
In the combined functions, the ovenware used
must be suitable for use in both the microwave
and the grill.
Aluminium containers and foil
Pre-cooked food in aluminium containers or in
aluminium foil can be put in the microwave if the
following aspects are respected:
Keep in mind the manufacturer’s
recommendations written on the packaging.
The aluminium containers cannot be more
than 3 cm high or come in contact with the
cavity walls (minimum distance 3 cm). Any
aluminium lid or top must be removed.
Put the aluminium container directly on top
of the turntable plate. If you use the
rectangular rack, put the container on a
china plate. Never put the container directly
on the rectangular rack!
The cooking time is longer because the
microwaves only enter the food from the top.
If you have any doubts, it is best to use only
dishes suitable for microwave use.
Aluminium foil can be used to reflect
microwaves during the defrosting process.
Delicate food, such as poultry or minced
meat, can be protected from excessive heat
by covering the respective
extremities/edges.
Important: aluminium foil cannot come into
contact with the cavity walls since this may
cause electrical arcing.
Lids
We recommend you use glass or plastic lids or
cling film since:
1. This will stop excessive evaporation (mainly
during very long cooking times);
2. The cooking times are shorter;
3. The food does not become dry;
4. The aroma is preserved.
The lid should have holes or openings so that no
pressure develops. Plastic bags must also be
opened. Baby feeding bottles or jars with baby
food and similar containers can only be heated
without their tops / lids otherwise they can burst.

33
EN
What kind of ovenware can be used?
Table of Ovenware
The table below gives you a general idea of what type of ovenware is suitable for each situation.
Operating mode
Type of
ovenware
Microwave
Grill / Hot Air
Combined
Functions
Defrosting /
heating
Cooking
Glass and china 1)
Home use, not flame resistant, can
be used in dish washer
yes
Yes
no
no
Glazed china
Flame resistant glass and china
yes
Yes
yes
yes
China, stone ware 2)
Unglazed or glazed without metallic
decorations
yes
Yes
no
no
Clay dishes 2)
Glazed
Unglazed
yes
no
yes
no
no
no
no
no
Plastic dishes 2)
Heat resistant to 100°C
Heat resistant to 250°C
yes
yes
no
yes
no
no
no
no
Plastic films 3)
Plastic film for food
Cellophane
no
yes
no
yes
no
no
no
no
Paper, cardboard, parchment 4)
yes
No
no
no
Metal
Aluminium foil
Aluminium wrappings 5)
Accessories
yes
no
yes
no
yes
yes
yes
yes
yes
no
yes
no
1. Without any gold or silver leaf edging; no
lead crystal.
2. Keep the manufacturer’s instructions in
mind!
3. Do not use metal clips for closing bags.
Make holes in the bags. Use the films only to
cover the food.
4. Do not use paper plates.
5. Only shallow aluminium containers without
lids/tops. The aluminium cannot come into
contact with the cavity walls.

34
EN
Oven Cleaning and Maintenance
Cleaning is the only maintenance normally
required.
Warning! Your microwave oven should be
cleaned regularly, with all food remains being
removed. If the microwave is not kept clean its
surfaces may deteriorate, reducing the oven’s
working life and possibly resulting in a
dangerous situation.
Warning! Cleaning should be done with the
oven power switched off. Take the plug out of
the socket or switch off the oven’s power
circuit.
Do not use harsh abrasive cleaners or sharp
metal scrapers to clean the oven door glass
since they can scratch the surface, which may
result in shattering of the glass.
Do not use aggressive or abrasive cleaning
products, scourers that scratch surfaces or
sharp objects, since stains may appear.
Do not use high pressure or stream jet
cleaning appliances.
Front surface
Normally you just need to clean the oven with a
damp cloth. If it is very dirty, add a few drops of
dishwashing liquid to the cleaning water.
Afterwards, wipe the oven with a dry cloth.
Immediately remove lime, fat, starch or egg white
stains. Corrosion can occur under these stains.
Do not let any water get inside the oven.
Oven interior
After each time the oven is used, clean the inside
walls with a damp cloth since this is the easiest
way to remove splashes or spots of food that may
have stuck to the inside.
To remove dirt that is harder to shift, use a non-
aggressive cleaning product. Do not use oven
sprays or other aggressive or abrasive
cleaning products.
Always keep the door and the oven front very
clean to ensure that the door opens and
closes properly.
Make sure water does not enter the microwave
ventilation holes.
Regularly take out the turntable plate and the
respective support and clean the cavity base,
especially after any liquid spillage.
Do not switch on the oven without the
turntable and the respective support being in
place.
If the oven cavity is very dirty, put a glass of water
on the turntable and switch on the microwave
oven for 2 or 3 minutes at maximum power. The
steam released will soften the dirt which can then
be cleaned easily using a soft cloth.
Unpleasant odours (e.g. after cooking fish) can be
eliminated easily. Put a few drops of lemon juice
in a cup with water. Put a spoonful of coffee in the
cup to avoid the water boiling over. Heat the water
for 2 to 3 minutes at maximum microwave power.

35
EN
Oven Cleaning and Maintenance
Oven ceiling
If the oven ceiling is dirty, the grill can be lowered
to make cleaning easier.
To avoid the danger of burning, wait until the
grill is cold before lowering it. Proceed as
follows:
1. Turn the grill support by 180º (1).
2. Lower the grill gently (2). Do not use
excessive force as this may cause
damage.
3. After cleaning the ceiling, put the grill (2)
back in its place, carrying out the previous
operation.
IMPORTANT WARNING: The grill heating
element support (1) may fall when it is rotated. If
this happens, insert the grill heating element
support (1) into the slot in the ceiling of the cavity
and rotate it 90º to the grill heating element
support (2) position.
The mica cover (3) located in the ceiling must
always be kept clean. Any food remains that
collect on the mica cover can cause damage or
provoke sparks.
Do not use abrasive cleaning products or
sharp objects.
To avoid any risk, do not remove the mica
cover.
The glass lamp cover (4) is located on the oven
ceiling and can be removed easily for cleaning.
For this you just need to unscrew it and clean it
with water and dishwashing liquid.
Accessories
Clean the accessories after each use. If they are
very dirty, soak them first of all and then use a
brush and sponge. The accessories can be
washed in a dish washing machine.
Make sure that the turntable plate and the
respective support are always clean. Do not
switch on the oven unless the turntable and the
respective support are in place.

36
EN
What should I do if the oven doesn’t work?
WARNING! Any type of repair must only be
done by a specialised technician. Any repair
done by a person not authorised by the
manufacturer is dangerous.
You do not need to contact Technical Assistance
to resolve the following questions:
The display is not showing! Check if:
- The time indication has been switched off
(see section on Basic Settings).
Nothing happens when I press the keys!
Check if:
- The Safety Block is active (see section on
Basic Settings).
The oven does not work! Check if:
- The plug is correctly fitted in the socket.
- The oven’s power is switched on.
- The door is completely closed. The door
should close with an audible click.
- There are any foreign bodies between the
door and the cavity front.
When the oven is operating I can hear some
strange noises! Check if:
- There is any electrical arcing inside the oven
caused by foreign metallic objects (see
section on type of ovenware).
- The ovenware is touching the oven walls.
- There are any loose items of cutlery or
cooking tools inside the oven.
The food doesn’t heat up or heats very
slowly! Check if:
- You have inadvertently used metal
ovenware.
- You have selected the correct operating
times and power level.
- The food you have put inside the oven is a
larger amount or colder than you usually put
in.
The food is too hot, dried out or burnt!
Check if you selected the correct operating
time and power level.
I hear some noises after the cooking
process is finished! This is not a problem.
The cooling fan keeps on working for some
time. When the temperature has dropped
sufficiently, the fan will switch itself off.
The oven switches on but the interior
light does not go on! If all the functions
work properly it is probable that the lamp
has blown. You can keep on using the oven.
Substitution of light bulb
WARNING: Ensure that the appliance is switched
off before replacing the lamp to avoid the
possibility of electric shock.
To substitute the light bulb, proceed as follows:
- Disconnect the oven from the power supply.
Take the plug out of the socket or switch off
the oven’s power circuit.
- Unscrew and remove the glass light cover
(1).
- Remove the halogen light bulb (2). Warning!
The bulb may be very hot.
- Fit a new 12V / 10W halogen bulb. Warning!
Do not touch the light bulb surface
directly with your fingers because you
may damage the bulb. Follow the lamp
manufacturer’s instructions.
- Screw the glass light cover into place (1).
- Connect the oven again to the power supply.

37
EN
Technical characteristics
Specifications
AC Voltage ..................................................................................... (see characteristics plate)
Power required ............................................................................... 3400 W
Grill power. ..................................................................................... 1500 W
Hot air power .................................................................................. 1600W
Microwave output power. ................................................................ 1000 W
Microwave frequency… .................................................................. 2450 MHz
Exterior dimensions (WHD). ....................................................... 595 455 542 mm
Interior dimensions (WHD). ........................................................ 420 210 390 mm
Oven capacity. ................................................................................ 38 ltr
Weight ............................................................................................ 35 kg
Environmental protection
Disposal of the packaging
The packaging bears the Green Dot mark.
Dispose of all the packaging materials such as
cardboard, expanded polystyrene and plastic
wrapping in the appropriate bins. In this way you
can be sure that the packaging materials will be
re-used. Keep all packaging away from small
children as it may present suffocation/choking
hazard.
Disposal of equipment no longer used
According to European Directive 2002/96/EC on
the management of waste electrical and
electronic equipment (WEEE), home electrical
appliances should not be put into the normal
systems for disposal of solid urban waste.
Outdated appliances should be collected
separately to optimise component material
recovery and recycling rates and to prevent
potential harm to human health and the
environment. The symbol of a rubbish container
superimposed by a diagonal cross should be put
on all such products to remind people of their
obligation to have such items collected
separately.
Consumers should contact their local authorities
or point of sale and request information on the
appropriate places to leave their old home
electrical appliances.
Before disposing of your appliance, render it
non-usable by pulling out the power cable,
cutting it off and disposing of it.

38
EN
Installation instructions
Before installation
Check that the input voltage indicated on the
characteristics plate is the same as the voltage
of the power outlet you are going to use.
Open the oven door and take out all the
accessories and remove the packing material.
Do not remove the mica cover on the ceiling of
the interior! This cover stops fat and pieces of
food damaging the microwave generator.
Warning! The front surface of the oven may be
wrapped with a protective film. Before using
the oven for the first time, carefully remove this
film, starting on the inside.
Make sure that the oven is not damaged in
any way. Check that the oven door closes
correctly and that the interior of the door and the
front of the oven opening are not damaged. If
you find any damage contact the Technical
Assistance Service.
DO NOT USE THE OVEN if the power cable or
the plug are damaged, if the oven does not
function correctly or if it has been damaged or
dropped. Contact the Technical Assistance
Service.
Put the oven on a flat and stable surface. The
oven must not be put close to any sources of
heat, radios or televisions.
During installation, make sure that the power
cable does not come into contact with any
moisture or objects with sharp edges behind
the oven. High temperatures can damage the
cable.
Warning: after the oven is installed you must
make sure you can access the plug.
After installation
The oven is equipped with a power cable and a
plug for single phase current.
If the oven is to be installed on a permanent
basis it should be installed by a qualified
technician. In such a case, the oven should be
connected to a circuit with an all-pole circuit
breaker with a minimum separation of 3 mm
between contacts.
WARNING: THE OVEN MUST BE EARTHED.
The manufacturer and retailers do not accept
responsibility for any damage that may be
caused to people, animals or property if these
installation instructions are not observed..
The oven only functions when the door is
closed correctly.
After the first use, clean the inside of the oven
and the accessories, following the cleaning
instructions given in the section “Oven cleaning
and maintenance”.
Fit the Turntable support in the centre of the
oven cavity and put the Turntable ring and the
Turntable plate on top, making sure they slot in.
Whenever you use the microwave, the turntable
plate and the respective accessories must be
inside and correctly fitted. The turntable plate
can rotate in both directions.
During installation, follow the instructions supplied separately.

39
IT
Indice
Informazioni per la sicurezza ........................................................................................................... 40
Istruzioni di sicurezza ...................................................................................................................... 44
I vantaggi delle microonde ............................................................................................................... 45
Descrizione dell'apparecchio........................................................................................................... 46
Impostazioni preliminari ................................................................................................................... 48
Funzioni base .................................................................................................................................... 50
Programmi speciali ........................................................................................................................... 55
Utilizzo del piatto di doratura ........................................................................................................... 58
Durante il funzionamento... .............................................................................................................. 59
Scongelare ........................................................................................................................................ 60
Cucinare con le microonde .............................................................................................................. 62
Cuocere con il grill ........................................................................................................................... 64
Arrostire e cuocere ........................................................................................................................... 67
Stoviglie adatte per le microonde ................................................................................................... 69
Pulizia e manutenzione .................................................................................................................... 71
Guasti, cosa fare? ............................................................................................................................. 73
Dati tecnici ......................................................................................................................................... 74
Istruzioni di montaggio .................................................................................................................... 75
Incasso .............................................................................................................................................. 76
Caro Cliente,
Grazie per aver scelto questo prodotto BARAZZA.
La preghiamo di leggere molto attentamente le istruzioni contenute in questo libretto al fine di poter
ottenere i migliori risultati possibili.
CONSERVI LA DOCUMENTAZIONI DI QUESTO PRODOTTO PER IL FUTURO.
Conservare queste istruzioni per l'uso sempre a portata di mano e consegnarle ad un eventuale
futuro utilizzatore al quale si è ceduto l'apparecchio!
Il manual d’uso è disponibili per il download anche alla pagina www.barazzasrl.it

40
IT
Informazioni per la sicurezza
Leggere attentamente le istruzioni fornite prima di installare e
utilizzare l'apparecchiatura. Il produttore non è responsabile se
un'installazione ed un uso non corretto dell'apparecchiatura
provocano lesioni e danni. Tenere sempre le istruzioni a portata di
mano in caso di necessità durante l'utilizzo."
SICUREZZA DEI BAMBINI E DELLE PERSONE VULNERABILI
AVVERTENZA! Rischio di soffocamento, lesioni o invalidità
permanente.
Questa apparecchiatura può essere usata da bambini a partire
dagli 8 anni e da adulti con limitate capacità fisiche, sensoriali o
mentali o con scarsa esperienza o conoscenza sull'uso
dell'apparecchiatura, se sorvegliati o se sono stati istruiti
relativamente all'uso dell'apparecchiatura e hanno capito i rischi
coinvolti.
Non consentire ai bambini di giocare con l'apparecchiatura.
Tenere i materiali di imballaggio al di fuori della portata dei
bambini.
AVVERTENZA:Tenere i bambini lontano dall'apparecchiatura
durante il funzionamento o raffreddamento. Le parti accessibili
sono incandescenti.
Se l’apparecchiatura dispone di un dispositivo di sicurezza per i
bambini, consigliamo di attivarlo. Tenere lontani
dall'apparecchiatura i bambini incustoditi sotto i 3 anni.
La pulizia e gli interventi di manutenzione non devono essere
eseguiti dai bambini senza supervisione..
AVVERTENZE DI SICUREZZA GENERALI
L'apparecchiatura è destinata all'uso domestico e applicazioni
simili, tra cui:
– cucine di negozi, uffici e altri ambienti di lavoro;
– fattorie;
– da clienti di hotel, motel e altri ambienti residenziali;
– nei bed and breakfast.

41
IT
Informazioni per la sicurezza
All'interno l'apparecchiatura si scalda mentre è in funzione. Non
toccare le resistenze dell'apparecchiatura. Servirsi sempre degli
appositi guanti da forno per estrarre o inserire accessori o
pentole resistenti al calore..
AVVERTENZA: Non si devono riscaldare liquidi o altri alimenti in
contenitori sigillati perché potrebbero esplodere.
Usare solo utensili adatti all'uso in forno a microonde
Quando si riscaldano o cuociono alimenti in recipienti di plastica,
carta, controllare il forno per evitare il rischio di incendio
L'apparecchiatura è destinata alla cottura di alimenti e bevande.
L'asciugatura di alimenti e capi di vestiario e il riscaldamento di
compresse riscaldanti, pantofole, spugne, panni umidi e simili
può comportare il rischio di lesione, accensione o incendio.
Attenzione! L'apparecchio non deve essere utilizzato se:
- lo sportello non si chiude correttamente,
- le cerniere dello sportello sono danneggiate,
- le superfici di contatto tra sportello e frontale sono danneggiate,
- il vetro dello sportello è danneggiato,
- nel vano cottura si creano spesso scintille senza che siano
presenti oggetti metallici.
L'apparecchio può essere di nuovo utilizzato, solo dopo che è
stato riparato da un tecnico del Servizio Assistenza.
Se viene emesso del fumo, spegnere l'apparecchiatura o
disinserire la spina del cavo di alimentazione e tenere la porta
chiusa per soffocare le eventuali fiamme.
Il riscaldamento a microonde di bevande può provocare
un'ebollizione ritardata con fuoriuscita della bevanda fare quindi
attenzione quando si manipola il contenitore.
Agitare o scuotere il contenuto dei biberon e dei vasetti di
alimenti per bambini e controllarne la temperatura prima del
consumo per evitare scottature
Non riscaldare nell'apparecchiatura le uova con il guscio e le
uova sode intere
in quanto potrebbero esplodere, anche successivamente alla
fase di

42
IT
Informazioni per la sicurezza
riscaldamento con il forno a microonde.
INSTALLAZIONE
Nell’installazione elettrica di questo apparecchio è necessario
disporre di un dispositivo che consenta di separare l’apparecchio
dalla rete con un’ampiezza dei contatti di almeno 3 mm in tutti i
poli. Per dispositivi di separazione adatti si intendono per es.
interruttori automatici, fusibili (i fusibili a vite devono essere
rimossi dalla presa), interruttori per corrente di guasto e
contattori. Questa installazione deve essere conforme alle
normative vigenti.
Se il collegamento elettrico avviene con spina e questa rimane
accessibile dopo l'installazione, non è necessario fornire il
dispositivo di separazione menzionato.
Protezione contro le scosse elettriche deve essere assicurata
attraverso il cablaggio (collegamento a terra).
La protezione contro il contatto diretto deve essere garantita dal
modo di integrazione.
AVVERTENZA! Il forno deve essere assolutamente collegato a
terra.
PULIZIA
Pulire l'apparecchiatura regolarmente e togliere eventuali residui
di cibo.
Non mantenendo l'apparecchiatura in condizioni pulite si può
provocare il deterioramento della superficie, pregiudicare la
durata dell'apparecchiatura e si possono creare delle situazioni di
pericolo
Non utilizzare detergenti abrasivi o raschietti di metallo per pulire
il vetro della porta per non rigare la superficie e causare la rottura
del vetro.
Non usare una pulitrice a vapore per pulire l'apparecchiatura.

43
IT
Informazioni per la sicurezza
Per un corretto funzionamento del forno, le superfici di contatto
dello sportello (la parte frontale del vano cottura e la parte interna
degli sportelli) devono essere mantenute sempre perfettamente
pulite.
Seguire le istruzioni per la pulizia fornite nella sezione "Pulizia e
manutenzione del forno.
RIPARAZIONI
AVVERTENZA: Prima di eseguire qualsiasi intervento di
manutenzione, scollegare l'apparecchiatura dalla rete elettrica.
AVVERTENZA: Qualsiasi intervento di servizio o riparazione che
preveda lo smontaggio di un coperchio previsto per proteggere
dall'esposizione all'energia a microonde va eseguito
esclusivamente da una persona competente.
AVVERTENZA: Se la porta o le guarnizioni della porta sono
danneggiate, il forno non deve essere messo in funzione finché
non è stato riparato da una persona competente.
Se il cavo di alimentazione è danneggiato, deve essere sostituito
dal produttore, da un tecnico autorizzato o da una persona
qualificata per evitare situazioni di pericolo.
Le operazioni di riparazione e manutenzione, in particolare quelle
relative ai componenti elettrici, possono essere eseguite solo da
tecnici autorizzati dal fabbricante.

44
IT
Istruzioni di sicurezza
Attenzione! Non riscaldare alcool puro o
bevande alcoliche nel forno a microonde.
PERICOLO D'INCENDIO!
Prudenza!
Per evitare che, durante il riscaldamento di
piccole quantità di cibo, gli alimenti si
riscaldino troppo e magari si infiammino, non
selezionare tempi di riscaldamento o livelli di
potenza troppo elevati. Il pane, per esempio,
può bruciarsi dopo soli 3 minuti se viene
impostata una potenza troppo alta.".
Utilizzare la funzione grill soltanto per gratinare.
Controllare puntualmente il forno. Se si utilizza
la modalità di funzionamento combinato per il
grill, fare attenzione al tempo.
Attenzione! Accertarsi che i cavi di
alimentazione di altri elettrodomestici non
entrino in contatto con lo sportello caldo del
forno. Il materiale isolante del cavo potrebbe
fondersi. Pericolo di corto circuito!.
Fare attenzione quando si riscaldano
alimenti liquidi!
Quando si estraggono dal forno alimenti liquidi
(p.e. acqua, caffè, the, latte, ecc.) che stanno
per raggiungere il punto di bollitura, si corre il
rischio che trabocchino. PERICOLO DI
FERIMENTI E SCOTTATURE!
Per evitare un tale inconveniente, mettere un
cucchiaino o una bacchetta di vetro nel
recipiente che li contiene.
Evitare danni al forno o altre situazioni
pericolose attenendosi alle seguenti istruzioni:
Prima di mettere in funzione il forno, assicurarsi
che il perno, l'anello di scorrimento e il relativo
piatto girante si trovino nel vano cottura.
Non accendere mai il forno a microonde se
vuoto. In assenza di vivande al suo interno, il
forno può sovraccaricarsi: PERICOLO DI
DANNI!
Inserire un bicchiere d'acqua nel forno per
verificarne la programmazione. L'acqua
assorbe le microonde e l'apparecchio non si
danneggia.
Non coprire o intasare i fori e le fessure
d'aerazione.
Utilizzare solo recipienti adatti al microonde.
Prima di utilizzare stoviglie e recipienti nel
forno, verificarne l'idoneità (vedi capitolo
Stoviglie adatte al microonde"").
Non rimuovere la copertura di mica applicata
sulla superficie superiore del vano cottura.
Questa copertura evita che il grasso e i resti di
cottura possano danneggiare il generatore del
microonde.
Non conservare nessun tipo di oggetti
infiammabili nel forno perché si potrebbero
incendiare, se si dovesse accendere
l'apparecchio.
Non utilizzare l'apparecchio come dispensa.
Non utilizzare il forno per friggere in olio,
perché non è possibile controllare la
temperatura dell'olio sotto l'influsso delle
microonde.
Non appoggiarsi né sedersi sullo sportello del
forno aperto. Il forno potrebbe danneggiarsi, in
particolare nella zona delle cerniere. Lo
sportello può tollerare un peso non superiore a
8 kg.
Le rastrelliere possono tollerare un carico
massimo di 8 kg. Per evitare di danneggiare il
forno, non superare tale carico.

45
IT
I vantaggi delle microonde
Nelle normali cucine il calore generato dalle
resistenze di riscaldamento o dal bruciatore a gas
penetra lentamente nella pietanza dall'esterno
verso l'interno. La perdita di calore provocata dal
riscaldamento dell'aria, dei componenti del forno e
dei recipienti è pertanto molto elevata.
Negli apparecchi a microonde, invece, è il cibo
stesso che si riscalda e il calore viene quindi
trasportato dall'interno verso l'esterno. In questo
modo il calore non viene disperso nell'aria, sulle
pareti del vano cottura o del recipiente (sempre
che questo sia adatto al microonde); vengono
riscaldate infatti solo le pietanze.
Gli apparecchi a microonde presentano quindi i
seguenti vantaggi:
1. Tempi di cottura ridotti: circa ¾ di tempo in
meno rispetto a quello necessario per una
cottura convenzionale.
2. Velocissimo scongelamento di alimenti:
diminuisce la possibilità che si formino
batteri.
3. Risparmio energetico.
4. Mantenimento del valore nutritivo
dell'alimento grazie alla riduzione del tempo
di cottura.
5. Di facile pulizia.
Funzionamento del forno a microonde
Nell'apparecchio a microonde è presente un tubo
termoionico, il cosiddetto magnetron, che
trasforma la corrente elettrica in onde
elettromagnetiche (in microonde). Queste onde
elettromagnetiche vengono trasportate all'interno
dell'apparecchio da un conduttore a onde e sono
distribuite da uno spanditore metallico o da un
piatto girevole.
All'interno dell'apparecchio le microonde si
espandono in tutte le direzioni, vengono riflesse
dalle pareti metalliche e penetrano uniformemente
nelle pietanze.
Perché gli alimenti si riscaldano.
Gli alimenti sono composti prevalentemente
d'acqua, le cui molecole sono messe in
movimento dalle microonde.
L'attrito che si forma tra le molecole produce
calore, il quale aumenta la temperatura
dell'alimento, lo scongela, lo cucina o lo riscalda.
Poiché il calore viene generato all'interno
dell'alimento:
diventa possibile cucinarlo senza aggiunta, o
con un'aggiunta minima, di liquidi o grassi;
i tempi di scongelamento, riscaldamento o
cottura nel forno a microonde sono minori
rispetto a quelli necessari con un forno
tradizionale,
le vitamine, i minerali e le sostanze nutritive
rimangono intatti;
il colore naturale e il sapore della pietanza
non sono soggetti a variazioni.
Le microonde possono penetrare in recipienti di
porcellana, vetro, cartone o plastica, ma non in
quelli di metallo. Non utilizzare pertanto recipienti
di metallo o con elementi in metallo nel forno a
microonde.
Le microonde vengono riflesse dal metallo,...
... penetrano nei recipienti di vetro e porcellana...
... e vengono quindi assorbite dal cibo.

46
IT
Descrizione dell'apparecchio
1. Pannello di controllo
6. Supporto del piatto girevole
2. Vetro della finestra
7. Anello del piatto girevole
3. Supporti Laterali
8. Piatto girevole
4. Linguetta
9. Vassoio di vetro
5. Uscita Aria Calda
10. Griglia rettangolare
11. Piatto di doratura
1.
Segnalatori di funzioni
4a.
Segnalatore di Peso / Potenza
2.
Selettore di funzioni
5.
Selettore/ Display di Ora / Durata
3.
Selettore/ Display di Temperatura
5a.
Segnalatore di Ora / Durata
3a.
Segnalatore di Temperatura
6.
Tasto Start / Stop / Blocco
4.
Selettore/ Display di Peso/ Potenza
di sicurezza
23:15
1
2
6
5
4
3
800
160
3a
4a
5a

47
IT
Descrizione delle modalità di funzionamento
Simbolo
Funzione
Potenza d'uscita
microonde
Alimenti
Microonde
200 W
Scongelare lentamente i cibi delicati; per scongelare e
proseguire la cottura a bassa potenza.
400 W
Cucinare carni, pesce e riso.
Scongelare velocemente piccole quantità e cibi per neonati
quali, ad es., biberon.
600 W
Riscaldare e cucinare cibi.
800 W
Cucinare verdure e patate.
Cucinare gratinati e piatti preparati.
Scongelare e cucinare piccole quantità.
1000 W
Riscaldare liquidi.
Microonde +
Grill
200 W
Gratinare toast.
400 W
Grigliare pollame e carne.
600 W
Cottura di vol-au-vent e sformati.
Grill
---
Grigliare.
Grill +
Aria calda
---
Grigliare carne e pesce, pezzature piccole.
Grigliare pollame.
Patate – scongelare e rosolare cibi surgelati.
Aria calda
---
Arrostire e cuocere.
Microonde +
Aria calda
200-600 W
Arrostire rapidamente carne, pesce e pollame.
Cuocere torte umide ed asciutte.

48
IT
Impostazioni preliminari
Impostazione dell'orologio
Quando l'ora indicata non è corretta, il display
dell'orologio lampeggia (p.e. dopo che si è
collegato il forno alla rete elettrica o dopo una
caduta di corrente). Per selezionare l'ora esatta
procedere nel seguente modo:
1. Premere il pulsante dell’Orologio. I numeri
delle ore iniziano a lampeggiare.
2. Premere i pulsanti “-” e “+” per impostare le
ore.
3. Premere di nuovo il pulsante dell’Orologio per
impostare i minuti, che continuano a
lampeggiare.
4. Premere i pulsanti “-” e “+” per impostare i
minuti.
5. Per concludere, premere di nuovo il pulsante
dell’Orologio.
Oscurare l'ora
Se il display dell'ora dovesse infastidire, lo si può
oscurare tenendo premuto il tasto
OROLOGIO/TIMER per tre secondi. I due punti
che separano le ore dai minuti continuano a
lampeggiare mentre l'orologio rimane oscurato.
Per riattivare il display, premere di nuovo per tre
secondi il tasto OROLOGIO/TIMER.
Blocco di messa in funzione
Il funzionamento dell'apparecchio può essere
bloccato per impedirne, per esempio, un utilizzo
improprio da parte dei bambini.
1. Per attivare la funzione "Blocco di messa in
funzione" tenere premuto il tasto STOP per 3
secondi, al termine dei quali verrà emesso
un segnale acustico e a display verrà
visualizzato “SAFE” (sicuro). L'apparecchio è
così bloccato e non può essere utilizzato in
alcun modo.
2. Si disattiva il blocco di messa in funzione,
tenendo premuto il tasto STOP per 3
secondi, al termine dei quali verrà emesso
un segnale acustico e a display verrà di
nuovo visualizzata l'ora.

49
IT
Impostazioni preliminari
Fermare il piatto girevole
1.Per fermare il piatto girevole, premere
contestualmente i tasti “+” e “Stop”.
2. Per ripristinare il funzionamento del piatto,
premere di nuovo contestualmente i tasti “+” e
“Stop”.

50
IT
Funzioni base
Microonde
Questa funzione può essere utilizzata per cucinare o riscaldare verdure, patate, riso, pesce o carne.
1. Premere il pulsante della funzione
Microonde. Il tasto corrispondente si
accende.
2. Premere il pulsante Impostazione Potenza.
Il segnalatore pertinente lampeggerà. Se non
si preme tale pulsante, il forno funzionerà
alla potenza di 800 W.
3. Premere i pulsanti “-” e “+” per impostare la
potenza del microonde.
4. Premere il pulsante Impostazione Tempo
per selezionare il tempo di funzionamento. Il
rispettivo segnalatore rimane in funzione.
5. Premere i pulsanti “-” e “+” per impostare il
tempo di funzionamento preteso, (per
esempio 1 minuto).
6. Premere il pulsante Start. Il forno comincia a
funzionare.
NOTA: se si seleziona una potenza pari a 1000
W, la durata di funzionamento non può
superare i 15 minuti.
Microonde – Avvio rapido
Questa funzione può essere utilizzata per riscaldare alimenti ad elevata percentuale liquida come
acqua, caffè, the e brodi.
1. Premere il tasto START. L'apparecchio inizia
a funzionare a potenza massima nella
modalità “Funzionamento con sole
microonde” per 30 secondi.
2. Se si desidera prolungare la durata di
funzionamento, premere di nuovo il tasto
START. Ogni volta che si preme il tasto, si
prolunga la durata di funzionamento di 30
secondi.
NOTA: se si seleziona una potenza pari a 1000
W, la durata di funzionamento non può
superare i 15 minuti.
00:30
1000
1,2

51
IT
Funzioni base
Grill
Questa funzione può essere utilizzata per rosolare velocemente la superficie delle vivande.
1. Premere il pulsante de funzione Grill. Il tasto
della funzione si accende.
2. Premere il pulsante Impostazione Tempo per
cambiare il tempo di funzionamento. Il rispettivo
segnalatore rimane in funzione.
3. Premere i pulsanti “-” e “+” per impostare il
tempo preteso (per esempio 15 minuti).
4. Premere il pulsante Start. Il forno comincia a
funzionare.
Microonde + Grill
Questa funzione può essere utilizzata per cucinare lasagne, pollame, patate arrosto e sformati.
1. Premere il pulsante della funzione Microonde
+ Grill. Il tasto della funzione si accende.
2. Premere il pulsante Impostazione Potenza,
per modificare la potenza del microonde. Il
rispettivo segnalatore rimane in funzione. Se
non si preme tale pulsante, il forno funzionerà
alla potenza di 600 W.
3. Premere i pulsanti “-” e “+” per impostare la
potenza pretesa.
4. Premere il pulsante Impostazione Tempo per
cambiare il tempo di funzionamento. Il rispettivo
segnalatore rimane in funzione.
5. Premere i pulsanti “-” e “+” per impostare il
tempo di funzionamento preteso (per esempio
10 minuti).
6. Premere il pulsante Start. Il forno comincia a
funzionare.
NOTA: Nella funzione combinata la potenza
delle microonde è limitata a 600 W.

52
IT
Funzioni base
Aria calda
Utilizzare questa funzione per cuocere ed arrostire.
1. Premere il pulsante della funzione Aria
calda. Il tasto della funzione si accende.
2. Premere il pulsante Impostazione
Temperatura, per alterare la potenza del
microonde. Il rispettivo segnalatore rimane in
funzione. Se non si preme tale pulsante, il
forno funzionerà alla potenza di 160ºC.
3. Premere i pulsanti “-” e “+” per impostare la
temperatura pretesa.
4. Premere il pulsante Impostazione Tempo
per cambiare il tempo di funzionamento
preteso. Il rispettivo segnalatore rimane in
funzione.
5. Premere i pulsanti “-” e “+” per impostare il
tempo di funzionamento preteso (per
esempio 12 minuti).
6. Premere il pulsante Start. Il forno comincia a
funzionare.
Microonde + Aria calda
Utilizzare questa funzione per cuocere ed arrostire.
1. Premere il pulsante della funzione
Microonde + Aria calda. Il tasto della
funzione si accende.
2. Premere il pulsante Impostazione
Temperatura, per alterare la temperatura. Il
rispettivo segnalatore rimane in funzione. Se
non si preme tale pulsante, il forno
funzionerà alla potenza di 160ºC.
3. Premere i pulsanti “-” e “+” per impostare la
temperatura pretesa.
4. Premere il pulsante Impostazione Potenza,
per modificare la potenza del microonde. Il
rispettivo segnalatore rimane in funzione. Se
non si preme tale pulsante, il forno
funzionerà alla potenza di 400 W.
5. Premere i pulsanti “-” e “+” per impostare la
potenza pretesa.
6. Premere il pulsante Impostazione Tempo
per cambiare il tempo di funzionamento
preteso. Il rispettivo segnalatore rimane in
funzione.
7. Premere i pulsanti “-” e “+” per impostare il
tempo di funzionamento preteso (per
esempio 12 minuti).
8. Premere il pulsante Start. Il forno comincia a
funzionare
NOTA: Durante il funzionamento combinato, la
potenza delle microonde è limitata a 600 W.
20:00
160
4
1
3,5
6
2
20:00
400
160
6
4
1
3,5,7
8
2

53
IT
Funzioni base
Grill + Aria calda
Utilizzare questa funzione per rosolare carne, pesce, pollame o patatine fritte.
1. Premere il pulsante della funzione Grill +
Aria calda. Il tasto della funzione si
accende.
2. Premere il pulsante Impostazione
Temperatura, per alterare la temperatura. Il
rispettivo segnalatore rimane in funzione. Se
non si preme tale pulsante, il forno
funzionerà alla potenza di 160ºC.
3. Premere i pulsanti “-” e “+” per impostare la
temperatura pretesa.
4. Premere il pulsante Impostazione Tempo
per cambiare il tempo di funzionamento
preteso. Il rispettivo segnalatore rimane in
funzione.
5. Premere i pulsanti “-” e “+” per impostare il
tempo di funzionamento preteso (per
esempio 12 minuti).
6. Premere il pulsante Start. Il forno comincia a
funzionare.
Scongelamento manuale in base al tempo
Questa funzione può essere utilizzata per scongelare velocemente qualsiasi tipo di alimento.
1. Premere il pulsante della funzione
Scongelamento per Tempo. Il tasto della
funzione si accende.
2. Premere il pulsante Impostazione del
Tempo per scegliere il tempo di
funzionamento. Il rispettivo segnalatore
rimane in funzione.
3. Premere i pulsanti “-” e “+” per impostare il
tempo di funzionamento preteso (per
esempio 10 minuti).
4. Premere il pulsante Start. Il forno comincia a
funzionare.
20:00
160
4
1
3,5
6
2

54
IT
Funzioni base
Scongelamento automatico in base al peso
Questa funzione può essere utilizzata per scongelare velocemente carne, pollame, pesce, frutta o
pane.
1. Premere il pulsante della funzione
Scongelamento per Peso. Il tasto della
funzione si accende.
2. Premere il pulsante de Selezione del Tipo
di Alimento per scegliere il tipo di alimento.
Il segnalatore pertinente lampeggerà.
3. Premere i pulsanti “-” e “+” per impostare il
tempo preteso, per esempio “Pr 01” (vedere
la tabella sotto).
4. Premere il pulsante Impostazione Peso per
alterare il peso dell’alimento. Il rispettivo
segnalatore rimane in funzione.
5. Premere i pulsanti “-” e “+” per impostare il
peso preteso.
6. Premere il pulsante Start. Il forno comincia a
funzionare.
Nota: Girare gli alimenti non appena il forno
emette un segnale acustico e a display viene
visualizzato: .
Nella seguente tabella sono riportati i programmi della funzione "Scongelamento automatico in base al
peso" con l'indicazione, in relazione al peso, degli intervalli di tempo per lo scongelamento e per il riposo
dei diversi alimenti (il tempo di riposo permette la distribuzione uniforme della temperatura all'interno
dell'alimento).
Programma
Alimento
Peso (g)
Tempo (min.)
Tempo di riposo (min.)
Pr 01
Carne
100 – 2000
2 – 43
20 – 30
Pr 02
Pollame
100 – 2500
2 – 58
20 – 30
Pr 03
Pesce
100 – 2000
2 – 40
20 – 30
Pr 04
Frutta
100 – 500
2 – 13
10 – 20
Pr 05
Pane
100 – 800
2 – 19
10 – 20
Nota importante: vedi “Indicazioni generali di scongelamento”.

55
IT
Programmi speciali
Programma P1 - Riscaldare le pietanze
Questo programma può essere utilizzato per riscaldare diversi tipi di alimenti.
1. Premere il pulsante della funzione Speciale
P1. Il tasto della funzione si accende.
2. Premere il pulsante de Selezione del Tipo
di Alimento per scegliere il tipo di alimento.
Il segnalatore pertinente lampeggerà.
3. Premere i pulsanti “-” e “+” per impostare il
tempo preteso, per esempio “A 01” (vedere
la tabella sotto).
4. Premere il pulsante Impostazione Peso per
alterare il peso dell’alimento. Il rispettivo
segnalatore rimane in funzione.
5. Premere i pulsanti “-” e “+” per impostare il
peso preteso.
6. Premere il pulsante Start. Il forno comincia a
funzionare.
Nella seguente tabella sono riportati i programmi della funzione speciale P1 con l'indicazione, in
relazione al peso, degli intervalli di tempo per lo scongelamento e per il riposo dei diversi alimenti (il
tempo di riposo permette la distribuzione uniforme della temperatura all'interno dell'alimento).
Programma
Alimenti
Peso (g)
Tempo (min.)
Nota
A 01
Minestre
200 – 1500
3 – 15
Girare 1 – 2 volte, con
coperchio
A 02
Piatti pronti; Ingredienti compatti
200 – 1500
3 – 20
Girare 1 – 2 volte, con
coperchio
A 03
Piatti pronti; p.e. spezzatino
200 – 1500
3 – 18
Girare 1 – 2 volte, con
coperchio
A 04
Verdure
200 – 1500
2,6 – 14
Girare 1 – 2 volte, con
coperchio
Note importanti
Utilizzare sempre recipienti adatti per le
microonde e un coperchio per evitare che
le parti liquide possano traboccare.
Durante il riscaldamento mescolare o
girare la pietanza più volte.
Il tempo necessario al riscaldamento
dell'alimento dipende dalla sua
temperatura di partenza. Gli alimenti che
sono appena stati tolti dal frigorifero hanno
bisogno di tempi di riscaldamento più
lunghi rispetto a quelli conservati a
temperatura ambiente. Se la temperatura
della pietanza non dovesse corrispondere a
quella desiderata, selezionare la volta
successiva un peso maggiore o minore. Al
termine del riscaldamento mescolare le
pietanze. Lasciarle quindi riposare per
permettere al calore di distribuirsi
uniformemente.
Attenzione! Al termine del riscaldamento il
recipiente potrebbe essere molto caldo. Le
microonde non surriscaldano generalmente i
recipienti, che però possono essere riscaldati dal
calore trasmesso dalle vivande che contengono.

56
IT
Programmi speciali
Programma P2 - Cuocere le pietanze
Questo programma può essere utilizzato per cuocere alimenti freschi.
1. Premere il pulsante della funzione Speciale
P2. Il tasto della funzione si accende.
2. Premere il pulsante de Selezione del Tipo
di Alimento per scegliere il tipo di alimento.
Il segnalatore pertinente lampeggerà.
3. Premere i pulsanti “-” e “+” per impostare il
tempo preteso, per esempio “b 01” (vedere la
tabella sotto).
4. Premere il pulsante Impostazione Peso per
alterare il peso dell’alimento. Il rispettivo
segnalatore rimane in funzione.
5. Premere i pulsanti “-” e “+” per impostare il
peso preteso.
6. Premere il pulsante Start. Il forno comincia a
funzionare.
Nella seguente tabella sono riportati i programmi della funzione speciale P2 con l'indicazione, in
relazione al peso, degli intervalli di tempo per lo scongelamento e per il riposo dei diversi alimenti (il
tempo di riposo permette la distribuzione uniforme della temperatura all'interno dell'alimento).
Programma
Alimenti
Peso (g)
Tempo
(min.)
Nota
b 01
Patate
200 – 1000
4 – 17
Girare 1 – 2 volte,
Con coperchio
b 02
Verdure
200 – 500
4 – 15
Girare 1 – 2 volte,
Con coperchio
b 03
Riso
200 – 1000
13 – 20
Rapporto riso/acqua: 1 a 2
b 04
Pesce
200 – 1000
4 – 13
Con coperchio
Note importanti
Utilizzare sempre recipienti con coperchio
adatti alle microonde per evitare che le
parti liquide possano traboccare.
Durante il riscaldamento mescolare o
girare la pietanza più volte.
Attenzione! Al termine della cottura il
recipiente potrebbe essere molto caldo. Le
microonde non surriscaldano
generalmente i recipienti, che però
possono essere riscaldati dal calore
trasmesso dalle vivande che contengono.
Indicazioni di cottura
Pesce intero – Aggiungere da 1 a 3 cucchiai
d'acqua o di succo di limone.
Riso – Per ogni pugno di riso aggiungere la
doppia quantità d'acqua.
Patate con buccia – Cuocere patate di
grandezza uguale dopo averle lavate ed aver
bucherellato più volte la buccia. Aggiungere da
1 a 3 cucchiai d'acqua.
Patate sbucciate e verdure fresche – Tagliarle
in pezzi di uguali dimensioni e aggiungere un
cucchiaio d'acqua per ogni 100 g di verdura;
salare a piacere.
b 01
200
2
4
1
3,5
6

57
IT
Programmi speciali
Programma P3 - Scongelare e cuocere
Questo programma può essere utilizzato per scongelare e poi cucinare diversi tipi di alimenti.
1. Premere il pulsante della funzione Speciale
P3. Il tasto della funzione si accende.
2. Premere il pulsante de Selezione del Tipo
di Alimento per scegliere il tipo di alimento.
Il segnalatore pertinente lampeggerà.
3. Premere i pulsanti “-” e “+” per impostare il
tempo preteso, per esempio “C 01” (vedere
la tabella sotto).
4. Premere il pulsante Impostazione Peso per
alterare il peso dell’alimento. Il rispettivo
segnalatore rimane in funzione.
5. Premere i pulsanti “-” e “+” per impostare il
peso preteso.
6. Premere il pulsante Start. Il forno comincia a
funzionare.
Nella seguente tabella sono riportati i programmi della funzione speciale P3 con l'indicazione, in
relazione al peso, degli intervalli di tempo per lo scongelamento e per il riposo dei diversi alimenti (il
tempo di riposo permette la distribuzione uniforme della temperatura all'interno dell'alimento).
Programma
Alimenti
Peso (g)
Tempo (min.)
Nota
C 01
Pizza
300 – 550
8 – 12
Griglia
C 02
Piatti pronti
350 – 500
8 – 14
Girare 1 volte,
con coperchio
C 03
Prodotti a base di patate
200 – 450
10 – 12
Vassoio in vetro
Note importanti
Utilizzate stoviglie adatte al microonde e
resistenti al calore (ad esempio le apposite
pirofile). Con il grill si ottengono
temperature molto elevate. Con il
programma C 02 utilizzate sempre un
coperchio per evitare la fuoriuscita di
liquidi.
Attenzione! Al termine della cottura il recipiente
potrebbe essere molto caldo. Sebbene le
microonde non riscaldino la maggior parte dei
contenitori, questi potrebbero diventare molto
caldi a causa del calore trasmesso dalla
resistenza del grill.
Indicazioni di cottura
Pizza, surgelata – Cuocere pizze o baguette
precotte e surgelate.
Piatti pronti, surgelati – Cuocere lasagne,
cannelloni, sformati di gamberetti surgelati.
Coprire sempre con il coperchio.
Piatti a base di patate, surgelati – Le patatine
fritte, le crocchette di patate e le patate saltate
in padella devono essere adatte alla cottura a
microonde.

58
IT
Utilizzo del piatto di doratura
Normalmente, durante la cottura di cibi quali pizze
o torte su un grill o in un forno a microonde, la
pasta diventa molle e umida. Questo problema
può essere evitato utilizzando un piatto di
doratura. Poiché, sul fondo del piatto di doratura
la temperatura può aumentare rapidamente, la
crosta diventa croccante e dorata.
Il piatto di doratura può anche essere utilizzato
per bacon, uova, salsicce, ecc..
NOTE MOLTO IMPORTANTI:
Poiché la temperatura del piatto di doratura
diventerà molto alta, indossare sempre dei
guanti da forno;
Non posizionare mai il piatto di doratura nel
forno qualora manchi il piatto di vetro;
Non posizionare alcun recipiente non
resistente al calore (ad esempio tazze di
plastica) sul piatto di doratura.
Modalità di cottura con il piatto di doratura:
1. Preriscaldare il piatto di doratura
selezionando la funzione Microonde e
Grill per 3-5 minuti a un livello di potenza
microonde di 600 W;
2. Pennellare il piatto di doratura con olio in
modo tale da garantire una leggera
doratura dei cibi;
3. Posizionare l’alimento fresco o congelato
direttamente sul piatto di doratura;
4. Posizionare il piatto di doratura sul piatto
girevole di vetro nel forno a microonde;
5. Selezionare la funzione Microonde e Grill
e il tempo di cottura come di seguito
descritto.
NOTE MOLTO IMPORTANTI:
Poiché il piatto di doratura prevede uno strato in
Teflon, usandolo in modo errato potrebbe
danneggiarsi. Non tagliare mai gli alimenti
direttamente sul piatto. Togliere gli alimenti dal
piatto prima di tagliarli.
Pulizia:
Il modo migliore per pulire il piatto di doratura
consiste nel lavarlo con acqua calda e detergente,
quindi risciacquarlo con acqua pulita. Non pulirla
utilizzando spazzole o spugne dure che
potrebbero danneggiare lo strato superiore.
Alimento
Peso
Tempo di
cottura
Tempo di
sosta
Raccomandazione
Pizza
200 g
4 - 5 min
---
Se la pizza é sottile.
Se la pizza é alta aumentare il tempo
di cottura di 1 – 2 minuti
300 g
5 - 6 min
---
400 g
7 – 8 min
---
Quiche e
Torte
200 g
3 – 4 min
2 – 3 min
300 g
5 - 6 min
2 – 3 min
Hamburger
150 - 200
8 - 10 min
5 – 8 min
Girare per 2 volte.
Patate al
forno
400 g
6 -8 min
---
Girare per 1 volta.

59
IT
Durante il funzionamento...
Interruzione di un procedimento di
cottura
Il procedimento di cottura può essere interrotto in
un qualsiasi momento premendo il tasto
START/STOP o aprendo lo sportello del forno.
Automaticamente
non vengono più irradiate le microonde,
si disattiva il grill, che rimane però molto
caldo (pericolo di scottature!),
si blocca il timer e a display viene visualizzato
il tempo di cottura rimanente.
A questo punto diventa possibile
1. girare o mescolare le pietanze per rendere
uniforme il procedimento di cottura,
2. modificare i parametri del procedimento,
3. interrompere il procedimento premendo il
tasto START/STOP.
Chiudere lo sportello e premere il tasto
START/STOP per riavviare il procedimento di
cottura.
Modifica dei parametri
I parametri di funzionamento (p.e. tempo, peso,
potenza) solo possono essere modificati quando il
processo di cottura è stato interrotto da una delle
seguenti azioni:
1. Girare la manopola in una direzione
qualsiasi per modificare la durata di cottura;
il nuovo tempo impostato viene subito
memorizzato.
2. Premere il tasto POTENZA/PESO per
modificare la potenza o il peso; iniziano a
lampeggiare le relative spie. Modificare i
parametri girando la manopola in una
direzione qualsiasi e selezionare il valore
desiderato premendo di nuovo il tasto
POTENZA/PESO.
Annullare un procedimento di cottura
Per annullare un procedimento di cottura,
premere il tasto START/STOP per 3 secondi.
Se il procedimento era già stato interrotto e lo si
desidera ora annullare, premere il tasto
START/STOP per altri 3 secondi.
Viene quindi emesso un segnale acustico e a
display viene visualizzata l'ora.
Termine di un procedimento di cottura
Al termine di un procedimento di cottura vengono
emessi 3 segnali acustici e a display viene
visualizzata la parola “End”.
Queste segnalazioni acustiche vengono ripetute
ogni 30 secondi fino a quando non si apre lo
sportello o non si preme il tasto START/STOP.

60
IT
Scongelare
Nella seguente tabella sono indicati i tempi
necessari per lo scongelamento di diversi
alimenti in base al loro peso e i rispettivi tempi di
riposo (utili per la distribuzione uniforme del
calore nelle vivande); le indicazioni sono seguite da
alcuni consigli utili.
Alimenti
Peso (g)
Tempo di
scongelamento (min.)
Tempo di riposo
(min.)
Consigli
Pezzo di carne intera,
maiale, manzo, vitello,
selvaggina
100
2-3
5-10
Girare una volta
200
4-5
5-10
Girare una volta
500
10-12
10-15
Girare 2 volte
1000
21-23
20-30
Girare 2 volte
1500
32-34
20-30
Girare 2 volte
2000
43-45
25-35
Girare 3 volte
Spezzatino
500
8-10
10-15
Girare 2 volte
1000
17-19
20-30
Girare 3 volte
Carne macinata
100
2-4
10-15
Girare 2 volte
500
10-14
20-30
Girare 3 volte
Salciccia arrosto
200
4-6
10-15
Girare una volta
500
9-12
15-20
Girare 2 volte
Pollame intero o a
pezzi
250
5-6
5-10
Girare una volta
Pollo
1000
20-24
20-30
Girare 2 volte
Pollastrello
2500
38-42
25-35
Girare 3 volte
Filetto di pesce
200
4-5
5-10
Girare una volta
Trota
250
5-6
5-10
Girare una volta
Granchio
100
2-3
5-10
Girare una volta
500
8-11
15-20
Girare 2 volte
Frutta
200
4-5
5-10
Girare una volta
300
8-9
5-10
Girare una volta
500
11-14
10-20
Girare 2 volte
Pane
200
4-5
5-10
Girare una volta
500
10-12
10-15
Girare una volta
800
15-17
10-20
Girare 2 volte
Burro
250
8-10
10-15
Ricotta
250
6-8
10-15
Panna
250
7-8
10-15

61
IT
Scongelare
Indicazioni generali di scongelamento
1. Per scongelare gli alimenti utilizzare solo
stoviglie adatte alle microonde (porcellana,
vetro o plastica idonea).
2. La funzione "Scongelamento in base al
peso" e i valori indicati nelle tabelle si
riferiscono allo scongelamento di cibi crudi.
3. La durata dello scongelamento dipende dalla
quantità e dalla spessore dell'alimento. Dato
da considerare quando si preparano gli
alimenti prima di metterli nel congelatore. Si
consiglia quindi di suddividere gli alimenti in
piccole porzioni a seconda della grandezza
del recipiente.
4. Distribuire gli alimenti all'interno del vano
cottura in modo che le parti più grosse (p.e.
di pesce o le cosce di pollo) siano rivolte
verso l'esterno. Le parti più sottili possono
essere protette ricoprendole con una
pellicola d'alluminio. Importante: la pellicola
di alluminio non deve toccare le pareti del
forno, perché potrebbero altrimenti formarsi
delle scintille.
5. I pezzi più spessi devono essere girati più
volte.
6. Distribuite gli alimenti surgelati il più
uniformemente possibile nel forno, perché le
parti più sottili si scongelano più
velocemente di quelle più spesse.
7. Gli alimenti più ricchi di grassi, come p.e. il
burro, il formaggio morbido o la panna, non
devono essere scongelati completamente,
perché il loro scongelamento viene
proseguito a temperatura ambiente.
Mescolare la panna congelata prima
dell’uso.
8. Il pollame deve essere appoggiato su un
piatto ribaltato per permettere il deflusso del
liquido che si forma durante lo
scongelamento.
9. Il pane deve invece essere arrotolato in un
tovagliolo per evitare che si secchi troppo.
10. Girare gli alimenti a intervalli regolari.
11. Togliere gli alimenti surgelati dalla loro
confezione e non dimenticarsi di rimuovere le
clip metalliche. Se gli alimenti dovessero
essere contenuti in vaschette adatte al
surgelamento e alla cottura o riscaldamento a
microonde, è necessario rimuoverne solo il
coperchio. In caso contrario appoggiare le
pietanze in recipienti adatti alle microonde.
12. Il liquido che si forma, soprattutto durante lo
scongelamento di pollame, deve essere
buttato via e non deve assolutamente entrare
in contatto con gli altri alimenti.
13. Non dimenticarsi che la funzione di
scongelamento prevede anche un tempo di
riposo durante il quale l'alimento si scongela
completamente.

62
IT
Cucinare con le microonde
Attenzione! Leggere attentamente il capitolo
"Indicazioni di sicurezza" prima di utilizzare il
forno a microonde.
Attenersi alle seguenti indicazioni durante la
cottura con le microonde.
Prima di riscaldare o cucinare alimenti con
buccia o pelle (p.e. mele, pomodori, patate,
salsicce), bucherellarli affinché non scoppino.
Tagliare gli alimenti a pezzi prima di iniziare a
cucinarli nel forno.
Prima di utilizzare un recipiente, assicurarsi che
sia adatto alle microonde (vedi capitolo
"Stoviglie adatte alle microonde").
Durante la preparazione di alimenti a basso
livello di umidità (p.e. scongelamento di
pane, cottura di pop-corn, ecc.) avviene una
rapida emissione di vapore. Il forno funziona
così a vuoto, la pietanza potrebbe bruciarsi e
danneggiare così l'apparecchio e il contenitore
in cui si trova. Impostare quindi un tempo di
preparazione assolutamente necessario e
controllare il procedimento.
Nel forno a microonde non è possibile
riscaldare grandi quantità di olio (friggere).
Togliere i piatti pronti dalla loro confezione
perché questa non è sempre resistente al
calore. Attenersi alle istruzioni fornite dal
produttore.
Se si vogliono mettere nel forno più
contenitori, p.e. delle tazze, disporli
uniformemente sul piatto girevole.
Non chiudere mai i sacchetti di plastica con clip
di metallo, utilizzare quelle di plastica.
Bucherellare più volte il sacchetto per
permettere al vapore di uscirne.
Assicurarsi che gli alimenti raggiungano una
temperatura di almeno 70°C durante la loro
cottura o riscaldamento.
Durante la cottura potrebbe formarsi condensa
sullo sportello del forno ed eventualmente
sgocciolare verso il basso. La formazione di
condensa è normale ed è ancora più
accentuata quando la temperatura ambiente è
bassa. La sicurezza del forno non ne viene
compromessa. Al termine della cottura
asciugare l'acqua di condensa.
Quando si riscaldano liquidi, utilizzare
contenitori con grandi aperture che
permettano la fuoriuscita del vapore.
Preparare gli alimenti attenendosi alle istruzioni, ai
tempi di cottura e ai livelli di potenza indicati nelle
tabelle.
Considerare comunque che i valori riportati sono
puramente indicativi e che possono essere
modificati a seconda dello stato di partenza, della
temperatura, dell'umidità e del tipo di alimento da
cuocere. Si consiglia di modificare i tempi di
cottura e i livelli di potenza in base alle singole
necessità. A seconda del tipo di alimento può
rendersi necessario prolungare o ridurre i tempi di
cottura, o aumentare o diminuire il livello di
potenza.
Cottura nel forno a microonde
1. Quanto maggiore la quantità di alimenti,
tanto più lungo sarà il tempo di cottura.
Ricordarsi sempre che
doppia quantità = durata raddoppiata
mezza quantità = durata dimezzata
2. Quanto minore sarà la temperatura, tanto più
lunga sarà la durata di cottura.
3. Gli alimenti liquidi si riscaldano più
velocemente.
4. La disposizione corretta degli alimenti sul
piatto girevole ne facilita la cottura uniforme.
Si possono cuocere contemporaneamente
alimenti di struttura diversa disponendo
quelli più compatti sul bordo del piatto e
quelli meno compatti nel suo centro.
5. Lo sportello del forno può essere aperto in
qualsiasi momento. L'apparecchio si spegne
automaticamente. Il forno rinizia a funzionare
dopo che si è richiuso lo sportello e si è
premuto di nuovo il tasto START/STOP.
6. La maggior parte degli alimenti deve essere
protetta con un coperchio, per poterne
mantenere il livello di umidità e il sapore
tipico. Il coperchio deve essere adatto alle
microonde ed avere dei fori che permettano
la fuoriuscita del vapore.

63
IT
Cucinare con le microonde
Tabelle e consigli – Preparazione delle verdure
Alimenti
Quantità (g)
Quantità di
liquido da
aggiungere
Potenza
(Watt)
Tempo
(min.)
Tempo di
riposo
(min.)
Suggerimenti
Cavolfiore
Broccoli
Funghi
500
300
250
100 ml
50 ml
25 ml
800
800
800
9-11
6-8
6-8
2-3
2-3
2-3
Dividere in rosette. Tagliare a
fette. Con coperchio.
Piselli e carote,
carote surgelate
300
250
100 ml
25 ml
800
800
7-9
8-10
2-3
2-3
Tagliare a fette o a dadini. Con
coperchio.
Patate
250
25 ml
800
5-7
2-3
Pelare e tagliare a pezzi di
uguale dimensioni. Con
coperchio.
Peperoni
Porro
250
250
25 ml
50 ml
800
800
5-7
5-7
2-3
2-3
Tagliare a pezzi o a listarelle.
Con coperchio.
Cavolo di
Bruxelles,
surgelato
300
50 ml
800
6-8
2-3
Con coperchio.
Crauti
250
25 ml
800
8-10
2-3
Con coperchio.
Tabelle e suggerimenti– Preparazione del pesce
Alimenti
Quantità (g)
Potenza
(Watt)
Tempo
(min.)
Tempo di
riposo
(min.)
Suggerimenti
Filetto di pesce
500
600
10-12
3
Con coperchio. A metà del tempo di cottura
girare.
Pesce intero
800
800
400
2-3
7-9
2-3
Con coperchio. A metà del tempo di cottura
girare. Se necessario, proteggere con pellicola
di alluminio le estremità sottili del pesce.

64
IT
Cuocere con il grill
Utilizzare la griglia in dotazione per ottenere buoni
risultati di cottura con il grill.
Sistemare la griglia nel forno in modo che non
tocchi le superfici metalliche del vano cottura,
perché altrimenti potrebbero formarsi delle
scintille che potrebbero danneggiare
l'apparecchio.
Avvertenze importanti
1. Quando si mette in funzione il grill per la
prima volta, è possibile che si formino fumo
e cattivo odore, provocati dall'utilizzo di oli
durante la produzione del forno.
2. Il vetro dello sportello si surriscalda durante
il funzionamento del forno. Tenere lontani i
bambini quando il forno è in funzione!
3. Anche le pareti del vano cottura si
surriscaldano molto durante la cottura con il
grill. Si consiglia pertanto l'utilizzo di guanti
da cucina per prelevare le pietanze dal
forno.
4. Generalmente, quando il grill viene fatto
funzionare per periodi di tempo prolungati, le
sue resistenze vengono momentaneamente
disattivate dal termostato di sicurezza.
5. Importante! Se le pietanze vengono cotte o
grigliate in contenitori, assicurarsi che questi
siano adatti alle microonde. Vedi capitolo
"Stoviglie adatte alle microonde".
6. Durante l'utilizzo del grill spruzzi di grasso
potrebbero macchiare le resistenze e
bruciarsi. È normale e non pregiudica il
funzionamento.
7. Pulire il vano cottura e gli utensili dopo ogni
utilizzo per impedire allo sporco di
incrostarsi.

65
IT
Cuocere con il grill
Tabelle e suggerimenti – Grill senza microonde
Alimenti
Quantità (g)
Tempo (min.)
Suggerimenti
Pesce
Orata
Sardine/caponi
800
6-8 pezzi
18-24
15-20
Ungere leggermente con il burro. Girare a
metà tempo di cottura e speziare.
Carne
Salsicce
6-8 pezzi
22-26
A metà del tempo di cottura bucherellare e
girare.
Hamburger, surgelati
3 pezzi
18-20
Girare 2 o 3 volte.
Costata (dallo spessore di circa
3 cm)
400
25-30
A metà del tempo di cottura aggiungere olio
e girare.
Pane
Pane tostato
4 pezzi
1½-3
Controllare la tostatura.
Sandwich al forno
2 pezzi
5-10
Controllare la cottura.
Preriscaldare il grill per 2 minuti. In assenza di
indicazioni contrarie, utilizzare la griglia per la
cottura. Sistemare la griglia su un piatto che
raccolga l'acqua e il grasso di cottura.
I tempi di cottura riportati sono puramente
indicativi e possono essere modificati in base alla
quantità e al tipo di pietanza che si vuole
preparare. Si possono preparare carne e pesce
dall'ottimo sapore, se prima di grigliarli li si unge
con olio vegetale, li si spezia e li si lascia marinare
per alcune ore. Salare solo dopo che sono stati
grigliati.
Non si corre il rischio che le salsicce scoppino, se
le si bucherella con una forchetta prima della
cottura.
A metà procedimento di cottura iniziare a
controllarlo e girare le pietanze.
Il grill è particolarmente adatto per la cottura di
pezzi sottili di carne e pesce. I pezzi di carne
sottili devono essere girati solo una volta, mentre
quelli più spessi più volte.

66
IT
Cuocere con il grill
Tabelle e suggerimenti – Combinazione microonde con grill
La combinazione microonde con grill è ideale per
preparare velocemente le pietanze e per dorarle
contemporaneamente. Gli alimenti possono anche
essere gratinati.
Le microonde e il grill funzionano
contemporaneamente: le microonde cuociono e il
grill tosta.
Ricette
Quantità (g)
Stoviglie
Potenza
(Watt)
Tempo (min.)
Tempo di
riposo (min.)
Sformato di pasta
500
piane
400
12-17
3-5
Sformato di patate
800
piane
600
20-22
3-5
Lasagne
circa 800
piane
600
15-20
3-5
Sformato di ricotta
circa 500
piane
400
18-20
3-5
2 cosce di pollo fresche
(sulla griglia)
200 g l'una
piane
400
10-15
3-5
Pollo
circa 1000
piane e ampie
400
35-40
3-5
Zuppa di cipolle
gratinata
2 tazze da 200
scodelle
400
2-4
3-5
Prima di utilizzare stoviglie e contenitori vari,
assicurarsi che siano adatti alle microonde.
Utilizzare esclusivamente recipienti adatti.
I recipienti che vengono utilizzati per la modalità di
cottura combinata, devono essere adatti sia alla
cottura con le microonde sia a quella con il grill.
Vedi capitolo "Stoviglie adatte alle microonde".
I valori riportati nella tabella sono puramente
indicativi e possono variare a seconda dello stato
di partenza, della temperatura, dell'umidità e del
tipo di alimento scelto.
Se il tempo di cottura non è stato sufficiente per
dorare la pietanza come desiderato, attivare la
funzione "Grill" per altri 5 o 10 minuti.
Osservare i tempi di riposo e girare i pezzi di
carne e pollame.
In assenza di indicazioni contrarie, utilizzare il
piatto girevole per la cottura.
I valori indicati nelle tabelle si riferiscono ad un
vano cottura freddo (non è necessario
preriscaldarlo).

67
IT
Arrostire e cuocere
Tabelle e suggerimenti – Preparazione di carne e torte
Microonde / Aria calda
Alimento
Quantità (g)
Potenza
(Watt)
Temperatura
ºC
Tempo
(min)
Tempo di
riposo
(min)
Suggerimenti
Roastbeef
1000-1500
400
200
30-40
20
Recipiente senza coperchio,
girare 1x
Lombata di maiale/
Costolette od ossa
Maiale arrosto
800-1000
200
180-190
50-60
20
Recipiente senza coperchio,
girare 1x
Pollo, intero
1000/1200
400
200
30-40
10
Recipiente senza coperchio.
Parte del petto verso il
basso. Girare 1x.
Pollo a pezzi
500-1000
400
200
25-35
10
Recipiente senza coperchio.
Sistemare i pezzi con la
pelle verso il basso. Girare
1X.
Vitella arrosto
1500/2000
200
180
60-65
20
Recipiente con coperchio
girare 1-2x, dopo aver
girato, continuare con la
cottura senza coprire.
Carne di manzo
arrosto
1500-1800
200
200
80-90
20
Recipiente con coperchio,
girare 1-2x
Microonde / Cottura
Alimento
Potenza
(Watt)
Temperatura ºC
Tempo
(min)
Tempo di riposo
(min)
Suggerimenti
Torta al cioccolato/ciliegia
200
200
30
5-10
Piatto girevole, grata
piccola, Stampo con
cerniera, Ø 28 cm
Cheessecake con frutta
400
180
40-45
5-10
Piatto girevole, grata
piccola, Stampo con
cerniera, Ø 28 cm
Crostata di mele
200
185
40-45
5-10
Piatto girevole, grata
piccola, Stampo con
cerniera, Ø 28 cm
Cheesecake con streusel
400
180
40-50
5-10
Piatto girevole, grata
piccola, Stampo con
cerniera, Ø 26 cm
Torta alle noci
200
170
30-35
5-10
Piatto girevole,
Stampo con cono
Consigli per arrostire
Girare i pezzi di carne a metà cottura. Quando
l’arrosto sarà pronto, lasciarlo riposare per altri 20
minuti a forno spento e chiuso. In tale modo, il
succo della carne si spargerà meglio.
La temperatura ed il tempo di arrosto dipendono
dal tipo di alimento e dalla relativa grandezza.
Nel caso in cui il peso dell’arrosto non figuri in
tabella, scegliere la segnalazione corrispondente
al peso immediatamente inferiore e prolungare il
tempo.
Consigli sulle stoviglie
Controllare che il recipiente ci stia all’interno del
forno
Recipienti di vetro caldi devono essere sistemati
sopra un panno da cucina asciutto. Se tali
recipienti sono sistemati su una superficie fredda
o bagnata il vetro potrà fendere o spaccare. Usare
delle prese per togliere i recipienti del forno.

68
IT
Cuocere
Tabelle e suggerimenti – Cuocere/ Aria calda
Alimento
Recipiente
Piano
Temperatura
Tempo (Min.)
Torta alle noci
Stampo con cono
Piatto girevole
160
50-60
Tarte de fruta
Stampo con cerniera Ø 28 cm
Piatto girevole
160
55-60
Plumcake
Stampo con cono
Piatto girevole
160
55-65
Crostate salate
Stampo rotondo in vetro
Piatto girevole
190-200
40-60
Torta di pan di Spagna
Stampo con cerniera Ø 26 cm
Piatto girevole
160
30-40
Tronco
Tortiera in vetro
1
200
12-15
Torta alle ciliegie
Tortiera in vetro
1
180-190
40-50
Consigli sugli stampi per torte
Gli stampi più usati sono quelli neri in metallo. Se
si usa in aggiunta il microonde, si devono usare
stampi per torte in vetro, ceramica o plastica. Detti
stampi devono essere resistenti a temperature
fino ai 250ºC. Se si usano questo tipo di stampi, le
torte rimarranno meno tostate.
Consigli su come cuocere torte
La temperatura e la cottura della torta dipendono
dalla qualità e quantità della pasta. Tentare prima
con una temperatura più bassa ed in seguito, se
necessario, regolare su un valore più elevato. Ad
una temperatura più bassa si riuscirà ad ottenere
una tostatura più uniforme. Sistemare sempre lo
stampo al centro del vassoio o sul piatto girevole.
Suggerimenti per cuocere
Come controllare se la torta è cotta:
Infilare uno stecchino nella parte più alta della
torta. Se la pasta non rimarrà attaccata allo
stecchino, la torta sarà pronta.
La torta diventa troppo scura
Cuocere ad una temperatura più bassa con un
tempo più lungo.
La torta risulta troppa asciutta:
Fare diversi fori con uno stecchino sulla torta già
pronta. Di seguito, innaffiare con succo od una
bevanda alcolica. In una prossima volta,
aumentare la temperatura di cottura in circa 10º
con un tempo più corto.
La torta non si stacca quando si capovolge:
Lasciare raffreddare la torta, a cottura ultimata,
durante 5 - 10 minuti, in tale modo, la torta si
stacca più facilmente dallo stampo. Nel caso in
cui la torta continuasse a non staccarsi, passare
accuratamente con un coltello per i bordi. In una
prossima volta, imburrare bene lo stampo.
Consigli per risparmiare energia
Quando si fa più di una torta, si consiglia di
infornarle una dopo l’altra. In tale modo si
approfitta il calore residuale del forno e si riduce il
tempo di cottura delle torte successive.
Utilizzare di preferenza stampi scuri, colorati o
smaltati in nero, visto che assorbono meglio il
calore.
In caso di tempi di cottura più lunghi si potrà
staccare il forno circa 10 minuti prima del tempo
previsto ed, in questo modo, approfittare il calore
residuale per ultimare la cottura.

69
IT
Stoviglie adatte per le microonde
Funzione microonde
Quando si utilizza la funzione Microonde non
dimenticarsi che queste vengono riflesse dalle
superfici metalliche, mentre il vetro, la porcellana,
la terraglia, la plastica e la carta si lasciano
attraversare.
Pertanto non utilizzare con le microonde
pentole e stoviglie di metallo o recipienti con
elementi o decorazioni metalliche. Non
utilizzare nemmeno stoviglie di vetro e terraglia
con decorazioni o riporti metallici (p.e. cristallo al
piombo).
Le stoviglie o i recipienti ideali per la cottura nel
forno a microonde sono il vetro pirofilo, la
porcellana o la terraglia, così come la plastica
termoresistente. Utilizzare stoviglie di vetro e
porcellana molto sottili e fragili solo per tempi di
cottura brevi, p.e. solo per riscaldare.
I cibi caldi trasmettono il calore alle stoviglie, che
possono così surriscaldarsi. Utilizzare pertanto
sempre una presina per prelevare le pietanze dal
forno.
Test stoviglie
Sistemare le stoviglie per 20 secondi nel forno e
accenderlo alla massima potenza. Se le stoviglie
rimangono fredde o si riscaldano solo
leggermente, significa che sono adatte alle
microonde. Se invece si dovessero riscaldare
troppo o dovessero formarsi scintille, significa che
non sono adatte.
Grill o Aria calda
Se si utilizza la funzione Grill o Aria calda le
stoviglie devono essere resistenti a temperature di
almeno 300°C.
Le stoviglie di plastica non sono adatte alla
cottura con il grill.
Funzioni combinate
Se si utilizza il funzioni combinate bisogna
utilizzare stoviglie adatte ad entrambe le due
modalità di cottura.
Contenitori e pellicole di alluminio
I piatti pronti contenuti in recipienti di alluminio o
avvolti in pellicole di alluminio possono essere
cotti nel forno a microonde, se si osservano le
seguenti indicazioni.
Osservare le indicazioni fornite dal produttore e
riportate sulla confezione.
I contenitori di alluminio non devono avere una
profondità superiore ai 3 cm e non devono
toccare le pareti del vano cottura (distanza
minima: 3 cm). Rimuovere i coperchi di
alluminio.
Sistemare il contenitore di alluminio
direttamente sul piatto girevole. Se si utilizza la
griglia, sistemare il recipiente su un piatto di
porcellana. Non appoggiare mai il contenitore
direttamente sulla griglia.
I tempi di cottura si prolungano perché le
microonde possono penetrare nelle pietanze
solo dall'alto. In caso di dubbi utilizzare
stoviglie conosciute che sono adatte alle
microonde.
Si può utilizzare la pellicola di alluminio durante
la modalità di scongelamento per riflettere le
microonde. Permette, per esempio, di
proteggere le parti delicate di alimenti come
pollame o carne macinata mentre li si scongela.
Importante! Il foglio di alluminio non deve
toccare le pareti del vano cottura, perché
altrimenti si potrebbero formare delle scintille.
Coperchio
Si consiglia l'utilizzo di coperchi di vetro, plastica o
pellicola trasparente, perché in questo modo
1. si evita un'eccessiva fuoriuscita di vapore
(soprattutto con tempi di cottura molto
lunghi);
2. si accelera il processo di cottura;
3. si impedisce che gli alimenti si essicchino;
4. si conserva l'aroma delle pietanze.
I coperchi non devono essere a tenuta stagna, per
evitare che si formi qualsiasi tipo di pressione. I
sacchetti di plastica devono presentare aperture
uniformi. I biberon, i vasetti con alimenti per
neonati e contenitori simili non devono essere
riscaldati con il coperchio perché altrimenti si
corre il rischio che scoppino.

70
IT
Stoviglie adatte per le microonde
Tabella - Stoviglie
La seguente tabella offre un quadro generale di quali tipi di stoviglie siano adatte ai diversi tipi di cottura.
Modo di
funzionamento
Tipo stoviglie
Microonde
Grill / Aria
calda
Funzioni
combinate
Scongelare /
riscaldare
Cuocere
Vetro e porcellana 1)
Adatte alla casa, non termoresistenti,
possono essere lavate nella
lavastoviglie.
sì
sì
no
no
Ceramica smaltata
Vetro termoresistente e porcellana
sì
sì
sì
sì
Ceramica e stoviglie in terraglia 2)
Non smaltate o smaltate ma senza
decorazioni metalliche
sì
sì
no
no
Stoviglie di terracotta 2)
smaltate
non smaltate
sì
no
sì
no
no
no
no
no
Stoviglie di plastica 2)
termoresistenti fino a 100°C
termoresistenti fino a 250°C
sì
sì
no
sì
no
no
no
no
Pellicole di plastica 3)
Pellicole per alimenti
Cellofan
no
sì
no
sì
no
no
no
no
Carta, cartone e pergamena 4)
sì
no
no
no
Metallo
Pellicola di alluminio
Confezioni di alluminio 5)
Accessori
sì
no
sì
no
sì
sì
sì
sì
sì
no
sì
sì
1. Senza bordo dorato o argentato e senza
cristallo al piombo.
2. Attenersi alle indicazioni del produttore!
3. Non utilizzare clip metalliche per chiudere i
sacchetti. Bucherellare i sacchetti. Utilizzare
le pellicole solo per coprire.
4. Non utilizzare piatti di carta.
5. Esclusivamente confezioni piane di alluminio
senza coperchio. L'alluminio non deve
toccare le pareti del vano cottura.

71
IT
Pulizia e manutenzione
La pulizia rappresenta generalmente l'unico tipo di
manutenzione necessaria.
Attenzione! Il forno a microonde deve essere
pulito regolarmente provvedendo alla rimozione di
tutti i resti di cottura. Se il forno non viene
mantenuto pulito correttamente, la sua superficie
si potrebbe danneggiare, riducendo così i tempi
di durata dell'apparecchio e creando,
eventualmente, situazioni pericolose.
Attenzione! Prima di iniziare la pulizia staccare
l'apparecchio dall'alimentazione di rete.
Togliere la spina dalla presa o disattivare il
circuito di alimentazione dell'apparecchio.
Non utilizzare detergenti aggressivi o prodotti
abrasivi, spugne abrasive e neppure oggetti
appuntiti, perché potrebbero macchiare
l'apparecchio.
Non utilizzare apparecchi di pulizia a
pressione o a getto di vapore.
Frontale dell'apparecchio
È sufficiente pulire il frontale dell'apparecchio con
un panno umido. Nel caso dovesse essere
particolarmente sporco, aggiungere un paio di
gocce di detergente all'acqua di pulizia. Asciugare
quindi l'apparecchio con un panno asciutto.
Per la pulizia di apparecchi con frontale di
alluminio utilizzare un detergente delicato per
vetro e un panno morbido e senza pelucchi. Pulire
la superficie in senso orizzontale e non facendo
pressione.
Rimuovere immediatamente resti di calcare,
grasso, amido e bianco d'uovo. Queste macchie
potrebbero corrodere l'apparecchio.
Evitare che defluisca dell'acqua all'interno
dell'apparecchio.
Vano cottura
Dopo ogni utilizzo pulire le pareti interne con un
panno umido, perché in questo modo è più facile
eliminare spruzzi e resti di cibo, prima che si
incrostino.
Utilizzare un detergente non aggressivo per
rimuovere le incrostazioni più tenaci. Non
utilizzare spray per forni o detergenti
aggressivi o abrasivi.
Assicurarsi che lo sportello e il frontale siano
sempre molto puliti, al fine di assicurare il
funzionamento perfetto dell'apparecchio.
Evitare che penetri acqua nelle fessure e nei fori
di aerazione del microonde.
Pulire regolarmente il fondo del vano cottura,
specialmente se vi si sono depositati liquidi,
rimuovendo il piatto girevole e il suo supporto (con
tanto di perno).
Non accendere l'apparecchio senza aver prima
reinserito il piatto con il suo supporto.
Se il vano cottura dovesse essere molto sporco,
appoggiare un bicchiere d'acqua sul piatto
girevole e far funzionare il forno alla massima
potenza per circa 2 o 3 minuti. Il vapore che si
forma ammorbidisce le macchie di sporco, che
possono poi essere facilmente rimosse con un
panno morbido.
Per neutralizzare facilmente eventuali odori
sgradevoli (p.e. quelli dopo la preparazione del
pesce), aggiungere un paio di gocce di succo di
limone o di aceto all'acqua di una tazza che sarà
poi messa nel forno e riscaldata per 2 o 3 minuti a
potenza massima (mettere un cucchiaino nella
tazza per evitare un ritardo di bollitura).

72
IT
Pulizia e manutenzione
Superficie superiore del vano cottura
Se dovesse essersi sporcata la superficie
superiore interna dell'apparecchio, smontare il grill
per facilitarne la pulizia.
Prima di sganciare il grill aspettare che si sia
raffreddato per evitare il rischio di scottature.
Procedere quindi come segue:
1. Ruotare di 180° il supporto del grill (1).
2. Abbassarlo quindi con cautela (2). Non fare
troppa forza perché si rischia altrimenti di
danneggiare l'apparecchio.
3. Dopo aver provveduto alla pulizia della
superficie, riportare il grill (2) nella sua
posizione originaria procedendo nella
sequenza inversa.
AVVISO IMPORTANTE: Il supporto del grill (1)
può cadere durante la rotazione. In questo caso
inserire il supporto del grill (1) nel foro che si trova
sulla parte superiore della cavità e ruotarlo di 90º
fino alla posizione di supporto per il grill (2).
La copertura (3) che si trova sulla superficie
superiore, deve essere sempre pulita. Resti di
cottura che dovessero accumularsi sulla copertura
potrebbero generare scintille o essere la causa di
danni all'apparecchio.
Non utilizzare detergenti abrasivi o oggetti
appuntiti.
La rimozione della copertura potrebbe creare
situazioni pericolose.
Il vetro per la copertura della luce (4) si trova sul
cielo dell'apparecchio e può essere rimosso
facilmente per essere pulito. Rimuovere il vetro di
copertura svitandolo e pulirlo con acqua e
detergente per piatti.
Accessori
Pulire gli accessori dopo ogni utilizzo. In caso
dovessero essere molto sporchi, metterli prima in
ammollo e quindi lavarli con una spazzola o una
spugna. Gli accessori possono essere lavati nella
lavastoviglie.
Assicurarsi che il piatto rotante e il suo supporto
siano sempre puliti. Non accendere mai
l'apparecchio senza aver prima reinserito il piatto
con il suo supporto.

73
IT
Guasti, cosa fare?
ATTENZIONE! Qualsiasi tipo di riparazione
deve essere effettuato solo da personale
specializzato. Qualsiasi riparazione che non
venga eseguita da personale autorizzato dalla
casa produttrice potrebbe rivelarsi pericolosa.
I seguenti guasti possono essere rimossi
dall'utente senza che sia necessario l'intervento
del Servizio Assistenza.
Il display è oscurato! Controllare se
- si è disattivata l'indicazione dell'ora (vedi
capitolo "Impostazioni base").
Premendo i tasti non si attiva nessuna
funzione! Controllare se
- si è attivato il blocco di messa in funzione
(vedi capitolo "Impostazioni base").
L'apparecchio non funziona! Controllare
se
- la spina è correttamente inserita nella presa,
- è attivo il circuito di alimentazione del forno,
- lo sportello è chiuso bene (lo sportello scatta
quando si chiude),
- degli elementi estranei si trovano tra
sportello e frontale del vano interno.
Durante il funzionamento del forno si
sentono rumori strani! Controllare se
- vengono generate scintille all'interno del
forno a causa della presenza di elementi
estranei di metallo (vedi capitolo "Stoviglie
adatte");
- le stoviglie toccano le pareti del vano cottura;
- nel vano cottura si trovano spiedini o
cucchiai.
Le pietanze non si riscaldano o si
riscaldano molto lentamente! Controllare
se
- si sono utilizzate inavvertitamente stoviglie
metalliche;
- il tempo di funzionamento e il livello di
potenza impostati sono corretti;
- il cibo sistemato nel vano cottura è in
quantità maggiore o è più freddo del solito.
Le pietanze sono diventate troppo calde,
si sono seccate o bruciate! Controllare se
si sono impostati un tempo di funzionamento
e un livello di potenza corretti.
Al termine del procedimento di cottura si
sente un rumore! Non si tratta di un guasto.
Al termine di una modalità di funzionamento
la ventola di raffreddamento rimane accesa
fino a quando la temperatura non è scesa a
sufficienza.
Il forno funziona ma non si accende la
luce interna! Se tutti i programmi
funzionano correttamente, significa che la
lampadina si è probabilmente bruciata. Si
può continuare ad utilizzare il forno.
Sostituzione della lampadina
Procedere come qui di seguito indicato per
sostituire la lampadina.
- Staccare l'apparecchio dall'alimentazione
elettrica. Togliere la spina dalla presa o
interrompere il circuito di alimentazione
dell'apparecchio.
- Svitare la copertura della luce (1).
- Rimuovere la lampada alogena (2).
Attenzione! La lampadina può essere
molto calda!
- Inserire una nuova lampada alogena da 12V
/ 10W. Attenzione! Non toccare mai il
vetro della lampadina direttamente con le
dita perché la si potrebbe danneggiare.
Attenersi alle indicazioni del produttore della
lampadina.
- Avvitare il vetro di copertura della lampadina
(1).
- Riallacciare l'apparecchio all'alimentazione
di corrente.

74
IT
Dati tecnici
Dati tecnici
Tensione (CA) ................................................................................. (vedi targhetta)
Potenza richiesta ............................................................................ 3400 W
Potenza del grill.... .......................................................................... 1500 W
Potenza dell’aria calda .................................................................... 1600 W
Potenza erogata, microonde. .......................................................... 1000 W
Frequenza del microonde … ........................................................... 2450 MHz
Dimensioni esterne (LxAxP) ............................................................ 595 455 542 mm
Dimensioni vano cottura (LxAxP) .................................................... 420 210 390 mm
Capacità forno. ................................................................................ 32 l
Peso ................................................................................................ 35 kg
Il Suo contributo alla salvaguardia dell'ambiente
Smaltimento dell'imballaggio
L'imballaggio è contrassegnato dal logo "Punto
Verde".
Utilizzare i contenitori appositi per smaltire tutti i
materiali dell'imballaggio come cartone,
polistirolo espanso e pellicole protettive. Si
assicura così il riciclaggio dei materiali
d'imballaggio.
Smaltimento di apparecchiature dismesse
La norma europea 2002/96/EC su apparecchi
elettrici ed elettronici dismessi (WEEE, Waste
Electrical and Electronic Equipment) vieta lo
smaltimento di elettrodomestici come rifiuti
residuali.
Gli apparecchi in disuso devono pertanto essere
recuperati separatamente dagli altri rifiuti per
ottimizzare la percentuale di recupero e
riciclaggio dei materiali di cui sono composti e
per evitare possibili danni alla salute delle
persone e all'ambiente. Il simbolo del cassonetto
barrato deve essere applicato su tutti i prodotti
per sottolineare che devono essere smaltiti
separatamente.
L'utilizzatore deve mettersi in contatto con gli
enti locali competenti o con i nostri punti vendita
per informarsi sul luogo di raccolta di vecchi
elettrodomestici più vicino.
Prima di procedere allo smaltimento rendere
sicuro l'apparecchio, staccando il cavo di
alimentazione, tagliandolo e smaltendolo quindi,
a sua volta, adeguatamente.

75
IT
Istruzioni di montaggio
Prima dell'installazione
Assicurarsi che la tensione di alimentazione
indicata sulla targhetta dati corrisponda a quella
della vostra rete elettrica.
Aprire lo sportello, rimuovere tutti gli accessori
e il materiale d'imballaggio.
Non rimuovere la copertura di mica applicata
sulla superficie superiore del vano cottura.
Questa copertura evita che il grasso e i resti di
cottura danneggino il generatore di microonde.
Attenzione! Il frontale dell'apparecchio potrebbe
essere ricoperto da un film protettivo.
Rimuovere la protezione con cautela prima della
prima messa in funzione, iniziando a staccarla
partendo dal basso.
Assicurarsi che l'apparecchio non sia
danneggiato. Verificare che lo sportello si
chiuda correttamente e che la parete interna
dello sportello, così come il frontale del vano
interno, non siano danneggiati. In presenza di
danni informare il Servizio Assistenza Tecnica.
NON UTILIZZARE L'APPARECCHIO se il cavo
d'alimentazione o la spina dovessero essere
danneggiati, se l'apparecchio non dovesse
funzionare correttamente, se si dovesse essere
danneggiato o se dovesse essere caduto. In tal
caso mettersi in contatto con il Servizio
Assistenza Tecnica.
Appoggiare l'apparecchio su una superficie
piana e stabile. L'apparecchio non deve essere
messo nelle vicinanze di radiatori, radio e
televisori.
Durante l'installazione assicurarsi che il cavo
di alimentazione non entri mai in contatto
con umidità, oggetti appuntiti e con il lato
posteriore dell'apparecchio, le cui elevate
temperature lo potrebbero danneggiare.
Attenzione! Sistemare l'apparecchio in modo
da poter raggiungere con facilità la spina.
Dopo l'installazione
L'apparecchio è dotato di un cavo di
alimentazione e di una spina per corrente
monofase.
Qualora il tipo di montaggio non dovesse
rendere accessibile la presa, far eseguire
l'installazione da un tecnico specializzato.
Questo tipo di incasso prevede infatti il
collegamento ad un circuito d'alimentazione
tramite un ruttore per tutti i poli con una distanza
minima di 3 mm tra i contatti.
ATTENZIONE! IL PRESENTE APPARECCHIO
DEVE ESSERE ASSOLUTAMENTE
COLLEGATO A TERRA.
Il produttore e il rivenditore declinano ogni
responsabilità per eventuali danni a persone,
animali o cose, dovuti alla mancata osservanza
delle presenti istruzioni di montaggio.
L'apparecchio funziona solo quando lo
sportello è perfettamente chiuso.
Pulire il vano cottura e gli accessori prima del
primo impiego attenendosi alle indicazioni di
pulizia riportate al capitolo "Pulizia e
manutenzione".
Inserire il perno al centro del vano cottura ed
appoggiare l'anello di scorrimento e il piatto
girevole in modo che scatti. Ogni qual volta
venga utilizzato il forno a microonde, è
necessario che sia il piatto girevole sia gli
appositi accessori siano correttamente disposti
all'interno del vano cottura. Il piatto girevole
può ruotare in tutte e due le direzioni.
Durante l'installazione attenersi a quanto contenuto nelle istruzioni allegate.

Installation / Incasso
EN
Push oven completely into the cabinet
and centre it.
Open microwave door and fasten the
appliance to the cabinet using the four
screws provided. Insert the screws
through the front holes.
IT
Inserire il microonde nella nicchia ed
allinearlo.
Aprire lo sportello del microonde e
fissare l'apparecchio al mobile da
cucina con le quattro viti allegate,
come indicato nel disegno.


Montage- und Bedienungsanleitung DE
Инструкция по применению RU
1MCFY
1630884-b

2
DE
Inhaltsverzeichnis
Sicherheitsinformationen ................................................................................................................... 3
Sicherheitshinweise ........................................................................................................................... 7
Die Vorteile der Mikrowelle ................................................................................................................ 8
Beschreibung des Gerätes ................................................................................................................ 9
Grundeinstellungen .......................................................................................................................... 11
Grundfunktionen ............................................................................................................................... 13
Sonderfunktionen ............................................................................................................................. 18
Benutzung des Bräunungstellers .................................................................................................... 21
Während des Betriebes... ................................................................................................................. 22
Auftauen ............................................................................................................................................ 23
Mit der Mikrowelle garen .................................................................................................................. 25
Zubereitung mit dem Grill ................................................................................................................ 27
Braten und Backen ........................................................................................................................... 30
Welche Art von Geschirr kann benutzt werden? ........................................................................... 33
Reinigung und Wartung des Gerätes .............................................................................................. 35
Was ist im Falle einer Funktionsstörung zu tun? .......................................................................... 37
Technische Eigenschaften ............................................................................................................... 38
Hinweise zum Umweltschutz ........................................................................................................... 38
Installationsanleitung ....................................................................................................................... 39
Einbau ................................................................................................................................................ 78
Sehr geehrter Kunde,
Danke dass Sie sich für dieses BARAZZA Gerät entschieden haben.
Wir bitten Sie die Gebrauchsanweisung sorgfältig durch zu lesen, dass Ihnen so die Handhabung des
Gerätes erleichtert.
Bewahren Sie die Unterlagen dieses Produktes für eventuelle nach Fragen auf.
Bewahren Sie die Gebrauchsanweisung griffbereit auf. Leihen Sie das Gerät immer mit der
Gebrauchsanweisung aus.
Die Gebrauchsanweisung ist auch auf unserer Homepage verfügbar www.barazzasrl.it

3
DE
Sicherheitsinformationen
Lesen Sie vor der Montage und Verwendung des Geräts
sorgfältig die mitgelieferte Anleitung. Der Hersteller haftet nicht für
Verletzungen oder Schäden, die durch eine fehlerhafte Montage
entstehen. Bewahren Sie die Anleitung zum Nachschlagen auf.
SICHERHEIT VON KINDERN UND SCHUTZBEDÜRFTIGEN
PERSONEN
WARNUNG! Es besteht Erstickungsgefahr, das Risiko von
Verletzungen oder permanenten Behinderungen.
Dieses Gerät kann dann von Kindern ab 8 Jahren, von Personen
mit eingeschränkten körperlichen, sensorischen oder geistigen
Fähigkeiten sowie von Personen ohne bisherige Erfahrung im
Umgang mit solchen Geräten bedient werden, wenn sie dabei
von einer Person, die für ihre Sicherheit verantwortlich ist,
beaufsichtigt werden.
Kinder dürfen nicht mit dem Gerät spielen.
Halten Sie das Verpackungsmaterial von Kindern fern.
WARNUNG: Halten Sie Kinder vom Gerät fern, wenn es in
Betrieb oder in der Abkühlphase ist. Berührbare Teile sind heiβ.
Falls Ihr Gerät mit einer Kindersicherung ausgestattet ist,
empfehlen wir, diese einzuschalten. Kinder unter 3 Jahren dürfen
sich nicht unbeaufsichtigt in der Nähe des Geräts aufhalten.
Reinigung und Wartung des Geräts darf nicht von Kindern ohne
Aufsicht erfolgen.
ALLGEMEINE SICHERHEIT
Dieses Gerät ist für die Verwendung im Haushalt und ähnliche
Zwecke vorgesehen, wie z.B:
– Personalküchenbereiche in Geschäften, Büros und anderen
Arbeitsumfeldern
– Bauernhöfe
– Für Gäste in Hotels, Motels und anderen Wohnumgebungen
– Pensionen und vergleichbaren Unterbringungsmöglichkeiten.

4
DE
Sicherheitsinformationen
Der Geräteinnenraum wird während des Betriebs heiß. Berühren
Sie nicht die Heizelemente im Geräteinnern. Verwenden Sie zum
Anfassen des Zubehörs und der Töpfe wärmeisolierende
Handschuhe.
WARNUNG: Erwärmen Sie keine Flüssigkeiten oder andere
Lebensmittel in geschlossenen Behältern. Sie könnten
explodieren.
Verwenden Sie nur mikrowellengeeignete Kochutensilien.
Wenn Sie Lebensmittel in Behältern aus Kunststoff oder Papier
erwärmen, beobachten Sie das Gerät aufmerksam, da die
Möglichkeit einer Entflammung besteht.
Achtung! Das Gerät darf nicht benutzt werden, falls
- die Tür nicht richtig schließt,
- die Scharniere der Tür beschädigt sind,
- die Kontaktflächen zwischen der Tür und der Stirnseite
beschädigt sind,
- die Glasscheibe der Tür beschädigt ist,
- im Inneren häufig ein Lichtbogen auftritt, ohne dass
irgendwelche metallischen Gegenstände vorhanden sind.
Das Gerät darf erst wieder benutzt werden, nachdem es von einem
Kundendiensttechniker repariert worden ist.
Das Gerät ist zum Erwärmen von Speisen und Getränken
vorgesehen. Das Trocknen von Kleidungsstücken und das
Erwärmen von Wärmekissen, Hausschuhen, Schwämmen,
feuchten Tüchern o.Ä. ist gefährlich, da es zu Verletzungen,
Entflammungen oder Bränden führen kann.
Wenn Rauch aus dem Gerät austritt, schalten Sie das Gerät aus
oder trennen Sie es vom Stromnetz, und halten Sie die Tür
geschlossen, um Flammenbildung zu vermeiden bzw. bereits
bestehende Flammen zu ersticken.
Das Erwärmen von Getränken in der Mikrowelle kann zu einem
verzögerten Überkochen führen. Seien Sie bei der Handhabung
des Behälters vorsichtig.

5
DE
Sicherheitsinformationen
Der Inhalt von Milchfläschchen und Gläsern mit Babynahrung
muss vor dem Verzehr umgerührt oder geschüttelt und die
Temperatur geprüft werden, um Verbrennungen zu vermeiden.
Eier in der Schale und ganze hartgekochte Eier dürfen in dem
Gerät nicht erwärmt werden, da sie auch nach Abschluss der
Erwärmung explodieren können.
INSTALLATION
In der elektrischen Installation ist eine Einrichtung vorzusehen,
die es ermöglicht, das Gerät mit einer Kontaktöffnungsweite von
mind. 3 mm allpolig vom Netz zu trennen. Als geeignete
Trennvorrichtung gelten z.B. LS Schalter, Sicherungen
(Schraubsicherungen sind aus der Fassung herauszunehmen),
FI-Schalter und Schütze.
Der Berührungsschutz muss durch den Einbau gewährleistet
sein.
REINIGUNG
Das Gerät muss regelmäßig gereinigt und
Lebensmittelablagerungen entfernt werden.
Wird das Gerät nicht regelmäßig gereinigt, können die
Oberflächen beschädigt werden; dies kann sich nachteilig auf die
Lebensdauer des Geräts auswirken und zu gefährlichen
Situationen führen.
Benutzen Sie keine Scheuermittel oder Metallschwämmchen zum
Reinigen der Ofenglastür; sie können die Glasfläche verkratzen
und zum Zersplittern der Scheibe führen.
Benutzen Sie zum Reinigen des Geräts keinen Dampfreiniger
Die Kontaktflächen der Tür (Stirnseite des Garraums und
Innenseite der Tür) müssen sehr sauber gehalten werden, um die
einwandfreie Funktionsweise zu gewährleisten.
Bitte beachten Sie die Hinweise bezüglich der Sauberkeit unter
dem Punkt “Reinigung und Wartung des Gerätes“.

6
DE
Sicherheitsinformationen
WARTUNG
WARNUNG: Trennen Sie vor Wartungsarbeiten das Gerät von
der Stromversorgung.
WARNUNG: Die Wartungs- oder Reparaturarbeiten, bei denen
die Abdeckung, die vor der Strahlungsenergie der Mikrowellen
schützt, entfernt werden muss, dürfen nur von Fachpersonal
durchgeführt werden.
WARNUNG: Sind die Tür oder die Türdichtungen beschädigt,
darf das Gerät erst nach der Reparatur durch autorisiertes
Fachpersonal in Betrieb genommen werden.
Falls das Netzkabel beschädigt wird, ist es vom Hersteller, von
autorisierten Vertretern oder von für diese Aufgabe qualifizierten
Technikern zu ersetzen, um gefährliche Situationen zu
vermeiden. Denn dazu sind Spezialwerkzeuge notwendig.
Reparaturen und Wartungsarbeiten, besonders an unter Strom
stehenden Teilen, dürfen nur durch vom Hersteller autorisierten
Technikern ausgeführt werden.

7
DE
Sicherheitshinweise
Achtung! Erwärmen Sie keinen reinen
Alkohol und keine alkoholischen Getränke in
der Mikrowelle. FEUERGEFAHR!
Vorsicht! Um zu verhindern, dass die
Nahrung zu sehr erhitzt wird oder sich
entzündet, ist es sehr wichtig, weder lange
Zeiträume noch zu hohe Leistungsstufen zu
wählen, wenn kleine Nahrungsmengen
erwärmt werden. Zum Beispiel kann Brot
nach 3 Minuten brennen, wenn eine zu hohe
Leistung eingestellt wird.
Nutzen Sie die Grillfunktion zum Toasten,
überwachen Sie ständig das Gerät. Falls Sie
eine kombinierte Betriebsart zum Toasten
verwenden, kann das Brot innerhalb einer
sehr kurzen Zeit verbrennen.
Klemmen Sie nie die Netzkabel anderer
elektrischer Geräte in die heiße Gerätetür
ein. Die Isolierung des Kabels kann
schmelzen. Kurzschlussgefahr!
Vorsicht beim Erwärmen von
Flüssigkeiten!
Wenn Flüssigkeiten (Wasser, Kaffee, Tee,
Milch, usw.) innerhalb des Gerätes den
Siedepunkt fast erreicht haben und plötzlich
herausgezogen werden, können sie
überschwappen. VERLETZUNGS- UND
VERBRENNUNGS-GEFAHR!
Geben Sie einen Teelöffel oder ein
Glasstäbchen in das Gefäß, um derartige
Situationen zu vermeiden, wenn Sie
Flüssigkeiten erhitzen.
Wenn Sie den Hinweisen gemäß vorgehen,
dann vermeiden Sie Schäden am Gerät und
sonstige gefährliche Situationen:
Setzen Sie das Gerät nicht ohne das
Kupplungsstück, den Rollring und den
entsprechenden Drehteller in Betrieb.
Schalten Sie die leere Mikrowelle nicht ein.
Sie kann überlastet und beschädigt werden,
wenn sich in ihr keine Speisen befinden.
BESCHÄDIGUNGSGEFAHR!
Stellen Sie ein Glas Wasser in das Gerät,
um dessen Programmierung zu testen. Das
Wasser absorbiert die Mikrowellen, und das
Gerät wird nicht beschädigt.
Verdecken oder verstopfen Sie die
Belüftungslöcher und -schlitze nicht.
Benutzen Sie nur für die Mikrowelle
geeignetes Geschirr. Vor Verwendung von
Geschirr und Gefäßen in der Mikrowelle,
überprüfen Sie deren Eignung (siehe
Abschnitt über die Art des Geschirrs).
Nehmen Sie die Abdeckung aus Glimmer an
der Decke des Innenraumes nicht ab. Diese
Abdeckung verhindert, dass Fett und
Speisereste den Mikrowellengenerator
beschädigen.
Bewahren Sie keinerlei brennbare
Gegenstände im Gerät auf, denn diese
können sich entzünden, wenn Sie das Gerät
einschalten.
Nutzen Sie das Gerät nicht als
Speisekammer.
Benutzen Sie das Gerät nicht, um im Ölbad
zu frittieren, da es unmöglich ist, die
Temperatur des Öles unter Einwirkung von
Mikrowellen zu kontrollieren.
Stützen oder setzen Sie sich nicht auf die
geöffnete Gerätetür. Das kann Schäden
besonders im Bereich der Scharniere
hervorrufen. Die Tür hält maximal 8 kg aus.
Der Drehteller und die Roste halten einer
Höchstbelastung von 8 kg stand.
Überschreiten Sie diese Belastung nicht, um
Schäden zu vermeiden.
.

8
DE
Die Vorteile der Mikrowelle
Im konventionellen Küchenherd dringt die von den
Widerstandsheizelementen oder Gasbrennern
ausgestrahlte Wärme langsam, von außen nach
innen, in die Nahrungsmittel ein. Dadurch entsteht
bei der Erwärmung der Luft, der Bauteile des
Herdes und der Gefäße ein großer Energieverlust.
In den Mikrowellengeräten wird die Wärme von
den Esswaren selbst erzeugt, das heißt, die
Wärme geht von innen nach außen. Es ergibt sich
keinerlei Wärmeverlust durch die Luft, die Wände
des Innenraumes und die Gefäße (falls diese für
Mikrowellengeräte geeignet sind), es werden
lediglich die Nahrungsmittel erhitzt.
Zusammenfassend weisen die Mikrowellengeräte
folgende Vorteile auf:
1. Einsparung an Garzeit, im allgemeinen
Verringerung um 3/4 der Zeit im Verhältnis
zum konventionellen Kochvorgang.
2. Superschnelles Auftauen der Lebensmittel,
dadurch Verringerung der Gefahr der
Bakterienbildung.
3. Energieersparnis.
4. Beibehaltung des Nährwertes der
Lebensmittel dank der Verkürzung der
Kochzeit.
5. Leichte Reinigung.
Funktionsweise des Mikrowellengerätes
Im Mikrowellengerät ist eine als Magnetron
bezeichnete Hochspannungsröhre vorhanden,
welche die Elektroenergie in Mikrowellenenergie
umwandelt. Diese elektromagnetischen Wellen
werden durch einen Wellenleiter in das Innere des
Gerätes geführt und von einer metallischen
Streueinrichtung bzw. einem Drehteller verteilt.
Im Inneren des Gerätes breiten sich die
Mikrowellen in sämtliche Richtungen aus, werden
von den metallischen Wänden reflektiert und
dringen gleichmäßig in die Speisen ein.
Warum die Lebensmittel warm werden
Der größte Teil der Nahrungsmittel enthält
Wasser, dessen Moleküle durch die Wirkung der
Mikrowellen in Schwingung versetzt werden.
Die Reibung zwischen den Molekülen erzeugt
Wärme, die die Temperatur der Lebensmittel
erhöht, sie auftaut, sie gart oder warm hält.
Da die Wärme im Inneren der Nahrungsmittel
entsteht:
können sie ohne oder mit wenig Flüssigkeit
oder Fett zubereitet werden,
verläuft das Auftauen, Erhitzen oder
Zubereiten im Mikrowellengerät schneller als
in einem konventionellen Herd,
bleiben die Vitamine, Mineralien und
Nährstoffe erhalten,
ändert sich weder die natürliche Farbe noch
das Aroma.
Die Mikrowellen durchdringen Porzellan, Glas,
Pappe oder Plastik, aber kein Metall. Benutzen
Sie deshalb im Mikrowellengerät keine
Metallgefäße oder Gefäße, die Metallteile
aufweisen.
Die Mikrowellen werden vom Metall reflektiert, ...
... durchdringen Glas und Porzellan ...
... und werden von den Lebensmitteln absorbiert.

9
DE
Beschreibung des Gerätes
1. Funktionsanzeigeleuchten/ Sensortasten
4a. Leistung- und Gewichtwahlleuchte / Sensortaste
2. „-“ und „+“ Sensortasten
5. Uhreinstell- und Zeitwahl Sensortaste
3. Temperaturwahl / Sensortaste
5a. Uhreinstell- und Zeitwahlanzeigeleuchte / Taste
3a.Temperaturanzeigeleuchte / Sensortaste
6. Start und Stopp / Sicherheitsverriegelungstasten
4. Leistung- und Gewichtwahl / Sensortaste
23:15
1
2
6
5
4
3
800
160
3a
4a
5a
1. Bedienblende
6. Kupplungsstück
2. Türglass
7. Rollring
3. Seitliche Verprägungen
8. Drehteller
4. Sicherheitsverriegelung
9. Glasfettpfanne
5. Heißluft Ausgang
10. Grillrost
11. Bräunungsteller

10
DE
Beschreibung des Gerätes
Funktionsbeschreibung
Symbol
Funktion
Ausgangsleistung
Mikrowelle
Lebensmittel
Mikrowelle
200 W
Langsames Auftauen von empfindlichen Speisen, zum
Auftauen und Weitergaren.
400 W
Garen von Fleisch, Fisch und Reis
Schnelles Auftauen kleiner Mengen, Babykost z.B.
Milchfläschchen.
600 W
Erhitzen und Garen von Gerichten.
800 W
Garen von Gemüse und Kartoffeln.
Garen von Aufläufen und Fertiggerichten.
Kleine Mengen erhitzen und garen.
1000 W
Flüssigkeiten erhitzen.
Grill
---
Speisen grillen.
Mikrowelle
+ Grill
200 W
Toastbrot überbacken.
400 W
Geflügel und Fleisch grillen.
600 W
Pasteten und Aufläufe zubereiten.
Heißluft
---
Braten und Backen.
Mikrowelle +
Heißluft
200-600 W
Schnelles Braten von Fleisch, Fisch und Geflügel
Backen von feuchten und trockenen Kuchen.
Grill
+Umluft
Fleisch und Fisch grillen, flache Stücke.
Geflügelteile grillen.
Kartoffel – Tiefkühlprodukte, auftauen und bräunen.

11
DE
Grundeinstellungen
Einstellung der Uhr
Nach Anschluss des Gerätes an das Netz oder
nach einem Stromausfall blinkt die Uhr und zeigt
damit an, dass die Uhrzeit nicht korrekt ist. Gehen
Sie folgendermaßen vor, um die Uhr einzustellen:
1. Drücken Sie die Uhr-Einstelltaste. Die
Stundenzahl beginnt zu blinken.
2. Drücken Sie die Tasten „-“ und „+“ um die
Stunden zu bestimmen.
3. Drücken Sie erneut die Uhr-Einstelltaste, um
die Minuten einzustellen. Sie beginnen zu
blinken.
4. Drücken Sie die Tasten „-“ und „+“ um die
Minuten zu bestimmen.
5. Drücken Sie erneut die Uhr-Einstelltaste, um
die Einstellung zu beenden.
Uhr ausblenden/anzeigen
Falls die Uhr Sie stört, können Sie diese
ausblenden, indem Sie die Uhr-Einstelltaste 3
Sekunden lang gedrückt halten. Die Punkte,
welche die Stunden von den Minuten trennen,
blinken weiter, solange die Uhr ausgeblendet ist.
Falls Sie die Uhrzeit wieder sehen wollen,
drücken sie die Uhr-Einstelltaste erneut 3
Sekunden lang.
Sicherheitsverriegelung
Der Betrieb des Gerätes kann blockiert werden
(zum Beispiel, um die Benutzung durch Kinder zu
verhindern).
1. Drücken Sie die Taste Stop 3 Sekunden lang,
um das Gerät zu blockieren. Daraufhin erklingt
ein akustisches Signal, und auf der Anzeige
erscheint das Wort „SAFE“. Das Gerät ist
verriegelt und gestattet keinerlei Bedienung.
2. Drücken Sie die Taste Stop erneut 3
Sekunden lang, um das Gerät zu entriegeln.
Daraufhin erklingt ein akustisches Signal, und
auf der Anzeige erscheint erneut die Uhrzeit

12
DE
Grundeinstellungen
Drehteller stoppen
1. Um den Drehteller zu stoppen Tasten „+“
und „Stop“ gleichzeitig drücken.
2. Um den Drehteller wieder in Betrieb zu
nehmen Tasten „+“ und „Stop“ noch mal
gleichzeitig drücken.

13
DE
Grundfunktionen
Mikrowelle
Diese Funktion benutzen, um Gemüse, Kartoffeln, Reis, Fisch und Fleisch zuzubereiten und
aufzuwärmen.
1. Drücken Sie die Funktionstaste Mikrowelle.
Die Funktionsanzeigeleuchte leuchtet.
2. Drücken Sie die Leistungswahl-Taste, um
die Mikrowellenleistung zu ändern. Die
entsprechende Anzeige und
Funktionsanzeigeleuchte blinken. Falls Sie
diese Taste nicht drücken, arbeitet das Gerät
mit einer Leistung von 800 W.
3. Drücken Sie die Tasten „-“ und „+“ um die
gewünschte Leistung zu bestimmen.
4. Drücken Sie die Zeitwahl-Taste, um die
Betriebsdauer zu ändern. Die entsprechende
Anzeige und Funktionsanzeigeleuchte
blinken.
5. Drücken Sie die Tasten „-“ und „+“ um die
gewünschte Betriebsdauer zu bestimmen. (z.
B.: 1 Minute).
6. Drücken Sie die Taste START. Das Gerät
beginnt zu arbeiten.
ANMERKUNG: Wenn die Leistung von 1000 W
gewählt wird, ist die Betriebsdauer auf ein
Maximum von 15 Minuten beschränkt.
Mikrowelle-Schnellstart
Diese Funktion benutzen, um Lebensmittel mit hohem Wassergehalt, wie Wasser, Kaffee, Tee und
dünne Suppe, zu erhitzen.
1. Drücken Sie die Taste Start. Das Gerät
beginnt in der Funktion Mikrowelle mit der
Höchstleistung 30 Sekunden lang zu
arbeiten.
2. Falls Sie beabsichtigen, die Betriebsdauer zu
verlängern, drücken Sie erneut die Taste
Start. Jedes Mal, wenn diese Taste gedrückt
wird, verlängert sich die Betriebsdauer um 30
Sekunden.
ANMERKUNG: Wenn die Leistung von 1000 W
gewählt wird, ist die Betriebsdauer auf ein
Maximum von 15 Minuten beschränkt.
00:30
1000
1,2

14
DE
Grundfunktionen
Grill
Diese Funktion benutzen, um die Oberfläche der Nahrungsmittel schnell zu bräunen.
1. Drücken Sie die Funktionstaste Grill. Die
Funktionsanzeigeleuchte leuchtet.
2. Drücken Sie die Zeitwahl-Taste, um die
Betriebsdauer zu ändern. Die entsprechende
Anzeige und Funktionsanzeigeleuchte
blinken.
3. Drücken Sie die Tasten „-“ und „+“ um die
gewünschte Betriebsdauer zu bestimmen. (z.
B.: 15 Minuten).
4. Drücken Sie die Taste START. Das Gerät
beginnt zu arbeiten.
Mikrowelle + Grill
Diese Funktion benutzen, um Lasagne, Geflügel, Bratkartoffeln und Aufläufe zuzubereiten.
1. Drücken Sie die Funktionstaste
Mikrowelle+Grill. Die
Funktionsanzeigeleuchte leuchtet.
2. Drücken Sie die Leistungswahl-Taste, um
die Mikrowellenleistung zu ändern. Die
entsprechende Anzeige und
Funktionsanzeigeleuchte blinken. Falls Sie
diese Taste nicht drücken, arbeitet das Gerät
mit einer Leistung von 600 W.
3. Drücken Sie die Tasten „-“ und „+“ um die
gewünschte Leistung zu bestimmen.
4. Drücken Sie die Zeitwahl-Taste, um die
Betriebsdauer zu ändern. Die entsprechende
Anzeige und Funktionsanzeigeleuchte
blinken.
5. Drücken Sie die Tasten „-“ und „+“ um die
gewünschte Betriebsdauer zu bestimmen. (z.
B.: 10 Minuten).
6. Drücken Sie die Taste START. Das Gerät
beginnt zu arbeiten.
Hinweis: Beim Kombinationsbetrieb ist die
Mikrowellenleistung auf 600 W begrenzt.

15
DE
Grundfunktionen
Heißluft
Diese Funktion zum Backen und Braten benutzen .
1. Drücken Sie die Funktionstaste Heißluft. Die
Funktionsanzeigeleuchte leuchtet.
2. Drücken Sie die Taste Temperaturwahl, um
die Temperatur zu ändern. Die
entsprechende Anzeige blinkt. Falls Sie die
Taste nicht drücken arbeitet das Gerät mit
einer Leistung von 160 ºC.
3. Drücken Sie die Tasten „-“ und „+“ um die
gewünschte Temperatur zu bestimmen.
4. Drücken Sie die Zeitwahl-Taste, um die
Betriebsdauer zu ändern. Die entsprechende
Anzeige und Funktionsanzeigeleuchte
blinken.
5. Drücken Sie die Tasten „-“ und „+“ um die
gewünschte Betriebsdauer zu bestimmen. (z.
B.: 12 Minuten).
6. Drücken Sie die Taste START. Das Gerät
beginnt zu arbeiten.
Mikrowelle + Heißluft
Diese Funktion zum Backen und Braten benutzen
1. Drücken Sie die Funktionstaste Mikrowelle
+ Heißluft. Die Funktionsanzeigeleuchte
leuchtet.
2. Drücken Sie die Temperaturwahl-Taste, um
die Temperatur zu ändern. Die
entsprechende Anzeige und
Funktionsanzeigeleuchte blinken. Falls Sie
diese Taste nicht drücken, arbeitet das Gerät
mit einer Temperatur von 160ºC.
3. Drücken Sie die Tasten „-“ und „+“ um die
gewünschte Leistung zu bestimmen.
4. Drücken Sie die Leistungswahl-Taste, um
die Leistung zu ändern. Die entsprechende
Anzeige blinkt. Falls Sie die Taste nicht
drücken arbeitet das Gerät mit einer Leistung
von 400 W.
5. Drücken Sie die Tasten „-“ und „+“ um die
gewünschte Temperatur zu bestimmen.
6. Drücken Sie die Zeitwahl-Taste, um die
Betriebsdauer zu ändern. Die entsprechende
Anzeige und Funktionsanzeigeleuchte
blinken.
7. Drücken Sie die Tasten „-“ und „+“ um die
gewünschte Betriebsdauer zu bestimmen. (z.
B.: 12 Minuten).
8. Drücken Sie die Taste START. Das Gerät
beginnt zu arbeiten.
Hinweis: Beim Kombinationsbetrieb ist die
Mikrowellen-leistung auf 600 W begrenzt.
20:00
160
4
1
3,5
6
2
20:00
400
160
6
4
1
3,5,7
8
2

16
DE
Grundfunktionen
Grill mit Umluft
Diese Funktion benutzen zum besonders krossen Braten von Fleisch, Fisch, Geflügel oder
Pommes frites
1. Drücken Sie die Funktionstaste Grill mit
Umluft Die Funktionsanzeigeleuchte
leuchtet.
2. Drücken Sie die Taste Temperaturwahl, um
die Temperatur zu ändern. Die
entsprechende Anzeige blinkt. Falls Sie die
Taste nicht drücken arbeitet das Gerät mit
einer Leistung von 160 ºC.
3. Drücken Sie die Tasten „-“ und „+“ um die
gewünschte Temperatur zu bestimmen.
4. Drücken Sie die Zeitwahl-Taste, um die
Betriebsdauer zu ändern. Die entsprechende
Anzeige und Funktionsanzeigeleuchte
blinken.
5. Drücken Sie die Tasten „-“ und „+“ um die
gewünschte Betriebsdauer zu bestimmen.
(z. B.: 12 Minuten).
6. Drücken Sie die Taste START. Das Gerät
beginnt zu arbeiten.
Auftauen nach Zeit (manuell)
Diese Funktion benutzen, um jegliche Art von Lebensmitteln schnell aufzutauen.
1. Drücken Sie die Auftauen nach Zeit
Funktionstaste. Die Funktionsanzeigeleuchte
leuchtet.
2. Drücken Sie die Zeitwahl-Taste, um die
Betriebsdauer zu ändern. Die entsprechende
Anzeige und Funktionsanzeigeleuchte
blinken.
3. Drücken Sie die Tasten „-“ und „+“ um die
gewünschte Betriebsdauer zu bestimmen.
(z. B.: 10 Minuten).
4. Drücken Sie die Taste START. Das Gerät
beginnt zu arbeiten.
20:00
160
4
1
3,5
6
2

17
DE
Grundfunktionen
Auftauen nach Gewicht (automatisch)
Diese Funktion benutzen, um Fleisch, Geflügel, Fisch, Obst und Brot schnell aufzutauen.
1. Drücken Sie die Auftauen nach Gewicht
Funktionstaste. Die
Funktionsanzeigeleuchte leuchtet.
2. Drücken Sie die Lebensmittelwahltaste,
um die Lebensmittelart zu ändern. Die
entsprechende Anzeige und
Funktionsanzeigeleuchte blinken.
3. Drücken Sie die Tasten „-“ und „+“ um den
gewünschten Programm zu bestimmen (z.
B.: „Pr 01“ siehe folgende Tabelle).
4. Drücken Sie die Gewichtswahl-Taste, um
das Gewicht der Speise einzustellen. Die
entsprechende Anzeige und
Funktionsanzeigeleuchte blinken.
5. Drücken Sie die Tasten „-“ und „+“ um das
gewünschte Gewicht zu bestimmen.
6. Drücken Sie die Taste START. Das Gerät
beginnt zu arbeiten.
Hinweis: Wenden sie die Nahrungsmittel,
sobald das Gerät ein akustisches Signal
aussendet und auf der Anzeige folgende
Angabe blinkt: .
Die folgende Tabelle zeigt die Programme der Funktion Auftauen nach Gewicht, unter Angabe der
Intervalle bezüglich Gewicht sowie Auftau- und Ruhezeiten (um zu gewährleisten, dass die Speise eine
einheitliche Temperatur erlangt).
Programm
Lebensmittel
Gewicht (g)
Zeit (min.)
Ruhezeit (min.)
Pr 01
Fleisch
100 – 2000
2 – 43
20 – 30
Pr 02
Geflügel
100 – 2500
2 – 58
20 – 30
Pr 03
Fisch
100 – 2000
2 – 40
20 – 30
Pr 04
Obst
100 – 500
2 – 13
10 – 20
Pr 05
Brot
100 – 800
2 – 19
10 – 20
Wichtige Anmerkung: Siehe „Allgemeine Hinweise zum Auftauen“.

18
DE
Sonderfunktionen
Sonderfunktion P1: Speisen erwärmen
Diese Funktion benutzen, um verschiedene Arten von Lebensmitteln zu erhitzen.
1. Drücken Sie die Sonderfunktionstaste P1.
Die Funktionsanzeigeleuchte leuchtet.
2. Drücken Sie die Lebensmittelwahltaste ,
um die Lebensmittelart zu ändern. Die
entsprechende Anzeige und
Funktionsanzeigeleuchte blinken.
3. Drücken Sie die Tasten „-“ und „+“ um das
gewünschten Programm zu bestimmen (z.
B.: „A 01“ siehe folgende Tabelle).
4. Drücken Sie die Gewichtswahl-Taste , um
das Gewicht der Speise einzustellen. Die
entsprechende Anzeige und
Funktionsanzeigeleuchte blinken.
5. Drücken Sie die Tasten „-“ und „+“ um das
gewünschte Gewicht zu bestimmen.
6. Drücken Sie die Taste START. Das Gerät
beginnt zu arbeiten.
Die folgende Tabelle zeigt die Programme der Sonderfunktion P1, unter Angabe der Intervalle bezüglich
Gewicht sowie Gar- und Ruhezeiten (um zu gewährleisten, dass die Speise eine einheitliche Temperatur
erlangt).
Programm
Lebensmittel
Gewicht (g)
Zeit (min.)
Anmerkung Ruhezeit
A 01
Suppe
200 – 1500
3 – 15
1 – 2 x wenden,
abdecken, 1-2 Min.
A 02
Fertiggerichte
kompakte Zutaten
200 – 1500
3 – 20
1 – 2 x wenden,
abdecken, 1-2 Min.
A 03
Fertiggerichte
z.B. Gulasch
200 – 1500
3 – 18
1 – 2 x wenden,
abdecken,1-2 Min.
A 04
Gemüse
200 – 1500
2,6 – 14
1 – 2 x wenden,
abdecken1-2 Min
Wichtige Anmerkungen:
Benutzen Sie stets mikrowellentaugliche
Gefäße und einen Deckel oder eine
Abdeckung, um Flüssigkeitsverluste zu
vermeiden.
Rühren Sie die Speise bzw. drehen Sie
diese während der Erhitzung mehrmals
um.
Die für die Erwärmung der Nahrungsmittel
notwendige Zeit hängt von deren
Ausgangstemperatur ab.
Die direkt aus dem Kühlschrank
entnommenen Lebensmittel benötigen mehr
Zeit zur Erhitzung als die, die Raumtemperatur
aufweisen. Falls die Temperatur des Essens
nicht der gewünschten entspricht, wählen Sie
nächstes Mal ein größeres oder kleineres
Gewicht.
Rühren Sie die Speise nach der Erwärmung
um. Lassen sie diese eine Zeit lang ruhen, um
die einheitliche Temperatur zu erreichen.
Achtung! Nach der Erwärmung kann das Gefäß
sehr heiß sein. Obgleich die Mikrowellen die
Mehrheit der Gefäße nicht erhitzen, können diese
durch die Übertragung der Wärme der Speise heiß
werden.

19
DE
Sonderfunktionen
Sonderfunktion P2: Speisen garen
Diese Funktion benutzen, um frische Lebensmittel zuzubereiten.
1. Drücken Sie die Sonderfunktionstaste P2.
Die Funktionsanzeigeleuchte leuchtet.
2. Drücken Sie die Lebensmittelwahltaste, um
die Lebensmittelart zu ändern. Die
entsprechende Anzeige und
Funktionsanzeigeleuchte blinken.
3. Drücken Sie die Tasten „-“ und „+“ um das
gewünschten Programm zu bestimmen (z.
B.: „b 01“ siehe folgende Tabelle).
4. Drücken Sie die Gewichtswahl-Taste, um
das Gewicht der Speise einzustellen. Die
entsprechende Anzeige und
Funktionsanzeigeleuchte blinken.
5. Drücken Sie die Tasten „-“ und „+“ um das
gewünschte Gewicht zu bestimmen.
6. Drücken Sie die Taste START. Das Gerät
beginnt zu arbeiten.
Die folgende Tabelle zeigt die Programme der Sonderfunktion P2, unter Angabe der Intervalle bezüglich Gewicht
sowie Gar- und Ruhezeiten (um zu gewährleisten, dass die Speise eine einheitliche Temperatur erlangt).
Programm
Lebensmittel
Gewicht (g)
Zeit (min.)
Anmerkung
b 01
Kartoffeln
200 – 1000
4 – 17
1 – 2 x wenden,
abdecken
b 02
Gemüße
200 – 1000
4 – 15
1 – 2 x wenden,
abdecken
b 03
Reis
200 – 500
13 – 20
1 Teil Reis, 2 Teile
Wasser, abdecken
b 04
Fisch
200 – 1000
4 – 13
abdecken
Wichtige Anmerkungen:
Benutzen Sie stets mikrowellentaugliche
Gefäße mit Deckel oder Abdeckung, um
Flüssigkeitsverluste zu vermeiden.
Rühren Sie die Speise bzw. drehen Sie
diese während der Garung mehrmals um.
Achtung! Nach der Zubereitung kann das
Gefäß sehr heiß sein. Obgleich die
Mikrowellen die Mehrheit der Gefäße nicht
erhitzen, können diese durch die
Übertragung der Wärme der Speise heiß
werden.
Anweisungen für die Zubereitung:
Fisch am Stück – Geben Sie 1 bis 3 Esslöffel
Wasser oder Zitronensaft hinzu.
Reis – Geben Sie eine Menge Reis und die
doppelte Menge Wasser hinzu.
Pellkartoffeln – Verwenden Sie Kartoffeln
gleicher Größe. Waschen Sie diese und
durchlöchern sie die Schale mehrmals. Geben
Sie 1 bis 3 Esslöfel Wasser hinzu.
Geschälte Kartoffeln und Frischgemüse –
Schneiden Sie beides in Stücke gleicher
Größe. Geben Sie einen Esslöffel Wasser pro
100 g Gemüse und Salz nach Belieben hinzu.
b 01
200
2
4
1
3,5
6

20
DE
Sonderfunktionen
Sonderfunktion P3: Auftauen & Überbacken
Diese Funktion benutzen, um verschiedene Arten von Lebensmitteln aufzutauen und zu überbacken.
1. Drücken Sie die Sonderfunktionstaste P3.
Die Funktionsanzeigeleuchte leuchtet.
2. Drücken Sie die Lebensmittelwahltaste, um
die Lebensmittelart zu ändern. Die
entsprechende Anzeige und
Funktionsanzeigeleuchte blinken.
3. Drücken Sie die Tasten „-“ und „+“ um das
gewünschten Programm zu bestimmen (z.
B.: „C 01“ siehe folgende Tabelle).
4. Drücken Sie die Gewichtswahl-Taste, um
das Gewicht der Speise einzustellen. Die
entsprechende Anzeige und
Funktionsanzeigeleuchte blinken.
5. Drücken Sie die Tasten „-“ und „+“ um das
gewünschte Gewicht zu bestimmen.
6. Drücken Sie die Taste START. Das Gerät
beginnt zu arbeiten.
Die folgende Tabelle zeigt die Programme der Sonderfunktion P3, unter Angabe der Intervalle bezüglich
Gewicht sowie Auftauzeiten (um zu gewährleisten, dass die Speise eine einheitliche Temperatur
erlangt).
Programm
Lebensmittel
Gewicht (g)
Zeit (min.)
Anmerkung
C 01
Pizza
300 – 550
8 – 12
kl. Rost
C 02
Fertiggerichte
350 – 500
8 – 14
1 x wenden
abdecken
C 03
Kartoffelerzeugnisse
200 – 450
10 – 12
Glasblech
Wichtige Anmerkungen:
Benutzen Sie stets mikrowellentaugliches
und hitzebeständiges Geschirr (z.B.
Auflaufformen). Durch den Grill entstehen
sehr hohe Temperaturen. Bei dem
Programm C 02 immer einen Deckel
auflegen, um Flüssigkeitsverluste zu
vermeiden.
Achtung! Nach der Zubereitung kann das
Gefäß sehr heiß sein. Obwohl die Mikrowellen
die Mehrheit der Gefäße nicht erhitzen, können
diese durch die Übertragungswärme des
Grillheizkörpers sehr heiß werden.
Anweisungen für die Zubereitung:
Pizza, tiefgekühlt – Verwenden Sie
tiefgekühlte, vorgebackene Pizzas oder
Baguette-Pizzas.
Fertiggerichte, tiefgekühlt – Verwenden Sie
z.B. Lasagne, Canneloni, Garnelenauflauf,
jeweils tiefgekühlt. Immer abdecken.
Kartoffelerzeugnisse, tiefgekühlt – Die
Pommes frites, Kartoffelkroketten und
Schwenkkartoffeln müssen für die
Zubereitung im Gerät geeignet sein.

21
DE
Benutzung des Bräunungstellers
Bei dem Garen von Pizza und
Kartoffelerzeugnissen mit dem Grill oder in
Kombination mit Grill und Mikrowelle bleibt die
Unterseite des Lebensmittels meist feucht. Das
lässt sich mit dem Bräunungsteller vermeiden. Er
erreicht eine hohe Temperatur und somit wird
eine goldbraune Kruste erzielt.
Wichtige Hinweise:
Verwenden Sie immer Topflappen oder
Handschuhe, der Bräunungsteller wird sehr heiß.
Stellen Sie den Bräunungsteller niemals ohne den
Glasdrehteller in das Gerät. Setzen Sie keine
hitzeempfindlichen Behältnisse auf den
Bräunungsteller (z.B. Plastikschalen).
Benutzung des Bräunungstellers:
1. Vorheizen des Bräunungstellers 3 – 5
Minuten mit der Funktion Mikrowelle/Grill mit
60 % (600 W) Leistung der Mikrowelle.
2. Bräunungsteller mit Öl bepinseln, damit die
Speisen gut bräunen.
3. Die Speisen, ob frisch oder gefroren, direkt
auf den Bräunungsteller legen.
4. Den Bräunungsteller auf den Drehteller ins
Mikrowellengerät stellen.
5. Die Funktion Mikrowelle/Grill wählen und die
Garzeit einstellen. Die folgende Tabelle gibt
einige Empfehlungen.
Lebensmittel
Gewicht (g)
Garzeit
(min)
Ruhezeit
(min)
Anmerrkung
Pizza
200
4-5
---
Mit dünnen Boden, bei
dickeren Boden erhöht sich
die Zeit um 1 – 2 Min.
300
5-6
---
400
7-8
---
Pasteten und Kuchen (TK)
200
3-4
2-3
300
5-6
2-3
Hamburger
150-200
8-10
5-8
2 x wenden.
Pommes frites, Rösti
400
6-8
---
1 x wenden.
Wichtige Hinweise:
Der Bräunungsteller ist mit Teflon beschichtet.
Diese Beschichtung kann bei unsachgemäßer
Benutzung beschädigt werden.
Die Lebensmittel nicht auf dem Bräunungsteller
schneiden.
Reinigung:
Den Bräunungsteller mit heißem Wasser und
Spülmittel reinigen. Keine kratzenden Schwämme
oder Scheuermittel verwenden, diese können die
Oberfläche beschädigen.

22
DE
Während des Betriebes...
Unterbrechung eines Kochvorgangs
Sie können den Kochvorgang jederzeit
unterbrechen, indem Sie einmal die Taste Stop
drücken bzw. die Gerätetür öffnen.
In jedem Falle:
hört die Ausstrahlung von Mikrowellen
auf,
wird der Grill deaktiviert, hat das Gerät aber
weiterhin eine sehr hohe Temperatur,
Verbrennungsgefahr!
stoppt die Zeitschaltuhr, und die Anzeige
gibt die restliche Betriebsdauer an.
Falls Sie es wünschen, können Sie:
1. die Lebensmittel wenden oder umrühren, um
einen einheitlichen Kochvorgang zu
erreichen,
2. die Einstellungen verändern,
3. den Vorgang abbrechen, indem Sie die
Taste Stop drücken.
Schließen Sie die Tür und drücken Sie die Taste
Start, um den Vorgang wieder aufzunehmen.
Änderung der Einstellungen
Die Einstellungen für (Zeit, Gewicht, Leistung,
usw.) können nur bei Unterbrechung des
Kochvorganges verändert werden, indem man
folgendermaßen vorgeht:
1. Drücken Sie die Tasten „-“ und „+“, um die
Zeit zu ändern. Die neu festgelegte Zeit wird
sofort übernommen.
2. Drücken Sie die Wahl-Taste
Gewicht/Leistung, um die Leistung oder
das Gewicht zu ändern. Die entsprechende
Anzeige beginnt zu blinken. Ändern Sie die
Einstellung, indem Sie die Tasten „-“ und „+“
drücken, und bestätigen Sie, indem Sie die
Wahl-Taste Gewicht/Leistung erneut
drücken.
3. Drücken Sie die Wahl-Taste Temperatur,
um die Temperatur zu ändern. Die
entsprechende Anzeige beginnt zu blinken.
Ändern Sie die Temperatur , indem Sie die
Tasten „-“ und „+“ drücken, und bestätigen
Sie, indem Sie die Wahl-Taste Temperatur
erneut drücken.
Einen Kochvorgang löschen
Falls Sie den Garvorgang löschen möchten,
drücken Sie zweimal die Stop Taste.
Falls der Vorgang unterbrochen worden ist und
Sie ihn löschen möchten, dann drücken die Stop
Taste.
Daraufhin ertönt ein akustisches Signal, und auf
der Anzeige erscheint die Uhrzeit.
Ende eines Kochvorgangs
Am Ende des Vorgangs ertönen 3 akustische
Signale, und auf der Anzeige erscheint die
Angabe „End“.
Die akustischen Signale werden alle 30 Sekunden
wiederholt, bis die Tür geöffnet oder die Taste
Stop gedrückt wird.

23
DE
Auftauen
Die folgende Tabelle zeigt zusammenfassend
die verschiedenen Auftau- und Ruhezeiten (um
zu gewährleisten, dass die Speisen eine
gleichmäßige Temperatur erlangen), in
Abhängigkeit von Art und Gewicht der
Nahrungsmittel, sowie die entsprechenden
Empfehlungen.
Lebensmittel
Gewicht (g)
Auftauzeit (min.)
Ruhezeit (min.)
Bemerkung
Fleisch am Stück,
Schwein, Rind, Kalb,
Wild
100
2-3
5-10
1 x wenden
200
4-5
5-10
1 x wenden
500
10-12
10-15
2 x wenden
1000
21-23
20-30
2 x wenden
1500
32-34
20-30
2 x wenden
2000
43-45
25-35
3 x wenden
Goulasch
500
8-10
10-15
2 x wenden
1000
17-19
20-30
3 x wenden
Hackfleisch
100
2-4
10-15
2 x wenden
500
10-14
20-30
3 x wenden
Bratwurst
200
4-6
10-15
1 x wenden
500
9-12
15-20
2 x wenden
Geflügel, Geflügelteile
250
5-6
5-10
1 x wenden
Hähnchen
1000
20-24
20-30
2 x wenden
Poularde
2500
38-42
25-35
3 x wenden
Fischfillet
200
4-5
5-10
1 x wenden
Forelle
250
5-6
5-10
1 x wenden
Krabben
100
2-3
5-10
1 x wenden
500
8-11
15-20
2 x wenden
Obst
200
4-5
5-10
1 x wenden
300
8-9
5-10
1 x wenden
500
11-14
10-20
2 x wenden
Brot
200
4-5
5-10
1 x wenden
500
10-12
10-15
1 x wenden
800
15-17
10-20
2 x wenden
Butter
250
8-10
10-15
Quark
250
6-8
10-15
Sahne
250
7-8
10-15

24
DE
Auftauen
Allgemeine Hinweise zum Auftauen
1. Nutzen Sie zum Auftauen nur Mikrowellen-
taugliches Geschirr (Porzellan, Glas, geeignete
Plastik).
2. Die Funktion Auftauen nach Gewicht und die
Tabellen beziehen sich auf das Auftauen von
rohen Esswaren.
3. Die Auftauzeit hängt von der Menge und der
Höhe des Nahrungsmittels ab. Wenn Sie
Lebensmittel einfrieren, berücksichtigen Sie
den Auftauvorgang. Verteilen Sie die
Lebensmittel gleichmäßig entsprechend der
Größe des Gefäßes.
4. Geben Sie das Gefriergut auf den Drehteller in
das Gerät. Die dicksten Teile des Fisches oder
der Hähnchenschenkel müssen nach außen
zeigen. Sie können die dünneren Teile mit
einer Alufolie schützen. Wichtig: Die Alufolie
darf nicht mit den Wänden des Garraumes in
Berührung kommen, da dies einen Lichtbogen
auslösen kann.
5. Die kompaktesten Stücke müssen mehrfach
gewendet werden.
6. Verteilen Sie die tiefgekühlten Nahrungsmittel
so gleichmäßig wie möglich, denn die
schmalsten und dünnsten Teile tauen schneller
auf als die dickeren und höheren Stellen.
7. Fettreiche Lebensmittel, wie Butter, Weißkäse
und Rahm, dürfen nicht völlig aufgetaut
werden. (es besteht die Gefahr der
Überhitzung) Bei Raumtemperatur sind sie in
wenigen Minuten zum Servieren bereit.
Tiefgekühlte Sahne sollte vor dem Verbrauch
durchgerührt werden.
8. Legen Sie Geflügel auf einen umgedrehten
Teller, damit die Auftauflüssigkeit abfließen
kann.
9. Brot kann in eine Serviette eingewickelt
werden, um das Austrocknen zu verhindern.
10. Drehen Sie die Nahrungsmittel in regelmäßigen
Abständen.
11. Nehmen Sie tiefgekühlte Nahrungsmittel aus
der Verpackung, und vergessen Sie nicht,
falls vorhanden, die Metallklammern zu
entfernen. Im Falle von Behältnissen, die
dazu dienen, die Lebensmittel im
Gefrierschrank aufzubewahren und
gleichermaßen zum Auftauen verwendet
werden können, brauchen Sie lediglich deren
Deckel zu entfernen. Geben Sie in allen
übrigen Fällen die Speisen in
mikrowellentaugliche Gefäße.
12. Die durch das Auftauen hauptsächlich bei
Geflügel anfallende Flüssigkeit, muss
weggegossen werden und darf keinesfalls mit
den übrigen Lebensmitteln in Berührung
kommen.
13. Beachten Sie, dass bei den Auftaufunktionen
eine Ruhezeit notwendig ist, bis das
Nahrungsmittel völlig aufgetaut ist.

25
DE
Mit der Mikrowelle garen
Achtung! Lesen Sie den Abschnitt
“Sicherheitshinweise” aufmerksam durch,
bevor Sie mit der Mikrowelle garen.
Befolgen Sie nachstehende Hinweise beim garen
mit der Mikrowelle:
Bevor Sie Lebensmittel mit einer Schale oder
einer Haut (z. B. Äpfel, Tomaten, Kartoffeln,
Würstchen) erhitzen oder kochen, stechen
Sie diese an, damit sie nicht platzen. Garen
Sie Lebensmittel möglichst von gleicher Größe
um ein gleichmäßiges Ergebnis zu erzielen.
Überprüfen Sie, bevor Sie ein Gefäß
benutzen, ob dieses für die Mikrowelle
geeignet ist (siehe Abschnitt über die Art des
Geschirrs).
Beim Verarbeiten von Nahrungsmitteln mit
geringer Feuchtigkeit (z. B.: Auftauen von
Brot, Zubereiten von Popcorn, usw.) tritt eine
rasche Verdampfung auf. Somit arbeitet das
Gerät im Leerlauf, und die Speise kann
verkohlen. Dieser Umstand kann Schäden am
Gerät und am Geschirr hervorrufen. Stellen
Sie deshalb nur die allernotwendigste Zeit ein
und überwachen Sie den Ablauf.
Es ist nicht möglich, große Mengen Öl
(Frittieren) im Mikrowellengerät zu erhitzen.
Nehmen Sie die Fertiggerichte aus deren
Verpackung, denn diese ist nicht immer
hitzebeständig. Befolgen Sie die vom
Hersteller gegebene Anleitung.
Haben Sie mehrere Gefäße, wie zum Beispiel
Tassen, dann ordnen Sie diese gleichmäßig
auf dem Drehteller an.
Verschließen Sie die Plastiktüten nicht mit
Metallklemmen sondern mit Plastikklemmen.
Durchlöchern Sie die Tüte mehrfach, damit der
Dampf leicht entweichen kann.
Vergewissern Sie sich beim Erwärmen oder
Zubereiten von Lebensmitteln, dass diese eine
Mindesttemperatur von 70°C erreichen.
Während der Zubereitung kann sich
Wasserdampf an der Glasscheibe der Tür
niederschlagen und gegebenenfalls
heruntertropfen. Das ist normal und kann noch
ausgeprägter sein, wenn die
Umgebungstemperatur niedrig ist. Die
Sicherheit des Gerätes wird nicht in Frage
gestellt. Wischen Sie nach Benutzung das
Kondenswasser ab.
Wenn Sie Flüssigkeiten erhitzen, dann
benutzen Sie Gefäße mit großen Öffnungen,
damit der Dampf leicht entweichen kann.
Bereiten Sie die Nahrungsmittel gemäß Anleitung
zu, und beachten Sie die in den Tabellen
angegebenen Kochzeiten sowie Leistungsstufen.
Berücksichtigen Sie, dass die angeführten Werte
lediglich der Orientierung dienen und, in
Abhängigkeit vom Ausgangszustand, von der
Temperatur, Feuchtigkeit und Art des
Nahrungsmittels, abweichen können. Es ist ratsam,
die Zeiten und Leistungsstufen den entsprechenden
Gegebenheiten anzupassen. Je nach Art der Speise
ist es notwendig, die Zubereitungszeiten zu
verlängern oder zu verkürzen bzw. die
Leistungsstufe zu erhöhen oder zu verringern.
Die Zubereitung in der Mikrowelle...
1. Je größer die Menge der Nahrungsmittel ist,
desto länger ist die Zubereitungszeit.
Beachten Sie:
Doppelte Menge = doppelte Zeit
Halbe Menge = halbe Zeit
2. Je geringer die Temperatur ist, desto länger ist
die Zubereitungszeit.
3. Die flüssigen Nahrungsmittel erwärmen sich
schneller.
4. Eine gute Verteilung der Lebensmittel auf dem
Drehteller erleichtert die gleichmäßige
Zubereitung. Wenn Sie die kompakteren
Nahrungsmittel an den Rand des Tellers und
die weniger kompakten in die Mitte des Tellers
legen, dann können Sie verschiedene Arten
von Lebensmitteln gleichzeitig erhitzen.
5. Die Tür des Gerätes kann zu jeder Zeit
geöffnet werden. Das Gerät schaltet sich
automatisch ab. Es setzt sich erst wieder in
Betrieb, wenn Sie die Tür schließen und
erneut die Starttaste drücken.
6. Die meisten Lebensmittel müssen abgedeckt
werden. Sie behalten dadurch ihre
Feuchtigkeit und ihren Eigengeschmack. Der
Deckel muss für Mikrowellen durchlässig sein
und über kleine Öffnungen verfügen, die das
Entweichen des Dampfes gestatten.

26
DE
Mit der Mikrowelle garen
Tabellen und Anregungen – Gemüse zubereiten
Lebensmittel
Menge (g)
Zugabe von
Flüssigkeit
Leistung
(Watt)
Zeit
(min.)
Ruhezeit
(min.)
Hinweise
Blumenkohl
Brokkoli
Pilze
500
300
250
100 ml
50 ml
25 ml
800
800
800
9-11
6-8
6-8
2-3
2-3
2-3
In Röschen teilen. In
Scheiben schneiden.
Abdecken
1 x wenden
Erbsen & Möhren,
Tiefgekühlte
Möhren
300
250
100 ml
25 ml
800
800
7-9
8-10
2-3
2-3
In Würfel oder Scheiben
schneiden. Abdecken
1 x wenden
Kartoffeln
250
25 ml
800
5-7
2-3
Schälen, in gleiche Stücke
schneiden. Abdecken
1 x wenden
Paprika
Porree
250
250
25 ml
50 ml
800
800
5-7
5-7
2-3
2-3
In Stücke oder Scheiben
schneiden. Abdecken
1 x wenden
Rosenkohl,
tiefgekühlt
300
50 ml
800
6-8
2-3
Abdecken
1 x wenden
Sauerkraut
250
25 ml
800
8-10
2-3
Abdecken
1 x wenden
Tabellen und Anregungen – Fisch zubereiten
Lebensmittel
Menge (g)
Leistung
(Watt)
Zeit
(min.)
Ruhezeit
(min.)
Hinweise
Fischfilet
500
600
10-12
3
Zugedeckt zubereiten. Nach der Hälfte der
Zeit umdrehen.
Ganzer Fisch
800
800
400
2-3
7-9
2-3
Zugedeckt zubereiten. Nach der Hälfte der
Zeit umdrehen. Gegebenenfalls die
dünneren Enden des Fisches bedecken.

27
DE
Zubereitung mit dem Grill
ACHTUNG: zugängliche Teile werden sehr heiß,
wenn der Grill in Betrieb ist. Kinder sollten
ferngehalten werden.
Benutzen Sie den mit dem Gerät mitgelieferten
Rost, um gute Ergebnisse mit dem Grill zu
erreichen. Er muss über den rechteckigen
Glasdrehteller in zwei mögliche Positionen
platziert werden, die unterschiedlichen Höhen
zum Grillen anbieten (siehe Abbildung unten).
Setzen Sie den Grillrost so ein, dass er die
Metalloberflächen des Nutzraumes nicht
berührt, da die Gefahr der Entstehung eines
Lichtbogens gegeben ist, der das Gerät
beschädigen kann.
WICHTIGE HINWEISE:
1. Beim ersten Einsatz des Grills ist das Auftreten
von etwas Rauch und Geruch festzustellen,
das auf den Gebrauch von Ölen während der
Herstellung zurückzuführen ist.
2. Die Glasscheibe der Tür erreicht während des
Betriebs sehr hohe Temperaturen. Halten Sie
Kinder fern!
3. Während der Nutzung des Grills erreichen die
Wände des Innenraumes sehr hohe
Temperaturen. Es wird der Gebrauch von
Küchenhandschuhen empfohlen.
4. Wird der Grill über einen längeren Zeitraum
betrieben, ist es normal, dass die Heizelemente
durch das Sicherheitsthermostat zeitweise
ausgeschaltet werden.
5. Wichtig! Wenn die Nahrungsmittel in Gefäßen
gegrillt oder gegart werden, ist es notwendig,
zu überprüfen, ob die Gefäße dazu geeignet
sind oder nicht. Siehe Abschnitt über die Art
des Geschirrs!
6. Beim Einsatz des Grills ist es möglich, dass
Fettspritzer an das Heizelement gelangen und
verbrannt werden. Das ist normal und stellt
keinerlei Art von Funktionsstörung dar.
7. Reinigen Sie den Innenraum und das Zubehör
nach jeder Zubereitung, damit der Schmutz
nicht verkrustet.

28
DE
Zubereitung mit dem Grill
Tabellen und Anregungen – Grill ohne Mikrowelle
Lebensmittel
Menge (g)
Zeit (min.)
Hinweise
Fisch
Goldbrasse
Sardinen/Seehahn
800
6-8 Stk.
18-24
15-20
Mit etwas Butter einstreichen. Nach der
Hälfte der Zeit, wenden und mit Gewürzen
bestreuen.
Fleisch
Würstchen
6-8 Stk.
22-26
Nach der Hälfte der Zeit einstechen und
wenden.
Hamburger, tiefgekühlt
3 Stk.
18-20
Nach der Hälfte der Zeit wenden
Mittelrippenstück (etwa 3 cm
stark)
400
25-30
Mit Öl bepinseln. Nach der Hälfte der Zeit
wenden.
Sonstiges
Toastbrote
4 Stk.
1½-3
Das Toasten beaufsichtigen. wenden
Sandwichs überbacken
2 Stk.
5-10
Das Überbacken beaufsichtigen.
Heizen Sie den Grill 2 Minuten vor. Falls kein
gegenteiliger Hinweis vorliegt, benutzen Sie den
Grillrost. Stellen Sie den Grillrost in eine
Auffangschüssel damit das heruntertropfende
Wasser und Fett aufgefangen werden darf.
Die angegebenen Zeiten sind lediglich
Orientierungswerte und können je nach
Zusammensetzung, Menge und angestrebtem
Zustand der Speise abweichen. Fisch und Fleisch
erlangen einen optimalen Geschmack, wenn Sie
diese vor dem Grillen mit Pflanzenöl einpinseln,
Gewürze und Kräuter hinzugeben und schließlich
einige Stunden lang marinieren lassen. Salzen
Sie erst nach dem Grillen.
Würstchen platzen nicht, wenn sie vorher mit
einer Gabel angestochen werden.
Beobachten Sie den Kochvorgang nach Ablauf
der Hälfte der Zeit, und wenden Sie die Speise.
Der Grill ist besonders dazu geeignet, dünne
Stücke Fleisch und Fisch zuzubereiten. Dünne
Fleischstücke brauchen nur einmal gewendet zu
werden, die dicken mehrere Male.

29
DE
Zubereitung mit dem Grill
Tabellen und Anregungen – Mikrowelle + Grill
Die Funktion Mikrowelle mit Grill ist ideal, um
Speisen schnell zuzubereiten und gleichzeitig zu
bräunen. Außerdem können Nahrungsmittel
überbacken werden.
Mikrowelle und Grill arbeiten gleichzeitig. Die
Mikrowelle gart und der Grill bräunt.
Gericht
Menge (g)
Geschirr
Leistung
(Watt)
Zeit (min.)
Ruhezeit
(min.)
Nudelauflauf
500
flach
400
12-17
3-5
Kartoffelauflauf
800
flach
600
20-22
3-5
Lasagne
etwa 800
flach
600
15-20
3-5
Quarkauflauf
etwa 500
flach
400
18-20
3-5
2 Hähnchenkeulen,
frisch (auf dem Rost)
jeweils 200
flach
400
10-15
3-5
Hähnchen
etwa 1000
flaches und breites
Gefäß
400
35-40
3-5
Zwiebelsuppe
überbacken
2 Tassen
zu 200
Suppenschalen
400
2-4
3-5
Überprüfen Sie, bevor Sie Geschirr und Gefäße in
der Mikrowelle benutzen, ob diese geeignet sind.
Verwenden Sie ausschließlich mikrowellen-
taugliches Geschirr.
Das Geschirr, das für die kombinierte Funktion
eingesetzt werden soll, muss sowohl für die
Mikrowelle als auch für den Grill geeignet sein.
Siehe Abschnitt über die Art des Geschirrs!
Beachten Sie, dass die angegebenen Zeiten
lediglich Orientierungswerte sind und je nach
Ausgangszustand, Temperatur, Feuchtigkeit und
Art des Nahrungsmittels abweichen können.
Falls die Zeit nicht ausreichend war, um das
Nahrungsmittel entsprechend zu bräunen, dann
behandeln Sie es weitere 5 oder 10 min. mit der
Grillfunktion.
Beachten Sie bitte die Ruhezeiten, und wenden
Sie die Fleisch- und Geflügelstücke
Benutzen Sie den Drehteller zur Zubereitung, falls
keine gegenteiligen Hinweise gegeben werden.
Die in den Tabellen angegebenen Werte gelten
unter Berücksichtigung dessen, dass der Garraum
kalt ist (es ist nicht nötig, ihn vorzuheizen).

30
DE
Braten und Backen
Tabellen und Ratschläge – Zubereitung von Fleisch und Kuchen
Mikrowelle / Heißluft
Speise
Gewicht
(g)
Leistung
(W)
Temperatur
ºC
Zeit
(Min.)
Ruhezeit
(Min.)
Hinweise
Roastbeef
1000-1500
400
200
30-40
20
Schüssel ohne Deckel 1x
wenden
Schweinerücken /
Kotelett o. Knochen
Nackenbraten
800-1000
200
180-190
50-60
20
Schüssel ohne Deckel
1Xwenden
Hähnchen, ganz
1000/1200
400
200
30-40
10
Schüssel ohne Deckel.
Brustseite nach unten. 1X
wenden.
Hähnchenteile /
halbe Hähnchen
500-1000
400
200
25-35
10
Schüssel ohne Deckel. Die
Stücke mit Haut nach
unten einlegen. 1X
wenden.
Kalbsnierenbraten
1500/2000
200
180
60-65
20
Schüssel mit Deckel. 1-2X
wenden, nach dem
Wenden ohne Decken
weitergaren
Rinderoberschale
1500-1800
200
200
80-90
20
Schüssel mit Deckel, 1-2 x
wenden
Mikrowelle / Backen
Gebäck
Leistung
(W)
Temperatur
ºC
Zeit
(Min.)
Ruhezeit
(Min.)
Hinweise
Schokoladen – Kirschkuchen
200
200
30
5-10
Drehteller, Springform, Ø
28 cm
Quarktorte mit Obst
400
180
40-45
5-10
Drehteller, Springform, Ø
28 cm
Gedeckter Apfelkuchen
200
185
40-45
5-10
Drehteller, Springform, Ø
28 cm
Käsekuchen mit Streusel
400
180
40-50
5-10
Drehteller, Springform, Ø
26 cm
Nusskuchen
200
170
30-35
5-10
Drehteller,
Napfkuchenform

31
DE
Braten und Backen
Tipps zum Braten -Backen
Wenden Sie die Fleischstücke nach der Hälfte der
Garzeit. Wenn der Braten fertig ist, sollte er noch
20 Minuten im ausgeschalteten, geschlossenen
Herd verbleiben. Auf diese Art und Weise wird der
Fleischsaft besser verteilt.
Die Temperatur und die Zubereitungszeit hängen
von der Art der Speise und der entsprechenden
Menge ab.
Falls das Bratengewicht in der Tabelle nicht
verzeichnet ist, wählen Sie die Angabe, welche
dem unmittelbar darunter liegenden Gewicht
entspricht, und verlängern Sie die Zeit.
Tipps zum Geschirr
Überprüfen Sie, ob das Geschirr überhaupt in das
Gerät passt.
Heißes Glasgeschirr sollte auf einem trockenen
Küchentuch abgestellt werden. Wenn es auf einer
kalten oder nassen Unterlage abgesetzt wird,
kann das Glas springen und zu Bruch gehen.
Benutzen Sie immer einen Topflappen, um das
Geschirr aus dem Ofen zu nehmen.

32
DE
Backen
Tabellen und Ratschläge – Backen/ Heißluft
Gebäck
Behältnis
Einschub
Temperatur
Zeit (Min.)
Nusskuchen
Napfkuchenform
Drehteller
170/180
30/35
Obsttorte/Rührteig
Springform Ø 28 cm
Drehteller
150/160
35/45
Napfkuchen
Napfkuchenform
Drehteller
170/190
30/45
Pikante Kuchen z.B.
Kartoffel-Pizza
Runde Glasform
Drehteller
160/180
50/70
Biskuittorte
Springform Ø 26 cm
Drehteller
160/170
40/45
Biskuitrolle
Glaskuchenblech
1
110
35/45
Kirschkuchen
Glaskuchenblech
1
170/180
35/45
Tipps zu den Kuchenbackformen
Am üblichsten sind dunkle Backformen aus
Metall. Falls Sie zusätzlich die Mikrowelle
benutzen, dann verwenden Sie Kuchenformen
aus Glas, Keramik oder Plastik. Diese müssen bis
250 °C hitzebeständig sein. Wenn Sie diese Art
von Formen einsetzen, wird der Kuchen weniger
gebräunt.
Tipps zum Kuchenbacken
Temperatur und Backzeit des Kuchens hängen
von der Qualität und der Menge der Zutaten ab.
Versuchen Sie es zuerst einmal mit einem
niedrigen Wert und wählen Sie das nächste Mal,
bei Bedarf, eine höhere Temperatur. Eine
niedrigere Temperatur ergibt eine gleichmäßigere
Bräunung. Stellen Sie die Backform immer in die
Mitte des Rostes oder auf den Drehteller.
Tipps zum Backen
Wie festgestellt wird, ob Kuchen
durchgebacken ist:
Stechen Sie mit einem Holzstäbchen
(Zahnstocher) in die höchste Stelle des Kuchens.
Wenn der Teig nicht am Holzstäbchen haften
bleibt, ist der Kuchen fertiggebacken.
Der Kuchen wird sehr dunkel:
Wählen Sie beim nächsten Mal eine niedrigere
Temperatur und lassen Sie den Kuchen länger
backen.
Der Kuchen ist zu trocken:
Stechen Sie mit einem Holzstäbchen kleine
Löcher in den fertigen Kuchen. Träufeln Sie
danach Obstsaft oder Alkoholisches darauf.
Erhöhen Sie beim nächsten Mal die Temperatur
um etwa 10 °C und verringern Sie die Backzeit.
Der Kuchen löst sich nicht beim Stürzen:
Lassen Sie den Kuchen nach dem Backen 5 bis
10 Minuten auskühlen; so löst er sich leichter aus
der Form. Sollte er sich immer noch nicht lösen,
dann fahren Sie mit einem Messer am Rand
entlang. Fetten Sie beim nächsten Mal die Form
gut ein.
Tipps zur Energieersparnis
Wenn Sie mehr als einen Kuchen backen, dann
ist es ratsam, diese kurz nacheinander in den
Herd zu schieben. Der Herd ist so noch warm,
und dadurch verkürzt sich die Backzeit des
darauffolgenden Kuchens.
Verwenden Sie vorzugsweise helle oder
emaillierte Backformen.
Bei längeren Back- bzw. Garzeiten können sie
das Gerät 10 Minuten vor deren Ende
ausschalten und die Restwärme zum
Fertigbacken oder – garen nutzen.

33
DE
Welche Art von Geschirr kann benutzt werden?
Funktion Mikrowelle
Beachten Sie bei der Funktion Mikrowelle, dass
die Mikrowellen von den metallischen Flächen
reflektiert werden. Glas, Porzellan, Steingut,
Plastik und Papier lassen die Mikrowellen durch.
Deshalb dürfen Metalltöpfe und –geschirr bzw.
Gefäße mit Metallteilen oder –dekor nicht in
der Mikrowelle benutzt werden. Glas und
Steingut mit Metalldekor und –teilen (z. B.,
Bleikristall) sind nicht zu verwenden.
Das Ideale für die Zubereitung im
Mikrowellengerät ist feuerfestes Glas, Porzellan
oder Steingut sowie hitzebeständige Plastik. Sehr
feines und zerbrechliches Glas und Porzellan
sollte nur kurzzeitig verwendet werden, z.B. um
etwas zu erwärmen.
Die heißen Speisen übertragen die Wärme auf
das Geschirr, das sehr heiß werden kann.
Benutzen Sie deshalb immer einen Topflappen!
Geschirrtest
Stellen Sie bei maximaler Mikrowellenleistung das
Geschirr 20 Sekunden lang in das Gerät. Falls es
kalt bleibt oder nur wenig erhitzt wird, ist es
geeignet. Wenn es sich jedoch sehr erwärmt oder
einen Lichtbogen hervorruft, ist es ungeeignet.
Funktionen Grill und Heiβluft
Im Falle der Funktionen Grill und Heiβluft muss
das Geschirr eine Temperatur von zumindest
300°C aushalten.
Plastikgeschirr ist ungeeignet.
Kombinierte Funktionen
Bei den kombinierten Funktionen muss das
benutzte Geschirr sowohl für die Mikrowelle als
auch für den Grill geeignet sein.
Aluminiumgefäße und –folien
Die in Aluminiumgefäßen oder -folie befindlichen
Fertiggerichte können unter Beachtung folgender
Aspekte in die Mikrowelle eingebracht werden:
Beachten Sie die Empfehlungen des
Herstellers auf der Verpackung.
Aluminiumgefäße dürfen nicht höher als 3
cm sein und nicht mit den Wänden des
Garraumes in Berührung kommen
(Mindestabstand 3 cm). Aluminiumdeckel
sind abzunehmen.
Stellen Sie das Aluminiumgefäß direkt auf
den Drehteller. Falls Sie den Grillrost
verwenden, stellen Sie das Gefäß auf einen
Porzellanteller. Stellen Sie das Gefäß nie
direkt auf den Rost!
Die Garzeit ist länger, denn die Mikrowellen
dringen nur von oben in die Speise ein.
Nutzen Sie im Zweifelsfalle nur
mikrowellentaugliches Geschirr.
Aluminiumfolie kann während des Auftau-
vorgangs benutzt werden, um die
Mikrowellen zu reflektieren. Empfindliche
Nahrungsmittel, wie Geflügel bzw.
Hackfleisch, können gegen übermäßige
Hitze geschützt werden, indem die
entsprechenden Stellen damit abgedeckt
werden.
Wichtig! Die Aluminiumfolie darf nicht mit
den Wänden des Nutzraumes in Berührung
kommen, da diese einen Lichtbogen
hervorrufen kann.
Deckel
Es wird die Benutzung von Deckeln aus Glas,
Plastik oder Klarsichtfolie empfohlen, denn auf
diese Art und Weise:
1. wird eine zu starke Verdampfung vermieden
(hauptsächlich bei sehr langen Garzeiten),
2. geht der Zubereitungsvorgang schneller
vonstatten,
3. werden die Speisen nicht ausgetrocknet,
4. wird das Aroma bewahrt.
Die Deckel dürfen nicht luftdicht abschließen,
damit keinerlei Druck entsteht. Plastiktüten
müssen gleichermaßen Öffnungen haben. Sowohl
Saugflaschen als auch Gläschen mit
Babynahrung und ähnliche Gefäße dürfen nur
ohne Deckel erwärmt werden, da sie platzen
können.

34
DE
Welche Art von Geschirr darf verwendet werden?
Tabelle – Geschirr
Folgende Tabelle gibt Ihnen eine allgemeine Übersicht, welcher Geschirrtyp für den jeweiligen Fall
geeignet ist.
Betriebsart
Geschirrtyp
Mikrowelle
Grill + Heiβluft
Kombinierte
Funktionen
Auftauen /
erwärmen
Zubereiten
Glas und Porzellan 1)
Für den Haushalt bestimmt, nicht
feuerfest, kann im Geschirrspüler
gereinigt werden.
ja
ja
nein
nein
Glasierte Keramik
Feuerfestes Glas und Porzellan
ja
ja
ja
ja
Keramik, Steingutgeschirr 2)
Ohne Glasur bzw. Glasur ohne
Metalldekors
ja
ja
nein
nein
Tongeschirr 2)
Glasiert
Unglasiert
ja
nein
ja
nein
nein
nein
nein
nein
Plastikgeschirr 2)
Hitzebeständig bis 100°C
Hitzebeständig bis 250°C
ja
ja
nein
ja
nein
nein
nein
nein
Plastikfolien 3)
Plastikfolie für Lebensmittel
Cellophan
nein
ja
nein
ja
nein
nein
nein
nein
Papier, Pappe, Pergament 4)
ja
nein
nein
nein
Metall
Aluminiumfolie
Aluminiumverpackungen 5)
Zubehör
ja
nein
ja
nein
ja
ja
ja
ja
ja
nein
ja
no
1. Ohne Gold- oder Silberrand und ohne
Bleikristall.
2. Hinweise des Herstellers beachten!
3. Benutzen Sie keine Metallklammern, um die
Tüten zu verschließen. Durchlöchern Sie die
Tüten. Nutzen Sie die Folien nur zum
Abdecken.
4. Verwenden Sie keine Pappteller.
5. Ausschließlich flache
Aluminiumverpackungen ohne Deckel. Das
Aluminium darf mit den Wänden des
Garraumes nicht in Berührung kommen.

35
DE
Reinigung und Wartung des Gerätes
Die Reinigung stellt die einzige, normalerweise
erforderliche Wartung dar.
Achtung! Das Mikrowellengerät ist regelmäßig zu
reinigen, wobei sämtliche Essensreste entfernt
werden müssen. Wenn das Mikrowellengerät
nicht ordnungsgemäß sauber gehalten wird, kann
seine Oberfläche in Mitleidenschaft gezogen
werden, was wiederum die Lebensdauer des
Gerätes verringern und gegebenenfalls zu
einer gefährlichen Situation führen kann.
Achtung! Die Reinigung muss an dem von der
Stromversorgung getrennten Gerät
durchgeführt werden. Ziehen Sie den Stecker
aus der Steckdose oder schalten Sie den
Stromversorgungskreis des Gerätes ab.
Benutzen Sie keine aggressiven Reinigungs-
oder Scheuermittel, keine kratzenden
Scheuertücher noch spitze Gegenstände,
denn es können Flecken entstehen.
Verwenden Sie keine Hochdruck- oder
Dampfstrahlreinigungsgeräte.
Stirnseite
Es reicht, das Gerät mit einem feuchten Lappen
zu reinigen. Geben Sie, falls es sehr verschmutzt
sein sollte, einige Tropfen Geschirrspülmittel ins
Waschwasser. Wischen Sie danach das Gerät mit
einem trockenen Lappen ab.
Benutzen Sie bei Geräten mit einer
Aluminiumvorderseite ein mildes
Glasreinigungsmittel und einen weichen,
fusselfreien Lappen. Wischen Sie diese in
horizontaler Richtung ab, ohne Druck auf die
Oberfläche auszuüben.
Entfernen Sie Kalk-, Fett-, Stärke- und
Eisweißflecken umgehend. Unter diesen Flecken
kann es zur Korrosion kommen.
Vermeiden Sie das Eindringen von Wasser ins
Geräteinnere.
Geräteinnenraum
Reinigen Sie nach jeder Nutzung die Innenwände
mit einem feuchten Lappen, so ist es leichter,
Spritzer und anhaftende Speisereste zu
beseitigen.
Nutzen Sie ein nicht aggressives Reinigungs-
mittel, um hartnäckigere Verunreinigungen zu
entfernen. Verwenden Sie weder
Backofensprays noch sonstige aggressive
bzw. scheuernde Reinigungsmittel.
Halten Sie die Tür und die Vorderseite des
Gerätes stets sehr sauber, um dessen
einwandfreie Funktionsweise zu
gewährleisten.
Verhindern Sie das Eindringen von Wasser in die
Belüftungslöcher und –schlitze der Mikrowelle.
Nehmen Sie regelmäßig den Drehteller und den
entsprechenden Träger (Kupplungsstück +
Rollring) ab und reinigen Sie den Boden des
Innenraumes, besonders wenn Flüssigkeiten
verschüttet worden sind.
Schalten Sie das Gerät ohne Drehteller und
dazugehörigen Träger nicht ein.
Falls der Garraum des Gerätes sehr verschmutzt
ist, dann stellen Sie ein Glas Wasser auf den
Drehteller und schalten Sie die Mikrowelle mit
maximaler Leistung 2 oder 3 Minuten lang ein.
Der freigesetzte Dampf weicht die Verschmutzung
auf, welche mit einem weichen Tuch leicht
abgewischt werden kann.
Unangenehme Gerüche (z. B., nach der
Zubereitung von Fisch) können mit Leichtigkeit
beseitigt werden. Geben Sie einige Tropfen
Zitronensaft oder Essig in eine Tasse Wasser.
Geben Sie einen Teelöffel in die Tasse, um einen
Siedeverzug zu vermeiden. Erhitzen Sie das
Wasser 2 bis 3 Minuten lang bei Maximallleistung
der Mikrowelle.

36
DE
Reinigung und Wartung des Gerätes
Decke des Gerätes
Wenn die Decke des Gerätes verunreinigt ist,
dann kann der Grill heruntergeklappt werden, um
die Reinigung zu erleichtern.
Warten Sie, bis der Grill erkaltet ist, bevor Sie
ihn herunterklappen, um eine
Verbrennungsgefahr auszuschließen.
Gehen Sie folgendermaßen vor:
1. Drehen Sie den Halter de Grills um 180º (1).
2. Klappen Sie den Grill vorsichtig herunter (2).
Wenden Sie keine übermäßige Kraft an,
da diese Schäden verursachen kann.
3. Bringen Sie nach Reinigung der Decke den
Grill (2) wieder in seine Lage, indem Sie
umgekehrt vorgehen.
WICHTIGER HINWEIS: Die Halterung des Grills
(1) kann herunterfallen, wenn sie gedreht wird.
Sollte dies passieren, schieben Sie die Halterung
des Grills (1) in das vorhandene Loch in der
Decke des Backofeninnenraumes und drehen Sie
sie um 90º bis zu der Position, die ein Halten des
Grills (2) ermöglicht.
Die Glimmerabdeckung (3), die sich an der
Decke befindet, muss ständig sauber gehalten
werden. Speisereste, die sich an der
Glimmerabdeckung angesammelt haben, können
Schäden bzw. Funken verursachen.
Verwenden Sie weder scheuernde Reinigungs-
mittel noch spitze Gegenstände.
Nehmen Sie die Glimmerabdeckung nicht ab,
um jegliches Risiko zu vermeiden.
Die Glasabdeckung der Lampe (4) befindet sich
an der Decke des Gerätes und kann zur
Reinigung leicht abgenommen werden.
Schrauben Sie diese dazu ab und reinigen Sie
diese mit Wasser und Geschirrspülmittel.
Zubehör
Reinigen Sie das Zubehör nach jeder Benutzung.
Falls es sehr verschmutzt ist, weichen Sie es
zuerst ein, und benutzen Sie dann eine Bürste
und einen Schwamm. Das Zubehör kann in einer
Geschirrspülmaschine gereinigt werden.
Vergewissern Sie sich, dass der Drehteller und
sein entsprechender Träger immer sauber sind.
Schalten Sie das Gerät ohne Drehteller und
entsprechenden Träger nicht ein.

37
DE
Was ist im Falle einer Funktionsstörung zu tun?
ACHTUNG! Jegliche Art von Reparatur darf
nur von spezialisierten Fachleuten ausgeführt
werden. Jeder Eingriff, der durch nicht vom
Hersteller autorisierte Personen
vorgenommen wird, ist gefährlich.
Folgende Probleme können behoben werden,
ohne den Kundendienst zu benachrichtigen:
Die Anzeige ist aus! Überprüfen, ob:
- die Stundenanzeige ausgeschaltet wurde
(siehe Abschnitt zu den Grundeinstellungen).
Es geschieht nichts, wenn die Tasten
gedrückt werden! Überprüfen, ob:
- die Sicherheitsverriegelung aktiviert ist
(siehe Abschnitt zu den Grundeinstellungen).
Das Gerät funktioniert nicht! Überprüfen,
ob:
- der Stecker richtig an die Steckdose
angeschlossen ist,
- der Stromversorgungskreis des Gerätes
eingeschaltet ist,
- die Tür ganz geschlossen ist. Die Tür muss
hörbar einrasten.
- Fremdkörper zwischen Tür und Stirnseite
des Innenraumes vorhanden sind.
Während des Betriebs sind eigenartige
Geräusche zu hören! Überprüfen, ob:
- Lichtbögen im Inneren des Gerätes
auftreten, welche durch metallische
Fremdkörper hervorgerufen werden (siehe
Abschnitt über die Art des Geschirrs),
- das Geschirr mit den Wänden des Gerätes
Berührung hat,
- im Geräteinneren lose Spieße oder Löffel
vorhanden sind.
Die Nahrungsmittel werden nicht heiß
oder werden sehr langsam heiß!
Überprüfen, ob:
- Sie aus Unachtsamkeit Metallgeschirr
benutzt haben,
- Sie eine geeignete Betriebsdauer bzw.
Leistungsstufe gewählt haben,
- Sie eine größere oder kältere
Nahrungsmittelmenge als gewöhnlich in das
Innere des Gerätes getan haben.
Das Nahrungsmittel ist übermäßig heiß,
ausgetrocknet oder verbrannt!
Überprüfen, ob Sie eine geeignete
Betriebsdauer bzw. Leistungsstufe gewählt
haben.
Nach Beendigung eines Kochvorgangs
ist ein Geräusch zu hören! Das ist kein
Problem. Der Kühlventilator läuft eine
gewisse Zeit lang nach. Wenn die
Temperatur genügend zurückgegangen ist,
schaltet sich der Ventilator ab.
Das Gerät funktioniert, die
Innenbeleuchtung geht aber nicht an!
Falls alle Funktionen richtig ablaufen, ist
wahrscheinlich die Lampe durchgebrannt.
Sie können das Gerät weiterhin benutzen.
Lampenwechsel
Gehen Sie folgendermaßen vor, um die Lampe
auszutauschen:
- Trennen Sie das Gerät von der
Stromversorgung. Ziehen Sie den Stecker
aus der Steckdose bzw. unterbrechen Sie
den Stromversorgungskreis des Gerätes.
- Schrauben Sie den Glasdeckel von der
Lampe (1) ab.
- Nehmen Sie die Halogenlampe heraus (2).
Achtung! Die Lampe kann sehr heiß sein.
- Setzen Sie eine neue Halogenlampe 12V /
10W ein. Achtung! Berühren Sie den
Glaskolben der Lampe nicht direkt mit
den Fingern, denn das kann ihr schaden.
Befolgen Sie die Anweisungen des
Lampenherstellers.
- Schrauben Sie den Glasdeckel der Lampe
ein (1).
- Schließen Sie das Gerät wieder an die
Stromversorgung an.

38
DE
Technische Eigenschaften
Spezifikation
Spannung (WS) .............................................................................. (siehe Typenschild)
Geforderte Leistung ........................................................................ 3400 W
Leistung des Grills .......................................................................... 1500 W
Leistung der Heißluft ....................................................................... 1600 W
Ausgangsleistung der Mikrowelle. ................................................... 1000 W
Mikrowellenfrequenz … ................................................................... 2450 MHz
Außenabmessungen (BHT). ....................................................... 595 455 542 mm
Abmessungen des Garraumes (BHT). ........................................ 420 210 390 mm
Fassungsvermögen des Ofens. ...................................................... 38 l
Gewicht ........................................................................................... 35 kg
Hinweise zum Umweltschutz
Entsorgung der Verpackung
Die Verpackung ist mit einem Grünen Punkt
gekennzeichnet.
Benutzen Sie geeignete Behältnisse, um alle
Verpackungsmaterialien, wie Pappe, Styropor und
Folien, zu entsorgen. Auf diese Weise wird die
Wiederverwertung der Verpackungsmaterialien
gewährleistet.
Entsorgung von stillgelegten Geräten
Die europäische Richtlinie 2002/96/EG über
Elektro- und Elektronik-Altgeräte (WEEE) sieht
vor, dass die elektrischen Haushaltgeräte nicht im
normalen Abfallfluss des festen Stadtmülls
entsorgt werden dürfen.
Die außer Betrieb gesetzten Geräte müssen
getrennt abgeholt werden, um den Anteil der
Rückgewinnung und Wiederverwendung der
Werkstoffe, aus denen sie bestehen, zu
optimieren und um potentielle Schäden für die
Gesundheit der Menschen und die Umwelt zu
vermeiden. Das Symbol, welches aus einem mit
einem Kreuz durchgestrichenen Müllcontainer
besteht, ist auf sämtlichen Erzeugnissen
anzubringen, um so an die Verpflichtung der
separaten Abholung zu erinnern.
Die Verbraucher haben sich mit den lokalen
Behörden bzw. den Verkaufsstellen in Verbindung
zu setzen, um Informationen über den Ort
einzuholen, der zur Lagerung der alten
elektrischen Haushaltsgeräte geeignet ist.
Machen Sie Ihr Gerät unbrauchbar, bevor Sie es
entsorgen. Ziehen Sie das Netzkabel heraus,
schneiden Sie es ab und entsorgen Sie es

39
DE
Installationsanleitung
Vor der Installation
Überprüfen Sie, dass die
Versorgungsspannung, die auf dem
Typenschild angegeben ist, mit Ihrer
Netzspannung übereinstimmt.
Öffnen Sie die Tür und entnehmen Sie alle
Zubehörteile sowie das Verpackungsmaterial.
Nehmen Sie die Abdeckung aus Glimmer an
der Decke des Innenraumes nicht ab. Diese
Abdeckung verhindert, dass Fett und Speisereste
den Mikrowellengenerator beschädigen.
Achtung! Die Vorderseite des Gerätes kann mit
einer Schutzfolie versehen sein. Ziehen Sie
diese Folie vor der ersten Benutzung des Gerätes
vorsichtig ab, indem Sie an deren Unterseite
beginnen.
Vergewissern Sie sich, dass das Gerät nicht
beschädigt ist. Überprüfen Sie, ob die Tür richtig
schließt und ob die Innenseite der Tür sowie die
Stirnseite des Innenraumes nicht beschädigt sind.
Benachrichtigen Sie den Kundendienst im Falle
von vorhandenen Schäden.
BENUTZEN SIE DAS GERÄT NICHT, falls das
Netzkabel oder der Stecker beschädigt ist, falls
das Gerät nicht richtig funktioniert bzw. wenn es
Schäden erlitten hat oder heruntergefallen ist.
Setzen Sie sich gegebenenfalls mit dem
Kundendienst in Verbindung.
Stellen Sie das Gerät auf eine ebene und stabile
Fläche. Das Gerät darf nicht in der Nähe von
Heizelementen, Radios und Fernsehgeräten
aufgestellt werden.
Vergewissern Sie sich während der
Installation, dass das Netzkabel nicht mit
Feuchtigkeit, scharfkantigen Gegenständen
und der Rückseite des Gerätes in Berührung
kommt, denn die hohen Temperaturen können
das Kabel beschädigen.
Achtung: Nach der Aufstellung des Gerätes ist
der Zugang zum Stecker zu gewährleisten.
Nach der Installation
Das Gerät ist mit einem Netzkabel und einem
Stecker für Einphasenstrom ausgestattet.
Im Falle eines Daueranschlusses ist das Gerät
von einem qualifizierten Techniker zu installieren.
In diesem Falle hat der Anschluss an einen
Stromkreis mit einem Unterbrecher für sämtliche
Pole, mit einem Mindestabstand von 3 mm
zwischen den Kontakten, zu erfolgen.
ACHTUNG: DAS GERÄT MUSS UNBEDINGT
GEERDET WERDEN.
Der Hersteller und die Wiederverkäufer lehnen
jegliche Haftung für eventuelle Schäden ab, die
Personen, Tieren oder Sachen zugefügt werden,
falls die Nichtbeachtung der vorliegenden
Installationsanleitung festgestellt wird.
Das Gerät funktioniert nur, wenn die Tür richtig
geschlossen ist.
Säubern Sie vor der ersten Benutzung das
Geräteinnere und die Zubehörteile gemäß den
Hinweisen zur Reinigung unter dem Punkt
“Reinigung und Wartung des Gerätes”.
Führen Sie das Kupplungsstück in der Mitte des
Garraumes ein und legen Sie den Rollring sowie
den Drehteller so auf, dass dieser einrastet.
Immer, wenn die Mikrowelle benutzt wird, ist es
notwendig, dass sowohl der Drehteller als auch
das entsprechende Zubehör sich im Garraum
befinden und richtig eingesetzt sind. Der
Drehteller dreht sich in beide Richtungen.
Während der Installation sind die getrennt mitgelieferten Anleitungen zu
befolgen.

40
RU
Содержание
Сведения по технике безопасности ............................................................................................ 41
Указания по безопасности ............................................................................................................. 45
Преимущества микроволновой печи .......................................................................................... 46
Описание микроволновой печи ................................................................................................... 47
Описание функций .......................................................................................................................... 48
Основные функции и режимы ...................................................................................................... 49
Использование блюда для хрустящей корочки ........................................................................ 59
Во время работы печи... ................................................................................................................ 60
Размораживание ............................................................................................................................. 61
Приготовление с помощью микроволн ...................................................................................... 63
Таблицы и советы – Обжаривание .............................................................................................. 68
Зажаривание и приготовление выпечки в микроволновой печи .......................................... 69
Приготовление выпечки ................................................................................................................ 70
Подходящая посуда ....................................................................................................................... 71
Подходящая посуда ....................................................................................................................... 72
Очистка и обслуживание микроволновой печи ........................................................................ 73
Что делать, если микроволновая печь не работает? .............................................................. 75
Технические характеристики ........................................................................................................ 76
Защита окружающей среды .......................................................................................................... 76
Инструкции по выполнению установки ...................................................................................... 77
Установка ......................................................................................................................................... 78
Уважаемый клиент,
Благодарим Вас за выбор этого продукта BARAZZA.
Прежде всего, мы хотим поблагодарить Вас за выбор нашей продукции.
Пожалуйста, внимательно прочитайте инструкции, содержащиеся в данном руководстве, так как
они помогут вам добиться лучших результатов при использовании Вашей микроволновой печи.
СОХРАНИТЕ ДОКУМЕНТАЦИЮ ДАННОГО ПРИБОРА ДЛЯ ДАЛЬНЕЙШЕГО ИСПОЛЬЗОВАНИЯ.
Всегда держите Ваше руководство по эксплуатации под рукой. Если Вы даете устройство
кому-нибудь другому, не забудьте также дать соответствующее руководство!
Руководство пользователя также доступна для скачивания на www.barazzasrl.it

41
RU
Сведения по технике безопасности
Перед установкой и эксплуатацией прибора внимательно
ознакомьтесь с приложенным руководством.
Производитель не несет ответственность за травмы и
повреждения, полученные/вызванные неправильной установкой
и эксплуатацией. Позаботьтесь о том, чтобы данное руководство
было у Вас под рукой на протяжении всего срока службы
прибора.
Безопасность детей и лиц с ограниченными возможностями
ВНИМАНИЕ!! Существует риск удушья, получения травм или
стойких нарушений нетрудоспособности
Данный прибор может эксплуатироваться детьми старше 8
лет и лицами с ограниченными физическими, сенсорными
или умственными способностями или с недостаточным
опытом или знаниями только при условии нахождения под
присмотром лица, отвечающего за их безопасность.
Не позволяйте детям играть с прибором.
Храните все упаковочные материалы вне досягаемости
детей.
ВНИМАНИЕ: Не подпускайте детей и домашних животных к
прибору, когда он работает или остывает. Доступные для
контакта части прибора сохраняют высокую температуру.
Если прибор оснащен функцией «Защита от детей»,
рекомендуется включить эту функцию.
Очистка и доступное пользователю техническое
обслуживание не должно производиться детьми без
присмотра.
Общие правила техники безопасности
Прибор предназначен для бытового и аналогичного
применения, например:
– в помещениях, служащих кухнями для обслуживающего
персонала в магазинах, офисах и на других рабочих местах;

42
RU
Сведения по технике безопасности
– в сельских жилых домах;
– для использования клиентами отелей, мотелей и других
мест проживания;
– в мини-гостиницах типа «ночлег и завтрак».
Во время работы прибора его внутренняя камера сильно
нагревается. Не прикасайтесь к нагревательным элементам
внутри прибора. Помещая в прибор или извлекая из него
посуду или аксессуары, всегда используйте кухонные
рукавицы.
ВНИМАНИЕ: Не нагревайте жидкости и другие продукты в
герметичных контейнерах. Они могут взорваться.
Используйте только ту посуду, которая подходит для ис
пользования в микроволновой печи
При нагреве продуктов в пластиковых или бумажных
контейнерах не оставляйте прибор без присмотра: может
произойти возгорание.
Прибор предназначен для нагревания продуктов и напитков.
Подсушивание продуктов, сушка одежды, разогрев грелок,
шлепанцев, губок, влажной одежды и т.п. несет в себе риск
травм, возгорания или пожара.
Предостережение! Запрещается пользоваться печью, если:
- Дверца не закрыта должным образом;
- Петли дверцы повреждены;
- Контактная поверхность между дверцей и передней частью
печи повреждена;
- Смотровое стекло дверцы повреждено;
- Внутри микроволновой печи часто возникает электрическая
дуга при отсутствии каких-либо металлических предметов.

43
RU
Сведения по технике безопасности
Печь может быть вновь использована только после того, как
ее ремонт будет выполнен специалистом Службы
технической поддержки.
При появлении дыма выключите прибор или извлеките вилку
сетевого шнура из розетки и не открывайте дверцу, чтобы не
допустить приток воздуха к источнику возгорания.
Разогревание в микроволновой печи напитков может приве
сти к задержанному бурному вскипанию. Следует проявлять
осторожность при извлечении контейнера.
Содержимое бутылочек и баночек с детским питанием
необходимо перемешать или взболтать и проверить
температуру перед употреблением, чтобы избежать ожогов.
Не следует нагревать в приборе как яйца в скорлупе, так и
яйца, сваренные вкрутую, так как они могут взорваться даже
после завершения нагрева при помощи СВЧ.
УСТАНОВКА
В электропроводке необходимо предусмотреть специальное
устройство, позволяющее отключать прибор от сети по всем
полюсам на ширину размыкания.
контактов не менее 3 мм. Подходящими устройствами для
этой цели считаются, например, выключатель линейных
предохранителей, предохранители (винтовые необходимо
выкручивать из гнезд), частотно импульсные выключатели и
контакторы.
Установленные устройства должны обеспечивать защиту от
случайного прикосновения к электропроводникам.
Очистка
Прибор следует регулярно чистить, а также удалять из него
какие бы то ни было остатки продуктов.
Если не поддерживать прибор в чистом состоянии, это может
привести к повреждению его поверхности, что, в свою
очередь, может неблагоприятно повлиять на срок службы

44
RU
Сведения по технике безопасности
прибора и даже привести к несчастному случаю.
Не используйте жесткие абразивные чистящие средства или
острые металлические скребки для чистки стеклянной
дверцы, так как ими можно поцарапать его поверхность, в
результате чего стекло может лопнуть.
Не используйте пароочистители для очистки прибора.
Контактные поверхности дверцы (передняя часть внутренней
камеры и внутренняя сторона дверцы) должны содержаться
в чистоте, чтобы обеспечить правильную работу печи
Пожалуйста, следуйте инструкциям по очистке, приведенным
в разделе "Очистка и техническое обслуживание
микроволновой печи".
Ремонт
ВНИМАНИЕ: Перед выполнением операций по очистке и
уходу отключите прибор от сети электропитания.
ВНИМАНИЕ: Все операции по обслуживанию и ремонту
прибора, в ходе которых требуется снятие кожуха,
защищающего от микроволнового излучения, должны
выполняться только квалифицированным специалистом.
ВНИМАНИЕ: Если дверца или дверное уплотнение
повреждено, прибором пользоваться нельзя, пока он не
будет отремонтирован квалифицированным специалистом."
В случае повреждения шнура питания во избежание
несчастного случая он должен быть заменен изготовителем,
авторизованным сервисным центром или специалистом с
равнозначной квалификацией.
Ремонт и техническое обслуживание, особенно токоведущих
частей, могут быть выполнены только специалистом,
уполномоченным изготовителем печи.

45
RU
Указания по безопасности
Редостережение! Запрещается нагревать
чистый спирт или алкогольные напитки в
микроволновой печи. ОПАСНОСТЬ
ВОЗГОРАНИЯ!
Осторожно! Во избежание перегрева или
сгорания пищи очень важно, чтобы не были
выбраны длительные периоды времени
работы или уровень мощности, которые
являются чрезмерными для нагрева
небольшого количества пищи. Например,
булочка может сгореть через 3 минуты, если
выбрана слишком большая мощность.
Для приготовления тостов используйте только
функцию Гриль, и все время держите печь под
присмотром. Если вы будете использовать
комбинированную функцию для поджаривания
хлеба, тосты очень быстро загорятся.
Следите, чтобы силовые кабели и другие
электроприборы не касались горячей дверцы
или не попадали в печь. Изоляция кабеля
может расплавиться. Опасность короткого
замыкания!
Соблюдайте осторожность при нагревании
жидкостей!
Жидкости (вода, кофе, чай, молоко и т.д.)
практически достигают температуры
кипения в печи; если в этот момент их
сразу вынуть из печи, они могут
выплеснуться из контейнеров. ОПАСНОСТИ
ТРАВМ И ОЖОГОВ!
Чтобы избежать подобной ситуации при
нагреве жидкостей, поместите чайную ложку
или стеклянную палочку внутрь контейнера.
Во избежание повреждения печи или
возникновения других опасных ситуаций,
следуйте этим инструкциям:
Никогда не включайте микроволновую
печь, когда она пустая. Если внутри печи
нет никакой пищи, может возникнуть
избыточный электрический заряд, и печь
может быть повреждена. ОПАСНОСТЬ
ПОВРЕЖДЕНИЯ ПРИБОРА!
Для тестирования программ печи
поместите стакан воды внутрь печи. Вода
поглощает микроволны, и печь не будет
повреждена.
Запрещается закрывать или загораживать
вентиляционные отверстия.
Используйте только посуду, подходящую
для использования в микроволновой печи.
Перед использованием посуды и
контейнеров в микроволновой печи,
убедитесь, что они подходят для этого (см.
раздел о типах посуды).
Никогда не снимайте слюды крышку на
потолке духового шкафа! Это покрытие
останавливается жир и кусочки пищи
повреждения микроволновый генератор.
Не храните легковоспламеняющиеся
объекты внутри печи, так как они могут
загореться при включении печи.
Не используйте печь для хранения
продуктов.
Не используйте печь для жарки, поскольку
невозможно контролировать температуру
масла при нагреве его микроволнами."
Не наклоняйтесь и не садитесь на
открытую дверцу духового шкафа. Это
может привести к повреждению печи,
особенно в зоне шарнира. Дверь может
иметь максимальный вес 8 кг.
Керамическое основание во внутренней
камере может нести максимальную
нагрузку 8 кг. Чтобы не повредить печь, не
следует превышать такую нагрузку".

46
RU
Преимущества микроволновой печи
В обычной плите тепло, которое излучается
через конфорки или газовые горелки,
медленно проникает снаружи внутрь пищи.
Вследствие этого, существует большая потеря
энергии за счет нагревания воздуха,
компонентов духовки и контейнеров, в которых
находится пища.
В микроволновой печи тепло генерируется
самими продуктами, то есть тепло идет
изнутри пищи наружу. В данном случае не
происходит потери тепла за счет нагревания
воздуха, стенок внутренней камеры
микроволновой печи, тарелок или контейнеров
(при условии, что используется безопасная
для использования в микроволновых печах
посуда). Другими словами это означает, что
нагревается только пища.
Микроволновые печи имеют следующие
преимущества:
1. Общая экономия времени приготовления
- уменьшение времени готовки на 3/4 по
сравнению с обычной готовкой.
2. Сверхбыстрая разморозка продуктов,
снижающая тем самым опасность
размножения бактерий.
3. Энергосбережение.
4. Сохранение пищевой ценности продуктов
из-за сокращения времени
приготовления.
5. Легкая очистка.
Как работает микроволновая печь
Микроволновая печь содержит клапан
высокого напряжения, который называется
магнетрон, преобразующий электрическую
энергию в энергию микроволн. Эти
электромагнитные волны направляются внутрь
духовки с помощью волновода и
распространяются при помощи металлических
рассеивателей или керамического основания.
Внутри микроволновой печи микроволны
распространяются во всех направлениях и
отражаются металлическими стенками, тем
самым равномерно проникая в пищу.
Почему еда нагревается
Большинство продуктов содержат воду, и
молекулы воды начинают вибрировать под
воздействием микроволн.
Трение между молекулами способствует
выделению тепла, которое повышает температуру
продуктов, что позволяет разморозить, приготовить
или сохранить их горячими.
Поскольку тепло образуется внутри продуктов:
Пища может быть приготовлена без каких-
либо жидкостей или жиров/масел, либо с
помощью очень небольшого их количества;
Разморозка, разогрев или приготовление
пищи в микроволновой печи происходит
быстрее, чем в обычной духовке;
В продуктах сохраняются витамины,
минералы и питательные вещества;
Естественный цвет и запах продуктов не
меняются.
Микроволны проходят сквозь фарфор, стекло,
картон или пластик, но не через металл. По
этой причине в микроволновой печи нельзя
использовать металлические контейнеры или
контейнеры с металлическими частями.
Микроволны отражаются от металла...
... но проходят через стекло и фарфор...
... и поглощаются продуктами.

47
RU
Описание микроволновой печи
1. – Индикаторы режима
4a. – Индикаторы мощности/веса
2. – Сенсор выбора функции/режима
5. – Сенсор выбора часов/таймера
3. – Сенсор выбора температуры
5a. – Индикаторы часов/таймера
3a.- Индикатор температуры
6. – Сенсоры Старт и Стоп / Защитная блокировка
4. – Сенсор выбора мощности/веса
23:15
1
2
6
5
4
3
800
160
3a
4a
5a
1. Панель управления
6. Привод поворотного стола
2. Стекло окошка дверцы
7. Роликовая подставка поворотного стола
3. Боковые направляющие
8. Тарелка поворотного стола
4. Шарниры
9. теклянный противень
5. Выпуск горячего воздуха
10. Прямоугольная решетка
11. Блюдо для хрустящей корочки

48
RU
Описание функций
Символ
Режим
Мощность
микроволн
Продукты
Микроволны
200 Вт
Медленное размораживание нежных продуктов, поддержание
блюда горячим
400 Вт
Приготовление на низкой температуре; приготовление риса
Быстрое размораживание, подогрев детского питания
600 Вт
Подогрев и приготовление продуктов
800 Вт
Приготовление овощей и другой пищи
Медленное приготовление и подогрев
Подогрев и приготовление небольших порций продуктов
1000 Вт
Быстрый нагрев жидкостей
Микроволны +
гриль
200 Вт
Обжаривание
400 Вт
Приготовление птицы и мяса на гриле
600 Вт
Выпекание пирогов и приготовление блюд под сыром
Гриль
Приготовление блюд на гриле
Гриль +
вентилятор
---
Приготовление мяса и рыбы на гриле
Приготовление птицы на гриле
Картофель глубокой заморозки – размораживание и
зажаривание
Горячий воздух
---
Зажаривание и выпекание
Микроволны +
горячий воздух
200-600 Вт
Быстрое зажаривание мяса, рыбы и птицы

49
RU
Основные функции и режимы
Установка часов
После первого подключения к электросети или
после отключения электроэнергии, индикация
часов начнет мигать, показывая, что
установлено неправильное текущее время.
Чтобы выставить часы, выполните следующее:
1. Прикоснитесь к сенсору Часы. Цифры,
показывающие часы, начнут мигать.
2. Прикасаясь к сенсорам «-» и «+»,
установите часы.
3. Снова прикоснитесь к сенсору Часы, чтобы
установить минуты. Цифры, показывающие
минуты, начнут мигать.
4. Прикасаясь к сенсорам «-» и «+»,
установите минуты.
5. Чтобы завершить процесс установки,
снова прикоснитесь к сенсору Часы.
Скрыть/показать часы
Если вы не хотите, чтобы часы отображались
на дисплее, вы можете их спрятать,
прикоснувшись и в течение 3 секунд
удерживая сенсор Часы. Точки, разделяющие
часы и минуты, будут мигать, но времени не
будет видно.
Чтобы снова вывести часы на дисплей,
прикоснитесь и в течение 3 секунд
удерживайте сенсор Часы.
Блокировка в целях безопасности
Работу печи можно заблокировать (например,
для предотвращения использования детьми).
1. Чтобы включить блокировку, прикоснитесь
и в течение 3 секунд удерживайте сенсор
Стоп. Раздастся звуковой сигнал и на
дисплее появится надпись SAFE. Печь
заблокирована, в этом состоянии вы не
можете ею пользоваться.
Чтобы разблокировать печь, снова
прикоснитесь и в течение 3 секунд
удерживайте сенсор Стоп. Раздастся звуковой
сигнал, и на дисплее высветится текущее
время.

50
RU
Основные функции и режимы
Остановка вращающегося подноса
1. Чтобы остановить вращающегося подноса,
нажмите «+» ключ и “Stop” ключ в то же время.
2.Чтобы начало вращающегося подноса,
нажмите снова «+» ключ и “Stop” ключ в то же
время.

51
RU
Основные функции и режимы
Микроволны
Используйте данный режим для приготовления и подогрева овощей, картофеля, риса, рыбы и
мяса.
1. Прикоснитесь к сенсору режима
Микроволны. Выбранный сенсор загорится.
2. Прикоснитесь к сенсору Выбор мощности
для изменения мощности микроволн.
Начнет мигать соответствующий индикатор.
Если вы не прикоснетесь к сенсору, печь
будет автоматически работать при
мощности 800 Вт.
3. Измените мощность микроволн с помощью
сенсоров «-» и «+».
4. Прикоснитесь к сенсору Выбор таймера
для изменения продолжительности
приготовления. Начнет мигать
соответствующий индикатор.
5. Измените продолжительность
приготовления с помощью сенсоров «-» и
«+» (напр., 1 минута).
6. Прикоснитесь к сенсору Старт. Печь начнет
работать.
ПРИМЕЧАНИЕ: При установленной
мощности 1000 Вт продолжительность
приготовления ограничено 15 минутами.
Микроволны – Быстрый старт
Используйте данный режим для быстрого подогрева продуктов и блюд с высоким содержанием
влаги, таких как вода, чай, кофе, жидкие супы.
Прикоснитесь к сенсору Старт. Печь начнет
работать в режиме «Микроволны» на
максимальной мощности в течение 30 секунд.
2. Если вы хотите увеличить
продолжительность приготовления, снова
прикоснитесь к сенсору Старт.
Каждое прикосновение увеличивает
продолжительность приготовления на 30
секунд.
ПРИМЕЧАНИЕ: При установленной
мощности 1000 Вт продолжительность
приготовления ограничено 15 минутами.
00:30
1000
1,2

52
RU
Основные функции и режимы
Гриль
Используйте данный режим для подрумянивания верха блюда.
1. Прикоснитесь к сенсору режима Гриль.
Выбранный сенсор загорится.
2. Прикоснитесь к сенсору Выбор таймера
для изменения продолжительности
приготовления. Начнет мигать
соответствующий индикатор.
3. Измените продолжительность
приготовления с помощью сенсоров «-» и «+»
(напр., 15 минут).
4. Прикоснитесь к сенсору Старт. Печь начнет
работать.
Микроволны + гриль
Используйте данный режим для приготовления лазаньи, птицы, запекания картофеля и
обжаривания продуктов.
1. Прикоснитесь к сенсору режима
Микроволны + гриль. Выбранный сенсор
загорится.
2. Прикоснитесь к сенсору Выбор мощности
для изменения мощности микроволн. Начнет
мигать соответствующий индикатор. Если вы
не прикоснетесь к сенсору, печь будет
автоматически работать при мощности 600
Вт.
3. Измените мощность микроволн с помощью
сенсоров «-» и «+».
4. Прикоснитесь к сенсору Выбор таймера
для изменения продолжительности
приготовления. Начнет мигать
соответствующий индикатор.
5. Измените продолжительность
приготовления с помощью сенсоров «-» и «+»
(напр., 10 минут).
6. Прикоснитесь к сенсору Старт. Печь начнет
работать.
Примечание: В комбинированном режиме
мощность микроволн ограничена на 600 Вт.

53
RU
Основные функции и режимы
Горячий воздух
Используйте данную функцию для запекания пищи.
1. Прикоснитесь к сенсору режима Горячий
воздух. Выбранный сенсор загорится.
2. Прикоснитесь Сенсор выбора температуры
для изменения температуры Начнет мигать
соответствующий индикатор. Если вы не
прикоснетесь к сенсору, печь будет
автоматически работать при мощности 160 ºC.
3. Измените температура с помощью сенсоров
«-» и «+».
4. Прикоснитесь к сенсору Выбор таймера
для изменения продолжительности
приготовления. Начнет мигать
соответствующий индикатор.
5. Измените продолжительность
приготовления с помощью сенсоров «-» и «+»
(напр., 12 минут).
6. Прикоснитесь к сенсору Старт. Печь
начнет работать.
Микроволны + Горячий воздух
Используйте данную функцию для быстрого запекания пищи.
1. Прикоснитесь к сенсору режима
Микроволны + Горячий воздух.
Выбранный сенсор загорится.
2. Прикоснитесь к сенсору выбора
температурыдля изменения температура.
Начнет мигать соответствующий
индикатор. Если вы не прикоснетесь к
сенсору, печь будет автоматически
работать при температура 160°C.
3. Измените мощность микроволн с
помощью сенсоров «-» и «+».
4. Прикоснитесь к сенсору выбора мощности
для изменения мощности. Начнет мигать
соответствующий индикатор. Если вы не
прикоснетесь к сенсору, печь будет
автоматически работать при 400 Вт.
5.Измените температура с помощью
сенсоров «-» и «+».
6.Прикоснитесь к сенсору Выбор таймера
для изменения продолжительности
приготовления. Начнет мигать
соответствующий индикатор.
7.Измените продолжительность
приготовления с помощью сенсоров «-» и
«+» (напр., 12 минут).
8. Прикоснитесь к сенсору Старт. Печь
начнет работать.
Примечание: В комбинированном режиме
мощность микроволн ограничена на 600 Вт.
20:00
160
4
1
3,5
6
2
20:00
400
160
6
4
1
3,5,7
8
2

54
RU
Основные функции и режимы
Гриль + Вентилятор
Используйте данную функцию для равномерного запекания пищи и одновременного
подрумянивания ее поверхности.
Прикоснитесь к сенсору режима Гриль с
вентилятором. Выбранный сенсор
загорится.
2. Прикоснитесь к сенсору Выбор
температуры для изменения температуры.
Начнет мигать соответствующий индикатор.
Если вы не прикоснетесь к сенсору, печь
будет автоматически работать при 160°C.
3. Измените температуру с помощью сенсоров
«-» и «+».
4. Прикоснитесь к сенсору Выбор таймера
для изменения продолжительности
приготовления. Начнет мигать
соответствующий индикатор.
5. Измените продолжительность
приготовления с помощью сенсоров «-» и
«+» (напр., 12 минут).
6. Прикоснитесь к сенсору Старт. Печь
начнет работать.
Размораживание по времени (ручной режим)
Используйте данный режим для быстрого размораживания различных видов продуктов.
1. Прикоснитесь к сенсору режима
Размораживание по времени. Выбранный
сенсор загорится.
2. Прикоснитесь к сенсору Выбор таймера
для изменения продолжительности
размораживания. Начнет мигать
соответствующий индикатор.
3. Измените продолжительность размо-
раживания с помощью сенсоров «-» и «+»
(напр., 10 минут).
4. Прикоснитесь к сенсору Старт. Печь
начнет работать
20:00
160
4
1
3,5
6
2

55
RU
Основные функции и режимы
Размораживание по весу (автоматический режим)
Используйте данный режим для быстрого размораживания мяса, птицы, рыбы, фруктов и
хлеба.
1. Прикоснитесь к сенсору режима
Размораживание по весу. Выбранный
сенсор загорится.
2. Прикоснитесь к сенсору Тип продукта
для изменения типа продукта. Начнут
мигать соответствующие индикаторы.
3. Выберите программу с помощью
сенсоров «-» и «+», например, «Pr 01»
(см. таблицу ниже).
4. Прикоснитесь к сенсору Выбор веса для
установки веса продукта. Начнет мигать
соответствующий индикатор.
5. Установите вес с помощью сенсоров «-» и
«+».
6. Прикоснитесь к сенсору Старт. Печь
начнет работать.
Примечание: Переворачивайте продукты,
когда печь оповещает вас коротким
звуковым сигналом и на дисплее
высвечивается .
В таблице программ режима «Размораживание по весу» приведены пределы веса продуктов,
время размораживания и время, на которое следует оставить продукт постоять, чтобы он
приобрел равномерную температуру.
Программа
Продукт
Вес, г
Время, мин.
Время выдержки, мин.
Pr 01
Мясо
100 – 2000
2 – 43
20 – 30
Pr 02
Птица
100 – 2500
2 – 58
20 – 30
Pr 03
Рыба
100 – 2000
2 – 40
20 – 30
Pr 04
Фрукты
100 – 500
2 – 13
10 – 20
Pr 05
Хлеб
100 – 800
2 – 19
10 – 20
Внимание! См. также раздел «Основные рекомендации по размораживанию».

56
RU
Автоматические режимы
Автоматический режим P1: Приготовление
Используйте данный режим для приготовления свежих продуктов.
1. Прикоснитесь к сенсору
Автоматический режим P1. Выбранный
сенсор загорится.
2. Прикоснитесь к сенсору Тип продукта
для изменения типа продукта. Начнут
мигать соответствующие индикаторы.
3. Выберите программу с помощью
сенсоров «-» и «+», например, «А 01»
(см. таблицу ниже).
4. Прикоснитесь к сенсору Выбор веса для
установки веса продукта. Начнет мигать
соответствующий индикатор.
5. Установите вес с помощью сенсоров «-»
и «+».
6. Прикоснитесь к сенсору Старт. Печь
начнет работать.
В таблице программ режима «Автоматический режим A» приведены пределы веса продуктов,
время приготовления и время, на которое следует оставить продукт постоять, чтобы он приобрел
равномерную температуру.
Программа
Продукт
Вес, г
Время, мин.
Время выдержки, мин.
A 01
Суп
200-1500
3-15
Перемешать 1-2 раза, подогревать под
крышкой, 1-2 мин.
A 02
Готовые блюда
плотные
продукты
200-1500
3-20
Перевернуть 1-2 раза, подогревать под
крышкой, 1-2 мин.
A 03
Готовые блюда
напр., гуляш
200-1500
3-18
Перемешать 1-2 раза, подогревать под
крышкой, 1-2 мин.
A 04
Овощи
200-500
2,6-14
Перемешать 1-2 раза, подогревать под
крышкой, 1-2 мин.
Внимание!
Используйте посуду, пригодную для
микроволновых печей, и всегда
накрывайте крышкой во избежание
потери влаги.
Несколько раз во время подогрева
перемешайте или подвигайте продукты.
Время необходимое для разогрева
зависит от изначальной температуры
продукта. Для продукта комнатной
температуры необходимо меньшее
время, чем для продукта только что
взятого из холодильника. Если при
подогреве не была достигнута желаемая
температура, в следующий раз
установите соответственно больший или
меньший вес продукта.
После подогрева подвигайте продукт или
встряхните посуду и дайте ему постоять
некоторое время, чтобы тепло
равномерно распределилось внутри
продукта.
Предупреждение! После разогрева посуда
может быть очень горячей. Большинство
посуды не нагревается микроволнами, но она
нагревается от тепла, генерируемого в
продуктах.

57
RU
Автоматические режимы
Автоматический режим P2: Приготовление
Используйте данный режим для приготовления свежих продуктов.
1. Прикоснитесь к сенсору Автоматический
режим P2. Выбранный сенсор загорится.
2. Прикоснитесь к сенсору Тип продукта для
изменения типа продукта. Начнут мигать
соответствующие индикаторы.
3. Выберите программу с помощью сенсоров
«-» и «+», например, «b 01» (см. таблицу
ниже).
4. Прикоснитесь к сенсору Выбор веса для
установки веса продукта. Начнет мигать
соответствующий индикатор.
5. Установите вес с помощью сенсоров «-» и
«+».
6. Прикоснитесь к сенсору Старт. Печь
начнет работать.
В таблице программ режима «Автоматический режим B» приведены пределы веса продуктов,
время приготовления и время, на которое следует оставить продукт постоять, чтобы он приобрел
равномерную температуру.
Программа
Продукт
Вес, г
Время, мин.
Примечание
b 01
Картофель
200-1000
4-17
Перевернуть 1-2 раза, готовить под крышкой
b 02
Овощи
200-1000
4-15
Перемешать 1-2 раза, готовить под крышкой
b 03
Рис
200-500
13-20
Одна часть риса, две части воды, готовить под крышкой
b 04
Рыба
200-1000
4-13
Готовить под крышкой
Bнимание!
Используйте посуду, пригодную для
микроволновых печей, и всегда
накрывайте крышкой во избежание
потери влаги.
Несколько раз во время разогрева
перемешайте или подвигайте продукты.
Предупреждение! После разогрева посуда
может быть очень горячей. Большинство
посуды не нагревается микроволнами, но она
нагревается от тепла, генерируемого в
продуктах.
Рекомендации по приготовлению
Куски рыбы – Добавьте 1-3 столовые
ложки воды или лимонного сока.
Рис – Добавьте в 2-3 раза больше воды,
чем риса.
Картофель в мундире – Выберите
одинаковый по размеру картофель.
Вымойте его и наколите кожуру в
нескольких местах. Не добавляйте воды.
Очищенный картофель и свежие овощи
– Нарежьте на одинаковые по размеру
кусочки. На каждые 100 г овощей
добавьте 1 столовую ложку воды и
посолите по вкусу.
b 01
200
2
4
1
3,5
6

58
RU
Автоматические режимы
Автоматический режим P3: Размораживание и обжаривание
Используйте данный режим для приготовления и обжаривания различных видов продуктов.
1. Прикоснитесь к сенсору Автоматический
режим P3. Выбранный сенсор загорится.
2. Прикоснитесь к сенсору Тип продукта для
изменения типа продукта. Начнут мигать
соответствующие индикаторы.
3. Выберите программу с помощью сенсоров
«-» и «+», например, «С 01» (см. таблицу
ниже).
4. Прикоснитесь к сенсору Выбор веса для
установки веса продукта. Начнет мигать
соответствующий индикатор.
5. Установите вес с помощью сенсоров «-» и
«+».
6. Прикоснитесь к сенсору Старт. Печь начнет
работать.
В таблице программ режима «Автоматический режим C» приведены пределы веса продуктов,
время размораживания/приготовления и время, на которое следует оставить продукт постоять,
чтобы он приобрел равномерную температуру.
Программа
Продукт
Вес, г
Время, мин.
Примечание
C 01
Пицца
300 – 550
8 – 12
стойка
C 02
Продукты и блюда
глубокой заморозки
350 – 500
8 – 14
Перевернуть 1 время,
готовить под крышкой
C 03
Блюда из картофеля, замороженные
200 – 450
10 – 12
стеклянная пластина
Внимание!
Используйте посуду, пригодную для
микроволновых печей, и всегда
накрывайте крышкой во избежание
потери влаги.
Предупреждение! После разогрева посуда
может быть очень горячей. Большинство
посуды не нагревается микроволнами, но она
нагревается от тепла, генерируемого в
продуктах.
Рекомендации по приготовлению
Замороженная пицца – Используйте
готовую замороженную пиццу.
Продукты и блюда глубокой заморозки –
Используйте лазанью, каннеллони,
суфле из креветок и другие
замороженные продукты и блюда.
Готовьте под крышкой.
Блюда из картофеля, замороженные –
Чипсы, картофельные крокеты и
картофель фри подходят для
приготовления в печи.

59
RU
Использование блюда для хрустящей корочки
Обычно при приготовлении таких блюд, как
пицца или пироги, на гриле или в
микроволновой печи тесто становится мокрым.
Этого можно избежать с помощью блюда для
хрустящей корочки. Дно блюда быстро
разогревается, обеспечивая румяную
хрустящую корочку.
Блюдо для хрустящей корочки также можно
использовать для приготовления бекона, яиц,
сосисок и т.д.
ОЧЕНЬ ВАЖНЫЕ ПРИМЕЧАНИЯ:
Всегда используйте варежки-прихватки, так
как блюдо для хрустящей корочки
становится очень горячим.
Никогда не помещайте блюдо для
хрустящей корочки в печь без стеклянной
тарелки.
Не ставьте на блюдо для хрустящей
корочки никакие предметы, которые не
являются термостойкими (например,
пластиковые миски).
Как готовить с использованием блюда для
хрустящей корочки:
1. Разогрейте блюдо для хрустящей
корочки, выбрав функцию Микроволны +
Гриль длительностью от 3 до 5 минут при
мощности микроволн 600 Вт.
2. Смажьте блюдо для хрустящей корочки
растительным маслом, чтобы пища
хорошо подрумянилась.
3. Поместите свежие или замороженные
продукты непосредственно на блюдо для
хрустящей корочки.
4. Поместите на блюдо для хрустящей
корочки на вращающееся стекло в
микроволновой печи.
5. Выберите функцию Микроволны + Гриль
и время готовке согласно указанному
ниже.
ОЧЕНЬ ВАЖНЫЕ ПРИМЕЧАНИЯ:
Так как на блюдо для хрустящей корочки
покрыто слоем тефлона, если Вы будете
использовать его неправильно, оно может
быть повреждено.
Запрещается резать пищу на блюде.
Уберите пищу с блюда перед тем как
нарезать ее.
Очистка:
Лучший способ очистить на блюдо для
хрустящей корочки - это вымыть его горячей
водой и моющим средством, а затем
ополоснуть чистой водой. Не используйте
щетку или жесткую губку, в противном случае
верхний слой будет поврежден.
Пища
Вес
Время
готовки
Время
выдерживания
Рекомендации
Пицца
200 г
4 - 5 мин
---
Если пицца тонкая.
Если пицца толстая, увеличьте
время на 1 – 2 минуты
300 г
5 - 6 мин
---
400 г
7 – 8 мин
---
Заварные
пирожки и
пироги
200 г
3 – 4 мин
2 – 3 мин
300 г
5 - 6 мин
2 – 3 мин
Гамбургеры
150 - 200 г
8 - 10 мин
5 – 8 мин
Перевернуть 2 раза.
Хрустящий
картофель
400 г
6 -8 мин
---
Перевернуть 1 раз.

60
RU
Во время работы печи...
Пауза
Вы можете в любой момент остановить
процесс приготовления, один раз
прикоснувшись к сенсору Стоп или открыв
дверцу печи.
В обоих случаях:
Немедленно прекращается излучение
микроволн.
Нагревательный элемент гриля перестает
работать, но остается горячим.
Опасность ожога!
Таймер останавливается, на дисплее
высвечивается время, оставшееся до
конца приготовления.
Теперь вы можете:
1. Перевернуть или подвигать продукты,
чтобы обеспечить их равномерное
приготовление.
2. Изменить параметры приготовления.
3. Отменить приготовление, прикоснувшись
к Стоп.
Чтобы возобновить процесс приготовления,
закройте дверцу печи и прикоснитесь к Старт.
Изменение параметров
Параметры приготовления (продолжите-
льность, вес, мощность…) могут быть
изменены только после прерывания процесса
приготовления пищи следующим образом:
1. С помощью сенсоров «-» и «+» измените
продолжительность приготовления.
Новое установленное значение начинает
действовать сразу.
2. Чтобы изменить мощность, прикоснитесь
к сенсору Выбор мощности. Дисплей и
соответствующий индикатор начнут
мигать. Измените мощность с помощью
сенсоров «-» и «+» и подтвердите ввод
повторным прикосновением к сенсору
Выбор мощности.
Отмена приготовления
Если вы хотите отменить приготовление,
прикоснитесь и в течение 3 секунд
удерживайте сенсор Стоп.
Раздастся короткий звуковой сигнал, и на
дисплее высветится текущее время.
Окончание приготовления Ende
После окончания приготовления раздастся три
коротких звуковых сигнала, и на дисплее
высветится слово End.
Звуковые сигналы повторяются каждые 30
секунд, пока вы не откроете дверцу печи или
не прикоснетесь к Стоп.

61
RU
Размораживание
В таблице ниже приведено время
размораживания и последующей выдержки
(для равномерного оттаивания) в зависимости
от типа и веса продуктов, а также даны
рекомендации.
Продукт
Вес, г
Время размораживания,
мин.
Время выдержки,
мин.
Рекомендации
Порционное мясо,
телятина, говядина,
свинина
100
2-3
5-10
Перевернуть 1 раз
200
4-5
5-10
Перевернуть 1 раз
500
10-12
10-15
Перевернуть 2 раза
1000
21-23
20-30
Перевернуть 2 раза
1500
32-34
20-30
Перевернуть 2 раза
2000
43-45
25-35
Перевернуть 3 раза
Гуляш
500
8-10
10-15
Перевернуть 2 раза
1000
17-19
20-30
Перевернуть 3 раза
Фарш
100
2-4
10-15
Перевернуть 1 раз
500
10-14
20-30
Перевернуть 2 раза
Сосиски
200
4-6
10-15
Перевернуть 1 раз
500
9-12
15-20
Перевернуть 2 раза
Порционная птица
250
5-6
5-10
Перевернуть 1 раз
Цыпленок
1000
20-24
20-30
Перевернуть 2 раза
Жирная курица
2500
38-42
25-35
Перевернуть 3 раза
Филе рыбы
200
4-5
5-10
Перевернуть 1 раз
Форель
250
5-6
5-10
Перевернуть 1 раз
Креветки
100
2-3
5-10
Перевернуть 1 раз
500
8-11
10-20
Перевернуть 2 раза
Фрукты
200
4-5
5-10
Перевернуть 1 раз
300
8-9
5-10
Перевернуть 1 раз
500
11-14
10-20
Перевернуть 2 раза
Хлеб
200
4-5
5-10
Перевернуть 1 раз
500
10-12
10-15
Перевернуть 1 раз
800
15-17
10-20
Перевернуть 2 раза
Сливочное масло
250
8-10
10-15
Сливочный сыр
250
6-8
10-15
Сливки
250
7-8
10-15

62
RU
Размораживание
Основные рекомендации по
размораживанию
1. При размораживании используйте посуду,
пригодную для микроволновых печей
(фарфор, стекло, подходящий пластик).
2. Режим «Размораживание по весу» и
соответствующие таблицы относятся к
размораживанию сырых продуктов.
3. Время размораживания зависит от
количества и размера продуктов. Постоянно
следите за процессом. Равномерно
распределите продукт в емкости.
4. По возможности равномерно распределите
продукт внутри печи. Толстую часть рыбы и
ножки курицы расположите ближе к краям
емкости. Наиболее нежные участки продукта
можно защитить, накрыв их кусочками
алюминиевой фольги. Важно: следите,
чтобы фольга не соприкасалась с
внутренними поверхностями печи, в
противном случае может возникнуть
электрический дуговой разряд.
5. Крупные куски в процессе размораживания
переверните несколько раз.
6. Распределяйте продукт как можно
равномернее: тонкие и узкие куски
оттаивают быстрее, чем толстые и широкие.
7. Жирные продукты, такие как сливочное
масло, сливочный сыр и сливки,
предпочтительнее размораживать не до
конца. Если им дать постоять при комнатной
температуре, они будут готовы к
употреблению через несколько минут. Если
в сильно замороженных сливках после
оттаивания вы обнаружили кусочки льда,
перед подачей перемешайте сливки.
8. Птицу кладите на перевернутую тарелку,
чтобы легче стекал сок.
9. Заверните хлеб в полотенце, чтобы он не
пересушился.
10. Включите пищу через регулярные
промежутки времени.
11. Выньте замороженные продукты из упаковки
и убедитесь, что не осталось никаких
металлических предметов (например,
скрепок). Емкости с продуктами из
морозильника, подходящие для
приготовления в микроволновой печи,
поставьте в печь и снимите крышку. В
любом другом случае перекладывайте
продукты в емкости, пригодные для
микроволновых печей.
12. Жидкость, образующуюся при оттаивании
продуктов, особенно от птицы, выливайте.
Ни в коем случае не допускайте попадания
этой жидкости на другие продукты.
13. Не забывайте, что после завершения
размораживания необходимо дать продукту
свободно постоять до полного оттаивания.

63
RU
Приготовление с помощью микроволн
Предупреждение! Перед приготовлением с
использованием микроволн внимательно
прочтите раздел «Меры безопасности».
Следуйте приведенным ниже рекомендациям
при приготовлении с использованием
микроволн:
При приготовлении или подогреве
проткните кожуру или кожицу
продуктов (таких как, яблоки, помидоры,
картофель, сосиски…), чтобы они не
лопнули. Крупные куски разрежьте на
мелкие.
Перед использованием емкости
проверьте, подходит ли она для
использования в микроволновой печи (см.
раздел «Подходящая посуда»).
При приготовлении продуктов с
небольшим содержанием влаги
(например, размораживание хлеба,
кукуруза для попкорна…) ее испарение
происходит очень быстро.
Микроволновая печь начинает работать
как пустая. В этом случае продукты могут
подгореть, а печь и емкость могут
повредиться. Поэтому точно
устанавливайте продолжительность
приготовления и постоянно следите за
процессом.
Запрещается нагревать большое
количество масла (фритюр) в
микроволновой печи.
Выньте готовые блюда из упаковки, так
как она не всегда подходит для
использования в микроволновой печи.
Далее следуйте указаниям
производителя блюда.
Если вы одновременно используете
несколько емкостей, например, чашки,
расставьте их на поворотном столе
равномерно.
Не закрывайте пластиковые упаковки
металлическими скрепками. Вместо них
пользуйтесь пластиковыми. Проткните
упаковку в нескольких местах для
обеспечения выхода пара.
Подогревая или готовя продукты,
убедитесь, что их температура достигла
не менее 70°С.
Во время приготовления пар может
конденсироваться на дверце печи и
начать капать. Это нормальное явление, более
характерное для помещений с низкой
температурой и при этом не влияющее на
безопасность функционирования печи. После
окончания приготовления протрите
образовавшийся на дверце конденсат.
При подогреве жидкостей пользуйтесь
сосудами с широким горлышком для
обеспечения свободного выхода пара.
Готовьте блюда в соответствии с инструкцией
и учитывайте рекомендуемые в таблице время
и уровень мощности.
Параметры приготовления блюд указаны
ориентировочно и зависят от состояния
продуктов, их температуры, влажности и типа.
Учитывая изначальные свойства продуктов,
уменьшайте или увеличивайте
продолжительность приготовления и уровень
мощности.
Приготовление с помощью микроволн...
1. Чем больше продуктов вы хотите
приготовить, тем больше времени вам
понадобиться. Помните:
двойное количество продуктов » двойное
время,
вдвое меньше продуктов » вдвое меньше
времени.
2. Чем ниже температура продукта, тем
больше времени потребуется на
приготовление.
3. Продукты с большим содержанием влаги
нагреваются быстрее.
4. Для получения успешного результата
равномерно распределяйте продукты на
поворотном столе. Уложив плотные куски
ближе к краю, а тонкие – ближе к центру, вы
можете готовить несколько видов продуктов
одновременно.
5. Вы можете открыть дверцу во время
приготовления пищи, и печь автоматически
выключится. Процесс приготовления
возобновится, как только вы закроете дверцу и
прикоснетесь к сенсору Старт.
6. Блюда, готовящиеся накрытыми, требуют
меньше времени для приготовления и лучше
сохраняют свои питательные свойства.
Крышки должны быть прозрачными для
микроволнового излучения и иметь небольшие
отверстия для выхода пара.

64
RU
Приготовление с помощью микроволн
Таблица и рекомендации – Приготовление овощей
Продукт
Количество, г
Количество
добавленной
жидкости,мл
Мощность,
Вт
Время,
мин.
Время
выдержки,
мин.
Рекомендации
Цветная капуста
Брокколи
Грибы
500
300
250
100
50
25
800
800
800
9-11
6-8
6-8
2-3
2-3
2-3
Нарезать тонкими
ломтиками.
Готовить под крышкой.
Перевернуть 1 раз.
Горошек с
морковкой
Замороженная
морковь
300
250
100
25
800
800
7-9
8-10
2-3
2-3
Нарезать крупными или
тонкими ломтиками.
Готовить под крышкой.
Перемешать 1 раз
Картофель
250
25
800
5-7
2-3
Очистить и нарезать на
кусочки одинакового
размера.
Готовить под крышкой.
Перевернуть 1 раз.
Перец
Порей
250
250
25
50
800
800
5-7
5-7
2-3
2-3
Нарезать крупными или
тонкими ломтиками.
Готовить под крышкой.
Перевернуть 1 раз.
Замороженная
брюссельская
капуста
300
50
800
6-8
2-3
Готовить под крышкой.
Перевернуть 1 раз.
Квашеная
капуста
250
25
800
8-10
2-3
Готовить под крышкой.
Перемешать 1 раз.
Таблицы и предложения – Готовка рыбы
Продукт
Количество, г
Мощность, Вт
Уровень
мощности
Время
выдержки, мин.
Рекомендации
Филе
рыбы
500
600
10-12
3
Готовьте под крышкой. Переверните
по прошествии половины времени
готовки.
Рыба
целиком
800
800
400
2-3
7-9
2-3
Готовьте под крышкой. Переверните
по прошествии половины времени
готовки. Может быть необходимо
накрыть концы рыбы.

65
RU
Cooking with the grill
нагреваться при гриль в использовании. Дети
должны находиться на расстоянии.
Для улучшения результата при приготовлении
на гриле металлическую используйте решетку,
поставляемую в комплекте с печью. Он должен
быть помещен на прямоугольный стеклянный
поднос двух возможных позиций, которые дают
различные высоты для гриля (показано на
рисунке ниже).
Установите решетку так, чтобы она не
касалась металлических поверхностей
камеры печи, в противном случае
существует опасность электрического
дугового разряда и повреждения печи.
ВАЖНЫЕ ПРИМЕЧАНИЯ!
1. Во время первого использования
микроволновой печи может появиться
запах и дым от масла, используемого в
процессе производства печи.
2. При приготовлении на гриле дверца печи
сильно нагревается. Не разрешайте
детям подходить близко к печи.
3. Во время работы гриля стенки камеры и
решетка сильно нагреваются.
Используйте кухонные перчатки.
4. Если гриль включен продолжительное
время, нагревательный элемент может
отключаться защитным термостатом.
5. Важно! Если вы собираетесь готовить в
емкости, в том числе на гриле, проверьте,
подходит ли эта емкость для
использования в микроволновой печи (см.
раздел «Подходящая посуда»).
6. Во время приготовления на гриле брызги
жира могут попадать на нагревательный
элемент и сгорать. Это не является
неисправностью и не влияет на
функционирование микроволновой печи.
7. После окончания приготовления
тщательно очистите внутренние
поверхности и аксессуары от остатков
пищи для предупреждения их пригорания.

66
RU
Приготовление на гриле
Таблица и рекомендации – Гриль
Продукт
Количество
Время, мин.
Рекомендации
Рыба
Морской окунь
Сардины/морской петух
800 г
6-8 шт.
18-24
15-20
Слегка натереть сливочным маслом. По
прошествии половины времени перевернуть
и посыпать приправами.
Мясо
Сосиски
6-8 шт.
22-26
По прошествии половины времени наколоть
и перевернуть.
Замороженный рубленый
бифштекс
3 шт.
18-20
По прошествии половины времени
наколоть.
Постные ребрышки
(толщиной около 3 см)
400 г
25-30
Натереть растительным маслом. По
прошествии половины времени полить
собравшимся жиром и перевернуть.
Остальное
Тосты
4 шт.
1½-3
Наблюдать за приготовлением.
Перевернуть.
Горячие сандвичи
2 шт.
5-10
Наблюдать за приготовлением.
Включите гриль за 2 минуты до начала
приготовления. Используйте металлическую
решетку, если нет других указаний. Установите
решетку на емкость для сбора капающего сока
и жира. Время, приведенное в таблице,
ориентировочное и зависит от состояния и
количества продуктов, а также от желаемого
результата. Мясо и рыба получатся вкуснее,
если их перед приготовлением натереть
растительным маслом, специями и травами и
оставить на несколько часов мариноваться.
Блюда солить после приготовления.
Сосиски не лопнут, если по прошествии
половины времени их наколоть вилкой.
По прошествии половины времени проверьте,
как идет процесс приготовления, и по
необходимости переверните продукты или
полейте маслом или жиром.
Гриль особенно хорош для поджаривания
тонких ломтиков мяса и рыбы. Тонкие кусочки
во время приготовления достаточно
перевернуть один раз, более толстые –
несколько раз. Если вы готовите рыбу,
сверните ее кольцом, положив хвост в рот, и в
таком виде положите рыбу на металлическую
решетку.

67
RU
Приготовление на гриле
Таблица и рекомендации – Микроволны + гриль
Режим «Микроволны + гриль» идеален для быстрого приготовления и одновременного
подрумянивания верха блюд. Поэтому в
данном режиме можно также готовить на гриле
или запекать блюда под сыром
(гратинировать).
Гриль и микроволны работают одновременно.
Микроволны готовят, а гриль зарумянивает
продукты.
Продукт
Количество,
г
Посуда
Мощность,
Вт
Время,
мин.
Время
выдержки,
мин.
Паста под сыром
500
низкая емкость
400
12-17
3-5
Картофель под сыром
800
низкая емкость
600
20-22
3-5
Лазанья
около 800
низкая емкость
600
15-20
3-5
Поджаренный сливочный
сыр
около 500
низкая емкость
400
18-20
3-5
2 свежих куриных бедра
(для приготовления на
гриле)
200 каждое
низкая емкость
400
10-15
3-5
Цыпленок
около 1000
низкая и широкая
емкость
400
35-40
3-5
Луковый суп под сыром
2 чашки 200 г
суповые чашки
400
2-4
3-5
Перед использованием посуды, убедитесь, что
она подходит для микроволн. Используйте
посуду и емкости, пригодные для
микроволновых печей.
Посуда, используемая в комбинированном
режиме, одновременно должна допускать ее
использование для гриля и являться
прозрачной для микроволн и (см. раздел
«Подходящая посуда»).
Помните, что параметры приготовления блюд
указаны ориентировочно и зависят от
состояния продуктов, их температуры,
влажности и типа.
Если блюдо не достаточно подрумянилось,
поставьте его под гриль еще на 5-10 минут.
Соблюдайте время выдержки и не забывайте
переворачивать мясо.
Для приготовления пользуйтесь тарелкой
поворотного стола, если нет других указаний.
Указанные в таблице значения действительны
для холодной перед началом приготовления
печи (нет необходимости предварительно
разогревать печь).

68
RU
Таблицы и советы – Обжаривание
Таблицы и рекомендации – Приготовление мяса и выпечки
Микроволны + конвекция
Продукт
Количество,
г
Мощность,
Вт
Температура,
ºC
Время,
мин.
Время
выдержки,
мин.
Рекомендации
Жаркое из
говядины
1000-1500
400
200
30-40
20
Не накрывать емкость
крышкой.
Перевернуть 1 раз
Свиное филе /
Отбивная на
или без кости
Жаркое из
свинины
800-1000
200
180-190
50-60
20
Не накрывать емкость
крышкой.
Перевернуть 1 раз
Цыпленок
(целиком)
1000/1200
400
200
30-40
10
Не накрывать емкость
крышкой.
Положите грудкой вниз.
Перевернуть 1 раз.
Половина
цыпленка
500-1000
400
200
25-35
10
Не накрывать емкость
крышкой.
Положите кожей вниз.
Перевернуть 1 раз.
Жаркое из
телячьего филе
1500/2000
200
180
60-65
20
Не накрывать емкость
крышкой.
Перевернуть 1-2 раза.
После переворачивания
не накрывать крышкой.
Говядина –
поясничная
часть
1500-1800
200
200
80-90
20
Не накрывать емкость
крышкой.
Перевернуть 1-2 раза
Microwave / Baking
Выпечка
Мощность,
Вт
Температура,
ºC
Время,
мин.
Время
выдержки,
мин.
Рекомендации
Шоколадно-
вишневый пирог
200
200
30
5-10
Поворотный стол, маленькая
решетка, разъемная форма Ø 28
см
Чизкейк с
фруктами
400
180
40-45
5-10
Поворотный стол, маленькая
решетка, разъемная форма Ø 28
см
Яблочный пирог
200
185
40-45
5-10
Поворотный стол, маленькая
решетка, разъемная форма Ø 28
см
Пирог со
сметаной и
фруктами
400
180
35-40
5-10
Поворотный стол, маленькая
решетка, разъемная форма Ø 28
см
Чизкейк с
посыпкой
400
180
40-50
5-10
Поворотный стол, маленькая
решетка, разъемная форма Ø 26
см

69
RU
Зажаривание и приготовление выпечки в микроволновой
печи
Рекомендации по зажариванию и
приготовлению выпечки
Куски мяса переворачивайте по прошествии
половины времени. После того как мясо
пожарилось, дайте ему постоять 20 минут в
выключенной и закрытой печи. Это поможет
сокам равномерно распределиться.
Необходимая температура и время для
зажаривания зависят от типа и количества
приготавливаемого мяса.
Если вес мяса, которое вы собираетесь
готовить, не указан в таблице, выберите
установку, следующую за необходимым вам
значением, и увеличьте продолжительность
приготовления.
Советы по использованию посуды
Убедитесь, что посуда, в которой вы
собираетесь готовить, подходит
микроволновой печи по размерам.
Вынимая из печи горячую стеклянную посуду,
ставьте ее на сухое кухонное полотенце – на
мокрой или холодной поверхности посуда
может лопнуть. Для извлечения посуды из
печи пользуйтесь кухонными перчатками.

70
RU
Приготовление выпечки
Таблицы и рекомендации – Выпекание при конвекции
Блюдо
Посуда
Уровень
Температура
Время, мин.
Торт из грецких орехов
Разъемная металлическая
форма
Поворотный стол
170/180
30/35
Фруктовый пирог
Разъемная металлическая
форма
Ø 28 см
Поворотный стол
150/160
35/45
Рождественский пирог
Разъемная металлическая
форма
Поворотный стол
170/190
30/45
Пикантная выпечка,
например, пицца с
картофелем
Круглая стеклянная форма
Поворотный стол
160/180
50/70
Бисквит
Разъемная металлическая
форма
Ø 26 см
Поворотный стол
160/170
40/45
Бисквитный рулет с
джемом
Стеклянная форма
1
110
35/45
Вишневый пирог
Стеклянная форма
1
170/180
35/45
Советы по использованию посуды для
выпечки
Самая распространенная посуда для выпечки –
черные металлические формы. Если вы
собираетесь готовить с помощью микроволн,
пользуйтесь стеклянной, керамической или
пластиковой посудой для выпечки, которая
должна выдерживать температуру до 250°С.
Однако в таких формах блюда меньше
подрумяниваются.
Советы по приготовлению выпечки
В зависимости от количества и типа выпечки
меняется температура и продолжительность
приготовления. Сначала попробуйте готовить с
меньшим временем и на более низких
температурах, затем по необходимости
увеличивайте значения. При низких
температурах изделие равномернее
пропекается. Форму с выпечкой ставьте на
середину поворотного стола.
Рекомендации по приготовлению выпечки
Как проверить, готова ли выпечка?
За 10 минут до окончания приготовления
проткните выпечку деревянной палочкой в
самом высоком месте. Если тесто не остается
на палочке, изделие готово.
Выпечка слишком темная
В следующий раз установите более низкую
температуру, а продолжительность выпекания
увеличьте.
Выпечка слишком сухая
После завершения приготовления с помощью
деревянной палочки проделайте в выпечке
небольшие отверстия. Сбрызните изделие
фруктовым соком или алкогольным напитком.
В следующий раз увеличьте температуру
приблизительно на 10°С, а продолжительность
выпекания сократите.
Выпечка при переворачивании не отстает
от формы
Оставьте готовую выпечку постоять 5-10
минут, и она свободнее выйдет из формы.
Если изделие все же не отстает, осторожно
проведите ножом вокруг формы по краям. В
следующий раз хорошо смажьте форму
маслом.
Совет по экономии энергии
При приготовлении более чем одного изделия
рекомендуется их выпекать одно за другим,
пока печь еще не остыла. Это позволит
сократить продолжительность приготовления
второго и последующих блюд.
Предпочтительнее использовать темные
формы для выпечки – крашеные или
эмалированные черные, – так как они лучше
поглощают тепло.
Если изделие требует длительного выпекания,
выключите печь за 10 минут до окончания
приготовления и используйте остаточное
тепло для завершения процесса выпечки.

71
RU
Подходящая посуда
Режим «Микроволны»
При использовании микроволн помните, что
они отражаются металлическими
поверхностями, а стекло, фарфор, глина,
пластик и бумага пропускают микроволны.
По этой причине в микроволновой печи
нельзя использовать металлические
сковороды и посуду или емкости с
металлическими деталями и украшением.
Декорированная или содержащая металлы
стеклянная и глиняная посуда (например,
свинцовый хрусталь) не подходит для
использования в микроволновой печи.
Идеальными материалами для
микроволновой печи являются стекло,
устойчивые к высоким температурам фарфор,
глина и пластик. Очень тонкое и хрупкое
стекло лучше использовать для
непродолжительного приготовления
(например, подогрева).
Горячая пища отдает тепло посуде, поэтому
посуда тоже может сильно нагреваться.
Поэтому всегда пользуйтесь кухонными
рукавицами!
Как проверить посуду, которую вы хотите
использовать в микроволновой печи?
Поставьте в печь емкость, которую вы хотите
использовать, и установите время 20 секунд и
максимальную мощность. Если по истечении
данного времени емкость осталась холодной
или только слегка нагрелась, она подходит для
микроволн. Если емкость сильно нагрелась
или вызвала искрение, такая посуда для
микроволновой печи не пригодна.
Режим гриля и конвекции
Для приготовления на гриле посуда должна
выдерживать температуру не менее 300°С.
Пластиковая посуда для использования на
гриле не подходит.
Режим «Микроволны + гриль»
Для режима «Микроволны + гриль» посуда
должна одновременно соответствовать
требованиям по использованию посуды для
микроволн и гриля.
Алюминиевые емкости и фольга
Готовые блюда в алюминиевых емкостях или
фольге можно ставить в микроволновую печь,
принимая во внимание приведенные ниже
условия:
Следуйте рекомендациям производителя,
указанным на упаковке.
Алюминиевые емкости не должны
превышать 3 см в высоту и касаться стенок
камеры печи (минимальное расстояние 3
см). Необходимо снять алюминиевую
крышку, если она есть.
Ставьте алюминиевую емкость
непосредственно на поворотный стол. При
использовании металлической решетки
ставьте емкость на фарфоровую тарелку.
Запрещается ставить алюминиевые емкости
прямо на металлическую решетку!
Время приготовления увеличивается, так
как микроволны проникают в продукты
только с верхней стороны. Если вы
сомневаетесь, лучше пользуйтесь
подходящей для микроволновой печи
посудой.
Алюминиевая фольга используется для
отражения микроволн во время процесса
размораживания. Края или выступающие
части нежных продуктов, таких как птица
или фарш, оберните фольгой для защиты
от перегрева.
Важно! Алюминиевая фольга не должна
соприкасаться со стенками камеры печи,
так как это может вызвать электрический
дуговой разряд.
Крышки
Рекомендуем вам использовать стеклянные
или пластиковые крышки или пищевую пленку
по следующим причинам:
1. Помогает избежать излишнего испарения
влаги (прежде всего, при длительном
приготовлении);
2. Сокращается время приготовления;
3. Продукты не пересушиваются;
4. Сохраняется аромат продуктов.
Крышки должны иметь отверстия,
предотвращающие возникновение излишнего
давления пара. Пластиковые пакеты
необходимо открывать. Баночки и бутылочки с
детским питанием и подобные емкости
разогревайте без крышек, в противном случае
емкости могут лопнуть.

72
RU
Подходящая посуда
Таблица типов посуды
В таблице ниже представлены типы посуды, пригодной для использования в микроволновой
печи.
Режим
Посуда
Микроволны
Гриль
Микроволны
+
гриль
Размораживание/
подогрев
Приготовление
Стекло и фарфор
1)
Для использования в домашнем
хозяйстве, неогнеупорные, пригодные
для мытья в посудомоечной машине
да
да
нет
нет
Глазурованный фарфор
Огнеупорное стекло и фарфор
да
да
да
да
Фарфор, каменная посуда
2)
Неглазурованная и глазурованная без
декорирования металлом
да
да
нет
нет
Глиняная посуда
2)
Глазурованная
Неглазурованная
да
нет
да
нет
нет
нет
нет
нет
Пластиковая посуда
2)
Термоустойчивая до 100°C
Термоустойчивая до 250°C
да
да
нет
да
нет
нет
нет
нет
Пластиковые пленки
3)
Пищевая пленка
Целлофан
нет
да
нет
да
нет
нет
нет
нет
Бумага, картон, пергамент
4)
да
нет
нет
нет
Металл
Алюминиевая фольга
Алюминиевая упаковка
5)
Оборудование
да
нет
да
нет
да
да
да
да
да
нет
да
нет
1. Посуда без золотых и серебряных
ободков; свинцовый хрусталь не
пригоден.
2. Учитывайте рекомендации произво-
дителя!
3. Не закрывайте упаковки металлическими
скрепками. Проделывайте отверстия в
упаковке. Пользуйтесь пластиковой
пленкой только, чтобы накрывать
продукты.
4. Не используйте бумажные тарелки!
5. Только низкие емкости без крышек. Не
допускайте соприкосновения алюминия со
стенками камеры микроволновой печи.

73
RU
Очистка и обслуживание микроволновой печи
Очистка
, практически, единственное мероприятие
необходимое для обслуживания
микроволновой печи.
Предупреждение! Регулярно очищайте печь.
Удаляйте осевшие на стенках камеры остатки
пищи. Если вы не следите за чистотой печи, ее
поверхности будут портиться, что приведет к
сокращению срока службы прибора, а
также может стать причиной возникновения
опасной ситуации.
Предупреждение! Перед очисткой печь
необходимо отсоединить от питания.
Извлеките вилку присоединительного
кабеля из розетки или выключите
автоматический выключатель питания.
Не пользуйтесь агрессивными или
абразивными чистящими средствами,
металлическими мочалками, которые могут
поцарапать поверхности печи, или
острыми предметами, так как они могут
оставить пятна или повреждения на
поверхностях печи.
Не пользуйтесь приборами, чистящими под
высоким давлением, и приборами для
очистки паром.
Передние поверхности
Обычно достаточно протирать печь влажной
тряпкой. Если печь сильно загрязнена,
добавьте в воду несколько капель средства
для ручного мытья посуды. После очистки с
использованием моющего средства протрите
печь сухой тряпкой.
Для очистки передней панели из алюминия
используйте средство для очистки стекол и
мягкую тряпку, не оставляющую ворсинок.
Протирайте движениями из стороны в сторону,
не нажимая на поверхность.
Сразу вытирайте пятна накипи, жира, крахмала
и яичного белка, так как под ними может
образовываться ржавчина.
Не позволяйте воде попадать внутрь камеры
печи.
Внутренние поверхности
Поле каждого использования очищайте стенки
камеры мягкой тряпкой: это самый простой
способ устранить остатки пищи и брызги,
осевшие на стенках во время приготовления.
Для удаления трудновыводимых загрязнений
пользуйтесь неагрессивными чистящими
средствами. Не используйте спреи для
очистки духовок и другие агрессивные и
абразивные чистящие средства.
Всегда содержите в полной чистоте дверцу
и торцевые поверхности печи, так как таким
образом вы обеспечите правильное
открывание и закрывание дверцы.
Следите, чтобы вода не попадала в
вентиляционные отверстия микроволновой
печи.
Регулярно вынимайте поворотный стол вместе
с приводом и очищайте дно камеры, особенно
при разлитии жидкости.
Не включайте микроволновую печь без
установленных на свое место поворотного
стола и привода.
Если поверхности камеры сильно загрязнены,
поставьте на поворотный стол чашку с водой и
включите печь на 2-3 минуты при
максимальной мощности микроволн. Пар
размягчит грязь, и ее можно будет протереть
мягкой тряпкой.
Для устранения неприятных запахов в печи
(например, после приготовления рыбы)
капните в чашку с водой несколько капель
лимонного сока. Положите в чашку чайную или
кофейную ложечку для предупреждения
бурления. Нагревайте воду в течение 2-3
минут на максимальной мощности микроволн.

74
RU
Очистка и техническое обслуживание микроволновой печи
Потолок камеры печи
При сильнозагрязненном потолке камеры для
облегчения очистки можно опустить
нагревательный элемент гриля.
Во избежание ожогов подождите, пока
нагревательный элемент полностью
остынет. Опустите гриль следующим образом:
1. Поверните держатель нагревательного
элемента на 90º (1).
2. Аккуратно опустите гриль (2). Не
применяйте силу, так как можете
повредить печь.
3. После очистки потолка, установите
нагревательный элемент (2) на место так
же, как вы его опустили.
Всегда содержите чистой защитную
слюдяную пластину (3), расположенную на
потолке камеры печи. Остатки пищи на
пластине могут вызывать повреждение или
искрение.
Не используйте абразивные чистящие
средства или острые предметы.
Во избежание риска не снимайте слюдяную
пластину.
Крышка лампочки (4) находится на потолке
камеры печи и легко снимается для очистки.
Для этого вам необходимо отвинтить крышку и
вымыть водой и средством для ручного мытья
посуды.
Оборудование
Очищайте оборудование после каждого
использования. При сильных загрязнениях
принадлежности сначала замочите, а потом
очистите щеткой и губкой. Оборудование
можно мыть в посудомоечной машине.
Следите за постоянной чистотой тарелки и
привода поворотного стола. Перед
включением микроволновой печи убедитесь,
что тарелка и привод установлены на свои
места.

75
RU
Что делать, если микроволновая печь не работает?
ПРЕДУПРЕЖДЕНИЕ! Ремонтные работы
должны производиться только
техническим специалистом. Ремонт,
выполненный не авторизованным со
стороны производителя лицом, опасен.
В следующих случаях нет необходимости
обращаться в сервисный центр, так как вы
можете определить причину неисправности
самостоятельно:
Дисплей не работает! Проверьте:
- Не скрыта ли индикация часов (см.
раздел «Основные функции и режимы.
Скрыть/
показать часы»).
При прикосновении к сенсорам ничего
не происходит! Проверьте:
- Может, включена защитная блокировка
(«Основные функции и режимы.
Защитная блокировка»).
Микроволновая печь не работает!
Проверьте:
- Правильно ли вставлена вилка в розетку.
- Включена ли печь.
- Плотно ли закрыта дверца. При
закрывании дверцы должен раздастся
щелчок.
- Может, между дверцей и торцевой частью
печи застрял предмет.
Во время работы печи слышны
странные звуки! Проверьте:
- Не происходит ли в печи искрение из-за
металлических предметов (см. раздел
«Подходящая посуда»).
- Не касается ли посуда стенок камеры.
- Не оставлены ли в печи столовые
приборы или приборы для приготовления
пищи.
Продукты не нагреваются или
нагреваются очень медленно!
Проверьте:
- Может, вы случайно использовали
металлическую посуду.
- Установили ли вы соответствующую
продолжительность и мощность
приготовления.
- Может, вы положили в печь большее
количество или более холодные
продукты, чем обычно.
Продукты очень горячие, пересохли
или подгорели! Проверьте, правильно
ли вы установили продолжительность и
мощность приготовления
Слышны звуки после завершения
процесса приготовления! Это не
является неисправностью. Охлаждающий
вентилятор еще некоторое время
продолжает работать. Когда температура
достаточно снизится, вентилятор
выключится автоматически.
Микроволновая печь включается, но
лампочка освещения не горит! Если все
функции печи работают нормально,
значит, могла перегореть лампочка. Вы
можете продолжать пользоваться печью.
Замена лампочки
Для замены лампочки выполните следующее:
- Отсоедините печь от питания. Извлеките
вилку присоединительного кабеля из
розетки или выключите автоматический
выключатель питания.
- Отвинтите и снимите крышку лампочки
(1).
- Выньте галогеновую лампочку (2).
Предупреждение! Лампочка может
быть очень горячей.
- Вставьте новую галогеновую лампочку 12
В / 10 Вт. Предупреждение! Не
касайтесь пальцами поверхности
галогеновой лампочки, так как можете
ее повредить. Следуйте инструкциям
производителя лампочки.
- Привинтите крышку на место (1).
- Снова подсоедините микроволновую
печь к питанию.

76
RU
Технические характеристики
Технические данные
Переменное напряжение .............................................................. (см. табличку данных)
Потребляемая мощность .............................................................. 3400 Вт\
Мощность гриля. ........................................................................... 1500 Вт
Мощность режима Горячий воздух. ............................................. 1600 Вт
Мощность микроволн на выходе. ................................................. 1000 Вт
Частота микроволн… .................................................................... 2450 МГц
Габаритные размеры (швг). ...................................................... 595 455 542 мм
Размеры камеры печи (швг). .................................................... 420 210 390 мм
Объем камеры печи. ..................................................................... 38 л
Вес .................................................................................................. 35 кг
Защита окружающей среды
Устранение упаковки
На упаковке стоит значок Green Point.
Сдайте упаковочные материалы (картон,
пенопласт, пластиковая упаковка) в пункт
приема вторичного сырья с тем, чтобы их
можно было переработать или использовать
повторно.
Отслужившее свой срок изделие
В соответствии с Европейской директивой
2002/96/ЕС по обращению с отходами от
электрического и электронного оборудования
(WEEE) бытовые электроприборы не подлежат
утилизации вместе с твердыми бытовыми
отходами.
Отслужившие свой срок изделия собирают в
специальных местах для возможности
использования материалов, подлежащих
переработке и вторичному использованию, и
во избежание причинения потенциального
ущерба здоровью человека и окружающей
среде. Символ перечеркнутого мусорного
контейнера на изделии или его упаковке
напоминает людям об этом и указывает, что
отслужившее изделие необходимо сдать в
специальный пункт сбора.
Для получения информации о местах приема
отслуживших электроприборов вы можете
обратиться к местным властям или в магазин,
где вы приобрели товар.
Отслужившее свой срок изделие нужно
сделать непригодным для использования. Для
этого извлеките шнур питания из розетки и
обрежьте его

77
RU
Инструкции по выполнению установки
Перед выполнением установки
Проверьте, что питающее напряжение,
указанное в паспортной табличке, закрепленной
на микроволновой печи, соответствует
напряжению в электрической розетке, к которой
будет подключена микроволновая печь.
Откройте дверцу микроволновой печи и
извлеките из микроволновой печи все
находящиеся в ней принадлежности и
упаковочные материалы.
Не удаляйте слюдяную накладку,
расположенную сверху, внутри микроволновой
печи. Эта накладка защищает генератор
микроволнового излучения от повреждений,
которые могут возникнуть при попадании на него
жира и пищи.
Предупреждение! Передняя поверхность
микроволновой печи может быть обернута
защитной пленкой. Перед первым
использованием микроволновой печи аккуратно
снимите эту пленку, начинайте снимать пленку с
внутренней поверхности.
Убедитесь в том, что на микроволновой печи
нет никаких повреждений. Проверьте, что
дверца микроволновой печи нормально
закрывается, и что на внутренней поверхности
дверцы и передней панели микроволновой печи
нет повреждений. Если вы обнаружите на
микроволновой печи какие-либо следы
повреждений, свяжитесь с торговой организацией,
в которой вы приобрели микроволновую печь, или
со службой технической поддержки
пользователей.
НЕ ВКЛЮЧАЙТЕ МИКРОВОЛНОВУЮ ПЕЧЬ, если
поврежден ее шнур питания или вилка шнура
питания, если печь не работает должным
образом, или если она была повреждена, или
если она упала. В этом случае свяжитесь с
торговой организацией, в которой вы приобрели
микроволновую печь, или со службой технической
поддержки пользователей.
Установите микроволновую печь на плоскую,
устойчивую поверхность. Не устанавливайте
микроволновую печь рядом с нагревательными
приборами, радиоприемниками и телевизорами.
При выполнении установки микроволновой
печи убедитесь в том, что шнур питания
микроволновой печи не находится в контакте с
водой, а также не соприкасается с острыми
краями. Воздействие высоких температур
может привести к повреждению шнура питания
микроволновой печи.
Предупреждение: микроволновая печь должна
быть установлена так, чтобы обеспечивался
свободный доступ к вилке ее шнура питания.
После выполнения установки
Микроволновая печь снабжена шнуром питания с
однофазной вилкой.
Если микроволновая печь устанавливается
стационарно, то установка микроволновой печи
должна выполняться специалистом, имеющим
соответствующую квалификацию. В этом случае
микроволновая печь должна быть подключена к
электросети через многополюсный
автоматический выключатель, расстояние между
контактами в котором должно быть не меньше 3
мм.
ПРЕДУПРЕЖДЕНИЕ: МИКРОВОЛНОВАЯ ПЕЧЬ
ДОЛЖНА БЫТЬ ЗАЗЕМЛЕНА.
Производитель и торговые организации не
принимают никаких претензий относительно
возмещения ущерба в случае травмирования
людей или животных, а также в случае нанесения
вреда имуществу, если во время установки
оборудования не были соблюдены инструкции по
установке микроволновой печи.
Микроволновая печь будет работать только в
том случае, если плотно закрыта ее дверца.
После первого использования микроволновой
печи очистите ее внутренние поверхности и
принадлежности в соответствии с инструкциями,
представленными в разделе "Чистка и
обслуживание микроволновой печи".
Установите опору поворотного стола (1) в центр
углубления на дне микроволновой печи, и
установите роликовое кольцо поворотного стола
(2) и поворотный стол (3), проверьте, что они
вошли в углубление. Во время эксплуатации
микроволновой печи поворотный стол и
связанные с ним детали должны находиться
внутри микроволновой печи и должны быть
правильно установлены. Поворотный стол
микроволновой печи должен вращаться в
обоих направлениях
При выполнении установки микроволновой печи пользуйтесь отдельными инструкциями
по установке микроволновой печи

78
RU
Einbau / Установка
DE
Die Mikrowelle in die Nische
einschieben und entsprechend
anpassen.
Die Tür der Mikrowelle öffnen und das
Gerät mit den vier mitgelieferten
Schrauben am Küchenmöbel wie im
Bild dargestellt befestigen.
RU
Вдвиньте микроволновую печь в
шкаф до отказа и выставьте ее по
центру.
Откройте дверцу микроволновой
печи и прикрепите печь к шкафу с
помощью четырех предназначенных
для этого винтов. Вставьте винты в
отверстия на передней панели.


Instrucciones de utilización ES
Instruções de utilização PT
1MCFY
1630882-b

2
ES
Índice
Información sobre seguridad ............................................................................................................ 3
Instrucciones de seguridad ............................................................................................................... 7
Las ventajas de las microondas ........................................................................................................ 8
Descripción del horno ........................................................................................................................ 9
Descripción de las Funciones ......................................................................................................... 10
Regulaciones base ........................................................................................................................... 11
Funciones Básicas ........................................................................................................................... 13
Funciones especiales ....................................................................................................................... 18
Utilizando el Plato Tostador ............................................................................................................. 21
Durante el funcionamiento... ............................................................................................................ 22
Descongelación ................................................................................................................................ 23
Cocinar con microondas .................................................................................................................. 25
Cocinar con grill ............................................................................................................................... 27
Asar y cocer ...................................................................................................................................... 30
¿Qué tipo de vajilla se puede utilizar? ............................................................................................ 33
Limpieza y Mantenimiento del horno .............................................................................................. 35
¿Qué hacer en caso de fallo de funcionamiento? ......................................................................... 37
Características técnicas ................................................................................................................... 38
Instrucciones de instalación ............................................................................................................ 39
Dimensiones de Instalación ............................................................................................................. 77
Estimado Cliente,
Gracias por haber elegido este producto BARAZZA.
Solicitamos una lectura atenta de las instrucciones que constan en este libro, que le permitirán obtener
un mejor resultado en la utilización del producto.
CONSERVE LA DOCUMENTACIÓN DE ESTE PRODUCTO PARA CONSULTAS FUTURAS.
Tenga el manual de instrucciones siempre a mano. ¡Si cede el aparato a terceros, entrégueles
también el correspondiente manual!
El manual del usuario también está disponible para su descarga en www.barazzasrl.it

3
ES
Información sobre seguridad
Antes de instalar y utilizar el aparato, lea atentamente las
instrucciones facilitadas. El fabricante no se hace responsable
de los daños y lesiones causados por una instalación y uso
incorrectos. Guarde siempre las instrucciones junto con el aparato
para futuras consultas.
SEGURIDAD DE NIÑOS Y PERSONAS VULNERABLES
ADVERTENCIA! Existe riesgo de sufrir asfixia, lesiones o
incapacidad permanente.
Este aparato puede ser utilizado por niños de 8 años en adelante
y por personas cuyas capacidades físicas, sensoriales o
mentales estén disminuidas o que carezcan de la experiencia y
conocimientos suficientes para manejarlo, siempre que cuenten
con la supervisión de una persona que se responsabilice de su
seguridad.
No deje que los niños jueguen con el aparato.
Mantenga los materiales de embalaje alejados de los niños..
ADVERTENCIA: Mantenga a los niños alejados del aparato
cuando esté funcionando o enfriándose. Las piezas de fácil
acceso están calientes.
Si el aparato dispone de dispositivo de seguridad para niños, se
recomienda activarlo. Los niños menores de 3 años no deben
estar sin vigilancia cerca del aparato.
Evite que un niño lleve a cabo la limpieza y el mantenimiento de
usuario sin la supervisión adecuada.
SEGURIDAD GENERAL
Este aparato está concebido para utilizarse en aplicaciones
domésticas y similares, tales como:
– áreas de cocina para el personal en tiendas, oficinas y otros
entornos de trabajo;
– granjas;
– por clientes en hoteles, moteles y otros entornos de tipo
residencial;
– entornos de tipo hostales o pensiones.

4
ES
Información sobre seguridad
El aparato se calienta cuando está en funcionamiento. No toque
las resistencias del aparato. Utilice siempre guantes de horno
cuando introduzca o retire accesorios o utensilios refractarios..
ADVERTENCIA: No caliente líquidos ni otros alimentos en
recipientes herméticos, ya que podrían explotar.
Utilice solamente utensilios aptos para hornos de micro-ondas
Cuando caliente alimentos en recipientes de papel o plástico,
vigile el aparato por la posibilidad de incendio.
El aparato está pensado para calentar alimentos y bebidas.
Secar alimentos o prendas, o calentar mantas térmicas,
zapatillas, esponjas, paños húmedos o similares puede conllevar
riesgo de lesiones o incendios.
¡Atención! El horno no puede utilizarse si:
- La puerta no cierra correctamente;
- Las bisagras de la puerta están dañadas;
- Las superficies de contacto entre la puerta y el frente están
dañadas;
- El cristal de la ventana está dañado;
- Hay frecuentemente arco eléctrico en el interior, sin que haya
presencia de ningún objeto de metal.
El horno sólo puede volver a ser utilizado después de haber sido
reparado por un técnico del Servicio de Asistencia Técnica.
Si se genera humo, apague o desenchufe el horno y deje la
puerta cerrada para sofocar las posibles llamas.
Las bebidas que se calientan en el microondas pueden romper a
hervir bruscamente en contacto con el aire; extreme la
precaución cuando manipule los recipientes.
Para evitar quemaduras, compruebe siempre la temperatura y
agite o mezcle los tarros o botes de alimentos infantiles
calentados antes de consumirlos.
Los huevos duros o con cáscara no se deben calentar en el
aparato, ya que pueden explotar incluso después de que el
microondas termine de calentar.

5
ES
Información sobre seguridad
INSTALACIÓN
En la instalación eléctrica se tiene que prever un dispositivo que
permita desconectar el aparato de la red en todos los polos con
una apertura de contactos de mín. 3mm. Como dispositivos de
separación apropiados se consideran, por ejemplo, cortacircuitos
automáticos, fusibles (los fusibles roscados se tienen que retirar
del porta fusibles), interruptores FI y contactores. Esta instalación
tiene que cumplir con los reglamentos vigentes.
Si la conexión eléctrica se hace con clavija y esta se queda
accesible después de la instalación, entonces no es necesario
prever el dispositivo de separación mencionado.
La protección contra choques eléctricos tiene que estar
garantizada a través de la instalación eléctrica (conexión de
tierra).
¡Atención! El horno tiene que ser obligatoriamente conectado a
tierra.
LIMPIEZA
El aparato se debe limpiar periódicamente y los restos de
alimentos se deben eliminar.
Si no se mantiene limpio el aparato, podría deteriorarse la
superficie y afectar negativamente a la vida útil del aparato y
posiblemente provocar situaciones de riesgo.
No utilice limpiadores abrasivos ásperos ni rascadores de metal
afilado para limpiar la puerta de cristal si no quiere arañar su
superficie, lo que podría hacer que el cristal se hiciese añicos.
No utilice un limpiador a vapor para limpiar el aparato.
Las superficies de contacto de la puerta (el frente de la cavidad y
la parte interior de la puerta) tienen que mantenerse bastante
limpias, de modo a garantizar el correcto funcionamiento.
Por favor, tenga en cuenta las indicaciones relativas a la limpieza
constantes en el punto “Limpieza y Mantenimiento del horno”.

6
ES
Información sobre seguridad
REPARACIÓN
ADVERTENCIA: Antes de realizar tareas de mantenimiento,
corte la corriente eléctrica.
ADVERTENCIA: Únicamente una persona competente puede
realizar tareas de reparación o mantenimiento que impliquen la
extracción de la tapa que protege frente a la exposición a la
energía de microondas.
ADVERTENCIA: Si la puerta o sus juntas estuvieran dañadas,
no utilice el aparato hasta que un técnico cualificado lo haya
reparado.
Si el cable eléctrico sufre algún daño, el fabricante, su servicio
técnico autorizado o un profesional tendrán que cambiarlo para
evitar riesgos.
Las reparaciones y mantenimiento, especialmente en piezas bajo
tensión, sólo pueden ser efectuadas por técnicos autorizados por
el fabricante.

7
ES
Instrucciones de seguridad
No caliente alcohol puro o bebidas
alcohólicas en el micro-ondas. ¡RIESGO DE
INCENDIO!
¡Cuidado!
Para evitar que los alimentos se calienten
demasiado o puedan arder, es muy
importante no seleccionar períodos de
tiempo largos, ni niveles de potencia
demasiado elevados, cuando calienta
pequeñas cantidades de alimentos. Por
ejemplo, un pan puede arder al cabo de 3
minutos si se ha seleccionado una
potencia demasiado alta.
Para tostar, utilice solamente la función grill y
vigile siempre el horno. Si utiliza una función
combinada para tostar, el pan se incendia en
muy poco tiempo.
Nunca pille los cables de alimentación de
otros aparatos eléctricos en la puerta caliente
del horno. El aislamiento del cable puede
derretirse. ¡Peligro de cortocircuito!
¡Cuidado al calentar líquidos!
Cuando los líquidos (agua, café, té, leche,
etc.) se encuentran casi a punto de ebullición
dentro del horno y se retiran repentinamente,
estos pueden ser proyectados hacia fuera del
recipiente. ¡PELIGRO DE LESIONES Y
QUEMADURAS!
Para evitar este tipo de situaciones, cuando
caliente líquidos, coloque una cuchara de té
o una varilla de cristal en el recipiente.
Procediendo según las indicaciones
siguientes evita daños en el horno y otras
situaciones peligrosas:
No ponga el horno en marcha sin el
acoplamiento, el anillo rotativo y el respectivo
plato.
No conecte el microondas en vacío. Este
puede quedar en sobrecarga y estropearse,
en el caso de que no haya alimentos en el
interior. ¡RIESGO DE DAÑOS!
Para efectuar pruebas de programación del
horno, coloque un vaso de agua en el interior
del horno. El agua absorberá las microondas
y el horno no se dañará.
No tape ni obstruya los orificios de
ventilación.
Utilice solamente vajilla adecuada para
microondas. Antes de utilizar vajilla y
recipientes en el microondas, compruebe si
estos son adecuados (ver capítulo sobre el
tipo de vajilla).
¡No retire la tapa de mica situada en el techo
de la cavidad! Esa tapa evita que las grasas
y los pedazos de alimentos dañen el
generador de microondas.
No guarde ningún objeto inflamable en el
interior del horno, pues puede arder si lo
conecta.
No use el horno como despensa.
No use el horno para freír en baño de aceite,
pues es imposible controlar la temperatura
del aceite bajo la acción de las microondas.
No se apoye ni se siente en la puerta abierta
del horno. Esto puede causar daños al horno,
en especial a la zona de las bisagras. La
puerta soporta un máximo de 8 kg.
El plato rotativo y las parrillas soportan una
carga máxima de 8 kg. No exceda esta carga
para evitar daños.

8
ES
Las ventajas de las microondas
En la cocina convencional, el calor radiado por las
resistencias o quemadores de gas penetra
lentamente en los alimentos, de fuera a dentro.
Existe por ello una gran pérdida de energía en el
calentamiento del aire, componentes del horno y
recipientes.
En el microondas, el calor es generado por los
propios alimentos, es decir, el calor pasa del
interior al exterior. No existe ninguna pérdida de
calor hacia el aire, paredes de la cavidad y
recipientes (en el caso de que sean adecuados
para hornos microondas), o sea, sólo se calienta
el alimento.
En resumen, los hornos microondas presentan las
siguientes ventajas:
1. Ahorro de tiempo de cocción; en general
reducción de hasta 3/4 del tiempo en
relación a la cocción convencional.
2. Descongelación ultrarrápida de alimentos,
reduciendo el peligro de desarrollo de
bacterias.
3. Ahorro de energía.
4. Conservación del valor nutritivo de los
alimentos debido a la reducción del tiempo
de cocción.
5. Fácil limpieza.
Modo de funcionamiento del horno
microondas
En el horno microondas existe una válvula de alta
tensión, llamada magnetrón, que convierte la
energía eléctrica en energía de microondas.
Estas ondas electromagnéticas son canalizadas
hacia el interior del horno a través de una guía de
ondas y distribuidas por un esparcidor metálico o
a través de un plato rotativo.
Dentro del horno, las microondas se propagan en
todos los sentidos y son reflejadas por las
paredes metálicas, penetrando uniformemente en
los alimentos.
Por qué se calientan los alimentos
La mayor parte de los alimentos contienen agua
cuyas moléculas vibran por acción de las
microondas.
El roce entre moléculas origina calor que eleva la
temperatura de los alimentos, descongelándolos,
cocinándolos o manteniéndolos calientes.
Como se forma el calor en el interior de los
alimentos:
Estos pueden ser cocinados sin, o con
pocos, líquidos o grasas;
Descongelar, calentar o cocinar en el horno
microondas es más rápido que en un horno
convencional;
Se conservan las vitaminas, los minerales y
las sustancias nutritivas;
No se altera el color natural, ni el aroma.
Las microondas pasan a través de porcelana,
cristal, cartón o plástico, pero no atraviesan el
metal. Por ese motivo, no utilice en el horno de
microondas recipientes metálicos o recipientes
que tengan partes metálicas.
Las microondas son reflejadas por el metal...
... atraviesan el cristal y la porcelana...
... y son absorbidos por los alimentos.

9
ES
Descripción del horno
1. Panel de mandos
6. Acoplamiento del motor
2. Cristal de la puerta
7. Anillo rotativo
3. Soportes estampados
8. Plato rotativo
4. Lengüeta
9. Bandeja de vidrio
5. Salida aire caliente
10. Parrilla rectangular
11. Plato tostador
1. – Indicador de funciones
4a . – Pantalla de peso / potencia
2. – Selector de funciones
5. – Tecla de selección de la hora / duración
3. – Tecla de selección de la temperatura del horno
5a. – Pantalla de hora / duración
3a. – Pantalla de temperatura del horno
6. – Tecla de Start / Stop / Bloqueo de
seguridad
4. – Tecla de selección del peso / potencia
23:15
1
2
6
5
4
3
800
160
3a
4a
5a

10
ES
Descripción de las Funciones
Símbolo
Función
Potencia Salida
Microondas
Alimentos
Microondas
200 W
Descongelar lentamente alimentos delicados; para
descongelar y seguir cociendo a baja potencia.
400 W
Cocer carne, pescado y arroz.
Descongelar rápidamente cantidades pequeñas y alimentos
para bebés, como por ejemplo biberones.
600 W
Calentar y cocer alimentos.
800 W
Cocer verduras y patatas.
Cocer gratinados y platos preparados.
Descongelar y cocer pequeñas cantidades.
1000 W
Calentar líquidos.
Microondas
+ Grill
200 W
Gratinar tostadas.
400 W
Gratinar aves y carne.
600 W
Cocinar pasteles de carne y gratinados.
Grill
----
Gratinar alimentos.
Grill
+ Ventilador
---
Gratinar carne y pescado, trozos finos.
Gratinar aves.
Patatas – descongelar y dorar los productos ultracongelados.
Aire caliente
---
Asar y cocer.
Microondas +
Aire caliente
200-600 W
Asar rápidamente carne, pescado y aves.
Cocer pasteles húmedos y secos.

11
ES
Regulaciones base
Ajuste del reloj
Después de conectar el horno a la corriente o tras
un fallo de energía, el reloj queda parpadeando,
indicando que el valor de la hora no es correcto.
Para ajustar el reloj proceda de la siguiente
forma:
1. Presione la tecla del Reloj. Los números de las
horas empiezan parpadeando.
2. Presione las teclas “-” y “+” para configurar el
valor de las horas.
3. Presione de nuevo la tecla del Reloj para
ajustar los minutos. Estos quedan
parpadeando.
4. Presione las teclas “-” y “+” para configurar el
valor de los minutos.
5. Para terminar, presione de nuevo la tecla del
Reloj.
Ocultar/Mostrar el Reloj
Si el reloj le incomoda, puede ocultarlo
presionando la tecla del Reloj durante 3
segundos. Los puntos que separan las horas de
los minutos permanecerán parpadeando mientras
el reloj está oculto.
Si desea volver a mostrar el reloj, presione de
nuevo la tecla del Reloj durante 3 segundos.
Bloqueo de Seguridad
El funcionamiento del horno puede ser bloqueado
(por ejemplo, para impedir su utilización por los
niños).
1. Para bloquear el horno, presione la tecla Stop
durante 3 segundos. A continuación, se emite
una señal acústica y la pantalla presenta la
palabra “SAFE”. El horno queda bloqueado, no
pudiendo realizarse ninguna operación.
2. Para desbloquear el horno, presione de nuevo
la tecla Stop durante 3 segundos. A
continuación se emite una señal acústica y en
la pantalla aparece de nuevo la indicación de
las horas.

12
ES
Regulaciones base
Parar plato giratorio
1. Para parar el plato giratorio, apretar al
mismo tiempo las teclas “+” y “Stop”.
2. Para volver a poner en marcha el plato,
apretar nuevamente al mismo tiempo las
teclas “+” y “Stop”.

13
ES
Funciones Básicas
Microondas
Utilizar esta función para cocer y calentar verduras, patatas, arroz, pescado y carne.
1. Presione la tecla de función Microondas. La
tecla de función se ilumina.
2. Presione la tecla de Selección de Potencia
para cambiar la potencia de microondas. El
indicador correspondiente empieza a
parpadear. Si no presiona esta tecla, el
horno funciona a la potencia de 800 W.
3. Presione las teclas de “-” y “+” para cambiar
la potencia del microondas.
4. Presione la tecla de Selección de Tiempo
para cambiar el tiempo de funcionamiento. El
indicador correspondiente empieza a
parpadear.
5. Presione las teclas de “-” y “+” para
configurar el tiempo de funcionamiento
deseado (por ej., 1 minuto).
6. Presione la tecla Start. El horno empieza a
funcionar.
NOTA: Cuando se selecciona la potencia de
1000 W, el tiempo de funcionamiento está
limitado a un máximo de 15 minutos.
Microondas – Inicio Rápido
Utilizar esta función para calentar rápidamente alimentos con elevado contenido de agua, tales como
agua, café, té o sopa no densa.
1. Presione la tecla Start. El horno empieza a
funcionar en la función Microondas a potencia
máxima durante 30 segundos.
2. En el caso de que pretenda aumentar el tiempo
de funcionamiento, presione de nuevo la tecla
Start. Cada vez que se presiona esta tecla, el
tiempo de funcionamiento aumenta en 30
segundos.
NOTA: Cuando se selecciona la potencia de
1000 W, el tiempo de funcionamiento está
limitado a un máximo de 15 minutos.
00:30
1000
1,2

14
ES
Funciones Básicas
Grill
Utilizar esta función para dorar rápidamente la superficie de los alimentos.
1. Presione la tecla de función del Grill. La tecla
de función se ilumina.
2. Presione la tecla de Selección de Tiempo
para cambiar el tiempo de funcionamiento. El
indicador correspondiente empieza a
parpadear.
3. Presione las teclas “-” y “+” para seleccionar el
tiempo deseado (por ej., 15 minutos).
4. Presione la tecla Start. El horno empieza a
funcionar.
Microondas + Grill
Utilizar esta función para cocinar lasaña, aves, patatas asadas y gratinados.
1. Presione la tecla de función Microondas +
Grill. La tecla de función se ilumina.
2. Presione la tecla de Selección de Potencia
para cambiar la potencia de microondas. El
indicador correspondiente empieza a
parpadear. Si no presiona esta tecla, el horno
funciona a la potencia de 600 W.
3. Presione las teclas de “-” y “+” para seleccionar
la potencia deseada.
4. Presione la tecla de Selección de Tiempo
para cambiar el tiempo de funcionamiento. El
indicador correspondiente empieza a
parpadear.
5. Presione las teclas “-” y “+” para seleccionar el
tiempo de funcionamiento deseado (por ej., 10
minutos).
6. Presione la tecla Start. El horno empieza a
funcionar.
NOTA: En el modo combinado la potencia del
microondas está limitada a 600 W.

15
ES
Funciones Básicas
Aire caliente
Utilizar esta función para cocinar y asar.
1. Presione la tecla de función Aire caliente.
La tecla de función se ilumina.
2. Presione la tecla de Selección de
Temperatura, para cambiar la potencia del
microondas. EL indicador correspondiente
empieza a parpadear. Si no presiona esta
tecla, el horno funciona a la potencia de
160ºC.
3. Presione las teclas de “-” y “+” para
seleccionar la temperatura deseada.
4. Presione la tecla de Selección de Tiempo,
para cambiar el tiempo de funcionamiento
deseado. El indicador correspondiente
empieza a parpadear.
5. Presione las teclas “-” y “+” para seleccionar
el tiempo de funcionamiento deseado, (por
ej., 12 minutos).
6. Presione la tecla Start. El horno comienza a
funcionar.
Microondas + Aire caliente
Utilizar esta función para cocer y asar.
1. Presione la tecla de función Microondas +
Aire caliente. La tecla de función se ilumina.
2. Presione la tecla de Selección de
Temperatura, para cambiar la temperatura.
El indicador correspondiente empieza a
parpadear. Si no presiona esta tecla, el
horno funciona a la potencia de 160ºC.
3. Presione las teclas de “-” y “+” para
seleccionar la temperatura deseada.
4. Presione la tecla de Selección de Potencia,
para cambiar la potencia del microondas. El
correspondiente indicador empieza a
parpadear. Si no presiona esta tecla, el
horno funciona a la potencia de 400 W.
5. Presione las teclas de “-” y “+” para
seleccionar la potencia deseada.
6. Presione la tecla de Selección de Tiempo,
para cambiar el tiempo de funcionamiento
deseado. El indicador correspondiente
empieza a parpadear.
7. Presione las teclas “-” y “+” para seleccionar
el tiempo de funcionamiento deseado (por
ej., 12 minutos).
8. Presione la tecla Start. El horno comienza a
funcionar.
NOTA: Durante el funcionamiento combinado,
la potencia del microondas está limitada a 600
W.
20:00
160
4
1
3,5
6
2
20:00
400
160
6
4
1
3,5,7
8
2

16
ES
Funciones Básicas
Grill con Ventilador
Utilizar esta función para dorar carne, pescado, aves o patatas fritas.
1. Presione la tecla de función Grill +
Ventilador. La tecla de función se ilumina.
2. Presione la tecla de Selcción de
Temperatura, para cambiar la temperatura
del microondas. El indicador
correspondiente empieza a parpadear. Si no
presiona esta tecla, el horno funciona a la
potencia de 160ºC.
3. Presione las teclas de “-” y “+” para
seleccionar la temperatura deseada.
4. Presione la tecla de Selección de Tiempo,
para cambiar el tiempo de funcionamiento
deseado. El indicador correspondiente
empieza a parpadear.
5. Presione las teclas “-” y “+” para seleccionar
el tiempo de funcionamiento deseado (por
ej., 12 minutos).
6. Presione la tecla Start. El horno comienza a
funcionar.
Descongelación por tiempo (manual)
Utilizar esta función para descongelar rápidamente cualquier tipo de alimento.
1. Presione la tecla de función por
Descongelación por Tiempo. La tecla de
función se ilumina.
2. Presione la tecla de Selección de Tiempo
para cambiar el tiempo de funcionamiento. El
indicador correspondiente empieza a
parpadear.
3. Presione las teclas “-” y “+” para seleccionar el
tiempo de funcionamiento deseado (por ej., 10
minutos).
4. Presione la tecla Start. El horno empieza a
funcionar.
20:00
160
4
1
3,5
6
2

17
ES
Funciones Básicas
Descongelación por peso (automático)
Utilizar esta función para descongelar rápidamente carne, aves, pescado, fruta y pan.
1. Presione la tecla de función Descongelación
por peso. La tecla de función se ilumina.
2. Presione la tecla de Selección de Tiempo
para cambiar el tipo de alimento. Los
indicadores de tiempo y del reloj empiezan a
parpadear.
3. Presione las teclas “-” y “+” para seleccionar el
tiempo deseado, por ej., “Pr 01” (véase la
siguiente tabla).
4. Presione la tecla de Selección de Peso para
definir el peso del alimento. El indicador
correspondiente empieza a parpadear.
5. Presione las teclas “-” y “+” para seleccionar el
peso deseado.
6. Presione la tecla Start. El horno empieza a
funcionar.
Nota: Dé la vuelta a los alimentos en el
momento en que el horno emita una señal
acústica y en el pantalla esté papadeando la
siguiente indicación: .
La siguiente tabla presenta los programas de la función de descongelación por peso, con indicación de
los rangos de peso, tiempos de descongelación y de reposo (de modo a garantizar que el alimento
alcance una temperatura uniforme).
Programa
Alimento
Peso (g)
Tiempo (min)
Tiempo de reposo (min)
Pr 01
Carne
100 – 2000
2 – 43
20 – 30
Pr 02
Aves
100 – 2500
2 – 58
20 – 30
Pr 03
Pescado
100 – 2000
2 – 40
20 – 30
Pr 04
Fruta
100 – 500
2 – 13
10 – 20
Pr 05
Pan
100 – 800
2 – 19
10 – 20
Nota importante: ver “Indicaciones generales para la descongelación”.

18
ES
Funciones especiales
Función Especial P1: Calentar alimentos
Utilizar esta función para calentar varios tipos de alimentos.
1. Presione la tecla de función Especial P1. La
tecla de función se ilumina.
2. Presione la tecla de Selección de Tipo de
Alimento para cambiar el tipo de alimento. Los
indicadores correspondientes empiezan a
parpadear.
3. Presione las teclas “-” y “+” para seleccionar el
tiempo deseado, por ej., “A 01” (ver tabla
siguiente).
4. Presione la tecla de Selección de Peso para
definir el peso del alimento. El respectivo
indicador empieza a parpadear.
5. Presione las teclas “-” y “+” para seleccionar el
peso deseado.
6. Presione la tecla Start. El horno empieza a
funcionar.
La siguiente tabla presenta los programas de la Función Especial P1, con indicación de los rangos de peso,
tiempos de funcionamiento y de reposo (de modo a garantizar que el alimento alcance una temperatura
uniforme).
Programa
Alimento
Peso (g)
Tiempo (min)
Observación
A 01
Sopa
200 – 1500
3 – 15
Volver 1 – 2x, tapar
A 02
Platos precocinados, alimentos compactos
200 – 1500
3 – 20
Volver 1 – 2x, tapar
A 03
Platos con varios alimentos menos
compactos
200 – 1500
3 – 18
Volver 1 – 2x, tapar
A 04
Verduras
200 – 1500
2,6 – 14
Volver 1 – 2x, tapar
Notas importantes:
Use siempre recipientes adecuados para
microondas y una tapa o cubierta de forma a
evitar la pérdida de líquidos.
Remueva o dé la vuelta a los alimentos
varias veces durante el calentamiento.
El tiempo requerido para calentar los
alimentos depende de su temperatura inicial.
Los alimentos sacados directamente del
frigorífico tardan más tiempo a calentar que
los alimentos que están a temperatura
ambiente. Si la temperatura del alimento no
se corresponde a la deseada, seleccione un
peso mayor o menor la próxima vez que caliente
el alimento.
Después de calentar, remueva los alimentos y
deje reposar durante algún tiempo para
uniformizar la temperatura.
¡Atención! Tras el calentamiento el recipiente
puede estar muy caliente. Pese a que las
microondas no calientan la mayoría de los
recipientes, estos pueden calentarse por
transmisión de calor de los alimentos.

19
ES
Funciones especiales
Función Especial P2: Cocinar
Utilizar esta función para cocinar alimentos frescos.
1. Presione la tecla de función Especial P2. La
tecla de función se ilumina.
2. Presione la tecla de Selección de Tipo de
Alimento para cambiar el tipo de alimento.
los indicadores correspondientes empiezan a
parpadear.
3. Presione las teclas “-” y “+” para seleccionar
el tiempo deseado, por ej., “b 01” (ver tabla
siguiente).
4. Seleccione el tipo de alimento deseado
girando el Botón Rotativo en cualquiera de
los sentidos, por ejemplo “b 01” (ver tabla
siguiente).
5. Presione las teclas “-” y “+” para seleccionar
el peso deseado.
6. Presione la tecla Start. El horno empieza a
funcionar.
La siguiente tabla presenta los programas de la función Especial P2, con indicación de los rangos de
peso, tiempos de funcionamiento y de reposo (de modo a garantizar que el alimento alcance una
temperatura uniforme).
Programa
Alimento
Peso (g)
Tiempo (min)
Observación
b 01
Patatas
200 – 1000
4 – 17
Volver 1 – 2x, tapar
b 02
Verduras
200 – 1000
4 – 15
Volver 1 – 2x, tapar
b 03
Arroz
200 – 500
13 – 20
Una cantidad de arroz, dos
partes de agua
b 04
Pescado
200 – 1000
4 – 13
Tapar
Notas importantes:
Use siempre recipientes adecuados para
microondas y una tapa o cubierta de forma a
evitar la pérdida de líquidos.
Remueva o dé la vuelta a los alimentos
varias veces durante el calentamiento.
Atención! Tras la cocción, el recipiente
puede estar muy caliente. Pese a que las
microondas no calientan la mayoría de los
recipientes, estos pueden calentarse por
transmisión del calor de los alimentos.
Instrucciones de preparación:
Pescado – Añada 1 a 3 cucharas de sopa de
agua o de zumo de limón.
Arroz – Añada una cantidad de agua
equivalente al doble de la cantidad de arroz.
Patatas con piel – Use patatas del mismo
tamaño. Lávelas y perfore la piel varias veces.
Añada 1 a 3 cucharas de sopa de agua.
Patatas sin piel y Verduras Frescas– Corte en
trozos del mismo tamaño. Añada una cuchara
de sopa de agua por cada 100 g de verduras y
sal al gusto.
b 01
200
2
4
1
3,5
6

20
ES
Funciones especiales
Función Especial P3: Descongelar & Gratinar
Utilizar esta función para descongelar y gratinar varios tipos de alimentos.
1. Presione la tecla de función Especial P3. La
tecla de función se ilumina.
2. Presione la tecla de Selección de Tipo de
Alimento para cambiar el tipo de alimento.
Los indicadores correspondientes empiezan
a parpadear.
3. Presione las teclas “-” y “+” para seleccionar
el tiempo deseado, por ej., “C 01” (ver tabla
siguiente).
4. Presione la tecla de Selección de Peso para
definir el peso del alimento. El respectivo
indicador empieza a parpadear.
5. Presione las teclas “-” y “+” para seleccionar el
peso deseado.
6. Presione la tecla Start. El horno empieza a
funcionar.
La siguiente tabla presenta los programas de la función Especial P3, con indicación de los rangos de
peso y tiempos de funcionamiento (de modo a garantizar que el alimento alcance una temperatura
uniforme).
Programa
Alimento
Peso (g)
Tiempo (min)
Observación
C 01
Pizza
300 – 550
8 – 12
Parrilla
C 02
Precocinados
350 – 500
8 – 14
Volver 1x, tapar
C 03
Derivados de patata
200 – 450
10 – 12
Bandeja de cristal
Notas importantes:
Utilice siempre vajilla apta para
microondas y resistente al calor (por
ejemplo moldes). El grill da lugar a
temperaturas muy altas. Cuando use el
programa C 02, coloque siempre una
tapadera para evitar pérdida de líquidos.
Atención! Tras la cocción, el recipiente puede
estar muy caliente. Aunque los microondas no
calientan la mayoría de los recipientes, estos
pueden llegar a alcanzar altas temperaturas
debido al calor emitido por la resistencia del grill.
Instrucciones de preparación:
Pizza congelada – Utilizar pizzas congeladas
precocinadas y pizzas-baguete.
Precocinados congelados – Utilizar lasaña,
canelones, souflé de gambas, todos congelados.
Tapar siempre.
Derivados de Patata congelados – Las patatas
fritas, las croquetas de patata y las patatas
salteadas tienen que ser adecuadas para su
preparación en el horno.

21
ES
Utilizando el Plato Tostador
Normalmente cuando se cocinan comidas como
pizzas o pasteles en el grill o en el horno
microondas, la masa o la pasta se queda
húmeda. Esto se puede evitar utilizando un plato
tostador. Como la parte inferior del plato tostador
alcanza temperaturas altas, la corteza se vuelve
crujiente y dorada.
El plato tostador también se puede utilizar para
panceta, huevos, salchichas, etc.
NOTAS MUY IMPORTANTES:
Utilizar en todo momento manoplas
especiales para horno ya que el plato
tostador se calienta mucho.
No colocar nunca el plato tostador en el
horno sin el plato de vidrio giratorio.
No colocar recipientes en el plato
tostador que no sean resistentes al calor
(por ejemplo: cuencos de plástico).
Cómo cocinar con el plato tostador:
1. Precalentar el plato tostador seleccionando
la función de Microondas y Grill de 3 a 5
minutos con potencia de microondas de
600W.
2. Extender aceite por el plato tostador para
que se doren bien los alimentos.
3. Colocar los alimentos en el plato tostador.
Usted puede colocar alimentos congelados
(como pizza congelada) sin descongelar
previamente.
4. Colocar el plato tostador sobre el plato
giratorio en el horno microondas.
5. Seleccionar la funcione Microondas + Grill y
el tiempo de cocción. Los Tiempos de
Cocción y de Reposo recomendados son
descritos en la tabla siguiente.
Comida
Peso (g)
Tiempo de
Cocción (min)
Tiempo de
Reposo (min)
Recomendaciones
Pizza
200
4-5
---
El tiempo de cocción es aplicable a
pizzas de masa fina.
Para pizzas precocinadas, incrementar el
tiempo un a dos minutos.
300
5-6
---
400
7-8
---
Quiches y
Pasteles
200
3-4
2-3
300
5-6
2-3
Hamburguesas
150-200
8-10
5-8
Volver 2X
Patatas fritas de
horno
400
6-8
---
Volver 1X
NOTAS MUY IMPORTANTES:
Como el plato tostador tiene una capa de Teflón,
ésta puede dañarse si se utiliza de manera
incorrecta.
Nunca cortar alimentos en el plato. Retirar los
alimentos del plato antes de cortar.
Cómo limpiar el plato tostador
La mejor manera de limpiar el plato tostador es
lavarlo con agua caliente y detergente y aclararlo
con agua limpia. No utilizar estropajos o abrasivos
ya que puede dañar la capa superior.

22
ES
Durante el funcionamiento...
Interrupción de una cocción
Puede interrumpir el proceso de cocción en
cualquier momento presionando una vez la tecla
Start/ Stop o abriendo la puerta del horno.
En cualquiera de los casos:
Cesa inmediatamente la emisión de
microondas.
El grill se desactiva pero mantiene una
temperatura muy elevada. ¡Peligro de
quemaduras!
El tiemporizador se para y el pantalla indica el
tiempo de funcionamiento restante.
Si lo desea puede entonces:
1. Dar la vuelta o remover los alimentos, para
obtener una cocción uniforme.
2. Cambiar los parámetros del proceso.
3. Cancelar el proceso, presionando la tecla
Start/Stop.
Para retomar el proceso, cierre la puerta y
presione la tecla Start/Stop.
Modificación de los parámetros
Los parámetros de funcionamiento (tiempo, peso,
potencia, etc.) solo pueden ser cambiados
cuando el proceso de cocción está interrumpido,
procediendo de la siguiente forma:
1. Para cambiar el tiempo, presione las teclas
“-” y “+” para seleccionar el tiempo deseado.
El nuevo tiempo definido es asumido
inmediatamente.
2. Para cambiar la potencia, presione la tecla
de Selección de Peso/Potencia. El
respectivo indicador empieza a parpadear.
Cambie el parámetro presionando las teclas
“-” y “+” para seleccionar el tiempo deseado
y valide presionando de nuevo la tecla de
Selección de Peso/Potencia.
Cancelar una cocción
Si desea cancelar el proceso de cocción, presione
la tecla Start/Stop durante 3 segundos.
A continuación, se emite una señal acústica y en
el pantalla aparece la indicación de las horas.
Fin de una cocción
Al final del proceso se emiten 3 señales acústicas
y en el pantalla aparece la indicación “End”.
Las señales acústicas se repiten cada 30
segundos, hasta que se abra la puerta o se
presione la tecla Start/Stop.

23
ES
Descongelación
La siguiente tabla presenta, de un modo
general, los diferentes tiempos de
descongelación y de reposo (de modo a
garantizar que el alimento alcance una
temperatura uniforme) en función del tipo y del
peso de los alimentos, y también las respectivas
recomendaciones.
Alimento
Peso (g)
Tiempo de
descongelación (min)
Tiempo de reposo
(min)
Observación
Trozos de carne,
cerdo, ternera, buey
100
2-3
5-10
Dar la vuelta 1 x
200
4-5
5-10
Dar la vuelta 1 x
500
10-12
10-15
Dar la vuelta 2 x
1000
21-23
20-30
Dar la vuelta 2 x
1500
32-34
20-30
Dar la vuelta 2 x
2000
43-45
25-35
Dar la vuelta 3 x
Carne estofada
500
8-10
10-15
Dar la vuelta 2 x
1000
17-19
20-30
Dar la vuelta 3 x
Carne picada
100
2-4
10-15
Dar la vuelta 2 x
500
10-14
20-30
Dar la vuelta 3 x
Salchicha
200
4-6
10-15
Dar la vuelta 1 x
500
9-12
15-20
Dar la vuelta 2 x
Aves, partes de aves
250
5-6
5-10
Dar la vuelta 1 x
Pollo
1000
20-24
20-30
Dar la vuelta 2 x
Pollo pequeño
2500
38-42
25-35
Dar la vuelta 3 x
Filete de pescado
200
4-5
5-10
Dar la vuelta 1 x
Trucha
250
5-6
5-10
Dar la vuelta 1 x
Gambas
100
2-3
5-10
Dar la vuelta 1 x
500
8-11
15-20
Dar la vuelta 2 x
Fruta
200
4-5
5-10
Dar la vuelta 1 x
300
8-9
5-10
Dar la vuelta 1 x
500
11-14
10-20
Dar la vuelta 2 x
Pan
200
4-5
5-10
Dar la vuelta 1 x
500
10-12
10-15
Dar la vuelta 1 x
800
15-17
10-20
Dar la vuelta 2 x
Mantequilla
250
8-10
10-15
Requesón
250
6-8
10-15
Nata
250
7-8
10-15

24
ES
Descongelación
Indicaciones generales para la descongelación
1. Para la descongelación, utilice solamente
vajilla adecuada para microondas
(porcelana, cristal, plástico adecuado).
2. La función Descongelación por peso y las
tablas se refieren a la descongelación de
alimentos crudos.
3. El tiempo de descongelación depende de la
cantidad y de la altura del alimento. Cuando
congele los alimentos, tenga en cuenta el
proceso de descongelación. Distribuya el
alimento en partes iguales al tamaño del
recipiente.
4. Distribuya lo mejor posible el alimento en el
interior del horno. Las partes más gruesas
de pescado o de los muslos de pollo deben
estar vueltas hacia fuera. Puede proteger las
partes más delicadas con una hoja de
aluminio. Importante: la hoja de aluminio no
puede entrar en contacto con las paredes de
la cavidad, pues puede causar arco
eléctrico.
5. Las piezas más densas deben ser vueltas
varias veces.
6. Distribuya el alimento congelado del modo
más uniforme posible, pues las partes más
estrechas y finas se descongelan más
deprisa que las partes más gruesas y altas.
7. Los alimentos ricos en grasa, como la
mantequilla, el requesón y la nata, no se
deben descongelar totalmente. Si están a
temperatura ambiente, en pocos minutos
estarán listos para ser servidos. En el caso
de la nata ultracongelada, si hubiera
pequeños trozos de hielo, hay que batirla
antes de consumirla.
8. Coloque las aves sobre un plato vuelto para
que la salsa de la carne pueda escurrir más
fácilmente.
9. El pan debe ser envuelto en una servilleta,
para no secar demasiado.
10. Dar la vuelta a la comida en intervalos
regulares.
11. Retire el alimento congelado de su embalaje y
no se olvide de retirar los clips de metal, en el
caso de que existan. En el caso de los
recipientes que sirven para guardar los
alimentos en el congelador y que también
pueden ser utilizados para calentar y cocinar,
retire solamente la tapa. En los demás casos,
coloque los alimentos en recipientes
adecuados para hornos microondas.
12. El líquido resultante de la descongelación,
principalmente de las aves, debe tirarse y en
ningún caso puede entrar en contacto con los
demás alimentos.
13. Tenga en cuenta que, en las funciones de
descongelación, es necesario un tiempo de
reposo, hasta que el alimento esté
completamente descongelado.

25
ES
Cocinar con microondas
¡Atención! Lea atentamente el capítulo
“Indicaciones de Seguridad” antes de cocinar
con microondas.
Siga las siguientes recomendaciones al cocinar
con microondas:
Antes de calentar o cocinar alimentos con
cáscara o piel (p. ej. manzanas, tomates,
patatas, salchichas) píquelos, para que no
revienten. Corte el alimento antes de iniciar
su preparación.
Antes de utilizar un recipiente, compruebe si
el mismo es adecuado para microondas (ver
capítulo sobre el tipo de vajilla).
Al confeccionar alimentos con poca
humedad (p. ej. descongelar pan, hacer
palomitas, etc.) se produce una evaporación
rápida. El horno funciona de este modo en
vacío y el alimento puede carbonizarse.
Esta situación puede causar daños al horno
y a la vajilla. De este modo, ajuste
solamente el tiempo necesario y vigile la
cocción.
No se puede calentar grandes cantidades
de aceite (freír) en el microondas.
Retire los platos precocinados de sus
envases, pues estos no siempre son
resistentes al calor. Siga las instrucciones
dadas por el fabricante.
Si tiene varios recipientes, como por
ejemplo tazas, dispóngalos uniformemente
sobre el plato rotativo.
No cierre las bolsas de plástico con pinzas
de metal, pero sí con pinzas de plástico.
Perfore varias veces la bolsa para que el
vapor pueda salir fácilmente.
Al calentar o cocinar alimentos, asegúrese
de que alcanzan una temperatura mínima
de 70°C.
Durante la cocción puede haber formación
de vapor de agua en el cristal de la puerta y
eventualmente acabar por condensarse.
Esta situación es normal y puede ser incluso
más significativa si la temperatura ambiente
es baja. La seguridad del horno no está en
cuestión. Después de la cocción, limpie el
agua resultante de la condensación.
Cuando caliente líquidos, utilice recipientes
con una gran apertura, para que el vapor
se pueda evaporar fácilmente.
Prepare los alimentos de acuerdo con las
indicaciones y tenga en cuenta los tiempos de
cocción y los niveles de potencia indicados en las
tablas.
Tenga en cuenta que los valores referidos son
sólo indicativos y que pueden variar en función
del estado inicial, de la temperatura, de la
humedad y del tipo de alimento. Es aconsejable
ajustar los tiempos y los niveles de potencia a
cada situación. En función del alimento, hay que
aumentar o acortar los tiempos de cocción, o
entonces subir o bajar el nivel de potencia.
Cocinar con microondas...
1. Cuanto mayor es la cantidad de los
alimentos, más largo es el tiempo de
cocción. Tenga en cuenta que::
Doble de la cantidad » doble del tiempo
Mitad de la cantidad » mitad del tiempo
2. Cuanto menor es la temperatura, mayor es
el tiempo de cocción.
3. Los alimentos líquidos se calientan más
deprisa.
4. Una buena distribución de los alimentos
sobre el plato rotativo facilita una cocción
uniforme. Si coloca los alimentos densos en
la parte exterior del plato y los menos
densos en el centro del plato, podrá calentar
diferentes tipos de alimentos
simultáneamente
5. La puerta del horno puede abrirse en
cualquier momento. El horno se desconecta
automáticamente. El microondas sólo sigue
funcionando si cierra la puerta e presione
otra vez el botón Start.
6. Los alimentos tapados requieren menos
tiempo de cocción, además de preservar
mejor las propias características. La tapa
tiene que dejar pasar las microondas y tener
pequeños orificios que permitan la salida del
vapor.

26
ES
Cocinar con microondas
Tablas y sugerencias – Cocinar verduras
Alimento
Cantidad
(g)
Adición de
líquidos
Potencia
(Watt)
Tiempo
(min.)
Tiempo de
reposo
(min.)
Indicaciones
Coliflor
Bróculi
Champiñones
500
300
250
100 ml
50 ml
25 ml
800
800
800
9-11
6-8
6-8
2-3
2-3
2-3
Cortar a rodajas. Tapar
Guisantes y
zanahorias,
Zanahorias
congeladas
300
250
100 ml
25 ml
800
800
7-9
8-10
2-3
2-3
Cortar en cubos o a rodajas.
Tapar
Patatas
250
25 ml
800
5-7
2-3
Pelar, cortar en partes
iguales. Tapar
Pimiento
Puerro
250
250
25 ml
50 ml
800
800
5-7
5-7
2-3
2-3
Cortar en pedazos o en
rodajas. Tapar
Col de Bruselas,
congelada
300
50 ml
800
6-8
2-3
Tapar
Repollo
250
25 ml
800
8-10
2-3
Tapar
Tablas y sugerencias – Cocinar pescado
Alimento
Cantidad (g)
Potencia
(Watt)
Tiempo
(min.)
Tiempo en
reposo
(min.)
Indicaciones
Filetes de
pescado
500
600
10-12
3
Cocinar tapado. Dar la vuelta una vez
transcurrida la mitad del tiempo.
Pescado entero
800
800
400
2-3
7-9
2-3
Cocinar tapado. Dar la vuelta una vez
transcurrida del tiempo. Eventualmente
cubrir las extremidades finas del
pescado.

27
ES
Cocinar con grill
Para obtener buenos resultados con el grill, utilice
la rejilla suministrada conjuntamente con el horno,
que debe ser colocado sobre el plato de cristal
rectangular en dos posiciones posibles que le dan
diferentes alturas para asar a la parrilla (ver la
figura abajo).
Ponga la rejilla de modo que no entre en
contacto con las superficies metálicas de la
cavidad, pues existe el peligro de arco
eléctrico, lo que puede dañar el horno.
INDICACIONES IMPORTANTES:
1. Cuando el grill se utiliza por primera vez se
observa la formación de algún humo y olor, que
resultan de la utilización de aceites durante el
proceso de fabricación.
2. El cristal de la puerta alcanza temperaturas
muy altas durante la utilización del grill.
Mantenga los niños alejados.
3. Durante el funcionamiento del grill, las paredes
de la cavidad y la rejilla alcanzan temperaturas
muy elevadas. Es aconsejable la utilización de
guantes de cocina.
4. Durante una utilización más prolongada del grill
es normal que las resistencias se desconecten
temporalmente, debido al termostato de
seguridad.
5. Importante! Cuando los alimentos se hacen al
grill o se cocinan en recipientes hay que
comprobar si el recipiente es o no adecuado.
¡Ver capítulo sobre el tipo de vajilla!
6. Al utilizar el grill es posible que las salpicaduras
de grasa lleguen a la resistencia y se quemen.
Esta es una situación normal y no representa
ningún tipo de fallo de funcionamiento.
7. Tras cada cocción, limpie el interior y los
accesorios, para que la suciedad no quede
incrustada.

28
ES
Cocinar con grill
Tablas y sugerencias – Grill sin microondas
Alimento
Cantidad (g)
Tiempo (min.)
Indicaciones
Pescado
Dorada
Sardina/cabracho
800
6-8 unid.
18-24
15-20
Unte ligeramente con mantequilla. Una vez
transcurrida la mitad del tiempo dé la
vuelta y unte con condimentos.
Carne
Salchicha
6-8 unid.
22-26
Pique una vez transcurrida la mitad del
tiempo de cocción y dé la vuelta.
Hamburguesa congelada
3 unid.
18-20
Volver 2 – 3x
Entrecot (aprox. 3 cm de
espesura)
400
25-30
Una vez transcurrida la mitad del tiempo
unte y dé la vuelta.
Demás
Tostadas
4 unid.
1½-3
Vigile las tostadas.
Gratinar sandwiches
2 unid.
5-10
Vigile el gratinado.
Caliente previamente el grill durante 2 minutos. Si
no hay ninguna indicación en contra, utilice la
rejilla. Coloque la rejilla en un recipiente para
recibir el agua y la grasa. Los tiempos referidos
son meramente indicativos y pueden variar en
función de la composición y de la cantidad del
alimento, bien como del estado deseado. El
pescado y la carne adquieren un óptimo sabor si,
antes de gratinar, se pincela con aceite vegetal,
especias y hierbas y se deja finalmente a marinar
durante algunas horas. Añada la sal solamente
después de gratinar.
Las salchichas no revientan si las pincha
anteriormente con un tenedor.
Una vez transcurrida la mitad del tiempo, vigile la
cocción y, si es necesario, dé la vuelta.
El grill es especialmente adecuado para
confeccionar pedazos de carne y pescado finos.
A los pedazos de carne finos sólo hay que dar la
vuelta una vez, los más gruesos varias veces.

29
ES
Cocinar con Grill
Tablas y sugerencias – Microondas + Grill
La función microondas con grill es ideal para
cocinar rápidamente y, al mismo tiempo, dorar
alimentos. Además, puede también gratinar los
alimentos.
El microondas y el grill funcionan
simultáneamente. Las microondas cocinan y el
grill gratina.
Plato
Cantidad (g)
Vajilla
Potencia
(Watt)
Tiempo
(min.)
Tiempo de
reposo (min.)
Pasta gratinada
500
Forma baja
400
12-17
3-5
Patatas gratinadas
800
Forma baja
600
20-22
3-5
Lasaña
aprox. 800
Forma baja
600
15-20
3-5
Requesón gratinado
aprox. 500
Forma baja
400
18-20
3-5
2 muslos de pollo, fresco
(sobre la rejilla)
cada 200
Forma baja
400
10-15
3-5
Pollo
aprox. 1000
Recipiente bajo y
ancho
400
35-40
3-5
Gratinar sopa de cebolla
2 tazas
de 200
Cuenco de sopa
400
2-4
3-5
Antes de utilizar vajilla y recipientes en el
microondas, compruebe si estos son adecuados.
Utilice solamente vajilla adecuada para
microondas.
La vajilla a utilizar en la función combinado tiene
que ser adecuada para microondas y para el grill.
¡Ver capítulo sobre el tipo de vajilla!
Tenga en cuenta que los valores referidos son
sólo indicativos y que pueden variar en función
del estado inicial, de la temperatura, de la
humedad y del tipo de alimento.
Si el tiempo no ha sido suficiente para dorar bien
el alimento, póngalo durante más 5 ó 10 min. en
la función grill.
Tenga en atención los tiempos de reposo y vuelve
los pedazos.
Los valores indicados en las tablas son válidos
teniendo en cuenta que la cavidad está fría (no
hay que calentar previamente).

30
ES
Asar y cocer
Tablas y sugerencias – Preparación de carne y pasteles
Microondas / Aire caliente
Alimento
Cantidad (g)
Potencia
(Watt)
Temperatura
ºC
Tiempo
(min)
Tiempo de
reposo
(min)
Instrucciones
Lomo bajo
1000-1500
400
200
30-40
20
Recipiente sin tapa, dar
la vuelta 1x
Solomillo de cerdo/
Costillas o hueso
Cerdo asado
800-1000
200
180-190
50-60
20
Recipiente sin tapa, dar
la vuelta 1x
Pollo entero
1000/1200
400
200
30-40
10
Recipiente sin tapa.
Coloque la pechuga
hacia abajo. Dar la vuelta
1x.
Pedazos de pollo
500-1000
400
200
25-35
10
Recipiente sin tapa.
Coloque los pedazos con
la piel, hacia abajo. Dar
la vuelta 1X.
Ternera asada
1500/2000
200
180
60-65
20
Recipiente con tapa, dar
la vuelta 1-2x; después
de darle vuelta, siga con
la cocción sin tapa.
Carne de vaca
asada
1500-1800
200
200
80-90
20
Recipiente con tapa, dar
la vuelta 1-2x
Microondas / Cocer
Alimento
Potencia
(Watt)
Temperatura º C
Tiempo
(min)
Tiempo
de reposo
(min.)
Instrucciones
Pastel de chocolate/cereza
200
200
30
5-10
Plato rotativo, trespiés
pequeño,
Molde de resorte, Ø 28
cm
Tarta de queso con fruta
400
180
40-45
5-10
Plato rotativo, trespiés
pequeño,
Molde de resorte, Ø 28
cm
Tarta de manzana
200
185
40-45
5-10
Plato rotativo, trespiés
pequeño,
Molde de resorte, Ø 28
cm
Tarta de queso con strudel
400
180
40-50
5-10
Plato rotativo, trespiés
pequeño,
Molde de resorte, Ø 26
cm
Tarta de nueces
200
170
30-35
5-10
Plato rotativo,
Molde agujereado

31
ES
Asar y cocer
Consejos sobre cómo asar
Gire los pedazos de carne cuando haya
transcurrido la mitad del tiempo de cocción.
Cuando el asado esté listo, déjelo reposar 20
minutos con el horno apagado y con la puerta
cerrada. Así, el jugo de la carne se distribuirá
mejor.
La temperatura y el tiempo de asado dependen
del tipo de alimento y de su cantidad
correspondiente.
Si en la tabla no se especifica el peso del asado,
opte por lo especificado para el peso más bajo
siguiente y aumente el tiempo.
Consejos sobre el recipiente
Compruebe que el recipiente cabe en el horno.
Los recipientes calientes de cristal han de
colocarse sobre un paño de cocina seco. Si se
colocaran sobre una superfície fría o mojada, el
cristal podría agrietarse o partirse. Utilice unos
agarradores para sacar el recipiente del horno

32
ES
Cocer
Tablas y sugerencias – Cocer/Aire caliente
Alimento
Recipiente
Nivel
Temperatura
Tiempo (Min.)
Pastel de nueces
Molde agujereado
Plato rotativo
160
50-60
Tarta de fruta
Molde de resorte Ø 28 cm
Plato rotativo
160
55-60
Pastel inglés
Molde agujereado
Plato rotativo
160
55-65
Tartas saladas
Molde redondo de cristal
Plato rotativo
190-200
40-60
Dulces simples (pão de ló)
Molde de resorte Ø 26 cm
Plato rotativo
160
30-40
Tronco
Molde de cristal para
pasteles
1
200
12-15
Dulce de cerezas
Molde de cristal para
pasteles
1
180-190
40-50
Consejos sobre los moldes para pasteles
Los moldes más utilizados son los de metal de
color oscuro. En caso de que utilice también el
microondas, emplee moldes de cristal, porcelana
o plástico para dulces, resistentes a temperaturas
de hasta 250º C. Con este tipo de molde los
dulces se queman menos.
Consejos sobre cómo cocinar pasteles
La temperatura y la cocción del pastel dependen
de la calidad y de la cantidad de la masa. La
primera vez elija una temperatura inferior y la vez
siguiente, si fuera necesario, una temperatura
más elevada. Con una temperatura inferior se
consiguen resultados más uniformes. Coloque
siempre el molde en el centro de la bandeja o
sobre el plato rotativo.
Consejos para la cocción
Cómo comprobar si un pastel está cocinado
Introduzca un palito en la parte más alta del
dulce. Si la masa no se queda pegada al palito, el
dulce está cocinado.
El pastel ha quedado muy oscuro
La próxima vez seleccione una temperatura más
baja y deje que el pastel hornee durante más
tiempo.
El pastel está muy seco
Realice unos pequeños agujeros en el mismo con
un palito. Luego, empápelo con un poco de zumo
o con una bebida alcohólica. La próxima vez
aumente la temperatura aproximadamente en 10º
y reduzca el tiempo de cocción.
El pastel no se despega después de darle
vuelta
Para que el pastel se despegue más fácilmente
del molde, una vez horneado déjelo enfriar entre
5 a 10 minutos. Si aún no se despega, introduzca
cuidadosamente un cuchillo entre el pastel y el
molde. La próxima vez engrase bien el molde.
Consejos para ahorrar energía
Cuando se prepara más de un pastel, se
aconseja introducirlos en el horno uno tras otro. El
horno permanece aún caliente reduciendo así el
tiempo de horneado del segundo pastel.
Utilice preferiblemente moldes oscuros, pintados
o esmaltados de negro, puesto que absorben
mejor el calor.
En caso de horneados más largos, se podrá
apagar el horno 10 minutos antes del final y
aprovechar el calor residual para terminar de
hornear el pastel.

33
ES
¿Qué tipo de vajilla se puede utilizar?
Función microondas
En la función microondas, tenga en cuenta que
las microondas son reflejadas por las superficies
metálicas. El cristal, la porcelana, el barro, el
plástico y el papel dejan pasar las microondas.
Por ello, las ollas y la vajilla de metal o los
recipientes con partes o decoraciones
metálicas no se pueden utilizar en el
microondas. El cristal y el barro con
decoraciones o partes metálicas (p. ej. cristal
de plomo) no se pueden utilizar.
Lo ideal para cocinar en el horno microondas es
utilizar cristal, porcelana o barro refractarios y
plástico resistente al calor. El cristal y la
porcelana muy finos y frágiles deben ser
utilizados, durante poco tiempo, para descongelar
o calentar alimentos ya preparados.
Los alimentos calientes transmiten calor a la
vajilla, la cual puede quedar muy caliente. Por
ello, utilice siempre un agarrador.
Pruebe la vajilla
Coloque la vajilla en el horno durante 20
segundos a potencia máxima de microondas. Si
esta está fría o poco caliente es adecuada. Sin
embargo, si se calienta mucho o causa arco
eléctrico, no es adecuada.
Función grill o aire caliente
En el caso de la función grill o aire caliente, la
vajilla tiene que ser resistente por lo menos a
temperaturas de 300°C.
La vajilla de plástico no es adecuada.
Funciones Combinadas
En las Funciones Combinadas, la vajilla a utilizar
tiene que ser adecuada tanto para el microondas
como para el grill.
Recipientes y películas de aluminio
Los platos precocinados en recipientes de
aluminio o con hoja de aluminio pueden ser
colocados en el microondas si se respetan los
siguientes aspectos:
Tenga en cuenta las recomendaciones del
fabricante que constan en el envase.
Los recipientes de aluminio no pueden tener
una altura superior a 3 cm ni entrar en
contacto con las paredes de la cavidad
(distancia mínima de 3 cm). Hay que
retirar la tapa de aluminio.
Coloque el recipiente de aluminio
directamente sobre el plato rotativo. Si
utiliza la rejilla, coloque el recipiente sobre
un plato de porcelana. Nunca coloque el
recipiente directamente sobre la rejilla!
El tiempo de cocción es más largo porque
las microondas entran en los alimentos
solamente por arriba. En caso de duda,
utilice solamente vajilla adecuada para
microondas.
La hoja de aluminio se puede utilizar para
reflejar las microondas durante el proceso
de descongelación. Los alimentos delicados,
tales como aves o carne picada, se pueden
proteger del calor excesivo cubriendo las
respectivas extremidades.
Importante: la hoja de aluminio no puede
entrar en contacto con las paredes de la
cavidad, pues puede provocar arco
eléctrico.
Tapas
Se recomienda la utilización de tapas de cristal,
de plástico o de una película adherente, porque
de este modo:
1. Impide una evaporación excesiva
(principalmente en los períodos de cocción
muy largos);
2. El proceso de cocción es más rápido;
3. Los alimentos no quedan secos;
4. Se preserva el aroma.
La tapa debe poseer orificios para que no se
forme ningún tipo de presión. Las bolsas de
plástico deben igualmente tener aberturas. Tanto
los biberones como los frascos con comida para
bebé y otros recipientes semejantes sólo se
pueden calentar sin tapa, pues pueden reventar.

34
ES
¿Qué tipo de vajilla se puede utilizar?
Tabla – Vajilla
La tabla siguiente le da una idea general sobre cuál es el tipo de vajilla adecuada a cada situación.
Modo de
funcionamiento
Tipo de vajilla
Microondas
Grill / Aire
Caliente
Funciones
Combinadas
Descongelar /
calentar
Cocinar
Cristal y porcelana 1)
Doméstico, no resistente al fuego, se
puede lavar en lavavajillas
sí
sí
no
no
Cerámica vidriada
Cristal y porcelana resistente al fuego
sí
sí
sí
sí
Cerámica, vajilla de gres 2)
Sin vidriados o vidriados sin
decoraciones metálicas
sí
sí
no
no
Vajilla de barro 2)
Vidriado
No vidriado
sí
no
sí
no
no
no
no
no
Vajilla de plástico 2)
Resistente al calor hasta 100°C
Resistente al calor hasta 250°C
sí
sí
no
sí
no
no
no
no
Películas de plástico 3)
Film plástico para alimentos
Celofán
no
sí
no
sí
no
no
no
no
Papel, cartón, pergamino 4)
sí
no
no
no
Metal
Hoja de aluminio
Envases de aluminio 5)
Accesorios
sí
no
sí
no
sí
sí
sí
sí
sí
no
sí
sí
1. Sin borde dorado o plateado y sin cristal de
plomo.
2. ¡Tenga en cuenta las indicaciones del
fabricante!
3. No utilice clips de metal para cerrar las
bolsas. Perfore las bolsas. Utilice las
películas sólo para tapar.
4. No utilice platos de papel.
5. Solamente envases de aluminio poco
profundos y sin tapa. El aluminio no puede
entrar en contacto con las paredes de la
cavidad.

35
ES
Limpieza y Mantenimiento del horno
La limpieza es el único mantenimiento
normalmente requerido.
¡Atención! El horno microondas debe limpiarse
regularmente, debiendo retirarse todos los restos
de comida. En el caso de que no se mantenga
debidamente limpio el horno microondas su
superficie puede deteriorarse, pudiendo
reducirse la vida útil del horno y
eventualmente resultar en una situación
peligrosa.
¡Atención! La limpieza debe ser efectuada con
el horno desconectado de la alimentación
eléctrica. Retire la clavija de la toma o
desconecte el circuito de alimentación del
horno.
No utilice productos de limpieza agresivos o
abrasivos, elementos que rayen o objetos
puntiagudos, pues pueden aparecer manchas.
No utilice aparatos de limpieza a alta presión o
a chorro de vapor.
Superficie frontal
Basta limpiar el horno con un paño húmedo. Si
está muy sucio, añada algunas gotas de
detergente de lavavajillas al agua de lavado.
Después limpie el horno con un paño seco.
En los hornos con frente de aluminio use un
producto limpiacristales suave y un paño suave
que no suelte hilos. Limpie en el sentido
horizontal sin ejercer presión sobre la superficie.
Retire inmediatamente las manchas de calcáreo,
grasa, almidón, clara de huevo. Debajo de estas
manchas puede producirse corrosión.
Evite la entrada de agua al interior del horno.
Interior del horno
Tras cada utilización, limpie las paredes interiores
con un paño húmedo porque así es más fácil
retirar las salpicaduras y la comida pegada.
Para retirar la suciedad más difícil, use un
producto de limpieza no agresivo. No utilice
sprays de horno ni otros productos de
limpieza agresivos o abrasivos.
Mantenga la puerta y el frente del horno
siempre bien limpios, de modo a asegurar un
correcto funcionamiento.
Evite la entrada de agua en los orificios de
ventilación del microondas.
Regularmente, retire el plato rotativo y el
respectivo soporte y limpie la base de la cavidad,
especialmente si se han derramado líquidos.
No conecte el horno sin el plato rotativo y el
respectivo soporte.
Si la cavidad del horno está muy sucia, coloque
un vaso con agua sobre el plato rotativo y conecte
el horno microondas durante 2 ó 3 minutos a
máxima potencia. El vapor liberado ablandará la
suciedad, que será fácilmente limpiada con un
paño suave.
Los olores desagradables (por ej., después de
cocinar pescado) pueden ser fácilmente
eliminados. Añada unas gotas de zumo de limón
o vinagre en una taza de agua. Introduzca una
cuchara de café en la taza para evitar una
ebullición retardada. Caliente el agua durante 2 a
3 minutos a potencia máxima de microondas.

36
ES
Limpieza y Mantenimiento del horno
Techo del Horno
Si el techo del horno está sucio, puede bajarse el
grill para facilitar la limpieza.
Espere hasta que el grill esté frío antes de
bajarlo, para evitar el peligro de quemadura.
Proceda de la siguiente forma:
1. Gire 180º el Soporte del Grill (1).
2. Baje suavemente el Grill (2). No use una
fuerza excesiva pues puede causar
daños.
3. Después de limpiar el techo coloque el Grill
(2) en su sitio, repitiendo el procedimiento
inverso.
AVISO IMPORTANTE: El soporte del grill (1)
puede caerse al rodarlo. Si esto sucede, inserte el
soporte del grill (1) en el orifício existente en el
techo del horno y ruédelo 90º hasta la posición de
soporte del grill (2).
La Tapa de Mica (3) situada en el techo debe
mantenerse siempre limpia. Los restos de
alimentos acumulados en la tapa de mica pueden
causar daños o provocar chispas.
No utilice productos de limpieza abrasivos ni
objetos puntiagudos.
No retire la tapa de mica, para evitar cualquier
riesgo.
La Tapa de Cristal de la Bombilla (4) está ubicada
en el techo del horno y puede ser retirada
fácilmente para limpieza. Para ello desenrósquela
y límpiela con agua y detergente de lavavajillas.
Accesorios
Limpie los accesorios tras cada utilización. En el
caso de que estén bastante sucios, ponga
primero a remojo y, a continuación, utilice un
cepillo y una esponja. Los accesorios pueden ser
lavados en el lavavajillas.
Asegúrese de que el plato rotativo y el respectivo
soporte están siempre limpios. No conecte el
horno sin el plato rotativo y el respectivo soporte.

37
ES
¿Qué hacer en caso de fallo de funcionamiento?
¡ATENCIÓN! Cualquier tipo de reparación sólo
puede ser ejecutada por técnicos
especializados. Toda reparación efectuada por
personas no autorizadas por el fabricante es
peligrosa.
Las siguientes situaciones pueden corregirse sin
contactar con la Asistencia Técnica.
¡El pantalla está apagado! Comprobar si:
- La indicación de las horas se ha
desconectado (ver capítulo sobre
Regulaciones Base).
¡No ocurre nada cuando se presionan las
teclas! Comprobar si:
- El Bloqueo de Seguridad está activo (ver
capítulo sobre Regulaciones Base).
- ¡El horno no funciona! Comprobar si:
- La clavija está correctamente conectada a la
toma.
- El circuito de alimentación del horno está
conectado.,
- La puerta está completamente cerrada. La
puerta tiene que cerrar de forma audible.
- Existen cuerpos extraños entre la puerta y el
frente de la cavidad.
¡Durante el funcionamiento del horno se
oyen ruidos extraños! Comprobar si:
- Existen arcos eléctricos en el interior del
horno generados por objetos metálicos
extraños (ver capítulo sobre el tipo de
Vajilla).
- La vajilla entra en contacto con las paredes
del horno.
- Existen pinchos o cucharas sueltos en el
interior del horno.
¡Los alimentos no se calientan o se
calientan muy lentamente! Comprobar si:
- Utilizó inadvertidamente vajilla de metal.
- Seleccionó el tiempo de funcionamiento y el
nivel de potencia adecuados.
- Colocó en el interior del horno una cantidad
mayor o más fría de alimentos que
habitualmente.
¡El alimento está excesivamente caliente,
reseco o quemado! Comprobar si
seleccionó el tiempo de funcionamiento y el
nivel de potencia adecuados.
¡Se oye un ruido después de acabar un
proceso! Esto no es un problema. El
ventilador de refrigeración sigue
funcionando durante algún tiempo. Cuando
la temperatura baja lo suficiente, el
ventilador se desconectará.
¡El horno funciona pero la iluminación
interior no enciende! Si todas las
funciones operan correctamente, es
probable que la bombilla esté fundida.
Puede seguir utilizando el aparato.
Sustitución de la Bombilla
Para sustituir la bombilla proceda de la siguiente
forma:
- Desconecte el horno de la alimentación
eléctrica. Retire la clavija de la toma o
desconecte el circuito de alimentación del
horno.
- Desenrosque y retire la tapa de cristal de la
bombilla (1).
- Retire la bombilla de halógeno (2).
¡Atención! La bombilla puede estar muy
caliente.
- Coloque una nueva bombilla de halógeno de
12V / 10W. ¡Atención! No toque
directamente la superficie de la bombilla
con los dedos porque puede dañarla.
Siga las instrucciones del fabricante de la
bombilla.
- Enrosque la tapa de cristal de la bombilla
(1).
- Vuelva a conectar el horno a la alimentación
eléctrica.

38
ES
Características técnicas
Especificaciones
Tensión AC ......................................................................................... (ver placa de características)
Potencia requerida ............................................................................. 3400 W
Potencia del grill. ................................................................................ 1500 W
Potencia del aire caliente ................................................................... 1600 W
Potencia de salida microondas. .......................................................... 1000 W
Frecuencia de microondas… .............................................................. 2450 MHz
Dimensiones exteriores (L A P). ....................................................... 595 455 542 mm
Dimensiones de la cavidad (L A P). .................................................. 420 210 390 mm
Capacidad del horno. ......................................................................... 38 ltr
Peso ................................................................................................... 35 kg
Indicaciones sobre protección medioambiental
Eliminación del embalaje
El embalaje está marcado con el Punto Verde.
Para eliminar todos los materiales de embalaje,
tales como el cartón, el poliuretano expandido y
las películas, utilice los contenedores adecuados.
De este modo se garantiza la reutilización de los
materiales de embalaje.
Eliminación de aparatos fuera de uso
La directiva Europea 2002/96/CE referente a la
gestión de Residuos de Aparatos Eléctricos y
Electrónicos (RAEE), prevé que los
electrodomésticos no deben ser tirados en el flujo
normal de los residuos sólidos urbanos.
Los aparatos desactualizados deben ser
recogidos separadamente para optimizar la tasa
de recuperación y reciclaje de los materiales que
los componen e impedir potenciales daños a la
salud humana y al medioambiente. El símbolo
constituido por un contenedor de basura marcado
con una cruz debe colocarse en todos los
productos para recordar la obligatoriedad de una
recogida separada.
Los consumidores deben contactar las
autoridades locales o los puntos de venta para
solicitar información referente al local adecuado
donde deben depositar los electrodomésticos
viejos.
Antes de eliminar su aparato, inutilícelo. Tire del
cable de alimentación, córtelo y elimínelo.

39
ES
Instrucciones de instalación
Antes de la instalación
Comprobar que la tensión de alimentación
indicada en la placa de características
corresponde a la tensión de su instalación.
Abra la puerta y retire todos los accesorios y el
material de embalaje.
¡No retire la tapa de mica situada en el techo de
la cavidad! Esa tapa evita que las grasas y los
trozos de alimentos causen daños al generador
de microondas.
¡Atención! La superficie frontal del horno puede
estar envuelta en una película de protección.
Antes de la primera utilización, retire esta película
cuidadosamente, empezando por la parte inferior.
Asegúrese de que el horno no está dañado.
Compruebe si la puerta del horno cierra
correctamente y si el interior de la puerta y el
frente de la cavidad no están dañadas. En caso
de daños, contacte el Servicio de Asistencia
Técnica.
NO UTILICE EL HORNO si el cable de
alimentación o la clavija están dañados, si el
horno no funciona correctamente o si ha sufrido
daños o se ha caído. Contacte el Servicio de
Asistencia Técnica.
Coloque el horno sobre una superficie plana y
estable. El horno no debe colocarse cerca de
elementos de calor, radios y televisores.
Durante la instalación, asegúrese de que el
cable de alimentación no entra en contacto
con humedad, objetos con aristas vivas o la
parte trasera del horno, pues las elevadas
temperaturas pueden dañar el cable.
Atención: tras la instalación del horno hay que
asegurar el acceso a la clavija.
Tras la instalación
El horno está equipado con un cable de
alimentación y con una clavija para corriente
monofásica.
En caso de conexión permanente, el horno debe
ser instalado por un técnico cualificado. En este
caso, la conexión debe hacerse a un circuito con
un dispositivo de corte omnipolar con separación
mínima de 3 mm entre contactos.
ATENCIÓN: EL HORNO TIENE QUE SER
OBLIGATORIAMENTE CONECTADO A TIERRA.
El fabricante y los revendedores declinan toda
responsabilidad por eventuales daños causados a
personas, animales o bienes en el caso de que se
compruebe la inobservancia de estas
instrucciones de instalación.
El horno sólo funciona si la puerta está
correctamente cerrada.
Antes de la primera utilización, limpie el interior
del horno y los accesorios, siguiendo las
indicaciones relativas a la limpieza que aparecen
en el punto “Limpieza y Mantenimiento del horno”.
Encaje el Acoplamiento en el centro de la cavidad
del horno y sobreponga el Anillo Rotativo y el
Plato Rotativo, hasta que este encaje. Siempre
que haga uso del microondas es necesario que,
tanto el plato rotativo como los respectivos
accesorios, estén en el interior y correctamente
colocados. El plato rotativo puede girar en
ambos sentidos.
Durante la instalación, seguir las dimensiones
descritas al final del manual.

40
PT
Índice
Informações de segurança .............................................................................................................. 41
Instruções de segurança .................................................................................................................. 45
As vantagens das Micro-ondas ....................................................................................................... 46
Descrição do forno ........................................................................................................................... 47
Descrição das Funções .................................................................................................................... 48
Regulações base .............................................................................................................................. 49
Funções Básicas .............................................................................................................................. 51
Funções especiais ............................................................................................................................ 56
Utilizando o Prato Tostador ............................................................................................................. 59
Durante o funcionamento... ............................................................................................................. 60
Descongelação ................................................................................................................................. 61
Cozinhar com Micro-ondas .............................................................................................................. 63
Cozinhar com Grill ............................................................................................................................ 65
Assar e cozer .................................................................................................................................... 68
Que tipo de loiça pode ser utilizada? ............................................................................................. 70
Limpeza e manutenção do forno ..................................................................................................... 72
O que fazer em caso de falha de funcionamento? ........................................................................ 74
Características técnicas ................................................................................................................... 75
Instruções de instalação .................................................................................................................. 76
Dimensões de Instalação ................................................................................................................. 77
Prezado cliente,
Obrigado por escolher este produto BARAZZA.
Pedimos-lhe que leia atentamente as instruções deste manual, pois isto permitir-lhe-á obter os melhores
resultados com o seu aparelho.
GUARDE A DOCUMENTAÇÃO DESTE APARELHO PARA CONSULTAS FUTURAS.
Mantenha este manual sempre à mão. Caso ceda o aparelho a terceiros, entregue-lhes também
as respetivas instruções!
Este manual de instruções também se encontra disponível em www.barazzasrl.it

41
PT
Informações de segurança
Leia atentamente as instruções fornecidas antes de instalar e
utilizar o aparelho. O fabricante não é responsável por lesões
ou danos resultantes da instalação e utilização incorrectas. Guarde
sempre as instruções junto do aparelho para futura referência.
SEGURANÇA PARA CRIANÇAS E PESSOAS VULNERÁVEIS
ADVERTENCIA! Risco de asfixia, ferimentos ou incapacidade
permanente
Este aparelho pode ser utilizado por crianças com 8 anos ou
mais e por pessoas com capacidades físicas, sensoriais ou
mentais reduzidas ou com pouca experiência e conhecimento se
forem supervisionadas por um adulto que seja responsável pela
sua segurança.
Não permita que as crianças brinquem com o aparelho.
Mantenha todos os materiais de embalagem fora do alcance das
crianças.
ADVERTÊNCIA: Mantenha as crianças afastadas do aparelho
quando este estiver a funcionar ou a arrefecer. As partes
acessíveis estão quentes.
Se o aparelho tiver um dispositivo de segurança para crianças,
recomendamos que o ative. É necessário vigiar as crianças com
menos de 3 anos quando se encontrarem perto do aparelho.
A limpeza e a manutenção básica não devem ser efetuadas por
crianças sem supervisão.
SEGURANÇA GERAL
Este aparelho destina-se exclusivamente a utilizações
domésticas ou semelhantes, tais como:
– áreas de cozinha destinadas ao pessoal em lojas, escritórios e
outros ambientes de trabalho;
– turismo rural;
– utilização por clientes de hotéis, motéis e outros ambientes
hoteleiros;
– ambientes do tipo residencial com dormida e pequeno-almoço."

42
PT
Informações de segurança
O interior do aparelho fica quente durante o funcionamento. Não
toque nos elementos de aquecimento do aparelho. Utilize
sempre luvas de forno para retirar e colocar acessórios ou
recipientes de ir ao forno.
ADVERTÊNCIA: Não aqueça líquidos ou outros alimentos em
recipientes fechados. Poderão explodir.
Utilize apenas utensílios adequados para utilizar em fornos
micro-ondas.
Quando aquecer alimentos em recipientes de plástico ou papel,
vigie o aparelho porque existe o risco de ignição.
O aparelho destina-se a aquecimento de alimentos e bebidas. A
secagem de alimentos ou vestuário, bem como o aquecimento
de botijas, chinelos, esponjas, tecidos húmidos e coisas
semelhantes representam risco de ferimentos, ignição e
incêndio.
ATENÇÃO! O forno não pode ser utilizado se:
- A porta não fechar corretamente;
- As dobradiças da porta estiverem danificadas;
- As superfícies de contacto entre a porta e a frente estiverem
danificadas;
- O vidro da janela estiver danificado;
- Houver frequentemente arco elétrico no interior, sem que haja a
presença de quaisquer objetos de metal.
O forno só pode voltar a ser utilizado depois de ter sido reparado
por um técnico do Serviço de Assistência Técnica.
Se observar saída de fumo, desligue o aparelho ou retire a ficha
da tomada e mantenha a porta fechada para abafar possíveis
chamas.
O aquecimento de bebidas no micro-ondas pode provocar
ebulições. Tenha cuidado quando manusear o recipiente.
O conteúdo de biberões e de boiões de comida para bebé deve
ser agitado e mexido e a sua temperatura deve ser verificada
antes de ser consumido, para evitar queimaduras.

43
PT
Informações de segurança
INSTALAÇÃO
Na instalação elétrica deve ser previsto um dispositivo que
permita separar o aparelho da corrente elétrica através de uma
abertura de contacto multipolar de no mínimo 3 mm. Como
dispositivos de separação são válidos p. ex. interruptores LS,
fusíveis (retirar os fusíveis roscados da tomada), Interruptores FI
e contactores. Esta instalação tem que cumprir com os
regulamentos vigentes.
Se a ligação elétrica se fizer com ficha e se esta ficar acessível
depois da instalação, neste caso não é necessário prever o
dispositivo de separação mencionado.
A proteção contra choques elétricos tem que ser garantida
através da instalação elétrica (conexão à terra).
ATENÇÃO: O forno tem que ser obrigatoriamente ligado à terra.
LIMPEZA
Deve limpar o aparelho e remover os resíduos de alimentos com
regularidade.
Se não mantiver o aparelho limpo, a superfície poderá deteriorar-
se e isso pode afetar negativamente a duração do aparelho e
resultar numa situação perigosa.
Não utilize produtos de limpeza abrasivos ou raspadores
metálicos afiados para limpar a porta de vidro porque podem
riscar a superfície e partir o vidro.
Não utilize uma máquina de limpar a vapor para limpar o
aparelho.
As superfícies de contacto da porta (a frente da cavidade e a
parte interior da porta) têm de ser mantidas bastante limpas, de
modo a garantir o correto funcionamento.
Por favor, tenha em atenção as indicações relativas à limpeza
constantes no ponto “Limpeza e Manutenção do forno”.

44
PT
Informações de segurança
REPARAÇÃO
ADVERTÊNCIA: Desligue a alimentação elétrica antes de
qualquer manutenção.
ADVERTÊNCIA: Apenas uma pessoa competente pode efetuar
ações de manutenção e reparação que envolvam a remoção da
cobertura que protege contra a exposição à energia de micro-
ondas.
ADVERTÊNCIA: Em caso de danos na porta ou nas juntas da
porta, não utilize o micro-ondas até que tenha sido reparado por
uma pessoa competente.
Se o cabo de alimentação estiver danificado, deve ser
substituído pelo fabricante, por um agente de assistência
autorizado ou por uma pessoa igualmente qualificada, para evitar
perigos.
As reparações e manutenções, especialmente em peças sob
tensão, só podem ser efetuadas por técnicos autorizados pelo
fabricante.

45
PT
Instruções de segurança
Atenção! Não aqueça álcool puro ou bebidas
alcoólicas no micro-ondas. RISCO DE FOGO!
Cuidado! De modo a evitar que os
alimentos aqueçam demasiado ou que
possam arder, é muito importante não
selecionar períodos de tempo longos, nem
níveis de potência demasiado elevados,
quando aquecer pequenas quantidades de
alimentos. Por exemplo, um pão pode arder
ao fim de 3 minutos se estiver definida uma
potência demasiado alta.
Para torrar, utilize somente a função Grill e
vigie sempre o forno. Se utilizar uma função
combinada para torrar, o pão incendeia-se
em muito pouco tempo.
Nunca entale os cabos de alimentação de
outros aparelhos elétricos na porta quente
do forno. O isolamento do cabo pode
derreter. Perigo de curto-circuito!
Cuidado ao aquecer líquidos!
Quando os líquidos (água, café, chá, leite,
etc.) se encontram quase em ponto de
ebulição dentro do forno e são retirados
repentinamente, estes podem ser projetados
para fora do recipiente. PERIGO DE
LESÕES E QUEIMADURAS!
Para evitar este tipo de situações quando
aquece líquidos, coloque uma colher de chá
ou uma vareta de vidro no recipiente.
Procedendo conforme as indicações
seguintes evita danos no forno e outras
situações perigosas:
Não coloque o forno em funcionamento sem
o acoplamento, o anel rotativo e o respetivo
prato.
Não ligue o micro-ondas em vazio. Este
pode ficar em sobrecarga e danificar-se,
caso não haja alimentos no interior. RISCO
DE DANOS!
Para efetuar testes de programação do
forno, coloque um copo de água no interior
do forno. A água absorverá as micro-ondas
e o forno não se danificará.
Não tape ou obstrua os orifícios de
ventilação.
Utilize apenas loiça adequada para micro-
ondas. Antes de utilizar loiça e recipientes
no micro-ondas, verifique se estes são
adequados (ver capítulo sobre o tipo de
loiça).
Não remova a tampa de mica situada no
teto da cavidade! Essa tampa evita que as
gorduras e pedaços de alimentos
danifiquem o gerador de micro-ondas.
Não guarde qualquer objeto inflamável no
interior do forno, pois pode arder se o ligar.
Não use o forno como despensa.
Não use o forno para fritar em banho de
óleo, pois é impossível controlar a
temperatura do óleo sob ação das micro-
ondas.
Não se apoie ou sente na porta aberta do
forno. Isto pode causar danos ao forno em
especial à zona das dobradiças. A porta
suporta um máximo de 8 kg.
O prato rotativo e as grelhas suportam uma
carga máxima de 8 kg. Não exceda esta
carga para evitar danos.

46
PT
As vantagens dos micro-ondas
No fogão convencional o calor radiado pelas
resistências ou queimadores de gás penetra
lentamente nos alimentos, de fora para dentro.
Existe por isso uma grande perda de energia no
aquecimento do ar, componentes do forno e
recipientes.
No micro-ondas o calor é gerado pelos próprios
alimentos, isto é o calor passa do interior para o
exterior. Não existe qualquer perda de calor para
o ar, paredes da cavidade e recipientes (caso
sejam adequados para fornos micro-ondas), ou
seja apenas o alimento é aquecido.
Resumidamente os fornos micro-ondas
apresentam as seguintes vantagens:
1. Economia de tempo de cozedura; em geral
redução de até 3/4 do tempo em relação à
cozedura convencional.
2. Descongelação ultra rápida de alimentos,
reduzindo o perigo de desenvolvimento de
bactérias.
3. Economia de energia.
4. Conservação do valor nutritivo dos alimentos
devido à redução do tempo de cozedura.
5. Fácil limpeza.
Modo de funcionamento do forno
micro-ondas
No forno micro-ondas existe uma válvula de alta
tensão designada por magnetrão que converte a
energia elétrica em energia de micro-ondas.
Estas ondas eletromagnéticas são canalizadas
para o interior do forno através de uma guia de
ondas e distribuídas por um espalhador metálico
ou através de um prato rotativo.
Dentro do forno as micro-ondas propagam-se em
todos os sentidos e são refletidas pelas paredes
metálicas, penetrando uniformemente nos
alimentos.
Porque é que os alimentos aquecem
A maior parte dos alimentos contêm água cujas
moléculas vibram por ação das micro-ondas.
A fricção entre moléculas origina calor que eleva
a temperatura dos alimentos, descongelando-os,
cozinhando-os ou mantendo-os quentes.
Como o calor se forma no interior dos alimentos:
Estes podem ser cozinhados sem/ou com
poucos líquidos ou gorduras;
Descongelar, aquecer ou cozinhar no forno
micro-ondas é mais rápido que num forno
convencional;
Conservam-se as vitaminas, os minerais e as
substâncias nutritivas;
Não se altera a cor natural, nem o aroma.
As micro-ondas passam através de porcelana,
vidro, cartão ou plástico mas não atravessam o
metal. Por esse motivo não utilize recipientes
metálicos ou recipientes que tenham partes
metálicas no forno de micro-ondas.
As micro-ondas são refletidas pelo metal...
... atravessam o vidro e a porcelana...
... e são absorvidos pelos alimentos.

47
PT
Descrição do forno
1. Painel de comandos
6. Acoplamento do motor
2. Vidro da porta
7. Anel rotativo
3. Estampagens suporte da bandeja
8. Prato rotativo
4. Linguete
9. Bandeja de vidro
5. Saída de ar quente
10. Grelha retangular
11. Prato tostador
23:15
1
2
6
5
4
3
800
160
3a
4a
5a
1. – Indicadores de funções
4a . – Display Peso / Potência
2. – Seletor de funções
5. – Tecla de seleção Hora / Duração
3. – Tecla de seleção Temperatura do Forno
5a. – Display Hora / Duração
3a. – Display Temperatura do forno
6. – Tecla Star / Stop / Bloqueio segurança
4. – Tecla de seleção de Peso / Potência

48
PT
Descrição das Funções
Símbolo
Função
Potência Saída
Micro-ondas
Alimentos
Micro-ondas
200 W
Descongelação delicada e gradual de alimentos.
Para descongelar e continuar a cozinhar.
400 W
Cozinhar carne, peixe e arroz
Descongelar rapidamente pequenas quantidades, alimento
para bebé, p.ex. biberão.
600 W
Aquecer e cozinhar pratos.
800 W
Cozinhar legumes e batatas.
Cozinhar soufflé e alimentos pré – confecionados.
Descongelar ou cozinhar pequenas quantidades.
1000 W
Aquecer líquidos.
Micro-ondas
+
Grelhador
200 W
Gratinar tostas.
400 W
Grelhar aves e carne.
600 W
Cozinhar empadões e gratinados.
Grelhador
---
Grelhar alimentos.
Grill
+
Ventilador
---
Grelhar carne e peixe, pedaços finos.
Grelhar aves.
Batatas – descongelar e dourar produtos ultracongelados.
Ar quente
---
Assar e cozer.
Micro-ondas
+
Ar quente
200-600 W
Assar rapidamente carne, peixe e aves.
Cozer bolos húmidos e secos.

49
PT
Regulações base
Acerto do relógio
Depois de o forno ter sido ligado à corrente ou
após uma falha de energia, o relógio fica a piscar
indicando que o valor da hora não é correto. Para
acertar o relógio proceda da seguinte forma:
1. Prima a tecla do Relógio. Os números das
horas começam a piscar.
2. Prima as teclas “-” e “+” para definir o valor das
horas.
3. Prima novamente a tecla do Relógio para
ajustar os minutos. Estes ficam a piscar.
4. Prima as teclas “-” e “+” para definir o valor dos
Minutos.
5. Para terminar, prima novamente a tecla do
Relógio.
Ocultar/Mostrar o Relógio
Se o relógio incomodar pode ocultá-lo
pressionando a tecla do Relógio durante 3
segundos. Os pontos que separam as horas dos
minutos permanecerão a piscar enquanto o
relógio estiver oculto.
Se pretender voltar a mostrar o relógio, prima
novamente a tecla do Relógio durante 3
segundos.
Bloqueio de Segurança
O funcionamento do forno pode ser bloqueado
(por exemplo, para impedir a utilização por parte
de crianças).
1. Para bloquear o forno, prima a tecla Stop
durante 3 segundos. Em seguida, é emitido
um sinal acústico e o mostrador apresenta
a palavra “SAFE”. O forno fica bloqueado,
não sendo permitida qualquer operação.
2.Para desbloquear o forno, prima novamente
a tecla Stop durante 3 segundos. Em
seguida é emitido um sinal acústico e no
mostrador surge novamente a indicação das
horas.

50
PT
Regulações base
Parar o prato rotativo
1. Para parar o prato rotativo prima em
simultâneo as teclas “+” e “Stop”.
2. Para colocar o prato rotativo novamente em
funcionamento, prima em simultâneo as
teclas “+” e “Stop”.

51
PT
Funções Básicas
Micro-ondas
Utilizar esta função para cozer e aquecer verduras, batatas, arroz, peixe e carne.
1. Prima a tecla de função Micro-ondas. A
tecla de função ilumina-se.
2. Prima a tecla de Seleção de Potência. O
sinalizador respetivo fica a piscar. Se não
premir esta tecla, o forno funciona à potência
de 800 W.
3. Prima as teclas de “-” e “+” para alterar a
potência de micro-ondas.
4. Prima a tecla de Seleção de Tempo para
alterar o tempo de funcionamento. O
sinalizador respetivo fica a funcionar.
5. Prima as teclas de “-” e “+” para definir o
tempo de funcionamento pretendidos, (por
exemplo 1 minuto).
6. Prima a tecla Start. O forno começa a
funcionar.
NOTA: Quando é selecionada a potência de
1000 W, o tempo de funcionamento está
limitado a um máximo de 15 minutos.
Micro-ondas – Início Rápido
Utilizar esta função para aquecer rapidamente alimentos com elevado conteúdo de água como água,
café, chá ou sopa não densa.
1. Prima a tecla Start. O forno começa a
funcionar na função Micro-ondas à potência
máxima durante 30 segundos.
2. Caso pretenda aumentar o tempo de
funcionamento prima novamente a tecla
Start. Cada vez que esta tecla for premida o
tempo de funcionamento será aumentado
em 30 segundos.
NOTA: Quando é selecionada a potência de
1000 W, o tempo de funcionamento está
limitado a um máximo de 15 minutos.
00:30
1000
1,2

52
PT
Funções Básicas
Grelhador
Utilizar esta função para dourar rapidamente a superfície dos alimentos.
1. Prima a tecla de função Grelhador. A tecla de
função ilumina-se.
2. Prima a tecla de Seleção de Tempo para
alterar o tempo de funcionamento. O
sinalizador respetivo fica a piscar.
3. Prima as teclas “-” e “+” para selecionar o
tempo pretendido (por exemplo 15 minutos).
4. Prima a tecla Start. O forno começa a
funcionar.
Micro-ondas + Grelhador
Utilizar esta função para cozinhar lasanha, aves, batatas assadas e gratinados.
1. Prima a tecla de função Micro-ondas +
Grelhador. A tecla de função ilumina-se.
2. Prima a tecla de Seleção de Potência, para
alterar a potência de micro-ondas. O
sinalizador respectivo fica a piscar. Se não
premir esta tecla, o forno funciona à potência
de 600 W.
3. Prima as teclas de “-” e “+” para selecionar a
potência pretendida.
4. Prima a tecla de Seleção de Tempo, para
alterar o tempo de funcionamento pretendido.
O sinalizador respetivo fica a piscar.
5. Prima as teclas “-” e “+” para selecionar o
tempo de funcionamento pretendido, (por
exemplo 10 minutos).
6. Prima a tecla Start. O forno começa a
funcionar.
NOTA: Na função combinada a potência das
micro-ondas está limitada a 600 W.

53
PT
Funções Básicas
Ar quente
Utilizar esta função para cozer e assar.
1. Prima a tecla de função Ar quente. A tecla
de função ilumina-se.
2. Prima a tecla de Seleção de Temperatura,
para alterar a potência de micro-ondas. O
sinalizador respetivo fica a piscar. Se não
premir esta tecla, o forno funciona à potência
de 160ºC.
3. Prima as teclas de “-” e “+” para selecionar a
temperatura pretendida.
4. Prima a tecla de Seleção de Tempo, para
alterar o tempo de funcionamento
pretendido. O sinalizador respetivo fica a
piscar.
5. Prima as teclas “-” e “+” para selecionar o
tempo de funcionamento pretendido, (por
exemplo 12 minutos).
6. Prima a tecla Start. O forno começa a
funcionar.
Micro-ondas + Ar quente
Utilizar esta função para cozer e assar.
1. Prima a tecla de função Micro-ondas + Ar
quente. A tecla de função ilumina-se.
2. Prima a tecla de Seleção de Temperatura,
para alterar a temperatura. O sinalizador
respetivo fica a piscar. Se não premir esta
tecla, o forno funciona à potência de 160ºC.
3. Prima as teclas de “-” e “+” para selecionar a
temperatura pretendida.
4. Prima a tecla de Seleção de Potência, para
alterar a potência de micro-ondas. O
sinalizador respetivo fica a piscar. Se não
premir esta tecla, o forno funciona à potência
de 400 W.
5. Prima as teclas de “-” e “+” para selecionar a
potência pretendida.
6. Prima a tecla de Seleção de Tempo, para
alterar o tempo de funcionamento
pretendido. O sinalizador respetivo fica a
piscar.
7. Prima as teclas “-” e “+” para selecionar o
tempo de funcionamento pretendido, (por
exemplo 12 minutos).
8. Prima a tecla Start. O forno começa a
funcionar
Nota: Durante o funcionamento combinado, a
potência das micro-ondas está limitada a 600
W.
20:00
160
4
1
3,5
6
2
20:00
400
160
6
4
1
3,5,7
8
2

54
PT
Funções Básicas
Grill com Ventilador
Utilizar esta função para dourar carne, peixe, aves ou batatas fritas.
1. Prima a tecla de função Grill + Ventilador.
A tecla de função ilumina-se.
2. Prima a tecla de Seleção de Temperatura,
para alterar a temperatura. O sinalizador
respetivo fica a piscar. Se não premir esta
tecla, o forno funciona à potência de 160ºC.
3. Prima as teclas de “-” e “+” para selecionar a
temperatura pretendida.
4. Prima a tecla de Seleção de Tempo, para
alterar o tempo de funcionamento
pretendido. O sinalizador respetivo fica a
piscar.
5. Prima as teclas “-” e “+” para selecionar o
tempo de funcionamento pretendido, (por
exemplo 12 minutos).
6. Prima a tecla Start. O forno começa a
funcionar.
Descongelação por tempo (manual)
Utilizar esta função para descongelar rapidamente qualquer tipo de alimento.
1. Prima a tecla de função Descongelação
por Tempo. A tecla de função ilumina-se.
2. Prima a tecla de Seleção de Tempo para
alterar o tempo de funcionamento. O
sinalizador respetivo fica a piscar.
3. Prima as teclas “-” e “+” para selecionar o
tempo de funcionamento pretendido, (por
exemplo 10 minutos).
4. Prima a tecla Start. O forno começa a
funcionar
20:00
160
4
1
3,5
6
2

55
PT
Funções Básicas
Descongelação por peso (automático)
Utilizar esta função para descongelar rapidamente carne, aves, peixe, fruta e pão.
1. Prima a tecla de função Descongelação por
Peso. A tecla de função ilumina-se.
2. Prima a tecla de Seleção de Tipo de
Alimento para alterar o tipo de alimento. Os
sinalizadores respetivos ficam a piscar.
3. Prima as teclas “-” e “+” para selecionar o
tempo pretendido, por exemplo “Pr 01” (ver
tabela seguinte).
4. Prima a tecla de Seleção de Peso para
alterar o peso do alimento. O sinalizador
respetivo fica a piscar.
5. Prima as teclas “-” e “+” para selecionar o
peso pretendido.
6. Prima a tecla Start. O forno começa a
funcionar.
Nota: Vire os alimentos sempre que o forno
emitir um sinal acústico e no mostrador
estiver a piscar a seguinte indicação: .
A seguinte tabela apresenta os programas da função descongelação por peso, com indicação dos
intervalos de peso, tempos de descongelação e de repouso (de modo a garantir que o alimento alcance
uma temperatura uniforme).
Programa
Alimento
Peso (g)
Tempo (min)
Tempo de repouso (min)
Pr 01
Carne
100 – 2000
2 – 43
20 – 30
Pr 02
Aves
100 – 2500
2 – 58
20 – 30
Pr 03
Peixe
100 – 2000
2 – 40
20 – 30
Pr 04
Fruta
100 – 500
2 – 13
10 – 20
Pr 05
Pão
100 – 800
2 – 19
10 – 20
Nota importante: ver “Indicações gerais para a descongelação”.

56
PT
Funções especiais
Função Especial P1: Aquecer alimentos
Utilizar esta função para aquecer vários tipos de alimentos.
1. Prima a tecla de função Especial P1. A tecla
de função ilumina-se.
2. Prima a tecla de Seleção de Tipo de
Alimento para alterar o tipo de alimento. Os
sinalizadores respetivos ficam a piscar.
3. Prima as teclas “-” e “+” para selecionar o
tempo pretendido, por exemplo “A 01” (ver
tabela seguinte).
4. Prima a tecla de Seleção de Peso para
alterar o peso do alimento. O sinalizador
respetivo fica a piscar.
5. Prima as teclas “-” e “+” para selecionar o
peso pretendido.
6. Prima a tecla Start. O forno começa a
funcionar.
A seguinte tabela apresenta os programas da Função Especial P1, com indicação dos intervalos de
peso, tempos de funcionamento e de repouso (de modo a garantir que o alimento alcance uma
temperatura uniforme).
Programa
Alimento
Peso (g)
Tempo (min)
Recomendações - Tempo de
repouso
A 01
Sopa
200 – 1500
3 – 15
Virar 1 – 2x, tapar,1-2 min.
A 02
Pratos pré-confecionados
alimentos densos
200 – 1500
3 – 20
Virar 1 – 2x, tapar 1-2 min.
A 03
Pratos com vários alimentos
Alimentos menos densos
200 – 1500
3 – 18
Virar 1 – 2x, tapar 1-2 min.
A 04
Legumes
200 – 1500
2,6 – 14
Virar 1 – 2x, tapar 1-2 min.
Notas importantes:
Use sempre recipientes adequados para
micro-ondas e uma tampa ou cobertura de
forma a evitar a perda de líquidos.
Mexa ou vire os alimentos várias vezes
durante o aquecimento.
O tempo requerido para aquecer os
alimentos depende da sua temperatura
inicial. Os alimentos retirados diretamente
do frigorífico demoram mais tempo a
aquecer que os alimentos que estejam à
temperatura ambiente. Se a temperatura
do alimento não corresponder ao desejado
selecione um peso maior ou menor da
próxima vez que aquecer o alimento.
Depois de aquecer mexa os alimentos e deixe
repousar durante algum tempo para
uniformizar a temperatura.
Atenção! Após o aquecimento o recipiente pode
estar muito quente. Apesar de as micro-ondas
não aquecerem a maioria dos recipientes, estes
podem aquecer por transmissão de calor dos
alimentos.

57
PT
Funções especiais
Função Especial P2: Cozinhar
Utilizar esta função para cozinhar alimentos frescos
1. Prima a tecla de função Especial P2. A tecla
de função ilumina-se.
2. Prima a tecla de Seleção de Tipo de
Alimento para alterar o tipo de alimento. Os
sinalizadores respetivos ficam a piscar.
3. Prima as teclas “-” e “+” para selecionar o
tempo pretendido, por exemplo “b 01” (ver
tabela seguinte).
4. Prima a tecla de Seleção de Peso para
alterar o peso do alimento. O sinalizador
respetivo fica a piscar.
5. Prima as teclas “-” e “+” para selecionar o
peso pretendido.
6. Prima a tecla Start. O forno começa a
funcionar.
A seguinte tabela apresenta os programas da função Especial P2, com indicação dos intervalos de
peso, tempos de funcionamento e de repouso (de modo a garantir que o alimento alcance uma
temperatura uniforme).
Programa
Alimento
Peso (g)
Tempo (min)
Recomendações
b 01
Batatas
200 – 1000
4 – 17
Virar 1 – 2x, tapar
b 02
Legumes
200 – 1000
4 – 15
Virar 1 – 2x, tapar
b 03
Arroz
200 – 500
13 – 20
1 parte de arroz, 2 partes de
água, tapar
b 04
Peixe
200 – 1000
4 – 13
Tapar
Notas importantes:
Use sempre recipientes adequados para
micro-ondas e uma tampa ou cobertura de
forma a evitar a perda de líquidos.
Mexa ou vire os alimentos várias vezes
durante o aquecimento.
Atenção! Após o cozinhado o recipiente
pode estar muito quente. Apesar de as micro-
ondas não aquecerem a maioria dos
recipientes, estes podem aquecer por
transmissão de calor dos alimentos.
Instruções de preparação:
Pedaços de peixe – Adicione 1 a 3 colheres
de sopa de água ou de sumo de limão.
Arroz – Adicione uma quantidade de água
equivalente ao dobro da quantidade de arroz.
Batatas com pele – Use batatas do mesmo
tamanho. Lave-as e perfure a casca várias
vezes. Adicione 1 a 3 colheres de sopa de
água.
Batatas sem pele e Legumes Frescos– Corte
em pedaços do mesmo tamanho. Adicione
uma colher de sopa de água por cada 100 g
de legumes e sal a gosto.
b 01
200
2
4
1
3,5
6

58
PT
Funções especiais
Função Especial P3: Descongelar & Gratinar
Utilizar esta função para descongelar e gratinar vários tipos de alimentos.
1. Prima a tecla de função Especial P3. A tecla
de função ilumina-se.
2. Prima a tecla de Seleção de Tipo de
Alimento para alterar o tipo de alimento. Os
sinalizadores respetivos ficam a piscar.
3. Prima as teclas “-” e “+” para selecionar o
tempo pretendido, por exemplo “C 01” (ver
tabela seguinte).
4. Prima a tecla de Seleção de Peso para
alterar o peso do alimento. O sinalizador
respetivo fica a piscar.
5. Prima as teclas “-” e “+” para selecionar o
peso pretendido.
6. Prima a tecla Start. O forno começa a
funcionar.
A seguinte tabela apresenta os programas da função Especial P3, com indicação dos intervalos de
peso e tempos de funcionamento (de modo a garantir que o alimento alcance uma temperatura
uniforme).
Programa
Alimento
Peso (g)
Tempo (min)
Recomendações
C 01
Pizza
300 – 550
8-12
Trempe
C 02
Pré-confecionados
350 – 500
8 – 14
Virar 1x, Tapar
C 03
Derivados de batata
200 – 450
10 – 12
Bandeja de vidro
Notas importantes:
Utilize sempre louça adequada para fornos
micro-ondas e resistente ao calor (por
exemplo, formas e travessas). O grelhador
atinge temperaturas muito elevadas. Utilize
sempre uma tampa com o programa C 02,
para evitar a perda de líquidos.
Atenção! Após o cozinhado o recipiente pode
estar muito quente. Embora os fornos micro-
ondas não aqueçam a maioria dos recipientes, o
calor gerado pela grelha pode deixá-los muito
quentes.
Instruções de preparação:
Pizza congelada – Utilizar pizzas congeladas
pré cozidas e pizzas-baguete.
Alimentos pré-confecionados ultracongelados –
p.ex lasanha, canneloni, souflé de camarão,
todos congelados. Tapar sempre.
Derivados de Batata congelados – As batatas
fritas, os croquetes de batata e as batatas
salteadas têm que ser adequados para
preparação no forno.

59
PT
Utilizando o Prato Tostador
Normalmente, quando se cozinham alimentos
como pizzas ou tartes/pastéis com grill ou com
Micro-ondas, a massa fica húmida. Isto pode ser
evitado utilizando o prato tostador. Como a parte
inferior do prato tostador atinge temperaturas
altas, a parte exterior do alimento torna-se
estaladiça e dourada.
O prato tostador também pode utilizado para
cozinhar bacon, ovos, salchichas, etc.
NOTAS MUITO IMPORTANTES:
Utilizar sempre luvas especiais para forno,
já que o prato tostador atinge temperaturas
elevadas.
Nunca colocar o prato tostador no Micro-
ondas sem bandeja.
Não colocar recipientes no prato tostador
que não sejam resistentes ao calor (por
exemplo: recipientes em plástico).
Como cozinhar com o prato tostador:
1. Pré aquecer o prato tostador selecionando a
função de Micro-ondas + Grill com tempo de 3
a 5 minutos com potência de Micro-ondas de
600W.
2. Espalhar óleo/azeite sobre o prato tostador
afim de obter um bom dourado dos alimentos.
3. Colocar os alimentos diretamente no prato
tostador. Pode colocar alimentos congelados
(como pizza congelada) sem descongelar
previamente.
4. Colocar o prato tostador sobre a bandeja do
forno Micro-ondas.
5. Selecionar as funções de Micro-ondas + Grill e
o tempo de cozedura. Os Tempos de
Cozedura e de Espera recomendados estão
descritos na tabela seguinte.
Alimento
Peso (g)
Tempo de
Cozedura (min)
Tempo de
Espera (min.)
Recomendações
Pizza
200
4-5
---
O tempo de cozedura é aplicável a
pizzas de massa fina.
Para pizzas pré cozinhadas,
aumentar o tempo entre 1 a 2
minutos.
300
5-6
---
400
7-8
---
Quiches e
tartes
200
3-4
2-3
300
5-6
2-3
Hambúrgueres
150-200
8-10
5-8
Virar 2x
Batatas fritas
de forno
400
6-8
---
Virar 1x
NOTAS MUITO IMPORTANTES:
Como o prato tostador tem uma capa anti-
aderente, esta pode ser danificada se for utilizada
de maneira incorreta.
Nunca cortar alimentos sobre o prato. Retirar os
alimentos do prato antes de cortar.
Como limpar o prato tostador:
A melhor maneira de limpar o prato tostador é
lavá-lo com água quente e detergente e enxaguar
com água limpa. Não utilizar escovas ou
abrasivos já que podem danificar a parte superior.

60
PT
Durante o funcionamento...
Interrupção de um cozinhado
Pode interromper o processo de cozinhado em
qualquer altura pressionando uma vez a tecla
Start/Stop ou abrindo a porta do forno.
Em qualquer dos casos:
Cessa imediatamente a emissão de micro-
ondas.
O grelhador é desativado mas mantém uma
temperatura muito elevada. Perigo de
queimadura!
O temporizador para e o mostrador indica o
tempo de funcionamento restante.
Se pretender pode então:
1. Virar ou mexer os alimentos, para obter um
cozinhado uniforme.
2. Alterar os parâmetros do processo.
3. Cancelar o processo, pressionando a tecla
Start/Stop.
Para retomar o processo, feche a porta e prima a
tecla Start/Stop.
Alteração dos parâmetros
Os parâmetros de funcionamento (tempo, peso,
potência, etc.) só podem ser alterados quando o
processo de cozinhado está interrompido,
procedendo da seguinte forma:
1. Para alterar o tempo, prima a tecla “-” e “+”.
O novo tempo definido é assumido
imediatamente.
2. Para alterar a potência, prima a tecla de
Seleção do Peso/Potência. O sinalizador
respetivo fica a piscar. Altere o parâmetro
premindo a tecla “-” e “+” valide
pressionando novamente a tecla de Seleção
do Peso/Potência.
Cancelar um cozinhado
Se pretender cancelar o processo de cozinhado,
prima a tecla Start/Stop durante 3 segundos.
Em seguida, é emitido um sinal acústico e no
mostrador aparece a indicação das horas.
Fim de um cozinhado
No final do processo são emitidos 3 sinais
acústicos e no mostrador aparece a indicação
“End”.
Os sinais acústicos são repetidos a cada 30
segundos, até que a porta seja aberta ou a tecla
Start/Stop seja premida.

61
PT
Descongelação
A seguinte tabela apresenta, de um modo geral,
os diferentes tempos de descongelação e de
repouso (de modo a garantir que o alimento
alcance uma temperatura uniforme) em função
do tipo e do peso dos alimentos e também as
respetivas recomendações.
Alimento
Peso (g)
Tempo de
descongelação (min)
Tempo de
repouso (min)
Observação
Pedaços de carne,
porco, vitela, vaca
100
2-3
5-10
Virar 1 x
200
4-5
5-10
Virar 1 x
500
10-12
10-15
Virar 2 x
1000
21-23
20-30
Virar 2 x
1500
32-34
20-30
Virar 2 x
2000
43-45
25-35
Virar 3 x
Carne estufada
500
8-10
10-15
Virar 2 x
1000
17-19
20-30
Virar 3 x
Carne picada
100
2-4
10-15
Virar 1 x
500
10-14
20-30
Virar 2 x
Salsicha
200
4-6
10-15
Virar 1 x
500
9-12
15-20
Virar 2 x
Aves, partes de aves
250
5-6
5-10
Virar 1 x
Frango
1000
20-24
20-30
Virar 2 x
Frango pequeno
2500
38-42
25-35
Virar 3 x
Filetes de peixe
200
4-5
5-10
Virar 1 x
Truta
250
5-6
5-10
Virar 1 x
Camarão
100
2-3
5-10
Virar 1 x
500
8-11
15-20
Virar 2 x
Fruta
200
4-5
5-10
Virar 1 x
300
8-9
5-10
Virar 1 x
500
11-14
10-20
Virar 2 x
Pão
200
4-5
5-10
Virar 1 x
500
10-12
10-15
Virar 1 x
800
15-17
10-20
Virar 2 x
Manteiga
250
8-10
10-15
Requeijão
250
6-8
10-15
Natas
250
7-8
10-15

62
PT
Descongelação
Indicações gerais para a descongelação
1. Para a descongelação, utilize apenas loiça
adequada para micro-ondas (porcelana,
vidro, plástico apropriado).
2. A função descongelação por peso e as
tabelas referem-se à descongelação de
alimentos crus.
3. O tempo de descongelação depende da
quantidade e da altura do alimento. Quando
congelar os alimentos tenha em conta o
processo de descongelação. Distribua o
alimento em partes iguais ao tamanho do
recipiente.
4. Distribua o melhor possível o alimento no
interior do forno. As partes mais grossas de
peixe ou das coxas de frango devem estar
viradas para fora. Pode proteger as partes
mais delicadas com uma folha de alumínio.
Importante: a folha de alumínio não pode
entrar em contacto com as paredes da
cavidade, pois pode causar arco elétrico.
5. As peças mais densas devem ser viradas
várias vezes.
6. Distribua o alimento congelado do modo
mais uniforme possível, pois as partes mais
estreitas e finas descongelam mais
rapidamente do que as partes mais grossas
e altas.
7. Os alimentos ricos em gordura como a
manteiga, o requeijão e as natas não devem
ser totalmente descongeladas. Se estiverem
à temperatura ambiente, em poucos minutos
estarão prontos a ser servidos. Antes de
utilizar natas ultracongeladas, mexa-as
primeiro.
8. Coloque as aves sobre um prato virado para
que o molho da carne possa escorrer mais
facilmente.
9. O pão deve ser envolvido num guardanapo,
para não secar demasiado.
10. Vire os alimentos em intervalos regulares.
11. Retire o alimento congelado da embalagem e
não se esqueça de remover os clips de metal,
caso existam. No caso dos recipientes que
servem para guardar os alimentos no
congelador e que também podem ser
utilizados para aquecer e cozinhar, retire
somente a tampa. Nos restantes casos,
coloque os alimentos em recipientes
adequados para fornos micro-ondas.
12. O líquido resultante da descongelação,
principalmente das aves, deve ser deitado
fora e em caso algum entrar em contacto com
os restantes alimentos.
13. Tenha atenção que na função de
descongelação é necessário um tempo de
repouso, até o alimento estar completamente
descongelado.

63
PT
Cozinhar com micro-ondas
Atenção! Leia atentamente o capítulo
“Indicações de Segurança” antes de cozinhar
com micro-ondas.
Siga as seguintes recomendações ao cozinhar
com micro-ondas:
Antes de aquecer ou cozinhar alimentos
com casca ou pele (p. ex. maçãs, tomates,
batatas, salsichas) pique-os, para que não
rebentem. Corte o alimento antes de iniciar
a sua preparação
Antes de utilizar um recipiente, verifique se
o mesmo é adequado para micro-ondas (ver
capítulo sobre o tipo de loiça).
Ao confecionar alimentos com pouca
humidade (p. ex. descongelar pão, fazer
pipocas, etc.) dá-se uma evaporação rápida.
O forno funciona deste modo em vazio e o
alimento pode carbonizar. Esta situação
pode causar danos no forno e na loiça.
Deste modo, ajuste apenas o tempo
necessário e vigie o cozinhado.
Não é possível aquecer grandes
quantidades de óleo (fritar) no micro-ondas.
Retire os pratos pré-confecionados das
embalagens, pois estas nem sempre são
resistentes ao calor. Siga as instruções
indicadas pelo fabricante.
• Se tiver vários recipientes, como por
exemplo chávenas, disponha-os
uniformemente sobre o prato rotativo.
Não feche os sacos de plástico com molas
de metal, mas sim com molas de plástico.
Perfure várias vezes o saco para que o
vapor possa sair facilmente.
Ao aquecer ou cozinhar alimentos certifique-
se de que atingem uma temperatura
mínima de 70°C.
Durante o cozinhado pode haver formação
de vapor de água no vidro da porta e
eventualmente acabar por pingar. Esta
situação é normal e pode ser mesmo mais
significativa se a temperatura ambiente for
baixa. A segurança do forno não é posta em
causa. Depois do cozinhado limpe a água
resultante da condensação.
Quando aquecer líquidos, utilize recipientes
com uma grande abertura, para que o
vapor possa sair facilmente.
Prepare os alimentos de acordo com as
indicações e tenha em atenção os tempos de
cozinhado e níveis de potência indicados nas
tabelas.
Tenha em atenção que os valores referidos são
apenas indicativos e que podem variar em função
do estado inicial, da temperatura, da humidade e
do tipo de alimento. É aconselhado ajustar os
tempos e os níveis de potência a cada situação.
Em função do alimento é necessário aumentar ou
encurtar os tempos cozinhado ou então elevar ou
baixar o nível de potência.
Cozinhar com micro-ondas...
1. Quanto maior for a quantidade dos
alimentos, mais longo é o tempo de
cozinhado. Tenha em atenção que:
Dobro da quantidade » dobro do tempo
Metade da quantidade » metade do
tempo
2. Quanto menor a temperatura, maior é o
tempo de cozinhado.
3. Os alimentos líquidos aquecem mais
rapidamente.
4. Uma boa distribuição dos alimentos sobre o
prato rotativo facilita um cozinhado uniforme.
Se colocar os alimentos densos na parte
exterior do prato e os menos densos no
centro do prato, poderá aquecer diferentes
tipos de alimentos em simultâneo.
5. A porta do forno pode ser aberta em
qualquer momento. Ele desliga-se
automaticamente. O micro-ondas só
continua a funcionar se fechar a porta e
prima novamente a tecla START.
6. Os alimentos tapados requerem menos
tempo de cozinhado, para além de
preservarem melhor as próprias
características. A tampa tem de deixar
passar as micro-ondas e ter pequenos
orifícios que permitam a saída do vapor.

64
PT
Cozinhar com micro-ondas
Tabelas e sugestões – Cozinhar legumes
Alimento
Quantidade
(g)
Adição de
líquidos
Potência
(Watt)
Tempo
(min.)
Tempo de
repouso
(min.)
Indicações
Couve-flor
Brócolos
Cogumelos
500
300
250
100 ml
50 ml
25 ml
800
800
800
9-11
6-8
6-8
2-3
2-3
2-3
Cortar às rodelas. Tapar
Virar 1x
Ervilhas &
cenouras
Cenouras
congeladas
300
250
100 ml
25 ml
800
800
7-9
8-10
2-3
2-3
Cortar aos cubos ou às
rodelas. Tapar
Virar 1x
Batatas
250
25 ml
800
5-7
2-3
Descascar, cortar em partes
iguais. Tapar Virar 1x
Paprica
Alho-porro
250
250
25 ml
50 ml
800
800
5-7
5-7
2-3
2-3
Cortar aos pedaços ou às
rodelas. Tapar Virar 1x
Couve-de-
bruxelas
congelada
300
50 ml
800
6-8
2-3
Tapar
Virar 1x
Chucrute
250
25 ml
800
8-10
2-3
Tapar. Virar 1x
Tabelas e sugestões – Cozinhar peixe
Alimento
Quantidade
(g)
Potência
(Watt)
Tempo
(min.)
Tempo em
repouso
(min.)
Indicações
Filetes de peixe
500
600
10-12
3
Cozinhar tapado. Virar após ter decorrido
metade do tempo.
Peixe inteiro
800
800
400
2-3
7-9
2-3
Cozinhar tapado. Virar após ter decorrido
metade do tempo. Eventualmente cobrir
as extremidades finas do peixe.

65
PT
Cozinhar com Grill
Para obter bons resultados com o Grill, utilize a
grelha fornecida em conjunto com o forno. A
grelha deve ser colocada sobre a Bandeja
Retangular em duas posições possíveis para
obter diferentes alturas para grelhar (ver imagem
abaixo).
Posicione a grelha de modo a não entrar em
contacto com as superfícies metálicas da
cavidade, pois existe o perigo de arco elétrico,
o que pode danificar o forno.
INDICAÇÕES IMPORTANTES:
1. Quando o grill é utilizado pela primeira vez
verifica-se a formação de algum fumo e cheiro,
que resultam da utilização de óleos durante o
processo de fabrico.
2. O vidro da porta atinge temperaturas muito
altas durante a utilização do grill. Mantenha as
crianças afastadas.
3. Durante o funcionamento do grill as paredes da
cavidade e a grelha atingem temperaturas
muito elevadas. Aconselha-se a utilização de
luvas de cozinha.
4. Durante uma utilização mais prolongada do grill
é normal que as resistências se desliguem
temporariamente, devido ao termóstato de
segurança.
5. Importante! Quando os alimentos são
grelhados ou cozinhados em recipientes é
necessário verificar se o recipiente é ou não
adequado. Ver capítulo sobre o tipo de loiça!
6. Ao utilizar o grill é possível que os salpicos de
gordura cheguem à resistência e fiquem
queimados. Esta é uma situação normal e não
representa qualquer tipo de falha de
funcionamento.
7. Após cada cozinhado, limpe o interior e os
acessórios, para que a sujidade não fique
incrustada.

66
PT
Cozinhar com Grill
Tabelas e sugestões – Grill sem micro-ondas
Alimento
Quantidade (g)
Tempo
(min.)
Indicações
Peixe
Dourada
Sardinha/ruivo
800
6-8 unid.
18-24
15-20
Barre ligeiramente com manteiga. Após ter decorrido
metade do tempo vire e barre com condimentos.
Carne
Salsicha
6-8 unid.
22-26
Pique após ter decorrido metade do tempo de
cozinhado e vire.
Hambúrguer
congelado
3 unid.
18-20
Virar após metade do tempo.
Entrecosto (aprox. 3
cm de espessura)
400
25-30
Pincelar com óleo. Após ter decorrido metade do
tempo unte e vire.
Restantes
Tostas
4 unid.
1½-3
Vigie as tostas. Virar
Gratinar sandes
2 unid.
5-10
Vigie o gratinado.
Aqueça previamente o grill durante 2 minutos. Se
não houver qualquer indicação em contrário,
utilize a grelha. Coloque a trempe sobre um
recipiente para que a água e a gordura possam
pingar. Os tempos referidos são meramente
indicativos e podem variar em função da
composição e da quantidade do alimento, bem
como do estado pretendido. O peixe e a carne
adquirem um ótimo sabor se, antes de grelhar,
pincelar com óleo vegetal, especiarias e ervas e
deixar finalmente a marinar durante algumas
horas. Adicione o sal somente depois de grelhar.
As salsichas não rebentam se as picar
anteriormente com um garfo.
Após ter decorrido metade do tempo, vigie o
cozinhado e se necessário vire ou pincele com
óleo. O grill é especialmente adequado para
confecionar pedaços de carne e peixe finos. Os
pedaços de carne finos só têm de ser virados
uma vez, os mais grossos várias vezes. No caso
do peixe é aconselhado unir as duas
extremidades do mesmo, boca com o rabo, e
colocá-lo sobre a grelha.

67
PT
Cozinhar com Grill
Tabelas e sugestões – Micro-ondas + Grill
A função micro-ondas com grill é ideal para
cozinhar rapidamente e, ao mesmo tempo, dourar
alimentos. Para além disso, pode também
gratinar os alimentos.
O micro-ondas e o grill funcionam
simultaneamente. As micro-ondas cozinham e o
grill tosta.
Prato
Quantidade (g)
Loiça
Potência
(Watt)
Tempo (min.)
Tempo de
repouso
(min.)
Massa gratinada
500
Forma baixa
400
12-17
3-5
Batatas gratinadas
800
Forma baixa
600
20-22
3-5
Lasanha
aprox. 800
Forma baixa
600
15-20
3-5
Requeijão gratinado
aprox. 500
Forma baixa
400
18-20
3-5
2 pernas de frango,
fresco (sobre a grelha)
cada 200
Forma baixa
400
10-15
3-5
Aves
aprox. 1000
Recipiente baixo e
largo
400
35-40
3-5
Gratinar sopa de cebola
2 Chávenas de
200
Malgas de sopa
400
2-4
3-5
Antes de utilizar loiça e recipientes no micro-
ondas, verifique se estes são adequados. Utilize
somente loiça adequada para micro-ondas.
A loiça a ser utilizada na função combinado tem
de ser adequada para micro-ondas e para
grelhador. Ver capítulo sobre o tipo de loiça!
Tenha em atenção que os valores referidos são
apenas indicativos e que podem variar em função
estado inicial, da temperatura, da humidade e do
tipo de alimento.
Se o tempo não foi suficiente para dourar bem o
alimento, ponha-o durante mais 5 ou 10 min. na
função grelhador.
Tenha em atenção os tempos de repouso e vire
os pedaços de aves.
Os valores indicados nas tabelas são válidos
tendo em atenção que a cavidade está fria (não é
necessário aquecer previamente).

68
PT
Assar e cozer
Tabelas e sugestões – Preparação de carne e bolos
Micro-ondas / Ar quente
Alimento
Quantidad
e (g)
Potência
(Watt)
Temperatura
ºC
Tempo
(min)
Tempo de
repouso (min)
Indicações
Rosbife
1000-1500
400
200
30-40
20
Recipiente sem tampa,
virar 1x
Lombo de porco/
Costeletas ou
ossos
Porco assado
800-1000
200
180-190
50-60
20
Recipiente sem tampa,
virar 1x
Frango, inteiro
1000/1200
400
200
30-40
10
Recipiente sem tampa,.
Parte do peito virada
para baixo. Virar 1x.
Frango em
pedaços
500-1000
400
200
25-35
10
Recipiente sem tampa.
Colocar os pedaços com
a pele virada para baixo.
Virar 1X.
Vitela assada
1500/2000
200
180
60-65
20
Recipiente com tampa,
virar 1-2x, depois de virar
continue com o
cozinhado sem o tapar
Carne de vaca
assada
1500-1800
200
200
80-90
20
Recipiente com tampa,
virar 1-2x
Micro-ondas / Cozer
Alimento
Potência
(Watt)
Temperatura
ºC
Tempo
(min)
Tempo de
repouso (min)
Indicações
Bolo de
chocolate/ cereja
200
200
30
5-10
Prato rotativo, trempe pequena,
Forma de mola, Ø 28 cm
Cheesecake com
fruta
400
180
40-45
5-10
Prato rotativo, trempe pequena,
Forma de mola, Ø 28 cm
Tarte de maçã
200
185
40-45
5-10
Prato rotativo, trempe pequena,
Forma de mola, Ø 28 cm
Cheesecake com
streusel
400
180
40-50
5-10
Prato rotativo, trempe pequena,
Forma de mola, Ø 26 cm
Bolo de nozes
200
170
30-35
5-10
Prato rotativo,
Forma de buraco
Conselhos sobre como assar
Vire as peças de carne a meio do tempo de
cozedura. Quando o assado estiver pronto,
deverá repousar ainda 20 minutos no forno
desligado e fechado. Deste modo, o suco da
carne ficará melhor distribuído.
A temperatura e o tempo de assadura dependem
do tipo de alimento e da respetiva quantidade.
Se não houver indicação do peso do assado na
tabela escolha a indicação correspondente ao
peso imediatamente mais baixo e prolongue o
tempo.
Conselhos sobre a loiça
Verifique se a loiça cabe no interior do forno
Recipientes de vidro quentes devem ser
colocados sobre um pano de cozinha seco. Se
estes recipientes forem colocados sobre uma
superfície fria ou molhada, o vidro pode estalar e
partir-se. Use pegas para retirar a loiça do forno.

69
PT
Cozer
Tabelas e sugestões – Cozer/ Ar quente
Alimento
Recipiente
Nível
Temperatura
Tempo (Min.)
Bolo de noz
Forma de buraco
Prato rotativo
160
50-60
Tarte de fruta
Forma de mola Ø 28 cm
Prato rotativo
160
55-60
Bolo inglês
Forma de buraco
Prato rotativo
160
55-65
Trates salgadas
Forma redonda em vidro
Prato rotativo
190-200
40-60
Bolo simples (pão de ló)
Forma de mola Ø 26 cm
Prato rotativo
160
30-40
Tronco
Forma em vidro para bolos
1
200
12-15
Bolo de cereja
Forma em vidro para bolos
1
180-190
40-50
Conselhos sobre as formas para bolos
As formas mais utilizadas são as pretas de metal.
Se utilizar adicionalmente o micro-ondas, utilize
formas para bolos de vidro, cerâmica ou plástico.
Estas têm de ser resistentes a temperaturas até
250ºC. Se utilizar este tipo de formas, os bolos
ficam menos tostados.
Conselhos sobre como cozinhar bolos
A temperatura e cozedura do bolo dependem da
qualidade e quantidade da massa. Tente,
primeiro, com um valor inferior e da próxima vez,
regule, se necessário, uma temperatura mais
elevada. Uma temperatura mais baixa irá permitir
obter um tostado mais uniforme. Coloque sempre
a forma no centro da bandeja ou sobre o prato
rotativo.
Sugestões para cozer
Como verificar se o bolo está cozido:
Espete um palito na parte mais alta do bolo. Se a
massa não ficar colada ao palito, o bolo está
pronto.
O bolo fica muito escuro
Da próxima vez selecione uma temperatura mais
baixa e deixe cozer o bolo durante mais tempo.
O bolo fica muito seco:
Faça pequenos orifícios com um palito no bolo já
pronto. Depois regue com sumo ou bebida
alcoólica. Da próxima vez aumente a temperatura
cerca de 10º e reduza o tempo de cozedura.
O bolo não se solta ao virar:
Deixe arrefecer o bolo depois de cozido, durante
5 a 10 minutos, assim solta-se mais facilmente da
forma. Caso, mesmo assim, o bolo não se solte,
passe cuidadosamente uma faca pela
extremidade. Da próxima unte bem a forma.
Conselhos para poupar energia
Quando fizer mais do que um bolo, é
aconselhável levá-los ao forno uns a seguir aos
outros. O forno ainda está quente e, assim reduz-
se o tempo de cozedura do segundo bolo.
Utilize, de preferência, formas escuras, pintadas
ou esmaltadas a preto, pois estas absorvem bem
o calor.
No caso de tempos de cozedura mais longos,
poderá desligar o forno 10 minutos antes do
tempo terminar e aproveitar o calor residual para
terminar o cozinhado.

70
PT
Que tipo de loiça pode ser utilizada?
Função micro-ondas
Na função micro-ondas tenha em atenção que as
micro-ondas são refletidas pelas superfícies
metálicas. O vidro, a porcelana, o barro, o
plástico, o papel deixam passar as micro-ondas.
Por isso as panelas e a loiça de metal ou os
recipientes com partes ou decorações
metálicas não podem ser utilizados no micro-
ondas. O vidro e o barro com decorações ou
partes metálicas (p. ex. cristal de chumbo) não
podem ser utilizados.
O ideal para cozinhar no forno micro-ondas é
utilizar vidro, porcelana ou barro refratários e
plástico resistente ao calor. O vidro e a porcelana
muito finos e frágeis devem ser utilizados, durante
pouco tempo, para descongelar ou aquecer
alimentos já confecionados.
Os alimentos quentes transmitem calor à loiça, a
qual pode ficar muito quente. Por isso, utilize
sempre uma pega!
Teste à loiça
Coloque a loiça no forno durante 20 segundos à
potência máxima de micro-ondas. Se esta estiver
fria ou pouco quente ela é adequada. Porém se
aquecer muito ou causar arco elétrico ela não é
adequada.
Função Grill / Ar Quente
No caso da função Grill / Ar Quente a loiça tem de
ser resistente pelo menos a temperaturas de
300°C.
A loiça de plástico não é adequada.
Funções combinadas
Nas funções combinadas a loiça a utilizar tem de
ser adequada tanto para micro-ondas como para
grelhador.
Recipientes e películas de alumínio
Os pratos pré confecionados em recipientes de
alumínio ou com folha de alumínio podem ser
colocados no micro-ondas se forem respeitados
os seguintes aspetos:
Tenha em atenção as recomendações do
fabricante constantes na embalagem.
Os recipientes de alumínio não podem ter uma
altura superior a 3 cm e entrar em contacto
com as paredes da cavidade (distância
mínima de 3 cm). A tampa de alumínio tem de
ser removida.
Coloque o recipiente de alumínio diretamente
sobre o prato rotativo. Se utilizar a grelha,
coloque o recipiente sobre um prato de
porcelana. Nunca coloque o recipiente
diretamente sobre a grelha!
O tempo de cozinhado é mais longo porque as
micro-ondas entram nos alimentos somente a
partir de cima. Em caso de dúvida, utilize
somente loiça adequada para micro-ondas.
A folha de alumínio pode ser utilizada para
refletir as micro-ondas durante o processo de
descongelação. Os alimentos delicados, como
aves ou carne picada, podem ser protegidos do
calor excessivo cobrindo as respetivas
extremidades.
Importante: a folha de alumínio não pode
entrar em contacto com as paredes da
cavidade, pois pode provocar arco elétrico.
Tampas
É recomendada a utilização de tampas de vidro,
de plástico ou de uma película aderente, porque
deste modo:
1. Impede uma evaporação excessiva
(principalmente nos períodos de cozinhado
muito longos);
2. O processo de cozinhado é mais rápido;
3. Os alimentos não ficam secos;
4. É preservado o aroma.
A tampa deve possuir orifícios para que não se
forme qualquer tipo de pressão. Os sacos de
plástico devem igualmente ter aberturas. Tanto os
biberões como os frascos com comida para bebé
e outros recipientes semelhantes só podem ser
aquecidos sem tampa, pois podem rebentar.

71
PT
Que tipo de loiça pode ser utilizada?
Tabela – Loiça
A tabela seguinte dá-lhe uma ideia geral sobre qual o tipo de loiça adequada a cada situação.
Modo de
funcionamento
Tipo de loiça
Micro-ondas
Grill / Ar
quente
Funções
combinadas
Descongelar /
aquecer
Cozinhar
Vidro e porcelana 1)
Doméstico, não resistente ao fogo,
pode ser lavado na máquina de lavar
loiça
sim
sim
não
não
Cerâmica vidrada
Vidro e porcelana resistente ao fogo
sim
sim
sim
sim
Cerâmica, loiça de grés 2)
Sem vidrados ou vidrados sem
decorações metálicas
sim
sim
não
não
Loiça de barro 2)
Vidrado
Não vidrado
sim
não
sim
não
não
não
não
não
Loiça de plástico 2)
Resistente ao calor até 100°C
Resistente ao calor até 250°C
sim
sim
não
sim
não
não
não
não
Películas de plástico 3)
Filme plástico para alimentos
Celofane
não
sim
não
sim
não
não
não
não
Papel, cartão, pergaminho 4)
sim
não
não
não
Metal
Folha de alumínio
Embalagens de alumínio 5)
Acessórios
sim
não
sim
não
sim
sim
sim
sim
sim
não
sim
sim
1. Sem rebordo dourado ou prateado e sem
cristal de chumbo.
2. Tenha em atenção as indicações do
fabricante!
3. Não utilize clips de metal para fechar os
sacos. Perfure os sacos. Utilize as películas
apenas para tapar.
4. Não utilize pratos de papel.
5. Somente embalagens de alumínio pouco
profundas e sem tampa. O alumínio não
pode entrar em contacto com as paredes da
cavidade.

72
PT
Limpeza e manutenção do forno
A limpeza é a única manutenção normalmente
requerida.
Atenção! O forno micro-ondas deve ser limpo
regularmente, devendo ser removidos todos os
restos de comida. Caso o forno micro-ondas não
seja mantido devidamente limpo pode ocorrer a
deterioração da sua superfície, podendo ser
reduzida a vida útil do forno e eventualmente
resultar numa situação perigosa.
Atenção! A limpeza deve ser efetuada com o
forno desligado da alimentação elétrica. Retire
a ficha da tomada ou desligue o circuito de
alimentação do forno.
Não utilize produtos de limpeza agressivos ou
abrasivos, esfregões que risquem ou objetos
pontiagudos, pois podem aparecer manchas.
Não utilize aparelhos de limpeza a alta
pressão ou a jacto de vapor.
Superfície frontal
Basta limpar o forno com um pano húmido. Se
estiver muito sujo, adicione algumas gotas de
detergente da loiça à água da lavagem. Depois
limpe o forno com um pano seco.
Nos fornos com frente em alumínio use um
produto limpa-vidros suave e um pano macio que
não liberte fios. Limpe no sentido horizontal sem
exercer pressão sobre a superfície.
Remova imediatamente as manchas de calcário,
gordura, amido, clara de ovo. Sob estas manchas
pode ocorrer corrosão.
Evite a entrada de água no interior do forno.
Interior do forno
Após cada utilização, limpe as paredes interiores
com um pano húmido porque assim é mais fácil
remover os salpicos e a comida agarrada.
Para retirar a sujidade mais difícil, use um produto
de limpeza não agressivo. Não utilize sprays de
forno nem outros produtos de limpeza
agressivos ou abrasivos.
Mantenha a porta e a frente do forno sempre
bem limpas de modo a assegurar um correto
funcionamento.
Evite a entrada de água nos orifícios de
ventilação do micro-ondas.
Regularmente retire o prato rotativo e o respetivo
suporte e limpe a base da cavidade,
especialmente se tiverem ocorrido derrames de
líquidos.
Não ligue o forno sem o prato rotativo e o
respetivo suporte.
Se a cavidade do forno estiver muito suja,
coloque um copo com água sobre o prato rotativo
e ligue o forno micro-ondas durante 2 ou 3
minutos na potência máxima. O vapor libertado
amolecerá a sujidade que será facilmente limpa
com um pano macio.
Os odores desagradáveis (por ex., depois de
cozinhar peixe) podem ser facilmente eliminados.
Coloque algumas gotas de sumo de limão ou
vinagre numa chávena de água. Introduza uma
colher de café na chávena para evitar uma
ebulição retardada. Aqueça a água durante 2 a 3
minutos à potência máxima de micro-ondas.

73
PT
Limpeza e Manutenção do forno
Teto do Forno
Se o teto do forno estiver sujo, o grelhador pode
ser baixado para facilitar a limpeza.
Aguarde até que o grelhador esteja frio antes
de o baixar, para evitar o perigo de
queimadura. Proceda da seguinte forma:
1. Rode 180º o Suporte do Grelhador (1).
2. Baixe suavemente o Grelhador (2). Não use
força excessiva pois pode causar danos.
3. Depois de limpar o teto reponha o Grelhador
(2) no seu sítio, repetindo o procedimento
inverso.
AVISO IMPORTANTE: O Suporte do Grelhador
(1) pode cair enquanto é rodado. Se tal
acontecer, insira o Suporte do Grelhador (1) no
orifício existente no teto da cavidade e rode-o 90º
até à posição de suporte do Grelhador (2).
A Tampa de Mica (3) localizada no teto deve
ser mantida sempre limpa. Os restos de
alimentos acumulados na tampa de mica podem
causar danos ou provocar faíscas.
Não utilize produtos de limpeza abrasivos nem
objetos pontiagudos.
Não retire a tampa de mica, para evitar
qualquer risco.
A Tampa de Vidro da Lâmpada (4) está localizada
no teto do forno e pode ser retirada facilmente
para limpeza. Para isso desenrosque-a e limpe-a
com água e detergente da loiça.
Acessórios
Limpe os acessórios após cada utilização. No
caso de estar bastante sujo, ponha primeiro de
molho e, em seguida, utilize uma escova e uma
esponja. Os acessórios podem ser lavados na
máquina de lavar loiça.
Certifique-se de que o prato rotativo e o respetivo
suporte estão sempre limpos. Não ligue o forno
sem o prato rotativo e o respetivo suporte.

74
PT
O que fazer em caso de falha de funcionamento?
ATENÇÃO! Qualquer tipo de reparação só
pode ser executada por técnicos
especializados. Qualquer reparação efetuada
por pessoas não autorizadas pelo fabricante é
perigosa.
As questões seguintes podem ser corrigidas sem
contactar a Assistência Técnica.
O mostrador está apagado! Verificar se:
- A indicação das horas foi desligada (ver
capítulo sobre Regulações Base).
Não acontece nada quando se primem as
teclas! Verificar se:
- O Bloqueio de Segurança está ativo (ver
capítulo sobre Regulações Base).
O forno não funciona! Verificar se:
- A ficha está corretamente ligada à tomada.
- O circuito de alimentação do forno está
ligado.
- A porta está completamente fechada. A
porta tem de fechar de forma audível.
- Existem corpos estranhos entre a porta e a
frente da cavidade.
Durante o funcionamento do forno ouvem-
se ruídos estranhos! Verificar se:
- Existem arcos elétricos no interior do forno
gerados por objetos metálicos estranhos
(ver capítulo sobre o tipo de Loiça).
- A loiça entra em contacto com as paredes
do forno.
- Existem espetos ou colheres soltos no
interior do forno.
Os alimentos não aquecem ou aquecem
muito lentamente! Verificar se:
- Utilizou inadvertidamente loiça de metal.
- Selecionou o tempo de funcionamento e o
nível de potência adequados.
- Colocou no interior do forno uma quantidade
maior ou mais fria de alimentos, do que
habitualmente.
O alimento está excessivamente quente,
ressequido ou então queimado! Verificar
se selecionou o tempo de funcionamento e
o nível de potência adequados.
Ouve-se um ruído depois de um
processo ter terminado! Isto não é um
problema. O ventilador de refrigeração
continua a funcionar durante algum tempo.
Quando a temperatura baixar o suficiente o
ventilador desligar-se-á.
O forno funciona mas iluminação interior
não acende! Se todas as funções operam
corretamente é provável que a lâmpada
esteja fundida. Pode continuar a utilizar o
aparelho.
Substituição da Lâmpada
Para substituir a lâmpada proceda da seguinte
forma:
- Desligue o forno da alimentação elétrica.
Retire a ficha da tomada ou desligue o
circuito de alimentação do forno.
- Desenrosque e remova a tampa de vidro da
lâmpada (1).
- Remova a lâmpada de halogéneo (2).
Atenção! A lâmpada pode estar muito
quente.
- Coloque uma nova lâmpada de halogéneo
de 12V / 10W. Atenção! Não toque a
superfície da lâmpada diretamente com
os dedos porque pode danificar a
lâmpada. Siga as instruções do fabricante
da lâmpada.
- Enrosque a tampa de vidro da lâmpada (1).
- Volte a ligar o forno à alimentação elétrica.

75
PT
Características técnicas
Especificações
Tensão AC ......................................................................................... (ver placa de características)
Potência requerida ............................................................................. 3400 W
Potência do grelhador. ....................................................................... 1500 W
Potência do ar quente ........................................................................ 1600 W
Potência de saída micro-ondas. ......................................................... 1000 W
Frequência de micro-ondas… ............................................................ 2450 MHz
Dimensões exteriores (L A P). .......................................................... 595 455 542 mm
Dimensões da cavidade (L A P). ...................................................... 420 210 390 mm
Capacidade do forno. ......................................................................... 38 ltr
Peso ................................................................................................... 35 kg
Indicações sobre proteção ambiental
Eliminação da embalagem
A embalagem está assinalada com o Ponto
Verde.
Para eliminar todos os materiais de
embalamento, como o cartão, esferovite e as
películas utilize os contentores adequados.
Deste modo é garantida a reutilização dos
materiais de embalamento.
Eliminação de aparelhos fora de uso
A diretiva Europeia 2002/96/CE referente à
gestão de Resíduos de Equipamentos Elétricos
e Eletrónicos (REEE), prevê que os
eletrodomésticos não devem ser escoados no
fluxo normal dos resíduos sólidos urbanos.
Os aparelhos desatualizados devem ser
recolhidos separadamente para otimizar a taxa
de recuperação e reciclagem dos materiais que
os compõem e impedir potenciais danos para a
saúde humana e para o ambiente. O símbolo
constituído por um contentor de lixo barrado
com uma cruz deve ser colocado em todos os
produtos de forma a recordar a obrigatoriedade
de recolha separada.
Os consumidores devem contactar as
autoridades locais ou os pontos de venda para
solicitar informação referente ao local
apropriado onde devem depositar os
eletrodomésticos velhos.
Antes de eliminar o seu aparelho, inutilize-o.
Puxe o cabo de alimentação, corte-o e elimine-
o.

76
PT
Instruções de instalação
Antes da instalação
Verificar que a tensão de alimentação indicada
na placa de características corresponde à tensão
da sua instalação.
Abra a porta e retire todos os acessórios e o
material de embalamento.
Não remova a tampa de mica situada no teto da
cavidade! Essa tampa evita que as gorduras e
pedaços de alimentos causem danos ao gerador
de micro-ondas.
Atenção! A superfície frontal do forno pode estar
envolvida numa película de proteção. Antes da
primeira utilização, retire esta película cuidado-
samente, começando pela parte inferior.
Certifique-se de que o forno não está
danificado. Verifique se a porta do forno fecha
corretamente e se o interior da porta e a frente da
cavidade não estão danificadas. Em caso de
danos contacte o Serviço de Assistência Técnica.
NÃO UTILIZE O FORNO se o cabo de
alimentação ou a ficha estiverem danificados, se
o forno não funciona corretamente ou se tiver
sofrido danos ou tiver caído. Contacte o Serviço
de Assistência Técnica.
Coloque o forno sobre uma superfície plana e
estável. O forno não deve ser colocado próximo
de elementos de calor, rádios e televisores.
Durante a instalação, certifique-se de que o
cabo de alimentação não entra em contacto
com humidade, objetos com arestas vivas ou
a traseira do forno, pois as elevadas
temperaturas podem danificar o cabo.
Atenção: após a instalação do forno é
necessário assegurar o acesso à ficha.
Após a instalação
O forno está equipado com um cabo de
alimentação e ficha para corrente monofásica.
Em caso de conexão permanente o forno deve
ser instalado por um técnico qualificado. Neste
caso, a conexão deve ser feita a um circuito com
um dispositivo de corte omnipolar com separação
mínima de 3 mm entre contactos.
ATENÇÃO: O FORNO TEM QUE SER
OBRIGATORIAMENTE CONECTADO À
TERRA.
O fabricante e os revendedores declinam
qualquer responsabilidade por eventuais danos
causados a pessoas, animais ou bens no caso de
se verificar inobservância destas instruções de
instalação.
O forno só funciona se a porta estiver
corretamente fechada.
Antes da primeira utilização, limpe o interior do
forno e os acessórios, seguindo as indicações
relativas à limpeza constantes no ponto “Limpeza
e Manutenção do forno”.
Encaixe o Acoplamento no centro da cavidade do
forno e sobreponha o Anel Rotativo e o Prato
Rotativo, até este encaixar. Sempre que fizer uso
do micro-ondas é necessário que, tanto o prato
rotativo como os respetivos acessórios estejam
no interior e corretamente colocados. O prato
rotativo pode girar em ambos os sentidos.
Durante a instalação, seguir as dimensões
indicadas no final deste manual.

77
Dimensiones de Instalación / Dimensões de Instalação
ES
Introduzca el horno en el mueble
hasta que el marco quede
alineado.
Abra la puerta del horno y fíjelo a
las paredes laterales del mueble,
con los 4 tornillos suministrados,
atraviese los 4 agujeros en el
marco del horno.
PT
Introduza o forno no móvel até que
o aro toque no móvel e alinhe-o.
Abra a porta do forno e fixe-o às
paredes laterais do móvel, com os
4 parafusos fornecidos, através
dos 4 furos no aro do forno.


Instructions d’utilisation FR
Gebruiksaanwijzing NL
1MCFY
1630883-b

2
FR
Sommaire
Consignes de sécurité........................................................................................................................ 3
Instructions de sécurité ..................................................................................................................... 7
Les avantages des micro-ondes ....................................................................................................... 8
Description du four ............................................................................................................................. 9
Réglages de base ............................................................................................................................. 11
Fonctions de base ............................................................................................................................ 13
Fonctions spéciales ......................................................................................................................... 18
Utilisation du plat à brunir ............................................................................................................... 21
Décongélation ................................................................................................................................... 23
Cuisiner aux micro-ondes ................................................................................................................ 25
Cuisiner au gril .................................................................................................................................. 27
Rôtir et cuire ...................................................................................................................................... 30
Quel type de vaisselle pouvez-vous utiliser? ................................................................................. 33
Nettoyage et entretien du four ......................................................................................................... 35
Que faire en cas de mauvais fonctionnement? .............................................................................. 37
Propriétés techniques ...................................................................................................................... 38
Protection de l'environnement ........................................................................................................ 38
Instructions pour l'installation ......................................................................................................... 39
Dimensions pour l'installation du four ........................................................................................... 78
Cher Client,
Merci d’avoir choisi ce produit BARAZZA.
Veuillez lire très attentivement les instructions de cette notice, afin d’obtenir les meilleurs résultats de
son utilisation.
CONSERVEZ CETTE NOTICE POUR TOUTE RÉFÉRENCE ULTÉRIEURE.
Gardez toujours le manuel d’utilisation à portée de main. Si vous prêtez cet appareil à quelqu’un,
n’oubliez pas de donner aussi le manuel!
Vous pouvez aussi télécharger le manuel d’utilisation sur www.barazzasrl.it

3
FR
Consignes de sécurité
Avant d'installer et d'utiliser cet appareil, lisez soigneusement
les instructions fournies. Le fabricant ne peut être tenu pour
responsable des dommages et blessures liés à une mauvaise
installation ou utilisation. Conservez toujours cette notice avec votre
appareil pour vous y référer ultérieurement.
SECURITE DES ENFANTS ET DES PERSONNES VULNERABLES
Avertissement! Risque d'asphyxie, de blessure ou d'invalidité
permanente.
Cet appareil peut être utilisé par des enfants de plus de 8 ans,
ainsi que des personnes dont les capacités physiques,
sensorielles et mentales sont réduites ou dont les connaissances
et l'expérience sont insuffisantes, à condition d'être surveillés par
une personne responsable de leur sécurité.
Ne laissez pas les enfants jouer avec l'appareil.
Ne laissez pas les emballages à la portée des enfants.
AVERTISSEMENT: Tenez les enfants éloignés de l'appareil
lorsqu'il est en cours de fonctionnement ou lorsqu'il refroidit. Les
parties accessibles sont chaudes.
Si l'appareil est équipé d'un dispositif de sécurité enfants, nous
vous recommandons de l'activer. Les enfants de moins de 3 ans
ne doivent pas être laissés sans surveillance à proximité de
l'appareil.
Les enfants ne doivent pas nettoyer ni entreprendre une opération
de maintenance sur l'appareil sans surveillance.
SÉCURITÉ GÉNÉRALE
Cet appareil est conçu uniquement pour un usage domestique et
des situations telles que:
– dans des cuisines réservées aux employés dans des magasins,
bureaux et autres lieux de travail;
– dans des bâtiments de ferme;
– par les clients, dans des hôtels et autres lieux de séjour;
– en chambre d'hôtes.

4
FR
Consignes de sécurité
L'intérieur de l'appareil devient chaud lorsqu'il est en
fonctionnement. Ne touchez pas les éléments chauffants se
trouvant dans l'appareil. Utilisez toujours des gants de cuisine
pour retirer ou enfourner des accessoires ou des plats allant au
four.
Avertissement! Ne faites pas chauffer de liquides ni d'autres
aliments dans des recipients hermétiquement fermés. Ils
pourraient exploser.
N'utilisez que des ustensiles adaptés à une utilisation dans un
four à microondes.
Lorsque vous faites chauffer des aliments dans des récipients en
plastique ou en papier, surveillez toujours l'appareil car ces
matières peuvent s'enflammer.
Cet appareil est uniquement destiné à chauffer des aliments et
des boissons. L'utiliser pour sécher des aliments ou des
vêtements, ou pour faire chauffer des compresses chauffantes,
des chaussons, des éponges, des tissus humides ou autres
pourrait provoquer des blessures ou un incendie."
Attention! Le four ne peut pas être utilisé si:
- La porte ne ferme pas correctement;
- Les gonds de la porte sont endommagés;
- Les surfaces de contact entre la porte et l'avant de l'appareil
sont endommagées;
- La vitre de la porte est endommagée;
- Il y a fréquemment un arc électrique à l'intérieur, malgré
l'absence de tout objet métallique.
Le four ne peut pas être réutilisé qu'après avoir été réparé par un
technicien du Service d'Assistance Technique.
En présence de fumée, éteignez ou débranchez l’appareil et
laissez la porte fermée pour étouffer les flammes.
Si vous chauffez des boissons au micro-ondes, celles-ci peuvent
entrer en ébullition après être sorties de l'appareil. Soyez prudent
lorsque vous manipulez le récipient.

5
FR
Consignes de sécurité
Mélangez ou remuez le contenu des biberons et des petits pots
pour bébés, puis vérifiez la température avant de nourrir votre
enfant afin d'éviterles brûlures.
Les oeufs dans leur coquille et les oeufs durs entiers ne doivent
pas être chauffés dans l'appareil car ils pourraient exploser,
même après la fin de la cuisson.
INSTALLATION
Prévoir, pour l’installation électrique, un dispositif permettant de
débrancher l’appareil du secteur au niveau de tous les pôles une
ouverture des contacts d’au moins 3 mm. Sont considérés
comme appropriés des dispositifs de protection tels que par ex.
les disjoncteurs, les fusibles (dévisser les fusibles de leur socle),
les disjoncteurs différentiels et les contacteurs. Cette installation
doit être faite conformément a la réglementation courante.
Si la connexion électrique se fait par une prise qui reste
accessible après l'installation, il n'est pas nécessaire de fournir le
dispositif de séparation mentionné.
L’encloisonnement doit être assurer de façon a proteger des
chocs électriques.
Attention: Le four doit être obligatoirement relié à la terre.
NETTOYAGE
Nettoyez régulièrement l'appareil et retirez-en les résidus
alimentaires.
Si vous ne nettoyez pas régulièrement l'appareil, sa surface peut
se détériorer, ce qui pourrait réduire sa durée de vie et provoquer
des situations dangereuses.
N'utilisez pas de produits abrasifs ni de racloirs pointus en métal
pour nettoyer la porte en verre car ils peuvent rayer sa surface,
ce qui peut briser le verre.
N'utilisez pas de nettoyeur vapeur pour nettoyer l'appareil.

6
FR
Consignes de sécurité
Les surfaces de contact de la porte (l'avant de la cavité et la
partie intérieure de la porte) doivent être maintenues très propres
pour garantir le bon fonctionnement du four.
S'il vous plaît, soyez attentif aux indications concernant le
nettoyage, figurant au point "Nettoyage et entretien du four".
RÉPARATION
Avertissement: Avant toute opération de maintenance,
déconnectez l'alimentation électrique.
Avertissement: Toute opération de maintenance ou de
réparation nécessitant le retrait de l'un des caches assurant la
protection contre les micro-ondes ne doit être confiée qu'à un
professionnel qualifié.
Avertissement: Si la porte ou les joints de la porte sont
endommagés, vous ne devez pas utiliser l'appareil tant qu'il n'a
pas été réparé par un professionnel qualifié.
Si le câble d'alimentation est endommagé, il ne doit être
remplacé que par un professionnel qualifié afin d'éviter tout
danger.
Les réparations ou opérations de maintenance, en particulier des
pièces sous tension, ne peuvent être réalisées que par des
techniciens certifiés par le fabricant.

7
FR
Instructions de sécurité
Attention! Ne chauffez pas de l’alcool
pur ni des boissons alcooliques.
RISQUE DE FEU!
Attention!
Pour éviter que les aliments ne chauffent
trop ou ne prennent feu, il est très important,
quand vous chauffez de petites quantités de
nourriture, de ne pas sélectionner des
périodes de fonctionnement trop longues, ni
des niveaux de puissance trop élevés. Le
pain, par exemple, peut brûler au bout de 3 m
avec une puissance trop élevée.
Utilisez la fonction gril seulement pour
gratiner et surveillez constamment l’appareil.
Si vous utilisez un mode de fonctionnement
combiné pour le gril, prêtez attention au
temps
N'approchez jamais les câbles
d'alimentation d'autres appareils électriques
de la porte chaude du four. La gaine isolante
pourrait fondre. Danger de court-circuit!
Attention quand vous chauffez des
liquides!
Si vous retirez des liquides du four (eau,
café, thé, lait, etc..) lorsqu'ils sont près
d'atteindre leur point d'ébullition, ils peuvent
déborder ou des gouttes peuvent être
projetées hors du récipient. DANGER DE
LÉSIONS ET DE BRÛLURES!
Pour éviter cette situation, mettez une
petite cuillère ou une baguette en verre dans
le récipient dont vous chauffez le contenu.
Vous éviterez d'endommager votre four
ainsi que toute autre situation dangereuse
si vous respectez les indications
suivantes:
Ne mettez pas le four en fonctionnement
sans le manchon, le support du plateau et le
plateau rotatif.
Ne mettez pas votre four en marche à vide.
Sans rien à chauffer, il peut en effet se
trouver en surcharge et être endommagé.
RISQUE DE DÉTÉRIORATION!
Pour effectuer des tests de programmation
du four, placez-y un verre d'eau. Celle-ci
absorbera les micro-ondes et le four ne sera
pas endommagé.
Ne couvrez et n'obstruez pas les ouvertures
de ventilation.
"N'utilisez que de la vaisselle adéquate pour
micro-ondes. Vérifiez, avant de les utiliser
dans le four, que la vaisselle et les récipients
sont adaptés (voir chapitre sur le type de
vaisselle).
Ne retirez pas le couvercle en mica situé au
plafond de la cavité! Ce couvercle évite que
les graisses et particules d'aliments
n'endommagent le générateur de micro-
ondes.
Ne laissez aucun objet inflammable dans le
four, il peut brûler si vous l'allumez.
N'utilisez pas le four comme rangement.
Vous ne pouvez pas cuire les œufs, avec
ou sans coquille, dans un four micro-ondes
car ils peuvent éclater.
N'utilisez pas le four micro-ondes pour frire
dans l'huile, car il est impossible d'en
contrôler la température sous l'action des
micro-ondes.
Pour éviter les brûlures, utilisez toujours
des gants de cuisine pour manipuler les
récipients et toucher le four.
Ne vous appuyez pas, ne mettez aucun
poids sur la porte ouverte du four. Cela
pourrait endommager la zone des gonds. La
porte peut supporter un poids maximum de 8
kg.
Le plateau rotatif et les grilles supportent
une charge maximum de 8 kg. Ne dépassez
pas cette charge, pour éviter des dégâts.

8
FR
Les avantages des micro-ondes
Avec une cuisinière traditionnelle, la chaleur
créée par les brûleurs de gaz ou par les
résistances pénètre lentement de l'extérieur vers
l'intérieur de l'aliment. Il y a par conséquent une
grande perte d'énergie pour chauffer l'air, les
composants du four et les récipients.
Dans les micro-ondes, la chaleur est générée
par les aliments eux-mêmes, elle passe de
l'intérieur vers l'extérieur. Il n'y a aucune perte
de chaleur dans l'air, dans les parois de la cavité
ni dans les récipients (s'ils sont bien adaptés aux
micro-ondes), c'est-à-dire que seul l'aliment est
chauffé.
En résumé, les fours micro-ondes offrent les
avantages suivants :
1. Gain de temps de cuisson : réduction jusqu'à
3/4 du temps par rapport à la cuisson
traditionnelle.
2. Décongélation ultrarapide des aliments, ce qui
réduit le risque de produire des bactéries.
3. Économie d'énergie.
4. Le temps de cuisson étant réduit, les aliments
gardent mieux leur valeur nutritive.
5. Nettoyage facile.
Mode de fonctionnement du four
micro-ondes
Le four micro-ondes possède une valve à haute
tension appelée magnétron, qui convertit
l'énergie électrique en énergie micro-ondes. Ces
ondes électromagnétiques sont canalisées vers
l'intérieur du four au moyen d'un conducteur
d'ondes puis distribuées par un diffuseur
métallique ou au moyen d'un plateau rotatif.
À l'intérieur du four, les micro-ondes se
propagent dans tous les sens et sont réfléchies
par les parois métalliques. Elles pénètrent alors
uniformément dans les aliments.
Comment les aliments chauffent-ils?
Tous les aliments contiennent de l'eau dont les
molécules vibrent sous l'action des micro-ondes.
La friction entre les molécules provoque la
chaleur qui élève la température des aliments.
Ils peuvent être décongelés, cuits ou maintenus
chauds.
Du fait que les aliments chauffent de l'intérieur:
Ils peuvent être cuisinés sans liquides ni
graisses, ou avec très peu;
Décongeler, chauffer ou cuisiner est plus
rapide dans un four micro-ondes que dans
un four conventionnel;
Les vitamines, sels minéraux et substances
nutritives sont conservés;
Ni la couleur naturelle ni le goût ne sont
altérés.
Les micro-ondes traversent la porcelaine, le
verre, le carton, le plastique, mais pas le métal.
Vous ne pouvez donc pas utiliser dans le four
micro-ondes de récipients métalliques, ou dont
certaines parties sont en métal.
Les micro-ondes sont réfléchies par le métal...
...traversent le verre et la porcelaine...
... et sont absorbées par les aliments.

9
FR
Description du four
1. – Indicateurs de fonctions
4a. – Affichage puissance / poids
2. – Sélecteur de fonctions
5. – Touche de sélection durée / horloge
3. –Touche de sélection de température du four
5a. – Affichage durée / horloge
3a. – Affichage de température du four
6. – Touche Start / Stop / Blocage de sécurité
4. – Touche de selection puissance/poids
23:15
1
2
6
5
4
3
800
160
3a
4a
5a
1. Tableau de commandes
6. Support du plateau tournant
2. Vitre de la porte
7. Anneau du plateau tournant
3. Supports latéraux
8. Plateau rotatif
4. Les captures
9. Bac en verre rectangulaire
5. Sortie d’air chaud
10. Grille rectangulaire
11. Plat à brunir

10
FR
Description des fonctions
Symbole
Fonction
Puissance Micro-
ondes
Aliments
Micro-ondes
200 W
Décongeler lentement les aliments délicats; pour décongeler
et continuer de cuire à faible puissance.
400 W
Cuire de la viande, du poisson et du riz.
Décongeler rapidement de petites quantités et aliments pour
bébés, comme par exemple les biberons.
600 W
Chauffer et cuire les aliments.
800 W
Cuire des légumes et pommes de terre.
Cuire des gratins et des plats cuisinés.
Décongeler et cuire de petites quantités.
1000 W
Chauffer des liquides.
Micro-ondes
+ Gril
200 W
Gratiner des toasts.
400 W
Griller volailles et viande.
600 W
Cuisiner tourtes et gratins.
Gril
---
Griller des aliments.
Gril
+ Ventilateur
---
Griller viande et poisson, en morceaux fins.
Griller de la volaille.
Frites – décongeler et dorer des produits ultracongelés.
Air chaud
---
Rôtir et cuire.
Micro-ondes +
Air chaud
200-600 W
Rôtir rapidement viande, poisson et volailles.
Cuire gâteaux secs et humides.

11
FR
Réglages de base
Réglage de l'horloge
Après une coupure d'électricité, ou si le four a
été rebranché, l'horloge clignote pour indiquer
que l'indication de l'heure n'est pas correcte.
Pour régler l'horloge, procédez de la façon
suivante:
1. Appuyez sur la touche de l'Horloge. Les
chiffres des heures commencent à clignoter.
2. Appuyez sur les touches «-» et «+» pour
définir les heures.
3. Appuyez de nouveau sur la touche Horloge
pour définir les minutes. Les minutes
clignotent.
4. Appuyez sur les touches «-» et «+» pour
définir les minutes.
5. Pour terminer, appuyez de nouveau sur la
touche Horloge.
Masquer/Afficher l'horloge
Vous pouvez masquer l'horloge en appuyant sur
la touche horloge pendant 3 secondes. Les
points séparant les heures des minutes
continueront à clignoter tant que l'horloge est
masquée.
Pour afficher l'horloge, quand elle est masquée,
appuyez sur la touche horloge pendant 3
secondes.
Blocage de sécurité
Vous pouvez bloquer le fonctionnement du four
(par exemple pour empêcher son utilisation par
des enfants).
1. Pour bloquer le four, appuyez sur la touche
Stop pendant 3 secondes. Un signal sonore
est alors émis et l'écran affiche le mot
«SAFE». Le four est alors bloqué, toute
opération est interdite.
2. Pour débloquer le four, appuyez de nouveau
sur la touche Stop pendant 3 secondes. Le
signal sonore est émis et l'écran donne de
nouveau indication de l'heure.

12
FR
Réglages de base
Arrêter le plateau tournant
1. Pour arrêter le plateau tournant, appuyez en
même temps sur les touches «+» et «Stop».
2. Pour remettre en marche le plateau, appuyez
à nouveau en même temps sur les touches
«+» et «Stop».

13
FR
Fonctions de base
Micro-ondes
Utilisez cette fonction pour cuire et chauffer légumes, pommes de terre, riz, poisson et viande.
Appuyez sur la touche de fonction Micro-ondes.
La touche de fonction s'allume.
2. Appuyez sur la touche Sélection de
Puissan-ce. Le témoin correspondant se met
à cligno-ter. En l'absence de sélection, le four
fonctionne à la puissance de 800 Watts.
3. Appuyez sur les touches «-» et «+» pour
modifier la puissance des micro-ondes.
4. Appuyez sur la touche Sélection du Temps
pour modifier le temps de fonctionnement. Le
témoin respectif se met à clignoter.
5. Définissez le temps de fonctionnement
désiré avec les touches «-» et «+» (par
exemple, 1 minute).
6. Appuyez sur la touche Start. Le four
commence à fonctionner.
Remarque: Si vous sélectionnez la puissance
de 1000 W, le temps de fonctionnement est
limité à un maximum de 15 minutes.
Micro-ondes – Lancement rapide
Utilisez cette fonction pour chauffer rapidement des aliments contenant beaucoup d'eau comme le
café, le thé ou de la soupe assez liquide.
1. Appuyez sur la touche Start. Le four se met
en marche en fonction Micro-ondes, à la
puissance maximum, pendant 30 secondes.
2. Si vous souhaitez prolonger le fonctionne-
ment du four, appuyez de nouveau sur la touche
Start, ce qui a pour effet d'augmenter le temps
de fonctionnement de 30 secondes.
Remarque: Quand vous sélectionnez la
puissance maximum de 1000 W, le temps de
fonctionnement est limité à un maximum de 15
minutes.
00:30
1000
1,2

14
FR
Fonctions de base
Gril
Utilisez cette fonction pour dorer rapidement la surface des aliments.
Appuyez sur la touche de fonction Gril. Le
témoin s'allume.
2. Appuyez sur la touche Sélection du temps
pour modifier le temps de fonctionnement. Le
témoin respectif clignote.
3. Appuyez sur «-» et «+» pour sélectionner le
temps voulu (par exemple 15 minutes).
4. Appuyez sur la touche Start. Le four
commen-ce à fonctionner.
Micro-ondes + Gril
Utilisez cette fonction pour cuisiner de la lasagne, des volailles, les pommes de terre rissolées et les
gratins.
Appuyez sur la touche de fonction Micro-ondes
+ Gril. La touche de fonction s'allume.
2. Appuyez sur la touche Sélection de
Puissance pour modifier la puissance des
micro-ondes. Le témoin respectif se met à
clignoter. Si vous ignorez cette touche, le four
fonctionne à la puissance de 600 W.
3. Appuyez sur «-» et «+» pour sélectionner la
puissance souhaitée.
4. Appuyez sur la touche Sélection du Temps
pour modifier le temps de fonctionnement. Le
témoin respectif se met à clignoter.
5. Sélectionnez le temps de fonctionnement
voulu en appuyant sur les touches «-» et «+»
(par exemple, 10 minutes).
6. Appuyez sur Start. Le four commence à
fonctionner.
Remarque: Pendant le fonctionnement en mode
combiné, la puissance du micro-ondes est
limitée à 600 W.

15
FR
Fonctions de base
Air chaud
Utiliser cette fonction pour cuire et rôtir.
1. Appuyez sur la touche de fonction Air chaud.
Le voyant de la touche s'allume.
2. Appuyer sur Sélection de Température, pour
modifier la température du micro-ondes. Le
témoin respectif clignote. En l'absence de
sélection, le four fonctionne à la température
de 160ºC.
3. Appuyer sur «-» et «+» pour sélectionner la
température désirée.
4. Appuyez sur Sélection de Temps, pour
modifier le temps de fonctionnement souhaité.
Le témoin respectif clignote.
5. Appuyez sur les touches «-» et «+» pour
sélectionner le temps de fonctionnement
voulu (par exemple, 12 minutes).
6. Appuyez sur Start. Le four commence à
fonctionner.
Micro-ondes + Air chaud
Utiliser cette fonction pour cuire et rôtir.
Appuyez sur la touche de fonction Micro-ondes
+ Air chaud. Le voyant de la touche s'allume.
2. Appuyez sur la touche Sélection de
Température pour modifier la température.
Le témoin clignote. À défaut, le four
fonctionnera à une température de 160ºC.
3. Appuyez sur «-» et «+» pour sélectionner la
température.
4. Appuyez sur la touche Sélection de
Puissance pour modifier la puissance du
micro-ondes. Le témoin respectif clignote. Si
vous ignorez cette touche, le four fonctionne à
la puissance de 400 W.
5. Appuyez sur «-» et «+» pour sélectionner la
puissance désirée.
6. Appuyez sur Sélection de Temps, pour
modifier le temps de fonctionnement souhaité.
Le témoin respectif clignote.
7. Appuyez sur les touches «-» et «+» pour
sélectionner le temps de fonctionnement
voulu (par exemple, 12 minutes).
8. Appuyez sur Start. Le four commence à
fonctionner.
Remarque: Pendant le fonctionnement en mode
combiné, la puissance du micro-ondes est
limitée à 600 W.
20:00
160
4
1
3,5
6
2
20:00
400
160
6
4
1
3,5,7
8
2

16
FR
Fonctions de base
Gril avec Ventilateur
Utiliser cette fonction pour dorer viande, poisson, volailles ou frites.
1. Appuyez sur la touche de fonction Gril +
Ventilateur. Le voyant de la touche s'allume.
2. Appuyez sur la touche Sélection de
Température pour modifier la température.
Le témoin clignote. À défaut, le four
fonctionnera à la température de 160ºC.
3. Appuyez sur les touches «-» et «+» pour
sélectionner la température souhaitée.
4. Appuyez sur la touche Sélection de Temps
pour modifier le temps de fonctionnement
désiré. Le témoin clignote.
5. Appuyez sur les touches «-» et «+» pour
sélectionner le temps de fonctionnement
désiré (par exemple, 12 minutes).
6. Appuyez sur Start. Le four commence à
fonctionner.
Décongélation en fonction du temps (manuel)
Utilisez cette fonction pour décongeler rapidement des différents types d'aliments.
1. Appuyez sur Décongélation en fonction du
temps. La touche s'allume.
2. Appuyez sur la touche Sélection de Temps
pour modifier le temps de fonctionnement. Le
témoin respectif s'allume.
3. Appuyez sur «-» et «+» pour sélectionner le
temps de fonctionnement désiré (par exemple,
10 minutes).
4. Appuyez sur la touche Start. Le four
commence à fonctionner.
20:00
160
4
1
3,5
6
2

17
FR
Fonctions de base
Décongélation en fonction du poids (automatique)
Utilisez cette fonction pour décongeler rapidement viande, volailles, poisson, fruit et pain.
Appuyez sur la touche de fonction
Décongélation en fonction du poids. La
touche s'allume.
2. Appuyez sur la touche Sélection du type
d'aliment pour modifier l'aliment sélectionné.
Les témoins respectifs clignotent.
3. Appuyez sur les touches «-» et «+» pour
sélectionner le temps voulu, par exemple 'Pr
01' (voir tableau ci-après).
4. Appuyez sur Sélection de poids pour
modifier le poids sélectionné. Le témoin
clignote.
5. Appuyez sur «-» et «+» pour sélectionner le
poids correspondant à l'aliment.
6. Appuyez sur Start. Le four commence à
fonctionner.
Remarque: Retournez les aliments dès que le
four émet un signal sonore et que clignote sur
l'écran l'indication suivante: .
Le tableau suivant vous présente les programmes de la fonction Décongélation en fonction du poids, en
indiquant les temps de décongélation et de repos (afin que l'aliment soit uniformément chauffé) en
fonction du poids de l'aliment.
Programme
Aliment
Poids (grammes)
Temps (minutes)
Temps de repos (minutes)
Pr 01
Viande
100 – 2000
2 – 43
20 – 30
Pr 02
Volailles
100 – 2500
2 – 58
20 – 30
Pr 03
Poisson
100 – 2000
2 – 40
20 – 30
Pr 04
Fruit
100 – 500
2 – 13
10 – 20
Pr 05
Pain
100 – 800
2 – 19
10 – 20
Observation importante: voir «Indications générales pour la décongélation».

18
FR
Fonctions spéciales
Fonction Spéciale P1: Chauffer des aliments
Utilisez cette fonction pour chauffer des différents types d'aliments.
1. Appuyez sur la touche de fonction Spécial P1.
La touche de fonction s'allume.
2. Appuyez sur la touche Sélection de type
d'aliment pour modifier l'aliment sélectionné.
Les témoins respectifs s'allument.
3. Appuyez sur «-» et «+» pour sélectionner le
temps voulu, par exemple 'A 01' (voir tableau ci-
après).
4. Appuyez sur Sélection de poids pour
sélectionner le poids correspondant à l'aliment.
Le témoin clignote.
5. Appuyez sur «-» et «+» pour sélectionner le
poids désiré.
6. Appuyez sur Start. Le four commence à
fonctionner.
Le tableau suivant vous présente les programmes de la Fonction Spéciale P1, en indiquant les temps de
fonctionnement et de repos (de façon à ce que l'aliment soit uniformément réchauffé) par rapport au
poids.
Programme
Aliment
Poids (g)
Temps (m)
Recommandations
A 01
Soupe
200 – 1500
3 – 15
Remuer 1-2 fois, couvrir
A 02
Plats préconfectionnés
Aliments denses
200 – 1500
3 – 20
Remuer 1-2 fois, couvrir
A 03
Plats d'aliments mélangés
Aliments moins denses
200 – 1500
3 – 18
Remuer 1-2 fois, couvrir
A 04
Légumes
200 – 1500
2,6 – 14
Remuer 1-2 fois, couvrir
Observations importantes:
Vous devez toujours utiliser des récipients
adaptés au micro-ondes et un couvercle pour
éviter la perte des liquides.
Remuez ou retournez les aliments plusieurs fois
pendant qu'ils chauffent.
Le temps nécessaire pour chauffer les aliments
dépend de leur température initiale. Les aliments
retirés directement du réfrigérateur mettent plus
de temps à chauffer que ceux à température
ambiante. Si la température de l'aliment ne vous
donne pas satisfaction, sélectionnez un poids
moindre ou plus important la prochaine fois que
vous réchauffez l'aliment. Après avoir réchauffé
les aliments, mélangez-les, puis laissez-les
reposer un peu afin d'uniformiser leur
température.
Attention! Le récipient peut être très chaud à la fin
du fonctionnement. La plupart des récipients ne sont
pas chauffés par les micro-ondes, mais ils peuvent
l'être par transmission de la chaleur des aliments.

19
FR
Fonctions spéciales
Fonction Spéciale P2: Cuisiner
Utilisez cette fonction pour cuisiner des aliments frais.
Appuyez sur la touche de fonction Spécial P2. La
touche de fonction s'allume.
2. Appuyez sur la touche Sélection de type
d'aliment pour modifier le type d'aliment
sélectionné. Les témoins correspondants
s'allument.
3. Appuyez sur «-» et «+» pour sélectionner le
temps voulu, par exemple 'b 01' (voir tableau ci-
après).
4. Appuyez sur Sélection de poids pour sélec-
tionner le poids de l'aliment. Le témoin s'allume.
5. Appuyez sur les touches «-» et «+» pour
sélectionner le poids correspondant.
6. Appuyez sur Start. Le four commence à
fonctionner.
Le tableau suivant présente les programmes de la Fonction Spéciale P2, en indiquant les temps de
fonctionnement et de repos (de façon à ce que l'aliment soit uniformément chauffé) en fonction du poids.
Programme
Aliment
Poids (g)
Temps (m)
Recommandations
b 01
Pommes de terre
200 – 1000
4 – 17
Remuer 1–2 fois, couvrir
b 02
Légumes
200 – 1000
4 – 15
Remuer 1–2 fois, couvrir
b 03
Riz
200 – 500
13 – 20
2 volumes d'eau pour 1
volume de riz
b 04
Poisson
200 – 1000
4 – 13
Couvrir
Observations importantes:
Vous devez toujours utiliser des récipients
adaptés au micro-ondes et un couvercle
pour éviter la perte des liquides.
Remuez ou retournez les aliments
plusieurs fois pendant qu'ils chauffent.
Attention! Le récipient peut être très
chaud à la fin du fonctionnement. La
plupart des récipients ne sont pas chauffés
par les micro-ondes, mais ils peuvent l'être
par transmission de la chaleur des
aliments.
Instructions de préparation:
Morceaux de poisson – Ajoutez 1 à 3
cuillères à soupe d'eau ou du jus de citron.
Riz – Ajoutez un volume d'eau équivalent
au double de celui du riz.
Pommes de terre non pelées – Choisissez
des pommes de terre de taille égale.
Lavez-les et percez-en la peau plusieurs
fois. Ajoutez 1 à 3 cuillères à soupe d'eau.
Pommes de terre pelées et légumes frais –
Coupez en morceaux de la même taille.
Ajoutez 1 cuillère à soupe d'eau pour 100 g
de légumes et salez à votre goût
b 01
200
2
4
1
3,5
6

20
FR
Fonctions spéciales
Fonction Spéciale P3: Décongeler et gratiner
Utilisez cette fonction pour décongeler et gratiner différents types d'aliments.
Appuyez sur la touche de fonction Spécial P3.
La touche de fonction s'allume.
2. Appuyez sur la touche Sélection de type
d'aliment pour modifier le type d'aliment
sélectionné. Les témoins correspondants
s'allument.
3. Appuyez sur «-» et «+» pour sélectionner le
temps voulu, par exemple 'C 01' (voir tableau
ci-après).
4. Appuyez sur la touche Sélection de poids
pour sélectionner le poids de l'aliment. Le
témoin s'allume.
5. Appuyez sur les touches «-» et «+» pour
sélectionner le poids correspondant.
6. Appuyez sur Start. Le four commence à
fonctionner.
Le tableau suivant présente les programmes de la Fonction Spéciale P3, en indiquant les temps de
fonctionnement (de façon à ce que l'aliment soit uniformément réchauffé) en fonction du poids.
Programme
Aliment
Poids (g)
Temps (m)
Recommandations
C 01
Pizza
300 – 550
8 – 12
Grille
C 02
Plats préconfectionnés
350 – 500
8 – 14
Remuer 1 fois, couvrir
C 03
Dérivés de pomme de terre
200 – 450
10 – 12
Plateau en verre
Observations importantes:
Utiliser uniquement de la vaisselle adaptée
au micro-ondes et résistant à la chaleur (p.
ex. plats à gratins). Le grill produit des
températures très élevées. Toujours couvrir
le plat d’un couvercle pour le programme C
02 afin d’éviter les pertes de liquide.
Attention! Le récipient peut être très chaud à la fin
du fonctionnement. Les fours à micro-ondes ne
chauffent pas la plupart des récipients, mais le
transfert de chaleur de l’élément chauffant du grill
peut néanmoins rendre ces derniers très chauds.
Instructions de préparation:
Pizzas congelées – Choisissez des pizzas
congelées précuites et des pizzas-baguette.
Aliments préconfectionnés ultracongelés –
Choisir lasagnes, cannelloni, soufflé de
crevettes, tous congelés. Toujours couvrir.
Dérivés de la pomme de terre congelés –
Les frites, les croquettes de pomme de terre
et les sautées doivent être adaptées à la
préparation au four micro-ondes.

21
FR
Utilisation du plat à brunir
Normalement, quand on fait cuire des pizzas ou
des gâteaux au gril ou au micro-ondes, la pâte
reste humide et molle. Vous pouvez éviter cela en
utilisant le plat gril. Comme la partie inférieure du
plat gril atteint des températures élevées, la partie
extérieure de l'aliment est bien grillée et dorée.
Le plat gril peut également être utilisé pour
cuisiner le bacon, les œufs, les saucisses, etc.
OBSERVATIONS TRÈS IMPORTANTES :
Utilisez toujours des gants de cuisine pour le
four car le plat gril atteint des températures très
élevées.
Ne mettez jamais le plat gril dans le micro-
ondes sans le plateau.
Ne mettez, pas dans le plat gril, des récipients
non résistants aux hautes températures (des
récipients en plastique, par exemple).
Comment cuisiner avec le plat gril :
1. Préchauffez le plat gril en sélectionnant la
fonction Micro-ondes + Gril pendant 3 à 5
minutes à la puissance de 600 W.
2. Versez de l'huile dans le plat gril pour que les
aliments soient bien dorés.
3. Placez les aliments directement dans le plat gril.
Vous pouvez mettre des aliments congelés
(pizza congelée, par exemple) sans décongeler
préalablement.
4. Placez le plat gril sur le plateau du four micro-
ondes.
5. Sélectionnez la fonction Micro-ondes + Gril et le
temps de cuisson. Nous vous recommandons
les temps de cuisson et de repos suivants.
OBSERVATIONS TRÈS IMPORTANTES :
Le plat gril est recouvert avec du Téflon qui peut
être endommagé à la suite d'une utilisation
incorrecte.
Ne coupez jamais les aliments dans le plat gril.
Retirer les aliments du plat avant de les couper.
Comment nettoyer le plat gril :
La meilleure façon de nettoyer le plat gril est de le
laver avec de l'eau chaude et du produit vaisselle,
puis de le rincer à l'eau claire. N'utilisez pas
d'abrasifs car ils pourraient endommager le
revêtement.
Aliments
Poids
Temps de
cuisson
Temps de
repos
Recommandation
Pizzas
200 g
4 - 5 min
---
Si la pizza est fine.
Si la pizza est épaisse, augmenter le
temps d'1 à 2 minutes.
300 g
5 - 6 min
---
400 g
7 – 8 min
---
Quiches et
tartes
200 g
3 – 4 min
2 – 3 min
300 g
5 - 6 min
2 – 3 min
Steaks
hachés
150 - 200
8 - 10 min
5 – 8 min
Retourner 2 fois.
Frites à cuire
au four
400 g
6 -8 min
---
Retourner 1 fois.

22
FR
Pendant le fonctionnement...
Interruption d'une cuisson
Vous pouvez interrompre le fonctionnement du
four à tout instant en appuyant une fois sur la
touche Start/Stop ou en ouvrant la porte du four.
Dans ces deux cas :
L'émission de micro-ondes cesse
immédiatement.
Le gril est désactivé mais garde une
température très élevée. Danger de brûlure !
Le temporisateur s'arrête et l'écran affiche le
temps de fonctionnement restant.
Vous pouvez alors :
1. remuer ou retourner les aliments, pour
obtenir une cuisson uniforme ;
2. modifier les paramètres de la cuisson ;
3. annuler la cuisson, en appuyant sur la
touche Start/Stop.
Pour reprendre la cuisson, fermez la porte et
appuyer sur la touche Start/Stop.
Modification des paramètres
Vous pouvez modifier les paramètres de
fonctionnement (temps, poids, puissance)
seulement quand la cuisson a été interrompue, en
procédant comme suit :
1. Pour modifier le temps de fonctionnement,
tournez le bouton rotatif dans l'un ou l'autre
sens. Le nouveau temps défini est
immédiatement pris en compte.
2. Pour modifier la puissance, appuyez sur la
touche Sélection de poids/puissance. Le
témoin respectif clignote. Modifiez le
paramètre en tournant le bouton rotatif et
validez en appuyant de nouveau sur
Sélection de poids/puissance.
Annuler une cuisson
Si vous souhaitez annuler le processus de
cuisson, appuyez sur Start/Stop pendant 3
secondes.
Un signal sonore est alors émis et l'écran affiche
l'heure.
Fin d'une cuisson
À la fin du processus de cuisson, 3 signaux
sonores sont émis et l'écran affiche « End ».
Les signaux sonores sont répétés toutes les 30
secondes jusqu'à ce que la porte soit ouverte ou
que vous appuyez sur la touche Start/Stop.

23
FR
Décongélation
Le tableau ci-dessous présente, d'une manière
générale, les différents temps pour la
décongélation et pour le repos (de façon à ce que
l'aliment soit uniformément réchauffé) en
fonction du type et du poids des aliments, et aussi
les respectives recommandations
Aliment
Poids (g)
Temps de
décongélation (m)
Temps de repos
(m)
Observation
Morceaux de viande,
porc, veau, bœuf
100
2-3
5-10
Retournez 1 fois
200
4-5
5-10
Retournez 1 fois
500
10-12
10-15
Retournez 2 fois
1000
21-23
20-30
Retournez 2 fois
1500
32-34
20-30
Retournez 2 fois
2000
43-45
25-35
Retournez 3 fois
Viande à l'étouffée
500
8-10
10-15
Retournez 2 fois
1000
17-19
20-30
Retournez 3 fois
Viande hachée
100
2-4
10-15
Retournez 1 fois
500
10-14
20-30
Retournez 2 fois
Saucisse
200
4-6
10-15
Retournez 1 fois
500
9-12
15-20
Retournez 2 fois
Volailles, morceaux
250
5-6
5-10
Retournez 1 fois
Poulet
1000
20-24
20-30
Retournez 2 fois
Poularde
2500
38-42
25-35
Retournez 3 fois
Filets de poisson
200
4-5
5-10
Retournez 1 fois
Truite
250
5-6
5-10
Retournez 1 fois
Crevettes
100
2-3
5-10
Retournez 1 fois
500
8-11
15-20
Retournez 2 fois
Fruit
200
4-5
5-10
Retournez 1 fois
300
8-9
5-10
Retournez 1 fois
500
11-14
10-20
Retournez 2 fois
Pain
200
4-5
5-10
Retournez 1 fois
500
10-12
10-15
Retournez 1 fois
800
15-17
10-20
Retournez 2 fois
Beurre
250
8-10
10-15
Tomme
250
6-8
10-15
Crème fraîche
250
7-8
10-15

24
FR
Décongélation
Indications générales pour la décongélation
1. Pour décongeler, utilisez uniquement de la
vaisselle adaptée au micro-ondes (porcelaine,
verre, plastique approprié).
2. La fonction Décongélation en fonction du poids
et les tableaux correspondants concernent les
aliments crus.
3. Le temps de décongélation dépend de la
quantité et de la hauteur de l'aliment. Quand
vous congelez des aliments, pensez déjà à leur
décongélation. Distribuez l'aliment en morceaux
de hauteur égale à celle du récipient.
4. Distribuez le mieux possible l'aliment à
l'intérieur du four. Les parties les plus grosses
du poisson ou des cuisses de poulet doivent
être tournées vers l'extérieur. Vous pouvez
protéger les parties les plus délicates avec une
feuille d'aluminium. Important: la feuille
d'aluminium ne doit pas entrer en contact avec
les parois de la cavité, car elle peut provoquer
un arc électrique.
5. Les morceaux les plus denses doivent être
retournés plusieurs fois.
6. Distribuez l'aliment congelé de la façon la plus
uniforme possible, les parties les plus étroites et
fines décongelant plus rapidement que les
parties grosses et hautes.
7. Les aliments riches en graisse comme le beurre
et la crème fraîche ne doivent pas être
complètement décongelés. S'ils sont à
température ambiante, ils seront prêts à être
servis en peu de temps. La crème congelée doit
être remuée avant son utilisation.
8. Mettez les volailles dans un plat creux pour que
le jus de la viande s'écoule plus facilement.
9. Le pain doit être enveloppé dans une serviette
de table pour ne pas trop sécher.
10. Tournez la nourriture à intervalles réguliers.
11. Retirez l'emballage de l'aliment congelé sans
oublier d'enlever les agrafes, le cas échéant.
Pour les récipients destinés à conserver les
aliments dans le congélateur et que vous
pouvez également utiliser dans le four, retirez
seulement le couvercle. Dans les autres cas,
mettez les aliments dans des récipients adaptés
au micro-ondes.
12. Vous devez enlever et jeter le liquide résultant
de la décongélation, principalement des
volailles. Il ne doit en aucun cas entrer en
contact avec les autres aliments.
13. Remarquez bien qu'un temps de repos est
nécessaire, dans la fonction Décongélation,
jusqu'à ce que l'aliment soit complètement
décongelé.

25
FR
Cuisiner aux micro-ondes
Attention! Lisez attentivement le chapitre
«Indications de sécurité» avant de cuisiner
avec votre micro-ondes.
Quand vous cuisinez avec le micro-ondes, suivez
les recommandations suivantes:
Avant de chauffer ou de cuisiner des
aliments ayant une peau ou une enveloppe
(saucisses, pommes de terre, tomates,
pommes), percez-les avec une fourchette
pour qu'ils n'éclatent pas à la cuisson.
Coupez l'aliment avant de le préparer.
Vérifiez que votre récipient est adapté aux
micro-ondes avant de l'utiliser (voir chapitre:
«Quel type de vaisselle utiliser?»).
Certains aliments contiennent peu d'eau et
son évaporation rapide dans le four peut
faire que ce dernier travaille à vide. L'aliment
peut alors carboniser (par exemple en
décongelant du pain ou en faisant des pop-
corns). Le four et la vaisselle peuvent être
endommagés. Le mieux est de surveiller la
cuisson et d'éviter tout dépassement du
temps nécessaire.
Il n'est pas possible de chauffer une grande
quantité d'huile (frire) dans le micro-ondes.
Retirez les emballages des plats
préconfectionnés car ils ne sont pas
toujours résistants à la chaleur. Suivez les
instructions données par le fabricant
Si vous mettez des récipients différents,
par exemple des tasses, disposez-les
uniformément sur le plateau rotatif.
Ne fermez pas les sacs plastiques avec des
pinces en métal. Choisissez-les en plastique.
Percez le sac en plusieurs endroits pour que
la vapeur puisse s'échapper.
Assurez-vous que les aliments que vous
chauffez ou que vous cuisinez atteignent une
température de 70ºC.
Pendant la cuisson, il est possible que de la
vapeur d'eau se condense sur la vitre de la
porte et que des gouttes s'écoulent. C'est
une situation normale, surtout quand la
température ambiante est basse. La sécurité
du four n'est pas en cause. Après l'utilisation,
essuyez l'eau de condensation.
Pour chauffer des liquides, utilisez des
récipients avec une grande ouverture,
pour mieux évacuer la vapeur.
Préparez les aliments en suivant les indications et
restez vigilant avec les temps de cuisson et les
niveaux de puissance qui sont indiqués dans les
tableaux.
Les chiffres sont donnés à titre d'indication. Ils
peuvent changer en fonction de l'état initial, de la
température, de l'humidité et du type d'aliment.
Nous vous conseillons d'ajuster les temps et les
niveaux de puissance à chaque situation. Selon
l'aliment, il faudra allonger ou raccourcir le temps
de cuisson, ou bien monter ou baisser le niveau
de puissance.
Cuisiner avec micro-ondes...
1. Plus grande est la quantité des aliments, plus
longue est la durée de la cuisson. Remarquez
bien:
Double quantité ⇒ double du temps
Moitié de la quantité ⇒ moitié du temps
2. Plus basse est la température, plus long est le
temps de cuisson.
3. Les aliments liquides se réchauffent plus
rapidement.
4. Une bonne distribution des aliments sur le
plateau rotatif facilite une cuisson uniforme. Si
vous chauffez en même temps des aliments
différents, placez ceux qui sont moins denses
au centre du plateau et les plus denses vers
l'extérieur du plateau.
5. La porte du four peut être ouverte à tout
moment. Le four s'éteint alors
automatiquement. Pour le remettre en
fonctionnement, fermez la porte et appuyez sur
la touche START.
6. Quand ils sont couverts, les aliments cuisent
plus rapidement et leurs qualités sont mieux
préservées. Les micro-ondes doivent pouvoir
traverser le couvercle qui doit avoir de petits
orifices pour laisser passer la vapeur d'eau.

26
FR
Cuisiner aux micro-ondes
Tableaux et suggestions – Cuisiner les légumes
Aliment
Quantité (g)
Addition de
liquides
Puissanc
e
(Watt)
Temps
(m)
Temps de
repos (m)
Indications
Choux-fleur
Brocolis
Champignons
500
300
250
100 ml
50 ml
25 ml
800
800
800
9-11
6-8
6-8
2-3
2-3
2-3
Couper en rondelles. Couvrir
Petits pois et
carottes,
Carottes
congelées
300
250
100 ml
25 ml
800
800
7-9
8-10
2-3
2-3
Couper en morceaux ou en
rondelles. Couvrir
Pommes de terre
250
25 ml
800
5-7
2-3
Peler, couper en morceau
égaux. Couvrir
Piment
Poireau
250
250
25 ml
50 ml
800
800
5-7
5-7
2-3
2-3
Couper en morceaux ou en
rondelles. Couvrir
Choux de
Bruxelles congelés
300
50 ml
800
6-8
2-3
Couvrir
Chou
250
25 ml
800
8-10
2-3
Couvrir
Tableaux et suggestions – Cuisiner le poisson
Aliment
Quantité (g)
Puissance
(Watt)
Temps
(m)
Temps de
repos
(m)
Indications
Filets de poisson
500
600
10-12
3
Couvrir. Retourner quand la moitié du temps
est écoulée.
Poisson entier
800
800
400
2-3
7-9
2-3
Couvrir. Retourner quand la moitié du temps
est écoulée. Éventuellement, couvrir les
extrémités fines du poisson.

27
FR
Cuisiner au gril
Pour obtenir de bons résultats avec le gril, utilisez
la grille fournie avec le four.
Pour de bons résultats avec le gril, utilisez la grille
rectangulaire fournie avec le four. Elle doit être
placé sur le plateau en verre rectangulaire dans
deux positions possibles qui donnent des hauteurs
différentes pour les grillades (voir image ci-
dessous).
Positionnez la grille de façon à ce qu'elle
n'entre pas en contact avec les surfaces
métalliques de la cavité, ce qui provoquerait un
arc électrique et pourrait détériorer le four.
INDICATIONS IMPORTANTES:
1. Lors de la première utilisation du gril, un peu de
fumée odorante peut se dégager. Elle résulte
de l'emploi d'huiles pendant le processus de
fabrication.
2. La vitre de la porte atteint des températures très
élevées quand le gril est utilisé. Ne laissez pas
les enfants s'approcher.
3. Nous vous conseillons de porter des gants de
cuisine car la grille et les parois de la cavité
atteignent des températures très élevées.
4. Le thermostat de sécurité fait que les
résistances s'éteignent temporairement lors
d'une utilisation prolongée du gril.
5. Important! Vous devez vérifier que les récipients
que vous utilisez quand vous cuisinez ou faites
griller des aliments sont bien adaptés au micro-
ondes. Voir le chapitre sur le type de vaisselle!
6. Quand vous utilisez le gril, des éclaboussures
de graisse peuvent atteindre la résistance et
être brûlées. C'est une situation normale qui ne
représente aucun problème de fonctionnement.
7. Nettoyez l'intérieur et les accessoires après
chaque cuisson, pour que les saletés ne
s'incrustent pas.

28
FR
Cuisiner au gril
Tableaux et suggestions – Gril sans micro-ondes
Aliment
Quantité (g)
Temps (m)
Indications
Poisson
Dorade
Sardine/ rascasse rouge
800
6-8 unités
18-24
15-20
Beurrez légèrement. Quand la moitié du
temps est écoulée, retournez et ajoutez les
condiments.
Viande
Saucisse
6-8 unités
22-26
Percez et retournez quand la moitié du
temps est écoulée.
Hamburger congelé
3 unités
18-20
Retourner 2 ou 3 fois.
Entrecôte (environ 3 cm
d'épaisseur)
400
25-30
Saucez et retournez quand la moitié du
temps est écoulée.
Autres
Toasts
4 unités
1½-3
Surveillez les toasts.
Gratiner des sandwichs
2 unités
5-10
Surveillez le gratin
Préchauffez le gril pendant 2 minutes. Sauf
indication contraire, utilisez la grille. Placez la grille
sur un récipient dans lequel l'eau et la graisse
puissent couler.
Les temps sont mentionnés à titre d'indication car
ils peuvent varier en fonction de la composition
des aliments, de leur quantité et de la cuisson
demandée. Le poisson et la viande gagnent un
goût délicieux si, avant de les griller, vous les
badigeonnez d'huile végétale, épices et herbes
aromatiques, et si vous les laisser mariner
quelques heures. Ne salez qu'après la grillade.
Les saucisses n'éclatent pas si vous les percez
préalablement avec une fourchette.
Au milieu du temps de fonctionnement, contrôlez
la cuisson, remuez ou retournez si nécessaire.
Le gril est spécialement adapté pour la cuisson de
la viande en morceaux et du poisson en filets. Les
morceaux fins de viande peuvent être retournés
une seule fois, les plus gros plusieurs fois.

29
FR
Cuisiner au gril
Tableaux et suggestions – Micro-ondes + Gril
La fonction Micro-ondes avec Gril est idéale
pour cuisiner rapidement et dorer en même
temps les aliments. Vous pouvez également les
gratiner.
Le micro-ondes et le gril fonctionnent
simultanément. Le micro-ondes cuit et le gril
gratine.
Plat
Quantité (g)
Vaisselle
Puissance
(Watt)
Temps (m)
Temps de
repos (m)
Pâtes gratinées
500
Récipient bas
400
12-17
3-5
Pommes de terres
gratinées
800
Récipient bas
600
20-22
3-5
Lasagne
environ 800
Récipient bas
600
15-20
3-5
Gratin de tomme
environ 500
Récipient bas
400
18-20
3-5
2 cuisses de poulet, frais
(sur la grille)
200 chaque
Récipient bas
400
10-15
3-5
Poulet
environ 1000
Récipient bas et
large
400
35-40
3-5
Soupe à l'oignon
gratinée
2 tasses de 200
Bol de soupe
400
2-4
3-5
Avant d'utiliser de la vaisselle et des récipients
dans le micro-ondes, vérifiez qu'ils y sont bien
adaptés. Utilisez seulement de la vaisselle
adaptée aux micro-ondes.
La vaisselle utilisée pour la fonction combinée doit
être adaptée aux micro-ondes et au gril. Voir le
chapitre sur le type de vaisselle!
Remarquez que les valeurs sont mentionnées à
titre indicatif et qu'elles peuvent varier en fonction
du temps initial, de la température, de l'humidité et
du type d'aliment.
Si l'aliment n'est pas assez doré, mettez-le 5 ou 10
minutes de plus en fonction Gril.
Faites attention aux temps de repos et retournez
les morceaux de volaille.
Sauf indications contraires, utilisez le plateau
rotatif pour cuisiner.
Les valeurs indiquées dans les tableaux sont
valables pour une cavité du four à froid (il n'est
nécessaire de préchauffer).

30
FR
Rôtir et cuire
Tableaux et suggestions – Préparation de viande et gâteaux
Micro-ondes / Air chaud
Aliment
Quantité (g)
Puissance
(Watt)
Température
Temps
(mn)
Temps de
repos (mn)
Indications
Rôti
1000-1500
400
200
30-40
20
Récipient sans couvercle,
tourner 1x
Filet de porc
Côtelette ou os
Rôti de porc
800-1000
200
180-190
50-60
20
Récipient sans couvercle,
tourner 1x
Poulet entier
1000-1200
400
200
30-40
10
Récipient sans couvercle,
bréchet vers le bas,
tourner 1x
Poulet en
morceaux
500-1000
400
200
25-35
10
Récipient sans couvercle,
Placer les morceaux la
peau en bas. Tourner 1x.
Rôti de veau
1500-2000
200
180
60-65
20
Récipient avec couvercle,
tourner 1-2x, puis
continuez la cuisson sans
couvercle
Rôti de bœuf
1500-1800
200
200
80-90
20
Récipient avec couvercle,
tourner 1-2x
Micro-ondes / Cuire
Aliment
Puissance
(Watt)
Température
Temps
(mn)
Temps de
repos
(mn)
Indications
Gâteau au chocolat/cerise
200
200
30
5-10
Plateau rotatif, petit
trépied, moule de
Ø 28 cm
Cheesecake aux fruits
400
180
40-45
5-10
Plateau rotatif, petit
trépied, moule de
Ø 28 cm
Tarte aux pommes
200
185
40-45
5-10
Plateau rotatif, petit
trépied, moule de
Ø 28 cm
Cheesecake su streusel
400
180
40-50
5-10
Plateau rotatif, petit
trépied, moule de
Ø 28 cm
Gâteau aux noix
200
170
30-35
5-10
Plateau rotatif,
Moule creux

31
FR
Rôtir et cuire
Conseils pour la cuisson
Retournez les pièces de viande à la moitié du
temps de cuisson. Quand le rôti est cuit, laissez-le
reposer 20 minutes dans le four éteint et fermé. Le
jus de la viande sera ainsi mieux réparti.
La température et le temps de cuisson dépendent
du type et de la quantité d'aliment.
S'il n'y a pas d'indication du poids exact du rôti
dans le tableau, choisissez le poids immédia-
tement inférieur et prolongez le temps.
Conseils pour la vaisselle
Vérifiez que la vaisselle entre bien à l'intérieur du
four.
Les récipients en verre, quand ils sont chauds,
doivent être posés sur un chiffon de cuisine sec.
Au contact d'une surface froide ou mouillée, le
verre pourrait se fendiller et éclater. Utilisez un
gant de cuisine pour retirer les plats du four.

32
FR
Cuire
Tableaux et suggestions – Cuire / Air chaud
Aliment
Récipient
Niveau
Température
Temp (mn)
Gâteau aux noix
Moule creux
Plateau rotatif
170/180
30/35
Tarte aux fruits
Moule de Ø 28 cm
Plateau rotatif
150/160
35/45
Gâteau anglais
Moule creux
Plateau rotatif
170/190
30/45
Tarte salée
Moule rond en verre
Plateau rotatif
160/180
50/70
Gâteau simple
Moule de Ø 26 cm
Plateau rotatif
160/170
40/45
Bûche
Moule à gâteau en verre
1
110
35/45
Gâteau aux cerises
Moule à gâteau en verre
1
170/180
35/45
Conseils pour les moules à gâteaux
Les moules les plus fréquents sont les moules
noirs en métal. Si vous utilisez les micro-ondes,
servez-vous de moules à gâteau en verre, en
céramique ou en plastique, résistant à des
températures de 250ºC. Avec ce type de moules,
les gâteaux sont moins dorés.
Conseils pour cuisiner les gâteaux
La température de cuisson des gâteaux dépend
de la qualité et de la quantité de pâte. Essayez
une première fois avec une température plutôt en
dessous, ce qui permet d'obtenir un doré plus
uniforme. La fois suivante, si nécessaire,
choisissez une température plus forte. Placez
toujours le moule au centre du plateau ou sur le
plateau rotatif.
Suggestions pour une bonne cuisson
Comment vérifier que le gâteau est cuit:
Enfoncez un couteau fin sur le dessus du gâteau.
Si la pâte ne colle pas au couteau, le gâteau est
cuit.
Le gâteau est très foncé:
La prochaine fois, sélectionnez une température
plus basse et laissez cuire le gâteau plus
longtemps.
Le gâteau est très sec:
Faites de petits orifices, avec une petite
fourchette, dans le gâteau déjà cuit, puis arrosez
avec du jus de fruit ou une boisson alcoolique. La
prochaine fois, montez la température de près de
10ºC et réduisez le temps de cuisson.
Le gâteau ne veut pas sortir du moule:
Laissez refroidir le gâteau 5 à 10 minutes. Si la
situation perdure, passez la lame d'un couteau
tout autour du gâteau pour le dégager. La
prochaine fois, beurrez mieux le moule.
Conseils pour économiser l'énergie
Quand vous faites plus de 1 gâteau, il est
préférable de les mettre au four les uns après les
autres. Encore chaud, le four cuira le deuxième
gâteau plus rapidement. Utilisez de préférence
des moules foncés, peints ou émaillés en noir, car
ils absorbent mieux la chaleur.
Dans le cas de cuissons qui demandent plus de
temps, vous pouvez éteindre le four 10 minutes
avant la fin pour profiter de la chaleur résiduelle.

33
FR
Quel type de vaisselle pouvez-vous utiliser?
Fonction Micro-ondes
Prenez garde que les micro-ondes sont réfléchies
par les surfaces métalliques. Le verre, la
porcelaine, la terre cuite, le plastique et le papier
laissent passer les micro-ondes.
Les récipients ou la vaisselle en métal, ou
ayant des parties ou des décorations
métalliques, ne doivent donc pas être utilisés
dans le micro-ondes. Le verre et la terre cuite
avec des décorations ou des parties
métalliques (comme le cristal de plomb) ne
doivent pas être utilisés.
L'idéal pour cuisiner au four micro-ondes est
d'utiliser le verre, la porcelaine ou la terre cuite
réfractaires, et le plastique résistant à la chaleur.
Le verre et la porcelaine très fins et fragiles
doivent être utilisés, peu de temps, pour
décongeler ou chauffer des aliments déjà
confectionnés.
La vaisselle peut être très chaude car les aliments
chauds lui transmettent leur chaleur. Vous devez
donc toujours utiliser un gant de cuisine!
Testez la vaisselle
Placez la vaisselle dans le four. Si au bout de 20
secondes à la puissance maximum elle ressort
froide ou tiède, alors vous pourrez l'utiliser. Elle
n'est pas adaptée si elle a beaucoup chauffé ou
provoqué un arc électrique.
Fonction Gril ou Air chaud
En fonction Gril ou Air chaud, la vaisselle doit
résister à des températures de 300ºC. N'utilisez
pas de vaisselle en plastique.
Fonctions combinées
En Fonctions combinées, la vaisselle doit être
adaptée autant aux micro-ondes qu'au gril.
Récipients et papier aluminium
Vous pouvez utiliser des récipients en aluminium
ou du papier aluminium dans le four, si vous
suivez les consignes suivantes:
Suivez les recommandations du fabricant
figurant sur l'emballage.
Ces récipients en aluminium ne doivent pas
avoir une hauteur supérieure à 3 cm ni entrer
en contact avec les parois de la cavité
(distance minimum de 3 cm). Le couvercle
en aluminium doit être retiré.
Mettez le récipient en aluminium directement
sur le plateau rotatif. Si vous utilisez la grille,
placez le récipient sur un plateau en
porcelaine. Ne mettez jamais le récipient
directement sur la grille!
Le temps de cuisson est plus long car les
micro-ondes entrent dans les aliments
seulement par le dessus. Dans le doute,
n'utilisez que de la vaisselle adaptée aux
micro-ondes.
Le papier aluminium peut être utilisé pour
réfléchir les micro-ondes pendant la
décongélation. Les aliments délicats, tels la
volaille ou la viande hachée, peuvent être
protégés d'un excès de chaleur en
recouvrant les extrémités.
Important: le papier aluminium ne peut
entrer en contact avec les parois de la cavité,
cela provoquerait un arc électrique.
Couvercles
Nous vous recommandons d'utiliser des
couvercles en verre, en plastique, ou une pellicule
adhérente, car ainsi:
1. Vous empêchez une évaporation excessive
(principalement pour les cuissons très
longues);
2. La cuisson est plus rapide;
3. Les aliments cuits ne sont pas secs;
4. Le goût est mieux préservé.
Le couvercle doit être percé d'orifices pour éviter
toute formation de pression. Les sacs en plastique
doivent également avoir des ouvertures. Les
biberons, les petits pots pour les bébés et tous les
récipients équivalents doivent être chauffés sans
couvercle, sinon ils pourraient éclater.

34
FR
Quel type de vaisselle pouvez-vous utiliser?
Tableau – Vaisselle
Le tableau suivant vous indique de manière générale quel type de vaisselle est adapté à chaque
situation.
Mode de
fonctionnement
Type vaisselle
Micro-ondes
Gril / Air chaud
Fonctions
combinées
Décongeler /
réchauffer
Cuisiner
Verre et porcelaine 1)
Vaisselle non résistante au feu, peut
être lavée au lave-vaisselle
oui
oui
non
non
Céramique vitrée
Verre et porcelaine résistant au feu
oui
oui
oui
oui
Céramique, vaisselle en grès 2)
Avec ou sans verre, sans décorations
métalliques
oui
oui
non
non
Vaisselle en terre cuite 2)
Avec du verre
Sans verre
oui
non
oui
non
non
non
non
non
Vaisselle en plastique 2)
Résistant à une chaleur de 100°C
Résistant à une chaleur de 250°C
oui
oui
non
oui
non
non
non
non
Films plastique 3)
Film plastique pour aliments
Cellophane
non
oui
non
oui
non
non
non
non
Papier, carton, parchemin 4)
oui
non
non
non
Métal
Papier aluminium
Emballages en aluminium 5)
Accessoires
oui
non
oui
non
oui
oui
oui
oui
oui
non
oui
non
1. Sans rebord doré ou argenté et sans cristal de
plomb.
2. Suivez les indications du fabricant !
3. Ne pas utilisez des agrafes en métal pour
fermer les sacs. Perforez les sacs. Utilisez le
film plastique uniquement pour recouvrir.
4. N'utilisez pas des assiettes en papier ou carton.
5. Utilisez uniquement des emballages en
aluminium peu profonds et sans couvercle.
L'aluminium ne doit pas entrer en contact avec
les parois de la cavité.

35
FR
Nettoyage et entretien du four
Le nettoyage est l'unique entretien normalement
nécessaire.
Attention! Le four micro-ondes doit être nettoyé
régulièrement, les éclaboussures et petites
particules doivent être enlevées. Si vous ne le
nettoyez pas régulièrement, la surface du four
peut se détériorer, la vie utile du four sera
réduite et une situation dangereuse peut
éventuellement apparaître.
Attention! Le nettoyage doit être effectué
quand le four est débranché de l'alimentation
électrique. Retirez la prise du mur ou
débranchez le circuit d'alimentation du four.
N'utilisez pas de produits de nettoyage
agressifs ou abrasifs, ni frottoirs qui peuvent
rayer les parois, ni objets pointus.
N'utilisez pas d'appareils de nettoyage à haute
pression ou qui projettent de la vapeur.
Surface avant
Un chiffon humide suffit pour nettoyer le four. S'il
est très sale, ajoutez quelques gouttes de produit
vaisselle dans l'eau pour humidifier le chiffon. En
suivant, essuyez tout le four avec un chiffon sec.
Pour les fours dont le devant est en aluminium,
utilisez un produit doux pour les vitres et un chiffon
doux ne laissant pas de fibres. Nettoyez
horizontalement sans exercer de pression sur la
surface.
Retirez immédiatement les taches de calcaire,
graisse, amidon, blanc d'œufs. Elles peuvent
provoquer de la corrosion.
Évitez que de l'eau entre dans le four.
Intérieur du four
Après chaque utilisation, nettoyez les parois
intérieures avec un chiffon humide. Il est ainsi plus
facile d'enlever éclaboussures et particules.
Pour les saletés les plus difficiles à enlever,
utilisez un produit de nettoyage non agressif.
N'utilisez pas de sprays pour four ni d'autres
produits de nettoyage agressifs ou abrasifs.
La porte et le devant du four doivent toujours
être bien propres pour assurer un
fonctionnement correct.
Évitez que de l'eau entre dans les orifices de
ventilation du micro-ondes.
Enlevez régulièrement le plateau rotatif et son
support pour nettoyer la base de la cavité, en
particulier quand des liquides ont débordé.
N'allumez pas le four sans le plateau rotatif et
son support.
Si la cavité du four est très sale, placez un verre
d'eau sur le plateau rotatif et faites fonctionner le
four micro-ondes pendant 2 ou 3 minutes à la
puissance maximum. La vapeur ainsi libérée va
ramollir les saletés qui seront plus faciles à
nettoyer avec un chiffon doux.
Les odeurs désagréables (comme après la
cuisson d'un poisson) peuvent être facilement
éliminées. Ajoutez quelques gouttes de jus de
citron ou de vinaigre dans une tasse d’eau. Mettez
une petite cuillère dans la tasse pour éviter une
ébullition après coup. Chauffez à la puissance
maximum pendant 2 à 3 minutes.

36
FR
Nettoyage et entretien du four
Plafond du four
Quand le plafond du four est sale, le gril peut être
abaissé pour en faciliter le nettoyage.
Attendez que le gril ait refroidi avant de
l'abaisser, pour éviter tout danger de brûlure.
Procédez comme suit:
1. Faites tourner le support du gril de 180º (1).
2. Abaissez doucement le gril (2). Ne forcez pas
excessivement, vous pourriez
l'endommager.
3. Quand le plafond est nettoyé, remettez le gril (2)
à sa place, puis bloquez-le avec son support en
le tournant de 90º.
AVIS IMPORTANT : si le support du grill (1)
tombe lorsque vous le faites pivoter, replacez-le
(1) dans l’orifice du plafond et faites-le pivoter de
90º jusqu’à sa position de support du grill (2).
Le couvercle en mica (3) situé dans le plafond
doit toujours être propre. Les particules
d'aliments qui s'y accumulent peuvent
endommager le four ou provoquer des étincelles.
N'utilisez pas de produits de nettoyage
abrasifs ni d'objets pointus.
Ne retirez pas le couvercle en mica, pour éviter
tout risque.
Le couvercle en verre de la lampe (4), situé dans
le plafond du four, peut être facilement retiré pour
être nettoyé. Dévissez-le et nettoyez-le avec de
l'eau et un peu de produit vaisselle.
Accessoires
Nettoyez les accessoires après chaque utilisation.
S'ils sont très sales, laissez-les d'abord tremper,
puis lavez-les avec une brosse et une éponge. Les
accessoires peuvent être lavés au lave-vaisselle.
Assurez-vous que le plateau rotatif et son support
sont toujours propres. N'allumez pas le four sans
le plateau rotatif et son support.

37
FR
Que faire en cas de mauvais fonctionnement ?
ATTENTION! Toute réparation ne peut être
effectuée que par des techniciens spécialisés.
Toute réparation effectuée par des personnes
non certifiées par le fabricant peut se révéler
dangereuse.
Les problèmes suivants peuvent être corrigés
sans appeler l'assistance technique:
L'écran ne s'allume pas! Vérifiez si:
- L'affichage de l'heure a été masquée (voir
chapitre Réglages de base).
Rien ne se passe quand on appuie sur les
touches! Vérifiez si:
- Le blocage de sécurité est actif (voir chapitre
Réglages de base).
Le four ne fonctionne pas! Vérifiez si:
- La prise est correctement branchée au mur.
- Le circuit d'alimentation du four est branché.
- La porte est complètement fermée. Assurez-
vous-en au son produit à la fermeture.
- Il y a des corps étrangers entre la porte et le
devant de la cavité.
Pendant le fonctionnement du four, des
bruits bizarres se font entendre! Vérifiez si:
- Des objets métalliques génèrent des arcs
électriques à l'intérieur du four (voir chapitre sur
le type de vaisselle).
- La vaisselle entre en contact avec les parois du
four.
- Il y a des instruments de cuisine à l'intérieur du
four.
Les aliments ne chauffent pas ou se
chauffent très lentement ! Vérifiez si:
- Vous avez utilisé de la vaisselle en métal.
- Vous avez sélectionné un temps de
fonctionnement et une puissance appropriés.
- Vous avez placé à l'intérieur du four une
quantité d'aliments plus importante ou plus
froide que d'habitude.
L'aliment est excessivement chaud, desséché
ou brûlé! Vérifiez que vous avez sélectionné le
temps de fonctionnement et le niveau de
puissance appropriés.
Un bruit se fait entendre à la fin d'un
fonctionnement! Ceci n'est pas un
problème. Le ventilateur de réfrigération
continue de fonctionner un moment. Il se
débranche quand la température est
suffisamment basse.
Le four fonctionne mais l'éclairage
intérieur ne s'allume pas ! Si toutes les
fonctions travaillent correctement, vous
devez probable-ment changer la lampe.
Vous pouvez continuer à utiliser l'appareil.
Remplacement de la lampe
Pour remplacer la lampe, procédez de la façon
suivante:
- Débranchez le four de l'alimentation électrique,
en retirant la prise du mur ou en coupant le
circuit d'alimentation du four.
- Dévissez et enlevez le couvercle en verre de la
lampe (1).
- Retirez la lampe halogène (2). Attention! La
lampe peut être très chaude.
- Installez une nouvelle lampe 12V / 10W.
Attention! Ne touchez pas la surface de la
lampe directement avec les doigts car cela
endommage la lampe. Suivez les instructions
du fabricant de la lampe.
- Revissez le couvercle en verre de la lampe (1).
Rebranchez le four à l'alimentation électrique.

38
FR
Propriétés techniques
Spécifications
Tension AC ..................................................................................... (voir plaque des charactéristiques)
Puissance requise .......................................................................... 3400 W
Puissance du Grill........................................................................... 1500 W
Puissance de l’air chaud ................................................................. 1600W
Puissance de sortie des micro-ondes. ............................................ 1000 W
Fréquence des micro-ondes… ....................................................... 2450 MHz
Dimensions hors-tout (LongueurxHauteurxProfondeur). ................. 595 455 542 mm
Dimensions de la cavité (LHP). .................................................. 420 210 390 mm
Capacité du four. ............................................................................ 38 ltr
Poids .............................................................................................. 35 kg
Protection de l'environnement
Élimination de l'emballage
L'emballage est signalé d'un Point vert.
Veuillez utiliser les conteneurs adéquats pour vous
débarrasser de tous les matériaux de l'emballage
comme carton, polystyrène expansé et film
plastique. Ils seront réutilisés pour d'autres
emballages.
Élimination des appareils hors d'usage
La directive européenne 2002/96/CE, concernant
la gestion des Résidus d'équipements électriques
et électroniques (REEE), prévoit que les appareils
électroménagers ne doivent pas être éliminés de
la même façon que les résidus urbains solides.
Les appareils usés doivent être recueillis
séparément afin d'optimiser le recyclage des
matériaux qui les composent et pour prévenir
d'éventuelles atteintes à la santé publique et à
l'environnement. Le symbole représentant une
grande poubelle barrée d'une croix doit être
apposé sur tous les produits de façon à rappeler
l'obligation d'une collecte à part.
Les consommateurs doivent entrer en contact
avec les autorités locales ou les points de vente
pour se renseigner sur le local approprié où ils
peuvent jeter les appareils hors d'usage.
Avant de vous défaire de votre appareil, tirez du
câble d'alimentation, coupez-le et éliminez-le.

39
FR
Instructions pour l'installation
Avant l'installation
Vérifiez que la tension de l'alimentation de
l'appareil, indiquée sur la plaque des
caractéristiques correspond à celle de votre
installation.
Ouvrez la porte du four et retirez tous les
accessoires ainsi que l'emballage.
N'enlevez pas le couvercle de mica situé au
plafond de la cavité du four ! Ce couvercle évite
que graisses et particules d'aliments
endommagent le générateur de micro-ondes.
Attention ! Le devant du four peut être enveloppé
d'une pellicule de protection. Retirez-la
soigneusement, avant la première utilisation, en
commençant par le bas.
Vérifiez que le four n'est pas endommagé.
Assurez-vous que la porte du four ferme correcte-
ment et que le côté intérieur de la porte et le
devant de la cavité ne sont pas abîmés. S'ils le
sont, appelez le Service d'assistance technique.
N'UTILISEZ PAS LE FOUR si le câble
d'alimentation ou la prise de courant sont
endommagés, si le four ne fonctionne pas
correctement ou s'il est endommagé ou bien
tombé. Appelez le Service d'assistance technique.
Installez le four sur une surface stable, le plus loin
possible des radios, télévisions et de tout ce qui
produit de la chaleur.
Pendant l'installation, assurez-vous que le
câble d'alimentation n'entre en contact ni avec
de l'humidité, ni avec des objets aux bords
coupants, ni avec la partie arrière du four en
raison de ses températures élevées.
Attention : la prise de courant doit rester
accessible, une fois le four installé.
Après l'installation
Le four est équipé d'un câble d'alimentation et
d'une prise pour courant monophasé.
En cas d'installation permanente, le four doit
être installé par un technicien qualifié. L'appareil
doit alors être branché au réseau au moyen d'un
dispositif disjoncteur multipolaire dont les contacts
sont séparés d'au moins 3 mm.
ATTENTION: LE FOUR DOIT ÊTRE
OBLIGATOIREMENT RELIÉ À LA TERRE.
Dans le cas où nos instructions d'installation ne
seraient pas respectées, le fabricant et les
revendeurs n'engagent pas leur responsabilité
pour d'éventuels dommages subis par les
personnes, les animaux ou les biens.
Le four ne fonctionne que si la porte est
correctement fermée.
Avant la première utilisation, nettoyez l'intérieur du
four ainsi que les accessoires en suivant les
indications figurant au point «Nettoyage et
entretien de votre four».
Emboîtez le manchon dans le centre de la cavité
du four, placez le support plateau puis le plateau
rotatif qui doit s'emboîter. Chaque fois que le four
est utilisé, il est important que ces accessoires
soient à l'intérieur du four et correctement placés.
Le plateau rotatif peut tourner dans les deux
sens.
Pendant l'installation, respecter les dimensions
indiquées à la fin de ce manuel.

40
NL
Inhoud
Veiligheidsinformatie........................................................................................................................ 41
Veiligheidsvoorschriften .................................................................................................................. 45
Voordelen van microgolven ............................................................................................................. 46
Beschrijving van de oven ................................................................................................................. 47
Omschrijving van functies ............................................................................................................... 48
Basisregelingen ................................................................................................................................ 49
Basisfuncties .................................................................................................................................... 51
Speciale functies .............................................................................................................................. 56
Gebruik van de bakplaat .................................................................................................................. 59
Tijdens de bereiding... ...................................................................................................................... 60
Ontdooien .......................................................................................................................................... 61
Koken met de magnetron ................................................................................................................. 63
Koken met de grill ............................................................................................................................. 65
Braden en koken ............................................................................................................................... 68
Koken ................................................................................................................................................. 70
Wat voor soort serviesgoed kan men gebruiken? ......................................................................... 71
Reiniging en onderhoud van de oven ............................................................................................. 73
Wat te doen bij storingen? ............................................................................................................... 75
Technische gegevens ...................................................................................................................... 76
Aanwijzingen over milieubescherming ........................................................................................... 76
Installatie-instructies ........................................................................................................................ 77
Afmetingen voor installatie .............................................................................................................. 78
Beste Klant,
Hartelijk dank voor het kiezen van dit BARAZZA product.
Om er zeker van te zijn dat uw apparaat optimaal presteert, dient u deze gebruiksaanwijzing aandachtig
door te lezen.
BEWAAR DE DOCUMENTATIE BIJ DIT PRODUCT VOOR LATER GEBRUIK.
Houd de gebruiksaanwijzing altijd bij de hand. Indien u dit apparaat aan iemand uitleent, vergeet
dan niet dit boekje mee te geven!
U kunt deze gebruiksaanwijzing ook downloaden via www.barazzasrl.it

41
NL
Veiligheidsinformatie
Lees zorgvuldig de meegeleverde instructies voor installatie
en gebruik van het apparaat. De fabrikant is niet
verantwoordelijk voor letsel en schade veroorzaakt door een
foutieve installatie. Bewaar de instructies van het apparaat voor
toekomstig gebruik.
VEILIGHEID VAN KINDEREN EN KWETSBARE MENSEN
Waarschuwing! Gevaar voor verstikking, letsel of permanente
invaliditeit..
Dit apparaat kan worden gebruikt door kinderen van 8 jaar en
ouder en door mensen met beperkte lichamelijke, zintuiglijke of
verstandelijke vermogens of een gebrek aan ervaring en kennis,
indien zij onder toezicht staan van een volwassene of van iemand
die verantwoordelijk is voor hun veiligheid.
Laat kinderen niet met het apparaat spelen.
Houd alle verpakkingsmaterialen uit de buurt van kinderen.
Waarschuwing: Houd kinderen uit de buurt van het apparaat als
het in werking is of afkoelt. Het apparaat is heet.
Als het apparaat is uitgerust met een kinderbeveiliging, raden wij
aan dit te activeren. Kinderen jonger dan 3 jaar moeten niet
zonder toezicht in de buurt van het apparaat worden gelaten.
Reiniging en onderhoud mag niet worden uitgevoerd door
kinderen zonder toezicht.
ALGEMENE VEILIGHEID
Dit apparaat is bedoeld voor huishoudelijk gebruik of
gelijksoortige toepassingen zoals:
– personeelskeukens in winkels, kantoren of andere
werkomgevingen,
– boerderijen,
– door gasten in hotels, motels en andere residentiële
omgevingen,
– bed-and-breakfast accomodaties.

42
NL
Veiligheidsinformatie
Van binnen wordt het apparaat heet als het in werking is. Raak
de verwarmingselementen in het apparaat niet aan. Gebruik altijd
ovenhandschoenen om accessoires of kookgerei te plaatsen of
verwijderen..
Waarschuwing: Verwarm geen vloeistoffen of andere
levensmiddelen in afgesloten houders. Deze kunnen dan
ontploffen.
Gebruik alleen hulpstukken die geschikt zijn voor gebruik in de
magnetron.
Let bij het opwarmen van voedsel in plastic of papieren houders
op het apparaat vanwege de mogelijkheid tot zelfontbranding.
Het apparaat is bedoeld voor het opwarmen van voedsel en
dranken. Het drogen van levensmiddelen of kleding en het
opwarmen van warmhoudpads, slippers, sponzen, vochtige
doekjes en dergelijke kan leiden tot letsel, zelfontbranding of
brand.
Opgelet! De oven niet gebruiken indien:
- De deur niet goed sluit;
- De deurscharnieren beschadigd zijn;
- Het aanrakingsoppervlak tussen de deur en de voorkant
beschadigd is;
- Het deurglas beschadigd is;
- Er binnenin regelmatig boogontlading ontstaat zonder de
aanwezigheid van enig metalen voorwerp.
De oven kan pas hergebruikt worden na reparatie door een
vakman van de technische dienst.
Als rook wordt waargenomen, zet dan het apparaat uit of trek de
stekker uit het stopcontact en houd de deur gesloten om
vlammen te doven.
Het in de magnetron opwarmen van dranken kan ertoe leiden dat
het langer duurt voordat het kookpunt wordt bereikt. Pas op als u
de houder uit de magnetron haalt.

43
NL
Veiligheidsinformatie
De inhoud van melkflesjes en potjes babyvoeding moet worden
geroerd of geschud en de temperatuur moet voor consumptie
worden gecontroleerd om brandwonden te voorkomen.
Eieren in de schaal en hele hardgekookte eieren mogen niet in
het apparaat worden opgewarmd omdat ze dan kunnen
ontploffen, zelfs nadat de magnetronverwarming is beëindigd.
INSTALLATIE
In het elektrische deel van de installatie is een inrichting voorzien,
die het mogelijk maakt om het apparaat met een
contactopeningsafstand van ten minste 3 mm meerpolig van het
net te scheiden.
Daarvoor geschikt scheidingsmechanismen zijn bijv.
beveiligingsschakelaar, zekeringen (schroefzekeringen kunnen
uit de houder worden gedraaid), aardlekschakelaar en
beveiligingen.
De aanraakbeveiliging dient door de inbouw gegarandeerd te
zijn."
REINIGING
Het apparaat moet regelmatig worden gereinigd en voedselresten
dienen te worden verwijderd.
Het niet schoonhouden van het apparaat kan leiden tot
beschadigingen
aan het oppervlak hetgeen weer een negatief effect kan hebben
op de levensduur van het apparaat wat weer kan leiden tot een
gevaarlijke situatie"
Gebruik nooit agressieve reinigingsmiddelen of scherpe metalen
schrapers om de glazen deur schoon te maken, deze kunnen
krassen veroorzaken op het oppervlak, waardoor het glas zou
kunnen breken.
Gebruik geen stoomreiniger om het apparaat schoon te maken.

44
NL
Veiligheidsinformatie
De aanrakingsoppervlakken van de deur (het gedeelte voorin de
oven en de binnenkant van de deur) dienen zeer schoon te
worden gehouden, zodat een correcte werking gegarandeerd kan
worden.
Gelieve de aanwijzingen over de reiniging in “Reiniging en
onderhoud van de oven” in acht te nehmen.
REPARATIE
Waarschuwing: Zet de stroomtoevoer uit alvorens onderhoud te
plegen.
Waarschuwing: Alleen een vakkundig persoon kan onderhouds-
of reparatiewerkzaamheden uitvoeren waarvoor de afdekking
moet worden verwijderd die beschermd tegen blootstelling aan
magnetronenergie.
Waarschuwing: Als de deur, scharnieren/handgrepen of
deurafdichtingen zijn beschadigd, mag het apparaat niet worden
gebruikt tot hij is gerepareerd door een vakkundig persoon.
Als de voedingskabel beschadigd is, moet de fabrikant, een
erkende serviceverlener of een gekwalificeerd persoon deze
vervangen teneinde gevaarlijke situaties te voorkomen.
Alle reparaties of onderhoud, in het bijzonder van onderdelen
onder stroom, mogen alleen door de fabrikant erkende
vakmensen worden uitgevoerd.

45
NL
Veiligheidsvoorschriften
Opgelet! Verwarm nooit alcohol of
alcoholhoudende dranken in de
magnetronoven. BRANDGEVAAR!
Om bij het opwarmen van kleine
hoeveelheden voedsel te voorkomen
dat voedingsmiddelen teveel zouden
opwarmen of vlam vatten, is het van
uiterst belang geen te lange tijden in te
stellen, noch te hoge
vermogensstanden te kiezen. Een
broodje kan bijvoorbeeld na 3 minuten
vlam vatten als er een te hoge
vermogensstand werd gekozen!
Gebruik de Grill functie uitsluitend om te
gratineren en houdt het apparaat
voortdurend in de gaten. Indien er een
combi-functie gebruikt wordt voor de grill,
moet goed op de tijd gelet worden.
Opgelet! Plaats de snoeren van andere
elektrische apparaten nooit tussen de hete
deur van de oven. Het isolatiemateriaal
van het snoer kan smelten. Gevaar voor
kortsluiting!
Voorzichtigheid geboden bij het
opwarmen van vloeistoffen!
Wanneer vloeistoffen (water, koffie, thee,
melk, enz.) bijna op het punt staan te
koken en plots uit de oven worden
verwijderd, zouden deze eruit kunnen
spuiten. GEVAAR VOOR LETSELS EN
BRANDWONDEN!
Om dit soort toestanden te voorkomen bij
het opwarmen van vloeistoffen, plaats een
plastic lepel of een glazen staafje in de
kom of het bakje.
Indien u de aanwijzingen opvolgt,
voorkomt u schade aan de oven en andere
gevaarlijke toestanden:
Zet de oven niet in werking zonder het
verbindingsstuk, de ring en het draaiplateau.
Zet de magnetronoven nooit aan als die leeg
is. Dit zou de oven kunnen overbelasten en
beschadigen als er geen voedsel in zit.
GEVAAR VOOR SCHADE!
Als u programmatests wil uitvoeren met de
oven, plaats er een glas water in. Het water
absorbeert de microgolven waardoor de oven
niet wordt beschadigd.
Bedek of sluit de ventilatieopeningen niet af.
Gebruik uitsluitend serviesgoed uit materiaal
dat geschikt is voor de magnetron. Alvorens
schalen en bakjes te gebruiken, controleer of
deze geschikt zijn (zie hoofdstuk over het
soort serviesgoed).
Verwijder het mica plaatje bovenin de
binnenruimte niet! Dit plaatje voorkomt dat vet
en voedsel de microgolfgenerator zouden
beschadigen.
Bewaar geen ontvlambare voorwerpen in de
oven, aangezien deze zouden kunnen vlam
vatten bij het aanzetten.
Gebruik de oven niet als voorraadkast.
Gebruik de oven niet om te frituren, want het
is onmogelijk de temperatuur van het vet te
controleren onder invloed van de
microgolven.
Leun of zit niet op de open deur van de oven.
Dit kan de oven beschadigen, vooral bij de
scharnieren. De deur kan een maximaal
gewicht van 8 kg dragen.
De roosters kunnen een gewicht dragen van
maximaal 8 kg. Overschrijd dit gewicht niet
om schade te voorkomen.

46
NL
Voordelen van microgolven
Bij een traditioneel fornuis dringt de hitte van de
weerstanden of gaspitten langzaam in het voedsel,
van buiten naar binnen toe. Er gaat daarom veel
energie verloren aan het opwarmen van de lucht,
onderdelen van het fornuis en potten of pannen.
Bij de magnetronoven wordt de hitte door het
voedsel zelf gegenereerd, d.w.z. dat de hitte van
de binnen naar buiten toegaat. Er gaat geen
warmte verloren aan de lucht, ovenwanden of
serviesgoed (als deze geschikt zijn voor de
magnetron), dus alleen het voedsel zelf wordt
opgewarmd.
Samengevat bieden magnetronovens de volgende
voordelen:
1. Kortere kooktijden; een vermindering van over
het algemeen ¾ van de tijd in vergelijking met
de conventionele methode.
2. Uiterst snel ontdooien van voedingmiddelen,
waardoor het gevaar voor bacteriën wordt
verminderd.
3. Energiebesparing.
4. De voedingswaarde van het voedsel wordt
behouden dankzij de kortere kooktijd.
5. Makkelijk te reinigen.
Hoe werkt de magnetronoven?
In de magnetronoven bevindt zich een
hoogspanningsventiel, magnetron genaamd, dat
elektrische energie omzet in microgolven. Deze
elektromagnetische golven worden naar de
binnenkant van de oven gestuurd en verdeeld
door een metalen verspreider of een draaiplateau.
Binnenin de oven verspreiden de microgolven zich
in alle richtingen, worden door de metalen wanden
weerkaatst en dringen het voedsel op gelijkmatige
wijze binnen.
Waarom wordt het voedsel warm?
De meeste voedingsmiddelen bevatten water,
waarvan de moleculen gaan trillen onder invloed
van de microgolven.
De wrijving tussen de moleculen veroorzaakt
warmte die de temperatuur van het voedsel
verhoogt en het ontdooit, kookt of warm houdt.
Aangezien de warmte binnenin het voedsel
ontstaat:
Kan dit zonder of met een beetje vocht of vet
gekookt worden;
Gaat het ontdooien, opwarmen of koken in
de magnetronoven sneller dan met een
conventionele oven;
Blijven vitamines, mineralen en
voedingsstoffen behouden;
Blijven de natuurlijke kleur en aroma
behouden.
De microgolven dringen door porselein, glas,
karton of plastic maar niet door metaal. Gebruik
daarom geen metalen schalen of bakjes of
serviesgoed met een metalen onderdeel in de
magnetronoven.
Microgolven worden door metaal weerkaatst...
... dringen door glas en porselein...
...en worden door de voedingsmiddelen
opgenomen.

47
NL
Beschrijving van de oven
1. – Functie-indicators
4a. – Selectietoets gewicht / vermogen
2. – Functiekeuze
5. – Display uur / duur
3. – Display oventemperatuur
5a. – Selectietoets uur / duur
3a. – Selectietoets oventemperatuur
6. – Toets Start / Stop /Veiligheidsblokkering
4. – Display gewicht / vermogen
23:15
1
2
6
5
4
3
800
160
3a
4a
5a
1. Bedieningspaneel
6. Motorverbindingsstuk
2. Deurglas
7. Draairing
3. Niveaus voor het plaatsen van het
rooster en plateau
8. Draaiplateau
9. Glazen plateau
4. Haak
10. Rechthoekige rooster
5. Warmeluchtuitlaat
11. Bakplaat

48
NL
Beschrijving van de oven
Omschrijving van functies
Symbool
Functie
Vermogensstanden
Magnetron
Voedsel
Magnetron
200 W
Langzaam ontdooien van kwetsbare voedingsmiddelen;
ontdooien en koken op laag vermogen.
400 W
Bereiden van vlees, vis en rijst.
Snel ontdooien van kleine hoeveelheden en babyvoeding,
zoals flessen.
600 W
Opwarmen en koken van eten.
800 W
Groente en aardappelen koken.
Gratineren en opwarmen van kant en klaar gerechten.
Ontdooien en koken kleine hoeveelheden.
1000 W
Vloeistof verwarmen.
Magnetron
+ Grill
200 W
Toast gratineren.
400 W
Gevogelte en vlees grilleren.
600 W
Pastei bereiden en gratineren.
Grill
---
Voedsel grilleren.
Grill
+ Ventilator
---
Kleine stukken vis of vlees grilleren.
Gevogelte grilleren.
Aardappelen – diepgevroren producten ontdooien en
bruineren.
Hete Lucht
---
Braden en koken.
Magnetron +
Hete Lucht
200-600 W
Snel vlees, vis en gevogelte braden.
Droog en vochtig gebak bereiden.

49
NL
Basisregelingen
De klok instellen
Nadat de oven op het stroomnet is aangesloten of
als er een stroomonderbreking is geweest, begint
de klok te knipperen, wat betekent dat de klok niet
meer juist staat. Ga om de klok in te stellen als
volgt te werk:
1. Druk op de toets Klok. De nummers van de
uren beginnen te knipperen.
2. Voer de uren in door op de “-” en “+” toetsen te
drukken.
3. Druk weer op de toets Klok om de minuten in te
stellen. De nummers van de minuten beginnen
te knipperen.
4. Voer de minuten in door op de “-” en “+” toetsen
te drukken.
5. Druk ten slotte nogmaals op Klok
Klok tonen/verbergen
Als de klok u stoort kunt u hem verbergen door de
toets Klok 3 seconden ingedrukt te houden. De
dubbelepunt tussen de uren en minuten blijft
knipperen als de klok verborgen is.
Als u de klok weer wil tonen, dient u nogmaals de
toets Klok 3 seconden ingedrukt te houden.
Veiligheidsblokkering
Het functioneren van de oven kan geblokkeerd
worden (bijvoorbeeld om te voorkomen dat
kinderen hem zouden gebruiken).
1. Het functioneren van de oven kan geblokkeerd
worden (bijvoorbeeld om te voorkomen dat
kinderen hem zouden gebruiken). Houd om de
oven te blokkeren de toets Stop 3 seconden
ingedrukt. U hoort dan een geluidssignaal en er
verschijnt “SAFE” op het display. De oven is
geblokkeerd waardoor er geen enkele operatie
kan worden uitgevoerd.
2. Om de oven te deblokkeren dient u nogmaals
de toets Stop 3 seconden ingedrukt te houden.
U hoort dan een geluidssignaal en op het
display wordt het uur weer weergegeven.

50
NL
Basisregelingen
Draaiplateau stoppen
1. Om het draaiplateau te stoppen, dient men
gelijktijdig de toetsen “+” en “Stop” in te drukken.
2. Om het bord weer te laten draaien, dient men
opnieuw gelijktijdig de toetsen “+” en "Stop“ in te
drukken.

51
NL
Basisfuncties
Magnetron
Gebruik deze functie om groente, aardappelen, rijst, vis en vlees te koken en op te warmen.
1. Druk op de toets Magnetron-functie. De
functietoets licht op.
2. Druk op de toets Vermogen instellen. De
respectieve indicator begint te knipperen. Als u
niet op deze toets drukt, zal de oven op een
vermogen van 800 W werken.
3. Druk op de “ ” en “ ” toetsen om het vermogen
van de magnetron te wijzigen.
4. Druk op de toets Tijd instellen om de
bereidingstijd te wijzigen. De respectieve
indicator begint te knipperen.
5. Druk op de “-“ e “+” toetsen om de gewenste
bereidingstijd in te stellen (bijvoorbeeld 1
minuut).
6. Druk op de Start-toets. De oven treedt in
werking.
OPMERKING: Als het vermogen op 1000 W is
ingesteld, is de kooktijd tot maximum 15
minuten beperkt.
Magnetron – Quick Start
Gebruik deze functie om snel voedsel met een hoog vochtgehalte op te warmen, zoals water, koffie,
thee of heldere soep.
1. Druk op de Start-toets. De oven begint
gedurende 30 seconden op het
maximumvermogen in de magnetron-functie te
werken.
2. Als u deze tijd wil verhogen, dient u nogmaals
op de Start-toets te drukken. Telkens u op deze
toets drukt zal de werkingstijd met 30 seconden
worden verlengd.
Opmerking: Als het vermogen op 1000 W is
ingesteld, is de kooktijd tot maximum 15 minuten
beperkt.
00:30
1000
1,2

52
NL
Basisfuncties
Grill
Gebruik deze functie om snel de oppervlakte van het voedsel bruin te maken.
1. Druk op de toets Grill-functie. De functietoets
licht op.
2. Druk op de toets Tijd instellen om de
bereidingstijd te wijzigen. De respectieve
indicator begint te knipperen.
3. Druk op de “-“ e “+” toetsen om de gewenste
bereidingstijd in te stellen (bijvoorbeeld 15
minuten).
4. Druk op de Start-toets. De oven treedt in
werking.
Magnetron + Grill
Gebruik deze functie om lasagne, gevogelte, gebakken aardappelen en gegratineerde gerechten te
bereiden.
Druk op de toets Magnetron.+ grill-functie. De
functietoets licht op.
2. Druk op de toets Vermogen instellen. De
respectieve indicator begint te knipperen. Als u
niet op deze toets drukt, zal de oven op een
vermogen van 600 W werken.
3. Stel het vermogen in door op de “-“ en “+”
toetsen te drukken.
4. Druk op de toets Tijd instellen om de
bereidingstijd te wijzigen. De respectieve
indicator begint te knipperen.
5. Druk op de “-“ e “+” toetsen om de gewenste
bereidingstijd in te stellen (bijvoorbeeld 10
minuten).
6. Druk op de Start-toets. De oven treedt in
werking.
Opmerking: In de gecombineerde functie wordt
het magnetronvermogen beperkt tot 600 W.

53
NL
Basisfuncties
Hete lucht
Gebruik deze functie om te koken en te braden.
1. Druk op de toets van de Hete lucht-functie. De
functietoets licht op.
2. Druk op de toets Temperatuur instellen om
het magnetronvermogen te wijzigen. De
respectieve indicator begint te knipperen. Als u
niet op deze toets drukt, zal de oven op een
temperatuur van 160ºC werken.
3. Druk op de “-” en “+” toetsen om de gewenste
temperatuur in te stellen.
4. Druk op de toets Tijd instellen om de
bereidingstijd te wijzigen. De respectieve
indicator begint te knipperen.
5. Druk op de “-” en “+” toetsen om de gewenste
bereidingstijd in te stellen (bijvoorbeeld 12
minuten).
6. Druk op de Start-toets. De oven treedt in
werking.
Magnetron + Hete lucht
Gebruik deze functie om te koken en te braden
1. Druk op de toets van de Magnetron + Hete
lucht-functie. De functietoets licht op.
2. Druk op de toets Temperatuur instellen om
het temperatuute wijzigen. De respectieve
indicator begint te knipperen. Als u niet op deze
toets drukt, zal de oven op een temperatuur van
160ºC werken.
3. Druk op de “-” en “+” toetsen om de gewenste
temperatuur in te stellen.
4. Druk op de toets Vermogen instellen om het
vermogen te wijzigen De respectieve indicator
begint te knipperen. Als u niet op deze toets
drukt, zal de oven op een vermogen van 400 W
werken.
5. Druk op de “-” en “+” toetsen om het gewenste
vermogen in te stellen.
6. Druk op de toets Tijd instellen om de
bereidingstijd te wijzigen. De respectieve
indicator begint te knipperen.
7. Druk op de “-” en “+” toetsen om de gewenste
bereidingstijd in te stellen (bijvoorbeeld 12
minuten).
8. Druk op de Start-toets. De oven treedt in
werking.
Opmerking: In de gecombineerde functie wordt
het magnetronvermogen beperkt tot 600 W.
20:00
160
4
1
3,5
6
2
20:00
400
160
6
4
1
3,5,7
8
2

54
NL
Basisfuncties
Grill + Ventilator
Gebruik deze functie om vlees, vis, gevogelte of gebakken aardappelen een bruin korstje te geven.
1. Druk op de toets van de Grill +
Ventilatorfunctie. De functietoets licht op.
2. Druk op de toets Temperatuur instellen om
het temperatuu te wijzigen. De respectieve
indicator begint te knipperen. Als u niet op deze
toets drukt, zal de oven op een temperatuur van
160ºC werken.
3. Druk op de “-” en “+” toetsen om de gewenste
temperatuur in te stellen.
4. Druk op de toets Tijd instellen om de
bereidingstijd te wijzigen. De respectieve
indicator begint te knipperen.
5. Druk op de “-” en “+” toetsen om de gewenste
bereidingstijd in te stellen (bijvoorbeeld 12
minuten).
6. Druk op de Start-toets. De oven treedt in
werking.
Ontdooien per tijd (handmatig)
Gebruik deze functie om snel allerlei soorten voedsel te ontdooien.
1. Druk op de toets Ontdooien per tijd-functie.
De functietoets licht op.
2. Druk op de toets Tijd instellen om de
bereidingstijd te wijzigen. De respectieve
indicator begint te knipperen.
3. Druk op de “-“ e “+” toetsen om de gewenste
bereidingstijd in te stellen (bijvoorbeeld 10
minuten).
4. Druk op de Start-toets. De oven treedt in
werking.
20:00
160
4
1
3,5
6
2

55
NL
Basisfuncties
Ontdooien per gewicht (automatisch)
Gebruik deze functie om snel vlees, gevogelte, vis, fruit en brood te ontdooien.
Druk op de toets Ontdooien per gewicht-functie.
De functietoets licht op.
2. Druk op de toets Soort voedsel instellen om
het soort voedsel te wijzigen. De respectieve
indicators beginnen te knipperen.
3. Druk op de “-“ en “+” toetsen om de gewenste
tijd in te stellen, bijvoorbeeld “Pr 01” (zie
onderstaande tabel).
4. Druk op de toets Gewicht instellen om het
gewicht van het voedsel aan te geven. De
respectieve indicator begint te knipperen.
5. Druk op de “-“ e “+” toetsen om het gewenste
gewicht in te stellen.
6. Druk op de Start-toets. De oven treedt in
werking.
Opmerking: Draai het voedsel om als de oven
een geluidssignaal geeft en er op het display de
volgende aanduiding begint te knipperen: .
De volgende tabel geeft een overzicht van de programma’s voor de ontdooi per gewicht-functie, met de
aanduiding van gewicht, ontdooi- en doorwarmtijden (zodat het voedsel een gelijkmatige temperatuur
krijgt).
Programma
Voedsel
Gewicht (kg)
Tijd (min)
Doorwarmtijd (min)
Pr 01
Vlees
100 – 2000
2 – 43
20 – 30
Pr 02
Gevogelte
100 – 2500
2 – 58
20 – 30
Pr 03
Vis
100 – 2000
2 – 40
20 – 30
Pr 04
Fruit
100 – 500
2 – 13
10 – 20
Pr 05
Brood
100 – 800
2 – 19
10 – 20
Belangrijk: zie “Algemene aanwijzingen om te ontdooien”.

56
NL
Speciale functies
Speciale functie P1: Voedsel opwarmen
Gebruik deze functie om verschillende soorten voedsel op te warmen.
1. Druk op de toets Speciale functie P1. De
functietoets licht op.
2. Druk op de toets Soort voedsel instellen om
het soort voedsel te wijzigen. De respectieve
indicators beginnen te knipperen.
3. Druk op de “-“ en “+” toetsen om de gewenste
tijd in te stellen, bijvoorbeeld “A 01” (zie
onderstaande tabel).
4. Druk op de toets Gewicht instellen om het
gewicht van het voedsel aan te geven. De
respectieve indicator begint te knipperen.
5. Druk op de “-“ e “+” toetsen om het gewenste
gewicht in te stellen.
6. Druk op de Start-toets. De oven treedt in
werking.
De volgende tabel geeft een overzicht van de programma’s voor de Speciale functie P1, met de
aanduiding van gewicht, bereidings en doorwarmtijden (zodat het voedsel een gelijkmatige temperatuur
krijgt).
Programma
Voedsel
Gewicht (g)
Tijd (min)
Aanwijzingen
A 01
Soep
200 – 1500
3 – 15
1 – 2x omkeren, afdekken
A 02
Vooraf bereide gerechten
200 – 1500
3 – 20
1 – 2x omkeren, afdekken
A 03
Gerechten met verschillende
voedingsmiddelen
200 – 1500
3 – 18
1 – 2x omkeren, afdekken
A 04
Groente
200 – 1500
2,6 – 14
1 – 2x omkeren, afdekken
Belangrijke opmerkingen:
Gebruik altijd schotels of bakjes die geschikt
zijn voor de magnetron en een deksel om
vochtverlies te voorkomen.
Roer en draai het voedsel regelmatig om tijdens
het opwarmen.
De tijdsduur voor het opwarmen van voedsel
hangt van de begintemperatuur af. Voedsel dat
rechtstreeks uit de koelkast komt heeft meer tijd
nodig om op te warmen dan voedsel dat op
kamertemperatuur staat. Als het voedsel niet de
gewenste temperatuur heeft, stel de volgende
keer dat u het voedsel opwarmt een hoger of
lager gewicht in.
Roer na het opwarmen in het voedsel of schud
de fles of het potje en laat enige tijd rusten
zodat de temperatuur gelijkmatig wordt
verdeeld.
Opgelet! Na het opwarmen kan het serviesgoed
zeer heet zijn. Hoewel de microgolven het
meeste serviesgoed niet opwarmen, kan dit
heet worden door warmte die het voedsel
afgeeft.

57
NL
Speciale functies
Speciale functie P2: Koken
Gebruik deze functie om vers voedsel te koken.
1. Druk op de toets Speciale functie P2. De
functietoets licht op.
2. Druk op de toets Soort voedsel instellen om
het soort voedsel te wijzigen. De respectieve
indicators beginnen te knipperen.
3. Druk op de “-“ en “+” toetsen om de gewenste
tijd in te stellen, bijvoorbeeld “b 01” (zie
onderstaande tabel).
4. Druk op de toets Gewicht instellen om het
gewicht van het voedsel aan te geven. De
respectieve indicator begint te knipperen.
5. Druk op de “-“ e “+” toetsen om het gewenste
gewicht in te stellen.
6. Druk op de Start-toets. De oven treedt in
werking.
De volgende tabel geeft een overzicht van de programma’s voor de Speciale functie P2, met de
aanduiding van gewicht, bereidings en doorwarmtijden (zodat het voedsel een gelijkmatige temperatuur
krijgt).
Programma
Voedsel
Gewicht (g)
Tijd (min)
Aanwijzingen
b 01
Aardappelen
200 – 1000
4 – 17
1 – 2x omkeren, afdekken
b 02
Groente
200 – 500
4 – 15
1 – 2x omkeren, afdekken
b 03
Rijst
200 – 1000
13 – 20
1 deel rijst, 2 delen water
b 04
Vis
200 – 1000
4 – 13
Afdekken
Belangrijke opmerkingen:
Gebruik altijd schotels of bakjes die geschikt
zijn voor de magnetron en een deksel om
vochtverlies te voorkomen.
Roer en draai het voedsel regelmatig om tijdens
het opwarmen.
Opgelet! Na het koken kan het serviesgoed zeer
heet zijn. Hoewel de microgolven het meeste
serviesgoed niet opwarmen, kan dit heet worden
door de warmte die het voedsel afgeeft.
Bereidingsinstructies:
Stukken vis – Voeg 1 à 3 eetlepels water of
citroensap toe.
Rijst – Voeg een dubbele hoeveelheid water toe
aan de rijst.
Aardappelen met schil – Gebruik aardappelen
van gelijke grootte. Spoel ze en prik de schil
enkele keren door. Voeg 1 à 3 eetlepels water
toe.
Aardappelen zonder schil en verse groente– Snijd
ze in gelijke stukken. Voeg een eetlepel water
toe per 100 g groente en zout naar smaak.
b 01
200
2
4
1
3,5
6

58
NL
Speciale functies
Speciale functie P3: Koken & Gratineren
Gebruik deze functie om verschillende voedingsmiddelen te koken en te gratineren.
1. Druk op de toets Speciale functie P3. De
functietoets licht op.
2. Druk op de toets Soort voedsel instellen om
het soort voedsel te wijzigen. De respectieve
indicators beginnen te knipperen.
3. Druk op de “-“ en “+” toetsen om de gewenste
tijd in te stellen, bijvoorbeeld “C 01” (zie
onderstaande tabel).
4. Druk op de toets Gewicht instellen om het
gewicht van het voedsel aan te geven. De
respectieve indicator begint te knipperen.
5. Druk op de “-“ e “+” toetsen om het gewenste
gewicht in te stellen.
6. Druk op de Start-toets. De oven treedt in
werking.
De volgende tabel geeft een overzicht van de programma’s voor de Speciale functie P3, met de
aanduiding van gewicht en bereidingstijd (zodat het voedsel een gelijkmatige temperatuur krijgt).
Programma
Voedsel
Gewicht (g)
Tijd (min)
Aanwijzingen
C 01
Pizza
300 – 550
8-12
Rooster
C 02
Kant-en-klaar-gerechten
400 – 1000
8 – 14
1x omkeren, afdekken
C 03
Aardappelproducten,
diepgevroren
200 – 450
10 – 12
Glasplaat
Belangrijke opmerkingen:
Gebruik altijd schotels of bakjes die geschikt
zijn voor de magnetron en een deksel om
vochtverlies te voorkomen.
Opgelet! Na het koken kan het serviesgoed zeer
heet zijn. Hoewel magnetronovens de meeste
bakjes e.d. niet verhitten, kunnen deze als gevolg
van warmteoverdracht wel erg heet worden.
Bereidingsinstructies:
Pizza, diepgevroren – Gebruik diepgevroren
kant-en-klare pizza’s.
Kant-en-klaarvoedsel, diepgevroren – Gebruik
diepgevroren lasagne, cannelloni,
garnalensouflé. Altijd afdekken.
Aardappelproducten, diepgevroren – Friet,
aardappelkroketten en gesauteerde
aardappelen dienen geschikt te zijn voor
bereiding in de oven.

59
NL
Gebruik van de bakplaat
Als men voedsel als pizza’s of taarten/pasteitjes
met de grill of magnetron bereidt, wordt het deeg
over het algemeen week. Dit kan worden
vermeden door de bakplaat te gebruiken.
Aangezien de onderkant van de bakplaat hoge
temperaturen bereikt, krijgt de buitenkant van het
voedsel een bruin korstje.
De bakplaat kan ook gebruikt worden om spek,
eieren, worstjes, enz. te bereiden.
ZEER BELANGRIJKE OPMERKINGEN:
Gebruik steeds speciale ovenwanten
aangezien de bakplaat hoge temperaturen
bereikt.
Plaats de bakplaat nooit in de magnetron
zonder het plateau.
Plaats geen servies op de bakplaat dat niet
hittebestendig is (bijvoorbeeld: plastic
servies).
Koken met de bakplaat:
1. Verwarm de bakplaat 3 à 5 minuten voor
door de functie Magnetron + Grill in te
stellen op een vermogen van 600W.
2. Smeer de bakplaat in met (olijf)olie om een
mooi bruin korstje te krijgen.
3. Plaats het voedsel rechtstreeks op de
bakplaat. U kan er diepgevroren voedsel
(zoals diepgevroren pizza) op plaatsen
zonder het eerst te laten ontdooien.
4. Plaats de bakplaat op het plateau in de
magnetronoven.
5. Stel de functie Magnetron + Grill en de
bereidingstijd in. De aanbevolen bereiding
en doorwarmtijden staan in onderstaande
tabel aangeduid.
Voedsel
Gewicht (g)
Bereidingstijd
(min)
Doorwarmtijd
(min.)
Aanwijzingen
Pizza
200
4-5
---
De bereidingstijd geldt voor pizza’s met
dun deeg.
Verleng voor kant-en-klare pizza’s met
1 à 2 minuten.
300
5-6
---
400
7-8
---
Quiches en
taarten
200
3-4
2-3
300
5-6
2-3
Hamburgers
150-200
8-10
5-8
2x omkeren
Ovengebakken
aardappelchips
400
6-8
---
1x omkeren
ZEER BELANGRIJKE OPMERKINGEN:
Aangezien de bakplaat een antiaanbaklaag heeft,
zou deze bij verkeerd gebruik beschadigd kunnen
worden.
Snijd nooit voedsel op de bakplaat. Verwijder het
voedsel van de plaat alvorens het te snijden.
Reiniging van de bakplaat:
De beste manier om de bakplaat te reinigen is
met warm water en afwasmiddel wassen en met
schoon water spoelen. Gebruik geen borstels,
bijtende of schuurmiddelen, aangezien deze het
oppervlak zouden kunnen beschadigen.

60
NL
Tijdens de bereiding...
Een bereiding onderbreken
Het bereidingsproces kan op elk moment worden
onderbroken door eenmaal op de Start/Stop-toets
te drukken of door de deur van de oven te openen.
In alle gevallen:
Stopt de uitzending van microgolven
onmiddellijk.
Wordt de grill stopgezet maar behoudt deze
een zeer hoge temperatuur. Gevaar voor
brandwonden!
De tijdschakelaar stopt en het display duidt de
resterende bereidingstijd aan.
U kan dan:
1. Het voedsel mengen of omkeren om een
gelijkmatig resultaat te krijgen.
2. De instellingen wijzigen.
3. Het proces stopzetten door op de Start/Stop-
toets te drukken.
Om het bereidingsproces voort te zetten, sluit de
deur en druk op de Start/Stop-toets.
Instellingen wijzigen
De werkinstellingen (tijd, gewicht, vermogen, enz.)
kunnen alleen worden gewijzigd het kookproces is
onderbroken door de volgende stappen te volgen:
1. Om de tijd te wijzigen, draai de Draaiknop in
een van beide richtingen. De nieuwe tijd
wordt onmiddellijk geregistreerd.
2. Om het vermogen of het gewicht te wijzigen,
druk op de toets Gewicht/Vermogen
instellen. Het respectieve display en de
indicator beginnen te knipperen. Wijzig de
parameter door op de "-" en "+" toetsen en
bevestig door nogmaals op de toets
Gewicht/Vermogen instellen.
Een bereiding stopzetten
Als u het bereidingsproces wil stopzetten, houd
dan de Start/Stop-toets 3 seconden ingedrukt.
Als het proces werd onderbroken en u het wil
stopzetten, houd dan de Start/Stop-toets 3
seconden ingedrukt.
U hoort vervolgens een geluidssignaal en het uur
verschijnt op het display.
Einde van een bereiding
Op het einde van een bereidingsproces hoort u 3
geluidssignalen en verschijnt er “End” op het
display
De geluidssignalen worden om de 30 seconden
herhaald totdat de deur wordt geopend of tot er op
de Start/Stop-toets wordt gedrukt.

61
NL
Ontdooien
Onderstaande tabel geeft een overzicht van de
verschillende ontdooi- en doorwarmtijden (zodat
het voedsel een gelijkmatige temperatuur
krijgt).naargelang van het soort voedsel, het
gewicht en bijbehorende aanbevelingen.
Voedsel
Gewicht (g)
Ontdooitijd (min)
Doorwarmtijd (min)
Opmerking
Stukken vlees,
kalfs-, runds- en
varkensvlees
100
2-3
5-10
1 x Omkeren
200
4-5
5-10
1 x Omkeren
500
10-12
10-15
2 x Omkeren
1000
21-23
20-30
2 x Omkeren
1500
32-34
20-30
2 x Omkeren
2000
43-45
25-35
3 x Omkeren
Stoofvlees
500
8-10
10-15
2 x Omkeren
1000
17-19
20-30
3 x Omkeren
Gehakt vlees
100
2-4
10-15
1 x Omkeren
500
10-14
20-30
2 x Omkeren
Worst
200
4-6
10-15
1 x Omkeren
500
9-12
15-20
2 x Omkeren
Gevogelte, stukken
gevogelte
250
5-6
5-10
1 x Omkeren
Kip
1000
20-24
20-30
2 x Omkeren
Poularde
2500
38-42
25-35
3 x Omkeren
Visfilets
200
4-5
5-10
1 x Omkeren
Forel
250
5-6
5-10
1 x Omkeren
Garnalen
100
2-3
5-10
1 x Omkeren
500
8-11
15-20
2 x Omkeren
Fruit
200
4-5
5-10
1 x Omkeren
300
8-9
5-10
1 x Omkeren
500
11-14
10-20
2 x Omkeren
Brood
200
4-5
5-10
1 x Omkeren
500
10-12
10-15
1 x Omkeren
800
15-17
10-20
2 x Omkeren
Boter
250
8-10
10-15
Kwark
250
6-8
10-15
Room
250
7-8
10-15

62
NL
Ontdooien
Algemene aanwijzingen om te ontdooien
1. Gebruik om te ondooien alleen serviesgoed dat
geschikt is voor gebruik in de magnetron
(porselein, glas, geschikt plastic).
2. De ontdooi per gewicht-functie en de tabellen
hebben betrekking op rauw voedsel.
3. De ontdooitijd hangt af van de hoeveelheid en
de dikte van het voedsel. Hou bij het ontdooien
van voedsel rekening met het ontdooiproces.
Verdeel het voedsel gelijkmatig over de schaal.
4. Verdeel het voedsel zo gelijkmatig mogelijk in
de oven. Dikkere stukken vis of kippenbouten
dienen aan de buitenkant te liggen. U kan de
delicatere delen met een stukje aluminiumfolie
afschermen. Belangrijk: de aluminiumfolie mag
niet in contact komen met de wanden,
aangezien dit boogontlading zou kunnen
veroorzaken.
5. De dikste stukken dienen verschillende malen
omgedraaid te worden.
6. Verdeel het diepgevroren voedsel zo gelijkmatig
mogelijk, aangezien de smallere en dunnere
delen sneller ontdooien dan de grotere en
dikkere delen.
7. Vetrijk voedsel zoals boter, kwark en room mag
niet helemaal ontdooien. Als het op
kamertemperatuur staat, is het binnen enkele
minuten klaar om opgediend te worden. Als er
in het geval van diepgevroren room stukjes ijs in
zitten, dient de room voor gebruik opgeklopt te
worden.
8. Leg gevogelte op een omgekeerd bord zodat
het vocht kan weglopen.
9. Wikkel brood in een papieren servet, zodat het
niet teveel uitdroogt.
10. Draai het voedsel op regelmatige tijdstippen.
11. Haal het diepgevroren voedsel uit de
verpakking en vergeet hierbij niet eventuele
metalen haakjes te verwijderen. Als de
verpakking om voedsel in de diepvriezer te
bewaren ook voor opwarmen en bereiden kan
dienen, verwijder dan alleen het deksel. Leg in
de overige gevallen het voedsel in schalen die
geschikt zijn voor magnetronovens.
12. Gooi het vocht, voornamelijk dat van gevogelte,
na het ontdooien weg en laat het in geen geval
in aanraking komen met het overige voedsel.
13. Let erop dat bij het automatische ontdooien er
een doorwarmtijd nodig is tot het voedsel
volledig is ontdooid.

63
NL
Koken met de magnetron
Opgelet! Lees aandachtig het hoofdstuk
“Veiligheidsinstructies” alvorens met de
magnetron te koken.
Volg de volgende aanwijzingen bij het koken met
de magnetron:
Vóór het opwarmen of bereiden van voedsel
met schil of vel (bijvoorbeeld appels, tomaten,
aardappelen, worsten) prik de schil of het vel
door zodat het niet uit elkaar kan spatten. Maak
een inkeping in het voedsel alvorens met de
bereiding te beginnen.
Alvorens een schaal of pot te gebruiken,
controleer of die geschikt is voor de magnetron
(zie hoofdstuk over het soort serviesgoed).
Bij het bereiden van voedsel met weinig vocht
(bijv. brood ontdooien, popcorn maken, enz.)
treedt er een snelle verdamping op. Op die
manier werkt de oven alsof hij leeg is en kan het
voedsel verkolen. Dit kan de oven en het
serviesgoed beschadigen. Stel daarom alleen
de nodige tijd in en blijf in de buurt.
Het is niet mogelijk grote hoeveelheden olie
(frituren) in de magnetronoven op te warmen.
Haal kant-en-klare maaltijden uit hun
verpakking, aangezien die niet altijd
hittebestendig zijn. Volg de door de fabrikant
opgegeven instructies.
Als er meerdere stukken serviesgoed zijn,
zoals bijvoorbeeld kopjes thee, verdeel die dan
gelijkmatig over het hele draaiplateau.
Sluit plastic zakken niet met metalen knijpers
maar met plastic knijpers. Prik de zak
verschillende keren door zodat stoom makkelijk
kan ontsnappen.
Als u voedsel kookt of opwarmt, controleer of
die een minimumtemperatuur van 70°C
bereiken.
Tijdens het kookproces kan er waterdamp
ontstaan op het glas van de deur dat eventueel
kan beginnen druppen. Dit is een normaal
verschijnsel dat zich zeker zal voordoen als de
omgevingstemperatuur laag is. De veiligheid
van de oven wordt daardoor niet beïnvloed.
Veeg na de bereiding het condensatiewater
weg.
Als u vloeistoffen opwarmt gebruik serviesgoed
met een grote opening, zodat stoom makkelijk
kan ontsnappen.
Bereid het voedsel volgens de aanwijzingen en
neem de in de tabellen aangegeven kooktijden en
vermogensstanden in acht.
Denk eraan dat de opgegeven waarden slechts
een aanwijzing zijn en dus kunnen variëren
naargelang van de begintoestand, de temperatuur,
de vochtigheid en het soort voedsel. Het is
aangeraden de tijden en vermogensstanden aan
elke situatie aan te passen. Naargelang van het
voedsel kan het nodig zijn de kooktijd te verlengen
of in te korten of de vermogensstand te verhogen
of verlagen.
Koken met de magnetron...
1. Hoe groter de hoeveelheid voedsel, hoe langer
de kooktijd. Denk eraan dat:
Dubbele hoeveelheid » dubbele tijd
Half de hoeveelheid » halve tijd
2. Hoe lager de temperatuur, hoe langer de
kooktijd.
3. Vloeibaar voedsel warmt sneller op.
4. Het gelijkmatig verdelen van het voedsel op het
draaiplateau vergemakkelijkt het gelijkvormig
kookproces. Als u de dikkere stukken voedsel aan
de buitenkant van het plateau legt en de dunnere
in het midden, zal u verschillende soorten voedsel
tegelijk kunnen opwarmen.
5. De deur van de oven kan op elk moment
worden geopend. De oven stopt automatisch met
werken. De magnetron gaat pas verderwerken als
u de deur sluit.
6. Afgedekt voedsel heeft minder kooktijd nodig en
behoudt bovendien beter zijn oorspronkelijke
smaak en kleur. Het deksel dient wel de
microgolven door te laten en moet van kleine
openingen zijn voorzien om stoom te laten
ontsnappen.

64
NL
Koken met de magnetron
Tabellen en suggesties – Groente koken
Voedsel
Hoeveelheid
(g)
Vocht
toevoegen
Vermogen
(Watt)
Tijd (min.)
Doorwarm-
tijd (min.)
Aanwijzingen
Bloemkool
Broccoli
Champignons
500
300
250
100 ml
50 ml
25 ml
800
800
800
9-11
6-8
6-8
2-3
2-3
2-3
De bovenkant met
boter besmeren. In
schijven snijden.
Afdekken
Erwten & wortels,
diepgevroren
wortels
300
250
100 ml
25 ml
800
800
7-9
8-10
2-3
2-3
In blokjes of
schijfjes snijden.
Afdekken
Aardappelen
250
25 ml
800
5-7
2-3
Schillen en in
gelijke stukken
snijden. Afdekken
Paprika
Prei
250
250
25 ml
50 ml
800
800
5-7
5-7
2-3
2-3
In blokjes of
schijfjes snijden.
Afdekken
Spruitjes,
diepgevroren
300
50 ml
800
6-8
2-3
Afdekken
Zuurkool
250
25 ml
800
8-10
2-3
Afdekken
Tabellen en suggesties – Vis bereiden
Voedsel
Hoeveelheid
(g)
Vermogen
(Watt)
Tijd (min.)
Doorwarmtijd
(min.)
Aanwijzingen
Visfilets
500
600
10-12
3
Afgedekt koken. Omkeren als de helft
van de tijd is verlopen.
Hele vis
800
800
400
2-3
7-9
2-3
Afgedekt koken. Omkeren als de helft
van de tijd is verlopen. Eventueel de
fijne uiteinden van de vis afdekken.

65
NL
Koken met de grill
Gebruik om een goed resultaat te bekomen met
de grill het bijgeleverde rooster samen met de
oven. Het moet over de rechthoekige glazen lade
worden geplaatst in twee mogelijke posities die
verschillende hoogtes te geven voor het grillen (zie
foto hieronder).
Plaats het rooster zo dat het niet in contact
komt met de metalen oppervlakken van de
binnenruimte, aangezien er gevaar voor
boogontlading bestaat, wat de oven kan
beschadigen.
BELANGRIJKE INSTRUCTIES:
1. Als de grill voor het eerst wordt gebruikt,
ontstaat er enige rook en geur, die het gevolg
zijn van de oliën die tijdens de fabricage werden
toegepast.
2. Het deurglas bereikt hoge temperaturen
wanneer de grill wordt gebruikt. Houd kinderen
buiten bereik.
3. Als de grill in werking is, bereiken de
ovenwanden en het rooster hoge temperaturen.
Het is daarom aangeraden ovenhandschoenen
te gebruiken.
4. Bij langer gebruik van de grill is het normaal dat
de weerstanden tijdelijk worden uitgeschakeld.
Dit komt door de veiligheidsthermostaat.
5. Belangrijk! Als u voedsel grilleert of kookt in
schalen, controleer of het serviesgoed geschikt
is. Zie hoofdstuk over het gebruik van
serviesgoed!
6. Bij het gebruik van de grill kan het gebeuren dat
vetspatjes op de weerstand terechtkomen en
aanbranden. Dit is normaal en wijst niet op het
slecht functioneren van de oven.
7. Reinig na elke bereiding de binnenkant en de
accessoires, zodat er geen vuil aankoekt.

66
NL
Koken met de grill
Tabellen en suggesties – Grill zonder magnetron
Voedsel
Hoeveelheid (g)
Tijd (min.)
Aanwijzingen
Vis
Zeebrasem
Sardine/poon
800
6-8 stuks
18-24
15-20
Een dun laagje boter aanbrengen.
Omkeren als de helft van de tijd is verlopen
en zout of kruiden aanbrengen.
Vlees
Worst
6-8 stuks
22-26
Doorprikken als de helft van de
bereidingstijd is verlopen en omdraaien.
Diepgevroren hamburger
3 stuks
18-20
2 tot 3 keer omdraaien
Sparerib (ca. 3 cm dik)
400
25-30
Beboteren en omdraaien als de helft van de
tijd is verlopen.
Overige
Toast
4 stuks
1½-3
Houd de toast in het oog.
Broodjes/sandwiches
gratineren
2 stuks
5-10
In het oog houden.
Verwarm de grill 2 minuten voor. Gebruik het
rooster, tenzij anders staat aangeduid, Plaats het
rooster op een bakje of bord, zodat vocht en vet
kunnen worden opgevangen.
De opgegeven tijden zijn slechts een aanwijzing
en kunnen variëren naargelang van de
samenstelling en de hoeveelheid voedsel, alsook
het gewenste resultaat. Vis en vlees krijgen een
heerlijke smaak als ze voor het grilleren worden
besprenkeld met plantaardige olie, kruiden en
specerijen en enkele uren blijven marineren. Voeg
het zout pas na het grilleren toe.
Worsten spatten niet uiteen als ze vooraf met een
vork worden doorprikt.
Als de helft van de tijd is verlopen, houd de
bereiding in het oog en keer eventueel om of
besprenkel met olie.
De grill is uitermate geschikt voor het bereiden van
dunne stukken vlees en vis. Dunne stukken vlees
hoeven maar een keer te worden omgedraaid,
dikkere stukken verscheidene keren. Bij vis wordt
aangeraden beide uiteinden samen te voegen, kop
en staart, en hem op het rooster te leggen.

67
NL
Koken met de grill
Tabellen en suggesties – Magnetron + Grill
De magnetron + grill-functie is ideaal om snel
voedsel te koken en het tegelijkertijd een bruin
korstje te geven. Bovendien kan u er ook voedsel
mee gratineren.
De magnetron en de grill functioneren gelijktijdig.
De microgolven koken en de grill braadt.
Gerecht
Hoeveelheid
(g)
Serviesgoed
Vermogen
(Watt)
Tijd (min.)
Doorwarmtijd
(min.)
Gegratineerde pasta
500
Lage vorm
400
12-17
3-5
Gegratineerde
aardappelen
800
Lage vorm
600
20-22
3-5
Lasagne
ca. 800
Lage vorm
600
15-20
3-5
Gegratineerde kwark
ca. 500
Lage vorm
400
18-20
3-5
2 verse kippenbouten (op
het rooster)
200 elk
Lage vorm
400
10-15
3-5
Gevogelte
ca. 1000
Hoge en brede
schaal of pot
400
35-40
3-5
Uiensoep gratineren
2 kopjes
van 200
Soepkommetjes
400
2-4
3-5
Controleer of het serviesgoed geschikt is voor de
magnetron alvorens het te gebruiken. Gebruik
alleen serviesgoed dat geschikt is voor de
magnetron.
Het serviesgoed dat voor de combinatiefunctie
wordt gebruikt dient zowel voor de magnetron als
voor de grill geschikt te zijn. Zie hoofdstuk over het
soort serviesgoed!
Denk eraan dat de opgegeven waarden slechts
aanwijzingen zijn en kunnen variëren naargelang
van de begintemperatuur, de vochtigheid en het
soort voedsel.
Als de tijd niet genoeg is om een bruin korstje te
krijgen, laat het voedsel nog 5 of 10 min. onder de
grill staan.
Houd rekening met de doorwarmtijden en keer de
stukken gevogelte om.
Gebruik het draaiplateau bij de bereiding tenzij
anders staat aangegeven.
De opgegeven waarden houden in dat de
binnenruimte koel is (het is niet nodig voor te
verwarmen).

68
NL
Braden en koken
Tabellen en suggesties – Vlees en gebak bereiden
Magnetron / Hete lucht
Voedsel
Hoeveelheid
(g)
Vermogen
(Watt)
Temperatuur
ºC
Tijd
(min)
Doorwarm
-tijd (min)
Aanwijzingen
Rosbief
1000-1500
400
200
30-40
20
Serviesgoed zonder deksel,
1x omkeren
Varkenshaas/
Koteletten of
beenvlees
Gebraden
varkensvlees
800-1000
200
180-190
50-60
20
Serviesgoed zonder deksel,
1x omkeren
Hele kip
1000/1200
400
200
30-40
10
Serviesgoed zonder deksel.
Borstkant naar beneden
plaatsen. 1x omkeren.
Stukken kip
500-1000
400
200
25-35
10
Serviesgoed zonder deksel.
Stukken met vel naar
beneden plaatsen.
1x omkeren.
Gebraden
kalfsvlees
1500/2000
200
180
60-65
10
Serviesgoed met deksel,
1-2x omkeren, ga na het
omkeren verder met de
bereiding maar zonder af te
dekken
Gebraden
rundsvlees
1500-1800
200
200
80-90
20
Serviesgoed met deksel,
1-2x afdekken
Magnetron / Koken
Voedsel
Vermogen
(Watt)
Temperatuur
ºC
Tijd
(min)
Doorwarm
-tijd (min)
Aanwijzingen
Chocolade-/kersentaart
200
200
30
5-10
Draaiplateau, kleine rooster,
Springvorm, Ø 28 cm
Kaastaart met fruit
400
180
40-45
5-10
Draaiplateau, kleine rooster,
Springvorm, Ø 28 cm
Appeltaart
200
185
40-45
5-10
Draaiplateau, kleine rooster,
Springvorm, Ø 28 cm
Kaastaart met streusel
400
180
40-50
5-10
Draaiplateau, kleine rooster,
Springvorm, Ø 28 cm
Notencake
200
170
30-35
5-10
Draaiplateau,
Bakvorm met opening in het
midden

69
NL
Braden en koken
Tips om te braden
Draai de stukken vlees om als de helft van de
kooktijd is verlopen. Laat als het gebraad klaar is
nog 20 minuten rusten in de uitgeschakelde en
gesloten oven. Zo wordt het vleessap beter
verdeeld.
De temperatuur en de bereidingstijd hangen af van
het soort voedsel en de hoeveelheid.
Als het gewicht van het gebraad niet in de tabel
staat aangeduid, kies dan het aangeduide gewicht
dat er net onder ligt en verleng de tijd.
Tips over het serviesgoed
Controleer of het serviesgoed in de oven past.
Warm serviesgoed van glas dient op een droge
keukendoek te worden geplaatst. Als zulk
serviesgoed op een koud of nat oppervlak wordt
geplaatst, kan het glas barsten en breken.
Gebruik pannenlappen of ovenwanten om het
serviesgoed uit de oven te halen.

70
NL
Koken
Tabellen en suggesties – Koken/ Hete lucht
Voedsel
Serviesgoed
Hoogte
Temperatuur
Tijd (min)
Notencake
Bakvorm met opening in
het midden
Draaiplateau
170/180
30/35
Fruittaart
Springvorm Ø 28 cm
Draaiplateau
150/160
35/45
Engelse cake
Bakvorm met opening in het
midden
Draaiplateau
170/190
30/45
Zoute taarten
Ronde glazen bakvorm
Draaiplateau
160/180
50/70
Biscuitdeeg
Springvorm Ø 26 cm
Draaiplateau
160/170
40/45
Boomstronk
Ronde glazen bakvorm
1
110
35/45
Kersentaart
Ronde glazen bakvorm
1
170/180
35/45
Tips over de bakvormen
De meest gebruikte bakvormen zijn de zwarte
metalen vormen. Als u ook de magnetron gebruikt,
gebruik dan bakvormen van glas, aardewerk of
kunststof. Deze dienen bestand te zijn tegen
temperaturen tot 250ºC. Als u dit soort vormen
gebruikt, wordt het gebak minder krokant.
Tips over het bereiden van gebak
De temperatuur en bereiding van het gebak
hangen af van de hoeveelheid en de kwaliteit van
het deeg. Probeer eerst een lagere temperatuur uit
en stel de volgende keer eventueel een hogere
temperatuur in. Een lagere temperatuur laat toe
gelijkmatiger te bakken. Plaats de bakvorm steeds
in het midden van het plateau.
Bereidingssuggesties
Hoe te controleren of het gebak gaar is
Steek een tandenstoker in het dikste gedeelte van
het gebak, 10 minuten voor het einde van de
bereidingstijd. Als het deeg niet aan de
tandenstoker blijft plakken, is het gebak klaar.
Het gebak is heel donker
Stel de volgende keer een lagere temperatuur in
en laat het gebak langere tijd gaar worden.
Het gebak is uitgedroogd
Maak met een tandenstoker kleine gaatjes in het
reeds gare gebak. Giet er daarna wat sap of
sterke drank over. Verhoog de volgende keer de
temperatuur met ongeveer 10º en verkort de
bereidingstijd.
Het gebak raakt niet los als het wordt
omgedraaid
Laat het gebak na de bereiding 5 à 10 minuten
afkoelen, waardoor het makkelijker uit de vorm
loskomt. Als het gebak dan nog niet loskomt,
maak de randen dan voorzichtig los met een mes.
Vet de bakvorm de volgende keer beter in.
Tips om energie te besparen
Als u meer dan één gebak klaarmaakt, is het
aangeraden de gebakken het ene na het andere te
bereiden. De oven is dan nog warm, wat de
bereidingstijd van het tweede gebak inkort.
Gebruik bij voorkeur donkere, geverfde of emaillen
bakvormen, want deze absorberen beter de
warmte.
In het geval van langere bereidingstijden, kan u de
oven 10 minuten voor het einde uitzetten en zo
van de resterende warmte gebruik maken om de
bereiding te voltooien.

71
NL
Wat voor soort serviesgoed kan men gebruiken?
Magnetron-functie
Houd er bij de magnetron-functie rekening mee
dat de microgolven door metalen oppervlakken
worden weerkaatst. Glas, porselein, aardewerk en
plastic laten microgolven door.
Daarom mag geen serviesgoed van metaal of
met metalen delen of versieringen in de
magnetron gebruikt worden. Glas en aardewerk
met metalen delen of versieringen (bijv.
loodkristal) mogen niet gebruikt worden.
Ideaal om in de magnetron te koken is resistent
glas, porselein of aardewerk en hittebestendig
plastic. Fijn en breekbaar glas of porselein dienen
korte tijd gebruikt te worden om vooraf bereid
voedsel te ontdooien of op te warmen.
Warm voedsel geeft warmte af aan de schalen, die
zeer heet kunnen worden. Gebruik daarom altijd
een pannenlap!
Het testen van serviesgoed
Plaats het servies in de oven gedurende 20
seconden op de hoogste vermogensstand van de
magnetron. Als dit hierna nog steeds koud is of
nauwelijks is opgewarmd, is het geschikt. Warmt
het echter op of ontstaat er boogontlading, dan is
het niet geschikt.
Grill of Hete lucht functie
Bij de Grill of Hete lucht functie dient het
serviesgoed tegen een temperatuur van minstens
300°C bestand te zijn.
Plastic serviesgoed is niet geschikt.
Gecombineerde Functie
Bij de Gecombineerde Functie dient het
serviesgoed zowel voor de magnetron als voor de
grill geschikt te zijn.
Aluminium bakjes en aluminiumfolie
Kant-en-klare gerechten in aluminium bakjes of
aluminiumfolie mogen in de oven worden geplaatst
indien het volgende in acht wordt genomen:
Houd rekening met de aanbevelingen van de
fabrikant op de verpakking.
Aluminium bakjes mogen niet hoger zijn dan 3
cm of in contact komen met de wanden van de
binnenruimte (minstens 3 cm afstand). Het
aluminium deksel dient te worden verwijderd.
Plaats het aluminium bakje rechtstreeks op het
draaiplateau. Als u het rooster gebruikt, plaats
het bakje dan op een porseleinen schotel.
Plaats het bakje nooit rechtstreeks op het
rooster!
De bereidingstijd is langer aangezien de
microgolven het voedsel alleen van bovenaf
binnendringen. In geval van twijfel, gebruik
alleen serviesgoed dat geschikt is voor de
magnetron.
Aluminiumfolie kan gebruikt worden om
microgolven te werkaatsen tijdens het
ontdooiproces. Delicaat voedsel zoals
gevogelte of gehakt vlees kan tegen
oververhitting worden beschermd door de
respectieve uiteinden af te dekken.
Belangrijk: de aluminiumfolie mag niet
rechtstreeks in contact komen met de wanden
van de binnenruimte, aangezien er
boogontlading zou kunnen ontstaan.
Deksels
Aangeraden wordt glazen of plastic deksels te
gebruiken of plastic folie, aangezien op deze
manier:
1. Overvloedige verdamping wordt
tegengegaan (voornamelijk bij lange
bereidingstijden);
2. Het bereidingsproces sneller is;
3. Het voedsel niet uitdroogt;
4. Het aroma behouden blijft.
Het deksel moet voorzien zijn van openingen
zodat er geen druk ontstaat. Plastic zakken dienen
eveneens openingen te hebben. Zowel flessen als
potjes met babyvoeding en andere gelijkaardige
potjes mogen alleen zonder deksel worden
opgewarmd, aangezien ze anders uit elkaar
zouden kunnen spatten.

72
NL
Wat voor soortserviesgoed kan men gebruiken?
Tabel – Serviesgoed
Onderstaande tabel geeft een overzicht van welk serviesgoed geschikt is voor elke situatie.
Ingestelde
functie
Serviesgoed
Magnetron
Grill /
Hete lucht
Gecombineerde
Functie
Ontdooien /
opwarmen
Koken
Glas en porselein 1)
Huishoudelijk, niet vuurvast, mag in
de vaatwasser
ja
ja
nee
nee
Geglazuurd aardewerk
Vuurvast glas en porselein
ja
ja
ja
ja
Gres serviesgoed 2)
Geglazuurd of niet, zonder metalen
versieringen
ja
ja
nee
nee
Terracotta 2)
Geglazuurd
Ongeglazuurd
ja
nee
ja
nee
nee
nee
nee
nee
Plastic 2)
Hittebestendig tot 100°C
Hittebestendig tot 250°C
ja
ja
nee
ja
nee
nee
nee
nee
Plastic folie 3)
Plastic film voor voedinsmiddelen
Cellofaan
nee
ja
nee
ja
nee
nee
nee
nee
Papier, karton, perkament 4)
ja
nee
nee
nee
Metaal
Aluminiumfolie
Aluminium verpakkingen 5)
Accessoires
ja
nee
ja
nee
ja
ja
ja
ja
ja
nee
ja
nee
1. Zonder gouden of zilveren rand en zonder
loodkristal.
2. Neem de aanwijzingen van de fabrikant in acht!
3. Gebruik geen metalen knijpers om de zakken te
sluiten. Doorprik de zakken. Gebruik de folies
alleen om af te dekken.
4. Gebruik geen papieren bordjes.
5. Alleen lage aluminium verpakkingen en zonder
deksel. Het aluminium mag niet in contact
komen met de wanden van de binnenruimte.

73
NL
Reiniging en onderhoud van de oven
Normaal gezien is het reinigen het enige nodige
onderhoud.
Opgelet! De magnetronoven dient regelmatig te
worden gereinigd en alle etensresten dienen te
worden verwijderd. Indien de magnetronoven niet
naar behoren wordt schoongemaakt, kan het
oppervlak ervan worden beschadigd, wat de
levensduur van de oven kan inkorten en
eventueel tot gevaarlijke toestanden leiden..
Opgelet! Het reinigen dient te gebeuren als de
oven van het elektriciteitsnet is losgekoppeld.
Trek de stekker uit het stopcontact of schakel
het elektriciteitscircuit van de oven uit.
Gebruik geen bijtende of schuurmiddelen,
schuursponzen of scherpe voorwerpen,
aangezien die vlekken en krassen kunnen
veroorzaken.
Gebruik geen hogedruk- of stoomreinigers.
Buitenkant
Het volstaat de oven met een vochtige doek te
reinigen. Als die heel vuil is, kan u enkele druppels
afwasmiddel aan het water toevoegen. Wrijf de
oven daarna droog met een droge doek.
Gebruik bij ovens met een aluminium voorkant
een zacht reinigingsmiddel voor glas en een
zachte doek die geen draden loslaat. Reinig in
horizontale richting zonder druk uit te oefenen op
het oppervlak.
Verwijder onmiddellijk kalkaanslag en vlekken
veroorzaakt door vet, zetmeel en eiwit. Deze
vlekken kunnen invreten. Vermijd dat er water in
de oven binnenkomt.
Binnenkant
Reinig na elk gebruik de binnenwanden met een
vochtige doek, aangezien het dan gemakkelijker is
spatjes en aangekoekt eten te verwijderen.
Gebruik om hardnekkig vuil te verwijderen een niet
bijtend middel. Gebruik geen ovensprays of
andere bijtende of schuurmiddelen.
Houd de deur en de voorkant van de oven altijd
schoon zodat een correcte werking kan
gegarandeerd worden.
Laat geen water in de ventilatieopeningen komen.
Verwijder regelmatig het draaiplateau en
respectieve houder en reinig de bodem van de
binnenruimte, vooral als er vocht is gemorst.
Schakel de oven niet aan zonder het
draaiplateau en de respectieve houder.
Als de binnenkant zeer vuil is, plaats een glas
water op het draaiplateau en zet de magnetron
gedurende 2 of 3 minuten in de hoogste
vermogensstand. De vrijgekomen waterdamp zal
het vuil losweken, dat nadien makkelijk met een
zachte doek kan worden verwijderd.
Onaangename geuren (bijv. na het bereiden van
vis) kunnen makkelijk geneutraliseerd worden
door een kop water met enkele druppels
citroensap of azijn, en een theelepel om een
laattijdig kookproces te voorkomen, 2 à 3
minuten in de hoogste vermogensstand van de
magnetron te verwarmen.

74
NL
Reiniging en onderhoud van de oven
Bovenwand van de oven
Als de bovenwand van de oven erg vuil is, kan het
grillelement naar beneden worden geklapt om het
reinigen te vergemakkelijken.
Wacht tot het grillelement is afgekoeld
alvorens het naar beneden te klappen om
brandwonden te voorkomen.
Ga als volgt te werk:
1. Draai de steunhaak van de grill 180º (1).
2. Klap het grillelement voorzichtig naar
beneden (2). Forceer niets, want dat zou
schade kunnen veroorzaken.
3. Nadat u de bovenwand hebt schoongemaakt,
plaats het grillelement weer op zijn plaats (2)
en draai de haak weer terug.
BELANGRIJKE WAARSCHUWING: De grillsteun
(1) kan bij draaien vallen. Als dit gebeurt, steek de
grillsteun (1) dan in de opening boven in de
magnetron en draai hem 90º tot aan de steunstand
van de grill (2).
Het mica plaatje (3) in de bovenwand dient
altijd goed schoongehouden te worden.
Opgehoopte etensresten op het plaatje kunnen
schade of vonken veroorzaken.
Gebruik geen bijtende reinigingsmiddelen of
scherpe voorwerpen.
Verwijder het mica plaatje niet om alle risico’s
te vermijden.
Het glazen omhulsel van het lampje (4) bevindt
zich in de bovenwand van de oven en kan
makkelijk worden verwijderd voor reiniging.
Schroef het los en reinig het met water en
afwasmiddel.
Accessoires
Reinig de accessoires na elk gebruik. Als deze erg
vuil zijn, laat ze eerst weken en gebruik vervolgens
een borstel en een spons. De accessoires kunnen
in de vaatwasser worden gewassen.
Controleer of het draaiplateau en respectieve
houder altijd schoon zijn. Schakel de oven niet aan
zonder het draaiplateau en de respectieve houder.

75
NL
Wat te doen bij storingen?
OPGELET! Alle reparaties dienen door
vakmensen te worden uitgevoerd. Alle
reparaties uitgevoerd door personen die niet
door de fabrikant worden erkend kunnen
gevaarlijk zijn.
De volgenden storingen kunnen worden verholpen
zonder contact op te nemen met de Technische
Dienst.
Het display staat uit! Controleer of:
- De uuraanduiding werd uitgeschakeld (zie
hoofdstuk over basisregelingen).
Er gebeurt niets als men op de toetsen
drukt! Controleer of:
- De veiligheidsblokkering ingeschakeld is (zie
hoofdstuk over basisregelingen).
De oven werkt niet! Controleer of:
- De stekker goed in het stopcontact zit.
- Het voedingscircuit van de oven aan staat.
- De deur goed dicht is. De deur moet met een
klik dichtgaan.
- Er een voorwerp tussen de deur en de
voorkant van de binnenruimte zit.
Er klinken vreemde geluiden als de oven
aan staat! Controleer of:
- Er boogontlading ontstaat in de oven door
metalen voorwerpen (zie hoofdstuk over het
soort serviesgoed).
- Het servies in contact komt met de
ovenwanden.
- Er losse spiesen of lepels in de oven liggen.
Het voedsel warmt niet of heel traag op!
Controleer of:
- U misschien per ongeluk metalen
serviesgoed hebt gebruikt.
- De juiste bereidingstijd en vermogensstand
hebt gekozen.
- U een grotere hoeveelheid voedsel of
voedsel dat kouder is dan normaal in de oven
hebt geplaatst.
Het voedsel is te warm, uitgedroogd of
aangebrand! Controleer of u de juiste
bereidingstijd en vermogensstand hebt
gekozen.
Er is een geluid hoorbaar als het
bereidingsproces is geëindigd! Dat is
geen probleem. De koelventilator werkt
gedurende enige tijd voort. Als de
temperatuur voldoende is gedaald, zal de
ventilator uitschakelen.
De oven werkt maar het lampje binnenin
niet! Als alle functies normaal werken is het
lampje mogelijk gesprongen. U kan het
apparaat gewoon verdergebruiken.
Het lampje vervangen
Ga om het lampje te vervangen als volgt te werk:
- Sluit de oven van het elektriciteitsnet af. Trek
de stekker uit het stopcontact of verbreek de
stroomtoevoer naar de oven.
- Schroef het glazen omhulsel (1) van het
lampje los.
- Verwijder het halogeen lampje (2). Opgelet!
Het lampje kan zeer heet zijn.
- Plaats een nieuw halogeen lampje van 12V /
10W. Opgelet! Raak het oppervlak van het
lampje niet rechtstreeks met de vingers
aan want dat zou het lampje kunnen
beschadigen. Volg de instructies van de
fabrikant van het lampje op.
- Schroef het glazen omhulsel vast (1).
Sluit de oven weer op het elektriciteitsnet
aan.

76
NL
Technische gegevens
Spanning AC ...................................................................................... (zie typeplaatje)
Vereist vermogen ............................................................................... 3400 W
Vermogen grill. ................................................................................... 1500 W
Heteluchtvermogen ............................................................................ 1600 W
Vermogen magnetron. ........................................................................ 1000 W
Microgolffrequentie … ........................................................................ 2450 MHz
Afmetingen ommanteling (bhd)....................................................... 595 455 542 mm
Afmetingen binnenruimte (bhd). ..................................................... 420 210 390 mm
Inhoud oven. ....................................................................................... 38 ltr
Gewicht .............................................................................................. 35 kg
Aanwijzingen over milieubescherming
Verwijdering van de verpakking
De verpakking draagt het teken van het Groene
Punt.
Om alle verpakkingsmaterialen te verwijderen,
zoals karton, piepschuim en beschermfolie,
gelieve de geschikte containers te gebruiken. Zo
wordt de recyclage van de verpakkingsmaterialen
gegarandeerd.
Verwijdering van afgedankte apparaten
De Europese richtlijn 2002/96/EG betreffende
afgedankte elektrische en elektronische
apparatuur (AEEA), voorziet dat
huishoudapparaten niet mogen worden afgevoerd
via het gewone circuit van het vaste stedelijke
afval.
Verouderde apparaten dienen afzonderlijk te
worden opgehaald om zo het terugwinnings- en
recyclagepercentage van het materiaal waaruit ze
zijn gemaakt optimaal ten goede te komen en
mogelijke schade voor de gezondheid en het
milieu te voorkomen. Het symbool van de
container met een kruis erover dient op elk product
te worden aangebracht om eraan te herinneren
dat het afzonderlijk moet worden opgehaald.
Voor informatie over de juiste plaats waar men
oude huishoudapparaten kan deponeren dient de
consument de plaatselijke autoriteiten of de
verkooppunten te contacteren.
Maak uw apparaat onbruikbaar alvorens het te
verwijderen. Trek het snoer los, snij het door en
verwijder het.

77
NL
Installatie-instructies
Vóór de installatie
Controleer of de stroomspanning op het
typeplaatje overeenkomt met de stroomspanning
van uw installatie.
Open de deur en verwijder alle accessoires en
verpakkingsmateriaal.
Verwijder het mica plaatje in de bovenwand van
de binnenruimte niet! Dit plaatje voorkomt dat vet
en voedsel de microgolfgenerator zouden
beschadigen.
Opgelet! De voorkant van de oven kan bedekt zijn
met een beschermende folie. Verwijder deze
folie voorzichtig voordat u het apparaat voor het
eerst gebruikt en begin daarbij bij de onderkant.
Controleer of de oven niet beschadigd is.
Controleer of de deur van de oven goed sluit en of
de binnenkant van de deur en de voorkant van de
binnenruimte niet beschadigd zijn. In geval van
schade, neem contact op met de technische
dienst.
GEBRUIK DE OVEN NIET als het snoer of de
stekker beschadigd zijn, als de oven niet correct
functioneert, beschadigd werd of gevallen is.
Neem contact op met de technische dienst.
Plaats de oven op een vlak en stabiel oppervlak.
Plaats de oven niet in de buurt van warmte-
elementen, radio’s en televisietoestellen.
Controleer tijdens de installatie of het snoer
niet in contact komt met vochtigheid, scherpe
voorwerpen of de achterkant van de oven,
aangezien de hoge temperaturen het snoer
kunnen beschadigen.
Opgelet: na de installatie van de oven moet de
stekker bereikbaar blijven.
Na de installatie
De oven is uitgerust met een snoer met stekker
voor eenfasestroom.
In geval van permanente aansluiting dient de
oven te worden geïnstalleerd door een vakman.
Hierbij dient de aansluiting te gebeuren op een
circuit met alle polen, met minimum 3 mm tussen
de contacten.
OPGELET: DE OVEN MOET GEAARD ZIJN.
De fabrikant en handelaars stellen zich niet
verantwoordelijk voor persoonlijke letsels, letsels
bij dieren of materiële schade indien de
installatieinstructies niet werden opgevolgd.
De oven werkt alleen als de deur goed gesloten
is.
Reinig voor de eerste ingebruikname de
binnenkant van de oven en de accessoires
volgens de aanwijzingen onder “Reiniging en
onderhoud van de oven”.
Plaats het verbindingsstuk in het midden van de
oven met de ring en het draaiplateau erbovenop
zo dat ze in elkaar passen. Telkens u de
magnetronoven gebruikt, dient u ervoor te
zorgen dat zowel het draaiplateau als de
respectieve accessoires correct binnenin de
oven zijn geplaatst. Het draaiplateau kan in
beide richtingen draaien.
Volg tijdens de installatie de apart gegeven aanwijzingen.

Dimensions pour l'installation du four / Afmetingen voor
installatie
FR
Introduisez le four dans le meuble
jusqu'à ce que l'avant du four butte sur
le bois et alignez-le.
Ouvrez la porte du four et fixez ce
dernier aux parois latérales du meuble
au moyen des 4 vis fournies, par les
trous prévus à cet effet.
NL
Plaats de oven in het meubelstuk
zodat het frame het meubelstuk raakt
en hij recht is uitgelijnd.
Open de ovendeur en zet de oven vast
aan de zijwanden van het meubelstuk
met behulp van de 4 bijgeleverlde
schroeven, via de 4 gaten in het frame
van de oven.


-
 1
1
-
 2
2
-
 3
3
-
 4
4
-
 5
5
-
 6
6
-
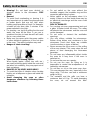 7
7
-
 8
8
-
 9
9
-
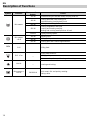 10
10
-
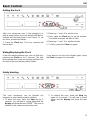 11
11
-
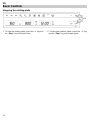 12
12
-
 13
13
-
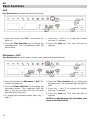 14
14
-
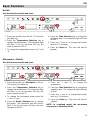 15
15
-
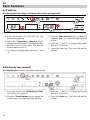 16
16
-
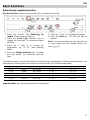 17
17
-
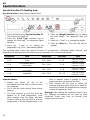 18
18
-
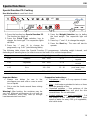 19
19
-
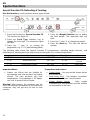 20
20
-
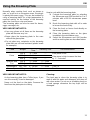 21
21
-
 22
22
-
 23
23
-
 24
24
-
 25
25
-
 26
26
-
 27
27
-
 28
28
-
 29
29
-
 30
30
-
 31
31
-
 32
32
-
 33
33
-
 34
34
-
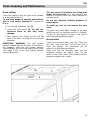 35
35
-
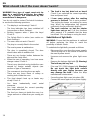 36
36
-
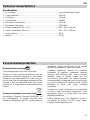 37
37
-
 38
38
-
 39
39
-
 40
40
-
 41
41
-
 42
42
-
 43
43
-
 44
44
-
 45
45
-
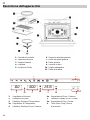 46
46
-
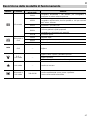 47
47
-
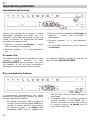 48
48
-
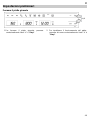 49
49
-
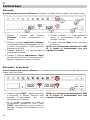 50
50
-
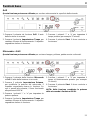 51
51
-
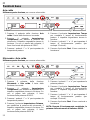 52
52
-
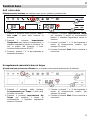 53
53
-
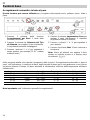 54
54
-
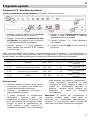 55
55
-
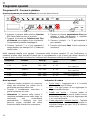 56
56
-
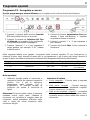 57
57
-
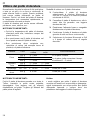 58
58
-
 59
59
-
 60
60
-
 61
61
-
 62
62
-
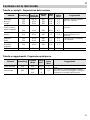 63
63
-
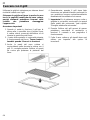 64
64
-
 65
65
-
 66
66
-
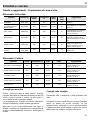 67
67
-
 68
68
-
 69
69
-
 70
70
-
 71
71
-
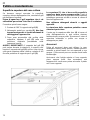 72
72
-
 73
73
-
 74
74
-
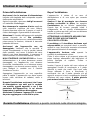 75
75
-
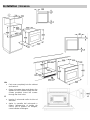 76
76
-
 77
77
-
 78
78
-
 79
79
-
 80
80
-
 81
81
-
 82
82
-
 83
83
-
 84
84
-
 85
85
-
 86
86
-
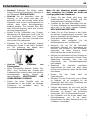 87
87
-
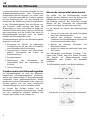 88
88
-
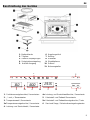 89
89
-
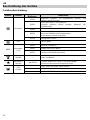 90
90
-
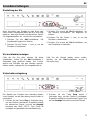 91
91
-
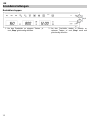 92
92
-
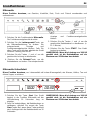 93
93
-
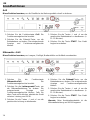 94
94
-
 95
95
-
 96
96
-
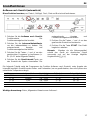 97
97
-
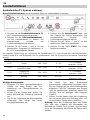 98
98
-
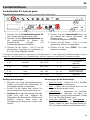 99
99
-
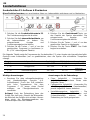 100
100
-
 101
101
-
 102
102
-
 103
103
-
 104
104
-
 105
105
-
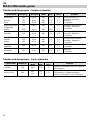 106
106
-
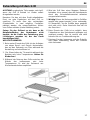 107
107
-
 108
108
-
 109
109
-
 110
110
-
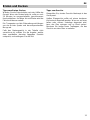 111
111
-
 112
112
-
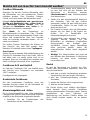 113
113
-
 114
114
-
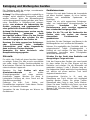 115
115
-
 116
116
-
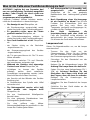 117
117
-
 118
118
-
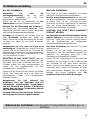 119
119
-
 120
120
-
 121
121
-
 122
122
-
 123
123
-
 124
124
-
 125
125
-
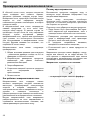 126
126
-
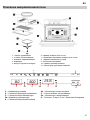 127
127
-
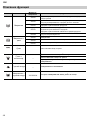 128
128
-
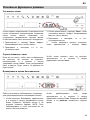 129
129
-
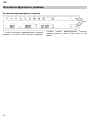 130
130
-
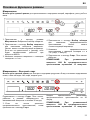 131
131
-
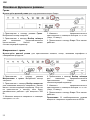 132
132
-
 133
133
-
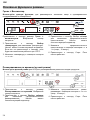 134
134
-
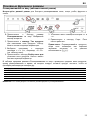 135
135
-
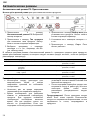 136
136
-
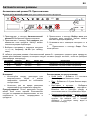 137
137
-
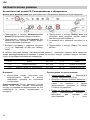 138
138
-
 139
139
-
 140
140
-
 141
141
-
 142
142
-
 143
143
-
 144
144
-
 145
145
-
 146
146
-
 147
147
-
 148
148
-
 149
149
-
 150
150
-
 151
151
-
 152
152
-
 153
153
-
 154
154
-
 155
155
-
 156
156
-
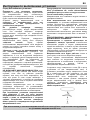 157
157
-
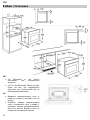 158
158
-
 159
159
-
 160
160
-
 161
161
-
 162
162
-
 163
163
-
 164
164
-
 165
165
-
 166
166
-
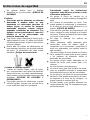 167
167
-
 168
168
-
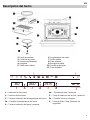 169
169
-
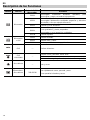 170
170
-
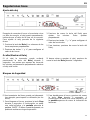 171
171
-
 172
172
-
 173
173
-
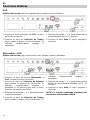 174
174
-
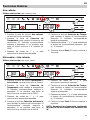 175
175
-
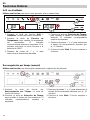 176
176
-
 177
177
-
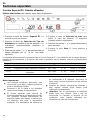 178
178
-
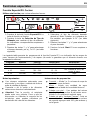 179
179
-
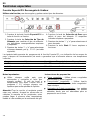 180
180
-
 181
181
-
 182
182
-
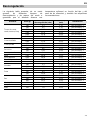 183
183
-
 184
184
-
 185
185
-
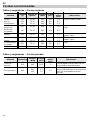 186
186
-
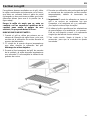 187
187
-
 188
188
-
 189
189
-
 190
190
-
 191
191
-
 192
192
-
 193
193
-
 194
194
-
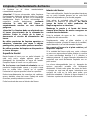 195
195
-
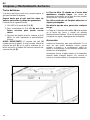 196
196
-
 197
197
-
 198
198
-
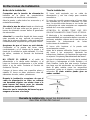 199
199
-
 200
200
-
 201
201
-
 202
202
-
 203
203
-
 204
204
-
 205
205
-
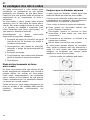 206
206
-
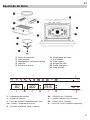 207
207
-
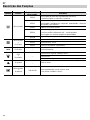 208
208
-
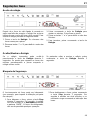 209
209
-
 210
210
-
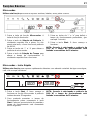 211
211
-
 212
212
-
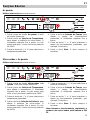 213
213
-
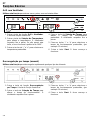 214
214
-
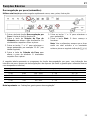 215
215
-
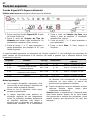 216
216
-
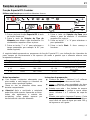 217
217
-
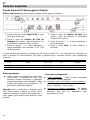 218
218
-
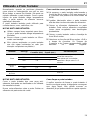 219
219
-
 220
220
-
 221
221
-
 222
222
-
 223
223
-
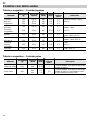 224
224
-
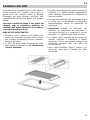 225
225
-
 226
226
-
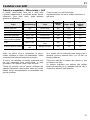 227
227
-
 228
228
-
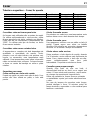 229
229
-
 230
230
-
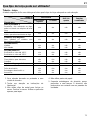 231
231
-
 232
232
-
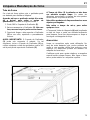 233
233
-
 234
234
-
 235
235
-
 236
236
-
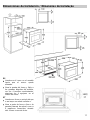 237
237
-
 238
238
-
 239
239
-
 240
240
-
 241
241
-
 242
242
-
 243
243
-
 244
244
-
 245
245
-
 246
246
-
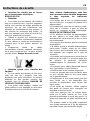 247
247
-
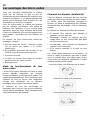 248
248
-
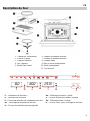 249
249
-
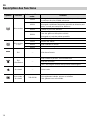 250
250
-
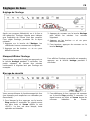 251
251
-
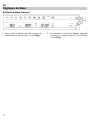 252
252
-
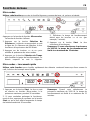 253
253
-
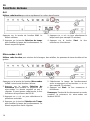 254
254
-
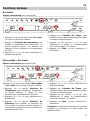 255
255
-
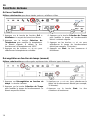 256
256
-
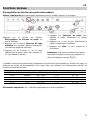 257
257
-
 258
258
-
 259
259
-
 260
260
-
 261
261
-
 262
262
-
 263
263
-
 264
264
-
 265
265
-
 266
266
-
 267
267
-
 268
268
-
 269
269
-
 270
270
-
 271
271
-
 272
272
-
 273
273
-
 274
274
-
 275
275
-
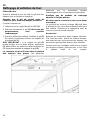 276
276
-
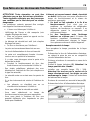 277
277
-
 278
278
-
 279
279
-
 280
280
-
 281
281
-
 282
282
-
 283
283
-
 284
284
-
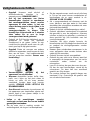 285
285
-
 286
286
-
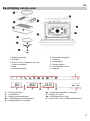 287
287
-
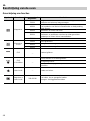 288
288
-
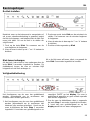 289
289
-
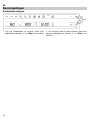 290
290
-
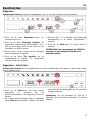 291
291
-
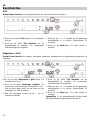 292
292
-
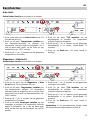 293
293
-
 294
294
-
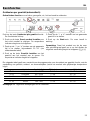 295
295
-
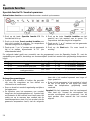 296
296
-
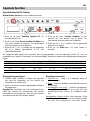 297
297
-
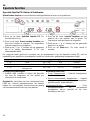 298
298
-
 299
299
-
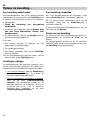 300
300
-
 301
301
-
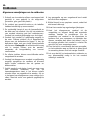 302
302
-
 303
303
-
 304
304
-
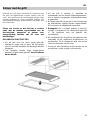 305
305
-
 306
306
-
 307
307
-
 308
308
-
 309
309
-
 310
310
-
 311
311
-
 312
312
-
 313
313
-
 314
314
-
 315
315
-
 316
316
-
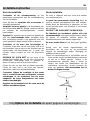 317
317
-
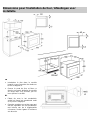 318
318
-
 319
319
-
 320
320


in andere talen
- italiano: Barazza 1MCFY Istruzioni per l'uso
- français: Barazza 1MCFY Mode d'emploi
- español: Barazza 1MCFY Instrucciones de operación
- Deutsch: Barazza 1MCFY Bedienungsanleitung
- português: Barazza 1MCFY Instruções de operação
Andere documenten
-
Gorenje BM 5120 AX de handleiding
-
ETNA ecm172 de handleiding
-
Inventum IMC6144RK Handleiding
-
LG MS-2387ARB de handleiding
-
Beko MWC 2010 EX Handleiding
-
Indesit MWHA212 de handleiding
-
Smeg FM 24 EB de handleiding
-
Aeg-Electrolux MCD3880E-M Handleiding
-
-
Haier HWO45NB4T0B1 Handleiding