
Printed in the Netherlands
110117.01 07-05
FOKKERSTRAAT 571 - 3125 BD SCHIEDAM - HOLLAND - TEL.: +31 10 4377700 - TELEX: 23470
TELEFAX: +31 10 4372673 - 4621286 - E-MAIL: [email protected] - INTERNET: http://www.vetus.com
Inleiding
Een beluchtingsklep voorkomt het moge-
lijk imploderen van een vaste vuilwater-
tank wanneer de vuilwatertank via een
afzuiginstallatie aan land geleegd wordt.
Installatie van een beluchtingsklep kan
nodig zijn om de beluchting van vuilwater-
tanks aan de betreffende ISO-norm te
laten voldoen.
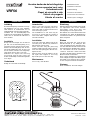
Installatie
Breng in de bovenzijde van de tank het
gat aan voor de beluchtingsklep (ø 57).
Verwijder zaagsel en boorsel uit de tank.
Monteer de beluchtingsklep met de mee-
geleverde pakking-ring. Zet de moer vast
met de sleutel, nooit met een waterpomp-
tang. Draai de moer niet te vast aan.
Controleer na 2 dagen of de moer nog
goed vastzit; draai de moer vaster aan
indien noodzakelijk. Herhaal dit nogmaals
na 4 dagen.
Onderhoud
Reinig de zeef indien noodzakelijk.
Vacuüm bediende beluchtingsklep
Vacuum operated vent valve
Unterdruckventil
Clapet de sécurité à vide
Válvula de purgado
Valvola di scarico
Installatieinstructies
Installation instructions
Einbauanleitung
Instructions d’installation
Instrucciones de instalación
Istruzioni per il montaggio
VRF56
NEDERLANDS
Introduction
Using a vent valve prevents rigid waste
water tanks from imploding when the
waste water tank is emptied on land via a
waste discharge system.
The installation of a vent valve may be
necessary to ensure that the venting of
waste water tanks complies with the rele-
vant ISO standards.
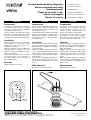
Installation
In the top of the tank, drill the hole for the
vent valve (ø 57). Remove any sawdust or
drill shavings from the tank.
Fit the vent valve using the gasket ring
supplied. Tighten the nut using a wrench -
never use water-pump pliers. Do not over-
tighten the nut.
After two days check the tightness of the
nut again and retighten if necessary.
Repeat the process after four days.
Maintenance
If necessary, clean the filter.
Einleitung
Ein Unterdruckventil verhindert das mögli-
che Implodieren eines festen Schmutz-
wassertanks, wenn dieser über eine
Absauganlage an Land geleert wird.
Der Einbau eines Unterdruckventils kann
erforderlich sein, damit die Belüftung des
Schmutzwassertanks der geltenden ISO-
Norm entspricht.
Einbau
Oben auf dem Tank das Loch für das
Unterdruckventil (ø 57) anbringen. Das
Säge- und Bohrmehl aus dem Tank entfer-
nen. Das Unterdruckventil zusammen mit
dem mitgelieferten Dichtungsring montie-
ren. Die Mutter mit dem Schrauben-
schlüssel festziehen. Dazu keinesfalls
eine Wasserpumpenzange benutzen! Die
Mutter nicht zu fest anziehen.
Nach 2 Tagen kontrollieren, ob die Mutter
noch richtig befestigt ist. Die Mutter gege-
benenfalls fester anziehen. Diese Kontrol-
le nach 4 Tagen nochmals wiederholen.
Wartung
Wenn erforderlich, das Sieb reinigen.
ENGLISH
DEUTSCH
Pagina wordt geladen...
Documenttranscriptie
VRF56 Vacuüm bediende beluchtingsklep Vacuum operated vent valve Unterdruckventil Clapet de sécurité à vide Válvula de purgado Valvola di scarico NEDERLANDS Installatieinstructies Installation instructions Einbauanleitung Instructions d’installation Instrucciones de instalación Istruzioni per il montaggio DEUTSCH ENGLISH Inleiding Introduction Einleitung Een beluchtingsklep voorkomt het mogelijk imploderen van een vaste vuilwatertank wanneer de vuilwatertank via een afzuiginstallatie aan land geleegd wordt. Installatie van een beluchtingsklep kan nodig zijn om de beluchting van vuilwatertanks aan de betreffende ISO-norm te laten voldoen. Using a vent valve prevents rigid waste water tanks from imploding when the waste water tank is emptied on land via a waste discharge system. The installation of a vent valve may be necessary to ensure that the venting of waste water tanks complies with the relevant ISO standards. Ein Unterdruckventil verhindert das mögliche Implodieren eines festen Schmutzwassertanks, wenn dieser über eine Absauganlage an Land geleert wird. Der Einbau eines Unterdruckventils kann erforderlich sein, damit die Belüftung des Schmutzwassertanks der geltenden ISONorm entspricht. Installatie Installation Einbau In the top of the tank, drill the hole for the vent valve (ø 57). Remove any sawdust or drill shavings from the tank. Fit the vent valve using the gasket ring supplied. Tighten the nut using a wrench never use water-pump pliers. Do not overtighten the nut. After two days check the tightness of the nut again and retighten if necessary. Repeat the process after four days. Oben auf dem Tank das Loch für das Unterdruckventil (ø 57) anbringen. Das Säge- und Bohrmehl aus dem Tank entfernen. Das Unterdruckventil zusammen mit dem mitgelieferten Dichtungsring montieren. Die Mutter mit dem Schraubenschlüssel festziehen. Dazu keinesfalls eine Wasserpumpenzange benutzen! Die Mutter nicht zu fest anziehen. Nach 2 Tagen kontrollieren, ob die Mutter noch richtig befestigt ist. Die Mutter gegebenenfalls fester anziehen. Diese Kontrolle nach 4 Tagen nochmals wiederholen. Breng in de bovenzijde van de tank het gat aan voor de beluchtingsklep (ø 57). Verwijder zaagsel en boorsel uit de tank. Monteer de beluchtingsklep met de meegeleverde pakking-ring. Zet de moer vast met de sleutel, nooit met een waterpomptang. Draai de moer niet te vast aan. Controleer na 2 dagen of de moer nog goed vastzit; draai de moer vaster aan indien noodzakelijk. Herhaal dit nogmaals na 4 dagen. Onderhoud Maintenance If necessary, clean the filter. Reinig de zeef indien noodzakelijk. Wartung Wenn erforderlich, das Sieb reinigen. FOKKERSTRAAT 571 - 3125 BD SCHIEDAM - HOLLAND - TEL.: +31 10 4377700 - TELEX: 23470 TELEFAX: +31 10 4372673 - 4621286 - E-MAIL: [email protected] - INTERNET: http://www.vetus.com Printed in the Netherlands 110117.01 07-05-
 1
1
-
 2
2


in andere talen
- English: Vetus VRF56 Installation guide
- italiano: Vetus VRF56 Guida d'installazione
- français: Vetus VRF56 Guide d'installation
- español: Vetus VRF56 Guía de instalación
- Deutsch: Vetus VRF56 Installationsanleitung
Gerelateerde papieren
-
Vetus Complete tank type WWS Installatie gids
-
-
-
-
-
Vetus ILTCONW Installatie gids
-
-
-
-