
Smart ePano 360
Bedienungsanleitung | User Guide
for German | English | French | Spanish | Italian
Portuguese | Dutch | Chinese (traditional and simplified)
www.rollei.de

2
www.rollei.com
Inhalt
Anleitung ......................4
Warnhinweise..................12
Entsorgung ...................13
Warnung hinsichtlich des Akkus ...14
Konformität ...................15
Content
Instruction Manual ..............16
Warning notes .................24
Disposal ......................25
Battery Warning ................26
Conformity ....................27

3
Contenu
Mode d’emploi .................28
Avertissements .................36
Élimination ....................37
Avertissement relatif à la batterie...38
Conformité ....................39
Contenido
Instrucciones...................40
Advertencias...................48
Eliminar residuos ...............49
Advertencia de batería ...........50
Conformidad...................51
Contenuto
Manuale di istruzioni ............52
Avvertenze ....................60
Smaltimento ...................61
Avvertenze relative alla batteria....62
Conformità . . . . . . . . . . . . . . . . . . . .63
Conteúdo
Manual de instruções ............64
Avisos ........................72
Eliminação ....................73
Aviso da bateria ................74
Conformidade..................75
Inhoud
Handleiding ...................78
Waarschuwingen ...............84
Beschikking ...................85
Batterij waarschuwing ...........86
Conformiteit ...................87
中國傳統: 內容
使用說明.....................88
警告說明.....................95
简体中文: 内容
使用说明.....................96
警告说明....................103

4
DEUTSCH
Anleitung
Lieferumfang
Smart ePano 360
Actioncam Adapter
Smartphone Halter
Fernbedienung
USB Kabel
1
32
5
4
1
2
3
4
5

5
Technische Daten
Batteriekapazität 400 mAh
Betriebsstrom 50 bis 300 mA
Betriebsspannung 3,3 V bis 4,2 V
Ladespannung 4,8 V - 5,0 V
Ladezeit Ca. 2 Stunden
Arbeitszeit 2–3 Stunden (bei voll aufgeladenem Akku)
Nennspannung 4,5 V DC
Leerlaufstrom Max. 55 mA
Drehzahl Panorama 1 Umdrehung pro Minute
Drehzahl Zeitraffer 15/30/60/90 Minuten pro Umdrehung
Betriebsgeräusch Max. 20 dB (A)
Max. Traglast 500 g
Abmessungen H: 65 mm, Ø 59 mm
Gewicht 98 g
Änderungen von Design und technischen Daten bleiben vorbehalten und bedürfen keiner Ankün-
digung. Smartphone und Actioncam sind nicht im Lieferumfang enthalten.
Die Bluetooth
®
Wortmarke und Logos sind eingetragene Warenzeichen der Bluetooth SIG, Inc.
und die Verwendung dieser Marken durch Rollei erfolgt unter Lizenz. Andere Warenzeichen und
Handels namen sind Eigentum ihrer jeweiligen Inhaber.

6
DEUTSCH
Statusanzeige
• Rote LED: Die rote Leuchte gibt den Ladestatus des Gerätes an. Die rote LED
leuchtet wenn das Gerät geladen wird und schaltet sich ab, sobald die Batterie
vollständig aufgeladen ist.
• Blaue LED: Wenn das Gerät erfolgreich via Bluetooth mit einem Gerät ver-
bunden ist, leuchtet die LED dauerhaft. Im Panorama Modus blinkt die blaue
LED. Sollten Sie den Zeitraffer Modus aktiviert haben, so schaltet sich die blaue
LED ab und die LEDs der Zeitrafferanzeige leuchten.
• Der Panoramakopf verfügt über eingebaute wiederaufladbare Akkus.
Die Ladezeit beträgt ca. 2 – 3 Stunden.
Hinweis: Sollten die rote und blaue LED abwechselnd leuchten und das Gerät sich
automatisch danach ausschalten, ist dies ein Anzeichen dafür,
dass die Batterie leer ist. Bitte laden Sie das Gerät wieder auf.
USB Ladebuchse
Statusanzeige
An / Aus, Panorama Taste
1
2
3
1 3
2

7
Statusanzeige
Zeitrafferanzeige
Zeitraffer beenden
Standfüße
1/4 Zoll Gewinde
Actioncam Adapter
Schrauben Sie den Actioncam Adapter auf
den Panoramakopf (1/4 Zoll Schraube
auf der Oberseite), anschließend befestigen
Sie Ihre Actioncam auf dem Adapter.
1
2
3
4
1 2
4
3

8
DEUTSCH
Smartphone Halter
1/4 Zoll Gewinde
Lösen
Drehrad
Festziehen
Smartphone Einsatz
Smartphone Einsatz
Vertikale Aufnahme
mit dem Smartphone
Horizontale Aufnahme
mit dem Smartphone
Befestigen Sie den Smartphone Halter über
die 1/4 Zoll Schraube auf der Oberseite des Panoramakopfes. Befestigen Sie an-
schließend Ihr Smartphone in der Halterung. Öffnen Sie dafür die Klemmung indem
Sie das Drehrad gegen den Uhrzeigersinn auf drehen. Stecken Sie dann Ihr Smart-
phone in den Klemmbereich (horizontal oder vertikal) und fixieren Sie das Telefon,
indem Sie das Drehrad im Uhrzeigersinn drehen.
1
1 1
2
2
2
3
4
5
2 4
1
3
5

9
Fernbedienung
Panoramaaufnahmen
Stop-Taste
An- / Ausschalter
Fototaste
Zeitraffertaste
Wenn die Fernbedienung eingeschaltet ist und bei drücken einer belieben Taste die
Statusanzeige für ca. 5 Sekunden dauerhaft leuchtet, dann hat die Fernbedienung
keine Verbindung zum Kopf. Ist die Fernbedienung eingeschaltet und bei drücken
einer beliebigen Taste blinkt die Statusanzeige nur kurz, dann ist die Fernbedienung
mit dem Kopf verbunden.
Diese Fernbedienung kann mit Android und iOS Systemen arbeiten und bietet
eine 2,4G Verbindung, die sehr stabil ist und eine Reichweite von ca. 10 m hat.
Die Fernbedienung hat 5 Funktionen, An-/Ausschalter, Fototaste, Panoramataste,
Zeitraffertaste und Stop-Taste.
1
2
3
4
5
1
2
3
5
4

10
DEUTSCH
Bedienung
1. Schieben Sie den An-/Ausschalter auf AN und die Fernbedienung wird sich auto-
matisch mit dem eingeschalteten Kopf verbinden.
2. Befestigen Sie Ihr Smartphone auf dem Panoramakopf. Starten Sie die Bluetooth
Funktion an Ihrem Smartphone und verbinden Sie es mit dem Rollei Smart
ePano 360.
3. Fotos aufnehmen: Öffnen Sie die Kamera-App Ihres Handys. Durch drücken der
Fototaste auf der Fernbedienung, nimmt Ihr Smartphone nun Bilder auf.
4. Panoramaaufnahmen: Um Panoramaaufnahmen durchführen zu können, gehen
Sie in den Panoramamodus Ihres Handys.
Drücken Sie den An/Aus Knopf auf dem Panoramakopf direkt zweimal und der
Kopf beginnt mit der Panoramaaufnahme und dreht sich im Uhrzeigersinn.
Drücken Sie die Taste dreimal, dreht sich der Kopf entgegen dem Uhrzeigersinn.
Drücken Sie die Panoramataste der Fernbedienung einmal und der Kopf dreht
sich im Uhrzeigersinn und die Aufnahme wird gestartet. Drücken Sie die
Panoramataste der Fernbedienung zweimal dreht sich der Kopf entgegen dem
Uhrzeigersinn.

11
Bedienung
5. Zeitrafferaufnahme: Um Zeitrafferaufnahmen zu starten, gehen Sie in das Zeit-
raffermenü des Smartphones.
Wenn Sie die Einstellungen direkt am Panoramakopf durchführen möchten,
drücken Sie die Zeitraffertaste des Kopfes mehrfach bis die LED der ge-
wünschten Zeit leuchtet. Anschließend drücken Sie die Zeitraffertaste zweimal
hintereinander und der Kopf startet mit der Zeitrafferaufnahme im eingestellten
Zeitintervall.
Wenn Sie die Fernbedienung nutzen, ist die Handhabung identisch wie oben
beschrieben.
6. Modus stoppen: Drücken Sie die Zeitraffertaste am Kopf direkt oder die
Stop-Taste an der Fernbedienung um den Modus zu beenden. Sie können den
Modus jederzeit beenden. Um den Panoramakopf auszuschalten drücken Sie die
An/Austaste am Kopf für ca. 3 Sekunden.

12
DEUTSCH
Bedienung
Hinweis: Wenn Sie den Modus beendet haben und ca. 5 Minuten lang keine
weitere Taste betätigen, geht der Panoramakopf in den Standby Modus. Dies wird
angezeigt, indem die blaue und rote LED im Wechsel leuchtet. Nach ca. 3 Minuten
im Standby Modus schaltet sich der Kopf komplett automatisch aus. Um den Kopf
aus dem Standby Modus zu holen, drücken Sie eine beliebige Taste (entweder auf
der Fernbedienung oder am Gerät selbst).
Warnhinweise
1. Benutzen Sie keine chemischen Lösungsmittel um das Gerät zu reinigen.
2. Lassen Sie das Produkt nicht mit säurehaltigen Mitteln in Berührung kommen.
3. Setzen Sie das Gerät keiner großen Hitze oder Feuer aus. Lagern Sie es nicht in
Umgebungen mit hohen Temperaturen.
4. Üben Sie keinen hohen Druck auf das Produkt aus und lassen Sie es nicht fallen.

13
Entsorgung
Verpackung entsorgen: Entsorgen Sie die Verpackung sortenrein.
Geben Sie Pappe und Karton zum Altpapier, Folien in die Wertstoff-
Sammlung.
Entsorgung elektrischer und elektronischer Altgeräte und/ oder
Batterien/Akkumulatoren durch Verbraucher in privaten Haus-
halten innerhalb der Europäischen Union. Dieses Symbol am Produkt
oder an der Verpackung weist darauf hin, dass es nicht mit dem Hausmüll
entsorgt werden darf. Sie müssen Ihr Altgerät und/oder Batterien/Akku-
mulatoren an entsprechende Sammelstellen zum Recycling elektrischer
und elektronischer Geräte und/oder Batterien/Akkumulatoren übergeben.
Weitere Informationen zum Recycling dieses Gerätes und/oder der Batterien/Akku-
mulatoren erhalten Sie bei Ihrer Stadtverwaltung, dem Laden, in dem Sie das Gerät
erworben haben, oder Ihrem Entsorgungsbetrieb. Das Recycling von Materialien
hilft bei der Schonung natürlicher Ressourcen und gewährleistet eine für die
menschliche Gesundheit und Umwelt sichere Art der Wiederverwertung.

14
DEUTSCH
Warnung hinsichtlich des Akkus
• Demontieren, schlagen oder durchstecken Sie den Akku nicht, achten Sie darauf,
den Akku nicht kurzzuschließen. Setzen Sie den Akku keinen Orten mit hohen
Temperaturen aus. Verwenden Sie den Akku nicht weiter, falls er ausläuft oder
sich ausdehnt.
• Immer über das System aufladen. Falls der Akku durch einen falschen Typen
ersetzt wird, besteht Explosionsgefahr.
• Halten Sie den Akku von Kindern fern.
• Akkus können explodieren, wenn sie einem offenen Feuer ausgesetzt werden.
Werfen Sie Akkus nie ins Feuer.
• Tauschen Sie Akkus nie selber aus; überlassen Sie dem Händler diese Aufgabe.
• Entsorgen Sie verbrauchte Akkus gemäß den örtlichen Vorschriften.
• Vor der Entsorgung des Gerätes ist der Akku zu entnehmen und gesondert zu
entsorgen. Zur Entnahme des Akkus öffnen Sie das Gehäuse über die Kreuz-
schrauben.
Achtung: Der Akku darf nicht eigenständig ausgewechselt werden!

15
Konformität
Der Hersteller erklärt hiermit, dass der Rollei Smart ePano360 gemäß den grund-
legenden Anforderungen und anderer einschlägiger Vorschriften der folgenden
CE-Direktiven die CE-Kennzeichnung zuerkannt wurde:
EMV-Richtlinie 2014/30/EU
RoHS-Richtlinie 2011/65/CE
RED-Richtlinie 2014/53/EU
WEEE-Richtline 2012/19/EC
Die CE-Konformitätserklärung kann von der auf der Garantiekarte angegebenen
Adresse erhalten werden.

16
ENGLISH
Instruction Manual
Scope of delivery
Smart ePano 360
actioncam adapter
smartphone holder
remote control
USB cable
1
32
5
4
1
2
3
4
5

17
Technical specification
Battery capacity 400 mAh
Working current 50 up to 300 mA
Working voltage 3.3 V up to 4.2 V
Charging voltage 4.8 V – 5.0 V
Charging time Approx. 2 hours
Continuous working 2–3 hours (with fully charged battery)
Rated voltage 4.5 V DC
No-load current Max. 55 mA
Rotational speed panorama 1 r/min
Rotational speed time laps 15/30/60/90 min/r
Noise Max. 20 dB (A)
Max. load 500 g
Dimensions H: 65 mm, Ø: 59 mm
Weight 98 g
Subject to technical changes. Smartphone and Actioncam are not included.
The Bluetooth
®
word mark and logos are registered trademarks owned by Bluetooth SIG, Inc. and
any use of such marks by Rollei is under license. Other trademarks and trade names are those of
their respective owners.

18
ENGLISH
Indicator lights
• Red light: The red light is the indicator for charging. The red light turns on
while charging. If the device is fully charged it will be turned off.
• Blue light: If the the device is successfully connected via Bluetooth the blue
light will be continuously on. During the panorma mode the blue light will
flash. In time lapse mode the blue light will be turned off and the time lapse
indication light will flash.
• The panorama head has a built-in rechargeable battery. The charging time is
about 2 - 3 hours.
Note: If you turn on the device and the blue and red light will flash alternatively
and afterwards the device is automatically turned off, this means the battery has
no power. The device needs to be charged.
USB charging
Indication light
On / Off switch, panoramic shooting button
1
2
3
1 3
2

19
Indicator lights
Time lapse indication
Time lapse stop button
Supporting leg
1/4 inch thread
Actioncam adapter
Screw the actioncam adapter onto the
1/4 inch screw on the top of the panoramic
head. Afterwards please attach your
actioncam by using the adapter.
1
2
3
4
1 2
4
3

20
ENGLISH
Smartphone adapter
1/4 inch thread
Loosen
Knob
Tighten
Slider
Attaching your
smartphone
Smartphone vertical
shooting
Smartphone horizontal
shooting
Screw the phone holder onto the 1/4 inch screw on the top of the panoramic head.
Then attach your smartphone onto the holder in the position you would like to
have it (vertical or horizontal). Therefore open the clamp of the phone holder by
turning the knob counter clockwise, put your smartphone into the clamp and turn
the knob clockwise to firmly fix your smartphone.
1
1
1
2
2
2
3
4
5
2 4
1
3
5

21
Remote control
Panorama shooting button
Stop button
Power button
Shoot button
Time lapse button
If the remote control is turned on and the indication light flashes for about 5
seconds when you press any button and turns off afterwards that means the head
is not connected. If the remote control is turned on and the indication light flashes
only once shortly when you press any button and turns off, then the remote is
connected with the head.
This remote control can work with Android and iOS and offers a 2,4G signal for
connecting. Therefore the connection is very stable and can work over a distance of
up to 10 meters. The remote has 5 functions, on/off button, photo button, panora-
ma button, time lapse button and the stop button.
1
2
3
4
5
1
2
3
5
4

22
ENGLISH
Operation
1. Slide the on/off switch to ON and the remote control will be automatically
connected with the powered on head.
2. Connect the panoramic head with your smartphone. Therefore start Bluetooth
on your mobile phone and connect with the Rollei Smart ePano 360.
3. Taking photos: Open the camera interface of your mobile phone. By pressing the
photo button on the remote control, the camera of your smartphone will now
take a photo.
4. Taking panoramic photos: To take panoramic shots please go into the panoramic
mode of your smartphone‘s camera.
If you press the on/off button on the panoramic head twice the panoramic head
will directly start and will rotate clockwise. If you press the on/off button on the
device three times it will immediately rotate counter clockwise.
If you use the remote control press the panoramic button once and the pano-
ramic head will immediately start to rotate clockwise and the cell phone will
start automatically. If you press the panoramic button twice, the cell phone will
automatically start the shooting and the head will rotate counter clockwise.

23
Operation
5. Time-Lapse shooting: To take time lapse shots please go into the time lapse
mode of your smartphone‘s camera.
If you want to set the time lapse function directly on the head, press the time
lapse button once (repeatedly) to set the desired time. After that press the time
lapse button twice and the head will directly start to turn around within the
amount of time that has been set.
If you use the remote control the usage is completely the same as on the head
itself.
6. Stop working: Press the time lapse button on the head or press the stop button
on the remote control to stop the panoramic head. You can stop the device at
any time. To turn it off press the head‘s on/off button for about 3 seconds.
Note: If you have stopped the panoramic head it will go into the standby mode
after 5 minutes, then the red and blue indicator light will ash alternatively. After
the device is in standby mode for about 3 minutes it will completely turned off
automatically. In standby mode press any button (on the remote or on the head) to
go in normal working mode.

24
ENGLISH
Warning notes
1. Do not use any chemical solvents to clean the product.
2. Do not sprinkle strongly acidic reagent to the product.
3. Do not put the product into fire or heat the battery. Do not store it in high
temperature environment.
4. Do not squeeze or drop the product.

25
Disposal
Disposal of Packaging: For disposal please separate packaging into
different types. Cardboard and board must be disposed of as paper and
foil must be recycled.
Disposal of Waste Electrical and Electronic Equipment and/or
Battery by users in private households in the European Union.
This symbol on the product or on the packaging indicates that this cannot
be disposed of as a household waste. You must dispose of your waste
equipment and battery by handling it over to the applicable take-back
scheme for the recycling of electrical and electronic equipment and
battery. For more information about recycling of this equipment and
battery, please contact your city office, the shop where you purchased the equip-
ment or your household waste disposal service. The recycling of materials will
help to conserve natural resources and ensure that it is recycled in a manner that
protects human health and environment.

26
ENGLISH
Battery Warning
• Never dismantle, crush, or pierce the battery, or allow the battery to short-
circuit. Do not expose battery being placed in high temperature environment, if
battery leaks or bulges, stop continue to use.
• Always charge using the charger. Risk of explosion if battery is replaced by an
incorrect typ.
• Keep the battery out of the reach of children.
• Batteries may explode if exposed to fire. Never through batteries into the fire.
• Never exchange batteries by yourselve, please let it be done by the retailer.
• Dispose used batteries by observing local regulations.
• Before disposing the device, please remove the battery. For removing the battery
open the housing via the screws.
Attention: It is not allowed to exchange the battery independently!

27
Conformity
The Manufacturer hereby declares that the CE marking was applied to the Rollei
Smart ePano 360 in accordance with the basic requirements and other relevant
provisions of the following CE Directives:
EMC directive 2014/30/EU
RoHS directive 2011/65/CE
RED directive 2014/53/EU
2012/19/EC WEEE Directive
The EC Declaration of Conformity can be requested from the address specified on
the Warranty card.

28
FRENCH
Mode d’emploi
Fournitures incluses
Smart ePano 360
Adaptateur d’actioncam
Support smartphone
Télécommande
Câble USB
1
32
5
4
1
2
3
4
5

29
Caractéristiques techniques
Capacité batterie 400 mAh
Courant de fonctionnement 50 à 300 mA
Tension de fonctionnement 3,3 V à 4,2 V
Tension de charge 4,8 V - 5,0 V
Temps de charge Env. 2 heures
Fonctionnement continu 2–3 heures (avec batterie pleinement chargée)
Tension nominale 4,5 V DC
Courant à vide Max. 55 mA
Vitesse de rotation panorama 1 tr/min
Vitesse de rotation time-lapse 15/30/60/90 min/tr
Bruit Max. 20 dB (A)
Charge max. 500 g
Dimensions | H: 65 mm, Ø 59 mm
Poids 98 g
Sous réserve de modifications techniques. Smartphone /Actioncam non fourni.
La marque et les logos Bluetooth
®
sont la propriété de Bluetooth SIG, Inc. et leur utilisation par
Rollei s’effectue sous licence. Les autres désignations commerciales et marques mentionnées sont
détenues par leur propriétaire respectif

30
FRENCH
Voyants d’état
• LED rouge: Le voyant rouge indique l’état de charge de l’appareil. La LED
rouge s’allume pendant le chargement de l’appareil et s‘éteint dès que la
batterie est entièrement rechargée.
• LED bleue: La LED reste allumée lorsque l‘appareil est connecté par
Bluetooth à un appareil. En mode panoramique, la LED bleue clignote. Si vous
avez activé le mode time-lapse, la LED bleue s’éteint et les voyants time-lapse
s’allument.
• La tête panoramique dispose de batteries intégrées rechargeables.
Le temps de charge est d’env. 2 à 3 heures.
Remarque: Si les LED rouge et bleue s’allument par alternance et si l’appareil
s’éteint ensuite automatiquement, cela indique que la
batterie est vide. Veuillez recharger l’appareil.
Prise de charge USB
Voyants d’état
Bouton marche / arrêt, panoramique
1
2
3
1 3
2

31
Voyants d’état
Affichage time-lapse
Arrêt time-lapse
Pieds de support
Filetage 1/4 po
Adaptateur d’actioncam
Vissez l‘adaptateur d‘actioncam sur la
tête panoramique (filetage 1/4 po sur
le haut), installez ensuite votre
actioncam sur l‘adaptateur.
1
2
3
4
1 2
4
3

32
FRENCH
Support smartphone
Filetage 1/4 po
Desserrage
Molette
Serrage
Glissière smartphone
Attacher votre
smartphone
Prise de vue verticale
avec le smartphone
Prise de vue horizontale
avec le smartphone
Installez le support pour smartphone sur le filetage 1/4 po sur le haut de la tête
panoramique. Installez ensuite votre smartphone dans le support. Ouvrez alors la
pince en faisant tourner la molette dans le sens antihoraire. Installez ensuite votre
smartphone dans la pince (horizontalement ou verticalement) et tournez la molette
dans le sens horaire.
1
1
1
2
2
2
3
4
5
2 4
1
3
5

33
Télécommande
Bouton prise panoramique
Bouton stop
Bouton marche / arrêt
Bouton prise de vue
Bouton time-lapse
Si la télécommande est allumée et si le voyant clignote pendant env. 5 secondes
lorsque vous appuyez sur n’importe quel bouton par la suite, cela indique que la
tête n’est pas connectée. Si la télécommande est allumée et si le voyant clignote
seulement de façon brève lorsque vous appuyez sur n’importe quel bouton et
s’éteint, cela signifie que la télécommande est connectée à la tête.
Cette télécommande peut fonctionner avec Android et iOS et propose une
connexion 2,4 G, très stable avec une portée d’env. 10 m. La télécommande a
5 fonctions, bouton marche/arrêt, bouton photo, bouton prise panoramique
bouton time-lapse et bouton stop.
1
2
3
4
5
1
2
3
5
4

34
FRENCH
Utilisation
1. Faites glisser le bouton marche/arrêt sur MARCHE et la télécommande se
connecte automatiquement à la tête allumée.
2. Connectez la tête panoramique à votre smartphone. Démarrez la fonction
Bluetooth sur votre smartphone et connectez-le au Smart ePano 360 de Rollei.
3. Prise de photos : Ouvrez l‘application Appareil-photo de votre téléphone por-
table. En appuyant sur le bouton photo de la télécommande, votre smartphone
prend des images.
4. Prises de vue panoramiques : Pour pouvoir effectuer des prises de vue panora-
miques, allez dans le mode panoramique de votre téléphone portable.
Appuyez directement sur le bouton marche/arrêt sur la tête panoramique deux
fois et la tête commence la prise de vue panoramique et tourne dans le sens
horaire. Appuyez sur le bouton trois fois et la tête tourne dans le sens contraire.
Appuyez sur le bouton prise panoramique de la télécommande une fois et la
tête tourne dans le sens horaire et la prise de photos commence. Appuyez sur le
bouton prise panoramique de la télécommande deux fois, la tête tourne dans le
sens antihoraire.

35
Utilisation
5. Prise en time-lapse : Pour lancer les prises de vues en time-lapse, allez dans le
menu Time-lapse de votre smartphone.
Si vous souhaitez effectuer les réglages directement sur la tête panoramique,
appuyez sur le bouton time-lapse de la tête plusieurs fois jusqu‘à ce que la LED
affiche le temps souhaité. Appuyez ensuite deux fois sur le bouton time-lapse et
la tête commence la prise de vue time-lapse à l‘intervalle de temps défini.
Si vous utilisez la télécommande, la manipulation est identique à celle décrite
ci-dessus.
6. Arrêt du mode : Appuyez sur le bouton time-lapse sur la tête directement ou
sur le bouton stop de la télécommande pour mettre fin au mode. Vous pouvez
quitter le mode à tout moment. Pour éteindre la tête panoramique, appuyez sur
le bouton marche/arrêt de la tête pendant env. 3 secondes.

36
FRENCH
Utilisation
Remarque: Si vous avez quitté le mode et si vous n’appuyez plus sur aucun
bouton pendant env. 5 minutes, la tête panoramique se met en veille. Cela est
indiqué par les LED bleue et rouge qui clignotent par alternance. Au bout de
3 minutes env. en veille, la tête s’éteint complètement. Pour sortir la tête du mode
veille, appuyez sur n’importe quel bouton (sur la télécommande ou sur
l’appareil lui-même).
Avertissements
1. N’utilisez pas de produit chimique pour nettoyer l‘appareil.
2. Ne laissez pas l‘appareil entrer en contact avec des produits acides.
3. N’exposez pas l’appareil à de fortes chaleurs ou au feu. Ne le stockez pas dans
un lieu présentant des températures élevées.
4. N’exercez aucune pression forte sur l’appareil et ne le laissez pas tomber.

37
Élimination
Éliminer l‘emballage: Éliminer les différents types d’emballage de
manière différenciée. Éliminer le carton et le carton-pâte avec les papiers
usés et les films das des collectes de matériaux recyclables.
Elimination des appareils électriques et électroniques et/ou des
piles/batteries usées par les consommateurs dans des domiciles
privés au sein de l’Union européenne. Ce symbole sur le produit ou
l’emballage signifie qu’il ne doit pas être éliminé avec les ordures
ménagères. Vous devez remettre vos appareils et/ou piles/batteries
usagés à des points de collecte compétents en matière de recyclage des
appareils électriques et électroniques et/ou piles/batteries usagés. Pour
toute information complémentaire sur le recyclage de cet appareil et/ou des piles/
batteries, adressez-vous à l’administration de votre ville, au magasin où vous
l’avez acheté ou à votre service de collecte des déchets. Le recyclage des matériaux
contribue à la préservation des ressources et garantit une valorisation des déchets
respectueuse de la santé humaine et de l’environnement.

38
FRENCH
Avertissement relatif à la batterie
• Ne pas démonter, transpercer ou manier avec brutalité la batterie ; veillez à ne
pas court-circuiter la batterie. Ne placez pas la batterie dans des lieux exposés
à de hautes températures. N’utilisez plus la batterie si elle présente des fuites
liquides ou si elle se dilate.
• Chargez-la toujours via le système. Il existe un risque d’explosion lorsque la
batterie est remplacée par un type de batterie incompatible.
• Tenez la batterie éloignée des enfants.
• Les batteries peuvent exploser lorsqu’elles sont exposées à une flamme nue.Ne
pas jetez la batterie dans un feu.
• Ne remplacez jamais la batterie vous-même ; confiez cette tâche à votre reven-
deur.
• Eliminez les batteries usées conformément aux prescriptions légales en vigueur
dans votre commune.
• Avant l’élimination de l’appareil, retirez la batterie et éliminez-la séparément.
Pour retirer la batterie, ouvrez le boîtier en retirant les vis cruciformes.
Attention: Ne remplacez pas la batterie vous-même!

39
Conformité
Le fabricant déclare par la présente que le marquage CE a été appliqué au Rollei
Smart ePano 360 en conformité avec les exigences de base ou autres dispositions
pertinentes des directives CE suivantes:
EMC directive 2014/30/EU
RoHS directive 2011/65/CE
RED directive 2014/53/EU
2012/19/EC WEEE Directive
La déclaration de conformité CE peut être réclamée à l’adresse spécifiée sur la
carte de garantie.

40
SPANISH
Instrucciones
Volumen de suministro
Smart ePano 360
Adaptador Actioncam
Soporte de smartphone
Mando a distancia
Cable USB
1
32
5
4
1
2
3
4
5

41
Especificaciones técnicas
Capacidad de la batería 400 mAh
Corriente de trabajo 50 hasta 300 mA
Voltaje de funcionamiento 3,3 V hasta 4,2 V
Tensión de carga 4,8 V - 5,0 V
Tiempo de carga Aprox. 2 horas
Trabajo continuo de 2 a 3 horas (con batería
completa mente cargada)
Tensión nominal 4,5 V DC
Corriente sin carga Máx. 55 mA
Panorama de velocidad de rotación 1 rev / min
Velocidad de rotación de lapso de tiempo 15/30/60/90 min/rev
Ruido máximo 20 dB (A)
Carga máxima 500 g
Dimensiones | Peso H: 65 mm, Ø 59 mm | 98 g
Sujeto a cambios técnicos. Los smartphones/actioncams no están incluidos en el volumen de sumi-
nistro. La marca de la palabra Bluetooth® y sus logotipos son marcas comerciales registradas
propiedad de Bluetooth SIG, Inc. y cualquier uso de dichas marcas por parte de Rollei está bajo
licencia. Otras marcas y nombres comerciales pertenecen a sus respectivos propietarios.

42
SPANISH
Indicación de estado
• LED rojo: La luz roja indica el estado de carga del dispositivo. El LED rojo
se ilumina cuando el dispositivo se está cargando y se apaga una vez que la
batería está completamente cargada.
• LED azul: Si el dispositivo está conectado a través de Bluetooth a un
dispositivo, el LED se ilumina de forma permanente. En el modo Panorama, el
LED azul parpadeará. Si está activado el modo de cámara rápida, el LED azul
se apaga y los LED de indicación de cámara rápida brillan.
• El cabezal panorámico tiene incorporadas baterías recargables. El tiempo de
carga es de aprox. 2–3 horas.
Nota: Si el LED azul y rojo brillan alternativamente y la unidad se apagar
automáticamente después de eso, esto es una indicación de que
la batería está vacía. Por favor, cargue de nuevo el dispositivo.
Enchufe de carga USB
Indicación de estado
Tecla de encendido / apagado, panorámica
1
2
3
1 3
2

43
Indicación de estado
Indicación de cámara rápida
Finalizar cámara rápida
Patas
Rosca de 1/4 pulgada
Adaptador Actioncam
Atornille el adaptador Actioncam en el
cabezal panorámico (tornillo de 1/4 de
pulgada en la parte superior), luego
coloque su Actioncam en el adaptador.
1
2
3
4
1 2
4
3

44
SPANISH
Soporte de smartphone
Rosca de 1/4 pulgada
Soltar
Rueda giratoria
Apretar
Insertar el smartphone
Fije su smartphone
Tomas verticales con el
smartphone
Tomas horizontales con
el smartphone
Coloque el soporte del teléfono en el tornillo de
1/4 de pulgada en la parte superior del cabezal panorámico. Luego coloque el
smartphone en el soporte. Abrir la sujeción girando la rueda giratoria de control
hacia la izquierda. A continuación, conecte su smartphone en la zona de sujeción
(horizontal o vertical) y fije el teléfono girando la rueda giratoria hacia la derecha.
1
1 1
2
2
2
3
4
5
2 4
1
3
5

45
Mando a distancia
Tomas panorámicas
Botón de parada
Encendido/apagado
Botón de fotos
Botón de cámara rápida
Si el mando a distancia está encendido y al pulsar cualquier botón la indicación de
estado permanece encendida durante unos 5 segundos, el mando a distancia no
está conectado con el cabezal. Si el control remoto está encendido y al pulsar
cualquier botón la luz indicación de estado parpadea brevemente, entonces el
mando a distancia está conectado con el cabezal.
Este mando a distancia puede funcionar con sistemas Android y iOS, ofreciendo
una conexión 2.4G, que es muy estable y tiene un alcance de aproximadamente
10 m. El mando a distancia tiene cinco funciones, de encendido / apagado, botón
de fotografía, botón de panorámicas, botón de cámara rápida y botón de parada.
1
2
3
4
5
1
2
3
5
4

46
SPANISH
Manejo
1. Deslice el interruptor de encendido / apagado a encendido (ON) y el mando a
distancia se conectará automáticamente al cabezal de encendido.
2. Monte su smartphone enl cabezal panorámico. Inicie la función Bluetooth en su
smartphone y conéctelo con el Rollei Smart ePano 360.
3. Tomar fotos: Abra la aplicación de la cámara en su teléfono. Pulsando el botón
de fotos en el mando a distancia su smartphone toma ahora las imágenes.
4. Tomas panorámicas: Con el fin de realizar tomas panorámicas, hay que ir al
modo panorámico en su smartphone.
Presione el botón de encendido / apagado en el cabezal panorámico dos veces
y el cabezal comienza con la toma panorámica y gira hacia la derecha. Pulse el
botón tres veces y el cabezal gira hacia la izquierda.
Pulse el botón de panorámica en el mando a distancia una vez, y el cabezal gira
hacia la derecha y se inicia la grabación. Si pulsa el botón de panorámica del
mando a distancia dos veces el cabezal gira hacia la izquierda.

47
Manejo
5. Toma de cámara rápida: Para iniciar la fotografía de cámara rápida, vaya al
menú de cámara rápida del smartphone.
Si se desea realizar los ajustes directamente en el cabezal panorámico, pulse el
botón de cámara rápida del cabezal varias veces hasta que se encienda el LED
del tiempo deseado. A continuación, pulse el botón de cámara rápida dos veces
sucesivas y el cabezal comienza la grabación de cámara rápida en el lapso de
tiempo establecido.
Si utiliza el mando a distancia, el manejo es el mismo que el descrito
anteriormente.
6. Detener el modo: Pulse el botón de cámara rápida directamente en el cabezal o
el botón de parada en el control remoto para seleccionar el modo. Puede salir
del modo en cualquier momento. Para girar el cabezal panorámico, pulse el
botón de encendido / apagado en la parte superior durante aproximadamente
3 segundos.

48
SPANISH
Manejo
Nota: Cuando haya terminado el modo y no haya ninguna operación adicional
durante aprox. 5 minutos, el cabezal panorámico entra en modo de espera.
Esto es indicado con el encendido y apagado de las luces LED azules y rojas
alternativamente. Después de aproximadamente 3 minutos en el modo de espera,
el cabezal se apaga por completo automáticamente. Para sacar el cabezal del
modo de espera, pulse cualquier tecla (ya sea en el mando a distancia o en el
propio dispositivo).
Advertencias
1. No utilice solventes químicos para limpiar el aparato.
2. No permita que el producto entre en contacto con fluidos ácidos.
3. No exponga este artefacto a gran calor o fuego. No lo guarde en ambientes de
alta temperatura.
4. No aplique presión excesiva sobre el producto y no lo deje caer.

49
Eliminar residuos
Eliminar el embalaje: Para eliminar el embalaje, tire la cartulina y
el cartón en el contenedor de reciclaje de papel y los plásticos en el
contenedor de plásticos.
Eliminación de Residuos Eléctricos y de Equipos Electrónicos y/o
de Batería por los usuarios en los hogares de la Unión Europea.
Este símbolo en el producto o en el empaque indica que esto no puede
eliminarse como basura casera. Debe deshacerse de sus residuos y/o
batería entregándolo al esquema de devolución aplicable para el reciclaje
de aparatos eléctricos y electrónicos y/o batería. Para obtener más
información sobre el reciclaje de este equipo y/o batería, póngase en
contacto con su oficina de la ciudad, la tienda donde adquirió el equipo o el
servicio de recolección de basura. El reciclaje de materiales ayuda a conservar los
recursos naturales y garantizar que se recicle de una manera que proteja el medio
ambiente y la salud humana.

50
SPANISH
Advertencia de batería
• Nunca desmonte, aplaste, o perfore la batería, o permita que la batería haga
cortocircuito. No exponga la batería a un ambiente de alta temperatura, si la
batería tiene fugas o se bombea, detenga su uso.
• Siempre carguelo usando el sistema. Hay riesgo de explosión si la batería se
reemplaza por otra de tipo incorrecto.
• Mantenga la batería fuera del alcance de los niños.
• Las baterías pueden explotar si se exponen directamente al fuego. Nunca arroje
las baterías al fuego.
• Nunca reemplace la batería por su cuenta; solicite al distribuidor que lo haga
por usted.
• Deseche las baterías usadas, observando las normas locales.
• Antes de desechar el aparato, retire la batería.
Precaución: La batería no se puede reemplazar de forma independiente!

51
Conformidad
El fabricante declara que el símbolo CE ha sido aplicado al Rollei Smart ePano 360
de conformidad con los requisitos básicos y otras disposiciones pertinentes de las
directivas CE siguientes:
Directiva EMC 2014/30/EU
Directiva RoHS 2011/65/CE
Directiva RED 2014/53/EU
Directiva 2012/19/EC WEEE
La declaración CE de conformidad puede solicitarse a la dirección indicada en la
tarjeta de garantía.

52
ITALIAN
Manuale di istruzioni
Dotazione
Smart ePano 360
Adattatore actioncam
Supporto per smartphone
Controllo remoto
Cavo USB
1
32
5
4
1
2
3
4
5

53
Specifiche tecniche
Capacità batteria 400 mAh
Corrente operativa Da 50 a 300 mA
Tensione operativa Da 3,3 V a 4,2 V
Tensione di carica 4,8 V - 5,0 V
Tempo di carica Approx. 2 ore
Funzionamento continuo 2–3 ore (con batteria completamente carica)
Tensione nominale 4,5 V DC
Corrente non di carico Max. 55 mA
Velocità rotazionale panorama 1 r/min
Velocità rotazionale time lap 15/30/60/90 min/r
Rumore Max. 20 dB (A)
Carico max. 500 g
Dimensioni H: 65 mm, Ø 59 mm
Peso 98 g
Soggetto a modifiche tecniche. Gli smartphone/actioncam non sono inclusi nella confezione.
Il marchio e i loghi Bluetooth
®
sono marchi registrati di proprietà di Bluetoth SIG, Inc. e qualsiasi
utilizzo di questi marchi da parte di Rollei è autorizzato sotto licenza. Altri marchi registrati e nomi
commerciali sono di proprietà dei rispettivi proprietari.

54
ITALIAN
Spie indicatore
• Spia rossa: La spia rossa è l‘indicatore per la ricarica. La spia rossa si accende
durante la ricarica. Se il dispositivo è completamente carico, si spegne.
• Spia blu: Se il dispositivo è collegato con successo via Bluetooth, la spia blu
resta accesa. In modalità panorama, la spia blu lampeggia. In modalità time
lapse, la spia blu si spegne e la spia di indicazione time lapse lampeggia.
• La testa panoramica ha una batteria ricaricabile integrata. Il tempo di carica è
di circa 2–3 ore.
Nota: Se si accende il dispositivo e la spia blu e rossa lampeggiano
alternativamente e il dispositivo si spegne automaticamente, ciò significa che la
batteria è scarica. Il dispositivo deve essere ricaricato.
Carica via USB
Spia indicatore
Interruttore On / Off, pulsante panoramica
1
2
3
1 3
2

55
Spie indicatore
Indicazione time lapse
Pulsante arresto time lapse
Gamba di supporto
Filettatura 1/4“
Adattatore actioncam
Avvitare l‘adattatore actioncam sulla
vite da 1/4“ sulla parte superiore della
testa panoramica. Poi fissare la propria
actioncam usando l‘adattatore.
1
2
3
4
1 2
4
3

56
ITALIAN
Supporto per smartphone
Filettatura 1/4“
Allentare
Manopola
Stringere
Cursore
Fissaggio dello
smartphone
Scatto verticale con
smartphone
Scatto orizzontale con
smartphone
Avvitare il supporto del telefono sulla vite da 1/4“ sulla parte superiore della testa
panoramica. Quindi fissare il proprio smartphone sul supporto nella posizione
desiderata (verticale od orizzontale). Quindi aprire il morsetto del supporto del
telefono ruotando la manopola in senso antiorario, porre il proprio smartphone nel
morsetto e ruotare in senso orario per fissare lo smartphone.
1
1
1
2
2
2
3
4
5
2 4
1
3
5

57
Telecomando
Pulsante scatto panorama
Pulsante Stop
Pulsante accensione
Pulsante scatto
Pulsante time lapse
Se il telecomando è acceso e la spia lampeggia per 5 secondi quando si preme un
qualsiasi pulsante e poi si spegne, ciò significa che la testa non è collegata. Se il
telecomando è accesso e la spia lampeggia solo una volta brevemente quando si
preme un qualsiasi pulsante e poi si spegne, il telecomando è collegato alla testa.
Questo telecomando può funzionare con Android e iOS e offre un segnale da 2,4G
per la connessione. Inoltre, la connessione è molto stabile e può funzionare per una
distanza di oltre 10 m. Il telecomando ha 5 funzioni, pulsante on/off, pulsante foto,
pulsante panorama, pulsante time lapse e pulsante stop.
1
2
3
4
5
1
2
3
5
4

58
ITALIAN
Funzionamento
1. Portare l‘interruttore on/off su ON e il telecomando si collega automaticamente
con la testa accesa.
2. Collegare la testa panoramica al proprio smartphone. Quindi avviare il
Bluetooth sul proprio cellulare e collegare a Rollei Smart ePano 360.
3. Scattare foto: Aprire l‘interfaccia della fotocamera del proprio telefono cellulare.
Premendo il pulsante foto sul telecomando, la fotocamera del proprio
smartphone scatterà una foto.
4. Scattare foto panoramica: Per scattare foto panoramiche andare nella modalità
della fotocamera del proprio smartphone.
Se si preme il pulsante on/off due volte sulla testa panoramica, la testa
panoramica si avvierà direttamente e ruoterà in senso orario. Se si preme il
pulsante on/off tre volte sul dispositivo, esso inizia immediatamente a ruotare
in senso antiorario.
Se si usa il telecomando premere una volta la testa panoramica ed essere
inizierà immediatamente a ruotare in senso orario e il telefono cellulare si avvia
automaticamente. Se si preme due volte il pulsante panoramica, il telefono
cellulare avvia automaticamente lo scatto e la testa ruoterà in senso antiorario.

59
Funzionamento
5. Scatto time-lapse: Per scatti time lapse andare nella modalità time lapse della
fotocamera del proprio smartphone.
Se si desidera impostare la funzione time lapse direttamente sulla testa,
premere una volta (ripetutamente) il pulsante time lapse per impostare il tempo
desiderato. Poi premere due volte il pulsante time lampse e la testa inizierà
direttamente a ruotare per il tempo impostato.
Se si usa il telecomando, l‘uso è completamente lo stesso di quando si usa sulla
testa stessa.
6. Arresto: Premere il pulsante time lapse sulla testa o premere il pulsante stop
sul telecomando per arrestare la testa panoramica. È possibile arrestare il
dispositivo in qualsiasi momento. Per spegnere premere il pulsante on/off della
testa per 3 secondi.

60
ITALIAN
Funzionamento
Nota: Se si è arrestata completamente la testa panoramica essa andrà in modalità
standby dopo 5 minuti, quindi la spia rossa e blu lampeggeranno alternativamente.
Dopo che il dispositivo è in modalità standby per 3 minuti, esso si spegne
automaticamente completamente. In modalità standby premere qualsiasi pulsante
(sul telecomando o sulla testa) per passare alla modalità di funzionamento
normale.
Avvertenze
1. Non usare solventi chimici per pulire il prodotto.
2. Non spruzzare reagente fortemente acido sul prodotto.
3. Non porre il prodotto nel fuoco o riscaldare la batteria. Non conservare in
ambiente ad alta temperatura.
4. Non spremere o far cadere il prodotto.

61
Smaltimento
Smaltire l’imballaggio: Smaltire l’imballaggio a seconda della tipologia.
Gettare cartone e cartoncino con i rifiuti cartacei, le pellicole con i
materiali riciclabili.
Smaltimento di dispositivi elettrici ed elettronici usati e/o di
batterie/accumulatori da parte di utenti domestici all’interno
dell’Unione Europea. Questo simbolo, qualora riportato sul prodotto o
sulla sua confezione, segnala che il prodotto non può essere smaltito con
i rifiuti domestici. È necessario consegnare il proprio dispositivo usato e/o
batterie/accumulatori nei punti di raccolta espressamente designati per il
riciclo di dispositivi elettrici ed elettronici e/o batterie e accumulatori.
È possibile ottenere ulteriori informazioni sul riciclo di questi dispositivi e/o delle
batterie/accumulatori presso la propria amministrazione comunali, presso l’ufficio
in cui è stato acquistato il dispositivo o presso la rispettiva attività di smaltimento.
Il riciclo dei materiali contribuisce alla protezione delle risorse naturali e garantisce
una modalità di riutilizzo sicura per la salute umana e per l’ambiente.

62
ITALIAN
Avvertenze relative alla batteria
• Non smantellare, inserire con forza o spingere la batteria. Prestare attenzione a
non mandare la batteria in corto circuito. Non posizionare la batteria in luoghi
in cui sia esposta a temperature elevate. Non continuare a utilizzare la batteria
qualora presenti delle perdite o si gonfi.
• Caricare sempre mediante il sistema. Qualora la batteria venga sostituita con
una tipologia sbagliata, sussiste il pericolo di esplosione.
• Tenere la batteria fuori dalla portata dei bambini.
• Le batterie possono esplodere se esposte a una fiamma aperta. Non gettare le
batterie nel fuoco.
• Non sostituire mai la batteria personalmente; affidare quest’incarico al
rivenditore.
• Smaltire le batterie usate in conformità con le disposizioni locali.
• Prima di smaltire il dispositivo è necessario rimuovere la batteria, per poi
smaltirla separatamente.
Attenzione: La batteria non può essere sostituita autonomamente!

63
Conformità
Il Costruttore con la presente dichiara che la marcatura CE è stata applicata al
Rollei Smart ePano 360 in conformità ai requisiti di base ed altre disposizioni
rilevanti delle direttive CE seguenti:
Direttiva EMC 2014/30/EU
Direttiva RoHS 2011/65/CE
Direttiva RED 2014/53/EU
Direttiva 2012/19/EC WEEE
La Dichiarazione di Conformità può essere richiesta all‘indirizzo specificato sul
Certificato di Garanzia.

64
PORTUGUESE
Manual de instruções
Volume da entrega
Smart ePano 360
Adaptador para Actioncam
Suporte para smartphone
Controlo remoto
Cabo USB
1
32
5
4
1
2
3
4
5

65
Dados Técnicos
Capacidade da bateria 400 mAh
Corrente de funcionamento 50 até 300 mA
Tensão de funcionamento 3,3 V até 4,2 V
Tensão de carregamento 4,8 V - 5,0 V
Tempo de carregamento Aprox. 2 horas
Funcionamento contínuo 2–3 horas
(com bateria completamente carregada)
Tensão nominal 4,5 V DC
Corrente sem carga máx. 55 mA
Velocidade rotacional panorama 1 r/min
Velocidade rotacional time lapse 15/30/60/90 min/r
Ruído máx. 20 dB (A)
Carga máxima 500 g
Dimensões | Peso H: 65 mm, Ø 59 mm | 98 g
Sujeito a alterações técnicas. Os smartphones/actioncams não estão incluídos no volume da entrega.
A palavra de marca Bluetooth
®
e os logótipos são propriedade da Bluetooth SIG, Inc., sendo que a
utilização destas marcas por parte da Rollei é feita sob licença. Outros símbolos de nomes comerciais
são propriedade dos respetivos proprietários.

66
PORTUGUESE
Luzes indicadoras
• LED vermelho: A luz vermelha indica o estado de carregamento do aparelho.
O LED vermelho acende-se quando o aparelho está a ser carregado e apaga-se
quando a bateria está completamente carregada.
• LED azul: Quando o aparelho estiver conectado com sucesso a um aparelho
via Bluetooth, o LED azul fica permanentemente aceso. No modo panorâmico
o LED azul pisca. Se ativar o modo de „time lapse“ o LED azul apaga-se e
acendem-se os LEDs indicadores do „time lapse“.
• A cabeça panorâmica dispõe de uma bateria recarregável incorporada.
O tempo de carregamento é aprox. 2–3 horas.
Indicação: Se os LEDs vermelho e azul piscarem alternadamente e depois o
aparelho se desligar automaticamente, significa que a bateria
está vazia. Por favor, carregue novamente o aparelho.
Carregamento USB
Luzes indicadoras
Ligar/Desligar, botão modo panorâmico
1
2
3
1 3
2

67
Luzes indicadoras
Indicador „time lapse“
Terminar „time lapse“
Pernas de apoio
Rosca 1/4 polegadas
Adaptador para Actioncam
Enrosque o adaptador para a actioncam
na cabeça panorâmica (rosca de 1/4
polegadas na parte superior).
Posteriormente, fixe a sua actioncam
no adaptador.
1
2
3
4
1 2
4
3

68
PORTUGUESE
Suporte para smartphone
Rosca de 1/4 polegadas
Soltar
Botão rotativo
Apertar
Botão deslizante
Colocação
do smartphone
Captura vertical com
o smartphone
Captura horizontal
com o smartphone
Fixe o suporte para o smartphone no parafuso de 1/4 polegadas no topo da cabeça
panorâmica. Posteriormente, fixe o seu smartphone no suporte. Para tal, abra
o grampo rodando o botão rotativo no sentido anti horário. Insira depois o seu
smartphone no grampo (horizontal ou vertical) e fixe o telefone, rodando o botão
rotativo no sentido horário.
1
1
1
2
2
2
3
4
5
2 4
1
3
5

69
Controlo remoto
Captura panorâmica
Botão para parar
Botão ligar/desligar
Botão para captura
Botão „time lapse“
Se o controlo remoto estiver ligado e se a luz indicadora se acender durante
aproximadamente 5 segundos ao pressionar qualquer botão, significa que o con-
trolo remoto não está conectado à cabeça. Se o controlo remoto estiver ligado e a
luz indicadora piscar brevemente ao pressionar qualquer botão, então o controlo
remoto está conectado à cabeça.
Este controlo remoto funciona com sistemas Android e iOS e permite uma conexão
de 2,4G, a qual é muito estável e tem um alcance de aprox. 10 m. O controlo
remoto tem 5 funções, botão ligar/desligar, botão de captura, botão panorâmico,
botão „time lapse“ e botão para parar.
1
2
3
4
5
1
2
3
5
4

70
PORTUGUESE
Funcionamento
1. Deslize o botão de ligar/desligar para a posição ON (ligado) e o controlo remoto
liga-se automaticamente à cabeça ligada.
2. Fixe o seu smartphone à cabeça panorâmica. Inicie a função de Bluetooth no
seu smartphone e conecte-o ao Rollei Smart ePano 360.
3. Captura de fotografias: abra a aplicação da máquina fotográfica do seu
telemóvel. Pressionando o botão de captura no controlo remoto, o seu
smartphone tira fotografias.
4. Capturas panorâmicas: para efetuar capturas panorâmicas entre no modo
panorâmico do seu telemóvel.
Pressione duas vezes o botão ligar/desligar na cabeça panorâmica e a cabeça
começa a captura panorâmica rodando no sentido horário. Prima o botão três
vezes e a cabeça roda no sentido anti horário.
Pressione uma vez o botão panorâmico do controlo remoto e a cabeça roda no
sentido horário, iniciando-se a captura fotográfica. Pressione o botão
pano râmico do controlo remoto duas vezes e a cabeça roda no sentido anti
horário.

71
Funcionamento
5. Captura “time lapse“: para iniciar a captura “time lapse“ entre no menu
de “time lapse“ do smartphone.
Se pretender efetuar as configurações diretamente na cabeça panorâmica,
pressione várias vezes o botão “time lapse“ da cabeça panorâmica até que o
LED do tempo pretendido se acenda. Posteriormente, pressione duas vezes
seguidas o botão “time lapse“ e a cabeça inicia com a captura “time lapse“ no
intervalo de tempo definido.
Se usar o controlo remoto, a utilização é idêntica à acima descrita para a
cabeça.
6. Parar o modo: pressione o botão „time lapse“ diretamente na cabeça ou o
botão parar no controlo remoto para terminar o modo de funcionamento. Pode
terminar o modo de funcionamento em qualquer altura. Para desligar a cabeça
panorâmica pressione o botão ligar/desligar na cabeça durante
aprox. 3 segundos.

72
PORTUGUESE
Funcionamento
Indicação: Se tiver terminado o modo de funcionamento e não tocar em mais
nenhum botão durante aprox. 5 minutos, a cabeça panorâmica entra no modo
standby. Tal é indicado pelo piscar intermitente do LED azul e vermelho. Após
aprox. 3 minutos no modo standby, a cabeça desliga-se automaticamente. Para
sair do modo standby, pressione qualquer botão (no controlo remoto ou no próprio
aparelho).
Avisos
1. Não use solventes químicos para limpar o aparelho.
2. O produto não pode entrar em contacto com reagentes ácidos.
3. Não coloque o produto junto do calor ou no fogo. Não o guarde em ambientes
com temperaturas elevadas.
4. Não exerça nenhuma pressão forte sobre o produto e não o deixe cair.

73
Eliminação
Eliminação de embalagens: Elimine as embalagens após proceder à
sua separação, de acordo com o tipo. Insira os componentes em papel e
cartão no recipiente para papel usado, e os plásticos no recipiente para
metais/plásticos, para posteriormente serem reciclados.
Eliminação de equipamento elétrico e/ou eletrónico e/ou da
bateria por utilizadores em casas particulares na união européia.
Este símbolo no produto ou no pacote indica que o mesmo não pode
ser descartado como sendo lixo doméstico. Deve descartar-se do seu
equipamento e/ou bateria reciclando-os como qualquer equipamento
elétrico ou eletrónico e/ou bateria. Para mais informação sobre
reciclagem destes equipamentos e/ou bateria, contate o escritório local,
a loja onde comprou o equipamento ou o serviço de coleta de lixo. A reciclagem
de materiais ajudará a conservar os recursos naturais e a assegurar-se de que os
mesmos são reciclados de forma a proteger a saúde humana e o ambiente.

74
PORTUGUESE
Aviso da bateria
• Nunca desmonte, esmague, ou perfure a bateria, ou permita que a bateria entre
em curto-circuito. Não exponha a bateria a altas temperaturas ambientais, se a
bateria vazar ou inchar, deixe de a usar.
• Carregue-a sempre usando este sistema. Risco de explosão se a bateria for
substituída por um tipo de bateria incorreto.
• Mantenha a bateria fora do alcance das crianças.
• As baterias podem explodir se expostas ao fogo. Nunca descarte as baterias
num fogo.
• Nunca substitua a bateria sozinho; peça ao revendedor para o fazer por si.
• O descarte de baterias usadas deve seguir os regulamentos locais.
• Antes de se descartar do dispositivo, remova a bateria.
Cuidado: A bateria não pode ser substituída de forma independente!

75
Conformidade
O fabricante declara por este modo que a etiqueta CE foi aplicada ao Rollei Smart
ePano 360 de acordo com os requisitos básicos e outras provisões relevantes das
seguintes diretivas da CE:
Diretiva EMC 2014/30/EU
Diretiva RoHS 2011/65/CE
Diretiva RED 2014/53/EU
Diretiva 2012/19/EC WEEE
A Declaração de Conformidade da CE pode ser solicitada através do endereço
especificado no cartão da garantia.

76
DUTCH
Handleiding
Standaard levering
Smart ePano 360
Actioncam adapter
Smartphonehouder
Afstandsbediening
USB-kabel
1
32
5
4
1
2
3
4
5

77
Technische gegevens
Batterijcapaciteit 400 mAh
Werkende stroom 50 tot 300 mA
Werkspanning 3,3 V tot 4,2 V
Laadspanning 4,8 V–5,0 V
Oplaadtijd Ongeveer 2 uur
Continu werken 2–3 uur (met volledig opgeladen batterij)
Nominale spanning 4,5 V DC
Onbelaste stroom Max. 55 mA
Rotatiesnelheid panorama 1 r/min
Rotatiesnelheid time laps 15/30/60/90 min/r
Geluid Max. 20 dB (A)
Max. belasting 500 g
Afmetingen H: 65 mm, Ø 59 mm
Gewicht 98 g
Technische wijzigingen voorbehouden. Smartphone en Actioncam zijn niet inbegrepen. Het
Bluetooth
®
wword en logo zijn geregistreerde handelsmerken en eigendom van Bluetooth SIG,
Inc. En ieder gebruk door Rollie is onder licentie. Andere handelsnamen en merken zijn die van
hun respectievelijke eigenaren.

78
DUTCH
Statusweergave
• Rode led: De rode led geeft de oplaadstatus van het apparaat aan. De rode
led brandt wanneer het apparaat wordt geladen en schakelt uit wanneer de
batterij volledig is opgeladen.
• Blauwe led: Wanneer het apparaat succesvol via Bluetooth met een apparaat
is verbonden, brandt de led voortdurend. In de panoramamodus knippert de
blauwe led. Als u de time-lapse modus hebt geactiveerd, schakelt de blauwe
led uit en de leds van de time-lapse-weergave branden.
• Het panoramische hoofd beschikt over een ingebouwde oplaadbare batterij.
De oplaadtijd bedraagt ongeveer 2–3 uur.
Aanwijzing: Als de rode en blauwe leds afwisselend oplichten en het apparaat
zich daarna automatisch uitschakelt, betekent dit, dat de
batterij leeg is. Laad het apparaat weer op.
USB-laadaansluiting
Statusweergave
Aan/uit, panoramaknop
1
2
3
1 3
2

79
Statusweergave
Weergave time-lapse
Time-lapse beëindigen
Poten
1/4 inch schroefdraad
Actioncam adapter
Schroef de actioncam adapter op het
panoramische hoofd (1/4 inch schroef
bovenop), bevestig vervolgens uw
actioncam op de adapter.
1
2
3
4
1 2
4
3

80
DUTCH
Smartphonehouder
1/4 inch schroefdraad
Losmaken
Draaiwiel
Vastzetten
Smartphone inzetstuk
Uw smartphone
toevoegen
Verticale opname met
de smartphone
Horizontale opname
met de smartphone
Bevestig de smartphonehouder over de 1/4 inch schroef op de bovenkant van het
panoramahoofd. Bevestig vervolgens uw smartphone in de houder. Open daarvoor
de klem door het draaiwiel tegen de klok in te draaien. Plaats dan uw smartphone
in het klemgebied (horizontaal of verticaal) en zet de telefoon vast, door het
draaiwiel met de klok mee te draaien.
1
1 1
2
2
2
3
4
5
2 4
1
3
5

81
Afstandsbediening
Panorama-opnamen
Stop-knop
Aan-/uitschakelaar
Fotoknop
Time-lapse knop
Als de afstandsbediening is ingeschakeld en bij het indrukken van een willekeurige
knop de statusweergave voor ongeveer 5 seconden blijft branden, dan heeft de
afstandsbediening geen verbinding met het hoofd. Als de afstandsbediening is
ingeschakeld en bij het indrukken van een willekeurige knop de statusweergave
slechts kort blijft branden, dan is de afstandsbediening met het hoofd verbonden.
Deze afstandsbediening kan met Android- en iOS-systemen werken en en biedt
een 2,4G verbinding, die zeer stabiel is en een bereik van ongeveer 10 m heeft. De
afstandsbediening heeft 5 functies, aan-/uitschakelaar, fotoknop, panoramaknop,
time-lapse knop en stop-knop.
1
2
3
4
5
1
2
3
5
4

82
DUTCH
Bediening
1. Schuif de aan-/uitschakelaar op AAN en de afstandsbediening verbindt
automatisch met het ingeschakelde hoofd.
2. Bevestig op smartphone op het automatische hoofd. Start de Bluetooth-functie
op uw smartphone en verbindt deze met de Rollei Smart ePano 360.
3. Foto’s nemen: Open de camera-app van uw mobiele telefoon. Door het drukken
op de fotoknop op de afstandsbediening, neemt uw smartphone nu foto’s.
4. Panorama-opnamen: Om panorama-opnamen uit te kunnen voeren, gaat u naar
de panoramamodus van uw mobiele telefoon.
Druk de aan/uit-knop op het panoramahoofd direct twee keer in en het hoofd
begint met de panorama-opnamen en het hoofd draait met de klok mee. Druk
drie keer op de knop en het hoofd draait tegen de klok in.
Druk één keer op de panoramaknop van de afstandsbediening en het hoofd
draait met de klok mee en de opname start. Door twee keer op de panorama-
knop van de afstandsbediening te drukken draait het hoofd tegen de klok in.

83
Bediening
5. Time-lapse opname: Om time-lapse opname te starten, gaat u naar het
time-lapse menu van de smartphone.
Als u de instellingen direct op het panoramahoofd wilt uitvoeren, drukt u
meerdere keren op de time-lapse knop van het hoofd tot het led van de
gewenste tijd gaat branden. Druk vervolgens twee keer achter elkaar op de
time-lapse knop en het hoofd start met de time-lapse opname in het
ingestelde tijdsinterval.
Als u de afstandsbediening gebruikt, is de bediening hetzelfde zoals hierboven
is beschreven.
6. Modus stoppen: Druk direct op de time-lapse knop aan het hoofd of de stop-
knop op de afstandsbediening om de modus te beëindigen. U kunt de modus op
elk moment beëindigen. Om het panoramische hoofd uit te schakelen, drukt u
de aan/uit-knop op het hoofd voor ongeveer 3 seconden in.

84
DUTCH
Bediening
Aanwijzing: Als u de modus hebt beëindigd en ongeveer 5 minuten lang geen
andere knop hebt ingedrukt, gaat het panoramische hoofd naar de stand-by
modus. Dit wordt aangegeven door het afwisselend branden van de blauwe en
rode led. Na ongeveer 3 minuten in de stand-by modus schakelt het hoofd
automatisch volledig uit. Om het hoofd uit de stand-by modus te halen, drukt u
een willekeurige knop in (op de afstandsbediening of het apparaat zelf).
Waarschuwingen
1. Gebruik geen chemische oplosmiddelen om het apparaat te reinigen.
2. Laat het product niet in contact komen met zuurhoudende middelen.
3. Stel het apparaat niet bloot aan hoge temperaturen of vuur. Bewaar het
apparaat niet in omgevingen met hoge temperaturen.
4. Oefen geen overmatige druk uit op het product en laat het niet vallen

85
Beschikking
Verpakking verpakken: Voor verwijdering, aparte verpakking in
verschillende soorten. Karton en karton moeten verijderd worden als
papier en folie moet worden gerecycleerd.
Afvall van elektrische en elektronische apparatuur en / of
batterijen door gebruikers in particuliere huishoudens in de
Euopese Unie. Dit symbool op het product of op de verpakking geeft
aan dat dit niet als hiushoudelijk afval kann worden verijderd. U moet uw
afvaluitrusting en / of batterij weggooien door deze over te dragen aan
het toepasselijke terugzettingsschema voor de recycling van elektrische
en elektronische apparatuur en / of batterijn. Voor meer informatie over
het recyclen van deze apparatuur en / of batterij kunt u cotact opnemen metuw
stadskantoor, de winkel waar u de apparatuur of uw huishoudelijke afvalafval hebt
gekocht. De recycling van materialen zal bijdragen tot het behoud van natuurlijke
hulpbronnen en ervoor te zorgen dat het gerecycleerd wordt op een manier die de
menslijke geondheid en het milieu beschermt.

86
DUTCH
Batterij waarschuwing
• De batterij nooit ontmantelen, verpletteren of doordringen of de batterij
kortsluiten. Laat de batterij niet blootgesteld worden in een omgeving met hoge
temperaturen, als de batterij lekt of buigt, stop dan met gebruik.
• Laad altijd op met de oplader. Gevaar voor explosie als de batterij vervangen
wordt door een onjuist type.
• Houd de batterij buiten bereik van kinderen.
• Batterijen kunnen ontploffen als ze blootgesteld worden aan blote brand.
Verwijder nooit batterijen in een brand.
• Vervang batterijen nooit zelf; laat deze taak over aan de dealer.
• Weggooien van gebruikte batterijen die de plaatselijke voorschriften houden.
• Voordat u het apparaat weggooit, moet de batterij worden verwijderd en apart
worden weggegooid. Om de batterij te verwijderen, opent u de behuizing met
de kruiskopschroeven.
Let op: De batterij mag niet onafhankelijk worden vervangen!

87
Conformiteit
De fabrikant verklaart hierbij dat de CE-markering is aangebracht op de Rollei
Smart ePano 360 in overeenstemming met de fundamentele eisen en andere
relevante bepalingen van de volgende CE-richtlijnen:
EMC 2014/30/EU richtlijn
RoHS 2011/65/CE richtlijn
RED 2014/53/EU richtlijn
2012/19/EC WEEE richtlijn
De EC-verklaring van overeenstemming kan worden aangevraagd via het adres
vermeld op de garantiekaart.

88
中國傳統
使用說明
標準配置
Smart ePano 360
運動攝影機適配器
智慧型手機支架
遙控
USB連接線
1
32
5
4
1
2
3
4
5

89
技術規格
電池容量 400毫安培時
工作電流 50至300毫安培 mA
工作電壓 3.3伏特至4.2伏特
充電電壓 4.8伏特-5.0伏特
充電時間 大約2小時
連續工作時間 2-3小時(在電池充滿的情況下)
額定電壓 4.5伏特,直流
空載電流 最大電流55毫安培
全景拍攝旋轉速度 1圈/分鐘
縮時攝影旋轉速度 15/30/60/90分鐘/圈
雜訊 最大20分貝(A)
最大承重 500克
尺寸 高:65毫米;直徑:59毫米
重量 98克
如有技術變化,請以變化為準。 智能手機和運動相機不包括在內。
Bluetooth
®
文字商標和徽標是Bluetooth SIG Inc.擁有的註冊商標,Rollei對此類商
標的任何使用均已獲得許可。其他商標和 商品名稱是各自所有者的商品名稱 。

90
中國傳統
指示燈
• 紅燈:紅燈顯示正在充電。充電時紅燈亮起。裝置充滿電後紅燈熄
滅。
• 藍燈:當裝置通過藍牙成功連接後,藍燈將長亮。當處於全景模式
時,藍燈閃爍。在縮時模式下,藍燈將熄滅,縮時指示燈將閃爍。
• 全景雲台內置可充電電池。充電時長約2-3小時。
注意:如果開啟裝置後,藍燈和紅燈交替閃爍,然後裝置自動關閉,這
意味著電池沒有電。裝置需要充電。
USB充電
指示燈
開/關切換開關,全景拍攝按鈕
1
2
3
1 3
2

91
指示燈
縮時指示
縮時停止按鈕
支撐腳管
直徑1/4英吋螺紋
運動攝影機適配器
將運動攝影機適配器擰到全景雲
台頂部的直徑1/4英吋螺絲上。
然後請使用適配器連接運動攝影機。
1
2
3
4
1 2
4
3

92
中國傳統
智慧型手機支架
直徑1/4英吋螺紋
鬆開
旋鈕
擰緊
滑塊
連接智慧型手機
智慧型手機垂直拍攝
智慧型手機水平拍攝
將手機支架擰到全景雲台
頂部的1/4英吋螺絲上。
然後將智慧型手機裝到支架
上並調整至想要的位置(垂直或水平)。逆時針轉動旋鈕,打開手機支架
的夾子,將智慧型手機放入夾子,順時針轉動旋鈕,將智慧型手機固定
穩妥。
1
1 1
2
2
2
3
4
5
2 4
1
3
5

93
遙控
全景拍攝按鈕
停止按鈕
電源按鈕
拍攝按鈕
縮時按鈕
如果遙控開啟,當您按下任何按鈕時,指示燈閃爍大約5秒後熄滅,意味
著沒有連接雲台。如果遙控開啟,當您按下任何按鈕時,指示燈僅短暫
閃爍一次後熄滅,意味著遙控連接了雲台。
該遙控可以與Android和iOS協同工作並提供2.4G信號連接。因此連接
非常穩定,工作距離可長達10米。遙控有5個功能,開/關按鈕、拍照按
鈕、全景按鈕,縮時按鈕和停止按鈕。
1
2
3
4
5
1
2
3
5
4

94
中國傳統
操作
1. 滑動開/關切換開關到「開」的位置,遙控會自動連接已啟動的雲台。
2. 將智慧型手機與全景雲台相連。開啟手機上的藍牙並連接Rollei
Smart ePano 360。
3. 拍照:打開手機上的相機介面。按遙控上的拍照按鈕,智慧型手機的
相機將開始拍照。
4. 拍攝全景照:要拍攝全景照,請進入智慧型手機相機的全景模式。
如果按全景雲台上的開/關按鈕兩次,全景雲台將直接啟動並順時針
旋轉。如果按裝置上的開/關按鈕三次,它將立即逆時針旋轉。
如果使用遙控按全景按鈕一次,全景雲台會立即啟動並順時針旋轉,
手機會自動啟動。如果按全景按鈕兩次,手機會自動開始拍攝,雲台
會逆時針旋轉。
5. 縮時拍攝:要縮時拍攝,請進入智慧型手機相機的縮時模式。
如想要在雲台上直接設定縮時功能,則(反復)按縮時按鈕一次來設
定所需時間。然後按縮時按鈕兩次,雲台會直接啟動並在設定時間內
旋轉。 如果使用遙控,使用方法和在雲台上使用完全一樣。

95
操作
6. 停止工作:按雲台上的縮時按鈕或按遙控上的停止按鈕來停止全景雲
台。您可以在任何時間停用裝置。要關閉裝置,按雲台上的開/關按
鈕約3秒。
注意:如果您已停用全景雲台,5分鐘後它將進入待機模式,然後紅藍指
示燈會交替閃爍。處於待機模式約3分鐘後,裝置將自動徹底關閉。在待
機模式下,按任意按鈕(遙控上或雲台上)即可進入正常工作模式。
警告說明
1. 請勿使用任何化學溶劑清潔本產品。
2. 請勿讓強酸試劑濺到本產品上。
3. 請勿將本產品投入火中或加熱電池。請勿將本產品存放在高溫環境
中。
4. 請勿擠壓本產品或使其跌落。

96
简体中文
使用说明
标准配置
Smart ePano 360
运动摄像机适配器
智能手机支架
遥控
USB连接线
1
32
5
4
1
2
3
4
5

97
技术规格
电池容量 400毫安时
工作电流 50至300毫安 mA
工作电压 3.3伏特至4.2伏特
充电电压 4.8伏特-5.0伏特
充电时间 大约2小时
连续工作时间 2-3小时(在电池充满的情况下)
额定电压 4.5伏特,直流
空载电流 最大电流55毫安
全景拍摄旋转速度 1圈/分钟
延时拍摄旋转速度 15/30/60/90分钟/圈
噪声 最大20分贝(A)
最大承重 500克
尺寸 高:65毫米;直径:59毫米
重量 98克
如有技术变化,请以变化为准。 智能手机和运动相机不包括在内。
Bluetooth
®
文字商标和徽标是Bluetooth SIG Inc.拥有的注册商标,Rollei对此类商
标的任何使用均已获得许可。其他商标和 商品名称是各自所有者的商品名称 。

98
简体中文
指示灯
• 红灯:红灯显示正在充电。充电时红灯亮起。设备充满电后红灯熄
灭。
• 蓝灯:当设备通过蓝牙成功连接后,蓝灯将常亮。当处于全景模式
时,蓝灯闪烁。在延时模式下,蓝灯将熄灭,延时指示灯将闪烁。
• 全景云台内置可充电电池。充电时长约2-3小时。
注意:如果开启设备后,蓝灯和红灯交替闪烁,然后设备自动关闭,这
意味着电池没有电。设备需要充电。
USB充电
指示灯
开/关切换开关,全景拍摄按钮
1
2
3
1 3
2

99
指示灯
延时指示
延时停止按钮
支撑脚管
直径1/4英寸螺纹
运动摄像机适配器
将运动摄像机适配器拧到全景云台
顶部的直径1/4英寸螺丝上。
然后请使用适配器连接运动摄像机。
1
2
3
4
1 2
4
3

100
简体中文
智能手机支架
1/4英寸螺纹
拧松
旋钮
拧紧
滑块
连接智能手机
智能手机垂直拍摄
智能手机水平拍摄
将手机支架拧到全景云
台顶部的1/4英寸螺丝上。
然后将智能手机装到支架
上并调节至想要的位置(垂直或水平)。
逆时针转动旋钮,打开手机支架的夹子,将智能手机放入夹子,
顺时针转动旋钮,将智能手机固定稳妥。
1
1 1
2
2
2
3
4
5
2 4
1
3
5

101
遥控
全景拍摄按钮
停止按钮
电源按钮
拍摄按钮
延时按钮
如果遥控开启,当您按下任何按钮时,指示灯闪烁大约5秒后熄灭,意味
着没有连接云台。如果遥控开启,当您按下任何按钮时,指示灯仅短暂
闪烁一次后熄灭,意味着遥控连接了云台。
该遥控可以与Android和iOS协同工作并提供2.4G信号连接。因此连接
非常稳定,工作距离可长达10米。遥控有5个功能,开/关按钮、拍照按
钮、全景按钮,延时按钮和停止按钮。
1
2
3
4
5
1
2
3
5
4

102
简体中文
操作
1. 滑动开/关切换开关到“开”的位置,遥控会自动连接已启动的云台。
2. 将智能手机与全景云台相连。开启手机上的蓝牙并连接Rollei Smart
ePano 360。
3. 拍照:打开手机上的相机界面。按遥控上的拍照按钮,智能手机的相
机将开始拍照。
4. 拍摄全景照:要拍摄全景照,请进入智能手机相机的全景模式。
如果按全景云台上的开/关按钮两次,全景云台将直接启动并顺时针
旋转。如果按设备上的开/关按钮三次,它将立即逆时针旋转。
如果使用遥控按全景按钮一次,全景云台会立即启动并顺时针旋转,
手机会自动启动。如果按全景按钮两次,手机会自动开始拍摄,云台
会逆时针旋转。
5. 延时拍摄:要延时拍摄,请进入智能手机相机的延时模式。
如想要在云台上直接设置延时功能,则(反复)按延时按钮单次来设
置所需时间。然后按延时按钮两次,云台会直接启动并在设置时间内
旋转。 如果使用遥控,使用方法和在云台上使用完全一样。

103
操作
6. 停止工作:按云台上的延时按钮或按遥控上的停止按钮来停止全景云
台。您可以在任何时间停用设备。要关闭设备,按云台上的开/关按钮
约3秒。
注意:如果您已停用全景云台,5分钟后它将进入待机模式,然后红蓝指
示灯会交替闪烁。处于待机模式约3分钟后,设备将自动彻底关闭。在待
机模式下,按任意按钮(遥控上或云台上)即可进入正常工作模式。
警告说明
1. 请勿使用任何化学溶剂清洁本产品。
2. 请勿让强酸试剂溅到本产品上。
3. 请勿将本产品投入火中或加热电池。请勿将本产品存放在高温环境
中。
4. 请勿挤压本产品或使其跌落。

www.rollei.com
For Europe
Distribution:
Rollei GmbH & Co. KG
In de Tarpen 42
D-22848 Norderstedt
Service Hotline:
+49 40 270750270
Return Service:
Rollei Service Deutschland
Denisstraße 28a
D-67663 Kaiserslautern
For Asia
分銷: Rollei HK Limited
香港九龍觀塘成業街 7 號
寧晉中心 17/F D2
分销: Rollei HK Limited
香港九龙观塘成业街 7 号
宁晋中心 17/F D2
Tel +852 2377 9023
Fax +852 2366 8091
www.cn.rollei.com/social
www.rollei.de/social
www.rollei.com/social
Documenttranscriptie
Smart ePano 360 Bedienungsanleitung | User Guide for German | English | French | Spanish | Italian Portuguese | Dutch | Chinese (traditional and simplified) www.rollei.de 2 Inhalt Anleitung . . . . . . . . . . . . . . . . . . . . . . 4 Warnhinweise . . . . . . . . . . . . . . . . . 12 Entsorgung . . . . . . . . . . . . . . . . . . . 13 Warnung hinsichtlich des Akkus . . . 14 Konformität . . . . . . . . . . . . . . . . . . 15 Content Instruction Manual . . . . . . . . . . . . . Warning notes . . . . . . . . . . . . . . . . . Disposal . . . . . . . . . . . . . . . . . . . . . . Battery Warning . . . . . . . . . . . . . . . . Conformity . . . . . . . . . . . . . . . . . . . . www.rollei.com 16 24 25 26 27 Contenu Mode d’emploi . . . . . . . . . . . . . . . . Avertissements . . . . . . . . . . . . . . . . Élimination . . . . . . . . . . . . . . . . . . . Avertissement relatif à la batterie . . Conformité . . . . . . . . . . . . . . . . . . . . 28 36 37 38 39 Conteúdo Manual de instruções . . . . . . . . . . . Avisos . . . . . . . . . . . . . . . . . . . . . . . Eliminação . . . . . . . . . . . . . . . . . . . . Aviso da bateria . . . . . . . . . . . . . . . . Conformidade . . . . . . . . . . . . . . . . . 64 72 73 74 75 Contenido Instrucciones . . . . . . . . . . . . . . . . . . Advertencias . . . . . . . . . . . . . . . . . . Eliminar residuos . . . . . . . . . . . . . . Advertencia de batería . . . . . . . . . . . Conformidad . . . . . . . . . . . . . . . . . . 40 48 49 50 51 Inhoud Handleiding . . . . . . . . . . . . . . . . . . . Waarschuwingen . . . . . . . . . . . . . . . Beschikking . . . . . . . . . . . . . . . . . . . Batterij waarschuwing . . . . . . . . . . . Conformiteit . . . . . . . . . . . . . . . . . . 78 84 85 86 87 Contenuto Manuale di istruzioni . . . . . . . . . . . . 52 Avvertenze . . . . . . . . . . . . . . . . . . . . 60 Smaltimento . . . . . . . . . . . . . . . . . . 61 Avvertenze relative alla batteria . . . 62 Conformità . . . . . . . . . . . . . . . . . . . .63 3 中國傳統: 內容 使用說明 . . . . . . . . . . . . . . . . . . . . 88 警告說明 . . . . . . . . . . . . . . . . . . . . 95 简体中文: 内容 使用说明 . . . . . . . . . . . . . . . . . . . . 96 警告说明 . . . . . . . . . . . . . . . . . . . 103 4 Anleitung Lieferumfang 1 Smart ePano 360 2 Actioncam Adapter 3 Smartphone Halter 4 Fernbedienung 5 USB Kabel 2 1 3 4 5 DEUTSCH Technische Daten Batteriekapazität Betriebsstrom Betriebsspannung Ladespannung Ladezeit Arbeitszeit Nennspannung Leerlaufstrom Drehzahl Panorama Drehzahl Zeitraffer Betriebsgeräusch Max. Traglast Abmessungen Gewicht 5 400 mAh 50 bis 300 mA 3,3 V bis 4,2 V 4,8 V - 5,0 V Ca. 2 Stunden 2–3 Stunden (bei voll aufgeladenem Akku) 4,5 V DC Max. 55 mA 1 Umdrehung pro Minute 15/30/60/90 Minuten pro Umdrehung Max. 20 dB (A) 500 g H: 65 mm, Ø 59 mm 98 g Änderungen von Design und technischen Daten bleiben vorbehalten und bedürfen keiner Ankündigung. Smartphone und Actioncam sind nicht im Lieferumfang enthalten. Die Bluetooth® Wortmarke und Logos sind eingetragene Warenzeichen der Bluetooth SIG, Inc. und die Verwendung dieser Marken durch Rollei erfolgt unter Lizenz. Andere Warenzeichen und Handelsnamen sind Eigentum ihrer jeweiligen Inhaber. 6 Statusanzeige • • • Rote LED: Die rote Leuchte gibt den Ladestatus des Gerätes an. Die rote LED leuchtet wenn das Gerät geladen wird und schaltet sich ab, sobald die Batterie vollständig aufgeladen ist. Blaue LED: Wenn das Gerät erfolgreich via Bluetooth mit einem Gerät verbunden ist, leuchtet die LED dauerhaft. Im Panorama Modus blinkt die blaue LED. Sollten Sie den Zeitraffer Modus aktiviert haben, so schaltet sich die blaue LED ab und die LEDs der Zeitrafferanzeige leuchten. Der Panoramakopf verfügt über eingebaute wiederaufladbare Akkus. Die Ladezeit beträgt ca. 2 – 3 Stunden. Hinweis: Sollten die rote und blaue LED abwechselnd leuchten und das Gerät sich automatisch danach ausschalten, ist dies ein Anzeichen dafür, dass die Batterie leer ist. Bitte laden Sie das Gerät wieder auf. 1 2 3 USB Ladebuchse Statusanzeige An / Aus, Panorama Taste DEUTSCH 1 2 3 Statusanzeige 1 2 3 4 7 Zeitrafferanzeige Zeitraffer beenden Standfüße 1/4 Zoll Gewinde 1 3 Actioncam Adapter Schrauben Sie den Actioncam Adapter auf den Panoramakopf (1/4 Zoll Schraube auf der Oberseite), anschließend befestigen Sie Ihre Actioncam auf dem Adapter. 4 2 8 Smartphone Halter 1 2 3 4 5 1/4 Zoll Gewinde Lösen Drehrad Festziehen Smartphone Einsatz 1 5 2 4 3 Smartphone Einsatz Vertikale Aufnahme mit dem Smartphone 2 Horizontale Aufnahme mit dem Smartphone 1 1 2 Befestigen Sie den Smartphone Halter über die 1/4 Zoll Schraube auf der Oberseite des Panoramakopfes. Befestigen Sie anschließend Ihr Smartphone in der Halterung. Öffnen Sie dafür die Klemmung indem Sie das Drehrad gegen den Uhrzeigersinn auf drehen. Stecken Sie dann Ihr Smartphone in den Klemmbereich (horizontal oder vertikal) und fixieren Sie das Telefon, indem Sie das Drehrad im Uhrzeigersinn drehen. DEUTSCH Fernbedienung 3 4 1 2 3 4 5 Panoramaaufnahmen Stop-Taste An- / Ausschalter Fototaste Zeitraffertaste 1 5 2 Wenn die Fernbedienung eingeschaltet ist und bei drücken einer belieben Taste die Statusanzeige für ca. 5 Sekunden dauerhaft leuchtet, dann hat die Fernbedienung keine Verbindung zum Kopf. Ist die Fernbedienung eingeschaltet und bei drücken einer beliebigen Taste blinkt die Statusanzeige nur kurz, dann ist die Fernbedienung mit dem Kopf verbunden. Diese Fernbedienung kann mit Android und iOS Systemen arbeiten und bietet eine 2,4G Verbindung, die sehr stabil ist und eine Reichweite von ca. 10 m hat. Die Fernbedienung hat 5 Funktionen, An-/Ausschalter, Fototaste, Panoramataste, Zeitraffertaste und Stop-Taste. 9 10 Bedienung 1. Schieben Sie den An-/Ausschalter auf AN und die Fernbedienung wird sich automatisch mit dem eingeschalteten Kopf verbinden. 2. Befestigen Sie Ihr Smartphone auf dem Panoramakopf. Starten Sie die Bluetooth Funktion an Ihrem Smartphone und verbinden Sie es mit dem Rollei Smart ePano 360. 3. Fotos aufnehmen: Öffnen Sie die Kamera-App Ihres Handys. Durch drücken der Fototaste auf der Fernbedienung, nimmt Ihr Smartphone nun Bilder auf. 4. Panoramaaufnahmen: Um Panoramaaufnahmen durchführen zu können, gehen Sie in den Panoramamodus Ihres Handys. Drücken Sie den An/Aus Knopf auf dem Panoramakopf direkt zweimal und der Kopf beginnt mit der Panoramaaufnahme und dreht sich im Uhrzeigersinn. Drücken Sie die Taste dreimal, dreht sich der Kopf entgegen dem Uhrzeigersinn. Drücken Sie die Panoramataste der Fernbedienung einmal und der Kopf dreht sich im Uhrzeigersinn und die Aufnahme wird gestartet. Drücken Sie die Panoramataste der Fernbedienung zweimal dreht sich der Kopf entgegen dem Uhrzeigersinn. DEUTSCH Bedienung 5. Zeitrafferaufnahme: Um Zeitrafferaufnahmen zu starten, gehen Sie in das Zeitraffermenü des Smartphones. Wenn Sie die Einstellungen direkt am Panoramakopf durchführen möchten, drücken Sie die Zeitraffertaste des Kopfes mehrfach bis die LED der gewünschten Zeit leuchtet. Anschließend drücken Sie die Zeitraffertaste zweimal hintereinander und der Kopf startet mit der Zeitrafferaufnahme im eingestellten Zeitintervall. Wenn Sie die Fernbedienung nutzen, ist die Handhabung identisch wie oben beschrieben. 6. Modus stoppen: Drücken Sie die Zeitraffertaste am Kopf direkt oder die Stop-Taste an der Fernbedienung um den Modus zu beenden. Sie können den Modus jederzeit beenden. Um den Panoramakopf auszuschalten drücken Sie die An/Austaste am Kopf für ca. 3 Sekunden. 11 12 Bedienung Hinweis: Wenn Sie den Modus beendet haben und ca. 5 Minuten lang keine weitere Taste betätigen, geht der Panoramakopf in den Standby Modus. Dies wird angezeigt, indem die blaue und rote LED im Wechsel leuchtet. Nach ca. 3 Minuten im Standby Modus schaltet sich der Kopf komplett automatisch aus. Um den Kopf aus dem Standby Modus zu holen, drücken Sie eine beliebige Taste (entweder auf der Fernbedienung oder am Gerät selbst). Warnhinweise 1. Benutzen Sie keine chemischen Lösungsmittel um das Gerät zu reinigen. 2. Lassen Sie das Produkt nicht mit säurehaltigen Mitteln in Berührung kommen. 3. Setzen Sie das Gerät keiner großen Hitze oder Feuer aus. Lagern Sie es nicht in Umgebungen mit hohen Temperaturen. 4. Üben Sie keinen hohen Druck auf das Produkt aus und lassen Sie es nicht fallen. DEUTSCH Entsorgung Verpackung entsorgen: Entsorgen Sie die Verpackung sortenrein. Geben Sie Pappe und Karton zum Altpapier, Folien in die WertstoffSammlung. Entsorgung elektrischer und elektronischer Altgeräte und/ oder Batterien/Akkumulatoren durch Verbraucher in privaten Haushalten innerhalb der Europäischen Union. Dieses Symbol am Produkt oder an der Verpackung weist darauf hin, dass es nicht mit dem Hausmüll entsorgt werden darf. Sie müssen Ihr Altgerät und/oder Batterien/Akkumulatoren an entsprechende Sammelstellen zum Recycling elektrischer und elektronischer Geräte und/oder Batterien/Akkumulatoren übergeben. Weitere Informationen zum Recycling dieses Gerätes und/oder der Batterien/Akkumulatoren erhalten Sie bei Ihrer Stadtverwaltung, dem Laden, in dem Sie das Gerät erworben haben, oder Ihrem Entsorgungsbetrieb. Das Recycling von Materialien hilft bei der Schonung natürlicher Ressourcen und gewährleistet eine für die menschliche Gesundheit und Umwelt sichere Art der Wiederverwertung. 13 14 Warnung hinsichtlich des Akkus • Demontieren, schlagen oder durchstecken Sie den Akku nicht, achten Sie darauf, den Akku nicht kurzzuschließen. Setzen Sie den Akku keinen Orten mit hohen Temperaturen aus. Verwenden Sie den Akku nicht weiter, falls er ausläuft oder sich ausdehnt. • Immer über das System aufladen. Falls der Akku durch einen falschen Typen ersetzt wird, besteht Explosionsgefahr. • Halten Sie den Akku von Kindern fern. • Akkus können explodieren, wenn sie einem offenen Feuer ausgesetzt werden. Werfen Sie Akkus nie ins Feuer. • Tauschen Sie Akkus nie selber aus; überlassen Sie dem Händler diese Aufgabe. • Entsorgen Sie verbrauchte Akkus gemäß den örtlichen Vorschriften. • Vor der Entsorgung des Gerätes ist der Akku zu entnehmen und gesondert zu entsorgen. Zur Entnahme des Akkus öffnen Sie das Gehäuse über die Kreuzschrauben. Achtung: Der Akku darf nicht eigenständig ausgewechselt werden! DEUTSCH Konformität Der Hersteller erklärt hiermit, dass der Rollei Smart ePano360 gemäß den grundlegenden Anforderungen und anderer einschlägiger Vorschriften der folgenden CE-Direktiven die CE-Kennzeichnung zuerkannt wurde: EMV-Richtlinie 2014/30/EU RoHS-Richtlinie 2011/65/CE RED-Richtlinie 2014/53/EU WEEE-Richtline 2012/19/EC Die CE-Konformitätserklärung kann von der auf der Garantiekarte angegebenen Adresse erhalten werden. 15 16 Instruction Manual Scope of delivery 1 Smart ePano 360 2 actioncam adapter 3 smartphone holder 4 remote control 5 USB cable 2 1 3 4 5 ENGLISH Technical specification Battery capacity Working current Working voltage Charging voltage Charging time Continuous working Rated voltage No-load current Rotational speed panorama Rotational speed time laps Noise Max. load Dimensions Weight 17 400 mAh 50 up to 300 mA 3.3 V up to 4.2 V 4.8 V – 5.0 V Approx. 2 hours 2 – 3 hours (with fully charged battery) 4.5 V DC Max. 55 mA 1 r/min 15/30/60/90 min/r Max. 20 dB (A) 500 g H: 65 mm, Ø: 59 mm 98 g Subject to technical changes. Smartphone and Actioncam are not included. The Bluetooth® word mark and logos are registered trademarks owned by Bluetooth SIG, Inc. and any use of such marks by Rollei is under license. Other trademarks and trade names are those of their respective owners. 18 Indicator lights • • • Red light: The red light is the indicator for charging. The red light turns on while charging. If the device is fully charged it will be turned off. Blue light: If the the device is successfully connected via Bluetooth the blue light will be continuously on. During the panorma mode the blue light will flash. In time lapse mode the blue light will be turned off and the time lapse indication light will flash. The panorama head has a built-in rechargeable battery. The charging time is about 2 - 3 hours. Note: If you turn on the device and the blue and red light will flash alternatively and afterwards the device is automatically turned off, this means the battery has no power. The device needs to be charged. 1 2 3 USB charging Indication light On / Off switch, panoramic shooting button 1 2 ENGLISH 3 Indicator lights 1 2 3 4 19 Time lapse indication Time lapse stop button Supporting leg 1/4 inch thread 3 Actioncam adapter Screw the actioncam adapter onto the 1/4 inch screw on the top of the panoramic head. Afterwards please attach your actioncam by using the adapter. 1 4 2 20 Smartphone adapter 1 2 3 4 5 1/4 inch thread Loosen Knob Tighten Slider 1 5 2 4 3 Attaching your smartphone 1 2 Smartphone vertical shooting 2 Smartphone horizontal shooting 1 Screw the phone holder onto the 1/4 inch screw on the top of the panoramic head. Then attach your smartphone onto the holder in the position you would like to have it (vertical or horizontal). Therefore open the clamp of the phone holder by turning the knob counter clockwise, put your smartphone into the clamp and turn the knob clockwise to firmly fix your smartphone. ENGLISH Remote control 3 4 1 2 3 4 5 Panorama shooting button Stop button Power button Shoot button Time lapse button 1 5 2 If the remote control is turned on and the indication light flashes for about 5 seconds when you press any button and turns off afterwards that means the head is not connected. If the remote control is turned on and the indication light flashes only once shortly when you press any button and turns off, then the remote is connected with the head. This remote control can work with Android and iOS and offers a 2,4G signal for connecting. Therefore the connection is very stable and can work over a distance of up to 10 meters. The remote has 5 functions, on/off button, photo button, panorama button, time lapse button and the stop button. 21 22 Operation 1. Slide the on/off switch to ON and the remote control will be automatically connected with the powered on head. 2. Connect the panoramic head with your smartphone. Therefore start Bluetooth on your mobile phone and connect with the Rollei Smart ePano 360. 3. Taking photos: Open the camera interface of your mobile phone. By pressing the photo button on the remote control, the camera of your smartphone will now take a photo. 4. Taking panoramic photos: To take panoramic shots please go into the panoramic mode of your smartphone‘s camera. If you press the on/off button on the panoramic head twice the panoramic head will directly start and will rotate clockwise. If you press the on/off button on the device three times it will immediately rotate counter clockwise. If you use the remote control press the panoramic button once and the panoramic head will immediately start to rotate clockwise and the cell phone will start automatically. If you press the panoramic button twice, the cell phone will automatically start the shooting and the head will rotate counter clockwise. ENGLISH Operation 5. Time-Lapse shooting: To take time lapse shots please go into the time lapse mode of your smartphone‘s camera. If you want to set the time lapse function directly on the head, press the time lapse button once (repeatedly) to set the desired time. After that press the time lapse button twice and the head will directly start to turn around within the amount of time that has been set. If you use the remote control the usage is completely the same as on the head itself. 6. Stop working: Press the time lapse button on the head or press the stop button on the remote control to stop the panoramic head. You can stop the device at any time. To turn it off press the head‘s on/off button for about 3 seconds. Note: If you have stopped the panoramic head it will go into the standby mode after 5 minutes, then the red and blue indicator light will flash alternatively. After the device is in standby mode for about 3 minutes it will completely turned off automatically. In standby mode press any button (on the remote or on the head) to go in normal working mode. 23 24 Warning notes 1. Do not use any chemical solvents to clean the product. 2. Do not sprinkle strongly acidic reagent to the product. 3. Do not put the product into fire or heat the battery. Do not store it in high temperature environment. 4. Do not squeeze or drop the product. ENGLISH Disposal Disposal of Packaging: For disposal please separate packaging into different types. Cardboard and board must be disposed of as paper and foil must be recycled. Disposal of Waste Electrical and Electronic Equipment and/or Battery by users in private households in the European Union. This symbol on the product or on the packaging indicates that this cannot be disposed of as a household waste. You must dispose of your waste equipment and battery by handling it over to the applicable take-back scheme for the recycling of electrical and electronic equipment and battery. For more information about recycling of this equipment and battery, please contact your city office, the shop where you purchased the equipment or your household waste disposal service. The recycling of materials will help to conserve natural resources and ensure that it is recycled in a manner that protects human health and environment. 25 26 Battery Warning • Never dismantle, crush, or pierce the battery, or allow the battery to shortcircuit. Do not expose battery being placed in high temperature environment, if battery leaks or bulges, stop continue to use. • Always charge using the charger. Risk of explosion if battery is replaced by an incorrect typ. • Keep the battery out of the reach of children. • Batteries may explode if exposed to fire. Never through batteries into the fire. • Never exchange batteries by yourselve, please let it be done by the retailer. • Dispose used batteries by observing local regulations. • Before disposing the device, please remove the battery. For removing the battery open the housing via the screws. Attention: It is not allowed to exchange the battery independently! ENGLISH Conformity The Manufacturer hereby declares that the CE marking was applied to the Rollei Smart ePano 360 in accordance with the basic requirements and other relevant provisions of the following CE Directives: EMC directive 2014/30/EU RoHS directive 2011/65/CE RED directive 2014/53/EU 2012/19/EC WEEE Directive The EC Declaration of Conformity can be requested from the address specified on the Warranty card. 27 28 Mode d’emploi Fournitures incluses 1 Smart ePano 360 2 Adaptateur d’actioncam 3 Support smartphone 4 Télécommande 5 Câble USB 2 3 1 4 5 FRENCH Caractéristiques techniques Capacité batterie Courant de fonctionnement Tension de fonctionnement Tension de charge Temps de charge Fonctionnement continu Tension nominale Courant à vide Vitesse de rotation panorama Vitesse de rotation time-lapse Bruit Charge max. Dimensions | Poids 400 mAh 50 à 300 mA 3,3 V à 4,2 V 4,8 V - 5,0 V Env. 2 heures 2–3 heures (avec batterie pleinement chargée) 4,5 V DC Max. 55 mA 1 tr/min 15/30/60/90 min/tr Max. 20 dB (A) 500 g H: 65 mm, Ø 59 mm 98 g Sous réserve de modifications techniques. Smartphone /Actioncam non fourni. La marque et les logos Bluetooth® sont la propriété de Bluetooth SIG, Inc. et leur utilisation par Rollei s’effectue sous licence. Les autres désignations commerciales et marques mentionnées sont détenues par leur propriétaire respectif 29 30 Voyants d’état • • • LED rouge: Le voyant rouge indique l’état de charge de l’appareil. La LED rouge s’allume pendant le chargement de l’appareil et s‘éteint dès que la batterie est entièrement rechargée. LED bleue: La LED reste allumée lorsque l‘appareil est connecté par Bluetooth à un appareil. En mode panoramique, la LED bleue clignote. Si vous avez activé le mode time-lapse, la LED bleue s’éteint et les voyants time-lapse s’allument. La tête panoramique dispose de batteries intégrées rechargeables. Le temps de charge est d’env. 2 à 3 heures. Remarque: Si les LED rouge et bleue s’allument par alternance et si l’appareil s’éteint ensuite automatiquement, cela indique que la batterie est vide. Veuillez recharger l’appareil. 1 2 3 Prise de charge USB Voyants d’état Bouton marche / arrêt, panoramique FRENCH 1 2 3 Voyants d’état 1 2 3 4 31 Affichage time-lapse Arrêt time-lapse Pieds de support Filetage 1/4 po 1 3 Adaptateur d’actioncam Vissez l‘adaptateur d‘actioncam sur la tête panoramique (filetage 1/4 po sur le haut), installez ensuite votre actioncam sur l‘adaptateur. 4 2 32 Support smartphone 1 2 3 4 5 Filetage 1/4 po Desserrage Molette Serrage Glissière smartphone 1 5 2 4 3 Attacher votre smartphone 1 2 Prise de vue verticale avec le smartphone 2 Prise de vue horizontale avec le smartphone 1 Installez le support pour smartphone sur le filetage 1/4 po sur le haut de la tête panoramique. Installez ensuite votre smartphone dans le support. Ouvrez alors la pince en faisant tourner la molette dans le sens antihoraire. Installez ensuite votre smartphone dans la pince (horizontalement ou verticalement) et tournez la molette dans le sens horaire. FRENCH Télécommande 3 4 1 2 3 4 5 Bouton prise panoramique Bouton stop Bouton marche / arrêt Bouton prise de vue Bouton time-lapse 1 2 Si la télécommande est allumée et si le voyant clignote pendant env. 5 secondes lorsque vous appuyez sur n’importe quel bouton par la suite, cela indique que la tête n’est pas connectée. Si la télécommande est allumée et si le voyant clignote seulement de façon brève lorsque vous appuyez sur n’importe quel bouton et s’éteint, cela signifie que la télécommande est connectée à la tête. Cette télécommande peut fonctionner avec Android et iOS et propose une connexion 2,4 G, très stable avec une portée d’env. 10 m. La télécommande a 5 fonctions, bouton marche/arrêt, bouton photo, bouton prise panoramique bouton time-lapse et bouton stop. 5 33 34 Utilisation 1. Faites glisser le bouton marche/arrêt sur MARCHE et la télécommande se connecte automatiquement à la tête allumée. 2. Connectez la tête panoramique à votre smartphone. Démarrez la fonction Bluetooth sur votre smartphone et connectez-le au Smart ePano 360 de Rollei. 3. Prise de photos : Ouvrez l‘application Appareil-photo de votre téléphone portable. En appuyant sur le bouton photo de la télécommande, votre smartphone prend des images. 4. Prises de vue panoramiques : Pour pouvoir effectuer des prises de vue panoramiques, allez dans le mode panoramique de votre téléphone portable. Appuyez directement sur le bouton marche/arrêt sur la tête panoramique deux fois et la tête commence la prise de vue panoramique et tourne dans le sens horaire. Appuyez sur le bouton trois fois et la tête tourne dans le sens contraire. Appuyez sur le bouton prise panoramique de la télécommande une fois et la tête tourne dans le sens horaire et la prise de photos commence. Appuyez sur le bouton prise panoramique de la télécommande deux fois, la tête tourne dans le sens antihoraire. FRENCH Utilisation 5. Prise en time-lapse : Pour lancer les prises de vues en time-lapse, allez dans le menu Time-lapse de votre smartphone. Si vous souhaitez effectuer les réglages directement sur la tête panoramique, appuyez sur le bouton time-lapse de la tête plusieurs fois jusqu‘à ce que la LED affiche le temps souhaité. Appuyez ensuite deux fois sur le bouton time-lapse et la tête commence la prise de vue time-lapse à l‘intervalle de temps défini. Si vous utilisez la télécommande, la manipulation est identique à celle décrite ci-dessus. 6. Arrêt du mode : Appuyez sur le bouton time-lapse sur la tête directement ou sur le bouton stop de la télécommande pour mettre fin au mode. Vous pouvez quitter le mode à tout moment. Pour éteindre la tête panoramique, appuyez sur le bouton marche/arrêt de la tête pendant env. 3 secondes. 35 36 Utilisation Remarque: Si vous avez quitté le mode et si vous n’appuyez plus sur aucun bouton pendant env. 5 minutes, la tête panoramique se met en veille. Cela est indiqué par les LED bleue et rouge qui clignotent par alternance. Au bout de 3 minutes env. en veille, la tête s’éteint complètement. Pour sortir la tête du mode veille, appuyez sur n’importe quel bouton (sur la télécommande ou sur l’appareil lui-même). Avertissements 1. N’utilisez pas de produit chimique pour nettoyer l‘appareil. 2. Ne laissez pas l‘appareil entrer en contact avec des produits acides. 3. N’exposez pas l’appareil à de fortes chaleurs ou au feu. Ne le stockez pas dans un lieu présentant des températures élevées. 4. N’exercez aucune pression forte sur l’appareil et ne le laissez pas tomber. FRENCH Élimination Éliminer l‘emballage: Éliminer les différents types d’emballage de manière différenciée. Éliminer le carton et le carton-pâte avec les papiers usés et les films das des collectes de matériaux recyclables. Elimination des appareils électriques et électroniques et/ou des piles/batteries usées par les consommateurs dans des domiciles privés au sein de l’Union européenne. Ce symbole sur le produit ou l’emballage signifie qu’il ne doit pas être éliminé avec les ordures ménagères. Vous devez remettre vos appareils et/ou piles/batteries usagés à des points de collecte compétents en matière de recyclage des appareils électriques et électroniques et/ou piles/batteries usagés. Pour toute information complémentaire sur le recyclage de cet appareil et/ou des piles/ batteries, adressez-vous à l’administration de votre ville, au magasin où vous l’avez acheté ou à votre service de collecte des déchets. Le recyclage des matériaux contribue à la préservation des ressources et garantit une valorisation des déchets respectueuse de la santé humaine et de l’environnement. 37 38 Avertissement relatif à la batterie • Ne pas démonter, transpercer ou manier avec brutalité la batterie ; veillez à ne pas court-circuiter la batterie. Ne placez pas la batterie dans des lieux exposés à de hautes températures. N’utilisez plus la batterie si elle présente des fuites liquides ou si elle se dilate. • Chargez-la toujours via le système. Il existe un risque d’explosion lorsque la batterie est remplacée par un type de batterie incompatible. • Tenez la batterie éloignée des enfants. • Les batteries peuvent exploser lorsqu’elles sont exposées à une flamme nue.Ne pas jetez la batterie dans un feu. • Ne remplacez jamais la batterie vous-même ; confiez cette tâche à votre revendeur. • Eliminez les batteries usées conformément aux prescriptions légales en vigueur dans votre commune. • Avant l’élimination de l’appareil, retirez la batterie et éliminez-la séparément. Pour retirer la batterie, ouvrez le boîtier en retirant les vis cruciformes. Attention: Ne remplacez pas la batterie vous-même! FRENCH Conformité Le fabricant déclare par la présente que le marquage CE a été appliqué au Rollei Smart ePano 360 en conformité avec les exigences de base ou autres dispositions pertinentes des directives CE suivantes: EMC directive 2014/30/EU RoHS directive 2011/65/CE RED directive 2014/53/EU 2012/19/EC WEEE Directive La déclaration de conformité CE peut être réclamée à l’adresse spécifiée sur la carte de garantie. 39 40 Instrucciones Volumen de suministro 1 Smart ePano 360 2 Adaptador Actioncam 3 Soporte de smartphone 4 Mando a distancia 5 Cable USB 2 3 1 4 5 SPANISH Especificaciones técnicas Capacidad de la batería Corriente de trabajo Voltaje de funcionamiento Tensión de carga Tiempo de carga Trabajo continuo de 400 mAh 50 hasta 300 mA 3,3 V hasta 4,2 V 4,8 V - 5,0 V Aprox. 2 horas 2 a 3 horas (con batería completamente cargada) Tensión nominal 4,5 V DC Corriente sin carga Máx. 55 mA Panorama de velocidad de rotación 1 rev / min Velocidad de rotación de lapso de tiempo 15/30/60/90 min/rev Ruido máximo 20 dB (A) Carga máxima 500 g Dimensiones | Peso H: 65 mm, Ø 59 mm | 98 g Sujeto a cambios técnicos. Los smartphones/actioncams no están incluidos en el volumen de sumi nistro. La marca de la palabra Bluetooth® y sus logotipos son marcas comerciales registradas propiedad de Bluetooth SIG, Inc. y cualquier uso de dichas marcas por parte de Rollei está bajo licencia. Otras marcas y nombres comerciales pertenecen a sus respectivos propietarios. 41 42 Indicación de estado • • • LED rojo: La luz roja indica el estado de carga del dispositivo. El LED rojo se ilumina cuando el dispositivo se está cargando y se apaga una vez que la batería está completamente cargada. LED azul: Si el dispositivo está conectado a través de Bluetooth a un dispositivo, el LED se ilumina de forma permanente. En el modo Panorama, el LED azul parpadeará. Si está activado el modo de cámara rápida, el LED azul se apaga y los LED de indicación de cámara rápida brillan. El cabezal panorámico tiene incorporadas baterías recargables. El tiempo de carga es de aprox. 2 – 3 horas. Nota: Si el LED azul y rojo brillan alternativamente y la unidad se apagar automáticamente después de eso, esto es una indicación de que la batería está vacía. Por favor, cargue de nuevo el dispositivo. 1 2 3 Enchufe de carga USB Indicación de estado Tecla de encendido / apagado, panorámica SPANISH 1 2 3 Indicación de estado 1 2 3 4 Indicación de cámara rápida Finalizar cámara rápida Patas Rosca de 1/4 pulgada 3 Adaptador Actioncam Atornille el adaptador Actioncam en el cabezal panorámico (tornillo de 1/4 de pulgada en la parte superior), luego coloque su Actioncam en el adaptador. 43 1 4 2 44 Soporte de smartphone 1 2 3 4 5 Rosca de 1/4 pulgada Soltar Rueda giratoria Apretar Insertar el smartphone 1 5 2 4 3 Fije su smartphone Tomas verticales con el smartphone 2 Tomas horizontales con el smartphone 1 1 2 Coloque el soporte del teléfono en el tornillo de 1/4 de pulgada en la parte superior del cabezal panorámico. Luego coloque el smartphone en el soporte. Abrir la sujeción girando la rueda giratoria de control hacia la izquierda. A continuación, conecte su smartphone en la zona de sujeción (horizontal o vertical) y fije el teléfono girando la rueda giratoria hacia la derecha. SPANISH Mando a distancia 3 4 1 2 3 4 5 Tomas panorámicas Botón de parada Encendido/apagado Botón de fotos Botón de cámara rápida 1 5 2 Si el mando a distancia está encendido y al pulsar cualquier botón la indicación de estado permanece encendida durante unos 5 segundos, el mando a distancia no está conectado con el cabezal. Si el control remoto está encendido y al pulsar cualquier botón la luz indicación de estado parpadea brevemente, entonces el mando a distancia está conectado con el cabezal. Este mando a distancia puede funcionar con sistemas Android y iOS, ofreciendo una conexión 2.4G, que es muy estable y tiene un alcance de aproximadamente 10 m. El mando a distancia tiene cinco funciones, de encendido / apagado, botón de fotografía, botón de panorámicas, botón de cámara rápida y botón de parada. 45 46 Manejo 1. Deslice el interruptor de encendido / apagado a encendido (ON) y el mando a distancia se conectará automáticamente al cabezal de encendido. 2. Monte su smartphone enl cabezal panorámico. Inicie la función Bluetooth en su smartphone y conéctelo con el Rollei Smart ePano 360. 3. Tomar fotos: Abra la aplicación de la cámara en su teléfono. Pulsando el botón de fotos en el mando a distancia su smartphone toma ahora las imágenes. 4. Tomas panorámicas: Con el fin de realizar tomas panorámicas, hay que ir al modo panorámico en su smartphone. Presione el botón de encendido / apagado en el cabezal panorámico dos veces y el cabezal comienza con la toma panorámica y gira hacia la derecha. Pulse el botón tres veces y el cabezal gira hacia la izquierda. Pulse el botón de panorámica en el mando a distancia una vez, y el cabezal gira hacia la derecha y se inicia la grabación. Si pulsa el botón de panorámica del mando a distancia dos veces el cabezal gira hacia la izquierda. SPANISH Manejo 5. Toma de cámara rápida: Para iniciar la fotografía de cámara rápida, vaya al menú de cámara rápida del smartphone. Si se desea realizar los ajustes directamente en el cabezal panorámico, pulse el botón de cámara rápida del cabezal varias veces hasta que se encienda el LED del tiempo deseado. A continuación, pulse el botón de cámara rápida dos veces sucesivas y el cabezal comienza la grabación de cámara rápida en el lapso de tiempo establecido. Si utiliza el mando a distancia, el manejo es el mismo que el descrito anteriormente. 6. Detener el modo: Pulse el botón de cámara rápida directamente en el cabezal o el botón de parada en el control remoto para seleccionar el modo. Puede salir del modo en cualquier momento. Para girar el cabezal panorámico, pulse el botón de encendido / apagado en la parte superior durante aproximadamente 3 segundos. 47 48 Manejo Nota: Cuando haya terminado el modo y no haya ninguna operación adicional durante aprox. 5 minutos, el cabezal panorámico entra en modo de espera. Esto es indicado con el encendido y apagado de las luces LED azules y rojas alternativamente. Después de aproximadamente 3 minutos en el modo de espera, el cabezal se apaga por completo automáticamente. Para sacar el cabezal del modo de espera, pulse cualquier tecla (ya sea en el mando a distancia o en el propio dispositivo). Advertencias 1. No utilice solventes químicos para limpiar el aparato. 2. No permita que el producto entre en contacto con fluidos ácidos. 3. No exponga este artefacto a gran calor o fuego. No lo guarde en ambientes de alta temperatura. 4. No aplique presión excesiva sobre el producto y no lo deje caer. SPANISH Eliminar residuos Eliminar el embalaje: Para eliminar el embalaje, tire la cartulina y el cartón en el contenedor de reciclaje de papel y los plásticos en el contenedor de plásticos. Eliminación de Residuos Eléctricos y de Equipos Electrónicos y/o de Batería por los usuarios en los hogares de la Unión Europea. Este símbolo en el producto o en el empaque indica que esto no puede eliminarse como basura casera. Debe deshacerse de sus residuos y/o batería entregándolo al esquema de devolución aplicable para el reciclaje de aparatos eléctricos y electrónicos y/o batería. Para obtener más información sobre el reciclaje de este equipo y/o batería, póngase en contacto con su oficina de la ciudad, la tienda donde adquirió el equipo o el servicio de recolección de basura. El reciclaje de materiales ayuda a conservar los recursos naturales y garantizar que se recicle de una manera que proteja el medio ambiente y la salud humana. 49 50 Advertencia de batería • Nunca desmonte, aplaste, o perfore la batería, o permita que la batería haga cortocircuito. No exponga la batería a un ambiente de alta temperatura, si la batería tiene fugas o se bombea, detenga su uso. • Siempre carguelo usando el sistema. Hay riesgo de explosión si la batería se reemplaza por otra de tipo incorrecto. • Mantenga la batería fuera del alcance de los niños. • Las baterías pueden explotar si se exponen directamente al fuego. Nunca arroje las baterías al fuego. • Nunca reemplace la batería por su cuenta; solicite al distribuidor que lo haga por usted. • Deseche las baterías usadas, observando las normas locales. • Antes de desechar el aparato, retire la batería. Precaución: La batería no se puede reemplazar de forma independiente! SPANISH Conformidad El fabricante declara que el símbolo CE ha sido aplicado al Rollei Smart ePano 360 de conformidad con los requisitos básicos y otras disposiciones pertinentes de las directivas CE siguientes: Directiva EMC 2014/30/EU Directiva RoHS 2011/65/CE Directiva RED 2014/53/EU Directiva 2012/19/EC WEEE La declaración CE de conformidad puede solicitarse a la dirección indicada en la tarjeta de garantía. 51 52 Manuale di istruzioni Dotazione 1 Smart ePano 360 2 Adattatore actioncam 3 Supporto per smartphone 4 Controllo remoto 5 Cavo USB 2 3 1 4 5 ITALIAN Specifiche tecniche Capacità batteria Corrente operativa Tensione operativa Tensione di carica Tempo di carica Funzionamento continuo Tensione nominale Corrente non di carico Velocità rotazionale panorama Velocità rotazionale time lap Rumore Carico max. Dimensioni Peso 53 400 mAh Da 50 a 300 mA Da 3,3 V a 4,2 V 4,8 V - 5,0 V Approx. 2 ore 2–3 ore (con batteria completamente carica) 4,5 V DC Max. 55 mA 1 r/min 15/30/60/90 min/r Max. 20 dB (A) 500 g H: 65 mm, Ø 59 mm 98 g Soggetto a modifiche tecniche. Gli smartphone/actioncam non sono inclusi nella confezione. Il marchio e i loghi Bluetooth® sono marchi registrati di proprietà di Bluetoth SIG, Inc. e qualsiasi utilizzo di questi marchi da parte di Rollei è autorizzato sotto licenza. Altri marchi registrati e nomi commerciali sono di proprietà dei rispettivi proprietari. 54 Spie indicatore • • • Spia rossa: La spia rossa è l‘indicatore per la ricarica. La spia rossa si accende durante la ricarica. Se il dispositivo è completamente carico, si spegne. Spia blu: Se il dispositivo è collegato con successo via Bluetooth, la spia blu resta accesa. In modalità panorama, la spia blu lampeggia. In modalità time lapse, la spia blu si spegne e la spia di indicazione time lapse lampeggia. La testa panoramica ha una batteria ricaricabile integrata. Il tempo di carica è di circa 2– 3 ore. Nota: Se si accende il dispositivo e la spia blu e rossa lampeggiano alternativamente e il dispositivo si spegne automaticamente, ciò significa che la batteria è scarica. Il dispositivo deve essere ricaricato. 1 2 3 Carica via USB Spia indicatore Interruttore On / Off, pulsante panoramica 1 2 ITALIAN 3 Spie indicatore 1 2 3 4 55 Indicazione time lapse Pulsante arresto time lapse Gamba di supporto Filettatura 1/4“ 3 Adattatore actioncam Avvitare l‘adattatore actioncam sulla vite da 1/4“ sulla parte superiore della testa panoramica. Poi fissare la propria actioncam usando l‘adattatore. 1 4 2 56 Supporto per smartphone 1 2 3 4 5 Filettatura 1/4“ Allentare Manopola Stringere Cursore 1 5 2 4 3 Fissaggio dello smartphone 1 2 Scatto verticale con smartphone 2 Scatto orizzontale con smartphone 1 Avvitare il supporto del telefono sulla vite da 1/4“ sulla parte superiore della testa panoramica. Quindi fissare il proprio smartphone sul supporto nella posizione desiderata (verticale od orizzontale). Quindi aprire il morsetto del supporto del telefono ruotando la manopola in senso antiorario, porre il proprio smartphone nel morsetto e ruotare in senso orario per fissare lo smartphone. ITALIAN Telecomando 3 4 1 2 3 4 5 Pulsante scatto panorama Pulsante Stop Pulsante accensione Pulsante scatto Pulsante time lapse 1 5 2 Se il telecomando è acceso e la spia lampeggia per 5 secondi quando si preme un qualsiasi pulsante e poi si spegne, ciò significa che la testa non è collegata. Se il telecomando è accesso e la spia lampeggia solo una volta brevemente quando si preme un qualsiasi pulsante e poi si spegne, il telecomando è collegato alla testa. Questo telecomando può funzionare con Android e iOS e offre un segnale da 2,4G per la connessione. Inoltre, la connessione è molto stabile e può funzionare per una distanza di oltre 10 m. Il telecomando ha 5 funzioni, pulsante on/off, pulsante foto, pulsante panorama, pulsante time lapse e pulsante stop. 57 58 Funzionamento 1. Portare l‘interruttore on/off su ON e il telecomando si collega automaticamente con la testa accesa. 2. Collegare la testa panoramica al proprio smartphone. Quindi avviare il Bluetooth sul proprio cellulare e collegare a Rollei Smart ePano 360. 3. Scattare foto: Aprire l‘interfaccia della fotocamera del proprio telefono cellulare. Premendo il pulsante foto sul telecomando, la fotocamera del proprio smartphone scatterà una foto. 4. Scattare foto panoramica: Per scattare foto panoramiche andare nella modalità della fotocamera del proprio smartphone. Se si preme il pulsante on/off due volte sulla testa panoramica, la testa panoramica si avvierà direttamente e ruoterà in senso orario. Se si preme il pulsante on/off tre volte sul dispositivo, esso inizia immediatamente a ruotare in senso antiorario. Se si usa il telecomando premere una volta la testa panoramica ed essere inizierà immediatamente a ruotare in senso orario e il telefono cellulare si avvia automaticamente. Se si preme due volte il pulsante panoramica, il telefono cellulare avvia automaticamente lo scatto e la testa ruoterà in senso antiorario. ITALIAN Funzionamento 5. Scatto time-lapse: Per scatti time lapse andare nella modalità time lapse della fotocamera del proprio smartphone. Se si desidera impostare la funzione time lapse direttamente sulla testa, premere una volta (ripetutamente) il pulsante time lapse per impostare il tempo desiderato. Poi premere due volte il pulsante time lampse e la testa inizierà direttamente a ruotare per il tempo impostato. Se si usa il telecomando, l‘uso è completamente lo stesso di quando si usa sulla testa stessa. 6. Arresto: Premere il pulsante time lapse sulla testa o premere il pulsante stop sul telecomando per arrestare la testa panoramica. È possibile arrestare il dispositivo in qualsiasi momento. Per spegnere premere il pulsante on/off della testa per 3 secondi. 59 60 Funzionamento Nota: Se si è arrestata completamente la testa panoramica essa andrà in modalità standby dopo 5 minuti, quindi la spia rossa e blu lampeggeranno alternativamente. Dopo che il dispositivo è in modalità standby per 3 minuti, esso si spegne automaticamente completamente. In modalità standby premere qualsiasi pulsante (sul telecomando o sulla testa) per passare alla modalità di funzionamento normale. Avvertenze 1. Non usare solventi chimici per pulire il prodotto. 2. Non spruzzare reagente fortemente acido sul prodotto. 3. Non porre il prodotto nel fuoco o riscaldare la batteria. Non conservare in ambiente ad alta temperatura. 4. Non spremere o far cadere il prodotto. ITALIAN Smaltimento Smaltire l’imballaggio: Smaltire l’imballaggio a seconda della tipologia. Gettare cartone e cartoncino con i rifiuti cartacei, le pellicole con i materiali riciclabili. Smaltimento di dispositivi elettrici ed elettronici usati e/o di batterie/accumulatori da parte di utenti domestici all’interno dell’Unione Europea. Questo simbolo, qualora riportato sul prodotto o sulla sua confezione, segnala che il prodotto non può essere smaltito con i rifiuti domestici. È necessario consegnare il proprio dispositivo usato e/o batterie/accumulatori nei punti di raccolta espressamente designati per il riciclo di dispositivi elettrici ed elettronici e/o batterie e accumulatori. È possibile ottenere ulteriori informazioni sul riciclo di questi dispositivi e/o delle batterie/accumulatori presso la propria amministrazione comunali, presso l’ufficio in cui è stato acquistato il dispositivo o presso la rispettiva attività di smaltimento. Il riciclo dei materiali contribuisce alla protezione delle risorse naturali e garantisce una modalità di riutilizzo sicura per la salute umana e per l’ambiente. 61 62 Avvertenze relative alla batteria • Non smantellare, inserire con forza o spingere la batteria. Prestare attenzione a non mandare la batteria in corto circuito. Non posizionare la batteria in luoghi in cui sia esposta a temperature elevate. Non continuare a utilizzare la batteria qualora presenti delle perdite o si gonfi. • Caricare sempre mediante il sistema. Qualora la batteria venga sostituita con una tipologia sbagliata, sussiste il pericolo di esplosione. • Tenere la batteria fuori dalla portata dei bambini. • Le batterie possono esplodere se esposte a una fiamma aperta. Non gettare le batterie nel fuoco. • Non sostituire mai la batteria personalmente; affidare quest’incarico al rivenditore. • Smaltire le batterie usate in conformità con le disposizioni locali. • Prima di smaltire il dispositivo è necessario rimuovere la batteria, per poi smaltirla separatamente. Attenzione: La batteria non può essere sostituita autonomamente! ITALIAN Conformità Il Costruttore con la presente dichiara che la marcatura CE è stata applicata al Rollei Smart ePano 360 in conformità ai requisiti di base ed altre disposizioni rilevanti delle direttive CE seguenti: Direttiva EMC 2014/30/EU Direttiva RoHS 2011/65/CE Direttiva RED 2014/53/EU Direttiva 2012/19/EC WEEE La Dichiarazione di Conformità può essere richiesta all‘indirizzo specificato sul Certificato di Garanzia. 63 64 Manual de instruções Volume da entrega 1 Smart ePano 360 2 Adaptador para Actioncam 3 Suporte para smartphone 4 Controlo remoto 5 Cabo USB 2 3 1 4 5 PORTUGUESE Dados Técnicos Capacidade da bateria Corrente de funcionamento Tensão de funcionamento Tensão de carregamento Tempo de carregamento Funcionamento contínuo Tensão nominal Corrente sem carga máx. Velocidade rotacional panorama Velocidade rotacional time lapse Ruído máx. Carga máxima Dimensões | Peso 65 400 mAh 50 até 300 mA 3,3 V até 4,2 V 4,8 V - 5,0 V Aprox. 2 horas 2–3 horas (com bateria completamente carregada) 4,5 V DC 55 mA 1 r/min 15/30/60/90 min/r 20 dB (A) 500 g H: 65 mm, Ø 59 mm | 98 g Sujeito a alterações técnicas. Os smartphones/actioncams não estão incluídos no volume da entrega. A palavra de marca Bluetooth® e os logótipos são propriedade da Bluetooth SIG, Inc., sendo que a utilização destas marcas por parte da Rollei é feita sob licença. Outros símbolos de nomes comerciais são propriedade dos respetivos proprietários. 66 Luzes indicadoras • • • LED vermelho: A luz vermelha indica o estado de carregamento do aparelho. O LED vermelho acende-se quando o aparelho está a ser carregado e apaga-se quando a bateria está completamente carregada. LED azul: Quando o aparelho estiver conectado com sucesso a um aparelho via Bluetooth, o LED azul fica permanentemente aceso. No modo panorâmico o LED azul pisca. Se ativar o modo de „time lapse“ o LED azul apaga-se e acendem-se os LEDs indicadores do „time lapse“. A cabeça panorâmica dispõe de uma bateria recarregável incorporada. O tempo de carregamento é aprox. 2–3 horas. Indicação: Se os LEDs vermelho e azul piscarem alternadamente e depois o aparelho se desligar automaticamente, significa que a bateria está vazia. Por favor, carregue novamente o aparelho. 1 2 3 Carregamento USB Luzes indicadoras Ligar/Desligar, botão modo panorâmico PORTUGUESE 1 2 3 Luzes indicadoras 1 2 3 4 Indicador „time lapse“ Terminar „time lapse“ Pernas de apoio Rosca 1/4 polegadas 3 Adaptador para Actioncam Enrosque o adaptador para a actioncam na cabeça panorâmica (rosca de 1/4 polegadas na parte superior). Posteriormente, fixe a sua actioncam no adaptador. 67 1 4 2 68 Suporte para smartphone 1 2 3 4 5 Rosca de 1/4 polegadas Soltar Botão rotativo Apertar Botão deslizante 1 5 2 4 3 Colocação do smartphone 1 2 Captura vertical com o smartphone 2 Captura horizontal com o smartphone 1 Fixe o suporte para o smartphone no parafuso de 1/4 polegadas no topo da cabeça panorâmica. Posteriormente, fixe o seu smartphone no suporte. Para tal, abra o grampo rodando o botão rotativo no sentido anti horário. Insira depois o seu smartphone no grampo (horizontal ou vertical) e fixe o telefone, rodando o botão rotativo no sentido horário. PORTUGUESE Controlo remoto 3 4 1 2 3 4 5 Captura panorâmica Botão para parar Botão ligar/desligar Botão para captura Botão „time lapse“ 1 5 2 Se o controlo remoto estiver ligado e se a luz indicadora se acender durante aproximadamente 5 segundos ao pressionar qualquer botão, significa que o controlo remoto não está conectado à cabeça. Se o controlo remoto estiver ligado e a luz indicadora piscar brevemente ao pressionar qualquer botão, então o controlo remoto está conectado à cabeça. Este controlo remoto funciona com sistemas Android e iOS e permite uma conexão de 2,4G, a qual é muito estável e tem um alcance de aprox. 10 m. O controlo remoto tem 5 funções, botão ligar/desligar, botão de captura, botão panorâmico, botão „time lapse“ e botão para parar. 69 70 Funcionamento 1. Deslize o botão de ligar/desligar para a posição ON (ligado) e o controlo remoto liga-se automaticamente à cabeça ligada. 2. Fixe o seu smartphone à cabeça panorâmica. Inicie a função de Bluetooth no seu smartphone e conecte-o ao Rollei Smart ePano 360. 3. Captura de fotografias: abra a aplicação da máquina fotográfica do seu telemóvel. Pressionando o botão de captura no controlo remoto, o seu smartphone tira fotografias. 4. Capturas panorâmicas: para efetuar capturas panorâmicas entre no modo panorâmico do seu telemóvel. Pressione duas vezes o botão ligar/desligar na cabeça panorâmica e a cabeça começa a captura panorâmica rodando no sentido horário. Prima o botão três vezes e a cabeça roda no sentido anti horário. Pressione uma vez o botão panorâmico do controlo remoto e a cabeça roda no sentido horário, iniciando-se a captura fotográfica. Pressione o botão panorâmico do controlo remoto duas vezes e a cabeça roda no sentido anti horário. PORTUGUESE Funcionamento 5. Captura “time lapse“: para iniciar a captura “time lapse“ entre no menu de “time lapse“ do smartphone. Se pretender efetuar as configurações diretamente na cabeça panorâmica, pressione várias vezes o botão “time lapse“ da cabeça panorâmica até que o LED do tempo pretendido se acenda. Posteriormente, pressione duas vezes seguidas o botão “time lapse“ e a cabeça inicia com a captura “time lapse“ no intervalo de tempo definido. Se usar o controlo remoto, a utilização é idêntica à acima descrita para a cabeça. 6. Parar o modo: pressione o botão „time lapse“ diretamente na cabeça ou o botão parar no controlo remoto para terminar o modo de funcionamento. Pode terminar o modo de funcionamento em qualquer altura. Para desligar a cabeça panorâmica pressione o botão ligar/desligar na cabeça durante aprox. 3 segundos. 71 72 Funcionamento Indicação: Se tiver terminado o modo de funcionamento e não tocar em mais nenhum botão durante aprox. 5 minutos, a cabeça panorâmica entra no modo standby. Tal é indicado pelo piscar intermitente do LED azul e vermelho. Após aprox. 3 minutos no modo standby, a cabeça desliga-se automaticamente. Para sair do modo standby, pressione qualquer botão (no controlo remoto ou no próprio aparelho). Avisos 1. Não use solventes químicos para limpar o aparelho. 2. O produto não pode entrar em contacto com reagentes ácidos. 3. Não coloque o produto junto do calor ou no fogo. Não o guarde em ambientes com temperaturas elevadas. 4. Não exerça nenhuma pressão forte sobre o produto e não o deixe cair. PORTUGUESE Eliminação Eliminação de embalagens: Elimine as embalagens após proceder à sua separação, de acordo com o tipo. Insira os componentes em papel e cartão no recipiente para papel usado, e os plásticos no recipiente para metais/plásticos, para posteriormente serem reciclados. Eliminação de equipamento elétrico e/ou eletrónico e/ou da bateria por utilizadores em casas particulares na união européia. Este símbolo no produto ou no pacote indica que o mesmo não pode ser descartado como sendo lixo doméstico. Deve descartar-se do seu equipamento e/ou bateria reciclando-os como qualquer equipamento elétrico ou eletrónico e/ou bateria. Para mais informação sobre reciclagem destes equipamentos e/ou bateria, contate o escritório local, a loja onde comprou o equipamento ou o serviço de coleta de lixo. A reciclagem de materiais ajudará a conservar os recursos naturais e a assegurar-se de que os mesmos são reciclados de forma a proteger a saúde humana e o ambiente. 73 74 Aviso da bateria • Nunca desmonte, esmague, ou perfure a bateria, ou permita que a bateria entre em curto-circuito. Não exponha a bateria a altas temperaturas ambientais, se a bateria vazar ou inchar, deixe de a usar. • Carregue-a sempre usando este sistema. Risco de explosão se a bateria for substituída por um tipo de bateria incorreto. • Mantenha a bateria fora do alcance das crianças. • As baterias podem explodir se expostas ao fogo. Nunca descarte as baterias num fogo. • Nunca substitua a bateria sozinho; peça ao revendedor para o fazer por si. • O descarte de baterias usadas deve seguir os regulamentos locais. • Antes de se descartar do dispositivo, remova a bateria. Cuidado: A bateria não pode ser substituída de forma independente! PORTUGUESE Conformidade O fabricante declara por este modo que a etiqueta CE foi aplicada ao Rollei Smart ePano 360 de acordo com os requisitos básicos e outras provisões relevantes das seguintes diretivas da CE: Diretiva EMC 2014/30/EU Diretiva RoHS 2011/65/CE Diretiva RED 2014/53/EU Diretiva 2012/19/EC WEEE A Declaração de Conformidade da CE pode ser solicitada através do endereço especificado no cartão da garantia. 75 76 Handleiding Standaard levering 1 Smart ePano 360 2 Actioncam adapter 3 Smartphonehouder 4 Afstandsbediening 5 USB-kabel 2 1 3 4 5 DUTCH Technische gegevens Batterijcapaciteit Werkende stroom Werkspanning Laadspanning Oplaadtijd Continu werken Nominale spanning Onbelaste stroom Rotatiesnelheid panorama Rotatiesnelheid time laps Geluid Max. belasting Afmetingen Gewicht 77 400 mAh 50 tot 300 mA 3,3 V tot 4,2 V 4,8 V – 5,0 V Ongeveer 2 uur 2–3 uur (met volledig opgeladen batterij) 4,5 V DC Max. 55 mA 1 r/min 15/30/60/90 min/r Max. 20 dB (A) 500 g H: 65 mm, Ø 59 mm 98 g Technische wijzigingen voorbehouden. Smartphone en Actioncam zijn niet inbegrepen. Het Bluetooth® wword en logo zijn geregistreerde handelsmerken en eigendom van Bluetooth SIG, Inc. En ieder gebruk door Rollie is onder licentie. Andere handelsnamen en merken zijn die van hun respectievelijke eigenaren. 78 Statusweergave • • • Rode led: De rode led geeft de oplaadstatus van het apparaat aan. De rode led brandt wanneer het apparaat wordt geladen en schakelt uit wanneer de batterij volledig is opgeladen. Blauwe led: Wanneer het apparaat succesvol via Bluetooth met een apparaat is verbonden, brandt de led voortdurend. In de panoramamodus knippert de blauwe led. Als u de time-lapse modus hebt geactiveerd, schakelt de blauwe led uit en de leds van de time-lapse-weergave branden. Het panoramische hoofd beschikt over een ingebouwde oplaadbare batterij. De oplaadtijd bedraagt ongeveer 2–3 uur. Aanwijzing: Als de rode en blauwe leds afwisselend oplichten en het apparaat zich daarna automatisch uitschakelt, betekent dit, dat de batterij leeg is. Laad het apparaat weer op. 1 2 3 USB-laadaansluiting Statusweergave Aan/uit, panoramaknop DUTCH 1 2 3 Statusweergave 1 2 3 4 79 Weergave time-lapse Time-lapse beëindigen Poten 1/4 inch schroefdraad 3 Actioncam adapter Schroef de actioncam adapter op het panoramische hoofd (1/4 inch schroef bovenop), bevestig vervolgens uw actioncam op de adapter. 1 4 2 80 Smartphonehouder 1 2 3 4 5 1/4 inch schroefdraad Losmaken Draaiwiel Vastzetten Smartphone inzetstuk 1 5 2 3 Uw smartphone toevoegen 1 4 1 2 Verticale opname met 2 de smartphone Horizontale opname met de smartphone Bevestig de smartphonehouder over de 1/4 inch schroef op de bovenkant van het panoramahoofd. Bevestig vervolgens uw smartphone in de houder. Open daarvoor de klem door het draaiwiel tegen de klok in te draaien. Plaats dan uw smartphone in het klemgebied (horizontaal of verticaal) en zet de telefoon vast, door het draaiwiel met de klok mee te draaien. DUTCH Afstandsbediening 3 4 1 2 3 4 5 Panorama-opnamen Stop-knop Aan-/uitschakelaar Fotoknop Time-lapse knop 1 5 2 Als de afstandsbediening is ingeschakeld en bij het indrukken van een willekeurige knop de statusweergave voor ongeveer 5 seconden blijft branden, dan heeft de afstandsbediening geen verbinding met het hoofd. Als de afstandsbediening is ingeschakeld en bij het indrukken van een willekeurige knop de statusweergave slechts kort blijft branden, dan is de afstandsbediening met het hoofd verbonden. Deze afstandsbediening kan met Android- en iOS-systemen werken en en biedt een 2,4G verbinding, die zeer stabiel is en een bereik van ongeveer 10 m heeft. De afstandsbediening heeft 5 functies, aan-/uitschakelaar, fotoknop, panoramaknop, time-lapse knop en stop-knop. 81 82 Bediening 1. Schuif de aan-/uitschakelaar op AAN en de afstandsbediening verbindt automatisch met het ingeschakelde hoofd. 2. Bevestig op smartphone op het automatische hoofd. Start de Bluetooth-functie op uw smartphone en verbindt deze met de Rollei Smart ePano 360. 3. Foto’s nemen: Open de camera-app van uw mobiele telefoon. Door het drukken op de fotoknop op de afstandsbediening, neemt uw smartphone nu foto’s. 4. Panorama-opnamen: Om panorama-opnamen uit te kunnen voeren, gaat u naar de panoramamodus van uw mobiele telefoon. Druk de aan/uit-knop op het panoramahoofd direct twee keer in en het hoofd begint met de panorama-opnamen en het hoofd draait met de klok mee. Druk drie keer op de knop en het hoofd draait tegen de klok in. Druk één keer op de panoramaknop van de afstandsbediening en het hoofd draait met de klok mee en de opname start. Door twee keer op de panoramaknop van de afstandsbediening te drukken draait het hoofd tegen de klok in. DUTCH Bediening 5. Time-lapse opname: Om time-lapse opname te starten, gaat u naar het time-lapse menu van de smartphone. Als u de instellingen direct op het panoramahoofd wilt uitvoeren, drukt u meerdere keren op de time-lapse knop van het hoofd tot het led van de gewenste tijd gaat branden. Druk vervolgens twee keer achter elkaar op de time-lapse knop en het hoofd start met de time-lapse opname in het ingestelde tijdsinterval. Als u de afstandsbediening gebruikt, is de bediening hetzelfde zoals hierboven is beschreven. 6. Modus stoppen: Druk direct op de time-lapse knop aan het hoofd of de stopknop op de afstandsbediening om de modus te beëindigen. U kunt de modus op elk moment beëindigen. Om het panoramische hoofd uit te schakelen, drukt u de aan/uit-knop op het hoofd voor ongeveer 3 seconden in. 83 84 Bediening Aanwijzing: Als u de modus hebt beëindigd en ongeveer 5 minuten lang geen andere knop hebt ingedrukt, gaat het panoramische hoofd naar de stand-by modus. Dit wordt aangegeven door het afwisselend branden van de blauwe en rode led. Na ongeveer 3 minuten in de stand-by modus schakelt het hoofd automatisch volledig uit. Om het hoofd uit de stand-by modus te halen, drukt u een willekeurige knop in (op de afstandsbediening of het apparaat zelf). Waarschuwingen 1. Gebruik geen chemische oplosmiddelen om het apparaat te reinigen. 2. Laat het product niet in contact komen met zuurhoudende middelen. 3. Stel het apparaat niet bloot aan hoge temperaturen of vuur. Bewaar het apparaat niet in omgevingen met hoge temperaturen. 4. Oefen geen overmatige druk uit op het product en laat het niet vallen DUTCH Beschikking Verpakking verpakken: Voor verwijdering, aparte verpakking in verschillende soorten. Karton en karton moeten verijderd worden als papier en folie moet worden gerecycleerd. Afvall van elektrische en elektronische apparatuur en / of batterijen door gebruikers in particuliere huishoudens in de Euopese Unie. Dit symbool op het product of op de verpakking geeft aan dat dit niet als hiushoudelijk afval kann worden verijderd. U moet uw afvaluitrusting en / of batterij weggooien door deze over te dragen aan het toepasselijke terugzettingsschema voor de recycling van elektrische en elektronische apparatuur en / of batterijn. Voor meer informatie over het recyclen van deze apparatuur en / of batterij kunt u cotact opnemen metuw stadskantoor, de winkel waar u de apparatuur of uw huishoudelijke afvalafval hebt gekocht. De recycling van materialen zal bijdragen tot het behoud van natuurlijke hulpbronnen en ervoor te zorgen dat het gerecycleerd wordt op een manier die de menslijke geondheid en het milieu beschermt. 85 86 Batterij waarschuwing • De batterij nooit ontmantelen, verpletteren of doordringen of de batterij kortsluiten. Laat de batterij niet blootgesteld worden in een omgeving met hoge temperaturen, als de batterij lekt of buigt, stop dan met gebruik. • Laad altijd op met de oplader. Gevaar voor explosie als de batterij vervangen wordt door een onjuist type. • Houd de batterij buiten bereik van kinderen. • Batterijen kunnen ontploffen als ze blootgesteld worden aan blote brand. Verwijder nooit batterijen in een brand. • Vervang batterijen nooit zelf; laat deze taak over aan de dealer. • Weggooien van gebruikte batterijen die de plaatselijke voorschriften houden. • Voordat u het apparaat weggooit, moet de batterij worden verwijderd en apart worden weggegooid. Om de batterij te verwijderen, opent u de behuizing met de kruiskopschroeven. Let op: De batterij mag niet onafhankelijk worden vervangen! DUTCH Conformiteit De fabrikant verklaart hierbij dat de CE-markering is aangebracht op de Rollei Smart ePano 360 in overeenstemming met de fundamentele eisen en andere relevante bepalingen van de volgende CE-richtlijnen: EMC 2014/30/EU richtlijn RoHS 2011/65/CE richtlijn RED 2014/53/EU richtlijn 2012/19/EC WEEE richtlijn De EC-verklaring van overeenstemming kan worden aangevraagd via het adres vermeld op de garantiekaart. 87 88 使用說明 標準配置 1 Smart ePano 360 2 運動攝影機適配器 3 智慧型手機支架 4 遙控 5 USB連接線 2 3 1 4 5 中國傳統 技術規格 電池容量 工作電流 工作電壓 充電電壓 充電時間 連續工作時間 額定電壓 空載電流 全景拍攝旋轉速度 縮時攝影旋轉速度 雜訊 最大承重 尺寸 重量 89 400毫安培時 50至300毫安培 mA 3.3伏特至4.2伏特 4.8伏特-5.0伏特 大約2小時 2-3小時(在電池充滿的情況下) 4.5伏特,直流 最大電流55毫安培 1圈/分鐘 15/30/60/90分鐘/圈 最大20分貝(A) 500克 高:65毫米;直徑:59毫米 98克 如有技術變化,請以變化為準。 智能手機和運動相機不包括在內。 Bluetooth®文字商標和徽標是Bluetooth SIG Inc.擁有的註冊商標,Rollei對此類商 標的任何使用均已獲得許可。其他商標和 商品名稱是各自所有者的商品名稱 。 90 指示燈 • • • 紅燈:紅燈顯示正在充電。充電時紅燈亮起。裝置充滿電後紅燈熄 滅。 藍燈:當裝置通過藍牙成功連接後,藍燈將長亮。當處於全景模式 時,藍燈閃爍。在縮時模式下,藍燈將熄滅,縮時指示燈將閃爍。 全景雲台內置可充電電池。充電時長約2-3小時。 注意:如果開啟裝置後,藍燈和紅燈交替閃爍,然後裝置自動關閉,這 意味著電池沒有電。裝置需要充電。 1 2 3 USB充電 指示燈 開/關切換開關,全景拍攝按鈕 1 2 中國傳統 3 指示燈 1 2 3 4 91 縮時指示 縮時停止按鈕 支撐腳管 直徑1/4英吋螺紋 1 3 運動攝影機適配器 將運動攝影機適配器擰到全景雲 台頂部的直徑1/4英吋螺絲上。 然後請使用適配器連接運動攝影機。 4 2 92 智慧型手機支架 1 2 3 4 5 直徑1/4英吋螺紋 鬆開 旋鈕 擰緊 滑塊 1 5 2 4 3 連接智慧型手機 1 2 智慧型手機垂直拍攝 智慧型手機水平拍攝 1 2 將手機支架擰到全景雲台 頂部的1/4英吋螺絲上。 然後將智慧型手機裝到支架 上並調整至想要的位置(垂直或水平)。逆時針轉動旋鈕,打開手機支架 的夾子,將智慧型手機放入夾子,順時針轉動旋鈕,將智慧型手機固定 穩妥。 中國傳統 遙控 3 4 1 2 3 4 5 全景拍攝按鈕 停止按鈕 電源按鈕 拍攝按鈕 縮時按鈕 1 5 2 如果遙控開啟,當您按下任何按鈕時,指示燈閃爍大約5秒後熄滅,意味 著沒有連接雲台。如果遙控開啟,當您按下任何按鈕時,指示燈僅短暫 閃爍一次後熄滅,意味著遙控連接了雲台。 該遙控可以與Android和iOS協同工作並提供2.4G信號連接。因此連接 非常穩定,工作距離可長達10米。遙控有5個功能,開/關按鈕、拍照按 鈕、全景按鈕,縮時按鈕和停止按鈕。 93 94 操作 1. 滑動開/關切換開關到「開」的位置,遙控會自動連接已啟動的雲台。 2. 將智慧型手機與全景雲台相連。開啟手機上的藍牙並連接Rollei Smart ePano 360。 3. 拍照:打開手機上的相機介面。按遙控上的拍照按鈕,智慧型手機的 相機將開始拍照。 4. 拍攝全景照:要拍攝全景照,請進入智慧型手機相機的全景模式。 如果按全景雲台上的開/關按鈕兩次,全景雲台將直接啟動並順時針 旋轉。如果按裝置上的開/關按鈕三次,它將立即逆時針旋轉。 如果使用遙控按全景按鈕一次,全景雲台會立即啟動並順時針旋轉, 手機會自動啟動。如果按全景按鈕兩次,手機會自動開始拍攝,雲台 會逆時針旋轉。 5. 縮時拍攝:要縮時拍攝,請進入智慧型手機相機的縮時模式。 如想要在雲台上直接設定縮時功能,則(反復)按縮時按鈕一次來設 定所需時間。然後按縮時按鈕兩次,雲台會直接啟動並在設定時間內 旋轉。 如果使用遙控,使用方法和在雲台上使用完全一樣。 中國傳統 操作 6. 停止工作:按雲台上的縮時按鈕或按遙控上的停止按鈕來停止全景雲 台。您可以在任何時間停用裝置。要關閉裝置,按雲台上的開/關按 鈕約3秒。 注意:如果您已停用全景雲台,5分鐘後它將進入待機模式,然後紅藍指 示燈會交替閃爍。處於待機模式約3分鐘後,裝置將自動徹底關閉。在待 機模式下,按任意按鈕(遙控上或雲台上)即可進入正常工作模式。 警告說明 1. 請勿使用任何化學溶劑清潔本產品。 2. 請勿讓強酸試劑濺到本產品上。 3. 請勿將本產品投入火中或加熱電池。請勿將本產品存放在高溫環境 中。 4. 請勿擠壓本產品或使其跌落。 95 96 使用说明 标准配置 1 Smart ePano 360 2 运动摄像机适配器 3 智能手机支架 4 遥控 5 USB连接线 2 3 1 4 5 简体中文 技术规格 电池容量 工作电流 工作电压 充电电压 充电时间 连续工作时间 额定电压 空载电流 全景拍摄旋转速度 延时拍摄旋转速度 噪声 最大承重 尺寸 重量 97 400毫安时 50至300毫安 mA 3.3伏特至4.2伏特 4.8伏特-5.0伏特 大约2小时 2-3小时(在电池充满的情况下) 4.5伏特,直流 最大电流55毫安 1圈/分钟 15/30/60/90分钟/圈 最大20分贝(A) 500克 高:65毫米;直径:59毫米 98克 如有技术变化,请以变化为准。 智能手机和运动相机不包括在内。 Bluetooth®文字商标和徽标是Bluetooth SIG Inc.拥有的注册商标,Rollei对此类商 标的任何使用均已获得许可。其他商标和 商品名称是各自所有者的商品名称 。 98 指示灯 • • • 红灯:红灯显示正在充电。充电时红灯亮起。设备充满电后红灯熄 灭。 蓝灯:当设备通过蓝牙成功连接后,蓝灯将常亮。当处于全景模式 时,蓝灯闪烁。在延时模式下,蓝灯将熄灭,延时指示灯将闪烁。 全景云台内置可充电电池。充电时长约2-3小时。 注意:如果开启设备后,蓝灯和红灯交替闪烁,然后设备自动关闭,这 意味着电池没有电。设备需要充电。 1 2 3 USB充电 指示灯 开/关切换开关,全景拍摄按钮 1 2 简体中文 3 指示灯 1 2 3 4 99 延时指示 延时停止按钮 支撑脚管 直径1/4英寸螺纹 1 3 运动摄像机适配器 将运动摄像机适配器拧到全景云台 顶部的直径1/4英寸螺丝上。 然后请使用适配器连接运动摄像机。 4 2 100 智能手机支架 1 2 3 4 5 1/4英寸螺纹 拧松 旋钮 拧紧 滑块 1 5 2 4 3 连接智能手机 1 2 智能手机垂直拍摄 智能手机水平拍摄 1 2 将手机支架拧到全景云 台顶部的1/4英寸螺丝上。 然后将智能手机装到支架 上并调节至想要的位置(垂直或水平)。 逆时针转动旋钮,打开手机支架的夹子,将智能手机放入夹子, 顺时针转动旋钮,将智能手机固定稳妥。 简体中文 遥控 3 4 1 2 3 4 5 全景拍摄按钮 停止按钮 电源按钮 拍摄按钮 延时按钮 1 5 2 如果遥控开启,当您按下任何按钮时,指示灯闪烁大约5秒后熄灭,意味 着没有连接云台。如果遥控开启,当您按下任何按钮时,指示灯仅短暂 闪烁一次后熄灭,意味着遥控连接了云台。 该遥控可以与Android和iOS协同工作并提供2.4G信号连接。因此连接 非常稳定,工作距离可长达10米。遥控有5个功能,开/关按钮、拍照按 钮、全景按钮,延时按钮和停止按钮。 101 102 操作 1. 滑动开/关切换开关到“开”的位置,遥控会自动连接已启动的云台。 2. 将智能手机与全景云台相连。开启手机上的蓝牙并连接Rollei Smart ePano 360。 3. 拍照:打开手机上的相机界面。按遥控上的拍照按钮,智能手机的相 机将开始拍照。 4. 拍摄全景照:要拍摄全景照,请进入智能手机相机的全景模式。 如果按全景云台上的开/关按钮两次,全景云台将直接启动并顺时针 旋转。如果按设备上的开/关按钮三次,它将立即逆时针旋转。 如果使用遥控按全景按钮一次,全景云台会立即启动并顺时针旋转, 手机会自动启动。如果按全景按钮两次,手机会自动开始拍摄,云台 会逆时针旋转。 5. 延时拍摄:要延时拍摄,请进入智能手机相机的延时模式。 如想要在云台上直接设置延时功能,则(反复)按延时按钮单次来设 置所需时间。然后按延时按钮两次,云台会直接启动并在设置时间内 旋转。 如果使用遥控,使用方法和在云台上使用完全一样。 简体中文 操作 6. 停止工作:按云台上的延时按钮或按遥控上的停止按钮来停止全景云 台。您可以在任何时间停用设备。要关闭设备,按云台上的开/关按钮 约3秒。 注意:如果您已停用全景云台,5分钟后它将进入待机模式,然后红蓝指 示灯会交替闪烁。处于待机模式约3分钟后,设备将自动彻底关闭。在待 机模式下,按任意按钮(遥控上或云台上)即可进入正常工作模式。 警告说明 1. 请勿使用任何化学溶剂清洁本产品。 2. 请勿让强酸试剂溅到本产品上。 3. 请勿将本产品投入火中或加热电池。请勿将本产品存放在高温环境 中。 4. 请勿挤压本产品或使其跌落。 103 www.rollei.de/social www.rollei.com/social For Europe For Asia Distribution: Rollei GmbH & Co. KG In de Tarpen 42 D-22848 Norderstedt 分銷: Rollei HK Limited 香港九龍觀塘成業街 7 號 寧晉中心 17/F D2 Service Hotline: +49 40 270750270 分销: Rollei HK Limited 香港九龙观塘成业街 7 号 宁晋中心 17/F D2 Return Service: Rollei Service Deutschland Denisstraße 28a D-67663 Kaiserslautern Tel +852 2377 9023 Fax +852 2366 8091 Email [email protected] www.cn.rollei.com/social www.rollei.com-
 1
1
-
 2
2
-
 3
3
-
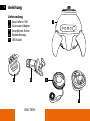 4
4
-
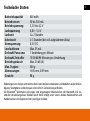 5
5
-
 6
6
-
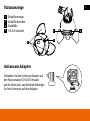 7
7
-
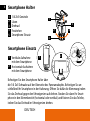 8
8
-
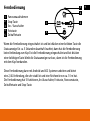 9
9
-
 10
10
-
 11
11
-
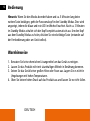 12
12
-
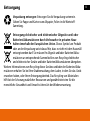 13
13
-
 14
14
-
 15
15
-
 16
16
-
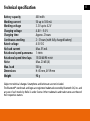 17
17
-
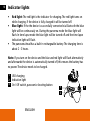 18
18
-
 19
19
-
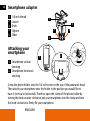 20
20
-
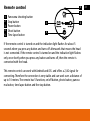 21
21
-
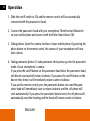 22
22
-
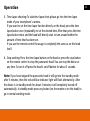 23
23
-
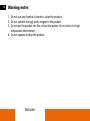 24
24
-
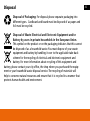 25
25
-
 26
26
-
 27
27
-
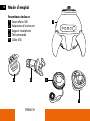 28
28
-
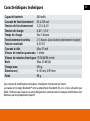 29
29
-
 30
30
-
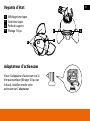 31
31
-
 32
32
-
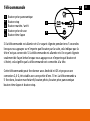 33
33
-
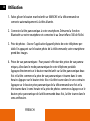 34
34
-
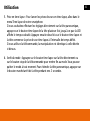 35
35
-
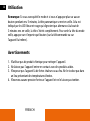 36
36
-
 37
37
-
 38
38
-
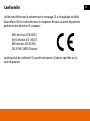 39
39
-
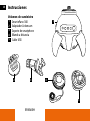 40
40
-
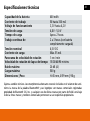 41
41
-
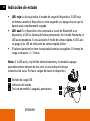 42
42
-
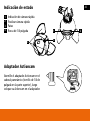 43
43
-
 44
44
-
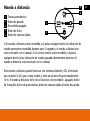 45
45
-
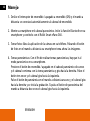 46
46
-
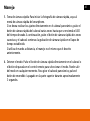 47
47
-
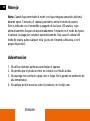 48
48
-
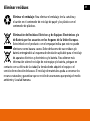 49
49
-
 50
50
-
 51
51
-
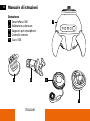 52
52
-
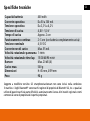 53
53
-
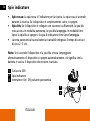 54
54
-
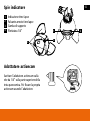 55
55
-
 56
56
-
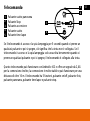 57
57
-
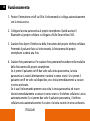 58
58
-
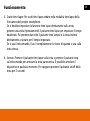 59
59
-
 60
60
-
 61
61
-
 62
62
-
 63
63
-
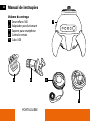 64
64
-
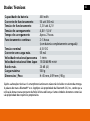 65
65
-
 66
66
-
 67
67
-
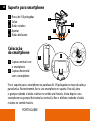 68
68
-
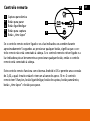 69
69
-
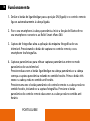 70
70
-
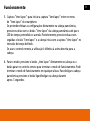 71
71
-
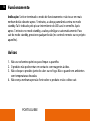 72
72
-
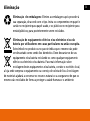 73
73
-
 74
74
-
 75
75
-
 76
76
-
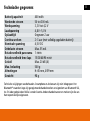 77
77
-
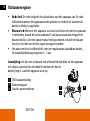 78
78
-
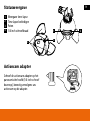 79
79
-
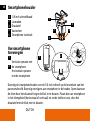 80
80
-
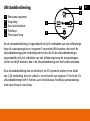 81
81
-
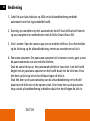 82
82
-
 83
83
-
 84
84
-
 85
85
-
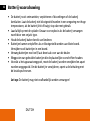 86
86
-
 87
87
-
 88
88
-
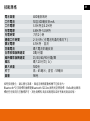 89
89
-
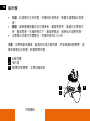 90
90
-
 91
91
-
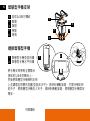 92
92
-
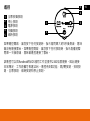 93
93
-
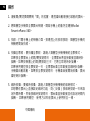 94
94
-
 95
95
-
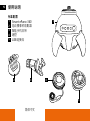 96
96
-
 97
97
-
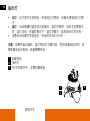 98
98
-
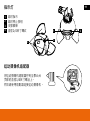 99
99
-
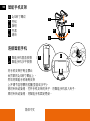 100
100
-
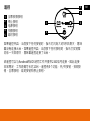 101
101
-
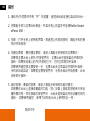 102
102
-
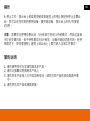 103
103
-
 104
104


in andere talen
- English: Rollei Smart ePano 360 User manual
- italiano: Rollei Smart ePano 360 Manuale utente
- français: Rollei Smart ePano 360 Manuel utilisateur
- español: Rollei Smart ePano 360 Manual de usuario
- Deutsch: Rollei Smart ePano 360 Benutzerhandbuch
- português: Rollei Smart ePano 360 Manual do usuário