
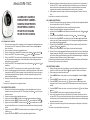
AANMELDEN CAMERA
ENREGISTRER CAMÉRA
KAMERA REGISTRIEREN
REGISTERING CAMERA
REGISTRAR CÁMARA
REGISTRARE CAMERA
NL: AANMELDEN CAMERA:
1. Neem de nieuwe camera uit de verpakking, sluit de meegeleverde voedingsadapter aan
en doe deze in een 230V stopcontact. Schakel de camera in door schakelaar naar
boven te schuiven.
2. Neem een paperclip en buig deze gedeeltelijk open.
3. Druk op de ouder-unit op toets MENU en blader met de toetsen of naar de optie .
4. Druk op toets SELECT en gebruik de toetsen of om de optie te selecteren.
5. Druk op toets SELECT en selecteer de toetsen of een nog niet gebruikt cameranum-
mer die zwart worden weergegeven. Cameranummers die in de achtergrond worden
weergegeven, zijn al in gebruik.
6. Druk op toets SELECT en bevestig de keuze door met de toetsen of het icoon “ “ te
selecteren.
7. Druk op toets SELECT, het pictogram van een zand- loper verschijnt in het display.
8. Neem nu de gebogen paperclip en druk hiermee in het kleine gaatje onder in de camera
(naast het woordje PAIR). Achter dit gaatje zit een klein drukknopje. Houd met de paper-
clip dit knopje ingedrukt totdat na ongeveer 5 seconden het power lampje op de extra
camera snel gaat knipperen.
9. Na enkele seconden verschijnt het beeld van de nieuwe camera op het scherm van de
ouder-unit.
De camera is nu aangemeld en kan gebruikt worden.
FR: ENREGISTRER CAMÉRA
1. Retirez la nouvelle caméra de son emballage, connectez l’adaptateur secteur fourni et
insérez-la dans une prise murale de 230V. Faites glisser l’interrupteur vers le haut pour
allumer la caméra.
2. Prenez un trombone et pliez-le partiellement ouvert.
3. Appuyez sur le bouton MENU et utilisez le bouton ou pour sélectionner l’option .
4. Appuyez sur le bouton SELECT et utilisez le bouton ou pour sélectionner l’option .
5. Appuyez sur le bouton SELECT et utilisez le bouton ou pour sélectionner un numéro
de caméra libre aché en noir. Les numéros de caméra achés en arrière-plan sont déjà
utilisés.
6. Appuyez sur le bouton SELECT et conrmez votre choix en sélectionnant l’icône “ ” avec
le bouton ou .
7. Appuyez sur le bouton SELECT et une icône de sablier apparaît à l’écran.
Alecto DVM-150C
8. Maintenant, utilisez le trombone plié pour appuyer sur le petit trou au bas de la caméra (à
côté du mot PAIR). Il existe un petit bouton-poussoir à l’intérieur de ce trou. Maintenez ce
bouton enfoncé avec le trombone jusqu’à ce que le voyant d’alimentation de la caméra
supplémentaire se mette à clignoter rapidement au bout d’environ 5 secondes.
9. Après quelques secondes, l’image de la nouvelle caméra apparaît à l’écran de l’unité pa-
rents.
La caméra est connectée et peut être utilisée.
DE: KAMERA REGISTRIEREN:
1. Nehmen Sie die neue Kamera aus der Verpackung, schließen Sie das mitgelieferte Netzteil
an und stecken Sie es in eine 230-V-Steckdose.
2. Schieben Sie den Schalter nach oben, um die Kamera einzuschalten.
3. Nehmen Sie eine Büroklammer und biegen sie teilweise auf.
4. Drücken Sie die Taste MENU an der Elterneinheit und wählen Sie mit der Taste oder die
Option .
5. Drücken Sie die Taste SELECT und wählen Sie mit der oder -Taste die Option .
6. Drücken Sie die Taste SELECT und wählen Sie mit der Taste oder eine freie Kamera-
nummer aus, die in Schwarz angezeigt wird. Die im Hintergrund angezeigten Kameranum-
mern werden derzeit bereits verwendet.
7. Drücken Sie die Taste SELECT und bestätigen Sie Ihre Auswahl, indem Sie das Symbol “
” mit der Taste oder auswählen.
8. Drücken Sie die Taste SELECT und im Display erscheint ein Sanduhrsymbol.
9. Drücken Sie nun mit der gebogenen Büroklammer auf das kleine Loch in der Unterseite der
Kamera (neben dem Wort PAIR). In diesem Loch bendet sich ein kleiner Druckknopf. Hal-
ten Sie diese Taste mit der Büroklammer gedrückt, bis die Betriebsanzeige der zusätzlichen
Kamera nach etwa 5 Sekunden schnell zu blinken beginnt.
10. Nach einigen Sekunden erscheint das Bild der neuen Kamera im Display der Elterneinheit.
Die Kamera ist jetzt registriert und betriebsbereit.
GB: REGISTERING CAMERA:
1. Remove the new camera from its packaging, connect the supplied power adaptor and
insert it into a 230V wall socket. Slide the switch upwards to switch on the camera.
2. Take a paper clip and bend it partially open.
3. Press the MENU button on the parent unit and use the or button to select the op-
tion.
4. Press the SELECT button and use the or button to select the option.
5. Press the SELECT button and use the or button to select a free camera number
displayed in black. Camera numbers shown in the background are currently being used
already.
6. Press the SELECT button and conrm your choice by selecting the “ ” icon with the or
button.
7. Press the SELECT button and an hourglass icon appears in the display.
8. Now use the bent paper clip to press the little hole in the bottom of the camera (next to
the word PAIR). There’s a small push-button inside this hole. Keep this button depressed
with the paper clip until the power indicator on the additional camera starts ashing rapidly
after approximately 5 seconds.
9. After several seconds the image of the new camera appears in the display of the parent
unit.
The camera is now registered and ready for use.

ES: REGISTRAR CÁMARA:
1. Extraiga la nueva cámara de su embalaje, conecte el adaptador de alimentación e inserte
en una toma de corriente de 230 V. Deslice el interruptor de hacia arriba para conectar la
cámara.
2. Coja un clip y cúrvelo para abrirlo.
3. Pulse el botón MENU en la unidad parental y use el botón o para seleccionar la opción
.
4. Pulse el botón SELECT y use el botón o para seleccionar la opción .
5. Pulse el botón SELECT y use el botón o para seleccionar el número de la cámara vi-
sualizada en negro. Los números de la cámara mostrados en el fondo son las que se están
utilizando actualmente.
6. Pulse el botón SELECT y conrme su elección seleccionando el icono “ ” con el botón
o .
7. Pulse el botón SELECT y un icono del reloj de arena se mostrará en pantalla.
8. Ahora use el clip curvado para pulsar el pequeño oricio en la parte inferior de la cámara
(junto a la palabra PAIR). Hay un pequeño botón pulsador en el interior del oricio. Manten-
ga pulsado este botón con el clip hasta que el indicador de corriente en la cámara adicional
parpadee rápidamente transcurridos aproximadamente 5 segundos.
9. Después de varios segundos aparece en la pantalla de la unidad parental la imagen de la
nueva cámara.
La cámara ya está registrada y lista para su uso.
I T: REGISTRARE CAMERA:
1. Rimuovere la nuova telecamera dall’imballaggio, collegare l’adattatore elettrico fornito,
inserirlo in una presa a muro da 230 V. Scorrere l’interruttore verso l’alto per accendere
la telecamera.
2. Prendere una graetta e piegarla parzialmente aperta.
3. Premere il pulsante MENU sull’unità principale usare il pulsante o il pulsante per selezio-
nare l’opzione .
4. Premere il pulsante SELECT e usare il pulsante o per scorrere l’opzione .
5. Premere il pulsante SELECT e usare il pulsante o per selezionare il numero della.
telecamera libera visuaizzata in nero. I numeri della telecamera mostrata in sottofondo sono
stati già usati al momento.
6. Premere il pulsante SELECT e conferma la tua scelta selezionando l’icona “ ” con il
pulsante o .
7. Premere il pulsante SELECT e apparirà un’icona a clessidra sul display.
8. Ora usare la graetta piegata per premere il piccolo foro alla base della telecamera (accan-
to alla parola PAIR). C’è un pulsante push all’interno del foro. Tieni il pulsante non premuto
con la graetta no a che l’indicatore di accensione sulla telecamera aggiuntiva inizia a a
lampeggiare rapidamente dopo circa 5 secondi.
9. Dopo diversi secondi l’immagine della nuova telecamera apparirà sul display dell’unità prin-
cipale.
La camera è ora registrata e pronta per l’uso.
V1.0
Service
Help
Service Help
WWW.ALECTO.NL
Hesdo, Australiëlaan 1
5232 BB, ‘s-Hertogenbosch
The Netherlands
WWW.ALECTO.NL
Hesdo, Australiëlaan 1, 5232 BB,
‘s-Hertogenbosch,
The Netherlands
VERKLARING VAN CONFORMITEIT
Hierbij verklaar ik, Hesdo, dat het type radioapparatuur Alecto DVM-150C conform is met Richtlijn
2014/53/EU. De volledige tekst van de EU-conformiteitsverklaring kan worden geraadpleegd op
het volgende internetadres: http://DOC.hesdo.com/DVM-150-DOC.pdf
Het gebruik is toegestaan in alle landen van de EU. In Frankrijk, Italië, Rusland en de Oekraïne is
alleen gebruik binnenhuis toegestaan.
DÉCLARATION DE CONFORMITÉ
Le soussigné, Hesdo, déclare que l’équipement radioélectrique du type Alecto DVM-150C est
conforme à la directive 2014/53/UE. Le texte complet de la déclaration UE de conformité est dis-
ponible à l’adresse internet suivante: http://DOC.hesdo.com/DVM-150-DOC.pdf
L’utilisation de cet équipement est autorisée dans tous les pays de l’UE. En France, Italie, Russie
et Ukraine, uniquement l’utilisation à l’intérieur est autorisée.
ÜBEREINSTIMMUNGSERKLÄRUNG
Hiermit erklärt Hesdo, dass der Funkanlagentyp Alecto DVM-150C der Richtlinie 2014/53/EU ent-
spricht. Der vollständige Text der EU-Konformitätserklärung ist unter der folgenden Internetadres-
se verfügbar: http://DOC.hesdo.com/DVM-150-DOC.pdf
Dieses Gerät darf in allen Ländern der EU verwendet werden. In Frankreich, Italien, Russland und
der Ukraine ist nur die Anwendung im Innenbereich zulässig.
DECLARATION OF CONFORMITY
Hereby, Hesdo declares that the radio equipment type Alecto DVM-150C is in compliance with
directive 2014/53/EU. The full text of the EU declaration of conformity is available at the following
internet address: http://DOC.hesdo.com/DVM-150-DOC.pdf
Use of this equipment is allowed in all countries of the EU. In France, Italy, Russia and Ukraine,
only indoor use is allowed.
DECLARACIÓN DE CONFORMIDAD
Por la presente, Hesdo declara que el tipo de equipo radioeléctrico Alecto DVM-150C es conforme
con la Directiva 2014/53/UE. El texto completo de la declaración UE de conformidad está disponi-
ble en la dirección Internet siguiente: http://DOC.hesdo.com/DVM-150-DOC.pdf
El uso de este equipo está permitido en todos los países de la UE. En Francia, Italia, Rusia y Ucra-
nia, solamente se permite el uso en interiores.
DICHIARAZIONE DI CONFORMITÀ
Il fabbricante, Hesdo, dichiara che il tipo di apparecchiatura radio Alecto DVM-150C è conforme
alla direttiva 2014/53/UE. Il testo completo della dichiarazione di conformità UE è disponibile al
seguente indirizzo Internet: http://DOC.hesdo.com/DVM-150-DOC.pdf
L’uso di questo apparecchio è consentito in tutti i paesi della UE. In Francia, Italia, Russia e Ucraina,
è consentito solo l’uso interno.
Pagina wordt geladen...
Documenttranscriptie
Alecto DVM-150C AANMELDEN CAMERA ENREGISTRER CAMÉRA KAMERA REGISTRIEREN REGISTERING CAMERA REGISTRAR CÁMARA REGISTRARE CAMERA NL: AANMELDEN CAMERA: 1. Neem de nieuwe camera uit de verpakking, sluit de meegeleverde voedingsadapter aan en doe deze in een 230V stopcontact. Schakel de camera in door schakelaar naar boven te schuiven. 2. Neem een paperclip en buig deze gedeeltelijk open. 3. Druk op de ouder-unit op toets MENU en blader met de toetsen of naar de optie . 4. Druk op toets SELECT en gebruik de toetsen of om de optie te selecteren. 5. Druk op toets SELECT en selecteer de toetsen of een nog niet gebruikt cameranummer die zwart worden weergegeven. Cameranummers die in de achtergrond worden weergegeven, zijn al in gebruik. 6. Druk op toets SELECT en bevestig de keuze door met de toetsen of het icoon “ “ te selecteren. 7. Druk op toets SELECT, het pictogram van een zand- loper verschijnt in het display. 8. Neem nu de gebogen paperclip en druk hiermee in het kleine gaatje onder in de camera (naast het woordje PAIR). Achter dit gaatje zit een klein drukknopje. Houd met de paperclip dit knopje ingedrukt totdat na ongeveer 5 seconden het power lampje op de extra camera snel gaat knipperen. 9. Na enkele seconden verschijnt het beeld van de nieuwe camera op het scherm van de ouder-unit. De camera is nu aangemeld en kan gebruikt worden. FR: ENREGISTRER CAMÉRA 1. Retirez la nouvelle caméra de son emballage, connectez l’adaptateur secteur fourni et insérez-la dans une prise murale de 230V. Faites glisser l’interrupteur vers le haut pour allumer la caméra. 2. Prenez un trombone et pliez-le partiellement ouvert. 3. Appuyez sur le bouton MENU et utilisez le bouton ou pour sélectionner l’option . 4. Appuyez sur le bouton SELECT et utilisez le bouton ou pour sélectionner l’option . 5. Appuyez sur le bouton SELECT et utilisez le bouton ou pour sélectionner un numéro de caméra libre affiché en noir. Les numéros de caméra affichés en arrière-plan sont déjà utilisés. 6. Appuyez sur le bouton SELECT et confirmez votre choix en sélectionnant l’icône “ ” avec le bouton ou . 7. Appuyez sur le bouton SELECT et une icône de sablier apparaît à l’écran. 8. Maintenant, utilisez le trombone plié pour appuyer sur le petit trou au bas de la caméra (à côté du mot PAIR). Il existe un petit bouton-poussoir à l’intérieur de ce trou. Maintenez ce bouton enfoncé avec le trombone jusqu’à ce que le voyant d’alimentation de la caméra supplémentaire se mette à clignoter rapidement au bout d’environ 5 secondes. 9. Après quelques secondes, l’image de la nouvelle caméra apparaît à l’écran de l’unité parents. La caméra est connectée et peut être utilisée. DE: KAMERA REGISTRIEREN: 1. Nehmen Sie die neue Kamera aus der Verpackung, schließen Sie das mitgelieferte Netzteil an und stecken Sie es in eine 230-V-Steckdose. 2. Schieben Sie den Schalter nach oben, um die Kamera einzuschalten. 3. Nehmen Sie eine Büroklammer und biegen sie teilweise auf. 4. Drücken Sie die Taste MENU an der Elterneinheit und wählen Sie mit der Taste oder die Option . 5. Drücken Sie die Taste SELECT und wählen Sie mit der oder -Taste die Option . 6. Drücken Sie die Taste SELECT und wählen Sie mit der Taste oder eine freie Kameranummer aus, die in Schwarz angezeigt wird. Die im Hintergrund angezeigten Kameranummern werden derzeit bereits verwendet. 7. Drücken Sie die Taste SELECT und bestätigen Sie Ihre Auswahl, indem Sie das Symbol “ ” mit der Taste oder auswählen. 8. Drücken Sie die Taste SELECT und im Display erscheint ein Sanduhrsymbol. 9. Drücken Sie nun mit der gebogenen Büroklammer auf das kleine Loch in der Unterseite der Kamera (neben dem Wort PAIR). In diesem Loch befindet sich ein kleiner Druckknopf. Halten Sie diese Taste mit der Büroklammer gedrückt, bis die Betriebsanzeige der zusätzlichen Kamera nach etwa 5 Sekunden schnell zu blinken beginnt. 10. Nach einigen Sekunden erscheint das Bild der neuen Kamera im Display der Elterneinheit. Die Kamera ist jetzt registriert und betriebsbereit. GB: REGISTERING CAMERA: 1. Remove the new camera from its packaging, connect the supplied power adaptor and insert it into a 230V wall socket. Slide the switch upwards to switch on the camera. 2. Take a paper clip and bend it partially open. 3. Press the MENU button on the parent unit and use the or button to select the option. 4. Press the SELECT button and use the or button to select the option. 5. Press the SELECT button and use the or button to select a free camera number displayed in black. Camera numbers shown in the background are currently being used already. 6. Press the SELECT button and confirm your choice by selecting the “ ” icon with the or button. 7. Press the SELECT button and an hourglass icon appears in the display. 8. Now use the bent paper clip to press the little hole in the bottom of the camera (next to the word PAIR). There’s a small push-button inside this hole. Keep this button depressed with the paper clip until the power indicator on the additional camera starts flashing rapidly after approximately 5 seconds. 9. After several seconds the image of the new camera appears in the display of the parent unit. The camera is now registered and ready for use. ES: REGISTRAR CÁMARA: 1. Extraiga la nueva cámara de su embalaje, conecte el adaptador de alimentación e inserte en una toma de corriente de 230 V. Deslice el interruptor de hacia arriba para conectar la cámara. 2. Coja un clip y cúrvelo para abrirlo. 3. Pulse el botón MENU en la unidad parental y use el botón o para seleccionar la opción . 4. Pulse el botón SELECT y use el botón o para seleccionar la opción . 5. Pulse el botón SELECT y use el botón o para seleccionar el número de la cámara visualizada en negro. Los números de la cámara mostrados en el fondo son las que se están utilizando actualmente. 6. Pulse el botón SELECT y confirme su elección seleccionando el icono “ ” con el botón o . 7. Pulse el botón SELECT y un icono del reloj de arena se mostrará en pantalla. 8. Ahora use el clip curvado para pulsar el pequeño orificio en la parte inferior de la cámara (junto a la palabra PAIR). Hay un pequeño botón pulsador en el interior del orificio. Mantenga pulsado este botón con el clip hasta que el indicador de corriente en la cámara adicional parpadee rápidamente transcurridos aproximadamente 5 segundos. 9. Después de varios segundos aparece en la pantalla de la unidad parental la imagen de la nueva cámara. La cámara ya está registrada y lista para su uso. IT: REGISTRARE CAMERA: 1. Rimuovere la nuova telecamera dall’imballaggio, collegare l’adattatore elettrico fornito, inserirlo in una presa a muro da 230 V. Scorrere l’interruttore verso l’alto per accendere la telecamera. 2. Prendere una graffetta e piegarla parzialmente aperta. 3. Premere il pulsante MENU sull’unità principale usare il pulsante o il pulsante per selezionare l’opzione . 4. Premere il pulsante SELECT e usare il pulsante o per scorrere l’opzione . 5. Premere il pulsante SELECT e usare il pulsante o per selezionare il numero della. telecamera libera visuaizzata in nero. I numeri della telecamera mostrata in sottofondo sono stati già usati al momento. 6. Premere il pulsante SELECT e conferma la tua scelta selezionando l’icona “ ” con il pulsante o . 7. Premere il pulsante SELECT e apparirà un’icona a clessidra sul display. 8. Ora usare la graffetta piegata per premere il piccolo foro alla base della telecamera (accanto alla parola PAIR). C’è un pulsante push all’interno del foro. Tieni il pulsante non premuto con la graffetta fino a che l’indicatore di accensione sulla telecamera aggiuntiva inizia a a lampeggiare rapidamente dopo circa 5 secondi. 9. Dopo diversi secondi l’immagine della nuova telecamera apparirà sul display dell’unità principale. La camera è ora registrata e pronta per l’uso. VERKLARING VAN CONFORMITEIT Hierbij verklaar ik, Hesdo, dat het type radioapparatuur Alecto DVM-150C conform is met Richtlijn 2014/53/EU. De volledige tekst van de EU-conformiteitsverklaring kan worden geraadpleegd op het volgende internetadres: http://DOC.hesdo.com/DVM-150-DOC.pdf Het gebruik is toegestaan in alle landen van de EU. In Frankrijk, Italië, Rusland en de Oekraïne is alleen gebruik binnenhuis toegestaan. DÉCLARATION DE CONFORMITÉ Le soussigné, Hesdo, déclare que l’équipement radioélectrique du type Alecto DVM-150C est conforme à la directive 2014/53/UE. Le texte complet de la déclaration UE de conformité est disponible à l’adresse internet suivante: http://DOC.hesdo.com/DVM-150-DOC.pdf L’utilisation de cet équipement est autorisée dans tous les pays de l’UE. En France, Italie, Russie et Ukraine, uniquement l’utilisation à l’intérieur est autorisée. ÜBEREINSTIMMUNGSERKLÄRUNG Hiermit erklärt Hesdo, dass der Funkanlagentyp Alecto DVM-150C der Richtlinie 2014/53/EU entspricht. Der vollständige Text der EU-Konformitätserklärung ist unter der folgenden Internetadresse verfügbar: http://DOC.hesdo.com/DVM-150-DOC.pdf Dieses Gerät darf in allen Ländern der EU verwendet werden. In Frankreich, Italien, Russland und der Ukraine ist nur die Anwendung im Innenbereich zulässig. DECLARATION OF CONFORMITY Hereby, Hesdo declares that the radio equipment type Alecto DVM-150C is in compliance with directive 2014/53/EU. The full text of the EU declaration of conformity is available at the following internet address: http://DOC.hesdo.com/DVM-150-DOC.pdf Use of this equipment is allowed in all countries of the EU. In France, Italy, Russia and Ukraine, only indoor use is allowed. DECLARACIÓN DE CONFORMIDAD Por la presente, Hesdo declara que el tipo de equipo radioeléctrico Alecto DVM-150C es conforme con la Directiva 2014/53/UE. El texto completo de la declaración UE de conformidad está disponible en la dirección Internet siguiente: http://DOC.hesdo.com/DVM-150-DOC.pdf El uso de este equipo está permitido enService todos los países deHelp la UE. En Francia, Italia, Rusia y Ucrania, solamente se permite el uso en interiores. WWW.ALECTO.NL DICHIARAZIONE DI CONFORMITÀ [email protected] Il fabbricante, Hesdo, dichiara che il tipo di apparecchiatura radio Alecto DVM-150C è conforme alla direttiva 2014/53/UE. Il testo completo della dichiarazione di conformità UE è disponibile al Hesdo, Australiëlaan 1 seguente indirizzo Internet: http://DOC.hesdo.com/DVM-150-DOC.pdf 5232 BB, ‘s-Hertogenbosch The Netherlands L’uso di questo apparecchio è consentito in tutti i paesi della UE. In Francia, Italia, Russia e Ucraina, è consentito solo l’uso interno. Service Help WWW.ALECTO.NL [email protected] Hesdo, Australiëlaan 1, 5232 BB, ‘s-Hertogenbosch, The Netherlands V1.0-
 1
1
-
 2
2
-
 3
3


in andere talen
- English: Alecto DVM-150 User manual
- italiano: Alecto DVM-150 Manuale utente
- español: Alecto DVM-150 Manual de usuario