Yamaha yht s1400 de handleiding
- Categorie
- Blu-Ray-spelers
- Type
- de handleiding
Deze handleiding is ook geschikt voor

English
YHT-S1400 Home Theater Package
Connection Guide
G
Printed in Malaysia WT51140
©
2009 Yamaha Corporation All rights reserved.
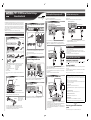
The Yamaha YHT-S1400 Home Theater Package has what you are looking for to add great sound
to your home theater. By following the steps in this Connection Guide, you will have your home
theater set up in no time and enjoy music and movies like never before. This guide consists of three
sections. The first section explains how to place the speaker and connect the speaker/antenna. The
second section explains how to connect the Blu-ray Disc Player and your TV. The third section
explains how to connect your satellite/cable set-top box. See the relevant guides or manuals for full
instructions and precautions.
Caution: Disconnect all components from AC outlets before proceeding.
Speaker and Antenna
1
Unpack and check the package contents. The following items are necessary for connecting
this system. See the relevant guides or manuals for a complete list of supplied items.
1 Speaker (NS-BR300)
2 Stand × 2 (for speaker)
3 Screw × 2 (for stand)
4 Subwoofer Integrated Receiver (SR-300)
5 Speaker cable
6 Indoor FM antenna
7 Blu-ray Disc Player (BD-S1065)
8 Audio pin cable
9 Video pin cable
0 Power cable
A HDMI cable
Note: To complete setup of this system, an optical digital cable and additional HDMI cable are
necessary.
Checking the package contents
1 2 3
4
5 6
7 8 9
0
YHT-S400
BD-S1065
A
2
The illustration is one of the images to place this system on the rack. If there is any obstacle
(TV stand, etc.) under the speaker, use the supplied stands as shown.
Placing the speaker
Speaker
Blu-ray Disc Player
Subwoofer Integrated Receiver
Screw holes
Screw holes
• Put the speaker on the stands and secure them with the supplied screws, as shown.
• You can adjust the height and width at which to attach the stands to the speaker
horizontally by selecting screw holes in the back of the speaker. The above illustration
shows attaching the stands using the lower and inner screw holes.
TV
Note: If you are not using the
supplied stands, attach the
supplied non-skid pads to the
bottom of the speaker.
1
2
3
Speaker
• Twist and pull off the insulation tube on the lead wire of the supplied speaker cable.
• Insert the lead wire into the terminal by matching the wire color with the color-coded
terminal on the rear panel, as shown.
• Repeat this process for the remainding lead wires to connect the speaker cable to the
speaker.
Brown
Connecting the speaker cable to the speaker
Red
Black
Green
Gray
White
Connecting the speaker cable to the
Subwoofer Integrated Receiver
4
Subwoofer Integrated Receiver
Connect the speaker cable to the Subwoofer Integrated Receiver. Be sure to insert the cable
by matching the wire color with the color-coded terminal on the rear panel.
To terminal
of the
speaker
To terminal
of the
speaker
To terminal
of the
speaker
Connecting the antenna
5
Subwoofer Integrated Receiver
Connect the supplied indoor FM antenna to the Subwoofer Integrated Receiver, as shown.
See the guides or manuals for more information about connecting an antenna.
Indoor FM antenna
This guide introduces two basic examples (A and B as follows) to connect the Blu-ray Disc Player
and your TV with Subwoofer Integrated Receiver.
Caution: Disconnect all components from AC outlets before proceeding.
The Blu-ray Disc Player and your TV
Connecting via the HDMI cable
A
Subwoofer Integrated Receiver
Blu-ray Disc Player
If your TV is HDMI-capable, you can connect it and Blu-ray Disc Player via the Subwoofer
Integrated Receiver. Using the supplied HDMI cables, connect the Blu-ray Disc Player’s
HDMI output jack to the HDMI IN 1 jack on the Subwoofer Integrated Receiver, as shown.
Subwoofer Integrated
Receiver
TV
Connect your TV’s HDMI jack to the HDMI OUT jack of the Subwoofer Integrated Receiver,
using an additional HDMI cable, as shown.
Note: To output sound of a TV from this system, connect the optical digital output jack of your
TV and the TV DIGITAL IN jack of the Subwoofer Integrated Receiver via an optical digital
cable (not included).
See the guides or manuals for more information about HDMI.
Connecting without HDMI cables
B
Subwoofer Integrated
Receiver
TV
• Use the supplied video pin cable to connect the Blu-ray Disc Player’s VIDEO jack to your
TV’s composite video jack, as shown.
• Use the supplied audio pin cable to connect the Blu-ray Disc Player’s MIXED 2CH jacks to
the Subwoofer Integrated Receiver’s ANALOG INPUT jacks, as shown.
• Use an optical digital cable (not included) to connect your TV’s optical digital output jack
to the Subwoofer Integrated Receiver’s DIGITAL IN jack, so as to output the sound of your
TV from the speaker.
Blu-ray Disc Player
This guide introduces how to connect your satellite/cable set-top box with the Subwoofer
Integrated Receiver.
Caution: Disconnect all components from AC outlets before proceeding.
• Connect the Subwoofer Integrated Receiver, Blu-ray Disc Player, and your other AV
components to suitable AC outlets.
• Turn on the Subwoofer Integrated Receiver first, and then your other AV components.
• Install the batteries in the Subwoofer Integrated Receiver’s remote control and the Blu-ray Disc
Player’s remote control.
• See the relevant guides or manuals for full operating instructions.
Activating the Secondary audio
Set “Secondary Audio” of the Blu-ray Disc Player (“Setup Menu” “Settings” “Audio Video
Settings” “Secondary Audio”) to “On” to listen to the most suitable sound for this system.
Preparing for BD-LIVE
BD-LIVE is a new feature of Blu-ray Disc that allows you to download and enjoy movie trailers or
bonus features.
Connect the Blu-ray Disc Player to the internet and connect a USB memory device to the Blu-ray
Disc Player to use BD-LIVE feature.
Note: For more information about these features, see the manual of the Blu-ray Disc Player.
Time to enjoy your Yamaha home theater
system!
Now, relax and enjoy the great sound of your Yamaha home theater system.
HDMI control function
You can operate the following functions of this system with the remote control of your TV
when the TV (HDMI control function supported) is connected to the HDMI OUT jack of this
system.
• Setting this system to standby (conjunction with TV)
Note: Automatic power off function of Blu-ray Disc Player is enable while the playback stops and
the Setup Menu screen is not displayed.
•Adjusting the volume
• Selecting a device to reproduce TV sounds (this unit or TV)
To activate the HDMI control function, set the parameter of the components respectively as
follows.
Blu-ray Disc Player (BD-S1065)
Set “HDMI Control” in the “Settings” of the “Setup Menu” to “Yes”.
Subwoofer Integrated Receiver (SR-300)
Set “HDMI CONTROL” in the setup menu to “ON”.
The HDMI-capable TV
See the instruction manual to activate the HDMI control (CEC) function.
For external components, refer to the instruction manual supplied with each component.
Satellite/cable set-top box
Subwoofer Integrated Receiver
Satellite/cable set-top box
Use an additional HDMI cable to connect your satellite/cable set-top box to the Subwoofer
Integrated Receiver’s HDMI IN 2 jack, as shown.
Almost Finished
Setting the Blu-ray Disc Player
Documenttranscriptie
YHT-S1400 Home Theater Package The Blu-ray Disc Player and your TV Connection Guide English © 2009 Yamaha Corporation All rights reserved. Printed in Malaysia WT51140 The Yamaha YHT-S1400 Home Theater Package has what you are looking for to add great sound to your home theater. By following the steps in this Connection Guide, you will have your home theater set up in no time and enjoy music and movies like never before. This guide consists of three sections. The first section explains how to place the speaker and connect the speaker/antenna. The second section explains how to connect the Blu-ray Disc Player and your TV. The third section explains how to connect your satellite/cable set-top box. See the relevant guides or manuals for full instructions and precautions. Satellite/cable set-top box G 3 Connecting the speaker cable to the speaker This guide introduces two basic examples (A and B as follows) to connect the Blu-ray Disc Player and your TV with Subwoofer Integrated Receiver. This guide introduces how to connect your satellite/cable set-top box with the Subwoofer Integrated Receiver. Caution: Disconnect all components from AC outlets before proceeding. Caution: Disconnect all components from AC outlets before proceeding. A Connecting via the HDMI cable Subwoofer Integrated Receiver Subwoofer Integrated Receiver Satellite/cable set-top box Blu-ray Disc Player Speaker Caution: Disconnect all components from AC outlets before proceeding. 1 Speaker and Antenna 1 Red Brown Green White Black Gray Checking the package contents YHT-S400 1 2 4 5 8 0 If your TV is HDMI-capable, you can connect it and Blu-ray Disc Player via the Subwoofer Integrated Receiver. Using the supplied HDMI cables, connect the Blu-ray Disc Player’s HDMI output jack to the HDMI IN 1 jack on the Subwoofer Integrated Receiver, as shown. 9 • Twist and pull off the insulation tube on the lead wire of the supplied speaker cable. • Insert the lead wire into the terminal by matching the wire color with the color-coded terminal on the rear panel, as shown. • Repeat this process for the remainding lead wires to connect the speaker cable to the speaker. 4 A Subwoofer Integrated Receiver TV Activating the Secondary audio Set “Secondary Audio” of the Blu-ray Disc Player (“Setup Menu” “Settings” “Audio Video Settings” “Secondary Audio”) to “On” to listen to the most suitable sound for this system. Subwoofer Integrated Receiver Connect your TV’s HDMI jack to the HDMI OUT jack of the Subwoofer Integrated Receiver, using an additional HDMI cable, as shown. To terminal of the speaker Note: To complete setup of this system, an optical digital cable and additional HDMI cable are necessary. To terminal of the speaker Placing the speaker TV To terminal of the speaker Note: To output sound of a TV from this system, connect the optical digital output jack of your TV and the TV DIGITAL IN jack of the Subwoofer Integrated Receiver via an optical digital cable (not included). B 5 Connecting without HDMI cables Blu-ray Disc Player Subwoofer Integrated Receiver Connecting the antenna TV Subwoofer Integrated Receiver Preparing for BD-LIVE BD-LIVE is a new feature of Blu-ray Disc that allows you to download and enjoy movie trailers or bonus features. Connect the Blu-ray Disc Player to the internet and connect a USB memory device to the Blu-ray Disc Player to use BD-LIVE feature. Note: For more information about these features, see the manual of the Blu-ray Disc Player. See the guides or manuals for more information about HDMI. Connect the speaker cable to the Subwoofer Integrated Receiver. Be sure to insert the cable by matching the wire color with the color-coded terminal on the rear panel. Speaker • Connect the Subwoofer Integrated Receiver, Blu-ray Disc Player, and your other AV components to suitable AC outlets. • Turn on the Subwoofer Integrated Receiver first, and then your other AV components. • Install the batteries in the Subwoofer Integrated Receiver’s remote control and the Blu-ray Disc Player’s remote control. • See the relevant guides or manuals for full operating instructions. Setting the Blu-ray Disc Player Connecting the speaker cable to the Subwoofer Integrated Receiver Unpack and check the package contents. The following items are necessary for connecting this system. See the relevant guides or manuals for a complete list of supplied items. 1 Speaker (NS-BR300) 7 Blu-ray Disc Player (BD-S1065) 2 Stand × 2 (for speaker) 8 Audio pin cable 3 Screw × 2 (for stand) 9 Video pin cable 4 Subwoofer Integrated Receiver (SR-300) 0 Power cable 5 Speaker cable A HDMI cable 6 Indoor FM antenna 2 Use an additional HDMI cable to connect your satellite/cable set-top box to the Subwoofer Integrated Receiver’s HDMI IN 2 jack, as shown. Almost Finished 6 BD-S1065 7 2 3 HDMI control function You can operate the following functions of this system with the remote control of your TV when the TV (HDMI control function supported) is connected to the HDMI OUT jack of this system. • Setting this system to standby (conjunction with TV) Note: Automatic power off function of Blu-ray Disc Player is enable while the playback stops and the Setup Menu screen is not displayed. • Adjusting the volume • Selecting a device to reproduce TV sounds (this unit or TV) To activate the HDMI control function, set the parameter of the components respectively as follows. Subwoofer Integrated Receiver The illustration is one of the images to place this system on the rack. If there is any obstacle (TV stand, etc.) under the speaker, use the supplied stands as shown. Screw holes Screw holes Note: If you are not using the supplied stands, attach the supplied non-skid pads to the bottom of the speaker. • Put the speaker on the stands and secure them with the supplied screws, as shown. • You can adjust the height and width at which to attach the stands to the speaker horizontally by selecting screw holes in the back of the speaker. The above illustration shows attaching the stands using the lower and inner screw holes. Blu-ray Disc Player (BD-S1065) Set “HDMI Control” in the “Settings” of the “Setup Menu” to “Yes”. Indoor FM antenna Connect the supplied indoor FM antenna to the Subwoofer Integrated Receiver, as shown. See the guides or manuals for more information about connecting an antenna. Subwoofer Integrated Receiver (SR-300) Set “HDMI CONTROL” in the setup menu to “ON”. Blu-ray Disc Player • Use the supplied video pin cable to connect the Blu-ray Disc Player’s VIDEO jack to your TV’s composite video jack, as shown. • Use the supplied audio pin cable to connect the Blu-ray Disc Player’s MIXED 2CH jacks to the Subwoofer Integrated Receiver’s ANALOG INPUT jacks, as shown. • Use an optical digital cable (not included) to connect your TV’s optical digital output jack to the Subwoofer Integrated Receiver’s DIGITAL IN jack, so as to output the sound of your TV from the speaker. The HDMI-capable TV See the instruction manual to activate the HDMI control (CEC) function. For external components, refer to the instruction manual supplied with each component. Time to enjoy your Yamaha home theater system! Now, relax and enjoy the great sound of your Yamaha home theater system.-
 1
1

Yamaha yht s1400 de handleiding
- Categorie
- Blu-Ray-spelers
- Type
- de handleiding
- Deze handleiding is ook geschikt voor
in andere talen
- English: Yamaha yht s1400 Owner's manual
- italiano: Yamaha yht s1400 Manuale del proprietario
- русский: Yamaha yht s1400 Инструкция по применению
- français: Yamaha yht s1400 Le manuel du propriétaire
- Deutsch: Yamaha yht s1400 Bedienungsanleitung
- dansk: Yamaha yht s1400 Brugervejledning
- suomi: Yamaha yht s1400 Omistajan opas
- svenska: Yamaha yht s1400 Bruksanvisning
- Türkçe: Yamaha yht s1400 El kitabı
- română: Yamaha yht s1400 Manualul proprietarului
Gerelateerde papieren
-
Yamaha YHT-S300 de handleiding
-
Yamaha YHT-S400 de handleiding
-
-
Yamaha YHTS401 de handleiding
-
-
Yamaha YSP-2200BL Handleiding
-
-
-
-