
UR 140
DEUTSCH
ENGLISH
FRANÇAIS
NEDERLANDS
ESPAÑOL
PORTUGUÊS

Dieses Symbol zeigt an, dass im Inneren des
Gerätes gefährliche Spannungen vorhanden sind,
und einen Stromschlag verursachen können.
Dieses Symbol weist auf wichtige Bedienungs-
und Wartungsanweisungen bezüglich des Geräts
hin.
Sicherheits- / Umwelt- / Aufstellhinweise
• Das Gerät ausnahmslos nur in trockenen Innenräumen betreiben.
• Niemals mit Feuchtigkeit in Verbindung bringen
• Niemals das Gerät öffnen. STROMSCHLAGGEFAHR ! Dies ist nur Fachpersonal gestattet.
• Schließen Sie das Gerät nur an eine vorschriftsmäßig installierte und geerdete Netzsteckdose an. Die Netzspannung
muss mit den Angaben auf dem Typenschild des Gerätes übereinstimmen.
• Achten Sie darauf, dass im Betrieb das Netzkabel niemals nass oder feucht wird. Das Netzkabel darf nicht eingeklemmt
oder anderweitig beschädigt werden.
• Lassen Sie beschädigte Netzstecker oder Netzkabel sofort von dem Kundenservice austauschen.
• Der Netzstecker dient als Trennvorrichtung und muss ohne Schwierigkeiten benutzbar sein.
• Bei Gewitter, Netzstecker sofort aus der Steckdose entfernen.
• Kinder sollten das Gerät nur unter Aufsicht Erwachsener betreiben.
• Das Gerät ausnahmslos nur mit einem trockenen Abstaubtuch reinigen.
KEINE REINIGUNGSMITTEL oder TÜCHER mit GROBEN Material verwenden!!!
• Das Gerät keiner Sonnenbestrahlung oder anderen Hitzequellen aussetzen.
• Stellen Sie das Gerät so auf, dass kein Hitzestau entstehen kann, also frei und gut belüftet.
• Keine offenen Flammen (z. B. Kerzen) auf dem Gerät platzieren.
• Es dürfen keine mit Flüssigkeit befüllten Behälter (z.B. Vasen) auf oder in die Nähe des Gerätes gestellt werden
• Decken Sie niemals die Belüftungsöffnungen zu!!!
• Das Gerät an einem sicheren, erschütterungsfreien Platz aufstellen.
• Gerät möglichst weit entfernt von Computern und Mikrowellengeräten platzieren, da es sonst evtl. zu
Empfangsstörungen im Radiobetrieb kommen kann.
• Sie dürfen das Gehäuse nicht öffnen oder reparieren. In diesem Falle ist die Sicherheit nicht gegeben und die Garantie
erlischt. Reparaturen sind ausschließlich durch einen Service-Center/Kundencenter auszuführen.
• Verwenden Sie nur Batterien, die frei von Quecksilber & Cadmium sind.
• Verbrauchte Batterien sind Sonderabfall und gehören NICHT in den Hausmüll!!! Geben Sie diese Ihrem Händler zurück
oder entsorgen Sie diese an geeigneten Sammelstellen Ihrer Stadt oder Gemeinde.
• Batterien dürfen nicht in die Hände von Kindern gelangen. Kinder können Batterien verschlucken. Wurde eine Batterie
verschluckt, muss sofort medizinische Hilfe in Anspruch genommen werden.
• Überprüfen Sie regelmäßig die Batterien um ein Auslaufen der Batterie zu vermeiden.
• Batterien dürfen keiner Hitze (z.B. Sonnenbestrahlung), Feuer ausgesetzt werden.
ACHTUNG
Explosionsgefahr bei falscher Batteriehandhabung
Nur durch den selben oder baugleichen Batterietyp ersetzen.

UR140 / Deutsche Bedienungsanleitung
BEDIENELEMENTE
1. LICHTINTENSITÄT HÖHER EINSTELLEN
2. LICHTINTENSITÄT NIEDRIGER EINSTELLEN
3. LICH EIN-/AUSSCHALTEN
4. SPEICHER/SPEICHER+/NAP/DISPLAY AUTOMATISCHE ABSCHALTUNG
5. LED LAMPEN
6. SNOOZE/SLEEP/DIMMER
7. EINSTELLEN/TEMPERATUR
8. << / TUNE - / JAHR/MONAT/TAG
9. ALARM 1 EIN/AUS / EINSTELLEN
10. DISPLAY
11. RADIO EIN / AUS
12. >> / TUNE + / DST/C-F
13. ALARM 2 EIN/AUS / EINSTELLEN
14. LAUTSTÄRKE + / AUTOMATISCHE DISPLAYÄNDERUNG EIN
15. LAUTSTÄRKE -
16. PROJEKTION 180° DREHEN / UHRZEIT UND TEMPERATUR
17. PROJEKTION EIN / AUS
18. PROJECTIONSFOCUS EINSTELLEN
19. LAUTSPRECHER
20. UKW-WURFANTENNE
21. TEMPERATURSENSOR
22. BATTERIEFACH
23. NETZKABEL
24. TYPENSCHILD

UR140 / Deutsche Bedienungsanleitung
LED-DISPLAY
INBETRIEBNAHME
Stellen Sie sicher, dass Ihr Hausstromnetz AC230V~50Hz hat und schließen den Netzstecker an
das Stromnetz an.
GANGRESERVE
Mit dieser Funktion läuft die Uhr intern (Anzeige leuchtet nicht) weiter bzw. die eingestellte
Alarmzeit und die gespeicherten Sender bleiben bei einem Stromausfall erhalten. Die Anzeige
leuchtet erst wieder auf, wenn das Stromnetz wieder verfügbar ist. Eine 3V CR2032 Knopfzelle
polrichtig in das Batteriefach (22) einlegen.
ZEIT- UND KALENDER EINSTELLUNG
1) Im ausgeschalteten Zustand, die Taste set. (7) drücken und halten bis die LED Anzeige
blinkt. Nachdem Sie im Einstellmodus sind, wird mit der set (7) Taste zwischen den
nachfolgenden Einstellungen gewechselt und mit Tasten << >> (8 / 12) jeweils eingestellt.
Jahr → Monat → Tag → 12/24 Stunden → Stunden → Minuten → Normal Modus
- << / Tune - Taste (8) Einstellung rückwärts
- >> / Tune + Taste (12) Einstellung vorwärts
- Taste << oder >> drücken und halten, um den Schnelllauf zu starten.
- Nach jeweilig erfolgter Einstellung, die Taste set. (7) drücken.
ALARM 1 und ALARM 2 EINSTELLUNG
Hinweis:
• Wecken mit Radio: Stellen Sie sicher, dass Sie die gewünschte Radiofrequenz vorab
eingestellt haben.
• Wenn Sie den Wecker/Alarm einstellen, legen Sie eine Weckzeit, die gewünschte
Lichtintensität, den Weckmodus und die gewünschte Wecklautstärke (nur bei Radio) fest.
5 Minuten vor der eingestellten Weckzeit aktivieren sich die LED Leuchten in der
dunkelsten Stufe und erhöhen sich langsam bis zum voreingestellten Maximum. Bei
Alarm aktiviert sich der ausgewählte Weckmodus, der allmählich lauter wird.
1) Im Uhrzeitmodus die Taste AL1 (9) kurz drücken, um die Alarmzeit anzeigen zu lassen.
2) Während die Alarmzeit angezeigt wird, die Taste AL1 (9) drücken und halten bis die
Anzeige blinkt.
3) Nachdem Sie im Einstellmodus sind, können Sie mit der Taste AL1 (9) zwischen den
nachfolgenden Einstellungen wechseln und mit Tasten << >> (8 / 12) jeweils einstellen.
STANDBY-
Indikator
Uhrzeit-Indikator
MHz-Indikator
ALARM 2-Indikator
PM-
Indikator
ALARM 1-
Indikator

UR140 / Deutsche Bedienungsanleitung
AL 1 Stunden → AL 1 Minuten → AL 1 Wochentage wählen (mit Tasten << >> (8 / 12) einstellen)
→ AL 1 Weckmodus (mit Tasten << >> (8 / 12) einstellen) → AL 1 Wecklautstärke [nur im
Radiomodus möglich] (mit Tasten << >> (8 / 12) einstellen) gewünschte Lichtintensität (mit
Tasten << >> (8 / 12) einstellen)
Normalmodus.
Wochentage auswählen Weckmodus auswählen
1-5: Montag bis Freitag Frequenzanzeige: Radio
1-7: Ganze Woche bu: Buzzer / Signalton
6-7: Samstag und Sonntag
1-1: Einen Tag in der Woche
(1= Montag / 2= Dienstag …)
Wenn Sie einen weiteren Alarm (z.B. für das Wochenende) einstellen möchten, wiederholen Sie
die oben genannten Schritte nur mit der AL2 (13) Taste.
- << / Tune - Taste (8) Einstellung rückwärts
- >> / Tune + Taste (12) Einstellung vorwärts
Taste << oder >> drücken und halten, um den Schnelllauf zu starten.
ALARM
Nachdem sich der Alarm (Signalton oder Radio) aktiviert hat und keine Taste gedrückt wird,
schaltet sich dieser nach ca. 30 Minuten automatisch ab und ist für den kommenden Tag wieder
aktiviert.
ALARM AKTIVIEREN / DEAKTIVIEREN
Drücken und halten Sie die Taste „ALARM 1“ (9) / „ALARM 2“ (13), um das Wecken/den Alarm
zu aktivieren bzw. deaktivieren. Sobald der Alarm aktiv ist, erscheint der jeweilige Alarmindikator
des jeweiligen Alarms in der Anzeige.
SNOOZE Schlummerfunktion (bei Alarm) :
- Taste SNOOZE (6) drücken (Der jew. Indikator AL1 oder AL2 blinkt)
- Der Alarm aktiviert sich nach ca. 9 Minuten wieder
- Dieser Vorgang kann mehrmals wiederholt werden
- Alarm aus: Taste EIN/AUS (11) drücken

UR140 / Deutsche Bedienungsanleitung
LED ANZEIGE DIMMEN / AUTOMATISCH ABSCHALTEN
Sie haben die Möglichkeit im Normalmodus (Uhrzeitmodus) durch Drücken der Taste SNOOZE
(6) die LED Anzeige dreistufig zu dimmen.
Weiterhin können Sie durch Drücken und Halten der Taste MEM. Set / M+ / display light auto
on-off / NAP (4) die LED Anzeige ausschalten. Der Indikator “ ” leuchtet auf, sobald die
Funktion aktiviert ist. Nach ca. 10 Sekunden Inaktivität schaltet sich die LED Anzeige
automatisch aus. Durch beliebigen Tastendruck schaltet sich die Anzeige erneut für ein paar
Sekunden ein. (Bei Alarm aktiviert sich die Anzeige generell).
Um die Abschaltung zu deaktivieren, drücken und halten Sie die Taste erneut.
AUTOMATISCHES WECHSELN D. ANZEIGE
Im ausgeschalteten Zustand die Taste Lautstärke + / DISPLAY AUTO CHANGE ON/OFF (14)
drücken und halten bis im Display “ON” erscheint. Die LED Anzeige zeigt nun im Wechsel die
Uhrzeit, Jahr und Datum an. Um die Funktion wieder zu deaktivieren drücken und halten Sie
erneut die Taste Lautstärke + (14) bis « OFF » im Display kurz angezeigt wird.
Drücken Sie kurz die Taste << (8) hintereinander, um manuell das Datum und Jahr anzeigen zu
lassen.
RADIO BETRIEB
- Taste ON/OFF (11) drücken, um den Radio einzuschalten.
- UKW-Wurfantenne komplett ausziehen, um den bestmöglichen Empfang zu erreichen.
- Drücken und halten Sie die Taste << (8) oder >> (12), um den nächst empfangenen Sender
anzuwählen. Die Taste << (8) oder >> (12) kurz drücken, um eine Feineinstellung
vorzunehmen.
- Gewünschte Lautstärke mit den Tasten - / + (14/15) einstellen
Jahr-Indikator
Monat-Indikator Tag-Indikator

UR140 / Deutsche Bedienungsanleitung
Festsender abspeichern und abrufen
- Wählen Sie den gewünschten Sender wie oben beschrieben an.
- Drücken und halten Sie die Taste MEM SET / M+ (4) für ca. 2 Sekunden bis “P02” in der LED
Anzeige blinkt.
- Wählen Sie mit der Taste << (8) oder >> (12) den gewünschten Festsenderplatz aus (max. 10
Stück)
- Drücken Sie kurz die MEM SET / M+ Taste (4), um die Eingabe zu bestätigen bzw. zu
speichern.
- Wiederholen Sie die o.g. Schritte, bis all Ihre gewünschten Sender abgespeichert sind.
- Im Radiomodus: Durch kurzes Drücken der Taste MEM SET / M+ (4), können Sie die
gespeicherten Festsender abrufen.
SLEEP / EINSCHLAFFUNKTION
Im Radiomodus, die SNOOZE/SLEEP Taste (6) drücken In der Anzeige erscheint “90”. In
binnen 5 Sekunden mit der SNOOZE/SLEEP Taste (6) die gewünschte Einschlafzeit einstellen.
Sie haben die Möglichkeit zwischen 90-60-30-15 Minuten zu wählen. Das Radio schaltet sich
automatisch nach Ablauf der Zeit ab. Mit der Taste ON/OFF wird die Einschlaffunktion vorab
deaktiviert.
NAP TIMER FUNKTION (Countdown Funktion mit Alarm)
Im ausgeschalteten Zustand können Sie die NAP Timer Funktion aktivieren. Drücken Sie die
Taste NAP (4) “N90” erscheint in der Anzeige. In binnen 5 Sekunden mit der NAP Taste (6) die
gewünschte Zeit (Minuten) einstellen. (nach 90-80-70-60-50-40-30-20-10 Minuten). Ein
Signalton schaltet sich automatisch nach der eingestellten Zeit ein. Durch Drücken der Taste
ON/OFF (11) können Sie die Funktion / Signalton deaktivieren.
* Bei der NAP TIMER FUNKTION schaltet sich ausschließlich ein Signalton ein; Radio als
Alarmmodus ist in dieser Funktion nicht möglich. *
Hinweis – Verwendung bei Kindern
Bitte weißen Sie Ihre Kinder darauf hin, dass ein unabsichtlicher Tastendruck „M+/NAP“ (4) links
an der Seite des Uhrenradios, den Kurzzeitwecker auf 90 Minuten sofort aktiviert. Dies könnte
die Tiefschlafphase Ihres Kindes stören. Vergewissern Sie sich, dass diese Funktion deaktiviert
„OFF“ ist.

UR140 / Deutsche Bedienungsanleitung
DST – Sommer-/Winterzeit
Mit dieser Funktion können Sie mit einem Knopfdruck die Sommer- & Winterzeit regeln. Taste >>
/ DST (12) drücken und halten bis sich die Stunde in der LED Anzeige ändert.
UHRZEIT PROJEKTION
Mit der Taste “ON/OFF °” (17) können Sie die Uhrzeitprojektion ein- bzw. ausschalten. Drehen
Sie mit den Drehregler (18) die Uhrzeitprojektion scharf. Mit der Taste “180°Flip” (16) können Sie
die Uhrzeitprojektion spiegeln.
Hinweis
Max. Reichweite der Uhrzeitprojektion = ca. 0,9 – 2,7 m
RESET
Bei Batteriewechsel (Gangreserve) oder einer Funktionsstörung, entnehmen Sie bitte den
Netzstecker von Ihrer Steckdose und stecken diesen wieder nach ca. 3 Minuten wieder an.
TECHNISCHE DATEN
Frequenz: UKW 87,5 – 108 MHz
Gangreserve: 3V CR2032 Knopfzelle (nicht inklusive)
Netzbetrieb: AC 230V~50Hz
IMPORTEUR
Wörlein GmbH Tel.: +49 9103 71 67 - 0
Gewerbestrasse 12 Fax.:+49 9103 71 67 - 12
GERMAN
Technische Änderungen und Druckfehler vorbehalten
Copyright by Wörlein GmbH, 90556 Cadolzburg
Vervielfältigung nur mit ausdrücklicher Genehmigung der Wörlein GmbH

ENVIRONMENTAL PROTECTION
Please contact your local authorities for details about collection points.
The materials are reusable according to their markings. By reusing, recycling or
other forms of utilization of old devices you make an important contribution to
the protection of our environment.
Do not dispose of this product with the normal household waste at the end
of its life cycle. Return it to a collection point for the recycling of electrical
and electronic devices. This is indicated by the symbol on the product,
user manual or packaging.
This symbol indicates the presence of dangerous
voltage inside the enclosure, sufficient enough to
cause electric shock.
WARNING
Risk of electric shock
Do not o
p
en!
Caution: To reduce the risk of electric shock, do not remove the
cover (or back). There are no user serviceable parts inside. Refer
servicing to qualified service personnel.
This symbol indicates the presence of important
operating and maintenance instructions for the
device.
Safety, Environmental and Setup Instructions
• Use the device in dry indoor environments only.
• Protect the device from humidity.
• Do not open the device. RISK OF ELECTRIC SHOCK! Refer opening and servicing to qualified personnel.
• Connect this device to a properly installed and earthed wall outlet only. Make sure the mains voltage corresponds with
the specifications on the rating plate.
• Make sure the mains cable stays dry during operation. Do not pinch or damage the mains cable in any way.
• A damaged mains cable or plug must immediately be replaced by an authorized service center.
• In case of lightning, immediately disconnect the device from the mains supply.
• Children should be supervised by parents when using the device.
• Clean the device with a dry cloth only.
Do NOT use CLEANING AGENTS or ABRASIVE CLOTHS!
• Do not expose the device to direct sunlight or other heat sources.
• Install the device at a location with sufficient ventilation in order to prevent heat accumulation.
• Do not cover the ventilation openings!
• Install the device at a safe and vibration-free location.
• Install the device as far away as possible from computers and microwave units; otherwise radio reception may be
disturbed.
• Do not open or repair the enclosure. It is not safe to do so and will void your warranty. Repairs only by authorized
service/ customer center.
• Only use mercury and cadmium-free batteries.
• Used batteries are hazardous waste and NOT to be disposed of with the household waste!!!
Return the batteries to your dealer or to collection points in your community.
• Keep batteries away from children. Children might swallow batteries.
Contact a physician immediately if a battery was swallowed.
• Check your batteries regularly to avoid battery leakage.
• Batteries shall not be exposed to excessive heat such as sunshine, fire or the like.
• CAUTION: Danger of explosion if battery is incorrectly replaced
Replace only with the same or equivalent type


LED DISPLAY
POWER CONNECTION
Plug the AC power cord to a household outlet AC source. This unit is equipped with a
battery back up system, it requires a 3V CR2032 flat lithium battery (not included).
Insert the battery in the battery compartment, making certain that the positive and
negative (+ and -) battery terminals are attached to the corresponding terminals on the
plate in the battery compartment. If an AC power failure occurs, the clock automatically
switches to the battery power supply, the clock and timer memory continue running.
When the AC power resumes, the clock switches back to AC again.
GETTING STARTED
1. TIME AND CALENDAR MANUAL SETTING
A. Setting Time and Calendar – Press set button (7) in normal mode and keep
depress over 2 seconds to enter time set mode, after enter the setting mode, press
set button (7) to change the mode cycle as follows :
Normal → Year → Month → Day → 12/24 H → Real time Hour → Real time Min →
Normal
Action (during data adjustment):
- Press << / Tune - button (8) to adjust data backward.
- Press >> / Tune + button (12) to adjust data forward.
- Keep depress << or >> button for 2 seconds to enable auto forward.
B. Setting Alarm 1 and Alarm 2 – Press alarm set button (9/13) during normal mode
and keep depress over 2 seconds to enter alarm set mode, after enter the setting
mode, press alarm set button (9/13) to change the mode cycle as follows :
Normal → AL 1 Hour → AL 1 Min → AL 1 weekday Alarm → AL 1 wake beep → AL 1
wake radio → AL 1 wake radio volume →Light → Light intensity → Normal.
Normal → AL 2 Hour → AL 2 Min → AL 2 weekday Alarm → AL 2 wake beep → AL 2
wake radio → AL 2 wake radio volume →Light → Light intensity →Normal.

Enable /disable the Alarm:
Press and hold the ALARM1 or ALARM2 button to enable or disable the alarm.
Once the alarm is activated, the respective alarm indicator will be appeared in
the display.

Listening to Radio
Press the ON/OFF button (11) to turn the unit on.
Use the Tune + or Tune – button to select the desired radio station. If you press and
hold the Tune + or Tune – button for one second, the release, the unit will automatically
scan to the next broadcasting station.
Press the ON/OFF button (11) to turn the radio OFF.
To set / recall the radio presets
Press the ON/OFF button (11) to turn the unit ON.
Use the Tune + or Tune - button to select the desired radio station.
Press the memory / memory + button; “P02” will blink in the display.
Press the memory / memory + button again to set the preset.
Repeat steps 2 through 4 to set more presets.
The unit can preset 10 stations totally for FM.
When “P01-P10” is blinking, press the Tune+ or Tune- button to select the preset
number.
When recalling preset stations, press memory / memory +/nap button to select the
preset number.
Note :
- Ensure that the FM antenna is completely unrolled and extended for best FM
reception.
Sleep operation
When listening to radio, press Snooze / Sleep/dimmer button (6) to enter sleep mode.
You can just adjust the sleep timer from 90 mins to 15 mins by pressing the Snooze /
Sleep/dimmer button (6). The unit will automatically turn off after the selected time.

NAP timer function (count down timer)
During radio off mode, press MEMORY.SET / MEMORY+ / NAP button (4) to turn on
NAP mode, the NAP time will keep by 5 seconds, within 5 seconds and press
MEMORY.SET / MEMORY+ / NAP button (4) button can change the duration from 90
min – 10 min.
The alarm buzzer will sound for 30 min and then shut off automatically. To stop the
alarm buzzer, press the ON/OFF button (11).
Press the MEMORY.SET / MEMORY+ / NAP button (4) has no effect during alarm
operation. Press ON/OFF button (11) to cancel NAP function.
Remark :
When using the NAP alarm did not the wake up light function
PROJECTION UNIT
- Focus setting : Adjust the projection clock brightness/focus by turning the
brightness/focus adjustment wheel unit the projected time is clearly shown on the
ceiling or wall.
- Adjust projected direction.
- To flip projected image by 180°, press 180° flip button (16).
- Converted the projection time or temperature, press keep depress over 2 seconds
to enter PROJECTION TIME 180° FLIP/TIME-TEMPERATURE button (16).
NOTE : PROJECTS TIME IMAGE ON THE CEILING OR WALL OF A DARKENED
ROOM.
MAXIMUN PROJECTION DISTANCE IS 3-9 FEET.
- SPECIFICATIONS
- Frequency range : 87.5 – 108 MHz
- Battery backup : 3V (CR2032 Flat Lithium battery x 1) not included
- Power supply : AC230V 50Hz
- Temperature range for Indoor : 0 to + 50°C or 32 to 122 °F
Select DST (daylight saving time) mode
For countries with daylight saving time (DST).the clock radio offers you DST option to
adjust summer time.
In standby mode press and hold >> / TUNE + / DST button (12) for 2 seconds. The
clock advances by one hour.
To exit DST mode, repeat the above operation.

RESETTING
If the system does not respond or exhibits erratic or intermittent operation, you may
have experienced an electrostatic discharge (ESD) or a power surge that triggered the
internal microcontroller to shut down automatically. If this occurs, simply disconnect the
ac power cord and remove the system backup battery, wait for at least 3 minutes and
then setup the unit again as if it is a brand new unit.
WARNING
1. No naked flame sources, such as lighted candles, should be placed on the
apparatus.
2. Do not place the product in closed bookcases or racks without proper ventilation.
3. Where the mains plug is used as the disconnect device, the disconnect device shall
remain readily operable.
4. The ventilation should not be impeded by covering the ventilation openings with
items, such as newspapers, table-cloths, curtains, etc.
5. It shall not be exposed to dripping or splashing and that no objects filled with liquids,
such as vases, shall be placed on the apparatus.
6. Do not connect FM antenna to outside antenna.
7. The unit should not be exposed to direct sunlight, very high or low temperature,
moisture, vibrations or placed in dusty environment.
8. Do not use abrasive, benzene, thinner or other solvents to clean the surface of the
unit. To clean, wipe it will mild non-abrasive detergent solution and clean soft cloth.
9. Never attempt to insert wires, pins or other such objects into the vents or opening of
the unit.
10. Disconnect device warning : Mains plug is used as the connection, so it should
always remain ready operate.
11. Batteries shall not be exposed to excessive heat such as sunshine, fire or the like.
12. Class 1LED product.
CAUTION
Danger of explosion if battery is incorrectly replaced
Replace only with the same or equivalent type

PROTECTION DE L’ENVIRONNEMENT
Ne jetez pas ce produit avec les ordures ménagères lorsqu’il est usagé.
Retournez-le à un point de collecte pour le recyclage des appareils
électriques et électroniques. Cette recommandation est indiquée par le
symbole sur le produit, le mode d’emploi ou l’emballage.
Veuillez contacter vos collectivités locales pour vous renseigner sur les points
de collecte.
Les composants sont réutilisables en fonction de leur marquage. En réutilisant,
recyclant ou employant autrement les vieux appareils, vous contribuerez de
façon signifiante à la protection de notre environnement.
Ce symbole indique la présence d’une tension
dangereuse à l’intérieur de l'appareil, qui est
suffisante pour provoquer un choc électrique.
ATTENTION
Risque d’électrocution
Ne
p
as ouvrir!
Ce symbole indique la présence de consignes
importantes de fonctionnement et d’entretien de
pour l’appareil.
Attention!: Pour réduire le risque d’électrocution, ne retirez pas le couvercle (ou
l’arrière). L’usager ne peut entretenir aucune pièce à l’intérieur. Confiez
l’entretien à un personnel qualifié.
Consignes de sécurité, d’environnement et d’installation
• N'utilisez l'appareil qu’à l’intérieur dans un lieu sec
• Protégez l’appareil contre l’humidité
• N’ouvrez pas l’appareil RISQUE D’ELECTROCUTION ! Faites effectuer l’ouverture et l’entretien par un personnel
qualifié
• Ne connectez cet appareil qu'à une prise murale correctement installée et reliée à la terre Assurez-vous que la tension
principale corresponde aux recommandations de la plaque d’indice
• Assurez-vous que le câble d’alimentation reste au sec pendant le fonctionnement. Ne pincez pas le câble et ne
l’endommagez d’aucune façon
• Un câble de réseau ou une prise abimés doivent être immédiatement remplacés par un centre agréé.
• En cas de tonnerre, débranchez immédiatement l’appareil de l’alimentation.
• Les enfants doivent être surveillés par leurs parents lorsqu’ils utilisent l’appareil.
• Ne nettoyez l’appareil qu’avec un tissu sec.
N’utilisez PAS de PRODUITS DETERGENTS ou de CHIFFONS ABRASIFS !
• N’exposez pas l’appareil à la lumière directe du soleil ou toute autre source de chaleur
• Installez l’appareil dans un emplacement suffisamment ventilé pour éviter une accumulation de chaleur.
• Ne recouvrez pas les grilles d’aération !
• Installez l’appareil dans un emplacement sécurisé et sans vibrations.
• Ne pas installer l’appareil à proximité d’ordinateurs et fours à micro-ondes; sinon la réception de radio pourrait être
perturbée.
• Ne pas ouvrir ou réparer l’appareil. Cela est dangereux et annulerait la garantie. La réparation doit être uniquement
effectuée que par un centre de réparations / service agréé.
• N’utilisez que des piles au mercure et sans cadmium.
• Les piles usagées sont des déchets dangereux et ne doivent PAS être jetées avec les ordures
ménagères !!! Ramenez les piles à votre point de vente ou aux points de collecte de votre ville.
• Eloignez les piles des enfants. Les enfants pourraient avaler les piles. En cas d’ingestion d’une
pile, contactez immédiatement un médecin.
• Vérifiez régulièrement vos piles pour éviter les fuites.
• Las baterías no deberán estar expuestos a un calor excesivo como el sol, el fuego o similares.
• PRECAUCIÓN: Peligro de explosión si la batería se sustituye incorrectamente
Reemplace sólo con el mismo tipo o equivalente

UR140 / Notice anglaise
FONCTIONS ET BOUTONS
1. POUR AUGMENTER L'INTENSITÉ DE LA LUMIÈRE
2. POUR DIMINUER L'INTENSITÉ DE LA LUMIÈRE
3. LUMIÈRE ALLUMÉE/ÉTEINTE
4. MÉM./MÉM+/SIESTE/ÉCLAIRAGE ÉCRAN AUTO
5. ABAT-JOUR
6. RAPPEL D'ALARME/VEILLE/VARIATEUR
7. RÉGLAGE/TEMPÉRATURE
8. << /RÉGLAGE -/ANNÉE/MOIS/JOUR
9. ACTIV/DÉSACTIV ALARME 1
10. ÉCRAN
11. MARCHE/ARRÊT
12. >> /RÉGLAGE +/HEURE D'ÉTÉ/C-F
13. ACTIV/DÉSACTIV ALARME 2
14. MONTER LE VOLUME/CHANGEMENT D'AFFICHAGE AUTO
15. BAISSER LE VOLUME
16. ROTATION À 180° DE L'HEURE PROJETÉE/HEURE- TEMPÉRATURE
17. ACTIV/DÉSACTIV PROJECTION
18. RÉGLAGE DE LA MISE AU POINT DE LA PROJECTION
19. HAUT-PARLEUR
20. ANTENNE FM
21. CAPTEUR DE TEMPÉRATURE (INTÉRIEURE)
22. COMPARTIMENT À PILE
23. CORDON D'ALIM. CA
24. ÉTIQUETTE

UR140 / Notice anglaise
ÉCRAN LED
RACCORDEMENT À L'ALIMENTATION
Branchez le cordon d'alimentation sur une prise secteur. Cet appareil est équipé d'un système de
sauvegarde à pile, il nécessite une pile plate au lithium CR2032 de 3 V (non fournie). Installez la
pile dans le compartiment à pile en respectant les polarités (+ et -), la polarité des bornes de la
pile doit correspondre aux bornes dans le compartiment. En cas de panne de courant, l'horloge
passe automatiquement à l'alimentation de secours à pile, la mémoire de l'horloge et du minuteur
continue de fonctionner. Quand le courant est rétabli, l'horloge fonctionnera de nouveau sur CA.
GUIDE DE PRISE EN MAIN
1. RÉGLAGE MANUEL DE L'HORLOGE
A. Réglage de l'heure et de la date : en mode normal, maintenez enfoncé Réglage (7) pendant
2 secondes pour accéder au mode de réglage de l'heure, appuyez ensuite sur Réglage (7)
pour changer de mode dans l'ordre suivant :
Normal → Année → Mois → Jour → Format 12/24 H → Heures réelles → Minutes réelles →
Normal
Action (pendant le réglage des données) :
- Appuyez sur <</Réglage - (8) pour diminuer la valeur.
- Appuyez sur >>/Réglage + (12) pour augmenter la valeur.
- Maintenez enfoncé << ou >> pendant 2 secondes pour activer l'avance auto.
B. Réglage de l'Alarme 1 et de l'Alarme 2 : en mode normal, maintenez enfoncé Réglage
d'alarme (9/13) pendant 2 secondes pour accéder au mode de réglage de l'alarme, appuyez
ensuite sur Réglage d'alarme (9/13) pour changer de mode dans l'ordre suivant :
Normal → Heures de AL1→ Minutes de AL1 → Jours d'alarme AL1 → Réveil AL1 avec sonnerie →
Réveil AL1 avec radio → Volume de la radio de réveil AL1 → Intensité lumineuse → Normal.
Indicateur de V
EILLE
Indicateur d'HEURE
Indicateur de Mhz
Indicateur d'ALARME 2
Indicateur APRÈS-MID
Indicateur d'ALARME 1

UR140 / Notice anglaise
Normal → Heures de AL2 → Minutes de AL2 → Jours d'alarme AL2 → Réveil AL2 avec sonnerie
→ Réveil AL2 avec radio → Volume de la radio de réveil AL2 → Intensité lumineuse → Normal.
Sélection du mode des jours d'alarme :
1-5 : Du lundi au vendredi
1-7 : Toute la semaine
6-7 : Samedi et dimanche
1-1 : Un jour de la semaine
Action (pendant le réglage des données) :
- Appuyez sur <</Réglage - (8) pour diminuer la valeur.
- Appuyez sur >>/Réglage + (12) pour augmenter la valeur.
- Maintenez enfoncé << ou >> pendant 2 secondes pour activer l'avance auto.
Lumière de réveil :
Elle s'allumera 5 minutes avant l'heure de l'alarme. La lumière sera faible au départ, puis sa
luminosité augmentera progressivement jusqu'au niveau maximum.
Activer / désactiver l'alarme
Appuyez et maintenez la touche "ALARM 1" (9) / bouton pour activer ou désactiver l'alarme
"ALARM 2" (13). Une fois que l'alarme est activée, le symbole sera apparu sur l'écran.
DURÉE DE L'ALARME ET FONCTION RAPPEL D'ALARME
Durée d'alarme : L'alarme avec sonnerie ou radio sera active pendant 30 minutes si vous
n'appuyez sur aucun bouton, puis elle s'arrêtera automatiquement et sonnera à la même
heure le lendemain.
Action pour le rappel d'alarme :
- Quand l'alarme sonne, appuyez sur Rappel d'alarme (6) pour activer la fonction de rappel
d'alarme, et la sonnerie ou la radio d'alarme s'arrêtera.
- L'intervalle de rappel d'alarme est de 9 minutes (sans compter les secondes de décalage)
- Le rappel d'alarme continuera jusqu'à ce que vous appuyiez sur Marche/arrêt (11) ou la
sonnerie ou la radio d'alarme s'arrêtera automatiquement au bout de 30 minutes.
Fonction d'éclairage de l'écran :
- Appuyez sur Mémorisation/mémoire+/éclairage d'écran auto/sieste (4) pendant
3 secondes, le voyant d'affichage LED s'allumera, l'éclairage LED s'éteindra
automatiquement au bout de 15 secondes. Appuyez sur n'importe quel bouton pour garder
l'éclairage allumé pendant 15 secondes.

UR140 / Notice anglaise
- Appuyez sur Mémorisation/mémoire +/éclairage d'écran auto/sieste (4) pendant 3 secondes,
le voyant d'écran LED s'éteindra pour désactiver cette fonction.
CHANGEMENT D'AFFICHAGE AUTO :
Avec la radio désactivée, maintenez enfoncé MONTER LE VOLUME/CHANGEMENT
D'AFFICHAGE AUTO (14) pendant 2 secondes pour accéder au mode de changement
d'affichage automatique. L'année s'affichera. Rappuyez pour afficher mois/jour/température,
l'heure s'affichera à nouveau au bout de 5 secondes.
Écouter la radio
Appuyez sur le bouton marche/arrêt (11) pour allumer l'appareil.
Utilisez le bouton Réglage + ou Réglage – pour sélectionner une station de radio. Si vous
maintenez enfoncé pendant une seconde le bouton Réglage + ou Réglage –puis le relâchez,
l'appareil recherchera automatiquement la prochaine station de radio.
Appuyez sur le bouton MARCHE/ARRÊT (11) pour éteindre la radio.
Régler/Charger une station préréglée
Appuyez sur le bouton marche/arrêt (11) pour allumer l'appareil.
Utilisez le bouton Réglage + ou Réglage – pour sélectionner une station de radio.
Appuyez sur Mémorisation/mémoire + et « P02 » clignotera.
Rappuyez dessus pour mémoriser la station.
Recommencez les étapes 2 à 4 pour régler d'autres stations.
L'appareil peut mémoriser jusqu'à 10 stations FM.
Quand « P01-P10 » clignote, appuyez sur le bouton Réglage + ou Réglage – pour sélectionner le
numéro à attribuer à la station mémorisée.
Pour charger une station mémorisée, appuyez sur le bouton Mémorisation/mémoire +/sieste
pour sélectionner le numéro de la station.
Indication d'ANNÉE
Indication du MOIS Indication du JOUR

UR140 / Notice anglaise
Remarque :
- Déployez complètement l'antenne FM afin d'obtenir la meilleure réception FM.
Fonction de mise en veille
En écoutant la radio, appuyez sur le bouton Rappel d'alarme/mise en veille/variateur (6) pour
passer en mode veille. Vous pouvez régler le minuteur entre 15 et 90 minutes en appuyant sur le
bouton Rappel d'alarme/mise en veille/variateur (6). L'appareil s'éteindra automatiquement
quand la durée sélectionnée sera écoulée.
Fonction de minuteur de SIESTE (compte à rebours)
Avec la radio désactivée, appuyez sur MÉMORISATION/MÉMOIRE+/SIESTE (4) pour passer en
mode SIESTE. La durée de la SIESTE restera affichée pendant 5 secondes. Vous aurez
5 secondes pour appuyez sur le bouton MÉMORISATION/MÉMOIRE+/SIESTE (4) et régler la
durée entre 10 et 90 minutes.
La sonnerie d'alarme sonnera pendant 30 minutes puis s'arrêtera automatiquement. Pour
arrêter la sonnerie d'alarme, appuyez sur le bouton Marche/arrêt (11).
Si vous appuyez sur MÉM./M+/SIESTE (4) pendant le fonctionnement de l'alarme, cela n'aura
aucun effet. Appuyez sur Marche/arrêt (11) pour désactiver la fonction de SIESTE.
Remarque :
L'alarme de sieste ne prend pas en charge la fonction de variateur de lumière.
DISPOSITIF DE PROJECTION
- Réglage de la mise au point : Réglez la luminosité et la mise au point de l'heure projetée en
tournant le bouton de réglage de la luminosité et de la mise au point jusqu'à ce que la
projection de l'heure soit clairement visible sur le plafond ou sur le mur.
- Réglez l'orientation de la projection.
- Pour pivoter l'image à 180°, utilisez le bouton de rotation (16).
- Pour basculer entre la projection d'heure et de température, maintenez enfoncé pendant
2 secondes ROTATION À 180° DE L'HEURE PROJETÉE/HEURE- TEMPÉRATURE (16).
Remarque : UTILISEZ LA PROJECTION DE L'HEURE SUR LE PLAFOND OU LE MUR D'UNE
PIÈCE SOMBRE.
La DISTANCE DE PROJECTION MAXIMUM EST DE 1 À 3 MÈTRES.

UR140 / Notice anglaise
- CARACTÉRISTIQUES TECHNIQUES
- Gamme de fréquence : 87.5 à 108 MHz
- Pile de secours : 3 V (1 pile plate au lithium CR2032) non fournie
- Alimentation : 230 Vca ~50 Hz
- Plage de température en intérieur : 0 à + 50 °C ou 32 à 122 °F
Sélection du mode d'heure d'été
Pour les pays utilisant l'heure d'été, ce radio-réveil est doté de l'option de réglage de l'heure d'été.
En mode veille, maintenez enfoncé >> /RÉGLAGE + /HEURE D'ÉTÉ (12) pendant 2 secondes.
L'heure avance d'une heure.
Pour quitter le mode HEURE D'ÉTÉ, recommencez l'opération ci-dessus.
RÉINITIALISATION
Si l'appareil ne répond pas ou présente des dysfonctionnements, il a peut-être reçu une
décharge électrostatique ou une surtension qui a causé l'arrêt automatique du microcontrôleur
interne. Dans ce cas, débranchez simplement le cordon d'alimentation et enlevez la pile de
secours de l'appareil, attendez au moins 3 minutes puis réglez à nouveau l'appareil comme s'il
était neuf.
CARACTÉRISTIQUES TECHNIQUES
Gamme de fréquences : 87,5 à 108 MHz
Pile de secours : 3 V (1 pile plate au lithium CR2032) non fournie
Alimentation : 230 Vca ~50 Hz

MILIEUBESCHERMING
De materialen zijn herbruikbaar volgens de markeringen. Door materiaal te
recyclen of oude apparaten op een andere manier te hergebruiken draagt
u bij aan het bescherming van ons milieu.
Gooi dit product niet weg bij het huishoudafval aan het einde van de
levensduur ervan. Breng het product terug naar een inzamelingspunt voor
hergebruik van electrische en electronische apparatuur. Dit wordt
aangegeven door dit symbool op het product, in de gebruiksaanwijzing of
op de verpakking.
Neem a.u.b. contact op met uw gemeente voor informatie over inzamelingspunten.
Dit symbool wijst op de aanwezigheid van een
gevaarlijke spanning binnenin de behuizing, die
groot genoeg is om electrische schokken te
veroorzaken.
WAARSCHUWING
Risico voor een elektrische schok
Niet openen!
Waarschuwing: Verwijder de behuizing (of achterzijde) niet, om het risico op
elektrische schokken te verkleinen. Geen voor de gebruiker te onderhouden
onderdelen binnenin het apparaat. Laat reparatie over aan gekwalificeerd
onderhoudspersoneel.
Dit symbool wijst de gebruiker op de
aanwezigheid van belangrijke gebruiks- en
onderhoudsinstructies voor het apparaat.
Veiligheids-, milieu- en instellingsaanwijzingen
• Gebruik het apparaat alleen binnenshuis in een droge omgeving.
• Bescherm het apparaat tegen vocht.
• Open het apparaat niet. ELECTRISCHE SCHOKGEVAAR! Laat opening en reparatie over aan gekwalificeerd
onderhoudspersoneel.
• Sluit dit apparaat alleen aan op een goed geïnstalleerd en geaard stopcontact. Zorg ervoor dat de netspanning
overeenkomt met het de specificaties op het etiket.
• Zorg ervoor dat het electriciteitssnoer droog blijft tijdens gebruik. Zorg ervoor dat het electriciteitssnoer niet afgeknepen
of op een andere manier beschadigd wordt.
• Beschadigde snoeren of stekkers moeten meteen vervangen worden door geautoriseerd onderhoudspersoneel.
• In geval van bliksem moet de stekker onmiddellijk uit het stopcontact getrokken worden.
• Wanneer kinderen het apparaat gebruiken, moeten de ouders toezicht houden.
• Reinig het apparaat alleen met een droge doek.
Gebruik GEEN SCHOONMAAKMIDDELEN of SCHUURSPONSJES!
• Stel het apparaat niet bloot aan direct zonlicht of andere hittebronnen.
• Installeer het apparaat op een plaats met voldoende ventilatie, om oververhitting te voorkomen.
• Dek de ventilatieopeningen niet af!
• Installeer het apparaat op een veilige en vibratie-vrije plaats.
• Installeer het apparaat zo ver mogelijk uit de buurt van computers en magnetrons; anders kan de radio-ontvangst
gestoord worden.
• Open de behuizing niet en probeer het apparaat niet te repareren. Dit is gevaarlijk en doet uw garantie vervallen.
Reparaties mogen alleen uitgevoerd worden door geautoriseerd onderhoudspersoneel.
• Gebruik alleen kwik- en cadmium-vrije batterijen.
• Gebruikte batterijen zijn gevaarlijk afval en mogen NIET weggegooid worden bij het uishoudelijk
afval!!! Breng de batterijen terug naar uw handelaar of naar inzamelingspunten in uw gemeente.
• Houd batterijen buiten bereik van kinderen. Kinderen kunnen batterijen per ongeluk inslikken.
Raadpleeg onmiddellijk een dokter wanneer een kind een batterij ingeslikt heeft.
• Controleer uw batterijen regelmatig om batterijlekkage te voorkomen.
• Batterijen mogen niet worden blootgesteld aan extreme hitte, zoals zonlicht, vuur of dergelijke.
• LET OP: Explosiegevaar als de batterij verkeerd wordt vervangen
Vervang alleen door hetzelfde of een gelijkwaardig type

UR140 / Nederlandse instructiehandleiding
FUNCTIE EN BESTURINGSELEMENTEN
1. OM DE LICHTINTENSITEIT HOGER IN TE STELLEN
2. OM DE LICHTINTENSITEIT LAGER IN TE STELLEN
3. LICHT AAN/UIT
4. GEHEUGEN/GEHEUGEN+/NAP/DISPLAY AUTOMATISCH UIT
5. LAMPEKAP
6. SLUIMER / SLAAP / DIMMER
7. INSTELLEN/ TEMPERATUUR
8. << / AFSTEMMEN - / JAAR/MAAND/DAG
9. ALARM 1 AAN / UIT ZETTEN
10. DISPLAY
11. AAN / UIT
12. >> / AFSTEMMEN + / DST/C-F
13. ALARM 2 AAN / UIT ZETTEN
14. VOLUME OMHOOG / DISPLAY AUTOMATISCH VERANDEREN AAN/UIT
15. VOLUME OMLAAG
16. PROJECTIETIJD 180° SPIEGELEN/TIJD-TEMPERATUUR
17. PROJECTIE AAN/UIT
18. FOCUSINSTELLING VOOR DE PROJECTIE-EENHEID
19. LUIDSPREKER
20. FM-ANTENNE
21. TEMPERATUURSENSOR (BINNENSHUIS)
22. BATTERIJVAK
23. NETSNOER
24. TYPEPLAATJE

UR140 / Nederlandse instructiehandleiding
LED-DISPLAY
ELEKTRICITEITSAANSLUITING
Steek de stekker van het netsnoer in een stopcontact. Dit apparaat is uitgerust met een
batterijback-upsysteem, het vereist een 3V CR2032 platte lithiumbatterij (niet meegeleverd).
Plaats de batterij in het batterijvak, ervoor zorgend dat de positieve en negatieve (+ en -)
poolklemmen op de corresponderende klemmen op de plaat in het batterijvak zijn aangesloten.
Wanneer een storing van de netvoeding optreedt, schakelt de klok automatisch over op
batterijvoeding, het klok- en timergeheugen blijven werken. Als de netvoeding hervat, schakelt
de klok weer naar netvoeding terug.
AAN DE SLAG
1. DE TIJD EN KALENDER HANDMATIG INSTELLEN
A. Instellen van de Tijd en Kalender – Druk in de normale modus op de “instellen”-knop (7) en
houd langer dan 2 seconden ingedrukt om de instelmodus van de tijd te openen. Druk na het
openen van de instelmodus op de “instellen”-knop (7) om de cyclus van de modus als volgt te
wijzigen:
Normaal → Jaar → Maand → Dag → 12/24-UUR → Actuele tijd Uur → Actuele tijd Minuut
→ Normaal
Actie (tijdens aanpassing van gegevens):
- Druk op de << / Afstemmen - knop (8) om de gegevens achteruit aan te passen.
- Druk op de >> / Afstemmen + knop (12) om de gegevens vooruit aan te passen.
- Druk op en houd de << of >> knop 2 seconden ingedrukt om het automatisch vooruit
spoelen in werking te stellen.
STANDBY-
indicator
TIJD-indicator
MHz-indicator
ALARM 2-indicator
PM-
indicator
ALARM 1-
indicator

UR140 / Nederlandse instructiehandleiding
-
B. Instellen Alarm 1 en Alarm 2 – Druk in de normale modus op de “instellen”-knop (9/13) en
houd langer dan 2 seconden ingedrukt om de instelmodus van het alarm te openen. Druk op
de “instellen”-knop (9/13) om de cyclus van de modus als volgt te wijzigen :
Normaal → AL 1 Uur → AL 1 Min → AL 1 weekdag Alarm → AL 1 wektoon → AL 1 wekradio → AL
1 wekradiovolume → Lichtintensiteit → Normaal.
Normaal → AL 2 Uur → AL 2 Min → AL 2 weekdag Alarm → AL 2 wektoon → AL 2
wekradio → AL 2 wekradiovolume → Lichtintensiteit → Normaal.
Selecteer de weekdagmodus van het alarm als volgt
1-5 : Maandag t/m vrijdag
1-7 : Hele week
6-7 : Zaterdag & zondag
1-1 : Eén dag van de week
Actie (tijdens aanpassing van gegevens) :
- Druk op de << / Afstemmen - knop (8) om de gegevens achteruit aan te passen.
- Druk op de >> / Afstemmen + knop (12) om de gegevens vooruit aan te passen.
- Druk op en houd de << of >> knop 2 seconden ingedrukt om het automatisch vooruit
spoelen in werking te stellen.
Alarmweklicht:
Het licht zal 5 minuten voor de ingestelde wekkertijd aan gaan. Het licht zal op een laag niveau
beginnen en geleidelijk tot het maximaal ingestelde niveau toenemen.
Het Alarm inschakelen/uitschakelen
Houd de “ALARM 1” (9) / “ALARM 2” (13) knop ingedrukt om het alarm in of uit te schakelen.
Zodra het alarm is geactiveerd, zal er een symbool op het scherm verschijnen.
ALARMDUUR EN SLUIMERFUNCTIE
Alarmduur – De alarmzoemer of radioalarm zal 30 minuten blijven werken als geen knop
wordt ingedrukt, vervolgens zal het automatisch stoppen en de volgende dag weer op
dezelfde alarmtijd afgaan.

UR140 / Nederlandse instructiehandleiding
Actie voor sluimeren :
- Druk tijdens het afgaan van het alarm op de “Sluimeren”-knop (6) om de sluimerfunctie in
werking te stellen, het zoemeralarm of radioalarm zal stoppen.
- Het interval van sluimeren is 9 minuten (de tweede verschuiving niet inbegrepen)
- Het sluimeren zal doorgaan tenzij op de “AAN/UIT”-knop (11) wordt gedrukt om het
zoemeralarm uit te schakelen of het radioalarm zal na 30 minuten automatisch stoppen.
Display verlichting aan/uit-functie:
- Druk op en houd de “Geheugen / Geheugen+ / Display automatisch uit /NAP”-knop (4) voor 3
seconden ingedrukt, de “ ”-Indicator van de LED-display gaat branden, de LED-display zal
na 15 seconden automatisch wordt uitgeschakeld. Druk op een willekeurige knop om de
LED-display voor 15 seconden aan te houden.
- Druk op en houd de “Geheugen / Geheugen+ / Display automatisch uit /NAP”-knop (4) voor 3
seconden ingedrukt, de “ ”-Indicator van de LED-display gaat uit om deze functie te
annuleren.
AUTOMATISCH DE INHOUD VAN DISPLAY WIJZIGEN:
Druk in de “Uit”-stand van de radio op de “VOLUME OMHOOG / DISPLAY
AUTOMATISCH VERANDEREN AAN/UIT”-knop (14) en houd langer dan 2 seconden
ingedrukt om de “Display automatisch veranderen”-modus van de tijd te openen. Om het
jaar weer te geven en druk nogmaals om “Maand/Dag/ Temperatuur” weer te geven, de
display keert na 5 seconden naar de tijdweergave terug.

UR140 / Nederlandse instructiehandleiding
Naar de radio luisteren
Druk op de “AAN/UIT”-knop (11) om de eenheid aan te zetten.
Gebruik de “Afstemmen +”- of “Afstemmen -”-knop om het gewenste radiostation te selecteren.
Wanneer u op de “Afstemmen +”- of “Afstemmen -”-knop drukt en voor één seconde ingedrukt
houdt en vervolgens loslaat, zal het apparaat automatisch het volgende zender scannen.
Druk op de “AAN/UIT”-knop (11) om de radio UIT te schakelen.
Om de voorinstellingen van de radio in te stellen / op te roepen
Druk op de “AAN/UIT”-knop (11) om de eenheid aan te zetten.
Gebruik de “Afstemmen +”- of “Afstemmen -”-knop om het gewenste radiostation te selecteren.
Druk op de “Geheugen / Geheugen +”-knop; “P02” zal in de display knipperen.
Druk opnieuw op de “Geheugen / Geheugen +”-knop om de voorinstelling in te stellen.
Herhaal de stappen 2 tot en met 4 om meer voorinstellingen in te stellen.
Het apparaat kan totaal 10 FM-stations vooraf instellen.
Wanneer “P01-P10” knippert, druk op de “Afstemmen +”- of “Afstemmen -”-knop om het nummer
van de voorinstelling te selecteren.
Bij het oproepen van vooraf ingestelde stations, druk op de “Geheugen / Geheugen +/nap”-knop
om het nummer van de voorinstelling te selecteren.
Opmerking :
- Voor de beste FM-ontvangst, zorg ervoor dat de FM-antennekabel volledig afgewikkeld
en gestrekt is.
Slaapmodus
Bij het luisteren naar radio, druk op de “Sluimer / Slaap/Dimmer”-knop (6) om de slaapmodus in
te schakelen. U kunt de slaaptimer van 90 minuten tot 15 minuten instellen door op de “Sluimer /
Slaap/Dimmer”-knop (6) te drukken. Het apparaat zal na de geselecteerde tijd automatisch
uitschakelen.
NAP-timer-functie (afteltimer)
Druk tijdens de "radio uit”-modus op de “GEHEUGEN / GEHEUGEN + / NAP”-knop (4) om de
NAP-modus in te schakelen. De NAP-tijd zal 5 seconden weergegeven worden, druk
ondertussen herhaaldelijk op de “GEHEUGEN / GEHEUGEN+ / NAP”-knop (4) om de duur van
90 - 10 minuten in te stellen.
De alarmzoemer zal voor 30 minuten luiden en vervolgens automatisch uitschakelen. Om de
alarmzoemer te stoppen, druk op de “AAN/UIT”-knop (11).

UR140 / Nederlandse instructiehandleiding
Het drukken op de “GEHEUGEN / GEHEUGEN+ / NAP”-knop (4) heeft tijdens de
alarmwerking geen effect. Druk op de “AAN/UIT”-knop (11) om de NAP-functie te annuleren.
Opmerking :
Wanneer het NAP-alarm wordt gebruikt, zal de weklichtfunctie niet werken.
PROJECTIE-EENHEID
- Focusinstelling : Pas de projectiescherpte van de klok aan, door aan de
helderheids-/focusregelaar te draaien totdat de geprojecteerde tijd duidelijk op het plafond of
de wand wordt weergegeven.
- Pas de projectierichting aan.
- Om het geprojecteerde beeld met 180° te spiegelen, druk op de “PROJECTIETIJD 180°
SPIEGELEN”-knop (16).
- Druk op en houd de “PROJECTIETIJD 180° SPIEGELEN/TIJD-TEMPERATUUR”-knop (16)
langer dan 2 ingedrukt seconden om de conversie van de projectietijd of temperatuur in te
stellen.
OPMERKING : PROJECTEERT EEN TIJDWEERGAVE OP HET PLAFOND OF DE MUUR VAN
EEN VERDUISTERDE KAMER.
DE MAXIMALE PROJECTIEAFSTAND BEDRAAGT 0,9 - 2,7 METER
- SPECIFICATIES
- Frequentiebereik : 87,5 - 108 MHz
- Back-upbatterij : 3V (CR2032 platte Lithium batterij x 1) niet meegeleverd
- Voeding : AC230V, 50Hz
- Temperatuurbereik voor gebruik : 0 tot +50°C of 32 tot 122 °F

UR140 / Nederlandse instructiehandleiding
-
De DST-modus (Daylight saving time/Zomertijd)
Voor landen met zomertijd (DST), biedt de klokradio u de DST-optie om de zomertijd aan te
passen.
Druk in de standby-modus op de “>> / AFSTEMMEN + / DST”-knop (12) en houd voor 2
seconden ingedrukt. De klok gaat één uur vooruit.
Herhaal de bovenstaande procedure om de DST-modus te verlaten.
RESETTEN
Als het systeem niet reageert, een onregelmatige of onderbroken werking vertoont, kunt u een
elektrische schok (ESD) of een spanningspiek hebben ondervonden, die de interne
microcontroller heeft geactiveerd om automatisch af te sluiten. Als dit gebeurt, ontkoppel het
netsnoer en verwijder de back-upbatterij van het systeem, wacht ten minste 3 minuten en stel
vervolgens de eenheid opnieuw in alsof het een nieuwe eenheid is.
Specificaties zijn onderhevig aan verandering zonder voorafgaande kennisgeving.

PROTECCIÓN MEDIOAMBI
ENTAL
No elimine este producto con la basura doméstica al terminar su vida útil.
Llévelo a un punto de recogida para reciclado de aparatos eléctricos y
electrónicos. Esto se indica mediante el símbolo en el producto, en el
manual de usuario o en el embalaje.
Consulte a las autoridades la información sobre los puntos de recogida.
Los materiales son reutilizables conforme a los símbolos. Al reutilizar, reciclar u
otras formas de utilización de aparatos antiguos, está contribuyendo a proteger
el medio ambiente.
Este símbolo indica la presencia de tensión
peligrosa en el interior, la suficiente para provocar
una sacudida eléctrica.
ADVERTENCIA
Riesgo de sacudida eléctrica
¡
No abrir!
Este símbolo indica la presencia de instrucciones
de funcionamiento y mantenimiento importantes
para el aparato.
Precaución: Para evitar el riesgo de sacudida eléctrica, no retire la tapa (o parte
posterior). No hay piezas útiles en el interior. Consulte cualquier reparación a
personal cualificado.
Medidas de seguridad, medioambientales y de montaje
• Utilice el aparato solo en entornos secos e interiores.
• Proteja el aparato de la humedad.
• No abra el aparato. ¡PELIGRO DE SACUDIDA ELÉCTRICA! Consulte con personal cualificado para su apertura y
reparación.
• Conecte el aparato a una toma de corriente correctamente instalada y con conexión a tierra. Asegúrese de que la
tensión de la red se corresponde con la que aparece en las especificaciones.
• Asegúrese de que el cable permanece seco durante el funcionamiento. No pinche ni dañe el cable de conexión a red
de ningún modo.
• Un cable de red dañado o clavija debe ser reemplazado inmediatamente por el centro de reparación autorizado.
• En caso de tormenta, desenchufe de la red inmediatamente.
• Los padres deberán supervisar a los niños cuando utilicen el aparato.
• Limpie el aparato solamente con un paño seco.
NO utilice LIMPIADORES NI PAÑOS ABRASIVOS
• No exponga el aparato a la luz solar directa o a otras fuentes de calor.
• Instale el aparato en un lugar con suficiente ventilación con el fin de evitar acumulación de calor.
• No cubra las aberturas de ventilación.
• Coloque el aparato en un lugar seguro y sin vibraciones.
• Coloque el aparato lo más lejos posible de ordenadores y microondas, de otro modo puede resultar afectada la
recepción de la radio.
• No abra ni repare el aparato. No es seguro hacerlo y anula la garantía. Las reparaciones solo las pueden realizar los
centros de atención al cliente autorizados.
• Utilice solo baterías sin mercurio y cadmio.
• Las baterías utilizadas son residuos peligrosos y no se deben desechar con la basura doméstica. Lleve las baterías a
su proveedor o a los puntos de recogida de su comunidad.
• Mantenga las baterías lejos de los niños. Podrían tragarse las baterías. En caso de tragarse una batería, consulte a un
médico inmediatamente.
• Compruebe las baterías regularmente para evitar fugas.
Las baterías no deberán estar expuestos a un calor excesivo como el sol, el fuego o similares.
• PRECAUCIÓN: Peligro de explosión si la batería se sustituye incorrectamente
Reemplace sólo con el mismo tipo o equivalente

UR140 / Manual de instrucciones en español
FUNCIONES Y CONTROLES
1. PARA AJUSTAR EN ALTA LA INTENSIDAD DE LA LUZ
2. PARA AJUSTAR EN BAJA LA INTENSIDAD DE LA LUZ
3. CONEXIÓN/DESCONEXIÓN DE LA LUZ
4. MEMORIA/MEMORIA+/DORMITAR/DISPLAY DE DESCONEXIÓN AUTOMÁTICA
5. PANTALLA DE LA LÁMPARA
6. REPETICIÓN / SUEÑO / ATENUADOR
7. AJUSTE/ TEMPERATURA
8. << / SINTONIZAR - / AÑO/MES/DÍA
9. AJUSTE CONEXIÓN / DESCONEXIÓN ALARMA 1
10. DISPLAY
11. CONEXIÓN / DESCONEXIÓN
12. >> / SINTONIZAR + / DST/C-F
13. AJUSTE CONEXIÓN / DESCONEXIÓN ALARMA 2
14. AUMENTO DE VOLUMEN / CONEXIÓN/DESCONEXIÓN DE CAMBIO AUTOMÁTICO DE
DISPLAY
15. REDUCCIÓN DE VOLUMEN
16. TIEMPO DE PROYECCIÓN DESPLAZAMIENTO DE 180º/TIEMPO - TEMPERATURA
17. CONEXIÓN / DESCONEXIÓN DE PROYECCIÓN
18. AJUSTE DE ENFOQUE PARA UNIDAD DE PROYECCIÓN
19. ALTAVOZ
20. ANTENA DE FM
21. SENSOR DE TEMPERATURA (EN LA PUERTA)
22. COMPARTIMENTO DE LA BATERÍA
23. CABLE DE ALIMENTACIÓN DE CA
24. ETIQUETA DE CARACTERÍSTICAS

UR140 / Manual de instrucciones en español
DISPLAY LED
CONEXIÓN ELÉCTRICA
Enchufe el cable de alimentación de CA a una fuente de CA de toma de corriente doméstica.
Esta unidad está equipada con un sistema de batería de respaldo, requiere una batería de litio
plana CR2032 de 3 V (no incluida). Introduzca la batería en el compartimento de la batería,
asegurándose de que los terminales de la batería positivo y negativo (+ y -) estén conectados a
los terminales correspondientes en la placa del compartimento de la batería. Si se produce un
fallo de alimentación de CA, el reloj automáticamente cambia a la fuente de alimentación de la
batería, y la memoria del reloj y del temporizador siguen funcionando. Cuando se reanuda la
energía de CA, el reloj vuelve a cambiar a CA.
INTRODUCCIÓN
1. AJUSTE MANUAL DE LA HORA Y DEL CALENDARIO
A. Ajuste de la hora y del calendario: Pulse el botón de ajuste (7) en el modo normal y
manténgalo pulsado durante 2 segundos para entrar en el modo de ajuste de hora; después,
entre en el modo de ajuste, pulse el botón de ajuste (7) para cambiar el ciclo de modo de la
siguiente manera:
Normal → Año → Mes → Día → 12/24 H → Hora en tiempo real → Min. en tiempo real →
Normal
Acción (durante el ajuste de datos):
- Pulse el botón << / Tune - (8) (<< / Sintonizar -) para ajustar los datos hacia atrás.
- Pulse el botón >> / Tune + (12) (>> / Sintonizar +) para ajustar los datos hacia adelante.
- Mantenga pulsado el botón << o >> durante 2 segundos para permitir el avance automático.
B. Ajuste de la Alarma 1 y Alarma 2 – Pulse el botón de ajuste de la alarma (9/13) durante el
modo normal y manténgalo pulsado durante 2 segundos para entrar en el modo de ajuste de
alarma; después, entre en el modo de ajuste, pulse el botón de ajuste de alarma (9/13) para
cambiar el ciclo de modo de la siguiente manera:
Normal → Hora de AL 1 → Min. de AL 1 → Alarma semanal de AL 1 → Pitido para despertar de AL
1 → Radio para despertar de AL 1 → Volumen de radio para despertar de AL 1 → Intensidad de
la luz → Normal.
Indicador de ESPERA
Indicador de HORA
Indicador de MHz
Indicador de ALARMA 2
Indicador de PM
Indicador de ALARMA 1

UR140 / Manual de instrucciones en español
Normal → Hora de AL 2 → Min. de AL 2 → Alarma semanal de AL 2 → Pitido para despertar de AL
2 → Radio para despertar de AL 2 → Volumen de radio para despertar de AL 2 → Intensidad de
la luz → Normal.
Seleccione el modo semanal de alarma de la siguiente manera:
1-5 : Lunes a viernes
1-7 : Semana completa
6-7 : Sábado y domingo
1-1 : Un día de la semana
Acción (durante el ajuste de datos):
- Pulse el botón << / Tune - (<< / Sintonizar -) (8) para ajustar los datos hacia atrás.
- Pulse el botón >> / Tune + (>> / Sintonizar +) (12) para ajustar los datos hacia adelante.
- Mantenga pulsado el botón << o >> durante 2 segundos para permitir el avance automático.
Activar / desactivar la alarma
Presione y mantenga el botón “ALARMA 1” (9) / “ALARMA 2" (13) para activar o desactivar la
alarma. Cuando esté activada, se mostrará el símbolo en pantalla..
Luz despertadora de alarma:
La luz se encenderá 5 minutos antes de la hora de alarma ajustada. La luz comenzará teniendo
una intensidad baja y aumentará gradualmente hasta el nivel máximo.
DURACIÓN DE LA ALARMA Y FUNCIÓN DE REPETICIÓN
Duración de la alarma: la alarma mediante pitidos o mediante la radio seguirá funcionando
durante 30 minutos si no se pulsa ninguna tecla; entonces, se parará automáticamente y
esperará a la misma hora de alarma del día siguiente.
Acción de la Repetición:
- Durante el funcionamiento de la alarma, si se pulsa el botón Snooze (Repetición) (6), se
habilitará la función de repetición, La alarma mediante pitidos o mediante la radio se detendrá.
- El intervalo de repeticiones es de 9 minutos (sin incluir el segundo desplazamiento)
- La repetición continuará a menos que se pulse el botón ON/OFF (Conexión/Desconexión) (11)
para desconectar la alarma, o bien la alarma del Zumbador o la alarma de la Radio se detengan
automáticamente después de 30 minutos.
Función de conexión/desconexión de la luz del display:
- Pulse el botón Memory. set / memory+ / display light auto on-off /NAP (Ajuste de memoria /
memoria+ / conexión-desconexión automática de la luz del display/DORMITAR) (4) durante
3 segundos, el indicador del display LED se encenderá; el display LED se apagará
automáticamente después de 15 segundos. Pulse cualquier botón para mantener el display
LED durante 15 segundos.
- Pulse el botón Memory. set / memory+ / display light auto on-off /NAP (Ajuste de memoria /
memoria+ / conexión-desconexión automática de la luz del display/DORMITAR) (4) durante
3 segundos, el indicador de display LED se apagará para cancelar esta función.

UR140 / Manual de instrucciones en español
CONTENIDO DE DISPLAY DE CAMBIO AUTOMÁTICO
En modo de desconexión de radio, pulse el botón VOLUME UP / DISPLAY AUTO CHANGE
ON/OFF (Aumento de volumen / Conexión/Desconexión de cambio automático de display)
(14) y manténgalo pulsado durante 2 segundos para entrar en el modo de cambio
automático de display de tiempo para mostrar el Año y púlselo de nuevo para mostrar
Mes/Día/ Temperatura; el display regresa a la visualización de tiempo después de 5
segundos.
Cómo escuchar la radio
Pulse el botón ON/OFF (Conexión/desconexión) (11) para encender la unidad.
Utilice el botón Tune + (Sintonizar +) o Sintonizar – (Tune –) para seleccionar la emisora de radio
deseada. Si pulsa y mantiene pulsado el botón Tune + (Sintonizar +) o Sintonizar – (Tune –)
durante un segundo y después lo suelta, la unidad buscará automáticamente la siguiente
emisora.Pulse el botón ON/OFF (Conexión/desconexión) (11) para apagar la radio.
Para establecer / invocar los preajustes de radio
Pulse el botón ON/OFF (Conexión/desconexión) (11) para encender la unidad.
Utilice el botón Tune + (Sintonizar +) o Sintonizar – (Tune –) para seleccionar la emisora de radio
deseada.
Pulse el botón memory / memory + (memoria / memoria +) ; “P02” parpadeará en el display.
Pulse de nuevo el botón memory / memory + (memoria / memoria +) para establecer el preajuste.
Repita los pasos 2 a 4 para establecer más preajustes.
La unidad puede preajustar 10 emisoras en total para FM.
Cuando parpadee “P01-P10”, pulse el botón Tune + (Sintonizar +) o Sintonizar – (Tune –) para
seleccionar el número preajustado.
Al invocar emisoras preajustadas, pulse el botón memory / memory +/nap (memoria / memoria +/
dormitar) para seleccionar el número preajustado.
Indicador de AÑO
Indicador de MES Indicador de DÍA

UR140 / Manual de instrucciones en español
Nota:
- Asegúrese de que la antena de FM esté completamente desenrollada y extendida para
tener la mejor recepción de FM.
Operación en modo de reposo
Al escuchar la radio, pulse el botón Snooze / Sleep/dimmer (Repetición/Reposo/atenuador) (6)
para entrar en el modo de reposo. Puede simplemente ajustar el temporizador de estado de
reposo de 90 mins. a 15 mins. pulsando el botón Snooze / Sleep/dimmer
(Repetición/Reposo/atenuador) (6). La unidad se apagará automáticamente después del tiempo
seleccionado.
Función de temporizador de DORMITAR (temporizador de cuenta regresiva)
Durante el modo de desconexión de radio, pulse el botón MEMORY.SET / MEMORY+ / NAP
(Ajuste de memoria / Memoria / Dormitar) (4) para activar el modo NAP (Dormitar); el tiempo de
NAP (Dormitar) se mantendrá durante 5 segundos, transcurrido dicho tiempo si pulsa el botón
MEMORY.SET / MEMORY+ / NAP (Ajuste de memoria / Memoria / Dormitar) (4) se puede
cambiar la duración de 90 min. a 10 min.
El zumbador de alarma sonará durante 30 min. y después se apagará automáticamente. Para
detener el zumbador de la alarma, pulse el botón ON/OFF (Conexión/desconexión) (11).
Pulsar el botón MEM.SET / MEMORY+ /NAP (Ajuste de memoria / Memoria + / Dormitar) (4) no
surte efecto durante el funcionamiento de la alarma. Pulse el botón ON/OFF
(Conexión/desconexión) (11) para cancelar la función NAP (Dormitar).
Observación:
Cuando se utiliza la alarma NAP (Dormitar) no funciona la luz de despertarse.
UNIDAD DE PROYECCIÓN
- Ajuste de enfoque: Ajuste el brillo/enfoque del reloj de proyección girando la rueda de ajuste
de brillo/enfoque hasta que la hora proyectada se muestre claramente sobre el techo o pared.
- Ajuste la dirección de proyección.
- Para desplazar la imagen proyectada en 180°, pulse el botón de desplazamiento en 180° (16).
- Para cambiar la proyección de la hora a la proyección de la temperatura, mantenga pulsado
durante 2 segundos el botón PROJECTION TIME 180° FLIP/TIME-TEMPERATURE (Hora de
proyección Desplazamiento de 180º / Hora-Temperatura) (16).
NOTA: PROYECTE LA IMAGEN DE LA HORA SOBRE EL TECHO O PARED DE UNA
HABITACIÓN OSCURA.
LA DISTANCIA DE PROYECCIÓN MÁXIMA ES DE 1-3 METROS.

UR140 / Manual de instrucciones en español
- ESPECIFICACIONES
- Gama de frecuencias: 87,5 – 108 MHz
- Batería de respaldo: 3 V (Batería de litio plana CR2032 x 1) no incluida
- Fuente de alimentación: 230 V CA 50 Hz
- Rango de temperaturas para interior: 0 a + 50 °C o 32 a 122 °F
Seleccionar el modo DST (horario de verano)
Para aquellos países con horario de verano (DST), el radio-reloj le ofrece la opción DST para
ajustar el horario de verano.
En el modo de espera pulse y mantenga pulsado el botón >> / TUNE + / DST (>> / Sintonizar + /
DST) (12) durante 2 segundos. El reloj avanza en una hora.
Para salir del modo DST, repita la operación anterior.
CÓMO REINICIAR EL SISTEMA
Si el sistema no responde o muestra un funcionamiento errático o intermitente, quizás haya
experimentado una descarga electroestática (ESD) o una sobretensión que haya disparado el
microcontrolador interno hasta producir una parada automática. Si esto ocurre, simplemente
desconecte el cable de alimentación de CA y retire la batería de respaldo del sistema, espere
durante al menos 3 minutos y después configure de nuevo la unidad como si fuera una unidad
totalmente nueva.
Estas especificaciones están sujetas a cambios sin previo aviso.

Este símbolo indica a presença de tensão
perigosa no interior do aparelho, suficiente para
provocar choques eléctricos.
Este símbolo indica a presença de instruções de
funcionamento e manutenção importantes para o
aparelho.
Instruções de Segurança, Ambientais e de Configuração
• Utilize o aparelho apenas em ambientes internos e secos.
• Proteja o aparelho da humidade.
• Não abra o aparelho. RISCO DE CHOQUE ELÉCTRICO! Permita que o aparelho seja aberto e assistido por um
técnico qualificado.
• Ligue este aparelho apenas a uma tomada de parede devidamente instalada com terra. Certifique-se de que a tensão
da rede eléctrica coresponde com as especificações da placa informativa do aparelho.
• Certifique-se de que o cabo de alimentação permanece seco durante o funcionamento. Não trilhe ou danifique o cabo
de alimentação de forma alguma.
• Um cabo de alimentação danificado deve ser imediatamente substituído por um centro de assistência técnica
autorizado.
• Em caso de ocorrência de trovoada, desligue imediatamente o aparelho da tomada.
• As crianças devem supervisionadas por um adulto responsável quando utilizarem o aparelho.
• Limpe o aparelho apenas com um pano seco.
NÃO utilize PRODUTOS DE LIMPEZA ou PANOS ABRASIVOS!
• Não exponha o aparelho a luz solar directa ou a outras fontes de calor.
• Instale o aparelho num local com ventilação suficiente para evitar a acumulação de calor.
• Não cubra as aberturas de ventilação!
• Instale o aparelho num local seguro e sem vibrações.
• Instale o aparelho o mais longe possível de computador e fornos microondas; caso contrário, a recepção de rádio
poderá sofrer interferências.
• Não abra ou repare o revestimento. Não é seguro fazê-lo e irá anular a sua garantia. As reparações devem ser
efectuadas apenas por um serviço/centro autorizado de assistência.
• Utilize apenas pilhas sem mercúrio nem cádmio.
• As pilhas usadas são um resíduo perigoso e NÃO devem ser colocadas juntamente com os resíduos domésticos!!!
Coloque as pilhas num dos pontos de recolha da sua localidade.
• Mantenha as pilhas afastadas das crianças. Estas poderão engolir as pilhas. Se uma pilha for engolida, contacte
imediatamente um médico.
• Verifique as suas pilhas regularmente para evitar derramamento das mesmas.
PROTEC
Ç
ÃO AMBIENTAL
Não junte este aparelho juntamente com os resíduos domésticos no final
do seu ciclo de vida útil. Coloque-o num ponto de recolha para reciclagem
de aparelhos eléctricos e electrónicos. Isto é indicado pelo símbolo no
aparelho, manual do utilizador ou na embalagem.
Os materiais são reutilizáveis de acordo com as marcas respectivas. Ao reutilizá-los,
reciclá-los ou qualquer outra forma de utilização de aparelhos antigos, está a contribuir de
forma importante para a protecção do nosso ambiente.
Contacte as suas autoridades locais para obter informações sobre pontos de
recolha.
AVISO
Risco de choque eléctrico.
Não abri
r
!
Cuidado: Para reduzir o risco de choque eléctrico, não retire a tampa (ou o
revestimento traseiro). Não existem no interior peças passíveis de serem substituídas
pelo utilizador. Permita que a assistência técnica seja efectuada por um técnico
qualificado.
As pilhas usadas são um resíduo perigoso e NÃO devem ser colocadas
j
untamente com os resíduos domésticos! Enquanto consumidor, está
legalmente obrigado a depositar todas as pilhas num local adequado para
uma reciclagem ambientalmente responsável – independentemente de as pilhas
conterem ou não substâncias perigosas*).
Coloque as pilhas gratuitamente num dos pontos de recolha públicos
na sua localidade ou em lojas que comercializem pilhas do mesmo tipo.
Coloque apenas pilhas completamente descarregadas.
*) marcadas Cd = cádmio, Hg = mercúrio, Pb = chumbo

UR140 / Manual de instruções em português
FUNÇÃO E CONTROLOS
1. DEFINIR A INTENSIDADE DA LUZ COMO ALTA
2. DEFINIR A INTENSIDADE DA LUZ COMO BAIXA
3. LIGAR/DESLIGAR LUZ
4. ECRÃ MEMÓRIA/MEMÓRIA+/SESTA/DESLIGAMENTO AUTOMÁTICO
5. SOMBRA DA LÂMPADA
6. SUSPENSÃO/REGULADOR DE LUZ
7. DEFINIR/TEMPERATURA
8. <</SINTONIZAR/ANO/MÊS/DIA
9. DEFINIÇÃO DE ALARME 1 LIGADO/DESLIGADO
10. ECRÃ
11. LIGAR/DESLIGAR
12. >>/SINTONIZAR +/DST/C-F
13. DEFINIÇÃO DE ALARME 2 LIGADO/DESLIGADO
14. LIGAR/DESLIGAR MUDANÇA AUTOMÁTICA DO ECRÃ/AUMENTO DE VOLUME
15. DIMINUIÇÃO DE VOLUME
16. HORA-TEMPERATURA/RODAR 180° HORA PROJECTADA
17. LIGAR/DESLIGAR PROJECÇÃO
18. AJUSTE DO FOCO PARA UNIDADE DE PROJECÇÃO
19. COLUNA
20. ANTENA FM
21. SENSOR DE TEMPERATURA (INTERIOR)
22. COMPARTIMENTO DE BATERIA
23. CABO DE ALIMENTAÇÃO CA
24. ETIQUETA DE POTÊNCIA NOMINAL DE PRECISÃO

UR140 / Manual de instruções em português
ECRÃ LED
TOMADA DE CORRENTE
Ligue o cabo CA a uma fonte de CA doméstica. Esta unidade está equipada com um sistema de
salvaguarda de bateria e requer uma bateria de lítio plana CR2032 de 3V (não incluída). Insira a
bateria no respectivo compartimento, certificando-se de que os terminais de bateria positivo e
negativo (+ e -) ficam colocados nos terminais correspondentes na placa do compartimento da
bateria. Se ocorrer uma falha de alimentação CA, o relógio mudará automaticamente para o
fornecimento de potência de bateria e a memória das horas e o relógio continuarão a funcionar.
Quando a alimentação CA for retomada, o relógio mudará novamente para CA.
COMEÇAR
1. DEFINIÇÃO MANUAL DA HORA E CALENDÁRIO
A. Definir a Hora e o Calendário – Mantenha o botão de definição (7) no modo normal premido
durante 2 segundos para entrar no modo de definição de hora. Depois de entrar no modo de
definição, prima o botão de definição (7) para mudar o ciclo do modo da seguinte forma:
Normal → Ano → Mês → Dia → 12/24 H → Horas em tempo real → Minutos em tempo real →
Normal
Acção (durante o ajuste dos dados):
- Prima o botão <</Sintonizar (8) para ajustar os dados para trás.
- Prima o botão >>/Sintonizar + (12) para ajustar os dados para a frente.
- Mantenha o botão << ou >> premido durante 2 segundos para activar o avanço automático.
B. Definir Alarme 1 e Alarme 2 – Prima o botão de definição do alarme (9/13) durante o modo
normal e mantenha-o premido durante 2 segundos para entrar no modo de definição. Depois
de entrar no modo de definição, prima o botão de definição do alarme (9/13) para mudar o
ciclo do modo da seguinte forma:
Indicador SUSPENSÃO
Indicador HORA
Indicador MHz
Indicador ALARME 2
Indicador PM
Indicador ALARME 1

UR140 / Manual de instruções em português
Normal → Hora do AL 1 → Min. do AL 1 → Alarme de dias úteis do AL 1 → Tom de despertador do
AL 1 → Rádio despertador do AL 1 → Volume do rádio despertador do AL 1 → Intensidade
da luz → Normal.
Normal → Hora do AL 2 → Min. do AL 2 → Alarme de dias úteis do AL 2 → Tom de despertador do
AL 2 → Rádio despertador do AL 2 → Volume do rádio despertador do AL 2 → Intensidade da luz
→ Normal.
Seleccione o modo de dias úteis do alarme da seguinte forma
1-5 : De segunda-feira a sexta-feira
1-7 : Toda a semana
6-7 : Sábado e Domingo
1-1 : Um dia da semana
Acção (durante o ajuste dos dados):
- Prima o botão <</Sintonizar (8) para ajustar os dados para trás.
- Prima o botão >>/Sintonizar + (12) para ajustar os dados para a frente.
- Mantenha o botão << ou >> premido durante 2 segundos para activar o avanço automático.
Activar/Desactivar o alarme
Prima e segure o botão “ALARME 1” (9) / “ALARME 2” (13) para activar ou desactivar o alarme.
Assim que o alarme esteja desactivado, o símbolo aparecerá no visor.
Luz de despertar do alarme:
A luz acenderá 5 minutos antes da hora do alarme definida. A luz acenderá num nível baixo e
aumentará gradualmente para o nível máximo.
DURAÇÃO DO ALARME E FUNÇÃO DE SUSPENSÃO
Duração do Alarme – O alarme sonoro ou o alarme de rádio será emitido durante 30
minutos se não premir nenhuma tecla, parará automaticamente e soará à mesma hora no
dia seguinte.
Acção para Suspensão:
- Durante o alarme, prima o botão Suspensão (6) para activar a função de suspensão e parar o
alarme sonoro ou o alarme de rádio.
- O intervalo de suspensão é de 9 minutos (não inclui segunda compensação)
- A suspensão irá continuar a menos que prima o botão LIGAR/DESLIGAR (11) para desactivar
o alarme de Campainha ou o alarme de Rádio. Irá parar automaticamente após 30 minutos.

UR140 / Manual de instruções em português
Função ligar/desligar luz do ecrã:
- Prima o botão Definição de memória/memória+/ligar/desligar luz do ecrã
automaticamente/SESTA (4) durante 3 segundos. O indicador ecrã LED acenderá e o
ecrã LED desligará automaticamente após 15 segundos. Prima qualquer botão para manter
o ecrã LED durante 15 segundos.
- Prima o botão Definição de memória/memória+/ligar/desligar luz do ecrã
automaticamente/SESTA (4) durante 3 segundos para apagar a luz do indicador do ecrã
LED , para cancelar esta função.
MUDAR AUTOMATICAMENTE CONTEÚDO DO ECRÃ:
No modo de rádio desligado, mantenha o botão LIGAR/DESLIGAR MUDANÇA AUTOMÁTICA
DO ECRÃ/AUMENTO DE VOLUME (14) premido durante 2 segundos para entrar no modo
de mudança automática da apresentação das horas. Para apresentar o Ano, prima
novamente para apresentar Mês/Dia/Temperatura, para o ecrã regressar à apresentação
das horas após 5 segundos.
Ouvir Rádio
Prima o botão LIGAR/DESLIGAR (11) para ligar a unidade.
Utilize o botão Sintonizar + ou Sintonizar – para seleccionar a estação de rádio pretendida. Se
mantiver o botão Sintonizar + ou Sintonizar – premido durante um segundo e, em seguida,
libertar, a unidade irá procurar automaticamente a estação de rádio seguinte.
Prima o botão LIGAR/DESLIGAR (11) para desligar o rádio.
Indicador ANO
Indicador MÊS Indicador DIA

UR140 / Manual de instruções em português
Para definir/revogar as predefinições do rádio
Prima o botão LIGAR/DESLIGAR (11) para ligar a unidade.
Utilize o botão Sintonizar + ou Sintonizar – para seleccionar a estação de rádio pretendida.
Prima o botão memória/memória +; “P02” piscará no ecrã.
Prima novamente o botão memória/memória + para predefinir.
Repita os passos do 2 ao 4 para efectuar mais predefinições.
A unidade pode predefinir 10 estações totalmente como FM.
Quando “P01-P10” começar a piscar, prima o botão Sintonizar+ ou Sintonizar- para seleccionar o
número da predefinição.
Quando estiver a revogar estações predefinidas, prima o botão memória/memória +/sesta para
seleccionar o número da predefinição.
Nota:
- Certifique-se de que a antena FM está totalmente desenrolada e esticada para uma melhor
recepção FM.
Operação de suspensão
Quando estiver a ouvir rádio, prima o botão Suspensão/regulador de luz (6) para entrar no modo
de suspensão. Pode ajustar o temporizador de suspensão de 90 a 15 minutos premindo o botão
Suspensão/regulador de luz (6). A unidade irá desligar automaticamente após a hora
seleccionada.
Função de temporizador SESTA (temporizador de contagem decrescente)
Durante o modo de rádio desligado, prima o botão DEFINIÇÃO DE
MEMÓRIA/MEMÓRIA+/SESTA (4) para activar o modo SESTA. A hora da SESTA permanecerá
durante 5 segundos. Se premir o botão DEFINIÇÃO DE MEMÓRIA/MEMÓRIA+/SESTA (4)
durante 5 segundos, poderá alterar a duração de 90 min. – 10 min.
A campainha do alarme soará durante 30 min. e, em seguida, desligará automaticamente. Para
parar a campainha do alarme, prima o botão LIGAR/DESLIGAR (11).
Se premir o botão DEFINIÇÃO DE MEMÓRIA/MEMÓRIA+/SESTA (4) não terá qualquer efeito
durante o funcionamento do alarme. Prima o botão LIGAR/DESLIGAR (11) para cancelar a
função SESTA.
Nota:Ao utilizar o alarme SESTA a função de luz de despertar não funcionará

UR140 / Manual de instruções em português
UNIDADE DE PROJECÇÃO
- Definição do foco Ajuste a luminosidade/foco do relógio de projecção rodando a roda de
foco/luminosidade até a hora projectada ser claramente apresentada no tecto ou na parede.
- Ajustar direcção projectada.
- Para rodar a imagem projectada 180°, prima o botão de rotação 180° (16).
- Para converter a temperatura ou a hora projectada, mantenha o botão
HORA-TEMPERATURA/RODAR 180° HORA PROJECTADA durante 2 segundos (16).
NOTA: PROJECTA A IMAGEM DA HORA NO TECTO OU PAREDE DE UMA SALA ESCURA.
A DISTÂNCIA MÁXIMA DE PROJECÇÃO É DE 3-9 PÉS.
- ESPECIFICAÇÕES
- Gama de frequência: 87.5 – 108 MHz
- Salvaguarda de bateria: 3V (Bateria de Lítio Plana CR2032 x 1) não incluída
- Fonte de alimentação: CA230V 50Hz
- Amplitude da temperatura para Interior: de 0 a + 50°C ou de 32 a 122 °F
Seleccionar modo DST (hora de Verão)
Para os países com hora de Verão (DST), o rádio despertador oferece a opção DST para ajustar a
hora de Verão.
No modo de suspensão, mantenha o botão >>/SINTONIZAR +/DST (12) premido durante 2
segundos. O relógio avança uma hora.
Para sair do modo DST, repita a operação acima.

UR140 / Manual de instruções em português
REPOSIÇÃO
Se o sistema não responder ou se apresentar um funcionamento errático ou intermitente, poderá
dever-se a uma descarga electrostática (ESD) ou a uma sobretensão que fez com que o
microcontrolador interno encerrasse automaticamente. Se isto ocorrer, desligue simplesmente o
cabo de alimentação CA, remova a bateria de salvaguarda do sistema, aguarde, pelo menos, 3
minutos e, em seguida, configure novamente a unidade como se fosse nova.
ESPECIFICAÇÕES
Gama de frequência: 87.5 – 108 MHz
Salvaguarda de bateria: 3V (Bateria de Lítio Plana CR2032 x 1) não incluída
Fonte de alimentação: CA230V ~ 50Hz
As especificações estão sujeitas a alterações sem aviso prévio.

HERSTELLER / IMPORTEUR
Wörlein GmbH
Gewerbestraße 12
D 90556 Cadolzburg, Germany
Tel: +49 9103 71 67 0
Fax: +49 9103 71 67 12
E-Mail: info@soundmaster.de
Internet: www.soundmaster.de
Hiermit bestätigt Wörlein GmbH, dass sich dieses Gerät in
Übereinstimmung mit den grundlegenden Anforderungen
und den übrigen einschlägigen Bestimmungen der Richtlinie
2014/53/EU befindet.
Eine Kopie der Konformitätserklärung kann unter
obenstehender Adresse bezogen werden.
Hereby, Wörlein GmbH declares that this device is in
compliance with the essential requirements and other
relevant provisions of Directive 2014/53/EU.
A copy of the declaration of conformity can be obtained from
the above address.
Par la présente, Wörlein GmbH déclare que cet appareil est
conforme aux exigences principales et autres clauses
applicables de la Directive 2014/53/EU.
Une copie de la déclaration de conformité peut être obtenue
à l'adresse ci-dessus.
Wörlein GmbH verklaart hierbij dat dit apparaat in
overeenkomst is met de essentiële vereisten en andere
relevante bepalingen van de Richtlijn 2014/53/EU.
Een kopie van de conformiteitsverklaring kunt u verkrijgen
op het hierboven vermelde adres.
Con la presente, Wörlein GmbH dichiara che questo
dispositivo è conforme ai requisiti essenziali e altre
disposizioni contenute nella Direttiva 2014/53/EU.
Una copia della dichiarazione di conformità può essere
richiesta all'indirizzo sopra indicato.
Härmed Wörlein GmbH deklarerar att denna enhet är i
överensstämmelse med de grundläggande kraven och andra
relevanta bestämmelser i direktiv 2014/53/EU.
En kopia av försäkran om överensstämmelse kan erhållas
från ovanstående adress.
Herved Wörlein GmbH erklærer, at denne enhed er i
overensstemmelse med de væsentlige krav og øvrige
relevante krav i direktiv 2014/53/EU.
En kopi af overensstemmelseserklæringen kan hentes fra
ovennævnte adresse.
Tímto Wörlein GmbH prohlašuje, že toto zařízení je ve shodě
se základními požadavky a dalšími příslušnými ustanoveními
směrnice 2014/53/EU.
Kopii prohlášení o shodě lze získat na výše uvedené adrese.
Por este meio, Wörlein GmbH declara que este dispositivo
está em conformidade com os requisitos essenciais e outras
disposições da Directiva 2014/53/EU.
Uma cópia da declaração de conformidade pode ser obtida
no endereço acima.
Wörlein GmbH confirma que este dispositivo cumple con los
requisitos esenciales y otras disposiciones relevantes de la
Directiva 2014/53 / UE.
Se puede obtener una copia de la declaración de
conformidad en la dirección anterior.
Wörlein GmbH týmto potvrdzuje, že toto zariadenie je v
súlade so základnými požiadavkami a ďalšími príslušnými
ustanoveniami smernice 2014/53 / EÚ.
Kópiu vyhlásenia o zhode je možné získať na uvedenej
adrese.
Wörlein GmbH potrjuje, da je ta naprava v skladu z
bistvenimi zahtevami in drugimi ustreznimi določbami
Direktive 2014/53 / EU.
Kopijo izjave o skladnosti je mogoče dobiti na zgornjem
naslovu.
Wörlein GmbH confirmă prin prezenta că acest dispozitiv
respectă cerințele esențiale și alte prevederi relevante ale
Directivei 2014/53 / UE.
O copie a declarației de conformitate poate fi obținută de la
adresa de mai sus.
Wörlein GmbH patvirtina, kad šis prietaisas atitinka esminius
reikalavimus ir kitas atitinkamas Direktyvos 2014/53 / ES
nuostatas.
Atitikties deklaracijos kopiją galima gauti iš pirmiau nurodyto
adreso.
A Wörlein GmbH megerősíti, hogy ez az eszköz megfelel a
2014/53 / EU irányelv alapvető követelményeinek és egyéb
vonatkozó rendelkezéseinek.
A megfelelőségi nyilatkozat egy példányát a fenti címről
szerezheti be.
Wörlein GmbH potvŭrzhdava, che tova ustrostvo e v
sŭotvet·stvie sŭs sŭshtestvenite iziskvaniya i drugi prilozhimi
razporedbi na Direktiva 2014/53 / ES. Kopie ot deklaratsiyata
za sŭotvet·stvie mozhe da bŭde polucheno ot
goreposocheniya adres.
Wörlein GmbH kinnitab käesolevaga, et see seade vastab
direktiivi 2014/53 / EL olulistele nõuetele ja muudele
asjakohastele sätetele.
Vastavusdeklaratsiooni koopiat saab eespool nimetatud
aadressilt.
Wörlein GmbH vahvistaa, että tämä laite on direktiivin
2014/53 / EU olennaisten vaatimusten ja muiden asiaa
koskevien säännösten mukainen.
Kopio vaatimustenmukaisuusvakuutuksesta on saatavissa
edellä mainitusta osoitteesta.
Ar šo Wörlein GmbH apstiprina, ka šī ierīce atbilst Direktīvas
2014/53 / ES būtiskajām prasībām un citiem attiecīgajiem
noteikumiem.
Atbilstības deklarācijas kopiju var iegūt, izmantojot iepriekš
minēto adresi.
Wörlein GmbH bekrefter herved at denne enheten er i
samsvar med de vesentlige kravene og andre relevante
bestemmelser i direktiv 2014/53 / EU.
En kopi av samsvarserklæringen kan fås fra adressen ovenfor.
Wörlein GmbH niniejszym potwierdza, że to urządzenie jest
zgodne z zasadniczymi wymaganiami i innymi stosownymi
postanowieniami dyrektywy 2014/53 / UE.
Kopię deklaracji zgodności można uzyskać pod powyższym
adresem.
-
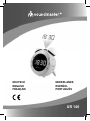 1
1
-
 2
2
-
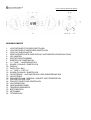 3
3
-
 4
4
-
 5
5
-
 6
6
-
 7
7
-
 8
8
-
 9
9
-
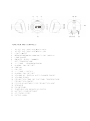 10
10
-
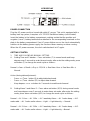 11
11
-
 12
12
-
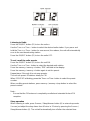 13
13
-
 14
14
-
 15
15
-
 16
16
-
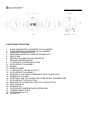 17
17
-
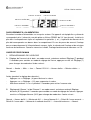 18
18
-
 19
19
-
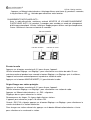 20
20
-
 21
21
-
 22
22
-
 23
23
-
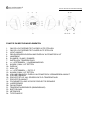 24
24
-
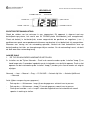 25
25
-
 26
26
-
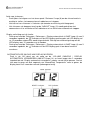 27
27
-
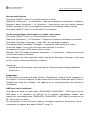 28
28
-
 29
29
-
 30
30
-
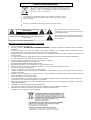 31
31
-
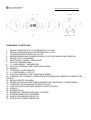 32
32
-
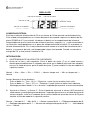 33
33
-
 34
34
-
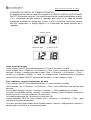 35
35
-
 36
36
-
 37
37
-
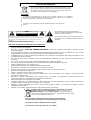 38
38
-
 39
39
-
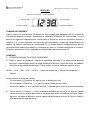 40
40
-
 41
41
-
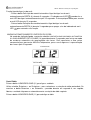 42
42
-
 43
43
-
 44
44
-
 45
45
-
 46
46


in andere talen
- italiano: Soundmaster UR 140 Manuale utente
- français: Soundmaster UR 140 Manuel utilisateur
- español: Soundmaster UR 140 Manual de usuario
- Deutsch: Soundmaster UR 140 Benutzerhandbuch
- português: Soundmaster UR 140 Manual do usuário