Stern Engineering SWAN 1010 AB1953 Installation and Maintenance Manual
- Type
- Installation and Maintenance Manual


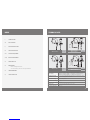
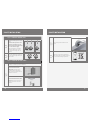
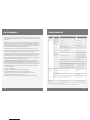
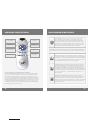
INDEX TECHNICAL DATA
Power supply
SWAN AB/ SWAN AB: Internal battery
SWAN B AB/ SWAN B AB: x .V AA batteries
SWAN E AB/ SWAN E AB: V transformer
Recommended water
pressure
.. bar ( PSI) With water pressure of more than 8 bars, use a
pressure reducing valve for reduction.
Preset sensor range mm Adjustable.
Minimum sensor range mm
Maximum sensor range mm
Security time seconds. Adjustable with remote control.
Hot water temperature Max °C
SWAN AB
SWAN AB
SWAN B AB
SWAN E AB
SWAN B AB
SWAN E AB
TECHNICAL DATA
PACK CONTENTS
PRE-INSTALLATION INFO
FAUCET INSTALLATION
SETTINGS ADJUSTMENT
BATTERY REPLACEMENT
SPARE PARTS LIST
MAINTENANCE
Filters cleaning instructions
Care and cleaning of chrome and special nishes
LIMITED WARRANTY
TROUBLESHOOTING

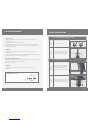
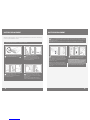
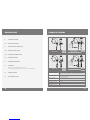
PACK CONTENTS
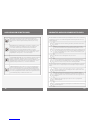
Familiarize yourself with the part names and conrm that the parts are included.
SWAN B/E AB SWAN B/E AB
PACK CONTENTS
Familiarize yourself with the part names and conrm that the parts are included.
x Faucet
and attachments
x Faucet
and attachments
x Allen Key x Allen Key
E VERSIONSB VERSIONS
V transformer
Battery box for
6 x .V batteries
E VERSIONSB VERSIONS
V transformer
Battery box for
6 x .V batteries

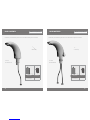
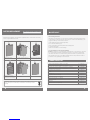
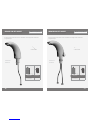
FAUCET INSTALLATION
STEP PREPARATION FOR MOUNTING THE FAUCET
Shut o the water supply.
Remove the hexagonal nut, the disk
and the gasket. Do not remove the
O-ring from the base of the faucet.
nut
disc
gasket
STEP INSTALLING THE FAUCET
Place the faucet with O-ring into the
hole in deck or lavatory. Make sure
the O-ring is located between the
deck or lavatory and the bottom of the
faucet.
Below the deck, slide the gasket, disk
and hexagonal nut over the flexible
hose and secure the faucet into place.
gasket
nut
disc
PREINSTALLATION INFO
CHECK CONTENTS
Separate all parts from the packaging and check each part with the “Pack
contents” section.
Pay attention to the dierent models variations.
Make sure all parts are accounted for before discarding any packaging material.
If any parts are missing, do not attempt to install your electronic faucet until you
obtain the missing parts.
WARNINGS
Do not install facing a mirror or any other electronic system operated by an
infrared sensor.
To prevent reflection problems, it is recommended to keep a minimum distance of
. meters between the faucet and any other objects.
PREPARATION FOR INSTALLATION
Flush water supply lines thoroughly before installing the faucet. Do not allow dirt,
Teflon tape or metal particles to enter the faucet.
Shut o water supply.
IMPORTANT
All plumbing is to be installed in accordance with applicable codes and
regulations.
mm
RECOMMENDED HOLE SIZE

FAUCET INSTALLATION
STEP CONNECTING THE WATER SUPPLY
Connect the flexible pipe to the water
supply.
For models with temperature control
connect the red flexible pipe to the
hot water supply and the blue flexible
pipe to the cold water supply.
Make sure the lter (s) is installed
between the flexible hose (s) and
the shut o valve (angle valve - not
supplied).
Turn on the central water supply and
the shut-o valves (angle valves) and
check for leaks.
STEP CONNECTING THE POWER SOURCE
If your model is Swan \ Swan : your product contains an internally mounted
V battery. To activate it, proceed to clause # .
If your model is Swan B \
Swan B: install the battery
box underneath the sink with the
cable connection pointing down and
connect the connectors.
If your model is Swan E \ Swan
E: Plug the transformer into the
electricity socket and connect the
connectors.
Remove the protective sticker from the
sensor
Wait a few seconds before activating the
faucet. If the range is unsatisfactory, refer to
the section titled “Settings adjustment”.
SECONDS
ABOUT
FAUCET INSTALLATION
INLET VERSION
INLETS VERSION

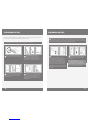
SETTINGS ADJUSTMENT
SETTINGS ADJUSTMENT
DETECTION
RANGE
DELAY IN TIME
SECURITY TIME
COMFORT FLUSH
DELAY OUT TIME
TEMPORARY OFF
FUNCTION
RESET
HYGIENE FLUSH
Adjusting the settings with the remote control
If necessary, the sensor settings can be adjusted as following:
Shut o the water supply. In order to adjust the sensor with the remote control, hold
the remote control straight in front of the sensor in a distance of about 6-8” (cm).
Choose the function you want to adjust by pressing once on one of the function buttons.
Aer pressing once on a specic function button, a quick flashing of the red light at the
front of the sensor will occur. At this stage, you can change the setting by pressing the
(+) or the (-) buttons, every push will increase or decrease one level. Aer nishing the
adjustment, turn the water supply back on.
DETECTION RANGE: Only if necessary, use the remote control to adjust the
sensor range as follows:
Press the RANGE button. Wait until a quick flashing of the blue light in the
sensor eye is perceived. Then, press + to increase the one level and – to
reduce it every push will increase or decrease one level.
NOTE: Once you have changed the detection range with the remote control, this
distance will be remembered by the sensor, even if the power source is disconnected.
DELAY IN TIME: If required, the delay in time can also be modied as
follows: Press the IN button. Wait until a quick flashing of the blue light
in the sensor eye is perceived. Then, press + to increase the delay in time
and – to reduce it.
DELAY OUT TIME: This button allows modifying the flushing start time
aer the user moves away from the product. A delay out time close to
0 will save more water. An increased delay out time will make the user
experience more comfortable.
If required, the delay out time can be modied as follows:
Press the OUT button. Wait until a quick flashing of the blue light in the
sensor eye is perceived. Then, press + to increase the delay out time and
– to reduce it.
TEMPORARY OFF FUNCTION: This function is ideal to perform any kind of
activity in front of the sensor without operating the system (for example,
cleaning).
The product will remain shut for minute when this button is pressed
once. To cancel this function and to return to normal operation press the
On/O button again or wait minute.

SETTINGS ADJUSTMENT MANUAL SETTINGS ADJUSTMENT
The sensor range is the range an object can be away from the sensor in order to activate
the faucet. The sensor is factory preset. If necessary, it can be adjusted as follows:
Disconnect the power supply, battery or transformer, from the sensor.
Make a short circuit between the (+) and the (-) of the sensor.
You can use a screw driver or another conductor material to make this
short circuit. Alternatively, aer disconnecting the power supply, activate
the sensor three or four times.Do not make a short circuit on the power
supply or on the sensor when the power supply is connected to the
sensor.
Reconnect the power supply to the sensor.
To go into the adjusting mode, put your hand in front of the sensor at a
distance of ”(cm) to ”(cm) within 5 seconds aer the reconnection
of the power supply.
NOTE: If you will not put your hand in front of the sensor aer connecting the power
supply, the sensor will not enter into adjusting mode and the previous setting will
return.
When the sensor goes into the adjusting mode and your hand is in front
of the sensor, a slow flashing of the red light at the front of the sensor will
occur.
Keep your hand at the front of the sensor until the slow flashing changes
into quick flashing. At this point, move your hand to the required distance
from the sensor and wait until the red light will stop flashing.
When the red light has turned o, the sensor has been adjusted to the
required distance.
Check the distance you have set and if it is not satisfactory, repeat steps
.
RESET BUTTON: This function restores all the factory settings except
for the sensor range. If required, press the Reset button and without
releasing it, press the + button once.
SECURITY TIME: The Security time, prevents continuous flushing of water
due to reflections or vandalism. By default, if the sensor is covered for
more than seconds the water flow will shut automatically. To resume
regular operation any obstruction must be removed.
Press the SEC button. Wait until a quick flashing of the red light of the
sensor eye is perceived. Then, press + to increase the security time and –
to reduce it.
HOUR HYGIENE FLUSH: This model includes a hours hygiene flush
which is disabled. To activate the hygiene flush, press the clock button.
Wait until a quick flashing of the blue light in the sensor eye is perceived.
Then press + to activate the hygiene flush. To disable it again, press – to
deactivate it.
COMFORT FLUSH: If your model includes a COMFORT FLUSH setting, it can
be activated by pressing the flush button.
When the button is pressed, one blink of the blue light in the sensor eye
is perceived. The pre-programmed flush cycle will take place then.
The Comfort flush cannot be interrupted or deactivated by pressing any
button until it is over.

Carefully push the sensor into the
faucet’s body to gain access to the
battery and pull it out of the body together
with the battery.
Replace the used battery with a new V
battery. A lithium battery is recommended.
Release the Allen screw to carefully
remove the faucet’s body.
Disconnect the connector from the elec-
tronic unit’s connector.
If your model is Swan :
Release the handle-set-screw to
remove the mixing handle. Release the
Allen screw to carefully remove the axis
assembly by pulling it out.
Turn o the shut o valve (angle valve).
If your model is Swan , go to
When the battery weakens, the red indicator light will blink at a constant rate. The battery
must be replaced within two weeks.
BATTERY REPLACEMENT BATTERY REPLACEMENT
To replace the battery at Swan \ Swan models:
Prior to reassembling the electronic unit and the battery, make sure that the o-ring is still
in its groove and not damaged. Replace it with a new one if needed. Clean and lubricate
it with silicone grease.
Important: Make sure that the faucet is not wet when reassembling the electronic unit.
screw
connectors
Reconnect the electronic unit’s
connector to the solenoid connector.
Place the body, and tighten the screw.
If your model is Swan :
Reassemble the axis-assembly and tighten
the Allen screw. Reassemble the mixing
handle and tighten the Allen screw.
Turn on the shut o valve (angle valve).
Carefully place the battery inside the
body and reassemble the electronic
unit in its place. Be sure to insert the elec-
tronic unit all the way back into the opening
in the faucet’s body by pushing it moder-
ately into the o-ring.
Swing the sensor gently to align it with its
location. Be careful and make sure that you
do not tear the o-ring. If torn replace it with
a new one.
7
o-ring
electronic unit
screw

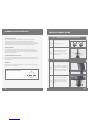
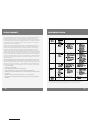
SPARE PARTS LIST
BATTERY REPLACEMENT MAINTENANCE
Filter cleaning instructions
This faucet is provided with one / two stainless steel lter(s) preventing foreign particles
to enter the lines. If the water flow has decreased, this can be because the lter(s) is/are
clogged. The lter(s) can be cleaned as follows:
. Shut-o the water shut o valve (angle valve).
. Disconnect the flexible pipe/s.
. Remove the lter(s) and wash it/them under running water.
. Reassemble the parts.
. Make sure that there is no water leakage.
Care and cleaning of chrome and special nishes
DO NOT use steel wool or cleansing agents containing alcohol, acid, abrasives, or the like.
Use of any prohibited cleaning or maintenance products or substances could damage
the surface of the faucet. For surface cleaning of faucet use ONLY soap and water, then
wipe dry with clean cloth or towel. When cleaning bathroom tile, the faucets should be
protected from any splattering of harsh cleansers.
Seals and Screws Kit for Swan models
Seals and Screws Kit for Swan models
-pack sensor kit for Swan & Swan AB
-pack sensor kit for Swan B\E & Swan B\E AB
-pack Solenoid valve kit
Filter
Battery box
-pack V transformer (EU)
Insert Kit for Swan AB
Insert Kit for Swan AB
Mixer Handle Kit
Mixer Kit
Remote control B (Optional)
When the battery weakens, the red indicator light will blink at a constant rate. The battery
must be replaced within two weeks.
IMPORTANT: Spent batteries should not be disposed of with normal household
waste. Contact your local authority for information on waste disposal and
recycling.
.Remove the old batteries .Carefully open the battery box. Unscrew the holding
screw
. Close the box
. Replace the used batteries
with a new X .V batteries
(Lithium battery is recommended).
New Battery
Old Battery
SWAN B AB/ SWAN B AB

LIMITED WARRANTY TROUBLESHOOTING
* “Security Mode”: If the sensor is covered for more than sec. the faucet will automatically shut off water flow.
To return to normal operation remove any blockage.
** In this case, the water flow will stop anyway after seconds because of the security time.
Y. Stern Engineering Ltd. warrants that its electronic products will be free of defects in
material and workmanship during normal use for two years from the date the product
is purchased.
If a defect is found in normal use, Y. Stern Engineering Ltd. will, at its discretion, repair,
provide a replacement part or product, or make appropriate adjustments. Damage
caused by accident, misuse, or abuse is not covered by this warranty. Improper care
and cleaning will void the warranty. Proof of purchase (original sales receipt) must be
provided to Stern Engineering Ltd. with all warranty claims.
Stern Engineering Ltd is not responsible for labor charges, installation, or other
incidental or consequential costs other than those noted above. In no event shall the
liability of Stern Engineering Ltd. exceed the purchase price of the product.
If you believe that you have a warranty claim, contact your Stern Distributor, Dealer
or Plumbing Contractor. Please be sure to provide all pertinent information regarding
your claim, including a complete description of the problem, the product, model
number, the date the product was purchased, from whom the product was purchased
and the installation date. Also include your original invoice.
Y. STERN ENGINEERING AND/OR SELLER DISCLAIM ANY LIABILITY FOR SPECIAL,
INCIDENTAL OR CONSEQUENTIAL DAMAGES. This warranty excludes product damage
due to installation error, incorrect maintenance, wear and tear, battery, product
abuse, or product misuse, whether performed by a contractor, service company, or the
consumer. This warranty does not cover product damage caused by the following:
- Incorrect installation.
- inversions of supply pipes.
- Pressures or temperatures exceeding recommended limits.
- Improper manipulation, tampering, bad or lapsed maintenance.
- Foreign bodies, dirt or scale introduced by the water supply or soap tank.
- Use of the soap outside of viscosity specications.
- Alteration of the original soap/foam dispenser components (including pipes).
SOLUTIONCAUSE INDICATOR PROBLEM
Replace batteryLow battery.
. Sensor flashes
continuously
when user’s
hands are within
the sensor’s
range.
No water
coming out
of the faucet:
Increase the range. Range is too short.. Red light
in the sensor
does not flash
once when
user’s hands
are within the
sensor’s range.
Decrease the range. Range is too long.
The battery must be replaced. . Battery is completely used up
. Unit is in “Security Mode”*
Eliminate cause of reflection.
. Sensor is picking up reflections from the
washbasin or another object.
Connect the electronic unit
connectors to the solenoid.
1. Connectors between the electronic unit and
solenoid are disconnected.
. Red light
in the sensor
flashes once
when user’s
hands are within
the sensor’s
range.
Unscrew solenoid, pull out the
plunger and the spring from
the solenoid and clean them.
Use scale remover material if
needed. When replacing the
plunger, please make sure that
the spring is in vertical position.
. Debris or scale in solenoid.
Clean the orice or replace
diaphragm.
. The central orice in the diaphragm is plugged
or the diaphragm is torn
Reduce the supply water
pressure.
. The water supply pressure is higher than 8 bar.
Shut o water supply and
unscrew one of the flexible
pipes in order to reduce the
pressure that blocks the
product.
. The water supply pressure is under 8 bars and
yet the pressure in the faucet’s body is higher.
This situation could be caused by a sudden
increase in the water supply pressure that the
back check prevents from dropping, even aer
water supply pressure drops under 8 bars.
Clean the orice or replace
diaphragm.
Debris or scale in diaphragm
. Sensor flashes
once when
user’s hands
are within the
sensor’s range.
Water flow
from spout
does not
stop:
Clean or eliminate case of
interference.
. Sensor is dirty or covered.**
. Red light in
the sensor does
not flash once
when user’s
hands are within
the sensor’s
range.
Decrease the range or eliminate
cause of reflection.
. Sensor is picking up reflections from the
washbasin or another object.
Remove, clean, re-installFilter or aerator is clogged
Water flow
diminished

INHOUDSOPGAVE TECHNISCHE GEGEVENS
Stroomvoorziening
SWAN AB / SWAN AB: Interne batterij
SWAN B AB / SWAN B AB: X ,V AA batterijen
SWAN E AB / SWAN E AB: V transformator
Aanbevolen waterdruk ,, BAR PSI, bij een waterdruk van meer dan 8 bar, gebruik
dan een drukreductieklep.
Voorgeprogrammeerd
sensorbereik
mm, aanpasbaar
Minimaal sensorbereik mm
Maximaal sensorbereik mm
Beveiliging tijd seconden. Aanpasbaar met afstandsbediening
Warmwater temperatuur Max °C
SWAN AB
SWAN AB
SWAN B AB
SWAN E AB
SWAN B AB
SWAN E AB
TECHNISCHE GEGEVENS
INHOUD VAN HET PAKKET
INFORMATIE VOOR DE INSTALLATIE
INSTALLATIE VAN DE KRAAN
AANPASSING VAN INSTELLINGEN
VERVANGING BATTERIJ
RESERVEONDERDELENLIJST
ONDERHOUD
Instructies voor het reinigen van de lters
Verzorging en reiniging van het chroom en speciale afwerkingen
BEPERKTE GARANTIE
PROBLEMEN OPLOSSEN

INHOUD VAN HET PAKKET INHOUD VAN HET PAKKET
Raak vertrouwd met de namen van de onderdelen en bevestig dat alle onderdelen
meegeleverd zijn.
SWAN B/E AB SWAN B/E AB
Raak vertrouwd met de namen van de onderdelen en bevestig dat alle onderdelen
meegeleverd zijn.
x Kraan met
toebehoren
x Kraan met
toebehoren
x Inbussleutel x Inbussleutel
E VERSIONSB VERSIONS
V transformer
Battery box for
6 x .V batteries
E VERSIONSB VERSIONS
V transformer
Battery box for
6 x .V batteries

INSTALLATIE VAN DE KRAAN
STAP VOORBEREIDING VOOR HET MONTEREN VAN DE KRAAN
Sluit de watertoevoer af.
Verwijder de zeskantige moer, de
schijf en de pakking. De O-ring
mag niet van de basis van de kraan
verwijderd worden.
moer
schijf
pakking
STAP INSTALLATIE VAN DE KRAAN
Plaats de kraan met O-ring in het gat
van de wastafel of de toiletfontein.
Zorg ervoor dat de O-ring zich tussen
de wastafel of de toiletfontein en de
onderkant van de kraan bevindt.
Schuif aan de onderkant van de
wastafel de pakking, de schijf en de
zeskantige moer over de flexibele
slang en bevestig de kraan op zijn
plaats.
pakking
moer
schijf
INFORMATIE VOOR DE INSTALLATIE
CONTROLEER DE INHOUD
Neem alle onderdelen uit de verpakking en controleer dat elk onderdeel
overeenkomt met de sectie “Inhoud van het pakket”. Let op de diverse
variaties van de modellen. Zorg dat alle onderdelen aanwezig zijn voordat u het
verpakkingsmateriaal verwijdert. Mochten er onderdelen ontbreken, installeer uw
elektronische kraan niet totdat u de ontbrekende onderdelen ontvangt.
WAARSCHUWINGEN
Niet installeren tegen een spiegel of een ander elektronisch systeem dat
functioneert met een infrarood sensor. Ter voorkoming van reflectieproblemen
wordt aanbevolen een minimale afstand van 1,50 meter te behouden tussen de
kraan en andere objecten.
VOORBEREIDING VAN DE INSTALLATIE
Spoel de toevoerleidingen grondig door voordat de kraan geïnstalleerd wordt.
Vuil, Teflon tape of metalen deeltjes mogen niet in de kraan achterblijven. Sluit de
watertoevoer af.
BELANGRIJK
al het sanitair moet worden geïnstalleerd in overeenstemming met de geldende
reglementen en voorschrien.
mm
AANBEVOLEN OMVANG VAN HET GA

INSTALLATIE VAN DE KRAAN
STAP AANSLUITEN VAN DE WATERTOEVOER
Sluit de flexibele slang aan op de
watertoevoer. Voor modellen met
een temperatuurregeling wordt de
rode flexibele slang op de warmwater
toevoer aangesloten en de blauwe
flexibele slang op de koudwater
toevoer. Zorg dat de lter(s) tussen de
flexibele slang(en) en de afsluitklep
(hoekventiel - niet meegeleverd) is/
zijn geïnstalleerd.
Open de hoofdkraan van de
watertoevoer en de afsluitkleppen
(hoekventielen) en controleer op
lekken.
STAP AANSLUITEN VAN DE STROOMVOORZIENING
Als uw model Swan \ Swan 1000 is: uw product bevat een intern gemonteerde
V batterij. Om deze te activeren, ga verder naar item # .
Als uw model Swan B \ Swan
B is: installeer de batterijdoos
onder de gootsteen waarbij de
kabelverbinding naar beneden is
gericht en sluit de connectoren aan.
Als uw model Swan E \ Swan
E is: verbind de transformator
met het stopcontact en sluit de
connectoren aan.
Verwijder de beschermende sticker van de
sensor
Wacht een paar seconden voordat de
kraan wordt geactiveerd. Als het bereik
niet naar wens is, raadpleeg dan het deel
“AANPASSING VAN DE INSTELLINGEN”.
SECONDEN
ONGEVEER
INSTALLATIE VAN DE KRAAN
INLET VERSION
INLETS VERSION

AANPASSING VAN DE INSTELLINGEN
AANPASSING VAN INSTELLINGEN
DE INSTELLINGEN MET DE AFSTANDSBEDIENING AANPASSEN
De sensorinstellingen kunnen indien nodig als volgt worden aangepast: Sluit de
watertoevoer af. Voor het aanpassen van de sensor met de afstandsbediening
moet de afstandsbediening recht voor de sensor op een afstand van ongeveer
6-8” (15-20 cm.) worden gehouden. Kies de functie die u wilt aanpassen door één
keer op één van de functietoetsen te drukken. Nadat u eenmaal op een bepaalde
functieknop hebt gedrukt, zal een rood lichtje aan de voorkant van de sensor snel
gaan knipperen. Nu kunt u de instelling wijzigen door op de (+) of op de (-) knop
te drukken, elke druk verhoogt of verlaagt één niveau. Nadat u de instelling hebt
beëindigd, opent u weer de watertoevoer.
DETECTIEBEREIK
WACHTTIJD
VEILIGHEIDSTIJD
COMFORTSPOELING
UITSTELTIJD
TIJDELIJKE
UITSCHAKELFUNCTIE
RESET
UUR HYGIENE
SPOELING
DETECTIEBEREIK: Deze kraan werd geleverd met een zelnstellende
sensor. Het ideale detectiebereik voor de specieke locatie wordt
automatisch ingesteld. Gebruik de afstandsbediening alleen indien
nodig om het sensorbereik als volgt aan te passen: Druk op de Bereik-
knop. Wacht tot u een snel knipperend rood licht in het sensoroog ziet.
Druk dan op + om het bereik te vergroten en op - om het te verkleinen.
Elke keer dat u drukt wordt een afstand vergroot of verlaagd.
OPMERKING: Nadat u het detectiebereik met de afstandsbediening hee veranderd,
wordt de afstand door de sensor onthouden, ook al is de stroombron losgekoppeld.
WACHTTIJD: Het wijzigen van de wachttijd wordt alleen aangeraden voor
spoelkleppen van urinoirs of toiletten. Indien vereist kan de wachttijd van
fonteinkranen ook als volgt worden gewijzigd: Druk op de IN-knop. Wacht
tot u een snel knipperend rood licht in het sensoroog ziet. Druk dan op +
om de wachttijd te verhogen en op - om deze te verlagen.
UITSTELTIJD: Met deze knop kunt u de tijd dat het water vloeit nadat de
gebruiker zijn handen van de fonteinkraan hee verwijderd, wijzigen.
Hoe dichter de uitsteltijd bij 0 is, hoe meer water u bespaart. Door een
verhoging van de uitsteltijd hee de gebruiker een meer aangename
ervaring. Indien vereist kan de uitsteltijd als volgt worden gewijzigd: Druk
op de OUT knop. Wacht tot u een snel knipperen van het rode licht in het
sensoroog ziet. Druk dan op + om de uitsteltijd te verhogen en op - om
deze te verlagen.
TIJDELIJKE UITSCHAKELFUNCTIE: Deze functie is ideaal om diverse
activiteiten voor de sensor uit te voeren zonder dat het systeem reageert
(bijvoorbeeld reinigen). De kraan blij 1 minuut lang uitgeschakeld
wanneer deze knop één keer wordt ingedrukt. Om de functie te annuleren
en terug te keren naar normale werking, druk nogmaals op de Aan/Uit
knop of wacht minuut.

AANPASSING VAN DE INSTELLINGEN HANDMATIGE AANPASSING VAN DE INSTELLINGEN
Het sensorbereik is de afstand dat een object verwijderd is van de sensor om de kraan
te activeren. De sensor is door de fabriek ingesteld. Indien nodig kan deze als volgt
worden aangepast:
Ontkoppel de stroomvoorziening, de batterij of de transformator van de
sensor.
Maak een kortsluiting tussen de (+) en de (-) van de sensor. U kunt
een schroevendraaier of ander geleidermateriaal gebruiken om deze
kortsluiting te maken. Als alternatief, activeer na het loskoppelen van de
stroomvoorziening de sensor drie of vier keer. Maak geen kortsluiting op
de stroomvoorziening of op de sensor als de stroomvoorziening op de
sensor is aangesloten.
Sluit de stroomvoorziening weer aan op de sensor.
Voor het openen van de aanpassingsmodus, moet uw hand binnen
seconden na de heraansluiting van de stroomvoorziening, op een afstand
van tot cm (” tot ”) voor de sensor worden gehouden.
LET OP: Als u uw hand na heraansluiting van de stroomvoorziening niet voor de sensor
houdt , opent de sensor de aanpassingsmodus niet en blij de vorige instelling van
kracht.
Wanneer de sensor in de aanpassingsmodus gaat en uw hand zich voor
de sensor bevindt, zal een rood lampje aan de voorzijde van de sensor
langzaam gaan knipperen.
Houd uw hand aan de voorzijde van de sensor totdat het langzame
knipperen verandert in snel knipperen. Verplaats nu uw hand naar de
gewenste afstand van de sensor en wacht tot het rode lampje niet meer
knippert.
Wanneer het rode lampje is gedoofd, is de sensor op de gewenste
afstand ingesteld.
Controleer de afstand die u hebt ingesteld en indien niet niet naar wens,
herhaal stappen .
RESET KNOP: Deze functie herstelt alle fabrieksinstellingen, met
uitzondering van het bereik van de sensors. Indien nodig, druk op de
Reset knop en houdt deze ingedrukt terwijl u één keer op de + knop
drukt.
VEILIGHEIDSTIJD: De veiligheidstijd voorkomt het doorlopend stromen
van water door reflecties of vandalisme. Als de sensor langer dan
90 seconden bedekt wordt, wordt de waterstroom automatisch
uitgeschakeld. Om de normale werking te hervatten, moet elke
belemmering worden verwijderd. Druk op de SeC knop. Wacht tot u een
snel knipperend rood licht in het sensoroog ziet. Druk dan op + om de
veiligheidstijd te verhogen en op - om deze te verlagen.
UUR HYGIËNE SPOELING: Als u een compatibel model met een -uurs
hygiëne spoeling hee, dan kunt u deze in- en uitschakelen. Om de
hygiëne spoeling in te schakelen, druk op de klok knop. Wacht tot u een
snel knipperend rood licht in het sensoroog ziet. Druk dan op + om de
hygiëne spoeling te activeren of op - om deze te deactiveren.
COMFORTSPOELING: Als uw model een Comfort spoelinstelling bevat,
kan deze worden geactiveerd door op de spoelknop te drukken. Wan-
neer u op de knop drukt, ziet u kort een blauw licht verschijnen in het
sensoroog. De voorgeprogrammeerde spoelcyclus zal dan plaatsvinden.
De Comfort-spoeling kan niet worden onderbroken of gedeactiveerd door
op een willekeurige knop te drukken totdat het over is.

Duw de sensor voorzichtig in de kraan
voor het bereiken van de batterij en
trek het samen met de batterij uit de kraan.
Vervang de gebruikte batterij met een
nieuwe V batterij. Aanbevolen wordt een
lithiumbatterij.
Draai de inbusschroef los en verwijder
de kraan voorzichtig. Ontkoppel de
connector van de connector van de elek-
tronische eenheid.
Als u model Swan hebt, draai
dan de schroef achter de kraan los
en verwijder de menghendel. Draai de
inbusschroef los en verwijder voorzichtig de
as-montagedoor deze eruit te trekken.
Sluit de afsluitklep (hoekventiel). Als u
model Swan hebt, ga dan naar .
Wanneer de batterij zwakker wordt, knippert het rode licht met een constante snelheid.
De batterij moet dan binnen twee weken vervangen worden.
VERVANGING BATTERIJ VERVANGING BATTERIJ
Voor het vervangen van de batterij bij Swan \ Swan modellen:
Controleer dat, voordat u de elektronische eenheid en de batterij opnieuw monteert, de
O-ringniet beschadigd is en zich nog in zijn groef bevindt. Indien nodig, vervang deze
met een nieuwe. Reinigen en insmeren met siliconenvet. Belangrijk: zorgervoor dat de kraan
niet nat is bij het opnieuw monteren van de elektronische eenheid.
screw
Sluit de connector van de elektronische
eenheid weer aan op de solenoide
connector. Plaats de kraan en draai de
schroef vast.
Als uw model Swan is: opnieuwde
as-montage monteren en de schroef
vastdraaien. Monteer de menghendel
opnieuw en draai de inbusschroef vast.
Open de afsluitklep (hoekventiel).
Plaats de batterij voorzichtig in de
kraan en de elektronische een-
heid op zijn plaats. Zorg ervoor dat u de
elektronische eenheid helemaal terug in
de opening van de kraan steekt door het
zachtjes in de O-ring te drukken. Draai de
sensor voorzichtig om deze op zijn plaats
de brengen. Doe dit alles met de nodige
voorzichtigheid om de O-ring niet te besch-
adigen. Bij beschadiging moet deze worden
vervangen.
connectors
electronic unit
o-ring
screw

RESERVEONDERDELENLIJST
VERVANGING BATTERIJ ONDERHOUD
Instructies voor het reinigen van de lters
Deze kraan is voorzien van één / twee roestvrij stalen lter(s) die voorkomen dat vreemde
deeltjes de leidingen binnendringen. Als de kracht van de waterstroom vermindert, is
het mogelijk dat de lter(s) verstopt is/zijn. De lter(s) kan/kunnen als volgt gereinigd
worden:
. Draai de afsluitklep (hoekventiel) dicht.
. Ontkoppel de flexibele slang(en).
. Verwijder de lter(s) en was deze onder stromend water.
. Monteer de onderdelen opnieuw.
. Zorg ervoor dat er geen lek is.
Verzorging en reiniging van het chroom en speciale afwerkingen Gebruik GEEN staalwol of
reinigingsmiddelen die alcohol, zuur, schuurmiddelen of dergelijke bevatten. Het gebruik
van dergelijke verboden reinigingsmiddelen of onderhoudsproducten of materialen kan
het oppervlak van de kraan beschadigen. Gebruik voor het reinigen van de buitenkant
van de kraan alleen water en zeep en veeg het vervolgens droog met een schone doek of
handdoek. Bij het schoonmaken van de tegels van de badkamer moeten de kranen worden
beschermd tegen spatten van harde reinigingsmiddelen.
Pakket met afsluitringen en schroeven voor Swan modellen
Pakket met afsluitringen en schroeven voor Swan modellen
stuks sensor pakket voor Swan & Swan AB
stuks sensor pakket voor Swan B \ E & Swan B \ E AB
-stuks Solenoid klep pakket
Filter
Batterijdoos
-stuks V transformator (Eu)
Invoer pakket voor Swan AB
Invoer pakket voor Swan AB
Menghendel pakket
Menghendel pakket
Afstandsbediening B (optioneel)
Wanneer de batterij zwakker wordt, knippert het rode licht met een constante snelheid. De
batterij moet dan binnen twee weken vervangen worden.
BELANGRIJK: Gebruikte batterijen mogen niet worden verwijderd met normaal
huishoudelijk afval. Neem contact op met de plaatselijke overheid voor
informatie over afvalverwijdering en recycling.
.Verwijder de oude
batterijen
.Open de batterijdoos voorzichtig. Draai de afsluitschroef los
. Sluit de doos
. Vervang de gebruikte batterijen
met 6 nieuwe 1,5V batterijen
(aanbevolen wordt lithium
batterijen).
New Battery
Old Battery
SWAN B AB/ SWAN B AB

BEPERKTE GARANTIE PROBLEMEN OPLOSSEN
* Veiligheidsmodus: Als de sensor langer dan seconden bedekt is, wordt de waterstroom automatisch door de
fonteinkraan afgesloten. Verwijder eventuele blokkering om naar de normale werking terug te keren.
** In dit geval zal de waterstroom door de veiligheidstijd na seconden worden gestopt.
Y. Stern Engineering Ltd. garandeert dat zijn elektronische producten gedurende twee
jaar vanaf de datum van aankoop van het product bij normaal gebruik vrij zijn van
materiaal- en fabricagefouten. Als bij normaal gebruik een defect wordt gevonden, zal
Y. Stern Engineering Ltd. naar eigen goeddunken repareren, een vervangend onderdeel
of product leveren, of de nodige aanpassingen aanbrengen. Schade door ongeval of
misbruik valt niet onder deze garantie.
Onjuiste verzorging en reiniging maken de garantie ongeldig. Met alle verzoeken om
garantie moet het aankoopbewijs (originele verkoop bon) aan Stern Engineering Ltd.
worden verstrekt. Stern Engineering Ltd is niet verantwoordelijk voor arbeidskosten,
installatie of andere incidentele of gevolgkosten behalve welke hierboven worden
vermeld. In geen geval is de aansprakelijkheid van Stern Engineering Ltd. hoger dan
de aankoopprijs van het product. Als u van mening bent dat u een claim op de garantie
hee, neem dan contact op met uw Stern distributeur, dealer of sanitair aannemer. Zorg
dat u alle relevante informatie betreende uw claim verstrekt, inclusief een volledige
beschrijving van het probleem, het product, het modelnummer, de aankoopdatum van
het product, van wie het product is gekocht en de datum van installatie. Voeg ook uw
originele factuur bij.
Y. STERN ENGINEERING EN/OF DE VERKOPER WIJST ELKE AANSPRAKELIJKHEID AF VOOR
SPECIALE, INCIDENTELE OF GEVOLGSCHADE. Deze garantie sluit productschade uit als
gevolg van een installatiefout, onjuist onderhoud, slijtage, batterij of productmisbruik,
ongeacht of deze door een aannemer, servicebedrijf of de consument zijn uitgevoerd.
Deze garantie geldt niet voor productschade die wordt veroorzaakt door het volgende:
- Incorrecte installatie.
- Omkering van toevoerpijpen.
- Druk of temperaturen boven de aanbevolen grenzen.
- Ongepaste behandeling, sabotage, slecht of onregelmatig onderhoud.
- Vreemde voorwerpen, vuil of kalk die door de watervoorziening of zeeptank worden
veroorzaakt.
- Gebruik van de zeep welke niet voldoet aan de viscositeit specicaties.
- Verandering van de originele zeep/schuimzeep dispenser componenten (inclusief
leidingen).

-
 1
1
-
 2
2
-
 3
3
-
 4
4
-
 5
5
-
 6
6
-
 7
7
-
 8
8
-
 9
9
-
 10
10
-
 11
11
-
 12
12
-
 13
13
-
 14
14
-
 15
15
-
 16
16
-
 17
17
-
 18
18
-
 19
19
-
 20
20


Stern Engineering SWAN 1010 AB1953 Installation and Maintenance Manual
- Type
- Installation and Maintenance Manual
in andere talen
- English: Stern Engineering SWAN 1010 AB1953
Andere documenten
-
 Stern Perfect Time Touch Faucet Installatie gids
-
VOLTCRAFT BS-20 Operating Instructions Manual
-
Ingersoll-Rand 293S Handleiding
-
-
-
Ingersoll Rand 1111 de handleiding
-
Swann Ultimate Personal Shaver Handleiding
-
-
-
