
DR 572
Bedienungsanleitung/Garantie
Gebruiksaanwijzing/Garantie • Mode d’emploi/Garantie
Instrucciones de servicio/Garantía • Istruzioni per l’uso/Garanzia
Instruction Manual/Guarantee • Instrukcja obsługi/Gwarancja
A használati utasítás/garancia
Duschradio
Doucheradio • Radio de douche
Radio para la ducha • Doccia per radio
Shower Radio •
Radio pod prysznic
Zuhanyrádió
5....-05-DR 572 28.08.2003 14:41 Uhr Seite 1

Inhalt
Inhoud • Sommaire • Indice • Indice • Contents • Spis treści • Tartalom
D
Übersicht Bedienelemente . . . . . . . . . . . . . . . . . . . . . . . . . .Seite 3
Bedienungsanleitung . . . . . . . . . . . . . . . . . . . . . . . . . . . . . . .Seite 4
Garantie . . . . . . . . . . . . . . . . . . . . . . . . . . . . . . . . . . . . . . . .Seite 6
NL
Overzicht bedieningselementen . . . . . . . . . . . . . . . . . . . . . .Pagina 3
Gebruiksaanwijzing . . . . . . . . . . . . . . . . . . . . . . . . . . . . . . . .Pagina 8
Garantie . . . . . . . . . . . . . . . . . . . . . . . . . . . . . . . . . . . . . . . .Pagina 10
F
Aperçu des éléments de commande . . . . . . . . . . . . . . . . . . .Page 3
Mode d’emploi . . . . . . . . . . . . . . . . . . . . . . . . . . . . . . . . . . .Page 12
Garantie . . . . . . . . . . . . . . . . . . . . . . . . . . . . . . . . . . . . . . . .Page 13
E
Vista de conjunto Elementos de mando . . . . . . . . . . . . . . . .Página 3
Instrucciones de servicio . . . . . . . . . . . . . . . . . . . . . . . . . . . .Página 14
Garantia . . . . . . . . . . . . . . . . . . . . . . . . . . . . . . . . . . . . . . . .Página 16
I Descrizione dei singoli pezzi . . . . . . . . . . . . . . . . . . . . . . . .Pagina 3
Istruzioni per l’uso . . . . . . . . . . . . . . . . . . . . . . . . . . . . . . . . .
Pagina 17
Garanzia . . . . . . . . . . . . . . . . . . . . . . . . . . . . . . . . . . . .Pagina 19
GB
Control element overview . . . . . . . . . . . . . . . . . . . . . . . . . . .Page 3
Instruction Manual . . . . . . . . . . . . . . . . . . . . . . . . . . . . . . . . .Page 20
Guarantee . . . . . . . . . . . . . . . . . . . . . . . . . . . . . . . . . . . . . .Page 22
PL
Przegląd elemetów obsługi . . . . . . . . . . . . . . . . . . . . . . . . .Strona 3
Instrukcja obsługi . . . . . . . . . . . . . . . . . . . . . . . . . . . . . . . .Strona 23
Gwarancja . . . . . . . . . . . . . . . . . . . . . . . . . . . . . . . . . . .Strona 25
H
A hasznalt elemek megtekintése . . . . . . . . . . . . . . . . . . . . .Oldal 3
A hasznalati utasítás . . . . . . . . . . . . . . . . . . . . . . . . . . . . . .Oldal 27
Garancia . . . . . . . . . . . . . . . . . . . . . . . . . . . . . . . . . . . . . . . .Oldal 29
5....-05-DR 572 28.08.2003 14:41 Uhr Seite 2

3
D
Übersicht der Bedienelemente
1 POWER Ein/Aus Schalter
2 TUNING Regler
3 VOL Lautstärkeregler
4 Bandwahlschalter (FM/AM)
5 Lautsprecher
6 Taste für Sirene
7 Aufhänger
8 Saugnäpfe
9 Verschlussschraube für das Batteriefach
10 Batteriefach
5....-05-DR 572 28.08.2003 14:41 Uhr Seite 3

Allgemeine Sicherheitshinweise
Verwenden Sie das Gerät nur für den vorgesehenen Zweck.
Bei Verwendung von externen Netzteilen auf die richtige Polarität und Spannung
achten, Batterien stets richtigherum einlegen.
Das Gerät so aufstellen, dass vorhandene Lüftungsöffnungen nicht verdeckt werden.
Niemals das Gehäuse des Gerätes öffnen. Durch unsachgemäße Reparaturen
können erhebliche Gefahren für den Benutzer entstehen. Bei Beschädigung des
Gerätes, insbesondere des Netzkabels, das Gerät nicht mehr in Betrieb nehmen,
sondern von einem Fachmann reparieren lassen. Netzkabel regelmäßig auf
Beschädigungen prüfen.
Ein defektes Netzkabel darf nur vom Hersteller, unserem Kundendienst oder einer
ähnlich qualifizierten Person durch ein gleichwertiges Kabel ersetzt werden, um
Gefährdungen zu vermeiden.
Benutzen Sie das Gerät längere Zeit nicht, ziehen Sie den Netzstecker aus der
Steckdose, bzw. entnehmen Sie die Batterien.
Diese Symbole können sich ggfs. auf dem Gerät befinden und sollen Sie auf fol-
gendes hinweisen:
Das Blitz-Symbol soll den Benutzer auf Teile im Inneren des Gerätes hin-
weisen, die gefährlich hohe Spannungen führen.
Das Symbol mit Ausrufezeichen soll den Benutzer auf wichtige
Bedienungs- oder Wartungs-Hinweise in den Begleitpapieren hinweisen.
Geräte mit diesem Symbol arbeiten mit einem „Klasse 1-Laser“ zur
Abtastung der CD. Die eingebauten Sicherheitsschalter sollen verhindern,
dass der Benutzer gefährlichem, für das menschliche Auge nicht sichtba-
rem Laserlicht ausgesetzt wird, wenn das CD-Fach geöffnet ist.
Diese Sicherheitsschalter sollten auf keinen Fall überbrückt oder manipuliert wer-
den, sonst besteht die Gefahr, dass Sie sich dem Laser-Licht aussetzen.
Batterien einlegen
(Batterien nicht im Lieferumfang enthalten)
• Um das Batteriefach zu öffnen, lösen Sie bitte die Schraube (9) auf der
Rückseite des Gerätes.
• Ziehen Sie die Kunststoffabdeckung nach unten ab und öffnen Sie das
Batteriefach.
• Legen Sie 3 Batterien des Typs AA 1,5V ein. Achten Sie auf die richtige
Polarität (siehe Batteriefachboden)!
• Schließen Sie das Gerät bitte wieder in umgekehrter Reihenfolge.
4
D
5....-05-DR 572 28.08.2003 14:41 Uhr Seite 4

• Wird das Gerät längere Zeit nicht benutzt, entnehmen Sie bitte die Batterien,
um ein „Auslaufen“ zu vermeiden.
• Wechseln Sie immer den kompletten Batteriesatz aus, erneuern Sie nicht nur
eine Batterie.
Achtung: Batterien gehören nicht in den Hausmüll. Bitte geben Sie verbrauchte
Batterien bei zuständigen Sammelstellen oder beim Händler ab.
Werfen Sie Batterien niemals ins Feuer.
Inbetriebnahme des Gerätes
• Schalten Sie das Gerät mit dem POWER Schalter (1) ein, indem Sie mittig auf
die „Taucherbrille“ drücken.
• Mit dem Bandwahlschalter (4), können Sie das gewünschte Frequenzband aus-
wählen. UKW = FM, Mittelwelle = AM.
• Stellen Sie den TUNING Regler (2) auf den gewünschten Sender.
• Durch Drehen des VOL Lautstärkeregler (3), können Sie die gewünschte
Lautstärke einstellen.
• Schalten Sie das Gerät nach dem Gebrauch mit dem POWER Schalter (1) wie-
der aus.
Es gibt 3 Möglichkeiten der Anbringung:
1. Saugnäpfe (8) zur Befestigung an glatten Flächen wie z.B. Fliesen.
2. Eine Aufhängeöse (7), wenn Sie eine Schraubenbefestigung bevorzugen
(Schrauben nicht im Lieferumfang enthalten).
3. Eine Kordel, um das Gerät z. B am Wasserhahn aufzuhängen.
Spritzwasserschutz
Das Gerät ist Spritzwasser geschützt. Es kann somit auch innerhalb der
Duschkabine verwendet werden. Tauchen Sie das Gerät jedoch nicht ins Wasser (z.
B. Badewanne), da sonst die Elektronik des Gerätes Schaden nimmt.
Sirene
Mit der Taste (6) können Sie eine integrierte Sirene aktivieren, um ggf. Hilfe zu
rufen, z. B. bei einem Badeunfall.
Reinigung und Aufbewahrung
• Reinigen Sie das Gerät mit einem feuchten Tuch und trocknen Sie es danach
gut ab.
• Benutzen Sie bitte keine scharfen Reinigungsmittel.
5
D
5....-05-DR 572 28.08.2003 14:41 Uhr Seite 5

Garantie
Wir übernehmen für das von uns vertriebene Gerät eine Garantie von 24 Monaten
ab Kaufdatum (Kassenbon).
Innerhalb der Garantiezeit beseitigen wir unentgeltlich die Mängel des Gerätes oder
des Zubehörs*), die auf Material- oder Herstellungsfehler beruhen, durch Reparatur
oder, nach unserem Ermessen, durch Umtausch. Garantieleistungen bewirken
weder eine Verlängerung der Garantiefrist, noch beginnt dadurch ein Anspruch auf
eine neue Garantie!
Als Garantienachweis gilt der Kaufbeleg. Ohne diesen Nachweis kann ein kosten-
loser Austausch oder eine kostenlose Reparatur nicht erfolgen.
Im Garantiefall geben Sie bitte das Grundgerät in der Originalverpackung zusammen
mit dem Kassenbon an Ihren Händler.
*) Schäden an Zubehörteilen führen nicht automatisch zum kostenlosen Umtausch
des kompletten Gerätes. Wenden Sie sich in desem Fall bitte an unsere Hotline!
Glasbruchschäden bzw. Brüche von Kunststoffteilen sind grundsätzlich kosten-
pflichtig!
Sowohl Defekte an Verbrauchszubehör bzw. Verschleißteilen (z.B. Motorkohlen,
Knethaken, Antriebsriemen, Ersatzfernbedienung, Ersatzzahnbürsten, Sägeblättern
usw.), als auch Reinigung, Wartung oder der Austausch von Verschleißteilen, fallen
nicht unter die Garantie und sind deshalb kostenpflichtig!
Die Garantie erlischt bei Fremdeingriff.
Nach der Garantie
Nach Ablauf der Garantiezeit können Reparaturen kostenpflichtig vom entsprechen-
den Fachhandel oder Reparaturservice ausgeführt werden.
6
D
5....-05-DR 572 28.08.2003 14:41 Uhr Seite 6

7
D
Service für unsere
Haushaltsartikel
Verschleißteile für Haushaltsartikel
(soweit diese nicht vom Fachmann
ausgewechselt werden müssen),
Ersatzkannen, Staubsaugerfilterbeutel
usw. können Sie mit Angabe des
Gerätetyps unter folgender Telefon-
Hotline bestellen:
0 21 52 / 20 06 – 888
Service für unsere
Unterhaltungselektronik
Verschleißteile und Ersatzteile für
unsere Unterhaltungselektronik (soweit
diese nicht vom Fachmann ausge-
wechselt werden müssen) wie z. B.
Fernbedienungen, Bedienteilklappen,
Lautsprecherblenden usw. können Sie
mit Angabe des Gerätetyps unter fol-
gender Telefon-Hotline bestellen:
0 2152 / 20 06 – 666
Für technische Fragen haben wir für Sie folgende e-mail-Adresse eingerichtet:
Interessieren Sie sich für weitere Clatronic-Produkte?
Besuchen Sie doch einmal unsere Homepage unter
www.clatronic.de oder www.clatronic.com
Auch Ihre Bestellungen nehmen wir gerne unter o. g. Homepage-Adresse entgegen.
5....-05-DR 572 28.08.2003 14:41 Uhr Seite 7

Algemene veiligheidsinstructies
Gebruik het apparaat uitsluitend voor het daarvoor bestemde doel.
Plaats het apparaat zodanig dat de aangebrachte luchtopeningen niet worden afge-
dekt.
Open nooit de behuizing van het apparaat. Door ondeskundige reparaties kunnen
aanzienlijke gevaren voor de gebruiker ontstaan. Neem het apparaat niet meer in
gebruik wanneer het apparaat - en in het bijzonder de kabel - beschadigingen ver-
toont, maar laat het eerst door een vakman repareren. Controleer de kabel regel-
matig op beschadigingen.
Een defecte kabel mag alleen door de fabrikant, onze technische dienst of een
soortgelijk gekwalificeerd persoon worden vervangen. Alleen zo kunnen gevaren
vermeden worden.
Onderbreek de stroomtoevoer of verwijder de batterijen wanneer u denkt, het appa-
raat langere tijd niet te gebruiken.
Volgende symbolen kunnen op uw apparaat zijn aangebracht. Zij hebben de vol-
gende betekenis:
Het bliksemsymbool wijst de gebruiker op onderdelen in het inwendige
van het apparaat die gevaarlijk hoge spanning voeren.
Het symbool met het uitroepteken verwijst naar belangrijke
bedienings- en onderhoudsinstructies in de begeleidende documentatie.
Apparaten met dit symbool werken met een „klasse 1-laser„ voor de afta-
sting van de CD. De ingebouwde veiligheidsschakelaars moeten voorko-
men dat de gebruiker wordt blootgesteld aan gevaarlijke, voor het mense-
lijk oog onzichtbaar laserlicht wanneer het CD-vak geopend is.
Deze veiligheidsschakelaars mogen in geen geval overbrugd of gemanipuleerd
worden omdat u anders gevaar loopt, aan het laserlicht te worden blootgesteld.
Overzicht van de bedieningselementen
1 POWER Aan-/Uitschakelaar 6 Toets voor sirene
2 TUNING-regelaar 7 Ophanging
3 VOL Volumeregelaar 8 Zuignappen
4 Bandkeuzeschakelaar (FM/AM) 9 Sluitschroef voor
5 Luidspreker het batterijenvakje
10 Batterijenvakje
8
NL
5....-05-DR 572 28.08.2003 14:41 Uhr Seite 8

Batterijen plaatsen
(niet bij de levering inbegrepen)
• Voor het openen van het batterijenvakje draait u de schroef (9) aan de achterzij-
de van het apparaat los.
• Trek de kunststof afdekking naar onder weg en open het batterijenvakje.
• Plaats 3 1,5 V-batterijen type AA. Let op de juiste polariteit (zie bodem van het
batterijenvakje).
• Sluit het apparaat weer in omgekeerde volgorde aan.
• Verwijder de batterijen wanneer u denkt, het apparaat langere tijd niet te gebrui-
ken. Zo voorkomt u dat batterijzuur uit de batterijen kan lekken.
• Vervang alleen een complete set batterijen en nooit één batterij.
Belangrijk: batterijen horen niet thuis in het huisafval. Geef verbruikte batterijen
altijd af in het gemeentelijke milieupark of bij de handelaar.
Gooi batterijen nooit in het vuur.
Ingebruikname van het apparaat
• Schakel het apparaat in met de POWER-schakelaar (1) door midden op de
“duikerbril” te drukken.
• Met de bandkeuzeschakelaar (4) kunt u de gewenste frequentieband kiezen.
UKW = FM, middengolf = AM.
• Stel de TUNING-regelaar (2) in op de gewenste zender.
• Door het draaien aan de volumeregelaar VOL (3) kunt u de gewenste geluids-
sterkte instellen.
• Schakel het apparaat na gebruik weer uit met POWER-schakelaar (1).
U kunt het apparaat op 3 manieren aanbrengen:
1. met zuignappen (8) voor de bevestiging op gladde oppervlakken zoals bijv.
tegels.
2. aan een ophangoog (7), wanneer u de voorkeur geeft aan een schroefbevesti-
ging (schroeven niet bij levering inbegrepen).
3. aan een koord om het apparaat bijv. aan een waterkraan op te hangen.
Spatwaterbescherming
Het apparaat is beschermd tegen spatwater. U kunt het dus ook in de douchecabi-
ne gebruiken. Dompel het apparaat echter niet in het water (bijv. badkuip) omdat
dan de elektronische eenheid wordt beschadigd.
Sirene
Met toets (6) kunt u een geïntegreerde sirene activeren om eventueel om hulp te
roepen, bijv. bij een ongeval in de badkamer.
9
NL
5....-05-DR 572 28.08.2003 14:41 Uhr Seite 9

Reiniging en bewaring
• Reinig het apparaat met een vochtige doek en droog het daarna goed af.
• Gebruik géén agressieve reinigingsmiddelen.
Dit apparaat is gekeurd conform de op dit moment van toepassing zijnde CE-
richtlijnen zoals bijvoorbeeld elektromagnetische compatibiliteit en laagspannings-
voorschriften en is geconstrueerd volgens de nieuwste veiligheidstechnische voor-
schriften.
Technische wijzigingen voorbehouden!
Garantie
Voor het door ons geleverde apparaat verlenen wij een garantie van 24 maanden
vanaf koopdatum (kassabon).
Eventuele gebreken aan het apparaat of aan het toebehoren*) die zijn ontstaan
door productie- of materiaalfouten verhelpen wij binnen deze periode kosteloos
door middel van reparatie of, naar ons oordeel, door vervanging. Eventuele garan-
tiegevallen verlengen noch de geldigheidsduur van de garantie, noch begint daar-
door een nieuwe garantieperiode!
Het koopbewijs geldt als garantiebewijs. Zonder dit bewijs kan geen kosteloze
reparatie of vervanging plaatsvinden.
Geef in geval van garantie het apparaat met de kassabon en in de originele verpak-
king af bij uw handelaar.
*) Schade aan onderdelen leidt niet automatisch tot kosteloze vervanging van het
complete apparaat. Neem in dit geval contact op met onze hotline! De reparatie van
glasbreuk of breuk van kunststofonderdelen wordt altijd berekend!
Niet defecten aan de hulpstukken of aan de slijtende onderdelen (bijv. koolborstels,
deeghaken, drijfriemen, reserveafstandsbediening, reservetandenborstels, zaag-
bladen enz.), maar ook reiniging, onderhoud of de vervanging van slijtende delen
vallen niet onder de garantie en geschieden altijd tegen berekening!
Bij ingrepen door derden komt de garantieverlening te vervallen.
Na de garantieperiode
Na afloop van de garantieperiode kunnen reparaties tegen berekening worden uit-
gevoerd door de betreffende vakhandelaar of de technische dienst.
10
NL
5....-05-DR 572 28.08.2003 14:41 Uhr Seite 10

Conseils de sécurité
N’utilisez l’appareil qu’aux fins auxquelles il est destiné.
Si vous utilisez une alimentation électrique externe, vérifiez la polarité et la tension
électrique. Placez toujours correctement les piles.
Installez toujours l’appareil de façon à ce que les ouvertures de ventilation ne
soient pas obstruées.
N’ouvrez jamais le bloc moteur de l’appareil. Des réparations mal appropriées peu-
vent entraîner des risques importants pour l’utilisateur. En cas d’endommagement
de l’appareil, en particulier du câble d’alimentation, ne mettez plus l’appareil en
marche et laissez un spécialiste se charger de la réparation. Contrôlez régulière-
ment le bon état du câble d’alimentation.
Pour éviter tout risque, seul le fabricant, son service après-vente ou un spécialiste
à qualification similaire sont aptes à remplacer un câble défectueux par un câble
équivalent.
Si l’appareil n’est pas utiliser pendant assez longtemps, débranchez le câble d’ali-
mentation ou retirez les piles.
Vous pouvez éventuellement trouver ces symboles sur l’appareil, qui ont la signifi-
cation suivante:
L’éclair indique à l’utilisateur les pièces dangereuses, situées à l’intérieur
de l’appareil, qui conduisent de hautes tensions.
Le point d’exclamation attire l’attention de l’utilisateur sur les remarques
importantes d’utilisation et d’entretien données dans les documents de
l’appareil.
Les appareils dotés de ce symbole fonctionnent avec un „laser de la clas-
se 1“ pour la lecture des disques CD. Les boutons de sécurité intégrés
sont chargés d’éviter qu’à l’ouverture du compartiment à CD l’utilisateur
entre en contact avec la lumière laser qui est dangereuse et invisible à
l’oeil humain.
Il est absolument interdit de court-circuiter ou manipuler ces boutons de sécurité,
ce qui risquerait sinon de mettre l’utilisateur en contact avec la lumière laser.
Description des éléments de commande
1 Bouton POWER Marche / Arrêt 6 Alarme
2 Régulateur TUNING 7 Suspension
3 VOL Réglage du son 8 Ventouses
4 Sélecteur de fréquences (FM/AM) 9 Vis de fermeture du
5 Haut-parleur compartiment à piles
10 Compartiment à piles
11
F
5....-05-DR 572 28.08.2003 14:41 Uhr Seite 11

Installation des piles
(non comprises à la livraison)
• Pour ouvrir le compartiment à piles desserrez la vis (9) située au dos de l’ap-
pareil.
• Faites coulisser le couvercle en plastique vers le bas pour ouvrir le comparti-
ment.
• Installez 3 piles de 1,5 V de type AA. Veillez à respecter la polarité (voir fond du
compartiment).
• Refermez l’appareil en procédant dans l’ordre inverse.
• Si l’appareil ne doit pas être utilisé pendant une période prolongée, retirez les
piles pour éviter que l’acide des piles ne “coulent”.
• Remplacez toujours toutes les piles à la fois et pas seulement une seule.
Attention: ne jetez en aucun cas vos piles avec les ordures ménagères. Vous êtes
priés de rapporter vos piles à une borne de recyclage ou à votre revendeur.
Ne jetez jamais les piles dans le feu.
Avant la première utilisation
• Mettez l’appareil en marche grâce à la touche POWER (1) en appuyant au
milieu du « masque de plongée ».
• Vous pouvez choisir la bande de fréquences désirée grâce au sélecteur de fré-
quences (4). UKW = FM, moyennes ondes = AM.
• Positionnez le bouton TUNING (2) sur la station désirée.
• Vous pouvez régler le son à l’aide du bouton VOL (3).
• Arrêtez l’appareil après utilisation à l’aide du bouton POWER (1).
3 fixations possibles:
1. A l’aide des ventouses (8) sur une surface lisse, par ex. des carreaux.
2. A l’aide d’un anneau de suspension (7) si vous préférez une fixation avec vis
(n’est pas livrée avec l’appareil).
3. Une corde, pour suspendre l’appareil par ex. à un robinet.
Protection anti-éclaboussures
Cet appareil est étanche aux éclaboussures. Il peut donc être utilisé sous la dou-
che. Ne le plongez cependant jamais dans l’eau (par ex. dans une baignoire), cela
risquerait sinon de l’endommager.
Alarme
Grâce à cette touche (6) vous pouvez activer une alarme intégrée, pour demander
de l’aide par ex. en cas d’accident sous la douche.
12
F
5....-05-DR 572 28.08.2003 14:41 Uhr Seite 12

Nettoyage et rangement
• Nettoyez l’appareil avec un torchon humide puis essuyez-le consciencieuse-
ment.
• N’utilisez jamais de détergent.
Cet appareil a été contrôlé d’après toutes les directives européennes actuelles
applicables, comme par exemple concernant la compatibilité électromagnétique et
la basse tension. Cet appareil a été fabriqué en respect des réglementations tech-
niques de sécurité les plus récentes.
Sous réserve de modifications techniques.
Garantie
Nous accordons une garantie de 24 mois à dater de la date d’achat (ticket de
caisse) pour l’appareil que nous vendons.
Pendant la durée de la garantie, nous éliminons gratuitement les défauts de l’appa-
reil ou des accessoires *) découlant d’un vice de matériau ou de fabrication au
moyen d’une réparation ou, selon notre estimation, au moyen d’un remplacement.
Les prestations dans le cadre de la garantie n’entraînent aucune prorogation de la
durée de garantie et ne donnent pas droit à une nouvelle garantie !
Le justificatif de garantie est le reçu. Sans ce justificatif, aucun remplacement
gratuit ni aucune réparation gratuite ne peuvent être effectués.
En cas de recours à la garantie, rapportez l’appareil dans son emballage d’origine
accompagné du ticket de caisse à votre revendeur.
*) Les endommagements de pièces d’accessoires ne justifient pas automatique-
ment l’échange gratuit de l’appareil complet. Contactez alors notre centrale télépho-
nique! La casse de pièces en verre ou en plastique est dans tous les cas à votre
charge!
Les défauts sur les accessoires ou les pièces d’usure (p.ex. les charbons de
moteurs, crochets, courroies d’entraînement, télécommande de rechange, brosses
à dents de rechange, lames de scies etc.) ainsi que le nettoyage, l’entretien ou le
remplacement de pièces d’usure ne sont pas garantis et sont donc payants !
En cas d’intervention étrangère, la garantie devient caduque.
Après la garantie
Après écoulement de la durée de garantie, les réparations peuvent être effectuées,
contre paiement, par le commerce spécialisé ou le service de réparation.
13
F
5....-05-DR 572 28.08.2003 14:41 Uhr Seite 13

Indicaciones generales para su seguridad
Utilice el aparato únicamente para la finalidad para la que ha sido construido.
El aparato se ha de dejar puesto de modo que no se tapen los orificios de airea-
ción existentes.
Jamás se abrirá la carcasa del cuerpo del aparato. Las reparaciones mal hechas
pueden generar considerables peligros para el usuario.
En caso de estar deteriorado el aparato, en especial el cable de conectar a red, ya
no se ha de poner más en servicio el aparato, sino que se hará que lo repare un
especialista. Controle periódicamente el cable de conexión a red para ver si se ha
deteriorado.
Sólo el fabricante, nuestro servicio posventa o un técnico con una cualificación
similar pueden cambiar un cable defectuoso por otro similar, para evitar todo tipo
de riesgo.
Saque de la toma de corriente la clavija de conectar a la red o bien quite las pilas
cuando no se vaya a usar el aparato durante largo tiempo.
Estos símbolos pueden encontrarse en caso dado en el aparato, y son para indicar
lo siguiente:
El símbolo del rayo advierte al usuario que hay componentes internos del
aparato que pueden tener tensiones peligrosamente altas.
El símbolo con el signo de exclamación advierte al usuario que hay
instrucciones de manejo y de mantenimiento importantes en la docu-
mentación que va adjunta.
Aparatos que llevan puesto este símbolo operan con un ”Lector Clase 1”
para explorar el CD. Los interruptores de seguridad incorporados sirven
para impedir que el usuario esté expuesto a luz láser invisible peligrosa
para la vista del usuario cuando está abierto el compartimiento del CD.
Bajo ningún concepto se ha de hacer un puenteado sobre estos interruptores de
seguridad ni deben ser manipulados. De hacerlo, existe el peligro de que Vd. esté
expuesto a la luz láser.
Descripción de los elementos de manejo
1 POWER Conector / desconector 6 Tecla para la sirena
2 Regulador-TUNING 7 Suspensión
3 VOL Regulador de volumen 8 Ventosas
4 Conmutador selector 9 Tapón roscado para
de bandas AM/FM la cámara para baterías
5 Altavoces 10 Cámara para baterías
14
E
5....-05-DR 572 28.08.2003 14:41 Uhr Seite 14

Introducción de baterías
(no está incluido en el suministro)
• Para abrir la cámara para baterías, suelte por favor el tornillo (9) en la parte
posterior del aparato.
• Retire la cubertura de plástico hacia abajo y abra la cámara para baterías.
• Introduzca 3 baterías de 1,5V, tipo AA. Tenga atención con la polaridad correcta
(vea la indicación en el suelo del compartimento de baterías).
• Por favor cierre de nuevo el aparato, pero en orden inverso.
• Si el aparato no se utiliza durante largo tiempo, saque las pilas para evitar todo
„derrame" del ácido de pilas.
• Siempre cambie todas las baterías de una vez, no cambie solamente una
batería.
Atención: Las baterías no se deben tirar a la basura doméstica. Por favor lleve las
baterías usadas a sitios especiales de recogida o a su concesionario.
Nunca tire las baterías al fuego.
Puesta en funcionamiento del aparato
• Conecte el aparato con el interruptor POWER (1) presionando en el centro
sobre „gafas de buceo”.
• Con el selector de bandas (4), puede ajustar la banda de frecuencias deseada.
Ondas ultracortas= FM, Onda media = AM.
• Coloque el regulador TUNING (2) sobre el emisor deseado.
• Girando el regulador de volumen VOL (3) puede ajustar el volumen deseado.
• Después del uso desconecte el aparato con el interruptor POWER (1).
Existen 3 posibilidades de suspensión:
1. Ventosas (8), para fijar en superficies lisas, como por ejemplo azulejos.
2. Un ojete de suspensión (7), si prefiere una suspensión con tornillos
(Los tornillos no se suministran).
3. Una cuerda, para colgar el aparato por ejemplo en el grifo de agua.
Protección contra los chorros de agua
El aparato está protegido contra el agua. Por este motivo también se puede usar
en la cabina de ducha. Pero no sumerja el aparato en agua (por ejemplo en la
bañera), ya que se puede dañar la electrónica del aparato.
Sirena
Con la tecla (6) puede activar una sirena integrada, con la que en que caso sea
necesario podrá llamar ayuda, p.ej. en un accidente de baño.
15
E
5....-05-DR 572 28.08.2003 14:41 Uhr Seite 15

Limpieza y almacenamiento
• Limpie el aparato con un paño húmedo y después sequelo bien.
• No utilice detergentes agresivos.
Este aparato se ha examinado según las normativas actuales y vigentes de la
Comunidad Europea, como p.ej. compatibilidad electromagnética y directiva de
baja tensión y se ha construido según las más nuevas especificaciones en razón
de la seguridad.
No reservamos el derecho de efectuar modificaciones técnicas.
Garantía
Para el aparato comercializado por nosotros nos responsabilizamos con una
garantía de 24 meses a partir de la fecha de compra (factura de compra).
Durante el período de garantía nos encargamos gratuítamente de los defectos del
aparato y de los accesorios*), que se hayan originado por defectos del material o
de la fabricación. Dependiendo de nuestra estimación se realizará una reparación
o un cambio. ¡Los servicios de garantía no prolangan la garantía, ni se incia por
ello un período nuevo de garantía!
Como comprobante para la garantía es válido la factura de compra. Sin este com-
probante no se podrá realizar un cambio o una reparación gratuíta.
En el caso de garantía lleve el aparato base en el embalaje original y la factura de
compra a su concesionario.
*) Defectos en los accesorios de uso o en las piezas de desgaste (p.ej. escobillas
de carbón del motor, varillas amasadoras, correas de transmisión, mando a
distancia de repuesto, cepillos de dientes de repuesto, hojas de sierra etc.), como
también la limpieza, mantenimiento o el recambio de piezas de desgaste no reca-
en en la garantía e irán al cargo del cliente!
En caso de intervención ajena se expira la garantía.
Después de la garantía
Después de haber expirado la garantía se pueden realizar las reparaciones por el
concesionario o por el servicio de reparaciones. Los gastos irán al cargo del cliente.
16
E
5....-05-DR 572 28.08.2003 14:41 Uhr Seite 16

Avvertenze generali per la sicurezza
Utilizzare l’apparecchio solo per l’uso previsto.
Collocare l’apparecchio in modo che le aperture per l’aerazione esistenti non ven-
gano coperte.
Non togliere mai la protezione dell’apparecchio. Riparazioni non a regola d’arte
possono causare notevoli pericoli per l’utente. Se l’apparecchio presenta danni,
soprattutto nella zona del cavo di collegamento, non metterlo più in funzione, ma
farlo riparare prima da un esperto. Esaminare regolarmente il cavo di collegamento
alla rete per verificare che non ci siano danni.
Un cavo di collegamento difettoso può essere sostituito con un cavo equivalente
solo dal produttore, dal nostro servizio assistenza o da persone similmente qualifi-
cate, al fine di evitare pericoli.
Se l’apparecchio non viene usato per un periodo di tempo prolungato, togliere il
blocchetto alimentatore dalla presa ovvero estrarre le batterie.
Questi simboli possono trovarsi eventualmente sull’apparecchio e rimandano ai
seguenti elementi:
Il simbolo del lampo fa presente all’utente la presenza di pezzi all’interno
dell’apparecchio che possono produrre alte tensioni pericolose.
Il simbolo con il punto esclamativo fa presente all’utente la presenza di
importanti avvertenze per l’uso e la manutenzione nei fogli di accompa-
gnamento dell’apparecchio.
Gli apparecchi dotati di questo simbolo lavorano con un „Laser classe 1“
per riprodurre i CD. Gli interruttori di sicurezza integrati hanno lo scopo di
impedire che l’utente venga esposto alla luce non visibile del laser, perico-
losa per l’occhio umano, aprendo lo scomparto per i CD.
Questi interruttori di sicurezza non devono mai essere cavallottati né manipolati
perché altrimenti sussiste il rischio di esposizione alla luce del laser.
Elementi di comando
1 POWER On/Off manopola 6 Tasto per sirena
2 Manopola di regolazione TUNING 7 Ganci
3 VOL Regolatore del volume 8 Ventose
4 Selezionatore di banda AM/FM 9 Tappo a vite per lo
5 Altoparlante scomparto portabatterie
10 Scomparto portabatterie
17
I
5....-05-DR 572 28.08.2003 14:41 Uhr Seite 17

Inserimento delle batterie
(non incluso nella fornitura)
• Per aprire lo scomparto portabatterie, svitare la vite (9) situata sul lato posterio-
re dell’apparecchio.
• Tirare verso il basso il coperchio in materiale plastico e aprire quindi lo scom-
parto portabatterie.
• Inserire 3 batterie da 1,5 V, tipo AA. Fare attenzione alla polarità corretta (v.
fondo vano batterie).
• Chiudere nuovamente l’apparecchio, effettuando nella sequenza inversa le ope-
razioni descritte.
• Si el aparato no se utiliza durante largo tiempo, saque las pilas para evitar todo
„derrame" del ácido de pilas.
• Sostituire sempre il set completo, non sostituire mai un’unica batteria.
Attenzione: non gettare le batterie nei rifiuti domestici. Buttare le batterie usate
negli appositi contenitori o restituirle al negoziante.
Non buttare mai le batterie nel fuoco.
Messa in funzione dell' unità
• Accendere l’ apparecchio con l’ interruttore POWER (1), premendo la
„maschera“.
• Con il selettore della banda di frequenza (4) è possibile impostare la banda di
frequenza desiderata. UKW = FM, onda media = AM.
• Regolare il regolatore TUNING (2) sul trasmittente desiderato.
• Girando il regolatore per il volume (3), si può regolare il volume.
• Spegnere l’ apparecchio dopo l’ uso con l’ interruttore POWER (1).
Ci sono tre possibilit⁄ di applicazione:
1. Ventose (8) per il fissaggio su superfici lisce, come per esempio piastrelle.
2. Gancio (7) per appendere l’apparecchio, se si preferisce un fissaggio con viti
(Le viti non sono incluse).
3. Una cordicella per appendere l’apparecchio, per esempio al rubinetto dell’ac-
qua.
Protezione antispruzzo
L’apparecchio è protetto contro gli spruzzi dell’acqua. In questo modo è possibile
utilizzarlo anche all’interno della cabina della doccia. Tuttavia non si deve immerge-
re la radio in acqua (per esempio vasca da bagno), perché cosû si danneggerebbe
l’elettronica dell’apparecchio.
Sirena
Con il tasto (6) si può attivare una sirena, eventualmente per chiamare aiuto dopo
un incidente facendo il bagno.
18
I
5....-05-DR 572 28.08.2003 14:41 Uhr Seite 18

Pulizia e conservazione
• Ai fini della pulizia dell’apparecchio, utilizzare un panno umido e asciugarlo suc-
cessivamente sempre con cura.
• Non utilizzare detergenti aggressivi.
Questo apparecchio è stato controllato sulla base di tutte le direttive CE attuali in
vigore in questo settore, quali per esempio la normativa in materia di compatibilità
elettromagnetica e la direttiva in materia di bassa tensione, ed è stato costruito
conformemente alle norme di sicurezza più moderne.
Con riserva di apportare modifiche tecniche.
Garanzia
Per l’apparecchio da noi messo in commercio ci assumiamo una garanzia di
24 mesi dalla data di acquisto (scontrino).
Durante la garanzia noi ci impegniamo ad eliminare gratuitamente i guasti dell’ap-
parecchio o degli accessori*), dovuti a difetti di materiale o di fabbricazione, riparan-
doli o, a nostra discrezione, sostituendoli. Le prestazioni in garanzia danno luogo a
una proroga della garanzia né danno diritto ad una nuova garanzia!
Per la garanzia è sufficiente lo scontrino di acquisto. Senza questo scontrino non
sussiste il diritto né ad una sostituzione né ad una riparazione gratuita.
In caso di garanzia consegnare al vostro rivenditore l’apparecchio base nell’imbal-
laggio originale unitamente allo scontrino.
*) Danni agli accessori non giustificano automaticamente lo scambio gratuito dell’-
apparecchio completo. Si prega di mettersi in contatto con la nostra centrale telefo-
nica. Danni alle parti di vetro oppure fratture ai pezzi di materia plastica sono obbli-
gatoriamente a spese del cliente.
La riparazione di pezzi d’uso ovvero soggetti a logoramento (cursori, ganci impa-
statori, cinghie di trasmissione, telecomandi di ricambio, spazzolini di ricambio,
lame di seghe ecc.) come anche operazioni di pulizia e manutenzione o la sostitu-
zione di pezzi soggetti a logoramento non rientrano nella garanzia e quindi sono a
pagamento!
La garanzia si annulla nel caso di intervento da parte di terzi.
Dopo la garanzia
Al termine della garanzia le riparazioni possono essere eseguite dietro pagamento
dal corrispettivo negozio specializzato o servizio riparazioni.
19
I
5....-05-DR 572 28.08.2003 14:41 Uhr Seite 19

General safety instructions
Use the device only for the intended purpose.
Assemble the device in such a way that the available ventilation openings are not
covered.
Never open the housing of the device. Incorrect repairs can constitute a considera-
ble risk for the user. Should the device become damaged, in particular the mains
supply cable, do not operate the device any longer, but rather have it repaired by an
expert. Check the mains supply cable regularly for damage.
For safety reasons a broken or damaged mains lead may only be replaced by an
equivalent lead from the manufacturer, our customer service department or a
similary qualified person.
If the device is not used for a longer period, remove the plug connector from the
plug socket or take out the batteries.
These symbols may be found on the machine and are intended to indicate the
following:
The lightning symbol should advise the user of parts in the inside of the
device which carry dangerously high voltage levels.
The symbol with an exclamation mark should advise the user of important
operation or maintenance instructions in the accompanying documentation.
Devices bearing this symbol work with a „class 1 laser“ for tracing the CD.
The built-in safety switches should prevent the user being exposed to dan-
gerous laser light, which is invisible to the human eye, when the CD com-
partment is opened.
Under no circumstances should these safety switches be bypassed or manipulated,
as this could result in a danger of exposure to the laser light.
Overview of the components
1 POWER On/Off switch 6 Siren button
2 Regulator TUNING 7 Hanger
3 VOL Volume regulator 8 Suckers
4 AM/FM band selector 9 Seal screw for the
5 Loudspeaker battery compartment
10 Battery compartment
20
GB
5....-05-DR 572 28.08.2003 14:41 Uhr Seite 20

Inserting the Batteries
(not supplied)
• To open the battery compartment, remove the screw (9) on the back of the
device.
• Pull the plastic cover downwards and open the battery compartment.
• Insert 3 1.5V AA type batteries. Match the polarities correctly (see the inside of
the battery compartment).
• Close the device by proceeding in the opposite order.
• If the device is not used for a long period of time, remove the batteries to avoid
the „spilling“ of battery acid.
• Always change the battery set completely, do not change just one battery.
Warning: batteries are not to be disposed of together with domestic wastes.
Dispose of the used batteries at the relevant collection bin or at your dealer’s.
Never throw batteries into the fire.
Commissioning the device
• Switch the device on using the POWER switch (1) by pressing the middle of the
"diving goggles".
• The desired frequency band can be set with the band selector switch (4).
UKW = FM, medium wave = AM.
• Turn the TUNING regulator (2) to the desired station.
• By turning the VOL regulator (3) you can set the desired volume.
• Switch the device off again after use by means of the POWER switch (1).
There are three ways for mounting:
1. Use the suckers (8) to stick to a smooth surface, e.g. tiles.
2. Use a hook (7) if you prefer to block it with screws (Screws not supplied).
3. Use a cord to hang it from the water faucet.
Splash-proof
The appliance is splash-proof. It can be used also inside the shower box. Do not dip
it in water (e.g. in the bathtub), as the electronic parts of the appliance may be
damaged.
Siren
With the button (6) you can activate an integrated siren to call for help, for example
in the case of a bathing accident.
21
GB
5....-05-DR 572 28.08.2003 14:41 Uhr Seite 21

Cleaning and storage
• Clean the device with a moist cloth and dry it well.
• Do not use abrasive detergents!
This device has been tested according to all relevant current CE guidelines,
such as electromagnetic compatibility and low voltage directives, and has been
constructed in accordance with the latest safety regulations.
Subject to technical changes without prior notice!
Guarantee
The device supplied by our Company is covered by a 24 month guarantee starting
on the date of purchase (receipt).
During the life of the guarantee any fault of the device or its accessories *) ascriba-
ble to material or manufacturing defects will be eliminated free of charge by repai-
ring or, at our discretion, by replacing it. The guarantee services do not entail an
extension of the life of the guarantee nor do they give rise to any right to a new
guarantee!
Proof of the guarantee is provided by the proof of purchase. Without proof of
purchase no free replacement or repair will be carried out.
For repairs or replacement during the life of the guarantee return the device in its
original packing together with the proof of purchase to your dealer.
*) Damage to accessories does not mean automatic free replacement of the whole
machine. In such cases please contact our hotline. Broken glass or breakage of
plastic parts are always subject to a charge.
Defects to consumables or parts subject to wearing (e.g. motor pistons, kneading
blades, drive shafts, spare remote control, spare toothbrushes, saw blades, etc.) as
well as cleaning, maintenance or the replacement of said parts are not covered by
the guarantee and hence are to be paid!
The guarantee lapses in case of unauthorized tampering.
After the expiry of the guarantee
After the expiry of the guarantee repairs can be carried by the competent dealer or
repair service against the payment of the ensuing costs.
22
GB
5....-05-DR 572 28.08.2003 14:41 Uhr Seite 22

Ogólne wskazówki związane z bezpieczną obsługą
Urządzenie należy używać tylko zgodnie z jego przeznaczeniem.
W przypadku używania oddzielnych zasilaczy należy zwrócić uwagę na bieguno-
wość i napięcie, baterie muszą zostać włożone do urządzenia zgodnie z oznac-
zoną biegunowością.
Urządzenie należy w taki sposób ustawić, żeby istniejące otwory wentylacyjne
nie zostały przykryte.
Nigdy nie wolno otwierać obudowy urządzenia. Niefachowo przeprowadzone
naprawy mogą być groźne w skutkach dla użytkownika. Przy uszkodzeniu
urządzenia, w szczególności kabla sieciowego, urządzenie nie może być
używane dopóki nie zostanie naprawione przez osobę z wymaganymi uprawnie-
niami. Przewód zasilający należy regularnie sprawdzać, czy nie jest uszkodzony.
W razie awarii proszę nie naprawiać urządzenia samemu lecz skorzystać z
pomocy autoryzowanego specjalisty.Jeżeli przewód zasilający nieodłączalny
ulegnie uszkodzeniu, to powinien on być wymieniony u wytwórcy lub w spec-
jalnym zakładzie naprawczym albo przez wykwalifikowaną osobę w celu uni-
knięcia zagrożenia.
Jeżeli urządzenie nie będzie przez dłuższy czas używane, należy wyciągnąć
wtyczkę z gniazdka lub wyjąć baterie.
Poniższe symbole mogą znajdować się na urządzeniu i mają zwracać Państwa
uwagę na:
Symbol błyskawicy ma zwrócić uwagę użytkownika na znajdujące się
we wnętrzu urządzenia części, które są pod niebezpiecznie wysokim
napięciem.
Symbol z wykrzyknikiem ma zwrócić uwagę użytkownika na znajdujące
się w załączonych dokumentach ważne wskazówki związane z
obsługą i konserwacją urządzenia.
Urządzenia z tym symbolem używają do odczytywania dźwięku z płyty
kompaktowej „Lasera klasy A“. Wbudowany wyłącznik bezpieczeństwa
ma zapobiec temu, żeby użytkownik w czasie otwierania kieszeni odt-
warzacza płyt kompaktowych został poddany niebezpiecznemu dla
ludzkich oczu oddziaływaniu niewidocznego światła lasera.
Wyłącznika tego nie należy w żadnym wypadku zmostkować lub też przy nim
manipulować, ponieważ grozi to niebezpieczeństwem, że użytkownik poddany
zostanie oddziaływaniu niebezpiecznego dla ludzkich oczu niewidocznego
światła lasera.
23
PL
5....-05-DR 572 28.08.2003 14:41 Uhr Seite 23

Zestawienie elementów obsługi
1 POWER Włącznik/ wyłącznik 6 Przycisk syreny
2 Regulator TUNING 7 Wieszak
3 VOL Regulator siły głosu 8 Przyssawki
4 Przełącznik wyboru pasma 9 Śruba zamykająca do
(FM/AM) kasetki na baterie
5 Głośnik 10 Kasetka na baterie
Wkładanie baterii
(nie objęte dostawą)
• W celu otwarcia kieszeni na baterie należy poluzować śrubę (9) na tylnej
ściance urządzenia.
• Przykrywkę z tworzywa sztucznego należy ściągnąć do dołu, a następnie
otworzyć kieszeń.
• Proszę umieścić w środku 3 baterii1,5 V, typ AA. Proszę pamiętać o pra-
widłowej polarności (patrz spód kieszeni na baterie).
• Aby zamknąć urządzenie należy przeprowadzić powyższe czynności w
odwrotnej kolejności.
• Jeżeli nie będą Państwo przez dłuższy czas korzystać z urządzenia proszę
wyjąć z niego baterie, aby zapobiec „wyciekowi” kwasu akumulatorowego.
• Proszę zawsze wymieniać cały komplet, a nie tylko jedną baterię.
Uwaga: Baterii nie należy wrzucać do zwykłych domowych śmieci. Zużyte
baterie proszę oddać do punktu zbiórki odpadów specjalnych lub do punktu
sprzedaży.
Nigdy nie wrzucaj baterii do ognia.
Użytkowanie urządzenia
• Odbiornik proszę włączać włącznikiem Power (1), wcis-kając pośrodku
„okulary nurka”.
• Za pomocą przełącznika pasma (4) możecie ustawiać Państwo wybrane
pasmo częstotliwości. UKW = FM, fale średnie = AM.
• Regulatorem Tuning (2) proszę ustawić pożądaną sta-cję.
• Kręcąc regulatorem głośności Vol (3) mogą Państwo ustawić pożądaną
głośność.
• Celem wyłączenia odbiornika proszę ponownie użyć włącznika Power (1).
Istnieją trzy sposoby mocowania radia:
1. Za pomocą przyssawek (8) mocujących odbiornik na gładkiej powierzchni,
jak np. glazura.
2. Jeżeli jednak preferują Państwo mocowanie za pomocą śrub, to służy do
tego uchwyt do podwieszania (7) (Zakup nie obejmuje śrub).
3. Za pomocą sznurka można zawiesić urządzenie np. na kranie.
24
PL
5....-05-DR 572 28.08.2003 14:41 Uhr Seite 24

Zabezpieczenie przed wodą rozpryskową
Urządzenie posiada zabezpieczenie przeciwbryzgowe. Dzięki temu może być
ono używane w kabinie prysznicowej. Jednakże nie należy zanurzać urządzenia
w wodzie (np. w wannie), ponieważ spowoduje to uszkodzenie jego elementów
elektronicznych.
Syrena
Przyciskiem (6) mogą Państwo włączyć zintegrowaną sy-renę, aby ewentualnie
wezwać pomoc, np. w razie wypadku poczas kąpieli.
Czyszczenie i przechowywanie
• Urządzenie należy czyścić wilgotną szmatką, a następnie dokładnie je wytr-
zeć.
• Proszę nie używać ostrych środków czyszczących.
Niniejsze urządzenie odpowiada wymaganiom normy bezpieczeństwa użytkowa-
nia oraz spełnia wymagania dyrektywy niskonapięciowej i kompatybilności elek-
tromagnetycznej.
Zastrzega się prawo do zmian technicznych!
WARUNKI GWARANCJI
Przyznajemy 24 miesięcy gwarancji na produkt licząc od daty zakupu.
W tym okresie będziemy bezpłatnie usuwać w terminie 14 dni od daty dostarcze-
nia wadliwego sprzętu z kartą gwarancyjną do miejsca zakupu wszystkie uszko-
dzenia powstałe w tym urządzeniu na skutek wady materiałów lub wadliwego
wykonania, naprawiając oraz wymieniając wadliwe części lub (jeśli uznamy za sto-
sowne) wymieniając całe urządzenie na nowe.
Sprzęt do naprawy powinien być dostarczony w komplecie wraz z dowodem
zakupu oraz z ważną kartą gwarancyjną do sprzedawcy
w miarę możliwości w
oryginalnym opakowaniu lub innym odpowiednim dla zabezpieczenia przed uszko-
dzeniem. W razie braku kompletnego opakowania fabrycznego, ryzyko uszkodze-
nia sprzętu podczas transportu do i z miejsca zakupu ponosi reklamujący.
Naprawa gwarancyjna nie dotyczy czynności przewidzianych w instrukcji obsługi,
do wykonania których zobowiązany jest użytkownik we własnym zakresie i na
własny koszt.
Gwarancja nie obejmuje:
• mechanicznych, termicznych, chemicznych uszkodzeń sprzętu i wywołanych
nimi wad,
• uszkodzeń powstałych w wyniku działania sił zewnętrznych takich jak wyłado-
wania atmosferyczne, zmiana napięcia zasilania i innych zdarzeń losowych,
• nieprawidłowego ustawienia wartości napięcia elektrycznego, zasilanie z nie-
odpowiedniego gniazda zasilania,
25
PL
5....-05-DR 572 28.08.2003 14:41 Uhr Seite 25

• sznurów połączeniowych, sieciowych, żarówek, baterii, akumulatorów,
• uszkodzeń wyrobu powstałych w wyniku niewłaściwego lub niezgodnego z
instrukcją jego użytkowania, przechowywania, konserwacji, samowolnego
zrywania plomb oraz wszelkich przeróbek i zmian konstrukcyjnych dokonanych
przez użytkownika lub osoby niepowołane,
• roszczeń z tytułu parametrów technicznych wyrobu, o ile są one zgodne z
podanymi przez producenta,
• prawidłowego zużycia i uszkodzeń, które mają nieistotny wpływ na wartość
lub działanie tego urządzenia.
Karta gwarancyjna bez pieczątki sklepu, daty sprzedaży, nie wypełniona, źle
wypełniona, ze śladami poprawek, nieczytelna wskutek zniszczenia, bez
możliwości ustalenia miejsca sprzedaży oraz dołączonego dowodu zakupu jest
nieważna.
Korzystanie z usług gwarancyjnych nie jest możliwe po upływie daty ważności
gwarancji. Gwarancja na części lub całe urządzenie, które są wymieniane kończy
się, wraz z końcem gwarancji na to urządzenie.
Wszystkie inne roszczenia, wliczając w to odszkodowania są wykluczone chyba, że
prawo przewiduje inaczej. Roszczenia wykraczające poza tą umowę nie są
uwzględniane przez tą gwarancję.
Gwarancja oraz zawarte w niej warunki obowiązują na terenie Rzeczpospolitej
Polskiej.
26
PL
5....-05-DR 572 28.08.2003 14:41 Uhr Seite 26

Általános biztonsági rendszabályok
Csak arra a célra használja a készüléket, mire készült!
Külső áramforrás használata esetén ügyeljen a megfelelő polaritásra és fes-
zültségre, az elemeket mindig jó irányban helyezze be!
Úgy állítsa fel a készüléket, hogy ne záródjanak el a meglévő szellőzőnyílások!
Soha ne nyissa ki a készülék burkolatát! A szakszerűtlen javítások jelentős ves-
zély forrásai lehetnek a használók számára. Ha a készülék, különösen a hálózati
csatlakozó kábel megsérült, a készüléket nem szabad üzembe helyezni, hanem
előbb szakemberrel meg kell javíttatni. Rendszeresen ellenőrizendő, hogy a
hálózati csatlakozó kábelen nincs-e sérülés.
Veszélyhelyzetek elkerülése végett a hibás csatlakozó kábelt csak a gyártóval, a
mi vevőszolgálatunkkal vagy hasonló szakképzettségű más személlyel szabad
pótoltatni azonos értékű kábellel.
Ha hosszabb időn át nem használja a készüléket, húzza ki a csatlakozó dugaszt
a konnektorból, ill. vegye ki belőle az elemeket!
Adott esetben a készüléken az alábbi szimbólumokat láthatja, amelyek a
következőkre hívják fel az Ön figyelmét:
A villám-szimbólum olyan alkatrészekre figyelmeztet a készülék belse-
jében, amelyek veszélyesen nagy feszültséget vezetnek.
A felkiáltójellel ellátott szimbólum a kísérőpapírokban található fontos
kezelési vagy karbantartási útmutatásokra hívja fel a használó figyel-
mét.
Az ezzel a szimbólummal jelzett készülékek „1. osztályú lézerrel“
működve tapogatják le a CD-t. A beépített biztonsági kapcsolók mega-
kadályozzák, hogy a használó emberi szemmel nem látható, veszélyes
lézersugárzás hatásának legyen kitéve, amikor a CD-rekesz fel van
nyitva.
Ezeket a biztonsági kapcsolókat semmi esetre sem szabad „megpatkolni“ vagy
más módon manipulálni, különben Ön lézersugárhatás veszélyének teheti ki
magát.
A kezelőelemek leírása
1 POWER Ki- /bekapcsoló gomb 6 Riasztógomb
2 TUNING szabályozó 7 Felfüggesztőfül
3 VOL hangerő-szabályozó 8 Tapadókorongok
4 Sávválasztó kapcsoló (FM/AM) 9 Az elemtartó rekesz
5 Hangszóró zárócsavarja
10 Elemtartó rekesz
27
H
5....-05-DR 572 28.08.2003 14:41 Uhr Seite 27

Tegye bele az elemeket
(nem hozzá járó tartozék)
• Az elemtartó rekesz felnyitásához oldja ki a csavart (9) a készülék hátlapján!
• Húzza le a műanyag borítást, és nyissa ki az elemtartó rekeszt!
• Helyezzen be 3 db 1,5 V-os, AA típusú elemet! Ügyeljen a helyes polaritásra!
(lásd az elemtartó rekesz fenekét, ill. a külső falon lévő domborított jelzést)!
• Zárja le ismét a készüléket fordított sorrendben!
• Ha hosszabb ideig nem használja a készüléket, vegye ki belőle az elemeket,
hogy elkerülje az akkumulátorsav esetleges „kifutását“.
• Mindig a teljes elemkészletet cserélje, ne csak egy-egy elem helyett tegyen
be újat!
Figyelem: Az elemek nem a háztartási szemétbe valók! Az elhasznált elemeket
vagy a megfelelő gyűjtőhelyen, vagy a kereskedőnél adja le!
Soha ne dobjon elemeket a tűzbe!
A készülék használatba vétele
• Kapcsolja be a készüléket a POWER kapcsolóval (1) úgy, hogy középen
megnyomja a „búvárszemüveget”!
• A sávválasztó kapcsolóval (4) választhatja ki a kívánt frekvenciasávot. URH =
FM, középhullám = AM.
• Állítsa a TUNING szabályozót (2) a kívánt adóra!
• A VOL hangerő-szabályozó (3) forgatásával tudja beállítani a kívánt
hangerőt.
• Használat után kapcsolja ki a készüléket a POWER kapcsolóval (1)!
Az elhelyezésre 3 lehetőség van:
1. Tapadókorongok (8) sima felületeken, pl. csempén való rögzítésre.
2. Egy felfüggesztőfül (7), ha előnyben részesíti a csavaros rögzítést (a csava-
rok nem hozzá adott tartozékok).
3. Egy fonott zsinór, hogy a készüléket pl. a vízcsapra lehessen akasztani.
Cseppvédelem
A készülék cseppvédett, tehát a zuhanyfülkén belül is használható. Ne mártsa
azonban a készüléket vízbe (pl. fürdőkád), mert attól meghibásodhat az elektro-
nikája.
Riasztó
A (6)-os gombbal aktiválhat egy beépített szirénát, hogy ha kell, pl. fürdŒszobai
baleset esetén, segítséget lehessen hívni.
28
H
5....-05-DR 572 28.08.2003 14:41 Uhr Seite 28

Tisztítás és tárolás
• Nedves ruhával tisztítsa meg a készüléket, utána pedig törölje gondosan
szárazra!
• Ne használjon semmilyen erős tisztítószert!
Ezt a készüléket az Európa Tanács minden vonatkozó aktuális irányelve szerint
(pl. elektromágnesesség-elviselő képesség vagy kisfeszültség-elviselő képes-
ség) ellenőriztük, és a legújabb biztonságtechnikai előírások szerint készült.
Megjegyezzük az esetleges müszaki változásokat!
Garancia
Garanciális igényeivel forduljon, kérem, a szerződéses kereskedőjéhez!
A garancia igazolására a pénztári nyugta szolgál. E nélkül az igazolás nélkül sem
díjmentes csere, sem díjtalan javítás nem végezhető.
Garanciális esetben eredeti csomagolásában adja át az alapkészüléket a pénz-
tári bizonylattal együtt annak a kereskedőnek, akitől a készüléket vásárolta!
*) A tartozékok hibái nem eredményezik automatikusan az egész készülék
díjtalan cseréjét. Ilyen esetekben forduljon „forró vonalunkhoz”! Az üvegtörésből,
ill. a műanyag alkatrészek töréséből eredő hibák megszüntetése mindenkor
térítésköteles.
Sem az elhasználódó tartozékokban, ill. kopó alkatrészekben (pl. szénkefe,
dagasztóhorog, hajtószíj, póttávvezérlő, pótfogkefe, fűrészlap stb.) bekövetkező
hibák, sem a tisztítás, karbantartás vagy a kopó alkatrészek cseréje nem esik a
garancia hatálya alá, következésképp térítésköteles.
Illetéktelen beavatkozás a garancia megszűnését eredményezi.
A garanciális idő után
A garanciális idő eltelte után a megfelelő szakkereskedésben vagy javítószol-
gálatnál végeztethet térítésköteles javításokat.
29
H
5....-05-DR 572 28.08.2003 14:41 Uhr Seite 29

D-47906 Kempen/Germany · Industriering Ost 40
Internet: http://www.clatronic.de · email: [email protected]
Technische Daten
Modell: DR 572
Spannungsversorgung: 3x 1,5 V Batterien Typ AA
Frequenzbereiche: UKW/FM 88-108 MHz
MW/AM 540-1600 KHz
Dieses Gerät wurde nach allen zutreffenden,
aktuellen CE-Richtlinien geprüft, wie z.B.
elektromagnetische Verträglichkeit und
Niederspannungsdirektive und wurde nach den
neuesten sicherheitstechnischen Vorschriften
gebaut.
Technische Änderungen vorbehalten!
Bitte führen Sie das ausgediente Gerät
einer umweltgerechten Entsorgung zu.
Stünings Medien, Krefeld • 08/03
5....-05-DR 572 28.08.2003 14:41 Uhr Seite 30
Documenttranscriptie
5....-05-DR 572 28.08.2003 14:41 Uhr Seite 1 Bedienungsanleitung/Garantie Gebruiksaanwijzing/Garantie • Mode d’emploi/Garantie Instrucciones de servicio/Garantía • Istruzioni per l’uso/Garanzia Instruction Manual/Guarantee • Instrukcja obsługi/Gwarancja A használati utasítás/garancia Duschradio Doucheradio • Radio de douche Radio para la ducha • Doccia per radio Shower Radio • Radio pod prysznic Zuhanyrádió DR 572 5....-05-DR 572 28.08.2003 14:41 Uhr Seite 2 Inhalt D NL F E I GB PL H Inhoud • Sommaire • Indice • Indice • Contents • Spis treści • Tartalom Übersicht Bedienelemente . . . . . . . . . . . . . . . . . . . . . . . . . .Seite Bedienungsanleitung . . . . . . . . . . . . . . . . . . . . . . . . . . . . . . .Seite Garantie . . . . . . . . . . . . . . . . . . . . . . . . . . . . . . . . . . . . . . . .Seite Overzicht bedieningselementen . . . . . . . . . . . . . . . . . . . . . .Pagina Gebruiksaanwijzing . . . . . . . . . . . . . . . . . . . . . . . . . . . . . . . .Pagina Garantie . . . . . . . . . . . . . . . . . . . . . . . . . . . . . . . . . . . . . . . .Pagina Aperçu des éléments de commande . . . . . . . . . . . . . . . . . . .Page Mode d’emploi . . . . . . . . . . . . . . . . . . . . . . . . . . . . . . . . . . .Page Garantie . . . . . . . . . . . . . . . . . . . . . . . . . . . . . . . . . . . . . . . .Page Vista de conjunto Elementos de mando . . . . . . . . . . . . . . . .Página Instrucciones de servicio . . . . . . . . . . . . . . . . . . . . . . . . . . . .Página Garantia . . . . . . . . . . . . . . . . . . . . . . . . . . . . . . . . . . . . . . . .Página Descrizione dei singoli pezzi . . . . . . . . . . . . . . . . . . . . . . . .Pagina Istruzioni per l’uso . . . . . . . . . . . . . . . . . . . . . . . . . . . . . . . . .Pagina Garanzia . . . . . . . . . . . . . . . . . . . . . . . . . . . . . . . . . . . .Pagina Control element overview . . . . . . . . . . . . . . . . . . . . . . . . . . .Page Instruction Manual . . . . . . . . . . . . . . . . . . . . . . . . . . . . . . . . .Page Guarantee . . . . . . . . . . . . . . . . . . . . . . . . . . . . . . . . . . . . . .Page Przegląd elemetów obsługi . . . . . . . . . . . . . . . . . . . . . . . . .Strona Instrukcja obsługi . . . . . . . . . . . . . . . . . . . . . . . . . . . . . . . .Strona Gwarancja . . . . . . . . . . . . . . . . . . . . . . . . . . . . . . . . . . .Strona A hasznalt elemek megtekintése . . . . . . . . . . . . . . . . . . . . .Oldal A hasznalati utasítás . . . . . . . . . . . . . . . . . . . . . . . . . . . . . .Oldal Garancia . . . . . . . . . . . . . . . . . . . . . . . . . . . . . . . . . . . . . . . .Oldal 3 4 6 3 8 10 3 12 13 3 14 16 3 17 19 3 20 22 3 23 25 3 27 29 5....-05-DR 572 28.08.2003 14:41 Uhr Seite 3 D Übersicht der Bedienelemente 1 2 3 4 5 6 7 8 9 10 POWER Ein/Aus Schalter TUNING Regler VOL Lautstärkeregler Bandwahlschalter (FM/AM) Lautsprecher Taste für Sirene Aufhänger Saugnäpfe Verschlussschraube für das Batteriefach Batteriefach 3 5....-05-DR 572 28.08.2003 14:41 Uhr Seite 4 Allgemeine Sicherheitshinweise D Verwenden Sie das Gerät nur für den vorgesehenen Zweck. Bei Verwendung von externen Netzteilen auf die richtige Polarität und Spannung achten, Batterien stets richtigherum einlegen. Das Gerät so aufstellen, dass vorhandene Lüftungsöffnungen nicht verdeckt werden. Niemals das Gehäuse des Gerätes öffnen. Durch unsachgemäße Reparaturen können erhebliche Gefahren für den Benutzer entstehen. Bei Beschädigung des Gerätes, insbesondere des Netzkabels, das Gerät nicht mehr in Betrieb nehmen, sondern von einem Fachmann reparieren lassen. Netzkabel regelmäßig auf Beschädigungen prüfen. Ein defektes Netzkabel darf nur vom Hersteller, unserem Kundendienst oder einer ähnlich qualifizierten Person durch ein gleichwertiges Kabel ersetzt werden, um Gefährdungen zu vermeiden. Benutzen Sie das Gerät längere Zeit nicht, ziehen Sie den Netzstecker aus der Steckdose, bzw. entnehmen Sie die Batterien. Diese Symbole können sich ggfs. auf dem Gerät befinden und sollen Sie auf folgendes hinweisen: Das Blitz-Symbol soll den Benutzer auf Teile im Inneren des Gerätes hinweisen, die gefährlich hohe Spannungen führen. Das Symbol mit Ausrufezeichen soll den Benutzer auf wichtige Bedienungs- oder Wartungs-Hinweise in den Begleitpapieren hinweisen. Geräte mit diesem Symbol arbeiten mit einem „Klasse 1-Laser“ zur Abtastung der CD. Die eingebauten Sicherheitsschalter sollen verhindern, dass der Benutzer gefährlichem, für das menschliche Auge nicht sichtbarem Laserlicht ausgesetzt wird, wenn das CD-Fach geöffnet ist. Diese Sicherheitsschalter sollten auf keinen Fall überbrückt oder manipuliert werden, sonst besteht die Gefahr, dass Sie sich dem Laser-Licht aussetzen. Batterien einlegen (Batterien nicht im Lieferumfang enthalten) • • • • 4 Um das Batteriefach zu öffnen, lösen Sie bitte die Schraube (9) auf der Rückseite des Gerätes. Ziehen Sie die Kunststoffabdeckung nach unten ab und öffnen Sie das Batteriefach. Legen Sie 3 Batterien des Typs AA 1,5V ein. Achten Sie auf die richtige Polarität (siehe Batteriefachboden)! Schließen Sie das Gerät bitte wieder in umgekehrter Reihenfolge. 5....-05-DR 572 • • 28.08.2003 14:41 Uhr Seite 5 Wird das Gerät längere Zeit nicht benutzt, entnehmen Sie bitte die Batterien, um ein „Auslaufen“ zu vermeiden. Wechseln Sie immer den kompletten Batteriesatz aus, erneuern Sie nicht nur eine Batterie. D Achtung: Batterien gehören nicht in den Hausmüll. Bitte geben Sie verbrauchte Batterien bei zuständigen Sammelstellen oder beim Händler ab. Werfen Sie Batterien niemals ins Feuer. Inbetriebnahme des Gerätes • • • • • Schalten Sie das Gerät mit dem POWER Schalter (1) ein, indem Sie mittig auf die „Taucherbrille“ drücken. Mit dem Bandwahlschalter (4), können Sie das gewünschte Frequenzband auswählen. UKW = FM, Mittelwelle = AM. Stellen Sie den TUNING Regler (2) auf den gewünschten Sender. Durch Drehen des VOL Lautstärkeregler (3), können Sie die gewünschte Lautstärke einstellen. Schalten Sie das Gerät nach dem Gebrauch mit dem POWER Schalter (1) wieder aus. Es gibt 3 Möglichkeiten der Anbringung: 1. Saugnäpfe (8) zur Befestigung an glatten Flächen wie z.B. Fliesen. 2. Eine Aufhängeöse (7), wenn Sie eine Schraubenbefestigung bevorzugen (Schrauben nicht im Lieferumfang enthalten). 3. Eine Kordel, um das Gerät z. B am Wasserhahn aufzuhängen. Spritzwasserschutz Das Gerät ist Spritzwasser geschützt. Es kann somit auch innerhalb der Duschkabine verwendet werden. Tauchen Sie das Gerät jedoch nicht ins Wasser (z. B. Badewanne), da sonst die Elektronik des Gerätes Schaden nimmt. Sirene Mit der Taste (6) können Sie eine integrierte Sirene aktivieren, um ggf. Hilfe zu rufen, z. B. bei einem Badeunfall. Reinigung und Aufbewahrung • • Reinigen Sie das Gerät mit einem feuchten Tuch und trocknen Sie es danach gut ab. Benutzen Sie bitte keine scharfen Reinigungsmittel. 5 5....-05-DR 572 28.08.2003 14:41 Uhr Seite 6 Garantie D Wir übernehmen für das von uns vertriebene Gerät eine Garantie von 24 Monaten ab Kaufdatum (Kassenbon). Innerhalb der Garantiezeit beseitigen wir unentgeltlich die Mängel des Gerätes oder des Zubehörs*), die auf Material- oder Herstellungsfehler beruhen, durch Reparatur oder, nach unserem Ermessen, durch Umtausch. Garantieleistungen bewirken weder eine Verlängerung der Garantiefrist, noch beginnt dadurch ein Anspruch auf eine neue Garantie! Als Garantienachweis gilt der Kaufbeleg. Ohne diesen Nachweis kann ein kostenloser Austausch oder eine kostenlose Reparatur nicht erfolgen. Im Garantiefall geben Sie bitte das Grundgerät in der Originalverpackung zusammen mit dem Kassenbon an Ihren Händler. *) Schäden an Zubehörteilen führen nicht automatisch zum kostenlosen Umtausch des kompletten Gerätes. Wenden Sie sich in desem Fall bitte an unsere Hotline! Glasbruchschäden bzw. Brüche von Kunststoffteilen sind grundsätzlich kostenpflichtig! Sowohl Defekte an Verbrauchszubehör bzw. Verschleißteilen (z.B. Motorkohlen, Knethaken, Antriebsriemen, Ersatzfernbedienung, Ersatzzahnbürsten, Sägeblättern usw.), als auch Reinigung, Wartung oder der Austausch von Verschleißteilen, fallen nicht unter die Garantie und sind deshalb kostenpflichtig! Die Garantie erlischt bei Fremdeingriff. Nach der Garantie Nach Ablauf der Garantiezeit können Reparaturen kostenpflichtig vom entsprechenden Fachhandel oder Reparaturservice ausgeführt werden. 6 5....-05-DR 572 28.08.2003 14:41 Uhr Service für unsere Haushaltsartikel Verschleißteile für Haushaltsartikel (soweit diese nicht vom Fachmann ausgewechselt werden müssen), Ersatzkannen, Staubsaugerfilterbeutel usw. können Sie mit Angabe des Gerätetyps unter folgender TelefonHotline bestellen: Seite 7 Service für unsere D Unterhaltungselektronik Verschleißteile und Ersatzteile für unsere Unterhaltungselektronik (soweit diese nicht vom Fachmann ausgewechselt werden müssen) wie z. B. Fernbedienungen, Bedienteilklappen, Lautsprecherblenden usw. können Sie mit Angabe des Gerätetyps unter folgender Telefon-Hotline bestellen: 0 21 52 / 20 06 – 888 0 21 52 / 20 06 – 666 Für technische Fragen haben wir für Sie folgende e-mail-Adresse eingerichtet: [email protected] Interessieren Sie sich für weitere Clatronic-Produkte? Besuchen Sie doch einmal unsere Homepage unter www.clatronic.de oder www.clatronic.com Auch Ihre Bestellungen nehmen wir gerne unter o. g. Homepage-Adresse entgegen. 7 5....-05-DR 572 28.08.2003 14:41 Uhr Seite 8 Algemene veiligheidsinstructies NL Gebruik het apparaat uitsluitend voor het daarvoor bestemde doel. Plaats het apparaat zodanig dat de aangebrachte luchtopeningen niet worden afgedekt. Open nooit de behuizing van het apparaat. Door ondeskundige reparaties kunnen aanzienlijke gevaren voor de gebruiker ontstaan. Neem het apparaat niet meer in gebruik wanneer het apparaat - en in het bijzonder de kabel - beschadigingen vertoont, maar laat het eerst door een vakman repareren. Controleer de kabel regelmatig op beschadigingen. Een defecte kabel mag alleen door de fabrikant, onze technische dienst of een soortgelijk gekwalificeerd persoon worden vervangen. Alleen zo kunnen gevaren vermeden worden. Onderbreek de stroomtoevoer of verwijder de batterijen wanneer u denkt, het apparaat langere tijd niet te gebruiken. Volgende symbolen kunnen op uw apparaat zijn aangebracht. Zij hebben de volgende betekenis: Het bliksemsymbool wijst de gebruiker op onderdelen in het inwendige van het apparaat die gevaarlijk hoge spanning voeren. Het symbool met het uitroepteken verwijst naar belangrijke bedienings- en onderhoudsinstructies in de begeleidende documentatie. Apparaten met dit symbool werken met een „klasse 1-laser„ voor de aftasting van de CD. De ingebouwde veiligheidsschakelaars moeten voorkomen dat de gebruiker wordt blootgesteld aan gevaarlijke, voor het menselijk oog onzichtbaar laserlicht wanneer het CD-vak geopend is. Deze veiligheidsschakelaars mogen in geen geval overbrugd of gemanipuleerd worden omdat u anders gevaar loopt, aan het laserlicht te worden blootgesteld. Overzicht van de bedieningselementen 1 2 3 4 5 8 POWER Aan-/Uitschakelaar TUNING-regelaar VOL Volumeregelaar Bandkeuzeschakelaar (FM/AM) Luidspreker 6 7 8 9 Toets voor sirene Ophanging Zuignappen Sluitschroef voor het batterijenvakje 10 Batterijenvakje 5....-05-DR 572 28.08.2003 14:41 Uhr Seite 9 Batterijen plaatsen NL (niet bij de levering inbegrepen) • • • • • • Voor het openen van het batterijenvakje draait u de schroef (9) aan de achterzijde van het apparaat los. Trek de kunststof afdekking naar onder weg en open het batterijenvakje. Plaats 3 1,5 V-batterijen type AA. Let op de juiste polariteit (zie bodem van het batterijenvakje). Sluit het apparaat weer in omgekeerde volgorde aan. Verwijder de batterijen wanneer u denkt, het apparaat langere tijd niet te gebruiken. Zo voorkomt u dat batterijzuur uit de batterijen kan lekken. Vervang alleen een complete set batterijen en nooit één batterij. Belangrijk: batterijen horen niet thuis in het huisafval. Geef verbruikte batterijen altijd af in het gemeentelijke milieupark of bij de handelaar. Gooi batterijen nooit in het vuur. Ingebruikname van het apparaat • • • • • Schakel het apparaat in met de POWER-schakelaar (1) door midden op de “duikerbril” te drukken. Met de bandkeuzeschakelaar (4) kunt u de gewenste frequentieband kiezen. UKW = FM, middengolf = AM. Stel de TUNING-regelaar (2) in op de gewenste zender. Door het draaien aan de volumeregelaar VOL (3) kunt u de gewenste geluidssterkte instellen. Schakel het apparaat na gebruik weer uit met POWER-schakelaar (1). U kunt het apparaat op 3 manieren aanbrengen: 1. met zuignappen (8) voor de bevestiging op gladde oppervlakken zoals bijv. tegels. 2. aan een ophangoog (7), wanneer u de voorkeur geeft aan een schroefbevestiging (schroeven niet bij levering inbegrepen). 3. aan een koord om het apparaat bijv. aan een waterkraan op te hangen. Spatwaterbescherming Het apparaat is beschermd tegen spatwater. U kunt het dus ook in de douchecabine gebruiken. Dompel het apparaat echter niet in het water (bijv. badkuip) omdat dan de elektronische eenheid wordt beschadigd. Sirene Met toets (6) kunt u een geïntegreerde sirene activeren om eventueel om hulp te roepen, bijv. bij een ongeval in de badkamer. 9 5....-05-DR 572 28.08.2003 14:41 Uhr Seite 10 Reiniging en bewaring NL • • Reinig het apparaat met een vochtige doek en droog het daarna goed af. Gebruik géén agressieve reinigingsmiddelen. Dit apparaat is gekeurd conform de op dit moment van toepassing zijnde CErichtlijnen zoals bijvoorbeeld elektromagnetische compatibiliteit en laagspanningsvoorschriften en is geconstrueerd volgens de nieuwste veiligheidstechnische voorschriften. Technische wijzigingen voorbehouden! Garantie Voor het door ons geleverde apparaat verlenen wij een garantie van 24 maanden vanaf koopdatum (kassabon). Eventuele gebreken aan het apparaat of aan het toebehoren*) die zijn ontstaan door productie- of materiaalfouten verhelpen wij binnen deze periode kosteloos door middel van reparatie of, naar ons oordeel, door vervanging. Eventuele garantiegevallen verlengen noch de geldigheidsduur van de garantie, noch begint daardoor een nieuwe garantieperiode! Het koopbewijs geldt als garantiebewijs. Zonder dit bewijs kan geen kosteloze reparatie of vervanging plaatsvinden. Geef in geval van garantie het apparaat met de kassabon en in de originele verpakking af bij uw handelaar. *) Schade aan onderdelen leidt niet automatisch tot kosteloze vervanging van het complete apparaat. Neem in dit geval contact op met onze hotline! De reparatie van glasbreuk of breuk van kunststofonderdelen wordt altijd berekend! Niet defecten aan de hulpstukken of aan de slijtende onderdelen (bijv. koolborstels, deeghaken, drijfriemen, reserveafstandsbediening, reservetandenborstels, zaagbladen enz.), maar ook reiniging, onderhoud of de vervanging van slijtende delen vallen niet onder de garantie en geschieden altijd tegen berekening! Bij ingrepen door derden komt de garantieverlening te vervallen. Na de garantieperiode Na afloop van de garantieperiode kunnen reparaties tegen berekening worden uitgevoerd door de betreffende vakhandelaar of de technische dienst. 10 5....-05-DR 572 28.08.2003 14:41 Uhr Seite 11 Conseils de sécurité F N’utilisez l’appareil qu’aux fins auxquelles il est destiné. Si vous utilisez une alimentation électrique externe, vérifiez la polarité et la tension électrique. Placez toujours correctement les piles. Installez toujours l’appareil de façon à ce que les ouvertures de ventilation ne soient pas obstruées. N’ouvrez jamais le bloc moteur de l’appareil. Des réparations mal appropriées peuvent entraîner des risques importants pour l’utilisateur. En cas d’endommagement de l’appareil, en particulier du câble d’alimentation, ne mettez plus l’appareil en marche et laissez un spécialiste se charger de la réparation. Contrôlez régulièrement le bon état du câble d’alimentation. Pour éviter tout risque, seul le fabricant, son service après-vente ou un spécialiste à qualification similaire sont aptes à remplacer un câble défectueux par un câble équivalent. Si l’appareil n’est pas utiliser pendant assez longtemps, débranchez le câble d’alimentation ou retirez les piles. Vous pouvez éventuellement trouver ces symboles sur l’appareil, qui ont la signification suivante: L’éclair indique à l’utilisateur les pièces dangereuses, situées à l’intérieur de l’appareil, qui conduisent de hautes tensions. Le point d’exclamation attire l’attention de l’utilisateur sur les remarques importantes d’utilisation et d’entretien données dans les documents de l’appareil. Les appareils dotés de ce symbole fonctionnent avec un „laser de la classe 1“ pour la lecture des disques CD. Les boutons de sécurité intégrés sont chargés d’éviter qu’à l’ouverture du compartiment à CD l’utilisateur entre en contact avec la lumière laser qui est dangereuse et invisible à l’oeil humain. Il est absolument interdit de court-circuiter ou manipuler ces boutons de sécurité, ce qui risquerait sinon de mettre l’utilisateur en contact avec la lumière laser. Description des éléments de commande 1 2 3 4 5 Bouton POWER Marche / Arrêt Régulateur TUNING VOL Réglage du son Sélecteur de fréquences (FM/AM) Haut-parleur 6 7 8 9 Alarme Suspension Ventouses Vis de fermeture du compartiment à piles 10 Compartiment à piles 11 5....-05-DR 572 28.08.2003 14:41 Uhr Seite 12 Installation des piles F (non comprises à la livraison) • • • • • • Pour ouvrir le compartiment à piles desserrez la vis (9) située au dos de l’appareil. Faites coulisser le couvercle en plastique vers le bas pour ouvrir le compartiment. Installez 3 piles de 1,5 V de type AA. Veillez à respecter la polarité (voir fond du compartiment). Refermez l’appareil en procédant dans l’ordre inverse. Si l’appareil ne doit pas être utilisé pendant une période prolongée, retirez les piles pour éviter que l’acide des piles ne “coulent”. Remplacez toujours toutes les piles à la fois et pas seulement une seule. Attention: ne jetez en aucun cas vos piles avec les ordures ménagères. Vous êtes priés de rapporter vos piles à une borne de recyclage ou à votre revendeur. Ne jetez jamais les piles dans le feu. Avant la première utilisation • • • • • Mettez l’appareil en marche grâce à la touche POWER (1) en appuyant au milieu du « masque de plongée ». Vous pouvez choisir la bande de fréquences désirée grâce au sélecteur de fréquences (4). UKW = FM, moyennes ondes = AM. Positionnez le bouton TUNING (2) sur la station désirée. Vous pouvez régler le son à l’aide du bouton VOL (3). Arrêtez l’appareil après utilisation à l’aide du bouton POWER (1). 3 fixations possibles: 1. A l’aide des ventouses (8) sur une surface lisse, par ex. des carreaux. 2. A l’aide d’un anneau de suspension (7) si vous préférez une fixation avec vis (n’est pas livrée avec l’appareil). 3. Une corde, pour suspendre l’appareil par ex. à un robinet. Protection anti-éclaboussures Cet appareil est étanche aux éclaboussures. Il peut donc être utilisé sous la douche. Ne le plongez cependant jamais dans l’eau (par ex. dans une baignoire), cela risquerait sinon de l’endommager. Alarme Grâce à cette touche (6) vous pouvez activer une alarme intégrée, pour demander de l’aide par ex. en cas d’accident sous la douche. 12 5....-05-DR 572 28.08.2003 14:41 Uhr Seite 13 Nettoyage et rangement • • F Nettoyez l’appareil avec un torchon humide puis essuyez-le consciencieusement. N’utilisez jamais de détergent. Cet appareil a été contrôlé d’après toutes les directives européennes actuelles applicables, comme par exemple concernant la compatibilité électromagnétique et la basse tension. Cet appareil a été fabriqué en respect des réglementations techniques de sécurité les plus récentes. Sous réserve de modifications techniques. Garantie Nous accordons une garantie de 24 mois à dater de la date d’achat (ticket de caisse) pour l’appareil que nous vendons. Pendant la durée de la garantie, nous éliminons gratuitement les défauts de l’appareil ou des accessoires *) découlant d’un vice de matériau ou de fabrication au moyen d’une réparation ou, selon notre estimation, au moyen d’un remplacement. Les prestations dans le cadre de la garantie n’entraînent aucune prorogation de la durée de garantie et ne donnent pas droit à une nouvelle garantie ! Le justificatif de garantie est le reçu. Sans ce justificatif, aucun remplacement gratuit ni aucune réparation gratuite ne peuvent être effectués. En cas de recours à la garantie, rapportez l’appareil dans son emballage d’origine accompagné du ticket de caisse à votre revendeur. *) Les endommagements de pièces d’accessoires ne justifient pas automatiquement l’échange gratuit de l’appareil complet. Contactez alors notre centrale téléphonique! La casse de pièces en verre ou en plastique est dans tous les cas à votre charge! Les défauts sur les accessoires ou les pièces d’usure (p.ex. les charbons de moteurs, crochets, courroies d’entraînement, télécommande de rechange, brosses à dents de rechange, lames de scies etc.) ainsi que le nettoyage, l’entretien ou le remplacement de pièces d’usure ne sont pas garantis et sont donc payants ! En cas d’intervention étrangère, la garantie devient caduque. Après la garantie Après écoulement de la durée de garantie, les réparations peuvent être effectuées, contre paiement, par le commerce spécialisé ou le service de réparation. 13 5....-05-DR 572 28.08.2003 14:41 Uhr Seite 14 Indicaciones generales para su seguridad E Utilice el aparato únicamente para la finalidad para la que ha sido construido. El aparato se ha de dejar puesto de modo que no se tapen los orificios de aireación existentes. Jamás se abrirá la carcasa del cuerpo del aparato. Las reparaciones mal hechas pueden generar considerables peligros para el usuario. En caso de estar deteriorado el aparato, en especial el cable de conectar a red, ya no se ha de poner más en servicio el aparato, sino que se hará que lo repare un especialista. Controle periódicamente el cable de conexión a red para ver si se ha deteriorado. Sólo el fabricante, nuestro servicio posventa o un técnico con una cualificación similar pueden cambiar un cable defectuoso por otro similar, para evitar todo tipo de riesgo. Saque de la toma de corriente la clavija de conectar a la red o bien quite las pilas cuando no se vaya a usar el aparato durante largo tiempo. Estos símbolos pueden encontrarse en caso dado en el aparato, y son para indicar lo siguiente: El símbolo del rayo advierte al usuario que hay componentes internos del aparato que pueden tener tensiones peligrosamente altas. El símbolo con el signo de exclamación advierte al usuario que hay instrucciones de manejo y de mantenimiento importantes en la documentación que va adjunta. Aparatos que llevan puesto este símbolo operan con un ”Lector Clase 1” para explorar el CD. Los interruptores de seguridad incorporados sirven para impedir que el usuario esté expuesto a luz láser invisible peligrosa para la vista del usuario cuando está abierto el compartimiento del CD. Bajo ningún concepto se ha de hacer un puenteado sobre estos interruptores de seguridad ni deben ser manipulados. De hacerlo, existe el peligro de que Vd. esté expuesto a la luz láser. Descripción de los elementos de manejo 1 2 3 4 5 14 POWER Conector / desconector Regulador-TUNING VOL Regulador de volumen Conmutador selector de bandas AM/FM Altavoces 6 7 8 9 Tecla para la sirena Suspensión Ventosas Tapón roscado para la cámara para baterías 10 Cámara para baterías 5....-05-DR 572 28.08.2003 14:41 Uhr Seite 15 Introducción de baterías E (no está incluido en el suministro) • • • • • • Para abrir la cámara para baterías, suelte por favor el tornillo (9) en la parte posterior del aparato. Retire la cubertura de plástico hacia abajo y abra la cámara para baterías. Introduzca 3 baterías de 1,5V, tipo AA. Tenga atención con la polaridad correcta (vea la indicación en el suelo del compartimento de baterías). Por favor cierre de nuevo el aparato, pero en orden inverso. Si el aparato no se utiliza durante largo tiempo, saque las pilas para evitar todo „derrame" del ácido de pilas. Siempre cambie todas las baterías de una vez, no cambie solamente una batería. Atención: Las baterías no se deben tirar a la basura doméstica. Por favor lleve las baterías usadas a sitios especiales de recogida o a su concesionario. Nunca tire las baterías al fuego. Puesta en funcionamiento del aparato • • • • • Conecte el aparato con el interruptor POWER (1) presionando en el centro sobre „gafas de buceo”. Con el selector de bandas (4), puede ajustar la banda de frecuencias deseada. Ondas ultracortas= FM, Onda media = AM. Coloque el regulador TUNING (2) sobre el emisor deseado. Girando el regulador de volumen VOL (3) puede ajustar el volumen deseado. Después del uso desconecte el aparato con el interruptor POWER (1). Existen 3 posibilidades de suspensión: 1. Ventosas (8), para fijar en superficies lisas, como por ejemplo azulejos. 2. Un ojete de suspensión (7), si prefiere una suspensión con tornillos (Los tornillos no se suministran). 3. Una cuerda, para colgar el aparato por ejemplo en el grifo de agua. Protección contra los chorros de agua El aparato está protegido contra el agua. Por este motivo también se puede usar en la cabina de ducha. Pero no sumerja el aparato en agua (por ejemplo en la bañera), ya que se puede dañar la electrónica del aparato. Sirena Con la tecla (6) puede activar una sirena integrada, con la que en que caso sea necesario podrá llamar ayuda, p.ej. en un accidente de baño. 15 5....-05-DR 572 28.08.2003 14:41 Uhr Seite 16 Limpieza y almacenamiento E • • Limpie el aparato con un paño húmedo y después sequelo bien. No utilice detergentes agresivos. Este aparato se ha examinado según las normativas actuales y vigentes de la Comunidad Europea, como p.ej. compatibilidad electromagnética y directiva de baja tensión y se ha construido según las más nuevas especificaciones en razón de la seguridad. No reservamos el derecho de efectuar modificaciones técnicas. Garantía Para el aparato comercializado por nosotros nos responsabilizamos con una garantía de 24 meses a partir de la fecha de compra (factura de compra). Durante el período de garantía nos encargamos gratuítamente de los defectos del aparato y de los accesorios*), que se hayan originado por defectos del material o de la fabricación. Dependiendo de nuestra estimación se realizará una reparación o un cambio. ¡Los servicios de garantía no prolangan la garantía, ni se incia por ello un período nuevo de garantía! Como comprobante para la garantía es válido la factura de compra. Sin este comprobante no se podrá realizar un cambio o una reparación gratuíta. En el caso de garantía lleve el aparato base en el embalaje original y la factura de compra a su concesionario. *) Defectos en los accesorios de uso o en las piezas de desgaste (p.ej. escobillas de carbón del motor, varillas amasadoras, correas de transmisión, mando a distancia de repuesto, cepillos de dientes de repuesto, hojas de sierra etc.), como también la limpieza, mantenimiento o el recambio de piezas de desgaste no recaen en la garantía e irán al cargo del cliente! En caso de intervención ajena se expira la garantía. Después de la garantía Después de haber expirado la garantía se pueden realizar las reparaciones por el concesionario o por el servicio de reparaciones. Los gastos irán al cargo del cliente. 16 5....-05-DR 572 28.08.2003 14:41 Uhr Seite 17 Avvertenze generali per la sicurezza I Utilizzare l’apparecchio solo per l’uso previsto. Collocare l’apparecchio in modo che le aperture per l’aerazione esistenti non vengano coperte. Non togliere mai la protezione dell’apparecchio. Riparazioni non a regola d’arte possono causare notevoli pericoli per l’utente. Se l’apparecchio presenta danni, soprattutto nella zona del cavo di collegamento, non metterlo più in funzione, ma farlo riparare prima da un esperto. Esaminare regolarmente il cavo di collegamento alla rete per verificare che non ci siano danni. Un cavo di collegamento difettoso può essere sostituito con un cavo equivalente solo dal produttore, dal nostro servizio assistenza o da persone similmente qualificate, al fine di evitare pericoli. Se l’apparecchio non viene usato per un periodo di tempo prolungato, togliere il blocchetto alimentatore dalla presa ovvero estrarre le batterie. Questi simboli possono trovarsi eventualmente sull’apparecchio e rimandano ai seguenti elementi: Il simbolo del lampo fa presente all’utente la presenza di pezzi all’interno dell’apparecchio che possono produrre alte tensioni pericolose. Il simbolo con il punto esclamativo fa presente all’utente la presenza di importanti avvertenze per l’uso e la manutenzione nei fogli di accompagnamento dell’apparecchio. Gli apparecchi dotati di questo simbolo lavorano con un „Laser classe 1“ per riprodurre i CD. Gli interruttori di sicurezza integrati hanno lo scopo di impedire che l’utente venga esposto alla luce non visibile del laser, pericolosa per l’occhio umano, aprendo lo scomparto per i CD. Questi interruttori di sicurezza non devono mai essere cavallottati né manipolati perché altrimenti sussiste il rischio di esposizione alla luce del laser. Elementi di comando 1 2 3 4 5 POWER On/Off manopola Manopola di regolazione TUNING VOL Regolatore del volume Selezionatore di banda AM/FM Altoparlante 6 7 8 9 Tasto per sirena Ganci Ventose Tappo a vite per lo scomparto portabatterie 10 Scomparto portabatterie 17 5....-05-DR 572 28.08.2003 14:41 Uhr Seite 18 Inserimento delle batterie I (non incluso nella fornitura) • • • • • • Per aprire lo scomparto portabatterie, svitare la vite (9) situata sul lato posteriore dell’apparecchio. Tirare verso il basso il coperchio in materiale plastico e aprire quindi lo scomparto portabatterie. Inserire 3 batterie da 1,5 V, tipo AA. Fare attenzione alla polarità corretta (v. fondo vano batterie). Chiudere nuovamente l’apparecchio, effettuando nella sequenza inversa le operazioni descritte. Si el aparato no se utiliza durante largo tiempo, saque las pilas para evitar todo „derrame" del ácido de pilas. Sostituire sempre il set completo, non sostituire mai un’unica batteria. Attenzione: non gettare le batterie nei rifiuti domestici. Buttare le batterie usate negli appositi contenitori o restituirle al negoziante. Non buttare mai le batterie nel fuoco. Messa in funzione dell' unità • • • • • Accendere l’ apparecchio con l’ interruttore POWER (1), premendo la „maschera“. Con il selettore della banda di frequenza (4) è possibile impostare la banda di frequenza desiderata. UKW = FM, onda media = AM. Regolare il regolatore TUNING (2) sul trasmittente desiderato. Girando il regolatore per il volume (3), si può regolare il volume. Spegnere l’ apparecchio dopo l’ uso con l’ interruttore POWER (1). Ci sono tre possibilit⁄ di applicazione: 1. Ventose (8) per il fissaggio su superfici lisce, come per esempio piastrelle. 2. Gancio (7) per appendere l’apparecchio, se si preferisce un fissaggio con viti (Le viti non sono incluse). 3. Una cordicella per appendere l’apparecchio, per esempio al rubinetto dell’acqua. Protezione antispruzzo L’apparecchio è protetto contro gli spruzzi dell’acqua. In questo modo è possibile utilizzarlo anche all’interno della cabina della doccia. Tuttavia non si deve immergere la radio in acqua (per esempio vasca da bagno), perché cosû si danneggerebbe l’elettronica dell’apparecchio. Sirena Con il tasto (6) si può attivare una sirena, eventualmente per chiamare aiuto dopo un incidente facendo il bagno. 18 5....-05-DR 572 28.08.2003 14:41 Uhr Seite 19 Pulizia e conservazione • • I Ai fini della pulizia dell’apparecchio, utilizzare un panno umido e asciugarlo successivamente sempre con cura. Non utilizzare detergenti aggressivi. Questo apparecchio è stato controllato sulla base di tutte le direttive CE attuali in vigore in questo settore, quali per esempio la normativa in materia di compatibilità elettromagnetica e la direttiva in materia di bassa tensione, ed è stato costruito conformemente alle norme di sicurezza più moderne. Con riserva di apportare modifiche tecniche. Garanzia Per l’apparecchio da noi messo in commercio ci assumiamo una garanzia di 24 mesi dalla data di acquisto (scontrino). Durante la garanzia noi ci impegniamo ad eliminare gratuitamente i guasti dell’apparecchio o degli accessori*), dovuti a difetti di materiale o di fabbricazione, riparandoli o, a nostra discrezione, sostituendoli. Le prestazioni in garanzia danno luogo a una proroga della garanzia né danno diritto ad una nuova garanzia! Per la garanzia è sufficiente lo scontrino di acquisto. Senza questo scontrino non sussiste il diritto né ad una sostituzione né ad una riparazione gratuita. In caso di garanzia consegnare al vostro rivenditore l’apparecchio base nell’imballaggio originale unitamente allo scontrino. *) Danni agli accessori non giustificano automaticamente lo scambio gratuito dell’apparecchio completo. Si prega di mettersi in contatto con la nostra centrale telefonica. Danni alle parti di vetro oppure fratture ai pezzi di materia plastica sono obbligatoriamente a spese del cliente. La riparazione di pezzi d’uso ovvero soggetti a logoramento (cursori, ganci impastatori, cinghie di trasmissione, telecomandi di ricambio, spazzolini di ricambio, lame di seghe ecc.) come anche operazioni di pulizia e manutenzione o la sostituzione di pezzi soggetti a logoramento non rientrano nella garanzia e quindi sono a pagamento! La garanzia si annulla nel caso di intervento da parte di terzi. Dopo la garanzia Al termine della garanzia le riparazioni possono essere eseguite dietro pagamento dal corrispettivo negozio specializzato o servizio riparazioni. 19 5....-05-DR 572 28.08.2003 14:41 Uhr Seite 20 General safety instructions GB Use the device only for the intended purpose. Assemble the device in such a way that the available ventilation openings are not covered. Never open the housing of the device. Incorrect repairs can constitute a considerable risk for the user. Should the device become damaged, in particular the mains supply cable, do not operate the device any longer, but rather have it repaired by an expert. Check the mains supply cable regularly for damage. For safety reasons a broken or damaged mains lead may only be replaced by an equivalent lead from the manufacturer, our customer service department or a similary qualified person. If the device is not used for a longer period, remove the plug connector from the plug socket or take out the batteries. These symbols may be found on the machine and are intended to indicate the following: The lightning symbol should advise the user of parts in the inside of the device which carry dangerously high voltage levels. The symbol with an exclamation mark should advise the user of important operation or maintenance instructions in the accompanying documentation. Devices bearing this symbol work with a „class 1 laser“ for tracing the CD. The built-in safety switches should prevent the user being exposed to dangerous laser light, which is invisible to the human eye, when the CD compartment is opened. Under no circumstances should these safety switches be bypassed or manipulated, as this could result in a danger of exposure to the laser light. Overview of the components 1 2 3 4 5 20 POWER On/Off switch Regulator TUNING VOL Volume regulator AM/FM band selector Loudspeaker 6 7 8 9 Siren button Hanger Suckers Seal screw for the battery compartment 10 Battery compartment 5....-05-DR 572 28.08.2003 14:41 Uhr Seite 21 Inserting the Batteries GB (not supplied) • • • • • • To open the battery compartment, remove the screw (9) on the back of the device. Pull the plastic cover downwards and open the battery compartment. Insert 3 1.5V AA type batteries. Match the polarities correctly (see the inside of the battery compartment). Close the device by proceeding in the opposite order. If the device is not used for a long period of time, remove the batteries to avoid the „spilling“ of battery acid. Always change the battery set completely, do not change just one battery. Warning: batteries are not to be disposed of together with domestic wastes. Dispose of the used batteries at the relevant collection bin or at your dealer’s. Never throw batteries into the fire. Commissioning the device • • • • • Switch the device on using the POWER switch (1) by pressing the middle of the "diving goggles". The desired frequency band can be set with the band selector switch (4). UKW = FM, medium wave = AM. Turn the TUNING regulator (2) to the desired station. By turning the VOL regulator (3) you can set the desired volume. Switch the device off again after use by means of the POWER switch (1). There are three ways for mounting: 1. Use the suckers (8) to stick to a smooth surface, e.g. tiles. 2. Use a hook (7) if you prefer to block it with screws (Screws not supplied). 3. Use a cord to hang it from the water faucet. Splash-proof The appliance is splash-proof. It can be used also inside the shower box. Do not dip it in water (e.g. in the bathtub), as the electronic parts of the appliance may be damaged. Siren With the button (6) you can activate an integrated siren to call for help, for example in the case of a bathing accident. 21 5....-05-DR 572 28.08.2003 14:41 Uhr Seite 22 Cleaning and storage GB • • Clean the device with a moist cloth and dry it well. Do not use abrasive detergents! This device has been tested according to all relevant current CE guidelines, such as electromagnetic compatibility and low voltage directives, and has been constructed in accordance with the latest safety regulations. Subject to technical changes without prior notice! Guarantee The device supplied by our Company is covered by a 24 month guarantee starting on the date of purchase (receipt). During the life of the guarantee any fault of the device or its accessories *) ascribable to material or manufacturing defects will be eliminated free of charge by repairing or, at our discretion, by replacing it. The guarantee services do not entail an extension of the life of the guarantee nor do they give rise to any right to a new guarantee! Proof of the guarantee is provided by the proof of purchase. Without proof of purchase no free replacement or repair will be carried out. For repairs or replacement during the life of the guarantee return the device in its original packing together with the proof of purchase to your dealer. *) Damage to accessories does not mean automatic free replacement of the whole machine. In such cases please contact our hotline. Broken glass or breakage of plastic parts are always subject to a charge. Defects to consumables or parts subject to wearing (e.g. motor pistons, kneading blades, drive shafts, spare remote control, spare toothbrushes, saw blades, etc.) as well as cleaning, maintenance or the replacement of said parts are not covered by the guarantee and hence are to be paid! The guarantee lapses in case of unauthorized tampering. After the expiry of the guarantee After the expiry of the guarantee repairs can be carried by the competent dealer or repair service against the payment of the ensuing costs. 22 5....-05-DR 572 28.08.2003 14:41 Uhr Seite 23 Ogólne wskazówki związane z bezpieczną obsługą PL Urządzenie należy używać tylko zgodnie z jego przeznaczeniem. W przypadku używania oddzielnych zasilaczy należy zwrócić uwagę na biegunowość i napięcie, baterie muszą zostać włożone do urządzenia zgodnie z oznaczoną biegunowością. Urządzenie należy w taki sposób ustawić, żeby istniejące otwory wentylacyjne nie zostały przykryte. Nigdy nie wolno otwierać obudowy urządzenia. Niefachowo przeprowadzone naprawy mogą być groźne w skutkach dla użytkownika. Przy uszkodzeniu urządzenia, w szczególności kabla sieciowego, urządzenie nie może być używane dopóki nie zostanie naprawione przez osobę z wymaganymi uprawnieniami. Przewód zasilający należy regularnie sprawdzać, czy nie jest uszkodzony. W razie awarii proszę nie naprawiać urządzenia samemu lecz skorzystać z pomocy autoryzowanego specjalisty.Jeżeli przewód zasilający nieodłączalny ulegnie uszkodzeniu, to powinien on być wymieniony u wytwórcy lub w specjalnym zakładzie naprawczym albo przez wykwalifikowaną osobę w celu uniknięcia zagrożenia. Jeżeli urządzenie nie będzie przez dłuższy czas używane, należy wyciągnąć wtyczkę z gniazdka lub wyjąć baterie. Poniższe symbole mogą znajdować się na urządzeniu i mają zwracać Państwa uwagę na: Symbol błyskawicy ma zwrócić uwagę użytkownika na znajdujące się we wnętrzu urządzenia części, które są pod niebezpiecznie wysokim napięciem. Symbol z wykrzyknikiem ma zwrócić uwagę użytkownika na znajdujące się w załączonych dokumentach ważne wskazówki związane z obsługą i konserwacją urządzenia. Urządzenia z tym symbolem używają do odczytywania dźwięku z płyty kompaktowej „Lasera klasy A“. Wbudowany wyłącznik bezpieczeństwa ma zapobiec temu, żeby użytkownik w czasie otwierania kieszeni odtwarzacza płyt kompaktowych został poddany niebezpiecznemu dla ludzkich oczu oddziaływaniu niewidocznego światła lasera. Wyłącznika tego nie należy w żadnym wypadku zmostkować lub też przy nim manipulować, ponieważ grozi to niebezpieczeństwem, że użytkownik poddany zostanie oddziaływaniu niebezpiecznego dla ludzkich oczu niewidocznego światła lasera. 23 5....-05-DR 572 28.08.2003 14:41 Uhr Seite 24 Zestawienie elementów obsługi PL 1 2 3 4 5 POWER Włącznik/ wyłącznik Regulator TUNING VOL Regulator siły głosu Przełącznik wyboru pasma (FM/AM) Głośnik 6 7 8 9 Przycisk syreny Wieszak Przyssawki Śruba zamykająca do kasetki na baterie 10 Kasetka na baterie Wkładanie baterii (nie objęte dostawą) • • • • • • W celu otwarcia kieszeni na baterie należy poluzować śrubę (9) na tylnej ściance urządzenia. Przykrywkę z tworzywa sztucznego należy ściągnąć do dołu, a następnie otworzyć kieszeń. Proszę umieścić w środku 3 baterii1,5 V, typ AA. Proszę pamiętać o prawidłowej polarności (patrz spód kieszeni na baterie). Aby zamknąć urządzenie należy przeprowadzić powyższe czynności w odwrotnej kolejności. Jeżeli nie będą Państwo przez dłuższy czas korzystać z urządzenia proszę wyjąć z niego baterie, aby zapobiec „wyciekowi” kwasu akumulatorowego. Proszę zawsze wymieniać cały komplet, a nie tylko jedną baterię. Uwaga: Baterii nie należy wrzucać do zwykłych domowych śmieci. Zużyte baterie proszę oddać do punktu zbiórki odpadów specjalnych lub do punktu sprzedaży. Nigdy nie wrzucaj baterii do ognia. Użytkowanie urządzenia • • • • • Odbiornik proszę włączać włącznikiem Power (1), wcis-kając pośrodku „okulary nurka”. Za pomocą przełącznika pasma (4) możecie ustawiać Państwo wybrane pasmo częstotliwości. UKW = FM, fale średnie = AM. Regulatorem Tuning (2) proszę ustawić pożądaną sta-cję. Kręcąc regulatorem głośności Vol (3) mogą Państwo ustawić pożądaną głośność. Celem wyłączenia odbiornika proszę ponownie użyć włącznika Power (1). Istnieją trzy sposoby mocowania radia: 1. Za pomocą przyssawek (8) mocujących odbiornik na gładkiej powierzchni, jak np. glazura. 2. Jeżeli jednak preferują Państwo mocowanie za pomocą śrub, to służy do tego uchwyt do podwieszania (7) (Zakup nie obejmuje śrub). 3. Za pomocą sznurka można zawiesić urządzenie np. na kranie. 24 5....-05-DR 572 28.08.2003 14:41 Uhr Seite 25 Zabezpieczenie przed wodą rozpryskową Urządzenie posiada zabezpieczenie przeciwbryzgowe. Dzięki temu może być ono używane w kabinie prysznicowej. Jednakże nie należy zanurzać urządzenia w wodzie (np. w wannie), ponieważ spowoduje to uszkodzenie jego elementów elektronicznych. Syrena Przyciskiem (6) mogą Państwo włączyć zintegrowaną sy-renę, aby ewentualnie wezwać pomoc, np. w razie wypadku poczas kąpieli. Czyszczenie i przechowywanie • • Urządzenie należy czyścić wilgotną szmatką, a następnie dokładnie je wytrzeć. Proszę nie używać ostrych środków czyszczących. Niniejsze urządzenie odpowiada wymaganiom normy bezpieczeństwa użytkowania oraz spełnia wymagania dyrektywy niskonapięciowej i kompatybilności elektromagnetycznej. Zastrzega się prawo do zmian technicznych! WARUNKI GWARANCJI Przyznajemy 24 miesięcy gwarancji na produkt licząc od daty zakupu. W tym okresie będziemy bezpłatnie usuwać w terminie 14 dni od daty dostarczenia wadliwego sprzętu z kartą gwarancyjną do miejsca zakupu wszystkie uszkodzenia powstałe w tym urządzeniu na skutek wady materiałów lub wadliwego wykonania, naprawiając oraz wymieniając wadliwe części lub (jeśli uznamy za stosowne) wymieniając całe urządzenie na nowe. Sprzęt do naprawy powinien być dostarczony w komplecie wraz z dowodem zakupu oraz z ważną kartą gwarancyjną do sprzedawcy w miarę możliwości w oryginalnym opakowaniu lub innym odpowiednim dla zabezpieczenia przed uszkodzeniem. W razie braku kompletnego opakowania fabrycznego, ryzyko uszkodzenia sprzętu podczas transportu do i z miejsca zakupu ponosi reklamujący. Naprawa gwarancyjna nie dotyczy czynności przewidzianych w instrukcji obsługi, do wykonania których zobowiązany jest użytkownik we własnym zakresie i na własny koszt. Gwarancja nie obejmuje: • mechanicznych, termicznych, chemicznych uszkodzeń sprzętu i wywołanych nimi wad, • uszkodzeń powstałych w wyniku działania sił zewnętrznych takich jak wyładowania atmosferyczne, zmiana napięcia zasilania i innych zdarzeń losowych, • nieprawidłowego ustawienia wartości napięcia elektrycznego, zasilanie z nieodpowiedniego gniazda zasilania, 25 PL 5....-05-DR 572 PL • • • • 28.08.2003 14:41 Uhr Seite 26 sznurów połączeniowych, sieciowych, żarówek, baterii, akumulatorów, uszkodzeń wyrobu powstałych w wyniku niewłaściwego lub niezgodnego z instrukcją jego użytkowania, przechowywania, konserwacji, samowolnego zrywania plomb oraz wszelkich przeróbek i zmian konstrukcyjnych dokonanych przez użytkownika lub osoby niepowołane, roszczeń z tytułu parametrów technicznych wyrobu, o ile są one zgodne z podanymi przez producenta, prawidłowego zużycia i uszkodzeń, które mają nieistotny wpływ na wartość lub działanie tego urządzenia. Karta gwarancyjna bez pieczątki sklepu, daty sprzedaży, nie wypełniona, źle wypełniona, ze śladami poprawek, nieczytelna wskutek zniszczenia, bez możliwości ustalenia miejsca sprzedaży oraz dołączonego dowodu zakupu jest nieważna. Korzystanie z usług gwarancyjnych nie jest możliwe po upływie daty ważności gwarancji. Gwarancja na części lub całe urządzenie, które są wymieniane kończy się, wraz z końcem gwarancji na to urządzenie. Wszystkie inne roszczenia, wliczając w to odszkodowania są wykluczone chyba, że prawo przewiduje inaczej. Roszczenia wykraczające poza tą umowę nie są uwzględniane przez tą gwarancję. Gwarancja oraz zawarte w niej warunki obowiązują na terenie Rzeczpospolitej Polskiej. 26 5....-05-DR 572 28.08.2003 14:41 Uhr Seite 27 Általános biztonsági rendszabályok H Csak arra a célra használja a készüléket, mire készült! Külső áramforrás használata esetén ügyeljen a megfelelő polaritásra és feszültségre, az elemeket mindig jó irányban helyezze be! Úgy állítsa fel a készüléket, hogy ne záródjanak el a meglévő szellőzőnyílások! Soha ne nyissa ki a készülék burkolatát! A szakszerűtlen javítások jelentős veszély forrásai lehetnek a használók számára. Ha a készülék, különösen a hálózati csatlakozó kábel megsérült, a készüléket nem szabad üzembe helyezni, hanem előbb szakemberrel meg kell javíttatni. Rendszeresen ellenőrizendő, hogy a hálózati csatlakozó kábelen nincs-e sérülés. Veszélyhelyzetek elkerülése végett a hibás csatlakozó kábelt csak a gyártóval, a mi vevőszolgálatunkkal vagy hasonló szakképzettségű más személlyel szabad pótoltatni azonos értékű kábellel. Ha hosszabb időn át nem használja a készüléket, húzza ki a csatlakozó dugaszt a konnektorból, ill. vegye ki belőle az elemeket! Adott esetben a készüléken az alábbi szimbólumokat láthatja, amelyek a következőkre hívják fel az Ön figyelmét: A villám-szimbólum olyan alkatrészekre figyelmeztet a készülék belsejében, amelyek veszélyesen nagy feszültséget vezetnek. A felkiáltójellel ellátott szimbólum a kísérőpapírokban található fontos kezelési vagy karbantartási útmutatásokra hívja fel a használó figyelmét. Az ezzel a szimbólummal jelzett készülékek „1. osztályú lézerrel“ működve tapogatják le a CD-t. A beépített biztonsági kapcsolók megakadályozzák, hogy a használó emberi szemmel nem látható, veszélyes lézersugárzás hatásának legyen kitéve, amikor a CD-rekesz fel van nyitva. Ezeket a biztonsági kapcsolókat semmi esetre sem szabad „megpatkolni“ vagy más módon manipulálni, különben Ön lézersugárhatás veszélyének teheti ki magát. A kezelőelemek leírása 1 2 3 4 5 POWER Ki- /bekapcsoló gomb TUNING szabályozó VOL hangerő-szabályozó Sávválasztó kapcsoló (FM/AM) Hangszóró 6 7 8 9 Riasztógomb Felfüggesztőfül Tapadókorongok Az elemtartó rekesz zárócsavarja 10 Elemtartó rekesz 27 5....-05-DR 572 28.08.2003 14:41 Uhr Seite 28 Tegye bele az elemeket H (nem hozzá járó tartozék) • • • • • • Az elemtartó rekesz felnyitásához oldja ki a csavart (9) a készülék hátlapján! Húzza le a műanyag borítást, és nyissa ki az elemtartó rekeszt! Helyezzen be 3 db 1,5 V-os, AA típusú elemet! Ügyeljen a helyes polaritásra! (lásd az elemtartó rekesz fenekét, ill. a külső falon lévő domborított jelzést)! Zárja le ismét a készüléket fordított sorrendben! Ha hosszabb ideig nem használja a készüléket, vegye ki belőle az elemeket, hogy elkerülje az akkumulátorsav esetleges „kifutását“. Mindig a teljes elemkészletet cserélje, ne csak egy-egy elem helyett tegyen be újat! Figyelem: Az elemek nem a háztartási szemétbe valók! Az elhasznált elemeket vagy a megfelelő gyűjtőhelyen, vagy a kereskedőnél adja le! Soha ne dobjon elemeket a tűzbe! A készülék használatba vétele • • • • • Kapcsolja be a készüléket a POWER kapcsolóval (1) úgy, hogy középen megnyomja a „búvárszemüveget”! A sávválasztó kapcsolóval (4) választhatja ki a kívánt frekvenciasávot. URH = FM, középhullám = AM. Állítsa a TUNING szabályozót (2) a kívánt adóra! A VOL hangerő-szabályozó (3) forgatásával tudja beállítani a kívánt hangerőt. Használat után kapcsolja ki a készüléket a POWER kapcsolóval (1)! Az elhelyezésre 3 lehetőség van: 1. Tapadókorongok (8) sima felületeken, pl. csempén való rögzítésre. 2. Egy felfüggesztőfül (7), ha előnyben részesíti a csavaros rögzítést (a csavarok nem hozzá adott tartozékok). 3. Egy fonott zsinór, hogy a készüléket pl. a vízcsapra lehessen akasztani. Cseppvédelem A készülék cseppvédett, tehát a zuhanyfülkén belül is használható. Ne mártsa azonban a készüléket vízbe (pl. fürdőkád), mert attól meghibásodhat az elektronikája. Riasztó A (6)-os gombbal aktiválhat egy beépített szirénát, hogy ha kell, pl. fürdŒszobai baleset esetén, segítséget lehessen hívni. 28 5....-05-DR 572 28.08.2003 14:41 Uhr Seite 29 Tisztítás és tárolás • • H Nedves ruhával tisztítsa meg a készüléket, utána pedig törölje gondosan szárazra! Ne használjon semmilyen erős tisztítószert! Ezt a készüléket az Európa Tanács minden vonatkozó aktuális irányelve szerint (pl. elektromágnesesség-elviselő képesség vagy kisfeszültség-elviselő képesség) ellenőriztük, és a legújabb biztonságtechnikai előírások szerint készült. Megjegyezzük az esetleges müszaki változásokat! Garancia Garanciális igényeivel forduljon, kérem, a szerződéses kereskedőjéhez! A garancia igazolására a pénztári nyugta szolgál. E nélkül az igazolás nélkül sem díjmentes csere, sem díjtalan javítás nem végezhető. Garanciális esetben eredeti csomagolásában adja át az alapkészüléket a pénztári bizonylattal együtt annak a kereskedőnek, akitől a készüléket vásárolta! *) A tartozékok hibái nem eredményezik automatikusan az egész készülék díjtalan cseréjét. Ilyen esetekben forduljon „forró vonalunkhoz”! Az üvegtörésből, ill. a műanyag alkatrészek töréséből eredő hibák megszüntetése mindenkor térítésköteles. Sem az elhasználódó tartozékokban, ill. kopó alkatrészekben (pl. szénkefe, dagasztóhorog, hajtószíj, póttávvezérlő, pótfogkefe, fűrészlap stb.) bekövetkező hibák, sem a tisztítás, karbantartás vagy a kopó alkatrészek cseréje nem esik a garancia hatálya alá, következésképp térítésköteles. Illetéktelen beavatkozás a garancia megszűnését eredményezi. A garanciális idő után A garanciális idő eltelte után a megfelelő szakkereskedésben vagy javítószolgálatnál végeztethet térítésköteles javításokat. 29 5....-05-DR 572 28.08.2003 14:41 Uhr Seite 30 Technische Daten Modell: DR 572 Spannungsversorgung: 3x 1,5 V Batterien Typ AA Frequenzbereiche: UKW/FM 88-108 MHz MW/AM 540-1600 KHz Dieses Gerät wurde nach allen zutreffenden, aktuellen CE-Richtlinien geprüft, wie z.B. elektromagnetische Verträglichkeit und Niederspannungsdirektive und wurde nach den neuesten sicherheitstechnischen Vorschriften gebaut. Technische Änderungen vorbehalten! D-47906 Kempen/Germany · Industriering Ost 40 Internet: http://www.clatronic.de · email: [email protected] Stünings Medien, Krefeld • 08/03 Bitte führen Sie das ausgediente Gerät einer umweltgerechten Entsorgung zu.-
 1
1
-
 2
2
-
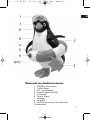 3
3
-
 4
4
-
 5
5
-
 6
6
-
 7
7
-
 8
8
-
 9
9
-
 10
10
-
 11
11
-
 12
12
-
 13
13
-
 14
14
-
 15
15
-
 16
16
-
 17
17
-
 18
18
-
 19
19
-
 20
20
-
 21
21
-
 22
22
-
 23
23
-
 24
24
-
 25
25
-
 26
26
-
 27
27
-
 28
28
-
 29
29
-
 30
30


Clatronic DR 572 de handleiding
- Type
- de handleiding
- Deze handleiding is ook geschikt voor
in andere talen
- English: Clatronic DR 572 Owner's manual
- italiano: Clatronic DR 572 Manuale del proprietario
- français: Clatronic DR 572 Le manuel du propriétaire
- español: Clatronic DR 572 El manual del propietario
- Deutsch: Clatronic DR 572 Bedienungsanleitung
- polski: Clatronic DR 572 Instrukcja obsługi
Gerelateerde papieren
-
Clatronic ka 2534 de handleiding
-
CTC Union Clatronic DR 564 CD de handleiding
-
-
-
-
-
-
-