Magimix NESPRESSO M150 Handleiding
- Categorie
- Accessoires voor het maken van koffie
- Type
- Handleiding

F
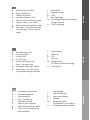
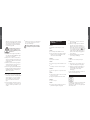
a: Réservoir d’eau amovible
b: Plaque chauffe-tasses
c:Sélecteur de fonction
d: Interrupteur Marche / Arrêt
e: Témoin lumineux de fonction (rouge)
f:Sélecteur vapeur / eau chaude
g: Témoin lumineux de température (jaune)
h: Buse vapeur / eau chaude pivotante
avec accessoire "aide à la mousse"
intégré
i:Porte-capsule
j:Bague de serrage
k: Grille
l:Bac d’égouttage
m: Clé hexagonale (pour démontage de
la cage à capsule)
n: Outil de nettoyage
GB
a: Removable water tank
b: Cup heating plate
c:Function knob
d: On/Off switch
e: Function control light (red)
f:Steam / hot water switch
g: Temperature control light (yellow)
h: Pivotal steam / hot water nozzle
with integrated frothing attachment
i:Capsule holder
j:Spout ring
k: Grill
l:Drip tray
m: Hexagonal key
(for removal of the capsule cage)
n: Cleaning tool
NL
a: Uitneembaar waterreservoir
b: Voorverwarmingsplaat
c:Funktieschakelaar
d: Aan- / Uitschakelaar
e: Controlelichtje (rood)
f:Stoom- en heet waterknop
g: Thermostaatcontrolelichtje (geel)
h: Stoom- en heet waterpijpje met
opschuimhulpstuk
i:Capsulehouder
j:Capsulehouderring
k: Rooster voor lekbakje
l:Lekbakje
m: Hexagonale sleutel
(om capsulehuis te verwijderen)
n: Ontstoppingsstaafje met boortje
FRANÇAISENGLISHNEDERLANDS

FRANÇAIS
Consignes de sécurité
Lisez attentivement ce mode d’emploi
avant d’utiliser votre machine
Nespresso.
●
Ne branchez la machine que dans une prise
avec mise à terre. Vérifiez que la tension
indiquée sur la plaque signalétique de la
machine corresponde à celle de votre
installation électrique.
●
Ne posez pas votre machine Nespresso sur
une surface chaude (plaque électrique par
exemple) ou à proximité d’une flamme.
●
Ne retirez pas le porte-capsule de la bague
de serrage tant que la machine fonctionne
car l’extraction de café se fait sous haute
pression.
●
N’utilisez la machine que lorsque le bac
d’égouttage et la grille sont en place.
●
Retirez la fiche d’alimentation lors du net-
toyage de votre machine.
●
Evitez que le cordon électrique n’entre en
contact avec des objets tranchants ou chauds.
Ne débranchez pas la fiche électrique en
tirant sur le cordon.
●
Evitez de toucher le cordon électrique ainsi
que les parties devenues chaudes durant l’uti-
lisation de la machine
(buse vapeur, partie
chromée du porte-capsule).
●
Ne plongez jamais la machine dans l’eau.
●
Tenez la machine et le cordon électrique hors
de la portée des enfants.
●
Pour le détartrage, conformez-vous à la noti-
ce ci-après.
●
Ne mettez pas en marche la machine si elle
est endommagée ou si le cordon est en mau-
vais état.
●
Le cordon ou tout autre élément défectueux
doit être remplacé uniquement par un centre
de service après-vente agréé. La machine ne
doit en aucun cas être ouverte par vos soins.
Accessoires
La machine est livrée avec une série d’acces-
soires :
●
1 clé hexagonale pour démonter la cage à
capsule,
●
1 outil de nettoyage,
●
2 tasses Nespresso.
Afin de vous permettre une utilisation immédiate
de la machine, celle-ci est également livrée avec
4 variétés de café Nespresso (4 x 10 capsules).
Pour toute information concernant les différentes
variétés de café Nespresso et pour commander les
capsules, adressez-vous à votre Nespresso Club,
dont l’adresse figure sur votre machine ou dans le
«Welcome-pack».
Préparation de la
machine (1-4)
●
Enlevez le réservoir en le soulevant par son
couvercle
(1) et remplissez-le d’eau (2).
●
Contenance maximale : 1,2 l = env. 24
tasses espresso ou env. 12 tasses cappuccino
de Nespresso.
●
Remettez le réservoir en place (3) tout en
exerçant une légère pression pour faciliter
l’ouverture de la soupape et refermez le cou-
vercle
(4).

FRANÇAIS
FRANÇAIS
●
Tournez le sélecteur de fonction vers la droite
sur la position et laissez couler environ
un demi réservoir d’eau
(8). Replacez le
sélecteur de fonction sur la position «0».
●
Tournez le sélecteur de fonction vers la
gauche sur la position et laissez couler le
reste du réservoir d’eau pour rincer le circuit
eau chaude / vapeur
(9). Replacez le sélec-
teur de fonction sur la position «0».
Préparation d’un
Nespresso (10-14)
Pour obtenir une qualité optimale de café, pré-
chauffez et rincez quotidiennement le système
avec le porte-capsule vide avant la préparation
de votre premier et après votre dernier espresso
de la journée. Cette opération se fait en tour-
nant le sélecteur de fonction vers la droite sur la
position pendant environ 5 secondes.
●
Remplissez le réservoir d’eau fraîche (1-4).
●
Placez le porte-capsule vide dans la bague
de serrage afin de le préchauffer
(5).
●
Placez le sélecteur de fonction sur la position
«0»
(10).
●
Mettez votre machine sous tension en plaçant
l’interrupteur Marche / Arrêt sur la position
(10). Le témoin de fonction (rouge) et le
témoin de température (jaune) s’allument.
●
Dès que le témoin de température jaune
s’éteint, la machine est chaude et prête à
fonctionner.
●
Retirez le porte-capsule de la bague de serra-
ge et introduisez une capsule, la partie large
vers le bas
(11). 1 capsule = 1 tasse
Nespresso.
La qualité de l’eau étant essentielle pour un bon
Nespresso, nous vous recommandons :
●
D’utiliser de l’eau fraîche du robinet.
●
De changer l’eau du réservoir quotidienne-
ment.
●
De nettoyer le réservoir au moins une fois par
semaine.
Nous vous déconseillons d’utiliser de l’eau miné-
rale ou distillée.
Première mise en service
(5-9)
Il est recommandé, lors de la première mise en
service de votre machine, de procéder au rinça-
ge du circuit d’eau :
●
Branchez la machine.
●
Remplissez le réservoir d’eau (1-4).
●
Placez le porte-capsule vide dans la bague
de serrage et faites-le pivoter de gauche à
droite. Il n’est pas nécessaire de serrer
fortement pour assurer l’étanchéité
(5).
●
Placez un récipient suffisamment large sous le
porte-capsule et un second sous la buse
vapeur / eau chaude
(6). Le sélecteur de
fonction doit être sur la position «0».
●
Mettez votre machine sous tension en plaçant
l’interrupteur Marche / Arrêt sur la position
(7). Placez le sélecteur vapeur / eau chaude
sur la position
(7). Le témoin de fonction
(rouge) et le témoin de température (jaune)
s’allument
(7).
●
Dès que le témoin de température jaune
s’éteint, la machine est chaude et prête à
fonctionner.
●
Replacez le porte-capsule dans la bague de
serrage et faites-le pivoter de gauche à droite
en serrant sans excès
(12).
●
Placez une tasse préchauffée (voir la rubrique
«Préchauffer les tasses») sous le porte-capsule.
●
Tournez le sélecteur de fonction vers la droite
sur la position
(13).
●
Une fois votre Nespresso préparé, replacez
le sélecteur de fonction sur la position «0».
Retirez le porte-capsule de la bague de serra-
ge et enlevez la capsule usagée
(14).
●
Afin que votre prochain Nespresso soit pré-
paré à une température optimale, replacez le
porte-capsule vide dans la bague de serrage
et faites-le pivoter de gauche à droite.
Préparation d’eau
chaude (15)
Avec cette machine, vous pouvez également pré-
parer de l’eau chaude pour le thé, le bouillon.
●
Remplissez le réservoir d’eau fraîche (1-4).
●
Tournez le sélecteur de fonction sur la posi-
tion «0»
(10).
●
Mettez votre machine sous tension en plaçant
l’interrupteur Marche / Arrêt sur la position
(7).
●
Dès que le témoin de température jaune
s’éteint, la machine est chaude et prête à
fonctionner.
●
Placez le sélecteur vapeur / eau chaude sur
la position
(7).
●
Plongez la buse vapeur / eau chaude dans un
récipient et tournez le sélecteur de fonction vers
la gauche sur la position
(15).
●
Une fois que le volume d’eau désiré est obte-
nu, replacez le sélecteur de fonction sur la
position «0».
●
Retirez le récipient et faites pivoter la buse
vapeur / eau chaude vers le bac d’égouttage.
Attention ! La buse vapeur / eau chaude
peut devenir brûlante.
Utilisation de la buse
vapeur
La buse vapeur aide à faire mousser le lait pour
la préparation d’un cappuccino ou pour chauf-
fer un liquide. La pompe à eau fonctionne alors
en cycle intermitent.
Important : Avant de faire de la vapeur, vérifiez
que le porte-capsule fixé dans la bague de ser-
rage soit vide pour éviter que le café ne se des-
sèche et ne bouche l’orifice de la sortie du café.
Faire mousser du lait pour
un cappuccino (16-17)
Vous pouvez faire mousser du lait pour
préparer un cappuccino. Pour ce faire, votre
machine est équipée d’un accessoire «aide à la
mousse» intégré, spécialement conçu à cet effet
et vous garantissant un résultat optimal.
●
Versez environ 1 dl de lait entier froid dans
un récipient assez haut (contenance maxima-
le : 0,5 l) pouvant être inséré sous la buse
vapeur / eau chaude.
●
Préparez d’abord un Nespresso dans une tasse
cappuccino en ne la remplissant qu’à un tiers.

FRANÇAIS
FRANÇAIS
●
Retirez le porte-capsule de la bague de serra-
ge, enlevez la capsule usagée et replacez le
porte-capsule vide dans la bague de serrage.
●
Placez le sélecteur vapeur / eau chaude sur
la position
(16). Dès que le témoin jaune
s’éteint, la machine est prête à fonctionner.
●
Plongez la buse vapeur dans le récipient et
tournez le sélecteur de fonction vers la
gauche sur la position
(17).Le témoin de
température jaune s’allume.
●
Maintenez l’extrémité de la buse sous la sur-
face du lait durant toute l’opération en évitant
de toucher le fond du récipient.
●
Pour arrêter la vapeur, replacez le sélecteur
de fonction sur la position «0». Le témoin de
température jaune s’éteint.
●
Retirez le récipient et faites pivoter la buse vers
le bac d’égouttage.
●
Tournez à nouveau le sélecteur de fonction
vers la gauche sur la position durant un
court instant afin d’éliminer les résidus de lait
pouvant se trouver à l’embouchure de la buse
vapeur.
●
Essuyez ensuite l’accessoire «aide à la mous-
se» intégré à l’aide d’une éponge humide.
Important : Pour extraire un Nespresso après
avoir utilisé la vapeur, laissez refroidir la machi-
ne. Pour cela, placez le porte-capsule vide dans
la bague de serrage, mettez un récipient sous la
sortie café et laissez couler l’équivalent d’une à
deux grandes tasses d’eau en tournant le sélec-
teur de fonction vers la droite sur la position .
Replacez le sélecteur de fonction sur la position
«0». Dès que le témoin de température jaune
s’éteint, la machine est prête à fonctionner.
Chauffer un liquide (18)
Grâce à sa buse vapeur / eau chaude, cette
machine vous permet également de chauffer un
liquide.
●
Tournez le sélecteur de fonction sur la posi-
tion «0».
●
Mettez votre machine sous tension en plaçant
l’interrupteur Marche / Arrêt sur la position .
●
Placez le sélecteur vapeur / eau chaude sur
la position . Dès que le témoin de tempé-
rature jaune s’éteint, la machine est prête à
fonctionner.
●
Glissez le tube de «l’aide à la mousse» de
3-5 mm vers le haut.
●
Plongez la buse vapeur / eau chaude dans le
récipient contenant le liquide à chauffer et
tournez le sélecteur de fonction vers la gauche
sur la position
(18). Le témoin de tempéra-
ture jaune s’allume.
●
Maintenez l’extrémité de la buse sous la surfa-
ce du liquide durant toute l’opération en évi-
tant de toucher le fond du récipient.
●
Pour arrêter la vapeur, replacez le sélecteur
de fonction sur la position «0». Le témoin de
température jaune s’éteint.
●
Retirez le récipient et faites pivoter la buse
vers le bac d’égouttage.
●
Essuyez la buse vapeur / eau chaude avec
un chiffon humide immédiatement après son
utilisation.
Important : Pour extraire un Nespresso après
avoir utilisé la vapeur, laissez refroidir la machi-
ne. Pour ce faire, placez le porte-capsule vide
dans la bague de serrage, mettez un récipient
●
Pour un entretien optimal du porte-capsule, le
Nespresso Club tient à votre disposition un
liquide nettoyant spécialement conçu à cet
effet.
●
Nettoyez la buse vapeur / eau chaude à l’ai-
de d’une éponge humide après chaque utili-
sation. Si la buse est obstruée, dévissez-la à
l’aide d’une pièce de monnaie et enlevez les
résidus se trouvant à l’embouchure avec une
aiguille. Profitez de cette opération pour enle-
ver l’accessoire «aide à la mousse» intégré
en dévissant, à l’aide d’une pièce de mon-
naie, la partie inférieure de la buse. Rincez
toutes les pièces dans de l’eau chaude.
●
Lors du remontage de la buse, assurez-vous
que les joints (O-ring) soient correctement pla-
cés
(21).
Nettoyage de la cage à
capsule (22-30)
La cage à capsule est vissée dans la partie infé-
rieure du thermobloc à l’intérieur de la bague
de serrage. Pour procéder à son nettoyage, sui-
vez les instructions suivantes :
●
Débranchez la machine, enlevez le réservoir
d’eau, le bac d’égouttage et le porte-capsule
(22).
●
Laissez refroidir la machine.
●
Retournez la machine à l’envers (23).
●
Placez la clé hexagonale sur le porte-capsule
(24) et débloquez la cage à capsule dans le
sens contraire des aiguilles d’une montre
(25).
●
Dévissez la cage à capsule à la main (26).
●
Rincez la cage à capsule sous l’eau couran-
te, nettoyez les deux orifices de la pointe
sous la sortie café et laissez couler l’équivalent
d’une à deux grandes tasses d’eau en tournant le
sélecteur de fonction vers la droite sur la position
. Replacez le sélecteur de fonction sur la
position «0». Dès que le témoin de température
jaune s’éteint, la machine est prête à fonctionner.
Préchauffer les tasses
Il est vivement recommandé de préchauffer les
tasses avec de l’eau très chaude avant le pre-
mier Nespresso de la journée. Les tasses sui-
vantes seront préchauffées en les entreposant sur
la plaque chauffe-tasses.
●
Pour préchauffer les tasses avec la buse
vapeur / eau chaude, suivez les instructions
décrites sous la rubrique «Préparation d’eau
chaude».
Nettoyage (19-21)
●
Après chaque extraction d’un Nespresso ou,
le cas échéant, l’utilisation de la buse vapeur
/ eau chaude, l’eau résiduelle se trouvant
dans le thermobloc s’écoule dans le bac
d’égouttage, provoquant un léger sifflement. Il
est donc nécessaire d’enlever la grille et de
vider le bac d’égouttage
(19) après environ
20 cafés et de les nettoyer par la même occa-
sion avec un liquide vaisselle, non abrasif.
●
Avant de repositionner le bac et la grille,
veillez à ce que le couvercle arrière du bac
d’égouttage soit bien en place
(20).
●
Le porte-capsule doit être fréquemment rincé
à l’eau courante ou placé vide dans la
bague de serrage en laissant couler l’eau
tout en exerçant un mouvement d’ouverture et
de fermeture du porte-capsule. Il est décon-
seillé de le passer au lave-vaisselle.

FRANÇAIS
FRANÇAIS
●
La machine est livrée avec une clé hexagona-
le et un outil de nettoyage qui vous seront
utiles pour le détartrage.
Attention! N’utilisez jamais de vinaigre,
cela attaquerait les joints de la machine.
d’arrosage au moyen de l’outil de nettoyage
livré avec la machine
(27) ainsi que l’arrivée
d’eau de la cage à capsule à l’aide de la
mèche spéciale se trouvant à l’extrémité de
l’outil de nettoyage
(27).
Attention ! Utilisez l’outil de net-
toyage avec prudence car une
mauvaise manipulation pourrait
vous blesser.
●
Soufflez à travers la cage à capsule dans le
sens indiqué par la flèche
(28) afin de déga-
ger les orifices de tout dépôt.
●
Nettoyez une seconde fois les deux orifices
de la pointe d’arrosage au moyen de l’outil
de nettoyage et soufflez à nouveau à travers
la cage à capsule.
●
Enduisez le pas de vis de la cage à capsule
de graisse alimentaire et assurez-vous que le
joint soit bien remis en place
(29).
●
Revissez la cage à capsule manuellement dans
la bague de serrage à l’aide de la clé hexago-
nale
(30).N’utilisez pas le porte-capsule pour
effectuer cette opération !
Détartrage
●
Pour obtenir un fonctionnement parfait de
votre machine et maintenir la qualité optimale
de votre Nespresso, nous vous recomman-
dons de détartrer votre machine régulière-
ment, selon la dureté de l’eau de votre
région.
●
Pour de plus amples informations, adressez-
vous à votre Nespresso Club qui tient à votre
disposition un matériel spécialement conçu à
cet effet.
Solutions à quelques
problèmes
Problème :
La température de votre Nespresso est trop
basse.
Solution :
●
Voir la rubrique «Préchauffer les tasses».
●
Après avoir placé le porte-capsule vide dans
la bague de serrage, préchauffez-le en lais-
sant couler de l’eau chaude
(8).
Problème :
La pompe émet un fort bruit.
Solution :
●
Assurez-vous qu’il y ait de l’eau dans le réser-
voir.
●
Vérifiez que le réservoir soit bien en place.
Problème :
Le lait pour le cappuccino n’est pas assez mous-
seux.
Solution :
●
Nettoyez la buse vapeur et l’accessoire «aide
à la mousse» intégré.
●
Employez uniquement du lait entier et froid.
Problème :
Le café ne coule pas.
Solution :
●
Assurez-vous que le porte-capsule soit bien en
place dans la bague de serrage
(12).
●
Assurez-vous que le réservoir soit bien en
place et rempli
(4).
●
Vérifiez si la cage à capsule est obstruée.
Pour cela, retirez le porte-capsule de la
bague de serrage, placez un récipient sous
la sortie café et tournez le sélecteur de fonc-
tion vers la droite sur la position . Si l’eau
ne coule pas librement (deux jets d’eau bien
visibles), nettoyez et débouchez la cage à
capsule (voir la rubrique «Nettoyage de la
cage à capsule»).
●
Procédez au détartrage de votre machine
(voir la rubrique «Détartrage).
Problème :
Le café fuit sur les côtés du porte-capsule.
Solution :
●
Assurez-vous que le porte-capsule soit bien
en place dans la bague de serrage
(12).
●
Nettoyez le porte-capsule de préférence à
l’aide du liquide nettoyant spécialement
conçu à cet effet (voir la rubrique
«Nettoyage»).
Pour de plus amples informations, veuillez vous
adresser à votre Nespresso Club.
Environnement
L’emballage est constitué exclusivement de maté-
riaux recyclables. L’élimination des anciens
appareils peut se faire en se renseignant auprès
des autorités locales.

ENGLISH
Safety Instructions
Read these instructions carefully
before using your Nespresso
machine.
●
Do not plug the machine into anything other
than a grounded electrical socket. Verify that
the voltage indicated on the technical specifi-
cations plate on the bottom of the unit corres-
ponds to your electrical installation.
●
Do not place your Nespresso machine on a
hot surface (an electrical heating plate for
example) or near a flame.
●
Do not remove the capsule holder from the
spout ring while the machine is functioning
since the extraction of coffee is done under
high pressure.
●
Do not use the machine without the drip tray
and grill in place.
●
Remove the plug when cleaning your machine.
●
Ensure that the electrical cord does not come
into contact with sharp or hot objects. Do not
disconnect the electrical plug by pulling on
the cord.
●
Avoid touching the electrical cord as well as
any other part which may become hot during
the use of the machine (steam nozzle, chrome
portion of capsule holder).
●
Never plunge the machine in water.
●
Keep the machine and the electrical cord out
of children’s reach.
●
For descaling, adhere to the directions which
follow.
●
Do not use the machine if it is damaged or if
the cord is in bad condition.
●
The cord or any other defective element must
be replaced exclusively by an authorized
after-sales service centre. Under no circum-
stances should you open the machine yourself.
Accessories
The machine is delivered with a range of acces-
sories:
●
1 hexagonal key to remove the capsule cage,
●
1 cleaning tool,
●
2 Nespresso cups.
Equally included are 4 varieties of Nespresso
coffee (4 x 10 capsules) allowing you to use the
machine immediately.
For further information concerning the different
varieties of Nespresso coffee and to order cap-
sules, contact your Nespresso Club at the address
found on your machine or in the «Welcome-pack».
Preparing the machine
(1-4)
●
Remove the water tank by lifting it out by its
lid
(1) and fill it with water (2).
●
Maximum capacity : 1.2 l = about 24
Nespresso espresso cups or about 12
cappuccino cups.
●
Applying light pressure to facilitate the ope-
ning of the bottom valve, put the water tank
back into place
(3) and close the lid (4).
Since water quality is essential to a good
Nespresso, we recommend that you:
●
Use fresh tap water.
●
Change the water in the tank daily.
●
Clean the tank at least once a week.
Electrical Instructions for UK and Republic of Ireland only
WARNING:
Always replace the fuse cover of the fitted plug, never use the plug
with the fuse cover omitted. If a replacement fuse cover is required, ensure it is the
same as the one visible on the pin face of the plug (i.e. RED OR ORANGE).
Fuse covers are available from:
BBS Ltd
Po Box 110
Farnham Surrey GU 104XL
Phone: 01252 727755
Use a 3A fuse approved by ASTA to BS1362, marked thus
For Duo chromed only:
WARNING:
a plug with a bared flexible cord is hazardous if engaged in a live
socket. If the fitted plug has been cut from the power supply cord, it should be
destroyed and replaced with a three pin plug in accordance with the following
code:
BLUE: neutral
BROWN: live
GREEN/YELLOW: earth
The wire which is coloured BLUE must be connected to the terminal in the plug which
is marked with the letter “N” or coloured BLUE or BLACK.
The wire which is coloured BROWN must be connected to the terminal in the plug
which is marked with the letter “L” or coloured BROWN or RED which is connected
to the fuse.
The wire which is coloured GREEN/YELLOW should be connected to the terminal
marked with the letter “E”, or by the earth symbol or coloured GREEN or
GREEN/YELLOW.

ENGLISH
ENGLISH
We advise you not to use distilled or mineral
water.
Start Up (5-9)
When starting up your machine for the first time,
it is advisable to first rinse the water circuit :
●
Plug in the machine.
●
Fill the water tank (1-4).
●
Insert the empty capsule holder in the spout
ring by turning it from left to right. It is not
necessary to tighten with great force to
obtain a perfect seal
(5).
●
Place a sufficiently large container under the
capsule holder and a second one under the
steam / hot water nozzle
(6). The function
knob should be on the «0» position.
●
Turn on your machine by pressing the On/Off
Switch to
(7). The steam / hot water switch
should be on the position. Both the red
function control light and the yellow tempera-
ture control light will go on
(7).
●
Once the yellow temperature control light
goes off, your machine is warmed up and
ready for use.
●
Turn the function knob to the position on
the right and let approximately half of the
water in the tank run through
(8). Return the
function knob to the «0» position.
●
Turn the function knob to the position on
the left and let the rest of the water in the
tank run through to rinse the steam / hot
water circuit
(9). Return the function knob to
the «0» position.
Preparing a Nespresso
(10-14)
To obtain optimal coffee quality, preheat the
machine daily with the empty capsule holder
and rinse the system before making the first and
after the last Nespresso of the day. Do this by
turning the function knob to the position on
the right for about 5 seconds.
●
Fill the water tank with fresh water (1-4).
●
Insert the capsule holder in the spout ring in
order to preheat it
(5).
●
Verify that the function knob is on the «0»
position
(10).
●
Turn on your machine by pressing the
On/Off Switch to
(10). Both the red light
and the yellow control light will go on.
●
Once the yellow temperature control light
goes off, your machine is warmed up and
ready for use.
●
Remove the capsule holder from the spout
ring and insert a capsule with the largest part
towards the base
(11). 1 capsule = 1 cup of
Nespresso.
●
Reinsert the capsule holder in the spout ring
by turning it from left to right without
tightening with great force
(12).
●
Place a preheated cup under the capsule hol-
der (see the section on “Preheating Cups”).
●
Turn the function knob to the position on
the right
(13).
●
Once your Nespresso is prepared, return the
function knob to the «0» position. Remove the
capsule holder from the spout ring and dis-
card the used capsule
(14).
●
To ensure that your next Nespresso will be
prepared at optimal temperature, reinsert the
capsule holder in the spout ring and turn it
from left to right.
Preparing Hot Water (15)
This machine equally allows you to prepare hot
water for tea or soup.
●
Fill the water tank with fresh water (1-4).
●
Verify that the function knob is on the «0»
position
(10).
●
Turn on your machine by pressing the
On/Off Switch to
(7).
●
Once the yellow temperature control light
goes off, your machine is warmed up and
ready for use.
●
Press the steam / hot water switch to the
position
(7).
●
Plunge the steam nozzle into a receptacle
and turn the function knob to the position
on the left
(15).
●
Once the desired quantity of water is obtai-
ned, return the function knob to
the «0» position.
●
Remove the receptacle and pivot the steam /
hot water nozzle over the drip tray.
Warning ! The steam / hot water nozzle
can become burning hot.
Using the steam nozzle
The steam nozzle is useful in making frothed
milk for a cappuccino, or for heating a liquid.
The water pump then works in an intermittent
cycle.
Important! Before making steam, verify that the
capsule holder inserted in the spout ring is
empty in order to avoid that coffee becomes
encrusted and blocks the coffee spout opening.
Making milk froth for a
cappuccino (16-17)
Your machine is equipped with an integrated fro-
thing attachment specially designed to froth milk
with optimal results when making a cappuccino.
To do this :
●
Pour approximately 1 dl of cold whole milk
into a sufficiently high pot (of not more than
0.5 l maximum capacity) that can be inserted
under the steam / hot water nozzle.
●
First prepare a Nespresso in a cappuccino
cup filling it only one-third full.
●
Remove the capsule holder from the spout
ring, discard the used capsule and reinsert
the empty capsule holder in the spout ring.
●
Press the steam / hot water switch to the
position
(16). Once the yellow temperature
control light goes off, the machine is ready
for use.
●
Plunge the steam nozzle into the receptacle
and turn the function knob to the position
on the left
(17). The yellow temperature
control light will go on.
●
Maintain the end of the nozzle under the sur-
face of the milk during the entire procedure
ensuring that it does not touch the base of the
receptacle.
●
Stop the steam by turning the function knob
to the «0» position. The yellow temperature
control light will go off.
●
Remove the receptacle and pivot the steam
nozzle over the drip tray.

ENGLISH
ENGLISH
●
Turn the function knob again to the posi-
tion on the left for just a second in order to
eliminate any residual milk that otherwise can
block the steam nozzle.
●
Wipe the integrated frothing attachment with
a clean damp cloth.
Important: To extract a Nespresso after having
used the steam, let the machine cool down. To do
this, insert the empty capsule holder into the spout
ring, place a receptacle under the coffee spout
and run the equivalent of one or two large cups of
water by turning the function knob to the posi-
tion on the right. Return the function knob to the
«0» position. Once the yellow temperature control
light goes off, the machine is ready for use.
Heating liquids (18)
You can also heat liquids thanks to the steam /
hot water nozzle on this machine.
●
Verify that the function knob is on the «0»
position.
●
Turn on your machine by pressing the
On/Off Switch to .
●
Press the steam / hot water switch to the
position. Once the yellow temperature control
light goes off, the machine is ready for use.
●
Slide the tube of the frothing attachment up
3-5 mm.
●
Plunge the steam nozzle into the receptacle
containing the liquid to be heated and turn
the function knob to the position on the
left
(18). The yellow temperature control light
will go on.
●
Maintain the end of the nozzle under the sur-
face of the liquid during the entire procedure
ensuring that it does not touch the base of the
receptacle.
●
Stop the steam by turning the function knob
to the «0» position. The yellow temperature
control light will go off.
●
Remove the receptacle and pivot the steam
nozzle over the drip tray.
●
Wipe the steam / hot water nozzle with a
clean damp cloth immediately after its use.
Important: To extract a Nespresso after having
used the steam, let the machine cool down. To
do this, insert the empty capsule holder in the
spout ring, place a receptacle under the coffee
spout and run the equivalent of one or two large
cups of water by turning the function knob to the
position on the right. . Return the function
knob to the «0» position. Once the yellow tem-
perature control light goes off, the machine is
ready for use.
Preheating Cups
It is highly recommended that you preheat the
cups with very hot water before making the first
Nespresso of the day. Subsequent cups can be
preheated by stocking them on the cup heating
plate.
●
To preheat cups with the steam / hot water
nozzle, follow the instructions given under the
section on: “Preparing Hot Water”.
Cleaning (19-21)
●
After the extraction of each Nespresso or the
use of the steam / hot water nozzle, residual
water in the thermoblock is discharged into
the drip tray provoking a light hissing noise.
It is therefore necessary to remove the grill
and empty the drip tray
(19) after about 20
coffees and, at same time, to clean them with
a non-abrasive, dish washing liquid.
●
Before reinserting the drip tray and grill,
ensure that the back cover of the drip tray is
properly in place
(20).
●
The capsule holder must be rinsed frequently.
Either run hot tap water through it or simply
insert the empty capsule holder in the spout
ring and let water run through it while slightly
loosening and re-tightening the capsuleholder
to vary the pressure flow. Cleaning the capsule
holder in the dishwasher is not recommended.
●
For optimal cleaning of your capsule holder,
a specially conceived cleaning product is
also available from your Nespresso Club.
●
Clean the steam / hot water nozzle with a
clean, damp cloth after each use. If the nozz-
le is blocked, unscrew it with the aid of a
coin and remove the residue causing the
blockage with a needle. Take this occasion to
remove the integrated frothing attachment
from the bottom part of the steam nozzle by
unscrewing it with the help of a coin if neces-
sary. Rinse all of the parts in hot water.
●
When reconnecting the nozzle, ensure that
the O-ring joints are put back properly into
place
(21) !
Cleaning the Capsule Cage
(22-30)
The capsule cage is screwed into the bottom
part of the thermoblock inside the spout ring. In
order to clean it, follow the instructions below.
●
Turn off the machine and remove the water
tank, the drip tray and the capsule holder
(22).
●
Let the machine cool down.
●
Turn the machine upside down (23).
●
Put the hexagonal key on the capsule holder
(24) and unscrew the capsule cage by tur-
ning the handle counterclockwise
(25).
●
Finish unscrewing the capsule cage by hand
(26).
●
Rinse the capsule cage under running water.
With the cleaning tool delivered with the
machine, clean the two holes on either side
of the water spout
(27) as well as the water
entry point of the capsule cage using the spi-
ral end of the cleaning tool
(27).
Warning ! Use the cleaning tool with
care since improper handling can
cause injury.
●
Blow through the capsule cage in the direc-
tion of the arrow
(28) in order to remove any
deposits.
●
Clean the two holes of the water spout with
the cleaning tool a second time and blow
through the capsule cage once again.
●
Coat the threads of the capsule cage with
lubricant and ensure that the O-ring joint is
put back properly into place
(29).
●
Manually screw the capsule cage back into
the spout ring with the help of the hexagonal
key
(30). No not use the capsule holder to
handle this procedure!
Descaling
●
For the perfect functioning of your machine
and to maintain the optimum quality of your
Nespresso, we recommend that you descale
your machine regularly depending on the
water hardness of your region.

ENGLISH
ENGLISH
●
For further information, contact your
Nespresso Club who has products specially
conceived for this purpose available to you.
●
The machine is delivered with a hexagonal
key and cleaning tool that will be useful to
you in descaling your machine.
Warning! Never use vinegar which can
damage the joints of the machine.
Solutions to Occasional
Problems
Problem:
Your Nespresso is not hot enough.
Solution :
●
See the section on “Preheating Cups”.
●
Preheat the capsule holder by inserting it
empty into the spout ring and running hot
water through it
(8).
Problem:
The pump makes a loud noise.
Solution :
●
Ensure that there is water in the water tank.
●
Verify that the water tank is properly in place.
Problem:
The milk for a cappuccino is not frothy enough.
Solution :
●
Clean the steam nozzle and the integrated
frothing attachment.
●
Only use cold, whole milk.
Problem:
Coffee does not flow out.
Solution :
●
Ensure that the capsule holder is properly in
place in the spout ring
(12).
●
Ensure that the water tank is properly in
place and filled
(4).
●
Verify that the capsule cage is not blocked.
To do this, remove the capsule holder from
the spout ring, place a receptacle under the
coffee spout and turn the function knob to the
position on the right. If water does not
flow freely (with two clearly visible water
jets), clean and unblock the capsule cage
(see the section on “Cleaning the Capsule
Cage”).
●
Descale your machine (see the section on
“Descaling”).
Problem:
Coffee runs down the sides of the capsule holder.
Solution :
●
Ensure that the capsule holder is properly in
place in the spout ring
(12).
●
Clean the capsule holder preferably with the
product specially conceived for this purpose
(see the section on “Cleaning”).
For more detailed information, contact your
Nespresso Club.
Environment
Our packaging is made exclusively of recyclable
materials. Check with your local authorities on
how best to dispose of old machines.

NEDERLANDS
Belangrijke veiligheids-
voorschriften
Lees deze gebruiksaanwijzing aan-
dachtig door voordat de Nespresso
machine in gebruik wordt genomen.
●
Sluit de machine alleen aan op een geaard
stopcontact. Kijk na of de aangeduide spanning
overeenkomt met uw elektrische installatie.
●
Plaats uw machine niet op hete oppervlaktes,
noch dicht bij een vlam.
●
Verwijder de capsulehouder nooit terwijl de
machine in werking is, omdat de machine
onder hoge druk staat.
●
Gebruik de machine niet zonder het lekbakje
of het rooster van het lekbakje.
●
Trek de stekker uit het stopcontact wanneer u
uw machine schoonmaakt.
●
Vermijd dat het elektrisch snoer in aanraking
komt met een heet of snijdend voorwerp.
Haal de stekker nooit uit het stopcontact door
aan het elektrisch snoer te trekken.
●
Vermijd aanraking met het elektrisch snoer en
met onderdelen die warm zijn (stoompijpje,
verchroomde deel van capsulehouder).
●
De machine nooit onder water dompelen.
●
De machine en het elektrisch snoer buiten
bereik van kinderen houden.
●
Voor het ontkalken kunt u bijgaande
instructies raadplegen.
●
Zet de machine niet aan indien deze bescha-
digd is, of als het elektrisch snoer in slechte
staat is.
●
Het elektrisch snoer of andere defecte onder-
delen mogen alleen door een erkende
Technische Dienst vervangen worden. De
machine niet zelf openen.
Accessoires
De machine is geleverd met de volgende
accessoires:
●
1 hexagonale sleutel om het capsulehuis te
verwijderen,
●
1 ontstoppingsstaafje met boortje,
●
2 Nespresso kopjes.
En een assortiment van 4 verschillende
Nespresso variëteiten (4 x 10 capsules) zodat u
uw machine gelijk kunt gebruiken.
Voor meer informatie over de verschillende
variëteiten van Nespresso en om capsules te
bestellen, kunt u zich wenden tot de Nespresso
Club. De gegevens van de Nespresso Club treft
u aan in de «Welkomstbrochure» verpakt bij de
machine.
Voorbereiden van de
machine (1-4)
●
Trek het deksel van het waterreservoir
omhoog en neem het waterreservoir uit de
machine
(1). Vul het waterreservoir met water
(2).
●
Maximale inhoud : 1,2 l. = circa 24
Nespresso espresso-kopjes of circa 12
cappuccino-kopjes.
●
Het waterreservoir terugplaatsen op de
machine en stevig aandrukken, zodat het
bodemventiel opent
(3). Het deksel sluiten (4).
Om een goede Nespresso te verkrijgen, dient u
met het volgende rekening te houden:

NEDERLANDS
NEDERLANDS
door het stoomcircuit lopen (9). Zet de
funktieschakelaar terug naar de «0» positie.
Bereiding van een
Nespresso (10-14)
Voor een optimale kwaliteit kunt u dagelijks de
capsulehouder voorverwarmen en de machine
doorspoelen voor het zetten van uw eerste en na
het laatste kopje Nespresso van de dag. Dit kunt
u doen door de funktieschakelaar op de positie
te zetten gedurende 5 seconden.
●
Vul het waterreservoir met vers water
(1-4).
●
Plaats de capsulehouder op de machine om
deze voor te verwarmen
(5).
●
Zet de funktieschakelaar op de «0» positie
(10).
●
Zet de machine aan door de aan- / uitscha-
kelaar in te schakelen naar . Zowel het
rode controlelichtjes als het gele lichtje
zullen gaan branden.
●
Zodra het gele thermostaatcontrolelichtje uit-
gaat, is de machine klaar voor gebruik.
●
Verwijder de capsulehouder. Plaats de cap-
sule met het zilverkleurig membraan naar
beneden in de houder
(11). 1 capsule = 1
kopje Nespresso.
●
Draai de capsulehouder met capsule van
links naar rechts, zonder deze té vast aan te
draaien
(12).
●
Plaats een voorverwarmd kopje onder de
koffie uitgang (zie «Voorverwarmen van kop-
jes»).
●
Draai de funktieschakelaar naar rechts naar
de positie
(13).
●
Gebruik vers leidingwater.
●
Ververs het water dagelijks.
●
Reinig het waterreservoir minimaal een keer
per week.
Wij adviseren u geen mineraal water of gedes-
tilleerd water te gebruiken.
Voor het eerste gebruik
(5-9)
Voor u de machine voor het eerst gebruikt, dient
het watercircuit doorgespoeld te worden.
●
Steek de stekker in het stopcontact.
●
Vul het waterreservoir (1-4).
●
Plaats de lege capsulehouder in de machine
door deze van links naar rechts te draaien.
Het is echter niet nodig deze al té vast aan te
draaien
(5).
●
Plaats een opvangbakje onder de capsule-
houder en een tweede bakje onder het
stoom- en heet waterpijpje
(6). De funktie-
schakelaar op de «0» positie zetten.
●
Zet uw machine aan door de aan- / uit scha-
kelaar in te schakelen naar
(7). De stoom-
en heet waterknop moet op de positie
staan. Zowel het rode controlelichtje als het
gele lichtje zullen gaan branden
(7).
●
Zodra het gele thermostaatcontrolelichtje uit-
gaat, is de machine klaar voor gebruik.
●
Draai de funktieschakelaar naar rechts op de
positie en laat circa de halve inhoud van
het waterreservoir door het watercircuit lopen
(8). Draai de funktieschakelaar terug naar de
«0» positie.
●
Draai de funktieschakelaar naar links naar
de positie en laat het resterende water
●
Zodra de gewenste hoeveelheid koffie in het
kopje is verkregen, draait u de funktieschake-
laar naar de «0» positie. Verwijder de cap-
sulehouder na het bereiden van uw
Nespresso en verwijder de gebruikte capsule
(14).
●
Om ook het volgende kopje Nespresso op de
ideale temperatuur te kunnen bereiden, dient
u de lege capsulehouder terug te plaatsen op
uw machine.
Bereiden van heet water
(15)
Met deze machine kunt u eveneens heet water
maken voor thee, oploskoffie of soep.
●
Vul het waterreservoir met vers water (1-4).
●
Zet de machine aan door de aan- / uitscha-
kelaar in te schakelen naar
(7).
●
Zodra het gele thermostaatcontrolelichtje uit-
gaat, is de machine klaar voor gebruik.
●
Zet de stoom- en heet waterknop op de
positie
(7).
●
Plaats een glas of beker onder het stoom- en
heet waterpijpje en draai de funktieschakelaar
naar links naar de positie
(15).
●
Zodra de gewenste hoeveelheid water verkre-
gen is, draait u de funktieschakelaar terug
naar de positie «0».
●
Neem het glas of beker weg en draai het
stoom- en heet waterpijpje boven het lekbakje.
Wees voorzichtig! Het stoom- en heet
waterpijpje is erg heet.
Bereiden van stoom
Het stoompijpje dient om melk op te schuimen
voor een cappuccino of om een vloeistof op te
warmen. Tijdens het bereiden van stoom is een
kloppend geluid te horen, dit wordt veroorzaakt
door het afwisselend werken van de
waterpomp.
Belangrijk! Kijk na of de capsulehouder leeg is
voor u stoom maakt om te voorkomen dat de
koffie zou uitdrogen en de opening van de
koffie uitgang zou verstoppen.
Wees voorzichtig! Het stoompijpje is
erg heet.
Opschuimen van de melk
voor cappuccino (16-17)
Met deze machine kunt u ook melk opschuimen
voor een cappuccino. Hiertoe is uw machine uit-
gerust met een speciaal geïntegreerd ‘opschuim-
hulpstuk’ dat u een optimaal resultaat garan-
deert.
●
Giet ongeveer 1 dl koude volle melk in een
kannetje (met een maximale inhoud van
0,5 l) dat onder het stoompijpje past.
●
Maak eerst een Nespresso klaar in een cap-
puccino kopje dat u maar voor één-derde vult.
●
Verwijder de gebruikte capsule en plaats de
capsulehouder weer terug op de machine.
●
Schakel de stoom- en heet waterknop in naar
de positie
(16). Zodra het gele thermo-
staatcontrolelichtje uitgaat, is de machine op
de juiste temperatuur voor het maken van
stoom.
●
Dompel het stoompijpje onder in het kannetje
en draai de funktieschakelaar naar links naar

NEDERLANDS
NEDERLANDS
de positie (17). Het gele thermostaatcon-
trolelichtje zal gaan branden.
●
Houd het uiteinde van het stoompijpje onder-
gedompeld in de melk zonder de bodem van
het kannetje te raken.
●
Wanneer u klaar bent met het opschuimen,
draait u de funktieschakelaar terug naar de
«0» positie. Het gele thermostaatcontrole-
lichtje zal uitgaan.
●
Verwijder het kannetje en draai het stoom-
pijpje boven het rooster van het lekbakje.
●
Herhaal het stomen nu nog even om eventuele
melkresten in het stoompijpje te verwijderen.
●
Maak dan het opschuimhulpstuk schoon met
een vochtige doek.
Belangrijk: Om een Nespresso te bereiden na
het gebruiken van de stoomfunktie, moet u de
machine laten afkoelen. Om de ideale tempera-
tuur zo snel mogelijk weer te verkrijgen, plaatst
u de capsulehouder op de machine en plaatst u
een glas of beker onder de koffie uitgang en
laat u ongeveer 1 à 2 grote kopjes water lopen
door de funktieschakelaar naar de positie te
draaien. Draai de funktieschakelaar terug naar
de «0» positie. Zodra het gele thermostaatcon-
trolelichtje uitgaat, is de machine klaar voor
gebruik.
Verwarmen van
vloeistoffen (18)
Dankzij het stoompijpje kunt u ook vloeistoffen
verwarmen.
●
Zet de funktieschakelaar op de «0» positie.
●
Zet de machine aan door de aan- / uitscha-
kelaar in te schakelen naar .
●
Zodra het gele thermostaatcontrolelichtje uit-
gaat, is de machine klaar voor gebruik.
●
Schuif het opschuimhulpstukje 3-5 mm naar
boven.
●
Dompel het stoompijpje onder in de vloeistof
in het kannetje en draai de funktieschakelaar
naar links naar de positie . Het gele
thermostaatcontrolelichtje zal gaan branden.
●
Houd het uiteinde van het stoompijpje onder-
gedompeld in de vloeistof zonder de bodem
van het kannetje te raken.
●
Wanneer u klaar bent met het verwarmen,
draait u de funktieschakelaar terug naar de
«0» positie. Het gele thermostaatcontrole-
lichtje zal uitgaan.
●
Verwijder het kannetje en draai het stoom- en
heet waterpijpje boven het rooster van het
lekbakje.
●
Maak het stoom- en heet waterpijpje schoon
met een vochtige doek onmiddellijk na het
gebruik.
Belangrijk: Om een Nespresso te bereiden na
het gebruiken van de stoomfunktie, moet u de
machine laten afkoelen. Om de ideale tempera-
tuur zo snel mogelijk weer te verkrijgen, plaatst
u de capsulehouder op de machine en plaatst u
een glas of beker onder de koffie uitgang en
laat u ongeveer 1 à 2 grote kopjes water lopen
door de funktieschakelaar naar rechts naar de
positie te draaien. Draai de funktie- schake-
laar naar de «0» positie. Zodra het gele thermo-
staatcontrolelichtje uitgaat, is de machine klaar
voor gebruik.
schroeven met een muntstuk en de restjes ver-
wijderen die zich in de opening bevinden
met behulp van een naald of paperclip.
Maak van deze handeling gebruik om ook
het opschuimhulpstuk los te maken (eventueel
met behulp van een tang) en te reinigen.
Maak deze onderdelen schoon met warm
water.
●
Controleer dat de zwarte rubberen O-
ringetjes op hun plaats blijven, terwijl u het
stoompijpje op zijn plaats schroeft
(21).
Schoonmaken van het
capsulehuis (22-30)
Het capsulehuis is in het onderste gedeelte van
het thermoblok geschroefd. Om dit schoon te
maken, volgt u de instructies hieronder:
●
Zet de machine uit, verwijder het waterreser-
voir, het lekbakje en de capsulehouder
(22).
●
Laat de machine afkoelen.
●
Draai uw machine om (23).
●
Plaats de hexagonale sleutel op de capsule-
houder
(24) en draai vervolgens het capsule-
huis naar rechts los
(25).
●
Draai het capsulehuis verder los met de hand
(26).
●
Spoel het capsulehuis uit onder de kraan.
Prik de 2 kleine gaatjes door met de bijge-
leverde naald
(27) en maak het bovenste
deel van het capsulehuis schoon met het
boortje aan de andere zijde van het ontstop-
pingsstaafje
(27).
Wees voorzichtig met het gebruik van
het ontstoppingsstaafje. Onzorgvuldig
gebruik kan leiden tot verwondingen.
Voorverwarmen van
kopjes
Wij adviseren u de kopjes voor te verwarmen
met heet water voor het eerste Nespresso kopje
van de dag. De andere kopjes zullen verwarmd
worden door deze op de voorverwarmingsplaat
te plaatsen.
●
Om de kopjes voor te verwarmen met behulp
van het stoom- en heet waterpijpje, volgt u de
instructies (zie «Bereiden van heet water»).
Schoonmaken (19-21)
●
Na elke Nespresso of gebruik van het stoom-
pijpje ontlucht de machine het thermoblok
(sissend geluid). Het daardoor vrijkomende
water loopt in het lekbakje. Het is noodzake-
lijk om na circa 20 espresso’s het lekbakje te
legen
(19) en tevens schoon te maken met
een niet schurend afwasmiddel.
●
Controleer of het achterste dekseltje van het
lekbakje goed geplaatst is, voordat u het lek-
bakje en het rooster terugplaatst op de
machine
(20).
●
De capsulehouder dient regelmatig gereinigd
te worden. Spoel de capsulehouder dagelijks
met heet water of plaats deze in de machine
en laat hier water doorlopen, terwijl u de cap-
sulehouder enkele malen van links naar rechts
beweegt. Het wordt afgeraden de cap-
sulehouder in de vaatwasmachine te reinigen.
●
Voor een perfect onderhoud van uw capsule-
houder is een speciaal schoonmaakprodukt
verkrijgbaar bij de Nespresso Club.
●
Maak het stoom- en heet waterpijpje schoon
met een vochtige doek na ieder gebruik.
Indien het pijpje verstopt is, kunt u deze los-

NEDERLANDS
●
Blaas door het capsulehuis in de richting van
de pijl
(28) om beide gaatjes vrij te maken
van eventuele achtergebleven restjes.
●
Prik de 2 kleine gaatjes in de capsulenaald
een tweede keer door met de bijgeleverde
naald en blaas nog een keer door het cap-
sulehuis.
●
Smeer de schroefdraad in met voedingsvet.
Verzeker u ervan dat de O-ring goed rond de
schroefdraad geplaatst wordt
(29).
●
Schroef dan het capsulehuis met de hand
weer vast en draai vast met de hexagonale
sleutel
(30). Gebruik niet de capsulehouder
bij deze handeling!
Ontkalken
●
Voor een optimale werking van uw machine
en de beste kwaliteit van uw Nespresso, is
het aan te bevelen uw machine regelmatig te
ontkalken, minstens 1 maal per 6 maanden.
Of vaker afhankelijk van de hardheid van
het water in uw omgeving.
●
Voor meer informatie kunt u zich wenden tot
de Nespresso Club waar u speciaal ontkal-
kingsmateriaal kunt verkrijgen.
●
Uw machine is geleverd met een hexagonale
sleutel en een ontstoppingsstaafje welke
nodig zijn voor het ontkalken.
Opgepast! Gebruik nooit (schoon
maak)azijn, dat de dichtingen van de
machine kan aantasten.
-
 1
1
-
 2
2
-
 3
3
-
 4
4
-
 5
5
-
 6
6
-
 7
7
-
 8
8
-
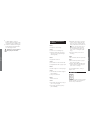 9
9
-
 10
10
-
 11
11
-
 12
12
-
 13
13


Magimix NESPRESSO M150 Handleiding
- Categorie
- Accessoires voor het maken van koffie
- Type
- Handleiding
in andere talen
- English: Magimix NESPRESSO M150 User manual
- français: Magimix NESPRESSO M150 Manuel utilisateur