
PNI MS500
Weather station/Метеорологична станция/Wetterstation/Estación
meteorológica/Station météo/Meteorológiai állomás/Stazione meteo/
Weerstation/Stacja pogodowa/Statie meteo

EN User manual......................................................... 3
BG Ръководство за употреба............................. 13
DE Benutzerhandbuch.............................................. 24
ES Manual de usuario............................................... 33
FR Manuel utilisateur............................................... 43
HU Használati utasítás.............................................. 53
IT Manuale utente.................................................. 63
NL Handleiding........................................................ 73
PL Instrukcja obsługi............................................... 83
RO Manual de utilizare............................................. 93

3User manual
English
Special warnings
»Before using this product, get familiar with how it works. Read the
operating instructions and safety warnings carefully.
»Use this product only for the purpose mentioned in the manual and only
as described.
»We do not assume any liability for damage to property or personal
injury resulting from improper use of the device, from unauthorized
modifications or repairs to it.
»This device may be used by children at least 8 years of age and by persons
with limited mental and physical abilities, provided that they are supervised
or instructed in the operation of the device and the potential risks.
»Do not attempt to use this device if it is defective.
»Do not expose the device to direct sunlight, excessive dust or moisture.
»This device uses batteries. Keep batteries out of the reach of children.
Do not use dierent brands of batteries and with dierent degrees of
charge. Do not attempt to use damaged batteries. For this device, use
only the recommended type of batteries. Do not attempt to charge non-
rechargeable batteries. If liquids leak from the batteries, they can have an
irritating eect on the skin and can even be toxic. Handle such batteries
only with gloves and dispose of them in specially created places. If you do
not use the device for a long time, we recommend that you remove the
batteries.
Product presentation
This weather station provides information about the indoor and outdoor
temperature expressed in Celsius degrees (°C) or Fahrenheit degrees
(°F) and information about humidity. The LCD screen displays icons with
recommendations for indoor ventilation, room climate change and room
climate evaluation.
This device was created for home use only and is not recommended for
commercial use.

User manual 4
English
Device description
A
+
−
AAA
+
−
AAA
+
−
AAA
1. Displays recommendations for changing environmental conditions (More
Wet; No Change; More Dry)
2. Time display (12h/ 24h)
3. Displays outdoor weather conditions
4. Multifunction button: Change channel/Increase the value displayed
on the screen
5. Multifunction button: Switches between°C and°F/Confirms a setting
6. Multifunction button: Memory/Decreases the value displayed on the

5User manual
English
screen
7. Displays the weather conditions inside the house.
8. Screen illumination button
9. Hangers
10. Battery compartment
11. Support foot
12. Battery compartment cover
B
+
−
AAA
+
−
AAA
13. Display
14. Led indicator
15. Hangers

User manual 6
English
16. TX button
17. °C/°F button
18. Channel selector (1/2/3)
19. Battery compartment
20. Battery compartment cover
Choosing the installation location
»When choosing the location, make sure that the device is not exposed to
sunlight, dust, moisture, heat or excessive cold.
»Do not place the device near heat sources.
»Install the outdoor sensor no more than 50 meters away from the weather
station. Make sure that there are no obstacles between the two devices
that could aect communication (for example, concrete walls).
Instructions for using the outdoor sensor
1. Insert 2 AAA batteries into the battery compartment.
2. The indicator light will flash briefly and the temperature, humidity and
radio communication channel (e.g. CH 1) will be displayed on the screen.
3. Next, the LED will flash once a minute to confirm the communication
with the weather station (indoor unit).
Instructions for using the weather station
1. Insert 3 AAA batteries into the battery compartment.
2. The screen will light up and it will display the weather information for
short time.
3. The weather station will look to communicate with the outdoor sensor.
4. The icons and will confirm the communication with the sensor.
If the outdoor temperature and humidity do not appear on the screen for 3
minutes, the weather station will stop searching for the radio signal from the
sensor. The icon will disappear from the screen, and instead of temperature
and humidity the symbols and will appear.
Lack of signal from the sensor can be caused by obstacles or too long distance

7User manual
English
between the two units.
If you are unable to establish an automatic connection between the two units,
you can follow the manual procedure below:
1. Hold down the button until the icon starts to blink.
2. Press the TX button on the outdoor sensor to transmit a radio signal to
the indoor unit.
Changing the communication channel
3 radio communication channels are available between the two units. Channel
1 is predefined.
»Open the battery compartment.
»Change the channel selector to one of the 3 positions.
»Hold down the button until the symbol flashes on the outdoor
sensor screen.
»Press the TX button on the outdoor sensor to transmit a radio signal to
the indoor unit.
The indoor unit will automatically display the new communication channel.
However, if this does not happen, you can manually change the communication
channel number. Press the button repeatedly to switch between the 3
channels: , , or (displays the 3 channels in the loop)
Time setting
1. Hold down the button for about 3 seconds. The time indicator will
flash on the screen.
2. Press the button or to reach the desired value.
3. Press again the button to confirm. The minute indicator will flash on
the screen.
4. Press the button or to reach the desired value.
5. Press again the button to confirm. The icon will flash on the
screen.
6. Press the button or to choose between 12 or 24 hour format.
7. Press the button to confirm. The icon will flash on the screen (it

User manual 8
English
activates the 24-hour storage of measured data).
8. Press the button or to disable this feature. The symbol will
appear on the screen.
9. Press the button to confirm. The screen will return to standard display
mode.
Note: If you have activated ( ) the 24-hour memory storage function, the saved
MIN and MAX values will be cleared every day at midnight. If you have disabled
this function ( ) the data will remain in memory until the battery runs out.
Display in basic mode
Once you have set the time and established communication with the outdoor
sensor, the device is in basic display mode.
In basic mode, the weather station displays the following information:
»The time (12h/24h)
The time is by default displayed in 24h mode. If you select 12h mode, the
“PM” or “AM” symbol appears in front of the time.
»Indoor climatic conditions
The temperature is expressed in Celsius degrees (°C) or Fahrenheit degrees
(°F) and is displayed to one decimal (eg 22.8°C).

9User manual
English
If the temperature drops below -9.9°C and rises above + 50°C (or 14°F and
122°F) the symbols (low) and (high) appear on the screen.
The relative humidity (RH%) it is also displayed above the temperature value.
If the symbol appears on the right side of the humidity value, you need to
change the batteries of the indoor unit.
The comfort level (WET; COMFORT; DRY) is also displayed in this area.
Wet. Humidity is between 66% and 95%
Optimal. Humidity is between 45% and 65%
Dry. Humidity is between 20% and 44%
Ventilation recommendation
Based on the values of temperature and humidity both inside and outside the
house, the weather station may recommend closing or opening the
windows for improving the climatic conditions.
»Room climate change
Based on the values of temperature and humidity both inside and outside the
house, the weather station may recommend changing the weather conditions.
Damper. A humidity increase of at least 5% is recommended.
Constant. The recommended increase or decrease of humidity
must not exceed 4%.
Drier. A humidity reduction of at least 5% is recommended.

User manual 10
English
Outdoor climatic conditions
The temperature is expressed in Celsius degrees (°C) or Fahrenheit degrees
(°F) and includes a decimal (eg 22.8°C).
If the temperature drops below -40°C and rises above + 60°C (or -40°F and
140°F) the symbols (low) and (high) appear on the screen.
Relative humidity (RH%) is also displayed above the temperature value.
Radio communication channel (e.g ) shows on which channel the
communication between the indoor and outdoor unit was established.
If the symbol appears on the right side of the communication channel, you
need to change the batteries of the outdoor unit.
Display of maximum and minimum values of temperature
and humidity
The maximum and minimum values of temperature and humidity are saved
automatically.
To display them:
»Press the button once. The icon appears both in the screen area
that displays the indoor climatic conditions, and in the area with the
outdoor values, next to the humidity value. The humidity and temperature
values will change on the screen and the maximum values recorded by the
weather station will be displayed.
»Press the button twice. The icon appears both in the screen
area that displays the indoor climatic conditions, and in the area with the
outdoor values, next to the humidity value. The humidity and temperature

11 User manual
English
values will change on the screen and the minimum value recorded by the
weather station will be displayed.
»Press 3 times the button to delete the recorded minimum and
maximum values.
Changing the temperature measurement unit
Press the button once to change between°C and °F for both indoor and
outdoor temperatures.
Troubleshooting
Problem Possible cause Recommendation
The two units cannot
communicate with
each other.
Between the two units
there are obstacles
(concrete walls, for
example) or other radio
devices that create
interference.
Change the location of
the two units and retry
pairing them.
Too long distance
between the two units. Reduce the distance
between the two units.
The batteries of one
of the two units are
discharged. Replace the batteries.
Technical specifications
Weather station
Power supply 3 x AAA 1.5V batteries
Temperature measuring range -9.9°C ~ +50°C/+14°F ~ +122°C
Temperature resolution 0.1°C/0.1°F
Humidity measuring range 20% ~ 95%RH
Humidity resolution 1%

User manual 12
English
Outdoor sensor
Power supply 2 x AAA 1.5V batteries
Temperature measuring range -40°C ~ +60°C/-40°F ~ +144°C
Temperature resolution 0.1°C/0.1°F
Humidity measuring range 20% ~ 95%RH
Humidity resolution 1%
Transmission frequency 433MHz
Transmission power 10 mW
Communication distance max. 50 m (in open filed)
Water resistance class IPX4 (splashproof)

Ръководство за употреба
Български
13
Предупреждения
»Преди да използвате този продукт, запознайте се с това как
работи. Прочетете внимателно инструкциите за експлоатация и
предупрежденията за безопасност.
»Използвайте този продукт само за целите, посочени в
ръководството и само както е описано.
»Ние не поемаме никаква отговорност за щети на имущество
или лични наранявания в резултат на неправилна употреба на
устройството, от неоторизирани модификации или ремонти на
устройството.
»Това устройство може да се използва от деца на възраст най-
малко 8 години и от лица с ограничени умствени и физически
способности, при условие че са наблюдавани или инструктирани
относно работата с устройството и потенциалните рискове.
»Не се опитвайте да използвате това устройство, ако е дефектно.
»Не излагайте устройството на пряка слънчева светлина,
прекомерен прах или влага.
»Това устройство използва батерии. Съхранявайте батериите на
място, недостъпно за деца. Не използвайте различни марки
батерии и с различна степен на зареждане. Не се опитвайте да
използвате повредени батерии. За това устройство използвайте
само препоръчания тип батерии. Не се опитвайте да зареждате
непрезареждащи се батерии. Ако течности изтекат от батериите,
те могат да имат дразнещ ефект върху кожата и дори могат да
бъдат токсични. Работете с такива батерии само с ръкавици и ги
изхвърляйте на специално създадени места. Ако не използвате
устройството дълго време, препоръчваме да извадите батериите.
Представяне на продукта
Тази метеорологична станция предоставя информация за вътрешната
и външната температура, изразена в градуси по Целзий (°C) или
градуси по Фаренхайт (°F) и информация за влажността. LCD екранът
показва икони с препоръки за вътрешна вентилация, промяна на
климата в стаята и оценка на климата в стаята.
Това устройство е създадено само за домашна употреба и не се

Ръководство за употреба
Български
14
препоръчва за търговска употреба.
Описание на устройството
A
+
−
AAA
+
−
AAA
+
−
AAA
1. Показва препоръки за променящи се условия на околната среда
(Повече мокро; Няма промяна; Повече сухо)
2. Показване на времето (12 часа/ 24 часа)
3. Показва външните метеорологични условия
4. Многофункционален бутон: Промяна на канал/Увеличаване
на стойността, показана на екрана

Ръководство за употреба
Български
15
5. Многофункционален бутон: Превключва между °C и °F/
Потвърждава настройка
6. Многофункционален бутон: Памет/Намалява стойността,
показана на екрана
7. Показва метеорологичните условия в къщата.
8. Бутон за осветяване на екрана
9. Закачалки
10. Отделение за батерии
11. Поддържащо стъпало
12. Капак на отделението за батерии
B
+
−
AAA
+
−
AAA

Ръководство за употреба
Български
16
13. Дисплей
14. Лед индикатор
15. Закачалки
16. Бутон TX
17. Бутон °C/°F
18. Селектор на канали (1/2/3)
19. Отделение за батерии
20. Капак на отделението за батерии
Избор на място за инсталиране
»Когато избирате място, уверете се, че устройството не е изложено
на слънчева светлина, прах, влага, топлина или прекомерен студ.
»Не поставяйте уреда близо до източници на топлина.
»Монтирайте външния сензор на не повече от 50 метра от
метеорологичната станция. Уверете се, че между двете
устройства няма препятствия, които биха могли да повлияят на
комуникацията (например бетонни стени).
Инструкции за използване на външния сензор
1. Поставете 2 батерии AAA в отделението за батерии.
2. Индикаторната светлина ще мига за кратко и температурата,
влажността и радиокомуникационният канал (напр. CH 1) ще се
покажат на екрана.
3. След това светодиодът ще мига веднъж в минута, за да потвърди
комуникацията с метеорологичната станция (вътрешно тяло).
Инструкции за използване на метеорологичната
станция
1. Поставете 3 батерии AAA в отделението за батерии.
2. Екранът ще светне и ще покаже информацията за времето за
кратко време.
3. Метеорологичната станция ще търси да комуникира с външния

Ръководство за употреба
Български
17
сензор.
4. Иконите и ще потвърди комуникацията със сензора.
Ако външната температура и влажност не се покажат на екрана в
продължение на 3 минути, метеорологичната станция ще спре да
търси радиосигнала от сензора. Иконата ще изчезнат от екрана
и вместо температура и влажност символите и ще се появи.
Липсата на сигнал от сензора може да бъде причинена от препятствия
или твърде голямо разстояние между двата модула.
Ако не можете да установите автоматична връзка между двете
устройства, можете да следвате ръчната процедура по-долу:
1. Задръжте натиснат бутона до иконата започва да мига.
1. Натиснете бутона TX на външния сензор, за да предадете
радиосигнал към вътрешното тяло.
Промяна на комуникационния канал
Има 3 радио комуникационни канала между двете единици. Канал 1
е предварително дефиниран.
»Отворете отделението за батерията.
»Променете селектора на канали в една от 3-те позиции.
»Задръжте натиснат бутона до символа мига на екрана на
външния сензор.
»Натиснете бутона TX на външния сензор, за да предадете
радиосигнал към вътрешното тяло.
Вътрешното тяло автоматично ще покаже новия канал за комуникация.
Ако обаче това не се случи, можете ръчно да промените номера на
комуникационния канал. Натиснете бутона неколкократно за
превключване между 3-те канала: , , или (показва 3-те
канала в цикъла)
Настройка на времето
• Задръжте натиснат бутона за около 3 секунди.

Ръководство за употреба
Български
18
Индикаторът за време ще мига на екрана.
Натисни бутона или за да достигне желаната стойност.
• Натиснете отново бутона за да потвърдите. Индикаторът за
минути ще мига на екрана.
• Натисни бутона или за да достигне желаната стойност.
• Натиснете отново бутона за да потвърдите. Иконата ще
мига на екрана.
• Натисни бутона и ли за избор между 12 или 24 часа филимат.
• Натисни бутона за да потвърдите. Иконата ще мига на
екрана (активира 24-часовия стил на измерване).
• Натисни бутона или за да деактивирате тази функция.
Символът ще се появи на екрана.
• Натисни бутона за да потвърдите. Екранът ще се върне в
стандартен режим на показване.
Забележка: Ако сте активирали ( ) 24-часовата функция за
съхранение на паметта, запаметените MIN и MAX стойности ще се
изчистват всеки ден в полунощ. Ако сте деактивирали тази функция
( ) данните ще останат в паметта, докато батерията се изтощи.
Дисплей в основен режим
След като зададете часа и установите комуникация с външния
сензор, устройството е в режим на основен дисплей.
В основен режим метеорологичната станция показва следната
информация:
»Часът (12h/24h)
Часът по подразбиране се показва в 24-часов режим. Ако изберете
12-часов режим, символът “PM” или “AM” се появява пред часа.
»Климатични условия на закрито

Ръководство за употреба
Български
19
Температурата се изразява в градуси по Целзий (°C) или градуси по
Фаренхайт (°F) и се показва до един десетичен знак (напр. 22,8°C).
Ако температурата падне под -9,9°C и се повиши над + 50°C (или 14°F
и 122°F), символите (ниско) и (високо) се появяват на екрана.
Относителната влажност (RH%) също се показва над стойността на
температурата.
Ако символът се появява от дясната страна на стойността на
влажността, трябва да смените батериите на вътрешното тяло.
Нивото на комфорт (WET; COMFORT; DRY) също се показва в тази
зона.
Мокра. Влажността е между 66% и 95%
Оптимално. Влажността е между 45% и 65%
Суха. Влажността е между 20% и 44%
Препоръка за вентилация
Въз основа на стойностите на температурата и влажността както
вътре, така и извън къщата, метеорологичната станция може да
препоръча затваряне или отваряне прозорците за подобряване
на климатичните условия.

Ръководство за употреба
Български
20
»Промяна на климата в стаята
Въз основа на стойностите на температурата и влажността както
вътре, така и извън къщата, метеорологичната станция може да
препоръча промяна на метеорологичните условия.
Амортисьор. Препоръчва се повишаване на влажността с
поне 5%.
Постоянна. Препоръчителното увеличаване или
намаляване на влажността не трябва да надвишава 4%.
Изсушител. Препоръчва се намаляване на влажността с
поне 5%
Климатични условия на открито
Температурата се изразява в градуси по Целзий (°C) или градуси по
Фаренхайт (°F) и включва десетичен знак (напр. 22,8°C).
Ако температурата падне под -40°C и се повиши над +60°C (или -40°F
и 140°F), символите (ниско) и (високо) се появяват на екрана.
Относителната влажност (RH%) също се показва над стойността на
температурата.
Радиокомуникационен канал (напр ) показва по кой канал е
установена комуникацията между вътрешното и външното тяло.
Ако символът се появява от дясната страна на комуникационния
канал, трябва да смените батериите на външното тяло.

Ръководство за употреба
Български
21
Показване на максимални и минимални стойности
на температура и влажност
Максималните и минималните стойности на температурата и
влажността се записват автоматично.
За да ги покажете:
»Натисни бутона веднъж. Иконата aсе появява както в
областта на екрана, която показва вътрешните климатични
условия, така и в областта с външните стойности, до стойността
на влажността. Стойностите за влажност и температура ще се
променят на екрана и ще се покажат максималните стойности,
записани от метеорологичната станция.
»Натисни бутона два пъти. Иконата се появява както в
областта на екрана, която показва вътрешните климатични
условия, така и в областта с външните стойности, до стойността
на влажността. Стойностите за влажност и температура ще се
променят на екрана и ще се покаже минималната стойност,
записана от метеорологичната станция.
»Натиснете 3 пъти бутона за да изтриете записаните минимални
и максимални стойности.
Промяна на единицата за измерване на
температурата
Натисни бутона веднъж, за да промените между °C и °F както за
вътрешна, така и за външна температура.

Ръководство за употреба
Български
22
Отстраняване на неизправности
проблем Възможна причина Препоръка
Двете единици
не могат да
комуникират
помежду си
Между двата модула
има препятствия
(бетонни стени
например) или други
радиоустройства,
които създават
смущения.
Променете
местоположението
на двете единици
и опитайте да ги
сдвоите отново.
Твърде голямо
разстояние между
двете единици.
Намалете
разстоянието между
двете единици.
Батериите на единия
от двата модула са
разредени
Сменете батериите
Технически спецификации
Метеорологична станция
Захранване 3 x AAA 1.5V батерии
Обхват на измерване на
температурата
-9.9°C ~ +50°C/+14°F ~ +122°C
Температурна разделителна
способност
0.1°C/0.1°F
Диапазон на измерване на
влажността
20% ~ 95%RH
Разделителна способност за
влажност
1%
Външен сензор
Захранване 2 x AAA 1.5V батерии
Обхват на измерване на
температурата
-40°C ~ +60°C/-40°F ~ +144°C

Ръководство за употреба
Български
23
Температурна разделителна
способност
0.1°C/0.1°F
Диапазон на измерване на
влажността
20% ~ 95%RH
Разделителна способност за
влажност
1%
Честота на предаване 433MHz
Мощност на предаване 10 mW
Комуникационно разстояние макс. 50 м (в открито поле)
Клас на водоустойчивост IPX4 (устойчив на пръски)

Benutzerhandbuch
Deutsche
24
Achtung
»Bevor Sie das Gerät benutzen, lesen Sie aufmerksam die
Gebrauchsanweisungen und die Sicherheitswarnungen.
»Verwenden Sie das Produkt nur für das im Handbuch erwähnte Zweck
und nur laut Gebrauchsanweisungen.
»Wir haften nicht für Schäden oder Körperverletzung verursacht durch eine
nicht entsprechende Verwendung des Gerätes, wegen unautorisierten
Veränderungen oder Reparaturen am Gerät.
»Das Gerät kann von Kindern über 8 Jahre oder von geistig behinderten
Menschen verwenden werden, unter der Bedingung, dass sie überwacht
werden oder dass sie über den Gebrauch und mögliche Risikos informiert
werden.
»Verwenden Sie das Gerät nicht, wenn es kaputt ist.
»Lagern Sie das Gerät nicht in Sonnenlicht, im Staub oder bei hoher
Feuchtigkeit.
»Das Gerät wird mit Batterien betrieben. Bewahren Sie die Batterien außer
Reichweite von Kindern auf, verwenden Sie gleiche Batterien. Verwenden
Sie keine kaputten Batterien. Verwenden Sie nur die Batterien, die für
dieses Gerät empfohlen werden. Laden Sie die Batterien nicht wieder.
Wenn aus den Batterien Flüssigkeiten fließen, können sie eine reizende
Wirkung auf die Haut haben, sie können auch toxisch sein. Benutzen
Sie Handschuhe und werfen Sie die Handschuhe an einem Sonderplatz.
Wenn Sie das Gerät für eine längere Zeit nicht verwenden, nehmen Sie
die Batterien heraus.
Produkteigenschaften
Das Gerät bietet Informationen über die Temperatur innerhalb und außerhalb
der Wohnung (°C oder °F) und Informationen über Feuchtigkeit. Der LCD
Bildschirm zeigt Piktogramme mit Empfehlungen hinsichtlich Lüftung des
inneren Raumes, Bewertung des Klimas und klimatische Veränderungen im
Zimmer, an. Das Gerät kann nur für häusliche Räume verwendet werden und
wird für Gewerbeimmobilien nicht empfohlen.

Benutzerhandbuch
Deutsche
25
Beschreibung
A
+
−
AAA
+
−
AAA
+
−
AAA
1. Es zeigt Empfehlungen über Veränderungen der Umweltbedingungen
(More Wet - feuchter, No Change - keine Veränderung, More Dry
-trockener) an.
2. Es zeigt die Uhrzeit an (12h/ 24h)
3. Es zeigt die Außenklimabedingungen an.
4. Multifunktionelle Taste: Kanal wechseln/ Erhöhung des auf dem
Bildschirm angezeigten Wertes
5. Multifunktionelle Taste: Es schaltet zwischen °C und°F/Es bestätigt

Benutzerhandbuch
Deutsche
26
eine Einstellung
6. Multifunktionelle Taste: Speicherraum/Es sinkt den auf dem
Bildschirm angezeigten Wert
7. Es zeigt die Klimabedingungen innerhalb der Wohnung
8. Taste Bildschirmbeleuchtung
9. Klemmen
10. Batterienraum
11. Stütze
12. Deckel Batterienraum
B
+
−
AAA
+
−
AAA

Benutzerhandbuch
Deutsche
27
13. Bildschirm
14. Led Anzeige
15. Klemmen
16. Taste TX
17. Taste Auswahl °C/°F
18. Kanal wählen (1/2/3)
19. Batterienraum
20. Deckel Batterienraum
Auswahl Einbaustelle
»Wenn Sie die Einbaustelle wählen, prüfen Sie, dass das Gerät nicht in der
Sonne, im Staub, in Feuchtigkeit, in Wärme oder Kälte liegt.
»Lagern Sie das Gerät nicht neben Wärmequllen.
»Bauen Sie den Außensensor 50 m weit vom Gerät. Prüfen Sie,
dass zwischen den 2 Geräten keine Hindernisse sind, das könnte die
Kommunikation verhindern (z. B. Betonwände).
Gebrauchsanweisungen Außensensor
1. Legen Sie 2 Batterien Typ AAA ein.
2. Die LED blinkt kurz und auf dem Bildschirm werden die Temperatur, die
Feuchtigkeit und den Sender angezeigt (z. B. CH 1)
3. Die LED blinkt einmal pro Minute, um die Kommunikation mit dem
Gerät zu bestätigen (innere Einheit).
Gebrauchsanweisungen Wetterstation
1. Legen Sie 3 Batterien Typ AAA ein.
2. Der Bildschirm leuchtet und zeigt kurz die Klimainformationen an.
3. Das Gerät sucht die Kommunikation mit dem Außensensor.
4. Die Piktogrammen und bestätigen die Kommunikation mit dem
Sensor.
Wenn in 3 Minuten keine Temperatur und Feuchtigkeit angezeigt werden,
stoppt die Wetterstation die Suche nach dem Radiosignal vom Sensor.
Das Symbol wird nicht mehr angezeigt, es werden folgende Symbole
angezeigt und .
Wenn der Sensor kein Signal hat, kann das von Hindernissen oder von einer

Benutzerhandbuch
Deutsche
28
zu große Entfernung verursacht werden.
Wenn Sie keine automatische Verbindung zwischen den 2 Einheiten herstellen
können, können Sie Folgendes vorgehen:
1. Drücken Sie die Taste bis das Symbol blinkt.
2. Drücken Sie die Taste TX aus dem Außensensor, um ein Radiosignal an
die Inneneinheit zu senden.
Sender wechseln
Es gibt 3 mögliche Kommunikationssender zwischen den 2 Einheiten. Der
Sender 1 ist vordefiniert.
»Önen Sie den Batterienraum.
»Wechseln Sie den Kanalauswahl auf einer der 3 Positionen.
»Drücken Sie die Taste bis der Außensensor das Symbol zeigt.
»Drücken Sie die Taste TX auf dem Außensensor, um ein Radiosignal an
die Inneneinheit zu senden.
Die Inneneinheit zeigt automatisch den neuen Kommunikationssender.
Wenn das nicht passiert, können Sie den Sender manuell wechseln. Drücken
Sie mehrmals die Taste um zwischen den 3 Sendern zu wechseln: ,
, oder (es zeigt kontinuierlich die 3 Sender an)
Uhrzeit einstellen
1. Drücken Sie die Taste für zirka 3 Sekunden. Das Uhr-Symbol blinkt.
2. Drücken Sie die Taste oder um den gewünschten Wert zu
erreichen.
3. Drücken Sie erneut die Taste um zu bestätigen. Das Minuten-Symbol
blinkt.
4. Drücken Sie die Taste oder um den gewünschten Wert zu
erreichen.
5. Drücken Sie erneut die Taste um zu bestätigen. Das Symbol
blinkt.
6. Drücken Sie die Taste oder um zwischen Format 12 oder 24
Stunden zu wählen.
7. Drücken Sie die Taste um zu bestätigen. Das Symbol blinkt

Benutzerhandbuch
Deutsche
29
(aktiviert die Speicherung für 24 Stunden der gemessenen Daten).
8. Drücken Sie die Taste oder um diese Funktion zu deaktivieren.
Auf dem Bildschirm erscheint .
9. Drücken Sie die Taste um zu bestätigen. Der Bildschirm kommt zum
normalen Betrieb zurück.
Hinweis: Wenn Sie ( ) die Speicherfunktion für 24 Stunden aktiviert haben,
werden die gespeicherten MIN und MAX Werte jeden Tag um Mitternacht
gelöscht. Wenn Sie diese Funktion ( ) deaktiviert haben, werden die Daten
gespeichert, bis die Batterie leer ist.
Anzeigen in Modus Standard
Wenn Sie die Uhr eingestellt haben und wenn die Kommunikation mit dem
Außensensor hergestellt wurde, ist das Gerät in Modus Standard.
In Modus Standard zeigt das Gerät folgende Informationen an:
»Uhr (12h/24h)
Die Uhr wird implizit in Modus 24h angezeigt. Wenn Sie den Modus 12h
auswählen, wird das Symbol “PM” oder “AM“ vor der Uhr angezeit.
»Klimabedingungen innerhalb der Wohnung

Benutzerhandbuch
Deutsche
30
Die Temperatur wird in Celsius (°C) oder Fahrenheit (°F) angezeigt und
schließt eine Dezimale ein (z. B. 22.8°C).
Wenn die Temperatur unter -9.9°C sinkt und über +50°C steigt (oder 14°F
und 122°F) werden folgende Symbole (low) und (high) angezeigt.
Die relative Feuchtigkeit (RH%) wird über den Wert der Temperatur
angezeigt.
Wenn auf der rechten Seite des Feuchtigkeitswertes das Symbol erscheint,
müssen Sie die Batterien der Inneneinheit ersetzen.
Das Komfortniveau (WET - feucht, COMFORT - optimal; DRY - trocken)
wird auch angezeigt.
Feucht. Feuchtigkeit zwischen 66% und 95%
Optim. Feuchtigkeit zwischen 45% und 65%
Trocken. Feuchtigkeit zwischen 20% und 44%
Empfehlungen den Raum zu lüften
Auf Grund der Temperatur-und Feuchtigkeitswerte innerhalb und außerhalb
der Wohnung kann das Gerät empfehlen, die Fenster zu schließen oder
zu önen um die Klimabedingungen zu verbessern.
»Empfehlungen die Klimabedingungen zu wechseln
Auf Grund der Temperatur-und Feuchtigkeitswerte innerhalb und außerhalb
der Wohnung kann das Gerät empfehlen, die Klimabedingungen zu wechseln:
Feuchter. Es wird empfohlen die Feuchtigkeit mindestens mit 5%
zu steigen.
Konstant. Die Erhöhung oder das Sinken der Feuchtigkeit muss
4% nicht überschreiten.
Trockener. Es wird empfohlen die Feuchtigkeit mindestens mit 5%
zu sinken.

Benutzerhandbuch
Deutsche
31
Anzeige externe Klimabedingungen
Die Temperatur wird in Celsius (°C) oder Fahrenheit (°F) angezeigt und
schließt eine Dezimale ein (z. B. 22.8°C).
Wenn die Temperatur unter -40°C sinkt und über +60°C steigt (oder -40°F
und 140°F) wird auf dem Bildschirm (low) und (high) angezeigt.
Die relative Feuchtigkeit (RH%) wird über den Wert der Temperatur
angezeigt.
Der Kommunikationssender (z. B. ) zeigt auf welchem Kanal die
Kommunikation zwischen Inneneinheit und Außeneinheit funktioniert.
Wenn auf der rechten Seite des Feuchtigkeitswertes das Symbol erscheint,
müssen Sie die Batterien der Außeneinheit ersetzen.
Anzeige der maximalen und der minimalen Temperatur-
und Feuchtigkeitswerte
Die maximalen und minimalen Werte für die Temperatur und Feuchtigkeit
werden automatisch gespeichert.
Für Ihr Anzeigen:
»Drücken Sie einmal die Taste . Das Symbol erscheint sowohl auf
dem Bildschirm mit den internen Klimabedingungen als auch in der Zone
mit externen Werten, neben dem Feuchtigkeitswert. Auf dem Bildschirm
werden die Feuchtigkeits-und Temperaturwerte geändert, es werden die
maximalen Werte angezeigt.
»Drücken Sie zweimal die Taste . Das Symbol erscheint sowohl auf
dem Bildschirm mit den internen Klimabedingungen als auch in der Zone

Benutzerhandbuch
Deutsche
32
mit externen Werten, neben dem Feuchtigkeitswert. Auf dem Bildschirm
werden die Feuchtigkeits-und Temperaturwerte geändert, es werden die
minimalen Werte angezeigt.
»Drücken Sie dreimal die Taste um die minimalen und maximalen
Werte zu löschen.
Wechseln der Messeinheit für Temperatur
Drücken Sie einmal die Taste um zwischen °C und °F zu wechseln. (sowohl
für Innentemperatur als auch für die Außentemperatur).
Probleme und Lösungen
Problem Mögliche Ursache Empfehlung
Die 2 Einheiten
können miteinander
nicht kommunizieren.
Zwischen den Einheiten
gibt es Hindernisse
(Betonwände) oder
andere Radiogeräte,
die Interferenzen
verursachen.
Wechseln Sie die Stelle
der 2 Einheiten und
koppeln Sie sie erneut
Zu große Strecke
zwischen den 2
Einheiten.
Reduzieren Sie die
Strecke zwischen den
Einheiten.
Die Batterien einer
Einheit sind leer. Ersetzen Sie die
Batterien.
Technische Spezifikationen
Wetterstation
Stromversorgung 3 x AAA 1.5V Batterien
Temperaturmessbereich -9.9°C ~ +50°C/+14°F ~ +122°C
Temperaturauflösung 0.1°C/0.1°F
Feuchtemessbereich 20% ~ 95%RH

Benutzerhandbuch
Deutsche
33
Feuchtigkeitsauflösung 1%
Außensensor
Stromversorgung 2 x AAA 1.5V Batterien
Temperaturmessbereich -40°C ~ +60°C/-40°F ~ +144°C
Temperaturauflösung 0.1°C/0.1°F
Feuchtemessbereich 20% ~ 95%RH
Feuchtigkeitsauflösung 1%
Übertragungsfrequenz 433MHz
Übertragungsleistung 10 mW
Kommunikationsentfernung max. 50 m (im oenen Feld)
Wasserdichtigkeitsklasse IPX4 (spritzwassergeschützt)

Manual de usuario
Español
34
Advertencias
»Antes de usar este producto, familiarícese con cómo funciona. Lea
atentamente las instrucciones de funcionamiento y las advertencias de
seguridad.
»Utilice este producto únicamente para el propósito indicado en el manual
y únicamente como se describe.
»No nos hacemos responsables de daños a la propiedad o lesiones
personales que surjan del uso inadecuado del dispositivo, modificaciones
no autorizadas o reparaciones realizadas en él.
»Este dispositivo puede ser utilizado por niños de al menos 8 años y
personas con capacidades mentales y físicas limitadas, siempre que estén
supervisados o capacitados en el funcionamiento del dispositivo y los
riesgos potenciales.
»No intente utilizar este dispositivo si está defectuoso.
»No exponga el dispositivo a la luz del sol directa, polvo y a la humedad
excesiva.
»Este dispositivo usa baterías. Mantenga las baterías fuera del alcance de
los niños. No utilice diferentes marcas de baterías y con diferentes grados
de carga. No intente utilizar pilas dañadas. Para este dispositivo, use solo el
tipo de baterías recomendado. No intente cargar baterías no recargables.
Si de las baterías se drenan las sustancias líquidas, pueden tener un efecto
irritante en la piel e incluso pueden ser tóxicas. Maneje estas baterías solo
con guantes y tírelas en lugares especialmente dispuestos. Si no utiliza
el dispositivo durante mucho tiempo, le recomendamos que retire las
baterías.
Descripción del producto
Esta estación meteorológica proporciona información sobre la temperatura
dentro de la casa y la temperatura exterior expresada en grados Celsius
(°C) o Fahrenheit (°F) e información sobre la humedad. La pantalla LCD
muestra iconos con recomendaciones para la ventilación del espacio interior,
evaluación del clima y los cambios climáticos en la habitación.
Este dispositivo fue creado solo para su uso en espacios domésticos y no se
recomienda para espacios comerciales.

Manual de usuario
Español
35
Descripción del dispositivo
A
+
−
AAA
+
−
AAA
+
−
AAA
1. Muestra recomendaciones sobre el cambio de las condiciones ambientales
(More Wet- Más húmedo; No Change-ningún cambio; More Dry-Más
seco)
2. Muestra la hora (12h/ 24h)
3. Muestra las condiciones climáticas externas
4. Botón multifuncional: cambiar canal/aumentar el valor mostrado en
la pantalla
5. Botón multifuncional: cambiar entre °C y °F/confirmar una

Manual de usuario
Español
36
configuración
6. Botón multifuncional: memoria/disminuye el valor mostrado en la
pantalla
7. Muestra las condiciones meteorológicas dentro de la casa.
8. Botón de iluminación de la pantalla
9. Ganchos
10. Compartimento de las baterías
11. Pierna de apoyo
12. Tapa del compartimento de las baterías
B
+
−
AAA
+
−
AAA
13. Pantalla

Manual de usuario
Español
37
14. Indicador LED
15. Ganchos
16. Botón TX
17. Botón de selección °C/°F
18. Selector de canal (1/2/3)
19. Compartimento de las baterías
20. Tapa del compartimento de las baterías
Elección de la ubicación de instalación
»Al elegir la ubicación, asegúrese de que el dispositivo no esté expuesto a
un exceso de sol, polvo, humedad, calor o frío.
»No coloque el dispositivo cerca de las fuentes de calor.
»Instale el sensor exterior a una distancia máxima de 50 metros de la
estación meteorológica. Asegúrese de que no haya obstáculos entre los
dos dispositivos que puedan afectar la comunicación (por ejemplo, muros
de concreto).
Instrucción para usar el sensor exterior
1. Inserte 2 baterías AAA en el compartimento de las baterías
2. El indicador LED parpadeará brevemente y en la pantalla se visualizará
la temperatura, la humedad y el canal de comunicación por radio (p. ej.
CH1).
3. A continuación, el LED parpadeará una vez por minuto para confirmar la
comunicación con la estación meteorológica (unidad interna).
Instrucciones para usar la estación meteorológica
1. Inserte 3 baterías AAA en el compartimento de las baterías
2. La pantalla se iluminará y mostrará la información meteorológica en
breve.
3. La estación meteorológica buscará la comunicación con el sensor del
exterior.
4. Los iconos y van a confirmar la comunicación con el sensor.

Manual de usuario
Español
38
Si la temperatura y la humedad externas no aparecen en la pantalla durante
3 minutos, la estación meteorológica dejará de buscar la señal de radio del
sensor. El símbolo desaparecerá de la pantalla, y en lugar de la temperatura
y humedad aparecerán e .
La falta de la señal del sensor puede ser causada por los obstáculos o demasiada
distancia entre las dos unidades.
Si no logra establecer una conexión automática entre las dos unidades, puede
seguir el procedimiento manual a continuación:
1. Mantenga tocado el botón hasta que el símbolo comienza a
parpadear en la pantalla.
2. Toque el botón TX del sensor externo para transmitir una señal de radio a
la unidad interior.
Cambio del canal de comunicación
Hay disponibles 3 canales de comunicación por radio entre las dos unidades.
El canal 1 está predefinido.
»Abra el compartimento de las baterías.
»Cambie el selector de canal a una de las 3 posiciones.
»Mantenga tocado el botón hasta que en la pantalla del sensor externo
parpadee el símbolo .
»Toque el botón TX del sensor externo para transmitir una señal de radio a
la unidad interior.
La unidad interior mostrará automáticamente el nuevo canal de comunicación.
Sin embargo, si esto no sucede, puede cambiar manualmente el número de
canal de comunicación. Pulse repetidamente el botón para cambiar entre
los 3 canales: , , o (mostrar los 3 canales en el bucle)
Configuración de la hora
1. Mantenga tocado el botón durante unos 3 segundos. El indicador de
la hora parpadeará en la pantalla.
2. Toque el botón o para alcanzar el valor deseado.
3. Toque el botón de nuevo para confirmar. El indicador de minutos

Manual de usuario
Español
39
parpadeará en la pantalla..
4. Toque el botón o para alcanzar el valor deseado.
5. Toque el botón de nuevo para confirmar. El indicador de minutos
parpadeará en la pantallan.
6. Toque el botón o para elegir entre el formato de 12 o 24 horas.
7. Toque el botón para confirmar. El símbolo parpadeará en la pantalla
(permite el almacenamiento de los datos medidos las 24 horas).
8. Toque el botón o para desactivar esta función. El símbolo
aparecerá en la pantalla.
9. Toque el botón para confirmar. La pantalla volverá al modo de
visualización normal.
Nota: Si ha habilitado ( ) la función de almacenamiento de 24 horas de las
mediciones, los valores mínimo y máximo guardados se eliminarán todos los días a
medianoche. Si ha desactivado esta función ( ) los datos permanecerán en la
memoria hasta que se agote la batería.
Visualización en modo estándar
Una vez que haya ajustado la hora y se ha establecido la comunicación con el
sensor externo, el dispositivo está en el modo de visualización estándar.
En el modo estándar, la estación meteorológica muestra la siguiente
información:
»La hora (12h/ 24h)
La hora se muestra por defecto en el modo 24h. Si selecciona el modo 12h “el
símbolo “ PM “o “AM” aparece antes de la hora.
»Las condiciones climáticas dentro de la casa.

Manual de usuario
Español
40
La Temperatura se expresa en grados Celsius (°C) o grados Fahrenheit (°F) e
incluye un decimal (por ejemplo, 22,8 °C).
Si la temperatura desciende por debajo de -9,9°C y se eleva por encima de
+50°C (o 14°F y 122°F) los símbolos ( (low) y (high) aparecen en la
pantalla.
La humedad relativa (RH%) también se muestra por encima del valor de
temperatura.
Si el símbolo aparece en el lado derecho del valor de la humedad, debe
cambiar las baterías de la unidad interior.
El nivel de confort (WET - mojado; COMFORT - óptimo; DRY - seco) este,
también se muestra en esta área.
Mojado. La humedad está entre 66% y 95%
Óptimo. La humedad está entre 45% y 65%%
Seco. La humedad está entre 20% y 44%
Recomendaciones para la ventilación de la habitación
En función de los valores de temperatura y humedad tanto dentro como fuera
de la casa, la estación meteorológica puede recomendar el cierre o la
apertura de las ventanas para mejorar las condiciones climáticas.

Manual de usuario
Español
41
»Recomendaciones para cambiar las condiciones climáticas
En función de los valores de temperatura y humedad tanto dentro como
fuera de la casa, la estación meteorológica puede recomendar el cambio de
las condiciones climáticas.
Más húmedo. Se recomienda un aumento de la humedad con al
menos un 5%.
Constante. El aumento o disminución recomendado de la
humedad no debe exceder el 4%.
Más seco. Se recomienda una disminución de la humedad con al
menos un 5%.
Visualización de las condiciones climáticas externas
La temperatura se expresa en grados Celsius (°C) o grados Fahrenheit (°F) e
incluye un decimal (por ejemplo, 22,8 °C).
Si la temperatura cae por debajo de -40 °C y sube por encima de + 60 °C (o
-40 °F y 140 °F), los símbolos aparecen en la pantalla. (low) y (high).
La humedad relativa (RH%) también se muestra por encima del valor de
temperatura.
Canal de comunicación por radio (p. ej ) muestra en qué canal se
estableció la comunicación entre la unidad interior y exterior.
Si el símbolo aparece en el lado derecho del canal de comunicación , necesita
cambiar las baterías de la unidad exterior.

Manual de usuario
Español
42
Visualización de los valores máximos y mínimos de
temperatura y humedad
Los valores máximos y mínimos de temperatura y humedad se guardan
automáticamente.
Para mostrarlos:
»Toque el botón una vez . El símbolo se visualiza tanto en el área de
»la pantalla que muestra las condiciones climáticas internas, así como en
el área con los valores externos, junto al valor de humedad. Los valores
de humedad y temperatura cambiarán en la pantalla y se mostrarán los
valores máximos registrados por la estación meteorológica.
»Toque el botón dos veces . El símbolo aparece tanto en el área de
la pantalla que muestra las condiciones climáticas internas, como en el
área con los valores externos, junto al valor de humedad. Los valores de
humedad y temperatura se cambiarán en la pantalla y se mostrarán los
valores mínimos registrados por la estación meteorológica.
»Toque el botón 3 veces para borrar los valores mínimo y máximo
registrados.
Cambio de la unidad de medida de la temperatura
Toque el botón una vez para cambiar entre °C y °F para temperaturas
interiores y exteriores.

Manual de usuario
Español
43
Problemas y soluciones
Avería Causa posible Recomendación
Las dos unidades no
pueden comunicarse
entre sí.
Entre las dos unidades
hay obstáculos (paredes
de hormigón, por
ejemplo)
u otros dispositivos
radio que crean
interferencias.
Cambia la ubicación
de las dos unidades
y vuelve a intentar
su apareamiento.
Demasiada distancia
entre las dos unidades. Reduzca la distancia
entre las dos unidades.
Las baterías de una de
las dos unidades están
descargadas. Reemplace las baterías.
Especificaciones técnicas
Estación meteorológica
Fuente de alimentación 3 x pilas AAA 1.5V
Rango de medición -9.9°C ~ +50°C/+14°F ~ +122°C
Resolución de temperatura 0.1°C/0.1°F
Rango de medición de humedad 20% ~ 95%RH
Resolución de humedad 1%
Sensor externo
Fuente de alimentación 2 x pilas AAA 1.5V
Rango de medición -40°C ~ +60°C/-40°F ~ +144°C
Resolución de temperatura 0.1°C/0.1°F
Rango de medición de humedad 20% ~ 95%RH
Resolución de humedad 1%
Frecuencia de comunicación radio 433MHz
Poder de transmision 10 mW
Distancia de comunicación máximo 50 m (en campo abierto)
Clase de resistencia al agua IPX4 (salpicaduras de agua)

Manuel utilisateur
Français
44
Faites attention!
»Avant d’utiliser ce produit, vous devez vous familiariser avec le
fonctionnement. Lisez avec attention les instructions d’utilisation et les
avertissements de sécurité.
»Utilisez ce produit uniquement dans le but mentionné dans le manuel et
seulement conformément à la description.
»On n’est pas responsable des dommages de la propriété ou de la
blessure personnelle à la suite de la mauvaise utilisation de l’appareil, des
modifications ou des réparations non autorisées.
»Ce dispositif peut être utilisé par les enfants d’au moins 8 ans et par
les personnes avec des capacités physiques limitées, à condition qu’ils
soient surveillés et formés au fonctionnement de l’appareil et aux risques
potentiels.
»N’essayez pas d’utiliser ce dispositif, s’il est endommagé.
»N’exposez pas le dispositif à la lumière directe du soleil, à la poussière et à
l’humidité excessive.
»Ce dispositif utilise des batteries. Gardez les batteries hors de portée
des enfants. Il ne faut pas utiliser des diérentes marques de batteries et
avec diérents degrés de charge. Vous ne devez pas utiliser des batteries
endommagées. Pour ce dispositif il faut utiliser uniquement le type
de batteries recommandé. N’essayez pas de charger les batteries non
rechargeables. Le liquide qui fuit des batteries peut irriter la peau et il
peut même être toxique. Il faut manipuler de telles batteries seulement
avec des gants et les jeter dans des endroits spécialement aménagés.
Si vous n’utilisez pas le dispositif pendant une longue période, on vous
recommande de retirer les batteries.
La présentation du produit
Cette station météo ore des informations sur la température à l’intérieur de la
maison et concernant la température extérieure, exprimée en degrés Celsius
(°C) ou Fahrenheit (°F), ainsi que les informations sur l’humidité. L’écran
LCD ache les pictogrammes avec les recommandations de ventilation
de l’intérieur, l’évaluation du climat et les changements climatiques dans la
chambre. Ce dispositif a été uniquement crée pour l’utilisation dans les espaces
domestiques et il n’est pas recommandé pour les espaces commerciaux.

Manuel utilisateur
Français
45
La description du dispositif
A
+
−
AAA
+
−
AAA
+
−
AAA
1. Aches les recommandations concernant le changement des conditions
d’environnement (More Wet - plus humide; No Change – aucun
changement; More Dry - plus sec)
2. Aches l’heure (12h/ 24h)
3. Aches les conditions climatiques externes
4. Bouton multifonctionnel: changement de la chaîne/augmenter la
valeur achée sur l’écran
5. Bouton multifonctionnel: changer entre °C si°F/confirmer un réglage

Manuel utilisateur
Français
46
6. Bouton multifonctionnel: mémoire/réduire la valeur achée sur
l’écran
7. Aches les conditions climatiques à l’intérieur de la maison.
8. Bouton éclairage de l’écran
9. Les branchements
10. Le compartiment des batteries
11. La béquille
12. Le couvercle du compartiment des batteries
B
+
−
AAA
+
−
AAA
13. L’écran
14. L’indicateur

Manuel utilisateur
Français
47
15. Les branchements
16. Le bouton TX
17. Le bouton de sélection °C/°F
18. Le sélecteur de la chaîne (1/2/3)
19. Le compartiment des batteries
20. Le couvercle du compartiment des batteries
Choisir l’emplacement d’installation
»Lorsque vous choisissez la location, assurez-vous que le dispositif ne sera
pas exposé au soleil, à la poussiere, à l’humidité, à la chaleur ou au froid
excessif.
»Il ne faut pas emplacer le dispositif à proximité de sources de chaleur.
»Vous devez installer le capteur extérieur à une distance maximale de 50
mètres de la station météo. Entre les deux dispositifs il ne faut exister des
obstacles qui puissent aecter la communication (par exemple les murs
en béton).
Les instructions d’utilisation du capteur pour l’extérieur
1. Introduisez dans le compartiment des batteries 2 batteries de type AAA.
2. L’indicateur va courtement clignoter et la température, l’humidité et la
chaîne de communication radio seront achées sur l’écran (par exemple
CH 1).
3. Alors la LED va clignoter une fois par minute afin de confirmer la
communication avec la statia météo (l’unité interne).
Les instructions d’utilisation de la station météo
1. Introduisez dans le compartiment des batteries 3 batteries de type AAA.
2. L’écran va s’allumer et les informations climatiques seront achées.
3. La station météo va chercher la communication avec le capteur de
l’extérieur.
4. Les pictogrammes et vont confirmer la communication avec le
capteur.

Manuel utilisateur
Français
48
Si pendant 3 minutes la température et l’humidité extérieure ne sont pas
achées sur l’écran, la station météo va arrêter la recherche du signal radio
du capteur. Le symbole disparaît de l’écran et au lieu de la température
et de l’humidité les symboles et seront achés.
L’absence du signal du capteur peut être causée par les obstacles ou par la
distance plus grande entre les deux unités.
Si vous ne pouvez pas établir une connexion automatique entre les deux
unités, vous pouvez suivre la procédure manuelle suivante:
1. Tenez appuyé sur le bouton jusqu’à ce que symbole commence à
clignoter sur l’écran.
2. Appuyez sur le bouton TX du capteur externe afin de transmettre un
signal radio à l’unité de l’intérieur.
Changer la chaîne de communication
Il y a 3 chaînes de communication radio disponibles entre les deux unités. La
chaîne 1 est prédéfinie.
»Ouvrez le compartiement des batteries.
»Changez le sélecteur des chaînes à l’une des 3 positions.
»Tenez appuyé sur le bouton jusqu’à ce que le symbole clignote sur
l’écran du capteur.
»Appuyez sur le bouton TX du capteur externe afin de transmettre un
signal radio à l’unité de l’intérieur.
L’unité d’intérieur va automatiquement acher la nouvelle chaîne de
communication. Si cela n’arrive pas, vous pouvez manuellement changer le
numéro de la chaîne de communication. Appuyez plusieurs fois sur le bouton
pour changer entre les 3 chaînes: , , ou (aches en boucle
les 3 chaînes).
Régler le temps
1. Tenez appuyé sur le bouton pendant environ 3 secondes. L’indicateur
pour l’heure va clignoter sur l’écran.
2. Appuyez sur le boutonl ou pour atteindre la valeur désirée.

Manuel utilisateur
Français
49
3. Appuyez de nouveau sur le bouton afin de confirmer. L’indicateur
pour les minutes va clignoter sur l’écran.
4. Appuyez sur le bouton ou pour atteindre la valeur désirée.
5. Appuyez de nouveau sur le bouton afin de confirmer. Le symbole
va clignoter sur l’écran.
6. Appuyez sur le bouton ou afin de choisir entre le format 12 ou 24
heures.
7. Appuyez sur le bouton afin de confirmer. Le symbole vva clignoter
sur l’écran (pour activer le stockage des données mesurées pendant 24
heures).
8. Appuyez sur le bouton ou pour désactiver cette fonction. Sur
l’écran sera aché le symbole .
9. Appuyez sur le bouton afin de confirmer. L’écran revient au mode
d’achage normal.
Observation: Si vous avez activé ( ) la fonction de stockage des données
mesurées pendant 24 heures, les valeurs MIN et MAX stockées seront eacées
chaque jour à minuit. Si vous avez désactivé cette fonction ( ) les données
seront stockées jusqu’à l’épuisement de la batterie.
L’achage dans le mode standard
Après avoir réglé le temps et la communication avec le capteur externe a été
établie, le dispositif se trouve dans le mode d’achage standard.
Dans le mode standard, la station météo ache les informations suivantes:
»L’heure (12h/24h)
L’heure est achée par défaut dans le mode 24 h. Si vous choisissez le mode
12 h, le symbole “PM” ou “AM“sera aché devant l’heure.

Manuel utilisateur
Français
50
»Les conditions climatiques à l’intérieur de la maison.
La température est exprimé en degrés Celsius (°C) ou Fahrenheit (°F) et
inclut une décimale (par exemple 22.8°C).
Si la température descend en dessous de -9.9°C ou si la température monte
au-dessus de +50°C, sur l’écran seront achés les symboles (low) et
(high).
L’humidité relative (RH%) est également achées au-dessus de la valeur de
température.
Si sur le côté droit de la valeur d’humidité apparaît le symbole , vous devez
remplacer les batteries de l’unité d’intérieur.
Le niveau de confort (WET - humide; COMFORT – optimal; DRY - sec) est
également aché dans cette zone.
Humide. La valeur d'humidité entre 66% et 95%
Optimal. La valeur d'humidité entre 45% et 65%
Sec. La valeur d'humidité entre 20% et 44%
Les recommandations de ventilation de la chambre
En vertu des valeurs de température et humidité à l’intérieur et à l’extérieur

Manuel utilisateur
Français
51
de la maison, la station météo peut recommander d’ouvrir ou de fermer
les fenêtres pour améliorer les conditions climatiques.
»Les recommandations pour changer les conditions climatiques
En vertu des valeurs de température et humidité à l’intérieur et à l’extérieur de
la maison, la station météo peut recommander la modification des conditions
climatiques.
Plus humide. On vous recommande l’augmentation de la valeur
d’humidité d’au moins 5%.
Constant. L'augmentation ou la réduction de la valeur d'humidité
ne doit pas dépasser 4%.
Plus sec. On vous recommande la réduction de la valeur
d'humidité d'au moins 5%.
L’achage des conditions climatiques externes
La température est exprimé en degrés Celsius (°C) ou Fahrenheit (°F) et
inclut une décimale (par exemple 22.8°C).
Si la température descend en dessous de -40°C ou si la température monte
au-dessus de +60°C (ou -40°F et 140°F) sur l’écran seront achés les
symboles (low) si (high).
L’humidité relative (RH%) est également achées au-dessus de la valeur de
température.
La chaîne de communication radio (par exemple ) montre sur quelle chaîne
on a établi la communication entre l’unité d’intérieur et l’unité d’extérieur.

Manuel utilisateur
Français
52
Si sur le côté droit de la valeur d’humidité apparaît le symbole , vous devez
remplacer les batteries de l’unité d’extérieur.
L’achage des valeurs maximales et minimales de
température et humidité
Les valeurs maximales et minimales de température et humidité seront
automatiquement stockées.
Pour acher ces valeurs:
»Appuyez une seule fois sur le bouton . Le symbole apparaît dans
la zone d’écran qui aches les conditions climatiques internes et dans
la zone des valeurs externes, près de la valeur d’humidité. Les valeurs
d’humidité et de température seront modifiées sur l’écran et les valeurs
maximales enregistrées par la station météo seront achées.
»Appuyez deux fois sur le bouton . Le symbole apparaît dans la zone
d’écran qui aches les conditions climatiques internes et dans la zone
des valeurs externes, près de la valeur d’humidité. Les valeurs d’humidité
et de température seront modifiées sur l’écran et les valeurs minimales
enregistrées par la station météo seront achées.
»Appuyez 3 fois sur le bouton pour eacer les valeurs minimales et
maximales enregistrées.
Changer l’unité de mesure de la température
Appuyez une seule fois sur le bouton pour changer entre°C et °F pour la
température de l’intérieur et pour celle de l’extérieur.

Manuel utilisateur
Français
53
Problèmes et solutions
Défaut La cause possible Recommandations
Les deux unités
ne peuvent pas
communiquer entre
eux.
Il y a des obstacles
entre les deux unités
(par exemple les murs
en béton) ou d’autres
dispositifs radio
qui créent des
interférences.
Changez la location
des deux unités
et essayez leur
accouplement.
Distance plus grande
entre les deux unités. Réduisez la distance
entre les deux unités.
Les batteries de l’une
des deux unités sont
déchargées.
Remplacez les
batteries.
Les spécifications techniques
La station météo
Alimentation 3 x batteries AAA 1.5V
Plage de mesure -9.9°C ~ +50°C/+14°F ~ +122°C
Résolution température 0.1°C/0.1°F
Plage de mesure humidité 20% ~ 95%RH
Résolution humidité 1%
Le capteur externe
Alimentation 2 x batteries AAA 1.5V
Plage de mesure -40°C ~ +60°C/-40°F ~ +144°C
Résolution température 0.1°C/0.1°F
Plage de mesure humidité 20% ~ 95%RH
Résolution humidité 1%
Fréquence communication radio 433MHz
Puissance d’émission 10 mW
Distance de communication max. 50 mètres (en plein champ)
Classe de résistance à l'eau IPX4 (pulverisation)

Használati utasítás
Magyar
54
Különleges figyelmeztetések
»A termék használata előtt ismerkedjen meg a működésével. Olvassa el
figyelmesen a használati utasítást és a biztonsági figyelmeztetéseket.
»Ezt a terméket csak a kézikönyvben említett célra és csak a leírtak szerint
használja.
»Nem vállalunk felelősséget a készülék nem rendeltetésszerű használatából,
jogosulatlan módosításából vagy javításából eredő anyagi vagy személyi
sérülésekért.
»Ezt a készüléket legalább 8 éves gyermekek, valamint korlátozott szellemi
és fizikai képességű személyek használhatják, feltéve, hogy felügyelik őket,
vagy kioktatják őket a készülék használatára és a lehetséges kockázatokra
vonatkozóan.
»Ne próbálja meg használni ezt a készüléket, ha hibás.
»Ne tegye ki a készüléket közvetlen napfénynek, túlzott pornak vagy
nedvességnek.
»Ez a készülék akkumulátort használ. Az elemeket tartsa távol a
gyermekektől. Ne használjon különböző márkájú és eltérő töltési fokozatú
akkumulátorokat. Ne próbáljon sérült elemeket használni. Ehhez a
készülékhez csak az ajánlott típusú elemeket használja. Ne próbálja meg
feltölteni a nem újratölthető elemeket. Ha folyadékok szivárognak ki az
elemekből, bőrirritáló hatásúak lehetnek, sőt mérgezőek is lehetnek. Az
ilyen elemeket csak kesztyűben szabad kezelni, és a speciálisan erre a célra
kialakított helyen dobja ki. Ha hosszabb ideig nem használja a készüléket,
javasoljuk, hogy vegye ki az elemeket.
Termékbemutató
Ez az időjárás-állomás információkat nyújt a beltéri és kültéri hőmérsékletről
Celsius-fokban (°C) vagy Fahrenheit-fokban (°F), valamint a páratartalomról.
Az LCD-képernyőn ikonok jelennek meg a beltéri szellőztetésre, a helyiségklíma
változására és a helyiségklíma értékelésére vonatkozó ajánlásokkal.
Ezt az eszközt csak otthoni használatra hozták létre, kereskedelmi használatra
nem ajánlott.

Használati utasítás
Magyar
55
Készülék leírása
A
+
−
AAA
+
−
AAA
+
−
AAA
1. Javaslatokat jelenít meg a változó környezeti feltételekhez (nedvesebb;
nincs változás; több száraz)
2. Időkijelzés (12h/24h)
3. Megjeleníti a kültéri időjárási viszonyokat
4. Többfunkciós gomb: Csatornaváltás/A képernyőn megjelenő érték
növelése
5. Többfunkciós gomb: Váltás°C és°F között/Megerősít egy beállítás
6. Többfunkciós gomb: Memória/Csökkenti a képernyőn megjelenő

Használati utasítás
Magyar
56
értéket
7. Megjeleníti a házon belüli időjárási viszonyokat.
8. Képernyő-megvilágítás gomb
9. Akasztók
10. Elemtartó
11. Támaszláb
12. Elemtartó rekesz fedele
B
+
−
AAA
+
−
AAA
13. Kijelző
14. LED kijelző
15. Akasztók

Használati utasítás
Magyar
57
16. TX gomb
17. °C/°F gomb
18. Csatornaválasztó (1/2/3)
19. Elemtartó
20. Elemtartó rekesz fedele
A telepítés helyének kiválasztása
»A hely kiválasztásakor ügyeljen arra, hogy a készüléket ne érje napfény,
por, nedvesség, meleg vagy túlzott hideg.
»Ne helyezze a készüléket hőforrások közelébe.
»A kültéri érzékelőt legfeljebb 50 méterre helyezze el a meteorológiai
állomástól. Győződjön meg arról, hogy a két eszköz között nincsenek
olyan akadályok, amelyek befolyásolhatják a kommunikációt (például
betonfalak).
Útmutató a kültéri érzékelő használatához
1. Helyezzen be 2 db AAA elemet az elemtartóba.
2. A jelzőfény röviden felvillan, és a hőmérséklet, a páratartalom és a
rádiókommunikációs csatorna (pl. CH 1) megjelenik a képernyőn.
3. Ezután a LED percenként egyszer felvillan, megerősítve a kommunikációt
az időjárás állomással (beltéri egység)
Útmutató az időjárás állomás használatához
1. Helyezzen be 3 db AAA elemet az elemtartóba.
2. A képernyő világít, és rövid ideig megjeleníti az időjárási információkat.
3. Az időjárás-állomás úgy néz ki, hogy kommunikál a kültéri érzékelővel.
4. Az ikonok és megerősíti a kommunikációt az érzékelővel.
Ha a külső hőmérséklet és páratartalom 3 percig nem jelenik meg a
képernyőn, az időjárás állomás leállítja az érzékelő rádiójelének keresését. Az
ikon eltűnik a képernyőről, a hőmérséklet és páratartalom helyett pedig a
szimbólumok és meg fog jelenni.
Az érzékelő jelének hiányát akadályok vagy a két egység közötti túl nagy

Használati utasítás
Magyar
58
távolság okozhatja.
Ha nem tud automatikus kapcsolatot létrehozni a két egység között, kövesse
az alábbi manuális eljárást:
1. Tartsa lenyomva a gombot egészen az ikonig villogni kezd.
2. Nyomja meg a TX gombot a kültéri érzékelőn, hogy rádiójelet küldjön a
beltéri egységnek.
A kommunikációs csatorna megváltoztatása
A két egység között 3 rádiókommunikációs csatorna áll rendelkezésre. Az 1.
csatorna előre meghatározott.
»Nyissa ki az elemtartó rekeszt.
»Állítsa a csatornaválasztót a 3 pozíció egyikére.
»Tartsa lenyomva a gombot a szimbólumig villog a kültéri érzékelő
képernyőjén.
»Nyomja meg a TX gombot a kültéri érzékelőn, hogy rádiójelet küldjön a
beltéri egységnek.
A beltéri egység automatikusan megjeleníti az új kommunikációs csatornát.
Ha azonban ez nem történik meg, manuálisan módosíthatja a kommunikációs
csatorna számát. Nyomja meg többször a gombot a 3 csatorna közötti
váltáshoz: , , vagy (megjeleníti a hurok 3 csatornáját)
Idő beállítás
1. Tartsa lenyomva a gombot körülbelül 3 másodpercig. Az időjelző
villogni fog a képernyőn.
2. Nyomja meg a gombot vagy hogy elérjük a kívánt értéket.
3. Nyomja meg újra a gombot megerősítéséhez. A percjelző villogni fog
a képernyőn.
4. Nyomja meg a gombot vagy hogy elérjük a kívánt értéket.
5. Nyomja meg újra a gombot megerősítéséhez. Az ikon villogni
fog a képernyőn.
6. Press the button vagy 12 vagy 24 órás formátum közül választhat.
7. nyomja meg a gombot megerősítéséhez. Az ikon villog a képernyőn

Használati utasítás
Magyar
59
(aktiválja a mért adatok 24 órás tárolását).
8. nyomja meg a gombot vagy a funkció letiltásához. A szimbólum
megjelenik a képernyőn.
9. nyomja meg a gombot megerősítéséhez. A képernyő visszatér normál
megjelenítési módba.
Megjegyzés: Ha aktiválta ( ) a 24 órás memóriatárolás funkcióval minden nap
éjfélkor törlődnek az elmentett MIN és MAX értékek. Ha letiltotta ezt a funkciót (
) az adatok az akkumulátor lemerüléséig a memóriában maradnak.
Kijelző alap módban
Miután beállította az időt, és létrejött a kommunikáció a kültéri érzékelővel, a
készülék alapkijelzési módba kerül.
Alap módban az időjárás állomás a következő információkat jeleníti meg:
»Idő (12h/24h)
Az idő alapértelmezés szerint 24 órás módban jelenik meg. Ha a 12 órás módot
választja, a „PM” vagy „AM” szimbólum jelenik meg az idő előtt.
»Beltéri éghajlati viszonyok
A hőmérséklet Celsius-fokban (°C) vagy Fahrenheit-fokban (°F) van

Használati utasítás
Magyar
60
megadva, és egy tizedes pontossággal jelenik meg (pl. 22,8°C).
Ha a hőmérséklet -9,9°C alá csökken és +50°C fölé emelkedik, a
szimbólumok (low) és (magas) jelenik meg a képernyőn.
A hőmérsékleti érték felett a relatív páratartalom (RH%) is megjelenik.
Ha a szimbólum A páratartalom értékének jobb oldalán megjelenik, ki kell
cserélni a beltéri egység elemeit.
Ezen a területen a komfortfokozat (WET; COMFORT; DRY) is megjelenik.
Nedves. A páratartalom 66% és 95% között van
Optimális. A páratartalom 45% és 65% között van
Száraz. A páratartalom 20% és 44% között van
Szellőztetési javaslat
A házon belüli és kívüli hőmérséklet és páratartalom értékek alapján a
meteorológiai állomás javasolhatja a bezárást vagy nyítás ablakok az
éghajlati viszonyok javítására.
»A szoba klímaváltozása
A házon belüli és kívüli hőmérséklet és páratartalom értékek alapján a
meteorológiai állomás javasolhatja az időjárási viszonyok megváltoztatását.
Csillapító. A páratartalom legalább 5%-os növelése javasolt.
Állandó. A páratartalom javasolt növelése vagy csökkentése nem
haladhatja meg a 4%-ot.
Szárító. A páratartalom legalább 5%-os csökkentése javasolt

Használati utasítás
Magyar
61
Kültéri éghajlati viszonyok
A hőmérséklet Celsius-fokban (°C) vagy Fahrenheit-fokban (°F) van
megadva, és egy tizedesjegyet is tartalmaz (pl. 22,8°C).
Ha a hőmérséklet -40°C alá csökken és +60°C fölé emelkedik, a szimbólumok
(low) és (magas) jelenik meg a képernyőn.
A hőmérsékleti érték felett a relatív páratartalom (RH%) is megjelenik.
Rádiós kommunikációs csatorna (pl ) megmutatja, hogy melyik csatornán
jött létre a kommunikáció a beltéri és a kültéri egység között.
Ha a szimbólum üzenet jelenik meg a kommunikációs csatorna jobb oldalán,
ki kell cserélni a kültéri egység elemeit.
Hőmérséklet és páratartalom maximum és minimum
értékeinek kijelzése
A hőmérséklet és páratartalom maximális és minimum értékei automatikusan
mentésre kerülnek.
Megjeleníteni őket:
»Nyomja meg a gombot egyszer. Az ikon megjelenik mind a
beltéri klímaviszonyokat megjelenítő képernyőterületen, mind a kültéri
értékeket tartalmazó területen a páratartalom mellett. A páratartalom és
a hőmérséklet értékek megváltoznak a képernyőn, és az időjárás állomás
által rögzített maximális értékek jelennek meg.
»Nyomja meg a gombot kétszer. Az ikon megjelenik mind a
beltéri klímaviszonyokat megjelenítő képernyőterületen, mind a kültéri
értékeket tartalmazó területen a páratartalom mellett. A páratartalom

Használati utasítás
Magyar
62
és a hőmérséklet értékek megváltoznak a képernyőn, és megjelenik a
meteorológiai állomás által rögzített minimális érték.
»Nyomja meg háromszor a gombot a rögzített minimum és maximum
értékek törléséhez.
A hőmérséklet mértékegységének megváltoztatása
Nyomja meg a gombot egyszer váltson °C és °F között mind a beltéri,
mind a kültéri hőmérsékleten.
Hibaelhárítás
Problem Lehetséges ok Ajánlást
The two units cannot
communicate with
each other.
A két egység között
akadályok (például
betonfalak) vagy egyéb
interferenciát okozó
rádióberendezések
találhatók.
Módosítsa a két egység
helyét, és próbálja újra
párosítani őket.
Túl nagy a távolság a
két egység között.
Csökkentse a
távolságot a két egység
között.
A két egység egyikének
akkumulátora lemerült Cserélje ki az elemeket
Műszaki adatok
Meteorológiai állomás
Tápegység 3 x AAA 1,5 V-os elem
Hőmérséklet mérési tartomány -9.9°C ~ +50°C/+14°F ~ +122°C
Hőmérséklet felbontás 0.1°C/0.1°F
Páratartalom mérési tartomány 20% ~ 95%RH
Páratartalom felbontás 1%

Használati utasítás
Magyar
63
Kültéri érzékelő
Tápegység 2 x AAA 1,5 V-os elem
Hőmérséklet mérési tartomány -40°C ~ +60°C/-40°F ~ +144°C
Hőmérséklet felbontás 0.1°C/0.1°F
Páratartalom mérési tartomány 20% ~ 95%RH
Páratartalom felbontás 1%
Átviteli frekvencia 433MHz
Átviteli teljesítmény 10 mW
Kommunikációs távolság max. 50 m (nyitott reszelőben)
Vízállósági osztály IPX4 (fröccsenésálló)

Manuale utente
Italiano
64
Avvertenze
»Prima di utilizzare questo prodotto, leggere attentamente le istruzioni per
l’uso e le avvertenze di sicurezza.
»Utilizzare questo prodotto solo per lo scopo indicato nel manuale e solo
come descritto.
»Non accettiamo responsabilità per danni a cose o lesioni personali
derivanti da un uso improprio del dispositivo, modifiche non autorizzate
o riparazioni.
»Questo dispositivo può essere utilizzato da bambini di almeno 8 anni di
età e da persone con capacità mentali e fisiche limitate, a condizione
che siano supervisionati o istruiti sul funzionamento del dispositivo e sui
potenziali rischi.
»Non tentare di utilizzare questo dispositivo se è difettoso.
»Non esporre il dispositivo alla luce solare diretta, a polvere o umidità
eccessive.
»Questo dispositivo utilizza batterie. Tenere le batterie fuori dalla portata
dei bambini. Non utilizzare batterie di marche diverse e con diversi gradi
di carica. Non tentare di utilizzare batterie danneggiate. Per questo
dispositivo, utilizzare solo il tipo di batterie raccomandato. Non tentare
di caricare batterie non ricaricabili. Se le batterie perdono dei liquidi,
questi possono avere un eetto irritante sulla pelle e possono persino
essere tossici. Maneggiare tali batterie solo con guanti e smaltirle in luoghi
appositamente progettati. Se non si utilizza il dispositivo per un lungo
periodo, si consiglia di rimuovere le batterie.
Presentazione del prodotto
Questa stazione meteorologica fornisce informazioni sulla temperatura
all’interno della casa e la temperatura esterna espressa in gradi Celsius (°C) o
Fahrenheit (°F) e informazioni sull’umidità. Lo schermo LCD visualizza icone
con raccomandazioni per la ventilazione della casa, la valutazione del clima e i
cambiamenti climatici nella stanza.
Questo dispositivo è stato progettato solo per uso domestico e non è
raccomandato per uso commerciale.

Manuale utente
Italiano
65
Descrizione del dispositivo
A
+
−
AAA
+
−
AAA
+
−
AAA
1. Visualizza i consigli per il cambiamento delle condizioni ambientali (More
Wet - più umido; No Change - Nessun cambiamento; More Dry - Più
secco)
2. Mostra l’ora (formato 12h/24h)
3. Visualizza le condizioni meteorologiche esterne
4. Tasto multifunzione: cambia canale/aumenta il valore visualizzato sullo
schermo
5. Tasto multifunzione: passa da°C a°F/Conferma un’impostazione

Manuale utente
Italiano
66
6. Tasto multifunzione: memoria/riduce il valore visualizzato sullo schermo
7. Visualizza le condizioni meteorologiche all’interno della casa.
8. Pulsante di illuminazione dello schermo
9. Agganci
10. Compartimento della batteria
11. Supporto
12. Coperchio vano batteria
B
+
−
AAA
+
−
AAA
13. Schermo
14. Led indicatore
15. Agganci

Manuale utente
Italiano
67
16. Pulsante TX
17. Selezione°C/°F
18. Selettore canale di communicazione (1/2/3)
19. Compartimento della batteria
20. Coperchio vano batteria
Scelta del luogo di installazione
»Quando si sceglie la posizione, assicurarsi che il dispositivo non sia esposto
a sole, polvere, umidità, calore o freddo eccessivo.
»Non posizionare il dispositivo vicino a fonti di calore.
»Installare il sensore esterno a una distanza massima di 50 metri dalla
stazione meteorologica. Assicurarsi che non vi siano ostacoli tra i due
dispositivi che potrebbero influire sulla comunicazione (ad esempio muri
di cemento).
Istruzioni per l’uso del sensore esterno
1. Inserire 2 batterie AAA nel vano batterie
2. Il LED lampeggerà brevemente e la temperatura, l’umidità ed il canale di
comunicazione radio (es. CH 1) verrano visualizzati sullo schermo.
3. Successivamente, il LED lampeggerà una volta al minuto per confermare
la comunicazione con la stazione meteorologica (unità interna).
Istruzioni per l’uso della stazione meteorologica
1. Inserire 3 batterie AAA nel vano batterie.
2. Lo schermo si illuminerà e visualizzerà a breve le informazioni
meteorologiche.
3. La stazione meteorologica cercherà la comunicazione con il sensore
dall’esterno.
4. Le icone e confermerano la comunicazione con il sensore.
Se la temperatura esterna e l’umidità non compaiono sullo schermo per 3
minuti, la stazione meteorologica interromperà la ricerca del segnale radio dal
sensore. L’icona scomparirà dallo schermo e al posto della temperatura e

Manuale utente
Italiano
68
dell’umidità appariranno le icone e .
La mancanza di segnale dal sensore può essere causata da ostacoli o troppa
distanza tra le due unità.
Se non si riesce a stabilire una connessione automatica tra le due unità, è
possibile seguire la procedura manuale di seguito:
1. Tenere premuto il tasto fino a quando l’icona incomincia a
lampeggiare sullo schermo del sensore esterno.
2. Premere il pulsante TX sul sensore esterno per trasmettere un segnale
radio all’unità interna.
Modifica del canale di comunicazione
Sono disponibili 3 canali di comunicazione radio tra le due unità. Il canale 1 è
predefinito.
»Aprire il vano batterie.
»Cambiare il selettore di canale in una delle 3 posizioni.
»Tenere premuto il tasto fino a quando l’icona incomincia a
lampeggiare sullo schermo del sensore esterno.
»Premere il pulsante TX sul sensore esterno per trasmettere un segnale
radio all’unità interna.
L’unità interna visualizzerà automaticamente il nuovo canale di comunicazione.
Tuttavia, se ciò non accade, è possibile modificare manualmente il numero del
canale di comunicazione. Premere più volte il pulsante per passare tra i 3
canali: , , oppure (visualizza i 3 canali nel loop)
Impostazione ora
1. Tenere premuto il tasto per circa 3 secondi. L’indicatore dell’ora
lampeggerà sullo schermo.
2. Premere il tasto oppure per raggiungere il valore desiderato.
3. Premere di nuovo il tasto per confermare. L’indicatore dei minuti
lampeggerà sullo schermo.
4. Premere il tasto oppure per raggiungere il valore desiderato.
5. Premere di nuovo il tasto per confermare. L’icona lampeggerà

Manuale utente
Italiano
69
sullo schermo.
6. Premere il tasto oppure per scegliere tra il formato 12 o 24 ore.
7. Premere il tasto per confermare. L’icona lampeggerà sullo schermo
(abilita la memorizzazione 24 ore su 24 dei dati misurati).
8. Premere il tasto oppure per disabilitare questa funzione. L’icona
apparirà sullo schermo.
9. Premere il tasto per confermare. Lo schermo tornerà alla normale
modalità di visualizzazione.
Nota: Se ha attivato ( ) la funzione di memorizzazione della memoria 24 ore
su 24, i valori MIN e MAX salvati verranno cancellati ogni giorno a mezzanotte.
Se ha disabilitato questa funzione ( ) i dati rimarranno in memoria fino
all’esaurimento della batteria.
Lo schermo nella modalità standard
Dopo aver impostato l’ora e aver stabilito la comunicazione con il sensore
esterno, il dispositivo è in modalità di visualizzazione standard.
In modalità standard, la stazione meteorologica visualizza le seguenti
informazioni:
»L’ora (12h/24h)
L’ora è per impostazione predefinita in modalità 24 ore. Se si seleziona la
modalità 12h, il simbolo “PM” o “AM” appare davanti all’ora.
»Condizioni climatiche all’interno della casa.

Manuale utente
Italiano
70
La temperatura è espressa in gradi Celsius (°C) o gradi Fahrenheit (°F) e
include un decimale (ad es. 22,8°C).
Se la temperatura scende sotto -9,9°C e sale sopra + 50°C (o 14°F e 122°F)
i simboli (low) si (high) appaiono sullo schermo.
L’umidità relativa (RH%) viene visualizzata sopra il valore della temperatura.
Se il simbolo appare sul lato destro del valore di umidità, è necessario
sostituire le batterie dell’unità interna.
Il livello di comfort (WET - umido; COMFORT - ottimo; DRY - asciuto)
viene visualizzato in quest’area.
Umido. L'umidità è compresa tra il 66% e il 95%
Ottimo. L'umidità è tra il 45% e il 65%
Asciutto. L'umidità è compresa tra il 20% e il 44%
Raccomandazioni sulla ventilazione della stanza
In base ai valori di temperatura e umidità sia all’interno che all’esterno della
casa, la stazione meteorologica può raccomandare di chiudere o aprire
le finestre per migliorare le condizioni meteorologiche.
»Raccomandazioni per il cambiamento delle condizioni climatiche

Manuale utente
Italiano
71
In base ai valori di temperatura e umidità sia all’interno che all’esterno della
casa, la stazione meteorologica può consigliare di modificare le condizioni
meteorologiche.
Più umido. Si consiglia un aumento dell'umidità di almeno il 5%.
Costante. L'aumento o la diminuzione dell'umidità raccomandati
non devono superare il 4%.
Più asciuto. Si consiglia una riduzione dell'umidità di almeno il 5%.
Visualizzazione delle condizioni climatiche esterne
La temperatura è espressa in gradi Celsius (°C) o gradi Fahrenheit (°F) e
include un decimale (ad es. 22,8°C).
Se la temperatura scende sotto -40°C e sale sopra + 60°C (o -40°F e 140°F)
i simboli (low) si (high) appaiono sullo schermo.
L’umidità relativa (RH%) viene visualizzata sopra il valore della temperatura.
Il canale di comunicazione radio (per esempio ) mostra su quale canale è
stata stabilita la comunicazione tra l’unità interna ed esterna.
Se il simbolo appare sul lato destro del valore di umidità, è necessario
sostituire le batterie dell’unità esterna.
Visualizzazione del valore massimo e minimo di temperatura

Manuale utente
Italiano
72
e umidità
I valori massimo e minimo di temperatura e umidità vengono salvati
automaticamente.
Per visualizzarli:
»Premere una volta il tasto . L’icona appare sia nell’area dello
schermo che mostra le condizioni climatiche interne, sia nell’area
con i valori esterni, accanto al valore dell’umidità. I valori di umidità e
temperatura cambieranno sullo schermo e verranno visualizzati i valori
massimi registrati dalla stazione meteorologica.
»Premere due volte il tasto . L’icona appare sia nell’area dello
schermo che mostra le condizioni climatiche interne, sia nell’area
con i valori esterni, accanto al valore dell’umidità. I valori di umidità e
temperatura cambieranno sullo schermo e verranno visualizzati i valori
minimi registrati dalla stazione meteorologica.
»Premere 3 volte il tasto per cancellare i valori minimi e massimi
registrati.
Modifica dell’unità di misurazione della temperatura
Premere una volta il tasto per cambiare tra°C e°F.
Problemi e soluzioni
Problema Possibile causa Raccomandazione
Le due unità non
possono comunicare
tra loro.
Tra le due unità sono
presenti ostacoli
(muri di cemento,
ad esempio) o altri
dispositivi radio che
creano interferenze.
Cambiare la posizione
delle due unità e
riprovare il loro
accoppiamento.
Distanza toppo lunga
tra le due unità. Ridurre la distanza tra
le due unità.
Le batterie di una delle
due unità sono scariche Sostituire le batterie.
Specifiche tecniche

Manuale utente
Italiano
73
Stazione meteo
Alimentazione 3 x batterie AAA 1.5V
Intervallo di misurazione della
temperatura -9.9°C ~ +50°C/+14°F ~ +122°C
Risoluzione della temperatura 0.1°C/0.1°F
Intervallo di misurazione dell'umidità 20% ~ 95%RH
Risoluzione dell'umidità 1%
Sensore esterno
Alimentazione 2 x batterie AAA 1.5V
Intervallo di misurazione della
temperatura -40°C ~ +60°C/-40°F ~ +144°C
Risoluzione della temperatura 0.1°C/0.1°F
Intervallo di misurazione dell'umidità 20% ~ 95%RH
Risoluzione dell'umidità 1%
Frequenza di comunicazione radio 433MHz
Potenza di trasmissione 10 mW
Distanza di comunicazione al massimo 50 m (in campo aperto)
Classe di resistenza all'acqua IPX4 (spruzzi d’acqua)

Handleiding
Nederlands
74
Speciale waarschuwingen
»Voordat u dit product gebruikt, moet u vertrouwd raken met hoe
het werkt. Lees de gebruiksaanwijzing en veiligheidswaarschuwingen
aandachtig door.
»Gebruik dit product alleen voor het in de handleiding genoemde doel en
alleen zoals beschreven.
»Wij aanvaarden geen enkele aansprakelijkheid voor materiële schade of
persoonlijk letsel als gevolg van oneigenlijk gebruik van het apparaat,
ongeautoriseerde wijzigingen of reparaties eraan.
»Dit apparaat mag worden gebruikt door kinderen vanaf 8 jaar en door
personen met beperkte mentale en fysieke vermogens, op voorwaarde
dat ze onder toezicht staan of instructies krijgen over de bediening van
het apparaat en de mogelijke risico’s.
»Probeer dit apparaat niet te gebruiken als het defect is.
»Stel het apparaat niet bloot aan direct zonlicht, overmatig stof of vocht.
»Dit apparaat gebruikt batterijen. Houd batterijen buiten het bereik
van kinderen. Gebruik geen batterijen van verschillende merken en
met verschillende laadgraden. Probeer geen beschadigde batterijen
te gebruiken. Gebruik voor dit apparaat alleen het aanbevolen type
batterijen. Probeer niet om niet-oplaadbare batterijen op te laden. Als
er vloeistoen uit de batterijen lekken, kunnen ze irriterend werken
op de huid en zelfs giftig zijn. Hanteer dergelijke batterijen alleen met
handschoenen en gooi ze weg op speciaal daarvoor bestemde plaatsen.
Als u het apparaat lange tijd niet gebruikt, raden wij u aan de batterijen
te verwijderen.
Productpresentatie
Dit weerstation geeft informatie over de binnen- en buitentemperatuur
uitgedrukt in graden Celsius (°C) of Fahrenheit graden (°F) en informatie over
luchtvochtigheid. Op het LCD-scherm worden pictogrammen weergegeven
met aanbevelingen voor binnenventilatie, klimaatverandering in de ruimte en
evaluatie van het ruimteklimaat.
Dit apparaat is alleen gemaakt voor thuisgebruik en wordt niet aanbevolen
voor commercieel gebruik.

Handleiding
Nederlands
75
Apparaat beschrijving
A
+
−
AAA
+
−
AAA
+
−
AAA
1. Geeft aanbevelingen weer voor veranderende omgevingsomstandigheden
(nat; geen verandering; meer droog)
2. Tijdweergave (12u/ 24u)
3. Geeft weersomstandigheden buitenshuis weer
4. Multifunctionele knop: Verander van kanaal/Verhoog de waarde die
op het scherm wordt weergegeven
5. Multifunctionele knop: Schakelt tussen °C en °F/Bevestigt een
instelling

Handleiding
Nederlands
76
6. Multifunctionele knop: Geheugen/Verlaagt de waarde die op het
scherm wordt weergegeven
7. Geeft de weersomstandigheden in huis weer.
8. Knop voor schermverlichting
9. hangers
10. Batterijcompartiment
11. steun voet
12. Deksel van het batterijcompartiment
B
+
−
AAA
+
−
AAA
13. Weergave
14. LED-indicator

Handleiding
Nederlands
77
15. hangers
16. TX-knop
17. °C/°F-knop
18. Kanaalkiezer (1/2/3)
19. Batterijcompartiment
20. Deksel van het batterijcompartiment
De installatielocatie kiezen
• Zorg er bij het kiezen van de locatie voor dat het apparaat niet wordt
blootgesteld aan zonlicht, stof, vocht, hitte of extreme kou.
• Plaats het apparaat niet in de buurt van warmtebronnen.
• Installeer de buitensensor op maximaal 50 meter afstand van het
weerstation. Zorg ervoor dat er geen obstakels zijn tussen de twee
apparaten die de communicatie kunnen beïnvloeden (bijvoorbeeld
betonnen muren).
Instructies voor het gebruik van de buitensensor
1. Plaats 2 AAA-batterijen in het batterijcompartiment.
2. Het indicatielampje knippert kort en de temperatuur, vochtigheid
en het radiocommunicatiekanaal (bijv. CH 1) worden op het scherm
weergegeven.
3. Vervolgens zal de LED eenmaal per minuut knipperen om de
communicatie met het weerstation (binnenunit) te bevestigen.
Instructies voor het gebruik van het weerstation
1. Plaats 3 AAA-batterijen in het batterijcompartiment.
2. Het scherm licht op en er wordt gedurende korte tijd de
weersinformatie weergegeven.
3. Het weerstation zal proberen te communiceren met de buitensensor.
4. de iconen en zal de communicatie met de sensor bevestigen.
Als de buitentemperatuur en luchtvochtigheid gedurende 3 minuten niet op
het scherm verschijnen, stopt het weerstation met zoeken naar het radiosignaal
van de sensor. Het icoon verdwijnen van het scherm, en in plaats van

Handleiding
Nederlands
78
temperatuur en vochtigheid de symbolen en zal verschijnen.
Een gebrek aan signaal van de sensor kan worden veroorzaakt door obstakels
met een te grote afstand tussen de twee units.
Als u geen automatische verbinding tussen de twee units tot stand kunt
brengen, kunt u de onderstaande handmatige procedure volgen:
1. Houd de knop ingedrukt tot het icoon begint te knipperen.
2. Druk op de TX-knop op de buitensensor om een radiosignaal naar de
binnenunit te verzenden.
Het communicatiekanaal wijzigen
Er zijn 3 radiocommunicatiekanalen beschikbaar tussen de twee units. Kanaal
1 is vooraf gedefinieerd.
»Open het batterijcompartiment.
»Zet de zenderkiezer op een van de 3 standen.
»Houd de knop ingedrukt tot het symbool knippert op het scherm
van de buitensensor.
»Druk op de TX-knop op de buitensensor om een radiosignaal naar de
binnenunit te verzenden.
De binnenunit geeft automatisch het nieuwe communicatiekanaal weer. Als
dit echter niet gebeurt, kunt u het nummer van het communicatiekanaal
handmatig wijzigen. Druk herhaaldelijk op de knop om te schakelen tussen
de 3 kanalen: , , of (geeft de 3 kanalen in de lus weer)
Tijd instelling
1. Houd de knop ingedrukt gedurende ongeveer 3 seconden. De
tijdindicator knippert op het scherm.
2. Druk op de knop of om de gewenste waarde te bereiken.
3. Press again the button bevestigen. De minutenaanduiding knippert
op het scherm.
4. Druk op de knop of om de gewenste waarde te bereiken.
5. Druk nogmaals op de knop bevestigen. Het icoon zal knipperen
op het scherm.

Handleiding
Nederlands
79
6. Druk op de knop of om te kiezen tussen 12 of 24-uurs formaat.
7. Druk op de knop bevestigen. Het icoon knippert op het scherm
(het activeert de 24-uurs opslag van meetgegevens).
8. Druk op de knop of om deze functie uit te schakelen. Het symbool
verschijnt op het scherm.
9. Druk op de knop bevestigen. Het scherm keert terug naar de
standaard weergavemodus.
Let op: als je hebt geactiveerd ( ) de 24-uurs geheugenopslagfunctie, de
opgeslagen MIN en MAX waarden worden elke dag om middernacht gewist. Als u
deze functie hebt uitgeschakeld ( ) de gegevens blijven in het geheugen totdat
de batterij leeg is.
Weergave in basismodus
Nadat u de tijd heeft ingesteld en communicatie met de buitensensor tot
stand heeft gebracht, bevindt het apparaat zich in de basisweergavemodus.
In de basismodus geeft het weerstation de volgende informatie weer:
»De tijd (12u/24u)
De tijd wordt standaard weergegeven in de 24-uursmodus. Als u de
12-uursmodus selecteert, verschijnt het symbool “PM” of “AM” voor de tijd.
»Klimaatomstandigheden binnenshuis

Handleiding
Nederlands
80
De temperatuur wordt uitgedrukt in Celsius graden (°C) of Fahrenheit
graden (°F) en wordt weergegeven tot op één decimaal (bijv. 22,8°C).
Als de temperatuur daalt tot onder -9,9°C en stijgt boven + 50°C (of 14°F en
122°F) zullen de symbolen (laag) en (hoog) op het scherm verschijnen.
De relatieve vochtigheid (RH%) deze wordt ook weergegeven boven de
temperatuurwaarde.
Als het symbool verschijnt aan de rechterkant van de vochtigheidswaarde, u
moet de batterijen van de binnenunit vervangen.
In dit gebied wordt ook het comfortniveau (WET; COMFORT; DRY)
weergegeven.
Nat. Luchtvochtigheid ligt tussen 66% en 95%
Optimaal. Luchtvochtigheid ligt tussen 45% en 65%
Droog. Luchtvochtigheid tussen 20% en 44%
Ventilatie aanbeveling
Op basis van de waarden van temperatuur en vochtigheid zowel binnen als
buiten het huis, kan het weerstation adviseren om te sluiten of opening
de ramen voor het verbeteren van de klimatologische omstandigheden.

Handleiding
Nederlands
81
»Klimaatverandering in de kamer
Op basis van de waarden van temperatuur en vochtigheid zowel binnen als
buiten het huis, kan het weerstation aanbevelen de weersomstandigheden te
wijzigen.
Demper. Een luchtvochtigheidsverhoging van minimaal 5% wordt
aanbevolen.
Constante. De aanbevolen toename of afname van de
luchtvochtigheid mag niet meer dan 4% bedragen.
Droger. Een luchtvochtigheidsreductie van minimaal 5% wordt
aanbevolen
Klimatologische omstandigheden buiten
De temperatuur wordt uitgedrukt in Celsius graden (°C) of Fahrenheit
graden (°F) en bevat een decimaal (bijv. 22,8°C).
Als de temperatuur daalt tot onder -40°C en stijgt boven + 60°C (of -40°F
en 140°F) dan zullen de symbolen (laag) en (hoog) op het scherm
verschijnen.
Boven de temperatuurwaarde wordt ook de relatieve vochtigheid (RH%)
weergegeven.
Radiocommunicatiekanaal (bijv ) geeft aan op welk kanaal de
communicatie tussen de binnen- en buitenunit tot stand is gekomen.
Als het symbool verschijnt aan de rechterkant van het communicatiekanaal,
moet u de batterijen van de buitenunit vervangen.

Handleiding
Nederlands
82
Weergave van maximale en minimale waarden van
temperatuur en vochtigheid
De maximum en minimum waarden van temperatuur en vochtigheid worden
automatisch opgeslagen.
Om ze weer te geven:
»Druk op de knop een keer. Het icoon verschijnt zowel in het
schermgebied dat de klimatologische omstandigheden binnenshuis
weergeeft, als in het gebied met de buitenwaarden, naast de
vochtigheidswaarde. De vochtigheids- en temperatuurwaarden
veranderen op het scherm en de maximale waarden die door het
weerstation zijn geregistreerd, worden weergegeven
»Druk op de knop tweemaal.Het icoon verschijnt zowel
in het schermgebied dat de klimatologische omstandigheden
binnenshuis weergeeft, als in het gebied met de buitenwaarden, naast
de vochtigheidswaarde. De vochtigheids- en temperatuurwaarden
veranderen op het scherm en de minimumwaarde die door het weerstation
is geregistreerd, wordt weergegeven.
»Druk 3 keer op de knop om de geregistreerde minimum en maximum
waarden te wissen.
De meeteenheid voor temperatuur wijzigen
Druk op de knop eenmaal om te wisselen tussen °C en °F voor zowel
binnen- als buitentemperaturen.

Handleiding
Nederlands
83
Probleemoplossen
Probleem Mogelijke oorzaak Aanbeveling
De twee eenheden
kunnen niet met elkaar
communiceren.
Tussen de twee units
bevinden zich obstakels
(betonnen muren
bijvoorbeeld) van
andere radioapparatuur
die interferentie
veroorzaken.
Wijzig de locatie van
de twee eenheden en
probeer ze opnieuw te
koppelen.
Te lange afstand tussen
de twee eenheden.
Verklein de afstand
tussen de twee
eenheden.
De batterijen van een van
de twee units zijn leeg Vervang de batterijen.
Technische specificaties
Weerstation
Stroomvoorziening 3 x AAA 1.5V batterijen
Temperatuur meetbereik: -9.9°C ~ +50°C/+14°F ~ +122°C
Temperatuur resolutie: 0.1°C/0.1°F
Meetbereik vochtigheid 20% ~ 95%RH
Vochtigheid resolutie 1%
Buitensensor
Stroomvoorziening 2 x AAA 1.5V batterijen
Temperatuur meetbereik: -40°C ~ +60°C/-40°F ~ +144°C
Temperatuur resolutie: 0.1°C/0.1°F
Meetbereik vochtigheid 20% ~ 95%RH
Vochtigheid resolutie: 1%
Zendfrequentie: 433MHz
Zendvermogen 10 mW
Communicatie afstand maximaal 50 m (in open veld)
Waterbestendigheidsklasse IPX4 (spatwaterdicht)

Instrukcja obsługi
Polskie
84
Specjalne ostrzeżenia
»Przed użyciem tego produktu zapoznaj się z jego działaniem. Przeczytaj
uważnie instrukcję obsługi i ostrzeżenia dotyczące bezpieczeństwa.
»Używaj tego produktu tylko do celów wymienionych w instrukcji i tylko
zgodnie z opisem.
»Nie ponosimy żadnej odpowiedzialności za uszkodzenia mienia lub
obrażenia ciała wynikające z niewłaściwego użytkowania urządzenia,
nieautoryzowanych modyfikacji lub napraw.
»Z tego urządzenia mogą korzystać dzieci w wieku co najmniej 8 lat
oraz osoby o ograniczonych zdolnościach umysłowych i fizycznych pod
warunkiem, że są one nadzorowane lub poinstruowane w zakresie obsługi
urządzenia i potencjalnych zagrożeń.
»Nie próbuj używać tego urządzenia, jeśli jest uszkodzone.
»Nie wystawiaj urządzenia na bezpośrednie działanie promieni słonecznych,
nadmiernego kurzu lub wilgoci.
»To urządzenie korzysta z baterii. Baterie należy przechowywać poza
zasięgiem dzieci. Nie używaj baterii różnych marek io różnym stopniu
naładowania. Nie próbuj używać uszkodzonych baterii. Do tego
urządzenia należy używać tylko zalecanego typu baterii. Nie próbuj
ładować baterii jednorazowych. Płyny wyciekające z baterii mogą działać
drażniąco na skórę, a nawet być toksyczne. Z takimi bateriami należy
obchodzić się wyłącznie w rękawiczkach i wyrzucać je w specjalnie do tego
przeznaczonych miejscach. Jeśli nie korzystasz z urządzenia przez dłuższy
czas, zalecamy wyjęcie baterii.
Prezentacja produktu
Stacja pogodowa dostarcza informacji o temperaturze wewnętrznej i
zewnętrznej wyrażonej w stopniach Celsjusza (°C) lub Fahrenheita (°F) oraz
informacje o wilgotności. Na ekranie LCD wyświetlane są ikony z zaleceniami
dotyczącymi wentylacji wewnętrznej, zmian klimatu w pomieszczeniu i oceny
klimatu w pomieszczeniu.
To urządzenie zostało stworzone wyłącznie do użytku domowego i nie jest
zalecane do użytku komercyjnego.

Instrukcja obsługi
Polskie
85
Opis urządzenia
A
+
−
AAA
+
−
AAA
+
−
AAA
1. Wyświetla zalecenia dotyczące zmieniających się warunków
środowiskowych (bardziej mokre; bez zmian; bardziej suche)
2. Wyświetlanie czasu (12h/24h)
3. Wyświetla zewnętrzne warunki pogodowe
4. Przycisk wielofunkcyjny: Zmień kanał/Zwiększ wartość wyświetlaną na
ekranie
5. Przycisk wielofunkcyjny: Przełącza między °C i °F/potwierdza
ustawienie

Instrukcja obsługi
Polskie
86
6. Przycisk wielofunkcyjny: pamięć/zmniejsza wartość wyświetlaną na
ekranie
7. Wyświetla warunki pogodowe w domu.
8. Przycisk podświetlenia ekranu
9. Wieszaki
10. Komora baterii
11. Podpórka
12. Pokrywa komory baterii
B
+
−
AAA
+
−
AAA
13. Wyświetlacz
14. Wskaźnik ledowy

Instrukcja obsługi
Polskie
87
15. Wieszaki
16. przycisk TX
17. Przycisk °C/°F
18. Selektor kanałów (1/2/3)
19. Komora baterii
20. Pokrywa komory baterii
Wybór miejsca instalacji
»Wybierając lokalizację, upewnij się, że urządzenie nie jest wystawione na
działanie promieni słonecznych, kurzu, wilgoci, ciepła lub nadmiernego
zimna.
»Nie umieszczaj urządzenia w pobliżu źródeł ciepła.
»Zainstaluj czujnik zewnętrzny nie dalej niż 50 metrów od stacji pogodowej.
Upewnij się, że między dwoma urządzeniami nie ma przeszkód, które
mogłyby wpłynąć na komunikację (np. betonowe ściany).
Instrukcja korzystania z czujnika zewnętrznego
1. Włóż 2 baterie AAA do komory baterii.
2. Lampka kontrolna zamiga na chwilę, a na ekranie wyświetli się temperatura,
wilgotność i kanał komunikacji radiowej (np. CH 1).
3. Następnie dioda LED będzie migać raz na minutę, potwierdzając
komunikację ze stacją pogodową (jednostka wewnętrzna)
Instrukcja korzystania ze stacji pogodowej
4. Włóż 3 baterie AAA do komory baterii.
5. Ekran zaświeci się i przez krótki czas będzie wyświetlał informacje o
pogodzie.
6. Stacja pogodowa będzie próbowała komunikować się z czujnikiem
zewnętrznym.
7. Ikony oraz potwierdzi komunikację z czujnikiem.
Jeśli temperatura zewnętrzna oraz wilgotność nie pojawią się na ekranie przez
3 minuty, stacja pogodowa przestanie szukać sygnału radiowego z czujnika.

Instrukcja obsługi
Polskie
88
Ikona z ekranu znikną, oraz zamiast temperatury i wilgotności symbole
oraz pojawi się.
Brak sygnału z czujnika może być spowodowany przeszkodami lub zbyt dużą
odległością między dwoma urządzeniami.
Jeśli nie możesz nawiązać automatycznego połączenia między dwoma
urządzeniami, możesz wykonać poniższą procedurę ręczną:
1. Przytrzymaj przycisk aż ikona zaczyna migać.
1. Naciśnij przycisk TX na czujniku zewnętrznym, aby przesłać sygnał
radiowy do jednostki wewnętrznej.
Zmiana kanału komunikacji
Pomiędzy dwoma jednostkami dostępne są 3 kanały komunikacji radiowej.
Kanał 1 jest wstępnie zdefiniowany.
»Otwórz komorę baterii.
»Zmień selektor kanałów na jedną z 3 pozycji.
»Przytrzymaj przycisk aż do symbolu miga na ekranie czujnika
zewnętrznego.
»Naciśnij przycisk TX na czujniku zewnętrznym, aby przesłać sygnał
radiowy do jednostki wewnętrznej.
Jednostka wewnętrzna automatycznie wyświetli nowy kanał komunikacji. Jeśli
jednak tak się nie stanie, możesz ręcznie zmienić numer kanału komunikacji.
Naciskaj przycisk wielokrotnie przełączać się między 3 kanałami: ,
, lub (wyświetla 3 kanały w pętli)
Ustawienie czasu
• Przytrzymaj przycisk przez około 3 sekundy. Na ekranie zacznie migać
wskaźnik czasu.
• Naciśnij przycisk lub aby osiągnąć żądaną wartość.
• Naciśnij ponownie przycisk to potwierdzić. Na ekranie zacznie migać
wskaźnik minut.
• Naciśnij przycisk lub aby osiągnąć żądaną wartość.
• Naciśnij ponownie przycisk potwierdzać. Ikona będzie migać na

Instrukcja obsługi
Polskie
89
ekranie.
• Naciśnij przycisk lub do wyboru format 12 lub 24 godzinny.
• Naciśnij przycisk potwierdzać. Ikona będzie migać na ekranie
(aktywuje 24-godzinne przechowywanie danych pomiarowych).
• Naciśnij przycisk lub aby wyłączyć tę funkcję. Symbol pojawi
się na ekranie.
• Naciśnij przycisk potwierdzać. Ekran powróci do standardowego trybu
wyświetlania.
Uwaga: Jeśli aktywowałeś ( ) funkcja 24-godzinnego przechowywania w
pamięci, zapisane wartości MIN oraz MAX będą kasowane codziennie o północy.
Jeśli wyłączyłeś tę funkcję ( ) dane pozostaną w pamięci do wyczerpania baterii.
Wyświetlacz w trybie podstawowym
Po ustawieniu czasu i nawiązaniu komunikacji z czujnikiem zewnętrznym
urządzenie znajduje się w podstawowym trybie wyświetlania.
W trybie podstawowym stacja pogodowa wyświetla następujące informacje:
»Czas (12h/24h)
Czas jest domyślnie wyświetlany w trybie 24h. Jeśli wybierzesz tryb 12h,
przed godziną pojawi się symbol „PM” lub „AM”.
»Warunki klimatyczne w pomieszczeniach

Instrukcja obsługi
Polskie
90
Temperatura jest wyrażona w stopniach Celsjusza (°C) lub stopniach
Fahrenheita (°F) oraz wyświetlana z dokładnością do jednego miejsca po
przecinku (np. 22,8°C).
Jeżeli temperatura spadnie poniżej -9.9°C oraz wzrośnie powyżej +50°C (lub
14°F oraz 122°F) symbole (niski) oraz (wysokie) pojawiają się na ekranie.
Wilgotność względna (RH%) jest również wyświetlana powyżej wartości
temperatury.
Jeśli symbol pojawia się po prawej stronie wartości wilgotności, należy
wymienić baterie jednostki wewnętrznej.
W tym obszarze wyświetlany jest również poziom komfortu (MOKRO;
KOMFORT; SUCHO).
Mokro. Wilgotność wynosi od 66% do 95%
Optymalny. Wilgotność od 45% do 65%
Suchy. Wilgotność waha się między 20% a 44%
Zalecenie wentylacji
Na podstawie wartości temperatury i wilgotności zarówno wewnątrz, jak i na
zewnątrz domu, stacja pogodowa może zalecić zamknięcie lub otwarcie
okna dla poprawy warunków klimatycznych.
»Zmiana klimatu w pomieszczeniu
Na podstawie wartości temperatury i wilgotności zarówno wewnątrz, jak i na
zewnątrz domu, stacja pogodowa może zalecić zmianę warunków pogodowych.
Amortyzator. Zalecany jest wzrost wilgotności o co najmniej 5%.

Instrukcja obsługi
Polskie
91
Stały. Zalecane zwiększenie lub zmniejszenie wilgotności nie może
przekraczać 4%.
Osuszacz. Zaleca się zmniejszenie wilgotności o co najmniej 5%
Warunki klimatyczne na zewnątrz
Temperatura jest wyrażona w stopniach Celsjusza (°C) lub stopniach
Fahrenheita (°F) oraz zawiera ułamek dziesiętny (np. 22,8°C).
Jeśli temperatura spadnie poniżej -40°C oraz wzrośnie powyżej +60°C
(lub -40°F oraz 140°F) symbole (niski) oraz (wysoki) pojawiają się na
ekranie.
Wilgotność względna (RH%) jest również wyświetlana powyżej wartości
temperatury.
Kanał komunikacji radiowej (np ) pokazuje na jakim kanale została
nawiązana komunikacja pomiędzy jednostką wewnętrzną a zewnętrzną.
Jeśli symbol pojawia się po prawej stronie kanału komunikacyjnego, należy
wymienić baterie w jednostce zewnętrznej.
Wyświetlanie maksymalnych i minimalnych wartości
temperatury oraz wilgotności
Maksymalne i minimalne wartości temperatury oraz wilgotności są zapisywane
automatycznie.
Aby je wyświetlić:

Instrukcja obsługi
Polskie
92
»Naciśnij przycisk pewnego razu. Ikona apojawia się zarówno w
obszarze ekranu, który wyświetla warunki klimatyczne w pomieszczeniu,
jak i w obszarze z wartościami zewnętrznymi, obok wartości wilgotności. Na
ekranie zmienią się wartości wilgotności i temperatury oraz maksymalne
wartości zarejestrowane przez stację pogodową.
»Naciśnij przycisk dwa razy. Ikona pojawia się zarówno w obszarze
ekranu, który wyświetla wewnętrzne warunki klimatyczne, jak i w obszarze
z wartościami zewnętrznymi, obok wartości wilgotności. Na ekranie
zmienią się wartości wilgotności i temperatury oraz minimalna wartość
zarejestrowana przez stację pogodową.
»Naciśnij 3 razy przycisk kasowanie zarejestrowanych wartości
minimalnych i maksymalnych.
Zmiana jednostki pomiaru temperatury
Naciśnij przycisk raz, aby zmienić pomiędzy °C i °F zarówno dla
temperatury wewnętrznej jak i zewnętrznej.
Rozwiązywanie problemów
Problem Możliwa przyczyna Rekomendacje
Dwie jednostki nie
mogą się ze sobą
komunikować.
Pomiędzy tymi dwoma
jednostkami znajdują
się przeszkody (np.
betonowe ściany)
lub inne urządzenia
radiowe, które
powodują zakłócenia.
Zmień lokalizację
dwóch jednostek i
spróbuj ponownie je
sparować.
Zbyt duża odległość
między dwiema
jednostkami.
Zmniejsz odległość
między dwiema
jednostkami.
Baterie jednej z
dwóch jednostek są
rozładowane Wymień baterie

Instrukcja obsługi
Polskie
93
Specyfikacja techniczna
Stacja pogodowa
Zasilacz 3 baterie AAA 1,5 V
Zakres pomiaru temperatury -9.9°C ~ +50°C/+14°F ~ +122°C
Rozdzielczość temperatury 0.1°C/0.1°F
Zakres pomiaru wilgotności 20% ~ 95%RH
Rozdzielczość wilgotności 1%
Czujnik zewnętrzny
Zasilacz 2 baterie AAA 1,5 V
Zakres pomiaru temperatury -40°C ~ +60°C/-40°F ~ +144°C
Rozdzielczość temperatury 0.1°C/0.1°F
Zakres pomiaru wilgotności 20% ~ 95%RH
Rozdzielczość wilgotności 1%
Częstotliwość transmisji 433MHz
Moc transmisji 10 mW
Odległość komunikacyjna max. 50 m (w otwartym polu)
Klasa wodoodporności IPX4 (bryzgoszczelny)

Manual de utilizare
Romana
94
Atentionari
»Inainte de a folosi acest produs, familiarizati-va cu modul de functionare
al acestuia. Cititi cu atentie instructiunile de utilizare si atentionarile de
siguranta.
»Folositi acest produs doar pentru scopul mentionat in manual si doar asa
cum este descris.
»Nu ne asumam raspunderea pentru daune aduse proprietatii sau vatamare
corporala care provine din folosirea necorespunzatoare a aparatului, din
modificari sau reparatii neautorizate aduse acestuia.
»Acest dispozitiv poate fi utilizat de copii cu varsta de cel putin 8 ani si de
persoane cu capacitati mintale si fizice limitate cu conditia ca acestia sa
fie supravegheati sau sa fie instruiti in legatura cu modul de functionare al
aparatului si cu potentialele riscuri.
»Nu incercati sa utilizati acest dispozitiv daca este defect.
»Nu expuneti dispozitivul la razele directe ale soarelui, la praf si umiditate
excesive.
»Acest dispozitiv foloseste baterii. Nu lasati bateriile la indemana copiilor.
Nu folositi marci diferite de baterii si cu grade diferite de incarcare. Nu
incercati sa folositi baterii deteriorate. Pentru acest dispozitiv, folositi
doar tipul de baterii recomandat. Nu incercati sa incarcati bateriile ne-
reincarcabile. Daca din baterii se scurg substante lichide, acestea pot avea
un efect iritativ asupra pielii si pot fi chiar toxice. Manipulati astfel de
baterii doar cu manusi si aruncati-le in locuri special amenajate. Daca nu
folositi dispozitivul o perioada indelungata de timp, va recomandam sa
scoateti bateriile.
Prezentare produs
Aceasta statie meteo ofera informatii despre temperatura din interiorul
locuintei si temperatura de afara exprimata in grade Celsius (°C) sau Fahrenheit
(°F) si informatii legate de umiditate. Ecranul LCD afiseaza pictograme cu
recomandari de ventilare a spatiului interior, evaluarea climatului si schimbarile
climaterice din camera.
Acest dispozitiv a fost creat doar pentru utilizarea in spatii domestice si nu
este recomandat pentru spatii comerciale.

Manual de utilizare
Romana
95
Descriere dispozitiv
A
+
−
AAA
+
−
AAA
+
−
AAA
1. Afiseaza recomandari privind schimbarea conditiilor de mediu (More Wet
- Mai umed; No Change - Nici o schimbare; More Dry - Mai uscat)
2. Afiseaza ora (12h/ 24h)
3. Afiseaza conditiile climaterice externe
4. Buton multifunctional: Schimbare canal/Creste valoarea afisata pe
ecran
5. Buton multifunctional: Schimba intre°C si°F/Confirma o setare
6. Buton multifunctional: Memorie/Scade valoarea afisata pe ecran

Manual de utilizare
Romana
96
7. Afiseaza conditiile climaterice din interiorul casei.
8. Buton iluminare ecran
9. Agatatori
10. Compartiment baterii
11. Picior de sprijin
12. Capac compartiment baterii
B
+
−
AAA
+
−
AAA
13. Ecran
14. Led indicator
15. Agatatoare
16. Buton TX

Manual de utilizare
Romana
97
17. Buton selectie°C/°F
18. Selector canal (1/2/3)
19. Compartiment baterii
20. Capac compartiment baterii
Alegerea locatiei de instalare
»Cand alegeti locatia, asigurati-va ca dispozitivul nu va fi expus la soare,
praf, umiditate, caldura sau frig excesiv.
»Nu amplasati dispozitivul in apropierea surselor de caldura.
»Instalati senzorul pentru exterior la o distanta maxima de 50 de metri de
statia meteo. Asigurati-va ca intre cele doua dispozitive nu sunt obstacole
care ar putea afecta comunicarea (de exemplu, pereti de beton).
Instructiuni de utilizare a senzorului pentru exterior
1. Introduceti in compartimentul pentru baterii 2 baterii tip AAA
2. Ledul indicator va clipi scurt, iar pe ecran vor fi afisate temperatura,
umiditatea si canalul de comunicare radio (de exemplu CH 1).
3. In continuare, ledul va clipi o data pe minut pentru a confirma comunicarea
cu statia meteo (unitatea interna).
Instructiuni de utilizare a statiei meteo
1. Introduceti in compartimentul pentru baterii 3 baterii tip AAA.
2. Ecranul se va ilumina si va afisa in scurt timp informatiile climaterice.
3. Statia meteo va cauta comunicarea cu senzorul de la exterior.
4. Pictogramele si vor confirma comunicarea cu senzorul.
Daca timp de 3 minute pe ecran nu apar temperatura si umiditatea exterioare,
statia meteo va opri cautarea semnalului radio provenit de la senzor. Simbolul
va disparea de pe ecran, iar in locul temperaturii si umiditatii vor aparea
simbolurile si .
Lipsa semnalului de la senzor poate fi cauzata de obstacole sau de distanta
prea mare dintre cele doua unitati.

Manual de utilizare
Romana
98
Daca nu reusiti sa stabiliti o conexiune automata intre cele doua unitati, puteti
urma procedura manuala de mai jos:
1. Tineti apasati butonul pana cand simbolul incepe sa clipeasca pe
ecran.
2. Apasati butonul TX de pe senzorul extern pentru a transmite un semnal
radio catre unitatea din interior.
Schimbarea canalului de comunicare
Sunt disponibile 3 canale de comunicare radio intre cele doua unitati. Canalul
1 este predefinit.
»Deschideti compartimentul pentru baterii.
»Schimbati selectorul de canal pe una din cele 3 pozitii.
»Tineti apasat butonul pana ce pe ecranul senzorului extern clipeste
simbolul .
»Apasati butonul TX de pe senzorul extern pentru a transmite un semnal
radio catre unitatea din interior.
Unitatea de interior va afisa automat noul canal de comunicare. Daca totusi,
acest lucru nu se intampla, puteti schimba manual numarul canalului de
comunicare. Apasati in mod repetat butonul pentru a schimba intre cele 3
canale: , , sau (afiseaza in bucla cele 3 canale)
Setare ora
1. Tineti apasat butonul timp de aproximativ 3 secunde. Indicatorul
pentru ora va clipi pe ecran.
2. Apasati butonul sau pentru a ajunge la valoarea dorita.
3. Apasati din nou butonul pentru a confirma. Indicatorul pentru minute
va clipi pe ecran.
4. Apasati butonul sau pentru a ajunge la valoarea dorita.
5. Apasati din nou butonul pentru a confirma. Simbolul va clipi pe
ecran.
6. Apasati butonul sau pentru a alege intre formatul de 12 sau 24 ore.
7. Apasati butonul pentru a confirma. Simbolul va clipi pe ecran
(activeaza stocarea 24 de ore a datelor masurate).

Manual de utilizare
Romana
99
8. Apasati butonul sau pentru a dezactiva aceasta functie. Pe ecran
va aparea simbolul .
9. Apasati butonul pentru a confirma. Ecranul se va intoarce la modul
normal de afisare.
Nota: Daca ati activat ( ) functia de memorare timp de 24 de ore a masuratorilor,
valorile MIN si MAX salvate vor fi sterse in fiecare zi la miezul noptii. Daca ati
dezactivat aceasta functie ( ) datele vor ramane in memorie pana se va termina
bateria.
Afisarea in modul standard
Odata ce ati setat ora si s-a stabilit comunicarea cu senzorul extern, dispozitivul
se afla in modul standard de afisare.
In modul standard, statia meteo afiseaza urmatoarele informatii:
»Ora (12h/24h)
Ora este in mod implicit afisata in modul 24h. Daca selectati modul 12h,
simbolul “PM” sau “AM“apare in fata orei.
»Conditiile climaterice din interiorul casei.

Manual de utilizare
Romana
100
Temperatura este exprimata in grade Celsius (°C) sau grade Fahrenheit (°F)
si include o zecimala (de exemplu 22.8°C).
Daca temperatura scade sub -9.9°C si creste peste +50°C (sau 14°F si 122°F)
pe ecran apar simbolurile (low) si (high).
Umiditatea relativa (RH%) este, de asemenea, afisata deasupra valorii de
temperatura.
Daca in partea dreapta a valorii de umiditate apare simbolul , trebuie sa
schimbati bateriile unitatii de interior.
Nivelul de confort (WET - umed; COMFORT - optim; DRY - uscat) este,
de asemenea, afisat in aceasta zona.
Umed. Umiditatea este cuprinsa intre 66% si 95%
Optim. Umiditatea este cuprinsa intre 45% si 65%
Uscat. Umiditatea este cuprinsa intre 20% si 44%
Recomandari de ventilare a camerei
Pe baza valorilor de temperatura si umiditate atat din interiorul cat si din
exteriorul casei, statia meteo poate recomanda inchiderea sau deschiderea
geamurilor pentru imbunatatirea conditiilor climaterice.
»Recomandari pentru schimbarea conditiilor climaterice
Pe baza valorilor de temperatura si umiditate atat din interiorul cat si din
exteriorul casei, statia meteo poate recomanda schimbarea conditiilor
climaterice.
Mai umed. Se recomanda o crestere a umiditatii cu cel putin 5%.

Manual de utilizare
Romana
101
Constant. Cresterea sau descresterea recomandata a umiditatii nu
trebuie sa depaseasca 4%.
Mai uscat. Se recomanda o scadere a umiditatii cu cel putin 5%.
Afisarea conditiilor climaterice externe
Temperatura este exprimata in grade Celsius (°C) sau grade Fahrenheit (°F)
si include o zecimala (de exemplu 22.8°C).
Daca temperatura scade sub -40°C si creste peste +60°C (sau -40°F si
140°F) pe ecran apar simbolurile (low) si (high).
Umiditatea relativa (RH%) este, de asemenea, afisata deasupra valorii de
temperatura.
Canalul de comunicare radio (de exemplu ) arata pe care canal s-a stabilit
comunicarea dintre unitatea de interior si cea de exterior.
Daca in partea dreapta a canalului de comunicare apare simbolul , trebuie sa
schimbati bateriile unitatii de exterior.
Afisarea valorilor maxime si minime de temperatura si
umiditate
Valorile maxime si minime de temperatura si umiditate sunt salvate in mod
automat.
Pentru afisarea acestora:
»Apasati o singura data butonul . Simbolul apare atat in zona de

Manual de utilizare
Romana
102
ecran care afiseaza conditiile climaterice interne, cat si in zona cu valorile
externe, langa valoarea de umiditate. Se vor schimba pe ecran valorile de
umiditate si temperatura si vor fi afisate cele maxime inregistrate de statia
meteo.
»Apasati de doua ori butonul . Simbolul apare atat in zona de
ecran care afiseaza conditiile climaterice interne, cat si in zona cu valorile
externe, langa valoarea de umiditate. Se vor schimba pe ecran valorile de
umiditate si temperatura si vor fi afisate cele minime inregistrate de statia
meteo.
»Apasati de 3 ori butonul pentru a sterge valorile minime si maxime
inregistrate.
Schimbarea unitatii de masura a temperaturii
Apasati o singura data butonul pentru a schimba intre°C si°F atat pentru
temperatura din interior cat si pentru cea de la exterior.
Probleme si solutii
Defectiune Posibila cauza Recomandare
Cele doua unitati nu
pot comunica intre ele.
Intre cele doua unitati
sunt obstacole (pereti
de beton, de exemplu)
sau alte dispozitive
radio care creeaza
interferente.
Schimbati locatia
celor doua unitati
si reincercati
imperecherea lor.
Distanta prea mare
intre cele doua unitati. Reduceti distanta
dintre cele doua unitati.
Bateriile uneia dintre
cele doua unitati sunt
descarcate Inlocuiti bateriile.

Manual de utilizare
Romana
103
Specificatii tehnice
Statie meteo
Alimentare 3 x baterii AAA 1.5V
Interval masurare -9.9°C ~ +50°C/+14°F ~ +122°C
Rezolutie temperatura 0.1°C/0.1°F
Interval masurare umiditate 20% ~ 95%RH
Rezolutie umiditate 1%
Senzor extern
Alimentare 2 x baterii AAA 1.5V
Interval masurare -40°C ~ +60°C/-40°F ~ +144°C
Rezolutie temperatura 0.1°C/0.1°F
Interval masurare umiditate 20% ~ 95%RH
Rezolutie umiditate 1%
Frecventa comunicare radio 433MHz
Putere de transmisie 10 mW
Distanta de comunicare maxim 50 m (in camp deschis)
Clasa de rezistenta la apa IPX4 (stropiri cu apa)

EN:
EU Simplified Declaration of Conformity
SC ONLINESHOP SRL declares that Weather station PNI MS500 complies with the
Directive EMC 2014/30/EU and RED 2014/53/UE. The full text of the EU declaration of
conformity is available at the following Internet address:
https://www.mypni.eu/products/7490/download/certifications
BG:
Опростена декларация за съответствие на ЕС
SC ONLINESHOP SRL декларира, че Метеорологична станция PNI MS500 спазва
директивата EMC 2014/30/EU и RED 2014/53/UE. Пълният текст на ЕС декларацията
за съответствие е достъпен на следния интернет адрес:
https://www.mypni.eu/products/7490/download/certifications
DE:
Vereinfachte EU- Konformitätserklärung
SC ONLINESHOP SRL erklärt, dass das Wetterstation PNI MS500 der Richtlinie EMC
2014/30/EU und RED 2014/53/UE entspricht. Sie finden den ganzen Text der EU-
Konformitätserklärung an der folgenden Internetadresse:
https://www.mypni.eu/products/7490/download/certifications
ES:
Declaración UE de conformidad simplificada
SC ONLINESHOP SRL declara que el Estación meteorológica PNI MS500 cumple con
la Directiva EMC 2014/30/EU y la Directiva RED 2014/53/EU. El texto completo de la
declaración de conformidad de la UE está disponible en la siguiente dirección de Internet:
https://www.mypni.eu/products/7490/download/certifications
FR
Déclaration de conformité simplifiée de l’UE
SC ONLINESHOP SRL déclare que Station météo PNI MS500 est conforme à la
directive EMC 2014/30/EU et RED 2014/53/UE. Le texte complet de la déclaration de
conformité UE est disponible à l’adresse Internet suivante:
https://www.mypni.eu/products/7490/download/certifications
HU:
Egyszerűsített EU Megfelelési Közlemény
SC ONLINESHOP SRL kijelenti azt, hogy a Meteorológiai állomás PNI MS500 megfelel
az EMC 2014/30/EU és RED 2014/53/UE irányelvnek. Az EU-megfelelőségi nyilatkozat
teljes szövege a következő internetes címen érhető el:
https://www.mypni.eu/products/7490/download/certifications

IT:
Dichiarazione UE di conformità semplificata
SC ONLINESHOP SRL dichiara che il Stazione meteorologica PNI MS500 è conforme alla
direttiva EMC 2014/30/UE e alla direttiva RED 2014/53/UE. Il testo completo della dichiarazione
di conformità europea è disponibile al seguente indirizzo Internet:
https://www.mypni.eu/products/7490/download/certifications
NL:
Vereenvoudigde EU-conformiteitsverklaring
SC ONLINESHOP SRL verklaart dat Weerstation PNI MS500 voldoet aan de richtlijn EMC
2014/30/EU en RED 2014/53/UE. De volledige tekst van de EU-conformiteitsverklaring is
beschikbaar op het volgende internetadres:
https://www.mypni.eu/products/7490/download/certifications
PL:
Uproszczona deklaracja zgodności UE
SC ONLINESHOP SRL oświadcza, że Stacja pogodowa PNI MS500 jest zgodny z dyrektywą
EMC 2014/30/EU i RED 2014/53/UE. Pełny tekst deklaracji zgodności UE dostępny jest pod
następującym adresem internetowym:
https://www.mypni.eu/products/7490/download/certifications
RO:
Declaratie UE de conformitate simplificata
SC ONLINESHOP SRL declara ca Statie meteo PNI MS500 este in conformitate cu Directiva
EMC 2014/30/EU si Directiva RED 2014/53/UE. Textul integral al declaratiei UE de conformitate
este disponibil la urmatoarea adresa de internet:
https://www.mypni.eu/products/7490/download/certifications


-
 1
1
-
 2
2
-
 3
3
-
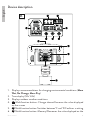 4
4
-
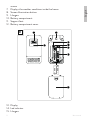 5
5
-
 6
6
-
 7
7
-
 8
8
-
 9
9
-
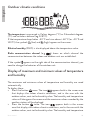 10
10
-
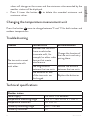 11
11
-
 12
12
-
 13
13
-
 14
14
-
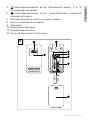 15
15
-
 16
16
-
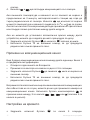 17
17
-
 18
18
-
 19
19
-
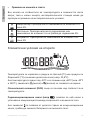 20
20
-
 21
21
-
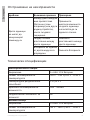 22
22
-
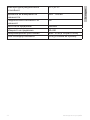 23
23
-
 24
24
-
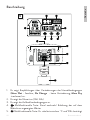 25
25
-
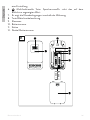 26
26
-
 27
27
-
 28
28
-
 29
29
-
 30
30
-
 31
31
-
 32
32
-
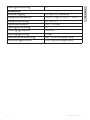 33
33
-
 34
34
-
 35
35
-
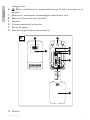 36
36
-
 37
37
-
 38
38
-
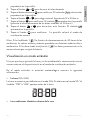 39
39
-
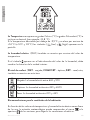 40
40
-
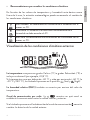 41
41
-
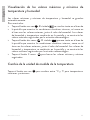 42
42
-
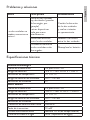 43
43
-
 44
44
-
 45
45
-
 46
46
-
 47
47
-
 48
48
-
 49
49
-
 50
50
-
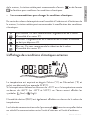 51
51
-
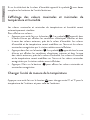 52
52
-
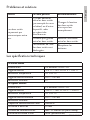 53
53
-
 54
54
-
 55
55
-
 56
56
-
 57
57
-
 58
58
-
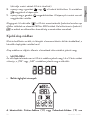 59
59
-
 60
60
-
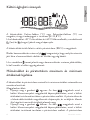 61
61
-
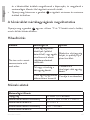 62
62
-
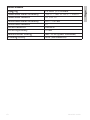 63
63
-
 64
64
-
 65
65
-
 66
66
-
 67
67
-
 68
68
-
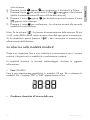 69
69
-
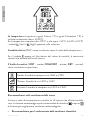 70
70
-
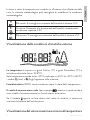 71
71
-
 72
72
-
 73
73
-
 74
74
-
 75
75
-
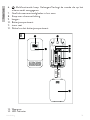 76
76
-
 77
77
-
 78
78
-
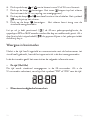 79
79
-
 80
80
-
 81
81
-
 82
82
-
 83
83
-
 84
84
-
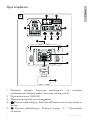 85
85
-
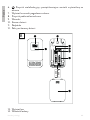 86
86
-
 87
87
-
 88
88
-
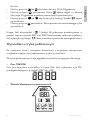 89
89
-
 90
90
-
 91
91
-
 92
92
-
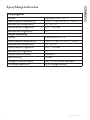 93
93
-
 94
94
-
 95
95
-
 96
96
-
 97
97
-
 98
98
-
 99
99
-
 100
100
-
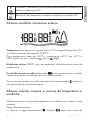 101
101
-
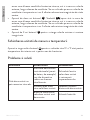 102
102
-
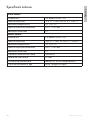 103
103
-
 104
104
-
 105
105
-
 106
106
-
 107
107


in andere talen
- italiano: PNI MS500 Manuale utente
- français: PNI MS500 Manuel utilisateur
- español: PNI MS500 Manual de usuario
- polski: PNI MS500 Instrukcja obsługi