
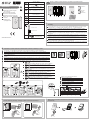
CR 2032 - Lithium
Autonomie 3 ans - Battery life 3 years
Consumption stand-by : 1 µA
Consumption : 12 mA
X3D alarme : [868 – 868.6] MHz et
[868.7 – 869.2] MHz 100 m Ý 300m
Maximum radio power < 10 mW,
receiver category: 2
-10°C / +70°C
+5°C / +40°C
IP
IP 30
75%
Important product
information (➋ ➌)
Contenu / Contents / Inhalt / Contenuto / Contenido / Spis treści/ Inhoud
www.deltadore.com
Instructions
Important
Product
Infor
mations
27 gr.
25 x 52 x 8 mm
12 x 52 x 9 mm
50 x 52 x 8 mm
A1 A2 B2 B1
A B
Mise en service / Activation / Inbetriebnahme / Attivazione / Activación / Uruchamianie /
Inbedrijfstelling
Clic
Lithium 3V
CR2032
A
Emplacement / Location / Einbauort / Posizionamento / Ubicación / Lokalizacja / Locatie
N°4
A B
B1
N°3
A B
A
N°5
A B
B1
B2
N°1
A
A
B
A1
A2
N°6
A
B
A2
N°7
A
B
N°2
A1
A2
B1
A
B
X
Z
Y1
Y2
A
B
X
Z
Y1
Y2
16 mm
12 mm
14 mm
16 mm
9 mm
6 mm
8 mm
9 mm
16 mm
11 mm
15 mm
15 mm
9 mm
6,5 mm
8 mm
8 mm
A
A1 A2 B2 B1
A B
B2
B1
B
Clic
Clic
2
< 5mm
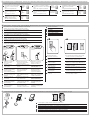
Fixation / Mounting / Montage / Fissaggio / Fijación / Mocowanie / Bevestigen
A
B
3 4
Présentation / Presentation / Beschreibung / Presentazione / Presentación / Prezentacja /
Voorstelling
1
FR
Le détecteur peut être associé à un système d’alarme DELTA DORE radio X3D et/ou à un récepteur
thermique X3D (ex : CALYBOX 2020 WT, TYBOX 1010 WT, etc ...) ou d’automatisme X3D.
EN
The detector can be associated with a DELTA DORE X3D wireless alarm system and/or an X3D
thermal receiver (e.g. CALYBOX 2020 WT, TYBOX 1010 WT, etc.) or X3D control system.
DE
Der Melder kann einer DELTA DORE Funk-Alarmanlage X3D und/oder einem X3D-Empfänger zur
Heizungsregelung (z. B.: CALYBOX 2020 WT, TYBOX 1010 WT usw...) oder Hausautomation zugeord-
net werden.
IT
Il sensore può essere associato ad un sistema d’allarme Delta Dore radio X3D e/o ad un ricevitore
termico X3D (per es: TYBOX 5100...) o di automatismo X3D.
ES
El detector se puede asociar con el sistema de alarma DELTA DORE radio X3D y/o con el receptor
térmico X3D (por ejemplo: CALYBOX 2020 WT, TYBOX 1010 WT, etc.) o con el de automatismo X3D.
PL
Czujnik mo¿na powi¹zaæ z systemem DELTA DORE radiem X3D i/lub odbiornikiem termicznym X3D
(np.: CALYBOX 2020 WT, TYBOX 1010 WT, itp.) lub automatyk¹ X3D.
NL
De detector kan worden gekoppeld aan een DELTA DORE radio X3D en/of thermische ontvanger X3D
(bijv: CALYBOX 2020 WT, TYBOX 1010 WT, enz...) of X3D automatisering.
FR
N°1
et
N°2
ne pas séparer les cales A1 et A2 avant le montage.
N°1
sur support métallique, l’utilisation des cales A1 et A2 est obligatoire.
EN
N°1
and
N°2
do not separate wedges A1 and A2 before mounting.
N°1
wedges A1 and A2 must be used on a metal support.
DE
N°1
und
N°2
Distanzplatten A1 und A2 vor der Montage nicht trennen.
N°1
Bei Metallhalterungen müssen die Distanzplatten A1 und A2 unbedingt
verwendet werden.
IT
N°1
e
N°2
Non separare i supporti A1 e A2 prima del montaggio
N°1
su sopporti metallici, l’utilizzo dei supporti A2 e A2 è obbligatorio.
ES
N°1
y
N°2
no separe la cuñas A1 y A2 antes del montaje.
N°1
el uso de cuñas A1 y A2 es obligatorio sobre soportes metálicos.
PL
N°1
i
N°2
przed monta¿em nie oddzielaæ klinów A1 i A2.
N°1
na metalowym pod³o¿u, u¿ywanie klinów A1 i A2 jest obowi¹zkowe.
NL
N°1
en
N°2
scheid de wiggen A1 en A2 niet voor de montage.
N°1
op de metalen steun is het gebruik van vulplaatjes A1 en A2.
FR
Préconisation : Le TYXAL MDO doit être installé sur des ouvrants peu sollicités (ex : fenêtre de chambre).
EN
Recommendation: TYXAL MDO must be fitted on openings that are not frequently used (e.g. bedroom window).
DE
Empfehlung: TYXAL MDO sollte an Fensterflügeln installiert werden, die wenig beansprucht werden
(z. B.: Schlafzimmerfenster).
IT
Raccomandazione: Il TYXAL MDO deve essere installato su delle parti apribili poco utilizzate (per es: finestra di una
camera)
ES
Recomendación: El dispositivo TYXAL MDO debe instalarse en aperturas de poco uso (por ejemplo: ventana de habitación).
PL
Zalecenie: Czujnik TYXAL MDO nale¿y montowaæ na rzadko otwieranych oknach (np. okno sypialni).
NL
Aanbeveling: De TYXAL MDO moet op weinig gebruikte openingen (bijv. slaapkamerraam) worden geïnstalleerd.
FR
Distances de déclenchement de l’aimant
EN
Magnet triggering distances
DE
Abstand zwischen Melder und Magnet
IT
Distanza tra parte fissa del contatto e magnete
ES
Distancias de activación del imán
PL
Odleg³ości zadzia³ania magnesu
NL
Afstanden van magneet
FR
Micro détecteur d’ouverture radio
EN
Wireless door/window magnetic
micro-contacts
DE
Micro-Funk-Öffnungsmelder
IT
Microsensori di apertura Radio
ES
Microdetectores de apertura radio
PL
Radiowy mikroczujnik
otwarcia
NL
Draadloze micro
openingsdetector
MDO TYXAL+

3
OFF
OK
1
2
> 3s
... ... ...
Exemple / Example / Beispiel /
Esempio / Ejemplo / przyk³ad /
Voorbeeld
Exemple / Example / Beispiel /
Esempio / Ejemplo / przyk³ad /
Voorbeeld
Mode autonome / Autonomous mode / Autonomer Betrieb / Modalità autonoma / Modo autónomo / Tryb autonomiczny / Autonome modus
6
Changement de la pile / Changing the batteries / Batterien ersetzen / Sostituzione delle batterie / Cambiar las pilas / Wymiana baterii / De batterijen vervangen
7
Clic
Lithium 3V
CR2032
Fonctionnement avec un système d’alarme / Operation with an alarm system / Betrieb mit einer Alarmanlage / Funzionamento con un sistema d’allarme / Funcionamiento con el sistema de alarma /
Działanie z systemem alarmowym / Werking met alarmsysteem
FR
• Association avec un système d’alarme
• Choix du mode de déclenchement
• Test
• Retour à la configuration usine
IT
• Associazione con un sistema d’allarme
• Scelta della modalità di scatto dell’allarme
• Test
• Ritorno alla configurazione di fabbrica
PL
• Powi¹zanie z systemem alarmowym
• Wybór sposobu wyzwalania
• Test
• Przywrócenie konfiguracji fabrycznej
EN
• Association with an alarm system
• Selection of triggering mode
• Test
• Restoring factory settings
ES
• Asociación con el sistema de alarma
• Selección del modo de activación
• Prueba
• Volver a la configuración de serie
NL
Koppelen aan een alarmsysteem
• Activeringsmodus selecteren
• Test
• Fabrieksinstellingen herstellen
DE
• Verbindung mit einer Alarmanlage
• Wahl des Auslösungsmodus
• Test
• Rückkehr zur Werkseinstellung
5
Voir notice
d’intallation
système
Vedi le
istruzioni
“Sistema”
Patrz ins-
trukcja
instalacji
systemu
Refer to
system
installation
guide
Ver manual
de instalación
del sistema
Zie
installatiehan-
dleiding
systeem
Siehe
Installationsan-
leitung
System
FR
Association avec un récepteur X3D (thermique ou automatisme)
Exemple : mise en arrêt du chauffage sur ouverture de fenêtre.
EN
Association with an X3D receiver (thermal or control system)
Example: heating system switches off when a window is opened.
DE
Verbindung mit X3D-Empfänger (Heizungsregelung oder Hausautomation)
Beispiel: Ausschalten der Heizung beim Öffnen eines Fensters.
IT
Associazione con un ricevitore X3D (termico o di automatismo)
Esempio: Arresto del riscaldamento a seguito dell’apertura di una finestra.
ES
Asociación con el receptor X3D (térmico o de automatismo)
Ejemplo: desactivación de la calefacción al abrir la ventana.
PL
Powi¹zanie z odbiornikiem X3D (termicznym lub automatyki)
Przyk³ad: wy³¹czenie ogrzewania po otwarciu okna.
NL
Koppelen met een ontvanger X3D (thermisch of automatisch)
Bijvoorbeeld: verwarming uitschakelen wanneer raam wordt geopend.
FR
➊ Mettez le récepteur en
attente d’association
(voir notice).
EN
➊ Set the receiver to
association wait mode
(refer to guide).
DE
➊ Schalten Sie den
Empfänger in Wartestellung
auf den Lernmodus.
(siehe Bedienungsanleitung).
IT
➊ Mettere il ricevitore in
attesa di associazione (vedi
istruzioni)
ES
➊ Ponga el receptor en
espera de asociación
(ver manual).
PL
➊ Ustaw odbiornik w trybie
oczekiwania na powi¹zanie
(patrz instrukcja).
NL
➊ De ontvanger in stand-by
zetten voor koppeling
(zie handleiding).
➋ Appuyez sur la touche du
détecteur. Le voyant s’allume
brièvement. Relâchez.
➋ Briefly press the detector button.
The LED will come on briefly.
Release.
➋ Drücken Sie die Taste am
Melder. Die Kontrollleuchte
leuchtet kurz auf. Taste
loslassen.
➋ Premere il pulsante del sensore.
Il LED si illumina brevemente.
Riavviare.
➋ Pulsar la tecla del detector. El
indicador se enciende breve-
mente. Suelte la tecla.
➋ Naciśnij przycisk czujnika.
Lampka sygnalizacyjna w³¹cza
siê na krótko. Zwolnij.
➋ Druk op de toets van de
detector. Het lampje licht
kortstondig op. Laat de toets los.
➌ Vérifiez que le récepteur a
bien pris en compte la de-
mande (voir sa notice).
➌ Check that the receiver has
acknowledged the request
(refer to the guide).
➌ Überprüfen Sie, ob der
Empfänger den Befehl
berücksichtigt hat (siehe
entsprechende Anleitung).
➌ Verificare che il ricevitore
abbia ricevuto correttamente il
comando (vedi istruzioni)
➌ Compruebe que el receptor ha
tenido en cuenta la solicitud
(ver su propio manual).
➌ Sprawdź, czy odbiornik
uwzglêdni³ ¿¹danie (patrz
instrukcja).
➌ Controleer of de ontvanger de
opdracht heeft ontvangen (zie
handleiding).
FR
Test de fonctionnement
EN
Operating test
DE
Betriebstest
IT
Test di funzionamento
ES
Prueba de funcionamiento
PL
Test działania
NL
Werking testen
1
2
FR
➊ Appuyez brièvement
sur la touche du détecteur.
EN
➊ Briefl y press the detector
button.
DE
➊ Drücken Sie kurz
die Taste am Melder.
IT
➊ Premere brevemente sul
pulsante del sensore.
ES
➊ Pulse brevemente
la tecla del detector.
PL
➊ Naciśnij na krótko
przycisk czujnika.
NL
➊ Druk kortstondig op de toets van
de detector.
➋ Le voyant du détecteur clignote rouge à chaque
ouverture ou fermeture, pendant 4 minutes.
➋ The detector LED flashes red for 4 minutes each
time the opening is opened or closed.
➋ Die Kontrollleuchte am Melder blinkt bei jedem
Öffnungs- oder Schließvorgang 4 Minuten lang rot.
➋ Il LED del sensore emette un flash ad ogni apertura
o chiusura, per 4 minuti.
➋ El indicador del detector parpadea de color rojo al
abrir o cerrar durante 4 minutos.
➋ Lampka czujnika miga na czerwono przy ka¿dym
otwarciu lub zamkniêciu, przez 4 minuty.
➋ Het lampje van de detector knippert (rood) bij elke
opening of sluiting, 4 minuten.
FR
Le voyant clignote à chaque ouverture ou fermeture, la pile est usée.
EN
The LED flashes whenever an opening is opened or closed. The battery is dead.
DE
Kontrollleuchte blinkt bei jedem Öffnungs- oder Schließvorgang, die Batterie ist leer.
IT
Il LED lampeggia ad ogni apertura, le batterie sono esaurite.
ES
Si el indicador parpadea al abrir y al cerrar quiere decir que la pila se ha gastado.
PL
Lampka miga przy ka¿dym otwarciu lub zamkniêciu – bateria jest roz³adowana.
NL
Als het lampje bij elke opening/sluiting knippert, dan is de batterij bijna leeg.
Documenttranscriptie
Contenu / Contents / Inhalt / Contenuto / Contenido / Spis treści/ Inhoud CR 2032 - Lithium Autonomie 3 ans - Battery life 3 years MDO TYXAL+ Micro détecteur d’ouverture radio Wireless door/window magnetic micro-contacts Micro-Funk-Öffnungsmelder Microsensori di apertura Radio Microdetectores de apertura radio Radiowy mikroczujnik otwarcia Draadloze micro openingsdetector FR EN DE IT ES PL NL Instructions Consumption stand-by : 1 µA Consumption : 12 mA X3D alarme : [868 – 868.6] MHz et [868.7 – 869.2] MHz 100 m Ý 300m Important Product Informations Maximum radio power < 10 mW, receiver category: 2 A A2 B2 B1 B +5°C / +40°C IP IP 30 75% 1 25 x 52 x 8 mm 50 x 52 x 8 mm Le détecteur peut être associé à un système d’alarme DELTA DORE radio X3D et/ou à un récepteur thermique X3D (ex : CALYBOX 2020 WT, TYBOX 1010 WT, etc ...) ou d’automatisme X3D. EN The detector can be associated with a DELTA DORE X3D wireless alarm system and/or an X3D thermal receiver (e.g. CALYBOX 2020 WT, TYBOX 1010 WT, etc.) or X3D control system. DE Der Melder kann einer DELTA DORE Funk-Alarmanlage X3D und/oder einem X3D-Empfänger zur Heizungsregelung (z. B.: CALYBOX 2020 WT, TYBOX 1010 WT usw...) oder Hausautomation zugeordnet werden. IT Il sensore può essere associato ad un sistema d’allarme Delta Dore radio X3D e/o ad un ricevitore termico X3D (per es: TYBOX 5100...) o di automatismo X3D. ES El detector se puede asociar con el sistema de alarma DELTA DORE radio X3D y/o con el receptor térmico X3D (por ejemplo: CALYBOX 2020 WT, TYBOX 1010 WT, etc.) o con el de automatismo X3D. PL Czujnik mo¿na powi¹zaæ z systemem DELTA DORE radiem X3D i/lub odbiornikiem termicznym X3D (np.: CALYBOX 2020 WT, TYBOX 1010 WT, itp.) lub automatyk¹ X3D. NL De detector kan worden gekoppeld aan een DELTA DORE radio X3D en/of thermische ontvanger X3D (bijv: CALYBOX 2020 WT, TYBOX 1010 WT, enz...) of X3D automatisering. 27 gr. Important product information (➋ ➌) www.deltadore.com Présentation / Presentation / Beschreibung / Presentazione / Presentación / Prezentacja / Voorstelling FR 12 x 52 x 9 mm 2 A1 -10°C / +70°C Emplacement / Location / Einbauort / Posizionamento / Ubicación / Lokalizacja / Locatie FR Préconisation : Le TYXAL MDO doit être installé sur des ouvrants peu sollicités (ex : fenêtre de chambre). EN Recommendation: TYXAL MDO must be fitted on openings that are not frequently used (e.g. bedroom window). DE Empfehlung: TYXAL MDO sollte an Fensterflügeln installiert werden, die wenig beansprucht werden (z. B.: Schlafzimmerfenster). IT Raccomandazione: Il TYXAL MDO deve essere installato su delle parti apribili poco utilizzate (per es: finestra di una camera) ES Recomendación: El dispositivo TYXAL MDO debe instalarse en aperturas de poco uso (por ejemplo: ventana de habitación). PL Zalecenie: Czujnik TYXAL MDO nale¿y montowaæ na rzadko otwieranych oknach (np. okno sypialni). NL Aanbeveling: De TYXAL MDO moet op weinig gebruikte openingen (bijv. slaapkamerraam) worden geïnstalleerd. FR N°1 N°1 EN N°1 N°1 N°1 DE N°2 A1 A1 A2 A2 B1 IT ES B Clic A A1 A2 B2 B1 B A et N°2 ne pas séparer les cales A1 et A2 avant le montage. sur support métallique, l’utilisation des cales A1 et A2 est obligatoire. and N°2 do not separate wedges A1 and A2 before mounting. wedges A1 and A2 must be used on a metal support. und N°2 Distanzplatten A1 und A2 vor der Montage nicht trennen. Bei Metallhalterungen müssen die Distanzplatten A1 und A2 unbedingt verwendet werden. N°1 e N°2 Non separare i supporti A1 e A2 prima del montaggio N°1 su sopporti metallici, l’utilizzo dei supporti A2 e A2 è obbligatorio. N°1 N°1 N°1 B PL A B N°1 N°1 NL N°1 N°1 N°3 B1 Clic N°1 A A B2 y N°2 no separe la cuñas A1 y A2 antes del montaje. el uso de cuñas A1 y A2 es obligatorio sobre soportes metálicos. i N°2 przed monta¿em nie oddzielaæ klinów A1 i A2. na metalowym pod³o¿u, u¿ywanie klinów A1 i A2 jest obowi¹zkowe. N°2 en scheid de wiggen A1 en A2 niet voor de montage. op de metalen steun is het gebruik van vulplaatjes A1 en A2. N°5 N°4 N°6 N°7 A2 FR Distances de déclenchement de l’aimant EN Magnet triggering distances DE Abstand zwischen Melder und Magnet IT Distanza tra parte fissa del contatto e magnete ES Distancias de activación del imán PL Odleg³ości zadzia³ania magnesu NL Afstanden van magneet < 5mm B1 X Y1 Y2 Z B1 B2 B B A 3 B A B A B A A Fixation / Mounting / Montage / Fissaggio / Fijación / Mocowanie / Bevestigen A Y1 Z A 4 16 mm 12 mm 14 mm 16 mm 9 mm 6 mm 8 mm 9 mm 16 mm 11 mm 15 mm 15 mm 9 mm 6,5 mm 8 mm 8 mm A B X Y2 Mise en service / Activation / Inbetriebnahme / Attivazione / Activación / Uruchamianie / Inbedrijfstelling B A Clic Lithium 3V CR2032 5 Fonctionnement avec un système d’alarme / Operation with an alarm system / Betrieb mit einer Alarmanlage / Funzionamento con un sistema d’allarme / Funcionamiento con el sistema de alarma / Działanie z systemem alarmowym / Werking met alarmsysteem Voir notice d’intallation système FR • Association avec un système d’alarme • Choix du mode de déclenchement • Test • Retour à la configuration usine EN • Association with an alarm system • Selection of triggering mode • Test • Restoring factory settings Refer to system installation guide DE • Verbindung mit einer Alarmanlage • Wahl des Auslösungsmodus • Test • Rückkehr zur Werkseinstellung Siehe Installationsanleitung System 6 IT • Associazione con un sistema d’allarme • Scelta della modalità di scatto dell’allarme • Test • Ritorno alla configurazione di fabbrica ES • Asociación con el sistema de alarma • Selección del modo de activación • Prueba • Volver a la configuración de serie Vedi le istruzioni “Sistema” Ver manual de instalación del sistema PL • Powi¹zanie z systemem alarmowym • Wybór sposobu wyzwalania • Test • Przywrócenie konfiguracji fabrycznej NL Koppelen aan een alarmsysteem • Activeringsmodus selecteren • Test • Fabrieksinstellingen herstellen Patrz instrukcja instalacji systemu Zie installatiehandleiding systeem Mode autonome / Autonomous mode / Autonomer Betrieb / Modalità autonoma / Modo autónomo / Tryb autonomiczny / Autonome modus FR Test de fonctionnement EN Operating test Association with an X3D receiver (thermal or control system) Example: heating system switches off when a window is opened. DE Betriebstest IT Verbindung mit X3D-Empfänger (Heizungsregelung oder Hausautomation) Beispiel: Ausschalten der Heizung beim Öffnen eines Fensters. Test di funzionamento DE ES Prueba de funcionamiento Associazione con un ricevitore X3D (termico o di automatismo) Esempio: Arresto del riscaldamento a seguito dell’apertura di una finestra. PL IT Test działania NL Werking testen ES Asociación con el receptor X3D (térmico o de automatismo) Ejemplo: desactivación de la calefacción al abrir la ventana. PL Powi¹zanie z odbiornikiem X3D (termicznym lub automatyki) Przyk³ad: wy³¹czenie ogrzewania po otwarciu okna. NL Koppelen met een ontvanger X3D (thermisch of automatisch) Bijvoorbeeld: verwarming uitschakelen wanneer raam wordt geopend. FR EN Association avec un récepteur X3D (thermique ou automatisme) Exemple : mise en arrêt du chauffage sur ouverture de fenêtre. 1 2 Exemple / Example / Beispiel / Esempio / Ejemplo / przyk³ad / Voorbeeld 1 3 2 OK Exemple / Example / Beispiel / Esempio / Ejemplo / przyk³ad / Voorbeeld OFF > 3s ... ... ... FR ➊ Mettez le récepteur en attente d’association (voir notice). ➋ Appuyez sur la touche du détecteur. Le voyant s’allume brièvement. Relâchez. EN ➊ Set the receiver to association wait mode (refer to guide). ➋ Briefly press the detector button. ➌ Check that the receiver has The LED will come on briefly. acknowledged the request Release. (refer to the guide). ➊ Schalten Sie den Empfänger in Wartestellung auf den Lernmodus. (siehe Bedienungsanleitung). ➋ Drücken Sie die Taste am Melder. Die Kontrollleuchte leuchtet kurz auf. Taste loslassen. IT ➊ Mettere il ricevitore in attesa di associazione (vedi istruzioni) ➋ Premere il pulsante del sensore. ➌ Verificare che il ricevitore Il LED si illumina brevemente. abbia ricevuto correttamente il Riavviare. comando (vedi istruzioni) ES ➊ Ponga el receptor en espera de asociación (ver manual). ➋ Pulsar la tecla del detector. El indicador se enciende brevemente. Suelte la tecla. ➌ Compruebe que el receptor ha tenido en cuenta la solicitud (ver su propio manual). PL ➊ Ustaw odbiornik w trybie oczekiwania na powi¹zanie (patrz instrukcja). ➋ Naciśnij przycisk czujnika. Lampka sygnalizacyjna w³¹cza siê na krótko. Zwolnij. ➌ Sprawdź, czy odbiornik uwzglêdni³ ¿¹danie (patrz instrukcja). NL ➊ De ontvanger in stand-by zetten voor koppeling (zie handleiding). ➋ Druk op de toets van de ➌ Controleer of de ontvanger de detector. Het lampje licht opdracht heeft ontvangen (zie kortstondig op. Laat de toets los. handleiding). DE 7 ➌ Vérifiez que le récepteur a bien pris en compte la demande (voir sa notice). ➌ Überprüfen Sie, ob der Empfänger den Befehl berücksichtigt hat (siehe entsprechende Anleitung). FR ➊ Appuyez brièvement sur la touche du détecteur. ➋ Le voyant du détecteur clignote rouge à chaque ouverture ou fermeture, pendant 4 minutes. EN ➊ Briefly press the detector button. ➋ The detector LED flashes red for 4 minutes each time the opening is opened or closed. DE ➊ Drücken Sie kurz die Taste am Melder. ➋ Die Kontrollleuchte am Melder blinkt bei jedem Öffnungs- oder Schließvorgang 4 Minuten lang rot. IT ➊ Premere brevemente sul pulsante del sensore. ➋ Il LED del sensore emette un flash ad ogni apertura o chiusura, per 4 minuti. ES ➊ Pulse brevemente la tecla del detector. ➋ El indicador del detector parpadea de color rojo al abrir o cerrar durante 4 minutos. PL ➊ Naciśnij na krótko przycisk czujnika. ➋ Lampka czujnika miga na czerwono przy ka¿dym otwarciu lub zamkniêciu, przez 4 minuty. NL ➊ Druk kortstondig op de toets van de detector. ➋ Het lampje van de detector knippert (rood) bij elke opening of sluiting, 4 minuten. Changement de la pile / Changing the batteries / Batterien ersetzen / Sostituzione delle batterie / Cambiar las pilas / Wymiana baterii / De batterijen vervangen Clic Lithium 3V CR2032 FR Le voyant clignote à chaque ouverture ou fermeture, la pile est usée. EN The LED flashes whenever an opening is opened or closed. The battery is dead. DE Kontrollleuchte blinkt bei jedem Öffnungs- oder Schließvorgang, die Batterie ist leer. IT Il LED lampeggia ad ogni apertura, le batterie sono esaurite. ES Si el indicador parpadea al abrir y al cerrar quiere decir que la pila se ha gastado. PL Lampka miga przy ka¿dym otwarciu lub zamkniêciu – bateria jest roz³adowana. NL Als het lampje bij elke opening/sluiting knippert, dan is de batterij bijna leeg.-
 1
1
-
 2
2


DELTA DORE TYXAL+ MDO BL Installatie gids
- Type
- Installatie gids
- Deze handleiding is ook geschikt voor
in andere talen
- English: DELTA DORE TYXAL+ MDO BL Installation guide
- italiano: DELTA DORE TYXAL+ MDO BL Guida d'installazione
- français: DELTA DORE TYXAL+ MDO BL Guide d'installation
- español: DELTA DORE TYXAL+ MDO BL Guía de instalación
- Deutsch: DELTA DORE TYXAL+ MDO BL Installationsanleitung
- polski: DELTA DORE TYXAL+ MDO BL Instrukcja instalacji
Gerelateerde artikelen
-
DELTA DORE TYXAL+ MDO BL Installatie gids
-
-
-
-
DELTA DORE TTRTC TYXAL+ Installatie gids
-
-
-
-
DELTA DORE DMDR BL TYXAL+ Installatie gids
-