CrockPot CSC089X-DIM Handleiding
- Categorie
- Snelkookpannen
- Type
- Handleiding

Instruction manual
• Bedienungsanleitung
• Gebruiksaanwijzing
• Instrukcja obsługi
• Manual de utilizare
• Instruktionsbok
CSC089X-DIM
Crockpot® Express Pressure Multi-Cooker Steamer Pack

English 4
Deutsch/German 19
Nederlands/Dutch 29
Svenska/Swedish 39
Polski/Polish 48
Română/Romanian 58
D
E
F
C
A
H
G
L
K
J
I
MANUAL
M
N
Q
R
O
P
S
T
B
U

4 5
ENGLISH
IMPORTANT SAFEGUARDS
When using electrical appliances, basic safety precautions should always
be followed to reduce the risk of fire, electric shock, and/or injury to persons
including the following:
1. Read all instructions before using this product.
2. This appliance shall not be used by children. Keep the appliance and it’s
cord out of reach of children. Children shall not play with the appliance.
Appliances can be used by persons with reduced physical, sensory or
mental capabilities or lack of experience and knowledge if they have
been given supervision or instruction concerning use of the appliance in
a safe way and understand the hazards involved.
3. Do not operate any appliance with a damaged cord or plug or after the
appliance malfunctions, or has been damaged in any manner. Return
the appliance to the manufacturer (see warranty) for examination, repair
or adjustment. Do not attempt to replace or splice a damaged cord. If
the supply cord is damaged it must be replaced by a special cord or
assembly available from the manufacturer or its service agent.
4. Do not use outdoors or for commercial purposes.
5. Do not use appliance for other than intended use. Misuse can cause
injuries. This appliance is not intended for deep frying foods.
6. This appliance cooks under pressure when using pressure cooking
functions. Improper use may result in scalding injury. Make certain unit
is properly closed before operating. See Operating Instructions.
7. This appliance generates heat during use. Do not touch hot surfaces.
Use handles or knobs.
8. Do not fill the unit over maximum fill line at 2/3 full. When cooking foods
that expand during cooking such as rice or dried vegetables, do not fill
the unit beyond the recommended level at 1/2 full. Over filling may cause
a risk of clogging the vent pipe and developing excess pressure. Follow
all cooking and recipe instructions.
9. Always check the pressure release devices for clogging before use.
Clean as necessary.
10. Place the Multi-Cooker so that the Steam Release Valve is positioned
away from the body.
11. Never place any part of the body, including face, hands, and arms over
the Steam Release Valve. Steam can result in serious burns.
12. Do not operate the Multi-Cooker without food or liquid in the Cooking
Pot.
13. To prevent risk of injury due to excessive pressure, replace Lid Sealing
Gasket only as recommended by the manufacturer. See Care and Cleaning
instructions.
14. Do not use the Lid to carry the Multi-Cooker.
15. Do not move or cover the Multi-Cooker while it is in operation.
16. After pressure cooking, do not open the pressure cooker until the unit
has cooled and all internal pressure has been released. If the Lid is
difficult to remove, this indicates that the cooker is still pressurized - do
not force it open. Any pressure in the cooker can be hazardous. See
Releasing Pressure Instructions.
17. Be careful when lifting and removing Lid after cooking. Always to using
oven glove tilt the Lid away from you as steam is hot and can result in
serious burns. Never place face over the Multi-Cooker.
18. Do not use this pressure cooker for pressure frying with oil.
19. To protect against electric shock, do not place or immerse power cord,
plugs or heating base in water or other liquid.
20. Do not use the Cooking Pot for food storage or place in the freezer.
21. To prevent damage to the Multi-Cooker do not use alkaline cleaning
agents when cleaning. Use a soft cloth and a mild detergent.
22. Always plug Power Cord fully into Multi-Cooker first, then plug cord into
the wall outlet.
23. Unplug from the outlet when not in use, Always unlug and allow to cool
before putting on or taking off parts and before cleaning. To disconnect,
ensure that the Multi-Cooker is OFF, then unplug Power Cord from outlet.
Do not disconnect by pulling on cord.
24. Do not let Power Cord hang over edge of table or counter or come into
contact with hot surfaces.
25. Extreme caution must be used when moving an appliance containing hot
liquids.
IMPORTANT SAFETY NOTICE:
When releasing pressure from the unit, ensure an oven glove is worn and
a kitchen utensil is used to gradually open the valve and release pressure.
Beware of escaping steam.
NEVER immerse the heating base, power cord or plug into water or any
other liquid.

6 7
26. Never use any accessory or attachment not recommended by the
manufacturer.
27. Do not place on or near wet surfaces, or heat sources such as a hot gas
or electric burner, or in a heated oven.
28. CAUTION: To protect against electrical shock and product damage,
do not cook directly in the Heating Base. Cook only in the removable
Cooking Pot provided.
29. WARNING: Spilled food can cause serious burns. Never drape cord over
edge of counter, never use outlet below counter, and never use with an
extension cord.
30. Do not plug in or turn on the Multi-Cooker without having the Cooking
Pot inside the Multi-Cooker.
31. Intended for household countertop use only. Keep 6 inches (152 mm)
clear from the wall and on all sides. Always use appliance on a dry,
stable, level surface.
SAVE THESE INSTRUCTIONS
HOUSEHOLD USE ONLY
FITTING A PLUG (UK & IRELAND ONLY)
This appliance must be earthed.
If the plug is not suitable for the socket outlets in your home, it can be removed and
replaced by a plug of the correct type.
If the fuse in a moulded plug needs to be changed, the fuse cover must be refitted. The
appliance must not be used without the fuse cover fitted.
If the plug is unsuitable, it should be dismantled and removed from the supply cord and
an appropriate plug fitted as detailed. If you remove the plug it must not be connected
to a 13 amp socket and the plug must be disposed of immediately.
If the terminals in the plug are not marked or if you are unsure about the installation of
the plug please contact a qualified electrician.
A short Power Cord is used to reduce the risk resulting from it being grabbed by
children, becoming entangled in, or tripping over a longer cord.
NOTICES:
1. Some countertop and table surfaces are not designed to withstand the prolonged heat generated by certain
appliances. Do not set the heated Multi-Cooker on a finished wood table. We recommend placing a hot pad or trivet
under your Multi-Cooker to prevent possible damage to the surface.
2. During initial use of this appliance, some slight smoke and/or odor may be detected. This is normal with many heating
appliances and will not recur after a few uses.
3. Please use caution when placing your Cooking Pot on a ceramic or smooth glass cook top stove, countertop, table
or other surface. It may scratch some surfaces if caution is not used. Always place heat resistant protective padding
under the Cooking Pot before setting on a table, countertop or other surface.
HOW TO USE YOUR CROCKPOT® EXPRESS PRESSURE
MULTI-COOKER
GETTING STARTED:
Remove all packaging, paper, and cardboard (including any located between the Cooking Pot and Heating Base).
Read and save the literature and be sure to read the service and warranty information.
Visit the Crockpot® website at www.crockpot.co.uk for additional information, hints, tips and recipes.
ASSEMBLY:
• Place Cooking Pot into the Heating Base
• Place Lid upon Multi-Cooker and align with . To lock, twist counterclockwise, aligning with . To unlock,
twist Lid clockwise and align with .
GETTING TO KNOW YOUR CROCKPOT®
EXPRESS PRESSURE MULTI-COOKER
1. Remove the Lid by turning clockwise to unlock, aligning with . Remove the Sealing Gasket from the Lid and wash
the gasket and the Lid in warm soapy water. Dry the Sealing Gasket and Lid thoroughly before reattaching the Sealing
Gasket to the Lid. Ensure the Sealing Gasket is smoothly and securely in place in the gasket holder. If the Sealing
Blue
(Neutral)
Brown
(Live)
Green/Yellow
(Earth)
Plug should be ASTA approved to BS1363
Fuse should be ASTA approved to BS1362
Ensure that the outer sheath of
the cable is firmly held by the cord grip
Locked Lid Unlocked Lid Open Lid
Figure 1
CROCKPOT EXPRESS PRESSURE MULTI-COOKER
COMPONENTS
APower Cord
BTongs
CLid Lock Pin
DLid Handle
ELid
FCooking Pot
GHeating Base
HControl Panel
IBobber Valve
JSteam Release Valve
KCondensation Collector
LPower Cord Port
CONTROL PANEL
MDisplay Screen
NTime Selection Buttons
UNDERSIDE OF LID
OGasket Fixing Ring
PSteam Release Valve Cover
QSealing Gasket
RBobber Valve
SPlastic Spoon
TSteaming Rack
USteamer Basket

8 9
Gasket is not in the correct position the Lid will not be able to form a seal and will not be able to gain pressure.
2. Remove the Cooking Pot and the Condensation Collector and wash in warm, soapy water. Dry thoroughly before
replacing back in the Multi-Cooker.
The Crockpot® Express Multi-Cooker has been designed with safety in mind and has various safety measures.
1. Pressure will not build if the Lid is not shut correctly and has not sealed.
2. Ensure Lid is in the completely locked position and the is aligned with .
3. Pressure will not build if the Steam Release Valve has not been switched to the Seal “ ” position.
4. Over filling may cause a risk of clogging the vent pipe and developing excess pressure.
5. The gasket and the valves can be removed for cleaning. (See page 15).
6. Once the pressure increases, the Lid cannot be opened. Safety sensors ensure the pressure remains within the set
range.
7. The Steam Release Valve has an extended finger tab, designed to keep the hand away from the top of the valve.
Always use a kitchen utensil when operating this tab. See RELEASING PRESSURE Instructions on page 11.
8. The pressure cooking functions require liquid to work. If the inside of the Cooking Pot does not have enough liquid, an
error will appear in the Display Screen. See ERROR CODES chart on page 17.
9. At the end of cooking, the Lid cannot be unlocked until all the pressure is released. This can be done using the
Natural Pressure Release Method or Quick Pressure Release Method, explained on page 11.
10. The Time Selection Buttons (+ and -) are used to set the cooking time. To advance slowly, simply press the + or -
button and release. To advance quickly, press and hold the + or - button. If you have passed the desired time, simply
press the opposite arrow button to return to the desired time.
NOTE: The timer can be selected for all programs and can be changed at any time during cooking by pressing START/
STOP and selecting a new function.
11. The PRESSURE ADJUST button is used to select desired cooking pressure (HIGH or LOW). Each pre-set cooking
setting automatically selects the optimum pressure for that selection, but it can be manually selected with this button
(see the Cooking Guide on page 68 for available adjustments).
12. The TEMP ADJUST button is used to select desired temperature (HIGH or LOW). The temperature may only be
adjusted on the SLOW COOK, YOGURT, and BROWN/SAUTÉ functions (see the Cooking Guide on page 68 for
available adjustments).
13. The START/STOP button starts and stops a cooking function. It must be pressed to change from one cooking function
to another after cooking has begun.
14. The Display Screen shows how much longer the food needs to cook from the selected time in hours and minutes
once the Multi-Cooker is preheated. While the Multi-Cooker is preheating, the display screen will show, “HEAt”.
GETTING STARTED
(NOTE: The Multi-Cooker beeps as each button is pressed.)
1. Add desired ingredients to Cooking Pot. Place Lid on top of Multi-Cooker and align with . To lock, twist
counterclockwise, aligning with .
2. Plug provided Power Cord into the Power Cord Port of the Multi-Cooker.
3. Plug other end of the Power Cord into a wall power outlet.
4. Select the cooking function you would like to use.
5. The START/STOP button and the time on the screen will flash.
6. Select the desired cook time by using the + and - buttons. Select the desired temperature using the TEMP ADJUST
button (if applicable).Select the desired pressure using the PRESSURE ADJUST button. (Please refer to the Cooking
Guide chart on page 68 for time and temperature recommendations.)
7. Press the START/STOP button. For pressure cooking functions, the word “HEAt” will appear on the Display Screen
during preheating time. Once the Multi-Cooker is preheated, the selected cooking time will appear on Display Screen.
Note: For Pressure Cooking functions, the average pre-heat time can vary depending on the volume and temperature
of the food being cooked. This can range from 5-30 minutes.
8. This Multi-Cooker allows you to delay the start of your cooking so that cooking finishes when you need it. See page 9
for instructions on the DELAY TIMER function.
9. After the set cooking time has elapsed, the Multi-Cooker will beep again and will automatically switch to the KEEP WARM
setting. The Display Screen will then change from the cook time to a new timer that will count up to 4:00 (4 hours) or until
you press the START/STOP button. After 4 hours in the KEEP WARM setting, the Multi-Cooker will turn off.
10. To end a cooking function at any time, press the START/STOP button.
11. When finished, unplug the Multi-Cooker and wait for it to cool completely before attempting to clean.
CAUTION: The Cooking Pot and Heating Base will get very hot while using this Multi-Cooker. Do not touch hot
surfaces. Always use pot holders or oven-mitts when using this Multi-Cooker. Always lift the Lid by tilting away from
you to avoid the steam.
HOW TO USE THE TIME DELAY
This Multi-Cooker allows you to delay the start of your cooking so that cooking finishes when you need it.
Note: The DELAY TIMER function is not available on the BROWN/SAUTÉ, KEEP WARM, or YOGURT settings.
Note: Do not use the DELAY TIMER function when the recipe has perishable ingredients such as meat, fish, eggs, or dairy,
as these may spoil.
1. Adjust the Multi-Cooker settings using the instructions on pages 10-14.
2. After setting the cooking time, press the DELAY TIMER button. The DELAY TIMER and START/STOP buttons will
flash, and “0:30” will flash on the Display Screen, to indicate the Multi-Cooker is being programmed on the delay
setting.
3. Press the + and - buttons until you reach the number of hours and minutes you want the cooking process to be
delayed (i.e., set the amount of time you wish to delay the cooking cycle).
4. Press START/STOP button to begin the delay feature. The timer and DELAY TIMER button will stop flashing, while
the START/STOP button will continue flashing. This will indicate that the Multi-Cooker has been set on the DELAY
TIMER setting. The Display Screen will countdown the delay time until 0:00 is reached. When 0:00 is reached, the
DELAY TIMER light will turn off and the START/STOP light will stop flashing to show that time delay has finished. The
word “HEAt” will appear on the display screen until the Multi-Cooker is fully pressurized. When the selected pressure
has been reached, the timer will start counting down.
Example:
It’s 4pm and you want to have a soup cooked and ready in 2 hours’ time for dinner at 6pm. You want to set the machine
now so you are free to do other things.
The pre-set function (if unchanged) will cook for 30 minutes at HIGH pressure. Time to gain pressure varies according to
humidity and water temperature, but let’s assume it takes 15 minutes to gain pressure. Therefore total time is 45 minutes.
To have the stew ready by 6pm, you will need to delay the start of your cooking by approximately 1 hour and 15 minutes.
1. Press SOUP
2. The Display Screen will flash “0:30”
3. Press the DELAY TIMER button and set for “1:15”
4. Press START/STOP
COOKING POT MARKINGS
Inside the removable Cooking Pot are markings to guide the fill level of the Cooking Pot. The word MAX indicates the
maximum fill line.
The 1/3, 1/2, and 2/3 markings are handy guides to use in your recipes.
CAUTION: Never load the Cooking Pot above the maximum ingredient level line marked MAX
on the inside of the Cooking Pot.
Foods that expand during cooking (e.g. rice) should never go above the 1/2 mark.
Note: The Multi-Cooker cannot pressure cook without liquid. Ensure a minimum of 250ml of
liquid is used inside the removable Cooking Pot.
2
3
2
1
1
3
MAX

10 11
PRESSURE COOKING
Pressure cooking is an ideal way to create quick, flavorful meals. Pressure cooking is a method of cooking food in liquid
(water, stock, wine, etc.) in a sealed Cooking Pot. The sealed Multi-Cooker retains steam and builds pressure, raising the
temperature of the liquid inside the pot above boiling point. The increased temperature of the liquid and the steam results in
reduced cooking times.
HIGH Pressure Setting is 6.5 - 10 PSI (45 - 70 kPa). It is suitable for a wide range of foods.
LOW Pressure Setting is 3.3 - 6.5 PSI (23 - 45 kPa). It is more suited to delicate foods like chicken fillet, fish and some
vegetables.
KEEP WARM Setting: When cooking time is completed, the Multi-Cooker automatically switches to the KEEP WARM setting
to prevent overcooking and to keep your cooked food warm until serving - perfect for busy families, those on the run and
those who need flexible meal times. This setting is not hot enough to cook and should only be used to keep warm, cooked
food for serving.
Ideal Meals to Pressure Cook: Soups, stocks, casseroles, sauces (e.g. pasta sauces), meat, rice, firm vegetables (beetroot,
potatoes) and desserts (e.g., pudding).
Capacity: Never fill the Cooking Pot above the MAX line. Foods that expand during cooking should never go above the
1/2 mark. The Multi-Cooker cannot pressure cook without liquid. Ensure a minimum of 250ml of liquid is used inside the
removable Cooking Pot.
MANUAL FUNCTION
This function allows the user to select their own pressure cooking time ranging from 1 minute to 2 hours, with a temperature
selection of Low or High. This is particularly suitable for those users who would like to pressure cook food items not covered
by our other cooking functions. This also gives the user greater scope for sourcing recipes from a wide range of sources.
Please follow our guidelines for Pressure Cooking on page 9.
USING THE PRESSURE COOKING FUNCTIONS
Place the Multi-Cooker on a flat, level surface.
Place Cooking Pot inside Heating Base. Plug the Multi-Cooker into a wall outlet. The Multi-Cooker will beep, and the
Display Screen will illuminate with four dashes (- - - -).
1. Place your food and liquid inside the removable Cooking Pot.
2. Place the Lid onto the Multi-Cooker and align with . To lock, rotate counterclockwise to the LOCKED position.
3. Using the finger tab, rotate the Steam Release Valve to the “Seal” position.
4. Select the desired cooking function
5. Adjust the cooking time and pressure if necessary.
Note: See the Cooking Guide on page 68 to find the possible time and pressure adjustments
6. Once you have made the desired adjustments, if any, press START/STOP.
7. The Multi-Cooker needs to gain pressure before pressure cooking can begin. When the Multi-Cooker is gaining
pressure, “HEAt” will appear on the Display Screen and the time will not count down. The amount of time the Multi-
Cooker takes to gain pressure varies according to humidity and water temperature, but average pressurization time is
5-30 minutes. When pressure has been reached, “HEAt” will disappear on the Display Screen, and the time will begin
to count down.
8. After the set cooking time has elapsed, the Multi-Cooker will beep and will automatically switch to the KEEP WARM
setting. The Display Screen will therefore change from the cook time to a new timer that will count up to 4:00 (4 hours)
or until you press the START/STOP button. After 4 hours in the KEEP WARM setting, the Multi-Cooker will go into
stand-by mode, and the Display Screen will illuminate with four dashes (----).
TIP:
1. The pressure cooking settings are in the Cooking Guide table on page 68.
2. If the lid is not shut correctly or if the Steam Release Valve is not in the “Seal” position, the Multi-Cooker cannot gain
pressure and an ERROR message will appear in the Display Screen. Ensure that the Sealing Gasket is placed evenly in
the lid. See the ERROR CODES chart on page 17.
3. It is common for some steam to release through the Bobber Valve during the cooking cycle. This is part of normal
operation of the unit.
Note: The Multi-Cooker cannot pressure cook without liquid. Ensure a minimum of 250ml of liquid is used inside the
removable Cooking Pot.
Caution: During cooking, steam will build up in the Multi-Cooker, so when lifting the lid use an oven glove to protect your
hands.
RELEASING PRESSURE AT THE END OF COOKING
A. Natural Pressure Release Method: After cooking cycle is complete, let Multi-Cooker naturally release pressure
through the Bobber Valve. Unit will gradually cool down on its own. Wait at least 10 minutes after cooking has
completed. If using a higher volume of food and liquid, this can take up to 20 minutes. And then, using a kitchen
utensil, gradually flick the tab on the Steam Release Valve to the “Release” position (see Figure 2). Do not place
any part of your hand or body over the steam outlet on top of the valve, as steam is very hot and can scald skin. The
pressure has been released when steam is no longer escaping from the valve and the Lid opens freely with minimal
force. Only then is it safe to remove the Lid and serve food.
B. Quick Pressure release method should be used with caution: Using a kitchen utensil, gradually flick the tab on
the Steam Release Valve to the “Release” setting (see Figure 2). Steam will release rapidly from the Steam Release
Valve. Do not place any part of your hand or body over the steam outlet on the top of the valve, as steam is very hot
and can scald skin. Use this method with caution when cooking liquid ingredients such as casseroles, soups, stocks,
beans and pulses. Never use this method when cooking rice, as rice tends to be very delicate. The pressure has been
released when steam is no longer escaping from the valve and the Lid opens freely with minimal force. Only then is it
safe to remove the Lid and serve food.
CAUTION:
1. Do not force the Lid to open. If it does not open easily this means that the Multi-Cooker is still under pressure.
2. During cooking, steam will build up in the Multi-Cooker, so when lifting the Lid use a kitchen glove or mitt to protect
your hand.
SLOW COOKING
LOW Setting: This is suitable for simmering and slow cooking. Recommended cooking times in LOW are from 6 to 8 hours.
HIGH Setting: This is for faster cooking. Recommended cooking times in HIGH are from 2 to 4 hours.
KEEP WARM Setting: When cooking time is completed, the Multi-Cooker automatically switches to the KEEP WARM setting
to prevent overcooking and to keep your cooked food warm until serving - perfect for busy families, those on the run and
those who need flexible meal times. This setting is not hot enough to cook and should only be used to keep hot, cooked
food warm for serving.
Note: When slow cooking, the ideal fill level for your ingredients is between the 1/2 and 2/3 marks. Never fill the Cooking
Pot above the MAX line.
Due to the multi-functionality of the CSC089X-DIM appliance, its slow cooking function works in a slightly different
way to regular Crockpots. If using a recipe for a similar-sized Crockpot®, you may need to increase the cooking
time for use with the CSC089X-DIM.
Pressure Release Valve
Valve CLOSED (“Seal”) Valve OPEN (“Release”) Valve REMOVE
Figure 2

12 13
USING THE SLOW COOK FUNCTION
The SLOW COOK function does not use pressure in the cooking process, but some pressure can build inside the unit during
cooking. When using this function, ensure the Steam Release Valve is in the “Release” position. This function will cook
similarly to standard slow cookers, using lower temperatures and longer cooking times to achieve tender, flavorful meals.
Place the Multi-Cooker on a flat, level surface.
Place Cooking Pot inside Heating Base. Plug the Multi-Cooker into a wall outlet. The Multi-Cooker will beep, and the
Display Screen will illuminate with four dashes (- - - -).
1. Place your food and liquid inside the removable Cooking Pot.
2. Place the Lid onto the Multi-Cooker and align with . To lock, rotate counterclockwise to the LOCKED position.
3. Using the finger tab, rotate the Steam Release Valve to the “Release” position.
Note: Although this setting will not use pressure in the cooking process, some pressure can build inside the unit during
cooking. This is why it’s important to keep the Steam Release Valve in the “Release” position.
4. Press the SLOW COOK button and adjust the time and temperature as needed.
Note: See the Cooking Guide on page 68 to find the possible time and temperature adjustments.
5. Press START/STOP. The time will begin to count down.
6. After the set cooking time has elapsed, the Multi-Cooker will beep and will automatically switch to the KEEP WARM
setting. The Display Screen will therefore change from the cook time to a new timer that will count up to 4:00 (4 hours)
or until you press the START/STOP button. After 4 hours in the KEEP WARM setting, the Multi-Cooker will turn off.
TIP: The SLOW COOK settings are in the Cooking Guide on page 68.
CAUTION: During slow cooking, steam may build up in the Multi-Cooker, so when lifting the Lid use a kitchen glove or mitt
to protect your hand.
STEAMING
The STEAM function is perfect for gently steaming fish and vegetables. It is pre-programmed to use the HIGH pressure
cooking setting. When steaming use the steaming rack or basket.
Capacity: When the Multi-Cooker is used with the STEAM function, the maximum capacity of liquid should be just under the
steamer basket or rack wires, so that the liquid is not touching the food.
Note: The unit cannot pressure cook without liquid. Ensure a minimum of 250ml of liquid is used inside the removable
Cooking Pot.
USING THE STEAM FUNCTION
Place the Multi-Cooker on a flat, level surface.
Place Cooking Pot inside Heating Base. Plug the Multi-Cooker into a wall outlet. The Multi-Cooker will beep, and the
Display Screen will illuminate with four dashes (- - - -).
1. Add a minimum of 250ml of water to the bottom of the removable Cooking Pot and insert the steamer basket or
cooking rack. Ensure water is just under the steamer basket or wires of the rack so that food is not touching water.
Note: The steamer basket should be placed directly on to the base of the Cooking Pot, not on top of the cooking rack.
2. Place your food in the steamer basket or on the cooking rack.
Note: When using the steamer basket do not fill beyond three quarters full. Make sure the basket handle is lowered
inside the basket before placing the lid on.
3. Place the Lid on and lock by rotating counterclockwise to the LOCKED position.
4. Using the finger tab, flick the Steam Release Valve to the “Seal” position.
5. Press the STEAM button and adjust the time and pressure as needed.
Note: See the Cooking Guide on page 68 to find the possible time and pressure adjustments.
6. Once you have made the desired adjustments, if any, press START/STOP.
7. The Multi-Cooker needs to gain pressure before pressure cooking can begin. When the Multi-Cooker is gaining
pressure, “HEAt” will appear on the Display Screen and the time will not count down. When pressure has been
reached, “HEAt” will disappear on the Display Screen, and the time will begin to count down.
8. After the set cooking time has elapsed, the Multi-Cooker will beep and will automatically switch to the KEEP WARM
setting. The Display Screen will therefore change from the cook time to a new timer that will count up to 4:00 (4 hours) or
until you press the START/STOP button. After 4 hours in the KEEP WARM setting, the Multi-Cooker will turn off.
TIP: See the Steaming Chart on page 69.
CAUTION: During cooking, steam will build up in the Multi-Cooker, so when lifting the Lid use a kitchen glove or mitt to
protect your hand. The steamer basket will also become hot during cooking, so please use a kitchen glove or mitt to protect
your hand when lifting the basket out of the cooking pot.
USING THE BROWN/SAUTÉ FUNCTION
This setting does not cook under pressure. It works similarly to standard cooking, requiring dry heat, and therefore does not
need the Lid. Do not use the Lid with this function.
Place the Multi-Cooker on a flat, level surface.
Place Cooking Pot inside Heating Base. Plug the Multi-Cooker into a wall outlet. The Multi-Cooker will beep, and the
Display Screen will illuminate with four dashes (- - - -).
1. Select the BROWN/SAUTÉ function and adjust the time and temperature if necessary, using the + and - buttons.
2. Press START/STOP.
3. When the Multi-Cooker is pre-heating, “HEAt” will appear on the Display Screen. When the temperature has been
reached, the timer will start counting down. Using plastic tongs, carefully add your food to the hot pot.
BROWN/SAUTÉ can be used for each of the following:
A. Brown (sear) meats for casseroles and soups. Browning meat prior to pressure cooking and slow cooking not only
gives your food great color, but it also seals in the juices and flavors and keeps the meat tender.
B. Sauté onions or mirepoix (mixture of chopped onion, carrot, and celery), among many other foods, often used in
pressure cooker and slow cooker recipes. Sautéing onions allows caramelization which contributes to flavor and color
in the end dish.
Capacity: When the Multi-Cooker is used to brown or sauté it may be best to cook in batches to ensure the food is evenly
cooked.
RICE COOKING
When cooking rice, use the RICE/RISOTTO function. This is suitable for all types of rice, including white and/or brown rice.
The RICE/RISOTTO function cooks under pressure for faster cooking.
Capacity: Since rice expands during cooking, do not fill Cooking Pot above the 1/2 mark when using the RICE/RISOTTO
function.
USING THE RICE/RISOTTO FUNCTION
Place the Multi-Cooker on a flat, level surface.
Place Cooking Pot inside Heating Base. Plug the Multi-Cooker into a wall outlet. The Multi-Cooker will beep, and the
Display Screen will illuminate with four dashes (- - - -).
1. Measure the desired quantity of rice.
Note: 1 cup uncooked white rice = 2 cups of cooked white rice (approximately). 1 cup uncooked brown rice = 2 cups
cooked brown rice (approximately).
2. Place the measured rice in a strainer and wash rice thoroughly under cold water. Wash until the water runs clear.
This removes excess starch which helps to achieve fluffier rice, and prevents rice grains sticking to the Cooking Pot.
Rinsing the rice reduces the build-up of starchy water and bubbles that sometimes form around the Valve Cover and
Lid, which can cause spitting from the Steam Release Valve.
3. Ensure the Cooking Pot is clean and dry before placing it inside the Heating Base.
4. Place the washed rice in the Cooking Pot. Add the quantity of water needed for your recipe (Standard ratio -- 1 cup of
uncooked rice : 1.5 cups of water). Ensure that a minimum of 250ml of liquid is placed inside the removable Cooking Pot.
5. Place the Lid on and lock by rotating counterclockwise to the LOCKED position.
6. Using the finger tab, flick the Steam Release Valve to the “Seal” position.

14 15
7. Press the RICE/RISOTTO button and adjust the time and pressure as needed.
Note: See the Cooking Guide on page 68 to find the possible time and pressure adjustments.
8. Once you have made the desired adjustments, if any, press START/STOP.
9. The Multi-Cooker needs to gain pressure before pressure cooking can begin. When the Multi-Cooker is gaining
pressure, “HEAt” will appear on the Display Screen and the time will not count down. When pressure has been
reached, “HEAt” will disappear on the Display Screen, and the time will begin to count down.
10. After the set cooking time has elapsed, the Multi-Cooker will beep and will automatically switch to the KEEP WARM
setting. The Display Screen will therefore change from the cook time to a new timer that will count up to 4:00 (4 hours)
or until you press the START/STOP button. After 4 hours in the KEEP WARM setting, the Multi-Cooker will turn off.
TIPS:
1. Do not keep rice in the pot for extended periods of time on the KEEP WARM setting, as the rice will become dry and
the quality will deteriorate. Use the supplied plastic spoon to stir and serve the rice. Do not use metal utensils, as
these will scratch the non-stick coating.
2. As rice grains can be delicate, at the end of cooking wait until the pressure releases naturally. Do not use the Quick
Pressure Release Method (see page 11 for instructions on the Natural Pressure Release Method).
3. Standard ratio for cooking rice -- 1 cup of uncooked rice : 1.5 cups of water
CAUTION: During cooking, steam will build up in the Multi-Cooker, so when lifting the Lid use a kitchen glove or mitt to
protect your hand.
TO CHANGE A SETTING
It’s easy to switch functions during cooking.
Press the START/STOP button and then select the new desired cooking function. A new timer will flash on the Display
Screen, and the selected function will also flash. Select the desired time, pressure, and/or temperature. Press the START/
STOP button and the new function will begin preheating.
To Change the Cooking Time:
You can change the cooking time before cooking begins by pressing the + and - buttons before pressing START/STOP.
Press and release to change slowly. Press and hold to change time quickly. If you pass the desired temperature or time,
press the opposite button.
To Change the Pressure:
You can change the pressure on certain pre-set functions before cooking begins by pressing the PRESSURE ADJUST
button before pressing START/STOP.
To Change the Temperature:
You can change the temperature on certain functions before cooking begins by pressing the TEMP ADJUST button before
pressing START/STOP.
CARE AND CLEANING
Cleaning should only be carried out when the the Crockpot® Express Pressure Multi-Cooker is cool and unplugged. Allow
the Multi-Cooker to completely cool before cleaning. Do not use the removable Cooking Pot on the stovetop, inside a
microwave oven or inside an oven. Use the pot only inside the Crockpot® Express Pressure Multi-Cooker Heating Base.
Wash the Sealing Gasket and Lid by hand in warm, soapy water. Dry all parts thoroughly.
Cooking Pot:
When removing the Cooking Pot from the Heating Base, always use two hands and lift directly upward. Failure to do so
may result in scratching the outside of the Cooking Pot (see figure 3).
If food sticks or burns to the surface of the Cooking Pot, then fill it with hot soapy water and let it soak before cleaning. Use
a rubber or nylon spatula to remove stubborn residue. If scouring is necessary, use a non-abrasive cleaner and a nylon
scouring pad or brush.
Although the Cooking Pot is dishwasher safe, we recommend hand-washing to preserve the non-stick coating.
If white spots form on surface of Cooking Pot, then soak it in a solution of vinegar or lemon juice and warm water for 30
minutes. Rinse and dry.
Note: Never use metal utensils or cleaning devices on the Cooking Pot, as this may result in scratching and damaging the
non-stick coating.
Exterior
Wipe the exterior of the Heating Base with a damp cloth and polish dry. DO NOT use harsh abrasives, scourers or
chemicals, as these will damage the surfaces. To prevent damage to the Multi-Cooker do not use alkaline cleaning agents
when cleaning. Only use a soft cloth and mild detergent. Never immerse the heating base, or power cord and plug in water
or any other liquid.
Condensation Collector
Empty any collected water from the Condensation Collector after each use. Wash in warm, soapy water.
Lid and Sealing Gasket
Always examine the gasket before each use. The silicon Sealing Gasket on the inside of your Multi-Cooker Lid may
deteriorate over time. Remove Sealing Gasket for cleaning as needed. Hand clean using warm, soapy water, dry
thoroughly, and replace Sealing Gasket in Lid before use. Leave the Lid upturned for storage, as this will also extend the
life of the gasket. Sealing Gasket may need to be replaced every 1 – 2 years depending on regular use. Contact Crockpot®
customer service to order replacement parts.
Steam Release Valve
Ensure the Steam Release Valve is clear from debris before you begin using the Multi-Cooker. Remove the valve and gently
clean. Ensure it is completely dry before replacing.
Steam Release Valve Cover
The Steam Release Valve Cover is on the underside of the Lid. Ensure it is clear from debris before you begin using the
Multi-Cooker. To clean, carefully pull the cover off and clean using warm, soapy water. Press the cover back into its place
after cleaning is complete.
UNDERSIDE OF LID
Bobber Valve
Gently press the valve up and down 2-3 times and ensure it is clear from debris before you begin using the Multi-Cooker.
Figure 3
Figure 4
Bobber Valve
Steam Release Valve Cover

16 17
Lid Lock Pin
Gently press the pin and ensure it is clear from debris before you begin using the Multi-Cooker.
Steamer Basket and Tongs
The Steamer Basket and Tongs are dishwasher safe. Although please note, as with any sieve type utensil, food debris may
become trapped in the mesh basket and require additional cleaning.
Note:
1. Condensation may collect inside the Heating Base under the removable Cooking Pot. This is normal. Allow to cool,
and then dry using kitchen cloth.
2. Always make sure that each component (pot, valves, gasket, etc.) is completely dry before you put back into the Multi-
Cooker.
TROUBLESHOOTING
Subject Question Solution
Power My Multi-Cooker will not
turn on Make sure outlet is functioning properly
Check that the Multi-Cooker is plugged in
Call Customer Service at 0800 052 3615
Doneness of
food My food was undercooked Make sure you selected the proper cooking setting
Make sure the Lid is properly placed and locked, and that Steam Release
Valve in “Seal” (closed) position.
Check the recipe to see that the proper pressure, temperature, and time
selection were made
Be sure the power was not interrupted
Make sure the Cooking Pot has enough liquid to create desired steam and
build pressure. Minimum of 250ml of liquid should be used when pressure
cooking. Never ll over the “MAX” line.
My food was overcooked Make sure the Cooking Pot was at least ½ full
Check that the proper pressure, temperature, and time were selected
Programming Can I set a time for the
Brown/Sauté program? Because sautéing is a function that generally requires your full attention this
may not be necessary. However, if desired a time can be selected.
Can I change the
cooking function, time or
temperature once the food
is cooking?
Yes, to change the cooking function, press START/STOP and select a new
cooking function. Change the time and temperature as required for the food.
Press START/STOP again. The time and temperature can be changed at
any time.
Cooking Can the Cooking Pot and
Lid be used on top of the
stove or in the oven?
The Cooking Pot and Lid are not oven safe. Neither can be used on the
stove or in the oven.
I stopped the cooking
process and changed
pressure settings, and
now the Multi-Cooker is
preheating again.
If a cooking cycle is stopped and a new one is started, the Multi-Cooker
may display “HEAt” until the new pressure is achieved.
Steam Steam is leaking out of
the Multi-Cooker • It is normal for a small amount of steam to come out of the Bobber Valve
before the Multi-Cooker is pressurized.
• If steam is coming out from the perimeter of the Lid, the Lid has not been
closed and locked completely.
Lid I am having trouble
removing the Lid. There is a safety feature to keep Lid from being removed while the Multi-
Cooker is under pressure. Please make sure to de-pressurize the unit by
rotating the Steam Release Valve into the “Release” (open) position. Refer
to Releasing Pressure section for further instructions.
ERROR CODES
Error Solution
“CLOSE LID” blinking
light Ensure that the Lid is closed completely and in the LOCKED position, aligning with .
Display “E1” The Multi-Cooker will stop the cooking cycle. Unplug Multi-Cooker and contact service center.
Display “E2” The Multi-Cooker will stop the cooking cycle. Unplug Multi-Cooker and contact service center.
Display “E3” The Multi-Cooker will stop the cooking cycle. Unplug Multi-Cooker, and allow to cool down
completely. Once Multi-Cooker has cooled down, check all parts of the Lid (See page 16). Turn
Lid to LOCKED position. Ensure Steam Release Valve is in “Seal” (closed) position. If this
error code occurs again, unplug Multi-Cooker and contact service center.
Display “E4” The Multi-Cooker will stop the cooking cycle. Unplug Multi-Cooker, and allow to cool down
completely. Once Multi-Cooker has cooled down, check Cooking Pot to ensure there is enough
liquid inside. Add more liquid if necessary (Minimum 250ml). Ensure no steam is coming out of
Cooking Pot before placing Lid back on Multi-Cooker. Turn Lid to LOCKED position. Ensure
Steam Release Valve is in “Seal” (closed) position. Select a pressure cooking function, and
then press START/STOP.
Display “E5” The Multi-Cooker will stop the cooking cycle. Unplug Multi-Cooker and allow to cool. Once it is
cooled down, remove the Lid and check the Cooking Pot. Do not use the Lid when using the
BROWN/SAUTÉ function.
When using the SLOW COOK function, make sure that the Steam Release Valve is in the
“Release” (open) position before starting the cooking cycle.
Display “E6” The Multi-Cooker will stop the cooking cycle. Unplug Multi-Cooker and allow to cool. Once it
is cooled down, remove the Lid and check the Cooking Pot. Add liquid as necessary. Ensure
a minimum of 250ml of liquid is used inside the removable Cooking Pot. If using a pressure
cooking function, ensure that the Steam Release Valve is in the “Seal” (closed) position.
HINTS AND TIPS
Hints and Tips to get the best use of your Crockpot® Express Pressure Multi-Cooker: Go to the Crockpot® website at
www.crockpot.co.uk for additional recipes, hints, tips and much more.
With your Crockpot® Express you can create a large variety of delicious meals, snacks and desserts. Various foods take
different times to cook perfectly, so sometimes it may take some trial and error to get the cooking times right for you.
1. Please refer to your Crockpot® Express owner’s manual when using your Multi-Cooker.
2. Never fill the Cooking Pot past the MAX line.
3. Do not leave Multi-Cooker plugged in when not in use.
4. Make sure Multi-Cooker is kept away from cabinets and walls when in use.
5. The Cooking Pot is designed to be used only in this Multi-Cooker. Do not use on stovetop, in microwave, or in oven.
6. The provided Steaming Rack is designed to be used in this Multi-Cooker. It should not damage the surface of the
Cooking Pot.
7. The Steamer Basket should not be filled over 3/4s full.
8. When the Tongs are in a closed position, pull the silicone ring at the top outwards to secure them in this position for
easy storage.
9. When removing the Lid, use a pot holder to grasp the Lid Handle and lift away from your body to allow steam to escape.
10. Always place a trivet or pot holder under the Cooking Pot if it is removed from the Heating Base.

18 19
HINTS AND TIPS FOR SLOW COOKING
• If you are slow cooking, you can use the BROWN/SAUTÉ function first, which allows you to sear meats and
vegetables at the beginning but also allows you to thicken sauces and make gravies at the end. Browning meat prior
to slow cooking not only gives your food great color, but it also seals in the juices and flavors and keeps the meat
tender.
• To thicken a casserole at the end of cooking, use the BROWN/SAUTÉ function and stir a small amount of corn flour
with water. Allow to simmer, stirring until thickened.
• When using the SLOW COOK function, make sure the Steam Release Valve is in the “Release” (open) position.
• When using the SLOW COOK function, the Multi-Cooker does not recover lost heat quickly, so only lift the Lid if
necessary or if instructed to do so in the recipe. It’s a good idea to monitor your slow cooking results throughout the
cooking cycle by quickly removing the Lid and checking, then quickly replacing the Lid. Different cuts and thickness of
meats and vegetables can vary cooking times.
• It is not uncommon for meat to cook faster than root vegetables. It is for this reason that we recommend chopping
all vegetables to a similar small size. Meat can be cut into larger chunks because if it is cut too small, it will break up
once cooked and tenderized.
• Slow Cooking reduces evaporation, resulting in the flavors and juices being maintained. Keep this in mind when
creating your own recipes, as you may not require as much liquid as you would when using other cooking methods.
Temperature Temperature Suggestions Recipes Ideas
High Use this setting for recipes that require shorter cooking
times, generally 4-6 hours. Ideal for sauces, chili, potato dishes, cheese
dishes, chicken wings and meatballs in sauce
Low Use this setting for recipes that require longer cook
times. This setting is used for recipes that usually
require cooking for more than 8 hours. Perfect for less
tender cuts of meats.
Ideal for less tender cuts of meat, braised
meats, dried beans, soups and stews
AFTER SALES SERVICE & REPLACEMENT PARTS
In the case the appliance does not operate but is under warranty, return the product to the place it was purchased for a
replacement. Please be aware that a valid form of proof of purchase will be required. For additional support, please contact
our Consumer Service Department at: United Kingdom: 0800 028 7154 | Spain: 0900 81 65 10 | France: 0805 542 055.
For all other countries, please call +44 800 028 7154. International rates may apply. Alternatively, e-mail: crockpotEurope@
newellco.com.
WASTE DISPOSAL
Waste electrical products should not be disposed of with household waste. Please recycle where facilities exist. E-mail us at
[email protected] for further recycling and WEEE information.
DEUTSCH
WICHTIGE SICHERHEITSHINWEISE
Beschädigte Stromkabel müssen durch den Hersteller, den Kundendienst oder
andere qualifizierte Personen ersetzt werden, um Gefahren auszuschließen.
1. Lesen Sie vor Verwendung des Produkts alle Anweisungen.
2. Das Gerät darf nicht von Kindern verwendet werden. Achten Sie
darauf, dass sich das Gerät und das dazugehörige Kabel außerhalb der
Reichweite von Kindern befinden. Kinder dürfen das Gerät nicht als
Spielzeug verwenden. Geräte können von Personen mit eingeschränkten
körperlichen, sensorischen oder geistigen Fähigkeiten oder mangelnder
Erfahrung und Wissen verwendet werden, wenn sie entsprechend in die
sichere Anwendung eingewiesen wurden und die damit verbundenen
Gefahren verstehen.
3. Verwenden Sie das Gerät NICHT nach einer Fehlfunktion des Geräts,
wenn Kabel oder Stecker beschädigt sind oder wenn das Gerät
beschädigt wurde. Versuchen Sie nicht, ein beschädigtes Stromkabel zu
ersetzen oder zu reparieren. Schicken Sie das Gerät zur Überprüfung,
Reparatur oder Einstellung zurück an den Hersteller (siehe Garantie).
Ist das Netzkabel beschädigt, muss es durch ein Spezialkabel oder eine
Spezialbaugruppe des Herstellers oder Kundendienstes ausgetauscht
werden.
4. Verwenden Sie das Gerät nicht im Freien oder für gewerbliche Zwecke.
5. Verwenden Sie das Gerät nicht für andere Zwecke als die hier
vorgesehenen. Falscher Gebrauch kann zu Verletzungen führen. Dieses
Gerät ist nicht für das Frittieren von Lebensmitteln bestimmt.
6. Bei Verwendung der Dampfgarfunktionen steht dieses Gerät unter
Druck. Eine unsachgemäße Verwendung kann zu Verbrühungen führen.
Vergewissern Sie sich vor dem Einschalten, dass das Gerät richtig
verschlossen ist. Siehe hierzu die Betriebsanleitung.
7. Dieses Geräts erzeugt während des Betriebs Hitze. Berühren Sie heiße
Oberflächen nicht. Berühren Sie nur die Haltegriffe.
WICHTIGER SICHERHEITSHINWEIS:
Schützen Sie Ihre Hände beim Ablassen von Dampf durch einen
Ofenhandschuh und öffnen Sie das Ventil langsam mithilfe eines
Küchenutensils. Achten Sie auf den austretenden Dampf.
Tauchen Sie den Heiztopf, das Netzkabel oder den Stecker NIE in Wasser
oder andere Flüssigkeiten.

20 21
8. Füllen Sie den Topf nur zu zwei Drittel, bis zur MAX-Linie. Wenn Sie
Lebensmittel zubereiten, die sich während des Garvorgangs ausdehnen,
wie z. B. Reis oder getrocknetes Gemüse, füllen Sie den Topf wie
empfohlen nur zur Hälfte. Wird der Topf überfüllt, kann dies dazu führen,
dass das Dampfventil verstopft und sich zu viel Druck aufbaut. Befolgen
Sie die Anweisungen in dieser Anleitung und in den Rezepten.
9. Prüfen Sie die Dampfventile vor der Verwendung auf Verstopfungen.
Reinigen Sie diese gegebenenfalls.
10. Stellen Sie den Multi-Kocher so auf, dass das Dampfventil vom Körper
weg weist.
11. Führen Sie nie einen Teil Ihres Körpers, einschließlich Gesicht, Hände
und Arme, über das Dampfventil. Dampf kann ernste Verbrühungen zur
Folge haben.
12. Verwenden Sie den Multi-Kocher nur, wenn sich Lebensmittel oder
Flüssigkeiten im Topf befinden.
13. Zur Vermeidung von Verletzungen durch Überdruck ersetzen Sie den
Dichtungsring des Deckels nur wie vom Hersteller empfohlen. Siehe
Anleitung zur Pflege und Reinigung.
14. Fassen Sie den Multi-Kocher zum Tragen nicht am Deckel.
15. Verschieben oder bedecken Sie den Multi-Kocher während der
Verwendung nicht.
16. Bei Verwendung der Dampfgarfunktion öffnen Sie den Dampfkocher erst,
wenn der Kocher abgekühlt ist und der Innendruck abgelassen wurde. Wenn
sich der Deckel nur schwer öffnen lässt, ist dies ein Hinweis, dass der Kocher
noch unter Druck steht. Öffnen Sie den Deckel nicht mit Gewalt. Der Druck im
Topf kann gefährlich sein. Siehe Anleitung zum Druckablassen.
17. Heben Sie den Deckel nach dem Kochen vorsichtig ab. Neigen Sie
den Deckel dabei von sich weg, da Dampf sehr heiß ist und schwere
Verbrühungen verursachen kann. Beugen Sie sich nie mit dem Gesicht
über den Multi-Kocher.
18. Benutzen Sie diesen Dampfkochtopf nicht, um mit Öl unter Druck zu frittieren.
19. Zum Schutz vor Stromschlägen tauchen Sie das Kabel, den Stecker oder
das Gerät nicht in Wasser oder andere Flüssigkeiten.
20. Verwenden Sie den Kochtopf nicht zur Lagerung von Lebensmitteln und
stellen Sie ihn nicht in den Tiefkühlschrank.
21. Reinigen Sie den Multi-Kocher nicht mit alkalischen Reinigungsmitteln.
Verwenden Sie ein weiches Tuch und ein mildes Reinigungsmittel.
22. Schließen Sie das Stromkabel zuerst an den Multi-Kocher an und dann
an die Netzsteckdose.
23. Trennen Sie das Gerät immer vom Netz, wenn es nicht verwendet wird,
bevor Sie Teile abnehmen oder befestigen oder bevor Sie es reinigen.
Lassen Sie das Gerät abkühlen, bevor Sie Teile abnehmen oder befestigen
oder bevor Sie es reinigen. Bevor Sie das Gerät vom Netz trennen,
vergewissern Sie sich, dass es ausgeschaltet ist und trennen dann das
Stromkabel vom Netz. Ziehen Sie den Stecker dabei nicht am Stromkabel.
24. Lassen Sie das Stromkabel nicht über den Rand des Tisches oder der
Anrichte hängen oder in Kontakt mit heißen Oberflächen kommen.
25. Seien Sie extrem vorsichtig, wenn Sie ein Gerät, das heiße Flüssigkeit
enthält, verschieben.
26. Die Verwendung von Zubehör, das nicht vom Hersteller des Geräts
empfohlen wird, kann zu Verletzungen führen.
27. Stellen Sie das Gerät nicht in die Nähe von oder auf nasse Oberflächen
oder von Hitzequellen wie Gas- oder Elektrobrennern oder in einen
heißen Ofen.
28. VORSICHT: Garen Sie Lebensmittel nicht direkt im Heiztopf, um
Stromschläge und eine Beschädigung des Kochers zu vermeiden.
Verwenden Sie hierzu nur den entnehmbaren Kochtopf.
29. WARNUNG Austretende Lebensmittel können schwere Verbrennungen
verursachen. Halten Sie das Gerät und das Stromkabel außerhalb der
Reichweite von Kindern. Führen Sie das Kabel nie über den Rand der
Anrichte, benutzen Sie nie eine Steckdose unter der Anrichte und
benutzen Sie das Gerät nie mit einem Verlängerungskabel.
30. Schließen Sie den Multi-Kocher nur an das Netz an und schalten Sie ihn
nur ein, wenn der Kochtopf im Heiztopf sitzt.
31. Nur für den Haushaltsgebrauch bestimmt. Betreiben Sie den Multi-Kocher
freistehend, mit einem Abstand von 152 mm an allen Seiten. Stellen Sie
den Multi-Kocher immer auf eine trockene, stabile und ebene Unterlage.
VERWAHREN SIE DIESE ANLEITUNG GUT NUR FÜR
DEN HAUSHALTSGEBRAUCH

22 23
BESTANDTEILE DES CROCKPOT®
EXPRESS-MULTI-KOCHERS
VERWENDUNG DES CROCKPOT® EXPRESS
MULTI-KOCHERS
ERSTE SCHRITTE:
Entfernen Sie alle Papp- und Papierteile der Verpackung (auch die Verpackung zwischen Kochtopf und Heiztopf). Lesen Sie
die Anleitung durch und verwahren Sie sie gut. Lesen Sie auch die Kundendienst- und Garantieinformationen durch.
ZUSAMMENSETZEN:
• Stellen Sie den Kochtopf in den Heiztopf
• Setzen Sie den Deckel auf den Multi-Kocher und richten Sie die Markierung an der Markierung aus. Um den
Topf zu verriegeln, drehen Sie den Deckel gegen den Uhrzeigersinn, bis über steht. Um den Topf wieder zu
entriegeln, drehen Sie den Deckel mit dem Uhrzeigersinn, bis über steht.
ERSTE SCHRITTE
(HINWEIS: Der Multi-Kocher lässt beim Drücken der Tasten einen Piepston ertönen.)
1. Geben Sie die gewünschten Zutaten in den Kochtopf. Setzen Sie den Deckel auf den Kochtopf und richten Sie an
aus. Um den Topf zu verriegeln, drehen Sie den Deckel gegen den Uhrzeigersinn, bis über steht.
AStromkabel
BKüchenzange
CDeckelverriegelungsstift
DDeckelgriff
EDeckel
FKochtopf
GHeiztopf
HBedienfeld
ISchwimmerventil
JDampfventil
KKondensat-sammler
KSteckdose
BEDIENFELD
MAnzeige
NZeitauswahltasten
DECKELUNTERSEITE
ODichtungsxierung
PDampfventil-abdeckung
QDichtungsring
RSchwimmerventil
SPlastiklöffel
TGareinsatz
UDämpfkorb
2. Schließen Sie das im Lieferumfang enthaltene Stromkabel an die Steckdose im Multi-Kocher an.
3. Schließen Sie das andere Ende des Stromkabels an eine Netzsteckdose an.
4. Wählen Sie die gewünschte Kochfunktion.
5. Die Taste START/STOP und die Zeitangabe auf der Anzeige beginnen zu blinken.
6. Wählen Sie mithilfe der Tasten + und - die gewünschte Garzeit. Wählen Sie ggf. mithilfe der Taste TEMP ADJUST die
gewünschte Temperatur. Wählen Sie mithilfe der Taste PRESSURE ADJUST den gewünschten Druck. (Empfehlungen
zu Garzeiten und -temperaturen finden Sie in der Gartabelle auf Seite 69.)
7. Drücken Sie die Taste START/STOP. Wenn Sie Dampfgarfunktionen verwenden, erscheint während der Vorheizzeit
auf der Anzeige die Angabe „HEAt“. Wenn der Multi-Kocher vorgeheizt ist, erscheint die ausgewählte Garzeit auf der
Anzeige.
Hinweis: Bei Dampfgarfunktionen benötigt das Gerät ungefähr 13 - 14 Minuten zum vorheizen. Ist der Topf sehr voll
oder ist der Inhalt sehr kalt, ist die Vorheizzeit u.U. etwas länger.
8. Bei diesem Multi-Kocher können Sie den Beginn der Garzeit später ansetzen, so dass Ihre Mahlzeit dann fertig ist,
wenn Sie essen wollen. Hinweise zum Einstellen der Funktion DELAY TIMER finden Sie auf Seite 23.
9. Wenn die eingestellte Garzeit verstrichen ist, ertönt ein Piepston und der Multi-Kocher schaltet automatisch in die
Einstellung KEEP WARM. Die Anzeige wechselt von der Anzeige der Garzeit zu einem weiteren Timer, der bis 4:00
zählt (4 Stunden) oder stoppt, wenn Sie die Taste START/STOP drücken. Nach 4 Stunden Warmhaltezeit schaltet der
Multi-Kocher aus.
10. Sie können den Kochvorgang jederzeit unterbrechen, indem Sie die Taste START/STOP drücken.
11. Wenn Sie mit der Essenszubereitung fertig sind, trennen Sie den Multi-Kocher vom Netz und warten Sie, bis er
vollständig abgekühlt ist, bevor sie ihn reinigen.
VORSICHT: Sowohl Kochtopf als auch Heiztopf werden während des Gebrauchs sehr heiß. Berühren Sie heiße
Oberflächen nicht. Benutzen Sie immer Topflappen oder -handschuhe, wenn Sie den Multi-Kocher anfassen. Neigen Sie
den Deckel beim Öffnen immer von sich weg, um nicht direkt mit dem entweichenden Dampf in Berührung zu kommen.
VERWENDUNG DER STARTZEITVORWAHL
Bei diesem Multi-Kocher können Sie den Beginn der Garzeit später ansetzen, so dass Ihre Mahlzeit dann fertig ist, wenn
Sie essen wollen.
Hinweis: Die Funktion DELAY TIMER steht nicht bei den Einstellungen BROWN/SAUTÉ, KEEP WARM oder YOGURT zur
Verfügung.
Hinweis: Verwenden Sie die Funktion DELAY TIMER nicht, wenn das Rezept leichtverderbliche Lebensmitteln wie Fleisch,
Fisch, Eier oder Milchprodukte vorsieht, da diese schlecht werden können.
1. Drücken Sie nach der Einstellung der Garzeit die Taste DELAY TIMER. Die Tasten DELAY TIMER und START/STOP
beginnen zu blinken und auf der Anzeige erscheint die Angabe „0:30“, um anzuzeigen, dass für den Multi-Kocher eine
Startzeitverzögerung eingestellt wird.
2. Drücken Sie die Tasten + und -, bis Sie die Anzahl Stunden und Minuten erreicht haben, nach denen der Garvorgang
beginnen soll (also die Zeitspanne, um die der Garvorgang verzögert werden soll).
3. Drücken Sie die Taste START/STOP, um die Startzeitverzögerung zu starten. Der Timer und die Taste DELAY TIMER
hören auf, zu blinken, die Taste START/STOP blinkt jedoch weiterhin. So erkennen Sie, dass die Einstellung DELAY
TIMER läuft. Die Zeitangabe auf der Anzeige läuft rückwärts, bis die Angabe 0:00 erreicht ist. Ist die Zeitangabe
0:00 erreicht, erlischt die DELAY TIMER-Leuchte und die START/STOP-Leuchte hört auf, zu blinken, um das Ende
der Startzeitverzögerung anzuzeigen. Bis der Multi-Kocher den erforderlichen Druck erreicht hat, erscheint auf der
Anzeige das Wort „HEAt“. Wenn der gewählte Druck erreicht hat, beginnt der Zähler, rückwärts zu zählen.
VERWENDUNG DER DAMPFGARFUNKTIONEN
Stellen Sie den Multi-Kocher auf eine stabile, ebene Unterlage. Setzen Sie den Kochtopf in den Heiztopf. Schließen Sie
den Multi-Kocher an eine Netzsteckdose an. Der Multi-Kocher gibt einen Piepston aus und auf der Anzeige erscheinen vier
Striche (- - - - ).
1. Geben Sie die Lebensmittel und Flüssigkeiten in den entnehmbaren Kochtopf.
2. Setzen Sie den Deckel auf den Multi-Kocher und richten Sie die Markierung an der Markierung aus. Um den
Deckel zu verriegeln, drehen Sie ihn entgegen dem Uhrzeigersinn bis zur Position .
Verriegelter Deckel Unverriegelter Deckel Geöffneter Deckel
Abbildung 1

24 25
3. Drehen das Dampfventil mithilfe des Stifts in die Position „Verriegelt“.
4. Wählen Sie die gewünschte Garfunktion.
5. Passen Sie ggf. die Garzeit und den Druck an.
Hinweis: Empfehlungen zu Garzeiten und -temperaturen finden Sie in der Gartabelle auf Seite 68.
6. Wenn Sie alle gewünschten Anpassungen vorgenommen haben, drücken Sie die Taste START/STOP.
7. Der Multi-Kocher muss Druck aufbauen, bevor der Dampfgarvorgang beginnen kann. Während des Druckaufbaus
erscheint auf der Anzeige die Angabe „HEAt“. Die Garzeiteinstellung läuft noch nicht. Wie lange der Multi-Kocher für
den Druckaufbau benötigt, hängt von der Feuchtigkeit und der Wassertemperatur ab. Im Allgemeinen werden 13 bis
15 Minuten benötigt. Wurde der erforderliche Druck erreicht, verschwindet die Angabe „HEAt“ und die eingestellte
Garzeit beginnt zu laufen.
8. Ist die eingestellte Garzeit verstrichen, ertönt ein Piepston und der Multi-Kocher schaltet automatisch in die
Einstellung KEEP WARM. Die Anzeige wechselt von der Anzeige der Garzeit zu einem weiteren Timer, der bis 4:00
zählt (4 Stunden) oder stoppt, wenn sie die Taste START/STOP drücken. Nach 4 Stunden in der Einstellung KEEP
WARM wechselt der Multi-Kocher in den Standby-Modus. Auf der Anzeige erscheinen vier Striche (- - - -).
Hinweis: Ohne Flüssigkeit kann der Multi-Kocher nicht mit Dampf garen. Stellen Sie sicher, dass sich mindestens 240 ml
Flüssigkeit im entnehmbaren Kochtopf befinden.
VORSICHT: Während des Garvorgangs bildet sich Dampf im Multi-Kocher. Verwenden Sie daher beim Öffnen des Deckels
Topflappen oder -handschuhe, um Ihre Hände zu schützen.
DAMPF ABLASSEN NACH BEENDIGUNG DES
GARVORGANGS
A. Dampf langsam eigenständig entweichen lassen: Lassen Sie den Multi-Kocher nach Beendigung des Garvorgangs
den Druck einfach über das Schwimmerventil ablassen. Der Topf kühlt langsam selbst ab. Warten Sie nach
Beendigung des Garvorgangs mindestens 10 Minuten und drücken Sie den Stift am Dampfventil mit einem Hilfsmittel
in die Position „Entriegelt“ (siehe Abbildung 2). Führen Sie Ihre Hand oder andere Körperteile nicht über die Öffnung
oben auf dem Dampfventil, um Verbrühungen durch heißen Dampf zu vermeiden. Der Druck ist abgebaut, wenn kein
Dampf mehr aus dem Ventil entweicht und sich der Deckel ohne Anstrengung öffnen lässt. Erst dann können Sie den
Deckel sicher abnehmen und das Essen servieren.
B. Gehen Sie beim Verfahren zum schnellen Ablassen von Dampf vorsichtig vor: Drücken Sie den Stift am
Dampfventil langsam mit einem Hilfsmittel in die Position „Entriegelt“ (siehe Abbildung 2). Der Dampf entweicht
schnell durch das Dampfventil. Führen Sie Ihre Hand oder andere Körperteile nicht über die Öffnung oben auf
dem Dampfventil, um Verbrühungen durch den heißen Dampf zu vermeiden. Verwenden Sie dieses Verfahren nur
mit Vorsicht, wenn Sie flüssige Gerichte wie Eintöpfe, Suppen, Brühen, Bohnen oder Hülsenfrüchte zubereiten.
Verwenden Sie dieses Verfahren NICHT, wenn Sie Reis zubereiten, da Reis sehr empfindlich ist. Der Druck ist
abgebaut, wenn kein Dampf mehr aus dem Ventil entweicht und sich der Deckel ohne Anstrengung öffnen lässt. Erst
dann können Sie den Deckel sicher abnehmen und das Essen servieren.
VORSICHT:
1. Öffnen Sie den Deckel nicht mit Gewalt. Lässt sich der Deckel nicht problemlos öffnen, steht der Multi-Kocher noch
Dampfventil
GESCHLOSSENES Ventil („Verriegelt“) OFFENES Ventil („Entriegelt“) Ventil ABNEHMEN
Abbildung 2
unter Druck.
2. Während des Garvorgangs bildet sich Dampf im Multi-Kocher. Verwenden Sie daher beim Öffnen des Deckels
Topflappen oder -handschuhe, um Ihre Hände zu schützen.
SCHONGAREN
Einstellung LOW: Diese Einstellung eignet sich für das Köcheln und langsame Garen. Bei dieser Einstellung werden
Garzeiten von 6 bis 8 Stunden empfohlen.
Einstellung HIGH: Diese Einstellung eignet sich für das schnellere Garen. Bei dieser Einstellung werden Garzeiten von 2
bis 4 Stunden empfohlen.
Einstellung KEEP WARM: Wenn der Garvorgang abgeschlossen ist, wechselt der Multi-Kocher automatisch in die
Warmhaltefunktion, um zu verhindern, dass die Lebensmittel überkocht werden und um Ihr Essen warmzuhalten, bis sie
bereit sind, es zu servieren.
VERWENDUNG DER SCHONGARFUNKTION
Die Funktion SLOW COOK verwendet beim Garen keinen Druck, es kann sich während des Garvorgangs jedoch etwas
Druck aufbauen. Vergewissern Sie sich bei Verwendung dieser Funktion, dass sich das Dampfventil in der Position
„Entriegelt“ befindet. Mit dieser Funktion werden die Lebensmittel ähnlich wie bei einem gewöhnlichen Schongarer bei
niedrigen Temperaturen und längeren Garzeiten gegart, um zarte, schmackhafte Gerichte zu erzielen.
Stellen Sie den Multi-Kocher auf eine stabile, ebene Unterlage. Setzen Sie den Kochtopf in den Heiztopf. Schließen Sie
den Multi-Kocher an eine Netzsteckdose an. Der Multi-Kocher gibt einen Piepston aus und auf der Anzeige erscheinen vier
Striche (- - - - ).
1. Geben Sie die Lebensmittel und Flüssigkeiten in den entnehmbaren Kochtopf.
2. Setzen Sie den Deckel auf den Multi-Kocher und richten Sie die Markierung an der Markierung aus. Um den
Deckel zu verriegeln, drehen Sie ihn entgegen dem Uhrzeigersinn bis zur Position .
3. Drehen Sie den Stift am Dampfventil in die Position „Entriegelt“.
Hinweis: Obwohl bei dieser Einstellung kein Druck für den Garvorgang erzeugt wird, kann sich während des Garens
etwas Druck bilden. Deshalb ist es wichtig, das Dampfventil in der Position „Entriegelt“ zu belassen.
4. Drücken Sie die Taste SLOW COOK und passen Sie Garzeit und -temperatur nach Ihren Wünschen an.
Hinweis: Empfehlungen zu Garzeiten und -temperaturen finden Sie in der Gartabelle auf Seite 68.
5. Drücken Sie START/STOP. Die Zeitanzeige beginnt abzulaufen.
6. Ist die eingestellte Garzeit verstrichen, ertönt ein Piepston und der Multi-Kocher schaltet automatisch in die
Einstellung KEEP WARM. Die Anzeige wechselt von der Anzeige der Garzeit zu einem weiteren Timer, der bis 4:00
zählt (4 Stunden) oder stoppt, wenn sie die Taste START/STOP drücken. Nach 4 Stunden Warmhaltezeit schaltet der
Multi-Kocher aus.
VERWENDUNG DER DÄMPFFUNKTION
Stellen Sie den Multi-Kocher auf eine stabile, ebene Unterlage. Setzen Sie den Kochtopf in den Heiztopf. Schließen Sie
den Multi-Kocher an eine Netzsteckdose an. Der Multi-Kocher gibt einen Piepston aus und auf der Anzeige erscheinen vier
Striche (- - - - ).
1. Geben Sie mindestens 250 ml Wasser in den entnehmbaren Gartopf und setzen Sie das Dämpfgitter oder den
Dämpfkorb ein. Das Wasser sollte nicht über den Dämpfeinsatz reichen, um sicherzustellen, dass die Lebensmittel
nicht direkt mit dem Wasser in Berührung kommen.
Hinweis: Der Dämpfkorb wird direkt auf den Boden des Gartopfs gesetzt, nicht auf das Dämpfgitter.
2. Legen Sie die Lebensmittel in den Dämpfkorb oder auf das Gitter.
Hinweis: Wenn Sie den Dämpfkorb verwenden, füllen Sie diesen maximal zu Dreiviertel. Vergewissern Sie sich vor
Schließen des Deckels, dass der Griff des Dämpfkorbs in den Korb abgesenkt wurde.
3. Setzen Sie den Deckel auf und verriegeln Sie ihn, indem Sie ihn entgegen dem Uhrzeigersinn bis in die Position
drehen.

26 27
4. Drehen Sie das Dampfventil mithilfe des Stifts in die Position „Verriegelt“.
5. Drücken Sie die Taste STEAM und passen Sie Garzeit und -temperatur nach Ihren Wünschen an.
6. Wenn Sie alle gewünschten Anpassungen vorgenommen haben, drücken Sie die Taste START/STOP.
7. Der Multi-Kocher muss Druck aufbauen, bevor der Dampfgarvorgang beginnen kann. Während des Druckaufbaus
erscheint auf der Anzeige die Angabe „HEAt“. Die Garzeit läuft noch nicht ab. Wurde der erforderliche Druck erreicht,
verschwindet die Angabe „HEAt“ und die eingestellte Garzeit beginnt zu laufen.
8. Ist die eingestellte Garzeit verstrichen, ertönt ein Piepston und der Multi-Kocher schaltet automatisch in die
Einstellung KEEP WARM. Die Anzeige wechselt von der Anzeige der Garzeit zu einem weiteren Timer, der bis 4:00
zählt (4 Stunden) oder stoppt, wenn sie die Taste START/STOP drücken. Nach 4 Stunden Warmhaltezeit schaltet der
Multi-Kocher aus.
TIPP: Empfehlungen zu Dämpfzeiten finden Sie in der Tabelle auf Seite 69.
VORSICHT: Während des Garvorgangs bildet sich Dampf im Multi-Kocher. Verwenden Sie daher beim Öffnen des Deckels
Topflappen oder -handschuhe, um Ihre Hände zu schützen. Der Dämpfkorb wird während des Garvorgangs heiß, nehmen
Sie ihn also nur mithilfe eines Topflappens oder -handschuhs aus dem Gartopf, um Verbrennungen vorzubeugen.
VERWENDUNG DER ANBRAT-/BRÄUNUNGSFUNKTION
Verwenden Sie diese Funktion nicht mit Deckel. Stellen Sie den Multi-Kocher auf eine ebene Unterlage. Setzen Sie den
Kochtopf in den Heiztopf. Schließen Sie den Multi-Kocher an eine Netzsteckdose an. Der Multi-Kocher gibt einen Piepston
aus und auf der Anzeige erscheinen vier Striche (- - - - ).
1. Wählen Sie die Funktion BROWN/SAUTÉ und passen Sie die Garzeit und -temperatur ggf. mithilfe der Tasten + und - an.
2. Drücken Sie START/STOP.
3. Während der Multi-Kocher vorheizt, erscheint auf der Anzeige die Angabe „HEAt“. Sobald die gewünschte Temperatur
erreicht ist, beginnt der Zähler, rückwärts zu zählen. Verwenden Sie Löffel oder Zangen aus Plastik, um die
Lebensmittel vorsichtig in den heißen Topf zu legen.
ZUBEREITUNG VON REIS
Zum Kochen von Reis verwenden Sie die Funktion RICE/RISOTTO. Diese Funktion eignet sich für alle Reisarten, auch
weißen und/oder braunen Reis.
Mit der Funktion RICE/RISOTTO wird der Reis unter Druck gegart.
Fassungsvermögen: Da sich Reis während des Garens ausdehnt, füllen Sie den Kochtopf bei Verwendung der Funktion
RICE/RISOTTO nicht über die Füllmarke 1/2.
VERWENDUNG DER FUNKTION RICE/RISOTTO
Stellen Sie den Multi-Kocher auf eine stabile, ebene Unterlage. Setzen Sie den Kochtopf in den Heiztopf. Schließen Sie
den Multi-Kocher an eine Netzsteckdose an. Der Multi-Kocher gibt einen Piepston aus und auf der Anzeige erscheinen vier
Striche (- - - - ).
1. Messen Sie die gewünscht Menge Reis ab.
2. Geben Sie den gewaschenen Reis in den Kochtopf. Geben Sie die für Ihr Rezept erforderliche Wassermenge hinzu.
Stellen Sie sicher, dass sich mindestens 240 ml Flüssigkeit im entnehmbaren Kochtopf befinden.
3. Setzen Sie den Deckel auf und verriegeln Sie ihn, indem Sie ihn entgegen dem Uhrzeigersinn bis in die Position
drehen.
4. Drehen Sie das Dampfventil mithilfe des Stifts in die Position „Verriegelt“.
5. Drücken Sie die Taste RICE/RISOTTO und passen Sie Garzeit und -temperatur nach Ihren Wünschen an.
Hinweis: Empfehlungen zu Garzeiten und -temperaturen finden Sie in der Gartabelle auf Seite 68.
6. Wenn Sie alle gewünschten Anpassungen vorgenommen haben, drücken Sie die Taste START/STOP.
7. Der Multi-Kocher muss Druck aufbauen, bevor der Dampfgarvorgang beginnen kann. Während des Druckaufbaus
erscheint auf der Anzeige die Angabe „HEAt“. Die Garzeit läuft noch nicht ab. Wurde der erforderliche Druck erreicht,
verschwindet die Angabe „HEAt“ und die eingestellte Garzeit beginnt zu laufen.
8. Ist die eingestellte Garzeit verstrichen, ertönt ein Piepston und der Multi-Kocher schaltet automatisch in die
Einstellung KEEP WARM. Die Anzeige wechselt von der Anzeige der Garzeit zu einem weiteren Timer, der bis 4:00
zählt (4 Stunden) oder stoppt, wenn sie die Taste START/STOP drücken. Nach 4 Stunden Warmhaltezeit schaltet der
Multi-Kocher aus.
ÄNDERN VON EINSTELLUNGEN
Drücken Sie die die Taste START/STOP und wählen Sie die gewünschte neue Garfunktion. Auf der Anzeige blinkt ein
neuer Timer und die ausgewählte Funktion. Wählen Sie die gewünschte Garzeit und den gewünschten Druck oder die
gewünschte Temperatur. Drücken Sie die Taste START/STOP. Die neue Funktion beginnt mit dem Vorheizen.
Ändern der Garzeit:
Vor Beginn des Garvorgangs können Sie die Garzeit mithilfe der Tasten + und - ändern, bevor Sie die Taste START/STOP
drücken. Um die Zeitangabe langsam zu ändern, drücken Sie die entsprechende Taste und lassen sie wieder los. Um die
Zeitangabe schnell zu ändern, halten Sie die entsprechende Taste gedrückt. Wenn Sie über die gewünschte Zeit oder
Temperatur hinausgehen, drücken Sie die entgegengesetzt Taste.
Ändern des Drucks:
Vor Beginn des Garvorgangs können Sie bei bestimmten voreingestellten Funktionen den Druck ändern, indem Sie die
Taste PRESSURE ADJUST drücken, bevor Sie die Taste START/STOP drücken.
Ändern der Temperatur:
Vor Beginn des Garvorgangs können Sie bei bestimmten voreingestellten Funktionen die Temperatur ändern, indem Sie die
Taste TEMP ADJUST drücken, bevor Sie die Taste START/STOP drücken.
PFLEGE UND REINIGUNG
Reinigen Sie den Crockpot® Express nur, wenn der Multi-Kocher abgekühlt und vom Netz getrennt ist. Lassen Sie den
Multi-Kocher vor dem Reinigen vollständig abkühlen.
Reinigen Sie die Dichtung und den Deckel von Hand mit warmem Seifenwasser. Trocknen Sie alle Teile gründlich ab.
Obgleich der Kochtopf spülmaschinengeeignet ist, empfehlen wir die Reinigung von Hand, um die Anti-Haftbeschichtung
möglichst lange zu erhalten. Sollten sich weiße Flecken auf der Oberfläche des Kochtopfes bilden, lassen Sie diesen 30
Minuten in einer Lösung aus warmem Wasser mit Essig oder Zitronensaft einweichen. Spülen Sie den Topf klar ab und
trocknen Sie ihn.
Wischen Sie das Äußere des Heiztopfes mit einem feuchten Tuch ab und reiben Sie ihn trocken. Verwenden Sie keine
scheuernden Reinigungsmittel, Lappen oder Chemikalien, um eine Beschädigung der Oberflächen zu vermeiden.
Tauchen Sie den Heiztopf nicht in Wasser oder andere Flüssigkeiten.
Kondensatsammler
Leeren Sie den Kondensatsammler nach jeder Verwendung. Reinigen Sie den Sammler mit warmem Seifenwasser.
Deckel und Dichtungsring
Reinigen Sie Deckel und Dichtungsring von Hand mit warmem Seifenwasser, trocknen Sie beide gründlich ab und legen Sie
den Dichtungsring vor einer erneuten Verwendung wieder in den Deckel ein. Der Dichtungsring muss je nach Häufigkeit
der Verwendung alle 1 bis 2 Jahre ersetzt werden.
Dampfventil
Vergewissern Sie sich vor jeder Verwendung, dass das Dampfventil nicht verunreinigt ist. Entfernen Sie das Ventil und
reinigen Sie es vorsichtig. Vergewissern Sie sich vor dem Wiedereinsetzen, dass es vollständig trocken ist.
Dampfventilabdeckung
Ziehen Sie die Abdeckung vorsichtig ab und reinigen Sie sie mit warmem Seifenwasser. Drücken Sie die Abdeckung nach
dem Reinigen wieder fest.
Dämpfkorb und Küchenzange
Dämpfkorb und Küchenzange sind spülmaschinengeeignet. Beachten Sie jedoch, dass wie bei allen siebähnlichen
Kochutensilien möglicherweise Lebensmittelreste in den Öffnungen haften bleiben und per Hand entfernt werden müssen.

28 29
FEHLERCODES
Fehler Problembehebung
Anzeige „E1“ oder „E2“ Trennen Sie den Multi-Kocher vom Netz und kontaktieren Sie den Kundendienst.
Anzeige „E3“ Trennen Sie den Multi-Kocher vom Netz und lassen Sie ihn vollständig abkühlen. Sobald der
Multi-Kocher abgekühlt ist, überprüfen Sie sämtliche Bestandteile des Deckels. Drehen Sie
den Deckel in die Position „Verriegelt“ . Vergewissern Sie sich, dass sich das Dampfventil in
der Position „Verriegelt“ (geschlossen) bendet. Wenn der Fehler wieder auftritt, trennen Sie
den Multi-Kocher vom Netz und kontaktieren Sie den Kundendienst.
Anzeige „E4“ Trennen Sie den Multi-Kocher vom Netz und lassen Sie ihn vollständig abkühlen. Sobald
der Multi-Kocher abgekühlt ist, überprüfen Sie den Kochtopf, um sicherzustellen, dass
sich ausreichend Flüssigkeit im Topf bendet. Fügen Sie ggf. mehr Flüssigkeit hinzu
(Mindestmenge 340 ml). Vergewissern Sie sich, dass kein Dampf aus dem Kochtopf
entweicht, bevor Sie den Deckel wieder auf den Multi-Kocher setzen. Drehen Sie den Deckel
in die Position „Verriegelt . Vergewissern Sie sich, dass sich das Dampfventil in der Position
„Verriegelt“ (geschlossen) bendet. Wählen Sie eine Dampfgarfunktion und drücken Sie die
Taste START/STOP.
Anzeige „E5“ Der Multi-Kocher stoppt den Garvorgang. Trennen Sie den Multi-Kocher vom Netz und lassen
Sie ihn abkühlen. Sobald der Multi-Kocher abgekühlt ist, nehmen Sie den Deckel ab und
überprüfen Sie den Kochtopf. Verwenden Sie die Funktion BROWN/SAUTÉ immer ohne
Deckel.
Wenn Sie die Funktion SLOW COOK verwenden, vergewissern Sie sich, dass sich das
Dampfventil in der Position „Entriegelt“ (offen) bendet, bevor Sie den Garvorgang starten.
Anzeige „E6“ Trennen Sie den Multi-Kocher vom Netz und lassen Sie ihn vollständig abkühlen. Sobald
der Multi-Kocher abgekühlt ist, nehmen Sie den Deckel ab und überprüfen Sie den
Kochtopf. Fügen Sie ggf. Flüssigkeit hinzu. Stellen Sie sicher, dass sich mindestens 340 ml
Flüssigkeit im entnehmbaren Kochtopf benden. Vergewissern Sie sich bei Verwendung der
Dampfgarfunktion, dass sich das Dampfventil in der Position „Verriegelt“ (geschlossen) bendet.
KUNDENDIENST UND ERSATZTEILE
Sollte das Gerät während der Garantiezeit nicht ordnungsgemäß funktionieren, senden Sie es an die Verkaufsstelle zurück,
um ein Ersatzgerät zu erhalten. Bitte beachten Sie, dass Sie einen Kaufbeleg vorweisen müssen. Weitere Unterstützung
durch den Kundendienst erhalten Sie hier: Großbritannien: 0800 028 7154 | Spanien: 0900 81 65 10 | Frankreich: 0805 542
055. Alle anderen Länder: +44 800 028 7154. Möglicherweise werden internationale Fernsprechgebühren erhoben. Oder
senden Sie eine E-Mail an: [email protected].
ENTSORGUNG
Ausgediente Elektroprodukte sollten nicht zusammen mit dem Haushaltsmüll entsorgt werden. Bitte zu einer
Recyclinganlage bringen, falls vorhanden. Senden Sie eine E-Mail an [email protected]., falls Sie weitere
Recycling- und WEEE-Informationen benötigen.
NEDERLANDS
BELANGRIJKE VEILIGHEIDSMAATREGELEN
Bij het gebruik van elektrische apparaten dienen altijd voorzorgsmaatregelen
te worden genomen om het risico van brand, elektrische schokken en/of
persoonlijk letsel te voorkomen, inclusief de volgende:
1. Lees alle instructies voordat het product in gebruik wordt genomen.
2. Dit apparaat mag niet door kinderen worden gebruikt. Houd het apparaat
en stroomsnoer buiten het bereik van kinderen. Laat kinderen niet met
dit apparaat spelen. Apparaten kunnen worden gebruikt door personen
met beperkt fysiek, zintuiglijk of mentaal vermogen, of een gebrek aan
ervaring en kennis, indien zij voldoende toezicht en instructies hebben
ontvangen over het veilige gebruik van het apparaat en zij de eventuele
gevaren ervan begrijpen.
3. Gebruik elektrische apparaten niet als het stroomsnoer of de stekker is
beschadigd, als het apparaat een storing heeft ontwikkeld of als het is
beschadigd. Probeer nooit een beschadigd stroomsnoer te vervangen of
te splitsen. Lever het apparaat in bij de fabrikant (zie de garantie) voor
controle, reparatie of afstelling. Als het stroomsnoer beschadigd raakt,
moet dit worden vervangen door een speciaal snoer of een speciale set
die verkrijgbaar is bij de fabrikant of zijn onderhoudsbedrijf.
4. Het apparaat is niet geschikt voor gebruik buiten of voor commerciële
doeleinden.
5. Gebruik het apparaat niet voor doeleinden anders dan het bestemde
gebruik. Fout gebruik kan letsel veroorzaken. Dit apparaat is niet
geschikt voor het frituren van voedsel.
6. Bij gebruik van de snelkookfuncties wordt onder druk gekookt. Fout gebruik
kan brandwonden veroorzaken. Zorg ervoor dat het apparaat goed is gesloten
voordat het wordt gebruikt. Raadpleeg de instructies voor gebruik.
7. Dit apparaat geeft warmte af tijdens gebruik. Raak de warme
oppervlakken niet aan. Gebruik de handgrepen en knoppen.
8. Vul het apparaat niet hoger dan 2/3 (maximale vulstreep). Bij het koken
BELANGRIJKE VEILIGHEIDSINFORMATIE:
Draag een ovenwant en open het ventiel geleidelijk met gebruik van een
keukengerei om de druk in het apparaat af te voeren. Pas op voor de hete
stoom die ontsnapt.
Dompel de behuizing met het verwarmingselement, het stroomsnoer en de
stekker NOOIT onder in water of een andere vloeistof.

30 31
van voedingswaren die opzwellen, zoals rijst of gedroogde groente, mag
u de pan niet meer dan halfvol (het aanbevolen niveau) maken. Wanneer
de pan te hoog wordt gevuld, kan de ventilatiebuis verstopt raken
waardoor overdruk ontstaat. Volg alle kook- en receptinstructies.
9. Controleer vóór gebruik altijd of de drukventielen niet verstopt zijn.
Reinig ze indien nodig.
10. Plaats het apparaat zodanig dat het stoomventiel niet naar uw lichaam is
gericht.
11. Houd alle lichaamsdelen, inclusief uw gezicht, handen en armen, uit de buurt
van het stoomventiel. Stoom kan ernstige brandwonden veroorzaken.
12. Gebruik de multicooker niet zonder voedsel of vloeistof in de kookschaal.
13. Vervang de afdichtingsring in het deksel uitsluitend volgens de
aanbevelingen van de fabrikant om risico van letsel door overdruk te
voorkomen. Raadpleeg de instructies voor onderhoud en reinigen.
14. Pak de multicooker niet op aan het deksel.
15. Verplaats of bedek de multicooker niet wanneer de pan wordt gebruikt.
16. Na het snelkoken mag het deksel pas worden geopend wanneer het
apparaat is afgekoeld en alle interne druk is afgevoerd. Als het deksel
moeilijk te openen is, betekent dit dat de snelkoker nog onder druk staat.
Probeer het deksel dan niet met kracht te openen. Alle druk in de kookpan
kan gevaarlijk zijn. Raadpleeg de instructies onder Druk afvoeren.
17. Wees voorzichtig wanneer u na het koken het deksel verwijdert. Open
het deksel altijd van u af; stoom kan erg heet zijn en brandwonden
veroorzaken. Houd uw gezicht nooit boven de multicooker.
18. Gebruik deze snelkoker niet om onder druk met olie te frituren.
19. Leg het snoer, de stekker of het apparaat niet in water of andere
vloeistoffen en dompel ze niet onder in water of een andere vloeistof; dit
om elektrische schokken te voorkomen.
20. Gebruik de schaal van de koker niet om voedsel te bewaren en zet de
schaal niet in de diepvries.
21. Gebruik geen alkalische reinigingsproducten. Deze kunnen het apparaat
beschadigen. Gebruik een zachte doek en mild wasmiddel.
22. Sluit het stroomsnoer altijd eerst goed aan op de multicooker voordat de
stekker in het stopcontact wordt gestoken.
23. Verwijder de stekker uit het stopcontact wanneer het apparaat niet wordt
gebruikt, alvorens onderdelen te plaatsen of te verwijderen en voordat
het apparaat wordt gereinigd. Laat het apparaat eerst afkoelen alvorens
onderdelen te plaatsen of te verwijderen en alvorens het apparaat te
reinigen. Schakel de multicooker UIT en verwijder de stekker uit het
stopcontact. Trek niet aan het stroomsnoer om de stekker te verwijderen.
24. Laat het stroomsnoer niet over de rand van een tafel of aanrecht hangen
of in contact komen met warme oppervlakken.
25. Wees uiterst voorzichtig wanneer u een apparaat met warme vloeistof
verplaatst.
26. Het gebruik van hulpstukken kan letsel veroorzaken en wordt daarom
afgeraden door de fabrikant.
27. Plaats het apparaat niet op of in de buurt van natte oppervlakken
of warmtebronnen, zoals een gas- of elektrisch kookstel, of in een
verwarmde oven.
28. VOORZICHTIG: Ter bescherming tegen elektrische schokken en
beschadiging van het product mag uw pan niet zonder de kookschaal
worden gebruikt. Kook alleen in de uitneembare kookschaal die bij het
product is geleverd.
29. WAARSCHUWING: Gemorste etenswaar kan ernstige brandwonden
veroorzaken. Houd het apparaat en stroomsnoer buiten het bereik van
kinderen. Hang het snoer nooit over de rand van het aanrecht, gebruik
geen stopcontact onder het aanrecht en gebruik geen verlengsnoer.
30. Steek de stekker niet in het stopcontact en schakel de multicooker niet
in zonder eerst de kookschaal in de multicooker te plaatsen.
31. Alleen bestemd voor huishoudelijk gebruik op een aanrecht. Zorg voor
een open ruimte van 152 mm om alle zijden van het apparaat. Gebruik
het apparaat alleen op een droog, stabiel en egaal oppervlak.
BEWAAR DEZE INSTRUCTIES UITSLUITEND VOOR
HUISHOUDELIJK GEBRUIK
CROCKPOT® EXPRESS MULTI-SNELKOKER: ONDERDELEN
AStroomsnoer
BKeukentang
CVergrendelingspen deksel
DHandgreep deksel
EDeksel
FKookschaal
GBehuizing met verwarmingselement
HBedieningspaneel
IBedrijfsventiel
JStoomventiel
KCondens-opvangbak
LAansluiting voor stroomsnoer
BEDIENINGSPANEEL
MDisplay
NTijdkeuzeknoppen
ONDERKANT VAN DEKSEL
OBevestiging voor afdichtingsring
PStoomventiel-klep
QAfdichtingsring
RBedrijfsventiel
SKunststof lepel
TStoomrekje
UStoommandje

32 33
UW CROCKPOT® EXPRESS MULTI-SNELKOKER GEBRUIKEN
OM TE BEGINNEN:
Verwijder alle verpakking, papier en karton (inclusief het verpakkingsmateriaal tussen de kookschaal en de behuizing met
het verwarmingselement). Lees en bewaar alle informatie en vooral ook de informatie over service en garantie.
ALVORENS GEBRUIK:
• Zet de kookschaal in de behuizing
• Zet het deksel op de multicooker zodat naar wijst. Draai het deksel linksom om te sluiten, zodat naar
wijst. Draai het deksel rechtsom om te openen, zodat naar wijst.
AAN DE SLAG
(OPMERKING: De multicooker laat een piepsignaal horen wanneer een knop wordt ingedrukt.)
1. Voeg de gewenste ingrediënten toe aan de kookschaal. Zet het deksel op de multicooker zodat naar wijst.
Vergrendel het deksel door dit linksom te draaien zodat. naar wijst.
2. Steek het bijgeleverde stroomsnoer in de hiervoor bestemde aansluiting op de multicooker.
3. Steek het andere uiteinde van het snoer in het stopcontact.
4. Selecteer de gewenste kookfunctie.
5. De knop START/STOP en de tijd knipperen op het display.
6. Stel de gewenste kooktijd in met gebruik van de knoppen + en -. Stel de gewenste temperatuur in met de knop TEMP
ADJUST (indien van toepassing). Stel de gewenste kookdruk in met de knop PRESSURE ADJUST. (Raadpleeg de
kookgids op pagina 68 voor aanbevolen tijd en temperatuur.)
7. Druk op de START/STOP-knop. Bij gebruik van snelkookfuncties verschijnt het woord HEAt in het display tijdens het
voorverwarmen. Wanneer de multicooker is voorverwarmd, verschijnt de ingestelde kooktijd in het display.
Opmerking: Voor snelkookfuncties duurt het voorverwarmen gemiddeld 13 tot 14 minuten. Bij grotere of zeer koude
inhoud kan het echter iets langer duren.
8. Met deze multicooker kunt u de starttijd van het koken uitstellen, zodat het gerecht klaar is wanneer u wilt eten. Op
pagina 33 vindt u instructies voor de hiervoor gebruikte functie DELAY TIMER.
9. Wanneer de ingestelde kooktijd is verlopen, geeft de multicooker weer een piepsignaal en schakelt automatisch over
in de warmhoudstand (KEEP WARM). De kooktijd op het display wordt nu vervangen door een nieuwe timer die
doortelt tot 4 uur of totdat u op de START/STOP-knop drukt. Na 4 uur in de warmhoudstand schakelt de multicooker
automatisch uit.
10. U kunt een kookfunctie op elk gewenst moment beëindigen door op de START/STOP-knop te drukken.
11. Als u klaar bent, verwijdert u de stekker uit het stopcontact en wacht u tot de koker volledig is afgekoeld voordat u het
apparaat reinigt.
VOORZICHTIG: De kookschaal en de behuizing met het verwarmingselement worden erg heet tijden gebruik van de
multicooker. Raak de warme oppervlakken niet aan. Gebruik altijd ovenwanten wanneer u deze multicooker gebruikt.
Kantel het deksel altijd van u af als u dit optilt, om contact met stoom te voorkomen.
DE 'DELAY TIMER' GEBRUIKEN
Met deze multicooker kunt u de starttijd van het koken uitstellen, zodat het gerecht klaar is wanneer u wilt eten.
Opmerking: De functie DELAY TIMER is niet beschikbaar in de instellingen BROWN/SAUTÉ (aanbraden/sauteren), KEEP
WARM (warmhouden) of YOGURT (yoghurt).
Opmerking: Gebruik de functie DELAY TIMER niet wanneer het gerecht bederfelijke ingrediënten bevat, zoals vlees, vis,
eieren of zuivelproducten.
1. Druk nadat u de kooktijd heeft ingesteld op de knop DELAY TIMER. De knoppen DELAY TIMER en START/
STOP knipperen, en '0:30' knippert in het display om aan te geven dat er een vertragingstijd wordt ingesteld op de
multicooker.
2. Druk op de knoppen + en - tot het aantal uren en minuten is bereikt waarmee u de kooktijd wilt vertragen (u stelt dus
in hoeveel later u de kookcyclus wilt laten beginnen).
3. Druk op de knop START/STOP om de vertragingsfunctie te starten. De timer en de knop DELAY TIMER stoppen te
knipperen, maar de knop START/STOP blijft knipperen. Dit betekent dat de functie DELAY TIMER van de multicooker
is ingeschakeld. De vertragingstijd in het display begint terug te tellen totdat 0:00 is bereikt. Wanneer 0:00 is
bereikt, gaat het lampje DELAY TIMER uit en stopt de knop START/STOP met knipperen om aan te geven dat de
vertragingstijd is verlopen. Het woord HEAt (opwarmen) verschijnt op het display totdat de multicooker zijn volledige
druk heeft bereikt. Als de geselecteerde druk is bereikt, begint de timer terug te tellen.
DE SNELKOOKFUNCTIES GEBRUIKEN
Zet de multicooker op een platte en vlakke ondergrond. Zet de kookschaal in de behuizing met het verwarmingselement.
Steek de stekker van de multicooker in een stopcontact. De multicooker laat een piepsignaal horen en in het display
verschijnen vier streepjes (- - - -).
1. Vul de kookschaal met het gewenste voedsel en de vloeistof.
2. Zet het deksel op de multicooker zodat naar wijst. Vergrendel het deksel door dit linksom in de stand
(LOCKED) te zetten.
3. Zet het stoomventiel met gebruik van het lipje in de stand 'Seal'.
4. Kies de gewenste kookfunctie.
5. Stel de kooktijd en -druk indien nodig in.
Opmerking: Raadpleeg de Kookgids op pagina 68 voor de juiste instelling van kooktijd en -druk.
6. Als alles naar wens is ingesteld (indien van toepassing), drukt u op START/STOP.
7. Voordat de multicooker kan beginnen, moet eerst de benodigde druk worden bereikt. Wanneer de multicooker bezig
is de gewenste druk te bereiken, verschijnt het woord HEAt op het display. De kooktijd begint dan nog niet terug te
tellen. De tijdsduur voor het opbouwen van de gewenste druk verschilt op basis van vochtigheid en watertemperatuur,
maar duurt gemiddeld 13 tot 15 minuten. Wanneer de druk is bereikt, verdwijnt HEAt van het display en begint de
kooktijd terug te tellen.
8. Wanneer de ingestelde kooktijd is verlopen, geeft de multicooker een piepsignaal en schakelt automatisch over in de
warmhoudstand (KEEP WARM). De kooktijd op het display wordt nu vervangen door een nieuwe timer die doortelt
tot 4 uur of totdat u op de START/STOP-knop drukt. Na 4 uur in de warmhoudstand schakelt de multicooker over op
standby. Het display geeft nu weer vier streepjes (----) weer.
Opmerking: Zonder vloeistof kan de multicooker niet snelkoken. Zorg dat er minstens 240 ml vloeistof wordt gebruikt in de
kookschaal van de multicooker.
VOORZICHTIG: Tijdens het koken ontwikkelt er zich stoom in de multicooker. Wees voorzichtig en bescherm uw hand met
een ovenwant wanneer u het deksel van de pan neemt.
DRUK AFVOEREN AAN HET EIND VAN DE KOOKCYCLUS
A. Druk op normale wijze afvoeren: Laat de multicooker na het koken de druk op natuurlijke wijze afvoeren via het
bedrijfsventiel. Het apparaat koelt vanzelf af. Wacht minstens tien minuten nadat de kookcyclus is beëindigd en zet
het lipje van het stoomventiel dan met behulp van een keukengerei in de stand 'Release' (Open) (zie afbeelding 2).
Zorg dat uw hand of ander lichaamsdeel zich niet boven het stoomventiel bevindt, aangezien de stoom erg heet kan
zijn en brandwonden kan veroorzaken. Als er geen stoom meer uit het ventiel komt, is alle druk afgevoerd en kan het
Vergrendeld deksel Ontgrendeld deksel Open deksel
Afbeelding 1

34 35
deksel met minimale kracht worden geopend. Dan pas is het veilig om het deksel te verwijderen en het eten op te doen.
B. Wees voorzichtig wanneer u de druk snel afvoert: Zet het lipje van het stoomventiel met behulp van een keukengerei
langzaam en geleidelijk in de stand 'Release' (Open) (zie afbeelding 2). De stoom ontsnapt nu snel via het
stoomventiel. Zorg dat uw hand of ander lichaamsdeel zich niet boven het stoomventiel bevindt, aangezien de stoom
erg heet kan zijn en brandwonden kan veroorzaken. Gebruik deze methode vooral voorzichtig wanneer u vloeibare
recepten bereid zoals stoofschotels, soep, bouillon, bonen en peulvruchten. Gebruik deze methode niet wanneer u
rijst kookt, aangezien rijst erg delicaat is. Als er geen stoom meer uit het ventiel komt, is alle druk afgevoerd en kan
het deksel met minimale kracht worden geopend. Dan pas is het veilig om het deksel te verwijderen en het eten op te
doen.
STOVEN:
1. Forceer het deksel niet open. Als het deksel niet makkelijk kan worden geopend, betekent dit dat de multicooker nog
onder druk staat.
2. Tijdens het koken ontwikkelt er zich stoom in de multicooker. Wees voorzichtig en bescherm uw hand met een
ovenwant wanneer u het deksel van de pan neemt.
COZIMENTO LENTO
Instelling LOW (Laag): Dit is geschikt voor sudderen en stoven. Aanbevolen kooktijd in de instelling LOW (Laag) is 6 tot 8
uur.
Instelling HIGH (Hoog): Hiermee wordt sneller gekookt. Aanbevolen kooktijd in de instelling HIGH (Hoog) is 2 tot 4 uur.
Instelling KEEP WARM (Warmhoudstand): Als de kooktijd is voltooid, schakelt de multicooker automatisch over naar de
warmhoudstand. Zo wordt uw eten niet overgaar en blijft het warm totdat u klaar bent om te eten.
HET APPARAAT ALS SLOWCOOKER GEBRUIKEN
Met de functie SLOW COOK (Stoven) wordt geen druk gebruikt, maar er kan echter wel enige druk ontstaan tijdens het
koken. Bij gebruik van deze functie moet u ervoor zorgen dat het stoomventiel in de stand 'Release' (Open) staat. Met deze
functie wordt op dezelfde manier als met slowcookers op lagere temperaturen en gedurende langere tijd gekookt, voor malse,
smaakvolle gerechten.
Zet de multicooker op een platte en vlakke ondergrond. Zet de kookschaal in de behuizing met het verwarmingselement.
Steek de stekker van de multicooker in een stopcontact. De multicooker laat een piepsignaal horen en in het display
verschijnen vier streepjes (- - - -).
1. Vul de kookschaal met het gewenste voedsel en de vloeistof.
2. Zet het deksel op de multicooker zodat naar wijst. Vergrendel het deksel door dit linksom in de stand
(LOCKED) te zetten.
3. Draai het stoomventiel met het lipje in de stand 'Release' (Open).
Opmerking: Met deze functie wordt geen druk gebruikt, maar er kan echter wel enige druk ontstaan tijdens het
koken. Daarom is het belangrijk dat het stoomventiel altijd in de stand 'Release' (Open) staat.
4. Druk op de knop SLOW COOK en stel de tijd en temperatuur naar wens in.
Drukventiel
Ventiel GESLOTEN ('Seal') Ventiel OPEN ('Release') Ventiel VERWIJDEREN
Afbeelding 2
Opmerking: Raadpleeg de kookgids op pagina 68 voor de instellingen van tijd en druk.
5. Druk op START/STOP. De tijdklok begint terug te tellen.
6. Wanneer de ingestelde kooktijd is verlopen, geeft de multicooker een piepsignaal en schakelt automatisch over in de
warmhoudstand (KEEP WARM). De kooktijd in het display wordt nu vervangen door een nieuwe timer die doortelt tot
4 uur of totdat u op de START/STOP-knop drukt. Na 4 uur in de warmhoudstand schakelt de multicooker uit.
DE STOOMFUNCTIE GEBRUIKEN
Zet de multicooker op een platte en vlakke ondergrond. Zet de kookschaal in de behuizing met het verwarmingselement.
Steek de stekker van de multicooker in het stopcontact. De multicooker laat een piepsignaal horen en in het display
verschijnen vier streepjes (- - - -).
1. Giet minimaal 250 ml water in de uitneembare schaal en plaats het rooster of mandje in de schaal. Zorg dat het water
de onderkant van het rooster of mandje net niet raakt; het voedsel mag niet in het water liggen.
Opmerking: Het stoommandje moet op de bodem van de schaal worden gezet en niet op het stoomrooster.
2. Plaats het eten in het stoommandje of op het rooster.
Opmerking: Het stoommandje mag tot maximaal driekwart worden gevuld. Laat het handvat van het mandje in de
mand zakken voordat u het deksel plaatst.
3. Breng het deksel aan en draai dit linksom in de stand (LOCKED) om het te sluiten.
4. Zet het stoomventiel met gebruik van het lipje in de stand 'Seal' (Gesloten).
5. Druk op de knop STEAM (Stomen) en stel de tijd en druk naar wens in.
6. Als alles naar wens is ingesteld (indien van toepassing), drukt u op START/STOP.
7. Voordat de multicooker kan beginnen, moet eerst de benodigde druk worden bereikt. Terwijl de druk wordt
opgebouwd, verschijnt het woord HEAt in het display. De kooktijd begint dan nog niet terug te tellen. Als de
geselecteerde druk is bereikt, verdwijnt het woord HEAt in het display en begint de kooktijd terug te tellen.
8. Als de kooktijd is verlopen, geeft de multicooker een piepsignaal en schakel automatisch over in de warmhoudstand.
Het display verandert van de weergave van de kooktijd in de weergave van een nieuwe timer die tot 4:00 (4 uur) telt
of totdat u op de knop START/STOP drukt. Na 4 uur in de warmhoudstand schakelt de multicooker automatisch uit.
TIP: Raadpleeg de stoomgrafiek op pagina 69.
VOORZICHTIG: Tijdens het koken ontstaat er stoom in de multicooker. Bescherm uw hand daarom met een ovenwant
wanneer u het deksel verwijdert. Het stoommandje wordt warm tijdens het stomen. Gebruik dus altijd een ovenwant of
gelijksoortig om de mand uit de schaal te tillen.
DE FUNCTIE VOOR BRUINEN/SAUTEREN GEBRUIKEN
Met deze functie mag het deksel niet worden gebruikt. Zet de multicooker op een platte en vlakke ondergrond. Zet de
kookschaal in de behuizing met het verwarmingselement. Steek de stekker van de multicooker in een stopcontact. De
multicooker laat een piepsignaal horen en in het display verschijnen vier streepjes (- - - -).
1. Kies de functie BROWN/SAUTÉ (Bruinen/sauteren) en stel indien nodig de tijd en temperatuur in met de knoppen +
en -.
2. Druk op START/STOP.
3. Tijdens het voorverwarmen verschijnt HEAt op het display. Zodra de temperatuur is bereikt, begint te timer terug te
tellen. Gebruik de plastic greep en voer heel voorzichtig uw eten toe aan de warme schaal.
RIJST KOKEN
Gebruik voor het koken van rijst de functie RICE/RISOTTO (Rijst/risotto). Deze functie is geschikt voor alle soorten rijst,
inclusief witte en bruine rijst.
Voor de functie RICE/RISOTTO (Rijst/risotto) wordt druk gebruikt om sneller te koken.
Capaciteit: Rijst zwelt op tijdens het koken, dus vul de schaal niet hoger dan tot de helft (het teken 1/2) bij gebruik van de
functie RICE/RISOTTO (Rijst/risotto).

36 37
DE FUNCTIE RICE/RISOTTO GEBRUIKEN
Zet de multicooker op een platte en vlakke ondergrond. Zet de kookschaal in de behuizing met het verwarmingselement.
Steek de stekker van de multicooker in een stopcontact. De multicooker laat een piepsignaal horen en in het display
verschijnen vier streepjes (- - - -).
1. Meet de gewenste hoeveelheid rijst.
2. Giet de gewassen rijst in de kookschaal. Voeg de benodigde hoeveelheid water toe voor uw recept. Zorg dat er
minstens 240 ml vloeistof wordt gebruikt in de kookpot van de multicooker.
3. Breng het deksel aan en draai dit linksom in de stand (LOCKED) om het te sluiten.
4. Zet het stoomventiel met gebruik van het lipje in de stand 'Seal' (Gesloten).
5. Druk op de knop RICE/RISOTTO (Rijst/risotto) en stel indien nodig de tijd en druk in.
Opmerking: Raadpleeg de kookgids op pagina 68 voor de instellingen van tijd en druk.
6. Als alles naar wens is ingesteld (indien van toepassing), drukt u op START/STOP.
7. Voordat de multicooker kan beginnen, moet eerst de benodigde druk worden bereikt. Wanneer de multicooker bezig
is de gewenste druk te bereiken, verschijnt het woord HEAt op het display. De kooktijd begint dan nog niet terug te
tellen. Wanneer de druk is bereikt, verdwijnt HEAt van het display en begint de kooktijd terug te tellen.
8. Wanneer de ingestelde kooktijd is verlopen, geeft de multicooker een piepsignaal en schakelt automatisch over in de
warmhoudstand (KEEP WARM). De kooktijd op het display wordt nu vervangen door een nieuwe timer die doortelt tot
4 uur of totdat u op de START/STOP-knop drukt. Na 4 uur in de warmhoudstand schakelt de multicooker uit.
EEN INSTELLING VERANDEREN
Druk op de knop START/STOP en kies de nieuwe kookfunctie. Een nieuwe timer begint te knipperen in het display en
de gekozen functie knippert nu ook. Kies de gewenste tijd, druk en/of temperatuur. Druk op de knop START/STOP en de
multicooker begint voor te verwarmen voor de nieuwe functie.
De kooktijd veranderen:
U kunt de kooktijd veranderen voordat de multicooker begint te koken door de knoppen + en - in te drukken voordat u op
START/STOP drukt. Als u de tijd langzaam wilt veranderen, drukt u de + of - kort in en laat u de knop weer los. Houd de
knop ingedrukt om de tijd snel te veranderen. Als u per ongeluk te ver gaat, drukt u de tegengestelde knop weer in om
terug te gaan.
De druk veranderen:
Voor bepaalde vooraf ingestelde functies kunt u de druk veranderen voordat het koken begint door op de knop PRESSURE
ADJUST te drukken voordat op de START/STOP wordt gedrukt.
De temperatuur veranderen:
Voor bepaalde functies kunt u de temperatuur veranderen voordat het koken begint door op de knop TEMP ADJUST te
drukken voordat op de START/STOP wordt gedrukt.
ONDERHOUD EN REINIGING
Alvorens de Crockpot® Express te reinigen moet het apparaat zijn afgekoeld en moet de stekker uit het stopcontact zijn
verwijderd. Laat het apparaat volledig afkoelen voordat het wordt gereinigd.
Was de afdichtingsring en het deksel met de hand af in warm water met afwasmiddel. Droog alle onderdelen goed af.
De kookschaal is geschikt voor de vaatwasser, maar u wordt aangeraden deze met de hand af te wassen om de anti-
aanbaklaag te beschermen. Als er zich witte puntjes op het oppervlak van de kookschaal vormen, zet u de schaal
gedurende 30 minuten in een oplossing van warm water en azijn of citroensap. Spoel de schaal goed om en droog hem af.
Neem de buitenkant van de behuizing af met een vochtige doek en droog het af. Gebruik GEEN schuurmiddelen,
schuursponsjes of chemische middelen, aangezien deze het oppervlak kunnen beschadigen.
Dompel de behuizing met het verwarmingselement niet onder in water of andere vloeistof.
Condens-opvangbak
Leeg het water uit de condens-opvangbak na elk gebruik. Reinig het bakje in warm water met afwasmiddel.
Deksel en afdichting
Was met de hand af in warm water met afwasmiddel, droog ze goed af en plaats de afdichting weer in het deksel voor
gebruik. De afdichting moet mogelijk elke 1 tot 2 jaar worden vervangen, afhankelijk van hoe vaak het apparaat wordt
gebruikt.
Stoomventiel
Controleer of het stoomventiel niet is verstopt voordat u de multicooker gebruikt. Verwijder het ventiel en maak dit
voorzichtig schoon. Zorg dat het ventiel helemaal droog is voordat het weer wordt aangebracht.
Deksel van het stoomventiel
Verwijder het dekseltje voorzichtig en was het af in warm water met afwasmiddel. Duw het weer op zijn plaats nadat het is
gereinigd.
Stoommandje en keukentang
Het stoommandje en de keukentang kunnen in de vaatwasmachine worden gereinigd. Let echter wel op dat er door het
materiaal voedselresten in het gaas van het mandje achter kunnen blijven die wellicht nog moeten worden verwijderd.
FOUTCODES
Fout Oplossing
Display geeft 'E1' of
'E2' weer Verwijder de stekker en neem contact op met het servicecentrum.
Display geeft 'E3' weer Verwijder de stekker van de multicooker en laat het apparaat volledig afkoelen. Als de
multicooker is afgekoeld, controleert u alle onderdelen van het deksel. Draai het deksel in de
stand (LOCKED). Controleer of het stoomventiel in de stand 'Seal' (Gesloten) staat. Als
de foutcode weer wordt weergegeven, verwijdert u de stekker en neemt u contact op met het
servicecentrum.
Display geeft 'E4' weer Verwijder de stekker van de multicooker en laat het apparaat volledig afkoelen. Als de
multicooker is afgekoeld, controleert u of er voldoende vloeistof in de kookschaal zit. Voeg zo
nodig vloeistof toe (minimum 340 ml). Zorg dat er geen stoom uit de kookschaal komt voordat
u het deksel weer op de multicooker aanbrengt. Draai het deksel in de stand (LOCKED).
Controleer of het stoomventiel in de stand 'Seal' (Gesloten) staat. Kies een snelkookfunctie en
druk op START/STOP.
Display geeft 'E5' weer De multicooker stopt de kookcyclus. Verwijder de stekker van de multicooker en laat het
apparaat afkoelen. Als het apparaat is afgekoeld, verwijdert u het deksel en controleert u de
kookschaal. Gebruik geen deksel wanneer u de functie BROWN/SAUTÉ (Bruinen/sauteren)
gebruikt. Zorg dat bij gebruik van de functie SLOW COOK (Stoven) dat het stoomventiel op de
stand 'Release' (Open) staat voordat de kookcyclus begint.
Display geeft 'E6' weer Verwijder de stekker van de multicooker en laat het apparaat afkoelen. Als het apparaat is
afgekoeld, verwijdert u het deksel en controleert u de kookschaal. Voeg zo nodig vloeistof toe.
Zorg dat er minstens 340 ml vloeistof wordt gebruikt in de kookpot van de multicooker. Zorg bij
gebruik van een snelkookfunctie dat het stoomventiel in de stand 'Seal' (Gesloten) staat.

38 39
AFTERSALES EN VERVANGINGSONDERDELEN
Als het apparaat niet werkt en nog onder garantie is, kunt u hiervoor een vervanging krijgen door het defecte apparaat in
te leveren bij het aankooppunt. U dient dan wel een geldig bewijs van aankoop te overhandigen. Voor meer support kunt
u contact opnemen met onze afdeling voor klantenservice: Verenigd Koninkrijk: 0800 0287154 | Spanje: 0900 816510
| Frankrijk: 0805 542055 Voor alle andere landen kunt u het volgende nummer bellen: +44 800 028 7154. Er kunnen
internationale beltarieven in rekening worden gebracht. U kunt ook een e-mail sturen aan: [email protected].
AFVALVERWIJDERING
Afgedankte elektrische apparaten mogen niet met het huisvuil worden weggegooid. Recycle uw apparaten indien de
faciliteiten hiervoor bestaan. Stuur een e-mail aan [email protected] voor verdere informatie omtrent recycling
en AEEA.
SVENSKA
VIKTIGA SÄKERHETSFÖRESKRIFTER
När du använder elektriska apparater ska du alltid följa grundläggande
försiktighetsåtgärder för att minska risken för brand, elstöt och/eller
personskada. Försiktighetsåtgärderna är som följer:
1. Läs alla anvisningar innan du använder produkten.
2. Apparaten får inte användas av barn. Apparaten och dess sladd ska
förvaras utom räckhåll för barn. Barn får inte leka med apparaten.
Den kan användas av personer med nedsatt fysisk, sensorisk eller
mental kapacitet eller brist på erfarenhet och kunskap om de har fått
handledning eller anvisningar om hur apparaten används på ett säkert
sätt och förstår riskerna som är involverade.
3. Använd inte en apparat med skadad sladd eller kontakt, om fel uppstår
på apparaten eller om den har skadats på något sätt. Försök inte att byta
ut eller skarva en skadad sladd. Returnera apparaten till tillverkaren (se
garantin) för undersökning, reparation eller justering. Om strömsladden
skadas måste den bytas ut mot en specialsladd eller -delar från
tillverkaren eller återförsäljaren.
4. Använd inte apparaten utomhus eller i kommersiella syften.
5. Använd inte apparaten för andra syften än den avsedda. Felaktig användning
kan orsaka skador. Apparaten är inte avsedd för fritering av mat.
6. Den här apparaten tillagar under tryck när du använder
tryckkokningsfunktionerna. Felaktig användning kan orsaka brännskada.
Se till att enheten är ordentligt stängd innan du använder den. Se
bruksanvisningen.
7. Den här apparaten genererar värme under användning. Vidrör inte heta
ytor. Använd handtag eller knappar.
8. Fyll inte enheten över maxlinjen (2/3). När du tillagar mat som
expanderas under tillagning, som ris eller torkade grönsaker, ska du inte
fylla enheten över den rekommenderade nivån (1/2). Om enheten fylls för
VIKTIGT SÄKERHETSMEDDELANDE:
När du släpper på trycket i enheten ska du se till att använda en grytvante
och ett köksredskap för att gradvis öppna ventilen och släppa på trycket.
Se upp för het ånga som kan släppas ut.
Sänk ALDRIG ned uppvärmningsbasen, strömsladden eller kontakten i
vatten eller någon annan vätska.

40 41
mycket kan detta orsaka en risk för igensättning av ventilationsröret och
utveckla för högt tryck. Följ alla tillagningsanvisningar och receptet.
9. Kontrollera alltid att det inte finns någon igensättning i
tryckavlastningsenheterna före användning. Rengör vid behov.
10. Placera multikokaren så att ångutsläppsventilen är riktad bort från kroppen.
11. Placera aldrig någon kroppsdel som ansikte, händer och armar över
ångutsläppsventilen. Ånga kan orsaka allvarliga brännskador.
12. Använd inte multikokaren utan mat eller vätska i kokkärlet.
13. För att förhindra risken för skada på grund av för högt tryck ska du
sätta tillbaka lockets förslutningspackning i enlighet med tillverkarens
rekommendationer. Se anvisningarna för skötsel och rengöring.
14. Bär inte multikokaren genom att hålla i locket.
15. Flytta inte och täck inte över multikokaren medan den används.
16. Efter tryckkokning ska du inte öppna tryckkokaren förrän enheten har
svalnat och allt inre tryck har släppt. Om det är svårt att ta bort locket
indikerar detta att kokaren fortfarande är under tryck – tvinga inte upp locket.
Tryck i kokaren kan vara farligt. Se anvisningarna om att släppa ut tryck.
17. Var försiktig när du lyfter och tar bort locket efter kokning. Luta alltid
locket bort från dig eftersom ångan är mycket varm och kan orsaka
allvarliga brännskador. Håll aldrig ansiktet över multikokaren.
18. Använd inte den här tryckkokaren för tryckfritering med olja.
19. Sänk inte ned sladden, kontakten eller enheten i vatten eller annan
vätska då detta kan orsaka elstötar.
20. Använd inte kokkärlet för att förvara mat och ställ det inte i frysen.
21. Använd inte alkaliska rengöringsmedel vid rengöring för att
förhindra skador på multikokaren. Använd en mjuk trasa och ett milt
rengöringsmedel.
22. Sätt alltid i strömsladden i multikokaren först och sätt sedan in
strömsladden i vägguttaget.
23. Koppla ur från uttaget när apparaten inte används innan du sätter på
eller tar bort delar och före rengöring. Låt svalna innan du sätter på
eller tar bort delar och före rengöring. För att koppla ur ska du se till att
multikokaren är avstängd och sedan ta ut strömsladden ur eluttaget.
Koppla inte ur genom att dra i sladden.
24. Låt inte strömsladden hänga över kanten på bordet eller bänken eller
komma i kontakt med heta ytor.
25. Var otroligt försiktig när du flyttar en apparat med heta vätskor.
26. Användning av andra tillbehör än de som rekommenderas av tillverkaren
av apparaten kan leda till skador.
27. Placera inte apparaten på eller nära blöta ytor eller värmekällor som
varma gas- eller elspisar eller en varm ugn.
28. VARNING: Tillaga inte mat direkt på uppvärmningsbasen eftersom detta
kan leda till elstöt och produktskada. Tillaga endast i det medföljande
löstagbara kokkärlet.
29. VARNING: Utspilld mat kan orsaka allvarliga brännskador. Håll apparaten
och sladden borta från barn. Häng aldrig sladden över bänkkanten,
använd aldrig ett uttag under bänken och använd aldrig med en
förlängningssladd.
30. Koppla inte in och slå inte på multikokaren om kokkärlet inte är inuti
multikokaren.
31. Endast för avsett hushållsbruk på köksbänk. Se till att det finns 152 mm
fri yta från väggen och på alla sidor. Använd alltid apparaten på en torr,
stabil och jämn yta.
SPARA DESSA ANVISNINGAR.
ENDAST FÖR HUSHÅLLSBRUK.
KOMPONENTER I CROCKPOT® EXPRESS MULTICOOKER
ANVÄNDA CROCKPOT® EXPRESS MULTICOOKER
KOMMA IGÅNG:
Ta bort alla förpackningar, allt papper och all kartong (även mellan kokkärlet och uppvärmningsbasen). Läs och spara
dokumentationen och se till att du läser service- och garantiinformationen.
MONTERING:
• Ställ kokkärlet på uppvärmningsbasen
AStrömsladd
BTång
CLocklåspinne
DLockhandtag
ELock
FKokkärl
GUppvärmningsbas
HKontrollpanel
ITryckventil
JÅngutsläppsventil
KKondensations-uppsamlare
LStrömsladdsport
KONTROLLPANEL
MSkärm
NTidsvalsknappar
LOCKETS UNDERSIDA
OPackningsfästring
PLock till ångutsläppsventil
QFörslutningspackning
RTryckventil
SPlastsked
TÅnggaller
UÅngkorg

42 43
• Sätt locket på multikokaren och rikta in med . Lås genom att vrida moturs och rikta in med . Lås upp
genom att vrida locket medurs och rikta in med .
KOMMA IGÅNG
(Obs! Multikokaren piper när du trycker på en knapp.)
1. Tillsätt önskade ingredienser i kokkärlet. Sätt på locket på multikokaren och rikta in med . Lås genom att vrida
moturs och rikta in med .
2. Sätt i den medföljande strömsladden i strömsladdsporten på multikokaren.
3. Sätt i den andra änden av strömsladden i ett vägguttag.
4. Välj den tillagningsfunktion du vill använda.
5. START/STOP-knappen och tiden och på skärmen börjar att blinka.
6. Välj önskad tillagningstid med knapparna + och -. Välj önskad temperatur med knappen TEMP ADJUST (i
tillämpliga fall). Välj önskat tryck med knappen PRESSURE ADJUST. (Tids-och temperaturrekommendationer finns
tillagningsdiagrammet på sida 68).
7. Tryck på START/STOP-knappen. För tryckkokningsfunktioner visas ordet ”HEAt” på skärmen under uppvärmningen.
När multikokaren är uppvärmd visas den valda tillagningstiden på skärmen.
Obs! För tryckkokningsfunktioner är 13–14 minuter den ungefärliga genomsnittliga uppvärmningstiden. Om
matinnehållet är större eller mycket kallt kan uppvärmningen ta något längre.
8. Med multikokaren kan du fördröja starten för tillagningen så att tillagningen är färdig när du vill. Anvisningar för DELAY
TIMER (fördröjningstimer) finns på sida 43.
9. När den inställda tillagningstiden är över piper multikokaren igen och växlar automatiskt till inställningen KEEP WARM
(varmhållning). Skärmen ändrar sedan från tillagningstid till en ny timer som räknar upp till 4:00 (4 timmar) eller tills du
trycker på knappen START/STOP. Efter fyra timmar i varmhållningsinställningen stängs multikokaren av.
10. För att avsluta en tillagningsfunktion kan du närsomhelst trycka på knappen START/STOP.
11. När du är färdig kopplar du ur multikokaren och väntar tills den har svalnat helt innan du rengör den.
VARNING: Kokkärlet och uppvärmningsbasen blir väldigt varma när du använder multikokaren. Rör inte vid varma
ytor. Använd alltid grytlappar när du använder multikokaren. Lyft alltid locket genom att luta apparaten bort från dig för
att undvika ångan.
ANVÄNDA TIDSFÖRDRÖJNINGEN
Med den här multikokaren kan du fördröja starten för tillagningen så att den är klar när du vill.
Obs! Funktionen FÖRDRÖJNINGSTIMER finns inte för inställningarna BROWN/SAUTÉ (bryning/sautering),
VARMHÅLLNING eller YOGHURT.
Obs! Använd inte FÖRDRÖJNINGSTIMERN om receptet innehåller ömtåliga ingredienser som kött, fisk, ägg eller
mjölkprodukter eftersom de kan förstöras.
1. Efter att tillagningstiden har ställts in trycker du på knappen DELAY TIMER (fördröjningstimer). Knappen DELAY
TIMER och START/STOP blinkar och ”0:30” blinkar på skärmen vilket indikerar att multikokaren programmeras med
fördröjningsinställningen.
2. Tryck på knapparna + och - tills du når antalet timmar och minuter som du vill att tillagningen ska fördröjas med.
3. Tryck på knappen START/STOP för att starta fördröjningsfunktionen. Timern och knappen DELAY TIMER slutar att
blinka medan knappen START/STOP fortsätter att blinka. Detta indikerar att multikokaren har ställts in på inställningen
DELAY TIMER. Skärmen räknar ned fördröjningstiden tills den når 0:00. När den har nått 0:00 släcks DELAY TIMER-
lampan och START/STOP-lampan slutar att blinka för att visa att tidsfördröjningen är över. Ordet ”HEAt” visas på
skärmen tills multikokaren är helt trycksatt. När det valda trycket har nåtts börjar timern att räkna ned.
ANVÄNDA TRYCKKOKARFUNKTIONERNA
Ställ multikokaren på en plan, jämn yta. Ställ kokkärlet på uppvärmningsbasen. Sätt i kontakten till multikokaren i ett
vägguttag. Multikokaren börjar pipa och skärmen lyser med fyra streck (- - - -).
1. Häll mat och vätska i det löstagbara kokkärlet.
2. Sätt locket på multikokaren och rikta in med . Lås genom att vrida moturs till läget LOCKED (låst).
3. Vrid ångutsläppsventilen med fingerstroppen till läget ”Seal” (försluta).
4. Välj önskad tillagningsfunktion.
5. Justera tillagningstid och tryck vid behov.
Obs! Se tillagningsdiagrammet på sida 68 för att hitta möjliga tids- och tryckjusteringar.
6. När du har gjort önskade justeringar (om några) trycker du på START/STOP.
7. Multikokaren måste få ökat tryck innan tryckkokningen kan börja. När trycket i multikokaren ökar visas ”HEAt”
på skärmen och tiden räknas inte ned. Den tid det tar för trycket i multikokaren att öka varierar beroende på
luftfuktigheten och vattentemperaturen, men den genomsnittliga trycksättningstiden är 13–15 minuter. När trycket har
uppnåtts försvinner ”HEAt” från skärmen och tiden börjar att räknas ned.
8. När den inställda tillagningstiden är över börjar multikokaren att pipa och växlar automatiskt till inställningen KEEP
WARM. Skärmen ändras därför från tillagningstiden till en ny timer som räknar upp till 4:00 (4 timmar) eller tills du
trycker på knappen START/STOP. Efter 4 timmar med inställningen KEEP WARM övergår multikokaren till väntläge
och skärmen blinkar med fyra streck (----).
Obs! Multikokaren kan inte tryckkoka utan vätska. Se till att det finns minst 2,3 dl vätska i det löstagbara kokkärlet.
VARNING: Under tillagningen bildas ånga i multikokaren, så använd en grytlapp för att skydda händerna när du lyfter på
locket.
SLÄPPA UT TRYCK VID SLUTET AV TILLAGNINGEN
A. Naturlig metod för tryckutsläpp: När tillagningscykeln är över låter du multikokaren släppa ut tryck naturligt genom
tryckventilen. Enheten svalnar gradvis av sig själv. Vänta åtminstone 10 minuter efter att tillagningen har slutförts och
för sedan stroppen på ångutsläppsventilen till ”Release” (släppa ut) med ett köksredskap (se figur 2). Placera inte
någon del av handen eller kroppen över ångutsläppet ovanpå ventilen eftersom ångan är het och kan bränna huden.
Trycket har släppts ut när ångan inte längre kommer ut ur ventilen och locket går lätt att öppna. Först då kan du på ett
säkert sätt lyfta på locket och servera mat.
B. Var försiktig när du använder snabbmetoden för tryckutsläpp: För gradvis stroppen på ångutsläppsventilen till
”Release” med ett köksredskap (se figur 2). Ånga släpps snabbt ut från ångutsläppsventilen. Placera inte någon
del av handen eller kroppen över ångutsläppet ovanpå ventilen eftersom ångan är het och kan bränna huden. Var
försiktig när du använder den här metoden för att tillaga flytande ingredienser som grytor, buljonger, soppor, bönor och
baljfrukter. Använd aldrig den här metoden när du tillagar ris eftersom ris kan vara väldigt ömtåligt. Trycket har släppts
ut när ångan inte längre kommer ut ur ventilen och locket går lätt att öppna. Först då kan du på ett säkert sätt lyfta på
locket och servera mat.
Låst lock Upplåst lock Öppet lock
Figur 1

44 45
VARNING:
1. Tvinga inte upp locket. Om det inte går lätt att öppna innebär det att multikokaren fortfarande är trycksatt.
2. Under tillagningen bildas ånga i multikokaren så använd en grytlapp för att skydda händerna när du lyfter på locket.
LÅNGSAMKOKNING
Inställningen LOW (låg): Den här inställningen är lämplig för sjudning och långsamkokning. Den rekommenderade koktiden
med inställningen LOW är 6–8 timmar.
Inställningen HIGH (hög): Detta är för snabbare tillagning. Den rekommenderade koktiden med inställningen HIGH är 2–4
timmar.
Inställningen KEEP WARM: När tillagningen är färdig växlar multikokaren automatiskt till inställningen KEEP WARM för att
förhindra att maten kokas för länge och för att hålla den tillagade maten varm tills den ska serveras.
ANVÄNDA FUNKTIONEN FÖR LÅNGSAMKOKNING
Funktionen SLOW COOK (långsamkokning) använder inte tryck under tillagningen men visst tryck kan bildas i enheten
under tillagningen. När du använder den här funktionen ska du se till att ångutsläppsventilen är i läget ”Release”. Den här
funktionen tillagar på ett liknande sätt som vanliga långsamkokare och använder lägre temperaturer och längre tillagningstider
för att skapa möra, smakrika måltider.
Ställ multikokaren på en plan, jämn yta. Ställ kokkärlet på uppvärmningsbasen. Sätt i kontakten till multikokaren i ett
vägguttag. Multikokaren börjar pipa och skärmen lyser med fyra streck (- - - -).
1. Häll mat och vätska i det löstagbara kokkärlet.
2. Sätt locket på multikokaren och rikta in med . Lås genom att vrida moturs till läget LOCKED .
3. Vrid ångutsläppsventilen till läget ”Release” med fingerstroppen.
Obs! Även om den här inställningen inte använder tryck i tillagningsprocessen kan visst tryck bildas i enheten under
tillagningen. Det är därför som det är viktigt att hålla ångutsläppsventilen i läget ”Release”.
4. Tryck på knappen SLOW COOK och justera tid och temperatur efter behov.
Obs! Se tillagningsdiagrammet på sida 68 för att hitta möjliga tids- och tryckjusteringar.
5. Tryck på START/STOP. Tiden börjar att räknas ned.
6. När den inställda tillagningstiden är över börjar multikokaren att pipa och växlar automatiskt till inställningen KEEP
WARM. Skärmen ändras därför från tillagningstiden till en ny timer som räknar upp till 4:00 (4 timmar) eller tills du
trycker på knappen START/STOP. Efter 4 timmar med inställningen KEEP WARM stängs multikokaren av.
ANVÄNDA ÅNGFUNKTIONEN
Ställ multikokaren på en plan, jämn yta. Ställ kokkärlet på uppvärmningsbasen. Sätt i kontakten till multikokaren i ett
vägguttag. Multikokaren börjar pipa och skärmen lyser med fyra streck (- - - -).
1. Häll minst 250 ml vatten i botten av den borttagbara tillagningsgrytan, och sätt i ånggallret eller ångkorgen. Se till att
vattenytan är precis under ångkorgen eller trådarna i ånggallret, så att maten inte vidrör vattnet.
Tryckutsläppsventil
Ventil STÄNGD (”försluta”) Ventil ÖPPEN (”släppa ut”) Ventil TA BORT
Figur 2
Obs! Ångkorgen ska placeras direkt i grytan, inte ovanpå tillagningsgallret.
2. Lägg maten i ångkorgen eller på tillagningsgallret.
Obs! Fyll inte ångkorgen mer än till tre fjärdedelar. Se till att korgens handtag har fällts ned i korgen innan du sätter
på locket.
3. Lägg på locket och lås genom att vrida moturs till läget LOCKED .
4. För fingerstroppen till ångutsläppsventilen till läget ”Seal” med ett köksredskap.
5. Tryck på knappen STEAM (ånga) och justera tid och tryck om det behövs.
6. När du har gjort önskade justeringar (om några) trycker du på START/STOP.
7. Multikokaren måste få ökat tryck innan tryckkokningen kan börja. När trycket i multikokaren ökar visas ”HEAt” på
skärmen och tiden räknas inte ned. När trycket har uppnåtts försvinner ”HEAt” från skärmen och tiden börjar att
räknas ned.
8. När den inställda tillagningstiden är över börjar multikokaren att pipa och växlar automatiskt till inställningen KEEP
WARM. Skärmen ändras därför från tillagningstiden till en ny timer som räknar upp till 4:00 (4 timmar) eller tills du
trycker på knappen START/STOP. Efter 4 timmar i inställningen KEEP WARM stängs multikokaren av.
TIPS: Se ångdiagrammet på sida 69.
VARNING: Under tillagningen bildas ånga i multikokaren så använd en grytlapp för att skydda händerna när du lyfter på
locket. Ångkorgen blir också varm under tillagning, så använd grillvantar när du lyfter upp den ur kokaren.
ANVÄNDA BRYNINGS-/SAUTERINGSFUNKTIONEN
Använd inte locket med den här funktionen. Ställ multikokaren på en plan, jämn yta. Ställ kokkärlet på uppvärmningsbasen.
Sätt i kontakten till multikokaren i ett vägguttag. Multikokaren börjar pipa och skärmen lyser med fyra streck (- - - -).
1. Välj funktionen BROWN/SAUTÉ och justera tid och temperatur vid behov med knapparna + och -.
2. Tryck på START/STOP.
3. När multikokaren värms upp visas ”HEAt” på skärmen. När temperaturen har uppnåtts börjar timern räkna ned. Tillsätt
maten försiktigt i det varma kokkärlet med en plasttång.
KOKA RIS
När du kokar ris ska du använda funktionen RICE/RISOTTO (ris/risotto). Den här funktionen är lämplig för alla slags ris, till
exempel vitt och/eller brunt ris.
Funktionen RICE/RISOTTO tillagar under tryck eftersom det går snabbare.
Kapacitet: Eftersom ris expanderar under tillagningen ska du inte fylla kokkärlet över markeringen 1/2 när du använder
funktionen RICE/RISOTTO.
ANVÄNDA FUNKTIONEN FÖR RIS/RISOTTO
Ställ multikokaren på en plan, jämn yta. Ställ kokkärlet på uppvärmningsbasen. Sätt i kontakten till multikokaren i ett
vägguttag. Multikokaren börjar pipa och skärmen lyser med fyra streck (- - - -).
1. Mät upp önskad mängd ris.
2. Lägg det sköljda riset i kokkärlet. Tillsätt den mängd vatten som krävs enligt receptet. Se till att det finns minst 240 ml
vätska i det löstagbara kokkärlet.
3. Lägg på locket och lås genom att vrida moturs till läget LOCKED .
4. För fingerstroppen till ångutsläppsventilen till läget ”Seal” med ett köksredskap.
5. Tryck på knappen RICE/RISOTTO och justera tid och tryck efter behov.
Obs! Se tillagningsdiagrammet på sida 68 för att hitta möjliga tids- och tryckjusteringar.
6. När du har gjort önskade justeringar (om några) trycker du på START/STOP.
7. Multikokaren måste få ökat tryck innan tryckkokningen kan börja. När trycket i multikokaren ökar visas ”HEAt” på
skärmen och tiden räknas inte ned. När trycket har uppnåtts försvinner ”HEAt” från skärmen och tiden börjar att
räknas ned.

46 47
8. När den inställda tillagningstiden är över börjar multikokaren att pipa och växlar automatiskt till inställningen KEEP
WARM. Skärmen ändras därför från tillagningstiden till en ny timer som räknar upp till 4:00 (4 timmar) eller tills du
trycker på knappen START/STOP. Efter 4 timmar i inställningen KEEP WARM stängs multikokaren av.
ÄNDRA EN INSTÄLLNING
Tryck på knappen START/STOP och välj sedan den nya önskade tillagningsfunktionen. En ny timer börjar blinka på
skärmen och den önskade funktionen börjar också att blinka. Välj önskad tid, tryck och/eller temperatur. Tryck på knappen
START/STOP så börjar den nya funktionen att värmas upp.
Ändra tillagningstiden:
Du kan ändra tillagningstiden innan tillagningen börjar genom att trycka på + och - och sedan trycka på START/STOP. Tryck
och släpp för att ändra långsamt. Tryck och håll ned för att ändra tiden snabbt. Om du går förbi den önskade temperaturen
eller tiden trycker du på den motsatta knappen.
Ändra trycket:
Du kan ändra trycket på vissa förinställda funktioner innan tillagningen börjar genom att trycka på knappen PRESSURE
ADJUST (justera tryck) innan du trycker på START/STOP.
Ändra temperaturen:
Du kan ändra temperaturen för vissa funktioner innan tillagningen börjar genom att trycka på knappen TEMP ADJUST
(justera temperatur) innan du trycker på START/STOP.
SKÖTSEL OCH RENGÖRING
Rengör endast när Crockpot® Express har svalnat och sladden har kopplats ur. Låt multikokaren svalna helt innan du rengör
den.
Rengör förslutningspackningen och locket med varmt vatten och diskmedel. Torka alla delar noga.
Även om kokkärlet tål maskindisk rekommenderar vi handdisk för att bevara nonstickbeläggningen. Om vita fläckar bildas
på kokkärlets yta blötlägger du den i en lösning med ättika, citronjuice och varmvatten i 30 minuter. Skölj och torka.
Torka uppvärmningsbasens utsida med en fuktig trasa och polera torrt. Använd INTE starka slipmedel, stålull eller
kemikalier eftersom dessa skadar ytorna.
Sänk aldrig ned uppvärmningsbasen i vatten eller någon annan vätska.
Kondensationsuppsamlare
Töm eventuell uppsamlad vätska från kondensationsuppsamlaren efter varje användningstillfälle. Rengör i varmt vatten med
diskmedel.
Lock och förslutningspackning
Handdiska med varmt vatten med diskmedel, torka noga och sätt tillbaka förslutningspackningen i locket före användning.
Förslutningspackningen kan behöva bytas ut en gång om året eller vartannat år beroende på hur ofta apparaten används.
Ångutsläppsventil
Se till att det inte finns något skräp i ångutsläppsventilen innan du börjar använda multikokaren. Ta bort ventilen och rengör
försiktigt. Se till att den är helt torr innan du sätter tillbaka den.
Lock till ångutsläppsventil
Ta försiktigt bort locket och rengör med varmt vatten med diskmedel. Tryck tillbaka locket på plats när du har rengjort.
Ångkorg och tång
Ångkorgen och tången kan diskas i diskmaskin. Observera dock att det kan fastna matrester i nätet på korgen, precis som i
andra köksredskap av sil- eller durkslagstyp, vilket kan kräva ytterligare rengöring.
FELKODER
Fel Lösning
Skärm ”E1” eller ”E2” Koppla ur multikokaren och kontakta servicecentret.
Skärm ”E3” Koppla ur multikokaren och låt den svalna helt. När multikokaren har svalnat kontrollerar
du alla delar i locket. Vrid locket till läget LOCKED . Se till att ångutsläppsventilen är i
läget ”Seal”. Om den här felkoden uppstår igen kopplar du ur multikokaren och kontaktar
servicecentret.
Skärm ”E4” Koppla ur multikokaren och låt den svalna helt. När multikokaren har svalnat kontrollerar du
kokkärlet för att se till att det nns tillräckligt med vätska i den. Tillsätt mer vätska vid behov
(minst 340 ml). Se till att ingen ånga kommer ut ur kokkärlet innan du sätter tillbaka locket på
multikokaren. Vrid locket till läget LOCKED . Se till att ångutsläppsventilen är i läget ”Seal”.
Välj en tryckkoksfunktion och tryck sedan på START/STOP.
Skärm ”E5” Multikokaren avbryter tillagningscykeln. Koppla ur multikokaren och låt den svalna. När den
har svalnat tar du bort locket och kontrollerar kokkärlet. Använd inte locket när du använder
funktionen BROWN/SAUTÉ.När du använder funktionen SLOW COOK ska du se till att
ångutsläppsventilen är i läget ”Release” innan du startar tillagningscykeln.
Skärm ”E6” Koppla ur multikokaren och låt den svalna. När den har svalnat tar du bort locket och
kontrollerar kokkärlet. Tillsätt vätska efter behov. Se till att det nns minst 340 ml vätska
i det löstagbara kokkärlet. Om du använder en tryckkoksfunktion ska du se till att
ångutsläppsventilen är i läget ”Seal”.
EFTERFÖRSÄLJNING OCH RESERVDELAR
Om apparaten inte fungerar och garantin fortfarande gäller returnerar du produkten till inköpsstället så att den kan bytas ut.
Tänk på att ett giltigt inköpsbevis krävs. Kontakta vår kundtjänstavdelning om du behöver ytterligare hjälp: Sverige: ring +46
31 300 05 00. Internationella priser kan gälla. Du kan också skicka e-post: [email protected].
AVFALLSHANTERING
Elektriskt avfall ska inte slängas tillsammans med hushållsavfall. Produkterna bör i möjligaste mån återvinnas. Skicka e-post
till oss på [email protected] om du vill veta mer om återvinning och WEEE.

48 49
POLSKI
WAŻNE OSTRZEŻENIA
Podczas korzystania z urządzeń elektrycznych należy zawsze przestrzegać
podstawowych zasad bezpieczeństwa, aby ograniczyć ryzyko pożaru,
porażenia prądem i/lub obrażeń osób. Są to m.in.:
1. Przed przystąpieniem do eksploatacji produktu należy zapoznać się ze
wszystkimi instrukcjami.
2. Urządzenie nie jest przeznaczone do użytku przez dzieci. Przechowuj
urządzenie i przewód w miejscu niedostępnym dla dzieci. Dzieci nie
powinny bawić się urządzeniem. Urządzenia mogą być używane przez
osoby o ograniczonej sprawności fizycznej, czuciowej lub psychicznej,
lub osoby niemające doświadczenia ani wiedzy, pod warunkiem że
korzystają z nich pod nadzorem lub zostały poinstruowane w zakresie
bezpiecznego używania urządzenia i mają świadomość ryzyka
związanego z jego użytkowaniem.
3. Urządzenia nie wolno używać, jeśli wtyczka lub przewód zasilający
są uszkodzone, jeśli wystąpiły zakłócenia działania urządzenia lub
urządzenie zostało upuszczone bądź uszkodzone w jakikolwiek
sposób. Nie podejmuj próby wymiany lub sklejania uszkodzonego
przewodu. Zwróć urządzenie do producenta (patrz gwarancja) celem
przeprowadzenia badania, naprawy lub regulacji. Uszkodzony przewód
zasilający musi być wymieniony na odpowiedni model, dostępny u
producenta lub w autoryzowanym serwisie.
4. Nie używaj na zewnątrz ani w celach komercyjnych.
5. Nie używaj urządzenia do celów innych niż jest przeznaczone.
Niewłaściwe użycie może spowodować obrażenia. Urządzenie nie jest
przeznaczone do smażenia w głębokim tłuszczu.
6. W przypadku korzystania z funkcji gotowania pod ciśnieniem w urządzeniu
stosowane jest gotowanie pod ciśnieniem. Niewłaściwe użycie może
skutkować oparzeniem. Przed korzystaniem z urządzenia upewnij się, że
urządzenie jest właściwie zamknięte. Patrz Instrukcja obsługi.
WAŻNA INFORMACJA DOTYCZĄCA BEZPIECZEŃSTWA:
Podczas obniżania ciśnienia w urządzeniu pamiętaj o założeniu rękawicy
kuchennej i korzystaniu ze sprzętu kuchennego, aby stopniowo otworzyć
zawór i obniżyć ciśnienie. Uważaj na wydobywającą się parę.
NIE WOLNO zanurzać podstawy grzewczej, przewodu zasilającego ani
wtyczki w wodzie ani w żadnej innej cieczy.
7. Urządzenie wytwarza ciepło podczas działania. Nie dotykaj gorących
powierzchni. Korzystaj z uchwytów lub pokręteł.
8. Nie napełniaj użytkownika powyżej linii maksymalnego napełnienia (2/3
wysokości). Podczas przyrządzania produktów zwiększających objętość
podczas gotowania, takich jak ryż lub suszone warzywa, nie napełniaj
urządzenia powyżej zalecanego poziomu 1/2 wysokości. Przepełnienie
może spowodować ryzyko zablokowania przewodów wentylacyjnych i
wytworzenie nadmiernego ciśnienia. Należy przestrzegać wszystkich
wskazówek gotowania i instrukcji zawartych w przepisach.
9. Przed użyciem zawsze sprawdź, czy urządzenia do redukcji ciśnienia nie
są zablokowane. W razie konieczności wyczyść je.
10. Ustaw multicooker w taki sposób, aby zawór wylotu pary był skierowany
w kierunku od użytkownika.
11. Nigdy nie umieszczaj żadnych części ciała (np. twarzy, dłoni i rąk) nad
zaworem wylotu pary. Para może spowodować ciężkie oparzenia.
12. Nie używaj multicookera bez żywności lub płynu w pojemniku do gotowania.
13. Aby zapobiec ryzyku obrażeń spowodowanych nadmiernym ciśnieniem,
wymieniaj uszczelkę pokrywki tylko w sposób zalecany przez producenta.
Więcej informacji można znaleźć w instrukcji konserwacji i czyszczenia.
14. Nie przenoś multicookera za pokrywkę.
15. Nie przemieszczaj ani nie przykrywaj multicookera podczas pracy.
16. Po zakończeniu gotowania pod ciśnieniem nie otwieraj urządzenia, zanim
ostygnie i zanim całe ciśnienie wewnętrzne zostanie uwolnione. Trudność ze
zdjęciem pokrywki oznacza, że wewnątrz multicookera wciąż panuje ciśnienie
— nie otwieraj go na siłę. Ciśnienie w multicookerze może być niebezpieczne.
Zapoznaj się ze wskazówkami uwalniania ciśnienia.
17. Podczas podnoszenia i zdejmowania pokrywki po gotowaniu zachowaj
ostrożność. Zawsze odchylaj pokrywkę od siebie, ponieważ para jest
gorąca i może skutkować ciężkim poparzeniem. Nigdy nie nachylaj
twarzy nad multicookerem.
18. Nie używaj multicookera ciśnieniowego do smażenia na oleju pod ciśnieniem.
19. Aby uniknąć porażenia prądem, nie umieszczaj ani zanurzaj wtyczki,
przewodu ani urządzenia w wodzie ani w żadnej cieczy.
20. Nie używaj naczynia do gotowania do przechowywania żywności ani nie
umieszczaj go w zamrażarce.
21. Aby uniknąć uszkodzenia multicookera, nie używaj do czyszczenia
zasadowych środków czyszczących. Stosuj miękką szmatkę i łagodny
detergent.

50 51
22. Zawsze w pierwszej kolejności podłącz przewód zasilający do gniazda
multicookera, a następnie do gniazda ściennego.
23. Wyjmij przewód zasilający z gniazda sieciowego, gdy multicooker
nie jest używany, przed montażem i demontażem części oraz przed
czyszczeniem. Przed montażem i demontażem części oraz przed
czyszczeniem odczekaj, aż urządzenie ostygnie. W celu rozłączenia
upewnij się, że multicooker jest wyłączony, a następnie wyjmij przewód
zasilający z gniazda ściennego. Nie rozłączaj, pociągając za przewód.
24. Nie pozwól, by przewód zasilający wisiał nad krawędzią stołu ani opierał
się o gorące powierzchnie lub dotykał gorących powierzchni.
25. Należy zachować najwyższą ostrożność podczas przenoszenia
urządzenia zawierającego gorące płyny.
26. Używanie dodatkowych akcesoriów niezalecanych przez producenta
urządzenia może spowodować obrażenia.
27. Nie stawiaj urządzenia na mokrych powierzchniach lub w ich pobliżu,
na źródłach ciepła, takich jak palnik gazowy lub elektryczny, ani w
rozgrzanym piekarniku.
28. PRZESTROGA: Aby uniknąć porażenia prądem i uszkodzenia
produktu, nie gotuj bezpośrednio w podstawie grzewczej. Gotuj tylko w
wyjmowanym naczyniu do gotowania.
29. OSTRZEŻENIE: Rozlana żywność może spowodować poważne oparzenia.
Trzymaj urządzenie i przewód z dala od dzieci. Nigdy nie przeciągaj
przewodu ponad krawędzią blatu, nie używaj wylotu pod blatem i nie
stosuj przedłużacza.
30. Nie podłączaj ani nie włączaj multicookera bez naczynia do gotowania w
środku.
31. Urządzenie jest przeznaczone wyłącznie do użytku domowego. Zachowaj
odległość 152 mm od ściany oraz ze wszystkich stron. Zawsze używaj
urządzenia na suchej, stabilnej i równej powierzchni.
ZACHOWAJ TE INSTRUKCJE UŻYTKOWANIA W
GOSPODARSTWIE DOMOWYM
LISTA ELEMENTÓW MULTICOOKER CIŚNIENIOWY
CROCKPOT® EXPRESS
SPOSÓB UŻYCIA MULTICOOKER CIŚNIENIOWY CROCKPOT®
EXPRESS
POCZĄTEK PRACY:
Usuń całe opakowanie, papier i karton (w tym znajdujący się między naczyniem do gotowania a podstawą grzewczą).
Przeczytaj i zachowaj wszystkie materiały drukowane oraz koniecznie zapoznaj się z informacjami o serwisie i gwarancji.
MONTAŻ:
• Umieść naczynie do gotowania na podstawie grzewczej
• Załóż pokrywkę na multicookera i wyrównaj symbol z . Aby zablokować, obróć w kierunku przeciwnym do ruchu
wskazówek zegara, wyrównując symbol z . Aby zablokować, obróć pokrywkę w kierunku zgodnym z ruchem
wskazówek zegara, wyrównując symbol z .
POCZĄTEK PRACY
(UWAGA: Po naciśnięciu każdego przycisku multicookera rozlega się sygnał dźwiękowy.)
1. Umieść produkty w naczyniu do gotowania. Przykryj multicookera pokrywką, wyrównując symbol z . Aby
APrzewód zasilający
BSzczypce
CTrzpień blokady pokrywki
DUchwyt pokrywki
EPokrywka
FNaczynie do gotowania
GPodstawa grzewcza
HPanel sterowania
IZawór pływakowy
JZawór wylotu pary
KPojemnik na skropliny
LGniazdo przewodu zasilającego
PANEL STEROWANIA
MWyświetlacz
NPrzyciski wyboru czasu
SPÓD POKRYWKI
OPierścień uszczelki
PPokrywa zaworu wylotu pary
QUszczelka
RZawór pływaka
SPlastikowa łyżka
TKratka do gotowania na parze
UKoszyk do gotowania na parze
Pokrywka zablokowana Pokrywka odblokowana Pokrywka otwarta
Rysunek 1
MULTICOOKER CIŚNIENIOWY

52 53
zablokować, obróć w kierunku przeciwnym do ruchu wskazówek zegara, wyrównując symbol z .
2. Podłącz znajdujący się w zestawie przewód zasilający do gniazda multicookera.
3. Podłącz drugi koniec przewodu zasilającego do gniazda ściennego.
4. Wybierz żądaną funkcję gotowania, której chcesz użyć.
5. Przycisk START/STOP i godzina na wyświetlaczu zaczną migać.
6. Wybierz żądany czas gotowania za pomocą przycisków + i -. Wybierz żądaną temperaturę za pomocą przycisku
TEMP ADJUST (jeśli dotyczy). Wybierz żądane ciśnienie za pomocą przycisku PRESSURE ADJUST (jeśli dotyczy).
(Rekomendacje na temat czasu i temperatury gotowania można znaleźć w tabeli na stronie 68 Instrukcji gotowania).
7. Naciśnij przycisk START/STOP. W przypadku funkcji gotowania pod ciśnieniem podczas nagrzewania na
wyświetlaczu pojawi się słowo „HEAt” (nagrzewanie). Gdy multicooker będzie rozgrzany, na wyświetlaczu pojawi się
wybrany czas gotowania.
Uwaga: W przypadku funkcji gotowania pod ciśnieniem nagrzewanie trwa około 13–14 minut. Jeśli żywności jest
więcej lub jeśli jest bardzo zimna, czas nagrzewania może być dłuższy.
8. Multicooker umożliwia opóźnienie rozpoczęcia gotowania, aby proces został zakończony w odpowiednim momencie.
Instrukcje dotyczące funkcji DELAY TIMER (opóźnienia czasomierza) można znaleźć na stronie 52.
9. Po upływie wyznaczonego czasu gotowania ponownie rozlegnie się sygnał dźwiękowy, a multicooker automatycznie
przełączy się na ustawienie KEEP WARM (utrzymywanie ciepła). Na wyświetlaczu zamiast czasu gotowania
wyświetlony zostanie nowy czasomierz z opcją GETTING STARTED (początek pracy) ustawioną na wartość 4:00
(4 godziny) lub po naciśnięciu przycisku START/STOP. Po 4 godzinach na ustawieniu KEEP WARM (utrzymywanie
ciepła) multicooker się wyłączy.
10. Aby zatrzymać funkcję gotowania, można w dowolnej chwili nacisnąć przycisk START/STOP.
11. Po zakończeniu odłącz multicookera od zasilania i przed próbą czyszczenia poczekaj, aż ostygnie.
PRZESTROGA: Podczas korzystania z multicookera naczynie do gotowania i podstawa grzewcza silnie się
nagrzewają. Nie dotykaj gorących powierzchni. Podczas korzystania z multicookera zawsze korzystaj z uchwytów lub
rękawic. Podnosząc pokrywkę, odchylaj ją od siebie, aby uniknąć poparzenia parą.
JAK KORZYSTAĆ Z OPÓŹNIENIA CZASOWEGO
Multicooker umożliwia opóźnienie rozpoczęcia gotowania, aby proces został zakończony w odpowiednim momencie.
Uwaga: Funkcja DELAY TIMER (opóźnienie czasomierza) nie jest dostępna na ustawieniach BROWN/SAUTÉ
(obsmażanie), KEEP WARM (utrzymywanie ciepła) lub YOGURT (jogurt).
Uwaga: Nie używaj funkcji DELAY TIMER (opóźnienie czasomierza), gdy przepis zawiera łatwo psujące się składniki, takie
jak mięso, ryba, jaja lub nabiał.
1. Po ustawieniu czasu gotowania naciśnij przycisk DELAY TIMER (opóźnienie czasomierza). Przyciski DELAY TIMER
(opóźnienie czasomierza) i START/STOP zaczną migać, a na wyświetlaczu zaczną migać cyfry „0:30”, co wskazuje,
że multicooker jest zaprogramowany na ustawienie opóźnienia.
2. Naciskaj przyciski + i - do momentu osiągnięcia tylu godzin i minut, o ile chcesz opóźnić proces gotowania (tzn.
ustawić czas, na jaki chcesz odłożyć rozpoczęcie cyklu gotowania).
3. Naciśnij przycisk START/STOP, aby zainicjować funkcję opóźnienia. Czasomierz i przycisk DELAY TIMER (opóźnienie
czasomierza) przestaną migać, a przycisk START/STOP będzie migać dalej. Oznacza to, że na multicookerze
włączono ustawienie DELAY TIMER (opóźnienie czasomierza). Na wyświetlaczu rozpocznie się odliczanie czasu
opóźnienia do osiągnięcia wartości 0:00. Po osiągnięciu wartości 0:00 kontrolka DELAY TIMER (opóźnienie
czasomierza) wyłączy się, a przycisk START/STOP przestanie migać, co sygnalizuje zakończenie czasu opóźnienia.
Na wyświetlaczu pojawi się słowo „HEAt” (nagrzewanie) do momentu osiągnięcia pełnego ciśnienia w multicookerze.
Po osiągnięciu wybranego ciśnienia czasomierz rozpocznie odliczanie.
KORZYSTANIE Z FUNKCJI GOTOWANIA POD CIŚNIENIEM
Ustaw multicookera na płaskiej, poziomej powierzchni. Umieść naczynie do gotowania na podstawie grzewczej. Podłącz
multicookera do gniazda ściennego. Rozlegnie się sygnał dźwiękowy, a na wyświetlaczu ukażą się cztery kreski (- - - -).
1. Umieść żywność i płyn wewnątrz wyjmowanego naczynia do gotowania.
2. Przykryj multicookera pokrywką, wyrównując symbol z . Aby zablokować, obróć w kierunku przeciwnym do
ruchu wskazówek zegara do pozycji LOCKED (zablokowane) .
3. Przy użyciu wypustki obróć zawór wylotu pary do pozycji „Seal” (uszczelnione).
4. Wybierz żądaną funkcję gotowania.
5. W razie potrzeby skoryguj czas gotowania i ciśnienie.
Uwaga: Dostępne korekty czasu i ciśnienia można znaleźć na stronie 68 Instrukcji gotowania.
6. Po dokonaniu ewentualnych korekt naciśnij przycisk START/STOP.
7. Przed rozpoczęciem gotowania pod ciśnieniem konieczne jest podniesienie ciśnienia wewnątrz multicookera. W
trakcie tego procesu na wyświetlaczu pojawi się słowo „HEAt” (nagrzewanie), a czas nie będzie odliczany. Czas
podnoszenia ciśnienia w multicookerze różni się w zależności od wilgotności i temperatury wody, ale średnio trwa to
13–15 minut. Po osiągnięciu odpowiedniej wartości ciśnienia słowo „HEAt” (nagrzewanie) na wyświetlaczu zgaśnie i
rozpocznie się odliczanie czasu.
8. Po upływie wyznaczonego czasu gotowania rozlegnie się sygnał dźwiękowy, a multicooker automatycznie przełączy
się na ustawienie KEEP WARM (utrzymywanie ciepła). Na wyświetlaczu zamiast czasu gotowania wyświetlony
zostanie nowy czasomierz z opcją GETTING STARTED (początek pracy) ustawioną na wartość 4:00 (4 godziny)
lub po naciśnięciu przycisku START/STOP. Po 4 godzinach na ustawieniu KEEP WARM (utrzymywanie ciepła)
multicooker przełączy się na tryb uśpienia, a na wyświetlaczu ukażą się cztery kreski (- - - -).
Uwaga: Aby korzystać z funkcji gotowania pod ciśnieniem, w multicookerze musi znajdować się płyn. Minimalna ilość płynu
w naczyniu do gotowania to 240 ml.
PRZESTROGA: Podczas gotowania w multicookerze będzie gromadzić się para, dlatego podczas podnoszenia pokrywki
używaj rękawic kuchennych, aby chronić dłonie.
OBNIŻANIE CIŚNIENIA PO ZAKOŃCZENIU GOTOWANIA
A. Naturalna metoda obniżania ciśnienia: Po zakończeniu cyklu gotowania ciśnienie w multicookerze zostaje w
naturalny sposób obniżone poprzez zawór pływakowy. Urządzenie stopniowo ostygnie samoczynnie. Odczekaj co
najmniej 10 minut po zakończeniu gotowania, a następnie przy użyciu przyborów kuchennych obróć wypustkę zaworu
wylotu pary do pozycji „Release” (rozszczelnione) (zob. rysunek 2). Nie umieszczaj żadnych części ciała (np. dłoni)
nad wylotem pary na górze zaworu, ponieważ para jest bardzo gorąca i może wywołać poparzenia skóry. Ciśnienie
zostało obniżone, gdy z zaworu nie wydobywa się para, a pokrywkę można łatwo podnieść przy użyciu minimalnej
siły. Tylko wówczas można bezpiecznie zdjąć pokrywkę i podać jedzenie.
B. Stosując metodę szybkiego obniżania ciśnienia, należy zachować ostrożność: Przy użyciu przyborów
kuchennych stopniowo obróć wypustkę zaworu wylotu pary do pozycji „Release” (rozszczelnione) (patrz rysunek
2). Para zacznie szybko wydobywać się z zaworu wylotu pary. Nie umieszczaj żadnych części ciała (np. dłoni) nad
wylotem pary na górze zaworu, ponieważ para jest bardzo gorąca i może wywołać poparzenia skóry. Metoda ta
wymaga zachowania ostrożności i sprawdza się podczas przyrządzania dań płynnych, takich jak potrawy z sosem,
zupy, buliony oraz dania z roślin strączkowych. Nigdy nie używaj jej podczas gotowania ryżu, który zazwyczaj jest
bardzo delikatny. Ciśnienie zostało obniżone, gdy z zaworu nie wydobywa się para, a pokrywkę można łatwo podnieść
przy użyciu minimalnej siły. Tylko wówczas można bezpiecznie zdjąć pokrywkę i podać jedzenie.
Zawór obniżania ciśnienia
Zawór ZAMKNIĘTY („Seal”) Zawór OTWARTY („Release”) Zawór USUNIĘTY
Rysunek 2

54 55
PRZESTROGA:
1. Nie zdejmuj pokrywki na siłę. Jeśli pokrywki nie da się łatwo podnieść, oznacza to, że multicooker wciąż znajduje się
pod ciśnieniem.
2. Podczas gotowania w multicookerze będzie gromadzić się para, dlatego podczas podnoszenia pokrywki używaj
rękawic kuchennych, aby chronić dłonie.
WOLNE GOTOWANIE
Ustawienie LOW (niskie): Odpowiednie w przypadku duszenia i wolnego gotowania. Zalecany czas gotowania na
ustawieniu LOW (niskie) wynosi od 6 do 8 godzin.
Ustawienie HIGH (wysokie): Służy do szybszego gotowania. Zalecany czas gotowania na ustawieniu HIGH (wysokie)
wynosi od 2 do 4 godzin.
Ustawienie KEEP WARM (utrzymywanie ciepła): Po upływie czasu gotowania multicooker automatycznie przełączy się na
ustawienie KEEP WARM (utrzymywanie ciepła), aby zapobiec rozgotowaniu i podtrzymać odpowiednią temperaturę potrawy
do momentu podania.
KORZYSTANIE Z FUNKCJI WOLNOWARU
Funkcja SLOW COOK (wolne gotowanie) nie korzysta z ciśnienia w procesie gotowania, mimo to ciśnienie w urządzeniu
może nieco wzrosnąć. Podczas korzystania z tej funkcji pamiętaj, aby zawór wylotu pary znajdował się w pozycji „Release”
(rozszczelnione). Funkcja ta przypomina standardowe wolnowary, to znaczy stosuje się w niej niższe temperatury i dłuższy
czas gotowania, aby otrzymać delikatne potrawy o bogatym smaku. Ustaw multicookera na płaskiej, poziomej powierzchni.
Umieść naczynie do gotowania na podstawie grzewczej. Podłącz multicookera do gniazda ściennego. Rozlegnie się sygnał
dźwiękowy, a na wyświetlaczu ukażą się cztery kreski (- - - -).
1. Umieść żywność i płyn wewnątrz wyjmowanego naczynia do gotowania.
2. Przykryj multicookera pokrywką, wyrównując symbo z . Aby zablokować, obróć w kierunku przeciwnym do
ruchu wskazówek zegara do pozycji LOCKED (zablokowane) .
3. Przy użyciu wypustki obróć zawór wylotu pary do pozycji „Release” (rozszczelnione).
Uwaga: Mimo że na tym ustawieniu w procesie gotowania nie jest stosowane ciśnienie, może ono nieco wzrosnąć.
Właśnie dlatego zawór wylotu pary powinien znajdować się w pozycji „Release” (rozszczelnione).
4. Naciśnij przycisk SLOW COOK (wolne gotowanie) oraz skoryguj czas i temperaturę stosownie do potrzeb.
Uwaga: Dostępne korekty czasu i ciśnienia można znaleźć na stronie 68 Instrukcji gotowania.
5. Naciśnij przycisk START/STOP. Rozpocznie się odliczanie czasu.
6. Po upływie wyznaczonego czasu gotowania rozlegnie się sygnał dźwiękowy, a multicooker automatycznie przełączy
się na ustawienie KEEP WARM (utrzymywanie ciepła). Na wyświetlaczu zamiast czasu gotowania wyświetlony
zostanie nowy czasomierz z opcją GETTING STARTED (początek pracy) ustawioną na wartość 4:00 (4 godziny)
lub po naciśnięciu przycisku START/STOP. Po 4 godzinach na ustawieniu KEEP WARM (utrzymywanie ciepła)
multicooker się wyłączy.
KORZYSTANIE Z FUNKCJI PARY
Ustaw multicookera na płaskiej, poziomej powierzchni. Umieść naczynie do gotowania na podstawie grzewczej. Podłącz
multicookera do gniazda ściennego. Rozlegnie się sygnał dźwiękowy, a na wyświetlaczu ukażą się cztery kreski (- - - -).
1. Wlej co najmniej 250 ml wody na dno wyjmowanego naczynia do gotowania, a następnie umieść w nim ruszt lub
koszyk do gotowania na parze. Woda powinna znajdować się tuż pod koszykiem lub kratką, tak aby żywność nie
stykała się z wodą.
Uwaga: Koszyk do gotowania na parze należy umieścić bezpośrednio na dnie garnka, nie na ruszcie do gotowania.
2. Ułóż żywność w koszyku lub na ruszcie do gotowania na parze.
Uwaga: Korzystając z koszyka do gotowania na parze, nie należy napełniać go powyżej 3/4 wysokości. Przed
założeniem pokrywy upewnij się, że uchwyt koszyka jest opuszczony do środka.
3. Załóż pokrywkę i zablokuj ją, obracając w kierunku przeciwnym do ruchu wskazówek zegara do pozycji LOCKED
(zablokowane) .
4. Przy użyciu wypustki obróć zawór wylotu pary do pozycji „Seal” (uszczelnione).
5. Naciśnij przycisk STEAM (para) oraz skoryguj czas i ciśnienie stosownie do potrzeb.
6. Po dokonaniu ewentualnych korekt naciśnij przycisk START/STOP.
7. Przed rozpoczęciem gotowania pod ciśnieniem konieczne jest podniesienie ciśnienia wewnątrz multicookera. W
trakcie tego procesu na wyświetlaczu pojawi się słowo „HEAt” (nagrzewanie), a czas nie będzie odliczany. Po
osiągnięciu odpowiedniej wartości ciśnienia słowo „HEAt” (nagrzewanie) na wyświetlaczu zgaśnie i rozpocznie się
odliczanie czasu.
8. Po upływie wyznaczonego czasu gotowania rozlegnie się sygnał dźwiękowy, a multicooker automatycznie przełączy
się na ustawienie KEEP WARM (utrzymywanie ciepła). Na wyświetlaczu zamiast czasu gotowania wyświetlony
zostanie nowy czasomierz z opcją GETTING STARTED (początek pracy) ustawioną na wartość 4:00 (4 godziny)
lub po naciśnięciu przycisku START/STOP. Po 4 godzinach na ustawieniu KEEP WARM (utrzymywanie ciepła)
multicooker się wyłączy.
WSKAZÓWKA: Zapoznaj się z tabelą gotowania na parze na stronie 69.
PRZESTROGA: Podczas gotowania w multicookerze będzie gromadzić się para, dlatego podczas podnoszenia pokrywki
używaj rękawic kuchennych, aby chronić dłonie. Koszyk do gotowania na parze nagrzewa się podczas gotowania, dlatego
podczas wyjmowania go z garnka należy używać rękawicy kuchennej lub innej ochrony.
KORZYSTANIE Z FUNKCJI OBSMAŻANIA
Z tą funkcją nie należy używać pokrywki. Ustaw multicookera na płaskiej, poziomej powierzchni. Umieść naczynie do
gotowania na podstawie grzewczej. Podłącz multicookera do gniazda ściennego. Rozlegnie się sygnał dźwiękowy, a na
wyświetlaczu ukażą się cztery kreski (- - - -).
1. Wybierz funkcję BROWN/SAUTÉ (obsmażanie) i razie potrzeby skoryguj czas i temperaturę przy użyciu przycisków + i -.
2. Naciśnij przycisk START/STOP.
3. W trakcie nagrzewania się multicookera na wyświetlaczu pojawi się słowo „HEAt” (nagrzewanie). Po osiągnięciu
odpowiedniej temperatury czasomierz rozpocznie odliczanie. Przy użyciu plastikowych przyborów kuchennych
ostrożnie umieść żywność w gorącym naczyniu.
GOTOWANIE RYŻU
Do gotowania ryżu służy funkcja RICE/RISOTTO (ryż/risotto). Jest ona odpowiednia dla wszystkich rodzajów ryżu, w tym
białego i/lub brązowego.
W funkcji RICE/RISOTTO (ryż/risotto) stosowane jest gotowanie pod ciśnieniem, co skraca jego czas.
Pojemność: Ponieważ ryż zwiększa objętość podczas gotowania, w trakcie korzystania z funkcji RICE/RISOTTO (ryż/
risotto) nie napełniaj naczynia do gotowania powyżej oznaczenia 1/2.
KORZYSTANIE Z FUNKCJI RICE/RISOTTO (RYŻ/RISOTTO)
Ustaw multicookera na płaskiej, poziomej powierzchni. Umieść naczynie do gotowania na podstawie grzewczej. Podłącz
multicookera do gniazda ściennego. Rozlegnie się sygnał dźwiękowy, a na wyświetlaczu ukażą się cztery kreski (- - - -).
1. Odmierz odpowiednią ilość ryżu.
2. Przepłucz ryż i wsyp go do naczynia do gotowania. Dodaj ilość wody określoną w przepisie. Pamiętaj, by do naczynia
do gotowania wlać co najmniej 240 ml płynu.
3. Załóż pokrywkę i zablokuj ją, obracając w kierunku przeciwnym do ruchu wskazówek zegara do pozycji LOCKED
(zablokowane) .
4. Przy użyciu wypustki obróć zawór wylotu pary do pozycji „Seal” (uszczelnione).
5. Naciśnij przycisk RICE/RISOTTO (ryż/risotto) oraz skoryguj czas i ciśnienie stosownie do potrzeb.
Uwaga: Dostępne korekty czasu i ciśnienia można znaleźć na stronie 68 Instrukcji gotowania.
6. Po dokonaniu ewentualnych korekt naciśnij przycisk START/STOP.
7. Przed rozpoczęciem gotowania pod ciśnieniem konieczne jest podniesienie ciśnienia wewnątrz multicookera. W
trakcie tego procesu na wyświetlaczu pojawi się słowo „HEAt” (nagrzewanie), a czas nie będzie odliczany. Po
osiągnięciu odpowiedniej wartości ciśnienia słowo „HEAt” (nagrzewanie) na wyświetlaczu zgaśnie i rozpocznie się

56 57
odliczanie czasu.
8. Po upływie wyznaczonego czasu gotowania rozlegnie się sygnał dźwiękowy, a multicooker automatycznie przełączy
się na ustawienie KEEP WARM (utrzymywanie ciepła). Na wyświetlaczu zamiast czasu gotowania wyświetlony
zostanie nowy czasomierz z opcją GETTING STARTED (początek pracy) ustawioną na wartość 4:00 (4 godziny)
lub po naciśnięciu przycisku START/STOP. Po 4 godzinach na ustawieniu KEEP WARM (utrzymywanie ciepła)
multicooker się wyłączy.
ABY ZMIENIĆ USTAWIENIE
Naciśnij przycisk START/STOP, a następnie wybierz nową żądaną funkcję gotowania. Na wyświetlaczu zacznie migać
nowy czasomierz oraz wybrana funkcja. Wybierz żądane wartości czasu, ciśnienie i/lub temperatury. Naciśnij przycisk
START/STOP, aby rozpocząć nagrzewanie pod kątem nowej funkcji.
Aby zmienić czas gotowania:
Przed rozpoczęciem gotowania możesz zmienić czas gotowania, naciskając przyciski + i -, zanim naciśniesz przycisk
START/STOP. Naciśnij i zwolnij przycisk, aby powoli zmienić czas. Naciśnij i zwolnij przycisk, aby szybko zmienić czas. Po
przekroczeniu żądanej temperatury lub czasu naciśnij przeciwny przycisk.
Aby zmienić ciśnienie:
Przed naciśnięciem przycisku START/STOP możesz zmienić ciśnienie w określonych wstępnie ustawionych funkcjach,
naciskając przycisk PRESSURE ADJUST (korekta ciśnienia).
Aby zmienić temperaturę:
Przed naciśnięciem przycisku START/STOP możesz zmienić temperaturę w określonych funkcjach, naciskając przycisk
TEMP ADJUST (korekta temperatury).
KONSERWACJA I CZYSZCZENIE
Urządzenie Crockpot® Express można czyścić tylko po ostygnięciu i odłączeniu zasilania. Przed rozpoczęciem czyszczenia
poczekaj, aż multicooker całkowicie ostygnie.
Uszczelkę i pokrywkę należy myć ręcznie ciepłą wodą z detergentem. Dokładnie wysusz wszystkie części.
Naczynie do gotowania nadaje się do mycia w zmywarce, ale zalecamy mycie ręczne, aby chronić powłokę
nieprzywierającą. Jeśli na powierzchni pojemnika do gotowania pojawią się białe plamy, należy namoczyć go w roztworze
octu lub soku z cytryny z wodą przez 30 minut. Opłucz i wysusz.
Podstawę grzewczą wytrzyj z zewnątrz wilgotną szmatką i wypoleruj do sucha. NIE używaj środków ściernych ani środków
chemicznych, ponieważ może to spowodować uszkodzenie powierzchni.
Nigdy nie zanurzaj podstawy grzewczej w wodzie ani w jakiejkolwiek innej cieczy.
Pojemnik na skropliny
Po każdym użyciu wylej wodę zgromadzoną w pojemniku na skropliny. Umyj go w ciepłej wodzie z detergentem.
Pokrywka i uszczelka
Umyj ręcznie w ciepłej wodzie z detergentem, dokładnie wysusz i ponownie załóż uszczelkę pokrywki przed użyciem.
Uszczelkę należy wymieniać co 1–2 lata w zależności od częstotliwości używania.
Zawór wylotu pary
Przed rozpoczęciem korzystania z multicookera upewnij się, że zawór wylotu pary nie jest zablokowany
zanieczyszczeniami. Wyjmij zawór i ostrożnie go oczyść. Przed ponownym założeniem upewnij się, że jest zupełnie suchy.
Osłona zaworu wylotu pary
Delikatnie zdejmij osłonę i umyj ją ciepłą wodą z detergentem. Po umyciu wciśnij osłonę z powrotem na miejsce.
Koszyk do gotowania na parze i szczypce
Koszyk do gotowania na parze i szczypce nadają się do mycia w zmywarce. Należy jednak pamiętać, że tak jak w
przypadku innych sprzętów kuchennych typu sitko, pomiędzy oczkami mogą pozostać resztki jedzenia wymagające
usunięcia.
KODY BŁĘDÓW
Błąd Rozwiązanie
Wyświetlane symbole
„E1” lub „E2” Odłącz multicookera od zasilania i skontaktuj się z serwisem.
Viser «E3» Wyświetlany symbol „E3” Odłącz multicookera od zasilania i odstaw do całkowitego
ostygnięcia. Gdy multicooker ostygnie, sprawdź wszystkie elementy pokrywki. Obróć pokrywkę
do pozycji LOCKED (zablokowane) . Upewnij się, że zawór wylotu pary znajduje się w
pozycji „Seal” (uszczelnione). Jeśli ten kod błędu pojawi się ponownie, odłącz multicookera od
zasilania i skontaktuj się z serwisem.
Wyświetlany symbol
„E4” Odłącz multicookera od zasilania i odstaw do całkowitego ostygnięcia. Gdy multicooker
ostygnie, sprawdź, czy w naczyniu do gotowania jest wystarczająca ilość płynu. W razie
konieczności dodaj więcej płynu (co najmniej 340 ml). Przez ponownym przykryciem
multicookera pokrywką upewnij się, że z urządzenia nie wydostaje się para. Obróć pokrywkę
do pozycji LOCKED (zablokowane) . Upewnij się, że zawór wylotu pary znajduje się w
pozycji „Seal” (uszczelnione). Wybierz funkcję gotowania pod ciśnieniem, a następnie naciśnij
przycisk START/STOP.
Wyświetlany symbol
„E5” Cykl gotowania multicookera zostanie zatrzymany. Odłącz multicookera od zasilania i odstaw
do ostygnięcia. Gdy multicooker ostygnie,zdejmij pokrywkę i sprawdź naczynie do gotowania.
Korzystając z funkcji BROWN/SAUTÉ (obsmażanie), nie używaj pokrywki.
Podczas korzystania z funkcji SLOW COOK (wolne gotowanie) pamiętaj, aby ustawić zawór
wylotu pary w pozycji „Release” (rozszczelnione) przed rozpoczęciem gotowania.
Wyświetlany symbol
„E6” Odłącz multicookera od zasilania i odstaw do ostygnięcia. Gdy multicooker ostygnie, zdejmij
pokrywkę i sprawdź naczynie do gotowania. W razie potrzeby dolej wody. Minimalna ilość
płynu w wyjmowanym naczyniu do gotowania to 340 ml. Podczas korzystania z funkcji
gotowania pod ciśnieniem pamiętaj, aby zawór wylotu pary znajdował się w pozycji „Seal”
(uszczelnione).
OBSŁUGA POSPRZEDAŻOWA I CZĘŚCI ZAMIENNE
W przypadku, gdy urządzenie nie działa, ale jest objęte gwarancją, należy zwrócić produkt do miejsca zakupu w
celu wymiany. Należy pamiętać, że wymagany jest ważny dowód zakupu. Aby uzyskać dodatkową pomoc, prosimy o
kontakt z działem obsługi klienta: Wielka Brytania: 0800 028 7154 | Hiszpania: 0900 81 65 10 | Francja: 0805 542 055.
Inne kraje: +44 800 028 7154. Mogą obowiązywać stawki międzynarodowe. Można także napisać wiadomość e-mail:
UTYLIZACJA
To urządzenie jest oznaczone zgodnie z Dyrektywą Europejską 2012/19/UE oraz ustawą o zużytym sprzęcie elektrycznym i
elektronicznym symbolem przekreślonego kontenera na odpady. Takie oznakowanie informuje, że sprzęt ten, po zakończeniu eksploatacji
nie może być umieszczany łącznie z innymi odpadami pochodzącymi z gospodarstwa domowego. Użytkownik sprzętu jest zobowiązany
do oddania go prowadzącym zbieranie zużytego sprzętu elektrycznego i elektronicznego. Punkty zbierania są prowadzone m.in. przez
sprzedawców hurtowych i detalicznych tego sprzętu oraz przez gminne jednostki organizacyjne prowadzące działalność w zakresie
odbierania odpadów.
Właściwe postępowanie ze zużytym sprzętem elektrycznym i elektronicznym przyczynia się do uniknięcia szkodliwych dla zdrowia
ludzi i środowiska naturalnego konsekwencji, wynikających z obecności składników niebezpiecznych oraz niewłaściwego składowania i
przetwarzania takiego sprzętu.

58 59
ROMÂNĂ
MĂSURI IMPORTANTE DE PROTECȚIE
Atunci când utilizați aparate electrice, trebuie să respectați întotdeauna
câteva măsuri de protecție de bază, pentru a reduce riscul de incendiu,
electrocutare și/sau leziuni; aceste măsuri sunt următoarele:
1. Citiți toate instrucțiunile înainte de a utiliza produsul.
2. Acest aparat nu va fi utilizat de copii. Nu lăsați aparatul și cablul la
îndemâna copiilor. Copiii nu trebuie să se joace cu acest produs.
Aparatele pot fi utilizate de persoane cu capacități fizice, senzoriale sau
mentale reduse sau lipsă de experiență și cunoștințe, cu condiția să fie
supravegheate sau instruite în privința utilizării în siguranță a aparatului
și să fi înțeles pericolele implicate.
3. Nu utilizați aparatul dacă ștecărul sau cablul acestuia este deteriorat,
dacă aparatul prezintă probleme de funcționare sau dacă a suferit orice
deteriorări. Nu încercați să înlocuiți sau să reparați cablul dacă acesta
este deteriorat. Returnați aparatul producătorului (a se vedea secțiunea
privind garanția) în vederea examinării, reparării sau reglării acestuia. În
cazul în care cablul de alimentare este deteriorat, acesta trebuie înlocuit
cu un cablu sau ansamblu special, disponibil la producător sau la
agentul de service al acestuia.
4. Nu utilizați aparatul în exterior sau în scopuri comerciale.
5. Nu utilizați aparatul decât în scopurile pentru care a fost conceput.
Utilizarea necorespunzătoare poate cauza leziuni corporale. Acest aparat
nu a fost conceput pentru prăjirea alimentelor.
6. Acest aparat funcționează sub presiune atunci când utilizați funcțiile
de fierbere sub presiune. Utilizarea incorectă implică riscul de opărire.
Asigurați-vă că unitatea este închisă corect înainte de a o porni.
Consultați instrucțiunile de utilizare.
7. Acest aparat generează căldură în timpul utilizării. Nu atingeți suprafețele
fierbinți. Utilizați mânerele sau rozetele.
NOTIFICARE IMPORTANTĂ PRIVIND SIGURANȚA:
Atunci când eliberați presiunea din unitate, utilizați întotdeauna o mănușă
de bucătărie și un instrument de gătit pentru a deschide treptat supapa și a
elibera presiunea. Evitați contactul cu aburul eliminat.
Nu scufundați NICIODATĂ baza de încălzire, cablul de alimentare sau
ștecherul în apă sau în orice alt lichid.
8. Atunci când umpleți unitatea, nu depășiți linia care indică nivelul maxim,
respectiv de 2/3 din volum. Atunci când preparați alimente care se dilată
în timpul preparării, cum ar fi orezul sau legumele uscate, nu depășiți
nivelul recomandat de umplere de 1/2 din volum. Umplerea excesivă
implică riscul de înfundare a țevii de aerisire și acumularea unui exces
de presiune. Urmați toate instrucțiunile din rețetă.
9. Înainte de utilizare, verificați dispozitivele de eliberare a presiunii pentru a
vă asigura că nu sunt înfundate. Curățați unitatea conform necesităților.
10. Amplasați aparatul de gătit multifuncțional astfel încât supapa de
eliberare a aburului să fie orientată în sens opus corpului aparatului.
11. Nu aduceți niciodată o parte a corpului, inclusiv fața, mâinile și brațele,
deasupra supapei de eliberare a aburului. Aburul poate cauza arsuri grave.
12. Nu porniți aparatul de gătit multifuncțional dacă în vasul de gătit nu se
află alimente sau lichide.
13. Pentru a preveni leziunile cauzate de presiunea excesivă, înlocuiți
garnitura de etanșare a capacului numai în conformitate cu recomandările
producătorului. Consultați instrucțiunile de îngrijire și curățare.
14. Nu transportați aparatul de gătit multifuncțional ținându-l de capac.
15. Nu mutați și nu acoperiți aparatul de gătit multifuncțional cât timp acesta
se află în funcțiune.
16. După prepararea alimentelor sub presiune, nu deschideți aparatul de
gătit sub presiune înainte de răcirea unității și eliberarea completă a
presiunii din interior. În cazul în care capacul este dificil de deschis,
acest lucru indică faptul că aparatul de gătit este presurizat; nu forțați
capacul pentru a îl deschide. Orice presiune din aparatul de gătit poate fi
periculoasă. Consultați instrucțiunile de eliberare a presiunii.
17. Procedați cu atenție atunci când deschideți și ridicați capacul după
prepararea alimentelor. Înclinați întotdeauna capacul în sens opus
corpului dvs., deoarece aburul este fierbinte și poate cauza arsuri grave.
Nu vă aduceți niciodată fața deasupra aparatului de gătit multifuncțional.
18. Nu utilizați acest aparat de gătit sub presiune pentru a prăji alimente sub
presiune, folosind ulei.
19. Pentru a vă proteja împotriva electrocutării, nu introduceți și nu
scufundați cablul, ștecărele sau aparatul în apă sau alte lichide.
20. Nu utilizați vasul de gătit pentru depozitarea alimentelor și nu îl
introduceți în congelator.
21. Pentru a preveni deteriorarea aparatului de gătit multifuncțional, nu
utilizați agenți de curățare alcalini pentru a îl curăța. Utilizați o lavetă

60 61
moale și un detergent neagresiv.
22. Conectați corect cablul de alimentare la aparatul de gătit multifuncțional
înainte de a conecta ștecărul la o priză electrică.
23. Deconectați aparatul de la priză atunci când nu îl utilizați, înainte de a
introduce sau de a scoate componente în/din acesta și înainte de a îl
curăța. Lăsați aparatul să se răcească înainte de a introduce sau de a
scoate componente în/din acesta și înainte de a îl curăța. Înainte de a
deconecta aparatul de gătit multifuncțional, asigurați-vă că acesta este
oprit; apoi, deconectați ștecărul de la priză. Nu deconectați aparatul de la
priză trăgând de cablu.
24. Nu lăsați cablul de alimentare să atârne peste marginea unei mese sau a
blatului de bucătărie sau să intre în contact cu suprafețe fierbinți.
25. Procedați cu deosebită atenție atunci când transportați aparatul plin cu
lichid fierbinte.
26. Utilizarea unor accesorii și atașamente nerecomandate de către
producătorul aparatului poate cauza leziuni corporale.
27. Nu așezați aparatul pe suprafețe umede sau în apropierea acestora sau
a surselor de căldură precum plitele electrice sau cu gaze ori într-un
cuptor încălzit.
28. ATENȚIE: Pentru a evita electrocutarea și deteriorarea produsului, nu
gătiți alimentele direct pe baza de încălzire. Preparați alimentele numai în
vasul demontabil de gătit, furnizat împreună cu aparatul.
29. AVERTISMENT: Alimentele vărsate pot cauza arsuri grave. Copiii nu
trebuie să se apropie de aparat și cablu. Nu treceți niciodată cablul
peste marginea blatului, nu utilizați o priză aflată sub blat și nu folosiți
niciodată un prelungitor.
30. Nu conectați la priză și nu porniți aparatul de gătit multifuncțional dacă
vasul de gătit nu se află în interiorul acestuia.
31. Aparatul este conceput numai pentru utilizarea casnică, pe un blat de
bucătărie. Păstrați un spațiu liber de 152 mm (6 in) pe toate laturile
aparatului. Utilizați aparatul numai dacă este așezat pe o suprafață
dreaptă, stabilă și uscată.
PĂSTRAȚI ACESTE INSTRUCȚIUNI.
EXCLUSIV PENTRU UTILIZARE CASNICĂ.
COMPONENTELE APARATULUI DE GĂTIT
MULTIFUNCȚIONAL CROCKPOT® EXPRESS
UTILIZAREA APARATULUI DE GĂTIT MULTIFUNCȚIONAL
CROCKPOT® EXPRESS
PRIMII PAȘI:
Îndepărtați complet ambalajul, hârtia și cartonul (inclusiv dintre vasul de gătit și baza de încălzire). Citiți și păstrați
documentația; de asemenea, nu uitați să citiți informațiile privind lucrările de service și garanția.
ASAMBLAREA:
• Așezați vasul de gătit pe baza de încălzire
• Așezați capacul pe aparatul de gătit multifuncțional și aliniați simbolurile și . Pentru blocare, rotiți în sens
antiorar, aliniind simbolurile și . Pentru deblocare, rotiți capacul în sens orar, aliniind simbolurile și .
PRIMII PAȘI
(NOTĂ: La fiecare apăsare a unui buton, aparatul de gătit multifuncțional emite un semnal sonor.)
1. Adăugați ingredientele dorite în vasul de gătit. Așezați capacul pe aparatul de gătit multifuncțional, aliniind simbolurile
și . Pentru blocare, rotiți în sens antiorar, aliniind simbolurile și .
2. Conectați cablul de alimentare furnizat la conectorul pentru cablul de alimentare de pe aparatul de gătit multifuncțional.
ACablu de alimentare
BClește
CȘtift de blocare a capacului
DMânerul capacului
ECapacul
FVas de gătit
GBază de încălzire
HPanoul de control
ISupapă de siguranță
JSupapă de eliberare a aburului
KColector de condens
LConectorul pentru cablul de alimentare
PANOUL DE CONTROL
MEcran de așare
NButoane de selectare a duratei
PARTEA INFERIOARĂ A CAPACULUI
OInel de xare a garniturii
PCapacul supapei de eliberare a aburului
QGarnitură de etanșare
RSupapă de siguranță
SLingură de plastic
TGrilaj pentru gătit în aburi
UCoș pentru gătire la abur
Capac blocat Capac deblocat Capac deschis
Figura 1

62 63
3. Conectați ștecărul cablului de alimentare la o priză electrică.
4. Selectați funcția de preparare pe care doriți să o utilizați.
5. Butonul START/STOP și durata afișată pe ecran vor clipi.
6. Selectați durata de preparare dorită, folosind butoanele + și -. Selectați temperatura dorită folosind butonul REGLARE
TEMPERATURĂ (dacă este cazul). Selectați presiunea dorită folosind butonul REGLARE PRESIUNE. (Pentru
informații privind duratele și temperaturile recomandate, consultați tabelul Ghid de preparare de la pagina 68.)
7. Apăsați butonul START/STOP. Pentru funcțiile de preparare sub presiune, indicația „HEAt” (Căldură) va apărea pe
ecranul de afișare în timpul preîncălzirii. Odată ce aparatul de gătit multifuncțional este preîncălzit, durata selectată de
preparare va apărea pe ecranul de afișare.
Notă: Pentru funcțiile de gătit sub presiune, durata medie de preîncălzire este de 13–14 minute. Dacă utilizați o
cantitate mare de ingrediente sau acestea sunt foarte reci, preîncălzirea poate dura puțin mai mult.
8. Acest aparat de gătit multifuncțional permite temporizarea începerii preparării alimentelor, astfel încât prepararea să
se încheie atunci când doriți. Pentru instrucțiuni referitoare la funcția TEMPORIZATORULUI, consultați pagina 62.
9. După scurgerea duratei de preparare setate, aparatul de gătit multifuncțional va emite din nou un semnal sonor și va
comuta automat la setarea de MENȚINERE LA CALD. Ecranul de afișare va comuta de la durata de preparare la un
cronometru nou, care va continua contorizarea până la durata maximă de 4:00 (4 ore), sau până ce apăsați butonul
START/STOP. După 4 ore la setarea de MENȚINERE LA CALD, aparatul de gătit multifuncțional se va opri.
10. Pentru a opri o funcție de preparare în orice moment, apăsați butonul START/STOP.
11. După finalizare, deconectați aparatul de gătit multifuncțional de la priză și așteptați răcirea completă a acestuia înainte
de a îl curăța.
ATENȚIE: Vasul de gătit și baza de încălzire vor atinge temperaturi foarte înalte în timpul utilizării aparatului de
gătit multifuncțional. Nu atingeți suprafețele fierbinți. Ridicați întotdeauna capacul înclinându-l în sens opus corpului
dvs. atunci când utilizați acest aparat de gătit multifuncțional. Ridicați întotdeauna capacul înclinându-l în sens opus
corpului dvs., pentru a evita contactul cu aburul.
UTILIZAREA TEMPORIZATORULUI
Acest aparat de gătit multifuncțional permite temporizarea începerii preparării alimentelor, astfel încât prepararea să se
încheie atunci când doriți.
Notă: Funcția TEMPORIZATORULUI nu este disponibilă pentru setările RUMENIRE/SOTE, MENȚINERE LA CALD sau
IAURT.
Notă: Nu utilizați funcția TEMPORIZATORULUI atunci când rețeta include ingrediente perisabile, precum carnea, peștele,
ouăle sau lactatele; în caz contrar, acestea se pot altera.
1. După setarea duratei de preparare, apăsați butonul TEMPORIZATOR. Butoanele TEMPORIZATOR și START/STOP
se vor aprinde intermitent, iar durata „0:30”va apărea intermitent pe ecranul de afișate, pentru a indica faptul că
aparatul de gătit multifuncțional este în curs de programare a setării temporizatorului.
2. Apăsați butoanele + și - până ce este afișată, în ore și minute, durata dorită de temporizare a preparării (respectiv,
până ce setați durata cu care doriți să întârziați ciclul de preparare).
3. Apăsați butonul START/STOP pentru a iniția funcția de temporizare. Cronometrul și butonul TEMPORIZATOR nu
vor mai clipi; butonul START/STOP va continua să se aprindă intermitent. Acest lucru va indica faptul că aparatul de
gătit multifuncțional are TEMPORIZATORUL activat. Pe ecranul de afișare, cronometrul va efectua numărătoarea
inversă până la atingerea valorii 0:00. Odată ce este atinsă valoarea 0:00, lumina TEMPORIZATORULUI se va stinge,
iar aprinderea intermitentă a luminii START/STOP va înceta, indicând încheierea duratei de temporizare. Indicația
„HEAt” (Căldură) va apărea pe ecranul de afișare până ce aparatul de gătit multifuncțional este complet presurizat. La
atingerea presiunii selectate, va începe numărătoarea inversă a cronometrului.
UTILIZAREA FUNCȚIILOR DE GĂTIT SUB PRESIUNE
Așezați aparatul de gătit multifuncțional pe o suprafață dreaptă și orizontală. Așezați vasul de gătit pe baza de încălzire.
Conectați aparatul de gătit multifuncțional la o priză electrică. Aparatul de gătit multifuncțional va emite un semnal sonor, iar
pe ecranul de afișare vor apărea patru liniuțe (- - - -).
1. Introduceți alimentele și lichidele în vasul de gătit detașabil.
2. Așezați capacul pe aparatul de gătit multifuncțional, aliniind simboluril și . Pentru blocare, rotiți în sens antiorar,
în poziția BLOCATĂ .
3. Folosind aripioara supapei de eliberare a aburului, rotiți supapa în poziția de etanșare.
4. Selectați funcția de preparare dorită.
5. Reglați durata preparării și presiunea, dacă este necesar.
Notă: Consultați Ghidul de preparare de la pagina 68 pentru valorile recomandate de durată și presiune.
6. După efectuarea setărilor dorite, dacă este cazul, apăsați butonul START/STOP.
7. Aparatul de gătit multifuncțional trebuie să acumuleze presiune înainte ca prepararea sub presiune să poată începe.
În timp ce aparatul de gătit multifuncțional acumulează presiune, indicația „HEAt” (Căldură) apare pe ecranul de
afișare, iar cronometrul nu efectuează numărătoarea inversă. Durata necesară pentru acumularea presiunii în aparatul
de gătit multifuncțional variază în funcție de umiditate și temperatura apei, însă durata medie de presurizare este de
13–15 minute. Odată ce este atinsă presiunea dorită, indicația „HEAt” (Încălzire) dispare de pe ecranul de afișare și
începe numărătoarea inversă.
8. După scurgerea duratei de preparare setate, aparatul de gătit multifuncțional emite un semnal sonor și comută
automat la setarea de MENȚINERE LA CALD. Ecranul de afișare va comuta de la durata de preparare la un
cronometru nou, care va continua contorizarea până la durata maximă de 4:00 (4 ore), sau până ce apăsați butonul
START/STOP. După 4 ore la setarea de MENȚINERE LA CALD, aparatul de gătit multifuncțional intră în modul de
standby, iar pe ecranul de afișare apar patru liniuțe (- - - -).
Notă: Aparatul de gătit multifuncțional nu poate găti sub presiune dacă nu conține lichid. Asigurați-vă că în vasul de gătit
detașabil se află cel puțin 230 ml (8 oz) de lichid.
ATENȚIE: În timpul preparării alimentelor, în aparatul de gătit multifuncțional se va acumula abur; prin urmare, atunci când
ridicați capacul, utilizați o mănușă de bucătărie sau un prosop pentru a vă proteja mâna.
ELIBERAREA PRESIUNII LA SFÂRȘITUL PREPARĂRII
ALIMENTELOR
A. Metoda de eliberare naturală a presiunii: După încheierea ciclului de preparare, lăsați aparatul de gătit
multifuncțional să elibereze natural presiunea, prin supapa de siguranță. Unitatea se va răci treptat, fără vreo
intervenție din partea dvs. După încheierea preparării, așteptați cel puțin 10 minute; apoi, utilizând o ustensilă de gătit,
aduceți aripioara supapei de eliberare a aburului în poziția de eliberare (a se vedea figura 2). Nu aduceți mâinile sau
alte părți ale corpului deasupra ieșirii de abur din partea de sus a supapei, deoarece aburul este foarte fierbinte și
poate cauza arsuri ale pielii. Presiunea este eliberată complet atunci când prin supapă nu mai iese abur, iar capacul
se deschide liber, prin aplicarea unei forțe minime. Numai atunci, puteți deschide capacul în siguranță pentru a servi
alimentele.
B. Metoda de eliberare rapidă a presiunii trebuie utilizată cu precauție: Utilizând o ustensilă de gătit, aduceți treptat
aripioara supapei de eliberare a aburului în poziția de eliberare (a se vedea figura 2). Aburul va fi eliminat rapid prin
supapa de eliberare a aburului. Nu aduceți mâinile sau alte părți ale corpului deasupra ieșirii de abur din partea
de sus a supapei, deoarece aburul este foarte fierbinte și poate cauza arsuri ale pielii. Utilizați această metodă cu
precauție când folosiți ingrediente lichide, de exemplu în cazul tocănițelor, ciorbelor, supelor, fasolei și lintei. Nu
utilizați niciodată această metodă când fierbeți orez, deoarece acesta este foarte delicat. Presiunea este eliberată
Supapa de eliberare a presiunii
Supapa ÎNCHISĂ („Etanșare”) Supapa DESCHISĂ („Eliberare”) Supapa în poziția
ÎNDEPĂRTARE
Figura 2

64 65
complet atunci când prin supapă nu mai iese abur, iar capacul se deschide liber, prin aplicarea unei forțe minime.
Numai atunci, puteți deschide capacul în siguranță pentru a servi alimentele.
ATENȚIE:
1. Nu forțați capacul să se deschidă. Dacă acesta nu se deschide cu ușurință, aparatul de gătit multifuncțional se află
încă sub presiune.
2. În timpul preparării alimentelor, în aparatul de gătit multifuncțional se va acumula abur; prin urmare, atunci când
ridicați capacul, utilizați o mănușă de bucătărie sau un prosop pentru a vă proteja mâna.
GĂTIREA LENTĂ
Setarea REDUSĂ: Aceasta este adecvată pentru fierberea la foc mic și gătirea lentă. Duratele recomandate de preparare
pentru setarea REDUSĂ sunt de 6–8 ore.
Setarea ÎNALTĂ: Aceasta este utilizată pentru gătirea mai rapidă. Duratele recomandate de preparare pentru setarea
ÎNALTĂ sunt de 2–4 ore.
Setarea de MENȚINERE LA CALD: La încheierea duratei de preparare, aparatul de gătit multifuncțional comută automat la
setarea MENȚINERE LA CALD pentru a preveni gătirea excesivă a alimentelor și a păstra alimentele calde până la servirea
mesei.
UTILIZAREA FUNCȚIEI DE GĂTIRE LENTĂ
Funcția de GĂTIRE LENTĂ nu utilizează presiunea; totuși, în unitate se poate acumula o anumită presiune în timpul
gătitului. Atunci când utilizați această funcție, asigurați-vă că supapa de eliberare a presiunii se află în poziția de „Eliberare”.
Această funcție este similară cu cea a aparatelor obișnuite de gătire lentă, utilizând temperaturi reduse și durate mai lungi de
preparare pentru a obține alimente fragede și pline de savoare. Așezați vasul de gătit multifuncțional pe o suprafață dreaptă
și orizontală. Așezați vasul de gătit pe baza de încălzire. Conectați aparatul de gătit multifuncțional la o priză electrică.
Aparatul de gătit multifuncțional va emite un semnal sonor, iar pe ecranul de afișare vor apărea patru liniuțe (- - - -).
1. Introduceți alimentele și lichidele în vasul de gătit detașabil.
2. Așezați capacul pe aparatul de gătit multifuncțional, aliniind simbolurile și . Pentru blocare, rotiți în sens
antiorar, în poziția BLOCATĂ .
3. Folosind aripioara supapei de eliberare a aburului, rotiți supapa în poziția de „Eliberare”.
Notă: Deși această setare nu utilizează presiunea în procesul de preparare, în unitate se poate acumula o anumită
presiune în timpul gătitului. De aceea, este important ca supapa de eliberare a presiunii să se afle în poziția de
„Eliberare”.
4. Apăsați butonul GĂTIRE LENTĂ și reglați durata și temperatura conform necesităților.
Notă: Consultați Ghidul de preparare de la pagina 68 pentru valorile recomandate de durată și presiune
5. Apăsați butonul START/STOP. Va începe numărătoarea inversă a cronometrului.
6. După scurgerea duratei de preparare setate, aparatul de gătit multifuncțional emite un semnal sonor și comută
automat la setarea de MENȚINERE LA CALD. Ecranul de afișare va comuta de la durata de preparare la un
cronometru nou, care va continua contorizarea până la durata maximă de 4:00 (4 ore), sau până ce apăsați butonul
START/STOP. După 4 ore la setarea de MENȚINERE LA CALD, aparatul de gătit multifuncțional se va opri.
UTILIZAREA FUNCȚIEI DE GENERARE A ABURULUI
Așezați vasul de gătit multifuncțional pe o suprafață dreaptă și orizontală. Așezați vasul de gătit pe baza de încălzire.
Conectați aparatul de gătit multifuncțional la o priză electrică. Aparatul de gătit multifuncțional va emite un semnal sonor, iar
pe ecranul de afișare vor apărea patru liniuțe (- - - -).
1. Adăugați minimum 250 ml de apă în vasul de gătit detașabil și introduceți grătarul sau coșul pentru gătire la abur.
Asigurați-vă că nivelul apei se află chiar sub coșul pentru gătire la abur sau sub firele grătarului, astfel încât alimentele
să nu atingă apa.
Notă: Coșul pentru gătire la abur trebuie amplasat direct pe baza vasului de gătit, nu deasupra grătarului de gătit.
2. Așezați alimentele în coșul pentru gătire la abur sau pe grătarul de gătit.
Notă: Când folosiți coșul pentru gătire la abur, nu îl umpleți mai mult de trei sferturi. Asigurați-vă că mânerul coșului
este coborât în coș înainte de a pune capacul.
3. Așezați capacul și blocați-l rotindu-l în sens antiorar, în poziția BLOCATĂ .
4. Folosind aripioara supapei de eliberare a aburului, rotiți supapa în poziția de etanșare.
5. Apăsați butonul ABUR și reglați durata și presiunea conform necesităților.
6. După efectuarea setărilor dorite, dacă este cazul, apăsați butonul START/STOP.
7. Aparatul de gătit multifuncțional trebuie să acumuleze presiune înainte ca prepararea sub presiune să poată începe.
În timp ce aparatul de gătit multifuncțional acumulează presiune, indicația „HEAt” (Căldură) apare pe ecranul de
afișare, iar cronometrul nu efectuează numărătoarea inversă. Odată ce este atinsă presiunea dorită, indicația „HEAt”
(Încălzire) dispare de pe ecranul de afișare și începe numărătoarea inversă.
8. După scurgerea duratei de preparare setate, aparatul de gătit multifuncțional emite un semnal sonor și comută
automat la setarea de MENȚINERE LA CALD. Ecranul de afișare va comuta de la durata de preparare la un
cronometru nou, care va continua contorizarea până la durata maximă de 4:00 (4 ore), sau până ce apăsați butonul
START/STOP.
RECOMANDARE: Consultați tabelul Gătirea în abur de la pagina 69.
ATENȚIE: În timpul preparării alimentelor, în aparatul de gătit multifuncțional se va acumula abur; prin urmare, atunci când
ridicați capacul, utilizați o mănușă de bucătărie sau un prosop pentru a vă proteja mâna. Coșul pentru gătire la abur se va
înfierbânta, de asemenea, în timpul gătirii, așadar folosiți o mănușă de bucătărie sau un prosop când ridicați coșul din vasul
de gătit.
UTILIZAREA FUNCȚIEI DE RUMENIRE/SOTE
Atunci când alegeți această funcție, nu utilizați capacul. Așezați vasul de gătit multifuncțional pe o suprafață dreaptă
și orizontală. Așezați vasul de gătit pe baza de încălzire. Conectați aparatul de gătit multifuncțional la o priză electrică.
Aparatul de gătit multifuncțional va emite un semnal sonor, iar pe ecranul de afișare vor apărea patru liniuțe (- - - -).
1. Selectați funcția RUMENIRE/SOTE și reglați durata și temperatura, dacă este necesar, folosind butoanele + și -.
2. Apăsați butonul START/STOP.
3. În timpul preîncălzirii aparatului de gătit multifuncțional, indicația „HEAt” (Căldură) apare pe ecranul de afișare. La
atingerea temperaturii necesare, va începe numărătoarea inversă a cronometrului. Adăugați alimentele în vasul
fierbinte, folosind un clește de bucătărie din plastic.
GĂTIREA OREZULUI
Atunci când gătiți orez, utilizați funcția OREZ/RISOTTO. Aceasta este adecvată pentru toate tipurile de orez, inclusiv orezul
alb/brun.
Funcția OREZ/RISOTTO gătește orezul sub presiune, reducând durata de preparare.
Capacitate: Deoarece orezul se dilată în timpul preparării, nu depășiți marcajul de 1/2 din volum al vasului de gătit atunci
când utilizați funcția OREZ/RISOTTO.
UTILIZAREA FUNCȚIEI OREZ/RISOTTO
Așezați vasul de gătit multifuncțional pe o suprafață dreaptă și orizontală. Așezați vasul de gătit pe baza de încălzire.
Conectați aparatul de gătit multifuncțional la o priză electrică. Aparatul de gătit multifuncțional va emite un semnal sonor, iar
pe ecranul de afișare vor apărea patru liniuțe (- - - -).
1. Măsurați cantitatea dorită de orez.
2. Așezați orezul spălat în vasul de gătit. Adăugați cantitatea de apă specificată în rețetă. Asigurați-vă că în vasul de
gătit detașabil se află minimum 240 ml de lichid.
3. Așezați capacul și blocați-l rotindu-l în sens antiorar, în poziția BLOCATĂ .
4. Folosind aripioara supapei de eliberare a aburului, rotiți supapa în poziția de etanșare.
5. Apăsați butonul OREZ/RISOTTO și reglați durata și presiunea conform necesităților.
Notă: Consultați Ghidul de preparare de la pagina 68 pentru valorile recomandate de durată și presiune.
6. După efectuarea setărilor dorite, dacă este cazul, apăsați butonul START/STOP.

66 67
7. Aparatul de gătit multifuncțional trebuie să acumuleze presiune înainte ca prepararea sub presiune să poată începe.
În timp ce aparatul de gătit multifuncțional acumulează presiune, indicația „HEAt” (Căldură) apare pe ecranul de
afișare, iar cronometrul nu efectuează numărătoarea inversă. Odată ce este atinsă presiunea dorită, indicația „HEAt”
(Încălzire) dispare de pe ecranul de afișare și începe numărătoarea inversă.
8. După scurgerea duratei de preparare setate, aparatul de gătit multifuncțional emite un semnal sonor și comută
automat la setarea de MENȚINERE LA CALD. Ecranul de afișare va comuta de la durata de preparare la un
cronometru nou, care va continua contorizarea până la durata maximă de 4:00 (4 ore), sau până ce apăsați butonul
START/STOP. După 4 ore la setarea de MENȚINERE LA CALD, aparatul de gătit multifuncțional se va opri.
PENTRU A SCHIMBA O SETARE
Apăsați butonul START/STOP și selectați noua funcție de preparare dorită. Pe ecranul de afișare va apărea intermitent un
nou cronometru; de asemenea, funcția selectată se va aprinde intermitent.
Selectați durata, presiunea și/sau temperatura dorită. Apăsați butonul START/STOP; noua funcție va începe preîncălzirea.
Pentru a schimba durata de preparare:
Pentru a schimba durata de preparare înainte de începerea ciclului, apăsați butoanele + și - înainte de a apăsa START/
STOP. Apăsați și eliberați butonul dorit pentru a modifica lent valoarea. Mențineți apăsat butonul dorit pentru a schimba
rapid valoarea. Dacă depășiți accidental temperatura sau durata dorită, apăsați butonul cu sens opus.
Pentru a modica presiunea:
Puteți modifica presiunea anumitor funcții presetate, înainte de începerea ciclului de preparare, apăsând butonul REGLARE
PRESIUNE înainte de a apăsa START/STOP.
Pentru a modica temperatura:
Puteți modifica temperatura anumitor funcții presetate, înainte de începerea ciclului de preparare, apăsând butonul
REGLARE TEMPERATURĂ înainte de a apăsa START/STOP.
ÎNTREȚINEREA ȘI CURĂȚAREA
Curățarea aparatului Crockpot® Express trebuie efectuată numai atunci când acesta este rece și deconectat de la priză.
Așteptați răcirea completă a aparatului de gătit multifuncțional înainte de a îl curăța.
Spălați garnitura de etanșare și capacul cu apă caldă și detergent de vase. Uscați complet toate componentele.
Deși vasul de gătit poate fi spălat în mașina de spălat vase, vă recomandăm să îl spălați manual pentru a proteja stratul
antiaderent al acestuia. Dacă pe suprafața vasului de gătit se formează puncte albe, scufundați vasul într-o soluție de oțet
sau suc de lămâie și apă caldă timp de 30 de minute. Clătiți și uscați.
Ștergeți exteriorul bazei de încălzire cu o lavetă umedă, apoi cu una uscată pentru a îndepărta complet apa. NU utilizați
substanțe abrazive, lavete abrazive sau substanțe chimice agresive, deoarece acestea vor cauza deteriorarea suprafețelor.
Nu scufundați niciodată baza de încălzire în apă sau orice alt lichid.
Colectorul de condens
După fiecare utilizare, goliți apa din colectorul de condens. Spălați-l cu apă caldă și detergent de vase.
Capacul și garnitura de etanșare
Spălați manual, folosind apă caldă și detergent de vase, uscați complet și montați garnitura de etanșare în capac înainte de
utilizare. Garnitura de etanșare trebuie înlocuită la intervale de 1–2 ani, în funcție de gradul de utilizare.
Supapa de eliberare a aburului
Înainte de utilizarea aparatului de gătit multifuncțional, asigurați-vă că pe supapa de eliberare a aburului nu există resturi.
Scoateți supapa și curățați-o cu grijă. Asigurați-vă că aceasta este complet uscată înainte de a o monta din nou.
Capacul supapei de eliberare a aburului
Scoateți cu grijă capacul și curățați-l folosind apă caldă și detergent de vase. Presați capacul în poziție după ce îl curățați.
Coșul pentru gătire la abur și cleștele
Coșul pentru gătire la abur și cleștele pot fi spălate în mașina de spălat vase. Cu toate acestea, vă atragem atenția că, la fel
ca în orice ustensilă de tip sită, se pot prinde resturi de alimente în coșul din sârmă, care să necesite curățare suplimentară.
CODURILE DE EROARE
erorii Soluția
Se așează „E1” sau
„E2” Deconectați aparatul de gătit multifuncțional de la priză și contactați centrul de service.
Se așează „E3” Deconectați aparatul de gătit multifuncțional de la priză și așteptați răcirea completă a
acestuia. După răcirea aparatului de gătit multifuncțional, vericați toate componentele
capacului. Rotiți capacul în poziția BLOCATĂ . Asigurați-vă că supapa de eliberare a
presiunii se aă în poziția de „Eliberare” (închisă). Dacă acest cod de eroare apare din nou,
deconectați aparatul de gătit multifuncțional de la priză și contactați centrul de service.
Se așează „E4” Deconectați aparatul de gătit multifuncțional de la priză și așteptați răcirea completă a
acestuia. După răcirea aparatului de gătit multifuncțional, vericați vasul de gătit pentru a
vă asigura că în acesta se aă sucient lichid. Adăugați lichid, dacă este necesar (minimum
340 ml). Asigurați-vă că din vasul de gătit nu ies aburi înainte de a așeza din nou capacul pe
aparatul de gătit multifuncțional.
Rotiți capacul în poziția BLOCATĂ . Asigurați-vă că supapa de eliberare a presiunii se
aă în poziția de „Eliberare” (închisă). Selectați o funcție de gătit sub presiune, apoi apăsați
butonul START/STOP.
Se așează „E5” Aparatul de gătit multifuncțional va opri ciclul de preparare. Deconectați aparatul de gătit
multifuncțional de la priză și așteptați răcirea acestuia. După răcirea aparatului, scoateți
capacul și vericați vasul de gătit. Nu instalați capacul atunci când folosiți funcția de
RUMENIRE/SOTE.
Atunci când utilizați funcția de GĂTIRE LENTĂ, asigurați-vă că supapa de eliberare a presiunii
se aă în poziția de „Eliberare” (deschisă) înainte de a iniția ciclul de preparare.
Se așează „E6” Deconectați aparatul de gătit multifuncțional de la priză și așteptați răcirea acestuia. După
răcirea aparatului, scoateți capacul și vericați vasul de gătit. Adăugați lichid conform
necesităților. Asigurați-vă că în vasul de gătit detașabil se aă cel puțin 340 ml de lichid. Atunci
când utilizați o funcție de gătit sub presiune, asigurați-vă că supapa de eliberare a presiunii se
aă în poziția de „Etanșare” (închisă).
POST-VÂNZARE ȘI PIESE DE SCHIMB
În cazul în care aparatul nu funcționează, dar este în garanție, duceți produsul înapoi în locul de unde a fost achiziționat
pentru a fi schimbat. Vă atragem atenția că va fi necesară o dovadă valabilă a achiziției. Pentru asistență suplimentară,
contactați Departamentul de servicii pentru consumatori la: Regatul Unit: 0800 028 7154 | Spania: 0900 81 65 10 | Franța:
0805 542 055. Pentru toate celelalte țări, sunați la +44 800 028 7154. Se pot aplica tarife internaționale. Alternativ, trimiteți
un e-mail la: [email protected].
ELIMINAREA DEȘEURILOR
Deșeurile provenite din produsele electrice nu trebuie eliminate împreună cu deșeurile menajere. Vă rugăm să le reciclați
dacă aveți această posibilitate. Pentru informații suplimentare privind reciclarea și deșeurile provenite din echipamentele
electrice și electronice (WEEE), contactați-ne prin e-mail la [email protected].

68 69
COOKING GUIDE
Cooking
Function Default Setting Pressure
Adjustments Temperature
Adjustments Cook Time Range
SLOW COOK High temp / 4 hours N/A Low-High 30 minutes – 20 hours
STEAM High pressure / 10 minutes Low-High N/A 1 minute - 1 hour
BROWN/
SAUTÉ High temp / 30 minutes N/A Low-High 3 minutes - 30 minutes
KEEP WARM Warm temp / 4 hours N/A Warm 30 minutes – 4 hours
MEAT/STEW High pressure / 35 minutes Low-High N/A 5 minutes - 2 hours
BEANS/CHILI High pressure / 20 minutes Low-High N/A 5 minutes – 2 hours
RICE/RISOTTO Low pressure / 12 minutes Low-High N/A 4 minutes - 30 minutes
YOGURT Low temp / 8 hours N/A Low-High Low: 6 hours - 12 hours
High: N/A
POULTRY High pressure / 15 minutes Low-High N/A 15 minutes – 2 hours
DESSERT Low pressure / 10 minutes Low-High N/A 5 minutes – 2 hours
SOUP High pressure / 30 minutes Low-High N/A 5 minutes – 2 hours
MANUAL High pressure / 5 minutes Low-High N/A 1 minute - 2 hours
STEAMING CHART
Food Amount Amount of
water Pre-prep Cooking
Time, minutes
Asparagus 250g 400ml trim woody ends 2
Broccoli 300g 400ml trim stalks 2
Brussel Sprouts 400g 400ml peel outer leaves, leave whole 4
Butternut Squash 1 whole, 900g-1kg 400ml cut in half, remove seeds, slice into 6 7
Carrots 500g 400ml sliced into 1 cm rounds 5
Carrots and Swede 600g 400ml peel and cut into similar sized pieces 6
Cauliower 500g 400ml cut into 5cm orets 3
Corn on the Cob 2 400ml remove any outer leaves 3
Frozen Chunky
Vegetables 500g 400ml cook from frozen 3
Green cabbage 1 whole 400ml cut into quarters 4
Leeks 500g 400ml trim ends and cut into 2 cm rounds 4
New Potatoes 750g 400ml leave whole 8
Sweet Potatoes 900g - 1kg 400ml peel and cut into large chunks 5
White potatoes, ideal
for mash 900g - 1kg 400ml peel and cut into large chunks 9
Basmati Rice 400g (2 cups) 600ml rinse rice before use 6
Brown Rice 400g (2 cups) 400ml rinse rice before use 22
Eggs 6 400ml whole in shell 7
Chicken llet 2-4 llets 400ml season before cooking 8
Asparagus 2-4 llets 400ml season before cooking 3


CSC089X-DIM_21MLM2 (EU) GCDS-CRP-SL P.N. ART0000918001 Rev A
www.crockpoteurope.com
email: [email protected]
© 2021 Jarden Consumer Solutions (Europe) Limited. All rights reserved.
Jarden Consumer Solutions (Europe) Limited, 5400 Lakeside, Cheadle Royal Business Park, Cheadle, Cheshire, SK8 3GQ, United Kingdom.
Newell Poland Services Sp. z o.o., Plac Andersa 7, Poznan, 61-894, Poland.
Jarden Consumer Solutions (Europe) Limited and Newell Poland Services Sp. z o.o. are subsidiaries of Newell Brands Inc.
The product you buy may differ slightly from the one shown on this carton due to continuing product development.
Da wir unsere Produkte kontinuierlich weiterentwickeln, kann das Gerät, das Sie erworben haben, geringfügig von dem auf der Verpackung dargestellten Gerät
abweichen.
Door de continue productontwikkeling kan het product dat u koopt iets afwijken van het getoonde product op deze doos.
Produkten som du har köpt kan skilja sig något från den som syns på förpackningen eftersom produkten utvecklas löpande.
Zakupiony produkt może nieznacznie różnić się od urządzenia widniejącego na opakowaniu ze względu na ciągły rozwój produktów.
Produsul cumpărat poate ușor diferit de cel ilustrat pe ambalaj, din cauza dezvoltării continue a produselor.
Made in China / Wyprodukowano w Chinach
-
 1
1
-
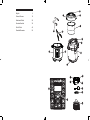 2
2
-
 3
3
-
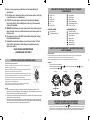 4
4
-
 5
5
-
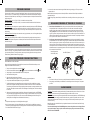 6
6
-
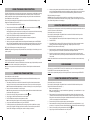 7
7
-
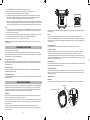 8
8
-
 9
9
-
 10
10
-
 11
11
-
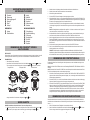 12
12
-
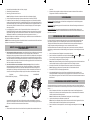 13
13
-
 14
14
-
 15
15
-
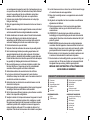 16
16
-
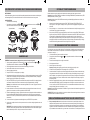 17
17
-
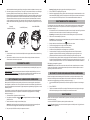 18
18
-
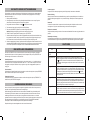 19
19
-
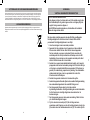 20
20
-
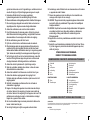 21
21
-
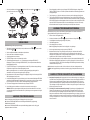 22
22
-
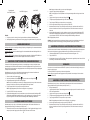 23
23
-
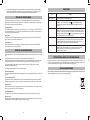 24
24
-
 25
25
-
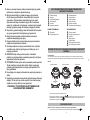 26
26
-
 27
27
-
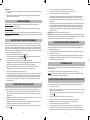 28
28
-
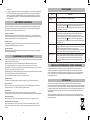 29
29
-
 30
30
-
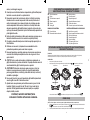 31
31
-
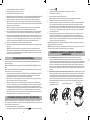 32
32
-
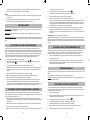 33
33
-
 34
34
-
 35
35
-
 36
36
-
 37
37


CrockPot CSC089X-DIM Handleiding
- Categorie
- Snelkookpannen
- Type
- Handleiding
in andere talen
- English: CrockPot CSC089X-DIM User manual
- Deutsch: CrockPot CSC089X-DIM Benutzerhandbuch
- svenska: CrockPot CSC089X-DIM Användarmanual
- polski: CrockPot CSC089X-DIM Instrukcja obsługi
- română: CrockPot CSC089X-DIM Manual de utilizare