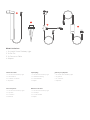
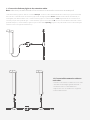
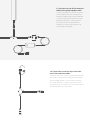
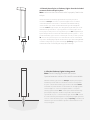
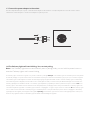
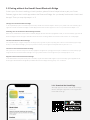
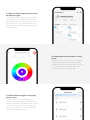
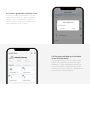
Hieronder vindt u korte informatie voor Smart Pathway Light.De Hombli Smart Pathway Light is ontworpen om uw pad te verlichten en een veiligere omgeving rondom het huis te creëren. Deze handleiding leidt u door de installatie, inclusief het koppelen met de Hombli app, het optioneel verbinden met Google, Alexa en Siri-snelkoppelingen, het instellen van slimme scenario's en het creëren van groepen. De lampen kunnen worden gekoppeld via Bluetooth of met de Hombli Smart Bluetooth Bridge waardoor u ze overal kunt bedienen. U kunt ze in de grond plaatsen met behulp van de meegeleverde pinnen. De lampen knipperen om aan te geven dat ze in koppelmodus staan.
Hieronder vindt u korte informatie voor Smart Pathway Light.De Hombli Smart Pathway Light is ontworpen om uw pad te verlichten en een veiligere omgeving rondom het huis te creëren. Deze handleiding leidt u door de installatie, inclusief het koppelen met de Hombli app, het optioneel verbinden met Google, Alexa en Siri-snelkoppelingen, het instellen van slimme scenario's en het creëren van groepen. De lampen kunnen worden gekoppeld via Bluetooth of met de Hombli Smart Bluetooth Bridge waardoor u ze overal kunt bedienen. U kunt ze in de grond plaatsen met behulp van de meegeleverde pinnen. De lampen knipperen om aan te geven dat ze in koppelmodus staan.


-
 1
1
-
 2
2
-
 3
3
-
 4
4
-
 5
5
-
 6
6
-
 7
7
-
 8
8
-
 9
9
-
 10
10
-
 11
11
-
 12
12
-
 13
13
-
 14
14
-
 15
15
-
 16
16
-
 17
17
-
 18
18
-
 19
19
-
 20
20
-
 21
21
-
 22
22
-
 23
23
-
 24
24


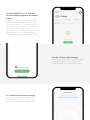
Hieronder vindt u korte informatie voor Smart Pathway Light.De Hombli Smart Pathway Light is ontworpen om uw pad te verlichten en een veiligere omgeving rondom het huis te creëren. Deze handleiding leidt u door de installatie, inclusief het koppelen met de Hombli app, het optioneel verbinden met Google, Alexa en Siri-snelkoppelingen, het instellen van slimme scenario's en het creëren van groepen. De lampen kunnen worden gekoppeld via Bluetooth of met de Hombli Smart Bluetooth Bridge waardoor u ze overal kunt bedienen. U kunt ze in de grond plaatsen met behulp van de meegeleverde pinnen. De lampen knipperen om aan te geven dat ze in koppelmodus staan.
in andere talen
Gerelateerde papieren

Andere documenten
-
 Namco Bandai Games 90500159 Handleiding
-
 Namco Bandai Games 90500129 Handleiding
-
 Namco Bandai Games Projection Television 90500124 Handleiding
-
 Namco Bandai Games 90500143 Handleiding
-
 Namco Bandai Games 90500135 Handleiding
-
 In-Lite Smart Bridge Handleiding
-
Haba 5587 de handleiding
-
 FlinQ FQC8262 10W Solar LED Floodlight Handleiding
-
Roche uPath PD-L1 image analysis for NSCLC IVD Algorithm Handleiding
-


