
Quick Start Guide 3
Beknopte handleiding 22
ML_TOC.fm Page 1 Wednesday, August 16, 2006 4:49 PM

Welcome to your new smartphone, combining
the best aspects of a mobile phone with the
high-speed Vodafone 3G data network and
organizer features.
This quick guide focuses on the phone features
that might be different from those on a standard
mobile phone. It also
describes some of the
unique smartphone
features and services.
If you need more help,
please see the User
Guide or your local
Vodafone website.
Getting Started 3
Smartphone Overview 4
Navigation and Text Entry 6
Using the Phone 8
Email Setup 11
Receiving Email 13
Sending Email 14
Contacts & Calendar 15
Messaging & Camera 17
Internet 18
Other Functions 19
If You Need Help 20
GroovyIIQSG_TOC.fm Page 2 Wednesday, August 16, 2006 4:33 PM

3
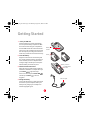
Getting Started
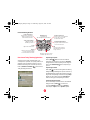
1. Insert your SIM card
Press the battery door release and slide the
door to open the battery compartment. With
the metal contacts facing the compartment,
slide the SIM card into the cutout in the lower-
right corner of the compartment until you feel
the card snap into place. Align the notches to
make sure you have the card oriented correctly.
2. Insert the battery
Align the metal contacts on the battery with
the contacts inside the battery compartment,
insert the battery into the compartment at a
45-degree angle, and then press it into place.
Slide the battery door back into place.
3. Follow onscreen instructions
Follow the onscreen instructions to finish the
installation. Installation is complete when you
press Finish (right action key).
If the screen turns off, press Power/End ,
and then press Center to turn off
Keyguard.
4. Charge the battery
Connect the AC charger to a wall outlet and to
the bottom of your smartphone. When your
battery is fully charged, your smartphone’s
indicator light glows green.
Notch
Battery contacts
Compartment
contacts
Indicator light
Battery door
release
QSG_EN_NL.book Page 3 Wednesday, August 16, 2006 4:26 PM

4
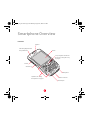
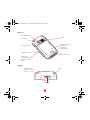
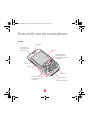
Smartphone Overview
Front view
Indicator light (phone and
charge indicator)
Multi-connector
5-way navigator with Center
button; see “Using the 5-way”
on page 6
Earpiece
Microphone
Headset jack
Side button
Volume
Screen
Keyboard; see “Using
the keyboard” on page 7
QSG_EN_NL.book Page 4 Wednesday, August 16, 2006 4:26 PM

5
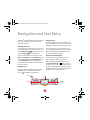
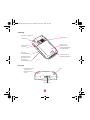
Back view
Top view
Camera lens
Speaker
Self-portrait mirror
Infrared (IR) port
Expansion card slot
Reset button
(located inside
expansion card slot
door)
Battery door release
SIM card slot (located
inside battery
compartment,
beneath battery)
Ringer switch
Stylus
External antenna
socket (for use with
car kits)
QSG_EN_NL.book Page 5 Wednesday, August 16, 2006 4:26 PM

6
Navigation and Text Entry
Your Palm
®
Treo™ 750v smartphone offers several
options for navigating around the screen and
entering information.
Waking up the screen
To save battery power, the screen is set to turn off
after a preset interval. To wake up the screen if it is
off, press Power/End . When the screen turns
on, press Center to turn off Keyguard.
You can set how long the screen stays on. Press
Start, select Settings, select the System tab, and
then select Power. Select the Advanced tab. Use
the On battery power setting to specify how
many minutes your smartphone stays idle before
the screen turns off.
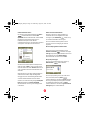
Using the 5-way
Using the 5-way, press Right
X, Left W, Up S, or
Down
T to move around the screen. Press
Center to highlight and select items.
Using the stylus
To use the stylus, slide it out of its holder on the
back of the device (see “Top view” on page 5), and
tap gently on the screen to select an item or icon.
You can also use the stylus to enter and correct
text and to draw on the screen. For many onscreen
elements, tapping and holding with the stylus
opens a menu of further options.
Using the onscreen keyboard
You can use the onscreen keyboard to enter
letters, numbers, and other characters in
applications that support this feature. Tap the
onscreen keyboard icon
in the center at
the bottom of any screen where it appears. After
opening the keyboard, tap the icon to the right of
the keyboard icon to set various input options. Tap
anywhere on the keyboard to close it.
Up S
Down
T
Left W
Right X
Center
QSG_EN_NL.book Page 6 Wednesday, August 16, 2006 4:26 PM

7
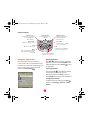
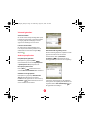
Using the keyboard
Using your Today screen
From your Today screen you can look up a
contact, make a call, see your appointments, see
the number of unread email or text messages, and
perform a web search. To access your Today
screen, press Phone/Send .
Opening applications
Press Start . On the Start menu, highlight the
application you want, or select Programs to view
additional applications. Press Center to open
the application.
Closing applications
Press and hold OK to open Memory Settings.
On the Running Programs tab, select an
application and then select Stop to close it, or
select Stop All to close all your open applications.
Changing input settings
To adjust the text entry settings, press Start ,
and then select Settings > Personal > Input >
Options.
Right action key
Activates the onscreen
command directly
above the key
Power/End
Turns the phone and the
screen on and off
OK
Returns to the application
you were in previously
Left action key
Activates the onscreen
command directly
above the key
Phone/Send
Opens the Today screen
Start
Opens the Start menu
Option
Lets you enter the characters
that appear above the letters
on each key
Alt
Lets you enter additional
characters for each key
5-way navigator
(See “Using the 5-way”
on page 6)
QSG_EN_NL.book Page 7 Wednesday, August 16, 2006 4:26 PM

8
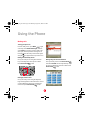
Using the Phone
Making calls
Turning your phone on
From the Today screen, press Menu (right
action key), select Wireless Manager, and then
select Phone. Your phone is ready to make calls
when your network operator’s name appears in
the upper-left of the Today screen and the signal-
strength icon appears at the top of the screen.
Dialing from the Today screen
Go to your Today screen. Using the numbered
keys on the keyboard, enter a phone number.
Press Phone/Send to dial.
Dialing by contact name
Go to your Today screen. Using the keyboard,
begin entering the first or last name of the contact
you want. When the number you want appears,
select it and press Phone/Send to dial.
Dialing using the onscreen Dial Pad
Go to your Today screen. Press Phone/Send
and select Dial Pad. Use the keyboard keys or tap
the onscreen Dial Pad to enter the number. Press
Phone/Send to dial.
QSG_EN_NL.book Page 8 Wednesday, August 16, 2006 4:26 PM

9
Creating a speed-dial button
Go to your Today screen. Press Menu
(right action key) and select
New Speed Dial.
Select Link to link this button to an existing
contact number (see “Creating a new contact” on
page 15), and then select the contact and the
number.
If the number is not in your Contacts list, select
Label and enter a name for this button, and then
select Number and enter the phone number you
want to dial with this button.
Optionally, you can enter a number or letter as the
Quick Key. When the Today screen is showing, you
can press and hold the Quick Key to instantly dial
this number.
If prompted, select either Text Speed Dial or
Picture Speed Dial to indicate which type of
button you want to create.
Dialing with a speed-dial button
On your Today screen, select a speed-dial button
with the 5-way, and then press Center . Or tap
a speed-dial button with the stylus.
If you entered a Quick Key for this number, simply
press and hold the Quick Key.
Dialing a recently called number
Go to your Today screen, press Phone/Send ,
and then select Call Log. Highlight the number
you want to call, and then press Call (left
action key) to dial.
Receive a call
To answer a call, press Answer (left action
key).
To ignore a call and send it to voicemail, press
Menu (right action key) and select Ignore.
To ignore a call and send a text message to the
caller, press Menu (right action key) and select
Ignore with text message.
QSG_EN_NL.book Page 9 Wednesday, August 16, 2006 4:26 PM

10
Using voicemail
Setting up voicemail
Go to your Today screen. Press and hold 1 on the
keyboard and follow the voice prompts to set up
your voicemail.
Listening to messages
Go to your Today screen. Press and hold 1, enter
your password, and then select Play .
Other call functions
Using the speakerphone
During a call, press Menu (right action key)
and select Speakerphone or Speakerphone off.
Muting a call
Press Menu (right action key) and select
Mute or Cancel Mute.
Swapping calls
When you are on a call, press Answer (left
action key) to answer a second incoming call.
Press Swap (left action key) to move
between callers.
Making a conference call
Answer a second call or put the first call on hold,
and make a second call. Press Conference
(right action key) to join the two calls in a
conference.
You can make more calls and join them in the
conference. When you’ve finished, press
Power/End to hang up all calls.
QSG_EN_NL.book Page 10 Wednesday, August 16, 2006 4:26 PM

11
Email Setup
Your smartphone offers several options for
sending and receiving email messages from an
existing personal or corporate account. Select the
option that works best for you based on the type
of account you have. The following options are
described in this guide:
Vodafone Business Email: Use this service to
automatically download messages from a
personal or corporate account.
Windows Mobile
®
email from Vodafone:
Wirelessly retrieve corporate email if your
corporate mail system uses Microsoft Exchange
Server 2003.
All of the available email options are discussed in
Introducing Your Palm
®
Treo™ 750v Smartphone.
Before you use email on your smartphone,
consult your network operator for pricing and
availability of email services and data rate plans.
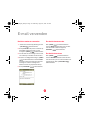
1. Vodafone Business Email
Your push email account provides secure, remote
access to corporate and personal email, contacts,
calendar, tasks, and desktop files directly from
your smartphone.
1. Contact the network operator for your country
to sign up for the service. See “Network
operator support” on page 21 for contact
information.
Note: The push email service may not available
in your country.
2. After you have obtained the service, on your
smartphone, press Start and select
Programs.
3. Select Email Setup .
4. Follow the onscreen instructions for setting up
your account and for downloading and
installing the software.
2. Windows Mobile email from
Vodafone
If your corporate email system uses Microsoft
Exchange Server 2003, you can wirelessly
synchronize email, contacts, tasks, and calendar
events, including full attachment downloads,
directly from the Exchange server to your
smartphone over the mobile network.
QSG_EN_NL.book Page 11 Wednesday, August 16, 2006 4:26 PM

12
Check with your IT administrator to make sure
that your corporate system supports this feature,
and then contact Vodafone for the optimum price
package and service plan. Visit
www.vodafone.com/business
for more
information. For setup instructions, see “Setting
up wireless synchronization” in
Introducing Your
Palm
®
Treo™ 750v Smartphone
.
ActiveSync
®
desktop software
settings
If you install ActiveSync desktop software, by
default the software is set up to synchronize email
messages as well as contacts, calendar events,
and tasks. If you are using a different method—
such as Vodafone Business Email or Windows
Mobile email from Vodafone—to download any of
these types of information, you need to change a
setting to turn off synchronization for that
information in ActiveSync desktop software. See
the User Guide on the Windows Getting Started
Disc for instructions.
QSG_EN_NL.book Page 12 Wednesday, August 16, 2006 4:26 PM

13
Receiving Email
Viewing messages
Vodafone Business Email
If you set up a push email account, new email
messages are sent to your smartphone as they
appear on the server.
POP/IMAP accounts
For ISP accounts and accounts you access using a
VPN server connection (typically a work account),
go to your Today screen and press E-mail
(left action key). Press Left
W until the name of
the account you want appears in the title bar.
Press Menu (right action key), and then
select Send/Receive to retrieve messages.
Navigation
In the Inbox screen, press Right X or Left W to
move through your various accounts. When you’re
viewing an open message, press Right
X or Left
W to move to the next or preceding message.
Receiving attachments
You can download, view, and edit attached files
including Microsoft Word Mobile, Excel
®
Mobile,
and PowerPoint
®
Mobile files, as well as PDF files.
To download an attachment, open the message
containing the attachment and scroll to the
attachment name (below the subject) to highlight
it and mark it for download. The attachment is
downloaded the next time messages are pushed
to your smartphone or you manually retrieve
messages. Scroll to and select the attachment
name (below the subject) to open the
attachment.
Deleting messages
Highlight the message you want to delete. Press
Menu (right action key), and then select
Delete.
QSG_EN_NL.book Page 13 Wednesday, August 16, 2006 4:26 PM

14
Sending Email
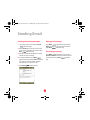
Creating and sending messages
1. Go to your Today screen and press E-mail
(left action key).
2. Press Left
W until you see the correct email
account name in the title bar, and then press
New (left action key).
3. Enter the recipient’s email address, a subject,
and the text of your message.
4. To add an attachment, press Menu
(right action key) and select Insert. Select the
type of item you want to attach, and then
select the file or record a voice note.
5. Press Send (left action key).
Replying to a message
Press Menu (right action key) and select
Reply. Enter any text you want to add, and then
press Send (left action key).
Forwarding a message
Press Menu (right action key) and select
Forward. Address the message and enter any text
you want to add. Press Send (left action
key).
QSG_EN_NL.book Page 14 Wednesday, August 16, 2006 4:26 PM

15
Contacts & Calendar
Contacts
Viewing and editing contact information
Press Start and select Contacts. To find a
contact, enter the first name, last name, or phone
number. (To enter a phone number, press
Option twice before pressing the number
keys. Press Option again when you’ve finished
entering numbers.) Select the entry you want to
open, and view the information.
To change contact information, press
Menu (right action key) and select Edit.
Make the changes you want and press OK .
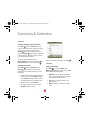
Creating a new contact
Press Start and select Contacts. Press
New (left action key). Use the 5-way
navigator to move between fields as you enter
information.
• To add a caller ID picture that appears when
that person calls, select Picture, and then
select Camera and take a picture, or select
an existing picture from Thumbnails View.
• To add a note, select the Notes tab.
• To assign a ringtone to the entry, select
Ring tone and select a tone.
After you enter all the information, press OK .
Calendar
Viewing your calendar
Press Start and select Calendar. Press
Menu (right action key) and select View.
Select one of the following views:
• Agenda: Shows your daily schedule in list
format. Upcoming appointments are bold;
past appointments are dimmed.
• Day: Shows your daily schedule in day-
planner format.
• Week: Shows your schedule for an entire
week.
QSG_EN_NL.book Page 15 Wednesday, August 16, 2006 4:26 PM

16
• Month: Shows your schedule for a whole
month.
A morning appointment
An afternoon appointment
Both morning and afternoon
appointments
An all-day event
• Ye a r : Shows a calendar for a six-month
period.
Use the 5-way to move to another day, week,
month, or year (based on the current view).
Make a new appointment
Press Menu (right action key) and select
New Appointment. Enter a subject (description)
and a location. Select Starts and Ends and select
the starting and ending date and time. Enter any
other settings you want, and then press OK .
Edit an entry
Highlight an entry in the calendar, press
Menu (right action key) and select Edit.
Tasks (to-do list)
Viewing tasks
Press Start and select Programs. Select
Ta sk s . When a task is complete, check the box
next to the task in the list.
Creating a task
Press Start and select Programs. Select
Ta sk s . Press Menu (right action key),
select New Ta s k , and then enter a description of
the task in the Subject field. Set any options you
want for the task, and then press OK .
QSG_EN_NL.book Page 16 Wednesday, August 16, 2006 4:26 PM

17
Messaging & Camera
Text and multimedia messaging
Before you use messaging on your smartphone,
consult your network operator for pricing and
availability of messaging services.
Creating a text message
Press Start and select Messaging. Press
New (left action key). Enter the recipient’s
mobile phone number or email address, and then
enter the message text. Press Send (left
action key).
Creating a multimedia message
Press Start and select Messaging. Press
Menu (right action key) and select New
MMS. Address your message and add a subject.
Select and select Add Picture or Add Video
to insert a picture or video. You can take a new
picture or video with the built-in camera or insert
an existing picture or video clip. Select Add Sound
to record a message or insert an existing sound.
Press Send .
Camera
Press Start and select Pictures & Videos.
Then select Camera . To record a video, press
Menu (right action key) and select Video
Mode.
Press Up
S, Down T, Left W, or Right X to adjust
settings, or press Menu (right action key)
and select Resolution to adjust the resolution.
Press Center to capture the picture or to start
recording. For videos, when you’ve finished
recording, press Stop (left action key) or
Center to stop recording.
Press OK to return to Thumbnails View.
QSG_EN_NL.book Page 17 Wednesday, August 16, 2006 4:26 PM

18
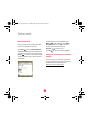
Internet
Browsing the web
Before you begin, be sure to subscribe to data
services from your network operator.
Press Start and select Internet Explorer.
Highlight the address line, enter the address of
the web page you want to view, and then press
Center . To return to a recently viewed page,
select the address line list, and then select the
web address.
To add a page as a favorite (bookmark), press
Menu (right action key), select Add to
Favorites, and then select Add. To view your
favorites, open the browser and Press
Favorites (left action key).
Press OK to close Internet Explorer Mobile.
Using your smartphone as a wireless
modem
You can connect your computer to the Internet
using your smartphone as a wireless modem. For
the latest drivers and information, go to
www.palm.com/treo750v-support
.
QSG_EN_NL.book Page 18 Wednesday, August 16, 2006 4:26 PM

19
Other Functions
Silencing sounds
Slide the Ringer switch to Sound Mode Off .
Your smartphone vibrates briefly. To hear sounds
again, slide the Ringer switch to Sound Mode
On . All previous sound settings are restored.
Protecting your information
Locking your keyboard (Keyguard)
By default, your keyboard locks so that you don’t
accidentally press buttons or activate items.
To dismiss Keyguard, press Center . To
manually turn on Keyguard, press Option and
Power/End .
Locking your smartphone
To protect your personal information, you can lock
your smartphone so that a password is required.
Press Start and select Settings. On the
Personal tab, select Lock . On the Password
tab, check the Prompt if device unused for box
to turn on the password feature.
Select the first list, and then select the time period
before you will be prompted to enter a password.
Select the Password type list, and select a format
for your password. Select Password and enter the
password. Remember to press Option before
entering numbers.
Select Confirm and enter the password again.
Press OK .
Turning the phone off (flight mode)
You can use the organizer features of your
smartphone even where calls are not permitted.
From your Today screen, press Menu (right
action key), select Wireless Manager, and then
select Phone. When your phone is off, the phone-
off icon appears at the top of the Today screen
and Phone Off appears in the upper-left corner of
the screen.
Setting alarms
Press Start and select Settings. Select the
System tab, and then select Clock & Alarms
.Select the Alarms tab. Check a box to turn
on that alarm, and enter the settings for that
alarm. Press OK to finish.
QSG_EN_NL.book Page 19 Wednesday, August 16, 2006 4:26 PM

20
If You Need Help
Introducing Your Palm
®
Treo™ 750v
Smartphone
This guide shows you how to move around on
your smartphone, set up features (such as
voicemail and email), and perform common tasks.
User Guide
The User Guide provides complete information on
using your smartphone, including descriptions of
advanced features not included in this quick
guide. The User Guide is available on the Windows
Mobile Getting Started Disc, or you can install it
from the CD to your computer. To access the User
Guide on your computer, double-click the Tre o
750v User Guide icon on your computer desktop.
A copy of the guide is included on your
smartphone. To view the on-device guide, press
Start and select Help.
Palm support
For up-to-date downloads, troubleshooting, and
support information, go to www.palm.com/
treo750v-support.
Corporate network support
If you are having problems synchronizing
information on a corporate network, contact your
IT administrator.
QSG_EN_NL.book Page 20 Wednesday, August 16, 2006 4:26 PM

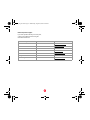
21
Network operator support
If you have questions about your service plan,
contact your network operator using the
information listed here.
Region Phone Number URL
Australia 1300 301030 www.vodafone.com.au
Greece 1399 www.vodafone.gr
Ireland 1907 www.vodafone.ie
Netherlands 1200 www.vodafone.nl
New Zealand 777 www.vodafone.co.nz
Portugal 16912 www.vodafone.pt
United Kingdom 191 www.vodafone.co.uk
QSG_EN_NL.book Page 21 Wednesday, August 16, 2006 4:26 PM

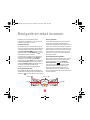
Proficiat met de aankoop van uw nieuwe
smartphone, waarin het beste van mobiele
telefonie is gecombineerd met het UMTS-netwerk
en Pocket Connect-oplossingen van Vodafone.
In deze beknopte handleiding komen vooral
functies aan de orde die mogelijk afwijken van de
functies van een
standaard mobiele
telefoon. Bovendien
wordt een aantal
unieke smartphone-
functies en -diensten
beschreven.
Raadpleeg de
gebruikershandleiding
of ga naar uw lokale
Vodafone-website als u
meer hulp nodig heeft.
Aan de slag 23
Overzicht van de smartphone 24
Navigatie en tekst invoeren 26
De telefoon gebruiken 28
Instellingen voor e-mail 31
E-mail ontvangen 33
E-mail verzenden 34
Contactpersonen en agenda 35
Berichten en camera 37
Internet 38
Andere functies 39
Als u hulp nodig heeft 40
GroovyIIQSG_TOC.FM Page 22 Wednesday, August 16, 2006 4:36 PM

23
Aan de slag
1. Plaats uw SIM-kaart
Druk op de ontgrendeling van het
batterijcompartiment en schuif het klepje naar
buiten om het compartiment te openen. Schuif de
SIM-kaart met de metalen contacten omlaag in de
uitsparing in de rechterbenedenhoek van het
compartiment totdat u voelt dat de kaart op zijn
plaats klikt. Houd de kaart zo dat de afgeschuinde
hoeken in de uitsparing passen.
2. Plaats de batterij
Houd de metalen contacten op de batterij recht
boven de contacten in het batterijcompartiment,
schuif de batterij onder een hoek van 45 graden in
het compartiment en druk hem vervolgens op zijn
plaats. Sluit het compartiment door het klepje weer
terug te schuiven.
3. Volg de instructies op het scherm
Volg de instructies op het scherm om de installatie te
voltooien. De installatie is klaar als u op
Voltooien
drukt (de rechteractietoets).
Als het scherm wordt uitgeschakeld, drukt u op
Aan-uit/beëindigen en vervolgens op de
middenknop om de toetsenblokkering uit te
schakelen.
4. Laad de batterij op
Sluit de AC-oplader aan op een stopcontact en de
aansluiting aan de onderkant van uw smartphone.
Zodra de batterij volledig is opgeladen, licht het
indicatielampje van de smartphone groen op.
Uitsparing
Batterijcontacten
Compartiment-
contacten
Indicatielampje
Ontgrendeling
van batterij-
compartiment
GroovyIIQSG_Body.FM Page 23 Wednesday, August 16, 2006 4:38 PM

24
Overzicht van de smartphone
Voorzijde
Indicatielampje
(telefoonstatus en
oplaadniveau)
Multi-connector
Navigatietoets met
middenknop; zie “De
navigatietoets gebruiken”
op pagina 26
Luidspreker
Microfoon
Headsetaansluiting
Zijknop
Volume
Scherm
Toetsenbord; zie “Het
toetsenbord gebruiken”
op pagina 27
GroovyIIQSG_Body.FM Page 24 Wednesday, August 16, 2006 4:38 PM

25
Achterzijde
Bovenzijde
Cameralens
Speakerphone
Spiegel voor zelfportret
Infraroodpoort
(IR-poort)
Sleuf voor
uitbreidingskaart
Resetknop (achter
het klepje voor de
sleuf voor de
uitbreidingskaart)
Ontgrendeling van
batterijcompartiment
Sleuf voor de
SIM-kaart (in het
batterijcompartiment,
onder de batterij)
Belschakelaar
Stylus
Aansluiting externe
antenne (voor
gebruik met een
car-kit)
GroovyIIQSG_Body.FM Page 25 Wednesday, August 16, 2006 4:38 PM

26
Navigatie en tekst invoeren
Uw Palm
®
Treo™ 750v-smartphone biedt
verschillende mogelijkheden om op het scherm te
navigeren en gegevens in te voeren.
Het scherm activeren
Om de batterij te sparen, wordt het scherm (na een
van tevoren opgegeven tijdsduur) uitgeschakeld. Als
u het uitgeschakelde scherm wilt activeren, drukt u
op Aan-uit/beëindigen . Zodra het scherm is
geactiveerd, drukt u op de middenknop om de
toetsenblokkering uit te schakelen.
U kunt instellen hoe lang het scherm geactiveerd
moet blijven. Druk op Start, selecteer Settings
(Instellingen), selecteer het tabblad System
(Systeem) en vervolgens Power (Stroom). Selecteer
het tabblad Advanced (Geavanceerd). Geef bij de
instelling On battery power (Op batterijstroom) op
na hoeveel minuten van inactiviteit van de
smartphone het scherm wordt uitgeschakeld.
De navigatietoets gebruiken
Druk rechts
X
, links
W
, omhoog
S
of omlaag
T
op de
navigatietoets om te navigeren op het scherm. Druk op de
middenknop om items te markeren en te selecteren.
De stylus gebruiken
Als u de stylus wilt gebruiken, schuift u deze uit de
houder op de achterzijde van het apparaat (zie
“Bovenzijde” op pagina 25) en tikt u zachtjes op het
scherm om een item of een pictogram te selecteren.
U kunt de stylus ook gebruiken om tekst in te voeren
of te corrigeren en om op het scherm te tekenen. Bij
veel elementen op het scherm opent u een menu
met opties door er met de stylus op te tikken en de
stylus erop te houden.
Het schermtoetsenbord gebruiken
Met het schermtoetsenbord kunt u letters, cijfers en
andere tekens invoeren in toepassingen die deze
functie ondersteunen. Tik op het pictogram
Schermtoetsenbord
wanneer dat midden
onder in het scherm wordt weergegeven. Als het
toetsenbord wordt weergegeven, tikt u op het
pictogram rechts van het pictogram voor het
schermtoetsenbord om invoeropties in te stellen.
Tik op een willekeurige plaats op het toetsenbord om
het uit te schakelen.
Omhoog S
Omlaag
T
Links W
Rechts X
Midden
GroovyIIQSG_Body.FM Page 26 Wednesday, August 16, 2006 4:38 PM

27
Het toetsenbord gebruiken
Het scherm Today (Vandaag) gebruiken
Vanuit het scherm Today (Vandaag) kunt u een
contactpersoon opzoeken, een oproep plaatsen, uw
afspraken inzien, het aantal ongelezen e-mail- en
tekstberichten weergeven en zoeken op internet.
Druk op Telefoon/verzenden om het scherm
Today (Vandaag) te activeren.
Toepassingen openen
Druk op Start . Markeer in het menu Start de
toepassing die u wilt openen of selecteer Programs
(Programma's) om meer toepassingen weer te geven.
Druk op de middenknop om de toepassing te
openen.
Toepassingen sluiten
Druk op
OK
en houd de toets ingedrukt om Memory
Settings (Geheugeninstellingen) te openen. Selecteer op
het tabblad Running Programs (Programma's die worden
uitgevoerd) een toepassing en selecteer vervolgens
Stop
(Sluiten) om die te sluiten, of selecteer
Stop All
(Alles
sluiten) om alle geopende toepassingen te sluiten.
Invoerinstellingen wijzigen
Als u de instellingen voor het invoeren van tekst wilt
wijzigen, drukt u op Start en selecteert u
vervolgens Settings (Instellingen) > Personal
(Persoonlijk) > Input (Invoer) > Options (Opties).
Rechter functietoets
Activeert het commando dat
boven deze toest in uw
beeldscherm staat.
Inschakelen/Beëindigen
gesprek Schakelt uw telefoon
en uw scherm in/uit
OK
U gaat één stap terug in
uw navigatie (terug naar
vorige scherm)
Linker functietoets
Activeert het commando
dat boven deze toest in
uw beeldscherm staat.
Telefoon/Verzenden
Opent het Today
(vandaag) scherm
Start
Opent het Start-menu
Opties
Hiermee selecteert u tekens
op uw toestenbord welke
boven de letters van staan.
Alt
Hiermee selecteert u extra
karakters bij iedere toets
Navigatietoets
(zie pagina 26
'De naviagtietoets gebruiken')
GroovyIIQSG_Body.FM Page 27 Wednesday, August 16, 2006 4:38 PM

28
De telefoon gebruiken
Gesprekken voeren
De telefoon inschakelen
Druk op het scherm Today (Vandaag) op Menu
(rechteractietoets), selecteer Wireless Manager
(Draadloos beheer) en selecteer vervolgens Phone
(Telefoon). De telefoon is gereed voor gebruik als de
naam van uw netwerkprovider linksboven in het scherm
Today (Vandaag) wordt weergegeven en het pictogram
voor signaalsterkte boven in het scherm verschijnt.
Een nummer kiezen vanuit het scherm Today (Vandaag)
Activeer het scherm Today (Vandaag). Voer een
telefoonnummer in met behulp van de cijfertoetsen op
het toetsenbord. Druk op Telefoon/verzenden om
het nummer te kiezen.
Kiezen via naam van contactpersoon
Activeer het scherm Today (Vandaag). Voer met behulp
van het toetsenbord de eerste letters in van de voor- of
achternaam van degene die u wilt bellen. Als het nummer
dat u zoekt, wordt weergegeven, selecteert u het en drukt
u op Telefoon/verzenden om het nummer te
kiezen.
Een nummer kiezen met het Dial Pad (Toetsenblok)
op het scherm
Ga naar het scherm Today (Vandaag). Druk op Tele fo on /
verzenden en selecteer Dial Pad (Toetsenblok).
Voer het nummer in met de toetsen van het toetsenbord
of tik op het toetsenblok op het scherm om ze in te
voeren. Druk op Telefoon/verzenden om het
nummer te kiezen.
GroovyIIQSG_Body.FM Page 28 Wednesday, August 16, 2006 4:38 PM

29
Snelkeuzetoetsen maken
Ga naar het scherm Today (Vandaag). Druk op Menu
(rechteractietoets) en selecteer
New
Speed Dial (Nieuwe snelkeuzetoets). Selecteer Link
(Koppeling) om de toets te koppelen aan een
bestaande contactpersoon (zie “Nieuwe
contactpersonen invoeren” op pagina 35) en selecteer
vervolgens de contactpersoon en het nummer.
Als het nummer niet in de lijst met contactpersonen
staat, selecteert u
Label
en voert u een naam in voor
deze toets. Daarna selecteert u
Number
(Nummer) en
voert u het telefoonnummer in dat u wilt kiezen met
deze toets.
Optioneel kunt u nog een cijfer of letter toewijzen als
sneltoets. Als het scherm Today (Vandaag) wordt
weergegeven, kunt u de sneltoets ingedrukt houden
om direct het desbetreffende nummer te kiezen.
Selecteer, als u daarom wordt gevraagd, Text Speed
Dial (Tekstsnelkeuze) of Picture Speed Dial
(Beeldsnelkeuze) om aan te geven welk type toets
u wilt maken.
Kiezen met een snelkeuzetoets
Selecteer in het scherm Today (Vandaag) een
snelkeuzetoets met de navigatietoets en druk
vervolgens op de middenknop . U kunt ook op
een snelkeuzetoets tikken met de stylus.
Als u een sneltoets heeft toegewezen aan dit
nummer, houdt u eenvoudigweg de sneltoets
ingedrukt.
Een recentelijk gekozen nummer kiezen
Activeer het scherm Today (Vandaag), druk op
Telefo on /v er ze nd en en selecteer vervolgens
Call Log (Gesprekkenlogboek). Markeer het nummer
dat u wilt kiezen en druk op Bellen
(linkeractietoets) om het nummer te kiezen.
Een oproep ontvangen
Als u een oproep wilt beantwoorden, drukt u op
Beantwoorden (linkeractietoets).
Als u een oproep wilt negeren en door wilt sturen
naar uw voicemail, drukt u op Menu
(rechteractietoets) en selecteert u Ignore (Negeren).
Als u een gespreksoproep wilt negeren en de beller
een tekstbericht wilt sturen, drukt u op Menu
(rechteractietoets) en selecteert u Ignore with text
message (Negeren met tekstbericht).
GroovyIIQSG_Body.FM Page 29 Wednesday, August 16, 2006 4:38 PM

30
Voicemail gebruiken
Voicemail instellen
Ga naar het scherm Today (Vandaag). Druk op het
toetsenbord op de toets 1 en houd die ingedrukt
en volg de gesproken aanwijzingen voor het
opgeven van instellingen voor voicemail.
Luisteren naar berichten
Ga naar het scherm Today (Vandaag). Houd
toets 1 op het toetsenbord ingedrukt, (voer uw
wachtwoord in) en selecteer vervolgens Play
(Afspelen) .
Andere oproepfuncties
De speakerphone gebruiken
Druk tijdens een gesprek op Menu
(rechteractietoets) en selecteer Speakerphone
of Speakerphone off (Speakerphone uit).
Een oproep op mute zetten
Druk op Menu (rechteractietoets) en
selecteer Mute of Cancel Mute (Mute annuleren).
Schakelen tussen gesprekken
Druk tijdens een gesprek op Beantwoorden
(linkeractietoets) om een tweede
binnenkomende gesprek aan te nemen. Druk op
Schakelen (linkeractietoets) om heen en
weer te schakelen tussen bellers.
Een telefonische vergadering voeren
Neem een tweede gesprek aan, of plaats een eerste
gesprek in de wacht en kies een tweede
telefoonnummer. Druk op Tel ef on is c h
vergaderen (rechteractietoets) om de
beide gesprekken op te nemen in een vergadering.
U kunt meer nummers kiezen en die gesprekken
toevoegen aan de vergadering. Als u klaar bent met
vergaderen, drukt u Aan-uit/Beëindigen om
alle gesprekken te beëindigen.
GroovyIIQSG_Body.FM Page 30 Wednesday, August 16, 2006 4:38 PM

31
Instellingen voor e-mail
U kunt met de smartphone op verschillende
manieren e-mailberichten verzenden en
ontvangen via een bestaande particuliere of
zakelijke account. Selecteer de optie die voor u
het beste werkt op grond van het type account dat
u heeft.
Vodafone Pocket Connect
Alle beschikbare e-mailopties worden behandeld
in
Introducing Your Palm
®
Treo™ 750v
Smartphone
.
Raadpleeg uw netwerkprovider voor prijzen,
beschikbaarheid van e-mailservices en
overdrachtssnelheid, voordat u de e-mailfuncties
van de smartphone gebruikt.
1. Vodafone Pocket Connect
Met een account voor push-e-mail beschikt u over
veilige, externe toegang tot zakelijke en particuliere
e-mail, contactpersonen, agenda, taken en bestanden
op uw computer, rechtstreeks via uw smartphone.
1. Neem contact op met de netwerkprovider in
uw land om u voor deze service aan te melden.
Zie “Ondersteuning door Vodafone” op
pagina 41 voor adresgegevens.
2. Nadat u voor de service bent geregistreerd,
drukt u op uw smartphone op Start en
selecteert u Programs (Programma's).
3. Selecteer Email Setup (Instellingen voor
e-mail) .
4. Volg de instructies op het scherm voor het
opgeven van de instellingen voor uw account en
het downloaden en installeren van de software.
2. Windows Mobile-e-mail
Als het e-mailsysteem van uw bedrijf werkt met
Microsoft Exchange Server 2003, kunt u draadloos
e-mail, contactpersonen, taken en
agendagebeurtenissen synchroniseren, met
inbegrip van het downloaden van bijlagen,
GroovyIIQSG_Body.FM Page 31 Wednesday, August 16, 2006 4:38 PM

32
rechtstreeks van de Exchange server naar de
smartphone via het mobiele netwerk.
Vraag bij de IT-beheerder na of het bedrijfssysteem
deze functie ondersteunt en neem vervolgens
contact op met Vodafone voor de bijbehorende
abonnementsvormen en service. Ga naar
www.vodafone.nl/zakelijk
voor meer informatie. Zie
“Setting up wireless synchronization” (Draadloze
synchronisatie instellen) in
Introducing Your Palm
®
Treo™ 750v Smartphone
.
Instellingen voor ActiveSync
®
desktop-software
Als u ActiveSync desktop-software installeert,
worden standaardinstellingen gekozen waarbij
e-mailberichten, contactpersonen,
agendagebeurtenissen en taken worden
gesynchroniseerd. Als u een andere methode
gebruikt, bijvoorbeeld push-e-mail van Vodafone
of Windows Mobile-e-mail van Vodafone, voor het
downloaden van dit soort informatie, zult u een
instelling moeten wijzigen om synchronisatie van
die informatie in de ActiveSync desktop-software
uit te schakelen. Zie de User Guide
(Gebruikershandleiding) op de Windows Getting
Started Disc voor instructies.
GroovyIIQSG_Body.FM Page 32 Wednesday, August 16, 2006 4:38 PM

33
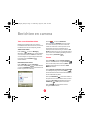
E-mail ontvangen
Berichten lezen
Door de provider beheerde push-e-mail
Als u een account heeft ingesteld voor push-e-mail,
worden nieuwe e-mailberichten naar de smartphone
verzonden als ze binnenkomen op de server.
POP/IMAP-accounts
Bij ISP-accounts en accounts die werken met een
VPN-serververbinding (gewoonlijk een zakelijke
account) activeert u het scherm Today (Vandaag)
en drukt u op E-mail (linkeractietoets).
Druk op Links
W tot de naam van de account die u
zoekt, wordt weergegeven op de titelbalk. Druk op
Menu (rechteractietoets) en selecteer
vervolgens Send/Receive (Zenden/ontvangen)
om berichten op te halen.
Navigatie
Druk in het scherm van het Postvak IN op Rechts X
of Links
W om te navigeren door uw accounts.
Druk, als u een geopend bericht leest, op Rechts
X
of Links
W om naar het volgende of vorige bericht
te gaan.
Bijlagen ontvangen
U kunt als bijlage ingesloten bestanden
downloaden, weergeven en bewerken, inclusief
bestanden van Microsoft Word Mobile, Excel
®
Mobile, PowerPoint
®
Mobile en PDF-bestanden.
Als u een bijlage wilt downloaden, opent u het
bericht met de bijlage en bladert u naar de naam
van de bijlage (onder de onderwerpregel) zodat
u de bijlage kunt markeren om te downloaden.
De bijlage wordt gedownload op het moment dat
er nieuwe berichten met de push-functie naar uw
smartphone worden gedownload, of wanneer u
handmatig berichten ophaalt. Blader naar de
naam van de bijlage (onder de onderwerpregel)
en selecteer deze om de bijlage te openen.
Berichten verwijderen
Markeer het bericht dat u wilt verwijderen. Druk op
Menu (rechteractietoets) en selecteer
vervolgens Delete (Verwijderen).
GroovyIIQSG_Body.FM Page 33 Wednesday, August 16, 2006 4:38 PM

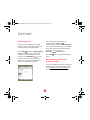
34
E-mail verzenden
Berichten maken en verzenden
1. Activeer het scherm Today (Vandaag) en druk
op E-mail (linkeractietoets).
2. Druk op Links
W tot de juiste accountnaam op
de titelbalk wordt weergegeven en druk
vervolgens op Nieuw (linkeractietoets).
3. Voer het adres van de ontvanger van de e-mail,
een onderwerp en de tekst van het bericht in.
4. Druk, als u een bijlage wilt toevoegen, op Menu
(rechteractietoets) en selecteer Insert
(Invoegen). Selecteer het type item dat u wilt
toevoegen en selecteer vervolgens het
bestand of neem een gesproken bericht op.
5. Druk op Verzenden (linkeractietoets).
Een bericht beantwoorden
Druk op Menu (rechteractietoets) en
selecteer Reply (Beantwoorden). Typ een tekst
voor het bericht en druk vervolgens op
Verzenden (linkeractietoets).
Een bericht doorsturen
Druk op Menu (rechteractietoets) en
selecteer Forward (Doorsturen). Geef het adres
voor het bericht op en voer eventueel tekst in die
u wilt toevoegen. Druk op Verzenden
(linkeractietoets).
GroovyIIQSG_Body.FM Page 34 Wednesday, August 16, 2006 4:38 PM

35
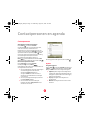
Contactpersonen en agenda
Contactpersonen
Adresgegevens weergeven en bewerken
Druk op Start en selecteer Contacts
(Contactpersonen). Als u een contactpersoon zoekt,
voert u de voornaam, de achternaam of het
telefoonnummer in. (Als u een telefoonnummer wilt
invoeren, drukt u twee keer op Optie voordat u op de
cijfertoetsen drukt. Druk opnieuw op Optie nadat u
het nummer heeft ingevoerd.) Selecteer de vermelding
die u wilt weergeven en bekijk de informatie.
Als u adresgegevens wilt wijzigen, drukt u op
Menu (rechteractietoets) en selecteert u Edit
(Bewerken). Breng de wijzigingen aan en druk op OK .
Nieuwe contactpersonen invoeren
Druk op Start en selecteer Contacts
(Contactpersonen). Druk op Nieuw
(linkeractietoets). Ga bij het invoeren van informatie met
de navigatietoets door de velden.
• Als u een afbeelding van een beller wilt toevoegen
die wordt weergegeven als de beller belt,
selecteert u Picture (Afbeelding), en
vervolgens Camera en maakt u een foto, of
selecteert u een bestaande foto in de weergave
met miniaturen.
• Als u een opmerking wilt toevoegen, selecteert u
het tabblad Notes (Notities).
• Als u een beltoon aan de vermelding wilt
toewijzen, selecteert u Ring tone (Beltoon) en
selecteert u een melodie.
Als u alle gegevens heeft ingevoerd, drukt u op OK .
Agenda
De agenda weergeven
Druk op Start en selecteer Calendar (Agenda). Druk
op Menu (rechteractietoets) en selecteer View
(Weergeven). Kies uit een van de volgende weergaven:
• Agenda (Agenda): weergave van het dagschema
in lijstopmaak. Toekomstige afspraken worden vet
weergegeven, afspraken die in het verleden liggen,
worden grijs weergegeven.
• Day (Dag): weergave van het dagschema in
roosteropmaak.
• Week (Week): weergave van het schema van een
hele week.
GroovyIIQSG_Body.FM Page 35 Wednesday, August 16, 2006 4:38 PM

36
• Month (Maand): weergave van het schema
van een hele maand.
Een afspraak in de ochtend
Een afspraak in de middag
Afspraken zowel in de ochtend als in de
middag
Een gebeurtenis die de hele dag beslaat
• Ye a r (Jaar): weergave van een kalender voor
een half jaar.
Ga naar een andere dag, week of maand of een
ander jaar met de navigatietoets (afhankelijk van
de huidige weergave).
Een nieuwe afspraak maken
Druk op
Menu
(rechteractietoets) en
selecteer
New Appointment
(Nieuwe afspraak).
Voer een onderwerp (beschrijving) in en een locatie.
Selecteer
Starts
(Begintijd) en
Ends
(Eindtijd) en
selecteer bij beide het tijdstip. Geef eventueel andere
instellingen op en druk vervolgens op
OK
.
Een vermelding bewerken
Markeer een vermelding in de agenda, druk op
Menu (rechteractietoets) en selecteer Edit
(Bewerken).
Ta ke n
Taken weergeven
Druk op Start en selecteer Programs
(Programma's). Selecteer Ta sk s (Taken) .
Schakel het selectievakje naast de taak in de lijst
in als die voltooid is.
Taken invoeren
Druk op Start en selecteer Programs
(Programma's). Selecteer Ta sk s (Taken) .
Druk
op
Menu
(rechteractietoets),
selecteer
New
Ta s k
(Nieuwe taak)
en voer een beschrijving van de
taak in het veld Subject (Onderwerp) in. Geef
eventueel opties voor de taak op en druk
op OK .
GroovyIIQSG_Body.FM Page 36 Wednesday, August 16, 2006 4:38 PM

37
Berichten en camera
Tekst- en multimediaberichten
Raadpleeg uw netwerkprovider voor prijzen en
beschikbaarheid van berichtenservices, voordat u de
berichtenfuncties van uw smartphone gebruikt.
Tekstberichten maken
Druk op Start en selecteer Messaging
(Berichten). Druk op Nieuw (linkeractietoets).
Voer het mobiele telefoonnummer of e-mailadres
van de ontvanger in en typ vervolgens de tekst van
het bericht. Druk op Verzenden
(linkeractietoets).
Multimediaberichten maken
Druk op Start en selecteer Messaging
(Berichten). Druk op Menu (rechteractietoets)
en selecteer New MMS (Nieuwe mms). Adresseer het
bericht en geef het een onderwerp.
Selecteer en selecteer Add Picture
(Foto toevoegen) of Add Video (Video toevoegen)
om een foto of video op te nemen in het bericht.
U kunt een nieuwe foto of video opnemen met de
ingebouwde camera of een bestaande foto of
videoclip aan het bericht toevoegen. Selecteer Add
Sound (Geluid toevoegen) om een gesproken bericht
op te nemen of een bestaand geluidsfragment toe te
voegen. Druk op Verzenden .
Camera
Druk op Start en selecteer Pictures & Videos
(Foto's en video's). Selecteer vervolgens Camera .
Als u een video wilt opnemen, drukt u op Menu
(rechteractietoets) en selecteert u Video
Mode (Videomodus).
Druk op Omhoog
S, Omlaag T, Links W of Rechts X
om instellingen op te geven, of druk op Menu
(rechteractietoets) en selecteer Resolution (Resolutie)
om de resolutie aan te passen.
Druk op de middenknop om de foto te maken of
het opnemen van de video te starten. Druk, als u video
opneemt, op Stop (linkeractietoets) of op de
middenknop om het opnemen af te breken.
Druk op OK om terug te keren naar de
weergave met miniaturen.
GroovyIIQSG_Body.FM Page 37 Wednesday, August 16, 2006 4:38 PM

38
Internet
Surfen op internet
Controleer, voordat u begint, bij uw netwerk-
provider (Vodafone) of u beschikt over de juiste
abonnementsvorm voor internetgebruik..
Druk op Start en selecteer Internet Explorer.
Markeer de adresbalk, voer het adres van de
webpagina in die u wilt weergeven en druk
vervolgens op de middenknop . Als u wilt
terugkeren naar een onlangs weergegeven
pagina, opent u de lijst van de adresbalk en
selecteert u het adres van die pagina.
Als u een pagina wilt toevoegen aan uw
favorieten, drukt u op Menu
(rechteractietoets), selecteert u Add to Favorites
(Toevoegen aan Favorieten), en vervolgens Add
(Toevoegen). Als u de favorieten wilt weergeven,
opent u de browser en drukt u op
Favorieten (linkeractietoets).
Druk op OK om Internet Explorer Mobile af te
sluiten.
De smartphone gebruiken als
draadloos modem
U kunt een computer verbinden met internet met
behulp van de smartphone als draadloos modem.
Ga naar www.palm.com/treo750v-support
voor
de nieuwste stuurprogramma's en informatie.
GroovyIIQSG_Body.FM Page 38 Wednesday, August 16, 2006 4:38 PM

39
Andere functies
Geluiden uitschakelen
Schuif de belschakelaar naar Sound Mode Off
(Geluidsmodus uit). De smartphone trilt even. Als u weer
geluid wilt horen, schuift u de belschakelaar naar Sound
Mode On (Geluidsmodus aan) . Alle eerdere
instellingen voor geluid worden weer geactiveerd.
Gegevens beschermen
Het toetsenbord blokkeren (Toetsenblokkering)
Standaard wordt het toetsenbord geblokkeerd, zodat u
niet per ongeluk gegevens kunt invoeren of functies kunt
activeren.
Als u de toetsenbordblokkering wilt uitschakelen, drukt u
op de
middenknop
. Als u de toetsenbordblokkering
handmatig wilt inschakelen, druk u op
Optie
en
Aan-uit/Beëindigen
.
Uw smartphone vergrendelen
Ter bescherming van uw persoonlijke gegevens, kunt u
uw smartphone vergrendelen, zodat een wachtwoord is
vereist.
Druk op Start en selecteer Settings (Instellingen).
Selecteer Lock (Vergrendelen) op het tabblad
Personal (Persoonlijk). Schakel op het tabblad Password
(Wachtwoord) het selectievakje bij Prompt if device
unused for (Wachtwoord vragen als apparaat niet
gebruikt wordt gedurende) in om de wachtwoordfunctie
in te schakelen.
Selecteer de eerste lijst en vervolgens de tijdsperiode tot
het opnieuw vragen naar het wachtwoord.
Selecteer de lijst Password type (Type wachtwoord) en
selecteer de notatie voor het wachtwoord. Selecteer
Password (Wachtwoord) en voer het wachtwoord in.
Vergeet niet om op Optie te drukken voor het
invoeren van cijfers.
Selecteer Confirm (Bevestigen) en voer het wachtwoord
nogmaals in. Druk op OK .
De telefoon uitschakelen
(vliegtuigstand)
U kunt de organiserfuncties van de smartphone ook
gebruiken op locaties waar telefoonverkeer niet is
toegestaan.
Druk op het scherm Today (Vandaag) op Menu
(rechteractietoets), selecteer Wireless Manager
(Draadloos beheer) en selecteer vervolgens Phone
(Telefoon). Als de telefoon is uitgeschakeld, wordt het
pictogram telefoon-uit weergegeven boven aan het
scherm Today (Vandaag) en verschijnt het bericht Phone
Off (Telefoon uit) in de linkerbovenhoek van het scherm.
Alarmfuncties instellen
Druk op Start en selecteer Settings (Instellingen).
Selecteer het tabblad System (Systeem) en vervolgens
Clock & Alarms (Klok en alarm) . Selecteer het
tabblad Alarms (Alarm). Schakel een selectievakje bij
een alarmfunctie in om de functie te activeren en geef de
instellingen voor de alarmfunctie op. Druk op OK om
de instellingen op te slaan.
GroovyIIQSG_Body.FM Page 39 Wednesday, August 16, 2006 4:38 PM

40
Als u hulp nodig heeft
Introducing Your Palm
®
Treo™ 750v
Smartphone
Aan de hand van deze (Engelstalige) handleiding
leert u omgaan met uw smartphone en functies
instellen (bijvoorbeeld voicemail en e-mail) en
algemene taken uitvoeren.
User Guide
In de (Engelstalige) gebruikershandleiding vindt u
volledige informatie over het gebruik van de
smartphone, evenals beschrijvingen van
geavanceerde functies die niet zijn opgenomen in
deze quick guide (snelgids beknopte handleiding).
De gebruikers-handleiding staat op de cd Windows
Mobile Getting Started, u kunt de handleiding vanaf
die cd ook op de computer installeren. Dubbelklik
op het pictogram Treo 750v User Guide op het
Bureaublad van de computer om de handleiding te
openen.
Op de smartphone is een kopie van de
handleiding opgeslagen. Als u die wilt inzien,
drukt u op Start en selecteert u Help.
Ondersteuning van Palm
Voor actuele downloads, het oplossen van
problemen en informatie over ondersteuning kunt
u terecht op www.palm.com/treo750v-support
.
Ondersteuning voor zakelijke netwerken
Neem contact op met uw IT-beheerder als u wordt
geconfronteerd met problemen bij het
synchroniseren van informatie op een
bedrijfsnetwerk.
GroovyIIQSG_Body.FM Page 40 Wednesday, August 16, 2006 4:38 PM

41
Ondersteuning door Vodafone
Als u vragen heeft over uw abonnementen kunt u
contact opnemen met Vodafone Klantenservice:
1200 (06 545 00 100)
www.vodafone.nl
GroovyIIQSG_Body.FM Page 41 Wednesday, August 16, 2006 4:38 PM

QSG_EN_NL.book Page 42 Wednesday, August 16, 2006 4:26 PM

QSG_EN_NL.book Page 43 Wednesday, August 16, 2006 4:26 PM

PN: 406-10797-00
AN: 185-10451-00
v 1.2
QSG_EN_NL.book Page 44 Wednesday, August 16, 2006 4:26 PM
-
 1
1
-
 2
2
-
 3
3
-
 4
4
-
 5
5
-
 6
6
-
 7
7
-
 8
8
-
 9
9
-
 10
10
-
 11
11
-
 12
12
-
 13
13
-
 14
14
-
 15
15
-
 16
16
-
 17
17
-
 18
18
-
 19
19
-
 20
20
-
 21
21
-
 22
22
-
 23
23
-
 24
24
-
 25
25
-
 26
26
-
 27
27
-
 28
28
-
 29
29
-
 30
30
-
 31
31
-
 32
32
-
 33
33
-
 34
34
-
 35
35
-
 36
36
-
 37
37
-
 38
38
-
 39
39
-
 40
40
-
 41
41
-
 42
42
-
 43
43
-
 44
44


in andere talen
- English: Palm Treo 750v Quick start guide
Gerelateerde papieren
Andere documenten
-
 Palm Computing V Getting Started
-
Motorola One Vision de handleiding
-
Motorola MOTO G8 Plus de handleiding
-
Motorola One Macro de handleiding
-
Motorola E6 Plus Handleiding
-
Motorola E6 Play Handleiding
-
Apple iPhone 6S de handleiding
-
LG KU800.AVDGBK Handleiding
-
-
Samsung Galaxy Tab Active Pro Handleiding
