VIRTUFIT Water Resistance Row 900 Handleiding
- Categorie
- Fitness, gymnastiek
- Type
- Handleiding


VirtuFit Water Resistance Row 900
3
EN
SAFETY INSTRUCTIONS
WARNING: Before beginning any exercise program, consult your physician.
This is especially importent for individuals over the age of 35 or persons with
pre-existing health problems. Read all instructions before using any
tness equipment. Save these instructions.
ATTENTION
- Before starting any exercise program you should consult your physician to determine if you
have any medical or physical conditions that could put your health and safety at risk or
prevent you from using the equipment properly. Your physician’s advice is essential if you are
taking any medication that may aect your heart rate, blood pressure, or cholesterol level.
- Be aware of your body’s signals. Incorrect or excessive exercise can damage your health.
Stop exercising if you experience any of the following symptoms: pain, tightness in your chest,
irregular heartbeat, shortness of breath, lightheadedness, dizziness, or feelings of nausea. If
you do experience any of these conditions, you should consult your physician before
continuing with your exercise program.
- Keep children and pets away from the equipment. The equipment is designed for adult use
only.
- Use the equipment on a solid, at level surface with a protective cover for your oor or carpet.
To ensure safety, the equipment should have at least 2 feet of free space all around it.
- Ensure that all nuts and bolts are securely tightened before using the equipment. The safety
of the equipment can only be maintained if it is regularly examined for damage and/or wear
and tear.
- Always use the equipment as indicated. If you nd any defective components while
assembling or checking the equipment, or if you hear any unusual noises coming from the
equipment during exercise, stop using the equipment immediately and don’t use the
equipment until the problem has been rectied.
- Wear suitable clothing while using the equipment. Avoid wearing loose clothing that may
become entangled in the equipment.
- Do not place ngers or objects into the moving parts of the equipment.
- The maximum user weight of this rower is 155kg.
- This equipment is not suitable for therapeutic use.
- Move with caution when lifting and moving the equipment. Always use proper lifting technique
and seek assistance if necessary.
- Your product is intended for use in cool, dry conditions. You should avoid storage in extreme
cold, hot, or damp areas as this may lead to corrosion and other related problems.
- This equipment is designed for indoor use only! It is not intended for commercial use or medical
treatment!


VirtuFit Water Resistance Row 900
5
EN
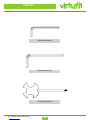
TOOL KIT
Bolt, Button Head (M8 x 1.25 x 135 mm) - 1 stuk
Bolt, Round Head (M6 x 1 x 15 mm) - 1 stuk
Washer (M10) - 1 stuk Washer (M8) - 5 stuks
Washer (M6) - 2 stuks
Acorn Nut (M8 x 1.25) - 1 stuk
Barrel Nut (M10 x 1.25 x90 mm) - 1 stuk
Stopper - 2 stuks
Fixing Lever -1 stuk
Lock Washer (M8) - 1 stuk
Bolt, Cross Head (M6 x 20 mm) - 2 stuks
Bolt, Hex Head (M8 x 1.25 x 15 mm) - 4 stuks
Screw, Cross Head (M5 x 10 mm) - 2 stuks

VirtuFit Water Resistance Row 900 6
EN
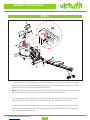
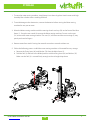
I. Slide the Seat (31) onto the rail (3).
II. Insert Rear end cap (97) into Rail (3), then secure with two Screws (98).
III. Secure the two stoppers (13) onto the Rail (3) with two Bolt (71) and Washer (Ø6) (79).
IV. Attach the Rear stand (4) to the rail (3) with four bolt (M8*15) (69) and washer (Ø8) (78)..
STEP 1
ASSEMBLY INSTRUCTIONS
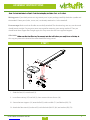
Missing parts: If you think you are missing certain parts in your package, carefully check the styrofoa and
the treadmill. Some parts (bolts, screws, etc.) are already attached to / in the treadmill.
Error message: Make sure that all cables are carefully attached. The aluminum legs are very sensitive and
should remain straight. Do you get an error message after mounting your rowing machine? Then you
should bend these copper feet straight again, this may cause the error message to disappear.
Allen bolts:
this way you prevent the head of the socket head from being turned.
7
ASSEMBLY INSTRUCTIONS
3
31
69
69
4
98
97
71
71 13 79
13
79
78
78
STEP 1
Slide the Seat (31) onto the rail (3).
Insert Rear end cap (97) into Rail (3), then secure with two Screws (98).
STEP 2
Secure the two stoppers (13) onto the Rail (3) with two Bolt (71) and Washer (Ø6) (79).
STEP 3
Attach the Rear stand (4) to the rail (3) with four bolt (M8*15) (69) and washer (Ø8) (78).

VirtuFit Water Resistance Row 900
7
EN
8
STEP 4
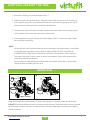
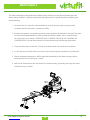
Attach the Rail (3) to the Main frame (2) with one Bolt (M6*15) (28) and one Barrel nut (M10) (28). Lock
the Rail (3) in unfold position with the Fixing lever (46) and one Washer (Ø10) (76).
NOTE: After tightening the Fixing lever (46) the rear stabilizer of the Base frame (1) might be raised
off the floor slightly, this is normal, it will rest on the floor once you are seated.
STEP 5
Install batteries into the Meter (52). Attach the Meter post (6) to Main frame (2) with one Bolt
(M8*135) (64), one washer (Ø8) (78), one lock washer (Ø8) (81), and Acorn nut (M8) (83).
STEP 6
Clip the Grommet (55) on to both sensor wire (54), then press the Grommet (55) into the Left cover
(50). Connect the Sensor wire (54) to the Connection wire of the meter (52). Push the excess wires
back into the Left cover (50).
I. Attach the Rail (3) to the Main frame (2) with one Bolt (M6*15)(28) and one Barrel nut (M10)(28).
Loch the Rail (3) in unfold position with the Fixing lever (46) and one Washer the Rail (3) in unfold
position with Fixing lever (46) and one Washer (Ø10)(76).
NOTE: After tightening the Fixing lever (46) the rear stabilizer of the Base frame (1) might be raised
o the oor slightly, this is normal, it will rest on the oor once you are seated.
II. Install batteries into the Meter (52). Attach the Meter post (6) to Main frame (2) with one Bolt
(M8*135) (64), one washer (Ø8) (78), one lock washer (Ø8) (81), and Acorn nut (M8) (83).
III. Clip the Grommet (55) on to both sensor wire (54), then press the Grommet (55) into the Left
cover (50). Connect the Sensor wire (54) to the Connection wire of the meter (52). Push the excess
wires back into the Left cover (50).
STEP 2
ASSEMBLY INSTRUCTIONS

VirtuFit Water Resistance Row 900
8
EN
HOW TO FILL AND EMPTY THE TANK
1. Remove the Fill plug (24) from the Upper tank (17)
2. To ll with water, refer to illustration A. Place the Funnel (108) into the tank. Use a water cup,
or the Syphon pump (107) and a bucket to ll the tank. Use water level gauge on the side of
tank to measure volume of water in tank to the desired level.
3. To empty tank, refer to illustration B. Place a bucket next to the rower. Use the Syphon pump
(107) to pump out the water from the tank into the bucket.
4. Once completed, insert the Fill plug (24) into the Upper tank (17). Please wipe excess water
from the frames after lling.
NOTE:
– Fill the tank only with municipal water, do not use well water. If municipal water is unavailable,
use distilled water and add a water purication tablet. NEVER USE POOL CHLORINE OR
CHLORINE BLEACH. Refer to the maintenance section for more advice on water treatment.
– The water in the tank is not for human or animal consumption. Please safely dispose of the
water after removal from the tank.
– Every 6 months a water purication tabelet needs to be added. If the water is still not clear,
change all water and rell with new water.
Refer to the detail view of illustration A. The water level gauge is positioned on the side of the tank.
DO NOT ll above the Maximum level- this could void the warranty. The amount of resistance is dictated
by the amount of water in the tank. For example level 3 of water oers light resistance, level 6 oers a
heavier resistance.
9
TANK VULLEN EN LEGEN
1. Verwijder de vul plug (24) van de bovenste tank (17).
2. Om te vullen met water kijk naar de illustratie A. Plaats de trechter (108) in de tank. Gebruik
een beker met water, of de pomp (107) en een emmer om de tank te vullen. Gebruik de water
aanduiding aan de zijkant van de tank om het water in de tank naar het gewenste niveau te
brengen.
3. Om de tank te legen, gebruik illustratie B. Plaats een emmer naast de roeier. Gebruik de pomp
(107) om water uit de tank in de emmer te pompen.
4. Wanneer dat gebeurd is, druk de vul plug (24) weer in de bovenste tank (17).
Let op:
• Vul de tank alleen met kraanwater. Voeg 1 waterzuiveringstablet toe (1 pakket is
inbegrepen.). Gebruik nooit chloorwater of chloor. Dit zal de tank beschadigen en de
garantie ongeldig maken.
• Voeg om de 6 maanden een waterzuiveringstablet toe. Als het water troebel blijft,
vervang dan het water in de tank.
• Water uit de tank is niet geschikt voor consumptie. Gooi het water weg, nadat het
uit de tank is gepompt.
WATER NIVEAU
Kijk naar de details op de illustratie A. Het water peil is gepositioneerd aan de zijkant van de tank
het maximale level tot waar je het mag vullen, is tot de hoogste streep. Vul niet tot boven de hoogste
streep, dit kan de garantie doen laten vervallen. De hoeveelheid weerstand dicteert de hoeveelheid
water in de tank. Level 3 bied bijvoorbeeld een lage weerstand aan, level 6 een hogere.
Water level Gauge
AB
Water cup
WATER LEVEL

VirtuFit Water Resistance Row 900
9
EN
STORAGE
1. To store the water rowing machine, simply keep it in a clean dry place. Avoid a room with high
humidity like a shed or near a washing machine.
2. To avoid damage to the electronics, remove the batteries before storing the Water rowing
machine for one year or more.
3. Move the Water rowing machine with the moving wheels end cap (26) on the front of the Base
frame (1). Grasp the rear stand (4) to move the Water rowing machine. Do not use the seat
(31) to move the water rowing machine. The seat (31) will move and the seat carriage (5) may
pinch your hand or ngers
4. Remove water from tank if storing the rower for more than a month without use.
5. Follow the following process to fold the water rowing machine as illustrated for easy storage.
a. Remove the Fixing lever (46) and Washer (76) from the Main frame (2).
b. Fold the Rail (3) and lock in the folded position with the xing lever (46) and Washer (76).
Make sure the Rail (3) is secured rmly enough or the rail might drop down.
10
OPBERGING
1. Berg de roeier op in een droge ruimte. Bij voorkeur geen ruimte waar een wasmachine staat of
een schuur.
2. Om schade te voorkomen bij de elektronica, haal de batterijen er uit als het toestel langer dan
een jaar opgeborgen is.
3. Vervoer de water roei machine met de wielen en de achterste kap (26) aan de voorkant van
het basis frame (1). Laat het stoeltje voorzichtig zakken in een lage positie. Pak de achterste
standaard (4) en rol weg.
4. Haal het water uit de roeier, wanneer het toestel langer dan een maand opgeborgen wordt.
5. Volg de volgende instructies op om de water roei machine op te vouwen om hem makkelijker
op te bergen.
a. Haal de bevestigingshendel (46) en ring (76) van het hoofd frame (2).
b. Vouw de rail (3) en bevestig de opgevouwen positie met de bevestigingshendel (46) en ring
(76). Zorg ervoor dat de rail (3) goed is bevestigd, zodat het niet valt.
.

VirtuFit Water Resistance Row 900
10
EN
MAINTENANCE
The safety and integrity designed into the Water rowing machine can only be maintained when the
Water rowing machine is regularly examined for damage and wear. Special attention should be given
to the following:
1. Sit on the Seat (31) and pull on the handlebar (8) to verify that the water system provides
resistance and the seat travel is smooth and stable
2. Periodic maintenance is required to maintain proper condition of the water in the tank. The water
must be refreshed periodically by adding a water purication tablet, such as sodium dichlor
(56% chlorine) every 6 months. NEVER USE POOL CHLORINE (TRICHLOR 90% CHLORINE) OR
CHLORINE BLEACH. Use of these products will void the warranty and damage the product.
3. Clean the roller tracks on the Rails (3) with an absorbent cloth. Do not let dirt accumulate.
4. It is the sole responsibility of the user/owner to ensure that regular maintenance is performed.
5. Worn or damaged components shall be replaced immediately or the Water rowing machine
removed from service until repair is made.
6. Add a bit of silicone oil on rails and wheels for smooth training. Depending on usage this needs
to be done every 3 months.
11
Onderhoud
De kwaliteit en veiligheid van de roeier kan alleen worden gewaarborgd, wanneer het toestel
regelmatig gecontroleerd wordt op schade en slijtage. De volgende punten moeten hierin extra in
acht worden gehouden:
1. Ga op de stoel (31) zitten en trek aan het handvat (8) om zeker te weten dat het water systeem
genoeg weerstand biedt, en de beweeglijkheid van de stoel soepel en stabiel is.
2. Om de zoveel tijd is onderhoud nodig om de kwaliteit van de werking van de water tank te
kunnen garanderen. Het water moet regelmatig ververst worden, dit kan door het oude water er
uit te halen en nieuw water toe te voegen of een waterzuiveringstablet in de tank te doen die is
bijgeleverd bij uw roeitrainer. Doe dit elke 6 maanden. Wanneer het water troebel blijft na het
toevoegen van de tablet, dan moet het water vervangen worden. Gebruik geen bleek of andere
schoonmaakmiddelen. Het gebruik van deze producten zorgt ervoor dat de garantie vervalt, en
kan het product beschadigen
3. Maak de bewegende delen zoals de rail en de wieltjes schoon met een droge doek. Zorg dat
vuil zich niet ophoopt. Controleer dit voor elke training.
4. Het is de verantwoordelijkheid van de gebruiker/eigenaar om er voor te zorgen dat periodiek
onderhoud word uitgevoerd.
5. Beschadigde onderdelen moeten direct vervangen worden. Neem contact op met uw dealer.
6. Doe een klein beetje siliconenolie op een stukje keuken papier of schoonmaakdoek. Smeer
een dunne lag olie op de gehele rail en wielen. Afhankelijk van het gebruik dient dit ongeveer
eens per kwartaal te gebeuren

VirtuFit Water Resistance Row 900
11
EN
LOOPBAND AFSTELLEN
OPERATING GUIDE
CONTROL PANEL
12
EXERCISE METER
【FUNCTION BUTTONS】
UP▲/ DOWN▼:Kies uw programma of verhoog of verlaag waardes.
ENTER: Om uw selectie te bevestigen.
Druk tijdens een training op ENTER om alle gegevens een voor een te laten zien.
START / STOP:Druk op START/STOP om de training te stoppen of te starten.
RESET: Druk RESET om het display naar het hoofdscherm te laten keren. Houd ingedruk
om te resetten.
RECOVERY: Om het RECOVERY programma te selecteren. Druk direct na de traning op
RECOVERY om uw training te analyseren.
【FUNCTIONS】
TIME: Stel de doeltijd in met de knoppen UP en DOWN (1 minuut ~ 99 minuten), in
stappen van 1 minuut.
TIME/500M: Uw gemiddelde tijd van 500 M wordt automatisch weergegeven.
SPM: Slagen per minuut.
DISTANCE: Stel de afstand in door op de knoppen UP en DOWN te drukken (10 ~ 99900 meter),
In stappen van 100 meter
STROKES: Stel het aantal slagen in door op de knoppen UP en DOWN te (10~9990 strokes)
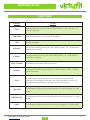
BUTTONS FUNCTION
(1) UP / DOWN Press these two buttons to scroll through available selection.
To adjust the function value upward and downward.
(2) ENTER – To conrm your selection
– During training, press the button to scan each display function
(3) START/STOP To start and stop your slected workout program
(4) RESET To return the computer back to the main menu. Press and hold to reset values.
(5) RECOVERY To activate the “RECOVERY PROGRAM” that will automatically evaluate your
tness immediately after your work out.

VirtuFit Water Resistance Row 900
12
EN
LOOPBAND AFSTELLEN
OPERATING GUIDE
FUNCTIONS
FUNCTIE UITLEG
TIME Set target time by pressing “UP” and “DOWN” buttons ( 1 min ~ 99 min , in 1
minute increments.
TIME/500M Your average 500 time is automatically displayed.
SPM Strokes per minute.
DISTANCE Preset target value by presiing “UP” and “DOWN” buttons ( 10 ~ 99900 meters ).
100 meters increments.
STROKES Set target value by pressing “UP” and “DOWN” buttons ( 10 ~ 9990 strokes ).
10 strokes increments.
TOTAL STROKES Accumulates total strokes from 0 up to 9999.
CALORIES Set target “CALORIES” by pressing “UP” or “DOWN” buttons ( 10Cal ~ 9990Cal ),
10 Cal increments.
PULSE
Set target value by pressing up / down / mode from 30 to 240, 1 BPM
increments. The computer will display user’s heart rate during training. The
pulse measurement function is only used by chest belt system.
CALENDAR The computer will display year, month and day when the computer is in sleep
mode.
TEMPERATURE The computer will display current temperature when the computer is in sleep
mode.
CLOCK The computer will display current clock when the computer is in sleep mode.

VirtuFit Water Resistance Row 900
13
EN
LOOPBAND AFSTELLEN
OPERATING GUIDE
OPERATION
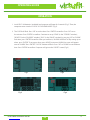
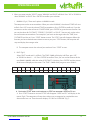
1. Install 2PCS AA batteries (included) and computer will beep for 2 seconds (Fig.1).Then, the
computer enters into the “CLOCK” & “CALENDAR MODE” (Fig.2).
2. The CLOCK will ash. Press “UP” to set the hour. Press “ENTER” to conrm. Press “UP” to set
the minutes. Press “ENTER” to conrm. Continue to set up “YEAR” (in the “STROKES” window);
”MONTH” (in the “CALORIES” window); “DAY” (in the “PULSE” window) by pressing “UP” or “DOWN”.
Each time, press “ENTER” to conrm. After you conrm it, “ALARM” will blink. To skip setting up an
alarm, press “ENTER”. To set up an alarm, press UP KEY to turn on ALARM. An arrow will appear
next to “ALARM”. Press “ENTER”. “CLOCK” window will ash. Press “UP” or “DOWN” to set the alarm
time. Press “ENTER” to conrm. Computer will go into the “SPORT” screen (Fig.3).
13
met 10 slagen per stap.
TOTAL STROKES: Totaal aantal slagen van 0 tot 9999.
CALORIES: Stel het aantal caloerien in door op de knoppen UP en DOWN te drukken (10Cal
~9990Cal).
PULSE:Stel de doelwaarde in door op de knoppen Up en DOWN te drukken van 30 tot 240, De
computer geeft de hartslag van de gebruiker tijdens de training weer. De pulsmeetfunctie
wordt alleen gebruikt door middel van een optionele borstband.
CALENDAR:De computer geeft jaar, maand en dag weer wanneer de computer in de slaapstand
staat.
TEMPERATURE: De computer geeft de huidige kamertemperatuur weer als de computer in de
slaapstand staat.
CLOCK: De computer geeft de huidige tijd weer als computer in de slaapstand staat.
【OPERATION】
1. Doe 2 AA batterijen (bijgesloten) en de computer zal piepen voor 2 seconden (fig.1).
daarna, de computer zal de KLOK EN KALENDER MODE weergeven (Fig. 2).
2. De klok gaat knipperen. Druk op UP om de tijd te veranderen. Druk op ENTER om te
bevestigen. Ga door om het jaar in te stellen (in het ‘aantal roeislagen’ schermpje);maand (in
het caloriën schermpje); dag (in het hartslag schermpje) door op UP en DOWN te drukken.
Elke keer druk op ENTER om te bevestigen. Wanneer je het hebt bevestigd ALARM gaat
knipperen. Om dat over te slaan druk op ENTER. Om een alarm in te stellen druk op UP KEY
om het alarm aan te zetten. Een pijltje gaat knipperen naast ALARM. Druk op ENTER. CLOCK
schermpje gaat knipperen. Druk op UP of DOWN om de alarmtijd in te stellen. Druk op ENTER
om te bevestigen. Computer gaat dan naar het SPORT scherm (Fig.3).
Fig.1 Fig.2
Fig.3 Fig.4

VirtuFit Water Resistance Row 900
14
EN
OPERATING GUIDE
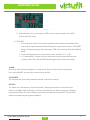
3. When you enter into the “SPORT” screen, “MANUAL” and “RACE” will blink. Press “UP” or “DOWN” to
select “MANUAL” or “RACE”. Press “ENTER” to conrm your selection.
I. MANUAL (Fig.4): There are 2 options in MANUAL mode
The computer can be set to countdown. When you select “MANUAL”, the value of “TIME” will start
to ash. Press “UP” to set the value of “TIME” to countdown. Press “ENTER” to conrm it. If you do
not want to set the value of time to “COUNTDOWN”, press “ENTER” to go to the next function. You
can set the values for “DISTANCE”, “STROKES”, “CALORIES”, or “PULSE”. (You can only set the value
for one function to countdown. For example, if you have set the target value for “TIME”, then
“DISTANCE” can’t be set.) Press “START” button to start. The “STOP” icon will disappear. When the
function you have selected counts down to zero or you press “STOP” button, the computer will
stop and display the average value.
B. The computer counts the value of your workout. Press “START” to start.
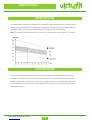
II. RACE (Fig.5):
Select “RACE” mode and L1 will ash. The “TIME / 500M will display 8:00.Then, press “UP”
or “DOWN” to select L1 ~ L15. Press “ENTER” to conrm. Then, you can set the distance of the
race (500M~10000M) while the value of “DISTANCE” is blinking. Press “ENTER” and the picture
of the race will display on the screen. The “TIME” / 500M of the programs are as follows:
L1 L2 L3 L4 L5 L6 L7 L8 L9 L10 L11 L12 L13 L14 L15
8:00 7:30 7:00 6:30 6:00 5:30 5:00 4:30 4:00 3:30 3:00 2:30 2:00 1:30 1:00
A. Press “START” button to start and “STOP” will disappear. “USER” and “PC” will display in the
matrix (Fig.6). The computer will stop when either user or computer has reached the race
distance that was set. Then the matrix displays “PC WIN” or “USER WIN” (Fig.7).
14
3. Wanneer je SPORT scherm in gaat,, MANUAL en RACE gaat knipperen. Druk op UP of
DOWN om MANUAL of RACE te selecteren. Druk op ENTER om je selectie te bevestigen.
(1) MANUAL (Fig.4): er zijn 2 opties in MANUAL mode.
A. de computer kan ingesteld worden op aftellen. Wanneer je MANUAL selecteert, de
waarde van TIME gaat beginnen de knipperen. Druk op UP om de waarde in te stellen
TIME in te stellen in aftellen, druk op ENTER om te bevestigen. Wanneer je niet de waarde
van COUNTDOWN wilt intstellen, druk op ENTER om naar de volgende functie te gaan, je
kan de waarden instellen van DISTANCE, STROKES, CALORIES, of PULSE. (je kan
alleen de waarde instellen van één functie. Bijvoorbeeld als je de gewenste waarde hebt
ingevuld van TIME, dan kan je niet DISTANCE invullen.)
druk op START om te beginnen. het STOP icoontje verdwijnt. Wanneer je functie die je
hebt ingesteld de waarde ‘0’ krijgt of je op STOP drukt, dan stopt de computer en zou de
gemiddelde waarden weergeven.
B. De computer telt de waarde van je workout. Druk op START om te beginnen.
(2) RACE (Fig.5):
Selecteer RACE mode an L1 gaat knipperen de TIME/500M geeft 8.00 weer dan, druk op
UP of DOWN om L1 – L15. Druk op ENTER te bevestigen. Dan, kan je de afstand invullen
van de race (500M-1000M) wanneer de waarde van DISTANCE knippert.
Druk op ENTER en het icoon van de race komt op het scherm
de TIME/500M van de programma’s zijn als volgt:
L1
L2
L3
L4
L5
L6
L7
L8
L9
L10
L11
L12
L13
L14
L15
8:00
7:30
7:00
6:30
6:00
5:30
5:00
4:30
4:00
3:30
3:00
2:30
2:00
1:30
1:00
Fig.5 Fig.6
A. Druk op de START knop om te beginnen en STOP zou weg gaan. USER en PC zou
komen te staan in het scherm (Fig.6). De computer stopt wanneer de gebruiker of de
gebruiker de race afstand heeft bereikt die heeft ingesteld. Dan geeft het scherm weer
‘PC WIN’ of ‘USER WIN’ (Fig.7).

VirtuFit Water Resistance Row 900
15
EN
OPERATING GUIDE
B. When the race is over, you can press START to start a race once again. Press RESET
to leave the RACE screen.
III. RECOVERY
1. This meter works with a 5.3 KHz chest strap heart rate monitor (not included). After
exercising for a period of time, keep wearing chest strap monitor and press “RECOVERY”
button. All function displays will stop except “TIME” starts counting down from 00:60 to
00:00.
2. Screen will display your heart rate recovery status with the F1,F2….to F6.
3. F1 is outstanding. F6 is poor. User may keep exercising to improve the heart rate
recovery status. (Press the RECOVERY button again to return the main display.)
ALARM
Alarm only works while the computer is in sleep mode. Alarm will not sound during exercise.
Press and hold RESET to go to clock screen to set up ALARM.
SLEEP MODE
The computer will go into sleep mode after about 4 minutes of inactivity
BATTERY
This meter uses 2 AA batteries, which are included. Changing the batteries will reset all values.
If there is a problem with the display, try changing the batteries rst. When changing the batteries,
change both of them. Do not mix battery types. Do not mix old and new batteries. Dispose of old
batteries according to your regional guidelines.
Fig.7
B. Wanneer de race voorbij is kan je op START drukken om de race opnieuw te laten

VirtuFit Water Resistance Row 900
16
EN
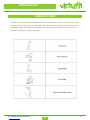
EXERCISE GUIDE
Rowing is an extremely eective form of exercising. It strengthens your heart and improves blood
circulation as well. There are involved all major muscle groups of back, waist, arms, shoulders, hips
and legs.
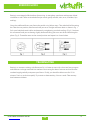
Sit on the saddle and fasten your feet to the pedals using Velcro straps. Then take hold of the rowing
bar. Take the start position, lean forward with your arms straight and knees bent as shown in Fig. 1.
Push your body backwards while simultaneously straightening your back and legs (Fig. 2). Continue
this movement until you are leaning slightly backwards.Bring your arms out of the side during this
phase (Fig. 3). Thereafter return to the second position and repeat it as shown below.
Rowing is a strenuous training style. Because of it, it is better to start with a short and easy program
and continue ti a longer and intensive workout. Start rowing for about 5 minutes and increase the
workout length gradually to improve your tness. Finally, you should be able to row for 15-20
minutes. Don’t try to do it too quikly. Try to train on alternate days, 3 times a week. Take recovery
time between workouts.
TRAINING TIME

VirtuFit Water Resistance Row 900
17
EN
EXERCISE GUIDE
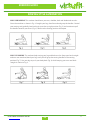
ONLY ARM ROWING: This workout should tone your arm, shoulder, back and abdominal muscles.
Sit on the machine as shown in Fig. 4. Straight your legs, lean forward and grasp the handles. Control
your moving and gradually lean back to just past the up-right position (Fig. 5) and continue to pull
the handles towards your chest (Fig. 6). Return to the starting position and repeat.
ROWING STYLE ALTERNATION
ONLY LEG ROWING: This workout helps toning your leg and back muscles. Keep your back straight
and arms out-stretched, bend your legs until you will grasp the rowing handles in the starting
position (Fig. 7). Use your legs to push your body back (Fig. 8) while keeping your arms and back
straight as shown in Fig. 9.

VirtuFit Water Resistance Row 900
18
EN
EXERCISE GUIDE
This phase should help improving blood circulation and make your muscles working properly while
reducing a cramp risk or injury. It is advisable to do a few stretching exercises as shown below. Each
stretching exercise should be taken for approx. 30 seconds. Don’t overstretch and don’t jerk your
muscles. If you feel pain, stop immediately.
WARMUP PHASE

VirtuFit Water Resistance Row 900
19
EN
EXERCISE GUIDE
It is a phase, during which you should put in your eort. After regular workout, your leg muscles
should get more exible.Keep steady tempo throughout your exercising. The workout intensity
should be sucient to raise your heartbeat into the target zone as shown below.
NOTE: This stage should last for at least 12 mins. Thus, most people start at approx. 15-20 mins.
In this stage, your cardio-vascular system and muscles should get calm. Repeat the warm-up
exercises, reduce your tempo and continue for approx. 5 mins. Repeat the stretching exercises,
but don’t overstretch or jerk your muscles. As you get tter, you can exercise longer and harder.
It is advisable to train at least three times a week and, if possible, to space your workouts evenly
throughout a week.
EXERCISE PHASE
COOLING DOWN

VirtuFit Water Resistance Row 900
20
EN
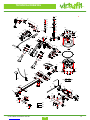
TECHNICAL DRAWING
3
EXPLODED-VIEW ASSEMBLY DRAWING
90
2
4
6
8
10
11
14
14
15
15
14
17
18
19
20 20
21
23
24
25
25
30
31
37
37
38
38
39
40
41
42
43
44
47
49 48
50
51
53
56
58
58
58
58
63
64
66
67
72
65
74
74
74
74
75
75
75
75
75
75
75
75
75
75
75
78
84
83
85
87
87
87
8787
88
54
55
57
61
81
89
33
33
32
32
91
73
93
73
93
73
93
73
93
1
16
16
26
27
27
26
29
29
44
60
63
68
77
45
70
77
77
79
80
80
82
82
86
3
46
76
9
92
95
91
75
75
100
99
96
69
69
28
28
84
85
72
5
12
71
71
13
79
34
34
36
13
79
78
7885
59
62
78
78
102
107
108
85
85
8578
78
59
59
59
34 22
22
22
22
34
72
79
21 21
21
21
21
7
52
101
101
106
75
71
13
79
71
13
79
97
62
85
98
35
103
104
105

VirtuFit Water Resistance Row 900
21
EN
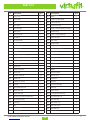
PART LIST
# Description QTY
1 Base frame 1
2 Main frame 1
3 Rail 1
4 Rear stand 1
5 Seat carriage 1
6 Meter post 1
7 Support plate 1
8 Handlebar 1
9 Rail connector 1
10 Impeller 1
11 Impeller shaft 1
12 Rail support 1
13 Stopper 4
14 Strap pulley bushing 3
15 Bungee cord pulley bushing 2
16 Small bungee cord pullay bushing 2
17 Upper tank 1
18 Lower tank 1
19 Rubber ring seal 1
20 Lower pad 4
21 Stainless washer 24
22 Bolt(M5*8) 4
23 Impeller shaf seal 1
24 Fill plug 1
25 Adjustable end cap 2
26 Wheel end cap 2
27 Round end cap 2
28 Barrel nut set (M10 match M6) 1
29 Rectangular plug 2
30 Oval plug 2
31 Seat 1
32 Pedal support 2
33 Pedal strap 2
# Description QTY
34 Roller 4
35 Plastic washer (Ø20) 1
36 Front end cap 1
37 Plastic bushing 2
38 Strao / bungee pulley bushing 2
39 Round plug 1
40 Strap / bungee pulley 1
41 Shaft retainer 1
42 Idle roller 1
43 Strap pulley 1
44 Bungee pulley 2
45 Small bungee pulley 1
46 Fixing lever 1
47 Hook pad 1
48 Spring pin 1
49 E-ring 1
50 Left cover 1
51 Right cover 1
52 Meter 1
53 Sensor holder 1
54 Sensor wire 2
55 Grommet 1
56 Magnet 2
57 One way bearing 1
58 Bearing 4
59 Roller shaft 4
60 Carriage bolt (M8*90) 2
61 Set screw (M5*8) 1
62 Bolt (M8*30) 4
63 Bolt (M10*95) 3
64 Bolt (M8*130) 1
65 Bolt (M6*35) 2
66 Bolt (M8*95) 1

VirtuFit Water Resistance Row 900
22
EN
PART LIST
# Description QTY
67 Bolt (M6*85) 1
68 Bolt (M6*65) 1
69 Bolt (M8*20) 4
70 Bolt (M8*65) 1
71 Bolt (M6*20) 4
72 Bolt (M6*15) 10
73 Bolt (M5*12) 8
74 Stainless screw (M3*24) 12
75 Screw (M4*16) 22
76 Washer (Ø10) 1
77 Arc washer (Ø10) 4
78 Washer (Ø8) 9
79 Washer (Ø6) 7
80 Lock washer (Ø10) 2
81 Lock washer (Ø8) 1
82 Acorn nut (M10) 2
83 Acorn nut (M8) 1
84 Nylock nut (M10) 3
85 Nylock nut (M8) 7
86 Nylock nut (M6) 2
87 Stainless nylock nut (M3) 12
# Description QTY
88 Bungee cord 1
89 Nylon band 2
90 Plate 1
91 Pedal cap 2
92 Bolt (M4*12) 2
93 Nylock nut (M5) 8
95 Strap 1
96 Plastic washer (Ø20) 1
97 Rear end cap 1
98 Bolt (M5*10) 2
99 Left front cover 1
100 Right front cover 1
101 Screw (M5*12) 4
102 Rubber ring 1
103 Allen wrench (5mm) 1
104 Allen wrench (6mm) 1
105 Combination wrench 1
106 Console cover 1
107 Syphon pump 1
108 Funnel 1

-
 1
1
-
 2
2
-
 3
3
-
 4
4
-
 5
5
-
 6
6
-
 7
7
-
 8
8
-
 9
9
-
 10
10
-
 11
11
-
 12
12
-
 13
13
-
 14
14
-
 15
15
-
 16
16
-
 17
17
-
 18
18
-
 19
19
-
 20
20
-
 21
21
-
 22
22
-
 23
23


VIRTUFIT Water Resistance Row 900 Handleiding
- Categorie
- Fitness, gymnastiek
- Type
- Handleiding
in andere talen
Gerelateerde papieren
Andere documenten
-
Tunturi Fit R60w Handleiding
-
-
-
Finnlo AQUON EVOLUTION Handleiding
-
-
 Flow Fitness Driver DMR500 Handleiding
-
-
-
-
 Flow Fitness Driver DWR700 Handleiding

