
• gebruiksaanwijzing
• instruction manual
BUILT
-
IN MICROWAVE OVEN
inbouw combi magnetron
IMC6032F

2 •

Nederlands • 3
11. snelstart pagina 10
12. ontdooien pagina 11
13. voorgeprogrammeerde menu’s pagina 11
14. kinderslot pagina 11
15. reiniging & onderhoud pagina 13
16. problemen & oplossingen pagina 13
17. installatie voorschrift pagina 13
18. product kaart pagina 16
Algemene service- en garantievoorwaarden pagina 30
11. quick start page 23
12. defrosting page 24
13. auto menu page 24
14. parental control page 24
15. cleaning & maintenance page 26
16. problems & solutions page 26
17. installation instructions page 26
18. product fiche page 28
General terms and conditions of service
and warranty page 32
Nederlands
English
1. veiligheidsvoorschriften pagina 4
2. productomschrijving pagina 8
3. voor het eerste gebruik pagina 8
4. klok instellen pagina 9
5. kookwekker instellen pagina 9
6. koken in de magnetron pagina 9
7. hete lucht met voorverwarm-functie pagina 10
8. hete lucht zonder voorverwarmen pagina 10
9. grillen pagina 10
10. combinatie koken pagina 10
1. safety instructions page 17
2. appliance description page 21
3. before first use page 21
4. setting the clock page 22
5. setting the kitchen timer page 22
6. cooking in the microwave page 22
7. convection with preheating function page 23
8. convection without preheating page 23
9. grill page 23
10. combination cooking page 23

• Lees eerst de gebruiksaanwijzing aandachtig en geheel
door voordat u het apparaat gaat gebruiken en bewaar
deze zorgvuldig voor latere raadpleging.
• Gebruik dit apparaat uitsluitend voor de in de
gebruiksaanwijzing beschreven doeleinden. Gebruik geen
agressieve reinigingsmiddelen in dit apparaat. Deze combi
magnetron is alleen geschikt om te verwarmen. Het apparaat is
niet geschikt voor industrieel of laboratorium gebruik.
• Probeer de combi magnetron niet te gebruiken met de
deur open. Dit kan resulteren in een gevaarlijke blootstelling
aan micro-energie. De veiligheidshaken niet stuk maken of
aanpassen.
• Plaats geen voorwerp tussen de deur van de combi magnetron.
Zorg ervoor dat de deur en de afdichting altijd schoon blijven.
• Als de deur of de afdichting beschadigd is, mag de combi
magnetron niet meer gebruikt worden totdat deze gemaakt is
door een expert.
• Let op: Vloeistoffen en ander voedsel mogen niet opgewarmd
worden in gesloten conservenblikken, omdat deze kunnen
exploderen door de druk.
• Reparaties aan elektrische apparaten dienen uitsluitend door
vakmensen uitge voerd te worden. Het is gevaarlijk om een
reparatie uit te voeren waarbij de behuizing van het apparaat
geopend moet worden. De behuizing beschermt tegen
blootstelling aan micro-energie.
• Het apparaat buiten bereik van kinderen houden. Kinderen
beseffen de gevaren niet, die kunnen ontstaan bij het omgaan
met elektrische apparaten. Laat kinde ren daarom nooit zonder
toezicht met elektrische apparaten werken. Houd het apparaat
en het snoer buiten bereik van kinderen jonger dan 8 jaar.
• Het apparaat kan worden gebruikt door kinderen van 8 jaar en
ouder en door personen met beperkte fysieke, zintuiglijke of
mentale vermogens of gebrek aan ervaring of kennis, wanneer zij
het apparaat onder toezicht gebruiken of zijn geïnstrueerd over
het veilige gebruik ervan en zij de daaruit voortkomende gevaren
begrijpen.
Nederlands
veiligheidsvoorschriften
1
4 • Nederlands

• Kinderen mogen niet met het apparaat spelen.
• Het apparaat mag niet door kinderen worden gereinigd of
onderhouden, tenzij dit onder toezicht gebeurt.
• Gebruik alleen materialen die geschikt zijn voor gebruik in de
combi magnetron.
• De combi magnetron moet regelmatig gereinigd worden en
verwijder voedselresten.
• Houd de combi magnetron in de gaten wanneer u voedsel
verwarmt in een plastic of papieren bakje. Het kan namelijk
spontaan ontbranden.
• In geval van rook de combi magnetron uitschakelen en de
stekker uit het stopcontact verwijderen. Houd de deur gesloten
om de vlammen te verstikken.
• Laat het voedsel niet te gaar worden.
• Gebruik de binnenkant van de combi magnetron niet als
opbergruimte. Bewaar er geen koekjes, brood, etc. in.
• Verwijder metalen sluitstrips en metalen handgrepen van
papieren of plastic bakjes/zakjes voordat deze in de combi
magnetron geplaatst wordt.
• Installeer de combi magnetron alleen volgens de instructies.
• Eieren in de schaal en hard gekookte eieren mogen niet in
de combi magnetron verwarmd worden, omdat ze kunnen
exploderen. Zelfs nadat de combi magnetron al uitgeschakeld is.
• Gebruik het apparaat niet wanneer de stekker, het snoer of het
apparaat beschadigd is, of wanneer het apparaat niet meer
naar behoren functioneert of wanneer het gevallen of op een
andere manier beschadigd is. Raadpleeg dan de winkelier of
onze technische dienst. In geen geval de stekker of het snoer
zelf vervangen.
• Het apparaat uitsluitend binnenshuis gebruiken en opbergen.
• De combi magnetron niet gebruiken in de buurt van water, een
vochtige kelder/ garage of in de buurt van een zwembad.
• Vermijdt het aanraken van de warme oppervlakken wanneer
het apparaat ingeschakeld is. De binnenkant wordt heet!
• De ventilatieopeningen nooit afdekken.
• Het netsnoer nooit scherp buigen of over hete delen laten lopen.
• Het niet schoon houden van de combi magnetron kan leiden
tot slijtage wat weer effect heeft op de levensduur en kan
resulteren in gevaarlijke situaties.
• De inhoud van babyflessen en potjes babyvoeding moeten
doorgeroerd of geschud worden voor de consumptie.
Nederlands • 5

Controleer de temperatuur om brandwonden te voorkomen.
• Let op: Het verwarmen van vloeistoffen kan resulteren in
explosief overkoken van de vloeistof. Ook nadat de combi
magnetron al uitgeschakeld is. Let goed op als het kopje of
bakje uit de combi magnetron gehaald wordt. Plaats daarom
altijd een kunststof of keramieken lepeltje in het kopje tijdens
het verwarmen.
• De combi magnetron is niet geschikt om gebruikt te worden
met een timer of een aparte afstandsbediening.
• Zorg er altijd voor dat het apparaat op een stevige, vlakke
ondergrond staat.
• Sluit het apparaat alleen aan op wisselstroom, op een
randgeaarde wandcontactdoos, met een netspanning
overeenkomstig met de informatie aangegeven op het
typeplaatje van het apparaat.
• Laat het apparaat niet onbeheerd achter indien het apparaat in
werking is.
• Indien u het apparaat wilt verplaatsen, dient u ervoor te zorgen
dat het apparaat uitgeschakeld is. U dient bij het verplaatsen
van het apparaat beide handen te gebruiken.
• Het apparaat nooit gebruiken met onderdelen die niet door de
fabrikant zijn aanbevolen of geleverd.
• Niet aan het snoer c.q. het apparaat trekken om de stekker uit
de wandcontactdoos te halen. Het apparaat nooit met natte of
vochtige handen aanraken.
• Als u besluit het apparaat, vanwege een defect, niet
langer te gebruiken, adviseren wij u, nadat u de stekker
uit de wandcontactdoos heeft verwijderd, het snoer
af te knippen. Breng het apparaat naar de betreffende
afvalverwerkingsafdeling van uw gemeente.
• Indien het apparaat na het inschakelen niet functioneert,
dan kan de zekering of de aardlekschakelaar in de elektra
verdeelkast zijn aangesproken. De groep kan te zwaar zijn belast
of een aardlekstroom kan zijn opgetreden.
• Ga bij storing nooit zelf repareren; het doorslaan van de
beveiliging in het apparaat kan duiden op een defect, dat niet
wordt verholpen door verwijdering of vervanging van deze
beveiliging. Het is noodzakelijk dat er uitsluitend originele
onderdelen gebruikt worden.
• Dompel het apparaat, het snoer of de stekker nooit onder in
water.
6 • Nederlands

• Dit apparaat is uitsluitend geschikt voor huishoudelijk gebruik.
Wanneer het apparaat oneigenlijk gebruikt wordt, kan er bij
eventuele defecten geen aanspraak op schadevergoeding
worden gemaakt en vervalt het recht op garantie.
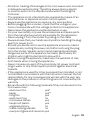
• Let op met de volgende materialen of ze wel of niet in de combi
magnetron gebruikt mogen worden:
- aluminium folie ja*
- papier ja**
- huishoudfolie ja
- aluminium bak nee
- magnetron servies ja
- hittebestendig plastic ja
- ongeglazuurd aardewerk nee
- metalen kookgerei nee
- ovenvast glas en keramiek ja
- normaal glas ja
- metalen sluitstrip nee
- bord met metalen sierrand nee
- kwikthermometer nee
- afgesloten pot nee***
- fles met nauwe hals nee
- braadzak ja
* Gebruik kleine stukjes om te voorkomen dat dunnere gedeelten
van bijvoorbeeld kip te snel gaar worden.
** Gebruik niet gedecoreerd keukenpapier voor het afdekken van
voedsel en voor de opname van vetten.
*** Verwijder het deksel en let op dat de pot niet te lang verwarmd
wordt. Het glas kan barsten.
• Klein huishoudelijke apparaten horen niet in de vuilnisbak.
Breng ze naar de betreffende afvalverwerkingsafdeling van
uw gemeente.
Nederlands • 7

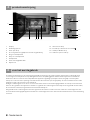
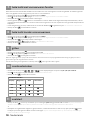
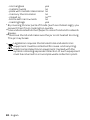
1. Display
2. Bedieningspaneel
3. Deur open knop
4. Rooster (alleen met grill/hete lucht functie gebruiken)
5. Ring voor draaiplateau
6. Nokje voor draaiplateau
7. Draaiplateau
8. Deur met veiligheidshaken
9. Kijkvenster
productomschrijving
2
voor het eerste gebruik
3
Voordat u het apparaat voor de eerste keer in gebruik neemt, dient u als volgt te werk te gaan: pak de combi magnetron
voorzichtig uit en verwijder al het verpakkingsmateriaal. De verpakking (plastic zakken en karton) buiten het bereik van
kinderen houden. Controleer na het uitpakken het apparaat zorgvuldig op uiterlijke schade, mogelijk ontstaan tijdens
transport. Controleer of de spanning overeenkomt met die vermeld is op het typeplaatje. Voor de installatie van de combi
magnetron volgt u de instructies in hoofdstuk 17.
Reinig de combi magnetron en alle accessoires met warm water en een mild reinigingsmiddel. Goed naspoelen met alleen
water en droog maken. Het apparaat is nu klaar voor gebruik. De combi magnetron kan bij het eerste gebruik “nieuw” ruiken,
dit is volkomen normaal, kan geen kwaad en zal vanzelf verdwijnen.
Het gebruik van de combi magnetron kan het signaal van uw televisie en radio verstoren. Plaats de combi magnetron dus
niet in de buurt van dergelijke apparatuur. Plaats de combi magnetron niet in de buurt van warmtebronnen zoals verwarming
of fornuis.
2.1 Oven functie knop
2.2 Instelknop of kiezen van een menu
2.3 START/ + 30 SEC-knop
2.4 STOP-knop en resetknop
8 • Nederlands
9
8
7
6 5
1
2
4
3
2.1
2.2
2.3
2.4

klok instellen
4
kookwekker instellen
5
koken in de magnetron
6
Zodra u de stekker van de combi magnetron in het stopcontact heeft gedaan, verschijnt op het display 0:00.
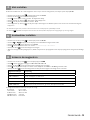
• Draai de functie knop naar
. In het display staat nu 00:00.
• Druk op de knop
, de uren zullen knipperen.
• Draai om het juiste uur in te stellen - 0-23 (24 uurs klok).
• Druk nogmaals op de knop
, de minuten zullen knipperen.
• Draai om de juiste minuten in te stellen - 0-59.
• Druk nogmaals op de knop
om de juiste tijd te bevestigen. De dubbele punt tussen de uren en de minuten zal gaan
knipperen.
- Als de klok niet ingesteld is, zal deze ook niet functioneren. Het display zal op 0:00 blijven staan.
- Als de knop
ingedrukt wordt tijdens het instellen van de klok, zal het display weer terug springen op de vorige ingave.
• Draai de functie knop naar
. In het display staat nu 00:00.
• Draai nu
en 00:00 knippert in het display. De kookwekker kan ingesteld worden.
• Druk op de knop
en het display toont 00:00.
• Draai om het aantal minuten in te stellen. De maximum tijd is 95 minuten.
• Druk op de knop
om de instelling te bevestigen.
• Wanneer de ingestelde tijd afgelopen is, klinkt er vijf keer een piepsignaal en het display springt weer terug naar de huidige
tijd.
• Draai de functie knop naar
. In het display knippert P100.
• Draai om het wattage te wijzigen. P100-P80-P50-P30-P10.
• Druk op de knop
om de instelling van het wattage te bevestigen.
• Draai om de juiste kooktijd in te stellen. De kooktijd kan van 0:05 tot 95:00 ingesteld worden.
• Druk op de knop
om de instelling van de kooktijd te bevestigen en de magnetron te starten.
Magnetronvermogen Toepassing
P10 = 90 Watt Zacht maken van boter of ijs
P30 = 270 Watt Soep, stamppot of ontdooien
P50 = 450 Watt Stamppot, vis
P80 = 720 Watt Rijst, vis, kip, gehakt
P100 = 900 Watt Opwarmen, melk, water koken, groenten, drankjes heet maken
De stappen van het instellen van de tijd is als volgt:
0-1 minuut : 5 seconden
1-5 minuten : 10 seconden
5-10 minuten : 30 seconden
10-30 minuten : 1 minuut
30-95 minuten : 5 minuten
Nederlands • 9

hete lucht met voorverwarm-functie
7
Het koken met hete lucht werkt hetzelfde als een traditionele oven. De magnetron wordt niet gebruikt. Voordat het gerecht
in de oven geplaatst wordt, adviseren wij u de oven voor te verwarmen.
• Draai de functie knop naar
. In het display knippert 130°C.
• Draai om de temperatuur te wijzigen. De temperatuur kan ingesteld worden van 130 tot 220°C.
• Druk op de knop
om de temperatuur te bevestigen.
• Druk nogmaals op de knop
om het voorverwarmen te starten. Wanneer de ingestelde temperatuur bereikt is, zal het
piepsignaal twee keer klinken om u er aan te herinneren het gerecht in de oven te plaatsen. De ingestelde temperatuur zal
knipperen.
• Plaats het gerecht in de oven, sluit de deur en stel met de draaiknop de gewenste tijd in. Het maximum is 95 minuten.
• Druk op de knop
om het bakken te starten.
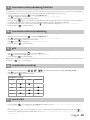
hete lucht zonder voorverwarmen
8
• Draai de functie knop naar . In het display knippert 130°C.
• Draai om de temperatuur te wijzigen. De temperatuur kan ingesteld worden van 130 tot 220°C.
• Druk op de knop
om de temperatuur te bevestigen.
• Stel met de draaiknop de gewenste tijd in. Het maximum is 95 minuten.
• Druk op de knop
om het bakken te starten.
grillen
9
• Draai de functie knop naar . In het display knippert G.
• Draai om de gewenste grilltijd in te stellen. Het maximum is 95 minuten.
• Druk op de knop
om het grillen te starten.
Extra: Als de grill ingesteld is op bijvoorbeeld 10 minuten dan zal er twee keer een piepsignaal klinken halverwege de grilltijd om aan te
geven dat het gerecht omgedraaid moet worden.
Sluit de deur als het gerecht gedraaid is en druk op de knop om het gerecht verder te grillen.
combinatie koken
10
• Draai de functie knop naar - - of . In het display knippert respectievelijk C-1, C-2, C-3 of C-4.
• Draai om de gewenste tijd in te stellen. Het maximum is 95 minuten.
• Druk op de knop
om het koken te starten.
Combinatiestanden
Display Magnetron Grill Hete lucht
C-1
� �
C-2
� �
C-3
� �
C-4
� � �
snelstart
11
• Druk op de knop om snel op te warmen op vol vermogen (900 Watt) gedurende 30 seconden. Bij het herhaaldelijk
drukken op dezelfde knop wordt de tijd telkens met 30 seconden verlengd. Het maximum is 95 minuten.
of
• Druk tijdens het gebruik van magnetron, grill, hetelucht, combinatiestanden en ontdooien op tijd op de knop
om de
kooktijd op vol vermogen met 30 seconden te verlengen. Bij het herhaaldelijk drukken op dezelfde knop wordt de tijd
telkens met 30 seconden verlengd.
10 • Nederlands

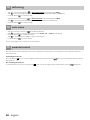
ontdooien
12
• Draai de functie knop naar om te ontdooien op gewicht. In het display knippert dEF1.
• Selecteer met de draaiknop het gewicht van het te ontdooien voedsel. Het gewicht moet tussen de 100 en 2000 gram
zijn.
• Druk op de knop om het ontdooien te starten.
• Draai de functie knop naar
om te ontdooien op tijd. In het display knippert dEF2.
• Selecteer met de draaiknop de gewenste ontdooitijd. De maximum tijd is 95 minuten.
• Druk op de knop om het ontdooien te starten.
voorgeprogrammeerde menu’s
13
• Draai de functie knop naar . In het display knippert A1.
• Draai de knop naar rechts om het juiste menu te kiezen en A 1, A 2, A 3..... A 10 verschijnt in het display.
• Druk op de knop om het juiste menu te bevestigen.
• Stel met de draaiknop het gewenste gewicht of portie in van het menu.
• Druk op de knop om het menu te starten.
Kijk op de volgende pagina voor het uitgebreide menu-overzicht.
kinderslot
14
De combi magnetron is voorzien van een kinderslot. Daarmee blokkeert u de complete bediening en kan uw kind het
apparaat niet per ongeluk aan zetten.
Kinderslot activeren:
Om de combi magnetron op het kinderslot te zetten, drukt u gedurende 3 seconden op de knop
. Er klinkt een lange
pieptoon en de indicatie voor het kinderslot
licht op. Het display geeft de huidige tijd aan als deze ingesteld is.
Kinderslot verwijderen:
Om het kinderslot weer te de-activeren, drukt u gedurende 3 seconden op de knop
. Er klinkt een lange pieptoon. De
kinderslot indicatie
verdwijnt.
Nederlands • 11

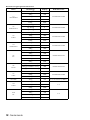
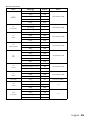
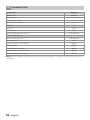
Overzicht voorgeprogrammeerde menu’s
Menu Gewicht (g) Display Gebruikte stand
A 1
OPWARMEN
150 g 150
MAGNETRON P100
250 g 250
350 g 350
450 g 450
600 g 600
A 2
AARDAPPELS
1 (± 230 g) 1
MAGNETRON P1002 (± 460 g) 2
3 (± 690 g) 3
A 3
VLEES
150 g 150
MAGNETRON P100
300 g 300
450 g 450
600 g 600
A 4
GROENTEN
150 g 150
MAGNETRON P100350 g 350
500 g 500
A 5
VIS
150 g 150
MAGNETRON P80
250 g 250
350 g 350
450 g 450
650 g 650
A 6
PASTA
50 g (met 450 ml. water) 50
MAGNETRON P80100 g (met 800 ml. water) 100
150 g (met 1200 ml. water) 150
A 7
SOEP
200 g 200
MAGNETRON P100400 g 400
600 g 600
A 8 CAKE 475 g 475 Voorverwarmen op 160°C
A 9
PIZZA
200 g 200
C-4300 g 300
400 g 400
A 10
KIP
500 g 500
C-4
750 g 750
1000 g 1000
1200 g 1200
12 • Nederlands

reiniging & onderhoud
15
Zet voordat u uw combi magnetron wilt reinigen het apparaat uit, verwijder de stekker uit de wandcontactdoos en laat het
apparaat volledig afkoelen.
Binnenkant
Maak de binnenkant van het apparaat na elk gebruik schoon. Gebruik een vochtige doek. Voor een grondige reiniging warm
water met afwasmiddel gebruiken en de binnenzijde goed drogen met een doek.
Accessoires
Reinig de losse accessoires zoals het draaiplateau, de ring voor het draaiplateau en het rooster met warm water en
afwasmiddel. Deze accessoires mogen ook in de vaatwasmachine gereinigd worden. Maak alles goed droog voordat het
weer gebruikt wordt.
Buitenkant
Reinig de buitenkant van het apparaat met een vochtige doek of spons. Indien noodzakelijk kunt u de buitenkant van het
apparaat met behulp van een mild afwasmiddel. Reinig ook de deur en het deurrubber goed.
problemen & oplossingen
16
Controleer eerst het onderstaande voordat u contact opneemt met de klantenservice.
Probleem Oplossing
De combi magnetron functioneert niet Zit de stekker in het stopcontact?
Is de zekering in de meterkast defect?
De combi magnetron warmt niet op Is de deur goed gesloten? Open de deur en doe deze opnieuw goed
dicht.
Het draaiplateau maakt lawaai Reinig de ring voor het draaiplateau en de bodem van de combi magne-
tron.
Het voedsel is niet goed ontdooit Is het vermogen en de tijd juist ingesteld? Heeft u het voedsel tijdens het
ontdooien geroerd of een keer omgedraaid?
installatievoorschrift
17
• De veiligheid tijdens het gebruik is alleen gegarandeerd als de montage technisch correct en in overeenstemming met dit
installatievoorschrift is uitgevoerd. De installateur is aansprakelijk voor schade veroorzaakt door een foutieve montage.
• De elektrische aansluiting mag alleen worden uitgevoerd door een bevoegde electriciën. Deze is op de hoogte van de
landelijke en regionale veiligheidsvoorschriften waaraan de aansluiting moet voldoen.
• De combi magnetron behoort tot beschermingsklasse I en mag alleen worden gebruikt in combinatie met een geaarde
aansluiting. De fabrikant is niet aansprakelijk voor de ongeschikte werking en de mogelijke schade veroorzaakt door
ongeschikte elektrische installaties.
• De combi magnetron moet worden aangesloten op een vaste installatie waarin middelen voor uitschakeling zijn
ingebouwd, in overeenstemming met de voorschriften van de installatie.
• Zorg ervoor dat de voedingskabel niet bekneld raakt tijdens de installatie of langs scherpe randen loopt. Hij moet zo
geplaatst worden dat er geen hete delen van de combi magnetron geraakt worden.
• Het aansluitpunt, de wandcontactdoos en/of de stekker moeten altijd toegankelijk zijn.
• Het keukenmeubel waarin de combi magnetron wordt gemonteerd, moet hittebestendig zijn(> 75°C).
• Controleer of het keukenmeubel waarin de combi magnetron wordt gemonteerd goed vaststaat. Bijvoorbeeld door deze
vast te schroeven aan de ernaast staande elementen.
• Door verkeerde installatie, aansluiting of montage vervalt de garantie.
• Attentie: elke wijziging in het apparaat, inclusief het monteren en het vervangen van de voedingskabel, moet worden
uitgevoerd door een erkende installateur.
Nederlands • 13

ELEKTRISCHE AANSLUITING
De netspanning moet overeenstemmen met de spanning weergegeven op het typeplaatje in de magnetron.
De groep in de meterkast moeten gezekerd zijn met minimaal 16 Ampère elk. De aansluitkabel moet een aderdoorsnede
hebben van minimaal 2,5 mm² en een lengte van 1,5 m. Als de kabel te kort is, kunt u de oven niet alvast aansluiten en tegen
de wand plaatsen voordat u de stekker in het stopcontact wilt steken.
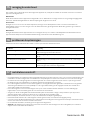
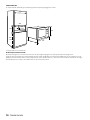
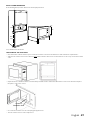
INBOUWMATEN
In onderstaande afbeelding is de afmeting van de uitsparing aangegeven in mm.
14 • Nederlands
600
min.
550
min.
45
560
595
450
388
380
20
min.
850
* niet geschikt voor onderbouw

Nederlands • 15
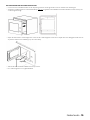
Opening
Schroef
HET INBOUWEN VAN DE COMBI MAGNETRON
• Controleer of het keukenmeubel en de uitsparing voldoen aan de gestelde eisen ten aanzien van afmetingen.
• Schuif de combi magnetron in het keukenkastje. Let op: zorg dat de aansluitkabel niet bekneld raakt en niet bovenop de
combi magnetron ligt.
• Open de deur van de combi magnetron. Schroef de combi magnetron aan de voorzijde vast met de bijgeleverde schroef
en plaats het kunststof afdekdopje op de schroefkop.
• Sluit de deur en steek de stekker in het stopcontact.
• De combi magnetron is nu gebruiksklaar.

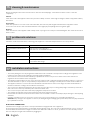
product kaart
18
Fabrikant INVENTUM
Typenummer IMC6032F
Type apparaat inbouw combi magnetron
Aantal ovenruimten 1
Warmtebron per ovenruimte elektrisch
Uitvoering
Capaciteit 32 liter
Draaiplateau Ø 315 mm
Afmeting (bxdxh) in mm - binnenzijde 335 x 340 x 230
Technische gegevens
Afmeting (bxdxh) in mm 595 x 468 x 388
Netto gewicht in kg 22,1
Elektrische aansluitwaarde -magnetron [W] 1550 watt
Magnetronvermogen 1000 watt
Elektrische aansluitwaarde - grill [W] 1100 watt
Elektrische aansluitwaarde - hetelucht [W] 2500 watt
Netspanning [V] / netfrequentie [Hz] 230V/ ~50
Opmerking: Op het typeplaatje - welke aan de binnenzijde geplaatst is - vindt u de de technische gegevens van de combi
magnetron ook vermeldt.
16 • Nederlands

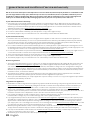
• Please read these instructions before operating the
appliance and retain for future use.
• The appliance is intended solely for domestic use within
the home. Do not use corrosive chemicals or vapors in this
appliance. This microwave oven is especially designed to heat. It
is not designed for industrial or laboratory use.
• Do not attempt to operate this microwave ovenwith the door
open since this can result in harmful exposure to microwave
energy. It is important not to break or tamper with the safety
interlocks.
• Do not place any object between the door of the microwave
oven. Don’t allow soil or cleaner residue to accumulate on the
sealing surfaces.
• If the door or door seal are damaged, the microwave oven must
not be operated until it has been repaired by a competent
person.
• Warning: Liquids and other foods must not be heated in sealed
containers since they are liable to explode.
• It is hazardous for anyone other than a competent person to
carry out any service or repairs that involve the removal of the
cover which gives protection against exposure to microwave
energy.
• An electrical appliance is not a toy, and should therefore always
be placed outside the reach of children. Children are not always
able to understand potential risks. Teach children a responsible
handling of electrical appliances.
• This appliance shall not be used by children from 0 to 8 years.
This appliance can be used by children over the age of 8 and
above if they are continuously supervised. This can be used by
people with reduced physical, sensory or mental capabilities
or lack of experience or knowledge, if they have been given
supervision or instruction concering use of the appliance in
a safe way and understand the hazards involved. Keep the
appliance and its cord out of reach of children aged less than 8
years.
• Cleaning and maintenance shall not be made by children.
English
safety instructions
1
English • 17

• Children must not play with the appliance.
• Only use utensils suitable for use in microwaves.
• The microwave oven should be cleaned regularly and any food
deposits should be removed.
• When heating food in plastic or paper containers, keep an eye on
the microwave oven due to the possibility of ignition.
• When you see smoke, switch off and unplug the microwave oven.
Keep the door closed in order to stifle any flames.
• Do not overcook the food.
• Do not use the microwave oven cavity for storage purposes. Do
not store items, such as bread, cookies, etc. inside.
• Remove metal wire twisties and metal handles from paper or
plastic containers/bags before placing them in the microwave
oven.
• Install or locate this microwave oven only in accordance with the
installation instructions.
• Eggs in the shell and whole hard-boiled eggs should not be
heated in the microwave oven since they may burst, even after
the microwave is shut off.
• Always carry out regular checks of the appliance and the power
cord to ensure no damage is evident. Should there be any
signs that the appliance or the power cord is damaged in the
slightest degree, the entire appliance should be returned to the
Customer Service Department. For your own safety, only use the
accessories and spare parts from the manufacturer which are
suitable for the appliance.
• Only use and store the appliance indoors.
• Do not use the microwave oven near water, in a wet basement/
garage or near a swimming pool.
• Attention! Avoid touching hot surfaces, especially the inside
of the appliance.
• Do not cover any vents of the microwave oven.
• Do not let the cord hang over the edge of the table or counter
and keep it away from the heated surface.
• Failure to maintain the microwave oven clean could lead to
deterioration of the surface that could adversely affect the life of
the appliance and possible result in a hazardous situation.
• The contents of feeding bottles and baby food jars shall
be stirred or shakes and the temperature checked before
consumption, in order to avoid burns.
18 • English

• Attention: heating of beverages in the microwave oven can result
in delayed eruptive boiling. Therefore always place a plastic
or ceramic spoon in the cup. Be careful when handling the
container.
• The appliance is not intended to be operated by means of an
external timer or separate remote-control system.
• Always use the appliance on a secure, dry, level surface.
• Before plugging into a socket, check that the voltage in your
home corresponds with the voltage printed on the appliance.
• Never leave the appliance unattended when in use.
• For your own safety, only use the accessories and spare parts
from the manufacturer which are suitable for the appliance.
• Never unplug it from the socket by pulling on the cable.
• Always ensure that your hands are dry before handling the plug,
switch or power cord.
• Should you decide not to use the appliance anymore, make it
inoperative by cutting the power cord after removing the plug
from the socket. We also recommend making all potentially
dangerous parts of the appliance harmless, particularly for
children who might be tempted to play with it.
• Before moving the appliance, make sure it is switched of. Use
both hands when moving the appliance.
• Never immerse any part of the main body, lid, power cord and
plug in water or any other liquid to protect against electrical
hazards.
• If the appliance is used for other purposes than intended, or is it
not handled in accordance with the instruction manual, the full
responsibility for any consequences will rest with the user. Any
damages to the product or other things are not covered by the
warranty.
• Be careful with the following materials if they can be used in the
microwave oven:
- aluminium foil yes*
- paper yes**
- cling film yes
- aluminium tray no
- microwave dishes yes
- heatproof plastic yes
- unglazed pottery no
- metal cooking utensils no
- ovenproof glass and ceramics yes
English • 19

- normal glass yes
- metallic twists no
- plate with metallic decoration no
- mercury thermometer no
- closed jar no***
- bottle with narrow neck no
- roasting bags yes
* By covering thinner parts of foods (such as chicken legs), you
prevent them from cooking too quickly.
** Use undecorated kitchen paper to cover food and to absorb
grease.
*** Remove the lid and make sure the jar is not heated too long.
The jar may break.
• Legislation requires that all electrical and electronic
equipment must be collected for reuse and recycling.
Electrical and electronic equipment marked with the
symbol indicating separate collection of such equipment
must be returned to a municipal waste collection point.
20 • English

appliance description
2
before first use
3
Before you use the appliance for the first time, please do as follows: Carefully unpack the appliance and remove all the
packaging material. Keep the material (plastic bags and cardboard) out of reach of children. Check the appliance after
unpacking for any damage, possible from transportation. Check that the voltage in your home corresponds with the voltage
printed on the appliance and plug it in a socket. Follow the installation instructions in chapter 17 for installing the microwave
oven.
Clean the microwave oven and the accessories with warm water and a mild detergent. Rinse well and dry thoroughly.
Using the microwave oven may cause interference to your radio or TV reception. Place the microwave oven therefore as far
away from such devices as possible. Do not place the microwave oven near a heat source.
1. Display
2. Control panel
3. Door open button
4. Grill rack (only to be used in grill/convection function)
5. Turntable ring assembly
6. Turntable shaft
7. Glass tray
8. Door with safety interlock system
9. Observation window
2.1 Oven function knob
2.2 Turn knob for adjusting or choosing auto menu
2.3 START/ + 30 SEC button
2.4 STOP/reset button
English • 21
9
8
7
6 5
1
2
4
3
2.1
2.2
2.3
2.4

setting the clock
4
setting the kitchen timer
5
cooking in the microwave
6
As soon as the microwave oven is plugged in, it will display 0:00 and the buzzer will ring once.
• Turn the oven function knob to
. The display shows 00:00.
• Press the button
, the hours will flash.
• Turn to adjust the hour. The input should be between 0-23 (24 hour).
• Press the button
again, the minutes will flash.
• Turn to adjust the minutes. The input should be between - 0-59.
• Press the button
again to confirm the time. The colon “:” will blink.
- If the clock is not set, it would not function when powered. The display will show 0:00.
- If you press the button
during the process of setting the clock the microwave oven will return to the previous setting.
• Turn the oven function knob to
. The display shows 00:00.
• Turn and 00:00 blinks in the display. The kitchen timer can be set.
• Press the button
and the display shows 00:00.
• Turn to adjust the cooking time. The maximum time is 95 minutes.
• Press the button
to confrum the setting.
• When the set time has ended, the buzzer will ring 5 times and the display will return to the current time.
• Turn the oven function knob to
. In the display P100 flashes.
• Turn to change the power. P100-P80-P50-P30-P10.
• Press the button
to confirm the power.
• Turn to adjust the cooking time. The cooking time can be set from 0:05 to 95:00.
• Press the button
again to confirm the cooking time and start the microwave oven.
Microwave power Application
P10 = 90 Watt Softening butter or ice cream
P30 = 270 Watt Soup, hotchpot or defrosting
P50 = 450 Watt Hotchpot, fish
P80 = 720 Watt Rice, fish, chicken, grounded meat
P100 = 900 Watt Heating, milk, boiling water, vegetables, heating beverages
The step quantities for adjusting the time are as follows:
0-1 minute : 5 seconds
1-5 minutes : 10 seconds
5-10 minutes : 30 seconds
10-30 minutes : 1 minute
30-95 minutes : 5 minutes
22 • English

convection with preheating function
7
Cooking with convection lets you cook the food as in a traditional oven. The microwave is not used. It is recommended that
you should preheat the oven to the necessary temperature before placing the food in the oven.
• Turn the oven function knob to
. In the display 130°C flashes.
• Turn to change the temperature. The temperature can be set from 130 to 220°C.
• Press the button
to confirm the temperature.
• Press the button
again to start the preheating. When the preheating temperature is reached, the buzzer will ring twice
to remind you to place the food in the oven. The preheated temperature is displayed and will flash.
• Place the food in the oven, close the door and use to set the desired cooking time. The maximum is 95 minutes.
• Press the button
to start the baking.
convection without preheating
8
• Turn the oven function knob to . In the display 130°C flashes.
• Turn to change the temperature. The temperature can be set from 130 to 220°C.
• Press the button
to confirm the temperature.
• Turn to adjust the cooking time. The maximum is 95 minutes.
• Press the button
to start the baking.
grill
9
• Tunr the oven function knob to . In the display G flashes.
• Turn to set the desired grilling time. The maximum is 95 minutes.
• Press the button
to start the grilling.
Extra: If half the grill time passes, the oven will ring twice. This is normal. For a better grilling result, you should turn the food over. Close the
door and press
again to continue grilling.
combination cooking
10
• Turn the oven function knob to - - or . In the display blinks respectively C-1, C-2, C-3 or C-4.
• Turn to set the desired time. The maximum is 95 minutes.
• Press the button
to start the program.
Combination settings
Display Microwave Grill Convection
C-1
� �
C-2
� �
C-3
� �
C-4
� � �
quick start
11
• Press the button to cook with full power (900 Watt) for 30 seconds. Each press on the same button increases the
time with 30 seconds. The maximum is 95 minutes.
or
• Press during the use of the microwave, grill, convection, combination setting and defrosting on time the button
to
increase the cooking time full power with 30 seconds. When pressed repeatedly on the same button the time increases
with 30 seconds.
English • 23

defrosting
12
• Turn the oven function knob to to defrost by weight. The display shows dEF1.
• Turn to select the weight of the food. The weight should be between 100 and 2000 gram.
• Press the button to start defrosting.
• Turn the oven function knob to
to defrost by time. In the display appears dEF2.
• Turn to select the desired defrosting time. The maximum time is 95 minutes.
• Press the button to start defrosting.
auto menu
13
• Turn the oven function knob to . In the display A1 blinks.
• Turn to the right to select the desired menu and A 1, A 2, A 3..... A 10 will be displayed.
• Press the button to confirm the menu.
• Turn
to select the desired weight or portion in the menu.
• Press the button to start the menu.
See the next page for the overview of the auto menus.
parental control
14
This microwave oven has parental control. You can block the control panel so your child can not accidentily activate the
microwave oven.
Activating the lock-out:
Press the button
for 3 seconds. A long beep will sound and the indicator lights up. The display will show the current
time when set.
De-activating the lock out:
To deactivate the lock out, press the button
for 3 seconds. A long beep will sound and the indicator disappears.
24 • English

Overview auto menu
Menu Weight (g) Display Power
A 1
REHEAT
150 g 150
MICROWAVE P100
250 g 250
350 g 350
450 g 450
600 g 600
A 2
POTATOES
1 (± 230 g) 1
MICROWAVE P1002 (± 460 g) 2
3 (± 690 g) 3
A 3
MEAT
150 g 150
MICROWAVE P100
300 g 300
450 g 450
600 g 600
A 4
VEGETABLES
150 g 150
MICROWAVE P100350 g 350
500 g 500
A 5
FISH
150 g 150
MICROWAVE P80
250 g 250
350 g 350
450 g 450
650 g 650
A 6
PASTA
50 g (with 450 ml. water) 50
MICROWAVE P80100 g (with 800 ml. water) 100
150 g (with 1200 ml. water) 150
A 7
SOUP
200 g 200
MICROWAVE P100400 g 400
600 g 600
A 8 CAKE 475 g 475 Preheat on 160°C
A 9
PIZZA
200 g 200
C-4300 g 300
400 g 400
A 10
CHICKEN
500 g 500
C-4
750 g 750
1000 g 1000
1200 g 1200
English • 25

problems & solutions
16
Check the solutions below before contacting your supplier or our technical department in case of a problem.
Problem Solution
The microwave oven does not
start
Is the power cord plugged in?
Is the fuse or circuit breaker blown?
The microwave oven does not
heat
Did the door close correctly? Open the door and shut it well again.
The turntable makes noise Clean the roller ring for the turntable and the bottom of the microwave oven.
The food is not well defrosted Has the power and time been set correctly? Did you stir or turn the food at least
once whilst defrosting?
installation instructions
17
• The safety during use can only be guaranteed when the hob is installed correctly and according to the regulations. The
installer is responsible for any damage caused by a faulty installation.
• The electrical connection must be made by a qualified electricien. This person is aware of the national and local
regulations the installation must comply with.
• The appliance falls under protection class I and can only be used in combination with a grounding conductor connection.
The manufacturer accepts no responsibility for any malfunction or damage caused by incorrect electrical installations.
• The appliance must be connected to a fixed installation and the means of disconnecting it from the fixed installation
must be installed according to the installation instructions.
• The connection cable must hang freely. Do not tie the power cable or pass it along sharp edges. It must be positioned so
that it does not touch any of the hot parts of the microwave oven.
• The connection point, the wall socket and/or plug must always be accessible.
• The cabinet into which the microwave is fitted, must be heat resistant (> 75°C).
• Ensure that the cabinet into which the microwave oven is installed is secure. For example, by mounting it to the adjoining
elements.
• Damage caused by incorrect connection, incorrect use or incorrect fitting is not covered by the guarantee.
Attention: any change to the appliance’s interior, including fitting and changing the power cable, must only be performed
by a qualified electricien.
cleaning & maintenance
15
Before cleaning the microwave oven be sure to switch it off and unplug it. Leave the microwave ovento cool down
completely.
Interior
Clean the inside of the appliance after every use. Use a damp cloth. For a thorough cleaning use warm soapy water and dry
the interior.
Accessories
Clean the separate accessories such as the turntable, the roller stay and the grill rack with warm soapy water. These
accessories can also be cleaned in the dishwasher. Thoroughly dry everything before using them again.
Exterior
Clean the exterior of the appliance with a damp cloth or sponge. If necessary use a mild detergent. Also clean the door and
the door seal.
26 • English
ELECTRICAL CONNECTION
Check that the voltage in your home corresponds with the voltage printed on the appliance.
These groups in the meter must be secured with at least 16 amps each. The connection cable must have a cross-section of
at least 2.5mm² and must have a length of at least 1.5 m. When the cable is too short, you have no room to already connect
the oven and place it against the wall before plugging it in.

English • 27
INSTALLATION DIMENSIONS
In the drawing below, all the dimensions are displayed in mm.
Installation Hole
Screw B
THE FIITING OF THE APPLIANCE
• Check that the cabinet and the space for the microwave oven meet the dimension and ventilation requirements.
• Slide the microwave oven in the cabinet. Note: Make sure the cable is not stuck and does not lie on top of the microwave
oven.
• Open the door of the microwave oven. Use the provided screw to fasten the microwave oven to the cabinet and place
the plastic cap on the screw.
• Close the microwave oven door and plug the appliance in.
• The microwave oven is now ready for use.
600
min.
550
min.
45
560
595
450
388
380
20
min.
850
* not suitable for built-under

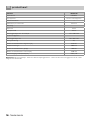
product fiche
18
Manufacturer INVENTUM
Model number IMC6032F
Type of appliance built-in microwave oven
Number of oven cavities 1
Heat source per oven cavity electric
Execution
Capacity 32 liter
Turn table Ø 315 mm
Dimensions (wxdxh) in mm - internal 335 x 340 x 230
Technical specifications
Dimensions (wxdxh) in mm 595 x 468 x 388
Nett weight in kg 22,1
Power consumption -microwave [W] 1550 watt
Microwave power 900 watt
Power consumption - grill [W] 1100 watt
Power consumption - convection [W] 2500 watt
Rated voltage [V] / frequency [Hz] 230V/ ~ 50
Remark: on the rating label - which can be found on the inside of the appliance - you will find the technical specifications of
the appliance.
28 • English

English • 29

30 • Nederlands
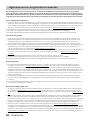
Hoe belangrijk service is, hoeven we je niet te vertellen. We ontwikkelen onze producten zodat je er jarenlang
onbezorgd plezier van kan hebben. Ontstaat er toch een probleem, dan vinden we dat je direct een oplossing mag
verwachten. Daarom bieden we je op onze producten een omruilservice, bovenop de rechten en vorderingen die je
op grond van de wet toekomen. Door een product of onderdeel om te ruilen, besparen we je tijd, moeite en kosten.
2 jaar volledige fabrieksgarantie
1. Op alle producten van Inventum krijg je als consument standaard 2 jaar volledige fabrieksgarantie. Binnen deze periode
wordt een defect product of onderdeel altijd gratis omgeruild voor een nieuw exemplaar. Om aanspraak te maken op de
2 jaar volledige fabrieksgarantie, kun je teruggaan naar de winkel waar je het product hebt gekocht of contact opnemen
met de consumentenservice van Inventum via het contactformulier op www.inventum.eu/service-aanvraag.
2. De garantieperiode van 2 jaar begint te lopen op de datum van aankoop van het product.
3. Voor het recht op garantie dien je een kopie van het originele aankoopbewijs te kunnen overleggen.
4. De garantie geldt uitsluitend bij normaal huishoudelijk gebruik van de Inventum producten binnen Nederland.
5 jaar Inventum garantie
1. Op de meeste groot huishoudelijke apparatuur en een selectie klein huishoudelijke producten biedt Inventum de 5
jaar Inventum garantie. Deze 5 jaar Inventum garantie bestaat uit de 2 jaar volledige fabrieksgarantie en daarna 3 jaar
aanvullende garantie. Het enige dat je hoeft te doen voor het recht op 3 jaar aanvullende garantie is het product te
registreren binnen 45 dagen na aankoop. In de volgende paragraaf lees je meer over het registreren van het product.
2. Voor de 5 jaar Inventum garantie geldt dat een defect product of onderdeel gedurende de eerste 2 jaar altijd gratis wordt
omgeruild voor een nieuw exemplaar. Gedurende het 3e tot en met het 5e jaar betaal je alleen de omruilkosten. De
actuele omruilkosten kun je terugvinden op www.inventum.eu/omruilkosten.
3. Om aanspraak te maken op de 5 jaar Inventum garantie kun je teruggaan naar de winkel waar je het product hebt gekocht
of contact opnemen met de consumentenservice van Inventum via het formulier op www.inventum.eu/service-
aanvraag.
4. De garantieperiode van 5 jaar begint te lopen op de datum van aankoop van het product.
5. Voor het recht op garantie dien je een kopie van het originele aankoopbewijs te kunnen overleggen.
6. De garantie geldt uitsluitend bij normaal huishoudelijk gebruik van de Inventum producten binnen Nederland.
Productregistratie
1. De 3 jaar aanvullende garantie is eenvoudig en kosteloos te regelen door het product binnen 45 dagen na aankoop
te registreren via de website www.inventum.eu/garantieregistratie. Wanneer je het product niet binnen 45 dagen na
aankoop hebt geregistreerd, heb je nog tot 2 jaar na aankoop de tijd om dit te regelen. Er zijn dan wel kosten aan deze
registratie verbonden. De eenmalige registratiekosten bedragen € 89,- voor elk afzonderlijk product. Registreren is alleen
mogelijk voor producten waar de 5 jaar Inventum garantie op van toepassing is. Of het product in aanmerking komt voor
de 5 jaar Inventum garantie vind je in de gebruiksaanwijzing van het product en bij de informatie over het product op de
website van Inventum.
2. De garantieperiode begint steeds te lopen vanaf de datum van aankoop van het product. Ook wanneer het product
pas later voor aanvullende garantie wordt geregistreerd, wordt de garantieperiode vanaf de originele aankoopdatum
berekend.
3. De 3 jaar aanvullende garantie kun je alleen aanvragen als je beschikt over een kopie van het originele aankoopbewijs en
het Inventum 5 jaar garantiecertificaat.
Groot huishoudelijke apparatuur
1. Storingen of defecten aan groot huishoudelijke apparatuur (vrijstaand- en inbouw witgoed) kunnen worden gemeld via
het formulier op www.inventum.eu/service-aanvraag, telefonisch bij de consumentenservice van Inventum of via de
winkel waar je de apparatuur hebt gekocht. Het telefoonnummer van de consumentenservice vind je op www.inventum.
eu.
2. Bij gemelde storingen of defecten aan groot huishoudelijke apparatuur heeft Inventum de mogelijkheid om ter plaatse
bij de consument in Nederland een witgoedmonteur het defecte apparaat te laten onderzoeken en vervolgens een
reparatie uit te laten voeren. De consumentenservice van Inventum kan ook besluiten dat het apparaat wordt omgeruild.
3. Als je een storing of defect aan groot huishoudelijke apparatuur meldt in de eerste 2 jaar vanaf de datum van aankoop,
brengt Inventum geen kosten in rekening voor omruilen, voorrijden, onderdelen, materiaalgebruik en arbeidsloon.
4. Als je het product op de hiervoor beschreven wijze hebt geregistreerd op www.inventum.eu/garantie-registratie en je
vervolgens een storing aan groot huishoudelijke apparatuur meldt in het 3e t/m 5e jaar vanaf de datum van aankoop, dan
is de 5 jaar Inventum garantie van toepassing en wordt het apparaat kosteloos gerepareerd of omgeruild. Je bent dan bij
reparatie of omruiling van het apparaat alleen omruilkosten verschuldigd. De actuele omruilkosten kun je terugvinden op
www.inventum.eu/omruilkosten. Indien je het product niet hebt geregistreerd, dan is de 3 jaar aanvullende garantie niet
van toepassing.
algemene service- en garantievoorwaarden

5. Bij een melding van een storing of defect zal een monteur binnen 1 werkdag contact opnemen voor het maken van een
bezoekafspraak. Bij melding in het weekend of op feestdagen is dit de eerstvolgende werkdag.
6. Indien je een storing of defect meldt via het formulier op www.inventum.eu/service-aanvraag, word je via mobiele
berichten en e-mail op de hoogte gehouden van de voortgang.
7. De garantieperiode begint te lopen op de datum van aankoop van het product.
8. Voor het recht op garantie dien je een kopie van het originele aankoopbewijs en het Inventum 5 jaar garantiecertificaat te
kunnen overleggen.
9. De garantie geldt uitsluitend bij normaal huishoudelijk gebruik van de Inventum producten binnen Nederland.
Storingen of defecten buiten de garantieperiode
1. In geval van storingen of defecten aan klein huishoudelijke apparatuur of groot huishoudelijke apparatuur buiten de
garantieperiode, kan hiervan melding worden gemaakt bij de consumentenservice via het contactformulier www.
inventum.eu/service-aanvraag of door te bellen met de consumentenservice.
2. De consumentenservice kan je vragen het product voor onderzoek of reparatie op te sturen. De kosten van verzending
zijn voor jouw rekening.
3. Aan het onderzoek naar de mogelijkheid tot repareren zijn kosten verbonden. Je moet hier vooraf toestemming voor
geven.
4. Bij groot huishoudelijke apparatuur kan Inventum op jouw verzoek een witgoedmonteur sturen. De voorrijkosten,
onderdeel- en materiaalkosten en arbeidsloon worden dan aan je in rekening gebracht.
5. In geval van opdracht tot reparatie moeten de reparatiekosten vooraf worden voldaan. Bij reparatie door een
witgoedmonteur, dienen de kosten van de reparatie ter plaatse bij de monteur, bij voorkeur via pinbetaling, te worden
afgerekend.
Uitgesloten van garantie
1. De hiervoor genoemde garanties gelden niet in geval van:
• normale slijtage;
• onoordeelkundig of oneigenlijk gebruik;
• onvoldoende onderhoud;
• het niet in acht nemen van de bedienings- en onderhoudsvoorschriften;
• ondeskundige montage of reparatie door derden of door de consument zelf;
• door de consument toegepaste niet originele onderdelen;
• zakelijk of bedrijfsmatig gebruik;
• het serienummer en/of rating-label is verwijderd.
2. Tevens geldt de garantie niet voor normale verbruiksartikelen, zoals:
• kneedhaken, bakblikken, (koolstof)filters, etc.;
• batterijen, lampjes, koolstoffilters, vetfilters enz.;
• externe verbindingskabels;
• glazen accessoires en glazen delen zoals ovendeuren;
• en soortgelijke zaken.
3. Buiten de garantie vallen transportschades, voor zover deze niet door Inventum zijn veroorzaakt. Controleer daarom je
nieuwe apparatuur voordat je deze in gebruik neemt. Als je beschadigingen aantreft, dien je deze binnen 5 werkdagen na
aankoop te melden bij de winkel waar je het product hebt gekocht, of bij de consumentenservice van Inventum via het
contactformulier op de website www.inventum.eu/service-aanvraag. Indien transportschades niet binnen deze termijn
worden gemeld, aanvaardt Inventum geen enkele aansprakelijkheid ter zake.
4. Van garantie en/of vervanging zijn uitgesloten: defecten aan, verlies en beschadiging aan het apparaat als gevolg van een
gebeurtenis die gewoonlijk verzekerd is onder de inboedelverzekering.
Van belang om te weten
1. Vervanging of herstel van een defect product of een onderdeel daarvan leidt niet tot verlenging van de oorspronkelijke
garantietermijn.
2. Vervangen onderdelen, verpakkingsmateriaal en omgewisselde apparaten worden meegenomen door de
witgoedmonteur en worden eigendom van Inventum.
3. Indien een klacht ongegrond is, komen alle kosten die daardoor zijn ontstaan voor rekening van de consument.
4. Na verloop van de garantietermijn worden alle kosten voor herstel of vervanging, inclusief administratie-, verzend- en
voorrijkosten aan de consument in rekening gebracht.
5. Inventum is niet aansprakelijk voor schade die is ontstaan als gevolg van onjuiste inbouwsituaties.
6. Inventum is niet aansprakelijk voor schade veroorzaakt door van buiten het apparaat ontstane oorzaken, tenzij deze
aansprakelijkheid voortvloeit uit dwingendrechtelijke bepalingen.
7. Op deze garantie- en servicevoorwaarden is Nederlands recht van toepassing. Geschillen zullen uitsluitend worden
berecht door de bevoegde Nederlandse rechter.
Nederlands • 31

We do not need to remind you of the importance of service. After all, we develop our products to a standard so that
you can enjoy them for many years, without any concerns. If, nevertheless, there is a problem, we believe you are
entitled to a solution straight away. Hence our products come with an exchange service, on top of the rights and
claims you are entitled to by law. By exchanging a product or part, we save you time, effort and costs.
2-year full manufacturer’s warranty
1. Customers enjoy a 2-year full manufacturer’s warranty on all Inventum products. Within this period, a faulty product
or part will always be exchanged for a new model, free of charge. In order to claim under the 2-year full manufacturer’s
warranty, you can either return the product to the shop you bought it from or contact the Inventum costumer service
department via the form at www.inventum.eu/service-aanvraag.
2. The 2-year warranty period starts from the date the product is bought.
3. In order to claim under the warranty, you must produce a copy of the original receipt.
4. The warranty applies only to normal domestic use of Inventum products within the Netherlands.
5-year Inventum warranty
1. Inventum offers a 5-year warranty on most large domestic appliances and a selection of small domestic appliances.
This 5-year Inventum warranty consists of a 2-year full manufacturer’s warranty, extended by a further 3-year warranty.
The only thing you need to do to qualify for the 3-year extended warranty is to register the product within 45 days of
purchase. You can read more about registering the product in the following paragraph.
2. In accordance with the 5-year Inventum warranty provisions, a faulty product or part will always be exchanged for a new
model during the first 2 years under the warranty. During the 3rd to 5th year under the warranty, you will only pay the costs
of exchange. The current costs of exchange are listed at www.inventum.eu/omruilkosten.
3. In order to claim under the 5-year Inventum warranty, you can either return the product to the shop you bought it from or
contact the Inventum costumer service department via the form at www.inventum.eu/service-aanvraag.
4. The 5-year warranty period starts from the date the product is bought.
5. In order to claim under the warranty, you must produce a copy of the original receipt.
6. The warranty applies only to normal domestic use of Inventum products within the Netherlands.
Product registration
1. The 3-year extended warranty is easy to obtain, free of charge, by registering the product within 45 days of purchase, via
the website www.inventum.eu/garantie- registratie. If you did not register the product within 45 days of purchase, you
can still do so up to 2 years after the purchase date. However, there will be a charge. The one-off registration charge is €
89 for each separate product. Registration is possible only for products that are subject to the 5-year Inventum warranty.
Whether the product qualifies for the 5-year Inventum warranty is stated in the product user manual and in the product
information sheet, on Inventum’s website.
2. The warranty period always starts from the date the product is bought. If the product is registered for the extended
warranty at a later date, the warranty period still starts from the original date of purchase.
3. The 3-year extended warranty can only be applied for if you are in the possession of a copy of the original receipt and the
Inventum 5-year warranty certificate.
Large domestic appliances
1. Breakdowns or faults in large domestic appliances (separate and built-in white goods) can be registered via the form at
www.inventum.eu/service-aanvraag, by calling the Inventum costumer service department or in the store where you
bought the device. The telephone number of the costumer service department can be found at www.inventum.eu.
2. In the event of breakdowns or faults in large domestic appliances, Inventum will have the option to have a service
engineer inspect the faulty device onsite at the customer in the Netherlands and to carry out repairs, there and then. The
Inventum customer service department can also decide to have the device exchanged.
3. If you suffer a breakdown or fault in a large domestic appliance during the first 2 years from the date of purchase,
Inventum will not charge any costs for the exchange, call-out or for parts and labour.
4. If you registered the product as described before at www.inventum.eu/garantie-registratie and you subsequently report
a breakdown of a large domestic appliance in the 3rd to 5th year of the date of purchase, the 5-year Inventum warranty
applies and the device will be repaired or exchanged, free of charge. In the event of a repair or exchange of the device,
you only pay the costs of exchange. The current costs of exchange are listed at www.inventum.eu/omruilkosten. If you did
not register the product, the 3-year extended warranty does not apply.
5. When reporting a breakdown or fault, a service engineer will contact the customer within 1 working day in order to make
an appointment. When the report is made in a weekend or during a public holiday, this will be the next working day.
6. If you report a breakdown or fault via the form at www.inventum.eu/service-aanvraag, you will be kept informed of the
progress via mobile messages and e-mail.
7. The warranty period starts from the date the product is bought.
general terms and conditions of service and warranty
32 • English

English • 33
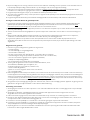
8. In order to claim under the warranty, you must produce a copy of the original receipt and the Inventum 5-year warranty
certificate.
9. The warranty applies only to normal domestic use of Inventum products within the Netherlands.
Breakdowns or faults outside the warranty period
1. Breakdowns or faults in small or large domestic appliances outside the warranty period, can be reported to the costumer
services department via the form at www.inventum.eu/service-aanvraag or by calling the costumer services department.
2. The costumer services department may ask you to send the product for inspection or repair. The costs of dispatch will
be at your expense.
3. The inspection to establish whether repair is possible involves a charge. You need to grant your permission for this, in
advance.
4. In the event of a large domestic appliance, Inventum, at your request, can send out a service engineer. In that case, you
will be charged the call-out costs, as well as parts and labour.
5. In the event of an instruction to repair, the repair costs must be paid in advance. In the event of a repair by a service
engineer, the costs of the repair must be settled with the engineer onsite, preferably by means of PIN payment.
Warranty exclusions
1. The following is excluded from the aforesaid warranties:
• normal wear and tear;
• improper use or misuse;
• insufficient maintenance;
• failure to comply with the operating and maintenance instructions;
• unprofessional installation or repairs by third parties or the customer himself;
• non-original parts used by the customer;
• use for commercial or business purposes;
• removal of the serial number and/or rating label.
2. In addition, the warranty does not apply to normal consumer goods, such as:
• dough hooks, baking tins, (carbon) filters, etc.;
• batteries, bulbs, carbon filters, fat filters etc.;
• external connection cables;
• glass accessories and glass parts such as oven doors;
• and similar items.
3. Transport damage not caused by Inventum is also excluded. Therefore, inspect your new device before starting to use it.
If you detect any damage, you must report this to the store where you purchased the product within 5 working days, or to
the Inventum customer service department via the form at www.inventum.eu/service-aanvraag. If transport damage is
not reported within this period, Inventum does not accept any liability in this respect.
4. The following are excluded from warranty and/or replacement: faults, loss of and damage to the device as a result of an
event that is normally insured under the home contents insurance.
Important to know
1. The replacement or repair of a faulty product, or a part thereof, does not lead to an extension of the original warranty
period.
2. Parts that have been replaced, packaging material and exchanged devices are taken back by the service engineer and
become the property of Inventum.
3. If a complaint is unfounded, all costs arising from it will be at the customer’s expense.
4. Following expiry of the warranty period, all costs of repair or replacement, including administration costs, dispatch and
call-out charges, will be charged to the customer.
5. Inventum cannot be held liable for damage as a result of devices built in incorrectly.
6. Inventum cannot be held liable for damage caused by external events, unless this liability arises from mandatory
statutory provisions.
7. These warranty and service provisions are governed by Dutch law. Disputes will be settled exclusively by the competent
Dutch court.

34 •

• 35

IMC6032F/02.0319V
Wijzigingen en drukfouten voorbehouden/ Änderungen und Druckfehler vorbehalten/
Sous réserve de modification / Modifications and printing errors reserved
Inventum Huishoudelijke
Apparaten B.V.
Meander 901
6825 MH Arnhem
info@inventum.eu
www.inventum.eu
twitter.com/inventum1908
facebook.com/inventum1908
youtube.com/inventum1908
persoonlijke verzorgingklein huishoudelijk witgoed inbouwwitgoed vrijstaand
-
 1
1
-
 2
2
-
 3
3
-
 4
4
-
 5
5
-
 6
6
-
 7
7
-
 8
8
-
 9
9
-
 10
10
-
 11
11
-
 12
12
-
 13
13
-
 14
14
-
 15
15
-
 16
16
-
 17
17
-
 18
18
-
 19
19
-
 20
20
-
 21
21
-
 22
22
-
 23
23
-
 24
24
-
 25
25
-
 26
26
-
 27
27
-
 28
28
-
 29
29
-
 30
30
-
 31
31
-
 32
32
-
 33
33
-
 34
34
-
 35
35
-
 36
36


in andere talen
- English: Inventum IMC6032F User manual
Gerelateerde artikelen
-
Inventum MN325CS Handleiding
-
Inventum MN250C Handleiding
-
Inventum MN255C Handleiding
-
Inventum MN305C de handleiding
-
Inventum MN307C Handleiding
-
Inventum IMC6125F Handleiding
-
Inventum MN306C de handleiding
-
Inventum MN256C de handleiding
-
Inventum MN260C Mikrowelle de handleiding
-
Inventum IMC6044RK Handleiding