
RS 110 C SB
www.burg.bizwww.burg.biz
BURG-WÄCHTER KG
Altenhofer Weg 15
58300 Wetter
Germany
www.burg.biz
RS 110 C SB
de
Bedienungs- und
Montageanleitung
en
Assembly and
user manuals
fr Instruction de montage
et mode d’emploi
nl Montage- en
gebruiksaanwijzing
it Istruzioni d’uso
e di montaggio
2 RS 110 C SB
Deutsch 4
English 7
Français 10
Nederlands 13
Italiano 16
Weitere Sprachen auf:
www.burg.biz
Further languages at:
www.burg.biz
Language
BA RS 110 C SB, EBA 210722

Bedienung
Öffnen
Zum Öffnen drehen Sie die vier Einstellräder
entlang der Markierung auf Ihren indivi-
duell eingestellten Code bzw. auf den
voreingestellten Werkscode 0-0-0-0.
Die Einstellräder stoppen automatisch bei
Null, wenn sie in Richtung Schiebebolzen
gedreht wer den. Diese Funktion hilft
dabei, das Schloss bei ungünstigen
Lichtverhältnissen zu öffnen, indem man die
Klicks der drehenden Einstellräder zählt.
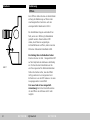
Einstellung Ihres individuellen Codes:
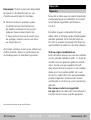
Drücken Sie den in Abb. 1 dargestellten Stift
auf der Kopfseite des Gehäuses vollständig
ein. Drehen Sie die Einstellräder auf die
von Ihnen gewünschte Zahlenkombination.
Stellen Sie hierbei sicher, dass die Ziffern
mittig positioniert und eingerastet sind.
Entlasten sie nun den Stift sodass er in seine
Ausgangsposition zurückfährt.
Der neue Code ist nun eingestellt.
Anmerkung: Bei Verlust des Zahlencodes
ist das Öffnen des Schlosses nicht mehr
möglich.
3 RS 110 C SB 4 | Deutsch RS 110 C SB
Structure
Abb. 1

RS 110 C SB Deutsch | 5
Schließen
Verdrehen Sie die Zahlenräder zueinander.
Anmerkung: Der Schiebebolzen kann
sowohl in geschlossener als auch in
geöffneter Position verriegelt werden.
Montageanleitung
Anmerkung: Zum vorübergehenden
Anbringen oder zu Testzwecken des
Zahlenschlosses ist es sinnvoll normale
Befestigungsschrauben zu verwenden.
Die endgültige Montage sollte mit den
mitgelieferten Sicherheitsschrauben
erfolgen.
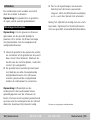
1 Halten Sie den Schieberiegel an die
gewünschte Position und prüfen
Sie, ob der Schiebebolzen und
das Tor / die Tür ordnungsgemäß
funktionieren. Sobald Sie die korrekte
Positionierung gefunden haben,
markieren Sie die Stelle, an der die
4 Schrauben angebracht werden sollen.
2 Bitte befestigen Sie den Schiebebolzen
mit den 4 beiliegenden Schrauben.
Beachten Sie hierbei, dass sich das
Gehäuse beim Anziehen nicht verzieht.

RS 110 C SB English | 7 6 | Deutsch RS 110 C SB
Anmerkung: Je nach Untergrund macht
es Sinn ein kleines Loch vorzubohren
um die Montage zu erleichtern. Der Bohrer
sollte entsprechend dem Untergrund und
dem Schraubendurchmesser ausgewählt
werden. Evtl. sind Dübel notwendig.
3 Justieren Sie nun das Gegenstück
analog zu den Angaben oben. Vor dem
nalen Befestigen führen Sie bitte eine
Funktionsprüfung durch.
Bitte reinigen Sie das Zahlen schloss bei
Bedarf mit einem feuchten Tuch. Ggfs. den
Schließmechanismus mit einem geeigneten
Schmiermittel behandeln.
Irrtum und Änderungen vorbehalten.
Operation
Open
To open, rotate all 4 dials to the pre-set
combination along the centre line.
The pre-set factory combination is 0-0-0-0.
The dials stop automatically at 0 if they
are turned towards the side bolt. This
fuctionality is helpful when the lock is
opened in poor light, as the clicks of the
turning dials can be counted.
Set your own combination
On the end of the locking bolt, fully
depress the small silver pin. (Fig. 1)
Whilst holding in the pin, rotate the 4
dials to your chosen secret combi nation.
Ensure the numbers are positioned
centrally and have clicked into position.
Release the pin to the original position.
Memorise and record the new combi nation
for future reference.
The new code is now set.
Note: If the new code is lost, the lock
cannot be opened any more.

8 | English RS 110 C SB RS 110 C SB English | 9
Lock
The combination must be scrambled by
rotating the 4 dials. The slide bolt can be
latched both while open and closed.
Fitting instructions
Note: Regular screws can be used to tem-
porally x the locking bolt before nally
xing using the security screws supplied.
It is important to drill a small pilot hole for
the screws as they cannot be unscrewed
once used.
1 Hold the slide bolt in the required
position and check the slide bolt and the
gate / door will function correctly. Once
positioned correctly, mark the location
of the 4 screw holes.
2 The slide bolt should be mounted using
all the 4 corner xing holes on the back
plate. Drill a small pilot hole for the
screws. Screws should be tight without
distorting the back plate.
Depending on the material of the installation
place it may make sense to drill small gui-
ding holes to facilitate tting. Drills should
be chosen according to material and screw
diameter. It may be advantageous to use
dowels.
3 Hold the counterpiece in the required
position and check the slide bolt and the
gate / door will open and close correctly.
Mark the location of the 2 screw holes
and drill small pilot holes. Fix in position
using the screws.
Maintenance: It is recommended the
dials are rotated weekly to keep them
moving freely. Please clean the lock with a
wet cloth if required, and use a common
lubricant for the locking mechnism.
Mistakes and changes reserved.

10 | Français RS 110 C SB RS 110 C SB Français | 11
Pour verrouiller
Il faut brouiller la combinaison choisie en
tournant les 4 cadrans.
NB: Le boulon coulissant peut être
verrouillé tant dans la position fermée
que dans la position ouverte.
Guide de montage
NB: Des vis ordinaires peuvent être utilisés
pour xer temporairement le boulon de
verrouillage avant la xation nale par les
vis de sécurité fournies. Il est important de
percer de petits trous de guidage pour les
boulons car, une fois utilisées, les vis ne
peuvent plus être dévissées.
1 Tenez le boulon coulissant dans la
position voulue et vériez le bon
fonctionnement du boulon coulissant et
de la porte. Après avoir trouvé la position
correcte, marquez l’emplacement des 4
trous de vis.
2 Il convient de monter le bouton
coulissant en utilisant tous les 4 trous
de xation coin dans la plaque dorsale.
Percez de petits trous de guidage pour
les vis. Les vis sont à serrer fermement
sans déformer la plaque.
Opération
Ouvrir
Tournez tous les 4 cadrans le long de la
ligne centrale.
Le préréglage usine est la combinaison
0-0-0-0.
En tournant les cadrans vers le boulon
coulissant, ceux-ci s’arrêtent automati que-
ment à zéro. Ceci permet d’ouvrir la serrure
à un faible éclairage en fonction du nombre
de clicks en tournant les cadrans.
Dénissez votre propre combinaison
Au bout du boulon de verrouillage,
appuyez entièrement la petite goupille
argentée (g. 1). Tout en tenant appuyée
la goupille, tournez les 4 cadrans an
de régler la combinaison choisie par
vous. Rassurez-vous que les chiffres sont
positionnés centralement et enclenchés.
Relâchez la goupille qui retournera en
place initiale. Retenez la nouvelle combi-
naison pour la prochaine utili sation.
Le nouveau code est déni.
Remarque: en cas de perte du nouveau
code il est impossible d‘ouvrir le verrou!

RS 110 C SB Nederlands | 13 12 | Français RS 110 C SB
Operatie
Openen
Draai alle 4 rollen naar de vooraf ingestelde
combinatie langs de middenlijn. De vooraf
in de fabriek ingestelde combinatie is
0-0-0-0.
De rollen stoppen automatisch bij null,
indien deze in richting van de schruifgrendel
worden gedraaid. Deze functie helpt om
het slot te openen bij weinig licht door het
aantal klikken te tellen als de rollen draaien.
Stel uw eigen combinatie in
Druk de kleine zilveren pen aan het uiteinde
van de grendel volledig in (Afb. 1). Draai de
4 rollen naar uw gekozen geheime combi-
natie, terwijl u de pin ingedrukt houdt.
Zorg ervoor dat de nummers in het midden
staan en in hun positie geklikt zijn. Laat
de pin los, zodat die in zijn oorspronkelijke
positie terugkomt. Onthoud de nieuwe
combinatie en sla hem op voor toekomstig
gebruik.
De nieuwe code is nu ingesteld.
Let op: Indien de code niet meer bekend is,
kan het slot niet meer worden geopend.
Remarque: Choisir la perceuse dépendant
du fonds et du diamètre des vis. Les
chevilles peuvent aider le montage.
3 Tenez le verrou en position voulue
et vérier le bon fonctionnement
du boulon coulissant et de la porte.
Indiquez deux emplacements des
2 trous de bis et percez de petits trous
de guidage. Fixez les verrous en place
au moyen des vis.
Au besoin, nettoyer le verrou en utilisant un
chiffon humide. Traiter le méchanisme de
verrouillage avec un lubriant approprié.
Sous réserve d’erreur et de modications.

14 | Nederlands RS 110 C SB RS 110 C SB Nederlands | 15
3 Pas nu de tegenhanger aan overeen-
komstig met die boven genoemde
stappen. Vóór de denitieve bevestiging
a.n.b. u een functionele test uitvoeren.
Reinig het cijferslot als nodig met een voch-
tige doek. Optioneel het sluitmechanisme
met een geschikt smeermiddel behandelen.
Fouten en wijzigingen voorbehouden.
Afsluiten
De combinatie moet worden vervormd
door de 4 rollen te draaien.
Opmerking: De grendel kan in gesloten
of open positie worden geblokkeerd.
Montage-instructies
Opmerking: U kunt gewone schroeven
gebruiken om de grendel tijdelijk te
plaatsen of te testen. De nale montage
zal plaatsvinden met de meegeleverde
veiligheidsschroeven.
1 Houd de grendel in de gewenste positie
en controleer of de grendel en de poort /
deur correct functioneren. Markeer de
locatie van de 4 schroefgaten, nadat die
correct zijn vastgesteld.
2 De grendel moet worden gemonteerd
met behulp van alle 4 meegeleverde
veiligheidsschroeven. De schroeven
moeten goed worden vastgedraaid
zonder de achterplaat te vervormen.
Opmerking: Afhankelijk van de
ondergrond is het aanbevolen kleine
geleidingsgaten voor de schroeven te
boren. De boor moet worden geselecteerd
op basis van de ondergrond en de schroef-
diameter. Eventueel zijn deuvels nodig.

16 | Italiano RS 110 C SB RS 110 C SB Italiano | 17
A questo punto la nuova combinazione
numerica risulta impostata.
Nota: in caso di perdita della combi nazione
personale non è più possibile aprire il
mecanismo.
Chiusura
Dopo la chiusura scomporre la
combinazione numerica girando
disordinatamente tutte e quattro le rotelle.
Annotazione: Il chiavistello scorrevole può
essere bloccato sia in posizione chiusa sia in
quella aperta.
Istruzioni per l’installazione
Annotazione: Per ssare il chiavistello
in modo provvisorio, ancor prima della
sua installazione denitiva con viti di
sicurezza in dotazione, usare le viti abituali.
E’ conveniente realizzare prima piccoli fori
di guida siccome le viti di sicurezza, una
volta avvitati a fondo, non possono essere
più tolti.
1 Collocare il chiavistello scorrevole nella
posizione desiderata e assicurarsi che
esso e il portone / porta si aprono e
chiudono correttamente. Dopo aver
trovato la posizione giusta segnare i
punti per realizzare quattro fori per
le viti.
Operazione
Apertura
Girare tutte e quattro le rotelle e trovare
la combinazione numerica preimpostata
sull’asse centrale.
La combinazione numerica preimpostata
di fabbrica è: 0-0-0-0.
Girando le rotelle in direzione del chia -
vistello scorrevole esse si fermano auto-
maticamente allo zero. Questa caratteristica
aiuta a sbloccare la serratura a visibilità
ridotta calcolando il numero dei click
percepiti durante la rotazione delle rotelle.
Impostare la combinazione personale
Premere a fondo il piccolo perno d’argento
ubicato sull’estremità del chiavistello
(g. 1). Tenere premuto il perno e girare
contestualmente le quattro rotelle no
al raggiungimento della combinazione
numerica personale. Assicurarsi che i
numeri si trovano esattamente sull’asse
centrale e che sono incastrati nella loro
posizione.
Liberare il perno e lasciarlo ritornare
nella sua posizione originaria. Ricordare
e annotare la combinazione numerica
personale!

18 | Italiano RS 110 C SB RS 110 C SB 19
Notizen2 Il chiavistello scorrevole deve essere
installato impegnando tutti e quattro
i fori angolari ubicati nella base piatta.
Realizzare prima piccoli fori di guida per
le viti. Le viti devono essere avvitate a
fondo senza deformare la base piatta.
Anmotazione: Segnare i punti per rea-
lizzare due fori per le viti. Realizzare prima
piccoli fori di guida per le viti. Fissare il dis-
positivo di arresto con le viti.
3 Collocare il dispositivo di arresto nella
posizione desiderata e assicurarsi che il
chiavistello scorrevole e il portone / porta
si aprono e chiudono correttamente.
Manutenzione: Pulire la supercie del
chiavestello con un panno umido. Utilizzare
un lubricante adeguato per il meccanismo
di chiusura.
Errori di stampa o di impaginazione e modiche
tecniche riservate.

20 RS 110 C SB
Notizen
-
 1
1
-
 2
2
-
 3
3
-
 4
4
-
 5
5
-
 6
6
-
 7
7
-
 8
8
-
 9
9
-
 10
10
-
 11
11


in andere talen
- English: BURG WACHTER RS 110 C SB User manual
- italiano: BURG WACHTER RS 110 C SB Manuale utente
- français: BURG WACHTER RS 110 C SB Manuel utilisateur
- español: BURG WACHTER RS 110 C SB Manual de usuario
- Deutsch: BURG WACHTER RS 110 C SB Benutzerhandbuch
Andere documenten
-
Abus FTS 3002 Installation and Operation Instructions
-
Digitus DA-40500 Snelstartgids
-
Chamberlain 1703EV / 1703REV de handleiding
-
-
Eurotops ELB-4111 Handleiding
-
Norauto 2546786 Foldable Case for Moving Base Platform Handleiding
-
DELSEY PARIS TRE00839 Handleiding
-
-
-
Chamberlain LiftMaster 1703E de handleiding