Zanussi ZVEEM6X3 Microwave Combi Oven Handleiding
- Categorie
- Magnetrons
- Type
- Handleiding

GETTING
STARTED?
EASY.
User Manual
ZVEEM6X3
ZVEIM6KN
ZVEKM6KN
ZVEKM6XN
ZVENM6K3
ZVENM6X3
ZVEWM6X3
NL Gebruiksaanwijzing 2
Combimagnetron
EN User Manual 35
Microwave combi-oven
FR Notice d'utilisation 66
Four à micro-ondes combiné
DE Benutzerinformation 99
Backofen mit Mikrowelle
PT Manual de instruções 133
Microondas com grelhador
ES Manual de instrucciones 167
Horno microondas combinado

GA NAAR ONZE WEBSITE VOOR:
Advies over gebruik, brochures, het oplossen van problemen, service- en reparatie-
informatie:
www.zanussi.com/support
Wijzigingen voorbehouden.
INHOUDSOPGAVE
1. VEILIGHEIDSINFORMATIE........................ 3
1.1 De veiligheid van kinderen en
kwetsbare personen.............................. 3
1.2 Algemene veiligheid.........................3
2. VEILIGHEIDSVOORSCHRIFTEN................6
2.1 Installeren........................................ 6
2.2 Elektrische aansluiting.....................7
2.3 Gebruik............................................ 8
2.4 Onderhoud en reiniging................... 9
2.5 Hanteren van glaswerk....................9
2.6 Binnenverlichting............................. 9
2.7 Service...........................................10
2.8 Verwijdering...................................10
3. BESCHRIJVING VAN HET PRODUCT.....10
3.1 Algemeen overzicht....................... 10
3.2 Accessoires................................... 11
4. BEDIENINGSPANEEL...............................11
4.1 Verzonken knoppen.......................11
4.2 Sensorvelden bedieningspaneel....11
5. VOORAFGAAND AAN HET EERSTE
GEBRUIK.......................................................12
5.1 Eerste reiniging..............................12
6. DAGELIJKS GEBRUIK............................. 12
6.1 Instellen: Verwarmingsfuncties......13
6.2 Instellen: Magnetronfuncties..........13
6.3 Verwarmingsfuncties..................... 14
6.4 Instellen: Kook- En Bakassistent... 15
6.5 Kook- En Bakassistent...................16
7. KLOKFUNCTIES....................................... 21
7.1 Klokfuncties................................... 21
7.2 Instellen: Klokfuncties....................22
8. GA ALS VOLGT TE WERK VOOR
GEBRUIK: ACCESSOIRES...........................23
8.1 Accessoires plaatsen.....................23
9. EXTRA FUNCTIES.................................... 24
9.1 Blokkering......................................24
9.2 Automatische uitschakeling........... 24
9.3 Koelventilator.................................25
10. AANWIJZINGEN EN TIPS.......................25
10.1 Magnetronaanbevelingen ........... 25
10.2 Kookgerei en materialen geschikt
voor de magnetron ..............................26
10.3 Aanbevolen vermogensinstellingen
voor verschillende soorten voedsel..... 27
10.4 Kooktafels voor testinstituten.......28
11. ONDERHOUD EN REINIGING................ 29
11.1 Opmerkingen over de reiniging....29
11.2 Hoe te verwijderen:
Inschuifrails/.........................................30
11.3 Hoe te vervangen: Lamp............. 30
12. PROBLEEMOPLOSSING........................31
12.1 Wat te doen als............................31
12.2 Service-informatie........................32
13. ENERGIEZUINIGHEID.............................32
13.1 Energiebesparing.........................32
14. MENUSTRUCTUUR.................................33
14.1 Menu............................................33
15. MILIEUBESCHERMING.......................... 34
2/200

1. VEILIGHEIDSINFORMATIE
Lees zorgvuldig de meegeleverde instructies voor installatie
en gebruik van het apparaat. De fabrikant is niet
verantwoordelijk voor verwondingen of schade die voortvloeit
uit de onjuiste installatie of het onjuiste gebruik. Bewaar de
instructies altijd op een veilige, toegankelijke plek voor
toekomstig gebruik.
1.1 De veiligheid van kinderen en kwetsbare personen
•Dit apparaat kan worden gebruikt door kinderen van 8 jaar
en ouder en door mensen met een beperkt lichamelijk,
zintuiglijk of verstandelijk vermogen of een gebrek aan
ervaring en kennis, indien zij onder toezicht staan of
instructies hebben gekregen over het veilig gebruiken van
het apparaat en indien zij de gevaren begrijpen. Kinderen
jonger dan 8 jaar en personen met zware en complexe
beperkingen dienen altijd uit de buurt van het apparaat te
worden gehouden, tenzij ze voortdurend onder toezicht
staan.
•Houd toezicht op kinderen om te voorkomen dat zij met het
apparaat gaan spelen..
•Houd alle verpakking uit de buurt van kinderen en gooi het
op passende wijze weg.
•WAARSCHUWING: Het apparaat en de toegankelijke
onderdelen ervan worden heet tijdens het gebruik. Houd
kinderen en huisdieren uit de buurt van het apparaat tijdens
het gebruik en bij het afkoelen.
•Als het apparaat is voorzien van een kinderslot, dient dit te
worden geactiveerd.
•Kinderen mogen zonder toezicht geen reinigings- en
onderhoudswerkzaamheden aan het apparaat uitvoeren.
1.2 Algemene veiligheid
•Dit apparaat is uitsluitend bestemd om mee te koken.
3/200
VEILIGHEIDSINFORMATIE

•Dit apparaat is bedoeld voor binnenshuis huishoudelijk
gebruik.
•Dit apparaat kan worden gebruikt in kantoren, hotelkamers,
bed & breakfast-kamers, boerderijgasthuizen en andere
soortgelijke accommodaties waar dergelijk gebruik de
(gemiddelde) huishoudelijke gebruiksniveaus niet
overschrijdt.
•Alleen een erkende installatietechnicus mag dit apparaat
installeren en de kabel vervangen.
•Gebruik het apparaat niet voordat u het in de ingebouwde
constructie installeert.
•Trek de stekker van het apparaat uit het stopcontact voordat
u welke soort onderhoud dan ook gaat uitvoeren.
•Als het netsnoer beschadigd is, moet de fabrikant, een
erkend servicecentrum of een gekwalificeerde persoon deze
vervangen teneinde gevaarlijke situaties met elektriciteit te
voorkomen.
•WAARSCHUWING: Zorg ervoor dat het apparaat is
uitgeschakeld voordat u de lamp vervangt om elektrische
schokken te voorkomen.
•WAARSCHUWING: Het apparaat en de toegankelijke
onderdelen ervan worden heet tijdens het gebruik. Zorg
ervoor dat je de verwarmingselementen of het oppervlak
van de apparaatruimte niet aanraakt.
•Gebruik altijd ovenhandschoenen om accessoires of
ovenschalen te verwijderen of erin te plaatsen.
•Activeer de magnetronfunctie niet wanneer het apparaat
leeg is. Metalen onderdelen in de ruimte kunnen elektrische
vonken veroorzaken.
•Tijdens bereiding in de magnetron zijn geen metalen
voedselbakjes en drinkbekers toegestaan. Deze vereiste is
niet van toepassing als de fabrikant heeft aangegeven dat
het formaat en de vorm van het metalen voorwerp geschikt
is voor bereiding in de magnetron.
4/200
VEILIGHEIDSINFORMATIE

•WAARSCHUWING: Als de deur of deurafdichtingen
beschadigd zijn, mag het apparaat niet worden gebruikt
totdat het is gerepareerd door een erkende
installatietechnicus.
•WAARSCHUWING: Alleen een erkende installatietechnicus
kan service- of reparatiewerkzaamheden uitvoeren waarbij
een afdekking wordt verwijderd die bescherming biedt tegen
blootstelling aan magnetronenergie.
•WAARSCHUWING: Warm geen vloeistoffen en ander
voedsel in afgesloten verpakkingen op. Ze kunnen
exploderen.
•Gebruik alleen voorwerpen die geschikt zijn voor gebruik in
de magnetron.
•Let bij het opwarmen van voedsel in plastic of papieren
verpakkingen op het apparaat vanwege de mogelijkheid tot
zelfontbranding.
•Het apparaat is bedoeld voor het opwarmen van voedsel en
dranken. Het drogen van voedsel of kleding en het
opwarmen van warmhoudkussentjes, slippers, sponzen,
vochtige doeken enzovoort kunnen leiden tot letsel,
vonkontsteking of brand.
•Als rook wordt uitgestoten, schakelt u het apparaat uit of
trekt u de stekker uit het stopcontact en houdt u de deur
gesloten om vlammen te kunnen doven.
•Het opwarmen van dranken in de magnetron kan tot
kookvertraging leiden. Wees voorzichtig bij het hanteren van
de verpakking.
•De inhoud van zuigflesjes en babyvoedingspotjes moet
worden geroerd of geschud en de temperatuur vóór het
gebruik worden gecontroleerd om brandwonden te
voorkomen.
•Eieren in hun schaal en hele hardgekookte eieren mogen
niet in het apparaat worden opgewarmd omdat ze kunnen
exploderen, zelfs nadat de opwarming in de magnetron is
beëindigd.
5/200
VEILIGHEIDSINFORMATIE

•Om de inschuifrailen te verwijderen trek eerst de voorkant
van de inschuifrail en dan de achterkant uit de zijwanden.
Plaats de inschuifrails in omgekeerde volgorde.
•Het apparaat moet regelmatig worden gereinigd en alle
voedselresten moeten worden verwijderd.
•Gebruik geen stoomreiniger om het apparaat schoon te
maken.
•Gebruik nooit agressieve reinigingsmiddelen of scherpe
metalen schrapers om de glazen deur schoon te maken.
Deze kunnen krassen veroorzaken op het oppervlak,
waardoor het glas zou kunnen breken.
•Als het apparaat niet in een schone toestand wordt
onderhouden, kan dit leiden tot een verslechtering van het
oppervlak. Dit kan de levensduur van het apparaat negatief
beïnvloeden en mogelijk een gevaarlijke situatie opleveren.
2. VEILIGHEIDSVOORSCHRIFTEN
2.1 Installeren
WAARSCHUWING!
Alleen een erkende installatietechnicus mag het apparaat installeren.
• Verwijder alle verpakkingsmaterialen.
• Installeer en gebruik geen beschadigd apparaat.
• Volg de installatie-instructies die zijn meegeleverd met het apparaat.
• Pas altijd op bij verplaatsing van het apparaat, want het is zwaar. Gebruik altijd
veiligheidshandschoenen en gesloten schoeisel.
• Trek het apparaat nooit aan de handgreep van zijn plaats.
• Installeer het apparaat op een veilige en geschikte plaats die aan alle installatie-eisen
voldoet.
• Houd de minimumafstand naar andere apparaten en units in acht.
• Controleer, voordat je het apparaat monteert, of de ovendeur onbelemmerd opent.
• Het apparaat is uitgerust met een elektrisch koelsysteem. Het moet worden gebruikt met de
elektrische voeding.
• De inbouwunit moet voldoen aan de stabiliteitsvereisten van DIN 68930.
Minimumhoogte kast (Minimumhoogte kast onder
werkblad)
444 (460) mm
Kastbreedte 560 mm
6/200
VEILIGHEIDSVOORSCHRIFTEN

Kastdiepte 550 (550) mm
Hoogte van de voorkant van het apparaat 455 mm
Hoogte van de achterkant van het apparaat 440 mm
Breedte van de voorkant van het apparaat 595 mm
Breedte van de achterkant van het apparaat 559 mm
Diepte van het apparaat 567 mm
Ingebouwde diepte van het apparaat 546 mm
Diepte met open deur 882 mm
Minimumgrootte ventilatieopening. Opening ge‐
plaatst aan de onderkant van de achterzijde
560x20 mm
Lengte netvoedingskabel. Kabel wordt in de rech‐
terhoek van de achterzijde geplaatst
1500 mm
Bevestigingsschroeven 3.5x25 mm
2.2 Elektrische aansluiting
WAARSCHUWING!
Gevaar voor brand en elektrische schokken.
• Alle elektrische aansluitingen moeten door een gediplomeerd elektromonteur worden
gemaakt.
• Dit apparaat moet worden aangesloten op een geaard stopcontact.
• Zorg ervoor dat de parameters op het vermogensplaatje overeenkomen met elektrische
vermogen van de netstroom.
• Gebruik altijd een juist geïnstalleerd schokbestendig stopcontact.
• Gebruik geen adapters met meerdere stekkers en verlengkabels.
• Zorg dat u de netstekker en het netsnoer niet beschadigt. Indien de voedingskabel moet
worden vervangen, dan moet dit gebeuren door onze Klantenservice.
• Laat de stroomkabel niet in aanraking komen met de deur van het apparaat of de niche
onder het apparaat, met name niet als deze werkt of als de deur heet is.
• De schokbescherming van delen onder stroom en geïsoleerde delen moet op zo'n manier
worden bevestigd dat het niet zonder gereedschap kan worden verplaatst.
• Steek de stekker pas in het stopcontact als de installatie is voltooid. Zorg ervoor dat het
netsnoer na installatie bereikbaar is.
• Als het stopcontact los zit, mag u de stekker niet in het stopcontact steken.
• Trek niet aan het netsnoer om het apparaat los te koppelen. Trek altijd aan de stekker.
7/200
VEILIGHEIDSVOORSCHRIFTEN

• Gebruik enkel correcte isolatievoorzieningen: stroomonderbrekers, zekeringen
(schroefzekeringen moeten uit de houder worden verwijderd), aardlekschakelaars en
contactgevers.
• De elektrische installatie moet een isolatieapparaat bevatten waardoor het apparaat volledig
van het lichtnet afgesloten kan worden. Het isolatieapparaat moet een contactopening
hebben met een minimale breedte van 3 mm.
• Dit apparaat wordt geleverd met een stekker en een netsnoer.
2.3 Gebruik
WAARSCHUWING!
Gevaar voor letsel, brandwonden, elektrische schokken of een explosie.
• De specificatie van dit apparaat niet wijzigen.
• Zorg ervoor dat de ventilatieopeningen niet geblokkeerd worden.
• Laat het apparaat tijdens de werking niet onbeheerd achter.
• Schakel het apparaat na elk gebruik uit.
• Wees voorzichtig met het openen van de deur van het apparaat wanneer het apparaat in
werking is. Er kan hete lucht vrijkomen.
• Gebruik het apparaat niet met natte handen of als het contact maakt met water.
• Oefen geen druk uit op de open deur.
• Gebruik het apparaat niet als werkblad of als opslagoppervlak.
• Open de deur van het apparaat voorzichtig. Het gebruik van ingrediënten met alcohol kan
een mengsel van alcohol en lucht veroorzaken.
• Laat geen vonken of open vlammen in contact met het apparaat komen wanneer u de deur
opent.
• Plaats geen ontvlambare producten of artikelen die vochtig zijn met ontvlambare producten
in, bij of op het apparaat.
• Gebruik de magnetronfunctie niet om het apparaat voor te verwarmen.
WAARSCHUWING!
Risico op schade aan het apparaat.
• Om schade of verkleuring van het email te voorkomen:
– leg geen aluminiumfolie op de bodem van de ruimte in het apparaat.
– plaats geen water direct in het hete apparaat.
– bewaar geen vochtige gerechten en voedsel in het apparaat nadat u klaar bent met
koken.
– wees voorzichtig bij het verwijderen of bevestigen van accessoires.
• Verkleuring van het email of roestvrij staal is niet van invloed op de werking van het
apparaat.
• Gebruik een diepe pan voor vochtige taarten. Vruchtensappen veroorzaken vlekken die
permanent kunnen zijn.
• Kook altijd met de deur van het apparaat gesloten.
• Als het apparaat achter een meubelpaneel gemonteerd is (bijv. een deur), zorg er dan voor
dat de deur nooit gesloten is als het apparaat in werking is. Warmte en vocht kunnen achter
een gesloten meubelpaneel ophopen en schade aan het apparaat, de behuizing of de vloer
veroorzaken. Sluit het meubelpaneel niet tot het apparaat compleet is afgekoeld na gebruik.
8/200
VEILIGHEIDSVOORSCHRIFTEN

2.4 Onderhoud en reiniging
WAARSCHUWING!
Gevaar voor letsel, brand en schade aan het apparaat.
• Schakel het apparaat uit en trek de stekker uit het stopcontact voordat u
onderhoudshandelingen verricht.
• Zorg ervoor dat het apparaat is afgekoeld. Er bestaat een risico dat de glasplaten kunnen
breken.
• Vervang direct de glazen deurpanelen als deze beschadigd zijn. Neem contact op met een
erkend servicecentrum.
• Wees voorzichtig als u de deur van het apparaat verwijdert. De deur is zwaar!
• Zorg ervoor dat de ovenruimte en de deur na elk gebruik worden afgeveegd. Stoom
geproduceerd tijdens de werking van het apparaat condenseert op de wanden en kan roest
veroorzaken.
• Reinig het apparaat regelmatig om te voorkomen dat het materiaal van het oppervlak
achteruitgaat.
• Vet en voedsel dat in het apparaat achterblijft, kan brand en elektrische vonken veroorzaken
wanneer de magnetronfunctie werkt.
• Maak het apparaat schoon met een vochtige zachte doek. Gebruik alleen neutrale
schoonmaakmiddelen. Gebruik geen schuurmiddelen, schuursponsjes, oplosmiddelen of
metalen voorwerpen.
• Volg als u een ovenspray gebruikt de aanwijzingen op de verpakking.
2.5 Hanteren van glaswerk
Als u uw glaswerk niet met passende zorg behandelt, kan dit leiden tot breuken, afsplintering,
barsten of aanzienlijke krassen:
• Mors geen koud water of andere vloeistoffen op het glaswerk omdat een plotselinge daling
van de temperatuur ertoe kan leiden dat het glas onmiddellijk breekt. Stukjes gebroken glas
kunnen zeer scherp zijn en moeilijk te vinden.
• Plaats heet glaswerk niet op een nat of koel oppervlak, direct op het aanrecht of een
metalen oppervlak of in de gootsteen of hanteer heet glaswerk niet met een vochtige doek.
• Gebruik of repareer geen glaswerk dat is afgesplinterd, gebarsten of zwaar bekrast.
• Laat heet glaswerk niet op of tegen een hard voorwerp stoten en sla er niet met keukengerei
tegen.
• Verwarm leeg of bijna leeg glaswerk niet in de magnetron, of oververhit olie of boter niet in
de magnetron (neem de minimale kooktijd in acht).
Laat heet glaswerk afkoelen op een koelrek, pannenlap of droge doek. Zorg ervoor dat het
glaswerk genoeg is afgekoeld voordat het wordt gewassen of in de koelkast of diepvries wordt
gezet.
Vermijd het hanteren van heet glaswerk (waaronder items met silicone grijpvlakken) zonder
droge pannenlappen.
Vermijd misbruik van de magnetron (bijv. de oven aanzetten zonder iets erin te zetten of met
een zeer kleine belasting).
2.6 Binnenverlichting
WAARSCHUWING!
Gevaar voor elektrische schokken.
9/200
VEILIGHEIDSVOORSCHRIFTEN

• Met betrekking tot de lamp(en) in dit product en reservelampen die afzonderlijk worden
verkocht: Deze lampen zijn bedoeld om bestand te zijn tegen extreme fysieke
omstandigheden in huishoudelijke apparaten, zoals temperatuur, trillingen, vochtigheid, of
zijn bedoeld om informatie te geven over de operationele status van het apparaat. Ze zijn
niet bedoeld voor gebruik in andere toepassingen en zijn niet geschikt voor verlichting in
huishoudelijke ruimten.
• Dit product bevat een lichtbron van energie-efficiëntieklasse G.
• Gebruik alleen lampjes met dezelfde specificaties.
2.7 Service
• Neem contact op met de erkende servicedienst voor reparatie van het apparaat.
• Gebruik alleen originele reserveonderdelen.
2.8 Verwijdering
WAARSCHUWING!
Gevaar voor letsel of verstikking.
• Neem contact op met uw plaatselijke overheid voor informatie over het afvoeren van het
apparaat.
• Haal de stekker uit het stopcontact.
• Snijd het netsnoer vlak bij het apparaat af en gooi het weg.
• Verwijder de deurvergrendeling om te voorkomen dat kinderen of huisdieren binnen in het
apparaat vast komen te zitten.
3. BESCHRIJVING VAN HET PRODUCT
3.1 Algemeen overzicht
1 2 43
10
4
3
1
28
9
5
6
7
Bedieningspaneel
Knop voor verwarmingsfuncties
Display
Bedieningsknop
Verwarmingselement
Magnetrongenerator
Lamp
Ventilator
Inschuifrails, verwijderbaar
Inzetniveaus
10/200
BESCHRIJVING VAN HET PRODUCT

3.2 Accessoires
Bakrooster
Voor kookgerei, bak- en braadvormen.
Bakplaat
Voor gebak en koekjes.
Glazen bodemplaat van de magnetron
Voor het bereiden van voedsel in de
magnetronstand.
4. BEDIENINGSPANEEL
4.1 Verzonken knoppen
Om het apparaat te bedienen, moet u de bedieningsknop indrukken. De knop komt dan naar
buiten.
4.2 Sensorvelden bedieningspaneel
Timer Snel op‐
warmen
Bin‐
nen‐
ver‐
lich‐
ting
Magne‐
tronvermo‐
gen
Instelling
bevestigen Druk op Draai aan de
knop
Selecteer een verwarmingsfunctie om de oven in te schakelen.
11/200
BEDIENINGSPANEEL

Draai de knop voor de verwarmingsfuncties naar de uit-stand om de oven uit te schakelen.
Display met toetsfuncties.
Indicatie‐
lampjes op
de display: Blokkering Kook- En Bak‐
assistent
Instellingen Indicatielampje mag‐
netronfunctie
Indicatie‐
lampjes ti‐
mer:
Voortgangsbalk – voor temperatuur of tijd. De
balk is volledig rood wanneer de oven de ingestel‐
de temperatuur bereikt.
5. VOORAFGAAND AAN HET EERSTE GEBRUIK
WAARSCHUWING!
Raadpleeg de hoofdstukken Veiligheid.
5.1 Eerste reiniging
Reinig de lege oven voor het eerste gebruik en stel de tijd in:
00:00
Stel de tijd in. Druk op .
6. DAGELIJKS GEBRUIK
WAARSCHUWING!
Raadpleeg de hoofdstukken Veiligheid.
12/200
VOORAFGAAND AAN HET EERSTE GEBRUIK

6.1 Instellen: Verwarmingsfuncties
Begin met koken
Stap 1 Stap 2
Selecteer een verwarmingsfunctie.
Stel de temperatuur in.
Druk op de regelknop WATT en draai aan deze
knop om het magnetronvermogen aan te pas‐
sen.
Druk op
.
6.2 Instellen: Magnetronfuncties
Stap 1 Verwijder alle accessoires uit de oven.
Plaats de glazen bodemplaat van de magnetron. Plaats het voedsel op de glazen
bodemplaat van de magnetron.
Stap 2 Selecteer de magnetronverwarmingsfunctie en druk op: om te beginnen met de
standaardinstellingen.
Het display toont: duur en magnetronvermogen.
Stap 3 Draai de knop voor de verwarmingsfuncties naar de uit-stand om de oven uit te
schakelen.
Je kunt de instellingen tijdens het koken aanpassen.
Draai aan de regelknop om de duur aan te passen. Druk op:
Druk op de regelknop WATT en draai aan deze knop om het magnetronvermogen aan te passen.
Druk op:
De maximale tijd van de magnetronfuncties is afhankelijk van het door jou
ingestelde magnetronvermogen:
MAGNETRONVERMOGEN MAXIMUMTIJD
100 - 600 W 59:55 minuten.
13/200
DAGELIJKS GEBRUIK

MAGNETRONVERMOGEN MAXIMUMTIJD
Meer dan 600 W 7 minuten
Als je de deur opent, stopt de functie. Om de functie opnieuw te starten, sluit de
deur. Druk op .
6.3 Verwarmingsfuncties
Standaardverwarmingsfuncties
Verwarmingsfunc‐
tie
Toepassing
Hetelucht
Bakken op maximaal twee rekstanden tegelijkertijd en voedsel drogen.
Stel de temperatuur 20 - 40 °C lager in dan voor Boven + onderwarmte.
Boven + onder‐
warmte
Voor het bakken en roosteren op één ovenniveau.
Circulatiegrill
Voor het braden van grote stukken vlees of gevogelte met bot op één ni‐
veau. Voor gratineren en bruinen.
Pizza-functie
Voor het bakken van pizza. Voor intensieve bruining en een krokante bo‐
dem.
Circulatiegrill +
magnetron
Om grotere stukken vlees op één niveau te roosteren. Voor gratineren en
bruinen.De functie met magnetron-boost.
Hetelucht + mag‐
netron
Bakken op één rekstand.De functie met magnetron-boost.
14/200
DAGELIJKS GEBRUIK

Verwarmingsfunc‐
tie
Toepassing
Ontdooien
Vlees, vis, gebak ontdooien, vermogensbereik: 100 - 200 W
Opwarmen
Vermogensbereik voor het opwarmen van vooraf bereide maaltijden en
delicate gerechten: 300 - 700 W
Magnetron
Opwarmen, koken, vermogensbereik: 100 - 1000 W
Menu
Om het menu te openen: Kook- En Bakassistent, Instellingen.
6.4 Instellen: Kook- En Bakassistent
Het Kook- En Bakassistent submenu bestaat uit een reeks extra functies en gerechten met
aanbevolen bereidingsfuncties, temperaturen en tijden. Je kunt de tijd en de temperatuur
tijdens het koken aanpassen.
Voor sommige gerechten kun je ook koken
met:
• Per gewicht
Kook- En Bakassistent - gebruik het om een gerecht snel te bereiden met de standaardin‐
stellingen:
Stap 1 Stap 2 Stap 3 Stap 4
P1 - P45
Open het menu. Selecteer Kook- En
Bakassistent. Druk op
.
Selecteer het ge‐
recht. Druk op .
Plaats het gerecht in
de oven. Instelling
bevestigen.
15/200
DAGELIJKS GEBRUIK

6.5 Kook- En Bakassistent
Legenda
Per gewicht beschikbaar.
Functie met magnetronvermogen. Gebruik een magnetronbestendig ac‐
cessoire.
Verwarm de oven voor voordat je begint met koken.
Lagerniveau.
Verwarmingsfunctie Toepassing
F1 Grillen Om dunne stukken voedsel te grillen en brood te roos‐
teren.
F2 Onderwarmte Voor het bakken van taarten met een krokante bodem
en het bewaren van voedsel.
F3 Bevroren gerechten Om kant-en-klaar-gerechten (bijv. patat, aardappelpar‐
tjes of loempia's) krokant te maken.
F4 Boven- en onderwarmte +
magnetron
Bakken en braden van voedsel op één rek. De functie
met magnetron-boost.
F5 Grill + magnetron Om gerechten korter te bereiden en tegelijkertijd een
bruin korstje te geven. De functie met magnetron-
boost.
Controleer wanneer de functie is afgelopen of het voedsel klaar is.
Gerecht Gewicht Plankniveau/accessoire Tijdsduur
Rundvlees
P1 Biefstuk,
rauw
1 - 1,5 kg; 4
- 5 cm dikke
stukken
1; bakplaat
Bak het vlees een paar minuten in een
hete pan. Plaats deze in de oven.
40 min
P2 Biefstuk: me‐
dium 50 min
P3 Biefstuk, gaar 60 min
16/200
DAGELIJKS GEBRUIK

Gerecht Gewicht Plankniveau/accessoire Tijdsduur
P4 Biefstuk, me‐
dium
180 - 220 g
per stuk;
plakjes van
3 cm dik
2 braadschaal op bakrooster
Bak het vlees een paar minuten in een
hete pan. Plaats deze in de oven.
15 min
P5 Rundvlees‐
braadstuk /
gestoofd (pri‐
me rib, boven‐
kant rond, dik‐
ke flank)
1,5 - 2 kg 1 braadschaal op bakrooster
Bak het vlees een paar minuten in een
hete pan. Voeg vloeistof toe. Plaats deze
in de oven.
120 min
P6 Biefstuk,
rauw (lang‐
zaam koken)
1 - 1,5 kg; 4
- 5 cm dikke
stukken
1; bakplaat
Gebruik uw favoriete kruiden of gewoon
zout en vers gemalen peper. Bak het
vlees een paar minuten in een hete pan.
Plaats deze in de oven.
75 min
P7 Biefstuk, me‐
dium (lang‐
zaam koken)
85 min
P8 Biefstuk, gaar
(langzaam ko‐
ken)
130 min
P9 Filet, rauw
(langzaam ko‐
ken)
0,5 - 1,5 kg;
5 - 6 cm dik‐
ke stukken
1; bakplaat
Gebruik uw favoriete kruiden of gewoon
zout en vers gemalen peper. Bak het
vlees een paar minuten in een hete pan.
Plaats deze in de oven.
75 min
P10 Filet, gemid‐
deld (lage
temperatuur
garen)
90 min
P11 Filet, gereed
(lage tempera‐
tuur garen)
120 min
Kalfsvlees
P12 Geroosterd
kalfsvlees
(bijv. schou‐
der)
0,8 - 1,5 kg;
4 cm dikke
stukken
1 braadschaal op bakrooster
Gebruik je favoriete kruiden. Voeg vloei‐
stof toe. Geroosterd.
80 min
Varkensvlees
17/200
DAGELIJKS GEBRUIK

Gerecht Gewicht Plankniveau/accessoire Tijdsduur
P13 Geroosterde
hals of schou‐
der van var‐
kensvlees
1,5 kg 1; keramische of glazen oven‐
schaal op rooster, geschikt voor MW
Gebruik je favoriete kruiden. Draai hal‐
verwege de bereidingstijd het vlees om.
90 min
P14 Aangetrokken
varkensvlees
(lage tempera‐
tuur garen)
1,5 - 2 kg 1; bakplaat
Gebruik je favoriete kruiden. Draai het
vlees na halverwege de bereidingstijd,
om een gelijkmatige bruining te krijgen.
215 min
P15 Lende, vers 1 - 1,5 kg; 5
- 6 cm dikke
stukken
1; braadschaal op bakrooster
Gebruik je favoriete kruiden.
55 min
P16 Spare ribs 2 - 3 kg; ge‐
bruik ruwe,
2 - 3 cm
dunne spare
ribs
2; diepe pan
Voeg vloeistof toe om de bodem van een
gerecht te bedekken. Draai halverwege
de bereidingstijd het vlees om.
90 min
Lamsvlees
P17 Lamsbeen
met botten
1,5 - 2 kg; 7
- 9 cm dikke
stukken
1; braadslede op bakplaat
Voeg vloeistof toe. Draai halverwege de
bereidingstijd het vlees om.
130 min
Gevogelte
P18 Hele kip 1,1 kg; vers 1; keramische of glazen oven‐
schaal op rooster, geschikt voor MW
Gebruik je favoriete kruiden. Leg de kip
met de borstzijde naar beneden en draai
hem om na de helft van de bereidingstijd.
40 min
P19 Halve kip 0,5 - 0,8 kg 2; bakplaat
Gebruik je favoriete kruiden.
40 min
P20 Kippenborst 180 - 200 g
per stuk 1 stoofschotel op bakrooster
Gebruik je favoriete kruiden. Bak het
vlees een paar minuten in een hete pan.
25 min
18/200
DAGELIJKS GEBRUIK

Gerecht Gewicht Plankniveau/accessoire Tijdsduur
P21 Kippenpoten,
vers
- 2; bakplaat
Als u eerst kippenpoten hebt gemari‐
neerd, stel dan een lagere temperatuur
in en kook ze langer.
30 min
P22 Hele eend 2 - 3 kg 1 braadschaal op bakrooster
Gebruik je favoriete kruiden. Plaats het
vlees op de braadslede. Draai de eend
na de helft van de bereidingstijd om.
100 min
P23 Gans, heel 4 - 5 kg ; diepe pan
Gebruik je favoriete kruiden. Plaats het
vlees op een diepe bakplaat. Draai de
gans na de helft van de bereidingstijd
om.
110 min
Overig
P24 Gehaktbrood 1 kg 1; bakrooster
Gebruik je favoriete kruiden.
60 min
Vis
P25 Hele vis, ge‐
grild
0,5 - 1 kg
per vis 1; bakplaat
Vul de vis met boter en gebruik je favor‐
iete kruiden en specerijen.
30 min
P26 Visfilet - 2 stoofschotel op bakrooster
Gebruik je favoriete kruiden.
20 min
Zoet bakken / nagerechten
P27 Cheesecake - 1; springvorm van 28 cm op
bakrooster
90 min
P28 Appelcake - 2; bakplaat 45 min
P29 Appeltaart - 1; taartvorm op bakrooster 40 min
19/200
DAGELIJKS GEBRUIK

Gerecht Gewicht Plankniveau/accessoire Tijdsduur
P30 Appeltaart - 1; 22 cm taartvorm op bak‐
rooster
60 min
P31 Brownies 2 kg 2; diepe pan 30 min
P32 Chocolade
muffins
- 2 muffinbakplaat op bakrooster 25 min
P33 Broodcake - 1; broodvorm op bakrooster 50 min
Groenten / Bijgerechten
P34 Gebakken
aardappelen
1 kg 1; bakplaat
Leg de hele aardappelen met de schil op
de bakplaat.
50 min
P35 Wegwerpen 1 kg 2; bakplaat bedekt met bakpapier
Gebruik je favoriete kruiden. Snijd aard‐
appelen in stukjes.
35 min
P36 Gegrilde ge‐
mengde
groenten
1 - 1,5 kg 2; bakplaat bedekt met bakpapier
Gebruik je favoriete kruiden. Snijd de
groenten in stukjes.
30 min
P37 Kroketten, be‐
vroren
0,5 kg 2; bakplaat 25 min
P38 Pommes, be‐
vroren
0,75 kg 2; bakplaat 25 min
Gratins, brood en pizza
P39 Vlees-/groen‐
telasagne met
droge noe‐
dels
1 - 1,5 kg ; 1; keramisch of glazen stoof‐
schotelgerecht op bakrooster
35 min
P40 Aardappelgra‐
tin (rauwe
aardappelen)
1,1 kg ; 2; keramisch of glazen stoof‐
schotelgerecht op bakrooster
Draai het gerecht na de helft van de be‐
reidingstijd.
35 min
20/200
DAGELIJKS GEBRUIK

Gerecht Gewicht Plankniveau/accessoire Tijdsduur
P41 Pizza fris, dun - 1; bakplaat bedekt met bakpapier 15 min
P42 Pizza fris, dik - 1; bakplaat bedekt met bakpapier 25 min
P43 Quiche - 1; bakblik op bakrooster 45 min
P44 Stokbrood /
ciabatta / wit‐
brood
0,8 kg 1; bakplaat bedekt met bakpapier
Meer tijd nodig voor witbrood.
30 min
P45 Volledig
graan / rog‐
ge / bruin
brood volle‐
dig graan in
broodpan
1 kg 1; bakplaat bedekt met bakpa‐
pier / bakrooster
60 min
7. KLOKFUNCTIES
7.1 Klokfuncties
Klokfunctie Toepassing
Kookwekker. Wanneer de tijd is verstreken, klinkt er een geluidssig‐
naal.
Kooktijd. Wanneer de timer stopt, klinkt het signaal en stopt de verwar‐
mingsfunctie.
Uitsteltijd. Om het begin en/of het einde van het koken uit te stellen.
Uptimer. Maximum is 23 uur 59 min. Deze functie heeft geen invloed
op de werking van de oven.
Om de Uptimer in en uit te schakelen, selecteer: Menu, Instellingen.
Klokfuncties zijn alleen beschikbaar voor: Hetelucht, Boven + onderwarmte, Circulatiegrill,
Pizza-functie, Circulatiegrill + magnetron, Hetelucht + magnetron.
21/200
KLOKFUNCTIES

7.2 Instellen: Klokfuncties
Instellen: Dagtijd
Stap 1 Stap 2 Stap 3
Om de tijd van de dag te wijzigen, opent u
het menu en selecteert u Instellingen, Dag‐
tijd.
Stel de klok in. Druk op: .
Instellen: Kookwekker
Stap 1
Op het dis‐
play ver‐
schijnt:
0:00
Stap 2 Stap 3
Druk op: . Stel de Kookwekker in Druk op: .
De timer begint onmiddellijk af te tellen.
Instellen: Kooktijd
Stap 1 Stap 2
Op het display
verschijnt:
0:00
Stap 3 Stap 4
Kies een verwar‐
mingsfunctie en
stel de tempera‐
tuur in.
Druk herhaalde‐
lijk: .
Stel de berei‐
dingstijd in. Druk op: .
De timer begint onmiddellijk af te tellen.
22/200
KLOKFUNCTIES

Instellen: Uitsteltijd
Stap 1 Stap 2
Het dis‐
play
toont:
de dag‐
tijd
STAR‐
TEN
Stap 3 Stap 4
Op het
display
ver‐
schijnt:
--:--
STOP
Stap 5 Stap 6
Selec‐
teer de
verwar‐
mings‐
functie.
Druk her‐
haaldelijk:
.
Stel de
starttijd
in.
Druk op:
.
Stel de
eindtijd
in.
Druk op:
.
De timer begint af te tellen op een ingestelde starttijd.
8. GA ALS VOLGT TE WERK VOOR GEBRUIK:
ACCESSOIRES
8.1 Accessoires plaatsen
Gebruik uitsluitend geschikt kookgerei en materiaal. Raadpleeg hoofdstuk 'Hints en tips',
kookgerei en materiaal geschikt voor de magnetron.
Een kleine inkeping bovenaan verhoogt de veiligheid. De inkepingen zijn ook anti-
kantelmechanismen. De hoge rand rond het rooster voorkomt dat het kookgerei van het rooster
afglijdt.
Bakrooster:
Plaats het rooster tussen de geleidestan‐
gen van de roostersteun en zorg ervoor
dat de pootjes omlaag staan.
23/200
GA ALS VOLGT TE WERK VOOR GEBRUIK:
ACCESSOIRES

Bakplaat:
Schuif de plaat tussen de geleidestangen
van de inschuifrail.
Glazen bodemplaat van de magnetron:
Gebruik de glazen bodemplaat van de
magnetron alleen met de magnetronfunc‐
tie. Het is niet geschikt voor de gecombi‐
neerde magnetronfunctie (bijv. grillen met
de magnetron).
Plaats het accessoire op de bodem van de
uitsparing.
Je kunt het voedsel direct op de glazen bo‐
demplaat van de magnetron plaatsen.
9. EXTRA FUNCTIES
9.1 Blokkering
Deze functie voorkomt dat de functie van het apparaat per ongeluk wordt gewijzigd.
Schakel het in als het apparaat werkt – de ingestelde bereiding gaat door, het bedieningspaneel
wordt vergrendeld.
Schakel het in als het apparaat is uitgeschakeld – het kan niet worden ingeschakeld, het bedie‐
ningspaneel is vergrendeld.
– houd ingedrukt om de
functie in te schakelen.
een geluidssignaal.
– houd ingedrukt om het
uit te schakelen.
3 x – knippert wanneer de vergrendeling wordt ingeschakeld.
9.2 Automatische uitschakeling
Om veiligheidsredenen schakelt de oven na bepaalde tijd uit als er een ovenfunctie in werking
is en u geen instellingen wijzigt.
24/200
EXTRA FUNCTIES

(°C) (h)
30 - 115 12.5
120 - 195 8.5
200 - 230 5.5
De automatische uitschakeling werkt niet met de functies: Binnenverlichting, Uitsteltijd.
9.3 Koelventilator
Als het apparaat in werking is, wordt de koelventilator automatisch ingeschakeld om de
oppervlakken van het apparaat koel te houden. Als je het apparaat uitschakelt, kan de
koelventilator blijven werken totdat het apparaat is afgekoeld.
10. AANWIJZINGEN EN TIPS
10.1 Magnetronaanbevelingen
Laten we koken!
Plaats het voedsel op de glazen bodemplaat die zich onderin de magnetronruimte bevindt.
Plaats het voedsel op een bord onderin de ruimte.
Draai het voedsel halverwege de ontdooi- en bereidingstijd om of roer het door.
Roer vloeibare gerechten zo nu en dan door.
Roer het voedsel voor het opdienen door.
Dek het voedsel voor bereiding en opwarming af.
Zet tijdens het opwarmen van dranken de lepel in de fles of het glas om de warmte beter te
verdelen.
Plaats het voedsel uit de verpakking in het apparaat. Verpakte kant-en-klaar-maaltijden kunnen
alleen in het apparaat worden verwarmd als de verpakking magnetronveilig is (raadpleeg de
informatie op de verpakking).
Koken in de magnetron
Bereid voedsel afgedekt. Bereid voedsel slechts zonder het te bedekken als je een korst wilt
behouden.
Kook de gerechten niet te lang door het vermogen en de tijd te hoog instellen. Het voedsel kan
uitdrogen, aanbranden of brand veroorzaken.
Gebruik het apparaat niet om eieren in de schaal en slakken in hun huis te bereiden, omdat
deze kunnen barsten. Prik het eigeel van gebakken eieren door voordat ze worden
opgewarmd.
Prik voedsel met huid of schil diverse malen door voordat je het bereidt.
Snij groenten in stukjes van gelijke grootte.
Schakel het apparaat uit, neem het voedsel uit het apparaat en laat een paar minuten rusten
om de warmte gelijkmatig te verdelen.
Ontdooien in de magnetron
Plaats het bevroren, uitgepakte voedsel op een klein omgekeerd bord met een bakje eronder of
op een ontdooirek of plastic zeef, zodat de dooivloeistof kan weglopen.
Verwijder telkens de stukken die zijn ontdooid.
25/200
AANWIJZINGEN EN TIPS

Je kunt een hoger magnetronvermogen gebruiken om fruit en groenten te bereiden zonder ze
eerst te ontdooien.
10.2 Kookgerei en materialen geschikt voor de magnetron
Gebruik alleen kookgerei en materiaal in de magnetron dat hier geschikt voor is. Gebruik
onderstaande tabel als referentie.
Controleer de specificaties van het kookgerei/materiaal voor gebruik.
Kookgerei/materiaal
Ovenvast glas en porselein zon‐
der metalen onderdelen, bijv. hit‐
tebestendig glas
Niet-ovenbestendig glas en por‐
selein zonder zilveren, gouden,
platina of andere metalen versie‐
ringen
X X
Glas en glaskeramiek van oven‐
bestendig / diepvriesbestendig
materiaal
Ovenvaste keramiek en aarde‐
werk zonder kwarts of metalen
onderdelen en metaalhoudend
glazuur
Keramiek, porselein en aarde‐
werk met ongeglazuurde onder‐
kant of met kleine gaatjes, bijv.
op handvaten
X X X
Tot 200 °C hittebestendige
kunststof
X
Karton, papier X X
Huishoudfolie X X
Magnetronfolie X
Braadschalen gemaakt van me‐
taal, bijv. email, gietijzer
X X X
26/200
AANWIJZINGEN EN TIPS

Kookgerei/materiaal
Bakblikken, zwarte lak of met si‐
liconen coating
X X X
Bakplaat X X X
Bakrooster X X
Glazen bodemplaat magnetron X
Kookgerei voor gebruik in mag‐
netron, bijv. pan voor knapperige
gerechten
X X
10.3 Aanbevolen vermogensinstellingen voor verschillende soorten
voedsel
De gegevens in de tabel dienen alleen als richtlijn.
700 - 1000 W
Aanbakken aan het begin van het kookproces Vloeistoffen opwarmen
500 - 600 W
Groenten koken Eiergerechten
bereiden
Hutspot laten
sudderen
Eenpansgerech‐
ten opwarmen
Ontdooien en
opwarmen van
bevroren maal‐
tijden
27/200
AANWIJZINGEN EN TIPS

300 - 400 W
Smelten van
kaas, chocolade,
boter
Rijst sudderen Babyvoeding op‐
warmen
Koken/opwarmen
van delicaat voed‐
sel
Doorgaan met
koken
100 - 200 W
Ontdooien van brood Ontdooien van fruit en
gebak
Ontdooien van kaas,
room, boter
Ontdooien van vlees,
vis
10.4 Kooktafels voor testinstituten
Informatie voor testinstituten
Testen volgens IEC 60705.
Gebruik het bakrooster, tenzij anders aangegeven.
MAGNETRON‐
FUNCTIE
(W) kg (min)
Cake, zacht 600 0.475 Bottom 7 - 9 Draai halverwege de
bereidingstijd de
kom 1/4.
Vleesbrood 400 0.9 2 25 - 32 Draai halverwege de
bereidingstijd de
kom 1/4.
Bouillon met stuk‐
jes ei
500 1 Bottom 18 -
Ontdooien van
vlees
200 0.5 Bottom 7 - 8 Draai het vlees hal‐
verwege de berei‐
dingstijd om.
28/200
AANWIJZINGEN EN TIPS

Gebruik het ovenrek.
COMBI‐
MAGNE‐
TRON‐
FUNCTIE (W) (°C) (min)
Cake, 0.7
kg
Boven- en
onderwarm‐
te + mag‐
netron
100 200 2 23 - 27 Draai halverwege
de bereidingstijd
de kom 1/4.
Aardap‐
pelgratin,
1.1 kg
Hetelucht +
magnetron
300 180 2 38 - 42 Draai halverwege
de bereidingstijd
de kom 1/4.
Kip, 1.1
kg
Circulatie‐
grill + mag‐
netron
400 230 1 35 - 40 Doe het vlees in
een ronde glazen
kom en draai het
halverwege de be‐
reidingstijd om.
11. ONDERHOUD EN REINIGING
WAARSCHUWING!
Raadpleeg de hoofdstukken Veiligheid.
11.1 Opmerkingen over de reiniging
Reinigings‐
middelen
Reinig de voorkant van het apparaat uitsluitend met een microvezeldoek met
warm water en een mild reinigingsmiddel.
Gebruik een reinigingsoplossing om metalen oppervlakken te reinigen.
Reinig vlekken met een mild reinigingsmiddel.
Dagelijks ge‐
bruik
Reinig de uitsparing telkens na gebruik. Vetophoping of andere resten kunnen
brand veroorzaken.
Reinig voorzichtig de bovenkant van het apparaat om resten en vet te verwijde‐
ren.
Bewaar het voedsel niet langer dan 20 minuten in het apparaat. Droog de ruim‐
te na elk gebruik uitsluitend met een microvezeldoek.
29/200
ONDERHOUD EN REINIGING

Accessoires
Reinig alle accessoires na elk gebruik en laat ze drogen. Gebruik alleen een
zachte doek met warm water en een mild reinigingsmiddel. De accessoires niet
in een afwasmachine reinigen.
Reinig de antiaanbakaccessoires niet met agressieve reinigingsmiddelen of
scherpe voorwerpen.
11.2 Hoe te verwijderen: Inschuifrails/
Verwijder de inschuifrails om de oven te reinigen.
Stap 1 Schakel de oven uit en wacht totdat deze is afgekoeld.
Stap 2 Trek de inschuifrails voorzichtig
naar boven toe uit de voorste
ophanging.
2
3
1
Stap 3 Trek de voorkant van de in‐
schuifrails weg van de zijwand.
Stap 4 Trek de inschuifrails uit de ach‐
terste ophanging.
Plaats de inschuifrails in omgekeerde volgorde.
11.3 Hoe te vervangen: Lamp
WAARSCHUWING!
Gevaar voor elektrische schokken.
Het lampje kan heet zijn.
Houd de halogeenlamp altijd met een doek vast om te voorkomen dat er vetrestjes op de
ovenlamp verbranden.
Voordat u de lamp vervangt:
Stap 1 Stap 2 Stap 3
Schakel de oven uit. Wacht tot
de oven afgekoeld is.
Trek de oven uit het stopcon‐
tact.
Plaats een doek op de bodem
van de holte.
Bovenlamp
Stap 1 Draai de glazen afdekking om die te verwijderen.
30/200
ONDERHOUD EN REINIGING

Stap 2 Reinig de glasafdekking.
Stap 3 Vervang de lamp door een geschikte 300 °C hittebestendige lamp.
Stap 4 Installeer het glazen deksel.
12. PROBLEEMOPLOSSING
WAARSCHUWING!
Raadpleeg de hoofdstukken Veiligheid.
12.1 Wat te doen als...
Neem in alle gevallen die niet in deze tabel zijn opgenomen contact op met een erkend
servicecentrum.
De oven gaat niet aan of warmt niet op
Probleem Controleer of de volgende zaken van toe‐
passing zijn...
Je kunt de oven niet inschakelen of bedienen. De oven is juist op een elektrische toevoer
aangesloten.
De oven wordt niet warm. De automatische uitschakeling is gedeacti‐
veerd.
De oven wordt niet warm. De zekering is niet doorgeslagen.
De oven wordt niet warm. De vergrendeling is uitgeschakeld.
Onderdelen
Probleem Controleer of de volgende zaken van toe‐
passing zijn...
De verlichting werkt niet. De lamp is opgebrand.
31/200
PROBLEEMOPLOSSING

Foutcodes
Op het display verschijnt… Controleer of de volgende zaken van toe‐
passing zijn...
00:00 Er was een stroomstoring. Stel de tijd van de
dag in.
Als het display een foutcode weergeeft die niet in deze tabel staat, schakelt u de zekering van het
huis uit en weer in om de oven opnieuw te starten. Als de foutcode opnieuw optreedt, neemt u
contact op met een erkend servicecentrum.
12.2 Service-informatie
Als je niet zelf het probleem kunt verhelpen, neem dan contact op met je verkoper of een
erkende serviceafdeling.
De contactgegevens van de servicedienst staan op het typeplaatje. Het typeplaatje bevindt zich
op het voorframe van de apparaatruimte. Verwijder het typeplaatje niet uit de apparaatruimte.
Wij raden je aan om de gegevens hier te noteren:
Model (MOD.) .........................................
Productnummer (PNC) .........................................
Serienummer (S.N.) .........................................
13. ENERGIEZUINIGHEID
13.1 Energiebesparing
Zorg ervoor dat de deur van het apparaat gesloten is als het apparaat in werking is. Open de
deur van het apparaat niet te vaak tijdens het koken. Houd het deurrubber schoon en zorg
ervoor dat het goed op zijn plaats vastzit.
Gebruik metalen kookgerei om meer energie te besparen (alleen als u geen magnetronfunctie
gebruikt).
Verwarm het apparaat niet voor alvorens te koken als dat niet hoeft.
Houd onderbrekingen tussen het bakken zo kort mogelijk als je een aantal gerechten
tegelijkertijd bereidt.
Koken met hete lucht
Gebruik indien mogelijk de bereidingsfuncties met hete lucht om energie te besparen.
Restwarmte
De ventilator en lamp blijven werken. Wanneer je de oven uitschakelt, geeft het display de
restwarmte aan. U kunt die warmte gebruiken om het eten warm te houden.
Wanneer de kookduur langer is dan 30 minuten, verlaag dan de oventemperatuur tot minimaal
3-10 minuten voor het einde van het koken. De restwarmte binnen in het apparaat zal blijven
koken.
32/200
ENERGIEZUINIGHEID

Je kunt de restwarmte gebruiken om andere maaltijden op te warmen.
Eten warm houden
Kies de laagst mogelijke temperatuurinstelling om de restwarmte te gebruiken en een maaltijd
warm te houden. Het indicatielampje van de restwarmte of temperatuur verschijnt op het
display.
Koken met de verlichting uitgeschakeld
Schakel de verlichting tijdens het koken uit. Doe het aan als je het nodig hebt.
14. MENUSTRUCTUUR
14.1 Menu
- selecteer om de Menu.
Menu-structuur te betreden
Kook- En Bakassistent Instellingen
Stap 1 Stap 2 Stap 3 Stap 4 Stap 5
O1 - O9
Selecteer de
Menu, Instellin‐
gen.
Instelling beves‐
tigen.
Selecteer de in‐
stelling.
Instelling beves‐
tigen.
Pas de waarde
aan en druk op
.
Instellingen
O1 Dagtijd Wijzigen O2 Helderheid display 1 - 5
O3 Toetstonen 1 - Piep
2 - Klik
3 - Geluid uit
O4 Geluidsvolume 1 - 4
O5 Uptimer Aan/uit O6 Binnenverlichting Aan/uit
O7 Demofunctie Activerings‐
code: 2468
O8 Softwareversie Controleren
33/200
MENUSTRUCTUUR

Instellingen
O9 Terug naar fabrieksin‐
stellingen
Ja / Nee
15. MILIEUBESCHERMING
Recycleer de materialen met het symbool . Gooi de verpakking in een geschikte
afvalcontainer om het te recycleren. Bescherm het milieu en de volksgezondheid en recycleer
op een correcte manier het afval van elektrische en elektronische apparaten. Gooi apparaten
gemarkeerd met het symbool niet weg met het huishoudelijk afval. Breng het product naar
het milieustation bij u in de buurt of neem contact op met de gemeente.
34/200
MENUSTRUCTUUR

VISIT OUR WEBSITE TO:
Get usage advice, brochures, trouble shooter, service and repair information:
www.zanussi.com/support
Subject to change without notice.
CONTENTS
1. SAFETY INFORMATION...........................36
1.1 Children and vulnerable people
safety................................................... 36
1.2 General Safety...............................36
2. SAFETY INSTRUCTIONS......................... 39
2.1 Installation......................................39
2.2 Electrical connection......................40
2.3 Use................................................ 40
2.4 Care and cleaning..........................41
2.5 Glassware use...............................41
2.6 Internal lighting.............................. 42
2.7 Service...........................................42
2.8 Disposal.........................................42
3. PRODUCT DESCRIPTION........................ 43
3.1 General overview...........................43
3.2 Accessories................................... 43
4. CONTROL PANEL.....................................44
4.1 Retractable knobs..........................44
4.2 Control panel sensor fields............ 44
5. BEFORE FIRST USE.................................44
5.1 Initial cleaning................................45
6. DAILY USE................................................ 45
6.1 How to set: Heating functions........45
6.2 How to set: Microwave functions... 45
6.3 Heating functions...........................46
6.4 How to set: Assisted Cooking........47
6.5 Assisted Cooking...........................48
7. CLOCK FUNCTIONS.................................53
7.1 Clock functions.............................. 53
7.2 How to set: Clock functions........... 54
8. HOW TO USE: ACCESSORIES................55
8.1 Inserting accessories.....................55
9. ADDITIONAL FUNCTIONS....................... 56
9.1 Lock............................................... 56
9.2 Automatic switch-off.......................56
9.3 Cooling fan.....................................57
10. HINTS AND TIPS.....................................57
10.1 Microwave recommendations .....57
10.2 Microwave suitable cookware and
materials ............................................. 57
10.3 Recommended power settings for
different kinds of food.......................... 59
10.4 Cooking tables for test institutes..59
11. CARE AND CLEANING...........................61
11.1 Notes on cleaning........................61
11.2 How to remove: Shelf supports ...61
11.3 How to replace: Lamp..................62
12. TROUBLESHOOTING.............................62
12.1 What to do if.................................62
12.2 Service data.................................63
13. ENERGY EFFICIENCY............................64
13.1 Energy saving..............................64
14. MENU STRUCTURE................................64
14.1 Menu............................................64
15. ENVIRONMENTAL CONCERNS.............65
35/200

1. SAFETY INFORMATION
Before the installation and use of the appliance, carefully read
the supplied instructions. The manufacturer is not responsible
for any injuries or damage that are the result of incorrect
installation or usage. Always keep the instructions in a safe
and accessible location for future reference.
1.1 Children and vulnerable people safety
•This appliance can be used by children aged from 8 years
and above and persons with reduced physical, sensory or
mental capabilities or lack of experience and knowledge if
they have been given supervision or instruction concerning
the use of the appliance in a safe way and understand the
hazards involved. Children of less than 8 years of age and
persons with very extensive and complex disabilities shall
be kept away from the appliance unless continuously
supervised.
•Children should be supervised to ensure that they do not
play with the appliance.
•Keep all packaging away from children and dispose of it
appropriately.
•WARNING: The appliance and its accessible parts become
hot during use. Keep children and pets away from the
appliance when in use and when cooling down.
•If the appliance has a child safety device, it should be
activated.
•Children shall not carry out cleaning and user maintenance
of the appliance without supervision.
1.2 General Safety
•This appliance is for cooking purposes only.
•This appliance is designed for single household domestic
use in an indoor environment.
36/200
SAFETY INFORMATION

•This appliance may be used in, offices, hotel guest rooms,
bed & breakfast guest rooms, farm guest houses and other
similar accommodation where such use does not exceed
(average) domestic usage levels.
•Only a qualified person must install this appliance and
replace the cable.
•Do not use the appliance before installing it in the built-in
structure.
•Disconnect the appliance from the power supply before
carrying out any maintenance.
•If the mains power supply cable is damaged, it must be
replaced by the manufacturer, its Authorised Service Centre
or similarly qualified persons to avoid an electrical hazard.
•WARNING: Ensure that the appliance is switched off before
replacing the lamp to avoid the possibility of electric shock.
•WARNING: The appliance and its accessible parts become
hot during use. Care should be taken to avoid touching
heating elements or the surface of the appliance cavity.
•Always use oven gloves to remove or insert accessories or
ovenware.
•Do not activate the microwave function when the appliance
is empty. Metal parts inside the cavity can create electric
arcing.
•Metallic containers for food and beverages are not allowed
during microwave cooking. This requirement is not
applicable if the manufacturer specifies size and shape of
metallic containers suitable for microwave cooking.
•WARNING: If the door or door seals are damaged, the
appliance must not be operated until it has been repaired by
a qualified person.
•WARNING: Only a qualified person can carry out any
service or repair operation that involves the removal of a
cover which gives protection against exposure to microwave
energy.
37/200
SAFETY INFORMATION

•WARNING: Do not heat liquids and other foods in sealed
containers. They are liable to explode.
•Use only utensils that are suitable for use in microwave
ovens.
•When heating food in plastic or paper containers, observe
the appliance due to the possibility of ignition.
•The appliance is intended for heating food and beverages.
Drying of food or clothing and heating of warming pads,
slippers, sponges, damp cloth and similar may lead to risk of
injury, ignition or fire.
•If smoke is emitted, switch off or unplug the appliance and
keep the door closed in order to stifle any flames.
•Microwave heating of beverages can result in delayed
eruptive boiling. Care must be taken when handling the
container.
•The contents of feeding bottles and baby food jars shall be
stirred or shaken and the temperature checked before
consumption, in order to avoid burns.
•Eggs in their shell and whole hard-boiled eggs should not be
heated in the appliance since they may explode, even after
microwave heating has ended.
•To remove the shelf supports first pull the front of the shelf
support and then the rear end away from the side walls.
Install the shelf supports in the opposite sequence.
•The appliance should be cleaned regularly and any food
deposits removed.
•Do not use a steam cleaner to clean the appliance.
•Do not use harsh abrasive cleaners or sharp metal scrapers
to clean the glass door since they can scratch the surface,
which may result in shattering of the glass.
•Failure to maintain the appliance in a clean condition could
lead to deterioration of the surface that could adversely
affect the life of the appliance and possibly result in a
hazardous situation.
38/200
SAFETY INFORMATION

2. SAFETY INSTRUCTIONS
2.1 Installation
WARNING!
Only a qualified person must install this appliance.
• Remove all the packaging.
• Do not install or use a damaged appliance.
• Follow the installation instructions supplied with the appliance.
• Always take care when moving the appliance as it is heavy. Always use safety gloves and
enclosed footwear.
• Do not pull the appliance by the handle.
• Install the appliance in a safe and suitable place that meets installation requirements.
• Keep the minimum distance from other appliances and units.
• Before mounting the appliance, check if the appliance door opens without restraint.
• The appliance is equipped with an electric cooling system. It must be operated with the
electric power supply.
• The built-in unit must meet the stability requirements of DIN 68930.
Cabinet minimum height (Cabinet under the work‐
top minimum height)
444 (460) mm
Cabinet width 560 mm
Cabinet depth 550 (550) mm
Height of the front of the appliance 455 mm
Height of the back of the appliance 440 mm
Width of the front of the appliance 595 mm
Width of the back of the appliance 559 mm
Depth of the appliance 567 mm
Built in depth of the appliance 546 mm
Depth with open door 882 mm
Ventilation opening minimum size. Opening placed
on the bottom rear side
560x20 mm
Mains supply cable length. Cable is placed in the
right corner of the back side
1500 mm
Mounting screws 3.5x25 mm
39/200
SAFETY INSTRUCTIONS

2.2 Electrical connection
WARNING!
Risk of fire and electric shock.
• All electrical connections should be made by a qualified electrician.
• The appliance must be earthed.
• Make sure that the parameters on the rating plate are compatible with the electrical ratings
of the mains power supply.
• Always use a correctly installed shockproof socket.
• Do not use multi-plug adapters and extension cables.
• Make sure not to cause damage to the mains plug and to the mains cable. Should the mains
cable need to be replaced, this must be carried out by our Authorised Service Centre.
• Do not let mains cables touch or come near the appliance door or the niche below the
appliance, especially when it operates or the door is hot.
• The shock protection of live and insulated parts must be fastened in such a way that it
cannot be removed without tools.
• Connect the mains plug to the mains socket only at the end of the installation. Make sure
that there is access to the mains plug after the installation.
• If the mains socket is loose, do not connect the mains plug.
• Do not pull the mains cable to disconnect the appliance. Always pull the mains plug.
• Use only correct isolation devices: line protecting cut-outs, fuses (screw type fuses removed
from the holder), earth leakage trips and contactors.
• The electrical installation must have an isolation device which lets you disconnect the
appliance from the mains at all poles. The isolation device must have a contact opening
width of minimum 3 mm.
• This appliance is supplied with a main plug and a main cable.
2.3 Use
WARNING!
Risk of injury, burns and electric shock or explosion.
• Do not change the specification of this appliance.
• Make sure that the ventilation openings are not blocked.
• Do not let the appliance stay unattended during operation.
• Deactivate the appliance after each use.
• Be careful when you open the appliance door while the appliance is in operation. Hot air can
release.
• Do not operate the appliance with wet hands or when it has contact with water.
• Do not apply pressure on the open door.
• Do not use the appliance as a work surface or as a storage surface.
• Open the appliance door carefully. The use of ingredients with alcohol can cause a mixture
of alcohol and air.
• Do not let sparks or open flames to come in contact with the appliance when you open the
door.
• Do not put flammable products or items that are wet with flammable products in, near or on
the appliance.
• Do not use microwave function to preheat the appliance.
40/200
SAFETY INSTRUCTIONS

WARNING!
Risk of damage to the appliance.
• To prevent damage or discoloration to the enamel:
– do not put aluminium foil directly on the bottom of cavity of the appliance.
– do not put water directly into the hot appliance.
– do not keep moist dishes and food in the appliance after you finish the cooking.
– be careful when you remove or install the accessories.
• Discoloration of the enamel or stainless steel has no effect on the performance of the
appliance.
• Use a deep pan for moist cakes. Fruit juices cause stains that can be permanent.
• Always cook with the appliance door closed.
• If the appliance is installed behind a furniture panel (e.g. a door) make sure the door is never
closed when the appliance operates. Heat and moisture can build up behind a closed
furniture panel and cause subsequent damage to the appliance, the housing unit or the floor.
Do not close the furniture panel until the appliance has cooled down completely after use.
2.4 Care and cleaning
WARNING!
Risk of injury, fire, or damage to the appliance.
• Before maintenance, deactivate the appliance and disconnect the mains plug from the mains
socket.
• Make sure the appliance is cold. There is the risk that the glass panels can break.
• Replace immediately the door glass panels when they are damaged. Contact the Authorised
Service Centre.
• Be careful when you remove the door from the appliance. The door is heavy!
• Make sure the cavity and the door are wiped dry after each use. Steam produced during the
operation of the appliance condensates on cavity walls and can cause corrosion.
• Clean regularly the appliance to prevent the deterioration of the surface material.
• Fat and food remaining in the appliance can cause fire and electric arcing when the
microwave function operates.
• Clean the appliance with a moist soft cloth. Use only neutral detergents. Do not use abrasive
products, abrasive cleaning pads, solvents or metal objects.
• If you use an oven spray, follow the safety instructions on its packaging.
2.5 Glassware use
Handling your glassware without an appropriate degree of care could result in breakage,
chipping, cracking or severe scratching:
• Do not spill cold water or other liquids on the glassware because a sudden temperature drop
may cause immediate breakage of the glass. Broken glass pieces may be extremely sharp
and difficult to locate.
• Do not place hot glassware on a wet or cool surface, directly on countertop or metal surface,
or in sink; or handle hot glassware with wet cloth.
• Do not use or repair any glassware that is chipped, cracked or severely scratched.
• Do not drop or hit glassware against a hard object or strike utensils against it.
• Do not heat empty or nearly empty glassware in microwave, or overheat oil or butter in
microwave (use minimum amount of cooking time).
41/200
SAFETY INSTRUCTIONS

Allow hot glassware to cool on a cooling rack, a potholder or a dry cloth. Make sure that the
glassware is cool enough before washing, refrigerating or freezing.
Avoid handling hot glassware (including ware with silicone gripping surfaces) without dry
potholders.
Avoid microwave misuse (i.e. running the oven without any load or small load).
2.6 Internal lighting
WARNING!
Risk of electric shock.
• Concerning the lamp(s) inside this product and spare part lamps sold separately: These
lamps are intended to withstand extreme physical conditions in household appliances, such
as temperature, vibration, humidity, or are intended to signal information about the
operational status of the appliance. They are not intended to be used in other applications
and are not suitable for household room illumination.
• This product contains a light source of energy efficiency class G.
• Use only lamps with the same specifications.
2.7 Service
• To repair the appliance contact the Authorised Service Centre.
• Use original spare parts only.
2.8 Disposal
WARNING!
Risk of injury or suffocation.
• Contact your municipal authority for information on how to dispose of the appliance.
• Disconnect the appliance from the mains supply.
• Cut off the mains electrical cable close to the appliance and dispose of it.
• Remove the door catch to prevent children or pets from becoming trapped in the appliance.
42/200
SAFETY INSTRUCTIONS

3. PRODUCT DESCRIPTION
3.1 General overview
1 2 43
10
4
3
1
28
9
5
6
7
Control panel
Knob for the heating functions
Display
Control knob
Heating element
Microwave generator
Lamp
Fan
Shelf support, removable
Shelf positions
3.2 Accessories
Wire shelf
For cookware, cake tins, roasts.
Baking tray
For cakes and biscuits.
Microwave bottom glass plate
To prepare food in microwave mode.
43/200
PRODUCT DESCRIPTION

4. CONTROL PANEL
4.1 Retractable knobs
To use the appliance press the knob. The knob comes out.
4.2 Control panel sensor fields
Timer Fast
Heat Up Light Microwave
power
Confirm
setting Press Turn the knob
Select a heating function to turn on the oven.
Turn the knob for the heating functions to the off position to turn the oven off.
Display with key functions.
Display in‐
dicators: Lock Assisted Cook‐
ing
Settings Microwave function
indicator
Timer indi‐
cators:
Progress bar - for temperature or time. The bar is
fully red when the oven reaches the set tempera‐
ture.
5. BEFORE FIRST USE
WARNING!
Refer to Safety chapters.
44/200
CONTROL PANEL

5.1 Initial cleaning
Before first use clean the empty oven and set the time:
00:00
Set the time. Press .
6. DAILY USE
WARNING!
Refer to Safety chapters.
6.1 How to set: Heating functions
Start cooking
Step 1 Step 2
Select a heating function.
Set the temperature.
Press WATT and turn the control knob to ad‐
just microwave power.
Press
.
6.2 How to set: Microwave functions
Step 1 Remove all accessories.
Insert microwave bottom glass plate. Put the food on the microwave bottom glass
plate.
Step 2 Select a microwave heating function and press: to start with default settings.
The display shows: duration and microwave power.
45/200
DAILY USE

Step 3 Turn the knob for the heating functions to the off position to turn off the oven.
You can adjust settings while cooking.
Turn the control knob to adjust duration. Press:
Press WATT and turn the control knob to adjust microwave power. Press:
The maximum time of microwave functions depends on microwave power you
set:
MICROWAVE POWER MAXIMUM TIME
100 - 600 W 59:55 minutes
More than 600 W 7 minutes
If you open the door, the microwave function stops. To start it again, close the
door. Press .
6.3 Heating functions
Standard heating functions
Heating function Application
True Fan Cooking
To bake on up to two shelf positions at the same time and to dry food. Set
the temperature 20 - 40 °C lower than for Conventional Cooking.
Conventional
Cooking
To bake and roast food on one shelf position.
Turbo Grilling
To roast large meat joints or poultry with bones on one shelf position. To
make gratins and to brown.
Pizza Function
To bake pizza. To make intensive browning and a crispy bottom.
46/200
DAILY USE

Heating function Application
Turbo Grilling +
MW
To roast large pieces of meat on one level. To make gratins and to
brown.The function with MW boost.
True Fan Cooking
+ MW
Baking on one shelf position.The function with MW boost.
Defrost
Defrosting meat, fish, cakes, power range: 100 - 200 W
Reheat
Heating up pre-prepared meals and delicate food, power range: 300 - 700
W
Microwave
Heating up, cooking, power range: 100 - 1000 W
Menu
To enter the Menu: Assisted Cooking, Settings.
6.4 How to set: Assisted Cooking
The Assisted Cooking submenu consists of a set of additional functions and dishes with
recommended cooking functions, temperatures and times. You can adjust the time and the
temperature during cooking.
For some of the dishes you can also cook with: • Weight Automatic
Assisted Cooking - use it to prepare a dish quickly with default settings:
Step 1 Step 2 Step 3 Step 4
P1 - P45
47/200
DAILY USE

Assisted Cooking - use it to prepare a dish quickly with default settings:
Enter the menu. Select Assisted
Cooking. Press .
Select the dish. Press
.
Insert the dish to the
oven. Confirm setting.
6.5 Assisted Cooking
Legend
Weight Automatic available.
Function with microwave power. Use microwave safe accessory.
Preheat the oven before you start cooking.
Shelf level.
Heating function Application
F1 Grill To grill thin pieces of food and to toast bread.
F2 Bottom Heat To bake cakes with crispy bottom and to preserve food.
F3 Frozen Foods To make convenience food (e.g., french fries, potato
wedges or spring rolls) crispy.
F4 Conventional Cooking + MW Baking and roasting food on one shelf position. The
function with MW boost.
F5 Grill + MW To cook food in a short time and to brown it. The func‐
tion with MW boost.
When the function ends check if the food is ready.
Dish Weight Shelf level / Accessory Duration
time
Beef
48/200
DAILY USE

Dish Weight Shelf level / Accessory Duration
time
P1 Roast Beef,
rare
1 - 1,5 kg; 4
- 5 cm thick
pieces
1; baking tray
Fry the meat for a few minutes on a hot
pan. Insert to the oven.
40 min
P2 Roast Beef,
medium 50 min
P3 Roast Beef,
well done 60 min
P4 Steak, medi‐
um
180 - 220 g
per piece; 3
cm thick sli‐
ces
2; roasting dish on wire shelf
Fry the meat for a few minutes on a hot
pan. Insert to the oven.
15 min
P5 Beef roast /
braised (prime
rib, top round,
thick flank)
1,5 - 2 kg 1; roasting dish on wire shelf
Fry the meat for a few minutes on a hot
pan. Add liquid. Insert to the oven.
120 min
P6 Roast Beef,
rare (slow
cooking)
1 - 1,5 kg; 4
- 5 cm thick
pieces
1; baking tray
Use your favourite spices or simply salt
and fresh grounded pepper. Fry the meat
for a few minutes on a hot pan. Insert to
the oven.
75 min
P7 Roast Beef,
medium (slow
cooking)
85 min
P8 Roast Beef,
well done
(slow cooking)
130 min
P9 Fillet, rare
(slow cooking)
0,5 - 1,5 kg;
5 - 6 cm
thick pieces
1; baking tray
Use your favourite spices or simply salt
and fresh grounded pepper. Fry the meat
for a few minutes on a hot pan. Insert to
the oven.
75 min
P10 Fillet, medium
(slow cooking) 90 min
P11 Fillet, done
(slow cooking) 120 min
Veal
49/200
DAILY USE

Dish Weight Shelf level / Accessory Duration
time
P12 Veal roast
(e.g. shoulder)
0,8 - 1,5 kg;
4 cm thick
pieces
1; roasting dish on wire shelf
Use your favourite spices. Add liquid.
Roast covered.
80 min
Pork
P13 Pork roast
neck or
shoulder
1,5 kg 1; ceramic or glass casserole
dish on wire shelf, MW suitable
Use your favourite spices. Turn the meat
after half of the cooking time.
90 min
P14 Pulled pork
(slow cooking)
1,5 - 2 kg 1; baking tray
Use your favourite spices. Turn the meat
after half of the cooking time to get an
even browning.
215 min
P15 Loin, fresh 1 - 1,5 kg; 5
- 6 cm thick
pieces
1; roasting dish on wire shelf
Use your favourite spices.
55 min
P16 Spare Ribs 2 - 3 kg; use
raw, 2 - 3
cm thin
spare ribs
2; deep pan
Add liquid to cover the bottom of a dish.
Turn the meat after half of the cooking
time.
90 min
Lamb
P17 Lamb leg with
bones
1,5 - 2 kg; 7
- 9 cm thick
pieces
1; roasting dish on baking tray
Add liquid. Turn the meat after half of the
cooking time.
130 min
Poultry
P18 Whole chick‐
en
1,1 kg; fresh 1; ceramic or glass casserole dish
on wire shelf, MW suitable
Use your favourite spices. Put the chick‐
en breast-side down and turn it over after
half of the cooking time.
40 min
P19 Half chicken 0,5 - 0,8 kg 2; baking tray
Use your favourite spices.
40 min
50/200
DAILY USE

Dish Weight Shelf level / Accessory Duration
time
P20 Chicken
breast
180 - 200 g
per piece 1; casserole dish on wire shelf
Use your favourite spices. Fry the meat
for a few minutes on a hot pan.
25 min
P21 Chicken legs,
fresh
- 2; baking tray
If you marinated chicken legs first, set
lower temperature and cook them longer.
30 min
P22 Duck, whole 2 - 3 kg 1; roasting dish on wire shelf
Use your favourite spices. Put the meat
on roasting dish. Turn the duck after half
of the cooking time.
100 min
P23 Goose, whole 4 - 5 kg ?; deep pan
Use your favourite spices. Put the meat
on deep baking tray. Turn the goose af‐
ter half of the cooking time.
110 min
Other
P24 Meat loaf 1 kg 1; wire shelf
Use your favourite spices.
60 min
Fish
P25 Whole fish,
grilled
0,5 - 1 kg
per fish 1; baking tray
Fill the fish with butter and use your fa‐
vourite spices and herbs.
30 min
P26 Fish fillet - 2; casserole dish on wire shelf
Use your favourite spices.
20 min
Sweet baking / desserts
P27 Cheesecake - 1; 28 cm springform tin on wire
shelf
90 min
P28 Apple cake - 2; baking tray 45 min
51/200
DAILY USE

Dish Weight Shelf level / Accessory Duration
time
P29 Apple tart - 1; pie form on wire shelf 40 min
P30 Apple pie - 1; 22 cm pie form on wire shelf 60 min
P31 Brownies 2 kg 2; deep pan 30 min
P32 Chocolate
muffins
- 2; muffin tray on wire shelf 25 min
P33 Loaf cake - 1; loaf pan on wire shelf 50 min
Vegetable / Side dishes
P34 Baked pota‐
toes
1 kg 1; baking tray
Put the whole potatoes with skin on bak‐
ing tray.
50 min
P35 Wegdes 1 kg 2; baking tray lined with baking pa‐
per
Use your favourite spices. Cut potatoes
into pieces.
35 min
P36 Grilled mixed
vegetables
1 - 1,5 kg 2; baking tray lined with baking pa‐
per
Use your favourite spices. Cut the vege‐
tables into pieces.
30 min
P37 Croquets, fro‐
zen
0,5 kg 2; baking tray 25 min
P38 Pommes, fro‐
zen
0,75 kg 2; baking tray 25 min
Gratins, bread and pizza
P39 Meat / vegeta‐
ble lasagna
with dry noo‐
dle plates
1 - 1,5 kg ; 1; ceramic or glass casserole
dish on wire shelf
35 min
52/200
DAILY USE

Dish Weight Shelf level / Accessory Duration
time
P40 Potato gratin
(raw potatoes)
1,1 kg ; 2; ceramic or glass casserole
dish on wire shelf
Rotate the dish after half of the cooking
time.
35 min
P41 Pizza fresh,
thin - 1; baking tray lined with baking
paper 15 min
P42 Pizza fresh,
thick - 1; baking tray lined with baking
paper
25 min
P43 Quiche - 1; baking tin on wire shelf 45 min
P44 Baguette /
Ciabatta /
White bread
0,8 kg 1; baking tray lined with baking
paper
More time needed for white bread.
30 min
P45 All grain /
rye / dark
bread all
grain in loaf
pan
1 kg 1; baking tray lined with baking
paper / wire shelf
60 min
7. CLOCK FUNCTIONS
7.1 Clock functions
Clock Function Application
Minute minder. When the timer ends, the signal sounds.
Cooking time. When the timer ends, the signal sounds and the heating
function stops.
Time Delay. To postpone the start and / or end of cooking.
Uptimer. Maximum is 23 h 59 min. This function has no effect on the
operation of the oven.
To turn on and off the Uptimer select: Menu, Settings.
53/200
CLOCK FUNCTIONS

Clock functions are available only for: True Fan Cooking, Conventional Cooking, Turbo Grilling,
Pizza Function, Turbo Grilling + MW, True Fan Cooking + MW.
7.2 How to set: Clock functions
How to set: Time of day
Step 1 Step 2 Step 3
To change the time of day enter the menu
and select Settings, Time of day. Set the clock. Press: .
How to set: Minute minder
Step 1
The display
shows:
0:00
Step 2 Step 3
Press: . Set the Minute minder Press: .
Timer starts counting down immediately.
How to set: Cooking time
Step 1 Step 2
The display
shows:
0:00
Step 3 Step 4
Choose a heating
function and set
the temperature.
Press repeated‐
ly: .
Set the cooking
time. Press: .
Timer starts counting down immediately.
54/200
CLOCK FUNCTIONS

How to set: Time Delay
Step 1 Step 2
The dis‐
play
shows:
the time
of day
START
Step 3 Step 4
The dis‐
play
shows:
--:--
STOP
Step 5 Step 6
Select
the
heating
func‐
tion.
Press re‐
peatedly:
.
Set the
start
time.
Press:
.
Set the
end
time.
Press:
.
Timer starts counting down at a set start time.
8. HOW TO USE: ACCESSORIES
8.1 Inserting accessories
Use only suitable cookware and material. Refer to "Hints and tips" chapter, Microwave suitable
cookware and materials.
A small indentation at the top increases safety. The indentations are also anti-tip devices. The
high rim around the shelf prevents cookware from slipping of the shelf.
Wire shelf:
Push the shelf between the guide bars of
the shelf support and make sure that the
feet point down.
Baking tray:
Push the tray between the guide bars of
the shelf support.
55/200
HOW TO USE: ACCESSORIES

Microwave bottom glass plate:
Use the microwave bottom glass plate only
with microwave function. It is not suitable
for combined microwave function (e.g. mi‐
crowave grilling).
Put the accessory on the bottom of the
cavity.
You can put the food directly on the micro‐
wave bottom glass plate.
9. ADDITIONAL FUNCTIONS
9.1 Lock
This function prevents an accidental change of the appliance function.
Turn it on when the appliance works - the set cooking continues, the control panel is locked.
Turn it on when the appliance is off - it cannot be turned on, the control panel is locked.
- press and hold to turn
on the function.
A signal sounds.
- press and hold to turn it
off.
3 x - flashes when the lock is turned on.
9.2 Automatic switch-off
For safety reasons the oven turns off after some time, if a heating function works and you do
not change any settings.
(°C) (h)
30 - 115 12.5
120 - 195 8.5
200 - 230 5.5
The Automatic switch-off does not work with the functions: Light, Time Delay.
56/200
ADDITIONAL FUNCTIONS

9.3 Cooling fan
When the appliance operates, the cooling fan turns on automatically to keep the surfaces of the
appliance cool. If you turn off the appliance, the cooling fan can continue to operate until the
appliance cools down.
10. HINTS AND TIPS
10.1 Microwave recommendations
Let's cook!
Place the food on the microwave bottom glass plate on the bottom of the cavity.
Place the food on a plate on the bottom of the cavity.
Turn or stir the food halfway through the defrosting and cooking time.
Stir liquid dishes from time to time.
Stir the food before serving.
Cover the food for cooking and reheating.
Put the spoon to the bottle or glass when heating drinks to ensure better heat distribution.
Put the food into the appliance without packaging. The packaged ready meals can be put into
the appliance only when the packaging is microwave safe (check information on the
packaging).
Microwave cooking
Cook food covered. If you want to keep a crust cook food without a cover.
Do not overcook the dishes by setting the power and time too high. The food can dry out, burn
or cause fire.
Do not use the appliance to cook eggs or snails in their shells, because they can burst. Pierce
the yolk of fried egg before reheating it.
Pierce food with skin or peel several times before cooking.
Cut vegetables into similar-sized pieces.
After you turn off the appliance, take the food out and let it stand for a few minutes to allow the
heat distribute evenly.
Microwave defrosting
Put the frozen, unwrapped food on a small upturned plate with a container below it, or on a
defrosting rack or plastic sieve so that the defrosting liquid can leak out.
Remove defrosted pieces subsequently.
To cook fruit and vegetables without defrosting them first, you can use a higher microwave
power.
10.2 Microwave suitable cookware and materials
For the microwave use only suitable cookware and materials. Use below table as a reference.
Check the cookware / material specification before use.
Cookware / Material
Ovenproof glass and porcelain
with no metal components, e.g.
heat-proof glass
57/200
HINTS AND TIPS

Cookware / Material
Non-ovenproof glass and porce‐
lain without any silver, gold, plat‐
inum or other metal decorations
X X
Glass and glass ceramic made
of ovenproof / frost-proof materi‐
al
Ovenproof ceramic and earthen‐
ware without any quartz or metal
components and glazes which
contain metal
Ceramic, porcelain and earthen‐
ware with unglazed bottom or
with small holes, e.g. on handles
X X X
Heat-resistant plastic up to
200 °C
X
Cardboard, paper X X
Clingfilm X X
Microwave clingfilm X
Roasting dishes made of metal,
e.g. enamel, cast iron
X X X
Baking tins, black lacquer or sili‐
con-coated
X X X
Baking tray X X X
Wire shelf X X
Microwave glass bottom plate X
Cookware for microwave use,
e.g. crisp pan
X X
58/200
HINTS AND TIPS

10.3 Recommended power settings for different kinds of food
The data in the table is for guidance only.
700 - 1000 W
Searing at the start of the cooking process Heating liquids
500 - 600 W
Cooking vegeta‐
bles
Cooking egg
dishes Simmering stews Heating one-plate
meals
Defrosting and
heating frozen
meals
300 - 400 W
Melting cheese,
chocolate, butter Simmering rice Heating baby
food
Cooking / Heating
delicate food
Continuing
cooking
100 - 200 W
Defrosting bread Defrosting fruit and
cakes
Defrosting cheese,
cream, butter Defrosting meat, fish
10.4 Cooking tables for test institutes
Information for test institutes
Tests according to IEC 60705.
59/200
HINTS AND TIPS

Use wire shelf unless otherwise specified.
MICROWAVE
FUNCTION
(W) (kg) (min)
Sponge cake 600 0.475 Bottom 7 - 9 Turn container
around by 1/4, half‐
way through the
cooking time.
Meatloaf 400 0.9 2 25 - 32 Turn container
around by 1/4, half‐
way through the
cooking time.
Egg custard 500 1 Bottom 18 -
Meat defrosting 200 0.5 Bottom 7 - 8 Turn the meat up‐
side down halfway
through the cooking
time.
Use the wire shelf.
MICRO‐
WAVE
COMBI
FUNC‐
TION
(W) (°C) (min)
Cake, 0.7
kg
Conven‐
tional Cook‐
ing + MW
100 200 2 23 - 27 Turn container
around by 1/4,
halfway through
the cooking time.
Potato
gratin,
1.1 kg
True Fan
Cooking +
MW
300 180 2 38 - 42 Turn container
around by 1/4,
halfway through
the cooking time.
Chicken,
1.1 kg
Turbo Grill‐
ing + MW
400 230 1 35 - 40 Put the meat in
round glass con‐
tainer and turn it
upside down half‐
way through the
cooking time.
60/200
HINTS AND TIPS

11. CARE AND CLEANING
WARNING!
Refer to Safety chapters.
11.1 Notes on cleaning
Cleaning
Agents
Clean the front of the appliance only with a microfibre cloth with warm water and
a mild detergent.
Use a cleaning solution to clean metal surfaces.
Clean stains with a mild detergent.
Everyday Use
Clean the cavity after each use. Fat accumulation or other residue may cause
fire.
Clean the appliance ceiling carefully from residue and fat.
Do not store the food in the appliance for longer than 20 minutes. Dry the cavity
only with a microfibre cloth after each use.
Accessories
Clean all accessories after each use and let them dry. Use only a microfibre
cloth with warm water and a mild detergent. Do not clean the accessories in a
dishwasher.
Do not clean the non-stick accessories using abrasive cleaner or sharp-edged
objects.
11.2 How to remove: Shelf supports
Remove the shelf supports to clean the oven.
Step 1 Turn off the oven and wait until it is cold.
Step 2 Carefully pull the shelf supports
up and out of the front catch.
2
3
1
Step 3 Pull the front end of the shelf
support away from the side
wall.
Step 4 Pull the supports out of the rear
catch.
61/200
CARE AND CLEANING

Install the shelf supports in the opposite sequence.
11.3 How to replace: Lamp
WARNING!
Risk of electric shock.
The lamp can be hot.
Always hold the halogen lamp with a cloth to prevent grease residue from burning on the lamp.
Before you replace the lamp:
Step 1 Step 2 Step 3
Turn off the oven. Wait until
the oven is cold.
Disconnect the oven from the
mains.
Put a cloth on the bottom of
the cavity.
Top lamp
Step 1 Turn the glass cover to remove it.
Step 2 Clean the glass cover.
Step 3 Replace the lamp with a suitable 300 °C heat-resistant lamp.
Step 4 Install the glass cover.
12. TROUBLESHOOTING
WARNING!
Refer to Safety chapters.
12.1 What to do if...
In any cases not included in this table please contact with an Authorised Service Centre.
The oven does not turn on or does not heat up
Problem Check if...
You cannot activate or operate the oven. The oven is correctly connected to an electrical
supply.
The oven does not heat up. The automatic switch-off is deactivated.
62/200
TROUBLESHOOTING

The oven does not turn on or does not heat up
The oven does not heat up. The fuse is not blown.
The oven does not heat up. The Lock is off.
Components
Problem Check if...
The lamp does not work. The lamp is burnt out.
Error codes
The display shows... Check if...
00:00 There was a power cut. Set the time of day.
If the display shows an error code that is not in this table turn the house fuse off and on to restart
the oven. If the error code recurs contact an Authorised Service Centre.
12.2 Service data
If you cannot find a solution to the problem yourself, contact your dealer or an Authorised
Service Centre.
The necessary data for the service centre is on the rating plate. The rating plate is on the front
frame of the appliance cavity. Do not remove the rating plate from the appliance cavity.
We recommend that you write the data here:
Model (MOD.) .........................................
Product number (PNC) .........................................
Serial number (S.N.) .........................................
63/200
TROUBLESHOOTING

13. ENERGY EFFICIENCY
13.1 Energy saving
Make sure that the appliance door is closed when the appliance operates. Do not open the
appliance door too often during cooking. Keep the door gasket clean and make sure it is well
fixed in its position.
Use metal cookware to improve energy saving (only when you use a non-microwave function).
When possible, do not preheat the appliance before cooking.
Keep breaks between baking as short as possible when you prepare a few dishes at one time.
Cooking with fan
When possible, use the cooking functions with fan to save energy.
Residual heat
The fan and lamp continue to operate. When you turn off the appliance, the display shows the
residual heat. You can use that heat to keep the food warm.
When the cooking duration is longer than 30 min, reduce the appliance temperature to
minimum 3 - 10 min before the end of cooking. The residual heat inside the appliance will
continue to cook.
Use the residual heat to warm up other dishes.
Keep food warm
Choose the lowest possible temperature setting to use residual heat and keep a meal warm.
The residual heat indicator or temperature appears on the display.
Cooking with the lamp off
Turn off the lamp during cooking. Turn it on only when you need it.
14. MENU STRUCTURE
14.1 Menu
- select to enter the Menu.
Menu structure
Assisted Cooking Settings
Step 1 Step 2 Step 3 Step 4 Step 5
O1 - O9
Select the Menu,
Settings. Confirm setting. Select the set‐
ting. Confirm setting. Adjust the value
and press .
64/200
ENERGY EFFICIENCY

Settings
O1 Time of day Change O2 Display brightness 1 - 5
O3 Key tones 1 - Beep
2 - Click
3 - Sound off
O4 Buzzer volume 1 - 4
O5 Uptimer On / Off O6 Light On / Off
O7 Demo mode Activation
code: 2468
O8 Software version Check
O9 Reset all settings Yes / No
15. ENVIRONMENTAL CONCERNS
Recycle materials with the symbol . Put the packaging in relevant containers to recycle it.
Help protect the environment and human health by recycling waste of electrical and electronic
appliances. Do not dispose of appliances marked with the symbol with the household waste.
Return the product to your local recycling facility or contact your municipal office.
65/200
MENU STRUCTURE

VISITEZ NOTRE SITE WEB POUR :
Obtenir des conseils d’utilisation, des brochures, un dépanneur, des informations sur
le service et les réparations :
www.zanussi.com/support
Sous réserve de modifications.
TABLE DES MATIÈRES
1. INFORMATION SUR LA SÉCURITÉ.........67
1.1 Sécurité des enfants et des
personnes vulnérables.........................67
1.2 Sécurité générale...........................68
2. CONSIGNES DE SÉCURITÉ.....................70
2.1 Installation......................................70
2.2 Branchement électrique.................71
2.3 Utilisation....................................... 72
2.4 Entretien et Nettoyage...................73
2.5 Utilisation du verre.........................73
2.6 Éclairage interne............................73
2.7 Service...........................................74
2.8 Mise au rebut.................................74
3. DESCRIPTION DE L'APPAREIL...............74
3.1 Vue d’ensemble.............................74
3.2 Accessoires................................... 75
4. BANDEAU DE COMMANDE.....................75
4.1 Manettes rétractables.................... 75
4.2 Touches tactiles du bandeau de
commande...........................................75
5. AVANT LA PREMIÈRE UTILISATION......76
5.1 Nettoyage initial............................. 76
6. UTILISATION QUOTIDIENNE...................76
6.1 Comment régler : Modes
de cuisson............................................77
6.2 Comment régler : Fonction
micro-ondes.........................................77
6.3 Modes de cuisson..........................78
6.4 Comment régler :
Cuisson assistée..................................79
6.5 Cuisson assistée............................80
7. FONCTIONS DE L'HORLOGE.................. 85
7.1 Fonctions de l’horloge....................85
7.2 Comment régler : Fonctions
de l’horloge.......................................... 86
8. CONSEILS D'UTILISATION :
ACCESSOIRES............................................. 87
8.1 Insertion des accessoires.............. 87
9. FONCTIONS SUPPLÉMENTAIRES..........88
9.1 Touches Verrouil............................88
9.2 Arrêt automatique.......................... 89
9.3 Ventilateur de refroidissement.......89
10. CONSEILS............................................... 89
10.1 Recommandations pour le
micro-ondes ........................................89
10.2 Ustensiles de cuisine et matériaux
adaptés aux micro-ondes ................... 90
10.3 Réglages recommandés pour
différents types d'aliments................... 91
10.4 Tableaux de cuisson pour les
instituts de tests...................................92
11. ENTRETIEN ET NETTOYAGE................ 93
11.1 Remarques concernant le
nettoyage.............................................94
11.2 Comment retirer : Supports de
grille .................................................... 94
11.3 Comment remplacer : Éclairage.. 95
12. DÉPANNAGE...........................................95
12.1 Que faire si…...............................95
12.2 Données de maintenance............96
13. RENDEMENT ÉNERGÉTIQUE................97
13.1 Économie d'énergie..................... 97
14. STRUCTURE DES MENUS.....................97
14.1 Menu ...........................................97
15. EN MATIÈRE DE PROTECTION DE
L'ENVIRONNEMENT.....................................98
66/200

1. INFORMATION SUR LA SÉCURITÉ
Avant d'installer et d'utiliser cet appareil, lisez soigneusement
les instructions fournies. Le fabricant ne pourra être tenu pour
responsable des blessures et dégâts résultant d'une mauvaise
installation ou utilisation. Conservez toujours les instructions
dans un lieu sûr et accessible pour vous y référer
ultérieurement.
1.1 Sécurité des enfants et des personnes
vulnérables
•Cet appareil peut être utilisé par des enfants âgés d'au
moins 8 ans et par des personnes ayant des capacités
physiques, sensorielles ou mentales réduites ou dénuées
d’expérience ou de connaissance, s'ils sont correctement
surveillés ou si des instructions relatives à l'utilisation de
l'appareil en toute sécurité leur ont été données et s’ils
comprennent les risques encourus. Les enfants de moins de
8 ans et les personnes ayant un handicap très important et
complexe doivent être tenus à l'écart de l’appareil, à moins
d'être surveillés en permanence.
•Veillez à ce que les enfants ne jouent pas avec l’appareil.
•Ne laissez pas les emballages à la portée des enfants et
jetez-les convenablement.
•AVERTISSEMENT : L'appareil et ses parties accessibles
deviennent chauds pendant l'utilisation. Tenez les enfants et
les animaux éloignés de l’appareil lorsqu’il est en cours
d’utilisation et de refroidissement.
•Si l'appareil est équipé d'un dispositif de sécurité enfants,
nous vous recommandons de l'activer.
•Le nettoyage et l'entretien par l'usager ne doivent pas être
effectués par des enfants sans surveillance.
67/200
INFORMATION SUR LA SÉCURITÉ

1.2 Sécurité générale
•Cet appareil est exclusivement destiné à un usage culinaire.
•Cet appareil est conçu pour un usage domestique unique,
dans un environnement intérieur.
•Cet appareil peut être utilisé dans les bureaux, les
chambres d’hôtel, les chambres d’hôtes, les maisons
d’hôtes de ferme et d’autres hébergements similaires
lorsque cette utilisation ne dépasse pas le niveau (moyen)
de l’utilisation domestique.
•Cet appareil doit être installé et le câble remplacé
uniquement par un professionnel qualifié.
•N'utilisez pas l'appareil avant de l'avoir installé dans la
structure encastrée.
•Débranchez l'appareil de l'alimentation électrique avant
toute opération d'entretien.
•Si le câble d’alimentation secteur est endommagé, son
remplacement doit être confié exclusivement au fabricant, à
son service après-vente ou à toute autre personne qualifiée
afin d’éviter tout danger électrique.
•AVERTISSEMENT : Assurez-vous que l'appareil est éteint
avant de remplacer l'ampoule pour éviter tout risque
d'électrocution.
•AVERTISSEMENT : L'appareil et ses parties accessibles
deviennent chauds pendant l'utilisation. Des précautions
doivent être prises pour éviter de toucher les éléments
chauffants ou la surface de la cavité de l'appareil.
•Utilisez toujours des gants de cuisine pour retirer ou insérer
des accessoires ou des plats allant au four.
•N'activez pas la fonction Micro-ondes lorsque l'appareil est
vide. Les pièces métalliques à l'intérieur de la cavité
peuvent créer un arc électrique.
•Les aliments ou boissons dans des récipients en métal ne
doivent jamais être chauffés au micro-ondes. Cet
avertissement ne s'applique pas si le fabricant indique la
68/200
INFORMATION SUR LA SÉCURITÉ

taille et la forme des récipients métalliques adaptés à la
cuisson au micro-ondes.
•AVERTISSEMENT : Si la porte ou les joints de porte sont
endommagés, l'appareil ne doit pas être utilisé tant qu'il n'a
pas été réparé par un professionnel qualifié.
•AVERTISSEMENT : Toute opération de maintenance ou
réparation nécessitant le retrait d'un couvercle assurant la
protection contre l'exposition à l'énergie du micro-ondes ne
doit être effectuée que par un professionnel qualifié.
•AVERTISSEMENT : Ne chauffez pas les liquides et autres
aliments dans des récipients scellés. Il sont susceptibles
d'exploser.
•N'utilisez que des ustensiles adaptés à une utilisation dans
un four à micro-ondes.
•Lorsque vous faites cuire des aliments dans des récipients
en plastique ou en papier, observez l'appareil car ces
matières peuvent s'enflammer.
•L'appareil est destiné à chauffer des aliments et des
boissons. Le séchage d'aliments ou de vêtements et le
réchauffement de coussinets, de chaussons, d'éponges, de
linge humide et autres peuvent provoquer des blessures,
l'inflammation ou un incendie.
•Si de la fumée est émise, mettez à l’arrêt ou débranchez
l'appareil et laissez la porte fermée pour étouffer les
flammes.
•Le chauffage au micro-ondes des boissons peut provoquer
une ébullition différée. Prenez des précautions lorsque vous
manipulez le récipient.
•Le contenu des biberons et des petits pots pour bébés doit
être remué ou secoué et la température vérifiée avant de
consommer, afin d'éviter tout risque de brûlure.
•Les œufs dans leur coquille et les œufs durs entiers ne
doivent pas être réchauffés dans l'appareil car ils pourraient
exploser, même après la fin de la cuisson au micro-ondes.
69/200
INFORMATION SUR LA SÉCURITÉ

•Pour retirer les supports de grille, tirez d'abord l'avant du
support de grille, puis l'arrière à distance des parois
latérales. Installez les supports de grille dans l'ordre inverse.
•Nettoyez régulièrement l'appareil et retirez les dépôts
alimentaires.
•N'utilisez pas de nettoyeur à vapeur pour nettoyer l'appareil.
•N'utilisez pas de produits abrasifs ni de racloirs pointus en
métal pour nettoyer la porte en verre car ils peuvent rayer la
surface, ce qui peut briser le verre.
•Si vous ne maintenez pas l'appareil dans des conditions de
propreté, il peut entraîner une détérioration de la surface qui
pourrait affecter la durée de vie de l'appareil et provoquer
une situation dangereuse.
2. CONSIGNES DE SÉCURITÉ
2.1 Installation
AVERTISSEMENT!
L'appareil doit être installé uniquement par un professionnel qualifié.
• Retirez l'intégralité de l'emballage.
• N'installez pas et ne branchez pas un appareil endommagé.
• Suivez scrupuleusement les instructions d'installation fournies avec l'appareil.
• Soyez toujours vigilants lorsque vous déplacez l'appareil car il est lourd. Utilisez toujours
des gants de sécurité et des chaussures fermées.
• Ne tirez jamais l'appareil par la poignée.
• Installez l'appareil dans un lieu sûr et adapté répondant aux exigences d'installation.
• Respectez l'espacement minimal requis par rapport aux autres appareils et éléments.
• Avant de monter l'appareil, vérifiez si la porte de l'appareil s'ouvre sans retenue.
• L’appareil est équipé d’un système de refroidissement électrique. Il doit être utilisé avec
l’alimentation électrique.
• L’unité intégrée doit répondre aux exigences de stabilité de la norme DIN 68930.
Hauteur minimale du meuble (Hauteur minimale
du meuble sous le plan de travail)
444 (460) mm
Largeur du meuble 560 mm
Profondeur du meuble 550 (550) mm
Hauteur de l’avant de l’appareil 455 mm
70/200
CONSIGNES DE SÉCURITÉ

Hauteur de l’arrière de l’appareil 440 mm
Largeur de l’avant de l’appareil 595 mm
Largeur de l’arrière de l’appareil 559 mm
Profondeur de l'appareil 567 mm
Profondeur d’encastrement de l’appareil 546 mm
Profondeur avec porte ouverte 882 mm
Dimensions minimales de l’ouverture de ventila‐
tion. Ouverture placée sur la partie inférieure de la
face arrière
560x20 mm
Longueur du câble d’alimentation secteur. Le câ‐
ble est placé dans le coin droit de la face arrière
1500 mm
Vis de montage 3.5x25 mm
2.2 Branchement électrique
AVERTISSEMENT!
Risque d'incendie ou d'électrocution.
• Tous les raccordements électriques doivent être effectués par un électricien qualifié.
• L’appareil doit être relié à la terre.
• Assurez-vous que les paramètres figurant sur la plaque signalétique correspondent aux
données électriques nominale de l’alimentation secteur.
• Utilisez toujours une prise de courant de sécurité correctement installée.
• N'utilisez pas d'adaptateurs multiprise et de rallonges.
• Veillez à ne pas endommager la fiche secteur ni le câble d'alimentation. Le remplacement
du câble d’alimentation de l’appareil doit être effectué par notre service après-vente agréé.
• Ne laissez pas les câbles d'alimentation entrer en contact ou s'approcher de la porte de
l'appareil ou de la niche d'encastrement sous l'appareil, particulièrement lorsqu'il est en
marche ou que la porte est chaude.
• La protection contre les chocs des parties sous tension et isolées doit être fixée de telle
manière qu'elle ne puisse pas être enlevée sans outils.
• Ne branchez la fiche secteur dans la prise secteur qu'à la fin de l'installation. Assurez-vous
que la prise secteur est accessible après l'installation.
• Si la prise secteur est détachée, ne branchez pas la fiche secteur.
• Ne tirez pas sur le câble secteur pour débrancher l'appareil. Tirez toujours sur la fiche de la
prise secteur.
• N'utilisez que des systèmes d'isolation appropriés : des coupe-circuits, des fusibles (les
fusibles à visser doivent être retirés du support), un disjoncteur différentiel et des
contacteurs.
71/200
CONSIGNES DE SÉCURITÉ

• L'installation électrique doit comporter un dispositif d'isolation qui vous permet de
déconnecter l'appareil du secteur à tous les pôles. Le dispositif d'isolement doit avoir une
largeur d'ouverture de contact de 3 mm minimum.
• Cet appareil est fourni avec une fiche électrique et un câble d’alimentation.
2.3 Utilisation
AVERTISSEMENT!
Risque de blessures, de brûlures, d'électrocution ou d'explosion.
• Ne modifiez pas les spécifications de cet appareil.
• Assurez-vous que les orifices d'aération ne sont pas obstrués.
• Ne laissez pas l'appareil sans surveillance durant son fonctionnement.
• Éteignez l'appareil après chaque utilisation.
• Soyez prudent lors de l'ouverture de la porte de l'appareil lorsque celui-ci fonctionne. De l'air
chaud peut se dégager.
• N'utilisez pas l'appareil avec des mains mouillées ou en contact avec de l'eau.
• N'exercez pas de pression sur la porte ouverte.
• N'utilisez pas l'appareil comme plan de travail ou comme espace de rangement.
• Ouvrez la porte de l'appareil avec précaution. L'utilisation d'ingrédients avec de l'alcool peut
provoquer un mélange d'alcool et d'air.
• Ne laissez pas des étincelles ou des flammes nues entrer en contact avec l'appareil lorsque
vous ouvrez la porte.
• Ne placez pas de produits inflammables ou d’éléments imbibés de produits inflammables à
l’intérieur, à proximité ou au-dessus de l’appareil.
• N'utilisez pas la fonction micro-ondes pour préchauffer l'appareil.
AVERTISSEMENT!
Risque d'endommagement de l'appareil.
• Pour éviter tout endommagement ou décoloration de l’émail :
– ne placez jamais de feuilles d'aluminium directement sur le fond de la cavité de
l'appareil.
– ne versez pas d'eau directement dans l'appareil chaud.
– ne conservez pas de plats et de nourriture humides dans l'appareil après avoir terminé
la cuisson.
– Installez ou retirez les accessoires avec précautions.
• La décoloration de l'émail ou de l'acier inoxydable est sans effet sur les performances de
l'appareil.
• Utilisez un plat à rôtir pour des gâteaux moelleux. Les jus de fruits provoquent des taches
qui peuvent être permanentes.
• Cuisinez toujours avec la porte de l’appareil fermée.
• Si l’appareil est installé derrière la paroi d’un meuble (par ex. une porte), veuillez à ce que la
porte ne soit jamais fermée lorsque l’appareil fonctionne. La chaleur et l’humidité peuvent
s’accumuler derrière la porte fermée du meuble et provoquer d’importants dégâts sur
l’appareil, votre logement ou le sol. Ne fermez pas la paroi du meuble tant que l’appareil n’a
pas refroidi complètement.
72/200
CONSIGNES DE SÉCURITÉ

2.4 Entretien et Nettoyage
AVERTISSEMENT!
Risque de blessure, d'incendie ou de dommages matériels sur l'appareil.
• Avant toute opération d'entretien, éteignez l'appareil et débranchez la fiche de la prise
secteur.
• Vérifiez que l'appareil est froid. Les panneaux de verre risquent de se briser.
• Remplacez immédiatement les vitres de la porte si elles sont endommagées. Contactez le
service après-vente agréé.
• Soyez prudent lorsque vous retirez la porte de l'appareil. La porte est lourde !
• Veillez à sécher la cavité et la porte après chaque utilisation. La vapeur produite durant son
fonctionnement se condense sur les parois de la cavité et peuvent entraîner une corrosion.
• Nettoyez régulièrement l'appareil afin de maintenir le revêtement en bon état.
• Les résidus de graisse et d'aliments dans l'appareil peuvent provoquer un incendie et un arc
électrique lorsque la fonction micro-ondes est en cours.
• Nettoyez l'appareil avec un chiffon doux humide. Utilisez uniquement des produits de lavage
neutres. N'utilisez pas de produits abrasifs, de tampons à récurer, de solvants ni d'objets
métalliques.
• Si vous utilisez un spray pour four, suivez les consignes de sécurité figurant sur son
emballage.
2.5 Utilisation du verre
En manipulant vos verres sans une attention particulière, vous pourriez les casser, les écailler,
les fissurer ou les rayer :
• Ne versez pas d'eau froide ou un autre liquide sur les plats en verre car vous pourriez
entraîner une chute brutale de température qui le brisera immédiatement. Les morceaux de
verre sont extrêmement coupants et difficiles à localiser.
• N'utilisez pas de chiffon mouillé pour porter le verre, et ne posez pas de verre chaud sur une
surface humide ou froide, directement sur le plan de travail ou sur une surface en métal ou
sur un évier.
• N'utilisez pas et ne réparez pas de récipient en verre écaillé, fissuré ou rayé.
• Ne faites pas tomber et ne cognez pas le verre contre un objet dur et ne tapez pas
d'ustensile dessus.
• Ne faites pas chauffer de récipient en verre vide ou presque vide au micro-ondes, et ne
surchauffez pas d'huile ou de beurre au micro-ondes (procédez par petites durées de
chauffage).
Laissez les récipients en verre chauds refroidir sur une grille, sur un dessous de plat ou sur un
chiffon sec. Assurez-vous que le verre est assez froid avant de le laver, de le placer au
réfrigérateur ou au congélateur.
Évitez de manipuler des récipients en verre chaud (y compris des plats avec des surfaces
antidérapantes en silicone) sans un dessous de plat sec.
Évitez toute mauvaise utilisation du micro-ondes (par ex. faire fonctionner le four à vide ou avec
une toute petite quantité d'aliments).
2.6 Éclairage interne
AVERTISSEMENT!
Risque d'électrocution !
73/200
CONSIGNES DE SÉCURITÉ

• Concernant la/les lampe(s) à l’intérieur de ce produit et les lampes de rechange vendues
séparément : Ces lampes sont conçues pour résister à des conditions physiques extrêmes
dans les appareils électroménagers, telles que la température, les vibrations, l’humidité, ou
sont conçues pour signaler des informations sur le statut opérationnel de l’appareil. Elles ne
sont pas destinées à être utilisées dans d'autres applications et ne conviennent pas à
l’éclairage des pièces d’un logement.
• Ce produit contient une source lumineuse de classe d’efficacité énergétique G.
• Utilisez uniquement des ampoules ayant les mêmes spécifications.
2.7 Service
• Pour réparer l'appareil, contactez le service après-vente agréé.
• Utilisez uniquement des pièces de rechange d'origine.
2.8 Mise au rebut
AVERTISSEMENT!
Risque de blessure ou d'asphyxie.
• Contactez votre service municipal pour obtenir des informations sur la marche à suivre pour
mettre l’appareil au rebut.
• Débranchez l'appareil de l'alimentation électrique.
• Coupez le câble d'alimentation au ras de l'appareil et mettez-le au rebut.
• Retirez le dispositif de verrouillage du hublot pour empêcher les jeunes et les animaux de
s'enfermer dans l'appareil.
3. DESCRIPTION DE L'APPAREIL
3.1 Vue d’ensemble
1 2 43
10
4
3
1
28
9
5
6
7
Bandeau de commande
Manette de sélection des modes de
cuisson
Affichage
Manette de commande
Résistance
Générateur de micro-ondes
Éclairage
Chaleur tournante
Support de grille, amovible
Niveaux de la grille
74/200
DESCRIPTION DE L'APPAREIL

3.2 Accessoires
Grille métallique
Pour les plats de cuisson, les moules à gâteaux,
les rôtis.
Plateau de cuisson
Pour les gâteaux et biscuits.
Plateau en verre du micro-ondes
Pour préparer les aliments en mode micro-ondes.
4. BANDEAU DE COMMANDE
4.1 Manettes rétractables
Pour utiliser l'appareil, appuyez sur la manette. La manette sort alors de son logement.
4.2 Touches tactiles du bandeau de commande
Minu‐
teur
Pré‐
chauffa‐
ge rapi‐
de
Eclai‐
rage
four
Puissance
du micro-
ondes
Confirmez
la configu‐
ration
Appuyez sur
la touche
Tournez la ma‐
nette
Sélectionnez un mode de cuisson pour allumer le four.
Tournez la manette des modes de cuisson sur la position Arrêt pour mettre à l’arrêt le four.
75/200
BANDEAU DE COMMANDE

Affichage avec les principales fonctions.
Voyants de
l’afficha‐
ge : Touches Ver‐
rouil.
Cuisson assis‐
tée
Configurations Indicateur de fonction
du micro-ondes
Voyants
du minu‐
teur :
Barre de progression - de la température ou de
l’heure. La barre est entièrement rouge lorsque le
four atteint la température réglée.
5. AVANT LA PREMIÈRE UTILISATION
AVERTISSEMENT!
Reportez-vous aux chapitres concernant la sécurité.
5.1 Nettoyage initial
Avant la première utilisation, nettoyez le four à vide et réglez la durée :
00:00
Réglez l’heure. Appuyez sur la tou‐
che .
6. UTILISATION QUOTIDIENNE
AVERTISSEMENT!
Reportez-vous aux chapitres concernant la sécurité.
76/200
AVANT LA PREMIÈRE UTILISATION

6.1 Comment régler : Modes de cuisson
Pour lancer la cuisson
Étape 1 Étape 2
Sélectionnez un mode de cuisson.
Réglez la température.
Appuyez sur WATT et tournez la manette pour
régler la puissance du micro-ondes.
Appuyez sur la touche
.
6.2 Comment régler : Fonction micro-ondes
Étape 1 Retirez les accessoires.
Insérez le plat en verre du micro-ondes. Placez les aliments sur le plateau en verre
du micro-ondes.
Étape 2 Sélectionnez le mode de cuisson micro-ondes et appuyez sur : pour commen‐
cer avec les paramètres par défaut.
L’affichage indique : durée et puissance du micro-ondes.
Étape 3 Tournez la manette des modes de cuisson sur la position Arrêt pour mettre à l’arrêt
le four.
Vous pouvez ajuster les réglages pendant la cuisson.
Tournez la manette de commande pour régler la durée. Appuyez sur :
Appuyez sur WATT et tournez la manette de commande pour régler la puissance du micro-ondes.
Appuyez sur :
La durée maximale des fonctions Micro-ondes dépend de la puissance
sélectionnée :
PUISSANCE DU MICRO-ONDES DURÉE MAXIMALE
100 – 600 W 59 min. 55 sec.
77/200
UTILISATION QUOTIDIENNE

PUISSANCE DU MICRO-ONDES DURÉE MAXIMALE
Plus de 600 W 7 minutes
Si vous ouvrez la porte, la fonction du micro-ondes s’arrête. Pour le redémarrer,
fermez la porte. Appuyez sur la touche .
6.3 Modes de cuisson
Modes de cuisson standard
Mode de cuisson Application
Chaleur tournante
Pour faire cuire sur 2 niveaux en même temps et pour sécher des ali‐
ments. Diminuez les températures de 20 à 40 °C par rapport à la Chauffa‐
ge Haut/Bas.
Chauffage
Haut/Bas
Pour cuire et rôtir des aliments sur un seul niveau.
Turbo gril
Pour rôtir de gros morceaux de viande ou de volaille avec os sur un seul
niveau. Pour gratiner et faire dorer.
Fonction Pizza
Pour cuire des pizzas. Pour faire dorer de façon intensive et obtenir un
dessous croustillant.
Turbo Gril + Micro-
ondes
Pour rôtir de grosses pièces de viande sur un seul niveau. Pour gratiner
et faire dorer.La fonction avec micro-ondes boost.
Chaleur tournante
+ Micro-ondes
Cuisson sur un seul niveau.La fonction avec micro-ondes boost.
78/200
UTILISATION QUOTIDIENNE

Mode de cuisson Application
Décongélation
Décongélation de viande, poisson, gâteaux, plage de puissance : 100 à
200 W
Réchauffer
Chauffage de plats préparés et d'aliments délicats, plage de puissance :
300 à 700 W
Micro-ondes
Chauffage, cuisson, plage de puissance : 100 à 1 000 W
Menu
Pour accéder au menu : Cuisson assistée, Configurations.
6.4 Comment régler : Cuisson assistée
Le sous-menu Cuisson assistée se compose d’un ensemble de fonctions et de plats
supplémentaires avec les fonctions de cuisson, les températures et les durées recommandées.
Vous pouvez régler la durée et la température pendant la cuisson.
Pour certains plats, vous pouvez également
réaliser la cuisson avec :
• Poids automatique
Cuisson assistée - vous pouvez l'utiliser pour préparer un plat rapidement avec les régla‐
ges par défaut :
Étape 1 Étape 2 Étape 3 Étape 4
P1 - P45
Accédez au menu. Sélectionner Cuisson
assistée. Appuyez
sur .
Sélectionnez le plat.
Appuyez sur la tou‐
che .
Placez le plat dans le
four. Confirmez la
configuration.
79/200
UTILISATION QUOTIDIENNE

6.5 Cuisson assistée
Légende
Poids automatique disponible.
Fonctionne avec la puissance des micro-ondes. Utilisez des accessoires
adaptés aux micro-ondes.
Préchauffez le four avant de commencer la cuisson.
Niveau de grille.
Mode de cuisson Application
F1 Gril Pour faire griller des aliments peu épais et du pain.
F2 Cuisson de sole Pour cuire des gâteaux à fond croustillant et pour stéri‐
liser des aliments.
F3 Plats Surgelés Pour rendre croustillants vos plats préparés, tels que
frites, pommes quartiers et nems.
F4 Chauffage Haut/Bas + Micro-
ondes
Cuisson et rôtissage sur un seul niveau. La fonction
avec micro-ondes boost.
F5 Gril + Micro-ondes Pour cuire des aliments rapidement et pour les faire
gratiner. La fonction avec micro-ondes boost.
Lorsque la fonction se termine, vérifiez si les aliments sont prêts.
Plat Poids Niveau/Accessoire Durée
Bœuf
P1 Rôti de bœuf,
saignant
1 - 1,5 kg ; 4
- 5 cm
d’épaisseur
1 ; plateau de cuisson
Faire frire la viande pendant quelques
minutes sur une poêle chaude. Insérez
au four.
40 min
P2 Rôti de bœuf,
à point 50 min
P3 Rôti de bœuf,
bien cuit 60 min
80/200
UTILISATION QUOTIDIENNE

Plat Poids Niveau/Accessoire Durée
P4 Steak de
bœuf, à point
180 - 220 g
par pièce ;
3 cm
d’épaisseur
2 ; plat à rôtir sur grille métalli‐
que
Faire frire la viande pendant quelques
minutes sur une poêle chaude. Insérez
au four.
15 min
P5 Bœuf rôti/
braisé (côte
de bœuf, intér‐
ieur de ronde,
flanchet)
1,5 - 2 kg 1 ; plat à rôtir sur grille métallique
Faire frire la viande pendant quelques
minutes sur une poêle chaude. Ajoutez
du liquide. Insérez au four.
120 min
P6 Rôti de bœuf,
saignant
(cuisson basse
température)
1 - 1,5 kg ; 4
- 5 cm
d’épaisseur
1 ; plateau de cuisson
Servez-vous de vos épices préférées ou
simplement du sel et du poivre fraîche‐
ment moulu. Faire frire la viande pendant
quelques minutes sur une poêle chaude.
Insérez au four.
75 min
P7 Rôti de bœuf,
à point (cuis‐
son basse
température)
85 min
P8 Rôti de bœuf,
bien cuit
(cuisson basse
température)
130 min
P9 Filet, saignant
(cuisson basse
température)
0,5 - 1,5 kg ;
5 - 6 cm
d'épaisseur
1 ; plateau de cuisson
Servez-vous de vos épices préférées ou
simplement du sel et du poivre fraîche‐
ment moulu. Faire frire la viande pendant
quelques minutes sur une poêle chaude.
Insérez au four.
75 min
P10 Filet, à point
(cuisson basse
température)
90 min
P11 Filet, bien cuit
(cuisson basse
température)
120 min
Veau
P12 Rôti de veau
(par ex. épau‐
le)
0,8 - 1,5 kg ;
4 cm
d'épaisseur
1 ; plat à rôtir sur grille métallique
Utilisez vos épices préférées. Ajoutez du
liquide. Rôti couvert.
80 min
81/200
UTILISATION QUOTIDIENNE

Plat Poids Niveau/Accessoire Durée
Porc
P13 Rôti de porc -
collet ou
épaule
1,5 kg 1 ; cocotte en céramique ou en
verre sur grille métalliqueet MW adapté
Utilisez vos épices préférées. Retournez
la viande à la moitié du temps de cuis‐
son.
90 min
P14 Émincé de
porc (cuisson
lente)
1,5 - 2 kg 1 ; plateau de cuisson
Utilisez vos épices préférées. Retournez
la viande à la moitié du temps de cuisson
pour faire dorer de manière homogène.
215 min
P15 Longe, fraî‐
che
1 - 1,5 kg ; 5
- 6 cm
d’épaisseur
1 ; plat à rôtir sur grille métallique
Utilisez vos épices préférées.
55 min
P16 Travers 2 - 3 kg ;
crus, 2 -
3 cm
d'épaisseur
2 plat profond
Ajoutez du liquide pour recouvrir le fond
d’un plat. Retournez la viande à la moitié
du temps de cuisson.
90 min
Agneau
P17 Gigot
d’agneau
avec os
1,5 - 2 kg ; 7
- 9 cm
d’épaisseur
1 ; plat à rôtir sur plateau de cuis‐
son
Ajoutez du liquide. Retournez la viande à
la moitié du temps de cuisson.
130 min
Volaille
P18 Poulet entier 1,1 kg ; frais 1 ; cocotte en céramique ou en
verre sur grille métalliqueet MW adapté
Utilisez vos épices préférées. Mettez
l’escalope de poulet vers le bas et retour‐
nez-le après la moitié du temps de cuis‐
son.
40 min
P19 Demi poulet 0,5 - 0,8 kg 2 ; plateau de cuisson
Utilisez vos épices préférées.
40 min
82/200
UTILISATION QUOTIDIENNE

Plat Poids Niveau/Accessoire Durée
P20 Escalope de
poulet
180 - 200 g
par pièce 1 ; cocotte sur grille métallique
Utilisez vos épices préférées. Faire frire
la viande pendant quelques minutes sur
une poêle chaude.
25 min
P21 Cuisses de
poulet, fraî‐
ches
- 2 ; plateau de cuisson
Si vous avez mariné les cuisses de pou‐
let, réglez une température inférieure et
faites-les cuire plus longtemps.
30 min
P22 Canard entier 2 - 3 kg 1 ; plat à rôtir sur grille métallique
Utilisez vos épices préférées. Placez la
viande sur un plat à rôtir. Retournez le
canard à la moitié du temps de cuisson.
100 min
P23 Oie entière 4 - 5 kg ? ; plat profond
Utilisez vos épices préférées. Placez la
viande sur un plateau de cuisson pro‐
fond. Retournez l’oie à la moitié du
temps de cuisson.
110 min
Autres
P24 Rôti haché 1 kg 1 ; grille métallique
Utilisez vos épices préférées.
60 min
Poisson
P25 Poisson en‐
tier, grillé
0,5 - 1 kg
par poisson 1 ; plateau de cuisson
Remplissez le poisson avec du beurre et
utilisez vos épices et herbes préférées.
30 min
P26 Filet de pois‐
son
- 2 ; cocotte sur grille métallique
Utilisez vos épices préférées.
20 min
Gâteaux/desserts
P27 Cheesecake - 1 ; moule à charnière de 28 cm
sur grille métallique
90 min
83/200
UTILISATION QUOTIDIENNE

Plat Poids Niveau/Accessoire Durée
P28 Gâteau aux
pommes
- 2 ; plateau de cuisson 45 min
P29 Tarte aux
pommes
- 1 ; moule à tarte sur grille métalli‐
que
40 min
P30 Tarte aux
pommes
- 1 ; moule à tarte de 22 cm sur
grille métallique
60 min
P31 Brownies 2 kg 2 ; plat profond 30 min
P32 Muffins au
chocolat
- 2 ; bac à muffins sur grille métalli‐
que
25 min
P33 Quatre-quarts - 1 ; moule quatre-quarts sur grille mé‐
tallique
50 min
Légumes/Garnitures
P34 Pommes de
terre au four
1 kg 1 ; plateau de cuisson
Placez les pommes de terre entières
avec la peau sur un plateau de cuisson.
50 min
P35 Quartiers 1 kg 2 ; plateau de cuisson recouvert de
papier sulfurisé
Utilisez vos épices préférées. Coupez les
pommes de terre en morceaux.
35 min
P36 Mélange de
légumes gril‐
lés
1 - 1,5 kg 2 ; plateau de cuisson recouvert de
papier sulfurisé
Utilisez vos épices préférées. Coupez les
légumes en morceaux.
30 min
P37 Croquettes
surgelées
0,5 kg 2 ; plateau de cuisson 25 min
P38 Pommes, sur‐
gelées
0,75 kg 2 ; plateau de cuisson 25 min
Gratins, pain et pizza
84/200
UTILISATION QUOTIDIENNE

Plat Poids Niveau/Accessoire Durée
P39 Lasagnes de
viande / légu‐
mes avec as‐
siettes de
nouilles sè‐
ches
1 - 1,5 kg ; 1 ; cocotte en céramique ou en
verre sur grille métallique
35 min
P40 Gratin de
pommes de
terre (pommes
de terre crues)
1,1 kg ; 2 ; cocotte en céramique ou en
verre sur grille métallique
Tournez le plat après la moitié du temps
de cuisson.
35 min
P41 Pizza fraîche,
fine - 1 ; plateau de cuisson recouvert
de papier sulfurisé 15 min
P42 Pizza fraîche,
épaisse - 1 ; plateau de cuisson recouvert
de papier sulfurisé
25 min
P43 Quiche - 1 ; plat de cuisson sur grille métalli‐
que
45 min
P44 Baguette/
Ciabatta/Pain
blanc
0,8 kg 1 ; plateau de cuisson recouvert
de papier sulfurisé
Prolonger le temps pour le pain blanc.
30 min
P45 Tous grains/
seigle/pain
complet
grains entiers
dans un mou‐
le à pain
1 kg 1 ; plateau de cuisson recouvert
de papier sulfurisé / grille métallique
60 min
7. FONCTIONS DE L'HORLOGE
7.1 Fonctions de l’horloge
Fonctions de l’horlo‐
ge
Application
Minuteur. Lorsque le minuteur termine le décompte, le signal sonore
retentit.
85/200
FONCTIONS DE L'HORLOGE

Fonctions de l’horlo‐
ge
Application
Heure de cuisson. Lorsque le minuteur termine le décompte, le signal
sonore retentit et le mode de cuisson s’arrête.
Départ différé. Pour différer le début et/ou la fin de la cuisson.
Compteur. Le maximum est de 23 h 59 min. Cette fonction n’a aucun
effet sur le fonctionnement du four.
Pour activer et désactiver le Compteur, sélectionnez : Menu , Configu‐
rations.
Les fonctions de l’horloge sont disponibles uniquement pour : Chaleur tournante, Chauffage
Haut/Bas, Turbo gril, Fonction Pizza, Turbo Gril + Micro-ondes, Chaleur tournante + Micro-
ondes.
7.2 Comment régler : Fonctions de l’horloge
Comment régler Heure actuelle
Étape 1 Étape 2 Étape 3
Pour modifier l'heure actuelle, accédez au
menu et sélectionnez Configurations, Heu‐
re actuelle.
Réglez l’horloge. Appuyez sur .
Comment régler Minuteur
Étape 1
L’affichage
indique :
0:00
Étape 2 Étape 3
Appuyez sur : . Réglez la Minuteur Appuyez sur .
Le minuteur commence son décompte immédiatement.
86/200
FONCTIONS DE L'HORLOGE

Comment régler Heure de cuisson
Étape 1 Étape 2
L’affichage in‐
dique :
0:00
Étape 3 Étape 4
Choisissez le mo‐
de de cuisson et
réglez la tempéra‐
ture.
Appuyez à plu‐
sieurs reprises :
.
Réglez le temps
de cuisson. Appuyez sur .
Le minuteur commence son décompte immédiatement.
Comment régler Départ différé
Étape 1 Étape 2
L'affi‐
chage
indi‐
que :
l'heure
actuelle
DÉ‐
MAR‐
RER
Étape 3 Étape 4
L’affi‐
chage
indique :
--:--
AR‐
RÊTER
Étape 5 Étape 6
Sélec‐
tionnez
le mode
de cuis‐
son.
Appuyez à
plusieurs
reprises :
.
Réglez
l’heure
de dé‐
part.
Appuyez
sur .
Réglez
l’heure
de fin.
Appuyez
sur .
Le minuteur commence à compter à l’heure réglée.
8. CONSEILS D'UTILISATION : ACCESSOIRES
8.1 Insertion des accessoires
Utilisez uniquement des récipients et des matériaux adaptés. Reportez-vous au paragraphe
« Ustensiles et matériaux adaptés aux micro-ondes » dans le chapitre « Conseils ».
Une petite indentation sur le dessus apporte plus de sécurité. Les indentations sont également
des dispositifs anti-bascule. Le rebord élevé de la grille empêche les ustensiles de cuisine de
glisser sur la grille.
87/200
CONSEILS D'UTILISATION : ACCESSOIRES

Grille métallique:
Poussez la grille entre les barres de guida‐
ge des supports de grille et assurez-vous
que les pieds sont orientés vers le bas.
Plateau de cuisson:
Poussez la plaque entre les rails du sup‐
port de grille.
Plateau en verre du micro-ondes:
N’utilisez le plateau en verre du micro-on‐
des qu’avec la fonction micro-ondes. Il
n’est pas adapté à la fonction micro-ondes
combinée (par ex. gril au micro-ondes).
Placez cet accessoire en bas de la cavité.
Vous pouvez placer les aliments directe‐
ment sur la plaque inférieure en verre du
micro-ondes.
9. FONCTIONS SUPPLÉMENTAIRES
9.1 Touches Verrouil.
Cette fonction permet d’éviter une modification involontaire de la fonction de l'appareil.
Activez-la lorsque l'appareil est allumé - la cuisson réglée est maintenue, le bandeau de comman‐
de est verrouillé.
Allumez-le lorsque l’appareil est éteint - il ne peut pas être allumé, le bandeau de commande est
verrouillé.
88/200
FONCTIONS SUPPLÉMENTAIRES

Cette fonction permet d’éviter une modification involontaire de la fonction de l'appareil.
- maintenez la touche
enfoncée pour activer la fonc‐
tion.
Un signal sonore retentit.
- maintenez la touche
enfoncée pour la désactiver.
3 x - clignote lorsque le verrouillage est activé.
9.2 Arrêt automatique
Pour des raisons de sécurité, le four s'éteint au bout d'un certain temps si un mode de cuisson
est en cours et vous ne modifiez aucun réglage.
(°C) (h)
30 - 115 12.5
120 - 195 8.5
200 - 230 5.5
L'arrêt automatique ne fonctionne pas avec les fonctions : Eclairage four, Départ différé.
9.3 Ventilateur de refroidissement
Lorsque l'appareil fonctionne, le ventilateur de refroidissement se met automatiquement en
marche pour refroidir les surfaces de l'appareil. Si vous éteignez l'appareil, le ventilateur de
refroidissement peut continuer à fonctionner jusqu'à ce que l'appareil refroidisse.
10. CONSEILS
10.1 Recommandations pour le micro-ondes
Cuisinons !
Placez les aliments sur le plateau en verre du micro-ondes, au fond de la cavité.
Placez les aliments sur une assiette au fond de la cavité.
Retournez ou remuez les aliments à la moitié du temps de décongélation et de cuisson.
De temps en temps, mélangez les plats liquides en cours de cuisson.
Mélangez les aliments avant de les servir.
Couvrez les aliments pour la cuisson et le réchauffage.
Introduisez une cuillère dans la bouteille ou le verre lorsque vous réchauffez des liquides, pour
garantir une meilleure distribution de la chaleur.
Placez les aliments dans l'appareil sans emballage. Les plats préparés emballés peuvent être
placés dans l'appareil uniquement si l'emballage est adapté à la cuisson au micro-ondes
(vérifiez les informations sur l'emballage).
89/200
CONSEILS

Cuisson au micro-ondes
Couvrez les aliments pour les faire cuire. Si vous souhaitez que les aliments restent
croustillants, faites-les cuire sans les couvrir.
Ne cuisez pas trop les plats en réglant une puissance ou une durée trop élevées. Les aliments
peuvent se dessécher, brûler ou prendre feu.
N'utilisez pas l'appareil pour cuire des œufs ou des escargots dans leur coquille car ils peuvent
exploser. Percez le jaune des œufs au plat avant de les réchauffer.
Percez plusieurs fois les aliments comportant une peau ou pelez-les avant de les faire cuire.
Coupez les légumes en morceaux de même taille.
Après avoir mis à l'arrêt l'appareil, sortez le plat et laissez-le reposer pendant quelques minutes
pour que la chaleur se répartisse uniformément.
Décongélation au micro-ondes
Placez les aliments surgelés déballés sur une petite assiette retournée avec un récipient en-
dessous, ou sur une grille de décongélation ou une passoire en plastique afin que l'eau de
décongélation puisse s'évacuer.
Retirez ensuite les morceaux décongelés.
Vous pouvez utiliser une puissance de micro-ondes plus élevée pour cuire les fruits et légumes
sans les décongeler.
10.2 Ustensiles de cuisine et matériaux adaptés aux micro-ondes
Pour la cuisson au micro-ondes, n'utilisez que des récipients et matériaux adaptés. Utilisez le
tableau ci-dessous comme référence.
Vérifiez les caractéristiques des ustensiles de cuisine / des matériaux avant utilisation.
Ustensiles de cuisine / Maté‐
riaux
Verre et porcelaine allant au four
ne contenant aucun composant
métallique, par ex. le verre résis‐
tant à la chaleur
Verre et porcelaine n'allant pas
au four sans décor en argent, or,
platine ou métal
X X
Verre et vitrocéramique en ma‐
tériau résistant aux températu‐
res élevées/basses
Récipients en céramique et en
faïence allant au four sans com‐
posant en quartz ou en métal ni
vernis contenant du métal
Céramique, porcelaine et faïen‐
ce dont le fond n'est pas verni
ou avec de petits trous, par
exemple sur les poignées
X X X
90/200
CONSEILS

Ustensiles de cuisine / Maté‐
riaux
Plastique résistant à la chaleur
jusqu'à 200 °C
X
Carton, papier X X
Film étirable X X
Film étirable pour micro-ondes X
Plats à rôtir en métal, par ex. en
émail, en fonte
X X X
Moules à gâteaux, laqués noirs
ou avec revêtement en silicone
X X X
Plateau de cuisson X X X
Grille métallique X X
Plateau en verre du micro-ondes X
Ustensiles pour une utilisation
au micro-ondes, par ex. plat
pour cuisson croustillante
X X
10.3 Réglages recommandés pour différents types d'aliments
Les données du tableau sont fournies à titre indicatif uniquement.
700 à 1 000 W
Saisir au début du processus de cuisson Chauffer des liquides
91/200
CONSEILS

500 à 600 W
Cuisson des lé‐
gumes
Faire cuire des
plats à base
d'œufs
Faire mijoter des
ragoûts
Réchauffer des
plats pour une as‐
siette
Décongeler et
chauffer des
plats surgelés
300 à 400 W
Faire fondre du
fromage, du cho‐
colat, du beurre
Faire mijoter
du riz
Réchauffer des
aliments pour
bébés
Cuire / Réchauffer
des aliments déli‐
cats
Poursuivre la
cuisson
100 à 200 W
Décongeler du pain Décongeler des fruits
et des gâteaux
Décongélation du fro‐
mage, de la crème,
du beurre
Décongeler de la
viande, du poisson
10.4 Tableaux de cuisson pour les instituts de tests
Informations pour les organismes de contrôle
Tests conformément à la norme IEC 60705.
Utilisez une grille métallique, sauf indication contraire.
FONCTION MI‐
CRO-ONDES
(W) (kg) (min)
Génoise 600 0.475 Dessous 7 - 9 Tournez le récipient
d'1/4 de tour à la
moitié du temps de
cuisson.
92/200
CONSEILS

Utilisez une grille métallique, sauf indication contraire.
FONCTION MI‐
CRO-ONDES
(W) (kg) (min)
Rôti haché 400 0.9 2 25 - 32 Tournez le récipient
d'1/4 de tour à la
moitié du temps de
cuisson.
Crème anglaise
aux œufs
500 1 Dessous 18 -
Décongélation de
viande
200 0.5 Dessous 7 - 8 Retournez la viande
à mi-cuisson.
Utilisez la grille métallique.
FONC‐
TION
COMBI
MICRO-
ONDES
(W) (°C) (min)
Gâteaux,
0,7 kg
Chauffage
Haut/Bas +
Micro-on‐
des
100 200 2 23 - 27 Tournez le réci‐
pient d'1/4 de tour
à la moitié du
temps de cuisson.
Gratin de
pommes
de terre,
1,1 kg
Chaleur
tournante +
Micro-on‐
des
300 180 2 38 - 42 Tournez le réci‐
pient d'1/4 de tour
à la moitié du
temps de cuisson.
Poulet,
1,1 kg
Turbo Gril +
Micro-on‐
des
400 230 1 35 - 40 Placez la viande
dans un plat en
verre rond et re‐
tournez-la à mi-
cuisson.
11. ENTRETIEN ET NETTOYAGE
AVERTISSEMENT!
Reportez-vous aux chapitres concernant la sécurité.
93/200
ENTRETIEN ET NETTOYAGE

11.1 Remarques concernant le nettoyage
Agent nettoy‐
ant
Nettoyez l’avant de l’appareil uniquement avec un chiffon en microfibre imbibé
d’eau tiède et d’un détergent doux.
Utilisez une solution de nettoyage pour nettoyer les surfaces métalliques.
Nettoyez les taches avec un détergent doux.
Utilisation
quotidienne
Nettoyez la cavité après chaque utilisation. L’accumulation de graisse ou d’au‐
tres résidus peut provoquer un incendie.
Nettoyez soigneusement la voûte de l'appareil pour éliminer les résidus et la
graisse.
Ne conservez pas les aliments dans l'appareil pendant plus de 20 minutes. Sé‐
chez la cavité uniquement avec un chiffon en microfibre après chaque utilisa‐
tion.
Accessoires
Nettoyez tous les accessoires après chaque utilisation et laissez-les sécher.
Utilisez uniquement un chiffon en microfibre avec de l’eau tiède et un détergent
doux. Ne lavez pas les accessoires au lave-vaisselle .
Ne nettoyez pas les accessoires anti-adhésifs avec un produit nettoyant abrasif
ou des objets tranchants.
11.2 Comment retirer : Supports de grille
Retirez les supports de grille pour nettoyer le four.
Étape 1 Éteignez le four et attendez qu’il soit froid.
Étape 2 Tirez avec précaution les sup‐
ports de grille vers le haut et
sortez-les de la prise avant.
2
3
1
Étape 3 Écartez l'avant du support de
grille de la paroi latérale.
Étape 4 Sortez les supports de la prise
arrière.
Installez les supports de grille dans l'ordre inverse.
94/200
ENTRETIEN ET NETTOYAGE

11.3 Comment remplacer : Éclairage
AVERTISSEMENT!
Risque d'électrocution.
L'éclairage peut être chaud.
Tenez toujours l'ampoule halogène avec un chiffon afin d'éviter que des résidus de graisse ne
brûlent sur l'ampoule.
Avant de remplacer l'éclairage :
Étape 1 Étape 2 Étape 3
Éteignez le four. Attendez que
le four ait refroidi.
Débranchez le four de l'ali‐
mentation secteur.
Placez un chiffon au fond de
la cavité.
Lampe supérieure
Étape 1 Tournez le diffuseur en verre pour le retirer.
Étape 2 Nettoyez le diffuseur en verre.
Étape 3 Remplacez l’ampoule par une ampoule adéquate résistant à une température de
300 °C.
Étape 4 Installez le diffuseur en verre.
12. DÉPANNAGE
AVERTISSEMENT!
Reportez-vous aux chapitres concernant la sécurité.
12.1 Que faire si…
Dans tous les cas ne figurant pas dans ce tableau, veuillez contacter un service après-vente
agréé.
Le four ne fonctionne pas ou ne chauffe pas
Problème Vérifiez si...
Vous ne pouvez pas activer le four ni la faire
fonctionner.
Le four est correctement branché à l'alimenta‐
tion électrique.
Le four ne chauffe pas. L’arrêt automatique est désactivé.
95/200
DÉPANNAGE

Le four ne fonctionne pas ou ne chauffe pas
Le four ne chauffe pas. Le fusible n'a pas disjoncté.
Le four ne chauffe pas. Le verrouillage est désactivé.
Composants
Problème Vérifiez si...
L’éclairage ne fonctionne pas. L’ampoule est grillée.
Codes d'erreur
L’affichage indique… Vérifiez si...
00:00 Une coupure de courant s’est produite. Réglez
l’heure actuelle.
Si l’affichage indique un code d’erreur qui ne figure pas dans ce tableau, désactivez et réenclen‐
chez le fusible de l’habitation pour redémarrer le four. Si le code d’erreur réapparaît, contactez un
service après-vente agréé.
12.2 Données de maintenance
Si vous ne trouvez pas de solution au problème, veuillez contacter votre revendeur ou un
service après-vente agréé.
Les informations nécessaires au service après-vente figurent sur la plaque signalétique. La
plaque signalétique se trouve sur le cadre avant de la cavité de l'appareil. Ne retirez pas la
plaque signalétique de la cavité de l'appareil.
Nous vous recommandons d’écrire les informations ici :
Modèle (Mod.) .........................................
Référence produit (PNC) .........................................
Numéro de série (SN) .........................................
96/200
DÉPANNAGE

13. RENDEMENT ÉNERGÉTIQUE
13.1 Économie d'énergie
Assurez-vous que la porte de l'appareil est fermée lorsque l'appareil est en fonctionnement.
Évitez d'ouvrir l'appareil trop souvent pendant la cuisson. Nettoyez régulièrement le joint de
porte et assurez-vous qu’il est bien en place.
Utilisez des plats en métal pour accroître les économies d'énergie (uniquement lorsque vous
utilisez une fonction sans micro-ondes).
Dans la mesure du possible, ne préchauffez pas l'appareil avant la cuisson.
Lorsque vous préparez plusieurs plats à la fois, faites en sorte que les pauses entre les
cuissons soient aussi courtes que possible.
Cuisson avec ventilation
Si possible, utilisez les fonctions de cuisson avec la ventilation pour économiser de l'énergie.
Chaleur résiduelle
L'éclairage et le ventilateur continuent de fonctionner. Lorsque vous mettez à l'arrêt l'appareil,
l'affichage montre la chaleur résiduelle. Vous pouvez utiliser cette chaleur pour le maintien au
chaud des aliments.
Si la cuisson doit durer plus de 30 minutes, réduisez la température de l'appareil au minimum 3
à 10 minutes avant la fin de la cuisson. La chaleur résiduelle à l'intérieur de l'appareil
poursuivra la cuisson.
Utilisez la chaleur résiduelle pour réchauffer d'autres plats.
Maintien des aliments au chaud
Sélectionnez la température la plus basse possible pour utiliser la chaleur résiduelle et
maintenir le repas au chaud. La température ou le voyant de chaleur résiduelle s'affichent.
Cuisson avec l'éclairage éteint
Éteignez l'éclairage en cours de cuisson. Ne l'allumez que lorsque vous en avez besoin.
14. STRUCTURE DES MENUS
14.1 Menu
- sélectionnez pour accéder au Menu .
Structure du Menu
Cuisson assistée Configurations
Étape 1 Étape 2 Étape 3 Étape 4 Étape 5
O1 - O9
97/200
RENDEMENT ÉNERGÉTIQUE

Sélectionnez le
Menu , Configu‐
rations.
Confirmez la
configuration.
Sélectionnez la
configuration.
Confirmez la
configuration.
Ajustez la valeur
et appuyez sur
.
Configurations
O1 Heure actuelle Modifier O2 Affichage Luminosi‐
té
1 - 5
O3 Son touches 1 - Bip
2 - Clic
3 - Son dés‐
activé
O4 Volume alarme 1 - 4
O5 Compteur Marche / Ar‐
rêt
O6 Eclairage four Marche / Arrêt
O7 Mode démo Code d'acti‐
vation : 2468
O8 Version du logiciel Contrôle
O9 Réinitialiser tous les
réglages
Oui/Non
15. EN MATIÈRE DE PROTECTION DE
L'ENVIRONNEMENT
Recyclez les matériaux portant le symbole . Déposez les emballages dans les conteneurs
prévus à cet effet. Contribuez à la protection de l'environnement et à votre sécurité, recyclez
vos produits électriques et électroniques. Ne jetez pas les appareils portant le symbole avec
les ordures ménagères. Emmenez un tel produit dans votre centre local de recyclage ou
contactez vos services municipaux.
98/200
STRUCTURE DES MENUS

BESUCHEN SIE UNSERE WEBSITE, UM:
Anwendungshinweise, Prospekte, Informationen zu Fehlerbehebung, Service und
Reparatur zu erhalten:
www.zanussi.com/support
Änderungen vorbehalten.
INHALTSVERZEICHNIS
1. SICHERHEITSHINWEISE........................100
1.1 Sicherheit von Kindern und
schutzbedürftigen Personen..............100
1.2 Allgemeine Sicherheit..................101
2. SICHERHEITSANWEISUNGEN..............103
2.1 Montage.......................................103
2.2 Elektrischer Anschluss.................104
2.3 Gebrauch.....................................105
2.4 Reinigung und Pflege.................. 106
2.5 Verwendung von Glasgeschirr.....106
2.6 Innenbeleuchtung........................ 107
2.7 Wartung....................................... 107
2.8 Entsorgung.................................. 107
3. GERÄTEBESCHREIBUNG..................... 107
3.1 Gesamtansicht.............................107
3.2 Zubehör....................................... 108
4. BEDIENFELD...........................................108
4.1 Versenkbare Knöpfe....................108
4.2 Sensorfelder des Bedienfelds......108
5. VOR DER ERSTEN VERWENDUNG...... 109
5.1 Erste Reinigung........................... 109
6. TÄGLICHER GEBRAUCH.......................109
6.1 Einstellung: Ofenfunktionen.........110
6.2 Einstellung:
Mikrowellenfunktionen....................... 110
6.3 Ofenfunktionen............................ 111
6.4 Einstellung: Koch-Assistent......... 112
6.5 Koch-Assistent.............................112
7. UHRFUNKTIONEN.................................. 118
7.1 Uhrfunktionen.............................. 118
7.2 Einstellung: Uhrfunktionen...........119
8. VERWENDUNG: ZUBEHÖR................... 120
8.1 Einsetzen des Zubehörs..............120
9. ZUSATZFUNKTIONEN............................121
9.1 Verriegelung................................ 121
9.2 Automatische Abschaltung.......... 122
9.3 Kühlgebläse.................................122
10. TIPPS UND HINWEISE..........................122
10.1 Mikrowellenempfehlungen ........122
10.2 Mikrowellengeeignetes
Kochgeschirr und Materialien ........... 123
10.3 Empfohlene Leistungseinstellungen
für verschiedene Arten von
Lebensmitteln.................................... 124
10.4 Gartabellen für Prüfinstitute.......125
11. REINIGUNG UND PFLEGE...................127
11.1 Hinweise zur Reinigung.............127
11.2 Entfernen: Einhängegitter .........128
11.3 Austausch: Lampe.....................128
12. FEHLERSUCHE.....................................129
12.1 Was zu tun ist, wenn ….............129
12.2 Service-Daten............................130
13. ENERGIEEFFIZIENZ............................. 130
13.1 Energiesparen........................... 130
14. MENÜSTRUKTUR................................. 131
14.1 Menü..........................................131
15. UMWELTTIPPS..................................... 132
99/200

1. SICHERHEITSHINWEISE
Lesen Sie vor der Montage und dem Gebrauch des Geräts
zuerst die Bedienungsanleitung. Bei Verletzungen oder
Schäden infolge nicht ordnungsgemäßer Montage oder
Verwendung übernimmt der Hersteller keine Haftung.
Bewahren Sie die Anleitung zum Nachschlagen an einem
sicheren und zugänglichen Ort auf.
1.1 Sicherheit von Kindern und schutzbedürftigen
Personen
•Das Gerät kann von Kindern ab 8 Jahren und Personen mit
eingeschränkten physischen, sensorischen oder geistigen
Fähigkeiten oder mit mangelnder Erfahrung/mangelndem
Wissen benutzt werden, wenn sie durch eine für ihre
Sicherheit zuständige Person beaufsichtigt werden oder von
dieser Person Anweisungen erhalten haben, wie das Gerät
sicher zu bedienen ist und welche Gefahren bei nicht
ordnungsgemäßer Bedienung bestehen. Kinder unter 8
Jahren und Personen mit schweren Behinderungen oder
Mehrfachbehinderung sollten vom Gerät ferngehalten
werden, wenn sie nicht ständig beaufsichtigt werden.
•Kinder sollten beaufsichtigt werden, um sicherzustellen,
dass sie nicht mit dem Gerät.
•Halten Sie sämtliches Verpackungsmaterial von Kindern
fern und entsorgen Sie es ordnungsgemäß.
•WARNUNG: Das Gerät und die zugänglichen Geräteteile
werden während des Betriebs heiß. Halten Sie Kinder und
Haustiere von dem Gerät fern, wenn es in Betrieb oder in
der Abkühlphase ist.
•Falls Ihr Gerät mit einer Kindersicherung ausgestattet ist,
empfehlen wir, diese einzuschalten.
•Kinder dürfen keine Reinigung und Wartung des Geräts
ohne Beaufsichtigung durchführen.
100/200
SICHERHEITSHINWEISE

1.2 Allgemeine Sicherheit
•Dieses Gerät ist nur zum Kochen bestimmt.
•Dieses Gerät ist für den Hausgebrauch in einem
Einfamilienhaus in Innenräumen bestimmt.
•Dieses Gerät darf in Büros, Hotelzimmern, Gästezimmern in
Pensionen, Bauernhöfen und anderen ähnlichen
Unterkünften verwendet werden, wenn diese Nutzung das
(durchschnittliche) Nutzungsniveau im Haushalt nicht
überschreitet.
•Die Montage des Geräts und der Austausch des Kabels
muss von einer Fachkraft vorgenommen werden.
•Verwenden Sie das Gerät nicht, bevor es in den
Einbauschrank gesetzt wird.
•Vor Wartungsarbeiten ist das Gerät von der elektrischen
Stromversorgung zu trennen.
•Wenn das Netzkabel beschädigt ist, muss es vom
Hersteller, seinem autorisierten Kundenservice oder einer
gleichermaßen qualifizierten Person ausgetauscht werden,
um Gefahren durch elektrischen Strom zu vermeiden.
•WARNUNG: Vergewissern Sie sich, dass das Gerät
ausgeschaltet ist, bevor Sie die Lampe austauschen, um
einen Stromschlag zu vermeiden.
•WARNUNG: Das Gerät und die zugänglichen Geräteteile
werden während des Betriebs heiß. Es ist darauf zu achten,
die Heizelemente oder die Oberfläche des Garraums nicht
zu berühren.
•Verwenden Sie stets Topfhandschuhe, um Zubehör oder
Geschirr herauszunehmen oder zu verstauen.
•Schalten Sie die Mikrowellenfunktion nicht ein, wenn das
Gerät leer ist. Metallteile im Garraum können einen
Lichtbogen erzeugen.
•Verwenden Sie beim Garen in der Mikrowelle keine
Metallbehälter für Speisen und Getränke. Diese Vorgabe gilt
nicht, wenn der Hersteller Angaben zur Größe und Form der
101/200
SICHERHEITSHINWEISE

Metallbehälter, die geeignet für das Garen in der Mikrowelle
sind, zur Verfügung gestellt hat.
•WARNUNG: Wenn die Tür oder Türdichtungen beschädigt
sind, darf das Gerät erst wieder in Betrieb genommen
werden, wenn es von einer Fachkraft repariert wurde.
•WARNUNG: Nur eine qualifizierte Fachkraft darf Wartungs-
oder Reparaturarbeiten ausführen, die die Entfernung einer
Abdeckung beinhalten, die Schutz vor der
Mikrowellenenergie bietet.
•WARNUNG: Erhitzen Sie keine Flüssigkeiten und andere
Lebensmittel in geschlossenen Behältern. Sie können
explodieren.
•Verwenden Sie nur mikrowellengeeignetes Kochgeschirr.
•Wenn Sie Lebensmittel in Behältern aus Kunststoff oder
Papier erwärmen, beobachten Sie das Gerät aufmerksam,
da die Möglichkeit einer Entflammung besteht.
•Das Gerät ist zum Erhitzen von Speisen und Getränken
bestimmt. Das Trocknen von Lebensmitteln oder
Kleidungsstücken und das Erhitzen von Wärmekissen,
Hausschuhen, Schwämmen, feuchten Tüchern und
Ähnlichem kann zu Verletzungen, Entflammungen oder
Bränden führen.
•Wenn Rauch austritt, schalten Sie das Gerät aus oder
ziehen Sie den Netzstecker aus der Steckdose und halten
Sie die Tür geschlossen, um Flammen zu ersticken.
•Das Erhitzen von Getränken in der Mikrowelle kann zu
einem verzögerten Überkochen führen. Seien Sie beim
Umgang mit dem Behälter vorsichtig.
•Der Inhalt von Saugflaschen und Gläsern mit Babynahrung
muss vor dem Verzehr umgerührt oder geschüttelt und die
Temperatur geprüft werden, um Verbrennungen zu
vermeiden.
•Eier mit Schale und ganze, hart gekochte Eier dürfen nicht
im Gerät erhitzt werden, da sie explodieren können, auch
nachdem die Erhitzung in der Mikrowelle beendet ist.
102/200
SICHERHEITSHINWEISE

•Ziehen Sie die Einhängegitter zuerst vorne und dann hinten
von den Seitenwänden weg. Setzen Sie die Einhängegitter
in umgekehrter Reihenfolge ein.
•Das Gerät muss regelmäßig gereinigt und alle Speisereste
entfernt werden.
•Reinigen Sie das Gerät nicht mit einem Dampfstrahlreiniger.
•Benutzen Sie zum Reinigen der Glastür keine scharfen
Scheuermittel oder Metallschwämmchen; sie könnten die
Glasfläche verkratzen und zum Zersplittern der Scheibe
führen.
•Wird das Gerät nicht in einem sauberen Zustand gehalten,
kann dies zu einer Verschlechterung der Oberfläche führen,
die sich negativ auf die Lebensdauer des Geräts auswirkt
und möglicherweise zu einer gefährlichen Situation führen
kann.
2. SICHERHEITSANWEISUNGEN
2.1 Montage
WARNUNG!
Die Montage des Geräts darf nur von einer qualifizierten Fachkraft durchgeführt
werden.
• Entfernen Sie das gesamte Verpackungsmaterial.
• Montieren Sie ein beschädigtes Gerät nicht und benutzen Sie es nicht.
• Halten Sie sich an die mitgelieferte Montageanleitung.
• Seien Sie beim Umsetzen des Gerätes vorsichtig, da es sehr schwer ist. Tragen Sie stets
Sicherheitshandschuhe und festes Schuhwerk.
• Ziehen Sie das Gerät nicht am Griff.
• Montieren Sie das Gerät an einem sicheren und geeigneten Ort, der den
Montageanforderungen entspricht.
• Die Mindestabstände zu anderen Geräten und Küchenmöbeln sind einzuhalten.
• Überprüfen Sie vor der Montage des Gerätes, ob sich die Gerätetür ungehindert öffnen
lässt.
• Das Gerät ist mit einem elektrischen Kühlsystem ausgestattet. Es muss mit der elektrischen
Stromversorgung betrieben werden.
• Das Einbaugerät muss die Stabilitätsanforderungen von DIN 68930 erfüllen.
Mindesthöhe des Einbaumöbels (Mindesthöhe des
Schranks unter der Arbeitsplatte)
444 (460) mm
103/200
SICHERHEITSANWEISUNGEN

Schrankbreite 560 mm
Schranktiefe 550 (550) mm
Höhe der Gerätevorderseite 455 mm
Höhe der Geräterückseite 440 mm
Breite der Gerätevorderseite 595 mm
Breite der Geräterückseite 559 mm
Gerätetiefe 567 mm
Geräteeinbautiefe 546 mm
Tiefe bei geöffneter Tür 882 mm
Mindestgröße der Belüftungsöffnung. Öffnung auf
der Rückseite unten
560x20 mm
Länge des Netzanschlusskabels. Das Kabel befin‐
det sich in der rechten Ecke auf der Rückseite
1500 mm
Befestigungsschrauben 3.5x25 mm
2.2 Elektrischer Anschluss
WARNUNG!
Brand- und Stromschlaggefahr.
• Alle elektrischen Anschlüsse sind von einem geprüften Elektriker vorzunehmen.
• Das Gerät muss geerdet sein.
• Stellen Sie sicher, dass die Daten auf dem Typenschild mit den elektrischen Nennwerten
der Netzspannung übereinstimmen.
• Schließen Sie das Gerät nur an eine ordnungsgemäß installierte Schutzkontaktsteckdose
an.
• Verwenden Sie keine Mehrfachsteckdosen oder Verlängerungskabel.
• Achten Sie darauf, Netzstecker und Netzkabel nicht zu beschädigen. Falls das Netzkabel
des Geräts ersetzt werden muss, lassen Sie diese Arbeit durch unseren autorisierten
Kundendienst durchführen.
• Achten Sie darauf, dass das Netzkabel die Gerätetür oder die Nische unter dem Gerät nicht
berührt oder in ihre Nähe gelangt, insbesondere wenn das Gerät eingeschaltet oder die Tür
heiß ist.
• Alle Teile, die gegen direktes Berühren schützen, sowie die isolierten Teile müssen so
befestigt werden, dass sie nicht ohne Werkzeug entfernt werden können.
104/200
SICHERHEITSANWEISUNGEN

• Stecken Sie den Netzstecker erst nach Abschluss der Montage in die Steckdose. Stellen Sie
sicher, dass der Netzstecker nach der Montage noch zugänglich ist.
• Falls die Steckdose lose ist, schließen Sie den Netzstecker nicht an.
• Ziehen Sie nicht am Netzkabel, wenn Sie das Gerät von der Stromversorgung trennen
möchten. Ziehen Sie stets am Netzstecker.
• Verwenden Sie nur geeignete Trenneinrichtungen: Überlastschalter, Sicherungen
(Schraubsicherungen müssen aus dem Halter entfernt werden können),
Fehlerstromschutzschalter und Schütze.
• Die elektrische Installation muss eine Trenneinrichtung aufweisen, mit der Sie das Gerät
allpolig von der Stromversorgung trennen können. Die Trenneinrichtung muss mit einer
Kontaktöffnungsbreite von mindestens 3 mm ausgeführt sein.
• Das Gerät wird mit einem Netzstecker und Netzkabel geliefert.
2.3 Gebrauch
WARNUNG!
Verletzungs-, Verbrennungs-, Stromschlag- oder Explosionsgefahr.
• Nehmen Sie keine technischen Änderungen am Gerät vor.
• Vergewissern Sie sich, dass die Lüftungsöffnungen nicht blockiert sind.
• Lassen Sie das Gerät während des Betriebs nicht unbeaufsichtigt.
• Schalten Sie das Gerät nach jedem Gebrauch aus.
• Gehen Sie beim Öffnen der Tür vorsichtig vor, wenn das Gerät in Betrieb ist. Es kann heiße
Luft freigesetzt werden.
• Benutzen Sie das Gerät nicht mit nassen Händen oder wenn es mit Wasser Kontakt hat.
• Üben Sie keinen Druck auf die offene Tür aus.
• Verwenden Sie das Gerät nicht als Arbeits- oder Abstellfläche.
• Öffnen Sie die Gerätetür vorsichtig. Die Verwendung von Zutaten mit Alkohol kann eine
Mischung aus Alkohol und Luft verursachen.
• Lassen Sie beim Öffnen der Tür keine Funken oder offenen Flammen mit dem Gerät in
Kontakt kommen.
• Platzieren Sie keine entflammbaren Produkte oder Gegenstände, die mit entflammbaren
Produkten benetzt sind, im Gerät, auf dem Gerät oder in der Nähe des Geräts.
• Heizen Sie das Gerät nicht mit der Mikrowellenfunktion vor.
WARNUNG!
Risiko von Schäden am Gerät.
• Um Beschädigungen und Verfärbungen der Emailbeschichtung zu vermeiden:
– Legen Sie keine Alufolie direkt auf den Boden des Garraums.
– Füllen Sie kein Wasser direkt in das heiße Gerät.
– Lassen Sie nach Abschluss des Garvorgangs kein feuchtes Geschirr oder feuchte
Speisen im Gerät stehen.
– Gehen Sie beim Herausnehmen oder Einsetzen des Zubehörs sorgfältig vor.
• Verfärbungen der Emaille- oder Edelstahlbeschichtung haben keine Auswirkung auf die
Leistung des Geräts.
• Verwenden Sie eine tiefe Pfanne für feuchte Kuchen. Fruchtsäfte verursachen Flecken, die
dauerhaft sein können.
• Kochen Sie immer bei geschlossener Gerätetür.
• Ist das Gerät hinter einer Möbelfront (wie etwa einer Tür) installiert, achten Sie darauf, dass
die Tür während des Gerätebetriebs nicht geschlossen wird. Hinter einer geschlossenen
105/200
SICHERHEITSANWEISUNGEN

Möbelfront können sich Hitze und Feuchtigkeit ansammeln und das Gerät, das Gehäuse
oder den Boden beschädigen. Schließen Sie die Möbelfront nicht, bevor das Gerät nach
dem Gebrauch völlig abgekühlt ist.
2.4 Reinigung und Pflege
WARNUNG!
Verletzungs-, Brandgefahr sowie Risiko von Schäden am Gerät.
• Schalten Sie das Gerät immer aus und ziehen Sie den Netzstecker aus der Steckdose,
bevor Reinigungsarbeiten durchgeführt werden.
• Vergewissern Sie sich, dass das Gerät abgekühlt ist. Es besteht die Gefahr, dass die
Glasscheiben brechen.
• Ersetzen Sie die Türglasscheiben umgehend, wenn sie beschädigt sind. Wenden Sie sich
an einen autorisierten Kundendienst.
• Gehen Sie beim Aushängen der Tür vorsichtig vor. Die Tür ist schwer!
• Wischen Sie den Garraum und die Tür nach jedem Gebrauch trocken. Der während des
Gerätebetriebs entstandene Dampf kondensiert auf den Wänden des Garraums und kann
zur Korrosion führen.
• Reinigen Sie das Gerät regelmäßig, um eine Verschlechterung des Oberflächenmaterials zu
verhindern.
• Fett- und Lebensmittelrückstände im Gerät können einen Brand und Funkenschlag
verursachen, wenn die Mikrowellenfunktion genutzt wird.
• Reinigen Sie das Geräts mit einem weichen, feuchten Tuch. Verwenden Sie ausschließlich
Neutralreiniger. Benutzen Sie keine Scheuermittel, scheuernde Reinigungsschwämmchen,
Lösungsmittel oder Metallgegenstände.
• Falls Sie ein Backofenspray verwenden, befolgen Sie die Sicherheitsanweisungen auf
seiner Verpackung.
2.5 Verwendung von Glasgeschirr
Wird Glasgeschirr nicht mit der gebührenden Vorsicht behandelt, kann dies zum Zerbrechen,
zum Abplatzen, zur Rissbildung oder zu tiefen Kratzern führen:
• Gießen Sie kein kaltes Wasser oder sonstige kalte Flüssigkeiten auf das Glasgeschirr, weil
ein plötzlicher Temperaturabfall zu einem spontanen Zerbrechen führen kann. Glassplitter
können sehr scharf und schwer zu finden sein.
• Stellen Sie kein heißes Glasgeschirr auf nasse oder kalte Oberflächen, direkt auf eine
Arbeitsplatte oder Metalloberfläche oder in die Spüle und verwenden Sie keine nassen
Tücher zur Handhabung von Glasgeschirr.
• Glasgeschirr mit Macken, Rissen oder tiefen Kratzer darf nicht verwendet oder repariert
werden.
• Achten Sie darauf, mit Glasgeschirr nicht gegen harte Objekte zu stoßen oder mit
Haushaltsutensilien dagegen zu kommen.
• Wärmen Sie leeres oder fast leeres Glasgeschirr nicht in der Mikrowelle auf, und überhitzen
Sie kein Öl und keine Butter in der Mikrowelle (verwenden Sie die kürzest mögliche Garzeit).
Lassen Sie heißes Glasgeschirr auf einem Kühlgestell, einem Topflappen oder einem
trockenen Tuch abkühlen. Achten Sie vor dem Abwaschen, Kühlen oder Gefrieren darauf, dass
das Glasgeschirr kühl genug ist.
Handhaben Sie Glasgeschirr (einschließlich Geschirr mit Silikon-Griffflächen) nie ohne trockene
Topflappen.
Vermeiden Sie eine Fehlbedienung der Mikrowelle (d.h. einen Betrieb ohne Beladung oder mit
zu geringer Beladung).
106/200
SICHERHEITSANWEISUNGEN

2.6 Innenbeleuchtung
WARNUNG!
Stromschlaggefahr.
• Bezüglich der Lampe(n) in diesem Gerät und separat verkaufter Ersatzlampen: Diese
Lampen müssen extremen physikalischen Bedingungen in Haushaltsgeräten standhalten,
wie z.B. Temperatur, Vibration, Feuchtigkeit, oder sollen Informationen über den
Betriebszustand des Gerätes anzeigen. Sie sind nicht für den Einsatz in anderen Geräten
vorgesehen und nicht für die Raumbeleuchtung geeignet.
• Dieses Produkt enthält eine Lichtquelle der Energieeffizienzklasse G.
• Verwenden Sie nur Lampen mit der gleichen Leistung .
2.7 Wartung
• Wenden Sie sich zur Reparatur des Geräts an den autorisierten Kundendienst.
• Dabei dürfen ausschließlich Originalersatzteile verwendet werden.
2.8 Entsorgung
WARNUNG!
Verletzungs- und Erstickungsgefahr.
• Informationen zur Entsorgung des Geräts erhalten Sie von Ihrer Gemeindeverwaltung.
• Trennen Sie das Gerät von der Stromversorgung.
• Schneiden Sie das Netzkabel in der Nähe des Geräts ab, und entsorgen Sie es.
• Entfernen Sie das Türschloss, um zu verhindern, dass sich Kinder, oder Haustiere im Gerät
einschließen.
3. GERÄTEBESCHREIBUNG
3.1 Gesamtansicht
1 2 43
10
4
3
1
28
9
5
6
7
Bedienfeld
Einstellknopf für die Ofenfunktionen
Display
Einstellknopf
Heizelement
Mikrowellengenerator
Lampe
Ventilator
Einschubschienen, herausnehmbar
Einschubebenen
107/200
GERÄTEBESCHREIBUNG

3.2 Zubehör
Kombirost
Für Kochgeschirr, Kuchenformen, Braten.
Backblech
Für Kuchen und Plätzchen.
Mikrowellen-Bodenplatte aus Glas
Zum Zubereiten von Speisen im
Mikrowellenmodus.
4. BEDIENFELD
4.1 Versenkbare Knöpfe
Drücken Sie zum Benutzen des Geräts den Knopf. Der Knopf kommt dann heraus.
4.2 Sensorfelder des Bedienfelds
Kurz‐
zeitwe‐
cker
Schnell‐
aufhei‐
zung
Back‐
ofen‐
be‐
leuch‐
tung
Mikrowel‐
lenleistung
Bestätigen
Sie die Ein‐
stellung
Drücken Sie Drehen Sie den
Knopf
Wählen Sie eine Ofenfunktion, um den Backofen einzuschalten.
108/200
BEDIENFELD

Drehen Sie den Knopf für die Ofenfunktionen in die Aus-Position, um den Backofen auszuschal‐
ten.
Display mit Tastenfunktionen.
Display-
Anzeigen: Verriegelung Koch-Assistent Einstellungen Mikrowellenfunktions‐
anzeige
Timer-An‐
zeigen:
Fortschrittsbalken - für Temperatur oder Zeit. Der
Balken ist vollständig rot, wenn der Ofen die einge‐
stellte Temperatur erreicht hat.
5. VOR DER ERSTEN VERWENDUNG
WARNUNG!
Siehe Kapitel Sicherheitshinweise.
5.1 Erste Reinigung
Reinigen Sie den leeren Backofen vor der ersten Inbetriebnahme und stellen Sie die Zeit
ein:
00:00
Stellen Sie die Zeit ein. Drücken Sie
.
6. TÄGLICHER GEBRAUCH
WARNUNG!
Siehe Kapitel Sicherheitshinweise.
109/200
VOR DER ERSTEN VERWENDUNG

6.1 Einstellung: Ofenfunktionen
Beginnen Sie mit dem Kochen
Schritt 1 Schritt 2
Wählen Sie eine Ofenfunktion.
Stellen Sie die Temperatur ein.
Drücken Sie WATT und drehen Sie den Ein‐
stellknopf, um die Mikrowellenleistung einzu‐
stellen.
Drücken Sie
.
6.2 Einstellung: Mikrowellenfunktionen
Schritt 1 Entfernen Sie alle Zubehörteile aus dem Backofen.
Setzen Sie die Mikrowellen-Bodenplatte aus Glas ein. Legen Sie die Lebensmittel
auf die untere Glasplatte der Mikrowelle.
Schritt 2 Wählen Sie die Mikrowellen-Ofenfunktion und drücken Sie: , um mit den Stan‐
dardeinstellungen zu beginnen.
Das Display zeigt die Dauer und Mikrowellenleistung an.
Schritt 3 Drehen Sie den Knopf für die Ofenfunktionen in die Aus-Position, um den Backofen
auszuschalten.
Sie können die Einstellungen während des Kochens anpassen.
Drehen Sie den Einstellknopf, um die Dauer anzupassen. Drücken Sie:
Drücken Sie WATT und drehen Sie den Einstellknopf, um die Mikrowellenleistung einzustellen.
Drücken Sie:
Die maximale Dauer der Mikrowellenfunktionen hängt von der eingestellten
Mikrowellenleistung ab:
MIKROWELLENLEISTUNG MAXIMALE DAUER
100 – 600 W 59:55 Minuten.
110/200
TÄGLICHER GEBRAUCH

MIKROWELLENLEISTUNG MAXIMALE DAUER
Mehr als 600 W 7 Minuten
Wenn Sie die Tür öffnen, wird die Mikrowellenfunktion ausgeschaltet. Um sie
erneut zu starten, schließen Sie die Tür. Drücken Sie .
6.3 Ofenfunktionen
Standard-Ofenfunktionen
Ofenfunktion Gerät
Heißluft
Zum Backen auf bis zu zwei Einschubebenen gleichzeitig und zum Dörren
von Lebensmitteln. Stellen Sie eine 20 - 40 °C niedrigere Backofentempe‐
ratur als bei Ober-/Unterhitze ein.
Ober-/Unterhitze
Zum Backen und Braten von Speisen auf einer Einschubebene.
Heißluftgrillen
Zum Braten großer Fleischstücke oder von Geflügel mit Knochen auf ei‐
ner Ebene. Zum Gratinieren und Überbacken.
Pizzastufe
Zum Backen von Pizza. Für ein intensives Überbacken und einen knuspri‐
gen Boden.
Heißluftgrillen +
MW
Braten großer Fleischstücke auf einer Ebene. Gratinieren und Überba‐
cken.Funktion mit Extraleistung der MW.
Heißluft + MW
Backen auf einer Einschubebene.Funktion mit Extraleistung der MW.
Auftauen
Auftauen von Fleisch, Fisch, Kuchen, Leistungsbereich: 100 - 200 W
111/200
TÄGLICHER GEBRAUCH

Ofenfunktion Gerät
Aufwärmen
Erhitzen von vorbereiteten Mahlzeiten und empfindlichen Lebensmitteln,
Leistungsbereich: 300 - 700 W
Mikrowelle
Aufwärmen, Kochen, Leistungsbereich: 100 - 1000 W
Menü
Aufrufen des Menüs: Koch-Assistent, Einstellungen.
6.4 Einstellung: Koch-Assistent
Das Koch-Assistent Untermenü besteht aus einer Reihe von zusätzlichen Funktionen und
Gerichten mit empfohlenen Kochfunktionen, Temperaturen und Zeiten. Sie können die Zeit und
Temperatur während des Garvorgangs einstellen.
Einige der Speisen können Sie auch mit der
folgenden Funktion zubereiten:
• Gewichtsautomatik
Koch-Assistent - Verwenden Sie diese Funktion, um ein Gericht schnell mit den Standard‐
einstellungen zuzubereiten:
Schritt 1 Schritt 2 Schritt 3 Schritt 4
P1 - P45
Öffnen Sie das Menü. Wählen Koch-Assis‐
tent. Drücken Sie
.
Wählen Sie das Ge‐
richt. Drücken Sie
.
Geben Sie das Ge‐
richt in den Backofen.
Bestätigen Sie die
Einstellung.
6.5 Koch-Assistent
Legende
Gewichtsautomatik verfügbar.
112/200
TÄGLICHER GEBRAUCH

Legende
Funktion mit Mikrowellenleistung. Verwenden Sie mikrowellenfestes Zu‐
behör.
Heizen Sie den Backofen vor, bevor Sie mit dem Kochen beginnen.
Einschubebene.
Ofenfunktion Gerät
F1 Grill Zum Grillen dünner Lebensmittel und zum Toasten von
Brot.
F2 Unterhitze Zum Backen von Kuchen mit knusprigen Böden und
zum Einkochen von Lebensmitteln.
F3 Tiefkühlgerichte Lässt Fertiggerichte (z. B. Pommes frites, Kroketten
oder Frühlingsrollen) schön knusprig werden.
F4 Ober-/Unterhitze + MW Backen und Braten von Speisen auf einer Einschub‐
ebene. Funktion mit Extraleistung der MW.
F5 Grill + MW Schnelleres Garen und Bräunen. Funktion mit Extra‐
leistung der MW.
Wenn die Funktion beendet ist, prüfen Sie, ob das Gericht fertig ist.
Speise Gewicht Einschubebene / Zubehör Dauer
Rindfleisch
P1 Roastbeef,
blutig
1 - 1,5 kg; 4
- 5 cm dicke
Stücke
1; Backblech
Braten Sie das Fleisch einige Minuten in
einer heißen Pfanne. Setzen Sie es in
den Backofen ein.
40 Min.
P2 Roastbeef, ro‐
sa 50 Min.
P3 Roastbeef,
durch 60 Min.
113/200
TÄGLICHER GEBRAUCH

Speise Gewicht Einschubebene / Zubehör Dauer
P4 Steak, rosa 180 - 220 g
pro Stück; 3
cm dicke
Scheiben
2; Bräter auf Kombirost
Braten Sie das Fleisch einige Minuten in
einer heißen Pfanne. Setzen Sie es in
den Backofen ein.
15 Min.
P5 Rinderbraten/
geschmort
(Prime Rib,
obere runde,
dicke Flanke)
1,5 - 2 kg 1; Bräter auf Kombirost
Braten Sie das Fleisch einige Minuten in
einer heißen Pfanne. Flüssigkeit hinzu‐
geben. Setzen Sie es in den Backofen
ein.
120 Min.
P6 Roastbeef,
blutig (Nieder‐
temperatur-
Garen)
1 - 1,5 kg; 4
- 5 cm dicke
Stücke
1; Backblech
Verwenden Sie Ihre Lieblingsgewürze
oder einfach Salz und frisch gemahlenen
Pfeffer. Braten Sie das Fleisch einige Mi‐
nuten in einer heißen Pfanne. Setzen Sie
es in den Backofen ein.
75 Min.
P7 Roastbeef, ro‐
sa (Niedertem‐
peratur-Garen)
85 Min.
P8 Roastbeef,
durch (Nieder‐
temperatur-
Garen)
130 Min.
P9 Filet, blutig
(Niedertempe‐
ratur-Garen)
0,5 - 1,5 kg;
5 - 6 cm di‐
cke Stücke
1; Backblech
Verwenden Sie Ihre Lieblingsgewürze
oder einfach Salz und frisch gemahlenen
Pfeffer. Braten Sie das Fleisch einige Mi‐
nuten in einer heißen Pfanne. Setzen Sie
es in den Backofen ein.
75 Min.
P10 Filet, rosa
(Niedertempe‐
ratur-Garen)
90 Min.
P11 Filet, fertig
(Niedertempe‐
ratur-Garen)
120 Min.
Kalb
P12 Kalbsbraten
(z. B. Schulter)
0,8 - 1,5 kg;
4 cm dicke
Stücke
1; Bräter auf Kombirost
Verwenden Sie Ihre Lieblingsgewürze.
Flüssigkeit hinzugeben. Braten zuge‐
deckt.
80 Min.
114/200
TÄGLICHER GEBRAUCH

Speise Gewicht Einschubebene / Zubehör Dauer
Schweinefleisch
P13 Schweinebra‐
ten oder
Schulter
1,5 kg 1; Keramik- oder Glasauflaufform
auf Kombirost, MW-fest
Verwenden Sie Ihre Lieblingsgewürze.
Wenden Sie das Fleisch nach der Hälfte
der Gardauer.
90 Min.
P14 Pulled Pork
(Niedertempe‐
ratur Garen)
1,5 - 2 kg 1; Backblech
Verwenden Sie Ihre Lieblingsgewürze.
Wenden Sie das Fleisch nach der Hälfte
der Garzeit, um eine gleichmäßige Bräu‐
nung zu erzielen.
215 Min.
P15 Lende, frisch 1 - 1,5 kg; 5
- 6 cm dicke
Stücke
1; Bräter auf Kombirost
Verwenden Sie Ihre Lieblingsgewürze.
55 Min.
P16 Rippchen 2 - 3 kg; ver‐
wenden Sie
rohe, 2 - 3
cm dünne
Rippchen
2; tiefe Pfanne
Flüssigkeit hinzufügen, um den Boden
eines Gerichts zu bedecken. Wenden
Sie das Fleisch nach der Hälfte der Gar‐
dauer.
90 Min.
Lamm
P17 Lammkeule
mit Knochen
1,5 - 2 kg; 7
- 9 cm dicke
Stücke
1; Bräter auf Backblech
Flüssigkeit hinzugeben. Wenden Sie das
Fleisch nach der Hälfte der Gardauer.
130 Min.
Geflügel
P18 Hähnchen,
ganz
1,1 kg;
frisch 1; Keramik- oder Glasauflaufform
auf Kombirost, MW-fest
Verwenden Sie Ihre Lieblingsgewürze.
Legen Sie das Hähnchen mit der Brust‐
seite nach unten und drehen Sie es nach
der Hälfte der Garzeit um.
40 Min.
P19 Halbes Hähn‐
chen
0,5 - 0,8 kg 2; Backblech
Verwenden Sie Ihre Lieblingsgewürze.
40 Min.
115/200
TÄGLICHER GEBRAUCH

Speise Gewicht Einschubebene / Zubehör Dauer
P20 Hähnchen‐
brust
180 - 200 g
pro Stück 1; Auflaufform auf Kombirost
Verwenden Sie Ihre Lieblingsgewürze.
Braten Sie das Fleisch einige Minuten in
einer heißen Pfanne.
25 Min.
P21 Hähnchen‐
schenkel,
frisch
- 2; Backblech
Wenn Sie die Hähnchenschenkel zuerst
marinieren, stellen Sie die niedrigere
Temperatur ein und garen Sie sie länger.
30 Min.
P22 Ente, ganz 2 - 3 kg 1; Bräter auf Kombirost
Verwenden Sie Ihre Lieblingsgewürze.
Legen Sie das Fleisch in den Bräter. Die
Ente nach der Hälfte der Garzeit wen‐
den.
100 Min.
P23 Gans, ganz 4 - 5 kg ?; tiefe Pfanne
Verwenden Sie Ihre Lieblingsgewürze.
Legen Sie das Fleisch auf das tiefe
Backblech. Die Gans nach der Hälfte der
Garzeit wenden.
110 Min.
Sonstige
P24 Hackbraten 1 kg 1; Kombirost
Verwenden Sie Ihre Lieblingsgewürze.
60 Min.
Fisch
P25 Ganzer Fisch,
gegrillt
0,5 - 1 kg
pro Fisch 1; Backblech
Fisch mit Butter füllen und Ihre Lieblings‐
gewürze und Kräuter verwenden.
30 Min.
P26 Fischfilet - 2; Auflaufform auf Kombirost
Verwenden Sie Ihre Lieblingsgewürze.
20 Min.
Süßes Backen/Desserts
P27 Käsekuchen - 1; Springform 28 cm auf Kombi‐
rost
90 Min.
116/200
TÄGLICHER GEBRAUCH

Speise Gewicht Einschubebene / Zubehör Dauer
P28 Apfelkuchen - 2; Backblech 45 Min.
P29 Apfelkuchen - 1; Kuchenform auf Kombirost 40 Min.
P30 Apfelkuchen - 1; 22 cm Kuchenform auf Kom‐
birost
60 Min.
P31 Brownies 2 kg 2; tiefe Pfanne 30 Min.
P32 Schokoladen‐
muffins
- 2; Muffin-Blech auf Kombirost 25 Min.
P33 Brotkuchen - 1; Brotpfanne auf Kombirost 50 Min.
Gemüse / Beilagen
P34 Ofenkartof‐
feln
1 kg 1; Backblech
Die ganzen Kartoffeln mit der Haut auf
das Backblech geben.
50 Min.
P35 Wegdes 1 kg 2; Backblech mit Backpapier ausge‐
kleidet
Verwenden Sie Ihre Lieblingsgewürze.
Kartoffeln in Stücke schneiden.
35 Min.
P36 Gegrilltes Ge‐
müse
1 - 1,5 kg 2; Backblech mit Backpapier ausge‐
kleidet
Verwenden Sie Ihre Lieblingsgewürze.
Gemüse in Stücke schneiden.
30 Min.
P37 Kroketten, ge‐
froren
0,5 kg 2; Backblech 25 Min.
P38 Pommes fri‐
tes, gefroren
0,75 kg 2; Backblech 25 Min.
Gratins, Brot und Pizza
117/200
TÄGLICHER GEBRAUCH

Speise Gewicht Einschubebene / Zubehör Dauer
P39 Fleisch-/
Gemüsela‐
sagne mit tro‐
ckenen Nu‐
delplatten
1 - 1,5 kg ; 1; Keramik- oder Glasauflauf‐
form auf Kombirost
35 Min.
P40 Kartoffelgra‐
tin (rohe Kar‐
toffeln)
1,1 kg ; 2; Keramik- oder Glasauflauf‐
form auf Kombirost
Drehen Sie das Gericht nach der Hälfte
der Garzeit um.
35 Min.
P41 Pizza frisch,
dünn - 1; Backblech mit Backpapier aus‐
gekleidet 15 Min.
P42 Pizza frisch,
dick - 1; Backblech mit Backpapier aus‐
gekleidet
25 Min.
P43 Quiche - 1; Backform auf Kombirost 45 Min.
P44 Baguette/
Ciabatta/
Weißbrot
0,8 kg 1; Backblech mit Backpapier aus‐
gekleidet
Für Weißbrot mehr Zeit nötig.
30 Min.
P45 Alle Getreide/
Roggen/dunk‐
les Brot, alle
Getreide in
Kastenform
1 kg 1; Backblech mit Backpapier aus‐
gekleidet / Kombirost
60 Min.
7. UHRFUNKTIONEN
7.1 Uhrfunktionen
Uhrfunktion Verwendung
Kurzzeit-Wecker. Nach Ablauf der Zeit ertönt der Signalton.
Garzeitdauer. Nach Ablauf des Timers ertönt ein akustisches Signal
und die Ofenfunktion stoppt.
Zeitvorwahl. Verzögerung des Starts und/oder Endes des Kochens.
118/200
UHRFUNKTIONEN

Uhrfunktion Verwendung
Uptimer. Max. 23 Std. 59 Min. Diese Funktion wirkt sich nicht auf den
Betrieb des Backofens aus.
Um den Uptimer ein- oder auszuschalten, wählen Sie: Menü, Einstel‐
lungen.
Uhr-Funktionen sind nur verfügbar für: Heißluft, Ober-/Unterhitze, Heißluftgrillen, Pizzastufe,
Heißluftgrillen + MW, Heißluft + MW.
7.2 Einstellung: Uhrfunktionen
Einstellung: Uhrzeit
Schritt 1 Schritt 2 Schritt 3
Um die Uhrzeit zu ändern, rufen Sie das
Menü auf und wählen Sie Einstellungen,
Tageszeit.
Stellen Sie die Uhrzeit
ein. Drücken Sie: .
Einstellung: Kurzzeit-Wecker
Schritt 1
Im Display
wird Folgen‐
des ange‐
zeigt:
0:00
Schritt 2 Schritt 3
Drücken Sie: . Stellen Sie Kurzzeit-We‐
cker Drücken Sie: .
Der Countdown des Timers startet umgehend.
119/200
UHRFUNKTIONEN

Einstellung: Garzeitdauer
Schritt 1 Schritt 2
Im Display
wird Folgen‐
des ange‐
zeigt:
0:00
Schritt 3 Schritt 4
Wählen Sie eine
Ofenfunktion und
stellen Sie die
Temperatur ein.
Drücken Sie wie‐
derholt: .
Stellen Sie die
Gardauer ein.
Drücken Sie:
.
Der Countdown des Timers startet umgehend.
Einstellung: Zeitvorwahl
Schritt
1
Schritt 2
Das
Display
zeigt
die Uhr‐
zeit an
START
Schritt 3 Schritt 4
Im Dis‐
play wird
Folgen‐
des an‐
gezeigt:
--:--
STOPP
Schritt 5 Schritt 6
Wählen
Sie die
Ofen‐
funkti‐
on.
Drücken
Sie wie‐
derholt:
.
Stellen
Sie die
Startzeit
ein.
Drücken
Sie: .
Stellen
Sie die
Endzeit
ein.
Drücken
Sie: .
Der Countdown des Timers beginnt zu der eingestellten Startzeit.
8. VERWENDUNG: ZUBEHÖR
8.1 Einsetzen des Zubehörs
Verwenden Sie nur geeignetes Kochgeschirr und Material. Siehe Kapitel „Ratschläge und
Tipps“, geeignetes Kochgeschirr und Materialien für die Mikrowelle.
Die kleine Einkerbung auf der Oberseite erhöht die Sicherheit. Die Vertiefungen sind auch
Kippsicherungen. Durch den umlaufend erhöhten Rand des Rosts ist das Kochgeschirr gegen
Abrutschen vom Rost gesichert.
120/200
VERWENDUNG: ZUBEHÖR

Kombirost:
Schieben Sie den Rost zwischen die Füh‐
rungsschienen der Einhängegitter mit den
Füßen nach unten zeigend.
Backblech:
Schieben Sie das Backblech zwischen die
Führungsstäbe der Einhängegitter.
Mikrowellen-Bodenplatte aus Glas:
Verwenden Sie die untere Glasplatte der
Mikrowelle nur zusammen mit der Mikro‐
wellenfunktion. Sie ist nicht für die kombi‐
nierte Mikrowellenfunktion geeignet (z. B.
Grillten mit der Mikrowelle).
Stellen Sie das Zubehörteil auf den Boden
des Garraums.
Sie können die Lebensmittel direkt auf die
untere Glasplatte der Mikrowelle legen.
9. ZUSATZFUNKTIONEN
9.1 Verriegelung
Diese Funktion verhindert ein versehentliches Verstellen der Gerätefunktion.
Einschalten, wenn das Gerät in Betrieb ist – das eingestellte Garen wird fortgesetzt und das Be‐
dienfeld ist verriegelt.
Schalten Sie sie ein, wenn das Gerät ausgeschaltet ist – sie kann nicht eingeschaltet werden,
denn das Bedienfeld ist verriegelt.
121/200
ZUSATZFUNKTIONEN

Diese Funktion verhindert ein versehentliches Verstellen der Gerätefunktion.
– gedrückt halten, um
die Funktion einzuschalten.
Ein Signal ertönt.
– gedrückt halten, um sie
auszuschalten.
3 x – blinkt, wenn die Verriegelung eingeschaltet ist.
9.2 Automatische Abschaltung
Der Backofen wird aus Sicherheitsgründen nach einiger Zeit ausgeschaltet, wenn eine
Ofenfunktion eingeschaltet ist und Sie die Einstellungen nicht ändern.
(°C) (Std.)
30 - 115 12.5
120 - 195 8.5
200 - 230 5.5
Die Abschaltautomatik funktioniert nicht mit den Funktionen: Backofenbeleuchtung,
Zeitvorwahl.
9.3 Kühlgebläse
Wenn das Gerät in Betrieb ist, schaltet sich das Kühlgebläse automatisch ein, um die
Oberflächen des Geräts kühl zu halten. Nach dem Abschalten des Geräts kann das
Kühlgebläse weiterlaufen, bis das Gerät abgekühlt ist.
10. TIPPS UND HINWEISE
10.1 Mikrowellenempfehlungen
Kochen wir!
Legen Sie die Speise auf die untere Glasplatte der Mikrowelle auf dem Garraumboden.
Legen Sie die Speise auf einen Teller auf dem Garraumboden.
Lebensmittel nach der Hälfte der Auftau- und Garzeit wenden oder umrühren.
Flüssige Speisen gelegentlich umrühren.
Rühren Sie das Gericht vor dem Servieren um.
Decken Sie das Gericht zum Garen und Aufwärmen ab.
Stellen Sie einen Löffel in die Flasche oder das Glas, wenn Sie Getränke erwärmen, um eine
bessere Hitzeverteilung zu erreichen.
Legen Sie die Lebensmittel ohne Verpackung in das Gerät. Fertiggerichte in Verpackungen
können nur ins Gerät gegeben werden, wenn die Verpackung mikrowellengeeignet ist (prüfen
Sie die Informationen auf der Verpackung).
122/200
TIPPS UND HINWEISE

Speisezubereitung in der Mikrowelle
Garen Sie Speisen abgedeckt. Speisen nur dann ohne Abdeckung garen, wenn eine Kruste
gewünscht ist.
Verkochen Sie die Speisen nicht, indem Sie die Leistung zu hoch und die Zeit zu lang
einstellen. Die Speise kann austrocknen, verbrennen oder einen Brand verursachen.
Das Gerät eignet sich nicht zum Kochen von Eiern in der Schale oder zum Zubereiten von
Schnecken im Schneckenhaus, da diese platzen können. Stechen Sie das Eigelb oder
Spiegelei an, bevor Sie es erwärmen.
Stechen Sie Speisen mit Haut oder Schale mehrfach an, bevor Sie sie garen.
Gemüse in gleich große Stücke schneiden.
Nachdem Sie das Gerät ausgeschaltet haben, nehmen Sie die Speisen heraus und lassen Sie
sie einige Minuten stehen, damit sich die Wärme gleichmäßig verteilt.
Auftauen in der Mikrowelle
Tiefgekühlte Lebensmittel aus der Verpackung nehmen und auf einen umgedrehten Teller
geben, der auf einem Behälter steht, damit die Auftauflüssigkeit abtropfen kann. Alternativ kann
auch ein Abtaugitter oder ein Plastiksieb verwendet werden.
Bereits angetaute Stücke nacheinander herausnehmen.
Durch Einstellen einer höheren Mikrowellenleistung kann Obst und Gemüse ohne vorheriges
Auftauen gegart werden.
10.2 Mikrowellengeeignetes Kochgeschirr und Materialien
Verwenden Sie nur mikrowellengeeignetes Kochgeschirr und Materialien. Verwenden Sie die
folgende Tabelle als Referenz.
Prüfen Sie vor der Verwendung die Kochgeschirr- und Materialspezifikationen.
Kochgeschirr / Material
Feuerfestes Glas und Porzellan
ohne Metallteile, z. B. hitzebes‐
tändiges Glas
Nicht feuerfestes Glas und Por‐
zellan ohne Verzierung aus Sil‐
ber, Gold, Platin oder Metall
X X
Glas und Glaskeramik aus hit‐
ze-/frostbeständigem Material
Backofengeeignete Keramik und
Steingut ohne Quarz- oder Me‐
tallteile oder metallhaltige Glasur
Keramik, Porzellan und Steingut
mit unglasiertem Boden oder mit
kleinen Löchern, z. B. auf den
Griffen
X X X
123/200
TIPPS UND HINWEISE

Kochgeschirr / Material
Hitzebeständiger Kunststoff bis
200 °C
X
Pappe, Papier X X
Frischhaltefolie X X
Mikrowellengeeignete Frischhal‐
tefolie
X
Bratgeschirr aus Metall, z. B.
Emaille, Gusseisen
X X X
Backformen, schwarz lackiert
oder silikonbeschichtet
X X X
Backblech X X X
Gitterrost X X
Mikrowellen-Bodenplatte aus
Glas
X
Kochgeschirr für die Mikrowelle,
z. B. Knusperpfanne
X X
10.3 Empfohlene Leistungseinstellungen für verschiedene Arten von
Lebensmitteln
Die Angaben in der Tabelle sind Richtwerte.
700 – 1000 W
Anbraten zu Beginn des Garvorgangs Erhitzen von Flüssigkeiten
124/200
TIPPS UND HINWEISE

500 – 600 W
Garen von Ge‐
müse
Garen von Ei‐
ergerichten
Köcheln von Ein‐
töpfen
Erwärmen von
Eintellergerichten
Auftauen und
Aufwärmen ge‐
frorener Spei‐
sen
300 - 400 W
Schmelzen von
Käse, Schokola‐
de, Butter
Köcheln von
Reis
Erwärmen von
Babynahrung
Garen/Erwärmen
von empfindlichen
Speisen
Weiter garen
100 - 200 W
Auftauen von Brot Auftauen von Obst
und Kuchen
Auftauen von Käse,
Sahne, Butter
Auftauen von Fleisch,
Fisch
10.4 Gartabellen für Prüfinstitute
Informationen für Prüfinstitute
Tests gemäß IEC 60705.
Verwenden Sie den Kombirost, sofern nicht anders angegeben.
MIKROWELLEN‐
FUNKTION
(W) (kg) (Min.)
Biskuit 600 0.475 Niedrig 7 - 9 Drehen Sie den Be‐
hälter um ein Viertel
herum, wenn die
Hälfte der Garzeit
vorüber ist.
125/200
TIPPS UND HINWEISE

Verwenden Sie den Kombirost, sofern nicht anders angegeben.
MIKROWELLEN‐
FUNKTION
(W) (kg) (Min.)
Hackbraten 400 0.9 2 25 - 32 Drehen Sie den Be‐
hälter um ein Viertel
herum, wenn die
Hälfte der Garzeit
vorüber ist.
Eierstich 500 1 Niedrig 18 -
Fleisch auftauen 200 0.5 Niedrig 7 - 8 Wenden Sie das
Fleisch, wenn die
Hälfte der Garzeit
vorüber ist.
Verwenden Sie den Kombirost.
MIKRO‐
WEL‐
LENK‐
OMBI‐
FUNKTI‐
ON
(W) (°C) (Min.)
Kasten‐
kuchen,
0,7 kg
Ober-/
Unterhitze
+ MW
100 200 2 23 - 27 Drehen Sie den
Behälter um ein
Viertel herum,
wenn die Hälfte
der Garzeit vorü‐
ber ist.
Kartoffel‐
gratin,
1,1 kg
Heißluft +
MW
300 180 2 38 - 42 Drehen Sie den
Behälter um ein
Viertel herum,
wenn die Hälfte
der Garzeit vorü‐
ber ist.
126/200
TIPPS UND HINWEISE

Verwenden Sie den Kombirost.
MIKRO‐
WEL‐
LENK‐
OMBI‐
FUNKTI‐
ON
(W) (°C) (Min.)
Hähn‐
chen, 1,1
kg
Heißluftgril‐
len + MW
400 230 1 35 - 40 Geben Sie das
Fleisch in einen
runden Glasbehäl‐
ter und wenden
Sie es, wenn die
Hälfte der Garzeit
vorüber ist.
11. REINIGUNG UND PFLEGE
WARNUNG!
Siehe Kapitel Sicherheitshinweise.
11.1 Hinweise zur Reinigung
Reinigungs‐
mittel
Reinigen Sie die Vorderseite des Geräts nur mit einem Mikrofasertuch mit war‐
mem Wasser und einem milden Reinigungsmittel.
Reinigen Sie die Metalloberflächen mit einer geeigneten Reinigungslösung.
Reinigen Sie Flecken mit einem milden Reinigungsmittel.
Täglicher Ge‐
brauch
Reinigen Sie den Garraum nach jedem Gebrauch. Fettansammlungen oder an‐
dere Speisereste könnten einen Brand verursachen.
Entfernen Sie Speise- und Fettreste vorsichtig von der Garraumdecke.
Lassen Sie die Speisen nicht länger als 20 Minuten im Gerät stehen. Trocknen
Sie den Garraum nach jedem Gebrauch nur mit einem Mikrofasertuch ab.
127/200
REINIGUNG UND PFLEGE

Zubehör
Reinigen Sie alle Zubehörteile nach jedem Gebrauch und lassen Sie sie trock‐
nen. Verwenden Sie nur ein Mikrofasertuch mit warmem Wasser und einem mil‐
den Reinigungsmittel. Reinigen Sie die Zubehörteile nicht im Geschirrspüler.
Reinigen Sie das Zubehör mit Antihaftbeschichtung nicht mit Scheuermitteln
oder scharfkantigen Gegenständen.
11.2 Entfernen: Einhängegitter
Entfernen Sie Einhängegitter zur Reinigung des Backofens.
Schritt
1
Schalten Sie den Backofen aus und warten Sie, bis er abgekühlt ist.
Schritt
2
Ziehen Sie die Einhängegitter
vorsichtig nach oben und aus
der vorderen Aufhängung.
2
3
1
Schritt
3
Ziehen Sie das Einhängegitter
vorne von der Seitenwand weg.
Schritt
4
Ziehen Sie die Gitter aus der
hinteren Aufhängung heraus.
Setzen Sie die Einhängegitter in umgekehrter Reihenfolge ein.
11.3 Austausch: Lampe
WARNUNG!
Stromschlaggefahr.
Die Lampe kann heiß sein.
Halten Sie die Halogenlampe stets mit einem Tuch, um zu verhindern, dass Fettrückstände auf
der Lampe einbrennen.
Bevor Sie die Lampe austauschen:
Schritt 1 Schritt 2 Schritt 3
Schalten Sie den Backofen
aus. Warten Sie, bis der Ofen
kalt ist.
Trennen Sie den Ofen von der
Netzversorgung.
Breiten Sie ein Tuch auf dem
Garraumboden aus.
128/200
REINIGUNG UND PFLEGE

Obere Lampe
Schritt
1
Drehen Sie die Glasabdeckung und nehmen Sie sie ab.
Schritt
2
Reinigen Sie die Glasabdeckung.
Schritt
3
Ersetzen Sie die Lampe durch eine geeignete, bis 300 °C hitzebeständige Lampe.
Schritt
4
Bringen Sie die Glasabdeckung an.
12. FEHLERSUCHE
WARNUNG!
Siehe Kapitel Sicherheitshinweise.
12.1 Was zu tun ist, wenn …
In allen Fällen, die nicht in dieser Tabelle aufgeführt sind, wenden Sie sich bitte an einen
autorisierten Kundendienst.
Der Backofen schaltet sich nicht ein oder heizt nicht auf
Störung Prüfen Sie, ob Folgendes zutrifft ...
Der Backofen kann nicht eingeschaltet oder
bedient werden.
Der Backofen ist ordnungsgemäß an die Span‐
nungsversorgung angeschlossen.
Der Backofen heizt nicht auf. Die ist Abschaltautomatik ausgeschaltet.
Der Backofen heizt nicht auf. Die Sicherung ist nicht durchgebrannt.
Der Backofen heizt nicht auf. Die Verriegelung ist nicht verschlossen.
Komponenten
Störung Prüfen Sie, ob Folgendes zutrifft ...
Die Lampe funktioniert nicht. Die Lampe ist durchgebrannt.
129/200
FEHLERSUCHE

Fehlercodes
Im Display erscheint … Prüfen Sie, ob Folgendes zutrifft ...
00:00 Es gab einen Stromausfall. Stellen Sie die Uhr‐
zeit ein.
Wenn das Display einen Fehlercode anzeigt, der nicht in dieser Tabelle enthalten ist, schalten Sie
die Haussicherung aus und wieder ein, um den Ofen neu zu starten. Wenn der Fehlercode erneut
angezeigt wird, wenden Sie sich an einen autorisierten Kundendienst.
12.2 Service-Daten
Wenn Sie das Problem nicht selbst lösen können, wenden Sie sich an Ihren Händler oder einen
autorisierten Kundendienst.
Die vom Kundendienst benötigten Daten finden Sie auf dem Typenschild. Das Typenschild
befindet sich am vorderen Rahmen des Garraums des Geräts. Entfernen Sie das Typenschild
nicht vom Garraum.
Wir empfehlen Ihnen, die Daten hier zu notieren:
Modell (MOD.): .........................................
Produktnummer (PNC) .........................................
Seriennummer (S.N.) .........................................
13. ENERGIEEFFIZIENZ
13.1 Energiesparen
Stellen Sie sicher, dass die Gerätetür geschlossen ist, wenn das Gerät in Betrieb ist. Die
Gerätetür darf während des Garvorgangs nicht zu oft geöffnet werden. Halten Sie die
Türdichtung sauber und stellen Sie sicher, dass sie sich fest in der richtigen Position befindet.
Verwenden Sie Kochgeschirr aus Metall, um mehr Energie zu sparen (nur, wenn Sie keine
Mikrowellenfunktion einschalten).
Heizen Sie, wenn möglich, das Gerät vor dem Garvorgang nicht vor.
Wenn Sie mehrere Speisen gleichzeitig zubereiten, halten Sie die Unterbrechungen beim
Backen so kurz wie möglich.
Garen mit Heißluft
Nutzen Sie, wenn möglich, die Garfunktionen mit Heißluft, um Energie zu sparen.
Restwärme
Ventilator und Lampe funktionieren weiter. Sobald Sie das Gerät ausschalten, wird im Display
die Restwärme angezeigt. Die Restwärme kann zum Warmhalten von Speisen genutzt werden.
Beträgt die Garzeit mehr als 30 Minuten, reduzieren Sie die Gerätetemperatur mindestens 3 -
10 Min. vor Ablauf des Garvorgangs. Durch die Restwärme im Gerät wird der Garvorgang
fortgesetzt.
130/200
ENERGIEEFFIZIENZ

Nutzen Sie die Restwärme, um andere Speisen aufzuwärmen.
Warmhalten von Speisen
Wählen Sie die niedrigste Temperatureinstellung, wenn Sie die Restwärme zum Warmhalten
von Speisen nutzen möchten. Die Restwärmeanzeige oder Temperatur werden auf dem
Display angezeigt.
Garen bei ausgeschalteter Backofenbeleuchtung
Schalten Sie die Lampe während des Garvorgangs aus. Schalten Sie sie nur ein, wenn Sie sie
benötigen.
14. MENÜSTRUKTUR
14.1 Menü
- Wählen Sie , um die Menü einzugeben.
Menü Struktur
Koch-Assistent Einstellungen
Schritt 1 Schritt 2 Schritt 3 Schritt 4 Schritt 5
O1 - O9
Wählen Sie Me‐
nü, Einstellun‐
gen.
Bestätigen Sie
die Einstellung.
Wählen Sie die
Einstellung.
Bestätigen Sie
die Einstellung.
Stellen Sie den
Wert ein und
drücken Sie .
Einstellungen
O1 Uhrzeit Ändern O2 Helligkeit 1 - 5
O3 Tastentöne 1 - Signalton
2 - Klicken
3 - Aus‐
schalten
O4 Lautstärke 1 - 4
O5 Uptimer Ein / Aus O6 Backofenbeleuch‐
tung
Ein / Aus
131/200
MENÜSTRUKTUR

Einstellungen
O7 DEMO Aktivi‐
erungscode:
2468
O8 Softwareversion Prüfen
O9 Gerät auf Werksein‐
stellungen zurückset‐
zen
Ja / Nein
15. UMWELTTIPPS
Recyceln Sie Materialien mit dem Symbol . Entsorgen Sie die Verpackung in den
entsprechenden Recyclingbehältern. Recyceln Sie zum Umwelt- und Gesundheitsschutz
elektrische und elektronische Geräte. Entsorgen Sie Geräte mit diesem Symbol nicht mit
dem Hausmüll. Bringen Sie das Gerät zu Ihrer örtlichen Sammelstelle oder wenden Sie sich an
Ihr Gemeindeamt.
132/200
MENÜSTRUKTUR

VISITE O NOSSO WEBSITE PARA:
Obter conselhos de utilização, folhetos, resolução de problemas e informações sobre
assistência e reparações:
www.zanussi.com/support
Sujeito a alterações sem aviso prévio.
ÍNDICE
1. INFORMAÇÕES DE SEGURANÇA........ 134
1.1 Segurança de crianças e pessoas
vulneráveis.........................................134
1.2 Segurança geral.......................... 134
2. INSTRUÇÕES DE SEGURANÇA............137
2.1 Instalação.................................... 137
2.2 Ligação elétrica ...........................138
2.3 Utilização..................................... 139
2.4 Manutenção e limpeza.................139
2.5 Utilização de peças de vidro........140
2.6 Iluminação interna....................... 140
2.7 Assistência técnica...................... 140
2.8 Eliminação................................... 141
3. DESCRIÇÃO DO PRODUTO...................141
3.1 Resumo geral.............................. 141
3.2 Acessórios................................... 141
4. PAINEL DE COMANDOS........................142
4.1 Botões retráteis............................142
4.2 Campos do sensor do painel de
comandos.......................................... 142
5. ANTES DA PRIMEIRA UTILIZAÇÃO......143
5.1 Limpeza inicial............................. 143
6. UTILIZAÇÃO DIÁRIA.............................. 143
6.1 Como definir: Tipos
de aquecimento................................. 143
6.2 Como definir: Funções do
micro-ondas.......................................144
6.3 Funções de aquecimento............ 144
6.4 Como definir: Cozedura assistida146
6.5 Cozedura assistida...................... 146
7. FUNÇÕES DE RELÓGIO........................ 152
7.1 Funções do relógio...................... 152
7.2 Como definir: Funções do relógio153
8. COMO UTILIZAR: ACESSÓRIOS...........154
8.1 Inserir acessórios.........................154
9. FUNÇÕES ADICIONAIS..........................155
9.1 Bloquear...................................... 155
9.2 Desligar automático.....................156
9.3 Ventoinha de arrefecimento.........156
10. SUGESTÕES E DICAS..........................156
10.1 Recomendações para o
microondas ....................................... 156
10.2 Recipientes e materiais adequados
para micro-ondas ..............................157
10.3 Definições de potência
recomendadas para diversos tipos de
alimentos........................................... 158
10.4 Tabelas de cozedura para
testes................................................. 159
11. MANUTENÇÃO E LIMPEZA................. 161
11.1 Notas sobre a limpeza...............161
11.2 Como remover: Apoios para
prateleiras .........................................162
11.3 Como substituir: Lâmpada.........162
12. RESOLUÇÃO DE PROBLEMAS...........163
12.1 O que fazer se…........................163
12.2 Dados de assistência técnica.... 164
13. EFICIÊNCIA ENERGÉTICA...................164
13.1 Poupança de energia.................164
14. ESTRUTURA DO MENU....................... 165
14.1 Menu..........................................165
15. PREOCUPAÇÕES AMBIENTAIS..........166
133/200

1. INFORMAÇÕES DE SEGURANÇA
Leia atentamente as instruções fornecidas antes de instalar e
utilizar o aparelho. O fabricante não é responsável por
quaisquer ferimentos ou danos resultantes de instalação ou
utilização incorretas. Guarde sempre as instruções em local
seguro e acessível para consultar no futuro.
1.1 Segurança de crianças e pessoas vulneráveis
•Este aparelho pode ser utilizado por crianças com 8 anos
de idade ou mais velhas e por pessoas com capacidades
físicas, sensoriais ou mentais reduzidas ou falta de
experiência e conhecimento se forem supervisionadas ou
instruídas no que respeita à utilização do aparelho de uma
forma segura e compreenderem os perigos envolvidos. É
necessário manter as crianças com menos de 8 anos de
idade e pessoas com incapacidades muito extensas e
complexas afastadas do aparelho, a menos que sejam
constantemente vigiadas.
•As crianças devem ser vigiadas para garantir que não
brincam com o aparelho.
•Mantenha todos os materiais de embalagem fora do
alcance das crianças e elimine-os de forma apropriada.
•AVISO: O forno e as partes acessíveis ficam quentes
durante a utilização. Mantenha as crianças e os animais
domésticos afastados do aparelho quando estiver a ser
utilizado e durante o arrefecimento.
•Se o aparelho tiver um dispositivo de segurança para
crianças, recomendamos que o ative.
•A limpeza e a manutenção básica do aparelho não devem
ser efetuadas por crianças sem supervisão.
1.2 Segurança geral
•Este aparelho destina-se apenas a ser utilizado para
cozinhar.
134/200
INFORMAÇÕES DE SEGURANÇA

•Este aparelho foi concebido unicamente para utilização
doméstica num ambiente interior.
•Este aparelho pode ser utilizado em escritórios, quartos de
hóspedes de hotéis, quartos de hóspedes de pousadas,
casas de hóspedes de turismo rural e outros alojamentos
semelhantes onde tal utilização não exceda os níveis de
utilização doméstica (médios).
•Apenas uma pessoa qualificada pode instalar este aparelho
e substituir o cabo.
•Não use o aparelho antes de instalá-lo na estrutura
embutida.
•Desligue o aparelho da fonte de alimentação antes de
realizar qualquer manutenção.
•Se o cabo de alimentação elétrica estiver danificado, deve
ser substituído pelo fabricante, por um Centro de
Assistência Técnica Autorizado ou por uma pessoa
igualmente qualificada, para evitar perigos elétricos.
•AVISO: Certifique-se de que o aparelho está desligado
antes de substituir a lâmpada, para evitar a possibilidade de
choque elétrico.
•AVISO: O forno e as partes acessíveis ficam quentes
durante a utilização. Deve ter cuidado para evitar tocar nas
resistências ou na superfície da cavidade do aparelho.
•Utilize sempre luvas de forno para retirar ou inserir
acessórios ou recipientes de ir ao forno.
•Não ative a função de microondas quando o aparelho
estiver vazio. As peças metálicas no interior da cavidade
podem criar arco eléctrico.
•Não é permitido utilizar recipientes metálicos de alimentos
ou bebidas para cozinhar com micro-ondas. Esta restrição
não se aplica se o fabricante especificar o tamanho e a
forma dos recipientes metálicos que podem ser utilizados
para cozinhar com micro-ondas.
135/200
INFORMAÇÕES DE SEGURANÇA

•AVISO: Em caso de danos na porta ou nos vedantes da
porta, não utilize o aparelho até que tenha sido reparado
por uma pessoa qualificada.
•AVISO: Apenas uma pessoa qualificada pode efetuar ações
de manutenção e reparação que envolvam a remoção da
cobertura que protege contra a exposição à energia de
microondas.
•AVISO: Não aqueça líquidos e outros alimentos em
recipientes selados. Podem explodir.
•Utilize apenas utensílios adequados para utilizar em fornos
microondas.
•Quando aquecer alimentos em recipientes de plástico ou
papel, vigie o aparelho, porque existe o risco de ignição.
•O aparelho destina-se a aquecer alimentos e bebidas. A
secagem de alimentos ou vestuário e o aquecimento de
almofadas de aquecimento, chinelos, esponjas, panos
tecidos húmidos e outros semelhantes podem resultar em
risco de ferimentos, ignição e incêndio.
•Se observar fumo, desligue o aparelho ou retire a ficha da
tomada e mantenha a porta fechada para abafar possíveis
chamas.
•O aquecimento de bebidas no microondas pode provocar
ebulição eruptiva retardada. Tenha cuidado ao manusear o
recipiente.
•O conteúdo de biberões e de boiões de comida para bebé
deve ser agitado e mexido e a temperatura deve ser
verificada antes do consumo, para evitar queimaduras.
•Os ovos inteiros e os ovos cozidos inteiros não devem ser
aquecidos no aparelho, porque podem explodir, mesmo
depois de ter terminado o aquecimento no microondas.
•Para remover os apoios para prateleiras, puxe primeiro a
parte da frente do apoio para prateleiras e depois a
extremidade traseira das paredes laterais. Instale os apoios
para prateleiras na sequência inversa.
136/200
INFORMAÇÕES DE SEGURANÇA

•O aparelho deve ser limpo regularmente e os depósitos de
alimentos devem ser removidos.
•Não utilize um aparelho de limpeza a vapor para limpar o
aparelho.
•Não utilize agentes de limpeza abrasivos ou raspadores
metálicos afiados para limpar a porta de vidro, porque
podem riscar a superfície e quebrar o vidro.
•Se não mantiver o aparelho limpo, a superfície pode
deteriorar-se e isso pode afetar negativamente a vida útil do
aparelho e resultar numa situação perigosa.
2. INSTRUÇÕES DE SEGURANÇA
2.1 Instalação
AVISO!
A instalação deste aparelho tem de ser efetuada por uma pessoa qualificada.
• Retire a embalagem toda.
• Não instale nem utilize o aparelho se estiver danificado.
• Siga as instruções de instalação fornecidas com o aparelho.
• Tenha sempre cuidado quando deslocar o aparelho porque ele é pesado. Utilize sempre
luvas de proteção e calçado fechado.
• Não puxe o aparelho pela pega.
• Instale o aparelho num local seguro e adequado que cumpra com os requisitos da
instalação.
• Respeite as distâncias mínimas relativamente a outros aparelhos e unidades.
• Antes de montar o aparelho, verifique se a porta do aparelho abre sem limitações.
• O aparelho está equipado com um sistema de arrefecimento elétrico. É necessário utilizar a
alimentação elétrica.
• A unidade de encastrar tem de cumprir os requisitos de estabilidade da norma DIN 68930.
Altura mínima do armário (altura mínima do armá‐
rio debaixo do balcão)
444 (460) mm
Largura do armário 560 mm
Profundidade do armário 550 (550) mm
Altura da parte da frente do aparelho 455 mm
Altura da parte de trás do aparelho 440 mm
Largura da parte da frente do aparelho 595 mm
137/200
INSTRUÇÕES DE SEGURANÇA

Largura da parte de trás do aparelho 559 mm
Profundidade do aparelho 567 mm
Profundidade de encastre do aparelho 546 mm
Profundidade com a porta aberta 882 mm
Dimensão mínima da abertura de ventilação.
Abertura localizada na parte inferior traseira
560x20 mm
Comprimento do cabo de alimentação elétrica. O
cabo sai pelo canto traseiro direito
1500 mm
Parafusos de montagem 3.5x25 mm
2.2 Ligação elétrica
AVISO!
Risco de incêndio e choque elétrico.
• Todas as ligações eléctricas devem ser efectuadas por um electricista qualificado.
• O aparelho tem de ficar ligado à terra.
• Certifique-se de que os parâmetros indicados na placa de características são compatíveis
com as características da alimentação eléctrica.
• Utilize sempre uma tomada devidamente instalada e à prova de choques elétricos.
• Não utilize adaptadores de tomadas duplas ou triplas, nem cabos de extensão.
• Certifique-se de que não danifica a ficha e o cabo de alimentação eléctrica. Se for
necessário substituir o cabo de alimentação, esta operação deve ser efectuada pelo nosso
Centro de Assistência Técnica.
• Não permita que algum cabo eléctrico toque na porta do aparelho ou no nicho abaixo do
aparelho, especialmente quando a porta estiver quente.
• As protecções contra choques eléctricos das peças isoladas e não isoladas devem estar
fixas de modo a não poderem ser retiradas sem ferramentas.
• Ligue a ficha à tomada elétrica apenas no final da instalação. Certifique-se de que a ficha
fica acessível após a instalação.
• Se a tomada eléctrica estiver solta, não ligue a ficha.
• Não puxe o cabo de alimentação para desligar o aparelho. Puxe sempre a ficha.
• disjuntores de protecção, fusíveis (os fusíveis de rosca devem ser retirados do suporte),
diferenciais e contactores.
• A instalação eléctrica deve possuir um dispositivo de isolamento que lhe permita desligar o
aparelho da corrente eléctrica em todos os pólos. O dispositivo de isolamento deve ter uma
abertura de contacto com uma largura mínima de 3 mm.
• Este aparelho é fornecido com ficha e cabo de alimentação.
138/200
INSTRUÇÕES DE SEGURANÇA

2.3 Utilização
AVISO!
Risco de ferimentos, queimaduras, choque elétrico ou explosão.
• Não altere as especificações deste aparelho.
• Certifique-se de que as aberturas de ventilação não ficam obstruídas.
• Não deixe o aparelho sem vigilância durante o funcionamento.
• Desative o aparelho após cada utilização.
• Tenha cuidado quando abrir a porta do aparelho com o aparelho em funcionamento. Pode
sair ar quente.
• Não utilize o aparelho com as mãos molhadas ou quando ele estiver em contacto com
água.
• Não aplique pressão sobre a porta aberta.
• Não utilize o aparelho como superfície de trabalho ou armazenamento.
• Abra a porta do aparelho com cuidado. A utilização de ingredientes com álcool pode
provocar uma mistura de álcool e ar.
• Evite que faíscas ou chamas entrem em contacto com o aparelho quando abrir a porta.
• Não coloque produtos inflamáveis, nem objetos molhados com produtos inflamáveis, no
interior, perto ou em cima do aparelho.
• Não utilize a função de micro-ondas para pré-aquecer o aparelho.
AVISO!
Risco de danos no aparelho.
• Para evitar danos ou descoloração no esmalte:
– não coloque folha de alumínio diretamente sobre o fundo da cavidade do aparelho.
– não coloque água diretamente no aparelho quente.
– não mantenha pratos e alimentos húmidos no aparelho após acabar de cozinhar.
– tenha cuidado quando remover ou montar os acessórios.
• A eventual descoloração do esmalte ou do aço inoxidável não afeta o desempenho do
aparelho.
• Utilize uma assadeira profunda para bolos húmidos. Os sumos de fruta provocam manchas
que podem ser permanentes.
• Cozinhe sempre com a porta do aparelho fechada.
• Se o aparelho ficar instalado atrás de uma porta de armário, nunca feche a porta com o
aparelho em funcionamento. Se a porta ficar fechada, poderá ocorrer acumulação de calor
e humidade que podem danificar o aparelho, os móveis ou o piso. Não feche a porta do
armário enquanto o aparelho não tiver arrefecido completamente após utilização.
2.4 Manutenção e limpeza
AVISO!
Risco de ferimentos, incêndio e danos no aparelho.
• Antes de qualquer ação de manutenção, desative o aparelho e desligue a ficha da tomada
elétrica.
• Certifique-se de que o aparelho está frio. Existe o risco de quebra dos painéis de vidro.
• Substitua imediatamente os painéis de vidro se estiverem danificados. Contacte um Centro
de Assistência Técnica Autorizado.
• Tenha cuidado quando remover a porta do aparelho. A porta é pesada!
139/200
INSTRUÇÕES DE SEGURANÇA

• Não se esqueça de limpar e secar bem a cavidade e a porta após cada utilização. O vapor
produzido durante o funcionamento do aparelho condensa nas paredes da cavidade e pode
causar corrosão.
• Limpe o aparelho com regularidade para evitar que o material da superfície se deteriore.
• Quaisquer restos de gordura ou alimentos que fiquem no aparelho podem provocar incêndio
e arco elétrico quando o micro-ondas estiver a funcionar.
• Limpe o aparelho com um pano macio e húmido. Utilize apenas detergentes neutros. Não
utilize produtos abrasivos, esfregões, solventes ou objetos metálicos.
• Se utilizar um spray para forno, siga as instruções de segurança da embalagem.
2.5 Utilização de peças de vidro
Manusear peças de vidro sem o cuidado adequado pode resultar em quebras, libertação de
lascas, rachaduras e riscos profundos:
• Não derrame água fria ou outros líquidos frios sobre peças de vidro quentes porque uma
descida súbita da temperatura pode fazer com que o vidro quebre imediatamente. Os
pedaços de vidro partido podem ser extremamente aguçados e difíceis de detetar.
• Não coloque uma peça de vidro sobre uma superfície molhada ou fria, por exemplo,
diretamente no balcão da cozinha, na banca ou noutra superfície metálica, nem manuseie
os vidros quentes com um pano molhado.
• Não utilize nem tente reparar qualquer peça de vidro que tenha perdido uma lasca, que se
tenha partido ou que tenha ficado riscada.
• Não deixe as peças de vidro cair, não bata com elas em objetos rígidos, nem bata com
utensílios nelas.
• Não aqueça uma peça de vidro vazia ou quase vazia no micro-ondas, nem sobreaqueça
óleo ou manteiga no micro-ondas (utilize o tempo de cozedura mínimo).
Permita que as peças de vidro arrefeçam num suporte próprio para arrefecimento, numa base
isolante para tacho ou sobre um pano seco. Certifique-se de as peças de vidro estão
suficientemente frias antes de as lavar ou de as meter no frigorífico ou no congelador.
Evite manusear as peças de vidro quentes (incluindo as peças que tenham pegas de silicone)
sem utilizar bases de tacho secas.
Evite utilizar o micro-ondas incorretamente (por exemplo, colocar o micro-ondas em
funcionamento sem alimentos ou com poucos alimentos).
2.6 Iluminação interna
AVISO!
Risco de choque elétrico.
• Relativamente à(s) lâmpada(s) no interior deste produto e às lâmpadas sobressalentes
vendidas separadamente: Estas lâmpadas destinam-se a suportar condições físicas
extremas em eletrodomésticos, tais como temperatura, vibração, humidade, ou destinam-se
a sinalizar informação relativamente ao estado operacional do aparelho. Não se destinam a
ser utilizadas em outras aplicações e não se adequam à iluminação de espaços
domésticos.
• Este produto contém uma fonte de luz da classe de eficiência energética G.
• Utilize apenas lâmpadas com as mesmas especificações.
2.7 Assistência técnica
• Para reparar o aparelho, contacte o Centro de Assistência Técnica Autorizado.
• Utilize apenas peças sobressalentes originais.
140/200
INSTRUÇÕES DE SEGURANÇA

2.8 Eliminação
AVISO!
Risco de ferimentos ou asfixia.
• Contacte a sua autoridade municipal para saber como descartar o aparelho corretamente.
• Desligue o aparelho da alimentação eléctrica.
• Corte o cabo de alimentação eléctrica do aparelho e elimine-o.
• Remova o trinco da porta para evitar que crianças ou animais de estimação fiquem presos
no aparelho.
3. DESCRIÇÃO DO PRODUTO
3.1 Resumo geral
1 2 43
10
4
3
1
28
9
5
6
7
Painel de commandos
Botão para os tipos de aquecimento
Visor
Botão de controlo
Elemento de aquecimento
Gerador de micro-ondas
Lâmpada
Ventilador
Apoio para prateleira, amovível
Nível das prateleiras
3.2 Acessórios
Prateleira em grelha
Para tachos, formas de bolos, assados.
Tabuleiro para assar
Para bolos e biscoitos.
141/200
DESCRIÇÃO DO PRODUTO

Prato de vidro do fundo do microondas
Para preparar alimentos no modo de microondas.
4. PAINEL DE COMANDOS
4.1 Botões retráteis
Para utilizar o aparelho, prima o botão. O botão fica saliente.
4.2 Campos do sensor do painel de comandos
Tempo‐
rizador
Aqueci‐
mento
rápido
Luz
Potência
do micro-
ondas
Confirmar a
definição Prima o botão Rodar o botão
Selecione um tipo de aquecimento para ligar o forno.
Rode o botão para as funções de aquecimento para a posição de desligado para desligar o forno.
Visor com funções chave.
Indicado‐
res do vi‐
sor: Bloquear Cozedura as‐
sistida
Definições Indicador de função
de micro-ondas
Indicado‐
res do
temporiza‐
dor:
142/200
PAINEL DE COMANDOS

Barra de progresso - para temperatura ou tempo.
A barra fica totalmente vermelha quando o forno
atinge a temperatura definida.
5. ANTES DA PRIMEIRA UTILIZAÇÃO
AVISO!
Consulte os capítulos relativos à segurança.
5.1 Limpeza inicial
Antes da primeira utilização, limpe o forno vazio e defina o tempo:
00:00
Acertar as horas. Premir .
6. UTILIZAÇÃO DIÁRIA
AVISO!
Consulte os capítulos relativos à segurança.
6.1 Como definir: Tipos de aquecimento
Começar a cozinhar
Passo 1 Passo 2
Selecione uma função de aquecimento.
Defina a temperatura.
Prima WATT e rode o botão de controlo para
ajustar a potência do micro-ondas.
Premir
.
143/200
ANTES DA PRIMEIRA UTILIZAÇÃO

6.2 Como definir: Funções do micro-ondas
Passo 1 Remover todos os acessórios.
Colocar o prato de vidro do microondas. Coloque os alimentos no prato de vidro do
fundo do micro-ondas.
Passo 2 Selecione uma função de aquecimento do micro-ondas e prima: para começar
com as predefinições.
O visor apresenta: duração e potência do micro-ondas.
Passo 3 Rode o botão para as funções de aquecimento para a posição off (desligado) para
desligar o forno.
Pode ajustar as definições enquanto cozinha.
Rode o botão de controlo para ajustar a duração. Prima:
Prima WATT e rode o botão de controlo para ajustar a potência do micro-ondas. Prima:
O tempo máximo das funções do micro-ondas depende da potência que definiu
para o micro-ondas:
POTÊNCIA DO MICRO-ONDAS TEMPO MÁXIMO
100 - 600 W 59:55 minutos
Superior a 600 W 7 minutos
Se abrir a porta, a função de micro-ondas para. Para recomeçar, feche a porta.
Premir .
6.3 Funções de aquecimento
Tipos de aquecimento normal
Tipo de aqueci‐
mento
Aplicação
Ventilado + Resis‐
tência Circ
Para cozer em até duas posições de prateleira ao mesmo tempo e para
secar alimentos. Defina a temperatura 20 - 40 °C abaixo da que utiliza
com Calor superior/inferior.
144/200
UTILIZAÇÃO DIÁRIA

Tipo de aqueci‐
mento
Aplicação
Calor superior/
inferior
Para cozer e assar alimentos numa posição de prateleira.
Grelhador ventila‐
do
Para assar peças de carne grandes ou aves com ossos numa posição da
prateleira. Para fazer gratinados e alourar.
Função Pizza
Para cozer pizza. Para um tostado intenso e uma base crocante.
Grelhador + Venti‐
lado + MO
Para assar peças de carne grandes num nível. Para fazer gratinados e
alourar.A função com complemento de micro-ondas.
Ventilado + Resis‐
tência Circ + MO
Cozer numa posição de prateleira.A função com complemento de micro-
ondas.
Descongelar
Descongelar carne, peixe, bolos, gama de potência: 100 - 200 W
Reaquecer
Aquecer refeições pré-cozinhadas e alimentos delicados, intervalo de po‐
tência: 300 - 700 W
Micro-ondas
Aquecer, cozinhar, intervalo de potência: 100 - 1000 W
Menu
Para entrar no menu: Cozedura assistida, Definições.
145/200
UTILIZAÇÃO DIÁRIA

6.4 Como definir: Cozedura assistida
O submenu Cozedura assistida consiste num conjunto de funções e pratos adicionais com
funções de cozedura, temperaturas e tempos recomendados. Pode ajustar o tempo e a
temperatura durante a cozedura.
Para alguns dos pratos, também pode cozinhar
com:
• Peso automático
Cozedura assistida - utilize-o para preparar rapidamente um prato com as definições pa‐
drão:
Passo 1 Passo 2 Passo 3 Passo 4
P1 - P45
Entre no menu. Selecione Cozedura
assistida. Prima .
Selecione o prato.
Premir .
Coloque o prato no
forno. Confirme a de‐
finição.
6.5 Cozedura assistida
Legenda
Peso automático disponível.
Função com potência de micro-ondas. Utilize um acessório adequado pa‐
ra micro-ondas.
Pré-aqueça o forno antes de começar a cozinhar.
Nível da prateleira.
Tipo de aquecimento Aplicação
F1 Grelhador Para grelhar alimentos finos e tostar pão.
F2 Aquecimento inferior Para cozer bolos com bases estaladiças e conservar
alimentos.
146/200
UTILIZAÇÃO DIÁRIA

Tipo de aquecimento Aplicação
F3 Congelados Para deixar os alimentos de conveniência (por exem‐
plo, batatas fritas, batatas em cunha ou crepes) estala‐
diços.
F4 Aquecimento superior/inferior +
MO
Cozer e assar alimentos numa posição de prateleira. A
função com complemento de micro-ondas.
F5 Grelhador + MO Para cozinhar alimentos em pouco tempo e tostá-los. A
função com complemento de micro-ondas.
Quando a função terminar, verifique se os alimentos estão prontos.
Prato Peso Nível de prateleira/acessório Tempo de
duração
Carne de vaca
P1 Carne assada,
mal passada 1 - 1,5 kg;
pedaços
com 4 - 5
cm de es‐
pessura
1; tabuleiro para assar
Frite a carne durante alguns minutos nu‐
ma frigideira quente. Insira no forno.
40 min
P2 Carne assada,
média 50 min
P3 Carne assada,
bem passada 60 min
P4 Bife, médio 180 - 220 g
por peça; fa‐
tias com 3
cm de es‐
pessura
2; assadeira numa prateleira em
grelha
Frite a carne durante alguns minutos nu‐
ma frigideira quente. Insira no forno.
15 min
P5 Carne assada/
estufada (cos‐
teleta de pri‐
meira, redondo
superior, flan‐
co espesso)
1,5 – 2 kg 1; assadeira numa prateleira em
grelha
Frite a carne durante alguns minutos nu‐
ma frigideira quente. Adicione líquido. In‐
sira no forno.
120 min
147/200
UTILIZAÇÃO DIÁRIA

Prato Peso Nível de prateleira/acessório Tempo de
duração
P6 Carne assada,
mal passada
(aquecimento
a baixa tempe‐
ratura)
1 - 1,5 kg;
pedaços
com 4 - 5
cm de es‐
pessura
1; tabuleiro para assar
Utilize as suas especiarias favoritas ou
simplesmente sal e pimenta moída fres‐
ca. Frite a carne durante alguns minutos
numa frigideira quente. Insira no forno.
75 min
P7 Carne assada,
média (aqueci‐
mento a baixa
temperatura)
85 min
P8 Carne assada,
bem passada
(aquecimento
a baixa tempe‐
ratura)
130 min
P9 Filete, mal
passado
(aquecimento
a baixa tempe‐
ratura)
0,5 - 1,5 kg;
pedaços
com 5 - 6
cm de es‐
pessura
1; tabuleiro para assar
Utilize as suas especiarias favoritas ou
simplesmente sal e pimenta moída fres‐
ca. Frite a carne durante alguns minutos
numa frigideira quente. Insira no forno.
75 min
P10 Filete, médio
(aquecimento
a baixa tempe‐
ratura)
90 min
P11 Filete, con‐
cluído (aque‐
cimento a bai‐
xa temperatu‐
ra)
120 min
Vitela
P12 Vitela assada
(p. ex., pá)
0,8 - 1,5 kg;
pedaços
com 4 cm
de espessu‐
ra
1; assadeira numa prateleira em
grelha
Utilize as suas especiarias favoritas. Adi‐
cione líquido. Assado coberto.
80 min
Porco
148/200
UTILIZAÇÃO DIÁRIA

Prato Peso Nível de prateleira/acessório Tempo de
duração
P13 Cachaço ou
pá de porco
assada
1,5 kg 1; caçarola em cerâmica ou vidro
na prateleira em grelha, adequado para
MW
Utilize as suas especiarias favoritas.
Após metade do tempo de cozedura, vire
a carne.
90 min
P14 Porco assado
(aquecimento
a baixa tempe‐
ratura)
1,5 – 2 kg 1; tabuleiro para assar
Utilize as suas especiarias favoritas. Vire
a carne após metade do tempo de coze‐
dura para obter um tostado uniforme.
215 min
P15 Lombo, fres‐
co
1 - 1,5 kg;
peças com
5 - 6 cm de
espessura
1; assadeira numa prateleira em
grelha
Utilize as suas especiarias favoritas.
55 min
P16 Entrecosto 2 - 3 kg; uti‐
lizar entre‐
costo com 2
- 3 cm de
espessura
2; tabuleiro para grelhar
Adicione líquido para cobrir o fundo de
um prato. Após metade do tempo de co‐
zedura, vire a carne.
90 min
Borrego
P17 Perna de bor‐
rego com os‐
sos
1,5 - 2 kg;
peças com
7 - 9 cm de
espessura
1; assadeira no tabuleiro para assar
Adicione líquido. Após metade do tempo
de cozedura, vire a carne.
130 min
Aves
P18 Frango inteiro 1,1 kg; fres‐
co 1; caçarola em cerâmica ou vidro
na prateleira em grelha, adequado para
MW
Utilize as suas especiarias favoritas. Co‐
loque o peito de frango virado para baixo
e vire-o ao fim de metade do tempo de
cozedura.
40 min
P19 Meio frango 0,5 - 0,8 kg 2; tabuleiro para assar
Utilize as suas especiarias favoritas.
40 min
149/200
UTILIZAÇÃO DIÁRIA

Prato Peso Nível de prateleira/acessório Tempo de
duração
P20 Peito de fran‐
go
180 - 200 g
por peça 1; caçarola na prateleira em gre‐
lha
Utilize as suas especiarias favoritas. Fri‐
te a carne durante alguns minutos numa
frigideira quente.
25 min
P21 Pernas de
frango, fres‐
cas
- 2; tabuleiro para assar
Se marinar as pernas de frango primeiro,
defina uma temperatura mais baixa e co‐
zinhe-as durante mais tempo.
30 min
P22 Pato inteiro 2 - 3 kg 1; assadeira numa prateleira em
grelha
Utilize as suas especiarias favoritas. Co‐
loque a carne numa assadeira. Vire o
pato após metade do tempo de cozedu‐
ra.
100 min
P23 Ganso, inteiro 4 - 5 kg ?; tabuleiro para grelhar
Utilize as suas especiarias favoritas. Co‐
loque a carne num tabuleiro para assar
fundo. Vire o ganso após metade do
tempo de cozedura.
110 min
Outro
P24 Rolo de Carne 1 kg 1; prateleira em grelha
Utilize as suas especiarias favoritas.
60 min
Peixe
P25 Peixe inteiro,
grelhado
0,5 - 1 kg
por peixe 1; tabuleiro para assar
Encha o peixe com manteiga e utilize as
suas especiarias e ervas favoritas.
30 min
P26 Filete de pei‐
xe
- 2; caçarola na prateleira em gre‐
lha
Utilize as suas especiarias favoritas.
20 min
Assados doces / sobremesas
150/200
UTILIZAÇÃO DIÁRIA

Prato Peso Nível de prateleira/acessório Tempo de
duração
P27 Cheesecake - 1; forma de mola de 28 cm na
prateleira em grelha
90 min
P28 Bolo de maçã - 2; tabuleiro para assar 45 min
P29 Tarte de maçã
coberta
- 1; forma circular na prateleira em
grelha
40 min
P30 Tarte de maçã - 1; forma de tarte de 22 cm na
prateleira em grelha
60 min
P31 Brownies 2 kg 2; tabuleiro para grelhar 30 min.
P32 Queques de
chocolate
- 2; tabuleiro de queques na prateleira
em grelha
25 min
P33 Bolo em for‐
ma de pão
- 1; tabuleiro de pão na prateleira em
grelha
50 min
Vegetais / acompanhamentos
P34 Batatas assa‐
das
1 kg 1; tabuleiro para assar
Coloque as batatas inteiras com a pele
no tabuleiro para assar.
50 min
P35 Batatas em
forma de cu‐
nha
1 kg 2; tabuleiro para assar forrado com
papel vegetal
Utilize as suas especiarias favoritas.
Corte as batatas em pedaços.
35 min.
P36 Legumes mis‐
turados
1 – 1,5 kg 2; tabuleiro para assar forrado com
papel vegetal
Utilize as suas especiarias favoritas.
Corte os legumes em pedaços.
30 min.
P37 Crequetes
congelados
0,5 kg 2; tabuleiro para assar 25 min
P38 Batatas con‐
geladas
0,75 kg 2; tabuleiro para assar 25 min
151/200
UTILIZAÇÃO DIÁRIA

Prato Peso Nível de prateleira/acessório Tempo de
duração
Gratinados, pão e pizza
P39 Lasanha de
carne/vege‐
tais com pra‐
tos de massa
seca
1 – 1,5 kg ; 1; caçarola em cerâmica ou vi‐
dro na prateleira em grelha
35 min.
P40 Batatas grati‐
nadas (batatas
cruas)
1,1 kg ; 2; caçarola em cerâmica ou vi‐
dro na prateleira em grelha
Rode o prato após metade do tempo de
cozedura.
35 min.
P41 Pizza fresca,
fina - 1; tabuleiro para assar forrado
com papel vegetal 15 min
P42 Pizza fresca,
grossa - 1; tabuleiro para assar forrado
com papel vegetal
25 min
P43 Quiche - 1; forma de assar na prateleira em
grelha
45 min
P44 Baguete/
Ciabatta/Pão
branco
0,8 kg 1; tabuleiro para assar forrado
com papel vegetal
Mais tempo necessário para o pão bran‐
co.
30 min.
P45 Pão integral/
centeio/escu‐
ro integral em
forma de pão
1 kg 1; tabuleiro para assar forrado
com papel vegetal / prateleira em gre‐
lha
60 min
7. FUNÇÕES DE RELÓGIO
7.1 Funções do relógio
Função de relógio Aplicação
Conta-minutos. É emitido um sinal sonoro quando o tempo terminar.
152/200
FUNÇÕES DE RELÓGIO

Função de relógio Aplicação
Tempo para cozinhar. Quando o temporizador termina é emitido um
sinal sonoro e a função de aquecimento pára.
Atraso do temporizador. Para adiar o início e/ou final do cozinhado.
Temporizador crescente. O máximo é de 23 h 59 min. Esta função não
afeta o funcionamento do forno.
Para ligar e desligar a Temporizador crescente selecione: Menu, Defi‐
nições.
As funções de relógio estão disponíveis apenas para: Ventilado + Resistência Circ, Calor
superior/inferior, Grelhador ventilado, Função Pizza, Grelhador + Ventilado + MO, Ventilado +
Resistência Circ + MO.
7.2 Como definir: Funções do relógio
Como definir: Hora
Passo 1 Passo 2 Passo 3
para alterar a hora do dia, entre no menu e
selecione Definições, Hora do dia. Acertar o relógio. Premir: .
Como definir: Conta-minutos
Passo 1
O visor mos‐
tra:
0:00
Passo 2 Passo 3
Premir: . Definir a Conta-minutos Premir: .
O temporizador inicia a contagem decrescente imediatamente.
153/200
FUNÇÕES DE RELÓGIO

Como definir: Tempo para cozinhar
Passo 1 Passo 2
O visor mos‐
tra:
0:00
Passo 3 Passo 4
Escolha uma fun‐
ção de aqueci‐
mento e defina a
temperatura.
Prima repetida‐
mente: .
Defina o tempo
da cozedura. Premir: .
O temporizador inicia a contagem decrescente imediatamente.
Como definir: Atraso do temporizador
Passo
1
Passo 2
O visor
apre‐
senta:
hora do
dia.
INI‐
CIAR
Passo 3 Passo 4
O visor
mostra:
--:--
PA‐
RAR
Passo 5 Passo 6
Selecio‐
ne a
função
de
aqueci‐
mento.
Prima re‐
petida‐
mente:
.
Defina a
hora de
início.
Premir:
.
Defina a
hora de
fim.
Premir:
.
O temporizador inicia a contagem decrescente a uma hora de início definida.
8. COMO UTILIZAR: ACESSÓRIOS
8.1 Inserir acessórios
Utilize apenas materiais e recipientes adequados. Consulte “Recipientes e materiais
adequados para micro-ondas” no capítulo “Sugestões e dicas”.
Um pequeno entalhe na parte inferior aumenta a segurança. Os entalhes são também
dispositivos anti-inclinação. A armação elevada à volta da prateleira impede que os recipientes
deslizem para fora da prateleira.
154/200
COMO UTILIZAR: ACESSÓRIOS

Prateleira em grelha:
Introduza a prateleira entre as barras-guia
dos apoios para prateleiras e certifique-se
de que os pés de apoio ficam para baixo.
Tabuleiro para assar:
Introduza o tabuleiro entre as barras-guia
do apoio para prateleiras.
Prato de vidro do fundo do microondas:
Utilize o prato de vidro do fundo do micro-
ondas apenas com a função de micro-on‐
das. Não é adequado para uma função de
micro-ondas combinada (por exemplo,
grelhador com micro-ondas).
Coloque o acessório no fundo da cavida‐
de.
Pode colocar os alimentos diretamente na
placa de vidro do fundo do micro-ondas.
9. FUNÇÕES ADICIONAIS
9.1 Bloquear
Esta função evita uma alteração acidental da função do aparelho.
Ligá-la com o aparelho a funcionar – a cozedura definida continua, o painel de controlo fica blo‐
queado.
Ligá-la quando o aparelho estiver desligado – não pode ser ligada, o painel de comandos está
bloqueado.
155/200
FUNÇÕES ADICIONAIS

Esta função evita uma alteração acidental da função do aparelho.
- mantenha premido pa‐
ra ligar a função.
É emitido um sinal sonoro.
- mantenha premido pa‐
ra desligar.
3 x - fica intermitente quando o bloqueio está ativo.
9.2 Desligar automático
Por questões de segurança, o forno desativa-se ao fim de algum tempo se estiver alguma
função de aquecimento ativa e não houver alteração de quaisquer configurações.
(°C) (h)
30 - 115 12.5
120 - 195 8.5
200 - 230 5.5
A Desativação Automática não funciona com as seguintes funções: Luz, Atraso do
temporizador.
9.3 Ventoinha de arrefecimento
Quando o aparelho está a funcionar, a ventoinha de arrefecimento liga-se automaticamente
para manter as superfícies do aparelho frias. Se desligar o aparelho, a ventoinha de
arrefecimento pode continuar a funcionar até o aparelho arrefecer.
10. SUGESTÕES E DICAS
10.1 Recomendações para o microondas
Vamos cozinhar!
Coloque os alimentos no prato de vidro da base do microondas na parte inferior da cavidade.
Coloque os alimentos num prato na parte inferior da cavidade.
Vire ou mexa os alimentos a meio do tempo de descongelação ou cozedura.
Mexa os preparados líquidos regularmente.
Mexa os alimentos antes de os servir.
Cubra os alimentos quando cozinhar e reaquecer.
Quando aquecer líquidos em frasco ou copo, mexa o conteúdo com uma colher para distribuir
melhor o calor.
Coloque os alimentos no aparelho sem embalagem. As refeições prontas embaladas podem
ser colocadas no aparelho se as embalagens forem próprias para micro-ondas (consulte as
indicações na embalagem).
156/200
SUGESTÕES E DICAS

Cozinhar no microondas
Cozinhe os alimentos com tampa. Se desejar obter uma crosta, cozinhe os alimentos sem
tampa.
Não cozinhar demasiado os pratos, regulando a potência e o tempo para um valor demasiado
elevado. Os alimentos podem secar, queimar ou incendiar-se.
Não utilize o aparelho para cozer ovos com casca e caracóis porque podem explodir. Perfure
as gemas dos ovos estrelados antes de os reaquecer.
Perfure várias vezes os alimentos que tenham casca ou pele antes de os cozinhar.
Corte os legumes em pedaços com tamanhos semelhantes.
Depois de desligar o aparelho, retirar os alimentos e deixá-los repousar durante alguns
minutos para permitir que o calor seja uniformemente distribuído.
Descongelar no microondas
Coloque os alimentos congelados e sem embalagem sobre um prato pequeno virado ao
contrário, ou sobre uma peneira de plástico ou um tabuleiro de descongelação, para que o
líquido da descongelação possa derramar.
Remova os pedaços à medida que foram ficando descongelados.
Para cozinhar fruta e legumes sem os descongelar antes, pode utilizar uma potência do
microondas maior.
10.2 Recipientes e materiais adequados para micro-ondas
Utilize apenas materiais e recipientes adequados para micro-ondas quando utilizar a função de
micro-ondas. Utilize a tabela em baixo como referência.
Verifique as especificações do recipiente/material antes da utilização.
Recipiente/Material
Porcelana e vidro próprios para
forno, sem componentes metáli‐
cos, por exemplo, vidro à prova
de calor
Vidro e porcelana não adequa‐
dos para forno, sem decorações
em prata, ouro, platina ou outro
metal
X X
Vidro e vitrocerâmica fabricados
em material adequado para for‐
no/congelador
Cerâmica e barro próprios para
forno sem componentes de
quartzo ou metal, nem revesti‐
mentos que contenham metal
157/200
SUGESTÕES E DICAS

Recipiente/Material
Cerâmica, porcelana ou barro
com fundo não vidrado ou pe‐
quenos orifícios, por exemplo,
nas pegas
X X X
Plástico resistente ao calor até
200 °C
X
Cartão, papel X X
Película aderente X X
Película aderente para micro-on‐
das
X
Assadeiras em metal, por exem‐
plo, esmalte, ferro fundido
X X X
Formas para assar, com revesti‐
mento de silicone ou laca preta
X X X
Tabuleiro para assar X X X
Prateleira em grelha X X
Prato de vidro do micro-ondas X
Recipientes para utilizar em mi‐
cro-ondas, por exemplo, uma fri‐
gideira de pega amovível
X X
10.3 Definições de potência recomendadas para diversos tipos de
alimentos
Os dados apresentados na tabela servem apenas como referência.
158/200
SUGESTÕES E DICAS

700 - 1000 W
Ferver no início do processo de confeção Aquecer líquidos
500 – 600 W
Cozinhar legu‐
mes
Confecionar
pratos com
ovos
Lume brando pa‐
ra estufados
Aquecer pratos
individuais
Descongelar e
aquecer refei‐
ções congela‐
das
300 – 400 W
Derreter queijo,
chocolate ou
manteiga
Cozer arroz
em lume bran‐
do
Aquecer comida
de bebé
Cozinhar / Aque‐
cer alimentos deli‐
cados
Continuar a co‐
zinhar
100 - 200 W
Descongelar pão Descongelar fruta e
bolos
Descongelar queijo,
natas, manteiga
Descongelar carne
ou peixe
10.4 Tabelas de cozedura para testes
Informação para institutos de teste
Testes de acordo com a norma IEC 60705.
159/200
SUGESTÕES E DICAS

Utilize a prateleira em grelha se não houver indicação contrária.
FUNÇÃO DE MI‐
CRO-ONDAS
(W) (kg) (min.)
Pão-de-ló 600 0.475 Inferior 7 - 9 Vire o recipiente a
1/4 ou metade do
tempo de cozedura.
Rolo de carne 400 0.9 2 25 - 32 Vire o recipiente a
1/4 ou metade do
tempo de cozedura.
Prato de ovos no
forno
500 1 Inferior 18 -
Descongelar carne 200 0.5 Inferior 7 - 8 Vire a carne de cima
para baixo a meio
do tempo de coze‐
dura.
Utilize a prateleira em grelha.
FUNÇÃO
COMBI‐
NADA
COM MI‐
CRO-
ONDAS
(W) (°C) (min)
Bolo, 0,7
kg
Aquecimen‐
to superior/
inferior +
MO
100 200 2 23 - 27 Vire o recipiente a
1/4 ou metade do
tempo de cozedu‐
ra.
Batatas
gratina‐
das, 1,1
kg
Ventilado +
Resistência
Circ + MO
300 180 2 38 - 42 Vire o recipiente a
1/4 ou metade do
tempo de cozedu‐
ra.
160/200
SUGESTÕES E DICAS

Utilize a prateleira em grelha.
FUNÇÃO
COMBI‐
NADA
COM MI‐
CRO-
ONDAS
(W) (°C) (min)
Frango,
1,1 kg
Grelhador +
Ventilado +
MO
400 230 1 35 - 40 Coloque a carne
no recipiente de vi‐
dro redondo e vire-
a de cima para
baixo a meio do
tempo de cozedu‐
ra.
11. MANUTENÇÃO E LIMPEZA
AVISO!
Consulte os capítulos relativos à segurança.
11.1 Notas sobre a limpeza
Agentes de
limpeza
Limpe a parte da frente do aparelho apenas usando um pano de microfibras
com água morna e um detergente suave.
Utilize uma solução de limpeza para limpar as superfícies metálicas.
Limpe manchas com um detergente suave.
Utilização di‐
ária
Limpe a cavidade após cada utilização. A acumulação de gordura ou outros re‐
síduos pode provocar incêndios.
Limpe cuidadosamente resíduos e gordura da parte superior do aparelho.
Não guarde alimentos no aparelho durante mais de 20 minutos. Seque a cavi‐
dade apenas usando um pano de microfibras após cada utilização.
161/200
MANUTENÇÃO E LIMPEZA

Acessórios
Limpe todos os acessórios após cada utilização e deixe-os secar. Utilize um
pano de microfibras com água morna e um detergente suave. Não lave os
acessórios na máquina de lavar loiça.
Não limpe acessórios antiaderentes utilizando detergentes abrasivos ou objetos
afiados.
11.2 Como remover: Apoios para prateleiras
Retire os apoios para prateleiras para limpar o forno.
Passo 1 Desligar o forno e aguardar até estar frio.
Passo 2 Puxe cuidadosamente os
apoios para prateleiras para ci‐
ma e para fora do suporte dian‐
teiro.
2
3
1
Passo 3 Afaste a parte da frente do
apoio para prateleiras para fora
da parede lateral.
Passo 4 Retire os apoios da patilha tra‐
seira.
Instale os apoios para prateleiras na sequência inversa.
11.3 Como substituir: Lâmpada
AVISO!
Risco de choque elétrico.
A lâmpada pode estar quente.
Segure sempre a lâmpada de halogéneo com um pano para evitar a queima de resíduos de
gordura na lâmpada.
Antes de substituir a lâmpada:
Passo 1 Passo 2 Passo 3
Desligue o forno. Aguarde até
que o forno esteja frio.
Desligue o forno da corrente
elétrica.
Coloque um pano no fundo da
cavidade.
162/200
MANUTENÇÃO E LIMPEZA

Lâmpada superior
Passo 1 Rode a proteção de vidro para a retirar.
Passo 2 Limpe a cobertura de vidro.
Passo 3 Substitua a lâmpada por uma lâmpada adequada, resistente ao calor até 300 °C.
Passo 4 Instale a cobertura de vidro.
12. RESOLUÇÃO DE PROBLEMAS
AVISO!
Consulte os capítulos relativos à segurança.
12.1 O que fazer se…
Em quaisquer casos não incluídos nesta tabela, contacte um centro de assistência autorizado.
O forno não liga ou não aquece
Problema Verificar se...
Não consegue ativar ou utilizar o forno. O forno está ligado corretamente à corrente
elétrica.
O forno não aquece. O desligar automático foi desativado.
O forno não aquece. O fusível não está fundido.
O forno não aquece. O Bloqueio está desativado.
Componentes
Problema Verificar se...
A lâmpada não funciona. A lâmpada está fundida.
163/200
RESOLUÇÃO DE PROBLEMAS

Códigos de erro
O visor mostra… Verificar se...
00:00 Houve um corte de energia. Definir a hora do
dia.
Se o visor apresentar um código de erro que não esteja presente nesta tabela, desligue e volte a
ligar o quadro elétrico de casa para reiniciar o forno. Se o código de erro recorrer, contacte um
Centro de Assistência Técnica Autorizado.
12.2 Dados de assistência técnica
Se não conseguir encontrar uma solução para o problema, contacte o seu fornecedor ou um
Centro de Assistência Técnica Autorizado.
Os dados necessários para o centro de assistência técnica encontram-se na placa de
identificação do aparelho. A placa de características está na moldura frontal da cavidade do
aparelho. Não remova a placa de características da cavidade do aparelho.
Recomendamos que escreva os dados aqui:
Modelo (MOD.) .........................................
Número do produto (PNC) .........................................
Número de série (S.N.) .........................................
13. EFICIÊNCIA ENERGÉTICA
13.1 Poupança de energia
Certifique-se de que a porta do aparelho está fechada quando o aparelho funcionar. Não abra
a porta do aparelho muitas vezes durante a confeção. Mantenha a junta da porta limpa e
certifique-se de que está bem fixa na posição correta.
Utilize recipientes de metal para melhorar a poupança de energia (apenas quando utilizar uma
função sem microondas).
Sempre que possível, não pré-aqueça o aparelho antes de cozinhar.
Quando preparar vários pratos de uma vez, reduza ao mínimo possível os intervalos entre
confeções.
Cozinhar com a ventoinha
Sempre que possível, utilize as funções de cozedura que utilizam a ventoinha, para poupar
energia.
Aquecimento residual
O ventilador e a lâmpada continuam ligadas. Quando desligar o aparelho, o visor indica o calor
residual. Pode utilizar esse calor para manter os alimentos quentes.
164/200
EFICIÊNCIA ENERGÉTICA

Quando a duração da cozedura for superior a 30 min, reduza a temperatura do aparelho para 3
a 10 min no mínimo antes do fim da cozedura. O calor residual no interior do aparelho
continuará a cozinhar.
Utilize o calor residual para aquecer outros pratos.
Manter os alimentos quentes
Para utilizar o calor residual para manter uma refeição quente, seleccione a regulação de
temperatura mais baixa possível. O visor apresenta o indicador de calor residual ou a
temperatura.
Cozinhar com a lâmpada desligada
Desligue a lâmpada durante a cozedura. Ligue-a apenas quando precisar.
14. ESTRUTURA DO MENU
14.1 Menu
- selecione para entrar no Menu.
Menu estrutura.
Cozedura assistida Definições
Passo 1 Passo 2 Passo 3 Passo 4 Passo 5
O1 - O9
Selecione o Me‐
nu, Definições.
Confirme a defi‐
nição.
Selecione a defi‐
nição.
Confirme a defi‐
nição.
Ajuste o valor e
prima .
Definições
O1 Hora Alterar O2 Brilho do visor 1 - 5
O3 Sons “teclado” 1 - Sinal so‐
noro
2 - Clique
3 - Som des‐
ligado
O4 Volume do alarme 1 - 4
165/200
ESTRUTURA DO MENU

Definições
O5 Temporizador cres‐
cente
Ligado/
Desligado
O6 Luz Ligado/Desli‐
gado
O7 Modo Demo Código de
ativação:
2468
O8 Versão do software Verificar
O9 Restaurar configura‐
ções
Sim / Não
15. PREOCUPAÇÕES AMBIENTAIS
Recicle os materiais que apresentem o símbolo . Coloque a embalagem nos contentores
indicados para reciclagem. Ajude a proteger o ambiente e a saúde pública através da
reciclagem dos aparelhos eléctricos e electrónicos. Não elimine os aparelhos que tenham o
símbolo juntamente com os resíduos domésticos. Coloque o produto num ponto de recolha
para reciclagem local ou contacte as suas autoridades municipais.
166/200
ESTRUTURA DO MENU

VISITE NUESTRO SITIO WEB PARA:
Obtener consejos, folletos, soluciones a problemas e información de servicio y
reparación:
www.zanussi.com/support
Salvo modificaciones.
CONTENIDO
1. INFORMACIÓN SOBRE SEGURIDAD... 168
1.1 Seguridad de niños y personas
vulnerables........................................ 168
1.2 Instrucciones generales de
seguridad...........................................168
2. INSTRUCCIONES DE SEGURIDAD....... 171
2.1 Instalación....................................171
2.2 Conexión eléctrica....................... 172
2.3 Uso.............................................. 173
2.4 Mantenimiento y limpieza............ 173
2.5 Uso de la cristalería.....................174
2.6 Iluminación interna.......................174
2.7 Asistencia tecnica........................174
2.8 Eliminación.................................. 175
3. DESCRIPCIÓN DEL PRODUCTO...........175
3.1 Resumen general........................ 175
3.2 Accesorios................................... 175
4. PANEL DE MANDOS.............................. 176
4.1 Mandos escamoteables...............176
4.2 Sensores del panel de control..... 176
5. ANTES DEL PRIMER USO..................... 177
5.1 Limpieza inicial............................ 177
6. USO DIARIO............................................ 177
6.1 Cómo ajustar: Funciones
de cocción..........................................177
6.2 Cómo ajustar: Funciones
del microondas.................................. 178
6.3 Funciones de cocción..................178
6.4 Cómo ajustar: Cocción asistida... 180
6.5 Cocción asistida...........................180
7. FUNCIONES DEL RELOJ....................... 186
7.1 Funciones de reloj....................... 186
7.2 Cómo ajustar: Funciones de reloj186
8. INSTRUCCIONES DE USO:
ACCESORIOS............................................. 188
8.1 Inserción de accesorios...............188
9. FUNCIONES ADICIONALES...................189
9.1 Bloqueo........................................189
9.2 Desconexión automática............. 189
9.3 Ventilador de refrigeración...........190
10. CONSEJOS............................................190
10.1 Recomendaciones para
microondas ....................................... 190
10.2 Recipientes y materiales
adecuados para microondas ............ 191
10.3 Ajustes de potencia recomendados
para distintos tipos de alimentos....... 192
10.4 Tablas de cocción para organismos
de control...........................................193
11. MANTENIMIENTO Y LIMPIEZA............194
11.1 Notas sobre la limpieza............. 194
11.2 Cómo quitar: Carriles de apoyo 195
11.3 Cómo cambiar: Bombilla............195
12. SOLUCIÓN DE PROBLEMAS...............196
12.1 Qué hacer si.............................. 196
12.2 Datos de servicio....................... 197
13. EFICACIA ENERGÉTICA......................197
13.1 Ahorro energético...................... 197
14. ESTRUCTURA DEL MENÚ...................198
14.1 Menú..........................................198
15. ASPECTOS MEDIOAMBIENTALES.....199
167/200

1. INFORMACIÓN SOBRE SEGURIDAD
Antes de instalar y utilizar el aparato, lea atentamente las
instrucciones facilitadas. El fabricante no se hace responsable
de lesiones o daños producidos como resultado de una
instalación o un uso incorrectos. Conserve siempre estas
instrucciones en lugar seguro y accesible para futuras
consultas.
1.1 Seguridad de niños y personas vulnerables
•Este aparato puede ser utilizado por niños de 8 años en
adelante y personas cuyas capacidades físicas, sensoriales
o mentales estén disminuidas o que carezcan de la
experiencia y conocimientos suficientes para manejarlo,
siempre que cuenten con las instrucciones o la supervisión
sobre el uso del electrodoméstico de forma segura y
comprendan los riesgos. Es necesario mantener alejados
del aparato a los niños de menos de 8 años, así como a las
personas con minusvalías importantes y complejas, salvo
que estén bajo supervisión continua.
•Es necesario vigilar a los niños para que no jueguen con el
aparato.
•Mantenga todo el material de embalaje fuera del alcance de
los niños y deséchelo de forma adecuada.
•ADVERTENCIA: El horno y las piezas accesibles se
calientan mucho durante el funcionamiento. Mantenga a los
niños y las mascotas alejados del aparato cuando esté en
uso y cuando se enfríe.
•Si este aparato tiene un bloqueo de seguridad para niños,
debe activarlo.
•La limpieza y mantenimiento de usuario del producto no
podrán ser realizados por niños sin supervisión.
1.2 Instrucciones generales de seguridad
•Este aparato está diseñado exclusivamente para cocinar.
168/200
INFORMACIÓN SOBRE SEGURIDAD

•Este aparato está diseñado para uso doméstico en
interiores.
•Este aparato se puede utilizar en oficinas, habitaciones de
hotel, habitaciones de Bed&Breakfast, casas de campo y
otros alojamientos similares donde dicho uso no exceda (en
promedio) los niveles de uso doméstico.
•Solo un electricista cualificado puede instalar este aparato y
sustituir el cable.
•No utilice el aparato antes de instalarlo en la estructura
empotrada.
•Desenchufe el aparato de la red eléctrica antes de realizar
tareas de mantenimiento.
•Si el cable de alimentación sufre algún daño, el fabricante,
su servicio técnico autorizado o un profesional tendrán que
cambiarlo para evitar riesgos.
•ADVERTENCIA: Asegúrese de que el aparato está
apagado antes de cambiar la bombilla para evitar el riesgo
de descarga eléctrica.
•ADVERTENCIA: El horno y las piezas accesibles se
calientan mucho durante el funcionamiento. Debe tener
cuidado para evitar tocar los elementos de calentamiento o
la superficie del interior del aparato.
•Utilizar siempre guantes o manoplas para horno para retirar
o introducir accesorios o recipientes.
•No active la función de microondas cuando el aparato esté
vacío. Las piezas metálicas en el interior de la cavidad
pueden generar arco eléctrico.
•No se pueden utilizar contenedores metálicos de alimentos
y bebidas durante la cocción con microondas. Este requisito
no se aplica si el fabricante especifica el tamaño y la forma
de los contenedores metálicos apropiados para cocción con
microondas.
•ADVERTENCIA: Si la puerta o los cierres de la puerta
sufren daños, no debe operar el aparato hasta que una
persona cualificada lo haya reparado.
169/200
INFORMACIÓN SOBRE SEGURIDAD

•ADVERTENCIA: Solo una persona cualificada puede
realizar tareas de reparación o mantenimiento que
impliquen la extracción de una tapa que protege contra la
exposición a la energía del microondas.
•ADVERTENCIA: No caliente líquidos ni otros alimentos en
recipientes herméticos. Podrían explotar.
•Utilice solamente utensilios aptos para hornos de
microondas.
•Cuando caliente alimentos en recipientes de papel o
plástico, vigile el aparato por la posibilidad de incendio.
•El aparato está diseñado para calentar alimentos y bebidas.
El secado de alimentos o ropa y el calentamiento de
almohadillas térmicas, pantuflas, esponjas, trapos húmedos
y similares pueden provocar riesgo de lesiones, ignición o
incendio.
•Si se genera humo, apague o desenchufe el aparato y deje
la puerta cerrada para sofocar las posibles llamas.
•El calentamiento de bebidas en el microondas puede
provocar un hervido brusco y lento. Extreme la precaución
cuando manipule los recipientes.
•Se agitará o removerá el contenido de los biberones y de
los tarros de comida para bebés y se controlará la
temperatura antes de consumirlos para evitar quemaduras.
•Los huevos con cáscara y los huevos duros enteros no
deben calentarse en el aparato, ya que pueden explotar,
incluso después de que haya terminado el calentamiento en
el microondas.
•Para retirar los carriles de apoyo, tire primero del frontal del
carril y, a continuación, separe el extremo trasero de las
paredes laterales. Instale los carriles de apoyo en el orden
inverso.
•Limpie el aparato con regularidad y elimine los restos de
comida.
•No utilice un limpiador a vapor para limpiar el aparato.
170/200
INFORMACIÓN SOBRE SEGURIDAD

•No utilice productos de limpieza abrasivos ásperos ni
rascadores de metal afilado para limpiar el cristal de las
tapas abisagradas de la placa si no quiere arañar su
superficie, lo que podría hacer que el cristal se hiciese
añicos.
•Si no se mantiene el aparato en condiciones limpias, la
superficie podría deteriorarse y afectar negativamente a la
vida útil del aparato y provocar situaciones de riesgo.
2. INSTRUCCIONES DE SEGURIDAD
2.1 Instalación
ADVERTENCIA!
Sólo un técnico cualificado puede instalar el aparato.
• Retire todo el embalaje.
• No instale ni utilice un aparato dañado.
• Siga las instrucciones de instalación suministradas con el aparato.
• Tenga cuidado al mover el aparato, porque es pesado. Utilice siempre guantes de
protección y calzado cerrado.
• No tire nunca del aparato sujetando el asa.
• Instale el aparato en un lugar seguro y adecuado que cumpla los requisitos de instalación.
• Respete siempre la distancia mínima entre el aparato y los demás electrodomésticos y
mobiliario.
• Antes de montar el aparato, compruebe si la puerta se abre sin limitaciones.
• El aparato está equipado con un sistema de refrigeración eléctrica. Debe utilizarse con la
fuente de alimentación eléctrica.
• La unidad empotrada debe cumplir los requisitos de estabilidad de la norma DIN 68930.
Altura mínima del armario (Altura mínima del ar‐
mario debajo de la encimera)
444 (460) mm
Ancho del armario 560 mm
Profundidad del armario 550 (550) mm
Altura de la parte frontal del aparato 455 mm
Altura de la parte trasera del aparato 440 mm
Anchura de la parte frontal del aparato 595 mm
Anchura de la parte trasera del aparato 559 mm
171/200
INSTRUCCIONES DE SEGURIDAD

Fondo del aparato 567 mm
Fondo empotrado del aparato 546 mm
Fondo con la puerta abierta 882 mm
Tamaño mínimo de la abertura de ventilación.
Abertura situada en la parte trasera inferior
560x20 mm
Longitud del cable de alimentación. El cable está
en la esquina derecha de la parte trasera
1500 mm
Tornillos de montaje 3.5x25 mm
2.2 Conexión eléctrica
ADVERTENCIA!
Riesgo de incendios y descargas eléctricas.
• Todas las conexiones eléctricas deben realizarlas electricistas cualificados.
• El aparato debe conectarse a tierra.
• Asegúrese de que los parámetros de la placa de características son compatibles con los
valores eléctricos del suministro eléctrico.
• Utilice siempre una toma con aislamiento de conexión a tierra correctamente instalada.
• No utilice adaptadores de enchufes múltiples ni cables prolongadores.
• Asegúrese de no provocar daños en el enchufe ni en el cable de red. Si es necesario
cambiar el cable de alimentación del aparato, debe hacerlo el centro de servicio técnico
autorizado.
• Evite que el cable de red toque o entre en contacto con la puerta del aparato o con el hueco
por debajo del aparato, especialmente mientras funciona o si la puerta está caliente.
• Los mecanismos de protección contra descargas eléctricas de componentes con corriente y
aislados deben fijarse de forma que no puedan aflojarse sin utilizar herramientas.
• Conecte el enchufe a la toma de corriente únicamente cuando haya terminado la
instalación. Asegúrese de tener acceso al enchufe del suministro de red una vez finalizada
la instalación.
• Si la toma de corriente está floja, no conecte el enchufe.
• No desconecte el aparato tirando del cable de conexión a la red. Tire siempre del enchufe.
• Use únicamente dispositivos de aislamiento apropiados: línea con protección contra los
cortocircuitos, fusibles (tipo tornillo que puedan retirarse del soporte), dispositivos de fuga a
tierra y contactores.
• La instalación eléctrica debe tener un dispositivo de aislamiento que permita desconectar el
aparato de todos los polos de la red. El dispositivo de aislamiento debe tener una apertura
de contacto con una anchura mínima de 3 mm.
• El aparato se suministra con enchufe y cable de red.
172/200
INSTRUCCIONES DE SEGURIDAD

2.3 Uso
ADVERTENCIA!
Riesgo de lesiones, quemaduras y descargas eléctricas o explosiones.
• No cambie las especificaciones de este aparato.
• Asegúrese de que las aberturas de ventilación no están bloqueadas.
• No deje el aparato desatendido durante el funcionamiento.
• Apague el aparato después de cada uso.
• Tenga cuidado al abrir la puerta del aparato mientras funciona. Puede liberarse aire
caliente.
• No utilice el aparato con las manos mojadas ni con agua en contacto.
• No ejerza presión sobre la puerta abierta.
• No utilice el aparato como superficie de trabajo ni para depositar objetos.
• Abra la puerta del aparato con cuidado. El uso de ingredientes con alcohol puede provocar
una mezcla de alcohol y aire.
• No deje que los chispas ni las llamas abiertas entren en contacto con el aparato cuando
abra la puerta.
• No coloque productos inflamables o artículos mojados con productos inflamables dentro,
cerca o sobre el aparato.
• No utilice la función de microondas para precalentar el aparato.
ADVERTENCIA!
Podría dañar el aparato.
• Para evitar daños o decoloraciones en el esmalte:
– no coloque papel de aluminio directamente en la parte inferior del interior del aparato.
– no ponga agua directamente en el aparato caliente.
– no deje platos húmedos ni alimentos en el aparato una vez finalizada la cocción.
– tenga cuidado al retirar o instalar los accesorios.
• La pérdida de color del esmalte o el acero inoxidable no afecta al rendimiento del aparato.
• Utilice una bandeja honda para pasteles húmedos. Los jugos de las frutas provocan
manchas permanentes.
• Cocina siempre con la puerta del aparato cerrada.
• Si el aparato se instala detrás de un panel de un mueble (por ejemplo una puerta)
asegúrese de que la puerta nunca esté cerrada mientras funciona el aparato. El calor y la
humedad pueden acumularse detrás de un panel del armario cerrado y provocar daños al
aparato, el alojamiento o el suelo. No cierre del panel del armario hasta que el aparato se
haya enfriado completamente después de su uso.
2.4 Mantenimiento y limpieza
ADVERTENCIA!
Existe riesgo de lesiones, incendios o daños al aparato.
• Antes de proceder con el mantenimiento, apague el aparato y desconecte el enchufe de la
red.
• Asegúrese de que el aparato esté frío. Los paneles de cristal pueden romperse.
• Cambie inmediatamente los paneles de cristal de la puerta que estén dañados. Póngase en
contacto con el servicio técnico autorizado.
• Tenga cuidado al desmontar la puerta del aparato. ¡La puerta es muy pesada!
173/200
INSTRUCCIONES DE SEGURIDAD

• Asegúrese de que el interior y la puerta se secan después de cada uso. El vapor producido
durante el funcionamiento del aparato se condensa en las paredes de la cavidad y puede
provocar corrosión.
• Limpie periódicamente el aparato para evitar el deterioro del material de la superficie.
• Los restos de comida o grasa en el interior del aparato podrían provocar un incendio y arcos
eléctricos cuando se utiliza la función de microondas.
• Limpie el aparato con un paño suave humedecido. Utilice solo detergentes neutros. No
utilice productos abrasivos, estropajos duros, disolventes ni objetos metálicos.
• Si utiliza aerosoles de limpieza para hornos, siga las instrucciones de seguridad del envase.
2.5 Uso de la cristalería
Si no manipula la cristalería con el cuidado necesario, puede romperse, desportillarse,
agrietarse o rayarse:
• No vierta agua ni otros líquidos fríos sobre la cristalería, porque la caída repentina de
temperatura puede provocar la rotura instantánea del cristal. Los trozos de cristal pueden
estar muy afilados y son difíciles de ver.
• No coloque cristalería caliente sobre una superficie húmeda o fría, ni directamente sobre
una encimera o una superficie de metal, ni tampoco en el fregadero. Tampoco debe
manipular la cristalería caliente con un paño húmedo.
• No utilice ni repare ningún objeto de cristalería desportillado, agrietado o con rayas
importantes.
• No deje caer ni golpee la cristalería con objetos duros ni la someta a impactos con
utensilios.
• No caliente recipientes de cristal vacíos o casi vacíos en el microondas, ni sobrecaliente el
aceite o la mantequilla en el microondas (utilice el tiempo de cocción mínimo).
Deje que la cristalería se enfríe sobre una rejilla, un agarrador o un paño seco. Asegúrese de
que la cristalería se haya enfriado lo suficiente antes de lavarla, refrigerarla o congelarla.
Evite sujetar artículos de cristal caliente (incluidos los que tienen superficies de sujeción de
silicona) sin un agarrador seco.
Evite el uso incorrecto del microondas (por ejemplo sin nada en el interior o con muy poco
alimento).
2.6 Iluminación interna
ADVERTENCIA!
Riesgo de descarga eléctrica.
• En cuanto a la(s) bombilla(s) de este producto y las de repuesto vendidas por separado:
Estas bombillas están destinadas a soportar condiciones físicas extremas en los aparatos
domésticos, como la temperatura, la vibración, la humedad, o están destinadas a señalar
información sobre el estado de funcionamiento del aparato. No están destinadas a utilizarse
en otras aplicaciones y no son adecuadas para la iluminación de estancias domésticas.
• Este producto contiene una fuente luminosa de la clase de eficiencia energética G.
• Utilice solo bombillas de las mismas características .
2.7 Asistencia tecnica
• Para reparar el aparato, póngase en contacto con el centro de servicio autorizado.
• Utilice solamente piezas de recambio originales.
174/200
INSTRUCCIONES DE SEGURIDAD

2.8 Eliminación
ADVERTENCIA!
Existe riesgo de lesiones o asfixia.
• Contacte con las autoridades locales para saber cómo desechar correctamente el aparato.
• Desconecte el aparato de la red.
• Corte el cable eléctrico cerca del aparato y deséchelo.
• Retire el pestillo de la puerta para evitar que los niños o las mascotas queden atrapados en
el aparato.
3. DESCRIPCIÓN DEL PRODUCTO
3.1 Resumen general
1 2 43
10
4
3
1
28
9
5
6
7
Panel de mandos
Mando de las funciones de cocción
Programador electrónico
Mando de control
Resistencia
Generador de microondas
Bombilla
Ventilador
Soporte de parrilla extraíble
Posiciones de las parrillas
3.2 Accesorios
Parrilla
Para utensilios de cocina, moldes de pastelería,
asados.
Bandeja
Para bizcochos y galletas.
175/200
DESCRIPCIÓN DEL PRODUCTO

Plato inferior de cristal para microondas
Para preparar alimentos en modo microondas.
4. PANEL DE MANDOS
4.1 Mandos escamoteables
Para usar el aparato, presione el mando. El mando sale del alojamiento.
4.2 Sensores del panel de control
Tempo‐
rizador
Calenta‐
miento
rápido
Luz
Potencia
del Mi‐
croondas
Confirmar
ajuste Pulse Gire el mando
Seleccione una función de cocción para encender el horno.
Gire el mando de las funciones de cocción hasta la posición de apagado para apagar el horno.
Pantalla con funciones principales.
Indicado‐
res de pan‐
talla: Bloqueo Cocción asisti‐
da
Ajustes Indicador de función
de microondas
Indicado‐
res de tem‐
porizador:
176/200
PANEL DE MANDOS

Barra de progreso - para la temperatura o el tiem‐
po. La barra está completamente roja cuando el
horno alcanza la temperatura ajustada.
5. ANTES DEL PRIMER USO
ADVERTENCIA!
Consulte los capítulos sobre seguridad.
5.1 Limpieza inicial
Antes del primer uso, limpie el horno vacío y ajuste el tiempo:
00:00
Ajuste la hora. Pulse .
6. USO DIARIO
ADVERTENCIA!
Consulte los capítulos sobre seguridad.
6.1 Cómo ajustar: Funciones de cocción
Empezar a cocinar
Paso 1 Paso 2
Seleccione una función de cocción.
Ajuste la temperatura.
Pulse WATT y gire el mando de control para
ajustar la potencia del microondas.
Pulse
.
177/200
ANTES DEL PRIMER USO

6.2 Cómo ajustar: Funciones del microondas
Paso 1 Retire todos los accesorios del horno.
Introduzca el plato inferior de cristal del microondas. Coloque el alimento en el plato
inferior de cristal para microondas.
Paso 2 Seleccione la función de cocción de microondas y pulse: para empezar con los
ajustes por defecto.
La pantalla indica: duración y potencia del microondas.
Paso 3 Gire el mando de las funciones de cocción hasta la posición de apagado para apa‐
gar el horno.
Puede modificar los ajustes durante la cocción.
Gire el mando de control para ajustar la duración. Pulse:
Pulse WATT y gire el mando de control para ajustar la potencia del microondas. Pulse:
El tiempo máximo de las funciones del microondas dependerá de la potencia del
microondas fijada:
POTENCIA DEL MICROONDAS TIEMPO MÁXIMO
100 - 600 W 59:55 minutos
Más de 600 W 7 minutos
Si abre la puerta, se detiene el funcionamiento del microondas. Cierre la puerta
para volver a encenderlo. Pulse .
6.3 Funciones de cocción
Funciones de cocción estándar
Función de coc‐
ción
Aplicación
Aire caliente
Para hornear en hasta dos posiciones de parrilla a la vez y para secar ali‐
mentos. Ajuste la temperatura entre 20 y 40°C menos que para Cocción
convencional.
178/200
USO DIARIO

Función de coc‐
ción
Aplicación
Cocción conven‐
cional
Para hornear y asar alimentos en una posición de parrilla.
Grill turbo
Asado con aire caliente para piezas de carne más grandes o aves con
hueso en un nivel. Para gratinar y dorar.
Función Pizza
Para hornear pizza. Para obtener un dorado más intenso y una base más
crujiente.
Grill turbo + mi‐
croondas
Para asar grandes piezas de carne en un nivel. Para gratinar y dorar.Fun‐
ción con refuerzo de microondas.
Aire caliente + mi‐
croondas
Horneado en una posición de parrilla.Función con refuerzo de microon‐
das.
Descongelar
Descongelar carne, pescado, pasteles, potencia: 100 - 200 W
Recalentar
Calentar comidas preparadas y delicadas, rango de potencia: 300 - 700
W
Microondas
Calentamiento, cocción, potencia: 100 - 1.000 W
Menú
Para acceder al menú: Cocción asistida, Ajustes.
179/200
USO DIARIO

6.4 Cómo ajustar: Cocción asistida
El submenú Cocción asistida consta de un conjunto de funciones y platos adicionales con
funciones de cocción, temperaturas y tiempos recomendados. Puede ajustar la hora y la
temperatura durante la cocción.
Para algunos de los platos, también puede co‐
cinar con:
• Peso automático
Cocción asistida - utilícelo para preparar rápidamente un plato con los ajustes predetermi‐
nados:
Paso 1 Paso 2 Paso 3 Paso 4
P1 - P45
Acceda al menú. Seleccionar Cocción
asistida. Pulse .
Seleccione el plato.
Pulse .
Introduzca el plato en
el horno. Confirmar
ajuste.
6.5 Cocción asistida
Leyenda
Peso automático disponible.
Funciona con potencia de microondas. Use un accesorio apto para mi‐
croondas.
Precaliente el horno antes de empezar a cocinar.
Nivel del estante.
Función de cocción Aplicación
F1 Grill Para asar al grill alimentos de poco espesor y tostar
pan.
F2 Calor inferior Para hornear pasteles con base crujiente y conservar
alimentos.
180/200
USO DIARIO

Función de cocción Aplicación
F3 Congelados Para productos precocinados (por ejemplo, patatas fri‐
tas, porciones de patata o rollitos de primavera) cru‐
jientes.
F4 Cocción convencional + micro Horneado y asado en una posición de parrilla. Función
con refuerzo de microondas.
F5 Grill + microondas Para cocinar la comida en poco tiempo y dorarla. Fun‐
ción con refuerzo de microondas.
Cuando termine la función, compruebe si la comida está lista.
Plato Peso Nivel/accesorio de la parrilla Duración
Vacuno
P1 Rosbif, poco
hecho
1 - 1,5 kg;
piezas de 4
- 5 cm
1 bandeja de hornear
Fría la carne durante unos minutos en
una sartén caliente. Introdúzcalo en el
horno.
40 min
P2 Rosbif, al
punto 50 min
P3 Rosbif, muy
hecho 60 min
P4 Bistec, en su
punto
180 - 220 g
por pieza;
rodajas de 3
cm de gro‐
sor
2 fuente de asado encendida pa‐
rrilla
Fría la carne durante unos minutos en
una sartén caliente. Introdúzcalo en el
horno.
15 min
P5 Asado de ter‐
nera/estofado
(costillas de
cebado, redon‐
do superior,
flanco grueso)
1,5 - 2 kg 1 fuente de asado encendida pa‐
rrilla
Fría la carne durante unos minutos en
una sartén caliente. Añada líquido. Intro‐
dúzcalo en el horno.
120 min
181/200
USO DIARIO

Plato Peso Nivel/accesorio de la parrilla Duración
P6 Rosbif, poco
hecho (coc‐
ción lenta)
1 - 1,5 kg;
piezas de 4
- 5 cm
1; bandeja
Use sus condimentos favoritos o simple‐
mente sal y pimienta con molienda fres‐
ca. Fría la carne durante unos minutos
en una sartén caliente. Introdúzcalo en el
horno.
75 min
P7 Rosbif, al
punto (cocción
lenta)
85 min
P8 Rosbif, muy
hecho (coc‐
ción lenta)
130 min
P9 Filete poco
hecho (coc‐
ción lenta)
0,5 - 1,5 kg;
trozos de 5 -
6 cm
1 bandeja de hornear
Use sus condimentos favoritos o simple‐
mente sal y pimienta con molienda fres‐
ca. Fría la carne durante unos minutos
en una sartén caliente. Introdúzcalo en el
horno.
75 min
P10 Filete, en su
punto (cocción
lenta)
90 min
P11 Filete hecho
(cocción lenta) 120 min
Ternera
P12 Asado de ter‐
nera (por
ejemplo, el
hombro)
0,8 - 1,5 kg;
piezas de 4
cm de gro‐
sor
1 fuente de asado encendida pa‐
rrilla
Use sus especias favoritas. Añada líqui‐
do. Asado cubierto.
80 min
Cerdo
P13 Cerdo asado
en el cuello o
en el hombro
1,5 kg 1; cacerola de cerámica o cristal
en la parrilla, apta para microondas
Use sus especias favoritas. Después de
la mitad del tiempo de cocción, voltee la
carne.
90 min
P14 Cerdo desmi‐
gado (cocción
lenta)
1,5 - 2 kg 1 bandeja de hornear
Use sus especias favoritas. Dé la vuelta
a la carne a la mitad del tiempo de coc‐
ción para dorar uniformemente.
215 min
182/200
USO DIARIO

Plato Peso Nivel/accesorio de la parrilla Duración
P15 Lomo, fresco 1 - 1,5 kg;
trozos de 5 -
6 cm
1; fuente de asado en laparrilla
Use sus especias favoritas.
55 min
P16 Costillas 2 - 3 kg; uti‐
lice repues‐
tos finos de
2 - 3 cm
2 bandeja honda
Añada líquido para cubrir la base de un
plato. Después de la mitad del tiempo de
cocción, voltee la carne.
90 min
Cordero
P17 Pierna de cor‐
dero con hue‐
so
1,5 - 2 kg;
piezas de 7
- 9 cm
1; fuente de asado en la bandeja
Añada líquido. Después de la mitad del
tiempo de cocción, voltee la carne.
130 min
Aves
P18 Pollo entero 1,1 kg; fres‐
co 1; cacerola de cerámica o cristal
en la parrilla, apta para microondas
Use sus especias favoritas. Coloque la
pechuga de pollo boca abajo y gírela
transcurrida la mitad del tiempo de coc‐
ción.
40 min
P19 Medio pollo 0,5 - 0,8 kg 2 bandeja de hornear
Use sus especias favoritas.
40 min
P20 Pechuga de
pollo
180 - 200 g
por pieza 1 cazuela sobre parrilla
Use sus especias favoritas. Fría la carne
durante unos minutos en una sartén ca‐
liente.
25 min
P21 Muslos de po‐
llo, frescos
- 2 bandeja de hornear
Si se marchan las patas de pollo marina‐
das, ajuste la temperatura más baja y
cocínelas más tiempo.
30 min
P22 Pato entero 2 - 3 kg 1 fuente de asado encendida pa‐
rrilla
Use sus especias favoritas. Coloque la
carne en la fuente. Dé la vuelta al pato a
la mitad del tiempo de cocción.
100 min
183/200
USO DIARIO

Plato Peso Nivel/accesorio de la parrilla Duración
P23 Ganso entero 4 - 5 kg ?; bandeja honda
Use sus especias favoritas. Coloque la
carne en la bandeja honda. Dele la vuel‐
ta a la mitad del tiempo de cocción.
110 min
Otros
P24 Pastel de car‐
ne
1 kg 1; parrilla
Use sus especias favoritas.
60 min
Pescado
P25 Pescado ente‐
ro, al grill
0,5 - 1 kg
por pescado 1 bandeja de hornear
Llene el pescado con mantequilla y utili‐
ce sus especias y hierbas favoritas.
30 min
P26 Filete de pes‐
cado
- 2 cazuela sobre parrilla
Use sus especias favoritas.
20 min
Horneado/postres dulces
P27 Tarta de que‐
so
- 1; molde desmontable de 28 cm
en la parrilla
90 min
P28 Tarta de man‐
zana
- 2; bandeja 45 min
P29 Tarta de man‐
zana
- 1; forma de pastel en la parrilla 40 min
P30 Pastel de
manzana
- 1 pastel de 22 cm en parrilla 60 min
P31 Brownies 2 kg 2 bandeja honda 30 min
P32 Magdalenas
de chocolate
- 2 bandeja para magdalenas encendi‐
da parrilla
25 min
P33 Pastel de ho‐
gaza
- 1; molde de pan en la parrilla 50 min
184/200
USO DIARIO

Plato Peso Nivel/accesorio de la parrilla Duración
Verduras / Guarniciones
P34 Patatas al
horno
1 kg 1; bandeja
Ponga las patatas enteras con piel en la
bandeja.
50 min
P35 Aros 1 kg 2 bandeja de hornear forrado con
papel de hornear
Use sus especias favoritas. Corte las pa‐
tatas en trozos.
35 min
P36 Verduras al
grill
1 - 1,5 kg 2 bandeja de hornear forrado con
papel de hornear
Use sus especias favoritas. Corte las
verduras en trozos.
30 min
P37 Croquetas
congeladas
0,5 kg 2; bandeja 25 min
P38 Pomos con‐
gelados
0,75 kg 2; bandeja 25 min
Gratinados, pan y pizza
P39 Lasaña de
carne/verdura
con platos de
fideos secos
1 - 1,5 kg ; 1; cacerola de cerámica o cristal
en la parrilla
35 min
P40 Patatas grati‐
nadas (patatas
crudas)
1,1 kg ; 2; cacerola de cerámica o cristal
en la parrilla
Gire el plato transcurrida la mitad del
tiempo de cocción.
35 min
P41 Pizza fresca y
fina - 1 bandeja de hornear forrado
con papel de hornear 15 min
P42 Pizza fresca,
gruesa - 1; bandeja forrada con papel de
hornear
25 min
P43 Quiche - 1; molde de hornear en la parrilla 45 min
185/200
USO DIARIO

Plato Peso Nivel/accesorio de la parrilla Duración
P44 Baguette /
chapata / pan
blanco
0,8 kg 1 bandeja de hornear forrado
con papel de hornear
Se necesita más tiempo para el pan
blanco.
30 min
P45 Todo el gra‐
no / centeno /
pan oscuro
de grano en
molde de pan
1 kg 1; bandeja forrada con papel de
hornear/parrilla
60 min
7. FUNCIONES DEL RELOJ
7.1 Funciones de reloj
Función de reloj Aplicación
Avisador. Al finalizar el tiempo, sonará la señal acústica.
Tiempo de cocción. Cuando el temporizador finaliza, suena la señal y
la función de cocción se detiene.
Tiempo de retardo. Para posponer el inicio y/o fin de la cocción.
Tiempo de funcionamiento. El máximo es 23 h 59 min. Esta función no
influye en el funcionamiento del horno.
Para encender y apagar Tiempo de funcionamiento seleccione: Menú,
Ajustes.
Las funciones de reloj solo están disponibles para: Aire caliente, Cocción convencional, Grill
turbo, Función Pizza, Grill turbo + microondas, Aire caliente + microondas.
7.2 Cómo ajustar: Funciones de reloj
Cómo ajustar: Hora
Paso 1 Paso 2 Paso 3
186/200
FUNCIONES DEL RELOJ

Cómo ajustar: Hora
Para cambiar la hora, acceda al menú y
seleccione Ajustes, Hora. Ajuste el reloj Pulse: .
Cómo ajustar: Avisador
Paso 1
La pantalla
muestra:
0:00
Paso 2 Paso 3
Pulse: . Ajustar la Avisador Pulse: .
El temporizador comienza la cuenta atrás inmediatamente.
Cómo ajustar: Tiempo de cocción
Paso 1 Paso 2
La pantalla
muestra:
0:00
Paso 3 Paso 4
Elija una función
de cocción y la
temperatura.
Pulse repetida‐
mente: .
Ajuste el tiempo
de cocción. Pulse: .
El temporizador comienza la cuenta atrás inmediatamente.
187/200
FUNCIONES DEL RELOJ

Cómo ajustar: Tiempo de retardo
Paso 1 Paso 2
La pan‐
talla
mues‐
tra: la
hora
INI‐
CIO
Paso 3 Paso 4
La pan‐
talla
muestra:
--:--
PA‐
RAR
Paso 5 Paso 6
Selec‐
cione la
función
de coc‐
ción.
Pulse re‐
petida‐
mente:
.
Ajuste la
hora de
inicio.
Pulse:
.
Ajuste la
hora de
fin.
Pulse:
.
El temporizador empieza a contar hacia atrás a una hora programada.
8. INSTRUCCIONES DE USO: ACCESORIOS
8.1 Inserción de accesorios
Utilice únicamente utensilios y materiales adecuados. Consulte los recipientes y materiales
adecuados para microondas en el capítulo “Consejos”.
Una pequeña muesca en la parte superior aumenta la seguridad. Las hendiduras también son
dispositivos antivuelco. El borde elevado que rodea la bandeja evita que los utensilios de
cocina resbalen de la parrilla.
Parrilla:
Inserte la parrilla entre las guías del carril y
asegúrese de que las hendiduras apuntan
hacia abajo.
188/200
INSTRUCCIONES DE USO: ACCESORIOS

Bandeja:
Introduzca la bandeja entre las guías del
carril de apoyo.
Plato inferior de cristal para microon‐
das:
Utilice el plato inferior de cristal para mi‐
croondas exclusivamente con la función
de microondas. No es adecuada para la
función combinada de microondas (p. ej.,
grill microondas).
Coloque el accesorio en el fondo de la ca‐
vidad.
Puede colocar los alimentos directamente
en el plato inferior de cristal para microon‐
das.
9. FUNCIONES ADICIONALES
9.1 Bloqueo
Esta función impide que se produzca accidentalmente un cambio en la función del aparato.
Actívela cuando el aparato esté en funcionamiento: la cocción ajustada continúa y el panel de
control está bloqueado.
Actívela cuando el aparato esté apagado: no se puede encender y el panel de control está blo‐
queado.
- mantenga pulsado pa‐
ra activar la función.
Suena una señal.
- mantenga pulsado para
apagarla.
3 x - parpadea cuando se enciende el bloqueo.
9.2 Desconexión automática
Por motivos de seguridad, el horno se desactiva transcurrido un tiempo si una función de
cocción está en funcionamiento y no se modifica ningún ajuste.
189/200
FUNCIONES ADICIONALES

(°C) (h)
30 - 115 12.5
120 - 195 8.5
200 - 230 5.5
La función de desconexión automática no funciona con las siguientes funciones: Luz, Tiempo
de retardo.
9.3 Ventilador de refrigeración
Cuando el aparato está en funcionamiento, el ventilador de enfriamiento se enciende
automáticamente para mantener frías sus superficies. Si apaga el aparato, el ventilador de
enfriamiento puede seguir funcionando hasta que se enfríe.
10. CONSEJOS
10.1 Recomendaciones para microondas
¡A cocinar!
Coloque la comida en el plato de cristal del microondas, en la base de la cavidad.
Coloque la comida en un plato en la base de la cavidad.
Remueva o de la vuelta a la comida a la mitad del tiempo de cocción o descongelación.
Remueva de vez en cuando los platos líquidos.
Remueva la comida antes de servirla.
Tape la comida para cocinar y recalentar.
Coloque la cuchara en la botella o el vaso al calentar bebidas para asegurar una mejor
distribución del calor.
Coloque los alimentos en el aparato sin ningún envoltorio. Las comidas envasadas solo
pueden introducirse en el aparato si su embalaje es apto para microondas (consulte la
información en el embalaje).
Cocción por microondas
Cocine la comida tapada. Cocine alimentos sin tapar solamente si desea un resultado
crujiente.
No recocine los platos ajustando una potencia y un tiempo demasiado elevados. La comida
puede secarse, quemarse o provocar fuego.
No utilice el aparato para cocinar huevos o caracoles con la cáscara porque pueden estallar.
Perfore la yema de los huevos fritos antes de recalentarlos.
Perfore la piel de los alimentos varias veces con un tenedor antes de cocinarlos.
Corte las verduras en trocitos de igual tamaño.
Después de apagar el aparato, saque los alimentos y déjelo reposar unos minutos para que el
calor se distribuya uniformemente.
Descongelación en el microondas
Coloque el alimento congelado sin desenvolver en un plato pequeño vuelto del revés con un
contenedor debajo o en una bandeja de descongelación o tamiz de plástico para que el líquido
de descongelación pueda salir.
Retire las piezas después de descongeladas.
190/200
CONSEJOS

Para cocinar frutas y verduras sin descongelarlas primero puede utilizar una potencia superior
del microondas.
10.2 Recipientes y materiales adecuados para microondas
Para el microondas, utilice solo utensilios y materiales adecuados. Consulte la tabla siguiente
como referencia.
Compruebe los utensilios de cocina / especificación de materiales antes de utilizarlo.
Material del utensilio de coci‐
na
Cristal y porcelana para horno
sin componentes de metal, p.
ej., vidrio térmico
Vidrio y porcelana no aptos para
horno sin plata, oro, platino ni
decoraciones de metal
X X
Cristal y vitrocerámica de mate‐
rial apto para horno y congela‐
ción
Cerámica y barro aptos para
horno sin cuarzo ni componen‐
tes metálicos, o vidriado que
contenga metales
Cerámica, porcelana o barro co‐
cido con fondo sin vidriar o con
pequeños orificios, p. ej., en las
asas
X X X
Plástico resistente al calor hasta
200 °C
X
Cartón, papel X X
Película de cocción X X
Película para microondas X
Fuentes de metal, como esmalte
o hierro fundido
X X X
Moldes, barniz negro o revesti‐
miento de silicona
X X X
191/200
CONSEJOS

Material del utensilio de coci‐
na
Bandeja X X X
Parrilla X X
Plato inferior de cristal para mi‐
croondas
X
Utensilios para microondas,
p.ej., Crostino
X X
10.3 Ajustes de potencia recomendados para distintos tipos de
alimentos
Los datos de la tabla son valores orientativos.
700 - 1.000 W
Sofreír al inicio del proceso de cocción calentar líquidos
500 - 600 W
Cocinar verduras Cocinar platos
de huevos
Estofados a fue‐
go lento
Calentar platos
únicos
Descongelar y
calentar platos
congelados
300 - 400 W
Fundir queso,
chocolate, man‐
tequilla
Cocer arroz Calentar alimen‐
tos infantiles
Cocinar / calentar
alimentos delica‐
dos
Continuar coci‐
nando
192/200
CONSEJOS

100 - 200 W
Descongelar pan Descongelar fruta y
pasteles
Descongelar queso,
nata, mantequilla
Descongelar carne,
pescado
10.4 Tablas de cocción para organismos de control
Información para institutos de pruebas
Pruebas realizadas de conformidad con IEC 60705.
Use la parrilla salvo que se indique lo contrario.
FUNCIÓN MI‐
CROONDAS
(W) (kg) (min)
Bizcocho 600 0.475 Inferior 7 - 9 Gire el recipiente un
cuarto de vuelta a
media cocción.
Pastel de carne 400 0.9 2 25 - 32 Gire el recipiente un
cuarto de vuelta a
media cocción.
Pudding de huevo 500 1 Inferior 18 -
Descongelar carne 200 0.5 Inferior 7 - 8 Dé la vuelta a la car‐
ne a media cocción.
Use la parrilla.
FUN‐
CIÓN DE
COMBI
MI‐
CROON‐
DAS
(W) (°C) (m)
Pastel,
0,7 kg
Cocción
convencio‐
nal + micro
100 200 2 23 - 27 Gire el recipiente
un cuarto de vuel‐
ta a media coc‐
ción.
193/200
CONSEJOS

Use la parrilla.
FUN‐
CIÓN DE
COMBI
MI‐
CROON‐
DAS
(W) (°C) (m)
Patatas
gratina‐
das, 1,1
kg
Aire calien‐
te + mi‐
croondas
300 180 2 38 - 42 Gire el recipiente
un cuarto de vuel‐
ta a media coc‐
ción.
Pollo, 1,1
kg
Grill turbo +
microondas
400 230 1 35 - 40 Coloque la carne
en un recipiente
de cristal redondo
y dele la vuelta a
media cocción.
11. MANTENIMIENTO Y LIMPIEZA
ADVERTENCIA!
Consulte los capítulos sobre seguridad.
11.1 Notas sobre la limpieza
Agentes lim‐
piadores
Limpie la parte frontal del aparato solo con un paño de microfibra humedecido
en agua tibia y detergente suave.
Utilice un producto de limpieza para limpiar las superficies metálicas.
Limpie las manchas con un detergente suave.
Uso diario
Limpie el interior después de cada uso. La acumulación de grasa u otros resi‐
duos puede provocar un incendio.
Retire los residuos de alimentos y la grasa de la bóveda del aparato.
No guarde la comida en el aparato más de 20 minutos. Seque la cavidad solo
con un paño de microfibra después de cada uso.
194/200
MANTENIMIENTO Y LIMPIEZA

Accesorios
Limpie todos los accesorios después de cada uso y déjelos secar. Use solo un
paño suave humedecido en agua tibia y detergente suave. No lave los acceso‐
rios en el lavavajillas.
Evite limpiar los accesorios antiadherentes con limpiadores abrasivos u objetos
afilados.
11.2 Cómo quitar: Carriles de apoyo
Para limpiar el horno, retire los carriles de apoyo.
Paso 1 Apague el horno y espere a que esté frío.
Paso 2 Tire con cuidado de los sopor‐
tes hacia arriba y hacia afuera
del tope delantero.
2
3
1
Paso 3 Tira del extremo delantero del
carril de apoyo para separarlo
de la pared lateral.
Paso 4 Extrae los carriles de la suje‐
ción posterior.
Instale los carriles de apoyo en el orden inverso.
11.3 Cómo cambiar: Bombilla
ADVERTENCIA!
Riesgo de descarga eléctrica.
La lámpara puede estar caliente.
Coja siempre la bombilla halógena con un paño para evitar quemar los residuos de grasa.
Antes de reemplazar la bombilla:
Paso 1 Paso 2 Paso 3
Apague el horno. Espere has‐
ta que el horno esté frío.
Desconecte el horno de la
red.
Coloque un paño en el fondo
de la cavidad.
Bombilla superior
Paso 1 Gire la tapa de cristal para extraerla.
195/200
MANTENIMIENTO Y LIMPIEZA

Paso 2 Limpie la tapa de cristal.
Paso 3 Cambie la bombilla por otra apropiada termorresistente hasta 300 °C.
Paso 4 Instale la tapa de cristal.
12. SOLUCIÓN DE PROBLEMAS
ADVERTENCIA!
Consulte los capítulos sobre seguridad.
12.1 Qué hacer si...
En cualquier caso no incluido en esta tabla, por favor contacte con un Centro de Servicio
Autorizado.
El horno no se enciende o no se calienta
Problema Compruebe que...
La placa no se enciende o no funciona. La batidora está bien conectada a la red eléc‐
trica.
El horno no se calienta. El apagado automático está desactivado.
El horno no se calienta. No ha saltado el fusible.
El horno no se calienta. El icono del candado está apagado.
Componentes
Problema Compruebe que...
La bombilla no funciona. La bombilla se ha fundido.
Código de error
La pantalla muestra… Compruebe que...
196/200
SOLUCIÓN DE PROBLEMAS

Código de error
00:00 Se ha producido un corte de corriente. Ajuste
la hora.
Si la pantalla muestra un código de error que no está en esta tabla, apague y encienda el fusible
de la vivienda para reiniciar el horno. Si el código de error se repite, contacte con un Centro de
servicio autorizado.
12.2 Datos de servicio
Si no logra subsanar el problema, póngase en contacto con su distribuidor o un centro de
servicio técnico autorizado.
Los datos que necesita para el Centro de servicio técnico se encuentran en la placa de
características. La placa de características se encuentra en el marco delantero del interior del
aparato. No retire la placa de características de la cavidad del aparato.
Se recomienda escribir los datos aquí:
Modelo (MOD): .........................................
Número de producto (PNC) .........................................
Número de serie (S.N.) .........................................
13. EFICACIA ENERGÉTICA
13.1 Ahorro energético
Asegúrese de que la puerta del aparato esté cerrada cuando esté en funcionamiento. No abra
la puerta del aparato muchas veces durante la cocción. Mantenga limpia la junta de la puerta y
asegúrese de que está bien fijada en su posición.
Utilice utensilios de cocina de metal para mejorar el ahorro energético, ()solo cuando utilice
una función de horno no microondas).
No precaliente el aparato antes de cocinar en la medida de lo posible.
Reduzca al máximo el tiempo entre horneados cuando prepare varios platos de una vez.
Cocción con ventilador
En la medida de lo posible, utilice las funciones de cocción con ventilador para ahorrar energía.
Calor residual
La bombilla y el ventilador siguen funcionando. Al apagar el aparato la pantalla mostrará el
calor residual. El calor puede emplearse para mantener caliente los alimentos.
Para una duración de la cocción superior a 30 minutos, reduzca la temperatura del aparato un
mínimo de 3 a 10 minutos antes de llegar al final de la cocción. El calor residual dentro del
aparato hará que la comida se siga cocinando.
Utilice el calor residual para calentar otros platos.
197/200
EFICACIA ENERGÉTICA

Mantener calientes los alimentos
Si desea utilizar el calor residual para mantener calientes los alimentos, seleccione el ajuste de
temperatura más bajo posible. El indicador de calor residual o la temperatura aparecen en la
pantalla.
Cocción con la bombilla apagada
Apague la luz mientras cocina. Enciéndala únicamente cuando la necesite.
14. ESTRUCTURA DEL MENÚ
14.1 Menú
- seleccione para acceder al Menú.
Menú estructura
Cocción asistida Ajustes
Paso 1 Paso 2 Paso 3 Paso 4 Paso 5
O1 - O9
Seleccione la
Menú, Ajustes.
Confirmar ajus‐
te.
Seleccione el
ajuste.
Confirmar ajus‐
te.
Ajuste el valor y
pulse .
Ajustes
O1 Hora Cambiar O2 Brillo de la pantalla 1 - 5
O3 Tono de teclas 1 - Pitido
2 - Haga clic
3 - Sonido
apagado
O4 Volumen del timbre 1 - 4
O5 Tiempo de funciona‐
miento
Encendido/
Apagado
O6 Luz Encendido/
Apagado
198/200
ESTRUCTURA DEL MENÚ

Ajustes
O7 Modo demostración Código de
activación.
2468
O8 Versión del software Comprobar
O9 Restaurar todos los
ajustes
Sí / No
15. ASPECTOS MEDIOAMBIENTALES
Recicle los materiales con el símbolo . Coloque el material de embalaje en los contenedores
adecuados para su reciclaje. Ayude a proteger el medio ambiente y la salud pública, así como
a reciclar residuos de aparatos eléctricos y electrónicos. No deseche los aparatos marcados
con el símbolo junto con los residuos domésticos. Lleve el producto a su centro de reciclaje
local o póngase en contacto con su oficina municipal.
199/200
*

WWW.ZANUSSI.COM/SHOP
867371948-B-482022
-
 1
1
-
 2
2
-
 3
3
-
 4
4
-
 5
5
-
 6
6
-
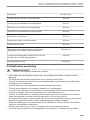 7
7
-
 8
8
-
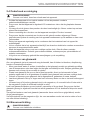 9
9
-
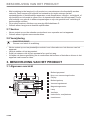 10
10
-
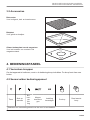 11
11
-
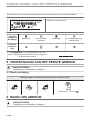 12
12
-
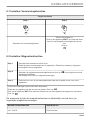 13
13
-
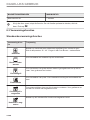 14
14
-
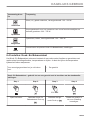 15
15
-
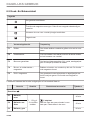 16
16
-
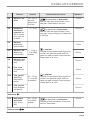 17
17
-
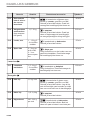 18
18
-
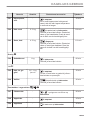 19
19
-
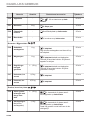 20
20
-
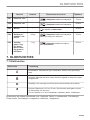 21
21
-
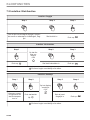 22
22
-
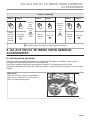 23
23
-
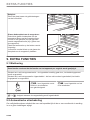 24
24
-
 25
25
-
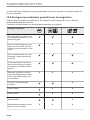 26
26
-
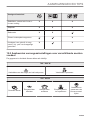 27
27
-
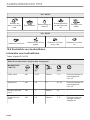 28
28
-
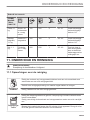 29
29
-
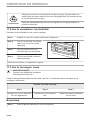 30
30
-
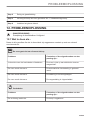 31
31
-
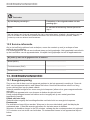 32
32
-
 33
33
-
 34
34
-
 35
35
-
 36
36
-
 37
37
-
 38
38
-
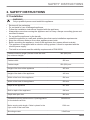 39
39
-
 40
40
-
 41
41
-
 42
42
-
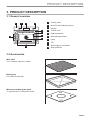 43
43
-
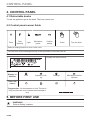 44
44
-
 45
45
-
 46
46
-
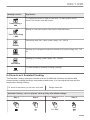 47
47
-
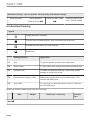 48
48
-
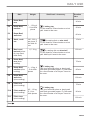 49
49
-
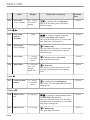 50
50
-
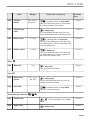 51
51
-
 52
52
-
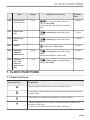 53
53
-
 54
54
-
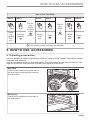 55
55
-
 56
56
-
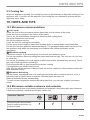 57
57
-
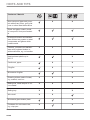 58
58
-
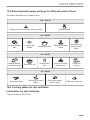 59
59
-
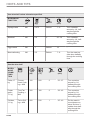 60
60
-
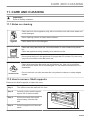 61
61
-
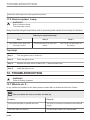 62
62
-
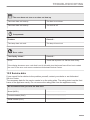 63
63
-
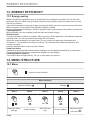 64
64
-
 65
65
-
 66
66
-
 67
67
-
 68
68
-
 69
69
-
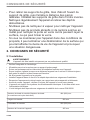 70
70
-
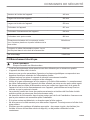 71
71
-
 72
72
-
 73
73
-
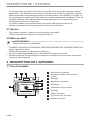 74
74
-
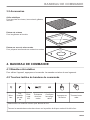 75
75
-
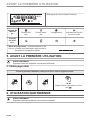 76
76
-
 77
77
-
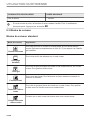 78
78
-
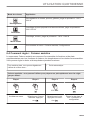 79
79
-
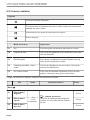 80
80
-
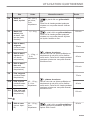 81
81
-
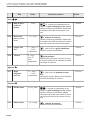 82
82
-
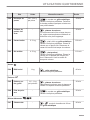 83
83
-
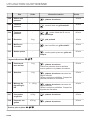 84
84
-
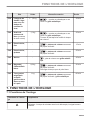 85
85
-
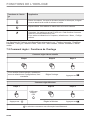 86
86
-
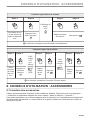 87
87
-
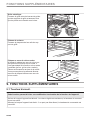 88
88
-
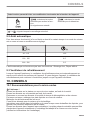 89
89
-
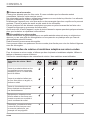 90
90
-
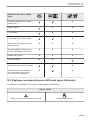 91
91
-
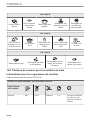 92
92
-
 93
93
-
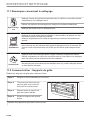 94
94
-
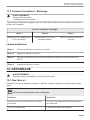 95
95
-
 96
96
-
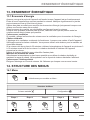 97
97
-
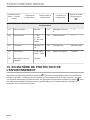 98
98
-
 99
99
-
 100
100
-
 101
101
-
 102
102
-
 103
103
-
 104
104
-
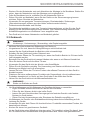 105
105
-
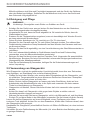 106
106
-
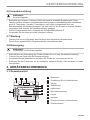 107
107
-
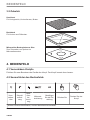 108
108
-
 109
109
-
 110
110
-
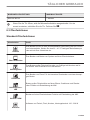 111
111
-
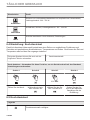 112
112
-
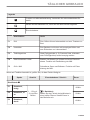 113
113
-
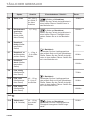 114
114
-
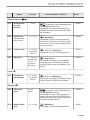 115
115
-
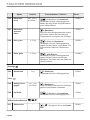 116
116
-
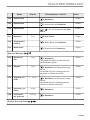 117
117
-
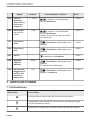 118
118
-
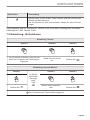 119
119
-
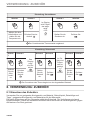 120
120
-
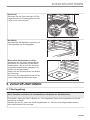 121
121
-
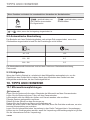 122
122
-
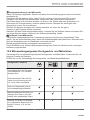 123
123
-
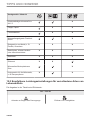 124
124
-
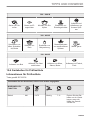 125
125
-
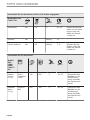 126
126
-
 127
127
-
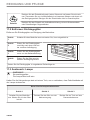 128
128
-
 129
129
-
 130
130
-
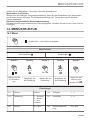 131
131
-
 132
132
-
 133
133
-
 134
134
-
 135
135
-
 136
136
-
 137
137
-
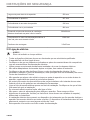 138
138
-
 139
139
-
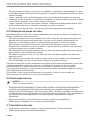 140
140
-
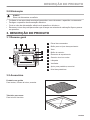 141
141
-
 142
142
-
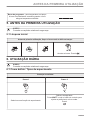 143
143
-
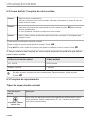 144
144
-
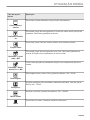 145
145
-
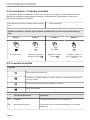 146
146
-
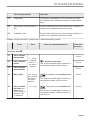 147
147
-
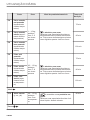 148
148
-
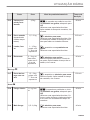 149
149
-
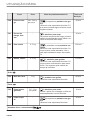 150
150
-
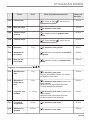 151
151
-
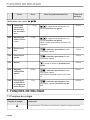 152
152
-
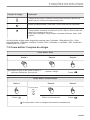 153
153
-
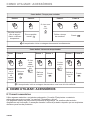 154
154
-
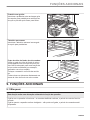 155
155
-
 156
156
-
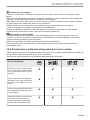 157
157
-
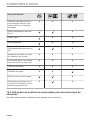 158
158
-
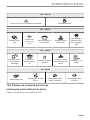 159
159
-
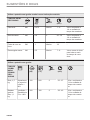 160
160
-
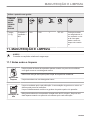 161
161
-
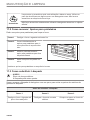 162
162
-
 163
163
-
 164
164
-
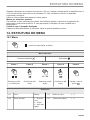 165
165
-
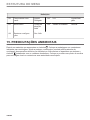 166
166
-
 167
167
-
 168
168
-
 169
169
-
 170
170
-
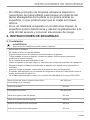 171
171
-
 172
172
-
 173
173
-
 174
174
-
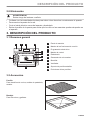 175
175
-
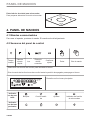 176
176
-
 177
177
-
 178
178
-
 179
179
-
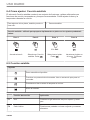 180
180
-
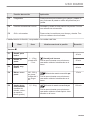 181
181
-
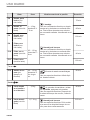 182
182
-
 183
183
-
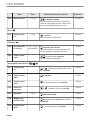 184
184
-
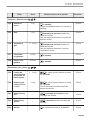 185
185
-
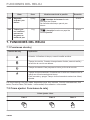 186
186
-
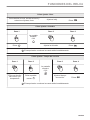 187
187
-
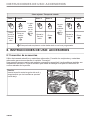 188
188
-
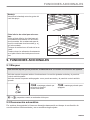 189
189
-
 190
190
-
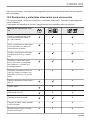 191
191
-
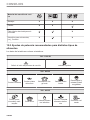 192
192
-
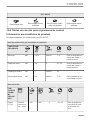 193
193
-
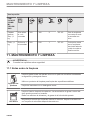 194
194
-
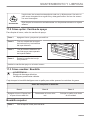 195
195
-
 196
196
-
 197
197
-
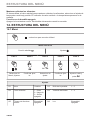 198
198
-
 199
199
-
 200
200


Zanussi ZVEEM6X3 Microwave Combi Oven Handleiding
- Categorie
- Magnetrons
- Type
- Handleiding
