Zanussi ZOB12401XU Handleiding
- Categorie
- Sandwich makers
- Type
- Handleiding


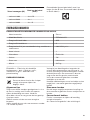
SAFETY INFORMATION
Before the installation and use of the appliance, carefully read the
supplied instructions. The manufacturer is not responsible for any
injuries or damages that are the result of incorrect installation or
usage. Always keep the instructions in a safe and accessible
location for future reference.
CHILDREN AND VULNERABLE PEOPLE SAFETY
• This appliance can be used by children aged from 8 years and
above and persons with reduced physical, sensory or mental
capabilities or lack of experience and knowledge if they have
been given supervision or instruction concerning the use of the
appliance in a safe way and understand the hazards involved.
• Children between 3 and 8 years of age and persons with very
extensive and complex disabilities shall be kept away unless
continuously supervised.
• Children of less than 3 years of age should be kept away
unless continuously supervised.
• Do not let children play with the appliance.
• Keep all packaging away from children and dispose of it
appropriately.
• Keep children and pets away from the appliance when it
operates or when it cools down. Accessible parts are hot.
• If the appliance has a child safety device, it should be activated.
• Children shall not carry out cleaning and user maintenance of
the appliance without supervision.
GENERAL SAFETY
• Only a qualified person must install this appliance and replace
the cable.
• WARNING: The appliance and its accessible parts become hot
during use. Care should be taken to avoid touching heating
elements.
• Always use oven gloves to remove or put in accessories or
ovenware.
2

• Before carrying out any maintenance, disconnect the appliance
from the power supply.
• Ensure that the appliance is switched off before replacing the
lamp to avoid the possibility of electric shock.
• Do not use a steam cleaner to clean the appliance.
• Do not use harsh abrasive cleaners or sharp metal scrapers to
clean the glass door since they can scratch the surface, which
may result in shattering of the glass.
• If the mains power supply cable is damaged, it must be
replaced by the manufacturer, its Authorised Service Centre or
similarly qualified persons to avoid an electrical hazard.
• To remove the shelf supports first pull the front of the shelf
support and then the rear end away from the side walls. Install
the shelf supports in the opposite sequence.
SAFETY INSTRUCTIONS
INSTALLATION
WARNING! Only a qualified person
must install this appliance.
• Remove all the packaging.
• Do not install or use a damaged appliance.
• Follow the installation instructions supplied with
the appliance.
• Always take care when moving the appliance as
it is heavy. Always use safety gloves and
enclosed footwear.
• Do not pull the appliance by the handle.
• Keep the minimum distance from other
appliances and units.
• Make sure that the appliance is installed below
and adjacent safe structures.
• The sides of the appliance must stay adjacent to
appliances or units with the same height.
ELECTRICAL CONNECTION
WARNING! Risk of fire and electric
shock.
• All electrical connections should be made by a
qualified electrician.
• The appliance must be earthed.
• Make sure that the parameters on the rating
plate are compatible with the electrical ratings
of the mains power supply.
• Always use a correctly installed shockproof
socket.
• Do not use multi-plug adapters and extension
cables.
• Make sure not to cause damage to the mains
plug and to the mains cable. Should the mains
cable need to be replaced, this must be carried
out by our Authorised Service Centre.
• Do not let mains cables touch or come near the
appliance door, especially when the door is hot.
• The shock protection of live and insulated parts
must be fastened in such a way that it cannot be
removed without tools.
• Connect the mains plug to the mains socket
only at the end of the installation. Make sure that
there is access to the mains plug after the
installation.
• If the mains socket is loose, do not connect the
mains plug.
• Do not pull the mains cable to disconnect the
appliance. Always pull the mains plug.
• Use only correct isolation devices: line
protecting cut-outs, fuses (screw type fuses
removed from the holder), earth leakage trips
and contactors.
• The electrical installation must have an isolation
device which lets you disconnect the appliance
from the mains at all poles. The isolation device
must have a contact opening width of minimum
3 mm.
• This appliance complies with the E.E.C.
Directives.
3

USE
WARNING! Risk of injury, burns and
electric shock or explosion.
• This appliance is for household use only.
• Do not change the specification of this
appliance.
• Make sure that the ventilation openings are not
blocked.
• Do not let the appliance stay unattended during
operation.
• Deactivate the appliance after each use.
• Be careful when you open the appliance door
while the appliance is in operation. Hot air can
release.
• Do not operate the appliance with wet hands or
when it has contact with water.
• Do not apply pressure on the open door.
• Do not use the appliance as a work surface or
as a storage surface.
• Open the appliance door carefully. The use of
ingredients with alcohol can cause a mixture of
alcohol and air.
• Do not let sparks or open flames to come in
contact with the appliance when you open the
door.
• Do not put flammable products or items that are
wet with flammable products in, near or on the
appliance.
WARNING! Risk of damage to the
appliance.
• To prevent damage or discoloration to the
enamel:
– do not put ovenware or other objects in the
appliance directly on the bottom.
– do not put aluminium foil directly on the
bottom of cavity of the appliance.
– do not put water directly into the hot
appliance.
– do not keep moist dishes and food in the
appliance after you finish the cooking.
– be careful when you remove or install the
accessories.
• Discoloration of the enamel or stainless steel
has no effect on the performance of the
appliance.
• Use a deep pan for moist cakes. Fruit juices
cause stains that can be permanent.
• This appliance is for cooking purposes only. It
must not be used for other purposes, for
example room heating.
• Always cook with the oven door closed.
• If the appliance is installed behind a furniture
panel (e.g. a door) make sure the door is never
closed when the appliance is in operation. Heat
and moisture can build up behind a closed
furniture panel and cause subsequent damage
to the appliance, the housing unit or the floor.
Do not close the furniture panel until the
appliance has cooled down completely after
use.
CARE AND CLEANING
WARNING! Risk of injury, fire, or
damage to the appliance.
• Before maintenance, deactivate the appliance
and disconnect the mains plug from the mains
socket.
• Make sure the appliance is cold. There is the
risk that the glass panels can break.
• Replace immediately the door glass panels
when they are damaged. Contact the
Authorised Service Centre.
• Be careful when you remove the door from the
appliance. The door is heavy!
• Clean regularly the appliance to prevent the
deterioration of the surface material.
• Clean the appliance with a moist soft cloth. Only
use neutral detergents. Do not use any abrasive
products, abrasive cleaning pads, solvents or
metal objects.
• If you use an oven spray, follow the safety
instruction on it's packaging.
• Do not clean the catalytic enamel (if applicable)
with any kind of detergent.
INTERNAL LIGHTING
WARNING! Risk of electric shock.
• The type of light bulb or halogen lamp used for
this appliance is for household appliances only.
Do not use it for house lighting.
• Before replacing the lamp, disconnect the
appliance from the power supply.
• Only use lamps with the same specifications.
SERVICE
• To repair the appliance contact an Authorised
Service Centre.
• Use original spare parts only.
DISPOSAL
WARNING! Risk of injury or
suffocation.
• Disconnect the appliance from the mains
supply.
4

• Cut off the mains electrical cable close to the
appliance and dispose of it.
• Remove the door catch to prevent children or
pets from becoming trapped in the appliance.
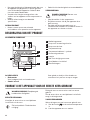
PRODUCT DESCRIPTION
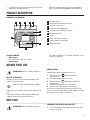
GENERAL OVERVIEW
21 53 4
7
6
9
5
4
3
2
1
10
8
1
Control panel
2
Knob for the heating functions
3
Knob for the timer
4
Knob for the temperature
5
Temperature indicator / symbol
6
Heating element
7
Lamp
8
Aqua cleaning container
9
Shelf support, removable
10
Shelf positions
ACCESSORIES
• Wire shelf
For cookware, cake tins, roasts.
• Combi pan
For cakes and biscuits. To bake and roast or as
a pan to collect fat.
BEFORE FIRST USE
WARNING! Refer to Safety chapters.
INITIAL CLEANING
Remove all accessories and removable shelf
supports from the oven.
Refer to "Care and cleaning" chapter.
Clean the oven and the accessories before first
use.
Put the accessories and the removable shelf
supports back to their initial position.
PREHEATING
Preheat the empty oven before first use.
1. Set the function and the maximum
temperature.
2. Let the oven operate for 1 hour.
3. Set the function and set the maximum
temperature.
4. Let the oven operate for 15 minutes.
5. Turn off the oven and let it cool down.
Accessories can become hotter than usual. The
oven can emit an odour and smoke. Make sure that
the airflow in the room is sufficient.
DAILY USE
WARNING! Refer to Safety chapters.
TURNING THE OVEN ON AND OFF
1. Turn the knob for the oven functions to select
an oven function.
5

2. Turn the knob for the temperature to select a
temperature.
3. To turn off the oven, turn the knobs for the oven
functions and temperature to the off position.
The lamp turns on when the oven operates.
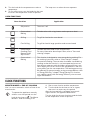
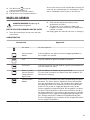
OVEN FUNCTIONS
Oven function Application
Off position The oven is off.
Conventional
Baking
To bake cakes with crispy bottom and to preserve food.
Grilling To grill flat food and to toast bread.
Fast Grilling To grill flat food in large quantities and to toast bread.
Conventional
Cooking (Top /
Bottom Heat)/
Aqua Clean
To bake and roast food on one shelf position.
For more information about Aqua Clean, refer to "Care and
cleaning" chapter.
Conventional
Baking
This function is designed to save energy during cooking. For
the cooking instructions refer to "Hints and tips" chapter,
Conventional Baking. The oven door should be closed during
cooking so that the function is not interrupted and to ensure
that the oven operates with the highest energy efficiency pos-
sible. When you use this function, the temperature in the cavi-
ty may differ from the set temperature. The heating power may
be reduced. For general energy saving recommendations refer
to "Energy Efficiency" chapter, Energy Saving.This function
was used to comply with the energy efficiency class accord-
ing to EN 60350-1.
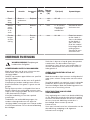
CLOCK FUNCTIONS
MINUTE MINDER + END OF COOKING
Use it to set an automatic switch-off time for an
oven function.
To operate the appliance manually
without a set time period, turn the
knob for the timer to . The Minute
Minder + End of Cooking is off.
1. Set an oven function and the temperature.
2. Turn the knob for the timer as far as it goes,
then turn it to necessary time period.
After the time period is completed, an acoustic
signal sounds. The appliance deactivates.
Turn the knob for the oven functions and the knob
for the temperature to the off position.
6

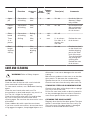
USING THE ACCESSORIES
WARNING! Refer to Safety chapters.
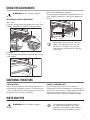
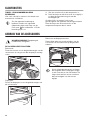
INSERTING THE ACCESSORIES
Wire shelf:
Push the shelf between the guide bars of the shelf
support and make sure that the feet point down.
Deep pan:
Push the deep pan between the guide bars of the
shelf support.
Wire shelf anddeep pan together:
Push the deep pan between the guide bars of the
shelf support and the wire shelf on the guide bars
above.
Small indentation at the top increase
safety. The indentations are also anti-
tip devices. The high rim around the
shelf prevents cookware from slipping
of the shelf.
ADDITIONAL FUNCTIONS
COOLING FAN
When the oven operates, the cooling fan turns on
automatically to keep the surfaces of the oven cool.
If you turn off the oven, the cooling fan can continue
to operate until the oven cools down.
SAFETY THERMOSTAT
Incorrect operation of the oven or defective
components can cause dangerous overheating. To
prevent this, the oven has a safety thermostat which
interrupts the power supply. The oven turns on
again automatically when the temperature drops.
HINTS AND TIPS
WARNING! Refer to Safety chapters. The temperature and baking times in
the tables are guidelines only. They
depend on the recipes and the quality
and quantity of the ingredients used.
7

COOKING RECOMMENDATIONS
The oven has five shelf positions.
Count the shelf positions from the bottom of the
oven floor.
Your oven may bake or roast differently to the oven
you had before. The below tables provide you with
the standard settings for temperature, cooking time
and shelf position.
If you cannot find the settings for a special recipe,
look for the similar one.
Baking cakes
Do not open the oven door before 3/4 of the set
cooking time is up.
Cooking meat and fish
Use a deep pan for very fatty food to prevent the
oven from stains that can be permanent.
Leave the meat for approximately 15 minutes before
carving so that the juice does not seep out.
To prevent too much smoke in the oven during
roasting, add some water into the deep pan. To
prevent the smoke condensation, add water each
time after it dries up.
Cooking times
Cooking times depend on the type of food, its
consistency, and volume.
Initially, monitor the performance when you cook.
Find the best settings (heat setting, cooking time,
etc.) for your cookware, recipes and quantities
when you use this appliance.
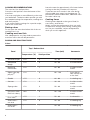
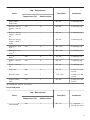
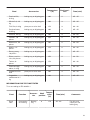
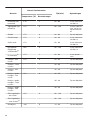
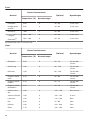
BAKING AND ROASTING TABLE
Cakes
Food
Top / Bottom Heat
Time (min) Comments
Temperature (°C) Shelf position
Whisked recipes 170 2 45 - 60 In a cake mould
Shortbread
dough
170 2 20 - 30 In a cake mould
Buttermilk
cheesecake
170 1 60 - 80 In a 26 cm cake
mould
Apple cake (Ap-
ple pie)
1)
170 2 80 - 100 In two 20 cm
cake moulds on
a wire shelf
Strudel 175 3 60 - 80 In a baking tray
Jam-tart 170 2 30 - 40 In a 26 cm cake
mould
Sponge cake 170 2 50 - 60 In a 26 cm cake
mould
Christmas cake /
Rich fruit cake
1)
160 2 90 - 120 In a 20 cm cake
mould
Plum cake
1) 175 1 50 - 60 In a bread tin
Small cakes -
one level
170 3 20 - 30 In a baking tray
Small cakes -
two levels
- - 25 - 35 In a baking tray
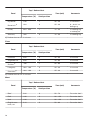
8

Food
Top / Bottom Heat
Time (min) Comments
Temperature (°C) Shelf position
Small cakes -
three levels
- - 30 - 45 In a baking tray
Biscuits / pastry
stripes - one lev-
el
140 3 30 - 35 In a baking tray
Biscuits / pastry
stripes - two lev-
els
- - 35 - 40 In a baking tray
Biscuits / pastry
stripes - three
levels
- - 35 - 45 In a baking tray
Meringues - one
level
120 3 80 - 100 In a baking tray
Meringues- two
levels
1)
- - 80 - 100 In a baking tray
Buns
1) 190 3 12 - 20 In a baking tray
Eclairs - one lev-
el
190 3 25 - 35 In a baking tray
Eclairs - two lev-
els
- - 35 - 45 In a baking tray
Plate tarts 180 2 45 - 70 In a 20 cm cake
mould
Rich fruit cake 160 1 110 - 120 In a 24 cm cake
mould
Victoria sand-
wich
170 1 50 - 60 In a 20 cm cake
mould
1) Preheat the oven for 10 minutes.
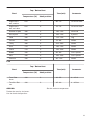
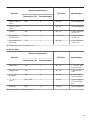
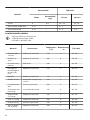
Bread and pizza
Food
Top / Bottom Heat
Time (min) Comments
Temperature (°C) Shelf position
White bread
1) 190 1 60 - 70 1 - 2 pieces,
500 gr per piece
9

Food
Top / Bottom Heat
Time (min) Comments
Temperature (°C) Shelf position
Rye bread 190 1 30 - 45 In a bread tin
Bread rolls
1) 190 2 25 - 40 6 - 8 rolls in a
baking tray
Pizza
1) 230 - 250 1 10 - 20 In a baking tray
or a deep pan
Scones
1) 200 3 10 - 20 In a baking tray
1) Preheat the oven for 10 minutes.
Flans
Food
Top / Bottom Heat
Time (min) Comments
Temperature (°C) Shelf position
Pasta flan 200 2 40 - 50 In a mould
Vegetable flan 200 2 45 - 60 In a mould
Quiches
1) 180 1 50 - 60 In a mould
Lasagne
1) 180 - 190 2 25 - 40 In a mould
Cannelloni
1) 180 - 190 2 25 - 40 In a mould
1) Preheat the oven for 10 minutes.
Meat
Food
Top / Bottom Heat
Time (min) Comments
Temperature (°C) Shelf position
Beef 200 2 50 - 70 On a wire shelf
Pork 180 2 90 - 120 On a wire shelf
Veal 190 2 90 - 120 On a wire shelf
English roast
beef, rare
210 2 50 - 60 On a wire shelf
10

Food
Top / Bottom Heat
Time (min) Comments
Temperature (°C) Shelf position
English roast
beef, medium
210 2 60 - 70 On a wire shelf
English roast
beef, well done
210 2 70 - 75 On a wire shelf
Shoulder of pork 180 2 120 - 150 With rind
Shin of pork 180 2 100 - 120 2 pieces
Lamb 190 2 110 - 130 Leg
Chicken 220 2 70 - 85 Whole
Turkey 180 2 210 - 240 Whole
Duck 175 2 120 - 150 Whole
Goose 175 2 150 - 200 Whole
Rabbit 190 2 60 - 80 Cut in pieces
Hare 190 2 150 - 200 Cut in pieces
Pheasant 190 2 90 - 120 Whole
Fish
Food
Top / Bottom Heat
Time (min) Comments
Temperature (°C) Shelf position
Trout / Sea
bream
190 2 40 - 55 3 - 4 fish
Tuna fish / Sal-
mon
190 2 35 - 60 4 - 6 fillets
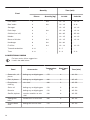
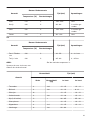
GRILLING
Preheat the oven for 3 minutes.
Use the fourth shelf position.
Set the maximum temperature.
11

Food
Quantity Time (min)
Pieces Quantity (kg) 1st side 2nd side
Fillet steaks 4 0.8 12 - 15 12 - 14
Beef steaks 4 0.6 10 - 12 6 - 8
Sausages 8 - 12 - 15 10 - 12
Pork chops 4 0.6 12 - 16 12 - 14
Chicken (cut in 2) 2 1 30 - 35 25 - 30
Kebabs 4 - 10 - 15 10 - 12
Breast of chicken 4 0.4 12 - 15 12 - 14
Hamburger 6 0.6 20 - 30 -
Fish fillet 4 0.4 12 - 14 10 - 12
Toasted sandwiches 4 - 6 - 5 - 7 -
Toast 4 - 6 - 2 - 4 2 - 3
CONVENTIONAL BAKING
For best results follow suggestions
listed in the table below.
Food Accessories
Temperature
(°C)
Shelf posi-
tion
Time (min)
Sweet rolls, 12
pieces
baking tray or dripping pan 175 3 40 - 50
Rolls, 9 pieces baking tray or dripping pan 180 2 35 - 45
Pizza, frozen,
0.35 kg
wire shelf 180 2 45 - 55
Swiss roll baking tray or dripping pan 170 2 30 - 40
Brownie baking tray or dripping pan 170 2 45 - 50
Soufflè, 6 pieces ceramic ramekins on wire
shelf
190 3 45 - 55
Sponge flan
base
flan base tin on wire shelf 180 2 35 - 45
Victoria Sand-
wich
baking dish on wire shelf 170 2 35 - 50
12

Food Accessories
Temperature
(°C)
Shelf posi-
tion
Time (min)
Poached fish,
0.3 kg
baking tray or dripping pan 180 2 35 - 45
Whole fish, 0.2
kg
baking tray or dripping pan 180 3 25 - 35
Fish fillet, 0.3 kg pizza pan on wire shelf 170 3 30 - 40
Pouched meat,
0.25 kg
baking tray or dripping pan 180 3 35 - 45
Shashlik, 0.5 kg baking tray or dripping pan 180 3 40 - 50
Cookies, 16
pieces
baking tray or dripping pan 150 2 30 - 45
Macaroons, 20
pieces
baking tray or dripping pan 180 2 45 - 55
Muffins, 12
pieces
baking tray or dripping pan 170 2 30 - 40
Savory pastry,
16 pieces
baking tray or dripping pan 170 2 35 - 45
Short crust bis-
cuits, 20 pieces
baking tray or dripping pan 150 2 40 - 50
Tartlets, 8
pieces
baking tray or dripping pan 170 2 30 - 40
Poached vege-
tables, 0.4 kg
baking tray or dripping pan 180 2 35 - 45
Vegetarian ome-
lette
pizza pan on wire shelf 180 3 35 - 45
Vegetables,
mediterrean 0.7
kg
baking tray or dripping pan 180 4 35 - 45
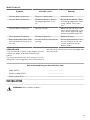
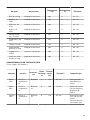
INFORMATION FOR TEST INSTITUTES
Tests according to IEC 60350-1.
Food Function
Accesso-
ries
Shelf
position
Temper-
ature
(°C)
Time (min) Comments
Small
cake
Convention-
al Cooking
Baking
tray
3 170 20 - 30 Put 20 small
cakes per one
baking tray.
13

Food Function
Accesso-
ries
Shelf
position
Temper-
ature
(°C)
Time (min) Comments
Apple
pie
Convention-
al Cooking
Wire
shelf
2 180 70 - 90 Use 2 tins (20 cm
diameter), diago-
nally shifted.
Fatless-
ponge
cake
Convention-
al Cooking
Wire
shelf
2 170 40 - 50 Use a cake mould
(26 cm diameter).
Preheat the oven
for 10 minutes.
Short
bread
Convention-
al Cooking
Baking
tray
3 140 -
150
25 - 45 -
Toast
4 - 6
pieces
Grilling Wire
shelf
4 max. 2 - 3 minutes
first side; 2 - 3
minutes sec-
ond side
Preheat the oven
for 3 minutes.
Beef
burger
6 pieces,
0.6 kg
Grilling Wire
shelf and
dripping
pan
4 max. 20 - 30 Put the wire shelf
on the fourth level
and the dripping
pan on the third
level of the oven.
Turn the food half-
way through the
cooking time.
Preheat the oven
for 3 minutes.
CARE AND CLEANING
WARNING! Refer to Safety chapters.
NOTES ON CLEANING
Clean the front of the oven with a soft cloth with
warm water and a mild cleaning agent.
To clean metal surfaces, use a dedicated cleaning
agent.
Clean the oven interior after each use. Fat
accumulation or other food remains may result in a
fire. The risk is higher for the grill pan.
Clean all accessories after each use and let them
dry. Use a soft cloth with warm water and a
cleaning agent. Do not clean the accessories in the
dishwasher.
Clean stubborn dirt with a special oven cleaner.
If you have nonstick accessories, do not clean them
using aggressive agents, sharp-edged objects or a
dishwasher. It can cause damage to the nonstick
coating.
Moisture can condense in the oven or on the door
glass panels. To decrease the condensation,
operate the oven for 10 minutes before cooking.
Clean the moisture from the cavity after each use.
STAINLESS STEEL OR ALUMINIUM OVENS
Clean the oven door with a damp cloth or sponge
only. Dry it with a soft cloth.
Do not use steel wool, acids or abrasive materials
as they can damage the oven surface. Clean the
oven control panel with the same precautions.
CLEANING THE DOOR GASKET
Regularly do a check of the door gasket. The door
gasket is around the frame of the oven cavity. Do
not use the oven if the door gasket is damaged.
Contact an Authorised Service Centre.
14

To clean the door gasket, refer to the general
information about cleaning.
REMOVING THE SHELF SUPPORTS
To clean the oven, remove the shelf supports.
CAUTION! Be careful when you
remove the shelf supports.
1. Pull the front of the shelf support away from the
side wall.
2. Pull the rear end of the shelf support away from
the side wall and remove it.
2
1
Install the removed accessories in the opposite
sequence.
AQUA CLEAN
This cleaning procedure uses humidity to help
remove remaining fat and food particles from the
oven.
1. Put 300 ml of water into the cavity
embossment at the bottom of the oven.
2. Set the function:
.
3. Set the temperature to 90 °C.
4. Let the oven operate for 30 minutes.
5. Turn off the oven and let it cool down.
6. When the oven is cool, clean it with a soft
cloth.
WARNING! Make sure that the
oven is cool before you touch it.
There is a risk of burns.
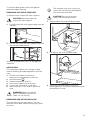
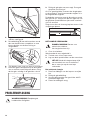
REMOVING AND INSTALLING DOOR
The oven door has two glass panels. You can
remove the oven door and the internal glass panel
to clean it.
The oven door may close if you try to
remove the internal glass panel before
you remove the oven door.
CAUTION! Do not use the oven
without the internal glass panel.
1. Open the door fully and hold both hinges.
2. Lift and turn the levers on both hinges.
3. Close the oven door halfway to the first
opening position. Then pull forward and remove
the door from its seat.
15

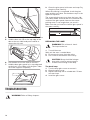
4. Put the door on a soft cloth on a stable surface.
5. Hold the door trim (B) on the top edge of the
door at the two sides and push inwards to
release the clip seal.
1
2
B
6. Pull the door trim to the front to remove it.
7. Hold the door glass panel by its top edge and
carefully pull it out. Make sure the glass slides
out of the supports completely.
8. Clean the glass panel with water and soap. Dry
the glass panel carefully.
When the cleaning is completed, install the glass
panel and the oven door. Do the above steps in the
opposite sequence.
The screen-printing zone must face the inner side
of the door. Make sure that after the installation the
surface of the glass panel frame on the screen-
printing zones is not rough when you touch it.
Make sure that you install the internal glass panel in
the seats correctly.
A
REPLACING THE LAMP
WARNING! Risk of electric shock.
The lamp can be hot.
1. Turn off the oven.
Wait until the oven is cooled down.
2. Disconnect the oven from the mains.
3. Put a cloth on the bottom of the cavity.
CAUTION! Always hold the halogen
lamp with a cloth to prevent grease
residue from burning on the lamp.
The back lamp
1. Turn the lamp glass cover to remove it.
2. Clean the glass cover.
3. Replace the lamp with a suitable 300 °C heat-
resistant lamp.
4. Install the glass cover.
TROUBLESHOOTING
WARNING! Refer to Safety chapters.
16

WHAT TO DO IF...
Problem Possible cause Remedy
The oven does not heat up. The oven is deactivated. Activate the oven.
The oven does not heat up. The Minute Minder + End of
Cooking programmer is not
set.
Set the Minute Minder + End
of Cooking programmer. Refer
to the chapter "Clock func-
tions".
The oven does not heat up. The fuse is blown. Make sure that the fuse is the
cause of the malfunction. If the
fuse is blown again and again,
contact a qualified electrician.
The lamp does not operate. The lamp is defective. Replace the lamp.
Steam and condensation settle
on the food and in the cavity of
the oven.
You left the dish in the oven for
too long.
Do not leave the dishes in the
oven for longer than 15 - 20
minutes after the cooking
process ends.
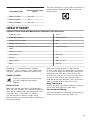
SERVICE DATA
If you cannot find a solution to the problem yourself,
contact your dealer or an Authorised Service
Centre.
The necessary data for the service centre is on the
rating plate. The rating plate is on the front frame of
the oven cavity. Do not remove the rating plate from
the oven cavity.
We recommend that you write the data here:
Model (MOD.) .........................................
Product number (PNC) .........................................
Serial number (S.N.) .........................................
INSTALLATION
WARNING! Refer to Safety chapters.
17

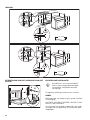
BUILDING IN
18
594
589
471
4
114
21546
560
595
+-1
min. 550
20
600
min. 560
3
5
80
33
200200
100
60
520
min. 1200
min. 550
20
595
+-1
18
590
min. 560
594
589
471
4
114
21546
560
3
5
min. 1200
70
33
200200
100
60
520
SECURING THE APPLIANCE TO THE
CABINET
A
B
ELECTRICAL INSTALLATION
The manufacturer is not responsible if
you do not follow the safety
precautions from the Safety chapters.
This appliance is supplied only with a main cable.
CABLE
Cable types applicable for installation or
replacement:
H07 RN-F, H05 RN-F, H05 RRF, H05 VV-F, H05
V2V2-F (T90), H05 BB-F
For the section of the cable refer to the total power
on the rating plate. You can also refer to the table:
18

Total power (W)
Section of the cable
(mm²)
maximum 1380 3 x 0.75
maximum 2300 3 x 1
maximum 3680 3 x 1.5
The earth cord (green / yellow cable) must be 2 cm
longer than phase and neutral cables (blue and
brown cables).
ENERGY EFFICIENCY
PRODUCT FICHE AND INFORMATION ACCORDING TO EU 65-66/2014
Supplier's name Zanussi
Model identification ZOB12401XU
Energy Efficiency Index 95.5
Energy efficiency class A
Energy consumption with a standard load, conventional
mode
0.84 kWh/cycle
Number of cavities 1
Heat source Electricity
Volume 78 l
Type of oven Built-In Oven
Mass 24.7 kg
EN 60350-1 - Household electric cooking
appliances - Part 1: Ranges, ovens, steam ovens
and grills - Methods for measuring performance.
ENERGY SAVING
The oven contains features which help
you save energy during everyday
cooking.
General hints
Make sure that the oven door is closed properly
when the oven operates. Do not open the door too
often during cooking. Keep the door gasket clean
and make sure it is well fixed in its position.
Use metal dishes to improve energy saving.
When possible, do not preheat the oven before you
put the food inside.
When the cooking duration is longer than 30
minutes, reduce the oven temperature to minimum
3 - 10 minutes before the end of the cooking time,
depending on the duration of the cooking. The
residual heat inside the oven will continue to cook.
Use the residual heat to warm up other dishes.
Keep breaks between baking as short as possible
when you prepare few dishes at one time.
Keep food warm
Choose the lowest possible temperature setting to
use residual heat and keep a meal warm.
Conventional Baking
Function designed to save energy during cooking.
When you use this function the lamp is off.
19

ENVIRONMENTAL CONCERNS
Recycle materials with the symbol . Put the
packaging in relevant containers to recycle it. Help
protect the environment and human health by
recycling waste of electrical and electronic
appliances. Do not dispose of appliances marked
with the symbol with the household waste.
Return the product to your local recycling facility or
contact your municipal office.
20

VEILIGHEIDSINFORMATIE
Lees zorgvuldig de meegeleverde instructies voor installatie en
gebruik van het apparaat. De fabrikant is niet verantwoordelijk
voor letsel of schade veroorzaakt door een verkeerde installatie of
verkeerd gebruik. Bewaar de instructies altijd op een veilige en
toegankelijke plaats voor toekomstig gebruik.
VEILIGHEID VAN KINDEREN EN KWETSBARE
MENSEN
• Dit apparaat kan worden gebruikt door kinderen van 8 jaar en
ouder en door mensen met beperkte lichamelijke, zintuiglijke of
verstandelijke vermogens of een gebrek aan ervaring en kennis,
indien zij onder toezicht staan of instructies hebben gekregen
over het veilig gebruiken van het apparaat en indien zij de
eventuele gevaren begrijpen.
• Kinderen tussen de 3 en 8 jaar oud en personen met zware en
complexe beperkingen dienen altijd uit de buurt te worden
gehouden, mits ze voortdurend onder toezicht staan.
• Houd kinderen jonger dan 3 jaar uit de buurt of onder
permanent toezicht.
• Laat kinderen niet spelen met het apparaat.
• Houd alle verpakking uit de buurt van kinderen en gooi het op
passende wijze weg.
• Houd kinderen en huisdieren uit de buurt van het apparaat als
het in werking is of afkoelt. Het apparaat is heet.
• Als het apparaat is voorzien van een kinderslot, dient dit te
worden geactiveerd.
• Kinderen mogen zonder toezicht geen reinigings- en
onderhoudswerkzaamheden aan het apparaat uitvoeren.
ALGEMENE VEILIGHEID
• Alleen een erkende installatietechnicus mag het apparaat
installeren en de kabel vervangen.
• WAARSCHUWING: Het apparaat en de toegankelijke
onderdelen ervan worden heet tijdens gebruik. U dient op te
passen dat u de verwarmingselementen niet aanraakt.
21

• Gebruik altijd ovenhandschoenen om accessoires of kookgerei
te plaatsen of verwijderen.
• Voordat u welke onderhoudshandeling dan ook verricht, de
stekker van het apparaat uit het stopcontact trekken.
• Zorg ervoor dat het apparaat is uitgeschakeld voordat u de
lamp vervangt om elektrische schokken te voorkomen.
• Gebruik geen stoomreiniger om het apparaat schoon te maken.
• Gebruik nooit agressieve reinigingsmiddelen of scherpe
metalen schrapers om de glazen deur schoon te maken, deze
kunnen krassen veroorzaken op het oppervlak, waardoor het
glas zou kunnen breken.
• Als het netsnoer beschadigd is, moet de fabrikant, een erkende
serviceverlener of een gekwalificeerd persoon deze vervangen
teneinde gevaarlijke situaties te voorkomen.
• Om de inschuifrails te verwijderen trekt u eerst de voorkant van
de inschuifrail en dan de achterkant uit de zijwanden. Installeer
de inschuifrails in de omgekeerde volgorde.
VEILIGHEIDSVOORSCHRIFTEN
MONTAGE
WAARSCHUWING! Alleen een
erkende installatietechnicus mag het
apparaat installeren.
• Verwijder alle verpakkingsmaterialen.
• Installeer en gebruik geen beschadigd apparaat.
• Volg de installatie-instructies op die zijn
meegeleverd met het apparaat.
• Pas altijd op bij verplaatsing van het apparaat,
want het is zwaar. Gebruik altijd
veiligheidshandschoenen en gesloten schoeisel.
• Trek het apparaat nooit aan de handgreep van
zijn plaats.
• Houd de minimumafstand naar andere
apparaten en units in acht.
• Zorg ervoor dat het apparaat onder en naast
veilige installaties wordt geïnstalleerd.
• De zijkanten van het apparaat moeten naast
apparaten of units staan van dezelfde hoogte.
AANSLUITING OP HET ELEKTRICITEITSNET
WAARSCHUWING! Gevaar voor
brand en elektrische schokken.
• Alle elektrische aansluitingen moeten door een
gediplomeerd elektromonteur worden gemaakt.
• Dit apparaat moet worden aangesloten op een
geaard stopcontact.
• Zorg ervoor dat de parameters op het
vermogensplaatje overeenkomen met
elektrische vermogen van de netstroom.
• Gebruik altijd een juist geïnstalleerd
schokbestendig stopcontact.
• Gebruik geen meerwegstekkers en
verlengsnoeren.
• Zorg dat u de hoofdstekker en kabel niet
beschadigt. Indien de voedingskabel moet
worden vervangen, dan moet dit gebeuren door
onze Klantenservice.
• Laat de stroomkabel niet in aanraking komen
met de deur van het apparaat, met name niet als
deze heet is.
• De schokbescherming van delen onder stroom
en geïsoleerde delen moet op zo'n manier
worden bevestigd dat het niet zonder
gereedschap kan worden verplaatst.
• Steek de stekker pas in het stopcontact als de
installatie is voltooid. Zorg ervoor dat het
netsnoer na installatie bereikbaar is.
• Sluit de stroomstekker niet aan op een losse
stroomaansluiting.
22

• Trek niet aan het netsnoer om het apparaat los
te koppelen. Trek altijd aan de stekker.
• Gebruik alleen de juiste isolatie-apparaten:
stroomonderbrekers, zekeringen
(schroefzekeringen moeten uit de houder
worden verwijderd), aardlekschakelaars en
contactgevers.
• De elektrische installatie moet een
isolatieapparaat bevatten waardoor het apparaat
volledig van het lichtnet afgesloten kan worden.
Het isolatieapparaat moet een contactopening
hebben met een minimale breedte van 3 mm.
• Dit apparaat voldoet aan de EU-richtlijnen.
GEBRUIK
WAARSCHUWING! Gevaar voor
letsel, brandwonden, elektrische
schokken of een explosie.
• Dit apparaat is uitsluitend bestemd voor
huishoudelijk gebruik.
• De specificatie van het apparaat mag niet
worden veranderd.
• Zorg ervoor dat de ventilatieopeningen niet
geblokkeerd zijn.
• Laat het apparaat tijdens het gebruik niet
onbeheerd achter.
• Schakel het apparaat telkens na gebruik uit.
• Wees voorzichtig met het openen van de deur
van het apparaat als het apparaat aan staat. Er
kan hete lucht ontsnappen.
• Bedien het apparaat niet met natte handen of
als het contact maakt met water.
• Oefen geen kracht uit op een geopende deur.
• Het apparaat mag niet worden gebruikt als
werkblad of aanrecht.
• Open de deur van het apparaat voorzichtig. Als
u alcoholische toevoegingen gebruikt, kan er
alcohol-luchtmengsel ontstaan.
• Houd vonken of open vlammen uit de buurt van
het apparaat bij het openen van de deur.
• Plaats geen ontvlambare producten of
gerechten die vochtig zijn gemaakt met
ontvlambare producten in, bij of op het
apparaat.
WAARSCHUWING! Risico op
schade aan het apparaat.
• Om schade of verkleuring van het email te
voorkomen:
– zet geen kookgerei of andere voorwerpen
direct op de bodem van het apparaat.
– leg geen aluminiumfolie op de bodem van
de ruimte in het apparaat.
– plaats geen water direct in het hete
apparaat.
– haal vochthoudende schotels en eten uit
het apparaat als u klaar bent met koken.
– wees voorzichtig bij het verwijderen of
bevestigen van accessoires.
• Verkleuring van het email of roestvrij staal is niet
van invloed op de werking van het apparaat.
• Gebruik een diepe pan voor vochtige taarten.
Fruitsappen kunnen permanente vlekken maken.
• Dit apparaat is uitsluitend bestemd om mee te
koken. Het mag niet worden gebruikt voor
andere doeleinden, zoals het verwarmen van
een kamer.
• Alle bereidingen moeten worden uitgevoerd met
gesloten ovendeur.
• Als het apparaat achter een meubelpaneel
gemonteerd is (bijv. een deur), zorg er dan voor
dat de deur nooit gesloten is als het apparaat in
werking is. Warmte en vocht kunnen achter een
gesloten meubelpaneel ophopen en schade aan
het apparaat, de behuizing of de vloer
veroorzaken. Sluit het meubelpaneel niet tot het
apparaat volledig afgekoeld is na gebruik.
ONDERHOUD EN REINIGING
WAARSCHUWING! Gevaar voor
letsel, brand en schade aan het
apparaat.
• Schakel het apparaat uit en trek de stekker uit
het stopcontact voordat u
onderhoudshandelingen verricht.
• Zorg ervoor dat het apparaat is afgekoeld. Er
bestaat een risico dat de glasplaten kunnen
breken.
• Vervang direct de glazen deurpanelen als deze
beschadigd zijn. Neem contact op met een
erkend servicecentrum.
• Wees voorzichtig als u de deur van het apparaat
verwijdert. De deur is zwaar!
• Reinig het apparaat regelmatig om te
voorkomen dat het materiaal van het oppervlak
achteruitgaat.
• Reinig het apparaat met een vochtige zachte
doek. Gebruik alleen neutrale
reinigingsmiddelen. Gebruik geen
schuurmiddelen, schuursponsjes,
oplosmiddelen of metalen voorwerpen.
• Raadpleeg, als u een ovenspray gebruikt, eerst
de aanwijzingen op de verpakking.
• Reinig niet het katalytisch email (indien van
toepassing) met een schoonmaakmiddel.
BINNENVERLICHTING
WAARSCHUWING! Gevaar voor
elektrische schokken.
23

• Het type gloeilampje of halogeenlampje dat voor
dit apparaat wordt gebruikt, is alleen geschikt
voor huishoudelijke apparaten. Gebruik deze
niet voor andere doeleinden.
• Voordat u het lampje vervangt, dient u de
stekker van het apparaat uit het stopcontact te
halen.
• Gebruik alleen lampjes met dezelfde
specificaties.
SERVICEDIENST
• Neem contact op met een erkende
servicedienst voor reparatie van het apparaat.
• Gebruik uitsluitend originele reserveonderdelen.
VERWIJDERING
WAARSCHUWING! Gevaar voor
letsel of verstikking.
• Haal de stekker uit het stopcontact.
• Snijd het netsnoer vlak bij het apparaat af en
gooi het weg.
• Verwijder de deurvergrendeling om te
voorkomen dat kinderen of huisdieren binnen in
het apparaat vast komen te zitten.
BESCHRIJVING VAN HET PRODUCT
ALGEMEEN OVERZICHT
21 53 4
7
6
9
5
4
3
2
1
10
8
1
Bedieningspaneel
2
Knop voor verwarmingsfuncties
3
Knop voor de timer
4
Temperatuurknop
5
Temperatuurindicator / symbool
6
Verwarmingselement
7
Lampje
8
Bak voor reiniging met water
9
Verwijderbare inschuifrail
10
Roosterhoogtes
ACCESSOIRES
• Bakrooster
Voor kookgerei, bak- en braadvormen.
• Combi schaal
Voor gebak en koekjes. Voor braden en
roosteren of als pan om vet op te vangen
VOORDAT U HET APPARAAT VOOR DE EERSTE KEER GEBRUIKT
WAARSCHUWING! Raadpleeg de
hoofdstukken Veiligheid.
EERSTE REINIGING
Verwijder all accessoires en verwijderbare
inschuifrails uit de oven.
Zie het hoofdstuk 'Onderhoud en
reiniging'.
Reinig de oven en accessoires voor het eerste
gebruik.
Zet de accessoires en verwijderbare inschuifrails
terug in de beginstand.
VOORVERWARMEN
Warm de lege oven voor het eerste gebruik voor.
1. Stel de functie en de maximumtemperatuur
in.
2. Laat het apparaat een uur werken.
24

3. Stel de functie en stel de
maximumtemperatuur in.
4. Laat de oven 15 minuten werken.
5. Zet de oven uit en laat deze afkoelen.
Accessoires kunnen heter worden dan normaal. De
oven kan een vreemde geur en rook afgeven. Zorg
dat er voldoende luchtcirculatie in de ruimte is.
DAGELIJKS GEBRUIK
WAARSCHUWING! Raadpleeg de
hoofdstukken Veiligheid.
HET IN- EN UITSCHAKELEN VAN DE OVEN
1. Draai de functieknop van de oven naar een
ovenfunctie.
2. Draai aan de temperatuurknop om een
temperatuur te kiezen.
3. Om de oven uit te schakelen, draait u de
knoppen voor de ovenfuncties en temperatuur
naar de uit-stand.
Het lampje gaat aan wanneer de oven in werking is.
OVENFUNCTIES
Ovenfunctie Applicatie
Uit-stand De oven staat uit.
Conventioneel
bakken
Voor het bakken van taarten met een knapperige bodem en
het inmaken van voedsel.
Grill Om plat voedsel te grillen en brood te roosteren.
Grill Intens Voor het roosteren van plat voedsel in grote hoeveelheden en
voor het maken van toast.
Boven + onder-
warmte (Boven-/
Onderwarmte)/
Aqua Clean
Voor het bakken en braden op een ovenniveau.
Zie voor meer informatie over Aqua Clean het hoofdstuk 'On-
derhoud en reiniging'.
Conventioneel
bakken
Deze functie is ontworpen om tijdens de bereiding energie te
besparen. Zie 'Hints and tips' hoofdstuk Conventioneel bak-
ken voor bereidingsinstructies. De ovendeur dient tijdens de
bereiding gesloten te zijn zodat de functie niet wordt onder-
broken en om ervoor te zorgen dat de oven werkt op de
hoogst mogelijke energie-efficiëntie. Bij het gebruik van deze
functie kan de temparatuur in de ruimte verschillen van de in-
gestelde temperatuur. Het verwarmingsvermogen kan worden
verminderd. Zie voor algemene energiebesparingsaanbevelin-
gen 'Energie-efficiëntie' hoofdstuk Energiebesparing.Deze
functie werd gebruik om te voldoen aan de energie-efficiëntie-
klasse volgens EN 60350-1.
25

KLOKFUNCTIES
TIMER - PROGRAMMERING EIND
BEREIDING
Hier stelt u de tijd in waarna u wilt dat de oven
automatisch uitschakelt.
Om het apparaat handmatig te
bedienen zonder een ingestelde
tijdperiode, draait u de knop van de
timer naar .De kookwekker + Einde
bereidingstijd is uit.
1. Stel een ovenfunctie en de temperatuur in.
2. Draai de knop van de timer zover als mogelijk is
en draai de knop dan terug tot aan de
benodigde tijd.
Als deze tijd is verstreken, hoort u een
geluidssignaal. Het apparaat wordt uitgeschakeld.
Draai de knop voor de ovenfuncties en de
temperatuurknop naar de uit-stand.
GEBRUIK VAN DE ACCESSOIRES
WAARSCHUWING! Raadpleeg de
hoofdstukken Veiligheid.
DE ACCESSOIRES PLAATSEN
Bakrooster:
Plaats het rooster tussen de geleidestangen van de
roostersteun en zorg ervoor dat de pootjes omlaag
staan.
Diepe pan:
Schuif de diepe pan tussen de geleidestangen van
de roostersteun.
Bakrooster endiepe plaatsamen:
Plaats diepe plaat tussen de geleiders van de
inschuifrails en het bakrooster op de geleiders
erboven.
Kleine inkepingen bovenaan verhogen
de veiligheid. Deze inkepingen zorgen
er ook voor dat ze niet omkantelen. De
hoge rand rond het rooster voorkomt
dat het kookgerei van het rooster
afglijdt.
26

EXTRA FUNCTIES
KOELVENTILATOR
Als de oven in werking is, wordt de koelventilator
automatisch ingeschakeld om de oppervlakken van
de oven koel te houden. Na het uitschakelen van de
oven blijft de ventilatie doorgaan totdat de oven is
afgekoeld.
VEILIGHEIDSTHERMOSTAAT
Een onjuiste bediening van de oven of defecte
componenten kunnen gevaarlijke oververhitting
veroorzaken. Om dit te voorkomen is de oven
voorzien van een veiligheidsthermostaat die de
stroomtoevoer onderbreekt. Zodra de temperatuur
is gedaald, wordt de oven automatisch weer
ingeschakeld.
AANWIJZINGEN EN TIPS
WAARSCHUWING! Raadpleeg de
hoofdstukken Veiligheid.
De temperaturen en baktijden in de
tabellen zijn slechts als richtlijn
bedoeld. Deze zijn afhankelijk van de
recepten en de kwaliteit en de
hoeveelheid van de gebruikte
ingrediënten.
KOOKADVIEZEN
De oven heeft vijf rekniveaus.
Tel de rekniveaus vanaf de bodem van de oven.
Uw oven kan anders bakken of roosteren dan de
oven die u tot nu toe gebruikt heeft. In de
onderstaande tabel vindt u de standaardinstellingen
voor temperatuur, kooktijd en roosterniveau.
Als u voor een speciaal recept de instelling niet
kunt vinden, zoek dan naar een soortgelijk recept.
Voor de bereiding van gebak
De ovendeur mag pas worden geopend als
driekwart van de baktijd is verstreken.
Voor de bereiding van vlees en vis
Gebruik een diepe bak voor erg vet voedsel om te
oven te behoeden voor blijvende vetvlekken.
Laat het vlees ongeveer 15 minuten rusten voordat
u het aansnijdt, zodat het vleessap er niet uit
stroomt.
Om te veel rook tijdens het braden in de oven te
vermijden, kunt u een beetje water in de lekbak
gieten. Om rook te vermijden, voegt u water toe
wanneer het is opgedroogd.
Bereidingstijden
De bereidingsduur is afhankelijk van het soort
voedsel, de samenstelling en het volume.
Houd in eerste instantie het bereidingsproces in de
gaten. Zoek bij het gebruik van dit apparaat de
beste instellingen (temperatuur, bereidingsduur,
etc.) voor uw kookgerei, recepten en hoeveelheden.
BAK- EN BRAADSCHEMA
Taart
Gerecht
Boven-/Onderwarmte
Tijd (min) Opmerkingen
Temperatuur (°C) Roosterhoogte
Schuimtaart 170 2 45 - 60 In een cakevorm
Zandtaartdeeg 170 2 20 - 30 In een cakevorm
27

Gerecht
Boven-/Onderwarmte
Tijd (min) Opmerkingen
Temperatuur (°C) Roosterhoogte
Kwarktaart met
karnemelk
170 1 60 - 80 In een cakevorm
van 26 cm
Appelgebak (ap-
peltaart)
1)
170 2 80 - 100 In twee cakevor-
men van 20 cm
op een bakroos-
ter
Strudel 175 3 60 - 80 Op een bakplaat
Confituurtaart 170 2 30 - 40 In een cakevorm
van 26 cm
Cake, zacht 170 2 50 - 60 In een cakevorm
van 26 cm
Kerstgebak /
Rijkgevulde
vruchtencake
1)
160 2 90 - 120 In een cakevorm
van 20 cm
Pruimentaart
1) 175 1 50 - 60 In een brood-
vorm
Cakejes - één
niveau
170 3 20 - 30 Op een bakplaat
Cakejes - twee
niveaus
- - 25 - 35 Op een bakplaat
Cakejes - drie
niveaus
- - 30 - 45 Op een bakplaat
Koekjes / geba-
kreepjes - één
niveau
140 3 30 - 35 Op een bakplaat
Koekjes / geba-
kreepjes - twee
niveaus
- - 35 - 40 Op een bakplaat
Koekjes / geba-
kreepjes - drie
niveaus
- - 35 - 45 Op een bakplaat
Schuimgebakjes
- één niveau
120 3 80 - 100 Op een bakplaat
Schuimgebakjes
- twee niveaus
1)
- - 80 - 100 Op een bakplaat
Broodjes
1) 190 3 12 - 20 Op een bakplaat
28

Gerecht
Boven-/Onderwarmte
Tijd (min) Opmerkingen
Temperatuur (°C) Roosterhoogte
Eclairs - één ni-
veau
190 3 25 - 35 Op een bakplaat
Eclairs- twee ni-
veaus
- - 35 - 45 Op een bakplaat
Taartjes 180 2 45 - 70 In een cakevorm
van 20 cm
Rijkgevulde
vruchtencake
160 1 110 - 120 In een cakevorm
van 24 cm
Victoriataart met
jamvulling
170 1 50 - 60 In een cakevorm
van 20 cm
1) Verwarm de oven 10 minuten voor.
Brood en pizza
Gerecht
Boven-/Onderwarmte
Tijd (min) Opmerkingen
Temperatuur (°C) Roosterhoogte
Witbrood
1) 190 1 60 - 70 1 - 2 stuks, 500
gram per stuk
Roggebrood 190 1 30 - 45 In een brood-
vorm
Broodjes
1) 190 2 25 - 40 6 - 8 broodjes
op een bakplaat
Pizza
1) 230 - 250 1 10 - 20 Op een bakplaat
of in een braad-
pan
Scones
1) 200 3 10 - 20 Op een bakplaat
1) Verwarm de oven 10 minuten voor.
29

Flans
Gerecht
Boven-/Onderwarmte
Tijd (min) Opmerkingen
Temperatuur (°C) Roosterhoogte
Pastataart 200 2 40 - 50 In een vorm
Hartige groen-
tentaart
200 2 45 - 60 In een vorm
Quiches
1) 180 1 50 - 60 In een vorm
Lasagne
1) 180 - 190 2 25 - 40 In een vorm
Cannelloni
1) 180 - 190 2 25 - 40 In een vorm
1) Verwarm de oven 10 minuten voor.
Vlees
Gerecht
Boven-/Onderwarmte
Tijd (min) Opmerkingen
Temperatuur (°C) Roosterhoogte
Rundvlees 200 2 50 - 70 Op een bak-
rooster
Varkensrug 180 2 90 - 120 Op een bak-
rooster
Kalfsvlees 190 2 90 - 120 Op een bak-
rooster
Engelse rosbief,
rood
210 2 50 - 60 Op een bak-
rooster
Engelse rosbief,
medium
210 2 60 - 70 Op een bak-
rooster
Engelse rosbief,
doorbakken
210 2 70 - 75 Op een bak-
rooster
Varkensschou-
der
180 2 120 - 150 Met zwoerd
Varkensschenkel 180 2 100 - 120 2 stuks
Lamsvlees 190 2 110 - 130 Bout
Kip 220 2 70 - 85 Heel
Kalkoen 180 2 210 - 240 Heel
Eend 175 2 120 - 150 Heel
30

Gerecht
Boven-/Onderwarmte
Tijd (min) Opmerkingen
Temperatuur (°C) Roosterhoogte
Gans 175 2 150 - 200 Heel
Konijn 190 2 60 - 80 In stukken ge-
sneden
Haas 190 2 150 - 200 In stukken ge-
sneden
Fazant 190 2 90 - 120 Heel
Vis
Gerecht
Boven-/Onderwarmte
Tijd (min) Opmerkingen
Temperatuur (°C) Roosterhoogte
Forel / Zeebra-
sem
190 2 40 - 55 3 - 4 vissen
Tonijn / zalm 190 2 35 - 60 4 - 6 filets
GRILL
Verwarm de oven 3 minuten voor.
Gebruik de vierde rekstand.
Stel de maximale temperatuur in.
Gerecht
Hoeveelheid Tijd (min)
Stuks
Hoeveelheid
(kg)
1e kant 2e kant
Tournedos 4 0.8 12 - 15 12 - 14
Biefstuk 4 0.6 10 - 12 6 - 8
Worstjes 8 - 12 - 15 10 - 12
Varkenskotelet 4 0.6 12 - 16 12 - 14
Kip (in 2 helften) 2 1 30 - 35 25 - 30
Vleesspiesen 4 - 10 - 15 10 - 12
Kippenborst 4 0.4 12 - 15 12 - 14
Hamburger 6 0.6 20 - 30 -
31

Gerecht
Hoeveelheid Tijd (min)
Stuks
Hoeveelheid
(kg)
1e kant 2e kant
Visfilet 4 0.4 12 - 14 10 - 12
Geroosterde sandwiches 4 - 6 - 5 - 7 -
Geroosterd brood 4 - 6 - 2 - 4 2 - 3
CONVENTIONEEL BAKKEN
Volg voor de beste resultaten de
volgende aanwijzingen op die
hieronder in de tabel staan.
Gerecht Accessoires
Temperatuur
(°C)
Roosterhoog-
te
Tijd (min)
Zoete broodjes,
12 stuks
bakplaat of lekschaal 175 3 40 - 50
Broodjes, 9
stuks
bakplaat of lekschaal 180 2 35 - 45
Pizza, bevroren,
0,35 kg
bakrooster 180 2 45 - 55
Koninginnen-
brood (opgerol-
de cake met
jam)
bakplaat of lekschaal 170 2 30 - 40
Brownie bakplaat of lekschaal 170 2 45 - 50
Soufflé, 6 stuks keramieken vormpjes op
rooster
190 3 45 - 55
Luchtige flanbo-
dem
flanvorm op rooster 180 2 35 - 45
Victoriataart met
jamvulling
ovenschaal op rooster 170 2 35 - 50
Gepocheerde
vis, 0,3 kg
bakplaat of lekschaal 180 2 35 - 45
Hele vis, 0,2 kg bakplaat of lekschaal 180 3 25 - 35
Visfilets 0,3 kg pizzavorm op rooster 170 3 30 - 40
Vlees in braad-
zak, 0,25 kg
bakplaat of lekschaal 180 3 35 - 45
32

Gerecht Accessoires
Temperatuur
(°C)
Roosterhoog-
te
Tijd (min)
Sjasliek, 0,5 kg bakplaat of lekschaal 180 3 40 - 50
Koekjes, 16
stuks
bakplaat of lekschaal 150 2 30 - 45
Makronen, 20
stuks
bakplaat of lekschaal 180 2 45 - 55
Muffins, 12
stuks
bakplaat of lekschaal 170 2 30 - 40
Hartige pastei-
tjes, 16 stuks
bakplaat of lekschaal 170 2 35 - 45
Zandkoekjes, 20
stuks
bakplaat of lekschaal 150 2 40 - 50
Taartjes, 8 stuks bakplaat of lekschaal 170 2 30 - 40
Gepocheerde
groenten, 0,4 kg
bakplaat of lekschaal 180 2 35 - 45
Vegetarische
omelet
pizzavorm op rooster 180 3 35 - 45
Groenten, medi-
terraans 0,7 kg
bakplaat of lekschaal 180 4 35 - 45
AANWIJZINGEN VOOR TESTINSTITUTEN
Testen volgens IEC 60350-1.
Gerecht -functie
Accessoi-
res
Roos-
terhoog-
te
Tempe-
ratuur
(°C)
Tijd (min) Opmerkingen
Kleine
cake
Boven +
onderwarm-
te
Bakplaat 3 170 20 - 30 Plaats per bak-
plaat 20 kleine
cakjes.
Appel-
taart
Boven +
onderwarm-
te
Bakroos-
ter
2 180 70 - 90 Gebruik 2 vormen
(20 cm diameter),
diagonaal ge-
plaatst.
Vetvrije
cake
Boven +
onderwarm-
te
Bakroos-
ter
2 170 40 - 50 Gebruik een cake-
vorm (26 cm dia-
meter).
Verwarm de oven
10 minuten voor.
33

Gerecht -functie
Accessoi-
res
Roos-
terhoog-
te
Tempe-
ratuur
(°C)
Tijd (min) Opmerkingen
Zand-
taart-
deeg
Boven +
onderwarm-
te
Bakplaat 3 140 -
150
25 - 45 -
Geroo-
sterd
brood
4 - 6
stuks
Grill Bakroos-
ter
4 max. 2 - 3 minuten
eerste kant; 2
- 3 minuten
tweede kant
Verwarm de oven
3 minuten voor.
Runder-
burger
6 stuks,
0,6 kg
Grill Rooster
en lek-
bak
4 max. 20 - 30 Plaats het rooster
op het vierde ni-
veau en de lekbak
op het derde ni-
veau in de oven.
Draai het voedsel
halverwege de be-
reidingstijd om.
Verwarm de oven
3 minuten voor.
ONDERHOUD EN REINIGING
WAARSCHUWING! Raadpleeg de
hoofdstukken Veiligheid.
OPMERKINGEN OVER SCHOONMAKEN
Maak de voorkant van de oven schoon met een
zachte doek, warm water en een mild
reinigingsmiddel.
Gebruik voor metalen oppervlakken een specifiek
reinigingsmiddel.
Reinig de binnenkant van de oven na elk gebruik.
Vetophoping of andere voedingsresten kunnen
brand veroorzaken. Het gevaar is groter voor de
grillpan.
Reinig alle accessoires na elk gebruik en laat ze
drogen. Gebruik een zachte doek met een warm
sopje en een reinigingsmiddel. De accessoires niet
in de afwasmachine reinigen.
Verwijder hardnekkig vuil met een speciale
ovenreiniger.
Toebehoren met antiaanbaklaag mogen niet
worden schoongemaakt met een agressief
reinigingsmiddel, voorwerpen met scherpe randen
of een afwasautomaat. Dit kan de antiaanbaklaag
beschadigen.
Vocht kan in de oven of op de glazen deurpanelen
condenseren. Om de condensvorming te
verminderen, laat u de oven voor het bereiden 10
minuten werken.Neem het vocht uit de ruimte na
ieder gebruik af.
OVENS VAN ROESTVRIJ STAAL OF
ALUMINIUM
Maak de ovendeur alleen met een vochtige doek of
natte spons schoon. Droog maken met een zachte
doek.
Vermijd het gebruik van staalwol, zure of schurende
producten, deze kunnen de oppervlakken van de
oven beschadigen. Maak het bedieningspaneel van
de oven net zo voorzichtig schoon
DE AFDICHTING VAN DE DEUR
SCHOONMAKEN
Voer regelmatig een controle van de deurafdichting
uit. De afdichting van de deur bevindt zich rondom
het frame aan de binnenkant van de oven. Gebruik
de oven niet als de afdichting van de deur is
beschadigd. Neem contact op met de
klantenservice.
Voor meer informatie over het schoonmaken van de
deurafdichting, raadpleegt u de algemene
informatie over reiniging.
34

VERWIJDERBARE INSCHUIFRAILS
Als u de binnenkant van de oven wilt reinigen,
verwijdert u de inschuifrails.
LET OP! Wees voorzichtig bij het
verwijderen van de inschuifrails.
1. Trek de inschuifrail bij de voorkant uit de
zijwand.
2. Trek de geleider bij de achterkant uit de
zijwand en verwijder deze.
2
1
Installeer de verwijderde accessoires in de
omgekeerde volgorde.
AQUA CLEAN
Deze reinigingsprocedure maakt gebruik van vocht
als hulpmiddel om achtergebleven vet en
voedselresten uit de oven te verwijderen.
1. Doe 300 ml water in de uitsparing onderin de
oven.
2. Stel de functie in. .
3. Stel de temperatuur in op 90 °C.
4. Laat de oven 30 minuten werken.
5. Zet de oven uit en laat deze afkoelen.
6. Wanneer de oven is afgekoeld, maak het
schoon met een zachte doek.
WAARSCHUWING! Zorg ervoor
dat de oven is afgekoeld voordat u
het apparaat aanraakt. Gevaar
voor brandwonden.
DE DEUR VERWIJDEREN EN INSTALLEREN
De ovendeur heeft twee glazen panelen. U kunt de
ovendeur en interne glasplaat verwijderen om ze te
reinigen.
De ovendeur kan dichtslaan als u het
interne glaspaneel probeert te
verwijderen als de deur nog
gemonteerd is.
LET OP! Gebruik de oven nooit
zonder de interne glasplaat.
1. Open de deur volledig en houd vast aan beide
scharnieren.
2. Til de hendels van beide scharnieren op en
draai eraan.
3. Sluit de ovendeur halverwege tot de eerste
openingsstand. Trek hem daarna naar voren en
haal hem uit zijn zitting.
35

4. Leg de deur op een zachte doek op een
stabiele ondergrond.
5. Deurafdekking (B) aan de bovenkant van de
deur aan beide kanten vastpakken en naar
binnen drukken om de klemsluiting te
ontgrendelen.
1
2
B
6. Trek de deur naar voren om hem te verwijderen.
7. Houd het glazen deurpaneel bij de bovenkant
vast en trek het voorzichtig naar buiten. Zorg
dat het glas volledig uit de geleiders schuift.
8. Reinig de glasplaat met een sopje. Droog de
glasplaat voorzichtig af.
Als u ze gereinigd hebt, monteer dan de glasplaat
en de ovendeur. Voer bovenstaande stappen uit in
de omgekeerde volgorde.
De bedrukte zone moet naar de binnenkant van de
deur gericht zijn. Zorg ervoor dat het oppervlak van
de glasplaat op de bedrukte zijde na de installatie
niet ruw aanvoelt.
Zorg ervoor dat u de interne glasplaat correct in de
uitsparingen plaatst.
A
HET LAMPJE VERVANGEN
WAARSCHUWING! Gevaar voor
elektrische schokken.
Het lampje kan heet zijn.
1. Oven uitschakelen.
Wacht totdat de oven afgekoeld is.
2. Trek de oven uit het stopcontact.
3. Leg een doek op de bodem van de ovenruimte.
LET OP! Houd de halogeenlamp altijd
met een doek vast om te voorkomen
dat er vetrestjes op de ovenlamp
verbranden.
Het achterste lampje
1. Draai het afdekglas van de lamp en verwijder
het.
2. Reinig de glasafdekking.
3. Vervang de lamp door een geschikte 300°C
hittebestendige lamp.
4. Plaats het afdekglas terug.
PROBLEEMOPLOSSING
WAARSCHUWING! Raadpleeg de
hoofdstukken Veiligheid.
36

PROBLEMEN OPLOSSEN
Probleem Mogelijke oorzaak oplossing
De oven wordt niet warm. De oven is uitgeschakeld. Schakel de oven in.
De oven wordt niet warm. De programmering Kookwek-
ker + Einde Bereidingstijd is
niet ingesteld.
Stel de programmering Kook-
wekker + Einde Bereidingstijd
in. Zie het hoofdstuk "Klok-
functies".
De oven wordt niet warm. De zekering is doorgeslagen. Controleer of de zekering de
oorzaak van de storing is. Als
de zekeringen keer op keer
doorslaan, neemt u contact op
met een erkende installateur.
Het lampje brandt niet. Het lampje is stuk. Vervang het lampje.
Stoom en condens slaan neer
op de gerechten en in de
ovenruimte.
Het gerecht heeft te lang in de
oven gestaan.
Laat gerechten na het berei-
den niet langer dan 15 - 20
minuten in de oven staan.
ONDERHOUDSGEGEVENS
Als u niet zelf het probleem kunt verhelpen, neem
dan contact op met uw verkoper ofeen erkende
serviceafdeling.
De contactgegevens van het servicecentrum staan
op het typeplaatje. Het typeplaatje bevindt zich aan
de voorkant van de binnenkant van de oven.
Verwijder het typeplaatje niet uit de ovenruimte.
Wij adviseren u om de gegevens hier te noteren:
Model (MOD.) .........................................
Productnummer (PNC) .........................................
Serienummer (S.N.) .........................................
MONTAGE
WAARSCHUWING! Raadpleeg de
hoofdstukken Veiligheid.
37

INBOUW
18
594
589
471
4
114
21546
560
595
+-1
min. 550
20
600
min. 560
3
5
80
33
200200
100
60
520
min. 1200
min. 550
20
595
+-1
18
590
min. 560
594
589
471
4
114
21546
560
3
5
min. 1200
70
33
200200
100
60
520
BEVESTIGING VAN HET APPARAAT AAN HET
KASTJE
A
B
ELEKTRISCHE INSTALLATIE
De fabrikant is niet verantwoordelijk
indien u deze veiligheidsmaatregelen
uit hoofdstuk 'Veiligheidsinformatie'
niet opvolgt.
Dit apparaat wordt geleverd met een netsnoer.
KABEL
Kabeltypes die van toepassing zijn op de installatie
of vervanging:
H07 RN-F, H05 RN-F, H05 RRF, H05 VV-F, H05
V2V2-F (T90), H05 BB-F
Voor het deel van de kabel raadpleegt u het totale
vermogen op het typeplaatje. U kunt ook de tabel
raadplegen:
38

Totaal vermogen (W)
Deel van de kabel
(mm²)
maximaal 1380 3 x 0.75
maximaal 2300 3 x 1
maximaal 3680 3 x 1.5
De aardekabel (groene/gele kabel) moet 2 cm
langer zijn dan de fase- en neutrale kabels (blauwe
en bruine kabels).
ENERGIEZUINIGHEID
PRODUCTKAART EN INFORMATIE VOLGENS EU 65-66/2014
Naam leverancier Zanussi
Modelidentificatie ZOB12401XU
Energie-efficiëntie Index 95.5
Energie-efficiëntieklasse A
Energieverbruik bij een standaardbelasting, stand boven +
onderwarmte
0.84 kWh/cyclus
Aantal ruimten 1
Warmtebron Elektriciteit
Volume 78 l
Soort oven Inbouwoven
Massa 24.7 kg
EN 60350-1 - Elektrische huishoudelijke
kookapparaten - deel 1: Reeksen, ovens,
stoomovens en grills - Methoden voor
prestatiemeting.
ENERGIEBESPARING
Deze oven bevat functies die u helpen
energie te besparen tijdens het
dagelijks koken.
Algemene tips
Zorg ervoor dat de ovendeur goed gesloten is als u
de oven in werking stelt. De deur niet openen
tijdens de bereiding met stoom. Houd het
deurrubber schoon en zorg ervoor dat het goed op
zijn plaats vastzit.
Gebruik metalen schalen om meer energie te
besparen.
Indien mogelijk de oven niet voorverwarmen voordat
u er voedsel in plaatst.
Verlaag bij een bereidingsduur langer dan 30
minuten de oventemperatuur met minimaal 3 - 10
minuten, afhankelijk van de bereidingsduur voordat
de kooktijd verstrijkt. De restwarmte in de oven
zorgt ervoor dat het gerecht wordt voltooid.
U kunt de restwarmte gebruiken om andere
maaltijden op te warmen.
Houd de onderbrekingen tussen het bakken zo kort
mogelijk als u een aantal gerechten tegelijkertijd
bereidt.
Eten warm houden
Kies de laagst mogelijke temperatuurinstelling om
de restwarmte te gebruiken en een maaltijd warm te
houden.
Conventioneel bakken
Functie is ontworpen om tijdens de bereiding
energie te besparen.
Als u deze functie gebruikt is de verlichting uit.
39

MILIEUBESCHERMING
Recycle de materialen met het symbool . Gooi
de verpakking in een geschikte verzamelcontainer
om het te recyclen. Help om het milieu en de
volksgezondheid te beschermen en recycle het
afval van elektrische en elektronische apparaten.
Gooi apparaten gemarkeerd met het symbool
niet weg met het huishoudelijk afval. Breng het
product naar het milieustation bij u in de buurt of
neem contact op met de gemeente.
40
*

41

42

43

WWW.ZANUSSI.COM/SHOP
867348128-B-492018
-
 1
1
-
 2
2
-
 3
3
-
 4
4
-
 5
5
-
 6
6
-
 7
7
-
 8
8
-
 9
9
-
 10
10
-
 11
11
-
 12
12
-
 13
13
-
 14
14
-
 15
15
-
 16
16
-
 17
17
-
 18
18
-
 19
19
-
 20
20
-
 21
21
-
 22
22
-
 23
23
-
 24
24
-
 25
25
-
 26
26
-
 27
27
-
 28
28
-
 29
29
-
 30
30
-
 31
31
-
 32
32
-
 33
33
-
 34
34
-
 35
35
-
 36
36
-
 37
37
-
 38
38
-
 39
39
-
 40
40
-
 41
41
-
 42
42
-
 43
43
-
 44
44


Zanussi ZOB12401XU Handleiding
- Categorie
- Sandwich makers
- Type
- Handleiding
in andere talen
- English: Zanussi ZOB12401XU User manual