

Inhoudsopgave
Veiligheidsinformatie 2
Veiligheidsvoorschriften 3
Beschrijving van het product 6
Voor het eerste gebruik 7
Dagelijks gebruik 7
Klokfuncties
9
Gebruik van de accessoires
11
Extra functies 12
Aanwijzingen en tips 12
Onderhoud en reiniging 21
Probleemoplossing 24
Montage 26
Energiezuinigheid
28
Wijzigingen voorbehouden.
Veiligheidsinformatie
Lees zorgvuldig de meegeleverde instructies voor installatie en
gebruik van het apparaat. De fabrikant is niet verantwoordelijk
voor letsel of schade veroorzaakt door een verkeerde installatie of
verkeerd gebruik. Bewaar de instructies altijd op een veilige en
toegankelijke plaats voor toekomstig gebruik.
Veiligheid van kinderen en kwetsbare mensen
• Dit apparaat kan worden gebruikt door kinderen van 8 jaar en
ouder en door mensen met beperkte lichamelijke, zintuiglijke of
verstandelijke vermogens of een gebrek aan ervaring en kennis,
indien zij onder toezicht staan of instructies hebben gekregen
over het veilig gebruiken van het apparaat en indien zij de
eventuele gevaren begrijpen.
• Laat kinderen niet met het apparaat spelen.
• Houd alle verpakking uit de buurt van kinderen en gooi het op
passende wijze weg.
• Houd kinderen en huisdieren uit de buurt van het apparaat als
het in werking is of afkoelt. Het apparaat is heet.
• Als het apparaat is voorzien van een kinderslot, dient dit te
worden geactiveerd.
• Kinderen mogen zonder toezicht geen reinigings- en
onderhoudswerkzaamheden aan het apparaat uitvoeren.
• Kinderen van 3 jaar en jonger moeten tijdens de werking van dit
apparaat altijd uit te buurt worden gehouden.
2 www.zanussi.com

Algemene veiligheid
• Alleen een erkende installatietechnicus mag het apparaat
installeren en de kabel vervangen.
• WAARSCHUWING: Het apparaat en de toegankelijke
onderdelen ervan worden heet tijdens gebruik. U dient op te
passen dat u de verwarmingselementen niet aanraakt. Houd
kinderen jonger dan 8 jaar uit de buurt of onder permanent
toezicht.
• Gebruik altijd ovenhandschoenen om accessoires of kookgerei
te plaatsen of verwijderen.
• Zet de stroomtoevoer uit alvorens onderhoud te plegen.
• Zorg ervoor dat het apparaat is uitgeschakeld voordat u de
lamp vervangt om elektrische schokken te voorkomen.
• Gebruik geen stoomreiniger om het apparaat schoon te maken.
• Gebruik nooit agressieve reinigingsmiddelen of scherpe
metalen schrapers om de glazen deur schoon te maken, deze
kunnen krassen veroorzaken op het oppervlak, waardoor het
glas zou kunnen breken.
• Als het netsnoer beschadigd is, moet de fabrikant, een erkende
serviceverlener of een gekwalificeerd persoon deze vervangen
teneinde gevaarlijke situaties te voorkomen.
• Overtollige voedselresten moeten verwijderd worden alvorens
de pyrolytische reiniging te starten. Verwijder alle onderdelen
van de oven.
• Om de inschuifrails te verwijderen trekt u eerst de voorkant van
de inschuifrail en dan de achterkant uit de zijwanden. Installeer
de inschuifrails in de omgekeerde volgorde.
Veiligheidsvoorschriften
Montage
WAARSCHUWING!
Alleen een erkende
installatietechnicus mag het
apparaat installeren.
• Verwijder alle verpakkingsmaterialen.
• Installeer en gebruik geen beschadigd
apparaat.
• Volg de installatie-instructies op die zijn
meegeleverd met het apparaat.
• Pas altijd op bij verplaatsing van het
apparaat, want het is zwaar. Gebruik altijd
veiligheidshandschoenen en gesloten
schoeisel.
• Trek het apparaat nooit aan de handgreep
van zijn plaats.
• Houd de minimumafstand naar andere
apparaten en units in acht.
• Zorg ervoor dat het apparaat onder en naast
veilige installaties wordt geïnstalleerd.
www.zanussi.com 3

• De zijkanten van het apparaat moeten naast
apparaten of units staan van dezelfde
hoogte.
• Het apparaat is uitgerust met een elektrisch
koelsysteem. Het heeft elektrische stroom
nodig.
Elektrische aansluiting
WAARSCHUWING!
Gevaar voor brand en elektrische
schokken.
• Alle elektrische aansluitingen moeten door
een gediplomeerd elektromonteur worden
gemaakt.
• Dit apparaat moet worden aangesloten op
een geaard stopcontact.
• Controleer of de elektrische informatie op
het typeplaatje overeenkomt met de
stroomvoorziening. Zo niet, neem dan
contact op met een elektromonteur.
• Gebruik altijd een correct geïnstalleerd,
schokbestendig stopcontact.
• Gebruik geen meerwegstekkers en
verlengsnoeren.
• Zorg dat u de hoofdstekker en kabel niet
beschadigt. Indien de voedingskabel moet
worden vervangen, dan moet dit gebeuren
door onze Klantenservice.
• Laat de stroomkabel niet in aanraking komen
met de deur van het apparaat, met name niet
als deze heet is.
• De schokbescherming van delen onder
stroom en geïsoleerde delen moet op zo'n
manier worden bevestigd dat het niet zonder
gereedschap kan worden verplaatst.
• Steek de stekker pas in het stopcontact als
de installatie is voltooid. Zorg ervoor dat het
netsnoer na installatie bereikbaar is.
• Sluit de stroomstekker niet aan op een losse
stroomaansluiting.
• Trek niet aan het netsnoer om het apparaat
los te koppelen. Trek altijd aan de stekker.
• Gebruik alleen de juiste isolatie-apparaten:
stroomonderbrekers, zekeringen
(schroefzekeringen moeten uit de houder
worden verwijderd), aardlekschakelaars en
contactgevers.
• De elektrische installatie moet een
isolatieapparaat bevatten waardoor het
apparaat volledig van het lichtnet afgesloten
kan worden. Het isolatieapparaat moet een
contactopening hebben met een minimale
breedte van 3 mm.
• Sluit de deur van het apparaat volledig
voordat u de stekker in het stopcontact
steekt.
• Dit apparaat voldoet aan de EEG-richtlijnen.
Gebruik
WAARSCHUWING!
Gevaar op letsel, brandwonden,
elektrische schokken of een
explosie.
• Dit apparaat is uitsluitend bestemd voor
huishoudelijk gebruik.
• De specificatie van het apparaat mag niet
worden veranderd.
• Zorg ervoor dat de ventilatieopeningen niet
geblokkeerd zijn.
• Laat het apparaat tijdens het gebruik niet
onbeheerd achter.
• Schakel het apparaat telkens na gebruik uit.
• Wees voorzichtig met het openen van de
deur van het apparaat als het apparaat aan
staat. Er kan hete lucht ontsnappen.
• Bedien het apparaat niet met natte handen
of als het contact maakt met water.
• Oefen geen kracht uit op een geopende
deur.
• Het apparaat mag niet worden gebruikt als
werkblad of aanrecht.
• Open de deur van het apparaat voorzichtig.
Als u alcoholische toevoegingen gebruikt,
kan er alcohol-luchtmengsel ontstaan.
• Houd vonken of open vlammen uit de buurt
van het apparaat bij het openen van de deur.
• Plaats geen ontvlambare producten of
gerechten die vochtig zijn gemaakt met
ontvlambare producten in, bij of op het
apparaat.
WAARSCHUWING!
Risico op schade aan het apparaat.
• Om schade of verkleuring van het email te
voorkomen:
– zet geen kookgerei of andere
voorwerpen direct op de bodem van het
apparaat.
– leg geen aluminiumfolie op de bodem
van het apparaat.
– plaats geen water direct in het hete
apparaat.
– haal vochthoudende schotels en eten uit
het apparaat als u klaar bent met koken.
– wees voorzichtig bij het verwijderen of
bevestigen van accessoires.
4 www.zanussi.com

• Verkleuring van het email heeft geen
ongewenst effect op de werking van het
apparaat.
• Gebruik een diepe pan voor vochtige
taarten. Fruitsappen kunnen permanente
vlekken maken.
• Dit apparaat is uitsluitend bestemd om mee
te koken. Het mag niet worden gebruikt voor
andere doeleinden, zoals het verwarmen van
een kamer.
• Alle bereidingen moeten worden uitgevoerd
met gesloten ovendeur.
• Als het apparaat achter een meubelpaneel
gemonteerd is (bijv. een deur), zorg er dan
voor dat de deur nooit gesloten is als het
apparaat in werking is. Warmte en vocht
kunnen achter een gesloten meubelpaneel
ophopen en schade aan het apparaat, de
behuizing of de vloer veroorzaken. Sluit het
meubelpaneel niet tot het apparaat volledig
afgekoeld is na gebruik.
Onderhoud en reiniging
WAARSCHUWING!
Gevaar voor letsel, brand en schade
aan het apparaat.
• Schakel het apparaat uit en trek de stekker
uit het stopcontact voordat u
onderhoudshandelingen verricht.
• Zorg dat het apparaat is afgekoeld. Er
bestaat een risico dat de glasplaten kunnen
breken.
• Vervang direct de glazen deurpanelen als
deze beschadigd zijn. Neem contact op met
de erkende servicedienst.
• Wees voorzichtig als u de deur van het
apparaat verwijderd. De deur is zwaar!
• Reinig het apparaat regelmatig om te
voorkomen dat het materiaal van het
oppervlak achteruitgaat.
• Reinig het apparaat met een vochtige zachte
doek. Gebruik alleen neutrale
reinigingsmiddelen. Gebruik geen
schuurmiddelen, schuursponsjes,
oplosmiddelen of metalen voorwerpen.
• Raadpleeg als u een ovenspray gebruikt
eerst de aanwijzingen op de verpakking.
• Reinig niet het katalytisch email (indien van
toepassing) met een schoonmaakmiddel.
Pyrolysereiniging
Risico op letsel / Brand /
Chemische uitstoot (dampen) in
pyrolitische modus.
• Voordat u de pyrolytische
zelfsreinigingsfunctie of de functie Het
eerste gebruik uitvoert, moet u eerst de
volgende items uit de binnenkant oven
verwijderen:
– eventueel grote hoeveelheden
etensresten, olie of gemorst vet /
deposito's.
– eventueel verwijderbare objecten
(inclusief plateaus, zijrails, etc., die met
het product zijn meegeleverd), in het
bijzonder potten en pannen met
antiaanbaklaag, ovenroosters, kookgerei,
etc.
• Lees zorgvuldig alle instructies voor
pyrolytische reiniging.
• Houd kinderen uit de buurt van het apparaat
als de pyrolytische reiniging in werking is.
Het apparaat wordt erg heet en er komt hete
lucht uit de ventilatieopeningen aan de
voorkant.
• Pyrolytische reiniging wordt uitgevoerd
onder hoge temperaturen waarbij er rook van
kookresten en constructiematerialen kan
komen. Daarom gelden de volgende
aanbevelingen voor consumenten:
– zorg voor goede ventilatie tijdens en na
elke pyrolytische reiniging.
– zorg tijdens en na het eerste gebruik bij
maximumtemperatuur voor voldoende
verluchting.
• In tegenstelling tot mensen, kunnen
bepaalde vogels en reptielen zeer gevoelig
zijn voor mogelijke rookgassen die tijdens
het reinigingsproces van alle pyrolytische
ovens worden uitgestoten.
– Houd huisdieren (met name vogels) uit
de buurt van het apparaat tijdens en na
de pyrolytische reiniging en gebruik
eerst een programma bij maximale
temperatuur in een goed geventileerde
ruimte.
• Kleine huisdieren kunnen ook zeer gevoelig
zijn voor de plaatselijke
temperatuurwijzigingen in de nabijheid van
alle pyrolytische ovens wanneer de
pyrolytische reiniging in werking is.
• Anti-aanbaklagen in potten en pannen,
schalen, keukengerei, enz. kunnen worden
beschadigd door de hoge temperatuur van
www.zanussi.com 5

het pyrolytische reinigingsproces van alle
pyrolytische ovens en kunnen mogelijk ook
kleine hoeveelheden schadelijke gassen
veroorzaken.
• Rookgassen die vrijkomen uit alle
pyrolytische ovens / kookresten zoals
beschreven, zijn niet schadelijk voor mensen,
inclusief zuigelingen of personen met
medische aandoeningen.
Binnenverlichting
• De gloeilampen of halogeenlampen in dit
apparaat zijn uitsluitend bedoeld voor
gebruik in huishoudelijke apparaten. Gebruik
deze niet voor andere doeleinden.
WAARSCHUWING!
Gevaar voor elektrische schokken!
• Voordat u het lampje vervangt, dient u de
stekker van het apparaat uit het stopcontact
te halen.
• Gebruik alleen lampjes met dezelfde
specificaties.
Verwijdering
WAARSCHUWING!
Gevaar voor letsel of verstikking.
• Haal de stekker uit het stopcontact.
• Snijd het netsnoer vlak bij het apparaat af en
gooi het weg.
• Verwijder de deurvergrendeling om te
voorkomen dat kinderen of huisdieren binnen
in het apparaat vast komen te zitten.
Servicedienst
• Neem contact op met een erkende
servicedienst voor reparatie van het
apparaat.
• Gebruik uitsluitend originele
reserveonderdelen.
Beschrijving van het product
Algemeen overzicht
6
5
9
7
8
5
4
1
2
3
31 42
1
Bedieningspaneel
2
Knop voor de ovenfuncties
3
Elektronische tijdschakelklok
4
Knop voor de temperatuur
5
Verwarmingselement
6
Lampje
7
Ventilator
8
Verwijderbare inschuifrail
9
Roosterhoogtes
Accessoires
• Bakrooster
Voor kookgerei, bak- en braadvormen.
• Bakplaat
Voor gebak en koekjes.
• Grill-/braadpan
Voor braden en roosteren of als schaal om
vet op te vangen.
6 www.zanussi.com

Voor het eerste gebruik
WAARSCHUWING!
Raadpleeg de hoofdstukken
Veiligheid.
Raadpleeg voor het instellen van de
dagtijd het hoofdstuk "Klokfuncties".
Eerste reiniging
Verwijder all accessoires en verwijderbare
inschuifrails uit het apparaat.
Zie het hoofdstuk 'Onderhoud en
reiniging'.
Reinig het apparaat en de accessoires voor het
eerste gebruik.
Zet de accessoires en verwijderbare
inschuifrails terug in de beginstand.
Voorverwarmen
Verwarm het apparaat voor om het resterende
vet weg te branden.
1. Stel de functie en de
maximumtemperatuur in.
2. Laat het apparaat een uur werken.
3. Stel de functie en stel de
maximumtemperatuur in.
4. Laat het apparaat 15 minuten werken.
Accessoires kunnen heter worden dan normaal.
Het apparaat kan een vreemde geur en rook
afgeven. Dit is normaal. Zorg dat er voldoende
luchtcirculatie in de ruimte is.
Dagelijks gebruik
WAARSCHUWING!
Raadpleeg de hoofdstukken
Veiligheid.
Verzonken knoppen
Om het apparaat te bedienen, moet u op de
bedieningsknop drukken. De bedieningsknop
komt naar voren.
Het apparaat aan- en uitzetten
Het hangt van het model of uw
apparaat knopsymbolen,
indicatielampjes of lampjes
heeft:
• Het lampje gaat aan als het
apparaat in werking is.
• Het symbool geeft aan of de
knop de kookzones, de
ovenfuncties of de temperatuur
bedient.
• Het indicatielampje gaat aan
wanneer de oven opwarmt.
1. Zet de functieknop van de oven op een
ovenfunctie.
2. Draai de temperatuurknop om een
temperatuur te kiezen.
3. Draai om het apparaat uit te schakelen, de
knop voor de ovenfuncties en de knop voor
de temperatuur in de uit-stand.
www.zanussi.com 7

Ovenfuncties
Ovenfunctie Toepassing
Uit-stand Het apparaat staat uit.
Multi Hetelucht Om op drie ovenniveaus te bakken of om voedsel te drogen.Stel
de temperatuur 20 - 40°C lager in dan voor Boven-/onderwarm-
te.
Boven-/Onder-
warmte
Voor het bakken en braden op een ovenniveau.
Multi Hetelucht
(Vochtig)
Om gebakken voedsel in bakblikken op één rekniveau te bakken.
Om tijdens de bereiding energie te besparen. Deze functie moet
worden gebruikt in overeenstemming met de kooktabellen om
de gewenste kookresultaten te bereiken. Voor meer informatie
over de aanbevolen instellingen raadpleegt u de kooktabellen.
Deze functie wordt gebruikt om de energie-efficiëntieklasse vast
te stellen overeenkomstig EN 60350-1.
Grill Intens Voor het roosteren van plat voedsel in grote hoeveelheden en
voor het maken van toast.
Circulatiegrill Voor het braden van grotere stukken vlees of gevogelte met bot-
ten op één niveau. Ook om te gratineren en te bruinen.
Pizza Hetelucht Om gerechten op één niveau te bakken met intensief bruineren
en een krokantere korst. Stel de temperatuur 20 - 40°C lager in
dan voor boven-/onderwarmte.
Vlees Voor het bereiden van erg mals, sappig gebraden voedsel.
Warmhouden Om het voedsel warm te houden.
Ontdooien Deze functie kan gebruikt worden om bevroren voedsel te ont-
dooien zoals groente en fruit. De ontdooitijd hangt af van de
hoeveelheid en dikte van het voedsel.
Pyrolyse Automatische pyrolytische reiniging van de oven. Hierdoor wor-
den vuilresten in de oven verbrand.
8 www.zanussi.com

Weergave
A B C
D
EFG
A. Timer
B. Opwarmen en restwarmte-indicatie
C. Waterreservoir (alleen geselecteerde
modellen)
D. Vleesthermometer (alleen geselecteerde
modellen)
E. Deurslot (alleen geselecteerde modellen)
F. Uren/minuten
G. Klokfuncties
Toetsen
Knop Functie Beschrijving
MIN De tijd instellen.
KLOK De klokfunctie instellen.
PLUS De tijd instellen.
Controlelampje bij voorverwarmen
Als u een ovenfunctie inschakelt, gaan de
balkjes op het display een voor een branden.
De balkjes geven aan dat de oventemperatuur
toeneemt of afneemt.
Klokfuncties
Tabel klokfuncties
Klokfunctie Toepassing
DAGTIJD Met deze functie kunt u de dagtijd weergeven of veranderen. U
kunt de dagtijd alleen wijzigen als het apparaat uit staat.
DUUR Instellen hoe lang het apparaat in werking is. Gebruik dit alleen
wanneer de ovenfunctie is ingesteld.
EINDE Instellen wanneer het apparaat wordt uitgeschakeld. Gebruik dit
alleen wanneer de ovenfunctie is ingesteld.
VERTRAGINGSTIJD Om de functies BEREIDINGSDUUR en EINDE te combineren.
KOOKWEKKER Gebruik de kookwekker voor het instellen van een afteltijd. Deze
functie heeft geen invloed op de werking van het apparaat. U
kunt de KOOKWEKKER op elk gewenst moment instellen, ook
als het apparaat uit staat.
www.zanussi.com 9

Klokfunctie Toepassing
00:00 TIMER MET OPTEL-
FUNCTIE
Als u geen andere klokfunctie instelt, zal de timer met optelfunc-
tie automatisch bijhouden hoe lang het apparaat werkt. Deze
wordt onmiddellijk ingeschakeld wanneer de oven begint met
opwarmen.
De timer met optelfunctie kan niet gebruikt worden met de func-
ties: BEREIDINGSDUUR, EINDE.
Dagtijd instellen en wijzigen
Wacht na de eerste aansluiting op het
stopcontact totdat het display en "12:00"
weergeeft. "12" knippert.
1. Druk op of om de uren in te stellen.
2. Druk op om te bevestigen en om naar
het instellen van de minuten te gaan.
Het display toont en het ingestelde uur.
"00" knippert.
3. Druk op of om de huidige minuten in
te stellen.
4. Druk op om te bevestigen of de
ingestelde dagtijd zal na vijf seconden
automatisch worden opgeslagen.
Op het display verschijnt de nieuwe tijd.
Druk om de dagtijd te wijzigen herhaaldelijk op
tot het indicatielampje voor de dagtijd
knippert op het display.
De DUUR instellen
1. Ovenfunctie instellen.
2. Blijf op drukken totdat begint te
knipperen.
3. Druk op
of om de minuten en uren
voor de BEREIDINGSDUUR in te stellen.
4. Druk op om te bevestigen.
Wanneer de tijd is verlopen, weerklinkt er
gedurende twee minuten een geluidssignaal.
en tijdinstelling knippert in het display. Het
apparaat wordt automatisch uitgeschakeld.
5. Druk op een willekeurige toets om het
geluidssignaal uit te zetten.
6. Draai de knop voor de ovenfuncties naar de
uit-stand.
Het EINDE instellen
1. Ovenfunctie instellen.
2. Blijf op drukken totdat begint te
knipperen.
3. Druk op of om de minuten en uren
voor de EINDTIJD in te stellen.
4. Druk op om te bevestigen.
Op de ingestelde tijd, weerklinkt er gedurende
twee minuten een geluidssignaal. en
tijdinstelling knippert in het display. Het
apparaat wordt automatisch uitgeschakeld.
5. Druk op een willekeurige toets om het
geluidssignaal uit te zetten.
6. Draai de knop voor de ovenfuncties naar de
uit-stand.
De functie TIJDVERTRAGING instellen
1. Ovenfunctie instellen.
2. Blijf op drukken totdat begint te
knipperen.
3. Druk op of om de minuten en uren
voor de BEREIDINGSDUUR in te stellen.
4. Druk op om te bevestigen. Op het
display knippert .
5. Druk op of om de minuten en uren
voor de EINDTIJD in te stellen.
6. Druk op om te bevestigen.
Het apparaat gaat later automatisch aan, werkt
voor de ingestelde BEREIDINGSDUUR en stop
aan op de ingestelde EINDTIJD. Op de
ingestelde tijd, weerklinkt er gedurende twee
minuten een geluidssignaal. en tijdinstelling
knippert in het display. Het apparaat wordt
uitgeschakeld.
7. Druk op een willekeurige toets om het
geluidssignaal uit te zetten.
8. Draai de knop voor de ovenfuncties naar de
uit-stand.
10 www.zanussi.com

De KOOKWEKKER instellen
1. Druk steeds opnieuw op tot op het
display verschijnt en "00" knippert.
2. Druk op of om de KOOKWEKKER in
te stellen.
U moet eerst de seconden en dan de
minuten instellen.
Als de ingestelde tijd langer is dan 60
minuten knippert op het display.
3. Stel de uren in.
4. De KOOKWEKKER start automatisch na
vijf seconden.
Na 90% van de ingestelde tijd klinkt er een
geluidssignaal.
5. Wanneer de ingestelde tijd is verlopen,
weerklinkt er gedurende twee minuten een
geluidssignaal. "00:00" en knipperen op
het display. Druk op een willekeurige toets
om het geluidssignaal uit te zetten.
TIMER MET OPTELFUNCTIE
Houd om de timer met optelfunctie te resetten
en ingedrukt. De timer gaat weer optellen.
Gebruik van de accessoires
WAARSCHUWING!
Raadpleeg de hoofdstukken
Veiligheid.
De accessoires plaatsen
Bakrooster:
Plaats het rooster tussen de geleidestangen van
de roostersteun en zorg ervoor dat de pootjes
omlaag staan.
Braadpan:
Plaats de braadpan tussen de geleidestangen
van de inschuifrails.
Bakrooster en braadpan samen:
Schuif de braadpan tussen de geleidestangen
van de roostersteun en het rooster op de
roostersteun er boven en zorg er hierbij voor dat
de pootjes naar beneden wijzen.
Kleine inkepingen bovenaan
verhogen de veiligheid. Deze
inkepingen zorgen er ook voor dat ze
niet omkantelen. De hoge rand rond
het rooster voorkomt dat het
kookgerei van het rooster afglijdt.
www.zanussi.com 11

Extra functies
Gebruik van het Kinderslot
Als het Kinderslot aanstaat, kan het apparaat
niet per ongeluk worden geactiveerd.
De deur is vergrendeld en de
symbolen SAFE en verschijnen
op het display als de pyrolysefunctie
in werking is. Dit kan worden
gecontroleerd op de knop.
1. Zorg dat de knop voor de ovenfuncties in
de uit-stand staat.
2. Druk en gedurende 2 seconden
tegelijkertijd in.
Er klinkt een geluidssignaal. SAFE en
verschijnen op het display.
Herhaal stap 2 om het kinderslot uit te
schakelen.
Restwarmte-indicatie
Wanneer u het apparaat uitschakelt, geeft het
display de restwarmte aan als de
temperatuur in de oven hoger is dan 40 °C.
Draai de knop voor de temperatuur naar links of
rechts om de oventemperatuur weer te geven.
Automatische uitschakeling
Om veiligheidsredenen schakelt het apparaat na
bepaalde tijd automatisch uit als er een
ovenfunctie in werking is en u geen instellingen
wijzigt.
Temperatuur (°C) Uitschakeltijd (u)
30 - 115 12.5
Temperatuur (°C) Uitschakeltijd (u)
120 - 195 8.5
200 - 245 5.5
250 - maximum 1.5
Druk na een automatische uitschakeling op een
willekeurige knop om het toestel opnieuw te
activeren.
De automatische uitschakeling werkt
niet met de functies: licht, duur,
einde.
Koelventilator
Als het apparaat in werking is, wordt de
koelventilator automatisch ingeschakeld om de
oppervlakken van het apparaat koel te houden.
Na het uitschakelen van het apparaat kan de
ventilatie doorgaan totdat het apparaat is
afgekoeld.
Veiligheidsthermostaat
Een onjuiste bediening van het apparaat of
defecte componenten kunnen gevaarlijke
oververhitting veroorzaken. Om dit te
voorkomen is de oven voorzien van een
veiligheidsthermostaat die de stroomtoevoer
onderbreekt. Zodra de temperatuur is gedaald,
wordt de oven automatisch weer ingeschakeld.
Aanwijzingen en tips
WAARSCHUWING!
Raadpleeg de hoofdstukken
Veiligheid.
De temperaturen en baktijden in de
tabellen zijn slechts als richtlijn
bedoeld. Deze zijn afhankelijk van de
recepten en de kwaliteit en de
hoeveelheid van de gebruikte
ingrediënten.
Algemene informatie
• Het apparaat heeft vijf inzetniveaus. Tel de
inzetniveaus vanaf de bodem van het
apparaat.
• Het apparaat heeft een speciaal systeem dat
de lucht circuleert en voor doorlopende
recycling van stoom zorgt. Dankzij dit
systeem is het mogelijk om voedsel te
bereiden in een atmosfeer met stoom en
worden de gerechten zacht van binnen en
knapperig van buiten. Bovendien worden de
12 www.zanussi.com

bereidingstijd en het energieverbruik tot een
minimum beperkt.
• Vocht kan in het apparaat of op de glazen
deurpanelen condenseren. Dit is normaal.
Ga altijd iets terug staan van het apparaat
als u de deur van het apparaat tijdens de
werking opent. Om de condens te
verminderen, dient u het apparaat 10
minuten te laten voorverwarmen.
• Veeg na elk gebruik het vocht van het
apparaat.
• Plaats geen voorwerpen direct op de bodem
van het apparaat en bedek de bodem tijdens
de bereiding niet met aluminiumfolie. Dit kan
de bakresultaten veranderen en de
emaillelaag beschadigen.
Voor de bereiding van gebak
• De ovendeur mag pas worden geopend als
driekwart van de baktijd is verstreken.
• Als u twee bakplaten tegelijkertijd gebruikt,
dient u één niveau ertussen leeg te laten.
Voor de bereiding van vlees en vis
• Gebruik een diepe bak voor erg vet voedsel
om te oven te behoeden voor blijvende
vetvlekken.
• Laat het vlees ongeveer 15 minuten rusten
voordat u het aansnijdt, zodat het vleessap
er niet uit stroomt.
• Om te veel rook tijdens het braden in de
oven te vermijden, kunt u een beetje water in
de lekbak gieten. Om rook te vermijden,
voegt u water toe wanneer het is
opgedroogd.
Bereidingstijden
De bereidingsduur is afhankelijk van het soort
voedsel, de samenstelling en het volume.
Houd in eerste instantie het bereidingsproces in
de gaten. Zoek bij het gebruik van dit apparaat
de beste instellingen (temperatuur,
bereidingsduur, etc.) voor uw kookgerei,
recepten en hoeveelheden.
Bak- en braadschema
Taart
Gerecht Boven-/onderwarmte Multi hetelucht Tijd (min) Opmer-
kingen
Tempera-
tuur (°C)
Rooster-
hoogte
Tempera-
tuur (°C)
Rooster-
hoogte
Schuimtaart 170 2 160 3 (2 en 4) 45 - 60 In een cake-
vorm
Zandtaart-
deeg
170 2 160 3 (2 en 4) 20 - 30 In een cake-
vorm
Kwarktaart
met karne-
melk
170 1 165 2 80 - 100 In een cake-
vorm van 26
cm
Appelgebak
(appeltaart)
1)
170 2 160 2 (links en
rechts)
80 - 100 In twee ca-
kevormen
van 20 cm
op een bak-
rooster
Strudel 175 3 150 2 60 - 80 Op een bak-
plaat
Confituur-
taart
170 2 165 2 (links en
rechts)
30 - 40 In een cake-
vorm van 26
cm
www.zanussi.com 13

Gerecht Boven-/onderwarmte Multi hetelucht Tijd (min) Opmer-
kingen
Tempera-
tuur (°C)
Rooster-
hoogte
Tempera-
tuur (°C)
Rooster-
hoogte
Cake, zacht 170 2 150 2 40 - 50 In een cake-
vorm van 26
cm
Kerstgebak /
Rijkgevulde
vruchtencake
1)
160 2 150 2 90 - 120 In een cake-
vorm van 20
cm
Pruimentaart
1)
175 1 160 2 50 - 60 In een
broodvorm
Cakejes -
één niveau
1)
170 3 150 - 160 3 20 - 30 Op een bak-
plaat
Cakejes -
twee niveaus
1)
- - 140 - 150 2 en 4 25 - 35 Op een bak-
plaat
Cakejes -
drie niveaus
1)
- - 140 - 150 1, 3 en 5 30 - 45 Op een bak-
plaat
Koekjes / ge-
bakreepjes -
één niveau
140 3 140 - 150 3 25 - 45 Op een bak-
plaat
Koekjes / ge-
bakreepjes -
twee niveaus
- - 140 - 150 2 en 4 35 - 40 Op een bak-
plaat
Koekjes / ge-
bakreepjes -
drie niveaus
- - 140 - 150 1, 3 en 5 35 - 45 Op een bak-
plaat
Schuimge-
bakjes - één
niveau
120 3 120 3 80 - 100 Op een bak-
plaat
Schuimge-
bakjes - twee
niveaus
1)
- - 120 2 en 4 80 - 100 Op een bak-
plaat
Broodjes
1)
190 3 190 3 12 - 20 Op een bak-
plaat
Eclairs - één
niveau
190 3 170 3 25 - 35 Op een bak-
plaat
14 www.zanussi.com

Gerecht Boven-/onderwarmte Multi hetelucht Tijd (min) Opmer-
kingen
Tempera-
tuur (°C)
Rooster-
hoogte
Tempera-
tuur (°C)
Rooster-
hoogte
Eclairs- twee
niveaus
- - 170 2 en 4 35 - 45 Op een bak-
plaat
Taartjes 180 2 170 2 45 - 70 In een cake-
vorm van 20
cm
Rijkgevulde
vruchtencake
160 1 150 2 110 - 120 In een cake-
vorm van 24
cm
Victoriataart
met jamvul-
ling
1)
170 1 160 2 (links en
rechts)
30 - 50 In een cake-
vorm van 20
cm
1) Verwarm de oven 10 minuten voor.
Brood en pizza
Gerecht Boven-/onderwarmte Multi hetelucht Tijd (min) Opmer-
kingen
Tempera-
tuur (°C)
Rooster-
hoogte
Tempera-
tuur (°C)
Rooster-
hoogte
Witbrood
1)
190 1 190 1 60 - 70 1 - 2 stuks,
500 gram
per stuk
Roggebrood 190 1 180 1 30 - 45 In een
broodvorm
Broodjes
1)
190 2 180 2 (2 en 4) 25 - 40 6 - 8 brood-
jes op een
bakplaat
Pizza
1)
230 - 250 1 230 - 250 1 10 - 20 Op een bak-
plaat of in
een braad-
pan
Scones
1)
200 3 190 3 10 - 20 Op een bak-
plaat
1) Verwarm de oven 10 minuten voor.
www.zanussi.com 15

Flans
Gerecht Boven-/onderwarmte Multi hetelucht Tijd (min) Opmer-
kingen
Tempera-
tuur (°C)
Rooster-
hoogte
Tempera-
tuur (°C)
Rooster-
hoogte
Pastataart 200 2 180 2 40 - 50 In een vorm
Hartige
groententaart
200 2 175 2 45 - 60 In een vorm
Quiches
1)
180 1 180 1 50 - 60 In een vorm
Lasagne
1)
180 - 190 2 180 - 190 2 25 - 40 In een vorm
Cannelloni
1)
180 - 190 2 180 - 190 2 25 - 40 In een vorm
1) Verwarm de oven 10 minuten voor.
Vlees
Gerecht Boven-/onderwarmte Multi hetelucht Tijd (min) Opmer-
kingen
Tempera-
tuur (°C)
Rooster-
hoogte
Tempera-
tuur (°C)
Rooster-
hoogte
Rundvlees 200 2 190 2 50 - 70 Op een bak-
rooster
Varkensrug 180 2 180 2 90 - 120 Op een bak-
rooster
Kalfsvlees 190 2 175 2 90 - 120 Op een bak-
rooster
Engelse ros-
bief, rood
210 2 200 2 50 - 60 Op een bak-
rooster
Engelse ros-
bief, medium
210 2 200 2 60 - 70 Op een bak-
rooster
Engelse ros-
bief, door-
bakken
210 2 200 2 70 - 75 Op een bak-
rooster
Varkens-
schouder
180 2 170 2 120 - 150 Met zwoerd
Varkens-
schenkel
180 2 160 2 100 - 120 2 stuks
Lamsvlees 190 2 175 2 110 - 130 Bout
Kip 220 2 200 2 70 - 85 Heel
Kalkoen 180 2 160 2 210 - 240 Heel
16 www.zanussi.com

Gerecht Boven-/onderwarmte Multi hetelucht Tijd (min) Opmer-
kingen
Tempera-
tuur (°C)
Rooster-
hoogte
Tempera-
tuur (°C)
Rooster-
hoogte
Eend 175 2 220 2 120 - 150 Heel
Gans 175 2 160 1 150 - 200 Heel
Konijn 190 2 175 2 60 - 80 In stukken
gesneden
Haas 190 2 175 2 150 - 200 In stukken
gesneden
Fazant 190 2 175 2 90 - 120 Heel
Vis
Gerecht Boven-/onderwarmte Multi hetelucht Tijd (min) Opmer-
kingen
Tempera-
tuur (°C)
Rooster-
hoogte
Tempera-
tuur (°C)
Rooster-
hoogte
Forel / Zee-
brasem
190 2 175 2 40 - 55 3 - 4 vissen
Tonijn / zalm 190 2 175 2 35 - 60 4 - 6 filets
Grill
Verwarm de lege oven 3 minuten
voor.
Gerecht Gewicht Tempera-
tuur (°C)
Tijd (min) Rooster-
hoogte
Stuks (g) 1e kant 2e kant
Tournedos 4 800 max. 12 - 15 12 - 14 4
Biefstuk 4 600 max. 10 - 12 6 - 8 4
Worstjes 8 - max. 12 - 15 10 - 12 4
Varkenskote-
let
4 600 max. 12 - 16 12 - 14 4
Kip (in 2
helften)
2 1000 max. 30 - 35 25 - 30 4
Vleesspiesen 4 - max. 10 - 15 10 - 12 4
Kippenborst 4 400 max. 12 - 15 12 - 14 4
www.zanussi.com 17

Gerecht Gewicht Tempera-
tuur (°C)
Tijd (min) Rooster-
hoogte
Stuks (g) 1e kant 2e kant
Hamburger 6 600 max. 20 - 30 - 4
Visfilets 4 400 max. 12 - 14 10 - 12 4
Geroosterde
sandwiches
4 - 6 - max. 5 - 7 - 4
Geroosterd
brood
4 - 6 - max. 2 - 4 2 - 3 4
Circulatiegrill
Rundvlees
Gerecht Gewicht Temperatuur
(°C)
Tijd (min) Roosterhoog-
te
Rosbief of ossenhaas,
rood
1)
per cm dikte 190 - 200 5 - 6 1 of 2
Rosbief of ossenhaas,
medium
1)
per cm dikte 180 - 190 6 - 8 1 of 2
Rosbief of ossenhaas,
doorbakken
1)
per cm dikte 170 - 180 8 - 10 1 of 2
1) Oven voorverwarmen.
Varkensvlees
Gerecht Gewicht (kg) Temperatuur
(°C)
Tijd (min) Roosterhoog-
te
Schouderstuk, nek-
stuk, hamlap
1 - 1.5 160 - 180 90 - 120 1 of 2
Kotelet, ribbetje 1 - 1.5 170 - 180 60 - 90 1 of 2
Gehaktbrood 0.75 - 1 160 - 170 50 - 60 1 of 2
Varkensschenkel
(voorgekookt)
0.75 - 1 150 - 170 90 - 120 1 of 2
Kalfsvlees
Gerecht Gewicht (kg) Temperatuur
(°C)
Tijd (min) Roosterhoogte
Geroosterd kalfs-
vlees
1 160 - 180 90 - 120 1 of 2
Kalfsschenkel 1.5 - 2 160 - 180 120 - 150 1 of 2
18 www.zanussi.com

Lamsvlees
Gerecht Gewicht (kg) Temperatuur
(°C)
Tijd (min) Roosterhoogte
Lamsbout, geroo-
sterd lamsvlees
1 - 1.5 150 - 170 100 - 120 1 of 2
Lamsrug, medium 1 - 1.5 160 - 180 40 - 60 1 of 2
Gevogelte
Gerecht Gewicht (kg) Temperatuur
(°C)
Tijd (min) Roosterhoogte
Stukken gevogelte 0,2 - 0,25 elk 200 - 220 30 - 50 1 of 2
Halve kip 0,4 - 0,5 elk 190 - 210 35 - 50 1 of 2
Kip, haantje 1 - 1.5 190 - 210 50 - 70 1 of 2
Eend 1.5 - 2 180 - 200 80 - 100 1 of 2
Gans 3.5 - 5 160 - 180 120 - 180 1 of 2
Turkije 2.5 - 3.5 160 - 180 120 - 150 1 of 2
Turkije 4 - 6 140 - 160 150 - 240 1 of 2
Vis (gestoomd)
Gerecht Gewicht (kg) Temperatuur
(°C)
Tijd (min) Roosterhoogte
Hele vis 1 - 1.5 210 - 220 40 - 60 1 of 2
Multi Hetelucht (Vochtig)
Tijdens de bereiding mag u de deur
van het apparaat enkel openen als
het noodzakelijk is.
Gerecht Temperatuur
(°C)
Tijd (min) Rooster-
hoogte
Pastagratin 190 - 200 45 - 55 2
Aardappelgratin 160 - 170 60 - 75 2
Moussaka 180 - 200 75 - 90 2
Lasagne 160 - 170 55 - 70 2
Cannelloni 170 - 190 65 - 75 2
Broodpudding 150 - 160 75 - 90 2
www.zanussi.com 19

Gerecht Temperatuur
(°C)
Tijd (min) Rooster-
hoogte
Rijstpudding 170 - 190 45 - 60 2
Appeltaart 150 - 160 75 - 85 2
Witbrood 180 - 190 50 - 60 2
Ontdooien
Gerecht Gewicht
(g)
Ontdooitijd
(min.)
Nadooitijd (min) Opmerkingen
Kip 1000 100 - 140 20 - 30 Leg de kip op een omgekeer-
de onderschotel in een groot
bord. Halverwege de berei-
dingstijd omdraaien.
Vlees 1000 100 - 140 20 - 30 Halverwege de bereidingstijd
omdraaien.
Vlees 500 90 - 120 20 - 30 Halverwege de bereidingstijd
omdraaien.
Forel 150 25 - 35 10 - 15 -
Aardbeien 300 30 - 40 10 - 20 -
Boter 250 30 - 40 10 - 15 -
Room 2 x 200 80 - 100 10 - 15 Room kan ook met nog licht
bevroren deeltjes goed wor-
den geklopt.
Gebak 1400 60 60 -
Drogen - Multi hetelucht
• Gebruik hiervoor een met boterhampapier of
bakpapier belegde plaat.
• Stop de oven voor een beter resultaat
halverwege de droogtijd, open de deur en
laat het één nacht afkoelen om het drogen te
voltooien.
Groenten
Gerecht Temperatuur
(°C)
Tijd (u) Roosterhoogte
1 stand 2 standen
Bonen 60 - 70 6 - 8 3 1 / 4
Paprika's 60 - 70 5 - 6 3 1 / 4
Groente in het zuur 60 - 70 5 - 6 3 1 / 4
20 www.zanussi.com

Gerecht Temperatuur
(°C)
Tijd (u) Roosterhoogte
1 stand 2 standen
Paddenstoelen 50 - 60 6 - 8 3 1 / 4
Kruiden 40 - 50 2 - 3 3 1 / 4
Fruit
Gerecht Temperatuur
(°C)
Tijd (u) Roosterhoogte
1 stand 2 standen
Pruimen 60 - 70 8 - 10 3 1 / 4
Abrikozen 60 - 70 8 - 10 3 1 / 4
Schijfjes appel 60 - 70 6 - 8 3 1 / 4
Peren 60 - 70 6 - 9 3 1 / 4
Onderhoud en reiniging
WAARSCHUWING!
Raadpleeg de hoofdstukken
Veiligheid.
Opmerkingen over schoonmaken
• Maak de voorkant van het apparaat schoon
met een zachte doek en een warm sopje.
• Gebruik voor metalen oppervlakken een
specifiek reinigingsmiddel.
• Reinig de binnenkant van het apparaat na elk
gebruik. Vetophoping of andere
voedingsresten kunnen brand veroorzaken.
Het gevaar is groter voor de grillpan.
• Verwijder hardnekkig vuil met een speciale
ovenreiniger.
• Reinig alle accessoires na elk gebruik en laat
ze drogen. Gebruik een zachte doek met een
warm sopje en een reinigingsmiddel.
• Toebehoren met antiaanbaklaag mogen niet
worden schoongemaakt met een agressief
reinigingsmiddel, voorwerpen met scherpe
randen of een afwasautomaat. Dit kan de
antiaanbaklaag beschadigen.
Apparaten van roestvrij staal of
aluminium
Maak de ovendeur alleen met een
vochtige doek of natte spons
schoon. Droog maken met een
zachte doek.
Vermijd het gebruik van staalwol,
zure of schurende producten, deze
kunnen de oppervlakken van de
oven beschadigen. Maak het
bedieningspaneel van de oven net
zo voorzichtig schoon.
Verwijderbare inschuifrails
Als u de binnenkant van de oven wilt reinigen,
verwijdert u de inschuifrails.
1. Trek de inschuifrail bij de voorkant uit de
zijwand.
www.zanussi.com 21

2. Trek de geleider bij de achterkant uit de
zijwand en verwijder deze.
2
1
Installeer de inschuifrails in de omgekeerde
volgorde.
Pyrolytische reiniging
LET OP!
Verwijder alle accessoires en
verwijderbare inschuifrails.
Start de pyrolytische reiniging niet
als u de ovendeur niet volledig heeft
gesloten. In sommige modellen geeft
de display "C3" weer als deze fout
zich voordoet.
WAARSCHUWING!
Het apparaat wordt heel heet.
Gevaar voor brandwonden.
LET OP!
Als er in hetzelfde kastje andere
apparaten zijn geïnstalleerd, gebruik
deze dan niet tegelijkertijd met de
pyrolytische functie. Het kan schade
aan het apparaat veroorzaken.
1. Verwijder de ergste etensresten met de
hand.
2. Reinig de binnenkant van de deur met warm
water om te voorkomen dat resten
inbranden door hete lucht.
3. Stel de pyrolytische functie in. Raadpleeg
de "Ovenfuncties".
4. Wanneer knippert, drukt u op of op
om de gewenste procedure in te stellen:
Optie Beschrijving
P1 Als de oven niet
erg vuil is. Tijds-
duur van de pro-
cedure: 1 uur.
P2 Als het vuil niet
eenvoudig te
verwijderen is.
Tijdsduur van de
procedure: 1 uur
30 min.
Druk op of draai de temperatuurknop om de
procedure te starten.
U kunt de eindfunctie gebruiken om het starten
van de reinigingsprocedure uit te stellen.
Tijdens de pyrolytische reiniging is het
ovenlampje uit.
5. Als de oven de ingestelde temperatuur
bereikt, vergrendelt de deur. Het display
toont het symbool en de balken van de
warmteaanduiding totdat de deur
ontgrendelt.
Draai, om de pyrolytische reiniging te
stoppen voordat deze is voltooid, de knop
voor de ovenfuncties naar de uit-stand.
6. Na afloop van de pyrolytische reiniging
geeft het display de tijd van de dag aan. De
ovendeur blijft vergrendeld.
7. Zodra het apparaat is afgekoeld, klinkt een
geluidssignaal en wordt de ovendeur
ontgrendeld.
Reinigingsherinnering
Om u te herinneren aan de pyrolytische
reiniging, knippert PYR in het display
gedurende 10 seconden na elke in- en
uitschakeling van het apparaat.
De reinigingsherinnering gaat
uit:
• na het einde van de functie
pyrolytische reiniging.
• Als u gelijktijdig op en
drukt terwijl PYR op het display
knippert.
De ovendeur reinigen
De ovendeur heeft drie glazen panelen .U kunt
de ovendeur en interne glazen panelen
verwijderen om ze te reinigen.
De ovendeur kan dichtslaan als u de
glasplaten probeert te verwijderen
als de deur nog gemonteerd is.
22 www.zanussi.com

LET OP!
Gebruik het apparaat nooit zonder
de glasplaten.
Open de deur
volledig en houd de
twee deurscharnieren
vast.
1
Til de hendels op de
twee scharnieren
omhoog en draai ze.
2
Sluit de ovendeur
halverwege tot de
eerste
openingsstand. Trek
hem daarna naar
voren en haal hem uit
zijn zitting.
3
Leg de deur op een
zachte doek op een
stabiele ondergrond.
4
2
B
1
Deurafdekking (B) aan de bovenkant van de
deur aan beide kanten vastpakken en naar
binnen drukken om de klemsluiting te
ontgrendelen. Trek de deur naar voren om hem
te verwijderen.
Houd de glazen deurpanelen bij de bovenkant
vast en trek ze er voorzichtig een voor een uit.
Start bij het bovenste paneel. Zorg dat het glas
volledig uit de geleiders schuift.
Reinig de glasplaten met een sopje. Droog de
glasplaten voorzichtig af.
Als u ze gereinigd hebt, monteer dan de
glasplaten en de ovendeur. Voer bovenstaande
stappen uit in de omgekeerde volgorde.
Zorg ervoor dat u de glasplaten (A en B) weer
in de juiste volgorde terugplaatst.Het middelste
paneel (B) heeft een decoratief frame. De
bedrukte zone moet naar de binnenkant van de
deur gericht zijn. Zorg ervoor dat het oppervlak
van het glasplaatframe (B) op de bedrukte zijde
na de installatie niet ruw aanvoelt.
A B
Zorg ervoor dat u het middelste ruitje correct in
de uitsparingen plaatst.
www.zanussi.com 23

A
B
Het lampje vervangen
Leg een doek op de bodem van de binnenkant
van het apparaat. Dit voorkomt schade aan het
afdekglas en de ovenruimte.
WAARSCHUWING!
Gevaar voor elektrocutie! Maak de
zekering los voordat u de lamp
vervangt.
De lamp en het afdekglas kunnen
heet zijn.
LET OP!
Houd de halogeenlamp altijd met
een doek vast om te voorkomen dat
er vetrestjes op de ovenlamp
verbranden.
1. Schakel het apparaat uit.
2. Verwijder de zekeringen in de
zekeringenkast, of schakel de
stroomonderbreker uit.
Het achterste lampje
1. Draai het afdekglas van de lamp naar rechts
en verwijder het.
2. Reinig het afdekglas.
3. Vervang de lamp door een geschikte 300
°C hittebestendige lamp.
4. Plaats het afdekglas terug.
Probleemoplossing
WAARSCHUWING!
Raadpleeg de hoofdstukken
Veiligheid.
Problemen oplossen
Probleem Mogelijke oorzaak Oplossing
U kunt de oven niet inschakelen
of bedienen.
De oven is niet aangesloten op
een elektriciteitsnet of is niet
goed geïnstalleerd.
Controleer of de oven goed is
aangesloten op het elektriciteits-
net (zie het aansluitdiagram in-
dien beschikbaar).
De oven wordt niet warm. De oven is uitgeschakeld. Schakel de oven in.
De oven wordt niet warm. De klok is niet ingesteld. Stel de klok in.
De oven wordt niet warm. De benodigde kookstanden zijn
niet ingesteld.
Zorg ervoor dat de instellingen
juist zijn.
De oven wordt niet warm. De automatische uitschakeling is
actief.
Raadpleeg "Automatisch uitscha-
kelen".
De oven wordt niet warm. Het kinderbeveiliging is geacti-
veerd.
Raadpleeg "Gebruik van het kin-
derbeveiliging".
24 www.zanussi.com

Probleem Mogelijke oorzaak Oplossing
De oven wordt niet warm. De zekering is doorgeslagen. Controleer of de zekering de oor-
zaak van de storing is. Als de ze-
keringen keer op keer doorslaan,
neemt u contact op met een er-
kende installateur.
Het lampje brandt niet. Het lampje is stuk. Vervang het lampje.
De bereiding van de gerechten
duurt te lang of de gerechten
worden te snel gaar.
De temperatuur is te laag of te
hoog.
Pas indien nodig de temperatuur
aan. Volg het advies in de hand-
leiding op.
Stoom en condens slaan neer op
de gerechten en in de ovenruim-
te.
Het gerecht heeft te lang in de
oven gestaan.
Laat gerechten na het bereiden
niet langer dan 15 - 20 minuten
in de oven staan.
Op het display verschijnt "C3". De reinigingsfunctie werkt niet.
De deur is niet volledig gesloten
of het deurslot is defect.
Sluit de deur volledig.
Op het display verschijnt "F102".
• U heeft de deur niet helemaal
gesloten.
• De deurvergrendeling is stuk.
• Sluit de deur volledig.
• Schakel het apparaat uit via
de huiszekering of de veilig-
heidsschakelaar in de zeke-
ringkast en schakel het appa-
raat dan weer in.
• Neem contact op met de
klantenservice, wanneer
"F102" opnieuw wordt weer-
gegeven.
Het display toont een foutcode
die niet in deze tabel staat.
Er is een elektrische fout.
• Schakel de oven uit via de
huiszekering of de veiligheids-
schakelaar in de zekeringkast
en schakel deze weer in.
• Neem contact op met de
klantenservice wanneer de
foutcode opnieuw wordt
weergegeven.
www.zanussi.com 25

Probleem Mogelijke oorzaak Oplossing
Het apparaat staat aan maar
wordt niet warm. De ventilator
werkt niet. Op het display ver-
schijnt "Demo".
De demofunctie is ingeschakeld.
1. Schakel de oven uit.
2. Druk op de -toets en houd
deze ingedrukt.
3. Het eerste nummer op het
display en het Demo-indica-
tielampje beginnen te knip-
peren.
4. Voer de code 2468 in door
op de of -knop te
drukken om de waarden te
veranderen en druk op
om te bevestigen.
5. Het volgende nummer begint
te knipperen.
6. Demo-modus schakelt uit
als u het laatste nummer be-
vestigt en de code juist is.
Onderhoudgegevens
Als u niet zelf het probleem kunt verhelpen,
neem dan contact op met uw verkoper of de
serviceafdeling.
De contactgegevens van het servicecentrum
staan op het typeplaatje. Het typeplaatje bevindt
zich voor aan de binnenkant van het apparaat.
Verwijder het typeplaatje niet uit de ovenruimte.
Wij adviseren u om de gegevens hier te noteren:
Model (MOD.) .........................................
Productnummer (PNC) .........................................
Serienummer (S.N.) .........................................
Montage
WAARSCHUWING!
Raadpleeg de hoofdstukken
Veiligheid.
26 www.zanussi.com

Inbouw
594
16
573
21548
min. 550
20
600
558
589
114
594
min. 560
3
5
558
21548
min. 550
20
589
594
114
16
573
590
min. 560
594
3
5
Bevestiging van het apparaat aan het
kastje
A
B
Elektrische installatie
De fabrikant is niet verantwoordelijk
indien u deze veiligheidsmaatregelen
uit hoofdstuk 'Veiligheidsinformatie'
niet opvolgt.
Dit apparaat wordt geleverd met een netsnoer.
Kabel
Kabeltypes die van toepassing zijn op de
installatie of vervanging:
H07 RN-F, H05 RN-F, H05 RRF, H05 VV-F,
H05 V2V2-F (T90), H05 BB-F
Voor het deel van de kabel raadpleegt u het
totale vermogen op het typeplaatje. U kunt ook
de tabel raadplegen:
Totaal vermogen
(W)
Deel van de kabel
(mm²)
maximaal 1380 3 x 0.75
maximaal 2300 3 x 1
maximaal 3680 3 x 1.5
De aardekabel (groene/gele kabel) moet 2 cm
langer zijn dan de fase- en neutrale kabels
(blauwe en bruine kabels).
www.zanussi.com 27

Energiezuinigheid
Productkaart en informatie volgens EU 65-66/2014
Naam leverancier Zanussi
Modelidentificatie ZOP37902XK
Energie-efficiëntie Index 81.2
Energie-efficiëntieklasse A+
Energieverbruik bij een standaardbelasting, stand boven + on-
derwarmte
0.93 kWh/cyclus
Energieverbruik bij een standaardbelasting, stand hetelucht 0.69 kWh/cyclus
Aantal ruimten 1
Warmtebron Electriciteit
Volume 72 l
Soort oven Inbouwoven
Massa 33.0 kg
EN 60350-1 - Elektrische huishoudelijke
kookapparaten - deel 1: Range-ovens, ovens,
stoomovens en grills - Methoden voor
prestatiemeting.
Energie besparen
Dit apparaat bevat functies die u
helpen energie te besparen tijdens
het dagelijks koken.
Algemene tips
Zorg ervoor dat de ovendeur goed is gesloten
als het apparaat werkt en houd de deur tijdens
de bereiding zo veel mogelijk gesloten.
Gebruik metalen schalen om meer energie te
besparen.
Indien mogelijk de oven niet voorverwarmen
voordat u er voedsel in plaatst.
Verlaag bij een bereidingsduur langer dan 30
minuten de oventemperatuur met minimaal 3 -
10 minuten, afhankelijk van de bereidingsduur
voordat de kooktijd verstrijkt. De restwarmte in
de oven zorgt ervoor dat het gerecht wordt
voltooid.
U kunt de restwarmte gebruiken om andere
maaltijden op te warmen.
Bereiding met hete lucht
Gebruik indien mogelijk de bereidingsfuncties
met hete lucht om energie te besparen.
Restwarmte
Bij sommige ovenfuncties worden, als een
programma met tijdselectie (Duur of Einde) in
werking is en de bereidingstijd langer is dan 30
minuten, de verwarmingselementen automatisch
10% eerder uitgeschakeld.
De lamp en ventilator blijven wel werken.
Eten warm houden
Kies de laagst mogelijke temperatuurinstelling
om de restwarmte te gebruiken en een maaltijd
warm te houden. Het display toont de
restwarmteaanduiding of -temperatuur.
Multi Hetelucht (Vochtig)
Functie is ontworpen om tijdens de bereiding
energie te besparen. Het functioneert op
zodanige wijze dat de temperatuur in de
ovenruimte tijdens een kookcyclus kan
verschillen van de temperatuur die staat
aangegeven op het display. Kooktijden kunnen
28 www.zanussi.com

verschillend zijn van de kooktijden in andere
programma's.
Wanneer u Multi hetelucht (vochtig) gebruikt,
wordt de lamp automatisch na 30 seconden
uitgeschakeld.
MILIEUBESCHERMING
Recycle de materialen met het symbool .
Gooi de verpakking in een geschikte
verzamelcontainer om het te recyclen. Help om
het milieu en de volksgezondheid te
beschermen en recycle het afval van elektrische
en elektronische apparaten. Gooi apparaten
gemarkeerd met het symbool niet weg met
het huishoudelijk afval. Breng het product naar
het milieustation bij u in de buurt of neem
contact op met de gemeente.
www.zanussi.com 29

Contents
Safety information 30
Safety instructions 31
Product description 34
Before first use 34
Daily use 34
Clock functions
36
Using the accessories
38
Additional functions 39
Hints and tips 39
Care and cleaning 47
Troubleshooting 50
Installation 52
Energy efficiency
53
Subject to change without notice.
Safety information
Before the installation and use of the appliance, carefully read the
supplied instructions. The manufacturer is not responsible for any
injuries or damages that are the result of incorrect installation or
usage. Always keep the instructions in a safe and accessible
location for future reference.
Children and vulnerable people safety
• This appliance can be used by children aged from 8 years and
above and persons with reduced physical, sensory or mental
capabilities or lack of experience and knowledge if they have
been given supervision or instruction concerning the use of the
appliance in a safe way and understand the hazards involved.
• Do not let children play with the appliance.
• Keep all packaging away from children and dispose of it
appropriately.
• Keep children and pets away from the appliance when it
operates or when it cools down. Accessible parts are hot.
• If the appliance has a child safety device, this should be
activated.
• Children shall not carry out cleaning and user maintenance of
the appliance without supervision.
• Children aged 3 years and under must be kept away from this
appliance when it is in operation at all times.
General Safety
• Only a qualified person must install this appliance and replace
the cable.
30 www.zanussi.com

• WARNING: The appliance and its accessible parts become hot
during use. Care should be taken to avoid touching heating
elements. Children less than 8 years of age shall be kept away
unless continuously supervised.
• Always use oven gloves to remove or put in accessories or
ovenware.
• Before maintenance cut the power supply.
• Ensure that the appliance is switched off before replacing the
lamp to avoid the possibility of electric shock.
• Do not use a steam cleaner to clean the appliance.
• Do not use harsh abrasive cleaners or sharp metal scrapers to
clean the glass door since they can scratch the surface, which
may result in shattering of the glass.
• If the mains power supply cable is damaged, it must be
replaced by the manufacturer, its Authorised Service Centre or
similarly qualified persons to avoid an electrical hazard.
• Excessive spillage must be removed before the pyrolytic
cleaning. Remove all parts from the oven.
• To remove the shelf supports first pull the front of the shelf
support and then the rear end away from the side walls. Install
the shelf supports in the opposite sequence.
Safety instructions
Installation
WARNING!
Only a qualified person must install
this appliance.
• Remove all the packaging.
• Do not install or use a damaged appliance.
• Follow the installation instruction supplied
with the appliance.
• Always take care when moving the appliance
as it is heavy. Always use safety gloves and
enclosed footwear.
• Do not pull the appliance by the handle.
• Keep the minimum distance from the other
appliances and units.
• Make sure that the appliance is installed
below and adjacent safe structures.
• The sides of the appliance must stay
adjacent to appliances or to units with the
same height.
• The appliance is equipped with an electric
cooling system. It must be operated with the
electric power supply.
Electrical connection
WARNING!
Risk of fire and electrical shock.
• All electrical connections should be made by
a qualified electrician.
• The appliance must be earthed.
• Make sure that the electrical information on
the rating plate agrees with the power
supply. If not, contact an electrician.
• Always use a correctly installed shockproof
socket.
• Do not use multi-plug adapters and
extension cables.
• Make sure not to cause damage to the
mains plug and to the mains cable. Should
the mains cable need to be replaced, this
www.zanussi.com 31

must be carried out by our Authorised
Service Centre.
• Do not let mains cables touch or come near
the appliance door, especially when the door
is hot.
• The shock protection of live and insulated
parts must be fastened in such a way that it
cannot be removed without tools.
• Connect the mains plug to the mains socket
only at the end of the installation. Make sure
that there is access to the mains plug after
the installation.
• If the mains socket is loose, do not connect
the mains plug.
• Do not pull the mains cable to disconnect
the appliance. Always pull the mains plug.
• Use only correct isolation devices: line
protecting cut-outs, fuses (screw type fuses
removed from the holder), earth leakage trips
and contactors.
• The electrical installation must have an
isolation device which lets you disconnect
the appliance from the mains at all poles.
The isolation device must have a contact
opening width of minimum 3 mm.
• Fully close the appliance door, before you
connect the mains plug to the mains socket.
• This appliance complies with the E.E.C.
Directives.
Use
WARNING!
Risk of injury, burns and electrical
shock or explosion.
• This appliance is for household use only.
• Do not change the specification of this
appliance.
• Make sure that the ventilation openings are
not blocked.
• Do not let the appliance stay unattended
during operation.
• Deactivate the appliance after each use.
• Be careful when you open the appliance
door while the appliance is in operation. Hot
air can release.
• Do not operate the appliance with wet hands
or when it has contact with water.
• Do not apply pressure on the open door.
• Do not use the appliance as a work surface
or as a storage surface.
• Open the appliance door carefully. The use
of ingredients with alcohol can cause a
mixture of alcohol and air.
• Do not let sparks or open flames to come in
contact with the appliance when you open
the door.
• Do not put flammable products or items that
are wet with flammable products in, near or
on the appliance.
WARNING!
Risk of damage to the appliance.
• To prevent damage or discoloration to the
enamel:
– do not put ovenware or other objects in
the appliance directly on the bottom.
– do not put aluminium foil directly on the
bottom of the appliance.
– do not put water directly into the hot
appliance.
– do not keep moist dishes and food in the
appliance after you finish the cooking.
– be careful when you remove or install
the accessories.
• Discoloration of the enamel has no effect on
the performance of the appliance.
• Use a deep pan for moist cakes. Fruit juices
cause stains that can be permanent.
• This appliance is for cooking purposes only.
It must not be used for other purposes, for
example room heating.
• Always cook with the oven door closed.
• If the appliance is installed behind a furniture
panel (e.g. a door) make sure the door is
never closed when the appliance is in
operation. Heat and moisture can build up
behind a closed furniture panel and cause
subsequent damage to the appliance, the
housing unit or the floor. Do not close the
furniture panel until the appliance has cooled
down completely after use.
Care and cleaning
WARNING!
Risk of injury, fire, or damage to the
appliance.
• Before maintenance, deactivate the
appliance and disconnect the mains plug
from the mains socket.
• Make sure the appliance is cold. There is the
risk that the glass panels can break.
• Replace immediately the door glass panels
when they are damaged. Contact the
Authorised Service Centre.
• Be careful when you remove the door from
the appliance. The door is heavy!
32 www.zanussi.com

• Clean regularly the appliance to prevent the
deterioration of the surface material.
• Clean the appliance with a moist soft cloth.
Only use neutral detergents. Do not use any
abrasive products, abrasive cleaning pads,
solvents or metal objects.
• If you use an oven spray, obey the safety
instructions on the packaging.
• Do not clean the catalytic enamel (if
applicable) with any kind of detergent.
Pyrolytic cleaning
Risk of Injury / Fires / Chemical
Emissions (Fumes) in Pyrolitic Mode.
• Before carrying out a Pyrolitic self-cleaning
function or the First Use please remove from
the oven cavity:
– any excess food residues, oil or grease
spills / deposits.
– any removable objects (including
shelves, side rails etc., provided with the
product) particularly any non-stick pots,
pans, trays, utensils etc.
• Read carefully all the instructions for
Pyrolytic cleaning.
• Keep children away from the appliance while
the Pyrolytic cleaning is in operation.
The appliance becomes very hot and hot air
is released from the front cooling vents.
• Pyrolytic cleaning is a high temperature
operation that can release fumes from
cooking residues and construction materials,
as such consumers are strongly advised to:
– provide good ventilation during and after
each Pyrolytic cleaning.
– provide good ventilation during and after
the first use at maximum temperature
operation.
• Unlike all humans, some birds and reptiles
can be extremely sensitive to potential fumes
emitted during the cleaning process of all
Pyrolytic Ovens.
– Remove any pets (especially birds) from
the vicinity of the appliance location
during and after the Pyrolytic cleaning
and first use maximum temperature
operation to a well ventilated area.
• Small pets can also be highly sensitive to the
localized temperature changes in the vicinity
of all Pyrolytic Ovens when the Pyrolytic self
cleaning program is in operation.
• Non-stick surfaces on pots, pans, trays,
utensils etc., can be damaged by the high
temperature Pyrolytic cleaning operation of
all Pyrolytic Ovens and can be also a source
for low level harmful fumes.
• Fumes released from all Pyrolytic Ovens /
Cooking Residues as described are not
harmful to humans, including infants or
persons with medical conditions.
Internal light
• The type of light bulb or halogen lamp used
for this appliance is only for household
appliances. Do not use it for house lighting.
WARNING!
Risk of electrical shock.
• Before replacing the lamp, disconnect the
appliance from the power supply.
• Only use lamps with the same specifications.
Disposal
WARNING!
Risk of injury or suffocation.
• Disconnect the appliance from the mains
supply.
• Cut off the mains electrical cable close to
the appliance and dispose of it.
• Remove the door catch to prevent children
or pets from becoming trapped in the
appliance.
Service
• To repair the appliance contact an
Authorised Service Centre.
• Use original spare parts only.
www.zanussi.com 33

Product description
General overview
6
5
9
7
8
5
4
1
2
3
31 42
1
Control panel
2
Knob for the oven functions
3
Electronic programmer
4
Knob for the temperature
5
Heating element
6
Lamp
7
Fan
8
Shelf support, removable
9
Shelf positions
Accessories
• Wire shelf
For cookware, cake tins, roasts.
• Baking tray
For cakes and biscuits.
• Grill- / Roasting pan
To bake and roast or as pan to collect fat.
Before first use
WARNING!
Refer to Safety chapters.
To set the Time of day refer to
"Clock functions" chapter.
Initial Cleaning
Remove all accessories and removable shelf
supports from the appliance.
Refer to "Care and cleaning"
chapter.
Clean the appliance and the accessories before
first use.
Put the accessories and the removable shelf
supports back to their initial position.
Preheating
Preheat the empty appliance to burn off the
remaining grease.
1. Set the function and the maximum
temperature.
2. Let the appliance operate for 1 hour.
3. Set the function and set the maximum
temperature.
4. Let the appliance operate for 15 minutes.
Accessories can become hotter than usual. The
appliance can emit an odour and smoke. This is
normal. Make sure that the airflow in the room is
sufficient.
Daily use
WARNING!
Refer to Safety chapters.
Retractable knobs
To use the appliance, press the control knob.
The control knob comes out.
34 www.zanussi.com

Activating and deactivating the
appliance
It depends on the model if your
appliance has lamps, knob
symbols or indicators:
• The lamp comes on when the
appliance operates.
• The symbol shows whether the
knob controls the oven functions
or the temperature.
• The indicator comes on when the
oven heats up.
1. Turn the knob for the oven functions to
select an oven function.
2. Turn the knob for the temperature to select
a temperature.
3. To deactivate the appliance turn the knobs
for the oven functions and temperature to
the off position.
Oven functions
Oven function Application
Off position The appliance is off.
True Fan Cooking To bake on up to three shelf positions at the same time and to
dry food. Set the temperature 20 - 40 °C lower than for Top /
Bottom Heat.
Top / Bottom Heat To bake and roast food on one shelf position.
Moist Fan Baking To prepare baked goods in tin on one shelf position. To save en-
ergy during cooking. This function must be used in accordance
with the cooking tables in order to achieve the desired cooking
result. To get more information about the recommended set-
tings, refer to the cooking tables. This function was used to de-
fine the energy efficiency class acc. to EN 60350-1.
Fast Grilling To grill flat food in large quantities and to toast bread.
Turbo Grilling To roast larger meat joints or poultry with bones on one shelf
position. Also to make gratins and to brown.
Pizza Setting To bake food on one shelf position for a more intensive brown-
ing and a crispy bottom. Set the temperature 20 - 40 °C lower
than for Top / Bottom Heat.
Meat To prepare very tender and juicy roasts.
Keep Warm To keep food warm.
www.zanussi.com 35

Oven function Application
Defrost This function can be used for defrosting frozen foods, such as
vegetables and fruits. The defrosting time depends on the
amount and size of the frozen food.
Pyrolysis To activate the automatic pyrolytic cleaning of the oven. This
function burns off residual dirt in the oven.
Display
A B C
D
EFG
A. Timer
B. Heat-up and residual heat indicator
C. Water drawer (selected models only)
D. Core temperature sensor (selected models
only)
E. Door lock (selected models only)
F. Hours / minutes
G. Clock functions
Buttons
Button Function Description
MINUS To set the time.
CLOCK To set a clock function.
PLUS To set the time.
Heat-up indicator
When you activate an oven function, the bars in
the display come on one by one. The bars
show that the oven temperature increases or
decreases.
Clock functions
Clock functions table
Clock function Application
TIME OF DAY To show or change the time of day. You can change the time of
day only when the appliance is off.
DURATION To set how long the appliance operates. Use only when an oven
function is set.
END To set when the appliance deactivates. Use only when an oven
function is set.
36 www.zanussi.com

Clock function Application
TIME DELAY To combine DURATION and END function.
MINUTE MINDER Use to set a countdown time. This function has no effect on the
operation of the appliance. You can set the MINUTE MINDER at
any time, also if the appliance is off.
00:00 COUNT UP TIMER If you do not set any other clock function the COUNT UP TIMER
automatically monitor how long the appliance operates. It is on
immediately when the oven starts to heat.
The Count Up Timer cannot be used with the functions: DURA-
TION, END.
Setting and changing the time
After the first connection to the mains, wait until
the display shows and "12:00". "12"
flashes.
1. Press or to set the hours.
2. Press to confirm and switch to set the
minutes.
The display shows and the set hour. "00"
flashes.
3. Press or to set the current minutes.
4. Press to confirm or the set time of day
will be saved automatically after 5 seconds.
The display shows the new time.
To change the time of day press again and
again until the indicator for the time of day
flashes in the display.
Setting the DURATION
1. Set an oven function.
2. Press again and again until starts to
flash.
3. Press
or to set the minutes and the
hours for DURATION time.
4. Press to confirm.
When the time ends an acoustic signal sounds
for 2 minutes. and time setting flash in the
display. The appliance deactivates
automatically.
5. Press any button to stop the acoustic
signal.
6. Turn the knob for the oven functions to the
off position.
Setting the END
1. Set an oven function.
2. Press again and again until starts to
flash.
3. Press or to set the hours and the
minutes for END time.
4. Press to confirm.
At the set time an acoustic signal sounds for 2
minutes. and time setting flash in the
display. The appliance deactivates
automatically.
5. Press any button to stop the acoustic
signal.
6. Turn the knob for the oven functions to the
off position.
Setting the TIME DELAY function
1. Set an oven function.
2. Press again and again until starts to
flash.
3. Press or to set the minutes and the
hours for DURATION time.
4. Press to confirm. The display shows
flashing .
5. Press or to set the hours and the
minutes for END time.
6. Press to confirm.
Appliance turns on automatically later on, works
for the set DURATION time and stops at the set
END time. At the set time an acoustic signal
sounds for 2 minutes. and time setting flash
in the display. The appliance deactivates.
7. Press any button to stop the acoustic
signal.
www.zanussi.com 37

8. Turn the knob for the oven functions to the
off position.
Setting the MINUTE MINDER
1. Press again and again until and "00"
flash in the display.
2. Press or to set the MINUTE
MINDER.
First you set the seconds, then the minutes.
When the time you set is longer than 60
minutes, flash in the display.
3. Set the hours.
4. The MINUTE MINDER starts automatically
after 5 seconds.
After 90% of the set time, an acoustic
signal sounds.
5. When the set time ends, an acoustic signal
sounds for 2 minutes. "00:00" and flash
in the display. Press any button to stop the
acoustic signal.
COUNT UP TIMER
To reset the Count Up Timer, press and hold
and . The timer starts to count up again.
Using the accessories
WARNING!
Refer to Safety chapters.
Inserting the accessories
Wire shelf:
Push the shelf between the guide bars of the
shelf support and make sure that the feet point
down.
Deep pan:
Push the deep pan between the guide bars of
the shelf support.
Wire shelf and the deep pan together:
Push the deep pan between the guide bars of
the shelf support and the wire shelf on the
guide bars above and make sure that the feet
point down.
Small indentation at the top increase
safety. The indentations are also
anti-tip devices. The high rim around
the shelf prevents cookware from
slipping of the shelf.
38 www.zanussi.com

Additional functions
Using the Child Lock
When the Child Lock is on, the appliance
cannot be activated accidentally.
The door is locked , symbols SAFE
and come on the display also
when Pyrolysis function operates. It
can be checked on the knob.
1. Ensure the knob for the oven functions is in
the off position.
2. Press and hold and at the same time
for 2 seconds.
An acoustic signal sounds. SAFE and
comes on in the display.
To deactivate the Child Lock, repeat step 2.
Residual heat indicator
When you deactivate the appliance, the display
shows the residual heat indicator if the
temperature in the oven is more than 40 °C.
Turn the knob for the temperature left or right to
show the oven temperature.
Automatic Switch-off
For safety reasons the appliance deactivates
automatically after some time if an oven function
operates and you do not change any settings.
Temperature (°C) Switch-off time (h)
30 - 115 12.5
Temperature (°C) Switch-off time (h)
120 - 195 8.5
200 - 245 5.5
250 - maximum 1.5
After an automatic switch-off, press any button
to operate the appliance again.
The Automatic switch-off does not
work with the functions: Light,
Duration, End.
Cooling fan
When the appliance operates, the cooling fan
activates automatically to keep the surfaces of
the appliance cool. If you deactivate the
appliance, the cooling fan can continue to
operate until the appliance cools down.
Safety thermostat
Incorrect operation of the appliance or defective
components can cause dangerous overheating.
To prevent this, the oven has a safety
thermostat which interrupts the power supply.
The oven activates again automatically when the
temperature drops.
Hints and tips
WARNING!
Refer to Safety chapters.
The temperature and baking times in
the tables are guidelines only. They
depend on the recipes and the
quality and quantity of the
ingredients used.
General information
• The appliance has five shelf positions. Count
the shelf positions from the bottom of the
appliance floor.
• The appliance has a special system which
circulates the air and constantly recycles the
steam. With this system you can cook in a
steamy environment and keep the food soft
inside and crusty outside. It decreases the
cooking time and energy consumption to a
minimum.
• Moisture can condense in the appliance or
on the door glass panels. This is normal.
Always stand back from the appliance when
you open the appliance door while cooking.
To decrease the condensation, operate the
appliance for 10 minutes before cooking.
• Clean the moisture after each use of the
appliance.
www.zanussi.com 39

• Do not put the objects directly on the
appliance floor and do not put aluminium foil
on the components when you cook. This can
change the baking results and cause
damage to the enamel.
Baking cakes
• Do not open the oven door before 3/4 of the
set cooking time is up.
• If you use two baking trays at the same time,
keep one empty level between them.
Cooking meat and fish
• Use a deep pan for very fatty food to prevent
the oven from stains that can be permanent.
• Leave the meat for approximately 15 minutes
before carving so that the juice does not
seep out.
• To prevent too much smoke in the oven
during roasting, add some water into the
deep pan. To prevent the smoke
condensation, add water each time after it
dries up.
Cooking times
Cooking times depend on the type of food, its
consistency, and volume.
Initially, monitor the performance when you
cook. Find the best settings (heat setting,
cooking time, etc.) for your cookware, recipes
and quantities when you use this appliance.
Baking and roasting table
Cakes
Food Top / Bottom Heat True Fan Cooking Time
(min)
Com-
ments
Tempera-
ture (°C)
Shelf po-
sition
Tempera-
ture (°C)
Shelf po-
sition
Whisked
recipes
170 2 160 3 (2 and 4) 45 - 60 In a cake
mould
Shortbread
dough
170 2 160 3 (2 and 4) 20 - 30 In a cake
mould
Buttermilk
cheesecake
170 1 165 2 80 - 100 In a 26 cm
cake mould
Apple cake
(Apple pie)
1)
170 2 160 2 (left and
right)
80 - 100 In two 20 cm
cake moulds
on a wire
shelf
Strudel 175 3 150 2 60 - 80 In a baking
tray
Jam-tart 170 2 165 2 (left and
right)
30 - 40 In a 26 cm
cake mould
Sponge cake 170 2 150 2 40 - 50 In a 26 cm
cake mould
Christmas
cake / Rich
fruit cake
1)
160 2 150 2 90 - 120 In a 20 cm
cake mould
40 www.zanussi.com

Food Top / Bottom Heat True Fan Cooking Time
(min)
Com-
ments
Tempera-
ture (°C)
Shelf po-
sition
Tempera-
ture (°C)
Shelf po-
sition
Plum cake
1)
175 1 160 2 50 - 60 In a bread tin
Small cakes
- one level
1)
170 3 150 - 160 3 20 - 30 In a baking
tray
Small cakes
- two levels
1)
- - 140 - 150 2 and 4 25 - 35 In a baking
tray
Small cakes
- three levels
1)
- - 140 - 150 1, 3 and 5 30 - 45 In a baking
tray
Biscuits /
pastry stripes
- one level
140 3 140 - 150 3 25 - 45 In a baking
tray
Biscuits /
pastry stripes
- two levels
- - 140 - 150 2 and 4 35 - 40 In a baking
tray
Biscuits /
pastry stripes
- three levels
- - 140 - 150 1, 3 and 5 35 - 45 In a baking
tray
Meringues -
one level
120 3 120 3 80 - 100 In a baking
tray
Meringues -
two levels
1)
- - 120 2 and 4 80 - 100 In a baking
tray
Buns
1)
190 3 190 3 12 - 20 In a baking
tray
Eclairs - one
level
190 3 170 3 25 - 35 In a baking
tray
Eclairs - two
levels
- - 170 2 and 4 35 - 45 In a baking
tray
Plate tarts 180 2 170 2 45 - 70 In a 20 cm
cake mould
Rich fruit
cake
160 1 150 2 110 - 120 In a 24 cm
cake mould
Victoria
sandwich
1)
170 1 160 2 (left and
right)
30 - 50 In a 20 cm
cake mould
1) Preheat the oven for 10 minutes.
www.zanussi.com 41

Bread and pizza
Food Top / Bottom Heat True Fan Cooking Time
(min)
Com-
ments
Tempera-
ture (°C)
Shelf po-
sition
Tempera-
ture (°C)
Shelf po-
sition
White bread
1)
190 1 190 1 60 - 70 1 - 2 pieces,
500 gr per
piece
Rye bread 190 1 180 1 30 - 45 In a bread tin
Bread rolls
1)
190 2 180 2 (2 and 4) 25 - 40 6 - 8 rolls in
a baking tray
Pizza
1)
230 - 250 1 230 - 250 1 10 - 20 In a baking
tray or a
deep pan
Scones
1)
200 3 190 3 10 - 20 In a baking
tray
1) Preheat the oven for 10 minutes.
Flans
Food Top / Bottom Heat True Fan Cooking Time
(min)
Com-
ments
Tempera-
ture (°C)
Shelf po-
sition
Tempera-
ture (°C)
Shelf po-
sition
Pasta flan 200 2 180 2 40 - 50 In a mould
Vegetable
flan
200 2 175 2 45 - 60 In a mould
Quiches
1)
180 1 180 1 50 - 60 In a mould
Lasagne
1)
180 - 190 2 180 - 190 2 25 - 40 In a mould
Cannelloni
1)
180 - 190 2 180 - 190 2 25 - 40 In a mould
1) Preheat the oven for 10 minutes.
Meat
Food Top / Bottom Heat True Fan Cooking Time
(min)
Com-
ments
Tempera-
ture (°C)
Shelf po-
sition
Tempera-
ture (°C)
Shelf po-
sition
Beef 200 2 190 2 50 - 70 On a wire
shelf
Pork 180 2 180 2 90 - 120 On a wire
shelf
42 www.zanussi.com

Food Top / Bottom Heat True Fan Cooking Time
(min)
Com-
ments
Tempera-
ture (°C)
Shelf po-
sition
Tempera-
ture (°C)
Shelf po-
sition
Veal 190 2 175 2 90 - 120 On a wire
shelf
English roast
beef, rare
210 2 200 2 50 - 60 On a wire
shelf
English roast
beef, medi-
um
210 2 200 2 60 - 70 On a wire
shelf
English roast
beef, well
done
210 2 200 2 70 - 75 On a wire
shelf
Shoulder of
pork
180 2 170 2 120 - 150 With rind
Shin of pork 180 2 160 2 100 - 120 2 pieces
Lamb 190 2 175 2 110 - 130 Leg
Chicken 220 2 200 2 70 - 85 Whole
Turkey 180 2 160 2 210 - 240 Whole
Duck 175 2 220 2 120 - 150 Whole
Goose 175 2 160 1 150 - 200 Whole
Rabbit 190 2 175 2 60 - 80 Cut in
pieces
Hare 190 2 175 2 150 - 200 Cut in
pieces
Pheasant 190 2 175 2 90 - 120 Whole
Fish
Food Top / Bottom Heat True Fan Cooking Time
(min)
Com-
ments
Tempera-
ture (°C)
Shelf po-
sition
Tempera-
ture (°C)
Shelf po-
sition
Trout / Sea
bream
190 2 175 2 40 - 55 3 - 4 fish
Tuna fish /
Salmon
190 2 175 2 35 - 60 4 - 6 fillets
www.zanussi.com 43

Grilling
Preheat the empty oven for 3
minutes before cooking.
Food Quantity Tempera-
ture (°C)
Time (min) Shelf po-
sition
Pieces (g) 1st side 2nd side
Fillet steaks 4 800 max. 12 - 15 12 - 14 4
Beef steaks 4 600 max. 10 - 12 6 - 8 4
Sausages 8 - max. 12 - 15 10 - 12 4
Pork chops 4 600 max. 12 - 16 12 - 14 4
Chicken (cut
in 2)
2 1000 max. 30 - 35 25 - 30 4
Kebabs 4 - max. 10 - 15 10 - 12 4
Breast of
chicken
4 400 max. 12 - 15 12 - 14 4
Hamburger 6 600 max. 20 - 30 - 4
Fish fillet 4 400 max. 12 - 14 10 - 12 4
Toasted
sandwiches
4 - 6 - max. 5 - 7 - 4
Toast 4 - 6 - max. 2 - 4 2 - 3 4
Turbo Grilling
Beef
Food Quantity Temperature
(°C)
Time (min) Shelf position
Roast beef or fillet, rare
1)
per cm of thick-
ness
190 - 200 5 - 6 1 or 2
Roast beef or fillet, me-
dium
1)
per cm of thick-
ness
180 - 190 6 - 8 1 or 2
Roast beef or fillet, well
done
1)
per cm of thick-
ness
170 - 180 8 - 10 1 or 2
1) Preheat the oven.
44 www.zanussi.com

Pork
Food Quantity (kg) Temperature
(°C)
Time (min) Shelf position
Shoulder, neck, ham
joint
1 - 1.5 160 - 180 90 - 120 1 or 2
Chop, spare rib 1 - 1.5 170 - 180 60 - 90 1 or 2
Meat loaf 0.75 - 1 160 - 170 50 - 60 1 or 2
Pork knuckle (pre-
cooked)
0.75 - 1 150 - 170 90 - 120 1 or 2
Veal
Food Quantity (kg) Temperature
(°C)
Time (min) Shelf position
Roast veal 1 160 - 180 90 - 120 1 or 2
Knuckle of veal 1.5 - 2 160 - 180 120 - 150 1 or 2
Lamb
Food Quantity (kg) Temperature
(°C)
Time (min) Shelf position
Leg of lamb, roast
lamb
1 - 1.5 150 - 170 100 - 120 1 or 2
Saddle of lamb 1 - 1.5 160 - 180 40 - 60 1 or 2
Poultry
Food Quantity (kg) Temperature
(°C)
Time (min) Shelf position
Poultry portions 0.2 - 0.25 each 200 - 220 30 - 50 1 or 2
Chicken, half 0.4 - 0.5 each 190 - 210 35 - 50 1 or 2
Chicken, poulard 1 - 1.5 190 - 210 50 - 70 1 or 2
Duck 1.5 - 2 180 - 200 80 - 100 1 or 2
Goose 3.5 - 5 160 - 180 120 - 180 1 or 2
Turkey 2.5 - 3.5 160 - 180 120 - 150 1 or 2
Turkey 4 - 6 140 - 160 150 - 240 1 or 2
Fish (steamed)
Food Quantity (kg) Temperature
(°C)
Time (min) Shelf position
Whole fish 1 - 1.5 210 - 220 40 - 60 1 or 2
www.zanussi.com 45

Moist Fan Baking
During cooking, open the appliance
door only when necessary.
Food Temperature
(°C)
Time (min) Shelf posi-
tion
Pasta gratin 190 - 200 45 - 55 2
Potato gratin 160 - 170 60 - 75 2
Moussaka 180 - 200 75 - 90 2
Lasagne 160 - 170 55 - 70 2
Cannelloni 170 - 190 65 - 75 2
Bread pudding 150 - 160 75 - 90 2
Rice pudding 170 - 190 45 - 60 2
Apple cake 150 - 160 75 - 85 2
White bread 180 - 190 50 - 60 2
Defrost
Food Quantity
(g)
Defrosting
time (min)
Further defrost-
ing time (min)
Comments
Chicken 1000 100 - 140 20 - 30 Place the chicken on an up-
turned saucer placed on a
large plate. Turn halfway
through.
Meat 1000 100 - 140 20 - 30 Turn halfway through.
Meat 500 90 - 120 20 - 30 Turn halfway through.
Trout 150 25 - 35 10 - 15 -
Strawberries 300 30 - 40 10 - 20 -
Butter 250 30 - 40 10 - 15 -
Cream 2 x 200 80 - 100 10 - 15 Cream can also be whipped
when still slightly frozen in
places.
Gateau 1400 60 60 -
Drying - True Fan Cooking
• Cover trays with grease proof paper or
baking parchment.
• For a better result, stop the oven halfway
through the drying time, open the door and
let it cool down for one night to complete the
drying.
46 www.zanussi.com

Vegetables
Food Temperature
(°C)
Time (h) Shelf position
1 position 2 positions
Beans 60 - 70 6 - 8 3 1 / 4
Peppers 60 - 70 5 - 6 3 1 / 4
Vegetables for sour 60 - 70 5 - 6 3 1 / 4
Mushrooms 50 - 60 6 - 8 3 1 / 4
Herbs 40 - 50 2 - 3 3 1 / 4
Fruit
Food Temperature
(°C)
Time (h) Shelf position
1 position 2 positions
Plums 60 - 70 8 - 10 3 1 / 4
Apricots 60 - 70 8 - 10 3 1 / 4
Apple slices 60 - 70 6 - 8 3 1 / 4
Pears 60 - 70 6 - 9 3 1 / 4
Care and cleaning
WARNING!
Refer to Safety chapters.
Notes on cleaning
• Clean the front of the appliance with a soft
cloth with warm water and a cleaning agent.
• To clean metal surfaces, use a dedicated
cleaning agent.
• Clean the appliance interior after each use.
Fat accumulation or other food remains may
result in a fire. The risk is higher for the grill
pan.
• Clean stubborn dirt with a special oven
cleaner.
• Clean all accessories after each use and let
them dry. Use a soft cloth with warm water
and a cleaning agent.
• If you have nonstick accessories, do not
clean them using aggressive agents, sharp-
edged objects or a dishwasher. It can cause
damage to the nonstick coating.
Stainless steel or aluminium appliances
Clean the oven door with a damp
cloth or sponge only. Dry it with a
soft cloth.
Do not use steel wool, acids or
abrasive materials as they can
damage the oven surface. Clean the
oven control panel with the same
precautions.
Removing the shelf supports
To clean the oven, remove the shelf supports.
1. Pull the front of the shelf support away from
the side wall.
www.zanussi.com 47

2. Pull the rear end of the shelf support away
from the side wall and remove it.
2
1
Install the shelf supports in the opposite
sequence.
Pyrolysis
CAUTION!
Remove all accessories and
removable shelf supports.
Do not start the Pyrolysis if you did
not fully close the oven door. In
some models, the display shows
"C3" when this error occurs.
WARNING!
The appliance becomes very hot.
There is a risk of burns.
CAUTION!
If there are other appliances installed
in the same cabinet, do not use
them when the Pyrolysis function
operates. It can cause damage to
the appliance.
1. Remove the worst dirt manually.
2. Clean the inner side of the door with hot
water, so that the residues do not burn from
the hot air.
3. Set the Pyrolysis function. Refer to "Oven
functions".
4. When flashes, press or to set
the necessary procedure:
Option Description
P1 If the oven is not
very dirty. Time
of the proce-
dure: 1 h.
P2 If you cannot
easily remove
the dirt. Time of
the procedure: 1
h 30 min.
Press or turn the knob for the temperature to
start the procedure.
You can use the End function to delay the start
of the cleaning procedure.
During the Pyrolysis the oven lamp is off.
5. When the oven is at its set temperature, the
door locks. The display shows the symbol
and the bars of the heat indicator until
the door unlocks.
To stop Pyrolysis before it is completed,
turn the knob for the oven functions to the
off position.
6. When Pyrolysis is completed, the display
shows the time of day. The oven door stays
locked.
7. When the appliance is cool again, an
acoustic signal sounds and the door
unlocks.
Cleaning reminder
To remind you that the Pyrolysis is necessary,
PYR flashes in the display for 10 seconds after
each activation and deactivation of the
appliance.
The cleaning reminder goes out:
• after the end of the Pyrolysis
function.
• if you press and at the
same time while PYR flashes in
the display.
Cleaning the oven door
The oven door has three glass panels.You can
remove the oven door and the internal glass
panels to clean them.
The oven door can close if you try to
remove the glass panels before you
remove the oven door.
CAUTION!
Do not use the appliance without the
glass panels.
48 www.zanussi.com

Open the door fully
and hold the two
door hinges.
1
Lift and turn the
levers on the two
hinges.
2
Close the oven door
halfway to the first
opening position.
Then pull forward and
remove the door from
its seat.
3
Put the door on a soft
cloth on a stable
surface.
4
2
B
1
Hold the door trim (B) on the top edge of the
door at the two sides and push inwards to
release the clip seal. Pull the door trim to the
front to remove it.
Hold the door glass panels by their top edge
and carefully pull them out one by one. Start
from the top panel. Make sure the glass slides
out of the supports completely.
Clean the glass panels with water and soap.
Dry the glass panels carefully.
When the cleaning is completed, install the
glass panels and the oven door. Do the above
steps in the opposite sequence.
Make sure that you put the glass panels (A and
B) back in the correct sequence. The middle
panel (B) has a decorative frame. The screen-
printing zone must face the inner side of the
door. Make sure that after the installation the
surface of the glass panel frame (B) on the
screen-printing zones is not rough when you
touch it.
A B
Make sure that you install the middle panel of
glass in the seats correctly.
A
B
Replacing the lamp
Put a cloth on the bottom of the interior of the
appliance. It prevents damage to the lamp glass
cover and the cavity.
www.zanussi.com 49

WARNING!
Danger of electrocution! Disconnect
the fuse before you replace the
lamp.
The lamp and the lamp glass cover
can be hot.
CAUTION!
Always hold the halogen lamp with a
cloth to prevent grease residue from
burning on the lamp.
1. Deactivate the appliance.
2. Remove the fuses from the fuse box or
deactivate the circuit breaker.
The back lamp
1. Turn the lamp glass cover counterclockwise
to remove it.
2. Clean the glass cover.
3. Replace the lamp with a suitable 300 °C
heat-resistant lamp.
4. Install the glass cover.
Troubleshooting
WARNING!
Refer to Safety chapters.
What to do if...
Problem Possible cause Remedy
You cannot activate or operate
the oven.
The oven is not connected to an
electrical supply or it is connec-
ted incorrectly.
Check if the oven is correctly
connected to the electrical sup-
ply (refer to the connection dia-
gram if available).
The oven does not heat up. The oven is deactivated. Activate the oven.
The oven does not heat up. The clock is not set. Set the clock.
The oven does not heat up. The necessary settings are not
set.
Make sure that the settings are
correct.
The oven does not heat up. The automatic switch-off is acti-
vated.
Refer to "Automatic switch-off".
The oven does not heat up. The Child Lock is on. Refer to "Using the Child Lock".
The oven does not heat up. The fuse is blown. Make sure that the fuse is the
cause of the malfunction. If the
fuse is blown again and again,
contact a qualified electrician.
The lamp does not operate. The lamp is defective. Replace the lamp.
It takes too long to cook the
dishes or they cook too quickly.
The temperature is too low or too
high.
Adjust the temperature if neces-
sary. Follow the advice in the
user manual.
Steam and condensation settle
on the food and in the cavity of
the oven.
You left the dish in the oven for
too long.
Do not leave the dishes in the
oven for longer than 15 - 20 mi-
nutes after the cooking process
ends.
50 www.zanussi.com

Problem Possible cause Remedy
The display shows "C3". The cleaning function does not
operate. You did not fully close
the door, or the door lock is de-
fective.
Fully close the door.
The display shows "F102".
• You did not fully close the
door.
• The door lock is defective.
• Fully close the door.
• Deactivate the oven with the
house fuse or the safety
switch in the fuse box and ac-
tivate it again.
• If the display shows "F102"
again, contact the Customer
Care Department.
The display shows an error code
that is not in this table.
There is an electrical fault.
• Deactivate the oven with the
house fuse or the safety
switch in the fuse box and ac-
tivate it again.
• If the display shows the error
code again, contact the Cus-
tomer Care Department.
The appliance is activated and
does not heat up. The fan does
not operate. The display shows
"Demo".
The demo mode is activated.
1. Deactivate the oven.
2. Press and hold the button
.
3. The first digit on the display
and Demo indicator start to
blink.
4. Enter the code 2468 by
pressing the buttons or
to change the values and
press to confirm.
5. The next digit starts to blink.
6. Demo mode deactivates
when you confirm the last
digit and the code is correct.
Service data
If you cannot find a solution to the problem
yourself, contact your dealer or an Authorised
Service Centre.
The necessary data for the service centre is on
the rating plate. The rating plate is on the front
frame of the appliance cavity. Do not remove
the rating plate from the appliance cavity.
We recommend that you write the data here:
Model (MOD.) .........................................
Product number (PNC) .........................................
Serial number (S.N.) .........................................
www.zanussi.com 51

Installation
WARNING!
Refer to Safety chapters.
Building In
594
16
573
21548
min. 550
20
600
558
589
114
594
min. 560
3
5
558
21548
min. 550
20
589
594
114
16
573
590
min. 560
594
3
5
Securing the appliance to the cabinet
A
B
Electrical installation
The manufacturer is not responsible
if you do not follow the safety
precautions from the Safety
chapters.
This appliance is supplied only with a main
cable.
Cable
Cable types applicable for installation or
replacement:
H07 RN-F, H05 RN-F, H05 RRF, H05 VV-F,
H05 V2V2-F (T90), H05 BB-F
For the section of the cable refer to the total
power on the rating plate. You can also refer to
the table:
Total power (W) Section of the ca-
ble (mm²)
maximum 1380 3 x 0.75
maximum 2300 3 x 1
maximum 3680 3 x 1.5
The earth cord (green / yellow cable) must be 2
cm longer than phase and neutral cables (blue
and brown cables).
52 www.zanussi.com

Energy efficiency
Product Fiche and information according to EU 65-66/2014
Supplier's name Zanussi
Model identification ZOP37902XK
Energy Efficiency Index 81.2
Energy efficiency class A+
Energy consumption with a standard load, conventional mode 0.93 kWh/cycle
Energy consumption with a standard load, fan-forced mode 0.69 kWh/cycle
Number of cavities 1
Heat source Electricity
Volume 72 l
Type of oven Built-In Oven
Mass 33.0 kg
EN 60350-1 - Household electric cooking
appliances - Part 1: Ranges, ovens, steam
ovens and grills - Methods for measuring
performance.
Energy saving
The appliance contains features
which help you save energy during
everyday cooking.
General hints
Make sure that the oven door is closed properly
when the appliance operates and keep it closed
as much as possible during the cooking.
Use metal dishes to improve energy saving.
When possible, do not preheat the oven before
you put the food inside.
When the cooking duration is longer than 30
minutes, reduce the oven temperature to
minimum 3 - 10 minutes before the end of the
cooking time, depending on the duration of the
cooking. The residual heat inside the oven will
continue to cook.
Use the residual heat to warm up other dishes.
Cooking with fan
When possible, use the cooking functions with
fan to save energy.
Residual heat
If a programme with the Duration or End Time
selection is activated and the cooking time is
longer than 30 minutes, the heating elements
deactivate automatically 10% faster in some
oven functions.
The fan and lamp continue to operate.
Keep food warm
Choose the lowest possible temperature setting
to use residual heat and keep a meal warm. The
display shows the residual heat indicator or
temperature.
Moist Fan Baking
Function designed to save energy during
cooking. It operates in such a way that the
temperature in the oven cavity may differ from
the temperature indicated on the display during
a cooking cycle and cooking times may be
different from the cooking times in other
programmes.
When you use Moist Fan Baking, the lamp
automatically deactivates after 30 seconds.
www.zanussi.com 53

ENVIRONMENTAL CONCERNS
Recycle the materials with the symbol . Put
the packaging in applicable containers to
recycle it. Help protect the environment and
human health and to recycle waste of electrical
and electronic appliances. Do not dispose
appliances marked with the symbol with the
household waste. Return the product to your
local recycling facility or contact your municipal
office.
54 www.zanussi.com
*

www.zanussi.com 55

www.zanussi.com/shop
867324497-B-342016
-
 1
1
-
 2
2
-
 3
3
-
 4
4
-
 5
5
-
 6
6
-
 7
7
-
 8
8
-
 9
9
-
 10
10
-
 11
11
-
 12
12
-
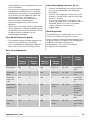 13
13
-
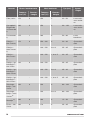 14
14
-
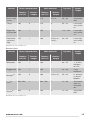 15
15
-
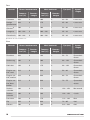 16
16
-
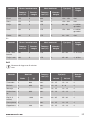 17
17
-
 18
18
-
 19
19
-
 20
20
-
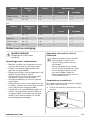 21
21
-
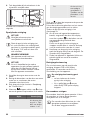 22
22
-
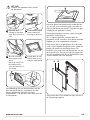 23
23
-
 24
24
-
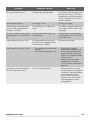 25
25
-
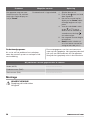 26
26
-
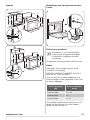 27
27
-
 28
28
-
 29
29
-
 30
30
-
 31
31
-
 32
32
-
 33
33
-
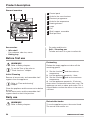 34
34
-
 35
35
-
 36
36
-
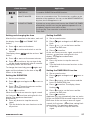 37
37
-
 38
38
-
 39
39
-
 40
40
-
 41
41
-
 42
42
-
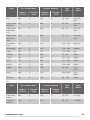 43
43
-
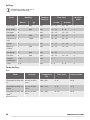 44
44
-
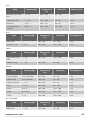 45
45
-
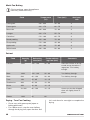 46
46
-
 47
47
-
 48
48
-
 49
49
-
 50
50
-
 51
51
-
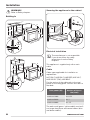 52
52
-
 53
53
-
 54
54
-
 55
55
-
 56
56


