
Bedienungsanleitung2 | User manual (GB)13 | Manuel d’utilisation (FR)24 | Manual de instrucciones35 | Istruzioni per l’uso46 | Bedieningshandleiding57 | Manual de instruções68 |
Инструкция по применению79
ZWILLING® FRESH & SAVE VACUUM STARTER SET

2
Sicherheit
DE
Sicherheit
Lesen Sie vor dem Gebrauch
der Vakuumpumpe diese Bedie-
nungsanleitung vollständig durch.
Bewahren Sie die Bedienungs-
anleitung an einem sicheren Ort
auf. Falls Sie die Vakuumpumpe
an Dritte weitergeben, geben Sie
auch die Bedienungsanleitung mit.
Die Nichtbeachtung dieser Bedie-
nungsanleitung kann zu schweren
Verletzungen oder Schäden
amGerät führen. Für Schäden, die
durch Nichtbeachtung dieser Be-
dienungsanleitung entstehen, über-
nimmt ZWILLING keine Haftung.
Sicherheitshinweise
Die Vakuumpumpe (im
Folgenden als „Gerät“ be-
zeichnet) ist ausschließlich
für ZWILLING FRESH &
SAVE Produkte vorgesehen,
die mithilfe von Vakuum eine
Verlängerung der Lebens-
mittelhaltbarkeit bezwecken.
Die Vakuumpumpe darf aus-
schließlich mit den mitgelie-
ferten oder von ZWILLING
zugelassenen Zubehör-
teilen genutzt werden. Jede
andere Verwendung giltals
nicht bestimmungsgemäß
und kann zu Personen- oder
Sachschäden führen. Das
Gerät ist für den häuslichen
Gebrauch bestimmt. Es
ist für eine gewerbliche
Nutzung nicht geeignet.
Benutzen Sie das Gerät
nicht ansich selbst, anderen
Personen oder Tieren.
Für bestimmte Personen be-
steht erhöhte Gefahr:
Dieses Gerät darf von Kin-
dern ab 8Jahren und von
Personen mit eingeschränk-
ter körperlicher, sensorischer
oder geistiger Leistungsfä-
higkeit oder mit mangelnder
Erfahrung und fehlenden
Kenntnissen nur dann be-
nutzt werden, wenn dieser
Personenkreis beaufsichtigt
wird oder in den sicheren
Gebrauch des Gerätes
eingewiesen wurde und die
mit dem Gerät verbundenen
Gefahren versteht. Kinder
dürfen nicht mit dem Gerät
spielen. Reinigung und War-
tung dürfen von Kindern
nicht ohne Beaufsichtigung
durchgeführt werden.
Bewahren Sie das Gerät
und das zugehörige An-
schlusskabel für Kinder unter
8Jahren unzugänglich
auf. Halten Sie Kinder von
Verpackungsmaterial fern.
Es
besteht Erstickungsgefahr.
Das Gerät verfügt über
einen fest verbauten Akku.
Unsachgemäße Hand-
habung verursacht Brand-
gefahr. Laden SiedenAkku
ausschließlich mit demmit-
gelieferten Ladekabel.
Zerlegen Sie den Akku nicht.
Das Gerät darf nicht kurzge-
schlossen und nicht ins Feuer
geworfen werden. Das Ge-
rät darf nicht geöffnet oder
auf sonstige Weise zerstört
werden.
Das Gerät wird mit elekt-
rischem Strom betrieben.
Daher besteht die Gefahr
eines elektrischen Schlags:
Das Gerät darf nur ge-
laden werden, wenn die
auf demTypenschild des
verwendeten Adapters an-
gegebene Spannung der
Spannung der Steckdose
entspricht. Stellen Sie sicher,
dass das Ladekabel nicht
geknickt oder eingeklemmt

www.zwilling.com 3
Sicherheit DE
Symbolerklärung
Verletzungsgefahr und Gefahr von Sachschäden durch
elektrischen Strom
Gefahr von Sachschäden und Schäden am Gerät
Tipps für eine eff ektive Nutzung
Wichtige Symbole am Gerät
GeräteklasseIII– Kleinspannung
CE-Prüfzeichen
Nicht im Hausmüll entsorgen
EAC-Prüfzeichen
UKCA-Prüfzeichen
wird und dass weder das
Ladekabel noch das Ge-
rät mit Hitzequellen (z.B.
Kochplatten, Gasfl ammen)
inBerührung kommen. Zie-
hen Siedas Netzteil immer
direkt aus der Steckdose
(nicht am Kabel).
Tragen Sie das Gerät nicht
am Ladekabel. Ziehen
Sie das Ladekabel sofort
nach Abschluss des Lade-
vorgangs vom Gerät ab.
Ziehen Sie nach jedem
Ladevorgang und bei
Gefahr oder Defekt sofort
den an das Ladekabel
angeschlossenen Netzad-
apter aus der Steckdose.
Trennen Sie das Gerät
vom Ladekabel, bevor Sie
es reinigen oder warten.
Während das Netzteil an
die Steckdose angeschlos-
sen ist, liegt Spannung am
Gerät an, selbst wenn es
ausgeschaltet ist. Schrau-
ben Sie das Gerät niemals
auf, und nehmen Sie keine
technischen Änderungen
daran vor.
Prüfen Sie das Gerät vor
jedem Gebrauch auf
Schäden. Falls Sie einen
Transportschaden feststellen,
wenden Sie sich umgehend
an den Händler, bei dem
Sie das Gerät erworben
haben. Betreiben Sie
niemals ein defektes Gerät
oder defekte Zubehörteile.
Betreiben Sie niemals ein
Gerät oder Zubehörteile,
die heruntergefallen sind. Im
Falle einer Störung wenden
Sie sich bitte an unseren
Kundendienst. Das Gerät
enthält keinerlei Teile, die
Sie selbst reparieren kön-
nen. Durch falsche Hand-
habung des Geräts können
Schäden entstehen.

4
DE
Technische Daten– Vakuumpumpe
Akkuspezifikation 3,7V, Li-Ion, 1200mAh
Netzteil
(nicht im Lieferumfang
enthalten)
Eingang: 100–240V∼, 50/60Hz
Ausgang: 5V⎓, 1000mA
Ladekabel USB 2.0 Typ A, Micro-USB, Länge 0,8m
Abmessungen (L×B×H) 50×50×190mm
Gewicht ca. 0,3kg
Material ABS-Kunststoff, Silikon
Der Lieferumfang des Startersets kann variieren.
Übersicht
7
7a 7b
2
3
6
1
4
5
1Akku-Symbol 5Ladestation
2Kontrolllampe 6USB-Anschluss
3EIN-/AUS-Taste 7Ladekabel mit USB2.0 (a) und
Micro-USB (b)
4Silikonaufsatz
Übersicht/Technische Daten

www.zwilling.com
5
Gebrauch
DE
Ablesen der Kontrolllampe und des Akku-Symbols
• Kontrolllampe blinkt: Vakuumiervorgang läuft
• Kontrolllampe leuchtet für 5Sekunden auf und erlischt anschlie-
ßend: Vakuumiervorgang abgeschlossen
• Akku-Symbol blinkt schnell: Ladezustand des Akkus ist niedrig
• Akku-Symbol blinkt langsam: Ladevorgang läuft
• Akku-Symbol leuchtet: Ladevorgang abgeschlossen, Ladegerät
kann abgezogen werden
1
Laden der Vakuumpumpe
Um die optimale Funktion des Akkus zu gewährleisten, laden Sie
ihn mindestens alle 3 bis 6Monate auf.
Laden Sie die Vakuumpumpe vor dem ersten Gebrauch vollständig auf.
Setzen Sie die Pumpe in die Ladestation ein. Stecken Sie den kleinen
USB-Stecker (Micro-USB) in die Buchse an der Ladestation. Stecken Sie
den größeren USB-Stecker (USB 2.0) in ein Netzteil, und schließen Sie
dieses an eine Steckdose an.
Sie können das Ladekabel auch an den USB-Anschluss eines Compu-
ters anschließen. Während des Ladevorgangs blinkt die Kontrolllampe
langsam. Wenn die Pumpe vollständig aufgeladen ist, leuchtet die
Kontrolllampe dauerhaft. Abhängig von der Stromquelle kann die Dauer
des Ladevorgangs 2 bis 5Stunden betragen.
Gebrauch
Herzlichen Glückwunsch zu Ihrem ZWILLING FRESH&SAVE
Vakuum-Starter set. Mit ZWILLING FRESH&SAVE Vakuumpro-
dukten halten Sie Ihre Lebensmittel länger frisch.
Beachten Sie, dass das Vakuumieren keinen Ersatz für das rich-
tige Einfrieren, Kühlen oder Konservieren von Lebensmitteln dar-
stellt. Die Haltbarkeit von Lebensmitteln hängt von zahlreichen
Faktoren ab, z.B. dem anfänglichen Keimgehalt des Lebensmit-
tels, der Einhaltung der korrekten Lager- und Kühlbedingungen
sowie der erforderlichen Hygiene bei der Verarbeitung und
Vakuumierung. Halten Sie die üblichen Aufbewahrungs- und
Hygiene verfahren für Lebensmittel ein. Trocken Sie das Lebens-
mittel, sofern möglich, vor dem Vakuumverpacken ab. Warten
Sie vor dem Vakuumieren, bis das Lebensmittel auf Raumtempe-
ratur abgekühlt ist. Einige Gemüsesorten geben im Rohzustand
Gase ab, was zu einem Vakuumverlust im Inneren der Verpa-
ckung führen kann. Hierzu zählen beispielsweise Kohl, Bohnen,
Zwiebeln und Knoblauch. Um Gasbildung zu vermeiden, sollten
diese Gemüsesorten vor dem Vakuumieren blanchiert werden.
Blauschimmelkäse sollte nicht unter Vakuum gelagert werden,
frische Pilze ausschließlich im tiefgekühlten Zustand.

6
Gebrauch
DE
Überfüllen Sie die Boxen nicht. Lassen Sie zum Rand immer
1–2cm frei. Achten Sie darauf, dass die Lebensmittel im Inneren
der Box nicht mit dem Ventil an der Innenseite des Deckels in
Berührung kommen.
1.
2.
ZWILLING FRESH&SAVE Vakuumboxen aus Glas sind ofen-
fest, wenn der Deckel entfernt wird (max. 180°C). Setzen Sie
die Vakuumbehälter keinen extremen Temperaturschwankungen
aus. So dürfen Sie den Glasbehälter beispielsweise nicht in einen
warmen Ofenstellen, wenn er unmittelbar zuvor im Kühlschrank
aufbewahrt wurde.
2
Vakuumieren von Boxen und Beuteln
Die Pumpe darf keine Flüssigkeiten (z.B. Wasser, Öl, Fleischsaft)
aufnehmen. Wenn Sie feststellen, dass Flüssigkeit in Richtung
derPumpe angesaugt wird, unterbrechen Sie den Vakuumiervor-
gang sofort durch Drücken der EIN-/AUS-Taste.
Die Dauer des Vakuumiervorgangs hängt von der Größe
und dem Füllstand des Behälters ab. Ist ein Behälter klei-
ner oder voller, verläuft der Vakuumiervorgang schneller.
Setzen Sie die Vakuumpumpe auf das Ventil des Behälters, und drü-
ckenSie sie ggf. leicht nach unten. Drücken Sie die EIN-/AUS-Taste an
der Pumpe.
Die Pumpe saugt automatisch die Luft aus dem Behälter. Der Vakuumier-
vorgang stoppt automatisch, wenn der Vakuumdruck daserforderliche
Niveau erreicht. Die Vakuumierung kann auch jederzeit durch Drücken
der EIN-/AUS-Taste manuell unterbrochen werden.
Wenn der erforderliche Vakuumdruck nicht erreicht werden kann, da
beispielsweise die Pumpe nicht korrekt sitzt, wird der Vakuumiervor-
gang automatisch nach 2Minuten gestoppt. Der Behälter ist ggf. nicht
ordnungsgemäß verschlossen.
Reinigen Sie die Vakuumboxen vor dem ersten Gebrauch.
Stellen Sie vor jeder Verwendung sicher, dass die Dichtung des
Deckels und der Behälterrand sauber und trocken sind.

www.zwilling.com
7
Gebrauch
DE
Zum Marinieren von Lebensmitteln oder Sous-Vide-Garen
wird die Verwendung des Marinieraufsatzes empfohlen.
Bringen Sie diesen am Ventil im Inneren des Beutels an,
bevor Sie die Beutel verschließen. Der Marinieraufsatz
erleichtert den Vakuumiervorgang, indem er das Einsau-
gen von Flüssigkeit für eine kurze Dauer verzögert. Sobald
Flüssigkeit an dem Marinieraufsatz angekommen ist, muss
die Pumpe sofort manuell gestoppt werden.
Die Öffnung des Beutels muss vollständig sauber und trocken
sein. Stellen Sie sicher, dass das Ventil im Inneren des Beutels
nicht mit dessen Inhalt in Berührung kommt.
Alle im Starterpaket enthaltenen Beutel und Boxen können zum
Aufwärmen von Lebensmitteln in der Mikrowelle verwendet
werden. Dies gilt selbst für Boxen mit angebrachten Deckeln. Für
ölhaltige Lebensmittel wird die Verwendung von Glasbehältern
empfohlen.
Stellen Sie vor der Verwendung der Boxen in der Mikrowelle
sicher, dass das Vakuum gelöst ist und der Deckel locker aufliegt.
Bei weichen oder flüssigen Lebensmitteln wird empfohlen,
diese vor dem Vakuumieren in den Beuteln kurz einzufrie-
ren. Eine feste Konsistenz verhindert, dass Ihre Lebensmittel
während des Vakuumiervorgangs zerdrückt werden oder
Flüssigkeiten in die Pumpe eindringen. Alternativ sind in
diesem Fall die ZWILLING FRESH&SAVE Vakuumboxen
besonders gut geeignet.

8
GebrauchDE
Beachten Sie, dass der PUSH-Knopf in der Mitte des Silikonven-
tils nach jedem Vakuumiervorgang gedrückt werden muss, um
das Ventil abschließend abzudichten.
Flaschen können mit dem Weinverschluss abgedichtet werden. Die
Pumpe stoppt automatisch, sobald der Vakuumdruck das erforderliche
Niveau erreicht.
1. 2.
Beutel können mit dem im Lieferumfang enthaltenen Zipper mühelos
verschlossen werden. Schieben Sie den Zipper seitlich auf den Beutel,
und ziehen Sie ihn am Rand entlang, um den Beutel zu verschließen.
Streichen Sie mit dem Finger mit leichtem Druck über die Verschluss-
leiste, um sicherzustellen, dass der Beutel ordnungsgemäß verschlossen
ist. Ziehen Sie zum Öff nen der Beutel die Verschlussleiste mit beiden
Händen auseinander.
1.
P
U
S
H
P
U
S
H
5.
3.
4.
1.
2.

www.zwilling.com
9
Gebrauch
DE
4
Verwendung von QR-Codes und der App
ZWILLING FRESH&SAVE Vakuumboxen und -beutel verfügen über
einen QR-Code, der mit der ZWILLINGApp verknüpft ist. Die App
ermöglicht eine einfache Verwaltung Ihrer vakuumierten Lebensmittel
und bietet eine optimale Übersicht über Ihre Vorräte. Mithilfe des
QR-Codes an den Produkten können Sie Ihre Lebensmittel im Hand-
umdrehen in der App erfassen. Die App erinnert Sie daran, wenn die
Haltbarkeit Ihrer Lebens mittel demnächst abläuft. Laden Sie zunächst
die ZWILLINGApp herunter, und scannen Sie anschließend den
QR-Code.
Jeder Vakuumbeutel verfügt über eine eindeutige Beutel-ID.
Anhand dieser ID können Sie Ihre Lebensmittel problemlos
identifizieren.
Weitere Informationen und die kostenlose App finden Sie unter:
www.zwilling.com/app
3
Öffnen eines vakuumierten Behälters
Um Vakuumboxen oder Flaschen zu öffnen, ziehen Sie das Silikonventil
vorsichtig zur Seite. Luft strömt langsam ein, und das Vakuum entweicht.
Die Behälter können geöffnet werden.
Nach dem Vakuumieren senkt sich der innere Deckel ab, und die Dichtung
dehnt sich aus (dieses Verhalten gilt nicht für Deckel von Lunchboxen).
Sobald sich der innere Deckel anhebt, sollte das Vakuum erneut aufgefüllt
werden. Verwenden Sie zum erneuten Vakuumieren die Vakuumpumpe.

10
Reinigen
DE
Reinigen
Ziehen Sie den Netzstecker, und trennen Sie die Vakuum-
pumpe vor der Reinigung vom Ladekabel.
1
Reinigen der Vakuumpumpe
Verwenden Sie zum Reinigen des Gehäuses der Vakuumpumpe und
der Ladestation nur ein trockenes oder leicht angefeuchtetes Tuch. Legen
Sie keine Teile der Pumpe in die Geschirrspülmaschine.
2
Reinigen des Silikonaufsatzes
Um den Silikonaufsatz zu reinigen, ziehen Sie sie vorsichtig nach unten
vom Gehäuse der Vakuumpumpe ab, und reinigen Sie sie mit Wasser.

www.zwilling.com
11
DE
Reinigen/Fehlerbehebung
3
Reinigen der Boxen
Die Vakuumboxen können in der Spülmaschine gereinigt werden.
4
Reinigen der Beutel
Sie können die Beutel von Hand reinigen und anschließend wiederver-
wenden. Lassen Sie die Beutel nach der Reinigung immer vollständig
trocknen. Wenn Sie rohes Fleisch, Fisch, Eier oder Rohmilchkäse in den
Beuteln aufbewahrt haben, müssen sie besonders gründlich gereinigt
werden.
Fehlerbehebung
Problem Mögliche
Ursache
Abhilfe
Die Pumpe
reagiert nicht auf
die Betätigung der
EIN-/AUS-Taste.
Der Ladezustand
des Pumpenakkus
ist niedrig oder der
Akku ist leer.
Laden Sie den Pumpenakku.
Die Pumpe erzeugt
beim Aufsetzen auf
einen Behälter kein
Vakuum, oder das
Vakuum bleibt nicht
bestehen.
Der Deckel des
Vakuumbehälters,
die Silikondichtung
oder das Ventil ist
falsch positioniert.
Stellen Sie sicher, dass sie
sich jeweils an der korrekten
Position befinden und der
Deckel fest geschlossen ist.
Die Silikondichtung
oder das Behälter-
ventil ist verunrei-
nigt oder nass.
Reinigen und trocknen Sie
die Silikondichtung und das
Ventil des Behälters.
Die Pumpe sitzt
zu locker auf dem
Ventil.
Drücken Sie die Pumpe wäh-
rend des Vakuumiervorgangs
leicht in die Umrandung um
dasVentil herum, um zwi-
schen Pumpe und Ventil eine
feste Abdichtung zu schaffen.

12
DE
Die oben beschrie-
benen Probleme
können nicht gelöst
werden.
Die Vakuumpumpe
ist ggf. defekt.
Wenden Sie sich an den
Kundendienst. Versuchen Sie
nicht, die Pumpe selbst zu
reparieren.
Die Pumpe stoppt
während des Va-
kuumiervorgangs
und lässt sich nicht
wieder einschal-
ten.
Die Pumpe hat
während des
Vakuumiervor-
gangs Flüssigkeiten
angesaugt.
Drehen Sie die Pumpe nicht
auf den Kopf. Schütteln Sie
die Pumpe leicht, um jegliche
Flüssigkeiten zu beseitigen.
Stellen Sie sicher, dass die
Pumpe und die Ladestation
vollständig trocken sind.
Schließen Sie die Pumpe
eine Sekunde an die Lade-
station an, um sie zurück-
zusetzen. Trennen Sie die
Pumpe von der Ladestation,
und drücken Sie die EIN-/
AUS-Taste. Weitere Flüssig-
keiten können austreten.
Wiederholen Sie diesen
Vorgang, wenn die Pumpe
wieder stoppt.
Kundendienst
Wenden Sie sich bei Problemen mit der Vakuumpumpe an den Kunden-
dienst. Ausführliche Informationen zu Service, Reparatur und Garantie
finden Sie unter www.zwilling.com/service.
Entsorgung
Das Gerät darf nicht im Hausmüll entsorgt werden. Füh-
renSie Ihr Altgerät zur umweltgerechten Entsorgung einer
Sammelstelle für Elektrogeräte zu. Durch die gesonderte
Sammlung der einzelnen Komponenten von Elektronikge-
räten können die negativen Folgen von Umweltverschmut-
zung vermieden und die Gefahren für die menschliche
Gesundheit reduziert werden, die infolge einer unsach-
gemäßen Produktentsorgung entstehen können. Darüber
hinaus ermöglicht dies die Wiederverwendung und
Verwertung der Materialien und trägt so zu Einsparungen
imHinblick auf Energie und Rohstoffe bei.
Fehlerbehebung/Kundendienst/Entsorgung

www.zwilling.com
13
Safety
GB
Safety
Please carefully read this user man-
ual in its entirety before using the
vacuum pump. Keep this manual in
a safe place. If you give the vacu-
um pump away, be sure to include
this manual with it. A failure to com-
ply with this user manual can lead
to serious injury or damage to the
appliance. ZWILLING does not
accept any liability for damage
caused by a failure to comply with
this user manual.
Safety information
The vacuum pump (here-
inafter referred to as the
“appliance”) is intended
to be exclusively used with
allZWILLING FRESH&
SAVE vacuum storage
options to create an ef-
fective vacuum seal for
long-lasting food storage.
It may only be used with
the accessories supplied or
approved by ZWILLING.
Any other use is considered
improper andmay result in
personal injury or property
damage. The appliance is
intended for domestic use.
It is not intended for com-
mercial use. Do not use
the appliance on yourself,
other persons or animals.
Certain persons are at
greater risk:
this appliance can be used
by children aged from
8years and above and
persons with reduced physi-
cal or sensory capabilities
or lack of experience and
knowledge if they have
been given supervision or
instruction concerning use
of the appliance in a safe
way and understand the
hazards involved. Children
shall not play with the ap-
pliance. Cleaning and user
maintenance shall not be
made by children without
supervision.
Keep the appliance and
its connecting cable in a
location that is not acces-
sible to children under
8years old. Keep children
away from the packaging
material. It poses a risk
ofsuffocation. The device
has a permanently installed
battery. Improper handling
causes the risk of fire. Only
charge the battery using
the included charging
cable. Do not disassemble
the battery. Do not short-cir-
cuit the appliance and do
not throw it into fire. Do not
open or otherwise destroy
the appliance.
The appliance is charged
with electric current. There
is therefore a danger of
electric shock. Only charge
the appliance if the volt-
age stated on the rating
plate ofthe used adapter
matches the voltage of
your socket. Make sure
that the charging cable
is not kinked or pinched
andmake sure that the
charging cable and the
appliance do not come
in contact with sources
of heat (e.g. hobs, gas
flames). Always directly
unplug the power adapter
from the socket (do not
pullthe charging cable).
Do not carry the appliance
by the charging cable.

14
SafetyGB
Explanation of symbols
Danger of harm to persons or property due to electric
current
Risk of property damage and damage to the appliance
Hints for eff ective use
Key to symbols on the appliance
Appliance class III - Low voltage
CE certifi cation mark
Do not throw away with household waste
EAC certifi cation mark
UKCA certifi cation mark
Disconnect the charging
cable from the appliance
immediately after the
charging process is com-
plete. After every charging
and in the event of danger
or a defect, unplug the
power adapter connect-
ed to the charging cable
fromthe socket immediate-
ly. Unplug the appliance
from the charging cable
prior to cleaning or main-
tenance. As long as the
power adapter is plugged
in, there is a voltage inside
the appliance, even if the
appliance is switched off .
Never unscrew the appli-
ance and do not make any
technical modifi cations.
Check the appliance for
damage prior to each use.
If you detect any trans-
port damage, contact the
dealer from whom you
purchased the appliance
immediately. Never use
afaulty appliance orfaulty
accessories. Never op-
erate an appliance or
accessories that have been
dropped. In the event of
a fault, please contact
our customer service.
The appliance does not
contain anyparts that you
areableto repair yourself.
Damage may occur if
the appliance is handled
incorrectly.

www.zwilling.com
15
GB
Overview/Technical data
Technical data – vacuum pump
Battery specification 3,7 V, Li-ion 1200 mAh
Power adapter
(not included)
Input: 100 – 240 V∼, 50/60 Hz
Output: 5 V⎓, 1000 mA
Charging cable USB 2.0 type A, micro USB, length 0.8 m
Dimensions (L x W x H) 50 x 50 x 190 mm
Weight approx. 0.3 kg
Material ABS plastic, silicone
Content in starter set may vary.
Overview
7
7a 7b
2
3
6
1
4
5
1Battery symbol 5Charging station
2Indicator light 6USB connection port
3On/Off button 7Charging cable with
USB 2.0 (a) and micro USB (b)
4Silicon top

16
Use
GB
Reading the indicator light and battery symbol
• Indicator light flashing: Vacuum sealing in process
• Indicator light lights up for 5 seconds and then turns off: Vacuum
sealing is complete
• Battery symbol flashing fast: Battery power is low
• Battery symbol flashing slow: Charging in process
• Battery symbol glowing: Fully charged, ready to unplug
1
Charging the vacuum pump
To maintain optimal battery function, charge at least once every
3 to 6 months.
Charge the vacuum pump fully before the first use. Place the pump
inthe charging station. Insert the small USB connector into the port at
the charging station. Insert the larger USB connector (USB 2.0) into
apower adapter and plug it into a wall socket.
You can also connect the charging cable to the USB port of a com-
puter. During charging, the indicator light will flash slowly. When the
pumpis fully charged, the indicator light will continuously glow. Depend-
ing on the power source charging may take 2 to 5 hours.
Use
Congratulations on your ZWILLING FRESH & SAVE vacuum
starter set. WithZWILLING FRESH & SAVE vacuum products
you can keep your food fresh for longer.
Please note that vacuuming is no a substitute for proper freezing,
cooling or preservation of food. The shelf life of food depends
on many factors, such as the initial germ content of the food, the
observance of correct storage and cooling conditions and the
required hygiene during processing and vacuuming. Maintain
theusual storage and hygiene procedures for food. Ifpossible,
dry the food before vacuum packaging. Always wait for the
food to cool down to room temperature before vacuuming.
Some vegetables emit gases in their raw state, which can
lead toa loss of vacuum inside the packaging. These include
cabbage, beans, onions and garlic. To prevent the formation
ofgases, these should be blanched before vacuuming. Blue
cheese should not be stored under vacuum, fresh mushrooms
only whendeep-frozen.

www.zwilling.com
17
Use
GB
Clean the vacuum boxes before using them for the first time.
Before each use, make sure that the seal of the lid and the edge
of the box are clean and dry.
Do not overfill the box. Always leave 1–2 cm free to the edge.
Make sure the food inside the box does not come in contact with
the valve on the inside of the lid.
1.
2.
2
Vacuum sealing boxes and bags
The pump must not absorb any liquids (e.g. water, oil, meat juic-
es). If you see that the pump is sucking in liquids, immediately
stop the vacuum sealing process by pressing the On/Off button.
The duration of the vacuum sealing process depends
on the size of the container and how much it is filled.
Ifa container is smaller or more full, the vacuum sealing
process is faster.
Place the vacuum pump on the valve of the box and, if necessary press
down lightly. Press the On/Off button on the pump.
The pump sucks the air out of the box. The vacuum sealing stops auto-
matically when the vacuum pressure reaches the right level. The vacuum
sealing can also be manually interrupted at any time by pressing the
On/Off button.
If the right level cannot be reached because, for example, the pump is
not seated correctly, the vacuum process will stop automatically after
2minutes. The container may not be closed properly.

18
Use
GB
For marinating or sous-vide cooking, we recommend the
use of the liquid barrier attachment. Clip it onto the valve
on the inside of the bag before sealing the bag. The liquid
barrier inhibits liquid absorption by the pump during the
vacuum sealing process. Stop the vacuum sealing process
immediately by pressing the ON/OFF button if you see
liquids getting nearer to the pump.
ZWILLING FRESH & SAVE glass vacuum boxes can be placed
in the oven if the lid is removed (max. 180°C). Do not expose
the glass vacuum boxes toextreme temperature shocks, e.g. do
not place a vacuum box out of the fridge into a warm oven.
The opening of the bag has to be completely clean and dry.
Make sure the valve on the inside of the bag does not come into
contact with its contents.
All bags and boxes included in the starter pack can be used to
warm up food in the microwave. Even boxes with attached lids.
For oily foods we recommend to use the glass boxes.
Before using the boxes in the microwave, make sure that the
vacuum has been released and the lid is resting loosely on top.
With soft or liquid foods, it helps to freeze them briefly be-
fore vacuuming into bags. A firm consistency prevents your
food from being crushed during vacuuming or liquid from
entering the pump. Alternatively, the ZWILLING FRESH &
SAVE vacuum boxes are particularly suitable here.

www.zwilling.com 19
Use GB
Bottles can be sealed using the wine sealer. The pump stops automati-
cally when the vacuum pressure reaches the right level.
1. 2.
Bags can be easily closed with the included zipper. Slide it sideways
onto the bag and move it across to close the bag. Then stroke your
fi nger with a little pressure over the sealing strip to ensure that the bag
isproperly closed. To open the bags, pull the sealing bar apart with
your hands.
1.
P
U
S
H
P
U
S
H
5.
3.
4.
1. 2.
Remember to press down the PUSH button in the middle of
thesilicone valve after each vacuuming process to fi nally seal
the valve.

20
Use
GB
4
Using QR codes and the app
ZWILLING FRESH & SAVE vacuum boxes and bags are equipped with
a QR code, which is matched to the ZWILLING app. With the help
of the app you can easily manage your vacuumed food and have a
perfect overview of your stocks. The QR code on the products makes it
easy to check the food into the app. The app reminds you when your
food is due to expire. First download the ZWILLING app and then scan
the QR code.
Each vacuum bag has a unique bag ID. This helps you to
clearly identify your food.
More information and to download the app for free:
www.zwilling.com/app
3
Opening a vacuumed container
To open vacuum boxes or bottles, carefully pull the silicone valve to the
side. Air flows in slowly and the vacuum escapes. The containers can be
opened.
After the vacuuming process, the inner lid of the vacuum box will be
lowered and the sealing is expanded (this behaviour does not apply
tolids from lunch boxes). As soon as the inner lid lifts, the vacuum
should be refreshed. Use the vacuum pump to vacuum the box again.

www.zwilling.com
21
Cleaning
GB
Cleaning
Unplug the power adapter and disconnect the vacuum
pump from the charging cable prior to cleaning.
1
Cleaning the vacuum pump
Only use a dry or slightly damp cloth to clean the body of the vacuum
pump and the charging station. Do not put any parts of the pump into
the dishwasher.
2
Cleaning the silicone top
To clean the silicone top, remove it from the body of the vacuum pump
by gently pulling downwards and clean it with water.

22
GB
Cleaning/Troubleshooting
3
Cleaning the boxes
The boxes can be cleaned in the dishwasher.
4
Cleaning the bags
You can clean the bags by hand and reuse them afterwards. Dry the
bags completely after each cleaning. If you have stored raw meat, fish,
eggs or raw milk cheese in them, they must be cleaned particularly
thoroughly.
Troubleshooting
Problem Possible cause Remedy
The pump does
not respond to the
On/Off button.
The battery of
thepump is low
or not charged.
Charge the pump’s battery.
The pump does
not create a vac-
uum when placed
on a container or
the vacuum does
not last.
The lid of the
vacuum contain-
er, the silicone
seal or the valve
is positioned
incorrectly.
Check that the positioning
is correct and that the lid is
properly closed.
The silicone seal
or the container
valve is dirty or
wet.
Clean and dry the silicone
seal and the valve of the
container.
The pump sits
tooloosely on
the valve.
During vacuum sealing, lightly
press the pump into the dock
surrounding the valve to cre-
ate a tight seal between the
pump and the valve.
The above prob-
lems cannot be
solved.
The vacuum
pump could be
broken.
Contact customer service.
Do not try to repair the pump
yourself.

www.zwilling.com
23
GB
The pump stops
during the vacuum
sealing process
and does not turn
back on.
The pump sucked
in liquids during
the vacuum seal-
ing process.
Do not turn the pump upside
down. Shake the pump
slightly to remove any liquid.
Make sure the pump and the
charging station are com-
pletely dry. Plug the pump into
the charging station for one
second to reset, then remove it
and push the On/Off button.
Additional liquids may drip
out. Repeat this process if the
pump stops again.
Customer Service
Please contact our customer service should you encounter any problems
with your vacuum pump. Detailed information on service, repairs and
warranty can be found at www.zwilling.com/service.
Disposal
Do not dispose of the appliance with household waste.
For an eco-friendly disposal, please return your old
appliance to a collection point for electrical appliances.
Separate collection of individual components of EE equip-
ment prevents negative effects of environmental pollution
and minimises danger to human health, which may occur
as aresult of improper product disposal. In addition, it
enables reuse and recovery of the materials, thus saving
energy and raw materials.
ZWILLING J.A. HENCKELS (UK) LTD
16 Handley Page Way,
Old Parkbury Lane,
Colney Street, St Albans, AL2 2DQ
UNITED KINGDOM
Troubleshooting/Customer Service/Disposal

24
Sécurité
FR
Sécurité
Avant d’utiliser la pompe sous
vide, lire ce manuel d’utilisation
dans son intégralité et avec
soin. Conserver ce manuel dans
unendroit sûr. Si la pompe sous
vide esttransmise à une tierce
personne, joindre ce manuel à la
pompe. Le non-respect de ce ma-
nuel d’utilisation peut entraîner des
blessures graves ou endommager
l’appareil. ZWILLING décline
toute responsabilité pour les dom-
mages causés par le non-respect
de ce manuel d’utilisation.
Informations de sécurité
La pompe sous vide
(ci-après
dénommée «l’ap-
pareil») est destinée à être
utilisée exclusivement avec
toutes les options de stoc-
kage sous vide ZWILLING
FRESH & SAVE pour créer
un vide efficace et assurer le
stockage sous vide à long
terme d’aliments. Elle ne doit
être utilisée qu’avec les ac-
cessoires fournis ou approu-
vés par ZWILLING. Toute
autre utilisation est considé-
rée comme inappropriée et
peut entraîner des blessures
ou des dommages maté-
riels. L’appareil est destiné
à un usage domestique. Il
n’est pas destiné à un usage
commercial. Ne pas utiliser
l’appareil sur soi-même, sur
d’autres personnes ou sur
des animaux.
Certaines personnes courent
un risque plus important:
cet appareil peut être
utilisé par des enfants
de 8 ans et plus et par
des personnes ayant des
capacités physiques ou
sensorielles réduites ou un
manque d’expérience et
de connaissances, si ces
personnes sont surveillées
ou ont reçu des instructions
sur l’utilisation de l’appareil
en toute sécurité et com-
prennent les risques impli-
qués. Les enfants ne sont
pas autorisés àjouer avec
l’appareil. Lenettoyage et
la maintenance à effectuer
par l’utilisateur ne doivent
pas être effectués par des
enfants sans surveillance.
Conserver l’appareil et son
câble de connexion dans
un endroit inaccessible aux
enfants de moins de 8 ans.
Ne pas laisser le matériel
d’emballage à la portée
des enfants. Celui-ci pré-
sente un risque d’asphyxie.
L’appareil est équipé d’une
batterie non amovible. Une
manipulation incorrecte
entraîne un risque d’incen-
die. Ne charger la batterie
qu’à l’aide du câble de
chargement fourni. Ne pas
démonter la batterie. Ne
pas court-circuiter l’appareil
et ne pas le jeter au feu.
Nepas ouvrir l’appareil
ni le détruire d’une autre
manière.
L’appareil est chargé avec
du courant électrique. Il y
a donc un risque de choc
électrique. Ne charger
l’appareil que si la tension
indiquée sur la plaque
signalétique de l’adapta-
teur utilisé correspond à la
tension de la prise. Veiller
àce que le câble de char-
gement ne soit pas plié ou
pincé et à ce que le câble
de chargement et l’appareil
n’entrent pas en contact

www.zwilling.com 25
Sécurité FR
Explication des symboles
Risque de dommages aux personnes ou aux biens en raison
du courant électrique
Risque de dommages matériels et d’endommagement de
l’appareil
Conseils pour une utilisation effi cace
Signifi cation des symboles présents sur
l’appareil
Appareil de catégorie III - Basse tension
Marque de certifi cation CE
Ne pas jeter avec les ordures ménagères
Marque de certifi cation EAC
Marque de certifi cation UKCA
avec des sources de
chaleur (p.ex. plaques de
cuisson, fl ammes de gaz).
Toujours débrancher direc-
tement l’adaptateur secteur
de la prise (ne pas tirer sur
le câble de chargement).
Ne pas transporter l’appa-
reil en le tenant par le câble
de chargement. Débrancher
le câble de chargement
del’appareil dès que le
processus de chargement
est terminé. Après chaque
chargement et en cas
de danger ou de défaut,
débrancher immédiatement
l’adaptateur secteur raccor-
dé au câble de chargement
de la prise de courant.
Débrancher l’appareil du
câble de chargement avant
le nettoyage ou l’entretien.
Tant que l’adaptateur sec-
teur estbranché, il y aune
tension dans l’appareil,
même si l’appareil est éteint.
Ne jamais dévisser l’appa-
reil et n’apporter aucune
modifi cation technique à
l’appareil.
Avant chaque utilisation,
vérifi er que l’appareil n’est
pas endommagé. En cas de
dommages dus au transport,
contacter immédiatement
lerevendeur chez qui
l’appareil a été acheté. Ne
jamais utiliser un appareil
ou des accessoires défec-
tueux. Ne jamais utiliser un
appareil ou des accessoires
qui sont tombés. En cas
de défaut, contacter notre
service clientèle. L’appareil
ne contient aucune pièce
que vous pouvez réparer
vous-même. Des dommages
peuvent survenir si l’ap-
pareil n’est pas manipulé
correctement.

26
FR
Caractéristiques techniques –
pompe sous vide
Spécifications de la batterie 3,7 V, Li-ion, 1200 mAh
Adaptateur secteur
(non fourni)
Entrée: 100 – 240 V∼, 50/60 Hz
Sortie: 5 V⎓, 1000 mA
Câble de chargement USB 2.0 type A, micro USB,
longueur 0,8 m
Dimensions (lxpxh) 50x50x190mm
Poids Env. 0,3 kg
Matériau Plastique ABS, silicone
Le contenu du kit de base peut varier.
Vue d’ensemble
7
7a 7b
2
3
6
1
4
5
1Symbole de la batterie 5Station de chargement
2Témoin lumineux 6Port de connexion USB
3Bouton Marche/Arrêt 7Câble de chargement avec
USB 2.0 (a) et micro USB (b)
4Capuchon en silicone
Vue d’ensemble/Caractéristiques techniques

www.zwilling.com
27
Utilisation
FR
Interprétation du voyant lumineux et du symbole de la batterie
• Clignotement du témoin lumineux: scellage sous vide en cours
• Le témoin lumineux s’allume pendant 5 secondes, puis s’éteint:
scellage sous vide terminé
• Clignotement rapide du symbole de la batterie: la puissance de la
batterie est faible
• Clignotement lent du symbole de la batterie: chargement en cours
• Symbole de la batterie allumé: charge complète, prêt à être
débranché
1
Chargement de la pompe sous vide
Pour maintenir le fonctionnement optimal de la batterie, la char-
ger au moins une fois tous les 3 à 6 mois.
Charger complètement la pompe sous vide avant la première utilisa-
tion. Placer la pompe dans la station de chargement. Insérer le petit
connecteur USB dans le port situé sur la station de chargement. Insérer
le plus gros connecteur USB (USB 2.0) dans un adaptateur secteur
etle brancher sur une prise murale.
Vous pouvez également connecter le câble de chargement au port
USB d’un ordinateur. Pendant le chargement, le témoin lumineux
clignote lentement. Lorsque la pompe est complètement chargée,
le témoin lumineux est allumé en permanence. Le chargement peut
prendre2 à 5 heures en fonction de la source d’alimentation.
Utilisation
Félicitations pour l’acquisition de votre kit de base de mise sous
vide ZWILLING FRESH & SAVE. Les produits de mise sous vide
ZWILLING FRESH & SAVE vous permettent de conserver plus
longtemps vos aliments frais.
Veuillez noter que la mise sous vide ne remplace pas la congéla-
tion, le refroidissement ou la conservation des aliments. La durée
de conservation des aliments dépend de nombreux facteurs,
tels que la teneur initiale en germes des aliments, le respect de
conditions de stockage et de refroidissement correctes et l’hy-
giène requise lors du conditionnement et de la mise sous vide.
Maintenir les procédures habituelles de stockage et d’hygiène
pour les aliments. Si possible, sécher les aliments avant de l’em-
baller sous vide. Toujours attendre que les aliments refroidissent
à température ambiante avant de les mettre sous vide. Certains
légumes émettent des gaz lorsqu’ils sont crus, ce qui peut
entraîner une perte de vide à l’intérieur de l’emballage. Il s’agit
notamment du chou, des haricots, des oignons et de l’ail. Pour
éviter la formation de gaz, il faut les blanchir avant de les mettre
sous vide. Le fromage bleu ne doit pas être conservé sous vide,
les champignons frais uniquement s’ils sont surgelés.

28
Utilisation
FR
Nettoyer les boîtes sous vide avant de les utiliser pour la
première fois. Avant chaque utilisation, s’assurer que le joint du
couvercle et le bord de la boîte sont propres et secs.
Ne pas trop remplir la boîte. Toujours laisser 1 à 2 cm libres
jusqu’au bord. S’assurer que les aliments à l’intérieur de la boîte
n’entrent pas en contact avec la valve à l’intérieur du couvercle.
1.
2.
2
Boîtes et sacs de scellage sous vide
La pompe ne doit pas absorber de liquides (p.ex. eau, huile,
jus de viande). Si la pompe aspire des liquides, arrêter immé-
diatement le processus de scellage sous vide en appuyant sur
lebouton Marche/Arrêt.
La durée du processus de scellage sous vide dépend de
la taille et du niveau de remplissage du conteneur. Si
unconteneur est plus petit ou plus plein, le processus de
scellage sous vide est plus rapide.
Placer la pompe sous vide sur la valve de la boîte et appuyer légère-
ment vers le bas si nécessaire. Appuyer sur le bouton Marche/Arrêt de
la pompe.
La pompe aspire automatiquement l’air de la boîte. Le scellage sous
vide s’arrête automatiquement lorsque la pression de vide atteint le bon
niveau. Il est également possible d’interrompre la procédure de scel-
lage sous vide manuellement à tout moment en appuyant sur le bouton
Marche/Arrêt.
Si le bon niveau ne peut être atteint parce que, par exemple, la pompe
n’est pas correctement positionnée, le processus de mise sous vide
s’arrête automatiquement après 2 minutes. Le conteneur peut ne pas
être correctement fermé.

www.zwilling.com
29
Utilisation
FR
Pour la marinade ou la cuisson sous vide, nous recomman-
dons d’utiliser le capuchon d’étanchéité. Le fixer sur la
valve à l’intérieur du sac avant de sceller le sac. Le capu-
chon d’étanchéité empêche l’absorption de liquide par la
pompe pendant le processus de scellage sous vide. Si des
liquides se rapprochent de la pompe, arrêter immédiate-
ment le processus de scellage sous vide en appuyant sur le
bouton Marche/Arrêt.
Les boîtes sous vide en verre ZWILLING FRESH & SAVE peuvent
être placées dans le four à condition d’enlever le couvercle
(max.180°C). Ne pas exposer les boîtes sous vide en verre
à des chocs thermiques importants, p.ex. en plaçant une boîte
sous vide sortie du réfrigérateur dans un four chaud.
L’ouverture du sac doit être complètement propre et sèche.
S’assurer que la valve à l’intérieur du sac n’entre pas en contact
avec son contenu.
Tous les sacs et boîtes inclus dans le kit de base peuvent être
utilisés pour réchauffer les aliments au micro-ondes. Même les
boîtes avec des couvercles attachés. Pour les aliments huileux,
nous recommandons d’utiliser les boîtes en verre.
Avant d’ouvrir les boîtes dans le micro-ondes, s’assurer que le
vide a été supprimé et que le couvercle repose librement sur le
dessus.
Pour les aliments mous ou liquides, il est judicieux de les
congeler brièvement avant de les mettre sous vide dans
des sacs. Une consistance ferme évite que vos aliments ne
soient écrasés lors de la mise sous vide ou que du liquide
ne pénètre dans la pompe. Les boîtes sous vide ZWILLING
FRESH & SAVE sont tout particulièrement bien adaptées
dans ces cas spécifiques.

30
UtilisationFR
Il est possible de sceller les bouteilles à l’aide du bouchon sous vide.
Lapompe s’arrête automatiquement lorsque la pression de vide atteint
le bon niveau.
1. 2.
3
Ouverture d’un conteneur sous vide
Pour ouvrir des boîtes ou des bouteilles sous vide, tirer avec précaution
la valve en silicone sur le côté. L’air entre lentement et remplace le vide.
Les boîtes peuvent alors être ouvertes.
Les sacs se ferment facilement grâce au zip à glissière inclus. Le faire
glisser latéralement sur le sac et le déplacer pour fermer le sac. Passer
ensuite un doigt sur la bande de scellage en exerçant une légère
pression pour s’assurer que le sac est bien fermé. Pour ouvrir les sacs,
écarter la barre de scellage avec les mains.
1.
P
U
S
H
P
U
S
H
5.
3.
4.
1. 2.
Ne pas oublier d’appuyer sur le bouton PUSH au milieu de
lavalve en silicone après chaque processus de mise sous vide
afi n de sceller défi nitivement la valve.

www.zwilling.com
31
Utilisation
FR
4
Utilisation des QR codes et de l’application
Les boîtes et sacs sous vide ZWILLING FRESH & SAVE sont munis d’un
QR code associé à l’application ZWILLING. L’application permet de
gérer facilement vos aliments mis sous vide et d’avoir une vue d’en-
semble parfaite de vos stocks. Le QR code sur les produits permet de
vérifier facilement les aliments dans l’application. L’application vous
rappelle la date d’expiration de vos aliments. Télécharger d’abord
l’application ZWILLING, puis scanner ensuite le QR code.
Chaque sac sous vide a un identifiant de sac unique. Cela
vous aide à identifier clairement vos aliments.
Pour plus d’informations et télécharger l’application gratuitement:
www.zwilling.com/app
Après le processus de mise sous vide, le couvercle intérieur de la boîte
sous vide est baissé et le scellage est dilaté (ceci ne s’applique pas
aux couvercles des boîtes à déjeuner). Dès que le couvercle intérieur se
soulève, le vide doit être rétabli. Utiliser la pompe sous vide pour mettre
à nouveau la boîte sous vide.

32
Nettoyage
FR
Nettoyage
Débrancher l’adaptateur secteur et débrancher la pompe
sous vide du câble de chargement avant le nettoyage.
1
Nettoyage de la pompe sous vide
Utiliser uniquement un chiffon sec ou légèrement humide pour nettoyer
le corps de la pompe sous vide et la station de chargement. Ne mettre
aucune pièce de la pompe dans le lave-vaisselle.
2
Nettoyage du dessus en silicone
Pour nettoyer le dessus en silicone, le retirer du corps de la pompe sous
vide en le tirant doucement vers le bas et le nettoyer à l’eau.

www.zwilling.com
33
FR
Nettoyage/Dépannage
3
Nettoyage des boîtes
Les boîtes se lavent au lave-vaisselle.
4
Nettoyage des sacs
Il est possible de nettoyer les sacs à la main et de les réutiliser ultérieu-
rement. Sécher complètement les sacs après chaque nettoyage. Si vous
avez conservé de la viande crue, du poisson, des œufs ou du fromage
au lait cru dans ces sacs, il est impératif de les nettoyer à fond.
Dépannage
Problème Cause
possible
Solution
La pompe ne réa-
git pas à l’action-
nement du bouton
Marche/Arrêt.
La batterie de la
pompe est faible
ou vide.
Charger la batterie de la
pompe.
La pompe ne crée
pas de vide lors-
qu’elle est placée
sur un conteneur
ou le vide ne dure
pas.
Le couvercle du
conteneur sous
vide, le joint en
silicone ou la
valve sont mal
positionnés.
Vérifier que le positionnement
est correct et que le couvercle
est bien fermé.
Le joint en sili-
cone ou la valve
du conteneur sont
sales ou humides.
Nettoyer et sécher le joint
en silicone et la valve du
conteneur.
La pompe est mal
fixée sur la valve.
Pendant le scellage sous vide,
presser légèrement la pompe
dans la cavité entourant
lavalve pour créer un joint
étanche entre la pompe
etlavalve.

34
FR
Les problèmes
ci-dessus ne
peuvent être
résolus.
La pompe sous
vide est peut-être
cassée.
Contacter le service clientèle.
Ne pas essayer de réparer la
pompe par soi-même.
La pompe s’arrête
pendant le proces-
sus de scellage
sous vide et ne
se remet pas en
marche.
La pompe
aaspiré des
liquides pendant
le processus
descellage sous
vide.
Ne pas retourner la pompe.
Secouer légèrement
lapompe pour retirer tout
liquide. S’assurer que la
pompe et la station de char-
gement sont complètement
sèches. Brancher la pompe
dans la station de chargement
pendant une seconde pour
la réinitialiser, puis la retirer
et appuyer sur le bouton
Marche/Arrêt. Des liquides
supplémentaires peuvent
s’égoutter. Répéter cette pro-
cédure si la pompe s’arrête
de nouveau.
Service clientèle
Veuillez contacter le service clientèle si vous rencontrez des problèmes
avec votre pompe sous vide. Des informations détaillées sur l’entretien, les
réparations et la garantie sont disponibles sur www.zwilling.com/service.
Élimination
Ne pas jeter l’appareil avec les ordures ménagères. Pour
le bon respect de l’environnement, veuillez retourner votre
ancien appareil à un point de collecte pour les appareils
électriques. La collecte séparée des différents composants
des équipements électriques et électroniques contribue
àatténuer les effets négatifs de la pollution de l’environ-
nement et minimise les risques pour la santé humaine, qui
peuvent résulter d’une destruction inappropriée du pro-
duit. De plus, elle permet la réutilisation et la récupération
des matériaux, économisant ainsi de l’énergie etdesma-
tières premières.
Dépannage/Service clientèle/Élimination

www.zwilling.com
35
Seguridad
ES
Seguridad
Lea atentamente este manual de
usuario en su totalidad antes de
utilizar la bomba de vacío. Guar-
de este manual en un lugar segu-
ro. Si entrega la bomba de vacío
a otra persona, asegúrese de
incluir este manual con ella. Si no
se siguen las instrucciones de este
manual de usuario, se pueden
producir lesiones graves odaños
en el aparato. ZWILLING no se
hace responsable de los daños
causados por el incumplimiento
de este manual de usuario.
Información de seguridad
La bomba de vacío (en lo
sucesivo denominada «apa-
rato») está destinada a uti-
lizarse exclusivamente con
todas las opciones deal-
macenamiento al vacío de
ZWILLING FRESH & SAVE
para crear un sellado al
vacío eficaz para el alma-
cenamiento prolongado de
alimentos. Solo se puede
utilizar con los accesorios
suministrados oaprobados
por ZWILLING. Cualquier
otro uso se considera inade-
cuado y puede causar le-
siones personales o daños
materiales. El aparato está
diseñado para uso domés-
tico. No está destinado
para uso comercial. No
utilice el aparato en usted
mismo, otras personas o
animales.
Ciertas personas están en
mayor riesgo:
Este aparato puede ser
utilizado por niños a partir
de 8 años y por personas
con capacidades físicas,
sensoriales reducidas o
con falta de experiencia
yconocimientos, siempre
que hayan sido supervi-
sados o instruidos en el
uso del aparato de forma
segura y comprendan
los peligros que conlleva.
Losniños nodeben jugar
con el aparato. Los niños no
deben llevar a cabo lalim-
pieza y el mantenimiento sin
supervisión.
Mantenga el aparato
y su cable de conexión
fuera del alcance de los
niños menores de 8 años.
Mantenga a los niños
alejados del material de
embalaje. Esto supone un
riesgo de asfixia. El aparato
tiene una batería instalada
de forma permanente.
Un manejo inadecuado
conlleva riesgo de incen-
dio. Cargue la batería
únicamente con el cable de
carga incluido. No desmon-
te la batería. No cortocircui-
te el aparato ni lo arroje al
fuego. No abra ni destruya
el aparato.
El aparato está cargado
con corriente eléctrica.
Porlo tanto, existe el ries-
go de sufrir una descarga
eléctrica. Cargue el apara-
to únicamente si la tensión
indicada en la placa de
características del adapta-
dor utilizado coincide con
la tensión de su toma de
corriente. Asegúrese de
que el cable de carga no
esté doblado o pellizcado
y deque tanto el cable de
carga como el aparato
no entren en contacto con

36
SeguridadES
Explicación de los símbolos
Peligro de daños a personas o a la propiedad debido a la
corriente eléctrica
Riesgo de daños materiales y daños en el aparato
Consejos para un uso efi caz
Clave de los símbolos del aparato
Aparato de clase III - Baja tensión
Marca de certifi cación CE
No tirar con la basura doméstica
Marca de certifi cación EAC
Marca de certifi cación UKCA
fuentes de calor (por ejem-
plo, fogones, llamas de
gas). Desenchufe siempre
directamente el adaptador
decorriente delenchu-
fe (no tire del cable de
carga).
No transporte el aparato
por el cable de carga.
Desconecte el cable de
carga del aparato inmedia-
tamente después de fi na-
lizar el proceso de carga.
Después de cada carga
y en caso de peligro o
defecto, desenchufe inme-
diatamente el adaptador
de corriente conectado al
cable de carga de la toma
de corriente. Desenchufe
elaparato del cable de car-
ga antes de limpiarlo ode
realizar su mantenimiento.
Mientras el adaptador de
corriente esté enchufado,
existe tensión en el interior
del aparato, incluso si este
está apagado. No des-
enrosque ni modifi que el
aparato.
Compruebe que el aparato
no esté dañado antes de
cada uso. Si detecta daños
de transporte, póngase en
contacto inmediatamente
con el distribuidor al que
adquirió el aparato. Nunca
utilice un aparato o acce-
sorios defectuosos. Nunca
utilice un aparato oacceso-
rios que se hayan caído. En
caso de avería, póngase
en contacto con nuestro ser-
vicio de atención al cliente.
El aparato no contiene
ninguna pieza queusted
mismo pueda reparar. Se
pueden producir daños
si el aparato se manipula
incorrectamente.

www.zwilling.com
37
ES
Vista general/Datos técnicos
Datos técnicos de la bomba
devacío
Especificación de la batería 3,7 V, Li-Ion, 1200 mAh
Adaptador de corriente
(no incluido)
Entrada: 100 – 240 V∼, 50/60 Hz
Salida: 5 V⎓, 1000 mA
Cable de carga USB 2.0 tipo A, micro USB,
longitud 0,8 m
Dimensiones
(long. x anch. x alt.) 50 x 50 x 190mm
Peso aprox. 0,3 kg
Material Plástico ABS, silicona
El contenido del kit básico puede variar.
Vista general
7
7a 7b
2
3
6
1
4
5
1Símbolo de batería 5Estación de carga
2Luz indicadora 6Puerto de conexión USB
3Botón de
encendido/apagado
7Cable de carga con
USB 2.0 (a) y micro USB (b)
4Tapa de silicona

38
Uso
ES
Lectura del símbolo de la luz indicadora y de la batería
• La luz indicadora parpadea: sellado al vacío en proceso
• La luz indicadora se enciende durante 5 segundos y luego se
apaga: sellado al vacío completado
• El símbolo de la batería parpadea rápidamente: la carga de la
batería es baja
• El símbolo de la batería parpadea lentamente: carga en proceso
• El símbolo de la batería se enciende: Completamente cargada,
lista para desconectar
1
Carga de la bomba de vacío
Para que el funcionamiento de la batería se mantenga óptimo,
cárguela al menos una vez cada 3 a 6 meses.
Cargue la bomba de vacío completamente antes del primer uso.
Coloque la bomba en la estación de carga. Inserte el conector USB
pequeño en el puerto de la estación de carga. Inserte el conector
USBmás grande (USB 2.0) en un adaptador de corriente y enchúfelo
a una toma de corriente de pared.
También puede conectar el cable de carga al puerto USB de un
ordenador. Durante la carga, la luz indicadora parpadeará lentamente.
Cuando la bomba está completamente cargada, la luz indicadora es-
tará encendida continuamente. Dependiendo de la fuente de energía,
la carga puede tardar de 2 a 5 horas.
Uso
Felicidades por su kit básico de envasado al vacío ZWILLING
FRESH & SAVE. Con los productos de envasado al vacío
ZWILLING FRESH & SAVE puede mantener sus alimentos fres-
cos por más tiempo.
Tenga en cuenta que el vacío no reemplaza la congelación,
el enfriamiento o la conservación de los alimentos. La conser-
vación de los alimentos depende de muchos factores, como el
contenido inicial de gérmenes de los alimentos, el cumplimiento
de las condiciones correctas de almacenamiento y refrigera-
ción, así como la higiene necesaria durante la elaboración y
el envasado al vacío. Mantenga los procedimientos habituales
dealmacenamiento e higiene de los alimentos. Si es posible, se-
que los alimentos antes de envasarlos al vacío. Espere siempre
a que los alimentos se enfríen a temperatura ambiente antes de
aplicarles vacío. Algunos vegetales emiten gases cuando están
crudos, lo que puede llevar a una pérdida de vacío en el interior
del envase. Entre ellos se encuentran la col, las judías, las cebo-
llas y el ajo. Para evitar la formación de gases, estos se deben
escaldar antes de aplicarles vacío. El queso azul no debe alma-
cenarse al vacío, las setas frescas solo cuando se congelan.

www.zwilling.com
39
Uso
ES
Limpie los recipientes de envasado al vacío antes de usarlos por
primera vez. Antes de cada uso, asegúrese de que el sello de la
tapa y el borde del recipiente estén limpios y secos.
No llene en exceso el recipiente. Deje siempre 1‒2 cm libres has-
ta el borde. Asegúrese de que los alimentos dentro del recipiente
no entren en contacto con la válvula del interior de la tapa.
1.
2.
2
Sellado al vacío de recipientes y bolsas
La bomba no debe succionar líquidos (p. ej., agua, aceite, jugo
de carne). Si ve que la bomba está succionando líquidos, deten-
ga inmediatamente el proceso de sellado al vacío pulsando el
botón de encendido/apagado.
La duración del proceso de sellado al vacío depende del
tamaño del recipiente y de la cantidad de llenado. Si un
recipiente es más pequeño o está más lleno, el proceso
de sellado al vacío es más rápido.
Coloque la bomba de vacío en la válvula del recipiente y, si es nece-
sario, presione ligeramente hacia abajo. Pulse el botón de encendido/
apagado de la bomba.
La bomba succiona el aire del recipiente. El sellado al vacío se detiene
automáticamente cuando la presión de vacío alcanza el nivel adecua-
do. El sellado al vacío también se puede interrumpir manualmente en
cualquier momento pulsando el botón de encendido/apagado.
Si no se puede alcanzar el nivel adecuado porque, por ejemplo,
la bomba no está bien colocada, el proceso de vacío se detendrá
automáticamente después de 2 minutos. Es posible que el recipiente
noestébien cerrado.

40
Uso
ES
Para el marinado o la cocción al vacío, recomendamos
utilizar el accesorio de barrera de líquido. Engánchelo
en la válvula del interior de la bolsa antes de sellarla. La
barrera de líquido inhibe que la bomba absorba el líquido
durante el proceso de sellado al vacío. Detenga elpro-
ceso de sellado al vacío inmediatamente presionando el
botón de encendido/apagado si ve que los líquidos se
acercan a la bomba.
Los recipientes de vacío de vidrio ZWILLING FRESH &SAVE se
pueden colocar en el horno si se retira la tapa (max.180°C).
No exponga los recipientes de vacío de vidrio a variaciones
detemperatura, por ejemplo, sacando un recipiente de vacío
dela nevera para meterla en el horno caliente.
La abertura de la bolsa debe estar completamente limpia y
seca. Asegúrese de que la válvula en el interior de la bolsa no
entre en contacto con su contenido.
Todas las bolsas y recipientes incluidos en el kit básico pueden
usarse para calentar comida en el microondas. Incluso recipien-
tes con tapas adjuntas. Para los alimentos grasos recomenda-
mos usar los recipientes de vidrio.
Antes de usar los recipientes en el microondas, asegúrese de
que se haya liberado el vacío y que la tapa esté apoyada suel-
ta en la parte superior.
En el caso de los alimentos blandos o líquidos, puede ayu-
dar congelarlos brevemente antes de envasarlos al vacío
en bolsas. Una consistencia firme evita que los alimentos
se aplasten durante el envasado al vacío o que el líquido
entre en la bomba. Como alternativa, los recipientes de
vacío ZWILLING FRESH & SAVE son particularmente
adecuados en este caso.

www.zwilling.com 41
Uso ES
Las botellas se pueden sellar con el sellador de vino. La bomba se
detiene automáticamente cuando la presión de vacío alcanza el nivel
adecuado.
1. 2.
3
Apertura de un recipiente al vacío
Para abrir recipientes o botellas de vacío, tire cuidadosamente de la
válvula de silicona hacia un lado. El aire entra lentamente y el vacío se
escapa. Los recipientes se pueden abrir.
Las bolsas se pueden cerrar fácilmente con la cremallera incluida.
Deslícela lateralmente sobre la bolsa y muévala para cerrarla. Luego,
presione con el dedo sobre la tira de sellado para asegurarse de
que la bolsa esté bien cerrada. Para abrir las bolsas, separe la tira de
sellado con las manos.
1.
P
U
S
H
P
U
S
H
5.
3.
4.
1. 2.
Recuerde pulsar el botón PUSH en el centro de la válvula de
silicona después de cada proceso de vacío para sellar fi nalmen-
te la válvula.

42
Uso
ES
4
Uso de los códigos QR y la aplicación
Los recipientes y las bolsas de vacío ZWILLING FRESH & SAVE están
provistos de un código QR, que se corresponde con la aplicación
ZWILLING. Conla ayuda de la aplicación se puede gestionar
fácilmente los alimentos envasados al vacío y tener una visión general
perfecta de las existencias. El código QR de los productos facilita
la comprobación delos alimentos en la aplicación. La aplicación le
recuerda cuando susalimentos están a punto de caducar. Primero des-
cargue la aplicación ZWILLING y luego escanee el código QR.
Cada bolsa de vacío tiene un identificador de bolsa único.
Esto le ayudará a identificar claramente sus alimentos.
Más información y descargar la aplicación de forma gratuita:
www.zwilling.com/app
Después del proceso de vacío, la tapa interior del recipiente de vacío
se bajará y el sellado se expandirá (este comportamiento no se aplica
a las tapas de las fiambreras). Tan pronto como la tapa interior se
levante, se deberá refrescar el vacío. Use la bomba de vacío para
aplicar vacío de nuevo al recipiente.

www.zwilling.com
43
Limpieza
ES
Limpieza
Desenchufe el adaptador de corriente y desconecte la
bomba de vacío del cable de carga antes de limpiarla.
1
Limpieza de la bomba de vacío
Limpie el cuerpo de la bomba de vacío y de la estación de carga
únicamente con un paño seco o algo húmedo. No coloque ninguna
pieza de la bomba en el lavavajillas.
2
Limpieza de la tapa de silicona
Para limpiar la tapa de silicona, retírela del cuerpo de la bomba de
vacío tirando suavemente hacia abajo y límpiela con agua.

44
ES
Limpieza/Resolución de problemas
3
Limpieza de los recipientes
Los recipientes se pueden lavar en el lavavajillas.
4
Limpieza de las bolsas
Puede limpiar las bolsas a mano y reutilizarlas después. Seque las
bolsas completamente después de cada limpieza. Si ha almacenado
carne, pescado, huevos o queso de leche cruda en ellas, debe limpiar-
las con especial cuidado.
Resolución de problemas
Problema Posible causa Remedio
La bomba no
responde al botón
de encendido/
apagado.
La batería de la
bomba está baja
o no está carga-
da.
Cargue la batería de la
bomba.
La bomba no
genera vacío
cuando se coloca
en un recipiente
o el vacío no se
mantiene.
La tapa del reci-
piente de vacío, la
junta de silicona
o la válvula no
están colocadas
correctamente.
Compruebe que la posición
es correcta y que la tapa
está bien cerrada.
La junta de silicona
o la válvula del
recipiente están
sucias o mojadas.
Limpie y seque la junta de
silicona y la válvula del
recipiente.
La bomba se
apoya demasia-
do suelta en la
válvula.
Durante el sellado al vacío,
presione ligeramente la bom-
ba en el muelle que rodea
la válvula para crear un sello
hermético entre la bomba
yla válvula.

www.zwilling.com
45
ES
Servicio de Atención al Cliente
Póngase en contacto con nuestro Servicio de Atención al Cliente en
caso de que tenga algún problema con su bomba de vacío. Puede
encontrar información detallada sobre el servicio, las reparaciones y la
garantía en www.zwilling.com/service.
Eliminación
No tire el aparato a la basura doméstica. Para una
eliminación respetuosa con el medioambiente, devuelva
el aparato usado a un punto de recogida de electro-
domésticos. La recolección por separado de cada uno
delos componentes previene los efectos negativos de
lacontaminación ambiental y minimiza el peligro para la
salud humana, que puede ocurrir como resultado de la
eliminación inadecuada del producto. Además, permite
la reutilización y recuperación de los materiales, ahorran-
do así energía y materias primas.
Los problemas
anteriores no se
pueden resolver.
La bomba de
vacío podría estar
dañada.
Póngase en contacto con
el servicio de atención al
cliente. No intente reparar la
bomba usted mismo.
La bomba se
detiene durante
el proceso de
sellado al vacío
y no se vuelve a
encender.
La bomba ha suc-
cionado líquidos
durante el proceso
de sellado al
vacío.
No ponga la bomba boca
abajo. Agite ligeramente la
bomba para eliminar cual-
quier líquido. Asegúrese de
que la bomba y la estación
de carga estén completa-
mente secas. Conecte la
bomba a la estación de car-
ga durante un segundo para
reiniciarla, luego retírela y
pulse el botón de encen-
dido/apagado. Pueden
gotear líquidos adicionales.
Repita este proceso si la
bomba se detiene de nuevo.
Resolución de problemas/Servicio de Atención al Cliente/Eliminación

46
Sicurezza
IT
Sicurezza
Leggere attentamente e fino in
fondo il presente manuale d’uso
prima di utilizzare la pompa per
sottovuoto. Custodire il presente
manuale in un luogo sicuro. In
caso di cessione della pompa per
sottovuoto a terzi, accertarsi di in-
cludere anche il presente manuale
d’uso. La mancata osservanza del
presente manuale d’uso può cau-
sare lesioni gravi o danni all’appa-
recchio. ZWILLING declina ogni
responsabilità per danni derivanti
dalla mancata osservanza del
presente manuale d’uso.
Avvertenze di sicurezza
La pompa per sottovuoto
(di seguito denominata
“apparecchio”) è destinata
ad essere utilizzata esclu-
sivamente con i prodotti
ZWILLING FRESH & SAVE
per creare un’efficace
tenuta del sottovuoto degli
alimenti che duri a lungo.
Può essere utilizzata esclu-
sivamente con gli acces-
sori forniti in dotazione o
approvati da ZWILLING.
Qualsiasi altro impiego è
da considerarsi improprio
epuò causare danni a per-
sone o cose. L’apparecchio
è destinato all’uso domesti-
co, Non è destinato all’uso
commerciale. Non utilizzare
l’apparecchio su se stessi,
su altre persone o animali.
Per determinate persone
esiste un rischio maggiore:
questo apparecchio può
essere usato da bambini
di almeno 8 anni di età e
da persone dalle facoltà
fisiche o sensoriali ridotte,
ovvero prive di esperienze
e conoscenze, solo sotto
stretta sorveglianza oppure
dopo che abbiano ricevuto
istruzioni relative all’uso
sicuro dell’apparecchio e
abbiano compreso i perico-
li ad esso inerenti. I bambini
non devono giocare con
l’apparecchio. Le opera-
zioni di pulizia e piccola
manutenzione non devono
essere svolte da bambini
non sorvegliati.
Custodire l’apparecchio e
ilsuo cavo di alimentazione
in un luogo non accessibile
ai bambini di età inferio-
rea 8anni. Tenere lontani
i bambini dal materiale
di imballaggio. Sussiste il
pericolo disoffocamento.
L’apparecchio è dotato
diuna batteria installata in
modo permanente. Con un
utilizzo improprio sussiste il
rischio di incendio. Caricare
la batteria utilizzando solo
il cavo di alimentazione in
dotazione. Non smontare
la batteria. Non cortocircu-
itare l’apparecchio e non
esporlo alle fiamme. Non
aprire o manomettere in
altro modo l’apparecchio.
L’apparecchio viene cari-
cato con corrente elettrica.
Sussiste quindi il pericolo
discossa elettrica. Caricare
l’apparecchio solo se la
tensione indicata sulla
targhetta dell’adattatore
utilizzato corrisponde
alla tensione della presa.
Fareattenzione a non pie-
gare o schiacciare il cavo
di alimentazione. Evitare
che il cavo di alimentazione

www.zwilling.com 47
Sicurezza IT
Spiegazione dei simboli
Pericolo di lesioni personali o danni materiali a causa della
corrente elettrica
Pericolo di danni materiali e danni all’apparecchio
Consigli per un utilizzo ottimale
Legenda dei simboli sull’apparecchio
Apparecchio di classe III - Bassa tensione
Marchio CE
Non smaltire l’apparecchio insieme ai rifi uti domestici.
Marchio EAC
Marchio UKCA
e l’apparecchio entrino in
contatto con fonti di calore
(es. fornelli elettrici o a gas).
Scollegare sempre l’adatta-
tore dalla presa in maniera
diretta (non tirare il cavo di
alimentazione).
Non trasportare l’apparec-
chio tenendolo per il cavo
di alimentazione. Al termine
del processo di carica,
scollegare immediatamente
il cavo di alimentazione
dalla presa. Dopo ogni
ricarica e in caso di perico-
lo o di difetto, scollegare
immediatamente dalla
presa l’adattatore collegato
al cavo di alimentazione.
Scollegare l’apparecchio
dal cavo di alimentazione
prima di pulirlo o di eff ettua-
re la manutenzione. Anche
se l’apparecchio è spento,
al suo interno è presente
tensione fi nché l’adattatore
è inserito nella presa. Non
aprire l’apparecchio e
non apportarvi modifi che
tecniche.
Prima di ogni utilizzo verifi -
care che l’apparecchio non
presenti danni. Se si riscon-
trano danni da trasporto,
rivolgersi immediatamente
al rivenditore presso cui è
stato acquistato l’apparec-
chio. Non utilizzare mai
un apparecchio difettoso
o accessori difettosi. Non
azionare mai un apparec-
chio o accessori che siano
caduti a terra. Se si riscon-
trano dei difetti, contattare
il nostro servizio clienti.
L’apparecchio non contie-
neparti che l’utente possa
riparare da solo. L’uso non
corretto dell’apparecchio
può causare danni.

48
IT
Dati tecnici - pompa per sottovuoto
Specifiche della batteria 3,7 V, ioni di litio, 1200mAh
Adattatore
(non incluso)
Ingresso: 100 – 240 V∼, 50/60 Hz
uscita: 5 V⎓, 1000 mA
Cavo di alimentazione USB 2.0 di tipo A, micro USB,
lunghezza 0,8 m
Dimensioni
(lungh. x largh. x alt.) 50 x 50 x 190 mm
Peso ca. 0,3 kg
Materiale Plastica ABS, silicone
Il contenuto dello starter set può variare.
Panoramica
7
7a 7b
2
3
6
1
4
5
1Simbolo della batteria 5Stazione di ricarica
2Indicatore luminoso 6Porta USB
3Pulsante on/off 7Cavo di alimentazione con
USB 2.0 (a) e micro USB (b)
4Tappo di silicone
Panoramica/Dati tecnici

www.zwilling.com
49
Utilizzo
IT
Come leggere l’indicatore luminoso e il simbolo della batteria
• L’indicatore luminoso lampeggia: processo di sottovuoto in corso
• L’indicatore luminoso resta acceso per 5 secondi e poi si spegne: il
processo di sottovuoto è terminato
• Il simbolo della batteria lampeggia velocemente: la batteria
èscarica
• Il simbolo della batteria lampeggia lentamente: ricarica in corso
• Il simbolo della batteria rimane illuminato: Ricarica completata,
scollegare l’apparecchio
1
Ricarica della pompa per sottovuoto
Per mantenere il funzionamento ottimale della batteria, ricaricar-
la almeno ogni 3–6 mesi.
Caricare completamente la pompa per sottovuoto prima del primo uti-
lizzo. Posizionare la pompa sulla stazione di ricarica Inserire il connetto-
re USB piccolo nella porta della stazione di ricarica. Inserire il connetto-
re USB grande (USB 2.0) in unadattatore e collegarlo a una presa.
È anche possibile collegare il cavo di alimentazione alla porta USB
di un computer. Durante la carica, l’indicatore luminoso lampeggia
lentamente. Quando la pompa è completamente carica, l’indicatore
luminoso rimane illuminato. A seconda della fonte di alimentazione,
laricarica può durare da 2 a 5 ore.
Utilizzo
Congratulazioni per l’acquisto dello starter set per sottovuoto
ZWILLING FRESH & SAVE. Con i prodotti sottovuoto ZWILLING
FRESH & SAVE è possibile mantenere gli alimenti freschi più a
lungo.
Tenere presente che il confezionamento sottovuoto non sosti-
tuisce il corretto congelamento e raffreddamento o la corretta
conservazione degli alimenti. La durata di conservazione degli
alimenti dipende da molti fattori, come ades. il contenuto inizia-
le di germi negli alimenti, l’osservanza delle corrette condizioni
di conservazione e di raffreddamento e l’igiene richiesta durante
la lavorazione e il confezionamento sottovuoto. Mantenere le
consuete procedure di conservazione e di igiene per gli alimenti.
Se possibile, asciugare gli alimenti prima di sottoporli al confe-
zionamento sottovuoto. Attendere sempre che il cibo si raffreddi
a temperatura ambiente prima di procedere con il confeziona-
mento sottovuoto. Alcune verdure emettono gas allo stato crudo,
che possono causare una perdita di vuoto all’interno della
confezione. Queste includono cavoli, fagioli, cipolle eaglio. Per
prevenire la formazione di gas, queste verdure devono essere
sbollentate prima del confezionamento sottovuoto. I formaggi
come il gorgonzola e simili non devono essere conservati sotto-
vuoto, i funghi freschi solo quando sono surgelati.

50
Utilizzo
IT
Pulire i contenitori per sottovuoto prima di utilizzarli per la prima
volta. Prima di ogni utilizzo, assicurarsi che la tenuta del coper-
chio e il bordo del contenitore siano puliti e asciutti.
Non riempire il contenitore eccessivamente. Lasciare sempre
1–2 cm di spazio libero dal bordo. Assicurarsi che gli alimenti
nel contenitore non entrino in contatto con la valvola all’interno
del coperchio.
1.
2.
2
Processo di sottovuoto in contenitori e sacchetti
La pompa non deve assorbire liquidi (ades. acqua, olio, succhi
della carne). Se si nota che la pompa sta aspirando liquidi, arre-
stare immediatamente il processo di confezionamento sottovuoto
premendo il pulsante on/off.
La durata del processo di sottovuoto dipende dalle
dimensioni e dal riempimento del contenitore. Il processo
di sottovuoto è più veloce seil contenitore è più piccolo o
più pieno.
Posizionare la pompa per sottovuoto sulla valvola del contenitore e, se
necessario, premerla leggermente verso il basso. Premere il pulsante
on/off sulla pompa.
La pompa aspira automaticamente l’aria dal contenitore. Il confezio-
namento sottovuoto si blocca automaticamente al raggiungimento del
giusto livello della pressione del vuoto. È possibile interrompere manual-
mente il confezionamento sottovuoto premendo il pulsante on/off.
Se non è possibile raggiungere il livello giusto perché, ad esempio, la
pompa non è posizionata correttamente, il processo di sottovuoto si
arresta automaticamente dopo 2 minuti. Il contenitore potrebbe non
essere chiuso correttamente.

www.zwilling.com
51
Utilizzo
IT
Per la marinatura o la cottura sottovuoto, si consiglia l’uso
dell’attacco per la barriera di liquidi. Agganciarlo alla
valvola all’interno del sacchetto prima di chiudere il sac-
chetto. La barriera raccoglie i liquidi inibendone l’assorbi-
mento da parte della pompa durante il confezionamento
sottovuoto. Arrestare immediatamente il processo di con-
fezionamento sottovuoto premendo il pulsante ON/OFF
sesi vedono liquidi avvicinarsi alla pompa.
I contenitori per sottovuoto in vetro ZWILLING FRESH & SAVE
possono essere messi nel forno se viene tolto il coperchio (max.
180°C). Non sottoporre i contenitori per sottovuoto in vetro
a shock termici estremi, ades. non mettere un contenitore per
sottovuoto nel forno caldo direttamente dal frigorifero.
L’apertura del sacchetto deve essere completamente pulita e
asciutta. Assicurarsi che la valvola all’interno del sacchetto non
entri in contatto con il suo contenuto.
Tutti i sacchetti e i contenitori inclusi nel kit di base possono esse-
re usati per riscaldare alimenti al microonde. Anche i contenitori
dotati di coperchi. Per alimenti oleosi si consiglia di utilizzare
contenitori di vetro.
Prima di utilizzare i contenitori nel microonde, accertarsi che
ilsottovuoto sia stato rilasciato e il coperchio non poggi salda-
mente.
È consigliabile congelare brevemente gli alimenti morbidi
o liquidi prima di confezionarli sottovuoto in sacchetti. Una
consistenza solida impedisce che il cibo venga schiacciato
durante il confezionamento sottovuoto o che il liquido entri
nella pompa. In alternativa, i contenitori per il sottovuoto
ZWILLING FRESH & SAVE sono particolarmente adatti in
questo caso.

52
UtilizzoIT
Le bottiglie possono essere chiuse sottovuoto utilizzando l’accessorio
per vino. La pompa si arresta automaticamente al raggiungimento del
giusto livello della pressione del vuoto.
1. 2.
3
Apertura di un contenitore confezionato sottovuoto
Per aprire contenitori o bottiglie sottovuoto, tirare con cautela la valvola
in silicone a lato. L’aria entra lentamente e il vuoto fuoriesce. I contenito-
ri possono essere aperti.
Per chiudere i sacchetti con facilità, usare il cursore in dotazione. Inse-
rirlo lateralmente e farlo scorrere sul bordo del sacchetto per chiuderlo.
Premere quindi con una leggera pressione del dito sulla striscia di chiu-
sura ermetica per assicurarsi che il sacchetto sia chiuso correttamente.
Per aprire i sacchetti, staccare con le mani le due estremità sigillate.
1.
P
U
S
H
P
U
S
H
5.
3.
4.
1. 2.
Dopo ogni processo di sottovuoto, ricordarsi di premere il
pulsante PUSH al centro della valvola in silicone per chiudere
ermeticamente la valvola.

www.zwilling.com
53
Utilizzo
IT
4
Utilizzo dei codici QR e dell’app
I contenitori e i sacchetti per sottovuoto ZWILLING FRESH & SAVE
sono dotati di un codice QR che è abbinato all’app ZWILLING. Con
l’aiuto dell’app è possibile gestire facilmente gli alimenti sottovuoto e
avere una perfetta panoramica sulle scorte. Il codice QR sui prodotti
facilita il controllo degli alimenti nell’app. L’app ricorda quando gli
alimenti stanno per scadere. Scaricare prima l’app ZWILLING e poi
scansionare il codiceQR.
Ogni sacchetto per sottovuoto ha un unico codice ID.
Questo aiuta a identificare chiaramente gli alimenti.
Per maggiori informazioni e per scaricare l’app gratuitamente:
www.zwilling.com/app
Al termine del confezionamento sottovuoto, il coperchio interno del con-
tenitore per sottovuoto si abbassa e la guarnizione si espande (questa
modalità non si applica ai coperchi dei contenitori per il pranzo). Non
appena il coperchio interno si solleva, il vuoto deve essere rinnovato.
Utilizzare la pompa per sottovuoto per creare di nuovo la tenuta sotto-
vuoto del contenitore.

54
Pulizia
IT
Pulizia
Prima di pulire la pompa per sottovuoto, scollegare l’a-
dattatore e disconnetterla dal cavo di alimentazione.
1
Pulizia della pompa per sottovuoto
Usare solo un panno asciutto o leggermente inumidito per pulire il cor-
po della pompa per sottovuoto e la stazione di ricarica. I componenti
della pompa non sono lavabili in lavastoviglie.
2
Pulizia del tappo in silicone
Per pulire il tappo in silicone, rimuoverlo dal corpo della pompa
persottovuoto tirandolo delicatamente verso il basso e sciacquarlo
conacqua.

www.zwilling.com
55
IT
Pulizia/Risoluzione dei problemi
3
Pulizia dei contenitori
I contenitori sono lavabili in lavastoviglie.
4
Pulizia dei sacchetti
È possibile pulire i sacchetti a mano e riutilizzarli in seguito. Asciugare
completamente i sacchetti dopo averli puliti. Se vi è stata conservata
carne cruda, pesce, uova o formaggio di latte crudo, i sacchetti devono
essere puliti in modo particolarmente accurato.
Risoluzione dei problemi
Problema Possibile
causa
Rimedio
La pompa non ri-
sponde al pulsante
on/off.
La batteria della
pompa è scarica.
Caricare la batteria della
pompa.
Quando la pompa
è posizionata su
un contenitore non
crea il vuoto oppu-
re il sottovuoto non
resta.
Il coperchio
delcontenitore,
la guarnizione
di silicone o la
valvola non è
posizionato/a
correttamente.
Controllare che il posiziona-
mento sia corretto e che il
coperchio sia ben chiuso.
La guarnizione
di silicone o la
valvola del con-
tenitore è sporca
obagnata.
Pulire e asciugare la guarni-
zione di silicone e la valvola
del contenitore.
La pompa non
è salda sulla
valvola.
Durante il confezionamento
sottovuoto premere legger-
mente la pompa sulla valvola
affinché siano a tenuta.

56
IT
Non è possibile
risolvere i problemi
indicati sopra.
La pompa per
sottovuoto
potrebbe essere
rotta.
Contattare il servizio clienti.
Non provare a riparare la
pompa da soli.
Durante il confe-
zionamento sotto-
vuoto la pompa
si arresta e non si
riaccende.
La pompa ha
aspirato del
liquido durante il
confezionamento
sottovuoto.
Non capovolgere la pompa.
Agitare leggermente la pom-
pa per eliminare il liquido.
Assicurarsi che la pompa e
la stazione di ricarica siano
completamente asciutte. Inse-
rire la pompa nella stazione
di ricarica per un secondo
per eseguire il reset, toglierla
e premere il pulsante on/
off. Può fuoriuscire ulteriore
liquido. Se la pompa si arre-
sta di nuovo, ripetere questo
processo.
Servizio clienti
In caso di problemi con la pompa per sottovuoto, contattare il servizio
clienti. Maggiori informazioni su assistenza, riparazioni e garanzia sono
disponibili su www.zwilling.com/service.
Smaltimento
Non smaltire l’apparecchio insieme ai rifiuti domestici.
Per uno smaltimento ecocompatibile, conferire il vecchio
apparecchio a un punto di raccolta per apparecchi
elettrici. La raccolta differenziata di singoli componenti
delle apparecchiature EE previene gli effetti negativi
dell’inquinamento atmosferico e riduce al minimo il
pericolo sull’uomo che potrebbe essere causato da uno
smaltimento inadeguato del prodotto. In questo modo
è inoltre possibile riutilizzare e recuperare il materiale,
risparmiando energia e materie prime.
Risoluzione dei problemi/Servizio clienti/Smaltimento

www.zwilling.com
57
Veiligheid
NL
Veiligheid
Lees deze gebruiksaanwijzing
volledig en zorgvuldig voordat u
de vacuümpomp gebruikt. Bewaar
deze handleiding op een veilige
plaats. Als u de vacuümpomp
doorgeeft, moet u deze handlei-
ding mee doorgeven. Het niet
naleven van de instructies in deze
gebruiksaanwijzing kan ernstig
persoonlijk letsel of schade aan
het apparaat tot gevolg hebben.
ZWILLING stelt zich niet aan-
sprakelijk voor schade die wordt
veroorzaakt door het niet naleven
van deze gebruiksaanwijzing.
Veiligheidsinformatie
De vacuümpomp (hierna
“apparaat” genoemd) is
exclusief bestemd voor
gebruik op alleZWILLING
FRESH & SAVE vacuüm
producten en accessoires,
om een efficiënte vacuümaf-
dichting te creëren voor
het langdurig bewaren
van voedingsmiddelen. De
pomp mag alleen worden
gebruikt met de accessoi-
res die worden geleverd
of zijn goedgekeurd door
ZWILLING. Elk ander
gebruik wordt beschouwd
als foutief gebruik enkan
persoonlijk letsel of ma-
teriële schade tot gevolg
hebben. Het apparaat is
bestemd voor huishoudelijk
gebruik. Het is niet bestemd
voor commercieel gebruik.
Gebruik het apparaat niet
op uzelf, andere personen
of dieren.
Bepaalde groepen perso-
nen lopen meer risico:
het apparaat kan worden
gebruikt door kinderen van
8jaar en ouder en door
personen met een fysieke
of zintuiglijke beperking of
meteen gebrek aan erva-
ring en kennis, mits iemand
toezicht op hen houdt of
zij zijn geïnstrueerd in het
veilige gebruik van het ap-
paraat en begrijpen welke
risico's het gebruik van het
apparaat met zich mee-
brengt. Kinderen mogen
niet met het apparaat spe-
len. Reiniging en onderhoud
mogen niet door kinderen
worden uitgevoerd zonder
supervisie.
Bewaar het apparaat
en de laadkabel op een
plaats die niet toegankelijk
is voor kinderen jonger
dan 8jaar. Houd kinderen
uit de buurt van de ver-
pakkingsmaterialen. Deze
veroorzakenverstikkingsge-
vaar. Het apparaat heeft
een permanent geïnstalleer-
de accu. Bij ondeskundige
omgang hiermee bestaat
brandgevaar. Laad de accu
alleen op met de meege-
leverde laadkabel. Haal
de accu niet uit elkaar. Laat
het apparaat niet kortsluiten
en gooi het niet in het vuur.
Open het apparaat niet
en verniel het niet op een
andere manier.
Het apparaat wordt op-
geladen met elektrische
stroom. Daarom bestaat
er gevaar voor elektrische
schokken. Laad het ap-
paraat alleen op als de
spanning vermeld op het
typeplaatje van de gebruik-
te adapter overeenkomt met
de spanning van uw con-
tactdoos. Zorg ervoor dat
de laadkabel niet geknikt of

58
VeiligheidNL
Toelichting bij de symbolen
Gevaar voor persoonlijk letsel of materiële schade door
elektrische stroom
Gevaar voor materiële schade en schade aan het appa-
raat
Tips voor effi ciënt gebruik
Toelichting bij de symbolen op het
apparaat
Apparaatklasse III - laagspanning
CE-certifi catiekenmerk
Niet weggooien met het huishoudelijk afval
EAC-certifi catiekenmerk
UKCA-certifi catiekenmerk
ergens tussengeklemd raakt,
en dat de laadkabel en het
apparaat niet in aanraking
komen met warmtebronnen
(bijv. fornuis, gasvlam).
Trekaltijd aan de voe-
dingsadapter zelf wanneer
udeze uit het stopcontact
trekt (niet aan de laadkabel
trekken).
Draag het apparaat niet bij
de laadkabel. Koppel de
laadkabel onmiddellijk na
het laadproces van het ap-
paraat los. Na iedere op-
laadbeurt en in geval van
gevaar of een defect moet
u de voedingsadapter van
de laadkabel onmiddellijk
uithet stopcontact trekken.
Koppel het apparaat los
van de laadkabel vóór de
reiniging of het onderhoud.
Zolang de voedingsadap-
ter in het stopcontact zit,
staat het apparaat onder
spanning, zelfs als het is
uitgeschakeld. Schroef
hetapparaat nooit open
en breng geen technische
wijzigingen aan.
Inspecteer het apparaat
op schade vóór elk ge-
bruik. Alsu transportschade
vaststelt, moet u onmiddellijk
contact opnemen met de
dealer die u het apparaat
heeft verkocht. Gebruik
nooit een defect apparaat
of defecte accessoires.
Gebruik nooit een appa-
raat of accessoires die op
de grond zijn gevallen.
Neem in geval van een
storing contact op met onze
klantenservice. Het appa-
raat bevat geenonderdelen
die u zelf kunt repareren.
Alshet apparaat niet cor-
rect wordt gebruikt, kan het
beschadigd raken.

www.zwilling.com
59
NL
Overzicht/technische gegevens
Technische gegevens – vacuümpomp
Accuspecificatie 3,7 V, Li-ion 1200 mAh
Voedingsadapter
(niet meegeleverd)
Input: 100 – 240 V∼, 50/60 Hz
Output: 5 V⎓, 1000 mA
Laadkabel USB 2.0 type A, micro USB,
lengte 0,8 m
Afmetingen (L x B x H) 50 x 50 x 190 mm
Gewicht ca. 0,3 kg
Materiaal ABS kunststof, siliconen
Inhoud van startset kan variëren.
Overzicht
7
7a 7b
2
3
6
1
4
5
1Accusymbool 5Laadstation
2Indicatorlampje 6USB-aansluitingspoort
3Aan/uit-knop 7Laadkabel met USB 2.0 (a) en
micro USB (b)
4Silicone-dop

60
Gebruik
NL
Het indicatorlampje en accusymbool aflezen
• Indicatorlampje knippert: vacuüm afdichten bezig
• Indicatorlampje brandt 5 seconden en gaat dan uit: vacuüm
afdichten is voltooid
• Accusymbool knippert snel: accu is bijna leeg
• Accusymbool knippert langzaam: opladen bezig
• Accusymbool gloeit: volledig opgeladen, voedingsadapter mag
worden losgekoppeld
1
De vacuümpomp opladen
Om een optimale werking van de accu te behouden, moet deze
minstens om de 3 à 6 maanden worden opgeladen.
Laad de vacuümpomp voor het eerste gebruik volledig op. Plaats de
pomp in het laadstation. Steek de kleine micro USB-connector in de
poort aan het laadstation. Steek de grotere USB-connector (USB 2.0)
in eenvoedingsadapter en sluit deze aan op een contactdoos.
U kunt de laadkabel ook aansluiten op de USB-poort van een compu-
ter. Tijdens het opladen knippert het indicatorlampje langzaam. Alsde
pomp volledigis opgeladen, brandt het indicatorlampje continu. Infunc-
tie van de voedingsbron kan het opladen 2 tot 5 uur duren.
Gebruik
Gefeliciteerd met uw aankoop van de ZWILLING FRESH &
SAVE startset voor vacuüm verpakken. Met ZWILLING FRESH
& SAVE-vacuümproducten kunt u voedingsmiddelen langer vers
houden.
Houd er rekening mee dat vacuüm verpakken geen vervanging
is voor het correct invriezen, koel bewaren of inmaken van
voedingsmiddelen. De houdbaarheid van voedingsmiddelen
isafhankelijk van veel factoren, bijvoorbeeld het oorspronkelijke
kiemgehalte van het voedingsmiddel, de correcte bewaring
enkoeling en de vereiste hygiëne bij het verwerken en vacuüm
verpakken. Pas steeds de normale procedures voor de bewaring
van en de hygiënische omgang met voedingsmiddelen toe. Dep
indien mogelijk de voedingsmiddelen droog voordat u ze vacu-
um verpakt. Wacht altijd tot de voedingsmiddelen zijn afgekoeld
tot kamertemperatuur voordat u ze vacuüm verpakt. Sommige
groenten geven gassen vrij in rauwe toestand. Deze kunnen
leiden tot verlies van het vacuüm in de verpakking. Voorbeelden
hiervan zijn kool, bonen, uien en knoflook. Om de vorming van
gassen tegen te gaan, moeten deze groenten worden geblan-
cheerd voordat ze vacuüm worden verpakt. Schimmelkaas mag
niet vacuüm worden verpakt; verse paddenstoelen alleen nadat
ze zijn diepgevroren.

www.zwilling.com
61
Gebruik
NL
Was de vacuümdozen vóór het eerste gebruik af. Zorg er voor
elk gebruik voor dat de afdichting van het deksel en de rand van
de doos schoon en droog zijn.
Overvul de doos niet. Laat steeds 1–2 cm vrij tot aan de rand.
Zorg ervoor dat de voedingsmiddelen in de doos niet in aanra-
king komen met het ventiel aan de binnenkant van het deksel.
1.
2.
2
Dozen en zakjes vacuüm afdichten
De pomp mag geen vloeistoffen absorberen (bijv. water, olie,
vleesjus). Als u merkt dat de pomp vloeistoffen aanzuigt, moet
uhet vacuümafdichtingsproces onmiddellijk stopzetten door
opde aan/uit-knop te drukken.
De duur van het vacuüm afdichten is afhankelijk van de
grootte van de recipiënt en van het vulniveau. Naarmate
een recipiënt kleiner of voller is, verloopt het vacuüm
afdichten sneller.
Plaats de vacuümpomp op het ventiel van de doos en duw hem indien
nodig voorzichtig naar beneden. Druk op de aan/uit-knop op de
pomp.
De pomp zuigt de lucht uit de doos. Het vacuüm afdichten stopt auto-
matisch als de vacuümdruk het juiste niveau bereikt. Het vacuüm afdich-
ten kan ook op een willekeurig moment handmatig worden stopgezet
door op de aan/uit-knop te drukken.
Als het juiste niveau niet kan worden bereikt, bijvoorbeeld omdat de
pomp niet correct is geplaatst, stopt het vacuüm afdichten automatisch
na 2 minuten. De recipiënt is mogelijk niet correct gesloten.

62
Gebruik
NL
Voor marinades en vacuümgaren bevelen wij het gebruik
van het vloeistofbarrière-hulpstuk aan. Bevestig het aan
het ventiel aan de binnenkant van het zakje voordat u het
zakje afsluit. De vloeistofbarrière zorgt ervoor dat er geen
vloeistof wordt opgezogen tijdens het vacuüm afdichten.
Als u merkt dat vloeistoffen in de buurt van de pomp
komen, moet u het vacuümafdichtingsproces onmiddellijk
stopzetten door op de AAN/UIT-knop te drukken.
De glazen ZWILLING FRESH & SAVE-vacuümdozen kunnen in
de oven worden geplaatst zonder het deksel (max. 180°C).
Stel de glazen vacuümdozen niet bloot aan extreme tempera-
tuurschommelingen, bijv. door een vacuümdoos uit de koelkast in
een warme oven te plaatsen.
De opening van het zakje moet volledig schoon en droog zijn.
Zorg dat het ventiel aan de binnenkant van het zakje niet in
aanraking komt met de inhoud.
Alle dozen en zakjes in het starterpack kunnen worden gebruikt
om voedsel op te warmen in de magnetron. Dit geldt zelfs voor
dozen met deksel. Voor olieachtige voedingsmiddelen bevelen
wij het gebruik van de glazen dozen aan.
Controleer voordat u de dozen in de magnetron gebruikt of het
vacuüm is opgeheven en het deksel los op de doos zit.
Bij zachte of vloeibare voedingsmiddelen is het handig
om deze kort in te vriezen vóór het vacuüm verpakken in
zakjes. Voedingsmiddelen met een stevige structuur wordt
bij het vacuüm verpakken namelijk niet platgedrukt, en er
worden geen vloeistoffen in de pomp gezogen. Als alter-
natief zijn de ZWILLING FRESH & SAVE-vacuümdozen
ideaal voor het verpakken van deze voedingsmiddelen.

www.zwilling.com 63
Gebruik NL
Flessen kunnen worden afgesloten met de wijnsealer. De pomp stopt
automatisch als de vacuümdruk het juiste niveau bereikt.
3
Een vacuüm afgesloten recipiënt openen
Om vacuüm afgesloten dozen of fl essen te openen, trekt u het silicone-ven-
tiel
voorzichtig naar de zijkant. Er stroomt langzaam lucht naar binnen en
het vacuüm wordt opgeheven. De recipiënt kan worden geopend.
1. 2.
Zakjes kunnen eenvoudig worden gesloten met de treksluiting. Schuif
deze langs de zijkant op het zakje en plaats over de volledige breedte
om het zakje te sluiten. Ga dan met uw vinger met lichte druk over de
sluitstrip om te controleren of het zakje correct is gesloten. Om het zakje
te openen, trekt u met beide handen de sluitstrip uit elkaar.
1.
P
U
S
H
P
U
S
H
5.
3.
4.
1. 2.
Denk eraan om na elk vacuümproces op de knop PUSH in het
midden van het silicone-ventiel te drukken om het ventiel volledig
af te sluiten.

64
Gebruik
NL
4
QR-codes en de app gebruiken
ZWILLING FRESH & SAVE-vacuümdozen en -zakjes hebben een
QR-code, die aande ZWILLING-app is gekoppeld. Met de app kunt
u vacuüm verpakte voedingsmiddelen eenvoudig beheren en hebt u
steeds een duidelijk overzicht van uw voorraad. Met de QR-code op
de producten kunt u voedingsmiddelen eenvoudig in de app registreren.
De app waarschuwt u wanneer de houdbaarheid van voedingsmidde-
len bijnaafloopt. Download eerst de ZWILLING-app en scan dan de
QR-code.
Elk vacuümzakje heeft een unieke ID. Zo kunt u voedings-
middelen duidelijk identificeren.
Voor meer informatie en om de app gratis te downloaden:
www.zwilling.com/app
Na het vacuüm verpakken is het binnenste deksel van de vacuümdoos
naar onderen getrokken en de afdichting geactiveerd (dit is niet het ge-
val bij deksels van lunchdozen). Zodra het binnenste deksel naar boven
gaat, moet het vacuüm worden ververst. Gebruik de vacuümpomp om
de doos opnieuw vacuüm te maken.

www.zwilling.com
65
Reiniging
NL
Reiniging
Trek voor het reinigen de voedingsadapter uit en koppel
de vacuümpomp los van de laadkabel.
1
De vacuümpomp schoonmaken
Gebruik uitsluitend een droge of licht vochtige doek om het hoofddeel
van de vacuümpomp en het laadstation schoon te maken. Plaats geen
enkel onderdeel van de pomp in de afwasmachine.
2
De silicone-dop schoonmaken
Om de silicone-dop schoon te maken, verwijdert u deze van het hoofd-
deel van de vacuümpomp door hem er voorzichtig uit te trekken en
reinigt u hem met water.

66
NL
Reiniging/verhelpen van storingen
3
De dozen schoonmaken
De dozen kunnen in de afwasmachine worden geplaatst.
4
De zakjes schoonmaken
U kunt de zakjes met de hand afwassen en deze hergebruiken. Droog
de zakjes volledig na elke wasbeurt. Als er rauw vlees, rauwe vis,
eieren of kaas van rauwe melk in is bewaard, moeten ze zeer grondig
worden schoongemaakt.
Verhelpen van storingen
Probleem Mogelijke
oorzaak
Corrigerende
maatregel
De pomp reageert
niet als er op de
aan/uit-knop
wordt gedrukt.
De accu van de
pomp is bijna leeg
of niet opgeladen.
Laad de accu van de pomp
op.
De pomp creëert
geen vacuüm wan-
neer hij op een
recipiënt wordt
geplaatst, of het
vacuüm blijft niet
behouden.
Het deksel van de
vacuümrecipiënt,
de silicone-afdich-
ting of het ventiel
is niet correct
geplaatst.
Controleer of de pomp
correct is geplaatst en het
deksel goed is afgesloten.
De silicone-afdich-
ting of het ventiel
van de recipiënt is
vuil of nat.
Reinig en droog de silico-
ne-afdichting en het ventiel
van de recipiënt.
De pomp zit te los
op het ventiel.
Duw tijdens het vacuüm
afdichten de pomp zachtjes
in het kuiltje rond het ventiel,
om voor een goede afslui-
ting tussen de pomp en het
ventiel te zorgen.

www.zwilling.com
67
NL
De bovenstaande
problemen kunnen
niet worden ver-
holpen.
De vacuümpomp
zou defect kunnen
zijn.
Neem contact op met de
klantenservice. Probeer de
pomp niet zelf te herstellen.
De pomp stopt
tijdens het vacuüm
afdichten en wordt
niet opnieuw
ingeschakeld.
De pomp heeft
tijdens het vacuüm
afdichten vloeistof-
fen opgezogen.
Draai de pomp niet onder-
steboven. Schud de pomp
voorzichtig heen en weer
om vloeistof te verwijderen.
Zorg dat de pomp en het
laadstation volledig droog
zijn. Plaats de pomp gedu-
rende een seconde inhet
laadstation om hem te reset-
ten, verwijder hem danen
druk op de aan/uit-knop.
Erkan meer vloeistof vrijko-
men. Herhaal dit proces als
de pomp opnieuw stopt.
Klantenservice
Neem contact op met onze klantenservice als u problemen ondervindt
met uw vacuümpomp. Gedetailleerde informatie over onderhoud, repa-
raties en garantie vindt u op www.zwilling.com/service.
Afvoer
Gooi het apparaat niet weg met het huishoudelijk afval.
Breng uw oude apparaat voor milieuvriendelijke afvoer
naar een inzamelpunt voor elektrische apparaten. Door
gescheiden inzameling van afzonderlijke componenten
van EE-apparatuur worden negatieve gevolgen voor het
milieu voorkomen en gevaren voor de menselijke gezond-
heid, die kunnen optreden als het product niet correct
wordt afgevoerd, tot het minimum beperkt. Bovendien
wordt zo hergebruik en recycling van materialen moge-
lijk. Hierdoor kunnen energie en grondstoffen worden
bespaard.
Verhelpen van storingen/klantenservice/afvoer

68
Segurança
PT
Segurança
Leia atentamente este manual
de instruções na íntegra antes
de utilizar a bomba de vácuo.
Guarde este manual em um local
seguro. Caso ceda a bomba de
vácuo a terceiros, certifique-se de
incluir este manual com ela. A não
observância das instruções deste
manual pode resultar em lesões
graves ou danos ao produto. A
ZWILLING se isenta de qualquer
responsabilidade por danos re-
sultantes da não observância das
instruções deste manual.
Informações de segurança
A bomba de vácuo (daqui
em diante designada por
“aparelho”) destina-se a
ser utilizada exclusivamente
em todas as opções de
armazenamento a vácuo
ZWILLING FRESH &
SAVE para criar vedação
à vácuo e garantir um
armazenamento de quali-
dade para seus alimentos.
O aparelho só pode ser
utilizado com os acessórios
fornecidos ou aprovados
pela ZWILLING. Qualquer
outra utilização é conside-
rada inadequada e po-
derá resultar em lesões ou
danosmateriais. O apare-
lho destina-se à utilização
doméstica. Não se destina
auso comercial. Não utilize
o aparelho em si próprio,
em outras pessoas ou em
animais.
Determinadas pessoas estão
sujeitas a um maior risco:
este aparelho pode ser uti-
lizado por crianças a partir
dos 8 anos e por pessoas
com capacidades físicas
ou sensoriais reduzidas ou
com falta de experiência
e conhecimentos, se forem
supervisionadas ou tiverem
recebido instruções quanto
à utilização segura do apa-
relho e compreenderem os
riscos envolvidos. As crian-
ças não devem brincar com
o aparelho. A limpeza e
amanutenção não devem
ser realizadas por crianças
sem supervisão.
Mantenha o aparelho
e seu respetivo cabo de
ligação num local que não
esteja acessível a crianças
com menos de 8 anos.
Mantenha as crianças
afastadas do material da
embalagem. Este represen-
ta um risco de asfixia. O
dispositivo tem uma bateria
instalada permanente-
mente. O manuseamento
inadequado causa o risco
de incêndio. Carregue
a bateria apenas com
ocabo de carregamento
incluído. Não desmonte
abateria. Não provoque
ocurto-circuito do aparelho
e não o coloque em con-
tato com fogo. Não abra
nem destrua o aparelho.
O aparelho está carrega-
do com corrente elétrica.
Portanto, existe o perigo de
choque elétrico. Carregue
o aparelho apenas se a
tensão indicada na placa
de classificação do adap-
tador utilizado correspon-
der à tensão da tomada.
Certifique-se de que o
cabo de carregamento
nãoestá dobrado ou aper-
tado. Certifique-se de que
o cabo de carregamento
e o aparelho não entrem
em contato com fontes de

www.zwilling.com 69
Segurança PT
Explicação dos símbolos
Perigo de lesões ou danos materiais devido à corrente
elétrica
Risco de danos materiais e danos no aparelho
Sugestões para utilização efi caz
Legenda dos símbolos no aparelho
Aparelho de classe III - Baixa tensão
Marca de certifi cação CE
Não descartar com resíduos domésticos
Marca de certifi cação EAC
Marca de certifi cação UKCA
calor (por exemplo, fogões,
chamas de gás). Sempre
desconecte diretamente
oadaptador de energia da
tomada (não puxe o cabo
de carregamento).
Não pendure o aparelho
pelo cabo de carregamen-
to. Desligue o cabo de
carregamento do aparelho
imediatamente após o
processo decarregamen-
to estar concluído. Após
cada carregamento e em
caso de perigo ou defeito,
desconecte o adaptador
de energia conectado ao
cabo de carregamento
datomada imediatamente.
Desligue o aparelho do
cabo de carregamento
antes da limpeza ou manu-
tenção. Enquanto oadap-
tador de alimentação
estiver ligado, existe tensão
dentro do aparelho, mesmo
que este esteja desliga-
do. Nunca desaparafuse
oaparelho e não efetue
quaisquer modifi cações
técnicas.
Verifi que se o aparelho
apresenta danos antes de
cada utilização. Se detec-
tar danos resultantes do
transporte, contate imedia-
tamente o fornecedor no
qual comprou o aparelho.
Nunca utilize um aparelho
ou acessório defeituoso.
Nunca opere um aparelho
ou acessório que tenha
caído. Em caso de defeito,
contate o nosso serviço de
apoio ao cliente. O apare-
lho não contém nenhuma
peça que o utilizador pos-
sa reparar por si próprio.
Podem ocorrer danos se
oaparelho for manuseado
incorretamente.

70
PT
Dados técnicos da bomba de vácuo
Especificações da bateria 3,7 V, íons de lítio, 1200 mAh
Adaptador de alimentação
(não incluído)
Entrada: 100 – 240 V∼, 50/60 Hz
Saída: 5 V⎓, 1000 mA
Cabo de carregamento USB 2.0 tipo A, micro USB,
comprimento: 0,8 m
Dimensões (C x L x A) 50 x 50 x 190 mm
Peso aprox. 0,3 kg
Material Plástico ABS, silicone
O conteúdo no conjunto pode variar.
Visão geral
7
7a 7b
2
3
6
1
4
5
1Símbolo da bateria 5Estação de carregamento
2Luz indicadora 6Porta de ligação USB
3Botão On/Off
(ligar/desligar)
7Cabo de carregamento com
USB 2.0 (a) e micro USB (b)
4Parte superior de silicone
Visão geral/Dados técnicos

www.zwilling.com
71
Utilização
PT
Interpretação da luz indicadora e do símbolo da bateria
• Luz indicadora intermitente: vedação a vácuo em curso
• A luz indicadora acende durante 5 segundos e depois apaga:
avedação a vácuo está concluída
• Luz indicadora da bateria piscando rapidamente: a bateria tem
pouca carga
• Luz indicadora da bateria piscando lentamente: carregamento em
curso
• Luz indicadora da bateria brilhando: totalmente carregada, pronta
para ser desligada
1
Carregamento da bomba de vácuo
Para manter o melhor funcionamento possível da bateria, carre-
gue-a, pelo menos, uma vez a cada 3 a 6 meses.
Carregue totalmente a bomba de vácuo antes da primeira utilização.
Coloque a bomba na estação de carregamento. Insira o conector
USBpequeno na porta da estação de carregamento. Insira o conec-
tor USB maior (USB 2.0) num adaptador de alimentação e ligue-o
aumatomada.
Também pode-se ligar o cabo de carregamento à porta USB de um
computador. Durante o carregamento, a luz indicadora fica piscando
lentamente. Quando a bomba está totalmente carregada, a luz indica-
dora brilha continuamente. O carregamento pode demorar de 2 a 5
horas dependendo da fonte de alimentação.
Utilização
Parabéns por ter adquirido um produto para vácuo ZWILLING
FRESH & SAVE. Com os produtos para vácuo ZWILLING FRESH&
SAVE, você poderá manter os alimentos frescos durante mais
tempo.
Observe que o armazenamento a vácuo não substitui oade-
quado congelamento, resfriamento ou conservação dosalimen-
tos. O prazo de validade dos alimentos depende de muitos
fatores, tais como o teor inicial de bactérias dos alimentos, a
observância das condições corretas de armazenamento, res-
friamento e ahigiene necessária durante o processamento eo
armazenamento a vácuo. Mantenha os procedimentos habituais
de higiene e armazenamento de alimentos. Se for possível,
sequeos alimentos antes de os embalar a vácuo. Deixe sempre
que os alimentos esfriem até à temperatura ambiente antes de
os embalar a vácuo. Alguns vegetais crus liberam gases, o que
pode levar à perda de vácuo no interior da embalagem. É o
caso decouve, feijão, cebola e alho. Para evitar a formação de
gases, estes vegetais devem ser escaldados antes do armaze-
namento a vácuo. O queijo azul não deve ser armazenado a
vácuo, os cogumelos frescos apenas quando ultracongelados.

72
Utilização
PT
Limpe os recipientes de vácuo antes de os utilizar pela primeira
vez. Antes de cada utilização, certifique-se de que a vedação
da tampa e a extremidade do recipiente estão limpos e secos.
Não encha o recipiente em excesso. Deixe sempre um espa-
ço livre entre 1 e 2 cm até a borda. Certifique-se de que os
alimentos no interior do recipiente não entrem em contato com
aválvula na parte de dentro da tampa.
1.
2.
2
Recipientes e sacos para vedação a vácuo
A bomba não deve absorver líquidos (por exemplo, água, óleo,
líquidos de carne). Se detectar que a bomba está absorvendo
líquidos, pressione o botão On/Off para parar imediatamente
oprocesso de vedação a vácuo.
A duração do processo de vedação a vácuo depende
do tamanho do recipiente e do respetivo nível de con-
teúdo. Se o recipiente for menor ou estiver mais cheio,
oprocesso de vedação a vácuo é mais rápido.
Coloque a bomba de vácuo na válvula do recipiente e, se for necessá-
rio, pressione levemente. Pressione o botão On/Off na bomba.
A bomba extrai o ar do recipiente. A vedação a vácuo para automa-
ticamente quando a pressão do vácuo atinge o nível correto. A veda-
ção a vácuo também pode ser interrompida manualmente em qualquer
altura ao pressionar o botão On/Off.
Se não for possível atingir o nível correto porque, por exemplo, abom-
ba não está devidamente encaixada, o processo a vácuo irá parar
automaticamente após 2 minutos. O recipiente pode não estarfecha-
do corretamente.

www.zwilling.com
73
Utilização
PT
Para marinar ou cozinhar em sous-vide, recomendamos
autilização do acessório da barreira de líquidos. Prenda-o
à válvula no interior do saco antes de o vedar. A barreira
de líquidos impede a absorção destes pela bomba duran-
te o processo de vedação a vácuo. Se detectar líquidos
próximos da bomba, pressione o botão ON/OFF para
parar imediatamente o processo de vedação a vácuo.
Os recipientes de vácuo de vidro ZWILLING FRESH & SAVE po-
dem ser utilizados no forno sem a tampa (max. 180°C). Não
exponha os recipientes de vácuo de vidro a grandes diferenças
de temperatura, por exemplo, tirar um recipiente de vácuo do
congelador ecolocar no forno quente.
A abertura do saco tem de estar completamente limpa e seca.
Certifique-se de que a válvula no interior do saco não entra em
contacto com o respetivo conteúdo.
Os sacos e recipientes incluídos no conjunto podem ser
utilizados para aquecer alimentos no micro-ondas. Até mesmo
recipientes com tampa. Recomendamos utilizar recipientes de
vidro no caso de alimentos gordurosos.
Antes de usar os recipientes no micro-ondas certifique-se de que
o vácuo foi liberado e que a tampa está solta em cima.
No caso de alimentos macios ou líquidos, é recomendável
congelá-los brevemente antes de os colocar em sacos
de vácuo. Uma consistência firme evita que os alimentos
sejam esmagados durante o armazenamento a vácuo
ou que os líquidos entrem na bomba. Em alternativa, os
recipientes de vácuo ZWILLING FRESH & SAVE são parti-
cularmente adequados neste caso.

74
UtilizaçãoPT
As garrafas podem ser vedadas com o selador para garrafas de vinho.
A bomba para automaticamente quando a pressão do vácuo atinge o
nível correto.
1. 2.
3
Abertura de um recipiente a vácuo
Para abrir recipientes ou garrafas de vácuo, puxe a válvula de silicone
para o lado. O ar entra lentamente e o vácuo é liberado. Os recipien-
tes podem ser abertos.
Os sacos podem ser fechados facilmente com o fecho de correr incluí-
do. Deslize lateralmente o fecho de correr para fechar o saco. Depois,
faça uma ligeira pressão com o dedo sobre a faixa de vedação para
garantir que o saco esteja bem fechado. Para abrir os sacos, separe a
faixa de vedação com as mãos.
1.
P
U
S
H
P
U
S
H
5.
3.
4.
1. 2.
Não se esqueça de pressionar o botão PUSH que se encontra
no meio da válvula de silicone depois de cada processo a
vácuo para vedar a válvula.

www.zwilling.com
75
PT
4
Utilizando o QR code e aplicativo
Os recipientes e sacos de vácuo ZWILLING FRESH & SAVE estão
equipados comum QR code, que está associado a um aplicativo da
ZWILLING. Com a ajuda do aplicativo, você pode facilmente monito-
rar os seus alimentos a vácuo e ter um controlo perfeito dos alimentos
conservados. O QR code nos produtos facilita a verificação dos
alimentos no aplicativo. O aplicativo avisa quando os alimentos estão
chegando ao fim do prazo de validade. Instale o aplicativo ZWILLING
e depois faça a leitura do QR code.
Cada saco de vácuo tem uma ID única. Isto permite-lhe
identificar claramente os seus alimentos.
Mais informações e instalação gratuita do aplicativo:
www.zwilling.com/app
Após o processo de vedação a vácuo, a tampa interior do recipiente
de vácuo baixa e a vedação expande-se (esta ação não se aplica
atampas de lancheiras). Quando a tampa interna se levanta, o vácuo
deve ser renovado. Utilize a bomba de vácuo para fazer a vedação
novamente.
Utilização/Limpeza

76
Limpeza
PT
Limpeza
Desligue o adaptador de alimentação da tomada e
desligue a bomba de vácuo do cabo de carregamento
antes da limpeza.
1
Limpeza da bomba de vácuo
Utilize apenas um pano seco ou ligeiramente húmido para limpar o
corpo da bomba de vácuo e a estação de carregamento. Não colo-
que qualquer peça da bomba na máquina de lavar louça.
2
Limpeza da parte superior de silicone
Para limpar a parte superior de silicone, puxe-a cuidadosamente para
baixo para retirar do corpo da bomba de vácuo e limpe-a com água.

www.zwilling.com
77
PT
Limpeza/Resolução de problemas
3
Limpeza dos recipientes
Os recipientes podem ser lavados na máquina de lavar louça.
4
Limpeza dos sacos
Pode-se limpar os sacos à mão e reutilizá-los posteriormente. Seque
os sacos completamente depois de limpar. Se tiver armazenado carne
crua, peixe, ovos ou queijo em sacos, estes devem ser particularmente
bem limpos.
Resolução de problemas
Problema Causa possível Solução
A bomba não
reage ao botão
On/Off.
A bateria da
bomba tem pouca
carga ou está
descarregada.
Carregue a bateria da
bomba.
A bomba não cria
vácuo quando
é colocada num
recipiente ou o
vácuo não dura.
A tampa do reci-
piente de vácuo,
ovedante de sili-
cone ou a válvula
está posicionada
incorretamente.
Verifique se o posicionamen-
to está correto e se a tampa
está devidamente fechada.
O vedante de sili-
cone ou a válvula
do recipiente está
sujo ou molhado.
Limpe e seque o vedante
de silicone e a válvula do
recipiente.
A bomba fica
demasiado solta
na válvula.
Durante a vedação a vá-
cuo, pressione ligeiramente
a bomba no suporte que
rodeia a válvula para criar
uma vedação justa entre
abomba e a válvula.

78
PT
Serviço de apoio ao cliente
Contate o nosso serviço de apoio ao cliente se detectar problemas na
bomba de vácuo. Encontre em contato com: www.zwilling.com/service.
Descarte
Não descarte o aparelho com resíduos domésticos. Para
um descarte ecológico, entregue o seu aparelho antigo
num ponto de coleta para aparelhos elétricos. A coleta
separada de componentes individuais de equipamento
elétrico e eletrônico previne os efeitos negativos da po-
luição ambiental e minimiza o perigo para a saúdeque
pode derivar do descarte incorreto do produto. Além
disso, permite a reutilização e a recuperação dos mate-
riais, economizando assim energia e matérias-primas.
Os problemas
acima não podem
ser solucionados.
A bomba de
vácuo pode estar
quebrada.
Contate o serviço de apoio
ao cliente. Não tente repa-
rar a bomba por si próprio.
A bomba para
durante o proces-
so de vedação a
vácuo e não volta
a ligar.
A bomba aspirou
líquidos durante o
processo de veda-
ção a vácuo.
Não vire a bomba ao con-
trário. Agite ligeiramente a
bomba para retirar qualquer
líquido existente. Certifique-
-se de que a bomba e a
estação de carregamento
estão completamente secas.
Ligue a bomba à estação
de carregamento durante
um segundo para reiniciar
e, em seguida, retire-a e
pressione o botão On/Off.
Líquidos adicionais podem
pingar. Repita este processo
se a bomba voltar a parar.
Resolução de problemas/Serviço de apoio ao cliente/Descarte

www.zwilling.com
79
Техника безопасности
RU
Техника безопасности
Перед использованием ва-
куумного насоса внимательно
прочитайте это руководство
пользователя. Храните это
руководство в надежном месте.
При передаче вакуумного насоса
другому владельцу обязательно
приложите к нему данное руко-
водство. Несоблюдение этого
руководства пользователя может
привести к серьезным травмам
или повреждению устройства.
Компания ZWILLING не несет ни-
какой ответственности за ущерб,
вызванный несоблюдением этого
руководства пользователя.
Информация по технике безопасности
Вакуумный насос (в
дальнейшем именуемый
«устройство») предназна-
чен для использования
только с системами вакуум-
ного хранения ZWILLING
FRESH & SAVE для создания
эффективной вакуумной
герметизации вцелях
долгосрочного хранения
продуктов. Он может
использоваться только с
аксессуарами, поставляе-
мыми или одобренными
компанией ZWILLING.
Любое другое использова-
ние считается неправиль-
ным и может привести к
травмам или материаль-
ному ущербу. Устройство
предназначено для быто-
вого использования. Оно
не предназначено для
коммерческого исполь-
зования. Не используйте
устройство на себе, других
людях или животных.
Определенные группы лиц
подвергаются повышенно-
му риску:
использование устройства
детьми старше 8 лет и
лицами с ограниченными
физическими или сен-
сорными способностями
и лицами с отсутствием
опыта и знаний, допуска-
ется только под наблюде-
нием, или если указанные
лица были ознакомлены с
правилами по безопасному
использованию устройства
и понимают связанные
сустройством опасности.
Детям запрещается играть
с устройством. Очистка
иобслуживание устрой-
ства не должны выполнять-
ся детьми без присмотра.
Храните устройство и
соединительный кабель
в месте, недоступном для
детей младше 8 лет. Непод-
пускайте близко детей к
упаковочному материалу.
Это создает опасность
удушья. Устройство имеет
стационарный аккумуля-
тор. Неправильное обра-
щение может привести к
пожару. Заряжайте аккуму-
лятор только с помощью
прилагаемого зарядного
кабеля. Не разбирайте
аккумулятор. Не допускай-
те короткого замыкания
прибора и не бросайте его
в огонь. Не вскрывайте и
не уничтожайте устройство
иным способом.
Устройство заряжается
электрическим током.
Поэтому существует опас-
ность поражения электри-
ческим током. Заряжайте
устройство только в том
случае, если напряжение,

80
Техника безопасности
RU
устройствоили неисправ-
ные аксессуары. Не ис-
пользуйте устройство или
аксессуары, которые упали
на пол. Вслучае неисправ-
ности свяжитесь с нашим
отделом обслуживания.
Устройство не содержит
каких-либо деталей, кото-
рые вы можете отремон-
тировать самостоятельно.
Неправильное обращение
с устройством может при-
вести к повреждениям.
указанное на заводской
табличке используемого
блока питания, соответству-
ет напряжению в вашей
розетке. Убедитесь, что за-
рядный кабель не изогнут
и не зажат и что зарядный
кабель и устройство не
соприкасаются систоч-
никами тепла (например,
конфорками, газовым пла-
менем). При отсоединении
блока питания от розетки
всегда тяните только за
блок питания. Запрещается
тянуть за зарядный кабель.
Не переносите устрой-
ство за зарядный кабель.
Отсоедините зарядный
кабель от устройства
сразу после завершения
процесса зарядки. После
каждой зарядки, а также
вслучае опасности или не-
исправности немедленно
вытяните из розетки блок
питания, соединенный
с зарядным кабелем.
Отсоедините устройство
от зарядного кабеля перед
очисткой или обслужива-
нием. Когда блокпитания
вставлен врозетку, внутри
устройства имеется напря-
жение, даже если оно вы-
ключено. Не развинчивайте
устройствоине выпол-
няйте никаких технических
изменений.
Перед каждым использова-
нием проверяйте устрой-
ство на наличие поврежде-
ний. Если вы обнаружили
какие-либо повреждения,
полученные при транс-
портировке, немедленно
свяжитесь сдилером,
укоторого выприобре-
ли устройство. Неис-
пользуйте неисправное

www.zwilling.com 81
RU
Общий вид
7
7a 7b
2
3
6
1
4
5
1Символ аккумулятора 5Зарядная станция
2Индикатор 6USB-порт
3Кнопка включения/выклю-
чения
7Зарядный кабель с USB 2.0 (a)
и micro USB (b)
4Силиконовая насадка
Условные обозначения
Опасность причинения ущерба людям или имуществу из-
за электрического тока
Опасность материального ущерба и повреждения прибо-
ра
Советы по эффективному использованию
Объяснение условных обозначений и
символов, имеющихся на устройстве
Бытовой прибор класса III - Низкое напряжение
Сертификационный знак CE
Не выбрасывать с бытовыми отходами.
Сертификационный знак EAC
Сертификационный знак UKCA
Техника безопасности/Общий вид

82
RU
Технические данные вакуумного насоса/ Использование
Использование
Поздравляем с приобретением вакуумного стартового
набора ZWILLING FRESH & SAVE! Использование вакуумных
аксессуаров ZWILLING FRESH & SAVE помогает дольше сохра-
нять свежесть продуктов питания.
Учтите, что вакуумная упаковка не заменяет правильное за-
мораживание, охлаждение или консервирование пищевых
продуктов. Срок годности при хранении пищевых продуктов
зависит от многих факторов, таких как начальное содержа-
ние микроорганизмов впищевых продуктах, соблюдение
правильных условий хранения и охлаждения и требуемая
гигиена при обработке и вакуумировании. Соблюдайте
обычные для пищевых продуктов процедуры хранения и
гигиены. Если возможно, высушите продукты перед вакуум-
ной упаковкой. Перед вакуумированием дождитесь, пока
продукты не остынут до комнатной температуры. Некото-
рые овощи в сыром виде выделяют газы, что может при-
вести к потере вакуума внутри упаковки. К ним относятся
капуста, бобы, луки чеснок. Чтобы предотвратить образо-
вание газов, их необходимо бланшировать перед вакууми-
рованием. Сыр с плесенью нельзя хранить под вакуумом,
свежие грибы – только при глубокой заморозке.
Технические данные
вакуумного насоса
Технические характеристи-
ки аккумулятора 3,7 В, литий-ионный, 1200 мАч
Блок питания
(не входит в комплект
поставки)
Вход: 100 – 240 В∼, 50/60 Гц
Выход: 5 В⎓, 1000 мА
Зарядный кабель USB 2.0 типа A, micro USB, длина 0,8 м
Размеры (Д x Ш x В) 50 x 50 x 190 мм
Вес ок. 0,3 кг
Материал АБС-пластик, силикон
Содержание стартового набора может быть иным.

www.zwilling.com
83
Использование
RU
2
Вакуум-герметизация контейнеров и пакетов
Вакуумный насос не должен всасывать жидкости (например,
воду, масло, мясной сок). Если вы видите, что насос всасыва-
ет жидкости, немедленно остановите процесс вакуум-герме-
тизации, нажав кнопку включения/выключения.
Продолжительность процесса вакуум-герметиза-
ции зависит от размера контейнера и степени его
наполнения. Чем меньше или более заполненный
контейнер, тем быстрее происходит процесс ва-
куум-герметизации.
Установите вакуумный насос на клапан контейнера и, при необходи-
мости, слегка нажмите на него. Нажмите кнопку включения/выключе-
ния насоса.
Насос всасывает воздух из контейнера. Вакуум-герметизация останав-
ливается автоматически, когда значение вакуума достигает нужного
уровня. Процесс вакуум-герметизации также может быть прерван
вручную в любое время нажатием кнопки включения/выключения.
Если нужный уровень не может быть достигнут, например, из-за
неправильной установки насоса, процесс вакуумирования автомати-
чески останавливается через 2 минуты. Контейнер может быть закрыт
неправильно.
Сигналы индикатора и символ аккумулятора
• Мигание индикатора: Выполняется вакуум-герметизация
• Индикатор загорается на 5 секунд, а затем гаснет: Вакуум-герме-
тизация завершена
• Символ аккумулятора мигает часто: Низкий уровень заряда
аккумулятора
• Символ аккумулятора мигает редко: Выполняется зарядка
• Символ аккумулятора светится: Зарядка полностью завершена,
готовность к отсоединению
1
Зарядка вакуумного насоса
Для поддержания оптимальной работы аккумулятора заря-
жайте его не реже одного раза в 3–6 месяцев.
Перед первым использованием полностью зарядите вакуумный
насос. Поместите насос на зарядную станцию. Вставьте меньший
USB-коннектор в порт на зарядной станции. Вставьте больший
USB-коннектор (USB 2.0) в блок питания и подключите его к розетке.
Вы также можете подключить зарядный кабель к USB-порту компью-
тера. Во время зарядки индикатор мигает редко. Когда насос полно-
стью заряжен, индикатор начинает гореть непрерывно. В зависимости
от источника питания, зарядка может занять от 2 до 5 часов.

84
Использование
RU
Отверстие пакета должно быть абсолютно чистым исухим.
Убедитесь в том, что клапан внутри пакета не соприкасается
с его содержимым.
Все пакеты и контейнеры, входящие в стартовый набор,
можно использовать для разогрева пищевых продуктов
в микроволновой печи. Это касается даже контейнеров
сприкрепленными крышками. Для жирных продуктов мы
рекомендуем использовать стеклянные контейнеры.
Прежде, чем использовать контейнеры в микроволновой
печи, убедитесь, что вакуум сброшен и крышка свободно
прилегает сверху.
Мягкие или жидкие продукты лучше слегка заморозить
незадолго перед тем, как вакуумировать их в пакетах.
Твердая консистенция предотвращает раздавливание
продуктов во время вакуумирования или попадание
жидкости в насос. В качестве альтернативы в этих
случаях особенно подходят вакуумные контейнеры
ZWILLING FRESH& SAVE.
Очистите вакуумные контейнеры перед их первым ис-
пользованием. Перед каждым использованием убедитесь,
чтоуплотнение крышки и края контейнера чистые и сухие.
Не переполняйте контейнер. Всегда оставляйте 1-2 см до
края. Убедитесь в том, что продукты внутри контейнера не
соприкасаются с клапаном на внутренней стороне крышки.
1.
2.
Стеклянные вакуумные контейнера ZWILLING FRESH & SAVE
можно поместить в духовку, если снята крышка (макс 180
°C). Не подвергайте стеклянные вакуумные контейнеры
воздействию резкогоизменения температуры, например,
не ставьте вынутый изхолодильника вакуумный контейнер
в разогретую духовку.

www.zwilling.com
85
Использование
RU
Пакеты можно легко закрыть с помощью замка-молнии. Наденьте его
сбоку на пакет и сместите, чтобы закрыть пакет. Затем слегка нада-
вите пальцем на уплотнительную полосу, чтобы убедиться, что пакет
плотно закрыт. Чтобы открыть пакеты, потяните за уплотнительную
планку руками.
1.
P
U
S
H
P
U
S
H
5.
3.
4.
1. 2.
Не забудьте нажимать кнопку PUSH в центре силиконового
клапана после каждого процесса вакуумирования, чтобы
окончательно уплотнить клапан.
Для маринования или низкотемпературного приготов-
ления в режиме «су-вид» мы рекомендуем использо-
вать насадку для защиты от жидкости. Перед запечаты-
ванием пакета прикрепите насадку на клапан внутри
пакета. Насадка для защиты от жидкости препятствует
всасыванию жидкостинасосом во время процесса
вакуум-герметизации. Если вы видите, чтожидкости
приближаются к насосу, немедленно остановите про-
цесс вакуум-герметизации, нажав кнопку включения/
выключения.

86
Использование
RU
После процесса вакуумирования внутренняя крышка вакуумного
контейнера опускается, а уплотнение расширяется (это поведение
не относится к крышкам ланч-боксов). После подъема внутренней
крышки необходимо повторно создать вакуум. Используйте вакуум-
ный насос, чтобы снова завакуумировать контейнер.
Бутылки могут быть закупорены пробкой для винных бутылок. Насос
останавливается автоматически, когда значение вакуума достигает
нужного уровня.
1. 2.
3
Открытие вакуумированного контейнера
Чтобы открыть вакуумные контейнеры или бутылки, осторожно
потяните силиконовый клапан в сторону. Воздух медленно поступает
вконтейнер, и вакуум исчезает. Контейнеры можно открыть.

www.zwilling.com
87
RU
Использование/Очистка
Очистка
Перед очисткой извлеките блок питания из розетки
иотсоедините вакуумный насос от зарядного кабеля.
1
Очистка вакуумного насоса
Для очистки корпуса вакуумного насоса и зарядной станции исполь-
зуйте только сухую или слегка влажную ткань. Не помещайте каки-
е-либо части насоса в посудомоечную машину.
2
Очистка силиконовой насадки
Чтобы очистить силиконовую насадку, снимите ее с корпуса вакуум-
ного насоса, осторожно потянув ее вниз, и промойте водой.
4
Использование QR-кодов и приложения
Вакуумные контейнеры и пакеты ZWILLING FRESH & SAVE снабжены
QR-кодом для использования через приложение ZWILLING. С помо-
щью приложения вы можете легко управлять вакуумированными
продуктами иполучать идеальный обзор своих запасов. QR-код на
продуктах позволяет легко проверять продукты в приложении. При-
ложение напомнит вам об истечении срока годности продуктов. Сна-
чала загрузите приложение ZWILLING, а затем отсканируйте QR-код.
Каждый вакуумный пакет имеет уникальный иденти-
фикатор. Он поможет вам четко идентифицировать
ваши продукты.
Для получения дополнительной информации и бесплатной загрузки
приложения:
www.zwilling.com/app

88
Очистка
RU
3
Очистка контейнеров
Контейнеры можно мыть в посудомоечной машине.
4
Очистка пакетов
Вы можете очистить пакеты вручную, а затем использовать их по-
вторно. Полностью высушите пакеты после каждой очистки. Если вы
хранили в них сырое мясо, рыбу, яйца или сыр из сырого молока, их
необходимо очистить особенно тщательно.

www.zwilling.com
89
Устранение неисправностей
RU
Указанные
выше проблемы
немогут быть
устранены.
Вакуумный насос
может быть сломан.
Обратитесь в отдел об-
служивания. Не пытайтесь
отремонтировать насос
самостоятельно.
Насос останав-
ливается во
время процесса
вакуум-гермети-
зации и больше
не включается.
Насос засосал
жидкости в процессе
вакуум-герметизации.
Не переворачивайте насос
вверх дном. Слегка встрях-
ните насос, чтобы удалить
всю жидкость. Убедитесь
втом, что насос и заряд-
ная станция полностью
сухие. Вставьте насос вза-
рядную станцию на одну
секунду, чтобы выполнить
сброс, затем снимите
его инажмите кнопку
включения/выключения.
Имеющиеся жидкости
могут вытечь. Повторите
этот процесс, если насос
снова остановится.
Устранение неисправностей
Проблема Возможная
причина
Устранение
Насос не
реагирует на
нажатие кнопки
включения/вы-
ключения.
Аккумулятор насоса
разряжен или
уровень его заряда
слишком низкий.
Зарядите аккумулятор
насоса.
При установке
на контей-
нер насос не
создает вакуум
или вакуум не
сохраняется.
Крышка вакуумного
контейнера, силико-
новое уплотнение
или клапан располо-
жены неправильно.
Проверьте правильность
расположения и правиль-
но ли закрыта крышка.
Силиконовое уплот-
нение или клапан
контейнера загрязне-
ны или мокрые.
Очистите и просушите
силиконовое уплотнение
иклапан контейнера.
Насос слишком
свободно сидит на
клапане.
Во время вакуум-герме-
тизации слегка вдавите
насос в разъем клапана,
чтобы создать плотное
уплотнение между насо-
сом и клапаном.

90
RU
Отдел обслуживания/Утилизация
Отдел обслуживания
При возникновении проблем с вакуумным насосом свяжитесь с нашим
отделом обслуживания. Подробную информацию об обслуживании,
ремонте и гарантии можно найти на сайте www.zwilling.com/service.
Утилизация
Не выбрасывайте устройство вместе с бытовыми
отходами. Для экологичной утилизации сдайте
отслужившее свой срок устройство в пункт сбора
электрических приборов. Раздельный сбор отдельных
компонентов электрооборудования предотвращает
негативные последствия загрязнения окружающей
среды и сводит к минимуму опасность для здоровья
человека, которая может возникнуть в результате
неправильной утилизации продукта. Кроме того, это
позволяет повторно использовать материалы, тем
самым экономя энергию и сырье.

www.zwilling.com
91

ZWILLING J.A. HENCKELS AG
Gruenewalder Strasse 14-22 · 42657 Solingen
Germany · www.zwilling.com
0103454Y1_06-20
Made in China
-
 1
1
-
 2
2
-
 3
3
-
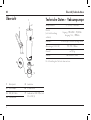 4
4
-
 5
5
-
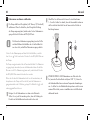 6
6
-
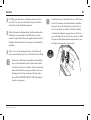 7
7
-
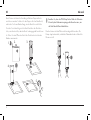 8
8
-
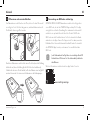 9
9
-
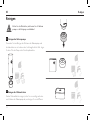 10
10
-
 11
11
-
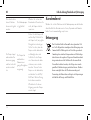 12
12
-
 13
13
-
 14
14
-
 15
15
-
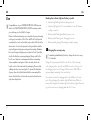 16
16
-
 17
17
-
 18
18
-
 19
19
-
 20
20
-
 21
21
-
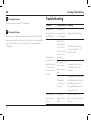 22
22
-
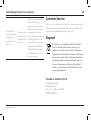 23
23
-
 24
24
-
 25
25
-
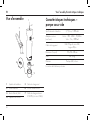 26
26
-
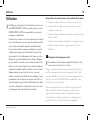 27
27
-
 28
28
-
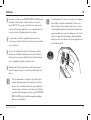 29
29
-
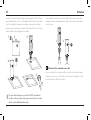 30
30
-
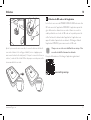 31
31
-
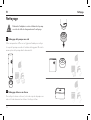 32
32
-
 33
33
-
 34
34
-
 35
35
-
 36
36
-
 37
37
-
 38
38
-
 39
39
-
 40
40
-
 41
41
-
 42
42
-
 43
43
-
 44
44
-
 45
45
-
 46
46
-
 47
47
-
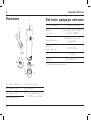 48
48
-
 49
49
-
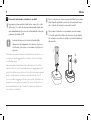 50
50
-
 51
51
-
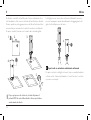 52
52
-
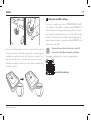 53
53
-
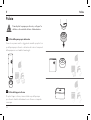 54
54
-
 55
55
-
 56
56
-
 57
57
-
 58
58
-
 59
59
-
 60
60
-
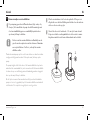 61
61
-
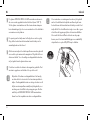 62
62
-
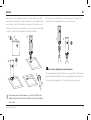 63
63
-
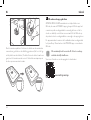 64
64
-
 65
65
-
 66
66
-
 67
67
-
 68
68
-
 69
69
-
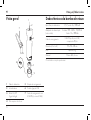 70
70
-
 71
71
-
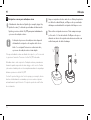 72
72
-
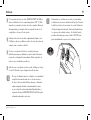 73
73
-
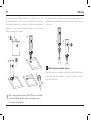 74
74
-
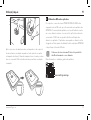 75
75
-
 76
76
-
 77
77
-
 78
78
-
 79
79
-
 80
80
-
 81
81
-
 82
82
-
 83
83
-
 84
84
-
 85
85
-
 86
86
-
 87
87
-
 88
88
-
 89
89
-
 90
90
-
 91
91
-
 92
92


in andere talen
- italiano: Zwilling 908656 Manuale utente
- français: Zwilling 908656 Manuel utilisateur
- español: Zwilling 908656 Manual de usuario
- Deutsch: Zwilling 908656 Benutzerhandbuch
- português: Zwilling 908656 Manual do usuário
Gerelateerde papieren
Andere documenten
-
Princess 01.492985.01.001 Handheld Vacuum Sealer Set de handleiding
-
Unold 48090 de handleiding
-
Solis 575 Handleiding
-
Caso Hand-Vakuumierer OneTouch Eco-Set - Vakuumierer Handleiding
-
Caso FastVAC 4000 Handleiding
-
Caso FastVAC 500 Handleiding
-
-
Solis EASY VAC PRO METAL 569 de handleiding
-