Emga 203015 Handleiding
- Categorie
- Accessoires voor het maken van koffie
- Type
- Handleiding

203015 G23NE 1
GEBRUIKSAANWIJZING
USER’S MANUAL
TOMATEN-SNIJDER
TOMATO SLICER
Model: *203015
ENGLISH NEDERLANDS

NEDERLANDS
203015 G23NE 2
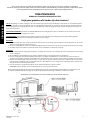
Lees voordat u begint zorgvuldig deze handleiding zodat u het apparaat correct kunt installeren en gebruiken.
Schade als gevolg van het niet volgen van de instruces vermeld in deze handleiding, maakt de garane te allen jde ongeldig.
Er wordt geadviseerd deze handleiding goed te bewaren voor uzelf en toekomsge gebruikers.
TOMATENSNIJDER
GEBRUIKS- EN ONDERHOUDSINSTRUCTIES
Snijd geen groenten die harder zijn dan tomaten!
LET OP: Zorgvuldige en nauwe naleving van de onderstaande instruces zal helpen de werking en levensduur van uw tomatensnijder te
verbeteren. Zorg ervoor dat u het apparaat voor en na elk gebruik grondig reinigt en voldoet aan de onderstaande reinigingsinstruces.
Vermijd het gebruik van reinigingsmiddelen met een hoge alkaliteit, omdat die de gegoten aluminium behuizing dof kunnen maken of
putjes kan veroorzaken.
VEILIGHEIDSOPMERKING: De messen zijn ZEER SCHERP! Wees voorzichg bij het hanteren en bedienen van de machine en houd de
handen uit de buurt van alle snijkanten en messen.
VOORBEREIDING: Zet het apparaat op een vlakke ondergrond. Uw tomatensnijder wordt gemonteerd en gebruiksklaar geleverd.
Overweeg voor uw gemak ook om de tafelstop te installeren als dat nodig is.
BEDIENING:
1. Trek het handvat naar je toe en leg de tomaat (of andere product) voorzichg op de schuifplaat tussen de duwplaten en de messen.
Wees voorzichg, want de messen zijn scherp.
2. Haal je hand weg. Met één snelle en vloeiende beweging duw je het handvat naar de messen en vang je de tomaat op in een bakje.
3. Verwijder de gesneden tomaat en eventueel resten van de schuifplank en herhaal de procedure.
REINIGING:
1. Om de duweenheid voor reiniging te verwijderen, verwijder de schroeven en de schuifstop en trek de duweenheid van het uiteinde
van de schuifplank.
2. Het schuiord en het bladschild kunnen worden verwijderd door hun montageschroeven te verwijderen.
3. Om voor reiniging de duweenheid volledig te demonteren, verwijder de bolkopmoeren aan de bovenkant van de eenheid en
verwijder voorzichg de duwplaten en afstandhouders. Verwijder de andere schroeven om de andere onderdelen te demonteren.
4. Mocht je de tomatensnijder in heet water wassen, zorg er dan voor dat je de tomatensnijder daarna aljd afspoelt in lauw of koud
water totdat de schuifplank weer op kamertemperatuur is. Heet water kan ervoor zorgen dat de schuifplank uitzet, waardoor het
moeilijk wordt om de duweenheid te duwen.
5. Voer de procedure in omgekeerde volgorde uit om de duweenheid weer in elkaar te zeen.
OPMERKING: Messen moeten opnieuw worden gespannen na het opnieuw monteren.
Als de duweenheid moeilijk schui nadat deze is opgedroogd, breng dan een voedselveilig smeermiddel aan op de groeven in de
schuifplaat. GEBRUIK GEEN plantaardige olie, omdat dit de duweenheid plakkerig en moeilijk te schuiven kan maken.
Beschikbare serviceonderdelen worden vermeld op de onderstaande tekening .

NEDERLANDS
NEDERLANDS
203015 G23NE 3
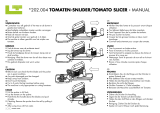
SERVICE ONDERHOUD
1. Wanneer u messen in de spanblokken plaatst, plaatst u één spanblok op een vlak oppervlak met de lange groef omhoog gedraaid
en het andere spanblok met de lange groef naar beneden gedraaid. Steek een mes (scherpe kant naar beneden) in de eindsleuf van
elk spanblok en duw een spanstaae in elk spanblok net ver genoeg om het mes vast te zeen. Steek een ander mes in de volgende
sleuf en druk op het spanstaae om deze vast te zeen. Herhaal dit totdat alle messen op hun plaats zien.
2. Wanneer u messen in de meshouder plaatst, moet u ervoor zorgen dat de scherpe kanten van de messen allen in de juiste richng
wijzen.
3. De messenset kan slechts op één manier worden geïnstalleerd: Van de 2 schroefgaten in het spanblokken moet het schroefgat dat
zich het dichtst bij de rand van het blok bevind naar beneden geplaatst zijn (dicht bij het schuiord). Als de scherpe randen van de
messen de verkeerde kant op wijzen, draai dan de messenset om.
4. Om de meseenheid in de meshouder vast te zeen, installeert u de twee zeskantbouten door de meshouder en in het spanblok aan
één uiteinde van de meshouder.
Draai de twee schroeven vast en installeer vervolgens de twee zeskantbouten losjes in de spanblok aan het andere uiteinde van de
meshouder (draai de meseenheid pas vast nadat de bladhouder op het frame is gemonteerd).
5. Wanneer u de meseenheid op het frame monteert, moet u ervoor zorgen dat de scherpe kant van de messen naar de
pusherassemblage is gericht.
BLADSPANNING
De spanning op de messen moet worden hersteld na elke demontage voor reiniging of vervanging van de messenset.
1. Zorg ervoor dat de meseenheid stevig op het frame is gemonteerd en dat de scherpe kant van de messen naar de duweenheid is
gericht.
2. Zorg ervoor dat de zeskantbouten aan de rechterkant van de meshouder goed vastzien.
3. Draai de zeskantbouten aan het linkeruiteinde van de meshouder vast. Om spanning van het mes te controleren, tokkelt u op de
achterkant (ongeslepen) kant van het mes totdat het mes “zingt”. Draai de bovenste en onderste schroeven geleidelijk aan totdat
de bovenste en onderste messen ongeveer hetzelfde klinken wanneer je op ze tokkeld.
LET OP: Probeer niet om de geslepen zijkanten van de messen te plukken of te tokkelen.
OPMERKING: Controleer de spanning van de messen voor elk gebruik om ervoor te zorgen dat ze strak zien.

203015 G23NE 4
ENGLISH
Before starng up, please read this manual carefully in order to ensure the correct and safe installaon and usage.
Damage caused by not following the instrucons of this manual will always invalidates the warranty.
CaterChef would like to emphasize that this instrucon manual needs to be readed carefully before usuge and should be
stored for later use.
TOMATO SLICER
OPERATION AND MAINTENANCE INSTRUCTIONS
Don’t cut vegetables that are harder than tomatoes!
PLEASE NOTE: Careful and close adherence with the below instrucons will help enhance the operaon and longevity of your Tomato
Slicer. Make sure to thoroughly clean the device prior to and aer each use, complying by the cleaning instrucons below. Avoid using
cleaners that are high in alkalinity as they may dull, discolor, or pit the casngs.
SAFETY REMINDER: The blades are VERY SHARP. Please exercise cauon when handling and operang the machine and keep hands away
from all cung edges and blades.
PREPARATION: Set the unit on a at surface. Your Slicer comes assembled and ready for use. For your convenience, please consider also
installing the table stop as necessary.
OPERATION:
1. Pull the handle towards you and carefully place the tomato or other produce onto the slide board between the pusher plates and
the blades. Exercise cauon as the blades are sharp.
2. Withdraw your hand. With one quick and seamless moon, push the handle towards the blades and catch the tomato in your hand
or a container.
3. Remove the sliced tomato and any product le on the slide board and repeat the procedure as desired.
CLEANING:
1. To remove the pusher assembly for cleaning, remove the thumb screws and the slide stop and pull the pusher o the end of the
slide board.
2. The slide board and the blade shield can be removed by removing their mounng screws.
3. To fully disassemble the pusher assembly for cleaning, remove the acorn and hex nuts at the top of the stack and carefully remove
the pusher plates and spacers. Remove the other screws to disassemble the other parts from the guide plate.
4. Should you wash the Tomato Slicer in hot water, make sure the always rinse in lukewarm or cold water thereaer. Hot water
may cause the slide board to expand, creang diculty in pushing the pusher assembly unl the slide board returns to room
temperature.
5. Reverse the procedure to reassemble.
NOTE: Blades must be re-tensioned following reassembly.
If pusher is hard to slide aer it has dried, apply a food grade lubricant to the grooves in the slide board.
DO NOT use vegetable oil as this may make the pusher scky and hard to slide.
Available service parts are noted on the drawing below.

203015 G23NE 5
ENGLISH
ENGLISH
TO SERVICE
1. When placing blades into the tension blocks, place one tension block on a worktable or at surface with the long groove turned
up and the other tension block with the long groove turned down. Insert a blade (sharp side down) in the end slot of each tension
block and push a tension rod into each tension block just far enough to secure the blade. Insert another blade in the next slot and
push the tension rod to secure it. Repeat unl all blades are in place.
2. When placing blades into the blade holder, be sure the sharp sides of blades are poinng in the right direcon.
3. The blade kit can be installed only one way: the mounng screw holes in the tension blocks nearest the end of the block must be
down toward the slide board. If the sharp edges of the blades are poinng the wrong way, turn the blade kit end for end.
4. To secure the blade assembly in the blade holder, install the two hex head screws through the blade holder and into the tension bar
at one end of the blade holder. Tighten the two screws, and then install the two hex screws loosely into the tension bar at the other
end of the blade holder (do not ghten the blades unl aer the blade holder is mounted on the frame).
5. When mounng the blade holder assembly on the frame, be sure the sharp side of the blades is directed toward the pusher
assembly.
BLADE TENSIONING
Tension on the blades must be restored following each disassembly for cleaning or replacement of the blade kit.
1. Be sure blade holder assembly is rmly mounted on the frame and the sharp side of the blades is toward the pusher assembly.
2. Be sure the hex head screws on the right side of the blade holder are ght.
3. Tighten the hex head screws on the le end of the blade holder. To check the blade ghtness, plug or strum the back (Unsharpened)
side of the blades unl the blades “hum”. Gradually ghten the top and boom screws unl the top and boom blades sound
about the same when plucked or strummed.
CAUTION: Do not try to pluck or strum the sharpened sides of the blades.
NOTE: Check the tension of the blades prior to each use to ensure they are ght.
-
 1
1
-
 2
2
-
 3
3
-
 4
4
-
 5
5


Emga 203015 Handleiding
- Categorie
- Accessoires voor het maken van koffie
- Type
- Handleiding
in andere talen
- English: Emga 203015 User manual
Gerelateerde papieren
Andere documenten
-
Bartscher 120400 Handleiding
-
Genius Nicer Dicer Chef de handleiding
-
 LOUIS TELLIER 202004 Handleiding
-
Domo DO9079KR de handleiding
-
Hendi 570159 Handleiding
-
Ninja BN650EU Food Processor Handleiding
-
Moulinex QA403G01 MASTERCHEF GOURMET de handleiding
-
Makita 1923B de handleiding
-
-
