
ES PT EN
FR DE NL
EL
Installation & Maintenance
www.teka.com

2
Instalación y Mantenimiento
Índice instrucciones de instalación y mantenimiento
INSTRUCCIONES DE SEGURIDAD ........ 3
Seguridad eléctrica ............................. 3
Seguridad para los niños .................... 4
Seguridad en el uso del horno ............ 4
Seguridad en la limpieza
y mantenimiento ................................. 5
Seguridad en el uso del ciclo
de limpieza por pirólisis ....................... 6
INSTAlACIóN ......................................... 7
Previo a la instalación .......................... 7
Instalación en columna .................. 7
Instalación bajo encimera .............. 7
Conexión eléctrica .............................. 7
Instalación del horno ........................... 7
INfORmACIóN mEDIOAmbIENTAl ....... 8
Retirada del embalaje ecológico .......... 8
Retirada del producto ......................... 8
Información energética ........................ 8
ANTES DEl pRImER USO ...................... 8
OTRAS INSTRUCCIONES
ImpORTANTES ........................................ 8
ACCESORIOS ......................................... 9
Montaje de las guías telescópicas. ...... 9
Guías telescópicas con clip abatible 9
Guías telescópicas con clip directo .. 9
lImpIEzA y mANTENImIENTO ............... 10
Limpieza del exterior y los accesorios
de horno ............................................. 10
Limpieza del interior del horno ............ 10
Desmontar los soportes laterales .... 10
Para montar los soportes .............. 10
Desmontar el panel de fondo ........ 10
Hornos con grill abatible ................ 11
Limpieza de la puerta del horno .......... 11
Desmontaje/montaje de puerta
con bisagra en cuerpo .................. 11
Desmontaje/montaje de puerta
con bisagra en puerta ................... 11
Desmontaje/montaje de los
cristales interiores de la puerta ...... 12
Cambio de la lámpara del horno ......... 12
Cambio de lámpara superior ......... 12
Cambio de lámpara lateral ............. 12
Cambio de lámpara LED ............... 12
Si algo no funciona ............................. 13
Información técnica ............................. 14
fIGURAS ................................................. 93

3
Instalación y Mantenimiento
Español
INSTRUCCIONES DE SEGURIDAD
Lea atentamente estas instrucciones para obtener el máxi-
mo rendimiento de su horno de una forma correcta y segura.
Guarde este manual de cara a que pueda leerlo un nuevo pro-
pietario.
Seguridad eléctrica
• En el caso de que el horno no lleve cable de alimentación,
los cables que se pueden utilizar en hornos no pirolíticos son
los siguientes: H05RR-F / H05VV-F / H05V2V2-F / H07RN-F /
H05SS-F. En hornos pirolíticos, sólo se puede utilizar cable
del tipo H05SS-F. El esquema de conexión se muestra en la
Figura 1.
• El horno debe conectarse siempre a una buena toma de tie-
rra y la instalación de este aparato tiene que cumplir los
reglamentos vigentes.
• El uso de este aparato está previsto para una altitud máxima
de 2.000 metros.
• Para la instalación del horno se deben incorporar medios
de desconexión total a la instalación fija de acuerdo con las
reglamentaciones de instalación (adecuado a la intensidad
a soportar y con una apertura mínima entre contactos de 3
mm) bajo las condiciones de categoría III de sobretensión,
para la desconexión en casos de emergencia, limpieza o
cambio de la lámpara. En ningún caso el cable de toma de
tierra podrá pasar por este interruptor.
• Este interruptor se puede sustituir por una clavija de enchu-
fe, siempre que pueda estar accesible en un uso normal.
• Cualquier manipulación o reparación del aparato, incluida
la sustitución del cable de alimentación, debe realizarse por
personas del Servicio de Asistencia Técnica autorizado usan-
do repuestos originales. Las reparaciones o manejo realizado
por otras personas pueden ocasionar daños al aparato o un
mal funcionamiento, poniendo en peligro su seguridad.

4
Instalación y Mantenimiento
• Desconecte su horno cuando esté averiado.
• En hornos combinados con encimera, sólo se podrán mon-
tar las recomendadas por el fabricante, a fin de evitar un
posible riesgo.
Seguridad para los niños
• Impida que los niños se acerquen al horno durante el coci-
nado o la limpieza por pirólisis, ya que se alcanzan tempe-
raturas elevadas.
• Los niños menores de 8 años deben permanecer alejados
a menos que estén bajo supervisión permanente. Los niños
no deben jugar con el aparato.
• Este aparato pueden utilizarlo niños con edad de 8 años y
superior y personas con capacidades físicas, sensoriales o
mentales estén reducidas, o falta de experiencia o conoci-
miento, si se les ha dado la supervisión o instrucción apro-
piadas respecto al uso del aparato de una manera segura y
comprenden los peligros que implica.
• Para México: Este aparato no se destina para utilizarse por per-
sonas (incluyendo niños) cuyas capacidades físicas, sensoria-
les o mentales sean diferentes o estén reducidas o carezcan
de experiencia o conocimiento, a menos que dichas personas
reciban una supervisión o capacitación para el funcionamiento
del aparato por una persona responsable de su seguridad.
Seguridad en el uso del horno
• El horno siempre tiene que funcionar con la puerta cerrada.
• Sólo utilice el horno cuando esté instalado en el interior del
mueble (Ver Instalación del horno).
• No instale el horno detrás de puertas decorativas. Esto po-
dría provocar sobrecalentamiento.
• El fabricante no se responsabiliza de un uso que no sea para
la preparación de alimentos de forma doméstica.
• No recubra el fondo del horno con hojas de papel de alu-
minio ni de cualquier otro material, ya que puede afectar al
cocinado y dañar el esmalte de la cavidad y el interior del
mueble de su cocina.

5
Instalación y Mantenimiento
Español
• No guarde aceites, grasas ni materiales inflamables en el
interior, ya que puede ser peligroso si pone el horno en fun-
cionamiento.
• No se apoye ni se siente en la puerta abierta, podría dañarla
además de poner en peligro su seguridad.
• La bandeja y la parrilla poseen un sistema para facilitar su
extracción parcial y manipular los alimentos. Coloque siem-
pre estos accesorios en el interior del horno como se indica
en el apartado Accesorios.
• Durante el uso el aparato se calienta, emplee guantes de
protección cuando quiera maniobrar dentro de él y evite to-
car los elementos de calentamiento.
• Use sólo la sonda de medida de temperatura suministrada
dentro del horno (modelos con esta prestación).
Seguridad en la limpieza y mantenimiento
• Debe desconectar el aparato de la red eléctrica para reali-
zar cualquier intervención.
• No utilizar limpiadores a vapor o agua a presión para limpiar
el horno.
• No use rascadores de metal afilados, estropajos metálicos,
cepillos de alambre ni polvos comerciales o abrasivos para
limpiar la puerta del horno, ya que podría arañar la superfi-
cie y provocar la rotura del cristal.
• La limpieza y el mantenimiento a realizar por el usuario no
deben realizarlo los niños sin supervisión.
• Antes de sustituir la lámpara, asegúrese primero que el hor-
no está desconectado de la red eléctrica para evitar la posi-
bilidad de choques eléctricos.
• Retirar todos los accesorios y vajilla del horno, incluyendo
los soportes de bandejas y/o guías telescópicas.
• Retirar cualquier derrame o resto excesivo de suciedad, ya
que durante el proceso de pirolisis podrían inflamarse co-
rriendo peligro de incendio.
• Por su seguridad, nunca ponga en funcionamiento el horno
sin el panel de fondo que protege el ventilador.

6
Instalación y Mantenimiento
Seguridad en el uso del ciclo de limpieza por pirólisis
Antes de comenzar el ciclo de limpieza:
• MUY IMPORTANTE: Retirar todos los accesorios y vajilla
del horno, incluyendo los soportes de bandejas y/o guías
telescópicas.
• Retirar cualquier derrame o resto excesivo de suciedad, ya
que durante el proceso de pirólisis podrían inflamarse co-
rriendo peligro de incendio.
• Retirar los restos de suciedad de la junta de horno.
• Seguir atentamente las instrucciones para programar el ci-
clo de limpieza por pirólisis.
Durante el proceso de limpieza por pirólisis:
• No deje paños ni cualquier otro elemento textil colgado del
tirador del horno ni en contacto con éste.
• Por seguridad, la encimera de cocción debe permanecer
apagada durante el funcionamiento del horno en modo pi-
rolítico, cuando éste vaya instalado debajo de la encimera.
• La luz interior del horno permanecerá apagada y no puede
encenderse.
• El horno está dotado de un mecanismo de bloqueo de segu-
ridad automático que impedirá la apertura de la puerta du-
rante el ciclo de limpieza. No intente abrir la puerta mientras
el bloqueo está activado.
INFORMACIÓN
En este libro se describen características generales de los
hornos, por lo que podrían no corresponder exactamente
con los de su horno. Para conocer las prestaciones y equi-
pamiento específico de su horno, debe consultar la Guía
de Uso que acompaña a este manual.
El fabricante se reserva el derecho de modificar característi-
cas del producto para mejorar el funcionamiento del mismo.

7
Instalación y Mantenimiento
Español
Instalación
Esta información va dirigida exclusivamente al
instalador, ya que es el responsable del monta-
je y conexión eléctrica. Si usted mismo instala
el horno, el fabricante no se hará responsable
de los posibles daños.
PREVIO A LA INSTALACIÓN
• Para manipular el horno utilice las asas la-
terales. Nunca utilice el tirador de la puerta
para levantar el horno.
• Cuando instale el horno debajo de una en-
cimera respete las instrucciones de instala-
ción de la misma.
• En general, deben evitarse los salientes (re-
fuerzos del mueble, tuberías, bases de en-
chufe, etc…) en la parte posterior del mueble.
• Cuando la base del enchufe de conexión a
red se coloque dentro del mueble en el que
se instala el horno, se hará dentro la zona
sombreada. Figura 2.
• El mueble en el que se instala el horno y
muebles adyacentes, deben soportar tem-
peraturas superiores a 85º C.
• Las instrucciones de instalación deben res-
petarse rigurosamente, de lo contrario, podría
bloquearse el circuito de ventilación del horno,
provocando altas temperaturas que podrían
dañar el mueble así como el propio aparato.
• Para ello, verifique las medidas del mueble y
de las aberturas a realizar en los mismos se-
gún las figuras que se indican a continuación:
Instalación en columna.
Horno de 60 cm: Figura 7*.
Horno de 45 cm: Figura 8*.
ATENCIÓN
* Para la instalación de hornos pirolíticos
NO realizar las aperturas en el mueble que
se muestran sombreadas.
Instalación bajo encimera.
Horno de 60 cm: Figura 9*.
Horno de 45 cm: Figura 10*.
ATENCIÓN
* Para la instalación de hornos pirolíticos
NO realizar las aperturas en el mueble que
se muestran sombreadas.
CONEXIÓN ELÉCTRICA
El instalador debe verificar que:
• La tensión y la frecuencia de la red se co-
rresponde con lo indicado en la Placa de
Características.
• La instalación eléctrica puede soportar la
potencia máxima indicada en la Placa de
Características.
• Después de la conexión eléctrica, verifique
el correcto funcionamiento de todos los ele-
mentos eléctricos del horno.
INSTALACIÓN DEL HORNO
Para todos los hornos y tras realizar la conexión
eléctrica,
1. Introduzca el horno en el mueble asegurán-
dose que el cable de alimentación no queda
atrapado, ni en contacto con partes calien-
tes del horno.
2. Observe que la carcasa del horno no esté en
contacto con las paredes del mueble y que
hay al menos una separación de 2 mm con
los muebles contiguos.
3. Centre el horno en el mueble de forma que
se garantice una distancia mínima de 5mm
entre el horno y las puertas de los muebles
que lo rodean. Figura 3.
4. Abra la puerta y clipe los topes de plástico
suministrados con su horno en los respecti-
vos alojamientos. Figura 11.
5. Sujete el horno al mueble con los tornillos
suministrados, roscándolos al mueble a tra-
vés de los topes.

8
Instalación y Mantenimiento
Antes del primer uso
Por el proceso de fabricación, puede haber en
el horno restos de grasas y otras impurezas,
para eliminarlos proceda como sigue:
1. Retire todos los elementos del embalaje, in-
cluido el plástico protector si lo lleva.
2. Conecte su horno en función
/ o en
su defecto
/ , a 200º C y durante 1
hora. Para ello consulte la Guía de Uso que
acompaña a este manual.
3. Enfríelo abriendo la puerta, de esta forma se
ventila no quedando olores en su interior.
4. Tras el enfriamiento, limpie el horno y los ac-
cesorios.
Durante este primer funcionamiento, se produ-
cen humos y olores por lo que se debe asegu-
rar una buena ventilación de la cocina.
Otras instrucciones importantes
No vierta agua en el fondo durante el funciona-
miento, ya que puede dañar el esmalte.
En cocinados con un alto contenido de líquidos
es normal que se produzcan algunas conden-
saciones en la puerta.
Información medioambiental
RETIRADA DEL EMBALAJE ECOLÓGICO
El embalaje está realizado con materiales total-
mente reciclables y pueden ser aprovechados
nuevamente. Consulte con su administración
municipal sobre las normas locales para retirar
estos materiales.
RETIRADA DEL PRODUCTO
ATENCIÓN
El símbolo
en el producto o en el em-
balaje, indica que este aparato no se puede
tratar como un desperdicio normal del ho-
gar. Usted debe entregarlo al punto de reco-
lección de equipos eléctricos y electrónicos
para su reciclaje. De esta forma usted ayu-
dará a evitar posibles consecuencias nega-
tivas para el ambiente y la salud pública por
una incorrecta manipulación.
Para obtener información más detallada
sobre el reciclado del aparato, póngase en
contacto con la administración de su ciu-
dad, con el servicio de desechos del hogar
o con el establecimiento donde compró el
producto.
INFORMACIÓN ENERGÉTICA
Ensayos para cumplir los requisitos de los re-
glamentos 66/2014 (Ecodiseño) y 65/2014 (Eti-
quetado Energético) conforme a la Normativa
EN 60350-1.
Mediciones de consumo realizadas en condi-
ciones distintas, pueden dar valores diferentes
a los reflejados para su horno.
Para conocer los datos de consumo energé-
tico de su horno, consulte la Guía de Uso que
acompaña a este manual.
ATENCIÓN
No se apoye en la puerta abierta del horno
durante los pasos 4 y 5, ya que al no estar el
horno fijado al mueble, éste podría vencerse
hacia delante y caer al suelo.

9
Instalación y Mantenimiento
Español
Al cerrar la puerta del horno durante el cocina-
do, se puede llegar a apreciar el sonido del aire
en el interior. Esto es un efecto normal, debi-
do a la presión que ejerce la puerta al cerrarse
para garantizar la estanqueidad de la cavidad.
Accesorios
No deposite recipientes ni alimentos en el suelo
del horno. Emplee siempre las bandejas y parri-
llas que se suministran con el horno.
Para la preparación de yogur, puede colocar
los vasos directamente en el suelo del horno.
Para cocinar cualquier otro alimento, introduzca
la bandeja o parrilla en las guías laterales de la
cavidad interior como se indica a continuación:
1. Entre dos varillas de los soportes laterales,
o sobre alguna de las guías extraíbles si su
horno las lleva.
2. La parrilla y algunas bandejas, llevan hendi-
duras de retención para evitar su extracción
accidental. Coloque estas hendiduras hacia
la parte trasera del horno y apuntando hacia
abajo. Figura 4.
3. La superficie de la parrilla en la que se van
a apoyar los recipientes, debe quedar por
debajo de las varillas laterales. Así evitará el
deslizamiento accidental del recipiente. Fi-
gura 5.
4. Las bandejas tienen una pestaña frontal
para facilitar su extracción. Coloque la ban-
deja con esta pestaña hacia el exterior del
horno. Figura 6.
MONTAJE DE LAS GUÍAS TELESCÓPICAS
Algunos modelos de horno, incorporan como
accesorio un kit de guías telescópicas.
Para el montaje de las guías telescópicas sobre
los soportes cromados, proceda como se indi-
ca a continuación:
Guías telescópicas con clip abatible
IMPORTANTE
Las guías deben colocarse en la altura 2,
empezando desde abajo. Figura 12.
1. Retire el film protector.
2. Enganche los clips grandes en la varilla su-
perior y abata la guía hasta enganchar los
clips pequeños en la varilla inferior. Figura 12.
3. Oirá un «click» cuando la guía esté correcta-
mente fijada. Figura 13.
4. La muesca para registro de la bandeja/pa-
rrilla, debe quedar en la parte delantera del
horno. Figura 13.
Guías telescópicas con clip directo
IMPORTANTE
Las guías de extracción sencilla pueden co-
locarse en las alturas 1, 2, 3 y 5, empezando
desde abajo. Figura 14.
Las guías de extracción doble pueden co-
locarse en las alturas 1, 2 y 3, empezando
desde abajo. Figura 15.
En los hornos de 45 cm, las guías telescó-
picas se colocan en la altura 1. Figura 16.
1. Enganche el clip en la varilla superior del ni-
vel deseado. Figura 17.
2. Oirá un «click» cuando la guía esté correcta-
mente fijada. Figura 18.
3. La muesca para registro de la bandeja/pa-
rrilla, debe quedar en la parte delantera del
horno. Figura 18.

10
Instalación y Mantenimiento
Limpieza y mantenimiento
Con el paso del tiempo, determinados tipos de
alimentos como el tomate, el vinagre, asados a la
sal… provocan cambios de coloración en el es-
malte. Esto es normal y no afecta al funcionamien-
to del mismo. No intente quitar estas manchas
con medios agresivos como los descritos, ya que
podría dañar permanentemente la superficie.
Limpie regularmente la junta del horno para eli-
minar restos de grasa o alimentos. Esto evitará
el deterioro y rotura de la junta en posteriores
cocinados.
Se recomienda limpiar esta junta sin desmontarla.
Desmontar los soportes laterales
1. Retire los accesorios del interior del horno.
2. Desenrosque completamente la tuerca de-
lantera de fijación (A), tire de los soportes
hacia delante (B) y retírelos. Figura 19.
Para montar los soportes
3. Encaje la muesca trasera en la tuerca trase-
ra de fijación.
4. Registre la tuerca delantera de fijación (C) en
la muesca delantera del soporte. Figura 20.
5. Abata el soporte con la tuerca (D) y gire ésta
hasta que quede ajustada (E). Figura 20.
Desmontar el panel de fondo
INFORMACIÓN
Para desmontar el panel del fondo, debe des-
montar primero los soportes laterales siguien-
do las instrucciones del apartado anterior.
A continuación:
1. Quite los tornillos inferiores (A) y luego el tor-
nillo superior (B). Figura 21.
2. Para montar el panel de fondo, proceda en
orden inverso.
ATENCIÓN
Debe desconectar el aparato de la red eléc-
trica para realizar cualquier intervención.
LIMPIEZA DEL EXTERIOR
Y LOS ACCESORIOS DE HORNO
Limpie el exterior del horno y los accesorios
con agua jabonosa y templada o con algún de-
tergente suave.
Para superficies inoxidables o superficies pin-
tadas, actúe con precaución y emplee sólo es-
ponjas o paños que no puedan rayarlos.
IMPORTANTE
Las guías telescópicas no deben introducir-
se en el lavavajillas. Esto haría que la grasa
que facilita el deslizamiento desaparezca y
las guías se atasquen quedando inservibles.
LIMPIEZA DEL INTERIOR DEL HORNO
Limpie regularmente el interior del horno para
eliminar restos de grasa o alimentos, los cuales
en posteriores cocinados desprenderán humos
y olores o provocarán la aparición de manchas.
Con el horno frío y para superficies esmaltadas
(ejemplo, suelo del horno) use cepillos de nylon
o esponjas con agua jabonosa y templada. Si
usa productos de limpieza de hornos, aplíque-
los sólo en las superficies esmaltadas y siguien-
do las instrucciones del fabricante.
ATENCIÓN
No limpie el interior de su horno con apa-
ratos limpiadores a vapor o agua a presión.
Tampoco utilice estropajos metálicos, cepillos
de alambre o cualquier utensilio que pueda ra-
yar el esmalte.

11
Instalación y Mantenimiento
Español
3. Cierre la puerta hasta la posición de blo-
queo. Figura 25.
4. Asiendo la puerta con ambas manos y por
los costados, levante la puerta hasta sacarla
totalmente de las bisagras Figura 25.
Para el montaje de la puerta
5. Asiendo la puerta con ambas manos por la
parte inferior de los laterales, introduzca los
brazos de las bisagras en sus alojamientos y
deje caer la puerta hasta el final del recorri-
do. Figura 26.
6. Abra completamente la puerta del horno.
Figura 26.
7. Gire los gatillos a su posición inicial.
ATENCIÓN
Tenga cuidado de que la puerta permanez-
ca totalmente introducida al girar los gatillos.
De lo contrario, podría bloquearse al intentar
cerrarla.
INFORMACIÓN
Si los gatillos oponen mucha resistencia,
puede ayudarse de una herramienta plana
para girarlos.
Desmontaje/montaje de puerta
con bisagra en puerta
1. Abra totalmente la puerta del horno.
2. Bloquee la bisagra girando los dos gatillos.
Figura 27.
3. Cierre la puerta hasta la posición de blo-
queo. Figura 28.
4. Asiendo la puerta con ambas manos y por
los costados, levante y separe la puerta has-
ta sacar totalmente las bisagras del horno.
Figura 28.
Para el montaje de la puerta, proceda de forma
inversa.
ATENCIÓN
Por su seguridad, nunca ponga en funcio-
namiento el horno sin el panel de fondo que
protege el ventilador.
Hornos con grill abatible
Para limpiar la parte superior del horno,
1. Espere a que su horno esté frío.
2. Empuje con ambas manos la varilla de la re-
sistencia de Grill (A) hacia la parte posterior
del horno, hasta soltarla de la tuerca de fija-
ción (B). Figura 22.
3. Deje caer la resistencia y limpie la parte su-
perior del horno. Figura 23.
4. Finalmente vuelva a colocar la resistencia de
Grill en su posición inicial procediendo a la
inversa.
Hornos con función Teka Hydroclean®
Por favor consulte la Guía de Uso de su horno.
Hornos con Función de Autolimpieza por
Pirólisis
Por favor consulte la Guía de Uso de su horno.
LIMPIEZA DE LA PUERTA DEL HORNO
Para facilitar la limpieza de la puerta, puede
desmontarla. Para ello, siga las instrucciones
correspondientes al tipo de puerta que incor-
pora su horno.
Desmontaje/montaje de puerta
con bisagra en cuerpo
1. Abra totalmente la puerta del horno.
2. Bloquee la bisagra girando los gatillos.
Figura 24.

12
Instalación y Mantenimiento
Desmontaje/montaje de los cristales
interiores de la puerta
ATENCIÓN
Si desmonta los cristales con la puerta mon-
tada en el horno, hágalo siempre con la bisa-
gra en posición de bloqueo. De lo contrario,
la puerta se cerrará pudiendo romperse los
cristales no desmontados y causar lesiones.
INFORMACIÓN
Para evitar esto, se recomienda desmontar
los cristales con la puerta desmontada si-
guiendo las instrucciones del apartado an-
terior.
Dependiendo del modelo, su horno puede te-
ner 2, 3 o 4 cristales. Siga las instrucciones co-
rrespondientes al tipo de puerta que incorpora
su horno.
1. Presione con los dedos sobre los botones
situados en la parte superior de ambos la-
dos de la puerta del horno. Figura 29.
2. Sin dejar de presionar, tire del cierre superior
de la puerta. Figura 30.
3. Retire los cristales de la puerta. Límpielos
con limpiacristales o agua con jabón, y un
paño suave.
ATENCIÓN
Ponga atención en el orden y posición de
los cristales cuando los retire, ya que debe-
rá montarlos en el mismo orden y posición
cuando termine la limpieza.
4. Una vez limpios, introduzca el cristal n.º 3
en la misma posición, de forma que la in-
dicación TERMOGLASS que llevan impresa
pueda verse como se indica en la Figura 31.
5. Para hornos pirolíticos, la indicación TER-
MOGLASS de los cristales n.º 3 y n.º 4 debe
verse como se indica en la Figura 32.
6. Coloque el cristal n.º 2 con la parte impresa
hacia el interior de la puerta.
7. Coloque de nuevo el cierre superior de la
puerta, asegurando que los botones latera-
les encajan en su alojamiento.
ATENCIÓN
Nunca ponga el horno a funcionar si falta al-
guno de los cristales de la puerta.
CAMBIO DE LA LÁMPARA DEL HORNO
ATENCIÓN
Para cambiar la lámpara, asegure primero
que el horno está desconectado de la red
eléctrica.
La lámpara a sustituir debe tener una resisten-
cia a la temperatura de hasta 300º C, solicítela
en el servicio de asistencia técnica.
Cambio de lámpara superior
1. Desenrosque la lente del portalámparas.
Figura 33.
2. Sustituya la lámpara y enrosque de nuevo la
lente.
Cambio de lámpara lateral
1. Suelte la lente de vidrio con la ayuda de una
herramienta de punta plana. Figura 34.
2. Sustituya la lámpara y monte de nuevo la
lente, asegurando que encaja en posición
correcta.
Cambio de lámpara LED
Contacte con el Servicio de Asistencia Técnica.

13
Instalación y Mantenimiento
Español
El horno no funciona
• Compruebe la conexión a la red.
• Verifique los fusibles y el limitador de su
instalación.
• Asegúrese que el reloj está en posición
manual o programado.
• Verifique la posición del selector de funcio-
nes y de temperaturas
La luz interior del horno no se enciende
• Sustituya la lámpara.
• Verifique el correcto montaje según las Ins-
trucciones de Instalación.
El piloto de calentamiento no se ilumina
• Seleccione una temperatura.
• Seleccione una función.
• Sólo se debe iluminar mientras el horno
está calentando para alcanzar la tempera-
tura seleccionada.
Generación de humos durante
el funcionamiento del horno
• Proceso normal en el primer funciona-
miento.
• Limpie periódicamente el horno.
• Reduzca la cantidad de grasa o aceite
añadido a la bandeja.
• No utilice temperaturas más altas de las
indicadas en las tablas de cocinado.
No se obtienen los resultados esperados
en el cocinado
• Revise las tablas de cocinado, para obte-
ner una orientación sobre el funcionamien-
to de su horno.
Mis accesorios y soportes fijación
bandejas están dañados
• No los ha retirado cuando ha realizado un
proceso de limpieza pirolítica.
• Es necesario sustituirlos por otros nuevos y
retirarlos en posteriores ciclos de limpieza.
El color del esmalte ha sufrido variaciones
o han aparecido manchas
• La composición química de algunos ali-
mentos puede generar estos cambios en
el esmalte.
• Es un proceso normal que no daña las pro-
piedades del esmalte.
El horno está apagado, el símbolo
iluminado y la puerta no puede abrirse
• Está accionado el bloqueo de puerta.
• Desactive el bloqueo de puerta siguiendo
las instrucciones que encontrará en la Guía
de Uso de su horno que acompaña a este
manual.
El horno está encendido, el símbolo
iluminado y la puerta no puede abrirse
• Está accionado el bloqueo de puerta.
• Gire el mando selector de funciones a la
posición
.
Si algo no funciona
En este apartado encontrará algunas de las
incidencias más habituales que pueden produ-
cirse en su horno, junto con las causas más
comunes y posibles soluciones.

14
Instalación y Mantenimiento
• Desactive el bloqueo de puerta siguiendo las
instrucciones que encontrará en la Guía de
Uso que acompaña a este manual.
• Para continuar cocinando, vuelva a selec-
cionar la función de cocinado deseada.
He girado el mando selector de funciones
a la posición
, he seleccionado el
programa de pirólisis P1, P2 ó P3 pero
el símbolo
parpadea rápidamente y
suena una alarma sonora
• La puerta del horno está mal cerrada, lue-
go no se puede bloquear la puerta, y se ha
bloqueado el proceso de pirolisis.
• Revise la puerta y asegúrese que está bien
cerrada. A continuación, ponga en posi-
ción
el mando selector de funciones y
vuelva a realizar la secuencia para activar la
pirolisis.
He girado el mando selector de
funciones a la posición
, he
seleccionado el programa de pirólisis
P1, P2 ó P3 pero el símbolo
no se
ilumina y el horno no calienta
• El interruptor de puerta no ha funcionado a
pesar de estar la puerta bien cerrada.
• Llame por favor al Servicio de Asistencia
Técnica ya que hay un fallo del interruptor
de puerta.
El programa de pirólisis ha terminado y
el horno está frío, sin embargo la puerta
está bloqueada y en la pantalla se muestra
encendido el símbolo
y 0:00
• No puso en posición
el mando selector
de funciones cuando terminó el programa
de pirólisis.
• Ponga en posición
el mando selector
de funciones.
He puesto en posición
el mando
selector de funciones y la puerta sigue
bloqueada
• El horno no se ha enfriado hasta alcanzar
la temperatura de seguridad.
• Espere a que la temperatura baje y el sím-
bolo
se apague.
Información técnica
ATENCIÓN
Si a pesar de estos consejos persiste el pro-
blema, póngase en contacto con su Servicio
de Asistencia Técnica.
Comunique al Servicio de Asistencia Técnica el
tipo de anomalía que usted observa indicando:
1. Número de Serie (S-No).
2. Modelo de Aparato (Mod.).
Está información la encontrará en la placa de
características de su horno, que puede ver al
abrir la puerta, en un lateral.

15
Instalação e Manutenção
Português
Índice - Instruções de Instalação e Manutenção
INSTRUÇÕES DE SEGURANÇA ............. 16
Segurança elétrica .................................... 16
Segurança para as crianças ..................... 17
Segurança na utilização do forno .............. 17
Segurança na limpeza
e manutenção ..................................... 18
Segurança na utilização do ciclo
de limpeza por pirólise ........................ 18
INSTAlAÇãO ........................................... 20
Antes da instalação ............................. 20
Instalação em coluna .................... 20
Instalação por baixo de bancada ... 20
Ligação elétrica ................................... 20
Instalação do forno ............................. 20
INfORmAÇÕES AmbIENTAIS ................ 21
Retirar da embalagem ecológica ......... 21
Retirar o produto ................................. 21
Informações energéticas ..................... 21
ANTES DA pRImEIRA UTIlIzAÇãO ........ 21
OUTRAS INSTRUÇÕES
ImpORTANTES ........................................ 21
ACESSóRIOS .......................................... 22
Montagem das guias telescópicas. ..... 22
Guias telescópicas com
clipe rebatível .................................. 22
Guias telescópicas com clipe direto 22
lImpEzA E mANUTENÇãO .................... 23
Limpeza do exterior e dos acessórios
do forno .............................................. 23
Limpeza do interior do forno ............... 23
Desmontar os suportes laterais ..... 23
Para montar os suportes ............... 23
Desmontar o painel do fundo ........ 23
Fornos com grill rebatível ............... 24
Limpeza da porta do forno .................. 24
Montagem/desmontagem de porta
com dobradiça na estrutura .......... 24
Montagem/desmontagem de porta
com dobradiça na porta ................ 24
Montagem/desmontagem dos
vidros interiores da porta ............... 25
Troca da lâmpada do forno ................. 25
Troca da lâmpada superior ............ 25
Troca da lâmpada lateral ............... 25
Troca da lâmpada LED .................. 25
Se alguma coisa não funcionar ........... 26
Informações técnicas .......................... 27
fIGURAS ................................................. 93

16
Instalação e Manutenção
INSTRUÇÕES DE SEGURANÇA
Leia atentamente as instruções para tirar o máximo partido
do seu forno de uma forma correta e segura. Guarde este ma-
nual para que possa ser consultado por um novo proprietário.
Segurança elétrica
• Caso o cabo de alimentação não seja fornecido com o for-
no, os seguintes cabos poderão ser utilizados em fornos
não-pirolíticos: H05RR-F / H05VV-F / H05V2V2-F / H07RN-F
/ H05SS-F. Em fornos pirolíticos apenas o cabo tipo H05SS-F
poderá ser utilizado. O esquema de ligação é apresentado na
figura 1.
• O forno deve ter sempre uma boa ligação à terra e a instala-
ção do mesmo deve cumprir os regulamentos em vigor.
• A utilização deste aparelho está prevista para uma altura
máxima de 2000 metros.
• Para a instalação do forno, devem ser incorporados meios
para desligar totalmente o forno da instalação fixa, de acordo
com os regulamentos de instalação (adequados à intensidade
a suportar e com uma abertura mínima de 3 mm entre con-
tactos) e segundo as condições da categoria III de sobreten-
são, para quando for necessário desligar o forno em caso de
emergência, limpeza ou troca da lâmpada. O cabo da tomada
de ligação à terra nunca deverá passar por este interruptor.
• Este interruptor pode ser substituído por uma ficha de to-
mada, caso esta possa estar sempre acessível durante a
utilização normal do forno.
• Qualquer manipulação ou reparação do aparelho, incluin-
do a substituição do cabo de alimentação, deve ser efetua-
da por pessoal autorizado do Serviço de Assistência Téc-
nica e com peças de substituição originais. As reparações
ou o manuseamento efetuados por outras pessoas podem
provocar danos no aparelho ou um mau funcionamento do
mesmo, colocando em risco a sua segurança.

17
Instalação e Manutenção
Português
• Desligue o forno se este estiver avariado.
• Em fornos combinados com bancada, poderão ser instala-
das apenas bancadas recomendadas pelo fabricante, evi-
tando, assim, possíveis riscos.
Segurança para as crianças
• Não deixe que as crianças se aproximem do forno em funcio-
namento, uma vez que este atinge temperaturas elevadas.
• As crianças menores de 8 anos também devem permanecer
longe do forno, a não ser que tenham a supervisão perma-
nente de um adulto. As crianças não devem brincar com o
aparelho.
• Este aparelho pode ser utilizado por crianças com idade
igual ou superior a 8 anos e por pessoas com capacidades
físicas, sensoriais ou mentais reduzidas, ou que não tenham
experiência ou conhecimento, caso permaneçam sobre su-
pervisão ou lhes sejam fornecidas instruções adequadas
sobre a utilização do aparelho de uma forma segura e com-
preendam os riscos.
Segurança na utilização do forno
• O forno tem de funcionar sempre com a porta fechada.
• Utilize o forno só quando este estiver instalado no interior
do móvel (Ver Instalação do forno).
• Não instale o forno por trás de portas decorativas. Isso pode
provocar um sobreaquecimento do mesmo.
• O fabricante não se responsabiliza por uma utilização do
forno que não seja para a preparação de alimentos de forma
doméstica.
• Não cubra o fundo do forno com folhas de papel de alumí-
nio, ou com qualquer outro material, pois isso pode afetar a
cozedura e danificar o esmalte do interior do forno e o inte-
rior do móvel da sua cozinha.
• Não guarde óleos, gorduras nem materiais inflamáveis no
interior, visto que pode ser perigoso caso coloque o forno
em funcionamento.

18
Instalação e Manutenção
• Não se apoie nem se sente na porta aberta, poderá danificá-
-la e colocar em perigo a sua segurança.
• O tabuleiro e a grelha possuem um sistema para facilitar a
sua extração parcial e para manipular os alimentos. Colo-
que sempre estes acessórios no interior do forno, conforme
indicado na secção Acessórios.
• Durante a utilização, o aparelho fica quente, por isso, utilize
luvas de proteção quando precisar de mexer no interior do
mesmo e evite tocar nos elementos de aquecimento.
• Utilize apenas a sonda de medição de temperatura forneci-
da dentro do forno (modelos com esta característica).
Segurança na limpeza e manutenção
• Deve desligar o aparelho da rede elétrica para efetuar qual-
quer intervenção.
• Não use máquinas a vapor ou de pressão para limpar o forno.
• Não utilize raspadores de metal afiados, esfregões metáli-
cos, escovas de arame ou pós comerciais ou abrasivos para
limpar a porta do forno, uma vez que pode arranhar a super-
fície e provocar uma rotura no vidro.
• A limpeza e manutenção que podem ser efetuadas pelo uti-
lizador não devem ser feitas por crianças sem supervisão.
• Antes de substituir a lâmpada, certifique-se primeiro de que
o forno está desligado da rede elétrica para evitar o perigo
de choque elétrico.
• Retire todos os acessórios e loiça do forno, incluindo os su-
portes de tabuleiro e/ou guias telescópicas.
• Remova qualquer substância vertida ou qualquer resto ex-
cessivo de sujidade, dado que durante o processo de piróli-
se podem inflamar-se e provocar um incêndio.
• Para sua segurança, nunca coloque o forno em funciona-
mento sem o painel inferior que protege o ventilador.
Segurança na utilização do ciclo de limpeza por pirólise
Antes de dar início ao ciclo de limpeza:
• MUITO IMPORTANTE: retire todos os acessórios e loiça, in-
cluindo os suportes de tabuleiro e/ou guias telescópicas.

19
Instalação e Manutenção
Português
• Remova qualquer substância vertida ou qualquer resto ex-
cessivo de sujidade, dado que durante o processo de piróli-
se podem inflamar-se e provocar um incêndio.
• Remova os restos de sujidade da junta do forno.
• Siga atentamente as instruções para programar o ciclo de
limpeza por pirólise.
Durante o processo de limpeza por pirólise:
• Não deixe panos nem qualquer outro elemento têxtil pendu-
rado no puxador do forno nem em contacto com o mesmo.
• Por questões de segurança, a placa de cocção deve perma-
necer desligada durante o funcionamento do forno em modo
pirolítico, caso este esteja instalado por baixo da bancada.
• A luz interior do forno permanecerá desligada e não se pode
acender.
• O forno conta com um mecanismo de bloqueio de seguran-
ça automático que impede a abertura da porta durante o ci-
clo de limpeza. Não tente abrir a porta enquanto o bloqueio
está ativado.
INFORMAÇÃO
Neste manual são descritas as características gerais de
um forno. Poderão existir diferenças entre este manual e
o seu forno. Para conhecer as funções e o equipamento
específicos do seu forno, deve consultar o Guia de Utiliza-
ção que acompanha este manual.
O fabricante reserva-se o direito de alterar as característi-
cas do produto para melhorar o funcionamento do mesmo.

20
Instalação e Manutenção
Instalação
Estas informações destinam-se exclusivamen-
te ao instalador, já que este é o responsável
pela montagem e ligação elétrica. Caso seja o
próprio utilizador a instalar o forno, o fabricante
não se responsabilizará por possíveis danos.
ANTES DA INSTALAÇÃO
• Para manipular o forno, utilize as pegas late-
rais. Nunca utilize o puxador da porta para
levantar o forno.
• Se instalar o forno por baixo de uma banca-
da, respeite as suas instruções de instalação.
• Em geral, devem evitar-se saliências (refor-
ços do móvel, tubagens, bases de tomadas,
etc.) na parte posterior do móvel.
• Se a base da tomada de ligação à rede for
colocada dentro do móvel no qual é instala-
do o forno, deverá ser colocada dentro da
zona sombreada. Figura 2.
• O móvel no qual o forno é instalado e os
móveis adjacentes devem suportar tempe-
raturas superiores a 85 ºC.
• As instruções de instalação devem ser res-
peitadas rigorosamente, caso contrário, o
circuito de ventilação do forno poderá ficar
bloqueado, provocando altas temperaturas
que podem danificar o móvel e o aparelho.
• Para tal, confirme as medidas do móvel
e das aberturas que devem ser feitas nos
mesmos de acordo com as figuras indica-
das a seguir:
Instalação em coluna.
Forno de 60 cm: figura 7*.
Forno de 45 cm: figura 8*.
ATENÇÃO
* Para a instalação de fornos pirolíticos,
NÃO faça as aberturas no móvel que apare-
cem sombreadas na imagem.
Instalação por baixo de bancada.
Forno de 60 cm: figura 9*.
Forno de 45 cm: figura 10*.
ATENÇÃO
* Para a instalação de fornos pirolíticos,
NÃO faça as aberturas no móvel que apare-
cem sombreadas na imagem.
LIGAÇÃO ELÉTRICA
O instalador deve verificar se:
• A tensão e a frequência da rede correspon-
dem ao indicado na Placa de Característi-
cas.
• A instalação elétrica pode suportar a potên-
cia máxima indicada na Placa de Caracterís-
ticas.
• Depois da ligação elétrica, verifique se todos
os elementos elétricos do forno estão a fun-
cionar corretamente.
INSTALAÇÃO DO FORNO
Para todos os fornos e após realizar a ligação
elétrica,
1. Coloque o forno no móvel, assegurando-se
de que o cabo de alimentação não fica pre-
so nem em contacto com partes quentes.
2. Certifique-se de que a estrutura do forno
não fica em contacto com as paredes do
móvel e de que existe pelo menos uma dis-
tância de 2 mm entre o forno e os móveis
adjacentes.
3. Coloque o forno no centro do móvel, para
que fique garantida uma distância mínima
de 5 mm entre o forno e os móveis adjacen-
tes. Figura 3.
4. Abra a porta e coloque os batentes de plás-
tico fornecidos com o forno nos respetivos
orifícios. Figura 11.
5. Prenda o forno ao móvel com os parafusos
fornecidos, aparafusando-os através dos
batentes.

21
Instalação e Manutenção
Português
Antes da primeira utilização
Devido ao processo de fabrico podem haver
vestígios de gordura e outras impurezas no for-
no. Para eliminá-los proceda da seguinte forma:
1. Retire todos os elementos da embalagem,
incluindo o plástico protetor, se incluído.
2. Ligue o seu forno na função
/ ou, se
esta não existir, na função
/ a 200 °C
e durante 1 hora. Para isso, consulte o Guia
de Utilização que acompanha este manual.
3. Arrefeça o forno abrindo a porta, para que
fique ventilado e sem odores no seu interior.
4. Após o arrefecimento, limpe o forno e os
acessórios.
Durante esta primeira utilização, são libertados
fumos e odores, por isso, a cozinha deve estar
bem ventilada.
Outras instruções importantes
Não verta água no fundo do forno durante o
funcionamento, visto que pode danificar o es-
malte.
Em cozinhados com um elevado conteúdo de
líquidos, é normal que ocorra alguma conden-
sação na porta do forno.
Informações ambientais
RETIRAR DA EMBALAGEM ECOLÓGICA
A embalagem foi produzida com materiais to-
talmente recicláveis e que podem ser reutili-
zados. Consulte a administração local da sua
cidade no que diz respeito às normas para re-
ciclar estes materiais.
RETIRAR O PRODUTO
ATENÇÃO
O símbolo
no produto ou na embala-
gem indica que este aparelho não pode ser
tratado como lixo doméstico normal. Deve
entregá-lo num ponto de recolha de equi-
pamento elétrico e eletrónico para a sua
reciclagem. Desta forma, ajudará a evitar
possíveis consequências negativas para o
ambiente e para a saúde pública devido a
uma manipulação incorreta.
Para obter informações mais detalhadas
sobre a reciclagem do aparelho, contacte a
administração local da sua cidade, o serviço
de gestão de resíduos domésticos ou o es-
tabelecimento onde adquiriu o produto.
INFORMAÇÕES ENERGÉTICAS
Testado em conformidade com os requisitos
dos regulamentos 66/2014 (conceção ecológi-
ca) e 65/2014 (etiquetagem de eficiência ener-
gética) da Norma EN 60350-1.
Medições de consumo energético efetuadas
em diferentes condições podem gerar valores
diferentes dos apresentados para o seu forno.
Para consultar os dados de consumo energéti-
co do seu forno, consulte o Guia de Utilização
que acompanha este manual.
ATENÇÃO
Não se apoie na porta aberta do forno du-
rante os passos 4 e 5, pois, como o forno
não está preso ao móvel, pode cair para a
frente no chão.

22
Instalação e Manutenção
Ao fechar a porta do forno durante a coze-
dura, é possível ouvir o som do ar no interior.
Este efeito é normal devido à pressão que a
porta exerce ao fechar para que o forno fique
estanque.
Acessórios
Não coloque recipientes nem alimentos no fun-
do do forno. Utilize sempre os tabuleiros e as
grelhas fornecidas com o forno.
Para preparar iogurte, pode colocar os fracos
diretamente no fundo do forno.
Para cozinhar qualquer outro alimento, intro-
duza o tabuleiro ou a grelha nas guias laterais
existentes no interior do forno, conforme indi-
cado a seguir:
1. Entre duas varetas dos suportes laterais ou
sobre alguma das guias amovíveis do forno,
caso existam.
2. A grelha e alguns tabuleiros têm fissuras de
retenção para evitar que sejam retirados por
acidente. Coloque essas fissuras na parte
traseira do forno e a apontar para baixo. Fi-
gura 4.
3. A superfície da grelha na qual vai colocar os
recipientes deve ficar por baixo das varetas
laterais. Assim, evita o deslizamento aciden-
tal do recipiente. Figura 5.
4. Os tabuleiros possuem uma aba frontal que
facilita a sua remoção. Coloque o tabuleiro
com essa aba voltada para o exterior do for-
no. Figura 6.
MONTAGEM DAS GUIAS TELESCÓPICAS
Alguns modelos incluem um kit de guias teles-
cópicas como acessório.
Para a montagem das guias telescópicas so-
bre os suportes cromados, proceda conforme
indicado a seguir:
Guias telescópicas com clipe rebatível
IMPORTANTE
As guias devem ser colocadas na posição 2,
começando por baixo. Figura 12.
1. Retire a película protetora.
2. Engate os clipes maiores na vareta supe-
rior e puxe a guia para baixo até que esta
engate nos clipes mais pequenos da vareta
inferior. Figura 12.
3. Irá ouvir um “click” quando a guia estiver de-
vidamente fixada. Figura 13.
4. O entalhe para a colocação do tabuleiro/da
grelha deve ficar na parte frontal. Figura 13.
Guias telescópicas com clipe direto
IMPORTANTE
As guias de extração fácil devem ser colo-
cadas nas posições 1, 2, 3 e 5, começando
por baixo. Figura 14.
As guias de extração dupla devem ser co-
locadas nas posições 1, 2 e 3, começando
por baixo. Figura 15.
Nos fornos de 45 cm, as guias telescópi-
cas colocam-se na posição 1. Figura 16.
1. Engate o clipe na vareta superior do nível
desejado. Figura 17.
2. Irá ouvir um “click” quando a guia estiver de-
vidamente fixada. Figura 18.
3. O entalhe para a colocação do tabuleiro/da
grelha deve ficar na parte frontal do forno.
Figura 18.

23
Instalação e Manutenção
Português
Limpeza e manutenção
Com o passar do tempo, determinados tipos
de alimentos, como tomate, vinagre, assados
em sal, etc., provocam uma alteração de cor
no esmalte. Isso é normal e não afeta a fun-
cionalidade do forno. Não tente tirar essas
manchas com produtos abrasivos, como os
descritos anteriormente, uma vez que podem
danificar a superfície permanentemente.
Limpe a junta regularmente para eliminar restos
de gordura ou alimentos. Isto evita a deteriora-
ção e rotura da junta em cozinhados posteriores.
Recomendamos limpar a junta sem a desmontar.
Desmontar os suportes laterais
1. Retire os acessórios do interior do forno.
2. Desenrosque totalmente a porca de fixação
dianteira (A), puxe os suportes para a frente
(B) e retire-os. Figura 19.
Para montar os suportes
3. Encaixe o entalhe traseiro na porca de fixa-
ção traseira.
4. Coloque a porca de fixação frontal (C) no en-
talhe frontal do suporte. Figura 20.
5. Fixe o suporte com a porca (D), enroscando-
-a até que fique ajustada (E). Figura 20.
Desmontar o painel do fundo
INFORMAÇÃO
Para desmontar o painel do fundo, deve
desmontar primeiro os suportes laterais se-
guindo as instruções da secção anterior.
De seguida:
1. Retire os parafusos inferiores (A) e depois o
superior (B). Figura 21.
2. Para montar o painel do fundo, faça o con-
trário.
ATENÇÃO
Deve desligar o aparelho da rede elétrica
para realizar qualquer intervenção.
LIMPEZA DO EXTERIOR
E DOS ACESSÓRIOS DO FORNO
Limpe o exterior do forno e os acessórios com
água morna com sabão ou com um detergente
suave.
Para superfícies inoxidáveis ou pintadas, pro-
ceda com precaução e utilize apenas esponjas
ou panos que não risquem.
IMPORTANTE
As guias telescópicas não devem ser lava-
das na máquina. Isso faria com que a gordu-
ra que facilita o deslizar desaparecesse e as
guias encravassem e ficassem inutilizáveis.
LIMPEZA DO INTERIOR DO FORNO
Limpe o interior regularmente para eliminar res-
tos de gordura ou de alimentos, que de futuro
podem libertar fumos e odores ou que podem
provocar o aparecimento de manchas.
Com o forno frio e em superfícies esmaltadas
(por exemplo, na base do forno) use escovas
de nylon ou esponjas com água morna e sa-
bão. Se utilizar produtos de limpeza de fornos,
aplique-os apenas nas superfícies esmaltadas
e siga as instruções do fabricante.
ATENÇÃO
Não limpe o interior do forno com máquinas
a vapor ou de pressão.
Não utilize esfregões metálicos, escovas de
arame ou qualquer utensílio que possa riscar
o esmalte.

24
Instalação e Manutenção
3. Feche a porta até à posição de bloqueio. Fi-
gura 25.
4. Segurando a porta pelos lados e com as
duas mãos, levante a porta até que esta saia
totalmente das dobradiças. Figura 25.
Para montar a porta
5. Segurando na porta pelos lados inferiores e
com as duas mãos, introduza os braços das
dobradiças nos respetivos orifícios e deixe
a porta cair até ao final para encaixar total-
mente. Figura 26.
6. Abra por completo a porta do forno. Figu-
ra 26.
7. Rode os gatilhos para a sua posição inicial.
ATENÇÃO
Tenha o cuidado de introduzir totalmente a
porta ou rodar os gatilhos. Caso contrário,
poderá ficar bloqueada quando a tentar fe-
char.
INFORMAÇÃO
Se os gatilhos oferecerem muita resistência,
pode utilizar uma ferramenta plana para os
fazer rodar.
Montagem/desmontagem de porta
com dobradiça na porta
1. Abra totalmente a porta do forno.
2. Bloqueie a dobradiça rodando os dois gati-
lhos. Figura 27.
3. Feche a porta até à posição de bloqueio. Fi-
gura 28.
4. Segurando na porta pelos lados e com as
duas mãos, levante e puxe a porta até que
esta saia totalmente das dobradiças do for-
no. Figura 28.
Para montar a porta, faça o contrário.
ATENÇÃO
Para sua segurança, nunca coloque o forno
em funcionamento sem o painel de fundo
que protege o ventilador.
Fornos com grill rebatível
Para limpar a parte superior do forno,
1. Aguarde até que o forno esteja frio.
2. Empurre a vareta da resistência do grill (A)
com as duas mãos em direção à parte pos-
terior do forno, até que esta se solte da por-
ca de fixação (B). Figura 22.
3. Deixe cair a resistência e limpe a parte supe-
rior do forno. Figura 23.
4. Por último, volte a colocar a resistência na
sua posição inicial fazendo o contrário.
Fornos com função Teka Hydroclean®
Consulte o Guia de Utilização do seu forno.
Fornos com função de autolimpeza por
pirólise
Consulte o Guia de Utilização do seu forno.
LIMPEZA DA PORTA DO FORNO
Para facilitar a limpeza da porta, pode desmon-
tá-la. Para o fazer, siga as instruções corres-
pondentes ao tipo de porta incorporada no seu
forno.
Montagem/desmontagem de porta
com dobradiça na estrutura
1. Abra totalmente a porta do forno.
2. Bloqueie a dobradiça rodando os gatilhos.
Figura 24.

25
Instalação e Manutenção
Português
Montagem/desmontagem dos vidros
interiores da porta
ATENÇÃO
Se desmontar os vidros com a porta monta-
da no forno, faça-o sempre com a dobradi-
ça na posição de bloqueio. Caso contrário,
a porta poderá fechar-se, partindo os vidros
não desmontados e causando ferimentos.
INFORMAÇÃO
Para evitar esta situação, recomendamos
que desmonte os vidros com a porta des-
montada, seguindo as instruções fornecidas
na secção anterior.
Dependendo do modelo, o seu forno pode ter
2, 3 ou 4 vidros. Siga as instruções correspon-
dentes ao tipo de porta incorporada no seu
forno.
1. Prima os botões situados na parte superior
de ambos os lados da porta do forno com
os dedos. Figura 29.
2. Sem deixar de pressionar, puxe o fecho su-
perior da porta. Figura 30.
3. Retire os vidros da porta. Limpe os vidros
com um produto limpa-vidros ou água com
sabão e um pano suave.
ATENÇÃO
Tenha em conta a ordem e posição dos vi-
dros quando os retirar, uma vez que depois
deverá montá-los na mesma ordem e posi-
ção quando terminar a limpeza.
4. Uma vez limpos, introduza o vidro n.º 3 na
mesma posição, para que a indicação TER-
MOGLASS impressa no mesmo fique visível,
conforme indicado na Figura 31.
5. Nos fornos pirolíticos, a indicação TERMO-
GLASS dos vidros n.º 3 e 4 deve ficar visível
conforme indicado na Figura 32.
6. Coloque o vidro n.º 2 com a parte impressa
voltada para o interior da porta.
7. Coloque novamente o fecho superior da
porta, certificando-se de que os botões la-
terais encaixam no respetivo orifício.
ATENÇÃO
Nunca ponha o forno a funcionar sem algum
dos vidros da porta.
TROCA DA LÂMPADA DO FORNO
ATENÇÃO
Para trocar a lâmpada, certifique-se primei-
ro de que o forno está desligado da rede
elétrica.
A lâmpada a substituir deve ter uma resistência
à temperatura de até 300 °C e pode solicitá-la
no serviço de assistência técnica.
Troca da lâmpada superior
1. Desenrosque a lente do suporte da lâmpada.
Figura 33.
2. Substitua a lâmpada e volte a enroscar no-
vamente a lente.
Troca da lâmpada lateral
1. Solte a lente de vidro com a ajuda de uma
ferramenta de ponta plana. Figura 34.
2. Substitua a lâmpada e monte de novo a len-
te, certificando-se de que encaixa na posi-
ção correta.
Troca da lâmpada LED
Contacte o Serviço de Assistência Técnica.

26
Instalação e Manutenção
O forno não funciona
• Verifique a ligação à rede.
• Verifique os fusíveis e o limitador de corren-
te da sua instalação.
• Certifique-se de que o relógio está na posi-
ção manual ou programado.
• Verifique a posição do seletor de funções
e de temperaturas.
A luz interior do forno não acende
• Substitua a lâmpada.
• Verifique se a lâmpada está montada cor-
retamente de acordo com as instruções de
instalação.
A luz piloto de aquecimento não acende
• Selecione uma temperatura.
• Selecione uma função.
• Esta só deve acender quando o forno es-
tiver a aquecer para atingir a temperatura
selecionada.
Libertação de fumos durante
o funcionamento do forno
• Processo normal na primeira utilização.
• Limpe periodicamente o forno.
• Reduza a quantidade de gordura ou óleo
no tabuleiro.
• Não utilize temperaturas mais elevadas do
que as indicadas nas tabelas de cocção.
Não se obtêm os resultados esperados
no cozinhado
• Reveja as tabelas e cocção para obter
uma orientação sobre o funcionamento do
seu forno.
Os meus acessórios e suportes de
fixação dos tabuleiros estão danificados
• Não os retirou quando efetuou o processo
de limpeza pirolítica.
• É necessário substituí-los por acessórios
novos e retirá-los nos próximos ciclos de
limpeza.
A cor do esmalte sofreu variações e
apareceram manchas
• A composição química de alguns alimen-
tos pode levar a alterações no esmalte.
• É um processo normal que não afeta as
propriedades do esmalte.
O forno está desligado, o símbolo
está aceso e não é possível abrir a porta
• O bloqueio da porta está acionado.
• Desative o bloqueio da porta seguindo
as instruções fornecidas no Guia de Utili-
zação do seu forno que acompanha este
manual.
O forno está ligado, o símbolo
está
aceso e não é possível abrir a porta
• O bloqueio da porta está acionado.
• Rode o seletor de funções para a posição
.
Se alguma coisa não funcionar
Nesta secção são apresentadas algumas das
situações mais habituais que podem ocorrer
no seu forno, juntamente com as causas mais
comuns e possíveis soluções.

27
Instalação e Manutenção
Português
• Desative o bloqueio de porta seguindo as
instruções fornecidas no Guia de Utiliza-
ção que acompanha este manual.
• Para continuar a cozinhar, volte a selecio-
nar a função de cozedura desejada.
Rodei o seletor de funções para a
posição
, selecionei o programa de
pirólise P1, P2 ou P3, mas o símbolo
pisca rapidamente e é emitido um
alarme sonoro
• A porta do forno está mal fechada, por isso
não é possível bloquear a porta e o pro-
cesso de pirólise foi bloqueado.
• Verifique a porta e certifique-se de que
está bem fechada. De seguida, coloque o
seletor de funções na posição
e volte a
efetuar a sequência para ativar o processo
de pirólise.
Rodei o seletor de funções para a
posição
, selecionei o programa de
pirólise P1, P2 ou P3, mas o símbolo
não acende e o forno não aquece
• O interruptor da porta não funcionou, ape-
sar de a porta estar bem fechada.
• Contacte o Serviço de Assistência Técni-
ca, uma vez que há uma falha no interrup-
tor da porta.
O programa de pirólise terminou e o
forno está frio, mas a porta continua
bloqueada e aparecem no ecrã o
símbolo
e a indicação 0:00
• Não colocou o seletor de funções na po-
sição
quando concluiu o programa de
pirólise.
• Coloque o seletor de funções na posição
.
Coloquei o seletor de funções na
posição
e a porta permanece
bloqueada
• O forno ainda não arrefeceu o suficiente
para atingir a temperatura de segurança.
• Espere que a temperatura baixe e o sím-
bolo
se apague.
Informações técnicas
ATENÇÃO
Se o problema persistir, contacte o Serviço
de Assistência Técnica.
Comunique ao Serviço de Assistência Técnica
o tipo de anomalia observado indicando:
1. Número de série (S-No).
2. Modelo do aparelho (Mod.).
Estas informações encontram-se na Placa de
Características do forno que pode consultar
abrindo a porta, num dos lados.

28
Installation & Maintenance
Installation and maintenance instructions index
SAfETy INSTRUCTIONS ........................ 29
Electrical safety ................................... 29
Child safety ......................................... 30
Oven use safety .................................. 30
Safety in cleaning
and maintenance ................................ 31
Safety when using the
pyrolytic cleaning cycle ....................... 31
INSTAllATION ........................................ 33
Before installation ................................ 33
Column installation ........................ 33
Undercounter installation ............... 33
Electrical connection ........................... 33
Oven installation .................................. 33
ENvIRONmENTAl INfORmATION .......... 34
Disposal of the ecological packaging .. 34
Product disposal ................................. 34
Energy information .............................. 34
bEfORE fIRST USE ............................... 34
OThER ImpORTANT
INSTRUCTIONS ...................................... 34
ACCESSORIES ....................................... 35
Assembling the telescopic runners ...... 35
Telescopic runners with folding clip . 35
Telescopic runners with direct clip .. 35
ClEANING AND mAINTENANCE............ 36
Cleaning the oven exterior and
accessories ......................................... 36
Cleaning the oven interior .................... 36
Assembling the side supports ....... 36
Assembling the supports ............... 36
Dismantling the bottom panel ........ 36
Ovens with a folding grill ................ 37
Cleaning the oven door ....................... 37
Dismantling/assembling the door
with hinge on body ........................ 37
Dismantling/assembling the door
with hinge on door ........................ 37
Dismantling/assembling the
interior glass panes of the door ..... 38
Changing the oven light bulb ............... 38
Changing the upper bulb .............. 38
Changing the side bulb ................ 38
Changing the LED lamp ................ 38
Trouble shooting ................................. 39
Technical Specifications ...................... 40
fIGURES ................................................. 93

29
Installation & Maintenance
English
SAFETY INSTRUCTIONS
Read these instructions carefully to obtain the best perfor-
mance from your oven, safely and correctly. Keep this manual
so that it can be read by a new owner.
Electrical safety
• If the power cable is not supplied with the oven, the follow-
ing cables may be used in non-pyrolytic ovens: H05RR-F /
H05VV-F / H05V2V2-F / H07RN-F / H05SS-F. In pyrolytic ov-
ens, only the H05SS-F-type cable may be used. The connec-
tion diagram is shown in Figure 1.
• The oven must always be plugged into a sound earth connec-
tion and its installation must comply with current regulations.
• This appliance is intended for use at a maximum altitude of
2,000 m.
• When installing the oven, total disconnection means must
be incorporated into the fixed installation in accordance
with the installation regulations (adapted to the current to
be supported and with a minimum space between the con-
tacts of 3 mm) based on surge protection category III con-
ditions, for disconnection in the event of an emergency and
when cleaning or changing the bulb. Under no circumstanc-
es must the earth wire pass through this switch.
• This switch may be replaced by a plug, provided it is acces-
sible for normal use.
• Any handling or repair to the appliance, including replace-
ment of the power cable, should be carried out by author-
ised Technical Service Personnel using original spare parts.
Repairs or handling by others may damage the appliance or
cause malfunctioning that could be hazardous to your safety.
• Unplug your oven if it malfunctions.

30
Installation & Maintenance
• In combined ovens with countertops and to avoid potential
risks, only those recommended by the manufacturer may be
assembled.
Child safety
• Do not allow children to come near the oven while in use or
during the pyrolytic cleaning cycle as it can reach very high
temperatures.
• Children under 8 years of age should be kept away from the
appliance unless they are under constant supervision. Chil-
dren should not be allowed to play with the appliance.
• The appliance may be used by children over the age of 8 and
people with reduced physical, sensory or mental capacities
or a lack of experience or know-how, provided they have
been given appropriate instructions or supervision on how
to use the appliance safely and they understand the dangers
involved.
Oven use safety
• The oven must always be operated with the door closed.
• Only use the oven after it has been installed inside the kitch-
en unit (See Installing the oven).
• Do not install the oven behind decorative doors. This can
cause it to overheat.
• The manufacturer is not responsible for any use of the oven
other than for the home preparation of food.
• Do not cover the bottom of the oven with aluminium foil, or
any other material, as this may affect cooking performance
and damage the enamel inside the oven and the interior of
your kitchen unit.
• Do not store oil, fats or inflammable materials inside the
oven. This may be dangerous if the oven is turned on.
• Do not lean or sit on the open oven door. It could be dam-
aged and you could be injured.

31
Installation & Maintenance
English
• The tray and rack have a system for easy partial removal
and handling of food. Always place these accessories inside
the oven, as indicated in the Accessories section.
• The oven heats up when in use, so always use oven gloves
when performing operations inside the oven and avoid
touching the heating elements.
• Only use the supplied temperature probe inside the oven (in
models that come with this feature).
Safety for cleaning and maintenance
• Disconnect the appliance from the mains power supply be-
fore any operation.
• Do not use steam cleaners or pressurised water to clean the
oven.
• Do not use metal scouring pads, wire brushes or commer-
cially available or abrasive powder cleansers to clean the
oven door as they can scratch the surface and cause the
glass to break.
• Cleaning and maintenance tasks to be carried out by the
user should not be done by children without supervision.
• Before replacing a bulb, first make sure that the oven has
been disconnected from the mains to avoid the possibility of
receiving an electric shock.
• Remove all accessories and dishes from the oven, including
the shelf supports and/or telescopic runners.
• Clean any spillages or excess dirt, as during the pyrolytic
cleaning cycle these could ignite and become a fire hazard.
• For your safety, never operate the oven without the back
panel (that protects the fan) in place.
Safety when using the pyrolytic cleaning cycle
Before starting the cleaning cycle:
• CAUTION: Remove all accessories and dishes from the oven,
including the shelf supports and/or telescopic runners.

32
Installation & Maintenance
• Clean any spillages or excess dirt, as during the pyrolytic
cleaning cycle these could ignite and become a fire hazard.
• Remove any dirt from the oven gasket.
• Carefully follow the instructions for programming the pyro-
lytic cleaning cycle.
During the pyrolytic cleaning process:
• Do not leave any cloths or fabric hanging from the oven han-
dle or in close contact with it.
• For safety reasons, if the oven has been installed below the
counter, the hob must not be in use while the oven is in py-
rolytic mode.
• The oven’s inside light will remain off and cannot be turned on.
• The oven is equipped with a safety lock mechanism that pre-
vents the door from being opened during the cleaning cycle.
Do not try to open the door while the lock is activated.
INFORMATION
This manual describes general oven characteristics, and
so they may not correspond in full to those of your oven.
Consult the User’s guide accompanying this manual to
learn about the specific features and equipment of your
oven.
The manufacturer reserves the right to change the prod-
uct characteristics in order to improve its operation.

33
Installation & Maintenance
English
Installation
This information is exclusively for the installer
who is responsible for assembly and electrical
connection. The manufacturer will not accept
liability for possible damage caused if you install
the oven yourself.
BEFORE INSTALLATION
• To handle the oven, use the grips at the
sides. Do not use the door handle to lift the
oven.
• When installing the oven under a counter,
follow the instructions for installing it.
• In general, protruding elements (furniture re-
inforcements, pipes, socket bases, etc.) at
the back of the unit must be avoided.
• When the base of the main power socket is
inside the unit in which the oven is installed,
this must be done in the shaded area.
Figure 2.
• The unit in which the oven is installed and
adjacent units must withstand temperatures
higher than 85 ºC.
• The installation instructions must be ad-
hered to strictly. If not, the oven’s ventilation
circuit may become blocked, causing high
temperatures that could damage the kitchen
unit and the appliance itself.
• For this purpose, check the unit measure-
ments and those of the holes to be drilled in
the units, as shown in the following figures:
Column installation.
60 cm oven: Figure 7*.
45 cm oven: Figure 8*.
CAUTION
* When installing pyrolytic ovens, DO NOT
drill any holes in the unit inside the shaded
areas.
Undercounter installation.
60 cm oven: Figure 9*.
45 cm oven: Figure 10*.
WARNING
* When installing pyrolytic ovens, DO NOT
drill any holes in the unit inside the shaded
areas.
ELECTRICAL CONNECTION
The fitter must ensure that:
• The mains power voltage and frequency
correspond to what is marked on the identi-
fication plate.
• The domestic wiring system can withstand
the maximum power marked on the identifi-
cation plate.
• After connecting the power supply, check
that all electrical parts of the oven are work-
ing correctly.
OVEN INSTALLATION
For all ovens. After the electrical connection has
been done:
1. Position the oven inside the unit and ensure
that the feed cable is not trapped or in con-
tact with parts of the oven that heat up.
2. Make sure that the body of the oven is not
in contact with the walls of the unit and that
there is a minimum space of 2 mm between
adjacent units.
3. Centre the oven in the unit so that there is a
minimum space of 5mm between the oven
and the doors of the furniture that surrounds
it. Figure 3.
4. Open the door and insert the plastic plugs
supplied with the oven into their respective
housings. Figure 11.
5. Fasten the oven to the unit with the screws
supplied, screwing them into the unit through
the stops.

34
Installation & Maintenance
Before first use
There may be traces of fat and other substanc-
es in the oven as a result of the manufacturing
process. These should be removed using the
following procedure:
1. Remove all the packaging from your oven,
including the protective plastic, if any.
2. Turn your oven to
/ , or if this setting
is not available to
/ , at 200 ºC for 1
hour. Consult the User’s guide accompany-
ing this manual on how to do this.
3. Cool the oven with the door open so that it
ventilates and no odours remain inside it.
4. Once cold, clean the oven and the accesso-
ries.
During this first operation, smoke and smells
will be produced. The kitchen should therefore
be well ventilated.
Other important instructions
Do not pour water on the bottom surface when
in use; this may damage the enamel.
It is normal for condensation to occur on the
oven door when cooking food with a high liquid
content.
Environmental information
DISPOSAL OF THE ECOLOGICAL PACK-
AGING
The packaging is made from totally recyclable
materials which can be put to other uses. Con-
sult your local council regarding the necessary
procedures for disposing of these materials.
PRODUCT DISPOSAL
WARNING
The
symbol on the product or packag-
ing indicates that this appliance cannot be
disposed of as normal household waste. It
should be taken to an electrical and elec-
tronic equipment collection point for recy-
cling. In this way, any negative consequenc-
es for the environment and public health
from incorrect handling can be avoided.
Contact your local council, household waste
disposal service or the establishment where
you bought the product from for more infor-
mation on recycling the appliance.
ENERGY INFORMATION
Tested to comply with the requirements of the
66/2014 (Eco-Design) and 65/2014 (Energy
Labelling) regulations in accordance with Regu-
lation EN 60350-1.
Energy consumption measurements taken un-
der different conditions may give different val-
ues from those indicated for your oven.
Consult the User’s guide accompanying this
manual to learn about the energy consumption
of your oven.
WARNING
Do not lean on the open door of the oven
while executing steps 4 and 5, as the oven
is not secured to the unit and it could move
forwards and fall to the floor.

35
Installation & Maintenance
English
When closing the oven door during cooking,
the sound of the air inside it can be heard. This
effect is normal due to the pressure exerted by
the door when it is closed, guaranteeing the
sealing of the cavity.
Accessories
Do not leave any containers or food on the oven
floor. Always use the trays and racks supplied
with the oven.
To prepare yoghurt, place the jars on the oven
floor.
To cook any other food, insert the tray or rack
into the runners inside the oven.
1. Between the two rails of the side supports or
on any of the extractable runners, if the oven
has them.
2. The rack and some of the trays have reten-
tion grooves to prevent them from acciden-
tally being removed. Place these grooves
towards the back of the oven, facing down-
wards. Figure 4.
3. The surface of the rack on which the con-
tainer will rest must be below the side rails.
This prevents the container from accidentally
sliding. Figure 5.
4. The trays have a tab at the front to facilitate
their removal. Place the tray with the tab
facing towards the outside of the oven. Fig-
ure 6.
ASSEMBLING THE TELESCOPIC RUN-
NERS.
Some oven models have a telescopic runner kit
accessory.
To assemble the telescopic runners on the
chrome-plated supports, proceed as follows:
Telescopic runners with folding clip
WARNING
The runners must be placed at height 2,
starting from below. Figure 12.
1. Remove the protective film.
2. Hook the large clips on the upper rail and
extend the runner until it hooks on the small
clips on the lower rail. Figure 12.
3. You will hear a "click" when the runner is cor-
rectly secured. Figure 13.
4. The notch to fix the tray/support must re-
main at the front part of the oven. Figure 13.
Telescopic runners with direct clip
WARNING
The single extraction runners must be
placed at heights 1, 2, 3 and 5 starting from
below. Figure 14.
The double extraction runners must be
placed at heights 1, 2 and 3 starting from
below. Figure 15.
In 45 cm ovens, the telescopic runners are
positioned at height 1. Figure 16.
1. Hook the clip on the top rail at the desired
level. Figure 17.
2. You will hear a "click" when the runner is cor-
rectly secured. Figure 18.
3. The notch to fix the tray/rack support must
remain at the front part of the oven. Fig-
ure 18.

36
Installation & Maintenance
Cleaning and maintenance
toes, vinegar and salt-baked dishes may cause
the enamel to change colour. This is normal and
does not affect the functioning of the oven. Do
not try to remove these stains using aggres-
sive methods such as those described, as this
could cause permanent damage to the surface.
Clean the oven seal regularly to eliminate all
traces of fat or food. This will prevent the seal
from becoming damaged and breaking during
subsequent cooking operations.
It is advisable to clean this seal without remov-
ing it.
Dismantling the side supports
1. Remove all accessories from inside the oven.
2. Completely loosen the nut at the front of the
fastening element (A), pull the supports for-
ward (B) and remove them. Figure 19.
Assembling the supports
3. Insert the rear notch into the rear fastening
nut.
4. Fix the front fastening nut (C) in the front
notch of the support. Figure 20.
5. Secure the support with the nut (D) and turn
until it is fully adjusted (E). Figure 20.
Dismantling the bottom panel
INFORMATION
To dismantle the bottom panel first disman-
tle the side supports, following the instruc-
tions set out in the previous section.
Then:
1. Remove the bottom screws (A) and then the
top screw (B). Figure 21.
2. To assemble the bottom panel, proceed in
the reverse order.
WARNING
Disconnect the appliance from the mains
power supply before any operation.
CLEANING THE OVEN EXTERIOR AND
OVEN ACCESSORIES
Clean the outside of the oven and accessories
with warm soapy water or with a mild deter-
gent.
Take great care when cleaning stainless steel or
painted surfaces. Use only sponges or cloths
that do not scratch.
CAUTION
The telescopic runners must not be placed
in the dishwasher. This will remove the fat
that enables them to slide and the runners
will become blocked, making them useless.
CLEANING THE OVEN INTERIOR
Clean the oven interior regularly to remove trac-
es of fat or food, which can later give off smoke
and odours and cause stains to appear.
Use nylon brushes or sponges with warm
soapy water to clean enamelled surfaces such
as the bottom of the oven. Clean when the
oven is cold. Use oven-cleaning products only
on enamelled surfaces and always follow the
manufacturer’s instructions.
WARNING
Do not clean the oven interior with steam or
pressurised-water cleaning equipment.
Do not use metal scouring pads, wire brushes
or any utensil that can scratch the enamel.
Over time, certain types of food such as toma-

37
Installation & Maintenance
English
3. Close the door to the locked position. Fig-
ure 25.
4. Hold the door with both hands holding on to
both sides, lift up and pull out the oven door
until the hinges are fully detached Figure 25.
Assembling the door
5. Hold the door with both hands at the lower
part of the sides, insert the hinge arms into
their housings and let the door fall as far as it
will go. Figure 26.
6. Open the oven door fully. Figure 26.
7. Turn the latches back to their original posi-
tion.
WARNING
Make sure the door is inserted completely
by turning the latches. If not, it can become
blocked when trying to close it.
INFORMATION
If the latches are hard to turn, use a flat tool
to turn them.
Dismantling/assembling the door
with hinge on door
1. Open the oven door fully.
2. Block the hinge by turning both latches. Fig-
ure 27.
3. Close the door to the locked position. Figure
28.
4. Hold the door with both hands holding on to
both sides, lift up and pull out the oven door
until the hinges are fully detached. Figure 28.
To assemble the door, carry out the steps in the
reverse order.
WARNING
For your safety, never operate the oven with-
out the back panel (that protects the fan) in
place.
Ovens with a folding grill
To clean the top part of the oven:
1. Wait until the oven is cold.
2. Push the rail of the grill element (A) with both
hands towards the back of the oven, to re-
lease it from the upper fastening nut (B). Fig-
ure 22.
3. Let the element fall and clean the top part of
the oven. Figure 23.
4. Then put the grill element back in place in its
original position and proceed in the reverse
order.
Ovens with the Teka Hydroclean® function
Please consult the oven User’s guide.
Ovens with the Pyrolytic Self-Cleaning
Function
Please consult the oven User’s guide.
CLEANING THE OVEN DOOR
For easy cleaning, the door can be dismantled.
To do this, follow the instructions for the type of
door your oven has.
Dismantling/assembling the door with
hinge on body
1. Open the oven door fully.
2. Block the hinge by turning the latches.
Figure 24.

38
Installation & Maintenance
Dismantling/assembling the interior glass
of the door
WARNING
If dismantling the glass panes with the door
fitted in the oven, always do it with the hinge
in the locked position. If not, the door will
close and the unmounted glass panes could
break and cause injury.
INFORMATION
To prevent this, dismantle the glass panes
with the door removed, following the instruc-
tions in the previous section.
Depending on the model, your oven may have
2, 3 or 4 panes of glass. Follow the instructions
for the type of door your oven has.
1. Using your fingers, press the buttons locat-
ed at the top of both sides of the oven door.
Figure 29.
2. Keep them pressed and pull on the plastic
seal above the door. Figure 30.
3. Remove the glass panes from the door.
Clean them with a glass cleaner or soap and
water and a soft cloth.
WARNING
Pay attention to the order and position of the
glass panes when removing them as they must
be reassembled in the same order and posi-
tion when you have finished cleaning them.
4. Once clean, insert pane no. 3 into the same
position so that the TERMOGLASS indica-
tion printed on it is visible as shown in Fig-
ure 31.
5. In pyrolytic ovens, the TERMOGLASS indi-
cation on panes numbers 3 and 4 must be
visible as shown in Figure 32.
6. Insert pane no. 2 with the printed part facing
toward the iner side of the door.
7. Re-attach the top seal of the door, making
sure that the side tabs fit into their housings.
WARNING
Never switch the oven on if any of the glass
panes on the door are missing.
CHANGING THE OVEN LIGHT BULB
WARNING
Make sure the oven has been disconnected
from the mains before changing the bulb.
The replacement bulb must withstand temper-
atures up to 300 ºC. You can order them from
the Technical Assistance Service Department.
Changing the upper bulb
1. Unscrew the glass cover of the bulb-holder.
Figure 33.
2. Replace the bulb and reassemble the glass
cover.
Changing the side bulb
1. Lift off the bulb-holder glass cover with a
flat-ended tool. Figure 34.
2. Change the bulb and reassemble the glass
cover, ensuring that everything fits in the cor-
rect position.
Changing the LED lamp
Call the Technical Assistance Service Depart-
ment.

39
Installation & Maintenance
English
The oven stops working
• Check the power connection.
• Check the fuses and the circuit breaker of
your installation.
• Make sure the timer is either in the manual
or programmed setting.
• Check the position of the control and tem-
perature dial.
The inside light does not go on
• Change the bulb.
• Check it has been properly installed as set
out in the Installation Instructions.
The heating pilot light does not turn on
• Select a temperature.
• Select a setting.
• It should only come on while the oven is
heating up to the selected temperature.
Oven smoking during use
• Normal during first use.
• Clean the oven regularly.
• Reduce the amount of fat or oil in the tray.
• Do not cook at temperatures higher than
those indicated in the cooking chart.
The expected cooking results are not
achieved
• Check the cooking charts for guidance on
how your oven operates.
My accessories and shelf supports are
damaged
• You did not removed the accessories and
supports during the pyrolytic cleaning cy-
cle.
• You must replace them and remove them
during subsequent cleaning cycles.
The enamel colour has changed or stains
have appeared
• The chemical composition of some food-
stuffs may cause changes in the enamel.
• This is normal and does not damage the
properties of the enamel.
The oven is off, the symbol
lights up
and the door will not open
• The door lock is activated.
• Deactivate the door lock following the in-
structions in the User’s guide supplied with
this manual.
The oven is on, the symbol
lights up
but the door will not open
• The door lock is activated.
• Turn the control dial to position
.
Trouble shooting
This section describes some of the most fre-
quent problems that can affect your oven,
along with the most common causes and pos-
sible solutions.

40
Installation & Maintenance
• Deactivate the door lock following the in-
structions in the User’s guide supplied with
this manual.
• To continue cooking, re-select the desired
cooking function.
I have turned the control dial to position
and selected a pyrolysis programme
(P1, P2 or P3) but the
symbol flashes
quickly and a buzzer sounds
• The oven door is not closed properly, so
the door cannot be locked and the pyrolyt-
ic process has been blocked.
• Check the door and make sure it is prop-
erly closed. Then set the control dial to the
position and repeat the sequence to ac-
tivate the pyrolysis.
I have turned the control dial to position
and selected a pyrolysis programme
(P1, P2 or P3) but the symbol
does
not light up and the oven does not heat
up
• The door switch is not working even
though the door is properly closed.
• Call the Technical Assistance Service De-
partment as there is a fault in the door
switch.
The pyrolysis programme has ended and
the oven is cold, but the door is locked
and symbol
and 0:00 are flashing
• You did not turn the control dial to position
when the pyrolysis programme ended.
• Set the control dial to position
.
The control dial is in position
and the
door is still locked
• The oven has not cooled down to the safe
temperature limit.
• Wait until the oven cools and the symbol
goes off.
Technical specifications
WARNING
If these problems persist despite these tips,
contact the Technical Service Department.
Inform the Technical Service Department of the
kind of problem you are experiencing and give
the:
1. Serial Number (S-No)
2. Model of Appliance (Mod.)
This information is on the oven identification
plate which is on one side of the opened door.

41
Installation et Entretien
Français
Indice des instructions d’installation et d’entretien
INSTRUCTIONS DE SÉCURITÉ .............. 42
Sécurité électrique .............................. 42
Sécurité des enfants ........................... 43
Sécurité lors de l'utilisation du four ...... 43
Sécurité du nettoyage
et de l’entretien ................................... 44
Sécurité lors de l’utilisation du cycle
de nettoyage par pyrolyse ................... 44
INSTAllATION ........................................ 46
Avant l’installation ............................... 46
Installation de fours encastrables ... 46
Installation de fours sous
les plaques de cuisson .................. 46
Branchement électrique ...................... 46
Installation du four ............................... 46
INfORmATIONS ENvIRONNEmENTAlES
47
Retrait de l'emballage écologique ....... 47
Retrait du produit ................................ 47
Informations énergétiques ................... 47
AvANT lA pREmIèRE UTIlISATION ....... 47
AUTRES INDICATIONS
ImpORTANTES ........................................ 47
ACCESSOIRES ....................................... 48
Montage des rails télescopiques ......... 48
Rails télescopiques à rabattement . 48
Rails télescopiques
à fixation directe ............................ 48
NETTOyAGE ET ENTRETIEN .................. 49
Nettoyage de l’extérieur
et des accessoires du four .................. 49
Nettoyage de l'intérieur du four ........... 49
Démontage des supports latéraux . 49
Montage des supports .................. 49
Démontage du panneau du fond ... 49
Fours à gril rabattable .................... 50
Nettoyage de la porte du four ............. 50
Démontage/montage de la porte
avec charnière intégrée ................. 50
Démontage/montage de la porte
avec charnière sur la porte ............ 50
Démontage/montage des
vitres intérieures de la porte ........... 51
Remplacement de l'ampoule du four .. 51
Remplacement de
l'ampoule supérieure ..................... 51
Remplacement de l'ampoule
latérale .......................................... 51
Remplacement de l'ampoule LED . 51
En cas de dysfonctionnement ............. 52
Informations techniques ...................... 53
fIGURES ................................................. 93

42
Installation et Entretien
CONSIGNES DE SÉCURITÉ
Lisez attentivement ces instructions afin d’obtenir de votre
four les meilleurs rendements en l’utilisant de façon correcte
et sécurisée. Conservez ce manuel afin qu'un nouveau pro-
priétaire puisse le lire.
Sécurité électrique
• Si le câble d’alimentation n’est pas fourni avec le four, les
câbles suivants peuvent être utilisés dans les fours non py-
rolytiques : H05RR-F / H05VV-F / H05V2V2-F / H07RN-F /
H05SS-F. Dans les fours pyrolytiques, seul le câble de type
H05SS-F peut être utilisé. Le schéma du branchement est
indiqué sur la Figure 1.
• Le four doit toujours être branché à une prise de terre et
l’installation de cet appareil doit respecter les normes de la
réglementation en vigueur.
• L’utilisation de cet appareil est prévue pour une altitude
maximale de 2 000 m.
• Il est nécessaire d’intégrer, lors de l'installation fixe, des
dispositifs de déconnexion totale du four conformément
aux réglementations d'installation (approprié pour suppor-
ter l’intensité et avec un espace d’ouverture entre contacts
d’au moins 3 mm) selon les conditions de la catégorie III
de surtension, pour le débranchement en cas d'urgence, le
nettoyage ou le remplacement d’une ampoule. Le câble de
prise de terre ne pourra en aucun cas passer par cet inter-
rupteur.
• Cet interrupteur peut être remplacé par une prise de courant
si cette dernière est accessible pour une utilisation normale.
• Toute manipulation ou réparation de l’appareil (remplace-
ment du câble électrique inclus) doit être effectuée par le
Service d’assistance technique agréé, avec les pièces de
rechange d’origine. Toute opération de ce type réalisée par

43
Installation et Entretien
Français
un tiers peut endommager l’appareil ou engendrer son dys-
fonctionnement et mettre votre sécurité en péril.
• Débranchez votre four en cas de panne.
• Pour les fours combinés aux plaques de cuisson, il sera uni-
quement possible de monter les plaques recommandées
par le fabricant afin d’éviter tout risque éventuel.
Sécurité des enfants
• Empêchez les enfants de s’approcher du four pendant la
cuisson ou le nettoyage par pyrolyse, car le four peut alors
atteindre des températures élevées.
• Les enfants de moins de 8 ans doivent être tenus à l’écart
de l’appareil sauf s'ils sont surveillés en permanence. Les
enfants ne doivent pas jouer avec l’appareil.
• Les enfants de 8 ans ou plus et les personnes aux aptitudes
physiques, sensorielles ou mentales réduites ou manquant
d’expérience ou de connaissance du four ne peuvent utiliser
cet appareil qu’en connaissance des dangers impliqués et si
elles sont surveillées ou ont reçu les indications adéquates.
Sécurité lors de l'utilisation du four
• N’allumez le four que si la porte est fermée.
• N’utilisez le four que lorsqu’il est encastré dans le meuble
(voir Installation du four).
• N’installez pas le four derrière des portes décoratives. Cela
pourrait provoquer une surchauffe.
• Le fabricant décline toute responsabilité en cas d’utilisation
du four autre que la preparation domestique d’aliments.
• Ne rangez pas d’huile, de graisse, ni de matières inflam-
mables à l’intérieur, car cela peut être dangereux lorsque le
four est mis en marche.
• Ne recouvrez pas la sole du four de feuilles de papier d’alu-
minium, ou tout autre matériel, car cela peut affecter la cuis-
son et endommager l’émail de la cavité du four ainsi que
l’intérieur de votre meuble de cuisine.

44
Installation et Entretien
• Ne vous appuyez pas sur la porte ouverte, ceci pourrait l’en-
dommager ou mettre votre sécurité en danger.
• La plaque et la grille disposent d'un système facilitant leur
extraction partielle et la manipulation des aliments. Repla-
cez toujours ces accessoires à l'intérieur du four, comme
l’indiquent les instructions du paragraphe Accessoires.
• L’appareil génère de la chaleur pendant son utilisation. Met-
tez des gants de protection lorsque vous êtes amené à inter-
venir à l’intérieur du four et évitez de toucher les éléments
chauffants.
• N’utilisez la sonde de cuisson fournie qu’à l’intérieur du four
(modèles qui en sont équipés).
Sécurité du nettoyage et de l’entretien
• Avant toute intervention, débranchez l’appareil du réseau
électrique.
• Ne pas utiliser de nettoyeur à vapeur ou de l’eau sous pres-
sion pour nettoyer le four.
• N’utilisez pas de grattoir en métal tranchant, de paille de fer,
de brosse métallique ou de poudres à récurer pour nettoyer
la porte du four, car cela pourrait endommager sa surface et
briser la vitre.
• Le nettoyage et l'entretien à effectuer ne doivent pas être
confiés à des enfants sans surveillance.
• Avant de remplacer l'ampoule, vérifiez que le four est dé-
branché afin d’éviter les éventuels chocs électriques.
• Retirez tous les accessoires et la vaisselle du four, y compris
les supports des plaques et/ou les rails télescopiques.
• Retirer tout écoulement ou résidu de saleté majeurs, car ces
derniers pourraient prendre feu et déclencher un incendie
pendant le cycle de pyrolyse.
• Pour votre sécurité, ne mettez jamais le four en marche sans
le panneau du fond, qui protège le ventilateur.
Sécurité lors de l’utilisation du cycle de nettoyage par
pyrolyse
Avant de lancer le cycle de nettoyage, vous devez :

45
Installation et Entretien
Français
• TRÈS IMPORTANT : Retirer du four tous les accessoires et
la vaisselle, y compris les supports des plaques et/ou les
rails télescopiques.
• Retirer tout écoulement ou résidu de saleté majeurs, car ces
derniers pourraient prendre feu et déclencher un incendie
pendant le cycle de pyrolyse.
• Retirer les résidus de saleté du joint du four.
• Suivre attentivement les instructions pour programmer le
cycle de nettoyage par pyrolyse.
Durant le processus de nettoyage par pyrolyse :
• Ne laissez pas de tissus ou tout autre textile pendu ou en
contact avec la poignée du four.
• Par sécurité, les plaques de cuisson doivent rester éteintes
durant le fonctionnement par pyrolyse du four si ce dernier
est installé en dessous.
• La lumière intérieure du four restera éteinte et ne peut pas
être allumée.
• Le four est pourvu d’un mécanisme de verrouillage de sécu-
rité qui empêchera l’ouverture de la porte pendant le cycle
de nettoyage. N’essayez pas d’ouvrir la porte lorsque le ver-
rouillage est activé.
INFORMATIONS
Ce manuel décrit les caractéristiques générales des fours
qui pourraient néanmoins ne pas correspondre en tout
point au vôtre. Pour en savoir plus sur les fournitures et
l’équipement spécifique de votre four, consultez le Guide
d'utilisation joint à ce manuel.
Le fabricant se réserve le droit de modifier les caractéris-
tiques du produit afin d’améliorer son fonctionnement.

46
Installation et Entretien
Installation
Ces informations sont destinées exclusivement
à l’installateur, responsable du montage et du
branchement électrique. Si vous installez vous-
même votre four, le fabricant n’assumera pas la
responsabilité des dommages éventuels.
AVANT L’INSTALLATION
• Utilisez les poignées latérales du four pour le
manipuler. N’utilisez jamais la poignée de la
porte pour soulever le four.
• Ces instructions sont également valables si
le four est installé en dessous de plaques de
cuisson.
• En règle générale, évitez les éléments sail-
lants (renforts du meuble, tuyaux, prises élec-
triques, etc.) de la partie arrière du meuble.
• Si le socle de la prise de raccordement à l’ali-
mentation secteur se trouve à l’intérieur du
meuble dans lequel est encastré le four, il doit
être installé dans la zone grisée. Figure 2.
• Le meuble acceuillant le four et les meubles
adjacents doivent pouvoir supporter des
températures supérieures à 85 ºC.
• Les instructions d’installation doivent être
méticuleusement respectées, sans quoi le
circuit de ventilation du four pourrait se blo-
quer, engendrer de hautes températures et
endommager le meuble et l’appareil.
• Pour ce faire, vérifiez les mesures du meuble
et des ouvertures à réaliser sur ce dernier
selon les figures indiquées ci-après :
Installation de fours encastrables.
Four de 60 cm : Figure 7*.
Four de 45 cm : Figure 8*.
MISE EN GARDE
* NE PAS réaliser d’ouverture sur les zones
grisées des meubles lors de l’installation des
fours pyrolytiques.
Installation sous les plaques de cuisson.
Four de 60 cm : Figure 9*.
Four de 45 cm : Figure 10*.
MISE EN GARDE
* NE PAS réaliser d’ouverture sur les zones
grisées des meubles lors de l’installation des
fours pyrolytiques.
BRANCHEMENT ÉLECTRIQUE
L’installateur doit vérifier que :
• La tension et la fréquence du réseau cor-
respondent à celles indiquées sur la plaque
signalétique.
• L'installation électrique peut supporter la
puissance maximale indiquée sur la plaque
signalétique.
• Tous les éléments électriques du four fonc-
tionnent correctement après le branchement
électrique.
INSTALLATION DU FOUR
Pour tous les fours et après avoir effectué le
branchement électrique :
1. Placez le four dans le meuble en vous as-
surant que le cordon d’alimentation n’est
pas coincé ni en contact avec des parties
chaudes du four.
2. Vérifiez que la carcasse du four n’est pas en
contact avec les parois du meuble et qu’il
y a au moins un espace de 2 mm avec les
meubles voisins.
3. Placez le four au centre du meuble de ma-
nière à assurer un espace minimum de
5 mm entre le four et les portes des meubles
voisins. Figure 3.
4. Ouvrez la porte et fixez les butées en plas-
tique fournis au four sur les zones prévues à
cet effet. Figure 11.
5.
Fixez le four au meuble à l’aide des vis fournies,
en les vissant au meuble grâce aux butées.

47
Installation et Entretien
Français
Avant la première utilisation
Pour éliminer les restes de graisse et autres
impuretés occasionnées par le processus de
fabrication, procédez comme suit :
1. Retirez tous les éléments de l’emballage, le
plastique de protection inclus, s’il y en a un.
2. Allumez votre four en mode
/ ou, à
défaut
/ , à 200 ºC pendant 1 heure.
Pour cela, consultez le Guide d’utilisation
fourni avec ce manuel.
3. Laissez refroidir le four en ouvrant la porte
afin qu’il soit ventilé et ne conserve pas les
odeurs à l’intérieur.
4. Une fois refroidi, nettoyez le four et les ac-
cessoires.
Lors de la première utilisation, des fumées et
des odeurs peuvent apparaître ; il faut donc as-
surer une bonne ventilation de la cuisine.
Autres instructions importantes
Ne versez pas d’eau sur la sole du four pendant
sa mise en marche, cela pourrait endommager
l’émail.
Il est normal qu’une condensation se forme sur
la porte du four avec les plats contenant beau-
coup de liquide.
Informations environnementales
RETRAIT DE L'EMBALLAGE ÉCOLOGIQUE
L’emballage est réalisé avec des matériaux en-
tièrement recyclables et pouvant être réutilisés.
Consultez votre mairie pour connaître les régle-
mentations municipales sur le recyclage de ces
matériaux.
RETRAIT DU PRODUIT
MISE EN GARDE
Le symbole
affiché sur le produit ou sur
l’emballage indique que cet appareil ne peut
être considéré comme un déchet ménager
classique. Apportez-le au centre de collecte
des équipements électriques et électroniques
afin qu’il soit recyclé. Vous contribuerez ainsi
à éviter des conséquences potentiellement
néfastes d’une manipulation inadéquate sur
l’environnement et sur la santé publique.
Afin d’obtenir plus d’informations concer-
nant le recyclage de cet appareil, prenez
contact avec la mairie de votre ville, avec
le service des déchets ménagers ou avec
l’établissement d’achat du produit.
INFORMATIONS ÉNERGÉTIQUES
Soumis à des essais répondant aux exigences
des normes 66/2014 (Écoconception) et
65/2014 (Étiquetage énergétique), conformé-
ment à la réglementation EN 60350-1.
Mesures de consommations réalisées dans
des conditions différentes pouvant fournir des
résultats différents de ceux indiqués pour votre
four.
Pour en savoir plus sur les données de consum-
mation énergétique de votre four, consultez le
Guide d’utilisation joint à ce manuel.
MISE EN GARDE
Ne vous appuyez pas sur les portes du four
durant les étapes 4 et 5, car le four, non fixé
au meuble, pourrait s’affaisser vers l’avant et
tomber au sol.

48
Installation et Entretien
Il est possible que vous entendiez le son de l’air
à l’intérieur du four lors de la fermeture de sa
porte du four pendant la cuisson. Il s’agit d’un
effet normal, dû à la pression qu'exerce la porte
en se fermant afin de garantir l’étanchéité de
la cavité.
Accessoires
Ne placez aucun récipient ou aliment sur la sole
du four. Utilisez toujours les plateaux et grilles
fournis avec le four.
Pour la préparation de yaourts, vous pouvez
placer les verres directement sur la sole du four.
Pour faire cuire un autre aliment, introduisez la
plaque ou la grille sur les rails latéraux de la ca-
vité intérieure, tel qu’indiqué ci-après :
1. Entre deux tiges des supports latéraux, ou
sur l’un des rails extractibles si votre four en
possède.
2. La grille et certains plateaux disposent de
fentes de retenue afin d’éviter leur retrait
accidentel. Placez ces fentes vers la paroi
arrière du four, dirigées vers le bas. Figure 4.
3. La surface de la grille sur laquelle reposeront
les récipients doit se situer en dessous des
tiges latérales. Vous éviterez ainsi le glisse-
ment accidentel du récipient. Figure 5.
4. Les plateaux disposent d’un rebord frontal
afin de faciliter leur extraction du four. Intro-
duisez ce plateau avec le rebord vers l’exté-
rieur du four. Figure 6.
MONTAGE DES RAILS TÉLESCOPIQUES
Certains modèles du four incluent un kit de rails
télescopiques.
Pour monter les rails télescopiques sur les
supports chromés, procédez tel qu’indiqué ci-
après :
Rails télescopiques à rabattement
IMPORTANT
Les rails doivent être placés sur le deuxième
niveau en partant du bas. Figure 12.
1. Retirez le film protecteur.
2.
Accrochez les grands crochets sur la tige su-
périeure et rabattez le rail pour accrocher les
petits crochets sur la tige inférieure. Figure 12.
3. Vous entendrez un « clic » lorsque le rail sera
correctement fixé. Figure 13.
4. L’encoche pour insérer le plateau/la grille
doit être placée vers la partie avant du four.
Figure 13.
Rails télescopiques fixables
IMPORTANT
Les rails d’extraction simple peuvent être
placés aux niveaux 1, 2, 3 et 5, à partir du
bas. Figure 14.
Les rails d’extraction double peuvent être
placés aux niveaux 1, 2 et 3, à partir du bas.
Figure 15.
Les rails télescopiques des fours de 45 cm
se placent sur le premier niveau. Figure 16.
1. Accrocher le crochet sur la tige supérieure
au niveau souhaité. Figure 17.
2. Vous entendrez un « clic » lorsque le rail sera
correctement fixé. Figure 18.
3. L’encoche pour insérer le plateau/la grille
doit être placée vers la partie avant du four.
Figure 18.

49
Installation et Entretien
Français
Nettoyage et entretien
Certains aliments comme la tomate, le vinaigre,
les sauces salées de rôtis, etc. peuvent altérer
l’aspect de l’émail. C’est normal et n’affectera
pas son fonctionnement. Ne tentez pas d’éli-
miner ces taches avec les produits agressifs,
risquant d’endommager la surface.
Nettoyez régulièrement les résidus de graisses
ou saleté laissés par les aliments sur le joint
pour éviter sa détérioration ou rupture.
Il est recommandé de nettoyer ce joint sans le
démonter.
Démontage des supports latéraux
1. Ôtez les accessoires de l’intérieur du four.
2. Dévissez complètement l’écrou de fixation
avant (A), tirez les supports vers l’avant (B)
et retirez les. Figure 19.
Montage des supports
3. Emboîtez l’encoche postérieure dans l’écrou
de fixation arrière.
4. Insérez l’écrou de fixation arrière (C) dans
l’encoche avant du support. Figure 20.
5. Rabattez le support avec l’écrou (D) et pivotez
jusqu’à ce qu’il soit bien ajusté (E). Figure 20.
Démontage du panneau du fond
INFORMATIONS
Pour démonter le panneau du fond, vous
devez d’abord démonter les supports la-
téraux en suivant les indications du para-
graphe antérieur.
Ensuite :
1. Retirez les vis inférieures (A) puis la vis supé-
rieure (B). Figure 21.
2. Pour monter le panneau du fond, procéder
dans l’ordre inverse.
MISE EN GARDE
Avant toute intervention, débranchez l’appa-
reil du réseau électrique.
NETTOYAGE DE L’EXTÉRIEUR
ET DES ACCESSOIRES DU FOUR
Nettoyez l’extérieur du four et les accessoires à
l’eau tiède savonneuse, ou avec un détergent
doux.
Pour les surfaces inoxydables ou peintes, pre-
nez garde de n’utiliser que des éponges et des
tissus ne pouvant pas les rayer.
IMPORTANT
Les rails télescopiques ne peuvent pas être
mis au lave-vaisselle. La graisse facilitant le
glissement des rails disparaîtrait, rendant les
rails télescopiques inutilisables.
NETTOYAGE DE L’INTÉRIEUR DU FOUR
Nettoyez régulièrement l’intérieur du four pour
éliminer les traces de graisse ou d’aliments qui
engendreront de la fumée et des odeurs ou
l’apparition de taches lors des cuissons futures
Utilisez une brosse en nylon ou une éponge et
de l’eau savonneuse tiède pour les surfaces
émaillées (ex. : sole du four) sur le four froid.
Si vous utilisez des produits pour fours, ne les
appliquez que sur les surfaces émaillées en res-
pectant les instructions du fabricant.
MISE EN GARDE
N’utilisez pas de nettoyants à vapeur ou la
pression de l’eau à l’intérieur du four.
N’utilisez pas non plus d'éponge métallique, de
brosse en fer ou tout ustensile pouvant rayer
l'émail.

50
Installation et Entretien
3. Fermez la porte jusqu’à la position de blo-
cage. Figure 25.
4. Des deux mains, agrippez la porte par les
côtés, soulevez-la du four jusqu’à la sortir
totalement des charnières. Figure 25
Montage de la porte
5. Saisissez la porte des deux mains par la par-
tie inférieure des côtés, introduisez les bras
des charnières à leur place et laissez retom-
ber la porte jusqu’à la fin de la manipulation.
Figure 26.
6. Ouvrez complètement la porte du four.
Figure 26.
7. Tournez les butées jusqu’à leur position initiale.
MISE EN GARDE
Faites attention que la porte reste bien in-
sérée lors du pivotement des butées, sans
quoi la porte pourrait se bloquer quand vous
essaierez de la fermer.
INFORMATIONS
Si les butées résistent, vous pouvez vous ai-
der d’un outil plat pour les faire pivoter.
Démontage/montage de la porte
avec charnière sur la porte
1. Ouvrez complètement la porte du four.
2. Bloquez la charnière en faisant pivoter les
deux butées. Figure 27.
3. Fermez la porte jusqu’à la position de ver-
rouillage. Figure 28.
4. Agrippez la porte des deux mains par les cô-
tés, soulevez et détachez-la jusqu’à la sortir
totalement des charnières du four. Figure 28.
Procédez dans l’ordre inverse pour remonter la
porte.
MISE EN GARDE
Pour votre sécurité, ne mettez jamais le four
en marche sans le panneau du fond qui pro-
tège le ventilateur.
Fours à gril rabattable
Pour nettoyer la partie supérieure du four :
1. Attendez que votre four soit froid.
2. Poussez la tige de la résistance du Gril (A) à
l’aide des deux mains vers la partie arrière
du four, jusqu’à ce qu’elle se dégage de
l’écrou de fixation (B). Figure 22.
3. Laissez retomber la résistance et nettoyez la
partie supérieure du four. Figure 23.
4. Replacez finalement la résistance du Gril à
sa position initiale en procédant dans l’ordre
inverse.
Fours équipés de la fonction Teka Hydroclean®
Veuillez consulter le guide d’utilisation de votre four.
Fours équipés de la fonction Auto-net-
toyage par pyrolyse
Veuillez consulter le guide d’utilisation de votre four.
NETTOYAGE DE LA PORTE DU FOUR
Pour faciliter le nettoyage de la porte, vous
pouvez la démonter. Pour ce faire, suivez les
instructions correspondant au type de porte
dont est doté votre four.
Démontage/montage de la porte
avec charnière intégrée
1. Ouvrez complètement la porte du four.
2. Bloquez la charnière en faisant pivoter les
butées. Figure 24.

51
Installation et Entretien
Français
Démontage/montage des vitres
intérieures de la porte
MISE EN GARDE
Si vous démontez les vitres avec la porte
montée sur le four, faites-le toujours avec la
charnière verrouillée. Sinon, la porte pourrait
se refermer et briser les vitres non démon-
tées et provoquer des lésions.
INFORMATIONS
Pour éviter cela, il est recommandé de dé-
monter les vitres avec la porte elle-même
démontée en suivant les indications du pa-
ragraphe antérieur.
Selon le modèle, votre four peut avoir 2, 3 ou
4 vitres. Suivez les instructions correspondant
au type de porte dont est doté votre four.
1. Appuyez manuellement sur les boutons si-
tués sur la partie supérieure des deux côtés
de la porte du four. Figure 29.
2. Tirer le montant supérieur de la porte sans
cesser d'exercer une pression. Figure 30.
3. Ôtez les vitres de la porte. Nettoyez-les avec
du produit pour les vitres ou de l'eau et du
savon à l’aide d’un chiffon doux.
MISE EN GARDE
Faites attention à l’ordre et la position des
vitres lorsque vous les retirez puisqu’elles
devront être remontées de la même façon
une fois le nettoyage terminé.
4. Une fois nettoyées, introduisez la vitre nº3
au même endroit, de sorte que la mention
TERMOGLASS imprimée dessus soit visible
tel qu’indiqué sur la Figure 31.
5. Pour les fours pyrolytiques, la mention TER-
MOGLASS des vitres nº3 et nº4 doit être vi-
sible tel que sur la Figure 32.
6. Placez la vitre nº2, partie imprimée dirigée
vers l’intérieur de la porte.
7. Placez de nouveau le montant supérieur en
haut de la porte en vous assurant que les
boutons latéraux sont à leur place.
MISE EN GARDE
N’allumez jamais le four s’il manque à la
porte l’une des vitres.
REMPLACEMENT DE L’AMPOULE DU FOUR
MISE EN GARDE
Avant de remplacer l’ampoule, vérifiez tout
d’abord que le four est bien débranché.
L’ampoule à remplacer doit être résistante à une
chaleur allant jusqu’à 300 °C ; commandez-la
auprès du Service d’assistance technique.
Remplacement de l'ampoule supérieure
1. Dévisser la lentille de la douille.
Figure 33.
2. Remplacez l'ampoule et vissez à nouveau la
lentille.
Remplacement de l’ampoule latérale
1. Retirez la lentille de la vitre à l'aide d'un outil
à bout plat. Figure 34.
2. Changez la lampe et remontez à nouveau la
lentille en vous assurant qu’elle est bien em-
boîtée.
Remplacement de l'ampoule LED
Contacter le Service d’assistance technique.

52
Installation et Entretien
Le four ne fonctionne pas
• Vérifiez le branchement.
• Vérifiez les fusibles et le limiteur de l’instal-
lation.
• Vérifiez si l'horloge est en mode manuel ou
programmé.
• Vérifiez la position du sélecteur de fonc-
tions et de températures.
La lumière à l’intérieur du four ne
s’allume pas
• Remplacez l’ampoule.
• Vérifiez que le montage est correctement
effectué à l’aide des instructions d’installa-
tion.
Le témoin de chauffage ne s’allume pas
• Sélectionnez une température.
• Sélectionnez une fonction.
• Le témoin s'allume uniquement lorsque le
four est en préchauffage pour atteindre la
température sélectionnée.
Génération de fumée lors
du fonctionnement du four
• Processus normal lors de la première utili-
sation.
• Nettoyez régulièrement le four.
• Réduisez la quantité de graisse ou d'huile
sur la plaque.
• N’utilisez pas des températures supé-
rieures à celles indiquées sur les tableaux
de cuisson.
Les résultats espérés ne sont pas
atteints lors de la cuisson
• Revoir les tableaux de cuisson pour obtenir
des indications sur le fonctionnement du four.
Mes accessoires et supports de fixation
des plaques sont endommagés
• Vous ne les avez pas retirés lors du lance-
ment du nettoyage pyrolytique.
• Il faut les remplacer par des éléments neufs
et les retirer du four lors des prochains cy-
cles de nettoyage.
La couleur de l’émail a changé ou des
taches ont fait leur apparition
• La composition chimique de certains ali-
ments peut provoquer ces changements
sur l’émail.
• C’est un processus normal qui n’affecte
pas les propriétés de l’émail.
Le four est éteint, le symbole
est allumé et la porte ne s’ouvre pas
•
Cette action active le verrouillage de la porte.
• Désactivez le verrouillage de la porte en
suivant les instructions que vous trouverez
dans le Guide d’utilisation de votre four,
fourni avec ce manuel.
Le four est allumé, le symbole
est allumé et la porte ne s’ouvre pas
•
Cette action active le verrouillage de la porte.
• Placez le sélecteur de fonction sur la posi-
tion
.
En cas de dysfonctionnement
Vous trouverez dans ce paragraphe certains
des incidents les plus communs pouvant se
produire sur votre four, ainsi que les causes les
plus répandues et d’éventuelles solutions.

53
Installation et Entretien
Français
• Désactivez le verrouillage de la porte en
suivant les instructions que vous trouverez
dans le Guide d’utilisation fourni avec ce
manuel.
• Pour poursuivre la cuisson, sélectionnez à
nouveau la fonction de cuisson souhaitée.
J’ai tourné le sélecteur de fonctions
sur la position
, ai sélectionné le
programme de pyrolyse P1, P2 ou P3
mais le symbole
clignote rapidement
et une alarme sonore retentit
• La porte du four est mal fermée, la porte
n'a donc pas pu être verrouillée et le pro-
cessus de pyrolyse s’est bloqué.
• Vérifiez la porte et assurez-vous qu’elle est
bien fermée. Mettez ensuite le sélecteur de
fonction sur la position
et réalisez à nou-
veau la séquence afin d’activer la pyrolyse.
J’ai tourné le sélecteur de fonctions
sur la position
, ai sélectionné le
programme de pyrolyse P1, P2 ou P3
mais le symbole
ne s’allume pas et le
four ne chauffe pas
• L’interrupteur de la porte n’a pas fonction-
né, même si la porte est bien fermée.
• Merci d’appeler le Service d’Assistance
Technique car il s’agit d’un problème d’in-
terrupteur de porte.
Le programme de pyrolyse est terminé
et le four est froid, cependant la porte
est verrouillée et l’écran affiche le
symbole
allumé et 0:00
• Vous n’avez pas placé le sélecteur de fonc-
tion en position
lorsque le programme
de pyrolyse s’est terminé.
• Placez le sélecteur de fonction sur la posi-
tion
.
J’ai placé le sélecteur de fonction sur la
position
et la porte reste bloquée
• Le four ne s’est pas refroidi jusqu’à at-
teindre la température de sécurité.
• Attendez que la température baisse et que
le symbole
s’éteigne.
Informations techniques
MISE EN GARDE
Si malgré ces conseils le problème persiste,
prenez contact avec le Service d’assistance
technique.
Informez le Service d’assistance technique du
type de défaillance que vous rencontrez en in-
diquant :
1. Le numéro de série (S-No)
2. Le modèle de l’Appareil (Mod.)
Vous trouverez ces informations sur la plaque
signalétique de votre four que vous pouvez
consulter sur l’un des côtés en ouvrant la porte.

54
Installation und Wartung
Inhaltsverzeichnis Installations- und Wartungsanleitung
SIChERhEITShINWEISE ........................ 55
Elektrische Sicherheit .......................... 55
Kindersicherheit .................................. 56
Sicherheit beim Gebrauch
des Backofens .................................... 56
Sicherheit bei Reinigung
und Wartung ....................................... 57
Sicherheit während des pyrolytischen
Selbstreinigungsvorgangs ................... 57
INSTAllATION ........................................ 59
Vor der Installation .............................. 59
Installation in Hochschrank ............ 59
Installation unter der Arbeitsplatte .. 59
Elektrischer Anschluss ........................ 59
Installation des Backofens ................... 59
UmWElTINfORmATIONEN .................... 60
Entsorgung der ökologischen
Verpackung ........................................ 60
Entsorgung des Produkts ................... 60
Energieinformationen .......................... 60
vOR DEm ERSTEN GEbRAUCh ............ 60
WEITERE WIChTIGE
GEbRAUChShINWEISE ......................... 60
zUbEhöR ............................................... 61
Montage der Teleskopauszüge ........... 61
Teleskopauszüge mit
ausklappbarer Klammer ................ 61
Teleskopauszüge mit
direkter Klammer ........................... 61
REINIGUNG UND WARTUNG ................. 62
Reinigung der Außenseiten und des
Backofenzubehörs .............................. 62
Reinigung des Backofeninnenraums ... 62
Ausbau der seitlichen
Führungsschienen ......................... 62
Einbau der Führungsschienen ....... 62
Ausbau der Rückwand .................. 62
Backöfen mit
ausklappbarem Grill ....................... 63
Reinigung der Backofentür .................. 63
Aus- und Einbau der Tür
mit Scharnier am Korpus ............... 63
Aus- und Einbau der Tür
mit Scharnier in der Tür ................. 63
Aus- und Einbau der
Innengläser der Tür ....................... 64
Austausch der Backofenlampe ........... 64
Austausch der oberen Lampe ....... 64
Austausch der seitlichen Lampe .... 64
Austausch der LED-Lampe ........... 64
Vorgehensweise bei
Funktionsstörungen ............................ 65
Technische Informationen ................... 66
AbbIlDUNGEN ....................................... 93

55
Installation und Wartung
Deutsch
SICHERHEITSHINWEISE
Lesen Sie die vorliegende Bedienungsanleitung aufmerksam
durch, um eine optimale Leistung Ihres Backofens auf ord-
nungsgemäße und sichere Art und Weise sicherzustellen. Be-
wahren Sie diese Anleitung auf, damit sie ein neuer Besitzer
lesen kann.
Elektrische Sicherheit
• Wurde mit dem Ofen kein Netzkabel mitgeliefert, dürfen für
Öfen ohne Pyrolysefunktion folgende Kabeltypen verwendet
werden: H05RR-F / H05VV-F / H05V2V2-F / H07RN-F / H05SS-F.
An Öfen mit Pyrolysefunktion darf nur der Kabeltyp H05SS-F
verwendet werden (Schaltplan in Abb. 1).
• Der Backofen muss immer an eine gute Erdung angeschlos-
sen werden und die Installation des Geräts muss den gel-
tenden Vorschriften entsprechen.
• Der Einsatz dieses Geräts ist bis maximal 2.000 Meter Höhe
vorgesehen.
• Der Anschluss muss unter Einhaltung der geltenden Instal-
lationsvorschriften durch einen der Leistung entsprechen-
den Schalter mit allpoliger Trennung vom Netz erfolgen (mi-
nimale Öffnung von 3 mm zwischen den Kontakten), um die
Abschaltung im Notfall, bei Reinigung oder Lampenwechsel
zu ermöglichen (Installation entsprechend Überspannungs-
kat. III). Das Erdungskabel darf auf keinen Fall über diesen
Schalter laufen.
•
Der Schalter kann durch einen Stecker ersetzt werden, voraus-
gesetzt, dass dieser bei normalem Gebrauch zugänglich ist.
• Jede Handhabung oder Reparatur des Geräts, einschl. des
Ersetzens des Stromkabels, muss durch den autorisierten
Kundendienst mit Originalersatzteilen durchgeführt werden.
Die Reparatur oder Handhabung durch andere Personen
kann Schäden oder Fehlfunktionen verursachen und somit
Ihre Sicherheit gefährden.

56
Installation und Wartung
•
Trennen Sie Ihren Backofen vom Stromnetz, wenn er defekt ist.
• Bei Backöfen, die mit Kochfeldern kombiniert sind, dürfen,
um mögliche Risiken zu vermeiden, nur die vom Hersteller
empfohlenen Kochfelder eingebaut werden.
Kindersicherheit
• Halten Sie Kinder während des Backofenbetriebs oder des
Reinigungsvorgangs durch Pyrolyse vom Gerät fern, da sehr
hohe Temperaturen erreicht werden.
• Kinder unter 8 Jahren dürfen nicht in der Nähe sein, sofern
sie nicht dauernd beaufsichtigt werden. Kinder dürfen nicht
mit dem Gerät spielen.
•
Dieses Gerät darf von Kindern ab 8 Jahren und von Personen
mit begrenzter körperlicher, sensorischer oder geistiger Fä-
higkeit oder mangelnder Erfahrung bzw. Kenntnis nur dann
benutzt werden, wenn sie die geeignete Anleitung oder An-
weisung bezüglich des sicheren Gebrauchs des Gerätes er-
halten haben und die damit verbundenen Gefahren verstehen.
Sicherheit beim Gebrauch des Backofens
• Beim Betrieb muss die Backofentür stets geschlossen sein.
• Benutzen Sie den Backofen erst, wenn er in das Einbaumö-
bel eingebaut ist (siehe Installation des Backofens).
• Installieren Sie den Backofen nicht hinter dekorativen Türen
(Überhitzungsgefahr!).
• Der Hersteller übernimmt keinerlei Haftung für eine Benut-
zung des Backofens, die nicht der Zubereitung haushaltsüb-
licher Lebensmittel dient.
• Decken Sie die Rückseite des Backofens nicht mit Alumini-
umfolie oder anderen Materialien ab, da dadurch das Gargut
beeinträchtigt und die Innenemaillierung sowie die Innen-
seite des Einbauschranks beschädigt werden könnten.
• Bewahren Sie kein Öl, Fett oder andere entzündliche Mate-
rialien im Inneren auf.
• Stützen oder setzen Sie sich nicht auf die geöffnete Backo-
fentür.

57
Installation und Wartung
Deutsch
• Backblech und Rost verfügen über ein System, welches das
teilweise Ausziehen und die Handhabung des Garguts er-
leichtert. Die Zubehörteile müssen immer gemäß den An-
weisungen im Abschnitt Zubehör angebracht werden.
• Während des Betriebs erhitzt sich das Gerät. Ziehen Sie
Schutzhandschuhe an, wenn Sie im Inneren hantieren und
vermeiden Sie es, die Heizelemente zu berühren.
• Verwenden Sie ausschließlich die Temperaturmesssonde,
die im Lieferumfang des Backofens enthalten ist (bei Model-
len mit diesem Zubehör).
Sicherheit bei Reinigung und Wartung
• Das Gerät muss vom Stromnetz getrennt werden, bevor da-
ran gearbeitet wird.
• Benutzen Sie keine Dampf- oder Hochdruckreiniger zum
Reinigen des Backofens.
• Benutzen Sie keine scharfen Metallschaber, metallischen
Topfkratzer, Drahtbürsten, Scheuerpulver oder Schleifmittel
zur Reinigung der Backofentür.
• Kinder dürfen die vom Benutzer auszuführende Reinigung
oder Wartung nicht ohne Aufsicht durchführen.
• Vor dem Auswechseln der Lampe ist sicherzustellen, dass
der Backofen vom Stromnetz getrennt ist.
• Entfernen Sie sämtliches Zubehör und Geschirr aus dem
Backofen, einschl. Führungsschienen und/oder Teleskopau-
szüge.
• Entfernen Sie Speisereste oder übermäßigen Schmutz, denn
diese könnten sich bei der Selbstreinigung entzünden.
• Zu Ihrer eigenen Sicherheit: Nehmen Sie den Backofen nie-
mals in Betrieb, wenn die Rückwand, die den Ventilator ver-
deckt, nicht eingebaut ist.
Sicherheit während des pyrolytischen
Selbstreinigungsvorgangs
Vor dem Beginn des Reinigungszyklus:
• SEHR WICHTIG: Entfernen Sie sämtliches Zubehör und Ge-
schirr aus dem Backofen, einschl. Führungsschienen und/
oder Teleskopauszüge.

58
Installation und Wartung
• Entfernen Sie Speisereste oder übermäßigen Schmutz, denn
diese könnten sich bei der Selbstreinigung entzünden.
• Entfernen Sie Schmutzreste von der Backofendichtung.
• Befolgen Sie aufmerksam die Anweisungen zum Program-
mieren des pyrolytischen Selbstreinigungsvorgangs.
Während des pyrolytischen Selbstreinigungsvorgangs:
• Lassen Sie keine Tücher oder anderen Textilien am Backo-
fengriff hängen oder mit ihm in Kontakt geraten.
• Das Kochfeld muss während des Pyrolyse-Vorgangs ausge-
schaltet sein, wenn dieses unter der Arbeitsplatte installiert
ist.
• Die Innenbeleuchtung des Backofens bleibt ausgeschaltet
und kann nicht eingeschaltet werden.
• Der Backofen ist mit einer automatischen Sicherheitsver-
riegelung ausgestattet, die das Öffnen der Tür während des
Reinigungszyklus verhindert. Versuchen Sie nicht, die Tür
im verriegelten Zustand zu öffnen.
HINWEIS
In diesem Handbuch werden die allgemeinen Eigenschaf-
ten der Backöfen beschrieben, die u. U. nicht genau mit
denen Ihres Backofens übereinstimmen. Leistungen und
spezifische Merkmale Ihres Backofens finden Sie in der
beiliegenden Bedienungsanleitung.
Der Hersteller behält sich das Recht vor, Produkteigen-
schaften zu ändern, um die Funktionsweise zu verbessern.

59
Installation und Wartung
Deutsch
Installation
Diese Informationen sind ausschließlich für den
Monteur bestimmt, da er für den Einbau und den
Elektroanschluss verantwortlich ist. Wenn Sie den
Backofen selbst anschließen, übernimmt der Her
-
steller keinerlei Haftung für eventuelle Schäden.
VOR DER INSTALLATION
•
Verwenden Sie die seitlichen Griffe zur Hand-
habung des Backofens. Verwenden Sie nie-
mals den Türgriff, um den Backofen zu heben.
• Bei Installation des Backofens unter der Ar-
beitsplatte beachten Sie bitte die Installati-
onsanleitung der Arbeitsplatte.
•
Vorsprünge (Verstärkungen des Einbauschranks,
Rohrleitungen, Steckdosen usw.) auf der Rück-
seite des Einbauschranks sind zu vermeiden.
•
Wenn die Steckdose für den Anschluss an das
Stromnetz im Inneren des Einbauschranks an-
gebracht wird, muss dies innerhalb des schat-
tierten Bereichs erfolgen (Abb. 2).
• Der Einbauschrank, in dem der Backofen
installiert wird, sowie die angrenzenden Mö-
belstücke müssen Temperaturen von über
85 ºC standhalten können.
• Installationsanleitung strikt befolgen. An-
dernfalls könnte der Ventilationskreislauf blo-
ckiert werden, wodurch hohe Temperaturen
entstehen können, die Einbauschrank und
Gerät selbst beschädigen können.
•
Überprüfen Sie die Abmessungen des Einbau-
schranks und die am Schrank zu sägenden
Öffnungen gemäß den folgenden Angaben:
Installation in Hochschrank
Backofen 60 cm hoch: Abb. 7*.
Backofen 45 cm hoch: Abb. 8*.
ACHTUNG
* Für die Installation von Pyrolyseöfen
NICHT die schattiert dargestellt Öffnungen
in den Einbauschrank sägen.
Installation unter der Arbeitsplatte.
Backofen 60 cm hoch: Abb. 9*.
Backofen 45 cm hoch: Abb. 10*.
ACHTUNG
* Für die Installation von Pyrolyseöfen
NICHT die schattiert dargestellten Öffnun-
gen in den Einbauschrank sägen.
ELEKTROANSCHLUSS
Der Monteur muss überprüfen, ob
• Netzspannung und -frequenz den Angaben
auf dem Typenschild entsprechen.
• Der Elektroanschluss die auf dem Typen-
schild genannte Höchstleistung verkraftet.
• Nach Anschluss an das Stromnetz überprü-
fen, ob alle elektrischen Bestandteile ord-
nungsgemäß funktionieren.
INSTALLATION DES BACKOFENS
Für alle Backöfen gilt nach dem Anschluss an
das Stromnetz:
1. Schieben Sie den Herd in den Einbau-
schrank und stellen Sie sicher, dass das
Stromkabel dabei weder eingeklemmt wird
noch in Berührung mit heißen Backofentei-
len kommen kann.
2. Achten Sie darauf, dass das Backofenge-
häuse nicht in Kontakt mit den Schrankwän-
den kommt und ein Mindestabstand von
2 mm zu den Schränken besteht.
3.
Stellen Sie den Backofen mittig in den Ein-
bauschrank, so dass ein Mindestabstand von
5 mm zwischen Backofen und den Türen der
Möbelstücke eingehalten wird (Abb. 3).
4. Die Tür öffnen und die mit gelieferten Kunst-
stoffanschläge in die entsprechenden Auf-
nahmen einrasten lassen (Abb. 11).
5. Befestigen Sie den Backofen mithilfe der
mitgelieferten Schrauben am Einbauschrank
(über die Anschläge in den Einbauschrank
einschrauben).

60
Installation und Wartung
Vor dem ersten Gebrauch
Bedingt durch den Herstellungsprozess kön-
nen im Backofen noch Fettreste und andere
Verunreinigungen vorhanden sein. Verfahren
Sie zu deren Entfernung wie folgt:
1.
Entfernen Sie alle Verpackungsteile einschl.
des evtl. vorhandenen Plastikschutzes.
2. Schließen Sie den Backofen an und lassen
Sie ihn in Funktion
/
bzw.
/
bei 200 ºC eine Stunde lang laufen. Schauen
Sie hierzu in der beigefügten Bedienungsan-
leitung nach.
3. Lassen Sie den Backofen abkühlen und öff-
nen Sie die Tür. So wird er gelüftet und es
bleiben keine Gerüche im Inneren zurück.
4. Reinigen Sie Backofen und Zubehör nach
dem Abkühlen.
Während der ersten Inbetriebnahme entstehen
Rauch und Gerüche. Sorgen Sie deshalb für
eine gute Belüftung der Küche.
Weitere wichtige Gebrauchshinweise
Gießen Sie während des Betriebs kein Wasser
auf den Backofenboden, das dies die Emaillie-
rung beschädigen kann.
Bei Gargut mit einem hohen Feuchtigkeitsge-
halt ist es normal, dass sich an der Backofentür
Kondenswasser bildet.
Umweltinformationen
ENTSORGUNG DER
ÖKOLOGISCHEN VERPACKUNG
Die Verpackung aus recycelbarem Material
kann wiederverwendet werden. Kontaktieren
Sie Ihre Gemeindeverwaltung bezüglich der
Entsorgungsvorschriften für dieses Material.
ENTSORGUNG DES PRODUKTS
ACHTUNG
Das Symbol
weist darauf hin, dass die-
ses Gerät nicht unter normalen Hausmüll
fällt. Sie müssen es für sein Recycling zur
Sammelstelle für elektrische und elektroni-
sche Geräte bringen, um eventuelle nega-
tive Folgen für Umwelt und öffentliche Ge-
sundheit durch eine nicht ordnungsgemäße
Handhabung zu vermeiden.
Weitere Informationen zur Entsorgung des
Gerätes erhalten Sie bei Ihrer zuständigen
Gemeindeverwaltung, bei Ihrem zuständi-
gen Müllentsorgungsbetrieb oder vom Ver-
käufer.
ENERGIEAUSKUNFT
Prüfungen zur Erfüllung der Anforderungen
der Verordnungen 66/2014 (Ökodesign) und
65/2014 (Energieetikettierung) gemäß Norm
EN 60350-1.
Verbrauchsmessungen, die unter anderen Be-
dingungen als unter den für Ihren Backofen
angegebenen durchgeführt wurden, können
andere Werte ergeben. Angaben über den
Energieverbrauch finden Sie in der beiliegenden
Bedienungsanleitung.
ACHTUNG
Stützen Sie sich während der Ausführung
der Schritte 4 und 5 nicht auf die offene
Backofentür auf, da der Backofen noch
nicht befestigt ist und nach vorne überkip-
pen und auf den Boden fallen könnte.

61
Installation und Wartung
Deutsch
Beim Schließen der Backofentür während des
Garvorgangs kann es sein, dass man das Ge-
räusch des Luftzugs im Inneren hört. Dies ist
ein ganz normaler Effekt, der aufgrund des
Drucks, den die Tür beim Schließen ausübt,
auftritt, um die Dichtigkeit des Innenraums zu
gewährleisten.
Zubehör
Stellen Sie keine Behälter oder Lebensmittel auf
den Backofenboden. Verwenden Sie immer die
mitgelieferten Backbleche und Roste.
Für die Zubereitung von Joghurt können Sie die
Gläser direkt auf den Backofenboden stellen.
Zum Garen anderer Lebensmittel schieben Sie
Backblech oder Rost wie folgt in die seitlichen
Führungsschienen des Backofeninnenraums:
1. Zwischen zwei Stangen der seitlichen Füh-
rungsschienen oder einer der ausziehbaren
Führungen, wenn Ihr Backofen mit solchen
ausgestattet ist.
2. Der Rost und einige Backbleche haben Fest-
stellkerben, um ihr versehentliches Heraus-
ziehen zu verhindern. Diese Kerben müssen
in Richtung der Rückseite des Backofens
und nach unten zeigen (Abb. 4).
3. Die Fläche des Rosts, auf der die Behälter
platziert werden, muss unterhalb der seitli-
chen Stangen liegen, um das versehentliche
Verrutschen des Behälters zu verhindern
(Abb. 5).
4. Die Backbleche haben eine vordere Lasche
für die einfache Herausnahme. Diese La-
sche muss in Richtung der Außenseite des
Backofens zeigen (Abb. 6).
MONTAGE DER TELESKOPAUSZÜGE
Einige Backofenmodelle enthalten als Zubehör
einen Satz Teleskopauszüge.
Für die Montage der Auszüge auf den ver-
chromten Führungsschienen gehen Sie wie
folgt vor:
Teleskopauszüge mit ausklappbarer Klammer
WICHTIG
Führungen auf Höhe 2 (Zählung von unten
beginnend) anbringen (Abb. 12).
1. Entfernen Sie den Schutzfilm.
2. Die großen Klammern in die obere Stange
ein haken und die Führung herunter klap-
pen, bis die kleinen Klammern in der unteren
Stange eingehakt sind (Abb. 12).
3. Wenn die Führung korrekt befestigt ist, ist
ein „Klick“ zu hören (Abb. 13).
4.
Die Kerbe zum Einsetzen des Rosts muss an
der Vorderseite des Backofens liegen (Abb. 13).
Teleskopauszüge mit direkter Klammer
WICHTIG
Führungen für einfaches Herausziehen auf
Höhen 1, 2, 3 und 5 (Zählung von unten be-
ginnend) anbringen (Abb. 14).
Führungen für zweifaches Herausziehen auf
Höhen 1, 2 und 3 anbringen (Abb. 15).
Bei 45 cm hohen Backöfen die Auszüge
auf Höhe 1 anbringen (Abb. 16).
1. Haken Sie die Klammer an der oberen Stan-
ge auf der gewünschten Höhe ein (Abb. 17).
2. Wenn die Führung korrekt befestigt ist, ist
ein „Klick“ zu hören (Abb. 18).
3. Die Kerbe zum Einsetzen des Backblechs/
Rosts sollte sich an der Vorderseite des
Backofens befinden (Abb. 18).

62
Installation und Wartung
Reinigung und Wartung
Lebensmittel wie Tomaten, Essig, in Salzkruste
Gebratenes usw. verursachen Verfärbungen in
der Emaillebeschichtung. Die wirkt sich nicht auf
die Funktionsweise der Beschichtung aus. Ver-
suchen Sie nicht, diese Flecken mit aggressiven
Reinigungsmitteln zu entfernen, da diese die
Oberfläche dauerhaft schädigen könnten.
Reinigen Sie die Backofendichtung regelmäßig,
um Fett- und Lebensmittelreste zu entfernen und
Beschädigung oder Bruch der Dichtung bei wei-
teren Garvorgängen zu verhindern.
Diese Dichtung reinigen, ohne sie auszubauen.
Ausbau der seitlichen Führungsschienen
1. Zubehör aus dem Innenraumentfernen.
2.
Vordere Befestigungsmutter (A) vollständig lö-
sen, Führungsschienen nach vorne (B) ziehen
und entfernen (Abb. 19).
Einbau der Führungsschienen
3. Hintere Kerbe in die hintere Befestigungs-
mutter ein haken.
4.
Vordere Befestigungsmutter (C) in die vordere
Kerbe der Führungsschiene ein haken (Abb. 20).
5.
Führungsschiene mit der Mutter (D) herunter
klappen und drehen bis sie eingerastet ist (E)
(Abb. 20).
Ausbau der Rückwand
HINWEIS
Um die Rückwand auszubauen, zuerst die
seitlichen Führungsschienen wie ioben be-
schrieben entfernen.
Anschließend:
1. Entfernen Sie erst die unteren Schrauben (A)
und dann die obere Schraube (B) (Abb. 21).
2. Um die Rückwand wieder einzubauen, ge-
hen Sie in umgekehrter Reihenfolge vor.
ACHTUNG
Das Gerät muss vom Stromnetz getrennt
werden, bevor daran gearbeitet wird.
REINIGUNG DER AUSSENSEITEN
UND DES BACKOFENZUBEHÖRS
Außenfläche und Zubehör mit lauwarmem Sei-
fenwasser oder mildem Reinigungsmittel reini-
gen.
Seien Sie bei rostfreien oder lackierten Oberflä-
chen vorsichtig und benutzen Sie nur Schwäm-
me oder Tücher, die keine Kratzer verursachen.
WICHTIG
Teleskopauszüge nicht in der Spülmaschi-
ne reinigt werden, da sonst das Gleitf ver-
schwindet und die Führungen stecken blei-
ben würden.
REINIGUNG DES BACKOFENINNENRAUMS
Innenraum regelmäßig reinigen, um Fett- oder
Lebensmittelreste zu entfernen, da sonst bei
folgenden Garvorgängen Rauch, Gerüche oder
Flecken entstehen können.
Bei kaltem Backofen und für emaillierte Oberflä-
chen (z. B. Backofenboden) Nylonbürste oder
Schwamm mit lauwarmem Seifenwasser benut-
zen. Backofenreiniger nur auf emaillierten Ober-
flächen und nach Herstelleranweisung benutzen.
ACHTUNG
Benutzen Sie zum Reinigen des Backofenin-
nenraums keine Dampf- oder Hochdruckrei-
niger.
Auch keine metallischen Topfkratzer, Draht-
bürsten oder andere Utensilien, die die Emaille-
beschichtung beschädigen könnten.

63
Installation und Wartung
Deutsch
3. Schließen Sie die Tür bis zur Verriegelungs-
position (Abb. 25).
4. Halten Sie die Tür mit beiden Händen an
den Seiten und heben Sie sie an, bis Sie sie
vollständig aus den Scharnieren gehoben
haben (Abb. 25).
Einbau der Tür
5. Halten Sie die Tür seitlich mit beiden Händen
an der Unterseite, stecken Sie die Scharnier-
arme in ihre Aufnahmen und schieben Sie
die Tür bis zum Anschlag hinein (Abb. 26).
6. Öffnen Sie die Tür des Backofens vollständig
(Abb. 26).
7. Drehen Sie die Verschlüsse in ihre ursprüng-
liche Position.
ACHTUNG
Achten Sie darauf, dass die Tür vollständig
eingesetzt ist, wenn Sie die Verschlüsse dre-
hen, da sie beim Versuch des Schließens
sonst blockieren könnte.
HINWEIS
Falls die Verschlüsse viel Widerstand entge-
gensetzen, können Sie ein flaches Werkzeug
zur Hilfe nehmen, um sie zu drehen.
Aus- und Einbau der Tür mit Scharnier
in der Tür
1. Öffnen Sie die Tür des Ofens vollständig.
2. Verriegeln Sie das Scharnier, indem Sie bei-
de Verschlüsse drehen (Abb. 27).
3. Schließen Sie die Tür bis zur Verriegelungs-
position (Abb. 28).
4. Halten Sie die Tür mit beiden Händen an den
Seiten und heben Sie sie an, bis die Schar-
niere vollständig aus dem Backofenkorpus
ausgetreten sind (Abb. 28).
Für den Einbau der Tür ist in umgekehrter Rei-
henfolge vorzugehen.
ACHTUNG
Zu Ihrer eigenen Sicherheit: Backofen nie-
mals in Betrieb nehmen, wenn die Rück-
wand nicht eingebaut ist.
Backöfen mit ausklappbarem Grill
Um den oberen Teil des Backofens zu reinigen:
1. Warten Sie, bis der Backofen abgekühlt ist.
2. Schieben Sie die Stange des Grillelements
(A) mit beiden Händen so weit nach hinten
in den Backofen, bis Sie sie von der Befesti-
gungsmutter (B) lösen (Abb. 22).
3.
Lassen Sie das Grillelement fallen und reinigen
Sie die Vorderseite des Backofens
(Abb. 23).
4. Bringen Sie das Grillelement wieder in seiner
ursprünglichen Position an und gehen Sie
dabei in umgekehrter Reihenfolge vor.
Backöfen mit Teka Hydroclean®-Funktion
Bitte lesen Sie die Bedienungsanleitung Ihres
Backofens.
Backöfen mit Selbstreinigungsfunktion
durch Pyrolyse
Bitte lesen Sie die Bedienungsanleitung Ihres
Backofens.
REINIGUNG DER BACKOFENTÜR
Zur leichteren Reinigung der Tür können Sie
diese abbauen. Beachten Sie bitte die entspre-
chenden Anweisungen je nach der in Ihrem
Backofen eingebauten Tür.
Aus- und Einbau der Tür mit Scharnier
am Korpus
1. Öffnen Sie die Tür des Ofens vollständig.
2. Verriegeln Sie das Scharnier, indem Sie die
Verschlüsse drehen (Abb. 24).

64
Installation und Wartung
Aus- und Einbau der Innengläser
der Tür
ACHTUNG
Wenn Sie die Scheiben bei montierter Tür
ausbauen, stellen Sie das Scharnier immer
auf die Verriegelungsposition, sonst wird
sich die Tür schließen und die nicht ausge-
bauten Scheiben könnten zerbrechen.
HINWEIS
Um dies zu vermeiden, ist es ratsam, die
Scheiben bei ausgebauter Tür wie im vor-
herigen Abschnitt beschrieben auszubauen.
Je nach Modell kann Ihr Backofen 2, 3 oder 4
Scheiben in der Tür haben. Beachten Sie bitte
die entsprechenden Anweisungen je nach der
in Ihrem Backofen eingebauten Tür.
1. Drücken Sie mit den Fingern auf die Knöpfe,
die sich oben an beiden Seiten der Backo-
fentür befinden (Abb. 29).
2.
Halten Sie die Knöpfe weiter gedrückt und zie-
hen Sie am oberen Riegel der Tür (Abb. 30).
3. Nehmen Sie die Scheiben aus der Tür.
Reinigen Sie sie mit einem Glasreiniger oder
Seifenwasser und einem weichen Tuch.
ACHTUNG
Merken Sie sich beim Herausnehmen Rei-
henfolge und Position der Scheiben, da Sie
diese nach der Reinigung exakt so wieder
montieren müssen.
4. Sobald sie sauber sind, setzen Sie Scheibe
Nr. 3 in der gleichen Position ein, und zwar
so, dass die Aufschrift TERMOGLASS wie in
Abb. 31 dargestellt zu sehen ist.
5. Bei Pyrolyseöfen muss die Aufschrift TER-
MOGLASS der Scheiben Nr. 3 und Nr. 4 wie
in Abb. 32 dargestellt zu sehen sein.
6. Bringen Sie Scheibe Nr. 2 mit der bedruck-
ten Seite in Richtung Innenseite der Tür an.
7. Bringen Sie den oberen Riegel der Tür wie-
der an und stellen Sie sicher, dass die seitli-
chen Knöpfe in ihre Aufnahmen einrasten.
ACHTUNG
Setzen Sie den Backofen niemals in Betrieb,
wenn eine der Scheiben der Tür fehlt.
AUSTAUSCH DER BACKOFENLAMPE
ACHTUNG
Bevor Sie die Lampe auswechseln, müssen
Sie sicherstellen, dass der Backofen vom
Stromnetz getrennt ist.
Die Ersatzlampe muss eine Temperaturbestän-
digkeit bis 300 ºC aufweisen. Sie kann beim
technischen Kundendienst bestellt werden.
Austausch der oberen Lampe
1. Schrauben Sie das Vorsatzglas der Lam-
penfassung ab (Abb. 33).
2. Tauschen Sie die Lampe aus und schrauben
Sie das Vorsatzglas wieder auf.
Austausch der seitlichen Lampe
1.
Nehmen Sie das Vorsatzglas mithilfe eines
Werkzeugs mit flacher Spitze heraus
(Abb.
34).
2. Wechseln Sie die Lampe aus, montieren Sie
das Vorsatzglas erneut und achten Sie dar-
auf, dass es in der richtigen Position sitzt.
Austausch der LED-Lampe
Kontaktieren Sie den technischen Kundendienst.

65
Installation und Wartung
Deutsch
Der Backofen funktioniert nicht.
• Überprüfen Sie den Stromanschluss.
• Überprüfen Sie die Sicherungen und den
Überspannungsbegrenzer der Installation.
• Stellen Sie sicher, dass die Uhr auf manuell
oder programmiert eingestellt ist.
• Überprüfen Sie die Position des Pro-
gramm- und Temperaturwählers.
Das Innenlicht des Backofens
funktioniert nicht.
• Ersetzen Sie die Lampe.
• Überprüfen Sie die korrekte Montage ge-
mäß der Installationsanleitung.
Die Heizanzeige leuchtet nicht auf.
• Wählen Sie eine Temperatur.
• Wählen Sie eine Funktion.
• Die Anzeige soll nur leuchten, während
sich der Backofen bis zur gewählten Tem-
peratur aufheizt.
Während des Backofenbetriebs
entwickelt sich Rauch.
• Normaler Vorgang bei der ersten Inbetrieb-
nahme.
• Reinigen Sie den Backofen in regelmäßi-
gen Abständen.
• Verringern Sie die Fett- oder Ölmenge auf
dem Backblech.
• Benutzen Sie keine höheren Temperaturen
als in der Gartabelle angegeben.
Es werden nicht die erwarteten
Garresultate erreicht.
• Konsultieren Sie die Gartabellen, um sich
über die Richtwerte für den Backofenbe-
trieb zu informieren.
Mein Zubehör und die Führungsschienen
der Backbleche sind beschädigt.
• Sie haben die Elemente vor der Durch-
führung des pyrolytischen Reinigungsvor-
gangs nicht entfernt.
• Sie müssen durch neue ersetzt und diese
müssen vor zukünftigen Reinigungsvor-
gängen immer entfernt werden.
Die Farbe der Emaille hat sich verändert
oder es haben sich Flecken gebildet.
• Die chemische Zusammensetzung einiger
Lebensmittel kann solche Veränderungen
auf der Emaille hervorrufen.
• Dies ist ein normaler Vorgang, der die Eigen-
schaften der Emaille nicht beeinträchtigt.
Der Backofen ist ausgeschaltet, das
Symbol
leuchtet und die Tür lässt
sich nicht öffnen.
• Die Türverriegelung ist aktiviert.
• Die Türverriegelung gemäß den Anwei-
sungen in der Bedienungsanleitung Ihres
Backofens, die diesem Handbuch beige-
fügt ist, deaktivieren.
Vorgehensweise bei Funktionsstörungen
In diesem Abschnitt finden Sie einige der am
häufigsten in Ihrem Backofen auftretenden Pro-
bleme zusammen mit den häufigsten Ursachen
und möglichen Lösungen.

66
Installation und Wartung
Der Backofen ist eingeschaltet, das
Symbol
leuchtet und die Tür lässt
sich nicht öffnen.
• Die Türverriegelung ist aktiviert.
• Drehen Sie den Funktionswahlknopf auf
Position
.
• Die Türverriegelung gemäß den Anwei-
sungen in der Bedienungsanleitung Ihres
Backofens, die diesem Handbuch beige-
fügt ist, deaktivieren.
• Um weiter garen zu können, wählen Sie er-
neut die gewünschte Backfunktion.
Ich habe den Funktionswahlknopf auf
Position
gedreht und die Pyrolyse-
Funktion P1, P2 bzw. P3 gewählt, aber
das Symbol
blinkt schnell und es
ertönt ein akustischer Alarm.
•
Die Backofentür ist nicht richtig geschlossen.
Deshalb kann die Türverriegelung nicht grei-
fen und der Pyrolysevorgang ist blockiert.
•
Überprüfen Sie die Tür und stellen Sie si-
cher, dass sie richtig geschlossen ist.
Anschließend stellen Sie den Funktions-
wahlknopf auf Position
und führen den
Ablauf erneut durch, um die Pyrolyse zu
aktivieren.
Ich habe den Funktionswahlknopf auf
Position
gedreht und die Pyrolyse-
Funktion P1, P2 bzw. P3 gewählt, aber
das Symbol
leuchtet nicht auf und
der Backofen heizt nicht.
• Die Türsicherung funktioniert nicht, obwohl
die Tür richtig geschlossen ist.
• Rufen Sie bitte den technischen Kunden-
dienst an, da es sich um einen Defekt der
Türsicherung handelt.
Das Pyrolyse-Programm ist beendet und
der Backofen ist kalt. Dennoch ist die
Tür verriegelt und auf dem Bildschirm
wird das Symbol
und 0:00 angezeigt.
• Sie haben den Funktionswahlknopf nicht
auf Position
gedreht, als das Pyroly-
se-Programm beendet war.
• Drehen Sie den Funktionswahlknopf
.
Ich habe den Funktionswahlknopf auf
Position
gedreht, aber die Tür ist
immer noch verriegelt.
• Der Backofen ist nicht bis auf die Sicher-
heitstemperatur abgekühlt.
• Warten Sie, bis die Temperatur zurückgeht
und das Symbol
erlischt.
Technische Informationen
ACHTUNG
Sollte das Problem trotz dem weiterhin be-
stehen, setzen Sie sich bitte mit dem techni-
schen Kundendienst in Verbindung.
Teilen Sie dem technischen Kundendienst den
Mangel mit, den Sie festgestellt haben, indem
Sie Folgendes angeben:
1. Seriennummer (S-No).
2. Gerätemodell (Mod.).
Diese Informationen finden Sie auf dem Typen-
schild seitlich in Ihrem Backofen, das Sie se-
hen, wenn Sie die Tür öffnen.

67
Installatie en onderhoud
Nederlands
Inhoudsopgave Installatie- en onderhoudsinstructies
vEIlIGhEIDSINSTRUCTIES .................... 68
Elektrische veiligheid ........................... 68
Veiligheid voor kinderen ....................... 69
Gebruiksveiligheid van de oven ........... 69
Veiligheid bij de reiniging
en het onderhoud ............................... 70
Veiligheid bij het gebruik van
de pyrolysereinigingscyclus ................. 70
INSTAllATIE ........................................... 72
Voorafgaand aan de installatie ............. 72
Installatie in een kolom .................. 72
Installatie onder een werkblad ....... 72
Elektrische aansluiting ......................... 72
Oveninstallatie ..................................... 72
mIlIEU-INfORmATIE .............................. 73
Milieuvriendelijke verwijdering
van de verpakking ............................... 73
Verwijdering van het product ............... 73
Energiegegevens ................................ 73
vOOR hET EERSTE GEbRUIK ............... 73
ANDERE bElANGRIJKE
INSTRUCTIES ......................................... 73
ACCESSOIRES ....................................... 74
Montage van de uitschuifbare rails ...... 74
Uitschuifbare rails met
inklapbare clip ................................ 74
Uitschuifbare rails met
inklapbare clip ................................ 74
REINIGING EN ONDERhOUD ................. 75
Reiniging van de buitenkant
en de ovenaccessoires ....................... 75
Reiniging van de binnenkant
van de oven ........................................ 75
De bakplaatsteunen demonteren .... 75
De steunen monteren .................... 75
Het achterpaneel demonteren ....... 75
Ovens met neerklapbare grill ......... 76
Reiniging van de ovendeur .................. 76
Demontage/montage van de
deur met scharnier in de oven ....... 76
Demontage/montage van de
deur met scharnier in de deur ........ 76
Demontage/montage van de
binnenglazen van de ovendeur ...... 77
De ovenlamp verwisselen .................... 77
De bovenlamp verwisselen ............ 77
De zijlamp verwisselen................... 77
De ledlamp verwisselen ................. 77
Als iets niet werkt ................................ 78
Technische gegevens .......................... 79
AfbEElDINGEN ...................................... 93

68
Installatie en onderhoud
VEILIGHEIDSINSTRUCTIES
Lees deze instructies aandachtig door om op juiste en veili-
ge
wijze het maximale rendement uit uw oven te halen. Bewaar
deze handleiding zodat een nieuwe eigenaar hem ook kan lezen.
Elektrische veiligheid
• Als de oven niet is uitgerust met een voedingskabel, kun-
nen de volgende kabels worden gebruikt in niet-pyrolyti-
sche ovens: H05RR-F / H05VV-F / H05V2V2-F / H07RN-F /
H05SS-F. In pyrolytische oven dienen uitsluitend kabels van
het type H05SS-F te worden gebruikt. Het aansluitschema
wordt in afbeelding 1 weergegeven.
• De oven moet altijd op een goede aardverbinding worden
aangesloten en de installatie van dit apparaat moet voldoen
aan de geldige reglementen.
• Dit product is bedoeld om gebruikt te worden op een hoogte
van maximaal 2.000 meter.
• Voor de installatie van de oven moet de vaste stroominstal-
latie zijn voorzien van systemen voor de volledige uitscha-
keling overeenkomstig de installatiereglementen (aange-
past aan de te verduren stroomdichtheid en met een ruimte
van minimaal 3 mm tussen de contacten) onder de omstan-
digheden van overspanning categorie III voor de uitschake-
ling in noodsituaties, de reiniging of de verwisseling van de
lamp. In geen geval mag de aardingskabel door deze scha-
kelaar worden geleid.
• Deze schakelaar kan worden vervangen door een stekker,
mits deze bij normaal gebruik toegankelijk is.
• Elke manipulatie of reparatie aan het apparaat, met inbegrip
van de vervanging van de voedingskabel, dient te worden
uitgevoerd door de bevoegde Technische Dienst die daarbij
originele reserveonderdelen dient te gebruiken. Reparaties
of hantering door andere personen kunnen schade aan het

69
Installatie en onderhoud
Nederlands
apparaat of een verkeerde werking veroorzaken en uw vei-
ligheid in gevaar brengen.
• Zet de oven uit wanneer hij kapot is.
• Bij ovens gecombineerd met een werkblad kunnen alleen de
door de fabrikant aanbevolen werkbladen worden gemon-
teerd om mogelijke risico’s te vermijden.
Veiligheid voor kinderen
• Laat kinderen tijdens het bakken en braden of de pyrolyse-
reiniging niet in de buurt van de oven komen. Het apparaat
kan namelijk zeer hoge temperaturen bereiken.
• Kinderen onder de 8 jaar moeten uit de buurt worden ge-
houden, tenzij er voortdurend op hen gelet wordt. Kinderen
mogen niet met het apparaat spelen.
• Dit apparaat kan gebruikt worden door kinderen ouder dan
8 jaar en personen met beperkte lichamelijke, zintuiglijke of
geestelijke vermogens of zonder ervaring of kennis, onder
toezicht en na de juiste aanwijzingen te hebben ontvangen
om het apparaat op veilige wijze te gebruiken en mits zij zich
bewust zijn van de gevaren die het met zich mee brengt.
Gebruiksveiligheid van de oven
• De oven mag alleen met gesloten deur in werking zijn.
• Gebruik de oven alleen wanneer deze aan de binnenkant
van het meubel is geïnstalleerd (Zie installatie van de oven).
• Installeer de oven niet achter decoratieve
deuren. Dit kan
oververhitting tot gevolg hebben.
• De fabrikant is niet aansprakelijk voor ander gebruik dan de
huishoudelijke bereiding van levensmiddelen.
• Bewaar geen oliën, vetten of brandbare materialen in de
oven. Dit kan gevaarlijk zijn als u de oven aanzet.
• Leun niet op de geopende deur en ga er evenmin op zitten. Dit kan
de ovendeur beschadigen en uw veiligheid in gevaar brengen.

70
Installatie en onderhoud
• De bakplaat en het rooster hebben een systeem waardoor zij
gedeeltelijk uit de oven getrokken en de etenswaren bewerkt
kunnen worden. Breng deze accessoires altijd in de oven aan
zoals wordt aangegeven in het hoofdstuk Accessoires.
• Tijdens het gebruik wordt het apparaat heet. Gebruik hand-
schoenen wanneer u iets in de oven wilt bewerken en raak
de verwarmingselementen niet aan.
• Gebruik alleen de meegeleverde temperatuursonde in de
oven (modellen met deze uitrusting).
Veiligheid bij de reiniging en het onderhoud
• Haal de stekker van het apparaat uit het stopcontact alvo-
rens er een willekeurige handeling aan uit te voeren.
• Gebruik geen stoom- of waterdrukreinigers om de oven
schoon te maken.
• Gebruik geen scherpe krabijzers, metalen schuursponzen,
staalborstels of commerciële schuurpoeders om de oven-
deur schoon te maken, aangezien het oppervlak hiermee
kan worden beschadigd of het glas kapot kan gaan.
• De reinigings- en onderhoudswerkzaamheden die de ge-
bruiker moet verrichten mogen niet zonder toezicht door
kinderen worden uitgevoerd.
• Controleer, voordat u het lampje gaat vervangen, eerst of
de stekker van de oven uit het stopcontact is gehaald, om
mogelijke elektrische schokken te voorkomen.
• Verwijder alle accessoires en vaatwerk uit de oven, met inbegrip
van de houders voor de bakplaten en/of telescoopgeleiders.
• Verwijder gelekt vocht of buitensporige vuilresten. Deze
kunnen tijdens het pyrolyseproces ontvlammen waardoor
brandgevaar ontstaat.
• Zet de oven, voor uw veiligheid, nooit aan zonder het achter-
paneel dat de ventilator beschermt.
Veiligheid bij het gebruik van de pyrolysereinigingscyclus
Voordat u met de reinigingscyclus begint:

71
Installatie en onderhoud
Nederlands
• ERG BELANGRIJK: Verwijder alle accessoires en vaatwerk
uit de oven, met inbegrip van de houders voor de bakplaten
en/of telescoopgeleiders.
• Verwijder gelekt vocht of buitensporige vuilresten. Deze
kunnen tijdens het pyrolyseproces ontvlammen waardoor
brandgevaar ontstaat.
• Verwijder de vuilresten van de ovenpakking.
• Volg de instructies voor het programmeren van de pyrolyse-
reinigingscyclus nauwkeurig op.
Tijdens het pyrolysereinigingsproces:
• Laat geen doeken of andere stoffen voorwerpen aan het
handvat van de oven hangen of ermee in aanraking komen.
• Uit veiligheidsoverwegingen moet de kookplaat tijdens het
pyrolyseproces van de oven uitgeschakeld blijven. Dit wan-
neer de oven onder het werkblad is geïnstalleerd.
• Het licht in de oven blijft uit en kan niet aangaan.
• De oven is uitgerust met een automatische blokkeerbeveili-
ging die voorkomt dat de deur tijdens het reinigingsproces
kan worden geopend. Probeer de ovendeur niet te openen
terwijl de blokkeerbeveiliging in werking is.
INFORMATIE
In deze handleiding worden de algemene eigenschappen
van ovens beschreven. Daarom kan het zijn dat ze niet
exact overeenstemmen met de eigenschappen van uw
oven. Kijk voor de mogelijkheden en specifieke toebeho-
ren van uw oven in de Gebruikershandleiding die bij deze
handleiding is gevoegd.
De fabrikant behoudt zich het recht voor om eigenschap-
pen van het product te wijzigen om de werking ervan te
verbeteren.

72
Installatie en onderhoud
Installatie
Deze informatie is uitsluitend bestemd voor de
installateur, aangezien hij verantwoordelijk is
voor de montage en elektrische aansluiting. Als
u zelf de oven installeert, dan is de fabrikant niet
aansprakelijk voor mogelijke schade.
VOORAFGAAND AAN DE INSTALLATIE
• Pak de oven bij de handvaten aan de zijkant
om hem te verplaatsen. Gebruik het handvat
van de deur nooit om de oven op te tillen.
• Wanneer u de oven onder een werkblad in-
stalleert, houdt u zich dan aan de installa-
tie-instructies daarvan.
• Voorkom uitstekende elementen (versterkin-
gen van het meubel, leidingen, stopcontac-
ten etc.) aan de achterkant van het meubel.
• Een stopcontact voor aansluiting op het
netwerk dat in het meubel waarin de oven
wordt geïnstalleerd, moet binnen de scha-
duwzone worden geplaatst. Afbeelding 2.
• Het keukenmeubel waarin de oven wordt
geïnstalleerd en de aangrenzende meubels
moeten temperaturen van meer dan 85 ºC
kunnen verdragen.
• Houd u aan de installatie-instructies. Zo niet,
dan kan het ventilatiecircuit van de oven ge-
blokkeerd raken, waardoor het keukenmeu-
bel en het apparaat zelf schade kunnen oplo-
pen door hoge temperaturen.
• Controleer de afmetingen van het meubel en
de daarin aan te brengen openingen volgens
onderstaande afbeeldingen.
Installatie in een kolom.
Oven van 60 cm: Afbeelding 7*.
Oven van 45 cm: Afbeelding 8*.
LET OP
* Voor de installatie van pyrolytische ovens
mogen GEEN openingen in de schaduwzones
van het keukenmeubel worden aangebracht.
Installatie onder een werkblad.
Oven van 60 cm: Afbeelding 9*.
Oven van 45 cm: Afbeelding 10*.
LET OP
* Voor de installatie van pyrolytische ovens
mogen GEEN openingen in de schaduwzones
van het keukenmeubel worden aangebracht.
ELEKTRISCHE AANSLUITING
De installateur dient te controleren of:
• De netspanning en frequentie overeenstem-
men met de op het gegevensplaatje aange-
duide gegevens.
• De elektrische aansluiting op het gegevens-
plaatje het aangeduide maximale vermogen
kan verdragen.
• Controleer na de elektrische aansluiting de
juiste werking van alle elektrische onderde-
len van de oven.
OVENINSTALLATIE
Voor alle ovens en na de elektrische aansluiting:
1. Plaats de oven in het keukenmeubel en
zorg ervoor dat de voedingskabel niet vast-
geklemd raakt of in aanraking komt met de
warme delen van de oven.
2. Kijk of de kast van de oven niet in aanraking
is met de wanden van het keukenmeubel en
of er minstens een afstand van 2 mm met de
aangrenzende meubels bestaat.
3. Centreer de oven in het meubel, zodat een
minimale afstand van 5mm tussen de oven
en de deuren van de aangrenzende meubels
wordt gegarandeerd. Afbeelding 3.
4. Open de deur en klem de bij de oven mee-
geleverde plastic buffers op hun respectieve
plaatsen. Afbeelding 11.
5. Bevestig de oven aan het meubel d.m.v. de
meegeleverde bouten, schroef ze vast aan
het meubel d.m.v. de buffers.

73
Installatie en onderhoud
Nederlands
Vóór het eerste gebruik
Door het productieproces kunnen er zich in de
oven vetresten of andere onzuiverheden bevin-
den. Ga om deze te verwijderen als volgt te werk:
1. Verwijder alle verpakkingsonderdelen, met in-
begrip van het beschermplastic als dat er is.
2. Zet uw oven een uur lang aan op 200 ºC, op
functie
/ of, in voorkomend geval, op
/ . Kijk hiervoor in de bij deze handlei-
ding gevoegde Gebruikershandleiding.
3. Laat de oven afkoelen door de deur te ope-
nen. Op deze manier wordt de oven geventi-
leerd en verdwijnen geuren uit de binnenkant.
4. Maak de oven en accessoires na het afkoe-
len schoon.
Tijdens deze eerste werking ontstaan er rook
en geuren. Vandaar dat u voor een goede ven-
tilatie van de keuken moet zorgen.
Andere belangrijke instructies
Giet geen water op de bodem terwijl de oven in
werking is, aangezien het email daardoor kan
beschadigen.
Bij gerechten met een hoog vloeistofgehalte is
het normaal dat er condens op de ovendeur
ontstaat.
Milieu-informatie
MILIEUVRIENDELIJKE VERWIJDERING
VAN DE VERPAKKING
De verpakking is gemaakt van volledig recycleba-
re materialen en kan opnieuw gebruikt worden.
Raadpleeg de gemeente over plaatselijke nor-
men voor het verwijderen van deze materialen.
VERWIJDERING VAN HET PRODUCT
LET OP
Het symbool
op het product of op de
verpakking geeft aan dat dit apparaat niet
kan worden behandeld als normaal huisaf-
val. U dient het voor het recyclen ervan bij
een afvalpunt voor elektrische en elektroni-
sche apparaten af te geven. Op deze manier
helpt u mogelijke negatieve gevolgen voor
het milieu en de volksgezondheid door een
onjuiste verwerking te voorkomen.
Voor meer gedetailleerde informatie over het
hergebruik van het apparaat kunt u contact
opnemen met de gemeente, de huisafval-
dienst of de winkel waar u het product heeft
gekocht.
ENERGIEGEGEVENS
Tests om te voldoen aan de eisen van de richtlij-
nen 66/2014 (ecologisch ontwerp) en 65/2014
(energie-etikettering) conform de Europese
norm EN 60350-1.
Verbruiksmetingen uitgevoerd onder diverse
omstandigheden kunnen andere dan de voor
uw oven weergegeven waarden geven.
Kijk voor de gegevens van het energieverbruik
van uw oven in de Gebruikershandleiding die bij
deze handleiding is gevoegd.
LET OP
Leun tijdens stap 4 en 5 niet op de geopen-
de ovendeur. Aangezien de oven nog niet
aan het meubel is vastgemaakt, kan deze
naar voren schieten en op de grond vallen.

74
Installatie en onderhoud
Als de ovendeur tijdens het bakken wordt ge-
sloten, is het geluid van de lucht in de oven te
horen. Dit is een normaal effect dat is te wij-
ten aan de druk die wordt uitgeoefend door de
deur wanneer deze wordt gesloten. Dit om de
luchtdichtheid van de oven te garanderen
Accessoires
Zet geen ovenschalen of etenswaren op de bo-
dem van de oven. Gebruik altijd de bakplaten en
roosters die bij de oven worden geleverd.
Voor het maken van yoghurt kunnen de glazen di-
rect op de bodem van de oven worden neergezet.
Voor het bereiden van andere etenswaren dient
de bakplaat of het rooster in de zijgeleiders in de
oven te worden geschoven, zoals hierna wordt
aangegeven:
1. Tussen de twee stangen van de zijsteunen of
op een van de uitschuifbare rails als de oven
daarmee is uitgerust.
2. Het rooster en sommige bakplaten zijn voor-
zien van gleuven om te voorkomen dat zij
per ongeluk naar buiten worden getrokken.
Plaats deze gleuven naar de achterzijde van
de oven en omlaag gericht. Afbeelding 4.
3. Het oppervlak van het rooster waarop de
ovenschalen komen te staan, moet onder de
zijstaafjes komen te zitten. Zo wordt voor-
komen dat de ovenschaal er per ongeluk af
glijdt. Afbeelding 5.
4. De bakplaten hebben aan de voorkant een
rand waarmee zij gemakkelijk uit de oven
getrokken kunnen worden. Plaats de bak-
plaat met deze rand richting de buitenkant
van de oven. Afbeelding 6.
MONTAGE VAN DE UITSCHUIFBARE RAILS
Sommige ovenmodellen zijn als accessoire
uitgerust met een set uitschuifbare rails (teles-
coopgeleiders).
Ga als volgt te werk om de uitschuifbare rails op
de verchroomde steunen te monteren:
Uitschuifbare rails met inklapbare clip
BELANGRIJK
De rails moeten van onderaf tellend op
hoogte 2 worden geplaatst. Afbeelding 12.
1. Verwijder de beschermfolie.
2.
Maak grote clips aan de bovenste stang vast
en klap de rail neer totdat de kleine clips aan de
onderste stang zijn vastgeklemd. Afbeelding 12.
3. U hoort een “klik” als de rail juist is vastge-
maakt. Afbeelding 13.
4. De inkeping voor de regeling van de bak-
plaat/het rooster dient aan de voorzijde van
de oven te zitten. Afbeelding 13.
Uitschuifbare rails met inklapbare clip
BELANGRIJK
De enkelvoudige uitschuifbare rails moeten
van onderaf tellend op de 1e, 2e, 3e en 5e
hoogte worden geplaatst. Afbeelding 14.
De dubbele uitschuifbare rails moeten van
onderaf tellend op de 1e, 2e en 3e hoogte
worden geplaatst. Afbeelding 15.
Bij ovens van 45 cm worden de uitschuifbare
rails op de 1e hoogte geplaatst. Afbeelding 16.
1. Maak de clip aan de bovenste stang van het
gewenste niveau vast. Afbeelding 17.
2. U hoort een “klik” als de rail juist is vastge-
maakt. Afbeelding 18.
3. De inkeping voor de regeling van de bak-
plaat/het rooster dient aan de voorzijde van
de oven te zitten. Afbeelding 18.

75
Installatie en onderhoud
Nederlands
Reiniging en onderhoud
Na verloop van tijd veroorzaken bepaalde etens-
waren zoals o.a. tomaten, azijn en in zout be-
reide gerechten verkleuringen van het email. Dit
is normaal en is niet van invloed op de werking
van de oven. Probeer deze vlekken niet met
agressieve reinigingsmiddelen zoals omschre-
ven schoon te maken, aangezien het oppervlak
hierdoor permanent kan worden beschadigd.
Maak de deurdichting regelmatig schoon om vet-
en voedselresten te verwijderen. Hiermee wordt
vermeden dat deze later verslijt en kapot gaat.
Aanbevolen wordt om de deurdichting schoon te
maken zonder hem te demonteren.
De bakplaatsteunen demonteren
1. Verwijder de accessoires uit de oven.
2. Schroef de voorste bevestigingsmoer (A)
volledig los, trek de steunen naar voren (B)
en verwijder ze. Afbeelding 19.
De steunen monteren
3. Pas de achterste inkeping in de achterste
bevestigingsmoer.
4. Doe de voorste bevestigingsmoer (C) in de
voorste inkeping van de steun. Afbeelding 20.
5. Klap de steun met de moer (D) in en draai
deze totdat hij goed zit (E). Afbeelding 20.
Het achterpaneel demonteren
INFORMATIE
Om het achterpaneel te demonteren moeten
eerst de zijsteunen worden uitgebouwd vol-
gens de aanwijzingen van de vorige paragraaf.
Hierna:
1. Verwijder de onderste bouten (A) en daarna
de bovenste bout (B). Afbeelding 21.
2. Monteer het achterpaneel door deze hande-
lingen in omgekeerde volgorde uit te voeren.
LET OP
Sluit het apparaat van de stroom af alvorens
er handelingen aan te verrichten.
REINIGING VAN DE BUITENKANT
EN DE OVENACCESSOIRES
Maak de buitenkant van de oven en de acces-
soires met lauwwarm zeepwater of met een
mild afwasmiddel schoon.
Wees voorzichtig met roestvrije of gelakte op-
pervlakken en gebruik alleen sponzen of doe-
ken die geen krassen kunnen veroorzaken.
BELANGRIJK
Doe de uitschuifbare rails niet in de vaatwas-
ser. In de vaatwasser verdwijnt het vet dat
het schuiven vergemakkelijkt, waardoor de
rails vastlopen en onbruikbaar worden.
REINIGING VAN DE BINNENKANT VAN DE OVEN
Maak de binnenkant van de oven regelmatig
schoon om vetresten of etenswaren te verwij-
deren. Deze geven bij een volgend gebruik rook
en geuren af of kunnen vlekken doen ontstaan.
Gebruik nylon borstels of sponzen met lauw
zeepsop voor geëmailleerde oppervlakken (oven-
bodem). Laat de oven eerst afkoelen. Gebruik
ovenreinigers alleen op de geëmailleerde opper-
vlakken, volgens de aanwijzingen van de fabrikant.
LET OP
Maak de binnenkant van uw oven niet schoon
met stoomreinigers of water onder druk.
Gebruik evenmin metalen schuursponsjes,
staalborstels of andere middelen die het email
kunnen beschadigen.

76
Installatie en onderhoud
3. Sluit de ovendeur tot in de vergrendelstand.
Afbeelding 25.
4. Pak de deur met beide handen aan de zij-
kanten beet, til de deur helemaal uit de
scharnieren Afbeelding 25.
De montage van de deur
5. Pak de deur met beide handen aan de on-
derzijde van de zijkanten vast, breng de pal-
len van de scharnieren op hun plaats aan en
druk de deur helemaal aan. Afbeelding 26.
6.
Doe de ovendeur helemaal open. Afbeelding 26.
7. Draai de beugels in hun aanvankelijke positie.
LET OP
Let erop dat de deur volledig aangebracht
blijft als de beugels worden gedraaid. An-
ders kunnen ze worden vergrendeld als u
probeert de deur te sluiten.
INFORMATIE
Als de beugels veel weerstand uitoefenen,
kunt u gebruik maken van een plat gereed-
schap om ze te draaien.
Demontage/montage van de
deur met scharnier in de deur
1. Doe de ovendeur helemaal open.
2. Vergrendel het scharnier door aan de twee
beugels te draaien. Afbeelding 27.
3. Sluit de ovendeur tot in de vergrendelstand.
Afbeelding 28.
4. Pak de deur met beide handen aan weerszij-
den vast, til hem op en haal hem volledig uit
de scharnieren van de oven. Afbeelding 28.
Ga in omgekeerde volgorde te werk om de
deur weer te monteren.
LET OP
Zet de oven, voor uw veiligheid, nooit aan
zonder het achterpaneel dat de ventilator
beschermt.
Ovens met neerklapbare grill
Voor het schoonmaken van de bovenkant van
de oven:
1. Wacht totdat de oven is afgekoeld.
2. Druk met beide handen de staaf van de gril-
lweerstand (A) tegen de achterkant van de
oven totdat hij loskomt uit de bevestigings-
moer (B). Afbeelding 22.
3. Laat de weerstand vallen en maak de bo-
venkant van de oven schoon. Afbeelding 23.
4. Breng tenslotte de grillweerstand weer in zijn
aanvankelijke positie aan door de handelin-
gen in omgekeerde volgorde uit te voeren.
Ovens met Teka Hydroclean® functie
Raadpleeg de Gebruikershandleiding van uw
oven.
Ovens met pyrolysezelfreinigingsfunctie.
Raadpleeg de Gebruikershandleiding van uw
oven.
REINIGING VAN DE OVENDEUR
Om de reiniging van de ovendeur te vergemak-
kelijken kan hij gedemonteerd worden. Volg
hiervoor de aanwijzingen op van het type deur
waarmee uw oven is uitgerust.
Demontage/montage van de deur
met scharnier in de oven
1. Doe de ovendeur helemaal open.
2. Vergrendel het scharnier door aan de
beugels te draaien. Afbeelding 24.

77
Installatie en onderhoud
Nederlands
Demontage/montage van de
binnenglazen van de ovendeur
LET OP
Als de glazen worden verwijderd terwijl de
ovendeur gemonteerd is, doe dit dan altijd met
vergrendeld scharnier. Zo niet, dan gaat de
ovendeur dicht en kunnen de niet gemonteer
-
de glazen kapotgaan en letsel veroorzaken.
INFORMATIE
Om dit te voorkomen wordt aanbevolen om
de glazen met gedemonteerde deur te ver-
wijderen volgens de aanwijzingen van de vo-
rige paragraaf.
Afhankelijk van het model kan uw oven 2, 3 of
4 glazen hebben. Volg de aanwijzingen op van
het type deur waarmee uw oven is uitgerust.
1. Druk met de vingers op de knoppen aan de
bovenkant aan weerszijden van de oven-
deur. Afbeelding 29.
2. Trek, terwijl u blijft drukken, aan de bovenste
vergrendeling van de deur. Afbeelding 30.
3. Verwijder de glazen uit de deur. Maak de gla-
zen met glasreiniger of water met zeep en
een zachte doek schoon.
LET OP
Let op de volgorde en de positie van de gla-
zen wanneer u ze verwijderd, want ze moeten
weer in dezelfde volgorde en positie worden
gemonteerd nadat ze zijn schoongemaakt.
4. Breng glas nr. 3 in dezelfde positie aan, zo-
dat de aanduiding TERMOGLASS te zien is
zoals wordt weergegeven in afbeelding 31.
5. Voor pyrolyse-ovens dient de aanduiding TER-
MOGLASS van de glazen nr. 3 en nr. 4 zicht-
baar te zijn zoals in afbeelding 32 te zien is.
6. Breng glas nr. 2 aan met het bedrukte deel
naar de binnenkant van de deur gericht.
7. Breng de bovenste deurvergrendeling op-
nieuw aan en zorg ervoor dat de zijknoppen
op hun plaats passen.
LET OP
Zet de oven nooit aan als een van de glazen
van de deur ontbreekt.
DE OVENLAMP VERWISSELEN
LET OP
Om de ovenlamp te vervangen dient de
oven van het lichtnet te worden afgesloten.
De te verwisselen lamp moet bestand zijn tegen
temperaturen tot 300 ºC. Bestel ze bij de Tech-
nische dienst.
De bovenlamp verwisselen
1. Schroef het glas van de fitting los. Afbeel-
ding 33.
2. Vervang de lamp en schroef het glas weer
vast.
De zijlamp verwisselen
1. Maak het glas van de lamp los met behulp
van een gereedschap met platte punt. Af-
beelding 34.
2. Vervang de lamp en monteer het glas weer
in de juiste positie.
De ledlamp verwisselen
Neem contact op met de Technische dienst.

78
Installatie en onderhoud
De oven werkt niet
• Controleer de aansluiting op het lichtnet.
• Controleer de zekeringen en de begrenzer
van uw installatie.
• Zorg ervoor dat de klok in de handbedie-
ningsstand staat of geprogrammeerd is.
• Controleer de stand van de functie- en
temperatuurschakelaar.
Het licht in de oven gaat niet aan
• Vervang de lamp.
• Controleer de juiste montage aan de hand
van de installatie-instructies.
Het opwarmcontrolelampje gaat niet aan
• Selecteer een temperatuur.
• Selecteer een functie.
• Het lampje hoort alleen te branden als de
oven aan het opwarmen is en de geselec-
teerde temperatuur heeft bereikt.
Rookvorming tijdens de werking
van de oven
• Normaal proces bij het eerste gebruik van
de oven.
• Maak de oven regelmatig schoon.
• Verminder de hoeveelheid aan de bak-
plaat toegevoegd vet of olie.
• Gebruik geen hogere temperaturen dan
die in de baktabellen aangegeven zijn.
Bij het bakken en braden worden niet
de gewenste resultaten bereikt
• Kijk de baktabellen na voor informatie over
de werking van uw oven.
Mijn accessoires en bakplaatsteunen
zijn beschadigd
• U hebt ze niet verwijderd tijdens een py-
rolytisch reinigingsproces.
• U moet ze vervangen door nieuwe en deze
bij toekomstige reinigingscycli verwijderen.
De kleur van het email is veranderd
of vertoont vlekken
• De chemische samenstelling van sommige
levensmiddelen kunnen deze veranderin-
gen in het email veroorzaken.
• Dit is een normaal proces dat de eigen-
schappen van het email niet aantast.
De oven is uit, het symbool
brandt en
de deur gaat niet open
• De vergrendeling van de deur is ingescha-
keld.
• Schakel de deurvergrendeling uit volgens
de aanwijzingen in de gebruikershandlei-
ding van uw oven die bij deze handleiding
wordt geleverd.
De oven staat aan, het symbool
brandt en de deur gaat niet open
• De vergrendeling van de deur is ingescha-
keld.
• Draai de functiekeuzeknop in de stand
.
Als iets niet werkt
In deze paragraaf vindt u een aantal van de
meest voorkomende incidenten met uw oven,
de meest gebruikelijke oorzaken en de mogelij-
ke oplossingen.

79
Installatie en onderhoud
Nederlands
• Schakel de deurvergrendeling uit volgens de
aanwijzingen in de gebruikershandleiding die
bij deze handleiding wordt geleverd.
• Om te blijven bakken of braden dient u op-
nieuw de gewenste bakfunctie te selecteren.
Ik heb de functieknop in stand
gezet,
ik heb het pyrolyseprogramma P1, P2 of
P3 geselecteerd, maar het symbool
knippert snel en er gaat een geluidsalarm
af.
• De ovendeur is niet goed gesloten, de deur
kan later niet vergrendeld worden en het
pyrolyseproces is geblokkeerd.
• Controleer de deur en zorg ervoor dat hij
goed gesloten is. Zet vervolgens de func-
tiekeuzeknop in stand
en herhaal de
handelingen om de pyrolyse in werking te
stellen.
Ik heb de functieknop in stand
gezet,
ik heb het pyrolyseprogramma P1, P2 of
P3 geselecteerd, maar het symbool
gaat niet branden en de oven wordt niet
warm
• De deurschakelaar heeft niet gewerkt on-
danks het feit dat de deur goed gesloten is.
• Neem contact op met de Technische
Dienst, want het gaat om een defect van
de deurschakelaar.
Het pyrolyseprogramma is klaar en de oven
is afgekoeld. De deur is echter vergrendeld
en op het scherm licht het symbool
en
0:00 op
• De functiekeuzeknop is niet in stand
gezet nadat het pyrolyseprogramma klaar
was.
• Zet de functiekeuzeknop in stand
.
Ik heb de functiekeuzeknop in stand
gezet, maar de deur blijft vergrendeld
• De oven is nog niet afgekoeld tot de veilig-
heidstemperatuur.
• Wacht totdat de temperatuur afneemt en
het symbool
uitgaat.
Technische gegevens
LET OP
Als het probleem ondanks deze adviezen
aanhoudt, neem dan contact op met de
Technische Dienst.
Geeft het soort storing dat u heeft waargeno-
men aan de Technische Dienst door met ver-
melding van:
1. Serienummer (S-No).
2. Toestelmodel (Mod.).
Deze informatie vindt u op het gegevensplaatje
van uw oven. U ziet dit plaatje aan de zijkant als
u de deur opent.

80
Εγκατάσταση και συντήρηση
ΟΔΗΓΙΕΣ ΑΣΦΑΛΕΙΑΣ .............................. 81
Ηλεκτρική ασφάλεια ........................... 81
Ασφάλεια παιδιών ............................... 82
Ασφάλεια κατά τη χρήση
του φούρνου....................................... 82
Ασφάλεια κατά τον καθαρισμό
και τη συντήρηση ................................ 83
Ασφάλεια κατά τη χρήση του
κύκλου καθαρισμού με πυρόλυση ....... 84
ΕΓΚΑΤΑΣΤΑΣΗ ......................................... 85
Πριν την εγκατάσταση ........................ 85
Εγκατάσταση σε στήλη ................. 85
Εγκατάσταση κάτω από
τον πάγκο ..................................... 85
Ηλεκτρική σύνδεση............................. 85
Εγκατάσταση του φούρνου ................ 85
ΠΛΗΡΟΦΟΡΙΕΣ ΓΙΑ ΤΟ ΠΕΡΙΒΑΛΛΟΝ ..... 86
Απόρριψη της οικολογικής
συσκευασίας ....................................... 86
Απόρριψη του προϊόντος .................... 86
Πληροφορίες για την ενέργεια ........... 86
ΠΡΙΝ ΤΗΝ ΠΡΩΤΗ ΧΡΗΣΗ ....................... 86
ΑΛΛΕΣ ΣΗΜΑΝΤΙΚΕΣ ΟΔΗΓΙΕΣ ............... 86
ΕΞΑΡΤΗΜΑΤΑ .......................................... 87
Τοποθέτηση των τηλεσκοπικών
οδηγών. .............................................. 87
Τηλεσκοπικοί οδηγοί με πτυσσόμενο
κλιπ ............................................... 87
Τηλεσκοπικοί οδηγοί με απευθείας
κλιπ ................................................... 87
ΚΑΘΑΡΙΣΜΟΣ ΚΑΙ ΣΥΝΤΗΡΗΣΗ .............. 88
Καθαρισμός της εξωτερικής επιφάνειας
και των εξαρτημάτων του φούρνου .... 88
Καθαρισμός του εσωτερικού
του φούρνου....................................... 88
Αφαίρεση των πλαϊνών
στηριγμάτων .................................. 88
Τοποθέτηση στηριγμάτων ............. 88
Αφαίρεση του πάνελ της πλάτης .. 88
Φούρνοι με πτυσσόμενο γκριλ ...... 89
Καθαρισμός της πόρτας
του φούρνου....................................... 89
Αφαίρεση/τοποθέτηση πόρτας
με μεντεσέ ενσωματωμένο στη
συσκευή ........................................ 89
Αφαίρεση/τοποθέτηση πόρτας
με μεντεσέ στην πόρτα ................. 89
Αφαίρεση/τοποθέτηση των
εσωτερικών κρυστάλλων της
πόρτας .......................................... 90
Αντικατάσταση του λαμπτήρα
του φούρνου....................................... 90
Αντικατάσταση άνω λαμπτήρα ...... 90
Αντικατάσταση πλαϊνού λαμπτήρα 90
Αντικατάσταση λαμπτήρα LED ..... 90
Αντιμετώπιση προβλημάτων ............... 91
Τεχνικές πληροφορίες ........................ 92
ΕΙΚΟΝΕΣ .................................................. 93

81
Εγκατάσταση και συντήρηση
Ελληνικά
-
-
-
-
-
-
-
-
-

82
Εγκατάσταση και συντήρηση
-
-
-
-
-
-
-
-
-

83
Εγκατάσταση και συντήρηση
-
-
-
-
-
-
-
-

84
Εγκατάσταση και συντήρηση
-
-
-
-
-
-

85
Εγκατάσταση και συντήρηση
Ελληνικά
Οι πληροφορίες αυτές απευθύνονται αποκλει-
στικά στον τεχνικό που θα εγκαταστήσει τη
συσκευή, καθώς είναι υπεύθυνος για τη συ-
ναρμολόγηση της και την ηλεκτρική σύνδεση.
Εάν εγκαταστήσετε μόνος σας τον φούρνο, ο
κατασκευαστής δεν ευθύνεται για τις ενδεχό-
μενες ζημιές που μπορεί να προκύψουν.
• Για την μεταφορά του φούρνου, χρησιμοποιείτε
τις πλαϊνές λαβές, ποτέ το χερούλι της πόρτας.
• Όταν εγκαθιστάτε τον φούρνο κάτω από
πάγκο, τηρείτε τις οδηγίες εγκατάστασης.
• Κατά κανόνα, πρέπει να αποφεύγεται η πα-
ρουσία προεξοχών (ενισχύσεις επίπλων, σω-
ληνώσεις, πλαίσια πριζών, κλπ.) στην πλάτη
του επίπλου.
• Όταν το πλαίσιο της πρίζας βρίσκεται στο
εσωτερικό του επίπλου όπου θα εγκατασταθεί
ο φούρνος, πρέπει να βρίσκεται εντός της σκι-
ασμένης περιοχής, σύμφωνα με την εικόνα 2.
•
Το έπιπλο όπου εγκαθίσταται ο φούρνος και
τα διπλανά έπιπλα πρέπει να είναι ανθεκτικά
σε θερμοκρασίες πάνω από 85º C.
• Οι οδηγίες εγκατάστασης πρέπει να τηρηθούν
αυστηρά, ειδάλλως ενδέχεται να μπλοκαριστεί
το κύκλωμα εξαερισμού και να αναπτυχθούν
υψηλές θερμοκρασίες που μπορεί να προκα
-
λέσουν ζημιά στο έπιπλο και τη συσκευή.
• Γι’ αυτό, επαληθεύστε τις διαστάσεις του επί-
πλου και των οπών που θα πρέπει να ανοι-
χθούν στα έπιπλα, σύμφωνα με τις εικόνες:
Φούρνος 60 cm: Εικόνα 7*.
Φούρνος 45 cm: Εικόνα 8*.
* Σε περίπτωση εγκατάστασης -
κάνετε στο έπιπλο
τα ανοίγματα που εμφανίζονται σκιασμένα
στις σχετικές απεικονίσεις.
Φούρνος 60 cm: Εικόνα 9*.
Φούρνος 45 cm: Εικόνα 10*.
* Σε περίπτωση εγκατάστασης -
κάνετε στο έπιπλο
τα ανοίγματα που εμφανίζονται σκιασμένα
στις σχετικές απεικονίσεις.
Ο τεχνικός που εγκαθιστά τη συσκευή πρέπει
να βεβαιωθεί ότι:
• Η τάση και η συχνότητα του δικτύου αντι-
στοιχούν με αυτές που αναγράφονται στην
πινακίδα χαρακτηριστικών.
• Η οικιακή ηλεκτρική εγκατάσταση μπορεί
να αντέξει τη μέγιστη ισχύ που αναφέρεται
στην πινακίδα χαρακτηριστικών.
• Μετά την ηλεκτρική σύνδεση, ελέγξτε τη
σωστή λειτουργία όλων των ηλεκτρικών
στοιχείων του φούρνου.
Για όλους τους φούρνους και μετά την πραγ-
ματοποίηση της ηλεκτρικής σύνδεσης:
1. Εισάγετε τον φούρνο στο έπιπλο φροντίζο-
ντας ώστε το καλώδιο τροφοδοσίας να μη
εγκλωβιστεί πουθενά και να μην έρχεται σε
επαφή με θερμαινόμενα μέρη του φούρνου.
2. Βεβαιωθείτε ότι το περίβλημα του φούρνου
δεν έρχεται σε επαφή με τα τοιχώματα του
επίπλου και ότι υπάρχει τουλάχιστον από-
σταση 2 mm από τα παρακείμενα έπιπλα.
3.
Τοποθετήστε τον φούρνο στο έπιπλο με τέ-
τοιο τρόπο ώστε να εξασφαλίζεται ελάχιστη
απόσταση 5 mm ανάμεσα στον φούρνο και τις
πόρτες των παρακείμενων επίπλων. Εικόνα 3.
4. Ανοίξτε την πόρτα και εισάγετε τους πλαστι-
κούς αναστολείς («ροδελίτσες») που παρέ-
χονται μαζί με τον φούρνο στις αντίστοιχες
υποδοχές. Εικόνα 11.
5. Στερεώστε τον φούρνο στο έπιπλο με τις
παρεχόμενες βίδες, βιδώνοντάς τις στο έπι-
πλο διαμέσου των αναστολέων.

86
Εγκατάσταση και συντήρηση
Κατά τη διαδικασία κατασκευής, μπορεί να απέ-
μειναν στον φούρνο υπολείμματα από λιπαρές
ουσίες και άλλες ακαθαρσίες. Για να τα αφαιρέ-
σετε, ακολουθήστε την παρακάτω διαδικασία:
1. Αφαιρέστε όλα τα υλικά της συσκευασίας,
συμπεριλαμβανομένου του πλαστικού προ-
στατευτικού, εφόσον περιλαμβάνεται στον
φούρνο σας.
2. Θέσετε τον φούρνο σας στη λειτουργία
/ ή, σε περίπτωση που δεν υπάρχει,
στη λειτουργία
/ , στους 200 ºC για
1 ώρα. Συμβουλευτείτε σχετικά τον οδηγό
χρήσης που συνοδεύει αυτό το εγχειρίδιο.
3. Αφήστε τον φούρνο να κρυώσει ανοίγοντας
την πόρτα: έτσι αερίζεται και δεν παραμένουν
οσμές στο εσωτερικό του.
4. Όταν κρυώσει εντελώς, καθαρίστε τον
φούρνο και τα εξαρτήματά του.
Στην πρώτη λειτουργία παράγονται οσμές και κα-
πνός: βεβαιωθείτε ότι η κουζίνα αερίζεται καλά.
Μη ρίχνετε νερό στον πυθμένα του φούρνου
όταν βρίσκεται σε λειτουργία γιατί μπορεί να
προκληθεί ζημιά στο εμαγιέ.
Κατά τη διάρκεια ψησίματος φαγητών με με-
γάλη περιεκτικότητα σε υγρά, είναι φυσιολογι-
κό να σχηματίζονται υδρατμοί στην πόρτα.
Η συσκευασία αποτελείται από υλικά πλήρως
ανακυκλώσιμα που μπορούν να επαναχρησι-
μοποιηθούν. Συμβουλευτείτε τις δημοτικές
αρχές διοίκησης της περιοχής σας για τους
ισχύοντες τοπικούς κανονισμούς σχετικά με
την απόρριψη των υλικών αυτών.
Το σύμβολο
πάνω στο προϊόν ή τη συ-
σκευασία, δηλώνει ότι η συσκευή αυτή δεν
μπορεί να απορριφθεί μαζί με τα οικιακά
απορρίμματα. Θα πρέπει να την παραδώσε-
τε σε εγκαταστάσεις συλλογής ηλεκτρικού
και ηλεκτρονικού εξοπλισμού για την ανακύ-
κλωσή της. Με τον τρόπο αυτό θα συμβάλ-
λετε ώστε να αποφευχθούν τυχόν αρνητικές
συνέπειες για το περιβάλλον και τη δημόσια
υγεία λόγω ακατάλληλου χειρισμού.
Για περισσότερες πληροφορίες σχετικά με
την ανακύκλωση της συσκευής, επικοινω-
νήστε με τις τοπικές αρχές διοίκησης, με
την υπηρεσία οικιακών απορριμμάτων ή με
το κατάστημα από το οποίο αγοράσατε το
προϊόν.
Δοκιμές για συμμόρφωση με τις απαιτήσεις
των κανονισμών 66/2014 (οικολογικός σχεδια-
σμός) και 65/2014 (ενεργειακή σήμανση) σύμ-
φωνα με το πρότυπο EN 60350-1.
Οι μετρήσεις κατανάλωσης που πραγματο-
ποιούνται κάτω από διαφορετικές συνθήκες,
μπορεί να έχουν ως αποτέλεσμα διαφορετι-
κές τιμές από αυτές που αναφέρονται για τον
φούρνο σας.
Για να ενημερωθείτε σχετικά με τα στοιχεία
της κατανάλωσης ενέργειας του φούρνου
σας, παρακαλούμε συμβουλευτείτε τον οδηγό
χρήσης που συνοδεύει αυτό το εγχειρίδιο.
Μη στηρίζεστε στην ανοιχτή πόρτα του
φούρνου κατά τα βήματα 4 και 5, καθώς
ο φούρνος δεν έχει ακόμα στερεωθεί στο
έπιπλο και θα μπορούσε να γείρει προς τα
εμπρός και να πέσει στο δάπεδο.

87
Εγκατάσταση και συντήρηση
Ελληνικά
Όταν, κατά τη διάρκεια του μαγειρέματος,
κλείνετε την πόρτα του φούρνου μπορεί να
ακούγεται ο ήχος του αέρα από το εσωτερι-
κό του φούρνου. Αυτό είναι ένα απόλυτα φυ-
σιολογικό φαινόμενο, το οποίο οφείλεται στην
πίεση που ασκεί η πόρτα όταν κλείνει ώστε να
εξασφαλίζεται η στεγανότητα του θαλάμου.
Μην εναποθέτετε σκεύη ή τρόφιμα στον πυθμένα
του φούρνου. Χρησιμοποιείτε πάντα τα ταψιά και
τις σχάρες που παρέχονται μαζί με τον φούρνο.
Όταν παρασκευάζετε γιαούρτι, μπορείτε να το-
ποθετείτε τα βαζάκια απευθείας στον πυθμένα
του φούρνου.
Για την παρασκευή οποιουδήποτε άλλου φαγη-
τού, εισάγετε το ταψί ή τη σχάρα στους πλευρι-
κούς οδηγούς του θαλάμου, όπως αναφέρεται
στη συνέχεια:
1. Ανάμεσα σε δύο ράβδους των πλαϊνών στη-
ριγμάτων ή πάνω σε έναν από τους τηλε-
σκοπικούς οδηγούς, εφόσον τους διαθέτει
ο φούρνος σας.
2. Η σχάρα και ορισμένα ταψιά διαθέτουν σχι-
σμές συγκράτησης ώστε να αποφεύγεται η
τυχαία εξαγωγή τους. Τοποθετήστε τις σχι-
σμές αυτές προς την πίσω πλευρά του φούρ-
νου στραμμένες προς τα κάτω. Εικόνα 4.
3. Η επιφάνεια της σχάρας πάνω στην οποία
θα στηριχτούν τα σκεύη, πρέπει να βρίσκε-
ται κάτω από τις πλαϊνές ράβδους. Με τον
τρόπο αυτό αποφεύγεται τυχαία ολίσθηση
του σκεύους. Εικόνα 5.
4. Τα ταψιά διαθέτουν μία εμπρόσθια προεξο-
χή για ευκολότερη εξαγωγή. Τοποθετήστε
το ταψί με την προεξοχή αυτή προς την
εξωτερική πλευρά του φούρνου. Εικόνα 6.
Ορισμένα μοντέλα φέρουν, ως εξάρτημα, ένα
σετ τηλεσκοπικών οδηγών.
Για να τοποθετήσετε τους τηλεσκοπικούς οδη-
γούς πάνω στα στηρίγματα χρωμίου, ακολου-
θήστε την παρακάτω διαδικασία:
Οι οδηγοί πρέπει να τοποθετηθούν στο επί-
πεδο 2, ξεκινώντας το μέτρημα από κάτω.
Εικόνα 12.
1. Αφαιρέστε το προστατευτικό πλαστικό.
Γαντζώστε τα μεγάλα κλιπ στην άνω ράβδο
και ανοίξτε τον οδηγό ώσπου τα μικρά κλιπ
να γαντζωθούν στην κάτω ράβδο. Εικόνα 12.
Όταν στερεωθεί σωστά ο οδηγός, θα ακού-
σετε ένα χαρακτηριστικό «κλικ». Εικόνα 13.
Η εγκοπή για τη στερέωση του ταψιού / της
σχάρας θα πρέπει να βρίσκεται στην μπρο-
στινή πλευρά του φούρνου. Εικόνα 13.
Οι οδηγοί απλής εξαγωγής μπορούν να το-
ποθετηθούν στα επίπεδα 1, 2, 3 και 5, ξε-
κινώντας το μέτρημα από κάτω. Εικόνα 14.
Οι οδηγοί διπλής εξαγωγής μπορούν να το-
ποθετηθούν στα επίπεδα 1, 2 και 3 ξεκινώ-
ντας το μέτρημα από κάτω. Εικόνα 15.
, οι τηλεσκοπικοί οδη-
γοί τοποθετούνται στο επίπεδο 1. Εικόνα 16.
1. Γαντζώστε το κλιπ στην άνω ράβδο του επι-
θυμητού επιπέδου. Εικόνα 17.
Όταν στερεωθεί σωστά ο οδηγός, θα ακού-
σετε ένα χαρακτηριστικό «κλικ». Εικόνα 18.
Η εγκοπή για τη στερέωση του ταψιού / της
σχάρας θα πρέπει να βρίσκεται στην μπρο-
στινή πλευρά του φούρνου. Εικόνα 18.

88
Εγκατάσταση και συντήρηση
Με το πέρασμα του χρόνου, ορισμένα τρόφι-
μα, όπως η τομάτα, το ξύδι ή τα τρόφιμα που
ψήνονται σε κρούστα αλατιού αλλοιώνουν το
χρώμα του σμάλτου. Πρόκειται για κάτι φυσι-
ολογικό που δεν επηρεάζει τη λειτουργία του
φούρνου. Μην προσπαθήσετε να αφαιρέσετε
τους λεκέδες αυτούς με επιθετικά προϊόντα,
όπως τα προαναφερόμενα, καθώς μπορεί να
προκαλέσουν μόνιμη ζημιά στην επιφάνεια.
Καθαρίζετε τακτικά το λάστιχο του φούρνου για
να αφαιρούνται υπολείμματα λιπαρών ουσιών ή
τροφίμων. Με τον τρόπο αυτό, αποφεύγεται η
φθορά και η θραύση του λάστιχου στο μέλλον.
Συνιστάται ο καθαρισμός του λάστιχου να γίνεται
χωρίς να το αφαιρείτε.
1. Αφαιρέστε τα εξαρτήματα από το εσωτερι-
κό του φούρνου.
2.
Ξεβιδώστε τελείως το μπροστινό παξιμάδι στε-
ρέωσης (Α), τραβήξτε τα στηρίγματα προς τα
εμπρός (Β) και αφαιρέστε τα. Εικόνα 19.
3. Εφαρμόστε την οπίσθια εγκοπή στο οπίσθιο
παξιμάδι στερέωσης.
4. Εισάγετε το εμπρόσθιο παξιμάδι στερέω-
σης (C) στην εμπρόσθια εγκοπή του στηρίγ-
ματος. Εικόνα 20.
5. Στερεώστε το στήριγμα με το παξιμάδι (D)
και περιστρέψτε το ώσπου να ρυθμιστεί
πλήρως (E). Εικόνα 20.
Για να αφαιρέσετε το πάνελ της πλάτης,
πρέπει πρώτα να αφαιρέσετε τα πλαϊνά
στηρίγματα ακολουθώντας τις οδηγίες στην
προηγούμενη ενότητα.
Στη συνέχεια:
1. Αφαιρέστε τις κάτω βίδες (Α) και μετά την
πάνω βίδα (Β). Εικόνα 21.
2. Για να τοποθετήσετε το πάνελ της πλάτης
στη θέση του, ακολουθήστε την ίδια διαδι-
κασία αντίστροφα.
Προτού πραγματοποιήσετε οποιαδήποτε
εργασία, αποσυνδέστε τη συσκευή από την
παροχή ηλεκτρικού ρεύματος.
-
Καθαρίστε τις εξωτερικές επιφάνειες του φούρ-
νου και τα εξαρτήματά του με διάλυμα από χλι-
αρό νερό και σαπούνι ή ήπιο απορρυπαντικό.
Προσέχετε ιδιαίτερα τις ανοξείδωτες ή βαμ-
μένες επιφάνειες και χρησιμοποιείτε μόνο
σφουγγάρια ή πανιά που δεν χαράζουν.
Οι τηλεσκοπικοί οδηγοί δεν πλένονται στο
πλυντήριο πιάτων. Κάτι τέτοιο θα αφαιρούσε
το γράσο που διευκολύνει την ολίσθηση τους,
με αποτέλεσμα οι οδηγοί να σκαλώνουν και
τους καταστούν ακατάλληλους προς χρήση.
Καθαρίζετε τακτικά το εσωτερικό του φούρ-
νου για να αφαιρείτε υπολείμματα από λίπη
ή τρόφιμα που στο μέλλον μπορεί να προκα-
λέσουν τη δημιουργία καπνών, οσμών και την
εμφάνιση κηλίδων.
Με τον φούρνο κρύο, καθαρίζετε τις επι-
σμαλτωμένες επιφάνειες (π.χ. τον πυθμένα
του φούρνου) με μαλακές βούρτσες από νά-
ιλον ή σφουγγάρια και χλιαρό σαπουνόνερο.
Εάν χρησιμοποιείτε προϊόντα καθαρισμού για
φούρνους, εφαρμόζετέ τα μόνο στις επισμαλ-
τωμένες επιφάνειες ακολουθώντας πάντα τις
οδηγίες του κατασκευαστή.
Μην καθαρίζετε το εσωτερικό του φούρνου
σας με ατμοκαθαριστές ή με νερό υπό πίεση.
Μη χρησιμοποιείτε επίσης μεταλλικά σφουγγά-
ρια, συρμάτινες βούρτσες ή οποιοδήποτε ερ-
γαλείο που θα μπορούσε να χαράξει το εμαγιέ.

89
Εγκατάσταση και συντήρηση
Ελληνικά
3. Κλείστε την πόρτα ως τη θέση όπου ασφα-
λίζει. Εικόνα 25.
4. Κρατώντας την πόρτα με τα δύο χέρια από
τα πλαϊνά, σηκώστε την ώσπου να βγει τε-
λείως από τους μεντεσέδες. Εικόνα 25.
5. Κρατώντας την πόρτα και με τα δυο σας
χέρια από την κάτω πλευρά των πλαϊνών, ει-
σάγετε τους βραχίονες των μεντεσέδων στις
υποδοχές τους και αφήστε την πόρτα να κα-
τέβει ως το τέλος της διαδρομής. Εικόνα 26.
6. Ανοίξτε εντελώς την πόρτα του φούρνου.
Εικόνα 26.
7. Γυρίστε τα άγκιστρα στην αρχική τους θέση.
Φροντίστε ώστε η πόρτα να έχει εισέλθει
εντελώς όταν γυρίσετε τα άγκιστρα. Στην
αντίθετη περίπτωση, μπορεί να μπλοκάρει
όταν προσπαθήσετε να την κλείσετε.
Αν τα άγκιστρα παρουσιάζουν μεγάλη αντί-
σταση, μπορείτε να τα στρέψετε με τη βοή-
θεια ενός επίπεδου εργαλείου.
1. Ανοίξτε εντελώς την πόρτα του φούρνου.
2. Ασφαλίστε τον μεντεσέ γυρίζοντας τα δύο
άγκιστρα. Εικόνα 27.
3. Κλείστε την πόρτα ως τη θέση όπου ασφα-
λίζει. Εικόνα 28.
4. Κρατώντας την πόρτα με τα δύο χέρια από
τα πλαϊνά, σηκώστε την και αφαιρέστε την
ώσπου να βγουν εντελώς οι μεντεσέδες
από τον φούρνο. Εικόνα 28.
Για να τοποθετήσετε την πόρτα ξανά στη θέση
της, ακολουθήστε την αντίστροφη διαδικασία.
Για την ασφάλειά σας, ποτέ μη θέτετε σε
λειτουργία τον φούρνο χωρίς το πάνελ της
πλάτης που προστατεύει τον ανεμιστήρα.
Για να καθαρίσετε την οροφή του φούρνου:
1.
Περιμένετε έως ότου κρυώσει ο φούρνος σας.
2. Σπρώξτε και με τα δύο χέρια τη ράβδο της
αντίστασης του γκριλ (Α) προς την πίσω
πλευρά του φούρνου έως ότου την απελευ-
θερώσετε από το παξιμάδι συγκράτησης
(Β). Εικόνα 22.
3. Αφήστε την αντίσταση να πέσει και καθαρί-
στε την οροφή του φούρνου. Εικόνα 23.
4. Τέλος, τοποθετήστε ξανά την αντίσταση
του γκριλ στην αρχική της θέση, εκτελώ-
ντας την ίδια διαδικασία αντίστροφα.
Παρακαλούμε συμβουλευτείτε τον οδηγό χρή-
σης του φούρνου σας.
Παρακαλούμε συμβουλευτείτε τον οδηγό χρή-
σης του φούρνου σας.
Για να διευκολυνθείτε στον καθαρισμό της
πόρτας, μπορείτε να την αφαιρέσετε. Για την
αφαίρεσή της, ακολουθήστε τις οδηγίες που
αντιστοιχούν στο είδος της πόρτας που φέρει
ο φούρνος σας.
1. Ανοίξτε εντελώς την πόρτα του φούρνου.
2. Ασφαλίστε τον μεντεσέ γυρίζοντας τα
άγκιστρα. Εικόνα 24.

90
Εγκατάσταση και συντήρηση
Αν θέλετε να αφαιρέσετε τα κρύσταλλα
με την πόρτα τοποθετημένη στον φούρνο,
κάνετέ το πάντα με τον μεντεσέ σε θέση
ασφάλισης. Στην αντίθετη περίπτωση, η
πόρτα θα κλείσει και τα κρύσταλλα που δεν
έχουν αφαιρεθεί μπορεί να σπάσουν και να
προκληθεί τραυματισμός.
Για να αποφευχθεί κάτι τέτοιο, συνιστάται
να αφαιρείτε τα κρύσταλλα αφού έχετε
πρώτα αφαιρέσει την πόρτα από τον φούρ-
νο, ακολουθώντας τις οδηγίες της παραπά-
νω ενότητας.
Ανάλογα με το μοντέλο, ο φούρνος σας μπο-
ρεί να διαθέτει 2, 3 ή 4 κρύσταλλα. Ακολουθή-
στε τις οδηγίες που αντιστοιχούν στο είδος της
πόρτας που φέρει ο φούρνος σας.
1. Πιέστε με τα δάχτυλά σας τα κουμπιά που
βρίσκονται στην άνω πλευρά των πλαϊνών
της πόρτας του φούρνου. Εικόνα 29.
2. Χωρίς να σταματήσετε να πιέζετε, τραβήξ-
τε το άνω κλείστρο της πόρτας. Εικόνα 30.
3. Αφαιρέστε τα κρύσταλλα της πόρτας. Κα-
θαρίστε τα με καθαριστικό τζαμιών ή με
σαπουνόνερο και ένα μαλακό πανί.
Όταν αφαιρείτε τα κρύσταλλα, παρατηρή-
στε προσεκτικά τη σειρά και τη φορά τους,
καθώς θα πρέπει να τα τοποθετήσετε ξανά
με την ίδια σειρά και φορά όταν θα έχει πλέ-
ον ολοκληρωθεί η διαδικασία καθαρισμού.
4. Αφού καθαρίσετε τα κρύσταλλα, εισάγετε
το κρύσταλλο 3 στην ίδια θέση, με τέτοιο
τρόπο ώστε η ένδειξη TERMOGLASS που
φέρει τυπωμένη στην επιφάνειά του να φαί-
νεται ακριβώς όπως και στην εικόνα 31.
5. Στους πυρολυτικούς φούρνους, η ένδειξη
TERMOGLASS των κρυστάλλων 3 και 4
πρέπει να φαίνεται όπως ακριβώς δείχνει η
εικόνα 32.
6. Τοποθετήστε το κρύσταλλο 2 με την τυπω-
μένη πλευρά προς το εσωτερικό της πόρτας.
7. Τοποθετήστε πάλι το άνω κλείστρο της πόρ-
τας αφού παράλληλα βεβαιωθείτε ότι τα πλα-
ϊνά κουμπιά εφαρμόζουν στις υποδοχές τους.
Μην θέτετε ποτέ τον φούρνο σε λειτουργία αν
λείπει κάποιο από τα κρύσταλλα της πόρτας.
Για να αλλάξετε τον λαμπτήρα, βεβαιωθεί-
τε πρώτα ότι ο φούρνος δεν είναι συνδεδε-
μένος στο ρεύμα.
Ο λαμπτήρας αντικατάστασης πρέπει να αντέ-
χει σε θερμοκρασία μέχρι 300 ºC. Ζητήστε τον
στην υπηρεσία τεχνικής εξυπηρέτησης.
1. Ξεβιδώστε το κάλυμμα της υποδοχής του
λαμπτήρα. Εικόνα 33.
2. Αντικαταστήστε τον λαμπτήρα και βιδώστε
πάλι το κάλυμμα.
1. Αφαιρέστε με ένα εργαλείο με επίπεδο
άκρο το γυάλινο κάλυμμα του λαμπτήρα.
Εικόνα 34.
2. Αντικαταστήστε τον λαμπτήρα και τοποθε-
τήστε πάλι το κάλυμμα στη θέση του φρο-
ντίζοντας να εφαρμόσει στη σωστή θέση.
Επικοινωνήστε με την υπηρεσία τεχνικής εξυ-
πηρέτησης.

91
Εγκατάσταση και συντήρηση
Ελληνικά
• Ελέγξτε τη σύνδεση στο ηλεκτρικό δίκτυο.
• Ελέγξτε τις επιμέρους ασφάλειες και τη
γενική ασφάλεια της εγκατάστασής σας.
• Βεβαιωθείτε ότι το ρολόι βρίσκεται στη χειρο-
κίνητη λειτουργία ή είναι προγραμματισμένο.
• Ελέγξτε τη θέση των διακοπτών επιλογής
λειτουργιών και θερμοκρασίας.
• Αντικαταστήστε το λαμπτήρα.
• Βεβαιωθείτε ότι έχει τοποθετηθεί σωστά,
σύμφωνα με τις οδηγίες εγκατάστασης.
• Επιλέξτε θερμοκρασία.
• Επιλέξτε λειτουργία.
• Η ένδειξη θέρμανσης ανάβει μόνο κατά
τη διάρκεια προθέρμανσης του φούρνου
και μέχρις ότου φθάσει στην επιλεγμένη
θερμοκρασία.
• Είναι φυσιολογικό την πρώτη φορά που ο
φούρνος τίθεται σε λειτουργία.
• Καθαρίζετε τακτικά τον φούρνο.
• Προσθέτετε μικρότερες ποσότητες λί-
πους ή λαδιού στο ταψί.
• Μην επιλέγετε θερμοκρασίες υψηλότερες
από τις συνιστώμενες στους πίνακες μα-
γειρέματος.
• Μελετήστε τους πίνακες μαγειρέματος
ώστε να προσανατολιστείτε σχετικά με
τον τρόπο λειτουργίας του φούρνου σας.
• Δεν τα αφαιρέσατε από τον φούρνο κατά
την εκτέλεση της διαδικασίας καθαρισμού
με πυρόλυση.
• Θα πρέπει να τα αντικαταστήσετε με και-
νούρια και θα πρέπει να θυμάστε να τα
αφαιρείτε πάντα κατά την εκτέλεση των
κύκλων καθαρισμού στο μέλλον.
• Η χημική σύνθεση ορισμένων τροφίμων
μπορεί να προκαλέσει αυτές τις αλλαγές
στο εμαγιέ.
• Πρόκειται για μια φυσιολογική διαδικασία
που δεν επηρεάζει τις ιδιότητες του εμαγιέ.
•
Έχει ενεργοποιηθεί το κλείδωμα της πόρτας.
• Απενεργοποιήστε το κλείδωμα της πόρ-
τας ακολουθώντας τις οδηγίες που θα
βρείτε στον οδηγό χρήσης του φούρνου
σας που συνοδεύει αυτό το εγχειρίδιο.
• Έχει ενεργοποιηθεί το κλείδωμα της πόρτας.
Στην ενότητα αυτή θα βρείτε ορισμένα από τα
πιο συνηθισμένα προβλήματα που ενδέχεται
να παρουσιάσει ο φούρνος σας, τις πιθανές
τους αιτίες, καθώς και τρόπους επίλυσής τους.

92
Εγκατάσταση και συντήρηση
• Στρέψτε τον διακόπτη επιλογής λειτουργί-
ας στη θέση
.
• Απενεργοποιήστε το κλείδωμα της πόρτας
ακολουθώντας τις οδηγίες που θα βρείτε
στον οδηγό χρήσης που συνοδεύει αυτό το
εγχειρίδιο.
• Για να συνεχίσετε με το μαγείρεμα, επι-
λέξτε ξανά την επιθυμητή λειτουργία μα-
γειρέματος.
• Η πόρτα του φούρνου δεν είναι καλά κλει-
σμένη και δεν μπορεί να κλειδώσει παρε-
μποδίζοντας την έναρξη της διαδικασίας
πυρόλυσης.
• Ελέγξτε την πόρτα και βεβαιωθείτε ότι είναι
καλά κλεισμένη. Στη συνέχεια, γυρίστε τον
διακόπτη επιλογής λειτουργίας στη θέση
και επαναλάβετε τις ίδιες κινήσεις για να
ενεργοποιήσετε τη διαδικασία πυρόλυσης.
• Ο διακόπτης της πόρτας δεν λειτουργεί
παρόλο που η πόρτα έχει κλείσει σωστά.
• Παρακαλούμε καλέστε την υπηρεσία τε-
χνικής εξυπηρέτησης, καθώς ο διακόπτης
της πόρτας παρουσιάζει βλάβη.
• Δε γυρίσατε στη θέση
τον διακόπτη επι-
λογής λειτουργίας μετά τη λήξη του προ-
γράμματος πυρόλυσης.
• Φέρετε στη θέση
τον διακόπτη επιλο-
γής λειτουργίας.
• Ο φούρνος δεν έχει κρυώσει αρκετά ώστε
να φτάσει στη θερμοκρασία ασφαλείας.
• Περιμένετε να μειωθεί η θερμοκρασία και
να σβήσει το σύμβολο
.
Αν το πρόβλημα επιμένει, παρά τις προανα-
φερόμενες πιθανές λύσεις, επικοινωνήστε
με την υπηρεσία τεχνικής εξυπηρέτησης.
Ενημερώστε την υπηρεσία τεχνικής εξυπηρέ-
τησης για το είδος του προβλήματος που διαπι-
στώσατε, αναφέροντας τα παρακάτω στοιχεία:
Σειριακό αριθμό (S-No).
Μοντέλο συσκευής (Mod.)
Τα στοιχεία αυτά αναγράφονται στην πινακίδα τε-
χνικών χαρακτηριστικών του φούρνου σας που μπο-
ρείτε να δείτε στο πλάι όταν ανοίξετε την πόρτα.

93
Figuras / Figuras / Figures / Figures / Abbildungen /
4 5
1
mín 5
3
90
2
6
Instalación y Mantenimiento / Instalação e Manutenção / Installation & Maintenance / Installation et Entretien / Installation und Wartung /
Installatie en onderhoud / Εγκατάσταση και συντήρηση

94
Instalación y Mantenimiento / Instalação e Manutenção / Installation & Maintenance / Installation et Entretien / Installation und Wartung /
Installatie en onderhoud / Εγκατάσταση και συντήρηση
9 10
11
* Para hornos pirolíticos NO realizar las aperturas.
* Para fornos pirolíticos, NÃO faça as aberturas.
* For pyrolytic ovens, DO NOT drill any holes.
* NE PAS réaliser d’ouverture pour des fours pyroly-
tiques.
* Für die Pyrolyseöfen NICHT die Öffnungen sägen.
* Voor gaten maken.
* κάνετε τα ανοίγματα όταν πρόκειται για
.
7 8

95
Instalación y Mantenimiento / Instalação e Manutenção / Installation & Maintenance / Installation et Entretien / Installation und Wartung /
Installatie en onderhoud / Εγκατάσταση και συντήρηση
12 13
14 15 16
17 18

96
Instalación y Mantenimiento / Instalação e Manutenção / Installation & Maintenance / Installation et Entretien / Installation und Wartung /
Installatie en onderhoud / Εγκατάσταση και συντήρηση
19 20
A
A
A
21 22
23
24 25 26

97
Instalación y Mantenimiento / Instalação e Manutenção / Installation & Maintenance / Installation et Entretien / Installation und Wartung /
Installatie en onderhoud / Εγκατάσταση και συντήρηση
27 28
29
31
33
30
32
34


www.teka.com
Cod. 3371040-00
-
 1
1
-
 2
2
-
 3
3
-
 4
4
-
 5
5
-
 6
6
-
 7
7
-
 8
8
-
 9
9
-
 10
10
-
 11
11
-
 12
12
-
 13
13
-
 14
14
-
 15
15
-
 16
16
-
 17
17
-
 18
18
-
 19
19
-
 20
20
-
 21
21
-
 22
22
-
 23
23
-
 24
24
-
 25
25
-
 26
26
-
 27
27
-
 28
28
-
 29
29
-
 30
30
-
 31
31
-
 32
32
-
 33
33
-
 34
34
-
 35
35
-
 36
36
-
 37
37
-
 38
38
-
 39
39
-
 40
40
-
 41
41
-
 42
42
-
 43
43
-
 44
44
-
 45
45
-
 46
46
-
 47
47
-
 48
48
-
 49
49
-
 50
50
-
 51
51
-
 52
52
-
 53
53
-
 54
54
-
 55
55
-
 56
56
-
 57
57
-
 58
58
-
 59
59
-
 60
60
-
 61
61
-
 62
62
-
 63
63
-
 64
64
-
 65
65
-
 66
66
-
 67
67
-
 68
68
-
 69
69
-
 70
70
-
 71
71
-
 72
72
-
 73
73
-
 74
74
-
 75
75
-
 76
76
-
 77
77
-
 78
78
-
 79
79
-
 80
80
-
 81
81
-
 82
82
-
 83
83
-
 84
84
-
 85
85
-
 86
86
-
 87
87
-
 88
88
-
 89
89
-
 90
90
-
 91
91
-
 92
92
-
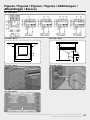 93
93
-
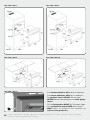 94
94
-
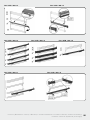 95
95
-
 96
96
-
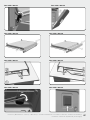 97
97
-
 98
98
-
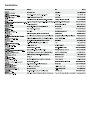 99
99
-
 100
100


in andere talen
- English: Teka HBE 435 ME User manual
- français: Teka HBE 435 ME Manuel utilisateur
- español: Teka HBE 435 ME Manual de usuario
- Deutsch: Teka HBE 435 ME Benutzerhandbuch
- português: Teka HBE 435 ME Manual do usuário