
Li-ion battery powered tube motors
with pull and remote operation
MANUAL CM-03/05

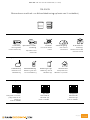
Trekbediening
Bedienen met
trekbediening
Li-ionbatterij
Geïntegreerde
lithium-ionbatterij
Kenmerken van de motor
Besturingsopties
Ondersteuning
Afstandsbediening
Bediening met een
afstandsbediening
Oplaadbaar via USB-
aansluiting
Oplaadbaar met
micro USB
Bediening via app
Bediening met de
MOTION-app
Draadloos
Installatie zonder
kabels
Connectiviteit
Compatibel met
domotica systemen
Snelheidsregeling
Consistente
rolsnelheid
Bi-directioneel
Tweewegs
communicatie voor
realtime reactie
Video
Uitleg over installatie,
programmeren en
bediening
rtube.nl/red980
App Store
Download de
MOTION-app
rtube.nl/red981
Google Play
Download de
MOTION-app
rtube.nl/red982
CM-03/05
Buismotoren met trek- en afstandsbediening op basis van li-ionbatterij
MOTION CM- 03/05-BUIS MOTO R (L I-I ON)
2/45
© Copyright

Conforms to
UL Std. 325
C
CSA Std. C22.2#247
Nederlands
Reiniging
Volg de algemene regels voor het reinigen van
het apparaat en de onderdelen:
Gebruik een zachte, pluisvrije, licht vochtige
doek. Voorkom dat er vocht in de openingen
komt.
Gebruik geen sprays, oplosmiddelen, alcohol
of schurende middelen.
Service & Ondersteuning
Voer zelf geen reparaties uit. Probeer het
apparaat niet te open of te demonteren. Gevaar
voor elektrische schokken en het vervallen van
de garantie. Bevat geen door de gebruiker te
vervangen onderdelen.
Garantie
Volg altijd eerst de instructie in deze handleiding
voordat u naar uw dealer gaat. Als het apparaat
defect lijkt of niet goed functioneert ga dan naar
uw dealer voor garantie.
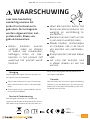
WAARSCHUWING
Lees deze handleiding
aandachtig alvorens het
product te monteren en te
gebruiken. De montage kan
worden uitgevoerd door niet-
professionals. Alleen voor
gebruik binnenshuis.
Kleine kinderen kunnen
verstrikt raken en stikken
in lussen van trekkoorden,
kettingen, linten en trek-
koorden in het product zelf
waarmee het product wordt
bediend.
Houd alle koorden buiten het
bereik van kleine kinderen om
wurging en verstrikking te
voorkomen.
Kinderen kunnen met hun nek
in een koord verstrikt raken.
Plaats bedden, kinderbedjes
en meubilair niet in de buurt
van koorden van raambekle-
ding.
Knoop koorden niet aan elkaar
vast.
Let erop dat koorden niet
in elkaar draaien en een lus
vormen.
MOTION CM- 03/0 5-BUIS MOTO R (L I-IO N)
© Copyright 3/45

Belangrijke veiligheidsinstructies
WAARSCHUWING: Om het risico op ernstige
verwondingen of op de dood te verminderen is
het belangrijk voor de veiligheid van personen
om deze instructies te volgen. Bewaar deze
instructies.
Lees alle installatie-instructies en volg ze op.
Dit apparaat kan worden gebruikt door
kinderen vanaf 8 jaar, door personen met
lichamelijke, zintuiglijke of verstandelijke
beperkingen en door personen zonder ervaring
en kennis, mits er sprake is van toezicht of
van instructies over het veilige gebruik van
het apparaat en mits ze de mogelijke gevaren
van het gebruik ervan hebben begrepen. Laat
kinderen niet met het apparaat spelen. Laat
kinderen het apparaat niet zonder toezicht
schoonmaken en onderhouden.
Laat de kinderen niet spelen met
vaste bedieningselementen. Houd de
afstandsbediening buiten bereik van kinderen.
Controleer regelmatig of de installatie niet
uit balans is en of er sporen zijn van slijtage
of schade aan kabels en veren. Gebruik het
product niet als er reparatie of aanpassing
nodig is.
Deze handleiding is ook online beschikbaar.
De aandrijving moet van de voedingsbron
worden losgekoppeld tijdens het vervangen
van onderdelen, schoonmaken en
onderhouden.
Het A-gewogen geluidsdrukniveau in de oren
van de gebruiker is gelijk aan of minder dan 70
dB(A).
Alleen voor gebruik binnenshuis en in
huishoudelijke omgevingen.
Koppel de aandrijving los van de voeding
of schakel de automatische bediening uit
wanneer er onderhoudswerkzaamheden in de
omgeving worden uitgevoerd, zoals tijdens het
wassen van ramen.
Zorg dat er geen andere personen in de buurt
zijn als u een dodemansschakelaar gebruikt.
Bedien het product niet wanneer er
onderhoudswerkzaamheden in de buurt
worden uitgevoerd, zoals het wassen van
ramen.
De buismotor mag alleen werken met een
veilige, extra lage spanning die overeenkomt
met de markering op het apparaat.
Dit apparaat bevat accu's die niet kunnen
worden vervangen.
Belangrijke installatie-instructie
WAARSCHUWING: Belangrijke
veiligheidsinstructies. Volg alle instructies;
onjuiste installatie kan tot ernstig letsel leiden.
Deze motor kan alleen worden gebruikt met
zacht materiaal voor aangedreven onderdelen.
Gevaarlijke onbeschermde bewegende
onderdelen van de aandrijving moeten hoger
dan 2,5m boven de vloer of andere vlakke
ondergrond die er toegang toe biedt worden
geïnstalleerd.
Installeer het bewegende deel van een
handmatige vrijgave minder dan 1,8 m hoog.
Het bewegende deel van een
dodemansschakelaar moet binnen het
zicht van het aangedreven onderdeel maar
uit de buurt van bewegende onderdelen
worden geplaatst. Het moet op een minimale
hoogte van 1,5 m worden geïnstalleerd en
ontoegankelijk zijn voor het publiek.
De massa en dimensie van het aangedreven
onderdeel moeten compatibel zijn met
het nominale vermogen en de nominale
bedrijfstijd.
Vaste bedieningsonderdelen moeten na de
installatie duidelijk zichtbaar zijn.
Het aangedreven deel moet compatibel zijn
met het nominale vermogen (1,1 N.m/2.2 Nm)
en de nominale bedrijfstijd (12 min.).
Minimale buisdiameter: Ø 25 mm.
MOTION CM- 03/0 5-BUIS MOTO R (L I-IO N)
© Copyright 4/45

De aandrijving is bedoeld om te worden
geïnstalleerd op een hoogte van minimaal
2,5m boven de vloer of een andere ondergrond
die toegang biedt.
De ontkoppeling van alle polen moet in de vaste
bedrading worden verwerkt volgens de
bedradingsregels.
FFC-handleiding
Dit apparaat voldoet aan deel 15 van de FCC-
regels.
Op het gebruik zijn de volgende twee
voorwaarden van toepassing:
(1) dit apparaat mag geen schadelijke storingen
veroorzaken;
(2) dit apparaat moet bestand zijn tegen alle
storingen die worden ontvangen,
inclusief storingen die een ongewenste werking
kunnen veroorzaken.
FCC-ID: ZY4CM03
FCC-ID: ZY4CM05
Wettelijk verplichte informatie
1 FCC-informatie voor de gebruiker
Dit product bevat geen onderdelen die door
de gebruiker kunnen worden gerepareerd en
mag alleen worden gebruikt met goedgekeurde
antennes. Wijzigingen of aanpassingen aan het
product zorgen dat wettelijke certificeringen en
goedkeuringen die van toepassing zijn ongeldig
worden.
2 FCC-kennisgevingen inzake
elektronische emissies
Dit apparaat voldoet aan deel 15 van de FCC-
regels.
Op het gebruik zijn de volgende twee
voorwaarden van toepassing:
1. Dit apparaat mag geen schadelijke storingen
veroorzaken;
2. Dit apparaat moet bestand zijn tegen alle
storingen die worden ontvangen, inclusief
storingen die een ongewenste werking kunnen
veroorzaken.
3 FFC-verklaring inzake storingen door
radiofrequentie
Deze apparatuur is getest en voldoet aan de
beperkingen voor digitale apparaten van Klasse
B,
zoals beschreven in deel 15 van de FCC-regels.
Deze limieten zijn opgesteld om redelijke
bescherming te bieden tegen schadelijke storing
wanneer de apparatuur in een bedrijfsomgeving
wordt bediend. Deze apparatuur genereert en
gebruikt radiofrequentie-energie en kan deze
energie uitstralen; als de apparatuur niet
wordt geïnstalleerd en gebruikt volgens de
instructies, kan deze schadelijke storingen in de
radiocommunicatie veroorzaken.
Gebruik van dit apparaat in een woonomgeving
kan mogelijk schadelijke storing veroorzaken. In
dat geval is de gebruiker verplicht om de storing
voor eigen rekening te verhelpen.
Als dit apparaat schadelijke storing aan
radiocommunicatie veroorzaakt (wat kan worden
vastgesteld door de apparatuur uit en aan te
zetten), dan wordt de gebruiker aangemoedigd
om de storing te verhelpen door een van de
volgende maatregelen uit te voeren:
Verstel of verplaats de ontvangstantenne;
Vergroot de afstand tussen de apparatuur en
de ontvanger;
Sluit de apparatuur op een stopcontact aan
dat zich in een ander circuit bevindt dan het
stopcontact van de ontvanger;
Raadpleeg de leverancier of een ervaren
radio-/tv-monteur voor hulp.
Nederlands
MOTION CM- 03/0 5-BUIS MOTO R (L I-IO N)
© Copyright 5/45

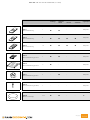
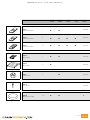
Kanalen Wand-
montage
Rolgordijnen
program-
meren
Enkele
selectie
Kanaal
selecteren
Max.
rolgordijnen
CM-11
Afstandsbediening 1■ ■ - - onbeperkt
CM-12
Afstandsbediening 5■ ■ ■ ■ onbeperkt
CM-13
Afstandsbediening 15 ■ ■ ■ ■ onbeperkt
CM-15
Afstandsbediening op muur 1■ ■ - - onbeperkt
CM-16
Afstandsbediening op muur 4 ■- - - onbeperkt
CM-17
Afstandsbediening op tafel 4 - ■- - onbeperkt
CM-18
Afstandsbediening (trekken) 1 - - - - onbeperkt
CM-20
Motion-wifi-bridge n.v.t. ■ ■ - - 30
MOTION CM- 03/0 5-BUIS MOTO R (L I-IO N)
© Copyright 6/45

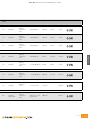
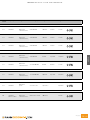
rolgordijnen
Max.
scènes Frequentie- bereik Voeding Lengte Breedte Hoogte Certificaten
n.v.t. 433 MHz 30 m bij
1 betonnen
muur
CR2430 3,0 volt 120 mm 45 mm 14 mm
n.v.t. 433 MHz 30 m bij
1 betonnen
muur
CR2430 3,0 volt 120 mm 45 mm 14 mm
n.v.t. 433 MHz 30 m bij
1 betonnen
muur
CR2430 3,0 volt 120 mm 45 mm 14 mm
n.v.t. 433 MHz 30 m bij
1 betonnen
muur
CR2430 3,0 volt 66 mm 32,5 mm 13,8 mm
n.v.t. 433 MHz 30 m bij
1 betonnen
muur
3 x CR2430 3,0 volt 86 mm 86 mm 17 mm
n.v.t. 433 MHz 30 m bij
1 betonnen
muur
2 x CR2450 3,0 volt 70,3 mm 62,7 mm 52,3 mm
n.v.t. 433 MHz 20 m open
ruimte 2 x LR44 1,5 volt 19,5 mm ø 69,9 mm
20 433 MHz
Wifi 2,4 GHz
30 m bij
1 betonnen
muur
Micro USB - 5 volt,
gelijkstroom 100 mm ø 25 mm
Nederlands
MOTION CM- 03/0 5-BUIS MOTO R (L I-IO N)
© Copyright 7/45

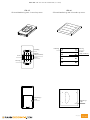
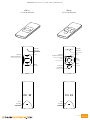
Koppelings-
knop
Koppelings-
knop
Kanaal
Selectie
Kanaal-
aanduiding
Omhoog
Omlaag
Midden
(stop/favoriet)
Midden
(stop/favoriet)
Omhoog
Kanaal-
aanduiding
Omlaag
Rechts
Links
CM-11
Afstandsbediening met 1 kanaal
CM-12
Afstandsbediening met 5 kanalen
MOTION CM- 03/0 5-BUIS MOTO R (L I-IO N)
© Copyright 8/45

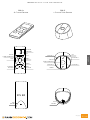
1
2
3
4
1 3
2 4
Omhoog
Kanaal-
aanduiding
Rechts
Omlaag
Vorige
Kanaal
Volgende
Kanaal
Midden
(stop/favoriet)
Links
Kanaal 1
Kanaal 3
Kanaal 2 Kanaal 4
Omlaag
Omhoog
Midden
(stop/favoriet)
Koppelings-
knop
Koppelings-
knop
CM-13
Afstandsbediening met 15 kanalen
CM-17
Tafel-afstandsbediening met 4 kanalen
Nederlands
MOTION CM- 03/0 5-BUIS MOTO R (L I-IO N)
© Copyright 9/45

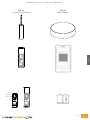
CM-15
Afstandsbediening met 1 kanaal op muur
CM-16
Afstandsbediening met 4 kanalen op muur
Koppelings-
knop
Koppelings-
knop
Omhoog
Rechts
Omlaag
Links
Midden
(stop/favoriet)
Omlaag
Omhoog
Midden
(stop/favoriet)
MOTION CM- 03/0 5-BUIS MOTO R (L I-IO N)
10/45
© Copyright

CM-18
Afstandsbediening met 1 kanaal
CM-20
Motion-bridge
Zie handleiding CM-20
Koppelings-
knop
Nederlands
MOTION CM- 03/0 5-BUIS MOTO R (L I-IO N)
11/45
© Copyright

Click!
Click!
Click!
2
3
4
1
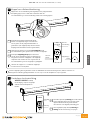
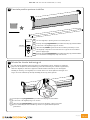
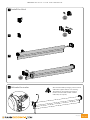
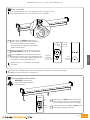
5Activeer de motor door deze op te laden met een
micro USB-kabel. Een groen ledlampje begint
te knipperen. De motor kan tijdens het opladen
worden gebruikt.
(Zie stap 25 om de motor te activeren
zonder micro USB-kabel)
Installeer het rolgordijn
Activeer de motor
MOTION CM- 03/0 5-BUIS MOTO R (L I-IO N)
12/45
© Copyright

7.1
6.1
6.2
6.3
7.2
6
7
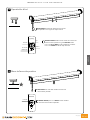
Druk kort op de knop omlaag om te controleren
of het rolgordijn op de juiste manier wordt
afgerold. De draairichting moet worden
veranderd als het rolgordijn omhoog gaat.
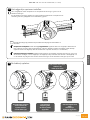
Koppel een afstandsbediening die rolgordijnen kan programmeren.
Raadpleeg pagina 4 en 5 voor meer informatie over de
afstandsbediening. In deze handleiding wordt CM-12 weergegeven.
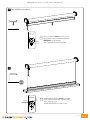
WAARSCHUWING: risico op
beschadiging. Stop het rolgordijn
voordat deze de eindposities
bereikt.
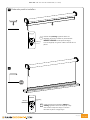
Om een rolgordijn goed te gebruiken en om te voorkomen dat deze beschadigd raakt, moeten er onder- en
bovengrenzen worden geprogrammeerd. Ga naar stap 12 als de eindposities al zijn ingesteld.
Druk kort op de programmeerknop op de
motor. Het rolgordijn begint te draaien om
aan te geven dat de programmeermodus is
geactiveerd. (Het rolgordijn blijft draaien totdat
de programmeermodus wordt uitgeschakeld.)
Herhaal de stappen 6.1 - 6.3 om een rolgordijn
uit een kanaal te verwijderen.
Druk op de koppelingsknop op de achterkant
van de afstandsbediening om het rolgordijn aan
het gewenste kanaal te koppelen. Het rolgordijn
stopt kort met draaien om aan te geven dat de
afstandsbediening aan het rolgordijn is gekoppeld.
Selecteer met behulp van de knop kanaalkeuze op de
afstandsbediening een gewenst kanaal voor het rolgordijn.
Kanaal-
keuze Koppelings-
knop
Kanaal-
aanduiding
Omhoog
Omlaag
Koppel een afstandsbediening
Controleer de draairichting
Druk tegelijkertijd op de knop omhoog en
omlaag om de draairichting te wijzigen.
Nederlands
MOTION CM- 03/0 5-BUIS MOTO R (L I-IO N)
© Copyright 13/45

9
9.1
8.1
8
Omlaag
Omhoog
Midden
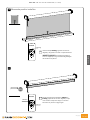
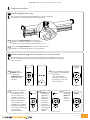
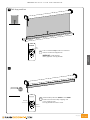
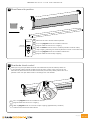
Houd de knop omlaag ingedrukt totdat het
rolgordijn de gewenste onderste positie bereikt.
WAARSCHUWING: Risico op beschadiging.
Laat het rolgordijn langzaam zakken tot de onderste
positie.
Onderste positie instellen
Houd tegelijkertijd de knoppen midden en
omhoog ingedrukt totdat het rolgordijn stopt
met draaien en opnieuw begint te draaien.
De onderste positie is opgeslagen.
MOTION CM- 03/0 5-BUIS MOTO R (L I-IO N)
14/45
© Copyright

10
11
10.1
11.1
Bovenste positie instellen
Omlaag
Midden
Houd de knop omhoog ingedrukt totdat het
rolgordijn de gewenste bovenste positie bereikt.
WAARSCHUWING: Risico op beschadiging.
Laat het rolgordijn langzaam omhoog bewegen
tot de bovenste positie.
Omhoog
Houd tegelijkertijd de knoppen midden en
omlaag ingedrukt totdat het rolgordijn stopt
met draaien en opnieuw begint te draaien.
De bovenste positie is opgeslagen.
Nederlands
MOTION CM- 03/0 5-BUIS MOTO R (L I-IO N)
15/45
© Copyright

12
12.2
13.1
12.1
13
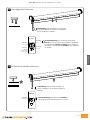
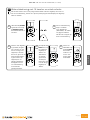
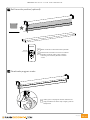
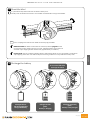
Optioneel: Favoriete positie instellen
Stel het rolgordijn in op een gewenste favoriete positie.
Druk kort op de programmeerknop om de
programmeermodus uit te schakelen. Het
rolgordijn stopt met draaien en kan worden
bediend.
Midden
Programmeermodus uitschakelen
Houd de knop ‘midden’ ingedrukt om deze
favoriete positie op te slaan. Het rolgordijn
stopt kort met draaien om aan te geven dat de
favoriete positie is opgeslagen.
MOTION CM- 03/0 5-BUISMOTOR (LI-ION)
16/45
© Copyright

14
15
Trekbediening: Trek en houd het koord vast
om het rolgordijn naar de favoriete positie te
bewegen.
Afstandsbediening: Druk op de knop midden om
het rolgordijn op de favoriete positie in te stellen.
Trekbediening: Trek een keer om het rolgordijn
naar de eindposities te bewegen. Trek opnieuw
om het rolgordijn te stoppen.
Afstandsbediening: Kies met behulp van de knop
kanaal het kanaal waaraan het rolgordijn is gekoppeld.
Druk op de knop omhoog of omlaag om het rolgordijn
te bedienen. Druk op de knop midden om het rolgordijn
te stoppen.
Omhoog
Omlaag
Midden
Kanaal-
keuze
Midden
Het rolgordijn bedienen
De favoriete positie activeren
Nederlands
MOTION CM- 03/0 5-BUIS MOTO R (L I-IO N)
17/45
© Copyright

17.2
17.1
16.1
16.2
16.3
16.4
16
17
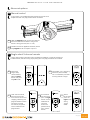
Stel het rolgordijn in op een gewenste favoriete positie.
Druk op de knop programmeren op de motor om de programmeermodus
te activeren. Het rolgordijn begint te draaien.
Houd de knop midden ingedrukt om deze favoriete positie op te slaan.
Het rolgordijn stopt kort met draaien om aan te geven dat de favoriete
positie is opgeslagen.
Druk op de knop programmeren op de motor om de programmeermodus
uit te schakelen. Het rolgordijn stopt met draaien.
Midden
Favoriete positie opnieuw instellen
Druk op de knop programmeren op de motor om de programmeermodus
te activeren. Het rolgordijn begint te draaien.
Houd de knop programmeren ingedrukt totdat het rolgordijn stopt met draaien
(circa 5 seconden); de directe bediening wordt nu uitgeschakeld of opnieuw
geactiveerd.
Als u op de knop ‘omhoog’ of ‘omlaag’ op de afstandsbediening drukt, beweegt het rolgordijn
gelijk naar de eindposities (directe bediening). De directe bediening kan worden uitgeschakeld,
zodat het rolgordijn in kleinere stappen kan worden bediend met behulp van de knoppen
‘omhoog’ en ‘omlaag’. Het rolgordijn kan nu alleen direct naar de eindposities bewegen als er
langer dan twee seconden op de knop ‘omhoog’ of ‘omlaag’ wordt gedrukt.
Schakel de directe bediening uit
MOTION CM- 03/0 5-BUIS MOTO R (L I-IO N)
18/45
© Copyright

18
18.1
19
Het is mogelijk om alleen eindposities te verwijderen of om terug te gaan naar de
fabrieksinstellingen.
Als de fabrieksinstellingen worden hersteld, worden de eindposities verwijderd en de
verbinding met een gekoppelde afstandsbediening gewist.
Druk op de knop ‘programmeren’ op de motor om de programmeermodus te
activeren.
Eindposities verwijderen: Houd de knop programmeren ingedrukt totdat het rolgordijn voor de eerste
keer stopt met draaien, zodat de eindlimieten voor het rolgordijn worden verwijderd. Houd de knop
ingedrukt totdat het rolgordijn voor de tweede keer stopt met draaien (ca. 10 seconden).
Fabrieksinstellingen herstellen: Houd de knop minimaal 20 seconden ingedrukt om terug te gaan naar
de fabrieksinstellingen van het rolgordijn. Het rolgordijn stopt twee keer met draaien. Het rolgordijn zal
na de tweede stop nog een keer draaien om te bevestigen dat de fabrieksinstellingen zijn hersteld.
Het rolgordijn opnieuw instellen
Gebruik een micro USB-
kabel om de
motor op te laden
Het ledlampje knippert
rood wanneer het
systeem actief is;
laad de batterij op
Het ledlampje
knippert groen;
de batterij wordt
opgeladen
Het ledlampje brandt
groen;
de batterij is
helemaal opgeladen
De batterij opladen
Nederlands
MOTION CM- 03/0 5-BUIS MOTO R (L I-IO N)
19/45
© Copyright

1
1
+
20
21
20.2
21.1 21.2
21.4 21.521.3
20.1 Houd de knop programmeren ingedrukt om het
rolgordijn handmatig te bedienen. Het rolgordijn zal
bewegen zo lang de knop wordt ingedrukt (max. 15 sec.).
Laat de knop programmeren los en herhaal stap 20.1 om het
rolgordijn in de tegenovergestelde richting te bewegen.
Als er geen afstandsbediening of trekbediening is, kan het rolgordijn
worden bediend via de programmeerknop op de motor.
Uitgebreide opties
De afstandsbediening begint
te zoeken naar rolgordijnen
(zoekmodus).
Deze modus wordt
aangegeven doordat de
ledlampjes van links naar
rechts knipperen.
Houd de knop
midden ingedrukt
en druk op de
koppelingsknop om
‘Enkele selectie’ te
activeren.
Druk op de knop
rechts om naar
het volgende
rolgordijn te
zoeken. De
zoekmodus
zal worden
geactiveerd.
Druk op de
knop ‘links’ om
naar de vorige
rolgordijn te
zoeken.
Druk in de
zoekmodus
op de knop
rechts om
‘Enkele
selectie’ af
te sluiten.
Nadat er een rolgordijn
is gevonden, knippert
het ledlampje van het
kanaal en begint het
rolgordijn te draaien
om aan te geven dat de
programmeermodus
is geactiveerd. Het
rolgordijn kan nu worden
gekoppeld/ontkoppeld
van de afstandsbediening
en/of worden
geprogrammeerd.
Met ‘Enkele selectie’ kunt u een programmeermodus voor een rolgordijn activeren via
een afstandsbediening, zonder dat u op de fysieke programmeerknop op het rolgordijn
hoeft te drukken.
Handmatige bediening
Afstandsbediening met 5 kanalen en enkele selectie
MOTION CM- 03/0 5-BUIS MOTO R (L I-IO N)
20/45
© Copyright

1
1
1
1
11
11
+
11
22
22.1
22.3
22.2
22.4 22.5
De afstandsbediening
begint te zoeken
naar rolgordijnen
(zoekmodus). Dit wordt
aangegeven door de
horizontale streepjes op
de afstandsbediening.
Houd de knop midden
ingedrukt en druk op
de koppelingsknop
om ‘Enkele selectie’ te
activeren.
Met ‘Enkele selectie’ kunt u een programmeermodus voor een rolgordijn activeren via
een afstandsbediening, zonder dat u op de fysieke programmeerknop op het rolgordijn
hoeft te drukken.
Druk op de knop
rechts om naar
het volgende
rolgordijn te
zoeken. De
zoekmodus
zal worden
geactiveerd.
Druk op de
knop ‘links’ om
naar de vorige
rolgordijn te
zoeken.
Druk in de
zoekmodus op
de knop rechts
om ‘Enkele
selectie’ af te
sluiten. Het
display toont
de letter O.
Nadat er een rolgordijn
is gevonden, knippert
het nummer van het
kanaal en begint het
rolgordijn te draaien
om aan te geven dat de
programmeermodus
is geactiveerd. Het
rolgordijn kan nu
worden gekoppeld/
ontkoppeld van de
afstandsbediening
en/of worden
geprogrammeerd.
Afstandsbediening met 15 kanalen en enkele selectie
Nederlands
MOTION CM- 03/0 5-BUIS MOTO R (L I-IO N)
21/45
© Copyright

1
133
1
1
3
1 1 3
11
3
3 3
3 3 3
+
+
24
23.1 23.2
23.3
24.3
24.4 24.5
24.1
23.4 23.5
23
24.2
Met ‘Kanaal selecteren’ kunnen rolgordijnen tussen kanalen/afstandsbedieningen worden
gekopieerd zonder dat er op de programmeerknop op de motoren hoeft te worden gedrukt.
Houd de knop
kanaal selecteren
ingedrukt en druk op
de koppelingsknop
om ‘Kanaal
selecteren’ te
activeren.
Druk op de
koppelingsknop
op de (nieuwe)
afstandsbediening
om het rolgordijnen
aan het nieuwe
kanaal te koppelen.
Ga terug naar het
kanaal dat in stap
23.1 is geselecteerd
en herhaal stap
23.2 om ‘Kanaal
selecteren’ af te
sluiten.
Alle rolgordijnen in het
geselecteerde kanaal
zullen beginnen te draaien
om aan te geven dat de
programmeermodus is
geactiveerd. Alle rolgor-
dijnen kunnen nu worden
gekopieerd naar een nieuw
kanaal op dezelfde af-
standsbediening of op een
andere afstandsbediening.
Selecteer een nieuw kanaal
op de (nieuwe) afstandsbe-
diening.
Met ‘Kanaal selecteren’ kunnen rolgordijnen tussen kanalen/afstandsbedieningen worden
gekopieerd zonder dat er op de programmeerknop op de motoren hoeft te worden gedrukt.
Selecteer het kanaal
dat u wilt kopiëren.
Houd de knop kanaal
selecteren ingedrukt
en druk op de
koppelingsknop om
‘Kanaal selecteren’ te
activeren.
Druk op de
programmeerknop
op de (nieuwe)
afstandsbediening
om het rolgordijnen
te koppelen
aan de (nieuwe)
afstandsbediening).
Ga terug naar
het kanaal dat u
in stap 24.1 hebt
geselecteerd
en herhaal stap
24.2 om ‘Kanaal
selecteren’ af te
sluiten.
Alle rolgordijnen in het
geselecteerde kanaal
zullen beginnen te draaien
om aan te geven dat de
programmeermodus is
geactiveerd. Alle rolgor-
dijnen kunnen nu worden
gekopieerd naar een
nieuw kanaal op dezelfde
afstandsbediening of op
andere afstandsbedienin-
gen. Selecteer een kanaal
op een (nieuwe) afstands-
bediening.
Afstandsbediening met 5 kanalen en kanaal selecteren
Afstandsbediening met 15 kanalen en kanaal selecteren
Selecteer het
kanaal waarvan het
rolgordijnen moeten
worden gekopieerd.
MOTION CM- 03/0 5-BUIS MOTO R (L I-IO N)
22/45
© Copyright

+
25
25.1 Houd de programmeerknop ingedrukt en trek twee keer om de motor in of uit te schakelen.
De motor kan ook worden geactiveerd door deze op te laden met een microUSB-kabel.
Om schade aan het rolgordijn te voorkomen, heeft de motor een transportmodus. Deze
zorgt dat het rolgordijn niet voortijdig wordt geactiveerd voordat deze is geïnstalleerd.
Veelgestelde vragen
Probleem Oorzaak Oplossing
Het rolgordijn werkt niet.
De motor is actief in de transportmodus. Activeer de motor. Zie stap 25.
De batterij van de motor is leeg. Laad de motor op. Zie stap 19.
De batterij van de afstandsbediening is
leeg. (Ledlampjes van afstandsbediening
knipperen snel.)
Vervang de batterij in de afstandsbediening.
Raadpleeg de handleiding voor de
afstandsbediening.
De batterij is verkeerd in de
afstandsbediening geplaatst.
Vervang de batterij in de afstandsbediening.
Raadpleeg de handleiding voor de
afstandsbediening.
RF-storing Controleer of de antenne van de motor niet
wordt gehinderd door metalen voorwerpen.
De afstand tussen de afstandsbediening en
de motor is te groot.
Ga dichter bij de motor staan.
De afstandsbediening is niet verbonden
met het rolgordijn.
Koppel de afstandsbediening aan de motor.
Zie stap 6.
Het ledlampje voor de motor
knippert rood.
De batterij van de motor is leeg. Laad de motor op. Zie stap 19.
Het rolgordijn wordt niet
opgeladen.
De oplader is niet aangesloten of
werkt niet.
Probeer een andere oplader of controleer
of de oplader op het stopcontact is
aangesloten.
Meerdere rolgordijnen reageren
op een afstandsbediening.
(Er kan niet slechts een rolgordijn
worden geprogrammeerd.)
Er zijn meerdere rolgordijnen aan een
kanaal gekoppeld.
Koppel het rolgordijn aan een vrij kanaal
om het te programmeren of gebruik
‘Enkele selectie’ om het rolgordijn te
programmeren.
Het rolgordijn beweegt in kleine
stapjes.
1) Er zijn geen eindposities geprogrammeerd;
2) De directe bediening is uitgeschakeld.
1) Programmeer eindposities Zie stap 8-11.
2) Activeer de directe bediening. Zie stap 17.
De favoriete positie kan niet
worden geprogrammeerd.
Er zijn geen eindposities geprogrammeerd. Programmeer eindposities.
Zie stap 8-11.
Het rolgordijn zakt te ver. De eindposities zijn verkeerd
geprogrammeerd.
Programmeer de eindposities opnieuw.
Zie stap 8-11.
Het rolgordijn beweegt in de
tegenovergestelde richting. De draairichting is verkeerd ingesteld. Verander de draairichting.
Zie stap 7.
Het rolgordijn blijft omhoog en
omlaag bewegen.
Het rolgordijn is actief in de
programmeermodus.
Druk op de knop ‘programmeren’ op de
motor om de programmeermodus af te
sluiten.
Activeer/deactiveer de motor
of
Nederlands
MOTION CM- 03/0 5-BUIS MOTO R (L I-IO N)
23/45
© Copyright

Pull Control
Operate with
pull control
Li-ion Battery
Integrated
lithium-ion battery
Motor features
Control options
Support
Remote Control
Operate with a
remote control
USB Rechargeable
htiw elbaegrahceR
micro USB
App Control
Operate with the
MOTION app
Wireless
Cable free
installation
Connectivity
Compatible with
home and building
automation
Speed Control
Consistent
rolling speed
Bi-directional
Two-way
communication for
real-time response
Video
How to install,
program and operate
rtube.nl/red980
App Store
Download the
MOTION app
rtube.nl/red981
Google Play
Download the
MOTION app
rtube.nl/red982
CM-03/05
Li-ion battery powered tube motors with
pull and remote operation
MOTION CM-03/ 05 L I-IO N TUBULAR MOT OR
© Copyright 24/45

Conforms to
UL Std. 325
C
CSA Std. C22.2#247
English
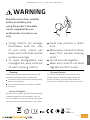
WARNING
Read the instructions carefully
before assembling and
using the product. Assembly
can be completed by non-
professionals. For indoor use
only.
Young children can strangle
themselves with the loop
of pull cords, chains and
tapes, and cords that operate
window coverings.
To avoid strangulation and
entanglement, keep cords out
of reach of young children.
Cords may ensnare a child’s
neck.
Move beds, cots and furniture
away from window covering
cords.
Do not tie cords together.
Make sure cords do not twist
together and form a loop.
Cleaning
Follow these general rules when cleaning the
outside of the device and its components:
Use a damp, soft, lint-free cloth. Avoid getting
moisture in openings.
Do not use aerosol sprays, solvents, alcohol,
or abrasives.
Service & Support
Do not perform repairs yourself. Do not attempt
to open the device or disassemble it. You run
the risk of electric shock and voiding the limited
warranty. No user-serviceable parts are inside.
Warranty Service
First follow the advice in this manual. If the
product appears to be damaged or does not
function properly, go to your local dealer for
instructions on how to obtain warranty service.
MOTION CM-03/ 05 L I-IO N TUBULAR MOT OR
25/45
© Copyright

Important Safety instructions
WARNING: To reduce the risk of severe injury or
death, it is important to follow these instructions for
personal safety. Save these instructions.
Read and follow all installation instructions.
This appliance can be used by children aged
8 years and above and persons with reduced
physical, sensory or mental capabilities or lack
of experience and knowledge if they have been
given supervision or instruction concerning use of
the appliance in a safe way and understand the
hazards involved. Children should not play with
the appliance. Cleaning and user maintenance
should not be performed by children without
supervision.
Do not allow children to play with fixed controls.
Keep remote controls away from children.
Frequently examine the installation for imbalance
and signs of wear or damage to cables and
springs. Do not use if repair or adjustment is
necessary.
This instruction manual is also available on the
website.
The drive must be disconnected from its power
source during cleaning, maintenance and when
replacing parts.
The A-weighted emission sound pressure level of
the drive is equal to or less than 70dB(A).
Indoor and household use only.
Disconnect the drive from the power supply
or switch off the automatic controls when
maintenance, such as window cleaning, is being
carried out in the vicinity.
When operating a biased switch, make sure that
other persons are kept away.
Do not operate when maintenance, such as
window cleaning, is being carried out in the
vicinity.
The tube motor must only be supplied with safety
extra low voltage corresponding to the marking on
the appliance.
This appliance contains batteries that are non-
replaceable.
Important Installation instructions
WARNING: Important safety instructions. Follow all
instructions, since incorrect installation can lead to
severe injury.
This motor can only be used with soft material for
driven parts.
Hazardous unprotected moving parts of the drive
must be installed higher than 2.5m above the
floor or any other level surface that could provide
access to it.
Install the actuating member of a manual release
at a height less than 1.8m.
The actuating member of a biased switch is to be
located within direct sight of the driven part but
away from moving parts. It is to be installed at a
minimum height of 1.5m and not accessible to
the public.
The mass and the dimension of the driven part
must be compatible with the rated torque and
rated operating time.
Fixed controls have to be clearly visible after
installation.
The driven part must be compatible with the rated
torque (1.1N.m/2.2N.m) and rated operating time
(12min).
Minimum tube diameter: Ø25mm.
The drive is intended to be installed at a height
of at least 2.5m above the floor or any other
accessible level surface.
All-pole disconnection switches must be
incorporated in the fixed wiring in accordance with
the wiring rules.
MOTION CM-03/ 05 L I-IO N TUBULAR MOT OR
© Copyright 26/45

FCC Manual
This device complies with Part 15 of the FCC Rules.
Operation is subject to the following two conditions:
(1) this device may not cause harmful interference,
and
(2) this device must accept any interference received,
including interference that may cause undesired
operation.
FCC ID: ZY4CM03
FCC ID: ZY4CM05
Regulatory Information
1 FCC Information for User
This product does not contain any user
serviceable components and is to be used with
approved antennas only. Any product changes or
modifications will invalidate all applicable regulatory
certifications and approvals.
2 FCC Electronic Emission Notices
This device complies with part 15 of the FCC Rules.
Operation is subject to the following two conditions:
1. This device may not cause harmful interference
2. This device must accept any interference received,
including interference that may cause undesired
operation.
3 FCC Radio Frequency Interference
statement
This equipment has been tested and found to
comply with the limits for a class B digital device,
pursuant to Part 15 of the FCC Rules. These limits
are designed to provide reasonable protection
against harmful interference when the equipment is
operated in a commercial environment. This
equipment generates, uses and can radiate radio
frequency energy and, if not installed and used in
accordance with the instructions, may cause harmful
interference to radio communications.
Operation of this equipment in a residential area
may cause harmful interference, in which case the
user will be required to correct the interference at
their own expense.
If this equipment does cause harmful interference
to radio or television reception, which can be
determined by turning the equipment off and on, the
user is encouraged to try to correct the
interference by one or more of the following
measures:
Reorient or relocate the receiving antenna
Increase the distance separating the equipment
and receiver
Connect the equipment to an outlet on a circuit
different from that to which the receiver is
connected
Consult the dealer or an experienced radio/TV
technician for help
EnglishEnglish
MOTION CM-03/ 05 L I-IO N TUBULAR MOT OR
© Copyright 27/45

Channels Wall
mount
Program
blinds
Single
select
Channel
select
Max.
blinds
CM-11
Hand-held remote 1■ ■ - - unlimited
CM-12
Hand-held remote 5■ ■ ■ ■ unlimited
CM-13
Hand-held remote 15 ■ ■ ■ ■ unlimited
CM-15
Wall remote 1■ ■ - - unlimited
CM-16
Wall remote 4 ■- - - unlimited
CM-17
Table remote 4 - ■- - unlimited
CM-18
Pull remote 1 - - - - unlimited
CM-20
Motion Wi-Fi bridge n/a ■ ■ - - 30
MOTION CM-03/ 05 L I-IO N TUBULAR MOT OR
© Copyright 28/45

English
Max.
scenes
Frequency Range Power supply Length Width Height Certificates
n/a 433 MHz 30 m with
1 concrete wall CR2430 3.0V 120 mm 45 mm 14 mm
n/a 433 MHz 30 m with
1 concrete wall CR2430 3.0V 120 mm 45 mm 14 mm
n/a 433 MHz 30 m with
1 concrete wall CR2430 3.0V 120 mm 45 mm 14 mm
n/a 433 MHz 30 m with
1 concrete wall CR2430 3.0V 66 mm 32,5 mm 13,8 mm
n/a 433 MHz 30 m with
1 concrete wall 3 x CR2430 3.0V 86 mm 86 mm 17 mm
n/a 433 MHz 30 m with
1 concrete wall 2 x CR2450 3.0V 70,3 mm 62,7 mm 52,3 mm
n/a 433 MHz 20 m open
space 2 x LR44 1.5V 19,5 mm ø 69,9 mm
20 433 MHz
Wi-FI 2.4 GHz 30 m with
1 concrete wall Micro USB - 5V DC 100 mm ø 25 mm
MOTION CM-03/ 05 L I-IO N TUBULAR MOT OR
© Copyright 29/45

Pair
button
Pair
button
Channel
Selection
Channel
indicator
Up
Down
Centre
(stop/favourite)
Centre
(stop/favourite)
Up
Channel
indicator
Down
Right
Left
CM-11
1 Channel Remote
CM-12
5 Channel Remote
MOTION CM-03/ 05 L I-IO N TUBULAR MOT OR
© Copyright 30/45

1
2
3
4
1 3
2 4
Up
Channel
indicator
Right
Down
Previous
Channel
Next
Channel
Centre
(stop/favourite)
Left
Channel 1
Channel 3
Channel 2 Channel 4
Down
Up
Centre
(stop/favourite)
Pair
button
Pair
button
CM-13
15 Channel Remote
CM-17
4 Channel Table Remote
English
MOTION CM-03/ 05 L I-IO N TUBULAR MOT OR
© Copyright 31/45

CM-15
1 Channel Wall Remote
CM-16
4 Channel Wall Remote
Pair
button
Pair
button
Up
Right
Down
Left
Centre
(stop/favourite)
Down
Up
Centre
(stop/favourite)
M O T I O N CM-03 /05 LI-I ON TUBULA R MO TOR
32/45
© Copyright

CM-18
1 Channel Tassel Remote
CM-20
Motion Bridge
See manual CM-20
Pair
button
English
MOTION CM-03/ 05 L I-IO N TUBULAR MOT OR
33/45
© Copyright

Click!
Click!
Click!
2
3
4
1
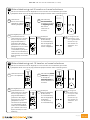
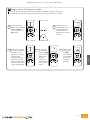
5Activate the motor by charging it with a micro
USB cable. A green LED will start flashing.
The motor can be used during charging.
(To activate the motor without a micro
USB cable, see step 25)
Install the blind
Activate the motor
MOTION CM-03/ 05 L I-IO N TUBULAR MOT OR
34/45
© Copyright

7.1
6.1
6.2
6.3
7.2
6
7
English
Shortly press the down button to check if the
blind unrolls the right way. If the blind moves
up, the rotational direction must be changed.
Pair a remote control that is able to program blinds. See pages 4 and 5
for remote control details. In this manual, CM-12 is displayed.
WARNING: risk of damage.
Stop the blind before reaching
the end positions.
End limits must be programmed to use a blind properly and to prevent it from being damaged.
Proceed to step 12 if end limits are already set.
Shortly press the program button on the
motor. The blind will start stepping, indicating
that program mode has been activated.
(The blind keeps stepping until the program
mode is deactivated.)
Repeat steps 6.1 - 6.3 to remove a blind from
a channel.
Press the pair button on the back of the remote
control to pair the blind with the selected channel.
The blind will shortly stop stepping, indicating that
the remote has been paired to the blind.
Select a desired channel for the blind using the
channel selection button on the remote control.
Channel
Selection Pair
button
Channel
indicator
Up
Down
Pair a remote
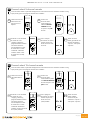
Check rotational direction
Simultaneously press the up and down button
to change the rotational direction.
M O T I O N CM-03 /05 LI-I ON T UBULAR MOT OR
35/45
© Copyright

9
9.1
8.1
8
Down
Up
Centre
Press and hold the down button until the
blind reaches the desired bottom position.
WARNING: risk of damage.
Slowly approach the bottom position.
Set bottom position
Simultaneously hold the centre and the up
button until the blind stops stepping and
starts stepping again.
The bottom position has been saved.
M O T I O N CM-03 /05 LI-I ON TUBULA R MO TOR
36/45
© Copyright

10
11
10.1
11.1
Set top position
Down
Centre
Press and hold the up button until the blind
reaches the desired top position.
WARNING: risk of damage.
Slowly approach the top position.
Up
English
Simultaneously hold the centre and the down
button until the blind stops stepping and
starts stepping again.
The top position has been saved.
MOTION CM-03/ 05 L I-IO N TUBULAR MOT OR
37/45
© Copyright

12
12.2
13.1
12.1
13
Move the blind to a desired favourite position.
Shortly press the program button to deactivate
program mode. The blind stops stepping and can
be operated.
Centre
Deactivate program mode
Hold the centre button to save this Favourite
position. The blind shortly stops stepping
indicating the favourite position has been
saved.
Set favourite position (optional)
MOTION CM-03/ 05 L I-IO N TUBULAR MOT OR
38/45
© Copyright

14
15
Pull control: Pull and hold to move the blind to
the favourite position.
Remote control: press the centre button to move
the blind to the favourite position.
Pull control: pull once to move the blind to the
end positions. Pull again to stop the blind.
Remote control: Choose the channel with which the
blind has been paired using the channel button.
Press the up or down button to operate the blind.
Press the centre button to stop the blind.
Up
Down
Centre
Channel
Selection
Centre
Operate the blind
Move to favourite position
English
MOTION CM-03/ 05 L I-IO N TUBULAR MOT OR
39/45
© Copyright

17.2
17.1
16.1
16.2
16.3
16.4
16
17
Move the blind to a desired favourite position.
Press the program button on the motor to activate
program mode. The blind starts stepping.
Hold the centre button to save this favourite position. The blind shortly
stops stepping, indicating the favourite position has been saved succesfully.
Press the program button on the motor to deactivate
program mode. The blind stops stepping.
Press the program button on the motor to activate
program mode. The blind starts stepping.
Hold the program button until the blind stops stepping (approximately 5 seconds)
to deactivate or reactivate direct control.
When pressing the up or down button on the remote control, the blind directly moves to
its end positions (direct control). To operate the blind with smaller steps using the up and
down button, direct control can be deactivated. Now, the blind only directly moves to its end
positions when the up or down button is held longer than two seconds.
Centre
Reset favourite position
Deactivate direct control
MOTION CM-03/ 05 L I-IO N TUBULAR MOT OR
40/45
© Copyright

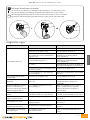
18
18.1
19
It is possible to only delete end limits or to do a factory reset.
Factory reset will delete the end limits and remove the connection to any paired remote.
Press the program button on the motor to activate program mode.
Delete end limits: to delete the end limits of the blind, hold the program button
until the blind stops stepping for the first time, and keep holding the button until
the blind stops stepping for the second time. (approximately 10 seconds)
Factory reset: to reset the blind to factory defaults hold the button for at least 20 seconds. The blind will
stop stepping twice. After the second stop the blind will give one extra step to confirm factory reset.
Use a micro USB cable
to charge the motor
LED light flashes
red during operation;
Charge the battery
LED light flashes
green;
battery is charging
LED light constantly
green;
battery is fully charged
Recharge the battery
Reset the blind
English
MOTION CM-03/ 05 L I-IO N TUBULAR MOT OR
41/45
© Copyright

1
1
+
20
21
20.2
21.1 21.2
21.4 21.521.3
20.1 Hold the program button to manually operate
the blind. The blind will move as long as the
button is being pressed. (max. 15 sec.)
To move the blind in opposite direction, release
the program button and repeat step 20.1.
In case there is no remote control or pull control, the blind can
be operated with the program button on the motor.
Advanced options
The remote starts searching
for blinds (search mode).
This is indicated by the LEDs
flashing from left to right.
To activate
Single select,
simultaneously
hold the centre
button and press
the pair button.
To search for
the next blind,
press the right
button. Search
mode will be
activated.
To find the
previous blind,
press the left
button.
To exit
Single select,
press the
right button
during
search
mode.
Once a blind is found,
the channel LED will
flash and the blind starts
stepping, indicating that
program mode has been
activated. The blind
can now be (un)paired
to the remote and/or
programmed.
Single select makes it possible to activate program mode on a single blind through a
remote control, without having to physically press the program button on the blind.
Manual control
Single select 5 channel remote
MOTION CM-03/ 05 L I-IO N TUBULAR MOT OR
42/45
© Copyright

1
1
1
1
11
11
+
11
22
22.1
22.3
22.2
22.4 22.5
The remote starts
searching for blinds
(search mode). This
is indicated by the
horizontal bars on the
remote.
To activate Single
select, simultaneously
hold the centre
button and press the
pair button.
Single select makes it possible to activate program mode on a single blind through a
remote control, without having to physically press the program button on the blind.
To search for
the next blind,
press the right
button. Search
mode will be
activated.
To find the
previous blind,
press the left
button.
To exit Single
select, press
the right
button during
search mode.
The display
shows the
letter O.
Once a blind is found,
the channel number
will flash and the
blind starts stepping,
indicating that
program mode has
been activated. The
blind can now be (un)
paired to the remote
and/or programmed.
Single select 15 channel remote
English
MOTION CM-03/ 05 L I-IO N TUBULAR MOT OR
43/45
© Copyright

1
13 3
1
1
3
1 1 3
1 1
3
3 3
3 3 3
+
+
24
23.1 23.2
23.3
24.3 24.4 24.5
24.1
23.4 23.5
23
24.2
Channel select makes it possible to copy blinds in between channels/remotes without having
to physically press the program button on the motors.
To activate
channel select,
simultaneously
hold the channel
selection button
and press the pair
button.
Press the pair
button on the (new)
remote to pair the
blinds with the new
channel.
To exit channel
select, go back to the
channel selected at
step 23.1 and repeat
step 23.2
All blinds in the selected
channel will start
stepping, indicating
program mode has been
activated. All blinds
can be copied to a new
channel on the same
remote or a different
remote. Select a new
channel on the (new)
remote.
Channel select makes it possible to copy blinds in between channels/remotes without having
to physically press the program button on the motors.
Select the channel
you would like to
copy.
To activate
channel select,
simultaneously hold
the channel selection
button and press the
pair button.
Press program
button on the (new)
remote to pair the
blinds with the
(new) remote.
To exit channel
select, choose
the channel you
selected at step 24.1
and repeat step 24.2
All blinds in the selected
channel will start
stepping, indicating
program mode has been
activated. All blinds
can be copied to a new
channel on the same
remote or to different
remotes. Select a channel
on a (new) remote.
Channel select 5 channel remote
Channel select 15 channel remote
Select the channel
from which the
blinds must be
copied.
M O T I O N CM-03 /05 LI-I ON T UBULAR MOT OR
44/45
© Copyright

+
25
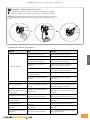
25.1 Hold the program button and pull twice to activate or deactivate the motor.
The motor can also be activated by charging it with a micro USB cable.
To prevent the blind from getting damaged, the motor has a transport
mode that makes sure the blind will not be activated before installation.
Frequently Asked Questions
Problem Cause Solution
Blind does not work.
Motor is in transport mode. Activate the motor. See step 25.
Motor battery is empty. Charge the motor. See step 19.
Remote battery is empty. (LEDS of
remote are flashing rapidly.)
Replace the battery in the remote.
See the manual of the remote.
Remote battery is inserted
incorrectly.
Replace the battery in the remote.
See the manual of the remote.
Radio-frequency interference Make sure that the antenna of the motor
is out of the way of metal objects.
The distance from the remote to
the motor is too far.
Move closer to the motor.
The remote is not connected to
the blind.
Pair the remote with the motor.
See step 6.
Motor LED flashes red. The battery of the motor is empty. Charge the motor. See step 19.
Blind is not charging. Charger is not plugged in or does
not work.
Try a different charger or make sure the
charger is plugged in the outlet.
Multiple blinds respond to a
remote. (Unable to program
a single blind)
Multiple blinds are paired with a
single channel.
Pair the blind with a free channel to
program or use single select to program
the blind.
Blind moves in small steps. 1) No end limits are programmed.
2) Direct control is deactivated.
1) Program end limits. See step 8 - 11.
2) Activate direct control. See step 17.
Favourite position can not
be programmed.
No end limits are programmed. Program end limits.
See step 8 - 11.
Blind lowers too far. End limits are programmed
incorrectly. Reprogram end limits. See step 8 - 11.
Blind moves in the opposite
direction.
The rotational direction has been
set incorrectly.
Change the rotational direction.
See step 7.
The blind keeps moving up
and down. The blind is in program mode. Press the program button on the motor
to exit program mode.
English
Activate / deactivate the motor
or
MOTION CM-03/ 05 L I-IO N TUBULAR MOT OR
45/45
© Copyright
-
 1
1
-
 2
2
-
 3
3
-
 4
4
-
 5
5
-
 6
6
-
 7
7
-
 8
8
-
 9
9
-
 10
10
-
 11
11
-
 12
12
-
 13
13
-
 14
14
-
 15
15
-
 16
16
-
 17
17
-
 18
18
-
 19
19
-
 20
20
-
 21
21
-
 22
22
-
 23
23
-
 24
24
-
 25
25
-
 26
26
-
 27
27
-
 28
28
-
 29
29
-
 30
30
-
 31
31
-
 32
32
-
 33
33
-
 34
34
-
 35
35
-
 36
36
-
 37
37
-
 38
38
-
 39
39
-
 40
40
-
 41
41
-
 42
42
-
 43
43
-
 44
44
-
 45
45


in andere talen
- English: Raamdecorati CM-03 User manual
Andere documenten
-
RAAMDECORATIE COM CMD-01 Gebruikershandleiding
-
Dometic Oceanair Skyvenetian Manual/Powered Handleiding
-
-
-
SKODA Octavia (2019/11) de handleiding
-
-
-
-
Lutron QSFC-EDU-BP-C Wire-Free Roller Shade Electronic Drive Unit Handleiding