Yamaha F01 de handleiding
- Categorie
- Synthesizer
- Type
- de handleiding
Deze handleiding is ook geschikt voor

ES
FR
DE
EN
Owner's Manual
Bedienungsanleitung
Mode d'emploi
Manual de instrucciones
ESPAÑOL
FRANÇAIS
DEUTSCH
ENGLISH
For information on assembling the keyboard stand, refer to the instructions at the end of this manual.
IMPORTANT – Check your power supply –
Make sure that your local AC mains voltage matches the voltage specified on the name plate on the bottom panel. In some areas a voltage selector may be
provided on the rear of the main keyboard unit near the power cord. Make sure that the voltage selector is set for the voltage in your area. The voltage selector is set
at 240V when the unit is initially shipped. To change the setting use a "minus" screwdriver to rotate the selector dial so that the correct voltage appears next to the
pointer on the panel.
Weitere Informationen über die Montage des Keyboard-Ständers erhalten Sie in den Anweisungen am Ende dieses Handbuchs.
WICHTIG —Überprüfung der Stromversorgung—
Vergewissern Sie sich vor dem Anschließen an das Stromnetz, daß die örtliche Netzspannung den Betriebsspannungswerten auf dem Typenschild an der Unterseite
des Instruments entspricht. In bestimmten Regionen ist auf der Rückseite des Instruments in der Nähe des Netzkabels ein Spannungswähler angebracht. Falls
vorhanden, muß der Spannungswähler auf die örtliche Netzspannung eingestellt werden. Der Spannungswähler wurde werkseitig auf 240 V voreingestellt. Zum
Verstellen drehen Sie den Spannungsregler mit einem Schlitzschraubendreher, bis der Zeiger auf den korrekten Spannungswert weist.
Pour obtenir les détails sur l'assemblage du pupitre du clavier, reportez-vous aux instructions figurant à la fin de ce manuel.
IMPORTANT —Contrôler la source d'alimentation—
Vérifiez que la tension spécifiée sur le panneau inférieur correspond à la tension du secteur. Dans certaines régions, l’instrument peut être équipé d’un sélecteur de
tension à l’arrière de l’unité principale, à côté du cordon d'alimentation. Vérifiez que ce sélecteur est bien réglé en fonction de la tension secteur de votre région. Le
sélecteur de tension est réglé sur 240 V au depart d'usine. Pour modifier ce réglage, utilisez un tournevis à lame plate pour tourner le sélecteur afin de mettre
l'indication correspondant à la tension de votre région vis à vis du repère triangulaire situé sur le panneau.
Para información sobre el montaje del soporte del teclado, consulte las instrucciones al final de este manual.
IMPORTANTE —Verifique la alimentación de corriente—
Asegúrese de que tensión de alimentación de CA de su área corresponde con la tensión especificada en la placa de características del panel inferior. Es posible
que en algunas zonas se suministre un selector de tensión en la parte posterior de la unidad principal, junto al cable de alimentación. Asegúrese de que el selector
de tensión esté ajustado a la tensión de su área. El selector de tensión se ajusta a 240V cuando la unidad sale de fábrica. Para cambiar el ajuste, emplee un
destornillador de cabeza "recta" para girar el selector de modo que aparezca la tensión correcta al lado del indicador del panel.

92-469 1 (bottom)
SPECIAL MESSAGE SECTION
PRODUCT SAFETY MARKINGS: Yamaha electronic
products may have either labels similar to the graphics
shown below or molded/stamped facsimiles of these
graphics on the enclosure. The explanation of these
graphics appears on this page. Please observe all cautions
indicated on this page and those indicated in the safety
instruction section.
See bottom of Keyboard enclosure for graphic symbol markings.
The exclamation point within the
equilateral triangle is intended to alert
the user to the presence of important
operating and maintenance (servic-
ing) instructions in the literature
accompanying the product.
The lightning flash with arrowhead
symbol, within the equilateral trian-
gle, is intended to alert the user to the
presence of uninsulated “dangerous
voltage” within the product’s enclo-
sure that may be of sufficient magni-
tude to constitute a risk of electrical
shock.
IMPORTANT NOTICE: All Yamaha electronic products
are tested and approved by an independent safety testing
laboratory in order that you may be sure that when it is
properly installed and used in its normal and customary
manner, all foreseeable risks have been eliminated. DO
NOT modify this unit or commission others to do so
unless specifically authorized by Yamaha. Product perfor-
mance and/or safety standards may be diminished.
Claims filed under the expressed warranty may be denied
if the unit is/has been modified. Implied warranties may
also be affected.
SPECIFICATIONS SUBJECT TO CHANGE: The
information contained in this manual is believed to be
correct at the time of printing. However, Yamaha reserves
the right to change or modify any of the specifications
without notice or obligation to update existing units.
ENVIRONMENTAL ISSUES: Yamaha strives to pro-
duce products that are both user safe and environmentally
friendly. We sincerely believe that our products and the
production methods used to produce them, meet these
goals. In keeping with both the letter and the spirit of the
law, we want you to be aware of the following:
Battery Notice: This product MAY contain a small non-
rechargeable battery which (if applicable) is soldered in
place. The average life span of this type of battery is
approximately five years. When replacement becomes
necessary, contact a qualified service representative to
perform the replacement.
Warning: Do not attempt to recharge, disassemble, or
incinerate this type of battery. Keep all batteries away
from children. Dispose of used batteries promptly and as
regulated by applicable laws. Note: In some areas, the
servicer is required by law to return the defective parts.
However, you do have the option of having the servicer
dispose of these parts for you.
Disposal Notice: Should this product become damaged
beyond repair, or for some reason its useful life is consid-
ered to be at an end, please observe all local, state, and
federal regulations that relate to the disposal of products
that contain lead, batteries, plastics, etc.
NOTICE: Service charges incurred due to lack of knowl-
edge relating to how a function or effect works (when the
unit is operating as designed) are not covered by the man-
ufacturer’s warranty, and are therefore the owners respon-
sibility. Please study this manual carefully and consult
your dealer before requesting service.
NAME PLATE LOCATION: The graphic below indi-
cates the location of the name plate. The model number,
serial number, power requirements, etc., are located on
this plate. You should record the model number, serial
number, and the date of purchase in the spaces provided
below and retain this manual as a permanent record of
your purchase.
CAUTION
RISK OF ELECTRIC SHOCK
DO NOT OPEN
CAUTION: TO REDUCE THE RISK OF ELECTRIC SHOCK.
DO NOT REMOVE COVER (OR BACK).
NO USER-SERVICEABLE PARTS INSIDE.
REFER SERVICING TO QUALIFIED SERVICE PERSONNEL.
Model
Serial No.
Purchase Date

* This applies only to products distributed by YAMAHA CORPORATION OF AMERICA. (class B)
(F01)
(2 wires)
• This applies only to products distributed by Yamaha-Kemble Music
(U.K.) Ltd.
(F11)
FCC INFORMATION (U.S.A.)
1. IMPORTANT NOTICE: DO NOT MODIFY THIS UNIT!
This product, when installed as indicated in the instruc-
tions contained in this manual, meets FCC require-
ments. Modifications not expressly approved by
Yamaha may void your authority, granted by the FCC, to
use the product.
2. IMPORTANT: When connecting this product to acces-
sories and/or another product use only high quality
shielded cables. Cable/s supplied with this product
MUST be used. Follow all installation instructions. Fail-
ure to follow instructions could void your FCC authori-
zation to use this product in the USA.
3. NOTE: This product has been tested and found to com-
ply with the requirements listed in FCC Regulations,
Part 15 for Class “B” digital devices. Compliance with
these requirements provides a reasonable level of
assurance that your use of this product in a residential
environment will not result in harmful interference with
other electronic devices. This equipment generates/
uses radio frequencies and, if not installed and used
according to the instructions found in the users manual,
may cause interference harmful to the operation of
other electronic devices. Compliance with FCC regula-
tions does not guarantee that interference will not occur
in all installations. If this product is found to be the
source of interference, which can be determined by
turning the unit “OFF” and “ON”, please try to eliminate
the problem by using one of the following measures:
Relocate either this product or the device that is being
affected by the interference.
Utilize power outlets that are on different branch (circuit
breaker or fuse) circuits or install AC line filter/s.
In the case of radio or TV interference, relocate/reorient
the antenna. If the antenna lead-in is 300 ohm ribbon
lead, change the lead-in to co-axial type cable.
If these corrective measures do not produce satisfac-
tory results, please contact the local retailer authorized
to distribute this type of product. If you can not locate
the appropriate retailer, please contact Yamaha Corpo-
ration of America, Electronic Service Division, 6600
Orangethorpe Ave, Buena Park, CA90620
The above statements apply ONLY to those products
distributed by Yamaha Corporation of America or its
subsidiaries.
IMPORTANT NOTICE FOR THE UNITED KINGDOM
Connecting the Plug and Cord
IMPORTANT. The wires in this mains lead are coloured in
accordance with the following code:
BLUE : NEUTRAL
BROWN : LIVE
As the colours of the wires in the mains lead of this appa-
ratus may not correspond with the coloured makings iden-
tifying the terminals in your plug proceed as follows:
The wire which is coloured BLUE must be connected to
the terminal which is marked with the letter N or coloured
BLACK.
The wire which is coloured BROWN must be connected to
the terminal which is marked with the letter L or coloured
RED.
Making sure that neither core is connected to the earth ter-
minal of the three pin plug.
IMPORTANT NOTICE FOR THE UNITED KINGDOM
Connecting the Plug and Cord
WARNING: THIS APPARATUS MUST BE EARTHED
IMPORTANT. The wires in this mains lead are coloured in
accordance with the following code:
GREEN-AND-YELLOW : EARTH
BLUE : NEUTRAL
BROWN : LIVE
As the colours of the wires in the mains lead of this apparatus
may not correspond with the coloured markings identifying the
terminals in your plug proceed as follows:
The wire which is coloured GREEN-and-YELLOW must be con-
nected to the terminal in the plug which is marked by the letter E
or by the safety earth symbol or colored GREEN or GREEN-
and-YELLOW.
The wire which is coloured BLUE must be connected to the ter-
minal which is marked with the letter N or coloured BLACK.
The wire which is coloured BROWN must be connected to the
terminal which is marked with the letter L or coloured RED.
• This applies only to products distributed by Yamaha-Kemble
Music (U.K.) Ltd.
(3 wires)

F11/F01 Owner’s Manual
4
ENGLISH
PRECAUTIONS
PLEASE READ CAREFULLY BEFORE PROCEEDING
* Please keep this manual in a safe place for future reference.
WARNING
Always follow the basic precautions listed below to avoid the possibility of serious injury or even death from electrical
shock, short-circuiting, damages, fire or other hazards. These precautions include, but are not limited to, the following:
• Only use the voltage specified as correct for the instrument. The required
voltage is printed on the name plate of the instrument.
• Check the electric plug periodically and remove any dirt or dust which may have
accumulated on it.
• Use only the supplied power cord/plug.
• Do not place the power cord near heat sources such as heaters or radiators, and
do not excessively bend or otherwise damage the cord, place heavy objects on
it, or place it in a position where anyone could walk on, trip over, or roll anything
over it.
• (F11) Be sure to connect to an appropriate outlet with a protective grounding
connection. Improper grounding can result in electrical shock.
• Do not open the instrument or attempt to disassemble the internal parts or
modify them in any way. The instrument contains no user-serviceable parts. If it
should appear to be malfunctioning, discontinue use immediately and have it
inspected by qualified Yamaha service personnel.
• Do not expose the instrument to rain, use it near water or in damp or wet
conditions, or place containers on it containing liquids which might spill into
any openings. If any liquid such as water seeps into the instrument, turn off the
power immediately and unplug the power cord from the AC outlet. Then have
the instrument inspected by qualified Yamaha service personnel.
• Never insert or remove an electric plug with wet hands.
• Do not put burning items, such as candles, on the unit.
A burning item may fall over and cause a fire.
• If the power cord or plug becomes frayed or damaged, or if there is a sudden
loss of sound during use of the instrument, or if any unusual smells or smoke
should appear to be caused by it, immediately turn off the power switch,
disconnect the electric plug from the outlet, and have the instrument inspected
by qualified Yamaha service personnel.
CAUTION
Always follow the basic precautions listed below to avoid the possibility of physical injury to you or others, or damage
to the instrument or other property. These precautions include, but are not limited to, the following:
• (F11) Always connect the three-pin attachment plug to a properly grounded
power source. (For more information about the main power supply, see
page 15.)
• When removing the electric plug from the instrument or an outlet, always hold
the plug itself and not the cord. Pulling by the cord can damage it.
• Remove the electric plug from the outlet when the instrument is not to be used
for extended periods of time, or during electrical storms.
• Do not connect the instrument to an electrical outlet using a multiple-connector.
Doing so can result in lower sound quality, or possibly cause overheating in the
outlet.
• Read carefully the attached documentation explaining the assembly process.
Failure to assemble the instrument in the proper sequence might result in
damage to the instrument or even injury.
• Do not expose the instrument to excessive dust or vibrations, or extreme cold or
heat (such as in direct sunlight, near a heater, or in a car during the day) to
prevent the possibility of panel disfiguration or damage to the internal
components.
• Do not use the instrument in the vicinity of a TV, radio, stereo equipment,
mobile phone, or other electric devices. Otherwise, the instrument, TV, or radio
may generate noise.
• Do not place the instrument in an unstable position where it might accidentally
fall over.
• Before moving the instrument, remove all connected cables.
• When setting up the product, make sure that the AC outlet you are using is
easily accessible. If some trouble or malfunction occurs, immediately turn off
the power switch and disconnect the plug from the outlet. Even when the power
switch is turned off, electricity is still flowing to the product at the minimum
level. When you are not using the product for a long time, make sure to unplug
the power cord from the wall AC outlet.
Power supply/Power cord
Do not open
Water warning
Fire warning
If you notice any abnormality
Power supply/Power cord
Assembly
Location
(1)B-12
1/2

ENGLISH
F11/F01 Owner’s Manual
5
• Before connecting the instrument to other electronic components, turn off the
power for all components. Before turning the power on or off for all
components, set all volume levels to minimum. Also, be sure to set the volumes
of all components at their minimum levels and gradually raise the volume
controls while playing the instrument to set the desired listening level.
• In the case of a model with a polished finish, gently remove dust and dirt with a
soft cloth. Do not wipe too hard since small particles of dirt can scratch the
instrument's finish.
• When cleaning the instrument, use a soft, dry or slightly damp cloth. Do not use
paint thinners, solvents, cleaning fluids, or chemical-impregnated wiping
cloths.
•Take care that the key cover does not pinch your fingers, and do not insert a
finger or hand in any gaps on the key cover or instrument.
• Never insert or drop paper, metallic, or other objects into the gaps on the key
cover, panel or keyboard. If this happens, turn off the power immediately and
unplug the power cord from the AC outlet. Then have the instrument inspected
by qualified Yamaha service personnel.
• Do not place vinyl, plastic or rubber objects on the instrument, since this might
discolor the panel or keyboard.
• In the case of a model with a polished finish, bumping the surface of the
instrument with metal, porcelain, or other hard objects can cause the finish to
crack or peel. Use caution.
• Do not rest your weight on, or place heavy objects on the instrument, and do not
use excessive force on the buttons, switches or connectors.
• Do not use the instrument/device or headphones for a long period of time at a
high or uncomfortable volume level, since this can cause permanent hearing
loss. If you experience any hearing loss or ringing in the ears, consult a
physician.
• Do not place the bench in an unstable position where it might accidentally fall
over.
• Do not play carelessly with or stand on the bench. Using it as a tool or step-
ladder or for any other purpose might result in accident or injury.
• Only one person should sit on the bench at a time, in order to prevent the
possibility of accident or injury.
• If the bench screws become loose due to extensive long-term use, tighten them
periodically using the included tool.
• Some data will be saved to internal memory of the F11/F01 (pages 55, 57). The
data is maintained even when the power is turned off. For maximum data
security Yamaha recommends that you save your important data to the USB
flash memory (F11) or computer (F01). This provides a convenient backup if the
internal memory is damaged (pages 55, 57).
Yamaha cannot be held responsible for damage caused by improper use or modifications to the instrument, or data that is lost or destroyed.
Always turn the power off when the instrument is not in use.
Connections
Maintenance
Handling caution
Using the bench (If included)
Saving data
(1)B-12
2/2

F11/F01 Owner’s Manual
6
ENGLISH
About this Owner’s Manual
Thank you for purchasing the Yamaha Digital Piano F11/F01! We recommend that you read this manual carefully so that
you can fully take advantage of the advanced and convenient functions of the F11/F01.
We also recommend that you keep this manual in a safe and handy place for future reference.
About this Owner’s Manual
The documentation for this instrument includes: Owner’s Manual (this document), Quick Operation Guide, and Data
List.
Owner’s Manual
Introduction (page 2):
Please read this section first.
Reference (page 10):
This section explains how to make detailed settings for the F11/F01’s various functions.
Appendix (page 68):
This section introduces reference material.
Quick Operation Guide
This explains the button/key assignments and how to use the panel controls.
Data List
The Data List contains XG voice/XG effect (for the F11) and MIDI related information. The Data List is available for
downloading from the Yamaha Manual Library.
Yamaha Manual Library
http://www.yamaha.co.jp/manual/
*The panel illustrations are taken from the F11.
*The illustrations and LED displays shown in this owner’s manual are for instructional purposes only and may appear
somewhat different from those on your instrument.
(F11) AVE-TCP, a TCP/IP protocol stack by ACCESS Co., Ltd., is installed in this product.
(F01) AVE
®
-SSL, an encryption module technology by ACCESS Co., Ltd., is installed in this product.
Trademarks:
•Windows is the registered trademarks of Microsoft
®
Corporation.
•All other trademarks are the property of their respective holders.
This product incorporates and bundles computer programs and contents in which Yamaha owns copyrights or with
respect to which it has license to use others’ copyrights. Such copyrighted materials include, without limitation, all
computer software, style files, MIDI files, WAVE data, musical scores and sound recordings. Any unauthorized use of
such programs and contents outside of personal use is not permitted under relevant laws. Any violation of copyright
has legal consequences. DON’T MAKE, DISTRIBUTE OR USE ILLEGAL COPIES.
This device is capable of using various types/formats of music data by optimizing them to the proper format music
data for use with the device in advance. As a result, this device may not play them back precisely as their producers or
composers originally intended.
Copying of the commercially available musical data including but not limited to MIDI data and/or audio data is
strictly prohibited except for your personal use.

ENGLISH
Accessories
F11/F01 Owner’s Manual
7
Accessories
• Owner’s Manual
This manual contains complete instructions for operating your F11/F01.
• Quick Operation Guide
• Bench
• AC Power Cord
Tuning
Unlike an acoustic piano, the instrument does not need to be tuned. It always stays perfectly in tune.
Transporting
If you move to another location, you can transport the instrument along with your other belongings. You can move the
unit as it is (assembled) or you can disassemble the unit.
Tr ansport the keyboard horizontally. Do not lean it up against a wall or stand it up on its side. Do not subject the
instrument to excessive vibration or shock.

F11/F01 Owner’s Manual
8
ENGLISH
Main Features
Main Features
Stylish and sophisticated digital piano
The instrument combines true piano sound in a modern, attractive cabinet that evokes the beauty of a
real acoustic grand piano–adding sophistication and musical expressiveness to your living space.
NW (Natural Wood) keyboard
The special Natural Wood keyboard of the instrument uses real-wood white keys, to reproduce as
closely as possible the experience of playing an actual acoustic grand piano. The authentic touch and
feel of the keys goes far beyond existing electronic keyboards, realistically recreating the hardness of the
keys, the balance between the weight of the key and hammer, and the characteristic weight gradations
of the keys. heavy in the low end, light in the high register. to make you feel as if you’re playing a real
grand piano. Moreover, this specially crafted keyboard lets you use techniques only possible on grand
pianos, such as playing the same note successively and having the sounds blend smoothly even without
use of the damper pedal, or playing the same key quickly and having perfect articulation without the
sound cutting off unnaturally.
Moving Key (F11)
The F11 features an impressive moving keyboard—with the Moving Key function. Whatever songs you
play back on the instrument, including the included 50 piano preset songs (Classic & Jazz), songs saved
to USB flash memory, or songs from the Internet using the streaming service, you can enjoy the perfor-
mance visually as well as aurally. This makes the F11 a wonderful instrument to have at home, as well
as an eye-catching, ear-catching instrument for a restaurant, store or any public space.
AWM Dynamic Stereo Sampling
The F11/F01 offers unmatched sonic realism as well as Yamaha’s original AWM Dynamic Stereo Sam-
pling tone-generation technology for rich, authentic voices. The G. Piano 1 and 2 voices are completely
constructed from samples painstakingly recorded from a full concert grand piano. The G. Piano 1 voice
features three velocity-switched samples (Dynamic Sampling), special “Sustain Sampling” that samples
the unique resonance of an acoustic grand piano’s soundboard and strings when the damper pedal is
pressed, and “Keyoff Samples” that add the subtle sound produced when the keys are released. These
sophisticated features and advanced technologies ensure that the instrument sounds and plays virtually
the same as an actual acoustic piano.
Internet Direct Connection (IDC) (F11)
Yamaha provides a special streaming service on its website that enables you to automatically play back
a wide variety of songs (song data) in various musical genres as background music directly on your
instrument.

ENGLISH
Table of Contents
F11/F01 Owner’s Manual
9
Introduction
Reference
Appendix
Table of Contents
SPECIAL MESSAGE SECTION ...................... 2
About this Owner’s Manual........................ 6
Accessories .................................................. 7
Main Features ............................................. 8
Table of Contents ....................................... 9
Panel Controls and Terminals................... 10
Accessing Various Background Music
(BGM) Functions .................................... 12
Before Using the F11/F01 ......................... 13
Key Cover ...........................................................13
Music Rest ..........................................................14
Connecting the Power Cord (F11)....................15
Connecting the Power Cord (F01)....................16
Turning the Power On.......................................17
Setting the Volume.............................................17
Using Headphones (option)..............................18
Checking the version number (F11) .................18
Listening to the 50 Piano Preset Songs
(Classic & Jazz) ....................................... 19
Enjoying the Moving Key Feature (F11)...........21
Listening to songs in USB Flash Memory... 22
Handling the USB Storage Device
(USB Flash Memory/Floppy Disk, etc.) .. 25
Handling the Floppy Disk Drive (FDD)
and Floppy Disks .................................... 26
Listening to the Songs on Internet (F11)... 27
Song Auto Revoice (F11)...................................28
Selecting & Playing Voices........................ 29
Selecting Voices..................................................29
Listening to the Voice Demonstration Tunes ..29
Selecting Alternate Voices (VARIATION) .......30
Using the Pedals .................................................30
Combining Two Voices (Dual mode)...............31
Saving the Voice Settings (F11)........................32
Splitting the Keyboard Range and Playing
Two Different Voices (Split mode)...............32
Using the Metronome........................................34
Selecting various digital reverb effects
(REVERB) ......................................................35
Transposition – [TRANSPOSE]........................36
Fine Tuning of the Pitch ....................................36
Touch Sensitivity – [TOUCH] ..........................37
Recording Your Performance.................... 38
Playing Back Recorded Songs ................... 40
Saving Your Recorded Performance to
USB Flash Memory.................................. 41
Internet Direct Connection (IDC) (F11) ... 42
Setting Up the Instrument to the Internet
Connection .................................................... 42
Connecting the Instrument to the Internet ..... 44
About the Internet Settings............................... 45
Checking the field strength
(when using a USB wireless LAN adaptor).. 46
Exporting the Connection Information ........... 47
Initializing Internet Settings.............................. 48
Internet Initial Settings...................................... 48
Glossary of Internet Terms ............................... 49
Connections ..............................................51
Connectors......................................................... 51
Connecting to a Computer ............................... 52
About MIDI................................................53
Data Backup (F11)..................................... 55
Backup Data in Internal Memory..................... 55
Backing Up Data to USB Flash Memory.......... 55
Restoring the Backup Data................................ 56
Data Backup (F01)..................................... 57
Backup Data in Internal Memory..................... 57
Backing Up Data to a Computer ...................... 57
Restoring the Backup Data................................ 57
Message List (F11) ....................................58
Message List (F01) ....................................59
Troubleshooting........................................ 60
Keyboard Stand Assembly ........................61
50 Piano Preset Songs (Classic & Jazz)
List........................................................... 64
Preset Voice List ........................................ 66
Voice Demo Song List ............................... 67
Index..........................................................68
Normal Setting List ...................................70
Program Change ....................................... 71
Specifications ............................................72

F11/F01 Owner’s Manual
10
ENGLISH
Panel Controls and Terminals
Panel Controls and Terminals
The illustrations are taken from the F11.
The jacks and terminals on the underside of the instrument as shown here may seem to be in reverse from your perspec-
tive in front of the instrument. Make sure when using these to carefully check the names as printed on the panel before
making connections.
1 [POWER] switch ..........................p. 17
Turns the power on/off.
2 [VOLUME] control....................... p. 17
Adjusts the volume level.
3 Display ........................................ p. 11
For showing various messages and certain settings of
the instrument. This may be unavailable, depending
on the status.
CAUTION
Do not turn off the power to the instrument while flash-
ing dashes appear in the display (indicating the opera-
tion is in process). Doing so may damage the data.
4 [PRESET 1]/[PRESET 2] lamp ........ p. 19
When this is lit, you can listen to the 50 piano preset
songs (Classic & Jazz).
5 [USB] lamp.................................. p. 22
When this is lit, you can listen to songs contained in
USB flash memory.
6 [USB] access lamp ....................... p. 22
Flashes in red while loading data from USB flash
memory.
7 [INTERNET] lamp (F11) ............... p. 27
When this is lit, you can listen to songs on the Inter-
net.
8 [INTERNET] access lamp (F11)..... p. 27
Flashes in red while accessing to the Internet.
9 [BGM] button ......... pp. 19, 22, 27, 29
Switches the BGM mode on and off for [PRESET 1]/
[PRESET 2]/[USB]/[INTERNET] (F11). For more
information, refer to page 12.
0 [– /NO]/[+/YES] button
For setting values or performing file operations.
PHONES
R
AUX INAUX OUT
L L RR L L R
MIDI USB
OUT
IN TO DEVICE
LM
P
I
JK
1
HG
32 965 8740A
D
CEF
B

ENGLISH
Panel Controls and Terminals
F11/F01 Owner’s Manual
11
A Voice buttons .............................. p. 29
Selects voices from 20 internal sounds including G.
PIANO 1 and 2 (in tandem with the
[VARIATION]
but-
ton). You can also combine two voices at the same time.
B [VARIATION] button .................... p. 30
This lets you call up an alternate setting (for example,
an alternate voice), depending on the selected setting.
C
[MOVING KEY] status lamp (F11) ..p. 21
Lights up in red if an error occurs while using the
Moving Key feature.
D [MOVING KEY] button (F11) ....... p. 21
Enables the Moving Key feature, which automati-
cally moves the keys in response to song playback—
including that of the 50 piano preset songs, songs in
USB flash memory, and songs from the Internet
using the streaming service.
E [PLAY/STOP] button ......pp. 20, 23, 28
For starting/stopping song playback of the 50 piano
preset songs (Classic & Jazz), songs in USB flash
memory, or songs on from the Internet using the
streaming service (F11).
F [REC] button ............................... p. 38
Record your performance.
G [METRONOME] button ............... p. 34
Control the metronome functions.
H [SPLIT] button ............................. p. 32
Allows you to play different voices on the left- and
right-hand sections of the keyboard.
I [PHONES] jacks ........................... p. 18
A set of standard stereo headphones can be plugged
in here for private practice.
J AUX OUT[L/L+R][R] jacks............. p. 51
For connecting recording equipment (such as a cassette
tape recorder), allowing you to record your performance.
K AUX IN[L/L+R][R] jacks ................ p. 51
Sends the output of the F11/F01 to a connected
instrument amplifier, mixing console, PA system, or
recording equipment.
L MIDI [IN][OUT] connectors ......... p. 52
For connecting to a MIDI device, allowing you to
take advantage of various MIDI functions.
M USB [TO DEVICE] terminal........... p. 52
For connecting to a USB flash memory device,
allowing you to save your own recorded songs and
play back songs contained on the device.
N [LAN] port (F11).......................... p. 52
By directly connecting the F11 to the Internet, you can
use the special streaming service on the Yamaha website
that enables you to automatically play back a wide vari-
ety of songs (song data) in various musical genres as
background music directly on your instrument.
CAUTION
Do not directly connect the [LAN] port to your computer.
The Internet functions cannot be used if so connected.
O [AC INLET] connector.......... pp. 15, 16
For connection of the power cord.
P Pedals ......................................... p. 30
For producing a range of expressive effects similar to
those produced by the pedals on an acoustic piano.
Display
•Check the operation on the display of the top panel as you use the instrument.
•The display indicates different values, as shown below, depending on the operation.
LAN
N
O
rear panel
F11
One of the song numbers from “50
Piano Preset Songs (Classic & Jazz)”
Tempo Parameter value

F11/F01 Owner’s Manual
12
ENGLISH
Accessing Various Background Music (BGM) Functions
Accessing Various Background Music
(BGM) Functions
A variety of functions can be called up (as listed below) by switching the [BGM] button on/off.
BGM
Consists of the following:
[PRESET 1]/[PRESET 2]....... Listening to the 50 Piano Preset Songs (Classic & Jazz) (page 19)
[USB]................................... Listening to songs in USB flash memory (page 22), saving your recorded performances to
USB flash memory (page 41)
[INTERNET] (F11)............. Listening to the songs on the internet using the streaming service (page 27)
BGM OFF
Pressing the [BGM] button turns off the [PRESET 1]/[PRESET 2]/[USB]/[INTERNET] (F11) lamps.
Playing Back Recorded Songs (page 40), Recording Your Performance (page 38), Selecting & Playing Voices (Playing)
(page 29)
MOVING KEY ON/OFF (F11)
The Moving Key feature on the F11 makes it possible for the keys of the keyboard to move automatically in response to
song playback. For more information, refer to page 21.
BGM BGM OFF
PRESET
USB
INTERNET (F11) The left lamps are turned off.
12 Playing Back Recorded Songs/Recording Your Performance/Selecting & Playing Voices
MOVING KEY ON/OFF (F11)

ENGLISH
Before Using the F11/F01
F11/F01 Owner’s Manual
13
Before Using the F11/F01
Key Cover
To open the key cover:
1. To open the cover, insert your fingers in the indenta-
tions on its front, lift the cover gently and fold it back.
2. Raise the folded cover and lean it against the front
panel.
To close the key cover:
1. If the music rest (page 14) is raised, lift it up and
against the cover to prevent damage to the panel.
2. Pull the cover down and toward yourself gently.
3. Unfold the cover and gently lower its front half.
CAUTION
Be careful to avoid catching your fingers
when opening or closing the cover.
CAUTION
Be careful to avoid catching your fingers
when opening or closing the cover.
CAUTION
Be careful to avoid catching your fingers
when opening or closing the cover.
CAUTION
Be careful to avoid catching your fingers
when opening or closing the cover.
CAUTION
Hold the key cover with both hands when opening or closing it, and do not release it until it is fully opened or closed.
Be careful to avoid catching fingers (yours or others, and especially those of children) in folding portion or between
the cover and main unit.

F11/F01 Owner’s Manual
14
ENGLISH
Before Using the F11/F01
Music Rest
The music rest is attached to the inside of the key cover.
To position the music rest for use:
Pull the music rest on the cover down and toward yourself.
To replace the music rest:
Lift the music rest up and against the cover.

ENGLISH
Before Using the F11/F01
F11/F01 Owner’s Manual
15
Connecting the Power Cord (F11)
Carefully read the following instructions and warnings before connecting the power cord.
1. Connect the supplied power cord to the [AC INLET] connector on the instrument’s rear panel. For an illustration of the
location of the [AC INLET] connector, see “Panel Controls and Terminals” (page 10).
2. Connect the other end of the power cord to an AC outlet. Make sure your F11 meets the voltage requirement for the
country or region in which it is being used.
In some areas, a plug adaptor may be provided to match the pin configuration of the AC wall outlets in your area.
WARNING
Make sure your F11 is rated for the AC voltage supplied in the area in which it is to be used (as listed
on the rear panel). Connecting the unit to the wrong AC supply can cause serious damage to the inter-
nal circuitry and may even pose a shock hazard!
WARNING
Use only the AC power cord supplied with the F11. If the supplied cord is lost or damaged and needs
to be replaced, contact your Yamaha dealer. The use of an inappropriate replacement can pose a fire
and shock hazard!
WARNING
The type of AC power cord provided with the F11 may be different depending on the country in which
it is purchased (a third prong may be provided for grounding purposes). Improper connection of the
grounding conductor can create the risk of electrical shock. Do NOT modify the plug provided with the
F11. If the plug will not fit the outlet, have a proper outlet installed by a qualified electrician. Do not
use a plug adapter which defeats the grounding conductor.
(The shape of plug differs
depending on your particular
locale.)
[AC INLET] connector

F11/F01 Owner’s Manual
16
ENGLISH
Before Using the F11/F01
Connecting the Power Cord (F01)
Carefully read the following instructions and warnings before connecting the power cord.
1. Connect the supplied power cord to the [AC INLET] connector on the instrument’s rear panel. For an illustration of the
location of the [AC INLET] connector, see “Panel Controls and Terminals” (page 10).
2. Connect the other end of the power cord to an AC outlet. Make sure your F01 meets the voltage requirement for the
country or region in which it is being used.
In some areas, a plug adaptor may be provided to match the pin configuration of the AC wall outlets in your area.
WARNING
Make sure your F01 is rated for the AC voltage supplied in the area in which it is to be used (as listed
on the rear panel). Connecting the unit to the wrong AC supply can cause serious damage to the inter-
nal circuitry and may even pose a shock hazard!
WARNING
Use only the AC power cord supplied with the F01. If the supplied cord is lost or damaged and needs
to be replaced, contact your Yamaha dealer. The use of an inappropriate replacement can pose a fire
and shock hazard!
[AC INLET] connector
(The shape of plug differs
depending on your particular
locale.)

ENGLISH
Before Using the F11/F01
F11/F01 Owner’s Manual
17
Turning the Power On
Press the [POWER] switch.
The power indicator located below the left end of the keyboard lights.
To turn off the power, press the [POWER] switch again.
CAUTION
Never interrupt the power supply while the instrument is loading data from a USB flash memory! Doing so can result in
loss of data.
CAUTION
Even when the instrument is turned off, electricity is still flowing to the instrument at the minimum level. When you are
not using the instrument for a long time or during electrical storms, make sure you unplug the AC power plug from the
wall AC outlet.
Setting the Volume
Initially set the [VOLUME] control about halfway between the “MIN” and “MAX” settings. Then, when you start playing,
re-adjust the
[VOLUME] control to the most comfortable listening level.
CAUTION
Do not use the instrument at a high volume level for a long period of time, or your hearing may be damaged.
TIP
Power indicator
If you close the key cover without turning the power off, the power indicator remains lit, indicating that the
power is still on.
TERMINOLOGY
VOLUME:
The volume level of the entire keyboard sound.
TIP
You can also adjust the [PHONES] output level and the AUX IN input level using the [VOLUME] control.
[POWER]
switch
Power indicator
The level decreases. The level increases.

F11/F01 Owner’s Manual
18
ENGLISH
Before Using the F11/F01
Using Headphones (option)
Connect a pair of headphones to one of the [PHONES] jacks.
Two [PHONES] jacks are provided.
You can connect two sets of standard stereo headphones. (If you are
using only one pair of headphones, you can plug them into either
jack.)
CAUTION
Do not use headphones at a high volume for an extended period of
time.
Doing so may cause hearing loss.
Checking the version number (F11)
You can check the version number of this instrument by simultaneously holding down the [MOVING KEY] button and
pressing A-1 on the keyboard (also see Quick Operation Guide). Press the [–/NO] or[+/YES] button to return to the orig-
inal display.
For instructions about how to update the instrument to the latest version, refer to the Yamaha website:
http://www.music.yamaha.com/idc
PHONES
bottom surface
standard stereo
phone plug
A-1

ENGLISH
Listening to the 50 Piano Preset Songs (Classic & Jazz)
F11/F01 Owner’s Manual
19
Listening to the 50 Piano Preset Songs
(Classic & Jazz)
The instrument features fifty built-in piano preset songs, including both classic pieces and jazz stan-
dards.
1 Turn the power on.
Press the [POWER] switch to turn the power on.
2 Adjust the volume.
Initially set the [VOLUME] control about half way between the “MIN” and
“MAX” settings. Then, when you start playing, re-adjust the [VOLUME] control
to the most comfortable listening level.
3 Turn on the [PRESET 1] or [PRESET 2] lamp.
Press the [BGM] button to turn on the [PRESET 1] or [PRESET 2] lamp. Preset 1
contains a variety of well-known classical music pieces while Preset 2 contains
many popular jazz standards. For a list of all 50 piano preset songs, see page 64.
4 Play any of the 50 piano preset songs.
4-1 Press the [–/NO] or [+/YES] button to select the num-
ber of the song you want to play.
rnd: Play all preset songs continuously
in random order.
ALL: Play all preset songs in sequence.
Sxx: Play all preset songs in each scene
(special sub categories within Classic or Jazz).
1 - 30 (PRESET 1): Select a preset song number and play only the selected song.
31 - 50 (PRESET 2): Select a preset song number and play only the selected song.
4
36
2
-1
45
-2
TERMINOLOGY
On the F11/F01, performance
data is called a “Song”. This
includes voice demonstration
tunes and 50 piano preset
songs (Classic & Jazz).
NOTE
You cannot select the [PRE-
SET 1] and [PRESET 2] lamps
while voice demo song playback
is in use (page 29) or the [REC]
button is on (page 38).
TERMINOLOGY
Random order:
The 50 Piano Preset Songs
(Classic & Jazz) are selected
and played back randomly by
the instrument—similar to the
shuffling of a deck of cards—
when pressing the [PLAY/
STOP] button.
Operation
Song number

F11/F01 Owner’s Manual
20
ENGLISH
Listening to the 50 Piano Preset Songs (Classic & Jazz)
Scene:
The 50 Piano Preset Songs (Classic & Jazz) have been divided into twenty three groups
or categories, to match a variety of listening preferences and to let you select your favor-
ite songs based on a scene description. For instance, if you want to listen to some “Ele-
gant” songs, select scene number 4. The songs that match that category will play
sequentially. For a list of the 50 piano preset songs (Classic & Jazz), see page 64.
Scene Titles:
Classic
Jazz
4-2 Press the [PLAY/STOP] button to start playback.
On the F11, the keys of the keyboard move automatically in response to song
playback (Moving Key). For more information, refer to page 21.
Adjust the Volume
Use the [VOLUME] control to adjust the volume.
5 Stop playback.
Press the [PLAY/STOP] button.
6 Turn the [PRESET 1] or [PRESET 2] lamp off.
Turn the [PRESET 1] or [PRESET 2] lamp off by pressing the [BGM] button.
TIP
Feel free to play the keyboard
along with the preset song. You
can also change the voice play-
ing on the keyboard.
TIP
You can adjust the Reverb Type
(page 35) that is applied to the
voice you play on the keyboard
and for preset song playback.
The Touch sensitivity (page 37)
for the keyboard voice can also
be adjusted to your liking.
NOTE
The default tempo “---” is auto-
matically selected whenever a
new preset song is selected, or
when playback of a new preset
song begins during “rnd” (ran-
dom), “ALL,” or “Sxx” (scene)
playback.
NOTE
When you select a different song
(or a different song is selected
during chained playback), an
appropriate Reverb Type will be
selected accordingly.
NOTE
The data of the 50 piano preset
songs is not transmitted via the
MIDI connectors.
- Home Party
- Morning
- Upbeat
- Elegant
- Relaxing
- Nighttime
- Melancholy
- Mood Music
- Fantasy
- Baroque and Pre-romantic Music
- Pre-romantic (Chopin)
- Post-romantic
- Modern French
- Home Party
- Daytime
- Afternoon
- Evening
- Midnight
- Elegant
- Upbeat
- Ballad
- Innocent
- Mood Music

ENGLISH
Listening to the 50 Piano Preset Songs (Classic & Jazz)
F11/F01 Owner’s Manual
21
Enjoying the Moving Key Feature (F11)
The F11 has a Moving Key feature in which the keys of the keyboard move automatically in response to song play-
back—including the included 50 piano preset songs (Classic & Jazz), songs saved to USB flash memory, and songs from
the Internet using the streaming service. This makes the instrument a true pleasure to see as well as hear. For more
information on the relationship between the Moving Key and the background music (BGM) mode, see page 12.
1 Turn on the Moving Key function.
Press the [MOVING KEY] button so that its indicator lights.
Keep in mind that the Moving Key feature applies only to the keys of the keyboard; the pedals do not move
automatically even if the [MOVING KEY] button is turned on and song playback is started.
2 Start playback.
Play back the desired songs. You can use Moving Key with the 50 piano preset songs (page 19), songs in USB
flash memory (page 22), or songs on the Internet using the streaming service (page 27).
The [MOVING KEY] status lamp (next to the button) lights, if an error occurs while using Moving Key. For
more information, refer to “Message List” on page 58.
3 Stop playback.
Stop song playback of the 50 piano preset songs (page 19), songs in USB flash memory (page 22), or songs on
the Internet using the streaming service (page 27).
4 Turn off the Moving Key function.
Press the [MOVING KEY] button again so that its indicator goes out.
Selecting the Part (Channel) for Moving Key
Depending on the particular song data, the song you’re playing may have several parts. Under the normal setting (Auto), the
instrument automatically chooses the best part for Moving Key playing, based on the particular song data. If you want to
change this part, manually select the channel for the desired part. Press one of the C4-F5 keys while holding the
[MOVING
KEY]
button (also see Quick Operation Guide). The current part setting appears on the display while both controls are held.
Press one of the C4-F5 keys while holding the [MOVING KEY] button (Quick operation guide). The current part set-
ting appears on the display while both controls are held.
Operation
[MOVING KEY] button
TIP
Normal setting: ON
TERMINOLOGY
Normal setting:
The phrase “Normal setting” refers to the default setting (factory setting) that is active when you
first turn on the power to the instrument.
C4-D
#
5Keyboard part (channel) 1-16
E5 Even if the song changes, the current part is maintained. The part is not selected automatically. “OFF”
appears on the display.
F5 The best part for each song is selected automatically (Normal setting). “ON” appears on the display.

F11/F01 Owner’s Manual
22
ENGLISH
Listening to songs in USB Flash Memory
Listening to songs in USB Flash Memory
You can conveniently connect a USB flash memory device to the instrument and listen to songs recorded to that device
(on a computer). You can also save your recorded performances on the instrument to the connected device and play those
songs back as well. Before using a USB flash memory device, be sure to read “Handling the USB Storage Device (USB
Flash Memory/Floppy Disk, etc.)” on page 25.
CAUTION
While playing a USB song or while the [USB] access lamp flashes in red, DO NOT pull out the USB flash memory or turn
the power off. Doing so can result in a loss of data.
Character Code
If the song cannot be loaded, you may need to change the character code setting.
International
Files with western alphabetical names (including umlaut or diacritic marks) can
be loaded (files with names in Japanese cannot be loaded).
Turn the power on while holding the [HARPSI.] and [VARIATION] buttons.
Japanese
Files with western alphabetical names and Japanese names can be loaded; how-
ever, file names including umlauts or diactric marks cannot be loaded.
Turn the power on while holding the [BASS] and [SPLIT] buttons.
1 Turn on the [USB] lamp.
Make sure that the USB flash memory is connected to the instrument, then turn
on the [USB] lamp by pressing the [BGM] button.
2 Play any of the USB songs.
2-1 Press the [–/NO] or [+/YES] button to select the num-
ber of the song you want to play.
rnd: Play all USB songs continuously in
random order.
ALL: Play all USB songs in sequence.
Uxx: Select the number of the desired USB
song, that of the performance which you’ve recorded and saved.
001-600 (F11): Select the number of the desired USB song, that which you’ve
saved by using a computer and play the song. The total num-
ber of available USB songs (including ones saved on the
instrument itself and those saved on computer) is 600. Hence,
the available number here may be less than 600 if some USB
songs (in Uxx above) have been saved on the instrument.
001-400(F01): Select a number of USB song, that which you’ve saved by
using a computer and play the song.
32
-2
14
2
-1
TIP
Normal setting: International
TERMINOLOGY
Normal setting:
The phrase “Normal setting”
refers to the default setting (fac-
tory setting) that is active when
you first turn on the power to the
instrument.
NOTE
You cannot turn on the [USB]
lamp while the voice demo song
playback is in use (page 29) or
the [REC] button is on (page 38).
NOTE
Certain songs may take more
time than others to start play-
back. Keep in mind that this
also affects the time between
playback of successively played
songs.
Operation
Song number

ENGLISH
Listening to songs in USB Flash Memory
F11/F01 Owner’s Manual
23
2-2 Press the [PLAY/STOP] button to start playback.
Adjust the Volume
Use the [VOLUME] control to adjust the volume.
3 Stop playback.
Press the [PLAY/STOP] button.
4 Turn the [USB] lamp off.
Turn the [USB] lamp off by pressing the [BGM] button.
Data format
This instrument can play back SMF Format 0 and Format 1 (Standard MIDI
file) and DOC (Disk Orchestra Collection) song data. When copying song data
from computer to USB flash memory, make sure to save it by using SMF Format
0 and Format 1. Keep in mind that songs recorded on other devices may use a
variety of voices not available on this instrument and hence may sound different
than the original songs.
TIP
The instrument has a conve-
nient Song Auto Revoice func-
tion (F11).
Refer to page 28.
TIP
Normal setting: ON (using the
specially created G. PIANO 1
Voice of the instrument)
To switch the specially created
G. PIANO 1 Voice of the instru-
ment to the conventional XG
Piano Voices of the same type,
turn the function OFF.
TIP
Feel free to play the keyboard
along with the USB song. You
can also change the voice play-
ing on the keyboard.
TIP
You can adjust the Reverb Type
(page 35) that is applied to the
voice you play on the keyboard
and for USB song playback. The
Touch sensitivity (page 37) for
the keyboard voice can also be
adjusted to your liking.
NOTE
The default tempo “---” is auto-
matically selected whenever a
new USB song is selected, or
when playback of a new USB
song begins during “rnd” (ran-
dom) or “ALL” playback.
NOTE
When you select a different
song (or a different song is
selected during chained play-
back), an appropriate Reverb
Type will be selected accord-
ingly.
NOTE
USB song data is not transmit-
ted via the MIDI connectors.
TERMINOLOGY
What is SMF (Standard MIDI
File)?
The SMF (Standard MIDI File)
format is one of the most com-
mon and widely compatible
sequence formats used for stor-
ing sequence data. There are
two variations: Format 0 and
Format 1. A large number of
MIDI devices are compatible
with SMF Format 0, and most
commercially available MIDI
sequence data is provided in
SMF Format 0.
IMPORTANT
When playing songs copied to a USB flash memory device from
a computer or other device, the songs must be stored either in
the USB flash memory’s root directory or a first-level/second-
level folder in the root directory. Songs stored in these locations
can be played as song data. Songs stored in third-level folders
created inside a second-level folder cannot be played by this
instrument.
USB flash memory
Can be played.
Cannot be played.
Song
File
Song
Folder
Song
File
Song
Folder
Song
File
Song
Folder
(Root)

F11/F01 Owner’s Manual
24
ENGLISH
Listening to songs in USB Flash Memory
Commercially Available Song Data
Song data purchased by using a computer and commercially available Disk Songs are
available when you connect the floppy disk drive to the instrument. The instrument is
compatible with the Song disks (floppy disks) that bear the following marks:
Specify the Song Part (Channel) and Play the Song (F01)
When listening to songs contained in USB flash memory, you can specify the song parts in this setting.
The “ALL” setting plays back all 16 parts, while “1+2” plays back parts 1 and 2.
Since piano songs are generally recorded to parts 1 and 2 exclusively, the “1+2” setting is best used with only the
piano voice.
Default setting is “ALL.”
Specify all parts as the designated part (ALL)
Press the A-1 key while holding the [BGM] button (also see Quick Operation Guide).
Specify parts 1 and 2 as the designated part (1+2)
Press the A
#
-1 key while holding the [BGM] button (also see Quick Operation Guide).
Keep in mind that songs recorded on other devices may use a variety of voices not available on this instrument and
hence may sound different than the original songs. In general, this instrument should be used to play back piano
songs.
(ALL)
Part 1 Part 2 Part 3
Piano voices
(1+2)
Other voices
NOTE
Before using a USB storage
device, be sure to read “Han-
dling the USB Storage Device
(USB Flash Memory/Floppy
Disk, etc.)” on page 25.
NOTE
Before using a floppy disk and
the disk slot, be sure to read
“Handling the Floppy Disk Drive
FDD) and Floppy Disks” on
page 26.
NOTE
Commercially available music
data is subject to protection by
copyright laws. Copying com-
mercially available data is
strictly prohibited, except for
your own personal use.

ENGLISH
Handling the USB Storage Device (USB Flash Memory/Floppy Disk, etc.)
F11/F01 Owner’s Manual
25
Handling the USB Storage Device
(USB Flash Memory/Floppy Disk, etc.)
This instrument features a built-in USB [TO DEVICE] terminal. By connecting the instrument to a USB storage device
with a standard USB cable, you can save data you’ve created to the connected device, as well as read data from the con-
nected device. Be sure to handle USB storage device with care. Follow the important precautions below.
For more information about the handling of USB storage device, refer to the owner’s manual of the USB storage device.
■ Compatible USB storage devices
• One USB storage device, such as a floppy disk drive,
hard disk drive, CD-ROM drive, flash memory
reader/writer, etc., can be connected to the USB [TO
DEVICE]
terminal. (If necessary, use a USB hub. The
number of USB storage devices that can be used with
musical instruments simultaneously even when a USB
hub is used is a maximum of one.) Other USB devices
such as a computer keyboard or mouse cannot be
used.
•The instrument does not necessarily support all com-
mercially available USB storage devices. Yamaha can-
not guarantee operation of USB storage devices that
you purchase. Before purchasing USB storage devices,
please consult your Yamaha dealer, or an authorized
Yamaha distributor (see list at end of the Owner’s
Manual) for advice, or visit the following web page:
http://music.yamaha.com/homekeyboard
Although CD-R/RW drives can be used to read data to
the instrument, they cannot be used for saving data.
■ Using USB Storage Devices
•When connecting a USB storage device to the USB
[TO DEVICE], make sure that the connector on the
device is appropriate and that it is connected in the
proper direction. Before removing the media from the
device, make sure that the instrument is not accessing
data (such as in the Save and Copy operations).
CAUTION
Avoid frequently turning the power on/off to the USB
storage device, or connecting/disconnecting the cable
too often. Doing so may result in the operation of the
instrument “freezing” or hanging up. While the instru-
ment is accessing data (such as in the Save and Copy
operations), do NOT unplug the USB cable, do NOT
remove the media from the device, and do NOT turn the
power off to either device. Doing so may corrupt the
data on either or both devices.
•If you are connecting a USB storage device and a LAN
adaptor at the same time, you should use a USB hub
device. The USB hub must be self-powered (with its
own power source) and the power must be on. Only
one USB hub can be used. If an error message appears
while using the USB hub, disconnect the hub from the
instrument, then turn on the power of the instrument
and re-connect the USB hub.
•Though the instrument supports the USB 1.1 stan-
dard, you can connect and use a USB 2.0 storage
device with the instrument. However, note that the
transfer speed is that of USB 1.1.
■ To protect your data (write-protect):
To prevent important data from being inadvertently
erased, apply the write-protect provided with each stor-
age device or media. If you are saving data to the USB
storage device, make sure to disable write-protect.

F11/F01 Owner’s Manual
26
ENGLISH
Handling the Floppy Disk Drive (FDD) and Floppy Disks
Handling the Floppy Disk Drive (FDD)
and Floppy Disks
The floppy disk drive allows you to load data from floppy disk to the instrument.
Be sure to handle floppy disks and treat the disk drive with care. Follow the important precautions below.
■ Floppy Disk Compatibility
3.5" 2DD and 2HD type floppy disks can be used.
■ Inserting/Removing Floppy Disks
Inserting a Floppy Disk into the Disk Drive:
•Hold the disk so that the label of the disk is facing
upward and the sliding shutter is facing forward,
towards the disk slot. Carefully insert the disk into the
slot, slowly pushing it all the way in until it clicks into
place and the eject button pops out.
Removing a Floppy Disk
•After checking that the instrument is not accessing*
the floppy disk (checking that the use lamp on the
floppy disk drive is off), firmly press the eject button
at the upper right of the disk slot all the way in.
When the floppy disk is ejected, pull it out of the
drive. If the floppy disk cannot be removed because it
is stuck, do not try to force it, but instead try pressing
the eject button again, or try re-inserting the disk and
attempt to eject it again.
*Access of the disk indicates an active operation and
the loading of data.
If a floppy disk is inserted while the power is on, the
disk is automatically accessed, since the instrument
checks whether the disk has data.
CAUTION
Do not remove the floppy disk or turn off the instrument
itself while the disk is being accessed.
Doing so may result not only in loss of data on the disk
but also damage to the floppy disk drive.
*Be sure to remove the floppy disk from the disk drive
before turning off the power. A floppy disk left in the
drive for extended periods can easily pick up dust and
dirt that can cause data-read and -write errors.
■ Cleaning the Disk Drive Read/Write Head
•Clean the read/write head regularly. This instrument
employs a precision magnetic read/write head which,
after an extended period of use, will pick up a layer of
magnetic particles from the disks used that will even-
tually cause read and write errors.
•To maintain the disk drive in optimum working order
Yamaha recommends that you use a commercially-
available dry-type head cleaning disk to clean the head
about once a month. Ask your Yamaha dealer about
the availability of proper headcleaning disks.
■ About Floppy Disks
Handle floppy disks with care, and follow
these precautions:
•Do not place heavy objects on a disk or bend or apply
pressure to the disk in any way. Always keep floppy
disks in their protective cases when they are not in
use.
•Do not expose the disk to direct sunlight, extremely
high or low temperatures, or excessive humidity, dust
or liquids.
•Do not open the sliding shutter and touch the exposed
surface of the floppy disk inside.
•Do not expose the disk to magnetic fields, such as
those produced by televisions, speakers, motors, etc.,
since magnetic fields can partially or completely erase
data on the disk, rendering it unreadable.
•Never use a floppy disk with a deformed shutter or
housing.
•Do not attach anything other than the provided labels
to a floppy disk. Also make sure that labels are
attached in the proper location.
To Protect Your Data (Write-protect Tab):
•To prevent accidental erasure of important data, slide
the disk’s write-protect tab to the “protect” position
(tab open). When saving data, make sure that the
disk’s write-protect tab is set to the “overwrite” posi-
tion (tab closed).
NOTE
Never insert anything but floppy disks
into the disk drive. Other objects may
cause damage to the disk drive or
floppy disks.
Write-protect tab open
(protect position)

ENGLISH
Listening to the Songs on Internet (F11)
F11/F01 Owner’s Manual
27
Listening to the Songs on Internet
(F11)
Yamaha provides a special website with a streaming data service that enables you to play back a range of songs (song data)
in various musical genres as background music on your instrument.
Before connect the instrument to the Internet, be sure to read “Internet Direct Connection (IDC) (F11)” on page 42.
1 Turn on the [INTERNET] lamp.
Make sure that the instrument is connected to the Internet, then select the
[INTERNET] lamp by pressing the [BGM] button (the [INTERNET] access lamp
flashes in red during Internet access).
2 Change the Channel.
Press the [–/NO] or [+/YES] button to change the channel. The current chan-
nel setting appears on the display.
2
15
34
TERMINOLOGY
Streaming
Streaming lets you listen to the
song data while it is being sent
from the Internet. It allows you
to call up the data repeatedly
but it does not allow you to save
the data to a file.
NOTE
You cannot select the [INTER-
NET] lamp while voice demo
song playback is in use
(page 29) or the [REC] button is
on (page 38).
NOTE
The LED displays shown in this
owner’s manual are for instruc-
tional purposes only and may
appear somewhat different from
those on your instrument.
Operation

F11/F01 Owner’s Manual
28
ENGLISH
Listening to the Songs on Internet (F11)
3 Start playback.
Press the [PLAY/STOP] button to start playback (the [INTERNET] access lamp
flashes in red during Internet access).
4 Stop playback.
Press the [PLAY/STOP] button.
5 Turn the [INTERNET] lamp off.
Turn the [INTERNET] lamp off by pressing the [BGM] button.
Song Auto Revoice (F11)
When you play back any commercially available XG song data or that created on other instruments, you can use Auto
Revoice to automatically assign the specially created G. PIANO 1 Voice of the instrument instead of the conventional XG
piano voices of the same type. If you want to keep the XG voice and disable this automatic reassignment, set Auto Revoice
to off.
Press the F
#
0 key while holding the [BGM] button to switch the function on/off. When
set to on, the instrument automatically replaces the conventional XG piano voice with
the G.PIANO Voice. When set to off, the XG voice is maintained.
The current ON/OFF setting appears on the display while both controls are held.
TIP
Feel free to play the keyboard
along with the streaming song.
You can also change the voice
playing on the keyboard.
TIP
You can adjust the Reverb Type
(page 35) that is applied to the
voice you play on the keyboard
as well as for the streaming
song on Internet playback. The
Touch sensitivity (page 37) for
the keyboard voice can also be
adjusted to your liking.
NOTE
The default tempo “---” is auto-
matically selected whenever a
song is selected.
NOTE
When you select a different
song (or a different song is
selected during chained play-
back), an appropriate Reverb
Type will be selected accord-
ingly.
NOTE
Song data streaming from the
Internet is not transmitted via
the MIDI connectors.
Operation
TIP
Normal setting: ON (using the
specially created G. PIANO 1
Voice of the instrument)
To switch the specially created
G. PIANO 1 Voice of the instru-
ment to the conventional XG
Piano Voices of the same type,
turn the function OFF.
NOTE
This setting will not affect the
voice you play on the keyboard.
The keyboard voice used is the
specially created G. PIANO 1
Voice of the instrument.
F
#
0
A-1

ENGLISH
Selecting & Playing Voices
F11/F01 Owner’s Manual
29
Selecting & Playing Voices
Selecting Voices
Select the desired voice by pressing one of the [VOICE] buttons.
To learn characteristics of the voices, listen to voice demo songs for each voice (page 29). Refer to
“Preset Voice List” on page 66 for more information on the characteristics of each preset voice.
Then, when you start playing, re-adjust the [VOLUME] control for the most comfort-
able listening level.
Listening to the Voice Demonstration Tunes
Vo ice demonstration tunes are provided that effectively demonstrate each of the F11/F01’s voices.
1 Play a Voice demo.
Press one of the voice buttons while holding the [BGM] button to start playback of all
demo songs starting from top left button to bottom right button-featuring the voice
normally selected by that voice button. For a list of the voice demo songs, see page 67.
2 Stop the Voice demo.
Press the [BGM] or [PLAY/STOP] button.
Voice buttons
Operation
TIP
You can control the loudness of
a voice by adjusting the force
with which you strike the keys,
although different playing styles
(touch sensitivities) have little or
no effect with certain musical
instruments.
Refer to “Preset Voice List” on
page 66.
1
2
12
NOTE
MIDI reception is not possible while
Voice demo playback is in use.
Voice demo song data is not trans-
mitted via the MIDI connectors.
NOTE
A voice demo cannot be played
while the [REC] button is on
(page 38).
Operation
NOTE
You cannot adjust the tempo of
voice demo songs. The default
tempo “---” of the selected voice
demo song is automatically set
and fixed during playback.
NOTE
Press the current voice button
during the voice demo song
playback to restart playback
from the top of the song.

F11/F01 Owner’s Manual
30
ENGLISH
Selecting & Playing Voices
Selecting Alternate Voices (VARIATION)
This feature lets you call up alternate “Variation” voices for each voice, each with its own characteristic sound and effect.
Refer to “Preset Voice List” on page 66 for more information on the characteristics of each variation.
Pressing the [VARIATION] or selected voice button toggles the variation on and off.
The indicator lights (ON) each time the [VARIATION] button is pressed.
Using the Pedals
The instrument has three foot pedals that produce a
range of expressive effects similar to those produced by
the pedals on an acoustic piano.
Damper (Right) Pedal
The damper pedal functions in the same way as a
damper pedal on an acoustic piano. When the damper
pedal is pressed, notes sustain longer. Releasing the pedal
immediately stops (damps) any sustained notes.
When you select the G. PIANO 1 or G. PIANO 1 VARIA-
TION voice on the F11/F01, pressing the damper pedal
activates the instrument’s special “Sustain Samples” to
accurately recreate the unique resonance of an acoustic
grand piano’s soundboard and strings.
Sostenuto (Center) Pedal
If you play a note or chord on the keyboard and press the
sostenuto pedal while the note(s) are held, those notes will
sustain as long as you hold the pedal (as if the damper
pedal had been pressed) but all subsequently played notes
will not be sustained. This makes it possible to sustain a
chord, for example, while other notes are played “staccato.”
Soft (Left) Pedal
The soft pedal reduces the volume and slightly changes the timbre of notes played while the
pedal is pressed. The soft pedal will not affect notes that are already playing when it is pressed.
[VARIATION] button
TIP
Normal setting: OFF
Operation
TIP
In Split mode, the Damper
Pedal Range function deter-
mines whether the damper
pedal affects the right voice, the
left voice, or both the left and
right voices (page 33).
When you press the damper
pedal here, the notes you
play before you release the
pedal have a longer sustain.
TIP
Organ and string voices will
continue to sound for as long as
the sostenuto pedal is
depressed.
When you press the soste-
nuto pedal here while holding
the note, the note will sustain
as long as you hold the pedal.

ENGLISH
Selecting & Playing Voices
F11/F01 Owner’s Manual
31
Combining Two Voices (Dual mode)
You can play two voices simultaneously across the entire range of the keyboard. In this way, you can simulate a melody
duet or combine two similar voices to create a thicker sound.
1 Engage Dual mode.
Press two voice buttons at the same time (or press one voice button while hold-
ing another). The voice indicators of both selected voices will light when Dual
mode is active.
•According to the voice numbering priority shown in the diagram on the
right, the lower value voice number will be designated as Voice 1 (the other
voice will be designated as Voice 2).
You can make the following settings for Voices 1 and 2 in Dual:
Dual Balance
You can set one voice as the main voice, and another voice as a softer, mixed voice.
While holding down the [METRONOME] button, press one of the F
#
5-F
#
6 keys (see
Quick Operation Guide). The current balance setting appears on the display while
both controls are held. A setting of “0” produces an equal balance between the two
Dual mode voices. Settings below “0” increase the volume of Voice 2 in relation to
Vo ice 1, and settings above “0” increase the volume of Voice 1 in relation to Voice 2.
Octave Shift
You can shift the pitch up and down in octave steps for Voice 1 and Voice 2 inde-
pendently. Depending on which voices you combine in Dual mode, the combi-
nation may sound better if one of the voices is shifted up or down an octave.
While holding down the [METRONOME] button, press one of the A4-D5 keys
(see Quick Operation Guide). The current Octave Shift setting appears on the
display while both controls are held.
Voice 2 Reverb Depth (F11)
While holding down the [METRONOME] button, press one of the F
#
1-F2 keys
(see Quick Operation Guide). The current Reverb Depth setting appears on the
display while both controls are held.
2 Exit from the Dual mode.
Press any single voice button.
12
TERMINOLOGY
Mode:
A mode is an operating condi-
tion of the instrument that allows
you to perform some special
function. In the Dual mode, for
example, you can play two
voices simultaneously across
the entire range of the keyboard.
NOTE
Dual and Split (page 32) modes
cannot be engaged at the same
time.
TIP
[VARIATION] in Dual Mode
The [VARIATION] button’s indicator
will light if the variation is engaged
for either or both of the Dual mode
voices. While Dual mode is
engaged, the [VARIATION] button
can be used to turn the variation for
both voices on or off.
To turn the variation on or off for
only one of the voices, hold the
voice button for the other voice
and press the button of the
voice for which you want to
change the variation.
TERMINOLOGY
Normal setting:
Balance will be decided accord-
ing to the balance default value
of the voice combination.
TIP
[REVERB] in Dual Mode
The Reverb Type (page 35)
assigned to Voice 1 will take pri-
ority over the other. (If the
reverb is set to OFF, Voice 2
Reverb Type will be in effect.)
TERMINOLOGY
Normal setting:
Octave will be decided accord-
ing to the octave default value of
the voice combination.
TERMINOLOGY
Normal setting: F2
The Voice 2 Reverb Depth is
determined according to the
default Voice 2 Reverb Depth
value for the voice.
Operation
Voice 1
A4 -1
Voice 2
C5 -1
A
#
40 C
#
50
B4 +1 D5 +1
12
8
345
67 910
Voice numbering priority

F11/F01 Owner’s Manual
32
ENGLISH
Selecting & Playing Voices
Saving the Voice Settings (F11)
Some of the current voice settings can be saved in the internal memory of the instrument. The data is maintained even
when the power is turned off.
Press the
[G. PIANO 1] button while holding the [REC] button (see Quick Operation
Guide). When saving is complete, an “End” message appears on the display for three
seconds. The following settings can be saved:
•Reverb Type and Depth
• Octave
•Volume
To initialize the voice settings
Turn the power on while holding the [REC] and [G. PIANO 1] buttons.
Splitting the Keyboard Range and Playing Two Dif-
ferent Voices (Split mode)
Split mode enables you to play two different voices on the keyboard — one with the left hand and another with the right
hand. For example, you can play a bass part using the Bass voice with the left hand, and a melody with the right hand.
1 Engage Split mode.
Press the [SPLIT] button so that its indicator lights. The default setting (BASS)
will be selected for the left-hand voice at first.
2 Specify the split point (the border between the
right-and left-hand range).
You can change the split point to any other key by pressing the key while hold-
ing the [SPLIT] button (or change the split point by pressing the [–/NO] or [+/
YES] button while holding the [SPLIT] button). The name of the current split
point key appears on the LED display while the [SPLIT] button is held.
The split point is initially set at the F
#
2 key by default.
If you do not need to change the split point, skip this operation.
NOTE
On the F01, you cannot specify
whether the voice settings are
saved in internal memory of the
instrument or not. The settings
are automatically saved when
you change the settings. When
you turn off the power to the
instrument, however, the saved
data will be lost.
Operation
12 534
Operation
NOTE
Dual (page 31) and Split modes
cannot be engaged simulta-
neously.
TIP
A specified “split point” key is
included in the left-hand range.
TIP
Normal setting:
F
#
2
(F
#
2) (G2) (A
b
2)
An example of split-point key display
followed by a high bar if sharp followed by a low bar if flat

ENGLISH
Selecting & Playing Voices
F11/F01 Owner’s Manual
33
3 Select a voice for the right hand.
Press a voice button.
4 Select a voice for the left hand.
Press the corresponding voice button while holding the [SPLIT] button. (The
indicator of the Left Voice button will light while the
[SPLIT] button is pressed.)
You can make the following settings for right and left voices in Split:
Split Balance
While holding down the [METRONOME] button, press one of the F
#
5-F
#
6
keys (see Quick Operation Guide). The current balance setting appears on the
display while both controls are held. A setting of “0” produces an equal balance
between the two Split mode voices. Settings below “0” increase the volume of
the left voice in relation to the right voice, and settings above “0” increase the
volume of the right voice in relation to the left voice.
Octave Shift
You can shift the pitch up and down in octave steps for the right voice and left
voice independently. You should make the setting depending on the note range
of the songs you play. While holding down the [METRONOME] button, press
one of the A4-D5 keys (see Quick Operation Guide). The current Octave Shift
setting appears on the display while both controls are held.
Left Voice Reverb Depth (F11)
While holding down the [METRONOME] button, press one of the F
#
1-F2 keys
(see Quick Operation Guide). The current Reverb Depth setting appears on the
display while both controls are held.
Damper Pedal Range
The Damper Pedal Range function determines whether the damper pedal
affects the right voice, the left voice, or both the left and right voices in Split
mode. While holding down the
[BGM] button, press one of the C0-D0 keys (see
Quick Operation Guide). The current range setting appears on the display while
both controls are held.
5 Exit Split mode.
Press the [SPLIT] button again so that its indicator goes out.
TIP
[VARIATION] in Split Mode
You can turn the variation on or
off for Split mode voices. Nor-
mally, the voice indicator of the
right voice lights in Split mode.
The [VARIATION] can be used
to turn the variation for the right
voice on or off as required.
While the [SPLIT] button is
held, however, the voice indica-
tor of the left voice lights. In this
state the [VARIATION] button
turns the variation for the left
voice on or off.
TIP
[REVERB] in Split Mode
The Reverb Type (page 35)
assigned to the right voice will
take priority over the other. (If
the reverb is set to OFF, the left
voice’s Reverb Type will be in
effect.)
TERMINOLOGY
Normal setting:
Balance will be decided accord-
ing to the balance default value
of the voice combination.
TERMINOLOGY
Normal setting:
Octave will be decided accord-
ing to the octave default value of
the voice combination.
TERMINOLOGY
Normal setting: F2
Left voice Reverb Depth will be
decided according to the left
voice Reverb Depth default
value of the voice.
TIP
The normal setting of Damper
pedal range is “for the right
Voice”.
Right Voice
A4 -1
Left Voice
C5 -1
A
#
40 C
#
50
B4 +1 D5 +1
C0 for the left Voice
C
#
0for both voices
D0 for the right Voice

F11/F01 Owner’s Manual
34
ENGLISH
Selecting & Playing Voices
Using the Metronome
The instrument features a built-in metronome (a device that keeps an accurate tempo) that is convenient for practicing.
1 Start the metronome.
The metronome sound is turned on by pressing
the [METRONOME] button.
Metronome volume
While holding down the [METRONOME] button, press one of the A-1-F
#
0
keys (see Quick Operation Guide). The current metronome volume setting
appears on the display while both controls are held.
Adjusting the tempo
The tempo of the metronome and user song recorder playback can be set by
using the [–/NO] or [+/YES] button.
Adjusting the time signature
The time signature (beat) of the metronome can be
set by pressing one of the A0-D1 keys while holding
the [METRONOME] button. You can set the beat to
0, 2, 3, 4, 5 or 6. The current setting appears on the
LED display while both controls are held.
2 Stop the metronome.
Turn off the metronome by pressing the [METRONOME] button.
1
2
[–/NO][+/YES] button
Operation
The beat indicator flashes
at the current tempo.
TIP
Normal setting:
F11: 7
F01: 5
TERMINOLOGY
F11: 5 to 500 beats per minute
Normal setting: 120
When the song is selected, it
becomes the default tempo “---”
of the song automatically during
playback.
F01: 32 to 280 beats per minute
Normal setting: 120
When the song is selected, it
becomes the default tempo “---”
of the song automatically during
playback.
NOTE
Because the metronome is for
practicing purposes, the tempo
of the metronome may differ
with the tempo of certain songs
in the 50 Piano Preset Songs.
beat
TIP
Normal setting:
0

ENGLISH
Selecting & Playing Voices
F11/F01 Owner’s Manual
35
Selecting various digital reverb effects (REVERB)
This control enables you to select various digital reverb effects for adding extra depth and expression to the sound, and
creating a realistic acoustic ambience.
Selecting Reverb Type
Press one of the G
#
6-C7 keys while holding the [METRONOME] button (see Quick
Operation Guide). The current Reverb Type setting appears on the display while both
controls are held.
Even if the REVERB effect is OFF, a “Soundboard Reverb” effect will be applied when
the G. PIANO 1 or 2 voice is selected.
Adjusting Reverb Depth
Press one of the A2-F
#
4 keys while holding the [METRONOME] button (see Quick
Operation Guide). The current Reverb Depth setting appears on the display while both
controls are held.
TIP
The default Reverb Type
(including OFF) and depth set-
tings are different for each
voice.
Operation
KeyReverb Type Description
G
#
6ROOM This setting adds a continuous reverb effect to the sound, similar to
the acoustic reverberation you would hear in a room.
A6 HALL1 For a “bigger” reverb sound, use the HALL 1 setting. This effect simu-
lates the natural reverberation of a small-size concert hall.
A
#
6 HALL 2 For a truly spacious reverb sound, use the HALL 2 setting. This effect
simulates the natural reverberation of a large concert hall.
B6 STAGE Simulates the reverb of a stage environment.
C7 OFF When no reverb effect is selected, no REVERB indicator is lit.
TIP
depth 0: no effect
depth 20: maximum Reverb
Depth
TIP
Default depth settings are differ-
ent for each voice.

F11/F01 Owner’s Manual
36
ENGLISH
Selecting & Playing Voices
Transposition – [TRANSPOSE]
This instrument’s Transpose function makes it possible to easily match the pitch of the keyboard in semitone intervals to
the range of a singer or other instruments. For example, if you set the transposition amount to “5,” playing the C key pro-
duces a pitch of F. In this way, you can play a song as though it were in C major, and the F11/F01 will automatically trans-
pose it to the key of F.
Press one of the F
#
5-F
#
6 keys while holding the [BGM] but-
ton (see Quick Operation Guide). The current amount of
transposition appears on the display while both controls are
held.
To transpose the pitch down (in semitone steps)
Press one of the F
#
5-B5 keys while holding the [BGM] button.
To transpose the pitch up (in semitone steps)
Press one of the C
#
6-F
#
6 keys while holding the [BGM] button.
To initialize the normal pitch
Press the C6 key while holding the [BGM] button.
Fine Tuning of the Pitch
You can fine tune the pitch of the entire instrument. This function is useful when you play the F11/F01 along with other
instruments or CD music. For the key assignment, refer to the Quick Operation Guide.
You can also use the keyboard to set the pitch.
To tune up (in about 0.2Hz steps)
Hold the A-1, B-1, and C0 keys simultaneously and press any key between C3 and B3.
The current pitch setting appears on the display while the key combination is held.
Example:
432.0Hz
To tune down (in about 0.2Hz steps)
Hold the A-1, B-1, and C
#
0 keys simultaneously and press any key between C3 and B3.
The current pitch setting appears on the display while the key combination is held.
To initialize standard pitch
Hold the A-1, B-1, C0, and C
#
0 keys simultaneously and press any key between C3 and
B3. The current pitch setting appears on the display while the key combination is held.
Operation
TERMINOLOGY
Transpose:
Changing the key signature of a
song. On the F11/F01, trans-
posing shifts the pitch of the
entire keyboard.
TIP
The transposition range:
F
#
5: -6 semitones (down one
octave)
C6: normal pitch
F
#
6: +6 semitones (up one
octave)
TIP
Notes below and above the C-2
…. G8 range of the F11/F01
sound one octave higher and
lower, respectively.
Transposition
TERMINOLOGY
Hz (Hertz):
This unit of measurement refers
to the frequency of a sound and
represents the number of times
a sound wave vibrates in a sec-
ond.
TIP
Setting range:
F11: 414.8Hz - 466.8Hz
F01: 427.0Hz - 453.0Hz
TIP
Normal setting:
440.0Hz
Operation

ENGLISH
Selecting & Playing Voices
F11/F01 Owner’s Manual
37
Touch Sensitivity – [TOUCH]
You can select four different types of keyboard touch sensitivity — HARD, MEDIUM, SOFT or FIXED — to match dif-
ferent playing styles and preferences.
Press one of the A6-A7 keys while holding the
[BGM] button (see Quick Operation
Guide).
The current touch type setting appears on the display while both controls are held.
TIP
This setting does not change
the weight of the keyboard.
TIP
Normal setting: MEDIUM
TIP
The touch sensitivity type will
become the common setting for
all voices. However, the touch
sensitivity settings may have lit-
tle or no effect with certain
voices that are not normally
responsive to keyboard dynam-
ics. (Refer to the “Preset Voice
List” on page 66.)
Operation
KeyTouch Type Description
A6 FIXED All notes are produced at the same volume no matter how hard the
keyboard is played.
A
#
6 SOFT Allows maximum loudness to be produced with relatively light key
pressure.
B6 MEDIUM Produces a fairly “standard” keyboard response.
C7 HARD Requires that the keys be played quite hard to produce maximum
loudness.

F11/F01 Owner’s Manual
38
ENGLISH
Recording Your Performance
Recording Your Performance
The ability to record and play back what you’ve played on the F11/F01
keyboard can be an effective practice aid. The F11/F01’s Song Recorder
allows the recording of one User song.
1 Exit from BGM mode.
Press the [BGM] button to exit from BGM mode (page 12).
2 Make all the initial settings.
Before you begin to record, select the voice you want to record (or voices if you
will be using Dual or Split mode). Make any other desired settings (tempo,
reverb, etc.) as well. You might also want to set the volume.
You can also adjust the playback volume using [VOLUME] control.
3 Turn the [REC] button on.
Press the [REC] button. Recording does not actually start yet.
The [REC] button indicator flashes in red.
The [PLAY/STOP] button indicator will flash at the current METRO-
NOME tempo setting.
CAUTION
Record mode can be disengaged before recording by pressing the [REC] button a sec-
ond time.
CAUTION
Keep in mind that when recording starts, the previously recorded data will be erased.
Please be careful not to erase important data.
TIP
You can record your perfor-
mance (audio data) to a cas-
sette tape recorder or other
recording device via the AUX
OUT[L/L+R][R] connector
(page 51).
Recording vs. Saving:
The format of performance data recorded on a cassette tape differs from that of
data recorded on the F11/F01. A cassette tape records audio signals. The F11/F01
“saves” information regarding note timing, voices, and a tempo value, but not
audio signals. When you play back recorded songs, the F11/F01 produces sound
based on the saved information. Therefore, recording on the F11/F01 may be
more accurately called “saving information.” However, this book often uses the
word “recording” because it seems to make more sense.
345 42
1
NOTE
A voice demo and a 50 Piano
Preset Song (Classic & Jazz)
cannot be played while the
[REC] button is on.
Operation
NOTE
You cannot record the perfor-
mance to the connected USB
flash memory directly. The
recorded songs are saved to the
instrument automatically. If you
want to save data to USB flash
memory, perform the Save
operation (page 41) after stop-
ping recording.

ENGLISH
Recording Your Performance
F11/F01 Owner’s Manual
39
4 Start recording.
Recording will begin automatically as soon as you play a note on the keyboard
or press the [PLAY/STOP] button.
The current measure number will appear on the display while recording
and the right-most dot on the LED display will flash at the current metro-
nome tempo setting.
5 Stop recording.
Press either the [REC] or [PLAY/STOP] button to stop recording.
When the recording is finished, the “End” appears on the display for three
seconds.
6 Play back the recorded performance.
Refer to “Playing Back Recorded Songs” on page 40.
TIP
If the metronome was on when
you started recording, you’ll be
able to keep time with the met-
ronome while recording, but the
metronome sound will not be
recorded.
NOTE
On the F01, the [PLAY/STOP]
and [REC] button indicators will
begin to flash when the recorder
memory is almost full. If the
memory becomes full during
recording, “FUL” will appear on
the display and recording will
stop automatically. (All recorded
data up to that point will be
retained.)
NOTE
Pressing the [PLAY/STOP] but-
ton to start recording, then
pressing it again to stop record-
ing will erase previously
recorded data
NOTE
You cannot re-record in the mid-
dle of a song.
The user song recorder records the following data:
•Notes played
•Voice selection
•[VARIATION] ON/OFF
•Pedal (Damper/Soft/Sostenuto)
•Reverb Type (including OFF)
•Reverb Depth
•Tempo
•Time signature (beat)
•Dual mode voices
•Dual balance
•Dual Octave Shift
•Dual Reverb Type
• Split mode voices
• Split balance
• Split Octave Shift
• Split Reverb Type
flash flash flash

F11/F01 Owner’s Manual
40
ENGLISH
Playing Back Recorded Songs
Playing Back Recorded Songs
You can play back songs recorded using the Record function (page 38). You can also
play the keyboard along with the playback.
1 Exit from BGM mode.
Press the [BGM] button to exit from BGM mode (page 12).
2 Start playback.
Press the [PLAY/STOP] button.
The current measure number appears on the display during playback.
•You can play the keyboard while the instrument is playing back a song. You
can also play the notes in a voice different from the playback voice by select-
ing a voice from the panel.
Adjust the volume
Use the [VOLUME] control to adjust the volume.
Adjust the tempo
You can adjust the playback tempo as required before or during playback. Refer
to page 34.
3 Stop playback.
When playback is complete, the instrument automatically stops and locates the
top of the song. To stop playback in the middle of a song, press the [PLAY/
STOP]
button.
NOTE
Song data is not transmitted via
the MIDI connectors.
1
2
3
NOTE
You cannot start playback while
voice demo song playback is in
use or the unit is in BGM mode.
NOTE
Playback cannot be started when
the recorder contains no data.
TIP
You can also enjoy playing
duets with yourself by recording
one part of a duet or a song for
two pianos, then playing the
other part while the recorded
part plays back.
TIP
F11 can move the keyboard
according to the recorded song
playback (Moving Key). For
more information, refer to
page 21.
TIP
If the metronome is being used
during playback, the metro-
nome will automatically stop
when playback is stopped.
TIP
If the Reverb Type is changed via
the panel controls during play-
back, both the playback and key-
board reverb effects will be
changed. On the F01, tempo
cannot be adjusted during play-
back.
TIP
Normal setting:
120
Operation

ENGLISH
Saving Your Recorded Performance to USB Flash Memory
F11/F01 Owner’s Manual
41
Saving Your Recorded Performance to
USB Flash Memory
The built-in song recorder on the F11/F01 allows you to record one User song, which you can then save to a USB flash
memory device (page 38). Use of a such a device allows you to save many songs (up to the capacity of the device), and
always maintain free space on the instrument itself for recording a new song.
1 Select a file container in the USB flash memory and
save the User song.
After making sure that the USB flash memory is connected to the instrument,
press the [PLAY/STOP] button while holding down the [VARIATION] button.
Then, press the [–/NO] and [+/YES] buttons to select a container (U00-U99)
and press the [PLAY/STOP] button. On the F01, after pressing the [PLAY/STOP]
button and the prompt “n y” (no/yes) appears in the display, press the [+/YES]
button to save the song. When the save operation is finished, an “End” message
appears on the display for three seconds.
CAUTION
To cancel the save operation, press any button (except [PLAY/STOP], [–/NO], or [+/
YES]) before pressing the [PLAY/STOP] button.
Overwriting the user song
If you select a container which contains a User song, three dots appear in the display
(e.g., “U.0.0.”). Press the [PLAY/STOP] button. If you do not want to overwrite the
song, press the [–/NO] button at the “n
–
y” (no/yes) prompt and select another con-
tainer. On the F01, after pressing the [PLAY/STOP] button and the prompt “n y” (no/
yes) appears in the display, press the [–/NO] button, and then select another container.
If you want to overwrite the song, press the [+/YES] button when “n
–
y” (no/yes)
appears in the display. On the F01, after pressing the [PLAY/STOP] button and the
prompt “n y” (no/yes) appears in the display, press the [+/YES] button to confirm
whether you wish to overwrite the user song or not, and then press the [+/YES] button
once more. When the save operation is finished, an “End” message appears on the dis-
play for three seconds.
[PLAY/STOP] button
[–/NO]/[+/YES] button [VARIATION] button
NOTE
Before using a USB flash mem-
ory device, be sure to read
“Handling the USB Storage
Device (USB Flash Memory/
Floppy Disk, etc.)” on page 25.
NOTE
The number of available file
containers is 100 (U00-U99).
NOTE
The user song is saved as SMF
Format 0.
Operation
Internal memory of
the instrument
User song
Save
USB flash memory
U00
U01
U02
U99
File
container

F11/F01 Owner’s Manual
42
ENGLISH
Internet Direct Connection (IDC) (F11)
Internet Direct Connection (IDC) (F11)
This feature lets you directly connect your instrument to the Internet. A streaming ser-
vice in the special Yamaha website enables you to play back a range of songs (song data)
in various musical genres as background music. You can enjoy not only listening to the
songs by your ears but also seeing the automatic playing keyboard by your eyes.
Here in this section, you may come across some unfamiliar terms and phrases related
to computers and online communications. To look up the meaning of these terms,
refer to the “Glossary of Internet Terms” on page 49.
Setting Up the Instrument to the Internet Connection
You can connect the instrument to a full-time online connection (ADSL, optical fiber,
cable Internet, etc.) via a router or a modem equipped with a router. For the latest ser-
vices and the specific instructions on connecting (as well as information on compatible
devices etc.), refer to the Yamaha website:
http://music.yamaha.com/homekeyboard
To use the Internet connection, you will first need to subscribe to an Internet service or
provider.
Connection example 1: Connecting by cable
(using a modem without router)
TERMINOLOGY
Streaming
Streaming lets you listen to the
song data while it is being sent
from the Internet. It allows you
to call up the data repeatedly
but it does not allow you to save
the data to a file.
Use a computer to connect to the Internet and get online before connecting the instrument,
since no modem or router settings can be made from the instrument itself.
NOTE
Depending on the Internet con-
nection, you may not be able to
connect to two or more devices
(for example, a computer and
the instrument), depending on
the contract with the provider.
This means you cannot connect
with the instrument. If in doubt,
check your contract or contact
your provider.
At the rear of the instrument, the [LAN] port is protected by a board. Before connecting the
LAN cable to the [LAN] port, loosen the right and left screws with your hand and remove the
board.
After connecting the cable, reattach the board and tighten both screws to secure it.
Rear view
NOTE
Connect the LAN cable to the
[LAN] port.
NOTE
Some types of modems require
an optional Ethernet hub net-
work for simultaneously con-
necting to several devices (such
as computer, musical instru-
ment, etc.).
Modem* No
router capability
Router
Cable type
LAN cable
LAN cable
[LAN] port
* Here, “modem” refers to an ADSL modem, optical network unit (ONU) or cable modem.

ENGLISH
Internet Direct Connection (IDC) (F11)
F11/F01 Owner’s Manual
43
Connection example 2: Connecting by cable (using a modem with router)
Connection example 3: Wireless connection
(using a wireless game adaptor)
Connection example 4: Wireless connection
(using a USB wireless LAN adaptor)
NOTE
Connect the LAN cable to the
[LAN] port.
ADSL modem
Router capability
LAN cable
LAN cable
[LAN] port
NOTE
Connect the wireless game
adaptor to the [LAN] port.
NOTE
In addition to the modem or an
access point, this connection
requires a router.
Modem* Access point
[LAN] port
Wireless Game Adaptor
* Here, “modem” refers to an ADSL modem, optical network unit (ONU) or cable modem.
NOTE
Connect the USB wireless LAN
adaptor to the USB [TO
DEVICE] terminal.
NOTE
In addition to the modem or an
access point, this connection
requires a router.
NOTE
The F11 is encrypted in WEP
format only.
Modem*
Access point
USB Wireless LAN Adaptor
USB [TO DEVICE] terminal
* Here, “modem” refers to an ADSL modem, optical network unit (ONU) or cable modem.

F11/F01 Owner’s Manual
44
ENGLISH
Internet Direct Connection (IDC) (F11)
Connecting the Instrument to the Internet
If you are using a connection by cable (using DHCP):
You do not need to make settings on the instrument. You can access the Internet simply
by connecting a router or a modem equipped with a router to the instrument via a
LAN cable.
Once the instrument is successfully connected to the Internet, the channel streamed
from the Internet will be shown on the display when you select the [INTERNET] lamp
with the [BGM] button.
You can play back the songs on the Internet using the streaming service. For
instructions on playing back songs, see “Listening to the Songs on Internet (F11)”
on page 27.
If you are using a connection by cable (using static IP address,
proxy server):
You need to make Internet settings on the instrument.
For instructions on making Internet settings, see “About the Internet Settings” on
page 45.
If you are using a wireless LAN (using a wireless game adaptor):
You do not need to make settings on the instrument.
You can access the Internet simply by connecting a wireless game adaptor to the instru-
ment.
*The wireless game adaptor requires settings such as the access point. For information
about how to make settings, read the owner's manual for the product you are using.
Once the instrument is successfully connected to the Internet, the channel streamed
from the Internet will be shown on the display when you select the [INTERNET] lamp
with the [BGM] button.
You can play back the songs on the Internet using the streaming service. For
instructions on playing back songs, see “Listening to the Songs on Internet (F11)”
on page 27.
If you are using a wireless LAN (using a USB wireless LAN adaptor):
You need to make Internet settings on the instrument.
For instructions on making Internet settings, see “About the Internet Settings” on
page 45.
NOTE
The most common router and
modem equipped with a router
have a DHCP function.

ENGLISH
Internet Direct Connection (IDC) (F11)
F11/F01 Owner’s Manual
45
About the Internet Settings
You can conveniently make Internet settings for your instrument from the special
Yamaha website.
If you select a wireless connection using the USB wireless LAN adaptor or a connection
by cable (using static IP address or proxy server), you need to make Internet settings
explained as follows.
Internet Settings
When you use the Internet Direct Connection (IDC) for the first time, you should make
the Internet settings according to the following illustration flow. This flow is shown to
make you easily understand how to load the setting file created by the computer to your
instrument. By following this flow, you won’t need to make difficult settings such as typ-
ing various data on your instrument.
For details, refer to the Yamaha webpage:
http://music.yamaha.com/idc
Creating the Internet Setting Files
You need to create the Internet setting files on the special Yamaha webpage using your
computer before making the Internet settings.
For information about how to create the Internet setting files, read the instructions on
the Yamaha webpage: http://music.yamaha.com/idc
Loading the Internet Setting Files
This procedure lets you make Internet settings by loading the Internet setting files created on the special Yamaha webpage
to the instrument.
1 Engage the Load mode.
Make sure that the USB flash memory device containing the saved Internet set-
ting file named “config.n21” is connected to the instrument, and then simulta-
neously hold down the
[BGM] button and press the [REC] button.
NOTE
You do not need to make the
Internet settings here if you are
using a connection by cable
(using DHCP) or a wireless LAN
(using a wireless game adaptor).
NOTE
The Internet settings will be
backed up.
F11
Access the spe-
cial Yamaha
website
Create the Inter-
net setting file
USB Flash
Memory
Save the file
to USB flash
memory
Load the
file to the
F11
1
2
NOTE
The Load mode cannot be
engaged while voice demo song
playback is in use (page 29) or
the unit is in BGM mode
(page 12) or when the [REC] but-
ton is on (page 38) or user song
playback is active (page 40).
NOTE
You can create the Internet set-
ting files (named “config.n21”)
on the special Yamaha webpage.
Operation

F11/F01 Owner’s Manual
46
ENGLISH
Internet Direct Connection (IDC) (F11)
CAUTION
To cancel loading, press any button (except the [PLAY/STOP] button) before
pressing the [PLAY/STOP] button in step 2.
2 Start loading.
Press the [PLAY/STOP] button.
When loading from the USB flash memory device
is completed, an “End” message will appear on
the display. Press any button to exit from this dis-
play.
Once loading is completed, you are now ready to access the Internet.
Once the instrument is successfully connected to the Internet, the channel
streamed from the Internet will be shown on the display when you select
[INTERNET] lamp with the [BGM] button.
For instructions on streaming, see “Listening to the Songs on Internet (F11)” on
page 27.
Checking the field strength (when using a USB wire-
less LAN adaptor)
You can check the field strength on the display, if you are using a USB wireless LAN
adaptor (Connection example 4 on page 43).
While holding down the [BGM] button, press the [VARIATION] button.
The field strength indication will appear on the display for about three seconds.
Field Strength Indications
NOTE
If loading is not successfully
completed, an “Err” message
and the error code will appear
alternately on the display.
NOTE
Error Code
You can check the description
for the error code on the
Yamaha website:
http://music.yamaha.com/idc
NOTE
Yamaha recommends that you
back up the Internet setting files
(page 55).
NOTE
The field strength can be dis-
played after making the Inter-
net connection.
NOTE
If you are using a wireless
game adaptor, the display pat-
tern for “No wireless LAN is
used” will appear.
Radio Status Display
No signal is present.
Field strength: Weak
Field strength: Medium
Field strength: Strong
No wireless LAN is used.

ENGLISH
Internet Direct Connection (IDC) (F11)
F11/F01 Owner’s Manual
47
Exporting the Connection Information
This procedure lets you export the detailed information on the current connection as a
text file to a USB flash memory device. You can check the information on your com-
puter.
1 Turn on the Export mode.
Make sure that a USB flash memory device is connected to the instrument, and
then press the [MOVING KEY] button while holding down the [BGM] button.
CAUTION
To cancel exporting, press any button (except the [PLAY/STOP], [–/NO] and
[+/YES] buttons) before pressing the [PLAY/STOP] button in step 2.
2 Start exporting.
Press the [PLAY/STOP] button.
A “n
–
y” message will appear on the display if a USB flash memory device con-
tains a file with the same name as the one you are attempting to export. Press
the [+/YES] button to execute the overwriting operation. Press the [–/NO] but-
ton to cancel exporting.
When exporting to the USB flash memory device
is completed, an “End” message will appear on
the display. Press any button to exit from this dis-
play.
After exporting, connect the USB flash memory device to your computer, and
then open the text file named “ConnectionInfo.txt” in the root directory of the
USB flash memory device to check the detailed connection information.
NOTE
The connection information file
does not allow you to manually
make Internet settings. The con-
nection information file is set to
“read only” and cannot be edited.
2
1
NOTE
The export mode cannot be
engaged while voice demo song
playback is in use (page 29) or
the unit is in BGM mode
(
page 12
) or when the [REC]
button is on (page 38) or user
song playback is active
(
page 40
).
Operation
NOTE
If exporting is not successfully
completed, an “Err” message
and the error code will appear
alternately on the display.
NOTE
Error Code
You can check the description
for the error code on the
Yamaha website:
http://music.yamaha.com/idc

F11/F01 Owner’s Manual
48
ENGLISH
Internet Direct Connection (IDC) (F11)
Initializing Internet Settings
To initialize the Internet settings, simultaneously hold down the [BGM] button and the
[PLAY/STOP] button and turn on the power.
Internet Initial Settings
NOTE
The settings of the Internet
function are not initialized when
using the “Initializing the data”
on page 55.
NOTE
Information of the streaming
channels and cookies will be ini-
tialized at the same time.
CAUTION
Initializing restores the instrument to the factory-programmed settings for all
Internet settings. Yamaha recommends you that you back up the Internet settings
before initializing.
See “Data Backup (F11)” on page 55 for details.
DHCP ON (available)
Wireless LAN OFF (no settings)
Proxy server OFF (no settings)

ENGLISH
Internet Direct Connection (IDC) (F11)
F11/F01 Owner’s Manual
49
Glossary of Internet Terms
Access point
A device that acts as a communication hub for multiple wireless devices, and
conventionally enables both wired and wireless LAN connections.
Broadband
An Internet connection technology/service (such as ADSL and optical fiber) that
allows for high-speed, high-volume data communication.
Browser
The software used to search for, access, and view web pages. For this instrument,
this refers to the display that shows the contents of the web pages.
Cookie
A system that records certain information that the user transfers when visiting a
website and using the Internet. The function is similar to a preference file in a
conventional computer program, in that it “remembers” certain information
such as your user name and password, so you don’t have to re-enter the informa-
tion each time you visit the site.
DHCP
This is a standard or protocol by which IP addresses and other low-level network
configuration information can be dynamically and automatically assigned each
time connection is made to the Internet.
Download
Tr ansferring data over a network, from a larger “host” system to a smaller “cli-
ent” system’s hard drive or other local storage device—much like copying files
from your hard disk drive to a floppy disk. For this instrument, this refers to the
process of transferring Song and other data from a website to the instrument.
Home page
The first page shown when opening a browser and connecting to the Internet.
This phrase is also used to mean the “front screen” or top page of a website.
Internet
A huge network made up of networks, the Internet allows high-speed data trans-
fer among computers, mobile phones and other devices.
IP address
A string of numbers assigned to each computer connected to a network, and
indicating the device’s location on the network.
LAN
Short for Local Area Network, this is a data-transfer network that connects a
group of computers at a single location (such as an office or home) by means of
a special cable.
Link
Location information in other sentences and images, etc. that are under buttons
and character strings on a web page. When the place with the link is clicked, the
page selection jumps to the relevant link.
Modem
A device which connects and allows data transfer between a conventional tele-
phone line and a computer. It converts the digital signals from the computer to
analog audio for sending over the phone line, and vice versa.
Provider
A communications business that offers Internet connection services. In order to
connect to the Internet, it is necessary to contract to a provider.
Proxy
A proxy server is a server that all computers on a local network have to go
through before accessing information on the Internet. It intercepts all or desig-
nated requests to the real server to see if it can fulfill the requests itself. If not, it
forwards the request to the real server. Proxy servers are used to improve perfor-
mance and speed, and to filter requests, usually for security and to prevent unau-
thorized access to an internal network.
Router
A device for connecting multiple computer networks. For example, a router is
necessary when connecting several computers in a house or office, and allow
them to all access the Internet and share data. A router is usually connected
between a modem and a computer, although some modems have a built-in
router.

F11/F01 Owner’s Manual
50
ENGLISH
Internet Direct Connection (IDC) (F11)
Server
A hardware system or computer used as a central point for a network, providing
access to files and services.
Site
Short for “website,” this refers to the group of web pages that are opened
together. For example, the collection of web pages whose addresses begin with
“http://www.yamaha.com/” is referred to as the Yamaha site.
SSL
Short for Secure Sockets Layer, a standard for transmitting confidential data
such as credit card numbers over the Internet.
Streaming
A method of data transfer over the Internet that allows you to listen to the song
data while it is being sent. The data can be accessed repeatedly, but it cannot be
saved.
URL
Short for Uniform Resource Locator, a string of characters used to identify and
link to specific websites and pages on the Internet. A complete URL usually starts
with the characters “http://.”
Web page
Refers to each individual page that makes up a website.
WEP
Short for Wired Equivalent Privacy, a security protocol for wireless networks.
WEP protects communication contents from being intercepted.
Wireless LAN
A LAN connection that allows data transfer through a wireless, cable-free con-
nection.
Wireless Game Adaptor (Wireless
Ethernet Converter or Bridge)
Device that allows easy wireless connection with digital consumer electronic
devices, printers, and game machines, etc. equipped with [LAN] ports.

ENGLISH
Connections
F11/F01 Owner’s Manual
51
Connections
Connectors
CAUTION
Before connecting the F11/F01 to other electronic components, turn off the power to all the components. Before turning
the power on or off to all components, set all volume levels to minimum (0). Otherwise, electrical shock or damage to the
components may result.
1 AUX OUT[L/L+R][R] jacks
You can connect these jacks to a stereo system to amplify the F11/F01 or to a cas-
sette tape recorder to record your performance. Refer to the diagram below and use
audio cables to make the connections.
CAUTION
When the F11/F01’s AUX OUT jacks are connected to an external audio system, first
turn on the power to the F11/F01, then to the external audio system. Reverse this order
when you turn the power off.
2 AUX IN[L/L+R][R] jacks
The stereo outputs from another instrument can be connected to these jacks,
allowing the sound of an external instrument to be reproduced via the F11/F01’s
speakers. Refer to the diagram below and use audio cables to make the connec-
tions.
R
AUX INAUX OUT
L L RR L L R
MIDI USB
OUT
IN TO DEVICE
LAN
12
34
5
(F11)
NOTE
Use audio cables and adaptor
plugs with no resistance.
NOTE
When the sound from the AUX
OUT jacks is routed to the AUX
IN jacks, the input sound will be
output from the speaker of the
F11/F01. The output sound may
be excessively loud and may
cause noise.
NOTE
Use only the AUX OUT [L/L+R]
jacks for connection with a
mono device.
AUX OUT
R L L R
Digital Piano Stereo
AUX OUT AUX IN
phone plug
(standard)
phone plug
(standard)
audio cable
NOTE
The F11/F01’s [VOLUME] con-
trol setting affects the input sig-
nal from the AUX IN jacks, but
the [REVERB] setting does not.
NOTE
Use only the AUX IN [L/L+R]
jack for connection with a mono
device.

F11/F01 Owner’s Manual
52
ENGLISH
Connections
CAUTION
When the F11/F01’s AUX IN jacks are connected to an external device, first turn on the
power to the external device, then to the F11/F01. Reverse this order when you turn
the power off.
3 USB [TO DEVICE] terminal
This terminal is for connection to a USB flash memory device. For more informa-
tion, refer to “Handling the USB Storage Device (USB Flash Memory/Floppy Disk,
etc.)” on page 25.
4 MIDI [IN][OUT] connectors
Use MIDI cables to connect external MIDI devices to these connectors.
Refer to “About MIDI” on page 53 for more information.
5 [LAN] port (F11)
This port allows direct connection of the F11 to the Internet, letting you use a spe-
cial streaming service on the Yamaha website for playing back songs in a variety of
musical genres as background music on the instrument. Before connecting the
instrument to the Internet, be sure to read “Internet Direct Connection (IDC)
(F11)” on page 42.
Connecting to a Computer
By connecting the F11/F01 to a computer, performance data of the instrument can be
used on the computer, and also performance data from the computer can be sent to
and play the sounds of the F11/F01.
A Yamaha UX16 or similar USB-MIDI interface (sold separately) will be necessary for
MIDI connection between the F11/F01 and a USB-equipped computer. Make sure to
purchase a Yamaha UX16 or a quality USB-MIDI interface at a musical instrument
store, computer store or electrical appliance store. If you use the UX16 interface, install
the driver supplied with the interface on your computer.
R
AUX IN
L L R
F11/F01
phone plug
(standard)
AUX IN
audio cable
phone plug
(standard)
AUX OUT
Tone
Generator
Tone
Generator
stereo phone plug
(standard)
OUTPUT
AUX IN
audio cable
phone plug
(standard)
USB
MIDI
OUT
IN
OUT
IN
USB
MIDI OUT MIDI IN
A USB-MIDI interface
(such as the Yamaha UX16)

ENGLISH
About MIDI
F11/F01 Owner’s Manual
53
About MIDI
MIDI (Musical Instrument Digital Interface) is a standard format for
data transmission/reception. It enables the transfer of performance
data and commands between MIDI devices and personal computers.
Using MIDI, you can control a connected MIDI device from the instru-
ment, or control the instrument from a connected MIDI device or com-
puter.
MIDI connectors
MIDI [IN]: Receives MIDI data.
MIDI [OUT]: Tr ansmits MIDI data.
MIDI cables
Prepare dedicated MIDI cables.
MIDI Transmit Channel Selection
In any MIDI control setup, the MIDI channels of the transmitting and receiving equip-
ment must be matched for proper data transfer. This parameter enables you to specify
the channel on which the instrument transmits MIDI data. Press one of the C1-E2 keys
while holding the [BGM] button (see Quick Operation Guide).
F11:
In Dual mode, Voice 1 data (the main voice) is transmitted on the specified channel and Voice 2
data is transmitted on the next higher channel number. In Split mode, the right voice data is trans-
mitted on the specified channel and the left voice data is transmitted on the channel two numbers
higher. (In other words, if the right voice is set to channel 3, then the left voice data will be transmit-
ted on channel 5). In either mode, no data is transmitted if the transmit channel is set to “OFF.”
F01:
In Dual/Split mode, Voice 1/right voice data is transmitted on its specified channel (Voice 2/left
voice data is transmitted on the next higher channel number relative to the specified channel). In
either mode, no data is transmitted if the transmit channel is set to “OFF.”
MIDI Receive Channel Selection
In any MIDI control setup, the MIDI channels of the transmitting and receiving equip-
ment must be matched for proper data transfer. This parameter enables you to specify
the channel on which the instrument receives MIDI data. Press one of the C3-F4 keys
while holding the [BGM] button (see Quick Operation Guide).
TIP
MIDI performance data and
commands are transferred in
the form of numeric values.
TIP
Since MIDI data that can be
transmitted or received varies
depending on the type of MIDI
device, check the “MIDI Imple-
mentation Chart” to find out
what MIDI data and commands
your devices can transmit or
receive.
TIP
You can also obtain detailed
information about MIDI from
various music books and other
publications.
TIP
Setting range: 1-16, OFF (not
transmitted)
Normal setting: 1
NOTE
Voice Demo/50 piano preset
song data and recorder play-
back data are not transmitted
via MIDI.
TIP
Setting range: ALL, 1&2(F01),
1-16
Normal setting: ALL
TIP
Program change and other like channel messages received will affect
the F11/F01’s panel settings or the notes you play on the keyboard, only
when you select the appropriate channels 1-16 on F11.
MIDI
OUT
IN

F11/F01 Owner’s Manual
54
ENGLISH
About MIDI
Local Control ON/OFF
“Local Control” refers to the fact that, normally, the F11/F01 keyboard controls its
internal tone generator, allowing the internal voices to be played directly from the key-
board. This situation is “Local Control On,” since the internal tone generator is con-
trolled locally by its own keyboard. Local control can be turned OFF, however, so that
the F11/F01 keyboard does not play the internal voices, but the appropriate MIDI
information is still transmitted via the MIDI OUT connector when notes are played on
the keyboard. At the same time, the internal tone generator responds to MIDI informa-
tion received via the MIDI IN connector. Press the C5 key while holding the [BGM]
button (see Quick Operation Guide).
Program Change ON/OFF
Normally the F11/F01 will respond to MIDI program change numbers received from
an external keyboard or other MIDI device, causing the correspondingly numbered
voice to be selected on the corresponding channel (the keyboard voice does not
change). The F11/F01 will normally also send a MIDI program change number when-
ever one of its voices is selected, causing the correspondingly numbered voice or pro-
gram to be selected on the external MIDI device if the device is set up to receive and
respond to MIDI program change numbers. This function makes it possible to cancel
program change number reception and transmission so that voices can be selected on
the F11/F01 without affecting the external MIDI device. Press the C
#
5 key while hold-
ing the [BGM] button (see Quick Operation Guide).
Control Change ON/OFF
Normally the F11/F01 will respond to MIDI control change data received from an
external MIDI device or keyboard, causing the voice on the corresponding channel to
be affected by pedal and other “control” settings received from the controlling device
(the keyboard voice is not affected only when you select 1-16 channels on F11). The
F11/F01 also transmits MIDI control change information when the pedal or other
appropriate controls are operated. This function makes it possible to cancel control
change data reception and transmission so that, for example, the F11/F01’s pedal and
other controls can be operated without affecting an external MIDI device. Press the D5
key while holding the [BGM] button (see Quick Operation Guide).
TIP
Setting range: ON/OFF
Normal setting: ON
TIP
Setting range: ON/OFF
Normal setting: ON
TIP
Setting range: ON/OFF
Normal setting: ON
TIP
For information on control change messages that can be used with the
F11/F01, refer to PROGRAM CHANGE on page 71.
TIP
For information on control change messages that can be used with the
F11/F01, refer to the MIDI Data Format on Data List. You can download
the Data List from the Yamaha website (page 6).

ENGLISH
Data Backup (F11)
F11/F01 Owner’s Manual
55
Data Backup (F11)
Backup Data in Internal Memory
The following data will be saved to internal memory of the instrument. The data is maintained even when the power is
turned off.
• BGM Mode
•Metronome Volume/Time Signature
•Moving Key On/Off
• Split Point
• Fine Tuning of the Pitch
•Character Code
•Internet Settings
•Channel (for streaming service)
•Cookies
Initializing the data
Turn off the power to the instrument. Then turn the power on while holding the C7 key.
Backing Up Data to USB Flash Memory
For maximum data security Yamaha recommends that you save your important data to a USB flash memory as backup.
This important data includes backup data in internal memory of the instrument (page 55), voice settings (page 32), and
the recorded performance (page 38).
1 Engage the Backup mode.
Make sure that the USB flash memory device is connected to the instrument,
then press the [REC] button while holding the [VARIATION] button.
CAUTION
To cancel backup, press any button (except [PLAY/STOP], [–/NO], or [+/YES]) before
pressing the [PLAY/STOP] button in step 2.
NOTE
To initialize the Internet settings,
refer to “Initializing Internet Set-
tings” on page 48.
C7
Operation

F11/F01 Owner’s Manual
56
ENGLISH
Data Backup (F11)
2 Start backup.
Press the [START] button.
The “n
–
y” prompt will appear on the display if the USB flash memory device
contains a file with the same name as the one you are attempting to backup.
Press the [+/YES] button to execute the overwrite operation. Press the [–/NO]
button to cancel backup. When the backup is finished, an “End” message
appears on the display.
3 Exit from the Backup mode.
Press the [–/NO] or [+/YES] button.
Restoring the Backup Data
The backup data in a USB flash memory device can be restored to the instrument.
1 Engage the Backup mode.
Make sure that the USB flash memory device containing the restore data
"F11.bup" is connected to the instrument, then press the [REC] button while
holding the [VARIATION] button.
2 Enable the Restore mode.
Press the [+/YES] button.
CAUTION
To cancel restore, press any button (except [PLAY/STOP], [–/NO], or [+/YES]) before
pressing the [PLAY/STOP] button in step 3.
3 Start the restore operation.
Press the [START] button.
When the restore operation is finished, an “End” message appears on the dis-
play.
4 Exit from the Restore mode.
Press the [–/NO] or [+/YES] button.
NOTE
The backup data file is automat-
ically named "F11.bup."
Operation

ENGLISH
Data Backup (F01)
F11/F01 Owner’s Manual
57
Data Backup (F01)
Backup Data in Internal Memory
The following data will be saved to internal memory of the instrument. The data is maintained even when the power is
turned off.
•Metronome Volume/Time Signature
• Fine Tuning of the Pitch
•Character Code
Initializing the data
Turn off the power to the instrument. Then turn the power on while holding the C7 key.
Backing Up Data to a Computer
In order to back up data from the instrument to a computer, you must first download
Musicsoft Downloader from the Yamaha website (below), and install it on your com-
puter.
http://music.yamaha.com/download/
System requirement for Musicsoft Downloader
For maximum data security Yamaha recommends that you use Musicsoft Downloader
to save your important data to a computer. This important data includes backup data
in internal memory of the instrument (page 55) and the recorded performance
(page 38). For information on saving backup data from the instrument to a computer,
refer to “Transferring Data Between the Computer and Instrument (for unprotected
data)” in the Help file that came with Musicsoft Downloader.
Restoring the Backup Data
The backup data "F01.bup" on a computer can be restored to the instrument. For
information on loading song data from a computer to this instrument, refer to “Trans-
ferring Data Between the Computer and Instrument (for unprotected data)” in the
Help file that came with Musicsoft Downloader.
C7
NOTE
You can download Musicsoft
Downloader without charge
from the Yamaha website.
CAUTION
Do not turn off the power to
the instrument or unplug
the instrument during data
transmission. Otherwise, the
data will not be saved. Fur-
thermore, USB flash mem-
ory operation may become
unstable, causing the entire
memory to be erased when
you turn the power to the
instrument on or off.
NOTE
Before you use this instrument,
close the Musicsoft Downloader
window and quit the application.
NOTE
The backup data file is automat-
ically named "F01.bup."
• OS : Windows
®
98SE/Me/2000/XP/Vista
• CPU : Intel
®
Pentium
®
or Celeron
®
chip of 233MHz or higher (500MHz or
higher recommended)
•Memory : 64MB or higher (256MB or higher recommended)
•Available hard disk capacity: 128MB or higher (512MB or higher recommended)
•Display : 800 × 600 High Color (16-bit)
•Others : Microsoft
®
Internet Explorer
®
version 5.5 or higher

F11/F01 Owner’s Manual
58
ENGLISH
Message List (F11)
Message List (F11)
In this chart, the comments are divided into three different parts: The initial sentence explains the meaning of the mes-
sage, while the “•” mark indicates the underlying problem and the “ → ” mark indicates the possible solution.
* When the message is a three-digit number (001-052), “Err” (Error) flashes alternately in the display with the number.
* When an operation (such as saving or data transfer) is in process, the display shows a sequence of flashing dashes.
Message*
Comment
001Indicates failure in accessing the USB flash memory or media.
• The USB flash memory device or media is not connected.
→ Connect a USB flash memory device or proper media to the USB [TO DEVICE] terminal.
• The media has not been formatted.
→ Format the USB flash memory device or media after making sure on your computer that the USB flash memory or
media you are formatting does not contain important data.
• If this message appears repeatedly other than described above:
→ Use another USB flash memory or media.
002Indicates that the song data cannot be loaded correctly.
004Indicates that the song data is too large to be loaded.
Indicates that the protected song data cannot be loaded.
005Media has not been formatted.
→ Format the USB flash memory device or media after making sure on your computer that the USB flash memory or
media you are formatting does not contain important data.
006Indicates that the protected song data cannot be loaded.
007There is no song data.
There is no file.
008Indicates failure in accessing the USB flash memory or media.
• The USB flash memory device or media is not connected.
→ Connect a USB flash memory device or media to the USB [TO DEVICE] terminal.
• The media has not been formatted.
→ Format the USB flash memory device or media after making sure on your computer that the USB flash memory or
media you are formatting does not contain important data.
010The data cannot be saved to internal memory of the instrument.
011Data in the USB flash memory hasn't been restored.
→ Press the [PLAY/STOP] button.
020This USB flash memory device cannot be used.
→ Use only USB flash memory devices compatible with the instrument.
022Displayed when the total amount of USB flash memory or USB hub has become too large.
→ Refer to “Handling the USB Storage Device (USB Flash Memory/Floppy Disk, etc.)” on page 25.
023Indicates failure in connecting the USB flash memory or media.
051An error has occurred in the Moving Key function. The [MOVING KEY] status lamp lights in red.
→ Please contact your nearest Yamaha dealer or authorized distributor.
052The temperature of moving key unit increases. The [MOVING KEY] status lamp flashes in red.
→ The instrument is automatically reset.
---Processing the current operation.
C L1Initializing the voice settings to the normal settings (factory defaults).
C L2Initializing the Internet settings to the normal settings.
C L3Initializing to the normal settings.
E50
Some abnormality has been detected in the power of the Moving Key function. The [MOVING KEY] status lamp lights in red.
→ If this happens, turn off the power to the instrument and disconnect the plug. However, if the [USB] access lamp is
flashing in red as well, turn off the power only after the lamp [USB] access lamp is off. Please contact your nearest
Yamaha dealer or authorized distributor.
E ndDisplayed when the current operation is completed.
FCL
Indicates that internal memory has been cleaned up. The backup data in internal memory of the instrument, voice settings, and
recorded performance are cleared, because the power has been turned off before the song save or load operations were completed.
CAUTION
Do not turn off the power of the instrument when “FCL” appears in the display. Doing so may cause the instrument to malfunction.
FULDisplayed when the total amount of files has become too large.
Displayed when internal memory is full.
Displayed when the media is full.
n
–
y Prompts you to confirm or cancel the overwrite operation.
Pr oIndicates that the media is write-protected.

ENGLISH
Message List (F01)
F11/F01 Owner’s Manual
59
Message List (F01)
In this chart, the comments are divided into three different parts: The initial sentence explains the meaning of the mes-
sage, while the “•” mark indicates the underlying problem and the “ → ” mark indicates the possible solution.
Message Comment
CL r Initializing to the normal settings (factory defaults).
c onDisplayed when Musicsoft Downloader is started on a computer connected to the instrument.
When this message appears, you cannot operate the instrument.
E 01Indicates failure in accessing the USB flash memory or media.
→ Use another USB flash memory or media.
E 02Indicates that the song data cannot be properly loaded.
E ndDisplayed when the current operation is completed.
E rrDisplayed when the MIDI/USB cable is disconnected while starting Musicsoft Downloader on a computer connected
to the instrument.
FCLIndicates that internal memory has been cleaned up. The backup data in internal memory of the instrument and
recorded performance are cleared, because the power has been turned off before the song save or load operations
were completed.
CAUTION
Do not turn off the power of the instrument when “FCL” appears in the display. Doing so may cause the instrument to
malfunction.
FULDisplayed when the total amount of files has become too large.
Displayed when internal memory is full.
Displayed when the media is full.
LodDisplayed when a protected song is loading.
nyConfirms whether each operation is executed or not.
n
–
y Prompts you to confirm or cancel the overwrite operation.
Pr oIndicates that the media is protected.

F11/F01 Owner’s Manual
60
ENGLISH
Troubleshooting
Troubleshooting
Problem Possible Cause and Solution
The instrument does not turn on. The instrument has not been plugged in properly. Securely insert the female plug into
the socket on the instrument, and the male plug into a proper AC outlet (page 15, 16).
A click or pop is heard when the power is
turned on or off.
This is normal when electrical current is being applied to the instrument.
Noise is heard from the speakers or head-
phones.
The noise may be due to interference caused by the use of a mobile phone in close
proximity to the instrument. Turn off the mobile phone, or use it further away from the
instrument.
The overall volume is low, or no sound is
heard.
• The Volume is set too low: set it to an appropriate level using the [VOLUME] control.
• Make sure a pair of headphones is not connected to the headphones jack
(page 18).
• Make sure that Local Control (page 54) is ON.
The pitch and/or tone of the Piano Voices in
certain ranges do not sound right.
The Piano Voices attempt to precisely simulate actual piano sounds. However, as a
result of sampling algorithms, overtones in some ranges may sound exaggerated, pro-
ducing a somewhat different pitch or tone. This is normal, and no cause for concern.
Mechanical noise is heard when the keys
move.
The keyboard mechanism of this instrument simulates the keyboard mechanism of an
actual piano. Mechanical noise is also heard on a piano. This is normal, and is no
cause for concern.
The USB flash memory device cannot be nor-
mally read and written.
The particular USB flash memory device is not supported by the instrument. The oper-
ation of the USB flash memory may become unstable.
The USB flash memory device has hung up
(stopped).
• The USB flash memory is not compatible with the instrument. Only use the USB
flash memory device whose compatibility has been confirmed by Yamaha (page 25).
• Disconnect the device and connect it to the instrument again.
(F11) The cover under the keyboard becomes
warm.
Heat might be generated while using the instrument. This is normal, and no cause for
concern.

ENGLISH
Keyboard Stand Assembly
F11/F01 Owner’s Manual
61
Keyboard Stand Assembly
The illustrations here are taken from the F11.
CAUTION
• Be careful not to confuse parts, and be sure to
install all parts in the correct direction. Please
assemble in accordance with the sequence given
below.
• Assembly should be carried out by at least two per-
sons.
• Be sure to use the correct screw size, as indicated
below. Use of incorrect screws can cause damage.
• Be sure to tighten up all screws upon completing
assembly of each unit.
•To disassemble, reverse the assembly sequence
given below.
Remove the following parts from the package.
1 Insert the rear panel (center).
Position the rear panel (center) so that the holes
face away from the front (keyboard side). Then
insert the projections on the panel into the holes
on top of the unit, as shown in the illustration.
CAUTION
• When the rear panel (center) is inserted in the
main unit, do not apply pressure to the rear panel
(center) from the front or rear. Doing so may dam-
age the projections of the rear panel (center),
allowing it to fall or be damaged.
Have a Phillips-head (+) screwdriver ready.
Assembly Parts
6 × 45 mm long screws × 4 1
6 × 14 mm short screws × 12 2
Rear panel (left) Rear panel (center) Rear panel (right)
Main unit
AC power cord
keyboard stand stabilizers: 2 pieces
Included in the packing pads.
Preparing the rear panels
When the package is shipped from the factory, the
rear panels are secured to the wooden fixing pads
with screws. Before you can start assembling the
rear panels, you must first remove them from the
fixing pads.
Removing the panels:
Stack two packing pads (included in the packing
box with the rear panels) under the rear panels,
then remove the screws as shown in the illustra-
tions.
CAUTION
• Do not use screws fixing rear panels to assem-
ble the instrument.
Rear panel (center)
Rear panels (left, right)
Stack two packing pads.
Fixing pad

F11/F01 Owner’s Manual
62
ENGLISH
Keyboard Stand Assembly
2 Install the rear panels (left and right).
1 Attach two short screws (6 ×
14mm) to each edge of the
rear panel (center) using
your fingers so that the
screw threads project about
10mm from the surface.
Make sure that the screws
will not loosen and fall out
of the holes.
2 Make sure that the screws you finger-tightened
in Step 1 have not loosened. Then position the
handhold of the rear (left) panel toward the
rear, and hook the bracket of the rear (left)
panel onto the projecting screws as shown in
the illustration 2. When doing so, be careful
that the bracket does not scratch the rear panel
(center).
3 Align the holes located under the handhold on
the rear panel (left) with the holes on the main
unit, then tighten two long screws (6 × 45mm)
to secure the panel to the unit.
4 Lightly tighten two short screws (6 × 14mm)
into the bracket on the bottom of the unit to
secure the panel to the unit.
5 Follow the same steps to install the rear panel
(right).
3 Fasten the rear panels securely.
Tighten the screws securely in the order shown in
the illustration. Be careful not to permit mis-
aligned levels on the front surface, or a gap on the
top surface of rear panels (center, left, and right).
4 Attach the fall-prevention bracket.
Align the second and fourth holes on the fall-pre-
vention bracket with the bracket holes on the bot-
tom of the unit, then secure the bracket using two
short screws (6 × 14mm).
5 Set the voltage selector and connect the
power cord.
Insert the AC power cord plug into the [AC
INLET] connector on the rear of the unit.
Voltage Selector
Before connecting the AC power cord, check the setting
of the voltage selector which is provided in some areas.
To set the selector for 110V, 127V, 220V or 240V main
voltages, use a “minus” screwdriver to rotate the selector
dial so that the correct voltage for your region appears
next to the pointer on the panel. The voltage selector is
set at 240V when the unit is initially shipped. After the
proper voltage has been selected, connect the AC power
cord to the AC INLET and an AC wall outlet. A plug
adaptor may be also provided in some areas to match the
pin configuration of the AC wall outlets in your area.
WARNING
An improper voltage setting can cause serious
damage to the instrument or result in improper
operation.
10mm
3
4
2
Position the bracket to
the rear of the rear
panel (left).
22
3
3
11
Edges must
be flush.
Do not allow
a gap.
(F11) (F01)
Voltage
Selector
Voltage
Selector

ENGLISH
Keyboard Stand Assembly
F11/F01 Owner’s Manual
63
After completing the assembly, please
check the following.
When you move the assembled instrument, be sure to
grasp the handles and the bottom of the keyboard.
CAUTION
Do not hold the key cover. Improper handling can
result in damage to the instrument or personal
injury.
• Are there any parts left over?
➝ Review the assembly procedure and correct any
errors.
• Is the instrument clear of doors and other mov-
able fixtures?
➝ Move the instrument to an appropriate location.
• Does the instrument make a rattling noise when
you shake it?
➝ Tighten all screws.
➝ Be sure to install the fall-prevention brackets
securely.
• Is the power cord inserted securely into the
sockets?
➝ Check the connection.
• If the main unit creaks or is otherwise unsteady
when you play on the keyboard, refer to the
assembly diagrams and retighten all screws.
Key cover
Hold here.
Do not hold here.

F11/F01 Owner’s Manual
64
ENGLISH
50 Piano Preset Songs (Classic & Jazz) List
50 Piano Preset Songs (Classic & Jazz)
List
[PRESET 1] (Classic)
The numbers below the Scene Title indicate the order of songs in each scene.
Some of the preset songs have been edited for length or arrangement, and may not be exactly the same as the original.
Scene No. 12345678910111213
Song
No.
1 Sonate, K.380, L.23 (D. Scarlatti) 1 1
2Aria, Goldberg-Variationen, BWV.988 (J. S. Bach) 1 1 2
3 Sonate für Klavier Nr.5, K.283 (W. A. Mozart) 2 1 3
4 Sonate für Klavier Nr.12, K.332 (W. A. Mozart) 1 3 2 4
5 Sonate für Klavier Nr.14 “Mondschein”, op.27-2 (L. v. Beethoven) 2 1 5
6Frühlingslied, op.62-6 (F. Mendelssohn) 3 1 6
7 Etude “Chanson de l'adieu”, op.10-3 (F. F. Chopin) 4 2 1 1
8 Etude “Aeolian Harp”, op.25-1 (F. F. Chopin) 5 3 2 2
9Valse, op.64-2 (F. F. Chopin) 33
10 Valse, op.69-2 (F. F. Chopin) 44
11 Nocturne, op.9-1 (F. F. Chopin) 53 5
12 Nocturne, op.9-2 (F. F. Chopin) 6 2 2 4 6
13 Träumerei, op.15-7 (R. Schumann) 7 3 2 1 7
14 Consolation No.3 (F. Liszt) 45 1
15 Melody in F, op.3-1 (A. Rubinstein) 8 3 2
16 Humoresque, op.101-7 (A. Dvoák) 9 4 2 3
17 Arietta, Lyriske småstykker I, op.12-1 (E. H. Grieg) 10 5 3 3 4
18 Romance sans paroles, op.17-3 (G. Fauré) 5 1
19 Salut d'amour, op.12 (E. Elgar) 11 4 4 6 5
20 To a wild rose, Woodland sketches, op.51-1 (E. A. MacDowell) 6 4 4 6
21 Tango, España, op.165-2 (I. Albéniz) 12 5 7 7
22 La fille aux cheveux de lin (C. A. Debussy) 13 7 5 2
23 Arabesque 1 (C. A. Debussy) 14 8 3
24 Clair de lune (C. A. Debussy) 15 8 4
25 Rêverie (C. A. Debussy) 96 5
26 Gymnopédie No.1 (E. Satie) 10 7 6
27 Je te veux (E. Satie) 16 6 9 7
28 Pavane pour une infante défunte (M. Ravel) 17 11 6 8
29 Menuet, Le tombeau de Couperin (M. Ravel) 18 12 9
30 A la manière de Borodine (M. Ravel) 10 10
Song Name (Composer)
Scene Title
Home Party
Morning
Upbeat
Elegant
Relaxing
Nighttime
Melancholy
Mood Music
Fantasy
Baroque and
Pre-romantic Music
Pre-romantic (Chopin)
Post-romantic
Modern French

ENGLISH
50 Piano Preset Songs (Classic & Jazz) List
F11/F01 Owner’s Manual
65
[PRESET 2] (Jazz)
* Performed by Shigeo Fukuda
The numbers below the Scene Title indicate the order of songs in each scene.
Some of the preset songs have been edited for length or arrangement, and may not be exactly the same as the original.
Scene No. 14 15 16 17 18 19 20 21 22 23
Song
No.
1 Alfie (B. Bacharach)* 1 1 1
2 Besame Mucho (C. Velazquez)* 1 1 1
3Bewitched (R. Rodgers) 2 1 2 2
4 Emily (J. Mandel)* 2 1 3 1 2
5Hey Jude (J. Lennon & P. McCartney)* 3 2 3
6How Deep Is the Ocean (I. Berlin)* 2 2
7I Didn't Know What Time It Was (R. Rodgers)* 3 3 3
8 If I Should Lose You (L. Robin & R. Rainger) 4 4
9 It Might As Well Be Spring (R. Rodgers)* 4 4 4 5 3
10 It Never Entered My Mind (R. Rodgers) 5 2 4
11 Mona Lisa (J. Livingston & R. Evans)* 5 5613 543
12 My Funny Valentine (R. Rodgers)* 2 4
13 Never Let Me Go (J. Livingston & R. Evans)* 3 6 5
14 Norwegian Wood (J. Lennon & P. McCartney)* 6 6 7 5
15 On Green Dolphin Street (N. Washington & B. Kaper)* 7 5 6
16 Over the Rainbow (H. Arlen)* 8 4 4 8 6
17 Smoke Gets in Your Eyes (J. Kern)* 9 7 5 5 9
18 Stella by Starlight (V. Young)* 10 6 8 6 7
19 The Nearness of You (H. Carmichael)* 11 9 7 6 10 6
20 You Are Too Beautiful (R. Rodgers) 7 10 7 7
Song Name (Composer)
Scene Title
Home Party
Daytime
Afternoon
Evening
Midnight
Elegant
Upbeat
Ballad
Innocent
Mood Music

F11/F01 Owner’s Manual
66
ENGLISH
Preset Voice List
Preset Voice List
Voice Name
Stereo
Sampling
Touch
Response
Dynamic
Sampling
*1
Key-Off
Sampling
*2
Voice Descriptions
G. PIANO 1
Recorded samples from a full concert grand piano. Also
includes three levels of dynamic sampling, sustain samples,
and key-off samples for exceptionally realistic acoustic
grand piano sound. Perfect for classical compositions as
well as any other style that requires acoustic piano.
VARIATION
Warm and mellow piano. Good for classical compositions.
G. PIANO 2
Spacious and clear piano with bright reverb. Good for popu-
lar music.
VARIATION
Bright, spacious piano. Good for popular or rock music.
E.PIANO 1
An electronic piano sound created by FM synthesis.
Extremely “musical” response with varying timbre according
to keyboard dynamics. Good for standard popular music.
VARIATION
A synth-generated type electronic piano sound often heard
in popular music. Used in the DUAL mode it blends well with
an acoustic piano voice.
E.PIANO 2
The sound of an electric piano using hammer-struck metallic
“tines”. Soft tone when played lightly, and an aggressive
tone when played hard.
VARIATION
A slightly different electric piano sound often heard in rock
and popular music.
HARPSI.
The definitive instrument for baroque music. Since harpsi-
chord uses plucked strings, there is no touch response.
There is, however, a characteristic additional sound when
the keys are released.
VARIATION
Mixes the same voice an octave higher for a more brilliant
tone.
ORGAN 1
This is a typical pipe organ sound (8 feet + 4 feet + 2 feet).
Good for sacred music from the Baroque period.
VARIATION
This is the organ's full coupler sound often associated with
Beach’s “Toccata and Fugue”.
ORGAN 2
The sound of a “tonewheel” type electric organ. Often heard
in jazz and rock idioms.
VARIATION
Uses a rotary speaker effect with a different speed. The vari-
ations speed is faster. If the variation is selected while hold-
ing a chord, the speed of the effect will gradually change.
STRINGS
Stereo-sampled, large-scale strings ensemble with realistic
reverb. Try combining this voice with piano in the DUAL
mode.
VARIATION
Spacious strings ensemble with a slow attack. Try combining
this voice with a piano or electric piano in the DUAL mode.
VIB./GTR.
Vibraphone played with relatively soft mallets. The tone
becomes more metallic the harder you play.
VARIATION
Warm and natural-sounding nylon guitar. Enjoy the quiet
ambience of nylon strings.
BASS
An upright bass played fingerstyle. Ideal for jazz and Latin
music.
VARIATION
Electric bass for a wide range of music styles, jazz, rock,
popular, and more.
*1. Dynamic Sampling provides multiple velocity-switched samples to accurately simulate the timbral response of
an acoustic instrument.
*2. Contains a very subtle sample that is produced when the keys are released.

ENGLISH
Voice Demo Song List
F11/F01 Owner’s Manual
67
Voice Demo Song List
The voice demonstration pieces listed above are short rearranged excerpts the original compositions.
All other songs are original (©2005 Yamaha Corporation).
Voice Name Title Composer
G. PIANO 1 “Eintritt” Waldszenen Op.82 R. Schumann
HARPSI. Gavotte J.S. Bach

F11/F01 Owner’s Manual
68
ENGLISH
Index
Index
Numerics
50 Piano Preset Songs (Classic & Jazz)...........................19
50 Piano Preset Songs (Classic & Jazz) List ...................64
A
Accessories.........................................................................7
ALL (display) .............................................................19, 22
AWM Dynamic Stereo Sampling .....................................8
B
Backup (F11) ...................................................................55
Backup (F01) ...................................................................57
BGM mode ......................................................................12
BGM OFF mode..............................................................12
C
Channel (Internet) (F11)................................................27
Character Code................................................................22
Control Change ...............................................................54
D
Damper Pedal Range (Split mode).................................33
Data Format.....................................................................23
Data List.............................................................................6
Display .............................................................................11
Dual Balance....................................................................31
Dual mode .......................................................................31
F
Floppy Disk......................................................................26
Floppy Disk Drive ...........................................................26
H
Headphones.....................................................................18
I
[INTERNET] (F11)...................................................12, 27
Internet Direct Connection (IDC) (F11)...................8, 42
Internet Settings (F11) ....................................................45
K
Key Cover ........................................................................13
Keyboard Stand Assembly .............................................. 61
L
Left Voice Reverb Depth (F11) ...................................... 33
Local Control ..................................................................54
M
Metronome......................................................................34
Metronome Volume .......................................................34
MIDI ................................................................................ 53
MIDI Receive Channel Selection ...................................53
MIDI Transmit Channel Selection ................................53
Mode................................................................................31
Moving Key (F11) .................................................8, 12, 21
Music Rest .......................................................................14
Musicsoft Downloader ...................................................57
N
Normal Setting (Factory Default) ............................ 21, 22
Normal Setting List.........................................................70
NW (Natural Wood) Keyboard ....................................... 8
O
Octave Shift (Dual mode)...............................................31
Octave Shift (Split mode) ...............................................33
P
Part (F01) ........................................................................24
Part (Moving Key) (F11) ................................................21
Pedals...............................................................................30
Pitch.................................................................................36
Power...............................................................................17
[PRESET 1] ...............................................................12, 19
[PRESET 2] ...............................................................12, 19
Preset Voice List..............................................................66
Program Change ....................................................... 54, 71

ENGLISH
Index
F11/F01 Owner’s Manual
69
Q
Quick Operation Guide ....................................................6
R
Radio Field Strength (F11) .............................................46
Recording.........................................................................38
Restore (F01) ...................................................................57
Restore (F11) ...................................................................56
Reverb ..............................................................................35
rnd (display) ..............................................................19, 22
S
Scene ................................................................................20
SMF Format.....................................................................23
Song Auto Revoice (F11) ................................................28
Specifications...................................................................72
Split Balance ....................................................................33
Split mode........................................................................32
Split point ........................................................................32
Streaming (F11).........................................................27, 42
Sxx (display) ....................................................................19
T
Tempo..............................................................................34
Time Signature ................................................................34
Touch...............................................................................37
Transpose.........................................................................36
U
[USB] .........................................................................12, 22
USB song..........................................................................22
USB Storage Device.........................................................25
User Song.........................................................................41
Uxx (display) ...................................................................22
V
Variation ..........................................................................30
Version Number (F11) ...................................................18
Voice 2 Reverb Depth (F11) ...........................................31
Voice Demo .....................................................................29
Voice Demo Song List.....................................................67
Voice Demonstration Tunes...........................................29
Voice Settings ..................................................................32
Volume ............................................................................17

F11/F01 Owner’s Manual
70
Normal Setting List/Liste der Normaleinstellungen/Liste
des réglages normaux/Lista de ajustes normales
Function Normal setting (factory default)
Part (Channel) Setting (Moving Key) ON (AUTO)
Song Auto Revoice ON
Voice G. PIANO 1
Variation OFF
Dual Mode OFF
Split Mode OFF
Split Mode Left Voice BASS
Reverb Type Preset for each voice
Reverb Depth Preset for each voice
Effect Type Preset for each voice
Effect Depth Preset for each voice
Touch Sensitivity MEDIUM
Metronome OFF
Metronome Volume F11: 7
F01: 5
Metronome Time Signature 0 (no accent)
Tempo 120
Transpose 0
Tuning 440Hz
Dual Balance Preset for each voice combination
Dual Octave Shift Preset for each voice combination
Dual Reverb Depth Preset for each voice combination
Split Point F
#
2
Split Balance Preset for each voice combination
Split Octave Shift Preset for each voice combination
Split Reverb Depth Preset for each voice combination
Split Damper Pedal Range Right
MIDI Transmit Channel 1
MIDI Receive Channel ALL
Local Control ON
Program Change Send & Receive ON
Control Change Send & Receive ON

F11/F01 Owner’s Manual
71
Program Change/Programmwechsel/Changement de
programme/Cambio de programa
*If you assign Program Change numbers using numbers 0 through 127, subtract one (1) from a Program change number (P.C. #)
listed above. For example, if you wish to change to a Program with the P.C. #1, specify number 0. When program change reception
is turned OFF, no program change data is transmitted or received. Also, Bank MSB/LSB is not transmitted or received.
*Wenn Sie zu den Programmen Nr. 0 bis 127 wechseln möchten, ziehen Sie bitte von der vorstehend aufgeführten Program-Change-
Nummer (P.C.#) eine Eins (1) ab. Wenn Sie beispielsweise zu einem Programm mit der P.C.# 1 wechseln möchten, geben Sie die
Nummer 0 an. Wenn der Empfang von Programmwechseln ausgeschaltet ist (OFF), werden keine Program-Change-Daten gesendet
oder empfangen. Außerdem werden keine Bank-MSB/LSB-Meldungen gesendet oder empfangen.
*Si vous affectez des numéros de changement de programme compris entre 0 et 127 ; vous devrez soustraire une unité (1) du numéro
de changement de programme correspondant inscrit dans la liste P.C. #. Par exemple, pour passer à un programme doté de la valeur
P.C. #1, il faut spécifier le chiffre 0. Lorsque la réception de changement de programme est désactivée (OFF), aucune donnée de
changement de programme n'est transmise ou reçue. La valeur du réglage Bank MSB/LSB n'est ni transmise ni reçue.
*Si asigna números de cambio de programa usando los números del 0 al 127, reste uno (1) de uno de los números de cambio de pro-
grama (nº P.C.) enumerados. Por ejemplo, si desea cambiar al programa con el nº P.C. 1, especifique el número 0. Cuando la
recepción de cambios de programa está apagada, no se transmite ni recibe ningún dato de cambio de programa. Tampoco se trans-
mite ni recibe el MSB/LSB de banco.
P. C .#=Program Change number/
Program-Change-Nummer/
Numéro de changement de programme/
Número de cambio de programa
Voice Name MSB LSB
P.C.#
(1–128)
G. PIANO 1 0 122 1
VARIATION 0 123 1
G. PIANO 2 0 112 1
VARIATION 0 112 2
E.PIANO 1 0 122 6
VARIATION 0 122 89
E.PIANO 2 0 122 5
VARIATION 0 123 5
HARPSI. 0 122 7
VARIATION 0 123 7
ORGAN 1 0 123 20
VARIATION 0 122 20
ORGAN 2 0 122 17
VARIATION 0 123 17
STRINGS 0 122 49
VARIATION 0 125 50
VIB./GTR. 0 122 12
VARIATION 0 122 25
BASS 0 122 33
VARIATION 0 122 34

F11/F01 Owner’s Manual
72
Specifications/Technische Daten/Caractéristiques
techniques/Especificaciones
*Specifications and descriptions in this owner’s manual are for information purposes only. Yamaha Corp. reserves the right to change
or modify products or specifications at any time without prior notice. Since specifications, equipment or options may not be the
same in every locale, please check with your Yamaha dealer.
*Die technischen Daten und Beschreibungen in dieser Bedienungsanleitung dienen nur der Information. Yamaha Corp. behält sich
das Recht vor, Produkte oder deren technische Daten jederzeit ohne vorherige Ankündigung zu verändern oder zu modifizieren. Da
die technischen Daten, das Gerät selbst oder Sonderzubehör nicht in jedem Land gleich sind, setzen Sie sich im Zweifel bitte mit
Ihrem Yamaha-Händler in Verbindung.
*Les caractéristiques techniques et les descriptions du mode d’emploi ne sont données que pour information. Yamaha Corp. se
réserve le droit de changer ou modifier les produits et leurs caractéristiques techniques à tout moment sans aucun avis. Du fait que
les caractéristiques techniques, les équipements et les options peuvent différer d’un pays à l’autre, adressez-vous au distributeur
Yamaha le plus proche.
* Las especificaciones y descripciones de este manual del propietario tienen sólo el propósito de servir como información. Yamaha
Corp. se reserva el derecho a efectuar cambios o modificaciones en los productos o especificaciones en cualquier momento sin pre-
vio aviso. Puesto que las especificaciones, equipos u opciones pueden no ser las mismas en todos los mercados, solicite información
a su distribuidor Yamaha.
Model
F11 F01
Keyboard NW (Natural Wood) Keyboard (Wood is used for the white keys)
Number of keys 88
Moving Key YES –
Sound Source AWM Dynamic Stereo Sampling
Polyphony (max.) 128 64
Voice Selection 10 × 2 variations
For Song playback: 480 XG Voices,
13 Drum/SFX Kits, GM2, GS
10 × 2 variations
Effect Reverb
Controls Dual, Split, Metoronome, Transpose,
Touch (Hard/Medium/Soft/Fixed), Tuning
Recording/Playback 1 user song; can be saved to USB device
Pedal Damper (apply a half pedal), Sostenuto, Soft
Voice Demo Songs 50 Piano Preset Songs (Classic & Jazz), 10 voice Demo Songs
Internet Direct Connection
[LAN] Port,
Wireless Game Adaptor ([LAN] Port),
External Adaptor
(via USB [TO DEVICE])
–
Memory Device Flash Memory (Internal) about 2MB about 512KB
USB Flash Memory YES (via USB [TO DEVICE])
Floppy Disk (2HD, 2DD) External Adaptor (via USB [TO DEVICE])
Hard Disk External Adaptor (via USB [TO DEVICE])
Memory Card (SmartMedia, etc.)
External Adaptor (via USB [TO DEVICE])
Connectors [PHONES] × 2, AUX OUT[L/L+R][R] jacks, AUX IN [L/L+R][R] jacks,
MIDI [IN][OUT], USB [TO DEVICE]
[LAN] –
Main Amplifiers 40W × 2
Speakers 16cm × 2, 5cm × 2
Dimensions (W × D × H) 1427mm × 400mm × 995mm
[56-3/16" × 15-3/4" × 39-3/16"]
Dimensions with keyboard stand stabilizers
(W × D × H)
1427mm × 480mm × 995mm
(56-3/16" × 18-15/16" × 39-3/16")
Weight 90kg (198lbs.,7oz) 76kg (167lbs., 9oz)
Accessories Owner's Manual, Quick Operation Guide, Bench, AC Power Cord

F11/F01 Owner’s Manual
73
*The followings are the titles, credits and copyright notices for seventeen (17) of the 50 Piano Preset Songs (Classic & Jazz) in this instrument:
*Nachfolgend die Titel, Credits und Hinweise zum Urheberrecht für siebzehn (17) der 50 Preset-Songs für Klavier (Klassik & Jazz) in
diesem Instrument:
* La liste suivante répertorie les titres, auteurs et avis de droits d'auteur de dix-sept (17) morceaux parmi les 50 morceaux de piano
présélectionnés (Classic & Jazz) sur l'instrument:
*A continuación se incluyen los títulos, fichas técnicas y avisos de copyright de diecisiete (17) de las 50 melodías predefinidas para
piano (clásica y jazz) de este instrumento:
Alfie
Theme from the Paramount Picture ALFIE
Wor ds by Hal David
Music by Burt Bacharach
Copyright
©
1966 (Renewed 1994) by Famous Music LLC
International Copyright Secured All Rights Reserved
Bésame Mucho (Kiss Me Much)
Music and Spanish Words by Consuelo Velazquez
English Words by Sunny Skylar
Copyright
©
1941, 1943 by Promotora Hispano Americana de
Musica, S.A.
Copyrights Renewed
All Rights Administered by Peer International Corporation
International Copyright Secured All Rights Reserved
Bewitched
from PAL JOEY
Wor ds by Lorenz Hart
Music by Richard Rodgers
Copyright
©
1941 (Renewed) by Chappell & Co.
Rights for the Extended Renewal Term in the U.S. Controlled
by Williamson Music and WB Music Corp. o/b/o The Estate Of
Lorenz Hart
International Copyright Secured All Rights Reserved
Hey Jude
Wor ds and Music by John Lennon and Paul McCartney
Copyright
©
1968 Sony/ATV Songs LLC
Copyright Renewed
All Rights Administered by Sony/ATV Music Publishing, 8
Music Square West, Nashville, TN 37203
International Copyright Secured All Rights Reserved
How Deep Is The Ocean (How High Is The Sky)
Wor ds and Music by Irving Berlin
Copyright
©
1932 by Irving Berlin
Copyright Renewed
International Copyright Secured All Rights Reserved
I Didn’t Know What Time It Was
from TOO MANY GIRLS
Wor ds by Lorenz Hart
Music by Richard Rodgers
Copyright
©
1939 (Renewed) by Chappell & Co.
Rights for the Extended Renewal Term in the U.S. Controlled
by Williamson Music and WB Music Corp. o/b/o The Estate Of
Lorenz Hart
International Copyright Secured All Rights Reserved
If I Should Lose You
from the Paramount Picture ROSE OF THE RANCHO
Wor ds and Music by Leo Robin and Ralph Rainger
Copyright
©
1935 (Renewed 1962) by Famous Music LLC
International Copyright Secured All Rights Reserved
It Might As Well Be Spring
from STATE FAIR
Lyrics by Oscar Hammerstein II
Music by Richard Rodgers
Copyright
©
1945 by WILLIAMSON MUSIC
Copyright Renewed
International Copyright Secured All Rights Reserved
It Never Entered My Mind
from HIGHER AND HIGHER
Wor ds by Lorenz Hart
Music by Richard Rodgers
Copyright
©
1940 (Renewed) by Chappell & Co.
Rights for the Extended Renewal Term in the U.S. Controlled
by Williamson Music and WB Music Corp. o/b/o The Estate Of
Lorenz Hart
International Copyright Secured All Rights Reserved
Mona Lisa
from the Paramount Picture CAPTAIN CAREY, U.S.A.
Wor ds and Music by Jay Livingston and Ray Evans
Copyright
©
1949 (Renewed 1976) by Famous Music LLC
International Copyright Secured All Rights Reserved
My Funny Valentine
from BABES IN ARMS
Wor ds by Lorenz Hart
Music by Richard Rodgers
Copyright
©
1937 (Renewed) by Chappell & Co.
Rights for the Extended Renewal Term in the U.S. Controlled
by Williamson Music and WB Music Corp. o/b/o The Estate Of
Lorenz Hart
International Copyright Secured All Rights Reserved
The Nearness Of You
from the Paramount Picture ROMANCE IN THE DARK
Wor ds by Ned Washington
Music by Hoagy Carmichael
Copyright
©
1937, 1940 (Renewed 1964, 1967) by Famous
Music LLC
International Copyright Secured All Rights Reserved
Never Let Me Go
from the Paramount Picture THE SCARLET HOUR
Wor ds and Music by Jay Livingston and Ray Evans
Copyright
©
1956 (Renewed 1984) by Famous Music LLC
International Copyright Secured All Rights Reserved
Norwegian Wood (This Bird Has Flown)
Wor ds and Music by John Lennon and Paul McCartney
Copyright
©
1965 Sony/ATV Songs LLC
Copyright Renewed
All Rights Administered by Sony/ATV Music Publishing, 8
Music Square West, Nashville, TN 37203
International Copyright Secured All Rights Reserved
Smoke Gets In Your Eyes
from ROBERTA
Wor ds by Otto Harbach
Music by Jerome Kern
Copyright
©
1933 UNIVERSAL - POLYGRAM INTERNA-
TIONAL PUBLISHING, INC.
Copyright Renewed
All Rights Reserved Used by Permission
Stella By Starlight
from the Paramount Picture THE UNINVITED
Wor ds by Ned Washington
Music by Victor Young
Copyright
©
1946 (Renewed 1973, 1974) by Famous Music LLC
International Copyright Secured All Rights Reserved
You Are Too Beautiful
from HALLELUJAH, I’M A BUM
Wor ds by Lorenz Hart
Music by Richard Rodgers
Copyright
©
1932 (Renewed) by Chappell & Co.
Rights for the Extended Renewal Term in the U.S. Controlled
by Williamson Music and WB Music Corp. o/b/o The Estate Of
Lorenz Hart
International Copyright Secured All Rights Reserved

F11/F01 Owner’s Manual
74
*The followings are the titles, credits and copyright notices for three (3) of the 50 Piano Preset Songs in this instrument:
*Nachfolgend die Titel, Credits und Hinweise zum Urheberrecht für drei (3) der 50 Preset-Songs für Klavier (Klassik & Jazz) in
diesem Instrument:
* La liste suivante répertorie les titres, auteurs et avis de droits d'auteur de trois (3) morceaux parmi les 50 morceaux de piano
présélectionnés (Classic & Jazz) sur l'instrument :
*A continuación se incluyen los títulos, fichas técnicas y avisos de copyright de tres (3) de las 50 melodías predefinidas para piano de
este instrumento:
Composition Title: ON GREEN DOLPHIN STREET
Composer’s Name: Bronislaw Kaper0372642
Owner’s Name: EMI MUSIC PUBLISHING LTD
Composition Title: EMILY
Composer’s Name: Johnny Mandel0258202
Owner’s Name: EMI MUSIC PUBLISHING LTD
Composition Title: OVER THE RAINBOW
Composer’s Name: Harold Arlen0286708
Owner’s Name: EMI MUSIC PUBLISHING LTD
*All Rights Reserved, Unauthorized copying, public performance and broadcasting are strictly prohibited.
*Alle Rechte vorbehalten; Unerlaubte Vervielfältigung, öffentliche Aufführung und/oder Ausstrahlung sind strengstens verboten.
*Tous droits réservés. Toute copie, performance publique ou radiodiffusion non autorisées sont strictement inter
*Reservados todos los derechos. Queda terminantemente prohibida toda copia, interpretación o difusión pública no autorizada.

F11/F01 Owner’s Manual
75
MEMO

The above warning is located on the bottom of the unit.
Explanation of Graphical Symbols
The lightning flash with arrowhead symbol
within an equilateral triangle is intended to alert
the user to the presence of uninsulated
“dangerous voltage” within the product’s
enclosure that may be of sufficient magnitude to
constitute a risk of electric shock to persons.
The exclamation point within an equilateral
triangle is intended to alert the user to the
presence of important operating and
maintenance (servicing) instructions in the
literature accompanying the product.
IMPORTANT SAFETY INSTRUCTIONS
1 Read these instructions.
2Keep these instructions.
3 Heed all warnings.
4 Follow all instructions.
5 Do not use this apparatus near water.
6 Clean only with dry cloth.
7 Do not block any ventilation openings. Install in
accordance with the manufacturer’s instructions.
8 Do not install near any heat sources such as radiators,
heat registers, stoves, or other apparatus (including
amplifiers) that produce heat.
9 Do not defeat the safety purpose of the polarized or
grounding-type plug. A polarized plug has two blades
with one wider than the other. A grounding type plug
has two blades and a third grounding prong. The wide
blade or the third prong are provided for your safety. If
the provided plug does not fit into your outlet, consult
an electrician for replacement of the obsolete outlet.
10 Protect the power cord from being walked on or pinched
particularly at plugs, convenience receptacles, and the
point where they exit from the apparatus.
11 Only use attachments/accessories specified by the
manufacturer.
12 Use only with the cart, stand,
tripod, bracket, or table specified
by the manufacturer, or sold with
the apparatus. When a cart is
used, use caution when moving
the cart/apparatus combination
to avoid injury from tip-over.
13 Unplug this apparatus during
lightning storms or when unused for long periods of
time.
14 Refer all servicing to qualified service personnel.
Servicing is required when the apparatus has been
damaged in any way, such as power-supply cord or plug
is damaged, liquid has been spilled or objects have
fallen into the apparatus, the apparatus has been
exposed to rain or moisture, does not operate normally,
or has been dropped.
(98-6500)
CAUTION: TO REDUCE THE RISK OF
ELECTRIC SHOCK, DO NOT REMOVE
COVER (OR BACK). NO USER-SERVICEABLE
PARTS INSIDE. REFER SERVICING TO
QUALIFIED SERVICE PERSONNEL.
CAUTION
RISK OF ELECTRIC SHOCK
DO NOT OPEN
WARNING
TO REDUCE THE RISK OF FIRE OR ELECTRIC SHOCK, DO NOT EXPOSE THIS APPARATUS TO RAIN OR MOISTURE.

For details of products, please contact your nearest Yamaha
representative or the authorized distributor listed below.
Pour plus de détails sur les produits, veuillez-vous adresser à Yamaha ou
au distributeur le plus proche de vous figurant dans la liste suivante.
Die Einzelheiten zu Produkten sind bei Ihrer unten aufgeführten
Niederlassung und bei Yamaha Vertragshändlern in den jeweiligen
Bestimmungsländern erhältlich.
Para detalles sobre productos, contacte su tienda Yamaha más cercana
o el distribuidor autorizado que se lista debajo.
CANADA
Yamaha Canada Music Ltd.
135 Milner Avenue, Scarborough, Ontario,
M1S 3R1, Canada
Tel: 416-298-1311
U.S.A.
Yamaha Corporation of America
6600 Orangethorpe Ave., Buena Park, Calif. 90620,
U.S.A.
Tel: 714-522-9011
MEXICO
Yamaha de México S.A. de C.V.
Calz. Javier Rojo Gómez #1149,
Col. Guadalupe del Moral
C.P. 09300, México, D.F., México
Tel: 55-5804-0600
BRAZIL
Yamaha Musical do Brasil Ltda.
Rua Joaquim Floriano, 913 - 4' andar, Itaim Bibi,
CEP 04534-013 Sao Paulo, SP. BRAZIL
Tel: 011-3704-1377
ARGENTINA
Yamaha Music Latin America, S.A.
Sucursal de Argentina
Viamonte 1145 Piso2-B 1053,
Buenos Aires, Argentina
Tel: 1-4371-7021
PANAMA AND OTHER LATIN
AMERICAN COUNTRIES/
CARIBBEAN COUNTRIES
Yamaha Music Latin America, S.A.
Torre Banco General, Piso 7, Urbanización Marbella,
Calle 47 y Aquilino de la Guardia,
Ciudad de Panamá, Panamá
Tel: +507-269-5311
THE UNITED KINGDOM
Yamaha-Kemble Music (U.K.) Ltd.
Sherbourne Drive, Tilbrook, Milton Keynes,
MK7 8BL, England
Tel: 01908-366700
IRELAND
Danfay Ltd.
61D, Sallynoggin Road, Dun Laoghaire, Co. Dublin
Tel: 01-2859177
GERMANY
Yamaha Music Central Europe GmbH
Siemensstraße 22-34, 25462 Rellingen, Germany
Tel: 04101-3030
SWITZERLAND/LIECHTENSTEIN
Yamaha Music Central Europe GmbH,
Branch Switzerland
Seefeldstrasse 94, 8008 Zürich, Switzerland
Tel: 01-383 3990
AUSTRIA
Yamaha Music Central Europe GmbH,
Branch Austria
Schleiergasse 20, A-1100 Wien, Austria
Tel: 01-60203900
CZECH REPUBLIC/SLOVAKIA/
HUNGARY/SLOVENIA
Yamaha Music Central Europe GmbH,
Branch Austria, CEE Department
Schleiergasse 20, A-1100 Wien, Austria
Tel: 01-602039025
POLAND
Yamaha Music Central Europe GmbH
Sp.z. o.o. Oddzial w Polsce
ul. 17 Stycznia 56, PL-02-146 Warszawa, Poland
Tel: 022-868-07-57
THE NETHERLANDS/
BELGIUM/LUXEMBOURG
Yamaha Music Central Europe GmbH,
Branch Benelux
Clarissenhof 5-b, 4133 AB Vianen, The Netherlands
Tel: 0347-358 040
FRANCE
Yamaha Musique France
BP 70-77312 Marne-la-Vallée Cedex 2, France
Tel: 01-64-61-4000
ITALY
Yamaha Musica Italia S.P.A.
Viale Italia 88, 20020 Lainate (Milano), Italy
Tel: 02-935-771
SPAIN/PORTUGAL
Yamaha-Hazen Música, S.A.
Ctra. de la Coruna km. 17, 200, 28230
Las Rozas (Madrid), Spain
Tel: 91-639-8888
GREECE
Philippos Nakas S.A. The Music House
147 Skiathou Street, 112-55 Athens, Greece
Tel: 01-228 2160
SWEDEN
Yamaha Scandinavia AB
J. A. Wettergrens Gata 1
Box 30053
S-400 43 Göteborg, Sweden
Tel: 031 89 34 00
DENMARK
YS Copenhagen Liaison Office
Generatorvej 6A
DK-2730 Herlev, Denmark
Tel: 44 92 49 00
FINLAND
F-Musiikki Oy
Kluuvikatu 6, P.O. Box 260,
SF-00101 Helsinki, Finland
Tel: 09 618511
NORWAY
Norsk filial av Yamaha Scandinavia AB
Grini Næringspark 1
N-1345 Østerås, Norway
Tel: 67 16 77 70
ICELAND
Skifan HF
Skeifan 17 P.O. Box 8120
IS-128 Reykjavik, Iceland
Tel: 525 5000
OTHER EUROPEAN COUNTRIES
Yamaha Music Central Europe GmbH
Siemensstraße 22-34, 25462 Rellingen, Germany
Tel: +49-4101-3030
Yamaha Corporation,
Asia-Pacific Music Marketing Group
Nakazawa-cho 10-1, Naka-ku, Hamamatsu,
Japan 430-8650
Tel: +81-53-460-2312
TURKEY/CYPRUS
Yamaha Music Central Europe GmbH
Siemensstraße 22-34, 25462 Rellingen, Germany
Tel: 04101-3030
OTHER COUNTRIES
Yamaha Music Gulf FZE
LOB 16-513, P.O.Box 17328, Jubel Ali,
Dubai, United Arab Emirates
Tel: +971-4-881-5868
THE PEOPLE’S REPUBLIC OF CHINA
Yamaha Music & Electronics (China) Co.,Ltd.
25/F., United Plaza, 1468 Nanjing Road (West),
Jingan, Shanghai, China
Tel: 021-6247-2211
HONG KONG
Tom Lee Music Co., Ltd.
11/F., Silvercord Tower 1, 30 Canton Road,
Tsimshatsui, Kowloon, Hong Kong
Tel: 2737-7688
INDONESIA
PT. Yamaha Music Indonesia (Distributor)
PT. Nusantik
Gedung Yamaha Music Center, Jalan Jend. Gatot
Subroto Kav. 4, Jakarta 12930, Indonesia
Tel: 21-520-2577
KOREA
Yamaha Music Korea Ltd.
8F, 9F, Dongsung Bldg. 158-9 Samsung-Dong,
Kangnam-Gu, Seoul, Korea
Tel: 080-004-0022
MALAYSIA
Yamaha Music Malaysia, Sdn., Bhd.
Lot 8, Jalan Perbandaran, 47301 Kelana Jaya,
Petaling Jaya, Selangor, Malaysia
Tel: 3-78030900
PHILIPPINES
Yupangco Music Corporation
339 Gil J. Puyat Avenue, P.O. Box 885 MCPO,
Makati, Metro Manila, Philippines
Tel: 819-7551
SINGAPORE
Yamaha Music Asia Pte., Ltd.
#03-11 A-Z Building
140 Paya Lebor Road, Singapore 409015
Tel: 747-4374
TAIWAN
Yamaha KHS Music Co., Ltd.
3F, #6, Sec.2, Nan Jing E. Rd. Taipei.
Taiwan 104, R.O.C.
Tel: 02-2511-8688
THAILAND
Siam Music Yamaha Co., Ltd.
891/1 Siam Motors Building, 15-16 floor
Rama 1 road, Wangmai, Pathumwan
Bangkok 10330, Thailand
Tel: 02-215-2626
OTHER ASIAN COUNTRIES
Yamaha Corporation,
Asia-Pacific Music Marketing Group
Nakazawa-cho 10-1, Naka-ku, Hamamatsu,
Japan 430-8650
Tel: +81-53-460-2317
AUSTRALIA
Yamaha Music Australia Pty. Ltd.
Level 1, 99 Queensbridge Street, Southbank,
Victoria 3006, Australia
Tel: 3-9693-5111
NEW ZEALAND
Music Houses of N.Z. Ltd.
146/148 Captain Springs Road, Te Papapa,
Auckland, New Zealand
Tel: 9-634-0099
COUNTRIES AND TRUST
TERRITORIES IN PACIFIC OCEAN
Yamaha Corporation,
Asia-Pacific Music Marketing Group
Nakazawa-cho 10-1, Naka-ku, Hamamatsu,
Japan 430-8650
Tel: +81-53-460-2312
NORTH AMERICA
CENTRAL & SOUTH AMERICA
EUROPE
AFRICA
MIDDLE EAST
ASIA
OCEANIA
HEAD OFFICE Yamaha Corporation, Pro Audio & Digital Musical Instrument Division
Nakazawa-cho 10-1, Naka-ku, Hamamatsu, Japan 430-8650
Tel: +81-53-460-3273
EKB41

U.R.G., Pro Audio & Digital Musical Instrument Division, Yamaha Corporation
© 2007 Yamaha Corporation
WK23540 709APAP5,2-02B0
Printed in China
Yamaha Home Keyboards Home Page (English only)
http://music.yamaha.com/homekeyboard
Yamaha Manual Library
http://www.yamaha.co.jp/manual/
-
 1
1
-
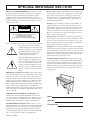 2
2
-
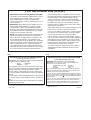 3
3
-
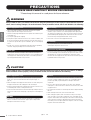 4
4
-
 5
5
-
 6
6
-
 7
7
-
 8
8
-
 9
9
-
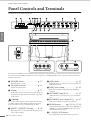 10
10
-
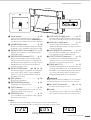 11
11
-
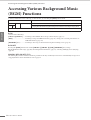 12
12
-
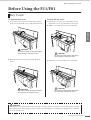 13
13
-
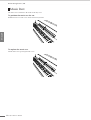 14
14
-
 15
15
-
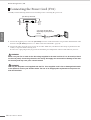 16
16
-
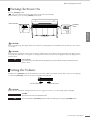 17
17
-
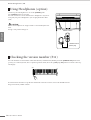 18
18
-
 19
19
-
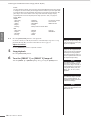 20
20
-
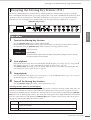 21
21
-
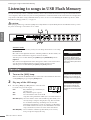 22
22
-
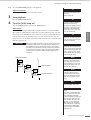 23
23
-
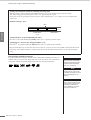 24
24
-
 25
25
-
 26
26
-
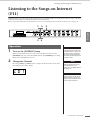 27
27
-
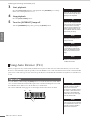 28
28
-
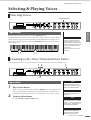 29
29
-
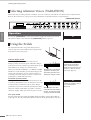 30
30
-
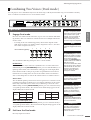 31
31
-
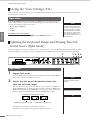 32
32
-
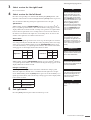 33
33
-
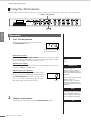 34
34
-
 35
35
-
 36
36
-
 37
37
-
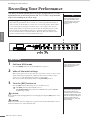 38
38
-
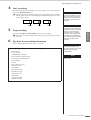 39
39
-
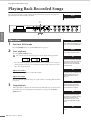 40
40
-
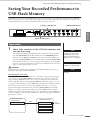 41
41
-
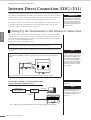 42
42
-
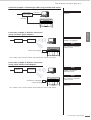 43
43
-
 44
44
-
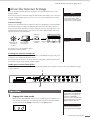 45
45
-
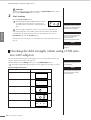 46
46
-
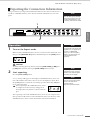 47
47
-
 48
48
-
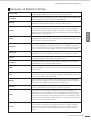 49
49
-
 50
50
-
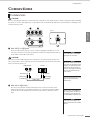 51
51
-
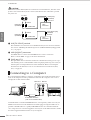 52
52
-
 53
53
-
 54
54
-
 55
55
-
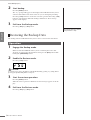 56
56
-
 57
57
-
 58
58
-
 59
59
-
 60
60
-
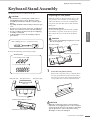 61
61
-
 62
62
-
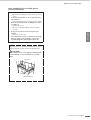 63
63
-
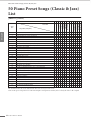 64
64
-
 65
65
-
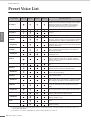 66
66
-
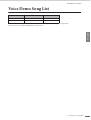 67
67
-
 68
68
-
 69
69
-
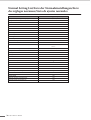 70
70
-
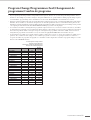 71
71
-
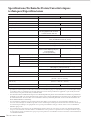 72
72
-
 73
73
-
 74
74
-
 75
75
-
 76
76
-
 77
77
-
 78
78


Yamaha F01 de handleiding
- Categorie
- Synthesizer
- Type
- de handleiding
- Deze handleiding is ook geschikt voor
in andere talen
- English: Yamaha F01 Owner's manual
- italiano: Yamaha F01 Manuale del proprietario
- русский: Yamaha F01 Инструкция по применению
- français: Yamaha F01 Le manuel du propriétaire
- español: Yamaha F01 El manual del propietario
- Deutsch: Yamaha F01 Bedienungsanleitung
- português: Yamaha F01 Manual do proprietário
- dansk: Yamaha F01 Brugervejledning
- suomi: Yamaha F01 Omistajan opas
- čeština: Yamaha F01 Návod k obsluze
- svenska: Yamaha F01 Bruksanvisning
- Türkçe: Yamaha F01 El kitabı
- polski: Yamaha F01 Instrukcja obsługi
- română: Yamaha F01 Manualul proprietarului