
DTX400K/DTX430K/DTX450K Owner’s Manual
1
Owner’s Manual
DTX400K
DTX430K
DTX450K
ELECTRONIC DRUM KIT
EN

DTX400K/DTX430K/DTX450K Owner’s Manual
2
Contents
PRECAUTIONS ............................................ 4
Welcome....................................................... 6
Product Manuals ......................................... 6
Setup
First Steps.................................................... 7
Package Contents ....................................... 8
Assembly Guide .........................................11
Setting Up for Sound ................................ 19
Connecting the Power..................................... 19
Connecting Headphones or Speakers ............ 19
Connecting a Music Player ............................. 19
Turning On the Drum Module.......................... 20
Turning Off the Drum Module.......................... 20
Auto Power-Off ................................................ 20
Restoring the Default Settings (Factory Set) ... 20
Component Names & Functions.............. 21
Control Panel .................................................. 21
Left Side.......................................................... 22
Right Side ....................................................... 22
Basic Techniques
Selecting & Playing a Kit .......................... 23
Selecting a Kit ................................................. 23
Adjusting Kit Sensitivity................................... 23
Playing Techniques................................... 24
Snare Pad ....................................................... 24
Hi-hat Cymbal ................................................. 24
Performing with a Song ............................ 25
Selecting a Song............................................. 25
Adjusting the Song Volume............................. 25
Adjusting the Volume of Muted Drum Parts .... 26
Looping Part of a Song ................................... 26
Using the Metronome ............................... 27
Starting and Stopping the Metronome ............ 27
Adjusting the Metronome Volume ................... 27
Confirming Tempo via Number Buttons .......... 27
Confirming Tempo via Voice Guidance ........... 27
Adjusting the Tempo ....................................... 28
Other Settings ................................................. 28
Practicing in Training Mode ......................29
Basic Training Mode Procedure....................... 29
1. Groove Check .............................................. 30
2. Rhythm Gate ............................................... 31
3. Measure Break............................................ 32
4. Tempo Up/Down..........................................33
5. Change Up .................................................. 34
6. Easy Session ..............................................35
7. Groove Tracker............................................. 36
8. Pad Gate ..................................................... 37
9. Part Mute.....................................................38
10. Fast Blast................................................... 39
Advanced Techniques
Setting Parameters using Menu Mode..... 40
Basic Menu Mode Procedure ..........................40
z Metronome Settings....................................41
x Kit Settings.................................................. 42
c MIDI Settings .............................................. 44
v Hi-hat Settings ............................................ 45
b Trigger Settings...........................................46
n Training Settings .........................................49
m Other Settings.............................................53
Integrating Separately Sold Accessories
..56
For DTX400K Owners .....................................56
For DTX430K & DTX450K Owners ................. 56
Connecting to a Computer........................57
Making Connections........................................57
MIDI Reference Manual .................................. 57
Reference
Troubleshooting......................................... 58
Data List .....................................................60
Specifications ............................................64
Index ........................................................... 65

DTX400K/DTX430K/DTX450K Owner’s Manual
3
SPECIAL MESSAGE SECTION
This product utilizes batteries or an external power supply (adapter). DO
NOT connect this product to any power supply or adapter other than one
described in the manual, on the name plate, or specifically recommended
by Yamaha.
This product should be used only with the components supplied or; a
cart, rack, or stand that is recommended by Yamaha. If a cart, etc., is
used, please observe all safety markings and instructions that accom-
pany the accessory product.
SPECIFICATIONS SUBJECT TO CHANGE:
The information contained in this manual is believed to be correct at the
time of printing. However, Yamaha reserves the right to change or modify
any of the specifications without notice or obligation to update existing units.
This product, either alone or in combination with an amplifier and head-
phones or speaker/s, may be capable of producing sound levels that could
cause permanent hearing loss. DO NOT operate for long periods of time at
a high volume level or at a level that is uncomfortable. If you experience
any hearing loss or ringing in the ears, you should consult an audiologist.
IMPORTANT: The louder the sound, the shorter the time period
before damage occurs.
NOTICE:
Service charges incurred due to a lack of knowledge relating to how a
function or effect works (when the unit is operating as designed) are not
covered by the manufacturer’s warranty, and are therefore the owners
responsibility. Please study this manual carefully and consult your dealer
before requesting service.
ENVIRONMENTAL ISSUES:
Yamaha strives to produce products that are both user safe and environ-
mentally friendly. We sincerely believe that our products and the production
methods used to produce them, meet these goals. In keeping with both the
letter and the spirit of the law, we want you to be aware of the following:
Battery Notice:
This product MAY contain a small non-rechargeable battery which (if
applicable) is soldered in place. The average life span of this type of bat-
tery is approximately five years. When replacement becomes necessary,
contact a qualified service representative to perform the replacement.
This product may also use “household” type batteries. Some of these may
be rechargeable. Make sure that the battery being charged is a recharge-
able type and that the charger is intended for the battery being charged.
When installing batteries, never mix old batteries with new ones, and
never mix different types of batteries. Batteries MUST be installed cor-
rectly. Mismatches or incorrect installation may result in overheating and
battery case rupture.
Warning:
Do not attempt to disassemble, or incinerate any battery. Keep all batter-
ies away from children. Dispose of used batteries promptly and as regu-
lated by the laws in your area. Note: Check with any retailer of household
type batteries in your area for battery disposal information.
Disposal Notice:
Should this product become damaged beyond repair, or for some reason
its useful life is considered to be at an end, please observe all local,
state, and federal regulations that relate to the disposal of products that
contain lead, batteries, plastics, etc. If your dealer is unable to assist you,
please contact Yamaha directly.
NAME PLATE LOCATION:
The name plate is located on the bottom of the product. The model num-
ber, serial number, power requirements, etc., are located on this plate.
You should record the model number, serial number, and the date of pur-
chase in the spaces provided below and retain this manual as a perma-
nent record of your purchase.
Model
Serial No.
Purchase Date
PLEASE KEEP THIS MANUAL
92-BP (bottom)
1. IMPORTANT NOTICE: DO NOT MODIFY THIS UNIT!
This product, when installed as indicated in the instructions contained
in this manual, meets FCC requirements. Modifications not expressly
approved by Yamaha may void your authority, granted by the FCC, to
use the product.
2. IMPORTANT: When connecting this product to accessories and/or
another product use only high quality shielded cables. Cable/s sup-
plied with this product MUST be used. Follow all installation instruc-
tions. Failure to follow instructions could void your FCC authorization
to use this product in the USA.
3. NOTE: This product has been tested and found to comply with the
requirements listed in FCC Regulations, Part 15 for Class “B” digital
devices. Compliance with these requirements provides a reasonable
level of assurance that your use of this product in a residential envi-
ronment will not result in harmful interference with other electronic
devices. This equipment generates/uses radio frequencies and, if not
installed and used according to the instructions found in the users
manual, may cause interference harmful to the operation of other
electronic devices. Compliance with FCC regulations does not guar-
antee that interference will not occur in all installations. If this product
is found to be the source of interference, which can be determined by
turning the unit “OFF” and “ON”, please try to eliminate the problem by
using one of the following measures:
Relocate either this product or the device that is being affected by the
interference.
Utilize power outlets that are on different branch (circuit breaker or
fuse) circuits or install AC line filter/s.
In the case of radio or TV interference, relocate/reorient the antenna.
If the antenna lead-in is 300 ohm ribbon lead, change the lead-in to
co-axial type cable.
If these corrective measures do not produce satisfactory results,
please contact the local retailer authorized to distribute this type of
product. If you can not locate the appropriate retailer, please contact
Yamaha Corporation of America, Electronic Service Division, 6600
Orangethorpe Ave, Buena Park, CA90620
The above statements apply ONLY to those products distributed by
Yamaha Corporation of America or its subsidiaries.
* This applies only to products distributed by YAMAHA CORPORATION OF AMERICA. (class B)
FCC INFORMATION (U.S.A.)
Responsible Party : Yamaha Corporation of America
Address : 6600 Orangethorpe Ave., Buena Park, Calif. 90620
Telephone : 714-522-9011
Type of Equipment : ELECTRONIC DRUM KIT
Model Name : DTX400K/DTX430K/DTX450K
This device complies with Part 15 of the FCC Rules.
Operation is subject to the following two conditions:
1) this device may not cause harmful interference, and
2) this device must accept any interference received including interfer-
ence that may cause undesired operation.
See user manual instructions if interference to radio reception is suspected.
* This applies only to products distributed by YAMAHA CORPORATION OF AMERICA. (FCC DoC)
COMPLIANCE INFORMATION STATEMENT (DECLARATION OF CONFORMITY PROCEDURE)

DTX400K/DTX430K/DTX450K Owner’s Manual
4
PRECAUTIONS
PLEASE READ CAREFULLY BEFORE PROCEEDING
Please keep this manual in a safe and handy place for future reference.
WARNING
Always follow the basic precautions listed below to avoid the possibility of serious injury or even death from electrical
shock, short-circuiting, damages, fire or other hazards. These precautions include, but are not limited to, the
following:
• Do not place the power cord near heat sources such as heaters or radiators. Also,
do not excessively bend or otherwise damage the cord, or place heavy objects on it.
• Only use the voltage specified as correct for the instrument. The required voltage
is printed on the name plate of the instrument.
• Use the specified adaptor (page 64) only. Using the wrong adaptor can result in
damage to the instrument or overheating.
• Check the electric plug periodically and remove any dirt or dust which may have
accumulated on it.
• Under no circumstances should any of the components of this product be taken apart
or customized. Doing so could result in electric shock, fire, injury, or malfunction.
• Do not sit or stand on the rack. Doing so could cause it to fall over or break,
possibly causing injury.
• Be careful with the holders for cymbal and tom pads as they have sharp tips. In
order to avoid injury, therefore, you should take special care whenever handling
these components.
• Be careful with the anti-slip stoppers on kick pads and foot pedals as they have
sharp tips. In order to avoid injury, therefore, you should take special care
whenever handling these components.
• Securely tighten fixing nuts and other fasteners. In addition, be sure to immediately
tighten any nuts that have come loose. If this precaution is not observed, pads may
fall off or the rack may collapse or fall over, possibly causing injury.
• Take care when setting up cables. If anyone were to trip on a cable, the instrument
could topple over and cause injury.
• Do not expose the instrument to rain, use it near water or in damp or wet conditions,
place on it any containers (such as vases, bottles or glasses) containing liquids
which might spill into any openings. If any liquid such as water seeps into the
instrument, turn off the power immediately and unplug the power cord from the AC
outlet. Then have the instrument inspected by qualified Yamaha service personnel.
• Never insert or remove an electric plug with wet hands.
• Do not put burning items, such as candles, on the unit. A burning item may fall
over and cause a fire.
• When one of the following problems occur, immediately turn off the power switch
and disconnect the electric plug from the outlet. Then have the device inspected by
Yamaha service personnel.
- The power cord or plug becomes frayed or damaged.
- It emits unusual smells or smoke.
- Some object has been dropped into the instrument.
- There is a sudden loss of sound during use of the instrument.
CAUTION
Always follow the basic precautions listed below to avoid the possibility of physical injury to you or others, or damage
to the instrument or other property. These precautions include, but are not limited to, the following:
• Do not connect the instrument to an electrical outlet using a multiple-connector.
Doing so can result in lower sound quality, or possibly cause overheating in the
outlet.
• When removing the electric plug from the instrument or an outlet, always hold the
plug itself and not the cord. Pulling by the cord can damage it.
• Remove the electric plug from the outlet when the instrument is not to be used for
extended periods of time, or during electrical storms.
• Read carefully the attached documentation explaining the assembly process.
Failure to assemble the instrument in the proper sequence might result in damage
to the instrument or even injury.
• Do not place hands or feet under a foot switch or foot pedal. Doing so could result
in injury.
• Do not use the electronic drum kit’s rack to hold acoustic drums. Doing so could
cause clamps to break and the drums to fall off, which in turn could lead to injury.
• Mind your fingers when adjusting clamps. Fingers can easily be caught and
crushed if care is not taken during this operation.
• Be careful with the tips of supports, arms, screws, and the like. Fingers can easily
be injured by sharp tips if these components are not handled carefully.
• Do not place the instrument in an unstable position where it might accidentally fall
over.
• Before moving the instrument, remove all connected cables, to prevent damage to
the cables or injury to anyone who might trip over them.
Power supply/AC power adaptor
Assembly
Water warning
Fire warning
If you notice any abnormality
Power supply/AC power adaptor
Assembly
Location
DMI-5 1/2

DTX400K/DTX430K/DTX450K Owner’s Manual
5
• When setting up the product, make sure that the AC outlet you are using is easily
accessible. If some trouble or malfunction occurs, immediately turn off the power
switch and disconnect the plug from the outlet. Even when the power switch is
turned off, electricity is still flowing to the product at the minimum level. When
you are not using the product for a long time, make sure to unplug the power cord
from the wall AC outlet.
• Use only the stand/rack specified for the instrument. When attaching the stand or
rack, use the provided screws only. Failure to do so could cause damage to the
internal components or result in the instrument falling over.
• Before connecting the instrument to other electronic components, turn off the
power for all components. Before turning the power on or off for all components,
set all volume levels to minimum.
• Be sure to set the volumes of all components at their minimum levels and
gradually raise the volume controls while playing the instrument to set the desired
listening level.
• Do not insert a finger or hand in any gaps on the instrument.
• Never insert or drop paper, metallic, or other objects into the gaps on the panel.
This could cause physical injury to you or others, damage to the instrument or
other property, or operational failure.
• Do not rest your weight on, or place heavy objects on the instrument, and do not
use excessive force on the buttons, switches or connectors.
• Do not use the instrument/device or headphones for a long period of time at a high
or uncomfortable volume level, since this can cause permanent hearing loss. If
you experience any hearing loss or ringing in the ears, consult a physician.
Always turn the power off when the instrument is not in use.
Even when the [ ] (Standby/On) switch is in standby status (power lamp is off), electricity is still flowing to the instrument at the minimum level.
When you are not using the instrument for a long time, make sure you unplug the power cord from the wall AC outlet.
NOTICE
To avoid the possibility of malfunction/damage to the prod-
uct, damage to data, or damage to other property, follow
the notices below.
Handling and Maintenance
• Do not use the instrument in the vicinity of a TV, radio,
stereo equipment, mobile phone, or other electric
devices. Otherwise, the instrument, TV, or radio may
generate noise.
• Do not expose the instrument to excessive dust or vibra-
tions, or extreme cold or heat (such as in direct sunlight,
near a heater, or in a car during the day) to prevent the
possibility of panel disfiguration, damage to the internal
components or unstable operation. (Verified operating
temperature range: 5° – 40°C, or 41° – 104°F.)
• Do not place vinyl, plastic or rubber objects on the
instrument, since this might discolor the panel or key-
board.
• When cleaning the drum module, be sure to use a clean,
dry cloth. Cleaning products that contain organic sol-
vents, paint thinner, detergents, and chemically-treated
cleaning cloths can cause discoloration and/or warping
and should not be used.
• When cleaning the pads, avoid cleaning products that
contain organic solvents, paint thinner, and alcohol as
they can cause discoloration and/or warping. Instead,
we recommend that you remove dust using a soft dry
cloth or wipe clean with a moist, tightly-wrung-out cloth.
If a pad is very dirty, wipe the dirt away using a cloth
moistened with a neutral detergent solution and tightly
wrung out. Following this, wipe away the detergent solu-
tion using a cloth soaked in water and tightly wrung out.
Information
About copyrights
• Copying of the commercially available musical data including but
not limited to MIDI data and/or audio data is strictly prohibited
except for your personal use.
• This product incorporates and bundles computer programs and
contents in which Yamaha owns copyrights or with respect to
which it has license to use others’ copyrights. Such copyrighted
materials include, without limitation, all computer software, style
files, MIDI files, WAVE data, musical scores and sound record-
ings. Any unauthorized use of such programs and contents out-
side of personal use is not permitted under relevant laws. Any
violation of copyright has legal consequences. DON’T MAKE,
DISTRIBUTE OR USE ILLEGAL COPIES.
About this manual
• The illustrations as shown in this manual are for instructional
purposes only, and may appear somewhat different from those
on your instrument.
• The company names and product names in this manual are the
trademarks or registered trademarks of their respective compa-
nies.
Connections
Handling caution
Yamaha cannot be held responsible for damage caused by improper use or modifications to the instrument, or data that is lost or destroyed.
Optional Pads
Within this Owner’s Manual, the optional external pads that may be connected to the drum module are referred to by
model name. Please note that these model names were up-to-date as of printing of this manual. Details regarding any
subsequently released models will be made available via the following web site.
http://www.yamaha.com/
DMI-5 2/2

DTX400K/DTX430K/DTX450K Owner’s Manual
6
Welcome
First of all, thank you for purchasing a Yamaha DTX400K, DTX430K, or DTX450K
Electronic Drum Kit. In order to get the most out of your new instrument, please be
sure to read this owner’s manual carefully. And after doing so, be sure to store it in a
safe place so that you can refer back to it again as needed.
Product Manuals
The DTX400K, DTX430K, and DTX450K are described in the following two manuals.
Owner’s Manual (this booklet)—Setup, Basic Techniques, Advanced Techniques,
and Reference sections.
Describes how to assemble your electronic drum kit and get it set up for playing.
Describes the basic techniques used when operating and playing the electronic drum kit.
Describes the setting of parameters and other more advanced modes of use.
Describes troubleshooting techniques and contains other reference materials.
MIDI Reference Manual (pdf)
* Not bundled with this product.
The drum module’s MIDI Reference Manual contains the following. See page 57 for more details.
• MIDI-related reference information
• Reference material that will prove useful when making music using the drum module and a computer
• Instructions on how to transfer songs from your computer to the drum module
Using PDF Manuals
The Reference Manual for your DTX400K, DTX430K, or DTX450K is made available in digital format as a
PDF document. As such, a computer and suitable software will be required in order to read it. We recommend
that Adobe® Reader® be used for this purpose as it allows you to quickly and easily search for keywords, to
print out specific sections, and to conveniently jump from page to page by clicking embedded links. Keyword
searching and link-based navigation in particular are extremely useful functions available only with digital-
type documents.
The most-recent version of Adobe® Reader® can be downloaded from the following web page.
http://www.adobe.com/products/reader/
Setup
Basic Techniques
Advanced Techniques
Reference

Setup
DTX400K/DTX430K/DTX450K Owner’s Manual
7
First Steps
1
2
3
4
Open the box and confirm that all parts are present
and correct.
Assemble the parts.
• The assembly process is described in detail on pages 8 through
18.
Make the necessary connections.
• Connect the pads to the drum module using the cables provided.
See page 18.
• Connect the power adaptor to the drum module and turn on the
module.
See page 19.
Play your electronic drum kit.
• Basic techniques used when operating and playing the electronic
drum kit are described in the Basic Techniques section (pages 23
to 39).
• More complex methods are described in the Advanced Tech-
niques section (pages 40 to 55).
Setup

Setup
DTX400K/DTX430K/DTX450K Owner’s Manual
8
Package Contents
After opening up the package containing your electronic drum kit, please verify that all of the follow-
ing parts are present.
For DTX400K Owners
•Parts !6, !7, and !8 are contained in Box 1.
•Parts !0 and !1 are contained in Box 2.
• The DTX400K does not have any parts numbered u, o, or !3.
•Parts !4 and !5 are almost identical in appearance but are actually different. They can be told apart by the sticker on the base sec-
tion.
•Parts e and i are almost identical in appearance but are actually different. Part i has a wing bolt, but part e does not. In addi-
tion, the polystyrene foam packaging used for part e is marked “T” (tom); while the packaging for part i is marked “S” (snare).
q Base supports (x2) w Vertical supports (x2) e Third tom part (x1)
r Left arm (x1) t Drum module (x1) y First/second tom part (x1)
Third tom pad
First tom pad Second tom pad
i Snare pad (x1) !0 Cymbal holders (x2) !1 Hi-hat holder (x1)
Rear side
Wing bolt
!2 Cymbal/hi-hat pads (x3) !4 Hi-hat controller (x1) !5 KU100 Kick Unit (x1)
!6 Nine-channel snake cable (x1) !7 Tuning key (x1) !8 Cable bands (x3)
!9 Power adaptor (x1) @0 Owner’s Manual (this booklet)
* May not be included depending on your
particular area. Please check with your
Yamaha dealer.

Package Contents
DTX400K/DTX430K/DTX450K Owner’s Manual
9
For DTX430K Owners
•Parts !6, !7, and !8 are contained in Box 1.
•Parts !0 and !1 are contained in Box 2.
• The DTX430K does not have any parts numbered u or o.
q Base supports (x2) w Vertical supports (x2) e Third tom part (x1)
t Drum module (x1) y First/second tom part (x1)
!0 Cymbal holders (x2) !1 Hi-hat holder (x1)
!2 Cymbal/hi-hat pads (x3) !3 KP65 Kick Pad (x1) !4 HH65 Hi-hat Controller (x1)
r Left arm (x1)
i Snare pad (x1)
!5 FP6110A Foot Pedal (x1) !6 Nine-channel snake cable (x1) !7 Tuning key (x1)
!8 Cable bands (x3) !9 Power adaptor (x1) @0 Owner’s Manual (this booklet)
* May not be included depending on your
particular area. Please check with your
Yamaha dealer.
Third tom pad
First tom pad Second tom pad

Package Contents
DTX400K/DTX430K/DTX450K Owner’s Manual
10
For DTX450K Owners
•Parts o, !6, !7, and !8 are contained in Box 1.
•Parts u, !0, and !1 are contained in Box 2.
q Base supports (x2) w Vertical supports (x2) e Third tom part (x1)
t Drum module (x1) y First/second tom part (x1)
!0 Cymbal holders (x2) !1 Hi-hat holder (x1) !2 Cymbal/hi-hat pads (x3)
!3 KP65 Kick Pad (x1) !4 HH65 Hi-hat Controller (x1)
r Left arm (x1)
!5 FP6110A Foot Pedal (x1)
!6 Nine-channel snake cable (x1) !7 Tuning key (x1) !8 Cable bands (x3)
!9 Power adaptor (x1) @0 Owner’s Manual (this booklet)
* May not be included depending on your
particular area. Please check with your
Yamaha dealer.
Third tom pad
First tom pad Second tom pad
i TP70S Snare Pad (x1) o S wing bolt (x1)u Hexagonal rod (x1)

Setup
DTX400K/DTX430K/DTX450K Owner’s Manual
11
Assembly Guide
Preparing the base
supports
1. Take the two base supports (q) and the tuning key (!7)
from the package, and using the tuning key, securely
tighten the s key bolts (i.e., the key bolts labeled s in
the figure).
2. Using the tuning key, loosen the key bolt on each of
the two base supports (q).
3. Viewing from the front as shown in the figure, place the
base supports (q) at the left and right approximately 50
cm apart.
Attaching the verti-
cal supports
1. Take a vertical support (w) from the package, and
insert it fully into the joint on the left base support.
2. Using the tuning key, tighten the key bolt that you
loosened in in order to secure the vertical sup-
port (w) in place.
3. Repeat 1. and 2. to assemble the right upright bar.
Fully assembled drum kit
(DTX450K shown)
CAUTION
• Choose a flat, hard surface on
which to assemble your elec-
tronic drum kit.
• Take care to avoid mixing up
parts or assembling them in the
wrong direction. In addition, the
assembly steps should be com-
pleted one at a time in the order
described.
• The assistance of at least one
other person will be required
when assembling the electronic
drum kit.
• Once a piece has been assem-
bled, be sure to tighten the cor-
responding nuts or bolts.
• To disassemble your electronic
drum kit, carry out the assembly
sequence in reverse.
Step 5
Step 10
Step 8
Step 4
Step 7
Step 6
Step 11
Step 9
Step 3
Step 2
Step 1
The two base supports are identical.
Step 1
!7
q
q
50 cm
Front
NOTE
The two vertical supports are identical.
CAUTION
After completing this step, lay the assembly down
safely to prevent it from falling over.
Step 2
w
Joint
Left
Right
NOTE
Step 1

Assembly Guide
DTX400K/DTX430K/DTX450K Owner’s Manual
12
Attaching the third
tom part
1. Take the third tom part (e) from the package, and
using the tuning key, securely tighten the s key bolt.
2. Loosen the key bolt.
3. Slide the third tom part (e) onto the right vertical sup-
port and lower it to the center of the support or there-
abouts. Ensure that the third tom pad is oriented as
shown in the above figure at this time.
4. Tighten the key bolt to secure the third tom part (e)
in place.
Attaching the left
arm
1. Take the left arm (r) from the package, and using the
tuning key, securely tighten the s key bolt.
2. Loosen the key bolt.
3. Slide the left arm (r) onto the left vertical support and
lower it to the center of the support or thereabouts.
Ensure that the left arm is oriented as shown in the
above figure at this time.
4. Tighten the key bolt to secure the left arm (r) in
place.
Attaching the drum
module
1. Take the drum module (t) from the package and
loosen the
key bolt.
2. Slide the drum module (t ) onto the left vertical sup-
port and lower it to a position about 10 cm from the top.
The angle at which the module should be assembled is
shown in the figure.
3. Tighten the key bolt to secure the drum module (t)
in place.
IMPORTANT
The third tom part (e) and the snare part (i) from the
DTX400K are almost identical in appearance, and special
care should be taken to avoid mixing them up during the
assembly process. To tell them apart, look for the wing
bolt, which is only found on part i. See the figure on
page 8 for more details.
Care should be taken to avoid assembling the third tom pad
upside-down or back-to-front.
CAUTION
After completing this step, lay the assembly down
safely to prevent it from falling over.
The third tom pad will be rotated into place in .
Step 3
e
Rear of third tom pad
Right vertical support
NOTE
NOTE
Step 12
The joint shown in the figure is not part of the DTX400K.
CAUTION
After completing this step, lay the assembly down
safely to prevent it from falling over.
CAUTION
After completing this step, lay the assembly down
safely to prevent it from falling over.
Step 4
r
Joint
Left vertical
support
Step 5
t
10 cm
Left vertical support

Assembly Guide
DTX400K/DTX430K/DTX450K Owner’s Manual
13
Attaching the first/second tom part
1. Take the first/second tom part (y) from the package,
and using the tuning key, securely tighten the s key
bolts.
2. Loosen the key bolts.
3. Slide the first/second tom part (y) onto the vertical
supports and move it down until the tops of the supports
are flush with the tops of the holes. Ensure that the tom
part is oriented as shown in the above figure at this time.
4. Tighten the key bolts to secure the first/second tom
part (y) in place.
The details of are different for the DTX400K, DTX430K, and DTX450K.
Attaching the snare
pad
1. Take the snare part (i) from the pack-
age and lightly tighten the wing bolt.
2. Place the snare part (i) on the left arm, which was
assembled in , and slide it back until the front
end of the arm is flush with the joint.
3. Securely tighten the wing bolt.
4. Loosen the key bolt located on the back of the snare
pad (i), and rotate the pad 180°, turning it over.
5. Tighten the key bolt to secure the snare pad (i) in
place.
Step 6
y
Rear of first tom pad
Rear of second
tom pad
Vertical supports
This part has two s key bolts, one each on the left and right.
This part has two
key bolts, one each on the left and right.
Care should be taken to avoid assembling the first and sec-
ond tom pads upside-down or back-to-front.
The tom pads will be rotated into place in .
NOTE
NOTE
NOTE
NOTE
Step 12
Step 7
For DTX400K Owners
Step 7
i
Wing bolt
Left arm
Joint
Step 4
i
180°
i

Assembly Guide
DTX400K/DTX430K/DTX450K Owner’s Manual
14
The details of are different for the DTX400K, DTX430K, and DTX450K.
Attaching the snare
pad
1. Loosen the wing bolt on the joint on
the left arm, which was attached in
.
2. Rotate the joint 90° counter-clockwise, making the joint
section horizontal.
3. Securely tighten the wing bolt.
4. Loosen the key bolt on the joint.
5. Take the snare pad (i) from the package and slide it
fully into the joint.
6. Tighten the key bolt to secure the snare pad (i) in
place.
Attaching the snare
pad
1. Loosen the wing bolt on the joint on
the left arm, which was attached in
.
2. Rotate the joint 90° counter-clockwise, making the joint
section horizontal.
3. Securely tighten the wing bolt.
4. Loosen the key bolt on the joint.
5. Take the hexagonal rod (u) from the package and slide
it fully into the joint.
6. Tighten the key bolt to secure the hexagonal rod (u)
in place.
7. Take the snare pad (i) and the S wing bolt (o) from
the package and lightly tighten the S wing bolt (o).
(Five or six turns is sufficient.)
8. Place the snare pad (i ) on the hexagonal rod (u),
which was attached in
6. above, and slide it fully back.
Then tighten the S wing bolt (o) to secure the snare
pad (i) in place.
9. Loosen the key bolt and adjust the angle of the snare
pad. When finished, retighten the key bolt to secure
the snare pad in place.
Step 7
For DTX430K Owners For DTX450K Owners
Step 7
Step 4
Left arm
Wing bolt
Joint
90°
i
i
Step 7
Step 4
Left arm
Wing bolt
Joint
90°
u
o
i
u
i
o

Assembly Guide
DTX400K/DTX430K/DTX450K Owner’s Manual
15
The details of are different for the DTX400K, DTX430K, and DTX450K.
Attaching the hi-hat
holder
1. Loosen the two key bolts on the joint on the snare-
pad part, which was attached in .
2. Take the hi-hat holder (!1) from the package and slide it
into the joint from the front as shown in the figure. Then
adjust the angle of the hi-hat holder.
• When correctly inserted, the tip of the hi-hat holder
(!1) will protrude slightly from the rear of the joint.
• When correctly oriented, the metal rod section at the
top of the hi-hat holder (!1) will be vertical.
3. Tighten the two key bolts to secure the hi-hat holder
(!1) in place.
Attaching the hi-hat
holder
1. Loosen the two key bolts on the joint on the left arm,
which was attached in .
2. Take the hi-hat holder (!1) from the package and slide it
into the joint from the rear as shown in the figure. Then
adjust the angle of the hi-hat holder.
• When correctly inserted, the tip of the hi-hat holder
(!1) will protrude slightly from the front of the joint.
• When correctly oriented, the metal rod section at the
top of the hi-hat holder (!1) will be vertical.
3. Tighten the two key bolts to secure the hi-hat holder
(!1) in place.
Attaching the cymbal holders
1. Loosen the four key bolts at the ends of the first/sec-
ond tom part, which was attached in .
2. Take the cymbal holders (!0) from the package and
insert them into the ends of the first/second tom part.
Then adjust the angles of the cymbal holders until they
are oriented as shown in the figure.
• When correctly inserted, the tips of the cymbal hold-
ers (!0) will protrude slightly from the bottom of the
tom part.
• When correctly oriented, the cymbal holders (!0) will
be as shown in the figure.
3. Tighten the four key bolts to secure the cymbal hold-
ers (!0) in place.
Step 8
For DTX400K and DTX430K Owners For DTX450K Owners
Step 8
!1
Snare pad
Joint
Step 7
Step 8
!1
Left arm
Joint
Step 4
Step 9
!0!0
The two cymbal holders are identical.
Step 6
NOTE

Assembly Guide
DTX400K/DTX430K/DTX450K Owner’s Manual
16
Attaching the hi-hat
Adjusting the position of the hi-
hat stopper pin
1. Using the tuning key, loosen the key bolt on the
stopper, which is located at the top of the hi-hat holder.
2. Adjust the position of the pin until, as shown in the fig-
ure, it is approximately 30° counter-clockwise from the
front-rear direction of the kit when viewed from above.
3. Tighten the key bolt to secure the stopper pin.
Assembling the hi-hat pad
1. Remove the wing nut, the washer, and the upper felt pad
from the hi-hat holder. (Do not remove the lower felt
pad.)
2. Take the hi-hat pad (!2; one of three) from the package
and place it on the hi-hat holder with the stopper pin
also passing through the hole provided.
3. Replace the felt pad removed in 1. above the hi-hat pad
(!2).
4. Replace the washer removed in 1. above the felt pad.
5. Tighten the wing nut to secure the hi-hat pad (!2) in
place. Ensure that the wing nut is firmly tightened.
Assembling the cym-
bal pads
In this step, the two remaining cymbal/hi-hat pads (!2) are
assembled. Accordingly,
1. to 4. must be performed twice.
1. Remove the wing nut and the upper felt pad from the
cymbal holder. (Do not remove the lower felt pad.)
2. Place the cymbal pad (!2) on the cymbal holder, with
the holder passing through the central hole.
3. Replace the felt pad removed in 1. above the cymbal
pad (!2).
4. Tighten the wing nut to secure the cymbal pad (!2) in
place.
Rotating the tom
pads into place
applies to each of the three tom pads. Accord-
ingly,
1. to 3. must be performed three times.
1. Loosen the key bolt on the tom pad (e or y).
2. Rotate the tom pad to a position where it will be easy to
play. (If necessary, refer to the picture of the properly
assembled kit on page 11.)
3. Tighten the key bolt to secure the tom pad in place.
This figure shows the hi-hat holder correctly inserted in
the DTX450K. It is inserted from the front in the DTX400K
and DTX430K, and therefore, faces in the opposite direc-
tion.
All three of the cymbal/hi-hat pads (!2) are identical. One
of these is to be used as the hi-hat pad.
Step 10
Pin
30°
30°
Pin
Front
Stopper
Hi-hat holder
Front
!2
Wing nut
Felt pad
Felt pad
Hi-hat holder
Stopper
Washer
The two cymbal pads (!2) are identical.
Step 11
!2
Wing nut
Felt pad
Felt pad
Cymbal holder
NOTE
Step 12
e
y
Step 12

Assembly Guide
DTX400K/DTX430K/DTX450K Owner’s Manual
17
is only required for the DTX430K and DTX450K. Owners of the DTX400K should skip to .
Assembling the kick pad
1. Take the kick pad (!3) from the pack-
age, remove the four wing bolts, spring
washers, and flat washers from the
kick pad holder, and arrange each set
nearby in the disassembled condition.
2. Assemble the base to the holder as shown below, and
then from the base side, assemble the wing bolts, spring
washers, and flat washers removed in
1. in order to
secure it in place.
3. Take the foot pedal (!5) from the package and insert the
beater into the hole in the holder as shown below.
4. Slide the beater rod into the hole until the tip protrudes
approximately 15 mm from the rear, and then tighten
the beater bolt using the tuning key.
5. Turn the foot pedal’s T-bolt counter-clockwise to loosen
it.
6. Fit the raised section at the front of the kick pad holder
into the foot-pedal’s assembly bracket.
7. Turn the foot pedal’s T-bolt clockwise to secure the
parts together.
8. Operate the pedal and confirm whether the beater head
strikes the kick pad near the center. If not, adjust the
length of the beater or move it left or right as required.
Positioning the hi-hat controller and kick drum
Arrange the hi-hat controller (!4) and the kick drum parts or
kick unit (!5) as shown in the figure on the left.
Step 13
Step 14
Step 13
!3
Wing bolt
Spring washer
Flat washer
Kick pad
Kick padBase
!5
Beater Tuning key
Holder
Connecting
rod
Connecting rod
Beater bolt
T- b o l t
Beater head
Assembly bracket Raised section T-bolt
Step 14
DTX400K
!4
!4
!5
DTX430K/DTX450K
Kick drum parts
IMPORTANT
The hi-hat controller (!4) and the kick unit (!5) from the
DTX400K are almost identical in appearance. They can be
told apart by the sticker on the base section.

Assembly Guide
DTX400K/DTX430K/DTX450K Owner’s Manual
18
Fine-tuning the positions of the pads and the drum module
Sit on your stool and adjust the positions of the pads and the
drum module to your liking.
• To adjust the height of the snare pad, loosen the
key bolt.
• To adjust the height of the third tom pad, loosen the
key bolt.
• To adjust the height of the drum module, loosen the
s
key bolt.
• To tilt the drum module forwards or backwards, loosen the
key bolt.
Connecting the pads to the drum module
1. Insert the mini plugs* at one end of the nine-channel
snake cable (!6) into the correct trigger input jacks
(SNARE to KICK/PAD) on the right side of the drum
module. (*: The smaller set of plugs.)
2. Insert the nine-channel snake cable’s standard plugs*
into the jacks in the corresponding pads. (*: The larger
set of plugs.)
3. Wrap the cables for the snare pad, the tom pads, and the
cymbal/hi-hat pads around the cable clips to prevent
them from being pulled out.
4. Using the cable bands (!8), secure the cables to the kit
rack at the positions in the figure above.
Congratulations—You have finished assembling
your electronic drum kit!
Step 15
Drum module
Snare pad
Third tom
pad
CAUTION
• Be sure to always retighten any key bolt after you have
finished adjusting the corresponding part.
• Before moving on to the next step, ensure that all key
bolts have been tightened.
• Refer back to if you wish to readjust the angle of the
snare pad.
• Refer back to if you wish to readjust the angles of the
tom pads.
NOTE
Step 7
Step 12
Step 16
RIDESNRHH
KICKHHCHHCRRIDETOM3TOM2TOM1SNR
TOM2TOM1CR TOM3 KICK HHC
RIDE
SNR
HH
KICK
HHC
TOM3
TOM2
TOM1
CR
KICK HHC
DTX400K
Right side of the drum module
Nine-channel snake cable
The sticker on each of the snake cable’s plugs indicates the
name of the corresponding pad.
NOTE
Excessive bending can damage the cables. Ensure, there-
fore, that they are not bent at an extreme angle when
wrapped around the clips.
NOTICE

Setup
DTX400K/DTX430K/DTX450K Owner’s Manual
19
Setting Up for Sound
1. Ensure that your drum module is turned off (i.e., none
of the buttons are lit).
2. Insert the power adaptor’s DC plug into the
[] connector on the left side of the
module.
3. Hook the power adaptor’s cord around the cord clip to
prevent it from being accidentally pulled out.
4. Plug the power adaptor’s AC power cord into an AC
wall socket or another electrical outlet.
Your drum module does not have built-in speakers. In order
to hear it, therefore, you will need to connect headphones or
monitor speakers via the [PHONES/OUTPUT] standard
stereo-audio jack. You can adjust the output volume using
the [VOLUME] buttons on the control panel.
You can connect a portable music player or another similar
source of audio to your drum module via the [AUX IN]
(auxiliary input) stereo mini-jack. This makes it possible to
play along with your favorite tunes.
Connecting the Power
CAUTION
Excessive bending can damage the power adaptor
cord and create a fire hazard. Ensure, therefore, that
the power cord is not bent at an extreme angle when
wrapped around the clip.
WARNING
Use only the power adaptor that came with your drum
module.
Cord clip
Power adaptor’s cord
Connecting Headphones or Speakers
The [PHONES/OUTPUT] jack is a stereo connector. You can con-
nect a 1/4” mono-audio jack to it, but in such a case, please be
sure to set the output to mono using the Stereo/Mono parameter
from Menu Mode (page 53).
CAUTION
To prevent hearing loss, avoid using headphones at a
high volume for extended periods of time.
Connecting a Music Player
• Whenever connecting other devices, ensure that the cables you
use have plugs that match the input or output connectors on
those devices.
• Before making connections, furthermore, you should also turn
the volume on the other devices fully down.
• When all connections have been made, use each device’s vol-
ume controller to balance its output with that of the drum mod-
ule.
NOTE
NOTICE
1/8” stereo-mini
to stereo-mini
cable
Portable music player,
etc.
Standard 1/4”
mono-audio jack
Powered speakers
or
Standard 1/4”
stereo-audio jack
Headphones

Setting Up for Sound
DTX400K/DTX430K/DTX450K Owner’s Manual
20
1. If you have connected your drum module to other audio
devices such as powered speakers, ensure that the vol-
ume on all other devices is turned down fully.
2. Press the [ ] (Standby/On) button.
The drum module will turn on and its buttons will light up.
1. If you have connected your drum module to other audio
equipment, ensure that the volume on all other devices
is turned down fully.
2. Press the [ ] (Standby/On) button.
The drum module will turn off and all button lights will
go out.
The Auto Power-Off function automatically turns off the
drum module after a certain period of inactivity. This helps
to save energy should you forget to turn it off yourself.
Setting the Auto Power-Off Function
You can set the amount of time that the Auto Power-Off
function will wait before turning off the drum module. For
details, see the description of the Auto Power-Off Time
parameter from Menu Mode (page 53).
Quickly disabling Auto Power-Off
To quickly disable the Auto Power-Off function, turn on the
drum module while holding down the [TRAINING] button.
The function will remain off until you set a new Auto
Power-Off time.
Straight out of the box, your drum module already contains
a wide range of pre-programmed drum kits and songs.
These default settings—collectively known as the Factory
Set—can be conveniently restored at any time if you have
accidentally overwritten them or wish to delete all of your
own settings. To do so, use the Factory Set function as fol-
lows.
1. Press the [ ] (Standby/On) button and verify that the
drum module turns off.
2. Turn on the drum module while holding down the
[VOLUME+] button and the [VOLUME–] button.
The drum module’s lights will flash and the Factory Set
will be restored.
Turning On the Drum Module
Connect the hi-hat controller before turning on the drum
module. Please do not turn the drum module on with the hi-
hat controller depressed. The drum module can not identify
the type of pedal properly and it causes that the kick may
produce much smaller sound than expected.
Turning Off the Drum Module
CAUTION
When setting up the product, make sure that the AC
outlet you are using is easily accessible. If some trou-
ble or malfunction occurs, immediately turn off the
power switch and disconnect the plug from the outlet.
Even when the power switch is turned off, electricity is
still flowing to the product at the minimum level. When
you are not using the product for a long time, make
sure to unplug the power cord from the wall AC outlet.
The drum module automatically stores all current settings
before it turns off. For this reason, please do not unplug the
power adaptor until all button lights have gone out.
Auto Power-Off
The drum module automatically stores all current settings before
it turns off.
NOTE
NOTICE
NOTE
• In certain modes of operation, the Auto Power-Off function will
not turn off the drum module when the set time has elapsed. We
recommend, therefore, that you always turn off the drum module
manually when you are finished using it.
• If you expect the drum module to be inactive for a certain length
of time while connected to other audio equipment, we recom-
mend that you turn the volume on the other equipment fully
down. Alternatively, you can disable the Auto Power-Off function
to ensure that the drum module stays on.
• Settings for the Auto Power-Off function do not represent exact
times and there may be some variation.
• By default, the Auto Power-Off time is set to 30 minutes.
Restoring the Default Settings
(Factory Set)
When you restore the Factory Set as described below, any
changes you have made to parameters will be lost. Before pro-
ceeding, therefore, you should ensure that they contain no irre-
placeable settings.
NOTICE
NOTE
Hold
NOTICE
Hold

Setup
DTX400K/DTX430K/DTX450K Owner’s Manual
21
Component Names & Functions
z Number buttons
• These buttons are used to select drum kits, songs, and
training types. (pages 23, 25, 29)
• You can use them to enter a tempo directly. (page 28)
• In Menu Mode, they are used to select settings. (page
40)
• Also in Menu Mode, you can use them to enter setting
values directly. (page 40)
x [KIT] button (page 23)
Use this button when you want to select a different drum
kit.
c [SONG] button (page 25)
Use this button when you want to select a different song.
v [ ] (metronome) button (page 27)
• This button is used to start and stop the built-in metro-
nome.
• In Training Mode, it is also used to start and stop train-
ing sessions.
b [] button
• Using this button, you can start and stop songs. (page
25)
• In Training Mode, it is also used to start and stop train-
ing sessions. (page 29)
n [ ] (Standby/On) button (page 20)
Use this button to turn the drum module on and off.
m [TRAINING] button (page 29)
This button is used to access Training Mode.
, [DRUM MUTE] button (page 25)
Using this button, you can mute and unmute drum parts
from a practice drum pattern.
. [TEMPO] buttons (page 28)
Use these buttons to increase or decrease the tempo in
steps of one BPM.
*: In Menu Mode, the [TEMPO] buttons can also be used to
increase or decrease settings.
⁄0 [VOLUME] buttons (page 19)
These buttons are used to adjust the overall volume of
the drum module. Press the [VOLUME+] button to
increase it and the [VOLUME–] button to decrease it.
z
x c
n
m
b
, . ⁄0
v
Control Panel

Component Names & Functions
DTX400K/DTX430K/DTX450K Owner’s Manual
22
⁄1 [USB TO HOST] terminal (page 57)
This terminal is used to connect the drum module to a
computer via a USB cable.
⁄2 [AUX IN] jack (page 19)
The Auxiliary Input stereo mini-jack is used to input
audio from an external source. For example, you can use
this jack to connect a portable music player, a CD player,
or another similar device and play along with your favor-
ite tunes.
⁄3 [PHONES/OUTPUT] jack (page 19)
Use this standard stereo-audio jack to connect head-
phones, an amplifier, a mixer, or other similar equip-
ment.
⁄4 Cord clip (page 19)
Wrap the power adaptor cord around this clip to prevent
accidental unplugging during use.
⁄5 [ ] connector (page 19)
Use this connector for the power adaptor that came with
your drum module.
⁄6 Trigger input jacks (page 18)
These jacks are used to connect the snare, tom, and cym-
bal pads.
⁄7 [HI-HAT CTL] jack (page 18)
The Hi-hat Control jack is used to connect a hi-hat con-
troller.
⁄8 [KICK/PAD] jack (page 18)
Use this jack to connect a kick pad or pedal. When using
a KP65 Kick Pad, an additional pad can be connected via
the kick pad itself.
⁄1 ⁄2 ⁄3 ⁄4 ⁄5
⁄6
⁄7 ⁄8
Right side
Left side
Control panel
Left Side Right Side

Basic Techniques
DTX400K/DTX430K/DTX450K Owner’s Manual
23
Selecting & Playing a Kit
For the purpose of this manual, the term “kit” refers to a full set of drum-sound assignments for all of
the pads. The drum module comes with ten different drum and percussion kits already set up.
1. Press the [KIT] button to activate Kit Mode.
2. Select a kit by pressing the corresponding number but-
ton ([1] to [10/0]).
3. Play the pads and see how the kit sounds.
Using the following procedure, you can change the sensitiv-
ity of a kit—that is, how the drum sounds change depending
on how hard you strike the pads. Sensitivity can be adjusted
to ten different levels.
While holding the [KIT] button, press either the [VOL-
UME+] or [VOLUME–] button.
• Each time you press the [VOLUME+] button, you
increase the sensitivity by one level. This means that
louder sounds can be more easily produced with softer
drumming.
• Each time you press the [VOLUME–] button, you
decrease the sensitivity by one level. This means that
louder sounds can only be produced by drumming hard.
Selecting a Kit
For detailed information on the ten preset kits, see the Data
List section (page 60).
Quick select from Song Mode or Training Mode
In order to select a kit quickly without having to leave
Song Mode or Training Mode, press and hold the [KIT]
button, and then press the number button ([1] to [10/0])
for the desired kit.
2
1
NOTE
Hold
Adjusting Kit Sensitivity
• You can set a different sensitivity for each of the drum module’s
ten kits.
• If you wish to set sensitivities on an individual pad basis, see the
descriptions of the Trigger Settings parameters from Menu Mode
(page 46).
Hold
More sensitive
pads
Less sensitive
pads
More sensitive
pads
Less sensitive
pads
NOTE
Basic Techniques

Basic Techniques
DTX400K/DTX430K/DTX450K Owner’s Manual
24
Playing Techniques
If using a TP70S Snare Pad, you will be able to produce
three distinct sounds (i.e., head, open rim, and closed rim)
depending on where you strike it, much the same as if you
were playing an acoustic snare.
Head shots
Hitting the main surface of the pad produces a head shot
sound.
Open rim shots
Hitting the open-rim zone produces an open rim-shot
sound.
Closed rim shots (cross sticking)
Hitting the closed-rim zone produces a closed rim-shot
sound.
Open/close
• You can produce an open hi-hat sound by striking the
hi-hat pad with the hi-hat controller’s pedal not
depressed.
• You can produce a closed hi-hat sound by striking the
hi-hat pad with the hi-hat controller’s pedal depressed.
• If using an HH65 Hi-hat Controller, you can operate
the pedal to recreate the sound of a closing hi-hat.
Foot closed
You can depress the hi-hat controller’s pedal to create a
foot-close sound without having to strike the hi-hat pad.
Hi-hat splash
Depressing the hi-hat controller’s pedal and then imme-
diately releasing it produces a hi-hat splash sound.
Snare Pad
Closed rim shots
(Rim 2)
Head shotsOpen rim shots (Rim 1)
Hi-hat Cymbal

Basic Techniques
DTX400K/DTX430K/DTX450K Owner’s Manual
25
Performing with a Song
The drum module comes complete with ten practice songs. Covering a wide range of genres, they
provide a convenient, enjoyable way to practice drumming.
1. Press the [SONG] button.
2. Press the [] button to start the current song.
3. If you wish press one of the number buttons ([1] to [10/
0]) to select a different one.
• You can stop song playback by pressing the [ ] but-
ton once again.
• If you wish to mute the programmed drum parts and hear
only the song parts, press the [DRUM MUTE] button. To
unmute the drum parts, press the [DRUM MUTE] button
once again.
• The most appropriate drum kit is pre-assigned to each of
the drum module’s songs, so whenever you select a new
song, the current kit will also change. If you wish to use a
different kit to play a certain song, please select that kit
after changing the song. For more details, see Quick select
from Song Mode or Training Mode (page 23).
Using the following procedure, you can set the volume of
the current song to your preferred level.
1. Press the [] button to start the song.
2. While holding the [SONG] button, press either the
[VOLUME+] or [VOLUME–] button.
• Each time you press the [VOLUME+] button, you
increase the song volume by one.
• Each time you press the [VOLUME–] button, you
decrease the song volume by one.
Selecting a Song
For detailed information on the ten built-in songs, see the Data
List section (page 60).
Quick select from Kit Mode or Training Mode
In order to select a song quickly without having to
leave Kit Mode or Training Mode, press and hold the
[SONG] button, and then press the number button ([1]
to [10/0]) for the desired song.
2
3
1
NOTE
Hold
Adjusting the Song Volume
Hold
Higher song volume
Lower song volume

Performing with a Song
DTX400K/DTX430K/DTX450K Owner’s Manual
26
If you press the [DRUM MUTE] button while playing a
song, the drum parts from the song will be muted—that is,
their volume will be reduced to zero. If, however, you would
like the drum parts to be slightly audible in this type of situ-
ation, you can adjust the muted volume as described below.
1. Press the [] button to start the song.
2. Press the [DRUM MUTE] button to mute the drum
parts.
3. While holding the [DRUM MUTE] button, press either
the [VOLUME+] or [VOLUME–] button.
• Each time you press the [VOLUME+] button, you
increase the volume of the muted drums by one.
• Each time you press the [VOLUME–] button, you
decrease the volume of the muted drums by one.
By pressing the [DRUM MUTE] button once again, you
can unmute the drum parts and restore their normal vol-
umes.
As described below, you can have a song playback between
two points set in units of one measure. To do so, you simply
need to set a loop start point (A) and a loop end point (B)
while the song is playing.
1. Press the [] button to start the song.
2. At point A, press and hold the [SONG] button and press
the [] button.
3. At point B, again press and hold the [SONG] button
and press the [] button.
To stop looped playback, press and hold the [SONG] button
and press the [] button.
Adjusting the Volume of Muted Drum
Parts
2
1
Hold
Maximum muted volume
Minimum muted volume
Looping Part of a Song
• When you select a different song, looped playback will be can-
celled automatically and points A and B will be reset.
• After an automatic lead-in (to help guide you into the phrase),
the range from Point A to Point B is played back repeatedly.
AB
Looping playback
Hold
NOTE

Basic Techniques
DTX400K/DTX430K/DTX450K Owner’s Manual
27
Using the Metronome
Playing your electronic drum kit along with the built-in metronome is a great way to perfect your
rhythm.
• Press the [] button to turn on the metronome.
• Press the [] button once again to turn it off.
To adjust the volume of the metronome, press and hold the
[] button, and then press either the [VOLUME+] or
[VOLUME–] button.
• Each time you press the [VOLUME+] button, you
increase the metronome volume by one.
• Each time you press the [VOLUME–] button, you
decrease the metronome volume by one.
Whenever necessary, you can confirm the drum module’s
current tempo from the flashing pattern of the number but-
ton lights.
Press either the [TEMPO+] or [TEMPO–] button once.
Each digit of the tempo will be flashed in sequence.
Example:
When the tempo is 108 BPM, the number button lights will
flash [1][0][8].
Whenever necessary, you can have the drum module speak
the current tempo to you as a BPM value.
Press and hold the [] button. You will hear the current
tempo spoken (in English), and the number button lights
will flash as described above.
Starting and Stopping the Metronome
Adjusting the Metronome Volume
Hold
Higher metronome volume
Lower metronome volume
Confirming Tempo via Number Buttons
Confirming Tempo via Voice Guidance

Using the Metronome
DTX400K/DTX430K/DTX450K Owner’s Manual
28
The following three methods are available when you want to
change the tempo.
Increasing or decreasing using the
[TEMPO+] or [TEMPO–] button
• Each time you press the [TEMPO+] button, you
increase the metronome BPM by one.
• Each time you press the [TEMPO–] button, you
decrease the metronome BPM by one.
Directly inputting a BPM using the number
buttons
1. While holding the [] button, enter the BPM using
the number buttons.
Example: Setting a tempo of 138 BPM
Press the number buttons in the sequence
[1][3][8].
2. After entering all necessary digits, remove your fin-
ger from the [] button.
The drum module will speak the new tempo to you
(in English).
Tapping the tempo on the pads
1. While holding the [] button, strike a pad at least
three times at the desired tempo.
2. Remove your finger from the [] button.
The following metronome-related settings can be made in
Menu Mode. For details, see the description of the Metro-
nome Settings parameter group from Menu Mode (page 41).
• Metronome pattern
• Metronome length in beats
• Metronome sound
• Number-button lighting pattern when using the metro-
nome
Adjusting the Tempo
Increase or decrease using the [TEMPO+] or
[TEMPO–] button
Direct input of a BPM using the number but-
tons
Setting a new tempo using pads (tap tempo)
• The drum module supports tempos between 30 and 300 BPM.
• If you select a different song (page 25) after adjusting the tempo,
the selected song’s tempo will be used for the metronome.
NOTE
Hold
• Number button [10/0] is used to enter the value zero.
You cannot use it to enter the number ten.
Example: Setting a tempo of 110 BPM
Press the number buttons in the sequence
[1][1][10/0].
You cannot do this by pressing [1][10/0].
• There is no need to enter a zero first in order to set a
two-digit tempo.
Example:
To set a tempo of 72 BPM, simply press the num-
ber buttons in the sequence [7][2]. You do not
need to press [0][7][2].
• Whenever the drum module is speaking the tempo, you
can enter a new tempo directly using the number but-
tons but without having to hold down the [ ] button.
Instead of using a pad, you can also tap the tempo by
pressing the [TEMPO+] or [TEMPO–] button at least
three times.
Other Settings
NOTE
Hold
NOTE

Basic Techniques
DTX400K/DTX430K/DTX450K Owner’s Manual
29
Practicing in Training Mode
The drum module’s Training Mode provides many different ways in which to practice playing the
drums. With ten different types of training available, you can finely hone your sense of rhythm, master
drum patterns from a range of different musical genres, or if you are a beginner, learn easy patterns in
an enjoyable way.
The basic procedure common to all ten types of training is
as follows.
1. Press the [TRAINING] button to acti-
vate Training Mode.
2. Select your desired training type by
pressing the corresponding number button ([1] to [10/
0]).
The [] and/or [] button will flash, indicating
that the drum module is on standby to start training.
3. Press the flashing [] or [] button to start train-
ing.
4. To end training, press the button used to start it in Step
3. above.
Scoring function
The drum module’s scoring function, which is used with
certain types of training, evaluates your ability on a scale of
one to ten and displays the result using the number buttons
([1] to [10/0]). Number button [10/0] represents the highest
score; number button [1], the lowest.
In addition, the Voice Guidance function announces the
results of scoring using the five levels shown below.
Basic Training Mode Procedure
• The buttons that flash at this time depend on the type of
training selected.
• Both the [ ] and [ ] buttons will flash with certain
types of training.
Training Mode
Work on your rhythm
1. Groove Check ............................................Page 30
2. Rhythm Gate..............................................Page 31
3. Measure Break ..........................................Page 32
4. Tempo Up/Down ........................................Page 33
5. Change Up ................................................Page 34
Have fun with drum patterns
6. Easy Session.............................................Page 35
7. Groove Tracker ...........................................Page 36
Learn new drum patterns
8. Pad Gate....................................................Page 37
9. Part Mute...................................................Page 38
Play as wildly as you can
10. Fast Blast.................................................Page 39
or
NOTE
or
• To select a different kit from Training Mode, press and
hold the [KIT] button, and then press the number button
([1] to [10/0]) for the desired kit. (See Quick select from
Song Mode or Training Mode on page 23.)
• To select a different song from Training Mode, press and
hold the [SONG] button, and then press the number but-
ton ([1] to [10/0]) for the desired song. (See Quick select
from Kit Mode or Training Mode on page 25.)
• If you wish to adjust the duration of training, see the description
of the Timer parameter from Menu Mode (page 49).
• If you wish to adjust the duration of Fast Blast training, see the
description of the Fast Blast Timer parameter from Menu Mode
(page 52).
Fast Blast training uses its own unique form of scoring. See page
39 for more details.
NOTE
Better scores
Try again
Great Fantastic
Good Excellent
NOTE

Practicing in Training Mode
DTX400K/DTX430K/DTX450K Owner’s Manual
30
Groove Check
As an aid to improving your timing, Groove Check uses the number button lights to show how early or late you are drumming.
Two different training styles are available—the first uses the metronome; the second lets you play along with a song. At the end
of training, the drum module will display your score using number buttons [1] to [10/0] and will also speak it to you.
1. Press the [TRAINING] button to activate Training
Mode.
2. Press number button [1].
The [] and [] buttons will flash, indicating that
the drum module is on standby to start training.
3. Press either the [] or [] button when you are
ready to go.
If you press the [] button, the metronome will be
used for training. Alternatively, if you press the []
button, the current song will be used.
4. Play the pads as tightly as you can along with the met-
ronome or song.
Display of individual strikes
• The number buttons ([1] to [10/0]) will flash to
indicate the accuracy of the timing of individual
strikes.
• If number buttons [5] and [6] flash together, your
timing for the current strike was perfect.
• Number buttons [6] to [10/0] indicate that the cur-
rent strike was late. The further from the [5] and [6]
number buttons, the later the strike.
• Number buttons [5] to [1] indicate that the current
strike was early. The further from the [5] and [6]
number buttons, the earlier the strike.
Display of current timing variation
• Half-lit number buttons ([1] to [10/0]) indicate how
tightly you are currently playing.
• The wider the band of half-lit number buttons, the
greater the degree of variation in your timing.
5. To end training, press the button used to start it in Step
3. above.
The drum module will display your score using number
buttons [1] to [10/0] and will also speak it to you (in
English). For more details regarding scoring, see Scor-
ing function (page 29).
1 3 3
2
Struck early Struck late
Perfect timing
(both flash together)
Range of timing
variation (half-lit)
Timing of current
strike (flashes)

Practicing in Training Mode
DTX400K/DTX430K/DTX450K Owner’s Manual
31
Rhythm Gate
Rhythm Gate training allows you to confirm by ear whether or not your timing is accurate. If you do not strike a pad in time, it
will not produce any sound. Two different training styles are available—the first uses the metronome; the second lets you play
along with a song. At the end of training, the drum module will display your score using number buttons [1] to [10/0] and will
also speak it to you.
1. Press the [TRAINING] button to activate Training
Mode.
2. Press number button [2].
The [] and [] buttons will flash, indicating that
the drum module is on standby to start training.
3. Press either the [] or [] button when you are
ready to go.
If you press the [] button, the metronome will be
used for training. Alternatively, if you press the []
button, the current song will be used.
4. Play the pads as tightly as you can along with the met-
ronome or song.
The pads will only produce a sound when struck in
time. In addition, the number buttons will light up as
shown below during this training.
5. Press number buttons [2] to [9] to adjust the difficulty
level (i.e., the width of the gate). Four different levels
are available as shown below. The higher the difficulty
level, the more accurate your timing will have to be in
order to produce a sound.
6. To end training, press the button used to start it in Step
3. above.
Your score will be displayed using number buttons [1]
to [10/0] and will also be spoken to you (in English).
For more details regarding scoring, see Scoring function
(page 29).
1 3 3
2 5
Struck early Struck late
Accurate timing
(Flash when pad struck)
Difficulty level
(gate width; half-lit)
Timing of current
strike (flashes)
No sound produced for pads
struck outside the gate width.
No sound produced for pads
struck outside the gate width.
Press [2] or [9].
Press [3] or [8].
Press [4] or [7].
Press [5] or [6].
Number buttons [1] and [10/0] are not used with this type of
training.
Easy
Difficulty
level
Hard
12345678 9 10/0
12345678 9 10/0
12345678 9 10/0
12345678 9 10/0
NOTE

Practicing in Training Mode
DTX400K/DTX430K/DTX450K Owner’s Manual
32
Measure Break
With Measure Break training, the metronome will be muted for certain measures in a sequence. For example, by setting the
measures during which you play fills to be muted in this way, you can check for any deviation in your timing when the metro-
nome returns. This will help you to play at a constant tempo throughout your performances. Please note that this type of train-
ing is not scored.
1. Press the [TRAINING] button to activate Training
Mode.
2. Press number button [3].
The [] button will flash, indicating that the drum
module is on standby to start training.
3. Press the [] button.
The metronome will start to play a sequence of four
measures in length.
4. If necessary, press the number buttons corresponding to
the measures in the sequence to toggle the metronome
on (fully-lit) or off (half-lit) for them.
• Each of the number buttons represents a measure in
the sequence.
• On the first beat of each measure, the corresponding
number button will flash.
5. Practice playing the pads along with the song.
6. To end training, press the [] button once again.
1 3,6
2 4
You can also change the number of measures in the metro-
nome sequence. To do so, press and hold the corresponding
number button ([2] to [10/0]) until the displayed sequence
length changes. For example, to set the sequence length to
eight measures, press and hold number button [8].
Flash: First beat of measure currently being played.
Fully-lit: Measures for
which the metro-
nome is played.
Half-lit: Measures for which the
metronome is not played.
NOTE

Practicing in Training Mode
DTX400K/DTX430K/DTX450K Owner’s Manual
33
Tempo Up/Down
Use Tempo Up/Down training to see how fast you can go and still maintain accurate timing. As you play along with a metro-
nome, the drum module will automatically increase the tempo if your timing is good and decrease it if not. Please note that this
type of training is not scored.
1. Press the [TRAINING] button to activate Training
Mode.
2. Press number button [4].
The [] button will flash, indicating that the drum
module is on standby to start training.
3. Press the [] button.
The metronome will start playing.
4. Focusing on accurate timing, play the pads along with
the metronome. The half-lit number buttons indicate
how much time remains before the end of the current
four measures.
The drum module will evaluate your timing after every
four measures.
• If your timing was accurate during the four measures,
the drum module will automatically increase the met-
ronome’s tempo and the number-button lights will
scan quickly once from left to right.
• If your timing was not accurate during the four mea-
sures, the drum module will automatically decrease
the metronome’s tempo and the number-button lights
will scan quickly once from right to left.
• Continue to play along with the metronome as the
tempo changes each four measures.
5. To end training, press the [] button once again.
If you would like to check or adjust the current tempo before you start training, see Using the Metronome
(page 27).
1 3,5
2
• If you wish to adjust the difficulty level for this training, see
the description of the Difficulty Level parameter from Menu
Mode (page 50).
• This training can be set either to mute pads when they are
not played in time or to play pads whenever they are struck.
For details, see the description of the Ignore Timing param-
eter from Menu Mode (page 50).
NOTE

Practicing in Training Mode
DTX400K/DTX430K/DTX450K Owner’s Manual
34
Change Up
In Change Up training, your aim is to maintain good timing as you play along with up to seven different practice rhythms that
change every two measures. The rhythms are assigned to number buttons [1] to [7], allowing you to freely choose which ones
you want to practice with. At the end of training, the drum module will display your score using number buttons [1] to [10/0]
and will also speak it to you.
1. Press the [TRAINING] button to activate Training
Mode.
2. Press number button [5].
The [] button will flash, indicating that the drum
module is on standby to start training.
3. Press the [] button when you are ready to go.
• A practice rhythm and the metronome will start to
play, and the practice rhythm will change after every
two measures.
4. Press number buttons [1] to [7] to select the rhythms to
practice with.
• When a number button is fully lit, the corresponding
rhythm will be included in the practice session.
• When a number button is half lit, the corresponding
rhythm will be skipped as you practice.
• The number buttons will flash to indicate which
rhythm you should be playing.
5. Focusing on accurate timing, play the practice rhythm
on the pads.
• To adjust the volume of the practice rhythm, press and
hold the [SONG] button, and then press either the
[VOLUME+] or [VOLUME–] button.
• To mute the practice rhythm and play along with only
the metronome, press the [DRUM MUTE] button.
• To unmute the practice rhythm, press the [DRUM
MUTE] button once again.
6. To end training, press the [] button once again.
The drum module will display your score using number
buttons [1] to [10/0] and will also speak it to you (in
English). For more details regarding scoring, see Scor-
ing function (page 29).
4
1 3,6
2
5
3
3
6
Fully-lit: Rhythm
included in practice
session
Half-lit: Rhythm not
included in practice
session (i.e., skipped)
• You can also press the [ ] button to end training.
• If you wish to adjust the difficulty level for this training, see
the description of the Difficulty Level parameter from Menu
Mode (page 50).
• This training can be set either to mute pads when they are
not played in time or to play pads whenever they are struck.
For details, see the description of the Ignore Timing param-
eter from Menu Mode (page 50).
• You can also change the number of measures for which
each practice rhythm is repeated by pressing number but-
ton [10/0]. When this button is half lit, each rhythm will be
played for four measures before changing; when fully lit, the
rhythm will be played for one measure; and when not lit, it
will be played for two measures.
NOTE

Practicing in Training Mode
DTX400K/DTX430K/DTX450K Owner’s Manual
35
Easy Session
Easy Session training lets you play a drum pattern along with an accompanying song simply by striking any pad(s) in time. As
such, it is not unlike a basic form of jamming with other band members. Please note that this type of training is not scored.
1. Press the [TRAINING] button to activate Training
Mode.
2. Press number button [6].
The [] button will flash, indicating that the drum
module is on standby to start training.
3. Press the [] button to start the accompaniment.
4. Play the pads along with the accompaniment.
• Regardless of which pad(s) you strike, the drum mod-
ule will play the correct sounds for the drum pattern.
For this reason, you will not necessarily hear the pad
you strike.
• If you stop playing the pads, the drum module will
stop playing the drum pattern.
• The half-lit number buttons provide a guide to varia-
tions in the drum pattern.
• In order to play the drum pattern correctly, the pads
must be struck at precisely the timing indicated by the
half-lit number buttons.
• To select a different song while training, hold down
the [SONG] button and press the corresponding num-
ber button ([1] to [10/0]).
5. To end training, press the [] button once again.
4
1
2
3, 54
The [DRUM MUTE] button is not used with this type of train-
ing.
Half lit = When to strike the pad(s)
NOTE

Practicing in Training Mode
DTX400K/DTX430K/DTX450K Owner’s Manual
36
Groove Tracker
Groove Tracker makes it simple to play a number of different practice drum patterns, which will automatically reflect the speed
and strength of your drumming. In addition, you can also freely add your own fills to the basic pattern. Please note that this type
of training is not scored.
1. Press the [TRAINING] button to activate Training
Mode.
2. Press number button [7].
The [] button will flash, indicating that the drum
module is on standby to start training.
3. Press the [] button when you are ready to go.
The drum module will play the practice drum pattern
once. In addition, the number buttons ([1] to [10/0]) will
light up as the pattern plays.
4. To select a different practice drum pattern, press the
corresponding number button ([1] to [10/0]).
5. Play the hi-hat or kick pad. Each time you do so, the
next part of the drum pattern will be played.
• Refer to the drum scores in the Data List section (page
62) for details on the pads to be played to advance
each drum pattern and how much the patterns advance
with each strike.
• The tempo of the drum pattern will change to reflect
the speed of your drumming.
• The volume of the drum pattern will change to reflect
the strength of your drumming.
• If you briefly stop drumming and then begin again,
the drum pattern will play from the start.
6. To end training, press the [] button once again.
4
1 3,6
2
• You can select which pad(s) you would like to use to
advance the drum pattern. For details, see the description
of the Groove Tracker Control Pad(s) parameter from
Menu Mode (page 51).
• You can set how much the practice drum pattern should
advance for each strike of the selected pad(s). For details,
see the description of the Groove Tracker Advance Step
parameter from Menu Mode (page 51).
NOTE
You can set the period of time after which the drum pattern
will return to the start when you stop drumming. For details,
see the description of the Groove Tracker Return Time
parameter from Menu Mode (page 50).
Muting specific parts from the practice drum pat-
tern
You can mute any of the individual drum parts (i.e.,
snare, kick, tom, hi-hat, and/or cymbal) that make up
the practice drum pattern. If, for example, you were to
mute the snare part, you could play whatever snare
pattern you like along with the rest of the drum parts.
1. Press the [DRUM MUTE] button and verify that it
lights up.
2. Strike the pad corresponding to the part from the
practice drum pattern you wish to mute.
• The selected drum part will now be muted.
• If the pad corresponding to the muted drum part is
not struck for certain period of time, it will be auto-
matically unmuted.
3. To manually unmute all drum parts, press the
[DRUM MUTE] button once again and verify that it
turns off.
The [ ] button is not used with this type of training.
NOTE
NOTE

Practicing in Training Mode
DTX400K/DTX430K/DTX450K Owner’s Manual
37
Pad Gate
In Pad Gate training, the pads will only produce a sound when your drumming precisely matches a practice drum pattern. At
the end of training, the drum module will display your score using number buttons [1] to [10/0] and will also speak it to you.
1. Press the [TRAINING] button to activate Training
Mode.
2. Press number button [8].
The [] button will flash, indicating that the drum
module is on standby to start training.
3. Press the [] button when you are ready to go.
• The drum module will start to play the practice drum
pattern.
• The number buttons ([1] to [10/0]) will light up to dis-
play the progression of the practice drum pattern.
4. If necessary, select a different practice drum pattern
using number buttons [1] to [10/0].
Drum scores for the various practice drum patterns can
be found in the Data List section (page 62).
5. Play the practice drum pattern on the pads.
• The pads will not produce a sound if they are struck
out of time.
• If you play any phrase other than the practice drum
pattern, the pads will not produce a sound.
• To select a different practice drum pattern, press the
corresponding number button ([1] to [10/0]).
6. To end training, press the [] button once again.
The drum module will display your score using number
buttons [1] to [10/0] and will also speak it to you (in
English). For more details regarding scoring, see Scor-
ing function (page 29).
4,5
1
2
3,6
Muting specific parts from the practice drum pat-
tern
You can mute any of the individual drum parts (i.e.,
snare, kick, tom, hi-hat, and/or cymbal) that make up
the practice drum pattern. If, for example, you were to
mute the snare part, you could focus your training on
just the snare pad.
1. Press the [DRUM MUTE] button and verify that it
lights up.
2. Strike the pad corresponding to the part from the
practice drum pattern you wish to mute.
• The selected drum part will now be muted.
• If the pad corresponding to the muted drum part is
not struck for certain period of time, it will be auto-
matically unmuted.
3. To manually unmute all drum parts, press the
[DRUM MUTE] button once again and verify that it
turns off.
• If you wish to adjust the difficulty level for this training, see the
description of the Difficulty Level parameter from Menu Mode
(page 50).
• You can choose either to mute pads when they are not played in
time or to play all pads regardless of when they are struck. For
details, see the description of the Ignore Timing parameter from
Menu Mode (page 50).
• You can set which groups of pads the drum module should con-
sider when deciding whether or not you are playing the correct
pattern. For details, see the description of the Pad Gate Group
parameter from Menu Mode (page 52).
NOTE

Practicing in Training Mode
DTX400K/DTX430K/DTX450K Owner’s Manual
38
Part Mute
Part Mute training lets you mute any or all of the drum parts (i.e., hi-hat, snare, kick, tom, and/or cymbal) and also the instru-
ment parts from an accompanying song. Please note that this type of training is not scored.
1.
Press the
[TRAINING]
button to activate Training Mode.
2. Press number button [9].
The [] button will flash, indicating that the drum
module is on standby to start training.
3. Press the [] button to start the current song.
Each of the drum parts and the non-drum parts are
assigned to different number buttons as shown in the dia-
gram, allowing you to mute and unmute them by press-
ing the corresponding button. (see the description below)
4. Practice playing the pads along with the song.
5. To select a different song while training, hold down the
[SONG] button and press the corresponding number
button ([1] to [10/0]).
6. To end training, press the [] button once again.
5
153,6
2
Muting drum parts
Muting with number buttons [1] to [5]
1. To mute a drum part, press the corresponding num-
ber button.
The part will be muted and the number button will light up.
2. To unmute a drum part, again press the correspond-
ing number button, which will be lit.
The part will be unmuted and the number button’s
light will go out.
Muting with the pads
1. Press the [DRUM MUTE] button and verify that it
lights up.
2. Strike the pad corresponding to the drum part you
wish to mute.
The selected part will be muted and the correspond-
ing number button will light up.
3. To manually unmute all drum parts, press the
[DRUM MUTE] button once again and verify that its
light goes out.
Muting non-drum parts
1. Press number button [9] to mute the accompanying
song’s bass part; press number button [10/0] to mute
the other instrument parts.
The number button(s) corresponding to the muted
song part(s) will light up.
2. To unmute song parts, again press the correspond-
ing number button(s), which will be lit.
The number button light(s) will go out.
KICK
TOM
HI-HAT
SNARE
CYMBAL Bass part Other song parts
Drum parts Non-drum parts
When you play the pads, the number buttons will flash to
indicate the corresponding drum parts.
NOTE
If the pad(s) corresponding to a muted drum part are not
struck for certain period of time, the part will be automati-
cally unmuted and the number button’s light will go out.
NOTE

Practicing in Training Mode
DTX400K/DTX430K/DTX450K Owner’s Manual
39
Fast Blast
In a Fast Blast training session, you just play the drums as wildly as you can over a set period of time. More a game than a form
of practice, your aim is to get the highest possible score. At the end of training, the drum module will display your score using
number buttons [1] to [10/0] and will also speak it to you.
1. Press the [TRAINING] button to activate Training
Mode.
2. Press number button [10/0].
The [] button will flash, indicating that the drum
module is on standby to start training.
3. Press the [] button.
4. Within the training time (10 seconds), play as many of
the pads as often as you can.
• The timer will start when you strike the first pad.
• Each time you strike a pad and increase your score,
the position of the fully-lit number button moves from
left to right.
• The half-lit number buttons indicate how much time is
left before the end of the training session. Specifically,
the half-lit number button lights will successively go
out from right to left, and the training session will end
when they are all turned off.
• When the training session has ended, the drum mod-
ule will display your score using number buttons [1]
to [10/0] and will also speak it to you (in English).
Example:
If you scored 980, the number buttons would flash
[9][8][0].
• To end a training session before the timer runs out,
press the [] button once again.
Fast Blast uses a different scoring system than the other types of training.
NOTE
1 3,4
2
Lights go out.
• If you would like to check your score once again, press any
of the number buttons [1] to [10/0].
• If you wish to adjust the training time, see the description of
the Fast Blast Timer parameter from Menu Mode (page 52).
NOTE

Advanced Techniques
DTX400K/DTX430K/DTX450K Owner’s Manual
40
Setting Parameters using Menu Mode
Menu Mode is used to set drum-module parameters and functions, which are arranged into the follow-
ing seven groups.
The basic procedure used to activate Menu Mode and select
the parameter to be set is as follows. For details of the indi-
vidual parameters, please see the corresponding sections
below.
1. While holding the [KIT] but-
ton, press the [SONG] button
to activate Menu Mode.
Number buttons [1] to [7]
will start to flash.
2. Press the number button corresponding to the group
containing the parameter you wish to set. (Parameter
groups are shown in the hierarchical list on the left.)
3. Press the number button corresponding to the parameter
you wish to set. (Parameters are shown in the hierarchi-
cal list on the left.) The number buttons flash continu-
ously to indicate the current setting.
4. Enter the new setting.
You can use the number buttons to directly set parame-
ters with numerical values, such as a velocity. To enter
the value 105, for example, press the number buttons in
the order [1][10/0][5].
• Number button [10/0] is used to enter the value zero.
You cannot use it to enter the number ten.
• If you take no action for awhile, the setting is auto-
matically stored.
• When you have entered a value, the number buttons
will flash continuously to indicate the new setting.
z Metronome Settings
1-1. Pattern ............................................................ Page 41
1-2. Beats.............................................................. Page 41
1-3. Sound............................................................. Page 41
1-4. Number Button Lighting Pattern ..................... Page 42
x Kit Settings
2-1. Pad Sound...................................................... Page 42
2-2. Pad Volume.................................................... Page 42
2-3. Pad Panning .................................................. Page 43
2-4. Double Bass Drum......................................... Page 43
2-5. Reverb ........................................................... Page 43
c MIDI Settings
3-1. Local Control .................................................. Page 44
3-2. Note Number ................................................. Page 44
v Hi-hat Settings
4-1. Clutch Position................................................ Page 45
4-2. Splash Sensitivity........................................... Page 45
4-3. Foot Close Position........................................ Page 45
4-4. Foot Close Velocity ........................................ Page 45
4-5. Kick Velocity................................................... Page 46
b Trigger Settings
5-1. Pad Velocity Curve ......................................... Page 46
5-2. Crosstalk........................................................ Page 47
5-3. Snare Pad Type ............................................. Page 48
5-4. Pedal Types ................................................... Page 48
5-5. Gain ............................................................... Page 49
5-6. Minimum Level............................................... Page 49
n Training Settings
6-1. Timer .............................................................. Page 49
6-2. Difficulty Level................................................ Page 50
6-3. Ignore Timing................................................. Page 50
6-4. Groove Tracker Return Time.......................... Page 50
6-5. Groove Tracker Control Pad(s)....................... Page 51
6-6. Groove Tracker Advance Step ....................... Page 51
6-7. Pad Gate Group.............................................. Page 52
6-8. Fast Blast Timer............................................. Page 52
m Other Settings
7-1. Kit Lock ........................................................... Page 53
7-2. Voice Guidance Volume ................................. Page 53
7-3. Auto Power-Off Time....................................... Page 53
7-4. Stereo/Mono................................................... Page 53
7-5. Initialize Kit ..................................................... Page 54
7-6. Initialize Song ................................................. Page 54
7-7. Revert to Last Power On ................................. Page 55
7-8. Factory Set ..................................................... Page 55
Basic Menu Mode Procedure
You can also use the [TEMPO+] and [TEMPO–] buttons to
increase and decrease setting values. Specifically, the
[TEMPO+] button increases the current setting by one each
time it is pressed; the [TEMPO–] button decreases it by one.
Hold
Number
button
Group
[1]
Metronome
Settings
[2] Kit Settings
[3] MIDI Settings
[4] Hi-hat Settings
[5] Trigger Settings
[6] Training Settings
[7] Other Settings
Number
button
Group
NOTE
Advanced Techniques

Setting Parameters using Menu Mode
DTX400K/DTX430K/DTX450K Owner’s Manual
41
1-1. Pattern
Using the following procedure, you can set one of eight pat-
terns for the drum module’s metronome.
1. While holding the [KIT] button, press the [SONG] but-
ton to activate Menu Mode.
2. Press number button [1] to select the Metronome Set-
tings parameter group.
3. Press number button [1] to select the Pattern parameter.
4. Select a new metronome pattern using the correspond-
ing number button ([1] to [8]). The available settings are
as follows.
1-2. Beats
Using the following procedure, you can set the metronome
to between 1 and 9 beats in length.
1. While holding the [KIT] button, press the [SONG] but-
ton to activate Menu Mode.
2. Press number button [1] to select the Metronome Set-
tings parameter group.
3. Press number button [2] to select the Beats parameter.
4. Select a new metronome length in beats using the corre-
sponding number button ([1] to [9]). The available set-
tings are as follows.
1-3. Sound
Using the following procedure, you can set the sound
played by the metronome to, for example, a standard click
sound, a cowbell, a drumsticks sound, or a spoken count.
1. While holding the [KIT] button, press the [SONG] but-
ton to activate Menu Mode.
2. Press number button [1] to select the Metronome Set-
tings parameter group.
3. Press number button [3] to select the Sound parameter.
4. Select a new metronome sound using the corresponding
number button ([1] to [6]). The available settings are as
follows.
z Metronome Settings
Steps:
MENU ([KIT] + [SONG]) [1] [1] Setting
Number
button
Setting
[1]
[2]
[3]
[4]
[5]
[6]
[7]
[8]
With settings [2], [4], [6], and [8], the first beat is accented.
Setting
3 3 3 3
3 3 3 3
NOTE
Steps:
MENU ([KIT] + [SONG]) [1] [2] Setting
Number button Setting
[1] 1 beat
[2] 2 beats
[3] 3 beats
[4] 4 beats
[5] 5 beats
[6] 6 beats
[7] 7 beats
[8] 8 beats
[9] 9 beats
Steps:
MENU ([KIT] + [SONG]) [1] [3] Setting
Number button Setting
[1] Metronome click 1
[2] Metronome click 2
[3] Cowbell
[4] Drumsticks
[5] Spoken count 1
[6] Spoken count 2
Setting
Setting

Setting Parameters using Menu Mode
DTX400K/DTX430K/DTX450K Owner’s Manual
42
1-4. Number Button Lighting Pattern
You can have number buttons [1] to [10/0] light up when
playing the metronome in Kit Mode or Song Mode. Use the
following procedure to set the buttons’ lighting pattern.
1. While holding the [KIT] button, press the [SONG] but-
ton to activate Menu Mode.
2. Press number button [1] to select the Metronome Set-
tings parameter group.
3. Press number button [4] to select the Number Button
Lighting Pattern parameter.
4. Select a new lighting pattern using the corresponding
number button ([1] to [3]). The available settings are as
follows.
2-1. Pad Sound
Using the following procedure, you can change the sounds
assigned to the current kit’s pads. This makes it very easy to
create your own unique kits.
1. While holding the [KIT] button, press the [SONG] but-
ton to activate Menu Mode.
2. Press number button [2] to select the Kit Settings
parameter group.
3. Press number button [1] to select the Pad Sound param-
eter.
4. Strike a pad to select it.
5. Enter a new drum-sound number using number buttons
[1] to [10/0]. For a list of sounds and numbers, see the
Voice List (page 61).
2-2. Pad Volume
Using the following procedure, you can adjust the volume
of the current kit’s pads.
1. While holding the [KIT] button, press the [SONG] but-
ton to activate Menu Mode.
2. Press number button [2] to select the Kit Settings
parameter group.
3. Press number button [2] to select the Pad Volume
parameter.
4. Strike a pad to select it.
5. Enter a new volume using number buttons [1] to [10/0].
Steps:
MENU ([KIT] + [SONG]) [1] [4] Setting
Number button Setting
[1] Off (no lighting)
[2] Pattern 1
[3] Pattern 2
Setting
x Kit Settings
Steps:
MENU ([KIT] + [SONG]) [2] [1] Setting
Setting
1 to 169
Steps:
MENU ([KIT] + [SONG]) [2] [2] Setting
Setting
0 to 127
Setting
Setting

Setting Parameters using Menu Mode
DTX400K/DTX430K/DTX450K Owner’s Manual
43
2-3. Pad Panning
Using the following procedure, you can adjust the panning
of the current kit’s pads.
1. While holding the [KIT] button, press the [SONG] but-
ton to activate Menu Mode.
2. Press number button [2] to select the Kit Settings
parameter group.
3. Press number button [3] to select the Pad Panning
parameter.
4. Strike a pad to select it.
5. Enter a new panning position using number buttons [1]
to [10/0]. A value of 64 corresponds to the center posi-
tion. Smaller values than this move the pad increasingly
towards the left; larger values move it towards the right.
2-4. Double Bass Drum
Using the following procedure, you can easily configure the
drum module to produce a kick drum sound when you oper-
ate the pedal connected to the [HI-HAT CONTROL] trig-
ger input jack. This convenient function provides support
for double bass drumming techniques.
1. While holding the [KIT] button, press the [SONG] but-
ton to activate Menu Mode.
2. Press number button [2] to select the Kit Settings
parameter group.
3. Press number button [4] to select the Double Bass Drum
parameter.
4. Set the parameter using number button [1] or [2]. The
available settings are as follows.
2-5. Reverb
Reverb effects add a warm ambience to sounds, simulating
the complex reflections of actual performance spaces, such
as a concert hall or a small club. Use the following proce-
dure to select a reverb effect for the current kit.
1. While holding the [KIT] button, press the [SONG] but-
ton to activate Menu Mode.
2. Press number button [2] to select the Kit Settings
parameter group.
3. Press number button [5] to select the Reverb parameter.
4. Select a reverb effect using the corresponding number
button ([1] to [10/0]). The available settings are as fol-
lows.
Steps:
MENU ([KIT] + [SONG]) [2] [3] Setting
Setting
0 to 127
Steps:
MENU ([KIT] + [SONG]) [2] [4] Setting
Number button Setting
[1] Off
[2] On
While the Double Bass Drum function is enabled, you will be
unable to use the hi-hat controller plugged into the [HI-HAT CON-
TROL] trigger input jack to simulate opening and closing of the hi-
hat.
Setting
Setting
NOTE
Steps:
MENU ([KIT] + [SONG]) [2] [5] Setting
Number button Setting
[1] Off
[2] Hall 1
[3] Hall 2
[4] Hall 3
[5] Room 1
[6] Room 2
[7] Room 3
[8] Stage 1
[9] Stage 2
[10/0] Plate
Setting

Setting Parameters using Menu Mode
DTX400K/DTX430K/DTX450K Owner’s Manual
44
3-1. Local Control
The Local Control parameter determines whether or not the
drum module’s internal tone generator will produce sounds
in response to playing of the pads or of songs. Normally,
this parameter is set to “On”, meaning that pads and songs
will generate sounds. When “Off” is selected, the tone gen-
erator is essentially disconnected from the pads and songs,
which will be unable to generate any sound. An “Off” set-
ting can prove highly useful when you wish to record your
drum performances as MIDI data on a sequencer or using
DAW software.
1. While holding the [KIT] button, press the [SONG] but-
ton to activate Menu Mode.
2. Press number button [3] to select the MIDI Settings
parameter group.
3. Press number button [1] to select the Local Control
parameter.
4. Set the parameter using number button [1] or [2]. The
available settings are as follows.
3-2. Note Number
Using the following procedure, you can set the MIDI note
number that is output when each of the pads is played.
1. While holding the [KIT] button, press the [SONG] but-
ton to activate Menu Mode.
2. Press number button [3] to select the MIDI Settings
parameter group.
3. Press number button [2] to select the Note Number
parameter.
4. Strike a pad to select it.
5. Enter a new note number using number buttons [1] to
[10/0].
c MIDI Settings
Steps:
MENU ([KIT] + [SONG]) [3] [1] Setting
Number
button
Setting Description
[1] Off
The internal tone generator does
not respond to pads and songs.
[2] On
The internal tone generator
responds to pads and songs.
• The drum module’s internal tone generator will continue to
respond to received MIDI data when Local Control is turned off.
• The drum module will continue to output drum performances as
MIDI data when Local Control is turned off.
Setting
NOTE
Steps:
MENU ([KIT] + [SONG]) [3] [2] Setting
Setting
0 to 127
Note number settings are relevant only when you have connected
your drum module to a computer. For more details, refer to the
MIDI Reference Manual (PDF).
Setting
NOTE

Setting Parameters using Menu Mode
DTX400K/DTX430K/DTX450K Owner’s Manual
45
4-1. Clutch Position
Using the following procedure, you can simulate the effect
of changing the hi-hat’s clutch position. The smaller the set-
ting, the quicker an open hi-hat sound will decay.
1. While holding the [KIT] button, press the [SONG] but-
ton to activate Menu Mode.
2. Press number button [4] to select the Hi-hat Settings
parameter group.
3. Press number button [1] to select the Clutch Position
parameter.
4. Enter a new clutch position using number buttons [1] to
[10/0].
4-2. Splash Sensitivity
Using the following procedure, you can set the degree of
sensitivity for detecting hi-hat foot splashes. The higher the
value, the easier it will be to produce a foot-splash sound
with the hi-hat controller. High values may, however, result
in splash sounds being unintentionally produced when, for
example, you operate the hi-hat controller lightly as you
keep time. It is a good idea, therefore, to set this parameter
to “Off” if you do not want to play foot splashes.
1. While holding the [KIT] button, press the [SONG] but-
ton to activate Menu Mode.
2. Press number button [4] to select the Hi-hat Settings
parameter group.
3. Press number button [2] to select the Splash Sensitivity
parameter.
4. Enter a new splash sensitivity using number buttons [1]
to [10/0].
4-3. Foot Close Position
Using the following procedure, you can adjust the position
at which the hi-hat switches from open to closed when you
operate the hi-hat controller. The lower the value, the
smaller the virtual opening between the top and bottom hi-
hats. Larger values increase the size of the gap between the
top and bottom cymbals, and this can prevent foot close or
foot splash sounds from being produced when you operate
the pedal.
1. While holding the [KIT] button, press the [SONG] but-
ton to activate Menu Mode.
2. Press number button [4] to select the Hi-hat Settings
parameter group.
3. Press number button [3] to select the Foot Close Posi-
tion parameter.
4. Enter a new foot close position using number buttons
[1] to [10/0].
4-4. Foot Close Velocity
Using the following procedure, you can adjust the velocity
(or power) of foot-close sounds produced using the hi-hat
controller.
1. While holding the [KIT] button, press the [SONG] but-
ton to activate Menu Mode.
2. Press number button [4] to select the Hi-hat Settings
parameter group.
3. Press number button [4] to select the Foot Close Veloc-
ity parameter.
4. Enter a new velocity using number buttons [1] to [10/0].
v Hi-hat Settings
Steps:
MENU ([KIT] + [SONG]) [4] [1] Setting
Setting
0 to 64
Steps:
MENU ([KIT] + [SONG]) [4] [2] Setting
Setting
0 to 127
Set this parameter to [0] in order to turn off foot splashes.
Setting
Setting
NOTE
Steps:
MENU ([KIT] + [SONG]) [4] [3] Setting
This parameter only has an effect when you are
using an HH65 Hi-hat Controller.
Setting
0 to 32
Steps:
MENU ([KIT] + [SONG]) [4] [4] Setting
This parameter only has an effect when you are
using the hi-hat controller that comes with the
DTX400K.
Setting
1 to 127
Setting
Setting

Setting Parameters using Menu Mode
DTX400K/DTX430K/DTX450K Owner’s Manual
46
4-5. Kick Velocity
Using the following procedure, you can adjust the velocity
(or power) of kick sounds produced using the hi-hat control-
ler. In order for the Kick Velocity parameter to have an
effect, Double Bass Drum must be set to “On” for the cur-
rent kit (page 43).
1. While holding the [KIT] button, press the [SONG] but-
ton to activate Menu Mode.
2. Press number button [4] to select the Hi-hat Settings
parameter group.
3. Press number button [5] to select the Kick Velocity
parameter.
4. Enter a new velocity using number buttons [1] to [10/0].
5-1. Pad Velocity Curve
Using the following procedure, you can select a velocity
curve for individual pads. A velocity curve determines how
the velocity (or power) of a sound is affected by how hard
you strike the pad.
1. While holding the [KIT] button, press the [SONG] but-
ton to activate Menu Mode.
2. Press number button [5] to select the Trigger Settings
parameter group.
3. Press number button [1] to select the Pad Velocity
Curve parameter.
4. Strike a pad to select it.
5. Enter a new velocity curve setting using number buttons
[1] to [10/0]. The available settings are as follows.
Steps:
MENU ([KIT] + [SONG]) [4] [5] Setting
This parameter only has an effect when you are
using the hi-hat controller that comes with the
DTX400K.
Setting
1 to 127
Setting
b Trigger Settings
Steps:
MENU ([KIT] + [SONG]) [5] [1] Setting
Setting
1 to 25
Setting
1
2
3
4
5
6
7
8
9
10
Velocity
Trigger input level
Velocity
Trigger input level

Setting Parameters using Menu Mode
DTX400K/DTX430K/DTX450K Owner’s Manual
47
5-2. Crosstalk
The term “crosstalk” refers to the output of spurious trigger
signals from a pad other than the one that was stuck as a
result of vibration or interference between pads. Using the
following procedure, you can adjust the Crosstalk parameter
for individual pads to prevent this phenomenon from occur-
ring.
1. While holding the [KIT] button, press the [SONG] but-
ton to activate Menu Mode.
2. Press number button [5] to select the Trigger Settings
parameter group.
3. Press number button [2] to select the Crosstalk parame-
ter.
4. Strike a pad to select it.
5. Enter a new setting (%) using number buttons [1] to
[10/0]. Larger values are more effective in preventing
crosstalk; however, they can also make it difficult to
play pads simultaneously during light drumming.
11
12
13
14
15
16
17
18
19
20
23
24
25
22
21
Velocity
Trigger input level
Velocity
Trigger input level
Velocity
Trigger input level
Steps:
MENU ([KIT] + [SONG]) [5] [2] Setting
Setting
0 to 99
Setting

Setting Parameters using Menu Mode
DTX400K/DTX430K/DTX450K Owner’s Manual
48
5-3. Snare Pad Type
Using the following procedure, you can specify the type of
snare pad connected to your drum module.
1. While holding the [KIT] button, press the [SONG] but-
ton to activate Menu Mode.
2. Press number button [5] to select the Trigger Settings
parameter group.
3. Press number button [3] to select the Snare Pad Type
parameter.
4. Select a new snare pad type using the corresponding
number button ([1] to [6]). The available settings are as
follows.
5-4. Pedal Types
Use the following parameter to specify the types of pedals
(i.e., hi-hat controller and kick) connected to your drum
module.
1. While holding the [KIT] button, press the [SONG] but-
ton to activate Menu Mode.
2. Press number button [5] to select the Trigger Settings
parameter group.
3. Press number button [4] to select the Pedal Types
parameter.
4. Select a new pedal type combination using the corre-
sponding number button ([1] to [5]). The available set-
tings are as follows.
Steps:
MENU ([KIT] + [SONG]) [5] [3] Setting
Number button Setting
[1]
Automatic identification
(only for [2] and [3])
[2] TP70S
[3] Snare pad that comes with DTX400K
[4] XP-series pad
[5] TP70S reversed
[6] XP-series pad reversed
• When set to [1], the drum module will automatically identify the
type of snare pad that came with your electronic drum kit when it
is turned on. If you then press and hold number button [1], the
drum module will flash number button [2] or [3] to indicate the
result of automatic identification.
• Whenever you change the type of snare connected to the drum
module, please update this setting using the corresponding
number button ([2] to [4]). For example, when you use the XP-
series pad, select [4].
• You can use setting [5] or [6] to switch (or reverse) the drum
sounds assigned to Rim 1 and Rim 2. This makes it easier for
left-handed drummers to configure their electronic drum kit.
Setting
NOTE
Steps:
MENU ([KIT] + [SONG]) [5] [4] Setting
Number
button
Setting
Hi-hat controller Kick pedal
[1] Automatic identification (only for [2] and [3])
[2] HH65 KP65
[3]
Hi-hat controller pedal
that comes with
DTX400K
KU100
[4]
Hi-hat controller pedal
that comes with
DTX400K
KP65
[5] HH65 KU100
• This parameter can normally be set to [1] (automatic identifica-
tion).
• When set to [1], the drum module will automatically identify the
type of pedal that came with your electronic drum kit when it is
turned on.
If you then press and hold number button [1], the drum module
will flash number button [2] or [3] to indicate the result of auto-
matic identification.
• Connect the hi-hat controller before turning on the drum module.
Please do not turn the drum module on with the hi-hat controller
depressed. The drum module can not identify the type of pedal
properly and it causes that the kick may produce much smaller
sound than expected.
• Whenever you change the type of hi-hat controller or kick pedal
connected to the drum module, please update this setting using
the corresponding number button ([2] to [5]).
Setting
NOTE

Setting Parameters using Menu Mode
DTX400K/DTX430K/DTX450K Owner’s Manual
49
5-5. Gain
Using the following procedure, you can set the gain level for
trigger signals output from individual pads. The higher the
gain setting, the louder the sounds produced by light drum-
ming.
1. While holding the [KIT] button, press the [SONG] but-
ton to activate Menu Mode.
2. Press number button [5] to select the Trigger Settings
parameter group.
3. Press number button [5] to select the Gain parameter.
4. Strike a pad to select it.
5. Enter a new gain level using number buttons [1] to [10/
0].
5-6. Minimum Level
When the strength with which you strike a pad is no more
than this level, the pad will not output a trigger signal in
response and no sound will be produced.
1. While holding the [KIT] button, press the [SONG] but-
ton to activate Menu Mode.
2. Press number button [5] to select the Trigger Settings
parameter group.
3. Press number button [6] to select the Minimum Level
parameter.
4. Strike a pad to select it.
5. Enter a new setting (%) using number buttons [1] to
[10/0].
6-1. Timer
Using the following procedure, you can set the practice
timer used in the drum module’s Training Mode. The timer
begins counting at the start of a training session, and when
the set time is reached, it automatically ends the session.
1. While holding the [KIT] button, press the [SONG] but-
ton to activate Menu Mode.
2. Press number button [6] to select the Training Settings
parameter group.
3. Press number button [1] to select the Timer parameter.
4. Select your preferred practice time using the corre-
sponding number button ([1] to [10/0]). The available
settings are as follows.
Steps:
MENU ([KIT] + [SONG]) [5] [5] Setting
Setting
1 to 127
Steps:
MENU ([KIT] + [SONG]) [5] [6] Setting
Setting
0 to 99 (%)
Setting
Setting
n Training Settings
Steps:
MENU ([KIT] + [SONG]) [6] [1] Setting
Number button Setting
[1] Off
[2] 30 seconds
[3] 60 seconds
[4] 90 seconds
[5] 120 seconds
[6] 150 seconds
[7] 180 seconds
[8] 300 seconds
[9] 480 seconds
[10/0] 600 seconds
The practice time set using this parameter applies to the following
types of training only.
• Groove Check
•Rhythm Gate
• Measure Break
• Tempo Up/Down
• Change Up
• Pad Gate
Other types of training are not affected.
Setting
NOTE

Setting Parameters using Menu Mode
DTX400K/DTX430K/DTX450K Owner’s Manual
50
6-2. Difficulty Level
Using the following procedure, you can set the level of
training difficulty for Tempo Up/Down (page 33), Change
Up (page 34), and Pad Gate (page 37).
1. While holding the [KIT] button, press the [SONG] but-
ton to activate Menu Mode.
2. Press number button [6] to select the Training Settings
parameter group.
3. Press number button [2] to select the Difficulty Level
parameter.
4. Select a new difficulty level using the corresponding
number button ([1] to [5]). The higher the level, the
more difficult the training.
6-3. Ignore Timing
Using the following procedure, you can set the Ignore Tim-
ing parameter for Tempo Up/Down (page 33), Change Up
(page 34), and Pad Gate (page 37) training. When set to
“On”, the pads will produce a sound whenever they are
struck; when “Off”, only pads played exactly in time will
produce a sound.
1. While holding the [KIT] button, press the [SONG] but-
ton to activate Menu Mode.
2. Press number button [6] to select the Training Settings
parameter group.
3. Press number button [3] to select the Ignore Timing
parameter.
4. Set the parameter using number button [1] or [2]. The
available settings are as follows.
6-4. Groove Tracker Return Time
Using the following procedure, you can set the period of
time after which the practice drum pattern in Groove
Tracker training (page 36) will return to the start when you
stop drumming.
1. While holding the [KIT] button, press the [SONG] but-
ton to activate Menu Mode.
2. Press number button [6] to select the Training Settings
parameter group.
3. Press number button [4] to select the Groove Tracker
Return Time parameter.
4. Enter a new return time setting using number buttons
[1] to [10/0]. The bigger the setting, the longer the
return time.
Steps:
MENU ([KIT] + [SONG]) [6] [2] Setting
Setting
1 to 5
The level of difficulty set using this parameter applies only to the
Tempo Up/Down, Change Up, and Pad Gate training types. Other
types of training are not affected.
Steps:
MENU ([KIT] + [SONG]) [6] [3] Setting
Setting
NOTE
Setting
Number
button
Setting Description
[1] Off
Pads played out of time will not
produce a sound.
[2] On
Pads will produce a sound when-
ever they are played.
This parameter applies only to the Tempo Up/Down, Change Up,
and Pad Gate training types. Other types of training are not
affected.
Steps:
MENU ([KIT] + [SONG]) [6] [4] Setting
Setting
1 to 10
• When set to [1], the practice drum pattern will not return to the
start.
• The time set using this parameter only applies to Groove Tracker
training. Other types of training are not affected.
NOTE
Setting
NOTE

Setting Parameters using Menu Mode
DTX400K/DTX430K/DTX450K Owner’s Manual
51
6-5. Groove Tracker Control Pad(s)
Using the following procedure, you can select which pad(s)
you would like to use to advance the practice drum pattern
in Groove Tracker training (page 36).
1. While holding the [KIT] button, press the [SONG] but-
ton to activate Menu Mode.
2. Press number button [6] to select the Training Settings
parameter group.
3. Press number button [5] to select the Groove Tracker
Control Pad(s) parameter.
4. Select a new setting using the corresponding number
button ([1] to [6]). The available settings are as follows.
6-6. Groove Tracker Advance Step
Using the following procedure, you can set how much the
practice drum pattern in Groove Tracker training (page 36)
should advance for each strike of the set pad(s).
1. While holding the [KIT] button, press the [SONG] but-
ton to activate Menu Mode.
2. Press number button [6] to select the Training Settings
parameter group.
3. Press number button [6] to select the Groove Tracker
Advance Step parameter.
4. Select a new advancement step using the corresponding
number button ([1] to [5]). The available settings are as
follows.
Steps:
MENU ([KIT] + [SONG]) [6] [5] Setting
Number
button
Setting Description
[1] Auto
The drum module will automati-
cally select the best setting for
the practice drum pattern.
[2]
Cymbal
+
hi-hat 1
The cymbal and hi-hat pads will
advance the pattern and will
also produce their own sounds.
[3]
Cymbal
+
hi-hat 2
The cymbal and hi-hat pads will
advance the pattern.
[4] Kick
The kick pad or pedal will
advance the pattern.
[5]
Snare
+
hi-hat
The snare and hi-hat pads will
advance the pattern.
[6] All
All pads and pedals will advance
the pattern.
• With a setting of [3] to [6], the corresponding pad(s) will not pro-
duce a drum sound of their own.
• When this parameter is set to [6], the [DRUM MUTE] button can-
not be used to mute the practice drum pattern.
Setting
NOTE
Steps:
MENU ([KIT] + [SONG]) [6] [6] Setting
Number
button
Setting Description
[1] Auto
The drum module will automati-
cally identify the best advance-
ment step for the practice drum
pattern.
[2]
The practice drum pattern will
advance in quarter-note steps.
[3]
The practice drum pattern will
advance in eighth-note steps.
[4]
The practice drum pattern will
advance in sixteenth-note
steps.
[5]
The practice drum pattern will
advance in eighth-note triplet
steps.
• The advancement step set using this parameter only applies to
Groove Tracker training. Other types of training are not affected.
• If, when set to [1], you press and hold number button [1], the
drum module will flash a number button between [2] and [5] to
indicate the result of automatic identification.
Setting
3
NOTE

Setting Parameters using Menu Mode
DTX400K/DTX430K/DTX450K Owner’s Manual
52
6-7. Pad Gate Group
Using the following procedure, you can set which groups of
pads the drum module should consider when deciding
whether or not you are playing the correct pattern in Pad
Gate training (page 37).
1. While holding the [KIT] button, press the [SONG] but-
ton to activate Menu Mode.
2. Press number button [6] to select the Training Settings
parameter group.
3. Press number button [7] to select the Pad Gate Group
parameter.
4. Select a new setting using the corresponding number
button ([1] to [4]). The available settings are as follows.
6-8. Fast Blast Timer
Using the following procedure, you can set the timer for
Fast Blast training sessions (page 39). When the timer
counts down to zero after the start of a training session, it
will automatically end the training.
1. While holding the [KIT] button, press the [SONG] but-
ton to activate Menu Mode.
2. Press number button [6] to select the Training Settings
parameter group.
3. Press number button [8] to select the Fast Blast Timer
parameter.
4. Select your preferred practice time using the corre-
sponding number button ([1] to [10/0]). The available
settings are as follows.
Steps:
MENU ([KIT] + [SONG]) [6] [7] Setting
Number
button
Setting Description
[1] All pads
Any pad will produce a sound
and be scored, as long as the
timing of your drumming is
correct.
[2] Group type 1
The kit will be separated into
five groups—Kick, Snare,
Toms, Cymbals, and Hi-hat. In
order for your drumming to
produce sounds and be
scored, you must strike pads
from the same group as those
from the practice drum pattern
and do so in time.
[3] Group type 2
More difficult than Group type
1, this setting splits each of the
toms and each of the cymbals
into individual groups. In addi-
tion, the hi-hat pad and the hi-
hat controller are also treated
separately.
[4] All notes
With this setting, you must play
the exact same practice drum
pattern as the drum module.
• The evaluation method set using this parameter applies only to
Pad Gate training. Other types of training are not affected.
• The higher the setting, the more difficult the training.
Setting
NOTE
Steps:
MENU ([KIT] + [SONG]) [6] [8] Setting
Number button Setting
[1] 10 seconds
[2] 30 seconds
[3] 60 seconds
[4] 90 seconds
[5] 120 seconds
[6] 150 seconds
[7] 180 seconds
[8] 300 seconds
[9] 480 seconds
[10/0] 600 seconds
The timer set using this parameter applies only to Fast Blast train-
ing. Other types of training are not affected.
Setting
NOTE

Setting Parameters using Menu Mode
DTX400K/DTX430K/DTX450K Owner’s Manual
53
7-1. Kit Lock
Normally, when you select a song, the drum module auto-
matically chooses the most appropriate kit. You can, how-
ever, use the Kit Lock function to prevent this if you wish to
keep the current kit when practicing with different songs.
1. While holding the [KIT] button, press the [SONG] but-
ton to activate Menu Mode.
2. Press number button [7] to select the Other Settings
parameter group.
3. Press number button [1] to select the Kit Lock parame-
ter.
4. Set the parameter using number button [1] or [2]. The
available settings are as follows.
7-2. Voice Guidance Volume
1. While holding the [KIT] button, press the [SONG] but-
ton to activate Menu Mode.
2. Press number button [7] to select the Other Settings
parameter group.
3. Press number button [2] to select the Voice Guidance
Volume parameter.
4. Enter a new voice guidance volume using number but-
tons [1] to [10/0]. Larger setting values represent higher
volumes and vice-versa.
7-3. Auto Power-Off Time
Using the following procedure, you can set the time until
the Auto Power-Off function (page 20) activates or you can
disable this function.
1. While holding the [KIT] button, press the [SONG] but-
ton to activate Menu Mode.
2. Press number button [7] to select the Other Settings
parameter group.
3. Press number button [3] to select the Auto Power-Off
Time parameter.
4. Set a time or disable this function using the correspond-
ing number button ([1] to [7]). The available settings are
as follows.
7-4. Stereo/Mono
Using the following procedure, you can set the [PHONES/
OUTPUT] jack to output either mono or stereo sound. We
recommend that you select the Mono setting if connecting a
standard mono-audio cable to this jack in order to use your
drum module with external speakers, a mixer, or other simi-
lar equipment.
1. While holding the [KIT] button, press the [SONG] but-
ton to activate Menu Mode.
2. Press number button [7] to select the Other Settings
parameter group.
3. Press number button [4] to select the Stereo/Mono
parameter.
4. Set the parameter using number button [1] or [2]. The
available settings are as follows.
m Other Settings
Steps:
MENU ([KIT] + [SONG]) [7] [1] Setting
Number button Setting
[1] Off
[2] On
Regardless of this parameter’s setting, you can always select a
new kit using the drum module’s control panel.
Steps:
MENU ([KIT] + [SONG]) [7] [2] Setting
Setting
1 to 10
Setting this parameter to [1] turns off the Voice Guidance function.
Setting
NOTE
Setting
NOTE
Steps:
MENU ([KIT] + [SONG]) [7] [3] Setting
Number button Setting
[1] Auto Power-Off disabled
[2] 5 minutes
[3] 10 minutes
[4] 15 minutes
[5] 30 minutes
[6] 60 minutes
[7] 120 minutes
Steps:
MENU ([KIT] + [SONG]) [7] [4] Setting
Number button Setting
[1] Stereo
[2] Mono
Setting
Setting

Setting Parameters using Menu Mode
DTX400K/DTX430K/DTX450K Owner’s Manual
54
7-5. Initialize Kit
Using the following procedure, you can restore a kit’s
default settings.
1. Press the [KIT] button.
2. Select the kit to initialize using the corresponding num-
ber button ([1] to [10/0]).
3. While holding the [KIT] button, press the [SONG] but-
ton to activate Menu Mode.
4. Press number button [7] to select the Other Settings
parameter group.
5. Press number button [5] to select the Initialize Kit func-
tion.
• Number button [1] will light up.
6. Press number button [1].
• Number button [1] will start to flash.
• If you do not wish to proceed with initialization, press
the [KIT] button now to exit Menu Mode.
7. Press number button [1].
• The kit will be initialized.
7-6. Initialize Song
Using the following procedure, you can restore a song’s
default settings.
1. Press the [SONG] button.
2. Select the song to initialize using the corresponding
number button ([1] to [10/0]).
3. While holding the [KIT] button, press the [SONG] but-
ton to activate Menu Mode.
4. Press number button [7] to select the Other Settings
parameter group.
5. Press number button [6] to select the Initialize Song
function.
• Number button [1] will light up.
6. Press number button [1].
• Number button [1] will start to flash.
• If you do not wish to proceed with initialization, press
the [KIT] button now to exit Menu Mode.
7. Press number button [1].
• The song will be initialized.
Steps:
MENU ([KIT] + [SONG]) [7] [5] [1] [1]
When you initialize a kit, all of the changes you have made to it
will be lost. Before proceeding, therefore, you should ensure that
the kit contains no irreplaceable settings.
NOTICE
Steps:
MENU ([KIT] + [SONG]) [7] [6] [1] [1]
When you initialize a song, all of the changes you have made to it
will be lost. Before proceeding, therefore, you should ensure that
the song contains no irreplaceable data.
NOTICE

Setting Parameters using Menu Mode
DTX400K/DTX430K/DTX450K Owner’s Manual
55
7-7. Revert to Last Power On
Using the following procedure, you can return all of the
parameters from Kit Mode, Song Mode, and Menu Mode to
the settings they had when you last turned on the drum mod-
ule.
1. While holding the [KIT] button, press the [SONG] but-
ton to activate Menu Mode.
2. Press number button [7] to select the Other Settings
parameter group.
3. Press number button [7] to select the Revert to Last
Power On function.
• Number button [1] will light up.
4. Press number button [1].
• Number button [1] will start to flash.
• If you do not wish to proceed with initialization, press
the [KIT] button now to exit Menu Mode.
5. Press number button [1].
• The parameters will be initialized.
7-8. Factory Set
Using the following procedure, you can return all of the
parameters from Kit Mode, Song Mode, and Menu Mode to
their default settings.
1. While holding the [KIT] button, press the [SONG] but-
ton to activate Menu Mode.
2. Press number button [7] to select the Other Settings
parameter group.
3. Press number button [8] to select the Factory Set func-
tion.
• Number button [1] will light up.
4. Press number button [1].
• Number button [1] will start to flash.
• If you do not wish to proceed with initialization, press
the [KIT] button now to exit Menu Mode.
5. Press number button [1].
• The parameters will be initialized.
Steps:
MENU ([KIT] + [SONG]) [7] [7] [1] [1]
When you reset parameters as described below, any changes
you have made to them since last turning on the drum module will
be lost. Before proceeding, therefore, you should ensure that they
contain no irreplaceable settings.
NOTICE
Steps:
MENU ([KIT] + [SONG]) [7] [8] [1] [1]
When you reset parameters as described below, any changes
you have made to them will be lost. Before proceeding, therefore,
you should ensure that they contain no irreplaceable settings.
You can also restore the Factory Set by turning on the drum mod-
ule with the [VOLUME+] button and the [VOLUME–] button held
down. See page 20 for more details.
NOTICE
NOTE

Advanced Techniques
DTX400K/DTX430K/DTX450K Owner’s Manual
56
Integrating Separately Sold Accessories
As described below, you can add various accessories* to your electronic drum kit for an even more
enjoyable drumming experience. (*: Sold separately)
By upgrading the KU100 Kick Unit and/or the hi-hat con-
troller included as part of the DTX400K, you can make your
electronic drum kit feel much closer to the real thing.
Replacing the KU100 Kick Unit with a KP65
Kick Pad
1. Assemble the KP65 Kick Pad. For details, see Step 13
on page 17.
2. Turn off the drum module.
The KP65 Kick Pad must be connected with the drum
module turned off.
3. Disconnect the cable from the KU100 and plug it into
the [OUT > DTX] jack on the back on the KP65.
4. Turn on the drum module.
5. Set the kick type to “KP65”. For more details, see the
description of the Pedal Types parameter from Menu
Mode (page 48).
6. Play the KP65 Kick Pad.
When you upgrade your KU100 to a KP65, you will need a
foot pedal to play the new kick pad.
Replacing the bundled hi-hat controller
with an HH65 Hi-hat Controller
1. Turn off the drum module.
The HH65 Hi-hat Controller must be connected with
the drum module turned off.
2. Disconnect the cable from the bundled hi-hat controller
and plug it into the [OUTPUT] jack on the HH65.
3. Turn on the drum module.
4. Set the hi-hat controller type to “HH65”. For more
details, see the description of the Pedal Types parameter
from Menu Mode (page 48).
5. Play the HH65 Hi-hat Controller.
Adding a PCY90AT Cymbal Pad
1. Turn off the drum module.
The PCY90AT Cymbal Pad must be connected with the
drum module turned off.
2. Using the cable that came with the cymbal pad, connect
it to the [PAD > IN] jack on the KP65 Kick Pad.
3. Turn on the drum module.
4. Play the newly added cymbal pad.
For DTX400K Owners
For DTX430K & DTX450K Owners

Advanced Techniques
DTX400K/DTX430K/DTX450K Owner’s Manual
57
Connecting to a Computer
While the drum module is highly powerful and versatile all
by itself, you can connect it to a computer via USB for even
greater convenience and flexibility. When connected in this
way, MIDI data can be freely exchanged with the computer,
allowing the drum module to be used as an input device for
music production applications. In this section, you’ll learn
how to make the necessary connections.
Supported operating systems:
• Windows XP, Service Pack 3 (32-bit); Windows
Vista (32-bit), and Windows 7 (32- or 64-bit)
• Mac OS X 10.5 to 10.7
1. Turn off the drum module.
2. Start up your computer.
Shut down all applications before proceeding to the
next step.
3. Connect the USB cable first to the drum module’s [USB
TO HOST] terminal and then to the computer.
4. Turn on the drum module.
You will now be able to exchange MIDI data between
the drum module and computer.
Yamaha USB-MIDI driver
In most situations, there is no need to install the Yamaha
USB-MIDI driver and the above setup procedure will suf-
fice. If, however, your computer is having difficulty com-
municating with the drum module, please download the
standard Yamaha USB-MIDI driver from the following web
page and install it on your computer.
http://download.yamaha.com/
Precautions when using the [USB TO HOST]
terminal
If proper care is not taken when connecting your drum mod-
ule to a computer via the [USB TO HOST] terminal, either
or both of the devices may freeze or data may become cor-
rupted or be permanently lost. Be sure, therefore, to observe
the following precautions at this time.
If the drum module or computer should freeze, restart the
application being used, reboot the computer, or turn the
drum module off once and then back on.
The drum module’s MIDI Reference Manual contains the
following.
• MIDI-related reference information
• Reference material that will prove useful when making
music using the drum module and a computer
• Instructions on how to transfer songs from your com-
puter to the drum module.
The MIDI Reference Manual is available for download as a
PDF file from the following web page below.
http://download.yamaha.com/
*: Yamaha Corporation reserves the right to modify this URL at
any time without prior notice.
Making Connections
• As the drum module has no built-in speakers, you will need to
connect headphones or an amplifier and speakers in order to
hear it. For details, see page 19.
• A USB cable is not included. In order to connect your drum mod-
ule to a computer, choose a USB A-B cable of less than 3
meters in length.
You may damage a computer not running one of the above oper-
ating systems by connecting the drum module to it. In addition,
there is no need to install the Yamaha USB-MIDI driver when
using one of the above operating systems.
NOTE
NOTICE
USB TO HOST terminal
(on left side)
Computer
USB cable
Drum module
USB
terminal
• Information on system requirements is also provided on the
above web page.
• The USB-MIDI driver may be revised and updated without prior
notice. Before installing, please visit the above web page to con-
firm that you have the most up-to-date version.
• Use a USB A-B cable of less than 3 meters in length.
• Before connecting to a computer via the [USB TO HOST] termi-
nal, restore it from any power-saving mode (such as Suspend,
Sleep, or Standby).
• Connect your computer via the [USB TO HOST] terminal before
turning on the drum module.
• Be sure to always perform the following steps before turning the
drum module on or off and either plugging in or unplugging the
USB cable.
* Shut down all applications.
* Ensure that no data is being sent from the drum module.
(Data is transmitted by striking the pads and by playing
songs and drum patterns.)
* When connected to a computer, allow at least 6 seconds to
pass between turning the drum module on and off and plug-
ging in or unplugging the USB cable.
MIDI Reference Manual
NOTE
NOTICE

Reference
DTX400K/DTX430K/DTX450K Owner’s Manual
58
Troubleshooting
In addition to the following, you can also find troubleshooting tips in the MIDI Reference Manual
(PDF). See page 57 for details on downloading this manual.
No sound is produced when a pad is struck, or the volume is lower than expected.
Check connections as follows.
• Ensure that the pads are properly connected to the drum module’s trigger input jacks.
• Ensure that the drum module is properly connected to headphones or other audio equipment, such as an amplifier
and/or speakers.
• Ensure that the amplifier and/or speakers connected to the drum module are turned on and are not set to the low-
est possible volume.
• Ensure that the cables for the hi-hat controller and the kick unit are not connected to each other’s jacks. (DTX400K
only; see page 17.)
• If you are using a KP65 Kick Pad, try adjusting its Level dial.
• If you are using a KU100 Kick Unit, connect the hi-hat controller before turning on the drum module. Please do not
turn the drum module on with the hi-hat controller depressed. The drum module can not identify the type of pedal
properly and it causes that the kick may produce much smaller sound than expected.
Check the drum module’s settings as follows.
• Ensure that the drum module’s volume is not turned fully down. (See page 19)
• Try adjusting the Pad Volume parameter from Menu Mode. (See page 42)
• Try adjusting the Gain parameter from Menu Mode. (See page 49)
• Try adjusting the Pad Velocity Curve parameter from Menu Mode. (See page 46)
• Try adjusting the Crosstalk parameter from Menu Mode. (See page 47)
• Ensure that the Snare Pad Type parameter from Menu Mode is set correctly. (See page 48)
• Ensure that the Pedal Types parameter from Menu Mode is set correctly. (See page 48)
• Ensure that the Local Control parameter from Menu Mode is set correctly. (See page 44)
If you cannot play foot closed hi-hat sounds, try the following.
• Ensure that you are operating the hi-hat controller in a firm and full manner.
• Ensure that the Double Bass Drum parameter from Menu Mode is set to “Off”. (See page 43)
• If you are using an HH65 Hi-hat Controller, set the Foot Close Position parameter from Menu Mode to a small
value. (See page 45)
Sounds or volumes are not as expected.
If hi-hat splash sounds are not produced as expected, try the following.
• Adjust the Splash Sensitivity parameter from Menu Mode. (See page 45)
If it is difficult to produce closed hi-hat sounds with an HH65 Hi-hat Controller, try the following.
• Adjust the Foot Close Position parameter from Menu Mode. (See page 45)
If it is difficult to produce louder and quieter foot-closed hi-hat sounds, try the following.
• Ensure that the Pedal Types parameter from Menu Mode is set correctly. (See page 48)
• If using the hi-hat controller that comes with the DTX400K, adjust the Foot Close Velocity parameter from Menu
Mode to an appropriate fixed level: This pedal does not support playing of louder and quieter foot-closed hi-hat
sounds. (See page 45)
If pads are producing only sounds at very high volumes (i.e., high velocities), try the following.
• Adjust the sensitivity of the drum kit. (See page 23)
• Adjust the Gain parameter from Menu Mode. High settings will result in loud drum sounds. (See page 49)
• Adjust the Pad Velocity Curve parameter from Menu Mode. (See page 46)
• Ensure that you are using only the recommended Yamaha pads. (Products from other manufacturers can output
excessively large signals.)
If the volumes of drum sounds produced by the various pads are poorly balanced, proceed as follows.
• Adjust the Pad Volume parameter from Menu Mode for each pad. (See page 42)
• Ensure that the Stereo/Mono parameter from Menu Mode is set correctly. (See page 53)
If the drum module’s volume is not well balanced with that of the device connected to the [AUX IN] jack
(such as a portable music player), proceed as follows.
• Ensure that the volume of the connected device is set to a suitable level. (See page 19)
If the volume of your drumming is not well balanced with that of a drum-module song, proceed as follows.
• Adjust the song volume. (See page 25)
Reference

Troubleshooting
DTX400K/DTX430K/DTX450K Owner’s Manual
59
If you notice double triggering, crosstalk, or skipped sounds (as described below), proceed as follows.
Double triggering—i.e., multiple sounds are produced in response to a single strike:
• If the pad or drum trigger in question features a controller for adjusting output or sensitivity, turn it down.
• Ensure that the Gain parameter from Menu Mode is not set too high. (See page 49)
Crosstalk—i.e., a sound is produced by a pad other than the one that was struck:
• Adjust the Crosstalk parameter from Menu Mode to a suitable level for each affected pad. (See page 47)
Skipped sounds—i.e., a pad does not produce a sound (usually during rolls or fills):
• Adjust the Crosstalk parameter from Menu Mode to a suitable level for each affected pad. (See page 47)
Other common questions
How do I make the drum module store it settings?
• The drum module automatically stores its settings whenever you turn it off using the [ ] (Standby/On) button.
(See page 20)
How do I reset all of the drum module’s parameters to their default settings?
• You can restore default settings using the Factory Set function. (See page 20)
How do I reset all of the drum module’s parameters to the settings they had when I last turned it on?
• You can do this using the Revert to Last Power On function. (See page 55)
How do I reset only a desired drum kit to the default setting?
• Initialize the kit from Menu Mode. (See page 54)
How do I stop the drum module turning off while I’m using it?
• Disable the Auto Power-Off function. (See page 20)
How do I stop the drum module changing the current drum kit when I select a different song?
• By default, your drum module always chooses the best kit for each song. To prevent it from doing so, enable the
Kit Lock function. (See page 53)
How do I have the drum module choose the best drum kit for each song?
• Disable the Kit Lock function. (See page 53)
What should I do if I can’t hear the voice guidance?
• Adjust the Voice Guidance Volume parameter from Menu Mode. (See page 53)

Reference
DTX400K/DTX430K/DTX450K Owner’s Manual
60
Data List
Kit List
1. Maple Custom
Kit with a Maple Custom Absolute sound.
2. Oak Custom
Kit with an Oak Custom sound.
3. Hard Rock
Rock kit with a double bass drum.
PAD No. Name
SNARE 22 MapleCustom
TOM1 45 Maple 1 H
TOM2 46 Maple 1 M
TOM3 47 Maple 1 L
RIDE 82 Warm Rd 20-1
CRASH 93 DarkCrash 18
HI-HAT 113 Bright 14
KICK 1 MapleCustom
PAD 8 9 War mC r as h 16
PAD No. Name
SNARE 23 OakCustom
TOM1 51 Oak H
TOM2 52 Oak M
TOM3 53 Oak L
RIDE 81 Bright Rd 20
CRASH 88 BrightCr 18
HI-HAT 115 Dark 13
KICK 2 OakCustom
PAD 8 9 War mC r as h 16
PAD No. Name
SNARE 25 HardRock
TOM1 57 HardRock H
TOM2 58 HardRock M
TOM3 59 HardRock L
RIDE 84 Warm Ride 22
CRASH 102 China 19
HI-HAT 116 Dark 14
KICK 5 HardRock
PAD 94 VividCrash 18
4. Vintage
A seventies sounding kit.
5. Funk
Kit with a high-pitched snare.
6. Session
Dry sounding kit with a deep snare.
PAD No. Name
SNARE 27 Vintage
TOM1 60 Vintage H
TOM2 61 Vintage M
TOM3 62 Vintage L
RIDE 86 Vintage Rd 22
CRASH 97 VintageCr 16
HI-HAT 118 Vintage 14
KICK 6 Vintage 24
PAD 98 VintageCr 18
PAD No. Name
SNARE 26 Funk
TOM1 54 Birch H
TOM2 55 Birch M
TOM3 56 Birch L
RIDE 83 Warm Rd 20-2
CRASH 91 DarkCrash 16
HI-HAT 117 Vivid 13
KICK 4 Birch 22
PAD 96 ThinCrash 16
PAD No. Name
SNARE 24 DeepOak
TOM1 48 Maple 2 H
TOM2 49 Maple 2 M
TOM3 50 Maple 2 L
RIDE 83 Warm Rd 20-2
CRASH 92 DarkCrash 17
HI-HAT 112 Bright 13
KICK 3 Oak 22
PAD 9 0 War mC r a s h 18
7. J a z z
Ideal kit for jazz drumming.
8. R&B
Electronic sounding kit.
9. Marching
Ideal kit for marching music.
PAD No. Name
SNARE 28 Jazz
TOM1 63 Jazz H
TOM2 64 Jazz M
TOM3 65 Jazz L
RIDE 82 Warm Rd 20-1
CRASH 85 Mellow Rd 18
HI-HAT 114 Bright 15
KICK 8 Jazz
PAD 87 Sizzle Ride
PAD No. Name
SNARE 39 HipHop 1
TOM1 69 T8-1 H
TOM2 70 T8-1 M
TOM3 11 T8-3
RIDE 109 R&B Ride
CRASH 100 Splash 12
HI-HAT 126 R&B
KICK 18 HipHop 1
PAD 99 Splash 10
PAD No. Name
SNARE 29 FieldSnare
TOM1 67 Marching M
TOM2 66 Marching H
TOM3 68 Marching L
RIDE 105 Hand Mute
CRASH 104 Hand Open
HI-HAT 119 Percussion 1
KICK 160 GranCasaOpen
PAD 95 HeavyCrash 18
10. Percussion
Kit containing a range of percussion
sounds.
PAD No. Name
SNARE 151 Cajon
TOM1 130 Bongo H
TOM2 139 Cowbell 1 SW
TOM3 129 Conga L
RIDE 149 Shaker 2
CRASH 99 Splash 10
HI-HAT 120 Percussion 2
KICK 7 Vintage 18
PAD 10 3 Tras h
Song List
No. Name Description
1 8beat Basic Suitable for practicing standard eight-beat songs.
2 Hard Rock Slightly up-tempo hard rock from the 70s.
3 Electro Pop Electronic pop with a kick on every beat.
4 Rock Shuffle Rock tune with a swung rhythm.
5 Heavy Metal A metal-type song using a double-bass drum.
6 16beat Rock A rock song perfect for practicing 16-beat rhythms.
7 Funk Rock Funky sounding rock song with a mid-tempo beat.
8 8beat Funk Funk tune based on an eight-beat rhythm.
9 Slow Blues Bluesy song with a laid back tempo.
10 4beat Jazz Mid-tempo jazz tune with a four-beat rhythm.

Data List
DTX400K/DTX430K/DTX450K Owner’s Manual
61
Voice List
1 MapleCustom
2 OakCustom
3 Oak 22
4Birch 22
5 HardRock
6 Vintage 24
7 Vintage 18
8Jazz
9T8-1
10 T8-2
11 T 8-3
12 T9-1
13 T9-2
14 T9 Hard
15 Electric
16 ElectricComp
17 ElectricClick
18 HipHop 1
19 HipHop 2
20 Break
21 DnB
22 MapleCustom
23 OakCustom
24 DeepOak
25 HardRock
26 Funk
27 Vintage
28 Jazz
29 FieldSnare
30 T8-1
31 T8-1 Clap
32 T8-2
33 T8-2 Clap
34 T9-1
35 T9-1 Clap
36 T9-2
37 T9-2 Clap
38 Analog
39 HipHop 1
40 HipHop 2
41 HipHop 3
42 R&B
43 Break
44 DnB
45 Maple 1 H
46 Maple 1 M
47 Maple 1 L
48 Maple 2 H
49 Maple 2 M
50 Maple 2 L
51 Oak H
52 Oak M
53 Oak L
54 Birch H
55 Birch M
56 Birch L
57 HardRock H
58 HardRock M
59 HardRock L
60 Vintage H
61 Vintage M
62 Vintage L
63 Jazz H
64 Jazz M
65 Jazz L
66 Marching H
67 Marching M
68 Marching L
69 T8-1 H
70 T8-1 M
71 T8-1 L
72 T8-2 H
73 T8-2 M
74 T8-2 L
75 T9-1 H
76 T9-1 M
77 T9-1 L
78 SynthTom H
79 SynthTom M
80 SynthTom L
81 Bright Rd 20
82 Warm Rd 20-1
83 Warm Rd 20-2
84 Warm Ride 22
85 Mellow Rd 18
86 Vintage Rd 22
87 Sizzle Ride
88 BrightCr 18
89 WarmCrash 16
90 WarmCrash 18
91 DarkCrash 16
92 DarkCrash 17
93 DarkCrash 18
94 VividCrash 18
95 HeavyCrash 18
96 ThinCrash 16
97 VintageCr 16
98 VintageCr 18
99 Splash 10
100 Splash 12
101 China 17
102 China 19
103 Trash
104 Hand Open
105 Hand Mute
106 Hand SW
107 T8 Ride
108 T9 Ride
109 R&B Ride
110 T8 Crash
111 SynthCrash
112 Bright 13
113 Bright 14
114 Bright 15
115 Da r k 13
116 Da r k 14
117 V i vi d 13
118 Vintage 14
119 Percussion 1
120 Percussion 2
121 T8-1
122 T8-2
123 T9-1
124 T9-2
125 Analog
126 R&B
127 DnB
128 Conga H
129 Conga L
130 Bongo H
131 Bongo L
132 Timbales H
133 Timbales L
134 PandeiroShake
1
35 Pandeiro Tap
136 PandeiroSlide
137 Tambourine 1
138 Tambourine 2
139 Cowbell 1 SW
140 Cowbell 2
141 Cowbell 3
142 Claves
143 Maracas
144 Triangle Open
145 Triangle Mute
146 WoodBlock H
147 WoodBlock L
148 Shaker 1
149 Shaker 2
150 Djembe
151 Cajon
152 Tabla Na 1
153 Tabla Na 2
154 Bayan Ge
155 Taiko Don
156 Taiko Ka
157 WindChime
158 Whistle S
159 Whistle L
160 GranCasaOpen
161 Metronome 1
162 Metronome 2
163 Clap
164 T9 Clap
165 Analog Clap 1
166 Analog Clap 2
167 HipHop Clap
168 AnalogCowbell
169 AnalogClaves
Kick
Snare
Tom Cymbal
Hi-Hat
Percussion

Data List
DTX400K/DTX430K/DTX450K Owner’s Manual
62
Drum Score
There are many different types of drum score commercially available, but we’ve chosen the following common format for the
examples below.
Scores for Groove Tracker and Pad Gate Training
Hi-Hat Cymbal (H.H.)
Ride Cymbal (RIDE)
Hi-Hat (H.H.)
Open Close
Crash Cymbal
Snare Drum
Snare Drum
(Brush Slap)
High Tom
Mid Tom
Low Tom
Hi-Hat Cymbal (PEDAL) Bass Drum
High Low
102
170
125
146
q 8beat Basic
Control Pads : Cymbal + hi-hat 1
Advance Step :
w Hard Rock
Control Pads : Cymbal + hi-hat 1
Advance Step :
e Electro Pop
Control Pad : Kick
Advance Step :
r Rock Shuffle
Control Pads : Cymbal + hi-hat 1
Advance Step :

Data List
DTX400K/DTX430K/DTX450K Owner’s Manual
63
256
148
107
116
56
132
t Heavy Metal
y 16beat Rock
u Funk Rock
i 8beat Funk
o Slow Blues
!0 4beat Jazz
Control Pad : Kick
Advance Step :
Control Pads : Snare + hi-hat
Advance Step :
Control Pad : Kick
Advance Step :
Control Pads : Cymbal + hi-hat 1
Advance Step :
Control Pads : Cymbal + hi-hat 1
Advance Step :
3
Control Pad : Kick
Advance Step :

Reference
DTX400K/DTX430K/DTX450K Owner’s Manual
64
Specifications
Drum module
* Specifications and descriptions in this owner’s manual are for information purposes only. Yamaha Corporation reserves the right to modify
products or specifications at any time without prior notice. Since specifications, equipment, and options may not be the same in every
locale, please check with your Yamaha dealer.
Tone generator
Ty pe AWM 2
Maximum polyphony 32 notes
Voices
Drum and percussion: 169
Keyboard: 128
Drum kits 10 (all of which may be edited and overwritten)
Songs 10
Reverb 9 types
Click-track
Tempo 30 to 300 BPM (Tap Tempo and Voice Guidance functions)
Beats 1/4 to 9/4
Other
Jacks and terminals
SNARE (mini stereo audio)
TOM1 (mini mono audio)
TOM2 (mini mono audio)
TOM3 (mini mono audio)
RIDE (mini mono audio)
CRASH (mini mono audio)
HI-HAT (mini mono audio)
HI-HAT CTL (mini stereo audio)
KICK/PAD (mini stereo audio)
[USB TO HOST] ports
[AUX IN] jack (mini stereo audio)
PHONES/OUTPUT (standard stereo audio)
DC IN
Power consumption 5 W
Power adaptor PA-130 or equivalent
Dimensions and weight 240 x 188 x 68 mm, 0.5kg

DTX400K/DTX430K/DTX450K Owner’s Manual
65
Index
Symbols
[] connector.................22
[] (metronome) button..................21
[ ] button ..................................21
[] (Standby/On) button ................. 21
[AUX IN] jack ................................... 22
[DRUM MUTE] button .....................21
[HI-HAT CTL] jack ........................... 22
[KICK/PAD] jack ..............................22
[KIT] button......................................21
[PHONES/OUTPUT] jack ................22
[SONG] button.................................21
[TEMPO] buttons.............................21
[TRAINING] button ..........................21
[USB TO HOST] terminal ..........22, 57
[VOLUME] buttons ..........................21
A
Assembly.........................................11
Auto Power-Off................................20
Auto Power-Off Time.......................53
B
Base support ...........................8, 9, 10
Beats ...............................................41
C
Cable band .............................. 8, 9, 10
Change Up ......................................34
Close ...............................................24
Closed rim shots..............................24
Clutch Position ................................45
Computer.........................................57
Control Panel...................................21
Cord clip ....................................19, 22
Cross sticking ..................................24
Crosstalk .........................................47
Cymbal holder .........................8, 9, 10
Cymbal pad .............................8, 9, 10
Cymbal/hi-hat pad ...................8, 9, 10
D
Data List ..........................................60
Difficulty Level ...........................31, 50
Double Bass Drum ..........................43
Drum module...........................8, 9, 10
Drum Score .....................................62
E
Easy Session................................... 35
External source ...............................22
F
Factory Set ................................20, 55
Fast Blast ........................................39
Fast Blast Timer ..............................52
First tom pad ...........................8, 9, 10
First/second tom part...............8, 9, 10
Foot Close Position .........................45
Foot Close Velocity .........................45
Foot closed......................................24
FP6110A .....................................9, 10
G
Gain.................................................49
Groove Check .................................30
Groove Tracker ............................... 36
Groove Tracker Advance Step........ 51
Groove Tracker Control Pad(s) ....... 51
Groove Tracker Return Time .......... 50
H
Have fun with drum patterns ........... 29
Head shots...................................... 24
Headphone ..................................... 19
Hexagonal rod................................. 10
HH65............................... 9, 10, 24, 56
Hi-hat Controller...................... 8, 9, 10
Hi-hat Cymbal ................................. 24
Hi-hat holder ........................... 8, 9, 10
Hi-hat pad ............................... 8, 9, 10
Hi-hat Settings ................................ 45
Hi-hat splash ................................... 24
I
Ignore Timing .................................. 50
Initialize Kit...................................... 54
Initialize Song.................................. 54
K
Kick Unit...................................... 8, 56
Kick Velocity.................................... 46
Kit.................................................... 23
Kit List ............................................. 60
Kit Lock ........................................... 53
Kit Settings...................................... 42
KP65 ..................................... 9, 10, 56
KU100 ......................................... 8, 56
L
Learn new drum patterns ................ 29
Left arm................................... 8, 9, 10
Left side .......................................... 22
Local Control................................... 44
Looping Part.................................... 26
M
Measure Break................................ 32
Menu Mode ..................................... 40
Metronome...................................... 27
Metronome Settings........................ 41
MIDI Reference Manual .............. 6, 57
MIDI Settings .................................. 44
Minimum Level................................ 49
Music Player ................................... 19
Mute ................................................ 26
N
Nine-channel snake cable....... 8, 9, 10
Note Number................................... 44
Number Button Lighting Pattern...... 42
Number buttons .............................. 21
O
Open ............................................... 24
Open rim shots................................ 24
Other Settings ................................. 53
P
Package Contents................... 8, 9, 10
Pad Gate......................................... 37
Pad Gate Group.............................. 52
Pad Panning ................................... 43
Pad Sound ...................................... 42
Pad Velocity Curve ......................... 46
Pad Volume .................................... 42
Part Mute ........................................ 38
Pattern ............................................ 41
PCY90AT........................................ 56
Pedal Types.................................... 48
Play as wildly as you can................ 29
Power adaptor .................. 8, 9, 10, 19
Practice song .................................. 25
R
Reverb ............................................ 43
Revert to Last Power On ................ 55
Rhythm Gate................................... 31
Right side........................................ 22
Rim 1 .............................................. 24
Rim 2 .............................................. 24
S
S wing bolt ...................................... 10
Score .............................................. 62
Scoring function .............................. 29
Second tom pad...................... 8, 9, 10
Sensitivity........................................ 23
Separately Sold Accessories .......... 56
Snare pad ......................... 8, 9, 10, 24
Snare Pad Type.............................. 48
Song ............................................... 25
Song List......................................... 60
Song parts ...................................... 25
Sound ............................................. 41
Speaker .......................................... 19
Splash Sensitivity............................ 45
Stereo/Mono ................................... 53
Store ............................................... 20
T
Tapping the tempo.......................... 28
Tempo............................................. 27
Tempo Up/Down............................. 33
Third tom part ......................... 8, 9, 10
Timer............................................... 49
TP70S....................................... 10, 24
Training Mode................................. 29
Training Settings............................. 49
Trigger input jacks .......................... 22
Trigger Settings .............................. 46
Tuning key .............................. 8, 9, 10
U
USB-MIDI driver.............................. 57
V
Vertical support....................... 8, 9, 10
Voice Guidance ........................ 27, 29
Voice Guidance Volume ................. 53
Voice List ........................................ 61
Volume............................................ 19
W
Wing bolt........................................... 8
Work on your rhythm ...................... 29
Reference

DTX400K/DTX430K/DTX450K Owner’s Manual
66

DTX400K/DTX430K/DTX450K Owner’s Manual
67
(weee_eu)
(standby)
(bottom)
Information for Users on Collection and Disposal of Old Equipment
This symbol on the products, packaging, and/or accompanying documents means that used electrical
and electronic products should not be mixed with general household waste.
For proper treatment, recovery and recycling of old products, please take them to applicable collection
points, in accordance with your national legislation and the Directives 2002/96/EC.
By disposing of these products correctly, you will help to save valuable resources and prevent any
potential negative effects on human health and the environment which could otherwise arise from
inappropriate waste handling.
For more information about collection and recycling of old products, please contact your local munici-
pality, your waste disposal service or the point of sale where you purchased the items.
[For business users in the European Union]
If you wish to discard electrical and electronic equipment, please contact your dealer or supplier for
further information.
[Information on Disposal in other Countries outside the European Union]
This symbol is only valid in the European Union. If you wish to discard these items, please contact
your local authorities or dealer and ask for the correct method of disposal.
OBSERVERA!
Apparaten kopplas inte ur växelströmskällan (nätet) så länge som den ar ansluten till vägguttaget, även om själva
apparaten har stängts av.
ADVARSEL: Netspændingen til dette apparat er IKKE afbrudt, sålænge netledningen sidder i en stikkontakt, som er
tændt — også selvom der er slukket på apparatets afbryder.
VAROITUS: Laitteen toisiopiiriin kytketty käyttökytkin ei irroita koko laitetta verkosta.
The model number, serial number, power requirements, etc., may be found on or near the name plate, which is at the
bottom of the unit. You should note this serial number in the space provided below and retain this manual as a perma-
nent record of your purchase to aid identification in the event of theft.
Model No.
Serial No.

For details of products, please contact your nearest Yamaha representative or the
authorized distributor listed below.
Pour plus de détails sur les produits, veuillez-vous adresser à Yamaha ou au
distributeur le plus proche de vous figurant dans la liste suivante.
Die Einzelheiten zu Produkten sind bei Ihrer unten aufgeführten Niederlassung und
bei Yamaha Vertragshändlern in den jeweiligen Bestimmungsländern erhältlich.
Para detalles sobre productos, contacte su tienda Yamaha más cercana o el
distribuidor autorizado que se lista debajo.
CANADA
Yamaha Canada Music Ltd.
135 Milner Avenue, Toronto, Ontario M1S 3R1, Canada
Tel: +1-416-298-1311
U.S.A.
Yamaha Corporation of America
6600 Orangethorpe Avenue, Buena Park, CA 90620, U.S.A.
Tel: +1-714-522-9011
MEXICO
Yamaha de México, S.A. de C.V.
Av. Insurgentes Sur 1647 Piso 9, Col. San José Insurgentes,
Delegación Benito Juárez, México, D.F., C.P. 03900
Tel: +52-55-5804-0600
BRAZIL
Yamaha Musical do Brasil Ltda.
Rua Fidêncio Ramos, 302 – Cj 52 e 54 – Torre B – Vila
Olímpia – CEP 04551-010 – São Paulo/SP, Brazil
Tel: +55-11-3704-1377
ARGENTINA
Yamaha Music Latin America, S.A., Sucursal Argentina
Olga Cossettini 1553, Piso 4 Norte,
Madero Este-C1107CEK, Buenos Aires, Argentina
Tel: +54-11-4119-7000
VENEZUELA
Yamaha Musical de Venezuela, C.A.
AV. Manzanares, C.C. Manzanares Plaza,
Piso 4, Oficina 0401, Baruta, Caracas, Venezuela
Tel: +58-212-943-1877
PANAMA AND OTHER LATIN
AMERICAN COUNTRIES/
CARIBBEAN COUNTRIES
Yamaha Music Latin America, S.A.
Edif. Torre Banco General, F7, Urb. Marbella,
Calle 47 y Aquilino de la Guardia, Panama,
P.O.Box 0823-05863, Panama, Rep.de Panama
Tel: +507-269-5311
THE UNITED KINGDOM/IRELAND
Yamaha Music Europe GmbH (UK)
Sherbourne Drive, Tilbrook, Milton Keynes, MK7 8BL, U.K.
Tel: +44-1908-366700
GERMANY
Yamaha Music Europe GmbH
Siemensstrasse 22-34, 25462 Rellingen, Germany
Tel: +49-4101-303-0
SWITZERLAND/LIECHTENSTEIN
Yamaha Music Europe GmbH, Rellingen,
Branch Switzerland in Zürich
Seefeldstrasse 94, 8008 Zürich, Switzerland
Tel: +41-44-3878080
AUSTRIA
Yamaha Music Europe GmbH, Branch Austria
Schleiergasse 20, 1100 Wien, Austria
Tel: +43-1-60203900
CZECH REPUBLIC/HUNGARY/
ROMANIA/SLOVAKIA/SLOVENIA
Yamaha Music Europe GmbH, Branch Austria
Schleiergasse 20, 1100 Wien, Austria
Tel: +43-1-60203900
POLAND/LITHUANIA/LATVIA/ESTONIA
Yamaha Music Europe GmbH
Sp.z o.o. Oddzial w Polsce
ul. Wrotkowa 14, 02-553 Warsaw, Poland
Tel: +48-22-880-08-88
BULGARIA
Dinacord Bulgaria LTD.
Bul.Iskarsko Schose 7 Targowski Zentar Ewropa
1528 Sofia, Bulgaria
Tel: +359-2-978-20-25
MALTA
Olimpus Music Ltd.
Valletta Road, Mosta MST9010, Malta
Tel: +356-2133-2093
NETHERLANDS/BELGIUM/LUXEMBOURG
Yamaha Music Europe, Branch Benelux
Clarissenhof 5b, 4133 AB Vianen, The Netherlands
Tel: +31-347-358040
FRANCE
Yamaha Music Europe
7 rue Ambroise Croizat, Zone d'activités de Pariest,
77183 Croissy-Beaubourg, France
Tel: +33-1-6461-4000
ITALY
Yamaha Music Europe GmbH, Branch Italy
Viale Italia 88, 20020, Lainate (Milano), Italy
Tel: +39-02-93577-1
SPAIN/PORTUGAL
Yamaha Music Europe GmbH Ibérica, Sucursal en España
Ctra. de la Coruna km. 17,200, 28231
Las Rozas de Madrid, Spain
Tel: +34-91-639-88-88
GREECE
Philippos Nakas S.A. The Music House
19th klm. Leof. Lavriou 190 02 Peania – Attiki, Greece
Tel: +30-210-6686260
SWEDEN
Yamaha Music Europe GmbH Germany filial
Scandinavia
JA Wettergrensgata 1, 400 43 Göteborg, Sweden
Tel: +46-31-89-34-00
DENMARK
Yamaha Music Denmark,
Fillial of Yamaha Music Europe GmbH, Tyskland
Generatorvej 8C, ST. TH., 2860 Søborg, Denmark
Tel: +45-44-92-49-00
FINLAND
F-Musiikki Oy
Antaksentie 4
FI-01510 Vantaa, Finland
Tel: +358 (0)96185111
NORWAY
Yamaha Music Europe GmbH Germany -
Norwegian Branch
Grini Næringspark 1, 1361 Østerås, Norway
Tel: +47-6716-7800
ICELAND
Hljodfaerahusid Ehf.
Sidumula 20
IS-108 Reykjavik, Iceland
Tel: +354-525-5050
CROATIA
Euro Unit D.O.O.
Slakovec 73
40305 Nedelisce
Tel: +38540829400
RUSSIA
Yamaha Music (Russia) LLC.
Room 37, entrance 7, bld. 7, Kievskaya street, Moscow,
121059, Russia
Tel: +7-495-626-5005
OTHER EUROPEAN COUNTRIES
Yamaha Music Europe GmbH
Siemensstrasse 22-34, 25462 Rellingen, Germany
Tel: +49-4101-303-0
Yamaha Music Gulf FZE
JAFZA-16, Office 512, P.O.Box 17328,
Jebel Ali FZE, Dubai, UAE
Tel: +971-4-801-1500
TURKEY
Yamaha Music Europe GmbH
Merkezi Almanya Türkiye İstanbul Şubesi
Maslak Meydan Sodak, Spring Giz Plaza Bagimsiz Böl.
No:3, Sanyer Istanbul, Turkey
Tel: +90-212-999-8010
CYPRUS
Nakas Music Cyprus Ltd.
Nikis Ave 2k
1086 Nicosia
Tel: + 357-22-511080
Major Music Center
21 Ali Riza Ave. Ortakoy
P.O.Box 475 Nicosia, Cyprus
Tel: (392) 227 9213
OTHER COUNTRIES
Yamaha Music Gulf FZE
JAFZA-16, Office 512, P.O.Box 17328,
Jebel Ali FZE, Dubai, UAE
Tel: +971-4-801-1500
THE PEOPLE’S REPUBLIC OF CHINA
Yamaha Music & Electronics (China) Co., Ltd.
2F, Yunhedasha, 1818 Xinzha-lu, Jingan-qu, Shanghai, China
Tel: +86-400-051-7700
HONG KONG
Tom Lee Music Co., Ltd.
11/F., Silvercord Tower 1, 30 Canton Road,
Tsimshatsui, Kowloon, Hong Kong
Tel: +852-2737-7688
INDIA
Yamaha Music India Private Limited
Spazedge Building, Ground Floor, Tower A, Sector-47,
Gurgaon- Sohna Road, Gurgaon-122002, Haryana, India
Tel: +91-124-485-3300
INDONESIA
PT. Yamaha Musik Indonesia (Distributor)
Yamaha Music Center Bldg. Jalan Jend. Gatot Subroto Kav.
4, Jakarta 12930, Indonesia
Tel: +62-21-520-2577
KOREA
Yamaha Music Korea Ltd.
8F, Dongsung Bldg. 21, Teheran-ro 87-gil, Gangnam-gu,
Seoul, 135-880, Korea
Tel: +82-2-3467-3300
MALAYSIA
Yamaha Music (Malaysia) Sdn. Bhd.
No.8, Jalan Perbandaran, Kelana Jaya, 47301
Petaling Jaya, Selangor, Malaysia
Tel: +60-3-78030900
SINGAPORE
Yamaha Music (Asia) Private Limited
Block 202 Hougang Street 21, #02-00,
Singapore 530202, Singapore
Tel: +65-6740-9200
TAI WAN
Yamaha Music & Electronics Taiwan Co., Ltd.
2F., No.1, Yuandong Rd. Banqiao Dist.
New Taipei City 22063, Taiwan
Tel: +886-2-7741-8888
THAILAND
Siam Music Yamaha Co., Ltd.
3, 4, 15, 16th Fl., Siam Motors Building, 891/1 Rama 1
Road, Wangmai, Pathumwan, Bangkok 10330, Thailand
Tel: +66-2215-2622
VIETNAM
Yamaha Music Vietnam Company Limited
15th Floor, Nam A Bank Tower, 201-203 Cach Mang Thang
Tam St., Ward 4, Dist.3, Ho Chi Minh City, Vietnam
Tel: +84-8-3818-1122
OTHER ASIAN COUNTRIES
http://asia.yamaha.com
AUSTRALIA
Yamaha Music Australia Pty. Ltd.
Level 1, 99 Queensbridge Street, Southbank,
Vic. 3006, Australia
Tel: +61-3-9693-5111
NEW ZEALAND
Music Works LTD
P.O.BOX 6246 Wellesley, Auckland 4680, New Zealand
Tel: +64-9-634-0099
COUNTRIES AND TRUST
TERRITORIES IN PACIFIC OCEAN
http://asia.yamaha.com
NORTH AMERICA
CENTRAL & SOUTH AMERICA
EUROPE
AFRICA
MIDDLE EAST
ASIA
OCEANIA
DMI12
HEAD OFFICE: Yamaha Corporation 10-1, Nakazawa-cho, Naka-ku, Hamamatsu, Japan 430-8650
Manual Development Department
© 2012 Yamaha Corporation
Published 12/2015 POAP*.*-**D0
Printed in Vietnam
WZ87640
Yamaha web site
http://www.yamaha.com/
Yamaha Downloads
http://download.yamaha.com/
Documenttranscriptie
ELECTRONIC DRUM KIT DTX400K DTX430K DTX450K Owner’s Manual EN DTX400K/DTX430K/DTX450K Owner’s Manual 1 Contents PRECAUTIONS ............................................ 4 Practicing in Training Mode ...................... 29 Welcome....................................................... 6 Basic Training Mode Procedure....................... 29 1. Groove Check .............................................. 30 Product Manuals ......................................... 6 2. Rhythm Gate ............................................... 31 3. Measure Break ............................................ 32 4. Tempo Up/Down.......................................... 33 Setup 5. Change Up .................................................. 34 First Steps.................................................... 7 6. Easy Session .............................................. 35 Package Contents ....................................... 8 7. Groove Tracker............................................. 36 Assembly Guide .........................................11 8. Pad Gate ..................................................... 37 Setting Up for Sound ................................ 19 Connecting the Power ..................................... 19 Connecting Headphones or Speakers ............ 19 Connecting a Music Player ............................. 19 Turning On the Drum Module.......................... 20 Turning Off the Drum Module.......................... 20 Auto Power-Off ................................................ 20 Restoring the Default Settings (Factory Set) ... 20 Component Names & Functions.............. 21 Control Panel .................................................. 21 Left Side .......................................................... 22 Right Side ....................................................... 22 Basic Techniques Selecting & Playing a Kit .......................... 23 10. Fast Blast................................................... 39 Advanced Techniques Setting Parameters using Menu Mode..... 40 Basic Menu Mode Procedure .......................... 40 z Metronome Settings.................................... 41 x Kit Settings.................................................. 42 c MIDI Settings .............................................. 44 v Hi-hat Settings ............................................ 45 b Trigger Settings........................................... 46 n Training Settings ......................................... 49 m Other Settings............................................. 53 Integrating Separately Sold Accessories .. 56 For DTX400K Owners ..................................... 56 For DTX430K & DTX450K Owners ................. 56 Selecting a Kit ................................................. 23 Adjusting Kit Sensitivity................................... 23 Connecting to a Computer........................ 57 Playing Techniques................................... 24 Making Connections........................................ 57 MIDI Reference Manual .................................. 57 Snare Pad ....................................................... 24 Hi-hat Cymbal ................................................. 24 Performing with a Song ............................ 25 Selecting a Song............................................. 25 Adjusting the Song Volume ............................. 25 Adjusting the Volume of Muted Drum Parts .... 26 Looping Part of a Song ................................... 26 Using the Metronome ............................... 27 Starting and Stopping the Metronome ............ 27 Adjusting the Metronome Volume ................... 27 Confirming Tempo via Number Buttons .......... 27 Confirming Tempo via Voice Guidance ........... 27 Adjusting the Tempo ....................................... 28 Other Settings ................................................. 28 2 9. Part Mute..................................................... 38 DTX400K/DTX430K/DTX450K Owner’s Manual Reference Troubleshooting......................................... 58 Data List ..................................................... 60 Specifications ............................................ 64 Index ........................................................... 65 SPECIAL MESSAGE SECTION This product utilizes batteries or an external power supply (adapter). DO NOT connect this product to any power supply or adapter other than one described in the manual, on the name plate, or specifically recommended by Yamaha. This product should be used only with the components supplied or; a cart, rack, or stand that is recommended by Yamaha. If a cart, etc., is used, please observe all safety markings and instructions that accompany the accessory product. SPECIFICATIONS SUBJECT TO CHANGE: The information contained in this manual is believed to be correct at the time of printing. However, Yamaha reserves the right to change or modify any of the specifications without notice or obligation to update existing units. This product, either alone or in combination with an amplifier and headphones or speaker/s, may be capable of producing sound levels that could cause permanent hearing loss. DO NOT operate for long periods of time at a high volume level or at a level that is uncomfortable. If you experience any hearing loss or ringing in the ears, you should consult an audiologist. IMPORTANT: The louder the sound, the shorter the time period before damage occurs. NOTICE: Service charges incurred due to a lack of knowledge relating to how a function or effect works (when the unit is operating as designed) are not covered by the manufacturer’s warranty, and are therefore the owners responsibility. Please study this manual carefully and consult your dealer before requesting service. This product may also use “household” type batteries. Some of these may be rechargeable. Make sure that the battery being charged is a rechargeable type and that the charger is intended for the battery being charged. When installing batteries, never mix old batteries with new ones, and never mix different types of batteries. Batteries MUST be installed correctly. Mismatches or incorrect installation may result in overheating and battery case rupture. Warning: Do not attempt to disassemble, or incinerate any battery. Keep all batteries away from children. Dispose of used batteries promptly and as regulated by the laws in your area. Note: Check with any retailer of household type batteries in your area for battery disposal information. Disposal Notice: Should this product become damaged beyond repair, or for some reason its useful life is considered to be at an end, please observe all local, state, and federal regulations that relate to the disposal of products that contain lead, batteries, plastics, etc. If your dealer is unable to assist you, please contact Yamaha directly. NAME PLATE LOCATION: The name plate is located on the bottom of the product. The model number, serial number, power requirements, etc., are located on this plate. You should record the model number, serial number, and the date of purchase in the spaces provided below and retain this manual as a permanent record of your purchase. ENVIRONMENTAL ISSUES: Yamaha strives to produce products that are both user safe and environmentally friendly. We sincerely believe that our products and the production methods used to produce them, meet these goals. In keeping with both the letter and the spirit of the law, we want you to be aware of the following: Battery Notice: This product MAY contain a small non-rechargeable battery which (if applicable) is soldered in place. The average life span of this type of battery is approximately five years. When replacement becomes necessary, contact a qualified service representative to perform the replacement. 92-BP (bottom) Model Serial No. Purchase Date PLEASE KEEP THIS MANUAL FCC INFORMATION (U.S.A.) 1. IMPORTANT NOTICE: DO NOT MODIFY THIS UNIT! antee that interference will not occur in all installations. If this product is found to be the source of interference, which can be determined by turning the unit “OFF” and “ON”, please try to eliminate the problem by using one of the following measures: Relocate either this product or the device that is being affected by the interference. Utilize power outlets that are on different branch (circuit breaker or fuse) circuits or install AC line filter/s. In the case of radio or TV interference, relocate/reorient the antenna. If the antenna lead-in is 300 ohm ribbon lead, change the lead-in to co-axial type cable. If these corrective measures do not produce satisfactory results, please contact the local retailer authorized to distribute this type of product. If you can not locate the appropriate retailer, please contact Yamaha Corporation of America, Electronic Service Division, 6600 Orangethorpe Ave, Buena Park, CA90620 The above statements apply ONLY to those products distributed by Yamaha Corporation of America or its subsidiaries. This product, when installed as indicated in the instructions contained in this manual, meets FCC requirements. Modifications not expressly approved by Yamaha may void your authority, granted by the FCC, to use the product. 2. IMPORTANT: When connecting this product to accessories and/or another product use only high quality shielded cables. Cable/s supplied with this product MUST be used. Follow all installation instructions. Failure to follow instructions could void your FCC authorization to use this product in the USA. 3. NOTE: This product has been tested and found to comply with the requirements listed in FCC Regulations, Part 15 for Class “B” digital devices. Compliance with these requirements provides a reasonable level of assurance that your use of this product in a residential environment will not result in harmful interference with other electronic devices. This equipment generates/uses radio frequencies and, if not installed and used according to the instructions found in the users manual, may cause interference harmful to the operation of other electronic devices. Compliance with FCC regulations does not guar* This applies only to products distributed by YAMAHA CORPORATION OF AMERICA. (class B) COMPLIANCE INFORMATION STATEMENT (DECLARATION OF CONFORMITY PROCEDURE) Responsible Party : Address : Telephone : Type of Equipment : Model Name : Yamaha Corporation of America 6600 Orangethorpe Ave., Buena Park, Calif. 90620 714-522-9011 ELECTRONIC DRUM KIT DTX400K/DTX430K/DTX450K This device complies with Part 15 of the FCC Rules. Operation is subject to the following two conditions: 1) this device may not cause harmful interference, and 2) this device must accept any interference received including interference that may cause undesired operation. See user manual instructions if interference to radio reception is suspected. * This applies only to products distributed by YAMAHA CORPORATION OF AMERICA. (FCC DoC) DTX400K/DTX430K/DTX450K Owner’s Manual 3 PRECAUTIONS PLEASE READ CAREFULLY BEFORE PROCEEDING Please keep this manual in a safe and handy place for future reference. WARNING Always follow the basic precautions listed below to avoid the possibility of serious injury or even death from electrical shock, short-circuiting, damages, fire or other hazards. These precautions include, but are not limited to, the following: Power supply/AC power adaptor Water warning • Do not place the power cord near heat sources such as heaters or radiators. Also, do not excessively bend or otherwise damage the cord, or place heavy objects on it. • Only use the voltage specified as correct for the instrument. The required voltage is printed on the name plate of the instrument. • Use the specified adaptor (page 64) only. Using the wrong adaptor can result in damage to the instrument or overheating. • Do not expose the instrument to rain, use it near water or in damp or wet conditions, place on it any containers (such as vases, bottles or glasses) containing liquids which might spill into any openings. If any liquid such as water seeps into the instrument, turn off the power immediately and unplug the power cord from the AC outlet. Then have the instrument inspected by qualified Yamaha service personnel. • Never insert or remove an electric plug with wet hands. • Check the electric plug periodically and remove any dirt or dust which may have accumulated on it. Fire warning • Do not put burning items, such as candles, on the unit. A burning item may fall over and cause a fire. Assembly • Under no circumstances should any of the components of this product be taken apart or customized. Doing so could result in electric shock, fire, injury, or malfunction. • Do not sit or stand on the rack. Doing so could cause it to fall over or break, possibly causing injury. • Be careful with the holders for cymbal and tom pads as they have sharp tips. In order to avoid injury, therefore, you should take special care whenever handling these components. If you notice any abnormality • When one of the following problems occur, immediately turn off the power switch and disconnect the electric plug from the outlet. Then have the device inspected by Yamaha service personnel. - The power cord or plug becomes frayed or damaged. - It emits unusual smells or smoke. • Be careful with the anti-slip stoppers on kick pads and foot pedals as they have sharp tips. In order to avoid injury, therefore, you should take special care whenever handling these components. - Some object has been dropped into the instrument. - There is a sudden loss of sound during use of the instrument. • Securely tighten fixing nuts and other fasteners. In addition, be sure to immediately tighten any nuts that have come loose. If this precaution is not observed, pads may fall off or the rack may collapse or fall over, possibly causing injury. • Take care when setting up cables. If anyone were to trip on a cable, the instrument could topple over and cause injury. CAUTION Always follow the basic precautions listed below to avoid the possibility of physical injury to you or others, or damage to the instrument or other property. These precautions include, but are not limited to, the following: • Do not use the electronic drum kit’s rack to hold acoustic drums. Doing so could cause clamps to break and the drums to fall off, which in turn could lead to injury. Power supply/AC power adaptor • Do not connect the instrument to an electrical outlet using a multiple-connector. Doing so can result in lower sound quality, or possibly cause overheating in the outlet. • When removing the electric plug from the instrument or an outlet, always hold the plug itself and not the cord. Pulling by the cord can damage it. • Mind your fingers when adjusting clamps. Fingers can easily be caught and crushed if care is not taken during this operation. • Be careful with the tips of supports, arms, screws, and the like. Fingers can easily be injured by sharp tips if these components are not handled carefully. • Remove the electric plug from the outlet when the instrument is not to be used for extended periods of time, or during electrical storms. Location • Do not place the instrument in an unstable position where it might accidentally fall over. Assembly • Read carefully the attached documentation explaining the assembly process. Failure to assemble the instrument in the proper sequence might result in damage to the instrument or even injury. • Before moving the instrument, remove all connected cables, to prevent damage to the cables or injury to anyone who might trip over them. • Do not place hands or feet under a foot switch or foot pedal. Doing so could result in injury. 4 DTX400K/DTX430K/DTX450K Owner’s Manual DMI-5 1/2 • When setting up the product, make sure that the AC outlet you are using is easily accessible. If some trouble or malfunction occurs, immediately turn off the power switch and disconnect the plug from the outlet. Even when the power switch is turned off, electricity is still flowing to the product at the minimum level. When you are not using the product for a long time, make sure to unplug the power cord from the wall AC outlet. • Use only the stand/rack specified for the instrument. When attaching the stand or rack, use the provided screws only. Failure to do so could cause damage to the internal components or result in the instrument falling over. Connections Handling caution • Do not insert a finger or hand in any gaps on the instrument. • Never insert or drop paper, metallic, or other objects into the gaps on the panel. This could cause physical injury to you or others, damage to the instrument or other property, or operational failure. • Do not rest your weight on, or place heavy objects on the instrument, and do not use excessive force on the buttons, switches or connectors. • Do not use the instrument/device or headphones for a long period of time at a high or uncomfortable volume level, since this can cause permanent hearing loss. If you experience any hearing loss or ringing in the ears, consult a physician. • Before connecting the instrument to other electronic components, turn off the power for all components. Before turning the power on or off for all components, set all volume levels to minimum. • Be sure to set the volumes of all components at their minimum levels and gradually raise the volume controls while playing the instrument to set the desired listening level. Yamaha cannot be held responsible for damage caused by improper use or modifications to the instrument, or data that is lost or destroyed. Always turn the power off when the instrument is not in use. Even when the [ ] (Standby/On) switch is in standby status (power lamp is off), electricity is still flowing to the instrument at the minimum level. When you are not using the instrument for a long time, make sure you unplug the power cord from the wall AC outlet. NOTICE Information To avoid the possibility of malfunction/damage to the product, damage to data, or damage to other property, follow the notices below. About copyrights Handling and Maintenance • Do not use the instrument in the vicinity of a TV, radio, stereo equipment, mobile phone, or other electric devices. Otherwise, the instrument, TV, or radio may generate noise. • Do not expose the instrument to excessive dust or vibrations, or extreme cold or heat (such as in direct sunlight, near a heater, or in a car during the day) to prevent the possibility of panel disfiguration, damage to the internal components or unstable operation. (Verified operating temperature range: 5° – 40°C, or 41° – 104°F.) • Do not place vinyl, plastic or rubber objects on the instrument, since this might discolor the panel or keyboard. • When cleaning the drum module, be sure to use a clean, dry cloth. Cleaning products that contain organic solvents, paint thinner, detergents, and chemically-treated cleaning cloths can cause discoloration and/or warping and should not be used. • When cleaning the pads, avoid cleaning products that contain organic solvents, paint thinner, and alcohol as they can cause discoloration and/or warping. Instead, we recommend that you remove dust using a soft dry cloth or wipe clean with a moist, tightly-wrung-out cloth. If a pad is very dirty, wipe the dirt away using a cloth moistened with a neutral detergent solution and tightly wrung out. Following this, wipe away the detergent solution using a cloth soaked in water and tightly wrung out. • Copying of the commercially available musical data including but not limited to MIDI data and/or audio data is strictly prohibited except for your personal use. • This product incorporates and bundles computer programs and contents in which Yamaha owns copyrights or with respect to which it has license to use others’ copyrights. Such copyrighted materials include, without limitation, all computer software, style files, MIDI files, WAVE data, musical scores and sound recordings. Any unauthorized use of such programs and contents outside of personal use is not permitted under relevant laws. Any violation of copyright has legal consequences. DON’T MAKE, DISTRIBUTE OR USE ILLEGAL COPIES. About this manual • The illustrations as shown in this manual are for instructional purposes only, and may appear somewhat different from those on your instrument. • The company names and product names in this manual are the trademarks or registered trademarks of their respective companies. Optional Pads Within this Owner’s Manual, the optional external pads that may be connected to the drum module are referred to by model name. Please note that these model names were up-to-date as of printing of this manual. Details regarding any subsequently released models will be made available via the following web site. http://www.yamaha.com/ DMI-5 2/2 DTX400K/DTX430K/DTX450K Owner’s Manual 5 Welcome First of all, thank you for purchasing a Yamaha DTX400K, DTX430K, or DTX450K Electronic Drum Kit. In order to get the most out of your new instrument, please be sure to read this owner’s manual carefully. And after doing so, be sure to store it in a safe place so that you can refer back to it again as needed. Product Manuals The DTX400K, DTX430K, and DTX450K are described in the following two manuals. Owner’s Manual (this booklet)—Setup, Basic Techniques, Advanced Techniques, and Reference sections. Setup Describes how to assemble your electronic drum kit and get it set up for playing. Basic Techniques Describes the basic techniques used when operating and playing the electronic drum kit. Advanced Techniques Describes the setting of parameters and other more advanced modes of use. Reference Describes troubleshooting techniques and contains other reference materials. MIDI Reference Manual (pdf) * Not bundled with this product. The drum module’s MIDI Reference Manual contains the following. See page 57 for more details. • MIDI-related reference information • Reference material that will prove useful when making music using the drum module and a computer • Instructions on how to transfer songs from your computer to the drum module Using PDF Manuals The Reference Manual for your DTX400K, DTX430K, or DTX450K is made available in digital format as a PDF document. As such, a computer and suitable software will be required in order to read it. We recommend that Adobe® Reader® be used for this purpose as it allows you to quickly and easily search for keywords, to print out specific sections, and to conveniently jump from page to page by clicking embedded links. Keyword searching and link-based navigation in particular are extremely useful functions available only with digitaltype documents. The most-recent version of Adobe® Reader® can be downloaded from the following web page. http://www.adobe.com/products/reader/ 6 DTX400K/DTX430K/DTX450K Owner’s Manual Setup First Steps Setup 1 2 Open the box and confirm that all parts are present and correct. Assemble the parts. • The assembly process is described in detail on pages 8 through 18. 3 Make the necessary connections. • Connect the pads to the drum module using the cables provided. See page 18. • Connect the power adaptor to the drum module and turn on the module. See page 19. 4 Play your electronic drum kit. • Basic techniques used when operating and playing the electronic drum kit are described in the Basic Techniques section (pages 23 to 39). • More complex methods are described in the Advanced Techniques section (pages 40 to 55). DTX400K/DTX430K/DTX450K Owner’s Manual 7 Setup Package Contents After opening up the package containing your electronic drum kit, please verify that all of the following parts are present. For DTX400K Owners • Parts !6, !7, and !8 are contained in Box 1. • Parts !0 and !1 are contained in Box 2. • The DTX400K does not have any parts numbered u, o, or !3. • Parts !4 and !5 are almost identical in appearance but are actually different. They can be told apart by the sticker on the base section. • Parts e and i are almost identical in appearance but are actually different. Part i has a wing bolt, but part e does not. In addition, the polystyrene foam packaging used for part e is marked “T” (tom); while the packaging for part i is marked “S” (snare). q Base supports (x2) w Vertical supports (x2) e Third tom part (x1) Third tom pad r Left arm (x1) t Drum module (x1) y First/second tom part (x1) First tom pad i Snare pad (x1) Second tom pad !0 Cymbal holders (x2) !1 Hi-hat holder (x1) !4 Hi-hat controller (x1) !5 KU100 Kick Unit (x1) Rear side Wing bolt !2 Cymbal/hi-hat pads (x3) !6 Nine-channel snake cable (x1) !7 Tuning key (x1) !9 Power adaptor (x1) @0 Owner’s Manual (this booklet) * May not be included depending on your particular area. Please check with your Yamaha dealer. 8 DTX400K/DTX430K/DTX450K Owner’s Manual !8 Cable bands (x3) Package Contents For DTX430K Owners • Parts !6, !7, and !8 are contained in Box 1. • Parts !0 and !1 are contained in Box 2. • The DTX430K does not have any parts numbered u or o. q Base supports (x2) w Vertical supports (x2) e Third tom part (x1) Third tom pad r Left arm (x1) t Drum module (x1) y First/second tom part (x1) First tom pad Second tom pad i Snare pad (x1) !0 Cymbal holders (x2) !1 Hi-hat holder (x1) !2 Cymbal/hi-hat pads (x3) !3 KP65 Kick Pad (x1) !4 HH65 Hi-hat Controller (x1) !5 FP6110A Foot Pedal (x1) !6 Nine-channel snake cable (x1) !7 Tuning key (x1) !8 Cable bands (x3) !9 Power adaptor (x1) @0 Owner’s Manual (this booklet) * May not be included depending on your particular area. Please check with your Yamaha dealer. DTX400K/DTX430K/DTX450K Owner’s Manual 9 Package Contents For DTX450K Owners • Parts o, !6, !7, and !8 are contained in Box 1. • Parts u, !0, and !1 are contained in Box 2. q Base supports (x2) w Vertical supports (x2) e Third tom part (x1) Third tom pad r Left arm (x1) t Drum module (x1) y First/second tom part (x1) First tom pad u Hexagonal rod (x1) i TP70S Snare Pad (x1) o S wing bolt (x1) !0 Cymbal holders (x2) !1 Hi-hat holder (x1) !2 Cymbal/hi-hat pads (x3) !3 KP65 Kick Pad (x1) !4 HH65 Hi-hat Controller (x1) !5 FP6110A Foot Pedal (x1) !6 Nine-channel snake cable (x1) !7 Tuning key (x1) !9 Power adaptor (x1) @0 Owner’s Manual (this booklet) * May not be included depending on your particular area. Please check with your Yamaha dealer. 10 Second tom pad DTX400K/DTX430K/DTX450K Owner’s Manual !8 Cable bands (x3) Setup Assembly Guide Fully assembled drum kit (DTX450K shown) CAUTION Step 6 Step 11 Step 5 Step 9 Step 10 • Choose a flat, hard surface on which to assemble your electronic drum kit. • Take care to avoid mixing up parts or assembling them in the wrong direction. In addition, the assembly steps should be completed one at a time in the order described. • The assistance of at least one other person will be required when assembling the electronic drum kit. Step 8 Step 3 Step 4 Step 7 Step 2 • Once a piece has been assembled, be sure to tighten the corresponding nuts or bolts. • To disassemble your electronic drum kit, carry out the assembly sequence in reverse. Step 1 Step 1 Step 2 Preparing the base supports Attaching the vertical supports !7 w Joint 50 cm q q Left Front 1. Take the two base supports (q) and the tuning key (!7) from the package, and using the tuning key, securely tighten the s key bolts (i.e., the key bolts labeled s in the figure). NOTE The two base supports are identical. 2. Using the tuning key, loosen the key bolt on each of the two base supports (q). 3. Viewing from the front as shown in the figure, place the base supports (q) at the left and right approximately 50 cm apart. Right 1. Take a vertical support (w) from the package, and insert it fully into the joint on the left base support. NOTE The two vertical supports are identical. 2. Using the tuning key, tighten the key bolt that you loosened in Step 1 in order to secure the vertical support (w) in place. CAUTION After completing this step, lay the assembly down safely to prevent it from falling over. 3. Repeat 1. and 2. to assemble the right upright bar. DTX400K/DTX430K/DTX450K Owner’s Manual 11 Assembly Guide Step 3 Step 4 Attaching the third tom part Attaching the left arm r Joint e Rear of third tom pad Left vertical support Right vertical support The joint shown in the figure is not part of the DTX400K. IMPORTANT 1. The third tom part (e) and the snare part (i) from the DTX400K are almost identical in appearance, and special care should be taken to avoid mixing them up during the assembly process. To tell them apart, look for the wing bolt, which is only found on part i. See the figure on page 8 for more details. Take the left arm (r) from the package, and using the tuning key, securely tighten the s key bolt. 2. 3. Loosen the key bolt. 4. Tighten the key bolt to secure the left arm (r) in place. 1. Take the third tom part (e) from the package, and using the tuning key, securely tighten the s key bolt. 2. 3. Loosen the key bolt. Slide the third tom part (e) onto the right vertical support and lower it to the center of the support or thereabouts. Ensure that the third tom pad is oriented as shown in the above figure at this time. CAUTION After completing this step, lay the assembly down safely to prevent it from falling over. NOTE Care should be taken to avoid assembling the third tom pad upside-down or back-to-front. 4. Slide the left arm (r) onto the left vertical support and lower it to the center of the support or thereabouts. Ensure that the left arm is oriented as shown in the above figure at this time. Step 5 Tighten the key bolt to secure the third tom part (e) in place. CAUTION Attaching the drum module t After completing this step, lay the assembly down safely to prevent it from falling over. 10 cm NOTE The third tom pad will be rotated into place in Step 12 . Left vertical support 1. Take the drum module (t) from the package and loosen the key bolt. 2. Slide the drum module (t) onto the left vertical support and lower it to a position about 10 cm from the top. The angle at which the module should be assembled is shown in the figure. 3. Tighten the key bolt to secure the drum module (t) in place. CAUTION After completing this step, lay the assembly down safely to prevent it from falling over. 12 DTX400K/DTX430K/DTX450K Owner’s Manual Assembly Guide Step 6 Attaching the first/second tom part 1. Rear of first tom pad Rear of second tom pad Take the first/second tom part (y) from the package, and using the tuning key, securely tighten the s key bolts. NOTE This part has two s key bolts, one each on the left and right. y 2. Loosen the key bolts. NOTE This part has two key bolts, one each on the left and right. 3. Vertical supports Slide the first/second tom part (y) onto the vertical supports and move it down until the tops of the supports are flush with the tops of the holes. Ensure that the tom part is oriented as shown in the above figure at this time. NOTE Care should be taken to avoid assembling the first and second tom pads upside-down or back-to-front. 4. Tighten the key bolts to secure the first/second tom part (y) in place. NOTE The tom pads will be rotated into place in Step 12 . The details of Step 7 are different for the DTX400K, DTX430K, and DTX450K. For DTX400K Owners Step 7 1. 4. Attaching the snare pad Loosen the key bolt located on the back of the snare pad (i), and rotate the pad 180°, turning it over. Take the snare part (i) from the package and lightly tighten the wing bolt. Wing bolt Left arm Joint 2. Place the snare part (i) on the left arm, which was assembled in Step 4 , and slide it back until the front end of the arm is flush with the joint. 3. Securely tighten the wing bolt. i 180° i 5. Tighten the key bolt to secure the snare pad (i) in place. i DTX400K/DTX430K/DTX450K Owner’s Manual 13 Assembly Guide The details of Step 7 are different for the DTX400K, DTX430K, and DTX450K. For DTX430K Owners Step 7 1. For DTX450K Owners Step 7 Attaching the snare pad 1. Loosen the wing bolt on the joint on the left arm, which was attached in Step 4 . Attaching the snare pad Loosen the wing bolt on the joint on the left arm, which was attached in Step 4 . Left arm Left arm Wing bolt Wing bolt 90° Joint 90° Joint 2. Rotate the joint 90° counter-clockwise, making the joint section horizontal. 2. Rotate the joint 90° counter-clockwise, making the joint section horizontal. 3. 4. Securely tighten the wing bolt. 3. 4. Securely tighten the wing bolt. Loosen the key bolt on the joint. Loosen the key bolt on the joint. u 5. Take the snare pad (i) from the package and slide it fully into the joint. i 5. Take the hexagonal rod (u) from the package and slide it fully into the joint. 6. Tighten the key bolt to secure the hexagonal rod (u) in place. 7. Take the snare pad (i) and the S wing bolt (o) from the package and lightly tighten the S wing bolt (o). (Five or six turns is sufficient.) o 6. i Tighten the key bolt to secure the snare pad (i) in place. i 8. Place the snare pad (i) on the hexagonal rod (u), which was attached in 6. above, and slide it fully back. Then tighten the S wing bolt (o) to secure the snare pad (i) in place. u o 9. 14 DTX400K/DTX430K/DTX450K Owner’s Manual i Loosen the key bolt and adjust the angle of the snare pad. When finished, retighten the key bolt to secure the snare pad in place. Assembly Guide The details of Step 8 are different for the DTX400K, DTX430K, and DTX450K. For DTX400K and DTX430K Owners Step 8 For DTX450K Owners Step 8 Attaching the hi-hat holder Attaching the hi-hat holder !1 Left arm Snare pad !1 Joint Joint 1. Loosen the two key bolts on the joint on the snarepad part, which was attached in Step 7 . 2. Take the hi-hat holder (!1) from the package and slide it into the joint from the front as shown in the figure. Then adjust the angle of the hi-hat holder. 1. Loosen the two key bolts on the joint on the left arm, which was attached in Step 4 . 2. Take the hi-hat holder (!1) from the package and slide it into the joint from the rear as shown in the figure. Then adjust the angle of the hi-hat holder. • When correctly inserted, the tip of the hi-hat holder (!1) will protrude slightly from the front of the joint. • When correctly inserted, the tip of the hi-hat holder • When correctly oriented, the metal rod section at the (!1) will protrude slightly from the rear of the joint. • When correctly oriented, the metal rod section at the top of the hi-hat holder (!1) will be vertical. 3. top of the hi-hat holder (!1) will be vertical. 3. Tighten the two key bolts to secure the hi-hat holder (!1) in place. 1. Loosen the four key bolts at the ends of the first/second tom part, which was attached in Step 6 . 2. Take the cymbal holders (!0) from the package and insert them into the ends of the first/second tom part. Then adjust the angles of the cymbal holders until they are oriented as shown in the figure. Tighten the two key bolts to secure the hi-hat holder (!1) in place. Step 9 !0 Attaching the cymbal holders !0 NOTE The two cymbal holders are identical. • When correctly inserted, the tips of the cymbal holders (!0) will protrude slightly from the bottom of the tom part. • When correctly oriented, the cymbal holders (!0) will be as shown in the figure. 3. Tighten the four key bolts to secure the cymbal holders (!0) in place. DTX400K/DTX430K/DTX450K Owner’s Manual 15 Assembly Guide Step 10 Step 11 Attaching the hi-hat Adjusting the position of the hihat stopper pin Assembling the cymbal pads Wing nut Felt pad Pin 30° 30° !2 Pin Felt pad Front Cymbal holder Stopper In this step, the two remaining cymbal/hi-hat pads (!2) are assembled. Accordingly, 1. to 4. must be performed twice. Hi-hat holder NOTE The two cymbal pads (!2) are identical. Front This figure shows the hi-hat holder correctly inserted in the DTX450K. It is inserted from the front in the DTX400K and DTX430K, and therefore, faces in the opposite direction. 1. Remove the wing nut and the upper felt pad from the cymbal holder. (Do not remove the lower felt pad.) 2. Place the cymbal pad (!2) on the cymbal holder, with the holder passing through the central hole. 1. Using the tuning key, loosen the key bolt on the stopper, which is located at the top of the hi-hat holder. 3. Replace the felt pad removed in 1. above the cymbal pad (!2). 2. Adjust the position of the pin until, as shown in the figure, it is approximately 30° counter-clockwise from the front-rear direction of the kit when viewed from above. 4. Tighten the wing nut to secure the cymbal pad (!2) in place. 3. Tighten the key bolt to secure the stopper pin. Step 12 Assembling the hi-hat pad Washer Wing nut Rotating the tom pads into place y Felt pad !2 Felt pad Stopper e Hi-hat holder All three of the cymbal/hi-hat pads (!2) are identical. One of these is to be used as the hi-hat pad. 16 1. Remove the wing nut, the washer, and the upper felt pad from the hi-hat holder. (Do not remove the lower felt pad.) 2. Take the hi-hat pad (!2; one of three) from the package and place it on the hi-hat holder with the stopper pin also passing through the hole provided. 3. Replace the felt pad removed in 1. above the hi-hat pad (!2). 4. 5. Replace the washer removed in 1. above the felt pad. Tighten the wing nut to secure the hi-hat pad (!2) in place. Ensure that the wing nut is firmly tightened. DTX400K/DTX430K/DTX450K Owner’s Manual Step 12 applies to each of the three tom pads. Accordingly, 1. to 3. must be performed three times. 1. 2. Loosen the key bolt on the tom pad (e or y). 3. Tighten the key bolt to secure the tom pad in place. Rotate the tom pad to a position where it will be easy to play. (If necessary, refer to the picture of the properly assembled kit on page 11.) Assembly Guide Step 13 is only required for the DTX430K and DTX450K. Owners of the DTX400K should skip to Step 14 . Step 13 Assembling the kick pad 5. 1. Take the kick pad (!3) from the package, remove the four wing bolts, spring washers, and flat washers from the kick pad holder, and arrange each set nearby in the disassembled condition. 2. Assemble the base to the holder as shown below, and then from the base side, assemble the wing bolts, spring washers, and flat washers removed in 1. in order to secure it in place. Turn the foot pedal’s T-bolt counter-clockwise to loosen it. T-bolt Wing bolt Spring washer 6. Fit the raised section at the front of the kick pad holder into the foot-pedal’s assembly bracket. 7. Turn the foot pedal’s T-bolt clockwise to secure the parts together. 8. Operate the pedal and confirm whether the beater head strikes the kick pad near the center. If not, adjust the length of the beater or move it left or right as required. Flat washer !3 Kick pad Base Kick pad 3. Take the foot pedal (!5) from the package and insert the beater into the hole in the holder as shown below. 4. Slide the beater rod into the hole until the tip protrudes approximately 15 mm from the rear, and then tighten the beater bolt using the tuning key. Beater Assembly bracket Raised section T-bolt Beater head Tuning key Holder Connecting rod !5 Beater bolt Connecting rod Step 14 Positioning the hi-hat controller and kick drum Kick drum parts !4 !4 IMPORTANT The hi-hat controller (!4) and the kick unit (!5) from the DTX400K are almost identical in appearance. They can be told apart by the sticker on the base section. !5 DTX400K Arrange the hi-hat controller (!4) and the kick drum parts or kick unit (!5) as shown in the figure on the left. DTX430K/DTX450K DTX400K/DTX430K/DTX450K Owner’s Manual 17 Assembly Guide Step 15 Fine-tuning the positions of the pads and the drum module Sit on your stool and adjust the positions of the pads and the drum module to your liking. • To adjust the height of the snare pad, loosen the key bolt. • To adjust the height of the third tom pad, loosen the key bolt. • To adjust the height of the drum module, loosen the s key bolt. • To tilt the drum module forwards or backwards, loosen the key bolt. Drum module CAUTION • Be sure to always retighten any key bolt after you have finished adjusting the corresponding part. • Before moving on to the next step, ensure that all key bolts have been tightened. NOTE • Refer back to Step 7 if you wish to readjust the angle of the snare pad. • Refer back to Step 12 if you wish to readjust the angles of the tom pads. Snare pad Third tom pad Step 16 Connecting the pads to the drum module TOM2 CR TOM1 Right side of the drum module RIDE HH SNR TOM1 TOM2 TOM3 RIDE CR HH SNR RIDE HH HHC KICK TOM3 SNR KICK DTX400K 1. CR HHC TOM1 TOM2 KICK KICK HHC HHC Insert the mini plugs* at one end of the nine-channel snake cable (!6) into the correct trigger input jacks (SNARE to KICK/PAD) on the right side of the drum module. (*: The smaller set of plugs.) 3. Insert the nine-channel snake cable’s standard plugs* into the jacks in the corresponding pads. (*: The larger set of plugs.) Wrap the cables for the snare pad, the tom pads, and the cymbal/hi-hat pads around the cable clips to prevent them from being pulled out. NOTICE Excessive bending can damage the cables. Ensure, therefore, that they are not bent at an extreme angle when wrapped around the clips. NOTE The sticker on each of the snake cable’s plugs indicates the name of the corresponding pad. 2. TOM3 Nine-channel snake cable 4. Using the cable bands (!8), secure the cables to the kit rack at the positions in the figure above. Congratulations—You have finished assembling your electronic drum kit! 18 DTX400K/DTX430K/DTX450K Owner’s Manual Setup Setting Up for Sound Connecting the Power Connecting Headphones or Speakers 1. Ensure that your drum module is turned off (i.e., none of the buttons are lit). 2. Insert the power adaptor’s DC plug into the [ ] connector on the left side of the module. 3. Hook the power adaptor’s cord around the cord clip to prevent it from being accidentally pulled out. Your drum module does not have built-in speakers. In order to hear it, therefore, you will need to connect headphones or monitor speakers via the [PHONES/OUTPUT] standard stereo-audio jack. You can adjust the output volume using the [VOLUME] buttons on the control panel. NOTE The [PHONES/OUTPUT] jack is a stereo connector. You can connect a 1/4” mono-audio jack to it, but in such a case, please be sure to set the output to mono using the Stereo/Mono parameter from Menu Mode (page 53). CAUTION To prevent hearing loss, avoid using headphones at a high volume for extended periods of time. Cord clip Power adaptor’s cord CAUTION Excessive bending can damage the power adaptor cord and create a fire hazard. Ensure, therefore, that the power cord is not bent at an extreme angle when wrapped around the clip. 4. Plug the power adaptor’s AC power cord into an AC wall socket or another electrical outlet. WARNING Use only the power adaptor that came with your drum module. Connecting a Music Player You can connect a portable music player or another similar source of audio to your drum module via the [AUX IN] (auxiliary input) stereo mini-jack. This makes it possible to play along with your favorite tunes. NOTICE • Whenever connecting other devices, ensure that the cables you use have plugs that match the input or output connectors on those devices. • Before making connections, furthermore, you should also turn the volume on the other devices fully down. • When all connections have been made, use each device’s volume controller to balance its output with that of the drum module. 1/8” stereo-mini to stereo-mini cable or Standard 1/4” stereo-audio jack Portable music player, etc. Standard 1/4” mono-audio jack Headphones Powered speakers DTX400K/DTX430K/DTX450K Owner’s Manual 19 Setting Up for Sound Turning On the Drum Module 1. If you have connected your drum module to other audio devices such as powered speakers, ensure that the volume on all other devices is turned down fully. 2. Press the [ ] (Standby/On) button. The drum module will turn on and its buttons will light up. NOTICE • In certain modes of operation, the Auto Power-Off function will not turn off the drum module when the set time has elapsed. We recommend, therefore, that you always turn off the drum module manually when you are finished using it. • If you expect the drum module to be inactive for a certain length of time while connected to other audio equipment, we recommend that you turn the volume on the other equipment fully down. Alternatively, you can disable the Auto Power-Off function to ensure that the drum module stays on. NOTE • Settings for the Auto Power-Off function do not represent exact times and there may be some variation. • By default, the Auto Power-Off time is set to 30 minutes. NOTE Connect the hi-hat controller before turning on the drum module. Please do not turn the drum module on with the hihat controller depressed. The drum module can not identify the type of pedal properly and it causes that the kick may produce much smaller sound than expected. Quickly disabling Auto Power-Off To quickly disable the Auto Power-Off function, turn on the drum module while holding down the [TRAINING] button. The function will remain off until you set a new Auto Power-Off time. Turning Off the Drum Module 1. 2. If you have connected your drum module to other audio equipment, ensure that the volume on all other devices is turned down fully. Press the [ ] (Standby/On) button. The drum module will turn off and all button lights will go out. CAUTION When setting up the product, make sure that the AC outlet you are using is easily accessible. If some trouble or malfunction occurs, immediately turn off the power switch and disconnect the plug from the outlet. Even when the power switch is turned off, electricity is still flowing to the product at the minimum level. When you are not using the product for a long time, make sure to unplug the power cord from the wall AC outlet. NOTICE The drum module automatically stores all current settings before it turns off. For this reason, please do not unplug the power adaptor until all button lights have gone out. Auto Power-Off Hold Restoring the Default Settings (Factory Set) Straight out of the box, your drum module already contains a wide range of pre-programmed drum kits and songs. These default settings—collectively known as the Factory Set—can be conveniently restored at any time if you have accidentally overwritten them or wish to delete all of your own settings. To do so, use the Factory Set function as follows. NOTICE When you restore the Factory Set as described below, any changes you have made to parameters will be lost. Before proceeding, therefore, you should ensure that they contain no irreplaceable settings. 1. Press the [ ] (Standby/On) button and verify that the drum module turns off. 2. Turn on the drum module while holding down the [VOLUME+] button and the [VOLUME–] button. The Auto Power-Off function automatically turns off the drum module after a certain period of inactivity. This helps to save energy should you forget to turn it off yourself. NOTE The drum module automatically stores all current settings before it turns off. Setting the Auto Power-Off Function You can set the amount of time that the Auto Power-Off function will wait before turning off the drum module. For details, see the description of the Auto Power-Off Time parameter from Menu Mode (page 53). 20 DTX400K/DTX430K/DTX450K Owner’s Manual Hold The drum module’s lights will flash and the Factory Set will be restored. Setup Component Names & Functions z x n c v b m , . ⁄0 Control Panel z Number buttons b[ ] button • These buttons are used to select drum kits, songs, and training types. (pages 23, 25, 29) • Using this button, you can start and stop songs. (page 25) • You can use them to enter a tempo directly. (page 28) • In Training Mode, it is also used to start and stop training sessions. (page 29) • In Menu Mode, they are used to select settings. (page 40) • Also in Menu Mode, you can use them to enter setting values directly. (page 40) x [KIT] button (page 23) Use this button when you want to select a different drum kit. c [SONG] button (page 25) Use this button when you want to select a different song. v[ ] (metronome) button (page 27) • This button is used to start and stop the built-in metronome. • In Training Mode, it is also used to start and stop training sessions. n[ ] (Standby/On) button (page 20) Use this button to turn the drum module on and off. m [TRAINING] button (page 29) This button is used to access Training Mode. , [DRUM MUTE] button (page 25) Using this button, you can mute and unmute drum parts from a practice drum pattern. . [TEMPO] buttons (page 28) Use these buttons to increase or decrease the tempo in steps of one BPM. *: In Menu Mode, the [TEMPO] buttons can also be used to increase or decrease settings. ⁄0 [VOLUME] buttons (page 19) These buttons are used to adjust the overall volume of the drum module. Press the [VOLUME+] button to increase it and the [VOLUME–] button to decrease it. DTX400K/DTX430K/DTX450K Owner’s Manual 21 Component Names & Functions Left side ⁄1 ⁄2 ⁄3 ⁄4 ⁄5 Right side Control panel ⁄6 Left Side This terminal is used to connect the drum module to a computer via a USB cable. ⁄2 [AUX IN] jack (page 19) The Auxiliary Input stereo mini-jack is used to input audio from an external source. For example, you can use this jack to connect a portable music player, a CD player, or another similar device and play along with your favorite tunes. ⁄3 [PHONES/OUTPUT] jack (page 19) Use this standard stereo-audio jack to connect headphones, an amplifier, a mixer, or other similar equipment. ⁄4 Cord clip (page 19) Wrap the power adaptor cord around this clip to prevent accidental unplugging during use. ] connector (page 19) Use this connector for the power adaptor that came with your drum module. 22 ⁄8 Right Side ⁄1 [USB TO HOST] terminal (page 57) ⁄5 [ ⁄7 DTX400K/DTX430K/DTX450K Owner’s Manual ⁄6 Trigger input jacks (page 18) These jacks are used to connect the snare, tom, and cymbal pads. ⁄7 [HI-HAT CTL] jack (page 18) The Hi-hat Control jack is used to connect a hi-hat controller. ⁄8 [KICK/PAD] jack (page 18) Use this jack to connect a kick pad or pedal. When using a KP65 Kick Pad, an additional pad can be connected via the kick pad itself. Basic Techniques Selecting & Playing a Kit Basic Techniques For the purpose of this manual, the term “kit” refers to a full set of drum-sound assignments for all of the pads. The drum module comes with ten different drum and percussion kits already set up. Selecting a Kit 1. 2. Adjusting Kit Sensitivity Press the [KIT] button to activate Kit Mode. Select a kit by pressing the corresponding number button ([1] to [10/0]). 2 Using the following procedure, you can change the sensitivity of a kit—that is, how the drum sounds change depending on how hard you strike the pads. Sensitivity can be adjusted to ten different levels. While holding the [KIT] button, press either the [VOLUME+] or [VOLUME–] button. More sensitive pads Hold 1 3. Play the pads and see how the kit sounds. NOTE For detailed information on the ten preset kits, see the Data List section (page 60). Quick select from Song Mode or Training Mode In order to select a kit quickly without having to leave Song Mode or Training Mode, press and hold the [KIT] button, and then press the number button ([1] to [10/0]) for the desired kit. Less sensitive pads • Each time you press the [VOLUME+] button, you increase the sensitivity by one level. This means that louder sounds can be more easily produced with softer drumming. • Each time you press the [VOLUME–] button, you decrease the sensitivity by one level. This means that louder sounds can only be produced by drumming hard. More sensitive pads Less sensitive pads Hold NOTE • You can set a different sensitivity for each of the drum module’s ten kits. • If you wish to set sensitivities on an individual pad basis, see the descriptions of the Trigger Settings parameters from Menu Mode (page 46). DTX400K/DTX430K/DTX450K Owner’s Manual 23 Basic Techniques Playing Techniques Snare Pad Hi-hat Cymbal If using a TP70S Snare Pad, you will be able to produce three distinct sounds (i.e., head, open rim, and closed rim) depending on where you strike it, much the same as if you were playing an acoustic snare. Closed rim shots (Rim 2) Open/close • You can produce an open hi-hat sound by striking the hi-hat pad with the hi-hat controller’s pedal not depressed. • You can produce a closed hi-hat sound by striking the hi-hat pad with the hi-hat controller’s pedal depressed. • If using an HH65 Hi-hat Controller, you can operate the pedal to recreate the sound of a closing hi-hat. Foot closed Open rim shots (Rim 1) Head shots You can depress the hi-hat controller’s pedal to create a foot-close sound without having to strike the hi-hat pad. Hi-hat splash Head shots Hitting the main surface of the pad produces a head shot sound. Open rim shots Hitting the open-rim zone produces an open rim-shot sound. Closed rim shots (cross sticking) Hitting the closed-rim zone produces a closed rim-shot sound. 24 DTX400K/DTX430K/DTX450K Owner’s Manual Depressing the hi-hat controller’s pedal and then immediately releasing it produces a hi-hat splash sound. Basic Techniques Performing with a Song The drum module comes complete with ten practice songs. Covering a wide range of genres, they provide a convenient, enjoyable way to practice drumming. Selecting a Song 1. 2. 3. Adjusting the Song Volume Press the [SONG] button. Press the [ ] button to start the current song. If you wish press one of the number buttons ([1] to [10/ 0]) to select a different one. Using the following procedure, you can set the volume of the current song to your preferred level. 1. Press the [ 2. While holding the [SONG] button, press either the [VOLUME+] or [VOLUME–] button. ] button to start the song. 3 Higher song volume 1 2 • You can stop song playback by pressing the [ ] but- Hold Lower song volume ton once again. • If you wish to mute the programmed drum parts and hear only the song parts, press the [DRUM MUTE] button. To unmute the drum parts, press the [DRUM MUTE] button once again. • The most appropriate drum kit is pre-assigned to each of • Each time you press the [VOLUME+] button, you increase the song volume by one. • Each time you press the [VOLUME–] button, you decrease the song volume by one. the drum module’s songs, so whenever you select a new song, the current kit will also change. If you wish to use a different kit to play a certain song, please select that kit after changing the song. For more details, see Quick select from Song Mode or Training Mode (page 23). NOTE For detailed information on the ten built-in songs, see the Data List section (page 60). Quick select from Kit Mode or Training Mode In order to select a song quickly without having to leave Kit Mode or Training Mode, press and hold the [SONG] button, and then press the number button ([1] to [10/0]) for the desired song. Hold DTX400K/DTX430K/DTX450K Owner’s Manual 25 Performing with a Song Adjusting the Volume of Muted Drum Parts If you press the [DRUM MUTE] button while playing a song, the drum parts from the song will be muted—that is, their volume will be reduced to zero. If, however, you would like the drum parts to be slightly audible in this type of situation, you can adjust the muted volume as described below. 1. 2. Press the [ As described below, you can have a song playback between two points set in units of one measure. To do so, you simply need to set a loop start point (A) and a loop end point (B) while the song is playing. A B ] button to start the song. Press the [DRUM MUTE] button to mute the drum parts. 1 2 3. Looping Part of a Song Looping playback 1. Press the [ 2. At point A, press and hold the [SONG] button and press the [ ] button. ] button to start the song. While holding the [DRUM MUTE] button, press either the [VOLUME+] or [VOLUME–] button. Maximum muted volume Hold 3. Hold Minimum muted volume • Each time you press the [VOLUME+] button, you increase the volume of the muted drums by one. • Each time you press the [VOLUME–] button, you decrease the volume of the muted drums by one. By pressing the [DRUM MUTE] button once again, you can unmute the drum parts and restore their normal volumes. 26 DTX400K/DTX430K/DTX450K Owner’s Manual At point B, again press and hold the [SONG] button and press the [ ] button. To stop looped playback, press and hold the [SONG] button and press the [ ] button. NOTE • When you select a different song, looped playback will be cancelled automatically and points A and B will be reset. • After an automatic lead-in (to help guide you into the phrase), the range from Point A to Point B is played back repeatedly. Basic Techniques Using the Metronome Playing your electronic drum kit along with the built-in metronome is a great way to perfect your rhythm. Starting and Stopping the Metronome Confirming Tempo via Number Buttons Whenever necessary, you can confirm the drum module’s current tempo from the flashing pattern of the number button lights. Press either the [TEMPO+] or [TEMPO–] button once. • Press the [ • Press the [ ] button to turn on the metronome. ] button once again to turn it off. Adjusting the Metronome Volume To adjust the volume of the metronome, press and hold the [ ] button, and then press either the [VOLUME+] or [VOLUME–] button. Higher metronome volume Hold Each digit of the tempo will be flashed in sequence. Example: When the tempo is 108 BPM, the number button lights will flash [1][0][8]. Lower metronome volume Confirming Tempo via Voice Guidance • Each time you press the [VOLUME+] button, you increase the metronome volume by one. • Each time you press the [VOLUME–] button, you decrease the metronome volume by one. Whenever necessary, you can have the drum module speak the current tempo to you as a BPM value. Press and hold the [ ] button. You will hear the current tempo spoken (in English), and the number button lights will flash as described above. DTX400K/DTX430K/DTX450K Owner’s Manual 27 Using the Metronome Adjusting the Tempo 2. The following three methods are available when you want to change the tempo. After entering all necessary digits, remove your finger from the [ ] button. The drum module will speak the new tempo to you (in English). NOTE • Number button [10/0] is used to enter the value zero. You cannot use it to enter the number ten. Increase or decrease using the [TEMPO+] or [TEMPO–] button Direct input of a BPM using the number buttons Setting a new tempo using pads (tap tempo) Example: Setting a tempo of 110 BPM Press the number buttons in the sequence [1][1][10/0]. You cannot do this by pressing [1][10/0]. • There is no need to enter a zero first in order to set a two-digit tempo. NOTE • The drum module supports tempos between 30 and 300 BPM. Example: To set a tempo of 72 BPM, simply press the number buttons in the sequence [7][2]. You do not need to press [0][7][2]. • If you select a different song (page 25) after adjusting the tempo, the selected song’s tempo will be used for the metronome. • Whenever the drum module is speaking the tempo, you can enter a new tempo directly using the number buttons but without having to hold down the [ ] button. Increasing or decreasing using the [TEMPO+] or [TEMPO–] button Tapping the tempo on the pads 1. While holding the [ ] button, strike a pad at least three times at the desired tempo. • Each time you press the [TEMPO+] button, you increase the metronome BPM by one. • Each time you press the [TEMPO–] button, you Hold decrease the metronome BPM by one. Directly inputting a BPM using the number buttons Hold 1. While holding the [ ] button, enter the BPM using the number buttons. Example: Setting a tempo of 138 BPM Press the number buttons in the sequence [1][3][8]. 2. Remove your finger from the [ NOTE Instead of using a pad, you can also tap the tempo by pressing the [TEMPO+] or [TEMPO–] button at least three times. Other Settings The following metronome-related settings can be made in Menu Mode. For details, see the description of the Metronome Settings parameter group from Menu Mode (page 41). • Metronome pattern • Metronome length in beats • Metronome sound • Number-button lighting pattern when using the metronome 28 DTX400K/DTX430K/DTX450K Owner’s Manual ] button. Basic Techniques Practicing in Training Mode The drum module’s Training Mode provides many different ways in which to practice playing the drums. With ten different types of training available, you can finely hone your sense of rhythm, master drum patterns from a range of different musical genres, or if you are a beginner, learn easy patterns in an enjoyable way. 4. Training Mode Work on your rhythm 1. Groove Check ............................................Page 30 2. Rhythm Gate..............................................Page 31 3. Measure Break ..........................................Page 32 4. Tempo Up/Down ........................................Page 33 5. Change Up ................................................Page 34 Have fun with drum patterns 6. Easy Session.............................................Page 35 7. Groove Tracker ...........................................Page 36 To end training, press the button used to start it in Step 3. above. • To select a different kit from Training Mode, press and hold the [KIT] button, and then press the number button ([1] to [10/0]) for the desired kit. (See Quick select from Song Mode or Training Mode on page 23.) • To select a different song from Training Mode, press and hold the [SONG] button, and then press the number button ([1] to [10/0]) for the desired song. (See Quick select from Kit Mode or Training Mode on page 25.) Learn new drum patterns 8. Pad Gate....................................................Page 37 9. Part Mute ...................................................Page 38 NOTE • If you wish to adjust the duration of training, see the description of the Timer parameter from Menu Mode (page 49). Play as wildly as you can 10. Fast Blast .................................................Page 39 • If you wish to adjust the duration of Fast Blast training, see the description of the Fast Blast Timer parameter from Menu Mode (page 52). Scoring function Basic Training Mode Procedure The basic procedure common to all ten types of training is as follows. 1. Press the [TRAINING] button to activate Training Mode. 2. Select your desired training type by pressing the corresponding number button ([1] to [10/ 0]). The drum module’s scoring function, which is used with certain types of training, evaluates your ability on a scale of one to ten and displays the result using the number buttons ([1] to [10/0]). Number button [10/0] represents the highest score; number button [1], the lowest. In addition, the Voice Guidance function announces the results of scoring using the five levels shown below. Better scores Try again Good Excellent Great The [ ] and/or [ ] button will flash, indicating that the drum module is on standby to start training. Fantastic NOTE Fast Blast training uses its own unique form of scoring. See page 39 for more details. or NOTE • The buttons that flash at this time depend on the type of training selected. • Both the [ ] and [ types of training. 3. Press the flashing [ ing. ] buttons will flash with certain ] or [ ] button to start train- or DTX400K/DTX430K/DTX450K Owner’s Manual 29 Practicing in Training Mode Groove Check As an aid to improving your timing, Groove Check uses the number button lights to show how early or late you are drumming. Two different training styles are available—the first uses the metronome; the second lets you play along with a song. At the end of training, the drum module will display your score using number buttons [1] to [10/0] and will also speak it to you. 2 1 1. Press the [TRAINING] button to activate Training Mode. 2. Press number button [1]. The [ ] and [ ] buttons will flash, indicating that the drum module is on standby to start training. 3. 4. 3 3 Display of individual strikes • The number buttons ([1] to [10/0]) will flash to indicate the accuracy of the timing of individual strikes. • If number buttons [5] and [6] flash together, your timing for the current strike was perfect. Press either the [ ] or [ ] button when you are ready to go. If you press the [ ] button, the metronome will be used for training. Alternatively, if you press the [ ] button, the current song will be used. • Number buttons [6] to [10/0] indicate that the current strike was late. The further from the [5] and [6] number buttons, the later the strike. • Number buttons [5] to [1] indicate that the current strike was early. The further from the [5] and [6] number buttons, the earlier the strike. Play the pads as tightly as you can along with the metronome or song. Struck early Perfect timing (both flash together) Display of current timing variation • Half-lit number buttons ([1] to [10/0]) indicate how tightly you are currently playing. Struck late • The wider the band of half-lit number buttons, the greater the degree of variation in your timing. Range of timing variation (half-lit) 30 DTX400K/DTX430K/DTX450K 5. Timing of current strike (flashes) Owner’s Manual To end training, press the button used to start it in Step 3. above. The drum module will display your score using number buttons [1] to [10/0] and will also speak it to you (in English). For more details regarding scoring, see Scoring function (page 29). Practicing in Training Mode Rhythm Gate Rhythm Gate training allows you to confirm by ear whether or not your timing is accurate. If you do not strike a pad in time, it will not produce any sound. Two different training styles are available—the first uses the metronome; the second lets you play along with a song. At the end of training, the drum module will display your score using number buttons [1] to [10/0] and will also speak it to you. 2 5 1 1. Press the [TRAINING] button to activate Training Mode. 2. Press number button [2]. The [ ] and [ ] buttons will flash, indicating that the drum module is on standby to start training. 3. Press either the [ ] or [ ] button when you are ready to go. If you press the [ ] button, the metronome will be used for training. Alternatively, if you press the [ ] button, the current song will be used. 4. 3 3 5. Press [2] or [9]. 1 Accurate timing (Flash when pad struck) 2 3 4 5 6 7 Easy 8 9 10/0 8 9 10/0 Press [3] or [8]. 1 Play the pads as tightly as you can along with the metronome or song. The pads will only produce a sound when struck in time. In addition, the number buttons will light up as shown below during this training. Struck early Press number buttons [2] to [9] to adjust the difficulty level (i.e., the width of the gate). Four different levels are available as shown below. The higher the difficulty level, the more accurate your timing will have to be in order to produce a sound. 2 3 4 5 6 7 Difficulty level Press [4] or [7]. 1 2 3 1 2 3 4 5 6 7 8 9 10/0 8 9 10/0 Press [5] or [6]. Struck late 4 5 6 7 Hard NOTE Number buttons [1] and [10/0] are not used with this type of training. Difficulty level (gate width; half-lit) Timing of current strike (flashes) No sound produced for pads struck outside the gate width. No sound produced for pads struck outside the gate width. 6. To end training, press the button used to start it in Step 3. above. Your score will be displayed using number buttons [1] to [10/0] and will also be spoken to you (in English). For more details regarding scoring, see Scoring function (page 29). DTX400K/DTX430K/DTX450K Owner’s Manual 31 Practicing in Training Mode Measure Break With Measure Break training, the metronome will be muted for certain measures in a sequence. For example, by setting the measures during which you play fills to be muted in this way, you can check for any deviation in your timing when the metronome returns. This will help you to play at a constant tempo throughout your performances. Please note that this type of training is not scored. 2 4 1 1. Press the [TRAINING] button to activate Training Mode. 2. Press number button [3]. The [ ] button will flash, indicating that the drum module is on standby to start training. 3. 3,6 4. If necessary, press the number buttons corresponding to the measures in the sequence to toggle the metronome on (fully-lit) or off (half-lit) for them. Flash: First beat of measure currently being played. Press the [ ] button. The metronome will start to play a sequence of four measures in length. Fully-lit: Measures for which the metronome is played. Half-lit: Measures for which the metronome is not played. • Each of the number buttons represents a measure in the sequence. • On the first beat of each measure, the corresponding number button will flash. 5. 6. Practice playing the pads along with the song. To end training, press the [ ] button once again. NOTE You can also change the number of measures in the metronome sequence. To do so, press and hold the corresponding number button ([2] to [10/0]) until the displayed sequence length changes. For example, to set the sequence length to eight measures, press and hold number button [8]. 32 DTX400K/DTX430K/DTX450K Owner’s Manual Practicing in Training Mode Tempo Up/Down Use Tempo Up/Down training to see how fast you can go and still maintain accurate timing. As you play along with a metronome, the drum module will automatically increase the tempo if your timing is good and decrease it if not. Please note that this type of training is not scored. If you would like to check or adjust the current tempo before you start training, see Using the Metronome (page 27). 2 1 1. Press the [TRAINING] button to activate Training Mode. 2. Press number button [4]. The [ ] button will flash, indicating that the drum module is on standby to start training. 3. Press the [ ] button. The metronome will start playing. 4. Focusing on accurate timing, play the pads along with the metronome. The half-lit number buttons indicate how much time remains before the end of the current four measures. The drum module will evaluate your timing after every four measures. • If your timing was accurate during the four measures, the drum module will automatically increase the metronome’s tempo and the number-button lights will scan quickly once from left to right. 3,5 • If your timing was not accurate during the four measures, the drum module will automatically decrease the metronome’s tempo and the number-button lights will scan quickly once from right to left. • Continue to play along with the metronome as the tempo changes each four measures. 5. To end training, press the [ ] button once again. NOTE • If you wish to adjust the difficulty level for this training, see the description of the Difficulty Level parameter from Menu Mode (page 50). • This training can be set either to mute pads when they are not played in time or to play pads whenever they are struck. For details, see the description of the Ignore Timing parameter from Menu Mode (page 50). DTX400K/DTX430K/DTX450K Owner’s Manual 33 Practicing in Training Mode Change Up In Change Up training, your aim is to maintain good timing as you play along with up to seven different practice rhythms that change every two measures. The rhythms are assigned to number buttons [1] to [7], allowing you to freely choose which ones you want to practice with. At the end of training, the drum module will display your score using number buttons [1] to [10/0] and will also speak it to you. 2 1 1. Press the [TRAINING] button to activate Training Mode. 2. Press number button [5]. The [ ] button will flash, indicating that the drum module is on standby to start training. 3. Press the [ 4 3,6 5 5. • To adjust the volume of the practice rhythm, press and hold the [SONG] button, and then press either the [VOLUME+] or [VOLUME–] button. • To mute the practice rhythm and play along with only ] button when you are ready to go. the metronome, press the [DRUM MUTE] button. • A practice rhythm and the metronome will start to • To unmute the practice rhythm, press the [DRUM play, and the practice rhythm will change after every two measures. 4. Press number buttons [1] to [7] to select the rhythms to practice with. • When a number button is fully lit, the corresponding rhythm will be included in the practice session. • When a number button is half lit, the corresponding rhythm will be skipped as you practice. • The number buttons will flash to indicate which rhythm you should be playing. 3 3 6 Focusing on accurate timing, play the practice rhythm on the pads. MUTE] button once again. 6. To end training, press the [ ] button once again. The drum module will display your score using number buttons [1] to [10/0] and will also speak it to you (in English). For more details regarding scoring, see Scoring function (page 29). NOTE • You can also press the [ ] button to end training. • If you wish to adjust the difficulty level for this training, see the description of the Difficulty Level parameter from Menu Mode (page 50). • This training can be set either to mute pads when they are not played in time or to play pads whenever they are struck. For details, see the description of the Ignore Timing parameter from Menu Mode (page 50). • You can also change the number of measures for which each practice rhythm is repeated by pressing number button [10/0]. When this button is half lit, each rhythm will be played for four measures before changing; when fully lit, the rhythm will be played for one measure; and when not lit, it will be played for two measures. Fully-lit: Rhythm included in practice session 34 DTX400K/DTX430K/DTX450K Half-lit: Rhythm not included in practice session (i.e., skipped) Owner’s Manual Practicing in Training Mode Easy Session Easy Session training lets you play a drum pattern along with an accompanying song simply by striking any pad(s) in time. As such, it is not unlike a basic form of jamming with other band members. Please note that this type of training is not scored. 2 1 4 1. Press the [TRAINING] button to activate Training Mode. 2. Press number button [6]. The [ ] button will flash, indicating that the drum module is on standby to start training. 3. 4. Press the [ 4 3, 5 ] button to start the accompaniment. Play the pads along with the accompaniment. • Regardless of which pad(s) you strike, the drum module will play the correct sounds for the drum pattern. For this reason, you will not necessarily hear the pad you strike. • If you stop playing the pads, the drum module will stop playing the drum pattern. • The half-lit number buttons provide a guide to variations in the drum pattern. Half lit = When to strike the pad(s) • In order to play the drum pattern correctly, the pads must be struck at precisely the timing indicated by the half-lit number buttons. • To select a different song while training, hold down the [SONG] button and press the corresponding number button ([1] to [10/0]). 5. To end training, press the [ ] button once again. NOTE The [DRUM MUTE] button is not used with this type of training. DTX400K/DTX430K/DTX450K Owner’s Manual 35 Practicing in Training Mode Groove Tracker Groove Tracker makes it simple to play a number of different practice drum patterns, which will automatically reflect the speed and strength of your drumming. In addition, you can also freely add your own fills to the basic pattern. Please note that this type of training is not scored. 2 1 1. 3,6 • If you briefly stop drumming and then begin again, Press the [TRAINING] button to activate Training Mode. 2. Press number button [7]. The [ ] button will flash, indicating that the drum module is on standby to start training. 3. Press the [ ] button when you are ready to go. The drum module will play the practice drum pattern once. In addition, the number buttons ([1] to [10/0]) will light up as the pattern plays. 4. To select a different practice drum pattern, press the corresponding number button ([1] to [10/0]). 5. Play the hi-hat or kick pad. Each time you do so, the next part of the drum pattern will be played. • Refer to the drum scores in the Data List section (page 62) for details on the pads to be played to advance each drum pattern and how much the patterns advance with each strike. • The tempo of the drum pattern will change to reflect 4 the drum pattern will play from the start. NOTE You can set the period of time after which the drum pattern will return to the start when you stop drumming. For details, see the description of the Groove Tracker Return Time parameter from Menu Mode (page 50). 6. To end training, press the [ ] button once again. Muting specific parts from the practice drum pattern You can mute any of the individual drum parts (i.e., snare, kick, tom, hi-hat, and/or cymbal) that make up the practice drum pattern. If, for example, you were to mute the snare part, you could play whatever snare pattern you like along with the rest of the drum parts. 1. Press the [DRUM MUTE] button and verify that it lights up. the speed of your drumming. • The volume of the drum pattern will change to reflect the strength of your drumming. NOTE • You can select which pad(s) you would like to use to advance the drum pattern. For details, see the description of the Groove Tracker Control Pad(s) parameter from Menu Mode (page 51). • You can set how much the practice drum pattern should advance for each strike of the selected pad(s). For details, see the description of the Groove Tracker Advance Step parameter from Menu Mode (page 51). 2. Strike the pad corresponding to the part from the practice drum pattern you wish to mute. • The selected drum part will now be muted. • If the pad corresponding to the muted drum part is not struck for certain period of time, it will be automatically unmuted. 3. To manually unmute all drum parts, press the [DRUM MUTE] button once again and verify that it turns off. NOTE The [ ] button is not used with this type of training. 36 DTX400K/DTX430K/DTX450K Owner’s Manual Practicing in Training Mode Pad Gate In Pad Gate training, the pads will only produce a sound when your drumming precisely matches a practice drum pattern. At the end of training, the drum module will display your score using number buttons [1] to [10/0] and will also speak it to you. 2 1 1. Press the [TRAINING] button to activate Training Mode. 2. Press number button [8]. The [ ] button will flash, indicating that the drum module is on standby to start training. 3. Press the [ ] button when you are ready to go. • The drum module will start to play the practice drum pattern. • The number buttons ([1] to [10/0]) will light up to dis- 4,5 3,6 Muting specific parts from the practice drum pattern You can mute any of the individual drum parts (i.e., snare, kick, tom, hi-hat, and/or cymbal) that make up the practice drum pattern. If, for example, you were to mute the snare part, you could focus your training on just the snare pad. 1. Press the [DRUM MUTE] button and verify that it lights up. play the progression of the practice drum pattern. 4. 5. If necessary, select a different practice drum pattern using number buttons [1] to [10/0]. Drum scores for the various practice drum patterns can be found in the Data List section (page 62). Play the practice drum pattern on the pads. • The pads will not produce a sound if they are struck out of time. • If you play any phrase other than the practice drum pattern, the pads will not produce a sound. • To select a different practice drum pattern, press the corresponding number button ([1] to [10/0]). 6. To end training, press the [ ] button once again. The drum module will display your score using number buttons [1] to [10/0] and will also speak it to you (in English). For more details regarding scoring, see Scoring function (page 29). 2. Strike the pad corresponding to the part from the practice drum pattern you wish to mute. • The selected drum part will now be muted. • If the pad corresponding to the muted drum part is not struck for certain period of time, it will be automatically unmuted. 3. To manually unmute all drum parts, press the [DRUM MUTE] button once again and verify that it turns off. NOTE • If you wish to adjust the difficulty level for this training, see the description of the Difficulty Level parameter from Menu Mode (page 50). • You can choose either to mute pads when they are not played in time or to play all pads regardless of when they are struck. For details, see the description of the Ignore Timing parameter from Menu Mode (page 50). • You can set which groups of pads the drum module should consider when deciding whether or not you are playing the correct pattern. For details, see the description of the Pad Gate Group parameter from Menu Mode (page 52). DTX400K/DTX430K/DTX450K Owner’s Manual 37 Practicing in Training Mode Part Mute Part Mute training lets you mute any or all of the drum parts (i.e., hi-hat, snare, kick, tom, and/or cymbal) and also the instrument parts from an accompanying song. Please note that this type of training is not scored. 5 1 1. 2. 3. 5 3,6 Press the [TRAINING] button to activate Training Mode. Press number button [9]. The [ ] button will flash, indicating that the drum module is on standby to start training. Press the [ ] button to start the current song. Each of the drum parts and the non-drum parts are assigned to different number buttons as shown in the diagram, allowing you to mute and unmute them by pressing the corresponding button. (see the description below) 4. 5. HI-HAT KICK CYMBAL SNARE TOM Drum parts Muting drum parts NOTE When you play the pads, the number buttons will flash to indicate the corresponding drum parts. Muting with the pads 1. Press the [DRUM MUTE] button and verify that it lights up. 2. Strike the pad corresponding to the drum part you wish to mute. The selected part will be muted and the corresponding number button will light up. 3. To manually unmute all drum parts, press the [DRUM MUTE] button once again and verify that its light goes out. NOTE If the pad(s) corresponding to a muted drum part are not struck for certain period of time, the part will be automatically unmuted and the number button’s light will go out. DTX400K/DTX430K/DTX450K 6. Practice playing the pads along with the song. To select a different song while training, hold down the [SONG] button and press the corresponding number button ([1] to [10/0]). To end training, press the [ ] button once again. Bass part Other song parts Non-drum parts Muting non-drum parts Muting with number buttons [1] to [5] 1. To mute a drum part, press the corresponding number button. The part will be muted and the number button will light up. 2. To unmute a drum part, again press the corresponding number button, which will be lit. The part will be unmuted and the number button’s light will go out. 38 2 Owner’s Manual 1. Press number button [9] to mute the accompanying song’s bass part; press number button [10/0] to mute the other instrument parts. The number button(s) corresponding to the muted song part(s) will light up. 2. To unmute song parts, again press the corresponding number button(s), which will be lit. The number button light(s) will go out. Practicing in Training Mode Fast Blast In a Fast Blast training session, you just play the drums as wildly as you can over a set period of time. More a game than a form of practice, your aim is to get the highest possible score. At the end of training, the drum module will display your score using number buttons [1] to [10/0] and will also speak it to you. NOTE Fast Blast uses a different scoring system than the other types of training. 2 1 1. Press the [TRAINING] button to activate Training Mode. 2. Press number button [10/0]. The [ ] button will flash, indicating that the drum module is on standby to start training. 3. 4. Press the [ ] button. Within the training time (10 seconds), play as many of the pads as often as you can. • The timer will start when you strike the first pad. • Each time you strike a pad and increase your score, the position of the fully-lit number button moves from left to right. 3,4 • When the training session has ended, the drum module will display your score using number buttons [1] to [10/0] and will also speak it to you (in English). Example: If you scored 980, the number buttons would flash [9][8][0]. • To end a training session before the timer runs out, press the [ ] button once again. NOTE • If you would like to check your score once again, press any of the number buttons [1] to [10/0]. • If you wish to adjust the training time, see the description of the Fast Blast Timer parameter from Menu Mode (page 52). • The half-lit number buttons indicate how much time is left before the end of the training session. Specifically, the half-lit number button lights will successively go out from right to left, and the training session will end when they are all turned off. Lights go out. DTX400K/DTX430K/DTX450K Owner’s Manual 39 Advanced Techniques Setting Parameters using Menu Mode Advanced Techniques Menu Mode is used to set drum-module parameters and functions, which are arranged into the following seven groups. z Metronome Settings 1-1. Pattern ............................................................ Page 41 1-2. Beats .............................................................. Page 41 1-3. Sound............................................................. Page 41 1-4. Number Button Lighting Pattern ..................... Page 42 x Kit Settings 2-1. Pad Sound...................................................... Page 42 2-2. Pad Volume.................................................... Page 42 2-3. Pad Panning .................................................. Page 43 2-4. Double Bass Drum......................................... Page 43 2-5. Reverb ........................................................... Page 43 Basic Menu Mode Procedure The basic procedure used to activate Menu Mode and select the parameter to be set is as follows. For details of the individual parameters, please see the corresponding sections below. 1. While holding the [KIT] button, press the [SONG] button to activate Menu Mode. Number buttons [1] to [7] will start to flash. Hold c MIDI Settings 3-1. Local Control .................................................. Page 44 3-2. Note Number ................................................. Page 44 2. v Hi-hat Settings 4-1. Clutch Position................................................ Page 45 4-2. Splash Sensitivity........................................... Page 45 4-3. Foot Close Position ........................................ Page 45 4-4. Foot Close Velocity ........................................ Page 45 4-5. Kick Velocity................................................... Page 46 Number button [1] b Trigger Settings 5-1. Pad Velocity Curve ......................................... Page 46 5-2. Crosstalk........................................................ Page 47 5-3. Snare Pad Type ............................................. Page 48 5-4. Pedal Types ................................................... Page 48 5-5. Gain ............................................................... Page 49 5-6. Minimum Level............................................... Page 49 n Training Settings 6-1. Timer .............................................................. Page 49 6-2. Difficulty Level ................................................ Page 50 6-3. Ignore Timing ................................................. Page 50 6-4. Groove Tracker Return Time .......................... Page 50 6-5. Groove Tracker Control Pad(s)....................... Page 51 6-6. Groove Tracker Advance Step ....................... Page 51 6-7. Pad Gate Group.............................................. Page 52 6-8. Fast Blast Timer............................................. Page 52 m Other Settings 7-2. Voice Guidance Volume ................................. Page 53 7-3. Auto Power-Off Time....................................... Page 53 7-4. Stereo/Mono................................................... Page 53 7-5. Initialize Kit ..................................................... Page 54 7-6. Initialize Song ................................................. Page 54 7-7. Revert to Last Power On ................................. Page 55 7-8. Factory Set ..................................................... Page 55 DTX400K/DTX430K/DTX450K [2] [3] Group Metronome Settings Kit Settings MIDI Settings Number button [4] [5] [6] [7] Group Hi-hat Settings Trigger Settings Training Settings Other Settings 3. Press the number button corresponding to the parameter you wish to set. (Parameters are shown in the hierarchical list on the left.) The number buttons flash continuously to indicate the current setting. 4. Enter the new setting. You can use the number buttons to directly set parameters with numerical values, such as a velocity. To enter the value 105, for example, press the number buttons in the order [1][10/0][5]. • Number button [10/0] is used to enter the value zero. You cannot use it to enter the number ten. • If you take no action for awhile, the setting is automatically stored. • When you have entered a value, the number buttons will flash continuously to indicate the new setting. 7-1. Kit Lock ........................................................... Page 53 40 Press the number button corresponding to the group containing the parameter you wish to set. (Parameter groups are shown in the hierarchical list on the left.) Owner’s Manual NOTE You can also use the [TEMPO+] and [TEMPO–] buttons to increase and decrease setting values. Specifically, the [TEMPO+] button increases the current setting by one each time it is pressed; the [TEMPO–] button decreases it by one. Setting Parameters using Menu Mode 1-2. Beats z Metronome Settings Steps: MENU ([KIT] + [SONG]) [1] [2] Setting 1-1. Pattern Steps: MENU ([KIT] + [SONG]) [1] [1] Setting Setting Setting Using the following procedure, you can set the metronome to between 1 and 9 beats in length. Using the following procedure, you can set one of eight patterns for the drum module’s metronome. 1. While holding the [KIT] button, press the [SONG] button to activate Menu Mode. 1. While holding the [KIT] button, press the [SONG] button to activate Menu Mode. 2. Press number button [1] to select the Metronome Settings parameter group. 2. Press number button [1] to select the Metronome Settings parameter group. 3. 4. Press number button [2] to select the Beats parameter. 3. 4. Press number button [1] to select the Pattern parameter. Select a new metronome pattern using the corresponding number button ([1] to [8]). The available settings are as follows. Number button Select a new metronome length in beats using the corresponding number button ([1] to [9]). The available settings are as follows. Number button [1] [2] [3] [4] [5] [6] [7] [8] [9] Setting [1] [2] Setting 1 beat 2 beats 3 beats 4 beats 5 beats 6 beats 7 beats 8 beats 9 beats [3] 1-3. Sound [4] Steps: MENU ([KIT] + [SONG]) [1] [3] Setting [5] Setting [6] [7] 3 3 3 3 3 3 3 3 [8] NOTE With settings [2], [4], [6], and [8], the first beat is accented. Using the following procedure, you can set the sound played by the metronome to, for example, a standard click sound, a cowbell, a drumsticks sound, or a spoken count. 1. While holding the [KIT] button, press the [SONG] button to activate Menu Mode. 2. Press number button [1] to select the Metronome Settings parameter group. 3. 4. Press number button [3] to select the Sound parameter. Select a new metronome sound using the corresponding number button ([1] to [6]). The available settings are as follows. Number button [1] [2] [3] [4] [5] [6] Setting Metronome click 1 Metronome click 2 Cowbell Drumsticks Spoken count 1 Spoken count 2 DTX400K/DTX430K/DTX450K Owner’s Manual 41 Setting Parameters using Menu Mode 1-4. Number Button Lighting Pattern Steps: MENU ([KIT] + [SONG]) [1] [4] Setting Setting You can have number buttons [1] to [10/0] light up when playing the metronome in Kit Mode or Song Mode. Use the following procedure to set the buttons’ lighting pattern. x Kit Settings 2-1. Pad Sound Steps: MENU ([KIT] + [SONG]) [2] [1] Setting Setting Using the following procedure, you can change the sounds assigned to the current kit’s pads. This makes it very easy to create your own unique kits. 1. While holding the [KIT] button, press the [SONG] button to activate Menu Mode. 2. Press number button [1] to select the Metronome Settings parameter group. 1. While holding the [KIT] button, press the [SONG] button to activate Menu Mode. 3. Press number button [4] to select the Number Button Lighting Pattern parameter. 2. Press number button [2] to select the Kit Settings parameter group. 4. Select a new lighting pattern using the corresponding number button ([1] to [3]). The available settings are as follows. 3. Press number button [1] to select the Pad Sound parameter. 4. 5. Strike a pad to select it. Number button [1] [2] [3] Setting Off (no lighting) Pattern 1 Pattern 2 Enter a new drum-sound number using number buttons [1] to [10/0]. For a list of sounds and numbers, see the Voice List (page 61). Setting 1 to 169 2-2. Pad Volume Steps: MENU ([KIT] + [SONG]) [2] [2] Setting Setting Using the following procedure, you can adjust the volume of the current kit’s pads. 1. While holding the [KIT] button, press the [SONG] button to activate Menu Mode. 2. Press number button [2] to select the Kit Settings parameter group. 3. Press number button [2] to select the Pad Volume parameter. 4. 5. Strike a pad to select it. Enter a new volume using number buttons [1] to [10/0]. Setting 0 to 127 42 DTX400K/DTX430K/DTX450K Owner’s Manual Setting Parameters using Menu Mode 2-3. Pad Panning 2-5. Reverb Steps: MENU ([KIT] + [SONG]) [2] [3] Setting Steps: MENU ([KIT] + [SONG]) [2] [5] Setting Setting Using the following procedure, you can adjust the panning of the current kit’s pads. 1. While holding the [KIT] button, press the [SONG] button to activate Menu Mode. 2. Press number button [2] to select the Kit Settings parameter group. 3. Press number button [3] to select the Pad Panning parameter. 4. 5. Strike a pad to select it. Enter a new panning position using number buttons [1] to [10/0]. A value of 64 corresponds to the center position. Smaller values than this move the pad increasingly towards the left; larger values move it towards the right. Setting 0 to 127 2-4. Double Bass Drum Steps: MENU ([KIT] + [SONG]) [2] [4] Setting Setting Reverb effects add a warm ambience to sounds, simulating the complex reflections of actual performance spaces, such as a concert hall or a small club. Use the following procedure to select a reverb effect for the current kit. 1. While holding the [KIT] button, press the [SONG] button to activate Menu Mode. 2. Press number button [2] to select the Kit Settings parameter group. 3. 4. Press number button [5] to select the Reverb parameter. Select a reverb effect using the corresponding number button ([1] to [10/0]). The available settings are as follows. Number button [1] [2] [3] [4] [5] [6] [7] [8] [9] [10/0] Setting Off Hall 1 Hall 2 Hall 3 Room 1 Room 2 Room 3 Stage 1 Stage 2 Plate Setting Using the following procedure, you can easily configure the drum module to produce a kick drum sound when you operate the pedal connected to the [HI-HAT CONTROL] trigger input jack. This convenient function provides support for double bass drumming techniques. 1. While holding the [KIT] button, press the [SONG] button to activate Menu Mode. 2. Press number button [2] to select the Kit Settings parameter group. 3. Press number button [4] to select the Double Bass Drum parameter. 4. Set the parameter using number button [1] or [2]. The available settings are as follows. Number button [1] [2] Setting Off On NOTE While the Double Bass Drum function is enabled, you will be unable to use the hi-hat controller plugged into the [HI-HAT CONTROL] trigger input jack to simulate opening and closing of the hihat. DTX400K/DTX430K/DTX450K Owner’s Manual 43 Setting Parameters using Menu Mode 3-2. Note Number c MIDI Settings Steps: MENU ([KIT] + [SONG]) [3] [2] Setting 3-1. Local Control Steps: MENU ([KIT] + [SONG]) [3] [1] Setting Setting The Local Control parameter determines whether or not the drum module’s internal tone generator will produce sounds in response to playing of the pads or of songs. Normally, this parameter is set to “On”, meaning that pads and songs will generate sounds. When “Off” is selected, the tone generator is essentially disconnected from the pads and songs, which will be unable to generate any sound. An “Off” setting can prove highly useful when you wish to record your drum performances as MIDI data on a sequencer or using DAW software. 1. While holding the [KIT] button, press the [SONG] button to activate Menu Mode. 2. Press number button [3] to select the MIDI Settings parameter group. 3. Press number button [1] to select the Local Control parameter. 4. Set the parameter using number button [1] or [2]. The available settings are as follows. Number button Setting [1] Off [2] On Description The internal tone generator does not respond to pads and songs. The internal tone generator responds to pads and songs. NOTE • The drum module’s internal tone generator will continue to respond to received MIDI data when Local Control is turned off. • The drum module will continue to output drum performances as MIDI data when Local Control is turned off. 44 DTX400K/DTX430K/DTX450K Owner’s Manual Setting Using the following procedure, you can set the MIDI note number that is output when each of the pads is played. 1. While holding the [KIT] button, press the [SONG] button to activate Menu Mode. 2. Press number button [3] to select the MIDI Settings parameter group. 3. Press number button [2] to select the Note Number parameter. 4. 5. Strike a pad to select it. Enter a new note number using number buttons [1] to [10/0]. Setting 0 to 127 NOTE Note number settings are relevant only when you have connected your drum module to a computer. For more details, refer to the MIDI Reference Manual (PDF). Setting Parameters using Menu Mode 4-3. Foot Close Position v Hi-hat Settings Steps: MENU ([KIT] + [SONG]) [4] [3] Setting 4-1. Clutch Position Steps: MENU ([KIT] + [SONG]) [4] [1] Setting Setting Using the following procedure, you can simulate the effect of changing the hi-hat’s clutch position. The smaller the setting, the quicker an open hi-hat sound will decay. Setting Using the following procedure, you can adjust the position at which the hi-hat switches from open to closed when you operate the hi-hat controller. The lower the value, the smaller the virtual opening between the top and bottom hihats. Larger values increase the size of the gap between the top and bottom cymbals, and this can prevent foot close or foot splash sounds from being produced when you operate the pedal. 1. While holding the [KIT] button, press the [SONG] button to activate Menu Mode. 2. Press number button [4] to select the Hi-hat Settings parameter group. 3. Press number button [1] to select the Clutch Position parameter. 1. Enter a new clutch position using number buttons [1] to [10/0]. While holding the [KIT] button, press the [SONG] button to activate Menu Mode. 2. Press number button [4] to select the Hi-hat Settings parameter group. 3. Press number button [3] to select the Foot Close Position parameter. 4. Enter a new foot close position using number buttons [1] to [10/0]. 4. Setting 0 to 64 4-2. Splash Sensitivity This parameter only has an effect when you are using an HH65 Hi-hat Controller. Steps: MENU ([KIT] + [SONG]) [4] [2] Setting Setting Using the following procedure, you can set the degree of sensitivity for detecting hi-hat foot splashes. The higher the value, the easier it will be to produce a foot-splash sound with the hi-hat controller. High values may, however, result in splash sounds being unintentionally produced when, for example, you operate the hi-hat controller lightly as you keep time. It is a good idea, therefore, to set this parameter to “Off” if you do not want to play foot splashes. Setting 0 to 32 4-4. Foot Close Velocity Steps: MENU ([KIT] + [SONG]) [4] [4] Setting Setting Using the following procedure, you can adjust the velocity (or power) of foot-close sounds produced using the hi-hat controller. 1. While holding the [KIT] button, press the [SONG] button to activate Menu Mode. 2. Press number button [4] to select the Hi-hat Settings parameter group. 3. Press number button [2] to select the Splash Sensitivity parameter. 1. While holding the [KIT] button, press the [SONG] button to activate Menu Mode. 4. Enter a new splash sensitivity using number buttons [1] to [10/0]. 2. Press number button [4] to select the Hi-hat Settings parameter group. 3. Press number button [4] to select the Foot Close Velocity parameter. 4. Enter a new velocity using number buttons [1] to [10/0]. Setting 0 to 127 NOTE Set this parameter to [0] in order to turn off foot splashes. This parameter only has an effect when you are using the hi-hat controller that comes with the DTX400K. Setting 1 to 127 DTX400K/DTX430K/DTX450K Owner’s Manual 45 Setting Parameters using Menu Mode 4-5. Kick Velocity Steps: MENU ([KIT] + [SONG]) [4] [5] Setting Setting Using the following procedure, you can adjust the velocity (or power) of kick sounds produced using the hi-hat controller. In order for the Kick Velocity parameter to have an effect, Double Bass Drum must be set to “On” for the current kit (page 43). This parameter only has an effect when you are using the hi-hat controller that comes with the DTX400K. 1. While holding the [KIT] button, press the [SONG] button to activate Menu Mode. 2. Press number button [4] to select the Hi-hat Settings parameter group. 3. Press number button [5] to select the Kick Velocity parameter. 4. Enter a new velocity using number buttons [1] to [10/0]. b Trigger Settings 5-1. Pad Velocity Curve Steps: MENU ([KIT] + [SONG]) [5] [1] Setting Setting Using the following procedure, you can select a velocity curve for individual pads. A velocity curve determines how the velocity (or power) of a sound is affected by how hard you strike the pad. 1. While holding the [KIT] button, press the [SONG] button to activate Menu Mode. 2. Press number button [5] to select the Trigger Settings parameter group. 3. Press number button [1] to select the Pad Velocity Curve parameter. 4. 5. Strike a pad to select it. Enter a new velocity curve setting using number buttons [1] to [10/0]. The available settings are as follows. Setting 1 to 25 Velocity Setting 1 to 127 1 2 3 4 5 Velocity Trigger input level 6 7 8 9 10 Trigger input level 46 DTX400K/DTX430K/DTX450K Owner’s Manual Setting Parameters using Menu Mode 5-2. Crosstalk Velocity 11 12 13 Steps: MENU ([KIT] + [SONG]) [5] [2] Setting 14 15 Setting Velocity Trigger input level 16 17 18 19 20 Trigger input level The term “crosstalk” refers to the output of spurious trigger signals from a pad other than the one that was stuck as a result of vibration or interference between pads. Using the following procedure, you can adjust the Crosstalk parameter for individual pads to prevent this phenomenon from occurring. 1. While holding the [KIT] button, press the [SONG] button to activate Menu Mode. 2. Press number button [5] to select the Trigger Settings parameter group. 3. Press number button [2] to select the Crosstalk parameter. 4. 5. Strike a pad to select it. Enter a new setting (%) using number buttons [1] to [10/0]. Larger values are more effective in preventing crosstalk; however, they can also make it difficult to play pads simultaneously during light drumming. Velocity Setting 0 to 99 21 22 23 24 25 Trigger input level DTX400K/DTX430K/DTX450K Owner’s Manual 47 Setting Parameters using Menu Mode 5-3. Snare Pad Type 5-4. Pedal Types Steps: MENU ([KIT] + [SONG]) [5] [3] Setting Steps: MENU ([KIT] + [SONG]) [5] [4] Setting Setting Using the following procedure, you can specify the type of snare pad connected to your drum module. Setting Use the following parameter to specify the types of pedals (i.e., hi-hat controller and kick) connected to your drum module. 1. While holding the [KIT] button, press the [SONG] button to activate Menu Mode. 1. 2. Press number button [5] to select the Trigger Settings parameter group. While holding the [KIT] button, press the [SONG] button to activate Menu Mode. 2. 3. Press number button [3] to select the Snare Pad Type parameter. Press number button [5] to select the Trigger Settings parameter group. 3. Press number button [4] to select the Pedal Types parameter. 4. Select a new pedal type combination using the corresponding number button ([1] to [5]). The available settings are as follows. 4. Select a new snare pad type using the corresponding number button ([1] to [6]). The available settings are as follows. Number button [1] [2] [3] [4] [5] [6] Setting Automatic identification (only for [2] and [3]) TP70S Snare pad that comes with DTX400K XP-series pad TP70S reversed XP-series pad reversed NOTE • When set to [1], the drum module will automatically identify the type of snare pad that came with your electronic drum kit when it is turned on. If you then press and hold number button [1], the drum module will flash number button [2] or [3] to indicate the result of automatic identification. • Whenever you change the type of snare connected to the drum module, please update this setting using the corresponding number button ([2] to [4]). For example, when you use the XPseries pad, select [4]. • You can use setting [5] or [6] to switch (or reverse) the drum sounds assigned to Rim 1 and Rim 2. This makes it easier for left-handed drummers to configure their electronic drum kit. Number button [1] [2] [3] [4] [5] Setting Hi-hat controller Kick pedal Automatic identification (only for [2] and [3]) HH65 KP65 Hi-hat controller pedal that comes with KU100 DTX400K Hi-hat controller pedal that comes with KP65 DTX400K HH65 KU100 NOTE • This parameter can normally be set to [1] (automatic identification). • When set to [1], the drum module will automatically identify the type of pedal that came with your electronic drum kit when it is turned on. If you then press and hold number button [1], the drum module will flash number button [2] or [3] to indicate the result of automatic identification. • Connect the hi-hat controller before turning on the drum module. Please do not turn the drum module on with the hi-hat controller depressed. The drum module can not identify the type of pedal properly and it causes that the kick may produce much smaller sound than expected. • Whenever you change the type of hi-hat controller or kick pedal connected to the drum module, please update this setting using the corresponding number button ([2] to [5]). 48 DTX400K/DTX430K/DTX450K Owner’s Manual Setting Parameters using Menu Mode 5-5. Gain Steps: MENU ([KIT] + [SONG]) [5] [5] Setting Setting Using the following procedure, you can set the gain level for trigger signals output from individual pads. The higher the gain setting, the louder the sounds produced by light drumming. n Training Settings 6-1. Timer Steps: MENU ([KIT] + [SONG]) [6] [1] Setting Setting Using the following procedure, you can set the practice timer used in the drum module’s Training Mode. The timer begins counting at the start of a training session, and when the set time is reached, it automatically ends the session. 1. While holding the [KIT] button, press the [SONG] button to activate Menu Mode. 2. Press number button [5] to select the Trigger Settings parameter group. 1. While holding the [KIT] button, press the [SONG] button to activate Menu Mode. 3. 4. 5. Press number button [5] to select the Gain parameter. 2. Press number button [6] to select the Training Settings parameter group. 3. 4. Press number button [1] to select the Timer parameter. Strike a pad to select it. Enter a new gain level using number buttons [1] to [10/ 0]. Setting 1 to 127 5-6. Minimum Level Steps: MENU ([KIT] + [SONG]) [5] [6] Setting Setting When the strength with which you strike a pad is no more than this level, the pad will not output a trigger signal in response and no sound will be produced. 1. While holding the [KIT] button, press the [SONG] button to activate Menu Mode. 2. Press number button [5] to select the Trigger Settings parameter group. 3. Press number button [6] to select the Minimum Level parameter. 4. 5. Strike a pad to select it. Select your preferred practice time using the corresponding number button ([1] to [10/0]). The available settings are as follows. Number button [1] [2] [3] [4] [5] [6] [7] [8] [9] [10/0] Setting Off 30 seconds 60 seconds 90 seconds 120 seconds 150 seconds 180 seconds 300 seconds 480 seconds 600 seconds NOTE The practice time set using this parameter applies to the following types of training only. • Groove Check • Rhythm Gate • Measure Break • Tempo Up/Down • Change Up • Pad Gate Other types of training are not affected. Enter a new setting (%) using number buttons [1] to [10/0]. Setting 0 to 99 (%) DTX400K/DTX430K/DTX450K Owner’s Manual 49 Setting Parameters using Menu Mode 4. 6-2. Difficulty Level Steps: MENU ([KIT] + [SONG]) [6] [2] Setting Set the parameter using number button [1] or [2]. The available settings are as follows. Number button Setting [1] Off [2] On Setting Using the following procedure, you can set the level of training difficulty for Tempo Up/Down (page 33), Change Up (page 34), and Pad Gate (page 37). 1. While holding the [KIT] button, press the [SONG] button to activate Menu Mode. 2. Press number button [6] to select the Training Settings parameter group. 3. Press number button [2] to select the Difficulty Level parameter. 4. Select a new difficulty level using the corresponding number button ([1] to [5]). The higher the level, the more difficult the training. Setting 1 to 5 NOTE The level of difficulty set using this parameter applies only to the Tempo Up/Down, Change Up, and Pad Gate training types. Other types of training are not affected. 6-3. Ignore Timing Steps: MENU ([KIT] + [SONG]) [6] [3] Setting Setting Using the following procedure, you can set the Ignore Timing parameter for Tempo Up/Down (page 33), Change Up (page 34), and Pad Gate (page 37) training. When set to “On”, the pads will produce a sound whenever they are struck; when “Off”, only pads played exactly in time will produce a sound. 50 1. While holding the [KIT] button, press the [SONG] button to activate Menu Mode. 2. Press number button [6] to select the Training Settings parameter group. 3. Press number button [3] to select the Ignore Timing parameter. DTX400K/DTX430K/DTX450K Owner’s Manual Description Pads played out of time will not produce a sound. Pads will produce a sound whenever they are played. NOTE This parameter applies only to the Tempo Up/Down, Change Up, and Pad Gate training types. Other types of training are not affected. 6-4. Groove Tracker Return Time Steps: MENU ([KIT] + [SONG]) [6] [4] Setting Setting Using the following procedure, you can set the period of time after which the practice drum pattern in Groove Tracker training (page 36) will return to the start when you stop drumming. 1. While holding the [KIT] button, press the [SONG] button to activate Menu Mode. 2. Press number button [6] to select the Training Settings parameter group. 3. Press number button [4] to select the Groove Tracker Return Time parameter. 4. Enter a new return time setting using number buttons [1] to [10/0]. The bigger the setting, the longer the return time. Setting 1 to 10 NOTE • When set to [1], the practice drum pattern will not return to the start. • The time set using this parameter only applies to Groove Tracker training. Other types of training are not affected. Setting Parameters using Menu Mode 6-5. Groove Tracker Control Pad(s) 6-6. Groove Tracker Advance Step Steps: MENU ([KIT] + [SONG]) [6] [5] Setting Steps: MENU ([KIT] + [SONG]) [6] [6] Setting Setting Setting Using the following procedure, you can select which pad(s) you would like to use to advance the practice drum pattern in Groove Tracker training (page 36). Using the following procedure, you can set how much the practice drum pattern in Groove Tracker training (page 36) should advance for each strike of the set pad(s). 1. While holding the [KIT] button, press the [SONG] button to activate Menu Mode. 1. While holding the [KIT] button, press the [SONG] button to activate Menu Mode. 2. Press number button [6] to select the Training Settings parameter group. 2. Press number button [6] to select the Training Settings parameter group. 3. Press number button [5] to select the Groove Tracker Control Pad(s) parameter. 3. Press number button [6] to select the Groove Tracker Advance Step parameter. 4. Select a new setting using the corresponding number button ([1] to [6]). The available settings are as follows. 4. Select a new advancement step using the corresponding number button ([1] to [5]). The available settings are as follows. Number button [1] [2] [3] Setting Auto Cymbal + hi-hat 1 Cymbal + hi-hat 2 [4] Kick [5] Snare + hi-hat [6] All Description The drum module will automatically select the best setting for the practice drum pattern. The cymbal and hi-hat pads will advance the pattern and will also produce their own sounds. The cymbal and hi-hat pads will advance the pattern. The kick pad or pedal will advance the pattern. Number button Setting Description [1] Auto The drum module will automatically identify the best advancement step for the practice drum pattern. [2] The practice drum pattern will advance in quarter-note steps. [3] The practice drum pattern will advance in eighth-note steps. [4] The snare and hi-hat pads will advance the pattern. All pads and pedals will advance the pattern. NOTE • With a setting of [3] to [6], the corresponding pad(s) will not produce a drum sound of their own. • When this parameter is set to [6], the [DRUM MUTE] button cannot be used to mute the practice drum pattern. 3 [5] The practice drum pattern will advance in sixteenth-note steps. The practice drum pattern will advance in eighth-note triplet steps. NOTE • The advancement step set using this parameter only applies to Groove Tracker training. Other types of training are not affected. • If, when set to [1], you press and hold number button [1], the drum module will flash a number button between [2] and [5] to indicate the result of automatic identification. DTX400K/DTX430K/DTX450K Owner’s Manual 51 Setting Parameters using Menu Mode 6-7. Pad Gate Group 6-8. Fast Blast Timer Steps: MENU ([KIT] + [SONG]) [6] [7] Setting Steps: MENU ([KIT] + [SONG]) [6] [8] Setting Setting Using the following procedure, you can set which groups of pads the drum module should consider when deciding whether or not you are playing the correct pattern in Pad Gate training (page 37). Using the following procedure, you can set the timer for Fast Blast training sessions (page 39). When the timer counts down to zero after the start of a training session, it will automatically end the training. 1. While holding the [KIT] button, press the [SONG] button to activate Menu Mode. 1. While holding the [KIT] button, press the [SONG] button to activate Menu Mode. 2. Press number button [6] to select the Training Settings parameter group. 2. Press number button [6] to select the Training Settings parameter group. 3. Press number button [7] to select the Pad Gate Group parameter. 3. Press number button [8] to select the Fast Blast Timer parameter. 4. Select a new setting using the corresponding number button ([1] to [4]). The available settings are as follows. 4. Select your preferred practice time using the corresponding number button ([1] to [10/0]). The available settings are as follows. Number button [1] [2] [3] [4] Setting Description Any pad will produce a sound and be scored, as long as the All pads timing of your drumming is correct. The kit will be separated into five groups—Kick, Snare, Toms, Cymbals, and Hi-hat. In order for your drumming to Group type 1 produce sounds and be scored, you must strike pads from the same group as those from the practice drum pattern and do so in time. More difficult than Group type 1, this setting splits each of the toms and each of the cymbals Group type 2 into individual groups. In addition, the hi-hat pad and the hihat controller are also treated separately. With this setting, you must play All notes the exact same practice drum pattern as the drum module. NOTE • The evaluation method set using this parameter applies only to Pad Gate training. Other types of training are not affected. • The higher the setting, the more difficult the training. 52 Setting DTX400K/DTX430K/DTX450K Owner’s Manual Number button [1] [2] [3] [4] [5] [6] [7] [8] [9] [10/0] Setting 10 seconds 30 seconds 60 seconds 90 seconds 120 seconds 150 seconds 180 seconds 300 seconds 480 seconds 600 seconds NOTE The timer set using this parameter applies only to Fast Blast training. Other types of training are not affected. Setting Parameters using Menu Mode 7-3. Auto Power-Off Time m Other Settings Steps: MENU ([KIT] + [SONG]) [7] [3] Setting 7-1. Kit Lock Steps: MENU ([KIT] + [SONG]) [7] [1] Setting Setting Normally, when you select a song, the drum module automatically chooses the most appropriate kit. You can, however, use the Kit Lock function to prevent this if you wish to keep the current kit when practicing with different songs. 1. 2. Setting Using the following procedure, you can set the time until the Auto Power-Off function (page 20) activates or you can disable this function. 1. While holding the [KIT] button, press the [SONG] button to activate Menu Mode. 2. While holding the [KIT] button, press the [SONG] button to activate Menu Mode. Press number button [7] to select the Other Settings parameter group. 3. Press number button [7] to select the Other Settings parameter group. Press number button [3] to select the Auto Power-Off Time parameter. 4. Set a time or disable this function using the corresponding number button ([1] to [7]). The available settings are as follows. 3. Press number button [1] to select the Kit Lock parameter. 4. Set the parameter using number button [1] or [2]. The available settings are as follows. Number button [1] [2] Number button [1] [2] [3] [4] [5] [6] [7] Setting Off On NOTE Regardless of this parameter’s setting, you can always select a new kit using the drum module’s control panel. Setting Auto Power-Off disabled 5 minutes 10 minutes 15 minutes 30 minutes 60 minutes 120 minutes 7-4. Stereo/Mono Steps: MENU ([KIT] + [SONG]) [7] [4] Setting 7-2. Voice Guidance Volume Steps: MENU ([KIT] + [SONG]) [7] [2] Setting Setting Setting Using the following procedure, you can set the [PHONES/ OUTPUT] jack to output either mono or stereo sound. We recommend that you select the Mono setting if connecting a standard mono-audio cable to this jack in order to use your drum module with external speakers, a mixer, or other similar equipment. 1. While holding the [KIT] button, press the [SONG] button to activate Menu Mode. 2. Press number button [7] to select the Other Settings parameter group. 3. Press number button [2] to select the Voice Guidance Volume parameter. 1. 4. While holding the [KIT] button, press the [SONG] button to activate Menu Mode. Enter a new voice guidance volume using number buttons [1] to [10/0]. Larger setting values represent higher volumes and vice-versa. 2. Press number button [7] to select the Other Settings parameter group. 3. Press number button [4] to select the Stereo/Mono parameter. 4. Set the parameter using number button [1] or [2]. The available settings are as follows. Setting 1 to 10 NOTE Setting this parameter to [1] turns off the Voice Guidance function. Number button [1] [2] Setting Stereo Mono DTX400K/DTX430K/DTX450K Owner’s Manual 53 Setting Parameters using Menu Mode 7-5. Initialize Kit 7-6. Initialize Song Steps: MENU ([KIT] + [SONG]) [7] [5] [1] [1] Using the following procedure, you can restore a kit’s default settings. NOTICE When you initialize a kit, all of the changes you have made to it will be lost. Before proceeding, therefore, you should ensure that the kit contains no irreplaceable settings. 1. 2. Press the [KIT] button. 3. Steps: MENU ([KIT] + [SONG]) [7] [6] [1] [1] Using the following procedure, you can restore a song’s default settings. NOTICE When you initialize a song, all of the changes you have made to it will be lost. Before proceeding, therefore, you should ensure that the song contains no irreplaceable data. 1. 2. Press the [SONG] button. While holding the [KIT] button, press the [SONG] button to activate Menu Mode. 3. While holding the [KIT] button, press the [SONG] button to activate Menu Mode. 4. Press number button [7] to select the Other Settings parameter group. 4. Press number button [7] to select the Other Settings parameter group. 5. Press number button [5] to select the Initialize Kit function. 5. Press number button [6] to select the Initialize Song function. Select the kit to initialize using the corresponding number button ([1] to [10/0]). • Number button [1] will light up. 6. • Number button [1] will light up. 6. Press number button [1]. • Number button [1] will start to flash. • If you do not wish to proceed with initialization, press • The kit will be initialized. 54 DTX400K/DTX430K/DTX450K the [KIT] button now to exit Menu Mode. 7. Press number button [1]. Owner’s Manual Press number button [1]. • Number button [1] will start to flash. • If you do not wish to proceed with initialization, press the [KIT] button now to exit Menu Mode. 7. Select the song to initialize using the corresponding number button ([1] to [10/0]). Press number button [1]. • The song will be initialized. Setting Parameters using Menu Mode 7-7. Revert to Last Power On Steps: MENU ([KIT] + [SONG]) [7] [7] [1] [1] Using the following procedure, you can return all of the parameters from Kit Mode, Song Mode, and Menu Mode to the settings they had when you last turned on the drum module. NOTICE When you reset parameters as described below, any changes you have made to them since last turning on the drum module will be lost. Before proceeding, therefore, you should ensure that they contain no irreplaceable settings. 7-8. Factory Set Steps: MENU ([KIT] + [SONG]) [7] [8] [1] [1] Using the following procedure, you can return all of the parameters from Kit Mode, Song Mode, and Menu Mode to their default settings. NOTICE When you reset parameters as described below, any changes you have made to them will be lost. Before proceeding, therefore, you should ensure that they contain no irreplaceable settings. 1. While holding the [KIT] button, press the [SONG] button to activate Menu Mode. 1. While holding the [KIT] button, press the [SONG] button to activate Menu Mode. 2. 2. Press number button [7] to select the Other Settings parameter group. Press number button [7] to select the Other Settings parameter group. 3. 3. Press number button [8] to select the Factory Set function. Press number button [7] to select the Revert to Last Power On function. • Number button [1] will light up. 4. 4. the [KIT] button now to exit Menu Mode. Press number button [1]. • The parameters will be initialized. Press number button [1]. • Number button [1] will start to flash. • If you do not wish to proceed with initialization, press Press number button [1]. • Number button [1] will start to flash. • If you do not wish to proceed with initialization, press 5. • Number button [1] will light up. the [KIT] button now to exit Menu Mode. 5. Press number button [1]. • The parameters will be initialized. NOTE You can also restore the Factory Set by turning on the drum module with the [VOLUME+] button and the [VOLUME–] button held down. See page 20 for more details. DTX400K/DTX430K/DTX450K Owner’s Manual 55 Advanced Techniques Integrating Separately Sold Accessories As described below, you can add various accessories* to your electronic drum kit for an even more enjoyable drumming experience. (*: Sold separately) For DTX400K Owners By upgrading the KU100 Kick Unit and/or the hi-hat controller included as part of the DTX400K, you can make your electronic drum kit feel much closer to the real thing. Replacing the KU100 Kick Unit with a KP65 Kick Pad 1. Assemble the KP65 Kick Pad. For details, see Step 13 on page 17. 2. Turn off the drum module. The KP65 Kick Pad must be connected with the drum module turned off. 3. Disconnect the cable from the KU100 and plug it into the [OUT > DTX] jack on the back on the KP65. Replacing the bundled hi-hat controller with an HH65 Hi-hat Controller 1. Turn off the drum module. The HH65 Hi-hat Controller must be connected with the drum module turned off. 2. Disconnect the cable from the bundled hi-hat controller and plug it into the [OUTPUT] jack on the HH65. 3. 4. Turn on the drum module. 5. Play the HH65 Hi-hat Controller. Set the hi-hat controller type to “HH65”. For more details, see the description of the Pedal Types parameter from Menu Mode (page 48). For DTX430K & DTX450K Owners Adding a PCY90AT Cymbal Pad 4. 5. Turn on the drum module. 6. Play the KP65 Kick Pad. Turn off the drum module. The PCY90AT Cymbal Pad must be connected with the drum module turned off. 2. Using the cable that came with the cymbal pad, connect it to the [PAD > IN] jack on the KP65 Kick Pad. 3. 4. Turn on the drum module. Set the kick type to “KP65”. For more details, see the description of the Pedal Types parameter from Menu Mode (page 48). When you upgrade your KU100 to a KP65, you will need a foot pedal to play the new kick pad. 56 1. DTX400K/DTX430K/DTX450K Owner’s Manual Play the newly added cymbal pad. Advanced Techniques Connecting to a Computer Making Connections While the drum module is highly powerful and versatile all by itself, you can connect it to a computer via USB for even greater convenience and flexibility. When connected in this way, MIDI data can be freely exchanged with the computer, allowing the drum module to be used as an input device for music production applications. In this section, you’ll learn how to make the necessary connections. NOTE • As the drum module has no built-in speakers, you will need to connect headphones or an amplifier and speakers in order to hear it. For details, see page 19. • A USB cable is not included. In order to connect your drum module to a computer, choose a USB A-B cable of less than 3 meters in length. Supported operating systems: • Windows XP, Service Pack 3 (32-bit); Windows Vista (32-bit), and Windows 7 (32- or 64-bit) • Mac OS X 10.5 to 10.7 NOTICE You may damage a computer not running one of the above operating systems by connecting the drum module to it. In addition, there is no need to install the Yamaha USB-MIDI driver when using one of the above operating systems. 1. 2. Turn off the drum module. 3. Connect the USB cable first to the drum module’s [USB TO HOST] terminal and then to the computer. Start up your computer. Shut down all applications before proceeding to the next step. NOTE • Information on system requirements is also provided on the above web page. • The USB-MIDI driver may be revised and updated without prior notice. Before installing, please visit the above web page to confirm that you have the most up-to-date version. Precautions when using the [USB TO HOST] terminal If proper care is not taken when connecting your drum module to a computer via the [USB TO HOST] terminal, either or both of the devices may freeze or data may become corrupted or be permanently lost. Be sure, therefore, to observe the following precautions at this time. If the drum module or computer should freeze, restart the application being used, reboot the computer, or turn the drum module off once and then back on. NOTICE • Use a USB A-B cable of less than 3 meters in length. • Before connecting to a computer via the [USB TO HOST] terminal, restore it from any power-saving mode (such as Suspend, Sleep, or Standby). • Connect your computer via the [USB TO HOST] terminal before turning on the drum module. • Be sure to always perform the following steps before turning the drum module on or off and either plugging in or unplugging the USB cable. * Shut down all applications. * Ensure that no data is being sent from the drum module. (Data is transmitted by striking the pads and by playing songs and drum patterns.) * When connected to a computer, allow at least 6 seconds to pass between turning the drum module on and off and plugging in or unplugging the USB cable. USB TO HOST terminal (on left side) USB terminal MIDI Reference Manual Computer Drum module USB cable 4. Turn on the drum module. You will now be able to exchange MIDI data between the drum module and computer. The drum module’s MIDI Reference Manual contains the following. • MIDI-related reference information • Reference material that will prove useful when making music using the drum module and a computer • Instructions on how to transfer songs from your computer to the drum module. The MIDI Reference Manual is available for download as a PDF file from the following web page below. http://download.yamaha.com/ Yamaha USB-MIDI driver *: Yamaha Corporation reserves the right to modify this URL at any time without prior notice. In most situations, there is no need to install the Yamaha USB-MIDI driver and the above setup procedure will suffice. If, however, your computer is having difficulty communicating with the drum module, please download the standard Yamaha USB-MIDI driver from the following web page and install it on your computer. http://download.yamaha.com/ DTX400K/DTX430K/DTX450K Owner’s Manual 57 Reference Troubleshooting Reference In addition to the following, you can also find troubleshooting tips in the MIDI Reference Manual (PDF). See page 57 for details on downloading this manual. No sound is produced when a pad is struck, or the volume is lower than expected. Check connections as follows. • Ensure that the pads are properly connected to the drum module’s trigger input jacks. • Ensure that the drum module is properly connected to headphones or other audio equipment, such as an amplifier and/or speakers. • Ensure that the amplifier and/or speakers connected to the drum module are turned on and are not set to the lowest possible volume. • Ensure that the cables for the hi-hat controller and the kick unit are not connected to each other’s jacks. (DTX400K only; see page 17.) • If you are using a KP65 Kick Pad, try adjusting its Level dial. • If you are using a KU100 Kick Unit, connect the hi-hat controller before turning on the drum module. Please do not turn the drum module on with the hi-hat controller depressed. The drum module can not identify the type of pedal properly and it causes that the kick may produce much smaller sound than expected. Check the drum module’s settings as follows. • Ensure that the drum module’s volume is not turned fully down. (See page 19) • Try adjusting the Pad Volume parameter from Menu Mode. (See page 42) • Try adjusting the Gain parameter from Menu Mode. (See page 49) • Try adjusting the Pad Velocity Curve parameter from Menu Mode. (See page 46) • Try adjusting the Crosstalk parameter from Menu Mode. (See page 47) • Ensure that the Snare Pad Type parameter from Menu Mode is set correctly. (See page 48) • Ensure that the Pedal Types parameter from Menu Mode is set correctly. (See page 48) • Ensure that the Local Control parameter from Menu Mode is set correctly. (See page 44) If you cannot play foot closed hi-hat sounds, try the following. • Ensure that you are operating the hi-hat controller in a firm and full manner. • Ensure that the Double Bass Drum parameter from Menu Mode is set to “Off”. (See page 43) • If you are using an HH65 Hi-hat Controller, set the Foot Close Position parameter from Menu Mode to a small value. (See page 45) Sounds or volumes are not as expected. If hi-hat splash sounds are not produced as expected, try the following. • Adjust the Splash Sensitivity parameter from Menu Mode. (See page 45) If it is difficult to produce closed hi-hat sounds with an HH65 Hi-hat Controller, try the following. • Adjust the Foot Close Position parameter from Menu Mode. (See page 45) If it is difficult to produce louder and quieter foot-closed hi-hat sounds, try the following. • Ensure that the Pedal Types parameter from Menu Mode is set correctly. (See page 48) • If using the hi-hat controller that comes with the DTX400K, adjust the Foot Close Velocity parameter from Menu Mode to an appropriate fixed level: This pedal does not support playing of louder and quieter foot-closed hi-hat sounds. (See page 45) If pads are producing only sounds at very high volumes (i.e., high velocities), try the following. • Adjust the sensitivity of the drum kit. (See page 23) • Adjust the Gain parameter from Menu Mode. High settings will result in loud drum sounds. (See page 49) • Adjust the Pad Velocity Curve parameter from Menu Mode. (See page 46) • Ensure that you are using only the recommended Yamaha pads. (Products from other manufacturers can output excessively large signals.) If the volumes of drum sounds produced by the various pads are poorly balanced, proceed as follows. • Adjust the Pad Volume parameter from Menu Mode for each pad. (See page 42) • Ensure that the Stereo/Mono parameter from Menu Mode is set correctly. (See page 53) If the drum module’s volume is not well balanced with that of the device connected to the [AUX IN] jack (such as a portable music player), proceed as follows. • Ensure that the volume of the connected device is set to a suitable level. (See page 19) If the volume of your drumming is not well balanced with that of a drum-module song, proceed as follows. • Adjust the song volume. (See page 25) 58 DTX400K/DTX430K/DTX450K Owner’s Manual Troubleshooting If you notice double triggering, crosstalk, or skipped sounds (as described below), proceed as follows. Double triggering—i.e., multiple sounds are produced in response to a single strike: • If the pad or drum trigger in question features a controller for adjusting output or sensitivity, turn it down. • Ensure that the Gain parameter from Menu Mode is not set too high. (See page 49) Crosstalk—i.e., a sound is produced by a pad other than the one that was struck: • Adjust the Crosstalk parameter from Menu Mode to a suitable level for each affected pad. (See page 47) Skipped sounds—i.e., a pad does not produce a sound (usually during rolls or fills): • Adjust the Crosstalk parameter from Menu Mode to a suitable level for each affected pad. (See page 47) Other common questions How do I make the drum module store it settings? • The drum module automatically stores its settings whenever you turn it off using the [ (See page 20) ] (Standby/On) button. How do I reset all of the drum module’s parameters to their default settings? • You can restore default settings using the Factory Set function. (See page 20) How do I reset all of the drum module’s parameters to the settings they had when I last turned it on? • You can do this using the Revert to Last Power On function. (See page 55) How do I reset only a desired drum kit to the default setting? • Initialize the kit from Menu Mode. (See page 54) How do I stop the drum module turning off while I’m using it? • Disable the Auto Power-Off function. (See page 20) How do I stop the drum module changing the current drum kit when I select a different song? • By default, your drum module always chooses the best kit for each song. To prevent it from doing so, enable the Kit Lock function. (See page 53) How do I have the drum module choose the best drum kit for each song? • Disable the Kit Lock function. (See page 53) What should I do if I can’t hear the voice guidance? • Adjust the Voice Guidance Volume parameter from Menu Mode. (See page 53) DTX400K/DTX430K/DTX450K Owner’s Manual 59 Reference Data List Kit List 1. Maple Custom Kit with a Maple Custom Absolute sound. PAD No. SNARE 22 MapleCustom TOM1 45 TOM2 46 TOM3 2. Oak Custom Kit with an Oak Custom sound. Name PAD No. Name SNARE 23 OakCustom Maple 1 H TOM1 51 Maple 1 M TOM2 52 47 Maple 1 L TOM3 RIDE 82 Warm Rd 20-1 CRASH 93 HI-HAT 113 KICK 1 PAD 89 PAD No. SNARE 25 HardRock Oak H TOM1 57 HardRock H Oak M TOM2 58 HardRock M 53 Oak L TOM3 59 HardRock L RIDE 81 Bright Rd 20 RIDE 84 Warm Ride 22 DarkCrash 18 CRASH 88 BrightCr 18 CRASH 102 China 19 Bright 14 HI-HAT 115 Dark 13 HI-HAT 116 MapleCustom KICK 2 OakCustom KICK 5 HardRock WarmCrash 16 PAD 89 WarmCrash 16 PAD 94 VividCrash 18 4. Vintage A seventies sounding kit. 5. Funk Kit with a high-pitched snare. PAD No. SNARE 27 Vintage Name PAD No. SNARE 26 Funk TOM1 60 TOM2 61 Vintage H TOM1 54 Vintage M TOM2 55 TOM3 62 Vintage L TOM3 RIDE 86 Vintage Rd 22 CRASH 97 HI-HAT KICK PAD Name Dark 14 6. Session Dry sounding kit with a deep snare. PAD No. SNARE 24 DeepOak Birch H TOM1 48 Maple 2 H Birch M TOM2 49 Maple 2 M 56 Birch L TOM3 50 Maple 2 L RIDE 83 Warm Rd 20-2 RIDE 83 Warm Rd 20-2 VintageCr 16 CRASH 91 DarkCrash 16 CRASH 92 DarkCrash 17 118 Vintage 14 HI-HAT 117 Vivid 13 HI-HAT 112 6 Vintage 24 KICK 4 Birch 22 KICK 3 Oak 22 98 VintageCr 18 PAD 96 ThinCrash 16 PAD 90 WarmCrash 18 7. Jazz Ideal kit for jazz drumming. PAD No. SNARE 28 Jazz TOM1 63 TOM2 64 TOM3 Name 8. R&B Electronic sounding kit. Name PAD No. 39 HipHop 1 Jazz H TOM1 69 Jazz M TOM2 70 65 Jazz L TOM3 11 RIDE 82 Warm Rd 20-1 RIDE CRASH 85 Mellow Rd 18 HI-HAT 114 Bright 15 KICK 8 Jazz PAD 87 Sizzle Ride PAD No. SNARE 151 Name Cajon TOM1 130 Bongo H TOM2 139 Cowbell 1 SW TOM3 129 Conga L RIDE 149 Shaker 2 CRASH 99 Splash 10 HI-HAT 120 Percussion 2 KICK 7 PAD 103 Vintage 18 Trash DTX400K/DTX430K/DTX450K Owner’s Manual Name Bright 13 9. Marching Ideal kit for marching music. SNARE 10. Percussion Kit containing a range of percussion sounds. 60 3. Hard Rock Rock kit with a double bass drum. Name PAD No. SNARE 29 FieldSnare Name T8-1 H TOM1 67 Marching M T8-1 M TOM2 66 Marching H T8-3 TOM3 68 Marching L 109 R&B Ride RIDE 105 Hand Mute CRASH 100 Splash 12 CRASH 104 Hand Open HI-HAT 126 R&B HI-HAT 119 Percussion 1 KICK 18 HipHop 1 KICK 160 GranCasaOpen PAD 99 Splash 10 PAD 95 HeavyCrash 18 Song List No. Name 1 8beat Basic Description Suitable for practicing standard eight-beat songs. 2 Hard Rock Slightly up-tempo hard rock from the 70s. 3 Electro Pop Electronic pop with a kick on every beat. 4 Rock Shuffle Rock tune with a swung rhythm. 5 Heavy Metal A metal-type song using a double-bass drum. 6 16beat Rock A rock song perfect for practicing 16-beat rhythms. 7 Funk Rock Funky sounding rock song with a mid-tempo beat. 8 8beat Funk Funk tune based on an eight-beat rhythm. 9 Slow Blues Bluesy song with a laid back tempo. 10 4beat Jazz Mid-tempo jazz tune with a four-beat rhythm. Data List Voice List Kick Tom 1 2 3 4 5 6 7 8 9 10 11 12 13 14 15 16 17 18 19 20 21 45 46 47 48 49 50 51 52 53 54 55 56 57 58 59 60 61 62 63 64 65 66 67 68 69 70 71 72 73 74 75 76 77 78 79 80 MapleCustom OakCustom Oak 22 Birch 22 HardRock Vintage 24 Vintage 18 Jazz T8-1 T8-2 T8-3 T9-1 T9-2 T9 Hard Electric ElectricComp ElectricClick HipHop 1 HipHop 2 Break DnB Snare 22 23 24 25 26 27 28 29 30 31 32 33 34 35 36 37 38 39 40 41 42 43 44 MapleCustom OakCustom DeepOak HardRock Funk Vintage Jazz FieldSnare T8-1 T8-1 Clap T8-2 T8-2 Clap T9-1 T9-1 Clap T9-2 T9-2 Clap Analog HipHop 1 HipHop 2 HipHop 3 R&B Break DnB Maple 1 H Maple 1 M Maple 1 L Maple 2 H Maple 2 M Maple 2 L Oak H Oak M Oak L Birch H Birch M Birch L HardRock H HardRock M HardRock L Vintage H Vintage M Vintage L Jazz H Jazz M Jazz L Marching H Marching M Marching L T8-1 H T8-1 M T8-1 L T8-2 H T8-2 M T8-2 L T9-1 H T9-1 M T9-1 L SynthTom H SynthTom M SynthTom L Cymbal 81 82 83 84 85 86 87 88 89 90 91 92 93 94 95 96 97 98 99 100 101 102 103 104 105 106 107 108 109 110 111 Percussion Bright Rd 20 Warm Rd 20-1 Warm Rd 20-2 Warm Ride 22 Mellow Rd 18 Vintage Rd 22 Sizzle Ride BrightCr 18 WarmCrash 16 WarmCrash 18 DarkCrash 16 DarkCrash 17 DarkCrash 18 VividCrash 18 HeavyCrash 18 ThinCrash 16 VintageCr 16 VintageCr 18 Splash 10 Splash 12 China 17 China 19 Trash Hand Open Hand Mute Hand SW T8 Ride T9 Ride R&B Ride T8 Crash SynthCrash Hi-Hat 112 113 114 115 116 117 118 119 120 121 122 123 124 125 126 127 Bright 13 Bright 14 Bright 15 Dark 13 Dark 14 Vivid 13 Vintage 14 Percussion 1 Percussion 2 T8-1 T8-2 T9-1 T9-2 Analog R&B DnB 128 129 130 131 132 133 134 135 136 137 138 139 140 141 142 143 144 145 146 147 148 149 150 151 152 153 154 155 156 157 158 159 160 161 162 163 164 165 166 167 168 169 Conga H Conga L Bongo H Bongo L Timbales H Timbales L PandeiroShake Pandeiro Tap PandeiroSlide Tambourine 1 Tambourine 2 Cowbell 1 SW Cowbell 2 Cowbell 3 Claves Maracas Triangle Open Triangle Mute WoodBlock H WoodBlock L Shaker 1 Shaker 2 Djembe Cajon Tabla Na 1 Tabla Na 2 Bayan Ge Taiko Don Taiko Ka WindChime Whistle S Whistle L GranCasaOpen Metronome 1 Metronome 2 Clap T9 Clap Analog Clap 1 Analog Clap 2 HipHop Clap AnalogCowbell AnalogClaves DTX400K/DTX430K/DTX450K Owner’s Manual 61 Data List Drum Score There are many different types of drum score commercially available, but we’ve chosen the following common format for the examples below. Hi-Hat Cymbal (H.H.) Ride Cymbal (RIDE) Hi-Hat (H.H.) Open Close Crash Cymbal Snare Drum Snare Drum (Brush Slap) High Tom Low Tom High Hi-Hat Cymbal (PEDAL) Bass Drum Scores for Groove Tracker and Pad Gate Training q 8beat Basic Control Pads : Cymbal + hi-hat 1 102 w Hard Rock Control Pads : Cymbal + hi-hat 1 170 e Electro Pop r Rock Shuffle Advance Step : Control Pads : Cymbal + hi-hat 1 146 DTX400K/DTX430K/DTX450K Advance Step : Control Pad : Kick 125 62 Advance Step : Owner’s Manual Advance Step : Mid Tom Low Data List t Heavy Metal Control Pad : Kick 256 y 16beat Rock Advance Step : Control Pads : Snare + hi-hat 148 u Funk Rock Advance Step : Control Pad : Kick 107 i 8beat Funk Advance Step : Control Pads : Cymbal + hi-hat 1 116 o Slow Blues Advance Step : Control Pads : Cymbal + hi-hat 1 56 !0 4beat Jazz Advance Step : 3 Control Pad : Kick 132 Advance Step : DTX400K/DTX430K/DTX450K Owner’s Manual 63 Reference Specifications Drum module Tone generator Click-track Type AWM2 Maximum polyphony 32 notes Voices Drum and percussion: 169 Keyboard: 128 Drum kits 10 (all of which may be edited and overwritten) Songs 10 Reverb 9 types Tempo 30 to 300 BPM (Tap Tempo and Voice Guidance functions) Beats 1/4 to 9/4 Jacks and terminals SNARE (mini stereo audio) TOM1 (mini mono audio) TOM2 (mini mono audio) TOM3 (mini mono audio) RIDE (mini mono audio) CRASH (mini mono audio) HI-HAT (mini mono audio) HI-HAT CTL (mini stereo audio) KICK/PAD (mini stereo audio) [USB TO HOST] ports [AUX IN] jack (mini stereo audio) PHONES/OUTPUT (standard stereo audio) DC IN Power consumption 5W Power adaptor PA-130 or equivalent Dimensions and weight 240 x 188 x 68 mm, 0.5kg Other * Specifications and descriptions in this owner’s manual are for information purposes only. Yamaha Corporation reserves the right to modify products or specifications at any time without prior notice. Since specifications, equipment, and options may not be the same in every locale, please check with your Yamaha dealer. 64 DTX400K/DTX430K/DTX450K Owner’s Manual Reference Index Symbols [ ] connector................. 22 [ ] (metronome) button.................. 21 [ ] button ..................................21 [ ] (Standby/On) button ................. 21 [AUX IN] jack ...................................22 [DRUM MUTE] button .....................21 [HI-HAT CTL] jack ...........................22 [KICK/PAD] jack ..............................22 [KIT] button...................................... 21 [PHONES/OUTPUT] jack ................ 22 [SONG] button.................................21 [TEMPO] buttons.............................21 [TRAINING] button ..........................21 [USB TO HOST] terminal .......... 22, 57 [VOLUME] buttons ..........................21 A Assembly.........................................11 Auto Power-Off................................20 Auto Power-Off Time.......................53 B Base support ...........................8, 9, 10 Beats ...............................................41 C Cable band .............................. 8, 9, 10 Change Up ...................................... 34 Close ...............................................24 Closed rim shots..............................24 Clutch Position ................................45 Computer.........................................57 Control Panel...................................21 Cord clip ....................................19, 22 Cross sticking ..................................24 Crosstalk .........................................47 Cymbal holder .........................8, 9, 10 Cymbal pad ............................. 8, 9, 10 Cymbal/hi-hat pad ...................8, 9, 10 D Data List ..........................................60 Difficulty Level ...........................31, 50 Double Bass Drum ..........................43 Drum module...........................8, 9, 10 Drum Score ..................................... 62 E Easy Session...................................35 External source ...............................22 F Factory Set ................................ 20, 55 Fast Blast ........................................39 Fast Blast Timer ..............................52 First tom pad ...........................8, 9, 10 First/second tom part...............8, 9, 10 Foot Close Position .........................45 Foot Close Velocity .........................45 Foot closed...................................... 24 FP6110A .....................................9, 10 G Gain.................................................49 Groove Check .................................30 Groove Tracker ............................... 36 Groove Tracker Advance Step........ 51 Groove Tracker Control Pad(s) ....... 51 Groove Tracker Return Time .......... 50 H Have fun with drum patterns ........... 29 Head shots ...................................... 24 Headphone ..................................... 19 Hexagonal rod................................. 10 HH65............................... 9, 10, 24, 56 Hi-hat Controller ...................... 8, 9, 10 Hi-hat Cymbal ................................. 24 Hi-hat holder ........................... 8, 9, 10 Hi-hat pad ............................... 8, 9, 10 Hi-hat Settings ................................ 45 Hi-hat splash ................................... 24 I Ignore Timing .................................. 50 Initialize Kit ...................................... 54 Initialize Song.................................. 54 K Kick Unit...................................... 8, 56 Kick Velocity.................................... 46 Kit.................................................... 23 Kit List ............................................. 60 Kit Lock ........................................... 53 Kit Settings ...................................... 42 KP65 ..................................... 9, 10, 56 KU100 ......................................... 8, 56 L Learn new drum patterns ................ 29 Left arm................................... 8, 9, 10 Left side .......................................... 22 Local Control ................................... 44 Looping Part.................................... 26 Pad Sound ...................................... 42 Pad Velocity Curve ......................... 46 Pad Volume .................................... 42 Part Mute ........................................ 38 Pattern ............................................ 41 PCY90AT........................................ 56 Pedal Types.................................... 48 Play as wildly as you can................ 29 Power adaptor .................. 8, 9, 10, 19 Practice song .................................. 25 R Reverb ............................................ 43 Revert to Last Power On ................ 55 Rhythm Gate................................... 31 Right side........................................ 22 Rim 1 .............................................. 24 Rim 2 .............................................. 24 S S wing bolt ...................................... 10 Score .............................................. 62 Scoring function .............................. 29 Second tom pad...................... 8, 9, 10 Sensitivity........................................ 23 Separately Sold Accessories .......... 56 Snare pad ......................... 8, 9, 10, 24 Snare Pad Type.............................. 48 Song ............................................... 25 Song List......................................... 60 Song parts ...................................... 25 Sound ............................................. 41 Speaker .......................................... 19 Splash Sensitivity............................ 45 Stereo/Mono ................................... 53 Store ............................................... 20 T Measure Break................................ 32 Menu Mode ..................................... 40 Metronome ...................................... 27 Metronome Settings ........................ 41 MIDI Reference Manual .............. 6, 57 MIDI Settings .................................. 44 Minimum Level ................................ 49 Music Player ................................... 19 Mute ................................................ 26 Tapping the tempo.......................... 28 Tempo............................................. 27 Tempo Up/Down............................. 33 Third tom part ......................... 8, 9, 10 Timer............................................... 49 TP70S....................................... 10, 24 Training Mode................................. 29 Training Settings............................. 49 Trigger input jacks .......................... 22 Trigger Settings .............................. 46 Tuning key .............................. 8, 9, 10 N U M Nine-channel snake cable....... 8, 9, 10 Note Number................................... 44 Number Button Lighting Pattern...... 42 Number buttons .............................. 21 O Open ............................................... 24 Open rim shots................................ 24 Other Settings ................................. 53 P Package Contents................... 8, 9, 10 Pad Gate......................................... 37 Pad Gate Group.............................. 52 Pad Panning ................................... 43 USB-MIDI driver.............................. 57 V Vertical support....................... 8, 9, 10 Voice Guidance ........................ 27, 29 Voice Guidance Volume ................. 53 Voice List ........................................ 61 Volume............................................ 19 W Wing bolt........................................... 8 Work on your rhythm ...................... 29 DTX400K/DTX430K/DTX450K Owner’s Manual 65 66 DTX400K/DTX430K/DTX450K Owner’s Manual Information for Users on Collection and Disposal of Old Equipment This symbol on the products, packaging, and/or accompanying documents means that used electrical and electronic products should not be mixed with general household waste. For proper treatment, recovery and recycling of old products, please take them to applicable collection points, in accordance with your national legislation and the Directives 2002/96/EC. By disposing of these products correctly, you will help to save valuable resources and prevent any potential negative effects on human health and the environment which could otherwise arise from inappropriate waste handling. For more information about collection and recycling of old products, please contact your local municipality, your waste disposal service or the point of sale where you purchased the items. [For business users in the European Union] If you wish to discard electrical and electronic equipment, please contact your dealer or supplier for further information. [Information on Disposal in other Countries outside the European Union] This symbol is only valid in the European Union. If you wish to discard these items, please contact your local authorities or dealer and ask for the correct method of disposal. (weee_eu) OBSERVERA! Apparaten kopplas inte ur växelströmskällan (nätet) så länge som den ar ansluten till vägguttaget, även om själva apparaten har stängts av. ADVARSEL: Netspændingen til dette apparat er IKKE afbrudt, sålænge netledningen sidder i en stikkontakt, som er tændt — også selvom der er slukket på apparatets afbryder. VAROITUS: Laitteen toisiopiiriin kytketty käyttökytkin ei irroita koko laitetta verkosta. (standby) The model number, serial number, power requirements, etc., may be found on or near the name plate, which is at the bottom of the unit. You should note this serial number in the space provided below and retain this manual as a permanent record of your purchase to aid identification in the event of theft. Model No. Serial No. (bottom) DTX400K/DTX430K/DTX450K Owner’s Manual 67 For details of products, please contact your nearest Yamaha representative or the authorized distributor listed below. Pour plus de détails sur les produits, veuillez-vous adresser à Yamaha ou au distributeur le plus proche de vous figurant dans la liste suivante. NORTH AMERICA CANADA Yamaha Canada Music Ltd. 135 Milner Avenue, Toronto, Ontario M1S 3R1, Canada Tel: +1-416-298-1311 U.S.A. Yamaha Corporation of America 6600 Orangethorpe Avenue, Buena Park, CA 90620, U.S.A. Tel: +1-714-522-9011 CENTRAL & SOUTH AMERICA MEXICO Yamaha de México, S.A. de C.V. Av. Insurgentes Sur 1647 Piso 9, Col. San José Insurgentes, Delegación Benito Juárez, México, D.F., C.P. 03900 Tel: +52-55-5804-0600 BRAZIL Yamaha Musical do Brasil Ltda. Rua Fidêncio Ramos, 302 – Cj 52 e 54 – Torre B – Vila Olímpia – CEP 04551-010 – São Paulo/SP, Brazil Tel: +55-11-3704-1377 ARGENTINA Yamaha Music Latin America, S.A., Sucursal Argentina Olga Cossettini 1553, Piso 4 Norte, Madero Este-C1107CEK, Buenos Aires, Argentina Tel: +54-11-4119-7000 VENEZUELA Yamaha Musical de Venezuela, C.A. AV. Manzanares, C.C. Manzanares Plaza, Piso 4, Oficina 0401, Baruta, Caracas, Venezuela Tel: +58-212-943-1877 PANAMA AND OTHER LATIN AMERICAN COUNTRIES/ CARIBBEAN COUNTRIES Yamaha Music Latin America, S.A. Edif. Torre Banco General, F7, Urb. Marbella, Calle 47 y Aquilino de la Guardia, Panama, P.O.Box 0823-05863, Panama, Rep.de Panama Tel: +507-269-5311 EUROPE THE UNITED KINGDOM/IRELAND Yamaha Music Europe GmbH (UK) Sherbourne Drive, Tilbrook, Milton Keynes, MK7 8BL, U.K. Tel: +44-1908-366700 GERMANY Yamaha Music Europe GmbH Siemensstrasse 22-34, 25462 Rellingen, Germany Tel: +49-4101-303-0 SWITZERLAND/LIECHTENSTEIN Yamaha Music Europe GmbH, Rellingen, Branch Switzerland in Zürich Seefeldstrasse 94, 8008 Zürich, Switzerland Tel: +41-44-3878080 AUSTRIA Yamaha Music Europe GmbH, Branch Austria Schleiergasse 20, 1100 Wien, Austria Tel: +43-1-60203900 CZECH REPUBLIC/HUNGARY/ ROMANIA/SLOVAKIA/SLOVENIA Yamaha Music Europe GmbH, Branch Austria Schleiergasse 20, 1100 Wien, Austria Tel: +43-1-60203900 POLAND/LITHUANIA/LATVIA/ESTONIA Yamaha Music Europe GmbH Sp.z o.o. Oddzial w Polsce ul. Wrotkowa 14, 02-553 Warsaw, Poland Tel: +48-22-880-08-88 BULGARIA Dinacord Bulgaria LTD. Bul.Iskarsko Schose 7 Targowski Zentar Ewropa 1528 Sofia, Bulgaria Tel: +359-2-978-20-25 MALTA Olimpus Music Ltd. Valletta Road, Mosta MST9010, Malta Tel: +356-2133-2093 Die Einzelheiten zu Produkten sind bei Ihrer unten aufgeführten Niederlassung und bei Yamaha Vertragshändlern in den jeweiligen Bestimmungsländern erhältlich. Para detalles sobre productos, contacte su tienda Yamaha más cercana o el distribuidor autorizado que se lista debajo. NETHERLANDS/BELGIUM/LUXEMBOURG Yamaha Music Europe, Branch Benelux Clarissenhof 5b, 4133 AB Vianen, The Netherlands Tel: +31-347-358040 FRANCE Yamaha Music Europe 7 rue Ambroise Croizat, Zone d'activités de Pariest, 77183 Croissy-Beaubourg, France Tel: +33-1-6461-4000 ITALY Yamaha Music Europe GmbH, Branch Italy Viale Italia 88, 20020, Lainate (Milano), Italy Tel: +39-02-93577-1 SPAIN/PORTUGAL Yamaha Music Europe GmbH Ibérica, Sucursal en España Ctra. de la Coruna km. 17,200, 28231 Las Rozas de Madrid, Spain Tel: +34-91-639-88-88 GREECE Philippos Nakas S.A. The Music House 19th klm. Leof. Lavriou 190 02 Peania – Attiki, Greece Tel: +30-210-6686260 SWEDEN Yamaha Music Europe GmbH Germany filial Scandinavia JA Wettergrensgata 1, 400 43 Göteborg, Sweden Tel: +46-31-89-34-00 DENMARK Yamaha Music Denmark, Fillial of Yamaha Music Europe GmbH, Tyskland Generatorvej 8C, ST. TH., 2860 Søborg, Denmark Tel: +45-44-92-49-00 FINLAND F-Musiikki Oy Antaksentie 4 FI-01510 Vantaa, Finland Tel: +358 (0)96185111 NORWAY Yamaha Music Europe GmbH Germany Norwegian Branch Grini Næringspark 1, 1361 Østerås, Norway Tel: +47-6716-7800 ICELAND Hljodfaerahusid Ehf. Sidumula 20 IS-108 Reykjavik, Iceland Tel: +354-525-5050 CROATIA Euro Unit D.O.O. Slakovec 73 40305 Nedelisce Tel: +38540829400 CYPRUS Nakas Music Cyprus Ltd. Nikis Ave 2k 1086 Nicosia Tel: + 357-22-511080 Major Music Center 21 Ali Riza Ave. Ortakoy P.O.Box 475 Nicosia, Cyprus Tel: (392) 227 9213 OTHER COUNTRIES Yamaha Music Gulf FZE JAFZA-16, Office 512, P.O.Box 17328, Jebel Ali FZE, Dubai, UAE Tel: +971-4-801-1500 ASIA THE PEOPLE’S REPUBLIC OF CHINA Yamaha Music & Electronics (China) Co., Ltd. 2F, Yunhedasha, 1818 Xinzha-lu, Jingan-qu, Shanghai, China Tel: +86-400-051-7700 HONG KONG Tom Lee Music Co., Ltd. 11/F., Silvercord Tower 1, 30 Canton Road, Tsimshatsui, Kowloon, Hong Kong Tel: +852-2737-7688 INDIA Yamaha Music India Private Limited Spazedge Building, Ground Floor, Tower A, Sector-47, Gurgaon- Sohna Road, Gurgaon-122002, Haryana, India Tel: +91-124-485-3300 INDONESIA PT. Yamaha Musik Indonesia (Distributor) Yamaha Music Center Bldg. Jalan Jend. Gatot Subroto Kav. 4, Jakarta 12930, Indonesia Tel: +62-21-520-2577 KOREA Yamaha Music Korea Ltd. 8F, Dongsung Bldg. 21, Teheran-ro 87-gil, Gangnam-gu, Seoul, 135-880, Korea Tel: +82-2-3467-3300 MALAYSIA Yamaha Music (Malaysia) Sdn. Bhd. No.8, Jalan Perbandaran, Kelana Jaya, 47301 Petaling Jaya, Selangor, Malaysia Tel: +60-3-78030900 SINGAPORE Yamaha Music (Asia) Private Limited Block 202 Hougang Street 21, #02-00, Singapore 530202, Singapore Tel: +65-6740-9200 TAIWAN RUSSIA Yamaha Music (Russia) LLC. Room 37, entrance 7, bld. 7, Kievskaya street, Moscow, 121059, Russia Tel: +7-495-626-5005 OTHER EUROPEAN COUNTRIES Yamaha Music Europe GmbH Siemensstrasse 22-34, 25462 Rellingen, Germany Tel: +49-4101-303-0 AFRICA Yamaha Music Gulf FZE JAFZA-16, Office 512, P.O.Box 17328, Jebel Ali FZE, Dubai, UAE Tel: +971-4-801-1500 Yamaha Music & Electronics Taiwan Co., Ltd. 2F., No.1, Yuandong Rd. Banqiao Dist. New Taipei City 22063, Taiwan Tel: +886-2-7741-8888 THAILAND Siam Music Yamaha Co., Ltd. 3, 4, 15, 16th Fl., Siam Motors Building, 891/1 Rama 1 Road, Wangmai, Pathumwan, Bangkok 10330, Thailand Tel: +66-2215-2622 VIETNAM Yamaha Music Vietnam Company Limited 15th Floor, Nam A Bank Tower, 201-203 Cach Mang Thang Tam St., Ward 4, Dist.3, Ho Chi Minh City, Vietnam Tel: +84-8-3818-1122 OTHER ASIAN COUNTRIES http://asia.yamaha.com MIDDLE EAST TURKEY Yamaha Music Europe GmbH Merkezi Almanya Türkiye İstanbul Şubesi Maslak Meydan Sodak, Spring Giz Plaza Bagimsiz Böl. No:3, Sanyer Istanbul, Turkey Tel: +90-212-999-8010 OCEANIA AUSTRALIA Yamaha Music Australia Pty. Ltd. Level 1, 99 Queensbridge Street, Southbank, Vic. 3006, Australia Tel: +61-3-9693-5111 NEW ZEALAND Music Works LTD P.O.BOX 6246 Wellesley, Auckland 4680, New Zealand Tel: +64-9-634-0099 COUNTRIES AND TRUST TERRITORIES IN PACIFIC OCEAN http://asia.yamaha.com DMI12 Yamaha web site http://www.yamaha.com/ Yamaha Downloads http://download.yamaha.com/ HEAD OFFICE: Yamaha Corporation 10-1, Nakazawa-cho, Naka-ku, Hamamatsu, Japan 430-8650 Manual Development Department © 2012 Yamaha Corporation Published 12/2015 POAP*.*-**D0 Printed in Vietnam WZ87640-
 1
1
-
 2
2
-
 3
3
-
 4
4
-
 5
5
-
 6
6
-
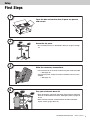 7
7
-
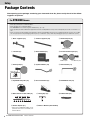 8
8
-
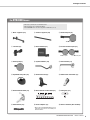 9
9
-
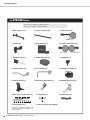 10
10
-
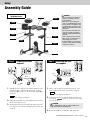 11
11
-
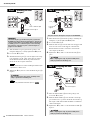 12
12
-
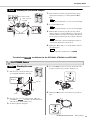 13
13
-
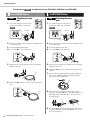 14
14
-
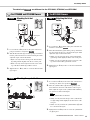 15
15
-
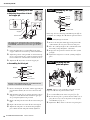 16
16
-
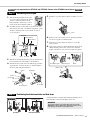 17
17
-
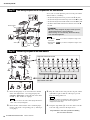 18
18
-
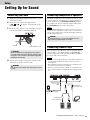 19
19
-
 20
20
-
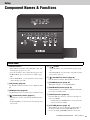 21
21
-
 22
22
-
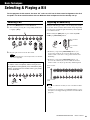 23
23
-
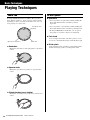 24
24
-
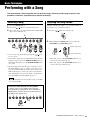 25
25
-
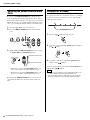 26
26
-
 27
27
-
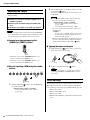 28
28
-
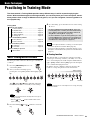 29
29
-
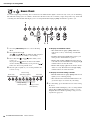 30
30
-
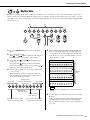 31
31
-
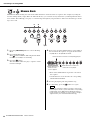 32
32
-
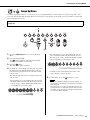 33
33
-
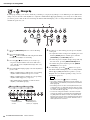 34
34
-
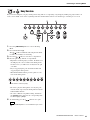 35
35
-
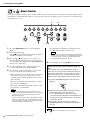 36
36
-
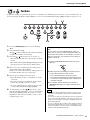 37
37
-
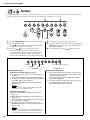 38
38
-
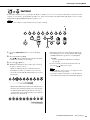 39
39
-
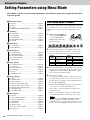 40
40
-
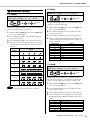 41
41
-
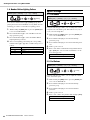 42
42
-
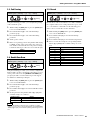 43
43
-
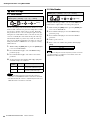 44
44
-
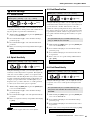 45
45
-
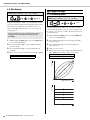 46
46
-
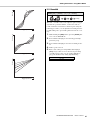 47
47
-
 48
48
-
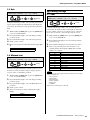 49
49
-
 50
50
-
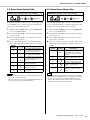 51
51
-
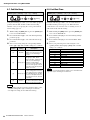 52
52
-
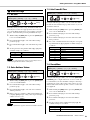 53
53
-
 54
54
-
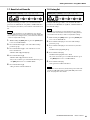 55
55
-
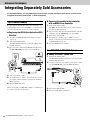 56
56
-
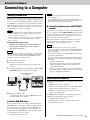 57
57
-
 58
58
-
 59
59
-
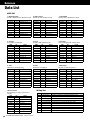 60
60
-
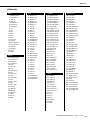 61
61
-
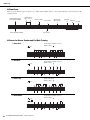 62
62
-
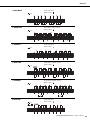 63
63
-
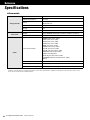 64
64
-
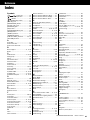 65
65
-
 66
66
-
 67
67
-
 68
68


Yamaha DTX400K de handleiding
- Categorie
- Muziek drums
- Type
- de handleiding
in andere talen
- English: Yamaha DTX400K Owner's manual
- italiano: Yamaha DTX400K Manuale del proprietario
- русский: Yamaha DTX400K Инструкция по применению
- français: Yamaha DTX400K Le manuel du propriétaire
- español: Yamaha DTX400K El manual del propietario
- Deutsch: Yamaha DTX400K Bedienungsanleitung
- português: Yamaha DTX400K Manual do proprietário
- dansk: Yamaha DTX400K Brugervejledning
- suomi: Yamaha DTX400K Omistajan opas
- čeština: Yamaha DTX400K Návod k obsluze
- svenska: Yamaha DTX400K Bruksanvisning
- Türkçe: Yamaha DTX400K El kitabı
- polski: Yamaha DTX400K Instrukcja obsługi
- română: Yamaha DTX400K Manualul proprietarului