Lexibook Mickey Mouse Clubhouse RP500MCH Handleiding
- Categorie
- Wekkers
- Type
- Handleiding
Deze handleiding is ook geschikt voor

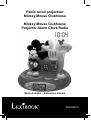
Radio réveil projecteur
Mickey Mouse Clubhouse
Mickey Mouse Clubhouse
Projector Alarm Clock Radio
Mode d’emploi – Instruction manual
RP500MCH


1
7
8
9
10
11
2
3
4
5
6
1
2
3
1

FRANÇAIS
4
5
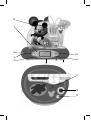
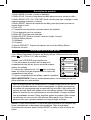
Description du produit
1. MODE: Sélectionner le mode.
2. SCAN: Rechercher des stations radio.
3. RADIO OFF / ON / VOLUME: Allumer ou éteindre la radio ; monter ou baisser
le volume.
4. RESET: Réinitialiser la fréquence radio pour lancer une nouvelle recherche de
stations.
5. Écran LCD
6. Compartiment à piles (sous l’appareil)
7. Base avec pieds de déclenchement de la « veilleuse »
8. SET: Sélectionner le réglage.
9. ADJUST: Régler les chiffres et activer la fonction répétition.
10. Bouton « Mickey Mouse »
11. Enceinte
12. Projecteur
13. PROJECT: Projeter l’heure et une icône Mickey Mouse Clubhouse sur le
plafond.
Informations concernant les piles
Votre radio réveil projecteur fonctionne avec 4 piles de type 1.5V AA / LR6
(non incluses).
Avant la première utilisation:
1. A l’aide d’un tournevis, ouvrez le couvercle des piles
situé sous l’appareil.
2. Insérez 4 piles de type AA 1.5V (non incluses) en
respectant la polarité indiquée.
3. Remettez le couvercle en place et serrez les vis.
Ne pas recharger les piles non rechargeables. Retirer les accumulateurs
du produit avant de les recharger. Ne charger les accumulateurs que sous
la surveillance d’un adulte. Ne pas mélanger différents types de piles ou
accumulateurs, ou des piles et accumulateurs neufs et usagés. Les piles et
accumulateurs doivent être mis en place en respectant la polarité. Les piles
et accumulateurs usagés doivent être enlevés du produit. Les bornes d’une
pile ou d’un accumulateur ne doivent pas être mises en court-circuit. Ne pas
jeter les piles au feu. Retirer les piles en cas de non utilisation prolongée. Cet
appareil doit être alimenté avec les piles spéciées seulement.
1.5V AA OR LR6
1.5V AA OR LR6
1.5V AA OR LR6
1.5V AA OR LR6
NOTE IMPORTANTE : Pour de meilleures performances, il est recommandé
d’utiliser des piles alcalines avec ce produit.

4
FRANÇAIS
5
HORLOGE
1. Pour régler l’horloge, appuyez 3 fois sur MODE.
2. Appuyez une fois sur SET: Les minutes se mettent à clignoter.
3. Réglez les minutes à l’aide de la touche ADJUST, puis appuyez sur SET pour
passer au réglage suivant.
Les réglages s’effectuent dans l’ordre suivant:
Minutes Heures Date Mois Jour de la semaine.
4. Conrmez tous les réglages en appuyant sur MODE.
CONSEIL: Maintenez enfoncée la touche ADJUST pour passer plus rapidement
d’un réglage à l’autre.
Date et heure d’alarme:
En mode horloge, maintenez enfoncée la touche ADJUST pour regarder la date
et maintenez enfoncée la touche SET pour vérier l’heure de l’alarme.
ALARME
1. Pour régler l’alarme, appuyez 2 fois sur MODE.
2. Réglez l’heure à l’aide de la touche ADJUST, puis appuyez sur SET pour
passer au réglage suivant.
3. Réglez les minutes à l’aide de la touche ADJUST, puis appuyez sur MODE
pour conrmer.
4. Lorsque l’alarme retentit, appuyez sur ADJUST pour la repousser de 5
minutes, ou sur SET pour l’éteindre complètement. L’alarme retentira à nouveau
le lendemain à la même heure.
Activer ou désactiver l’alarme:
En mode horloge, appuyez simultanément sur SET et sur ADJUST. Le symbole
apparaît à l’écran, indiquant que l’alarme est activée.
Installation
Déballage
Lors du déballage, vériez que l’emballage contient tous les éléments suivants:
1 x radio réveil projecteur Mickey Mouse Clubhouse
1 x mode d’emploi
AVERTISSEMENT: Tous les matériaux d’emballage, comme le ruban adhésif, les
feuilles en plastique, les celles et les étiquettes ne font pas partie de ce produit
et doivent être jetés.
Réglages
ATTENTION : D’importantes interférences électromagnétiques ou des décharges
électrostatiques peuvent provoquer un mauvais fonctionnement ou une perte de
données. Si l’appareil ne fonctionne pas correctement, appuyez sur le bouton
RESET ou enlevez puis remettez les piles.

FRANÇAIS
6
7
BIP HORAIRE
Pour activer ou désactiver le bip horaire, maintenez enfoncée la touche SET, puis
appuyez sur MODE. Si le jour de la semaine est afché en haut de l’écran, cela
signie que le bip horaire est activé.
CHRONOMÈTRE
1. Appuyez une fois sur MODE.
2. Appuyez sur ADJUST pour lancer ou arrêter le chronomètre.
3. Appuyez sur SET pour remettre le chronomètre à zéro.
4. Appuyez sur MODE pour revenir au mode horloge.
RADIO
1. Tournez le bouton RADIO OFF / ON / VOLUME dans le sens des aiguilles
d’une montre pour allumer la radio, puis pour monter le volume.
2. Appuyez sur SCAN pour lancer une recherche de stations de radio.
3. Appuyez sur RESET si vous voulez relancer la recherche depuis le début de
l’échelle de fréquences.
4. Pour obtenir une qualité de réception optimale, tirez l’antenne au maximum
et orientez-la dans toutes les directions jusqu’à trouver l’orientation permettant
d’obtenir la meilleure réception.
5. Tournez le bouton RADIO OFF / ON / VOLUME dans le sens contraire des
aiguilles d’une montre pour baisser le volume, puis pour éteindre la radio.
MELODIES
Appuyez sur Mickey Mouse pour déclencher l’une des 4 mélodies
préenregistrées.
VEILLEUSE
Appuyez une fois sur la base du réveil pour activer la veilleuse. Appuyez une
nouvelle fois sur la base pour l’arrêter.
Note : lorsqu’elle est activée, la veilleuse reste allumée pendant 1 heure.
PROJECTEUR
1. Appuyez sur PROJECT pour projeter l’heure et une icône Mickey Mouse
Clubhouse sur le plafond. L’image projetée s’estompe progressivement au bout
de quelques secondes.
Données techniques
Échelle de fréquence FM 87.5 – 108MHZ
Dimensions H64 x L191 x 135mm
Piles 4 x AA 1,5V

6
FRANÇAIS
7
Entretien
An d’éviter tout risque d’électrocution ou d’incendie, débranchez l’appareil avant
de le nettoyer. Le revêtement de l’appareil peut être nettoyé avec un chiffon à
poussière, comme un meuble. Pour l’extérieur de l’appareil, utilisez un chiffon
propre, doux, légèrement imbibé d’eau tiède non savonneuse. Faites
particulièrement attention lors du nettoyage et du séchage des parties en
plastique. Pour le panneau avant, vous pouvez si vous le souhaitez utiliser un
chiffon humide et du savon doux.
Garantie
Ce produit est couvert par une garantie de un an.
Pour tout service après-vente et pour toute plainte intervenant pendant la
période de garantie, adressez-vous à votre magasin de vente en présentant une
preuve d’achat valide. Notre garantie couvre tous les défauts liés aux matériaux
et à la fabrication, mais exclut toute détérioration résultant du non-respect des
instructions du mode d’emploi ou d’une négligence de la part de l’utilisateur
(démontage, exposition à la chaleur ou à l’humidité, etc.). Il est recommandé de
conserver l’emballage pour référence ultérieure.
Dans un souci d’amélioration de nos services, nous procédons régulièrement
à des modications des couleurs et de certains détails du produit montré sur
l’emballage.
REMARQUE: Conservez ce mode d’emploi car il contient des informations
importantes.
Référence : RP500MCH
Conçu et développé en Europe – Fabriqué en Chine
© 2010 Lexibook®
© Disney
Lexibook S.A
2, avenue de Scandinavie
91953 Courtaboeuf Cedex
France
Service consommateurs à votre écoute :
0892 23 27 26 (0.34€ TTC/min)
www.lexibook.com
Informations sur la protection de l’environnement
Tout appareil électrique usé est une matière recyclable et ne devrait pas faire partie des ordures
ménagères ! Nous vous demandons de bien vouloir nous soutenir en contribuant activement
au ménagement des ressources et à la protection de l’environnement en déposant cet appareil
dans des sites de collecte (si existants).
Ce produit n’est pas un jouet.

8
ENGLISH
9
1. MODE button: Selects the setting mode.
2. SCAN button: Search the radio frequency to nd radio channels.
3. RADIO OFF / ON / VOLUME knob: Roll the knob to turn the radio on or off and
increase or decrease the volume.
4. RESET button: Resets the radio frequency so you can start scanning for
channels from the beginning.
5. LCD screen
6. Battery compartment (at the bottom of the unit)
7. Night-light rubber feet
8. SET button: Selects a setting.
9. ADJUST button: Changes the number and activates the snooze function.
10. Mickey Mouse button
11. Speaker
12. Projector
13. PROJECT button: Projects the time and a Mickey Mouse Clubhouse icon
onto the ceiling.
Battery information
Your Mickey Mouse Clubhouse Radio Alarm Clock Projector works with 4 x 1.5V
AA / LR6 type batteries (not included).
When you use the RP500TS for the rst time:
1. Using a screwdriver, open the battery compartment
cover located at the bottom of the unit.
2. Install the 4 x AA 1.5V batteries (not included)
observing the polarity markings inside the battery
compartment.
3. Close the battery compartment and tighten the screw.
Non-rechargeable batteries are not to be recharged. Rechargeable batteries
are to be removed from the product before being charged. Rechargeable
batteries are only to be charged under adult supervision. Different types of
batteries or new and used batteries are not to be mixed. Only batteries of the
same or equivalent type as recommended are to be used. Batteries are to be
inserted with the correct polarity. Exhausted batteries are to be removed from
the product. The supply terminals are not to be short circuited. Do not throw
batteries into a re. Remove the batteries if you are not going to use the
product for a long period of time.
1.5V AA OR LR6
1.5V AA OR LR6
1.5V AA OR LR6
1.5V AA OR LR6
IMPORTANT NOTE: For better performance, it is recommended to use alkaline
batteries with this product.
Product description

8
9
ENGLISH
CLOCK
1. To set the clock, press MODE 3 times.
2. Press SET once: the minute digit starts ashing.
3. Press ADJUST to change the setting value. Then press SET to move to the
next setting.
The setting sequence is displayed in the following order:
Minutes Hours Date Month Day of the week.
5. Press and hold ADJUST to quickly scroll through the values.
To view the date and alarm time:
In clock mode, press and hold ADJUST to check the date or press and hold SET
to check the alarm time.
ALARM
1. To set the alarm, press MODE twice.
2. Press ADJUST to change the hour value. Then press SET to move to the next
setting.
3. Press ADJUST to change the minute value. Then press MODE to conrm.
4. When the alarm sounds, press ADJUST to snooze the alarm for 5 minutes or
press SET to turn it off. The alarm will ring at the same time the next day.
To activate or deactivate the alarm:
In clock mode, press SET and ADJUST at the same time. appears when the
alarm is activated.
Installation
Unpacking the device
When unpacking, ensure that the following elements are included:
1 x Mickey Mouse Clubhouse Radio Alarm Clock Projector
1 x instruction manual
WARNING: All packaging materials, such as tape, plastic sheets, wire ties and
tags are not part of this product and should be discarded.
Settings
WARNING: Malfunction or loss of memory may be caused by strong frequency
interference or electrostatic discharge. Should any abnormal function occur, press
the RESET button or remove the batteries and insert them again.

10
ENGLISH
11
HOURLY CHIME
To turn the hourly chime on or off, press and hold SET and then press MODE.
When you see the days of the week at the top of the screen the hourly chime is
on.
STOPWATCH
1. Press MODE once.
2. Press ADJUST to start or stop the stopwatch.
3. Press SET to restart the stopwatch from zero.
4. Press MODE to go back to the clock mode.
RADIO
1. Roll the RADIO OFF / ON / VOLUME knob to the right to turn it on and
increase the volume.
2. Press SCAN to search for radio channels.
3. Press RESET if you want to search for channels from the start of the frequency
range.
4. To get the best reception, fully extend the radio antenna and move it about to
nd where the reception is clearest.
5. Roll the RADIO OFF / ON / VOLUME knob to the left to decrease the volume
and turn it off.
MELODIES
Press Mickey Mouse to play one of the 4 preloaded melodies.
NIGHTLIGHT
Press once on the base of the clock to switch on the nightlight. Press again to
stop it.
Note: when activated, the nightlight will stay on for 1 hour.
PROJECTOR
Press PROJECT to project the time and a Mickey Mouse Clubhouse icon onto
the ceiling. The projection will gradually fade out after a few seconds.
Specications
FM tuner 87.5 – 108MHZ
Dimensions H64 x W191 x 135mm
Batteries 4 x AA 1.5V

10
11
ENGLISH
Warranty
This product is covered by our 1-year warranty.
For any claim under the warranty or after sale service, please contact your
distributor and present a valid proof of purchase. Our warranty covers any
manufacturing material and workmanship defect, with the exception of any
deterioration arising from the non-observance of the instruction manual or from
any careless action implemented on this item (such as dismantling, exposition to
heat and humidity, etc.). It is recommended to keep the packaging for any further
reference.
In a bid to keep improving our services, we could implement modication on the
colours and the details of the product shown on the packaging.
NOTE: Please keep this instruction manual, it contains important information.
Reference: RP500MCH
Designed and developed in Europe – Made in China
© 2010 Lexibook®
© Disney
United Kingdom & Ireland
For any further information, please call Helpline: 0808 1003015
Environmental Protection
Unwanted electrical appliances can be recycled and should not be discarded along with regular
household waste! Please actively support the conservation of resources and help protect the
environment by returning this appliance to a collection centre (if available).
This product is not a toy.
Maintenance
To prevent re or shock hazard, disconnect your unit from the AC power source
when cleaning. The nish on your unit may be cleaned with a dust cloth and
cared for as other furniture. Use a soft, clean cloth moistened with plain,
lukewarm water to clean the exterior of the unit. Use caution when cleaning and
wiping the plastic parts. Mild soap and a damp cloth may be used on the front
panel.

12
ESPAÑOL
13
Descripción del producto
1. Botón “MODE”: permite seleccionar el modo de conguración.
2. Botón “SCAN”: permite efectuar una búsqueda por las bandas de frecuencia
para encontrar las emisoras de radio disponibles.
3. Mando “RADIO OFF/ON/VOLUME” (apagar-encender radio/volumen): gire el
mando para encender o apagar la radio, así como para aumentar o disminuir el
volumen.
4. botón “RESET”: pone a cero la banda de frecuencia de la radio, de manera
que le sea posible efectuar una nueva búsqueda de emisoras desde el principio.
5. Pantalla LCD
6. Compartimento de las pilas (en la cara inferior del aparato)
7. Patas de goma/interruptor de luz de noche
8. botón “SET”: permite seleccionar un parámetro determinado.
9. Botón “ADJUST”: permite cambiar los valores de los distintos parámetros y
activa la función “Snooze” (posposición de la alarma).
10. Botón de Mickey Mouse
11. Altavoz
12. Proyector
13. Botón “PROJECT”: proyecta en el techo la indicación de la hora y una
imagen Mickey Mouse Clubhouse.
Información relacionada con las pilas
Su radio reloj despertador con función de proyector “Mickey Mouse Clubhouse”
funciona con 4 pilas de 1,5 V de tipo AA/LR6 (no incluidas).
Antes de utilizar por primera vez su aparato modelo
RP500TS, lleve a cabo los siguientes pasos preliminares:
1. Utilizando un destornillador, abra la tapa del
compartimento de las pilas situado en la cara inferior del
aparato.
2. Instale 4 pilas de 1,5 V de tipo AA (no incluidas)
observando las indicaciones de polaridad que se
muestran en el interior del compartimento de las pilas.
3. Cierre el compartimento de las pilas y apriete el tornillo.
1.5V AA OR LR6
1.5V AA OR LR6
1.5V AA OR LR6
1.5V AA OR LR6
NOTA IMPORTANTE: Para que el producto funcione de manera óptima, se
recomienda la utilización de pilas alcalinas.

12
13
ESPAÑOL
Instalación
Desembalaje del aparato
Cuando desembale el aparato, asegúrese de que los siguientes elementos están
presentes en el paquete:
1 Radio reloj despertador con función de proyector “Mickey Mouse Clubhouse”
1 manual de instrucciones
¡ADVERTENCIA! Todos los elementos utilizados para el embalaje tales como
cintas, recubrimientos plásticos, ataduras metálicas y etiquetas no forman parte
de este producto y, por lo tanto, deberán desecharse.
¡ADVERTENCIA! Las descargas electrostáticas o interferencias de una
frecuencia sucientemente fuerte podrán provocar el funcionamiento anormal
del aparato o la pérdida de los datos almacenados en su memoria. En caso de
observarse algún funcionamiento anormal, pulse el botón de reinicio (RESET), o
bien retire y vuelva a instalar las pilas.
No se deben intentar cargar aquellas pilas que no sean recargables. Las
pilas recargables deberán retirarse del producto antes de cargarlas. Las pilas
recargables deberán recargarse únicamente bajo la supervisión de un adulto.
No deberán mezclarse diferentes tipos de pilas ni tampoco pilas nuevas con
otras usadas. Utilice únicamente pilas del mismo tipo o equivalentes a las
recomendadas. Inserte las pilas observando la polaridad correcta. Deberán
retirarse del producto las pilas agotadas. No cortocircuite los terminales de
alimentación. No arroje las pilas al fuego. Retire las pilas del producto si no
va a utilizarlo durante periodos prolongados.

14
ESPAÑOL
15
RELOJ
1. Para proceder a congurar el reloj, pulse 3 veces el botón MODE.
2. Pulse una vez el botón SET: las cifras correspondientes a los minutos
comenzarán a parpadear.
3. Pulse el botón ADJUST para modicar el valor mostrado. A continuación, pulse
el botón SET para pasar al siguiente parámetro.
La secuencia de ajuste se muestra conforme al siguiente orden:
Minutos Horas Día Mes Día de la semana.
4. Pulse el botón MODE para conrmar su selección.
CONSEJO: mantenga pulsado el botón ADJUST para que las cifras pasen de
manera más rápida.
Para visualizar la fecha y la hora congurada para la alarma, proceda como
sigue:
Desde el modo de reloj, mantenga pulsado el botón ADJUST para comprobar la
fecha, o bien mantenga pulsado el botón SET para comprobar la hora
congurada para la alarma.
ALARMA
1. Para congurar la alarma, pulse dos veces el botón MODE.
2. Pulse el botón ADJUST para modicar el valor de la hora mostrado. A
continuación, pulse el botón SET para pasar al siguiente parámetro.
3. Pulse el botón ADJUST para modicar el valor los minutos mostrado. A
continuación, pulse el botón MODE para conrmar su selección.
4. Cuando suene la alarma, pulse el botón ADJUST para posponerla y hacer que
suene al cabo de 5 minutos, o bien pulse el botón SET para cancelarla
completamente. La alarma volverá sonar el día siguiente a la misma hora.
Cómo activar o desactivar la función de alarma:
Desde el modo de reloj, pulse simultáneamente los botones SET y ADJUST. Se
mostrará el icono cuando la función de alarma esté activada.
Conguración
ALARMA HORARIA
Para activar o desactivar el tono de alarma horaria, mantenga pulsado el botón
SET y, a continuación, pulse el botón MODE. Cuando se muestren los días de la
semana en la parte superior de la pantalla, será indicativo de que la función de
alarma horaria está activada.
CRONÓMETRO
1. Pulse una vez el botón MODE.
2. Pulse el botón ADJUST para iniciar o detener el cronómetro.
3. Pulse el botón SET para volver a iniciar el cronómetro desde el valor cero.
4. Pulse el botón MODE para regresar al modo de reloj.

14
15
ESPAÑOL
Mantenimiento
Para evitar riesgos de incendio o electrocución, desconecte el aparato del
suministro eléctrico mientras procede a su limpieza. El acabado de su aparato
puede limpiarse con una bayeta, de la misma manera utilizada para limpiar
sus otros muebles. Para limpiar el exterior del aparato, utilice un paño limpio y
suave, ligeramente humedecido con agua clara y tibia. Tenga cuidado al limpiar
los elementos de plástico del aparato. Si lo desea, podrá utilizar un tipo de jabón
suave y un paño humedecido para limpiar el panel frontal.
Especicaciones
Sintonizador de FM 87.5 – 108 MHZ
Dimensiones 64 (alto) x 191 (ancho) x 135 (profundidad) mm
Pilas 4 pilas de 1,5 V de tipo AA
RADIO
1. Gire el mando RADIO OFF/ON/VOLUME hacia la derecha para encender la
radio y aumentar el volumen.
2. Pulse el botón SCAN para buscar emisoras de radio.
3. Pulse el botón RESET si desea volver a buscar emisoras de radio desde el
principio de la banda de frecuencia.
4. Para obtener la mejor recepción de radio posible, extienda completamente la
antena y oriéntela según sea necesario hasta encontrar la posición en la que se
obtiene la mejor calidad de recepción.
5. Gire el mando RADIO OFF/ON/VOLUME hacia la izquierda para disminuir el
volumen y apagar la radio.
MELODÍAS
Pulse el botón de Mickey Mouse para reproducir una de las 4 melodías
pregrabadas.
LUZ DE NOCHE
Presione una sola vez la base del reloj para encender la luz de noche. Vuelva al
presionarla para apagarla.
Nota: una vez activada, la luz de noche permanecerá encendida durante 1 hora.
FUNCIÓN PROYECTOR
Pulse el botón PROJECT para que se muestre en el techo la hora y una imagen
divertida. La proyección irá atenuándose gradualmente al cabo de unos
segundos hasta desaparecer.

16
ESPAÑOL
17
Garantía
Este producto está cubierto por nuestra garantía de un (1) año.
Para efectuar cualquier reclamación en garantía o solicitud de reparación
posventa, le rogamos que se ponga en contacto con su distribuidor y le presente
un comprobante válido de compra. Nuestra garantía cubre aquellos defectos de
material o mano de obra que sean imputables al fabricante, a excepción de todo
aquel deterioro que se produzca como consecuencia de la no observación de
las indicaciones señaladas en el manual de instrucciones o de toda intervención
improcedente en el aparato (como por ejemplo, desmontaje, exposición al calor o
humedad, etc.). Se recomienda conservar el embalaje para poder utilizarlo como
referencia futura.
En nuestro continuo afán de optimización de servicios, podremos implementar
modicaciones en los colores y detalles del producto mostrado en el embalaje.
NOTA: por favor conserve este manual de instrucciones, ya que contiene
informaciones importantes.
Referencia: RP500MCH
Diseñado y desarrollado en Europa - Fabricado en China
© 2010 Lexibook®
© Disney
España
Servicio atención al cliente: 902367933
www.lexibook.com
Precauciones para la protección del medioambiente
¡Al nal de su vida útil, los aparatos eléctricos pueden reciclarse y no deberán desecharse junto
con los desperdicios domésticos! Le rogamos que apoye activamente la conservación de los
recursos naturales y contribuya a la protección del medioambiente desechando este aparato
eléctrico en un centro de reciclaje autorizado (si lo hay) al nal de su vida útil.
Este producto no es un juguete.

16
17
PORTUGUÊS
1. Botão MODE: Escolhe o modo de denição.
2. Botão SCAN: Procura a frequência de rádio para encontrar canais de rádio.
3. Botão RADIO OFF / ON / VOLUME: Rode o botão para ligar e desligar o rádio
e para aumentar e diminuir o volume.
4. Botão RESET: Reinicia a frequência de rádio, para que possa procurar os
canais desde o início.
5. Ecrã LCD.
6. Compartimento das pilhas (na parte inferior da unidade).
7. Pé de borracha com luz nocturna.
8. Botão SET: Escolhe uma denição.
9. Botão ADJUST: Muda o número e activa a função “snooze”.
10. Botão Mickey Mouse
11. Altifalante
12. Projector
13. Botão PROJECT: Projetos da época e um ícone de Mickey Mouse
Clubhouse no tecto.
Informação acerca das pilhas
O seu Rádio Despertador Projector do Mickey Mouse Clubhouse funciona com 4
pilhas AA / LR6 de 1,5V (não incluídas).
Quando usar o RP500TS pela primeira vez:
1. Com uma chave de fendas, abra a tampa do
compartimento das pilhas, que se encontra na parte
inferior da unidade.
2. Coloque as 4 pilhas AA de 1,5V (não incluídas),
tendo em conta os sinais da polaridade no interior do
compartimento das pilhas.
3. Feche o compartimento das pilhas e aperte o parafuso.
Não recarregue pilhas não recarregáveis. As pilhas recarregáveis têm de ser
retiradas do produto antes de serem recarregadas. As pilhas recarregáveis
só podem ser recarregadas sob a supervisão de um adulto. Não misture dif-
erentes tipos de pilhas nem pilhas novas com pilhas usadas. Utilize apenas
pilhas do mesmo tipo ou equivalentes às recomendadas. Coloque as pilhas
com a polaridade correcta. Retire as pilhas gastas do produto. Não coloque
os terminais em curto-circuito. Não atire as pilhas para o fogo. Retire as
pilhas se não usar o produto durante um longo período de tempo.
AVISO: O mau funcionamento ou perda de memória podem ser causados por
fortes interferências ou descargas electrostáticas. Caso ocorra algum
funcionamento anormal, prima o botão RESET ou retire e volte a colocar as
pilhas.
1.5V AA OR LR6
1.5V AA OR LR6
1.5V AA OR LR6
1.5V AA OR LR6
NOTA IMPORTANTE: Para um melhor desempenho, recomendamos que use
pilhas alcalinas com este produto.
Descrição do produto

18
PORTUGUÊS
19
RELÓGIO
1. Para acertar o relógio, prima MODE 3 vezes.
2. Prima SET: O dígito dos minutos começa a piscar.
3. Prima ADJUST para alterar os valores. De seguida, prima SET para passar
para o acerto seguinte.
A sequência de acerto é apresentada na seguinte ordem:
Minutos Horas Data Mês Dia da semana.
5. Prima MODE para conrmar.
DICA: Prima e mantenha premido ADJUST para correr rapidamente os valores.
Para ver a data e as horas do despertador:
No modo de relógio, prima e mantenha premido ADJUST para vericar a data, ou
prima e mantenha premido SET para vericar a hora do despertador.
DESPERTADOR
1. Para acertar o despertador, prima duas vezes MODE.
2. Prima ADJUST para alterar as horas. De seguida, prima SET para passar para
o acerto seguinte.
3. Prima ADJUST para alterar os minutos. De seguida, prima MODE para
conrmar.
4. Quando o despertador tocar, prima ADJUST para que o despertador volte a
tocar passados 5 minutos, ou prima SET para o desligar. O despertador volta a
tocar à mesma hora no dia seguinte.
Para activar ou desactivar o despertador:
No modo de relógio, prima SET e ADJUST em simultâneo. aparece quando o
despertador é activado.
Instalação
Retirar o aparelho da caixa
Quando retirar o aparelho da caixa, certique-se de que os seguintes elementos
estão incluídos:
1 Rádio Despertador Projector do Mickey Mouse Clubhouse
1 Manual de instruções
AVISO: Todos os materiais de empacotamento, como ta, películas de plástico,
arames e etiquetas não fazem parte deste brinquedo e deverão ser deitados
fora.
Denições

18
19
PORTUGUÊS
TOQUE HORÁRIO
Para ligar e desligar o toque horário, prima e mantenha premido SET e depois
prima MODE. Quando vir os dias da semana no topo do ecrã, o toque horário
está ligado.
CRONÓMETRO
1. Prima MODE.
2. Prima ADJUST para iniciar ou parar o cronómetro.
3. Prima SET para reiniciar o cronómetro em zero.
4. Prima MODE para voltar ao modo de relógio.
RÁDIO
1. Rode o botão RADIO OFF / ON / VOLUME para a direita para o ligar e
aumentar o volume.
2. Prima SCAN para procurar canais de rádio.
3. Prima RESET se quiser procurar canais desde o início das frequências.
4. Para obter uma melhor recepção, estique completamente a antena do rádio e
mova-a para encontrar a melhor recepção.
5. Rode o botão RADIO OFF / ON / VOLUME para a esquerda para diminuir o
volume e para desligar.
MELODIAS
Prima o Mickey Mouse para reproduzir uma das 4 melodias pré-memorizadas.
LUZ NOCTURNA
Prima uma vez a base do relógio para ligar a luz nocturna. Prima de novo para a
desligar.
Nota: Quando activada, a luz nocturna permanece ligada durante 1 hora.
PROJECTOR
Prima PROJECT para o projeto de tempo e um Mickey Mouse Clubhouse ícone
no tecto. A projecção vai desvanecendo passados uns segundos.
Especicações
Sintonizador FM 87.5 – 108MHZ
Dimensões A64 x C191 x L135mm
Pilhas 4 x AA 1,5V

20
PORTUGUÊS
21
Manutenção
Para evitar fogo ou o perigo de choques, desligue o aparelho da alimentação AC
quando proceder à limpeza. O acabamento da sua unidade pode ser limpo com
um pano do pó e cuidado tal como para qualquer outro mobiliário. Use um pano
suave e limpo, ligeiramente embebido em água morna para limpar o exterior da
unidade. Tenha cuidado quando limpar as peças de plástico. Pode usar
detergente neutro e um pano ligeiramente embebido em água no painel
dianteiro.
Garantia
Este produto é abrangido pela nossa garantia de 1 ano.
Se precisar de usar a nossa garantia ou serviço pós-venda, contacte o seu
revendedor e apresente-lhe uma prova válida de compra. A nossa garantia
abrange defeitos de material e de fabrico, com a excepção de qualquer
deterioração devido à não observância do manual de instruções ou qualquer
acção descuidada implementada no produto (como desmontagem, exposição
ao calor e humidade, etc.). Recomendamos que guarde a caixa para futuras
referências.
Num esforço constante para melhorar os nossos serviços, podemos implementar
modicações nas cores e detalhes do produto apresentado na caixa.
NOTA: Por favor, guarde este manual de instruções, pois contém informações
importantes.
Referência: RP500MCH
Desenhado e desenvolvido na Europa – Fabricado na China
© 2010 Lexibook®
© Disney
Portugal
AJ AGUIAR
Atendimento a clientes á sua disposição: 227455403
www.lexibook.com
Protecção Ambiental
Os aparelhos eléctricos indesejados podem ser reciclados e não deverão ser eliminados
juntamente com o lixo doméstico comum! Por favor, apoie activamente na conservação dos
recursos e ajude a proteger o ambiente, entregando este aparelho num centro de recolha (se
disponível).
Este produto não é um brinquedo.

20
21
ITALIANO
Descrizione del prodotto
1. Pulsante MODE (modalità): Seleziona la modalità di impostazione.
2. Pulsante SCAN (scansioneI: Ricerca la frequenza radio per trovare canali
radio.
3. Manopola RADIO OFF / ON / VOLUME: Ruotare la manopola per accendere e
spegnere la radio e aumentare o diminuire il volume.
4. Pulsante RESET: Resetta la frequenza radio quindi si può iniziare la scansione
dei canali dall’inizio.
5. Schermo LCD
6. Vano batterie (sotto l’unità)
7. Piedini in gomma luce notturna
8. Pulsante SET (imposta): Seleziona una impostazione.
9. Pulsante ADJUST (regola): Cambia il numero e attiva la funzione snooze.
10. Pulsante Mickey Mouse
11. Cassa
12. Proiettore
13. Pulsante PROJECT (proietta): Proietta l’ora e l’immagine Mickey Mouse
Clubhouse sul softto.
Informazioni sulle batterie
L’orologio radio sveglia con proiettore Mickey Mouse Clubhouse funziona con 4
batterie 1,5 V AA / LR6 (non fornite).
Quando si utilizza il RP500TS per la prima volta:
1. Con un cacciavite, aprire il coperchio del vano batterie
collocato sotto l’unità.
2. Inserire le 4 batterie AA 1,5 V (non fornite)
osservando la polarità indicata nel vano batterie.
3. Chiudere il vano batterie e serrare la vite.
Le batterie non ricaricabili non devono essere ricaricate. Le batterie
ricaricabili devono essere rimosse dal prodotto prima di essere caricate.
Le batterie ricaricabili devono essere caricate solo sotto supervisione di un
adulto. Diversi tipi di batterie o batterie nuove e usate non devono essere
mescolati. Utilizzare insieme solo batterie dello stesso tipo o equivalente a
quello consigliato da utilizzare. Le batterie devono essere inserite con la
corretta polarità. Le batterie esaurite devono essere rimosse dal prodotto.
I terminali forniti non sono da cortocircuitare. Non gettare le batterie nel
fuoco. Rimuovere le batterie se non si intende utilizzare il gioco per un lungo
periodo di tempo.
1.5V AA OR LR6
1.5V AA OR LR6
1.5V AA OR LR6
1.5V AA OR LR6
NOTA IMPORTANTE: Per migliori prestazioni, si consiglia di utilizzare batterie
alcaline con questo prodotto.

22
ITALIANO
23
AVVERTENZA: Il cattivo funzionamento o la perdita di memoria può essere
causato da una forte interferenza di frequenza o scariche elettrostatiche. In caso
di qualsiasi funzionamento anormale, premere il pulsante RESET o rimuovere le
batterie e inserirle di nuovo.
OROLOGIO
1. Per impostare l’orologio, premere MODE 3 volte.
2. Premere SET una volta: inizia a lampeggiare la cifra dei minuti.
3. Premere ADJUST per modicare il valore di impostazione. Quindi premere
SET per passare all’impostazione successiva.
La sequenza di impostazione viene visualizzato nel seguente ordine:
Ore Minuti Data Mese Giorno della settimana.
4. Premere MODE per confermare.
SUGGERIMENTO: Tenere premuto ADJUST per scorrere rapidamente i valori.
Per visualizzare la data e l’orario della sveglia:
In modalità orologio, premere e tenere premuto ADJUST per vericare la data
oppure tenere premuto SET per controllare l’ora della sveglia.
SVEGLIA
1. Per impostare la sveglia, premere MODE due volte.
2. Premere ADJUST per modicare il valore ora. Quindi premere SET per
passare all’impostazione successiva.
3. Premere ADJUST per modicare il valore minuto. Quindi premere MODE per
confermare.
4. Quando la sveglia suona, premere ADJUST per lo snooze della sveglia per 5
minuti o premere SET per spegnerlo. La sveglia suonerà al tempo stesso il giorno
successivo.
Per attivare o disattivare la sveglia:
In modalità orologio, premere SET e ADJUST allo stesso tempo. appare
quando la sveglia è attivata.
Installazione
Aprire la confezione
Quando si apre la confezione, controllare che contenga i seguenti elementi:
1 x Orologio radio sveglia con proiettore Mickey Mouse Clubhouse
1 x manuale di istruzioni
ATTENZIONE: Tutti i materiali di imballaggio, come nastri, fogli di plastica, cavi
ed etichette non fanno parte di questo prodotto e devono essere eliminati.
Impostazioni

22
23
ITALIANO
CRONOMETRO
1. Premere MODE una volta.
2. Premere ADJUST per avviare o arrestare il cronometro.
3. Premere SET per riavviare il cronometro da zero.
4. Premere MODE per tornare alla modalità orologio
RADIO
1. Girare la manopola RADIO OFF / ON / VOLUME verso destra per accenderlo
e aumentare il volume.
2. Premere SCAN per la ricerca di canali radio.
3. Premere RESET se si desidera effettuare la ricerca dei canali a partire
dall’inizio della gamma di frequenze.
4. Per ottenere la migliore ricezione, estendere completamente l’antenna radio e
spostarla nel punto in cui la ricezione è più chiara.
5. Girare la manopola RADIO OFF / ON / VOLUME verso sinistra per diminuire il
volume e spegnere.
MELODIE
Premere Mickey Mouse per ascoltare una delle 4 melodie precaricate.
LUCE NOTTURNA
Premere una volta sulla base dell’orologio per accendere la luce notturna.
Premere di nuovo per spegnerla.
Nota: Quando viene attivata, la luce notturna resterà accesa per 1 ora.
PROIETTORE
Prima PROJECT para o projeto de tempo e um Mickey Mouse Clubhouse ícone
sul softto. La proiezione scomparirà gradualmente dopo pochi secondi.
Speciche tecniche
Sintonizzatore FM 87.5 – 108 MHz
Dimensioni H 64 x L 191 x 135 mm
Batterie 4 x AA 1,5 V
SEGNALE ORARIO
Per attivare o disattivare il segnale orario, premere e tenere premuto SET quindi
premere MODE. Quando si vedono i giorni della settimana alla parte superiore
dello schermo il segnale orario è in funzione.

24
ITALIANO
25
Manutenzione
Per evitare incendi o scosse elettriche, scollegare l’unità dalla fonte di
alimentazione AC durante la pulizia. La nitura dell’apparecchio può essere
pulita con un panno per la polvere e curato come gli altri mobili. Usare un panno
morbido e pulito inumidito con acqua tiepida per pulire l’esterno della macchina.
Prestare attenzione durante la pulizia e stronando le parti in plastica. Sapone
delicato e un panno umido possono essere utilizzati sul pannello frontale.
Garanzia
Questo prodotto è coperto dalla nostra garanzia di 1 anno.
Per qualsiasi richiesta di intervento in garanzia o il servizio post vendita,
contattare il distributore e presentare una prova di acquisto valida. La garanzia
copre qualsiasi difetto di fabbricazione e materiali di lavorazione, con l’eccezione
di un eventuale deterioramento derivante dal mancato rispetto delle istruzioni
contenute nel manuale o ad azioni sconsiderate sull’articolo (smontaggio,
esposizione al calore e umidità, ecc.) Si raccomanda di conservare la confezione
per eventuali necessità future.
Nel tentativo di continuare a migliorare i nostri servizi, potremmo apportare
modiche ai colori ed i dettagli del prodotto indicato sulla confezione.
NOTA: Si prega di conservare il presente manuale di istruzioni, che contiene
importanti informazioni.
Riferimento: RP500MCH
Progettato e sviluppato in Europa – Fabbricato in Cina
© 2010 Lexibook®
© Disney
www.lexibook.com
Protezione Ambientale
Gli apparecchi elettrici di scarto possono essere riciclati e non devono essere gettati insieme ai
riuti domestici! Si prega di sostenere attivamente la conservazione delle risorse e proteggere
l’ambiente restituendo l ‘apparecchio ad un centro di raccolta (se disponibile).
Questo prodotto non è un giocattolo.

24
25
DEUTSCH
1. MODE-Taste: Auswahl des Einstellungsmodus
2. SCAN-Taste: Durchsuchen der Radiofrequenz nach Radiosendern
3. RADIO OFF/ ON/ VOLUME-Regler: Drehen Sie am Regler, um das Radio
ein- oder auszuschalten und die Lautstärke zu erhöhen oder zu reduzieren.
4. RESET-Taste: Setzt die Radiofrequenz zurück, sodass Sie die Suche nach
Radiosendern von Anfang an beginnen können.
5. LC-Display
6. Batteriefach (im Boden des Gerätes)
7. Nachtlicht-Gummistandfüße
8. SET-Taste: Auswahl einer Einstellung
9. ADJUST-Taste: Einstellen der Zahlen und Aktivierung der Snoozefunktion
10. Mickey MouseTaste
11. Lautsprecher
12. Projektor
13. PROJECTOR-Taste: Projektion der Uhrzeit an die Zimmerdecke
Batterieinformationen
Ihr Mickey Mouse Projektor-Radiowecker benötigt zum Betrieb 4 x 1,5V LR6/
AA Batterien (nicht mitgeliefert).
Wenn Sie den RP500TS zum ersten Mal benutzen:
1. Öffnen Sie mithilfe eines Schraubendrehers die
Batteriefachabdeckung im Boden des Gerätes.
2. Legen Sie die 4 x LR6/AA 1,5 V Batterien (nicht
mitgeliefert) unter Beachtung der Polaritätsmarkierungen
im Batteriefach ein.
3. Schließen Sie das Batteriefach und ziehen Sie die
Schraube fest.
Nicht-auadbare Batterien dürfen nicht aufgeladen werden. Auadbare Batterien müssen
aus dem Gerät vor dem Auaden entfernt werden. Auadbare Batterien dürfen nur unter
Aufsicht eines Erwachsenen aufgeladen werden. Unterschiedliche Batterietypen oder
neue und alte Batterien dürfen nicht zusammen benutzt werden. Es dürfen nur Batterien
desselben oder eines gleichwertigen Typs verwendet werden. Batterien müssen unter
Beachtung der korrekten Polarität eingelegt werden. Verbrauchte Batterien müssen aus
dem Gerät entfernt werden. Die Anschlusskontakte dürfen nicht kurzgeschlossen werden.
Batterien dürfen nicht ins Feuer geworfen werden. Entfernen Sie die Batterien aus dem
Produkt, wenn es für längere Zeit nicht benutzt wird.
1.5V AA OR LR6
1.5V AA OR LR6
1.5V AA OR LR6
1.5V AA OR LR6
IMPORTANT NOTE: For better performance, it is recommended to use alkaline
batteries with this product.
Produktbeschreibung
WARNUNG: Fehlfunktionen oder Speicherverlust können durch starke
Frequenzstörungen oder elektrostatische Entladungen verursacht werden. Sollte
das Gerät nicht ordnungsgemäß funktionieren, drücken Sie die RESET-Taste
oder entfernen Sie die Batterien und legen sie wieder ein.

26
DEUTSCH
27
UHR
1. Um die Uhr zu stellen, drücken Sie dreimal MODE.
2. Drücken Sie einmal SET: Die Minuten beginnen zu blinken.
3. Drücken Sie ADJUST, um den Einstellungswert zu ändern. Drücken Sie dann
SET, um zur nächsten Einstellung zu gelangen.
Die Einstellungen werden in folgender Reihenfolge angezeigt:
Minuten Stunden Datum Monat Wochentag.
Tipp: Halten Sie ADJUST gedrückt, um schnell durch die Werte zu scrollen.
Um das Datum und die Weckzeit anzusehen:
Halten Sie im Uhrzeitmodus ADJUST gedrückt, um das Datum zu prüfen oder
halten Sie SET gedrückt, um die Weckzeit zu prüfen.
WECKZEIT
1. Um die Weckzeit einzustellen, drücken Sie zweimal MODE.
2. Drücken Sie ADJUST, um den Stundenwert zu ändern. Drücken Sie dann SET,
um zur nächsten Einstellung zu gelangen.
3. Drücken Sie ADJUST, um den Minutenwert zu ändern. Drücken Sie zur
Bestätigung MODE.
4. Wenn der Weckalarm ertönt, drücken Sie ADJUST, um die Snoozefunktion
nach 5 Minuten zu aktivieren oder drücken Sie SET, um den Weckalarm aus-
zuschalten. Der Weckalarm wird zur gleichen Zeit am nächsten Tag klingeln.
Um den Weckalarm zu aktivieren oder deaktivieren:
Drücken Sie im Uhrzeitmodus gleichzeitig SET und ADJUST. wird angezeigt,
wenn der Weckalarm aktiviert ist.
Aufstellen
Auspacken des Gerätes
Achten Sie beim Auspacken darauf, dass die folgenden Elemente enthalten sind:
1 x Mickey Mouse Clubhouse Projektor-Radiowecker
1 x Bedienungsanleitung
WARNUNG: Das gesamte Verpackungsmaterial wie Klebeband, Plastikfolie,
Drähte und Etiketten ist nicht Teil dieses Spielzeuges und sollte entsorgt werden.
Einstellungen

26
27
DEUTSCH
STUNDENLÄUTEN
Um das Stundenläuten ein- oder auszuschalten, halten Sie SET gedrückt und
drücken Sie anschließend MODE. Wenn Sie die Wochentage oben auf dem
Display sehen, ist das Stundenläuten aktiviert.
STOPPUHR
1. Drücken Sie einmal MODE.
2. Drücken Sie ADJUST, um die Stoppuhr zu starten oder anzuhalten.
3. Drücken Sie SET, um die Stoppuhr erneut von null zu starten.
4. Drücken Sie MODE, um in den Uhrzeitmodus zurückzukehren.
RADIO
1. Drehen Sie den RADIO OFF/ ON/ VOLUME-Regler nach rechts, um es
einzuschalten und die Lautstärke zu erhöhen.
2. Drücken Sie SCAN, um die Radiosender zu suchen.
3. Drücken Sie RESET, wenn Sie nach Sendern ab Anfang des
Frequenzbereiches suchen möchten.
4. Um den besten Empfang zu erhalten, ziehen Sie die Radioantenne ganz aus
und bewegen Sie die Antenne, um die Stellung mit dem klarsten Empfang zu
nden.
5. Drehen Sie den RADIO OFF/ ON/ VOLUME-Regler nach links, um die
Lautstärke zu verringern und das Radio auszuschalten.
MELODIEN
Drücken Sie Mickey Mouse, um eine der 4 vorgespeicherten Melodien
abzuspielen.
NACHTLICHT
Drücken Sie einmal auf die Basis der Uhr, um das Nachtlicht einzuschalten.
Drücken Sie erneut, um das Licht auszuschalten.
Hinweis: Wenn eingeschaltet, bleibt das Nachtlicht für 1 Stunde aktiviert.
PROJEKTOR
Drücken Sie PROJECT, um das lustige Bild an der Zimmerdecke zu sehen. Das
Projektionsbild wird allmählich nach ein paar Sekunden ausgeblendet.
Technische Daten
FM-Tuner Gewicht 87.5 – 108MHZ
Abmessungen H64 x W191 x 135mm
Batterien 4 x AA 1.5V

28
DEUTSCH
29
Garantie
Dieses Produkt wird von unserer 1-Jahre-Garantie abgedeckt.
Für jede Inanspruchnahme der Garantie oder des Kundenservices wenden Sie
sich bitte an Ihren Fachhändler und legen Sie einen gültigen Kaufbeleg vor.
Unsere Garantie deckt alle Material- und Herstellungsmängel ab, mit Ausnahme
von Verschleißerscheinungen, die aus der Missachtung der Bedienungsanleitung
oder fahrlässigen Handlungen an diesem Produkt resultieren (wie z. B.
Auseinanderbauen, das Gerät Hitze oder Feuchtigkeit aussetzen usw.). Es wird
empfohlen, die Verpackung für spätere Verwendung aufzubewahren.
Im Bemühen unseren Service weiterhin zu verbessern, können wir an den
Farben und der Ausführung des Produktes, wie es auf der Verpackung abgebildet
ist, Änderungen vornehmen.
HINWEIS: Bitte bewahren Sie diese Bedienungsanleitung auf, sie enthält wich-
tige Informationen.
Referenz: RP500MCH
Entworfen und entwickelt in Europa – hergestellt in China
©2010 Lexibook®
©Disney
Deutschland & Österreich
Service-Hotline: 01805 010931 (0.14€ TTC/Minute)
E-Mail: [email protected]
www.lexibook.com
Umweltschutz:
Ausrangierte Elektrogeräte können recycelt werden und sollten nicht mit dem normalen
Hausmüll entsorgt werden! Bitte unterstützen Sie aktiv die Erhaltung natürlicher Ressourcen
und helfen Sie die Umwelt zu schützen, indem Sie dieses Gerät bei einer Sammelstelle abge-
ben (sofern vorhanden).
Dieses Produkt ist kein Spielzeug.
Wartung
Um Brand- oder Stromschlaggefahr zu vermeiden, trennen Sie Ihr Gerät von der
AC-Stromversorgung, wenn Sie es reinigen. Die Oberächenausführung Ihres
Gerätes kann mit einem Staubtuch gereinigt und so wie andere Möbelstücke
gepegt werden. Reinigen Sie das Geräteäußere mit einem weichen, sauberen
Tuch, das mit klarem, lauwarmem Wasser angefeuchtet ist. Seien Sie
vorsichtig, wenn Sie die Plastikteile reinigen und abwischen. Eine milde Seife und
ein feuchtes Tuch können zum Reinigen der Vorderseite verwendet werden.

28
29
NEDERLANDS
Productbeschrijving
1. MODE knop: Opent de instelmodus.
2. SCAN knop: Doorloopt de radiofrequentie om radiokanalen te vinden.
3. RADIO OFF / ON / VOLUME knop: Draai aan de knop om de radio aan of uit
te zetten en om het volume te verhogen of te verlagen.
4. RESET knop: Reset de radiofrequentie zodat u vanaf het begin kunt scannen
naar kanalen.
5. LCD-scherm
6. Batterijvak (onderaan het apparaat)
7. Nachtlamp rubber voeten
8. SET knop: Opent een instelling.
9. ADJUST knop: Wijzigt het getal en activeert de snooze-functie.
10. Mickey Mouse knop
11. Luidspreker
12. PROJECT knop: Projecten van de tijd en een Mickey Mouse Clubhouse
pictogram op het plafond.
Batterij-informatie
Uw Mickey Mouse Clubhouse radio-alarmklok met projector wordt aangedreven
door 4 x 1,5V AA / LR6 type batterijen (niet meegeleverd).
Als u de RP500TS voor de eerste maal gebruikt:
1. Open het batterijvak, dat zich achteraan het apparaat
bevindt, met behulp van een schroevendraaier.
2. Plaats de 4 x AA 1,5V batterijen (niet meegeleverd)
en let hierbij op de juiste polariteit aangegeven binnenin
het batterijvak.
3. Sluit het batterijvak en draai de schroef vast.
Laad nooit niet-oplaadbare batterijen op. Haal de oplaadbare batterijen uit
het speelgoed voordat u deze laadt. Oplaadbare batterijen mogen enkel
opgeladen worden onder toezicht van een volwassene. Meng geen
verschillende soorten batterijen of oude met nieuwe batterijen. Het wordt
aanbevolen om alleen batterijen van hetzelfde of gelijkwaardig type te
gebruiken. Plaats de batterijen volgens de juiste polariteit. Verwijder
uitgeputte batterijen uit het speelgoed. De voedingsbron mag niet
kortgesloten worden. Gooi geen batterijen in vuur. Haal de batterijen uit als u
het speelgoed gedurende een lange periode niet zult gebruiken.
WAARSCHUWING: Storing of geheugenverlies van het apparaat kan worden
veroorzaakt door sterke frequentiestoringen of elektrostatische ontlading. Als het
apparaat niet naar behoren werkt, druk op de RESET knop of haal de batterijen
uit en plaats deze dan opnieuw.
1.5V AA OR LR6
1.5V AA OR LR6
1.5V AA OR LR6
1.5V AA OR LR6
BELANGRIJKE OPMERKING: Voor een optimale prestatie wordt het
aanbevolen om alkaline batterijen met dit product te gebruiken.

30
NEDERLANDS
31
KLOK
1. Druk driemaal op MODE om de klok in te stellen.
2. Druk eenmaal op SET: de minutenweergave begint te knipperen.
3. Druk op ADJUST om de waarde te wijzigen. Druk dan op SET om naar de
volgende instelling te gaan.
De volgorde van weergegeven instellingen is als volgt:
Minuten Uur Datum Maand Dag van de week.
4. Druk op MODE om te bevestigen.
TIP: Druk op ADJUST en houd deze ingedrukt om snel door de waarden te
scrollen.
Om de datum en alarmtijd te bekijken:
In de klokmodus, druk op ADJUST en houd deze ingedrukt om de datum te
controleren of druk op SET en houd deze ingedrukt om de alarmtijd de
controleren.
ALARM
1. Druk tweemaal op MODE om het alarm in te stellen.
2. Druk op ADJUST om de uurwaarde te wijzigen. Druk dan op SET om naar de
volgende instelling te gaan.
3. Druk op ADJUST om de minutenwaarde te wijzigen. Druk dan op MODE om te
bevestigen.
4. Als het alarm afgaat, druk op ADJUST om het alarm gedurende 5 minuten
te onderbreken of druk op SET om het alarm uit te zetten. Het alarm gaat de
volgende dag op hetzelfde tijdstip opnieuw af.
Om het alarm in of uit te schakelen:
In de klokmodus, druk tegelijkertijd op SET en ADJUST. verschijnt als het alarm
is ingeschakeld.
Installatie
Het apparaat uitpakken
Controleer tijdens het uitpakken of de volgende onderdelen aanwezig zijn:
1 x Mickey Mouse Clubhouse radio-alarmklok met projector
1 x gebruiksaanwijzing
WAARSCHUWING: Alle verpakkingsmateriaal, zoals kleefband, plastic vellen,
koorden en labels vormen geen onderdeel van dit speelgoed en dienen verwi-
jderd te worden.
Instellingen

30
31
NEDERLANDS
UURALARM
Druk op SET en houd deze ingedrukt en druk dan op MODE om het uuralarm
aan of uit te zetten. Het uuralarm is ingeschakeld als de dagen van de week aan
de bovenzijde van het scherm worden weergegeven.
STOPWATCH
1. Druk eenmaal op MODE.
2. Druk op ADJUST om de stopwatch te starten of te stoppen.
3. Druk op SET om de stopwatch op nul te zetten.
4. Druk op MODE om naar de klokmodus terug te keren.
RADIO
1. Draai de RADIO OFF / ON / VOLUME knop naar rechts om de radio aan te
zetten en het volume te verhogen.
2. Druk op SCAN om naar radiokanalen te zoeken.
3. Druk op RESET als u wilt zoeken naar kanalen vanaf het begin van het
frequentiebereik.
4. Rol de radio-antenne volledig uit en beweeg deze om de positie te vinden waar
de ontvangst het beste is.
5. Draai de RADIO OFF / ON / VOLUME knop naar links om het volume te
verlagen en de radio uit te zetten.
MELODIEEN
Druk op Mickey Mouse om een van de 4 vooringestelde melodieën af te spelen.
NACHTLAMP
Druk eenmaal op het voetstuk van de klok om de nachtlamp in te schakelen.
Druk nogmaals om deze uit te schakelen.
Opmerking: De nachtlamp blijft gedurende 1 uur ingeschakeld.
PROJECTOR
Druk op PROJECT om de tijd en een Mickey Mouse Clubhouse pictogram op het
plafond project. De projectie dooft na enkele seconden langzaam uit.
Technische gegevens
FM-tuner 87.5 – 108MHZ
Afmetingen H64 x B191 x D135mm
Batterijen 4 x AA 1,5V

32
NEDERLANDS
Onderhoud
Haal de stekker van het apparaat uit het stopcontact voordat u deze
schoonmaakt om brand- en schokgevaar te vermijden. Maak de buitenkant van
uw apparaat schoon met een stofdoek en onderhoud deze op dezelfde manier
als andere apparatuur. Gebruik een zachte, schone doek, bevochtigd in lauw
water om de buitenkant van het apparaat schoon te maken. Wees voorzichtig als
u de plastic onderdelen schoonmaakt. Gebruik milde zeep en een licht
bevochtigde doek om het frontpaneel schoon te maken.
Garantie
Dit product is gedekt door onze garantie van een jaar.
Voor elke vordering onder de garantie of dienst na verkoop, neem contact op met
uw verdeler en leg een geldig aankoopbewijs voor. Onze garantie dekt om het
even welke materiaal- of fabricagefout, met uitzondering van schade veroorzaakt
door het niet opvolgen van de gebruiksaanwijzing of door een onachtzame actie
uitgevoerd op dit apparaat (zoals ontmanteling, blootstelling aan warmte of
vocht, enz.). Het is aanbevolen om de verpakking te bewaren voor toekomstige
raadpleging.
Om onze diensten te verbeteren, is het mogelijk dat de kleuren en de details van
het product zoals weergegeven op de verpakking wijzigen.
OPMERKING: Bewaar deze gebruiksaanwijzing, het bevat belangrijke informatie.
Referentie: RP500MCH
Ontworpen en ontwikkeld in Europa – Vervaardigd in China
© 2010 Lexibook®
© Disney
www.lexibook.com
Bescherming van het milieu
Afgedankte elektrische apparatuur kan worden gerecycled en mag niet met het gewone
huishoudelijk afval worden weggegooid. Steun het behoud van onze natuurlijke rijkdommen
op een actieve manier en help met het beschermen van het milieu door dit apparaat bij een
inzamelpunt in te leveren (indien voorhanden).
IM code: RP500MCHIM1290
Dit product is geen speelgoed.

32
YOUR OPINION MATTERS / VOTRE AVIS COMPTE
Help us make products better than ever! Please fill out the following form in English or in French, and return it to / Aidez-nous à rendre nos
produits encore meilleurs! Merci de bien vouloir remplir ce coupon en français ou en anglais et de nous le retourner à l’adresse suivante :
Name of product / Nom du produit:
Date of purchase / Date de l’achat : ____/_____/_____
Store / Enseigne :
Birth Date of the user / Date de naissance de l’utilisateur de ce produit : ____/_____/_____
What is your overall impression of the product? / Vous trouvez le produit globalement :
Very satisfactory/Très satisfaisant Satisfactory/Satisfaisant
Please feel free to leave your comments here / Vous pouvez à présent utiliser l’espace suivant pour nous donner vos remarques :
Find all our new products / Retrouvez toute notre actualité: http://www.lexibook.com
First name/Prénom : Last name/Nom de famille :
Address/Adresse :
Zip code/Code Postal : Country/Pays :
Phone/Téléphone : Email :
Average/Moyen
Disappointing/Décevant Very disappointing/Très décevant
LEXIBOOK S.A,
Mon avis compte
2, avenue de Scandinavie,
91953 Courtaboeuf Cedex
FRANCE
City/Ville :
Conformément aux articles 34 et suivants de la loi « Informatique et Libertés » du 6 janvier 1978, vous disposez d'un droit d'accès, de modification,
de rectification et de suppression des données qui vous concernent. Vous pouvez l'exercer sur simple demande à notre adresse. Si vous ne souhaitez
pas que ces données soient utilisées à des fins de prospection commerciale, veuillez cocher ici :
Reference of product / Référence du produit

LEXIBOOK S.A,
Mon avis compte,
2, avenue de Scandinavie,
91953 Courtaboeuf Cedex
FRANCE
Affranchir
ici
-
 1
1
-
 2
2
-
 3
3
-
 4
4
-
 5
5
-
 6
6
-
 7
7
-
 8
8
-
 9
9
-
 10
10
-
 11
11
-
 12
12
-
 13
13
-
 14
14
-
 15
15
-
 16
16
-
 17
17
-
 18
18
-
 19
19
-
 20
20
-
 21
21
-
 22
22
-
 23
23
-
 24
24
-
 25
25
-
 26
26
-
 27
27
-
 28
28
-
 29
29
-
 30
30
-
 31
31
-
 32
32
-
 33
33
-
 34
34


Lexibook Mickey Mouse Clubhouse RP500MCH Handleiding
- Categorie
- Wekkers
- Type
- Handleiding
- Deze handleiding is ook geschikt voor
in andere talen
- italiano: Lexibook Mickey Mouse Clubhouse RP500MCH Manuale utente
- français: Lexibook Mickey Mouse Clubhouse RP500MCH Manuel utilisateur
- español: Lexibook Mickey Mouse Clubhouse RP500MCH Manual de usuario
- Deutsch: Lexibook Mickey Mouse Clubhouse RP500MCH Benutzerhandbuch
- português: Lexibook Mickey Mouse Clubhouse RP500MCH Manual do usuário
Gerelateerde artikelen
-
Lexibook AL500DP de handleiding
-
-
-
Lexibook AL500TS de handleiding
-
Lexibook AL500MCH de handleiding
-
-
-
-
-
