Color Kinetics COLOR KINETICS FlexElite IntelliHue, 5 Nodes, White Node/Cable, 152 mm (6 in) On-Center Node Spacing Handleiding
- Type
- Handleiding

PUB-000432-00 (R02) 8 January 2019
FlexElite
IntelliHue, RGBW, RGBA, IntelliWhite
www.colorkinetics.com
Installation Instructions
INSTRUCTIONS D’INSTALLATION INSTRUCCIONES DE INSTALACIÓN
ISTRUZIONI PER L’INSTALLAZIONE INSTALLATIE-INSTRUCTIES
INSTALLATIONSANWEISUNGEN インストール手順 安装指示
A
Must be installed by a qualified electrician in accordance with all
national and local electrical and construction codes and regulations.
Doit être installé par un électricien qualifié conformément aux codes et réglementa-
tions électriques nationaux et locaux du bâtiment.
La instalación debe realizarla un electricista calificado siguiendo todos los códigos y
normativas eléctricas y de construcción, tanto nacionales como locales.
Devono essere installati da un elettricista qualificato in conformità con le norme
locali e nazionali vigenti in materia di costruzioni edilizie e installazione di impianti
elettrici.
Moet door een gekwalificeerd elektricien overeenkomstig alle nationale en lokale
elektrische verordeningen worden geïnstalleerd.
Muss von einem geprüften Elektriker in Übereinstimmung mit allen nationalen und
örtlichen elektrischen Codes und Regelungen installiert werden.
国または地域の建築コードおよび規制にすべて従い、資格のある電気技師が設置してくだ
さい。
必须根据所有国家和地方的电气和施工准则及规范,由符合资格的电工进行安装
B
Before installing this product, please visit the product page
at www.colorkinetics.com for the latest version of the installation
instructions. Due to continuous improvements and innovations,
installation instructions may change without notice.
Avant de procéder à l’installation de ce produit, veuillez consulter la page Web du
produit à l’adresse www.colorkinetics.com pour obtenir les instructions de montage
les plus récentes. En raison des améliorations et innovations sans cesse entreprises,
les instructions de montage peuvent être modifiées sans préavis.
Antes de instalar este producto, visite la página del producto en www.colorkinetics.
com para consultar la última versión de las instrucciones de instalación. Debido a las
continuas mejoras e innovaciones, las instrucciones de instalación pueden cambiar
sin previo aviso.
Prima di installare il prodotto, visitare la pagina relativa all’indirizzo www.colork-
inetics.com per la versione più recente delle istruzioni d’installazione. Grazie ai
miglioramenti e alle innovazioni continue, le istruzioni sono soggette a modifiche
senza preavviso.
Ga voordat u dit product installeert, eerst naar de productpagina op www.colork-
inetics.com voor de meeste recente versie van de installatie-instructies. Vanwege
voortdurende verbeteringen en innovaties kunnen de installatie-instructies zonder
bericht gewijzigd worden.
Besuchen Sie vor der Installation des Produkts bitte die Produktseite unter www.
colorkinetics.com, um die aktuellen Installationsanweisungen herunterzuladen.
Aufgrund kontinuierlicher Verbesserungen und Innovationen können die Installa-
tionsanweisungen ohne Vorankündigung geändert werden.
この製品を設置する前に、www.colorkinetics.com の製品ページにアクセスして、最新の設置
手順を確認してください。改善・改良を継続的に行っているため、取り付け手順が予告なく変
更されることがあります。
安装该产品之前,请先访问产品页面 www.colorkinetics.com 以获取最新版的安装说明。
由于在不断地改进和创新,安装说明可能会有所改动,恕不另行通知。

2 FlexElite, IntelliHue, RGBW, RGBA, IntelliWhite Installation Instructions
Important Important Importante Importante Belangrijk Wichtig 重要 重要事项
Keep nodes in protective packaging shells until nal installation.
Conservez les nœuds dans les coques d’emballage de protection jusqu’à l’installation finale.
Mantenga los nodos en sus envoltorios protectores hasta la instalación final.
Conservare i nodi in involucri protettivi fino all’installazione finale.
Bewaar de nodes in hun beschermende verpakking totdat ze geïnstalleerd worden.
Lassen Sie die Knoten bis zur endgültigen Installation in ihren Schutzverpackungen.
ノードは設置が完了するまで保護パッケージ シェルに入れたままにしてください。
最终安装之前,请将节点保存在带有保护功能的包装内。
FlexElite LED node system must be powered and controlled through the PDS-400 48V CA4
Power/Data Supply or other approved hardware.
Le système de nœud à LED FlexElite doit être alimenté et contrôlé par l’alimentation électrique/données
PDS-400 48V CA4 ou tout autre matériel homologué.
El sistema de nodos LED FlexElite debe alimentarse y controlarse mediante el PDS-400 48V CA4 Power/Data
Supply u otro hardware aprobado.
Il sistema di nodi LED FlexElite deve essere alimentato e controllato tramite alimentazione/dati PDS-400 da 48 V CA4
o altra strumentazione approvata.
Het FlexElite LED nodesysteem moet gevoed en bestuurd worden via de PDS-400 48V CA4 Power/Data Supply of andere goedgekeurde
hardware.
Das LED-Knoten-System FlexElite muss über die Strom-/Datenversorgung PDS-400 48V CA4 oder eine andere bestätigte Hardware
eingeschaltet und gesteuert werden.
FlexElite LED ノード システムの電源供給と制御には PDS-400 48V CA4 電源/データサプライまたはその他の承認済みハードウェアを使用する必
要 が ありま す。
FlexElite LED 节点系统必须通过 PDS-400 48V CA4 电源/数据源或其他通过主证的硬件进行充电或控制。
Do not over stretch node sections.
Ne distendez pas les sections de nœud
No extienda demasiado las secciones de nodo
Non tirare eccessivamente le sezioni dei nodi
Rek de nodesecties niet te veel uit
Überspannen Sie die Knotenabschnitte nicht
ノード セクションを伸 ばしすぎないようにしてください
切勿过度拉伸节点部件
Record location and serial number of each node section.
Enregistrer l’emplacement et le numéro de série de chaque section de nœud.
Registre la ubicación y el número de serie de cada sección de nodo.
Registrare ubicazione e numero di serie di ogni sezione dei nodi.
Noteer de locatie en het serienummer van elke nodesectie.
Notieren Sie Standort und Seriennummer jedes Knotenabschnitts.
各ノード セクションの位置とシリアル番号を記録します。
记录每个节点部件的位置和序列号。
Pre-testing of node sections can be performed in the shipping box.
Le test préliminaire des sections de nœud peut être effectué dans la boîte d’expédition.
La prueba previa de las secciones de nodo se puede realizar en la caja de embalaje.
Il test preliminare delle sezioni dei nodi può essere eseguito nella confezione di spedizione.
Vooraf testen van de nodesecties kan worden uitgevoerd in de transportdoos.
Ein vorheriger Funktionstest der Knotenabschnitte kann innerhalb des Versandkartons erfolgen.
ノード セクションの事前テストは配送用ボックスの中で実施できます。
可在包装箱中对节点部件进行预测试。
Do not hot swap node sections
Ne permutez pas les sections de nœud à chaud
No intercambie secciones de nodo mientras estén conectadas
Non sostituire a caldo le sezioni dei nodi
Wissel geen onder spanning staande nodes uit
Knotenabschnitte nicht unter Spannung herausziehen oder anschließen
ノード セクションを電源が入ったまま交換しないでください
切勿热插拔节点部件
Serial Number

FlexElite, IntelliHue, RGBW, RGBA, IntelliWhite Installation Instructions 3
1
2
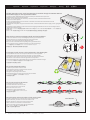
Confirm all components received
Confirmez la réception de l’intégralité des composants
Compruebe si ha recibido todos los componentes
Confermare tutti i componenti ricevuti
Controleer alle ontvangen componenten
Bestätigen Sie, dass Sie alle Bestandteile erhalten haben
すべてのコンポーネントが揃っていることを確認します。
确认收到了所有部件
D
Keep node sections boxed until nal installation
Conservez les sections de nœud dans leur boîte jusqu’à l’installation nale
Mantenga las secciones de nodo en su caja hasta la instalación nal
Conservare le sezioni dei nodi nella confezione no all’installazione nale
Bewaar de nodesecties in hun dozen totdat ze geïnstalleerd worden.
Lassen Sie die Knoten bis zur endgültigen Installation verpackt.
ノード セクションは設置が完了するまでボックスに入れたままにしてください
最终安装之前,请将节点部件保存在包装箱内
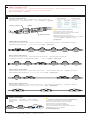
100 m (330 ft) max per run (PDS to terminator)
100 m maxi par série (entre le PDS et le dernier bloc terminaison)
100 m (330 pies) máx por recorrido (PDS hasta el último terminador)
Max 100 m (330 ft) per fila (da PDS a ultimo terminale)
100 m maximaal per lengte (van PDS tot laatste afsluiter)
100 m max pro Weg (PDS an der letzten Terminierung)
敷設あたり最長 100 m (330 フィート) (PDS から最終ターミネーターまで)
最大间距(PDS 到最后一个端接器)最多 100 米(330 英尺)
Terminator Node section
Node sections
Terminator
Terminator
Terminator
Terminator
Jumper cable
Leader cable
Leader cable
Leader cable
Leader cable
Leader cable
PDS-400 48V CA4
Power/Data Supply
(supports 160 nodes
total)
Alimentation électrique/données
PDS-400 48V CA4 (prend en charge
160 nœuds au total)
PDS-400 48V CA4 Power/Data Supply
(admite 160 nodos en total)
Alimentazione/Dati PDS-400 da 48 V
CA4 (supporta 160 nodi in totale)
PDS-400 48V CA4 Power/Data Supply
(ondersteunt in totaal 160 nodes)
Strom-/Datenversorgung PDS-400 48V
CA4 (unterstützt bis zu 160 Knoten)
PDS-400 48V CA4 電源/データサプライ (
合計 160 ノードに対応)
PDS-400 48V CA4 电源/数据源(共支持
160 个节点)
Node mounting clips (optional)
Clips de montage des nœuds (en option)
Clips de montaje de nodos (opcionales)
Clip di montaggio dei nodi (opzionali)
Nodemontageklemmen (optioneel)
Knotenmontage-Clips (optional)
ノード取付クリップ (オプション)
节点装配夹(可选)
Node section
Section de nœud
Sección de nodo
Sezione nodo
Nodesectie
Knotenbereich
ノード セクション
节点部件
Dome lens (optional)
Lentille en forme de dôme (en option)
Lente de cubierta (opcional)
Lente a cupola (opzionale)
Koepellens (optioneel)
Kugellinse (optional)
ドーム型レンズ (オプション)
圆形透镜(可选)
Jumper cable (optional)
Câble bretelle (en option)
Cable de arranque (opcional)
Cavo di connessione (opzionale)
Jumperkabel (optioneel)
Überbrückungskabel (optional)
ジャンパーケーブル (オプション)
跨接电缆(可选)
Leader cable with terminator
Câble conducteur avec bloc terminaison
Cable guía con terminador
Cavo principale con terminale
Hoofdaansluitkabel met afsluiter
Anschlusskabel mit Terminierung
ターミネーター付きリーダーケーブル
带端接器的主电缆
Verify the electrical plan and all necessary surge protection requirements.
Vérifiez le plan électrique et toutes les exigences de protection contre les surtensions nécessaires.
Verifique el plan eléctrico y todos los requisitos necesarios de protección contra sobretensiones.
Verificare il piano elettrico e tutti i requisiti necessari per la protezione dalle sovratensioni.
Controleer het elektrische plan en alle noodzakelijke overspanningsbeveiliging eisen.
ÜberPrüfen Sie den elektrischen Plan und alle notwendigen Überspannungsschutz Anforderungen.
電気的計画と必要なすべてのサージ保護要件を確認します。
验证电气计划和所有必要的浪涌保护要求。
B Important Surge Protection Requirement: www.colorkinetics.com/KB/surge-protection

4 FlexElite, IntelliHue, RGBW, RGBA, IntelliWhite Installation Instructions
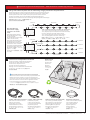
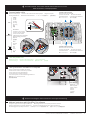
152.4 mm (6 in)
304.8 mm (12 in)
500 mm (19.6 in)
609.6 mm (24 in)
1 m (39.3 in)
Center screw
Vis centrale
Centre el tornillo
Vite centrale
Centrale schroef
Mittlere Schraube
中心ネジ
中心螺钉
Two screws
Deux vis
Dos tornillos
Due viti
Twee schroeven
Zwei Schrauben
ネジ (2 本)
两个螺钉
Zip tie
Collier de serrage
Cierre de cremallera
Chiudere la fascetta
Kabelbinder
Kabelbinder
ジップタイ
束线带
Zip tie
Collier de serrage
Cierre de cremallera
Chiudere la fascetta
Kabelbinder
Kabelbinder
ジップタイ
束线带
Mounting option 1: Install node mounting clips
Option de montage 1 : installez les clips de montage des nœuds
Opción de montaje 1: instalar los clips de montaje de nodos
Opzione di montaggio 1: Installare clip di montaggio dei nodi
Montagemogelijkheid 1: Instaleren van nodemontageklemmen
Montageoption 1: Knotenmontage-Clips montieren
取付オプション 1: ノード取付クリップを取り付けます
安装选项 1: 使用装配夹安装节点
3
D
Mounting hardware customer supplied
Matériel de montage fourni par le client
Hardware de montaje suministrada por el cliente
Strumenti di montaggio forniti dal cliente
Bevestigingshardware wordt niet meegeleverd
Kundenseitiges Befestigungsmaterial
取付け用ハードウェア (付属していません)
用于安装的五金由客户自备
C
Do not over stretch node sections.
Ne distendez pas les sections de nœud
No extienda demasiado las secciones de nodo
Non tirare eccessivamente le sezioni dei nodi
Rek de nodesecties niet te veel uit
Überspannen Sie die Knotenabschnitte nicht
ノード セクションを伸 ばしすぎないようにしてください
切勿过度拉伸节点部件
Mounting option 2: Install node without mounting clip
Option de montage 2 : installez le nœud sans clip de montage
Opción de montaje 2: instalar el nodo sin clip de montaje
Opzione di montaggio 2: Installare il nodo senza montare i clip
Montagemogelijkheid 2: Instaleren van node zonder montageklem
Montageoption 2: Montage ohne Befestigungs-Clips
取付オプション 2: 取付クリップを使用しないでノードを取り付けます
安装选项 2: 不使用装配夹安装节点
Centerline markings
Mounting clip spacing

FlexElite, IntelliHue, RGBW, RGBA, IntelliWhite Installation Instructions 5
5
D
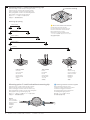
Release air vacuum to restore dome shape
Relâchez le vide d’air pour rétablir la forme de dôme
Libere el vacío de aire para restaurar la forma de la cubierta
Rilasciare il vuoto dell’aria per ripristinare la forma della cupola
Laat lucht instromen om de koepelvorm te herstellen
Luftvakuum entweichen lassen, um die Kugelform wiederherzustellen
真空を解放してドーム型を復元します
释放空气以恢复圆形
D
Trim Ring can not be repositioned after clamping
La bague décorative ne peut pas être repositionnée après serrage
El aro de ajuste no se puede recolocar después de sujetarlo
L’anello di tenuta non può essere riposizionato dopo il serraggio
Montagerand kan niet meer verschoven worden nadat hij is vastgeklemd
Einstellring kann nach dem Festklemmen nicht verstellt werden
締め付け後はトリム リングの位置を変更できません
装饰环在固定后无法重新放置
SNAP!
Protective
packaging
shell
Remove node from protective packaging shell and
secure into mounting clip
Retirez le nœud de la coque d’emballage de protection et bloquez-le dans le clip de montage
Retire el nodo de su envoltorio protector y sujételo al clip de montaje
Rimuovere il nodo dall’involucro protettivo e fissarlo al clip di montaggio
Verwijder de node uit de beschermende verpakking en zet hem vast in de montageklem
Knoten aus der Schutzverpackung nehmen und am Befestigungs-Clip sichern
保護パッケージ シェルからノードを取り出し、取付クリップで固定します
从保护性包装壳中取出节点,并固定到安装夹上
Attach optional Dome Lens accessory
Fixez l’accessoire de lentille en forme de dôme (en option) Monte el accesorio opcional de lente de cubierta Collegare l’accessorio lente a cupola
Bevestigen van de optionele koepellens optionale Kugellinse montieren ドーム型レンズ アクセサリーを取り付けます (オプション) 安装可选的圆形透镜配件
Dome Lens Trim Ring
4
Optional accessory En option Opcional Opzionale Opties Optional オプ ション 可选

6 FlexElite, IntelliHue, RGBW, RGBA, IntelliWhite Installation Instructions
8
7
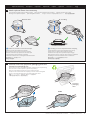
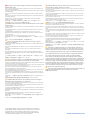
Connect node sections
Connectez les sections de nœud Conecte las secciones de nodo Collegare le sezioni dei nodi
Sluit de nodesecties aan Knotenabschnitte verbinden ノード セクションを接続します 连接节点部件
Attach Terminator
Fixez le terminateur Attach terminator Adjuntar terminación
Fissare il terminatore Terminator bevestigen ターミネータ取り付け
连接端接器
Jumper Cable Length Leader Cable Length
1 ft (0.3 m) 0.5 m (1.64 ft) 25 ft (7.6 m)
2 ft (0.6 m) 1 m (3.28 ft) 50 ft (15.2 m)
5 ft (1.52 m) 2 m (6.56 ft) 100 ft (30.4 m)
10 ft (3 m) 200 ft (60.9 m)
CLICK!
CLICK!
Leader cable to node sections
Câble conducteur reliant les sections de nœud Cable guía a secciones de nodo Cavo principale alle sezioni dei nodi Hoofdaansluitkabel naar nodesecties
Anschlusskabel zu den Knotenabschnitten リーダーケーブルとノード セクションの接続 主电缆到节点部件
Direct connect node sections
Connectez directement les sections de nœud Conecte directamente las secciones de nodo Collegare direttamente le sezioni dei nodi
Direct aansluiten van nodesecties Knotenabschnitte direkt verbinden ノード セクションとの直接接続 直接连接节点部件
Jumper cable to node sections
Câble bretelle reliant les sections de nœud Cable de arranque a secciones de nodo Cavo di connessione alle sezioni dei nodi Jumperkabel naar nodesecties
Überbrückungskabel zu den Knotenabschnitten ジャンパーケーブルとノード セクションの接続 跨接电缆到节点部件
Jumper cable to jumper cable
Câble bretelle reliant un câble bretelle Cable de arranque a cable de arranque Cavo di connessione al cavo di connessione Jumperkabel naar jumperkabel
Überbrückungskabel zum Überbrückungskabel ジャンパーケーブルとノード セクションの接続 跨接电缆到跨接电缆
C
Do not hot swap node sections
Ne permutez pas les sections de nœud à chaud
No intercambie secciones de nodo mientras estén conectadas
Non sostituire a caldo le sezioni dei nodi
Wissel geen onder spanning staande nodes uit
Knotenabschnitte nicht unter Spannung herausziehen oder anschließen
ノード セクションを電源が入ったまま交換しないでください
切勿热插拔节点部件
C
Terminator required at the end of each complete run
Bloc terminaison requis à l’extrémité de chaque série complète
Al nal de cada recorrido completo se necesita un terminador
Terminale richiesto alla ne di ogni ciclo completo
Afsluiter vereist aan het einde van elke complete lengte
Terminierung (Abschlusswiderstand) am Ende jedes Wegs erforderlich
敷設の終端それぞれにターミネーターが必要です
每个电缆末端处都需要用到端接器
Make sure power is OFF
Assurez-vous que l’alimentation est coupée Asegúrese de que la alimentación eléctrica esté desconectada Assicurarsi che l’alimentazione sia disattivata
Zorg dat de voeding is uitgeschakeld Vergewissern Sie sich, dass die Stromzufuhr ABGESCHALTET ist
電源が OFF であることを確認します 确保电源关闭
6
Output connector
Input connector

FlexElite, IntelliHue, RGBW, RGBA, IntelliWhite Installation Instructions 7
Address luminaires with QuickPlay Pro software
Configurer les appareils à l’aide du logiciel QuickPlay Pro Beleuchtungseinheiten mit der QuickPlay Pro-Software ansteuern
Direccionar los lámparas con el software QuickPlay Pro Impostare i gruppi di illuminazione con il software QuickPlay Pro
Adresbevestigingen met QuickPlay Pro-software QuickPlay Pro ソフトウェアで器具を操作します 使用 QuickPlay Pro 软件配置各灯具
Turn the power ON
Rétablissez le courant Encienda la alimentación eléctrica Attivare l’alimentazione
Schakel de voeding in Schalten Sie die Stromzufuhr EIN 電源を ON にします 打开电源
9
10
12
11
Connect leader cable
Branchez le câble principal Enchufe el cable de alimentación eléctrica principal Collegare il cavo pilota
Sluit de geleidekabel aan Schließen Sie das Masterkabel an リーダー ケーブルを接続します 连接引线电缆
To LED node sections
Reliant les sections de nœud à LED
A secciones de nodo LED Alle sezioni dei nodi LED
Naar LED-nodesecties Zu den LED-Knotenabschnitten
LED ノード セクションへ 到 LED 节点部件
To LED node sections
Reliant les sections de nœud à LED
A secciones de nodo LED Alle sezioni dei nodi LED
Naar LED-nodesecties Zu den LED-Knotenabschnitten
LED ノード セクションへ 到 LED 节点部件
48V +
Data
DC
Common
Test system when installation is complete
Testez le système lorsque l’installation est terminée
Pruebe el sistema cuando la instalación haya finalizado
Testare il sistema al termine dell’installazione
Test het systeem als de installatie is voltooid
Testen Sie das System, wenn die Installation abgeschlossen ist.
設置が完了したら、システムをテストします
完成安装后测试系统
Test Button
Bouton test
Botón de prueba
Pulsante di prova
Testknop
Testtaste
テストボタン
测试按钮
Data
Common
48V +
DC
Voltage
Tension
Tensión
Tensione
Spanning
Spannung
電圧
電壓
DC Common
commune à courant continu
común de corriente continua
comune corrente continua
gelijkspanning gemeenschappelijke
Gleichspannungs gemeinsame
直流コモン
直流通用
Data
Données
Datos
Dati
Data
Daten
データ
数据
E Address and Congure: www.colorkinetics.com/support/addressing/
E Installation details: see the PDS-400 48V CA4 Installation Instructions
www.colorkinetics.com/ls/pds/pds400/

A
Ensure that main power supply is o before installing or wiring
FlexElite LED nodes.
Assurez-vous que l’alimentation électrique principale est hors tension avant d’installer ou de
câbler les nœuds à LED FlexElite.
Asegúrese de que la fuente de alimentación principal esté apagada antes de instalar o cablear
nodos LED FlexElite.
Assicurarsi che l’alimentazione principale sia spenta prima di installare o cablare i nodi LED
FlexElite.
Zorg ervoor dat de netspanning is uitgeschakeld voorafgaand aan het installeren of bedraden
van FlexElite LED-nodes.
Achten Sie darauf, dass die Stromversorgung ausgeschaltet ist, bevor Sie die FlexElite
LED-Knoten installieren oder anschließen.
FlexElite LED ノードを設置または配線する前に、主電源が切れていることを確認してください。
在安装或连线 FlexElite LED 节点之前,请确保主电源已关闭。
B
FlexElite LED nodes have no user serviceable parts. Do not attempt
to open them.
Les nœuds à LED FlexElite ne comportent pas de pièces réparables par l’utilisateur. N’essayez
pas de les ouvrir.
Los nodos LED FlexElite no tienen piezas cuyo mantenimiento pueda realizar el usuario. No
intente abrirlos.
I nodi LED FlexElite non contengono parti riparabili dall’utente. Non tentare di aprirli.
FlexElite LED-nodes bevatten geen door de gebruiker te onderhouden onderdelen. Probeer
niet deze te openen.
FlexElite LED-Knoten sind wartungsfrei. Versuchen Sie nicht, sie zu önen.
FlexElite LED ノードにユーザーによる修理が可能な部品はありません。 ノードを開かないようにしてく
ださい。
FlexElite LED 节点中没有用户可维修的部件。 请不要试图打开它们。
B
Do not use FlexElite LED nodes if the lens, housing, or power
cables are damaged.
N’utilisez pas les nœuds à LED FlexElite si la lentille, le boîtier ou les câbles d’alimentation sont
endommagés.
No utilice los nodos LED FlexElite si el objetivo, la carcasa o los cables de alimentación están
dañados.
Non utilizzare i nodi LED FlexElite se la lente, il corpo o i cavi di alimentazione risultano
danneggiati.
Gebruik FlexElite LED-nodes niet als de lens, behuizing of voedingskabels beschadigd zijn.
Verwenden Sie die FlexElite LED-Knoten nicht, wenn die Linse, das Gehäuse oder Stromkabel
beschädigt sind.
レンズ、筐体、または電源ケーブルが破損している場合は、FlexElite LED ノードを使用しないでくださ
い。
如果透镜、外壳或电源线损坏,切勿使用 FlexElite LED 节点。
B
Do not attempt to install or use FlexElite LED nodes until you read
and understand the installation instructions and safety labels.
N’essayez pas d’installer ou d’utiliser les nœuds à LED FlexElite à moins d’avoir lu et compris les
instructions d’installation et les étiquettes de sécurité.
No intente instalar o utilizar los nodos LED FlexElite hasta que no haya leído y comprendido las
instrucciones de instalación y las etiquetas de seguridad.
Non tentare di installare o utilizzare i nodi LED FlexElite prima di aver letto e compreso le
istruzioni di installazione e le etichette di sicurezza.
Probeer FlexElite LED-nodes niet te installeren of te gebruiken voordat u de installatie-instruc-
ties en veiligheidslabels hebt gelezen en begrepen.
Versuchen Sie nicht, die FlexElite LED-Knoten zu installieren oder zu verwenden, so lange Sie
noch nicht die Installationsanweisungen und die Sicherheitsaufkleber gelesen und verstanden
haben.
FlexElite LED ノードを設置および使用する際は、設置手順書および安全ラベルをよく読んでから行って
ください。
请在阅读并理解本安装说明和安全标签之后再尝试安装或使用 FlexElite LED 节点。
B
FlexElite LED node sections are suitable for direct mounting on
ammable structural materials, e.g., wood, etc.
Les sections de nœud à LED FlexElite conviennent pour un montage direct sur des matériaux
de structure inammable comme le bois.
Las secciones de nodo LED FlexElite pueden montarse directamente sobre materiales estruc-
turales inamables, como puede ser la madera.
Le sezioni dei nodi LED FlexElite possono essere montate direttamente su materiali strutturali
inammabili come il legno e così via.
FlexElite LED-nodes kunnen rechtstreeks bevestigd worden op ontvlambare bouwmaterialen,
zoals hout.
Die FlexElite LED-Knotenabschnitte eignen sich für die direkte Montage auf brennbaren
Konstruktionsmaterialien wie z. B. Holz usw.
FlexElite LED ノード セクション制御モジュールは、可燃性の建築材料 (木材など) に直接取り付けるの
に適しています。
FlexElite LED 节点部件适合直接安装在易燃结构材料上,如木头等。
B
FlexElite LED node sections shall, under no circumstance, be
covered with insulating material of any kind.
Les sections de nœud à LED FlexElite ne doivent en aucun cas être recouvertes d’un matériau
isolant, quel qu’il soit.
Las secciones de nodo LED FlexElite no se deben cubrir en ninguna circunstancia con material
aislante de ningún tipo.
Le sezioni dei nodi LED FlexElite non dovrebbero essere coperti in nessun caso con materiali
isolanti o altri materiali simili.
FlexElite LED-nodes mogen onder geen enkele omstandigheid worden afgedekt met isolatie-
materiaal van welke soort dan ook.
Die FlexElite LED-Knotenabschnitte sollten unter keinen Umständen von Isoliermaterial oder
anderen, ähnlichen Materialien verdeckt werden.
FlexElite LED ノード セクションは、断熱材によって覆わないようにしてください。
在任何情况下,FlexElite LED 节点部件均不得覆盖任何类型的绝热材料。
C
Do not hot swap FlexElite LED node sections. Ensure that power to the series is o before
connecting or disconnecting LED node sections.
Ne permutez pas les sections de nœud à LED FlexElite à chaud. Assurez-vous que l’alimenta-
tion reliant la série est hors tension avant de connecter ou déconnecter les sections de nœud
à LED.
No intercambie secciones de nodo LED FlexElite mientras estén conectadas. Asegúrese de que
la alimentación de la serie esté desconectada antes de conectar o desconectar secciones de
nodo LED.
Non sostituire a caldo le sezioni dei nodi LED FlexElite. Prima di collegare o scollegare le sezioni
dei nodi LED, assicurarsi che la serie non sia alimentata.
Wissel onder spanning staande FlexElite LED-nodes niet uit. Zorg dat er geen stroom op de
serie staat voordat u LED-nodes aansluit of loskoppelt.
Sie sollten die FlexElite LED-Knotenabschnitte nicht unter Spannung herausziehen oder
anschließen. Stellen Sie sicher, dass die Stromversorgung der LED-Knotenabschnitte
abgeschaltet ist.
FlexElite LED ノード セクションを電源が入ったまま交換しないでください。 LED ノード セクションを接
続または切断する前に、必ず系統の電源を切ってください。
切勿热插拔 FlexElite LED 节点部件。 连接或断开 LED 节点部件时,请确保该串连线路上的所有
设备电源均已断开。
C
This device complies with Part 15 of the FCC Rules. Operation is
subject to the following two conditions: (1) this device may not cause
harmful interference, and (2) this device must accept any interference
received, including interference that may cause undesired operation.
This equipment has been tested and found to comply with the limits
for a Class A digital device, pursuant to Part 15 of the FCC Rules.
These limits are designed to provide reasonable protection against
harmful interference when the equipment is operated in a commercial
environment. This equipment generates, uses, and can radiate radio
frequency energy and, if not installed and used in accordance with the
instruction manual, may cause harmful interference to radio commu-
nications. Operation of this equipment in a residential area is likely to
cause interference in which case the user will be required to correct
the interference at his own expense.
C
This Class A digital apparatus complies with Canadian ICES-003. Cet
appareil numérique de la classe A est conforme à la norme
NMB-003 du Canada.
© 2018 Signify Holding. All rights reserved. Specifications are subject to
change without notice. No representation or warranty as to the accuracy
or completeness of the information included herein is given and any
liability for any action in reliance thereon is disclaimed. All trademarks
are owned by Signify Holding or their respective owners.
www.colorkinetics.com
Documenttranscriptie
FlexElite IntelliHue, RGBW, RGBA, IntelliWhite Installation Instructions INSTRUCTIONS D’INSTALLATION INSTRUCCIONES DE INSTALACIÓN ISTRUZIONI PER L’INSTALLAZIONE INSTALLATIONSANWEISUNGEN INSTALLATIE-INSTRUCTIES インストール手順 A Must be installed by a qualified electrician in accordance with all national and local electrical and construction codes and regulations. Doit être installé par un électricien qualifié conformément aux codes et réglementations électriques nationaux et locaux du bâtiment. La instalación debe realizarla un electricista calificado siguiendo todos los códigos y normativas eléctricas y de construcción, tanto nacionales como locales. Devono essere installati da un elettricista qualificato in conformità con le norme locali e nazionali vigenti in materia di costruzioni edilizie e installazione di impianti elettrici. Moet door een gekwalificeerd elektricien overeenkomstig alle nationale en lokale elektrische verordeningen worden geïnstalleerd. Muss von einem geprüften Elektriker in Übereinstimmung mit allen nationalen und örtlichen elektrischen Codes und Regelungen installiert werden. 国または地域の建築コードおよび規制にすべて従い、資格のある電気技師が設置してくだ さい。 必须根据所有国家和地方的电气和施工准则及规范,由符合资格的电工进行安装 安装指示 B Before installing this product, please visit the product page at www.colorkinetics.com for the latest version of the installation instructions. Due to continuous improvements and innovations, installation instructions may change without notice. Avant de procéder à l’installation de ce produit, veuillez consulter la page Web du produit à l’adresse www.colorkinetics.com pour obtenir les instructions de montage les plus récentes. En raison des améliorations et innovations sans cesse entreprises, les instructions de montage peuvent être modifiées sans préavis. Antes de instalar este producto, visite la página del producto en www.colorkinetics. com para consultar la última versión de las instrucciones de instalación. Debido a las continuas mejoras e innovaciones, las instrucciones de instalación pueden cambiar sin previo aviso. Prima di installare il prodotto, visitare la pagina relativa all’indirizzo www.colorkinetics.com per la versione più recente delle istruzioni d’installazione. Grazie ai miglioramenti e alle innovazioni continue, le istruzioni sono soggette a modifiche senza preavviso. Ga voordat u dit product installeert, eerst naar de productpagina op www.colorkinetics.com voor de meeste recente versie van de installatie-instructies. Vanwege voortdurende verbeteringen en innovaties kunnen de installatie-instructies zonder bericht gewijzigd worden. Besuchen Sie vor der Installation des Produkts bitte die Produktseite unter www. colorkinetics.com, um die aktuellen Installationsanweisungen herunterzuladen. Aufgrund kontinuierlicher Verbesserungen und Innovationen können die Installationsanweisungen ohne Vorankündigung geändert werden. この製品を設置する前に、www.colorkinetics.com の製品ページにアクセスして、最新の設置 手順を確認してください。改善・改良を継続的に行っているため、取り付け手順が予告なく変 更されることがあります。 安装该产品之前,请先访问产品页面 www.colorkinetics.com 以获取最新版的安装说明。 由于在不断地改进和创新,安装说明可能会有所改动,恕不另行通知。 PUB-000432-00 (R02) 8 January 2019 www.colorkinetics.com Important Important Importante Importante Belangrijk Wichtig 重要 重要事项 FlexElite LED node system must be powered and controlled through the PDS-400 48V CA4 Power/Data Supply or other approved hardware. Le système de nœud à LED FlexElite doit être alimenté et contrôlé par l’alimentation électrique/données PDS-400 48V CA4 ou tout autre matériel homologué. El sistema de nodos LED FlexElite debe alimentarse y controlarse mediante el PDS-400 48V CA4 Power/Data Supply u otro hardware aprobado. Il sistema di nodi LED FlexElite deve essere alimentato e controllato tramite alimentazione/dati PDS-400 da 48 V CA4 o altra strumentazione approvata. Het FlexElite LED nodesysteem moet gevoed en bestuurd worden via de PDS-400 48V CA4 Power/Data Supply of andere goedgekeurde hardware. Das LED-Knoten-System FlexElite muss über die Strom-/Datenversorgung PDS-400 48V CA4 oder eine andere bestätigte Hardware eingeschaltet und gesteuert werden. FlexElite LED ノード システムの電源供給と制御には PDS-400 48V CA4 電源/データサプライまたはその他の承認済みハードウェアを使用する必 要があります。 FlexElite LED 节点系统必须通过 PDS-400 48V CA4 电源/数据源或其他通过主证的硬件进行充电或控制。 Keep nodes in protective packaging shells until final installation. Conservez les nœuds dans les coques d’emballage de protection jusqu’à l’installation finale. Mantenga los nodos en sus envoltorios protectores hasta la instalación final. Conservare i nodi in involucri protettivi fino all’installazione finale. Bewaar de nodes in hun beschermende verpakking totdat ze geïnstalleerd worden. Lassen Sie die Knoten bis zur endgültigen Installation in ihren Schutzverpackungen. ノードは設置が完了するまで保護パッケージ シェルに入れたままにしてください。 最终安装之前,请将节点保存在带有保护功能的包装内。 Pre-testing of node sections can be performed in the shipping box. Le test préliminaire des sections de nœud peut être effectué dans la boîte d’expédition. La prueba previa de las secciones de nodo se puede realizar en la caja de embalaje. Il test preliminare delle sezioni dei nodi può essere eseguito nella confezione di spedizione. Vooraf testen van de nodesecties kan worden uitgevoerd in de transportdoos. Ein vorheriger Funktionstest der Knotenabschnitte kann innerhalb des Versandkartons erfolgen. ノード セクションの事前テストは配送用ボックスの中で実施できます。 可在包装箱中对节点部件进行预测试。 Do not hot swap node sections Ne permutez pas les sections de nœud à chaud No intercambie secciones de nodo mientras estén conectadas Non sostituire a caldo le sezioni dei nodi Wissel geen onder spanning staande nodes uit Knotenabschnitte nicht unter Spannung herausziehen oder anschließen ノード セクションを電源が入ったまま交換しないでください 切勿热插拔节点部件 Do not over stretch node sections. Ne distendez pas les sections de nœud No extienda demasiado las secciones de nodo Non tirare eccessivamente le sezioni dei nodi Rek de nodesecties niet te veel uit Überspannen Sie die Knotenabschnitte nicht ノード セクションを伸ばしすぎないようにしてください 切勿过度拉伸节点部件 Record location and serial number of each node section. Enregistrer l’emplacement et le numéro de série de chaque section de nœud. Registre la ubicación y el número de serie de cada sección de nodo. Registrare ubicazione e numero di serie di ogni sezione dei nodi. Noteer de locatie en het serienummer van elke nodesectie. Notieren Sie Standort und Seriennummer jedes Knotenabschnitts. 各ノード セクションの位置とシリアル番号を記録します。 记录每个节点部件的位置和序列号。 2 FlexElite, IntelliHue, RGBW, RGBA, IntelliWhite Installation Instructions Serial Number B Important Surge Protection Requirement: 1 www.colorkinetics.com/KB/surge-protection Verify the electrical plan and all necessary surge protection requirements. Vérifiez le plan électrique et toutes les exigences de protection contre les surtensions nécessaires. Verifique el plan eléctrico y todos los requisitos necesarios de protección contra sobretensiones. Verificare il piano elettrico e tutti i requisiti necessari per la protezione dalle sovratensioni. Controleer het elektrische plan en alle noodzakelijke overspanningsbeveiliging eisen. ÜberPrüfen Sie den elektrischen Plan und alle notwendigen Überspannungsschutz Anforderungen. 電気的計画と必要なすべてのサージ保護要件を確認します。 验证电气计划和所有必要的浪涌保护要求。 Terminator Node section Jumper cable Leader cable PDS-400 48V CA4 Power/Data Supply (supports 160 nodes total) 100 m (330 ft) max per run (PDS to terminator) 100 m maxi par série (entre le PDS et le dernier bloc terminaison) 100 m (330 pies) máx por recorrido (PDS hasta el último terminador) Max 100 m (330 ft) per fila (da PDS a ultimo terminale) Alimentation électrique/données PDS-400 48V CA4 (prend en charge 160 nœuds au total) 100 m maximaal per lengte (van PDS tot laatste afsluiter) 100 m max pro Weg (PDS an der letzten Terminierung) 敷設あたり最長 100 m (330 フィート) (PDS から最終ターミネーターまで) PDS-400 48V CA4 Power/Data Supply (admite 160 nodos en total) 最大间距(PDS 到最后一个端接器)最多 100 米(330 英尺) Leader cable Alimentazione/Dati PDS-400 da 48 V CA4 (supporta 160 nodi in totale) PDS-400 48V CA4 Power/Data Supply (ondersteunt in totaal 160 nodes) Terminator Leader cable Terminator Strom-/Datenversorgung PDS-400 48V CA4 (unterstützt bis zu 160 Knoten) PDS-400 48V CA4 電源/データサプライ ( 合計 160 ノードに対応) Terminator Leader cable PDS-400 48V CA4 电源/数据源(共支持 160 个节点) Terminator Leader cable 2 Node sections Confirm all components received Node section Compruebe si ha recibido todos los componentes Sección de nodo Confirmez la réception de l’intégralité des composants Confermare tutti i componenti ricevuti Section de nœud Sezione nodo Nodesectie Controleer alle ontvangen componenten Bestätigen Sie, dass Sie alle Bestandteile erhalten haben Knotenbereich すべてのコンポーネントが揃っていることを確認します。 ノード セクション 确认收到了所有部件 节点部件 D Keep node sections boxed until final installation Conservez les sections de nœud dans leur boîte jusqu’à l’installation finale Mantenga las secciones de nodo en su caja hasta la instalación final Conservare le sezioni dei nodi nella confezione fino all’installazione finale Bewaar de nodesecties in hun dozen totdat ze geïnstalleerd worden. Lassen Sie die Knoten bis zur endgültigen Installation verpackt. ノード セクションは設置が完了するまでボックスに入れたままにしてください 最终安装之前,请将节点部件保存在包装箱内 Leader cable with terminator Jumper cable (optional) Node mounting clips (optional) Dome lens (optional) Câble conducteur avec bloc terminaison Câble bretelle (en option) Clips de montage des nœuds (en option) Lentille en forme de dôme (en option) Cable guía con terminador Cable de arranque (opcional) Clips de montaje de nodos (opcionales) Lente de cubierta (opcional) Cavo principale con terminale Cavo di connessione (opzionale) Clip di montaggio dei nodi (opzionali) Lente a cupola (opzionale) Hoofdaansluitkabel met afsluiter Jumperkabel (optioneel) Nodemontageklemmen (optioneel) Koepellens (optioneel) Anschlusskabel mit Terminierung Überbrückungskabel (optional) Knotenmontage-Clips (optional) Kugellinse (optional) ターミネーター付きリーダーケーブル ジャンパーケーブル (オプション) ノード取付クリップ (オプション) ドーム型レンズ (オプション) 带端接器的主电缆 跨接电缆(可选) 节点装配夹(可选) 圆形透镜(可选) FlexElite, IntelliHue, RGBW, RGBA, IntelliWhite Installation Instructions 3 3 Mounting option 1: Install node mounting clips Centerline markings Option de montage 1 : installez les clips de montage des nœuds Opción de montaje 1: instalar los clips de montaje de nodos Opzione di montaggio 1: Installare clip di montaggio dei nodi Montagemogelijkheid 1: Instaleren van nodemontageklemmen Montageoption 1: Knotenmontage-Clips montieren 取付オプション 1: ノード取付クリップを取り付けます 安装选项 1: 使用装配夹安装节点 Mounting clip spacing 152.4 mm (6 in) C Do not over stretch node sections. Ne distendez pas les sections de nœud No extienda demasiado las secciones de nodo Non tirare eccessivamente le sezioni dei nodi 304.8 mm (12 in) Rek de nodesecties niet te veel uit Überspannen Sie die Knotenabschnitte nicht ノード セクションを伸ばしすぎないようにしてください 切勿过度拉伸节点部件 500 mm (19.6 in) 609.6 mm (24 in) 1 m (39.3 in) Center screw Two screws Zip tie Vis centrale Deux vis Collier de serrage Centre el tornillo Dos tornillos Cierre de cremallera Vite centrale Due viti Chiudere la fascetta Centrale schroef Twee schroeven Kabelbinder Mittlere Schraube Zwei Schrauben Kabelbinder 中心ネジ ネジ (2 本) ジップタイ 中心螺钉 两个螺钉 束线带 Mounting option 2: Install node without mounting clip D Mounting hardware customer supplied Option de montage 2 : installez le nœud sans clip de montage Matériel de montage fourni par le client Opción de montaje 2: instalar el nodo sin clip de montaje Hardware de montaje suministrada por el cliente Opzione di montaggio 2: Installare il nodo senza montare i clip Strumenti di montaggio forniti dal cliente Montagemogelijkheid 2: Instaleren van node zonder montageklem Bevestigingshardware wordt niet meegeleverd Montageoption 2: Montage ohne Befestigungs-Clips Kundenseitiges Befestigungsmaterial 取付オプション 2: 取付クリップを使用しないでノードを取り付けます 取付け用ハードウェア (付属していません) 安装选项 2: 不使用装配夹安装节点 用于安装的五金由客户自备 Zip tie Collier de serrage Cierre de cremallera Chiudere la fascetta Kabelbinder Kabelbinder ジップタイ 束线带 4 FlexElite, IntelliHue, RGBW, RGBA, IntelliWhite Installation Instructions Optional accessory 4 En option Opcional Opzionale Attach optional Dome Lens accessory Fixez l’accessoire de lentille en forme de dôme (en option) Bevestigen van de optionele koepellens Opties Monte el accesorio opcional de lente de cubierta optionale Kugellinse montieren Optional オプション 可选 Collegare l’accessorio lente a cupola ドーム型レンズ アクセサリーを取り付けます (オプション) Dome Lens 安装可选的圆形透镜配件 Trim Ring D Release air vacuum to restore dome shape D Trim Ring can not be repositioned after clamping Relâchez le vide d’air pour rétablir la forme de dôme La bague décorative ne peut pas être repositionnée après serrage Libere el vacío de aire para restaurar la forma de la cubierta El aro de ajuste no se puede recolocar después de sujetarlo Rilasciare il vuoto dell’aria per ripristinare la forma della cupola L’anello di tenuta non può essere riposizionato dopo il serraggio Laat lucht instromen om de koepelvorm te herstellen Montagerand kan niet meer verschoven worden nadat hij is vastgeklemd Luftvakuum entweichen lassen, um die Kugelform wiederherzustellen Einstellring kann nach dem Festklemmen nicht verstellt werden 真空を解放してドーム型を復元します 締め付け後はトリム リングの位置を変更できません 释放空气以恢复圆形 装饰环在固定后无法重新放置 5 Remove node from protective packaging shell and secure into mounting clip Retirez le nœud de la coque d’emballage de protection et bloquez-le dans le clip de montage Retire el nodo de su envoltorio protector y sujételo al clip de montaje Rimuovere il nodo dall’involucro protettivo e fissarlo al clip di montaggio Verwijder de node uit de beschermende verpakking en zet hem vast in de montageklem Knoten aus der Schutzverpackung nehmen und am Befestigungs-Clip sichern 保護パッケージ シェルからノードを取り出し、取付クリップで固定します 从保护性包装壳中取出节点,并固定到安装夹上 Protective packaging shell SNAP! FlexElite, IntelliHue, RGBW, RGBA, IntelliWhite Installation Instructions 5 6 Make sure power is OFF Assurez-vous que l’alimentation est coupée Zorg dat de voeding is uitgeschakeld 電源が OFF であることを確認します 7 Asegúrese de que la alimentación eléctrica esté desconectada 确保电源关闭 Connect node sections Connectez les sections de nœud Sluit de nodesecties aan Assicurarsi che l’alimentazione sia disattivata Vergewissern Sie sich, dass die Stromzufuhr ABGESCHALTET ist Conecte las secciones de nodo Knotenabschnitte verbinden Output connector Collegare le sezioni dei nodi ノード セクションを接続します 连接节点部件 CLICK! Jumper Cable Length Leader Cable Length 1 ft (0.3 m) 0.5 m (1.64 ft) 25 ft (7.6 m) 2 ft (0.6 m) 1 m (3.28 ft) 50 ft (15.2 m) 5 ft (1.52 m) 2 m (6.56 ft) 100 ft (30.4 m) 10 ft (3 m) 200 ft (60.9 m) C Do not hot swap node sections Ne permutez pas les sections de nœud à chaud No intercambie secciones de nodo mientras estén conectadas Input connector Non sostituire a caldo le sezioni dei nodi Wissel geen onder spanning staande nodes uit Knotenabschnitte nicht unter Spannung herausziehen oder anschließen ノード セクションを電源が入ったまま交換しないでください 切勿热插拔节点部件 Leader cable to node sections Câble conducteur reliant les sections de nœud Anschlusskabel zu den Knotenabschnitten Cable guía a secciones de nodo Cavo principale alle sezioni dei nodi リーダーケーブルとノード セクションの接続 Hoofdaansluitkabel naar nodesecties 主电缆到节点部件 Direct connect node sections Connectez directement les sections de nœud Direct aansluiten van nodesecties Conecte directamente las secciones de nodo Knotenabschnitte direkt verbinden Collegare direttamente le sezioni dei nodi ノード セクションとの直接接続 直接连接节点部件 Jumper cable to node sections Câble bretelle reliant les sections de nœud Cable de arranque a secciones de nodo Überbrückungskabel zu den Knotenabschnitten Cavo di connessione alle sezioni dei nodi ジャンパーケーブルとノード セクションの接続 Jumperkabel naar nodesecties 跨接电缆到节点部件 Jumper cable to jumper cable Câble bretelle reliant un câble bretelle Cable de arranque a cable de arranque Überbrückungskabel zum Überbrückungskabel 8 Attach Terminator Fixez le terminateur Fissare il terminatore Attach terminator Cavo di connessione al cavo di connessione ジャンパーケーブルとノード セクションの接続 Adjuntar terminación Terminator bevestigen ターミネータ取り付け Jumperkabel naar jumperkabel 跨接电缆到跨接电缆 C Terminator required at the end of each complete run Bloc terminaison requis à l’extrémité de chaque série complète Al final de cada recorrido completo se necesita un terminador 连接端接器 CLICK! Terminale richiesto alla fine di ogni ciclo completo Afsluiter vereist aan het einde van elke complete lengte Terminierung (Abschlusswiderstand) am Ende jedes Wegs erforderlich 敷設の終端それぞれにターミネーターが必要です 每个电缆末端处都需要用到端接器 6 FlexElite, IntelliHue, RGBW, RGBA, IntelliWhite Installation Instructions E Installation details: see the PDS-400 48V CA4 Installation Instructions www.colorkinetics.com/ls/pds/pds400/ 9 To LED node sections Connect leader cable Branchez le câble principal Sluit de geleidekabel aan Enchufe el cable de alimentación eléctrica principal Schließen Sie das Masterkabel an Collegare il cavo pilota リーダー ケーブルを接続します Voltage Tension 连接引线电缆 Reliant les sections de nœud à LED A secciones de nodo LED Alle sezioni dei nodi LED Naar LED-nodesecties Zu den LED-Knotenabschnitten LED ノード セクションへ 到 LED 节点部件 Tensión 48V + 48V + Tensione Spanning DC Common Spannung 電圧 Data 電壓 DC Common commune à courant continu común de corriente continua DC Common comune corrente continua gelijkspanning gemeenschappelijke Gleichspannungs gemeinsame 直流コモン 直流通用 Data Données Data Datos Dati To LED node sections Data Reliant les sections de nœud à LED Daten A secciones de nodo LED データ 数据 10 11 Turn the power ON Rétablissez le courant Encienda la alimentación eléctrica Schakel de voeding in Schalten Sie die Stromzufuhr EIN Alle sezioni dei nodi LED Naar LED-nodesecties Zu den LED-Knotenabschnitten LED ノード セクションへ 到 LED 节点部件 Attivare l’alimentazione 電源を ON にします 打开电源 Test system when installation is complete Testez le système lorsque l’installation est terminée Pruebe el sistema cuando la instalación haya finalizado Testare il sistema al termine dell’installazione Test het systeem als de installatie is voltooid Testen Sie das System, wenn die Installation abgeschlossen ist. 設置が完了したら、 システムをテストします 完成安装后测试系统 Test Button Bouton test Botón de prueba Pulsante di prova Testknop Testtaste テストボタン 测试按钮 E Address and Configure: www.colorkinetics.com/support/addressing/ 12 Address luminaires with QuickPlay Pro software Configurer les appareils à l’aide du logiciel QuickPlay Pro Direccionar los lámparas con el software QuickPlay Pro Adresbevestigingen met QuickPlay Pro-software Beleuchtungseinheiten mit der QuickPlay Pro-Software ansteuern Impostare i gruppi di illuminazione con il software QuickPlay Pro QuickPlay Pro ソフトウェアで器具を操作します 使用 QuickPlay Pro 软件配置各灯具 FlexElite, IntelliHue, RGBW, RGBA, IntelliWhite Installation Instructions 7 A Ensure that main power supply is off before installing or wiring B FlexElite LED node sections shall, under no circumstance, be Assurez-vous que l’alimentation électrique principale est hors tension avant d’installer ou de câbler les nœuds à LED FlexElite. Les sections de nœud à LED FlexElite ne doivent en aucun cas être recouvertes d’un matériau isolant, quel qu’il soit. Asegúrese de que la fuente de alimentación principal esté apagada antes de instalar o cablear nodos LED FlexElite. Las secciones de nodo LED FlexElite no se deben cubrir en ninguna circunstancia con material aislante de ningún tipo. Assicurarsi che l’alimentazione principale sia spenta prima di installare o cablare i nodi LED FlexElite. Le sezioni dei nodi LED FlexElite non dovrebbero essere coperti in nessun caso con materiali isolanti o altri materiali simili. Zorg ervoor dat de netspanning is uitgeschakeld voorafgaand aan het installeren of bedraden van FlexElite LED-nodes. FlexElite LED-nodes mogen onder geen enkele omstandigheid worden afgedekt met isolatiemateriaal van welke soort dan ook. Achten Sie darauf, dass die Stromversorgung ausgeschaltet ist, bevor Sie die FlexElite LED-Knoten installieren oder anschließen. Die FlexElite LED-Knotenabschnitte sollten unter keinen Umständen von Isoliermaterial oder anderen, ähnlichen Materialien verdeckt werden. FlexElite LED ノードを設置または配線する前に、主電源が切れていることを確認してください。 FlexElite LED ノード セクションは、断熱材によって覆わないようにしてください。 在安装或连线 FlexElite LED 节点之前,请确保主电源已关闭。 在任何情况下,FlexElite LED 节点部件均不得覆盖任何类型的绝热材料。 B FlexElite LED nodes have no user serviceable parts. Do not attempt C Do not hot swap FlexElite LED node sections. Ensure that power to the series is off before Les nœuds à LED FlexElite ne comportent pas de pièces réparables par l’utilisateur. N’essayez pas de les ouvrir. Ne permutez pas les sections de nœud à LED FlexElite à chaud. Assurez-vous que l’alimentation reliant la série est hors tension avant de connecter ou déconnecter les sections de nœud à LED. FlexElite LED nodes. to open them. Los nodos LED FlexElite no tienen piezas cuyo mantenimiento pueda realizar el usuario. No intente abrirlos. I nodi LED FlexElite non contengono parti riparabili dall’utente. Non tentare di aprirli. FlexElite LED-nodes bevatten geen door de gebruiker te onderhouden onderdelen. Probeer niet deze te openen. FlexElite LED-Knoten sind wartungsfrei. Versuchen Sie nicht, sie zu öffnen. FlexElite LED ノードにユーザーによる修理が可能な部品はありません。ノードを開かないようにしてく ださい。 FlexElite LED 节点中没有用户可维修的部件。 请不要试图打开它们。 B Do not use FlexElite LED nodes if the lens, housing, or power cables are damaged. N’utilisez pas les nœuds à LED FlexElite si la lentille, le boîtier ou les câbles d’alimentation sont endommagés. No utilice los nodos LED FlexElite si el objetivo, la carcasa o los cables de alimentación están dañados. Non utilizzare i nodi LED FlexElite se la lente, il corpo o i cavi di alimentazione risultano danneggiati. Gebruik FlexElite LED-nodes niet als de lens, behuizing of voedingskabels beschadigd zijn. Verwenden Sie die FlexElite LED-Knoten nicht, wenn die Linse, das Gehäuse oder Stromkabel beschädigt sind. レンズ、筐体、 または電源ケーブルが破損している場合は、FlexElite LED ノードを使用しないでくださ い。 如果透镜、外壳或电源线损坏,切勿使用 FlexElite LED 节点。 B Do not attempt to install or use FlexElite LED nodes until you read and understand the installation instructions and safety labels. N’essayez pas d’installer ou d’utiliser les nœuds à LED FlexElite à moins d’avoir lu et compris les instructions d’installation et les étiquettes de sécurité. No intente instalar o utilizar los nodos LED FlexElite hasta que no haya leído y comprendido las instrucciones de instalación y las etiquetas de seguridad. Non tentare di installare o utilizzare i nodi LED FlexElite prima di aver letto e compreso le istruzioni di installazione e le etichette di sicurezza. Probeer FlexElite LED-nodes niet te installeren of te gebruiken voordat u de installatie-instructies en veiligheidslabels hebt gelezen en begrepen. Versuchen Sie nicht, die FlexElite LED-Knoten zu installieren oder zu verwenden, so lange Sie noch nicht die Installationsanweisungen und die Sicherheitsaufkleber gelesen und verstanden haben. covered with insulating material of any kind. connecting or disconnecting LED node sections. No intercambie secciones de nodo LED FlexElite mientras estén conectadas. Asegúrese de que la alimentación de la serie esté desconectada antes de conectar o desconectar secciones de nodo LED. Non sostituire a caldo le sezioni dei nodi LED FlexElite. Prima di collegare o scollegare le sezioni dei nodi LED, assicurarsi che la serie non sia alimentata. Wissel onder spanning staande FlexElite LED-nodes niet uit. Zorg dat er geen stroom op de serie staat voordat u LED-nodes aansluit of loskoppelt. Sie sollten die FlexElite LED-Knotenabschnitte nicht unter Spannung herausziehen oder anschließen. Stellen Sie sicher, dass die Stromversorgung der LED-Knotenabschnitte abgeschaltet ist. FlexElite LED ノード セクションを電源が入ったまま交換しないでください。LED ノード セクションを接 続または切断する前に、必ず系統の電源を切ってください。 切勿热插拔 FlexElite LED 节点部件。 连接或断开 LED 节点部件时,请确保该串连线路上的所有 设备电源均已断开。 C This device complies with Part 15 of the FCC Rules. Operation is subject to the following two conditions: (1) this device may not cause harmful interference, and (2) this device must accept any interference received, including interference that may cause undesired operation. This equipment has been tested and found to comply with the limits for a Class A digital device, pursuant to Part 15 of the FCC Rules. These limits are designed to provide reasonable protection against harmful interference when the equipment is operated in a commercial environment. This equipment generates, uses, and can radiate radio frequency energy and, if not installed and used in accordance with the instruction manual, may cause harmful interference to radio communications. Operation of this equipment in a residential area is likely to cause interference in which case the user will be required to correct the interference at his own expense. C This Class A digital apparatus complies with Canadian ICES-003. Cet appareil numérique de la classe A est conforme à la norme NMB-003 du Canada. FlexElite LED ノードを設置および使用する際は、設置手順書および安全ラベルをよく読んでから行って ください。 请在阅读并理解本安装说明和安全标签之后再尝试安装或使用 FlexElite LED 节点。 B FlexElite LED node sections are suitable for direct mounting on flammable structural materials, e.g., wood, etc. Les sections de nœud à LED FlexElite conviennent pour un montage direct sur des matériaux de structure inflammable comme le bois. Las secciones de nodo LED FlexElite pueden montarse directamente sobre materiales estructurales inflamables, como puede ser la madera. Le sezioni dei nodi LED FlexElite possono essere montate direttamente su materiali strutturali infiammabili come il legno e così via. FlexElite LED-nodes kunnen rechtstreeks bevestigd worden op ontvlambare bouwmaterialen, zoals hout. Die FlexElite LED-Knotenabschnitte eignen sich für die direkte Montage auf brennbaren Konstruktionsmaterialien wie z. B. Holz usw. FlexElite LED ノード セクション制御モジュールは、可燃性の建築材料 (木材など) に直接取り付けるの に適しています。 FlexElite LED 节点部件适合直接安装在易燃结构材料上,如木头等。 © 2018 Signify Holding. All rights reserved. Specifications are subject to change without notice. No representation or warranty as to the accuracy or completeness of the information included herein is given and any liability for any action in reliance thereon is disclaimed. All trademarks are owned by Signify Holding or their respective owners. www.colorkinetics.com-
 1
1
-
 2
2
-
 3
3
-
 4
4
-
 5
5
-
 6
6
-
 7
7
-
 8
8


Color Kinetics COLOR KINETICS FlexElite IntelliHue, 5 Nodes, White Node/Cable, 152 mm (6 in) On-Center Node Spacing Handleiding
- Type
- Handleiding
in andere talen
- English: Color Kinetics COLOR KINETICS FlexElite IntelliHue, 5 Nodes, White Node/Cable, 152 mm (6 in) On-Center Node Spacing Operating instructions
- italiano: Color Kinetics COLOR KINETICS FlexElite IntelliHue, 5 Nodes, White Node/Cable, 152 mm (6 in) On-Center Node Spacing Istruzioni per l'uso
- français: Color Kinetics COLOR KINETICS FlexElite IntelliHue, 5 Nodes, White Node/Cable, 152 mm (6 in) On-Center Node Spacing Mode d'emploi
Gerelateerde papieren
-
Color Kinetics AuxBox Handleiding
-
Philips COLOR KINETICS iColor Accent Compact, RGBW, 1228.5 mm (48.4 in), Translucent Lens Handleiding
-
Color Kinetics Flex Compact eW Color Kinetics Handleiding
-
-
-
Color Kinetics BCX423 4000 4.0W 120V WB 12IN UL Handleiding
-
-
Andere documenten
-
Samlexpower PDS-10 V2.0 de handleiding
-
Marmitek IPTV Coax Pro Handleiding
-
Samlexpower PDS-10 de handleiding
-
CHAUVET DJ DMX-AN Gebruikershandleiding
-
Linksys VLP0203 Handleiding
-
Philips Chromacore Optibin ColorBlast TR Installatie gids
-
Gima 22390 de handleiding
-
AVENTICS Series G3 Electronic Module - ATEX de handleiding
-
Briteq BT-NODE28 (5pin XLR) de handleiding
-