Yamaha DKC-900 de handleiding
- Categorie
- Digitale piano's
- Type
- de handleiding

IT
ES
DE
FR
EN
Owner’s manual
Mode d’emploi
Benutzerhandbuch
Manual de instrucciones
Manuale di istruzioni
DKC-900
Disklavier Control Unit

1. IMPORTANT NOTICE: DO NOT MODIFY THIS
UNIT!
This product, when installed as indicated in the instructions
contained in this manual, meets FCC requirements. Modifi-
cations not expressly approved by Yamaha may void your
authority, granted by the FCC, to use the product.
2. IMPORTANT: When connecting this product to accesso-
ries and/or another product use only high quality shielded
cables. Cable/s supplied with this product MUST be used.
Follow all installation instructions. Failure to follow instruc-
tions could void your FCC authorization to use this product in
the USA.
3. NOTE: This product has been tested and found to comply
with the requirements listed in FCC Regulations, Part 15 for
Class “B” digital devices. Compliance with these require-
ments provides a reasonable level of assurance that your
use of this product in a residential environment will not result
in harmful interference with other electronic devices. This
equipment generates/uses radio frequencies and, if not
installed and used according to the instructions found in the
users manual, may cause interference harmful to the opera-
* This applies only to products distributed by Yamaha Corporation of America. (class B)
tion of other electronic devices. Compliance with FCC regu-
lations does not guarantee that interference will not occur in
all installations. If this product is found to be the source of
interference, which can be determined by turning the unit
“OFF” and “ON”, please try to eliminate the problem by using
one of the following measures:
Relocate either this product or the device that is being
affected by the interference.
Utilize power outlets that are on different branch (circuit
breaker or fuse) circuits or install AC line filter/s.
In the case of radio or TV interference, relocate/reorient the
antenna. If the antenna lead-in is 300 ohm ribbon lead,
change the lead-in to co-axial type cable.
If these corrective measures do not produce satisfactory
results, please contact the local retailer authorized to distrib-
ute this type of product. If you can not locate the appropriate
retailer, please contact Yamaha Corporation of America,
Electronic Service Division, 6600 Orangethorpe Ave, Buena
Park, CA90620
The above statements apply ONLY to those products distrib-
uted by Yamaha Corporation of America or its subsidiaries.
FCC INFORMATION (U.S.A.)
* This applies only to products distributed by
Yamaha Corporation of America.
COMPLIANCE INFORMATION STATEMENT
(Supplierʼs declaration of conformity procedure)
Responsible Party : Yamaha Corporation of America
Address : 6600 Orangethorpe Ave., Buena Park, Calif. 90620
Telephone : 714-522-9011
Type of Equipment : Disklavier Control Unit
Model Name : DKC-900
This device complies with Part 15 of the FCC Rules.
Operation is subject to the following two conditions:
1) this device may not cause harmful interference, and
2) this device must accept any interference received including interference
that may cause undesired operation.
(FCC SDoC)

Explanation of Graphical Symbols
The lightning flash with arrowhead symbol
within an equilateral triangle is intended to
alert the user to the presence of uninsulated
“dangerous voltage” within the product’s
enclosure that may be of sufficient
magnitude to constitute a risk of electric
shock to persons.
The exclamation point within an equilateral
triangle is intended to alert the user to the
presence of important operating and
maintenance (servicing) instructions in the
literature accompanying the product.
IMPORTANT SAFETY INSTRUCTIONS
1 Read these instructions.
2 Keep these instructions.
3 Heed all warnings.
4 Follow all instructions.
5 Do not use this apparatus near water.
6 Clean only with dry cloth.
7 Do not block any ventilation openings. Install in
accordance with the manufacturer’s instructions.
8 Do not install near any heat sources such as
radiators, heat registers, stoves, or other apparatus
(including amplifiers) that produce heat.
9 Do not defeat the safety purpose of the polarized or
grounding-type plug. A polarized plug has two
blades with one wider than the other. A grounding
type plug has two blades and a third grounding
prong. The wide blade or the third prong are
provided for your safety. If the provided plug does
not fit into your outlet, consult an electrician for
replacement of the obsolete outlet.
10 Protect the power cord from being walked on or
pinched particularly at plugs, convenience
receptacles, and the point where they exit from the
apparatus.
11 Only use attachments/accessories specified by the
manufacturer.
12 Use only with the cart, stand,
tripod, bracket, or table
specified by the manufacturer,
or sold with the apparatus.
When a cart is used, use
caution when moving the cart/
apparatus combination to
avoid injury from tip-over.
13 Unplug this apparatus during lightning storms or
when unused for long periods of time.
14 Refer all servicing to qualified service personnel.
Servicing is required when the apparatus has been
damaged in any way, such as power-supply cord or
plug is damaged, liquid has been spilled or objects
have fallen into the apparatus, the apparatus has
been exposed to rain or moisture, does not operate
normally, or has been dropped.
(UL60065_03)
CAUTION: TO REDUCE THE RISK OF
ELECTRIC SHOCK, DO NOT REMOVE
COVER (OR BACK). NO USER-SERVICEABLE
PARTS INSIDE. REFER SERVICING TO
QUALIFIED SERVICE PERSONNEL.
CAUTION
RISK OF ELECTRIC SHOCK
DO NOT OPEN
WARNING
TO REDUCE THE RISK OF FIRE OR ELECTRIC SHOCK, DO NOT EXPOSE THIS APPARATUS TO RAIN OR
MOISTURE.

Explication des symboles graphiques
L'éclair avec une flèche à l'intérieur d'un
triangle équilatéral est destiné à attirer
l'attention de l'utilisateur sur la présence
d'une « tension dangereuse » non isolée
à l'intérieur de l'appareil, pouvant être
suffisamment élevée pour constituer
un risque d'électrocution.
Le point d'exclamation à l'intérieur d'un
triangle équilatéral est destiné à attirer
l'attention de l'utilisateur sur la présence
d'instructions importantes sur l'emploi ou la
maintenance (réparation) de l'appareil dans la
documentation fournie.
CONSIGNES DE SÉCURITÉ À LIRE ATTENTIVEMENT
1 Lisez les instructions ci-après.
2 Conservez ces instructions.
3 Tenez compte des avertissements.
4 Suivez toutes les instructions.
5 N'utilisez pas cet instrument dans un milieu humide.
6 Employez uniquement un chiffon sec pour nettoyer
l'instrument.
7 N'obstruez pas les ouvertures prévues pour la
ventilation. Installez l'instrument conformément aux
instructions du fabricant.
8 N'installez pas l'instrument près d'une source de
chaleur, notamment un radiateur, une bouche de
chaleur, un poêle ou autres (y compris les
amplificateurs).
9 Ne modifiez pas les caractéristiques de la fiche avec
mise à la terre polarisée. Une fiche polarisée est dotée
de deux broches (l'une est plus large que l'autre). Une
fiche avec mise à la terre comprend deux broches,
ainsi qu'une troisième qui relie l'instrument à la terre.
La broche la plus large (ou troisième broche) permet de
sécuriser l'installation électrique. Si vous ne pouvez
pas brancher le cordon d'alimentation dans la prise
d'alimentation, demandez à un électricien de la
remplacer.
10 Protégez le cordon d'alimentation. Cela permet d'éviter
de marcher dessus ou de le tordre au niveau de la
fiche, de la prise d'alimentation et des points de
contact sur l'instrument.
11 N'employez que les dispositifs/accessoires indiqués
par le fabricant.
12 Utilisez uniquement le chariot, le
socle, le trépied, le support ou le
plan indiqués par le fabricant ou
livrés avec l'instrument. Si vous
utilisez un chariot, soyez
prudent si vous le déplacez avec
l'instrument posé dessus pour
éviter de le renverser.
13 Débranchez l'instrument en cas d'orage ou lorsque
vous ne l'utilisez pas pendant des périodes
prolongées.
14 Confiez toutes les réparations à des techniciens
qualifiés. Des réparations sont nécessaires lorsque
l'instrument est endommagé, notamment dans les cas
suivants : cordon d'alimentation ou fiche défectueuse,
liquides ou objets projetés sur l'appareil, exposition
aux intempéries ou à l'humidité, fonctionnement
anormal ou chute.
(UL60065_03)
ATTENTION
RISQUE D'ÉLECTROCUTION
NE PAS OUVRIR
ATTENTION : POUR RÉDUIRE LES RISQUES D'ÉLECTROCUTION,
NE PAS RETIRER LE CAPOT (OU LE DOS). NE CONTIENT
PAS DE PIÈCES NÉCESSITANT L'INTERVENTION
DE L'UTILISATEUR. POUR TOUTE INTERVENTION,
FAIRE APPEL À DES PROFESSIONNELS QUALIFIÉS.
AVERTISSEMENT
N'UTILISEZ PAS L'INSTRUMENT SOUS LA PLUIE OU DANS UN ENVIRONNEMENT HUMIDE, FAUTE DE QUOI VOUS
RISQUEZ DE PROVOQUER UN INCENDIE OU DE VOUS ÉLECTROCUTER.

(weee_eu_en_02)
(weee_eu_fr_02)
Information for users on collection and disposal of old equipment:
This symbol on the products, packaging, and/or accompanying documents means that used electrical and electronic
products should not be mixed with general household waste.
For proper treatment, recovery and recycling of old products, please take them to applicable collection points, in
accordance with your national legislation.
By disposing of these products correctly, you will help to save valuable resources and prevent any potential negative
effects on human health and the environment which could otherwise arise from inappropriate waste handling.
For more information about collection and recycling of old products, please contact your local municipality, your
waste disposal service or the point of sale where you purchased the items.
For business users in the European Union:
If you wish to discard electrical and electronic equipment, please contact your dealer or supplier for further
information.
Information on Disposal in other Countries outside the European Union:
This symbol is only valid in the European Union. If you wish to discard these items, please contact your local
authorities or dealer and ask for the correct method of disposal.
Informations concernant la collecte et le traitement des déchets d’équipements électriques et
électroniques
Le symbole sur les produits, l'emballage et/ou les documents joints signifie que les produits électriques ou
électroniques usagés ne doivent pas être mélangés avec les déchets domestiques habituels.
Pour un traitement, une récupération et un recyclage appropriés des déchets d’équipements électriques et
électroniques, veuillez les déposer aux points de collecte prévus à cet effet, conformément à la réglementation
nationale.
En vous débarrassant correctement des déchets d’équipements électriques et électroniques, vous contribuerez à la
sauvegarde de précieuses ressources et à la prévention de potentiels effets négatifs sur la santé humaine qui
pourraient advenir lors d'un traitement inapproprié des déchets.
Pour plus d'informations à propos de la collecte et du recyclage des déchets d’équipements électriques et
électroniques, veuillez contacter votre municipalité, votre service de traitement des déchets ou le point de vente où
vous avez acheté les produits.
Pour les professionnels dans l'Union européenne :
Si vous souhaitez vous débarrasser des déchets d’équipements électriques et électroniques, veuillez contacter votre
vendeur ou fournisseur pour plus d'informations.
Informations sur la mise au rebut dans d'autres pays en dehors de l'Union européenne :
Ce symbole est seulement valable dans l'Union européenne. Si vous souhaitez vous débarrasser de déchets
d’équipements électriques et électroniques, veuillez contacter les autorités locales ou votre fournisseur et demander
la méthode de traitement appropriée

(weee_eu_de_02)
(weee_eu_es_02)
(weee_eu_it_02)
(For European Countries) Importer: Yamaha Music Europe GmbH Siemensstrasse 22-34, 25462 Rellingen, Germany
Verbraucherinformation zur Sammlung und Entsorgung alter Elektrogeräte
Befindet sich dieses Symbol auf den Produkten, der Verpackung und/oder beiliegenden Unterlagen, so sollten
benutzte elektrische Geräte nicht mit dem normalen Haushaltsabfall entsorgt werden.
In Übereinstimmung mit Ihren nationalen Bestimmungen bringen Sie alte Geräte bitte zur fachgerechten Entsorgung,
Wiederaufbereitung und Wiederverwendung zu den entsprechenden Sammelstellen.
Durch die fachgerechte Entsorgung der Elektrogeräte helfen Sie, wertvolle Ressourcen zu schützen, und verhindern
mögliche negative Auswirkungen auf die menschliche Gesundheit und die Umwelt, die andernfalls durch
unsachgerechte Müllentsorgung auftreten könnten.
Für weitere Informationen zum Sammeln und Wiederaufbereiten alter Elektrogeräte kontaktieren Sie bitte Ihre
örtliche Stadt- oder Gemeindeverwaltung, Ihren Abfallentsorgungsdienst oder die Verkaufsstelle der Artikel.
Information für geschäftliche Anwender in der Europäischen Union:
Wenn Sie Elektrogeräte ausrangieren möchten, kontaktieren Sie bitte Ihren Händler oder Zulieferer für weitere
Informationen.
Entsorgungsinformation für Länder außerhalb der Europäischen Union:
Dieses Symbol gilt nur innerhalb der Europäischen Union. Wenn Sie solche Artikel ausrangieren möchten,
kontaktieren Sie bitte Ihre örtlichen Behörden oder Ihren Händler und fragen Sie nach der sachgerechten
Entsorgungsmethode.
Información para usuarios sobre la recogida y eliminación de los equipos antiguos
Este símbolo en los productos, embalajes y documentos anexos significa que los productos eléctricos y electrónicos
no deben mezclarse con los desperdicios domésticos normales.
Para el tratamiento, recuperación y reciclaje apropiados de los productos antiguos, llévelos a puntos de reciclaje
correspondientes, de acuerdo con la legislación nacional.
Al deshacerse de estos productos de forma correcta, ayudará a ahorrar recursos valiosos y a impedir los posibles
efectos desfavorables en la salud humana y en el entorno que de otro modo se producirían si se trataran los
desperdicios de modo inapropiado.
Para obtener más información acerca de la recogida y el reciclaje de los productos antiguos, póngase en contacto
con las autoridades locales, con el servicio de eliminación de basuras o con el punto de venta donde adquirió los
artículos.
Para los usuarios empresariales de la Unión Europea:
Si desea desechar equipos eléctricos y electrónicos, póngase en contacto con su vendedor o proveedor para
obtener más información.
Información sobre la eliminación en otros países fuera de la Unión Europea:
Este símbolo solo es válido en la Unión Europea. Si desea desechar estos artículos, póngase en contacto con las
autoridades locales o con el vendedor y pregúnteles el método correcto.
Informazioni per gli utenti sulla raccolta e lo smaltimento di vecchia attrezzatura
Questi simboli sui prodotti, sull'imballaggio e/o sui documenti che li accompagnano, indicano che i prodotti elettrici ed
elettronici non devono essere mischiati con i rifiuti generici.
Per il trattamento, il recupero e il riciclaggio appropriato di vecchi prodotti, si prega di portarli ai punti di raccolta
designati, in accordo con la legislazione locale.
Smaltendo correttamente questi prodotti si potranno recuperare risorse preziose, oltre a prevenire potenziali effetti
negativi sulla salute e l'ambiente che potrebbero sorgere a causa del trattamento improprio dei rifiuti.
Per ulteriori informazioni sulla raccolta e il riciclaggio di vecchi prodotti, si prega di contattare l’amministrazione
comunale locale, il servizio di smaltimento dei rifiuti o il punto vendita dove sono stati acquistati gli articoli.
Per utenti imprenditori dell'Unione europea:
Se si desidera scartare attrezzatura elettrica ed elettronica, si prega di contattare il proprio rivenditore o il proprio
fornitore per ulteriori informazioni.
Informazioni sullo smaltimento negli altri Paesi al di fuori dell'Unione europea:
Questi simboli sono validi solamente nell'Unione Europea; se si desidera scartare questi articoli, si prega di
contattare le autorità locali o il rivenditore e richiedere informazioni sulla corretta modalità di smaltimento.

English
Disklavier Control Unit DKC-900
Owner’s Manual


English
3
Thank you for purchasing the Disklavier Control Unit!
Before using your this product, please read this manual thoroughly and retain it for future reference.
About this product
Installing this product to your Disklavier piano additionally allows you to play back accompanying audio
sounds. These include professional vocal performances by worldwide famous artists, acoustic performances
on instruments such as violin and cello, and other audio sounds—giving you the experience and atmosphere
of an actual live performance. This product also lets you perform simple operations from the screen of your
smartphone or tablet. Moreover, you can still enjoy the Silent Piano™ function, Auto Play function, as well as
the recording and playback functions of the Disklavier E3 and Disklavier Mark IV.
The following instruction manuals are available for
this product.
Booklet manual
Disklavier Control Unit DKC-900 Owner’s
Manual (this book)
Please keep this manual for future reference along
with the Disklavier E3 owner’s manual or Disklavier
Mark IV owner’s manual.
Disklavier ENSPIRE Built-in song list
This is a list of built-in songs that can be
automatically played by this product.
You can also download this list from the Yamaha
website.
Online Manuals (PDF)
Disklavier ENSPIRE Controller
Application Instruction Manual
This is the operation manual for the ENSPIRE
Controller app, which is a special app that lets you
actually operate the various functions of this
product.
You can call up this operation manual from the
Information screen of the ENSPIRE Controller app.
You can also download the manual from the
Yamaha website.
To obtain these materials, access the Yamaha
Downloads website, then enter the model name for
searching the desired files.
Please make sure that you have the following
accessories:
• Owner’s Manual (this book) 1
• Built-in song list 1
• USB wireless LAN adaptor (UD-WL01) 1
• AC adaptor* (PA-300C or an equivalent
recommended by Yamaha) 1
• Power cord* × 1
• Audio cable × 1 (pin plugs - pin plugs)
• Bracket* × 1
* When installing this product, it may already be connected.
Welcome to the Yamaha Disklavier
TM
!
About the Manuals
Yamaha Downloads
https://download.yamaha.com/
Included Accessories

4
PRECAUTIONS
PLEASE READ CAREFULLY BEFORE PROCEEDING
Please keep this manual in a safe and handy place for future reference.
WARNING
• This AC adaptor is designed for use with only Yamaha electronic
instruments. Do not use for any other purpose.
• Indoor use only. Do not use in any wet environments.
CAUTION
• When setting up, make sure that the AC outlet is easily accessible. If
some trouble or malfunction occurs, immediately turn off the power
switch of the instrument and disconnect the AC adaptor from the
outlet. When the AC adaptor is connected to the AC outlet, keep in
mind that electricity is flowing at the minimum level, even if the
power switch is turned off. When you are not using the instrument
for a long time, make sure to unplug the power cord from the wall
AC outlet.
WARNING
Always follow the basic precautions listed below to avoid the possibility of serious injury or even death from electrical
shock, short-circuiting, damages, fire or other hazards. These precautions include, but are not limited to, the following:
• When one of the following problems occur, immediately turn off the
power switch and disconnect the electric plug from the outlet. Then
have the device inspected by Yamaha service personnel.
- When foreign matter or liquid gets inside this product.
- It emits unusual smells or smoke.
- There is a sudden loss of sound during use of this product.
• Use the specified adaptor (page 3) only. Using the wrong adaptor
can result in damage to this product or overheating.
• Use only the supplied power cord. Using other power cords may
cause heat or electric shock.
• This AC adaptor is designed for use with only Yamaha electronic
instruments. Do not use for any other purpose. It may cause
damage, heat or fire.
• The power adaptor is for indoor use only and should not be used
outdoors or in a dripping environment.
• Do not expose the instrument to rain, use it near water or in damp or
wet conditions, or place on it any containers (such as vases, bottles
or glasses) containing liquids which might spill into any openings.
If any liquid such as water seeps into the instrument, turn off the
power immediately and unplug the power cord from the AC outlet.
Then have the instrument inspected by qualified Yamaha service
personnel.
• Never insert or remove an electric plug with wet hands.
• This product contains no user-serviceable parts. Do not open the
instrument or attempt to disassemble or modify the internal
components in any way. If it should appear to be malfunctioning,
discontinue use immediately and have it inspected by qualified
Yamaha service personnel.
• Always remove the power plug from the AC outlet before cleaning
this product. Leaving the power plug connected presents a risk of
electric shock.
• Check the electric plug periodically and remove any dirt or dust
which may have accumulated on it.There is a risk of electric shock
or short circuit.
• Use a dry cloth to wipe the units.It may cause an electric shock, fire
or breakdown.
For the AC Adaptor
For the DKC-900
Power supply/AC adaptor
Location
Do not open
Maintenance
DMI-7 1/2

English
5
CAUTION
Always follow the basic precautions listed below to avoid the possibility of physical injury to you or others, or damage
to the instrument or other property. These precautions include, but are not limited to, the following:
• Do not place the power cord near heat sources such as heaters or
radiators. Also, do not excessively bend or otherwise damage the
cord, or place heavy objects on it.
• Do not connect the instrument to an electrical outlet using a multiple
connector. Doing so can result in lower sound quality, or possibly
cause overheating in the outlet.
• Do not use if the power cord or plug is damaged. It may cause an
electric shock, short circuit or fire.
• Remove the electric plug from the outlet when the instrument is not
to be used for extended periods of time, or during electrical
storms.It may cause an electric shock, short circuit or fire.
• When removing the electric plug from this product or an outlet,
always hold the plug itself and not the cord. Pulling by the cord can
damage it.
• Do not place the instrument in an unstable position where it might
accidentally fall over.
• Do not locate this product in a place subject to excessive heat, low
temperatures, or direct sunlight. This could be a fire hazard and may
damage the finish and internal parts.
• Do not place objects in front of the instrument’s air vent, since this
may prevent adequate ventilation of the internal components, and
possibly result in this product overheating.
• Do not use near other appliances such as TVs, radios, speakers, etc.
Due to the extensive use of digital circuits, noise may occur in TVs
and radios.
• When setting up the product, make sure that the AC outlet you are
using is easily accessible. If some trouble or malfunction occurs,
immediately turn off the power switch and disconnect the plug from
the outlet. Even when the power switch is turned off, electricity is
still flowing to the product at the minimum level. When you are not
using the product for a long time, make sure to unplug the power
cord from the wall AC outlet.
• Before connecting the instrument to other electronic components,
turn off the power for all components. Before turning the power on
or off for all components, set all volume levels to minimum.
• Do not drag when moving this product. There is a risk of damaging
the floor.
• Before moving the instrument, remove all connected cables, to
prevent damage to the cables or injury to anyone who might trip
over them.
• Do not pinch your hands or feet when moving this product. There is
a risk of injury.
• When moving this product, do it slowly and carefully. There is a risk
of this product falling and colliding with the surroundings. We
recommend that you use a specialized vendor to transport or move
this product.
• Do not rest your weight on, or place heavy objects on this product,
and do not use excessive force on the buttons, switches or
connectors.
• Never insert or drop paper, metallic, or other objects into the gaps
on the panel or keyboard. This could cause physical injury to you or
others, damage to this product or other property, or operational
failure. It may cause electric shock, short circuit, fire or breakdown.
• Do not use this product/device or headphones for a long period of
time at a high or uncomfortable volume level, since this can cause
permanent hearing loss. If you experience any hearing loss or
ringing in the ears, consult a physician.
• Close the fallboard when not using this product. Open and close the
keyboard lid with both hands. Make sure that people around you
don’t touch the keyboard lid carelessly. There is a risk of injury by
holding your hand or finger in the Keyboard lid.
• Do not go near the instrument during an earthquake. Strong shaking
during an earthquake could cause the instrument to move or tip
over, resulting in damage to this product or its parts, and possibly
causing injury.
Always turn the power off when the instrument is not in use.
Power supply/AC adaptor
Location
Connections
Yamaha cannot be held responsible for damage caused by
improper use or modifications to the instrument, or data that is
lost or destroyed.
Transportation
Handling caution
DMI-7 2/2

6
Trademarks & Copyrights
• The contents of this manual and the copyrights thereof are under exclusive ownership by Yamaha
Corporation.
• Yamaha, Disklavier, Disklavier ENSPIRE, Silent Piano, DisklavierRadio, PianoSoft, and PianoSoftPlus are
trademarks of Yamaha Corporation.
• SmartKey and CueTIME are trademarks of Yamaha Corporation or Yamaha Corporation of America.
• Disklavier ENSPIRE software, Copyright © 2016 Yamaha Corporation.
• This contains programs licensed under the GNU General Public License, GNU Lesser General Public
License, the BSD Copyright, the Artistic License, and others.
• This product includes software developed by the OpenSSL Project for use in the OpenSSL Toolkit.
(http://www.openssl.org/)
• App Store is a trademark of Apple Inc., registered in the U.S. and other countries.
• Android and Google Play are trademarks of Google LLC.
• The company names and product names in this manual are the trademarks or registered trademarks of their
respective companies.
• All illustrations and screens shown in this Owner’s Manual are for purposes of explaining operation, and
may differ somewhat from actual specifications.
Notes on Source Code Distribution
For three years after the factory shipment, you may request from Yamaha the source code for any portions of
the product which are licensed under the GNU General Public License by writing to the following address:
10-1 Nakazawa-cho, Naka-ku, Hamamatsu, Shizuoka, 430-8650, JAPAN
Piano Development Department, Yamaha Corporation
The source code will be provided at no charge; however, we may require you to reimburse Yamaha for the
cost of delivering the source code to you.
• Note that we shall bear no responsibility whatsoever for any damage arising from changes (additions/
deletions) made to the software for this product by a third party other than Yamaha (or party authorized by
Yamaha).
• Note that re-use of source code released to the public domain by Yamaha is unguaranteed, and Yamaha
shall not bear any responsibility whatsoever for the source code.
The model number, serial number, power requirements, etc., may be
found on or near the name plate, which is at the bottom of the unit.
You should note this serial number in the space provided below and
retain this manual as a permanent record of your purchase to aid iden-
tification in the event of theft.
Model No.
Serial No.
(bottom_en_01)

English
7
Table of Contents
About the Manuals .................................................3
Included Accessories .............................................3
Chapter 1 Introduction ................ 8
Main Features ........................................................8
Names of Parts and Their Functions......................9
Compatible Media and File Format......................12
Chapter 2 Getting Started.......... 13
Connecting the AC Power Cable .........................13
Connect powered speakers (Sold separately for
Upright piano).......................................................14
Turning the Power On/Off ....................................15
How to use the Silent Piano™ Function (For Pianos
Equipped with the Silent Piano™ Function).........17
Connecting the Product and Smart Device to a
Network................................................................18
Choosing the Network Connection Method..........19
Wireless Network Connection by WPS................21
Wired Network Connection ..................................23
Direct Wireless Connection..................................24
Using the ENSPIRE Controller App .....................25
IDC Registration...................................................25
Chapter 3 Other Settings........... 26
Updating this product ...........................................26
Initializing Network Settings .................................27
Chapter 4 Troubleshooting......... 28
Error Indications...................................................30
Chapter 5 Glossary ................... 31
Chapter 6 Specifications............ 33
General Specifications .........................................33
Appendix XG Voice List........... A-3
XG Drum Kit List...... A-6
MIDI Data Format .... A-8
MIDI IMPLEMENTATION CHART
.... at the end of the book

8
1
Chapter
Introduction
This product provides a variety of sophisticated features and advanced
functions that greatly expand the capabilities of your piano—and enhance
your musical enjoyment.
Simple operation with your smart device
Note:
Yamaha product firmware and
supplied apps may occasionally be
updated to improve functionality
and operability. Certain functions
may not be available with older
versions, so we recommend that you
update to the latest version. Refer to
page 26 for how to update the
version of this product.
• By connecting your smartphone, tablet or other smart device to the same
network as this product and installing the special ENSPIRE Controller
app, you can use a variety of functions, such as the auto play function that
records and reproduces piano performances and the ensemble function
that plays various instrumental parts using the wide range of voices
produced by the built-in tone generator.
• Choose your favorites from 500 built-in songs or purchased songs, and
enjoy your favorite songs in your own original playlist.
Huge Variety of Professional-quality Songs
• A total of 500 piano pieces are stored internally, ranging in genre from
famous classical pieces to popular music and jazz, there for you to enjoy
as the mood takes you. Songs including professional vocal performances
by artists in collaboration with Yamaha let you experience the atmosphere
of a live performance, and Yamaha also provides a special 24-hour
DisklavierRadio streaming service.
* An optional powered speaker is required to play back parts other than the piano sound.
(Sold separately for upright piano.)
• Music of various genres is available for purchase via download from the
yamahamusicsoft.com on the Yamaha website, letting you buy the latest
songs at any time from the comfort of your home. Insert a USB flash drive
to your Internet-connected Disklavier in order to download and
immediately start playing purchased data via the ENSPIRE Controller
app.
Convenient function (SmartKey function)
• SmartKey feature that shows you the next key to play with by moving the
keys slightly—an ideal function for beginners. Playing the keys in the
order shown leads you through the song, allowing even beginning players
to enjoy practicing. For SmartKey Songs, please refer to the included
built-in song list.
Main Features
See page 25 for more information on the ENSPIRE
Controller app.

Introduction
English
1
Chapter
9
[] (Standby/On) button/indicator
Turns this product on or off. When this button is
operated, the [ ] lamp on the front of the switch box
indicates the power status as follows.
[- VOLUME +] buttons/indicators
These display the volume level (over 10 steps).
Each indicator shows the volume in 2 steps with
varying brightness.
[ /] (Play/Pause) button/indicator
For starting and pauses playback.
• Playback starts from the last loaded song before
turning the power off.
• If the last song cannot be loaded, playback starts
from the first song of the internal demo songs.
The indicator lights up when playing back a song.If
song playback is stopped/paused, the indicator will
go dark.
HEADPHONE jack
Used to connect a set of headphones. When
headphones are connected, the sound of the
acoustic piano is cancelled and the electronic piano
sounds can be heard through the headphones.
Caution:
• To prevent damage to your hearing, refrain from raising the
volume to excessive levels, and do not use the headphones for
extended periods of time.
• Do not pull the headphone cord or apply excessive force on the
plug. This can damage the headphone and lead to sound output
malfunction.
[USB] terminal
Used to connect the USB flash drive.
Note:
This product cannot detect the USB flash drive if two or more
memory devices are connected at the same time.
Error indicator
Flashes when some error has occurred. See “Error
Indications” on page 30.
Names of Parts and Their Functions
This product consists of the following units.
• Switch Box (following)...................... Turn this product on/off to control functions.
• Control Center Unit (page 11).......... It is equipped with terminals for connecting external devices.
Switch Box (Front and Bottom panel)
Front panel
Condition Status
Off This product cannot be turned on
because the power plug is unplugged.
Lit This product is turned on.
Dim lit This product is turned off (standby).
Flashing This product is shutting down.
Slow flashing This product is starting up.
Bottom panel

Introduction
1
Chapter
10
[AUTO PLAY] switch
For activating or deactivating the auto play function.
If you leave the switch set to “ON,” playback
automatically starts when the power is turned on.
(Default setting: OFF)
[AUTO OFF MODE] switch
When this is turned on, this product will turn off
automatically if the following conditions continue for
a certain period of time. (Default setting: ON)
• No operation has been performed on the switch
box.
• No operation has been performed on the
ENSPIRE Controller app.
• The keyboard has not been played.
• This product has not received the MIDI data.
Note:
You can change the automatic turn off time with the ENSPIRE
Controller app.
[MAINTENANCE] button
For service personnel only. Do not touch this button.
[USB] terminal
Used to connect the USB wireless LAN adaptor
(UD-WL01).
Note:
This product cannot detect the USB flash drive if two or more
memory devices are connected at the same time.
[WLAN] switch
For setting the method for wireless LAN connection
when connecting the USB wireless LAN adaptor to
the [USB] terminal. See “Connecting the Product
and Smart Device to a Network” on page 18.
(Default setting: RT)
Switch Box (Rear Panel)
Functions that can be operated by Switch Box
The functions that can be operated with the Switch Box are only power on/off, song playback/pause, and
volume control of acoustic piano/internal electronic sound source (page 15). The other functions are
controlled only from the application of your smartphone or tablet.

Introduction
English
1
Chapter
11
[USB] (To DEVICE) terminal
Used to connect the USB flash drive.
Note:
This product cannot detect the USB flash drive if two or more
memory devices are connected at the same time.
[LAN] port
Used to connect the router or hub using an Ethernet
cable.
[USB] (To HOST) terminal
Used to connect the computer using a USB cable.
[MIDI IN]/[MIDI OUT] jacks
Used to connect to the MIDI input or output jacks of
external MIDI devices using MIDI cables.
[DIGITAL OUT] jack
Used to connect to the digital input jack of an
external audio device using a digital coaxial cable.
[OMNI] (SYNC) [IN]/[OUT] jacks
Used to connect to the input or output jacks of
external audio devices using RCA cables.
[OUTPUT] jacks
Used to connect the monitor speakers.
Control Center Unit
Rear panel
Side panel

Introduction
1
Chapter
12
Compatible Device
Caution:
• Do not remove the USB flash
drive or turn on or off the power
during data transfer as breakage
may result.
• Do not insert and remove the USB
flash drive too frequently as
breakage may result.
• Be careful not to bump the USB
flash drive with your legs when it
is connected to the unit.
• Do not insert any objects other
than the USB flash drive into the
USB terminal as it may become
unusable.
Note:
Yamaha does not assure the
operation of the commercially
available USB flash drives.
USB Flash Drive
• The USB flash drive should be formatted in FAT16 or FAT32 file system.
• Check that the USB flash drive is free of memory and software protection
before attempting to use it, as these kinds of protection will prohibit access
to the memory.
• This product is USB 2.0 compliant. You can also connect USB 3.0
devices, however data will be transferred at USB 2.0 speeds.
Compatible File Formats
This product can handle these four types of file format:
Compatible Media and File Format
Song
Format
File Format Extension
MIDI SMF0
Standard MIDI File format 0 for playback and
recording.
.MID
SMF1
Standard MIDI File format 1 for playback only.
.MID
Audio WAV
Uncompressed audio file format commonly used to
create standard audio CDs. This product can play
back 44.1kHz/16bit stereo WAV files.
.WAV
MP3
Compressed audio file format commonly used in
computers and smart devices.
.MP3

13
English
2
Chapter
Getting Started
1 Connect the AC power cable extending from the piano to the
AC wall outlet. This connection provides power to the
autoplay piano.
2 Connect the power cord connected to the DKC-900’s power
adaptor. This connection supplies power to the control
center unit and the switch box.
Connect the plugs of the AC adaptor in the order shown in the
illustration.
Connecting the AC Power Cable
Warning:
Use the AC power cable attached to
the piano. Use of other AC power
cables may result in damage,
overheating, or fire.
Grand piano Upright piano
Caution:
• Do not stretch the cable or bend its
ends.
• Do not attempt to use the cable if it
is stretched or if the ends of the
cable have been bent. Attempting
to do so may cause interruptions to
the power supply.
• Always turn off the main unit
power before disconnecting the
AC power cable.
• When you wish to move the piano,
unplug the AC power cable from
the AC outlet before proceeding.
• Unplug the AC power cable from
the AC outlet if you do not intend
to use the instrument for an
extended period of time.
DC plug
AC adaptor
Power cord
DC IN jack
AC plug
AC outlet
In the upright piano,
the DC plug of the
power adaptor is
connected to the DC
IN terminal
beforehand.

Getting Started
2
Chapter
14
You can connect powered speakers to the [OUTPUT] jacks as illustrated.
* The audio cable should be 3m or less in length, and use an audio cable (conversion cable) that
matches the shape of the INPUT LINE jack on the speaker side.
Connect powered speakers (Sold separately for Upright piano)
Notice:
To avoid possible damage to the
devices, first turn on the power to
this pruduct, then to the external
device.
When turning off the power, first
turn off the power to the external
device, then to this pruduct.
POWER
ON
OFF
INPUT
PARALLEL
LINE 1
(--10dB)
LINE 2
(--4dB)
POWER
ON
OFF
INPUT
PARALLEL
LINE 1
(--10dB)
LINE 2
(--4dB)
Speaker (Left) Speaker (Right)
Audio cable Audio cable
Control Center Unit (Side)

Getting Started
English
2
Chapter
15
Turning the Power On
1 Make sure that the main switch on the power supply unit/
inlet box is turned on.
Under normal use, the power switch of the power supply unit remains
on, but there is no problem, but if you do not use it for a long period of
time or if you feel something wrong, turn off the power supply unit and
turn the power cord from the outlet.
2 Press the [] (Standby/On) button.
The [ ] indicator flashes slowly (every one second).
After several seconds, the [ ] indicator lights up. This product is now
ready for use.
Turning the Power Off (Standby)
1 Press the [] (Standby/On) button.
The [ ] indicator flashes (every 0.5 seconds).
After several seconds, the [ ] indicator lights up dimly.
Turning the Power On/Off
ON OFF
MAINS
In the case of Grand piano In the case of Upright piano
Power supply
unit (located
underneath
the piano)
Power supply
unit (located
on the rear)
Flashing slowly
Flashing

Getting Started
2
Chapter
16
Setting the Auto Off Function
You can turn the power off automatically if you do not use the product for the
time specified with the ENSPIRE Controller app.
Note:
1 Set the [AUTO OFF MODE] switch on the rear of the switch
box.
When set to ON, this product
automatically turns off under the
following conditions:
• No operation is performed on the
switch box.
• No operation is performed on the
ENSPIRE Controller app.
• The keyboard is not being played.
• This product does not receive the
MIDI data.
Setting Description
ON The auto off function is activated. The product is automatically
turned off if you do not use it for the time specified with the
ENSPIRE Controller app.
OFF The auto off function is deactivated. Use the [] (Standby/On)
button to turn the power off.

Getting Started
English
2
Chapter
17
This product has the original mechanism of a piano that strikes strings with
hammers, and also has a “Silent Piano™ function” that effectively mutes the
sound. When the sound is muted, the hammers inside the piano do not strike
the strings, and the piano sound is heard entirely as electronic sound from
powered speaker (in Quiet mode) or the headphones (in Headphone mode).
The method of switching to each mode is as follows.
[Quiet Mode]
Note:
To use Quiet mode, a powered
speaker (sold separately for upright
piano) is required.
In this mode, the hammers do not strike the strings, and the piano sound can
be heard from a powered speaker (Sold separately for upright piano). This is
convenient when you wish to play with a quieter sound, etc.
[Headphone mode]
In this mode, the piano sound is entirely heard from the headphones, which is
convenient when you do not wish to produce piano sound, such as when
practicing at night.
Silent Piano™ Function on Grand Piano
Quiet Mode
Perform this operation from the ENSPIRE Controller app (page 25). Switch
the Silent Piano™ function mode to Quiet with “Acoustic/Quiet” on the
Balance screen within the app. (If the headphones are connected to the
[HEADPHONE] jack, disconnect the headphones.)
Headphone mode
Note:
When headphones are connected,
“Acoustic/Quiet” is automatically
set to “Headphone.”
Connect the headphones to the [HEADPHONE] jack of the DKC-900 switch
box to switch to Headphone mode.
Silent Piano™ Function on Upright Piano
Quiet Mode
Press down the center pedal and slide it to the left to set to Quiet mode. (If
the headphones are connected to the [HEADPHONE] jack, disconnect the
headphones.)
Headphone mode
Press down the center pedal and slide it to the left to set to Quiet mode, and
then connect the headphones to the [HEADPHONE] jack of the switch box to
switch to Headphone mode.
How to use the Silent Piano™ Function
(For Pianos Equipped with the Silent Piano™ Function)

Getting Started
2
Chapter
18
Note:
By connecting this product and smart device to a network, you can enjoy a
variety of features through the Internet Direct Connection (IDC) services or
control this product using your smart device (ENSPIRE Controller app).
To fully control this product with the ENSPIRE Controller app, you must
connect this product and smart device.
Here is the summary for connection:
Preparations
• To use the Internet connection, you will first need to subscribe to an
Internet service or provider.
• Use a computer to obtain and configure Internet service. You cannot
obtain Internet service or configure router settings on a local area network
using this product itself.
Connecting the Product and Smart Device to a Network
• This product attempts to achieve a
balance between security and
usability in its network
implementation. However, a
determined hacker may be able to
defeat these security measures and
utilize the network of the
purchaser in an unauthorized
manner. Since each network is
different, only the purchaser can
determine whether the security
measures discussed here will
adequately protect their network.
• The purchaser acknowledges that
connection to the Internet and use
of this product Internet features is
done at the risk of the purchaser. In
no event shall Yamaha, its
subsidiaries or Yamaha’s and/or
its subsidiaries’ directors, officers,
or employees be responsible for
unauthorized access, loss or
alteration of the data of the
purchaser or be liable for any
damage from intrusions.
Internet Direct Connection (IDC)
Internet Direct Connection (IDC) is a feature that allows you to connect
this product directly to the Internet. IDC users are able to listen to a
streaming broadcast (DisklavierRadio), and receive valuable information
such as product updates. This product can be upgraded remotely as new
technologies and services are developed through the IDC service.
Install the ENSPIRE Controller app to your smart device
(page 25).
3
Search for this product using the ENSPIRE Controller app
and connect to it (page 25).
4
Choose the connection method (page 19).
1
Connect this product and smart device to a network
(page 21 to 24).
2

Getting Started
English
2
Chapter
19
You can use one of the three methods of connections below. Select one
which is most suitable for your network environment.
Wireless Network Connection by WPS ( page 21)
Choose this if you have a wireless router (access point) that supports WPS.
Connection will be established via a wireless router (access point).
Requirements:
• USB wireless LAN adaptor (UD-WL01)
• Wireless router (access point) that supports WPS
Choosing the Network Connection Method
WPS (Wi-Fi Protected Setup)
WPS is a wireless networking standard that makes connections between
a router and wireless devices faster and easier. A router with WPS
functionality is required to use WPS. Consult your wireless router (access
point) specifications for compatibility information.
Wireless router
(access point)
Internet
Wireless LAN
Wireless LAN
Smart devices

Getting Started
2
Chapter
20
Wired Network Connection ( page 23)
Note:
Use an STP (shielded twisted pair)
cable for connection.
Choose this if you have a wireless router (access point) that does not support
WPS. Connection will be established via wireless router (access point).
Note:
Requirements:
• Ethernet cable
• Wireless router (access point)
Direct Wireless Connection ( page 24)
Note:
If this product is connected directly
to your smart device, no Internet
access is available on your smart
device.
Choose this if you do not have a wireless router (access point) or there is no
wireless router (access point) available nearby. You can use this product as
an access point to establish a direct wireless connection between this
product and your smart device.
Requirements:
• USB wireless LAN adaptor (UD-WL01)
To ensure proper security, when
connecting this product to the
Internet, be sure to connect via a
router, etc.
Set an appropriate password for the
router, etc. being used.
Do not connect directly to the
communication circuits (including
public line LAN) of the
telecommunications carriers (mobile
telecommunication companies,
fixed-line telecommunication
companies, Internet providers, etc.).
Wireless router
(access point)
Internet
Ethernet cable
Wireless LAN
Smart devices
Wireless LAN Smart devices

Getting Started
English
2
Chapter
21
Note:
To check whether your wireless
router (access point) supports WPS,
refer to the owner’s manual supplied
with your wireless router (access
point).
If your wireless router (access point) supports WPS, you can easily connect
this product to a network just by following the procedures below, without
making any additional settings, such as entering a password.
1 Press the [] (Standby/On) button to turn the power off.
2 Connect the USB wireless LAN adaptor (UD-WL01) to the
[USB] terminal on the rear of the switch box.
3 Check that the [WLAN] switch on the rear of the switch box
is set to “RT.”
Note:
On powering up, the display may
indicate an error message that
flashes in red, reading “The wireless
router (access point) is not found.”
However, you can safely ignore the
error, and proceed to step 5.
4 Press the [] (Standby/On) button to turn the power on.
5 Hold down the WPS button on the USB wireless LAN adaptor
(UD-WL01) for at least five seconds.
The LED lamp on the USB wireless LAN adaptor (UD-WL01) flashes
every 0.5 seconds.
Note:
For details on the WPS setting, refer
to the owner’s manual supplied with
your wireless router (access point).
6 Press the WPS button on your wireless router (access point)
within two minutes after step 5.
When this product is successfully connected to the wireless router
(access point), the LED lamp on the USB wireless LAN adaptor
(UD-WL01) lights up.
Connection between this product and the wireless router (access point)
is now established. Once this product is connected to your wireless
router (access point) by WPS, the setting will be remembered by this
product, and you will not need to repeat this process the next time.
Wireless Network Connection by WPS
LED lamp
WPS button
[WLAN] switch
Continue to the next page

Getting Started
2
Chapter
22
Note:
For details on the Wi-Fi setting,
refer to the owner’s manual supplied
with your smart device.
7 Open the Wi-Fi setting screen on your smart device.
8 Enable the Wi-Fi function.
9 From the network list shown on the screen, tap on the
network to which you connected this product.
If necessary, enter a password, and then connect.

Getting Started
English
2
Chapter
23
If your wireless router (access point) does not support WPS, you can connect
this product to a wireless router (access point) using an Ethernet cable.
1 Press the [] (Standby/On) button to turn the power off.
Note:
2 Connect the wireless router (access point) to the [LAN] port
on the control center unit using an Ethernet cable.
Note:
For details on the DHCP setting, refer
to the owner’s manual supplied with
your wireless router (access point).
3 Enable the DHCP server function on the wireless router
(access point).
4 Press the [] (Standby/On) button to turn the power on.
Connection between this product and the wireless router (access point)
is automatically established in approximately 15 to 20 seconds.
Note:
For details on the Wi-Fi setting,
refer to the owner’s manual supplied
with your smart device.
5 Open the Wi-Fi setting screen on your smart device.
6 Enable the Wi-Fi function.
7 From the displayed network list, tap the network to which
this product is connected.
If necessary, enter a password, and then connect.
Wired Network Connection
To ensure proper security, when
connecting this product to the
Internet, be sure to connect via a
router, etc.
Set an appropriate password for the
router, etc. being used.
Do not connect directly to the
communication circuits (including
public line LAN) of the
telecommunications carriers (mobile
telecommunication companies,
fixed-line telecommunication
companies, Internet providers, etc.).
Wireless router
(access point)
Ethernet cable
Control center unit

Getting Started
2
Chapter
24
Note:
If this product is connected directly
to your smart device, no Internet
access is available on your smart
device.
You can use this product as an access point to establish a direct wireless
connection between this product and your smart device.
1 Press the [] (Standby/On) button to turn the power off.
2 Connect the USB wireless LAN adaptor (UD-WL01) to the
[USB] terminal on the rear of the switch box.
Note:
As a default, the [WLAN] switch is
set to the “RT” position.
3 Set the [WLAN] switch on the rear of the switch box to “AP.”
4 Press the [] (Standby/On) button to turn the power on.
When this product is set as an access point, the LED lamp of the USB
wireless LAN adaptor (UD-WL01) lights up. You can now use this
product as an access point.
Note:
For details on the Wi-Fi setting,
refer to the owner’s manual supplied
with your smart device.
5 Open the Wi-Fi setting screen on your smart device.
6 Enable the Wi-Fi function.
Note:
[DKV**********] differs
depending on each Disklavier.
7 From the network list shown on the screen, tap on
[DKV**********].
Direct Wireless Connection
LED lamp
WPS button
[WLAN] switch

Getting Started
English
2
Chapter
25
Installing the App
Note:
To connect your smart device to this product, you must install the ENSPIRE
Controller app to your smart device.
For details, search for “ENSPIRE Controller” on the App Store or Google
Play.
For the ENSPIRE Controller app functions and operation instructions, refer to
the Disklavier ENSPIRE Controller operation manual. The ENSPIRE
Controller operation manual is located on the Information page within the
ENSPIRE Controller app.
You can also download it from the website below.
https://download.yamaha.com/
Connect a smart device to this product
After you have connected your smart device to a network, open the ENSPIRE
Controller app and select this product from the list. Tapping this product
name will open the control screen of that Disklavier.
Note:
To use the IDC service, initial registration is required using an Internet-
connected computer.
Please register at the following website:
https://member.yamaha.com/myproduct/regist/
Once you have an IDC account, you will interact with that account using the
ENSPIRE Controller app. To use the full IDC service, you are required to
enter your registered ID (e-mail address) and password on the ENSPIRE
Controller app.
Using the ENSPIRE Controller App
• The application supports iOS and
Android devices.
• For details on the application, refer
to the description on the download
site.
IDC Registration
• If you have already registered for
the IDC service with any other
instrument, you do not need to
register again. You can use your
ID and password obtained through
that registration.
• Some IDC service functions do not
require an ID and password.

26
3
Chapter
Other Settings
Note:
Yamaha product firmware may occasionally be updated to improve
functionality and operability. Certain functions may not be available with older
firmware versions, so we recommend following the instructions below to
update to the latest version.
1 Download the update program file.
You can download the update program from the following site:
https://download.yamaha.com/
Note:
It is recommended that the USB
flash drive only contains the update
program file.
2 Copy “en_update.bin” included in the downloaded file to the
root directory of the USB flash drive.
3 Press the [] (Standby/On) button to turn the power off.
4 Connect the USB flash drive to the [USB] terminal on the
front of the switch box.
Important:
DO NOT turn the power off or
disconnect the USB flash drive
during update.
5 While holding down the [ /] (Play/Pause) button, press
the [] (Standby/On) button.
If any available update program is detected, this product starts to
update. The update progress is indicated with the [- VOLUME +]
indicators.
When the update is complete, this product restarts automatically.
After this product restarts, check the firmware version using the
ENSPIRE Controller app.
Updating this product
• To update this product, you will
need a USB flash drive with 2GB
or more of free space.
• You can also update this product
using the ENSPIRE Controller
app. To update this product using
the app, Internet connection is
required.
USB flash drive
[USB] terminal
+
Flashing
twice

Other Settings
English
3
Chapter
27
If the ENSPIRE Controller app cannot connect to this product due to the
improper network settings, follow the procedure below to initialize network
settings on this product.
1 Press the [] (Standby/On) button to turn the power off.
2 While holding down the [- VOLUME +] buttons, press the
[] (Standby/On) button.
After this product is turned on, restart the ENSPIRE Controller app.
Initializing Network Settings
+

28
4
Chapter
Troubleshooting
If you are having difficulty operating this product, see if any of the symptoms listed below apply
to your problem and follow the recommended remedy.
Power
Symptom Remedy
This product does not turn on. Make sure that the main switch on the power supply unit is
turned on.
Make sure that the AC power cable is securely connected
to a suitable AC wall outlet.
If this product still cannot be turned on, disconnect it from
the AC wall outlet, and consult your Yamaha piano dealer.
Switch Box
Symptom Remedy
The switch box does not appear to work correctly. Turn off the switch box, wait 5 seconds, then turn it back on.
If the problem continues, consult your Yamaha piano
dealer.
The switch box becomes hot. The chassis of the switch box may become hot depending
on usage conditions.
Playback
Symptom Remedy
This product does not read a song file. Make sure that the name of the SMF song has the
extension of “.mid” and the audio song has “.wav” or “.mp3.”
Some notes drop out during playback. When a piano song is played back at a low volume,
complex note trills and faint pianissimo passages
sometimes drop out. In such cases, increase this product
volume level.

Troubleshooting
English
4
Chapter
29
Network
Symptom Remedy
This product cannot connect to the Internet via a
wireless router (access point).
Make sure that the wireless router (access point) is turned
on.
This product and the wireless router (access point) might
be too far apart. Place this product and the wireless router
(access point) closer to each other.
There might be an obstacle between this product and the
wireless router (access point). Move the wireless router
(access point) to a location where there are no obstacles
between them.
If you connect this product and the wireless router (access
point) using an Ethernet cable, enable the DHCP server
function on your wireless router (access point).
Wireless network is not found. Microwave ovens or other wireless devices in your network
area might disturb the wireless communication. Turn off
these devices.
Access to the network is restricted by the firewall settings of
the wireless router (access point). Check the firewall setting
of the wireless router (access point).
The ENSPIRE Controller app does not detect this
product.
This product and smart device are not on the same
network. Check the network connections and settings on
the wireless router (access point), and then connect this
product and smart device to the same network.
A sudden sound comes from the piano when
wireless connection to a smart device is used.
When the speaker mark is tapped on the Select Disklavier
ENSPIRE screen of the app, a chord (C-E-G) is
automatically played one time for individual confirmation
from the selected piano. This is not a malfunction.

Troubleshooting
4
Chapter
30
The error indicator may flash in red when some error has occurred. Refer to the table below for an explanation
of the indication.
Example of Indication:
• Error message also appears on the control screen of the ENSPIRE Controller app. To close the message,
tap on “Close” on the pop-up.
• Pressing any of [- VOLUME +] or [ /] (Play/Pause) buttons turns off the error indicator, and the
[- VOLUME +] indicators return to the previous status.
Error Indications
Indication Situation Remedy
Firmware update is failed. Turn off the power of this product.
Download the update program and try
to update the firmware again. If the
problem still persists, consult your
Yamaha piano dealer.
Two or more USB flash drives
are connected at the same time.
You can use only one USB flash drive
at a time. Disconnect the other USB
flash drive.
The USB flash drive is
protected.
Unprotect the USB flash drive.
The wireless router (access
point) is not found.
Make sure that the wireless router
(access point) is turned on.
If you connect this product and the
wireless router (access point) using an
Ethernet cable, make sure that the
cable is firmly connected to the
wireless router (access point).
This product cannot obtain the
IP address.
Check the settings of your network
devices.
The piano control unit does not
work properly.
Consult your Yamaha piano dealer. If
you are using the ENSPIRE Controller
app, please tell them the message on
the screen.
Flashing
Lighting up
Twice
Twice

31
English
5
Chapter
Glossary
This glossary provides basic definitions of terms used frequently in this manual.
DHCP
This is a standard or protocol by which IP addresses
and other low-level network configuration
information can be dynamically and automatically
assigned each time a connection is made to the
Internet.
Ensemble Song
A song which contains piano parts and
accompanying instrumental voices. An ensemble
song contains the same left- and right-hand parts as
an L/R song, and in addition, up to 13
accompanying instrument tracks. These extra
tracks are played by the internal XG tone generator.
The accompanying tracks may be used for acoustic
bass, drums, strings, vibes, etc.
General MIDI (GM)
An addition to the MIDI standard that simplifies the
transfer of MIDI song files between instruments of
different manufacturers. A MIDI song recorded
using a GM compatible tone generator should play
back correctly when used with any GM compatible
tone generator. The standard specifies that a GM
compatible tone generator must support 24-note
polyphony, 16 parts, and 128 standard voices.
Internet
A huge network made up of networks, the Internet
allows high-speed data transfer among computers,
mobile phones and other devices.
ISP (Internet Service Provider)
A communications business that offers Internet
connection services. In order to connect to the
Internet, it is necessary to have active service with
an Internet service provider.
LAN
Short for Local Area Network, this is a data-transfer
network that connects a group of computers at a
single location (such as an office or home) by
means of a special cable.
MIDI
An acronym for Musical Instrument Digital Interface.
MIDI allows electronic musical instruments to
communicate with each other.
PianoSoft™
PianoSoft software contains prerecorded songs
made by Yamaha specifically for use with this
product.
PianoSoftAudio
PianoSoftAudio software contains real audio and
MIDI signals for playing back on this product.
PianoSoftPlus™
PianoSoftPlus software contains Ensemble songs
that can be played on this product.
Polyphony
The maximum number of voices (or sounds) that
can be produced at a time from MIDI instruments.
Router
A device for connecting multiple computer networks.
For example, a router is necessary when
connecting several computers in a house or office,
to allow all of them access the Internet and share
data. A router is usually connected between a
modem and a computer, although some modems
have a built-in router.

Glossary
5
Chapter
32
SMF
Abbreviation for Standard MIDI File.
SMF Song Format
A song file format supported by MIDI sequencers
and music software.
Song
Normally, a short piece of music with lyrics.
However, for clarity in Disklavier manuals, the term
is used to refer to any piece of music of any genre.
Standard MIDI File
A file of MIDI data that can be read and used by a
number of different MIDI devices and computers.
USB
An interface for connecting an external “plug and
play” device. This product is equipped with three TO
DEVICE terminals with USB 2.0 standard and one
TO HOST terminal. An external storage device,
such as USB flash drive, can be used with this
product by connecting it to a TO DEVICE terminal.
Also this product enables you to enjoy a variety of
MIDI features by connecting a computer to TO
HOST terminal.
Voice
The sounds produced by a tone generator
expressing various instruments.
Wi-Fi
Wi-Fi (Wireless Fidelity) is a technology that allows
an electronic device to exchange data or connect to
the Internet wirelessly using radio waves. Wi-Fi
offers the advantage of eliminating the complexity of
making connections with network cables by using
wireless connection. Only products that complete
Wi-Fi Alliance interoperability tests can carry the
“Wi-Fi Certified” trademark.
WPS
WPS (Wi-Fi Protected Setup) is a standard
established by the Wi-Fi Alliance, which allows easy
establishment of a wireless home network.
XG
Yamaha XG is an extension of the GM (General
MIDI) format. Its greater polyphony, more voices,
and use of effects enhances the compatibility
between MIDI devices. When a song in the Yamaha
XG format is played on another XG-compatible tone
generator or synthesizer, it plays and sounds as the
original composer/creator intended.

33
English
6
Chapter
Specifications
Specifications are subject to change without prior notice.
General Specifications
Compatible Storage Medium USB flash drive
Built-in Songs 500 songs
Compatible File Formats Standard MIDI File (SMF) format 0, Standard MIDI File (SMF) format 1, WAVE, MP3
Compatible Song Formats PianoSoft, PianoSoftPlus, PianoSoftAudio, SmartKey
Switch Box Buttons POWER , VOLUME –/+, PLAY/PAUSE, MAINTENANCE
Switches AUTO PLAY, AUTO OFF MODE, WLAN
Dimension
(W × D × H)
220 x 70 x 30 mm (8-11/16 x 2-3/4 x 1-3/16 inch)
Control
Center Unit
Dimension
(W × D × H)
224 x 130 x 76 mm (8-13/16 x 5-1/8 x 3 inch)
Connectors MIDI MIDI IN, MIDI OUT
Audio OUTPUT, OMNI (SYNC) IN, OMNI (SYNC) OUT, DIGITAL OUT, HEADPHONE (mini)
Others LAN, USB (TO HOST × 1, TO DEVICE × 3)
Tone
Generator
Piano Sound CFX Binaural Sampling, CFX Stereo Sampling
Pitch Control 414.8 Hz to 466.8 Hz (tunable in 0.2 Hz increments)
Polyphony 256 notes (max.)
Voices for Playing 16 voices (Piano, Electric Piano 1, Electric Piano 2, Electric Piano 3, Harpsichord 1,
Harpsichord 2, Vibraphone, Celesta, Pipe Organ 1, Pipe Organ 2, Pipe Organ 3,
Pipe Organ 4, Jazz Organ, Strings, Choir, Synth Pad)
Voice Module Modes XG, GM
Normal Voices 480 Voices
Drum Kits 12 kits
Power Source AC 100V to 240V, 50/60Hz
Supplied Accessories Owner’s Manual, Built-in song list, Audio cable, AC adaptor (PA-300C or an equivalent
recommended by Yamaha), Power cord, USB wireless LAN adaptor (UD-WL01), Bracket
Option Accessories Bracket for CF Series Grand Piano (DKCB-900CF)

MEMO

Appendix
Disklavier Control Unit DKC-900
Appendix


A-3
XG Voice ListAppendix
XG Voice List
Voice Group Voice Name MSB LSB PRG
Element
Piano GrandPiano 0 0 1 2*
GrndPianoKSP 0 1 1 1
MellowGrPno 0 18 1 2
PianoStrings 0 40 1 2
Dream 0 41 1 2
BrightPiano 0 0 2 2
BritePnoKSP 0121
ElecGrandPno 0 0 3 2
ElecGrPnoKSP0132
DetunedCP80 0 32 3 2
LayeredCP1 0 40 3 2
LayeredCP2 0 41 3 2
Honkytonk 0 0 4 2
HonkytonkKSP 0 1 4 2
El.Piano1 0 0 5 2
El.Piano1KSP 0 1 5 1
MellowEP1 0 18 5 2
ChorusEP1 0 32 5 2
HardEl.Piano 0 40 5 2
VXfadeEl.P1 0 45 5 2
60sEl.Piano1 0 64 5 1
El.Piano2 0 0 6 2
El.Piano2KSP 0 1 6 1
ChorusEP2 0 32 6 2
DXEPHard 0 33 6 2
DXLegend 0 34 6 2
DXPhaseEP 0 40 6 2
DX+AnalogEP 0 41 6 2
DXKotoEP 0 42 6 2
VXfadeEl.P2 0 45 6 2
Harpsichord 0 0 7 1
Harpsi.KSP 0171
Harpsichord2 0 25 7 2
Harpsichord3 0 35 7 2
Clavi. 0081
Clavi.KSP 0 1 8 1
Clavi.Wah 0 27 8 2
PulseClavi. 0 64 8 1
PierceClavi. 0 65 8 2
Chromatic
Percussion
Celesta 0 0 9 1
Glockenspiel 0 0 10 1
MusicBox 0 0 11 2
Orgel 0 64 11 2
Vibraphone 0 0 12 1
VibesKSP 0 1 12 1
HardVibes 0 45 12 2
Marimba 0 0 13 1
MarimbaKSP 0 1 13 1
SineMarimba 0 64 13 2
Balimba 0 97 13 2
LogDrums 0 98 13 2
Xylophone 0 0 14 1
TubularBells 0 0 15 1
ChurchBells 0 96 15 2
Carillon 0 97 15 2
Dulcimer 0 0 16 1
Dulcimer2 0 35 16 2
Cimbalom 0 96 16 2
Santur 0 97 16 2
Organ DrawbarOrgan 0 0 17 1
DetDrawOrgan 0 32 17 2
60sDrawOrg1 0 33 17 2
60sDrawOrg2 0 34 17 2
70sDrawOrg1 0 35 17 2
DrawbarOrg2 0 36 17 2
60sDrawOrg3 0 37 17 2
EvenBarOrg 0 38 17 2
16+2’2_3Org 0 40 17 2
OrganBass 0 64 17 1
70sDrawOrg2 0 65 17 2
CheezyOrgan 0 66 17 2
DrawbarOrg3 0 67 17 2
Perc.Organ 0 0 18 1
70sPercOrg1 0 24 18 2
DetPercOrgan 0 32 18 2
LightOrgan 0 33 18 2
Organ Perc.Organ2 0 37 18 2
RockOrgan 0 0 19 1
RotaryOrgan 0 64 19 2
SlowRotary 0 65 19 2
FastRotary 0 66 19 2
ChurchOrgan 0 0 20 2
ChurchOrgan3 0 32 20 2
ChurchOrgan2 0 35 20 2
NotreDame 0 40 20 2
OrganFlute 0 64 20 2
Trem.OrganFl 0 65 20 2
ReedOrgan 0 0 21 1
PuffOrgan 0 40 21 2
Accordion 0 0 22 1
AccordIt 0 32 22 2
Harmonica 0 0 23 1
Harmonica2 0 32 23 2
TangoAccord 0 0 24 1
TangoAccord2 0 64 24 2
Guitar NylonGuitar 0 0 25 1
NylonGuitar2 0 16 25 1
NylonGuitar3 0 25 25 2
VelGtrHarmo 0 43 25 1
Ukulele 0 96 25 1
SteelGuitar 0 0 26 1
SteelGuitar2 0 16 26 1
12StrGuitar 0 35 26 2
Nylon&Steel 0 40 26 2
Steel&Body 0 41 26 2
Mandolin 0 96 26 2
JazzGuitar 0 0 27 1
MellowGuitar 0 18 27 1
JazzAmp 0 32 27 2
CleanGuitar 0 0 28 1
ChorusGuitar 0 32 28 2
MutedGuitar 0 0 29 1
FunkGuitar1 0 40 29 2
MuteSteelGtr 0 41 29 2
FunkGuitar2 0 43 29 1
JazzMan 0 45 29 2
Overdriven 0 0 30 1
GuitarPinch 0 43 30 1
Distortion 0 0 31 1
FeedbackGtr 0 40 31 2
FeedbackGtr2 0 41 31 2
GtrHarmonics 0 0 32 1
GtrFeedback 0 65 32 1
GtrHarmonic2 0 66 32 1
Bass AcousticBass 0 0 33 1
JazzRhythm 0 40 33 2
VXUprghtBass 0 45 33 2
FingerBass 0 0 34 1
FingerDark 0 18 34 2
FlangeBass 0 27 34 2
Bass&DistEG 0 40 34 2
FingerSlap 0 43 34 1
FingerBass2 0 45 34 2
Mod.Bass 0 65 34 2
PickBass 0 0 35 1
MutePickBass 0 28 35 1
FretlessBass 0 0 36 1
Fretless2 0 32 36 2
Fretless3 0 33 36 2
Fretless4 0 34 36 2
Syn.Fretless 0 96 36 2
SmthFretless 0 97 36 2
SlapBass1 0 0 37 1
ResonantSlap 0 27 37 1
PunchThumb 0 32 37 2
SlapBass2 0 0 38 1
Velo.Sw.Slap 0 43 38 1
SynthBass1 0 0 39 1
SynBass1Dark 0 18 39 1
FastResoBass 0 20 39 1
AcidBass 0 24 39 1
ClaviBass 0 35 39 2
Voice Group Voice Name MSB LSB PRG
Element
* The number of elements becomes 4 when the damper pedal is pressed.

XG Voice List
A-4
Bass TechnoBass 0 40 39 2
Orbiter 0 64 39 2
SquareBass 0 65 39 1
RubberBass 0 66 39 2
Hammer 0 96 39 2
SynthBass2 0 0 40 2
MellowSyBass 0 6 40 1
SequenceBass 0 12 40 2
ClickSynBass 0 18 40 2
SynBass2Dark 0 19 40 1
SmoothSyBass 0 32 40 2
ModulrSyBass 0 40 40 2
DXBass 0 41 40 2
XWireBass 0 64 40 2
Strings Violin 0 0 41 1
SlwAtkViolin 0 8 41 1
Viola 0 0 42 1
Cello 0 0 43 1
Contrabass 0 0 44 1
Trem.Strings 0 0 45 1
SlwAtTremStr 0 8 45 1
SuspenseStr 0 40 45 2
PizzicatoStr 0 0 46 1
Orch.Harp 0 0 47 1
YangChin 0 40 47 2
Timpani 0 0 48 1
Ensemble Strings1 0 0 49 1
StereoStrngs 0 3 49 2
SlwAtkStrngs 0 8 49 1
ArcoStrings 0 24 49 2
60’sStrings 0 35 49 2
Orchestra 0 40 49 2
Orchestra2 0 41 49 2
TremOrchstra 0 42 49 2
Velo.Strings 0 45 49 2
Strings2 0 0 50 1
S.SlowStrngs 0 3 50 2
LegatoStrngs 0 8 50 2
WarmStrings 0 40 50 2
Kingdom 0 41 50 2
70’sStrings 0 64 50 1
Strings3 0 65 50 1
SynStrings1 0 0 51 2
ResoStrings 0 27 51 2
SynStrings4 0 64 51 2
SynStrings5 0 65 51 2
SynStrings2 0 0 52 2
ChoirAahs 0 0 53 1
StereoChoir 0 3 53 2
ChoirAahs2 0 16 53 2
MellowChoir 0 32 53 2
ChoirStrings 0 40 53 2
VoiceOohs 0 0 54 1
SynthVoice 0 0 55 1
SynthVoice2 0 40 55 2
Choral 0 41 55 2
AnalogVoice 0 64 55 1
OrchestraHit 0 0 56 2
OrchestrHit2 0 35 56 2
Impact 0 64 56 2
Brass Trumpet 0 0 57 1
Trumpet2 0 16 57 1
BriteTrumpet 0 17 57 2
WarmTrumpet 0 32 57 2
Trombone 0 0 58 1
Trombone2 0 18 58 2
Tuba 0 0 59 1
Tuba2 0 16 59 1
MutedTrumpet 0 0 60 1
FrenchHorn 0 0 61 1
Fr.HornSolo 0 6 61 1
FrenchHorn2 0 32 61 2
HornOrchestr 0 37 61 2
BrassSection 0 0 62 1
Tp&TbSection 0 35 62 2
BrassSect2 0 40 62 2
HighBrass 0 41 62 2
MellowBrass 0 42 62 2
SynthBrass1 0 0 63 2
QuackBrass 0 12 63 2
ResoSynBrass 0 20 63 2
PolyBrass 0 24 63 2
Voice Group Voice Name MSB LSB PRG
Element
Brass SynthBrass3 0 27 63 2
JumpBrass 0 32 63 2
AnaVelBrass1 0 45 63 2
AnalogBrass1 064632
SynthBrass2 0 0 64 1
SoftBrass 0 18 64 2
SynthBrass4 0 40 64 2
ChoirBrass 0 41 64 2
AnaVelBrass2 0 45 64 2
AnalogBrass2 064642
Reed SopranoSax 0 0 65 1
AltoSax 0 0 66 1
SaxSection 0 40 66 2
HyperAltoSax 0 43 66 1
TenorSax 0 0 67 1
BreathyTenor 0 40 67 2
SoftTenorSax 0 41 67 2
TenorSax2 0 64 67 1
BaritoneSax 0 0 68 1
Oboe 0 0 69 1
EnglishHorn 0 0 70 1
Bassoon 0 0 71 1
Clarinet 0 0 72 1
Pipe Piccolo 0 0 73 1
Flute 0 0 74 1
Recorder 0 0 75 1
PanFlute 0 0 76 1
BlownBottle 0 0 77 2
Shakuhachi 0 0 78 1
Whistle 0 0 79 1
Ocarina 0 0 80 1
Synth. Lead SquareLead 0 0 81 2
SquareLead2 0 6 81 1
LMSquare 0 8 81 2
Hollow 0 18 81 1
Shroud 019812
Mellow 0 64 81 2
SoloSine 0 65 81 2
SineLead 066811
SawtoothLead 0 0 82 2
SawtoothLd2 0 6 82 1
ThickSaw 0 8 82 2
DynamicSaw 018821
DigitalSaw 019822
BigLead 0 20 82 2
HeavySynth 0 24 82 2
WaspySynth 0 25 82 2
PulseSaw 040822
Dr.Lead 0 41 82 2
VelocityLead 045822
Seq.Analog 0 96 82 2
CalliopeLead 0 0 83 2
PureLead 065832
ChiffLead 0 0 84 2
Rubby 0 64 84 2
CharangLead 0 0 85 2
DistortedLd 0 64 85 2
WireLead 0 65 85 2
VoiceLead 0 0 86 2
SynthAahs 0 24 86 2
VoxLead 064862
FifthsLead 0 0 87 2
BigFive 0 35 87 2
Bass&Lead 0 0 88 2
Big&Low 0 16 88 2
Fat&Perky 0 64 88 2
SoftWhirl 0 65 88 2
Synth. Pad NewAgePad 0 0 89 2
Fantasy 0 64 89 2
WarmPad 0 0 90 2
ThickPad 016902
SoftPad 0 17 90 2
SinePad 0 18 90 2
HornPad 0 64 90 2
RotaryStrngs 065902
PolySynthPad 0 0 91 2
PolyPad80 0 64 91 2
ClickPad 065912
AnalogPad 066912
SquarePad 0 67 91 2
ChoirPad 0 0 92 2
Heaven 0 64 92 2
Voice Group Voice Name MSB LSB PRG
Element

XG Voice List
A-5
XG Voice ListAppendix
Synth. Pad Itopia 0 66 92 2
CCPad 0 67 92 2
BowedPad 0 0 93 2
Glacier 0 64 93 2
GlassPad 0 65 93 2
MetallicPad 0 0 94 2
TinePad 0 64 94 2
PanPad 0 65 94 2
HaloPad 0 0 95 2
SweepPad 0 0 96 2
Shwimmer 0 20 96 2
Converge 0 27 96 2
PolarPad 0 64 96 2
Celestial 0 66 96 2
Synth. Effects Rain 0 0 97 2
ClaviPad 0 45 97 2
HarmoRain 0 64 97 2
AfricanWind 0 65 97 2
Carib 0 66 97 2
SoundTrack 0 0 98 2
Prologue 0 27 98 2
Ancestral 0 64 98 2
Crystal 0 0 99 2
SynthDr.Comp 0 12 99 2
Popcorn 0 14 99 2
TinyBells 0 18 99 2
RoundGlocken 0 35 99 2
GlockenChime 0 40 99 2
ClearBells 0 41 99 2
ChorusBells 0 42 99 2
SynthMallet 0 64 99 1
SoftCrystal 0 65 99 2
LoudGlocken 0 66 99 2
ChristmasBel 0 67 99 2
VibeBells 0 68 99 2
DigitalBells 0 69 99 2
AirBells 0 70 99 2
BellHarp 0 71 99 2
Gamelimba 0 72 99 2
Atmosphere 0 0 100 2
WarmAtmos. 0 18 100 2
HollwRelease 0 19 100 2
NylonElPiano 0 40 100 2
NylonHarp 0 64 100 2
HarpVox 0 65 100 2
Atmos.Pad 0 66 100 2
Planet 0 67 100 2
Brightness 0 0 101 2
FantasyBells 0 64 101 2
Smokey 0 96 101 2
Goblins 0 0 102 2
GoblinsSynth 0 64 102 2
Creeper 0 65 102 2
RingPad 0 66 102 2
Ritual 0 67 102 2
ToHeaven 0 68 102 2
Night 0 70 102 2
Glisten 0 71 102 2
BellChoir 0 96 102 2
Echoes 0 0 103 2
Echoes2 0 8 103 2
EchoPan 0 14 103 2
EchoBells 0 64 103 2
BigPan 0 65 103 2
SynthPiano 0 66 103 2
Creation 0 67 103 2
StarDust 0 68 103 2
Reso&Panning 0 69 103 2
Sci-Fi 0 0 104 2
Starz 0 64 104 2
Ethnic Sitar 0 0 105 1
DetunedSitar 0 32 105 2
Sitar2 0 35 105 2
Tambra 0 96 105 2
Tamboura 0 97 105 2
Banjo 0 0 106 1
MutedBanjo 0 28 106 1
Rabab 0 96 106 2
Gopichant 0 97 106 2
Oud 0 98 106 2
Shamisen 0 0 107 1
Koto 0 0 108 1
Voice Group Voice Name MSB LSB PRG
Element
Ethnic Taisho-kin 0 96 108 2
Kanoon 0 97 108 2
Kalimba 0 0 109 1
Bagpipe 0 0 110 2
Fiddle 0 0 111 1
Shanai 0 0 112 1
Shanai2 0 64 112 1
Pungi 0 96 112 1
Hichiriki 0 97 112 2
Percussive TinkleBell 0 0 113 2
Bonang 0 96 113 2
Altair 0 97 113 2
GamelanGongs 0 98 113 2
StereoGamlan 0 99 113 2
RamaCymbal 0 100 113 2
AsianBells 0 101 113 2
Agogo 0 0 114 2
SteelDrums 0 0 115 1
GlassPerc. 0 97 115 2
ThaiBells 0 98 115 2
Woodblock 0 0 116 1
Castanets 0 96 116 1
TaikoDrum 0 0 117 1
GranCassa 0 96 117 1
MelodicTom 0 0 118 2
MelodicTom2 0 64 118 1
RealTom 0 65 118 2
RockTom 0 66 118 2
SynthDrum 0 0 119 1
AnalogTom 0 64 119 1
ElectroPerc. 0 65 119 2
Rev.Cymbal 0 0 120 1
Sound Effects GtrFretNoise 0 0 121 1
BreathNoise 0 0 122 1
Seashore 0 0 123 2
BirdTweet 0 0 124 2
TelephonRing 0 0 125 1
Helicopter 0 0 126 1
Applause 0 0 127 1
Gunshot 0 0 128 1
SFX CuttingNoise 64 0 1 1
CuttingNoiz2 64 0 2 2
StringSlap 64 0 4 1
Fl.KeyClick 640171
Shower 64 0 33 1
Thunder 64 0 34 1
Wind 64 0 35 1
Stream 640362
Bubble 64 0 37 2
Feed 640382
Dog 640491
Horse 640501
BirdTweet2 64 0 51 1
Ghost 64 0 55 2
Maou 64 0 56 2
PhoneCall 64 0 65 1
DoorSqueak 64 0 66 1
DoorSlam 64 0 67 1
ScratchCut 64 0 68 1
ScratchSplit 64 0 69 2
WindChime 640701
TelphonRing2 64 0 71 1
CarEngineIgn 64 0 81 1
CarTiresSqel 64 0 82 1
CarPassing 64 0 83 1
CarCrash 64 0 84 1
Siren 640852
Train 640861
JetPlane 64 0 87 2
Starship 640882
Burst 640892
RollrCoaster 64 0 90 2
Submarine 64 0 91 1
Laugh 64 0 97 1
Scream 64 0 98 1
Punch 64 0 99 1
Heartbeat 64 0 100 1
FootSteps 64 0 101 1
MachineGun 64 0 113 1
LaserGun 64 0 114 2
Explosion 64 0 115 2
Firework 64 0 116 2
Voice Group Voice Name MSB LSB PRG
Element

A-6
XG Drum Kit List
: Same as Standard Kit 1
: No Sound
Bank Select MSB (0-127) 127 127 127 127 127 127
Bank Select LSB (0-127) 0 0 0 0 0 0
Program Change (0-127) 0 1 8 16 24 25
Program Change (1-128) 1 2 9 17 25 26
MIDI
Key Off
Alternate
Group
Standard Kit1 Standard Kit2 Room Kit Rock Kit Electro Kit Analog Kit
Note # Note
13 C#-1 3 Surdo Mute
14 D-1 3 Surdo Open
15 D#-1 Hi Q
16 E-1 Whip Slap
17 F-1 4 Scratch H
18 F#-1 4 Scratch L
19 G-1 Finger Snap
20 G#-1 Click Noise
21 A-1 Metronome Click
22 A#-1 Metronome Bell
23 B-1 Seq Click L
24 C0 Seq Click H
25 C#0 Brush Tap
26 D0 Brush Swirl
27 D#0 Brush Slap
28 E0 Brush Tap Swirl Reverse Cymbal Reverse Cymbal
29 F0 Snare Roll
30 F#0 Castanet Hi Q 2 Hi Q 2
31 G0 Snare Soft Snare Soft 2 Snare Noisy Snare Snappy Electro Snare Noisy 4
32 G#0 Sticks
33 A0 Kick Soft Kick 3 Kick 3
34 A#0 Open Rim Shot Open Rim Shot H Short
35 B0 Kick Tight Kick 2 Kick Gate Kick Analog Short
36 C1 Kick Kick Shot Kick Gate Kick Gate Heavy Kick Analog
37 C#1 Side Stick Side Stick Light Side Stick Analog
38 D1 Snare Snare Short Snare Snappy Snare Rock Snare Noisy 2 Snare Analog
39 D#1 Hand Clap
40 E1 Snare Tight Snare Tight H Snare Tight Snappy Snare Rock Tight Snare Noisy 2 Snare Analog 2
41 F1 Floor Tom L Tom Room 1 Tom Room 1 Tom Electro 1 Tom Analog 1
42 F#1 1 Hi-Hat Closed Hi-Hat Closed Analog
43 G1 Floor Tom H Tom Room 2 Tom Room 2 Tom Electro 2 Tom Analog 2
44 G#1 1 Hi-Hat Pedal Hi-Hat Closed Analog 2
45 A1 Low Tom Tom Room 3 Tom Room 3 Tom Electro 3 Tom Analog 3
46 A#1 1 Hi-Hat Open Hi-Hat Open Analog
47 B1 Mid Tom L Tom Room 4 Tom Room 4 Tom Electro 4 Tom Analog 4
48 C2 Mid Tom H Tom Room 5 Tom Room 5 Tom Electro 5 Tom Analog 5
49 C#2 Crash Cymbal 1 Crash Analog
50 D2 High Tom Tom Room 6 Tom Room 6 Tom Electro 6 Tom Analog 6
51 D#2 Ride Cymbal 1
52 E2 Chinese Cymbal
53 F2 Ride Cymbal Cup
54 F#2 Tambourine
55 G2 Splash Cymbal
56 G#2 Cowbell Cowbell Analog
57 A2 Crash Cymbal 2
58 A#2 Vibraslap
59 B2 Ride Cymbal 2
60 C3 Bongo H
61 C#3 Bongo L
62 D3 Conga H Mute Conga Analog H
63 D#3 Conga H Open Conga Analog M
64 E3 Conga L Conga Analog L
65 F3 Timbale H
66 F#3 Timbale L
67 G3 Agogo H
68 G#3 Agogo L
69 A3 Cabasa
70 A#3 Maracas Maracas 2
71 B3 Samba Whistle H
72 C4 Samba Whistle L
73 C#4 Guiro Short
74 D4 Guiro Long
75 D#4 Claves Claves 2
76 E4 Wood Block H
77 F4 Wood Block L
78 F#4 Cuica Mute Scratch H 2 Scratch H 2
79 G4 Cuica Open Scratch L 2 Scratch L 2
80 G#4 2 Triangle Mute
81 A4 2 Triangle Open
82 A#4 Shaker
83 B4 Jingle Bells
84 C5 Bell Tree
85 C#5
86 D5
87 D#5
88 E5
89 F5
90 F#5
91 G5
* Key Off: Keys marked with a circle stop sounding the instant they are released.
* Alternate Group: Playing any instrument within a numbered group will immediately stop the sound of any other instrument in the same group of the same number.

XG Drum Kit List
A-7
XG Drum Kit ListAppendix
: Same as Standard Kit 1
: No Sound
Bank Select MSB (0-127) 127 127 127 127 126 126
Bank Select LSB (0-127) 0 00000
Program Change (0-127) 27 32 40 48 0 1
Program Change (1-128) 28 33 41 49 1 2
MIDI
Key Off
Alternate
Group
Dance Kit Jazz Kit Brush Kit Symphony Kit SFX Kit1 SFX Kit2
Note # Note
13 C#-1 3
14 D-1 3
15 D#-1
16 E-1
17 F-1 4
18 F#-1 4
19 G-1
20 G#-1
21 A-1
22 A#-1
23 B-1
24 C0
25 C#0
26 D0
27 D#0
28 E0 Reverse Cymbal
29 F0
30 F#0 Hi Q 2
31 G0 Snare Techno Snare Jazz H Brush Slap 2
32 G#0
33 A0 Kick Techno Q Kick Soft 2
34 A#0 Rim Gate Open Rim Shot Light
35 B0 Kick Techno L Gran Cassa
36 C1 Kick Techno Kick Jazz Kick Jazz Gran Cassa Mute Cutting Noise Phone Call
37 C#1 Side Stick Analog Side Stick Light Side Stick Light Cutting Noise 2 Door Squeak
38 D1 Snare Clap Snare Jazz L Brush Slap 3 Band Snare Door Slam
39 D#1 String Slap Scratch Cut
40 E1 Snare Dry Snare Jazz M Brush Tap 2 Band Snare 2 Scratch H 3
41 F1 Tom Analog 1 Tom Brush 1 Wind Chime
42 F#1 1 Hi-Hat Closed 3 Telephone Ring 2
43 G1 Tom Analog 2 Tom Brush 2
44 G#1 1 Hi-Hat Closed Analog 3
45 A1 Tom Analog 3 Tom Brush 3
46 A#1 1 Hi-Hat Open 3
47 B1 Tom Analog 4 Tom Brush 4
48 C2 Tom Analog 5 Tom Brush 5
49 C#2 Crash Analog Hand Cymbal
50 D2 Tom Analog 6 Tom Brush 6
51 D#2 Hand Cymbal Short
52 E2 Flute Key Click Car Engine Ignition
53 F2 Car Tires Squeal
54 F#2 Car Passing
55 G2
Car Crash
56 G#2 Cowbell Analog Siren
57 A2 Hand Cymbal 2 Train
58 A#2 Jet Plane
59 B2
Hand Cymbal 2 Short Starship
60 C3 Burst
61 C#3 Roller Coaster
62 D3 Conga Analog H Submarine
63 D#3 Conga Analog M
64 E3 Conga Analog L
65 F3
66 F#3
67 G3
68 G#3 Shower Laugh
69 A3 Thunder Scream
70 A#3 Maracas 2
Wind Punch
71 B3
Stream Heart Beat
72 C4 Bubble Foot Steps
73 C#4 Feed
74 D4
75 D#4 Claves 2
76 E4
77 F4
78 F#4 Scratch H 2
79 G4 Scratch L 2
80 G#4 2
81 A4 2
82 A#4
83 B4
84 C5 Dog Machine Gun
85 C#5 Horse Laser Gun
86 D5 Bird Tweet 2 Explosion
87 D#5 Firework
88 E5
89 F5
90 F#5 Ghost
91 G5 Maou
* Key Off: Keys marked with a circle stop sounding the instant they are released.
* Alternate Group: Playing any instrument within a numbered group will immediately stop the sound of any other instrument in the same group of the same number.

A-8
MIDI Data Format
* For upright pianos (excluding some models), the sostenuto pedal information (Control Change 66) is not transmitted.
MIDI Channel Message (1)
[ MIDI (Silent) ]
MIDI Events
Status byte 1st Data byte 2nd Data byte MIDI Reception MIDI Transmission
Status Data (HEX) Parameter Data (HEX) Parameter
Song
Part
Piano
Playback
Channel
Panel
Operation
Song
Playback
MIDI
Input
Key Off 8nH (n: Channel Number) kk Key Number (0-127) vv Velocity (0-127) × × ×
[GM1] [GM2]
Key On 9nH (n: Channel Number) kk Key Number (0-127) vv Key On: vv=1-127 × × ×
[GM1] [GM2] Key Off: vv=0
Control Change BnH 0 (00H) Bank Select MSB 0 (00H) Normal × × ×
[GM2] 64 (40H) SFX Voice
118 (76H) GS Rhythm
119 (77H) GS Normal
120 (78H) GM2 Rhythm
121 (79H) GM2 Normal
126 (7EH) SFX Kit
127 (7FH) Drum Kit
1 (01H) Modulation 0-127 (00H...7FH) Data × × × ×
[GM1] [GM2]
5 (05H) Portamento Time 0-127 (00H...7FH) Data × × × ×
[GM2]
6 (06H) Data Entry MSB 0-127 (00H...7FH) Data × × × ×
[GM2]
7 (07H) Main Volume 0-127 (00H...7FH) Data × × ×
[GM1] [GM2]
10 (0AH) Panpot 0-127 (00H...7FH) L64…C…R63 × × × ×
[GM1] [GM2]
11 (0BH) Expression 0-127 (00H...7FH) Data × × × ×
[GM1] [GM2]
32 (20H) Bank Select LSB 0-127 (00H...7FH) Data × × ×
[GM2]
38 (26H) Data Entry LSB 0-127 (00H...7FH) Data × × × ×
[GM2]
64 (40H) Damper 0-127 (00H...7FH) Data × × ×
[GM1] [GM2]
65 (41H) Portamento 0-127 (00H...7FH) OFF: 0-63 × × × ×
[GM2] ON: 64-127
66 (42H) Sostenuto 0-127 (00H...7FH) OFF: 0-63 × × ×
[GM2] ON: 64-127
67 (43H) Soft Pedal 0-127 (00H...7FH) OFF: 0-63 × × ×
[GM2] ON: 64-127
71 (47H) Harmonic Content 0-127 (00H...7FH) -64…0…+63 × × × ×
[GM2]
72 (48H) Release Time 0-127 (00H...7FH) -64…0…+63 × × × ×
[GM2]
73 (49H) Attack Time 0-127 (00H...7FH) -64…0…+63 × × × ×
[GM2]
74 (4AH) Brightness 0-127 (00H...7FH) -64…0…+63 × × × ×
[GM2]
75 (4BH) Decay Time 0-127 (00H...7FH) -64…0…+63 × × × ×
[GM2]
76 (4CH) Vibrate Rate 0-127 (00H...7FH) -64…0…+63 × × × ×
[GM2]
77 (4DH) Vibrate Depth 0-127 (00H...7FH) -64…0…+63 × × × ×
[GM2]
78 (4EH) Vibrate Delay 0-127 (00H...7FH) -64…0…+63 × × × ×
[GM2]
84 (54H) Portamento Control 0-127 (00H...7FH) Key no. (0-127) × × × ×
91 (5BH) Effect1 Depth 0-127 (00H...7FH) Data × × × ×
(Reverb Send Level) [GM2]
93 (5DH) Effect3 Depth 0-127 (00H...7FH) Data × × × ×
(Chorus Send Level) [GM2]
94 (5EH) Effect4 Depth 0-127 (00H...7FH) Data × × × ×
(Variation Send Level)
96 (60H) RPN Increment — — The data byte is ignored × × × ×
97 (61H) RPN Decrement — — The data byte is ignored × × × ×
98 (62H) NRPN LSB 0-127 (00H...7FH) Data × × × ×
99 (63H) NRPN MSB 0-127 (00H...7FH) Data × × × ×
100 (64H) RPN LSB 0-127 (00H...7FH) Data × × × ×
[GM2]
101 (65H) RPN MSB 0-127 (00H...7FH) Data × × × ×
[GM2]
Mode Message BnH (n: Channel Number) 120 (78H) All Sound Off 0 (00H) Data × × ×
[GM2]
121 (79H) Reset All Controllers 0 (00H) Data × × ×
[GM1] [GM2]
122 (7AH) Local Control 0 (00h) OFF × × ×
127 (7FH) ON
123 (7BH) All Note Off 0 (00H) Data × × ×
[GM1] [GM2]
124 (7CH) Omni Off 0 (00H) Data × × × ×
[GM2]
125 (7DH) Omni On 0 (00H) Data × × × ×
[GM2]
126 (7EH) Mono 0-16 (00H...10H) Data × × × ×
[GM2]
127 (7FH) Poly 0 (00H) Data × × × ×
[GM2]
Program Change CnH (n: Channel Number) pp (00H...7FH) Voice Number (0-127) — — — × × ×
[GM1] [GM2]
Channel After Touch DnH (n: Channel Number) vv (00H...7FH) Data — — — × × ××
[GM1] [GM2]
Polyphonic After Touch AnH (n: Channel Number) kk (00H...7FH) Key Number (0-127) vv (00H...7FH) Data × × ×
Pitch Bend Change EnH (n: Channel Number) cc (00H...7FH) LSB dd (00H...7FH) MSB × × × ×
[GM1] [GM2]
Realtime Message F8H MIDI Clock — — — — × ×
FAHStart —— —— × ×
FBH Continue — — — — × ×
FCH Stop — — — — × ×
FEHActive Sens [GM2]—— ——
FFH System Reset — — — — × ×

MIDI Data Format
A-9
MIDI Data FormatAppendix
Parameters Controlled by NRPN (Non-Registered Parameter Numbers)
* NRPN MSB: 14H-1FH (for drums) message is accepted as long as the channel is set with a drum voice.
* Data Entry LSB will be ignored.
Parameters Controlled by RPN (Registered Parameter Numbers)
MIDI Channel Message (2)
[ MIDI (Silent) ]
NRPN Data Entry
Parameter Data Range
MIDI Reception MIDI Transmission
MSB LSB MSB LSB
Song
Part
Piano
Playback
Channel
Panel
Operation
Song
Playback
MIDI
Input
01H 08H mmH — Vibrato Rate mm: 00H-40H-7FH (-64…0…+63)
××××
01H 09H mmH — Vibrato Depth mm: 00H-40H-7FH (-64…0…+63)
××××
01H 0AH mmH — Vibrato Delay mm: 00H-40H-7FH (-64…0…+63)
××××
01H 20H mmH — Low Pass Filter Cutoff Frequency mm: 00H-40H-7FH (-64…0…+63)
××××
01H 21H mmH — Low Pass Filter Resonance mm: 00H-40H-7FH (-64…0…+63)
××××
01H 30H mmH — EQ BASS mm: 00H-40H-7FH (-64…0…+63)
×××××
01H 31H mmH — EQ TREBLE mm: 00H-40H-7FH (-64…0…+63)
×××××
01H 34H mmH — EQ BASS Frequency mm: 04H-28H (32…2.0k [Hz])
×××××
01H 35H mmH — EQ TREBLE Frequency mm: 1CH-3AH (500…16.0k [Hz])
×××××
01H 63H mmH — EG Attack Time mm: 00H-40H-7FH (-64…0…+63)
××××
01H 64H mmH — EG Decay Time mm: 00H-40H-7FH (-64…0…+63)
××××
01H 66H mmH — EG Release mm: 00H-40H-7FH (-64…0…+63)
××××
14H rrH mmH — Drum Low Pass Filter Cutoff Frequency rr: drum instrument note number
××××
mm: 00H-40H-7FH (-64…0…+63)
15H rrH mmH — Drum Low Pass Filter Resonance rr: drum instrument note number
××××
mm: 00H-40H-7FH (-64…0…+63)
16H rrH mmH — Drum EG Attack Rate rr: drum instrument note number
××××
mm: 00H-40H-7FH (-64…0…+63)
17H rrH mmH — Drum EG Decay Rate rr: drum instrument note number
××××
mm: 00H-40H-7FH (-64…0…+63)
18H rrH mmH — Drum Pitch Coarse rr: drum instrument note number
××××
mm: 00H-40H-7FH (-64…0…+63)
19H rrH mmH — Drum Pitch Fine rr: drum instrument note number
××××
mm: 00H-40H-7FH (-64…0…+63)
1AH rrH mmH — Drum Level rr: drum instrument note number
××××
mm: 00H-7FH (0…127)
1CH rrH mmH — Drum Pan rr: drum instrument note number
××××
mm: 00H, 01H-40H-7FH (RND, L63…C…R63)
1DH rrH mmH — Drum Reverb Send Level rr: drum instrument note number
××××
mm: 00H-7FH (0…127)
1EH rrH mmH — Drum Chorus Send Level rr: drum instrument note number
××××
mm: 00H-7FH (0…127)
1FH rrH mmH — Drum Variation Send Level rr: drum instrument note number
××××
mm: 00H-7FH (0…127)
(Variation Connection = SYSTEM)
mm: 00H, 01H-7FH (OFF, ON)
(Variation Connection = INSERTION)
24H rrH mmH — Drum HPF Cutoff Frequency rr: drum instrument note number
×××××
mm: 00H-40H-7FH (-64…0…+63)
30H rrH mmH — Drum EQ Bass Gain rr: drum instrument note number
×××××
mm: 00H-7FH (0…127)
31H rrH mmH — Drum EQ Treble Gain rr: drum instrument note number
×××××
mm: 00H-7FH (0…127)
34H rrH mmH — Drum EQ Bass Frequency rr: drum instrument note number
×××××
mm: 04H-28H (32…2.0k [Hz])
35H rrH mmH — Drum EQ Treble Frequency rr: drum instrument note number
×××××
mm: 1CH-3AH (500…16.0k [Hz])
40H rrH mmH — Drum VELOCITY PITCH SENS. rr: drum instrument note number
×××××
mm: 00H-0FH (0…15)
41H rrH mmH — Drum VELOCITY LPF CUTOFF SENS. rr: drum instrument note number
×××××
mm: 00H-0FH (0…15)
[ MIDI (Silent) ]
RPN Data Entry
Parameter Data Range
MIDI Reception MIDI Transmission
MSB LSB MSB LSB
Song
Part
Piano
Playback
Channel
Panel
Operation
Song
Playback
MIDI
Input
00H 00H mmH — Pitch Bend Sensitivity mm: 00H-18H (0…+24 [semitones])
××××
[GM1] [GM2]
00H 01H mmH llH Fine Tune mm ll: 00H 00H -100 [cent]
××××
[GM1] [GM2] …
mm ll: 40H 00H 0 [cent]
…
mm ll: 7FH 7FH 100 [cent]
00H 02H mmH — Coarse Tune mm: 28H-40H-58H (-24…0…+24 [semitones])
××××
[GM1] [GM2]
00H 05H mmH llH Modulation Sensitivity mm: Specified in semitone increments
××××
[GM2] ll: Specified in 100/128 cent increments
7FH 7FH — — Null —
××××
[GM2]

MIDI Data Format
A-10
MIDI Parameter Change Table (XG SYSTEM)
MIDI Parameter Change Table (SYSTEM INFORMATION)
* Transmitted in response to dump request. Not received.
MIDI Parameter Change Table (EFFECT1)
MIDI Parameter Change Table
[ MIDI (Silent) ]
Address
(H)
Size
(H)
Data
(H)
Parameter Description
XG Default
(H)
MIDI Reception MIDI Transmission
Song
Part
Piano
Playback
Channel
Panel
Operation
Song
Playback
MIDI
Input
00 00 00 4 00-0F MASTER TUNE -102.4…0…+102.3 [cent] Panel setting value
×××××
00-0F 1st bit3-0bit15-12
00-0F 2nd bit3-0bit11-8
00-0F 3rd bit3-0bit7-4
4th bit3-0bit3-0
04 1 00-7F MASTER VOLUME 0…127 7F
××××
05 1 00-7F MASTER ATTENUATOR 0…127 00
×××××
06 1 28-58 TRANSPOSE -24…0…+24 [semitones] 40
××××
7D 1 N DRUM SETUP RESET N: Drum setup number —
××××
7E 1 00 XG SYSTEM ON 00=XG system ON —
××××
7F 1 00 ALL PARAMETER RESET 00=ON —
××××
TOTAL SIZE 07
[ MIDI (Silent) ]
Address
(H)
Size
(H)
Data
(H)
Parameter Description
MIDI Reception MIDI Transmission
Song
Part
Piano
Playback
Channel
Panel
Operation
Song
Playback
MIDI
Input
01 00 00 E 20-7F Model Name 1 32…127
(ASCII CHARACTER)
—— × ×
……… …
0D 20-7F Model Name 14 32…127
(ASCII CHARACTER)
0E 1 NOT USED —————
0F 1 NOT USED —————
TOTAL SIZE 10
[ MIDI (Silent) ]
Address
(H)
Size
(H)
Data
(H)
Parameter Description
XG Default
(H)
MIDI Reception MIDI Transmission
Song
Part
Piano
Playback
Channel
Panel
Operation
Song
Playback
MIDI
Input
02 01 00 2 00-7F REVERB TYPE MSB Refer to Effect Parameter List 01(=HALL1) × × × ×
00-7F REVERB TYPE LSB 00
02 1 00-7F REVERB PARAMETER 1 Refer to Effect Parameter List Depends on Reverb Type × × × ×
03 1 00-7F REVERB PARAMETER 2 Refer to Effect Parameter List Depends on Reverb Type × × × ×
04 1 00-7F REVERB PARAMETER 3 Refer to Effect Parameter List Depends on Reverb Type × × × ×
05 1 00-7F REVERB PARAMETER 4 Refer to Effect Parameter List Depends on Reverb Type × × × ×
06 1 00-7F REVERB PARAMETER 5 Refer to Effect Parameter List Depends on Reverb Type × × × ×
07 1 00-7F REVERB PARAMETER 6 Refer to Effect Parameter List Depends on Reverb Type × × × ×
08 1 00-7F REVERB PARAMETER 7 Refer to Effect Parameter List Depends on Reverb Type × × × ×
09 1 00-7F REVERB PARAMETER 8 Refer to Effect Parameter List Depends on Reverb Type × × × ×
0A 1 00-7F REVERB PARAMETER 9 Refer to Effect Parameter List Depends on Reverb Type × × × ×
0B 1 00-7F REVERB PARAMETER 10 Refer to Effect Parameter List Depends on Reverb Type × × × ×
0C 1 00-7F REVERB RETURN -∞dB…0dB…+6dB (0…64…127) 40 × × × ×
0D 1 01-7F REVERB PAN L63…C…R63 40 × × × ×
TOTAL SIZE 0E
02 01 10 1 00-7F REVERB PARAMETER 11 Refer to Effect Parameter List Depends on Reverb Type × × × ×
11 1 00-7F REVERB PARAMETER 12 Refer to Effect Parameter List Depends on Reverb Type × × × ×
12 1 00-7F REVERB PARAMETER 13 Refer to Effect Parameter List Depends on Reverb Type × × × ×
13 1 00-7F REVERB PARAMETER 14 Refer to Effect Parameter List Depends on Reverb Type × × × ×
14 1 00-7F REVERB PARAMETER 15 Refer to Effect Parameter List Depends on Reverb Type × × × ×
15 1 00-7F REVERB PARAMETER 16 Refer to Effect Parameter List Depends on Reverb Type × × × ×
TOTAL SIZE 06

MIDI Data Format
A-11
MIDI Data FormatAppendix
[ MIDI (Silent) ]
Address
(H)
Size
(H)
Data
(H)
Parameter Description
XG Default
(H)
MIDI Reception MIDI Transmission
Song
Part
Piano
Playback
Channel
Panel
Operation
Song
Playback
MIDI
Input
02 01 20 2 00-7F CHORUS TYPE MSB Refer to Effect Parameter List 41(=CHORUS1)
××××
00-7F CHORUS TYPE LSB 00
22 1 00-7F CHORUS PARAMETER 1 Refer to Effect Parameter List Depends on Chorus Type
××××
23 1 00-7F CHORUS PARAMETER 2 Refer to Effect Parameter List Depends on Chorus Type
××××
24 1 00-7F CHORUS PARAMETER 3 Refer to Effect Parameter List Depends on Chorus Type
××××
25 1 00-7F CHORUS PARAMETER 4 Refer to Effect Parameter List Depends on Chorus Type
××××
26 1 00-7F CHORUS PARAMETER 5 Refer to Effect Parameter List Depends on Chorus Type
××××
27 1 00-7F CHORUS PARAMETER 6 Refer to Effect Parameter List Depends on Chorus Type
××××
28 1 00-7F CHORUS PARAMETER 7 Refer to Effect Parameter List Depends on Chorus Type
××××
29 1 00-7F CHORUS PARAMETER 8 Refer to Effect Parameter List Depends on Chorus Type
××××
2A 1 00-7F CHORUS PARAMETER 9 Refer to Effect Parameter List Depends on Chorus Type
××××
2B 1 00-7F CHORUS PARAMETER 10 Refer to Effect Parameter List Depends on Chorus Type
××××
2C 1 00-7F CHORUS RETURN -∞dB…0dB…+6dB (0…64…127) 40
××××
2D 1 01-7F CHORUS PAN L63…C…R63 40
××××
2E 1 00-7F SEND CHORUS TO REVERB -∞dB…0dB…+6dB (0…64…127) 00
××××
TOTAL SIZE 0F
02 01 30 1 00-7F CHORUS PARAMETER 11 Refer to Effect Parameter List Depends on Chorus Type
××××
31 1 00-7F CHORUS PARAMETER 12 Refer to Effect Parameter List Depends on Chorus Type
××××
32 1 00-7F CHORUS PARAMETER 13 Refer to Effect Parameter List Depends on Chorus Type
××××
33 1 00-7F CHORUS PARAMETER 14 Refer to Effect Parameter List Depends on Chorus Type
××××
34 1 00-7F CHORUS PARAMETER 15 Refer to Effect Parameter List Depends on Chorus Type
××××
35 1 00-7F CHORUS PARAMETER 16 Refer to Effect Parameter List Depends on Chorus Type
××××
TOTAL SIZE 06
[ MIDI (Silent) ]
Address
(H)
Size
(H)
Data
(H)
Parameter Description
XG Default
(H)
MIDI Reception MIDI Transmission
Song
Part
Piano
Playback
Channel
Panel
Operation
Song
Playback
MIDI
Input
02 01 40 2 00-7F VARIATION TYPE MSB Refer to Effect Parameter List 05 (=DELAY L, C, R) × × × ×
00-7F VARIATION TYPE LSB 00
42 2 00-7F VARIATION PARAMETER 1 MSB Refer to Effect Parameter List Depends on Variation Type × × × ×
00-7F VARIATION PARAMETER 1 LSB
44 2 00-7F VARIATION PARAMETER 2 MSB Refer to Effect Parameter List Depends on Variation Type × × × ×
00-7F VARIATION PARAMETER 2 LSB
46 2 00-7F VARIATION PARAMETER 3 MSB Refer to Effect Parameter List Depends on Variation Type × × × ×
00-7F VARIATION PARAMETER 3 LSB
48 2 00-7F VARIATION PARAMETER 4 MSB Refer to Effect Parameter List Depends on Variation Type × × × ×
00-7F VARIATION PARAMETER 4 LSB
4A 2 00-7F VARIATION PARAMETER 5 MSB Refer to Effect Parameter List Depends on Variation Type × × × ×
00-7F VARIATION PARAMETER 5 LSB
4C 2 00-7F VARIATION PARAMETER 6 MSB Refer to Effect Parameter List Depends on Variation Type × × × ×
00-7F VARIATION PARAMETER 6 LSB
4E 2 00-7F VARIATION PARAMETER 7 MSB Refer to Effect Parameter List Depends on Variation Type × × × ×
00-7F VARIATION PARAMETER 7 LSB
50 2 00-7F VARIATION PARAMETER 8 MSB Refer to Effect Parameter List Depends on Variation Type × × × ×
00-7F VARIATION PARAMETER 8 LSB
52 2 00-7F VARIATION PARAMETER 9 MSB Refer to Effect Parameter List Depends on Variation Type × × × ×
00-7F VARIATION PARAMETER 9 LSB
54 2 00-7F VARIATION PARAMETER 10 MSB Refer to Effect Parameter List Depends on Variation Type × × × ×
00-7F VARIATION PARAMETER 10 LSB
56 1 00-7F VARIATION RETURN -∞dB…0dB…+6dB (0…64…127) 40 × × × ×
57 1 01-7F VARIATION PAN L63…C…R63 40 × × × ×
58 1 00-7F SEND VARIATION TO REVERB -∞dB…0dB…+6dB (0…64…127) 00 × × × ×
59 1 00-7F SEND VARIATION TO CHORUS -∞dB…0dB…+6dB (0…64…127) 00 × × × ×
5A 1 00-01 VARIATION CONNECTION INSERTION, SYSTEM 00 × × × ×
5B 1 00-7F VARIATION PART NUMBER Reception: Part1…16 (0…15) 7F × × × ×
Transmission: Part1…16 (0…15)
AD (64)
OFF (127)
5C 1 00-7F MW VARIATION CONTROL DEPTH -64…0…+63 40 × × × ×
5D 1 00-7F BEND VARIATION CONTROL DEPTH -64…0…+63 40 × × × ×
5E 1 00-7F CAT VARIATION CONTROL DEPTH -64…0…+63 40 × × × ×
5F 1 00-7F AC1 VARIATION CONTROL DEPTH -64…0…+63 40 × × × ×
60 1 00-7F AC2 VARIATION CONTROL DEPTH -64…0…+63 40 × × × ×
TOTAL SIZE 21
02 01 70 1 00-7F VARIATION PARAMETER 11 Refer to Effect Parameter List Depends on Variation Type × × × ×
71 1 00-7F VARIATION PARAMETER 12 Refer to Effect Parameter List Depends on Variation Type × × × ×
72 1 00-7F VARIATION PARAMETER 13 Refer to Effect Parameter List Depends on Variation Type × × × ×
73 1 00-7F VARIATION PARAMETER 14 Refer to Effect Parameter List Depends on Variation Type × × × ×
74 1 00-7F VARIATION PARAMETER 15 Refer to Effect Parameter List Depends on Variation Type × × × ×
75 1 00-7F VARIATION PARAMETER 16 Refer to Effect Parameter List Depends on Variation Type × × × ×
TOTAL SIZE 06

MIDI Data Format
A-12
MIDI Parameter Change Table (MULTI EQ)
* The MULTI EQ parameter cannot be reset to its factory setting with XG SYSTEM on.
MIDI Parameter Change Table (EFFECT2)
* The EFFECT2 parameter cannot be reset to its factory setting with XG SYSTEM on.
The second byte of the address is considered as an insertion effect number.
n: insertion effect number
The insertion effect number range is from 0 to 1. Values outside the range are handled as unknown and ignored.
For effect types that do not require MSB, the parameters for address 02-0B will be received and the parameters for address 30-42 will not be received.
For effect types that require MSB, the parameters for address 30-42 will be received and the parameters for address 02-0B will not be received.
When bulk dumps that include effect type data are transmitted, the parameters for address 02-0B will always be transmitted. However, for effect types that require MSB, the parameters for
address 02-0B will not be received when the bulk dump is received.
[ MIDI (Silent) ]
Address
(H)
Size
(H)
Data
(H)
Parameter Description
MIDI Reception MIDI Transmission
Song
Part
Piano
Playback
Channel
Panel
Operation
Song
Playback
MIDI
Input
02 40 00 1 00-04 EQ TYPE flat, jazz, pops, rock, classic
×××××
01 1 34-4C EQ GAIN1 -12…0…+12 [dB]
×××××
02 1 04-28 EQ FREQUENCY1 32…2.0k [Hz]
×××××
03 1 01-78 EQ Q1 0.1…12.0
×××××
04 1 00-01 EQ SHAPE1 shelving, peaking
×××××
05 1 34-4C EQ GAIN2 -12…0…+12 [dB]
×××××
06 1 0E-36 EQ FREQUENCY2 100…10.0k [Hz]
×××××
07 1 01-78 EQ Q2 0.1…12.0
×××××
08 1 NOT USED —————
09 1 34-4C EQ GAIN3 -12…0…+12 [dB]
×××××
0A 1 0E-36 EQ FREQUENCY3 100…10.0k [Hz]
×××××
0B 1 01-78 EQ Q3 0.1…12.0
×××××
0C 1 NOT USED —————
0D 1 34-4C EQ GAIN4 -12…0…+12 [dB]
×××××
0E 1 0E-36 EQ FREQUENCY4 100…10.0k [Hz]
×××××
0F 1 01-78 EQ Q4 0.1…12.0
×××××
10 1 NOT USED —————
11 1 34-4C EQ GAIN5 -12…0…+12 [dB]
×××××
12 1 1C-3A EQ FREQUENCY5 0.5k…16.0k [Hz]
×××××
13 1 01-78 EQ Q5 0.1…12.0
×××××
14 1 00-01 EQ SHAPE5 shelving, peaking
×××××
TOTAL SIZE 15
[ MIDI (Silent) ]
Address
(H)
Size
(H)
Data
(H)
Parameter Description
MIDI Reception MIDI Transmission
Song
Part
Piano
Playback
Channel
Panel
Operation
Song
Playback
MIDI
Input
03 n 00 2 00-7F INSERTION EFFECT TYPE MSB Refer to Effect Parameter List × × × ×
00-7F INSERTION EFFECT TYPE LSB
02 1 00-7F INSERTION EFFECT PARAMETER 1 Refer to Effect Parameter List × × × ×
03 1 00-7F INSERTION EFFECT PARAMETER 2 Refer to Effect Parameter List × × × ×
04 1 00-7F INSERTION EFFECT PARAMETER 3 Refer to Effect Parameter List × × × ×
05 1 00-7F INSERTION EFFECT PARAMETER 4 Refer to Effect Parameter List × × × ×
06 1 00-7F INSERTION EFFECT PARAMETER 5 Refer to Effect Parameter List × × × ×
07 1 00-7F INSERTION EFFECT PARAMETER 6 Refer to Effect Parameter List × × × ×
08 1 00-7F INSERTION EFFECT PARAMETER 7 Refer to Effect Parameter List × × × ×
09 1 00-7F INSERTION EFFECT PARAMETER 8 Refer to Effect Parameter List × × × ×
0A 1 00-7F INSERTION EFFECT PARAMETER 9 Refer to Effect Parameter List × × × ×
0B 1 00-7F INSERTION EFFECT PARAMETER 10 Refer to Effect Parameter List × × × ×
0C 1 00-7F INSERTION EFFECT PART NUMBER Reception: Part1…16 (0…15) × ×××
Transmission: Part1…16 (0…15)
AD (64)
OFF (127)
0D 1 00-7F MW INSERTION CONTROL DEPTH -64…0…+63 × × × ×
0E 1 00-7F BEND INSERTION CONTROL DEPTH -64…0…+63 × × × ×
0F 1 00-7F CAT INSERTION CONTROL DEPTH -64…0…+63 × × × ×
10 1 00-7F AC1 INSERTION CONTROL DEPTH -64…0…+63 × × × ×
11 1 00-7F AC2 INSERTION CONTROL DEPTH -64…0…+63 × × × ×
TOTAL SIZE 12
20 1 00-7F INSERTION EFFECT PARAMETER 11 Refer to Effect Parameter List × × × ×
21 1 00-7F INSERTION EFFECT PARAMETER 12 Refer to Effect Parameter List × × × ×
22 1 00-7F INSERTION EFFECT PARAMETER 13 Refer to Effect Parameter List × × × ×
23 1 00-7F INSERTION EFFECT PARAMETER 14 Refer to Effect Parameter List × × × ×
24 1 00-7F INSERTION EFFECT PARAMETER 15 Refer to Effect Parameter List × × × ×
25 1 00-7F INSERTION EFFECT PARAMETER 16 Refer to Effect Parameter List × × × ×
TOTAL SIZE 6
30 2 00-7F INSERTION EFFECT PARAMETER 1 MSB Refer to Effect Parameter List × × × ×
00-7F INSERTION EFFECT PARAMETER 1 LSB
32 2 00-7F INSERTION EFFECT PARAMETER 2 MSB Refer to Effect Parameter List × × × ×
00-7F INSERTION EFFECT PARAMETER 2 LSB
34 2 00-7F INSERTION EFFECT PARAMETER 3 MSB Refer to Effect Parameter List × × × ×
00-7F INSERTION EFFECT PARAMETER 3 LSB
36 2 00-7F INSERTION EFFECT PARAMETER 4 MSB Refer to Effect Parameter List × × × ×
00-7F INSERTION EFFECT PARAMETER 4 LSB
38 2 00-7F INSERTION EFFECT PARAMETER 5 MSB Refer to Effect Parameter List × × × ×
00-7F INSERTION EFFECT PARAMETER 5 LSB
3A 2 00-7F INSERTION EFFECT PARAMETER 6 MSB Refer to Effect Parameter List × × × ×
00-7F INSERTION EFFECT PARAMETER 6 LSB
3C 2 00-7F INSERTION EFFECT PARAMETER 7 MSB Refer to Effect Parameter List × × × ×
00-7F INSERTION EFFECT PARAMETER 7 LSB
3E 2 00-7F INSERTION EFFECT PARAMETER 8 MSB Refer to Effect Parameter List × × × ×
00-7F INSERTION EFFECT PARAMETER 8 LSB
40 2 00-7F INSERTION EFFECT PARAMETER 9 MSB Refer to Effect Parameter List × × × ×
00-7F INSERTION EFFECT PARAMETER 9 LSB
42 2 00-7F INSERTION EFFECT PARAMETER 10 MSB Refer to Effect Parameter List
××××
00-7F INSERTION EFFECT PARAMETER 10 LSB
TOTAL SIZE 14

MIDI Data Format
A-13
MIDI Data FormatAppendix
MIDI Parameter Change Table (MULTI PART)
[ MIDI (Silent) ]
Address
(H)
Size
(H)
Data
(H)
Parameter Description
XG Default
(H)
MIDI Reception MIDI Transmission
Song
Part
Piano
Playback
Channel
Panel
Operation
Song
Playback
MIDI
Input
08 nn 00 1 00-20 NOT USED
×××××
01 1 00-7F BANK SELECT MSB 0…127 part10=7F, other parts=00
×××
02 1 00-7F BANK SELECT LSB 0…127 00
×××
03 1 00-7F PROGRAM NUMBER 1…128 00
×××
04 1 00-0F, 7F Rcv CHANNEL 1…16, OFF Part No.
××××
05 1 00-01 MONO/POLY MODE MONO, POLY 01
××××
06 1 00-02 SAME NOTE NUMBER KEY ON ASSIGN SINGLE, MULTI, INST (for Drum) 01
××××
07 1 00-03 PART MODE NORMAL, DRUM, DRUMS1…2 part10=02, other parts=00
××××
08 1 28-58 NOTE SHIFT -24…0…+24 [semitones] 40
××××
09 2 00-0F DETUNE -12.8…0…+12.7 [Hz] 08 00
××××
00-0F 1st bit3-0bit7-4
2nd bit3-0bit3-0
0B 1 00-7F VOLUME 0…127 64
××××
0C 1 00-7F VELOCITY SENSE DEPTH 0…127 40
××××
0D 1 00-7F VELOCITY SENSE OFFSET 0…127 40
××××
0E 1 00-7F PAN RND, L63…C…R63 40
××××
0F 1 00-7F NOTE LIMIT LOW C-2…G8 00
××××
10 1 00-7F NOTE LIMIT HIGH C-2…G8 7F
××××
11 1 00-7F DRY LEVEL 0…127 7F
××××
12 1 00-7F CHORUS SEND 0…127 00
××××
13 1 00-7F REVERB SEND 0…127 28
××××
14 1 00-7F VARIATION SEND 0…127 00
××××
15 1 00-7F VIBRATO RATE -64…0…+63 40
××××
16 1 00-7F VIBRATO DEPTH -64…0…+63 40
××××
17 1 00-7F VIBRATO DELAY -64…0…+63 40
××××
18 1 00-7F FILTER CUTOFF FREQUENCY -64…0…+63 40
××××
19 1 00-7F FILTER RESONANCE -64…0…+63 40
××××
1A 1 00-7F EG ATTACK TIME -64…0…+63 40
××××
1B 1 00-7F EG DECAY TIME -64…0…+63 40
××××
1C 1 00-7F EG RELEASE TIME -64…0…+63 40
××××
1D 1 28-58 H -24…0…+24 [semitones] 40
××××
1E 1 00-7F MW LOW PASS FILTER CONTROL -9600…0…+9450 [cent] 40
××××
1F 1 00-7F MW AMPLITUDE CONTROL -100…0…+100 [%] 40
××××
20 1 00-7F MW LFO PMOD DEPTH 0…127 0A
××××
21 1 00-7F MW LFO FMOD DEPTH 0…127 00
××××
22 1 00-7F MW LFO AMOD DEPTH 0…127 00
××××
23 1 28-58 BEND PITCH CONTROL -24…0…+24 [semitones] 42
××××
24 1 00-7F BEND LOW PASS FILTER CONTROL -9600…0…+9450 [cent] 40
××××
25 1 00-7F BEND AMPLITUDE CONTROL -100…0…+100 [%] 40
××××
26 1 00-7F BEND LFO PMOD DEPTH 0…127 00
××××
27 1 00-7F BEND LFO FMOD DEPTH 0…127 00
××××
28 1 00-7F BEND LFO AMOD DEPTH 0…127 00
××××
TOTAL SIZE 29
30 1 00-01 Rcv PITCH BEND OFF, ON 01
××××
31 1 00-01 Rcv CH AFTER TOUCH (CAT) OFF, ON 01
××××
32 1 00-01 Rcv PROGRAM CHANGE OFF, ON 01
××××
33 1 00-01 Rcv CONTROL CHANGE OFF, ON 01
××××
34 1 00-01 Rcv POLY AFTER TOUCH (PAT) OFF, ON 01
××××
3
5 1 0
0-01 Rcv NOTE MESSAGE OFF, ON 01
××××
36 1 00-01 Rcv RPN OFF, ON 01
××××
37 1 00-01 Rcv NRPN OFF, ON XGmode=01, GMmode=00
××××
38 1 00-01 Rcv MODULATION OFF, ON 01
××××
39 1 00-01 Rcv VOLUME OFF, ON 01
××××
3A 1 00-01 Rcv PAN OFF, ON 01
××××
3B 1 00-01 Rcv EXPRESSION OFF, ON 01
××××
3C 1 00-01 Rcv HOLD1 OFF, ON 01
××××
3D 1 00-01 Rcv PORTAMENTO OFF, ON 01
××××
3E 1 00-01 Rcv SOSTENUTO OFF, ON 01
××××
3F 1 00-01 Rcv SOFT PEDAL OFF, ON 01
××××
40 1 00-01 Rcv BANK SELECT OFF, ON 01
××××
41 1 00-7F SCALE TUNING C -63…0…+63 [cent] 40
××××
42 1 00-7F SCALE TUNING C# -63…0…+63 [cent] 40
××××
43 1 00-7F SCALE TUNING D -63…0…+63 [cent] 40
××××
44 1 00-7F SCALE TUNING D# -63…0…+63 [cent] 40
××××
45 1 00-7F SCALE TUNING E -63…0…+63 [cent] 40
××××
46 1 00-7F SCALE TUNING F -63…0…+63 [cent] 40
××××
47 1 00-7F SCALE TUNING F# -63…0…+63 [cent] 40
××××
48 1 00-7F SCALE TUNING G -63…0…+63 [cent] 40
××××
49 1 00-7F SCALE TUNING G# -63…0…+63 [cent] 40
××××
4A 1 00-7F SCALE TUNING A -63…0…+63 [cent] 40
××××
4B 1 00-7F SCALE TUNING A# -63…0…+63 [cent] 40
××××
4C 1 00-7F SCALE TUNING B -63…0…+63 [cent] 40
××××
4D 1 28-58 CAT PITCH CONTROL -24…0…+24 [semitones] 40
××××
4E 1 00-7F CAT LOW PASS FILTER CONTROL -9600…0…+9450 [cent] 40
××××
4F 1 00-7F CAT AMPLITUDE CONTROL -100…0…+100 [%] 40
××××
50 1 00-7F CAT LFO PMOD DEPTH 0…127 00
××××
51 1 00-7F CAT LFO FMOD DEPTH 0…127 00
××××
52 1 00-7F CAT LFO AMOD DEPTH 0…127 00
××××

MIDI Data Format
A-14
nn: part number
If there is a Drum voice assigned to the part, the following parameters are ineffective.
• BANK SELECT LSB
• PORTAMENTO
• MONO/POLY
• SCALE TUNING
• POLY AFTER TOUCH
• PITCH EG
53 1 28-58 PAT PITCH CONTROL -24…0…+24 [semitones] 40 × × × ×
54 1 00-7F PAT LOW PASS FILTER CONTROL -9600…0…+9450 [cent] 40 × × × ×
55 1 00-7F PAT AMPLITUDE CONTROL -100…0…+100 [%] 40 × × × ×
56 1 00-7F PAT LFO PMOD DEPTH 0…127 00 × × × ×
57 1 00-7F PAT LFO FMOD DEPTH 0…127 00 × × × ×
58 1 00-7F PAT LFO AMOD DEPTH 0…127 00 × × × ×
59 1 00-5F AC1 CONTROLLER NUMBER 0…95 10 × × × ×
5A 1 28-58 AC1 PITCH CONTROL -24…0…+24 [semitones] 40 × × × ×
5B 1 00-7F AC1 LOW PASS FILTER CONTROL -9600…0…+9450 [cent] 40 × × × ×
5C 1 00-7F AC1 AMPLITUDE CONTROL -100…0…+100 [%] 40 × × × ×
5D 1 00-7F AC1 LFO PMOD DEPTH 0…127 00 × × × ×
5E 1 00-7F AC1 LFO FMOD DEPTH 0…127 00 × × × ×
5F 1 00-7F AC1 LFO AMOD DEPTH 0…127 00 × × × ×
60 1 00-5F AC2 CONTROLLER NUMBER 0…95 11 × × × ×
61 1 28-58 AC2 PITCH CONTROL -24…0…+24 [semitones] 40 × × × ×
62 1 00-7F AC2 LOW PASS FILTER CONTROL -9600…0…+9450 [cent] 40 × × × ×
63 1 00-7F AC2 AMPLITUDE CONTROL -100…0…+100 [%] 40 × × × ×
64 1 00-7F AC2 LFO PMOD DEPTH 0…127 00 × × × ×
65 1 00-7F AC2 LFO FMOD DEPTH 0…127 00 × × × ×
66 1 00-7F AC2 LFO AMOD DEPTH 0…127 00 × × × ×
67 1 00-01 PORTAMENTO SWITCH OFF, ON 00 × × × ×
68 1 00-7F PORTAMENTO TIME 0…127 00 × × × ×
69 1 00-7F PITCH EG INITIAL LEVEL -64…0…+63 40 × × × ×
6A 1 00-7F PITCH EG ATTACK TIME -64…0…+63 40 × × × ×
6B 1 00-7F PITCH EG RELEASE LEVEL -64…0…+63 40 × × × ×
6C 1 00-7F PITCH EG RELEASE TIME -64…0…+63 40 × × × ×
6D 1 01-7F VELOCITY LIMIT LOW 1…127 01 × × × ×
6E 1 01-7F VELOCITY LIMIT HIGH 1…127 7F × × × ×
TOTAL SIZE 3F
70 1 NOT USED — —————
71 1 NOT USED — —————
72 1 00-7F EQ BASS GAIN -12dB…+12dB 40 × × × × ×
73 1 00-7F EQ TREBLE GAIN -12dB…+12dB 40 × × × × ×
TOTAL SIZE 04
74 1 NOT USED — —————
75 1 NOT USED — —————
76 1 04-28 EQ BASS FREQUENCY 32…2.0k [Hz] 0C × × × × ×
77 1 1C-3A EQ TREBLE FREQUENCY 500…16.0k [Hz] 36 × × × × ×
78 1 NOT USED — —————
79 1 NOT USED — —————
7A 1 NOT USED — —————
7B 1 NOT USED — —————
7C 1 NOT USED — —————
7D 1 NOT USED — —————
7E 1 NOT USED — —————
7F 1 NOT USED — —————
TOTAL SIZE 0C
0A nn 40 1 00-7F MW OFFSET LEVEL CONTROL -100 - 100 [%] 40 × × × ×
41 1 00-7F BEND OFFSET LEVEL CONTROL -100 - 100 [%] 40 × × × ×
42 1 00-7F CAT OFFSET LEVEL CONTROL -100 - 100 [%] 40 × × × ×
43 1 00-7F PAT OFFSET LEVEL CONTROL -100 - 100 [%] 40 × × × ×
44 1 00-7F AC1 OFFSET LEVEL CONTROL -100 - 100 [%] 40 × × × ×
45 1 00-7F AC2 OFFSET LEVEL CONTROL -100 - 100 [%] 40 × × × ×
TOTAL SIZE 06
[ MIDI (Silent) ]
Address
(H)
Size
(H)
Data
(H)
Parameter Description
XG Default
(H)
MIDI Reception MIDI Transmission
Song
Part
Piano
Playback
Channel
Panel
Operation
Song
Playback
MIDI
Input

MIDI Data Format
A-15
MIDI Data FormatAppendix
MIDI Parameter Change Table (DRUM SETUP)
n: drum setup number (0-1)
rr: note number (0D-5B)
In the following cases, the unit will initialize all drum setups.
• XG SYSTEM ON received
• GM SYSTEM ON received
• GM LEVEL 2 SYSTEM ON received
• GS RESET received
• DRUM SETUP RESET received (only when in XG mode)
When a part to which a drum setup is assigned receives a program change, the assigned drum setup will be initialized.
If the same drum setup is assigned to two or more parts, changes in drum setup parameters (including program changes) will apply to all parts to which it is assigned.
[ MIDI (Silent) ]
Address
(H)
Size
(H)
Data
(H)
Parameter Description
XG Default
(H)
MIDI Reception MIDI Transmission
Song
Part
Piano
Playback
Channel
Panel
Operation
Song
Playback
MIDI
Input
3n rr 00 1 00-7F PITCH COARSE -64…0…+63 40
××××
01 1 00-7F PITCH FINE -64…0…+63 [cent] 40
××××
02 1 00-7F LEVEL 0…127 Depends on the note
××××
03 1 00-7F ALTERNATE GROUP OFF, 1…127 Depends on the note
××××
04 1 00-7F PAN RND, L63…C…R63 Depends on the note
××××
05 1 00-7F REVERB SEND 0…127 Depends on the note
××××
06 1 00-7F CHORUS SEND 0…127 Depends on the note
××××
07 1 00-7F VARIATION SEND 0…127 7F
××××
08 1 00-01 KEY ASSIGN SINGLE, MULTI 00
××××
09 1 00-01 Rcv NOTE OFF OFF, ON Depends on the note
××××
0A 1 00-01 Rcv NOTE ON OFF, ON 01
××××
0B 1 00-7F LOW PASS FILTER CUTOFF FREQUENCY -64…0…+63 40
××××
0C 1 00-7F LOW PASS FILTER RESONANCE -64…0…+63 40
××××
0D 1 00-7F EG ATTACK RATE -64…0…+63 40
××××
0E 1 00-7F EG DECAY1 RATE -64…0…+63 40
××××
0F 1 00-7F EG DECAY2 RATE -64…0…+63 40
××××
TOTAL SIZE 10
20 1 00-7F EQ BASS GAIN -12…+12 [dB] 40
×××××
21 1 00-7F EQ TREBLE GAIN -12…+12 [dB] 40
×××××
22 1 NOT USED — —————
23 1 NOT USED — —————
24 1 04-28 EQ BASS FREQUENCY 32…2.0k [Hz] 0C
×××××
25 1 1C-3A EQ TREBLE FREQUENCY 500…16.0k [Hz] 36
×××××
26 1 NOT USED — —————
27 1 NOT USED — —————
28 1 NOT USED — —————
29 1 NOT USED — —————
2A 1 NOT USED — —————
2B 1 NOT USED — —————
2C 1 NOT USED — —————
2D 1 NOT USED — —————
TOTAL SIZE 0E

MIDI Data Format
A-16
* Not received when Receive System Exclusive Message is set to off.
* Not transmitted when Transmit System Exclusive Message is set to off.
System Exclusive Messages (Universal Non Realtime Messages)
System Exclusive Messages (XG)
System Exclusive Messages (Others)
System Exclusive Messages (1)
[ MIDI (Silent) ]
MIDI Event Data Format
MIDI Reception MIDI Transmission
Song Part
Piano
Playback
Channel
Panel
Operation
Song
Playback
MIDI Input
GM1 System On F0 7E XN 09 01 F7 ××××
[GM1] [GM2] 11110000 F0 = Exclusive status
01111110 7E = Universal Non-Real Time
0xxxnnnn XN = When N is received N=0-F, whichever is received. X=ignored
00001001 09 = Sub-ID #1=General MIDI Message
00000001 01 = Sub-ID #2=General MIDI On
11110111 F7 = End of Exclusive
System Exclusive Messages (2)
[ MIDI (Silent) ]
MIDI Event Data Format
MIDI Reception MIDI Transmission
Song Part
Piano Playback
Channel
Panel Operation Song Playback
XG Parameter Change F0 43 1n 4C hh mm ll dd … F7 ××
11110000 F0 = Exclusive status Refer to Parameter Change Table
01000011 43 = YAMAHA ID
0001nnnn 1n = Device Number n=always 0 (when transmit), n=0-F (when recieve)
01001100 4C = Model ID
0hhhhhhh hh = Address High
0mmmmmmm mm = Address Mid
0lllllll ll = Address Low
0ddddddd dd = Data
……
11110111 F7 = End of Exclusive
XG Bulk Dump F0 43 0n 4C aa bb hh mm ll dd … dd cc F7 ××
11110000 F0 = Exclusive status Refer to Parameter Change Table
01000011 43 = YAMAHA ID
0000nnnn 0n = Device Number n=always 0 (when transmit), n=0-F (when recieve)
01001100 4C = Model ID
0aaaaaaa aa = Byte Count MSB
0bbbbbbb bb = Byte Count LSB
0hhhhhhh hh = Address High
0mmmmmmm mm = Address Mid
0lllllll ll = Address Low
0ddddddd dd = Data
::
0ddddddd dd = Data
0ccccccc cc = Checksum
11110111 F7 = End of Exclusive
XG Parameter Request F0 43 3n 4C hh ll F7 ××
11110000 F0 = Exclusive status Refer to Parameter Change Table
01000011 43 = YAMAHA ID
0011nnnn 3n = Device Number n=always 0 (when transmit), n=0-F (when recieve)
01001100 4C = Model ID
0hhhhhhh hh = Address High
0mmmmmmm mm = Address Mid
0lllllll ll = Address Low
11110111 F7 = End of Exclusive
XG Dump Request F0 43 2n 4C hh mm ll F7 ××
11110000 F0 = Exclusive status Refer to Parameter Change Table
01000011 43 = YAMAHA ID
0010nnnn 2n = Device Number n=always 0 (when transmit), n=0-F (when recieve)
01001100 4C = Model ID
0hhhhhhh hh = Address High
0mmmmmmm mm = Address Mid
0lllllll ll = Address Low
11110111 F7 = End of Exclusive
[ MIDI (Silent) ]
MIDI Event Data Format
MIDI Reception MIDI Transmission
Song Part
Piano Playback
Channel
Panel Operation Song Playback
MIDI Master Tuning F0 43 1n 27 30 00 00 mm ll cc F7 × × × ×
11110000 F0 = Exclusive status
01000011 43 = YAMAHA ID
0001nnnn 1n n= always 0(when transmit), n=0-F(when receive)
00100111 27 = Model ID of TG100
00110000 30 = Address High
00000000 00 = Address Mid
00000000 00 = Address Low
0000mmmm 0m = Master Tune MSB
0000llll 0l = Master Tune LSB
0ccccccc cc = don’t care
11110111 F7 = End of Exclusive

MIDI Data Format
A-17
MIDI Data FormatAppendix
System Exclusive Messages (Preset Voice)
* For each depth value, the rest value is 40H = voice parameter.
[ MIDI (Silent) ]
MIDI Event Data Format
MIDI Reception MIDI Transmission
Song Part
Piano Playback
Channel
Panel Operation Song Playback
String Resonance Depth F0 43 73 01 50 11 0n 02 dd F7 ×××
11110000 F0 = Exclusive status
01000011 43 = YAMAHA ID
01110011 73 = Clavinova ID
00000001 01 = Model ID (Clavinova common ID)
01010000 50 = SubID
00010001 11 = SubID
0000nnnn 0n = Channel (00-0F)
00000010 02 = SubID (String Resonance Depth)
0ddddddd dd = Depth (00-48)
11110111 F7 = End of Exclusive
Sustain Sample Depth F0 43 73 01 50 11 0n 03 dd F7 ×××
11110000 F0 = Exclusive status
01000011 43 = YAMAHA ID
01110011 73 = Clavinova ID
00000001 01 = Model ID (Clavinova common ID)
01010000 50 = SubID
00010001 11 = SubID
0000nnnn 0n = Channel (00-0F)
00000011 03 = SubID (Sustain Sample Depth)
0ddddddd dd = Depth (00-48)
11110111 F7 = End of Exclusive
Key Off Sampling Depth F043730150110n04ddF7 ×××
11110000 F0 = Exclusive status
01000011 43 = YAMAHA ID
01110011 73 = Clavinova ID
00000001 01 = Model ID (Clavinova common ID)
01010000 50 = SubID
00010001 11 = SubID
0000nnnn 0n = Channel (00-0F)
00000100 04 = SubID (Key Off Sampling Depth)
0ddddddd dd = Depth (00-50)
11110111 F7 = End of Exclusive
Soft Pedal
Depth
F0 43 73 01 50 11 0n 05 dd F7 ×××
11110000 F0 = Exclusive status
01000011 43 = YAMAHA ID
01110011 73 = Clavinova ID
00000001 01 = Model ID (Clavinova common ID)
01010000 50 = SubID
00010001 11 = SubID
0000nnnn 0n = Channel (00-0F)
00000101 05 = SubID (Soft Pedal Depth)
0ddddddd dd = Depth (00-7F)
11110111 F7 = End of Exclusive

MEMO

Mode 1 : OMNI ON. POLY Mode 2 : OMNI ON. MONO : YES
Mode 3 : OMNI OFF. POLY Mode 4 : OMNI OFF. MONO
× : NO
MIDI IMPLEMENTATION CHART
Yamaha Disklavier
Model: DKC-900
Date: 01-AUG-2019
Version: 1.00
Function... Transmitted Recognized Remarks
Basic Channel
Default 1-16 1-16 Memorized
Changed 1-16 1-16
Mode
Default 3 3
Messages × 3, 4 (m=1) *1, *2
Altered ***************** ×
Note Number
21-108 0-127
: True Note ***************** 0-127
Velocity
Note ON 9nH, v=1-127 v=1-127
Note OFF 8nH, v=0-127
After Touch
Key’s *4 ×
Ch’s × ×
Pitch Bend × 0-24 semi *1
Control Change
0, 32 × *1 Bank Select
7, 11 ×
1, 5, 10 × *1
6, 38 × *1 Data Entry
64 Hold1 (Sustain)
65 × *1 Portamento
66 *3 *1 Sostenuto
67 Soft (Shift) Pedal
71-74, 84 × *1
91, 93, 94 × *1 Effect Depth
96-101 × *1
Prog Change
× 0-127
: True # *****************
System Exclusive
Common
: Song Pos × ×
: Song Sel × ×
: Tune × ×
System Real Time
: Clock × ×
: Commands × ×
Aux Messages
: All Sound OFF (120, 126, 127)
:
Reset All Cntrls
× (121)
: Local ON/OFF ×
: All Notes OFF (123-125)
: Active Sense
: Reset × ×
Notes
*1 = Only ESBL Part can recognized.
*2 = m is always treated as 1 regardless of value.
*3 = Transmit if this model has a Sostenuto Pedal.
*4 = Applying further pressure on the key does not output key aftertouch information.

YK703A0
10-1 Nakazawa-cho, Naka-ku,
Hamamatsu, 430-8650 Japan
Manual Development Group
Copyright © 2019 Yamaha Corporation
Published 10/2019 MWEI-A0
-
 1
1
-
 2
2
-
 3
3
-
 4
4
-
 5
5
-
 6
6
-
 7
7
-
 8
8
-
 9
9
-
 10
10
-
 11
11
-
 12
12
-
 13
13
-
 14
14
-
 15
15
-
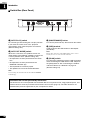 16
16
-
 17
17
-
 18
18
-
 19
19
-
 20
20
-
 21
21
-
 22
22
-
 23
23
-
 24
24
-
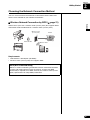 25
25
-
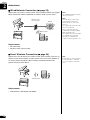 26
26
-
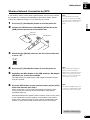 27
27
-
 28
28
-
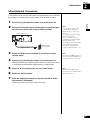 29
29
-
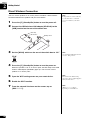 30
30
-
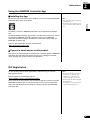 31
31
-
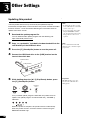 32
32
-
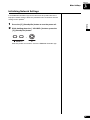 33
33
-
 34
34
-
 35
35
-
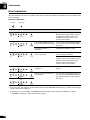 36
36
-
 37
37
-
 38
38
-
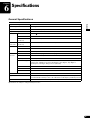 39
39
-
 40
40
-
 41
41
-
 42
42
-
 43
43
-
 44
44
-
 45
45
-
 46
46
-
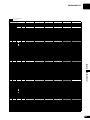 47
47
-
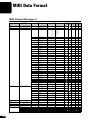 48
48
-
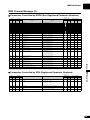 49
49
-
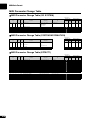 50
50
-
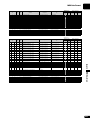 51
51
-
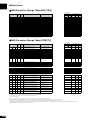 52
52
-
 53
53
-
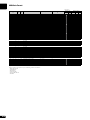 54
54
-
 55
55
-
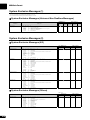 56
56
-
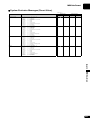 57
57
-
 58
58
-
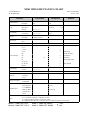 59
59
-
 60
60


Yamaha DKC-900 de handleiding
- Categorie
- Digitale piano's
- Type
- de handleiding
in andere talen
- English: Yamaha DKC-900 Owner's manual
- italiano: Yamaha DKC-900 Manuale del proprietario
- русский: Yamaha DKC-900 Инструкция по применению
- français: Yamaha DKC-900 Le manuel du propriétaire
- español: Yamaha DKC-900 El manual del propietario
- Deutsch: Yamaha DKC-900 Bedienungsanleitung
- português: Yamaha DKC-900 Manual do proprietário
- dansk: Yamaha DKC-900 Brugervejledning
- čeština: Yamaha DKC-900 Návod k obsluze
- polski: Yamaha DKC-900 Instrukcja obsługi
- română: Yamaha DKC-900 Manualul proprietarului